


WS 9065 – Bedienungsanleitung
Funktionen:
` DCF77 - funkgesteuerte Uhrzeit
` Uhrzeit im 12 oder 24 Stunden Zeitformat
` Alarmfunktion
` Schlummerfunktion (OFF(aus) oder 1~60 Minuten)
` Batterieendanzeige
` USB-Anschluss für das Aufladen von mobilen Geräten (5V1A)
` Temperatur in °C oder °F
` Luftfeuchtigkeit: Innen- und Aussenmessbereich:
20%RH ~ 95%RH
` Temperatur:
— Innentemperatur-Messbereich:
-9.9°C (14.2°F) ~ 50°C (122°F)
— Aussentemperatur-Messbereich:
-25°C (-13°F) ~ 50°C (122°F)
— Frostalarm für Aussentemperatur
` Speicherung von maximalen /minimalen Werten von Temperatur und Luftfeuchtigkeit
` Funk-Aussensender:
— Wandanbringung oder Tischaufstellung
— 3 Kanäle auswählbar
— 433.92MHz RF Übertragungsfrequenz
— 60 Meter Übertragungsreichweite im Freifeld
` Wettervorhersage durch Symbole
` Stromversorgung:
Wetterstation:
Batterien: 2 x LR06 AA
Netzteil: 5V1.2A
Außensender:
Batterien:2 x LR06 AA
DE1
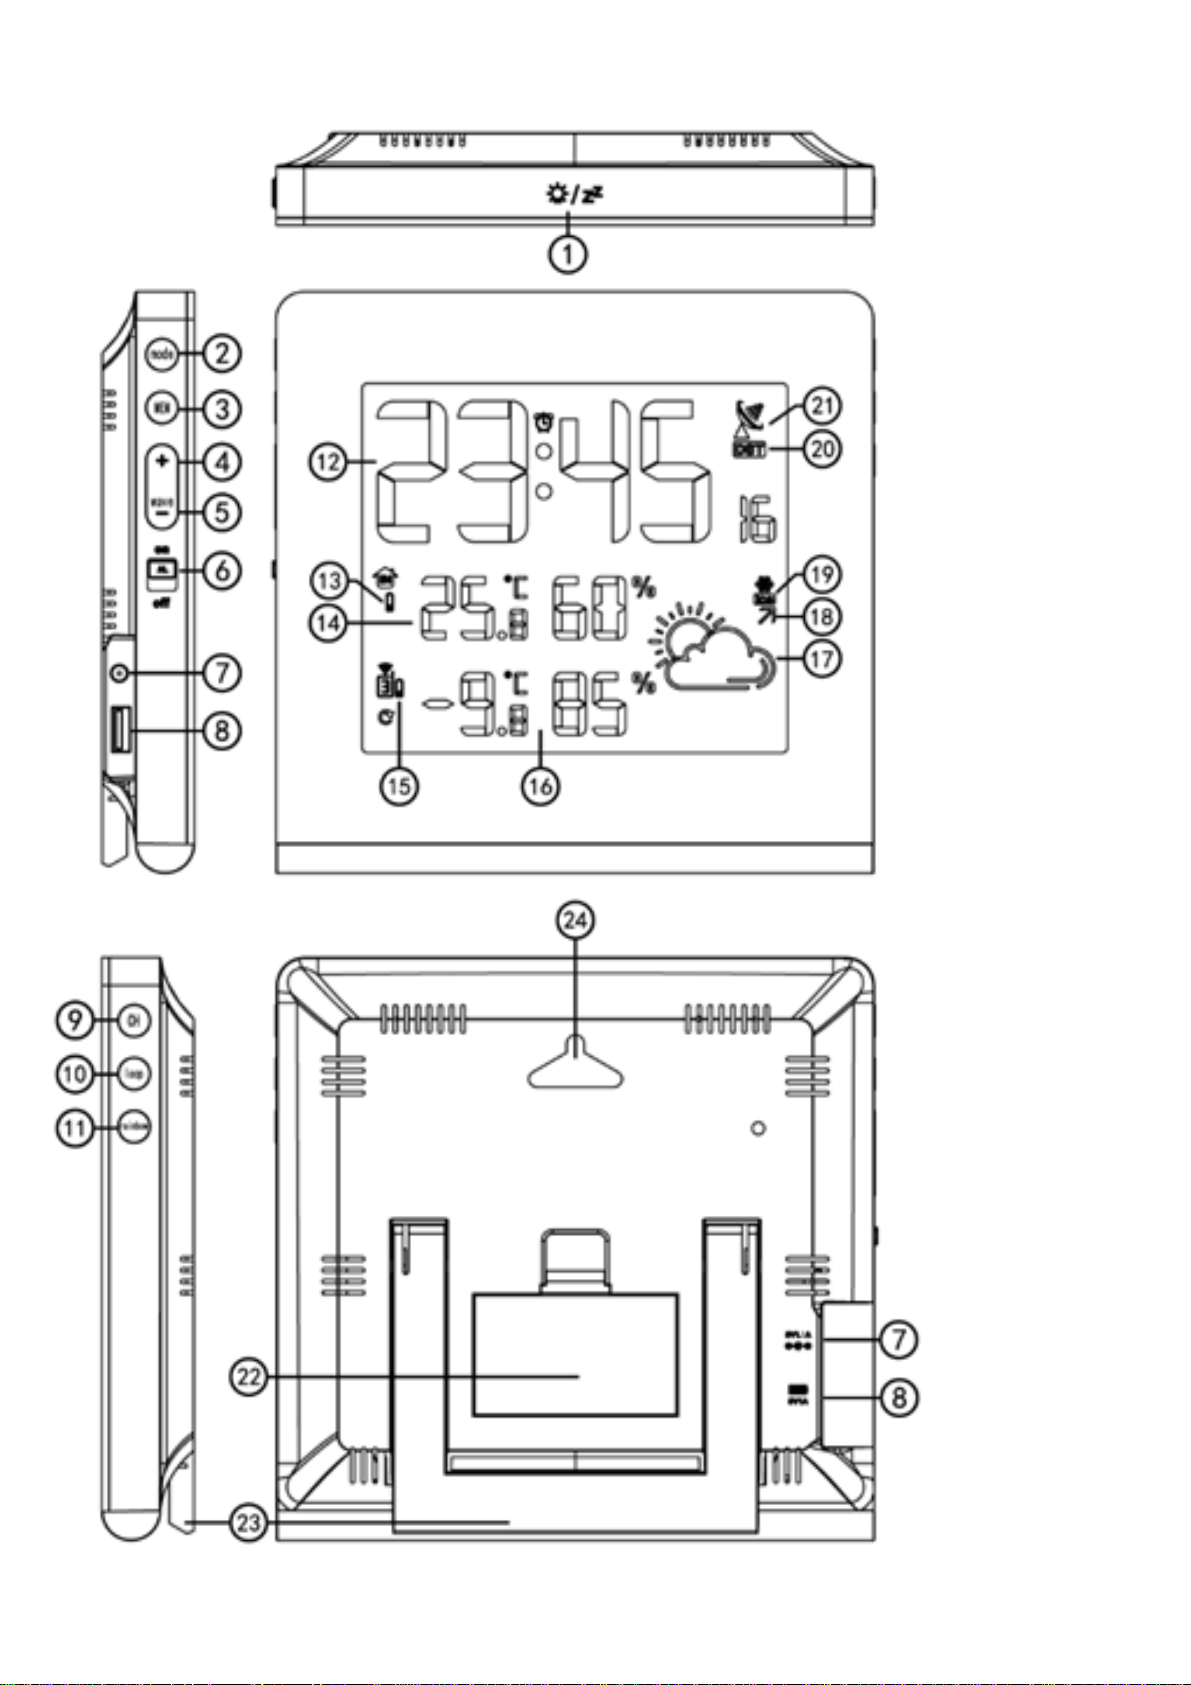
Aufbau: Wetterstation
DE2
1㸸 “Light/Snooze”-Taste
2㸸 “Mode”-Taste
3㸸 “MEM”-Taste
4㸸 “+”-Taste
5㸸 “-/Wave”-Taste
6㸸 “Alarm ON/OFF”-Schalter
7㸸 Netzteilanschluss
8㸸 USB-Anschluss
9㸸 “CH”-Taste
10㸸“loop”-Taste
11㸸“rainbow”-Taste
12㸸Uhrzeit
13㸸Batterieendanzeige der Wetterstation
14㸸Innentemperatur und –luftfeuchtigkeit
15㸸Batterieendanzeige des Aussensenders
16㸸Aussentemperatur und -luftfeuchtigkeit
17: Wettervorhersage-Symbol
18: Luftdrucktrend
19: Frostalarm-Symbol
20: DST-Zeitsymbol
21: Funkempfang-Symbol
22: Batteriefachabdeckung
23: Standfuß
24: Wandanbringungsvertiefung
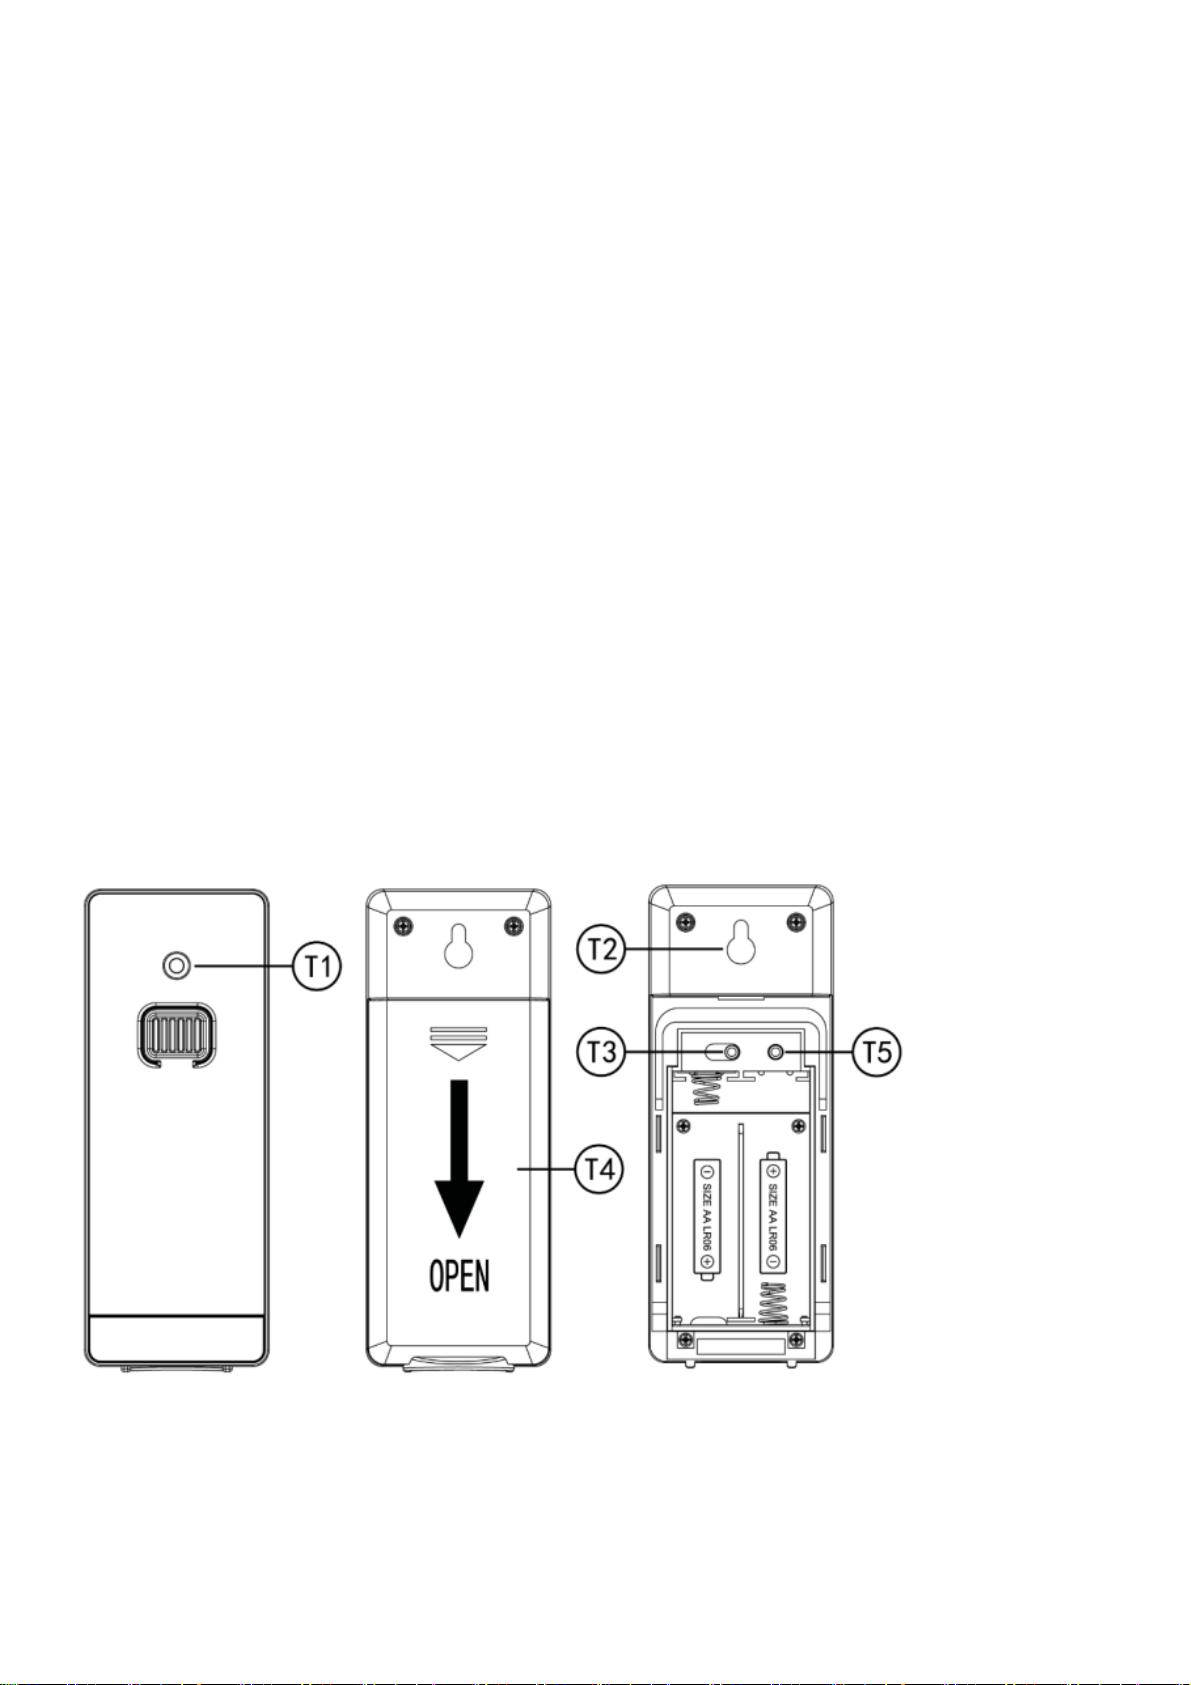
Aufbau: Aussensender
T1: Übertragungsindikator (Lampe)
T2: Wandanbringungsvertiefung
T3: Kanalschalter
T4: Batteriefachabdeckung
T5: Reset-Taste
DE3

Inbetriebnahme:
` Öffnen Sie die Batteriefachabdeckung der Wetterstation
` Legen Sie 2 x AA Batterien unter Beachtung der Polarität [ “+” und “ –“ Markierungen] in das
Batteriefach ein. Diese Batterien sind als Back-Up für das Netzteil gedacht.
` Verbinden Sie die Wetterstation mit dem enthaltenen Netzteil und stecken Sie das Netzteil in eine
Haushaltssteckdose.
` Alle Symbole auf der LCD-Anzeige leuchten für 3 Sekunden auf und ein Signalton ist zu hören,
sobald die Wetterstation mit Strom versorgt wird. Die Innentemperatur und –luftfeuchtigkeit werden
angezeigt.
` Die Wetterstation beginnt mit der Suche nach dem Funksignal des Aussensenders. Das
Funkempfang-Symbol im „OUTDOOR“ Bereich der Anzeige blinkt für 3 Minuten während dieses
Vorgangs.
` Öffnen Sie die Batteriefachabdeckung des Aussensenders und legen Sie 2 x AA Batterien unter
Beachtung der Polarität [ “+” und “ –“ Markierungen] in das Batteriefach ein.
` Nach dem Empfang der Aussensenderdaten sucht die Station nach dem Funkzeitsignal.
Empfang des Funksignals:
` Die Wetterstation sucht nach 3 Minuten nach jedem Neustart und nach dem Einlegen von neuen
Batterien automatisch nach dem DCF77 Funkzeitsignal. Das Funkempfang-Symbol blinkt während
dieses Vorgangs.
` Die Station sucht täglich um 1:00 /2:00 / 3:00 Uhr automatisch nach dem DCF77 Funkzeitsignal,
um die Uhrzeit aktuell zu halten und Abweichungen zu korrigieren. Das Funkempfang-Symbol wird
nicht mehr angezeigt, wenn die Synchronisation mit dem Funkzeitsignal fehlgeschlagen ist und die
Station sucht zur nächsten vollen Stunde erneut nach dem Funkzeitsignal. Dieser Vorgang wird bis
zu 5 mal durchgeführt.
` Halten Sie die “Wave”-Taste für 2 Sekunden gedrückt um manuell nach dem DCF77 Funkzeitsignal
zu suchen. Die Suche nach dem Funkzeitsignal wird beendet, wenn innerhalb von 7 Minuten kein
Signal empfangen wird. Das Funkempfang-Symbol wird nicht mehr angezeigt und zur nächsten
vollen Stunden wird das Funksignal erneut gesucht.
` Drücken Sie die “Wave”-Taste während der Signalsuche um die Suche nach dem Funkzeitsignal
zu beenden.
Hinweise:
` Ein blinkendes Funkempfang-Symbol zeigt an, das derzeit das DCF77 Funkzeitsignal gesucht wird.
` Ein erfolgreicher Empfang des DCF77 Funkzeitsignals wird durch ein dauerhaft angezeigtes
Funkempfang-Symbol angezeigt.
` Eine minimale Entfernung von 2,5 Metern zu allen Störquellen wie Fernsehgeräten,
Computermonitoren oder anderen Netzteilen wird empfohlen.
` Während des Funkempfangs sind die USB-Aufladefunktion und die
automatisch ausgeschaltet.
` Der Funkempfang ist in Räumen mit Betonwänden (z.B.: Keller) und in Büroräumen deutlich
schwächer. Platzieren Sie die Station bei Empfangsproblemen nah an ein Fenster.
` Während der Suche des Funkzeitsignals haben nur die "Light/snooze"-Taste und die “Wave”-
Taste eine Funktion, alle anderen Tasten sind deaktiviert. Drücken Sie die “Wave”-Taste um die
Signalsuche zu beenden und erneut auf die Funktionen aller Tasten zugreifen zu können.
Manuelle Zeiteinstellung:
` Halten Sie die “Mode”-Taste für 2 Sekunden gedrückt und die Temperatureinheit blinkt. Drücken
Sie die “+” und die “-” Taste um die Temperatureinheit als °C oder °F auszuwählen.
` Drücken Sie die “Mode”-Taste um die Einstellung zu bestätigen und 12/24HR blinkt. Drücken Sie
die “+” und die “-” Taste um 12 Stunden oder 24 Stunden als Zeitformat einzustellen.
` Drücken Sie die “Mode”-Taste um die Einstellung zu bestätigen und die Zeitzone blinkt. Drücken
Sie die “+” und die “-” Taste um die Zeitzone (-12 bis +12) einzustellen. Hinweis, für die Zeitzone in
Deutschland nutzen Sie die „0“ als Einstellung.
Hintergrundbeleuchtung
DE4

` Drücken Sie die “Mode”-Taste um die Einstellung zu bestätigen und die Stundenanzeige blinkt.
`
Drücken Sie die “+” und die “-” Taste um die Stunde einzustellen.
`
Drücken Sie die “Mode”-Taste um die Einstellung zu bestätigen und die Minutenanzeige blinkt.
Drücken Sie die “+” und die “-” Taste um die Minuten einzustellen.
` Drücken Sie die “Mode”-Taste um die Einstellung zu bestätigen und die Wettervorhersage blinkt.
Drücken Sie die “+” und die “-” Taste um das Symbol zum aktuellen Wetter einzustellen.
` Drücken Sie die “Mode”-Taste um die Einstellung zu bestätigen und zu beenden. Die Station kehrt
in die normale Zeitanzeige zurück.
Hinweis:
` Die Station kehrt automatisch in die normale Zeitanzeige zurück, wenn innerhalb von 20 Sekunden
keine Taste betätigt wird.
Alarmeinstellung
` Schieben Sie den “AL” Schalter auf die "on" Position und das “”-Symbol wird auf dem LCD
angezeigt. Ein Signalton ist gleichzeitig zu hören (außer während der Signalsuche) und die
Alarmfunktion ist angeschaltet. Schieben Sie den “AL” Schalter auf die "off" Position, das “”-
Symbol wird nicht mehr angezeigt und die Alarmfunktion ist ausgeschaltet.
` Drücken Sie einmal die “Mode”-Taste und auf dem LCD wird die Alarmzeit angezeigt. Halten Sie
die “Mode”-Taste für 2 Sekunden gedrückt und die Stunde der Alarmzeit blinkt. Drücken Sie die
“+” und die “-” Taste um die Stunde der Alarmzeit einzustellen.
` Drücken Sie die “Mode”-Taste um die Einstellung zu bestätigen und die Minuten der Alarmzeit
blinken. Drücken Sie die “+” und die “-” Taste um die Minuten der Alarmzeit einzustellen.
` Drücken Sie die “Mode”-Taste um die Einstellung zu bestätigen und die Schlummerzeit blinkt.
Drücken Sie die “+” und die “
` Drücken Sie die “Mode”-Taste um die Einstellung zu bestätigen und zu beenden.
Hinweise:
` Die Station kehrt automatisch in die normale Zeitanzeige zurück, wenn innerhalb von 20 Sekunden
keine Taste betätigt wird.
` Der Alarmton ist für 2 Minuten zu hören, wenn der Alarm ausgelöst wird und nicht durch das
Betätigen einer Taste frühzeitig beendet wird. In diesem Fall wird der Alarm nach 24 Stunden
erneut zu hören sein.
` Ansteigender Alarmton (Dauer: 2 Minuten) ändert während des Alarms 4x die Lautstärke.
Ausschalten des Alarmtons
` Drücken Sie während des Alarmtons jede Taste außer der “Light/snooze”-Taste, um den Alarm zu
beenden. Die Alarmzeit muss nicht neu eingestellt werden, der Alarm wird am nächsten Tag zur
gleichen Zeit erneut ausgelöst.
Schlummerfunktion
` Drücken Sie während des Alarmtons die “Light/snooze” Taste und die Schlummerfunktion wird
angeschaltet. Der Alarm ist nach Ablauf der Schlummerdauer erneut zu hören.
Empfang der Aussensenderdaten
` Die Wetterstation empfängt automatisch die aktuellen Daten des Aussensenders für
Aussentemperatur und Aussenluftfeuchtigkeit, sobald Batterien in die Station eingelegt werden.
` Der Aussensender sendet automatisch die aktuellen Daten für Aussentemperatur und
Aussenluftfeuchtigkeit an die Wetterstation, sobald Batterien in den Sender eingelegt werden.
` Halten Sie die “CH”-Taste für 3 Sekunden gedrückt um den manuellen Signalempfang zu starten.
Im Fall, dass die Wetterstation keine Daten des Aussensenders empfängt ( - -.- wird auf dem LCD
angezeigt) , Das Funkempfang-Symbol blinkt auf dem LCD und die Wetterstation sucht nach dem
Aussensendersignal.
` Drücken Sie die “CH”-Taste um CH1, CH2, CH3 oder eine Wechseldarstellung als allen Kanälen
-” Taste um die Schlummerdauer von 1-60 Minuten einzustellen.
DE5
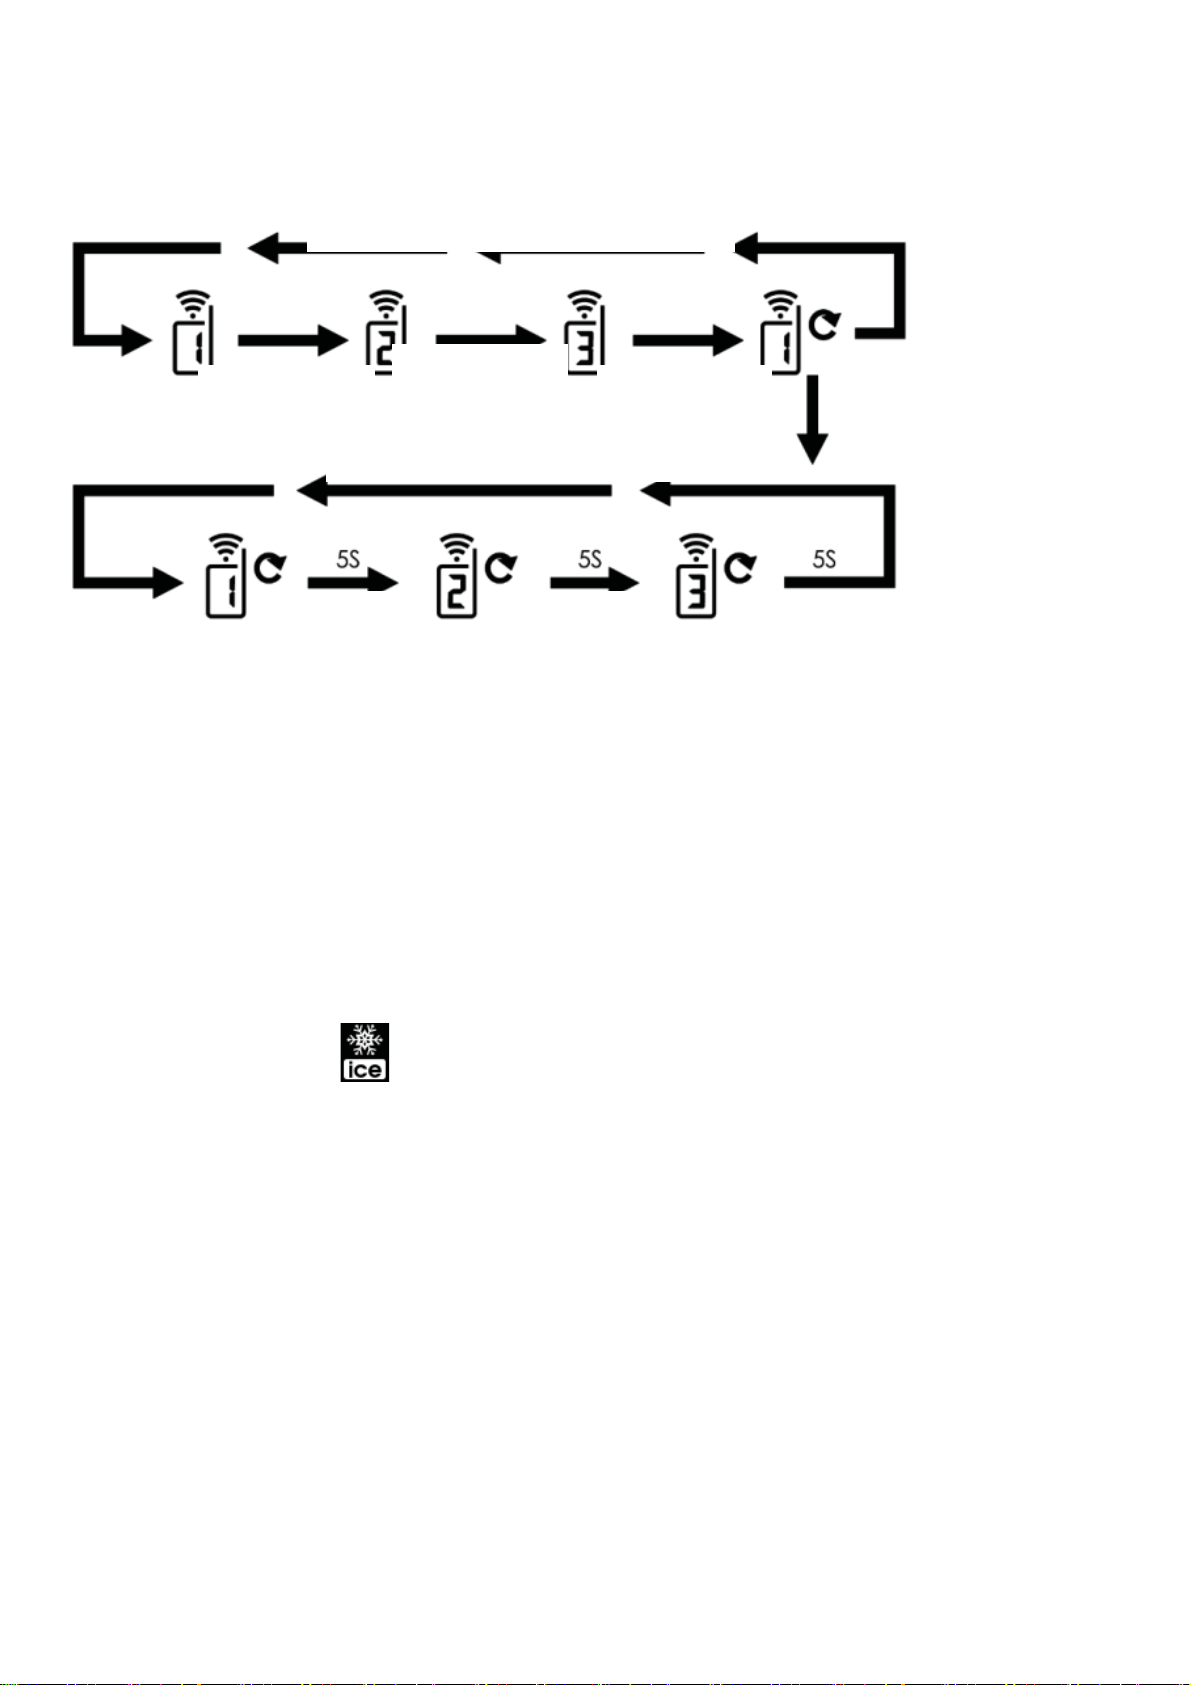
auszuwählen, wenn mehrere Aussensendersignale von der Station empfangen werden. Der
“CH“-Taste drücken
“CH“-Taste
drücken
“CH“-Taste
drücken
Automatisch
Automatisch
Automatisch
“CH“-Taste
Kanalschalter auf der Rückseite des Aussensenders muss passend zum gewünschten Kanal
eingestellt werden.
drücken
Maximale/minimale Messwerte
` Drücken Sie die “MEM”-Taste und die maximalen Werte für Temperatur und Luftfeuchtigkeit
werden angezeigt. Drücken Sie die “MEM”-Taste erneut und die minimalen Werte für Temperatur
und Luftfeuchtigkeit werden angezeigt.
` Passend werden zu den Werten “MAX” oder “MIN” Symbole auf dem LCD angezeigt.
` Halten Sie die “MEM”-Taste für 3 Sekunden gedrückt und die maximalen und minimalen Werte für
Temperatur und Luftfeuchtigkeit werden zurückgesetzt.
Hinweis:
` Bei Messwerten unterhalb des Messbereiches wird LL.L angezeigt. Bei Messwerten oberhalb des
Messbereiches wird HH.H angezeigt.
Frostalarm
` Das Frostalarm-Symbol wird blinkend angezeigt, wenn eine Außentemperatur zwischen –1ć
bis + 2.9 ć oder +30.2 bis + 37.2gemessen wird.
Wettervorhersage
` Die Wettervorhersage wird auf Basis von Änderungen des Luftdrucks errechnet und kann von der
derzeitigen Wettersituation abweichen.
` Die Wetterstation kann folgende Wettersymbole anzeigen:
DE6

㸸
Sonnig
Leicht bewölkt
Bewölkt
Regen
Schnee
Starker Regen
/ Gewitter
` Diese Wettersymbole sagen die mögliche Wettersituation für die nächsten 8 Stunden voraus und
nicht das derzeitige Wetter.
Hintergrundbeleuchtung
` Drücken Sie die “Light/snooze”-Taste während des Batteriebetriebs und die
Hintergrundbeleuchtung leuchtet für 8 Sekunden auf.
` Drücken Sie die “rainbow”-Taste mehrfach um eine von 8 Farben für die Hintergrundbeleuchtung
zu wählen: weiss, rot, orange, gelb, grün, cyan, blau und lila.
` Drücken Sie die “-”-Taste während des Netzteilbetriebs um die Helligkeit der
Hintergrundbeleuchtung auszuwählen und drücken Sie die “rainbow”-Taste um die Farbe der
Hintergrundbeleuchtung einzustellen.
` Drücken Sie die “loop”-Taste und die Farbe der Hintergrundbeleuchtung verändert sich langsam.
Drücken Sie “loop”-Taste erneut, wenn Ihre gewünschte Farbe angezeigt wird und diese wird
gespeichert.
USB-Aufladefunktion㸸
` Der USB-Anschluss auf der Rückseite der Basisstation bietet DC 5V 1A Ausgangsstrom zum
Aufladen von mobilen Geräten.
Umwelteinflüsse auf Funkempfang
Die Station empfängt kabellos die genaue Uhrzeit. Wie bei allen kabellosen Geräten kann der
Funkempfang durch folgende Einflüsse beeinträchtigt sein:
x lange Übertragungswege
x naheliegende Berge und Täler
x nahe Autobahnen, Gleisen, Flughäfen, Hochspannungsleitungen, etc.
DE7
x nahe Baustellen
x inmitten hoher Gebäude
x in Betonbauten
x nahe elektrischer Geräte (Computer, Fernseher, etc) und metallischer Gegenstände
x in bewegten Fahrzeugen
Platzieren Sie die Station an einem Ort mit optimalem Empfang, z.B. in der Nähe von Fenstern und
entfernt zu metallischen oder elektrischen Gegenständen.
Vorsichtsmaßnahmen
x Der Empfänger dieses Gerätes ist ausschließlich für den Gebrauch in Innenräumen gedacht.
x Setzen Sie das Gerät nicht extremer Gewalteinwirkung oder Stößen aus.
x Setzen Sie das Gerät nicht hohen Temperaturen, direktem Sonnenlicht, Staub und Feuchtigkeit
aus.
x Tauchen Sie das Gerät nicht in Wasser.
x Vermeiden Sie den Kontakt mit ätzenden Materialien.
x Werfen Sie das Gerät nicht ins Feuer. Es könnte explodieren.
x Öffnen Sie nicht das Gehäuse und manipulieren Sie nicht bauliche Bestandteile des Geräts.
Batterie-Sicherheitshinweise
x Verwenden Sie nur Alkali-Batterien, keine wiederaufladbaren Batterien.
x Legen Sie die Batterien unter Beachtung der Polarität (+/-) richtig ein.
x Ersetzen Sie stets einen vollständigen Batteriesatz.
x Mischen Sie niemals alte und neue Batterien.
x Entfernen Sie erschöpfte Batterien sofort.
x Entfernen Sie die Batterien bei Nichtnutzung.
x Laden Sie die Batterien nicht auf und werfen Sie sie nicht ins Feuer. Sie könnten explodieren.
x Bewahren Sie die Batterien nicht in der Nähe von Metallobjekten auf, da ein Kontakt einen
Kurzschluss verursachen kann.
x Setzen Sie Batterien keinen hohen Temperaturen, extremer Feuchtigkeit oder direktem
Sonnenlicht aus.
x Bewahren Sie Batterien außerhalb der Reichweite von Kindern auf. Verschlucken der Batterien
kann zum Ersticken führen.
Verwenden Sie das Produkt ausschließlich für den vorgesehenen Zweck!
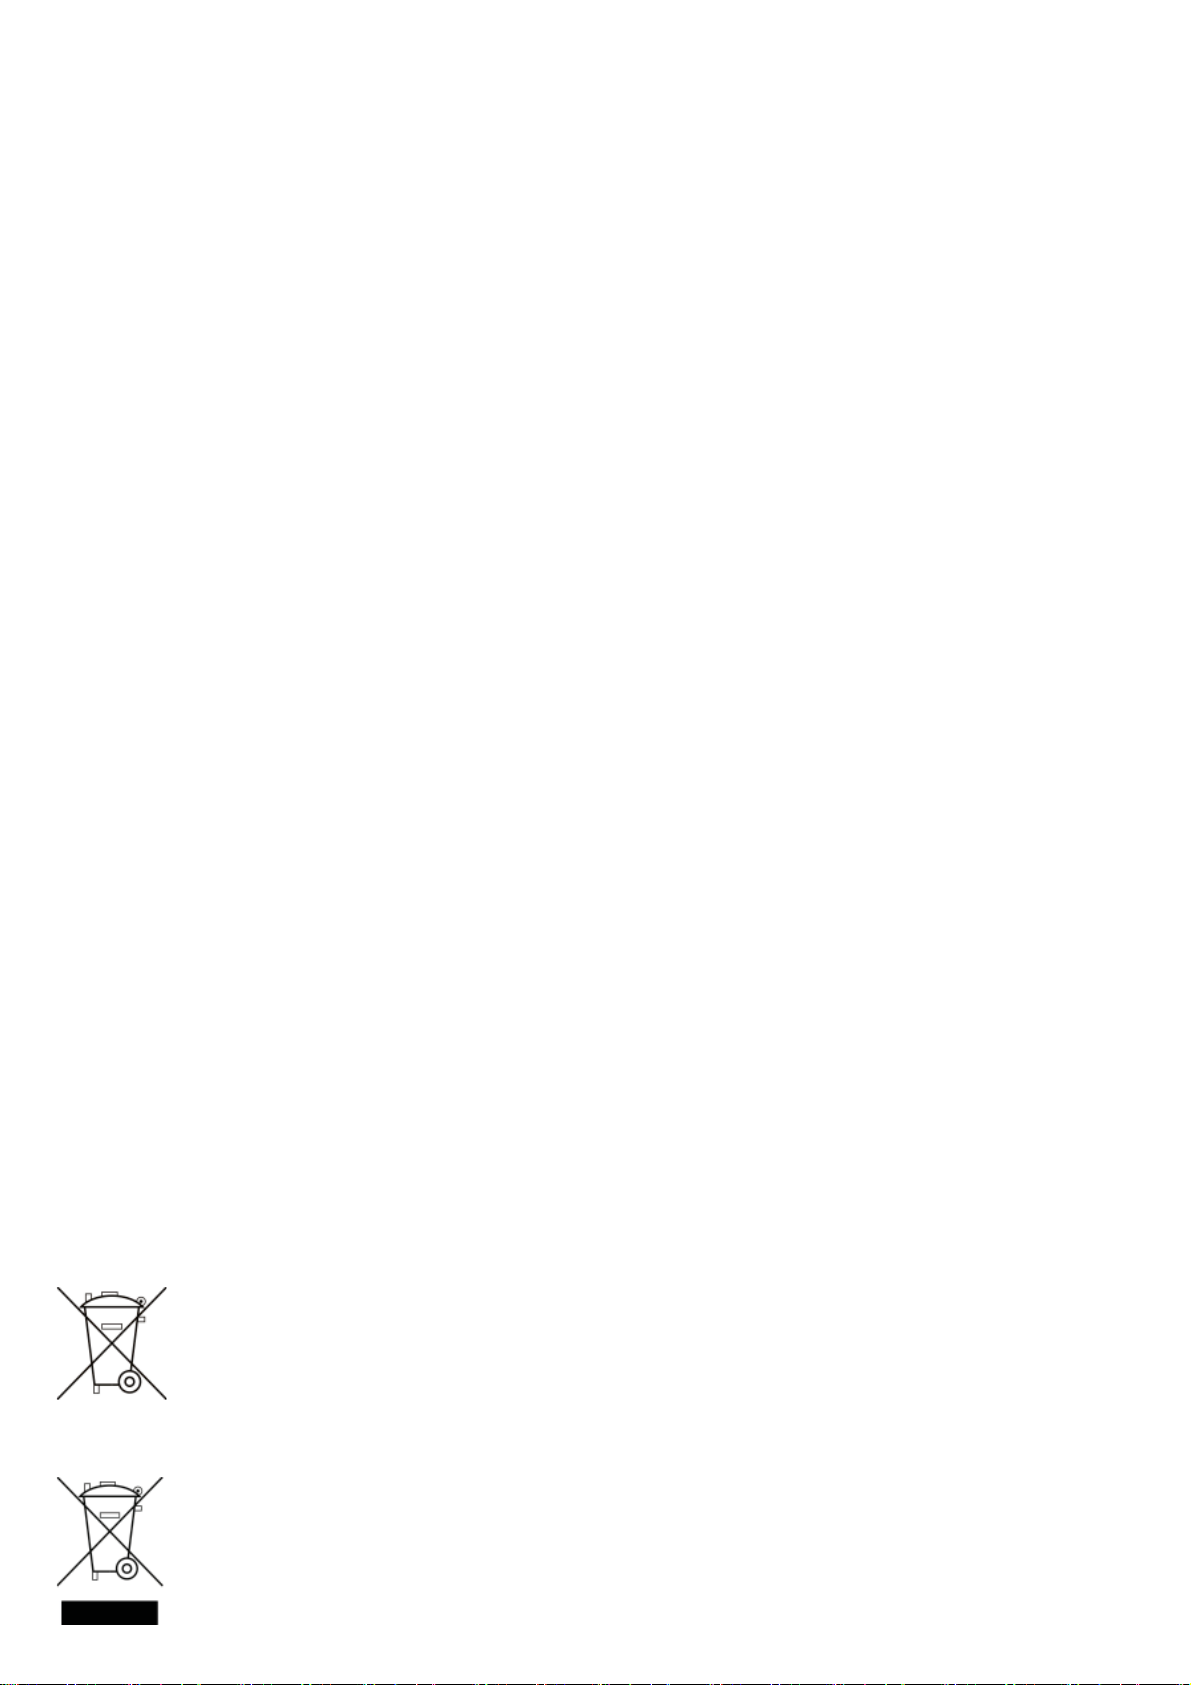
Hinweispflicht nach dem Batteriegesetz
Altbatterien gehören nicht in den Hausmüll. Wenn Batterien in die Umwelt
gelangen, können diese Umwelt- und Gesundheitsschäden zur Folge haben. Sie
können gebrauchte Batterien unentgeltlich bei ihrem Händler und Sammelstellen
zurückgeben. Sie sind als Verbraucher zur Rückgabe von Altbatterien gesetzlich
verpflichtet!
Hinweispflicht nach dem Elektronikgerätegesetz
Laut Elektro- und Elektronikgerätegesetz (ElektroG) gehört Elektroschrott nicht in
den Hausmüll, sondern ist zu recyceln oder umweltfreundlich zu entsorgen.
Entsorgen Sie ihr Gerät in einen Recycling Container oder an eine lokale
Abfallsammelstelle.
DE8

WS 9065 – Manual
Features:
` DCF radio controlled time function
` Time in 12 or 24 hour format
` Alarm function
` Snooze function (OFF or 1~60min)
` Low battery indicator
` USB socket for mobile device charging(5V1A)
` Temperature in °C or °F format
` Humidity: Indoor & Outdoor measurement range:
20%RH ~ 95%RH
` Temperature:
— Indoor temperature measurement ranges:
-9.9°C (14.2°F) ~ 50°C (122°F)
— Outdoor temperature measurement ranges:
-25°C (-13°F) ~ 50°C (122°F)
— Outdoor thermometer ice alert
` Maximum /minimum value record of temperature and humidity
` Wireless Outdoor Sensor:
— Wall Mount or Table Stand
— 3 Channel selectable
— 433.92MHz RF transmitting frequency
— 60 meter transmission range in an open area
` Weather forecasting function
` Power Supply:
Weather Station:
Battery: 2 x LR06 AA
Adapter: 5V1.2A
Remote Sensor:
Battery:2 x LR06 AA
EN1

Appearance description: Station
EN2

1㸸 “Light/snooze” touch button
2㸸 ““mode” button
3㸸 “MEM” button
4㸸 “+” button
5㸸 “-/Wave” button
6㸸 Alarm ON/OFF switch
7㸸 Adapter input socket
8㸸 USB socket
9㸸 “CH” button
10㸸“loop” button
11㸸“rainbow” button
12㸸time
13㸸Weather station low battery indicator
14㸸Indoor temperature and humidity
15㸸Remote sensor low battery indicator
16㸸Outdoor temperature and humidity
17: Weather forecast symbol
18: Barometric pressure trend display
19: Ice alert icon
20: Time DST icon
21: Radio Controlled Icon
22: Battery compartment cover
23: Stand
24: Wall mounting hole
Appearance description: Outdoor sensor
T1: Transmission indication lamp
T2: Wall mounting hole
T3: Channel switch
T4: Battery compartment cover
T5: Reset button
EN3

Initial operation:
`
` Open the weather station battery compartment cover
` Insert 2 x AA batteries observing polarity [ “+” and “ –“ marks]. These batteries are intended as
back-up for adapter.
` Insert the provided power adapter and connect to the power socket.
` Once the weather station is powered, all icons on the LCD will light up for 3 seconds, and you will
hear a beep tone, then indoor temperature & humidity will be displayed.
` The Weather Station will now start to search for the outdoor remote sensor. This operation takes
about 3 minutes and will be indicated by a flashing reception RF antenna symbol in the
“OUTDOOR” display area on the receiver.
` Open the remote sensor battery compartment cover and insert 2 x AA batteries observing polarity [
“+” and “–“ marks]
` After receiver has received the outdoor remote sensor, it will enter the radio controlled time
reception mode.
Reception of the Radio signal:
` The clock will automatically search the DCF signal after 3 minutes of any restart or changing of new
fresh batteries. The radio mast icon starts to flash.
` At 1:00 /2:00 / 3:00 AM, the clock automatically carries out the synchronization procedure with the
DCF signal to correct any deviations to the exact time. If this synchronization attempt is
unsuccessful (the radio mast icon disappears from the display), the clock will automatically attempt
another synchronization at the next full hour. This procedure is repeated automatically up to total 5
times.
` To start manual DCF signal reception, press and hold the “Wave” button for two seconds. If no
signals received within 7 minutes, then the DCF signal search stops (the radio mast icon disappears)
and start again at the next full one hour.
` During DCF reception, to stop searching radio signal, press the “Wave” button once.
Please note:
` A flashing radio mast icon indicates that the DCF signal reception has started
` A continuously displayed radio mast icon indicates that the DCF signal was received successfully
` We recommend a minimum distance of 2.5 meters (8.2Feet) to all sources of interference, such as
televisions or computer monitors or switching power adapter.
` When receiving the DCF radio wave, it will automatically turn off the USB charging and backlight.
` Radio reception is weaker in rooms with concrete walls (e.g.: in cellars) and in offices. In such
extreme circumstances, place the system close to the window.
` During the RC receive mode, only the "Light/snooze" and “Wave” buttons have a function, other
buttons are not functional. If you want to use other functions, please press “Wave” button to exit
the DCF reception mode.
Manual time setting:
` Press and hold the “mode” button for 2 seconds, the temperature unit starts to flash. Press the “+”
and “-” buttons to set the temperature unit to °C or °F.
` Press the “mode” button to confirm your setting, 12/24HR start to flash. Press the “+” and “-”
buttons to set 12 or 24 hour mode.
` Press the “mode” button to confirm your setting, the time zone starts to flash, Press the “+” and “-”
buttons set a time zone (-12 to +12).
` Press the “mode” button to confirm your setting, the hour display starts to flash. Press the “+” and
“-” buttons to set the hour.
Press the “mode” button to confirm your setting, the minute display starts to flash. Press the “+”
`
and “-” buttons to set the minute.
` Press the “mode” button to confirm your setting, the weather forecast starts to flash. Press the “+”
and “-” buttons to select the current weather.
` Press the “mode” button to confirm your setting and to end the setting procedures, the clock
automatically returns to the normal time mode.
EN4

Please note:
` If there is no valid operation within 20 seconds, the clock automatically returns to the normal time
mode.
Alarm setting
` Push the “AL” switch to the "on" position, the LCD displays the “ ” icon. At the same time
issued BI-BI sound (Except for RC), the alarm function is ON. Push the “AL” switch to the "off"
position, the “ ” icon will disappears from the display, the alarm function is OFF.
` Press the “mode” button once and the LCD displays alarm time. Press and hold the “mode” button
for 2 seconds until hour of the alarm time starts to flash. Press the “+” and “-” buttons to set the hour.
` Press the “mode” button to confirm your setting, The Minute of the Alarm time starts to flash. Press
the “+” and “-” buttons to set the minute.
` Press the “mode” button to confirm your setting, the snooze time starts to flash. Press the “+” and
“-” buttons to set the snooze duration from 1-60 minutes.
` Press the “mode” button to confirm your setting and to end the setting procedure.
Please note:
` If there is no valid operation within 20 seconds, the clock automatically returns to the normal time
mode.
` The alarm will sound for 2 minutes if you do not deactivate it by pressing any button. In this case
the alarm will be repeated automatically after 24 hours.
` Rising alarm sound (crescendo, duration: 2 minutes) changes the volume 4 times whilst the alarm
signal is heard.
Switching off the alarm signal
` When the alarm is ringing, press any button except the “Light/snooze” button to stop the alarm
signal. It is not necessary to reactivate the alarm. It will ring again this time next day.
Snooze function
` When the alarm is ringing, touch the “Light/snooze” button the alarm mode will to get to SNOOZE
mode. The alarm signal sounds again after the set snooze durati
RF Transmission Procedure
` The weather station automatically starts receiving transmission from outdoor thermo sensor for
outdoor temperature & humidity after batteries inserted.
` The remote sensor will automatically transmit temperature and humidity signal to the weather
station after batteries inserted.
` If the weather station failed to receive transmission from outdoor sensor (“- -.-”display on the LCD),
press and hold the “CH” button for 3 seconds to receive transmission manually. RF icon flashes on
on.
the LCD᧨The weather station starts to receive the remote sensor.
` If the weather station receives 2 or 3 transmitters signals, press the “CH” button to select CH2, CH3
data or cyclic display. The channel switch on the back of the transmitter must be set to a number
that fits the desired channel.
EN5

Press “CH“ button
Press “CH“
Press “CH“
Press “CH“
Automatic
Automatic
Maximum/minimum values
`Press the “MEM” button once, the LCD will display maximum value of temperature/ humidity. The
LCD will display the minimum value of temperature/humidity if press once “MEM” button again after
the maximum value is displayed.
` At the same time, there are “MAX” or “MIN” displayed on the LCD.
` The temperature/humidity maximum/minimum value can be reset by pressing and holding the
“MEM” button for 3 seconds.
Please note:
` If the temperature reading is below the measuring ranges, LL.L will be displayed. If the temperature
reading is above the measuring ranges, HH.H will be displayed.
Ice alert
` The ice alert symbol appears and flashing when the outdoor temperature at –1ć to + 2.9 ć
or +30.2 to + 37.2.
Weather forecasting function
` The weather forecast is calculated from evaluation of fluctuations in the barometric pressure and
may deviate from the actual weather conditions.
` The weather station displays the following weather symbols:
EN6

㸸
Sunny
Slightly cloudy
Cloudy
Rainy
Snowy
Heavy rain
` The weather symbols indicate the probable weather over the next 8 hours and not the current
weather.
Background lighting
` In battery powered mode, touch the “Light/snooze” button and the backlight illuminates for 8
seconds.
` Press the “rainbow” button to set different backlight colors, Change one color every time you press
it, there are 8 kinds: white, red, orange, yellow, green, cyan, blue and purple.
` In adapter powered mode, press the “-” button to adjust the brightness of the backlight, press the
“rainbow” button to set different backlight colors.
` Press the “loop” button, the backlight color will evolve slowly, when evolving to your favorite color,
press “loop” button again to stay in this color.
USB Charging Function㸸
` The USB socket on the back of the main device provides DC 5V 1A output power for handheld
mobile device charging.
Environmental reception effects
The station obtains the accurate time with wireless technology. Same as all wireless devices, the
reception is maybe affected by the following circumstances:
x long transmitting distance
x nearby mountains and valleys
x near freeway, railway, airports, high voltage cable etc.
EN7

x near construction site
x among tall buildings
x inside concrete buildings
x near electrical appliances (computers, TV’s, etc) and metallic structures
x inside moving vehicles
Place the station at a location with optimal signal, i.e. close to a window and away from metal
surfaces or electrical appliances.
Precautions
x This main unit is intended to be used only indoors.
x Do not subject the unit to excessive force or shock.
x Do not expose the unit to extreme temperatures, direct sunlight, dust or humidity.
x Do not immerse in water.
x Avoid contact with any corrosive materials.
x Do not dispose this unit in a fire as it may explode.
x Do not open the inner back case or tamper with any components of this unit.
Batteries safety warnings
x Use only alkaline batteries, not rechargeable batteries.
x Install batteries correctly by matching the polarities (+/-).
x Always replace a complete set of batteries.
x Never mix used and new batteries.
x Remove exhausted batteries immediately.
x Remove batteries when not in use.
x Do not recharge and do not dispose of batteries in fire as the batteries may explode.
x Ensure batteries are stored away from metal objects as contact may cause a short circuit.
x Avoid exposing batteries to extreme temperature or humidity or direct sunlight.
x Keep all batteries out of reach from children. They are a choking hazard.
Use the product only for its intended purpose!
Consideration of duty according to the battery law
Old batteries do not belong to domestic waste because they could cause
damages of health and environment. You can return used batteries free of charge
to your dealer and collection points. As end-user you are committed by law to
bring back needed batteries to distributors and other collecting points!
Consideration of duty according to the law of electrical devices
This symbol means that you must dispose of electrical devices separated from the General
household waste when it reaches the end of its useful life. Take your unit to your
local waste collection point or recycling centre. This applies to all countries of
the European Union, and to other European countries with a separate waste
collection system.
EN8

Guide d'utilisation - WS 9065
Caractéristiques :
` Fonction heure radio pilotée DCF
` Heure au format 24/12 heures
` Fonction d'alarme
` Fonction de rappel d’alarme (INACTIF ou de 1 à 60 min)
` Indicateur de faible niveau des piles
` Port USB pour charger des appareils portables (5V1A)
` Température en °C ou °F
` Humidité : Plage de mesure de température intérieure et extérieure :
20%HR ~ 95%HR
` Température :
— Plage de mesure de température intérieure :
de -9,9°C (14,2°F) à 50 C (122 F)
— Plage de mesure de température extérieure :
de -25°C (-13°F) à 50 C (122 F)
— Thermomètre extérieur d’alerte de gel
` Enregistrement des valeurs maximum/minimum de température et d'humidité
` Capteur extérieur sans fil :
— Support mural ou de table
— 3 canaux
— Fréquence d'émission RF 433,92MHz
— Rayon de transmission de 60 mètres dans un espace dégagé
` Prévisions météo
` Alimentation électrique :
Station météo :
Piles : 2 x LR06 AA
Adaptateur : 5V 1,2A
Unité d'extérieure :
Piles : 2 x LR06 AA
FR1

Description : Station
FR2

1: Touche tactile «rétroéclairage/rappel d’alarme»
2: Touche « MODE »
3: Touche «MEM»
4: Touche « + »
5: Touche «-/Wave»
6: Commutateur Activer/Désactiver l’alarme
7: Prise d'entrée secteur
8: Port USB
9: Touche «CH»
10: Touche «boucle»
11: Touche «arc-en-ciel»
12: heure
13: Indicateur piles faibles de la station météo
14: Température et humidité intérieures
15: Indicateur piles faibles du capteur distant
16: Température et humidité extérieures
17: Symboles de prévisions météo
18: Affichage des tendances de la pression barométrique
19: Icône alerte de gel
20: Icône heure d’été
21: Icône de la radiocommande
22: Couvercle du compartiment à piles
23: Support
24: Trou d’accrochage à un mu
Description : Capteur extérieur
T1 : Témoin d’indication de transmission
T2 : Trou d’accrochage à un mur
T3 : Sélecteur de canal
T4 : Couvercle du compartiment à piles
T5 : Touche de réinitialisation
FR3

Mise en marche :
` Ouvrez le compartiment à piles de la station météo
` Insérez 2 piles AA en respectant les polarités [marques « + » et « - »]. Ces piles servent de
secours pour l’adaptateur.
` Insérez l’adaptateur secteur fourni et le brancher dans une prise secteur.
` Une fois la station météo allumée, tous les icônes de l’écran LCD s’allument pendant 3 secondes,
et un bip sera émis, et la température et l’humidité intérieures s’affichent.
` La station météo lance la recherche du capteur distant extérieur. Cette opération prend environ 3
minutes et est indiquée par le symbole d’une antenne de réception RF clignotante dans la zone
d'affichage «extérieur» du récepteur.
` Ouvrez le compartiment à piles du capteur extérieur et insérez 2 piles AA en respectant les
polarités [signes «+» et «-»]
` Après l’établissement d’une connexion avec le capteur extérieur, le récepteur passe en mode
réception du signal horaire radio-piloté.
Réception du signal radio
` L'horloge va rechercher automatiquement le signal DCF 3 minutes après chaque redémarrage ou
remplacement de piles. L'icône d'antenne radio se met à clignoter.
` À 1 : 00/2 : 00/3 : L'horloge effectue automatiquement une procédure de synchronisation avec le
signal DCF pour corriger les écarts avec l'heure exacte à 00 heure. En cas d’échec des tentatives
de synchronisation (l'icône d'antenne radio disparaît de l'écran), le système va automatiquement
essayer une nouvelle synchronisation après une heure. Cette procédure est répétée
automatiquement à raison d'un nombre maximal de 5 tentatives.
` Pour lancer la réception manuelle du signal DCF, maintenez appuyée la touche «Wave» pendant
deux secondes. Si aucun signal n’est reçu dans les 7 minutes, la recherche du signal DCF
s’arrête (l’icône de l’antenne radio disparaît), vous devez alors recommencer à la prochaine heure
pleine.
` Pendant la réception DCF, pour arrêter la recherche du signal radio, appuyez une fois sur la
touche « WAVE » une fois.
Prière de noter :
` Un icône d'antenne radio clignotant indique que la réception du signal DCF a démarré
` Une icône d'antenne radio affichée de façon continue indique que le signal DCF est reçu avec
succès
` Veillez à respecter une distance minimale de 2,5 m (8,2 pieds) de toute source d'interférence telle
que téléviseurs, écrans d'ordinateur ou adaptateur d'alimentation.
` Lors de la réception du signal radio DCF, elle arrête automatiquement la charge USB et éteint le
rétroéclairage.
` La réception du signal radio est plus faible dans des pièces avec murs en béton (ex. sous-sol) et
dans les immeubles. Dans de telles circonstances extrêmes, placez le système près d’une
fenêtre.
` En mode réception RC, seules les touches «Rétroéclairage/Rappel d’alarme» et «Wave»
fonctionnent. Pour pouvoir effectuer d'autres fonctions, appuyez sur la touche « Wave » pour
quitter le mode réception.
RÉGLAGE MANUEL DE L’HEURE :
` Maintenez appuyée la touche «mode» pendant 2 secondes, l’unité de température se met à
clignoter. Utilisez les touches «+»/«-» pour choisir l’unité de température C ou F.
` Appuyez sur la touche «mode» pour confirmer le réglage, 12h/24h se met à clignoter. Utilisez les
touches «+»/«-» pour choisir le mode 12 ou 24 heures.
` Appuyez sur la touche «mode» pour confirmer le réglage, le fuseau horaire se met à clignoter,
utilisez les touches «+»/«-» pour choisir un fuseau horaire (-12 à +12).
` Appuyez sur « mode » pour confirmer votre réglage, les heures se mettent à clignoter. Utilisez les
touches «+»/«-» pour régler les heures.
FR4

` Appuyez sur « mode » pour confirmer votre réglage, les minutes se mettent à clignoter. Utilisez
les touches «+»/«-» pour régler les minutes.
` Appuyez sur la touche «mode» pour confirmer le réglage, les prévisions météo se mettent à
clignoter. Utilisez les touches «+»/«-» pour sélectionner la météo actuelle.
` Appuyez sur la touche «mode» pour confirmer le réglage et pour terminer les procédures de
réglage, l’horloge retourne automatiquement en mode affichage normal de l'heure.
Prière de noter :
` Si aucune opération n’est effectuée pendant 20 secondes, l’horloge revient automatiquement au
mode affichage normal de l'heure.
Réglage de l’alarme
` Positionnez le commutateur «AL» sur «on», l’icône « » apparaît à l’écran. En même temps,
des bips sont émis (sauf pour RC), la fonction alarme est activée. Positionnez le commutateur
«AL» sur «off», l’icône « » disparaît de l’écran, la fonction alarme est désactivée.
` Appuyez sur la touche «mode» pour afficher l’heure de l’alarme. Maintenez appuyée la touche
«mode» pendant 2 secondes jusqu’à ce que l’heure de l’alarme se mette à clignoter. Utilisez les
touches «+»/«-» pour régler les heures.
` Appuyez sur la touche «mode» pour confirmer votre réglage, les minutes de l’heure de l’alarme
se mettent à clignoter. Utilisez les touches «+»/«-» pour régler les minutes.
` Appuyez sur la touche «mode» pour confirmer votre réglage, la durée de rappel d’alarme se met
à clignoter. Utilisez les touches «+»/«-» pour régler la durée de rappel d’alarme de 1 à 60
minutes.
` Appuyez sur la touche «mode» pour confirmer votre réglage et quitter la procédure de réglage.
Prière de noter :
` Si aucune opération n’est effectuée pendant 20 secondes, l’horloge revient automatiquement au
mode affichage normal de l'heure.
` L'alarme retentit pendant 2 minutes si vous ne la désactivez pas en appuyant sur une touche
quelconque. Dans ce cas, l'alarme sera déclenchée automatiquement au bout de 24 heures.
` Augmentation du volume de l’alarme (crescendo, durée : 2 minutes) change le volume 4 fois
durant la sonnerie de l'alarme.
Arrêter le signal d'alarme
` Lorsque l’alarme se déclenche, appuyez sur une touche quelconque, à l’exception de
«Rétroéclairage/Rappel d’alarme» pour arrêter l’alarme. Il n’est pas nécessaire de réactiver
l'alarme. L’alarme se déclenche le lendemain à la même heure.
Rappel d’alarme
` Lorsque l’alarme se déclenche, appuyez sur la touche
passer en mode Rappel d’alarme. L’alarme se déclenche après la durée de rappel d’alarme fixée.
Procédure de transmission RF :
` Dès que les piles sont insérées, la station météo reçoit automatiquement le signal transmis par le
capteur extérieur de température et d'humidité.
` Dès que les piles sont insérées, le capteur extérieur transmet automatiquement le signal de
température et d'humidité à la station météo.
` Si la station météo n'arrive pas à recevoir un signal du capteur extérieur («- -.-» affiché à l'écran
LCD), maintenez appuyée la touche «CH» pendant 3 secondes pour forcer la réception manuelle.
L’icône RF clignote sur l’écran LCD, la station météo commence à recevoir le signal du capteur
distant.
` Si la station météo reçoit 2 ou 3 signaux d’émetteurs différents, appuyez sur la touche «CH» pour
sélectionner CH2, CH3 ou un affichage alterné.
«Rétroéclairage/Rappel d’alarme» pour
FR5

Automatique
Appuyez sur la touche « CH »
Appuyez sur
« CH »
Appuyez sur
Appuyez sur
CH »
Automatique
Automatique
Valeurs maximales/minimales
` Appuyez sur la touche «MEM» pour afficher la température/humidité maximale. L’écran LCD
affiche la température/humidité minimale si vous appuyez à nouveau sur la touche «MEM» une
fois les valeurs maximales sont affichées.
` «MAX» ou «MIN» sera affiché sur l’écran LCD.
` Les valeurs maximum/minimum de température/humidité peuvent être remises à zéro en
maintenant appuyée la touche «MEM» pendant 3 secondes.
Prière de noter :
` Si la température est inférieure aux plages de mesure, LL.L sera affiché. Si la température est
supérieure aux plages de mesure, HH.H sera affiché.
Alerte de gel
« CH »
«
` Le symbole alerte de gel apparaît clignotant lorsque la température extérieure est comprise
entre -1°C et +2,9°C (+30,2°F - +37,2°F).
Prévisions météo
` Les prévisions météo sont calculées à partir de l'évaluation des fluctuations de la pression
barométrique et peuvent être différentes des conditions météo réelles.
` La station météo affiche les symboles météorologiques suivants :
FR6

Ensoleillé
Partiellement
Fortes pluies
nuageux
Nuageux
Pluvieux
Neigeux
` Les symboles indiquent les prévisions météo pour les 8 prochaines heures.
Rétroéclairage
` En mode fonctionnement sur piles, appuyez sur la touche «Rétroéclairage/Rappel d’alarme»
pour allumer l’écran pendant 8 secondes.
` Appuyez sur la touche «arc-en-ciel» pour choisir différentes couleurs pour le rétroéclairage, la
couleur change à chaque fois que vous appuyez dessus, il y a 8 couleurs : blanc, rouge, orange,
jaune, vert, cyan, bleu et pourpre.
` En mode fonctionnement sur secteur, appuyez sur la touche «-» pour régler la luminosité du
rétroéclairage, appuyez sur la touche «arc-en-ciel» pour choisir différentes couleurs.
` Appuyez sur la touche «boucle», pour que la couleur du rétroéclairage s’intensifie
progressivement, appuyez de nouveau sur la touche «boucle» pour garder la couleur actuelle.
Fonction de charge USB :
` Le port USB situé à l’arrière de l’unité principale fournit une alimentation de sortie 5VCC 1A pour
la charge d’un appareil portable .
Qualité de la réception
La station utilise la technologie de transmission sans fil pour récupérer le signal d'horloge et ajuster
l'heure en conséquence. Comme avec tout appareil de communication sans fil, la qualité de cette
réception se dégrade dans les circonstances suivantes:
x longue distance de transmission
x Montagnes et vallées proches
x près d'une autoroute, d'un chemin de fer, d'un aéroport, d'une ligne à haute tension, etc.
x près d'un chantier de construction
FR7

x au milieu de hauts bâtiments
x à l'intérieur d'un bâtiment en béton
x à proximité d'un appareil électrique (ordinateur, téléviseur, etc.) et d'une structure métallique
x à l'intérieur d'un véhicule en déplacement
Placez la station à un endroit adapté pour une bonne réception des signaux radio, en l'occurrence
près d'une fenêtre et loin de toute surface métallique et de tout appareil électrique.
Précautions
x Installez l'appareil en intérieur.
x N'exposez pas l'appareil à des forces et des chocs excessifs.
x N'exposez pas l'appareil à des températures extrêmes, directs du soleil, à la poussière ou à
l'humidité.
x Ne plongez pas l'appareil dans l'eau.
x Évitez tout contact avec des matériaux corrosifs.
x Ne jetez pas l'appareil dans le feu, elle risque d'exploser.
x N'ouvrez pas le coffret de l'appareil et n'altérez aucun de ses composants.
Avertissements de sécurité concernant les piles
x Utilisez uniquement des piles alcalines, ne pas des piles rechargeables.
x Installez les piles en respectant le sens des polarités (+/-).
x Remplacez toujours toutes les piles en même temps.
x Ne combinez pas des piles usagées avec des piles neuves.
x Retirez immédiatement les piles déchargées de l'appareil.
x Retirez les piles lorsque vous n'envisagez pas d'utiliser votre appareil avant longtemps.
x N'essayez pas de recharger des piles qui ne sont pas rechargeables et ne jetez aucune pile
dans le feu (elle risque d'exploser).
x Rangez vos piles de façon à ce qu'aucun objet métallique ne puisse mettre leurs bornes en
court-circuit.
x Évitez d'exposer les piles à des températures extrêmes, à une humidité extrême et aux rayons
directs du soleil.
x Conservez vos piles hors de portée des enfants. Elles présentent un risque d'étouffement.
Utilisez le produit uniquement pour son usage prévu!
Noter l'obligation de la Loi sur la batterie
Les piles ne doivent pas être déposées avec vos ordures ménagères. Dans le cas
où vous le faites vous risquez de provoquer des dommages importants à votre
environnement ou à la santé d'autrui. Vous pouvez rendre les piles usagées à
votre commerçant qui vous les a vendues ou d'office à une collecte. Vous en tant
qu'utilisateur ou consommateur vous êtes obligés par la loi de retourner les piles
usagées!
Noter l'obligation de la Loi sur les appareils électriques
Ce symbole signifie que les appareils électriques ne doivent pas être jetés aux
ordures ménagères à la fin de leur vie utile. Ramenez votre appareil à votre point
local de collecte de déchets ou à un centre de recyclage. Ceci s'applique à tous
les pays de l'Union européenne et aux autres pays européens disposant d'un
système de collecte des déchets sélectif.
FR8

Hinweis: Bedienungsanleitung in 8 Sprachen
Zusätzlich zu dieser gedruckten Bedienungsanleitung können Sie die Bedienungsanleitung in 8
Sprachen auf der offiziellen Internetseite www.technoline.de herunterladen.
Note: Instruction manual in 8 languages
In addition to this printed user manual, you can download the user manual in 8 languages from the
official website www.technoline.de .
Remarque: Mode d'emploi en 8 langues
En plus de ce manuel d'utilisation imprimé, vous pouvez télécharger le manuel d'utilisation en 8
langues sur le site officiel www.technoline.de .
Nota: Instrucciones de uso en 8 idiomas
Además de este manual de usuario impreso, puede descargar el manual de usuario en 8 idiomas
desde el sitio web oficial www.technoline.de .
Opmerking: Gebruiksaanwijzing in 8 talen
Naast deze gedrukte gebruiksaanwijzing kunt u de gebruiksaanwijzing in 8 talen downloaden van de
officiële website www.technoline.de .
Nota: Istruzioni per l'uso in 8 lingue
Oltre a questo manuale utente stampato, è possibile scaricare il manuale utente in 8 lingue dal sito
ufficiale www.technoline.de .
Poznámka: Návod k obsluze ve 8 jazycích
Kromě tohoto tištěného manuálu si můžete stáhnout manuál v 8 jazycích na oficiálních stránkách
www.technoline.de .
Uwaga: Instrukcja obsługi w 8 językach
Oprócz niniejszej drukowanej instrukcji obsługi można pobrać instrukcję obsługi w 8 językach z
oficjalnej strony internetowej www.technoline.de .
 Loading...