

Page 1
Bedienungsanleitung – WS 7060
Funktionen
3 Tasten: +/MAX/MIN; -/C/F; ALERT
℃/℉ wählbar
Innentemperatur-Messbereich:32℉~122℉(0℃~50℃)
Innen-/Außenluftfeuchtigkeits-Messbereich:20%~95%
Außentemperatur-Messbereich:-58℉~122℉(-50℃~50℃)
Temperatur-Messzyklus: 30 Sekunden
Außenwerte über 3 Kanäle (OUT-1, OUT-2, OUT-3)
Temperatur und Luftfeuchtigkeit mit Max/Min-Funktion
Manuelles Löschen von Max/Min-Messwerten
Außentemperatur mit Alarmfunktion
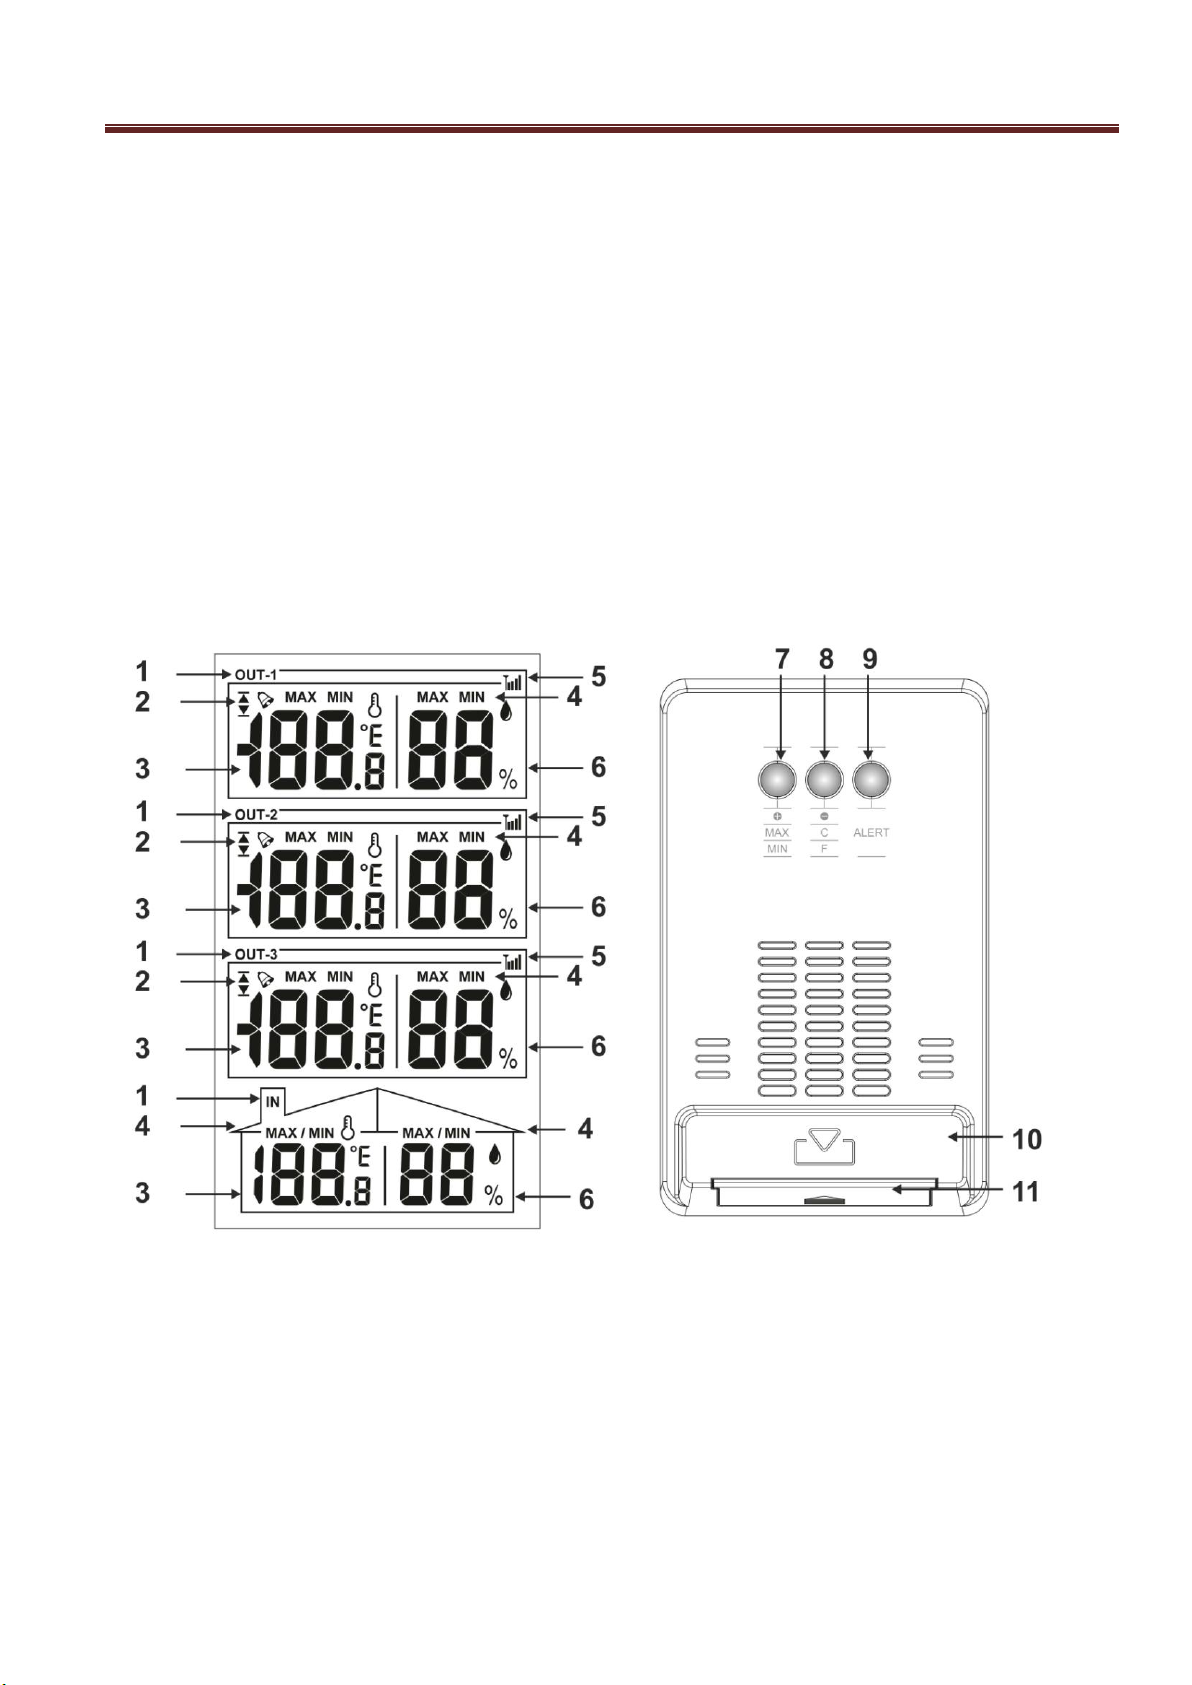
Produktübersicht
1 – Kanalbezeichnung 2 – Alarmsymbole mit Unter- und Obergrenze
3 – Temperatur 4 – Max/Min Symbol
5 – Empfangssymbol für Außensender 6 – Luftfeuchtigkeit
7 – + /MAX / MIN Taste 8 – - / °C / °F Taste
9 – ALERT Taste 10 – Standfuß
11 – Batteriefach mit Batteriefachabdeckung
- DE01 -
Page 2

Außensender
Bedienungsanleitung – WS 7060
A – Sendernummer (identisch mit Standardeinstellung) B – Aufhängeöse
C – Kanalschalter (Standardeinstellung identisch mit Sendernummer) D – Batteriefachabdeckung
E – Batteriefach F – Standfuß
Inbetriebnahme
- Entfernen Sie die Batteriefachabdeckung von der Station und von allen Außensendern.
- Stellen Sie sicher, dass die eingestellte Kanalnummer auf der Rückseite der Außensensoren mit der
Sensornummer auf der jeweiligen Vorderseite der Außensensoren übereinstimmt.
- Legen Sie jeweils 2 x AAA Batterien in jedes Batteriefach der Außensensoren ein.
- Legen Sie 2 x AAA Batterien in das Batteriefach der Station.
- Schieben Sie die Batteriefachabdeckungen wieder fest auf die Batteriefächer der Station und der
- DE02 -
Page 3

Bedienungsanleitung – WS 7060
Außensendern.
- Nach dem Einlegen der Batterien werden für 2 Sekunden alle Symbole auf dem Display angezeigt und die
Station wechselt für 3 Minuten in den Außensender-Empfangsmodus. Behalten Sie die Außensender solange
nahe bei der Station, bis alle Kanäle auf dem Display Messwerte anzeigen. Sobald alle Messwerte empfangen
werden, können die Außensender weiter entfernt von der Station aufgestellt werden.
Hinweis:
Ist ein Empfang der Außensenderdaten innerhalb von 3 Minuten möglich, wird das Empfangssymbol nicht
mehr beim entsprechenden Kanal auf dem Display angezeigt.
Nehmen Sie das Gerät in diesen Fall mit einem neuen und vollen Satz Batterien erneut in Betrieb, bis alle
Außensender mit der Station verbunden sind.
Einstellung des Temperaturalarms
- Halten Sie die Alert Taste für 3 Sekunden im normalen Anzeigemodus gedrückt um in die Alarmeinstellung zu
wechseln.
- Drücken Sie die + oder die – Taste um einen Außensenderkanal zu wählen
- Drücken Sie die Alert Taste um den ausgewählten Kanal zu bestätigen. Das Untergrenzensymbol blinkt.
- Drücken Sie die + oder die – Taste um den Wert für die Untergrenze einzustellen.
- Drücken Sie die Alert Taste um die Alarmanpassungen zu bestätigen. Das Obergrenzensymbol blinkt.
- Drücken Sie die + oder die – Taste um den Wert für die Obergrenze einzustellen.
- Drücken Sie die Alert Taste um die Alarmanpassungen zu bestätigen. Das Ober- und Untergrenzensymbol
blinken gleichzeitig.
- Drücken Sie die + oder die – Taste um den Alarm für diesen Kanal zu aktivieren und das Alarmsymbol
blinkt. Drücken Sie die + oder die – Taste erneut um den Alarm für diesen Kanal zu deaktivieren und das
Alarmsymbol wird nicht länger angezeigt.
- Drücken Sie die Alert Taste um alle Änderungen zu speichern und die Alarmeinstellung zu beenden.
Hinweis:
- Solange ein Alarm aktiviert bleibt, wird das entsprechende Alarmsymbol angezeigt.
- Standardeinstellung für die Untergrenze sind 0 ℃ und für die Obergrenze sind 35℃.
- Die Alarmeinstellung wird automatisch beendet, wenn während der Alarmeinstellung für 20 Sekunden keine
Taste betätigt wird.
- Drücken Sie die + oder die – Taste in der Alarmeinstellung einmal, um die Werte um eine Einheit zu ändern
oder halten Sie die + oder die – Taste gedrückt um die Werte schneller anzupassen.
Temperaturalarm
- Diese Station hat eine Ober- und Untergrenze für 3 Alarme, einen für jeden Außensenderkanal.
- Das oder das Symbol und das Symbol blinken und der Alarm ertönt, wenn die Temperatur eine
- DE03 -
Page 4

Bedienungsanleitung – WS 7060
eingestellte Grenze erreicht, höher als die Obergrenze oder niedriger als die Untergrenze ist.
- Drücken Sie während des Alarms eine beliebige Taste um den Alarmton zu beenden, das Symbol blinkt
weiterhin. Ansonsten wird der Alarmton nach einer Minute automatisch beendet, wenn keine Taste betätigt
wird.
- Das Symbol blinkt erst dann nicht mehr und wird wieder dauerhaft angezeigt, wenn die Temperaturwerte
nicht mehr die gesetzten Grenzen erreichen oder überschreiben.
Hinweis
- Der Alarm kann in der Alarmeinstellung dauerhaft ausgeschaltet bzw. deaktiviert werden.
Außensenderempfang
- Bei der Inbetriebnahme und beim manuellen Außensenderempfang wechselt die Station für 3 Minuten in den
Außensenderempfang und das Empfangssymbol blinkt.
- Drücken Sie die – Taste für 3 Sekunden um den Außensenderempfang manuell zu beginnen.
- Der Außensenderempfang war erfolgreich, wenn alle Kanäle auf dem Display Messwerte anzeigen und alle
Empfangssymbole dauerhaft angezeigt werden.
Hinweis:
- Empfängt ein Kanal innerhalb von einer Stunde keine Messwerte vom entsprechenden Außensender, dann
wechselt die Station für 3 Minuten in den Außensenderempfang und die letzten empfangenen Werte im
entsprechenden Kanal blinken. Nach einer Stunde ohne erfolgreichen Empfang des jeweiligen Außensenders
wird der Kanal für andere Außensender freigegeben und die Station wechselt für 3 Minuten in den
Außensenderempfang. Der entsprechende Kanal auf dem Display zeigt in diesem Fall --.- anstatt der üblichen
Werte an und die Max/Min Werte des Kanals werden. Dieser Vorgang wird wiederholt, bis ein
Außensendersignal empfangen wird.
- Die Sensordaten werden wieder angezeigt und die MIN/MAX Werte werden wieder aufgezeichnet, sobald
nach dem Verlust der Messwerte das Außensendersignal erneut empfangen wird.
MIN/MAX Werte
- Die höchsten und niedrigsten Messwerte in jedem Kanal werden aufgezeichnet und können jederzeit
angezeigt werden.
- Drücken Sie die +/MAX/MIN Taste einmal im normalen Anzeigemodus um die MAX Werte in allen Kanälen auf
dem Display anzuzeigen.
- Drücken Sie die +/MAX/MIN Taste erneut um die MIN Werte in allen Kanälen auf dem Display anzuzeigen.
- Drücken Sie die +/MAX/MIN Taste erneut um in den normalen Anzeigemodus zurückzukehren.
- Halten Sie die +/MAX/MIN Taste für 3 Sekunden gedrückt, um alle aufgezeichneten MIN/MAX Werte zu
löschen und es werden für 1 Sekunde keine Werte auf dem Display angezeigt um eine erfolgreiche Löschung
der MIN/MAX Daten anzuzeigen.
- DE04 -
Page 5

Bedienungsanleitung – WS 7060
Temperatureinheit
- Drücken Sie die -/C/F Taste im normalen Anzeigemodus, um zwischen der Temperatureinheit °C oder °F
auszuwählen.
Messbereiche von Temperatur und Luftfeuchtigkeit
- Innentemperatur-Messbereich: 32℉~122℉(0℃~50℃)
- Abgleichzyklus: 30 Sekunden
- Außentemperatur-Messbereich: -58℉~122℉(-50℃~50℃)
- Innen-/Außenluftfeuchtigkeits-Messbereich: 20%~95%
- Bei einem Temperaturwert oberhalb des Messbereichs wird HH.H und bei einen Temperaturwert unterhalb des
Messbereichs wird LL.L auf dem Display angezeigt.
- Bei einem Luftfeuchtigkeitswert oberhalb des Messbereichs wird 95% und bei einen Luftfeuchtigkeitswert
unterhalb des Messbereichs wird 20%auf dem Display angezeigt.
Batterieendanzeige
Die Batterieendanzeige wird in einem Kanal auf dem Display angezeigt, wenn die Batterie in der Station oder
im entsprechenden Außensender fast leer sind. Eine sichtbare Batterieendanzeige bedeutet, dass die Batterien
des entsprechenden Außensenders oder der Station so schnell wie möglich gegen einen Satz neuer Batterien
ausgewechselt werden sollten.
Umwelteinflüsse auf Funkempfang
Wie bei allen kabellosen Geräten kann der Funkempfang der Station durch folgende Einflüsse beeinträchtigt sein:
lange Übertragungswege
inmitten hoher Gebäude
in Betonbauten
nahe elektrischer Geräte (Computer, Fernseher, etc) und metallischer Gegenstände
in bewegten Fahrzeugen
Platzieren Sie die Station an einem Ort mit optimalem Empfang, z.B. in der Nähe von Fenstern und entfernt zu
metallischen oder elektrischen Gegenständen.
Beachten Sie, dass der Außensender nur im absoluten Freifeld (ohne Störquellen) seine maximale Reichweite
nutzen kann. Jede Störquelle, die sich zwischen Außensender und Station befindet (Dächer, Mauern, Böden,
Decken, dicke Bäume, etc.), verringert die Reichweite des Senders um die Hälfte.
Vorsichtsmaßnahmen
Dieses Gerät ist ausschließlich für den Gebrauch in Innenräumen gedacht.
Setzen Sie das Gerät nicht extremer Gewalteinwirkung oder Stößen aus.
Setzen Sie das Gerät nicht hohen Temperaturen, direktem Sonnenlicht, Staub und Feuchtigkeit aus.
Tauchen Sie das Gerät nicht in Wasser.
Vermeiden Sie den Kontakt mit ätzenden Materialien.
Werfen Sie das Gerät nicht ins Feuer. Es könnte explodieren.
Öffnen Sie nicht das Gehäuse und manipulieren Sie nicht bauliche Bestandteile des Geräts.
- DE05 -
Page 6

Bedienungsanleitung – WS 7060
Batterie-Sicherheitshinweise
Verwenden Sie nur Alkali-Batterien, keine wiederaufladbaren Batterien.
Legen Sie die Batterien unter Beachtung der Polarität (+/-) richtig ein.
Ersetzen Sie stets einen vollständigen Batteriesatz.
Mischen Sie niemals alte und neue Batterien.
Entfernen Sie erschöpfte Batterien sofort.
Entfernen Sie die Batterien bei Nichtnutzung.
Laden Sie die Batterien nicht auf und werfen Sie sie nicht ins Feuer. Sie könnten explodieren.
Bewahren Sie die Batterien nicht in der Nähe von Metallobjekten auf, da ein Kontakt einen Kurzschluss
verursachen kann.
Setzen Sie Batterien keinen hohen Temperaturen, extremer Feuchtigkeit oder direktem Sonnenlicht aus.
Bewahren Sie Batterien außerhalb der Reichweite von Kindern auf. Verschlucken der Batterien kann zum
Ersticken führen.
Verwenden Sie das Produkt ausschließlich für den vorgesehenen Zweck!
Hinweispflicht nach dem Batteriegesetz
Altbatterien gehören nicht in den Hausmüll. Wenn Batterien in die Umwelt gelangen, können diese Umweltund Gesundheitsschäden zur Folge haben. Sie können gebrauchte Batterien unentgeltlich bei ihrem Händler
und Sammelstellen zurückgeben. Sie sind als Verbraucher zur Rückgabe von Altbatterien gesetzlich
verpflichtet!
Hinweispflicht nach dem Elektronikgerätegesetz
Laut Elektro- und Elektronikgerätegesetz (ElektroG) gehört Elektroschrott nicht in den Hausmüll, sondern ist
zu recyceln oder umweltfreundlich zu entsorgen. Entsorgen Sie ihr Gerät in einen Recycling Container oder
an eine lokale Abfallsammelstelle.
- DE06 -
Page 7

Manual – WS 7060
Main Function
Three Main Button: +/MAX/MIN; -/C/F; ALERT
℃/℉ changeable
Indoor temperature testing scope:32℉~122℉(0℃~50℃)
Indoor humidity testing scope:20%~95%
Outdoor temperature testing scope:-58℉~122℉(-50℃~50℃)
Temperature testing cycle: 30 seconds
Outdoor with 3 channels (OUT-1, OUT-2, OUT-3)
Temperature and humidity with Max/Min function
Manual clearing of Max/Min data
Outdoor temperature with alarm function
Product overview
1 – Channel indicator 2 – Alarm symbols with up limit and down limit
3 – Temperature 4 – Max/Min indicator
5 – Sensor reception indicator 6 – Humidity
7 – + /MAX / MIN button 8 – - / °C / °F button
9 – ALERT button 10 – Stand
11 – Battery compartment with battery cover
- EN01 -
Page 8

Outdoor sensor
Manual – WS 7060
A – Sensor number (same as default channel setting) B – Wall mounting hole
C – Channel switch (default set to sensor number) D – Battery cover
E – Battery compartment F – Stand
Initial operation
- Slide the battery cover off the battery compartment of all sensors and the main station.
- Make sure that the set number on the channel switch is the same as sensor number on front of sensor.
- Insert 2 x AAA batteries into the battery compartment of each of the outdoor sensors.
- Insert 2 x AAA batteries into the battery compartment of the main station.
- Slide the battery cover back onto the battery compartments of all outdoor sensors and the main station.
- When fully powered, the display on the main station will show all symbols for 2 seconds and then change into
sensor receiving mode for 3 minutes. Keep the sensors close to the main station until all channels display
- EN02 -
Page 9

Manual – WS 7060
values. Outdoor sensors can be placed away from the main station as soon as all channels are receiving
values.
Note:
Should the sensor reception fail after 3 minutes, the reception symbol of the specific channel will disappear.
In this case, restart initial operation with a set of fresh and full batteries until all sensors can be connected.
Temperature alarm setting
- In normal display mode, press the Alert button for 3 seconds to enter alert setting mode
- In alert setting mode, press the + or – button to select an outdoor channel.
- Press the Alert button to confirm the selected channel. The down limit symbol is blinking.
- Press the + or – button to change the value of the down limit.
- Press the Alert button to confirm the alert changes. The up limit symbol is blinking.
- Press the + or – button to change the value of the up limit.
- Press the Alert button to confirm the alert changes. The up&down limit symbol is blinking.
- Press the + or – button to activate the alarm and the alarm symbol is blinking. Press the + or – button
again to deactivate the alarm and alarm symbol is no longer displayed.
- Press the Alert button to confirm the alert changes and exit the alert setting mode.
Note:
- The alarm symbol will be permanently displayed in the corresponding channel as long as the alarm stays
activated.
- Down limit default value is 0 ℃, up limit default value is 35℃.
- In alert setting mode, it will be exit when there is no any operation in 20 seconds
- In alert setting mode, press the + or – button once to change value by 1 unit or hold the + or – button to quicker
adjust the value.
Temperature alarm
- This station has an up limit & down limit for 3 alarms, one for each outdoor channel.
- If temperature reaches a limit, is higher then up limit or below down limit, then the or and the
symbols will flash and the alarm will sound.
- While alarming, press any button to stop the alarm sound, but the symbol will still be flashing. The alarm
sound will also turn off automatically after 1 minute, if no button is pressed.
- The symbol will no longer blink and become permanent again, once the temperature value is no longer at
or beyond the set temperature limit.
Note
- The alarm can permanently be deactivated by using the temperature alearm setting.
- EN03 -
Page 10

Manual – WS 7060
Outdoor sensor reception
- While doing initial operation or manual reception, the outdoor reception mode will be entered for 3 minutes and
the reception symbol will flash.
- Press the – button for 3 seconds to start outdoor reception mode manually.
- The outdoor reception mode was successful once every channel displays values and the reception symbol
will be displayed permanently on the display.
Note:
- When sensor data in each channel not receives the same ID code within one hour, the channel will display the
last received value flashing, then enter 3 minutes outdoor receiving mode. After one hour, it will clear ID code
then enter 3 minutes RF receiving mode, at this time the display in which channel will display --.-, clearing the
Max/Min value. It will repeat until a signal is received.
- When the sensor data was lost, but the signal received again, the sensor date will be displayed and the
MAX/MIN value recorded
MIN/MAX values
- The lowest and highest values in each channel will be recorded and can be displayed at any time.
- In normal display mode, press the +/MAX/MIN button once to display the MAX values in each channel.
- Press the +/MAX/MIN button once again to display the MIN values.
- Press the +/MAX/MIN button once again to return to normal display mode.
- To clear all recorded values, press the +/MAX/MIN button for 3 seconds and the values on the display will
vanish for 1 second to indicate successful MAX/MIN clearing.
Displayed Temperature unit
- In normal display, press the -/C/F button to change the temperature unit between °C and °F.
Temperature and humidity range
- Indoor temperature scope: 32℉~122℉(0℃~50℃)
- Testing cycle: 30 seconds
- Outdoor temperature scope: -58℉~122℉(-50℃~50℃)
- Indoor/Outdoor humidity scope: 20%~95%
- When temperature value higher than scope it will display HH.H and when temperature lower than scope it will
display LL.L.
- When humidity value higher than scope it will display 95% and when humidity lower than scope it will display
20%.
Low battery indicator
When batteries in outdoor sensors or the main station are starting to run low on energy, the low battery indicator
- EN04 -
Page 11

Manual – WS 7060
will be displayed in the corresponding section on the display. This symbol indicates that the batteries in this specific
sensor or station should be changed as soon as possible.
Environmental reception effects
Same as all wireless devices, the reception of the station is maybe affected by the following circumstances:
long transmitting distance
among tall buildings
inside concrete buildings
near electrical appliances (computers, TV’s, etc) and metallic structures
inside moving vehicles
Place the station at a location with optimal signal, i.e. close to a window and away from metal surfaces or electrical
appliances.
Keep in mind that the outdoor transmitter only has the optimal transmission range in open area with no
obstructions. Each obstruction between the transmitter and the station (roof, walls, floors, ceilings, thick trees, etc.)
will effectively cut the transmission range in half.
Precautions
This main unit is intended to be used only indoors.
Do not subject the unit to excessive force or shock.
Do not expose the unit to extreme temperatures, direct sunlight, dust or humidity.
Do not immerse in water.
Avoid contact with any corrosive materials.
Do not dispose this unit in a fire as it may explode.
Do not open the inner back case or tamper with any components of this unit.
Batteries safety warnings
Use only alkaline batteries, not rechargeable batteries.
Install batteries correctly by matching the polarities (+/-).
Always replace a complete set of batteries.
Never mix used and new batteries.
Remove exhausted batteries immediately.
Remove batteries when not in use.
Do not recharge and do not dispose of batteries in fire as the batteries may explode.
Ensure batteries are stored away from metal objects as contact may cause a short circuit.
Avoid exposing batteries to extreme temperature or humidity or direct sunlight.
Keep all batteries out of reach from children. They are a choking hazard.
Use the product only for its intended purpose!
Consideration of duty according to the battery law
Old batteries do not belong to domestic waste because they could cause damages of health and environment.
You can return used batteries free of charge to your dealer and collection points. As end-user you are
committed by law to bring back needed batteries to distributors and other collecting points!
Consideration of duty according to the law of electrical devices
This symbol means that you must dispose of electrical devices separated from the General household waste
when it reaches the end of its useful life. Take your unit to your local waste collection point or recycling centre.
This applies to all countries of the European Union, and to other European countries with a separate waste
collection system.
- EN05 -
Page 12

Guide d'utilisation – WS 7060
1 – Indicateur de canal
2 – Symboles d'alarme avec limite max. et min.
3 – Température
4 – Indicateur Max/Min
5 – Indicateur de capteur de réception
6 – Humidité
7 – Touche +/MAX/MIN
8 – Touche –/C/F
9 – Touche d'alerte
10 – Support
11 – Compartiment à piles avec couvercle
Fonctions principales
Trois touches principales : +/MAX/MIN ; –/C/F ; ALERT
°C ou °F
Plage de la température intérieure : 0°C~50°C (32°F~122°F)
Plage de l'humidité intérieure : 20%~95%
Plage de la température extérieure : -50°C~50°C (-58°F~122°F)
Cycle de détection de température : toutes les 30 secondes
Capteur extérieur avec 3 canaux (OUT-1, OUT-2, OUT-3)
Fonction Max/Min de la température et de l'humidité
Effacement manuel des données Max/Min
Fonction d'alarme pour la température extérieure
Vue d’ensemble de l’appareil
- FR01 -
Page 13

A – Numéro de capteur (le même que celui du canal par défaut)
B – Trou de montage mural
C – Sélecteur de canal (réglé par défaut sur le numéro de capteur)
D – Couvercle du compartiment à piles
E – Compartiment à piles
F – Support
Capteur extérieur
Guide d'utilisation – WS 7060
Première utilisation
- Ouvrez les couvercles des compartiments à piles de tous les capteurs et de la station principale.
- Assurez-vous que le numéro au niveau du Sélecteur de canal est identique à celui situé à l’avant du capteur.
- Insérez 2 piles AAA dans le compartiment à piles de chacun des capteurs extérieurs.
- Insérez 2 piles AAA dans le compartiment à piles de la station principale.
- Fermez les couvercles des compartiments à piles de tous les capteurs extérieurs et de la station principale.
- FR02 -
Page 14

Guide d'utilisation – WS 7060
- Lorsque la station principale est complètement chargée, tous les symboles restent affichés pendant
2 secondes, puis passe en mode réception des capteurs pendant 3 minutes. Placez les capteurs tout près de
la station principale jusqu’à ce que tous les canaux affichent des mesures. Les capteurs extérieurs peuvent
être placés éloignés de la station principale dès que tous les canaux reçoivent des mesures.
Remarque :
En cas d’échec de réception d'un capteur après 3 minutes, le symbole de réception de son canal disparaît.
Dans ce cas, redémarrez l’opération initiale avec des piles neuves jusqu’à ce que tous les capteurs soient
connectés.
Réglage de l'alarme de température
- En mode affichage normal, maintenez appuyée la touche Alert pendant 3 secondes pour passer en mode
réglage d’alerte
- En mode réglage d’alerte, utilisez les touches +/– pour sélectionner un canal extérieur.
- Appuyez sur la touche Alert pour confirmer le canal sélectionné. Le symbole de limite inférieure se met à
clignoter.
- Utilisez les touches +/– pour modifier la valeur de la limite inférieure.
- Appuyez sur la touche Alert pour confirmer les changements d’alerte. Le symbole de limite supérieure se
met à clignoter.
- Utilisez les touches +/– pour modifier la valeur de la limite supérieure.
- Appuyez sur la touche
inférieure se mettent à clignoter.
- Utilisez les touches +/– pour activer l’alarme ; le symbole de l’alarme se met à clignoter. Utilisez les
touches +/– pour désactiver l’alarme ; le symbole d’alarme disparait.
- Appuyez sur la touche Alert pour confirmer les changements d’alerte et quitter le mode réglage de l’alerte.
Remarque :
- Le symbole d’alarme reste affiché dans le canal correspondant tant que l’alarme est activée.
- La valeur de limite inférieure par défaut est 0°C, la valeur de limite supérieure par défaut est de 35°C.
- En mode réglage de l’alerte, si aucune opération n’est effectuée pendant 20 secondes, la station retourne au
mode normal.
- En mode réglage de l’alerte, utilisez les touches +/– pour changer une valeur par pas de 1 ou maintenez
pour confirmer les changements d’alerte. Les symboles de limite supérieure et
Alert
appuyée l'une des touche +/– pour aller rapidement.
Alarme de température
- Cette station dispose d’une limite supérieure et inférieure pour 3 alarmes, une pour chaque canal extérieur.
- Si la température atteint une valeur supérieure à la limite supérieure ou inférieure à la limite inférieure, alors le
symbole , , ou se met à clignoter et l’alarme retentit.
- FR03 -
Page 15

Guide d'utilisation – WS 7060
- En cas d'alarme, appuyez sur une touche pour arrêter l'alarme, mais le symbole reste clignotant. L’alarme
s’éteint automatiquement après 1 minute, si aucune touche n’est appuyée.
- Le symbole cesse de clignoter une fois la température n’est plus en dehors de la plage de température
définie.
Remarque
- L’alarme peut être désactivée en permanence à l’aide du réglage de la température de l’alarme.
Réception des capteurs extérieurs
- En effectuant l'opération initiale ou une réception manuelle, le mode réception extérieure s’effectue pendant
3 minutes et le symbole de réception se met à clignoter.
- Maintenez appuyée la touche – pendant 3 secondes pour lancer le mode réception extérieure de façon
manuelle.
- Le mode réception extérieure est considéré réussi une fois chaque canal affiche des valeurs et le symbole de
réception s’affiche en permanence à l’écran.
Remarque :
- Lorsque les données du capteur dans chaque canal ne reçoivent pas le même code ID au bout d'une heure, le
canal affiche la dernière valeur reçue clignotante, puis passe en mode réception extérieure pendant 3 minutes.
Au bout d’une heure, elle efface le code ID et passe en mode réception RF pendant 3 minutes ; pendant ce
temps, le canal affiche --.-, effaçant ainsi les valeurs Max/Min. Elle répète cette opération jusqu'à ce qu'un
signal soit reçu.
- Lorsque les données du capteur sont perdues, mais le signal est à nouveau reçu, la date du capteur sera
affichée et la valeur MAX/MIN enregistrée
Valeurs MIN/MAX
- Les valeurs les plus basses et les plus élevées de chaque canal seront enregistrées et peuvent être affichées
à tout moment.
- En mode d'affichage normal, appuyez une fois sur la touche +/MAX/MIN pour afficher les valeurs MAX dans
chaque canal.
- Appuyez à nouveau sur la touche +/MAX/MIN pour afficher les valeurs MIN.
- Appuyez sur la touche +/MAX/MIN pour retourner au mode affichage normal.
- Pour effacer toutes les valeurs enregistrées, maintenez appuyée la touche +/MAX/MIN pendant 3 secondes et
les valeurs disparaissent de l’écran pendant 1 seconde pour indiquer que les valeurs ont été effacées avec
succès.
Unité de température affichée
- En mode affichage normal, appuyez sur la touche –/C/F pour basculer entre les unités de température Celsius
et Fahrenheit.
- FR04 -
Page 16

Guide d'utilisation – WS 7060
Plage de température et d'humidité
- Plage de température intérieure : 0°C~50°C (32°F~122°F)
- Cycle de test : toutes les 30 secondes
- Plage de température extérieure : -50°C~50°C (-58°F~122°F)
- Plage d'humidité intérieure/extérieure : 20%~95%
- Lorsque la valeur de la température est supérieure à la plage, la station affiche HH.H et, si elle est inférieure,
elle affiche LL.L
- Lorsque la valeur de l'humidité est supérieure à la plage, la station affiche 95% et, si elle est inférieure, elle
affiche 20%.
Indicateur de faible niveau des piles
Lorsque les piles des capteurs extérieurs ou de la station principale deviennent faibles l'indicateur piles faibles
apparaît dans la section correspondante de l'écran. Ce symbole indique que les piles d'un capteur ou de la station
doivent être remplacées dès que possible.
Effets de l'environnement sur la réception
Comme pour tout appareil sans fil, la réception de la station peut être affectée par les conditions suivantes :
Distance de transmission longue
Hauts bâtiments dans le voisinage
À l’intérieur de bâtiments en béton
À proximité d'appareils électriques (ordinateurs, téléviseurs, etc.) et de structures métalliques
À l’intérieur de véhicules en mouvement
Placez votre station météo dans un endroit avec des signaux optimaux, par exemple près d'une fenêtre, loin des
surfaces métalliques et des appareils électriques.
Il convient de noter que la portée de transmission de l'émetteur extérieur n'est optimale que dans des zones
dégagées sans aucune obstruction. Chaque obstacle entre l'émetteur et la station (toit, murs, sols, plafonds,
arbres touffus etc.) réduit la portée de transmission de moitié.
Précautions
Cet appareil n'est destiné qu'à une utilisation intérieure.
Ne soumettez pas l’appareil à une force ou à un choc excessif.
N’exposez pas l’appareil à la lumière directe du soleil, à des températures extrêmes, à l’humidité ou à la
poussière.
Ne plongez pas l’appareil dans l’eau.
Éviter tout contact avec des matériaux corrosifs.
Ne jetez pas cet appareil au feu, il risque d’exploser.
Ne pas ouvrir l’arrière du boîtier intérieur ou modifier les composants de cette unité.
- FR05 -
Page 17

Guide d'utilisation – WS 7060
Ne jetez pas les piles usagées avec les ordures ménagères car elles sont nuisibles pour la santé et
l'environnement. Vous pouvez ramener les piles usagées sans frais à votre revendeur et aux points de
collecte. En tant que consommateur, vous êtes obligés par la loi de ramener les piles usagées aux revendeurs
et aux points de collecte !
Ce symbole signifie que les appareils électriques ne doivent pas être jetés aux ordures ménagères à la fin de
leur vie utile. Ramenez votre appareil à un point de collecte de déchets ou à un centre de recyclage local. Ceci
s'applique à tous les pays de l'Union européenne et aux autres pays européens disposant d'un système de
collecte sélectif des déchets.
Avertissements de sécurité concernant les piles
Utilisez uniquement des piles alcalines non rechargeables.
Installez les piles en respectant les polarités (+/–).
Remplacez toujours toutes les piles en même temps.
Ne mélangez pas des piles usagées avec des piles neuves.
Lorsque les piles sont déchargées, les retirer immédiatement de l’appareil.
Retirez les piles lorsque vous n’allez pas utiliser l’appareil.
N’essayez pas de recharger des piles qui ne sont pas rechargeables et ne jetez aucune pile au feu (elle risque
d’exploser).
Rangez vos piles de façon à ce qu’aucun objet métallique ne puisse causer de court-circuit.
Évitez d’exposer les piles à des températures extrêmes, à l’humidité ou à la lumière directe du soleil.
Conservez vos piles hors de la portée des enfants. Elles présentent un risque d’étouffement.
N’utilisez cet appareil que pour l'usage auquel il est destiné !
Obligation légale concernant la mise au rebut des piles
Respect de l'obligation de la loi sur les appareils électriques
- FR06 -
Page 18

`Manual – WS 7060
1 – Indicador de canales
2 – Símbolos de alarma con límite superior y límite inferior
3 – Temperatura
4 – Indicador Máx./Mín.
5 – Indicador de recepción del sensor
6 – Humedad
7 – Botón +/MÁX/MÍN
8 - Botón –/C/F
9 – Botón ALERTA
10 – Soporte
11 – Compartimento de las pilas con la cubierta
de las pilas
Función principal
Tres botones principales: +/MÁX/MÍN; –/C/F; ALERTA
°C/°F cambiable
Alcance de prueba de la temperatura interior: 32°F~122°F (0°C ~50°C)
Alcance de prueba de la humedad interior: 20%~95%
Alcance de prueba de la temperatura exterior: -58°F~122°F (-50°C ~50°C)
Ciclo de comprobación de la temperatura: 30 segundos
Exterior con 3 canales (OUT-1, OUT-2, OUT-3)
Temperatura y humedad con función Máx./Mín.
Eliminación manual de los datos Máx./Mín.
Temperatura exterior con función de alarma
Vista general del producto
- ES01 -
Page 19

A –Número de sensores (el mismo que la configuración del canal por defecto)
B – Agujero de montaje en pared
C – Interruptor de canales (fijado por defecto con el número de sensores)
D – Cubierta de las pilas
E – Compartimento de las pilas
F – Soporte
Sensor exterior
`Manual – WS 7060
Puesta en funcionamiento
- Retire la cubierta de las pilas del compartimento de las pilas de todos los sensores y de la estación principal.
- Asegúrese que el número fijado en el interruptor de canales es el mismo que el número del sensor situado en
la parte delantera del sensor.
- Inserte 2 pilas AAA en el compartimento de la pilas de cada sensor exterior.
- Inserte 2 pilas AAA en el compartimento de la pilas de la estación principal.
- Vuelva a deslizar la cubierta de las pilas en el compartimento de las pilas de todos los sensores exteriores y
de la estación principal.
- ES02 -
Page 20

`Manual – WS 7060
- Cuando esté con alimentación, la pantalla de la estación principal mostrará todos los símbolos durante
2 segundos y después cambiará al modo de recepción del sensor durante 3 minutos. Mantenga los sensores
cerca de la estación principal hasta que todos los canales muestren valores. Los sensores exteriores pueden
colocarse alejados de la estación principal tan pronto como todos los canales reciban valores.
Nota:
En caso de que la recepción del sensor falle después de 3 minutos, el símbolo de recepción del canal
específico desaparecerá.
En este caso, vuelva a iniciar el funcionamiento inicial con unas pilas nuevas y cargadas hasta que se puedan
conectar todos los sensores.
Configuración de alerta de temperatura
- En modo pantalla normal, pulse el botón Alert durante 3 segundos para entrar en el modo de configuración de
alerta.
- En el modo configuración de alerta, pulse el botón + o – para seleccionar un canal exterior.
- Pulse el botón Alert para confirmar el canal seleccionado. El símbolo del límite inferior parpadea.
- Pulse el botón + o – para cambiar el valor del límite inferior.
- Pulse el botón Alert para confirmar los cambios de alerta. El símbolo del límite superior parpadea.
- Pulse el botón + o – para cambiar el valor del límite superior.
- Pulse el botón
parpadea.
- Pulse el botón + o – para activar la alarma y parpadea el símbolo de la alarma . Vuelva a pulsar el botón +
o – para desactivar la alarma y ya no se mostrará el símbolo de la alarma .
- Pulse el botón Alert para confirmar los cambios de alerta y salir del modo de configuración de alerta.
Nota:
- El símbolo de alarma se mostrará permanentemente en el correspondiente canal siempre y cuando la
alarma permanezca activada.
- El valor por defecto del límite inferior es 35°C.
- En el modo configuración de alerta, se saldrá cuando no haya ninguna operación en 20 segundos.
- En el modo configuración de alerta, pulse el botón + o – una vez para cambiar el valor en 1 unidad o
mantenga pulsado el botón + o – para ajustar el valor más rápido.
para confirmar los cambios de alerta. El símbolo del límite superior e inferior
Alert
Alarma por temperatura
- Esta estación tiene un límite superior y un límite inferior para 3 alarmas, una por cada canal exterior.
- Si la temperatura alcanza un límite superior al límite superior o inferior al límite inferior, entonces los símbolos
o y parpadearán y la alarma sonará.
- ES03 -
Page 21

`Manual – WS 7060
- Mientras suena la alarma, pulse cualquier botón para detener la alarma, pero el símbolo seguirá
parpadeando. El sonido de la alarma asimismo se pagará automáticamente después de 1 minuto, si no se
pulsa ningún botón.
- El símbolo ya no parpadeará y quedará de forma permanente una vez que el valor de la temperatura ya
no esté o supere el límite de temperatura fijado.
Nota
- Se puede desactivar permanentemente la alarma usando la configuración de alarma por temperatura.
Recepción del sensor exterior
- Mientras realiza el funcionamiento inicial o la recepción manual, se entrará en el modo de recepción exterior
durante 3 minutos y parpadeará el símbolo de recepción .
- Pulse el botón – durante 3 segundos para iniciar manualmente el modo de recepción exterior.
- El modo de recepción exterior tiene éxito una vez que cada canal muestra los valores y el símbolo de
recepción se mostrará permanentemente en la pantalla.
Nota:
- Cuando los datos del sensor en cada canal no reciban el mismo código ID en una hora, el canal mostrará el
ultimo valor recibido parpadeando; después, entrará en 3 minutos en el modo de recepción exterior. Después
de una hora, borrará el código ID; posteriormente, entrará en 3 minutos en el modo de recepción RD; en este
momento el canal mostrará --.-, eliminando el valor máximo / mínimo. Esto se repetirá hasta que se reciba una
señal.
- Cuando se pierdan los datos del sensor, pero se vuelva a recibir la señal, se mostrarán los datos del sensor y
se registrar el valor MÁX/MÍN.
Valores MÍN/MÁX
- Se registrarán los valores más altos y más bajos y se pueden mostrar en cualquier momento.
- En modo de pantalla normal, pulse una vez el botón +/MAX/MIN para mostrar los valores MÁX en cada canal.
- Vuelva a pulsar el botón +/MAX/MIN para mostrar los valores MÍN.
- Vuelva a pulsar el botón +/MAX/MIN para volver al modo de pantalla normal.
- Para eliminar todos los valores guardados, pulse el botón +/MAX/MIN durante 3 segundos y los valores en la
pantalla desaparecerán durante 1 segundos para indicar una eliminación con éxito de los valores MÁX/MÍN.
Unidad de temperatura mostrada
- En la pantalla normal, pulse el botón –/C/F para cambiar la unidad de temperatura entre °C y °F.
Alcance de temperatura y humedad
- Alcance de temperatura interior: 32°F~122°F (0°C~50°C)
- Ciclo de prueba: 30 segundos
- Alcance de temperatura exterior: -58°F~122°F (-50°C~50°C)
- ES04 -
Page 22

`Manual – WS 7060
- Alcance de humedad interior / exterior: 20%~95%
- Cuando el valor de la temperatura sea mayor que el alcance, mostrará HH.H y cuando el valor de la
temperatura sea menor que el alcance mostrará LL.L.
- Cuando el valor de la humedad sea mayor que el alcance, mostrará 95% y cuando el valor de la humedad sea
menor que el alcance mostrará 20%.
Indicador de batería baja
Cuando las pilas de los sensores exteriores o de la estación principal empiecen a agotarse, el indicador de batería
baja aparecerá en la sección correspondiente de la pantalla. Este símbolo indica que las pilas en este sensor
o estación específicos deben cambiarse a la mayor brevedad posible.
Efectos del medio ambiente sobre la recepción
Al igual que todos los dispositivos inalámbricos, la recepción de la estación puede verse afectada por las
siguientes circunstancias:
largas distancias de transmisión
encontrarse entre edificios altos
en el interior de edificios de hormigón
proximidad de aparatos eléctricos (PCs, TVs, etc.) y estructuras metálicas
en el interior de vehículos en movimiento
Coloque la estación en una posición donde obtenga una señal óptima, p.ej. cerca de una ventana y lejos de
superficies metálicas o aparatos eléctricos.
Tenga en cuenta que el transmisor exterior sólo tiene un rango de transmisión óptimo en zonas abiertas, sin
obstáculos. Cada obstáculo entre el transmisor y la estación (tejado, paredes, suelos, techos, árboles grandes,
etc.) reducirá el alcance de la señal a la mitad.
Precauciones
La unidad principal está diseñada solamente para interiores.
No golpee la unidad ni la someta a una fuerza excesiva.
No exponga la unidad a temperaturas extremas, luz directa del sol, polvo o humedad.
No la sumerja en el agua.
Evite que entre en contacto con materiales corrosivos.
No se deshaga de la unidad arrojándola al fuego, ya que podría explotar.
No abra la carcasa posterior interna ni altere ningún componente de la unidad.
Advertencias de seguridad sobre las pilas
Use solamente pilas alcalinas, no use pilas recargables.
Instale las pilas correctamente, haciendo coincidir las polaridades (+/–).
Siempre cambie el juego completo de pilas.
Nunca mezcle baterías usadas y nuevas.
- ES05 -
Page 23

`Manual – WS 7060
No debe tirar las pilas usadas a la basura de su hogar, ya que pueden causar daños a la salud y al medio
ambiente. Puede devolver las pilas usadas sin cargo alguno a su distribuidor y puntos de recogida. ¡Como
usuario final, tiene la obligación de devolver las pilas que utilice a su distribuidor y otros puntos de
recolección!
Este símbolo indica que no debe deshacerse de los aparatos eléctricos en la basura doméstica general
cuando lleguen al final de su vida útil. Lleve su unidad a su punto de recogida selectiva de basura o al centro
de reciclaje de su localidad. Esto es de aplicación en todos los países de la Unión Europea, y en otros países
no europeos con sistema de recogida selectiva de basuras.
Quite las pilas agotadas de inmediato.
Quite las pilas cuando no se utilicen.
No las recargue ni las deseche en el fuego, ya que pueden explotar.
Asegúrese de que las pilas estén almacenadas lejos de objetos metálicos, ya que el contacto con ellos puede
causar un cortocircuito.
Evite exponer las pilas a temperaturas extremas, a la humedad o a los rayos directos del sol.
Mantenga todas las pilas lejos del alcance de los niños. Constituyen peligro de asfixia.
¡Use el producto únicamente para la finalidad prevista!
Consideración de obligaciones según la ley sobre pilas
Consideración de obligaciones según las leyes sobre dispositivos electrónicos
- ES06 -
Page 24

Handleiding – WS 7060
1 – Kanaalindicator
2 – Alarmsymbooltjes met hoger en lager limiet
3 – Temperatuur
4 – Max./min. indicator
5 – Ontvangstindicator van sensor
6 – Luchtvochtigheid
7 – +/MAX/MIN-toets
8 – –/C/F-toets
9 – ALARM-toets
10 – Steun
11 – Batterijhouder met batterijklepje
Hoofdfuncties
Drie hoofdtoetsen: +/MAX/MIN; –/C/F; ALARM
°C/°F verwisselbaar
Meetbereik binnentemperatuur: 0°C ~50°C (32°F~122°F)
Meetbereik luchtvochtigheid binnen: 20%~95%
Meetbereik buitentemperatuur: -50°C ~50°C (-58°F~122°F)
Meetcyclus van temperatuur: 30 seconden
Buiten met 3 kanalen (BUITEN-1, BUITEN-2, BUITEN-3)
Temperatuur en vochtigheid met max./min. functie
Handmatig wissen van max./min. gegevens
Buitentemperatuur met alarmfunctie
Productoverzicht
- NL01 -
Page 25

A – Sensornummer (hetzelfde als de standaard kanaalinstelling)
B – Gat voor muurmontage
C – Kanaalschakelaar (standaard ingesteld op het sensornummer)
D – Batterijklepje
E – Batterijhouder
F – Steun
Buitensensor
Handleiding – WS 7060
Eerste gebruik
- Schuif het batterijklepje van de batterijhouder van alle sensoren en van het hoofdstation af.
- Zorg ervoor dat het ingestelde nummer op de kanaalschakelaar hetzelfde is als het sensornummer op de
voorzijde van de sensor.
- Installeer 2 x type AAA batterijen in de batterijhouder van elk van de buitensensoren.
- Installeer 2 x type AAA batterijen in de batterijhouder van het hoofdstation.
- Schuif het batterijklepje terug op de batterijhouders van alle buitensensoren en van het hoofdstation.
- NL02 -
Page 26

Handleiding – WS 7060
- Wanneer volledig van stroom voorzien, zal de display op het hoofdstation voor 2 seconden alle symbooltjes
weergeven en vervolgens 3 minuten lang op de ontvangstmodus van de sensor schakelen. Houd de sensoren
dicht bij het hoofdstation totdat alle kanalen waarden weergeven. Zodra alle kanalen eenmaal waarden
ontvangen, kunt u de buitensensoren uit de buurt van het hoofdstation plaatsen.
Opmerking:
Indien de sensorontvangst na 3 minuten niet is geslaagd, zal het ontvangstsymbooltje van het betreffende
kanaal verdwijnen.
Herstart in dit geval de aanvankelijke werking met een set verse en volledig opgeladen batterijen totdat de
verbinding met alle sensoren is gelukt.
Het temperatuuralarm instellen
- Druk in de normale weergavemodus 3 seconden op de toets Alert om de alarminstellingen te openen.
- Druk in de instellingsmodus van het alarm op de toets + of – om een buitenkanaal te selecteren.
- Druk op de toets Alert om het geselecteerde kanaal te bevestigen. Het symbooltje “lager limiet” zal
knipperen.
- Druk op de toets + of – om de waarde van de lagere limiet te veranderen.
- Druk op de toets Alert om de alarmwijzigingen te bevestigen. Het symbooltje “hoger limiet” zal nu
knipperen.
- Druk op de toets + of – om de waarde van de hogere limiet te veranderen.
- Druk op de toets
knipperen.
- Druk op de toets + of – om het alarm te activeren en het alarmsymbooltje zal beginnen te knipperen. Druk
nogmaals op de toets + of – om het alarm te deactiveren; het alarmsymbooltje zal niet langer worden
weergegeven.
- Druk op de toets Alert om de alarmwijzigingen te bevestigen en de instellingsmodus van het alarm te verlaten.
Opmerking:
- Het alarmsymbooltje zal permanent worden weergegeven in het corresponderende kanaal voor zolang
het alarm geactiveerd blijft.
- De standaard waarde van de lagere limiet is 0°C, terwijl de standaard waarde van de hogere limiet 35°C is.
- Als u in de instellingsmodus van het alarm 20 seconden op geen enkele toets drukt, wordt de modus
om de alarmwijzigingen te bevestigen. Het symbooltje “hoger & lager limiet” zal
Alert
automatisch verlaten.
- Druk in de instellingsmodus van het alarm eenmaal op de toets + of – om de waarde met 1 eenheid te
veranderen of houd de toets + of – ingedrukt om de waarde sneller aan te passen.
- NL03 -
Page 27

Handleiding – WS 7060
Temperatuuralarm
- Dit station biedt een hoger limiet en lager limiet voor 3 alarmen, eentje voor elk buitenkanaal.
- Als de temperatuur een limiet bereikt, d.w.z. hoger dan de hogere limiet of lager dan de lagere limiet, dan zal
of en het symbooltje knipperen terwijl het alarm klinkt.
- Druk tijdens het alarm op een willekeurige toets om het alarmgeluid te stoppen, al zal het symbooltje
blijven knipperen. Het alarmgeluid zal ook na 1 minuut automatisch alarm uitschakelen als er op geen enkele
toets wordt gedrukt.
- Het symbooltje zal stoppen met knipperen en weer constant blijven zodra de temperatuurwaarde niet
meer op of over de ingestelde temperatuurlimiet is.
Opmerking
- Het alarm kan permanent worden gedeactiveerd door de instellingen van het temperatuuralarm te gebruiken.
Ontvangst van de buitensensor
- Tijdens het aanvankelijke gebruik of tijdens de handmatige ontvangst, zal de ontvangstmodus van de
buitensensor 3 minuten lang worden geopend terwijl het ontvangstsymbooltje knippert.
- Houd de toets – 3 seconden ingedrukt om de ontvangstmodus van de buitensensor handmatig te starten.
- De ontvangstmodus van de buitensensoren is geslaagd zodra elk kanaal waarden weergeeft en het
ontvangstsymbooltje permanent wordt weergegeven op de display.
Opmerking:
- Wanneer de sensorgegevens in elk kanaal binnen één uur niet dezelfde ID-code ontvangen, zal het kanaal de
laatst ontvangen waarde knipperend weergeven en vervolgens na 3 seconden de ontvangstmodus van de
buitensensor openen. De ID-code zal na één uur worden gewist en vervolgens wordt de RF-ontvangstmodus
3 minuten lang geopend; de display zal nu voor het betreffende kanaal --.- weergeven en de max./min. waarde
wissen Dit zal worden herhaald totdat er een signaal wordt ontvangen.
- Wanneer de sensorgegevens verloren zijn geraakt, maar het signaal wordt echter weer ontvangen, dan zullen
de sensorgegevens worden weergegeven en de MAX/MIN waarden worden geregistreerd.
MIN/MAX waarden
- De laagste en hoogste waarde in elk kanaal zullen worden geregistreerd en kunnen op elk gewenst moment
worden weergegeven.
- Druk in de normale weergavemodus eenmaal op de toets +/MAX/MIN om de max. waarde in elk kanaal weer
te geven.
- Druk nogmaals op de toets +/MAX/MIN om de min. waarden weer te geven.
- Druk nog een keer op de toets +/MAX/MIN om terug te keren naar de normale weergavemodus.
- Houd de toets +/MAX/MIN 3 seconden ingedrukt om alle geregistreerde waarden te wissen; de waarden op de
display zullen voor 1 seconde verdwijnen om aan te geven dat het wissen van de max./min. waarden is
geslaagd.
- NL04 -
Page 28

Handleiding – WS 7060
De weergegeven temperatuureenheid
- Druk in de normale weergavemodus op de toets –/C/F om de temperatuureenheid te wisselen tussen °C en °F.
Temperatuur- en vochtigheidbereik
- Bereik van de binnentemperatuur: 0°C~50°C (32°F~122°F)
- Meetcyclus: 30 seconden
- Bereik van de buitentemperatuur: -50°C~50°C (-58°F~122°F)
- Vochtigheidbereik binnen/buiten: 20%~95%
- Wanneer de temperatuurwaarde hoger is dan het meetbereik, zal de display “HH.H” weergeven en wanneer
de temperatuur lager is dan het meetbereik zal “LL.L” worden weergegeven.
- Wanneer de vochtigheidwaarde lager is dan het meetbereik, zal de display “95%” weergeven en wanneer de
vochtigheid lager is dan het meetbereik zal “20%” worden weergegeven.
Indicator batterij bijna leeg
Wanneer de batterijen in de buitensensor of het hoofdstation uitgeput raken, zal de indicator “lage batterij”
worden weergegeven in de corresponderende sectie van de display. Dit symbooltje betekent dat de batterijen in de
betreffende sensor of in het station zo spoedig mogelijk moeten worden vervangen.
Omgevingseffecten op ontvangst
Zoals met alle draadloze apparatuur, kan de ontvangst van het station in de volgende omstandigheden worden
aangetast:
Lange zendafstand
Tussen hoge gebouwen
Binnenin betonnen gebouwen
Nabij elektrische apparatuur (computers, TV's, enz.) en metalen structuren
Binnenin bewegende voertuigen
Plaats het station op een plek met optimale signalen, d.w.z. dicht in de buurt van een raam en uit de buurt van
metalen oppervlaktes of elektrische apparaten.
Vergeet niet dat de buitenzender alleen een optimaal zendbereik heeft in een open gebied zonder obstructies. Het
zendbereik wordt typisch gehalveerd door elke obstructie tussen de zender en het station (dak, muren, plafonds,
dikke bomen, enz.).
Voorzorgsmaatregelen
Het hoofdapparaat is uitsluitend bestemd voor gebruik binnenshuis.
Stel het apparaat niet bloot aan overmatige krachten of schokken.
Stel het apparaat niet bloot aan extreme temperaturen, direct zonlicht, stof of vochtigheid.
Dompel het apparaat niet onder in water.
Laat het niet in contact komen met bijtende materialen.
Stel het apparaat niet bloot aan open vuur, omdat het kan exploderen.
Open nooit de interne achterbehuizing en modificeer geen enkele onderdelen van dit apparaat.
- NL05 -
Page 29

Handleiding – WS 7060
Oude batterijen behoren niet tot huishoudelijk afval, omdat deze schadelijk zijn voor de volksgezondheid en
het milieu. U kunt verbruikte batterijen kosteloos inleveren bij uw dealer of inzamelpunten. U bent als
eindgebruiker wettelijk verplicht verbruikte batterijen in te leveren bij distributeurs of andere inzamelpunten!
Dit symbooltje betekent dat u elektrische apparaten aan het einde van hun levensduur niet als algemeen,
huishoudelijk afval mag afvoeren. Lever uw apparaat in bij een plaatselijk inzamelpunt voor afvalverwerking
of bij een recyclingcentrum. Dit geldt voor alle landen in de Europese Unie, en voor andere Europese landen
met inzamelsystemen voor gescheiden afval.
Veiligheidswaarschuwingen batterijen
Gebruik uitsluitend alkaline batterijen, geen herlaadbare batterijen.
Neem bij het plaatsen van de batterijen de juiste polariteit in acht (+/–).
Vervang altijd alle batterijen tegelijk.
Gebruik nooit nieuwe en gebruikte batterijen door elkaar.
Verwijder lege batterijen onmiddellijk.
Verwijder de batterijen als het toestel niet wordt gebruikt.
Herlaad de batterijen niet en gooi ze niet in vuur, omdat de batterijen zouden kunnen ontploffen.
Zorg ervoor dat de batterijen uit de buurt van metalen voorwerpen worden bewaard, omdat hierdoor kortsluiting
kan ontstaan.
Stel batterijen niet bloot aan extreme temperaturen, vochtigheid of direct zonlicht.
Houd alle batterijen buiten bereik van kinderen. Er bestaat gevaar van verstikking.
Gebruik dit product uitsluitend voor het doel waarvoor het is bedoeld!
Neem wettelijke heffingen in verband met de afvoer van batterijen in aanmerking
Houd rekening met heffingen in het kader van wetgeving m.b.t. het afvoeren van elektrische apparatuur.
- NL06 -
Page 30

Manuale – WS 7060
1 – Indicatore canale
2 – Simboli allarme con limite superiore e limite inferiore
3 – Temperatura
4 – Indicatore Max/Min
5 – Indicatore ricezione sensore
6 – Umidità
7 – Pulsante +/MAX/MIN
8 – Pulsante –/C/F
9 – Pulsante ALERT
10 – Supporto
11 – Vano batteria con coperchio batteria
Funzioni principali
Tre pulsanti principali: +/MAX/MIN; –/C/F; ALERT
°C/°F selezionabile
Intervallo di test della temperatura interna: 32°F~122°F (0°C ~50°C)
Intervallo di test dell'umidità interna: 20%~95%
Intervallo di test della temperatura esterna: -58°F~122°F (-50°C ~50°C)
Ciclo di misurazione della temperatura: 30 secondi
Esterno con 3 canali (OUT-1, OUT-2, OUT-3)
Temperatura e umidità con funzione Max/Min
Cancellazione manuale di dati Max/Min
Temperatura esterna con funzione allarme
Panoramica prodotto
- IT01 -
Page 31

A – Numero sensore (come impostazione canale predefinita)
B – Foro montaggio a parete
C – Selettore canale (impostazione predefinita a numero sensore)
D – Coperchio batteria
E – Vano batteria
F – Supporto
Sensore esterno
Manuale – WS 7060
Funzionamento iniziale
- Rimuovere il coperchio del vano batteria di tutti i sensori e la stazione principale.
- Assicurarsi che il numero impostato sul selettore canale sia lo stesso numero sensore sulla parte anteriore del
sensore.
- Inserire 2 batterie di tipo AAA nel vano batterie di ciascun sensore esterno.
- Inserire 2 batterie di tipo AAA nel vano batterie della stazione principale.
- Far scorrere indietro il coperchio del vano batteria di tutti i sensori esterni e la stazione principale.
- IT02 -
Page 32

Manuale – WS 7060
- Quando alimentato, il display sulla stazione principale mostrerà tutti i simboli per 2 secondi e quindi passa alla
modalità di ricezione del sensore per 3 minuti. Tenere i sensori vicino alla stazione principale fino a quando
tutti i canali mostrano valori. Sensori esterni possono essere posti lontano dalla stazione principale non
appena tutti i canali stanno ricevendo valori.
Nota:
Se la ricezione del sensore fallisce dopo 3 minuti, l'icona di ricezione del canale specifico scompare.
In questo caso, riavviare l'operazione iniziale con un set di batterie nuove e cariche fino a quando tutti i sensori
possono essere collegati.
Impostazione allarme temperatura
- In modalità visualizzazione normale, premere il pulsante Alert per 3 secondi per accedere alla modalità di
impostazione dell'allarme
- In modalità impostazione allarme, premere il pulsante + o – per selezionare un canale esterno.
- Premere il pulsante Alert per confermare il canale selezionato. L'icona di limite inferiore lampeggia.
- Premere il pulsante + o – per modificare il valore del limite inferiore.
- Premere il pulsante Alert per confermare le modifiche dell'allarme. L'icona di limite superiore lampeggia.
- Premere il pulsante + o – per modificare il valore del limite superiore.
- Premere il pulsante
lampeggia.
- Premere il pulsante + o – per attivare l'allarme e l'icona dell'allarme lampeggia. Premere il pulsante + o –
per disattivare l'allarme e l'icona dell'allarme non è più visualizzata.
- Premere il pulsante Alert per confermare le modifiche dell'allarme e uscire dalla modalità di impostazione
dell'allarme.
Nota:
- Il simbolo dell'allarme sarà visualizzato in modo permanente nel canale corrispondente fino a quando
l'allarme resta attivato.
- Il valore predefinito del limite inferiore è 0°C, il valore predefinito del limite superiore è 35°C.
- In modalità impostazione allarme, si esce quando non è effettuata alcuna operazione entro 20 secondi.
- In modalità impostazione allarme, premere una volta il pulsante + o – per modificare il valore di 1 unità o
tenere premuto il pulsante + o – per regolare in modo più veloce il valore.
per confermare le modifiche dell'allarme. L'icona di limite inferiore e superiore
Alert
Allarme temperatura
- Questa stazione ha un limite superiore e un limite inferiore per 3 allarmi, uno per ogni canale esterno.
- Se la temperatura raggiunge un limite, superiore al limite superiore o inferiore al limite inferiore, le icone o
e lampeggiano.
- IT03 -
Page 33

Manuale – WS 7060
- Durante l'allarme, premere qualsiasi pulsante per arrestare il suono dell'allarme, ma l'icona continua a
lampeggiare. Il suono dell'allarme si spegne automaticamente dopo 1 minuto, se non è premuto alcun
pulsante.
- L'icona non lampeggerà più e resterà nuovamente fissa, una volta che il valore della temperatura non è
più presente od oltre il limite di temperatura impostato.
Nota
- L'allarme può essere disattivato in modo permanente usando l'impostazione di allarme della temperatura.
Ricezione sensore esterno
- Durante il funzionamento iniziale o la ricezione manuale, si accederà per 3 minuti alla modalità di ricezione
esterna e l'icona di ricezione lampeggia.
- Premere il pulsante – per 3 secondi per avviare manualmente la modalità di ricezione esterna.
- La modalità di ricezione esterna avrà successo una volta che ogni canale visualizza i valori e l'icona di
ricezione sarà visualizzata in modo permanente sul display.
Nota:
- Quando i dati del sensore in ogni canale non ricevono lo stesso codice ID entro un'ora, il canale visualizzerà
l'ultimo valore ricevuto lampeggiante, poi accede alla modalità di ricezione esterna per 3 minuti. Dopo un'ora,
cancellerà il codice ID poi accede alla modalità di ricezione RF per 3 minuti, in questo fase il display
visualizzerà --.-, cancellando il valore Max/Min. Ciò sarà ripetuto fino a quando un segnale non è ricevuto.
- Quando i dati del sensore sono persi, ma il segnale continua ad essere ricevuto, sarà visualizzata la data del
sensore e registrato il valore MAX/MIN.
Valori MIN/MAX
- I valori più alto e più basso in ogni canale saranno registrati e possono essere visualizzati in qualsiasi
momento.
- In modalità visualizzazione normale, premere una volta il pulsante +/MAX/MIN per visualizzare i valori MAX in
ciascun canale.
- Premere ancora una volta il pulsante +/MAX/MIN per visualizzare i valori MIN.
- Premere ancora una volta il pulsante +/MAX/MIN per ritornare alla modalità di visualizzazione normale.
- Per cancellare tutti i valori registrati, premere il pulsante +/MAX/MIN per 3 secondi e i valori sul display
spariranno per 1 secondo per indicare la cancellazione di MAX/MIN con successo.
Unità temperatura visualizzata
- Nella visualizzazione normale, premere il pulsante –/C/F per modificare l'unità di temperatura tra °C e °F.
- IT04 -
Page 34

Manuale – WS 7060
Intervallo temperatura e umidità
- Intervallo temperatura interna: 32°F~122°F (0°C~50°C)
- Ciclo di test: 30 secondi
- Intervallo temperatura esterna: -58°F~122°F (-50°C~50°C)
- Intervallo umidità interna/esterna 20%~95%
- Quando il valore della temperatura è superiore all'intervallo sarà visualizzato HH.H e quando la temperatura è
inferiore all'intervallo sarà visualizzato LL.L.
- Quando il valore dell'umidità è superiore all'intervallo sarà visualizzato 95% e quando l'umidità è inferiore
all'intervallo sarà visualizzato 20%.
Indicatore di batteria quasi scarica
Quando le batterie nei sensori esterni o nella stazione principale iniziano a scaricarsi, la spia di batteria scarica
sarà visualizzata nella sezione corrispondente del display. Questa icona indica che le batterie in questo sensore o
stazione specifico devono essere sostituite quanto prima.
Effetti della ricezione ambientale
Come per tutti i dispositivi wireless, la ricezione della stazione può essere influenzata dalle seguenti circostanze:
Lunga distanza di trasmissione
Collocazione tra edifici alti
Collocazione all'interno di edifici in cemento
Prossimità di apparecchiature elettriche (computer, TV e altro) e strutture metalliche
Collocazione all'interno di veicoli in movimento
Collocare la stazione in una posizione con segnale ottimale, ad esempio vicino a una finestra e lontano da
superfici metalliche o apparecchiature elettriche.
Ricordarsi che il trasmettitore esterno ha un raggio di trasmissione ottimale in area aperta senza ostruzioni.
Eventuali ostacoli tra il trasmettitore e la stazione (tetti, pareti, pavimenti, soffitti, grossi alberi, ecc) potrebbero
dimezzare la portata delle trasmissioni.
Precauzioni
L'unità principale è destinata solo all'uso in ambienti interni.
Non esporre l'unità a sollecitazioni eccessive o urti.
Non esporre l'unità a temperature estreme, luce solare diretta, polvere o umidità.
Non immergere in acqua.
Evitare il contatto con qualsiasi materiale corrosivo.
Non gettare l'unità nel fuoco in quanto potrebbe esplodere.
Non aprire l'alloggiamento posteriore interno né alterare componenti di questa unità.
- IT05 -
Page 35

Manuale – WS 7060
Le batterie vecchie non appartengono ai rifiuti domestici in quanto possono causare danni alla salute e
all'ambiente. È possibile consegnare le batterie usate gratuitamente al proprio rivenditore e punti di raccolta.
L'utente finale è obbligato per legge a portare le batterie esauste ai distributori e agli altri punti di raccolta!
Questo simbolo indica che i dispositivi elettrici alla fine del loro ciclo di vita devono essere smaltiti
separatamente dai rifiuti domestici generali. Portare l'unità al proprio punto di raccolta rifiuti locale o a un
centro per la raccolta differenziata. Questa disposizione si applica a tutti i paesi dell’Unione europea e agli
altri paesi europei in cui viene praticata la raccolta differenziata.
Avvisi di sicurezza delle batterie
Utilizzare solo batterie alcaline, non batterie ricaricabili.
Installare le batterie correttamente rispettando la polarità (+/–).
Sostituire sempre un set completo di batterie.
Non utilizzare mai batterie usate e nuove contemporaneamente.
Rimuovere immediatamente le batterie scariche.
Rimuovere le batterie inutilizzate.
Non ricaricare e non smaltire le batterie nel fuoco in quanto possono esplodere.
Assicurarsi che le batterie siano conservate lontano da oggetti metallici in quanto il contatto può causare un
corto circuito.
Evitare di esporre le batterie a temperatura o a umidità estreme o a luce solare diretta.
Tenere tutte le batterie fuori dalla portata dei bambini perché potrebbero causare il rischio di soffocamento.
Utilizzare il prodotto solo per lo scopo previsto.
Obblighi in base alla normativa sulle batterie
Considerazione sulla funzione in base alla normativa sui dispositivi elettrici
- IT06 -
Page 36

Manuál – WS 7060
1 – Indikátor kanálu
2 – Symboly alarmu s horním a dolním limitem
3 – Teplota
4 – Indikátor Max./Min.
5 – Indikátor příjmu senzoru
6 – Vlhkost
7 – Tlačítko+/MAX/MIN
8 – –/tlačítko C/F
9 – Tlačítko VÝSTRAHA
10 – Stojan
11 – Prostor pro baterie s krytem baterie
Hlavní funkce
Tři hlavní tlačítka: +/MAX/MIN; –/C/F; VÝSTRAHA
Měnitelné °C/°F
Rozsah testování vnitřní teploty: 32 °F až 122 °F (0 °C až 50 °C)
Rozsah testování vnitřní vlhkosti: 20%~95%
Rozsah testování venkovní teploty: -58°F až 122 °F (-50°C až 50 °C)
Interval měření teploty: 30 sekund
Venkovní s 3 kanály (výstup-1, výstup-2, výstup-3)
Teplota a vlhkost s funkcí Max./Min.
Manuální vymazání dat Max./Min.
Venkovní teplota s funkcí alarmu
Přehled produktu
- CZ01 -
Page 37

A – Číslo senzoru (stejné jako výchozí nastavení kanálu)
B – Otvor pro montáž na stěnu
C – Spínač kanálu (výchozí nastavení čísla senzoru)
D – Kryt baterie
E – Prostor pro baterie
F – Stojan
Venkovní senzor
Manuál – WS 7060
První použití
- Ze všech senzorů a z hlavní stanice sejměte kryt prostoru pro baterie.
- Ujistěte se, že nastavené číslo na přepínači kanálů je stejné jako číslo senzoru na přední straně senzoru.
- Do každého venkovního senzoru vložte do prostoru pro baterie 2x baterie velikosti AAA.
- Do prostoru pro baterie hlavní stanice vložte 2x baterie velikosti AAA.
- U všech venkovních senzorů a hlavní stanice zacvakněte kryt zpět na prostor pro baterie.
- CZ02 -
Page 38

Manuál – WS 7060
- Při plném nabití se na displeji hlavní stanice zobrazí po dobu 2 sekund všechny symboly a poté se po dobu
3 minut přepne senzor do režimu příjmu. Udržujte senzory v blízkosti hlavní stanice, dokud nebudou
zobrazeny hodnoty všech kanálů. Venkovní senzory mohou být umístěny mimo hlavní stanici, jakmile všechny
kanály přijímají hodnoty.
Poznámka:
Pokud senzor příjem nepřijímá ani po 3 minutách, symbol příjmu daného kanálu zmizí.
V takovém případě restartujte počáteční operaci se sadou nabitých a nových baterií, dokud nebudou připojeny
všechny senzory.
Nastavení teplotního alarmu
- V normálním režimu zobrazení stiskněte na 3 sekundy tlačítko Alert a otevřete režim nastavení výstrahy.
- V režimu nastavení výstrahy stiskněte tlačítko + nebo – a vyberte venkovní kanál.
- Stisknutím tlačítka Alert potvrďte zvolený kanál. Symbol spodního limitu bliká.
- Stisknutím tlačítka + nebo – změníte hodnotu spodního limitu.
- Stisknutím tlačítka Alert potvrďte změny výstrahy. Symbol horního limitu bliká.
- Stisknutím tlačítka + nebo – změníte hodnotu horního limitu.
- Stisknutím tlačítka
- Stisknutím tlačítka + nebo – aktivujete alarm, symbol alarmu bliká. Opětovným stisknutím tlačítka +
nebo – se deaktivuje alarm a symbol alarmu se již nebude zobrazovat.
- Stiskněte tlačítko Alert pro potvrzení změn výstrahy a ukončení režimu nastavení výstrah.
Poznámka:
- Dokud bude alarm aktivován, zůstane symbol alarmu zobrazen na příslušném kanálu.
- Výchozí hodnota spodního limitu je 0 °C, výchozí mezní hodnota je 35 °C.
- Režim nastavení výstrah bude ukončen, pokud během 20 sekund nedojde k žádným operacím.
- V režimu nastavení výstrahy jednou stiskněte tlačítko + nebo – a změňte hodnoty o 1 jednotku, přidržením
tlačítka + nebo – můžete hodnotu upravit rychleji.
potvrďte změny výstrahy. Symbol horního a spodního limitu bliká.
Alert
Teplotní alarm
- Tato stanice má spodní a horní limit pro 3 alarmy, jeden pro každý venkovní kanál.
- Pokud teplota dosáhne hranice horního nebo spodního limitu, pak budou symboly nebo symboly
blikat a spustí se alarm.
- Pokud je alarm spuštěný, stisknutím libovolného tlačítka ukončíte zvukový signál alarmu, symbol však
bude stále blikat. Pokud nestiskněte žádné tlačítko, zvukový signál alarmu se po 1 minutě automaticky vypne.
- Pokud hodnota teploty již nedosahuje nebo nepřesahuje nastavený teplotní limit, symbol přestane blikat
a znovu bude trvale zobrazen.
Poznámka
- Alarm lze trvale deaktivovat pomocí nastavení teplotního alarmu.
- CZ03 -
Page 39

Manuál – WS 7060
Příjem venkovního senzoru
- Během počátečního provozu nebo ručního příjmu bude režim venkovního příjmu zadán na dobu 3 minut
a symbol příjmu bude blikat.
- Na dobu 3 sekund stiskněte tlačítko – a spusťte manuální režim venkovního příjmu.
- Pokud každý kanál zobrazuje hodnoty a symbol příjmu je trvale zobrazen na displeji, byl režim
venkovního příjmu úspěšný.
Poznámka:
- Pokud data senzorů v jednotlivých kanálech neobdrží stejný kód ID během jedné hodiny, kanál zobrazí
blikající poslední hodnotu a poté vstoupí do 3minutového režimu venkovního příjmu. Po uplynutí jedné hodiny
se vymaže kód ID, následně vstoupí do 3minutového přijímacího režimu RF, přitom se na displeji kanálu
zobrazí --.- a vymaže se hodnota Max./Min. To se bude opakovat, dokud nebude signál přijat.
- Pokud došlo ke ztrátě dat senzoru, ale signál je znovu přijat, zobrazí se data senzoru a zaznamená hodnota
MAX/MIN.
Hodnoty MIN/MAX
- V každém kanálu budou zaznamenávány nejnižší a nejvyšší hodnoty, které lze kdykoli zobrazit.
- V normálním režimu zobrazení jednou stiskněte tlačítko +/MAX/MIN a zobrazte MAX hodnoty v jednotlivých
kanálech.
- Dalším stisknutím tlačítka +/MAX/MIN zobrazíte MIN hodnoty.
- Dalším stisknutím tlačítka +/MAX/MIN se vrátíte do normálního režimu zobrazení.
- Chcete-li vymazat všechny zaznamenané hodnoty, stiskněte na dobu 3 sekund tlačítko +/MAX/MIN, hodnoty
na displeji na dobu 1 sekundy zmizí, což značí úspěšné vymazání hodnoty MAX/MIN.
Zobrazené jednotky teploty
- V normálním zobrazení stiskněte tlačítko –/C/F a změňte jednotky teploty mezi °C a °F.
Rozsah teploty a vlhkosti
- Rozsah vnitřní teploty: 32 °F až 122 °F (0 °C až 50 °C)
- Zkušební cyklus: 30 sekund
- Rozsah venkovní teploty: -58°F až 122 °F (-50°C až 50 °C)
- Rozsah vnitřní/venkovní vlhkosti: 20%~95%
- Pokud je hodnota teploty vyšší než daný rozsah, zobrazí se HH.H, pokud je hodnota teploty nižší než daný
rozsah, zobrazí se LL.L.
- Pokud je hodnota vlhkosti vyšší než daný rozsah, zobrazí se 95 %, pokud je vlhkost nižší než daný rozsah,
zobrazí se 20 %.
- CZ04 -
Page 40

Manuál – WS 7060
Indikátor slabé baterie
Pokud se baterie na venkovních senzorech nebo na hlavní stanici začínají vybíjet, zobrazí se v příslušné části
displeje indikátor vybité baterie . Tento symbol znamená, že by se co nejdříve měly v tomto konkrétním senzoru
nebo stanici vyměnit baterie.
Vlivy prostředí na příjem signálu
Stejně jako u všech bezdrátových zařízení může být příjem stanice ovlivněn následujícími okolnostmi:
Dlouhá přenosová vzdálenost
Umístění mezi vysokými stavbami
Umístění uvnitř betonových staveb
Blízkost elektrických zařízení (počítačů, televizorů apod.) a kovových předmětů
Umístění uvnitř jedoucích vozidel
Stanici umístěte na místě s optimálním signálem, to znamená v blízkosti okna a mimo dosah vlivu kovových
povrchů nebo elektrických zařízení.
Mějte na paměti, že venkovní vysílač má optimální přenosový dosah pouze v otevřeném prostoru bez jakýchkoli
překážek. Jakákoli překážka mezi vysílačem a stanicí (střecha, stěny, podlahy, stropy, vzrostlé stromy apod.) sníží
přenosový dosah na polovinu.
Bezpečnostní opatření
Tato jednotka je určena pro použití ve vnitřních prostorách.
Nevystavujte jednotku působení nadměrné síly ani otřesům.
Nevystavujte jednotku extrémním teplotám, přímému slunečnímu svitu, prachu či vlhkosti.
Neponořujte do vody.
Vyhněte se kontaktu s jakýmkoliv korozivním materiálem.
Nevhazujte jednotku do ohně, hrozí nebezpečí exploze.
Neotevírejte vnitřní kryt a nemanipulujte s žádnými součástkami této jednotky.
Bezpečnostní opatření u baterií
Používejte pouze alkalické baterie, nikdy ne dobíjecí baterie.
Vložte baterie se správnou polaritou (+/−).
Vždy vyměňte kompletní sadu baterií.
Nikdy nemíchejte dohromady použité a nové baterie.
Slabé baterie okamžitě vyjměte.
Jestliže zařízení nepoužíváte, vyjměte z něj baterie.
Baterie nenabíjejte a nevhazujte je do ohně – mohou explodovat.
Baterie skladujte mimo dosah kovových předmětů, kontakt s nimi může způsobit zkrat.
Nevystavujte baterie extrémním teplotám, vlhkosti či přímému slunečnímu svitu.
Veškeré baterie skladujte mimo dosah dětí. Hrozí riziko udušení.
- CZ05 -
Page 41

Manuál – WS 7060
Staré baterie nepatří do domácího odpadu, protože mohou způsobit škody na zdraví a životním prostředí.
Použité baterie můžete zdarma vrátit prodejci a do sběrných míst. Jako koncoví uživatelé jste vázáni
zákonem, abyste použité baterie vrátili distributorům a do jiných sběrných míst!
Tento symbol znamená, že elektrická zařízení na konci jejich životnosti je třeba likvidovat odděleně od
běžného domácího odpadu. Zařízení vraťte do místního sběrného místa nebo centra pro recyklaci. To platí
pro všechny země Evropské unie a ostatní evropské země se samostatným systémem shromažďování
odpadu.
Výrobek používejte pouze k zamýšlenému účelu!
Likvidace baterií podle předpisů
Povinnosti dle zákona o elektrických zařízeních
- CZ06 -
Page 42

Podręcznik – WS 7060
1 – Wskaźnik kanału
2 – Symbole alarmów z limitem górnym i dolnym
3 – Temperatura
4 – Wskaźnik maks ./ min.
5 – Wskaźnik odbioru czujnika
6 – Wilgotność
7 – Przycisk +/MAKS./MIN.
8 – Przycisk –/C/F
9 – Przycisk ALARM
10 – Podstawka
11 – Komora baterii z pokrywą
Główna funkcja
Trzy główne przyciski: +/MAKS/MIN; –/C/F; ALARM
Zmienne jednostki temperatury °C/°F
Zakres testowy temperatury wewnątrz: 32°F - 122°F (0°C - 50°C)
Zakres testowy wilgotności wewnątrz: 20% - 95%
Zakres testowy temperatury za zewnątrz: -58°F - 122°F (-50°C - 50°C)
Cykl testowy temperatury: 30 sekund
Na zewnątrz z 3 kanałami (OUT-1, OUT-2, OUT-3)
Funkcja maks. / min. temperatury i wilgotności
Ręczne czyszczenie danych maks. / min.
Temperatura na zewnątrz z funkcją alarmu
Przegląd produktu
- PL01 -
Page 43

A – Numer czujnika (taki sam jak domyślne ustawienie kanału)
B – Otwór do montażu ściennego
C – Przełącznik kanału (domyślnie ustawiony na numer czujnika)
D – Pokrywa baterii
E – Komora baterii
F – Podstawka
Czujnik zewnętrzny
Podręcznik – WS 7060
Działania wstępne
- Zsunąć pokrywę z komory baterii wszystkich czujników i stacji głównej.
- Upewnić się, że ustawiony numer na przełączniku kanału jest taki sam jak numer czujnika umieszczony na
jego przodzie.
- Do komory baterii obydwu czujników zewnętrznych włożyć 2 baterie AAA.
- Włożyć 2 baterie AAA do komory baterii stacji głównej.
- Nasunąć ponownie pokrywę komory baterii we wszystkich czujnikach i stacji głównej.
- PL02 -
Page 44

Podręcznik – WS 7060
- Jeśli stacja główna jest w pełni zasilana, na wyświetlaczu pojawią się przez 2 sekundy wszystkie symbole, a
następnie stacja przejdzie na 3 minuty w tryb odbioru sygnału czujnika. Do chwili pojawienia się wartości
wszystkich kanałów czujniki powinny znajdować się blisko stacji głównej. Czujnik zewnętrzne można umieścić
z dala od stacji głównej, jak tylko wszystkie kanały będą wyświetlały wartości.
Uwaga:
Jeśli odbiór sygnału z czujnika nie powiedzie się po 3 minutach, zniknie symbol odbioru sygnału określonego
kanału.
W takim przypadku należy powtórzyć działanie wstępne z zestawem nowych i naładowanych baterii do chwili
podłączenia wszystkich czujników.
Ustawianie alarmu temperatury
- W normalnym trybie, przytrzymać przycisk Alert przez 3 sekundy, aby przejść w tryb ustawiania alarmu.
- W trybu ustawiania alarmu, nacisnąć przycisk + lub –, aby wybrać kanał zewnętrzny.
- Nacisnąć przycisk Alert, aby potwierdzić wybrany kanał. Miga symbol dolnego limitu .
- Nacisnąć przycisk + lub –, aby zmienić wartość dolnego limitu.
- Nacisnąć przycisk Alert, aby potwierdzić zmiany alarmu. Miga symbol górnego limitu .
- Nacisnąć przycisk + lub –, aby zmienić wartość górnego limitu.
- Nacisnąć przycisk
- Nacisnąć przycisk + lub –, aby włączyć alarm. Zacznie migać symbol alarmu . Ponownie nacisnąć przycisk
+ lub –, aby wyłączyć alarm. Gaśnie symbol alarmu .
- Nacisnąć przycisk Alert, aby potwierdzić zmiany alarmu i opuścić tryb ustawiania alarmu.
Uwaga:
- Symbol alarmu wyświetla się stale na odpowiednim kanale, jak długo alarm pozostaje włączony.
- Domyślna wartość limitu dolnego wynosi 0°C, domyślna wartość limitu górnego wynosi 35°C.
- Tryb ustawiania alarmu wyłączy się po 20 sekundach nieaktywności.
- W trybie ustawiania alarmu, nacisnąć jednokrotnie przycisk + lub –, aby zmienić wartość o 1 jednostkę lub
przytrzymać przycisk + lub –, aby szybciej dostosować wartość.
, aby potwierdzić zmiany alarmu. Miga symbol górnego i dolnego limitu .
Alert
Alarm temperatury
- Stacja posiada limit górny i dolny dla 3 alarmów, jeden na każdy kanał zewnętrzny.
- Jeśli temperatura osiągnie wartość limitu, jest wyższa niż limit górny lub poniżej limitu dolnego, zacznie migać
lub oraz symbole i rozlegnie się sygnał dźwiękowy.
- Podczas alarmu nacisnąć przycisk, aby zatrzymać alarm dźwiękowy, ale symbol będzie stale migać.
Alarm dźwiękowy wyłączy się również automatycznie po 1 minucie, jeśli nie zostanie naciśnięty żaden
przycisk.
- Symbol nie będzie już migał i ponownie zacznie świecić stale, kiedy wartość temperatury nie osiąga ani
nie przekracza ustawionego limitu temperatury.
- PL03 -
Page 45

Podręcznik – WS 7060
Uwaga
- Alarm można wyłączyć na stałe, korzystając z ustawień alarmu temperatury.
Odbiór sygnału z czujnika zewnętrznego
- Podczas działań wstępnych lub ręcznego odbioru sygnału, na 3 minuty przechodzi się w tryb odbioru sygnału
z czujnika zewnętrznego i miga symbol odbioru .
- Naciskać przycisk – przez 3 sekundy, aby uruchomić ręcznie tryb odbioru sygnału z czujnika zewnętrznego.
- Tryb odbioru sygnału z czujnika zewnętrznego zostanie zakończony pomyślnie, kiedy na wyświetlaczu pojawią
się wartości wszystkich kanałów, a symbol odbioru będzie świecił się stale.
Uwaga:
- Kiedy dane czujnika w każdym kanale nie trzymają tego samego kodu ID w ciągu jednej godziny, ostatnio
odebrana wartość kanału będzie migać, a następnie urządzenie przejdzie na 3 minuty w tryb odbioru sygnału z
czujnika zewnętrznego. Po jednej godzinie kod ID zostanie wyczyszczony, a następnie urządzenie przejdzie
na 3 minuty w tryb odbioru RF. W tym czasie w danym kanale będzie wyświetlać się --.-, czyszcząc wartości
maks./min. Czynność będzie powtarzać się do chwili odbioru sygnału.
- Po utracie danych z czujnika, ale po ponownym odbiorze sygnału, wyświetlą się dane czujnika i zapisane
zostaną wartości MAKS./MIN.
Wartości MIN./MAKS.
- Najniższa i najwyższa wartość w każdym kanale zostanie zapisana i będzie można ją wyświetlić w dowolnym
momencie.
- W normalnym trybie, nacisnąć jednokrotnie przycisk +/MAX/MIN, aby wyświetlić wartości MAKS. w każdym
kanale.
- Ponownie nacisnąć jednokrotnie przycisk +/MAX/MIN, aby wyświetlić wartości MIN.
- Ponownie nacisnąć jednokrotnie przycisk +/MAX/MIN, aby wrócić do normalnego trybu wyświetlania.
- Aby wyczyścić wszystkie zapisane wartości, naciskać przez 3 sekundy przycisk +/MAX/MIN,a wartości na
wyświetlaczu znikną na 1 sekundę, aby wskazać pomyślne usunięcie wartości MAKS./MIN.
Wyświetlana jednostka temperatury
- W normalnym trybie, nacisnąć przycisk –/C/F, aby zmienić jednostkę temperatury z °C na °F lub odwrotnie.
Zakres temperatury i wilgotności
- Zakres temperatury wewnątrz: 32°F - 122°F (0°C - 50°C)
- Cykl testowania: 30 sekund
- Zakres temperatury za zewnątrz: -58°F - 122°F (-50°C - 50°C)
- Zakres wilgotności wewnątrz/na zewnątrz: 20% - 95%
- Kiedy wartość temperatury jest wyższa od zakresu, na wyświetlaczu pojawi się HH.H, a kiedy temperatura
będzie niższa od zakresu – pojawi się LL.L.
- PL04 -
Page 46

Podręcznik – WS 7060
- Kiedy wartość wilgotności jest wyższa od zakresu, na wyświetlaczu pojawi się 95%, a kiedy wilgotność będzie
niższa od zakresu – pojawi się 20%.
Wskaźnik rozładowania baterii
Kiedy baterie w czujnikach zewnętrznych lub stacji głównej zaczynają się wyczerpywać, w odpowiedniej części
wyświetlacza pojawi się wskaźnik niskiego poziomu baterii . Symbol ten wskazuje, że jak najszybciej należy
wymienić baterie w określonym czujniku lub stacji.
Wpływ środowiska na odbiór
Podobnie jak w przypadku wszystkich urządzeń bezprzewodowych odbiór stacji może być zakłócony
następującymi czynnikami:
duża odległość przekazu
usytuowanie pomiędzy wysokimi budynkami
usytuowanie wewnątrz betonowych budynków
znajdujące się w pobliżu urządzenia elektryczne (komputery, telewizory itd.) i struktury metalowe
usytuowanie w poruszających się pojazdach.
Stację najlepiej jest ustawić w miejscu, gdzie uzyska ona najlepszy zasięg sygnału, tj. blisko okna i z dala od
metalowych powierzchni czy urządzeń elektrycznych.
Należy pamiętać, że nadajnik zewnętrzny osiągnie optymalny zakres przekazu wyłącznie na otwartej przes trzeni,
bez żadnych przeszkód. Każda przeszkoda pomiędzy nadajnikiem i stacją (dach, ściany, podłogi, sufity, grube
drzewa itd.) skutecznie ograniczają zasięg przekazu o połowę.
Środki ostrożności
Jednostkę główną można wykorzystywać jedynie w pomieszczeniach.
Nie stosować nadmiernej siły i nie potrząsać urządzeniem podczas korzystania.
Nie wystawiać jednostki na ekstremalne temperatury, bezpośrednie światło słoneczne, kurz czy wilgoć.
Nie zanurzać w wodzie.
Unikać kontaktu z materiałami korodującymi.
Urządzenia nie wolno utylizować w ogniu, ponieważ może wybuchnąć.
Nie otwierać tylnej obudowy wewnętrznej ani nie ingerować w żadne komponenty urządzenia.
Ostrzeżenia bezpieczeństwa dotyczące baterii
Używać wyłącznie baterii alkalicznych, a nie baterii akumulatorowych.
Włożyć baterie prawidłowo, zgodnie z biegunowością (+/–).
Zawsze należy wymieniać cały zestaw baterii.
Nigdy nie wolno mieszać zużytych i nowych baterii.
Zużyte baterie należy natychmiast wymieniać.
Wyjmować baterie, jeśli urządzenie nie jest używane.
Nie ładować ponownie baterii ani nie wyrzucać ich do ognia, ponieważ mogą eksplodować.
- PL05 -
Page 47

Podręcznik – WS 7060
Stare baterie nie należą do odpadów domowych, ponieważ mogą szkodzić zdrowiu i środowisku. Zużyte
baterie można oddać bezpłatnie u swojego sprzedawcy lub w punktach zbiórek. Użytkownik końcowy jest
zobowiązany prawem do zwrotu odpowiednich baterii sprzedawcom lub w innych punktach zbiórek!
Ten symbol oznacza, że użytkownik musi utylizować urządzenia elektryczne z dala od ogólnych odpadów
domowych, kiedy osiągną one koniec okresu eksploatacji. Swoje urządzenie najlepiej jest oddać w lokalnym
punkcie zbiórki odpadów lub centrum recyklingu. Dotyczy to wszystkich państw Unii Europejskiej oraz
innych państw europejskich, w których obowiązuje system zbierania odpadów segregowanych.
Należy upewnić się, że baterie są przechowywane z dala od metalowych obiektów, ponieważ zetknięcie z nimi
może spowodować zwarcie.
Unikać wystawiania baterii na działanie ekstremalnych temperatur, na wilgoć czy światło słoneczne.
Baterie należy trzymać w miejscu niedostępnym dla dzieci. Stwarzają one zagrożenie udławienia się.
Produkt należy używać tylko zgodnie z przeznaczeniem!
Zobowiązania według przepisów prawa dotyczących baterii
Zobowiązania według przepisów prawa dotyczących urządzeń elektrycznych
- PL06 -
 Loading...