

Page 1
WS 6870
Bedienungsanleitung…………………………………………………………………………………2
Instructions manual………………………………………………………………..…………………8
Manuel d'instructions……………………..……...…………………………………………………14
Manual de instrucciones……………………..……............................................……….………20
Gebruikshandleiding……………………..……...……………………………………………….…26
Manuale d'istruzioni……………………..……...………………………………………………..…32
Instrukcja obsługi ……………………..……...………………………………………………..…...38
Instrukční manuál ……………………..……...………………………………………………..…...45
Page 2
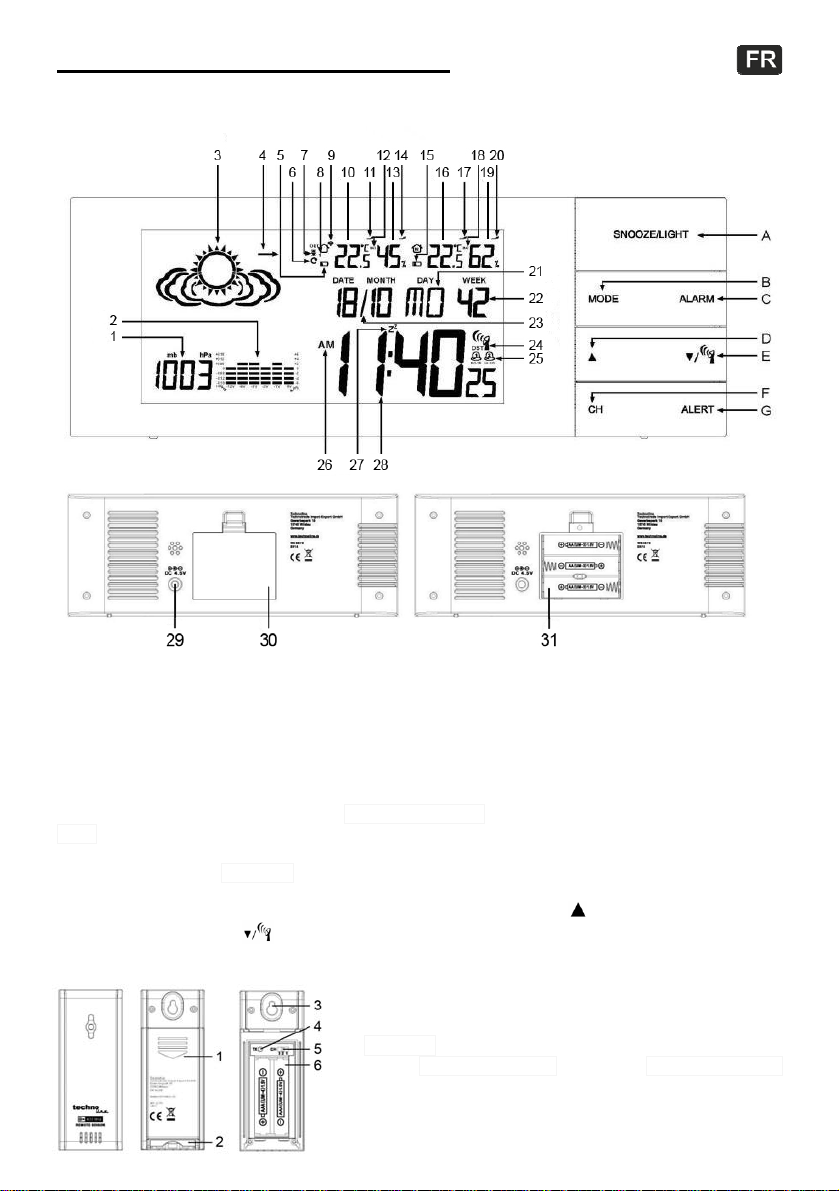
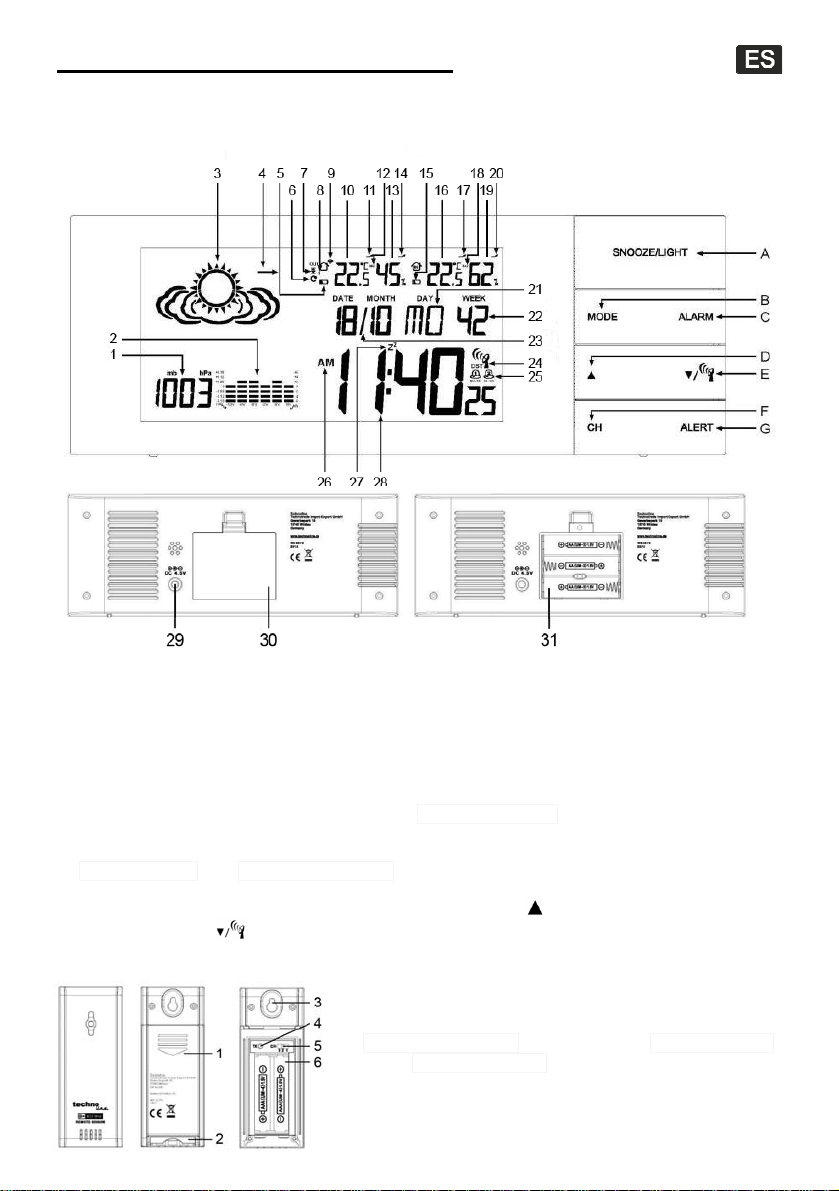
WS 6870 – Wetterstation
Bedienungsanleitung
WETTER-
STATION
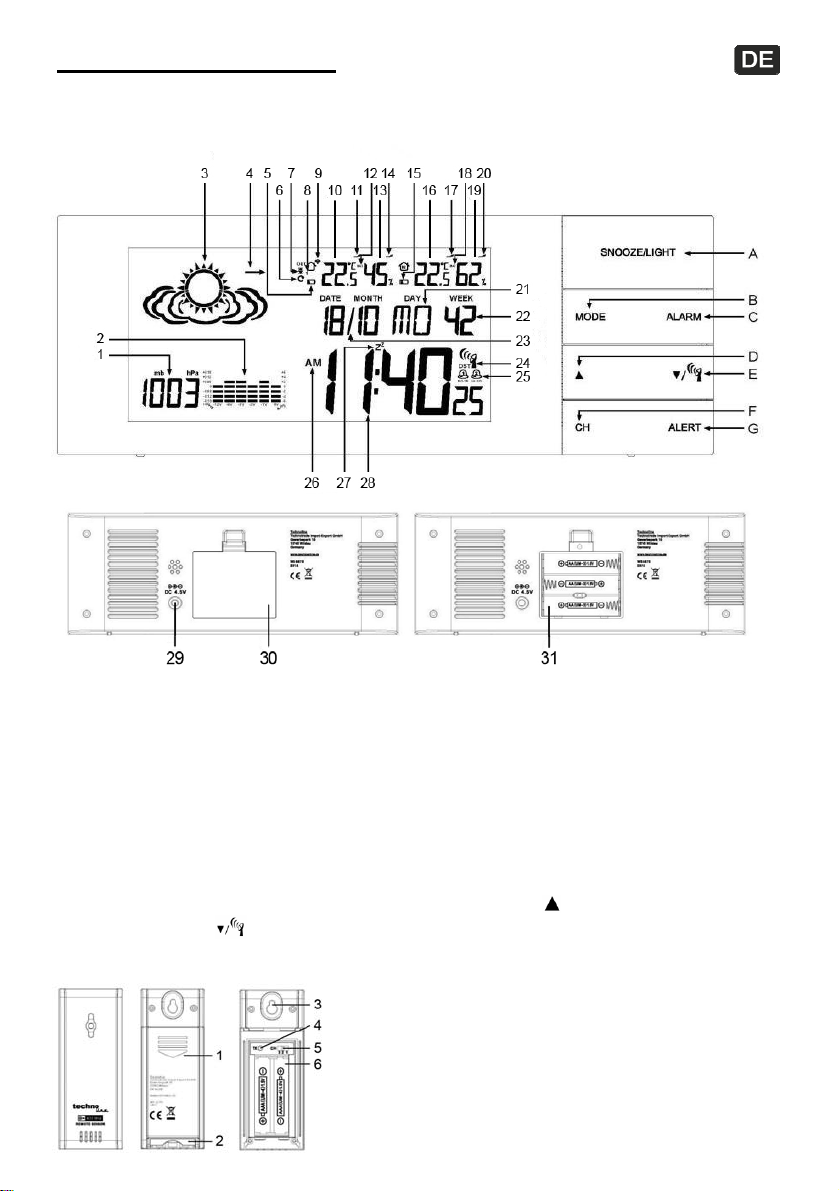
1 Luftdruck ● 2 Luftdruckhistorie ● 3 Wettervorhersage ● 4 Wettertendenz ● 5 Batterieendanzeige
(Außensender) ● 6 Wechselanzeige Kanal 1-3 ● 7 Temperaturalarm ● 8 Außensenderkanal
9 Außensendersignal ● 10 Außentemperatur ● 11 Außentemperaturtendenz ● 12 Außentemperatur
MIN/MAX ● 13 Außenluftfeuchtigkeit ● 14 Außenluftfeuchtigkeitstendenz ● 15 Batterieendanzeige
(Wetterstation) ● 16 Innentemperatur ● 17 Innentemperaturtendenz ● 18 Innentemperatur MIN/MAX
19 Innenluftfeuchtigkeit ● 20 Innenluftfeuchtigkeitstendenz ● 21 Wochentag ● 22
23 Datum ● 24 DCF-Zeit-Signal (mit DST Symbol) ● 25 Alarme ● 26 AM/PM Format ● 27 Schlummeralarm ● 28 Uhrzeit
29 DC Anschluss ● 30 Batterieabdeckung ● 31 Batteriefach
Funktionstasten: A SNOOZE/LIGHT ● B MODE ● C ALARM ● D
(runter/ DCF-Signal) ● F CH (Kanal) ● G ALERT
E
AUßENSENDER
1 Batterieabdeckung ● 2 Standfuß ● 3 Aufhängeöse ● 4 TX
5 Kanalschalter ● 6 Batteriefach
(hoch)
Kalenderwoche
Page 3
EMPFANGSBEEINFLUSSUNG DURCH DIE UMWELT
Die Wetterstation empfängt die aktuelle Uhrzeit und Außensenderdaten über Funkempfang. Wie bei
allen kabellosen Geräten kann der Funkempfang der Wetterstation durch folgende Einflüsse
beeinträchtigt sein:
• lange Übertragungswege
• nahe liegende Berge und Täler
• inmitten hoher Gebäude
• nahe Autobahnen, Gleisen, Flughäfen, Hochspannungsleitungen, etc.
• nahe Baustellen
• in Betonbauten
• nahe elektrischer Geräte (Computer, Fernseher, etc.)
• in bewegten Fahrzeugen
• nahe metallischer Gegenstände
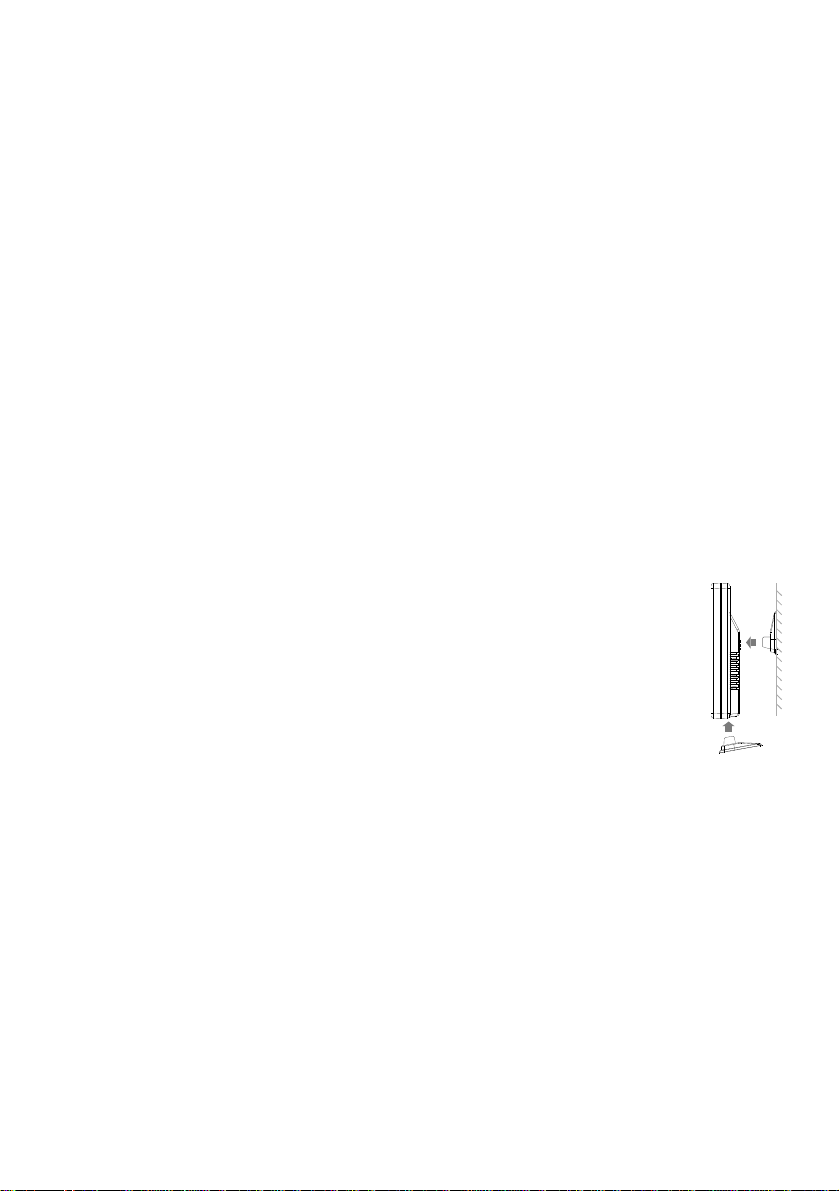
Platzieren Sie die Station an einem Ort mit optimalem Empfang, z.B. in der Nähe von Fenstern und
entfernt zu metallischen oder elektrischen Gegenständen.
INBETRIEBNAHME
Schritt 1 Stecken Sie den AC/DC-Adapter in eine Steckdose und stecken Sie den DC-Netzteilstecker
in den entsprechenden Anschluss an der Rückseite der Wetterstation.
Schritt 2 Öffnen Sie die Batterieabdeckung an der Rückseite der Wetterstation und legen Sie 3 x AAA
Batterien (nicht enthalten) unter Berücksichtigung der korrekten Polarität (+/-) in das Batteriefach auf
der Rückseite der Wetterstation ein. Legen Sie die Batterieabdeckung wieder auf das Batteriefach.
Schritt 3 Stellen Sie die Wetterstation und dem Außensender dicht nebeneinander. Öffnen Sie die
Batterieabdeckung an der Rückseite des Außensenders. Stellen Sie sicher, dass die
Auswahl des Kanals auf Position eins steht (rechte Position), legen Sie 2 x AAA Batterien
(nicht enthalten) unter Berücksichtigung der korrekten Polarität (+/-) in das Batteriefach
und legen Sie die Batterieabdeckung wieder auf das Batteriefach. Die Wetterstation
empfängt nach wenigen Sekunden das Signal des Außensenders.
Beachten Sie, dass der Außensender nur im absoluten Freifeld (ohne Störquellen) seine
maximale Reichweite von 30 Meter nutzen kann. Jede Störquelle, die sich zwischen
Außensender und Station befindet (Dächer, Mauern, Böden, Decken, dicke Bäume, etc.),
verringert die Reichweite des Senders.
Hinweis:
• Die Wetterstation beginnt das DCF-Zeitsignal zu suchen, nachdem die Wetterstation die
Außentemperatur vom Außensender empfangen hat. Dieser Vorgang kann über Nacht andauern.
Stellen Sie die Uhrzeit manuell ein, wenn kein DCF-Zeitsignal empfangen wurde.
• Während dem Empfang des DCF-Zeitsignals wird Ihr Thermometer keine Temperaturmessung
durchführen. Nach der ersten Inbetriebnahme benötigen die Temperaturwerte bis zu 30 Minuten
um sich zu stabilisieren.
Nutzung weiterer Außensender
Hinweis: Bis zu 3 Außensender können von der Wetterstation empfangen werden.
Drücken Sie die
Drücken Sie die CHANNEL Taste länger als 2 Sekunden um den Kanal zurückzusetzen und nach
Außensendern zu suchen.
Wenn Sie mehr als einen Außensender benutzen (maximal 3), können Sie die Ergebnisse von jedem
Außensender separat abfragen. Hierzu müssen Sie jeden Außensender auf einen anderen Kanal legen:
Öffnen Sie das Batteriefach des Außensenders und wählen Sie mit dem Kanal-Schalter einen Kanal
(1,2 oder 3). Drücken Sie die TX Taste, um eine Verbindung mit der Wetterstation herzustellen.
CHANNEL
Taste um den Außensender-Kanal zu wählen. Die Reihenfolge ist CH1 – CH2 – CH3.
Page 4

Backup-Batterien
Die Backup-Batterien versorgen die Wetterstation mit Strom, wenn die Verbindung zu anderen
Stromquellen unterbrochen ist. Die LCD-Anzeige wird im Backup-Modus ausgeschaltet. Die Uhrzeit
und die Alarmzeit bleiben gespeichert, auch während eines Stromausfalls. Die Alarmfunktion
funktioniert wie im normalen Betrieb.
Außensender-Funksignal
Nach dem Einlegen der Batterien beginnt die Wetterstation automatisch die Suche nach dem
Funksignal des Außensenders. Das Funksignal des Außensenders
Hinweis: Die Signalsuche dauert ungefähr 3 Minuten.
DCF-ZEITSIGNAL UND SIGNALSTÄRKE-ANZEIGE
Sobald das Außensender-Funksignal erfolgreich empfangen wurde, beginnt die Wetterstation
automatisch mit der Suche nach dem DCF-Funksignal. Das Empfangssymbol
Bei einem starken empfangenden DCF-Zeitsignal wird das komplette Empfangssymbol
auf dem LCD angezeigt.
Bei keinen oder einem schwach empfangendem DCF-Zeitsignal verschwindet das Empfangssymbol
vom Display. Stellen Sie in diesem Fall die Wetterstation an einen Ort mit einem besseren Empfang
oder entfernen Sie das Netzteil, um die Suche nach dem DCF-Zeitsignal erneut zu starten.
Hinweis:
• Dieser Vorgang dauert durchschnittlich 7 Minuten. Empfängt die Station das DCF-Zeit-Signal nicht
innerhalb dieses Zeitraumes, wird die Suche nach dem DCF-Zeit-Signal beendet.
• Während der DCF-Funksignalsuche können Sie nur die SNOOZE/LIGHT Taste für die
Hintergrundbeleuchtung nutzen. Alle weiteren Funktionen sind in diesem Zeitraum blockiert.
• Das DST-Symbol wird auf dem LCD angezeigt, wenn die Sommerzeit aktiviert ist.
Halten Sie während des Empfangs die
Sie die
zurückzukehren.
Automatischer und manueller Empfang
Die Station startet den automatischen Empfang jeden Tag um 1:00, 2:00 und 3:00 Uhr. Wenn die
Station um 3:00 Uhr das DCF-Signal nicht empfangen hat, wird die Station um 4:00 Uhr erneut das
Signal suchen. Wenn die Station erneut kein Signal empfangen kann, wird sie um 5:00 Uhr erneut das
Signal suchen. Sollte der Empfang wiederholt nicht möglich sein, wird das Signal automatisch am
nächsten Tag um 1:00 Uhr erneut gesucht.
Zum Starten des manuellen DCF-Zeitsignalempfangs drücken Sie die
wechselt in den Funkempfangsmodus
MANUELLE ZEITEINSTELLUNG
Halten Sie die MODE Taste für 3 Sekunden gedrückt um in den Einstellungsmodus zu wechseln.
Die12-Stundenanzeige blinkt. Drücken Sie die
Stundenanzeige zu wählen. Drücken Sie die MODE Taste um Ihre Einstellung zu bestätigen und zur
nächsten Einstellung zu wechseln.
Die vollständige Einstellsequenz ist: 12/24 Stunden, Zeitzone, Stunde, Minute, Jahr, Monat, Datum,
Sprache der Wochentagsanzeige.
Drücken Sie die
anschließend jeweils die MODE Taste, um Ihre Einstellung zu bestätigen und zur nächsten Einstellung
zu wechseln.
Drücken Sie nach der letzten Einstellung die MODE Taste, um zur normalen Zeitanzeige
zurückzukehren.
Taste gedrückt, um in den Empfangsmodus und zur Signalstärkeanzeige
oder die Taste um die gewünschten Werte einzustellen und drücken Sie
Taste gedrückt, um den DCF-Empfang zu beenden. Halten
.
oder Taste um zwischen der 12- oder 24-
blinkt auf dem LCD.
blinkt auf dem LCD.
dauerhaft
Taste. Die Zeitanzeige
Page 5
ALARMEINSTELLUNG
Sie können 2 Alarmzeiten in der Wetterstation einstellen:
Drücken Sie die ALARM Taste um in den Alarm-Einstellungsmodus zu wechseln.
Halten Sie die ALARM Taste für 3 Sekunden gedrückt, um Alarmzeit 1 einzustellen. Die Stundenziffer
beginnt zu blinken. Drücken Sie die
oder die Taste um die gewünschte Stunde einzustellen.
Drücken Sie die MODE Taste um Ihre Einstellung zu bestätigen und zur nächsten Einstellung zu
wechseln. Die Minutenziffer blinkt. Drücken Sie die
oder die Taste, um die gewünschte Minute
einzustellen. Drücken Sie die MODE Taste um Ihre Einstellung zu bestätigen.
Drücken Sie die ALARM Taste für 3 Sekunden um in die zweite Alarmeinstellung zu wechseln. Halten
Sie die ALARM Taste für 3 Sekunden gedrückt, um Alarmzeit 2 einzustellen. Folgen Sie den
Anweisungen zur Einstellung der Alarmzeit 1 um die gewünschte Alarmzeit einzustellen.
Drücken Sie die ALARM Taste um Ihre Einstellung zu bestätigen.
Hinweis: A1 (erster Alarm) ist der Alarm von Montag bis Freitag, A2 (zweiter Alarm) ist der Alarm für
Samstag und Sontag.
Alarm 1 und/oder Alarm 2 AN/AUS schalten
Drücken sie die ALARM Taste, um in den Alarm-Einstellungsmodus zu wechseln.
Wenn Alarm 1 (A1) angezeigt wird, drücken Sie die
Taste um den Alarm zu aktivieren
(Glockensymbol leuchtet auf) oder zu deaktivieren.
Wenn Alarm 2 (A2) angezeigt wird, drücken Sie die
Taste um den Alarm zu aktivieren
(Glockensymbol leuchtet auf) oder zu deaktivieren.
Drücken Sie den MODE Taste um Ihre Einstellung zu bestätigen.
Hinweis: Der Alarmdauer beträgt 2 Minuten.
Schlummeralarm
Beim Erreichen der eingestellten Alarmzeit 1 oder 2 beginnt die Wetterstation zu klingen und das A1
oder A2 Symbol blinkt. Drücken Sie die SNOOZE Taste, der Alarmton wird ausgeschaltet und das A1
oder A2 Symbol blinkt weiterhin. Der Alarm ertönt erneut nach 5 Minuten.
Alarm stoppen
Beim Erreichen der eingestellten Alarmzeit 1 oder 2 beginnt die Wetterstation zu klingen und das A1
oder A2 Symbol blinkt. Drücken Sie eine beliebige Taste um den Alarm abzubrechen, das A1 oder A2
Symbol wird statisch. Der Alarm wird am nächsten Tag zur gleichen Zeit erneut ertönen.
WETTERVORHERSAGE UND BAROMETER
Die Wetterstation hat ein eingebautes Barometer, welches den Luftdruck misst. Nach der
Inbetriebnahme zeigt die Anzeige das „Sonnig & bewölkt“ Symbol an. Die Wetterstation benötigt etwa
24 Stunden, um genug Daten über Luftdruckveränderungen zu sammeln und eine Wettervorhersage
für die nächsten 12 – 24 Stunden zu erstellen.
Hinweis: Ihre Wetterstation sagt die Wettersituation der nächsten 12 – 24 Stunden voraus. Diese
Vorhersage muss nicht mit der derzeitigen Wettersituation übereinstimmen.
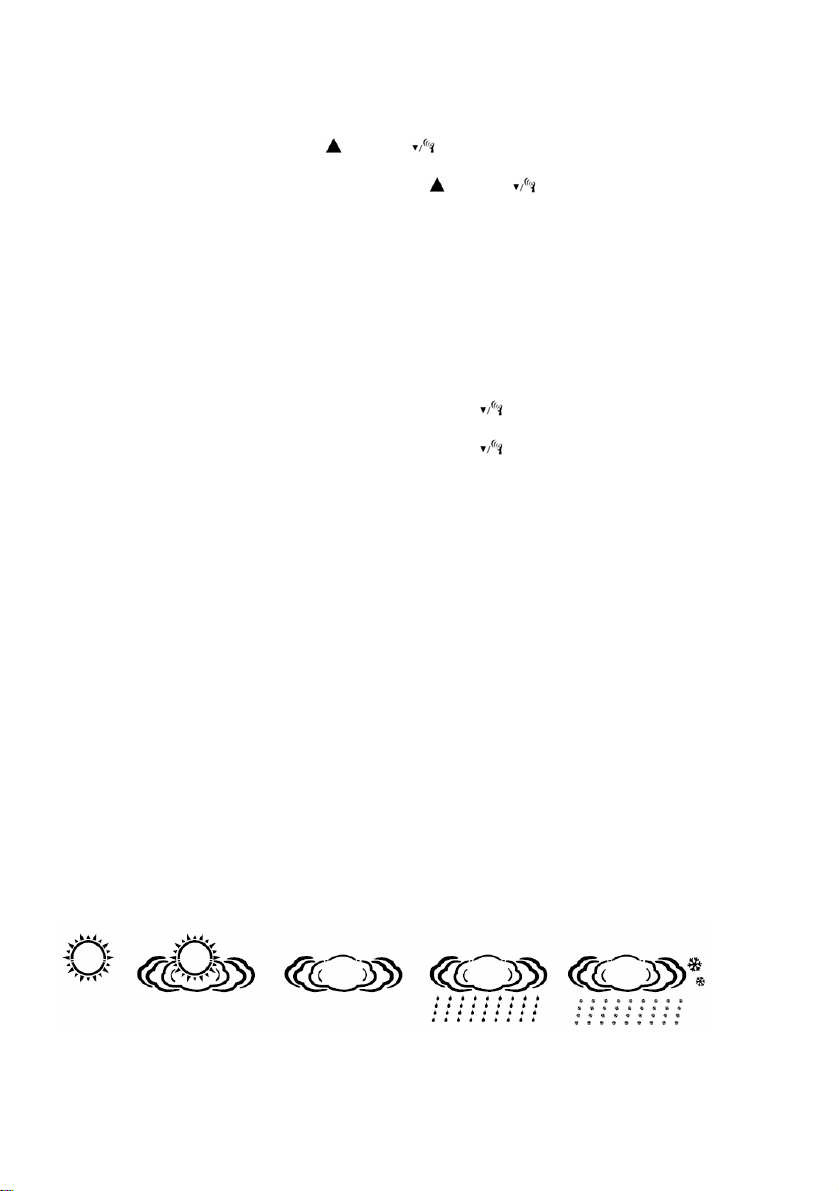
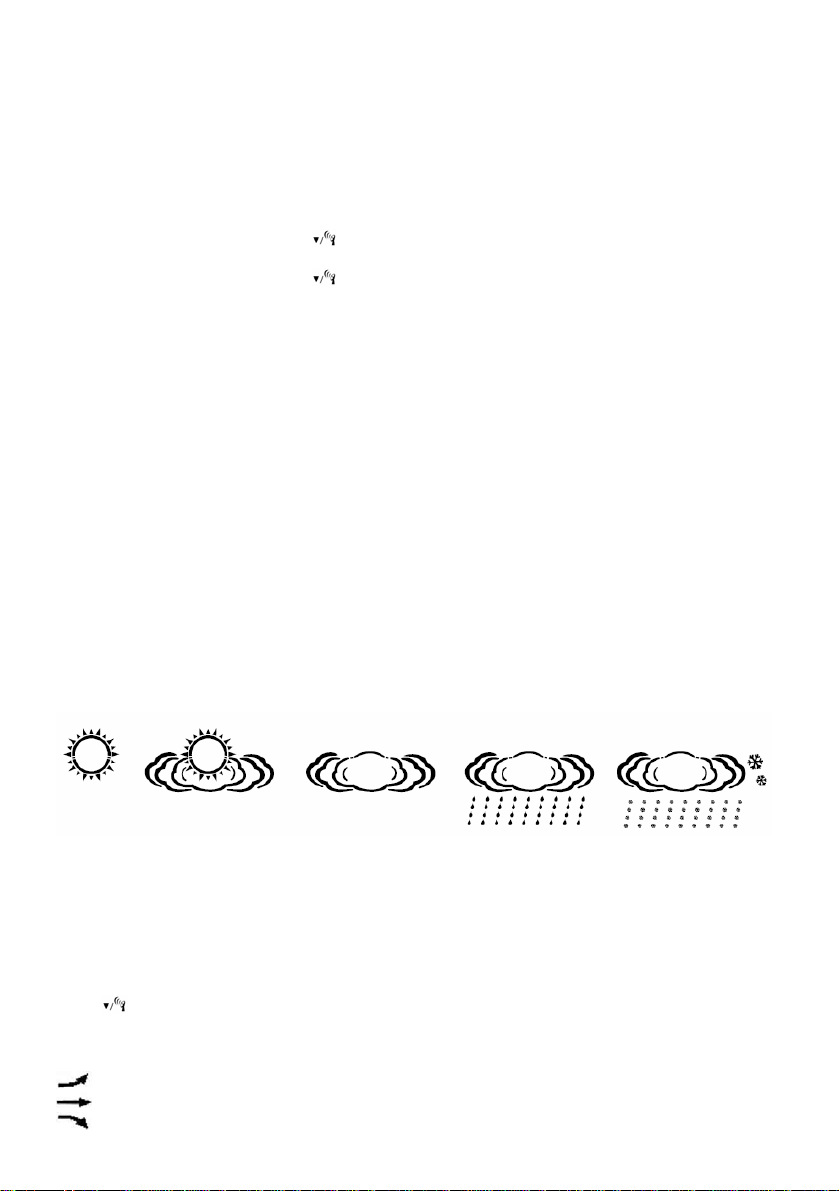
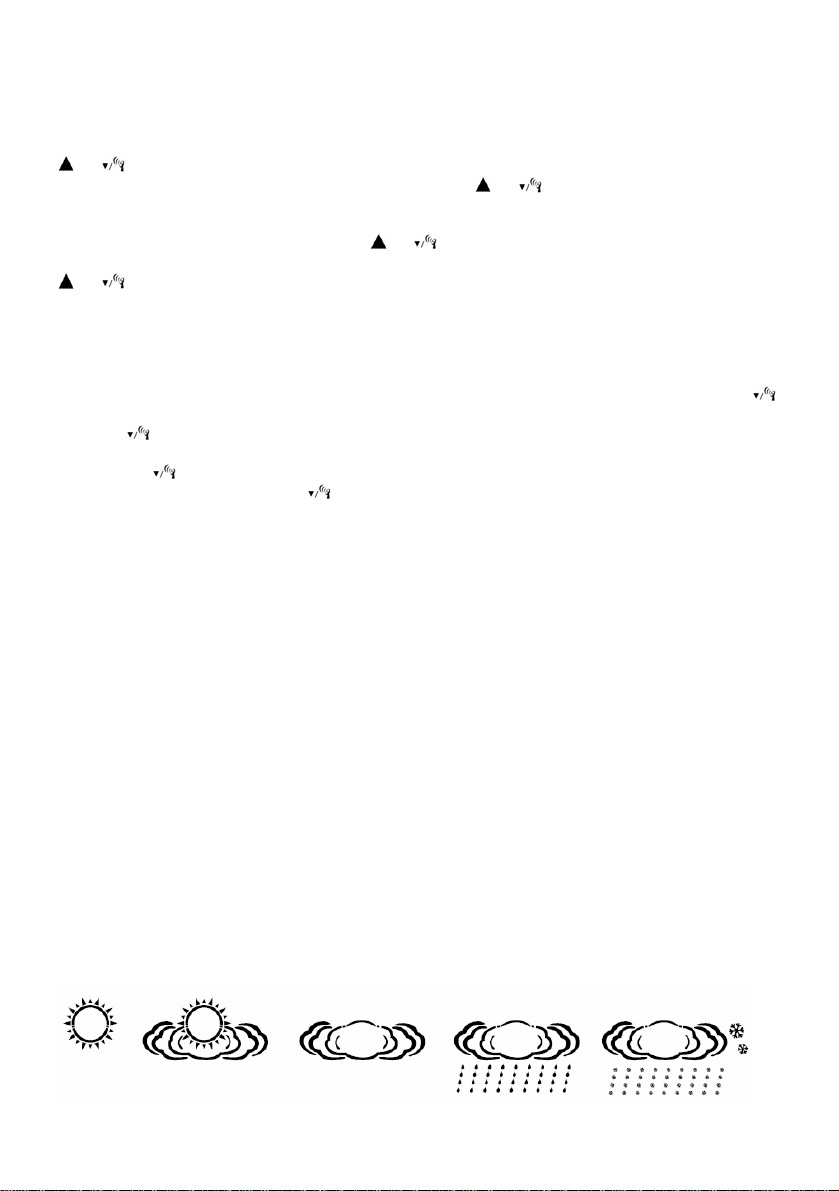
Es werden 5 Arten von Wettersymbolen zur Wettervorhersage genutzt:
Sonnig leicht bewölkt bewölkt Regen Schnee
Hinweis: Jegliche Bewegung der Wetterstation im Haus oder Gebäude wird die Genauigkeit der
Vorhersage beeinflussen, da es zu Änderungen der Temperatur und der Höhe/ Lage kommt. Die
Wetterstation benötigt erneut 24 Stunden um sich zu stabilisieren und eine Wettervorhersage für die
nächsten 12 – 24 Stunden zu erstellen.
Page 6
TEMPERATUR UND LUFTFEUCHTIGKEIT
Temperaturanzeige in °C/°F
Drücken Sie die
Anzeige der Temperatur- und Luftfeuchtigkeitsentwicklung
Die Wetterstation kann die Temperatur- und Luftfeuchtigkeitsentwicklung anzeigen:
Temperatur/ Luftfeuchtigkeit wird steigen
Temperatur/ Luftfeuchtigkeit wird konstant bleiben
Temperatur/ Luftfeuchtigkeit wird sinken
MIN/MAX Temperatur und Luftfeuchtigkeit
Drücken Sie die
anzuzeigen.
Um den Temperatur- und Luftfeuchtigkeitsverlauf zu löschen, halten Sie die
MIN/MAX Anzeige länger als 3 Sekunden gedrückt.
Hinweis: (wenn weitere Außensender empfangen werden)
Drücken Sie während der MIN/MAX Anzeige der Temperatur/Luftfeuchtigkeit die CH Taste um die
Werte eines anderen Außensenders anzuzeigen.
Temperaturalarm
Die voreingestellte MAX-Temperatur ist 60°C, die voreingestellte MIN-Temperatur ist -40°C.
Drücken Sie die ALERT Taste um den Temperaturalarm zu aktivieren. Das Temperaturalarm-Symbol
erscheint auf dem LCD. Halten sie die ALERT Taste mehr als 3 Sekunden lang gedrückt um den
Temperaturalarm einzustellen. Die MAX-Temperatur blinkt. Drücken Sie die
gewünschten Höchstwert einzustellen und drücken Sie die ALERT Taste um die Einstellungen zu
bestätigen und zur nächsten Einstellung zu wechseln. Die MIN-Temperatur blinkt. Drücken Sie die
oder
Drücken Sie die ALERT Taste um die Einstellungen zu bestätigen und zur aktuellen
Temperaturanzeige zurückzukehren.
Der Alarm wird jede Minute 5 Sekunden lang ertönen, wenn sich die Temperatur außerhalb der
vorgegeben Spanne befindet. Drücken Sie eine beliebige Taste um den Alarm zu stoppen. Das
Temperaturalarm-Symbol wird jedoch weiter blinken bis die Temperatur wieder innerhalb der
vorgegebenen Spanne liegt.
Drücken Sie die ALERT Taste um die Temperaturalarmfunktion zu beenden. Das TemperaturalarmSymbol verschwindet vom LCD.
Hinweis: (wenn weitere Außensender empfangen werden)
Wenn sie den Temperatur-Alarm für den Außenkanal 2 oder 3 einstellen wollen, drücken sie die CH
Taste um zwischen den Kanälen zu wechseln bevor Sie mit der Einstellung des Temperatur-Alarms
beginnen.
Wenn der Temperaturalarm nicht den aktuell angezeigten Kanal betrifft, blinkt nur das
Temperaturalarm-Symbol auf, nicht die aktuell angezeigte Temperatur. Der Alarm wird nicht ertönen.
BATTERIEENDANZEIGE
Wenn die Batterien schwach sind, erscheint die Batterieendanzeige auf dem Display. Stellen Sie
sicher, dass Sie die Batterien bei der nächsten Gelegenheit austauschen.
BELEUCHTUNG
Ist die Wetterstation nicht mich dem Netzteil verbunden, drücken Sie die SNOOZE/LIGHT Taste, um
die Hintergrundbeleuchtung für 5 Sekunden zu aktivieren. Ist die Wetterstation mit dem Netzteil
verbunden, leuchtet die Hintergrundbeleuchtung dauerhaft.
Taste um den gewünschten Tiefstwert einzustellen.
Taste um zwischen der Temperaturanzeige Celsius und Fahrenheit zu wechseln.
Taste um die Höchst- und Tiefstwerte für Temperatur und Luftfeuchtigkeit
Taste während der
oder Taste um den
Page 7
TECHNISCHE DATEN
Temperaturmessbereich:
Innentemperatur: 0°C bis +50°C (+32°F bis +122°F)
(das Display zeigt HH.H / LL.L außerhalb dieses Messbereiches)
Außentemperatur: -20°C bis +65°C(-4°F bis +149°F)
(das Display zeigt HH.H / LL.L außerhalb dieses Messbereiches)
Temperaturauflösung: 0.1°C
Luftfeuchtigkeitsmessbereich: 20% - 95%
(das Display zeigt HH.H / LL.L außerhalb dieses Messbereiches)
RH% Auflösung: 1%
Luftdruck: 850 hPa bis 1050 hPa
25.1 inHg bis 31.01 inHg
Kalender: 2000-2099
Alarmzeit: 2 Minuten
Schlummerzeit: 5 Minuten
Übertragungsfrequenz: 433 MHz
Übertragungsreichweite: 30 m (Freifeld)
VORSICHTSMASSNAHMEN
• Dieses Gerät ist ausschließlich für den Gebrauch in Innenräumen gedacht.
• Setzen Sie das Gerät nicht extremer Gewalteinwirkung oder Stößen aus.
• Setzen Sie das Gerät nicht hohen Temperaturen, direktem Sonnenlicht, Staub und Feuchtigkeit
aus.
• Tauchen Sie das Gerät nicht in Wasser.
• Vermeiden Sie den Kontakt mit ätzenden Materialien.
• Werfen Sie das Gerät nicht ins Feuer. Es könnte explodieren.
• Öffnen Sie nicht das Gehäuse und manipulieren Sie nicht bauliche Bestandteile des Geräts.
Batterie-Sicherheitshinweise
• Bitte lesen Sie vor der Inbetriebnahme sorgfältig alle Anweisungen.
• Verwenden Sie nur Alkali-Batterien, keine wiederaufladbaren Batterien.
• Legen Sie die Batterien unter Beachtung der Polarität (+/-) richtig ein.
• Ersetzen Sie stets einen vollständigen Batteriesatz.
• Mischen Sie niemals alte und neue Batterien.
• Entfernen Sie erschöpfte Batterien sofort.
• Entfernen Sie die Batterien bei Nichtnutzung.
• Laden Sie die Batterien nicht auf und werfen Sie sie nicht ins Feuer. Sie könnten explodieren.
• Bewahren Sie die Batterien nicht in der Nähe von Metallobjekten auf, da ein Kontakt einen
Kurzschluss verursachen kann.
• Setzen Sie Batterien keinen hohen Temperaturen, extremer Feuchtigkeit oder direktem
Sonnenlicht aus.
• Bewahren Sie Batterien außerhalb der Reichweite von Kindern auf. Verschlucken der Batterien
kann zum Ersticken führen.
Hinweispflicht nach dem Batteriegesetz
Altbatterien gehören nicht in den Hausmüll. Wenn Batterien in die Umwelt gelangen, können diese Umwelt- und
Gesundheitsschäden zur Folge haben. Sie können gebrauchte Batterien unentgeltlich bei ihrem Händler und
Sammelstellen zurückgeben. Sie sind als Verbraucher zur Rückgabe von Altbatterien gesetzlich verpflichtet!
Hinweispflicht nach dem Elektronikgerätegesetz
Laut Elektro- und Elektronikgerätegesetz (ElektroG) gehört Elektroschrott nicht in den Hausmüll, sondern ist zu
recyceln oder umweltfreundlich zu entsorgen. Entsorgen Sie ihr Ladegerät in einen Recycling Container oder an
eine lokale Abfallsammelstelle.
Page 8

WS 6870 - Weather station
Instruction manual
WEATHER
STATION
1 Air pressure ● 2 Air pressure history ● 3 Weather forecast ● 4 Weather tendency ● 5 Low battery
indicator (outdoor transmitter) ● 6 Running display channel 1-3 ● 7 Temperature alert ● 8 Outdoor
transmitter channel ● 9 Outdoor transmitter signal ● 10 Outdoor temperature ● 11 Outdoor
temperature tendency ● 12 Outdoor temperature MIN/MAX ● 13 Outdoor humidity ● 14 Outdoor
humidity tendency ● 15 Low battery indicator (weather station) ● 16 Indoor temperature ● 17 Indoor
temperature tendency ● 18 Indoor temperature MIN/MAX ● 19 Indoor humidity ● 20 Indoor humidity
tendency ● 21 Weekday ● 22 Calendar week ● 23 Date ● 24 DCF-time-signal (with DST symbol)
25 Alarms ● 26 AM/PM format ● 27 Snooze alarm ● 28 Time
29 DC connection ● 30 Battery cover ● 31 Battery compartment
Function keys: A SNOOZE/LIGHT ● B MODE ● C ALARM ● D
(down/ DCF-signal) ● F CH (channel) ● G ALERT
E
OUTDOOR TRANSMITTER
1 Battery cover ● 2 Stand ● 3 Hanging hole ● 4 TX
5 Channel selector ● 6 Battery compartment
(up)
Page 9
ENVIRONMENTAL RECEPTION EFFECTS
The weather station obtains the accurate time and outdoor transmitter data with wireless technology.
Same as all wireless devices, the reception is maybe affected by the following circumstances:
• long transmitting distance
• nearby mountains and valleys
• near freeway, railway, airports, high voltage cable etc.
• near construction site
• among tall buildings
• inside concrete buildings
• near electrical appliances (computers, TV’s, etc) and metallic structures
• inside moving vehicles
Place the weather station at a location with optimal signal, i.e. close to a window and away from metal
surfaces or electrical appliances.
QUICK SETUP
Step 1 Plug in the AC/DC adaptor to any AC household outlet. Then plug in the power jack to the back
of the weather station.
Step 2 Slide open the battery cover at the back of the weather station and insert 3 x AAA batteries
(not included) into the battery compartment by observation the correct +/- polarity. Replace the battery
cover.
Step 3 Keep the weather station and outdoor transmitter next to each other. Slide opens the battery
cover at the back of the outdoor transmitter. Make sure the channel selector on the back of the
outdoor transmitter is set at position 1 (right position) and insert 2 x AAA batteries (not
included) into the battery compartment by observation the correct +/- polarity. Replace
the battery cover. The weather station will receive data signal from the outdoor transmitter
in few seconds.
Keep in mind that the outdoor transmitter has a maximum open-area transmission of 30
meter with no obstructions. Actual transmission range will depend on any obstruction in
the path of the signal. Each obstruction (roof, walls, floors, ceilings, thick trees, etc.) will
effectively cut signal range in half.
Note:
• After the weather station has received the outdoor temperature from outdoor transmitter, it will
start to search for the DCF-time-signal. This may take overnight. In case the weather station does
not receive the DCF-time-signal, set the clock manually.
• During any reception of DCF-time-signal, the thermometer does not take temperature
measurement. After first time installation, the temperature readings will get stable and become
more accurate in around 30 minutes.
Using further outdoor transmitters
Note: Up to 3 outdoor transmitters are receivable by the weather station.
Press
CHANNEL
Press and hold CHANNEL button for 3 seconds to clear the channel and search for an outdoor
transmitter.
While using more than one outdoor transmitter, the data from each outdoor transmitter can be
received separately.
Make sure for each outdoor transmitter a different channel number is set:
Open the battery compartments of the outdoor transmitters and slide the channel selector to a desired
channel position (1,2 or 3). Press TX button to send a signal to the weather station.
button to choose the outdoor transmitter channel. The sequence is CH1 – CH2 – CH3.
Page 10

Back-up batteries
When the power supply is not in use or interrupted, the weather station will be powered by the back-up
batteries. The LED display is turned off, but all settings remain stored (also in the event of a power
failure). Also the alarm functions work as usual.
OUTDOOR TRANSMITTER SIGNAL
After inserting the batteries the weather station starts to search for the outdoor transmitter signal. The
icon flashes in LCD. When the outdoor transmitter signal is detected, the icon disappears from
LCD.
Note: Searching for outdoor transmitter signal takes around 3 minutes.
DCF-TIME-SIGNAL AND SIGNAL STRENGTH DISPLAY
After the weather station has received the outdoor temperature from outdoor transmitter, it will start to
search for the DCF-time-signal.
When strong DCF-time-signal is detected, full
When weak or no DCF-time-signal is detected, the
station to another area for better reception or unplug the power jack to start reception of DCF-timesignal again.
Note:
• Searching for DCF-time-signal takes around 7 minutes. If the weather station does not receive
DCF-time-signal within this time, it will stop to search for the DCF-time-signal.
• During DCF-reception mode only SNOOZE/LIGHT button works. All other functions are blocked.
• Display will show DST symbol when Daylight Saving Time is activated.
During DCF-reception mode, press and hold
Press and hold
Automatic and manual reception
The weather station starts automatic reception everyday at 1:00, 2:00, and 3:00 o’clock. If it fails to
receive the DCF-time-signal until 3:00 o’clock, it will start again reception at 4:00 o’clock. If it fails
again, it will start again reception at 5:00 o’clock. If it fails again, it will start again automatic reception
at 1:00 o’clock at the next day.
To start manually the reception of DCF-time-signal press
will go to radio reception mode
MANUAL TIME SETTING
Press and hold MODE button for 3 seconds to enter setting mode. The 12h-display-format flashes.
Press
or to choose between 12h (AM/PM mode)or 24h-display-format. Press MODE button to
confirm the setting and enter next setting.
The setting order is: 12/24h, time zone, hour, minute, year, month, day, language for weekday
For each setting press
setting.
After last setting press MODE button to return to normal time display.
ALARM SETTING
2 alarms can be set:
Press ALARM button once to enter alarm setting mode.
Press and hold ALARM button for 3 seconds to set Alarm Time 1. The hour digits flash. Press
again to return to reception mode and signal strength indication.
icon flashes in LCD.
.
or to select and press MODE button to confirm the setting and enter next
icon is displayed.
icon disappears from LCD. Replace the weather
button to stop the reception of DCF-time-signal.
button once anytime. The time display
or
to select. Press MODE button to confirm the setting and enter next setting. The minute digits flash.
or to select. Press MODE button to confirm the setting.
Press
Page 11
Press ALARM button once again to enter setting mode for Alarm 2. Press and hold ALARM button for
3 seconds to set Alarm Time 2 and use same setting instructions as for Alarm Time 1 to set the
desired alarm time.
Finally press MODE button to return to normal time display.
Note: Alarm 1 (A1) means alarm from Monday to Friday, Alarm 2 (A2) means alarm on Saturday and
Sunday.
Turn ON/OFF alarm 1 and/or alarm 2
Press ALARM button once to enter alarm setting mode.
When Alarm 1 (A1) is shown, press
Press ALARM button once again to enter setting mode for Alarm 2.
When Alarm 2 (A2) is shown, press
Finally press MODE button to return to normal time display.
Note: Alarm duration is 2 minutes.
Snooze alarm
When time reaches the set alarm time 1 or 2, the clock will beep with blinking A1 or A2 icon. Press
SNOOZE button once, the alarm sound will stop and A1 or A2 icon keeps blinking. Alarm will sound
again in 5 minutes.
Stop the alarm
When time reaches the set alarm time 1 or 2, the clock will beep with blinking A1 or A2 bell symbol.
Press any button, the alarm sound will stop and A1 or A2 bell symbol becomes static. The alarm will
beep again same time next day.
WEATHER FORECAST AND BAROMETER
The weather station has a built-in barometer which measures the barometric pressure. After power up,
the display shows Sunny & Cloudy icon. The weather station takes around 24 hours to gather data of
barometric pressure changes and predicts next 12 – 24 hours weather conditions.
Note: The weather station predicts next 12 – 24 hours weather conditions. It may not match with the
current weather condition outside.
There are 5 types of weather icons for predicted weather condition:
to activate (bell symbol lights up) or deactivate the alarm.
to activate (bell symbol lights up) or deactivate the alarm.
Sunny Sunny & Cloudy Cloudy Rainy Snowy
Note: Moving the weather station around your house or building will affect its accuracy because the
sudden change of temperature or height/ attitude will affect the accuracy of the weather station. It will
take 24 hours to get stable again to predict next 12 – 24 hours weather conditions.
TEMP ERATURE AND HUMI D ITY
Temperature display in °C/°F
Press
Temperature & humidity tendency
The weather station can display the temperature and humidity tendency as follow:
to switch between Celsius and Fahrenheit temperature format.
temperature/ humidity will increase
temperature/ humidity will be constant
temperature/ humidity will decrease
Page 12

MIN/MAX temperature and humidity
to display the maximum and minimum values of temperature and humidity.
Press
While display the MIN/MAX values press and hold
Note: (if the station is connected with further outdoor transmitters)
While display the MIN/MAX values press CH button to display the maximum and minimum values of
temperature and humidity of the other outdoor transmitters.
Temperature alert setting
The default MAX alert temperature is 60°C, the default MIN alert temperature is -40°C.
Press ALERT button to activate the temperature alarm. The temperature alert symbol lights up in
LCD. Press and hold ALERT button for 3 seconds to enter temperature alarm setting mode. The
maximum degree digits flash. Press
button to confirm the setting and enter next setting. The minimum degree digits flash. Press
to set the required minimum value. Finally press ALERT button to confirm the setting and return to
current temperature display.
After setting, the alert will automatically ring 5 seconds each minute, when the current outdoor
temperature is below set MIN or above set MAX alert temperature.
Press any button will stop the alarm, but temperature alert symbol will flash until temperature is back in
the required range.
Press ALERT button to deactivate the temperature alert function. The temperature alert symbol will
disappear from LCD.
Note: (if the station is connected with further outdoor transmitters)
To set temperature alert for outdoor transmitter 2 or 3 press CH button to change to a different
channel before you start the temperature alert setting for the chosen channel.
If the temperature alert is not in the currently displayed channel, the temperature alert symbol flashes
in the LCD, but alert will not ring.
LOW BATTERY INDICATOR
If the batteries are weak, the low battery indicator appears in the LCD. Make sure to replace the
batteries at the earliest opportunity.
BACKLIGHT
If the weather station is not connected to DC power, press the SNOOZE/LIGHT button to illuminates
the LCD for 5 seconds.
If the weather station is connected to DC power the backlight is always on.
SPECIFICATIONS
Temperature measuring range:
Indoor: 0°C to +50°C (+32°F to +122°F)
(display shows HH.H / LL.L if out of this range)
Outdoor: -20°C to +65°C (-4°F to +149°F)
(display shows HH.H / LL.L if out of this range)
Temperature resolution: 0.1°C
Humidity measuring range: 20% - 95%
(display shows HH.H / LL.L if out of this range)
Humidity resolution: 1%
Air pressure: 850 hPa to 1050 hPa
25.1 inHg to 31.01 inHg
Calendar: 2000-2009
or to set the required maximum value. Press ALERT
for 3 seconds to reset the values.
or
Page 13
Alarm duration: 2 minutes
Snooze duration: 5 minutes
Transmission frequency 433 MHz
Transmission range 30 m (open area)
PRECAUTIONS
• This main unit is intended to be used only indoors.
• Do not subject the unit to excessive force or shock.
• Do not expose the unit to extreme temperatures, direct sunlight, dust or humidity.
• Do not immerse in water.
• Avoid contact with any corrosive materials.
• Do not dispose this unit in a fire as it may explode.
• Do not open the inner back case or tamper with any components of this unit.
Batteries safety warnings
• Please read all instructions carefully before use.
• Use only alkaline batteries, not rechargeable batteries.
• Install batteries correctly by matching the polarities (+/-).
• Always replace a complete set of batteries.
• Never mix used and new batteries.
• Remove exhausted batteries immediately.
• Remove batteries when not in use.
• Do not recharge and do not dispose of batteries in fire as the batteries may explode.
• Ensure batteries are stored away from metal objects as contact may cause a short circuit.
• Avoid exposing batteries to extreme temperature or humidity or direct sunlight.
• Keep all batteries out of reach from children. They are a choking hazard.
Consideration of duty according to the battery law
Old batteries do not belong to domestic waste because they could cause damages of health and environment. You
can return used batteries free of charge to your dealer and collection points. As end-user you are committed by law
to bring back needed batteries to distributors and other collecting points!
Consideration of duty according to the law of electrical devices
This symbol means that you must dispose of electrical devices from the General household waste when it reaches
the end of its useful life. Take your charger to your local waste collection point or recycling centre. This applies to all
countries of the European Union, and to other European countries with a separate waste collection system.
Page 14
WS 6870 – Station météorologique
Manuel d'instructions
STATION
MÉTÉO
Pression atmosphérique ● 2 12h historique de pression atmosphérique ● 3 Prévision
1
météorologique ● 4 Tendances météorologiques ● 5 Charge des piles (emetteur exterieur) ● 6
Changement d'affichage des canals 1-3 ● 7 Alarme de température ● 8 Canal d’emetteur exterieur ● 9
Signal d’emetteur exterieur ● 10 Température extérieure ● 11 Tendance de température extérieure ●
Température extérieure MIN/MAX ● 13 Humidité extérieure ● 14 Tendance d’humidité extérieure ●
12
Charge des piles (station météo) ● 16 Température intérieure ● 17 Tendance de température
15
intérieure ● 18 Température intérieure MIN/MAX ● 19 Humidité intérieure ● 20 Tendance d’humidité
intérieure ● 21 Jour de la semaine ● 22 Calendrier semaine ● 23 Date ● 24 Signal horaire DCF (avec
icône DST) ● 25 Alarmes ● 26 AM/PM format ● 27 Alarme avec fonction répétition ● 28 Heure
DC connection ● 30 Couvercle de compartiment des batteries ● 31 Compartiment des batteries
29
Touches de fonction: A SNOOZE/LIGHT ● B MODE ● C ALARM ● D (en haut)
(en bas/ signal DCF) ● F CH (canal) ● G ALERT
E
EMETTEUR EXTERIEUR
Couvercle de compartiment des batteries
1
table ● 3 trou de suspension ● 4 TX ● 5 Sélecteur de canal
Compartiment des batteries
6
● 2 Utilisation sur
Page 15
QUALITÉ DE LA RÉCEPTION
La station utilise la technologie de transmission sans fil pour récupérer le signal d'horloge et ajuster
l'heure en conséquence. Comme avec tout appareil de communication sans fil, la qualité de cette
réception se dégrade dans les circonstances suivantes:
• longue distance de transmission
• Montagnes et vallées proches
• près d'une autoroute, d'un chemin de fer, d'un aéroport, d'une ligne à haute tension, etc.
• près d'un chantier de construction
• au milieu de hauts bâtiments
• à l'intérieur d'un bâtiment en béton
• à proximité d'un appareil électrique (ordinateur, téléviseur, etc.) et d'une structure métallique
• à l'intérieur d'un véhicule en déplacement
Placez la station à un endroit adapté pour une bonne réception des signaux radio, en l'occurrence
près d'une fenêtre et loin de toute surface métallique et de tout appareil électrique.
INSTALLATION RAPIDE
Étape 1 Branchez l'adaptateur secteur dans une prise secteur. Branchez ensuite la fiche
d'alimentation à l'arrière de la station.
Étape 2 Faites glisser le couvercle du compartiment à piles situé à l'arrière de la station pour l'ouvrir et
insérez 3 piles AAA (non fournies) en respectant les polarités +/-. Remettre le couvercle du
compartiment à piles.
Étape 3 Faites en sorte que la station et l'émetteur extérieur soient proches l'un de l'autre. Faites
glisser le couvercle du compartiment à piles situé à l'arrière de l'émetteur extérieur pour l'ouvrir.
Assurez-vous que le sélecteur de canal à l'arrière de l'émetteur extérieur soit positionné
sur 1 (position de droite) et insérez 2 piles AAA (non fournies) en respectant les polarités
+/-. Remettre le couvercle du compartiment à piles. La station météo reçoit le signal de
données à partir de l'émetteur extérieur en quelques secondes.
N'oubliez pas que l'émetteur extérieur a une portée de 30 mètres dans un espace dégagé
sans aucun obstacle. La portée de transmission réelle peut varier en fonction des
obstacles qui se trouvent sur le chemin du signal. Chaque obstruction (toit, murs,
planchers, plafonds, arbres touffus, etc.) aura pour effet de réduire de moitié la portée du
signal.
Remarque:
• Dès que la station reçoit la température extérieure de l'émetteur, elle commence à rechercher le
signal horaire DCF. Cela peut prendre toute la nuit. Dans le cas où la station n'arrive pas à capter
le signal horaire DCF, vous pouvez régler l'heure manuellement.
• Au cours de la réception du signal horaire DCF, le thermomètre ne prend pas de mesures de la
température. Après la première installation, les relevés de température deviennent stables et plus
précis dans environ 30 minutes.
Utiliser d'autres capteurs extérieurs
Remarque: Jusqu'à 3 transmetteurs extérieurs sont recevables par la station météo.
Appuyez sur la touche CH pour choisir le canal du capteur extérieur selon la séquence CH1 - CH2 - CH3.
Maintenez appuyée la touche CHANNEL pendant plus de 3 secondes pour désactiver le canal et
rechercher un capteur extérieur.
Si vous utilisez plus d'un capteur (max. 3), vous pouvez recevoir les données de chacun d'eux de
manière indépendante. Vous devez affecter un numéro de canal différent à chaque capteur:
Ouvrez le compartiment à piles et utilisez le commutateur de sélection de canal (1,2 ou 3) pour
sélectionner un canal. Maintenez appuyée la touche TX pour envoyer un signal à la station météo.
Page 16

Piles de secours
En cas de coupure de courant, la station sera alimentée par les piles de secours. L'écran LED sera
éteint, mais l'heure et l'heure de l'alarme restent mémorisées (également dans le cas d'une panne de
courant). En plus, l'alarme continue à fonctionner normalement.
Réception du signal du capteurs extérieurs
La station météo commence automatiquement à chercher le capteur extérieur. Le symbole
signal RF du canal se met à clignoter sur l'écran LCD indiquant que la station de base est à la
recherche du signal RF du canal. Lorsque le capteur extérieur est détecté, le symbole
du canal disparaît de l'écran.
Remarque: Cette opération peut prendre environ 3 minutes.
AFFICHAGE DU SIGNAL DCF ET LA FORCE DU SIGNAL
Dès que la station reçoit la température extérieure de l'émetteur, elle commence à rechercher le signal
horaire DCF. L'icône de réception
Lorsqu'un fort signal horaire DCF est détecté, l'écran affiche le symbole radio complet
Lorsqu'un faible signal horaire DCF est détecté, l'écran affiche l'icône de réception
à un autre endroit pour une meilleure réception ou débranchez la prise d'alimentation pour relancer la
réception du signal horaire DCF.
Remarque:
• Cette opération peut prendre environ 7 minutes, pendant ce temps l'icône de la radio se met à
clignoter sur l'écran LCD.
• Pendant la recherche du signal DCF, vous pouvez appuyez sur la touche SNOOZE/LIGHT pour
activer le rétroéclairage, mais toutes les autres touches de fonction de la station météo restent
verrouillées.
• Dès que la station météo reçoit le signal DST (heure d'été), le symbole DST s'affiche sur l'écran
LCD. DST indique que l'heure d'été est activée.
Maintenez appuyée la touche
capter le signal radio DCF.
Réception automatique et manuelle
La station commence à la réception automatique chaque jour à 1h00, 2h00 et 3h00. Si elle ne reçoit
pas de signal horaire DCF jusqu'à 3h00, elle relance la réception à 4h00. En cas de nouvel échec, elle
relance la réception à 5h00. En cas de nouvel échec, elle relance la réception à 5h00.
Pour lancer la réception manuelle du signal horaire DCF, appuyez une fois sur la touche
L'affichage de l'heure passe en mode réception radio
RÉGLAGE MANUEL DE L'HORLOGE
Maintenez appuyée la touche MODE pendant environ 2 secondes. 12hr se met à clignoter à l’écran.
Appuyez sur la touche
Confirmez votre réglage en appuyant sur la touche MODE, le fuseau horaire se met à clignoter.
Appuyez sur la touche
Confirmez votre réglage en appuyant sur la touche MODE, les heures se mettent à clignoter. Appuyez
sur la touche
Répétez les mêmes étapes pour régler les éléments suivants.
Voici la séquence complète des réglages: 12/24 hr, fuseau horaire, heures, minutes, année, mois, jour,
langue d'affichage du jour.
Appuyez sur MODE pour revenir à l'affichage normal de l'heure.
ou pour choisir l'heure appropriée.
ou pour choisir entre l'affichage 12 ou 24 heures.
ou pour choisir le fuseau horaire approprié.
se met à clignoter.
pendant environ 3 secondes. L'horloge radio-pilotée essaie de
.
du signal RF
.
. Placez la station
de
.
Page 17
RÉGLAGE DE L'ALARME
L'appareil comprend 2 alarmes.
Appuyez sur la touche ALARM pour passer au mode alarme 1.
Maintenez appuyée la touche ALARM pendant environ 2 secondes pour régler l'alarme 1. L'heure de
l'alarme réglée sera affichée sur l'écran LCD. Les heures se mettent à clignoter. Appuyez sur la touche
ou pour choisir l'heure appropriée. Appuyez sur la touche ALARM pour confirmer votre choix.
Les minutes se mettent à clignoter. Appuyez sur la touche
ou pour régler les minutes. Appuyez
sur la touche ALARM pour confirmer votre choix.
Appuyez sur la touche ALARM pour confirmer et passer au réglage de l'alarme 2, les heures se
mettent à clignoter. Appuyez sur la touche
ou pour choisir l'heure appropriée. Appuyez sur la
touche ALARM pour confirmer votre choix. Les minutes se mettent à clignoter. Appuyez sur la touche
ou pour régler les minutes. Appuyez sur la touche ALARM pour confirmer votre choix.
Appuyez sur MODE pour revenir à l'affichage normal de l'heure.
Remarque: A1 pour l'alarme du lundi au vendredi, A2 pour l'alarme de samedi et dimanche.
Activer/désactiver l'alarme 1 et/ou 2
Appuyez sur la touche ALARM pour passer au mode alarme 1 (A1). Appuyez sur la touche
l'icône de l'alarme 1 apparaît sur l'écran LCD. L'alarme 1 vient d'être activée. Appuyez de nouveau sur
la touche
pour masquer l'icône d'alarme de l'écran LCD. L'alarme 1 vient d'être désactivée.
Appuyez sur la touche ALARM pour confirmer et passer au mode réglage de l'alarme 2 (A2). Appuyez
sur la touche
Appuyez de nouveau sur la touche
, l'icône de l'alarme 2 apparaît sur l'écran LCD. L'alarme 2 vient d'être activée.
pour masquer l'icône d'alarme de l'écran LCD. L'alarme 2 vient
d'être désactivée.
Appuyez sur la touche ALARM pour confirmer et quitter le mode réglage de l'alarme.
Appuyez sur MODE pour revenir à l'affichage normal de l'heure.
Remarque: La durée de l'alarme est 2 minutes.
Rappel d’alarme
Lorsque l'heure de l'alarme 1 ou l'alarme 2 est atteint, l'horloge émet se met à sonner avec l'indicateur
A1 ou A2 clignotant. Appuyez une fois sur la touche SNOOZE, la sonnerie de l'alarme s'arrête et
l'indicateur A1 ou A2 continue de clignoter. L'alarme se déclenche à nouveau au bout de 5 minutes.
Arrêter l'alarme
Lorsque l'heure de l'alarme 1 ou l'alarme 2 est atteint, l'horloge émet se met à sonner avec l'indicateur
A1 ou A2 clignotant. Appuyez sur une touche quelconque pendant, la sonnerie de l'alarme s'arrête et
l'indicateur A1 ou A2 devient fixe. L'alarme se déclenche le lendemain à la même heure.
PRÉVISIONS MÉTÉO ET BAROMÈTRE
La station dispose d'un baromètre intégré qui mesure la pression barométrique. Une fois allumé,
l'écran affiche l'icône partiellement nuageux. La station prend environ 24 heures pour collecter des
données de changements de pression barométrique et donne des prévisions météo pour les 12 - 24
prochaines heures.
Remarque: La station météo donne des prévisions météo pour les 12 - 24 prochaines heures. Elles
peuvent ne pas correspondre aux conditions météo actuelles à l'extérieur.
Il y a cinq types d'icônes pour les prévisions météo:
,
Ensoleillé Ensoleillé et nuageux Nuageux Pluvieux Neigeux
Page 18

Remarque: Le déplacement de la station autour de votre maison ou d'un bâtiment affecte sa précision
car un changement brusque de la température ou de la hauteur/l'attitude affecte la précision. Il faut 24
heures pour que la station redevienne stable et pouvoir donner des prévisions météo pour les 12 - 24
prochaines heures.
TEMPÉRATURE ET HUMIDITÉ
Affichage des températures en°C/°F
Appuyez sur la touche
Affichage de la tendance de la température et de l'humidité
Une fois connectée avec succès, la station météo peut afficher la tendance de la température et de
l'humidité:
indique une tendance de température/humidité à la hausse
indique une tendance de température/humidité invariable
indique une tendance de température/humidité en baisse
Affichage de la Température/Humidité MIN/MAX
Appuyez sur la touche
Maintenez appuyée la touche
température/humidité maximale/minimale.
Remarque: Appuyez sur la touche CHANNEL pour afficher la température/humidité
maximale/minimale à partir des différents canaux.
Réglage de l'alerte de température
La température MAX par défaut est de 60 °C, la température MIN est -40 °C.
Appuyez sur la touche ALERT pour activer l'alarme de température. Le symbole d'alerte de
température sera affiché. Maintenez appuyée la touche ALERT pendant plus de 3 secondes pour
régler l'alarme de température. Appuyez sur la touche
Appuyez sur ALERT pour confirmer le réglage. La séquence est maximum, minimum et quitter.
Appuyez sur la touche ALERT pour revenir à l'affichage de la température normale
Une fois le réglage terminé, l'alerte sera déclenchée automatiquement lorsque la température
extérieure est inférieure à la température d'alerte MIN ou supérieur à la température d'alerte MAX
fixée. L'alarme sera déclenchée chaque minute pendant 5 secondes jusqu'à ce que la température
soit dans la plage requise. Appuyez sur une touche quelconque pour arrêter l'alarme, mais le symbole
reste clignotant jusqu'à ce que la température devienne dans la plage requise.
Appuyez sur la touche ALERT pour désactiver l'alarme de température. Le symbole d'alerte de
température sera affiché.
Remarque: Pour régler l'alerte de température extérieure pour le canal 2 ou 3, appuyez sur la touche
CH pour choisir un canal avant de régler l'alerte de température pour le canal choisi. Mais si l'alarme
de température ne correspond pas au canal actuellement affiché, le symbole d'alerte clignote sur
l'écran LCD uniquement et la température correspondante ne clignote pas.
AFFICHAGE DE L'ÉTAT DES PILES
Dès que les piles sont faibles, l'indicateur piles faibles apparaît sur l'écran LCD de la station météo.
Veillez à remplacer les piles le plus tôt possible.
RÉTROÉCLAIRAGE
Appuyez sur la touche SNOOZE/LIGHT. Le rétroéclairage s'allume pendant 5 secondes lorsque
l'appareil n'est pas branché à l'alimentation CC.
Le rétroéclairage reste allumé lorsque l'appareil est branché à l'alimentation CC.
pour basculer entre l'unité de température Celsius et Fahrenheit.
pour fficher la température/humidité maximale/minimale.
pendant plus de 3 secondes pour réinitialiser l'historique de
ou pour fixer la valeur appropriée.
Page 19

SPÉCIFICATIONS
Plage de températures:
Intérieur: 0 °C à +50 °C (+32°F à +122°F)
(dans le cas contraire HH.H/LL.L sera affiché)
Extérieure: -20°C à +65°C (-4°F à +149°F)
(dans le cas contraire HH.H/LL.L sera affiché)
Résolution: 0,1°C
Plage d'humidité: 20 % - 95 %
(dans le cas contraire HH.H/LL.L sera affiché)
Précision: 1%
Pression atmosphérique: 850 hPa à 1050 hPa
25,1 inHg à 31,01 inHg
Calendrier: 2000-2099
Durée de l’alarme: 2 minutes
Durée de alarme repetif: 5 minutes
Fréquence de transmission: 433 MHz
Portée de transmission: 30m (zone dégagée)
PRÉCAUTIONS
• Installez l'appareil en intérieur.
• N'exposez pas l'appareil à des forces et des chocs excessifs.
• N'exposez pas l'appareil à des températures extrêmes, directs du soleil, à la poussière ou à
l'humidité.
• Ne plongez pas l'appareil dans l'eau.
• Évitez tout contact avec des matériaux corrosifs.
• Ne jetez pas l'appareil dans le feu, elle risque d'exploser.
• N'ouvrez pas le coffret de l'appareil et n'altérez aucun de ses composants.
Avertissements de sécurité concernant les piles
• Lisez attentivement toutes les instructions avant la première utilisation.
• Utilisez uniquement des piles alcalines, ne pas des piles rechargeables.
• Installez les piles en respectant le sens des polarités (+/-).
• Remplacez toujours toutes les piles en même temps.
• Ne combinez pas des piles usagées avec des piles neuves.
• Retirez immédiatement les piles déchargées de l'appareil.
• Retirez les piles lorsque vous n'envisagez pas d'utiliser votre appareil avant longtemps.
• N'essayez pas de recharger des piles qui ne sont pas rechargeables et ne jetez aucune pile dans
le feu (elle risque d'exploser).
•
Rangez vos piles de façon à ce qu'aucun objet métallique ne puisse mettre leurs bornes en court-circuit.
• Évitez d'exposer les piles à des températures extrêmes, à une humidité extrême et aux rayons
directs du soleil.
• Conservez vos piles hors de portée des enfants. Elles présentent un risque d'étouffement.
Noter l'obligation de la Loi sur la batterie
Noter l'obligation de la Loi sur les appareils électriques
Les piles ne doivent pas être déposées avec vos ordures ménagères. Dans le cas où vous le faites vous risquez de
provoquer des dommages importants à votre environnement ou à la santé d'autrui. Vous pouvez rendre les piles
usagées à votre commerçant qui vous les a vendues ou d'office à une collecte. Vous en tant qu'utilisateur ou
consommateur vous êtes obligés par la loi de retourner les piles usagées!
Ce symbole signifie que les appareils électriques ne doivent pas être jetés aux ordures ménagères à la fin de leur vie
utile. Ramenez votre chargeur à votre point local de collecte de déchets ou à un centre de recyclage. Ceci s'applique
à tous les pays de l'Union européenne et aux autres pays européens disposant d'un système de collecte des
déchets sélectif.
Page 20
WS 6870 – Estación meteorológica
Manual de instrucciones
ESTACION
METEOROLÓGICA
Presión atmosférica ● 2 12h historial del p resión atmosférica ● 3 Prévisions météorologiques
1
Tendances météorologiques ● 5 Indicador de baterías bajas (transmisor exterior) ● 6 pantalla
4
alternativa para los canales 1-3 ● 7 Alarma para temperatura ● 8 Canal del transmisor exterior
Señal del transmisor exterior ● 10 T emperatura exterior ● 11 Tendancia della temperatura exterior
9
T emperatura exterior MIN/MAX ● 13 Humedad exterior ● 14 Tendancia del humedad exterior
12
Indicador de baterías bajas (estacion meteorológica) ● 16 Temperatura interior ● 17 Tendancia
15
della temperatura interior ● 18 Temperatura interior MIN/MAX ● 19 Humedad interior ● 20 Tendancia
del humedad interior ● 21 Día de la semana ● 22 Semana calendario ● 23 Fecha ● 24 Señal horaria
DCF (con el símbolo DST) ● 25 Alarmas ● 26 AM/PM formato ● 27 Alarma retardo ● 28 Hora
Conexión de CC
29
● 30 Cubierta de la batería ● 31 Compartimiento de la batería
Teclas de función:
A SNOOZE/LIGHT ● B MODE ● C ALARM ● D (hasta)
(abajo/ señal RF) ●
E
CH (canal) ● G ALERT
F
TRANSMISOR EXTERIOR
Cubierta de la batería
1
TX ● 5 Selector de canales ● 6 Compartimiento de la batería
4
● 2 Soporte ● 3 Orificio para colgar
Page 21

EFECTOS AMBIENTALES EN LA RECEPCIÓN
La estacion obtiene la hora exacta con tecnología inalámbrica. Al igual que todos los dispositivos
inalámbricos, las recepción puede verse afectada por las siguientes circunstancias:
• largas distancias de transmisión
• proximidad de montañas y valles
• proximidad de autopistas, vías de tren, aeropuertos, cables de alta tensión, etc.
• proximidad de edificios en construcción
• entre edificios altos
• en el interior de edificios de hormigón
• proximidad de aparatos eléctricos (PCs, TVs, etc.) y de estructuras metálicas
• en el interior de vehículos en movimiento
Coloque la estación en una posición donde obtenga una señal óptima, p.ej. cerca de una ventana y
lejos de superficies metálicas o aparatos eléctricos.
AJUSTE RÁPIDO
Paso 1 Enchufe el adaptador eléctrico en cualquier toma de corriente de la red eléctrica de su hogar.
Luego conecte la clavija de alimentación en la parte trasera de la estación.
Paso 2 Deslice la tapa del compartimiento de las pilas en la parte trasera de la estación y coloque 3
pilas AAA (no incluidas) en el compartimiento observando la polaridad +/- correcta. Vuelva a colocar
la tapa de las pilas.
Paso 3 Coloque la estación y el transmisor exterior uno junto al otro. Deslice la tapa del
compartimiento de las pilas en la parte trasera de transmisor exterior. Compruebe que el selector del
canal en la parte trasera del transmisor exterior se encuentra en la posición 1 (posición
correcta) y coloque 2 pilas AAA (no incluidas) en el compartimiento observando la
polaridad +/- correcta. Vuelva a colocar la tapa de las pilas. La estación recibirá la señal
de datos procedente del transmisor exterior en unos segundos.
Tenga presente que el transmisor exterior tiene una distancia de transmisión máxima de
30 metros en áreas abiertas sin obstrucciones. La distancia de transmisión real
dependerá de la existencia de obstrucciones en el camino de la señal. Cada obstrucción
(tejado, paredes, suelos, techos, árboles grandes, etc.) reducirá el alcance de la señal a
la mitad.
Nota:
• Después de que la estación haya recibido la temperatura exterior procedente del transmisor,
empezará a buscar la señal horaria DCF. Esto puede durar toda la noche. En el caso de que la
estación no encuentre la señal horaria DCF, ajuste la hora del reloj manualmente.
• Durante la recepción de la señal horaria DCF, el termómetro no efectúa ninguna toma de
temperatura. Tras la primera instalación, las lecturas de temperatura serán estables y más
precisas transcurridos unos 30 minutos.
El uso de otros transmisores exteriores
Nota: Hasta 3 emisores puedan ser recibidos por la estación meteorológica.
Pulse el botón CHANNEL para seleccionar el canal del transmisor exterior, la secuencia es
CH1 - CH2 - CH3.
Pulse el botón CHANNEL durante más de 2 segundos para borrar el canal y buscar un transmisor
exterior.
Si utiliza más de un sensor (3 como máximo), puede recibir los datos de cada uno de los sensores
exteriores por separado. Tiene que cambiar cada sensor a un número de canal diferente:
Abra el compartimiento de las pilas y utilice el interruptor de selección de canal para elegir un canal.
Mantenga pulsado el botón TX para enviar una señal a la estación meteorológica.
Page 22

PILAS DE RESPALDO
Cuando haya un corte en la red eléctrica, la estación será alimentada por las pilas de respaldo. La
pantalla LED se apagará, pero las horas del reloj y de la alarma permanecerán en memoria (también
en el caso de un fallo de alimentación). La alarma también funciona como de costumbre.
RECEPCIÓN DE LA SEÑAL DEL TRANSMISOR EXTERIOR
El dispositivo de la estación meteorológica comienza a buscar el transmisor exterior automáticamente.
El símbolo de la señal del canal RF
buscando la señal del canal RF. Cuando se ha captado correctamente el transmisor exterior,
desaparecerá el símbolo de la señal del canal RF
Nota: Este proceso tarda unos 3 minutos.
PRESENTACIÓN DE LA SEÑAL HORARIA DCF Y DE FUERZA DE SEÑAL
Después de que la estación haya recibido la temperatura exterior procedente del transmisor,
empezará a buscar la señal horaria DCF. El icono de recepción
Cuando la estación detecta una señal horaria DCF con fuerza, aparece permanentemente el símbolo
de radio completa
Cuando la señal DCF es débil o no es detectada, aparecerá icono de recepción
de ubicación a una zona con mejor recepción o desenchufe la fuente de alimentación para reiniciar la
recepción de la señal horaria DCF.
Nota:
• Este proceso tarda unos 7 minutos, que se indica mediante el icono de radio que parpadea en la
pantalla LCD. Si el reloj no recibe la señal horaria DCF durante, dejará de buscar la señal horaria DCF.
• Durante la búsqueda de la señal DCF, puede pulsar el botón SNOOZE/LIGHT para que se
encienda solamente la luz de fondo, pero el resto de los botones de función de la estación
meteorológica permanecerán bloqueados.
• Mientras el dispositivo de la estación meteorológica capta la señal DST, aparecerá el símbolo DST
en la pantalla LCD. DST indica que el horario de verano está activo.
Mantenga pulsado el botón
intenta captar la señal de radio DCF. Mantenga pulsado
Recepción automática y manual
La estación inicia la recepción automática todos los días a la 1:00, 2:00, y 3:00 en punto. Si no
consigue recibir la señal horaria DCF hasta las 3:00 en punto, volverá a iniciar la recepción a las 4:00
en punto. Si vuelve a fallar, iniciará la recepción a las 5:00 en punto. Si vuelve a falla, iniciará la
recepción automática otra vez a la 1:00 en punto del día siguiente.
Para iniciar manualmente al recepción de la señal horaria DCF, pulse el botón
cualquier momento. La pantalla de la hora entrará en modo de recepción radio
AJUSTE MANUAL DE LA HORA
Mantenga pulsado el botón MODE durante 2 segundos aproximadamente. La pantalla de 12 horas
parpadea. Pulse el botón
pulsado el botón
opción de configuración rápida para ajustes posteriores.
Confirme la configuración al pulsar el botón MODE, la pantalla de zona horaria parpadea. Pulse el
botón
MODE, la pantalla de la hora parpadea. Pulse el botón
Repita los mismos pasos para establecer los siguientes valores.
La secuencia de configuración completa es 12/24 horas, zona horaria, hora, minuto, año, mes, fecha,
idioma de la pantalla de la fecha.
Después de la última configuración pulse el botón MODE para volver a mostrar la hora normal.
o para establecer la zona horaria deseada. Confirme la configuración al pulsar el botón
en la pantalla.
o para ajustar la pantalla a 12 o 24 horas. Consejo: Si mantiene
o , la configuración se efectúa más rápidamente. También puede utilizar esta
parpadea en la pantalla LCD e indica que el dispositivo está
de la pantalla.
parpadea.
. Cambie la estación
durante 3 segundos aproximadamente. El reloj controlado por radio
para volver al modo de recepción.
una vez, en
.
o para establecer la hora deseada.
Page 23

AJUSTAR LA ALARMA
Se pueden configurar 2 alarmas en este dispositivo.
Pulse el botón ALARM, entre en el modo de configuración del modo 1.
Mantenga pulsado el botón ALARM durante 3 segundos aproximadamente, se puede establecer la
alarma 1. Aparece la hora de la alarma programada en la pantalla LCD. La pantalla de las horas
parpadea. Pulse el botón
confirmar la configuración. La pantalla de los minutos parpadea. Pulse el botón
o para establecer la hora deseada. Pulse el botón MODE para
o para
establecer los minutos deseados. Pulse el botón MODE para confirmar la configuración.
Pulse el botón ALARM para confirmar y entrar en la configuración de la alarma 2, la pantalla de las
horas parpadea. Pulse el botón
confirmar la configuración. La pantalla de los minutos parpadea. Pulse el botón
o para establecer la hora deseada. Pulse el botón MODE para
o para
establecer los minutos deseados.
Después de la última configuración pulse el botón MODE para volver a mostrar la hora normal.
Nota: A1 es para la alarma de lunes a viernes, A2 es para la alarma de sábado a domingo.
Activar/desactivar la alarma 1 y/o la alarma 2
Pulse el botón ALARM, entre en la configuración de la alarma.
Pulse el botón
alarma 1. Pulse el botón
, aparece el icono de alarma 1 aparece en la pantalla LCD. Se ha activado la
de nuevo, y el icono de alarma desaparece de la pantalla LCD. Se ha
desactivado la alarma 1.
Pulse el botón ALARM para confirmar y entrar en la configuración de la alarma 2. Pulse el botón
aparece el icono de alarma 2 aparece en la pantalla LCD. Se ha activado la alarma 2. Pulse el botón
de nuevo, y el icono de alarma desaparece de la pantalla LCD. Se ha desactivado la alarma 2.
Después de la última configuración pulse el botón MODE para volver a mostrar la hora normal.
Nota: El sonido de la alarma dura 2 minutos.
Retardo de alarma
Cuando llega la hora establecida para que suenen la alarma 1 o la alarma 2, el reloj emitirá un sonido
‘bip-bip’ con los iconos A1 o A2 parpadeando. Pulse el botón SNOOZE una vez, y el sonido de la
alarma parará pero el iconos A1 o A2 correspondiente continuará parpadeando. La alarma volverá a
sonar 5 minutos más tarde.
Parar el sonido de la alarma
Cuando llega la hora establecida para que suenen la alarma 1 o la alarma 2, el reloj emitirá un sonido
‘bip-bip’ con los iconos A1 o A2 parpadeando. Pulse cualquier botón mientras suena la alarma para
que deje de sonar la alarma y el iconos A1 o A2 deja de parpadear. La alarma volverá a sonar otra
vez a la misma hora al día siguiente.
PRONÓSTICO DEL TIEMPO ATMOSFÉRICO Y BARÓMETRO
La estación tiene un barómetro incorporado que mide la presión barométrica. Después de encender la
estación, en la pantalla aparece el icono de Parcialmente nublado. La estación tarda unas 24 horas
en obtener los datos de la variación de la presión barométrica y hacer una predicción de las
condiciones meteorológicas para las próximas 12 – 24 horas.
Nota: Su estación meteorológica proporciona la previsión meteorológica para las próximas 12 – 24
horas. Puede no coincidir con las condiciones meteorológicas actuales del exterior.
Hay cinco tipos de iconos para las condiciones de la previsión meteorológica:
,
Soleado Medio nublado Nublado Lluvioso Nevando.
Page 24

Nota: Si mueve la estación por la casa o por el edificio afectará a su precisión ya que un repentino
cambio de temperatura o altura afectará a la presión del resultado. Tardará otras 24 horas en volver a
estabilizarse para hacer una predicción para las próximas 12 – 24 horas.
TEMPERATURA Y HUMEDAD
Visualización de temperaturas en °C/°F
Pulse el botón
Visualización de la tendencia de temperatura y humedad
Después de realizar la conexión correctamente, puede aparecer la tendencia de
temperatura/humedad en la pantalla de la estación meteorológica. Se pueden ver las siguientes
pantallas:
indica que la tendencia de la temperatura/humedad es creciente
indica que la tendencia de la temperatura/humedad es constante
indica que la tendencia de la temperatura/humedad es decreciente
Visualización de la humedad y la temperatura máxima y mínima
Pulse el botón
Con el fin de restablecer el historial de temperatura/humedad, pulse el botón
segundos, mientras aparece el valor MÍN o MÁX.
Nota: (si la estación está conectado con otros transmisores al aire libre)
Para comprobar la humedad y la temperatura máxima y mínima, pulse CH para comprobar el valor de
los diferentes canales.
Configuración de la alerta de temperatura
La temperatura MÁX por defecto es 60 °C, la temperatura MÍN es -40 °C.
Pulse el botón ALERT para activar la alarma de temperatura. Aparece el símbolo de alerta de
temperatura. Pulse el botón ALERT durante más de 3 segundos para establecer la alarma de
temperatura. Pulse el botón
confirmar la configuración.
La secuencia es máxima, mínima y después salir.
Una vez efectuada la configuración, la alerta comenzará automáticamente, cuando la temperatura
exterior actual se encuentre por debajo del MÍN establecido o por encima de la temperatura de alerta
MÁX establecida.
Por último, pulse el botón ALERT para confirmar el ajuste y volver a la pantalla la temperatura actual.
La alarma sonará 5 segundos cada minuto hasta que la temperatura alcance el rango requerido.
Pulse cualquier botón para detener la alarma, pero el símbolo parpadeará hasta que la temperatura
alcance el rango requerido.
Pulse el botón ALERT para desactivar la función de alerta de temperatura. El símbolo de alerta de
temperatura desaparecerá.
Nota: (si la estación está conectado con otros transmisores al aire libre)
En caso de que quiera establecer la alerta de temperatura del canal exterior 2 o 3, pulse el botón CH
para cambiar a un canal diferente antes de iniciar la configuración de la alerta de temperatura del
canal elegido. Sin embargo, si el aviso de temperatura no es para el canal que aparece actualmente,
sólo parpadea el símbolo de alerta en la pantalla LCD y la temperatura correspondiente no parpadea.
Pantalla de estado de las pilas
Si se están agotando las pilas, aparece el indicador de batería baja en la pantalla LCD de la estación
meteorológica. No olvide reemplazar las pilas lo antes posible.
Luz de fondo
Pulse el botón SNOOZE/LIGHT. La luz de fondo se enciende durante 5 segundos cuando no está
conectada a la alimentación de CC.
Si se conecta la alimentación de CC, la luz de fondo permanecerá siempre encendida.
para cambiar entre las escalas de temperatura Centígrados y Fahrenheit.
para que aparezca la humedad y la temperatura máxima y mínima.
durante más de 3
o para establecer el valor requerido. Pulse el botón ALERT para
Page 25

ESPECIFICACIONES
Margen de temperaturas:
Interiores: 0°C hasta +50°C (+32°F hasta +122°F)
(la pantalla mostrará HH.H/LL.L si está fuera del margen)
Exteriores: -20°C hasta +65°C (-4°F hasta +149°F)
(la pantalla mostrará HH.H/LL.L si está fuera del margen)
Resolución: 0,1°C
Margen de humedad: 20% - 95%
(la pantalla mostrará HH.H/LL.L si está fuera del margen)
Resolución: 1%
Rango de la presión atmosférica: 850 hPa hasta 1050 hPa
25,1 inHg hasta 31,01 inHg
Calendario: 2000-2099
Duración de la alarma: 2 minutos
Retardo de la alarma: 5 minutos
Frecuencia de transmisión: 433 MHz
Rango de transmisión: 30m (campo libre)
PRECAUCIONES
• Esta unidad está diseñada para usarla solamente en interiores.
• No someta unidad a fuerzas o golpes excesivos.
• No exponga la unidad a temperaturas extremas, directa a los rayos del sol, polvo o humedad.
• No la sumerja en el agua.
• Evite el contacto con cualquier material corrosivo.
• No se deshaga de esta unidad arrojándola al fuego ya que puede explotar.
• No abra la carcasa trasera interior ni manipule ninguno de los componentes de esta unidad.
Advertencias de seguridad sobre las baterías
• Por favor, lea detenidamente todas las instrucciones antes de usarla.
• Utilizar solamente baterías alcalinas. No utilizar recargables baterías.
• Coloque las baterías correctamente haciendo coincidir la polaridad (+/-).
• Reemplace siempre el juego completo de baterías.
• Nunca mezcle baterías usadas y nuevas.
• Quite las baterías gastadas inmediatamente.
• Saque las baterías cuando no use la unidad.
• No recargue las baterías ni las arroje al fuego ya que pueden reventar.
• Compruebe que guarda las baterías alejadas de objetos metálicos ya que un contacto con estos
puede causar un cortocircuito.
• Evite exponer las baterías a altas temperaturas, humedad o a los rayos directos del sol.
• Guarde las baterías lejos del alcance de los niños. Pueden atragantarse con ellas.
Obligación en virtud de la ley de baterías
Obligación en virtud de la ley de los dispositivos eléctricos
Las baterías usadas no deben ser eliminadas en la basura doméstica. Si las baterías llegan al medio ambiente,
éstas pueden ocasionar graves efectos para la salud o para el proprio medio ambiente. Puede devolver las baterías
usadas de forma gratuita a su distribuidor o suministrador. Según la ley, como consumidor uste destá obligado a
devolver las baterías usadas!
Este símbolo indica que no debe arrojar los dispositivos eléctricos a la basura doméstica general cuando alcancen
el final de su vida a útil. Lleve su cargador a un punto de recogida selectiva de basura o a un centro de reciclaje.
Esto es de aplicación en todos los países de la Unión Europea, y en otros países europeos con sistemas de
recogida selectiva de basuras.
Page 26

WS 6820 – Weerstation
Gebruiksaanwijzing
WEERSTATION
Luchtdruk ● 2 Luchtdruk tendentie ● 3 Weersvoorspelling ● 4 Weertendens ● 5 Batterij-indicator
1
(Buitenzender) ● 6 Wisselstroom display voor kanaal 1-3 ● 7 Temperatuuralarm ● 8 Buitenzenderkanaal 9 Buitenzendersignal ● 10 Buitentemperatuur ● 11 Buitentemperatuurtendens ● 12 Buitentemperatuur MIN/MAX ● 13 Buitenluchtvochtigheid ● 14 Buitenluchtvochtigheidtendens ● 15 Batterijindicator (Weerstation) ● 16 Binnentemperatuur ● 17 Binnentemperatuurtendens ● 18 Binnentemperatuur MIN/MAX 19 Binnenluchtvochtigheid ● 20 Binnenluchtvochtigheidtendens ● 21 Weekdag
Kalender week
22
Sluimerfunktie ● 28 Tijd
27
aansluiting
DC
29
Functietoetsen
23 Datum ● 24 DCF-tijdsignaal (met DST icoon) ● 25 Alarmen ● 26 AM/PM format
● 30 B
:
atterijdeksel
SNOOZE/LIGHT ● B MODE ● C ALARM ● D (hoog)
A
beneden
(
E
Batterijcompartiment
● 31
/ DCF-signaal) ● F CH (kanaal) ● G ALERT
BUITENZENDER
atterijdeksel
B
1
Kanaalschakelaar
5
● 2 Staan ● 3
Batterijcompartiment
● 6
Opknoping lus
● 4 TX
Page 27

MILIEUEFFECTEN OP RADIO-ONTVANGST
Het station behoudt de exacte tijd via draadloze technologie. Zoals met alle draadloze apparatuur kan
de ontvangstkwaliteit in de volgende omstandigheden worden aangetast:
• lange zendafstand
• in de buurt van bergen en valleien
• in de buurt van snelwegen, spoorwegen, vliegvelden, hoogspanningskabels, enz.
• in de buurt van bouwterreinen
• in de buurt van hoge gebouwen
• binnenin betonnen gebouwen
• in de buurt van elektrische apparatuur (computers, TV’s, enz.) en metalen structuren
• binnenin bewegende voertuigen
Plaats het station op een locatie met een optimaal signaal, bijv. dicht bij een raam en uit de buurt van
metalen oppervlaktes of elektrisache apparatuur.
SNEL VAN START
Stap 1 Steek de AC/DC-adapter in een willekeurig AC-stopcontact. Steek de stroomstekker
vervolgens in de achterzijde van het station.
Stap 2 Schuif het batterijklepje op de achterzijde van het station open en installeer 3 x AAA batterijen
(niet inbegrepen) in de batterijhouder, let hierbij a.u.b. op de juiste polariteit +/-. Plaats het
batterijklepje terug.
Stap 3 Houd het station en de buitenzender naast elkaar. Schuif het batterijklepje op de achterzijde
van de buitenzender open. Zorg ervoor dat de kanaalschakelaar op de achterzijde van de
buitenzender is ingesteld op positie 1 (rechts positie) en installeer 2 x AAA batterijen (niet
inbegrepen) in de batterijhouder, let hierbij a.u.b. op de juiste polariteit +/-. Plaats het
batterijklepje terug. Het station zal binnen enkele seconden een gegevenssignaal vanuit
de buitenzender ontvangen.
Vergeet niet dat de buitenzender een maximaal overdrachtbereik heeft van 30 meter in
een open gebied zonder obstructies. Het daadwerkelijke overdrachtbereik zal afhangen
van eventuele obstructies in het signaalpad. Elke obstructie (dak, muren, vloeren,
plafonds, dikke bomen, enz.) zal het effectieve signaalbereik halveren.
Opmerking:
• Nadat het station de buitentemperatuur vanuit de zender heeft ontvangen, zal het beginnen te
zoeken naar het DCF-tijdsignaal. Dit kan een nachtje duren. Indien het station het DCF-tijdsignaal
niet kan vinden, kunt u de klok handmatig instellen.
• De thermometer zal tijdens ontvangst van het DCF-tijdsignaal geen temperatuurmetingen
uitvoeren. De temperatuurlezingen zullen na de aanvankelijke installatie stabiliseren en na ca. 30
minuten nauwkeuriger worden.
Het gebruik van overige buitenzenders
Opmerking: Tot 3 outdoor zenders zijn te ontvangen door het weerstation.
Druk op de toets CHANNEL om het kanaal voor de buitensensor te selecteren, deze volgorde is
CH1 - CH2 - CH3. Druk langer dan 3 seconden op de toets CHANNEL om het kanaal te wissen en
naar een buitensensor te zoeken.
Als u meer dan één sensor (max. 3) gebruikt, kunt u de gegevens van elk van de buitensensoren
afzonderlijk ontvangen. U dient elke sensor op een verschillend kanaalnummer te schakelen:
Open de batterijhouder en gebruik de kanaalselectieschakelaar om een kanaal te kiezen. Houd de TXtoets ingedrukt om een signaal naar het weerstation te zenden.
BACK-UPBATTERIJEN
Page 28

Wanneer de voeding niet in gebruik is of wordt onderbroken, zal het station van stroom worden
voorzien door de back-upbatterijen. De LED-display wordt uitgeschakeld, maar de tijd en alarmtijd
blijven behouden (ook in het geval van stroomuitval). Ook de alarmfuncties blijven normaal werken.
SIGNAALONTVANGST VAN HET BUITENZENDERS
Het weerstation begint automatisch te zoeken naar de buitensensor. Het signaalsymbooltje van het
RF-kanaal
knippert op de LCD om aan te geven dat het apparaat naar het signaal zoekt van het
RF-kanaal. Wanneer de buitensensor succesvol is gevonden, zal het signaalsymbooltje van het RFkanaal
uit de display verdwijnen.
Opmerking: Dit proces kan ca. 3 minuten duren.
WEERGAVE VAN DCF-TIJDSIGNAAL EN SIGNAALSTERKTE
Nadat het station de buitentemperatuur vanuit de zender heeft ontvangen, zal het beginnen te zoeken
naar het DCF-tijdsignaal.
Wanneer een krachtig DCF-tijdsignaal wordt ontvangen, blijft het radiosymbooltje
icoontje knippert.
permanent op de
display branden.
Wanneer zwakke of geen DCF-tijd-signaal wordt gedetecteerd, verdwijnt het pictogram van LCD
Vervang het weerstation naar een ander gebied voor een betere ontvangst of trek de stekker om de
ontvangst van de DCF-tijd-signaal opnieuw te beginnen.
Opmerking:
• Dit proces duurt ca. 7 minuten, wat zal worden aangegeven door het knipperende radio-icoontje
op de LCD.
• U kunt tijdens het zoeken naar het DCF-signaal alleen het achtergrondlicht inschakelen via de
toets SNOOZE/LIGHT, terwijl alle andere functietoetsen van het weerstation zijn geblokkeerd.
• Het DST-symbooltje zal op de LCD worden weergegeven terwijl het weerstation het DST-signaal
ontvangt. DST betekent dat de zomertijd actief is.
Houd tijdens ontvangst de toets
ingedrukt om de ontvangst van het DCF-tijdsignaal te stoppen.
Houd nog een keer ingedrukt om terug te keren naar de ontvangstmodus en weergave van
de signaalsterkte.
Automatische en handmatige ontvangst
Het station start de automatische ontvangst elke dag om 1:00u, 2:00u en 3:00u. Als het station het
DCF-tijdsignaal niet kan ontvangen tot 3:00u, zal het de ontvangst weer starten om 4:00u. Als het
opnieuw mislukt, zal het de ontvangst weer starten om 5:00u. Als het nogmaals mislukt, zal het de
automatische ontvangst de volgende dag om 1:00u starten.
Houd de toets
voor ca. 2 seconden ingedrukt. De radiogestuurde klok probeert het DCF-
radiosignaal op te pikken.
HANDMATIGE TIJDINSTELLING
Houd de toets MODE voor ca. 2 seconden ingedrukt. De 12-uur display knippert. Druk op de toets
of
om de display op 12 of 24 uur in te stellen.
.
Bevestig uw instellingen door op de toets MODE te drukken, de tijdzone zal nu op de display
knipperen. Druk op de toets
of om de gewenste tijdzone in te stellen.
Bevestig uw instellingen door op de toets MODE te drukken, de uren zullen nu op de display
knipperen. Druk op de toets
of om de gewenste uren in te stellen.
Herhaal dezelfde stappen om de volgende waarden in te stellen.
De complete instelvolgorde is 12/24 uur, tijdzone, uur, minuut, jaar, maand, datum, taal van datumweergave.
Na de laatste instelling druk op MODE knop om terug te keren naar de normale tijdweergave.
Page 29
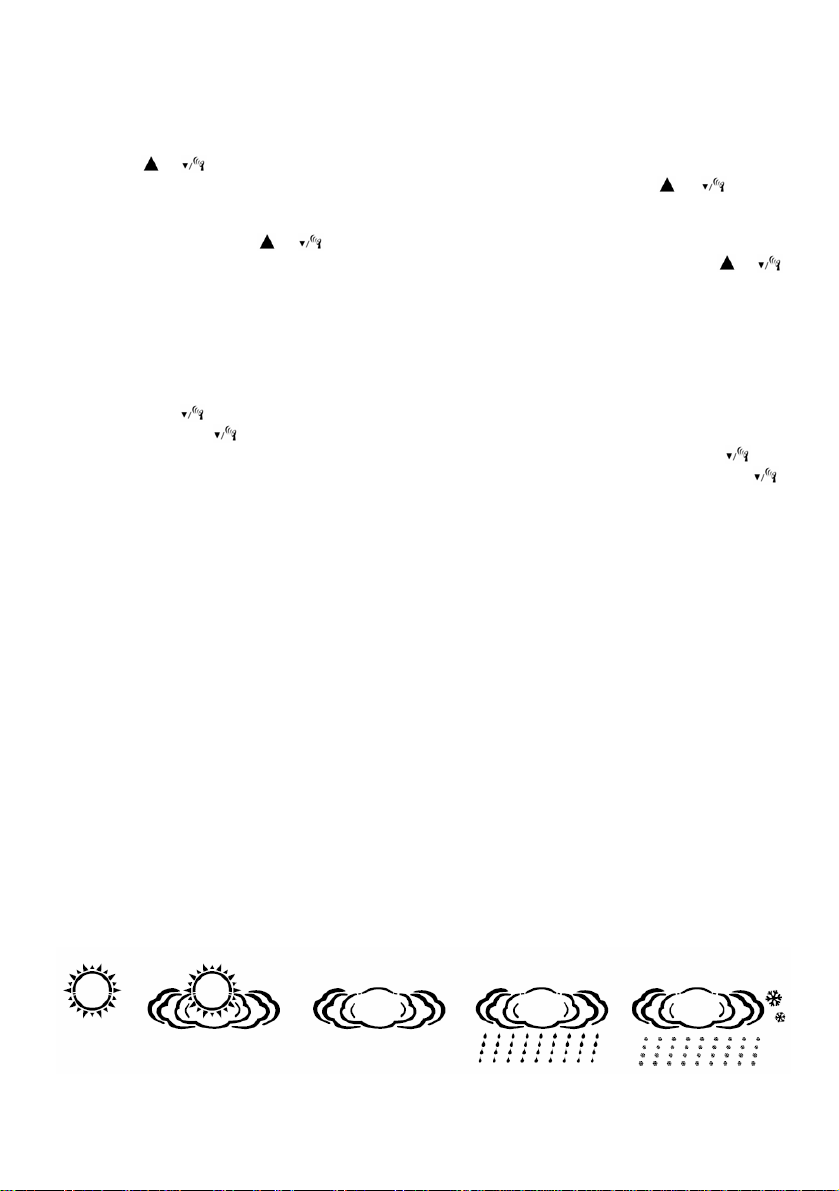
ALARMINSTELLING
U kunt 2 alarmen instellen in dit apparaat:
Druk op de toets ALARM om de instellingsmodus voor alarm te openen.
Houd de toets ALARM voor ca. 2 seconden ingedrukt, om alarm 1 in te stellen. De ingestelde
alarmtijd zal op de LCD-display worden aangegeven. De uren zullen nu op de display knipperen. Druk
op de toets
bevestigen. De minuten zullen nu op de display knipperen. Druk op de toets
of om de gewenste uren in te stellen. Druk op de toets ALARM om uw instelling te
of om de
gewenste minuten in te stellen. Druk op de toets ALARM om uw instelling te bevestigen.
Druk op de toets ALARM om te bevestigen en alarminstelling 2 te openen, de uren zullen vervolgens
knipperen. Druk op de toets
uw instelling te bevestigen. De minuten zullen nu op de display knipperen. Druk op de toets
of om de gewenste uren in te stellen. Druk op de toets ALARM om
of
om de gewenste minuten in te stellen. Druk op de toets ALARM om uw instelling te bevestigen.
Na de laatste instelling druk op MODE knop om terug te keren naar de normale tijdweergave.
Opmerking: A1 staat voor het alarm van maandag tot vrijdag en A2 voor het alarm van zaterdag tot zondag.
Alarm 1 en/of alarm 2 in/uitschakelen
Druk op de toets ALARM om alarminstelling te openen.
Druk op de toets
nogmaals op de toets
Druk op de toets ALARM om te bevestigen en alarminstelling 2 te openen. Druk op de toets
, het icoontje voor alarm 1 verschijnt op de LCD. Alarm 1 is nu geactiveerd. Druk
, het alarmicoontje verdwijnt uit de LCD. Alarm 1 is nu gedeactiveerd.
, het
icoontje voor alarm 2 verschijnt op de LCD. Alarm 2 is nu geactiveerd. Druk nogmaals op de toets
het alarmicoontje verdwijnt uit de LCD. Alarm 2 is nu gedeactiveerd.
Druk op de toets MODE om te bevestigen en de alarminstelling te verlaten.
Opmerking: Het alarm klinkt voor 2 minuten.
Sluimerfunctie
Wanneer de tijd de ingestelde alarmtijd 1 of 2 bereikt, zal de klok een pieptoon laten horen terwijl het
symbool A1 of A2 knippert. Druk eenmaal op de toets SNOOZE, het alarmgeluid zal stoppen en
symbool A1 of A2 knippert. Na 5 minuten gaat het alarm opnieuw af.
Het alarm stoppen
Wanneer de tijd de ingestelde alarmtijd 1 of 2 bereikt, zal de klok een pieptoon laten horen terwijl het
symbool A1 of A2 knippert. Druk op een willekeurige toets, het alarmgeluid zal stoppen en symbool A1
of A2 stopt met knipperen. Het alarm zal de volgende dag op dezelfde tijd weer klinken.
WEERSVOORSPELLING EN BAROMETER
Het station is voorzien van een ingebouwde barometer om de barometrische druk te meten. Na het
station in te schakelen, zal de display het icoontje Zonnig & Bewolkt weergeven. Het duurt ongeveer
14 uur totdat het station voldoende gegevens van de barometrische drukschommelingen heeft
waargenomen en de weersverwachting voor de volgende 12 – 24 uur kan weergeven.
Opmerking: Uw weerstation voorspelt de weerscondities voor de volgende 12 – 24 uur. Het komt
mogelijk niet overeen met de huidige weersomstandigheden buiten.
Er zijn vijf soorten weericoontjes voor de weersvoorspelling:
,
Zonnig Halfzonnig Bewolkt Regenachtig Sneeuwachtig.
Page 30
Opmerking: Het station in uw huis of gebouw verplaatsen, zal de nauwkeurigheid van het station
aantasten, wegens een plotselinge verandering in temperatuur of hoogte/attitude. Het zal 24 uur duren
totdat het station weer stabiel is en de volgende 12 – 24 uur kan voorspellen.
TEMPERATUUR- EN VOCHTIGHEID
Temperatuurwaarden weergeven in °C/°F
Druk op de toets
De temperatuur- en vochtigheidtrend weergeven
Na een geslaagde verbinding, kan het weerstation de temperatuur/vochtigheidtrend weergeven. Het
volgende kan worden weergegeven:
geeft een oplopende trend in temperatuur/vochtigheid aan.
geeft een constante trend in temperatuur/vochtigheid aan.
geeft een aflopende trend in temperatuur/vochtigheid aan.
De Maximum/Minimum Temperatuur/Vochtigheid weergeven
Druk op de toets
U kunt de temperatuur/vochtigheidgeschiedenis terugstellen door langer dan 2 seconden op de toets
te drukken terwijl de MIN of MAX waarde wordt weergegeven.
Opmerking: (als de zender is verbonden met verdere outdoor zenders)
U kunt de minimum/maximum temperatuur/vochtigheid controleren door op de toets CH te drukken en
de waarde van de verschillende kanalen te controleren.
Temperatuuralarm instellen
De standaard MAX temperatuur is 60°C, MIN temperatuur is -40°C
Druk op de toets ALERT om het temperatuuralarm te activeren. Het symbooltje van het
temperatuuralarm wordt weergegeven. Druk langer dan 3 seconden op ALERT om het
temperatuuralarm in te stellen. Druk op de toets
op de toets ALERT om de instelling te bevestigen.
De volgorde is maximum, minimum, en vervolgens verlaten.
Het alarm zal na de instelling automatisch klinken wanneer de huidige buitentemperatuur lager is dan
de ingestelde MIN of hoger is dan de ingestelde MAX alarmtemperatuur. Het alarm zal elke minuut 5
seconden klinken totdat de temperatuur weer binnen het ingestelde bereik valt. Druk op een
willekeurige toets om het alarm te stoppen, het symbooltje zal echter blijven knipperen totdat de
temperatuur weer binnen het ingestelde bereik valt.
Druk op de toets ALERT om de temperatuuralarmfunctie te deactiveren. Het symbooltje voor het
temperatuuralarm zal verdwijnen.
Opmerking: (als de zender is verbonden met verdere outdoor zenders)
Als u het temperatuuralarm wilt instellen voor buitenkanaal 2 of 3, kunt u op de toets CH drukken om een
ander kanaal te selecteren voordat u begint met de instelling van het temperatuuralarm voor het gekozen
kanaal. Als de temperatuurwaarschuwing echter niet voor het huidig weergegeven kanaal geldt, zal alleen
het alarmsymbooltje op de LCD-display knipperen terwijl de relevante temperatuur niet knippert.
BATTERIJSTATUS
De lage batterij indicator verschijnt op de LCD-display van het weerstation zodra de batterijen uitgeput
raken. Zorg er a.u.b. voor de batterijen zo snel mogelijk te vervangen.
ACHTERGRONDLICHT
Raak de toets SNOOZE/LIGHT aan. Het achtergrondlicht schakelt voor 5 minuten in wanneer niet
aangesloten op DC-voeding. Als de DC-voeding is aangesloten, blijft het achtergrondlicht continu branden.
om de temperatuurschaal te wisselen tussen Celsius en Fahrenheit.
om de Maximum/Minimum Temperatuur/Vochtigheid weer te geven.
of om de gewenste waarde in te stellen. Druk
Page 31

SPECIFICATIES
Temperatuurbereik:
Binnen: 0°C tot +50°C (+32°F tot +122°F)
(display toont HH.H/LL.L indien buiten dit bereik)
Buiten: -20°C tot +65°C (-4°F tot +149°F)
(display toont HH.H/LL.L indien buiten dit bereik)
Resolutie: 0,1°C
Vochtigheidbereik: 20% - 95%
(display toont HH.H/LL.L indien buiten dit bereik)
RH% Resolutie: 1%
Luchtdrukbereik: 850 hPa tot 1050 hPa
25,1 inHg tot 31,01 inHg
Kalender: 2000-2099
Alarmduur: 2 minuten
Sluimerduur: 5 minuten
Zendfrequentie: 433 MHz
Zendbereik: 30m (vrij veld)
VORRZORGSMAATREGELEN
• Dit hoofdapparaat is uitsluitend bestemd voor binnenshuis gebruik.
• Stel het apparaat niet bloot aan overmatige krachten of schokken.
• Stel het apparaat niet bloot aan hoge temperaturen, direct zonlicht, stof en vocht.
• Niet onderdompelen het apparaat in water
• Vermijd contact met bijtende stoffen.
• Gebruik het apparaat niet in een vuur. Deze kan ontploffen.
• Niet open de behuizing en niet manipuleren structurele componenten van het apparaat.
Batterijvoorschriften
• Lees vóór gebruik alle instructies.
• Gebruik uitsluitend alkaline batterijen, geen oplaadbare batterijen.
• Installeer batterijen correct volgens de polariteitmarkeringen (+/-).
• Vervang altijd een volledige set batterijen.
• Combineer nooit gebruikte en nieuwe batterijen.
• Verwijder onmiddellijk uitgeputte batterijen.
• Verwijder batterijen wanneer niet in gebruik.
• Batterijen nooit opladen of in vuur werpen om ontploffing te voorkomen.
• Houd de batterijen niet in de nabijheid van metalen voorwerpen. Een contact kan een kortsluiting
veroorzaken.
• Houd alle batterijen buiten bereik van kinderen omdat ze een verstikkingsgevaar vormen.
• Bewaar de verpakking voor eventueel toekomstig gebruik.
Verordening verwijdering batterijen
Verordening verwijdering elektrische apparaten
Oude batterijen horen niet in het huisvuil. Als batterijen in het milieu terechtkomen kunnen deze milieu en
gezondheidsproblemen tot gevolg hebben. U kunt gebruikte batterijen kosteloos bij uw handelaar of
inzamelplaatsen teruggeven. U bent als verbruiker wettelijk verplicht oude batterijen, als omschreven, in te leveren.
Dit symbool betekent dat elektrische apparatuur, wanneer hij het eind van zijn levensduur bereikt, niet mag worden
afgevoerd met het gewone huishoudelijk afval. Breng de lader naar het plaatselijke inzamelpunt voor afval of
recyclingcentrum. Dit is van toepassing voor alle landen van de Europese Unie en op de overige Europese landen
met een systeem voor gescheiden afvalinzameling.
Page 32

WS 6870 - Stazione meteorologica
Manuale di istruzioni
STAZIONE
METEOROLOGICA
Pressione dell'aria ● 2 12h storia de pressione dell'aria ● 3 Previsioni del tempo ● 4 Indicatore delle
1
tendenze del tempo ● 5 Indicatore batterie scariche (sensore externo) ● 6 Display cambiare di canali
1-3 ● 7 Allarme per la temperatura ● 8 Canale del sensore externo ● 9 Signal del sensore externo
Temperatura esterna ● 11 Tendenza della temperatura esterna ● 12 Temperatura esterna
10
MIN/MAX ● 13 Umidità esterna ● 14 Tendenza della umidità esterna ● 15 Indicatore batterie scariche
(stazione meteorologica) ● 16 Temperatura interna ● 17 Tendenza della temperatura interna
Temperatura interna MIN/MAX ● 19 Umidità interna ● 20 Tendenza della umidità interna
18
Giorno della settimana ● 22 Calendario settimana
21
Allarmi 26 AM/PM formato ● 27 Ritardo allarme ● 28 Ora del giorno
25
● 23 Data ● 24 Segnale DCF (con icona DST)
DC input ● 30 Coperchio batteria
29
Tasti funzione:
SNOOZE/LIGHT ● B MODE ● C ALARM ● D
A
(giù/ segnale RF) ● F CH canale ● G ALERT
E
● 31 Vano batteria
(su)
SENSORE EXTERNO
Coperchio batteria
1
● 2 Stare ● 3 Occhiello per appendere
4 TX ● 5 Selettore di canale ● 6 Vano batteria
Page 33

EFFETTI RICEZIONE AMBIENTALE
La stazione ottiene l'orario preciso con tecnologia wireless. Come per tutti i dispositivo wireless, la
ricezione può essere influenzata dalle seguenti circostanze:
• lunga distanza di trasmissione
• prossimità di montagne e valli
• in prossimità di autostrada, stazione, aeroporti, cavi di alta tensione ecc.
• in prossimità di cantieri
• tra edifici alti
• all'interno di edifici in cemento
• in prossimità di apparecchiature elettriche (computer, TV, ecc.) e di strutture metalliche
• all'interno di veicoli in movimento
Porre la stazione in una posizione con segnale ottimale, ad es. vicino a una finestra e lontano da
superfici in metallo o apparecchiature elettriche.
INSTALLAZIONE RAPIDA
Passo 1 Collegare l'alimentatore AC/DC a una comune presa domestica AC. Poi, collegare la spina di
alimentazione sul retro della stazione.
Passo 2 Fare scorrere il coperchio delle batterie sul retro della stazione per aprirlo e inserire 3 batterie
di tipo AAA (non incluse) nel vano batteria, prestando attenzione alla corretta polarità +/-.
Riposizionare il coperchio delle batterie.
Passo 3 Tenere la stazione vicino al trasmettitore per esterni. Aprire il coperchio del vano batteria sul
retro del trasmettitore per esterni. Accertarsi che il selettore di canale sul retro del trasmettitore per
esterni sia sulla posizione 1 (giusta posizione) e inserire 2 batterie di tipo AAA (non
incluse) nel vano batteria, prestando attenzione alla corretta polarità +/-. Riposizionare
il coperchio delle batterie. La stazione riceverà il segnale dati dal trasmettitore esterno
entro pochi secondi.
Tenere presente che il trasmettitore esterno ha una portata in campo libero di 30 metri.
La portata effettiva della trasmissione dipenderà dalla presenza di eventuali ostacoli
sul percorso del segnale. Ogni ostruzione (tetto, pareti, pavimenti, soffitti, alberi grandi
ecc.) ridurrà il raggio di trasmissione della metà.
Nota:
• Dopo che la stazione ha ricevuto la temperatura esterna dal trasmettitore,
comincerà a cercare il segnale orario DCF. Questa operazione potrebbe richiedere
una notte. Se la stazione non riceve il segnale orario DCF, impostare l'orologio
manualmente.
• Durante la ricezione del segnale orario DCF, il termometro non misurerà la temperatura. Se l'unità
è installata per la prima volta, impiegherà circa 30 minuti per ricevere misurazioni stabili e
accurate.
Utilizzo di ulteriori sensori esterni
N
ota: Fino a 3 sensori esterni sono ricevibile dalla stazione meteorologica.
Premere il pulsante
Premere i
sterno.
e
Se si utilizza più di un sensore (max. 3), è possibile ricevere i dati da ogni sen
separatamente. È necessario commutare ogni sensore a un numero di canale
Aprire il vano batteria e usare il selettore del canale per scegliere u
T
enere il pulsante TX per inviare un segnale alla stazione meteo.
l pulsante CHANNEL per più di 2 secondi per cancellare il canale e la ricerca del sensore
CHANNEL
per scegliere il canale del sensore esterno, la sequenza è CH1 - CH2 - CH3.
sore esterno
diverso:
n canale.
Page 34

Batterie tampone
Se l'alimentazione non è in uso o viene interrotta, la stazione sarà alimentata dalle batterie tampone. Il
display LED si spegnerà, ma l'ora e la sveglia resteranno memorizzate (anche in caso di
un'interruzione di corrente). Anche la sveglia funzionerà regolarmente.
SEGNALE DEL TRASMETTITORE ESTERNO
La stazione meteo inizia automaticamente a cercare il sensore esterno. Il simbolo del segnale del
canale RF
Quando il sensore esterno è rilevato con successo, il simbolo del segnale del canale RF
al display.
d
ota: Questo processo richiede circa 3 minuti.
N
S
EGNALE ORARIO DCF E VISUALIZZAZIONE DELL'INTENSITÀ DEL SEGNALE
Dopo che la stazione ha ricevuto la temperatura es
segnale orario DCF. L'icona di ricezione lampeggia.
Quando viene rilevato un segnale DCF forte, il simbolo della radio completa
permanente sul display.
In caso di segnale DCF debole o di nessun segnale, l'icona di ricezione
posizione della stazione per avere una ricezione migliore oppure scollegare la spina di alimentazione
er ripetere la procedura di ricerca del segnale orario DCF.
p
Nota:
• Questo processo dura circa 7 minuti, che sarà indicato dall'icona della radio lampe
sull'LCD Se l'orologio non riceve il segnale orario DCF entro ora, la ricerca sarà interrotta.
• Durante la ricerca del segnale DCF, è possibile toccare il pulsante SNOOZE/LIGHT per
solo la retroilluminazione, ma tutte gli altri pulsanti della stazione meteo sono bloccati.
• Mentre la stazione meteo inizia a ricevere
sull'LCD. DST indica che l'ora legale è attiva.
Durante la ricezione, premere e tenere premuto il tasto
orario DCF. Premere e tenere premuto di
vi
sualizzazione dell'intensità del segnale.
Ricezione automatica e manuale
La stazione comincia la ricezione automatica ogni giorno alle ore 1:00, 2:00 e 3:00. Se non riesce a
ricevere il segnale fino alle 3:00, ripeterà la ricerca alle 4:00. Se ancora una volta la ricerca non va a
buon fine, sarà ripetuta alle 5:00. Se anche in questo caso l'
automatica ricomincerà alle ore 1:00 del giorno successivo.
Per avviare la ricezione manuale del segnale
ell'ora entrerà in modalità di ricezione radio
IMPOSTAZIONE MANUALE DELL’ORA
Tenere premu il pulsante MODE per circa 2 secondi. Il display 12 ore lampeggia. Premere il
pulsante
il pulsante MODE, il display del fuso orario lampeggia. Premere il pulsante
fuso orario necessario.Confermare la propria impostazione premendo il pulsante MODE, il display
dell'ora lampeggia. Premere il pulsante
passaggi per impostare i valori seguenti. La sequenza di impostazione completa è 12/24 ore, fuso
orario, ora, minuti, anno, mese, data, lingua della data.
fine, premere il tasto MODE per tornare alla visualizzazione normale.
In
lampeggia sull'LCD e indica che il dispositivo sta cercando il segnale del canale RF.
scompare
terna dal trasmettitore, comincerà a cercare il
è mostrato in modo
svanisce. Cambiare la
ggiante
attivare
il segnale DST, il simbolo DST sarà visualizzato
p
er interrompere la ricezione del segnale
nuovo il tasto
orario DCF, premere una volta il tasto
. d
to
o per impostare il display 12 o 24 ore. Confermare la propria impostazione premendo
o per impostare l'ora necessaria. Ripetere gli stessi
per tornare alla modalità di ricezione e
operazione non va a buon fine, la ricerca
. Il display
o per impostare il
Page 35

IMPOSTAZIONE DELLA SVEGLIA
È possibile impostare 2 sveglie in questo dispositivo:
Premere il pulsante ALARM, accedere alla modalità di impostazione Sveglia 1. Tenere premuto il
pulsante ALARM per circa 3 secondi, è possibile impostare Sveglia 1. L'orario impost o per la sveglia
è indicato sul display LCD. Il display delle ore lampeggia. Premere il pulsan
te
at
o per impostare
re l'impol'ora necessaria. Premere il pulsante MODE per conferma stazione.
Il display dei minuti lampeggia. Premere il pulsante
o per impostare i minuti necessari.
Premere il pulsante MODE per confermare l'impostazione.
Premere il pulsante ALARM per confermare e ccedere all'impostazione della Sveglia 2, il display
delle ore lampeggia. Premere il pulsante
MODE per confermare l'impostazione. Il display dei minuti lampeggia. Premere il pulsante
a
o per impostare l'ora necessaria. Premere il pulsante
o
per impostare i minuti necessari. Premere il pulsante MODE per confermare l'impostazione.
fine, premere il tasto MODE per tornare alla visualizzazione normale.
In
Not : A1 è per la sveglia da Lunedì a Venerdì, A2 è per la sveglia da Sabato a Domenica.
a
Attivazione/Disattivazione della sveglia 1 e/o sveglia 2
Premere il pulsante ALARM, accedere all'impostazione Sveglia 1. Premere il pulsante
della Sveglia 1 appare sull'LCD. La Sveglia 1 è stata attivata. Premere nuovamente il pulsante
, l'icona
e
l'icona della sveglia scompare dall'LCD. La Sveglia 1 è stata disattivata.
Premere il pulsante ALARM per confermare e accedere all'impostazione della Sv
eglia 2. Premere il
pulsante , l'icona della Sveglia 2 ppare sull'LCD. La Sveglia 2 è stata attivata.
Premere nu aovamente il pulsante
e l'icona della sveglia scompare dall'LCD. La Sveglia 2 è stata
disattivata.
fine, premere il tasto per tornare alla visualizzazione normale.
MODEIn
N
ota: La sveglia dura 2 minuti.
Intervallo ripetizione sveglia
Al sopraggiungere dell'ora impostata per la sveglia 1 o sveglia 2, l'unità emetterà un segnale acustico
e l'icona A1 o A2 lampeggerà. Premendo il tasto SNOOZE una volta, il suono della sv
in
terromperà e A1 o A2 continuerà a lampeggiare. La sveglia suonerà di nuovo dopo 5 minuti.
eglia si
Interruzione della sveglia
Al sopraggiungere dell'ora impostata per la sveglia 1 o sveglia 2, l'unità emetterà un segnale acustico
e l'icona A1 o A2 lampeggerà. Premere qualsiasi pulsante mentre la sveglia suona per interrompere il
segnale della sveglia e l'ic
s
uccessivo alla stessa ora.
ona A1 o A2 diventerà statica. La sveglia suonerà di nuovo il giorno
P
REVISIONI DEL TEMPO E BAROMETRO
La stazione è dotata di barometro integrato che misura la pressione barometrica. Dopo avere acceso
l'unità, sul display appariranno le icone Sereno e Nuvoloso. La stazione impiega circa 24 ore per
raccogliere i dati delle
variazioni della pressione barometrica e prevede le condizioni meteo per le
prossime 12 – 24 ore.
Nota: La stazione meteo prevede le condizioni me
c
orrispondere alle condizioni meteo esterne attuali.
teo per le prossime 12 – 24 ore. Ciò può non
Cinque icone indicano le condizioni meteo previste.
Soleggiato Parzialmente
soleggiato
Nuvoloso Piovoso Nevoso
Page 36

Nota: Spostando la stazione meteo in casa o nell'edificio possono verificarsi cambiamenti improvvisi
della temperatura o dell'altezza/altitudine che ne influenzano l'accuratezza. L'unità impiega 24 ore per
stabilizzarsi nuovamente e prevedere la situazione meteorologica delle prossime 12 – 24 ore.
TEMPERATURA E UMIDITÀ
Visualizzazione temperature in °C/°F
Premere il pulsante
Visualizzazione della tendenza di temperatura e umidità
Dopo una connessione con successo, la stazione meteo più visualizzare la tendenza di
temperatura/umidità. È possibile vedere i seguenti display:
indica che la temperatura/umidità è in una tendenza crescente
indica che la temperatura/umidità è in una tendenza costante
indica che la temperatura/umidità è in una tendenza decrescente
Impostazione avviso temperatura
La temperatura MAX predefinita è 60°C, la temperatura MIN è -40°C.
Premere il pulsante ALERT per attivare l'avviso della temperatura. Il simbolo di avviso della
temperatura è visualizzato. Premere il pulsante ALERT per più di 2 secondi per impostare l'avviso
della temperatura. Premere il pulsante
Premere il pulsante ALERT per confermare l'impostazione. La sequenza è massima, minima e quindi
uscire. Dopo l'impostazione, l'avviso inizierà automaticamente, quando la temperatura esterna attuale
è impostata al di sotto dell'impostazione MIN o oltre l'impostazione MAX.
Infine, premere il tasto ALERT per confermare l'impostazione e tornare alla visualizzazione della
temperatura corrente.
.
La sveglia suona per 5 secondi ogni minuti fino a quando la temperatura è nell'intervallo richiesto.
Premere qualsiasi pulsante per interrompere la sveglia, ma il simbolo lampeggerà fino a quando la
temperatura è nell'intervallo richiesto.
Premere il pulsante ALERT per disattivare la funzione d’avviso della temperatura. Il simbolo d’avviso
della temperatura scomparirà.
Nota: (se la stazione è collegata con ulteriori sensori esterni)
Nel caso in cui si desideri impostare l'avviso della temperatura per il canale esterno 2 o 3, premere il
pulsante CH per passare a un canale diverso prima di iniziare l'impostazione dell'avviso della
temperatura per il canale scelto. Tuttavia, se l'avviso della temperatura non per il canale visualizzato al
momento, il simbolo dell'avviso lampeggia sul display LCD solo e la temperatura non lampeggia.
DISPLAY STATO BATTERIA
L'indicatore di batteria scarica appare sul display LCD della stazione meteo se le batterie sono
scariche. Assicurarsi di sostituire le batterie alla prima opportunità.
RETROILLUMINAZIONE
Toccare il pulsante
all'alimentazione CC. Se l'alimentazione CC è collegata, la retroilluminazione è sempre accesa.
CARATTERISTICHE TECNICHE
Intervallo di temperatura:
Interno: da 0 °C a +50 °C (da +32 °F a +122 °F)
Esterno: da -20 °C a +65 °C (da -4 °F a +149 °F)
Risoluzione temperatura: 0,1 °C
per commutare tra le scale di temperatura Celsius e Fahrenheit.
o per impostare il valore necessario.
SNOOZE/LIGHT
. La retroilluminazione illumina per 5 secondi quando non collegato
(il display mostra HH.H/LL.L se al di fuori di questo intervallo)
(il display mostra HH.H/LL.L se al di fuori di questo intervallo)
Page 37

Intervallo di umidità: 20% - 95%
(il display mostra HH/LL se fuori dall'intervallo)
Risoluzione RH%: 1%
Calendario: 2000-2099
Durata sveglia: 2 minuti
Durata funzione snooze: 5 minuti
Frequenza di trasmissione: 433 MHz
Intervallo di trasmissione: 30m (campo libero)
PRECAUZIONI
• Il dispositivo principale è progettata solo per l'utilizzo in ambienti interni.
• Non sottoporre il dispositivo a forza eccessiva e urti.
• Non esporre il dispositivo a temperature estreme, luce solare diretta, polvere o umidità.
• Non immergere il dispositivo in acqua.
• Evitare il contatto con materiali corrosivi.
• Non gettare il dispositivo nel fuoco perché potrebbe esplodere.
• Non aprire la cassa interna o manomettere i componenti di questa dispositivo.
Avvertenze per l'uso sicuro delle batterie
• Si prega di leggere attentamente tutte le istruzioni prima dell'uso.
• Uilizzare solo batterie alcaline. Non utilizzare batterie ricaricabili.
• Installare le batterie correttamente rispettando le polarità (+/-).
• Sostituire sempre il set completo di batterie.
• Non mescolare mai batterie usate e nuove.
• Rimuovere immediatamente le batterie scariche.
• Rimuovere le batterie quando non sono utilizzate.
• Non conservare le batterie in prossimità di oggetti metallici. Un contatto potrebbe causare un corto
circuito.
• Non ricaricare le batterie e non gettarle nel fuoco perché potrebbero esplodere.
• Non esporre le batterie a temperature elevate, all'umidità o alla luce solare diretta.
• Tenere tutte le batterie lontano dalla portata dei bambini per evitare rischi di soffocamento.
Obbligo di avviso secondo la legge sulle batterie
Le batterie esaurite non devono essere considerate rifiuti domestici. Le batterie smaltite nell’ambiente possono
causare danni all’ambiente e alla salute. È possibile restituire gratuitamente le batterie usate al proprio rivenditore e
consegnarle ai centri di raccolta. Il consumatore è tenuto per legge alla restituzione delle batterie scariche!
Obbligo di avviso secondo la legge sulle dispositivi elettrici
Questo simbolo indica che i dispositivi elettrici alla fine del loro ciclo di vita devono essere smaltiti separatamente
dai rifiuti domestici generali. Portare il caricabatterie al proprio punto di raccolta rifiuti locale o a un centro di
riciclaggio. Ciò si applica in tutti i paesi dell'Unione Europea e in altri paesi Europei con sistemi di raccolta
differenziata dei rifiuti.
Page 38

WS 6870 — stacja pogody LED
Instrukcja obsługi
STACJA
BAZOWA
PL
1 ciśnienie powietrza ● 2 historia ciśnienia powietrza ● 3 Prognoza pogody ● 4 tendencja pogody
● 5 Wskaźnik niskiego poziomu baterii (nadajnik na zewnątrz) ● 6 długość 1-3 wyświetlacz kanału ●
7 powiadomienie temperatury ● 8 nadajnik na zewnątrz kanału ● 9 nadajnik sygnału na zewnątrz ●
10 Temperatura zewnętrzna ● 11 Tendencja temperatury zewnętrznej ● 12 Temperatura
zewnętrzna MIN / MAX ● 13 Wilgotność odkryty ● 14 Tendencja wilgotności na zewnątrz ● 15
wskaźnik niskiego poziomu baterii (stacja pogodowa) ● 16 Temperatura w pomieszczeniu ● 17
Temperatura wewnętrzna tendencja ● 18 Temperatura wewnętrzna MIN / MAX ● 19 Wilgotność w
pomieszczeniu ● 20 Tendencja wilgotności wewnętrznej ● 21 Dzień tygodnia ● 22 Kalendarz
tydzień ● 23 Data ● 24 DCF-czas-sygnał (z symbolem DST) ● 25 Alarmy ● 26 w formacie AM / PM
● 27 Alarm drzemki ● 28 Czas ● 29 zasilania DC ● 30 Pokrywa baterii ● 31 Komora baterii ●
Klawisze funkcyjne: A DRZEMKA/ŚWIATŁO ● B TRYB ● C ALARM ● D DO GÓRY ●
E
DO DOŁU/odbiór sygnału DCF ● F CH KANAŁ ● G ALERT
NADAJNIK ZEWNĘTRZNY
1 Pokrywka baterii ● 2 Podstawka ● 3 Otwór ● 4 Przycisk
TX ● 5 Przełącznik wyboru kanału ● 6 Komora baterii
Page 39

Środowiskowe efekty odbioru
Stacja pobiera dokładny czas za pomocą technologii bezprzewodowej. Tak jak we wszystkich
urządzeniach bezprzewodowych, odbiór może być zakłócany przez następujące okoliczności:
• duża odległość przekazu
• góry i doliny pobliżu
• bliskość autostrad, linii kolejowych, lotnisk, linii wysokiego napięcia, itd.
• bliskość budów
• wzdłuż wysokich budynków
• wewnątrz betonowych budynków
• w pobliżu urządzeń elektrycznych (komputerów, telewizorów, itd.) i konstrukcji metalowych
• w poruszających się pojazdach
Stację należy ustawić w miejscu z optymalnym sygnałem, tzn. blisko okna i z dala od powierzchni
metalowych lub urządzeń elektrycznych.
SZYBKA KONFIGURACJA
Krok 1 Włożyć adapter AC/DC do dowolnego gniazdka domowego AC. Następnie podłączyć wtyczkę
zasilającą z tyłu stacji.
Krok 2 Otworzyć pokrywę baterii z tyłu stacji i włożyć 3 baterie AAA (nie dołączone) do komory baterii,
zwracając uwagę na prawidłową polaryzację +/-. Założyć pokrywę baterii.
Krok 3 Stacja i nadajnik zewnętrzny powinny znajdować się blisko siebie. Otworzyć pokrywę baterii z
tyłu nadajnika zewnętrznego. Upewniwszy się, że przełącznik wyboru kanału z tyłu nadajnika
zewnętrznego znajduje się w położeniu 1 (właściwe położenie), włożyć 2 baterie AAA
(nie dołączone) do komory baterii, zwracając uwagę na prawidłową polaryzację +/-.
Założyć pokrywę baterii. W ciągu kilku sekund stacja otrzyma sygnał danych z
nadajnika zewnętrznego.
Należy pamiętać, że maksymalny zakres przekazu nadajnika zewnętrznego wynosi 30
m, bez żadnych przeszkód. Rzeczywisty zakres przekazu zależy od tego, czy na
ścieżce sygnału znajdują się jakiekolwiek przeszkody. Każda przeszkoda (dach,
ściany, podłogi, sufity, grube drzewa, itd.) będą zmniejszały zakres sygnału o połowę.
Uwaga:
• Po otrzymaniu danych o temperaturze na zewnątrz z nadajnika, stacja rozpocznie
wyszukiwanie sygnału czasu DCF. Może to potrwać całą noc. Jeśli stacja nie
pobierze sygnału czasu DCF, zegar należy ustawić ręcznie.
• Podczas odbioru sygnału czasu DCF termometr nie dokonuje pomiarów temperatury. Po
pierwszej instalacji odczyty temperatury ustabilizują się i staną się bardziej dokładne po około 30
minutach.
Korzystanie odkryte kolejne nadajniki
Uwaga: Stacja otrzymuje sygnały od maksymalnie 3 zewnętrznych nadajników.
Nacisnąć przycisk „CH”, aby wybrać kanał czujnika zewnętrznego. Kolejność kanałów jest
następująca: CH1 - CH2 - CH3 - CH1.
Nacisnąć przycisk „CH” i przytrzymać przez ponad 3 sekundy, aby skasować kanał i wyszukać czujnik
zewnętrzny.
Wykorzystując więcej niż jeden czujnik (maks. 3), dane można otrzymywać osobno z każdego
czujnika zewnętrznego. Każdy czujnik należy podłączyć do innego numeru kanału:
Otworzyć komorę baterii i użyć przełącznika wyboru kanału, aby wybrać kanał. (1/2/3)
Przytrzymać przycisk TX, aby wysłać sygnał do stacji pogody.
Page 40

Baterie zastępcze
Jeśli stacja nie jest podłączona do źródła zasilania lub zasilanie zostanie przerwane, będzie ona
zasilana przez baterie zastępcze. Wyświetlacz LED jest wyłączony, ale czas i czas alarmu pozostają
zapisane (również w przypadku awarii zasilania). Również funkcje alarmu pracują w normie.
Sygnał nadajnika zewnątrz
Stacja pogody automatycznie zaczyna szukać czujnika zewnętrznego. Symbol sygnału kanału
miga na wyświetlaczu LCD i wskazuje, że urządzenie wyszukuje sygnał kanału. Po pomyślnym
wykryciu czujnika zewnętrznego, symbol sygnału kanału zewnętrznego
znika z wyświetlacza.
Uwaga: Proces ten może potrwać około 3 minuty.
WYŚWIETLACZ SYGNAŁU CZASU DCF I SIŁY SYGNAŁU
Po otrzymaniu danych o temperaturze na zewnątrz z nadajnika, stacja rozpocznie wyszukiwanie
sygnału czasu DCF.
ikona będzie migać.
Po wykryciu silnego sygnału czasu DCF, na wyświetlaczu pokazuje się na stałe pełny symbol
łączności radiowej „
” .
W przypadku słabego sygnału czasu DCF lub jego braku, na wyświetlaczu pojawi się na stałe pełny
symbol łączności radiowej
. Stację należy przenieść w inne miejsce o lepszym obiorze lub wyjąć
wtyczkę zasilającą, aby ponownie rozpocząć pobieranie sygnału czasu DCF.
Uwaga:
*
Ten proces może potrwać około 7 minut. Jeśli stacja pogodowa nie otrzyma DCF-time-sygnał w tym
czasie, to się skończy, aby wyszukać DCF-time-sygnał.
*
Podczas wyszukiwaniu sygnału DCF, można nacisnąć przycisk SNOOZE/LIGHT, aby uruchomić
tylko podświetlenie, ale wszystkie pozostałe przyciski funkcyjne stacji pogody pozostaną
zablokowane.
*
Podczas gdy stacja radiowa pobiera sygnał DST, na wyświetlaczu LCD pokazuje się symbol DST.
DST wskazuje, że aktywny jest czas letni.
Podczas odbioru, należy nacisnąć i przytrzymać przycisk
DCF. Ponownie nacisnąć i przytrzymać przycisk
, aby powrócić do trybu odbioru i wskazywania
, aby zatrzymać odbiór sygnału czasu
siły sygnału.
Automatyczny i ręczny odbiór
Stacja rozpoczyna automatyczny odbiór codziennie o 1:00, 2:00 i 3:00 godzinie. Jeśli do godziny 3:00
nie uda się pobrać sygnału czasu DCF, stacja rozpocznie go ponownie pobierać o 4:00 godzinie. Jeśli
czynność znowu się nie powiedzie, stacja rozpocznie ponowny odbiór o 5:00 godzinie. Jeśli i tym
razem czynność nie zakończy się sukcesem, ponowny automatyczny odbiór zostanie uruchomiony
następnego dnia o 1:00 godzinie.
Aby rozpocząć ręczny odbiór sygnału czasu DCF, należy nacisnąć jeden raz przycisk
Wyświetlacz czasu przełączy się na tryb odbioru sygnału radiowego
.
RĘCZNE USTAWANIE CZASU
Przytrzymać naciśnięty przycisk „MODE” przez około 2 sekundy. Miga 12-godzinny tryb wyświetlania.
.
Nacisnąć przycisk „
” lub „ ”, aby ustawić 12 lub 24-godzinny tryb wyświetlania.
Page 41
Wskazówka: Ustawień można dokonać szybciej, przytrzymując naciśnięty przycisk „ ” lub „ ”.
Opcji szybkich ustawień można używać również do dalszych ustawień.
Potwierdzić ustawienie, naciskając przycisk „MODE”. Zacznie migać wyświetlacz strefy czasowej.
Nacisnąć przycisk „
Potwierdzić ustawienie, naciskając przycisk „MODE”, zacznie migać wyświetlacz godziny. Nacisnąć
przycisk „
Powtórzyć te same kroki, aby ustawić następne wartości.
Kolejne ustawienia wyświetlacza obejmują: format 12 i 24 godzinny, strefa czasowa, godzina, minuta,
rok, miesiąc, data, wyświetlanie języka daty.
USTAWANIE ALARMU
Urządzenie umożliwia ustawienie 2 alarmów.
Nacisnąć przycisk „ALARM”, a następnie przejść do trybu ustawiania alarmu 1.
Przytrzymać naciśnięty przycisk „ALARM” przez około 2 sekundy i ustawić alarm 1. Ustawiony czas
alarmu pojawia się na wyświetlaczu LCD.
Miga tryb wyświetlania godziny. Nacisnąć przycisk „
Nacisnąć przycisk „MODE”, aby potwierdzić ustawienie.
Miga tryb wyświetlania minut. Nacisnąć przycisk „
Nacisnąć przycisk „MODE”, aby potwierdzić ustawienie.
Nacisnąć przycisk „ALARM”, aby potwierdzić i przejść do ustawiania alarmu 2. Miga tryb wyświetlania
godzin. Nacisnąć przycisk „
aby potwierdzić ustawienie.
Miga tryb wyświetlania minut. Nacisnąć przycisk „
Nacisnąć przycisk „MODE”, aby potwierdzić ustawienie.
Uwaga: A1 dotyczy alarmu od poniedziałku do piątku, a A2 - od soboty do niedzieli.
Włączanie/wyłączanie alarmu 1 i/lub alarmu 2
Naciśnij przycisk ALARM, aby wejść do trybu ustawień alarmu.
Podczas alarmu 1 (A1) jest widoczny, naciśnij przycisk
dzwonka) lub wyłączyć alarm.
Po raz kolejny, aby wejść w tryb ustawień dla alarmu 2. Naciśnij przycisk ALARM.
Podczas alarmu 2 (A2) jest widoczny, naciśnij przycisk
dzwonka) lub wyłączyć alarm.
Nacisnąć przycisk „MODE”, aby potwierdzić ustawienie.
Uwaga: Czas alarmu wynosi 2 minut.
Alarm drzemki
Kiedy nadejdzie czas ustawionego alarmu 1 lub alarmu 2, rozlegnie się sygnał dźwiękowy, któremu
będzie towarzyszyło miganie ikona A1 lub A2. Należy jednokrotnie nacisnąć przycisk SNOOZE,
dźwięk alarmu zostanie wstrzymany, a ikona A1 lub A2 będzie dalej migać. Alarm rozlegnie się
ponownie za 5 minut.
Zatrzymanie alarmu
Kiedy nadejdzie czas ustawionego alarmu 1 lub alarmu 2, rozlegnie się sygnał dźwiękowy, któremu
będzie towarzyszyło miganie diody ikona A1 lub A2. Naciśnij dowolny przycisk, dźwięk alarmu
” lub „ ”, aby ustawić żądaną godzinę.
” lub „ ”, aby ustawić żądaną strefę czasową.
” lub „ ”, aby ustawić żądaną godzinę.
” lub „ ”, aby ustawić żądane minuty.
” lub „ ”, aby ustawić żądaną godzinę. Nacisnąć przycisk „ALARM”,
” lub „ ”, aby ustawić żądane minuty.
, aby włączyć (świeci się symbol
, aby włączyć (świeci się symbol
Page 42

zostanie wstrzymany, a ikona A1 lub A2 przestaje migać. Alarm rozlegnie się ponownie o tej samej
godzinie następnego dnia.
PROGNOZA POGODY I BAROMETR
Stacja posiada wbudowany barometr, który mierzy ciśnienie atmosferyczne. Po włączeniu na
wyświetlaczu pojawią się ikony słońca i zachmurzenia. Stacja potrzebuje około 24 godzin, aby zebrać
dane o zmianach ciśnienia atmosferycznego i prognozuje warunki pogodowe na kolejne 12-24
godziny.
Uwaga: Stacja pogodowa prognozuje pogodę na następne 12-24 godziny. Prognoza może nie
zgadzać się z aktualnymi warunkami atmosferycznymi na zewnątrz.
Istnieją 5 rodzaje ikon pogody odpowiadające prognozowanym warunkom pogody:
Słoneczny Słonecznie i pogodnie Mętny Deszczowy Śnieżny
Uwaga: Przemieszczanie stacji po domu czy budynku wpłynie na dokładność jej pomiarów w wyniku
nagłej zmiany temperatury czy wysokości. Ponowne uzyskanie stabilności zabiera około 24 godz., co
umożliwi prognozę pogody na następne 12-24 godz.
TEMPERATURA I WILGOTNOŚĆ
Wyświetlanie temperatur w °C/°F
Nacisnąć przycisk „
Wyświetlanie tendencji temperatury i wilgotności
Po pomyślnym podłączeniu, stacja pogody może wyświetlać tendencję temperatury i wilgotności. Na
wyświetlaczu mogą pojawić się następujące wskaźniki:
Wyświetlanie maksymalnej/minimalnej temperatury/wilgotności
Nacisnąć przycisk „
W celu zresetowania historii temperatury/wilgotności, należy nacisnąć przycisk „
sekundy podczas wyświetlania się wartości MIN lub MAX.
Uwaga: (jeśli stacja jest połączony z dalszymi nadajników zewnętrznych)
Aby sprawdzić minimalną/maksymalną temperaturę/wilgotność, należy nacisnąć przycisk „CH” celem
sprawdzenia wartości różnych kanałów.
Ustawianie alarmu temperatury
Domyślna MAX temperatura wynosi 60 °C, a MIN temperatura wynosi -40 °C.
”, aby zmienić skalę temperatury z Celsjusza na Fahrenheita lub odwrotnie.
1.
2. wskazuje tendencję stałą temperatury i wilgotności.
3. wskazuje tendencję spadkową temperatury i wilgotności.
”, aby wyświetlić maksymalną/minimalną temperaturę/wilgotność.
wskazuje tendencję rosnącą temperatury i wilgotności.
” przez ponad 3
Page 43

Nacisnąć przycisk „ALERT”, aby włączyć alarm temperatury. Pojawia się symbol alarmu temperatury.
Nacisnąć przycisk „ALERT” przez ponad 2 sekundy, aby ustawić alarm temperatury. Maksymalna
cyfry stopnia błysk. Nacisnąć przycisk „
Nacisnąć przycisk „ALERT”, aby potwierdzić ustawienie. Minimalne cyfry stopnia błysk. Nacisnąć
przycisk „
potwierdzić ustawienie.
Alarm będzie się rozlegać przez 5 sekund co minutę, aż temperatura nie osiągnie żądanego zakresu.
Aby zatrzymać alarm, należy nacisnąć jakikolwiek przycisk, ale symbol
Będzie migać do chwili osiągnięcia przez temperaturę żądanego zakresu.
Nacisnąć przycisk „Alert”, aby wyłączyć funkcję alarmu temperatury. Symbol alarmu temperatury
znika z wyświetlacza LCD.
Uwaga: (jeśli stacja jest połączony z dalszymi nadajników zewnętrznych)
Aby ustawić alarm temperatury kanału zewnętrznego 2 lub 3, należy nacisnąć przycisk „CH” w celu
zmiany na inny kanał, jeszcze przed wprowadzeniem zmiany alarmu temperatury wybranego kanału.
Jednakże, jeśli ostrzeżenie o temperaturze nie dotyczy wyświetlanego obecnie kanału, na
wyświetlaczu będzie migać jedynie symbol alarmu, nie wskazując przy tym odpowiedniej temperatury.
Wyświetlacz poziomu naładowania baterii
Wskaźnik niskiego poziomu naładowania baterii pojawia się na wyświetlaczu LCD stacji pogody, jeśli
baterie są na wyczerpaniu. Należy wówczas jak najszybciej wymienić baterie.
Podświetlenie
Nacisnąć przycisk SNOOZE/LIGHT. Podświetlenie włącza się na 5 sekund, jeśli urządzenie nie jest
podłączone do źródła zasilania prądem stałym (DC).
Jeśli z kolei urządzenie jest podłączone do źródła zasilania prądem stałym (DC), podświetlenie jest
aktywne cały czas.
SPECYFIKACJA
Zakres pomiaru temperatury:
Wewnątrz: od 0°C do +50°C (od +32°F do +122°F)
Na zewnątrz: od -20°C do +65°C (od -4°F do +149°F)
Stopniowanie temperatury: 0.1°C
Zakres pomiaru wilgotności: 20% - 95%
Rozdzielczość wilgotności: 1%
Ciśnienie atmosferyczne: od 850 hPa do 1050 hPa
Kalendarz: 2000-2009
Czas trwania alarmu: 2 minuty
Czas trwania drzemki: 5 minuty
Częstotliwość przekazu: 433 MHz
Zakres przekazu: 30 m (wolne pole)
” lub „ ”,aby ustawić żądaną wartość minimalną. Nacisnąć przycisk „ALERT”, aby
(jeśli wartości przekraczają przewidziany zakres, na wyświetlaczu
pojawi się HH.H/LL.L)
(jeśli wartości przekraczają przewidziany zakres, na wyświetlaczu
pojawi się HH.H/LL.L)
(jeśli wartości przekraczają przewidziany zakres, na wyświetlaczu
pojawi się HH.H/LL.L)
od 25.1 inHg do 31.01 inHg
” lub „ ”,aby ustawić żądaną wartość maksymalną.
Page 44

ŚRODKI OSTROŻNOŚCI
• Urządzenie jest przeznaczone do zastosowań we wnętrzach..
• Nie narażać urządzenia na działanie dużych sił lub wstrząsów.
• Nie należy wystawiać urządzenia na działanie wysokich temperatur, bezpośredniego światła
słonecznego, kurzu, wilgoci.
• Nie zanurzać w wodzie.
• Unikać kontaktu z wszelkimi korozyjnych.
• Nie wyrzucać urządzenia do ognia, gdyż może wybuchnąć.
• Nie otwierać obudowy i nie ingerują w wewnętrzne części urządzenia.
Ostrzeżenia bezpieczeństwa dotyczące baterii
• Przed użyciem należy dokładnie przeczytać wszystkie instrukcje.
• Używać tylko baterii alkalicznych. Nie wolno używać akumulatorów.
• Włożyć baterie prawidłowo, zgodnie z biegunowością (+/-).
• Zawsze należy wymieniać cały zestaw baterii.
• Nigdy nie wolno mieszać zużytych i nowych baterii.
• Zużyte baterie należy natychmiast wymieniać.
• Wyjmować baterie, jeśli urządzenie nie jest używane.
• Nie ładować ponownie baterii ani nie wyrzucać ich do ognia, ponieważ mogą eksplodować.
• Nie przechowuj baterie w pobliżu przedmiotów metalowych. Styczność może spowodować
zwarcie.
• Unikać narażania baterii na działanie bardzo wysokich temperatur lub wilgotności bądź
bezpośredniego nasłonecznienia.
• Baterie należy trzymać w miejscu niedostępnym dla dzieci. Powodują one zagrożenie
udławieniem.
Zawiadomienie wymagań na mocy dyrektywy baterii
Stare baterie nie należądo odpadów domowych, ponieważ mogą one powodować uszkodzeń zdrowia i
środowiska. Możesz powrócić używanych baterii i akumulatorów do punktów dealerskich i zbiórki. Użytkownika
końcowego są zobowiązane przez prawo przywrócić potrzebne baterie do dystrybutorów i innych punktów
zbiorczych!
Zawiadomienie wymagań na mocy dyrektywy urządzenia elektryczne
Ten symbol oznacza, że należy oddzielać urządzenia elektryczne od ogólnych odpadów domowych po
zakończeniu ich żywotności. Ładowarkę należy oddać do lokalnego punktu zbiórki odpadów lub centrum
recyklingu. Dotyczy to wszystkich państw Unii Europejsk
obowiązuje system zbierania odpadów segregowanych.
iej oraz innych państw europejskich, w których
Page 45

WS 6870 – Meteorologická stanice
Instruction manual
Základnová
stanice
CZ
1 Tlak vzduchu ● 2 historie tlaku vzduchu ● 3 Předpověď počasí ● 4 Počasí tendence ● 5
Indikátor vybité baterie (venkovní vysílač) ● 6 Displej Běh kanál 1-3 ● 7 Teplota
upozornění ● 8 Venkovní vysílač kanál ● 9 Venkovní vysílač signálu ● 10 Venkovní teplota
● 11 tendenci venkovní teploty ● 12 Venkovní teplota MIN / MAX ● 13 Venkovní vlhkost ●
14 tendence Venkovní vlhkost ● 15 Indikátor vybité baterie (meteorologická stanice) ● 16
Vnitřní teplota ● 17 tendence Vnitřní teplota ● 18 Vnitřní teplota MIN / MAX ● 19 Vnitřní
vlhkost ● 20 tendence Vnitřní vlhkost ● 21 Den v týdnu ● 22 Kalendář týden ● 23 Datum ●
24 DCF-time signál (se symbolem DST) ● 25 Alarmy ● 26 AM / PM formát ● 27 Snooze
alarm ● 28 Čas ● 29 Připojení DC ● 30 Kryt baterie ● 31 Přihrádka na baterie
Funkční klávesy: A Tlačítko OPAKOVANÉ BUZENÍ/PODSVÍCENÍ ● B Tlačítko REŽIM ●
C Tlačítko BUDÍK ● D
Tlačítko se šipkou NAHORU● E Tlačítko
se šipkou DOLŮ/příjem signálu DCF ● F CH (Tlačítko KANÁL) ● G
Tlačítko VÝSTRAHA
Venkovní vysílač
1 Kryt prostoru pro baterie ● 2 Stojan ● 3 Poutko ● 4
Tlačítko „TX“ ● 5 Přepínač kanálu ● 6 Prostor pro
baterie
Page 46

ENVIRONMENTÁLNÍ DOPADY PŘIJMU
Stanice přijímá přesný čas pomocí bezdrátové technologie. Stejně jako u všech bezdrátových přístrojů
mohou být tyto ovlivněny následujícími okolnostmi:
• dlouhá přenosová vzdálenost
• blízké hory a údolí
• blízká dálnice, železnice, letiště, vysokonapěťové kabely atd.
• blízké staveniště
• mezi vysokými stavbami
• uvnitř betonových staveb
• blízké elektrické přístroje (počítače, TV atd.) a kovových konstrukcí
• uvnitř jedoucích vozidel
Umístěte stanici do místa s optimálním signálem např. blízko okna a daleko od kovových povrchů či
elektrických přístrojů.
RYCHLÉ NASTAVENÍ
Krok 1 Zapojte AC/DC adaptér do jakékoliv AC zásuvky. Pak zapojte konektor napájecího kabelu do
zadní části stanice.
Krok 2 Vysunutím otevřete dvířka bateriového krytu a vložte tři baterie AAA (nejsou součástí dodávky)
do přihrádky na baterie po zjištění správné polarity +/-. Bateriový kryt vraťte zpět.
Krok 3 Uchovávejte stanici a venkovní vysílač vedle sebe. Vysunutím otevřete bateriový kryt na zadní
straně venkovního vysílače. Ujistěte se, že je volič kanálů na zadní straně venkovního vysílače
nastaven do polohy 1 (pravá pozice) a vložte dvě baterie AAA (nejsou součástí
dodávky) do přihrádky na baterie po ověření správné polarity +/-. Bateriový kryt vraťte
zpět. Stanice začne přijímat datový signál z venkovního vysílače za pár sekund.
Mějte na paměti, že venkovní vysílač má ve venkovním prostředí maximální dosah 30
metrů bez překážek. Skutečný přenosový rozsah bude záviset na tom, zda v cestě
signálu existují nějaké překážky. Každá překážka (střecha, stěny, stropy a stromy s
širokými kmeny atd.) účinně sníží rozsah signálu na polovinu.
Poznámka:
• Poté, co stanice načte z vysílače venkovní teplotu, začne vyhledávat časový
signál DCF. To může trvat přes noc. Pokud stanice časový signál DCF nezachytí,
nastavte hodiny ručně.
• Během příjmu časového signálu DCF neprovádí teploměr měření teploty. Po
první instalaci se teplotní data stabilizují a zpřesní b
Použití dalších venkovních vysílačů
Poznámka: Až 3 venkovních vysílačů jsou pohledávky z meteorologické stanice.
Stisknutím tlačítka „CHANNEL“ vyberte kanál venkovního čidla. Pořadí je CH1 - CH2 - CH3.
Stisknutím tlačítka „CHANNEL“ a jeho podržením po dobu delší než 3 sekundy všechny kanály
vymažete a vyhledáte venkovní čidlo.
Pokud používáte více než jedno venkovní čidlo (maximálně 3), lze přijímat data z jednotlivých čidel
samostatně. Jednotlivá čidla je nutné nastavit na různá čísla kanálů:
Otevřete prostor pro baterie a nastavením přepínače kanálů vyberte příslušný kanál. (kanál 1 / 2 / 3)
Stiskněte tlačítko „TX“ a odešlete tak signál do meteostanice.
ěhem 30 minut.
Page 47

Záložní baterie
Pokud se zdroj napájení nepoužívá nebo přeruší, bude stanice napájena ze záložních baterií. LED
displej je vypnutý, ale čas a čas na budíku zůstane uložený (a to i v případě výpadku napájení).
Funkce budíku pracují obvyklým způsobem.
VENKOVNÍ VYSÍLAČ SIGNÁLU
Meteostanice automaticky spustí vyhledávání signálu venkovního čidla. Na LCD displeji bude blikat
symbol signálu rádiového kanálu
Jakmile bude signál venkovního čidla úspěšně nalezen, symbol signálu rádiového kanálu
a bude tak značit, že zařízení vyhledává signál rádiového kanálu.
z displeje
zmizí.
Poznámka: Tento proces trvá přibližně 3 minuty.
ZOBRAZENÍ ČASOVÉHO SIGNÁLU DCF A SÍLY SIGNÁLU
Poté, co stanice načte z vysílače venkovní teplotu, začne vyhledávat časový signál DCF.
V případě zjištění silného časového signálu DCF se na displeji zobrazují Ikona
.
Ikona bliká.
V případě zjištění slabého nebo nulového časového signálu DCF se na displeji zobrazuje Ikona
Přemístěte stanici do jiné oblasti pro lepší příjem nebo odpojte napájecí kabel, aby byl znovu zahájen
příjem časového signálu DCF.
Poznámka:
*
V železobetonových budovách může být příjem rádiového signálu výrazně zhoršen.
*
Během vyhledávání signálu DCF lze stisknout pouze tlačítko „SNOOZE/LIGHT“ a zapnout tak
podsvícení. Všechna ostatní tlačítka s různými funkcemi meteostanice budou během vyhledávání
blokována.
*
Pokud bude meteostanice přijímat signál DST (letního času), bude se na LCD displeji zobrazovat
symbol DST. Symbol DST znamená, že je aktivní letní čas.
Během příjmu stiskněte a podržte tlačítko
stisknutím tlačítka
se vraťte do režimu příjmu a indikace síly signálu.
pro zastavení příjmu časového signálu DCF. Dalším
Automatický a ruční příjem
Stanice zahájí automatický příjem každý den v 1:00, 2:00 a 3:00 hodiny. Pokud se jí nepodaří přijmout
časový signál DCF do 3:00 hodin, zahájí příjem znovu ve 4:00 hodiny. Pokud se znovu nezdaří, začne
s příjmem znovu v 5:00 hodin. Pokud se znovu nezdaří, zahájí automatický příjem znovu v 1:00 hodin
další den.
Pokud chcete ručně zahájit příjem časového signálu DCF, znovu stiskněte tlačítko
času přejde do režimu příjmu rádiového signálu
.
. Zobrazení
RUČNÍ NASTAVENÍ ČASU
Stiskněte tlačítko „MODE“ a podržte jej stisknuté po dobu přibližně 3 sekund. Bude blikat 12hodinové
.
zobrazení. Stisknutím tlačítka „
Tip: Podržíte-li tlačítko „
“ nebo „ “ nastavte 12- nebo 24 hodinový formát zobrazení.
“ nebo „ “ stisknuté, bude nastavení rychlejší.
Potvrďte své nastavení stisknutím tlačítka „MODE“. Začne blikat zobrazení časového pásma.
Stisknutím tlačítka „
“ nebo „ “ nastavte požadované časové pásmo.
Potvrďte své nastavení stisknutím tlačítka „MODE“. Začne blikat zobrazení hodin. Stisknutím tlačítka
“ nebo „ “ nastavte požadovanou hodinu.
„
Page 48
Stejným postupem nastavte následující hodnoty.
Kompletní pořadí nastavení je 12- nebo 24 hodinový formát, časové pásmo, hodiny, minuty, rok,
měsíc, datum a jazyk zobrazení data.
NASTAVENÍ ALARMU
V tomto zařízení lze nastavit 2 budíky.
Stisknutím tlačítka „ALARM“ aktivujte režim nastavení budíku 1.
Podržte tlačítko „ALARM“ stisknuté po dobu přibližně 2 sekund, poté lze nastavit budík 1. Nastavená
doba budíku se zobrazí na LCD displeji.
Začne blikat zobrazení hodin. Stisknutím tlačítka „
Stisknutím tlačítka „MODE“ své nastavení potvrďte.
Začne blikat zobrazení minut. Stisknutím tlačítka „
Stisknutím tlačítka „MODE“ své nastavení potvrďte.
Stisknutím tlačítka „ALARM“ svou volbu potvrďte a přejděte do režimu nastavení budíku 2. Začne
blikat zobrazení hodin. Stisknutím tlačítka „
Stisknutím tlačítka „MODE“ své nastavení potvrďte.
Začne blikat zobrazení minut. Stisknutím tlačítka „
Stisknutím tlačítka „MODE“ své nastavení potvrďte.
Poznámka: A1 představuje budík od pondělí do pátku, A2 představuje budík v sobotu a neděli.
Aktivace / deaktivace alarmu 1 a/nebo alarmu 2
Stisknutím tlačítka „ALARM“ aktivujte nastavení budíku 1. Stiskněte tlačítko „
se zobrazí ikona budíku 1. Budík 1 se aktivuje.
Znovu stiskněte tlačítko „
Stisknutím tlačítka „ALARM“ svou volbu potvrďte a přejděte do nastavení budíku 2. Stiskněte tlačítko
“. Na LCD displeji se zobrazí ikona budíku 2. Budík 2 se aktivuje.
„
Znovu stiskněte tlačítko „
Stisknutím tlačítka „ALARM“ svou volbu potvrďte a uložte tak nastavení budíku.
Poznámka: Doba trvání alarmu je 2 minut.
Opakovaný alarm
Jakmile čas dosáhne nastaveného času alarmu 1 nebo 2, budou hodiny pípat a bude blikat kontrolka
A1 nebo A2 Ikona. Jednou stiskněte tlačítko SNOOZE; zvuk alarmu se zastaví a hodnota A1 nebo A2
Ikona bude stále blikat. Budík se opět rozezní za 5 minut.
Zastavení alarmu
Jakmile čas dosáhne nastaveného času alarmu 1 nebo 2, budou hodiny pípat a bude blikat kontrolka
A1 nebo A2 Ikona. Po stisknutí libovolného tlačítka utichne pípání budíku a A1 nebo A2 Ikona se
přestanou blikat. Budík znovu zapípá ve stejnou dobu další den.
“. Ikona budíku z LCD displeje zmizí. Budík 1 se deaktivuje.
“. Ikona budíku z LCD displeje zmizí. Budík 2 se deaktivuje.
“ nebo „ “ nastavte požadovanou hodinu.
“ nebo „ “ nastavte požadované minuty.
“ nebo „ “ nastavte požadovanou hodinu.
“ nebo „ “ nastavte požadované minuty.
“. Na LCD displeji
Page 49

PŘEDPOVĚĎ POČASÍ A BAROMETR
Stanice má vestavěný barometr, který měří barometrický tlak. Po zapnutí ukazuje displej ikony
Slunečno a zataženo. Stanice 24 hodin shromažďuje údaje o změnách barometrického tlaku a
předpovídá další vývoj počasí na 12–24 hodin.
Poznámka: Vaše meteostanice předpovídá dalších 12–24 hodin počasí. Předpověď se nemusí
shodovat se současným stavem venkovního počasí.
Existují 5 typy ikon počasí pro předpovídané počasí.
Jasno Polojasno Oblačno Déšť Sněhové srážky
Poznámka: Přemísťování stanice v okolí domu nebo budovy bude mít vliv na její přesnost, protože
náhlá změna teploty nebo výšky/nadmořské výšky ovlivní přesnost stanice. Bude trvat 24 hodin, než
se stanice zestabilizuje a bude moci předpovědět dalších 12 – 24 hodin.
TEPLOTA A VLHKOST
Zobrazení teploty ve °C nebo °F
Stisknutím tlačítka „
Fahrenheita.
Zobrazení tendence teploty a vlhkosti
Po úspěšném připojení může meteostanice zobrazovat tendenci teploty a vlhkosti. Zobrazovat se
mohou následující symboly:
1.
2.
3.
Zobrazení maximální/minimální teploty/vlhkosti
Maximální/minimální teplotu/vlhkost zobrazíte stisknutím tlačítka „
Chcete-li resetovat historii teploty/vlhkosti, stiskněte během zobrazení hodnoty MIN nebo MAX tlačítko
„
Poznámka: (je-li stanice připojena s dalšími venkovních vysílačů)
Chcete-li zobrazit minimální/maximální hodnotu teploty/vlhkosti pro různé kanály, stiskněte tlačítko
„CH“.
Nastavení teplotního výstrahy
Výchozí MAX teplota je 60 °C , výchozí MIN teplota je -40 °C.
Teplotní výstrahu aktivujete stisknutím tlačítka „ALERT“. Zobrazí se symbol teplotní výstrahy.
Teplotní výstrahu nastavíte stisknutím tlačítka „ALERT“ a jeho podržením po dobu delší než 2
sekundy.
představuje vzrůstající tendenci teploty/vlhkosti.
představuje konstantní tendenci teploty/vlhkosti.
představuje klesající tendenci teploty/vlhkosti.
“ a podržte jej stisknuté po dobu delší než 3 sekundy.
“ přepnete mezi zobrazením teploty ve stupních Celsia a ve stupních
“.
Stisknutím tlačítka „
Stisknutím tlačítka „ALERT“ nastavení potvrďte.
Pořadí nastavení je maximum, minimum a poté ukončení.
“ nebo „ “ nastavte požadovanou hodnotu.
Page 50

Po nastavení se výstraha spustí automatiky, klesne-li aktuální venkovní teplota pod nastavenou MIN
teplotu nebo překročí-li nastavenou MAX teplotu výstrahy.
Stisknutím tlačítka „ALERT“ nastavení potvrďte.
Výstraha bude každou minutu znít po dobu 5 sekund, dokud se teplota nevrátí do požadovaného
rozsahu.
Stisknutím jakéhokoli tlačítka výstrahu zastavíte. Symbol však bude stále blikat, dokud se teplota
nevrátí do požadovaného rozsahu.
Funkci teplotní výstrahy deaktivujete stisknutím tlačítka „ALERT“. Symbol teplotní výstrahy zmizí.
Poznámka: (je-li stanice připojena s dalšími venkovních vysílačů)
Pokud chcete teplotní výstrahu nastavit pro venkovní kanály 2 nebo 3, přepněte se před nastavením
teplotní výstrahy pro vybraný kanál stisknutím tlačítka „CH“ na daný kanál. Pokud se však teplotní
varování nevztahuje na aktuálně zobrazený kanál, bude na LCD displeji blikat symbol výstrahy,
příslušná teplota ale blikat nebude.
Zobrazení stavu baterie
Pokud jsou baterie slabé, zobrazí se na LCD displeji meteostanice indikátor slabé baterie. Baterie při
nejbližší možné příležitosti vyměňte.
Podsvícení
Stiskněte tlačítko „SNOOZE/LIGHT“. Není-li zařízení připojeno k napájení stejnosměrným proudem,
rozsvítí se podsvícení na dobu 5 sekund.
Je-li zařízení připojeno k napájení stejnosměrným proudem, zůstane podsvícení svítit.
Specifikace
Rozsah teplot
Vnitřní 0 °C až +50 °C (+32 °F až +122 °F)
Venkovní -20 °C až +65 °C (-4 °F až +149 °F)
Teplotní rozlišení 0,1 °C
Rozsah vlhkosti 20-95 % (je-li vlhkost mimo tento rozsah, zobrazí se na displeji HH/LL)
Rozlišení relativní vlhkosti 1 %
Rozsah tlaku vzduchu 850 hPa až 1050 hPa
25,1 inHg až 31,01 inHg
Doba buzení 2 minuty
Doba opakovaného buzení 5 minuty
K alendář 2000-2099
Přenosová frekvence 433 MHz
Přenosový dosah 30 m (v otevřeném prostoru)
(je-li teplota mimo tento rozsah, zobrazí se na displeji HH.H/LL.L)
(je-li teplota mimo tento rozsah, zobrazí se na displeji HH.H/LL.L)
Page 51

UPOZORNĚNI
• Tato jednotka je k použití pouze v interiéru.
• Nevystavujte přístroj nadměrné síle nebo nárazu.
• Nevystavujte přístroj extrémním teplotám, přímému slunečnímu záření, prachu nebo vlhkosti.
• Nikdy neponořujte do vody.
• Vyhněte se kontaktu s korozívními materiály.
• Nevhazujte tento přístroj do ohně, mohl by explodovat.
• Neotevírejte vnitřní pouzdro nebo manipulovat s jakýmikoli součástí této jednotky.
Baterie a bezpečnostní varování
• Před použitím si prosím pečlivě přečtěte všechny pokyny.
• Používat pouze alkalické baterie. Nepoužívejte dobíjecí baterie.
• Baterie vkládejte správně odpovídající polaritou (+/-).
• Vždy vyměňte kompletní sadu baterií.
• Nikdy nemíchejte použité a nové baterie.
• Okamžitě odstraňte vybité baterie.
• Baterie vyjměte, když není zařízení v provozu.
• Nenabíjejte a nevhazujte baterie do ohně, mohly by explodovat.
• Ujistěte se, že jsou baterie uloženy mimo dosah kovových předmětů, neboť kontakt mů
že způsobit
zkrat.
• Nevystavujte baterie extrémním teplotám nebo vlhkosti nebo přímému slunečnímu záření.
• Ukládejte baterie mimo dosah dětí. Existuje riziko udušení
.
Všimněte si požadavky podle baterie-směrnice
Staré baterie nepatří do domovního odpadu, protože by mohly způsobit škody na zdraví a životní prostředí.
Můžete se vrátit použité baterie a akumulátory bezplatně na vašich prodejců a sběrných míst. Koncový uživ
zavazuje zákon přivézt potřebné baterie distributorům a dalších sběrných míst!
Všimněte si požadavky podle zlikvidovat elektrická zařízení
Tento symbol znamená, že je potřeba likvidovat elektrická zařízení odděleně od běžného domácího odpadu na
konci jeho životnosti. Nabíječku vraťte do místního sběrného místa nebo centra pro recyklaci. To platí pro
všechny země Evropské unie a ostatní evropské země se samostatným systémem shromažďování
odpadu.
atel se
 Loading...