

Page 1
WS6600 Desktop Weather Station
Instruction Manual
Introduction
This desktop weather station comes with barometric weather prediction, clock, calendar,
indoor and outdoor temperature and humidity display. It is battery powered with AC
charger. It is recommended to use the AC charger at all times.
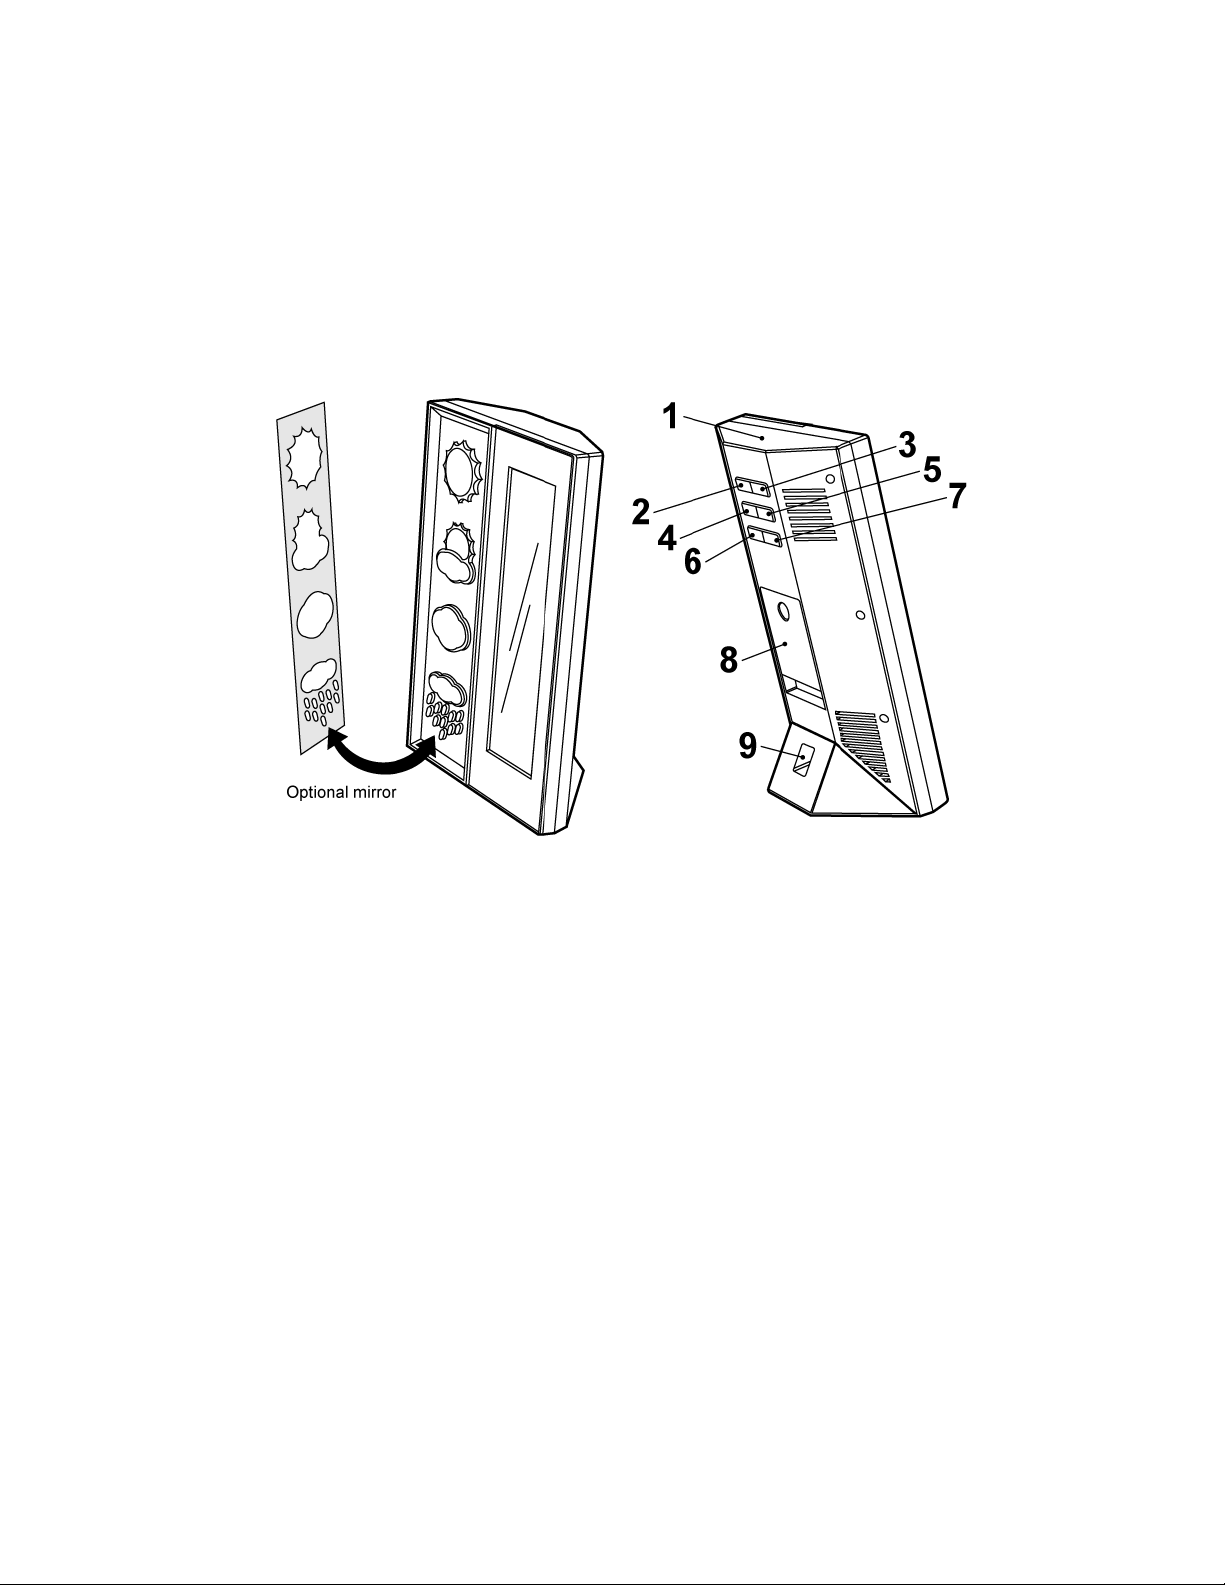
Fig. 1 Front view Fig. 2 Back view
1. SNOOZE/ LIGHT button
2. HISTORY button
3. MODE/ SET button
4. -/ RCC button
5. +/ C/ F button
6. CHANNEL button
7. MAX/ MIN button
8. Battery compartment
9. DC line in jack
General notes:
1. It is recommended to set up the remote temperature sensor before setting up the
weather station/ clock. See “Configuring Remote Temperature Sensor(s)”
for more information. Batteries and AC adapter should be used together.
2. Please note all other clock/ weather station settings seize to function when the
clock is in RCC synchronization mode. See “RCC Synchronization” for
additional information.
3. During initial installation, the temperature and humidity sensor may take up to an
hour or more to acclimatize to current conditions.
Page 2
Getting started
Installing AC adapter:
Plug in AC/DC adapter at DC input jack (9) (see fig. 2). Use only approved adapters.
Optional mirror finish:
User might choose to use optional mirror finish for decoration purposes. Carefully
remove adhesive tape backing on the back of the mirror finish and place the mirror finish
on the weather station (see fig. 1).
Batteries installation
1. Open battery compartment (8) on the back of the unit (see fig. 2).
2. Install/ replace 3 x AAA size batteries in the compartment. It is recommended that
only alkaline batteries are used.
3. Replace the battery compartment (8) on the back of the unit.
4. A short beep will be heard to confirm proper installation of batteries.
5. It will take approximately 3 seconds for the screen to light up.
Batteries safety warnings:
1. Please read all instructions carefully before use.
2. Install batteries correctly by matching the polarities (+/-).
3. Always replace a complete set of batteries.
4. Never mix used and new batteries.
5. Remove exhausted batteries immediately.
6. Remove batteries when not in use.
7. Do not recharge and do not dispose of batteries in fire as the batteries may
explode.
8. Ensure batteries are stored away from metal objects as contact may cause a
short circuit.
9. Avoid exposing batteries to temperature or humidity extremes or direct sunlight.
10. Keep all batteries out of reach from children. They are a choking hazard.
11. Please retain packaging for future reference.
Setting up the weather station:
The weather station will sound once batteries are installed or ac adapter is plugged in.
1. Press -/ RCC button (4) or +/ C/ F button (5) to change the current weather
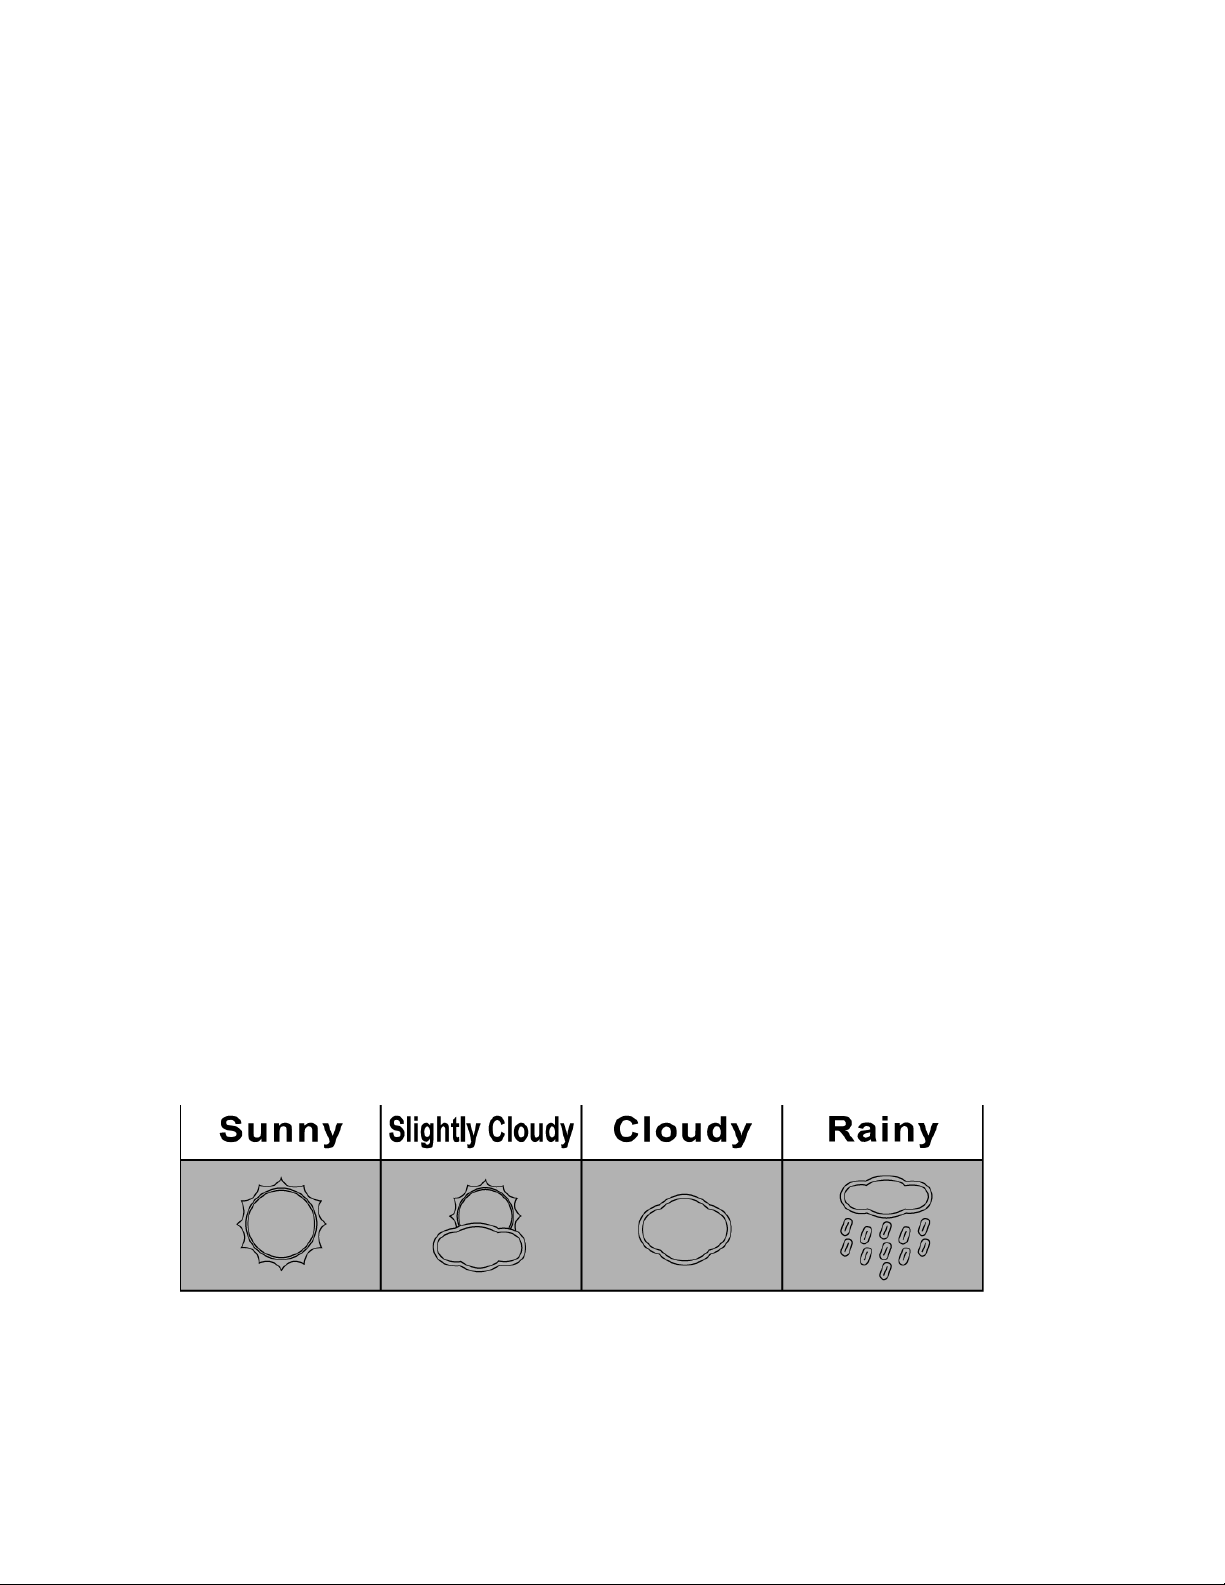
situation of your location. See fig. 3 below for the weather pattern that is
resembles your immediate area.
Fig. 3 Weather pattern
2. Press HISTORY button (2) to confirm weather pattern.
Interpreting the weather forecast symbols
Page 3

The weather station requires at least 24 hours on acclimatizing to local weather
conditions. The weather station process and analyze the weather patterns for the past
24 hours in order to determine the future weather. Until that time has elapsed, the
predicted weather forecast may not accurately reflect the actual weather for your
immediate area.
The weather station will display the symbols (see fig. 3) to indicate the predicted weather
forecast for the next 12 to 24 hours for an area within a radius of approximately 30-50
km.
Note:
1. Accuracy rate might be lower in extreme weather conditions. The weather
forecast is only for reference only and it is only for domestic use only. Do NOT
rely on the weather station for weather forecast if any serious matter replies on it
including but not limited to: personal health, life and death situation, any business
or financial decisions, and/or agricultural planning.
2. The weather forecast does not display the current weather. It displays the
weather for the future.
Glowing weather icons
Lit weather forecast icons will glow from dim to bright and back to dim at a regular
interval.
Adjusting the weather station:
1. Press HISTORY button (2) for 3 seconds until a beep sound is heard.
2. Press -/ RCC button (4) or +/ C/ F button (5) to toggle between absolute “ABS”
and relative “REL” atmospheric pressure.
3. Press HISTORY button (2) to confirm.
4. Press -/ RCC button (4) or +/ C/ F button (5) to toggle between atmospheric
pressure units of Pascal (hPa) to inch of mercury (inHg)
5. Press HISTORY button (2) to confirm.
6. Press -/ RCC button (4) or +/ C/ F button (5) to change the sea level closest to
your location. The sea level units are in meters (1 meter equals approximately
3.28 feet). Contact your local weather bureaus or authorities for more information.
7. Press HISTORY button (2) to confirm sea level.
8. Press -/ RCC button (4) or +/ C/ F button (5) to change the current weather
situation of your location. See fig. 3 above for the weather pattern that is
resembles your immediate area.
9. Press HISTORY button (2) to confirm.
Reading Pressure trend:
1. Recorded memory of the barometric pressure changes are displayed with 3
arrows to show pressure trend.
Note: It is only possible to measure the barometric pressure trend properly when
Page 4

the unit remains at the same altitude. When moving around at different
altitudes within a short period of time, the air pressure and the barometric
pressure will change. The pressure trend will only be correct and regulate
the has remain at a constant altitude for 24 hours or more.
To recall recorded pressure history reading
The barometric pressure reading is recorded at an hourly interval and can be recalled
and displayed up to previous 12 hours.
Press HISTORY button (2) repeatedly to view pressure recorded in the past hours. -1
HR indicates the pressure of the previous hour. The pressure reading history will appear
for 20 seconds before the current pressure returns.
RCC Synchronization:
Where ever available, this clock will automatically synchronize with the radio control
towers at the following time: 02:00, 03:00, 04:00, 05:00.
User may also manually synchronize the clock by following the instructions below.
Press and hold down the -/ RCC button (4) for approximately 3 seconds until is
flashing.
When this signal is flashing, the clock is attempting to synchronize with the radio control.
will flash when a strong signal is received and the clock will synchronize with the
radio control. This process can take up to 7 minutes. will stop flashing and will be
displayed once the signal is received and in synchronization.
will not be displayed if the clock is not able to synchronize within this period of
time. User may manually synchronize again at a later time or the clock will automatically
attempts to synchronize at the above mentioned time.
When the clock is attempting to synchronize, press down the -/ RCC button (4) to cancel
RCC synchronization.
Please note all other clock/ weather station settings seize to function when the clock is in
RCC synchronization mode. Wait until the clock is no longer attempting to synchronize
or it is synchronized to set other clock and weather station function.
If the alarm goes off during synchronization mode, RCC synchronization will seize
immediately. Follow the above instructions again to set synchronization.
Successful reception or failed reception
When is only shown, the DCF time cannot be received in this location.
When is mostly shown and changes to frequently, it is very unlikely that the
DCF time can be received in this location.
Page 5

When is mostly shown with occasional , it is very likely that the DCF time can
be received in this location.
When is only shown, it is very likely that the DCF time can be received in this
location.
RCC Zone offset
This clock is equipped with radio controlled time adjustment. The user will need to work
out the time zone signal they receive at their current location and make (any) adjustment
as required. This function also allows for daylight saving adjustment. Contact your local
weather bureaus or authorities for more information.
Press -/ RCC button (4) once for +1 time zone.
Press -/ RCC button (4) once again for +2 time zone.
Press -/ RCC button (4) once again for -1 time zone.
Press -/ RCC button (4) once again for same time zone.
To set time manually:
Hold down the MODE/ SET button (3) for approximately 3 seconds until the display is
flashing.
Press MODE/ SET button (3) again. Press -/ RCC button (4) or +/ C/ F button (5) to
toggle between AM / PM and 24-hour clock
Press MODE/ SET button (3) again. Press -/ RCC button (4) or +/ C/ F button (5) to
change the hour setting.
Press MODE/ SET button (3) again. Press Press -/ RCC button (4) or +/ C/ F button (5)
to change the minute setting.
Press MODE/ SET button (3) again. Press -/ RCC button (4) or +/ C/ F button (5) to
change the year setting.
Press MODE/ SET button (3) again. Press -/ RCC button (4) or +/ C/ F button (5) to
change the month/date and date/month setting.
Press MODE/ SET button (3) again. Press -/ RCC button (4) or +/ C/ F button (5) to
change the month setting.
Press MODE/ SET button (3) again. Press -/ RCC button (4) or +/ C/ F button (5) to
change the date setting.
Press MODE/ SET button (3) again. Press -/ RCC button (4) or +/ C/ F button (5) to
change the weekday language setting.
ENG for English; GE for German; IT for Italian; FR for French; NE for Dutch; ES for
Spanish; DA for Danish
Press MODE/ SET button (3) again to confirm settings. Display will no longer flash.
To see alarm time:
Press MODE/ SET button (3) once and alarm time 1 will be shown as indicated by AL.
Press MODE/ SET button (3) again and the current time will be shown.
To set alarm time:
Press MODE/ SET button (3) once and alarm time will be shown as indicated by AL.
Press and hold MODE/ SET button (3) for approximately 3 seconds until the digits flash.
Press -/ RCC button (4) or +/ C/ F button (5) to change the hour setting.
Press MODE/ SET button (3) again.
Page 6

Press -/ RCC button (4) or +/ C/ F button (5) to change the minute setting.
Press MODE/ SET button (3) again.
When alarm time is shown, press -/ RCC button (4) or +/ C/ F button (5) to turn on and
off the alarm. will be shown when the alarm is on.
The alarm will sound for 120 seconds when the preset alarm time is reached. Hit any
button on the back of the clock to deactivate the alarm. The clock will automatically enter
snooze mode if the alarm is not deactivated.
Hit the “SNOOZE / LIGHT” button (1) when the alarm is on to enter snooze mode.
will flash when the clock is it snooze mode. The alarm will sound again in 5
minutes. Hit any button on the back of the clock to deactivate the alarm.
Please note that alarm time setting seize to function when the clock is in RCC
synchronization mode. Wait until synchronization has ended before setting the alarm
time.
Configuring the thermometer
This weather station is equipped to synchronize up to 3 remote temperature sensors.
One remote temperature sensor is included. Additional remote temperature sensor is
available for purchase separately. Please contact your local distributor for purchase.
Remote temperature sensors
Fig. 4 Back View Fig. 5 Back view - open
RTS 1. Hang hole
RTS 2. Battery compartment screws
RTS 3. TX button
RTS 4. RESET button
RTS 5. CHANNEL 123 switch
Batteries installation
1. Open battery compartment on the back of the unit by removing the
two small screws (RTS 2) with a Philips head screwdriver. (see fig. 4)
Page 7

2. Install/ replace 2 x AAA size batteries in the compartment. It is
recommended that only alkaline batteries are used. Do not use
rechargeable batteries.
3. The weather station is capable of receiving up to 3 different channels.
Select the channel number (1, 2, or 3) by sliding the CHANNEL 123
switch (RTS 5). If you only have 1 remote temperature sensor, select
1.
4. Press the RESET button (RTS 4) once and the red light will flash once.
5. Replace the battery compartment on the back of the unit by tightening
the two screws (RTS 2).
Installation
1. Place the remote temperature sensor at a desired place by mounting
the unit’s hang hole (RTS 1) on a screw (screw not included).
Alternatively, the unit can be place on a flat horizontal surface.
2. The unit can be placed indoor or outdoor. The unit is weather proof.
Do not submerge unit in water. Do not expose unit to water for
prolonged periods. Avoid accumulation of water and or snow on unit.
Avoid exposing unit to direct sunlight. Remove unit from the exterior in
extreme or harsh weather, including but not limited to hurricane,
typhoon, and cyclones seasons. Do not place the unit in area of high
winds.
3. Do not place the remote temperature sensor more than 30 meters (98
feet) from the receiving weather station. The remote temperature
sensor is most effective if there are no obstruction and interference
between the remote temperature sensor and the weather station. The
remote temperature sensor might have to closer than 30 meters if the
weather station is not able to receive any signals. This is due to
obstructions and interference. The user might need to experiment with
various locations to get the best reception.
Configuring Weather Station to receive remote temperature signals.
1. Follow the above instructions to set up remote temperature sensor.
2. Press and hold CHANNEL button (6) on weather station for 3
seconds. will flash. This will reset all temperature memories.
3. The weather station will begin scanning for signals for channel 1. As
soon as signals are received for channel 1, the temperature will be
displayed. The weather station will automatically scans for the other
channels. It will scan each channel for approximately 3 seconds
before skipping to the next channel.
4. Once all your channels are received press CHANNEL button (6) once
to confirm the channel. will no longer be displayed.
5. The weather station will receive a new signal automatically every 30
seconds to update the remote temperature.
6. Press CHANNEL button (6) on weather station repeatedly to toggle
between channel 1 CH1, channel 2 CH2, and channel 3 CH3.
Page 8

7. will be displayed if any of the remote temperature sensor’s
battery needs replacing.
Temperature memory
1. Press MAX/ MIN button (7) to display maximum recorded temperature,
minimum recorded temperature, and current temperature. MAX
indicates maximum temperature. MIN indicates minimum temperature.
2. Press and hold MAX/ MIN button (7) for approximately 3 seconds to
reset the maximum and minimum temperature and humidity records.
Temperature display
1. The IN temperature displays the indoor temperature. It is the
temperature of the location of the weather station.
2. The OUT temperature displays the temperature of the remote
temperature sensors.
3. Press CHANNEL button (6) on weather station repeatedly to display
the temperature of channel 1, channel 2 and channel 3.
4. When is shown, the display will automatically show through all
the remote sensors channel. Press CHANNEL button (6) to cancel.
Celsius / Fahrenheit
1. Press +/ C/ F button (5) to toggle between displaying the temperature
in Celsius and Fahrenheit.
Temperature Trend
1. indicates the temperature is in a increasing trend.
2. indicates the temperature is in a no change trend.
3. indicates the temperature is in a decreasing trend.
Warnings
Do not subject the unit to excessive force, shock, dust, temperature or humidity.
Do not immerse the unit in water.
Dispose the complete unit when battery is no longer charging or when the unit is
no longer displaying the temperature and humidity.
Do not remove any screws.
Do not dispose this unit in a fire. IT MAY EXPLODE.
Keep unit away from small children. The unit or parts of the unit might be a
choking hazard.
Never attempt to recharge the batteries in any other methods.
Dispose the unit legally.
Recycle when possible.
Page 9

Specifications
Indoor temperature range: 0℃ to 50℃ ( 32°F to 122°F)
Outdoor temperature range: -20℃ to 50℃ ( -4°F to 122°F)
Relative humidity range: 20% - 95%
Barometeric pressure range: 930 mb to 1050 mb
Power: 3 x AAA Micro 1.5V batteries
Consideration of duty according to the battery law
Old batteries don’t belong to domestic waste because they could cause damages
of health and environment. End-user are committed by law to bring back needed
batteries to distributors and other collecting points.
 Loading...