

Page 1
TM 3080-RF
1. Operat ion and Displ ay
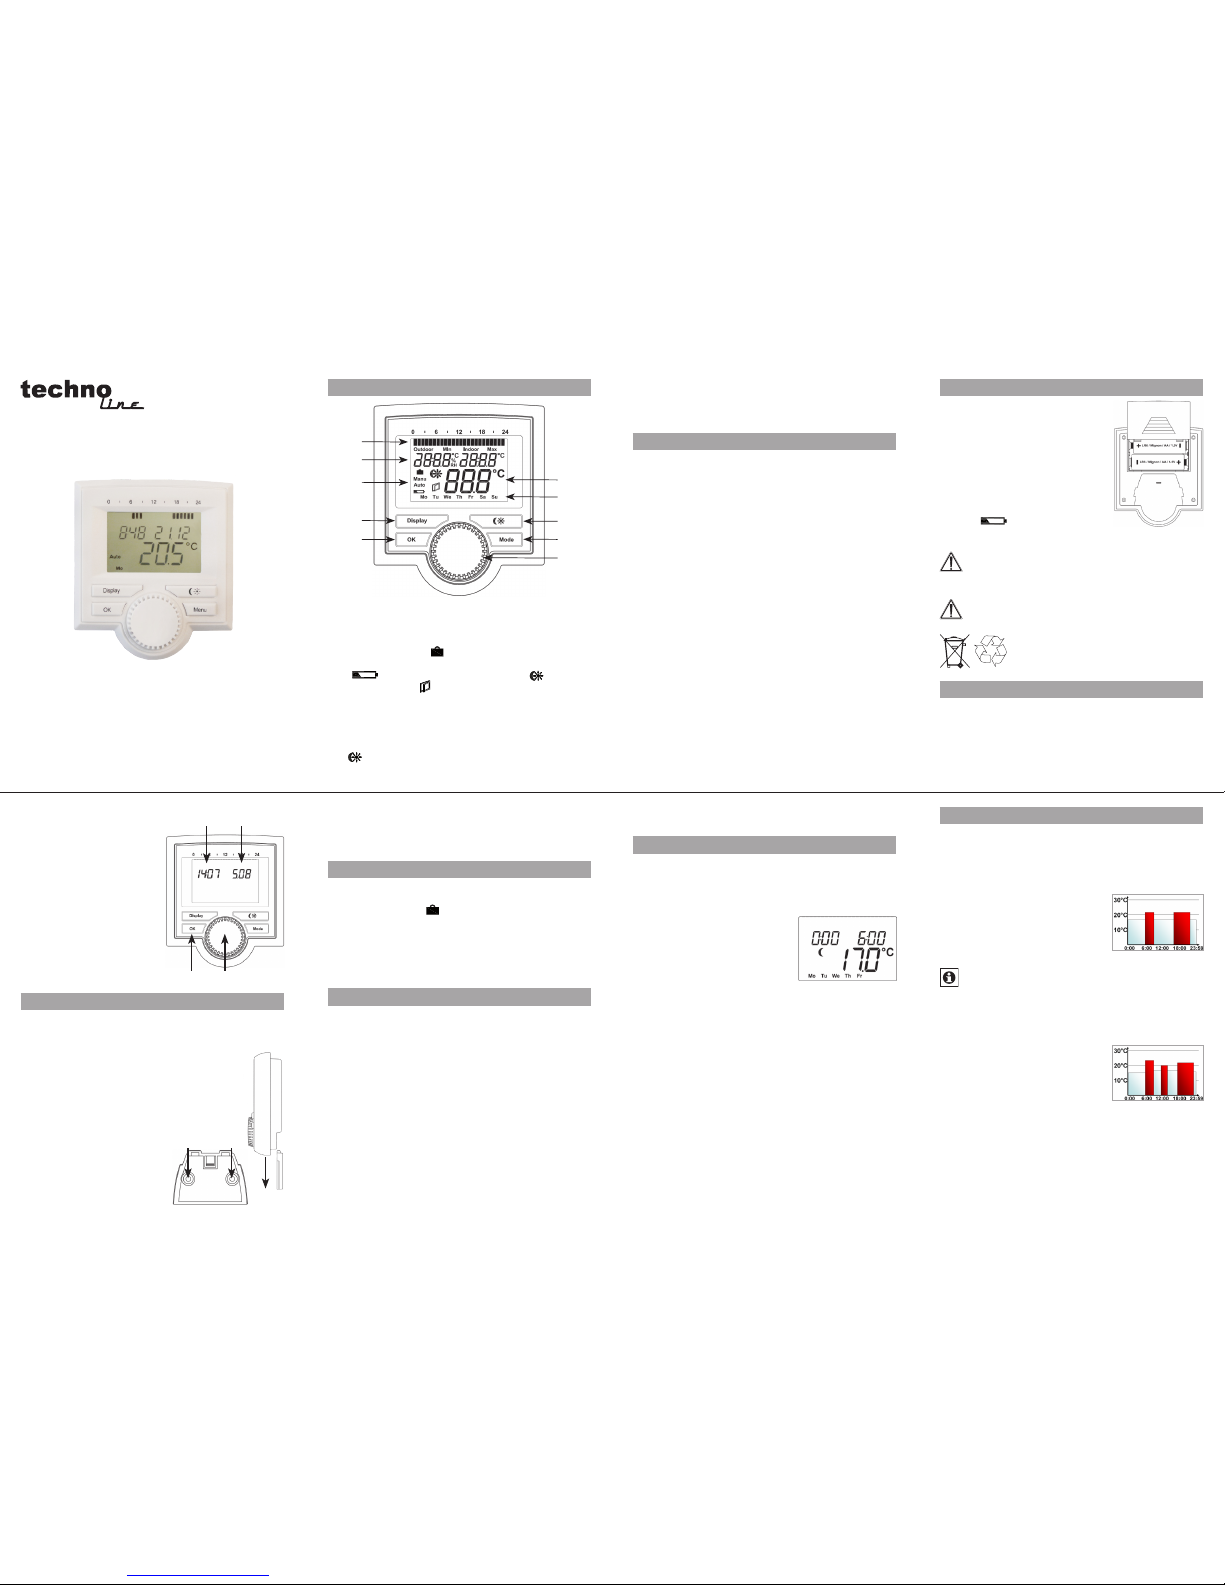
I Mode button: Press and hold down the button for more
than 3 seco nds to open the c onfigurat ion menu
J Settti ng wheel: f or making adjustments (e.g. tem pe-
rature)
2. Inte nded use
The wall therm ostat is a user-friendly device for programming and rem otely controlling radio energy-saving
controlle rs for radiators.
The weekly pr ogram (see 8) set at the wa ll thermo stat is adopted by the taught-in radio energy-saving
controllers.
The wall thermostat features an interna l s ensor for
measuri ng a room’s temper ature and h umidity, with the
detected te mperatur e then being t ransferr ed to the radio
energy-s aving controllers.
Sy ste m co mpo nent s su ch as ou tdoo r t empe ratu re
sensor s, remote controls and wi ndow con tacts c an also
be taught-in to t he wall therm ostat.
The de vice m ay only be operated indoors an d must be
protected from the ef fects of damp and dust, a s well as
solar or oth er methods o f heat radia tion.
Using th e device for any purpo se other than what is described in this op erating manual does not fall wi thin th e
scope of intended u se and shall invalidate any warranty
or li ability. This also applies to any conversio n or modification wor k.
This devic e is intended f or domesti c use only.
3. Inse rtin g (repla cing) th e batteries
Remove the battery compart-•
ment cover.
Insert 2 new LR0 6 (Migno n/AA) •
batteri es into the battery compartment.
Reattach the battery compart-•
ment cover an d click into pl ace.
New alkaline batter ies have a life of
approxima tely two years. A battery
symbol (
) will indicate w hen
the bat teries need to be replaced .
Never recha rge standard batte ries.
Doing so will p resent a risk of explosi on.
Do not throw the b atterie s into a fire.
Do not shor t-circ uit batter ies.
Used batteries should not be disposed
of with regular domestic waste. Instead,
take them to your loc al battery disposal point.
4. Sett ing the date an d time of d ay
The firmware versi on nu mber will be displ ayed b riefl y
once you have inserted/re placed the batterie s and then
you will be automati cally prompted to s et the date and
time of day.
Use the set ting wheel ( D) to set the year ( B).•
Confirm wit h OK (C).•
Use the setting wheel (D) •
to set the month ( B).
Confirm wit h OK (C).•
Use the setting wheel (D) •
to set the day (B).
Confirm wit h OK (C).•
Use the setting wheel (D) •
to set the hour ( A).
Confirm wit h OK (C).•
Use the setting wheel (D) •
to set the minut e (A).
Confirm wit h OK (C).•
After setting time and date
the display will then switch
to normal vi ew.
5. Mount ing of wall ther mostat
The wall thermos tat must be mounted in th e same room
as the devices, such as radio ene rgy-savin g contro llers,
wind ow co ntacts or remote con trols, that have been
taught-in to it .
First of all, fi nd an approp riate moun-•
ting locati on, making s ure that no
electri city or sim ilar lines r un there.
Use a pen to mar k the bore hol e posi-•
tions (a) of the wa ll mount on the wa ll.
If you are work ing with a stone wa ll, •
you should dr ill the hole s using a
5 mm drill. The n insert
a plug into eac h of the
drilled ho les.
If you are work ing with a •
wooden wall, yo u should
drill the ma rked holes (a) u sing a 1.5 mm drill.
Now use screw s to fix the wall mou nt to the wall.•
Slide the wal l thermost at down from above onto the •
wall mount.
6. Oper ating m odes
To switc h bet ween the 3 operati ng modes desc ribe d
below, press th e mode but ton briefly:
Holida y function • (
): Set a temperatur e that is to b e
maintain ed until a fixed p oint in time.
Manu: • Manual o peration – The temperatu re is set ma-
nually usi ng the setti ng wheel.
Auto: • Weekly pro gram – The tempera ture is co ntrolled
automatic ally in accor dance with the s tored weekly
program.
7. Configura tion menu
The configuration menu can be used to modify settings.
To access this menu, press and hold down the mode button (for more than 3 seconds).
Pro• : For setting the weekly program (see Section “8 Set-
ting the week ly progra m”)
dAt• : For modi fying the ti me of day and date
CAL• : Time sett ing for desc aling func tion
dSt• : Automatic switchover at the start or end of daylig ht
saving time c an be deacti vated.
AEr• : For setting the “window open” temperature so that
the te mperature is automaticall y re duced in the event
of ventilati on
rES• : For restor ing the facto ry setti ngs
UnL• : For tea ching out all taught-in wireless compo-
nents
Use the setting wheel to select menu items and the OK button to confirm your choice. Press the mode button again
to return to the previous level. After 60 seconds without
anything happening, the menu will close automatically.
8. Set ting th e weekly progr am
The weekly program al lows yo u to set up to 3 separate
heating periods (7 switc hing times) for each day of the
week. Programming is p erform ed in relati on to the selected days , for which temp eratures mu st be stored for a
period fr om 00:00 to 23:59.
Press and h old dow n the mode •
button for more than 3 seconds.
“Pro” will app ear on the dis play.•
Confirm wit h OK.•
“dAy” will appe ar on the dis-•
pla y.
The setting wheel can be used to select an indivi dual day •
of the week, all working days, the weeke nd or the entire
week (exampl e shows workin g days selec ted).
Confirm wit h OK.•
Use the setting wheel to set the first time segmen t •
(example show s 0:00 to 6:00).
Confirm wit h OK.•
Then, s elect t he requ ired tem perature for the selec ted •
time segme nt (example sh ows 17.0°C).
Confirm wit h OK.•
Keep repeating this process until you have finished storing •
temperat ures for the pe riod from 0:00 to 23:59.
In Auto mo de, the se t weekly program is adopte d by the
taught-in ra dio energ y-saving co ntroller s automatic ally
and the temperatu re can be modifi ed at a ny time vi a the
setting wheel. The mod ified tem perature will then be re tained unt il the next pr ogram cha ngeover.
9. Weekly p rogram: Exam ples
The wall th ermost at all ows yo u to store up to 3 heati ng
period s (7 switching times) wi th individual temperature
setting s for each day of the week. The fac tory setting
consist s of two heating p hases (f rom 6:00 until 9:0 0 and
from 17:00 un til 23:0 0 respecti vely) for every single day
of the week:
From 00:00 to 06:00 17.0°C
From 06:00 to 09:00 21.0°C
From 09:00 to 17:00 17.0°C
From 17:00 to 23:00 21.0°C
From 23:00 to 23:59 17.0°C
To represent the switching periods, the display shows
bars for every other switching interval. In this examp-
le, no bars a re shown for the i nterval.
If a room also needs to be heated at around noon, the correspondi ng progra m might look li ke this:
Monday t o Sunda y
From 00:00 to 0 6:00 16.0°C
From 06:00 to 0 9:00 22.0°C
From 09:00 to 12:00 17.0°C
From 12:00 to 14:00 20.0°C
From 14:00 to 17:30 17.0°C
From 17:30 to 23:30 21.0°C
From 23:30 to 23:59 16.0°C
If you have a hom e office a nd on ly want it to be heated
during the day on working days , you can progra m the following time s:
Please read th is manual ca refully in ord er to help you put
the device into op eration. Kee p the manual han dy so you
can refer to it a t a later date!
A Switching p eriods se t within week ly progra m
B Time & date indicator, indoor-humidity (% RH) & tem-
perature , indoor- and outdoor-temperatur e, outdoormin- & max-tem perature; f unctions
C Holiday function (
), manual op eration (Manu), automatic operation (Auto), “ba tter y empt y“ sym bol
(
), set-back /comfor t tempera ture ( ), “window
open” symbo l (
)
D Display but ton: Switch betwee n display modes (e.g.
time & date or ind oor-humidity & -temper ature)
E OK but ton: For confirm ing/saving , teaching in
F Cur rent tempe rature set ting, funct ions
G Day of the week
H
-b utt on : Fo r sw it ch ing be tw een se t-b ac k a nd c om -
fort temp eratures
5
2
6
3
7
4
8
A
B
C
D
E
I
F
G
J
H
a a
ACB
D
Page 2

Monday t o Sunda y
From 00:00 to 0 8:30 17.0°C
From 08:30 to 17:00 21.0°C
From 17:00 to 23:59 17.0°C
Satur day and Sunday
From 00:00 to 23:59 15.0° C
10. Disp lay cont ent duri ng normal oper ation
During norm al operatio n, the display
shows: switching periods, indoor humidity, indoor temperatur e, operating
mode, temperature setting a nd d ay
of the we ek. The bars indicatin g the
weekly p rogram’s swi tching pe riods
are show n for every other ti me inter val. For an ex ample,
please ref er to “9. Weekl y program: E xamples”.
11. Changing t he display view
The up per p art of the display can be used to show other va lues instead of the indoor hu midity and the indoor
temperat ure. The Displ ay b utton is used to change the
view. The fo llowing a lternative s are avai lable, de pending
on whether or not an outdoor temperature sensor has been
taught-in to th e wall thermo stat:
No outdo or sens or With ou tdoor se nsor
Indoor hum idity and
temperature
Indoor hum idity and
temperature
Time and date
Outdoor an d indoor
temperature
Min. and ma x. outdoor
temperature
Time and date
You can delete the saved min./ma x. outdoor tempe rature
values by pressin g and ho lding down the Display but ton
for longer t han 3 secon ds.
12. Teachin g-in to ra dio energy-sa ving con trollers
In order to enable communication between radio c omponents, the dev ices have to be taught-in to one anoth er.
Proceed as follows to a llow radio energy-s aving controllers to be ma naged via a wal l thermos tat:
First of all, the radio energy-sav ing controller must be set •
to teach-in mod e. For more inform ation on this, refer to
the operat ing manual fo r the relevant device.
The wall thermostat then needs to trans mit a radio signal for •
t e a c h i n g - i n p u r p o s e s . To d o t h i s , p r e s s a n d h o l d d o w n t h e O K
button on th e wall thermo stat for longer than 3 se conds.
“LEA” and the remaining teach-in ti me (s tarting a t 3 0 •
seconds) app ear on the display and the wall thermosta t
transmit s a teach-in s ignal.
When the ra dio energy-saving controller receives the •
teach-in s ignal, “ECF” a ppears on i ts display.
The wall ther mostat can b e taught-in to as many radio
energy-s aving controllers as y ou wish.
If there is inter ference in terms of radio commu nica-
tion, the radi o energy-s aving contro ller contin ues to
regulate the temperature autonomously, in ac cordance
with the most recent specific ations made by the wall thermostat.
Re mot e co ntr ols o r wi ndo w co nta cts tha t ha ve pr evi -
ous ly bee n taugh t-in to t he radi o ener gy-sav ing co ntroller mu st be taught-i n to the wall ther mostat dir ectly.
If the batter ies in a radio e nergy-sav ing controller
have been rep laced, it can take up to 1½ hours un til
the actua tor starts to r eceive da ta from the wall thermostat again a nd switches to “ ECF” mode.
13. Teaching -in to the wall th ermost at
Up to 5 system components such as re mote controls,
win dow conta cts or add ition al outd oor temp era ture
sensor s can be taugh t-in to the wall the rmostat .
To do this, pres s and hold down the OK button for long-•
er than 3 sec onds.
“LEA” and the remaining teach-in time (30 seconds) •
appear on t he display.
The devic e to be tau ght-in now ne eds to transmit a r a-•
dio signal (by pressing a bu tton on a remote co ntrol,
for example).
Once teaching-in ha s been c ompleted successfully, a •
code for t he taught-i n device a ppears on the wall thermostat’s displ ay for 3 seconds: rC – remote control, SC
– window cont act, Ot – outd oor temper ature sensor.
The display t hen return s to the standa rd view. •
If 5 de vices h ave alrea dy bee n taught- in to th e wall
thermostat, “Err” appears on the display. In this case,
one of the taught-in devices needs to be taught-out before
a new device ca n be taught-i n (see 14).
14. Teaching ou t wireless com ponen ts
Compon ents that have be en taught in on the actuator
can b e taug ht out again using the “UnL” (Unlearn) function. All wire less compo nents are tau ght out at once wit h
this functi on.
Press and hold down t he m ode button for mo re than •
3 seconds .
Use the set ting wheel to s elect the “ UnL” menu item.•
Confirm wit h OK.•
”ACC” will appear o n the display ; press OK to co nfirm.•
15. Comfor t and set-back te mperature s
The comfo rt/set-b ack tempe rature bu tton (
) provides
an easy a nd conveni ent way of switching b etween t hese
two temperatures. The factory settings are 21.0°C and
17.0°C resp ectively. To adapt the m, procee d as follows:
Press and hold down the comfor t/set-back temper ature •
button (
) for more than 3 second s.
The sun symbol ( •
) will a ppear on the display along
with the cur rent comfo rt temper ature.
Use the settin g wheel to modif y the temperat ure; press •
OK to confirm.
The moon symbo l ( •
) will appe ar together wit h the setback tempe rature.
Use the settin g wheel to modif y the temperat ure; press •
OK to confirm.
The temperature can even be modified in Auto mode at any
time by using this button. The new settin g will be retained
until the pro gram’s next switc hing time.
16. Set ting the holid ay function
If you want a fixed tempera ture to be maintain ed for a set
period of time while y ou are on ho liday or dur ing a party,
you can make us e of the Holiday f unction.
Press and rel ease the mod e button repe atedly until th e •
suitcase sy mbol (
) appears on the disp lay.
Use the se tting wh eel to set the end of the time period •
during whi ch the temper ature is to be maintaine d.
Press the OK b utton to confi rm.•
Then use th e setting wh eel to set the da te.•
Press the OK b utton to confi rm.•
Use the setting wheel to set the temperatu re; press OK to •
confirm. Th e display wil l flash to confir m your settings.
The set temperature will remain in force until the specified
time. After that, the wall thermost at will adopt Auto mode.
Wireless comma nds from the window contac t and remote
control wil l continue to b e executed.
17. Setting ro utine d escaling
Routine descaling is carried ou t once a week to protect
against va lve calcific ation. The user can c hange the tim e
at wh ich th is fu nction is perfor med (factor y set is 12:00
on Saturday s).
Press and hold down th e M ode button for more t han •
3 sec.
Use the hand wheel to sel ect the “CAL” menu item.•
Confirm your s election by pressin g the OK butto n.•
Use the hand wheel to sel ect the day of th e week.•
Confirm your s election by pressin g the OK butto n.•
Use the hand wheel to sel ect the time.•
Confirm your s election by pressin g the OK butto n.•
18. “Win dow open” funct ion
If a window contact has been taught-in to the wall thermostat, it will automa tically lower the tempe rature w hen
windows are open. That allows to save on heating co sts.
Whilst th is funct ion is a ctive, the “window open” sym bol
(
) appears on the display. The target temperature which
applies he re is adjustable.
Hold down the m ode button f or more than 3 s econds.•
Use the set ting wheel to s elect the “AEr” m enu item.•
Confirm wit h OK.•
Use the set ting wheel to s et the temper ature.•
press OK to co nfirm.•
19. Restor ing the factor y settings
You can reset the wall thermostat to its initial state. This will
clear all th e setting s that have been m ade manually.
Hold down the m ode button f or more than 3 s econds.•
Use the set ting wheel to s elect the “r ES” menu item.•
Confirm wit h OK.•
“ACC” will appear o n the display; p ress OK to confirm.•
20. Chi ld-pr oof lock /Operating i nhibit
Operati on can be inhi bited.
To activate/de activate the operating inhibit, briefly press •
the “Mode” an d
buttons at t he same time.
After act ivation, “LOC ” will appea r on the display.•
To deactivate the fu nction, pre ss both buttons again.•
21. Sett ing the h eating b reak
If the h eating i s turne d off during summer, the batteries in
the radio energy-savi ng controlle rs can be saved. To achieve
th is, th e va lv es a re ope ne d fu ll y an d t he c al ci fica ti on p ro tec tion function continues to run. Radio commands from window contac ts or remote co ntrols are n o longer execu ted.
To ac tivate the heating break, turn the setting wheel •
clockwi se during manual operation (Manu) u ntil “On”
appear s on the display.
To termi nate the heating bre ak q uit manual ope ration •
(Manu) or turn the se tting whe el anticlo ckwise.
22. Se ttin g frost pr otection mod e
If you do not want the room to be heated, the valve can be
cl os ed. It w il l on ly be o pe ne d ag ai n if the re is a ri sk o f f ree zing due to f rost. Limescale protectio n measure s remain
in place. Wireless comm ands from the window conta ct or
remote cont rol will no lon ger be execute d.
and the rece ption characteristi cs of the receiver, e nvironmenta l factors such as humidit y in the vicini ty have
an importa nt role to play, as do on-site structural /screening conditi ons.
Techno Trade Import- Expor t GmbH hereby d eclares th at
this device co mplies with the essenti al require ments and
other relevant regulation s of Directive 1999/5/EC. You can
find the full de claration of conform ity at
www.technoline-berlin.de/Konformitaetserklaerung.
26. Techni cal specifica tions
Supply volt age: 3 V
Max. cur rent consu mption: 3 0 mA
Batteri es: 2 x LR06 (Mig non/AA)
Batteri e life: approx. 2 yea rs
Display: LC-Displ ay
Radio freq uency: 868,3 MHz
Range of tra nsmissio n
in open air: 20 m
Housing di mensions: 82 x 92 x 30 mm (W x H x D)
We reser ve the right to mak e any tech nical c hange s
that co nstit ute an improvem ent to the d evice.
Issue 1 Eng lish 02/2010
Documen tation © 2009 TechnoTrade Impo rt-Export G mbH, Wildau.
All right s reserved.
CC-TC-O-W M-W-R3, V1.2 907-40
9
13
10
14
11
15
12
16
To activa te frost protection mode, turn the setting wheel •
anticlockwise during manual operation (Manu) until “OFF”
appear s on the display.
To terminate frost prote ction mode, quit manual oper a-•
tion (Manu) o r turn the set ting wheel clockwi se.
23. Ins tructions fo r disposal
Do not dis pose of the devic e with regula r
domest ic waste.
Electron ic equipm ent must b e dispose d of at local c ollectio n poin ts for waste electr onic e quipment in complianc e with the Waste Electrical and
Electron ic Equipmen t Directiv e.
The CE Marking is simply an offi cial symbol relating to the free movement of a product; it does not
warrant a pr oduct’s cha racteris tics.
24. Saf ety ins tructions
This device is n ot a toy; do not allow childr en to play with
it. Do not leave packagi ng material lyin g around, as it can
be dangerous in the hands of a child. Do not open the device: it does not contain any compone nts that need to be
servic ed by the user. In the event of an error, please return
the device to ou r servic e department.
25. Gen eral Informa tion ab out rad io opera tion
Radio transmis sion is perform ed on a non-exclusive transmission path, whic h me ans that there is a pos sibility of
interfe rence occu rring.
Interfe rence can also be caused by switchi ng operation s,
electrical motors or defective electrical devices. The range
of transmission within buildings can differ greatly from that
available in the o pen air. Be sides th e transmitting power
 Loading...