

Page 1
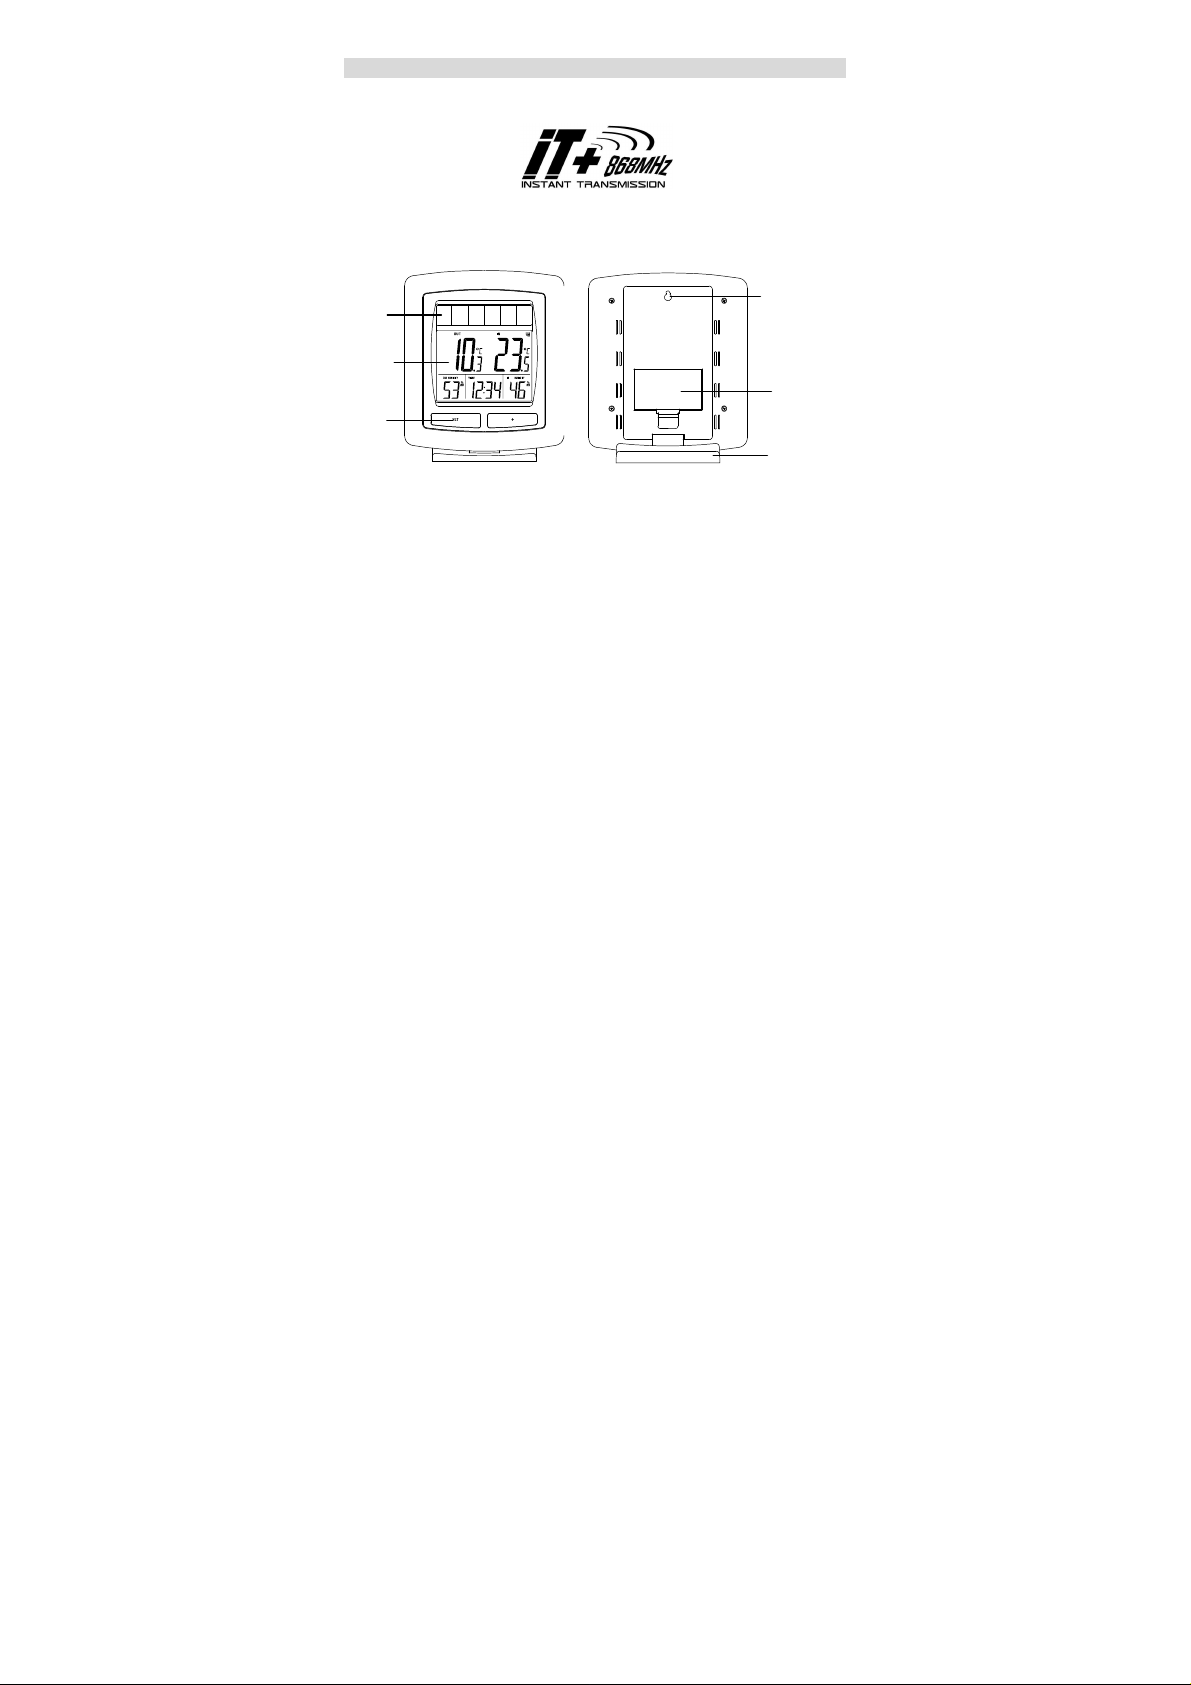
LCD
display
Solar
panel
SOLAR STATION
Function
keys
INSTRUCTION MANUAL
FEATURES:
SOLAR STATION:
•
24h time format display
•
Solar mode setting
•
Indoor and outdoor temperature display in ºC with MIN/MAX records
•
Indoor and outdoor humidity display in RH%
•
Primary Alkaline battery or rechargeable Alkaline battery selection
•
Low battery indicators
•
Wall mount or freestanding
Wall Mount
Location
Battery
compartment
Stand
1
Page 2
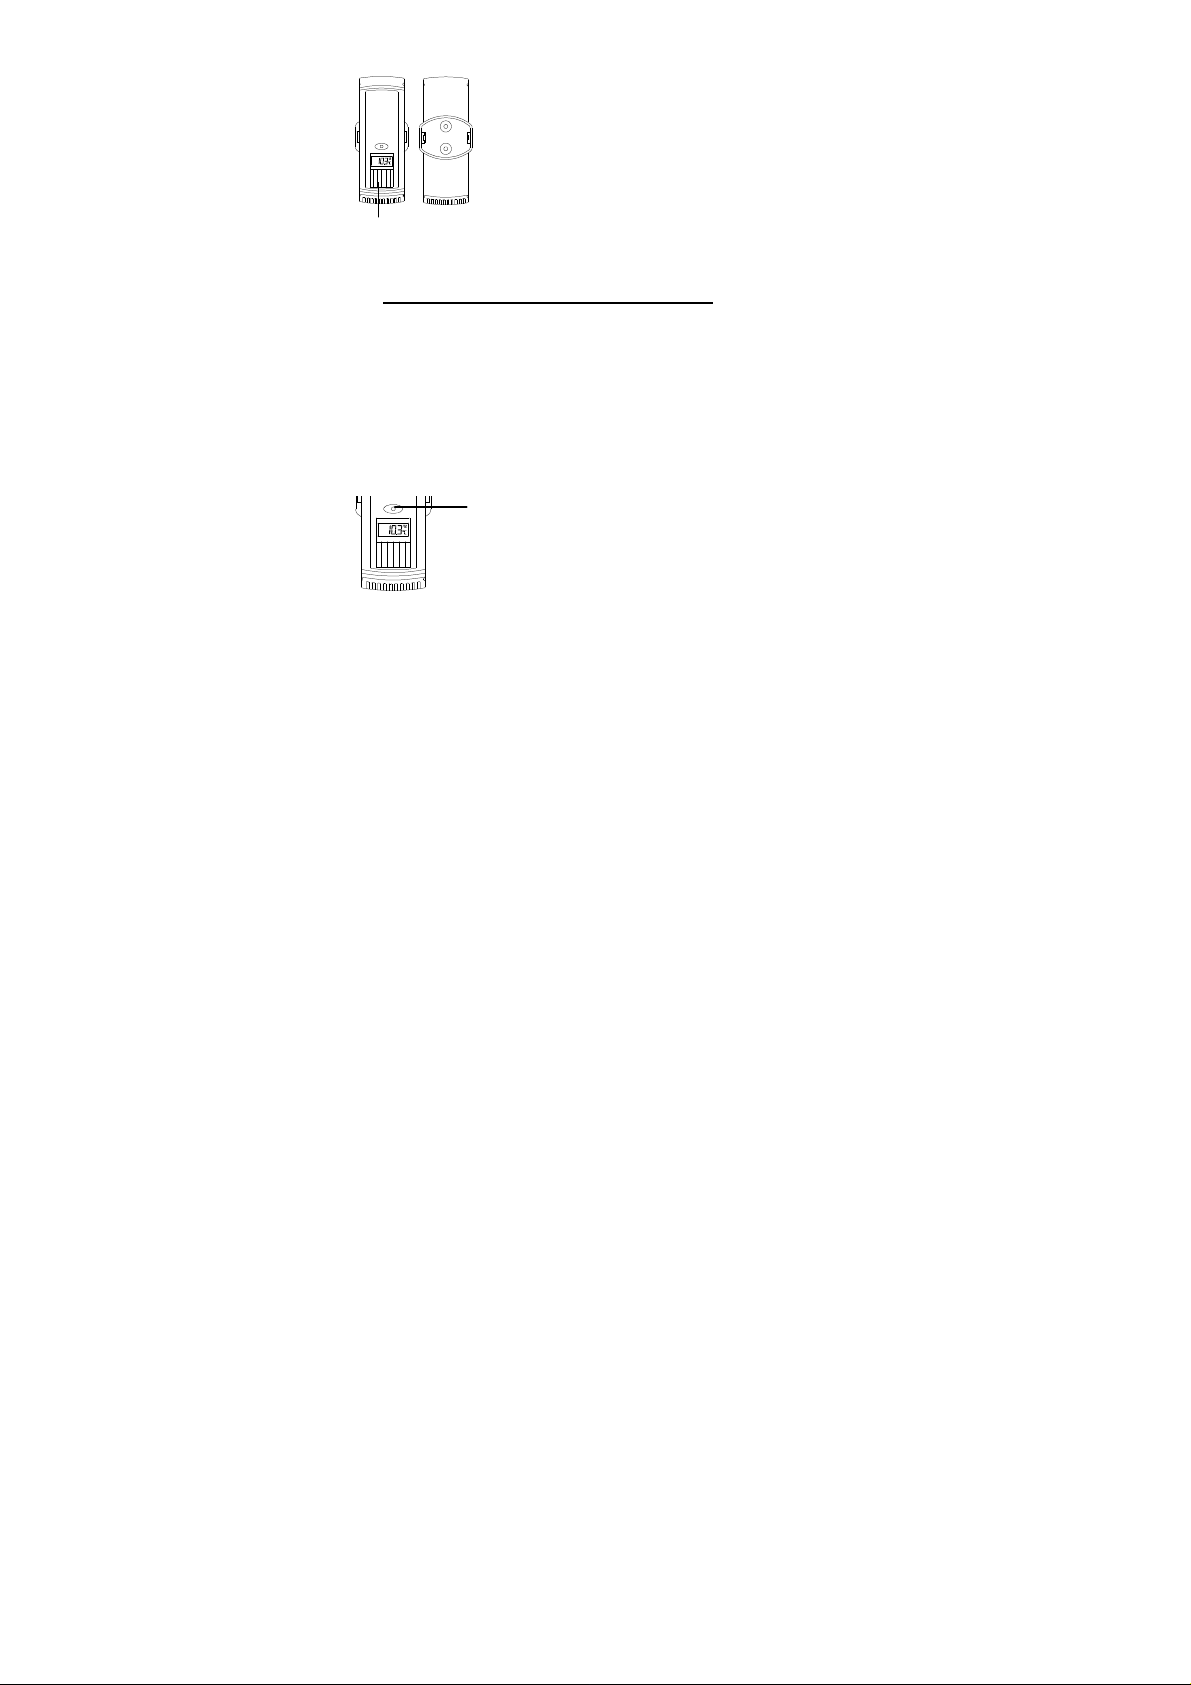
SOLAR-POWERED TRANSMITTER:
Note: only use a small pointed pen to
• Remote transmission of outdoor temperature and
humidity to the Solar Station by 868 MHz signals
• LCD will automatically alternate and display the
outdoor temperature and humidity data
• Recharge batteries by solar-powered cells
•
Wall mounting case
Solar panel
Note:
•
The solar-powered transmitter uses solar cells to charge the rechargeable
batteries (2 x AAA rechargeable batteries).
•
Those rechargeable batteries cannot be replaced.
SOLAR TRANSMITTER OPERATION MODES
Important:
Users need to press the reset key to activate the solar transmitter and link
the transmission to the Solar Station (receiver).
It is important to allow sufficient light to reach the solar panel while activating the
solar transmitter. Make sure the lights are on in the setup room and the solar
panel is facing a 60W light bulb or brighter - do not cover with hands or other
objects.
SOLAR TRANSMITTER RESET KEY:
The solar transmitter has 3 operations modes:
RESET key
press the RESET key to re-active the
transmitter into Normal Operation Mode.
2
Page 3

Normal Operation Mode:
•
This mode occurs when the battery voltage is higher than 2.5V.
•
The transmitter will measure and transmit the temperature and humidity
data to the Solar Station every 5 seconds.
•
If a dark environment is detected, it will measure and transmit the
temperature every 10s.
•
If the battery voltage is dropped lower than 2.8V, it will measure and
transmit the temperature every 10s
•
If battery voltage is dropped lower than 2.4V, will go into Idle mode.
•
If the solar transmitter is placed into a dark environment for 72 hours, will
goes into Stop mode.
•
If the user cover the solar cell for 10 seconds and press the reset button,
"StP" will be displayed on the LCD. Then the transmitter enters STOP
mode.
Idle Operation Mode:
•
This mode is occurred when the battery voltage is dropped lower than
2.4V
•
LCD is turned off
•
Does not perform temperature measurement and transmission
•
If battery voltage is raised higher than 2.5V, will go into Normal mode
•
If the solar transmitter is placed into a dark environment for 72 hours, will
goes into Stop mode.
Stop Operation Mode:
•
This mode is occurred when the solar transmitter is placed into a dark
environment for 72 hours or the user cover the solar cell for 10 seconds
and press the RESET button
•
The transmitter is in a standby state. Without perform any operation and
LCD is off
•
Under a bright condition, press the reset button to wake up the transmitter
into normal operation mode (battery voltage is higher than 2.5V). ). If the
battery is lower than 2.4V, a “Lo” icon will be shown in the LCD for a while.
Then the transmitter will enter the idle mode.
•
The most power saving mode.
3
Page 4

INITIAL SETUP
It is very important to follow these steps:
1.
Open the battery compartment, and make sure that the battery switch is
in the BATTERY position (not the SOLAR position).
2.
Battery switch in the BATTERY position
3. Now locate the battery insulator tab, and gently pull to remove it.
4. Slide the battery switch to the SOLAR position
5. Battery switch in the SOLAR position
6.
Continue to section titled “Setup After Changing/Installing the
Batteries”
TO INSTALL / REPLACE BATTERY IN THE SOLAR STATION
The Solar Station can use either the included 2 x Alkaline rechargeable
batteries (charged by solar panel) or 2 x AA Alkaline batteries (nonrechargeable; not included).
Important: the battery type selection (rechargeable or non-rechargeable)
must be made BEFORE inserting the battery into the compartment
otherwise it may cause damage to the station!
The included Alkaline rechargeable batteries should provide you with many
years of service.
If you choose to use non-rechargeable batteries, the battery switch MUST be
moved to the BATTERY position (not the SOLAR position). In this position, the
solar cells do not charge the batteries.
REGARDLESS OF THE TYPE OF BATTERY INSTALLED, THE BATTERY
SWITCH MUST BE IN THE BATTERY POSITION WHEN THE BATTERY IS
INSERTED.
If rechargeable batteries are used, the Battery switch should be moved to the
SOLAR position AFTER they have been inserted.
To use the included rechargeable Alkaline batteries (charged by solar
panel):
1. Remove the insulation tape.
2. Replace battery cover
3. Remove the black protective foil on the solar panel.
DO NOT SET THE CLOCK.
4
Page 5
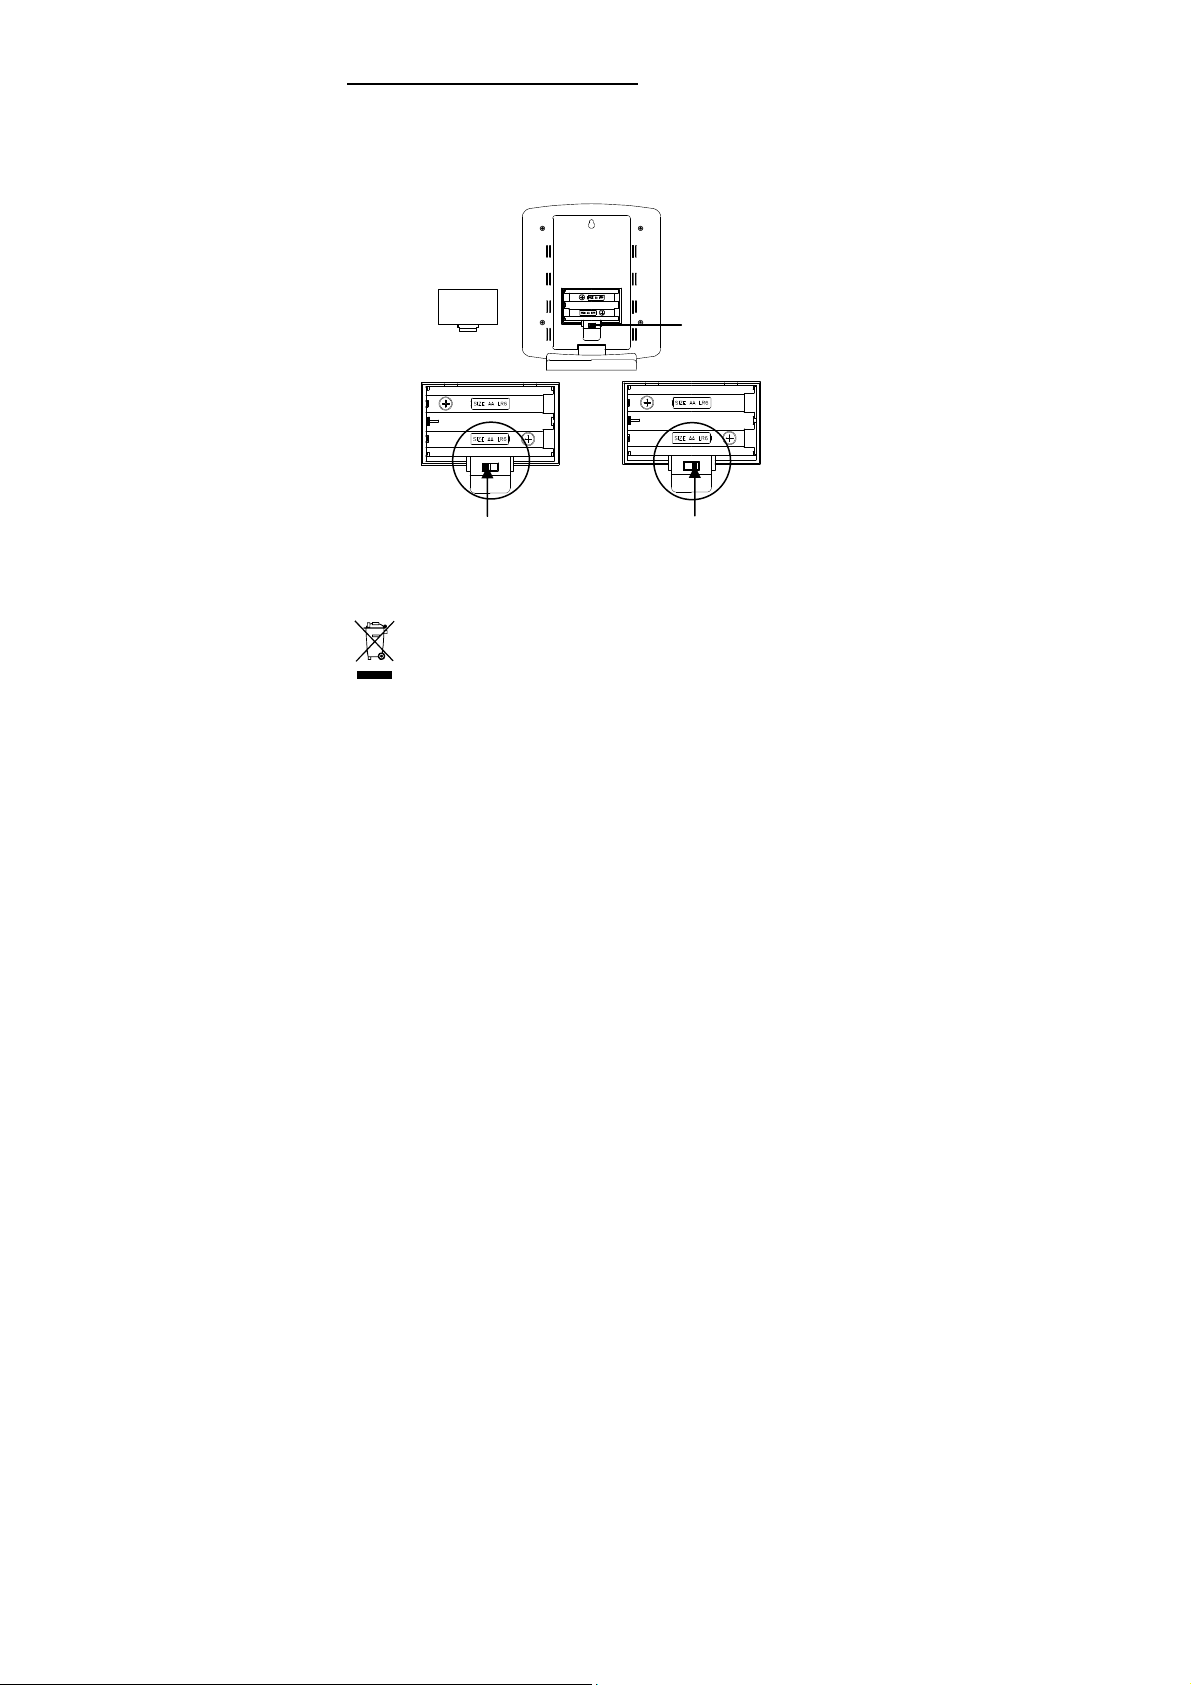
To use non-rechargeable Alkaline batteries:
Use switch
to select
which type of battery will
Rechargeable Alkaline
1. Remove the included rechargeable AA batteries from the compartment.
2. Use the switch to select the Alkaline battery (see below).
3. Insert 2 x AA Alkaline batteries into the compartment, observing the
correct polarity (see marking inside battery compartment.)
4. Replace battery cover
DO NOT SET THE CLOCK.
Battery cover
be used before inserting
the battery into the
compartment
Primary Alkaline
battery switch position
battery switch position
Note: For best performance, batteries should be replaced at least once every 2
years to maintain the best running accuracy. Ensure that the batteries used are
new and the correct size.
Please help in the preservation of the environment and return
used batteries to an authorized depot.
5
Page 6

SETUP AFTER CHANGING/REPLACING THE BATTERIES IN THE
SOLAR STATION
1. First, press the reset button on the Solar Transmitter. All segments of the
LCD will light up briefly. The code number and the security code (for
example, “20”) will be displayed sequentially. Next, the batteries voltage
will be shown on the LCD, it should be higher than 2.4V in order to
maintain the normal operation. The current temperature/humidity will be
display on the transmitter, and the transmitter starts the transmission of
signal.
2. Within 2 minutes of the start up of transmitter, insert the batteries to the
Solar Station. Once the batteries of the Solar Station are in place, all
segments of the Solar Station’s LCD will light up briefly and the time
(00:00), date, indoor temperature will be displayed on the Solar Station. If
they are not shown in the LCD after 30 seconds, reinstall the batteries of
the Solar Station again. Once the indoor data is displayed, the Solar
Station will start receiving the outdoor data.
3. The outdoor temperature and humidity data should then be displayed on
the Solar Station. If this does not happen after 2 minutes, the batteries will
need to be removed from the display and reset from step 1.
4. In order to ensure better reception and transmission, the distance
between the Solar Station and the transmitter should not be more than
100m to ensure sufficient 868 MHz transmission. (see notes on
“Positioning” and “868 MHz Reception”).
Note: When changing the batteries:
1. Be careful that they do not spring free from the contacts.
2. Press any button 20 times with the batteries removed.
3. Always wait at least 10 minutes after removing batteries before re-
inserting; otherwise start up problems may occur.
FUNCTION KEYS
The solar station has 2 easy to use keys:
SET key : To enter into the set modes for: time and solar modes
To toggle between the display modes
6
Page 7

Outdoor
+ key : To change any values in manual set modes
Outdoor
humidity
display
To reset all the MIN/MAX temperature records to current
temperatures
LCD SCREEN DESCRIPTIONS
The solar station LCD is divided into 2 sections and once the batteries are
inserted, all the segments will light up briefly before displaying the information
for time, indoor and outdoor temperature and indoor and outdoor humidity.
Low battery icon (station)
temperature
* When the signal from the transmitter is successfully received by the Solar
Station, this icon will be switched on. (If not successful, the icon will not be
shown on the LCD). User can therefore easily see whether the last reception
was successful (“ON” icon) or not (“OFF” icon). On the other hand, the short
blinking of the icon shows that a reception is being done at that time.
LOW BATTERY INDICATOR:
-RX Low battery indicator is displayed on the LCD when the Solar Station
batteries voltage is low.
-TX Low battery indicator is displayed on the LCD when the Solar Transmitter
batteries voltage is low.
Low battery icon (transmitter)
Time
Outdoor
transmission
reception icon*
Indoor
temperature
Indoor humidity
display
7
Page 8

MANUAL SETTINGS
After completion of the above described procedures in “Setting-up” the manual
setting modes can be entered by pressing the SET key. The following settings
can now be programmed:
•
Manual time setting
•
Solar mode setting
MANUAL TIME SETTING
1. Press and hold the SET key for 3 seconds to enter the time setting mode.
2. The hour digits start flashing.
3. Set the desired hours by pressing and releasing the + key followed by
pressing the SET key.
4. Now the minute digits start flashing.
5. Set the desired minutes by pressing and releasing the + key. If the + key
is held, the units will increase by 5.
6. Press the SET key again to confirm and enter the Solar Mode setting.
SOLAR MODE
The Solar Mode is used for saving the power consumption of the rechargeable
battery (Default setting ON):
1. The characters “ON” or “OFF” will start flashing. By use of the + key
select “ON” or “OFF” to set the solar mode.
2. Press and release the SET key to exit the setting mode and switch back to
the normal display mode.
If the solar mode setting is ON:
•
LCD will automatically turn OFF if the environment is too dark
•
LCD will automatically turn ON if the environment is bright enough; the
surrounding environment brightness is checked every 5 seconds.
•
No information will be displayed when the LCD is OFF, but all the
settings and operations will remain, except for the temperature and
humidity measurements.
•
The outdoor data will not be received if the LCD is OFF for more than
10 minutes.
•
If the user wants to check data while the display is automatically turned
off, because the environment is not bright enough, take the solar
station into a brighter environment. The display will turn on again.
8
Page 9

If the solar mode setting is OFF:
•
LCD will remain ON constantly.
•
All outdoor data reception and measurements will be performed even if
a dark environment is detected.
STOP MODE
If the Solar Station is placed in a dark environment for 72 hours continually, the
solar station will go to the stop mode:
•
The most power saving condition.
•
The Solar Station will not perform any operation and the LCD will also be
OFF.
•
Users need to press any key to wake up the Solar Station and to reactivate the transmission with the solar transmitter.
EXIT THE MANUAL SETTING MODES
If no keys are pressed for at least 15 seconds in setting mode, the solar station
will automatically switch back to normal display mode.
TO VIEW THE INDOOR AND OUTDOOR MIN/MAX
TEMPERATURES
1. From normal display, press the + key once to view the MIN/MAX outdoor
temperature.
2. Press the + key again to view the MIN/MAX indoor temperature.
3. Press the + key a third time to return to normal display.
Note:
•
The resolution for the MIN/MAX temperature records is 0.5ºC
•
If no keys are pressed for 15 seconds, the Solar Station will automatically
switch back to normal display.
TO RESET THE MIN/MAX TEMPERATURE RECORDS:
Press and hold the + key for 3 seconds to reset the MIN/MAX temperature
records. This will reset all the indoor and outdoor MIN/MAX records to current
temperatures.
9
Page 10

CHANGING THE DISPLAY MODE
The LCD1 will now display:
outdoor temperature/ outdoor
humidity
indoor
temperature/ indoor humidity
The Solar Station can be set to show different displays:
1. From normal display, press the SET key:
2. Press the SET key again
The LCD1 will display:
3. Press the SET key again and the display will return to the normal display
IN
868MHZ RECEPTION CHECK FOR OUTDOOR SOLAR
TRANSMITTER
The Solar Station will receive the outdoor data every 50 seconds. If the
temperature data is not being received 2 minutes after setting up (or the display
shows “- - -”), then please check the following points:
1. The distance of the Solar Station or outdoor transmitter should be at least
2 meters away from any interfering sources such as computer monitors or
TV sets.
2. Avoid placing the receiver onto or in the immediate proximity of metal
window frames.
10
Page 11

3. Using other electrical products such as headphones or speakers operating
on the same signal frequency (868MHz) may prevent correct signal
transmission and reception.
4. Neighbors using electrical devices operating on the 868MHz signal
frequency can also cause interference.
Note: When the 868 MHz signal is received correctly, do not re-open the battery
cover of the Solar Station, as the batteries may spring free from the contacts
and force a false reset. Should this happen accidentally then reset all units (see
“TO INSTALL / REPLACE BATTERY IN THE SOLAR STATION” and “INITIAL
SETUP” above) otherwise transmission problems may occur.
The maximum transmission range is 100m from the outdoor transmitter to the
Solar Station (in open space). However, this depends on the surrounding
environment and interference levels. If no reception is possible despite the
observation of these factors, all system units have to be reset (see “TO
INSTALL / REPLACE BATTERY IN THE SOLAR STATION” and “INITIAL
SETUP”).
POSITIONING THE SOLAR STATION:
Before permanently mounting, ensure that the Solar Station is able to receive
868MHz signals from the desired location. In addition, the Solar Station should
be placed in a bright environment for the rechargeable batteries to be able to
recharge.
There are two possible ways to mount the solar station:
• use of the detachable stand, or
• wall mounting
TABLE STANDING
The Solar Station comes attached with a table stand, which
provides the option of table standing the unit in addition to wall
mounting.
11
Page 12

WALL MOUNTING
1. Install a mounting screw (not included) into a wall—
leaving approximately 5mm extended from the wall.
2.
Place the Solar Station onto the screw, using the hanging
hole on the backside. Gently pull the Solar Station down
to lock the screw into place.
Note: Always ensure that the Solar Station locks onto the
screw before releasing.
POSITIONING THE SOLAR TRANSMITTER:
It is important to place the solar transmitter in a bright
environment for the rechargeable batteries to be able to recharge.
Do not place the sensor directly in the sun!
The solar transmitter can be placed onto any flat surface or wall
mounted using the bracket which doubles as a stand or wall
mount base.
TO WALL MOUNT
1. Secure the bracket onto a desired wall using the screws and
plastic anchors.
2. Clip the solar transmitter onto the bracket.
Note:
The mounting surface can affect the transmission range. If, for
instance, the unit is attached to a piece of metal, it may then either
reduce or increase the transmitting range. For this reason, we
recommend not to place the unit on any metal surfaces or in any position where
a large metal or highly polished surface is in the immediate vicinity (garage
doors, double glazing, etc.). Before securing in place, please ensure that the
Solar Station can receive the 868MHz signal from the solar transmitter at the
positions that you wish to place them.
12
Page 13

CARE AND MAINTENANCE:
• Avoid placing the units in areas prone to vibration and shock as these may
cause damage.
• Avoid areas where the units can be exposed to sudden changes in
temperature, i.e. direct sunlight, extreme cold and wet/moist conditions as
these will lead to rapid changes which reduce the accuracy of readings.
• When cleaning the LCD and casing, use a soft damp cloth only. Do not
use solvents or scouring agents.
• Do not submerge the units into water.
• Immediately remove all low powered batteries to avoid leakage and
damage. Replace only with new batteries of the recommended size.
• Do not make any repairs to the units. Please return them to the original
point of purchase. Opening and tampering with the units may invalidate
the warranty.
SPECIFICATIONS:
Temperature measuring range
Indoor : -9°C to 59.9°C with 0.1°C or 1°C resolution, depending on the
Outdoor : -39°C to 59.9°C with 0.1°C or 1°C resolution, depending on the
Temperature checking interval:
Indoor : every 2 minutes
Outdoor : every 50 seconds
Humidity measuring range
Indoor : 20% to 95% with 1% resolution
(“—“ displayed if the indoor temperature is OFL; “19%” displayed if
Outdoor : 1% to 99% with 1% resolution
(“—“ displayed if temperature is OFL; “1%” displayed if below 1%,
Humidity checking interval :
Indoor humidity : every 2 minutes
display location (“--.-“ or “--.0” displayed if outside this range)
display location resolution (“--.-“ or “--.0” displayed if outside this
range)
below 20%, “96%” displayed is above 95%)
“99%” displayed is above 99%)
13
Page 14

Outdoor humidity : every 50 seconds
Power consumption
Solar Station :
Alkaline rechargeable battery : 2 x AA, 1.5V (included), rechargeable by
solar cell
Rechargeable Alkaline battery life : 18 – 60 months, depending on usage
Primary Alkaline battery : 2 x AA, 1.5V battery (not included)
Primary Alkaline battery life : about 24 months
Solar transmitter : 2 x AAA, 1.5V (included), rechargeable by
solar cell
Rechargeable Alkaline battery life : 18 – 60 months, depending on usage
Dimensions (L x W x H)
Solar Station : 135.4 x 30.6 x 153.9mm
Solar transmitter : 36 x 16 x 102.6mm
LIABILITY DISCLAIMER
•
The electrical and electronic wastes contain hazardous substances.
Disposal of electronic waste in wild country and/or in unauthorized
grounds strongly damages the environment
•
Please contact your local or/and regional authorities to retrieve the
addresses of legal dumping grounds with selective collection
•
All electronic instruments must from now on be recycled. User shall take
an active part in the reuse, recycling and recovery of the electrical and
electronic waste.
•
The unrestricted disposal of electronic waste may do harm on public
health and the quality of environment.
•
This product must however not be thrown in general rubbish collection
points.
•
As stated on the gift box and labeled on the product, reading the “User
manual” is highly recommended for the benefit of the user.
•
The manufacturer and supplier cannot accept any responsibility for any
incorrect readings and any consequences that occur should an inaccurate
reading take place.
•
This product is not to be used for medical purposes or for public
information.
14
Page 15

•
R&TTE DIRECTIVE 1999
/5/EC
This product is only designed to be used in the home as indication of the
future weather and is not 100% accurate. Weather forecasts given by this
product should be taken only as an indication and not as being totally
accurate.
•
The specifications of this product may change without prior notice.
•
This product is not a toy. Keep out of the reach of children.
•
No part of this manual may be reproduced without written consent of the
manufacturer.
Summary of the Declaration of Conformity : We hereby declare
that this wireless transmission device does comply with the
essential requirements of R&TTE Directive 1999/5/EC.
15
 Loading...