

Page 1
AIR QUALITY MONITOR
A
r
y
y
t
A
A
y
A
INTRODUCTION:
Congratulations on purchasing this Air Quality Monitor with display of
indoor temperature and humidity. It is further acting as a DCF-77 radio
controlled clock with calendar display and alarm clock function. This
innovative product is ideal for use in the home or office.
FEATURES:
• DCF radio controlled time with manual setting
• DCF Time reception ON/OFF
• Time zone setting: ± 12 hours
• 12/24h time display
• Calendar display
• Alarm setting with snooze function
• Indoor temperature display in ºC / ºF
• Indoor humidity display in RH%
• Air quality alert setting
• Air quality indicator
• Low battery indicator
• LED Back-light
SETTING UP:
1. Open the battery cover at the back of the air quality monitor as
indicated below.
2. Checking the correct polarization, insert 2 x C, IEC LR14, 1.5V
Alkaline batteries into the battery compartment and replace the
cover.
3. When the batteries are inserted, all the segments of the LCD
will light up briefly and a “beep” will sound. The air quality
monitor will now start receiving the DCF time signal. After
approximate 3 to 5 minutes, the DCF time will be displayed.
4. If after 10 minutes, the DCF time has not been received, press
the SET key to manually enter a time initially.
Note:
• The Equivalent CO
minutes.
• The air quality sensor will take up to 5 days after inserting
batteries to condition itself for the room it is placed. If the unit is
placed into another room, there might be a reconditioning time
of several days as well.
INSTALLING AND REPLACING THE BATTERY IN THE
AIR QUALITY MONITOR
1. Remove the cover at the back of the air quality monitor.
2. Insert batteries observing the correct polarity (see marking).
3. Replace compartment cover.
BATTERY CHANGE:
It is recommended to replace the batteries in the unit regularly to
ensure optimum accuracy of the unit (Battery life See Specifications
below).
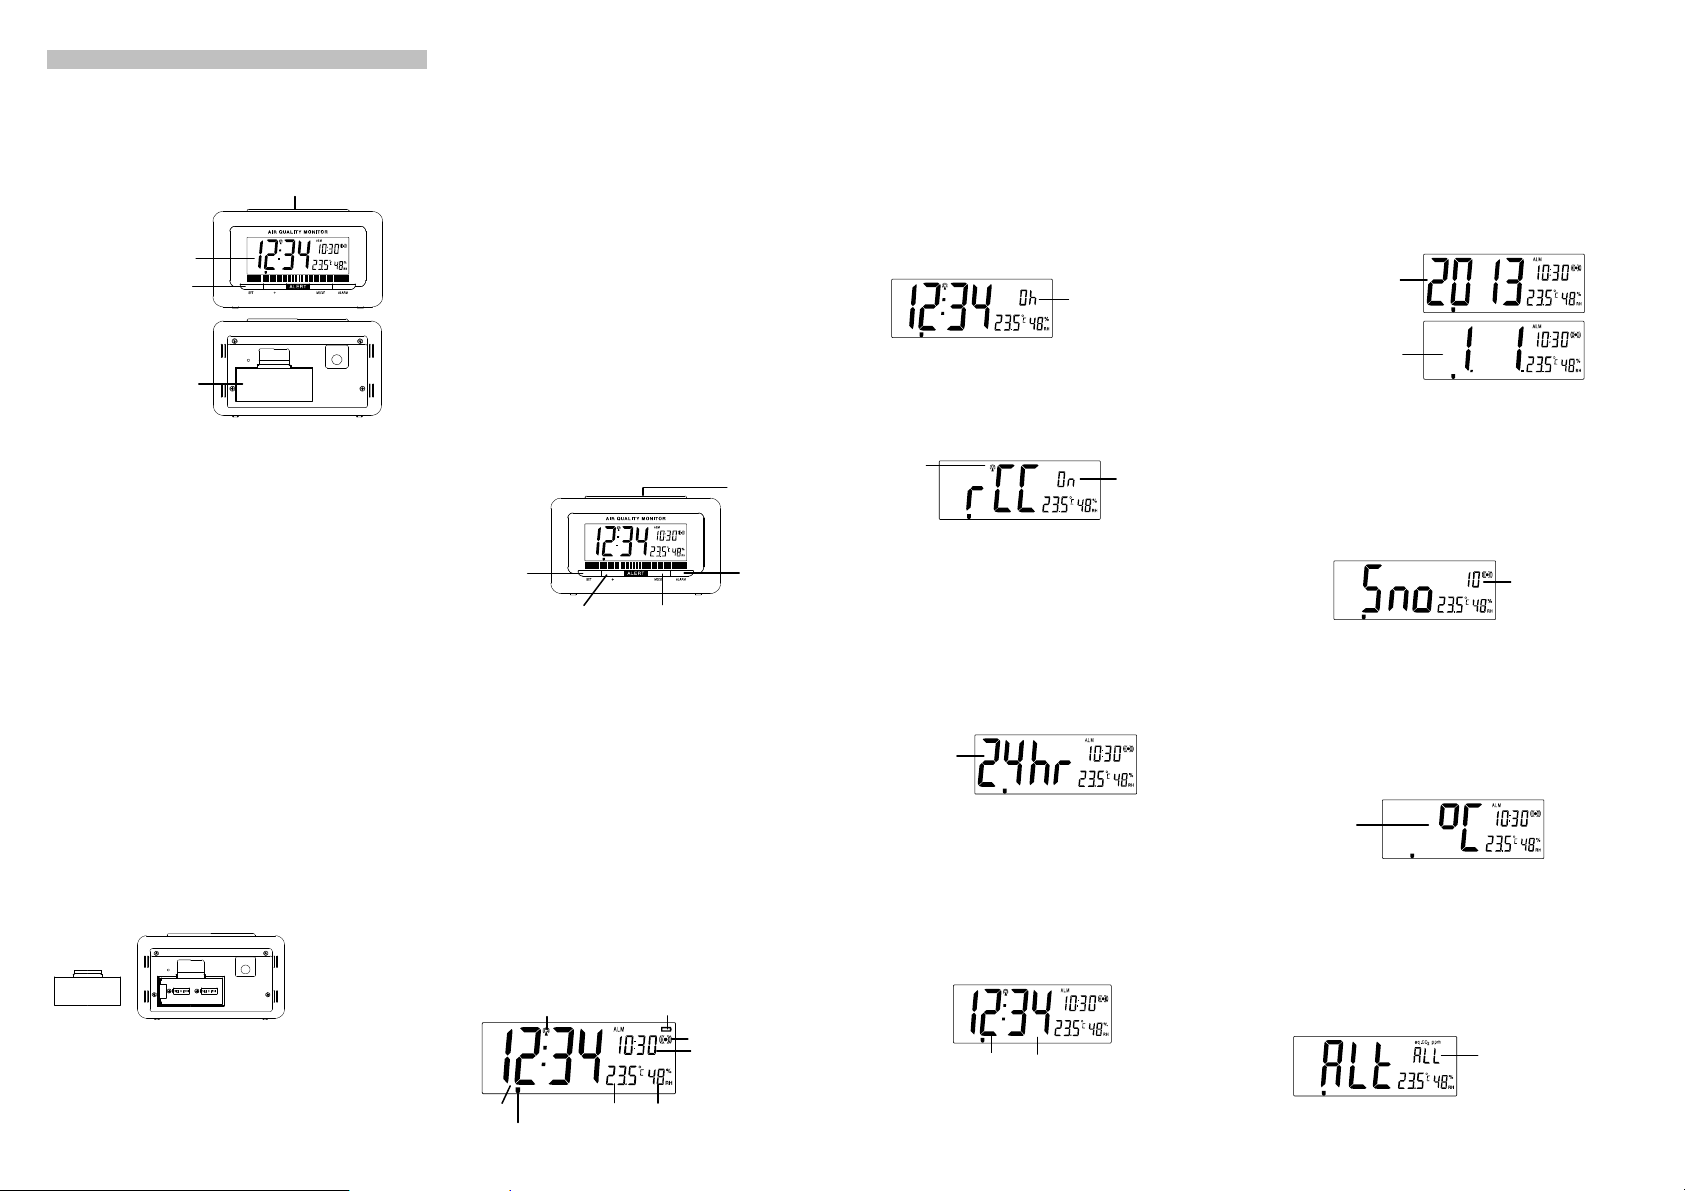
Instructions manual
LCD displa
Function keys
Batter
compartmen
Function key
ppm will only be displayed after 30
2
The air quality monitor
uses 2 x C, IEC LR14
1.5V batteries. To
install and replace the
batteries, please
follow the steps below:
DCF RADIO CONTROLLED TIME
The time base for the radio controlled time is a Cesium Atomic Clock
operated by the Physikalisch Technische Bundesanstalt
Braunschweig which has a time deviation of less than one second in
one million years. The time is coded and transmitted from Mainflingen
near Frankfurt via frequency signal DCF-77 (77.5 kHz) and has a
transmitting range of approximately 1,500 km. Your radio-controlled
clock receives this signal and converts it to show the precise time in
summer or wintertime.
The quality of the reception depends greatly on the geographic
location. In normal cases, there should be no reception problems
within a 1,500 km radius of Frankfurt.
DCF reception is done twice daily at 02:00 and 03:00 am. If the
reception is not successful at 03:00 am, then the next reception takes
place the next day at 02:00 am.
If the tower icon flashes, but does not set the time or the DCF tower
does not appear at all, then please take note of the following:
• Recommended distance to any interfering sources like
computer monitors or TV sets is a minimum of 1.5 - 2 meters.
• Within ferro-concrete rooms (basements, superstructures), the
received signal is naturally weakened. In extreme cases,
please place the unit close to a window and/ or point its front or
back towards the Frankfurt transmitter.
• During nighttime, the atmospheric disturbances are usually less
severe and reception is possible in most cases. A single daily
reception is adequate to keep the accuracy deviation below 1
second.
KEY FUNCTIONS:
The Air Quality Monitor has 5 easy-to-use keys:
SNOOZE key
SET key
SET key:
• Press and hold to enter the manual setting modes: time zone,
DCF ON/OFF, 12/24 hour time display, manual time, calendar
display, snooze time, ºC / ºF temperature display, alert settings
• Press briefly to display the calendar for about 6 seconds
• Stop alarm ringing
+ key:
• Press to change, set, toggle all manual settings
• Stop alarm ringing
MODE key:
• Press to toggle between: alarm time, seconds, and Equivalent
CO
• Stop alarm ringing
• Exit the manual setting mode
ALARM key:
• Press and hold to enter the alarm setting mode
• Activate / deactivate the alarm
• Stop alarm ringing
• Exit the manual setting mode
SNOOZE key:
• Enter snooze during alarm ringing
,
• Exit the manual setting mode
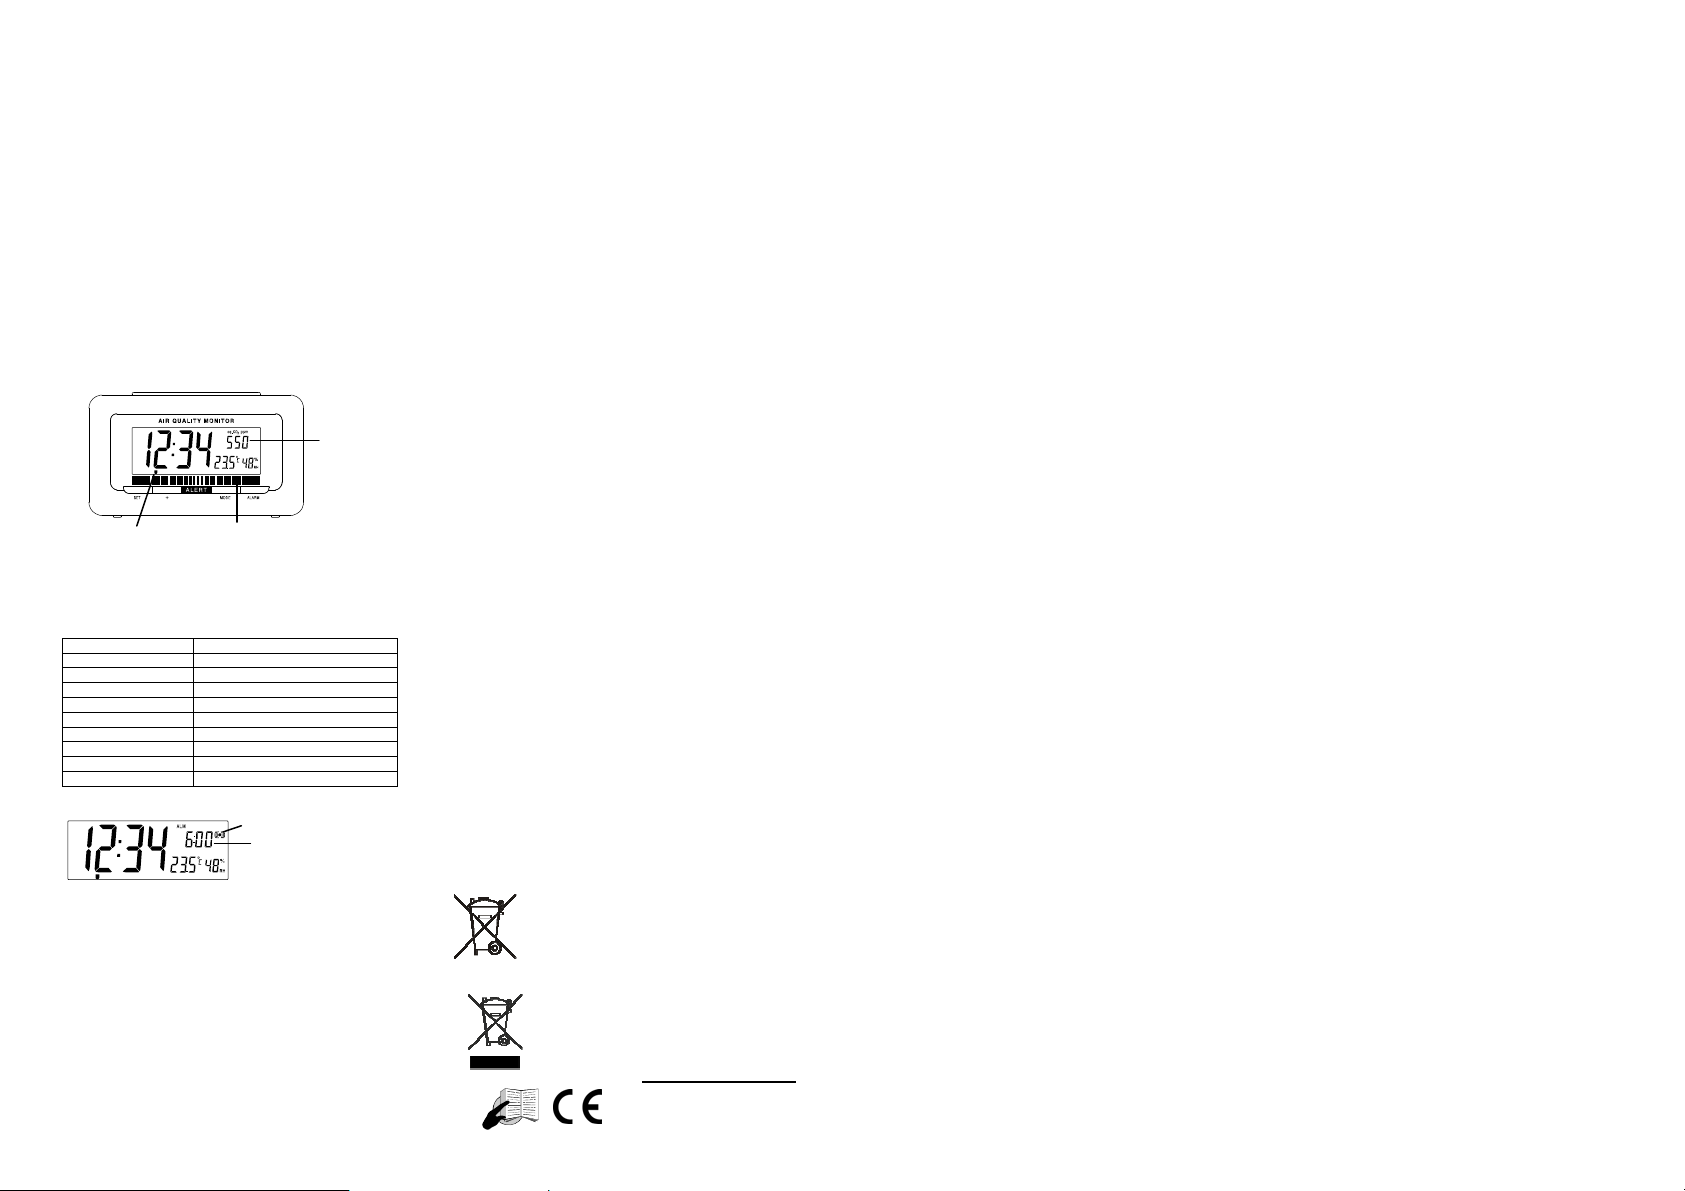
LCD SCREEN
DCF Tower icon (for time reception)
ppm display
2
+ key
Time
Indoor temperature
in ºC/ºF
MODE key
Low battery icon
larm icon
larm time /
Equivalent CO
ppm / seconds
displa
Indoor relative
humidity % RH
LARM key
2
ir quality indicato
MANUAL SETTINGS:
The following manual settings can be done in the setting mode:
• Time zone setting
• DCF ON/OFF setting
• 12/24 hour time setting
• Time setting
• Calendar setting
• Snooze setting
• ºC / ºF temperature display setting
• Air quality alert setting
Press and hold the SET button for about 3 second to enter the setting
mode:
TIME ZONE SETTING
Flashing
The time zone default is "0" hour. To set a different time zone:
1. The current time zone value starts flashing.
2. Use the + key to set the time zone. The range runs from 0, 1,
2…12, -12, -11, -10… -2, -1, 0, in consecutive 1-hour intervals.
3. Confirm with the SET key and enter the Time reception
On/Off setting.
TIME RECEPTION ON/OFF SETTING
Flashing
Flashing
In area where reception of the radio-controlled time (DCF time) is not
possible, the time reception function can be turned OFF. The clock will
then work as a normal quartz clock. (Default setting is ON).
1. The digit “ON” and tower icon will start flashing on the LCD.
2. Use the + key to turn OFF the time reception function if
necessary.
3. Confirm with the SET key and enter the 12/24 hour time
display setting.
Note:
If the Time Reception function is turned OFF manually, the clock will
not attempt any reception of the radio-controlled time (DCF time) as
long as the Time Reception OFF function is activated. The Time
Reception icon and the DCF icon will not be displayed on the LCD.
12/24 HOUR TIME DISPLAY SETTING
Flashing
1. “12hr” or “24hr” flashes in the LCD. (default 24hr)
2. Press the + key to select the “12hr” or “24hr” display mode.
3. Confirm with the SET key and enter the Manual time setting.
Note:
When 24h time display is selected, the calendar format will be date
and month display. When 12h time display is selected, the calendar
format will be month and date display.
MANUAL TIME SETTING
In case the air quality monitor is not able to detect the radio-controlled
time (DCF time) signal (disturbances, transmitting distance, etc.), the
time can be manually set. The clock will then work as a normal Quartz
clock.
To set the clock:
1. The hour digits start flashing in the time display section.
2. Use the + key to adjust the hours and then press SET key to go
to the minute setting.
Minutes (flashing)Hours (flashing)
3. The minute will be flashing. Press the + key to just the minutes.
4. Confirm with the SET key and enter the Calendar setting.
Note:
The unit will still try to receive the signal despite a manual setting.
When the signal is received, the manually set time will automatically
be replaced by the received time. During reception attempts, the DCF
tower icon will flash. If reception has been unsuccessful, the DCF
tower icon will not appear but reception will still be attempted.
CALENDAR SETTING
The date default of the air quality monitor is 1. 1. of the year 2013
after initial set-up. Once the radio-controlled time signals are received,
the date is automatically updated. However, if the signals are not
received, the date can also be set manually. To do this:
Year (flashing)
1. The year starts flashing. Use the + key, set the year required.
2. Press the SET key to enter the month setting.
3. The month digit will be flashing. Press the + key to set the
4. Press the SET key to enter the date setting.
5. The date digit will be flashing. Press the + key to set the date.
6. Confirm with the SET key and enter the Snooze setting.
SNOOZE SETTING
The snooze time can be set OFF or to a maximum time of 30 minutes
(default is 10 minutes):
1. The snooze time (in minute) digit will be flashing. Use the + key
2. Confirm with the SET button and enter the ºC/ºF temperature
Note:
If the snooze time has been set “OFF”, the snooze function will not be
activated.
°C/°F TEMPERATURE UNIT SETTING
The default temperature reading is set to °C (degree Celsius). To
select °F (degree Fahrenheit):
1. The “°C” will be flashing, use the + key to toggle between “°C”
2. Confirm with the SET key and enter the Air quality alert
AIR QU ALITY ALERT SETTING
The air quality monitor has 3 alert settings (default: ALL):
• ALL: LED alert flashing with alert sound
• OFF: alert off (no LED alert flashing, no alert sound)
• LED: LED alert flashing only
"Date. Month."
(for 24h time display)
"Month. Date."
(for 12h time display)
The range runs from 2013 to 2049 (default is 2013).
month.
Flashing
to set the snooze time (in minute). Each pressing of the button
will increase the snooze time by 5 minutes (5, 10…30 min).
The snooze can also be set OFF when the “OFF” digit is being
displayed.
unit setting.
Flashing
and “°F”.
setting.
“ALL” flashing
1. The setting starts flashing. Use the + key to set the required
setting (ALL, LED, OFF).
Page 2
A
A
2. Confirm with the SET key and the exit the manual settings.
A
Note:
If the air quality alert has been set to “ALL” or “LED”:
• Equivalent CO
LED alert blinks at a slower speed (1.5s) and no alert sound.
• Equivalent CO
LED alert blinks at faster speed (0.5s) and has alert sound.
(Alert will sound only if the air quality setting has been set to
ALL).
Note about the air quality alert:
• The air quality alert will sound for a maximum duration of 30
minutes. To stop the alert, press any key.
• If the time alarm or the DCF reception occurs while the air
quality is on alert mode, the air quality alert sound and LED
flashing will momentarily stop. It will restart once the time alarm
is stopped, or after the DCF time reception is done.
AIR QUALITY INDICATOR
The air quality indicator is located on the bottom of the LCD. It
changes from GREEN to RED by measuring the Equivalent CO
The Equivalent CO2 ppm can be displayed when pressing the MODE
key briefly:
ppm > 1500ppm:
2
ppm > 2000ppm:
2
ir quality indicator
* The air quality value shown, after sensor conditioning, may differ +/250 ppm.
Note:
A 9-level bar graph is used to indicate “GREEN” to “RED” air quality
level in the surrounding environment:
Levels Equivalent CO
GREEN (level 1) 450 – 600ppm
Level 2 650 – 800ppm
Level 3 850 – 1000ppm
Level 4 1050 – 1200ppm
Level 5 1250 – 1500ppm
Level 6 1550 – 1800ppm
Level 7 1850 – 2100ppm
Level 8 2150 – 2400ppm
RED (level 9) ≥ 2450ppm
ALARM SETTING
To set alarm:
1. Press and hold ALARM key for about 3 seconds until the alarm
time display flashes.
2. The hour digit will be flashing. Press the + key to adjust the
hour.
3. Then, press ALARM key and the minute digit will start flashing.
Press + key to set the minute.
4. Press again the ALARM key to confirm the setting and exit the
alarm setting.
Note:
• To activate/ deactivate the alarm function, press the ALARM
button once. The display of the alarm icon represents that the
alarm is "ON".
• The duration of alarm sounding is 180 seconds.
Bar graph
larm icon (ON)
ppm
2
Equivalent CO
ppm (parts per
million) value*
larm time
2
Equivalent CO
ppm (parts per
million) value*
2
TO ACTIVATE THE SNOOZE FUNCTION AND
STOPPING THE ALARM:
1. When the alarm is sounding, press the SNOOZE key to
activate the snooze function. The alarm will stop and reactivate after the time interval of the snooze time pre-set by
user.
2. To stop the alarm completely, press any keys other than the
SNOOZE key.
SPECIFICATIONS:
Recommended temperature range:
+5ºC to +40ºC / +41ºF to 139.8ºF
Temperature measuring range:
Indoor : -9.9ºC to +59.9ºC with 0.1ºC resolution /
Relative humidity measuring range:
Indoor : 20% to 95% with 1% resolution (display “- -“ if
ppm.
Equivalent CO
450ppm to 6950ppm with 50ppm resolution (display OFL > 6950ppm)
Measuring intervals:
Indoor temperature checking interval : every 16 seconds
Indoor humidity checking interval : every 16 seconds
2
Air quality level checking interval : every 3 minutes
Power consumption: 2 x C, IEC LR14, 1.5V
Dimensions (L x W x H): 149.4 x 49 x 83.7mm
Precautions
• This main unit is intended to be used only indoors.
• Do not subject the unit to excessive force or shock.
• Do not expose the unit to extreme temperatures, direct sunlight,
• Do not immerse in water.
• Avoid contact with any corrosive materials.
• Do not dispose this unit in a fire as it may explode.
• Do not open the inner back case or tamper with any components
Batteries safety warnings
• Please read all instructions carefully before use.
• Use only alkaline batteries, not rechargeable batteries.
• Install batteries correctly by matching the polarities (+/-).
• Always replace a complete set of batteries.
• Never mix used and new batteries.
• Remove exhausted batteries immediately.
• Remove batteries when not in use.
• Do not recharge and do not dispose of batteries in fire as the
• Ensure batteries are stored away from metal objects as contact
• Avoid exposing batteries to extreme temperature or humidity or
• Keep all batteries out of reach from children. They are a choking
Consideration of duty according to the battery law
Consideration of duty according to the law of electrical devices
14.1ºF to +139.8ºF with 0.2ºF resolution
(OFL displayed if outside this range. In degree F
display, OFL will displayed when over 99.9ºF)
temperature is OFL, except when the temperature is
100ºF to 139.8ºF; display “19%” if < 20% and “96%”
if > 95%)
ppm measuring range:
2
dust or humidity.
of this unit.
batteries may explode.
may cause a short circuit.
direct sunlight.
hazard.
Old batteries do not belong to domestic waste because they
could cause damages of health and environment. You can
return used batteries free of charge to your dealer and
collection points. As end-user you are committed by law to
bring back needed batteries to distributors and other
collecting points!
This symbol means that you must dispose of electrical
devices from the General household waste when it reaches
the end of its useful life. Take your unit to your local waste
collection point or recycling centre. This applies to all
countries of the European Union, and to other European
countries with a separate waste collection system.
R&TTE Directive 1999/5/EC
Summary of the Declaration of
Conformity: We hereby declare that
this wireless transmission device
does comply with the essential
requirements of R&TTE Directive
1999/5/EC.
 Loading...