

Page 1

TL-SBC 8280
TL-SBC 8280
TL-SBC 8280TL-SBC 8280
Full-Size Socket 478 Pentium 4
Intel 845G CPU Card
USER’S MANUAL
USER’S MANUAL
USER’S MANUALUSER’S MANUAL
Version 1.0
Page 2

Acknowledgments
Award is a registered trademark of Award Software International,
Inc.
PS/2 is a trademark of International Business Machines
Corporation.
Intel and Pentium 4 are registered trademarks of Intel
Corporation.
Microsoft Windows is a registered trademark of Microsoft
Corporation.
Winbond is a registered trademark of Winbond Electronics
Corporation.
All other product names or trademarks are properties of their
respective owners.
ii TL-SBC 8280 User’s Manual
Page 3

Table of Contents
Introduction.............................................................. 1
Product Description.............................................................1
Checklist..............................................................................2
Specifications ......................................................................3
Board Dimensions...............................................................4
Installations ............................................................. 5
Installing the CPU...............................................................6
ATX Power Installation.......................................................7
MicroPCI Daughter Card Installation.................................7
Installing the Memory.........................................................8
Setting the Jumpers .............................................................9
Connectors on TL-SBC 8280...............................................14
Watchdog Timer................................................................26
BIOS Setup............................................................. 31
Drivers Installation................................................ 53
Appendix................................................................ 69
A. I/O Port Address Map...................................................69
B. Interrupt Request Lines (IRQ)......................................70
TL-SBC 8280 User’s Manual iii
Page 4

This page is intentionally left blank.
iv TL-SBC 8280 User’s Manual
Page 5

INTRODUCTION
Introduction
Product Description
The TL-SBC 8280, Pentium 4 Full Size PICMG CPU Card
incorporates the Intel® advanced 845G Chipset Memory Controller hub
and supports 478-pin Intel Pentium 4 processors of 1.3GHz and up to
2.6GHz+ with FSB 533MHz/400MHz. TL-SBC 8280 supports the
Pentium 4 processor with 256-KB L2 cache and the Pentium 4
processor with 512-KB L2 cache on 0.13 micron process.
The I/O functions are on TL-SBC 8280 integrated onto the ICH4. It
supports either the integrated graphics device (IGD) on the GMCH or
an external graphics device on AGP. The IGD has 3D, 2D, and video
capabilities. The system memory size can be up to 2 GB, using the two
DDR sockets on board. Six USB ports are supported with the USB
1.1/2.0 standard.
TL-SBC 8280 optionally supports the ATI Mobility M7 graphics
controller with 16MB or 32MB embedded memory. Interface supported
are LVDS, TMDS and dual CRT. The VGA functionality offers
unprecedented video quality and
capability
Gigabit LAN controller for faster networking access.
. TL-SBC 8280 also optionally comes with an Intel 82540
integrated MPEG-2 decode
TL-SBC 8280 supports a MicroPCI socket for MicroPCI daughter
cards with VGA, VGA/LAN, Ethernet (LAN), SCSI, and IEEE 1394
functions.
This CPU card represents the perfect choice for those who want
superior p erformance for rugge d and demanding applications in
industrial automation, image processing, multimedia and
telecommunications.
TL-SBC 8280 User’s Manual 1
Page 6

INTRODUCTION
Checklist
Your TL-SBC 8280 package should include the items listed below.
The TL-SBC 8280 Industrial CPU Card
••••
This User’s Manual
••••
1 IDE Ribbon Cable
••••
1 Floppy Ribbon Connector
••••
2 Serial Port Ribbon Cable and 1 Parallel Port Attached to a
••••
Mounting Bracket
1 Y-Cable supporting a PS/2 Keyboard and a PS/2 Mouse
••••
1 CD containing t he following:
••••
Chipset Drivers
••••
Flash Memory Utility
••••
2 TL-SBC 8280 User’s Manual
Page 7

Specifications
INTRODUCTION
CPU Socket
CPU
CPU Front Side Bus
Chipset
L2 Cache
BIOS
System Memory
Integrated VGA
Optional VGA
LAN
Audio
LPC I/O
IDE Interface
FDD Interface
Parallel Port
Serial Ports
Watchdog Timer
SSD Interface
Hardware Monitoring
USB
IrDA
Keyboard and Mouse
Extra Features
Power Consumption
Form Factor
Dimensions
Socket 478
Intel Pentium 4, 1.30GHz ~ 2.6GHz+
533MHz / 400MHz
Intel 845G Chipset
128K/256K/512K, CPU integrated
Award BIOS, ACPI supported
Two DDDR sockets, up to 2GB DDR SDRAM
Intel 845G integrated VGA
Supports CRT interface
ATI Mobility M7 graphics controller
16MB/32MB embedded memory
Frame buffer (DDR, AGP4)
LVDS/TMDS/dual CRT interface
ICH4 integrated Ethernet controller
10Base-T / 100Base-TX Protocol
Optional Gigabit Ethernet solution
ICH4 integrated audio
Optional AC97 codec and audio cable
W83627HF chipset supports IrDA x 1, Parallel x 1, COM1
(RS232), COM2 (RS232/422/485), FDC up to 2.88MB
(3Mode support) Hardware Monitor (3 thermal inputs, 6
voltage monitor inputs, VID0-4, 3 fan headers)
Built in ICH4; Two enhanced IDE supports 4 IDE devices
including UDMA33/66/100, PIO mode 4 and bus master
Supports up to two floppy disk drives: 3.5" and/or 5.25"
drives; 3 Mode support
One parallel port supports SPP/EPP/ECP
One RS-232/422/485 and one RS-232 port
Generates system reset; 256 levels
Supports 2MB~144MB M-Systems DiskOnChip flash disk
Built in W83627HF; monitors system/CPU temperature and
voltage status
Supports 6 USB ports, USB 1.1/2.0 compliant
Pin header
PS/2 type connectors
ISA High Drive, PCI to ISA Bridge (ITE 8888)
One MicroPCI socket, ATX 12V power connector
Pentium 4 1.8GHz with 512MB DDR SDRAM
+5V: 5.7A +12V: 8.5A
Pentium 4 2.2GHz with 512MB DDR SDRAM
+5V: 6.4A +12V: 6.3A
Full Size CPU Card
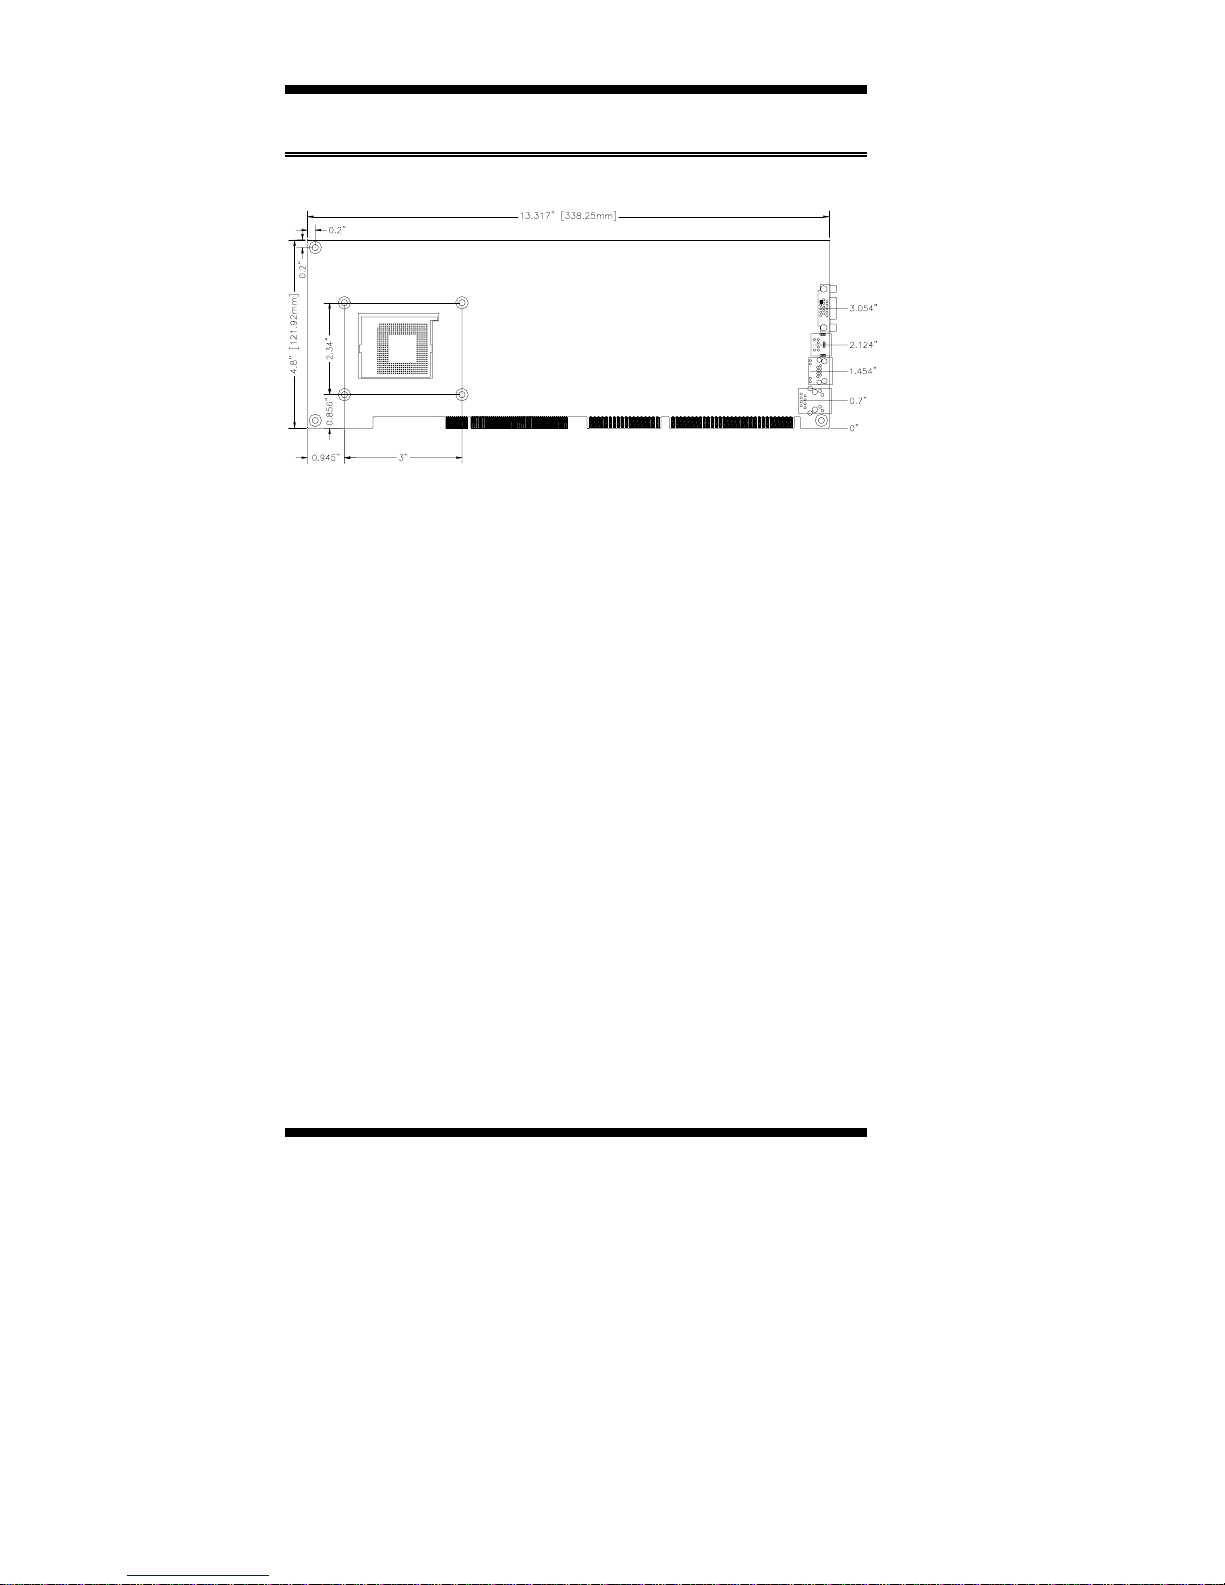
338mm x 122mm (13.3” x 4.8”)
TL-SBC 8280 User’s Manual 3
Page 8
INTRODUCTION
Board Dimensions
4 TL-SBC 8280 User’s Manual
Page 9

INSTALLATIONS
Installations
This section provides information on how to use the jumpers and
connectors on the TL-SBC 8280 in order to set up a workable system.
The topics covered are:
Installing the CPU ...................................................................6
ATX Power Installation...........................................................7
MicroPCI Daughter Card Installation......................................7
Installing the Memory.............................................................8
Setting the Jumpers..................................................................9
Connectors on TL-SBC 8280..................................................14
Watchdog Timer....................................................................26
TL-SBC 8280 User’s Manual 5
Page 10
INSTALLATIONS
Installing the CPU
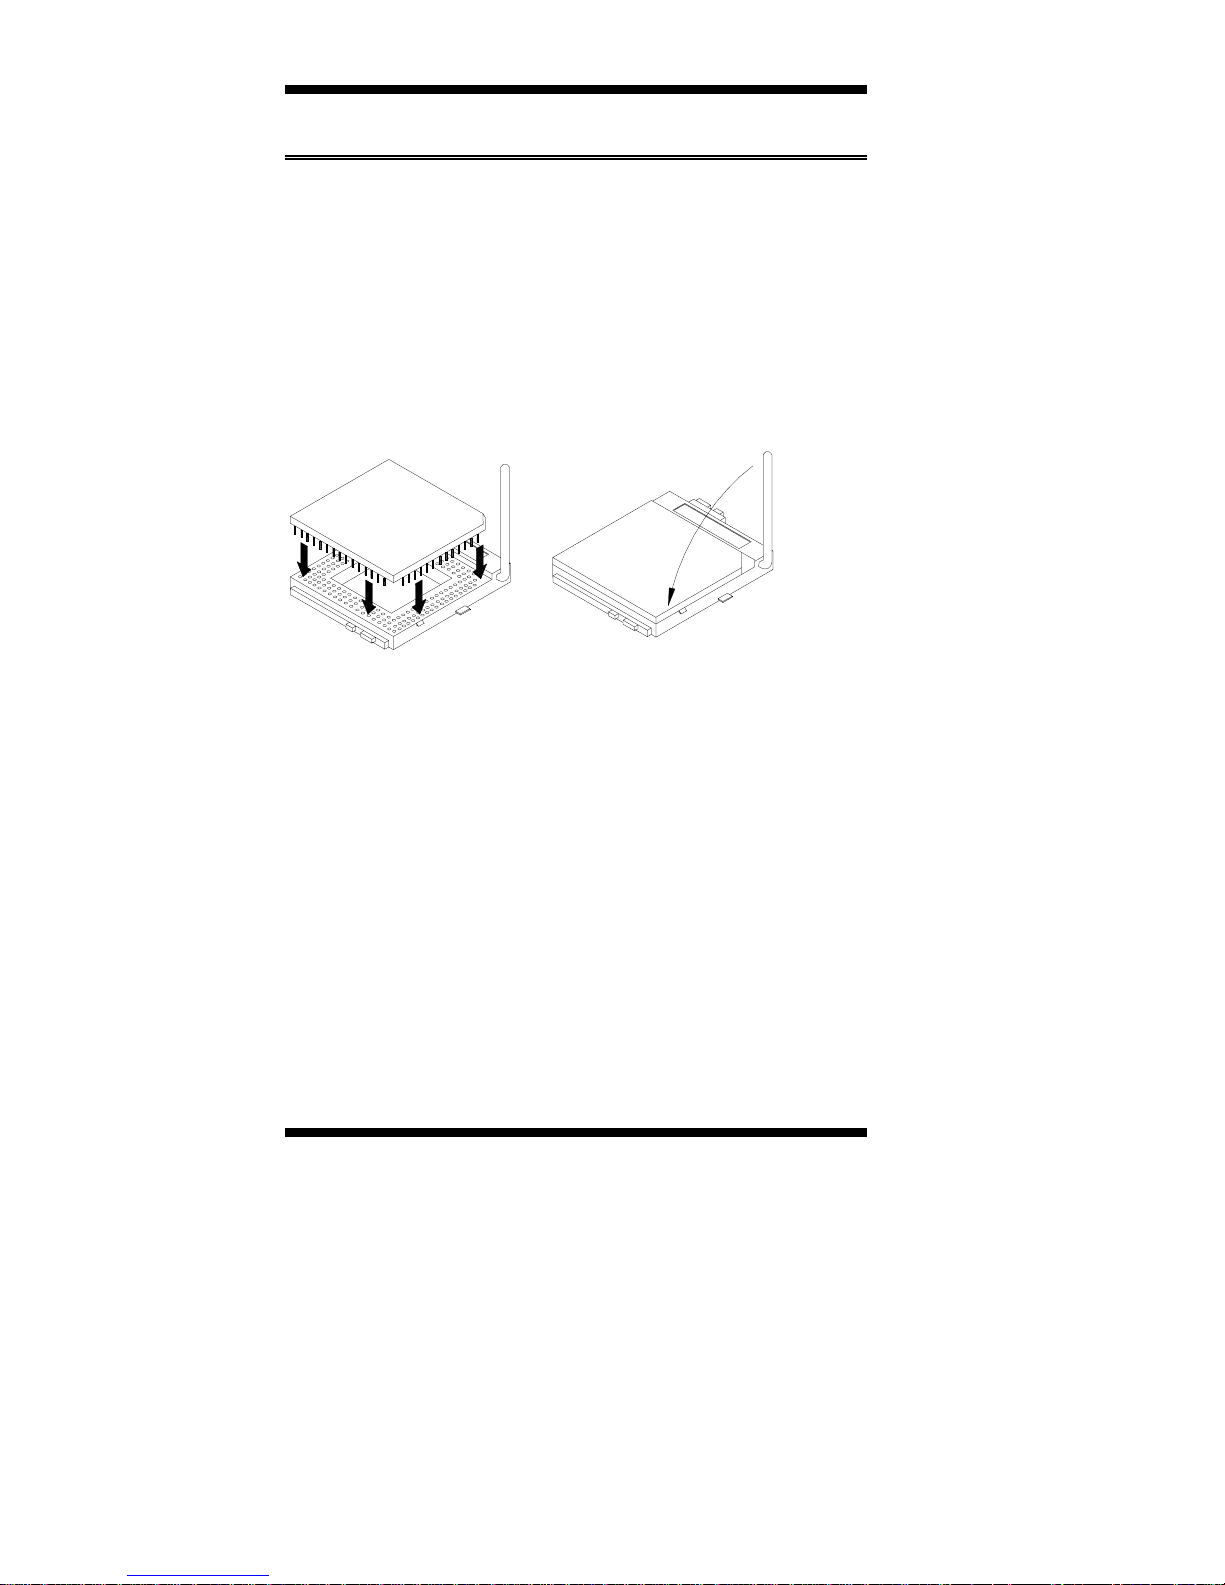
The TL-SBC 8280 CPU Card supports a Socket 478 processor socket
for Intel Pentium 4 processors.
The Socket 478 processor socket comes with a lever to secure the
processor. Raise this lever to about a 90° angle to allow the insertion of
the processor. Place the processor into the socket by making sure the
notch on the corner of the CPU corresponds with the notch on the
inside of the socket. Once the processor has slide into the socket, return
the lever to the lock position. Refer to the figures below.
After you have installed the processor into the socket, check if the
jumpers for the CPU type and speed are correct.
NOTE:
6 TL-SBC 8280 User’s Manual
Ensure that the CPU heat sink and the CPU top surface are in
total contact to avoid CPU overheating problem that would
cause your system to hang or be unstable.
Page 11
INSTALLATIONS
g
ATX Power Installation
The system power is provided to the TL-SBC 8280 CPU card with the
J1 and J8 ATX power connectors. Please note that the J8 external ATX
power connector should be connected to the backplane for TL-SBC 8280 to
function. J8 is a 3-pin power connector. J1 is a 4-pin 12V power
connector. J1 is to be connected to the ATX power supply.
MicroPCI Daughter Card Installation
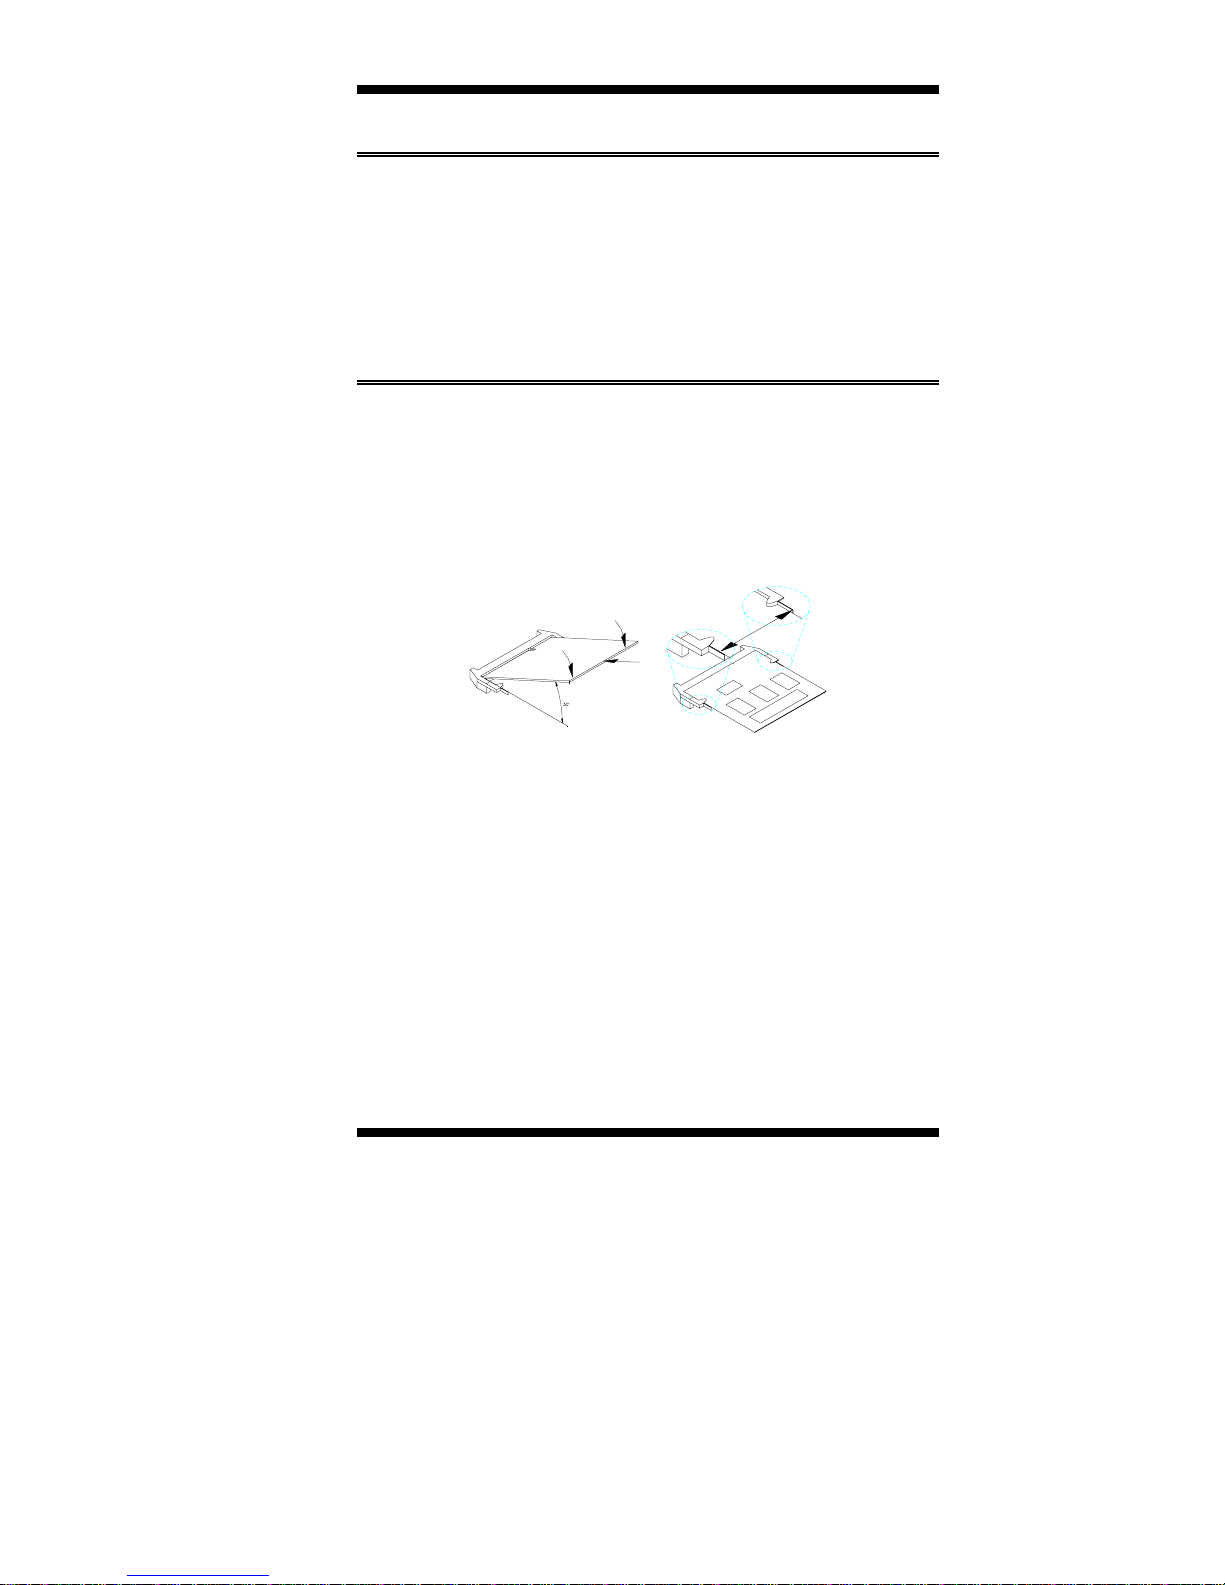
To insert the Micr oPCI daughter cards, position it at 30° to the PCB
and gently push it into the MicroPCI connector (See Figure 1 below).
The card will not fit when inserted at an angle of 45° or 15°. Once
inserted, slowly press the card towards the PCB until it locks on both
sides to the clips of the connector. Screw the card to the PCB to secure
the installation. To remove the MicroPCI card, pull the ‘clips’ sideways
as shown in Figure 2 below.
Figure 1.
TL-SBC 8280 User’s Manual 7
Fi
ure 2.
Page 12
INSTALLATIONS
Installing the Memory
The TL-SBC 8280 CPU Card supports two DDR memory sockets for a
maximum total memory of 2GB in DDR memory type. The memory
module capacities supported are 64MB, 128MB, 256MB, 512MB and
1GB. The following table lists the supported SDR DIMM
configurations. Intel 845G supports configurations defined in the
JEDEC DDR DIMM specification only (A, B, C). Non-JEDEC
standard DIMMs such as double-sided x16 DDR SDRAM DIMMs are
not supported.
Supported DDRM DIMM Configurations.
Density 64 Mbit 128Mbit 256Mbit 512Mbit
Device
Width
Single/
Double
184-pin
DDR
Installing and Removing Memory Modules
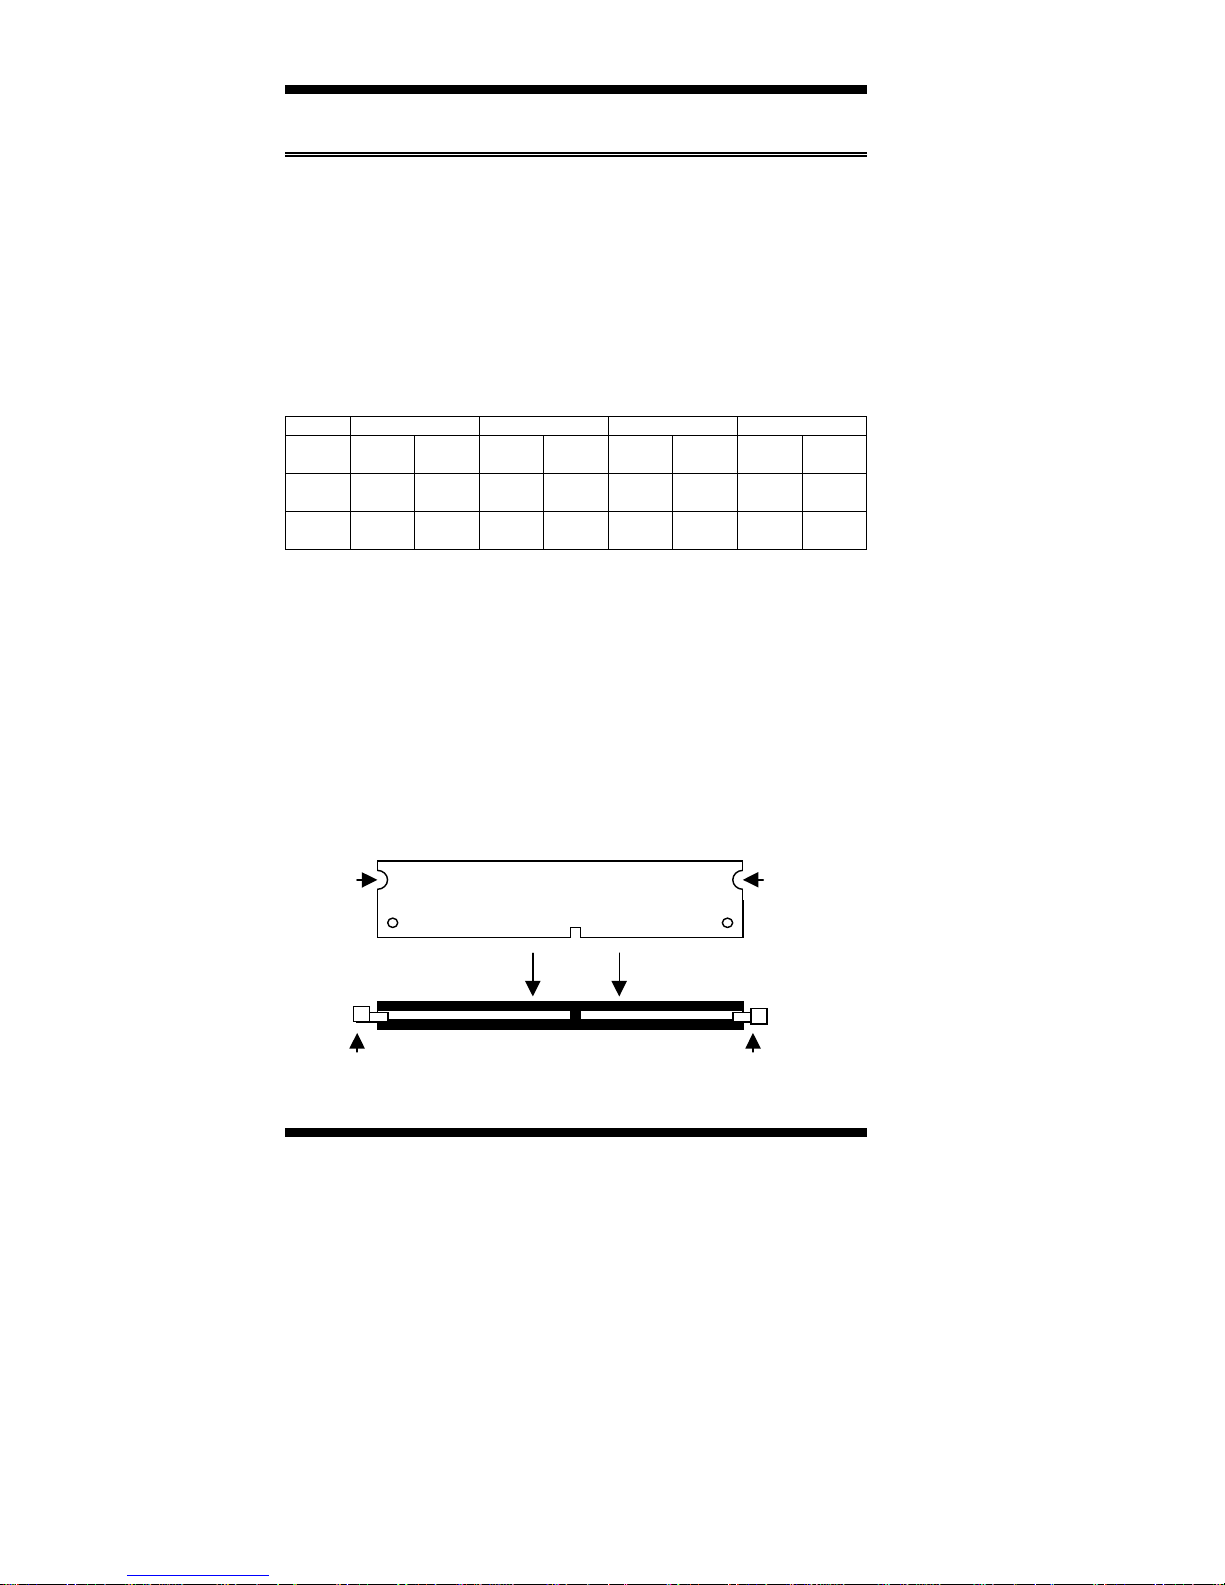
To install the DDR modules, locate the memory slot on the CPU card
and perform the following steps:
X8 X16 X8 X16 X8 X16 X8 X16
SS/DS SS/DS SS/DS SS/DS SS/DS SS/DS SS/DS SS/DS
64/128MB 32MB/NA 128/256MB 64MB/NA 256/512MB 128MB/NA 512/1024M 256MB/NA
1. Hold the DDR module so that the key of the DDR module aligns with
those on the memory slot.
2. Gently push the DDR module in an upright position until the clips of
the slot close to hold the DDR module in place when the DDR
module touches the bottom of the slot.
3. To remove the DDR module, press the clips with both hands.
DDR Module
LockLock
Lock Lock
8 TL-SBC 8280 User’s Manual
Page 13

INSTALLATIONS
Setting the Jumpers
Jumpers are used on TL-SBC 8280 to select various settings and
features according to your needs and applications. Contact your
supplier if you have doubts about the best configuration for your needs.
The following lists the connectors on TL-SBC 8280 and their respective
functions.
Jumper Locations on TL-SBC 8280..............................................10
Configuring the CPU Frequency....................................................11
JP16: CPU Front Side Bus Select..................................................11
JP2, JP3, JP4: RS232/422/485 (COM2) Selection........................11
JP5: DiskOnChip Address Select...................................................11
JP6: Clear CMOS Contents...........................................................12
JP8, JP9, JP10, JP11, JP12: CRT VGA Signal Select...................12
JP13: Gigabit LAN Enable/Disable...............................................12
SW1: LVDS Resolution Select......................................................13
TL-SBC 8280 User’s Manual 9
Page 14
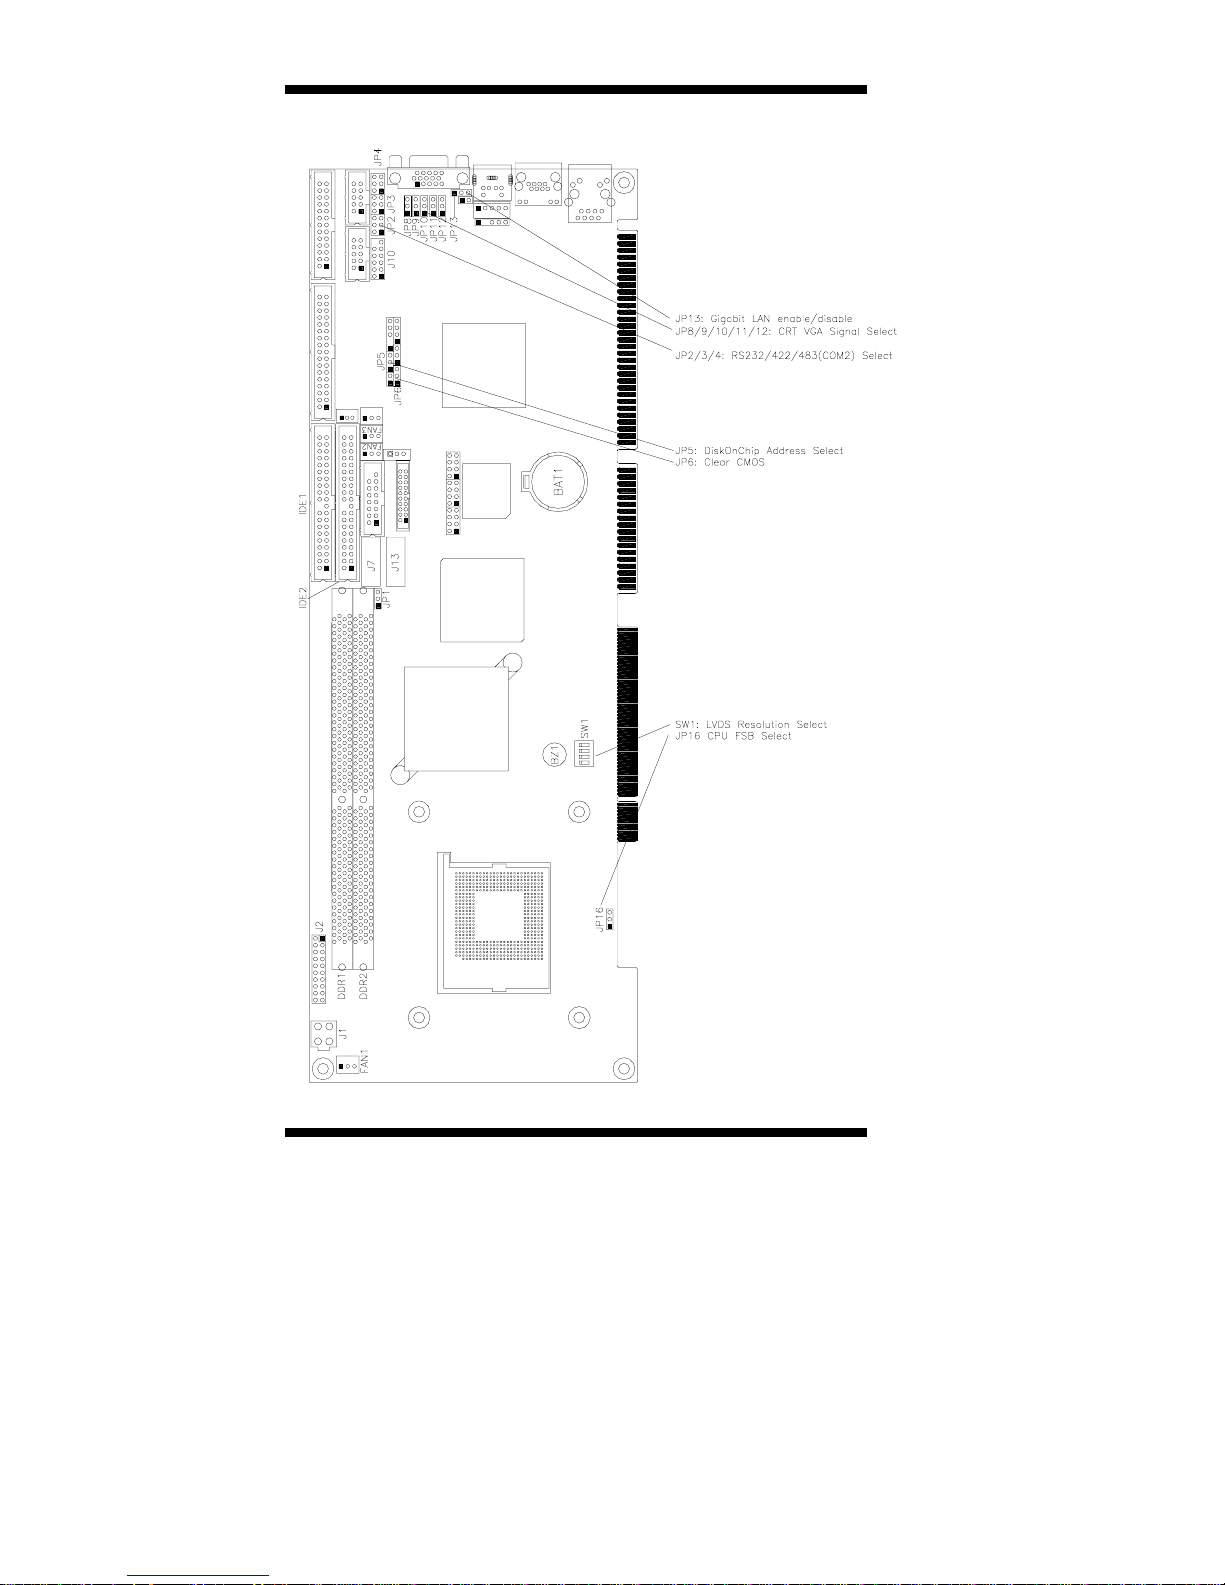
INSTALLATIONS
Jumper Locations on TL-SBC 8280
10 TL-SBC 8280 User’s Manual
Page 15
INSTALLATIONS
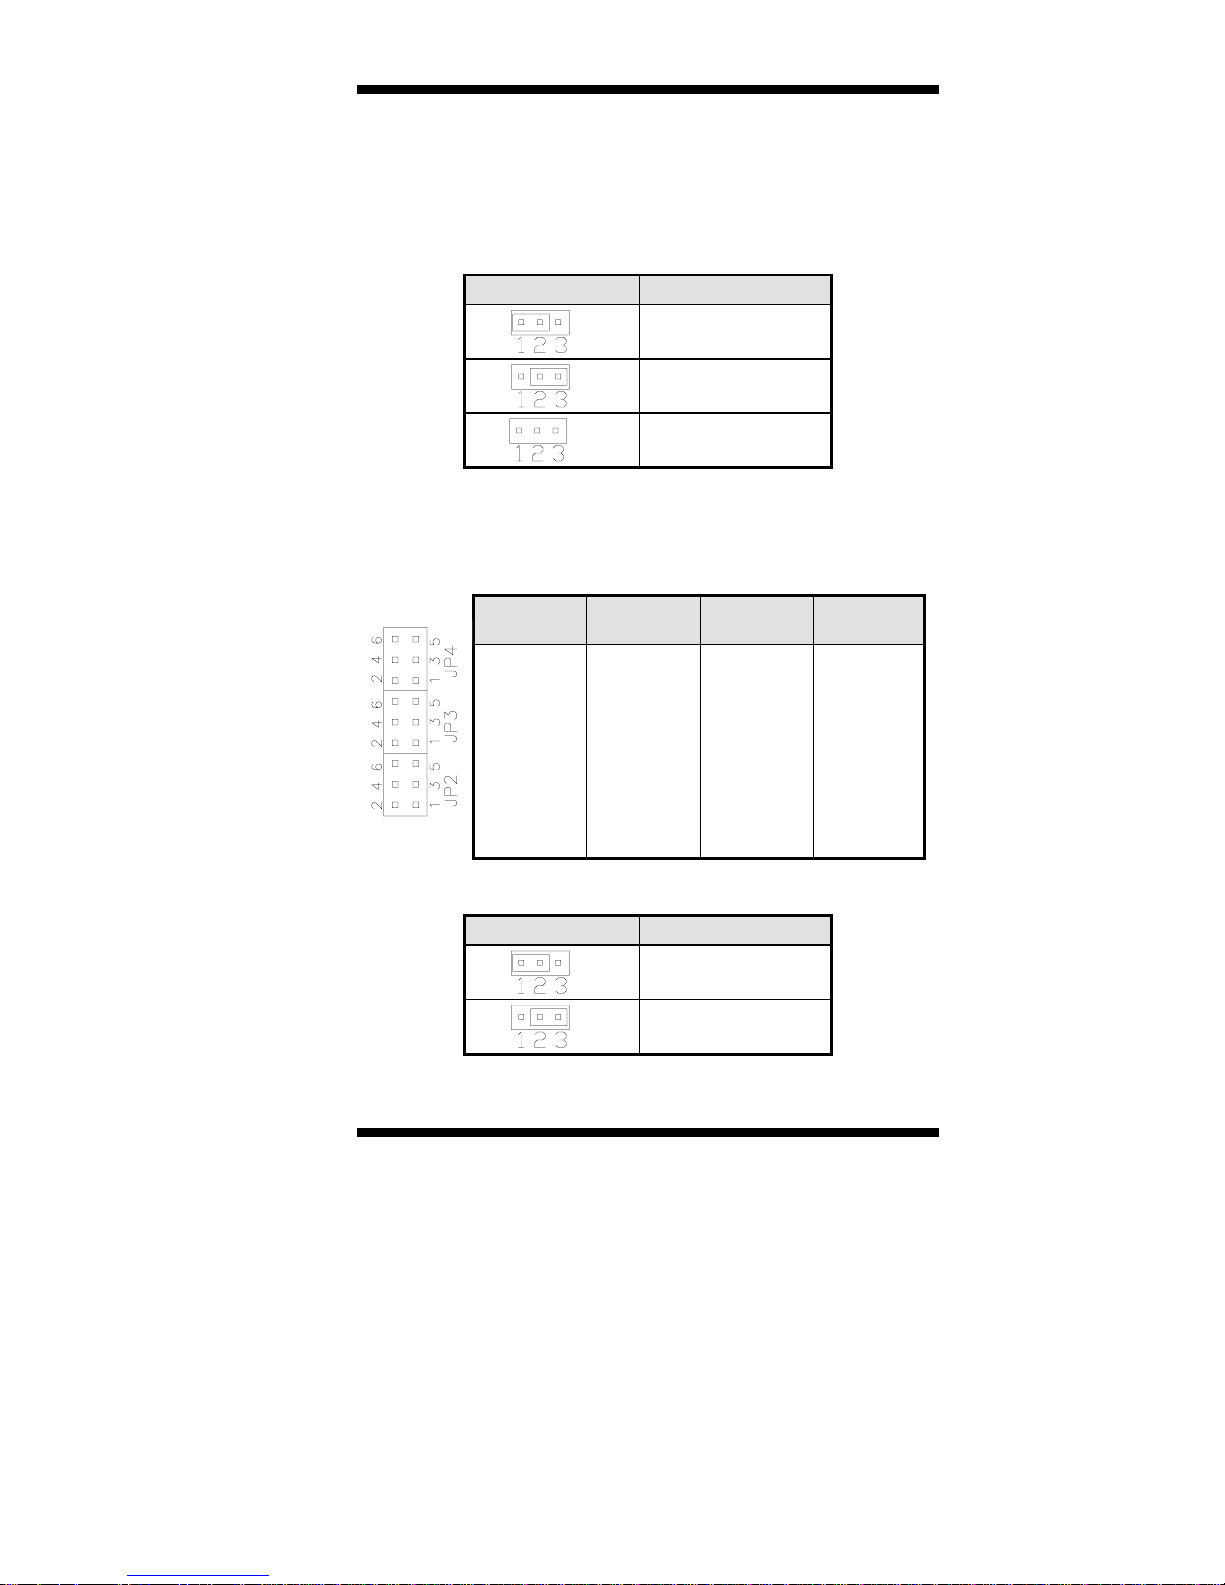
Configuring the CPU Frequency
The TL-SBC 8280 CPU card does not provide DIP switches to
configure the processor speed (CPU frequency). However, JP16 can be
used to select the Front Side Bus of the processor.
JP16: CPU Front Side Bus Select
JP16 Front Side Bus
Auto (Default)
100Mhz
133Mhz
JP2, JP3, JP4: RS232/422/485 (COM2) Selection
COM1 is fixed for RS-232 use only.
COM2 is selectable for RS232, RS-422 and RS-485.
The following table describes the jumper settings for COM2 selection.
COM2
Function
RS-232 RS-422 RS-485
JP2:
1-2
JP2:
3-4
JP2:
5-6
Jumper
Setting
(pin closed)
JP3:
3-5 & 4-6
JP3:
1-3 & 2-4
JP3:
1-3 & 2-4
JP4:
3-5 & 4-6
JP4:
1-3 & 2-4
JP4:
1-3 & 2-4
JP5: DiskOnChip Address Select
JP5 Address
D0000-D7FFF
D8000-DFFFF (default)
TL-SBC 8280 User’s Manual 11
Page 16
INSTALLATIONS
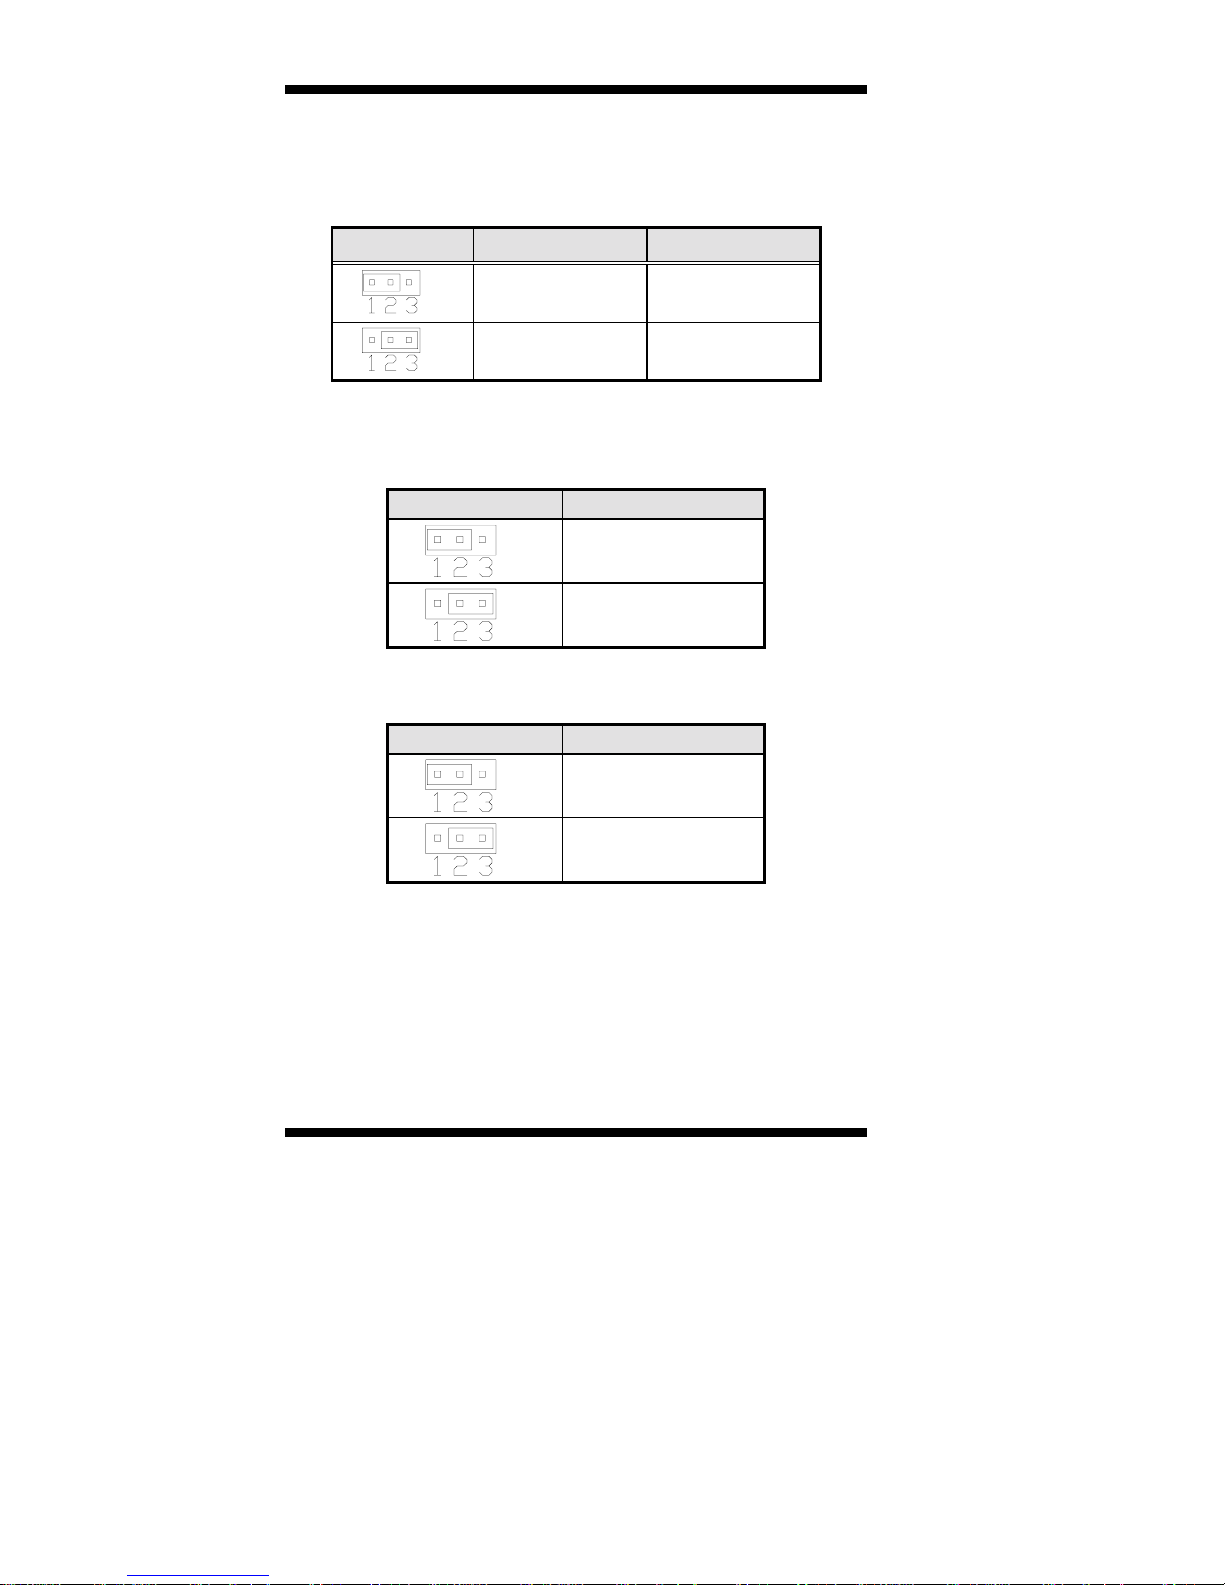
JP6: Clear CMOS Contents
Use JP6, a 3-pin header, to clear the CMOS contents.
Note that the
ATX-power connector should be disconnected from the CPU card
before clearing CMOS.
JP6 Setting Function
Pin 1-2
Short/Closed
Pin 2-3
Short/Closed
Normal
Clear CMOS
JP8, JP9, JP10, JP11, JP12: CRT VGA Signal Select
Use JP8, JP9, JP10, JP11, and JP12 to select the CRT VGA signal,
either from the on board VGA or from an optional MicroPCI VGA.
JP8/9/10/11/12 Function
On Board VGA
MicroPCI VGA
JP13: Gigabit LAN Enable/Disable
JP13 Function
Enable Gigabit LAN
Disable Gigabit LAN
* Note: Use this jumper only when your CPU card has the Gigabit
LAN function.
12 TL-SBC 8280 User’s Manual
Page 17

SW1: LVDS Resolution Select
SW1-1 SW1-2 SW1-3 Resolution
OFF ON ON 800x600 18 bit
ON OFF ON 1024x768 18bit
OFF OFF ON 1024x768 24 bit
ON ON OFF 1280x1024 18 bit
OFF ON OFF 1400x1050 18 bit
ON OFF OFF 1600x1200 18 bit
INSTALLATIONS
TL-SBC 8280 User’s Manual 13
Page 18

INSTALLATIONS
Connectors on TL-SBC 8280
The connectors on TL-SBC 8280 allows you to connect external
devices such as keyboard, floppy disk drives, hard disk drives, printers,
etc. The following table lists the connectors on TL-SBC 8280 and their
respective functions.
Connector Locations on TL-SBC 8280.......................................... 15
IDE1, IDE2: EIDE Connectors......................................................16
FDD1: Floppy Drive Connector..................................................... 17
J1: ATX 12V/+12V Power Connector...........................................17
FAN1: CPU Fan Power Connector................................................17
FAN2: System Fan Power Connector ............................................18
FAN3: Auxiliary Fan Power Connector.........................................18
J2: System Function Connector...................................................... 18
J3: Parallel Port Connector ............................................................20
J5, J6: COM1 and COM2 Serial Ports Connector .........................21
J7, J13: LVDS Connectors (2nd channel, 1st channel)..................21
J8: External ATX Power Connector ..............................................22
J9: CRT2 / TV-Out Connector.......................................................22
J10: External Audio Connector......................................................22
J12: IrDA Connector......................................................................23
J15: CD-In Audio Connector .........................................................23
J16: TMDS Panel Connector (on ID120) ......................................23
J17: VGA CRT Connector.............................................................24
J18, J19, J20: USB Connectors......................................................24
J21, J22: External PS/2 Keyboard and Mouse Connector..............25
J23: PS/2 Keyboard and Mouse Connector...................................25
J25: Gigabit LAN RJ45 Connector ................................................25
J26: Primary RJ45 Connector........................................................25
14 TL-SBC 8280 User’s Manual
Page 19

Connector Locations on TL-SBC 8280
INSTALLATIONS
IDE1, IDE2: EIDE Connectors
FDD1: Floppy Drive Connector
J1: ATX 12V/+12V Power Connector
FAN1: CPU Fan Power Connector
FAN2: System F a n Power Connector
FAN3: Auxiliary Fan Power Connector
J2: System Fun ction Connector
J3: Parallel Port Connector
J5, J6: COM1 and COM2 Serial Ports
J7, J13: LVDS C onnectors
J8: External ATX Power Connector
J9: CRT2 / TV-Ou t Connector
J10: External Audio Connector
J12: IrDA Connect or
J15: CD-In Audio Connector
J16: TMDS Panel Co nnector (on ID120)
J17: VGA CRT Connector
J18, J19, J20: US B Connectors
J21, J22: External PS/2 KB and Mouse
J23: PS/2 Keyboard and Mouse
J25: Gigabit LAN RJ45 Connector (option)
J26: Primary RJ45 Connector
TL-SBC 8280 User’s Manual 15
Page 20
INSTALLATIONS
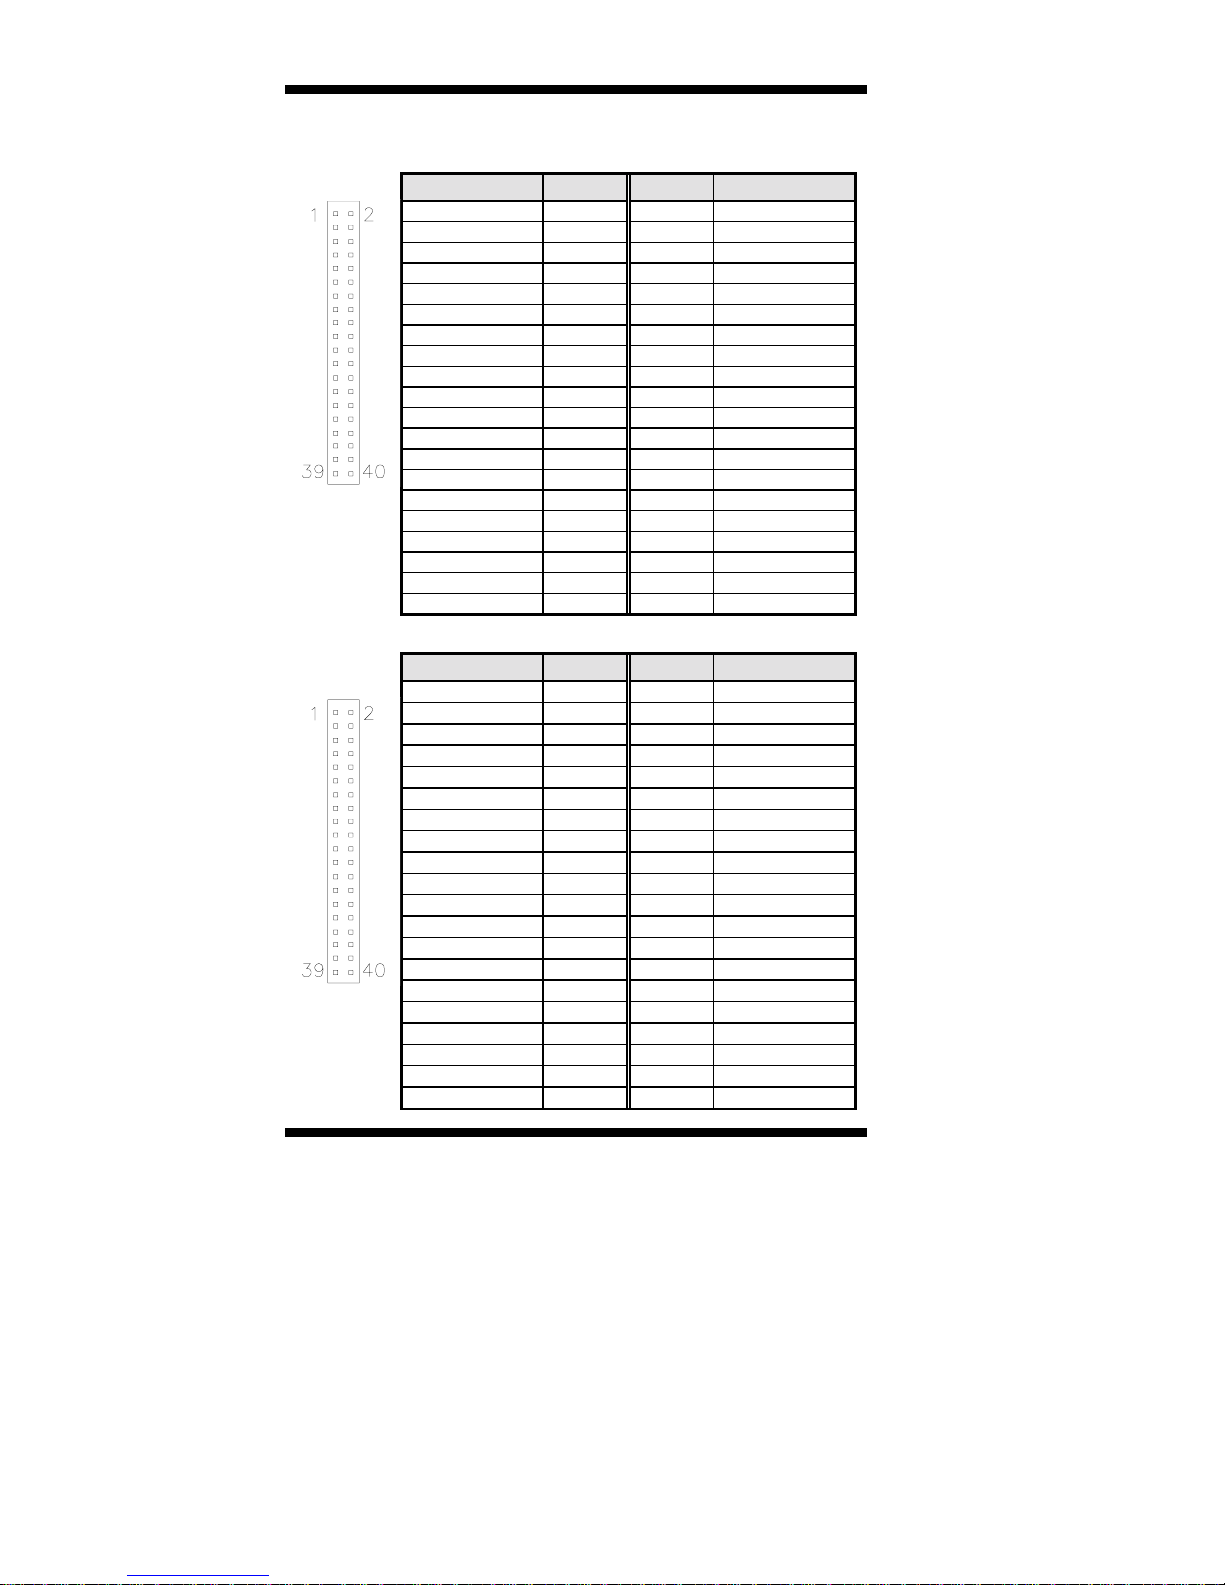
IDE1, IDE2: EIDE Connectors
IDE1: Primary IDE Connector
Signal Name Pin # Pin # Signal Name
Reset IDE 1 2 Ground
Host data 7 3 4 Host data 8
Host data 6 5 6 Host data 9
Host data 5 7 8 Host data 10
Host data 4 9 10 Host data 11
Host data 3 11 12 Host data 12
Host data 2 13 14 Host data 13
Host data 1 15 16 Host data 14
Host data 0 17 18 Host data 15
Ground 19 20 Protect pin
DRQ0 21 22 Ground
Host IOW 23 24 Ground
Host IOR 25 26 Ground
IOCHRDY 27 28 Host ALE
IDE1
DACK0 29 30 Ground
IRQ14 31 32 No connect
Address 1 33 34 No connect
Address 0 35 36 Address 2
Chip select 0 37 38 Chip select 1
Activity 39 40 Ground
IDE2: Secondary IDE Connector
Signal Name Pin # Pin # Signal Name
Reset IDE 1 2 Ground
Host data 7 3 4 Host data 8
Host data 6 5 6 Host data 9
Host data 5 7 8 Host data 10
Host data 4 9 10 Host data 11
Host data 3 11 12 Host data 12
Host data 2 13 14 Host data 13
Host data 1 15 16 Host data 14
Host data 0 17 18 Host data 15
Ground 19 20 Protect pin
DRQ1 21 22 Ground
Host IOW 23 24 Ground
Host IOR 25 26 Ground
IOCHRDY 27 28 Host ALE
IDE2
DACK1 29 30 Ground
IRQ15 31 32 No connect
Address 1 33 34 No connect
Address 0 35 36 Address 2
Chip select 0 37 38 Chip select 1
Activity 39 40 Ground
16 TL-SBC 8280 User’s Manual
Page 21
INSTALLATIONS
FDD1: Floppy Drive Connector
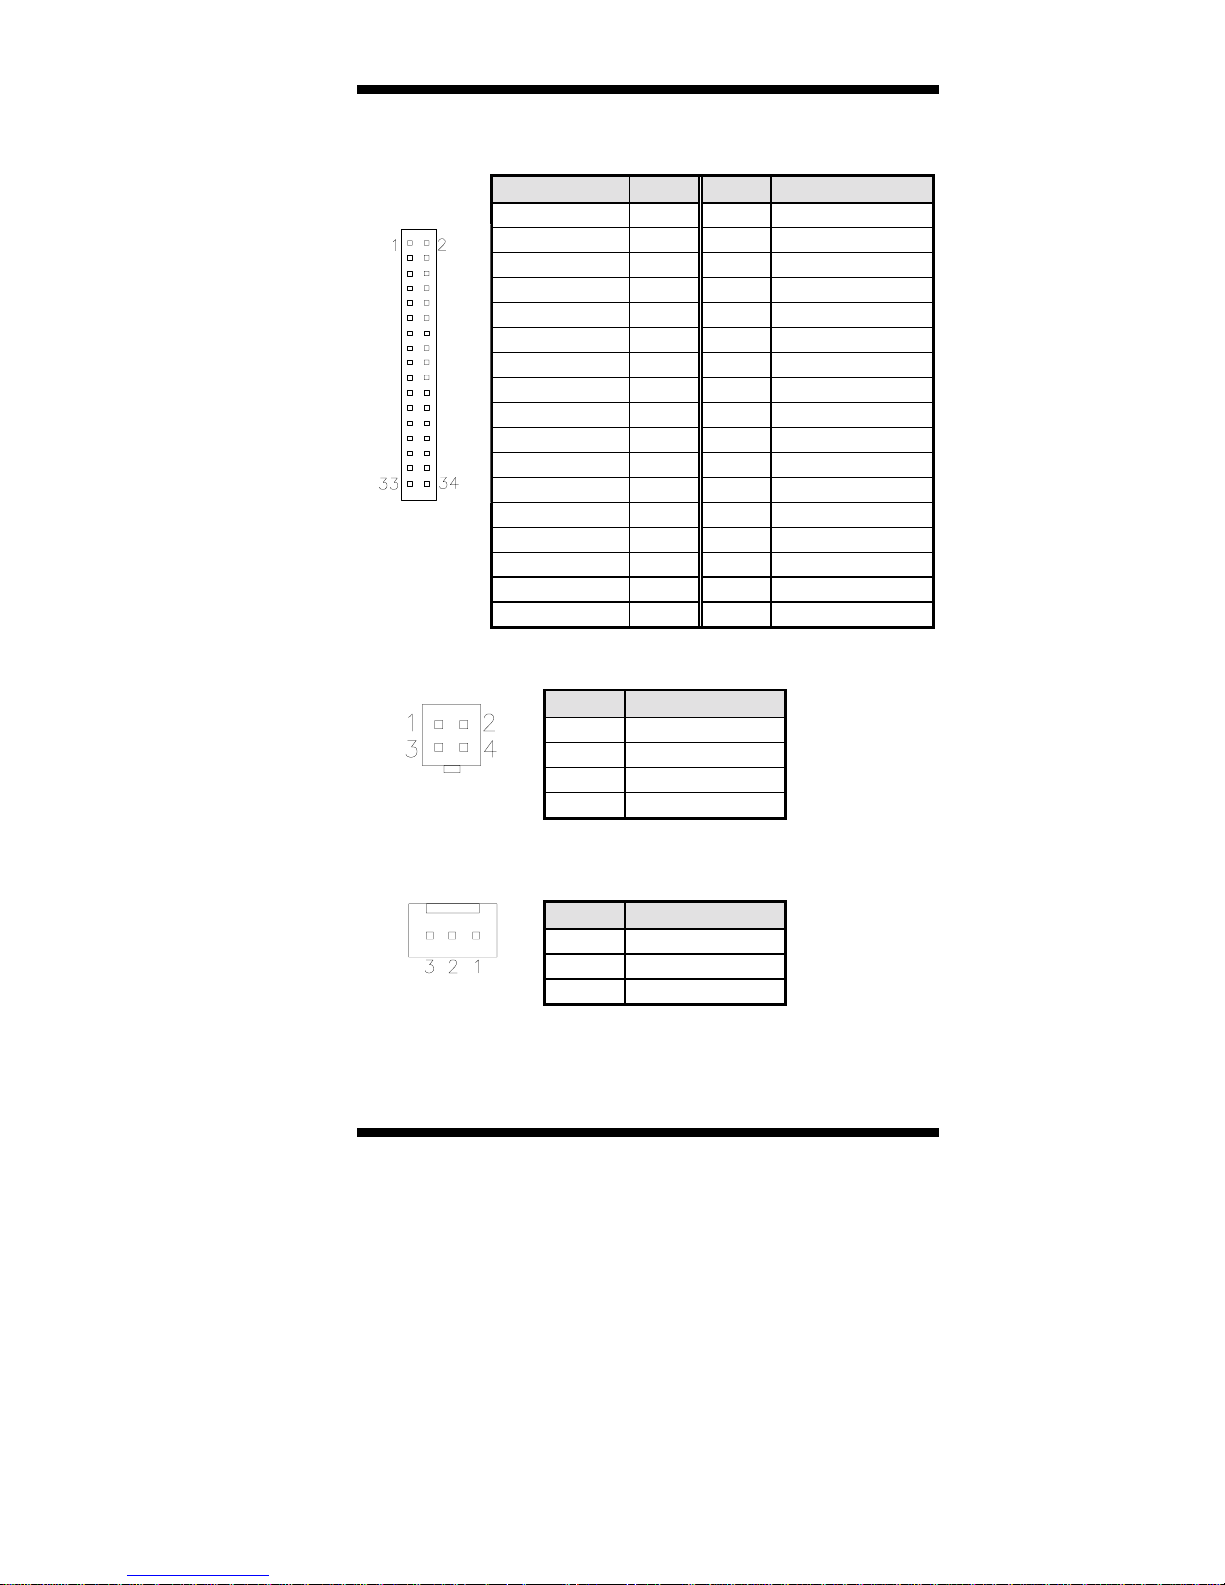
FDD1 is a 34-pin header and will support up to 2.88MB floppy drives.
Signal Name Pin # Pin # Signal Name
Ground 1 2 RM/LC
Ground 3 4 No connect
Ground 5 6 No connect
Ground 7 8 Index
Ground 9 10 Motor enable 0
Ground 11 12 Drive select 1
Ground 13 14 Drive select 0
Ground 15 16 Motor enable 1
Ground 17 18 Direction
Ground 19 20 Step
Ground 21 22 Write data
Ground 23 24 Write gate
FDD1
Ground 25 26 Track 00
Ground 27 28 Write protect
Ground 29 30 Read data
Ground 31 32 Side 1 select
Ground 33 34 Diskette change
J1: ATX 12V/+12V Power Connector
Pin # Signal Name
1 Ground
2 Ground
3 +12V
4 +12V
FAN1: CPU Fan Power Connector
FAN1 is a 3-pin header for the CPU fan. The fan must be a 12V fan.
Pin # Signal Name
1 Ground
2 +12V
3 Rotation detection
TL-SBC 8280 User’s Manual 17
Page 22

INSTALLATIONS
FAN2: Sy stem Fan Power Connector
FAN2 is a 3-pin header for the system fan. The fan must be a 12V fan.
Pin # Signal Name
1 Ground
2 +12V
3 Rotation detection
FAN3: Auxiliary Fan Power Connector
FAN3 is a 3-pin header for a 12V fan.
Pin # Signal Name
1 Ground
2 +12V
3 Rotation detection
J2: System Function Connector
J2 provides connectors for system indicators that provide light
indication of the computer activities and switches to change the
computer status. J2 is a 20-pin header that provides interfaces for the
following functions.
Hard Disk Drive LED
Reset Switch
Not Defined
ATX Power On Switch
SMI / Hardware Switch
Power LED
Speaker
Speaker: Pins 1 - 4
This connector provides an interface to a speaker for audio
tone generation. An 8-ohm speaker is re commended.
Pin # Signal Name
1 Speaker out
2 No connect
3 Ground
4+5V
18 TL-SBC 8280 User’s Manual
Page 23
INSTALLATIONS
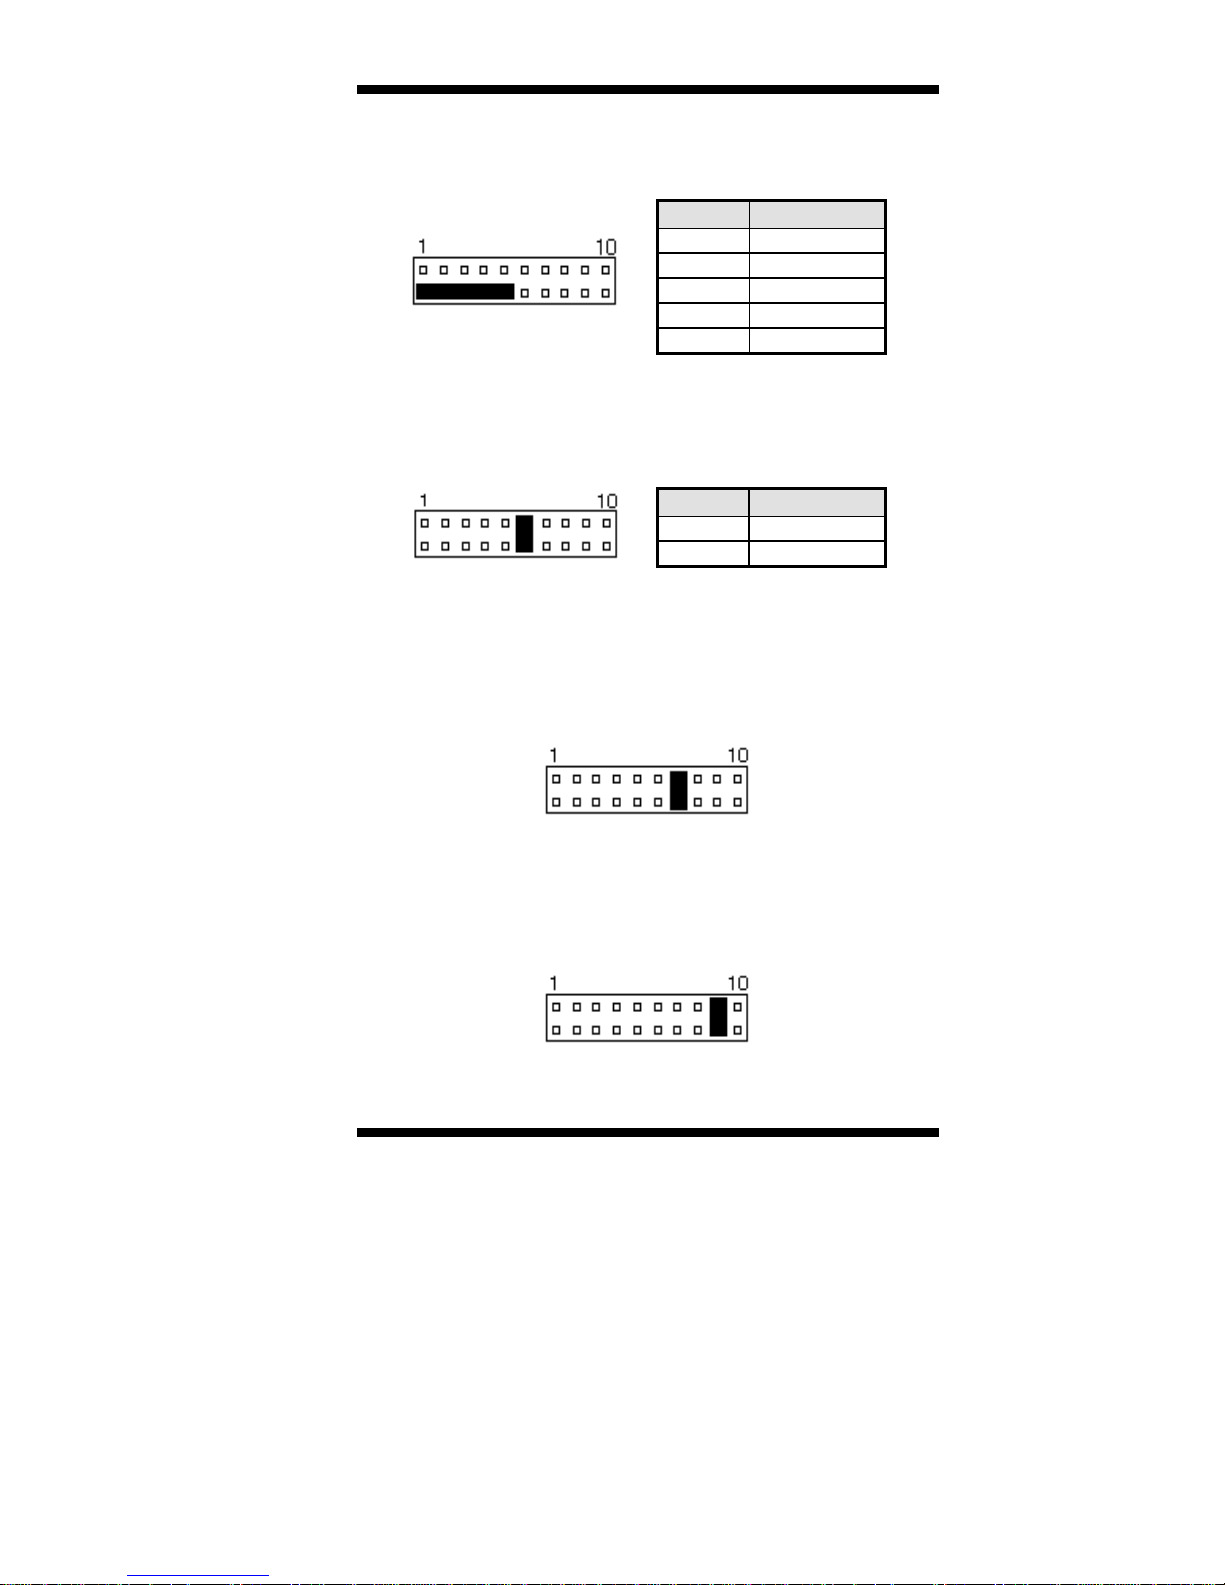
Power LED: Pins 11 - 15
The power LED indicates the status of the main power
switch.
Pin # Signal Name
11 Power LED
12 No connect
13 Ground
14 No connect
15 Ground
SMI/Hardware Sw it ch: Pins 6 and 16
This connector supports the "Green Switch" on the control
panel, which, when pressed, will force the system into the
power-saving mode immediately.
Pin # Signal Name
6SMI
16 Ground
ATX Power ON Switch: Pins 7 a nd 17
This 2-pin connector is an “ATX Power Supply On/Off
Switch” on the system that connects to the power switch on
the case. When pressed, the power switch will force the
system to power on. When pressed again, it will force the
system to power off.
Reset Switch: Pins 9 and 19
The reset switch allows the user to reset the system without
turning the main power switch off and then on again.
Orientation is not required when making a connection to
this header.
TL-SBC 8280 User’s Manual 19
Page 24
INSTALLATIONS
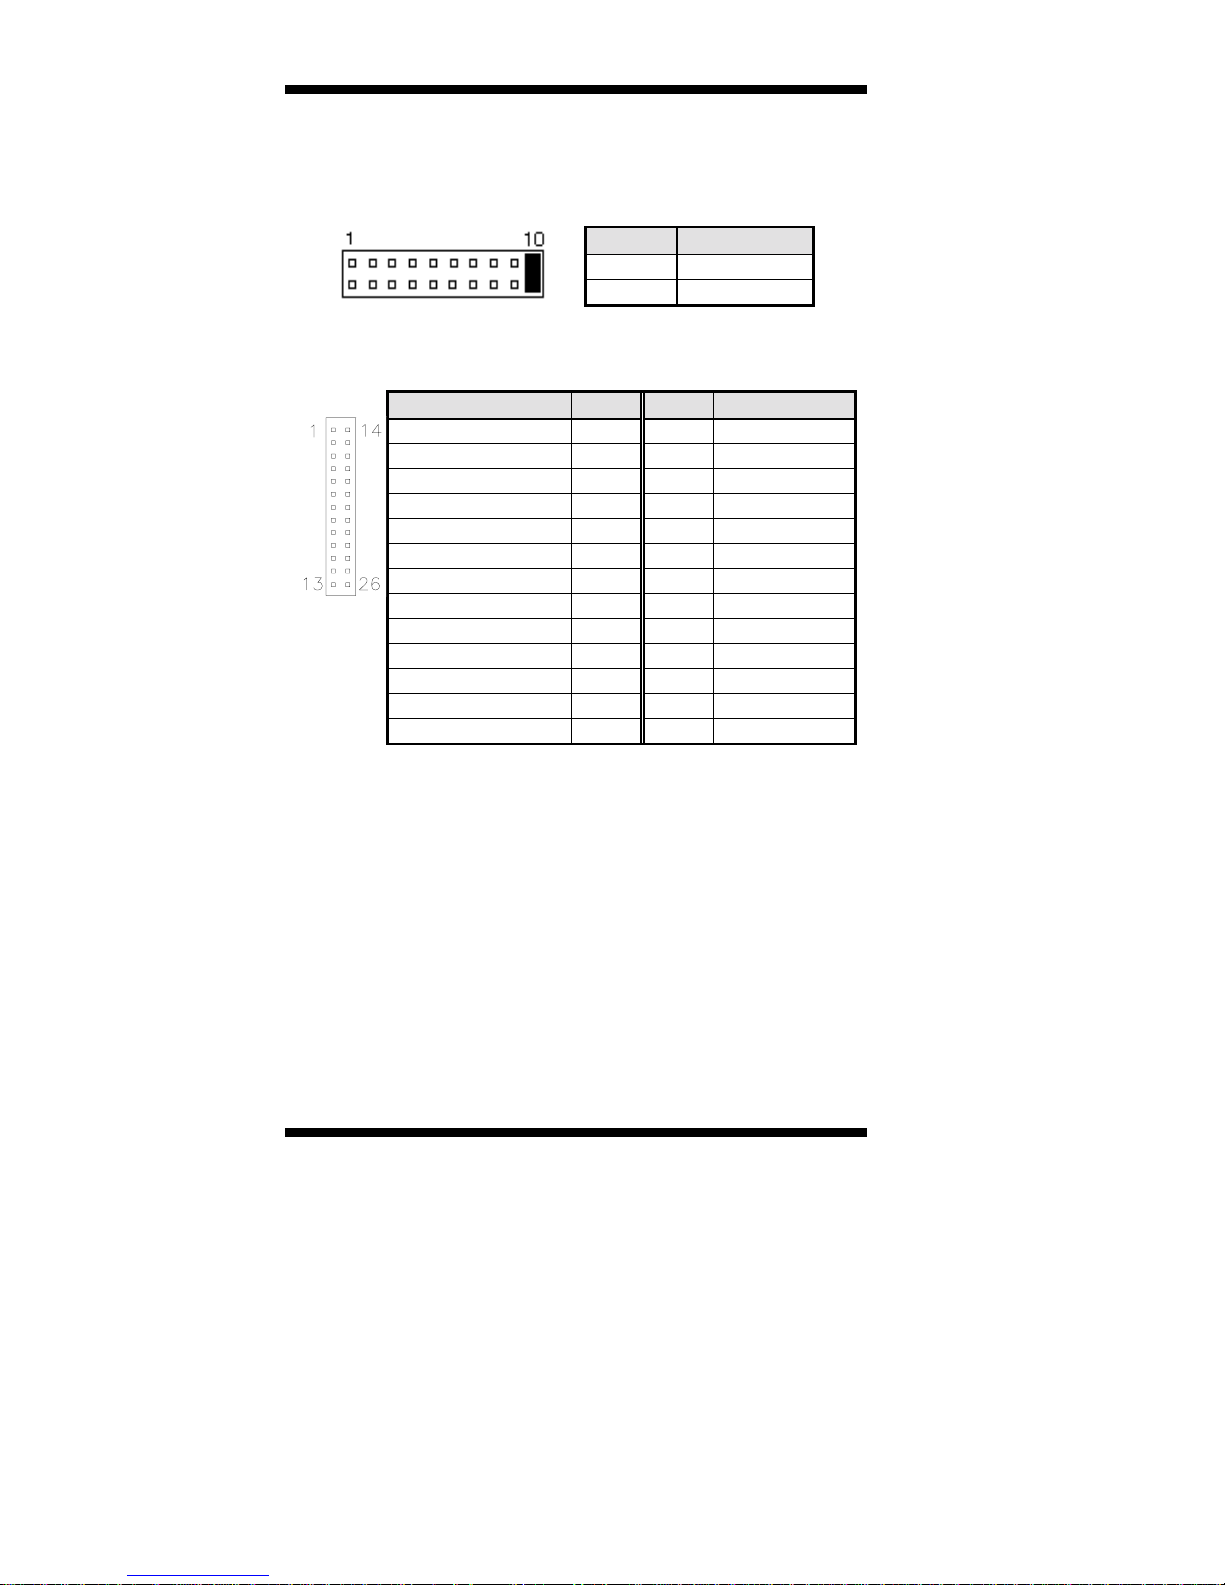
Hard Disk Drive LED Connector: Pins 10 and 20
This connector connects to the hard drive activity LED on
control panel. This LED will flash when the HDD is being
accessed.
Pin # Signal Name
10 HDD Active
20 5V
J3: Parallel Port Connector
The following table describes the pin out assignments of this connector.
Signal Name Pin # Pin # Signal Name
Line printer strobe 1 14 AutoFeed
PD0, parallel data 0 2 15 Error
PD1, parallel data 1 3 16 Initialize
PD2, parallel data 2 4 17 Select
PD3, parallel data 3 5 18 Ground
PD4, parallel data 4 6 19 Ground
PD5, parallel data 5 7 20 Ground
J3
PD6, parallel data 6 8 21 Ground
PD7, parallel data 7 9 22 Ground
ACK, acknowledge 10 23 G round
Busy 11 24 Ground
Paper empty 12 25 Ground
Select 13 N/A N/A
20 TL-SBC 8280 User’s Manual
Page 25
INSTALLATIONS
J5, J6: COM1 and COM2 Serial Ports Connector
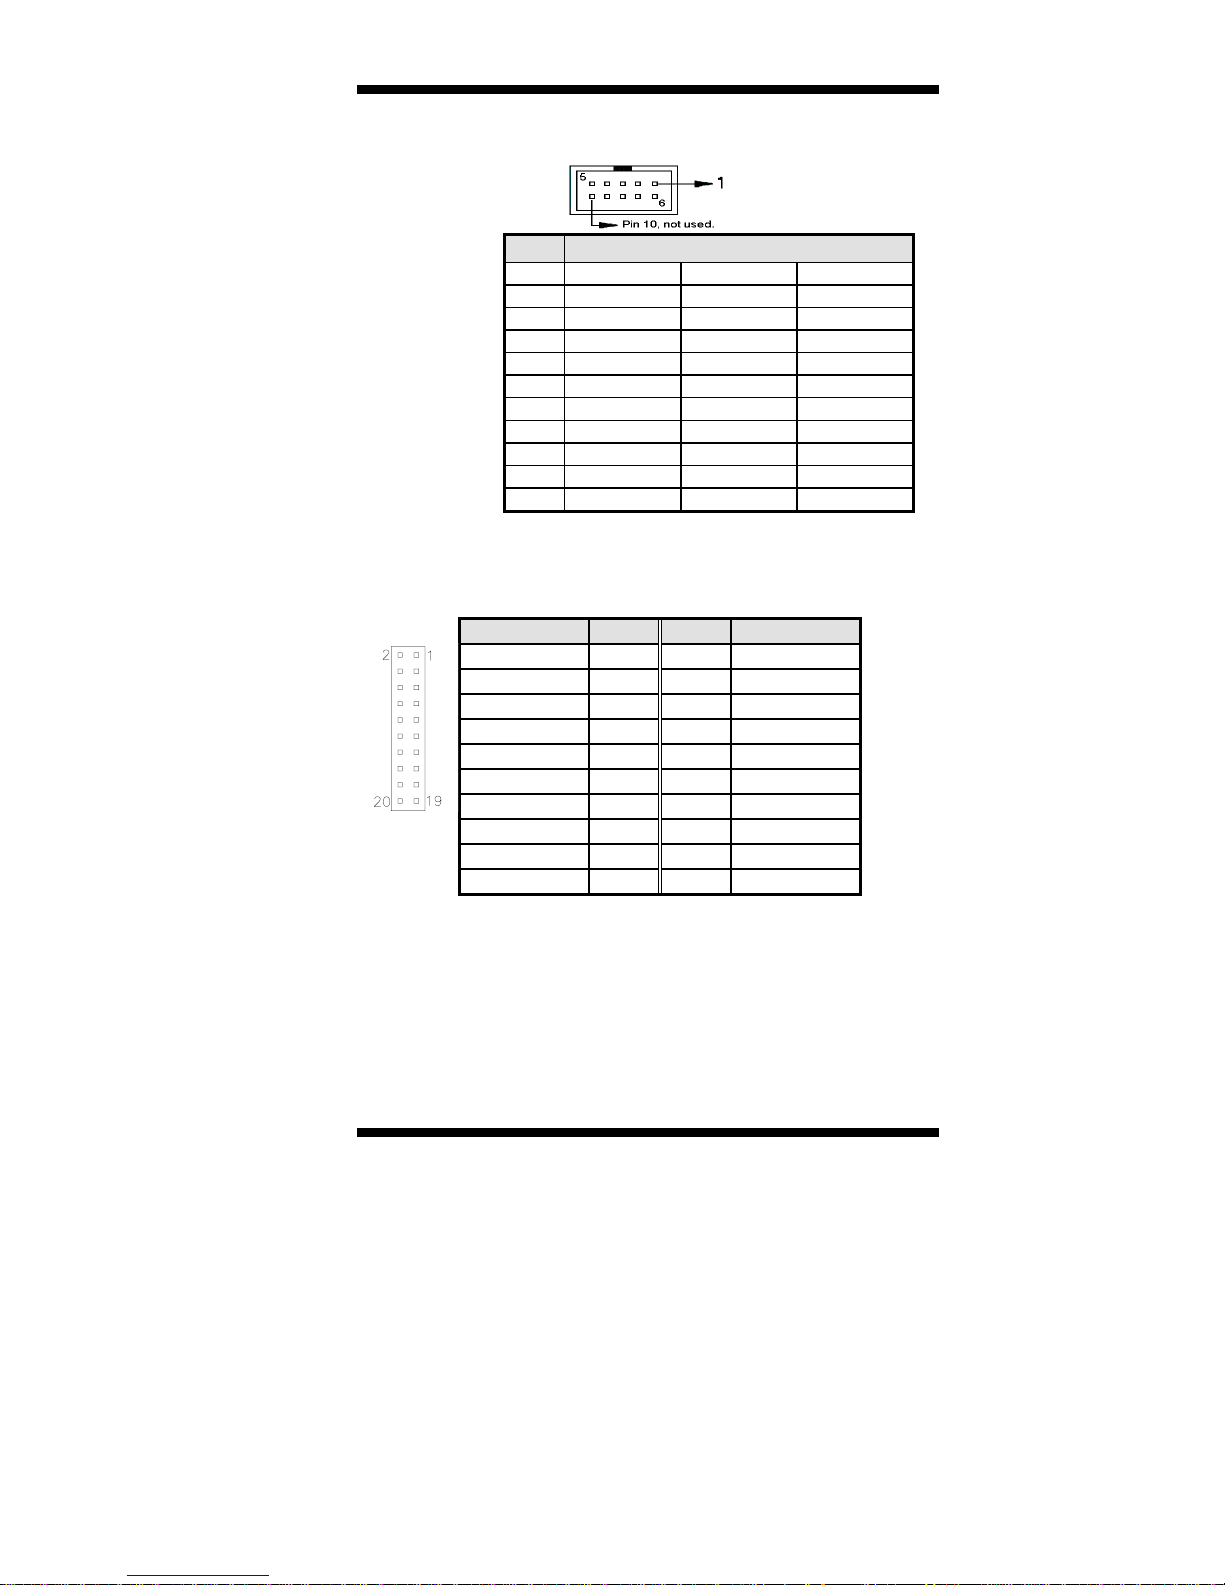
J5 and J6 both 10-pin headers, are the onboard serial port connectors.
J5
Fixed as
RS-232
J6
Configurable
as RS-232/ RS-
422/485 with
jumpers
JP2/JP3/JP4
Pin # Signal Name
RS-232 RS-422 RS-485
1 DCD TX- DATA2RX TX+DATA+
3TX RX+ NC
4DTR RX- NC
5 GND GND GND
6 DSR RTS- NC
7RTS RTS+ NC
8CTS CTS+ NC
9RI CTS- NC
10 NC NC NC
J7, J13: LVDS Connectors (2nd channel, 1st channel)
The LVDS connectors are composed of the first channel (J13) and
second channel (J7) to support 24-bit or 48-bit.
Signal Name Pin # Pin #
Signal Name
TX0- 2 1 TX0+
Ground 4 3 Ground
TX1- 6 5 TX1+
5V/3.3V 8 7 Ground
TX3- 10 9 TX3+
TX2- 12 11 TX2+
Ground 14 13 Ground
TXC- 16 15 T XC+
5V/3.3V 18 17 ENABKL
+12V 20 19 +12V
TL-SBC 8280 User’s Manual 21
Page 26
INSTALLATIONS
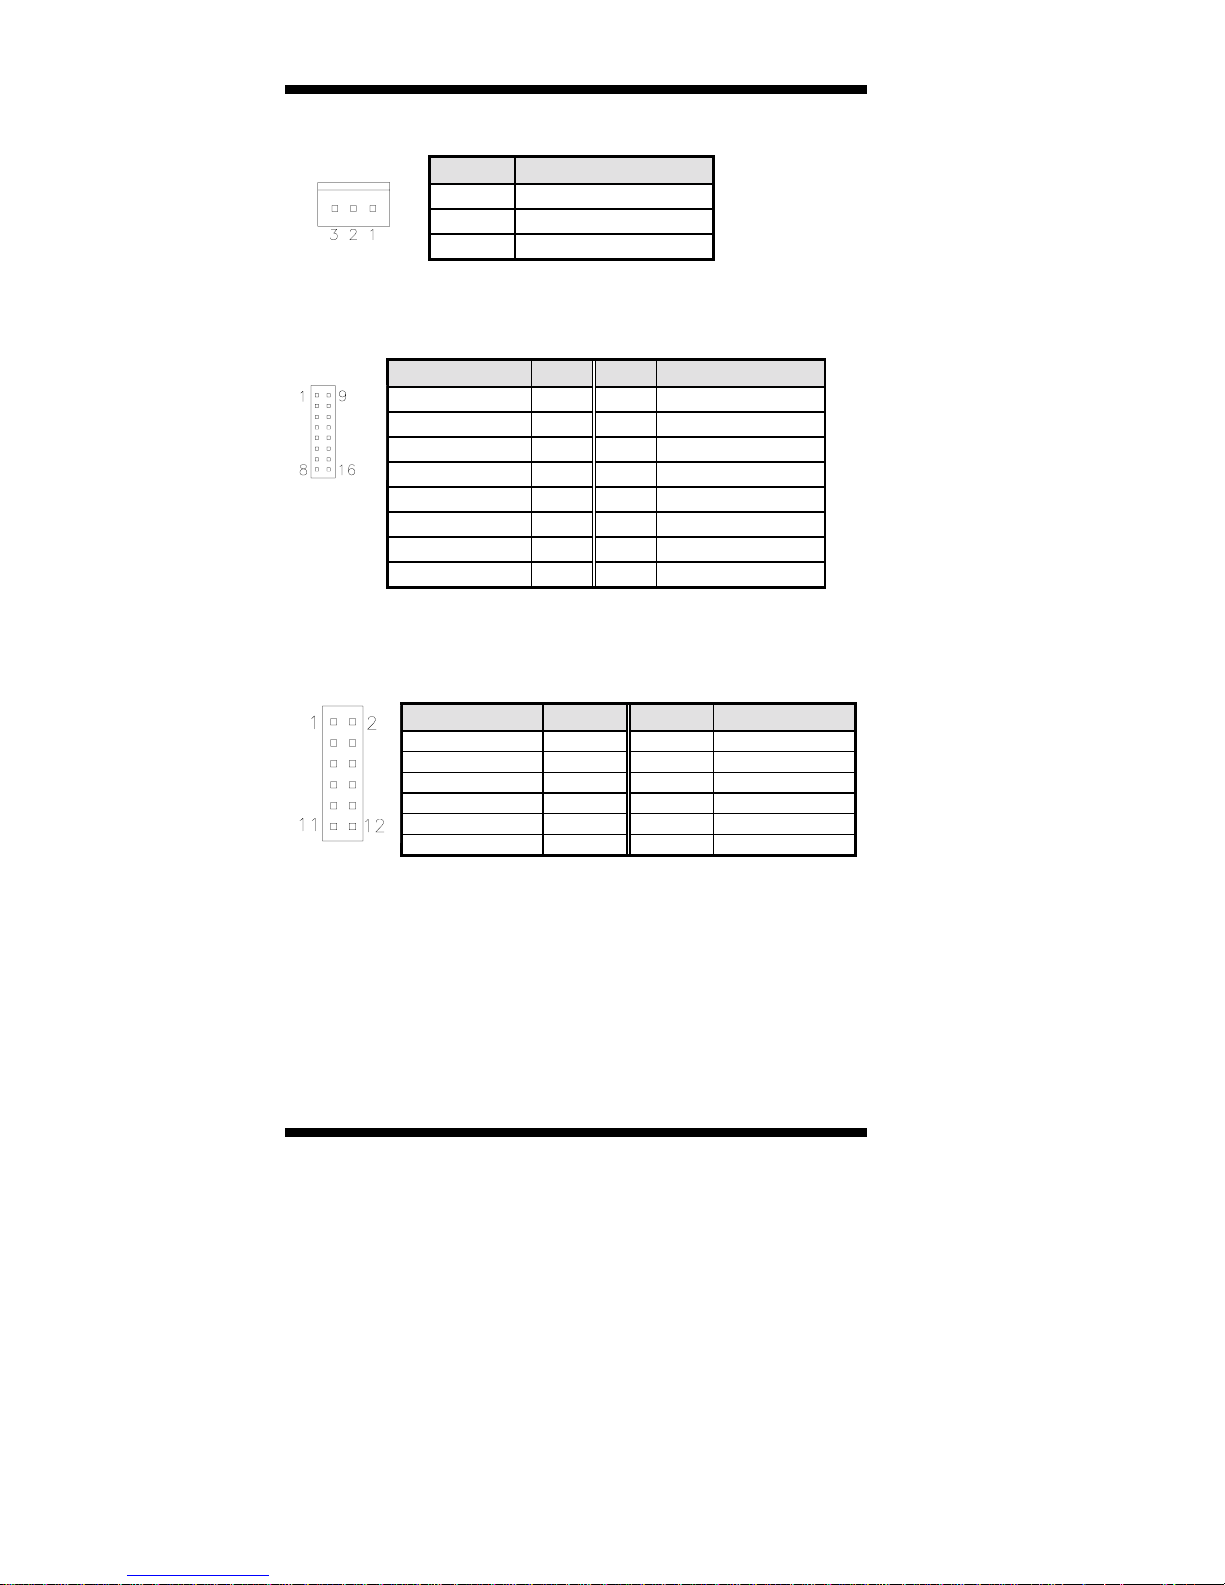
J8: External ATX Power Connector
Pin # Signal Name
1 Ground
2 PS-ON (soft on/off)
3 5VSB (Standby +5V)
J9: CRT2 / TV-Out Connector
This connector allows you to connect to a second CRT monitor or use with a
TV output device.
Signal Name Pin # Pin # Signal Name
Red / C 1 9 +5V
Green / Y 2 10 Ground
Blue / COMP 3 11 N. C.
J9
N.C. 4 12 CRT2 DDCDAT
Ground 5 13 HSYNC
Ground 6 14 VSYNC
Ground 7 15 CRT2 DDCCLK
Ground 8 16 N.C.
J10: External Audio Connector
J10 is a 12-pin header that is used to connect to the ID120 daughter
card that integrates jacks for Line In, Line Out and Speaker.
Signal Name Pin # Pin # Signal Name
LINEOUT_R 1 2 LINEOUT_L
Ground 3 4 Ground
LINEIN_R 5 6 LINEIN L
Ground 7 8 Ground
Mic-In 9 10 VREFOUT
Ground 11 12 Protect pin
22 TL-SBC 8280 User’s Manual
Page 27
INSTALLATIONS
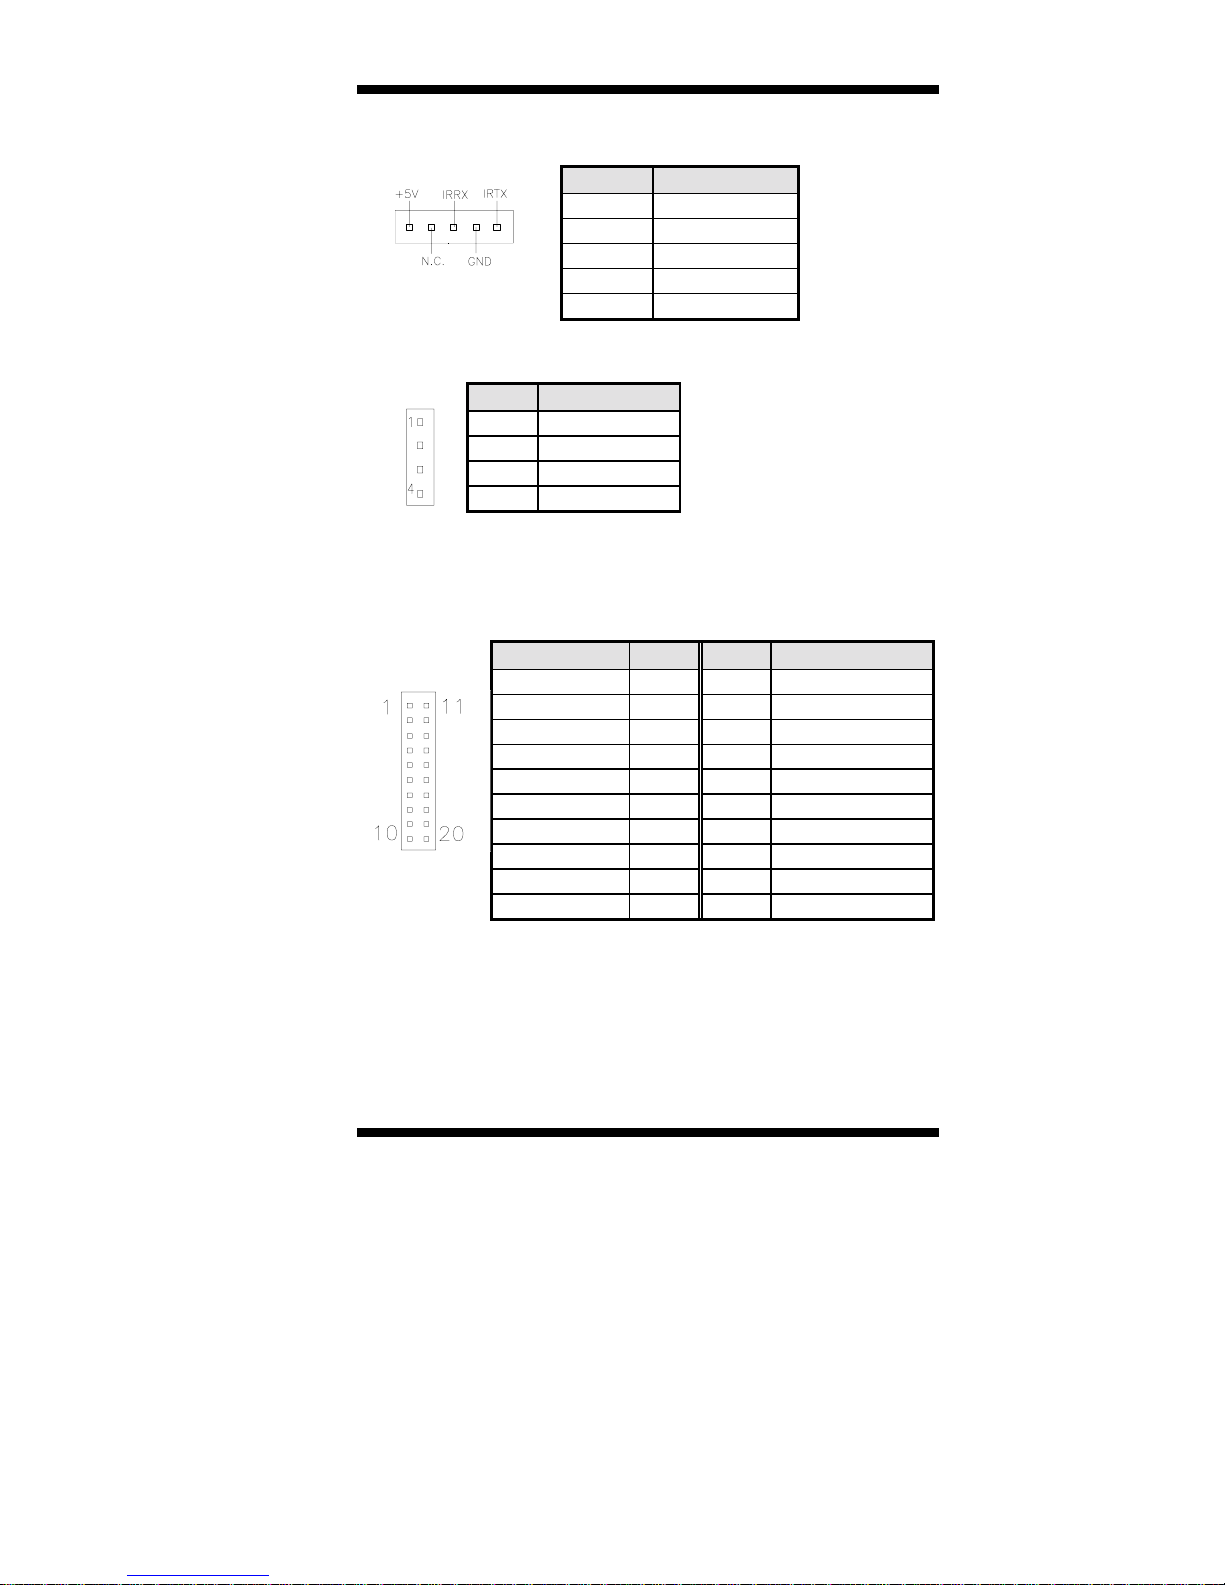
J12: IrDA Connector
J12 is used for an optional IrDA connector for wireless communication.
Pin # Signal Name
1+5V
2 No connect
3 Ir RX
4 Ground
5 Ir TX
J15: CD-In Audio Connector
Pin # Signal Name
1 CD Audio R
2 Ground
3 Ground
4 CD Audio L
J16: TMDS Panel Connector (on ID120)
TMDS stands Transition Minimized Differential Signaling. J16 TMDS
panel connector is to be connected to the optional ID120 daughter card.
Signal Name Pin # Pin # Signal Name
TX1P 1 11 TX2P
TXIN 2 12 TX2N
GND 3 13 GND
GND 4 14 GND
TXCP 5 15 TX0P
TXCN 6 16 TX0N
GND 7 17 NC
J16
+5v 8 18 NC
HTPG 9 19 DDCDATA
NC 10 20 DDCCLK
TL-SBC 8280 User’s Manual 23
Page 28
INSTALLATIONS
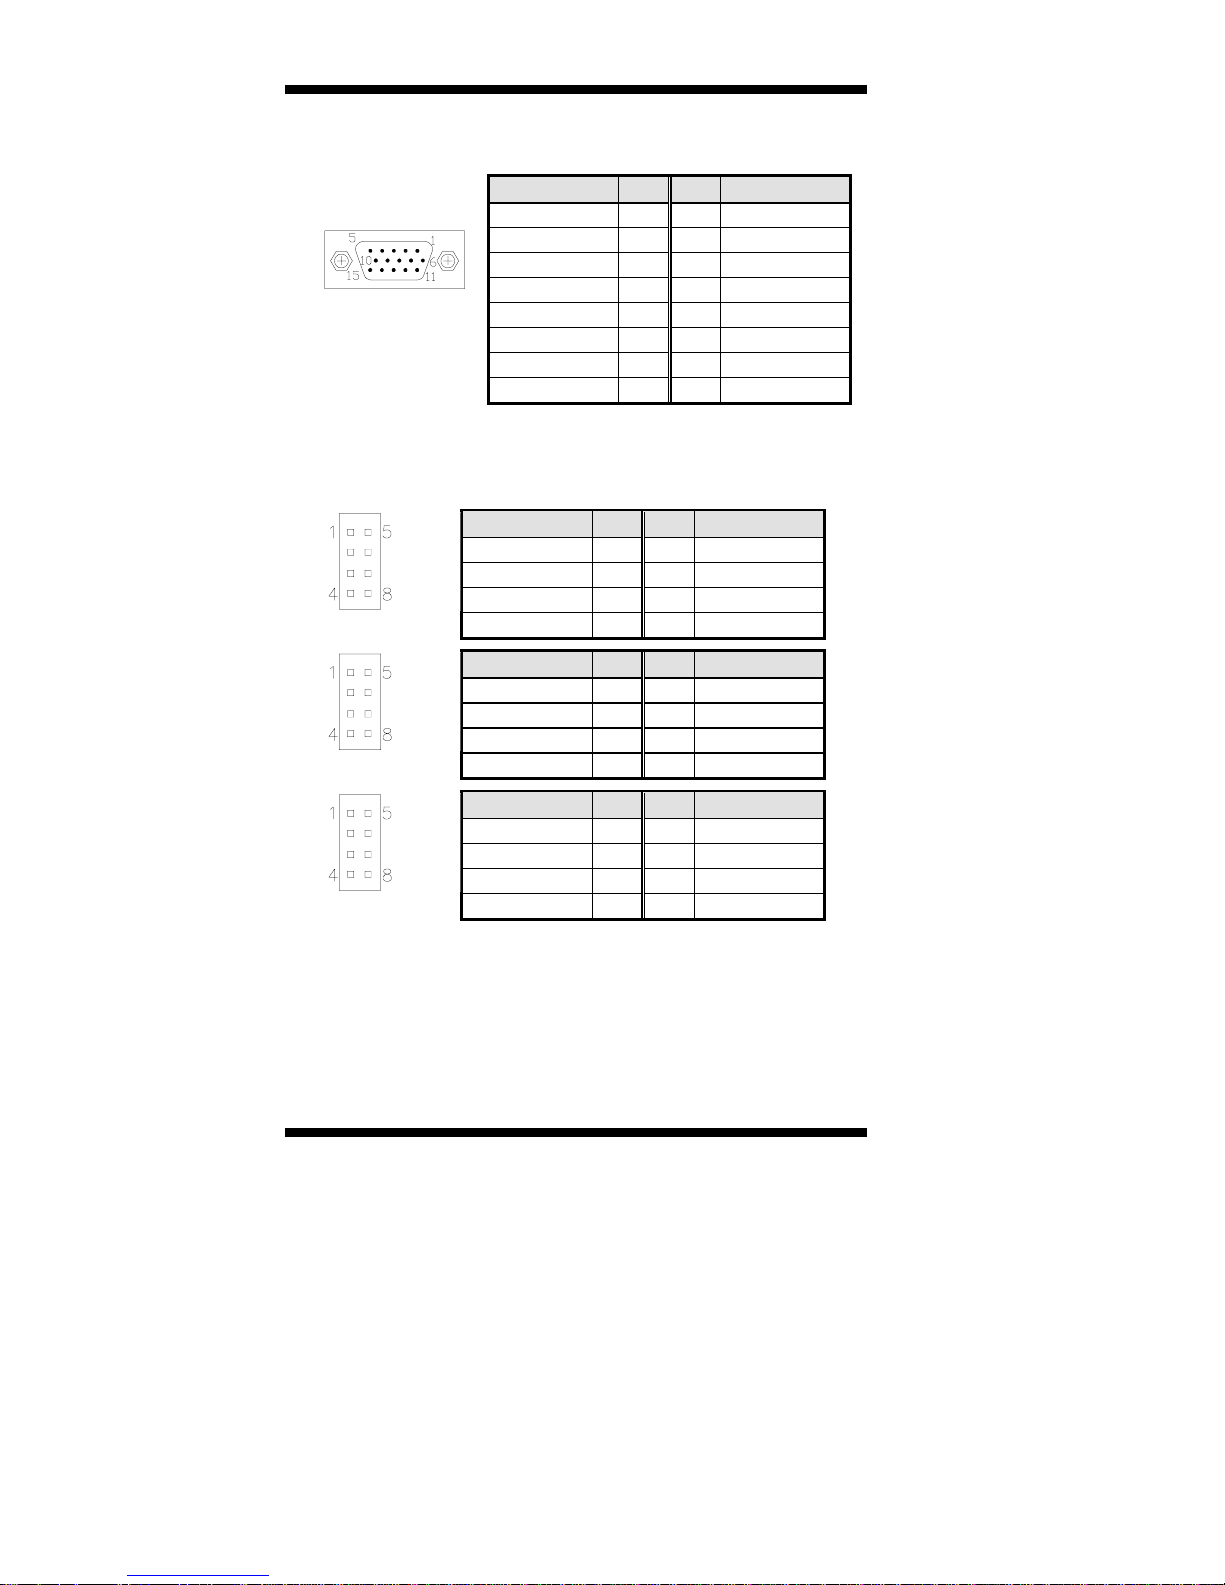
J17: VGA CRT Connector
The pin assignments of the J17 VGA CRT connector are as follows:
Signal Name Pin Pin Signal Name
Red 1 2 Green
Blue 3 4 N.C.
GND 5 6 GND
J26
GND 7 8 GND
N.C. 9 10 GND
N.C. 11 12 N.C.
HSYNC 13 14 VSYNC
NC 15
J18, J19, J20: USB Connectors
The following table shows the pin outs of the USB pin headers
connectors. Overall, the two pin headers support four USB ports.
Signal Name Pin Pin Signal Name
Vcc 1 5 Ground
USB0- 2 6 USB1+
USB0+ 3 7 USB1-
J18
Ground 4 8 Vcc
Signal Name Pin Pin Signal Name
Vcc 1 5 Ground
USB2- 2 6 USB3+
USB2+ 3 7 USB3-
J19
Ground 4 8 Vcc
Signal Name Pin Pin Signal Name
Vcc 1 5 Ground
USB4- 2 6 USB5+
USB4+ 3 7 USB5-
J20
24 TL-SBC 8280 User’s Manual
Ground 4 8 Vcc
Page 29
INSTALLATIONS
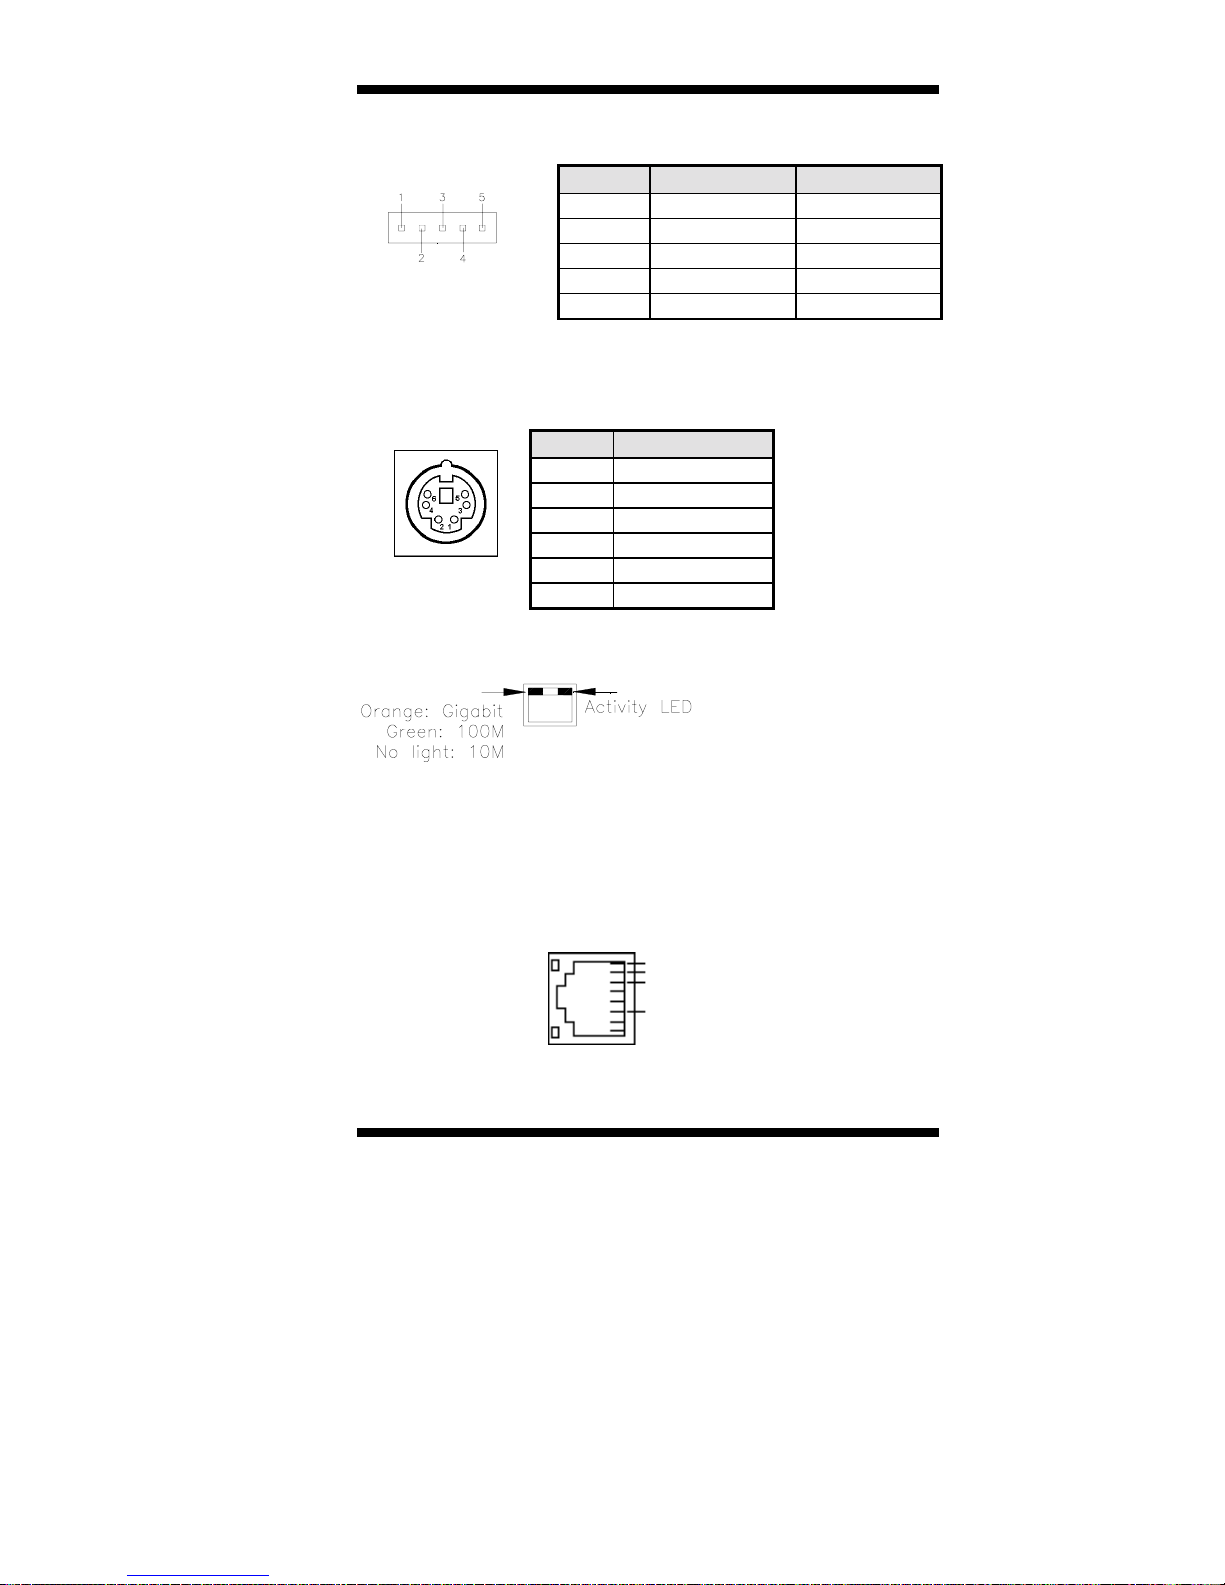
J21, J22: External PS/2 Keyboard and Mouse Connector
Pin # J21 J22
1 Mouse data KB clock
2N.C.KB data
3 Ground N.C.
4 Vcc Ground
5 Mouse clock Vcc
J23: PS/2 Keyboard and Mouse Connector
J23 uses a Y-cable with dual D-connectors for a PS/2 keyboard and a
PS/2 mouse.
Pin # Signal Name
1 Mouse data
2 Keyboard data
3 Ground
4Vcc
J23
5 Mouse Clock
6 Keyboard Clock
J25: Gigabit LAN RJ45 Connector
J25 is the Gigabit LAN RJ45 connector.
* Note: This connector is only present when your CPU card has the
Gigabit LAN function.
J26: Primary RJ45 Connector
J26 is the primary RJ-45 connector based on the chipset integrated
LAN. The figure below shows the pin out assignments of the connector
and its corresponding input jack.
Active LED
Link LED
RJ-45
TL-SBC 8280 User’s Manual 25
TD+(pin#1)
TD-(pin#2)
RD+(pin#3)
RD-(pin#6)
Page 30

INSTALLATIONS
Watchdog Timer Configuration
The WDT is used to generate a variety of output signals after a user
programmable count. The WDT is suitable for use in the prevention of
system lock-up, such as when software becomes trapped in a deadlock.
Under these sort of circumstances, the timer will count to zero and the
selected outputs will be driven. Under normal circumstance, the user
will restart the WDT at regular intervals before the timer counts to zero.
SAMPLE CODE:
This code and information is provided "as is" without warranty of any
kind, either expressed or implied, including but not limited to the
implied warranties of merchantability and/or fitness for a particular
purpose.
;[]================================================
; Name : Enable_And_Set_Watchdog
; IN : AL - 1sec ~ 255sec
; OUT : None
;[]================================================
Enable_And_Set_Watchdog Proc Near
push ax ;save time interval
call Unlock_Chip
movcl, 2Bh
call Read_Reg
and al, NOT 10h
call Write_Reg ;set GP24 as WDTO
movcl, 07h
moval, 08h
call Write_Reg ;switch to LD8
26 TL-SBC 8280 User’s Manual
Page 31

INSTALLATIONS
movcl, 0F5h
call Read_Reg
and al, NOT 08h
call Write_Reg ;set count mode as second
pop ax
movcl, 0F6h
call Write_Reg ;set watchdog timer
moval, 01h
movcl, 30h
call Write_Reg ;watchdog enabled
call Lock_Chip
ret
Enable_And_Set_Watchdog Endp
;[]===============================================
; Name : Disab le_Watchdog
; IN : None
; OUT : None
;[]===============================================
Disable_Watchdog Proc Near
call Unlock_Chip
movcl, 07h
moval, 08h
call Write_Reg ;switch to LD8
xor al, al
movcl, 0F6h
call Write_Reg ;clear watchdog timer
xor al, al
movcl, 30h
call Write_Reg ;watchdog disabled
call Lock_Chip
ret
Disable_Watchdog Endp
;[]===============================================
TL-SBC 8280 User’s Manual 27
Page 32

INSTALLATIONS
; Name : Unlock_Chip
; IN : None
; OUT : None
;[]===============================================
Unlock_Chip Proc Near
movdx, 2Eh
moval, 87h
out dx, al
out dx, al
ret
Unlock_Chip Endp
;[]================================================
; Name : Lock_Chip
; IN : None
; OUT : None
;[]================================================
Unlock_Chip Proc Near
movdx, 2Eh
moval, 0AAh
out dx, al
ret
Unlock_Chip Endp
;[]================================================
; Name : W rite_Reg
; IN : CL - register index
; AL - Value to write
; OUT : None
;[]================================================
Write_Reg Proc Near
push ax
movdx, 2Eh
moval,cl
out dx,al
pop ax
inc dx
out dx,al
ret
Write_Reg Endp
;[]================================================
28 TL-SBC 8280 User’s Manual
Page 33

INSTALLATIONS
; Name : Read _Reg
; IN : CL - register index
; OUT : AL - Value to read
;[]=================================================
==
Read_Reg Proc Near
moval, c l
movdx, 2Eh
out dx, al
inc dx
in al, dx
ret
Read_Reg Endp
;[]================================================
TL-SBC 8280 User’s Manual 29
Page 34

INSTALLATIONS
This page was intentionally left blank.
30 TL-SBC 8280 User’s Manual
Page 35

BIOS SETUP
BIOS Setup
This chapter describes the different settings available in the Award
BIOS that comes with the CPU card. The topics covered in this chapter
are as follows:
BIOS Introduction
BIOS Setup
Standard CMOS Setup
Advanced BIOS Features
Advanced Chipset Features
Integrated Peripherals
Power Management Setup
PNP/PCI Configurations
PC Health Status
Frequency/Voltage Control
Load Fail-Safe Defaults
Load Setup Defaults
......................................................................32
.................................................................................32
..............................................................34
..........................................................37
......................................................40
................................................................43
........................................................46
...........................................................49
........................................................................50
......................................................51
............................................................52
..................................................................52
Set Supervisor/User Password
Save & Exit Setup
Exit Without Saving
......................................................................52
..................................................................52
.................................................52
TL-SBC 8280 User’s Manual 31
Page 36

BIOS SETUP
BIOS Introduction
The Award BIOS (Basic Input/Output System) installed in your
computer system’s ROM supports Intel Pentium 4 processors. The
BIOS provides critical low-level support for a standard device such as
disk drives, serial ports and parallel ports. It also adds virus and
password protection as well as special support for detailed fine-tuning
of the chipset controlling the entire system.
BIOS Setup
The Award BIOS provides a Setup utility program for specifying the
system configurations and settings. The BIOS ROM of the system
stores the Setup utility. When you turn on the computer, the Award
BIOS is immediately activated. Pressing the <Del> key immediately
allows you to enter the Setup utility. If you are a little bit late pressing
the <Del> key, POST (Power On Self Test) will continue with its test
routines, thus preventing you from invoking the Setup. If you still wish
to enter Setup, restart the system by pressing the ”Reset” button or
simultaneously pressing the <Ctrl>, <Alt> and <Delete> keys. You can
also restart by turning the system Off and back On again. The following
message will appear on the screen:
Press <DEL> to Enter Setup
In general, you press the arrow keys to highlight i t ems, <Enter> to
select, the <PgUp> and <PgDn> keys to change entries, <F1> for help
and <Esc> to quit.
When you enter the Setup utility, the Main Menu screen will appear on
the screen. The Main Menu allows you to select from various setup
functions and exit choices.
32 TL-SBC 8280 User’s Manual
Page 37

BIOS SETUP
CMOS Setup Utility – Copyright © 1984-2001 Award Software
Standard CMOS Features Frequency/Volt age Cont rol
Advanced BIOS Features Load Fail-Safe Defaults
Advanced Chipset Features Load Optimized Defaults
Integrated Peripherals Set Supervisor Password
Power Management Setup Set User Pass word
PnP/PCI Configurations Save & Exit Setup
PC Health Status Exit Without Saving
ESC : Quit
F10 : Save & Exit Setup
Time, Date, Hard Disk Type…
! " # $
: Select Item
The section below the setup items of the Main Menu displays the
control keys for this menu. At the bottom of the Main Menu just below
the control keys section, there is another section, which displays
information on the currently highlighted item in the list.
Note:
Warning:
If the system cannot boot after making and saving system
changes with Setup, the Award BIOS supports an override
to the CMOS settings that resets your system to its default.
It is strongly recommended that you avoid making any
changes to the chipset defaults. These defaults have been
carefully chosen by both Award and your system
manufacturer to provide the absolute maximum
performance and reliability. Changing the defaults could
cause the system to become unstable and crash in some
cases.
TL-SBC 8280 User’s Manual 33
Page 38

BIOS SETUP
Standard CMOS Setup
“Standard CMOS Setup” choice allows you to record some basic
hardware configurations in your computer system and set the system
clock and error handling. If the CPU card is already installed in a
working system, you will not need to select this option. You will need
to run the Standard CMOS option, however, if you change your system
hardware configurations, the onboard battery fails, or the configuration
stored in the CMOS memory was lost or damaged.
CMOS Setup Utility – Copyright © 1984-2001 Award Software
Date (mm:dd:yy) Tue, Mar 26 2001 Item Help
Time (hh:mm:ss) 00 : 00 : 00 Menu Level
IDE Primary Master Press Enter 13020 MB Change the day, month,
IDE Primary Slave Press Enter None Year and century
IDE Secondary Master Press Enter None
IDE Secondary Slave Press Enter None
Drive A 1.44M, 3.5 in.
Drive B None
Video EGA/VGA
Halt On All Errors
Base Memory 640K
Extended Memory 129024K
Total Memory 130048K
Standard CMOS Features
At the bottom of the menu are the control keys for use on this menu. If
you need any help in each item field, you can press the <F1> key. It will
display the relevant information to help you. The memory display at the
lower right-hand side of the menu is read-only. It will adjust
automatically according to the memory changed. The following
describes each item of this menu.
Date
The date format is:
Day : Sun to Sa t
Month : 1 to 12
Date : 1 to 31
Year : 1994 to 2079
To set the date, highlight the “Date” field and use the PageUp/
PageDown or +/- keys to set the current time.
34 TL-SBC 8280 User’s Manual
Page 39

BIOS SETUP
Time
The time format is:
Hour : 00 to 23
Minute : 00 to 59
Second : 00 to 59
To set the time, highlight the “Time” field and use the <PgUp>/
<PgDn> or +/- keys to set the current time.
IDE Primary HDDs / IDE Secondary HDDs
The onboard PCI IDE connectors provide Primary and Secondary
channels for connecting up to four IDE hard disks or other IDE devices.
Each channel can support up to two hard disks; the first is the “Master”
and the second is the “Slave”.
Press <Enter> to configure the hard disk. The selections include Auto,
Manual, and None. Select ‘Manual’ to define the drive information
manually. You will be asked to enter the following items.
CYLS :
HEAD :
PRECOMP :
LANDZ :
SECTOR :
Number of cylinders
Number of read/write heads
Write precompensation
Landing zone
Number of sectors
The Access Mode selections are as follows:
Auto
Normal (HD < 528MB)
Large (for MS-DOS only)
LBA (HD > 528MB and
supports Logical Block
Addressing)
Drive A / Drive B
These fields identify the types of floppy disk drive A or drive B that has
been installed in the computer. The available specifications are:
360KB
5.25 in.
1.2MB
5.25 in.
720KB
3.5 in.
1.44MB
3.5 in.
2.88MB
3.5 in.
TL-SBC 8280 User’s Manual 35
Page 40

BIOS SETUP
Video
This field selects the type of video display card installed in your system.
You can choose the following video display cards:
EGA/VGA For EGA, VGA, SEGA, SVGA
or PGA monitor adapters. (default)
CGA 40 Power up in 40 column mode.
CGA 80 Power up in 80 column mode.
MONO For Hercules or MDA adapters.
Halt On
This field determines whether or not the system will halt if an error is
detected during power up.
No errors The system boot will not be halted for any
error that may be detected.
All errors Whenever the BIOS detects a non-fatal error,
the system will stop and you will be prompted.
All, But Keyboard The system boot will not be halted for a
keyboard error; it will stop for all other errors
All, But Diskette The system boot will not be halted for a disk
error; it will stop for all other errors.
All, But Disk/Key T he system boot will not be halted for a key-
board or disk error; it will stop for all others.
36 TL-SBC 8280 User’s Manual
Page 41

BIOS SETUP
Advanced BIOS Features
This section allows you to configure and improve your system and
allows you to set up some system features according to your preference.
CMOS Setup Utility – Copyright © 1984-2001 Award Software
Virus Warning
CPU L1 and L2 Cache Enabled Menu Level
Quick Power On Self Test Enabled
First Boot Device Floppy
Second Boot Device HDD-0
Third Boot Device CD-ROM
Boot Other Device Enabled
Swap Floppy Drive Disabled
Boot Up Floppy Seek Enabled
Boot Up Numlock Status On
Gate A20 Option Fast
Typematic Rate Setting Disabled
Typematic Rate (chars/Sec) 6
Typematic Delay (Msec) 250
Security Option Setup
APIC Mode Enabled
MPS Version Control for OS 1.4
OS Select For DRAM>64MB Non-OS2
Report No FDD For WIN 95 Yes
Small Logo (EPA) Show Disabled
Virus Warning
This item protects the boot sector and partition table of your hard disk
against accidental modifications. If an attempt is made, the BIOS will
halt the system and display a warning message. If this occurs, you can
either allow the operation to continue or run an anti-virus program to
locate and remove the problem.
Advanced BIOS Features
Disabled
ITEM HELP
Allows you choose
the VIRUS warning
feature for IDE Hard
Disk boot sector
protection. If this
function is enabled
and someone
attempt to write
data into this area,
BIOS will show a
warning message
on screen and
alarm beep
CPU L1 and L2 Cache
Cache memory is additional memory that is much faster than
conventional DRAM (system memory). CPUs from 486-type on up
contain internal cache memory, and most, but not all, modern PCs have
additional (external) cache memory. When the CPU requests data, the
system transfers the requested data from the main DRAM into cache
memory, for even faster access by the CPU. These items allow you to
enable (speed up memory access) or disable the cache function. By
default, these items are
Enabled
.
Quick Power On Self Test
When enabled, this field speeds up the Power On Self Test (POST)
after the system is turned on. If it is set to
Enabled
, BIOS will skip
some items.
TL-SBC 8280 User’s Manual 37
Page 42

BIOS SETUP
First/Second/Third Boot Device
These fields determine the drive that the system searches first for an
operating system. The options available include
0, SCSI, CDROM, HDD-1, HDD-2, HDD-3, LAN
Floppy, LS/ZIP, HDD-
and
Disable
.
Boot Other Device
These fields allow the system to search for an operating system from
other devices other than the ones selected in the First/Second/Third
Boot Device.
Swap Floppy Drive
This item allows you to determine whether or not to enable Swap
Floppy Drive. When enabled, the BIOS swaps floppy drive assignments
so that Drive A becomes Drive B, and Drive B becomes Drive A. By
default, this field is set to
Disabled.
Boot Up Floppy Seek
This feature controls whether the BIOS checks for a floppy drive while
booting up. If it cannot detect one (either due to improper configuration
or its absence), it will flash an error message.
Boot Up NumLock Status
This allows you to activate the NumLock function after you power up
the system.
Gate A20 Option
This field allows you to select how Gate A20 is worked. Gate A20 is a
device used to address memory above 1 MB.
Typematic Rate Setting
When disable d, continually holdi ng down a key on your keyboard will
generate only one instance. When enabled, you can set the two
typematic controls listed next. By default, this field is set to
Disabled.
Typematic Rate (Chars/Sec)
When the typematic rate is enabled, the system registers repeated
keystrokes speeds. Settings are from 6 to 30 characters per second.
Typematic Delay (Msec)
When the typematic rate is enabled, this item allows you to set the time
interval for displaying the first and second characters. By default, this
item is set to
38 TL-SBC 8280 User’s Manual
250msec.
Page 43

BIOS SETUP
Security Option
This field allows you to limit access to the System and Setup. The
default value is
the User Password every time you boot up. When you select
. When you select
Setup
System,
the system prompts for
the
Setup,
system always boots up and prompts for the Supervisor Password only
when the Setup utility is called up.
APIC Mode
APIC stands for Advanced Programmable Interrupt Controller. The
default setting is
Enabled
.
MPS Version Control for OS
This option is specifies the MPS (Multiprocessor Specification) version
for your operating system. MPS version 1.4 added extended
configuration tables to improve support for multiple PCI bus
configurations and improve future expandability. The default setting is
.
1.4
OS Select for DRAM > 64MB
This option allows the system to access greater than 64MB of DRAM
memory when used with OS/2 that depends on certain BIOS calls to
access memory. The default setting is
Non-OS/2
.
Report No FDD For WIN 95
If you are using Windows 95/98 without a floppy disk drive, select
Enabled to release IRQ6. This is required to pass Windows 95/98's
SCT test. You should also disable the Onboard FDC Controller in the
Integrated Peripherals screen when there's no floppy drive in the
system. If you set this feature to Disabled, the BIOS will not report the
missing floppy drive to Win95/98.
Small Logo (EPA) Show
The EPA logo appears at the right side of the monitor screen when the
system is boot up. The default setting is
TL-SBC 8280 User’s Manual 39
Disabled
.
Page 44

BIOS SETUP
Advanced Chipset Features
This Setup menu controls the configuration of the chipset.
CMOS Setup Utility – Copyright © 1984-2001 Award Software
DRAM Timing Selectable By SPD ITEM HELP
CAS Latency Time 2.5 Menu Level
Active to Precharge Delay 6
DRAM RAS# to CAS# Delay 3
DRAM RAS# Precharge 3
Turbo Mode Disabled
Memory Frequency For Auto
System BIOS Cacheable Enabled
Video BIOS Cacheable Disabled
Memory Hole At 15M-16M Disabled
Delayed Transaction Enabled
Delay Prior to Thermal 16 Min
AGP Aperture Size (MB) 64
ICH4 LAN Enabled
** On-Chip VGA Setting **
On-Chip VGA Enabled
On-Chip Frame Buffer Size 8MB
Boot Display Auto
FlashROM Write Protect Disabled
DRAM Timing Selectable
This option refers to the method by which the DRAM timing is
selected. The default is
Advanced Chipset Features
By SPD
.
CAS Latency Time
You can select CAS latency time in HCLKs of 2/2 or 3/3. The system
board designer should set the values in this field, depending on the
DRAM installed. Do not change the values in this field unless you
change specifications of the installed DRAM or the installed CPU. The
choices are 2 and 3.
Active to Precharge Delay
The default setting for the Active to Precharge Delay is 6.
DRAM RAS# to CAS# Delay
This option allows you to insert a delay between the RAS (Row
Address Strobe) and CAS (Column Address Strobe) signals. This delay
occurs when the SDRAM is written to, read from or refreshed.
Reducing the delay improves the performance of the SDRAM.
40 TL-SBC 8280 User’s Manual
Page 45

BIOS SETUP
DRAM RAS# Precharge
This option sets the number of cycles required for the RAS to
accumulate its charge before the SDRAM refreshes. The default setting
for the Active to Precharge Delay is 3.
Memory Frequency For
This field sets the frequency of the DRAM memory installed. The
default setting is
. The other settings are
Auto
PC200
and
PC266
.
System BIOS Cacheable
The setting of
Enabled
allows caching of the system BIOS ROM at
F000h-FFFFFh, resulting in better system performance. However, if
any program writes to this memory area, a system error may result.
Video BIOS Cacheable
The Setting
Enabled
allows caching of the video BIOS ROM at
C0000h-F7FFFh, resulting in better video performance. However, if
any program writes to this memory area, a system error may result.
Memory Hole At 15M-16M
In order to improve performance, certain space in memory can be
reserved for I SA car ds. This memory must be mapped into the memory
space below 16 MB. The choices are
Enabled
and
Disabled
.
Delayed Transaction
The chipset has an embedded 32-bit posted write buffer to support
delay transactions cycles. Select
Enabled
to support compliance with
PCI specification version 2.1.
Delay Prior to Thermal
This field activates the CPU thermal function after the systems boots
for the set number of minutes. The options are
16Min
and
64Min
.
AGP Aperture Size
The field sets aperture size of the graphics. The aperture is a portion of
the PCI memory address range dedicated for graphics memory address
space. Host cycles that hit the aperture range are forwarded to the AGP
without any translation. The default setting is
TL-SBC 8280 User’s Manual 41
64M
.
Page 46

BIOS SETUP
FlashROM Write Protect
By default, the FlashROM Write Protect field is disabled. This field is
related to the flashing of the BIOS ROM.
ICH4 LAN
By default, this field sets the ICH4 LAN function as
Enabled
.
On-Chip VGA
By default, the On-Chip VGA or 845G chipset-integrated VGA is
Enabled
.
On-Chip Frame Buffer Size
The On-Chip Frame Buffer Size can be set us 1MB or 8MB. This
memory is shared with the system memory.
Boot Display
Boot Display determines the display output device where the system
boots. The options are Auto, CRT, TV and EFP.
42 TL-SBC 8280 User’s Manual
Page 47

BIOS SETUP
Integrated Peripherals
This section sets co nfigurations fo r your hard di sk and other int egrated
peripherals.
CMOS Setup Utility – Copyright © 1984-2001 Award Software
On-Chip Primary PCI IDE
IDE Primary Master PIO
IDE Primary Slave PIO
IDE Primary Master UDMA
IDE Primary Slave UDMA
On-Chip Secondary PCI IDE
IDE Secondary Master PIO
IDE Secondary Slave PIO
IDE Secondary Master UDMA
IDE Secondary Slave UDMA
USB 2.0 Controller
USB Controller
USB Keyboard Support
AC97 Audio Auto
Init Display First PCI Slot
IDE HDD Block Mode Enabled
Onboard FDC Controller Enabled
Onboard Serial Port 1 3F8/IRQ4
Onboard Serial Port 2 2F8/IRQ3
UART Mode Select Normal
Onboard Parallel Port 378/IRQ7
Parallel Port Mode SPP
PWRON After PWR-Fail Off
Midi Port Address Disabled
Midi Port IRQ 10
Integrated Peripherals
Enabled ITEM HELP
Auto Menu Level
Auto
Auto
Auto
Enabled
Auto
Auto
Auto
Auto
Disabled
Enabled
Disabled
OnChip Primary/Secondary PCI IDE
The integrated peripheral controller contains an IDE interface with
support for two IDE channels. Select
Enabled
to activate each channel
separately.
IDE Primary/Secondary Master/Slave PIO
These fields allow your system hard disk controller to work faster.
Rather than have the BIOS issue a series of commands that transfer to
or from the disk drive, PIO (Programmed Input/Output) allows the
BIOS to communicate with the controller and CPU directly.
The system supports five modes, numbered from 0 (default) to 4, which
primarily differ in timing. When Auto is selected, the BIOS will select
the best available mode.
TL-SBC 8280 User’s Manual 43
Page 48

BIOS SETUP
IDE Primary/Secondary Master/Slave UDMA
These fields allow your system to improve disk I/O throughput to
33Mb/sec with the Ultra DMA/33 feature. The options are
Disabled
.
Auto
and
USB 2.0 Controller
The options for this field are
field is set to
Disabled
. In order to use USB 2.0, necessary OS drivers
Enabled
and
Disabled
. By default, this
must be installed first.
USB Controller
The options for this field are
field is set to
Enabled
.
Enabled
and
Disabled
. By default, this
USB Keyboard Support
The options for this field are
field is set to
Disabled
.
Enabled
and
Disabled
. By default, this
AC97 Audio
The default setting of the AC97 Audio is
Auto
.
Init Display First
This field allows the system to initialize first the VGA card on chip or
the display on the PCI Slot. By default, the
PCI Slot
VGA is initialized
first.
IDE HDD Block Mode
This field allows your hard disk controller to use the fast block mode to
transfer data to and from your hard disk drive.
Onboard FDC Controller
Select
Enabled
if your system has a floppy disk controller (FDC)
installed on the CPU card and you wish to use it. If you install an add-in
FDC or the system has no floppy drive, select Disabled in this field.
This option allows you to select the onboard FDD port.
44 TL-SBC 8280 User’s Manual
Page 49

BIOS SETUP
Onboard Serial/Parallel Port
These fields allow you to select the onboard serial and parallel ports
and their addresses. The default values for these ports are:
Serial Port 1 3F8/IRQ4
Serial Port 2 2F8/IRQ3
Parallel Port 378H/IRQ7
UART Mode Select
This field determines the UART 2 mode in your computer. The default
value is
Normal
. Other options include
IrDA
and
ASKIR
.
Parallel Port Mode
This field allows you to determine parallel port mode function.
SPP Standard Printer Port
EPP Enhanced Parallel Port
ECP Extended Cap a bilities Port
PWRON After PWR-Fail
This field sets the system power status whether on or off when power
returns from a power failure situation.
Midi Port Address
The option settings for this field are
330, 400
and
Disabled
.
Midi Port IRQ
The default Midi Port IRQ is 10.
TL-SBC 8280 User’s Manual 45
Page 50

BIOS SETUP
Power Management Setup
The Power Management Setup allows you to save energy of your
system effectively.
CMOS Setup Utility – Copyright © 1984-2001 Award Software
Power Supply Type
ACPI Function
ACPI Suspend Type
Power Management
Video Off Method
Video Off In Suspend
Suspend Type
Modem Use IRQ
Suspend Mode
HDD Power Down
Soft-Off by PWR-BTTN
CPU THRM-Throttling
Wake-Up by PCI Card
Power On by Ring
Resume by Alarm
Date (of Month) Alarm 0
Time (hh:mm:ss) Alarm 0 : 0 : 0
** Reload Global Timer Events **
Primary IDE 0 Enabled
Primary IDE 1 Enabled
Secondary IDE 0 Enabled
Secondary IDE 1 Enabled
FDD, COM, LPT Port Enabled
PCI PIRQ[A-D] # Enabled
Power Management Setup
ATX ITEM HELP
Enabled Menu Level
SI (POS)
User Define
V/H Sync+Blank
Yes
Stop Grant
3
Disabled
Disabled
Instant-Off
50%
Disabled
Disabled
Disabled
Power Supply Type
This field sets the power supply type that is in your system. By default,
the setting is set to
ATX
.
ACPI Function
Enable this function to support ACPI (Advance Configuration and
Power Interface).
ACPI Suspend Type
This field sets the ACPI Power Management standby state. The default
setting is
S1 (POS)
46 TL-SBC 8280 User’s Manual
.
Page 51

BIOS SETUP
Power Management
This field al lows you to select the type of power saving management
modes. There are four selections for Power Management.
Min. Power Saving Minimum power management
Max. Power Saving Maximum power management.
User Define Each of the ranges is from 1 min. to
1hr. Except for HDD Power Down
which ranges from 1 min. to 15 min.
Video Off Method
This field defines the Video Off features. There are three options.
V/H SYNC + Blank Default setting, blank the screen and turn
off vertical and horizontal scanning.
DPMS Allows BIOS to control the video display.
Blank Screen Writes b lanks to the video buffer.
Video Off In Suspend
When enabled, the video is off in suspend mode. The default setting is
.
Yes
Suspend Type
The default setting for the Suspend Type field is
Stop Grant
.
Modem Use IRQ
This field sets the IRQ used by the Modem. By default, the setting is 3.
Suspend Mode
When enabled, and after the set time of system inactivity, all devices
except the CPU will be shut off.
HDD Power Down
When enabled, and after the set time of system inactivity, the hard disk
drive will be powered down while all other devices remain active.
Soft-Off by PWRBTN
This field defines the power-off mode when using an ATX power
supply. The
Instant Off
pressing the power button. In the
mode allows powering off immediately upon
Delay 4 Sec
mode, the system powers
off when the power button is pressed for more than four seconds or
enters the suspend mode when pressed for less than 4 seconds.
TL-SBC 8280 User’s Manual 47
Page 52

BIOS SETUP
CPU THRM-Throttling
When the system enters Doze mode, the CPU clock runs only part of
the time. You may select the percent of time that the clock runs.
Wake-Up by PCI Cards
Enable this field to allow wake up function through a PCI card.
Power On by Ring
This field enables or disables the power on of the system through the
modem connected to the serial port or LAN.
Resume by Alarm
This field enables or disables the resumption of the system operation.
When enabled, the user is allowed to set the
Date
and
Time
.
Reload Global Timer Events
The HDD, FDD, COM, LPT Ports, and PCI PIRQ are I/O events which
can prevent the system from entering a power saving mode or can
awaken the system from such a mode. When an I/O device wants to
gain the attention of the operating system, it signals this by causing an
IRQ to occur. When the operating system is ready to respond to the
request, it interrupts itself and performs the service.
48 TL-SBC 8280 User’s Manual
Page 53

BIOS SETUP
PNP/PCI Configurations
This option configure s the PCI bus system. All PCI bus systems on the
system use INT#, thus all installed PCI cards must be set to this value.
CMOS Setup Utility – Copyright © 1984-2001 Award Software
PNP OS Install
Reset Configuration Data
Resources Controlled By
IRQ Resources
DMA Resources
PCI/VGA Palette Snoop
PnP/PCI Configurations
No ITEM HELP
Disabled
Auto (ESCD)
Press Enter
Press Enter
Disabled
Menu Level
Default is Disabled.
Select Enabled to reset
Extended System
Configuration Data
(ESCD) when you exit
Setup if you have
installed a new add-on
and the system
reconfiguration has
caused such a serious
conflict that the OS
cannot boot
PNP OS Install
Enable the PNP OS Install option if it is supported by the operating
system installed. The default value is
No.
Reset Configuration Data
This field allows you to determine whether to reset the configuration
data or not. The default value is
Disabled.
Resources Controlled by
This PnP BIOS can configure all of the boot and compatible devices
automatically with the use of a use a PnP operating system such as
Windows 95.
PCI/VGA Palette Snoop
Some non-standard VGA display cards may not show colors properly.
This field allows you to set whether or not MPEG ISA/VESA VGA
cards can work with PCI/VGA. When this field is enabled, a PCI/VGA
can work with an MPEG ISA/VESA VGA card. When this field is
disabled, a PCI/VGA cannot work with an MPEG ISA/VESA card.
TL-SBC 8280 User’s Manual 49
Page 54

BIOS SETUP
PC Health Status
This section shows the parameters in determining the PC Health Status.
These parameters include temperatures, fan speeds and voltages.
CMOS Setup Utility – Copyright © 1984-2001 Award Software
CPU Warning Temperature Disabled
Warning Beep Disabled
Current System Temp.
Current System Temp.
CPUFAN Speed
SystemFAN2 Speed
SystemFAN3 Speed
Vcore (V)
VCC3(V)
+5(V)
+12(V)
-12(V)
VBAT
5VSB(V)
Shutdown Temperature Disabled
PC Health Status
ITEM HELP
28°C/82°F
35°C/95°F
4166 RPM
0 RPM
0 RPM
1.63V
3.37V
5.05V
12.09V
(-)12.03V
3.21V
5.05V
CPU Warning Temperature
This field allows the user to set the temperature so that when the
temperature is reached, the system sounds a warning. This function can
help prevent damage to the system that is caused by overheating.
Temperatures/Fan Speeds/Voltages
These fields are the parameters of the hardware monitoring function
feature of the CPU card. The values are read-only values as monitored
by the system and show the PC health status.
Shutdown Temperature
This field allows the user to set the temperature by which the system
automatically shuts down once the threshold temperature is reached.
This function can help prevent damage to the system that is caused by
overheating.
50 TL-SBC 8280 User’s Manual
Page 55

BIOS SETUP
Frequency/Voltage Control
This section shows the user how to configure the processor frequency.
CMOS Setup Utility – Copyright © 1984-2001 Award Software
CPU Clock Ratio
Auto Detect PCI Clk
Spread Spectrum
Frequency/Voltage Control
12X ITEM HELP
Disabled
Disabled
Menu Level
CPU Clock Ratio
The CPU Ratio, also known as the CPU bus speed multiplier, can be
configured through this field. T he de fault se tting is
. This parameter
12X
can be used in conjunction with the above field to change the
processor’s speed.
Auto Detect PCI Clk
This field enables or disables the auto detection of the PCI clock.
Spread Spectrum
This field sets the value of the spread spectrum. The default setting is
Disabled
. This field is for CE testing use only
.
TL-SBC 8280 User’s Manual 51
Page 56

BIOS SETUP
Load Fail-Safe Defaults
This option allows you to load the troubleshooting default values
permanently stored in the BIOS ROM. These default settings are nonoptimal and disable all high-performance features.
Load Setup Defaults
This option allows you to load the default values to your system
configuration. These default settings are optimal and enable all high
performance features.
Set Supervisor/User Password
These two options set the system password. Supervisor Password sets a
password that will be used to protect the system and Setup utility. User
Password sets a password that will be used exclusively on the system.
To specify a p assword, highlight the t ype you want and pre ss <Enter> .
The Enter Password: message prompts on the screen. Type the
password, up to eight characters in length, and press <Enter>. The
system confirms your password by asking you to type it again. After
setting a password, the screen automatically returns to the main screen.
To disable a password, just press the <Enter> key when you are
prompted to enter the password. A message will confirm the password
to be disabled. Once the password is disabled, the system will boot and
you can enter Setup freely.
Save & Exit Setup
This option allows you to determine whether or not to accept the
modifications. If you type “Y”, you will quit the setup utility and save
all changes into the CMOS memory. If you type “N”, you will return to
Setup utility.
Exit Without Saving
Select this option to exit the Setup utility without saving the changes
you have made in this session. Typing “Y” will quit the Setup utility
without saving the modifications. Typing “N” will return you to Setup
utility.
52 TL-SBC 8280 User’s Manual
Page 57

DRIVERS INSTALLATION
Drivers Installation
This section describes the installation procedures for software and
drivers under the Windows 98, Windows NT 4.0 and Windows 2000.
The software and drivers are included with the CPU card. If you find
the items missing, please contact the vendor where you made the
purchase. The contents of this section include the following:
Intel Chipset Software Installation Utility.........................54
Intel Application Accelerator............................................57
ATI M7 VGA Driver Installation......................................61
Intel 845G Chipset Graphics Driver..................................64
Sigmatel AC97 Codec Audio Driver.................................66
Intel PRO LAN Drivers Installation..................................68
IMPORTANT NOTE:
After installing your Windows operating system (Windows
98/98SE/ME/2000/XP), you must install first the Intel Chipset Software
Installation Utility before proceeding with the drivers installation.
TL-SBC 8280 User’s Manual 53
Page 58
DRIVERS INSTALLATION
Intel Chipset Software Installation Utility
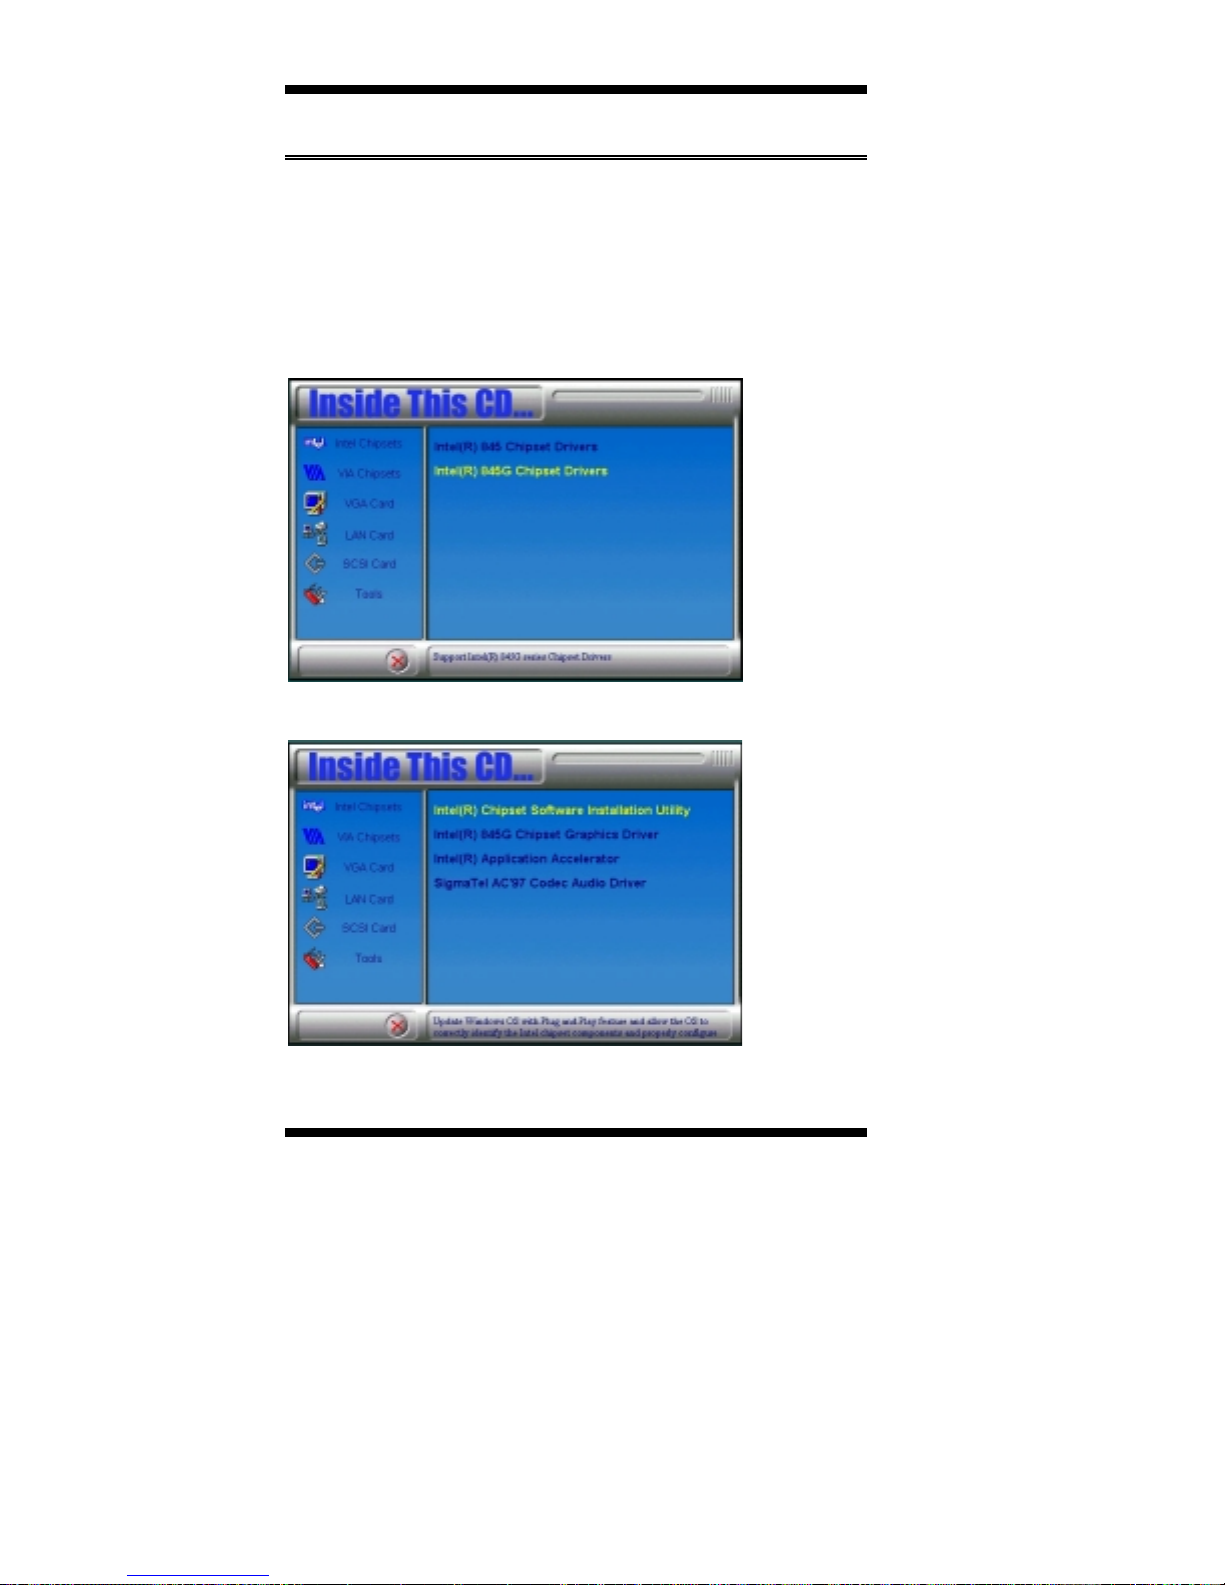
The Intel Chipset Software Installation Utility, to be installed first
before the software drivers, will enable Plug & Play INF support for
Intel chipset components. Follow the instructions below to complete the
installation under Windows 98/98SE/ME/2000/XP.
1. Insert the CD that comes with the CPU card and the screen below
would appear. Click Intel Chipsets and then Intel 845G Chipset
Drivers.
2. Click Intel Chipset Software Installation Utility.
54 TL-SBC 8280 User’s Manual
Page 59
DRIVERS INSTALLATION
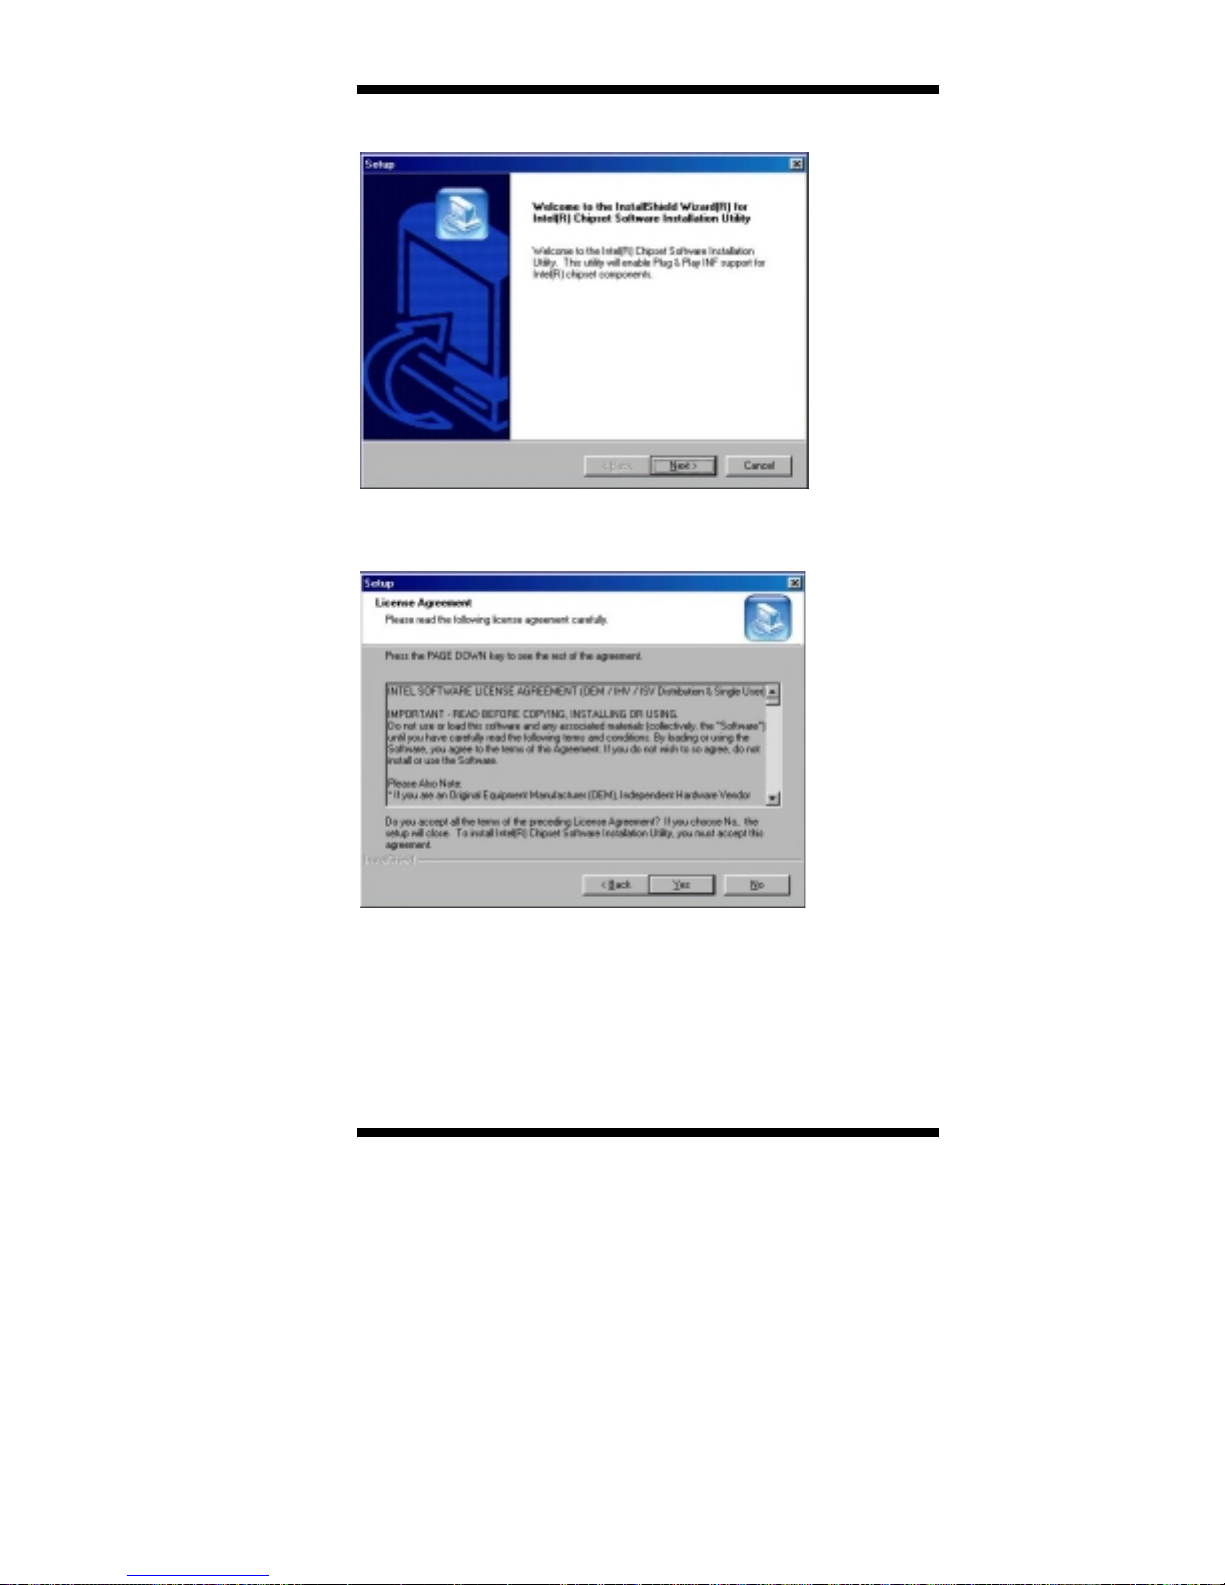
3. When the Welcome screen appears, click Next to continue.
4. Click Yes to accept the software license agreement and proceed with
the installation process.
TL-SBC 8280 User’s Manual 55
Page 60
DRIVERS INSTALLATION
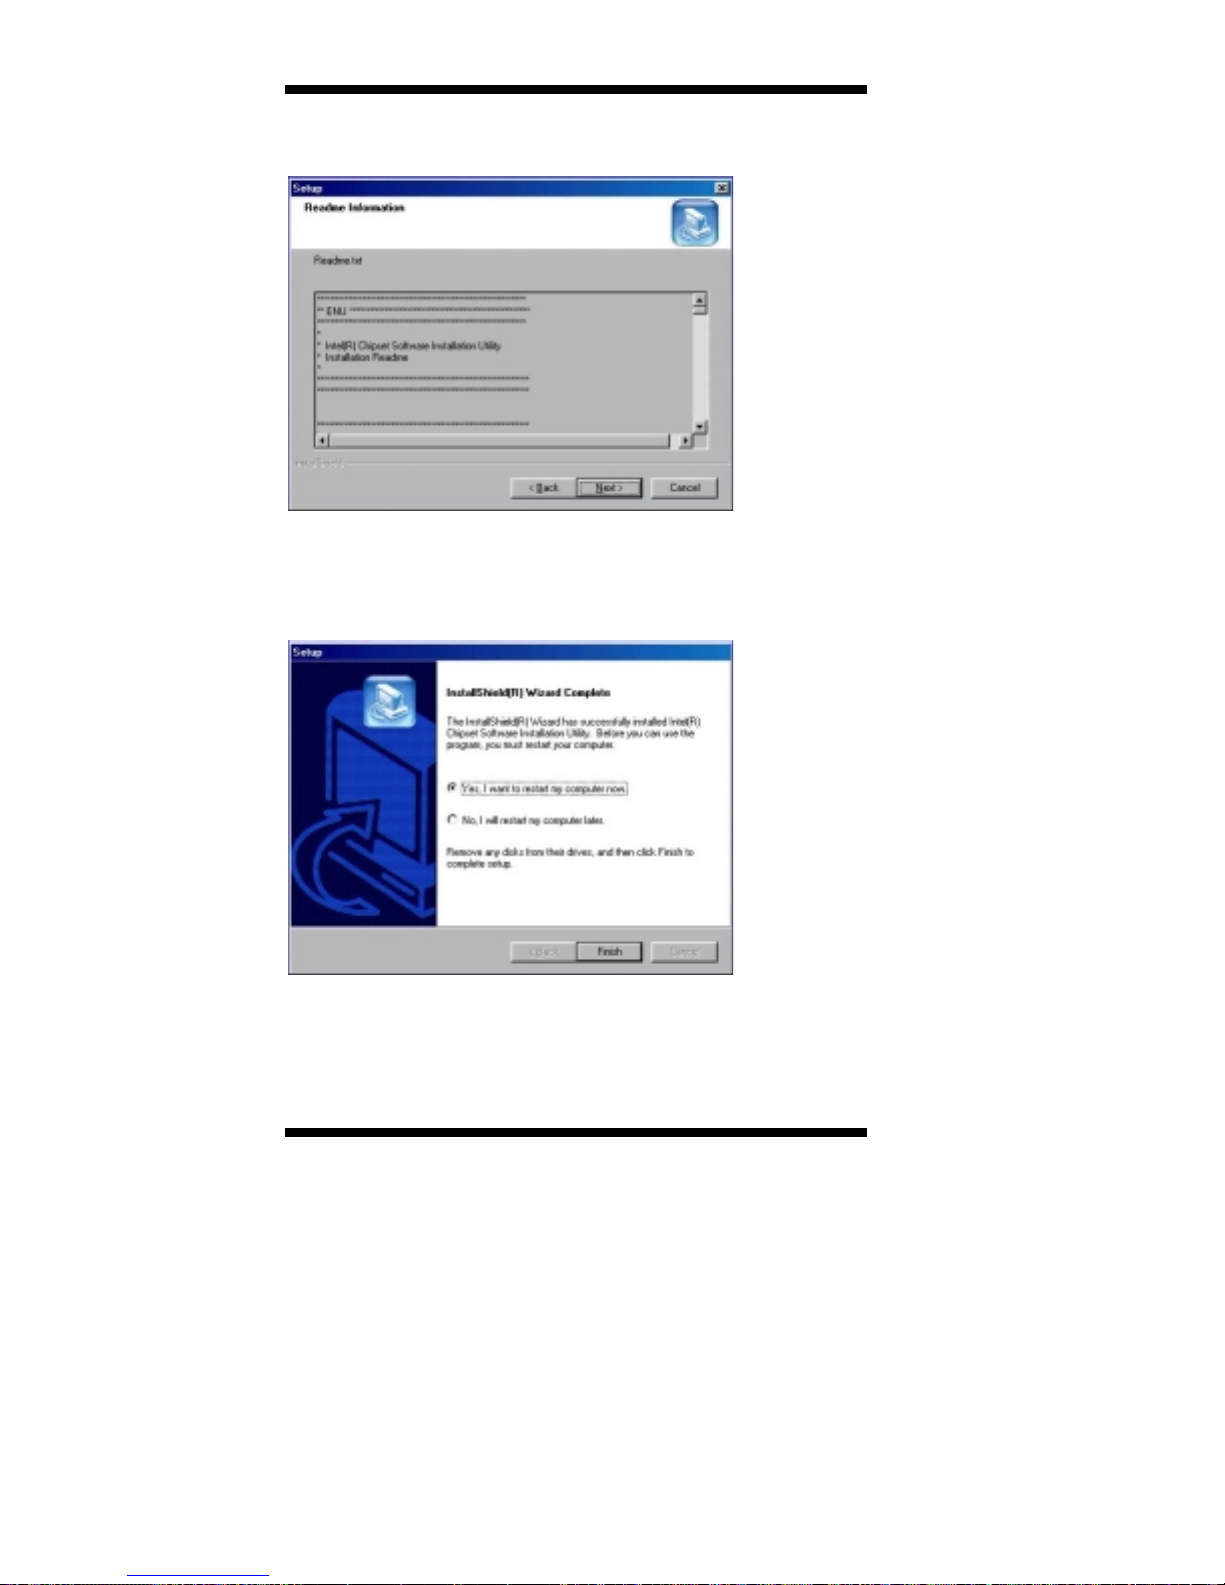
5. On Readme Information screen, click Next to continue the
installation.
6. The Setup process is now complete. Click Finish to restart the
computer and for changes to take effect. When the computer has
restarted, the system will be able to find some devices. Restart your
computer when prompted.
56 TL-SBC 8280 User’s Manual
Page 61
DRIVERS INSTALLATION
Intel Application Accelerator
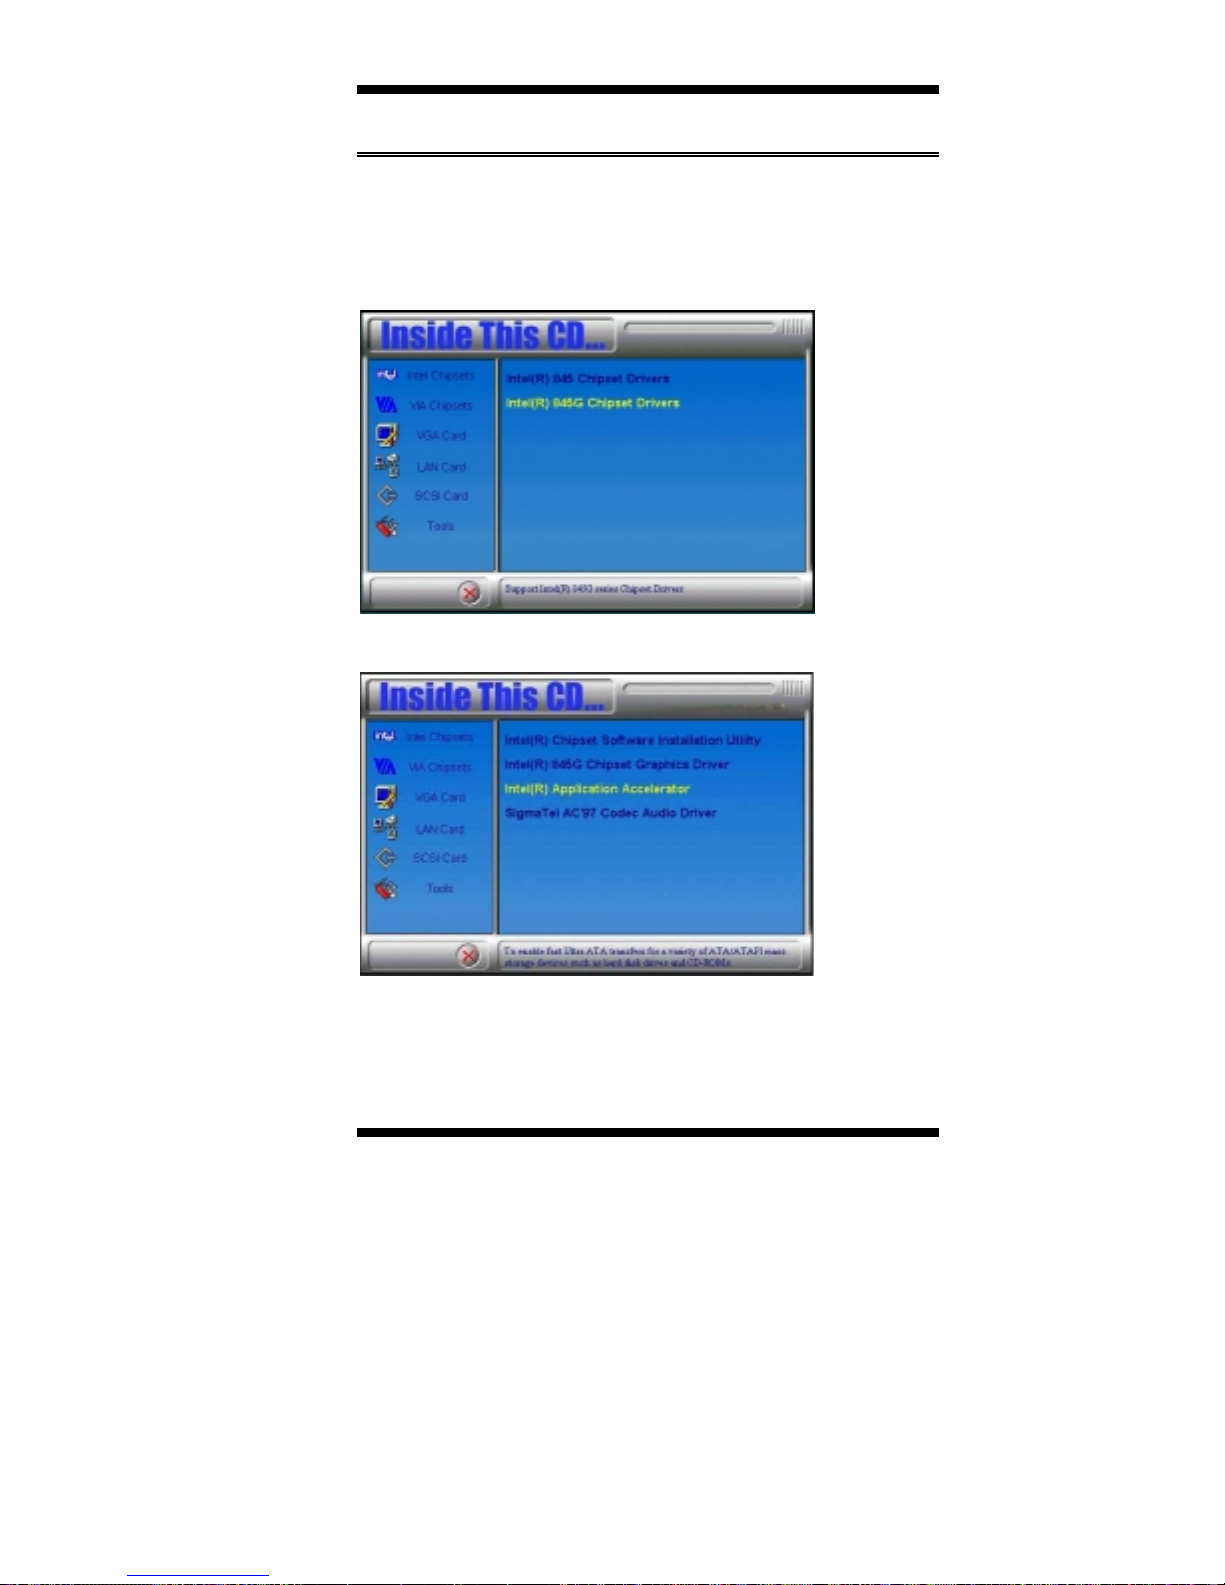
Follow the steps below to install Intel Application Accelerator with the
InstallShield Wizard under Windows 98/98SE/ME/2000/XP/NT 4.0.
1. Insert the CD that comes with the CPU card and the screen below
would appear. Click Intel Chipsets and then Intel 845G Chipset Drivers.
2. Click Intel Application Accelerator.
TL-SBC 8280 User’s Manual 57
Page 62
DRIVERS INSTALLATION
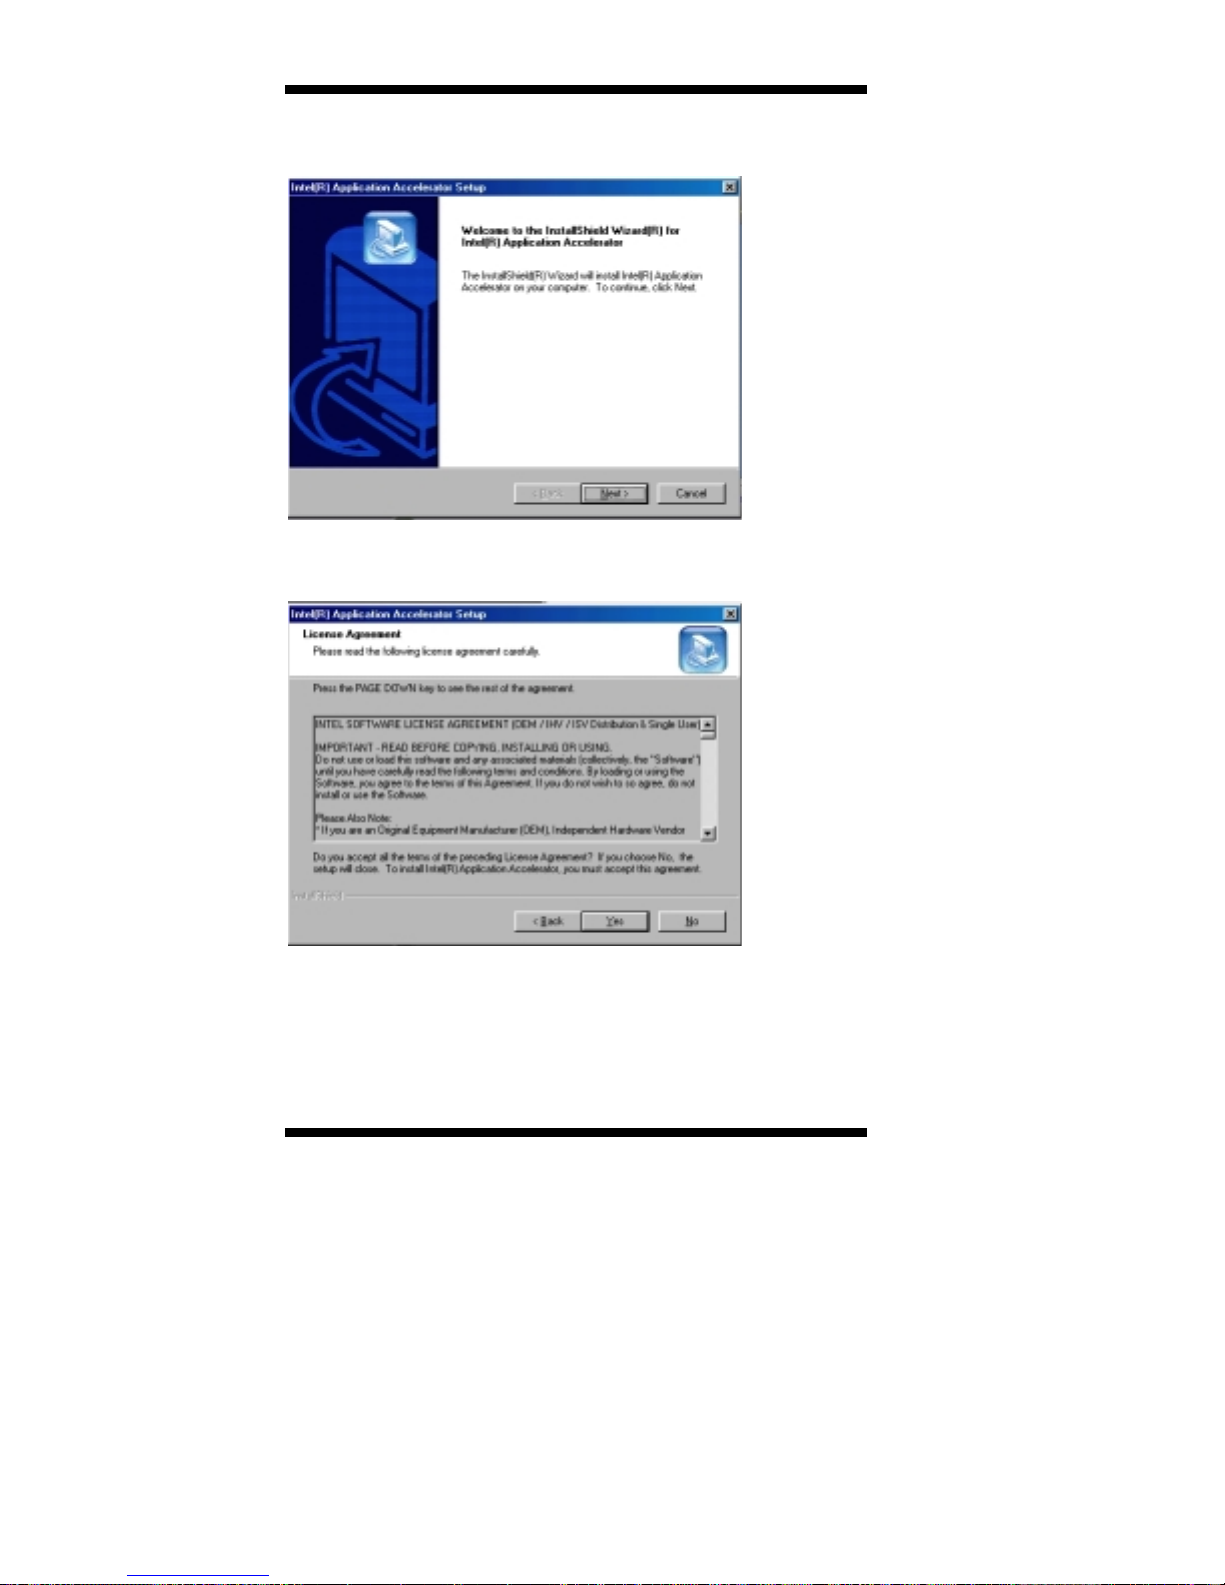
3. The Welcome screen of the Install Shield Wizard for Intel
Application Accelerator.
4. Click Yes to accept the software license agreement and proceed with
the installation process.
58 TL-SBC 8280 User’s Manual
Page 63
DRIVERS INSTALLATION
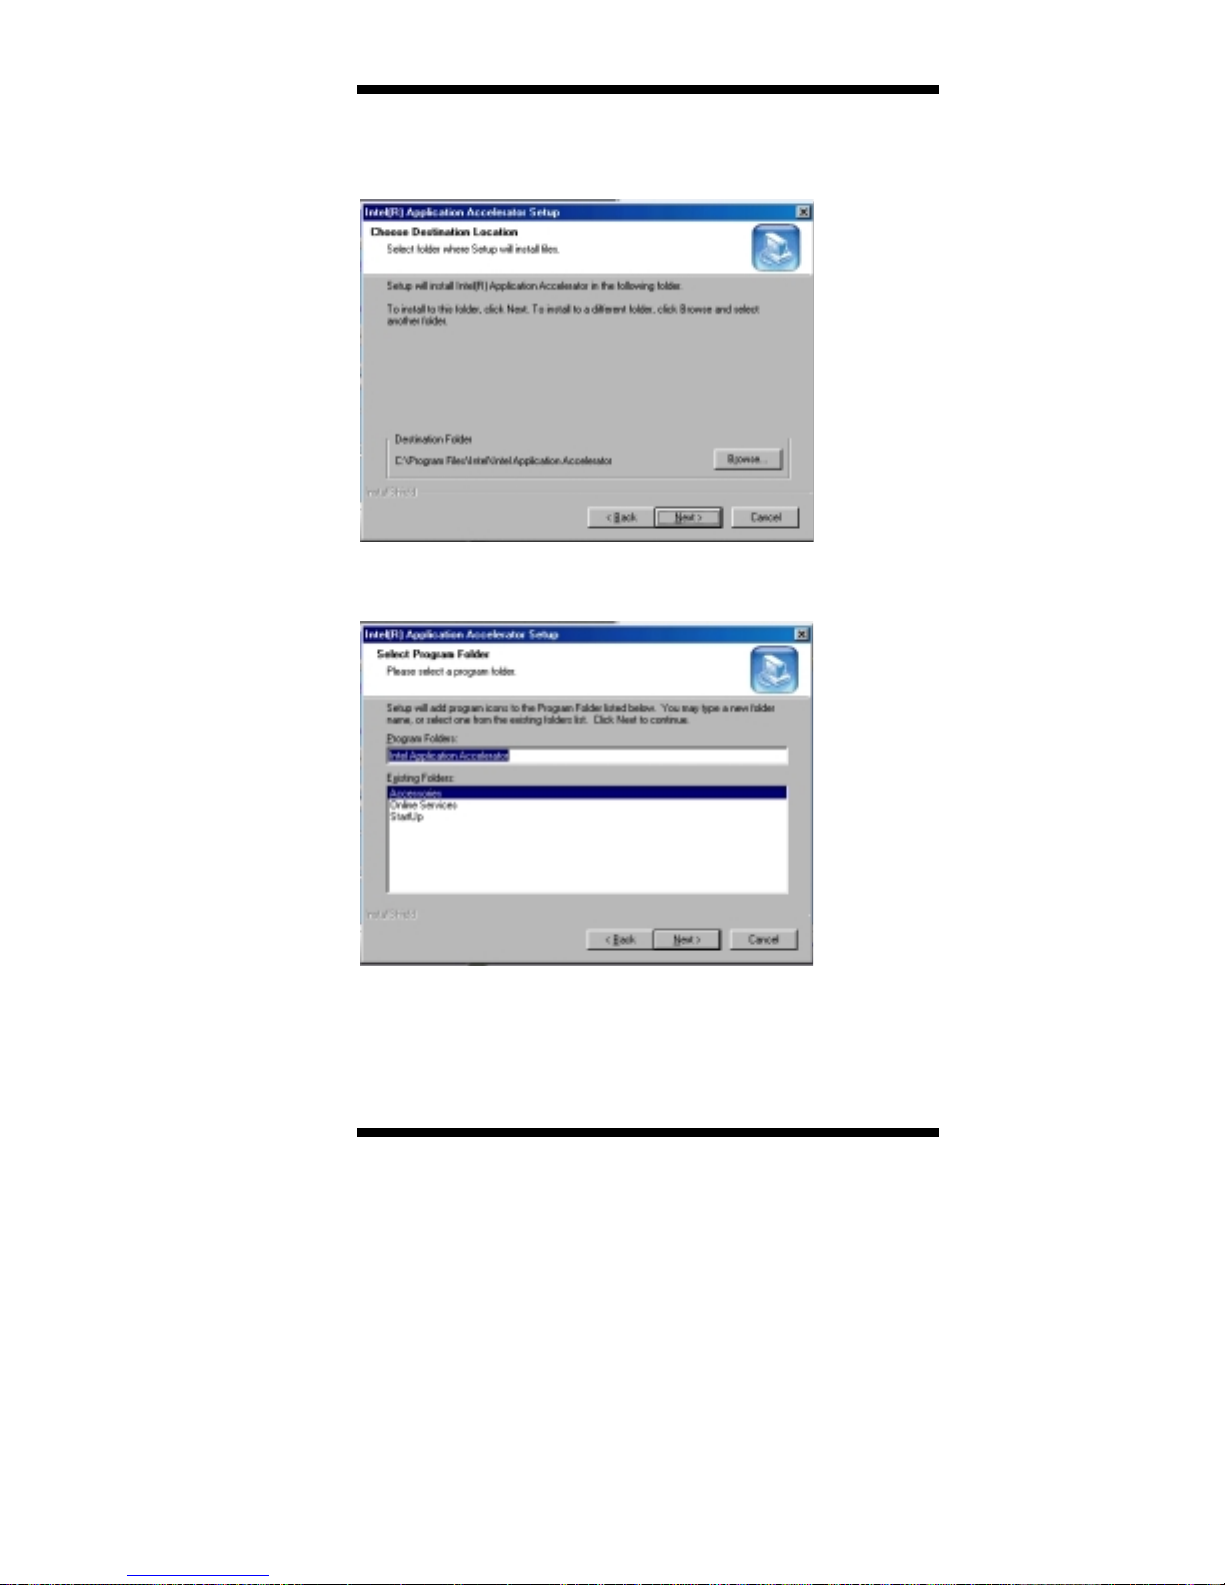
5. You are now required to select the folder where Setup will install
files. Click Next to accept the default folder or click Browse to
configure the location.
6. You are now asked to select a program folder. Click Next to accept
the default program folder or enter the folder name you prefer.
TL-SBC 8280 User’s Manual 59
Page 64
DRIVERS INSTALLATION
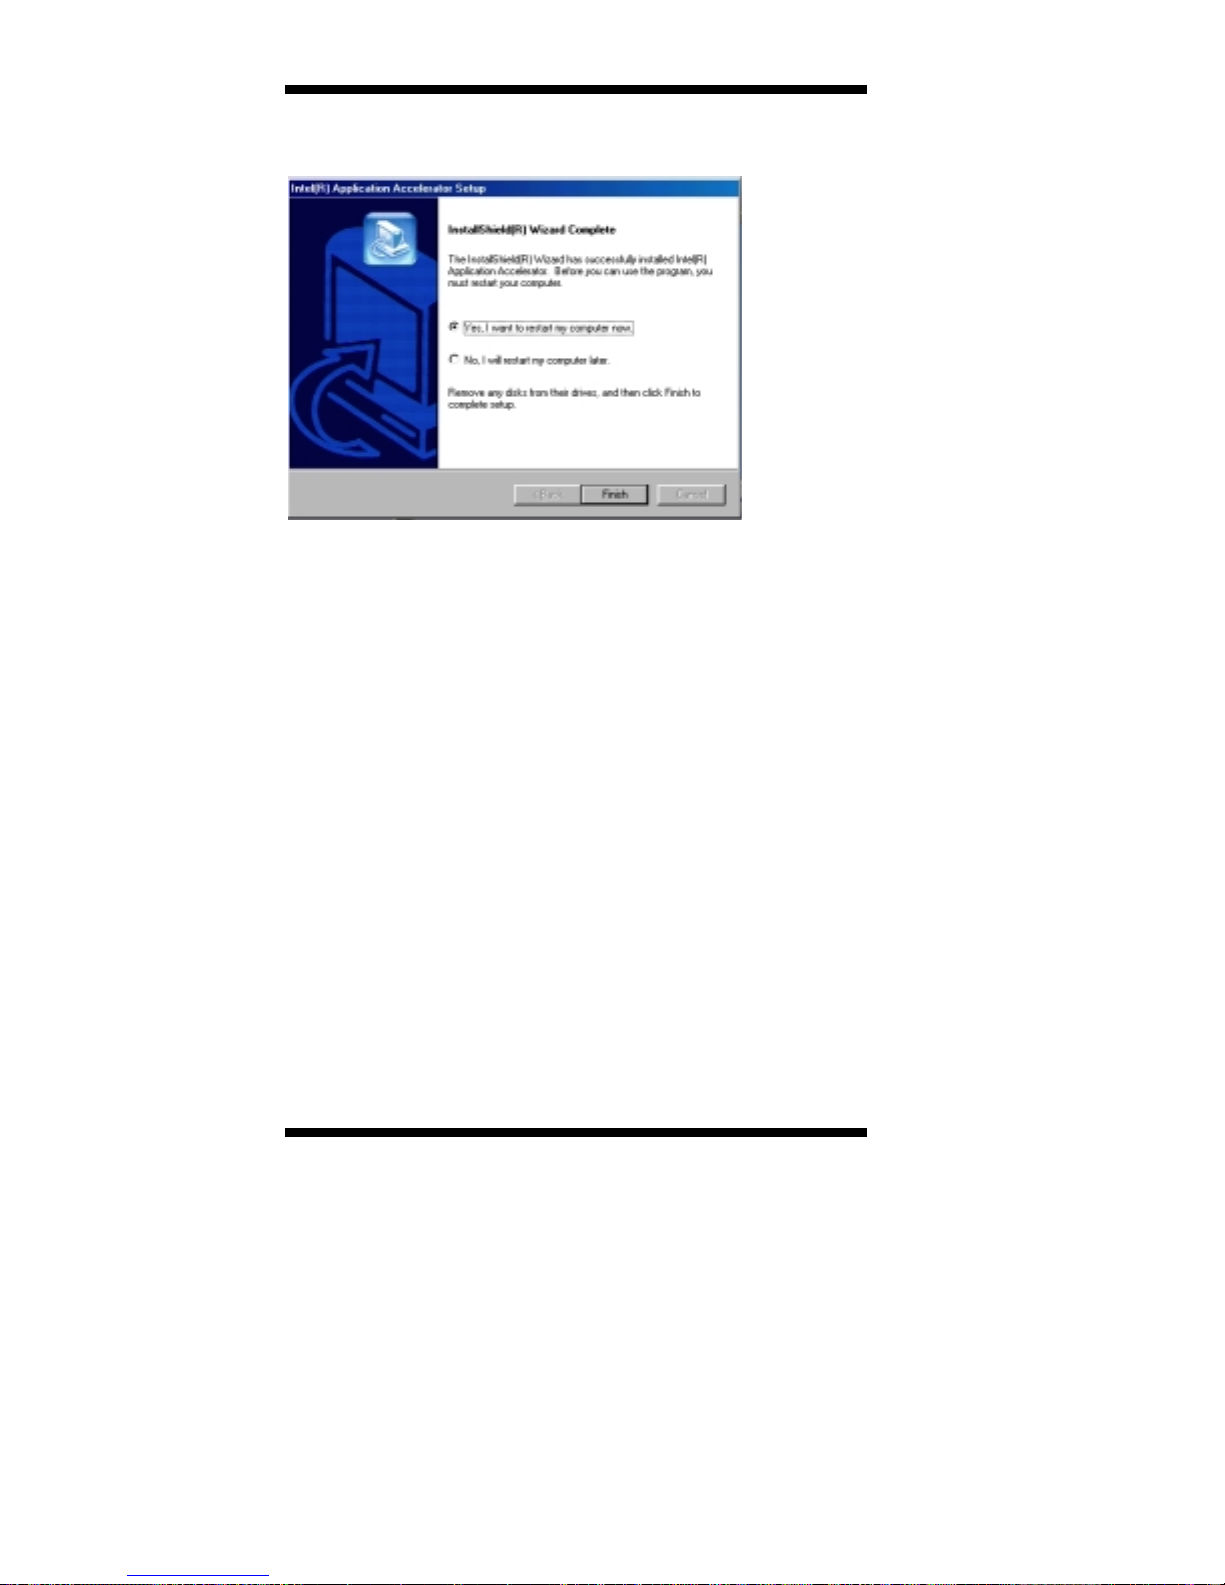
7. The InstallShield Wizard has completed installation. Click Finish for
the computer to restart and changes to take effect.
60 TL-SBC 8280 User’s Manual
Page 65
DRIVERS INSTALLATION
ATI M7 VGA Driver Installation
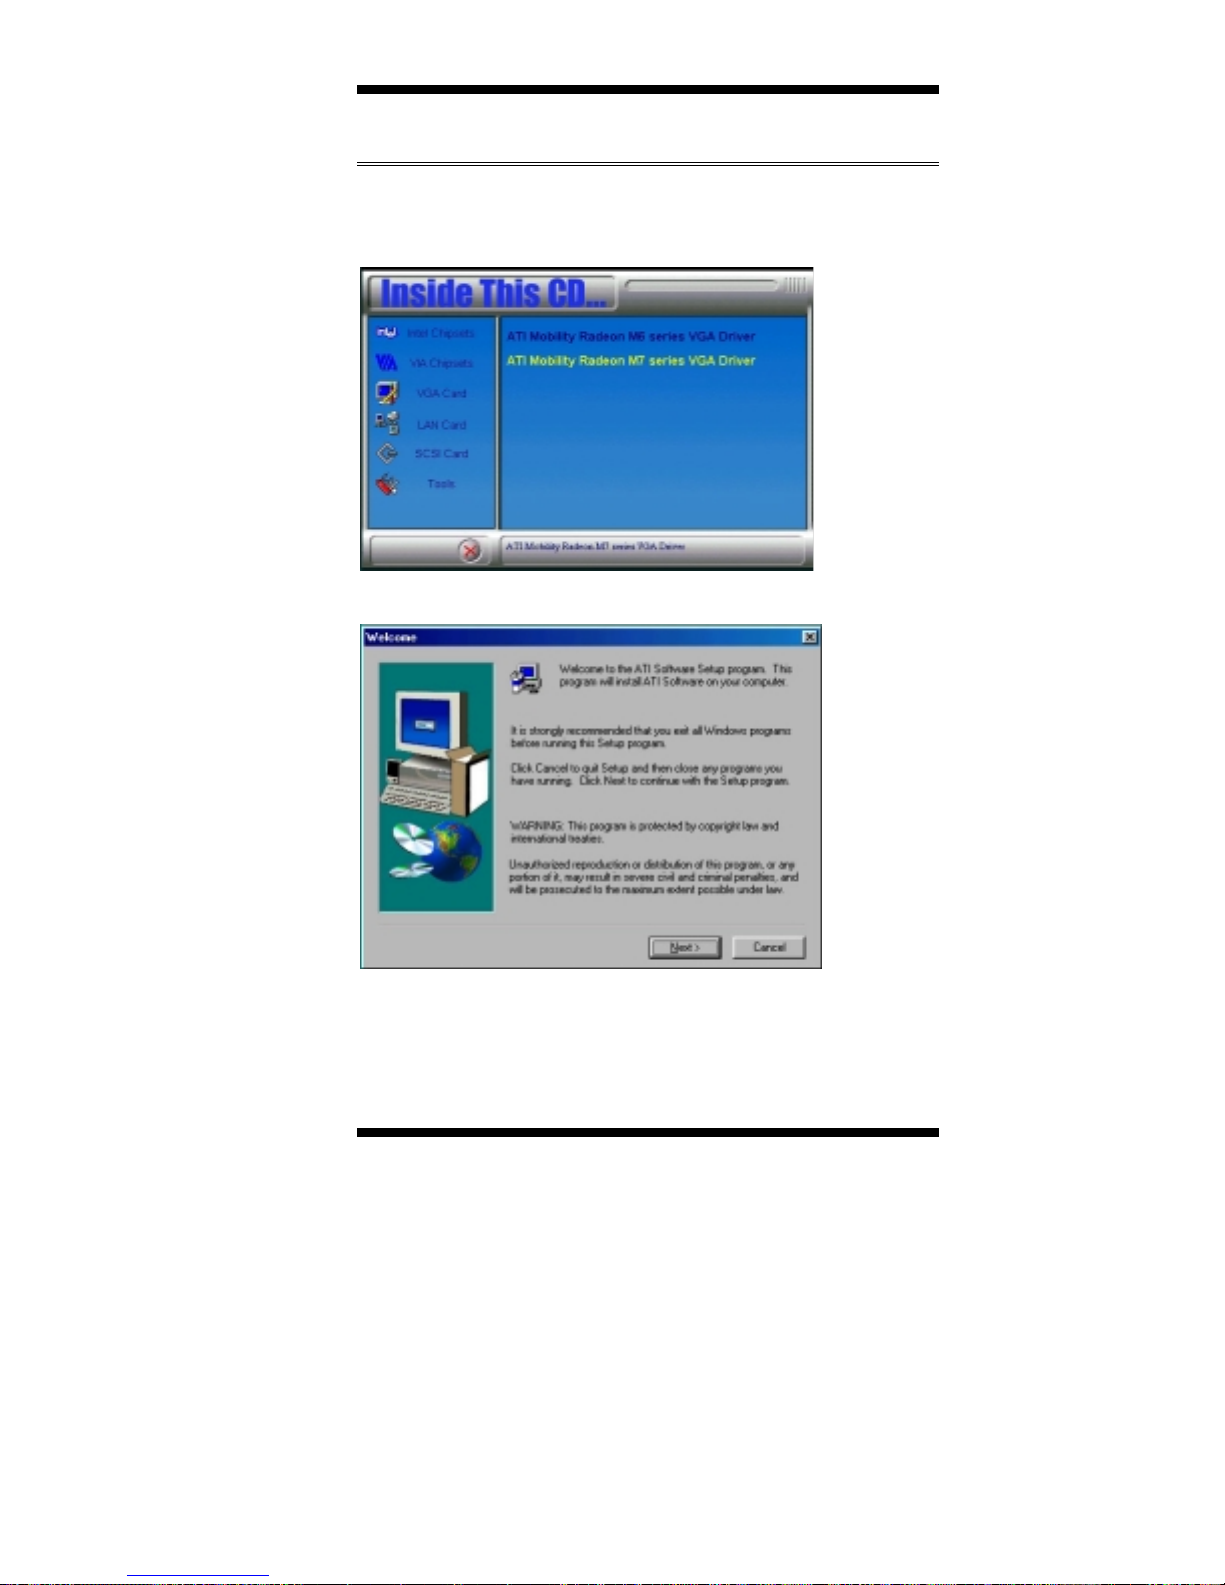
1. Insert the CD that comes with the CPU card. On the initial screen,
click VGA Card on the left side and the screen below would appear.
Click ATI Mobility Radeon M7 series VGA Driver.
2. When the Welcome screen appears, click Next to continue.
TL-SBC 8280 User’s Manual 61
Page 66
DRIVERS INSTALLATION
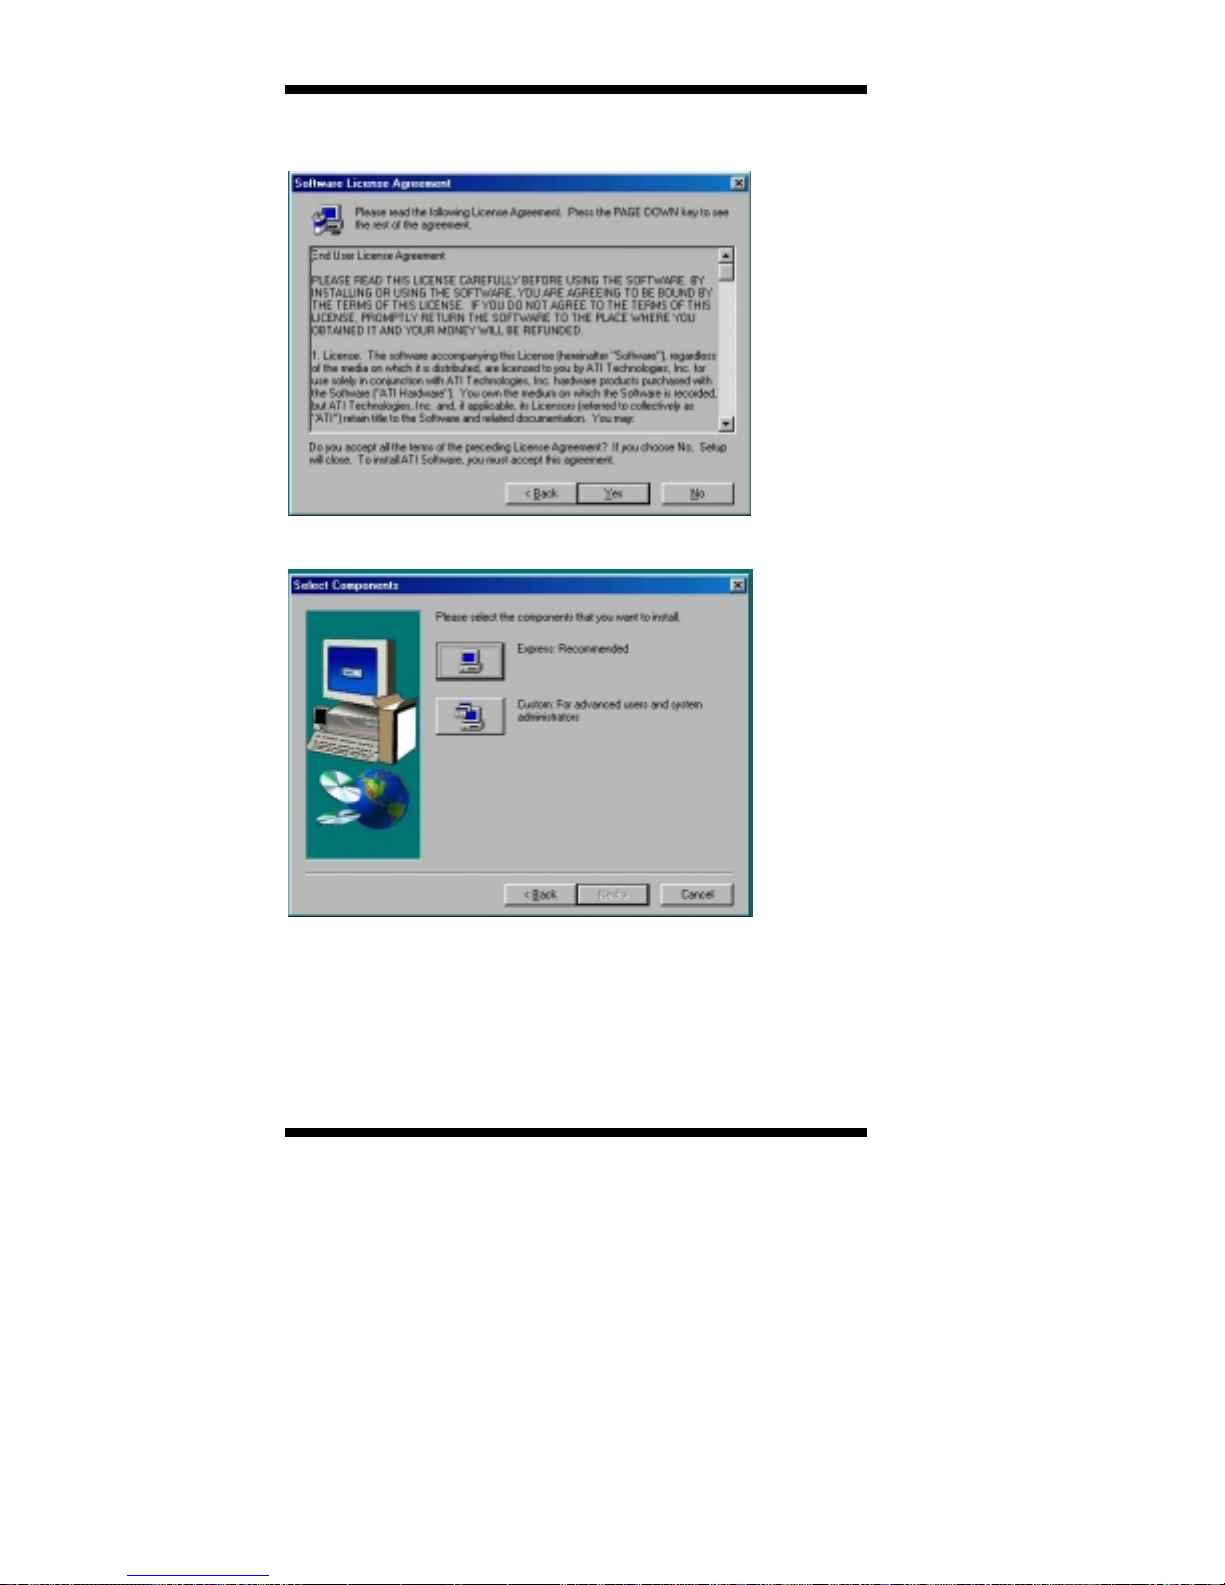
3. Click Yes to accept the software license agreement and proceed with
the installation process.
4. Select on the Express icon and click Next to continue.
62 TL-SBC 8280 User’s Manual
Page 67
DRIVERS INSTALLATION
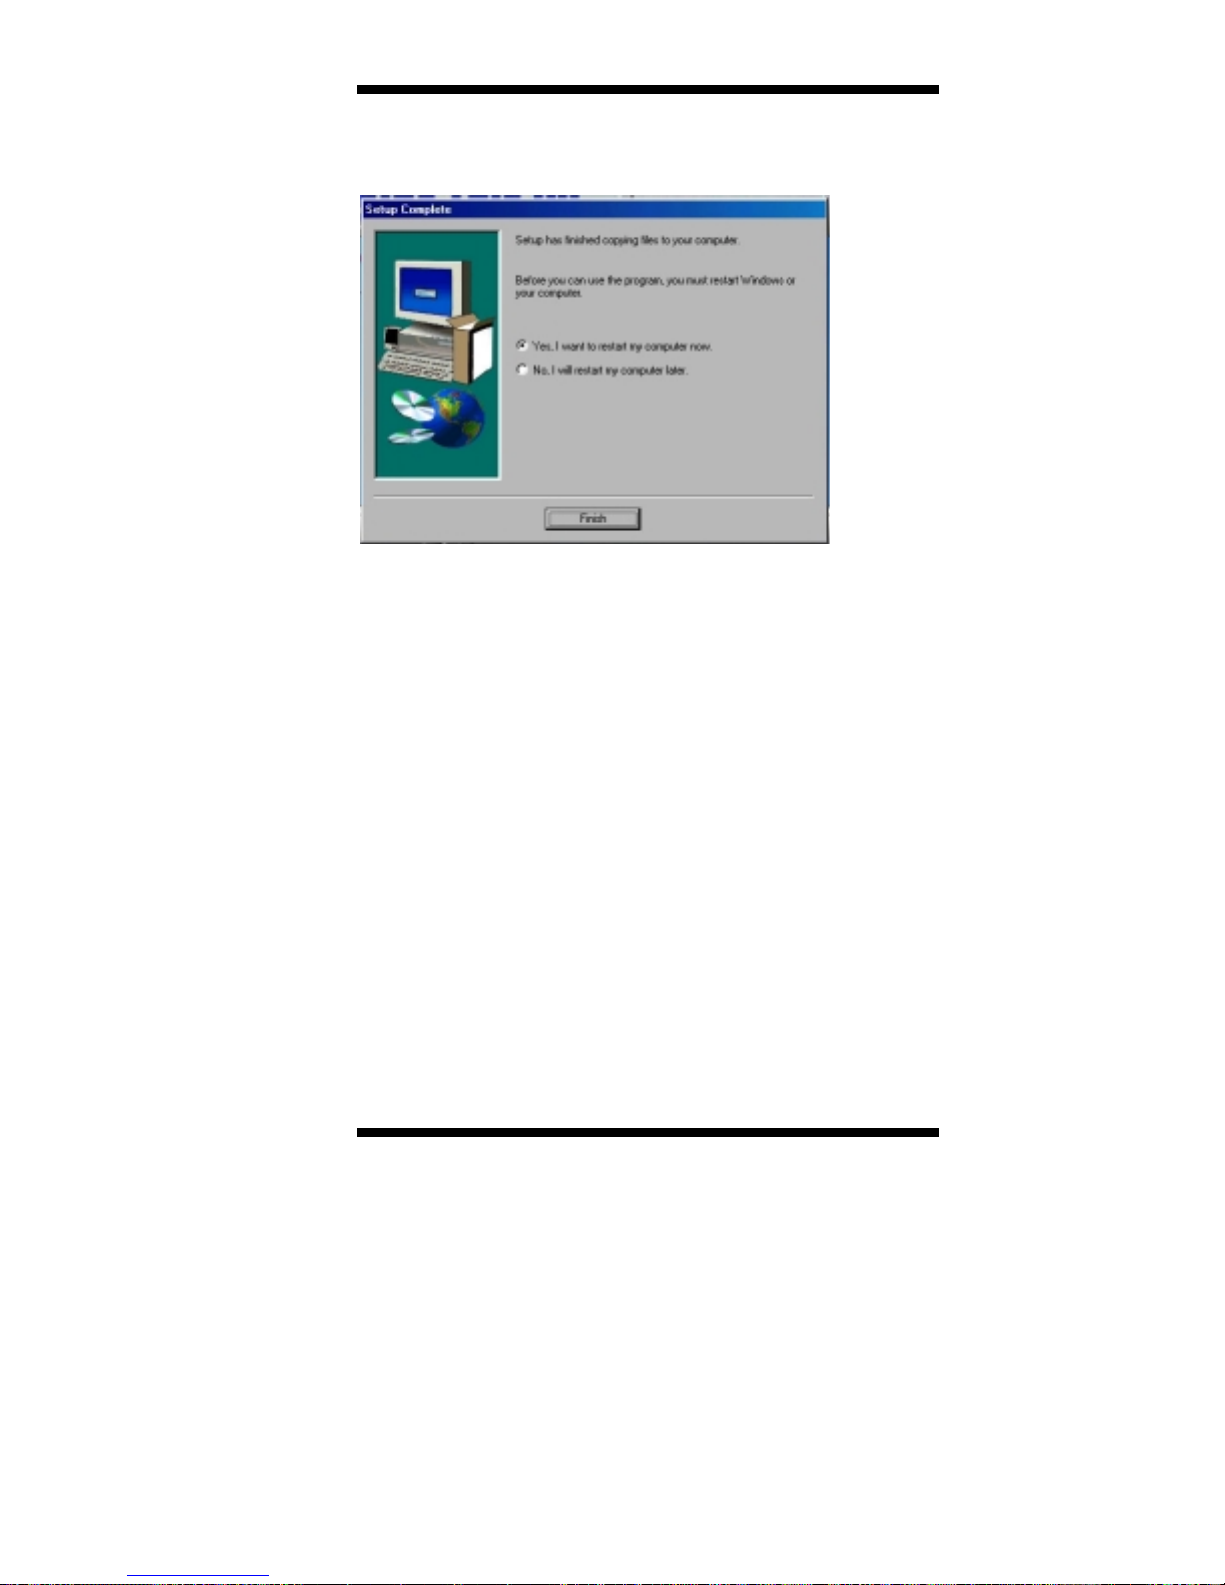
5. The Setup process is now complete. Click Finish to restart the
computer and for changes to take effect. Restart your computer when
prompted.
TL-SBC 8280 User’s Manual 63
Page 68
DRIVERS INSTALLATION
Intel 845G Chipset Graphics Driver
Installation
Follow the steps below to install the Intel 845G graphics driver under
Windows 98/98SE/ME/2000/XP/NT 4.0.
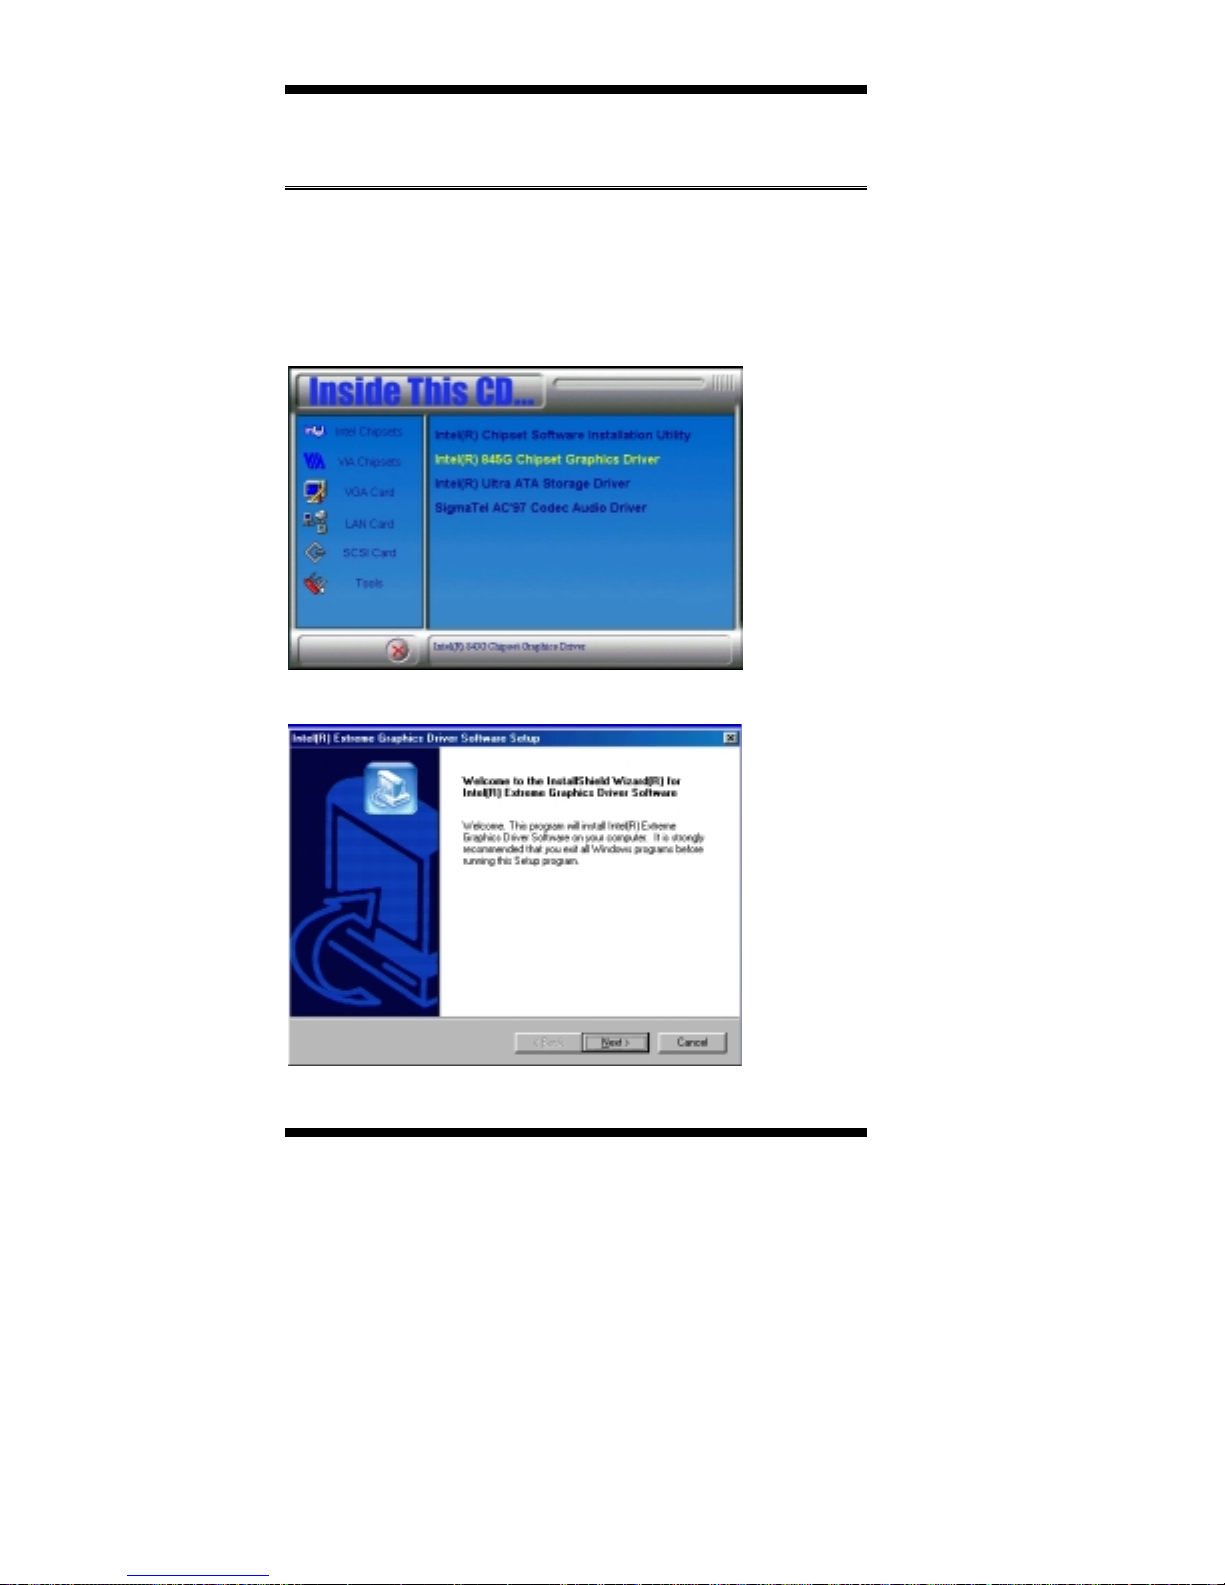
1. Insert the CD that comes with the CPU card. Click Intel Chipsets on
the left side of the screen. Then select, Intel 845G Chipset Drivers,
then Intel 845G Chipset Graphics Driver.
2. When the Welcome screen appears, click Next to continue.
64 TL-SBC 8280 User’s Manual
Page 69
DRIVERS INSTALLATION
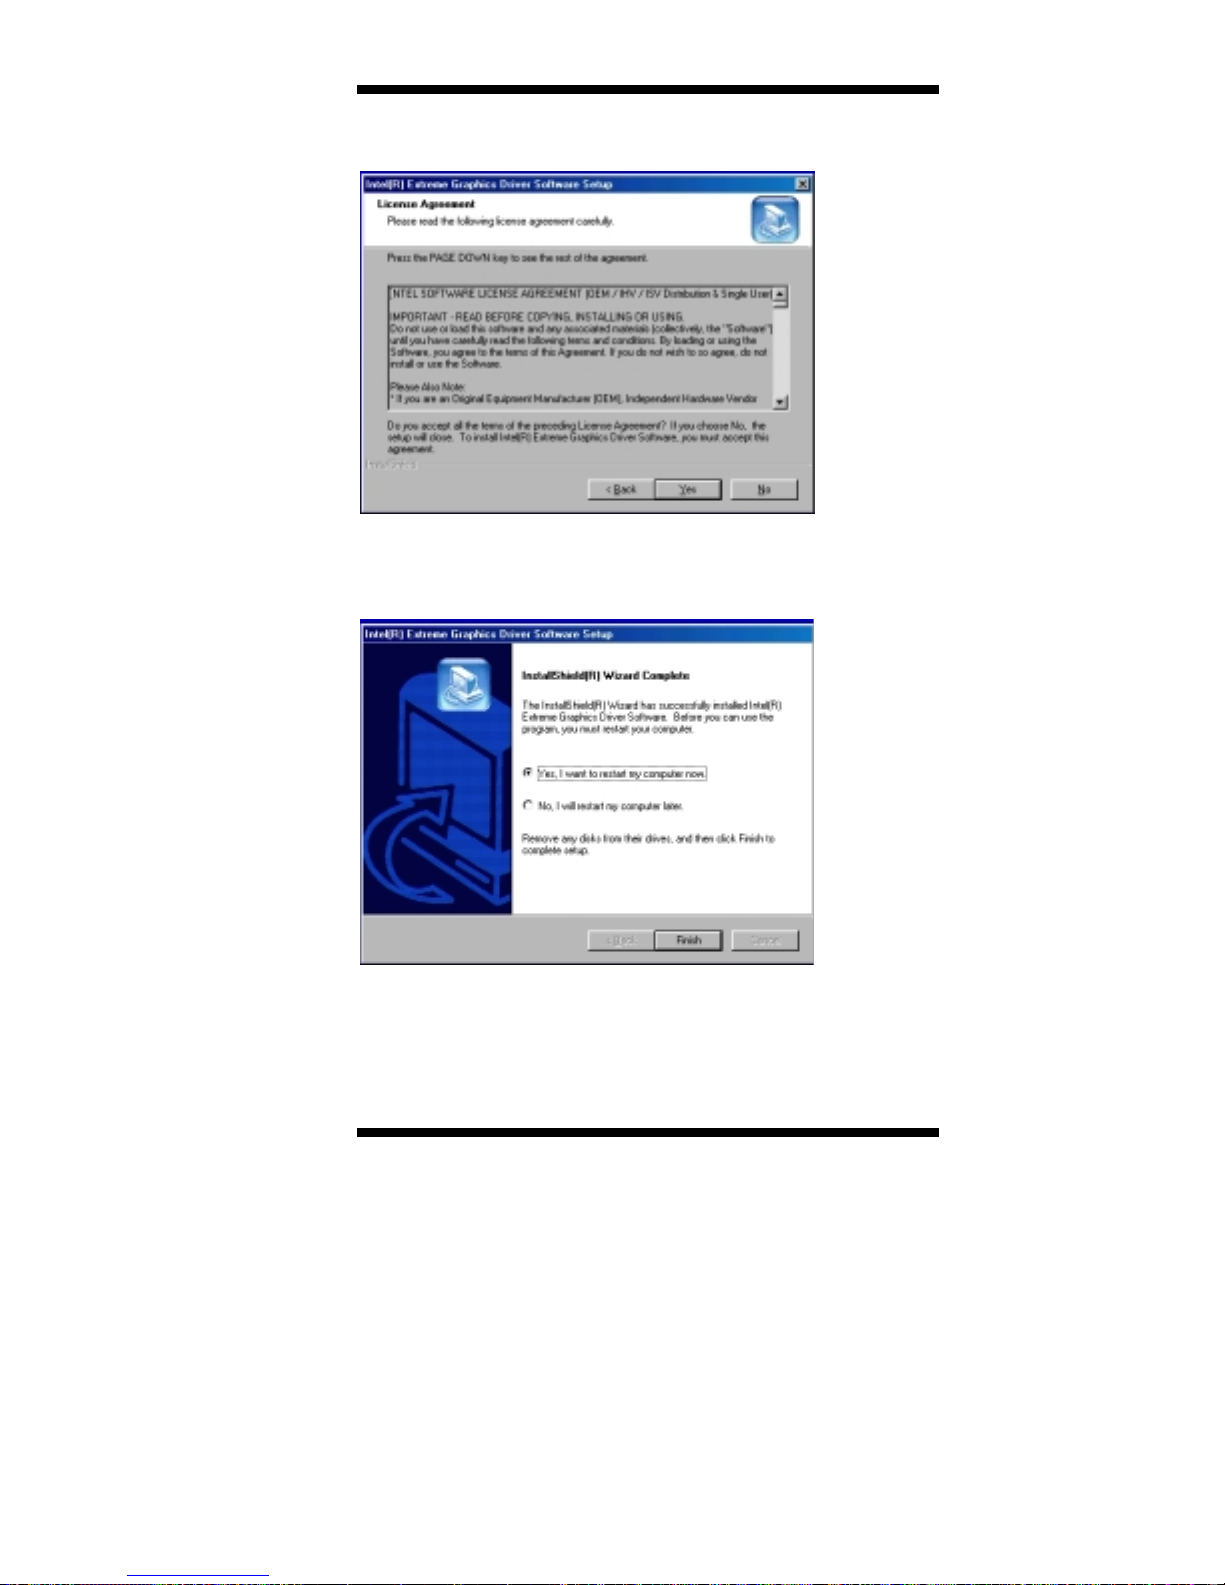
3. Click Yes to accept the software license agreement and proceed with
the installation process.
4. The Setup process is now complete. Click Finish to restart the
computer and for changes to take effect. Restart your computer when
prompted.
TL-SBC 8280 User’s Manual 65
Page 70
DRIVERS INSTALLATION
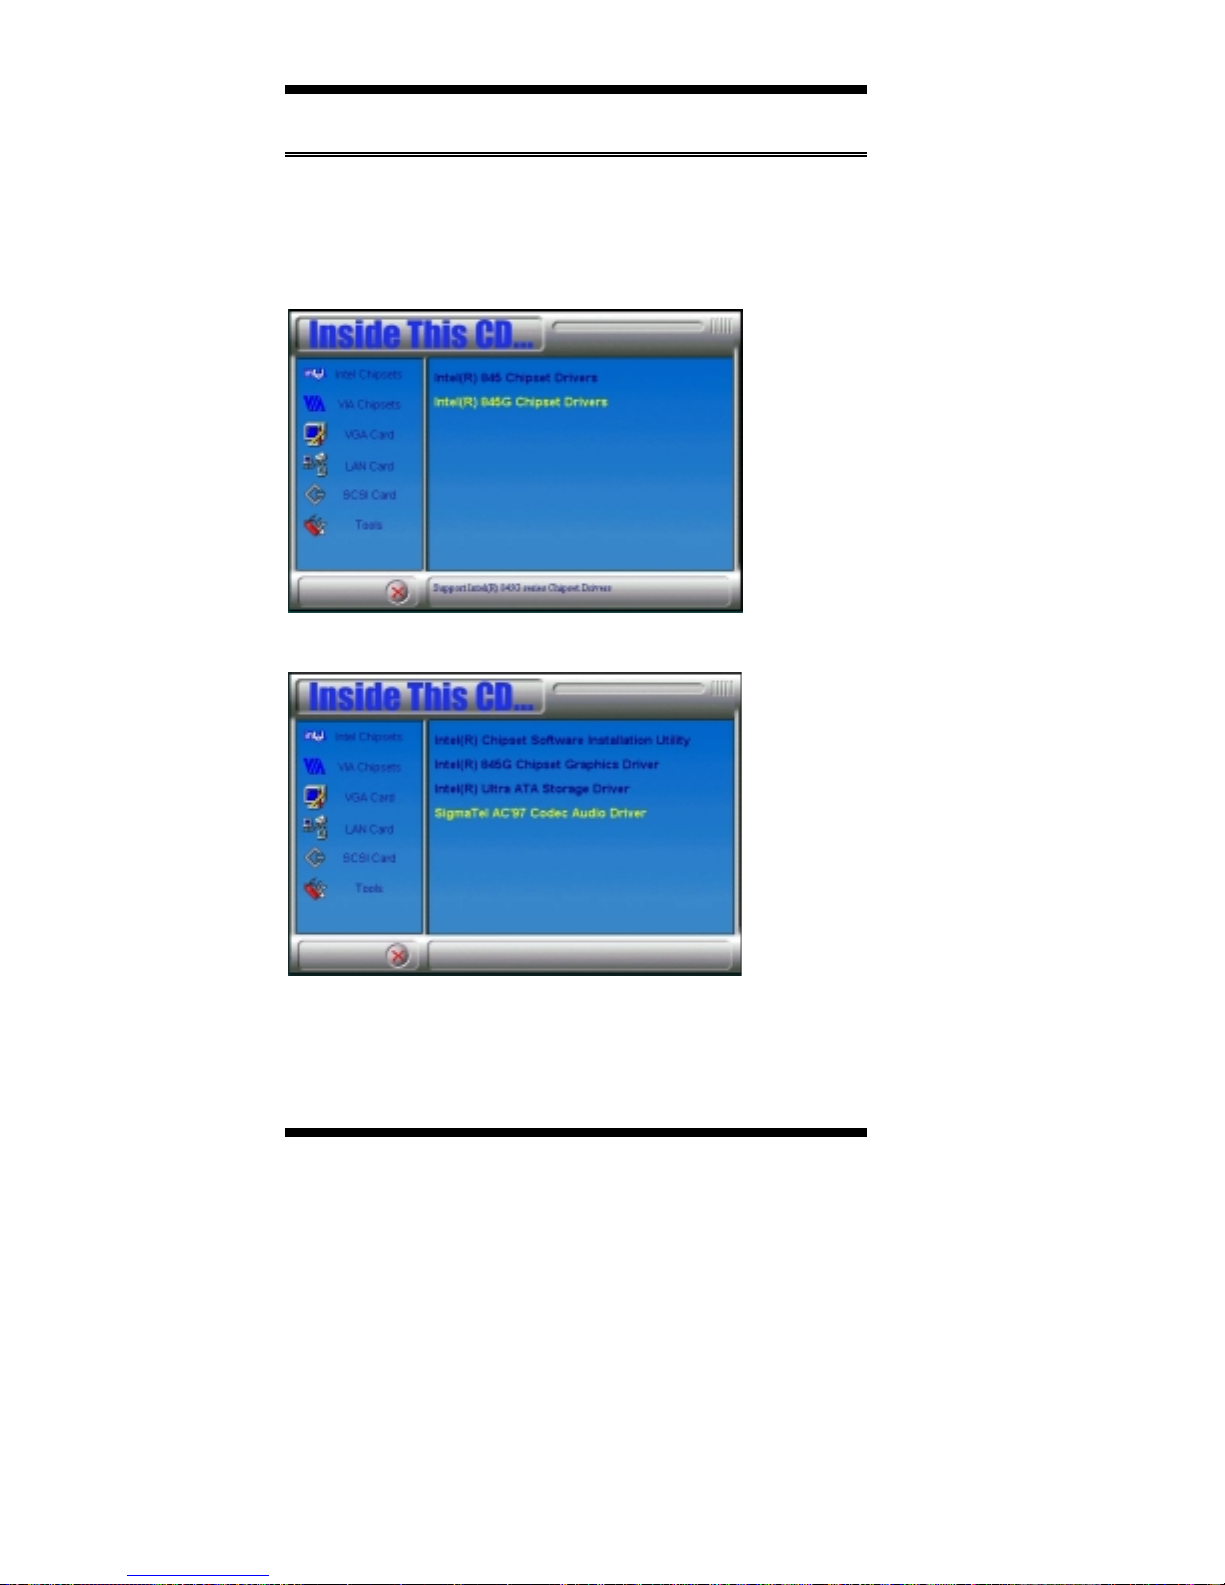
Sigmatel AC97 Codec Audio Dr iver Installation
Follow the steps below to install SigmaTel AC97 Audio Drivers on
your system.
1. Insert the CD that comes with the CPU card and the screen below
would appear. Click Intel Chipsets, then Intel 845G Chipset Drivers.
2. Click SigmaTel AC97 Audio Driver.
66 TL-SBC 8280 User’s Manual
Page 71
DRIVERS INSTALLATION
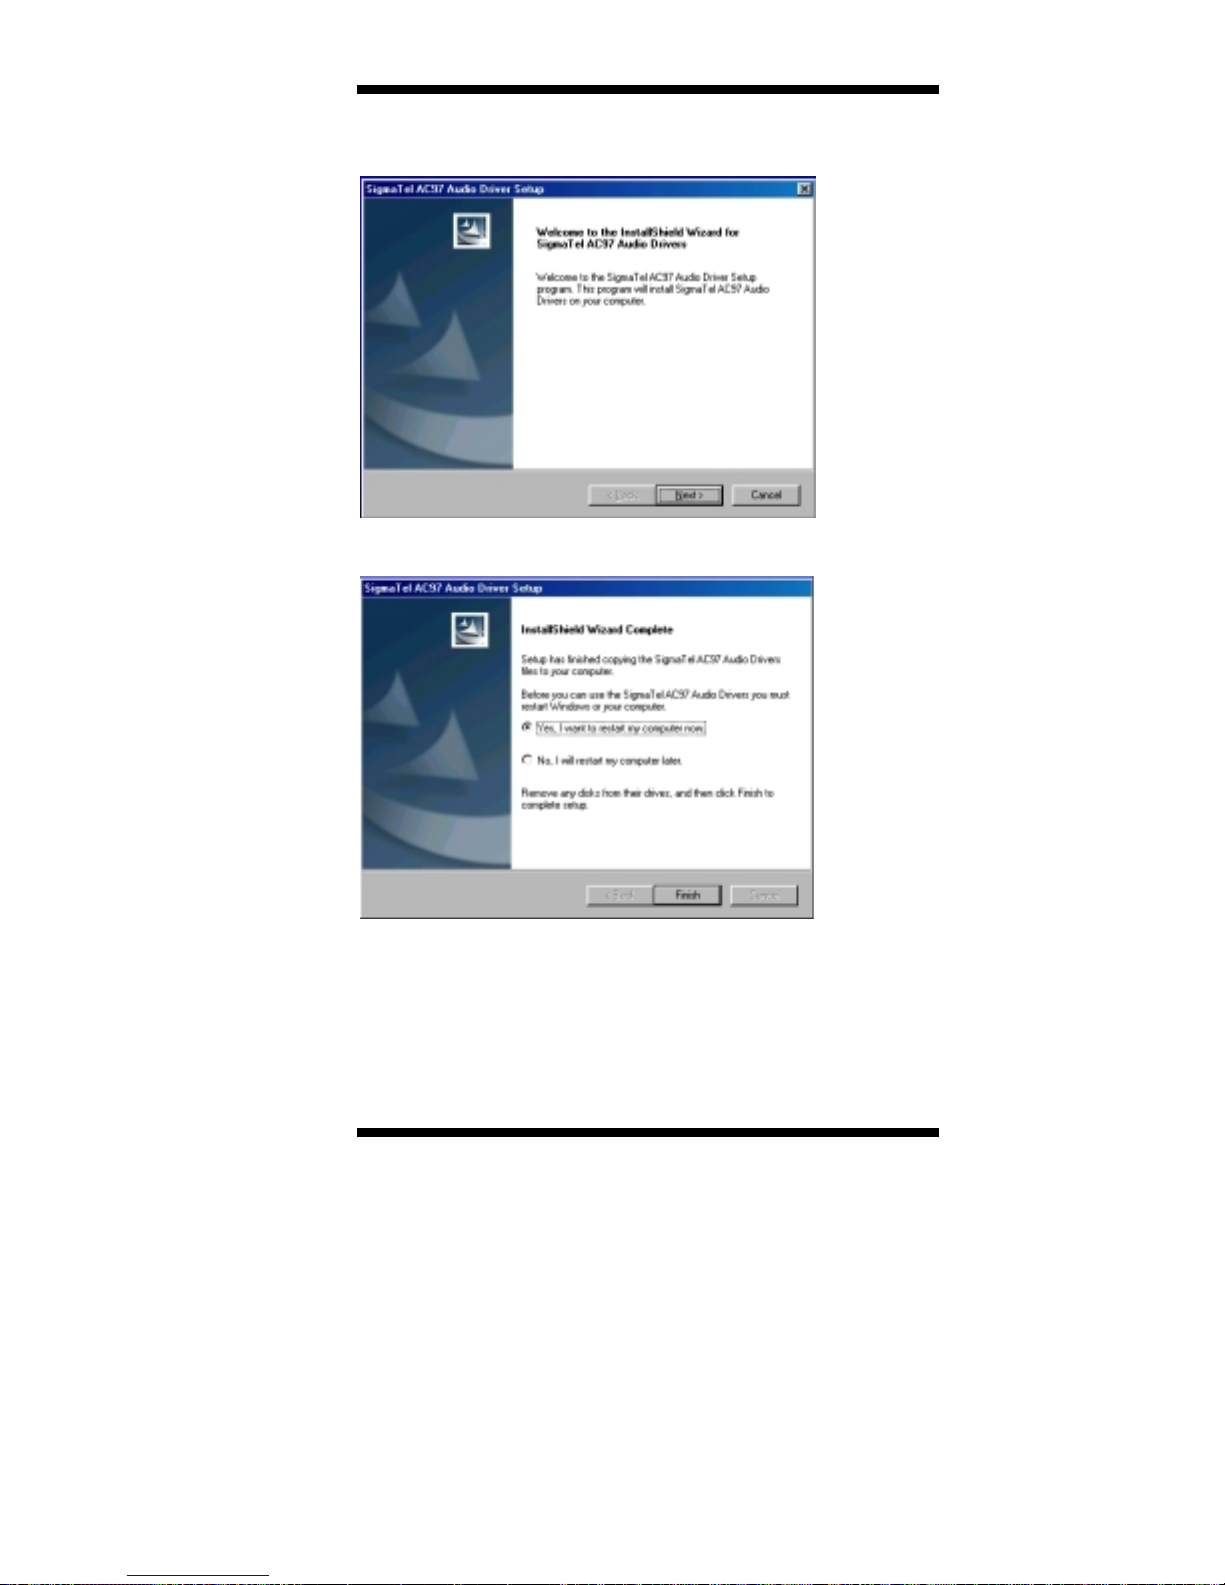
3. The Welcome screen of the SigmaTel AC97 Audio Driver Setup
program appears. To continue and start the installation, click Next.
4. Finish to restart the computer and for changes to take effect. .
TL-SBC 8280 User’s Manual 67
Page 72
DRIVERS INSTALLATION
Intel PRO LAN Drivers Installation
The Intel PRO LAN drivers support both Intel® PRO/100 and
PRO/1000 drivers. Follow the steps below to complete the installation.
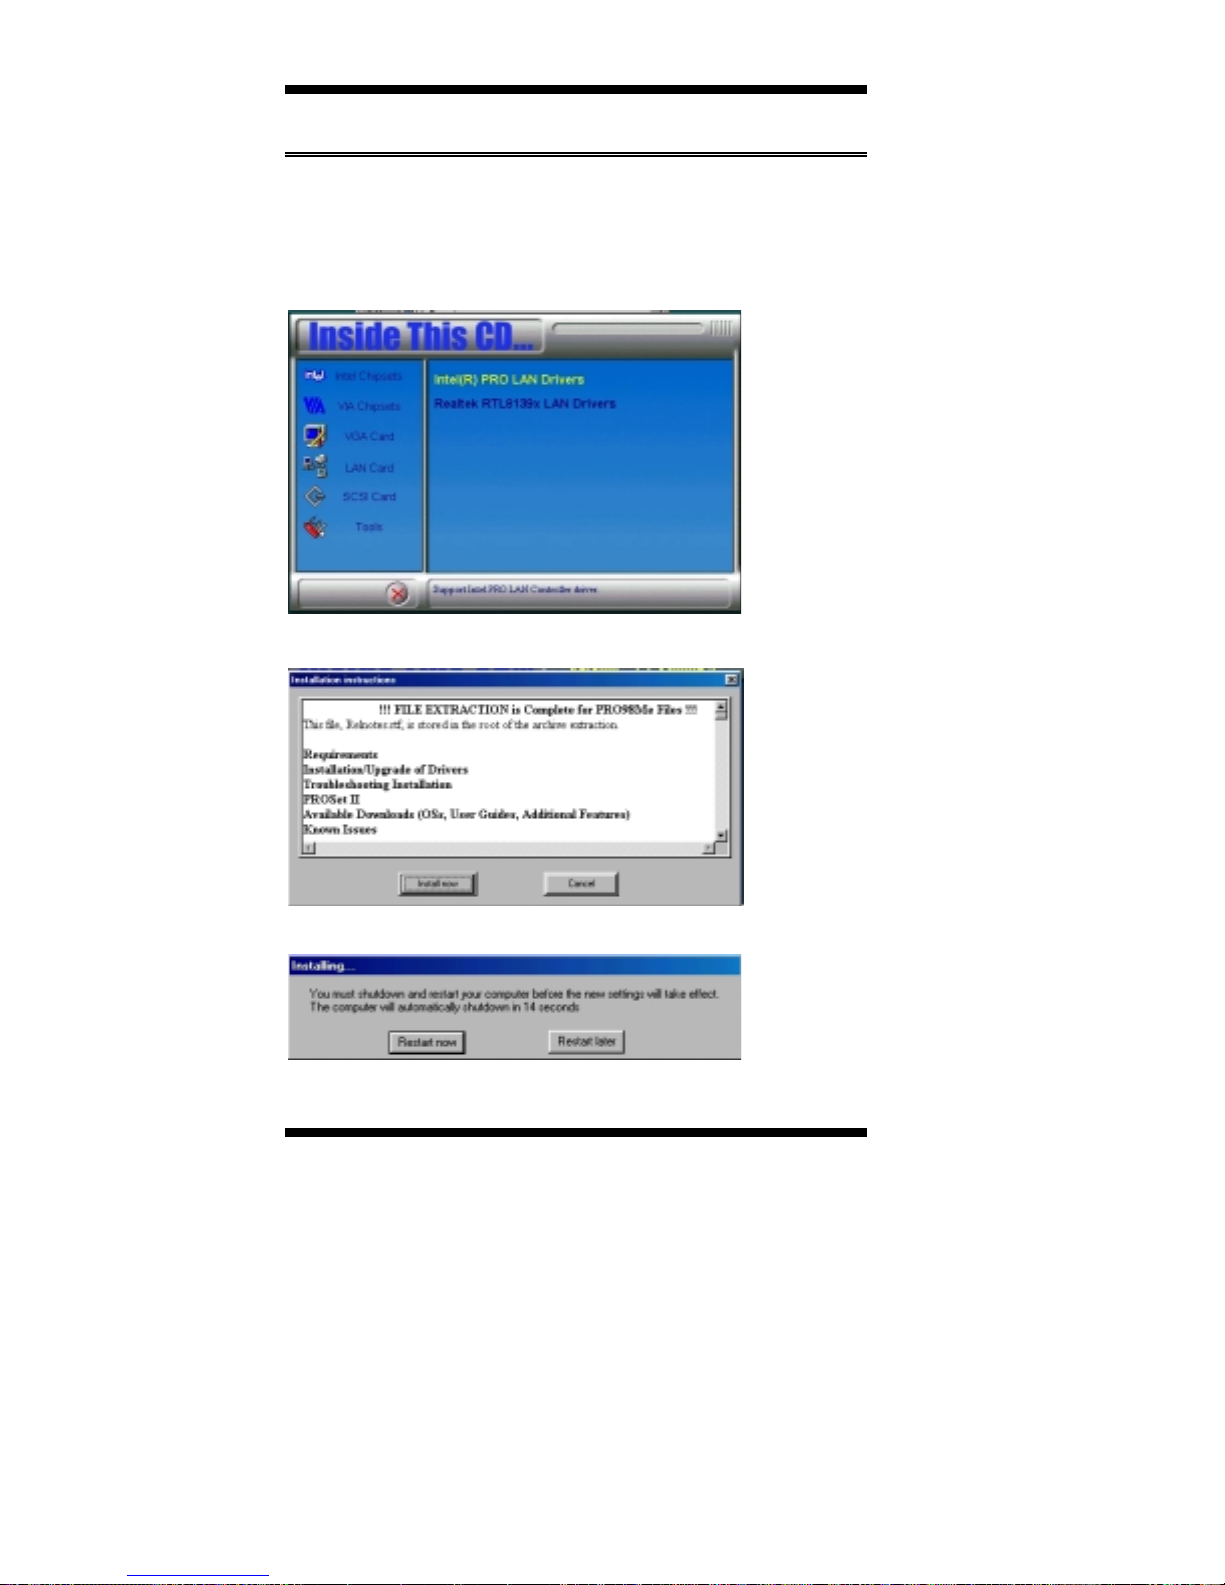
1. Insert the CD that comes with the CPU card and the screen below
would appear. Click on LAN Card on the left side to make the LAN
drivers selection. Click on Intel(R) PRO LAN Drivers.
2. Click Install Now.
3. Click Restart to restart the computer and new settings to take effect.
68 TL-SBC 8280 User’s Manual
Page 73

APPENDIX
Appendix
A. I/O Port Address Map
Each peripheral device in the system is assigned a set of I/O port
addresses which also becomes the identity of the device. The following
table lists the I/O port addresses used.
Address Device Description
000h - 01Fh DMA Controller #1
020h - 03Fh Interrupt Controller #1
040h - 05Fh Timer
060h - 06Fh Keyboard Controller
070h - 07Fh Real Time Clock, NMI
080h - 09Fh DMA Page Register
0A0h - 0BFh Interrupt Controller #2
0C0h - 0DFh DMA Controller #2
0F0h Clear Math Coprocessor Busy Signal
0F1h Reset Math Coprocessor
1F0h - 1F7h IDE Interface
278 - 27F Parallel Port #2(LPT2)
2F8h - 2FFh Serial Port #2(COM2)
2B0 - 2DF Graphics adapter Controller
378h - 3FFh Parallel Port #1(LPT1)
360 - 36F Network Ports
3B0 - 3BF Monochrome & Printer adapter
3C0 - 3CF EGA adapter
3D0 - 3DF CGA adapter
3F0h - 3F7h Floppy Disk Controller
3F8h - 3FFh Serial Port #1(COM1)
TL-SBC 8280 User’s Manual 69
Page 74

APPENDIX
B. Interrupt Request Lines (IRQ)
Peripheral devices use interrupt request lines to notify CPU for the
service required. The following table shows the IRQ used by the
devices on board.
Level Function
IRQ0 System Timer Output
IRQ1 Keyboard
IRQ2 Interrupt Cascade
IRQ3 Serial Port #2
IRQ4 Serial Port #1
IRQ5 Reserved
IRQ6 Floppy Disk Controller
IRQ7 Parallel Port #1
IRQ8 Real Time Clock
IRQ9 Reserved
IRQ10 Reserved
IRQ11 Reserved
IRQ12 PS/2 Mouse
IRQ13 80287
IRQ14 Primary IDE
IRQ15 Secondary IDE
70 TL-SBC 8280 User’s Manual
 Loading...