

Page 1
TOP 600 XT PRO
User’s manual
Manuel de l’utilisateur
Benutzerhandbuch
Page 2
Technogym®, XT PROTM, RotexTM, CHR
TM
, Natural StrideTM are trademarks owned by Technogym® S.r.l. in Italy and other countries.
Key
TM
, CPR
TM
, Technogym SystemTM, TGSTM, SmartkeyTM, TGS
* “Smartkey” and “TGS Key” refer to the mark illustrated here.
Cardio Theater
Copyright © Technogym
Technogym
®
is a registered trademark of Cardio Theater®.
®
s.r.l., June 2002
®
is committed to a policy of continuous improvement and reserves the right to modify its
products and documentation without prior notice.
Les appellations Technogym®, XT PROTM, RotexTM, CPR
TM
Stride
sont des marques déposées de Technogym® s.r.l. pour l’Italie et pour les autres pays.
* La désignation “clé TGS” se réfère à la marque de forme représentée ci-contre.
®
Cardio Theater
Copyright © Technogym
Technogym
est une marque déposée de Cardio Theater®.
®
s.r.l., juin 2002
®
suit une politique d’amélioration continue et se réserve le droit de modifier ses produits et
leur documentation sans aucune obligation de préavis.
TM
, Technogym SystemTM, TGSTM, Natural
Die Bezeichnungen Technogym®, XTPRO™, Rotex™, CPR™, Technogym System™, TGS™, Natural
®
Stride™ sind Markenzeichen von Technogym
S.r.l. in Italien und anderen Ländern.
* Die Bezeichnung “TGS-Schlüssel” bezieht sich auf das nebenstehend abgebildete
Markenzeichen.
Cardio Theater
Copyright © Technogym
Technogym
®
ist ein eingetragenes Markenzeichen von Cardio Theater®.
®
S.r.l., Juni 2002
®
behält sich das Recht vor, ohne Vorankündigung Änderungen an den Produkten und der
Dokumentation vorzunehmen.
Page 3
User’s manual. ........................................................................................................................... 5
Manuel de l’utilisateur. ..................................................................................................... 69
Benutzerhandbuch. ........................................................................................................ 133
. .............................................................................................. 197
Page 4
Page 5
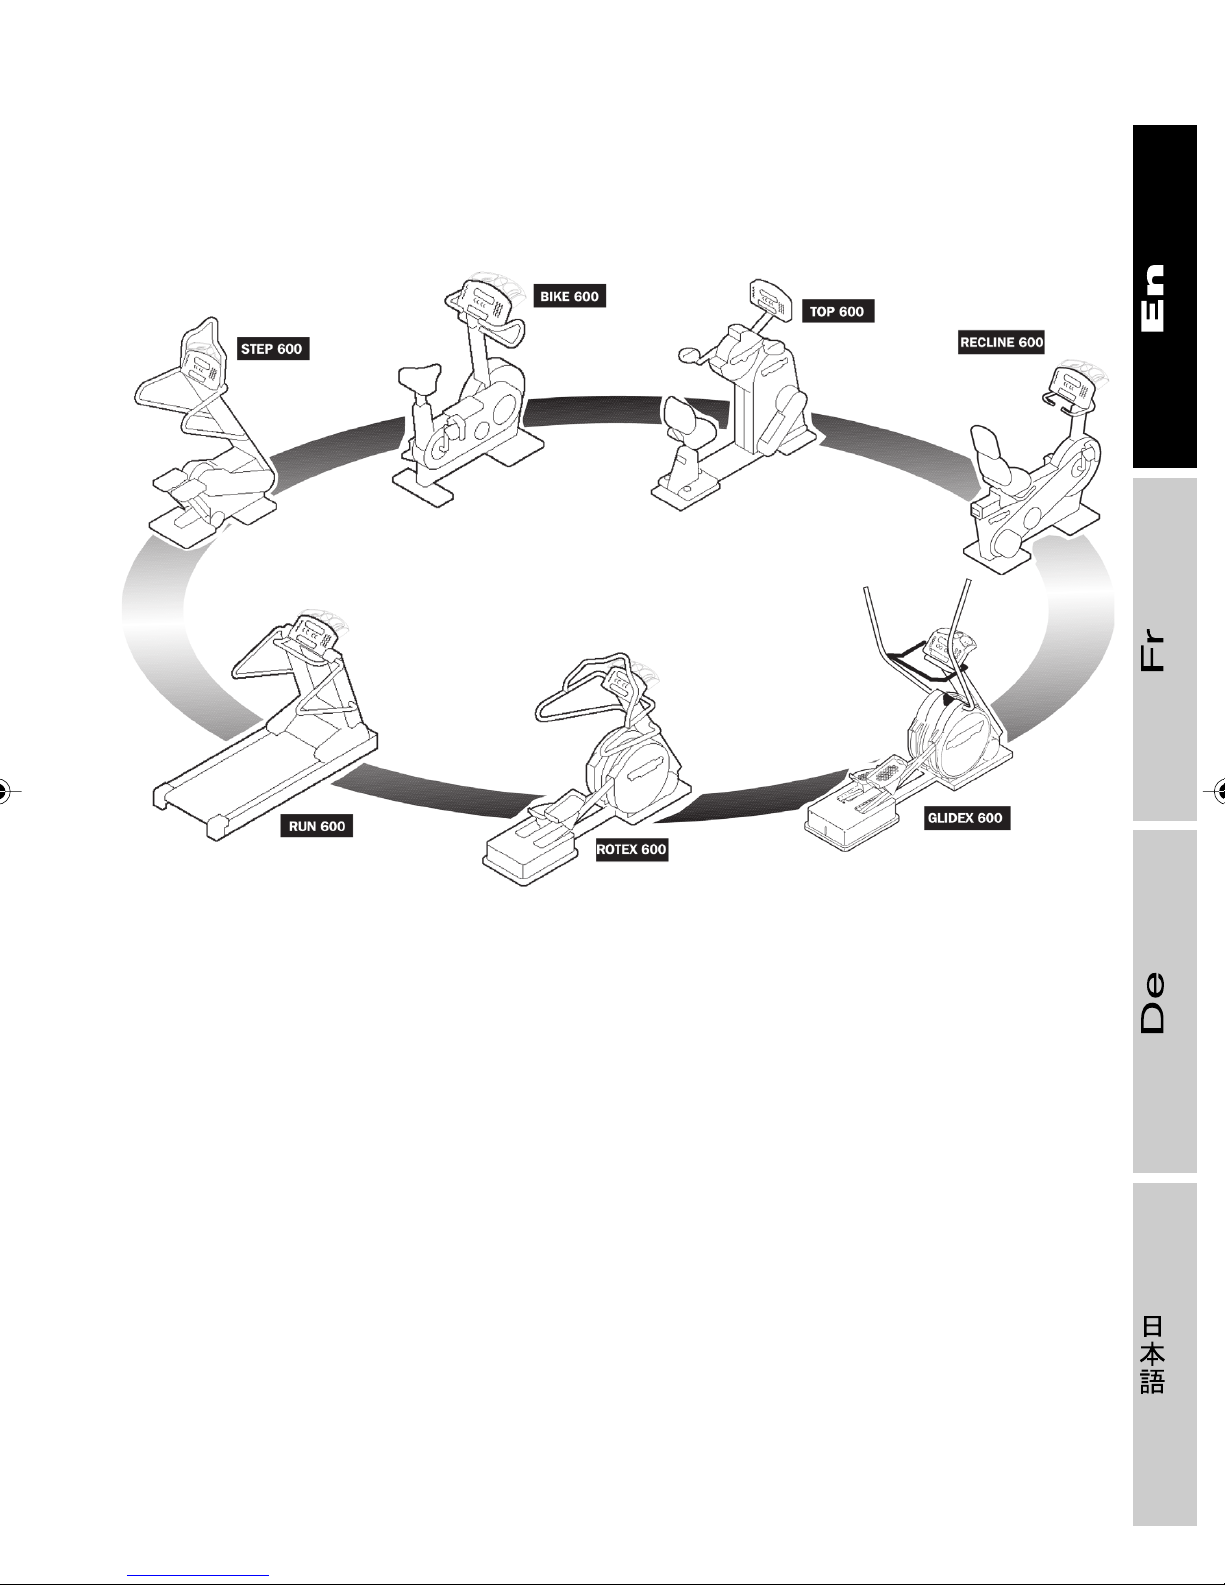
XT PRO
User’s manual
Tutti gli attrezzi
The XT PRO line consists of 7 high-performance equipments for cardiovascular and aerobic
exercise: Bike 600; Recline 600; Top 600; Step 600; Rotex 600; Run 600; Glidex 600.
These 7 equipments can be set to run different exercise programs addressing the needs of
all users, both athletes and not, who want to improve or just maintain their physical condition.
It is now commonly accepted that regular aerobic exercise is the best way to prevent all
pathologies that afflict the cardiovascular, respiratory, and muscle systems. To improve aerobic
exercise, the XT PRO line of products is equipped with a heart rate monitor that lets users
keep their heart rate under constant control. All you have to do is grasp the handgrips in the
heart sensor area or wear the chest band with built-in transmitter to see your heart rate
displayed on the control panel.
Page 6
Contents
TOP 600 XT PRO. ................................................................................................................................................................ 8
INTRODUCTION
1 TECHNICAL INFORMATION
1.1 Manufacturer and equipment identification
. ................................................................................................................................................................. 10
. ................................................................................................................... 11
. .................................................................................. 11
1.2 Description of the equipment. ................................................................................................................... 12
1.2.1 Main components. ............................................................................................................................. 12
1.2.2 Technical specifications. .............................................................................................................. 13
1.2.3 Accessories. ........................................................................................................................................... 14
1.2.4 Safety devices and tags. .............................................................................................................. 16
1.3 Installation and assembly. ............................................................................................................................ 18
1.3.1 Assembly. ................................................................................................................................................. 20
1.3.2 Moving the equipment. .................................................................................................................. 21
1.3.3 Leveling. ................................................................................................................................................... 21
1.3.4 Power hookup. ..................................................................................................................................... 22
1.3.5 Power hookup to another equipment or device. ....................................................... 23
1.4 Maintenance. .......................................................................................................................................................... 25
1.4.1 Routine maintenance. ................................................................................................................... 25
1.4.2 Extraordinary maintenance. ...................................................................................................... 27
1.4.3 Troubleshooting
1.5 Technical Support Service
1.6 Storage
. ...................................................................................................................................................................... 31
1.7 Disposal of the equipments
. ................................................................................................................................. 28
. ......................................................................................................................... 30
. ....................................................................................................................... 31
2 USING TOP 600
. .................................................................................................................................................. 32
2.1 Precautions for safe use
2.2 Monitoring heart rate. ...................................................................................................................................... 34
2.2.1 How to put on the chest band
2.2.2 Correct use of chest band. ......................................................................................................... 36
2.3 User adjustments. ............................................................................................................................................... 38
2.3.1 Use with wheelchair
2.4 Ergonomic position on equipment. ....................................................................................................... 39
2.5 Medical and athletic information and advice. ............................................................................... 40
2.5.1 The importance and benefits of physical exercise
2.5.2 How to choose aerobic workout intensity....................................................................... 41
2.5.3 Stretching exercises. ....................................................................................................................... 43
. .............................................................................................................................. 32
. ................................................................................................. 36
. ....................................................................................................................... 39
. ................................................ 40
Page 7
CONTENTS
7
3 CONTROL PANEL. ........................................................................................................................................... 45
3.1 Turning the equipment on and off
. ........................................................................................................ 50
3.2 How to change control panel settings. .............................................................................................. 52
3.3 Exercising in “simplified mode”. .............................................................................................................. 54
3.4 Exercising with QUICK START. ................................................................................................................ 55
3.5 The level test. ......................................................................................................................................................... 56
3.6 Manual workout
3.7 Exercising with predefined profiles
. .................................................................................................................................................. 57
. ..................................................................................................... 59
3.8 Exercising at a constant heart rate (CHR). ..................................................................................... 61
3.9 Exercising with the Smartkey*. ................................................................................................................. 63
3.10 Performance Index (P.I.). ................................................................................................................................ 64
3.11 Other messages appearing on the display. ................................................................................... 65
3.12 Access codes for technical information. ........................................................................................... 67
Page 8
Top 600 XT PRO
Top 600 is an innovative equipment that is part of the Technogym XT PRO line. These
equipments have been conceived to offer cardiovascular workouts that combine perfect
biomechanical equilibrium, functionality, and design. XT PRO line equipments feature the
exclusive CHR system, which has been conceived by Technogym to let the user maintain the
desired heart rate throughout the entire workout. As a result, safe and effective exercise is
ensured, regardless of the user’s relative level of fitness.
Top 600 is perfectly integrated into the XT PRO line, featuring the same basic functions and
operating procedures. These include manual mode exercise, where the effort level and
duration of the workout are personally selected; predefined profiles; and the test, to determine
the optimum personal level of effort for training.
With Top 600, all main muscles in the shoulders, arms, and trunk (muscles of the scapularhumeral cingulum, brachial triceps, brachial biceps, deltoid, trapezius, dorsals) are called
into action, offering excellent cardiovascular exercise even to those individuals who are in
poor shape.
Thus, thanks to its simplicity and safety, Top 600 is appropriate for use by a wide variety of
persons, from professional athletes to those undergoing rehabilitation, in addition to sedentary
types, seniors, and people suffering from heart disease.
Finally, the easy to reach and use control panel simplifies reading workout data, which are
continually updated, and progressive adjustment of the training level to one’s own physical
condition and athletic preparation. Personalized exercise programs can be saved on the
equipment memory, or the user can select a predefined profile. A last alternative is to exercise
freely, modifying the workout parameters at any time.
WARNING
The manufacturer Technogym S.r.l. accepts responsibility for the equipment only if
the following precautions are observed:
- The equipment must be used in compliance with its specifications;
- It is necessary to carefully read every part of the user’s manual;
- The place of installation must comply with the requirements set out in the user’s
manual;
- The electrical system must conform to the regulations in force in the country of
use;
- The installation, maintenance and adjustments must be carried out by qualified
technician authorized by Technogym;
- The manager of the club or rehabilitation center must correctly instruct the users
concerning the correct and improper uses of the equipment;
- The user must wear appropriate clothing;
Page 9
TOP 600 XT PRO
- Towels or other such items must not be placed on the equipment;
- Rehabilitation exercises must be performed in the presence of qualified
personnel.
9
Page 10
Introduction
This manual, written in the manufacturer’s native language and translated into the language
of the user country, is an integral part of the equipment’s standard equipment and must
always be kept with it; the manual must accompany the equipment even in the event of a
move or sale. It must be stored in a place accessible to and known by authorized personnel
and protected from heat and humidity.
The manual contains valuable information and useful suggestions about workout methods
as well as medical-athletic advice. It is therefore a guide for both professional users and
beginners with no athletic knowledge.
These titles will serve as a guide in reading the manual:
WARNING
This tag highlights important information that must not be ignored.
DANGER
This tag highlights the rules to follow scrupulously in order to avoid hazardous
situations for people or the equipment.
? INFORMATION
This tag highlights answers to the most common questions.
Before using the equipment we recommend reading
the manual in its entirety.
Page 11
1 Technical information
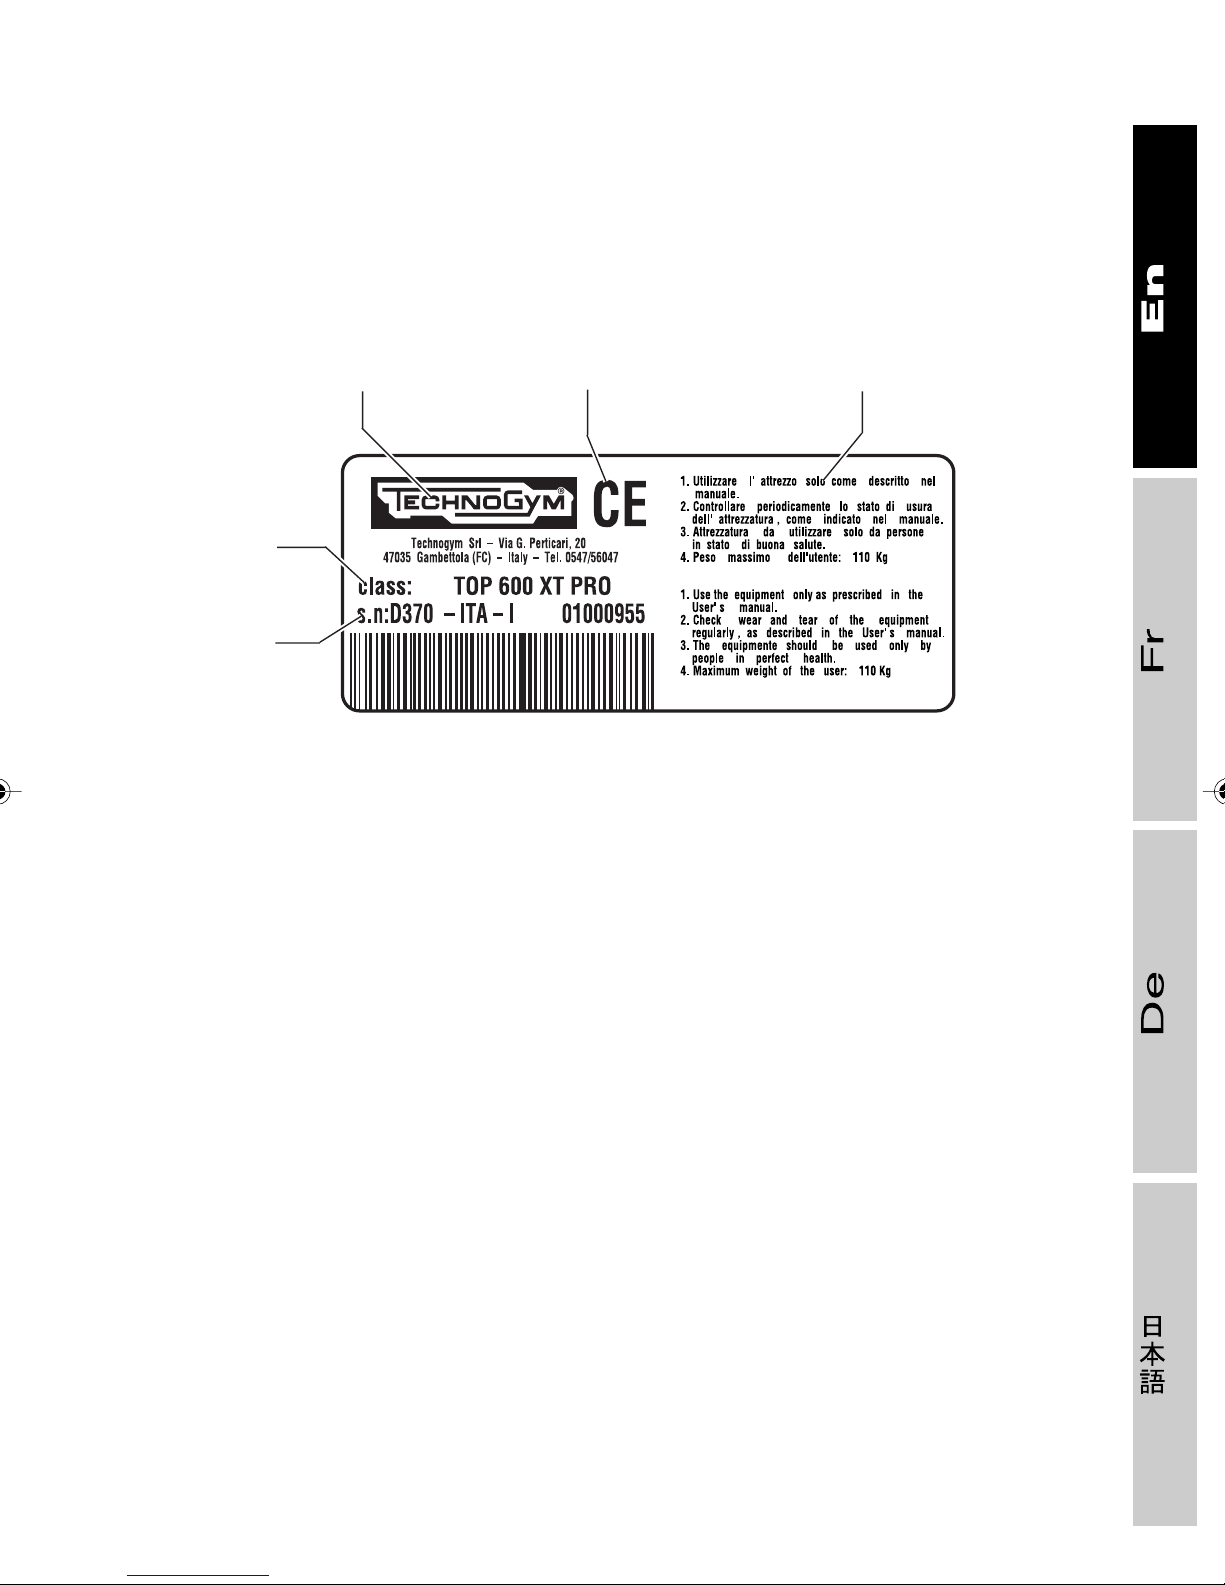
1.1 Manufacturer and equipment identification
A
E
C
A - Maker’s name and address
B - EC conformity mark
C - Serial number
B
D
01327007
D - Warnings
E - Class of the equipment
Page 12
12
1.2 Description of the equipment
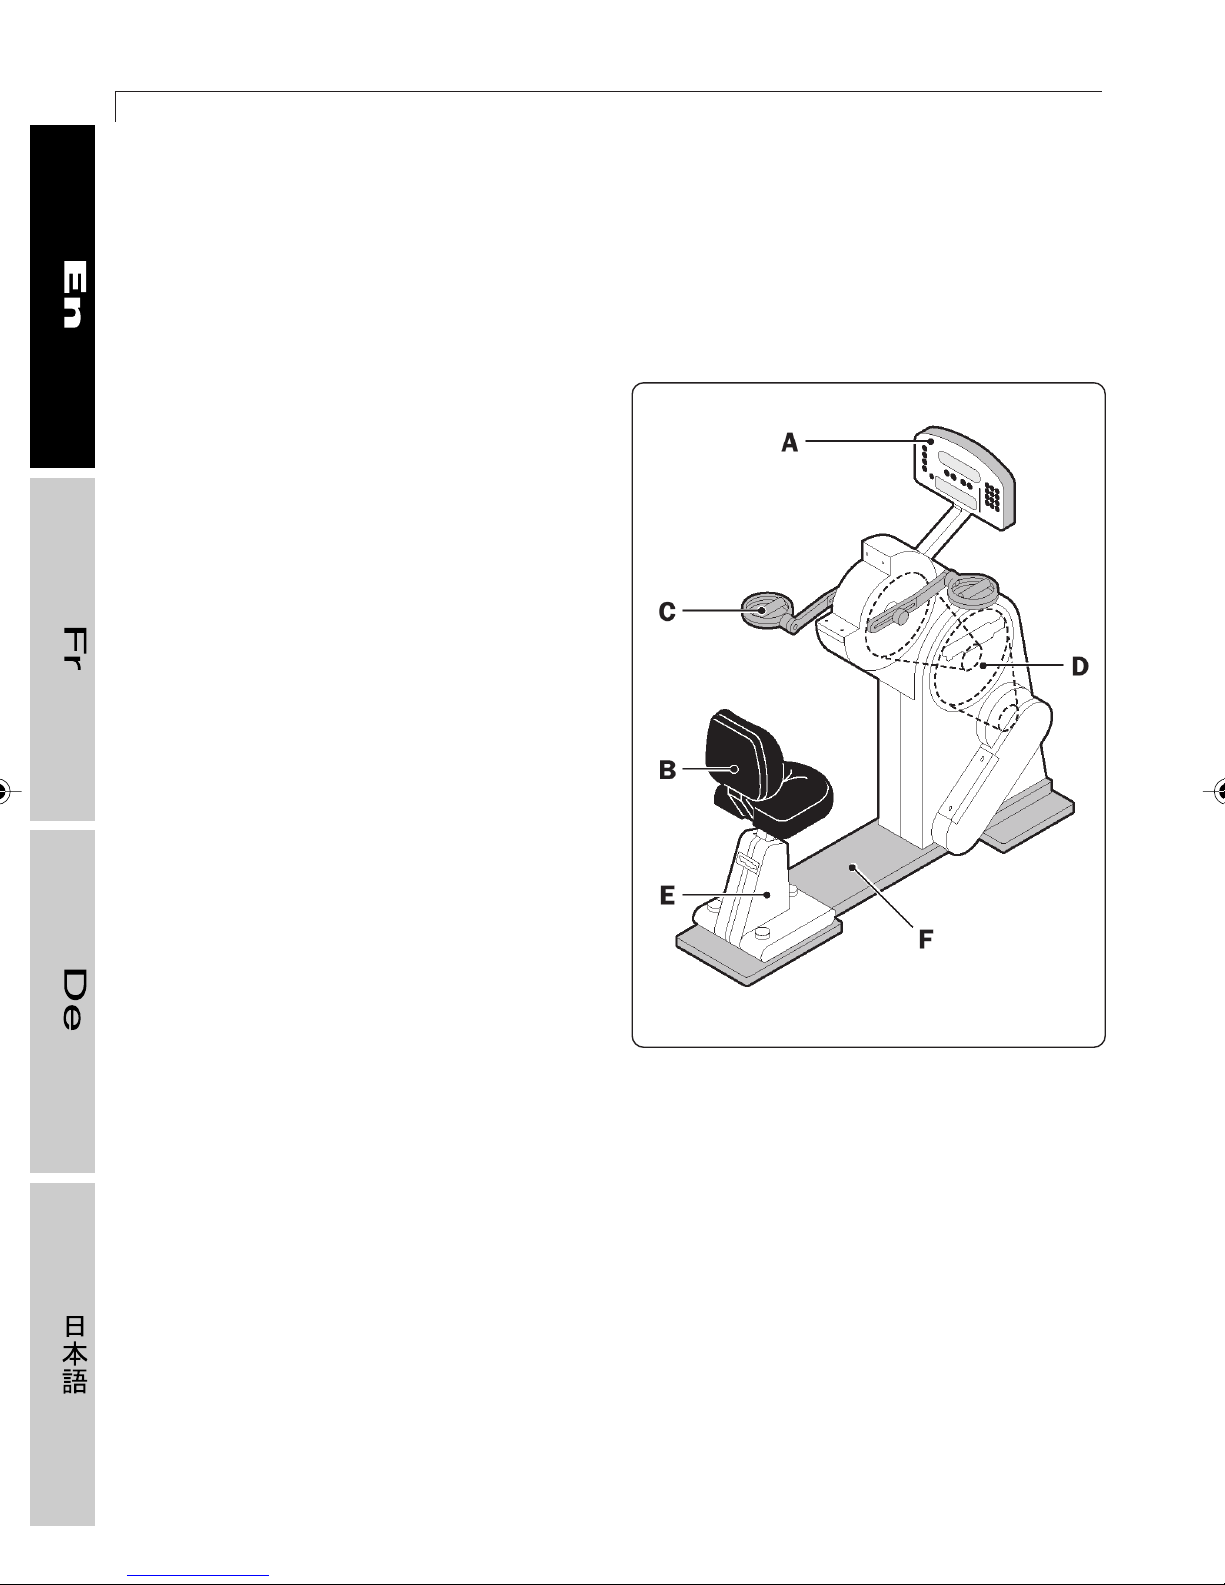
1.2.1 Main components
A Control panel: lets you operate all
available functions, from setting exercise
programs to displaying workout
messages and data.
B Seat: adjustable height, with a backrest
to ensure proper back support.
C Handgrips: adjustable in length, they
must be gripped to perform the exercise.
TOP 600 XT PRO
D Transmission belt: the transmission belt
is connected to the alternator for regulation
of its electromagnetic resistance.
E Seat pillar: this supports the seat and can
be easily removed from the frame for
positioning of a wheelchair for disabled
persons.
F Frame: the bearing structure of the
equipment that guarantees its solidity,
robustness, and durability.
103
Page 13
1.2 DESCRIPTION OF THE EQUIPMENT
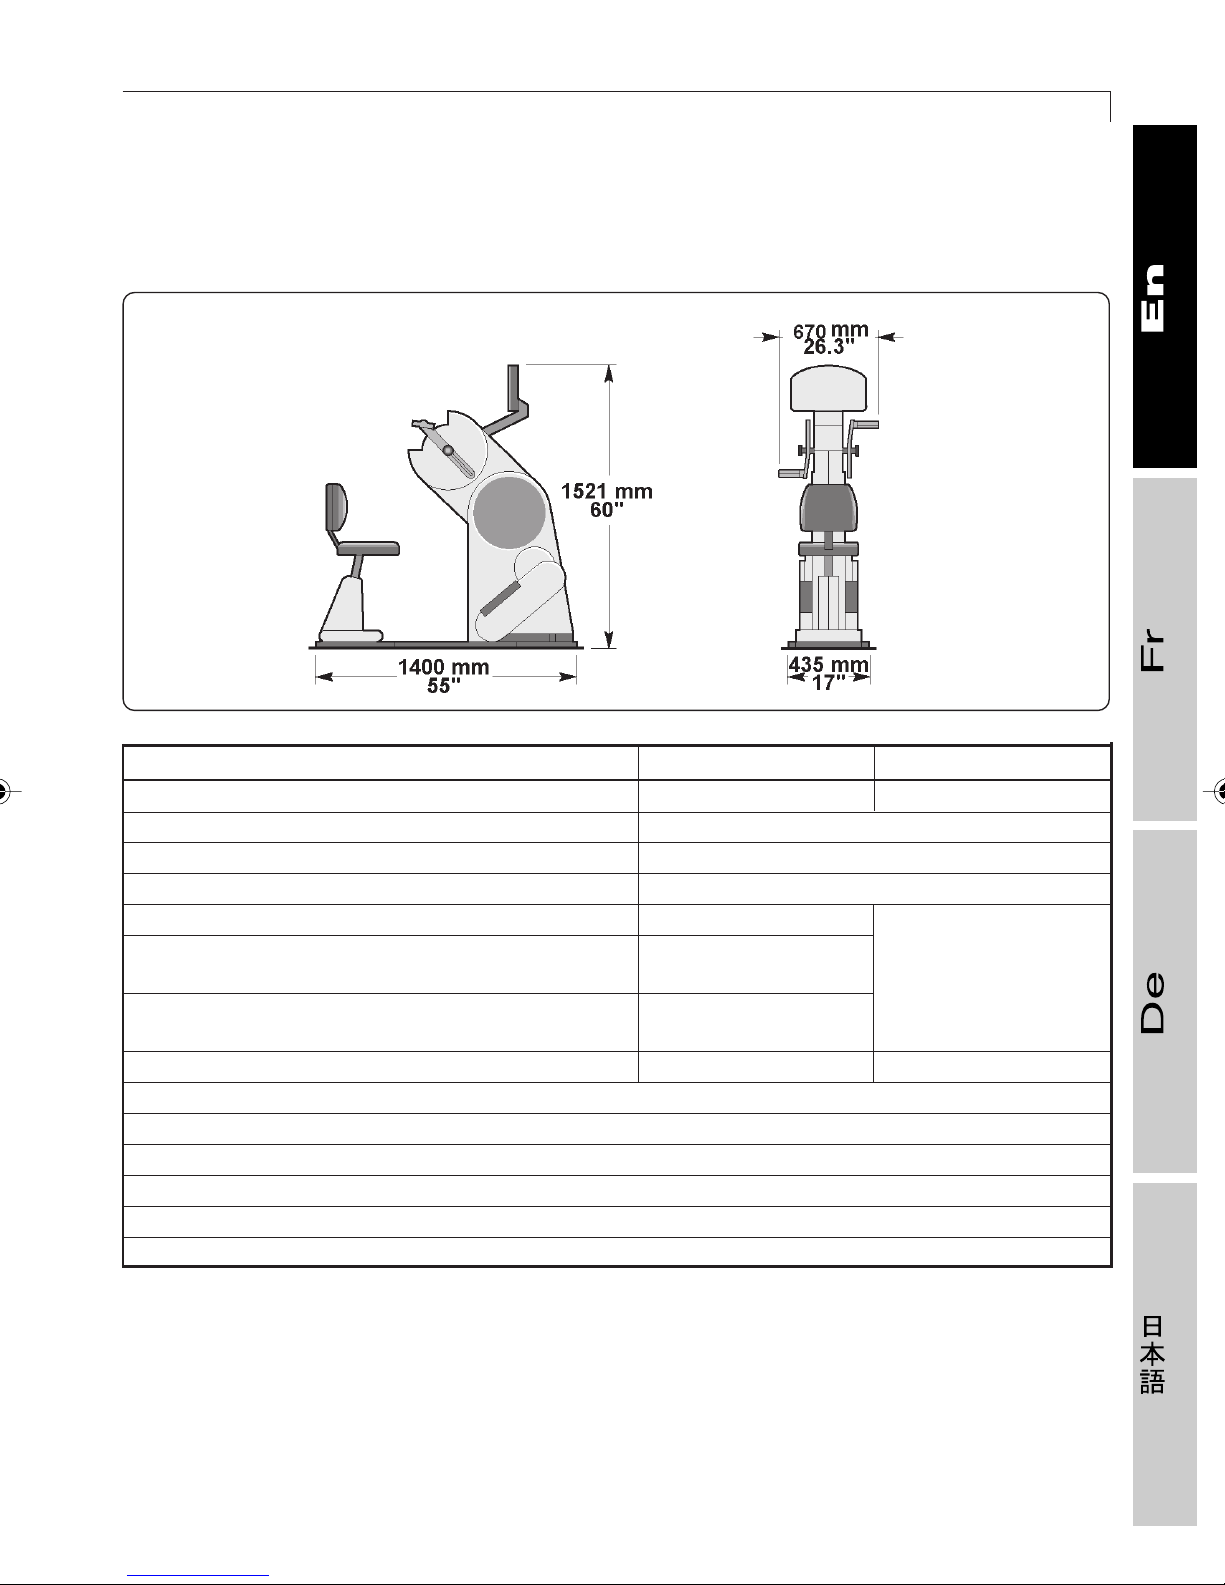
1.2.2 Technical specifications
13
106
Europa America
Power 110/230 V ~ 50/60 Hz 110~Vac 50/60 Hz
Absorbed power 150 VA
Maximum mechanical power output of the equipment 500 W
Fuses 2 x F3A 5 x 20mm
EMI EN 60601-1-2
Safety EN 60601-1
EN 957-1 UL 2601-1
Directives 73/23 CEE
93/68 CEE
Weight 98 kg 216 lb
Recommended speed: 50-60 RPM
Noise level below: 70 dB
Electromagnetic resistance system
Adjustment of resistance with 12 different levels of effort
Number of functions: 5
Maximum weight of the user: 110 kg
The equipment generates no electromagnetic disturbance.
Class I equipment, with a Type B attached part.
Normal, non-waterproofed equipment.
Equipment not suitable for use in the presence of anaesthetic mixtures inflammable in air,
oxygen or nitrous oxide.
Equipment for continuous use.
Grounding of current under normal conditions max 250 µA.
Page 14
14
1.2.3 Accessories
❒❒
❒ Standard accessories
❒❒
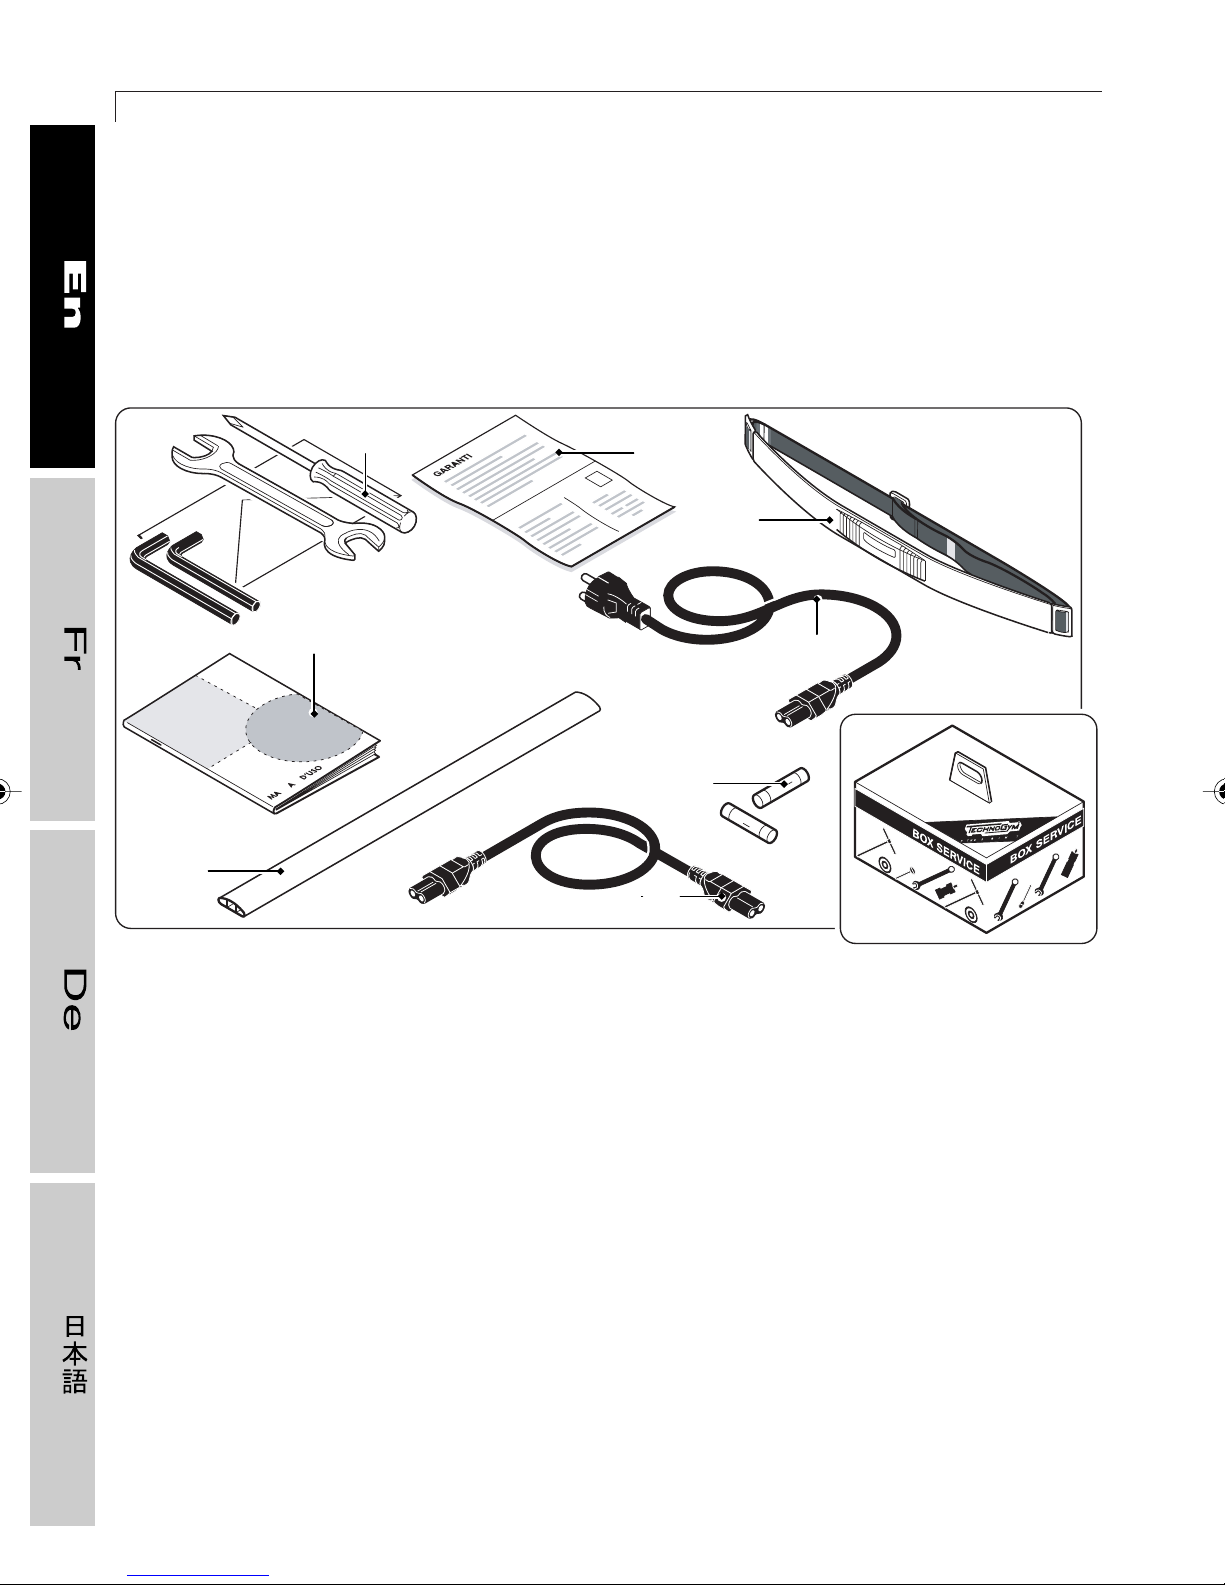
The standard accessories are supplied in the “Service Box”:
TOP 600 XT PRO
F
01241002
A Set of tools
B
A
C
E
H
G
D
B User’s manual
C Warranty certificate
D Serial cable for connection with another equipment
E Chest band with transmitter for the heart rate meter
F Race-way to cover the cable
G Replacement fuses (F 3A, 5x20 mm)
H Power cable
Page 15
1.2 DESCRIPTION OF THE EQUIPMENT
❒❒
❒ Optional accessories
❒❒
C
Pcd
15
104
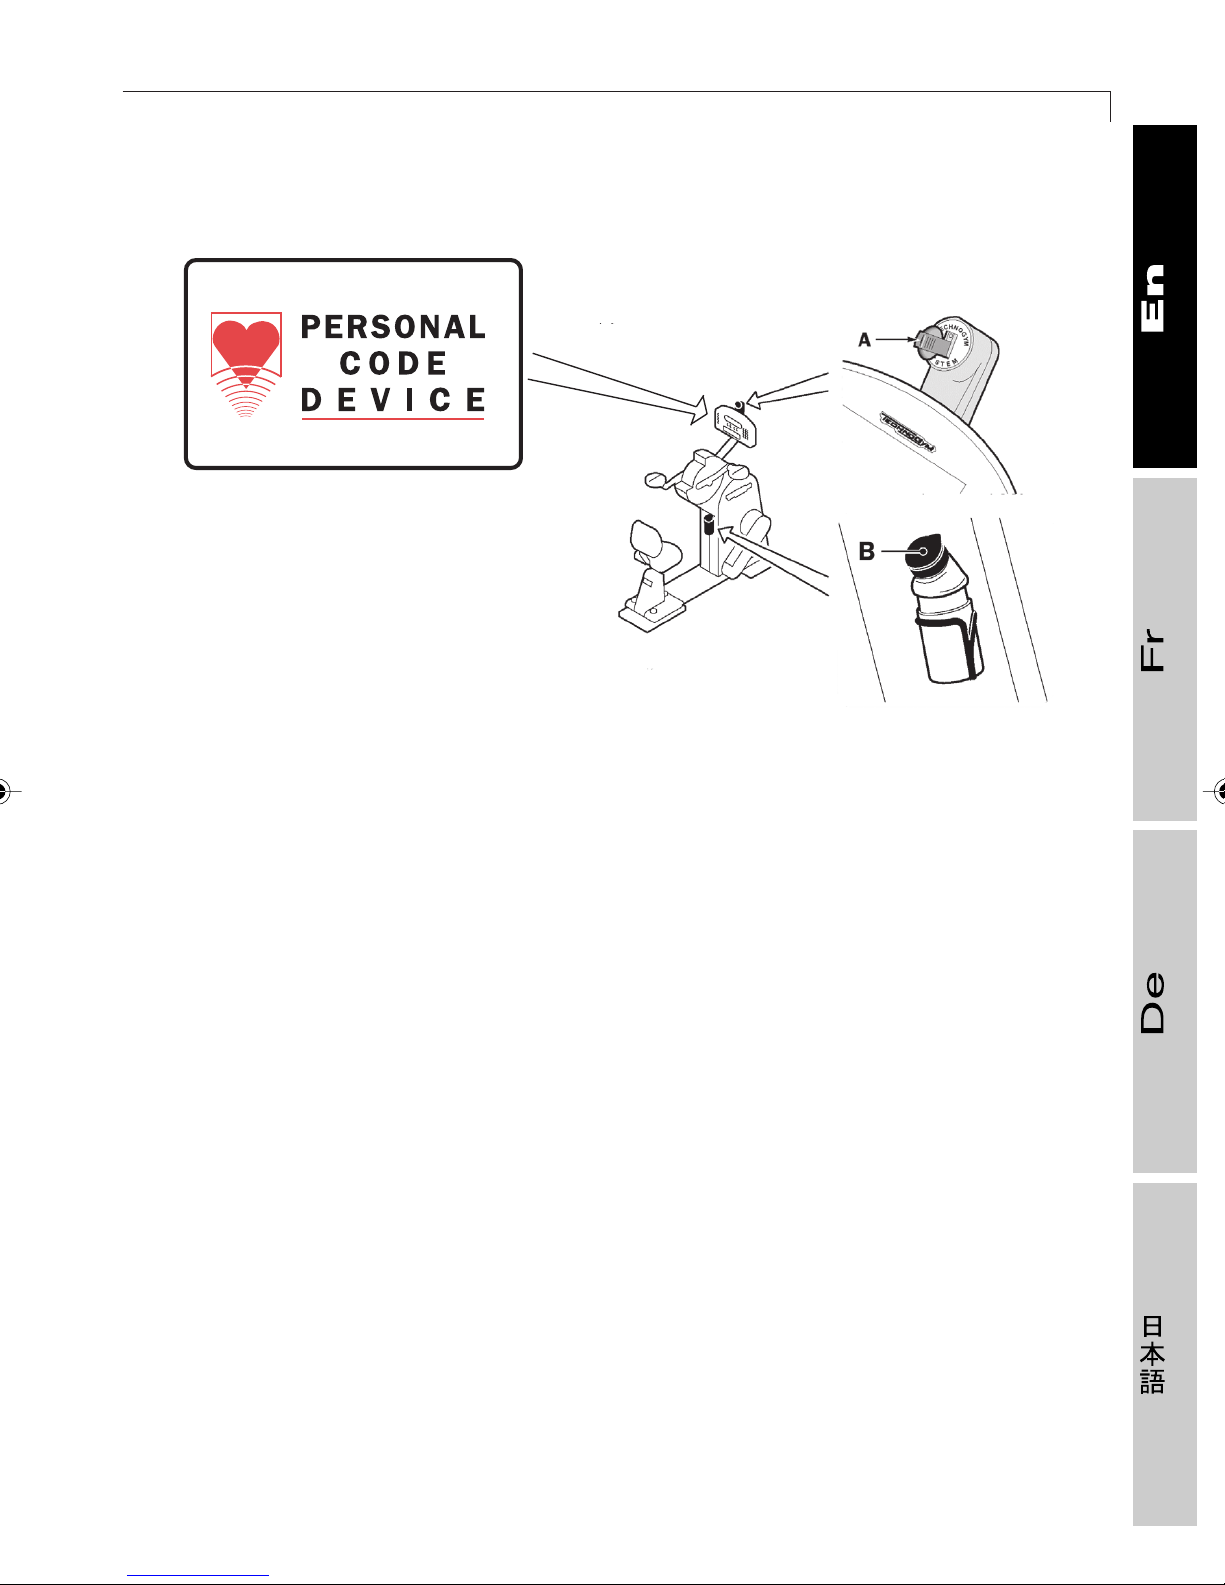
A Smartkey*, which interfaces with the equipment through the Smartkey* reader device. It
stores customized workout programs based on the user’s specific needs and aims.
B Water bottle and bottle bracket: for replenishment of bodily fluids while exercising.
C Personal Code Device: heart rate detection system used by the equipment to harmonize
itself solely with the heart rate of the user. It is activated by putting on the chest band with
the code type transmitter. If the Personal Code Device is installed, the sticker illustrated
above is affixed to the control panel.
Page 16
16
1.2.4 Safety devices and tags
TOP 600 XT PRO
105
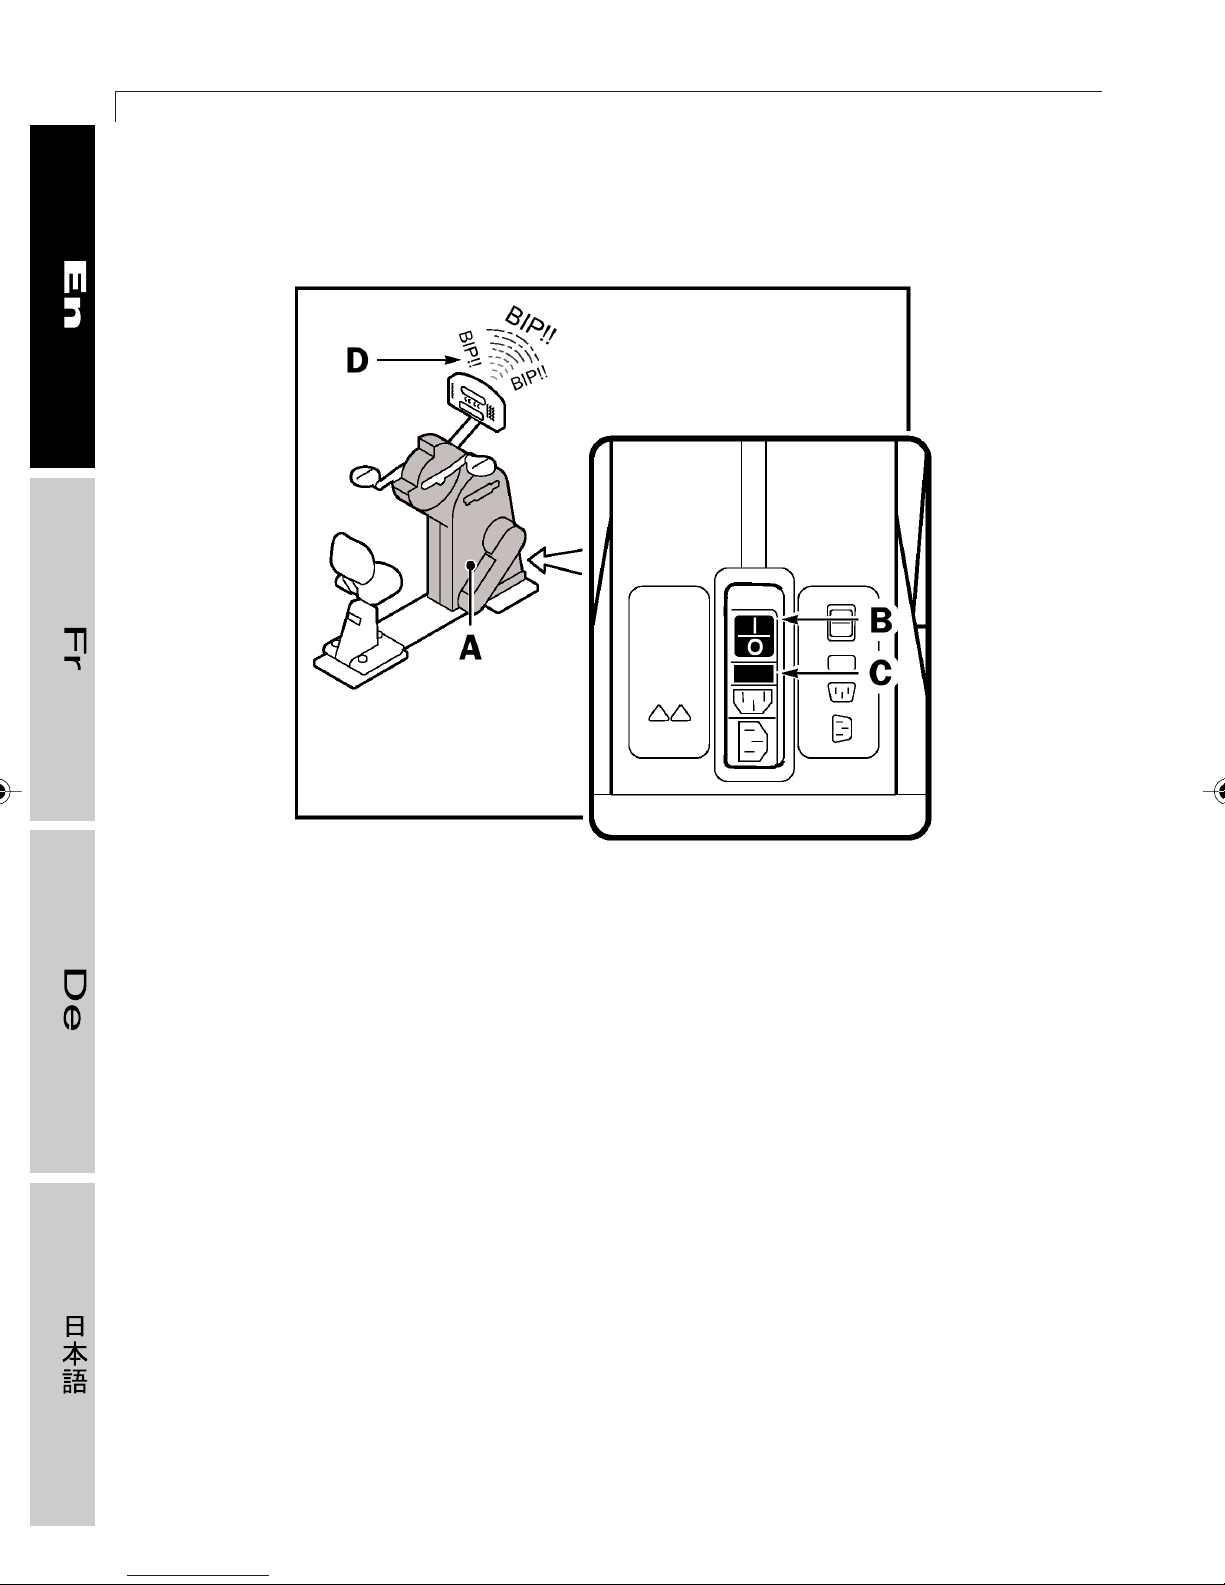
A Fixed panels: these cover the internal transmission.
B General switch: turns power on and off.
C Fuses: they protect the equipment’s electrical parts. When power surges, the fuses blow,
preventing damage to the electronics inside.
D Beep: a beep informs the user that the Top 600 is being turned on, an exercise session
has started or ended, or his or her heart rate is high.
Page 17
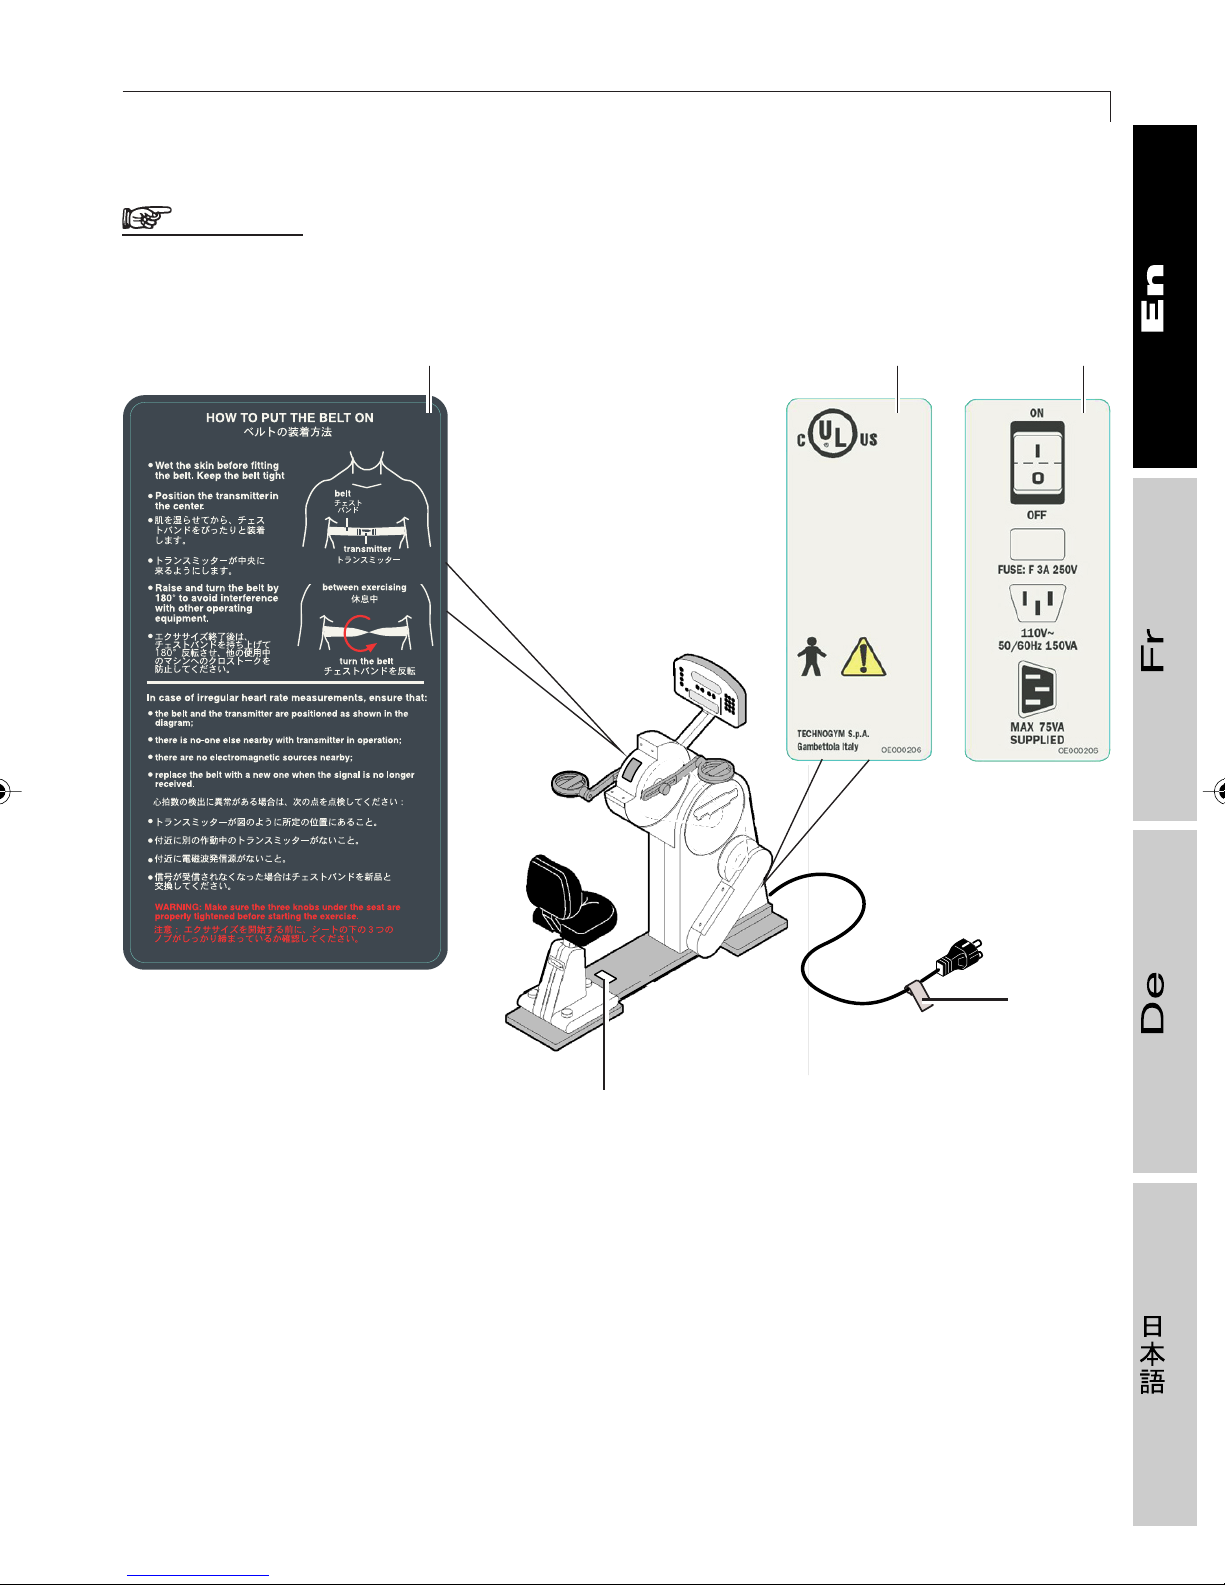
1.2 DESCRIPTION OF THE EQUIPMENT
WARNING
Please heed the stickers attached to the equipment because they warn of possible
hazard.
BAA
17
01327002
0EKD270C-ing-gia
01327001
C
D
A The label near the general power switch explains how to connect the equipment to the
power source.
B The sign beneath the control panel contains specific instructions on how to put on the
chest band for the heart rate meter.
C The label attached to the power cord contains the electrical specifications.
D The sticker on the platform warns the user to tighten the seat knobs.
Page 18
TOP 600 XT PRO
18
1.3 Installation and assembly
❒❒
❒ Installation environment
❒❒
To make workouts on XT PRO equipments safe, easy, and productive, the training space
must satisfy specific requirements. In particular, before deciding where to install the equipment,
we recommend ensuring that:
- the temperature is between +10° and +25°C (50° and 77°F);
- enough air is circulating to keep humidity during exercise between 20% and 90%;
- the lighting is sufficient to make the space a pleasant and relaxing place to exercise in;
- there is a wide margin of free space all around the equipment to ensure safety;
- that the floor is flat, stable and vibration-free, with enough support for the equipment plus
user.
If the equipments are to be installed in a public recreation space, the premises must satisfy
all legal codes.
Page 19
1.3 INSTALLATION AND ASSEMBLY
❒❒
❒ Unwrapping
❒❒
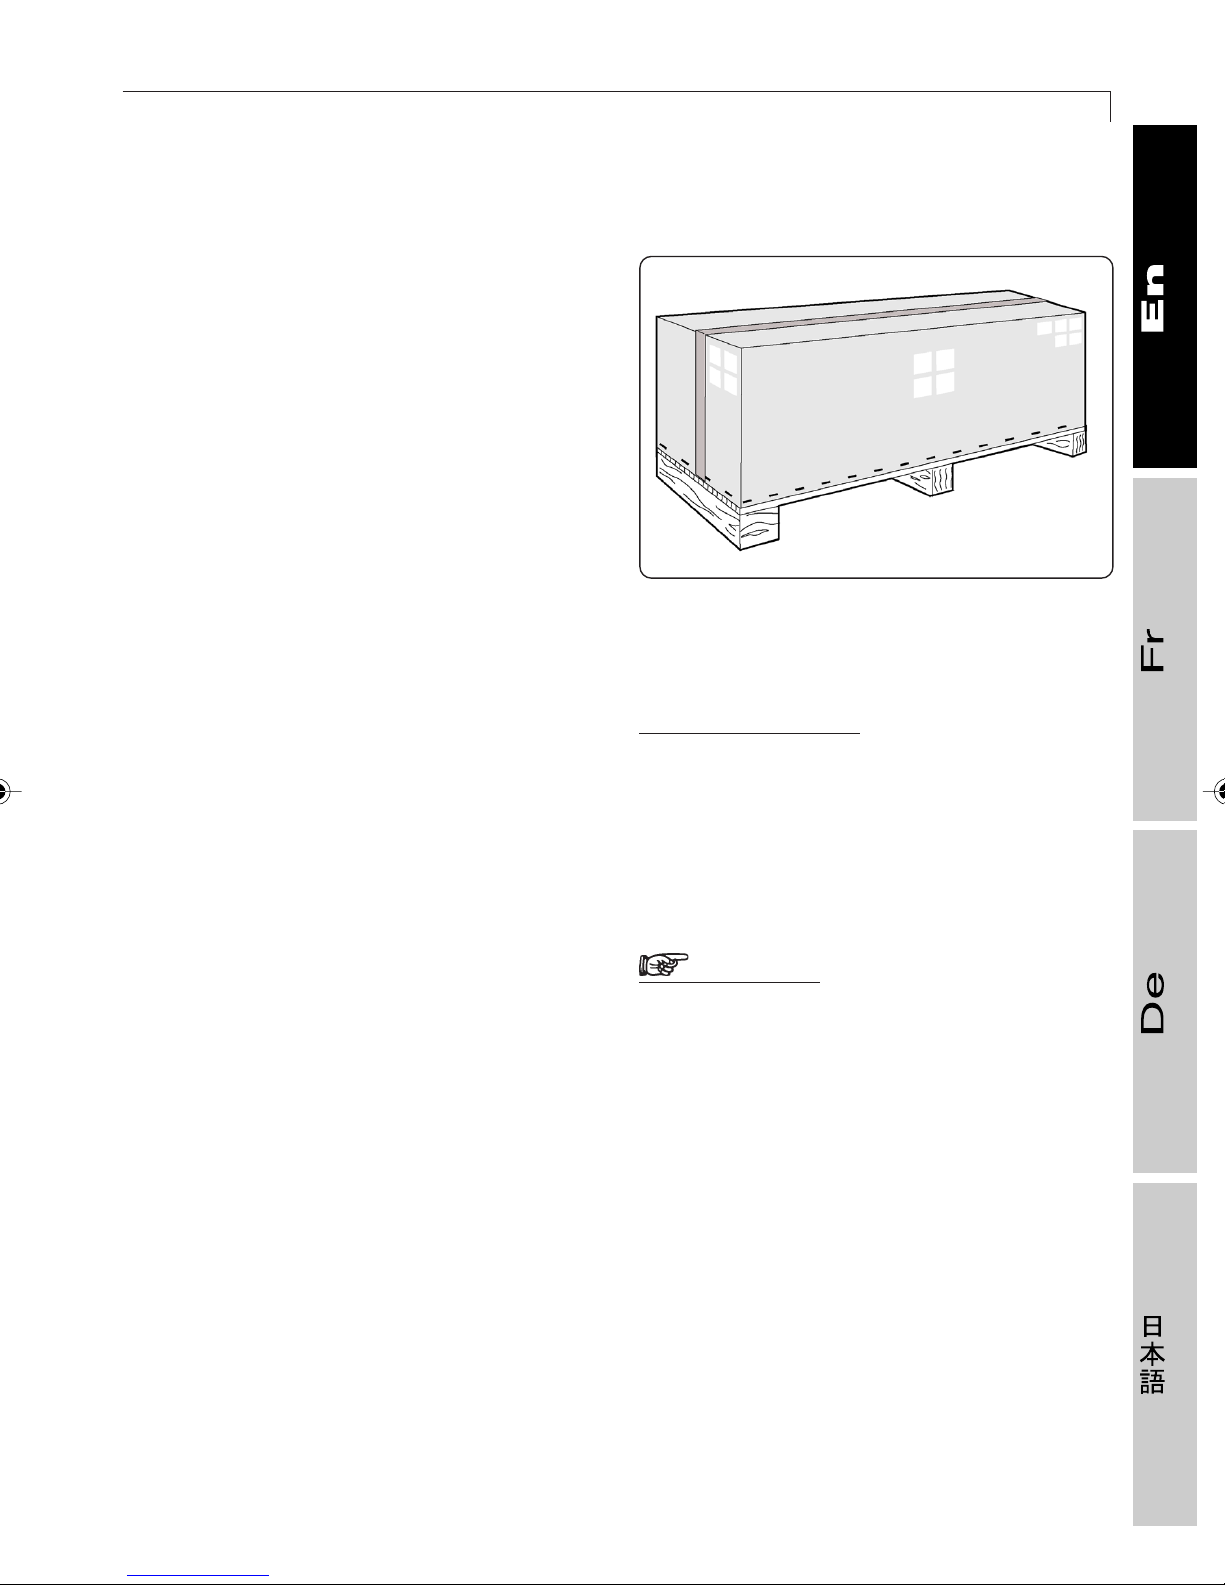
Top 600 XT PRO is delivered in assembled
form and specially wrapped in transparent
plastic or cardboard and loaded on a pallet,
depending on the destination.
The packaged material can be lifted and
moved with normal lifting equipment; the
instructions are printed directly on the
packaging.
19
To protect people and property, carefully
assess what normal hoisting and handling
equipment to use, on the basis of the
equipment’s final destination.
As indicated on the packaging itself, to
unwrap the equipment packaged in
cardboard and resting on a pallet, remove
the metal staples securing the outer carton
to the pallet, and then lift up the carton.
Visually inspect the packaging material to
make sure it is not damaged.
To unwrap the material, remove the fasteners
and place the packaging materials on the
ground, and specifically:
- all the wrapping materials;
- the service box containing the standard
accessories.
9
? INFORMATION
We recommend saving all packing
materials for re-use in case of a move.
WARNING
Do not discard the packaging
materials in the environment.
Instead, follow locally applicable laws
for the disposal of urban refuse.
Page 20
20
1.3.1 Assembly
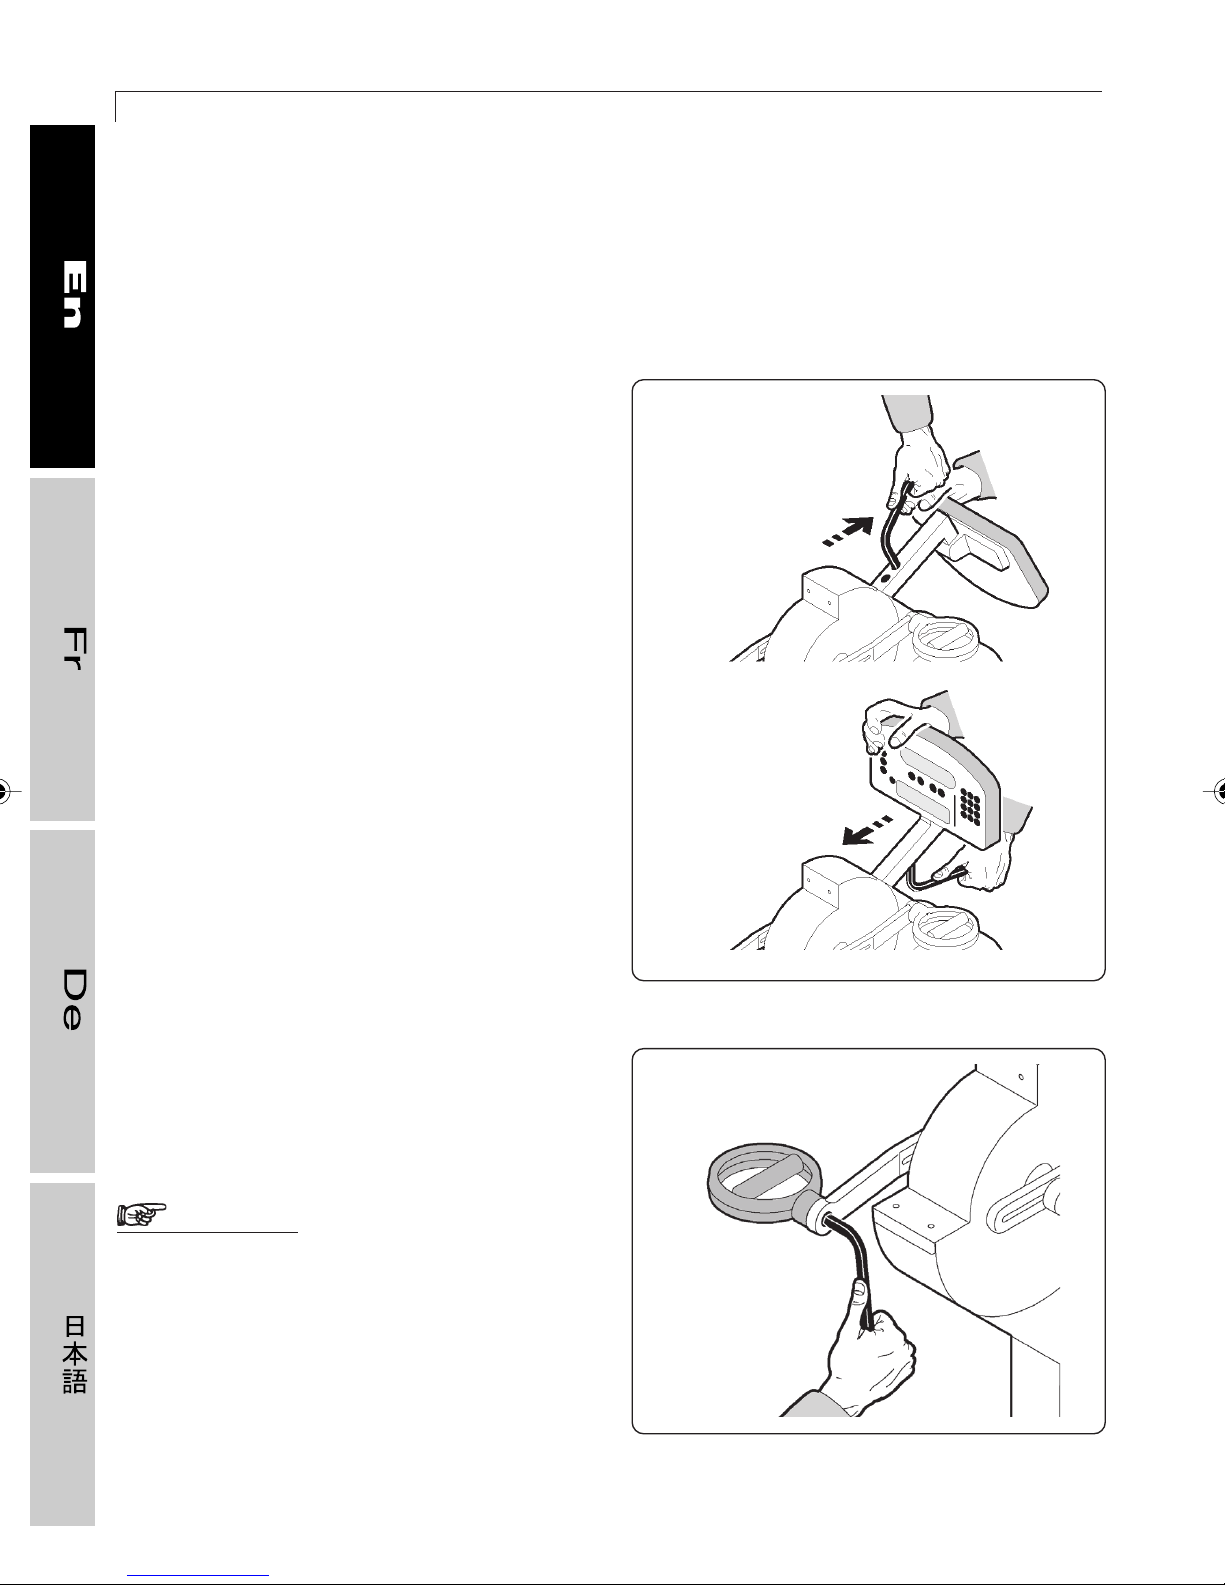
Slide the equipment off the pallet onto the
floor in the position where it is to be installed.
The control panel is turned upside down. To
right it, unscrew the two upper screws and
gently extract them from the frame, taking
care not to disturb the cables.
TOP 600 XT PRO
Turn the control panel 90°, reinsert it in the
frame, and screw the two screws all the way
into the lower part.
Screw on the handgrips with an octagonal
wrench, tightening them fully.
WARNING
The equipment must be assembled
by a person with general mechanical
skills and experience.
107
107-2
Page 21
1.3 INSTALLATION AND ASSEMBLY
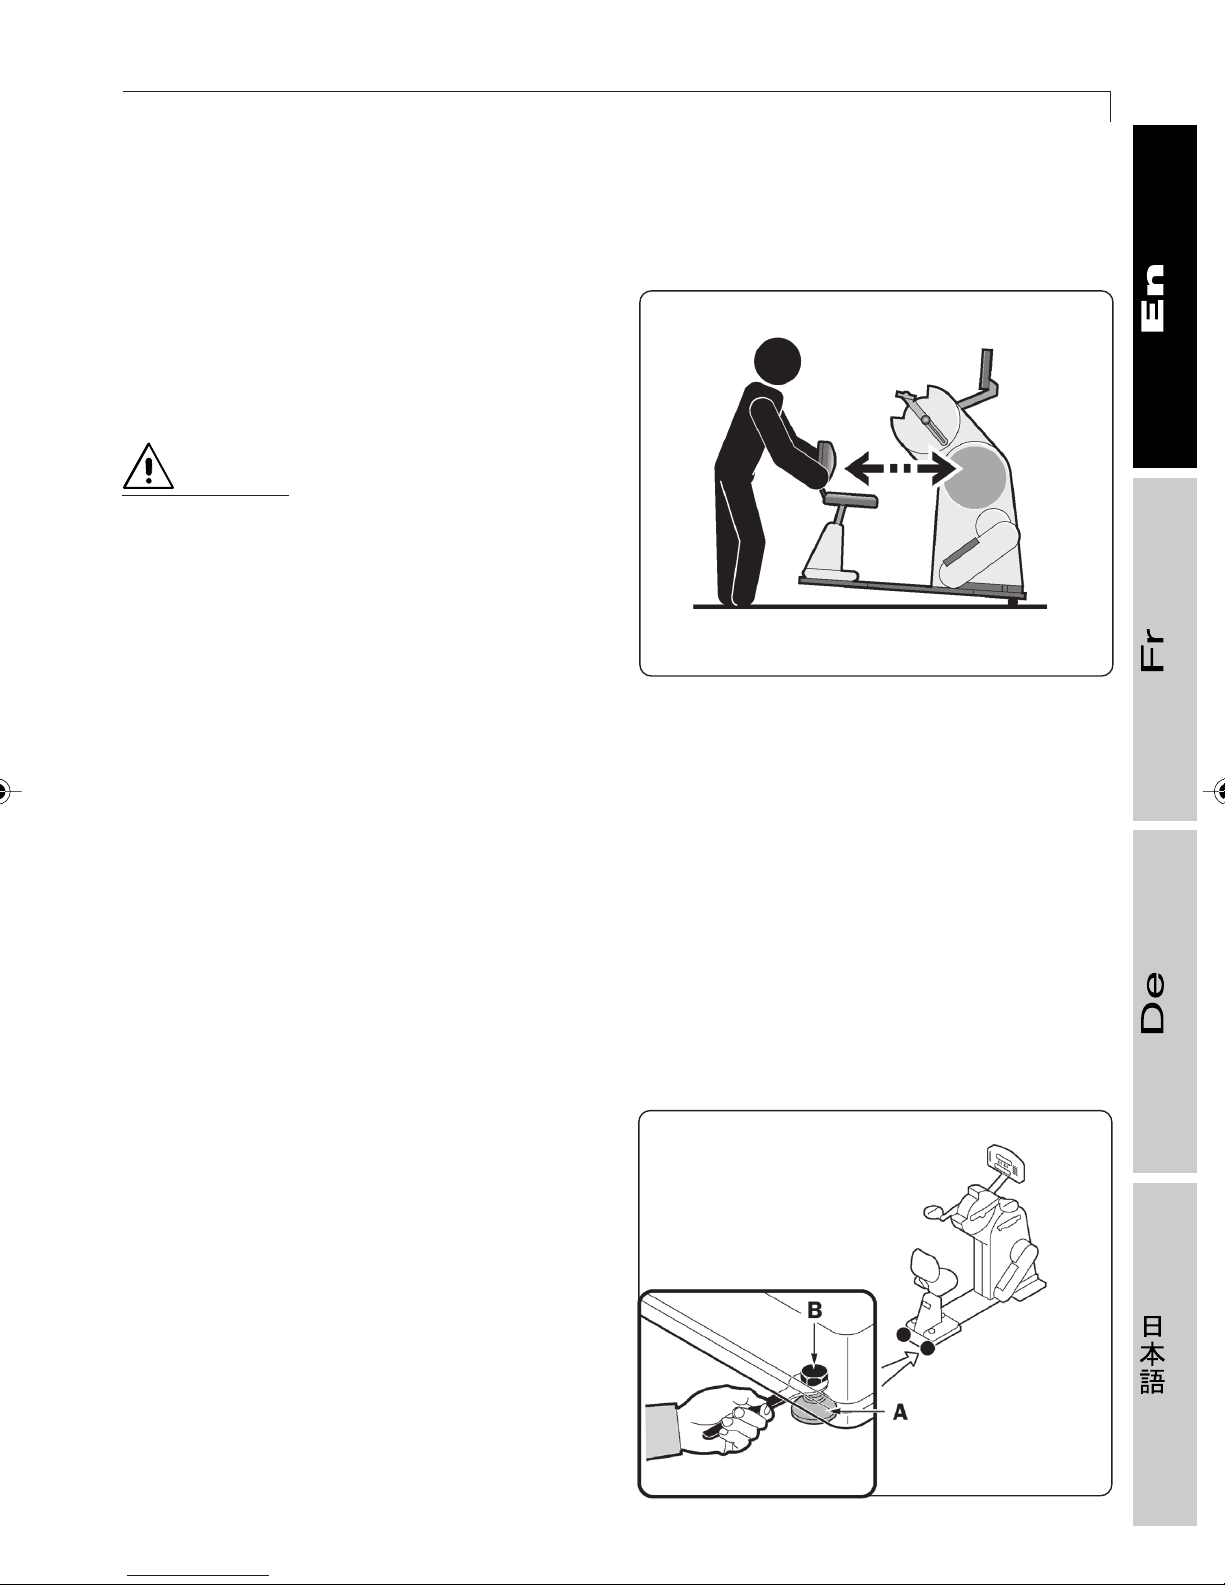
1.3.2 Moving the equipment
To move the equipment off the pallet to the
floor, lift it as indicated in the illustration and
let it slide onto the ground. This procedure
must be performed by at least two persons.
DANGER
Great caution must be exercised
while moving and positioning it on the
ground, since the equipment could
lose its balance.
The equipment is equipped with mounted
front wheels. To move the equipment, you
must grasp it as shown in the illustration and
then push or pull it.
21
108
If floor conditions do not permit the use of
wheels, the equipment must be moved with
normal hoisting and moving equipment.
1.3.3 Leveling
The back feet are used for leveling:
A - screw or unscrew the feet until the frame
is horizontal
B - after adjusting, tighten the lock nuts.
107-1
Page 22
TOP 600 XT PRO
22
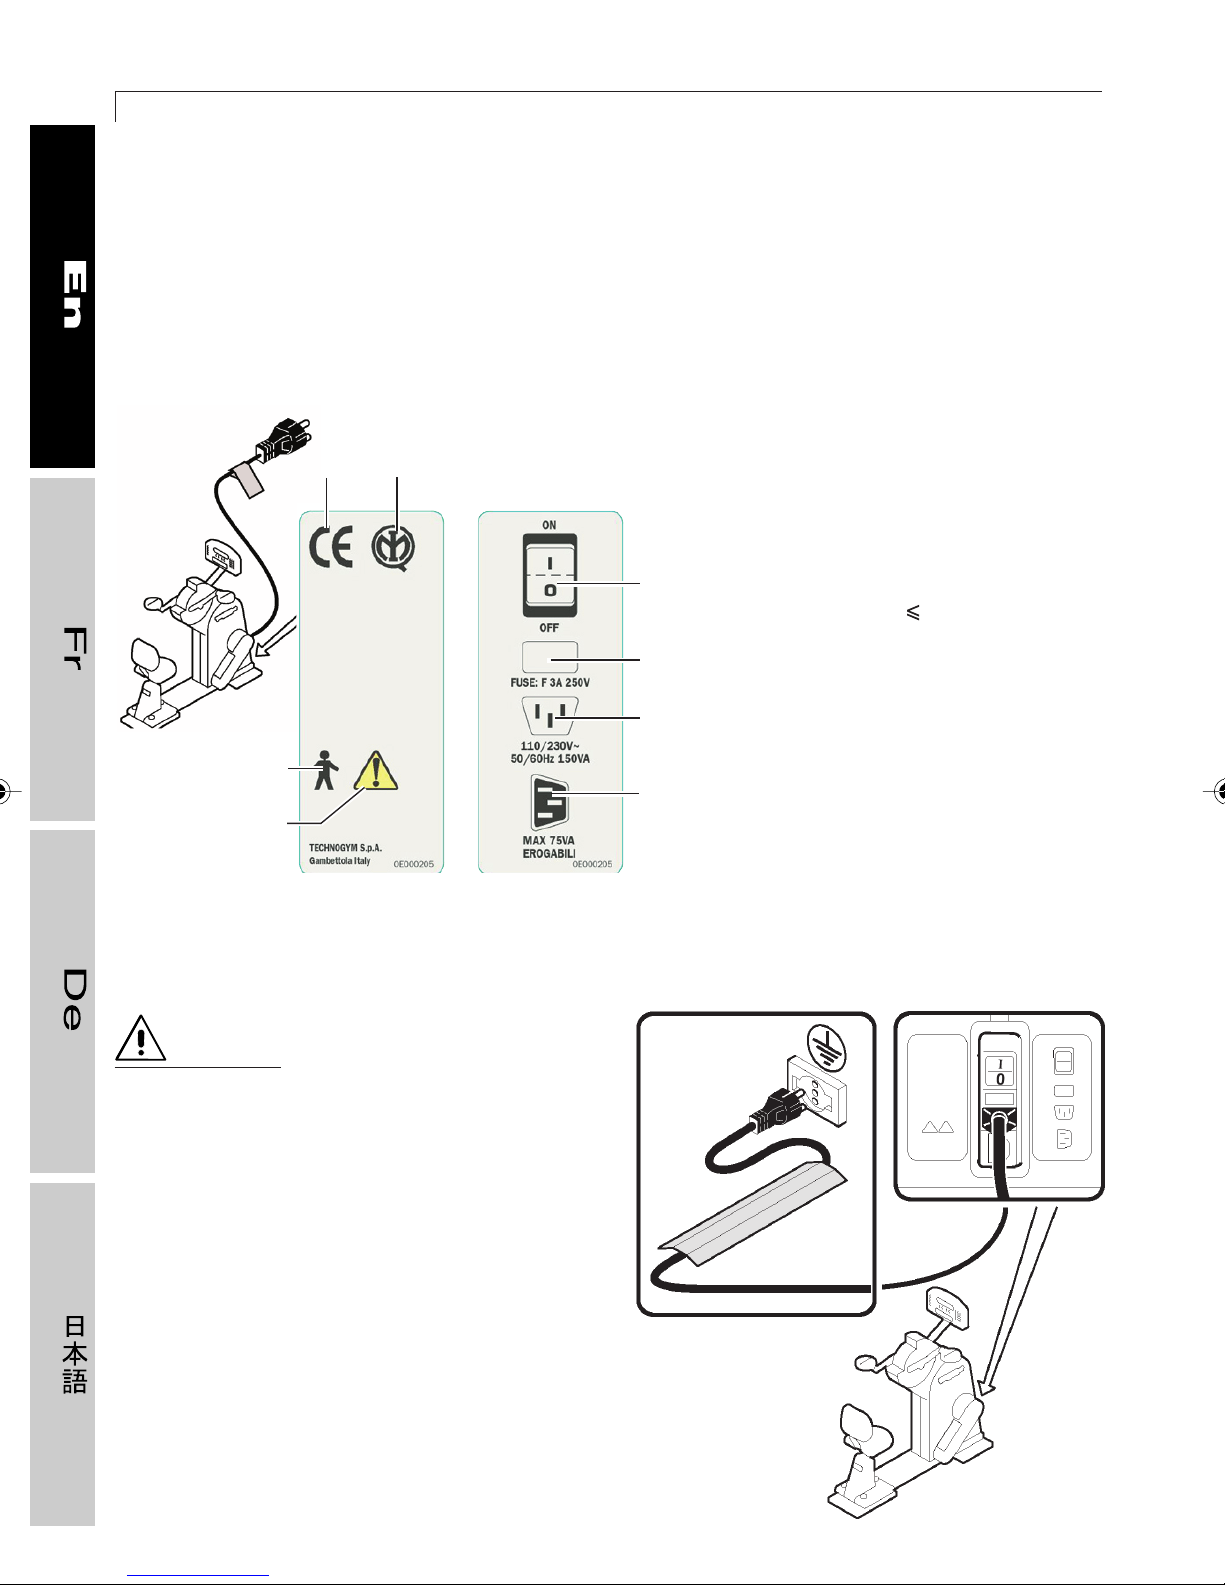
1.3.4 Power hookup
Before connecting the equipment to the main power supply, ensure that the electrical system
is in compliance with applicable code. Check the information printed on the sticker near the
socket and on the cable:
1) Indicates the type of fuse: F 3A,
5 x 20 mm
7
8
2) Indicates the main power
specifications: 110/230 Vac~
50/60 Hz 150 VA
01327003
5
6
01327002
DANGER
The wall socket must be located in a
place where the equipment can be
plugged in and unplugged easily and
safely.
4
1
3) Indicates the auxiliary socket
specifications:
75 VA
4) Illustrates the main power switch:
I = on; 0 = off
2
5) Indicates a device with a type B
applied part
3
6) Indicates reference to user’s
manual
7) Indicates compliance with the CE
directives
8) Indicates the IMQ certification
agency marking
The equipment switch must be set at
0 (off) when plugging it in.
Connect the power cable first to the
equipment socket and then to the wall
socket.
If possible, protect the cable from damage
by using the supplied raceways.
109-1
Page 23
1.3 INSTALLATION AND ASSEMBLY
WARNING
Periodically confirm that the cable is undamaged.
DANGER
The power feed must be grounded . If it has not been grounded already, it must
be by an electrician before hookup to the equipment.
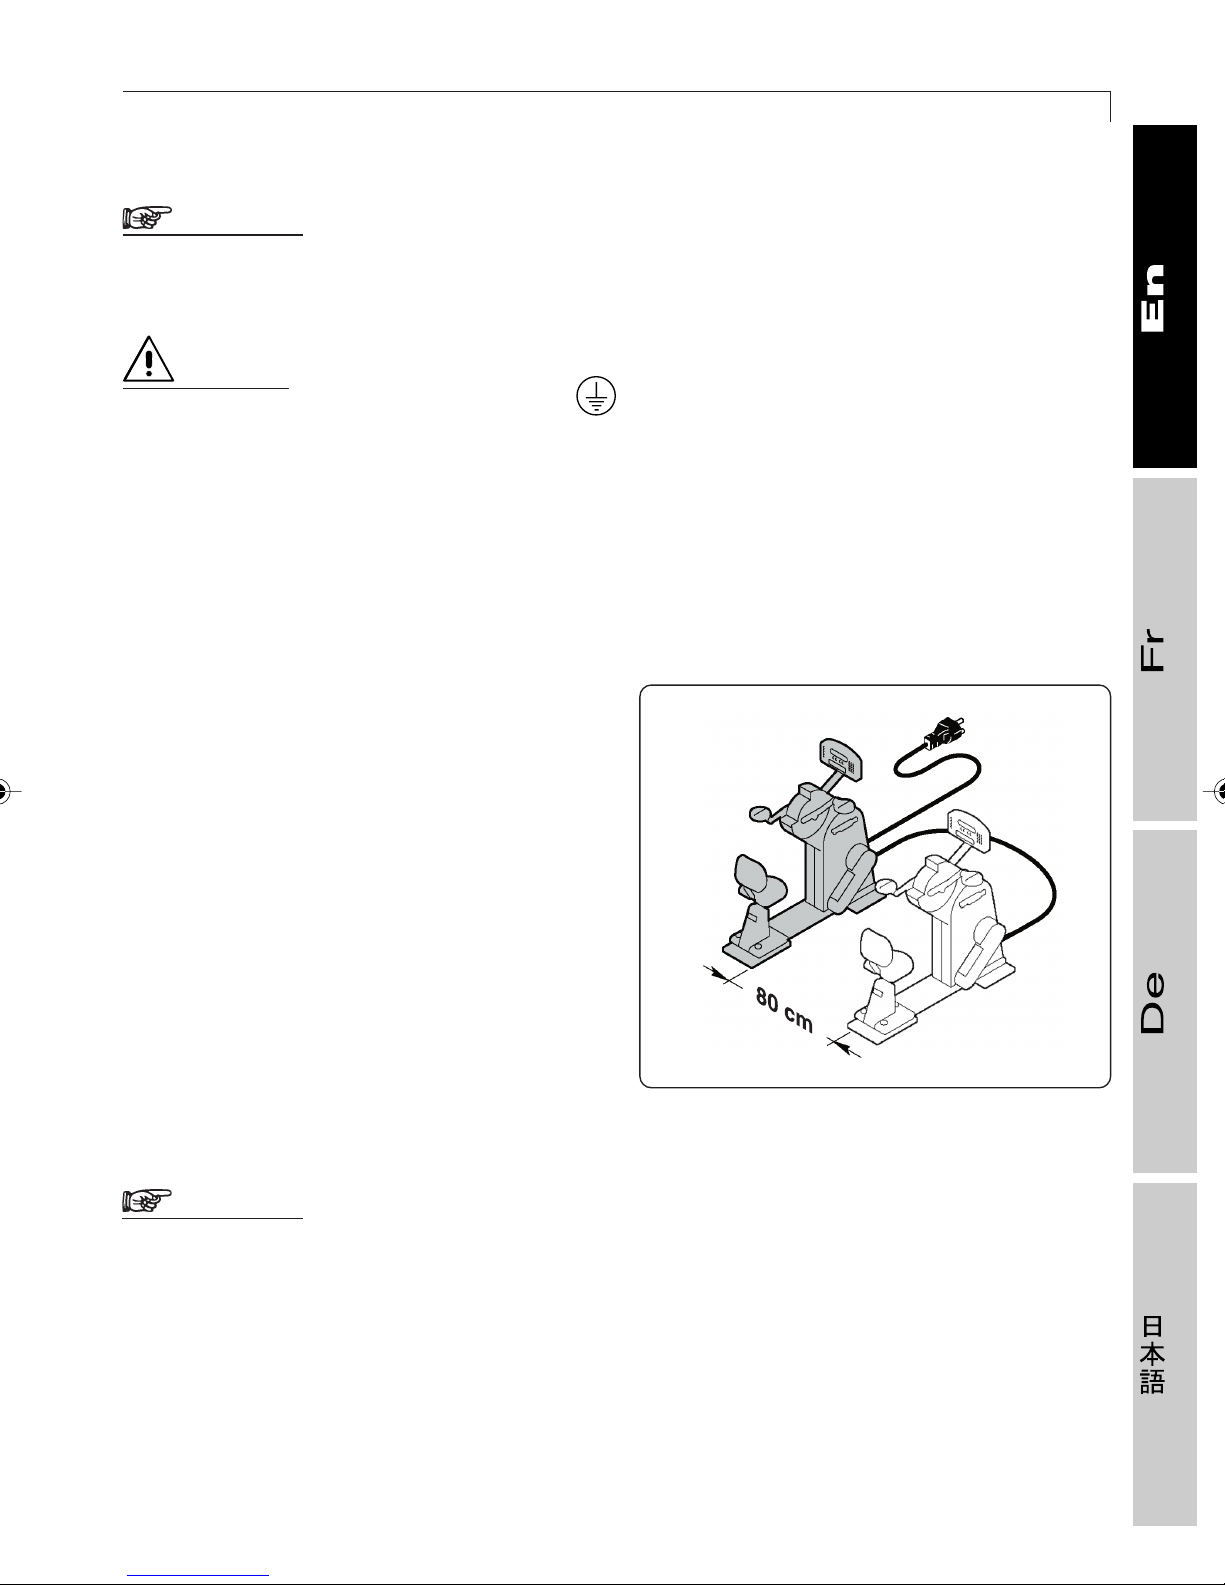
1.3.5 Power hookup to another equipment or device
23
The characteristics of Top 600 allow two
equipments to be connected together.
Use the standard serial cable to connect the
two equipments. Insert the plugs in the
special sockets (close to the sockets for the
main power supply).
WARNING
Top 600 can only be connected to another equipment of the same type, that is to
say to another Top 600. The auxiliary inlet socket must not be used for other
purposes. Safety requires that you ensure that the grounded current on the main
power cord does not exceed 500 µA.
01237006
Page 24
24
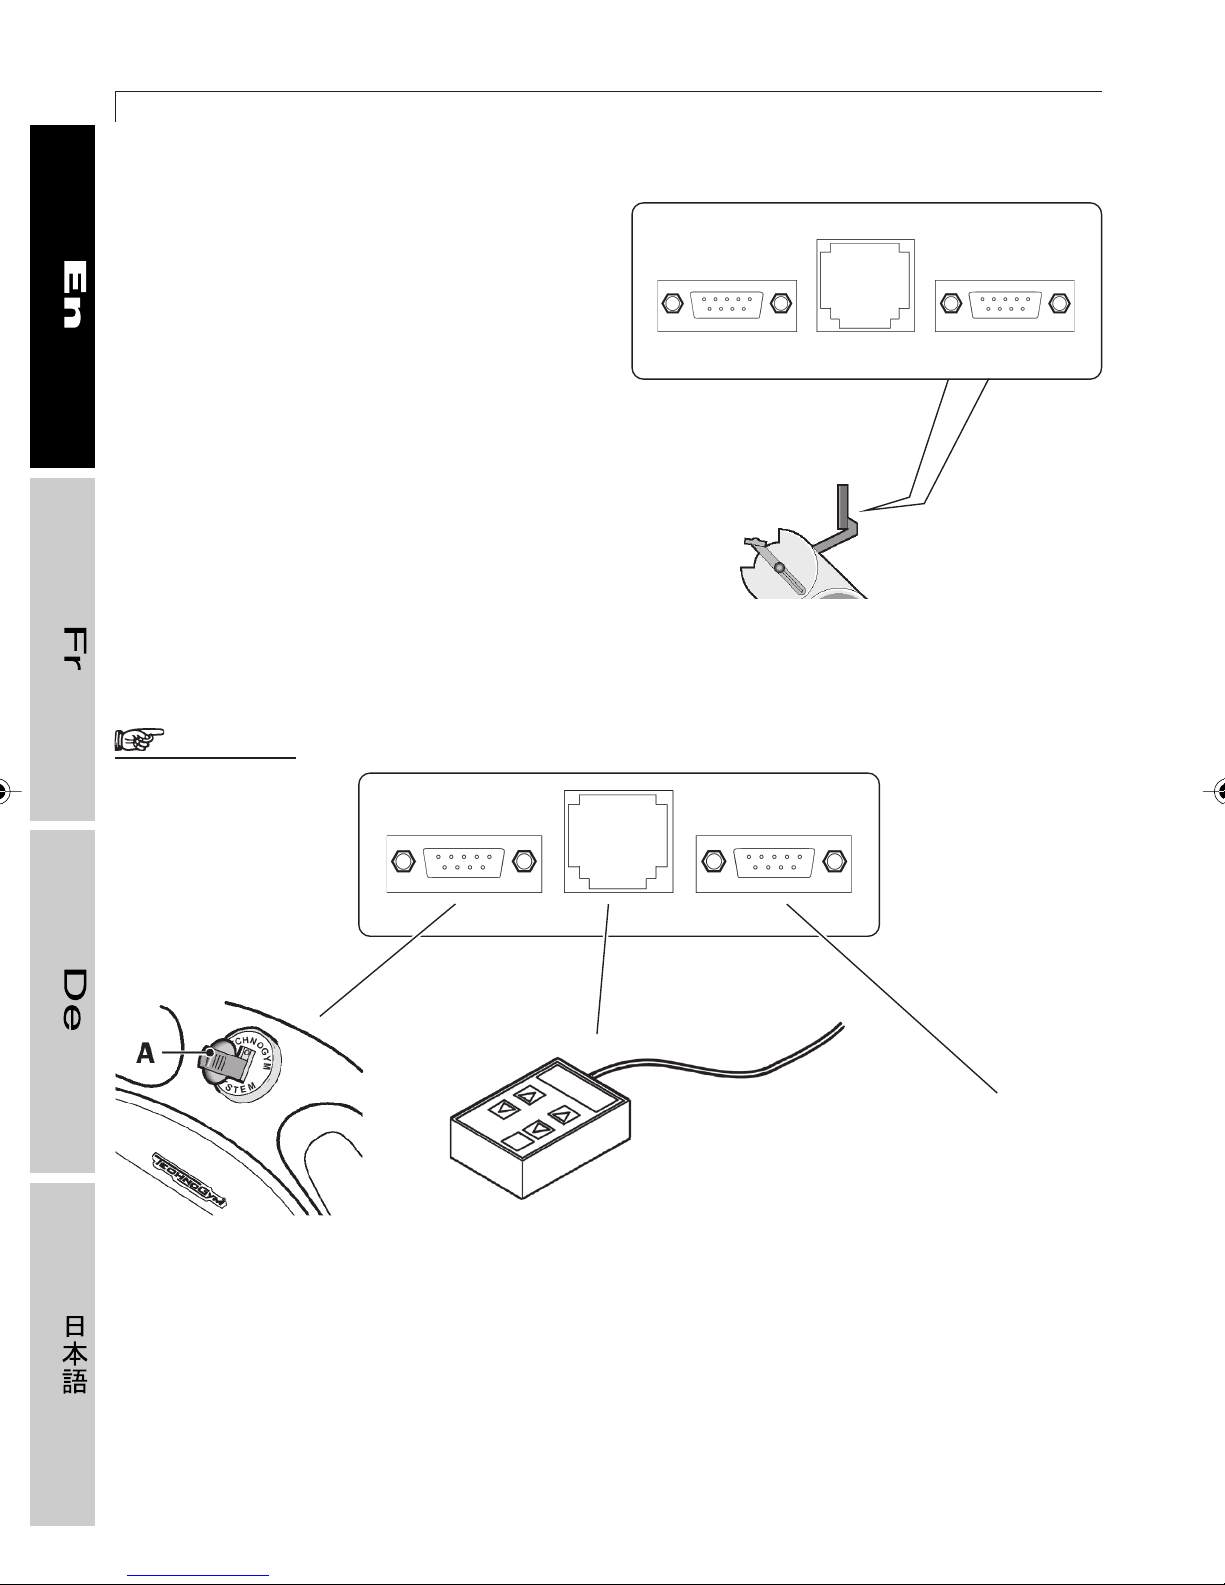
XT PRO line equipments can be connected
not only with each other but also with an
audio-video receiving device such as
Cardio Theater and Smartkey* reader.
TOP 600 XT PRO
Three connectors are installed on the back
of the control panel, specifically for making
these types of connections. The connectors
are furnished with a safety cover that
absolutely must not be removed if the
socket is not used.
Only the specialized personnel from
Technogym Technical Support Service are
authorized to remove the safety cover, during
installation. The removed cover must then
be kept by the user.
WARNING
seriale
seriale
Particolare Top
lettore TGS
Only the Smartkey* reader
may be connected with the
Smartkey* socket (IEC 950).
Cardio_U
The central RJ45 socket
may be connected only with
the Cardio Theater, in
conformity with international
norms (IEC 950).
AUX
Only devices in compliance
with the IEC 950 standard
may be connected with the
AUX socket. These devices
must be located at least 2
meters away from the
equipment.
Page 25
1.4 MAINTENANCE
1.4 Maintenance
1.4.1 Routine maintenance
❒❒
❒ Cleaning and care of equipment
❒❒
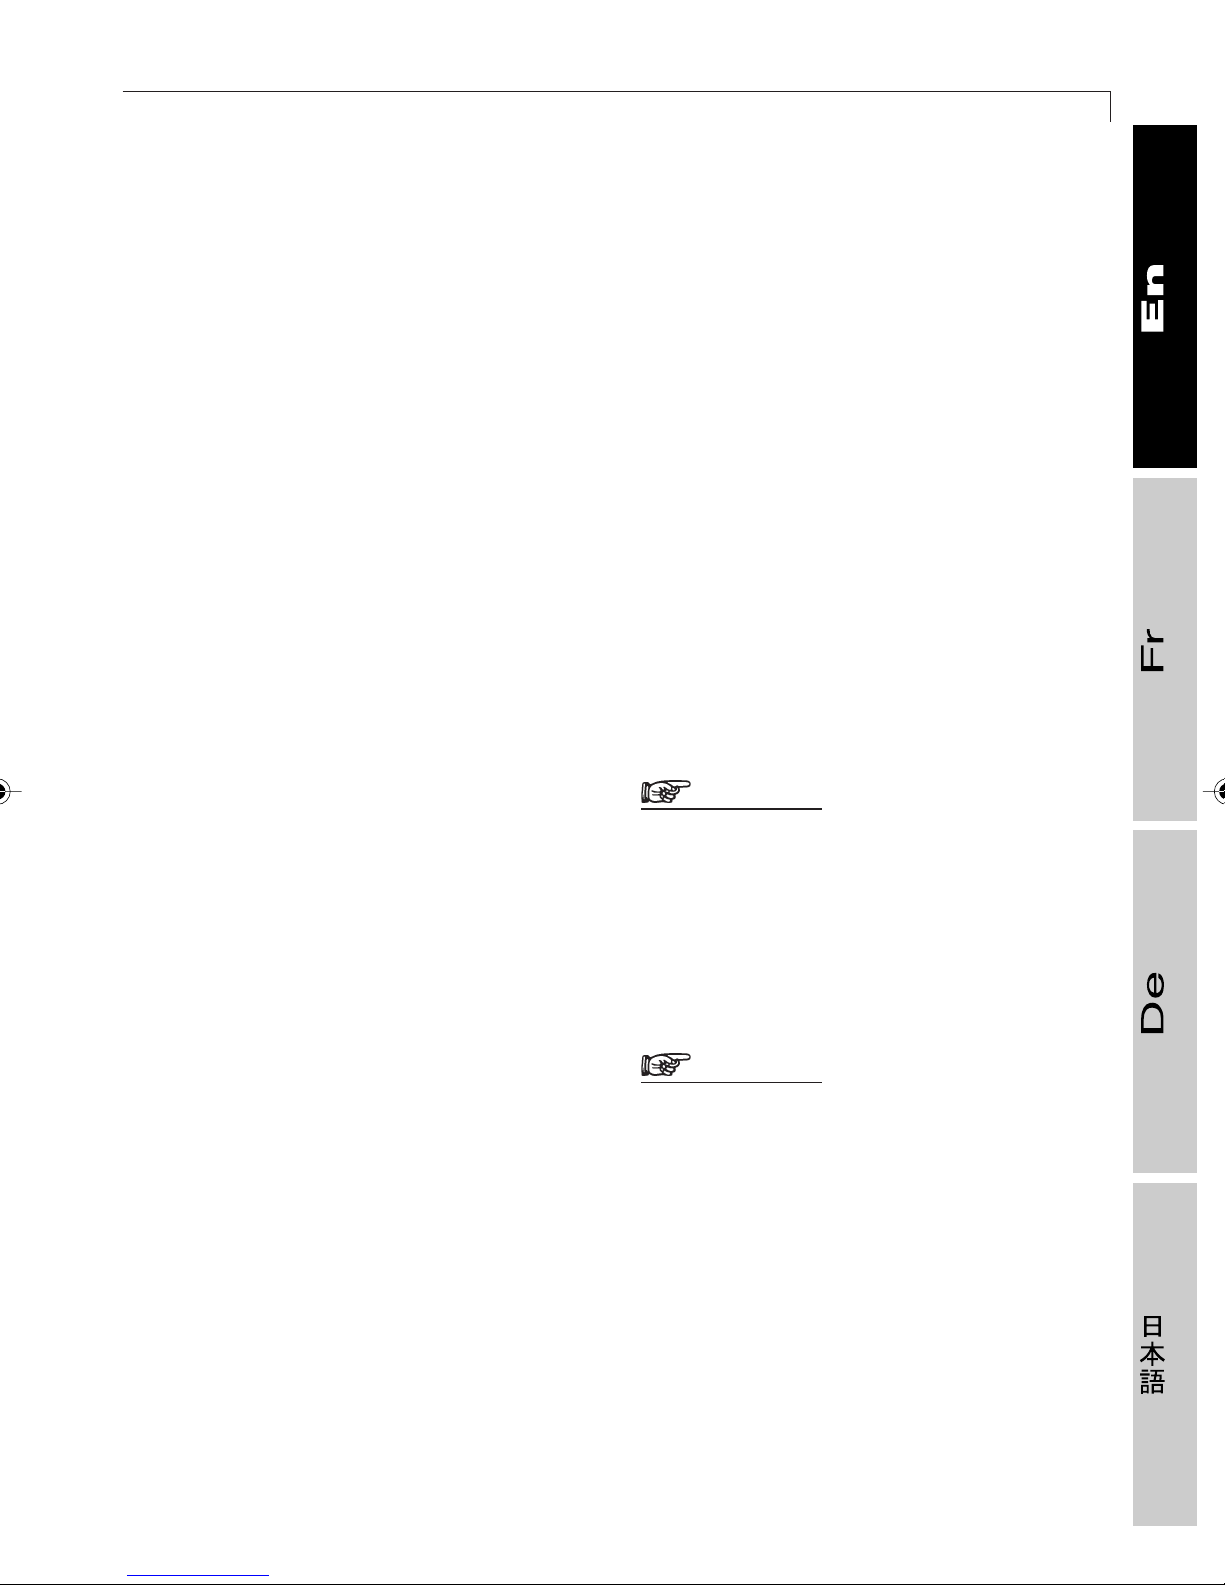
The equipment should be kept clean and
dusted in accordance with normal hygienic
practices, especially if it is used in a fitness
center or by more than one person.
The control panel should be cleaned as
follows:
25
- turn off the equipment, setting the switch
at 0;
- unplug the equipment from the wall
socket;
- clean the display with a damp (not
soaking) cloth.
Clean the entire equipment weekly:
- with the equipment turned off, clean the
external parts with a damp sponge;
- move the equipment to vacuum the spot
on which it stands.
If the chest band needs washing, use a
water-and-soap solution, then let it dry for a
few hours in a warm, dry place, far from direct
sources of heat.
To sterilize the chest band, use a disinfectant
for surgical tools, available in drugstores.
WARNING
Take care not to rub too hard on the
control panel or on the signs and
instructions on the stickers.
WARNING
If the equipment is used for medical
purposes, it is recommended to
clean the chest band after each use.
Use common dish detergent to clean the
water bottle. Avoid chemical products or
solvents.
Page 26
26
❒❒
❒ Lubrication and inspections
❒❒
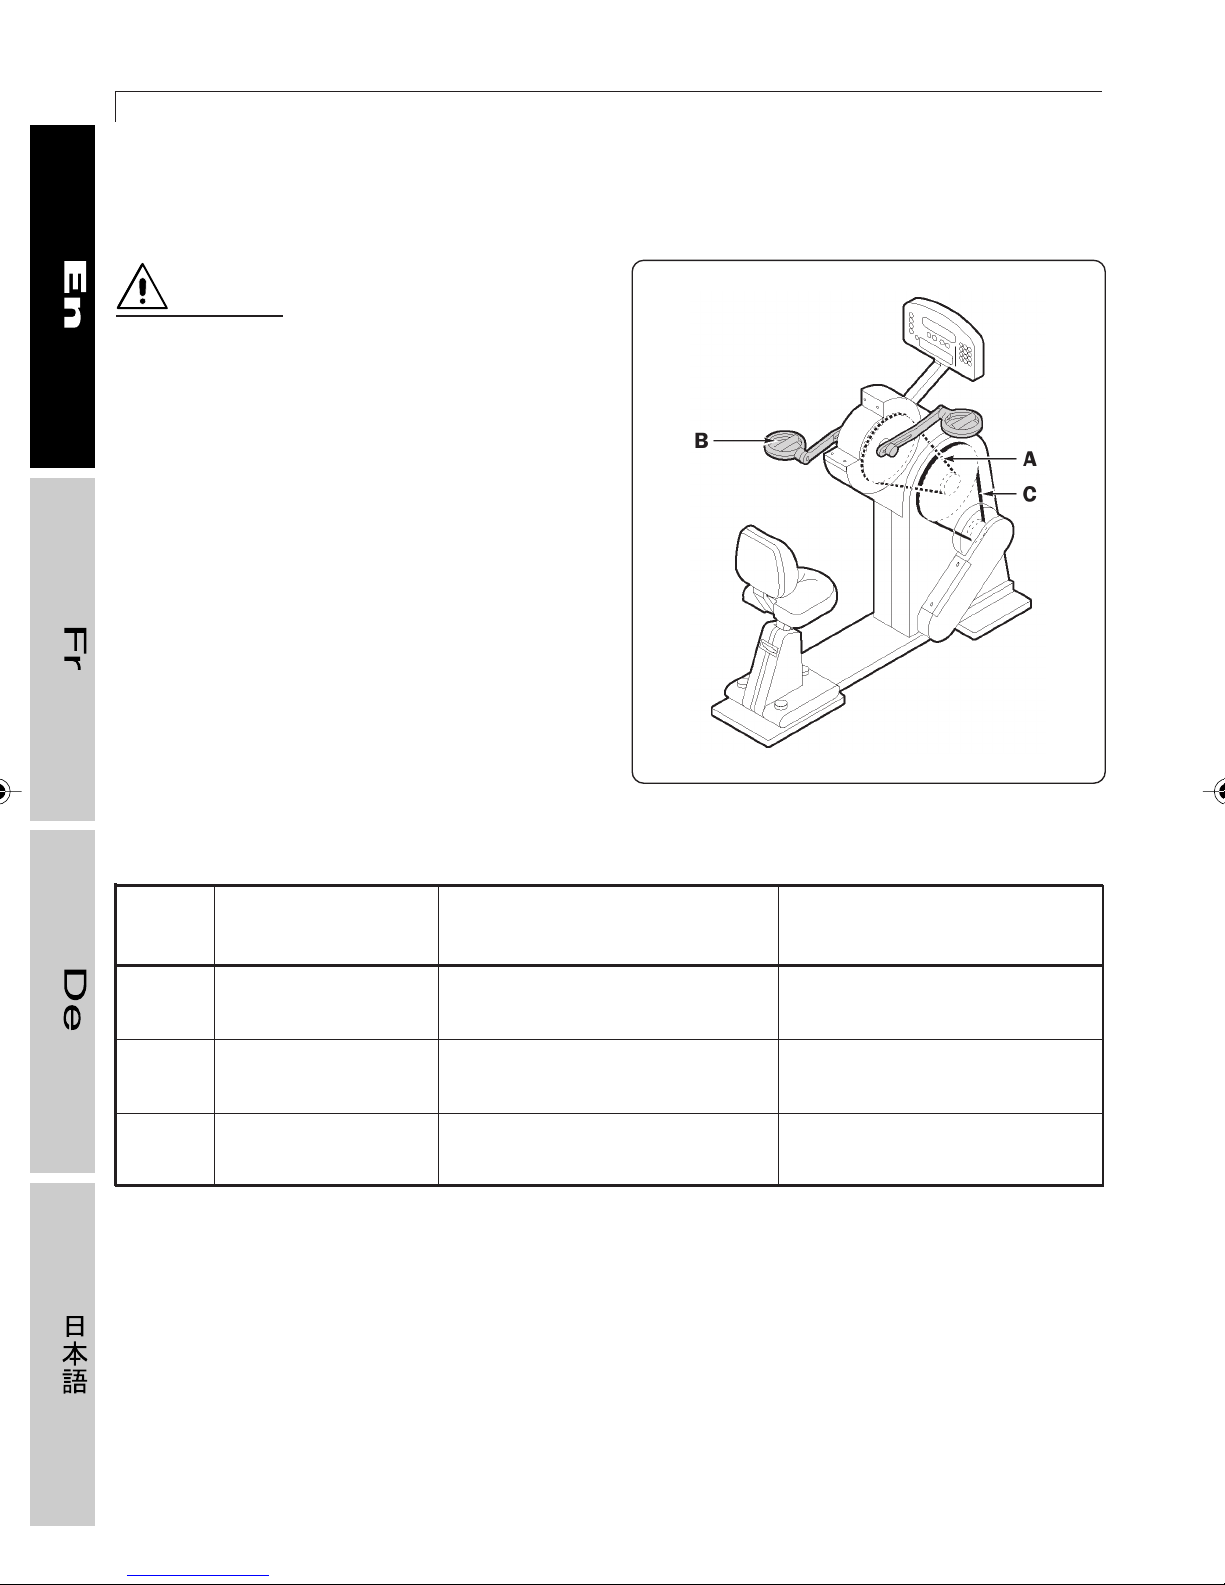
DANGER
Periodic maintenance, adjustment,
and lubrication must be performed
by Technogym Technical Support
Service personnel.
TOP 600 XT PRO
Pos. Description
A Chain drive
B Handgrips
C Transmission belt
Type of work
Inspection of lubrication
Inspection of free play
Inspection of wear and tear
114
Frequency
Monthly
Monthly
Monthly
Page 27
1.4 MAINTENANCE
1.4.2 Extraordinary maintenance
❒❒
❒ Replacement of fuses
❒❒
WARNING
The fuses must be replaced by the
Technogym Technical Support
Service.
DANGER
Before replacing the fuses, turn off
the equipment, setting the switch at
0 and unplugging it from the wall
socket.
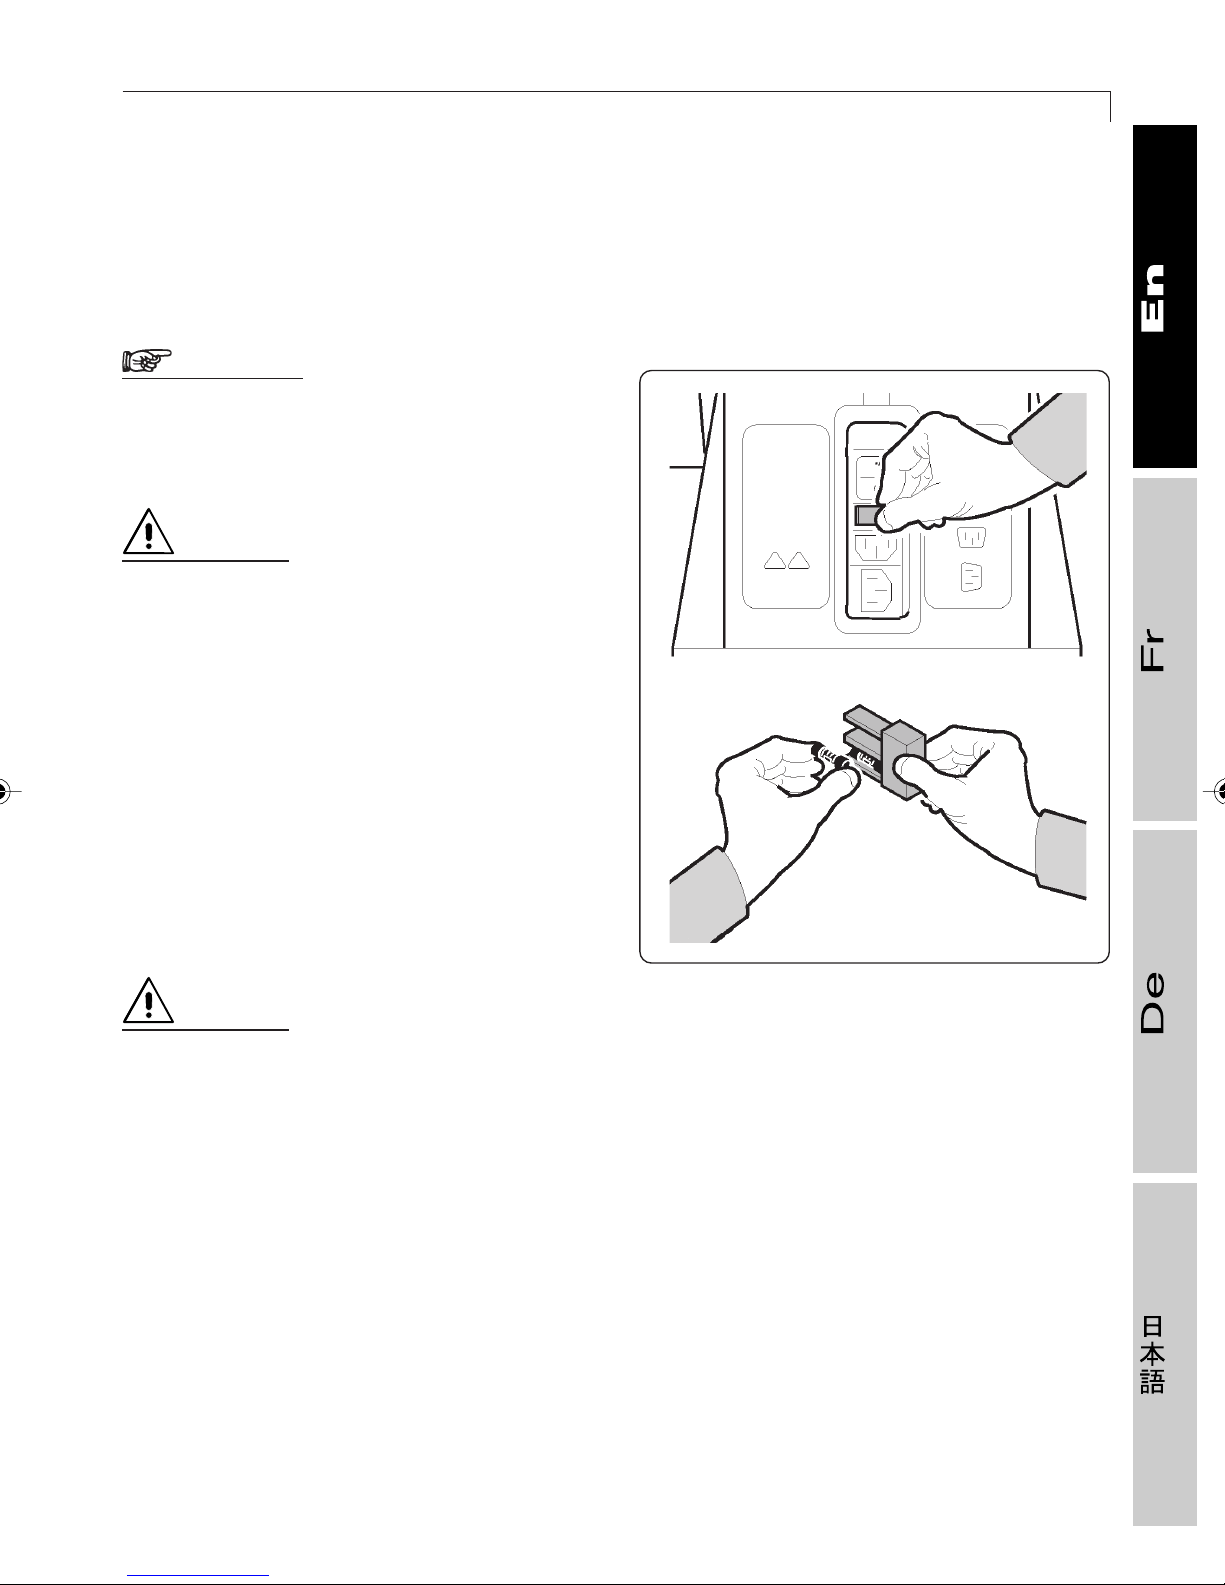
27
Remove the fuse holder near the switch,
pushing on the lever.
Replace the blown fuse with a new one as
supplied (F 3A).
Return the fuse-holder to its housing, making
sure it snaps in.
DANGER
If the supply of fuses is exhausted,
use others having the same electrical
characteristics, with identical rating
and certified: F 3A.
115
Page 28
TOP 600 XT PRO
28
1.4.3 Troubleshooting
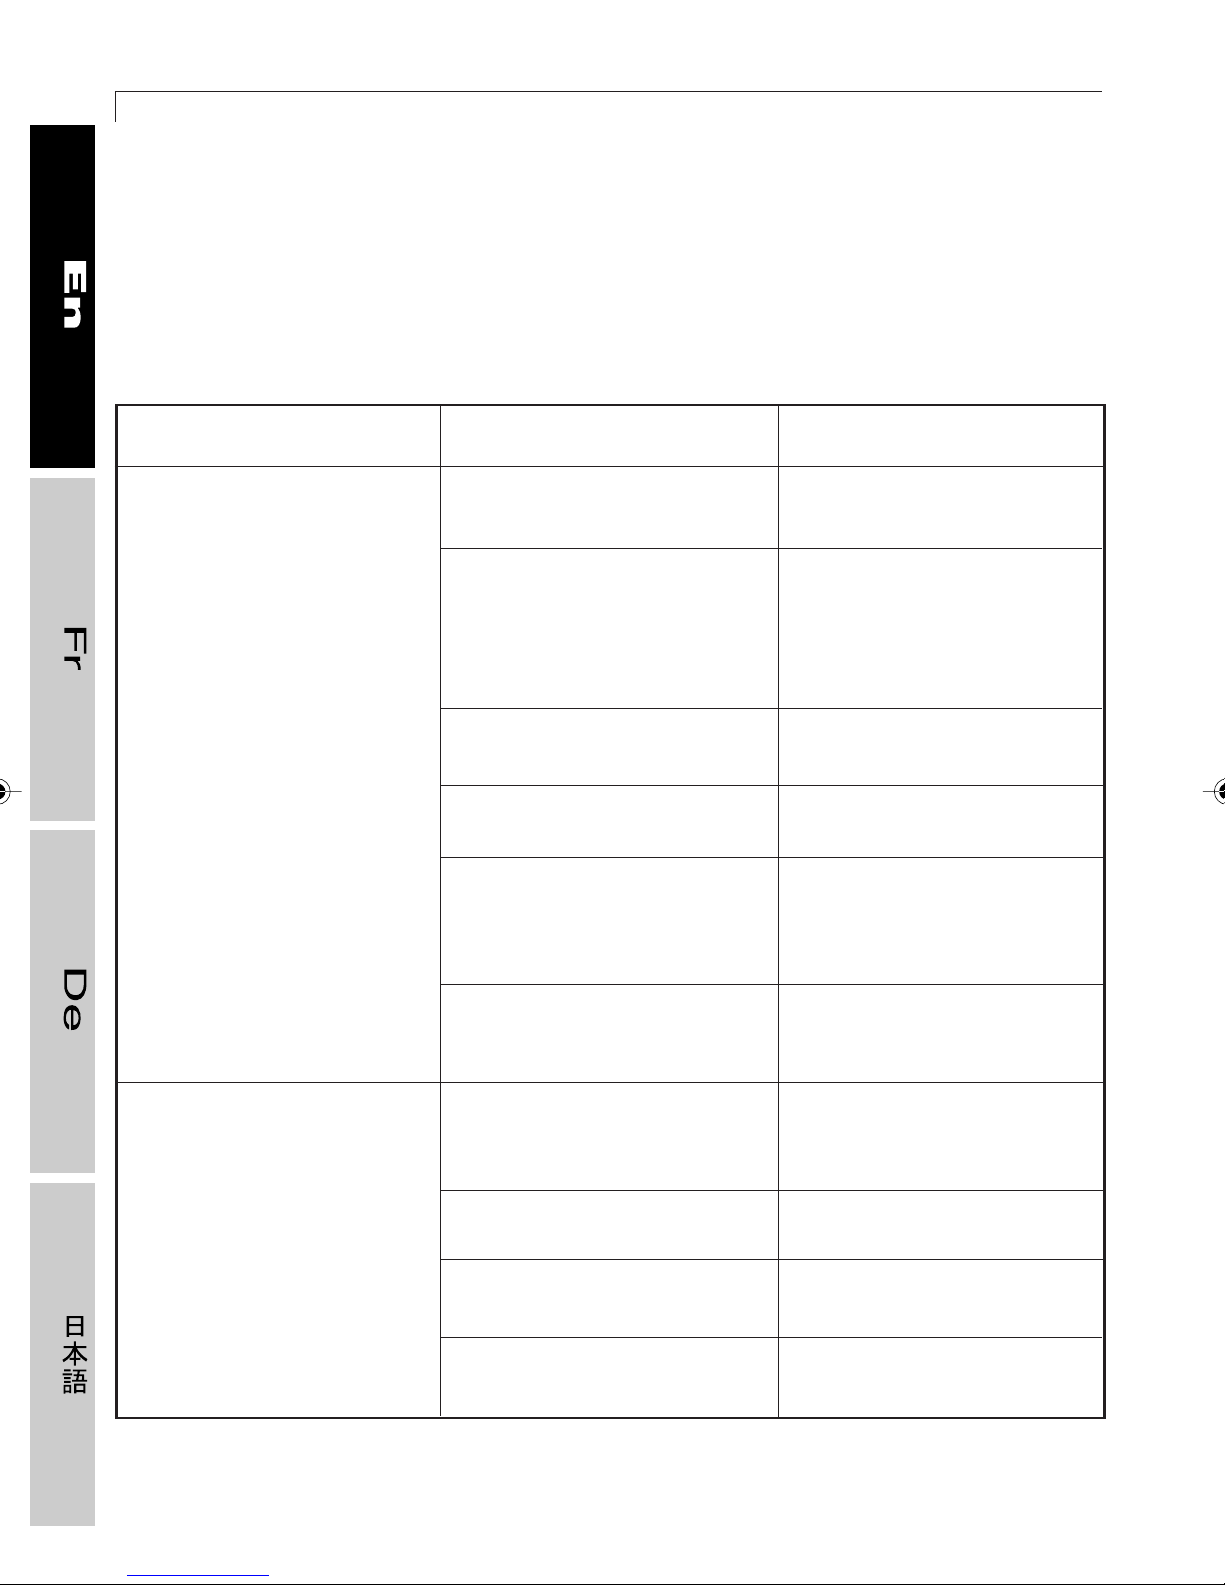
The following list identifies a series of problems that could arise during normal use of the
equipment. In the event that the suggested remedies do not resolve the problem, contact
Technical Support Service for a service call.
Problem
The equipment does not
turn on
Cause
The power cord in not
plugged in.
No current.
The power cord
in damaged.
Problems with installation
of power cord.
The fuses have blown.
The control panel connector
has been accidentally
disconnected.
Remedy
Plug the power cord
into the wall socket.
Check the socket
the equipment uses,
plugging in other equipment
you know
is in working order.
Contact Technogym
Technical Support Service.
Check the connection.
To replace the blown fuse
with a spare (F 3A) Contact
Technogym Technical
Support Service.
Contact Technogym
Technical Support Service.
Too noisy
The equipment’s support
is uneven.
The bearings are damaged.
The alternator is damaged.
The transmission belt
is worn out.
Check and level
the equipment, using
the rear adjustment feet.
Contact Technogym
Technical Support Service.
Contact Technogym
Technical Support Service.
Contact Technogym
Technical Support Service.
Page 29
1.4 MAINTENANCE
29
Problem
When the equipment
is running, data are
incorrect or unreliable
Problems in monitoring
heart rate with the chest
band
Cause
A key is stuck on the
keyboard.
The equipment is near
sources of static (e.g.
appliances).
An internal connector
has been accidentally
disconnected.
There is an internal contact
inside the control panel.
The alternator belt is slack.
Other transmitters are
located nearby.
Remedy
If the problem persists,
contact Technogym
Technical Support Service.
Move the equipment
elsewhere or move
the appliances.
Contact Technical
Technogym Support
Service.
Contact Technical
Technogym Support Service.
Contact Technical
Technogym Support Service.
Move the equipment far
enough away so that
the signals do not overlap
(the minimum distance
between the two
equipments must be 31.5
inches, or 80 cm).
Strong sources of static
are located nearby.
The chest band is worn out.
The chest band is not in
proper contact with the skin.
The control panel
does not function properly.
The transmitter is damaged.
Find the sources (such
as appliances) and move
them or the equipment.
Replace it by ordering it
directly from Technogym
Technical Support Service.
Moisten the inside of the
chest band with water.
Contact Technical
Technogym Support Service.
Replace the chest band
by ordering it directly
from Technogym Technical
Support Service.
Page 30
30
1.5 Technical Support Service
The Technogym Technical Support Service
provides:
- telephone consultation;
- information about which services are
covered by the warranty and which must
be paid for;
- on-site servicing;
- shipment of original spare parts.
When you contact the Technogym Technical
Support Service you must give the following
information:
TOP 600 XT PRO
- equipment model,
- date of purchase,
- serial number,
- precise description of the problem
encountered.
WARNING
Work on the equipment by persons
unauthorized by Technogym invalidates
the warranty.
00350049
Page 31
1.6 STORAGE
31
1.6 Storage
In the event of long periods of disuse, we recommend storing the equipment:
- in a dry, clean place, covered with a cloth to protect it from dust;
- at a room temperature of 10° to 25°C (50° to 77°F) and relative humidity between 20%
and 90%.
For better storage, use the original packing materials.
1.7 Disposal of the equipments
Always ensure that the equipment pose no danger to people and do not let children play with
them. As a precaution, when a equipment is unused for a long time or when you want to
dispose of it, deactivate it by unplugging it.
Disposing of the equipment in the environment, in public areas, or in private ones used by
the public is prohibited.
Top 600 XT PRO is made of recyclable materials such as steel, aluminum and plastic, which
must be disposed of pursuant to urban waste and refuse regulations, contacting a company
specialized in urban and environmental sanitation.
❒❒
❒ Disposing of the chest band and water bottle
❒❒
The chest band that transmits heart rate data and water bottle are not made of recyclable
materials so do not dispose of them in the environment.
Contact a company specialized in urban and environmental sanitation.
Page 32
2 Using Top 600
2.1 Precautions for safe use
DANGER
Use of Top 600 for any purpose other
than that for which it was designed
and built - to exercise the shoulders
and arms - is improper and thus
dangerous.
Perform only those exercises for which the
specific equipment was designed, and do
so only as prescribed by this manual.
The equipment may be used only after a
medical check-up for the specific type of
exercise you intend to do and in compliance
with the user requirements stipulated by
the maker.
Before beginning a workout program, ask
your doctor about possible limits on using
the equipment.
WARNING
Before starting any exercise it’s a
good idea to read the entire manual
and familiarize yourself with the
equipment’s controls.
Set up the workout on the basis of your state
of health, starting exercise at the appropriate
rhythm and speed.
For certain physical conditions, the
equipment should be used only under the
close supervision of a specialized physician.
If you feel ill during the workout (dizziness,
chest pains, etc.) stop exercising
immediately and call your doctor.
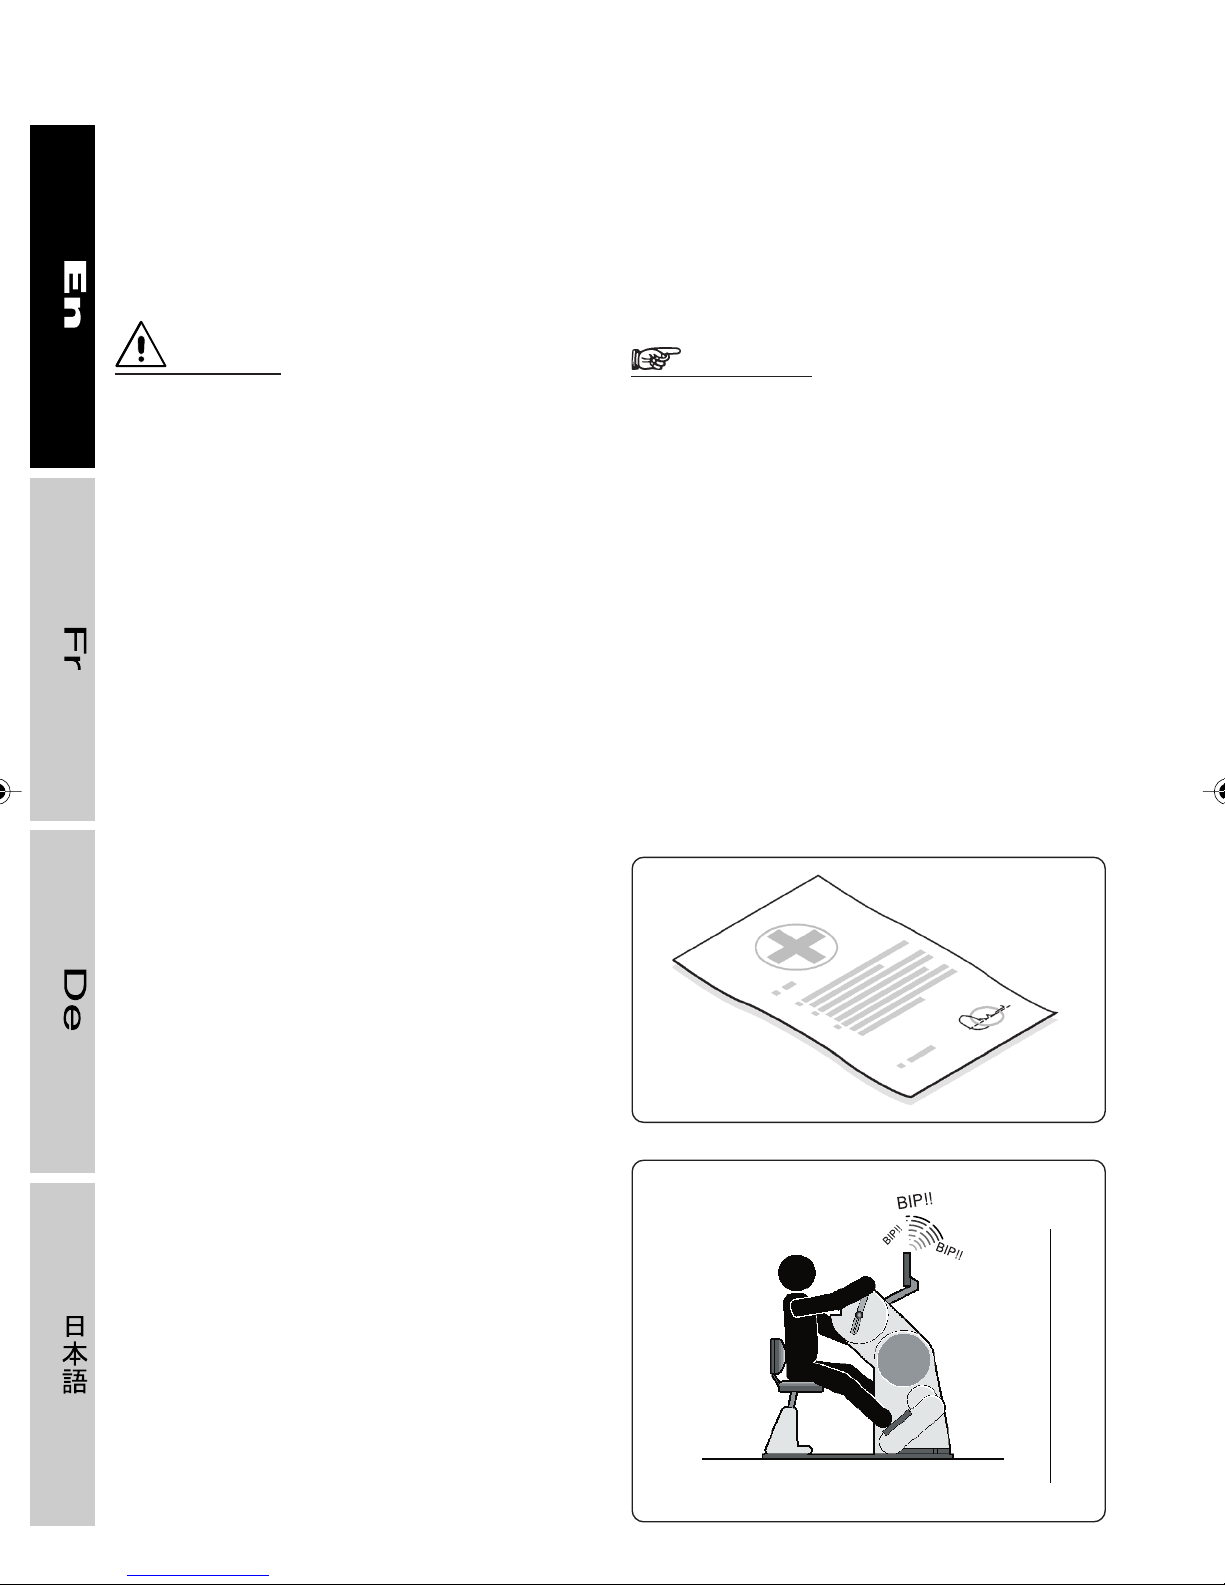
If the audio signal sounds for 5 seconds
during exercise and the message “
Heart Rate
high and you should slow down.
Wear gym shoes and exercise clothes; do
not wear clothing that blocks perspiration.
” appears, your heart rate is too
4
High
01327004
Page 33
2.1 PRECAUTIONS FOR SAFE USE
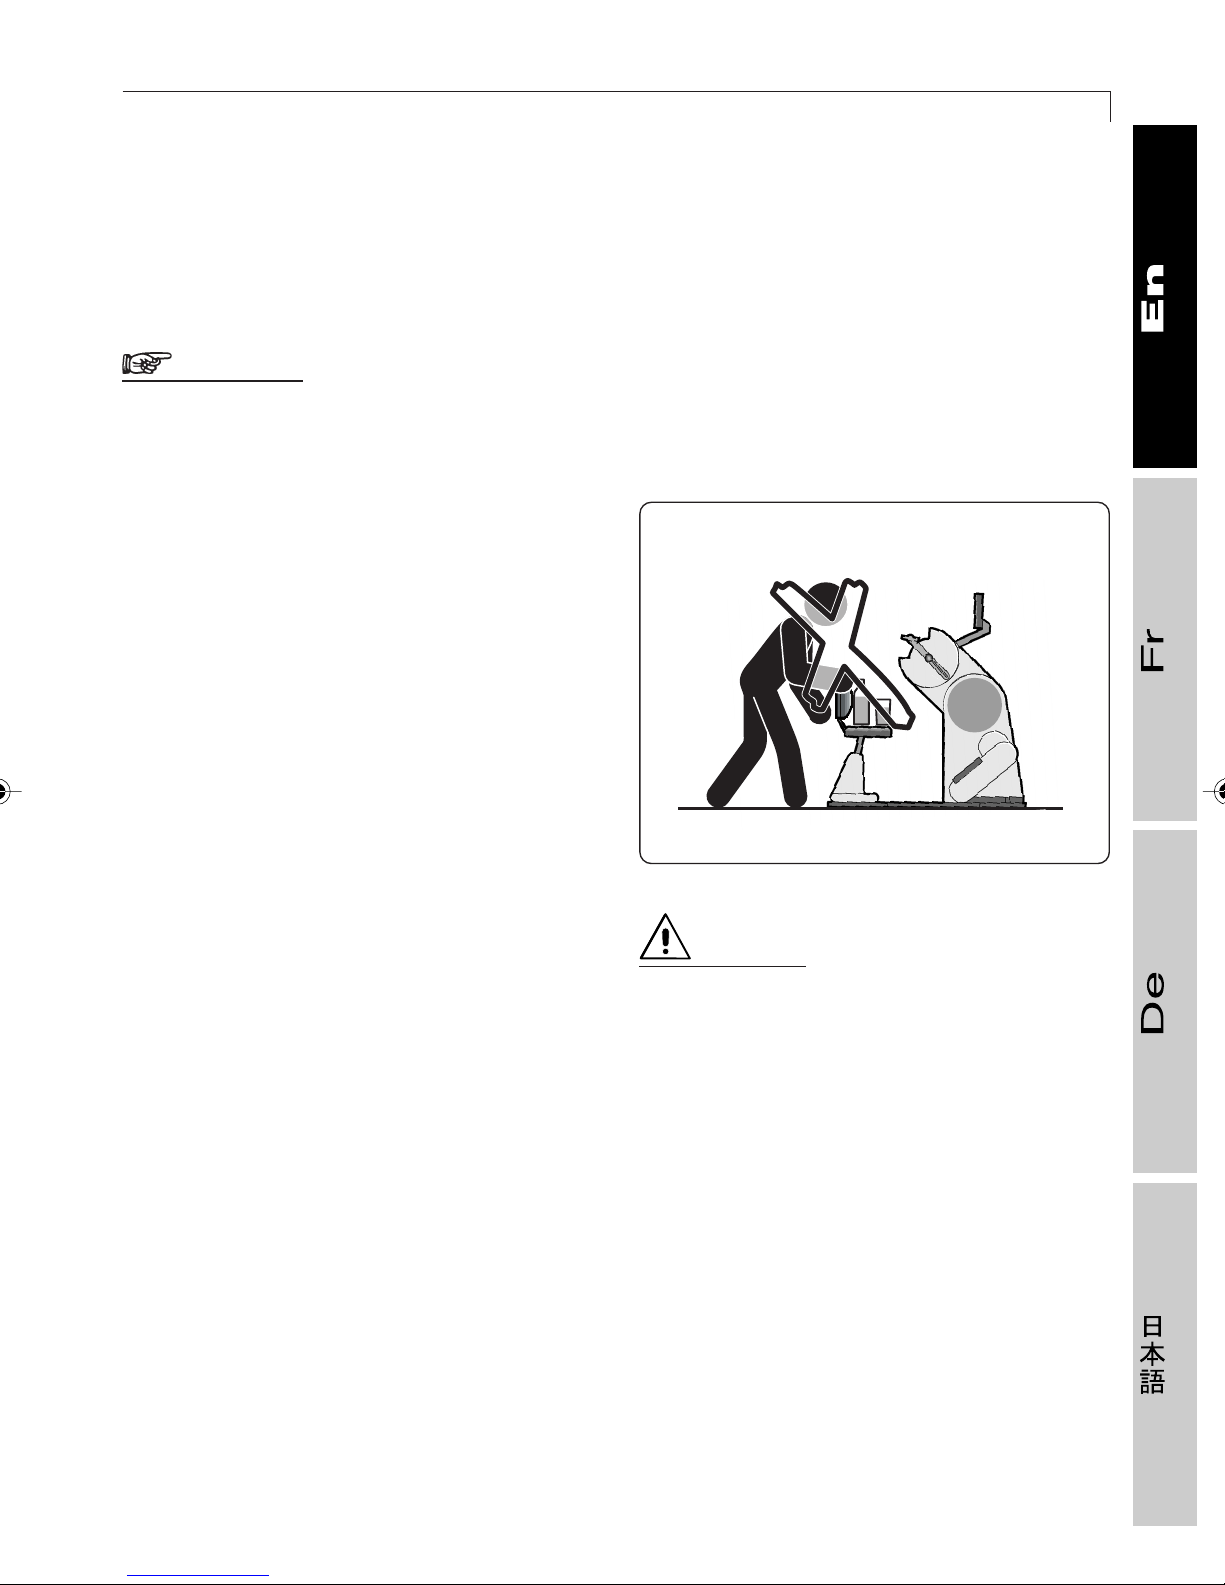
At the start of every exercise position yourself
correctly on the equipment, watching out for
components that could hamper you and make
you slip or fall.
WARNING
Check the tightness of the seat
knobs.
While exercising do not place your feet
beneath the moving parts.
While exercising keep your hands away from
the moving parts.
33
Do not place beverages or liquids on or near
the equipment.
Keep your clothing and towels away from
the equipment so they don’t interfere with its
moving parts.
Do not use the equipment near inflammable
liquids or gas to avoid the risk of a fire being
started by flying sparks.
Do not expose the equipment to spraying or
spurting water.
Do not leave the equipment outdoors
exposed to the elements (rain, sun, etc.).
The equipment must not be located near
heat sources, electromagnetic sources (such
as TVs, electrical motors, antennas, etc.),
medical equipment, laser devices, electrostimulators, etc.
XT PRO line equipments are primarily
intended for use at athletic clubs, gyms, and
similar organizations in entirely indoor
locations.
01327005
DANGER
There is high voltage inside the
equipment, so the cover must be
removed only by authorized
personnel.
Use by children under the age of 14 is
prohibited unless they are directly supervised
by an adult.
The equipment has been designed and built
in conformity with safety and health
requirements. Nevertheless, some parts of
the equipments may pose risks that are not
obvious. Therefore, pay special attention to
any potential hazards of crushing your upper
or lower limbs.
Page 34
34
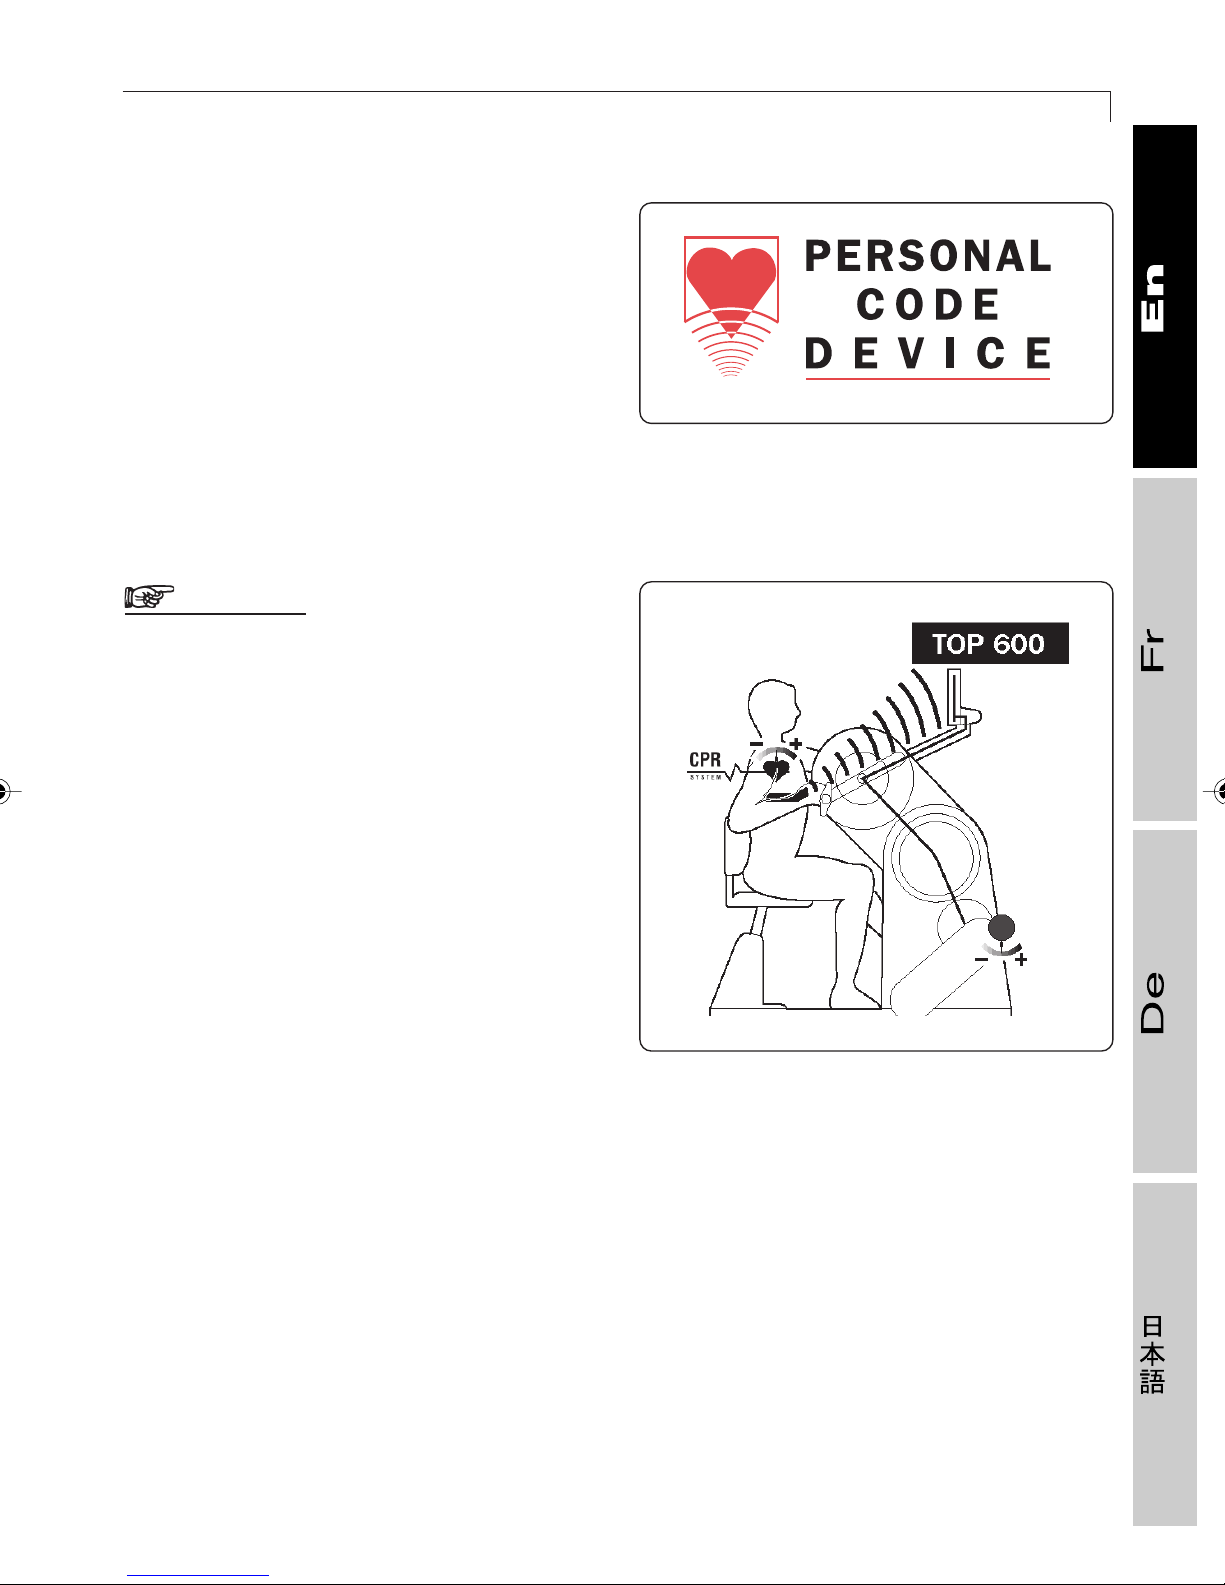
2.2 Monitoring heart rate
The condition of your heart and
cardiovascular system are fundamental to
physical fitness. The more often you can
check your heart rate the more effective your
workout will be.
Monitoring heartbeat is important for both
athletes and amateurs because it enables
them to program workouts better. Top 600
XT PRO let every user monitor heart rate
precisely with the chest band containing the
heart rate transmitter, which you wear
wrapped around your thorax.
TOP 600 XT PRO
The heart rate transmitter incorporated in the
chest band sends the equipment heart rate
signals; these signals are processed and
shown on the display so the user can
continuously monitor his or her heart rate.
This constant monitoring of the heart rate
makes the chest band useful tool for
improving workout effectiveness and safety,
and we thus highly recommend their use.
DANGER
During a workout, your heart rate
must never be more than 85% of its
maximum (unless you’re a trained
competitive athlete).
To calculate the percentage, use the
table in paragraph 2.5.2.
Page 35
2.2 MONITORING HEART RATE
If the heart rate detection device is of the
coded type (refer to the optional accessories,
in paragraph 1.2.3), the data generated by
the chest band is transmitted in
coded
form,
that is, by a specific chest band to be used
with that specific equipment and not any
other. As a result, interference with nearby
equipments is avoided and a more precise
measurement of the heart rate is obtained.
WARNING
The only function of the heart rate
monitor is to show heart rate during
exercise and excludes any diagnostic
use of a medical nature; it is not for
detection of heart anomalies or
problems. The heart rate shown on the
display is only indicative and cannot
be considered absolutely certain.
35
Pcd
58
Page 36
36
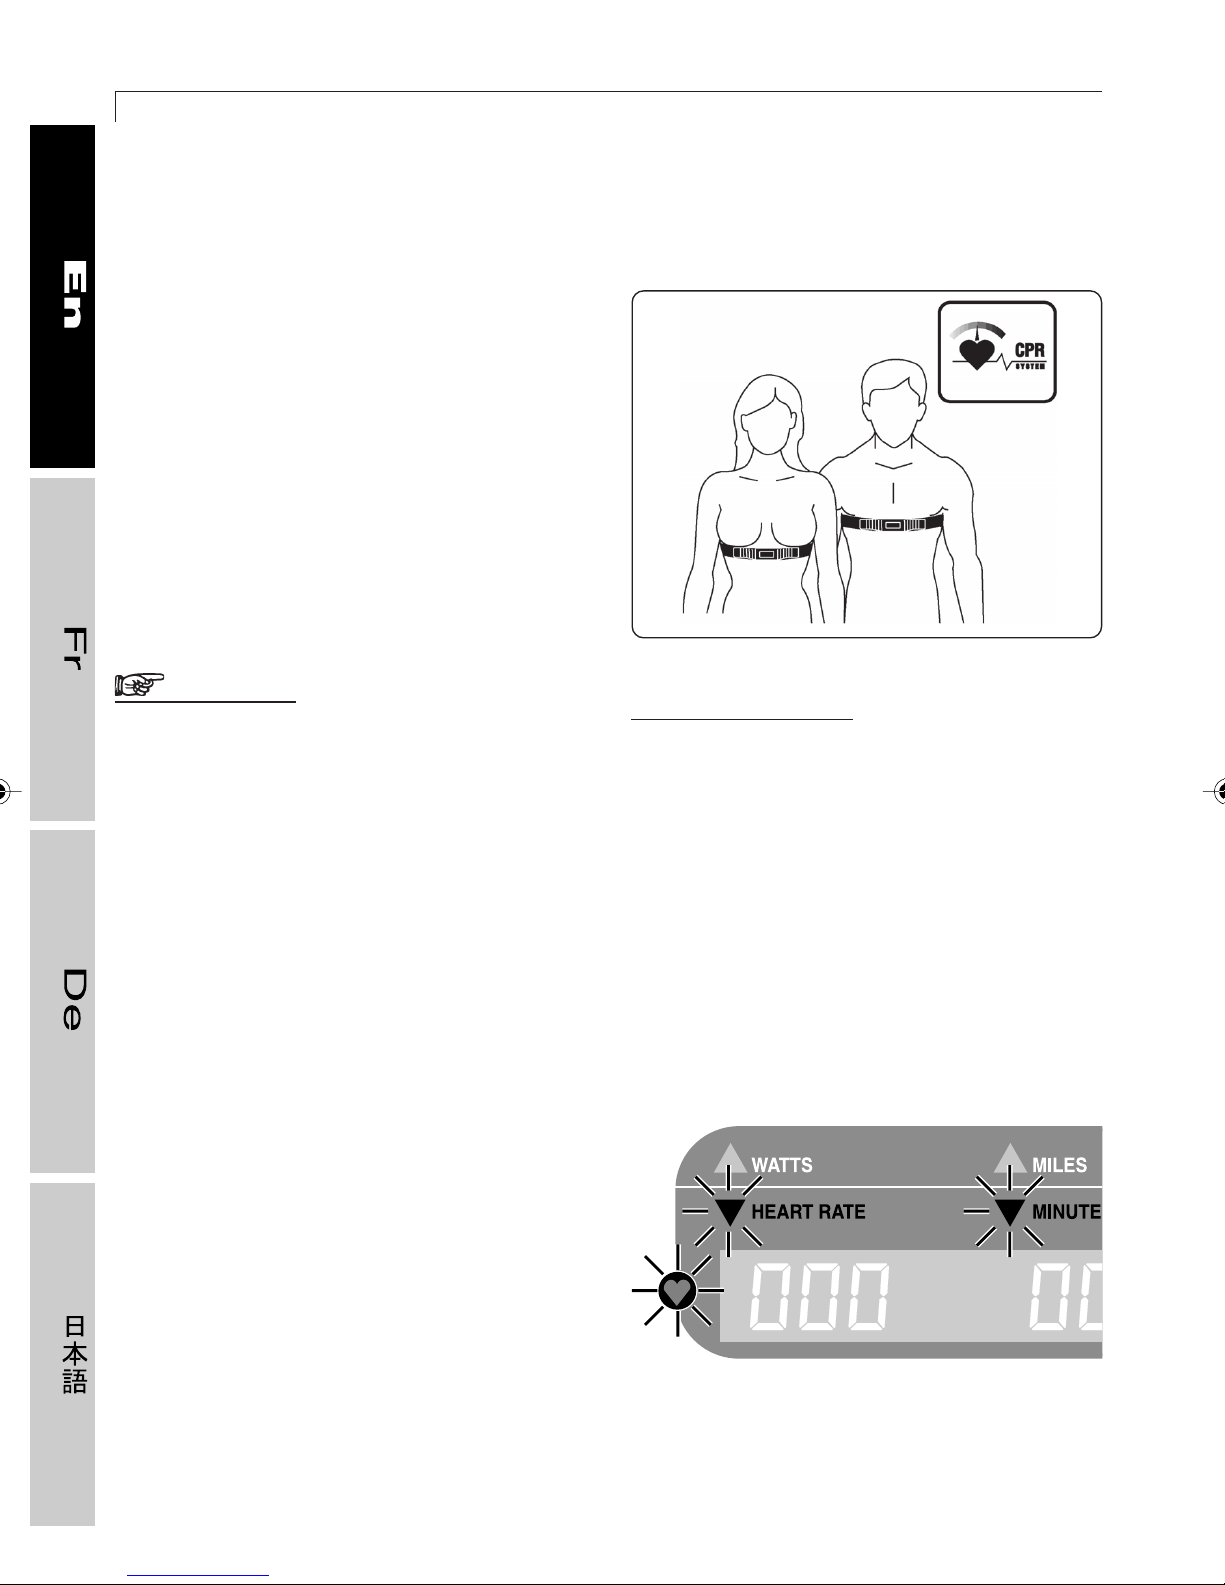
2.2.1 How to put on the chest band
Before putting the chest band on moisten it
on the inside.
It is worn in direct contact with the skin, on
the lower pectoral area.
Regulate the tightness of the elastic around
the chest so that the band stays firmly in
place throughout the workout, and check
signal reception on the control panel (the
heart-shaped light on the display should be
blinking).
TOP 600 XT PRO
60
WARNING
The chest band’s battery has a life of
about 1000 hours. After this time it is
advisable to replace the chest band
with another original one supplied by
Technogym.
2.2.2 Correct use of chest band
To guarantee the accuracy of reported data,
the chest band must be used correctly,
heeding precautions and giving it the care
due a precision instrument.
? INFORMATION
For the sake of hygiene, Technogym
recommends that chest band use be
strictly personal.
In case of irritation the chest band
can be worn over a T-shirt so long as
the contact zone is moistened.
Periodically, and especially if the band falls,
you should check how the heart rate
transmitter is working, as follows: take a
pulse count on your wrist and compare the
beats with the frequency shown on the
display panel.
01417004
Should you have any doubts about the
correctness of the display data, contact the
Technogym Technical Support Service.
Page 37
2.2 MONITORING HEART RATE
We recommend keeping the transmitter out
of hot rooms and direct sunlight and far from
heat sources.
Pulse count is faulty when there are sources
of electromagnetic radiation present (TV,
cellular phones, etc.).
If you want to wash the chest band, use a
water-and-soap solution and then let it dry
for a few hours in a warm, dry place, far from
direct sources of heat (see section
maintenance
).
Routine
Take care not to stretch or bend the rubber:
bad maintenance can cause the electrodes
to lose their conductivity.
37
Only one transmitter should be within the
receiver’s reception range, otherwise the
receiver could get several signals at the
same time and make errors in visualizing
heart rate. If there are several equipments
with heart rate receivers in the same area,
the recommended minimum distance
between them is 80 cm.
These problems do not arise if the equipment
is equipped with the Personal Code Device,
a system that allows the equipment to
harmonize solely with the heart rate of the
user (see section
Optional accessory
).
Pcd
Page 38
38
2.3 User adjustments
❒❒
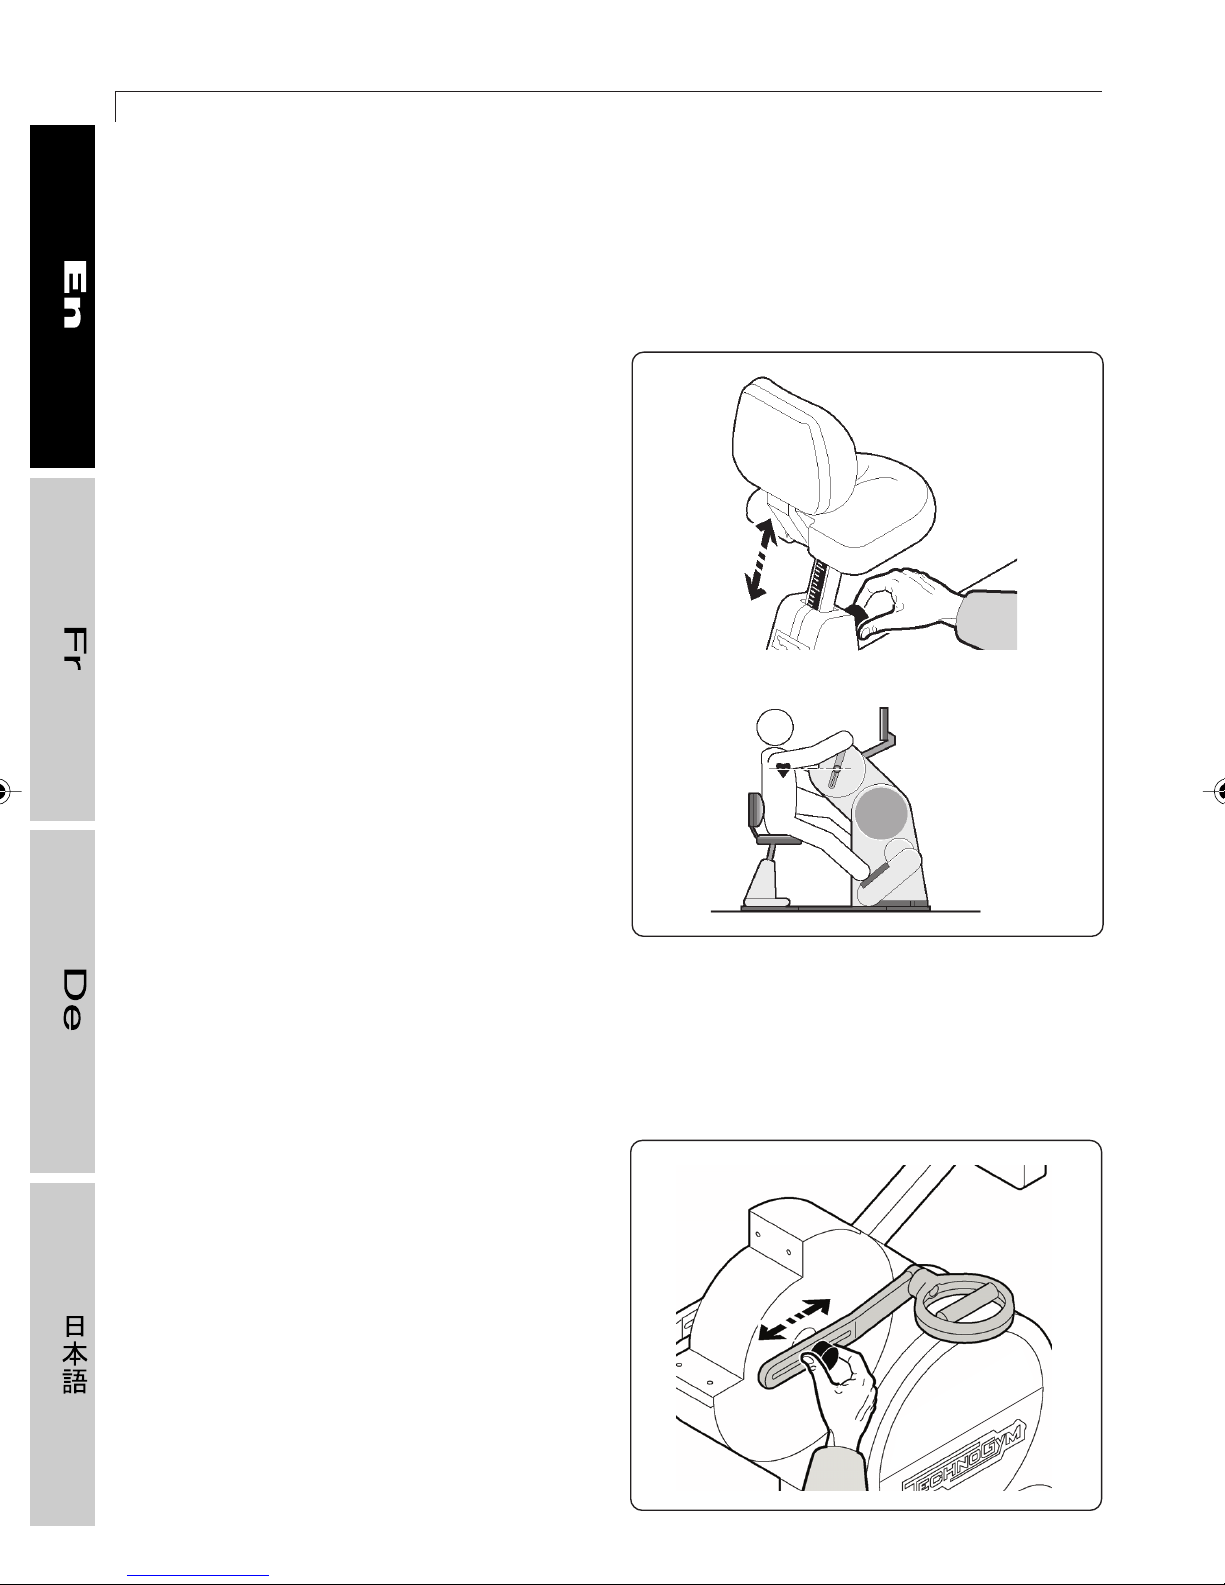
❒ Adjusting the seat
❒❒
To adjust the seat, pull the knob placed in
front of the seat itself.
Once seated, your heart must be at the same
level as the fulcrum of the lever rotation.
A graduated scale is printed on the seat pillar.
Once you find the right position for yourself,
we recommend that you record this number
on your training chart.
TOP 600 XT PRO
❒❒
❒ Adjusting the handgrip levers
❒❒
To adjust the handgrip levers, unscrew the
side knobs. The levers are equipped with a
sliding spring catch mechanism that makes
it easy to find the right position. However,
you can also lock the levers between the
reference markers.
Lock the side knobs in place.
111
111-1
Page 39
2.4 ERGONOMIC POSITION ON EQUIPMENT
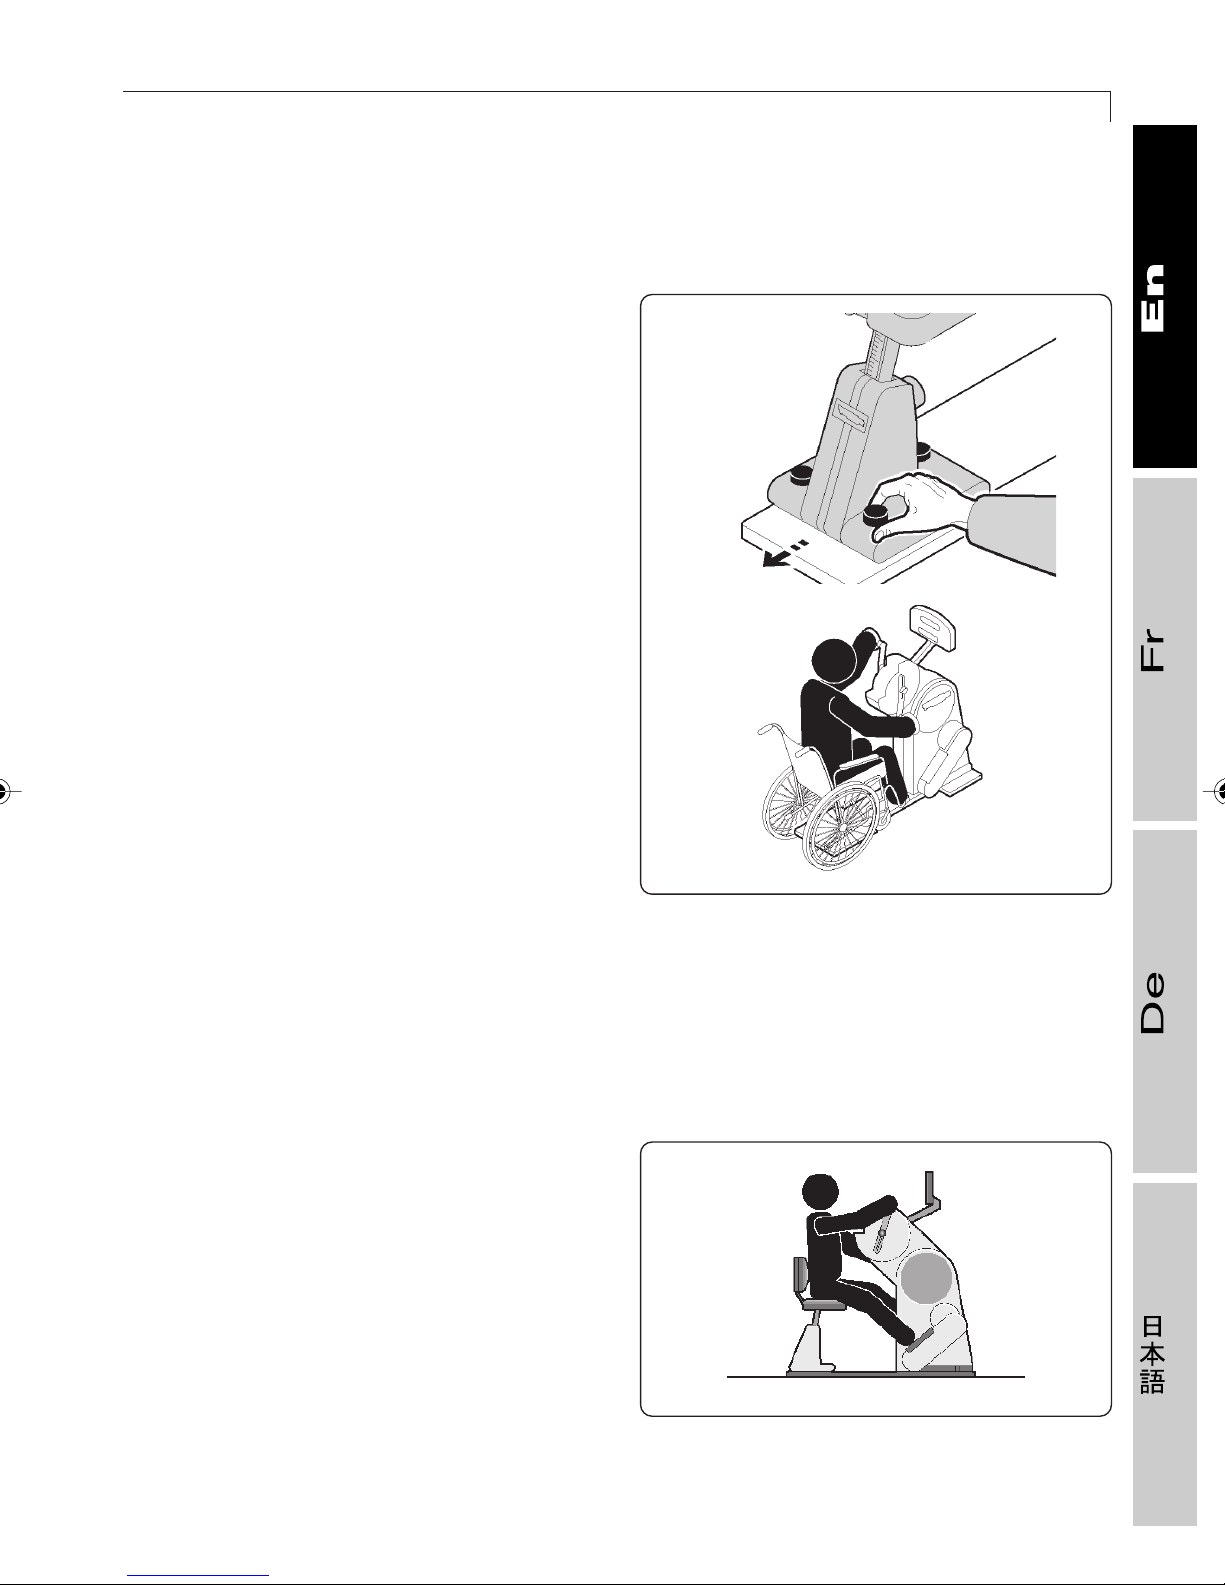
2.3.1 Use with wheelchair
So that the equipment can also be used by
disabled persons, Technogym has designed
the frame to accommodate a wheelchair:
unscrew the 3 knobs locking the seat to the
frame and remove the seat.
This operation must be carried out by the
staff of the club.
Move the wheel chair into position in place
of the seat and block it with the special
restraints.
39
The user may now exercise independently.
At the end of the exercise, reinstate the
normal conditions and ensure that the three
knobs are securely locked down.
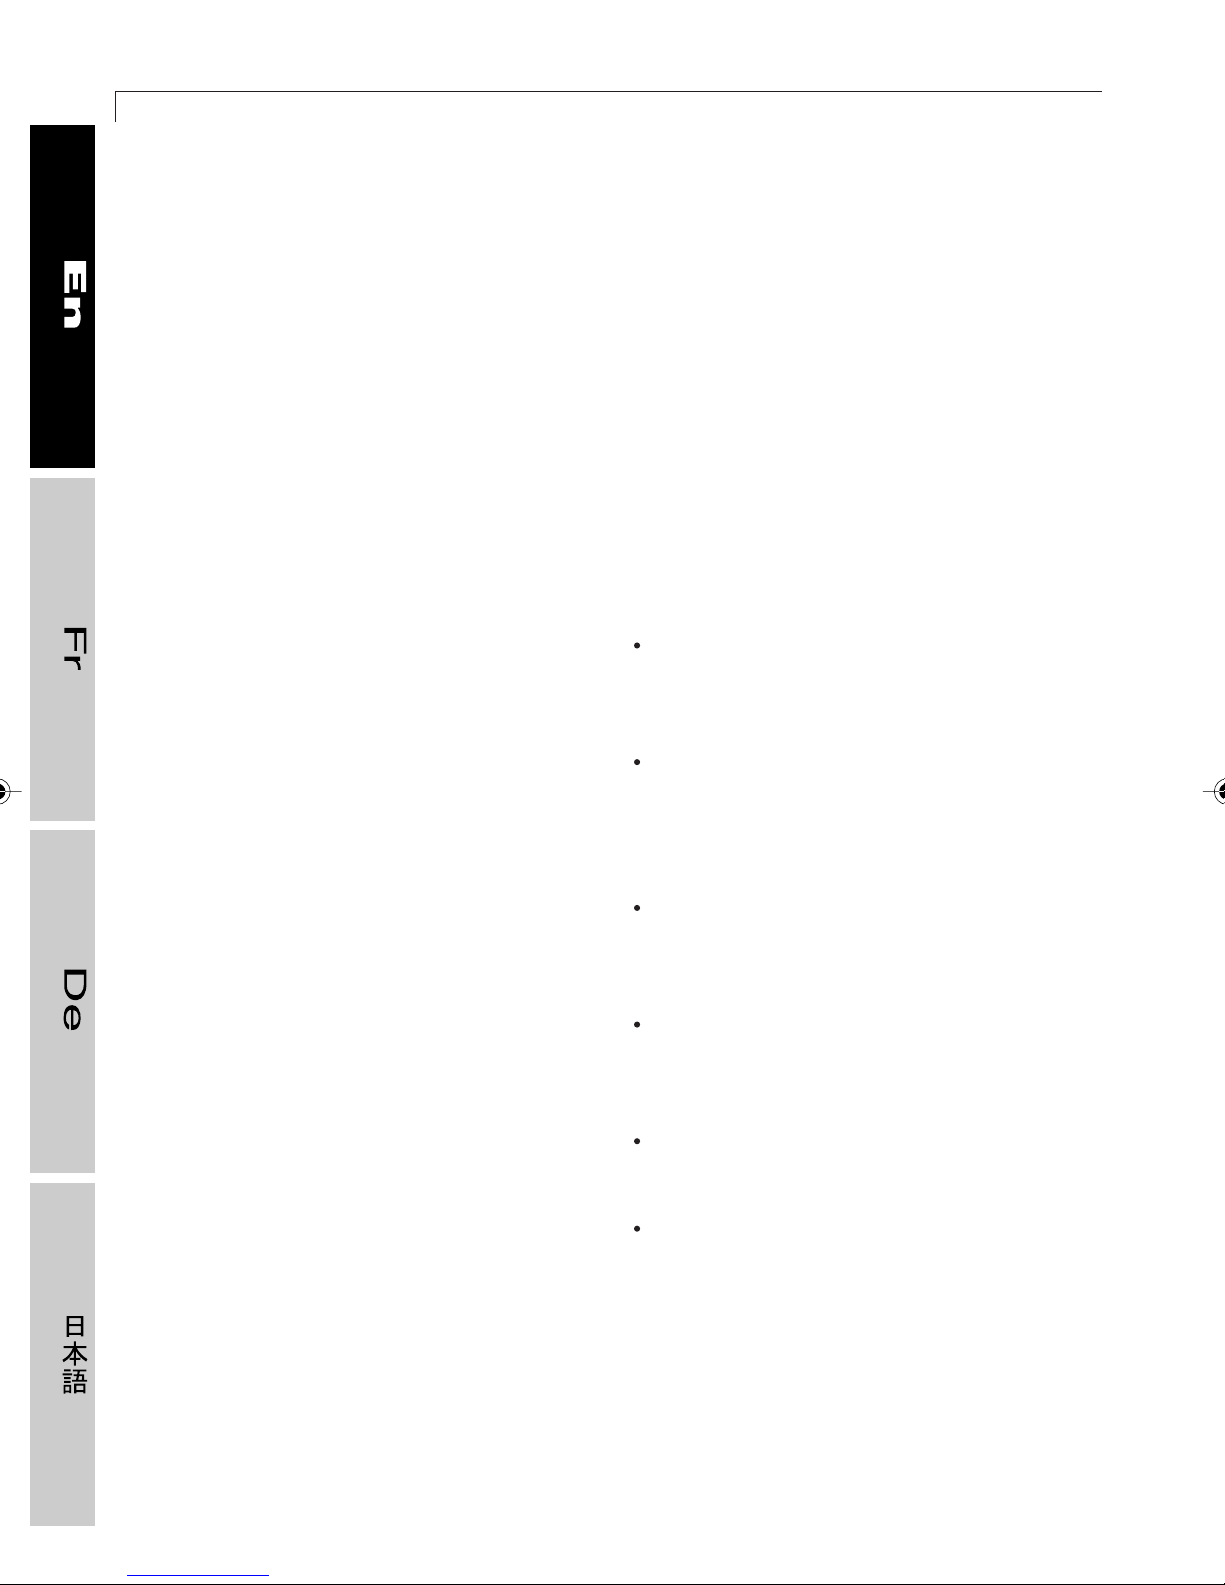
2.4 Ergonomic position on equipment
Place your feet on the special footrests or on
the ground and then grasp the handgrips.
Any other position may be potentially
unstable and lead to a loss of balance.
112-1
112
Page 40
40
2.5 Medical and athletic information and advice
2.5.1 The importance and benefits of physical exercise
TOP 600 XT PRO
Sedentary living and bad eating habits
steadily debilitate our physical abilities and
lead to increased body weight. The role
played by exercise in preventing major
diseases has been known for some time, as
has the fact that sedentariness is a prime
cause of ill health - in fact it has been
recognized and labeled as an actual illness:
hypokinesia.
Exercising regularly and practicing the right
habits (a balanced diet, moderate alcohol
intake, no smoking) are essential to
achieving and maintaining physical and
mental well-being and preventing most of
the pathologies afflicting industrialized
society (cardiovascular diseases, obesity
and muscle and bone diseases).
The basic components of physical exercise
are:
contractions, while at the same time
stimulating your heart and respiratory and
circulatory systems. Other types of aerobic
exercise are swimming, cross-country skiing,
cycling and rowing.
The main benefits of doing the right kind of
exercise regularly can be summed up as:
A greater feeling of physical well-being
and agility, with positive impact on mood
and self-esteem.
Improved capacity to sustain physical
effort, even routine ones like climbing the
stairs at home or office, without getting
tired.
A change in body composition, with a
lower percentage of body fat and a higher
amount of muscle tissue.
- cardiovascular (or aerobic) exercise,
- strengthening or toning muscles,
- stretching (see section 2.5.3);
any self-respecting program should include
all three components, in different proportions
depending on the goal you want to achieve.
The XT PRO line of equipments let you do
cardiovascular (or aerobic) workouts, that is,
exercise large masses of muscles (legs, arms
and torso) through continual, rhythmic
Burning more calories during the day,
which is important for keeping weight
stable or losing it.
Regulating blood pressure, thanks to
better-toned blood vessel walls.
Changes in lipid composition, with fewer
triglycerides and less cholestorol,
lessening the possibility of
atherosclerosis.
Page 41
2.5 MEDICAL AND ATHLETIC INFORMATION AND ADVICE
41
Exercising regularly has a positive effect on
blood pressure, on the amount of cholesterol
in the blood, on heart and blood vessel
functioning, on the capacity to burn fats and
carbohydrates. In thus reducing the risk of
heart disease, it contributes to a better and
longer life.
To benefit from aerobic exercise, you must
do it regularly, at moderate intensity and
for an adequately long time (at least 20
minutes).
Specifically, aerobic exercise should be
done 3 to 5 times a week, 20 to 50 minutes
per session at an intensity between 60 and
80% of your theoretical maximum HR (see
section 2.5.2).
Workloads should be increased gradually,
whenever you manage to finish the workout
without overtiring yourself.
WARNING
Do not overdo it, especially at the
start, because overly strenuous
workouts can be harmful.
2.5.2 How to choose aerobic workout intensity
Being fit means having frequently subjected
your body to enough heavy stimulus to
provoke changes in your organs and your
body’s systems.
To improve aerobic capacity, it is important
to keep your heart rate between 60 and 80%
of the maximum while exercising. In fact,
exercising too lightly is not enough of a
stimulus, while exercising too intensely
produces large amounts of lactic acid whose
accumulation overtires your muscles and
makes you stop exercising.
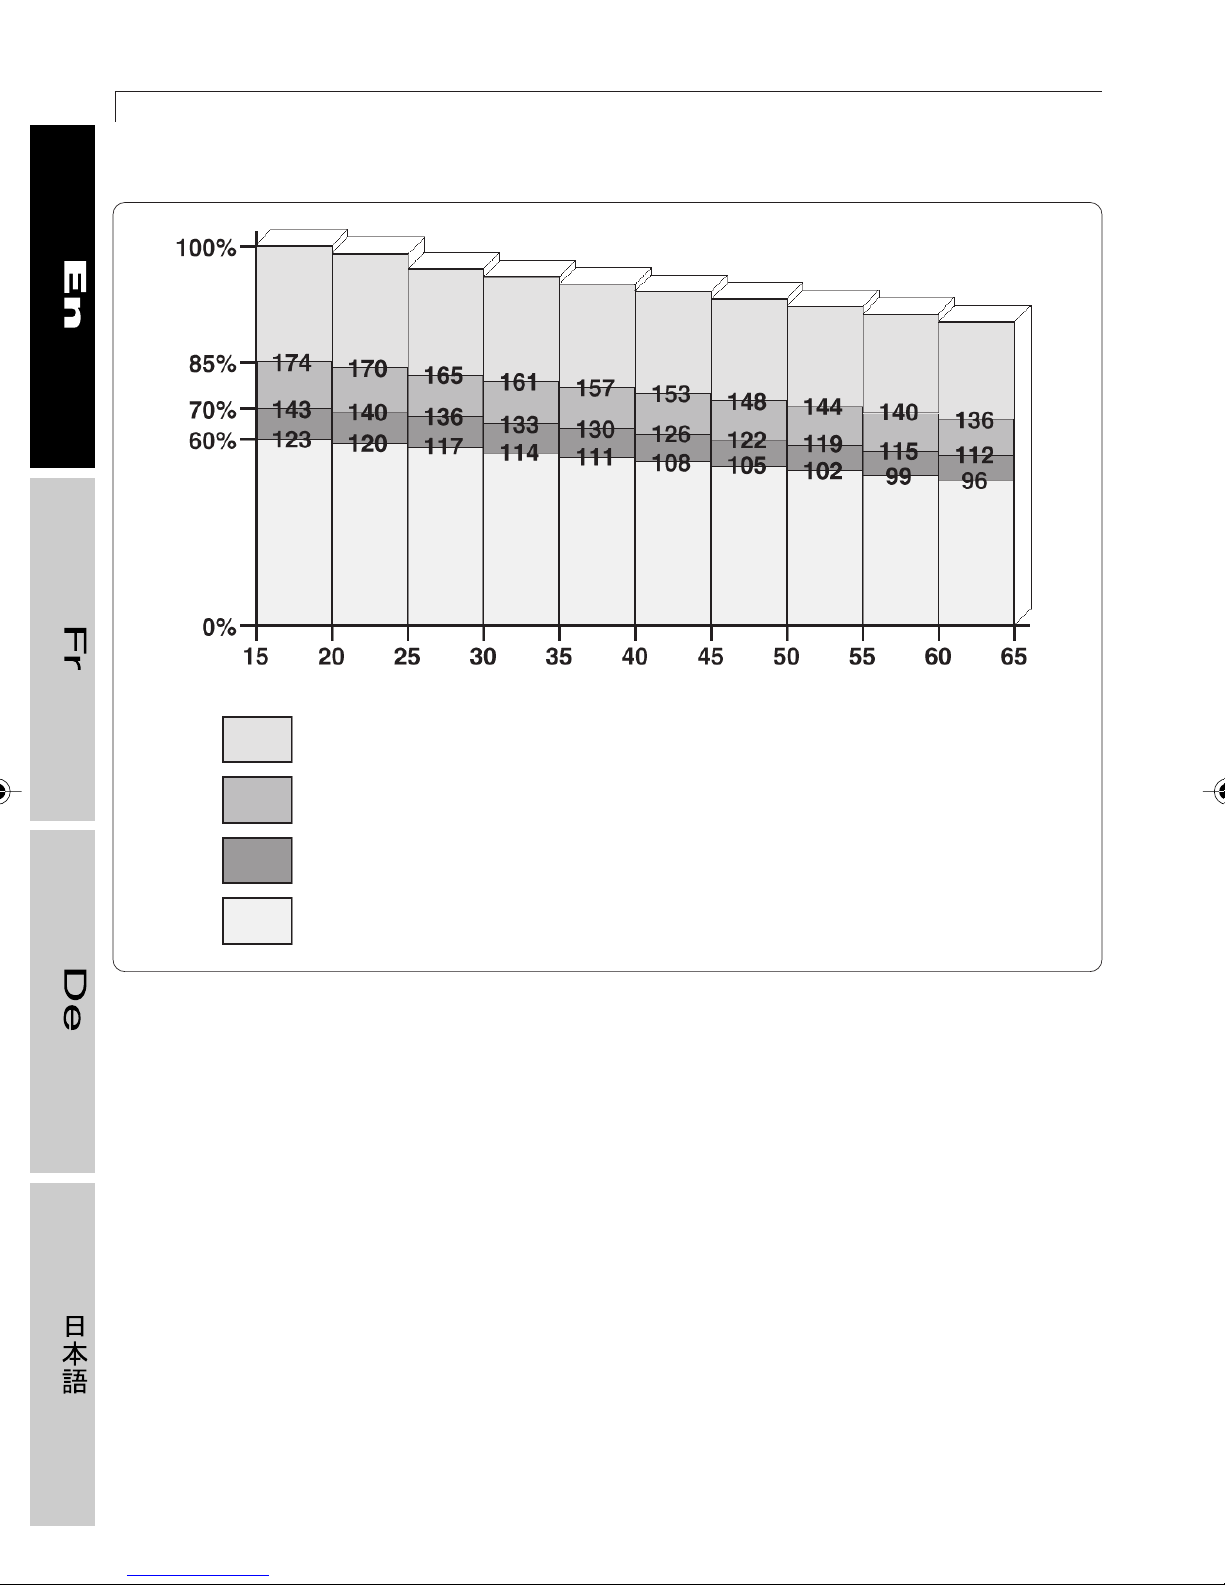
The following table shows the optimal pulse
rate levels in relation to age and the goal
being pursued. Theoretical maximum heart
rate (100%) is calculated on the basis of age
using the formula: 220 - age.
Page 42
42
Heart rate per minute
TOP 600 XT PRO
Age
Area reserved to competitive athletes’ workouts (requiring a doctor’s certificate)
Aerobic zone with a primarily cardio-circulatory component (keep heart rate
between 70% and 85%)
Aerobic zone primarily using fats as an energy source (keep heart rate between
60% and 70%)
Zone of little training interest
grafico per FC
To read the graph just find your age on the horizontal axis and scan up the vertical until you
reach amounts corresponding to 60%, 70%, 85%.
Aerobic exercise performed at a heart rate between 60% and 70% mainly burns fats as an
energy source.
When doing aerobics at a heart rate of 70% to 85% the cardio circulatory component prevails.
For example, if someone 30 years old wants to burn off fat, the heart rate during exercise
should be kept between 114 (60%) and 133 (70%); if he or she wants to improve cardiorespiratory capacity, the heart rate should be kept between 133 (70%) and 161 (85%).
In any case it is advisable not to exceed 85% of maximum heart rate (for example, at age
40, 85% of maximum heart rate is 153).
Page 43
2.5 MEDICAL AND ATHLETIC INFORMATION AND ADVICE
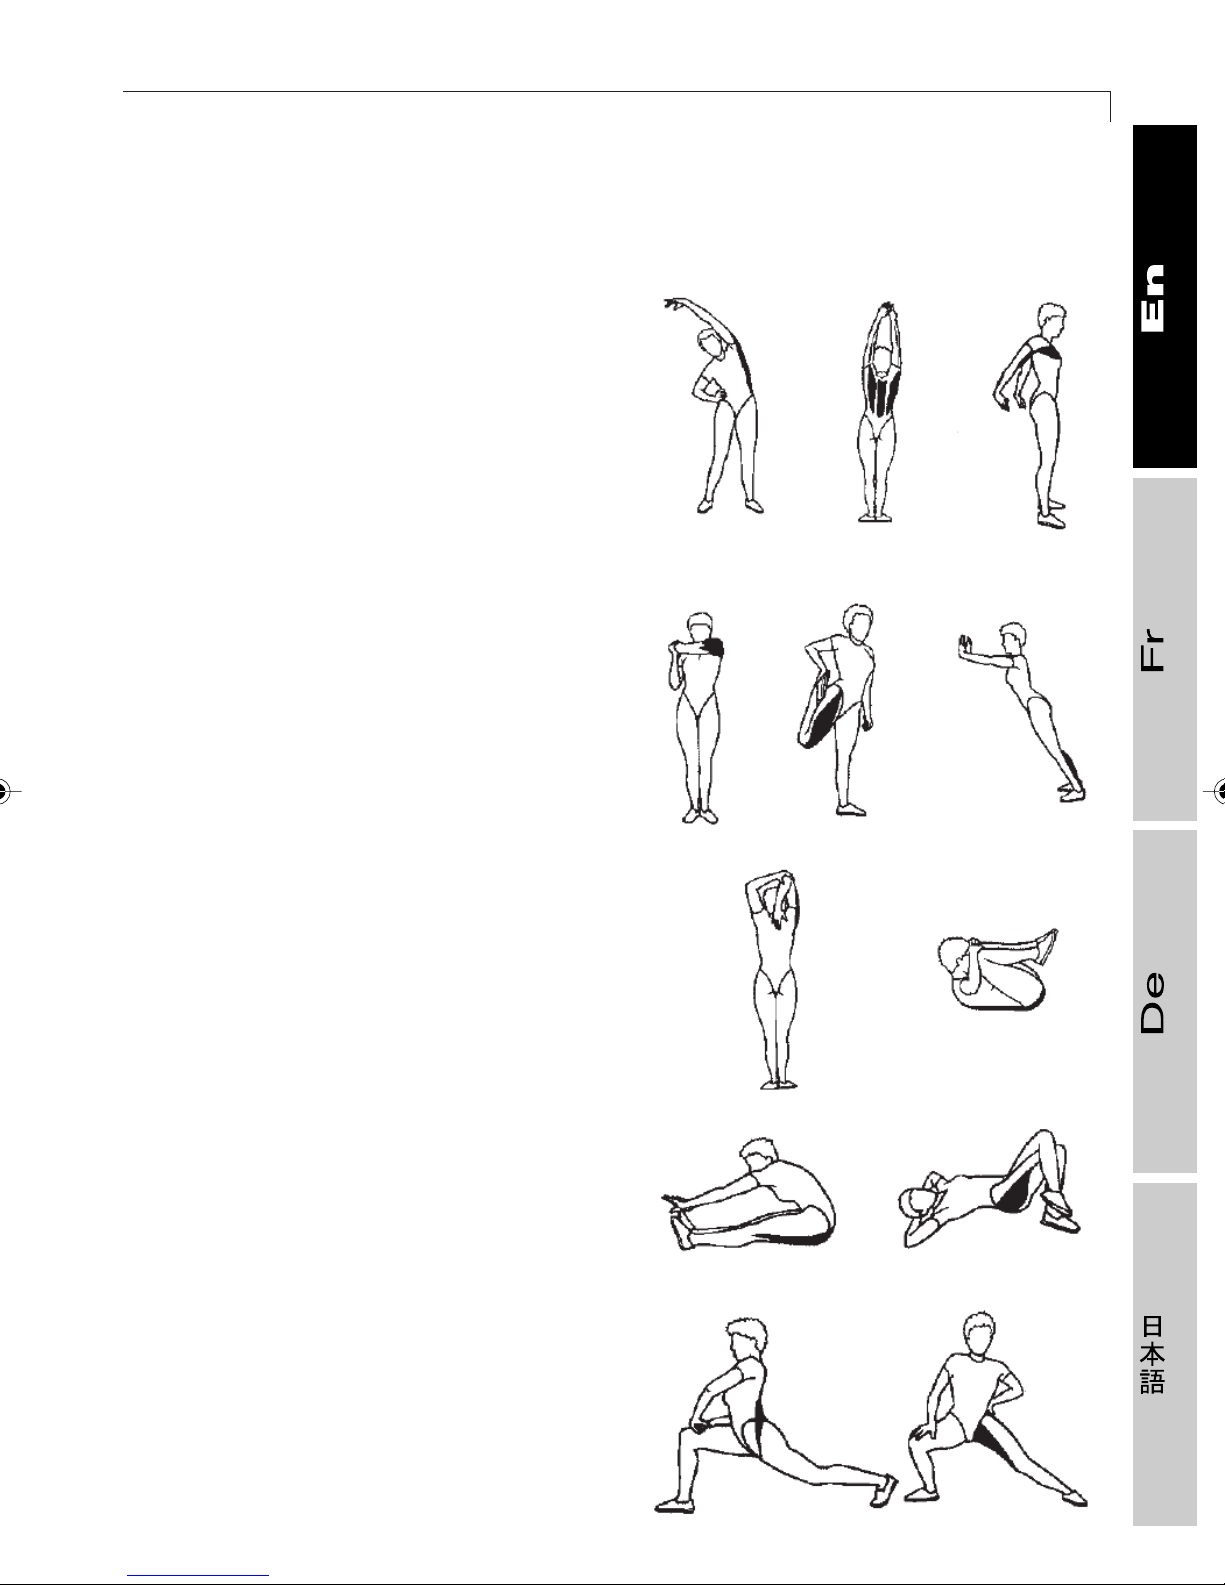
2.5.3 Stretching exercises
Stretching exercises are not an optional but
an integral part of a physical exercise
program. Muscle and skeletal flexibility are
important to your health. In a standing
position our body structure is kept in balance
by “tie rods” composed of an active muscular
part and a passive connective one.
Systematically checking flexibility is very
important both for the sedentary person
(because it keeps connective tissue from
shortening due to inactivity) and for the
athlete, because good limb mobility
increases performance and makes you less
prone to injury.
43
It’s a good idea to do stretching exercises
before and after a workout. The warm-up
stage should include several minutes of lowintensity aerobics like walking or pedaling
followed by suitable exercises that stretch
the muscles you use in walking/running (the
calf and thigh muscles) so they are “warmed
up” to prevent injuries. At the end of the
workout you should spend some time
stretching in order to recoup and get rid of
the toxins you’ve produced, to keep the
muscles you’ve used from shortening, and
to relax.
The easiest technique, especially when
you’re alone, is called the Anderson or “static
stretching” technique, which has to be done
without brusque, quick or violent
movements.
61
Page 44
44
We advise dividing the exercise into two
parts:
TOP 600 XT PRO
first stage
: get comfortably into the correct
position shown in the illustration, hold the
stretch for ten seconds and relax;
second stage
: after relaxing, stretch a few
more inches and hold that position for 10 to
30 seconds.
Page 45
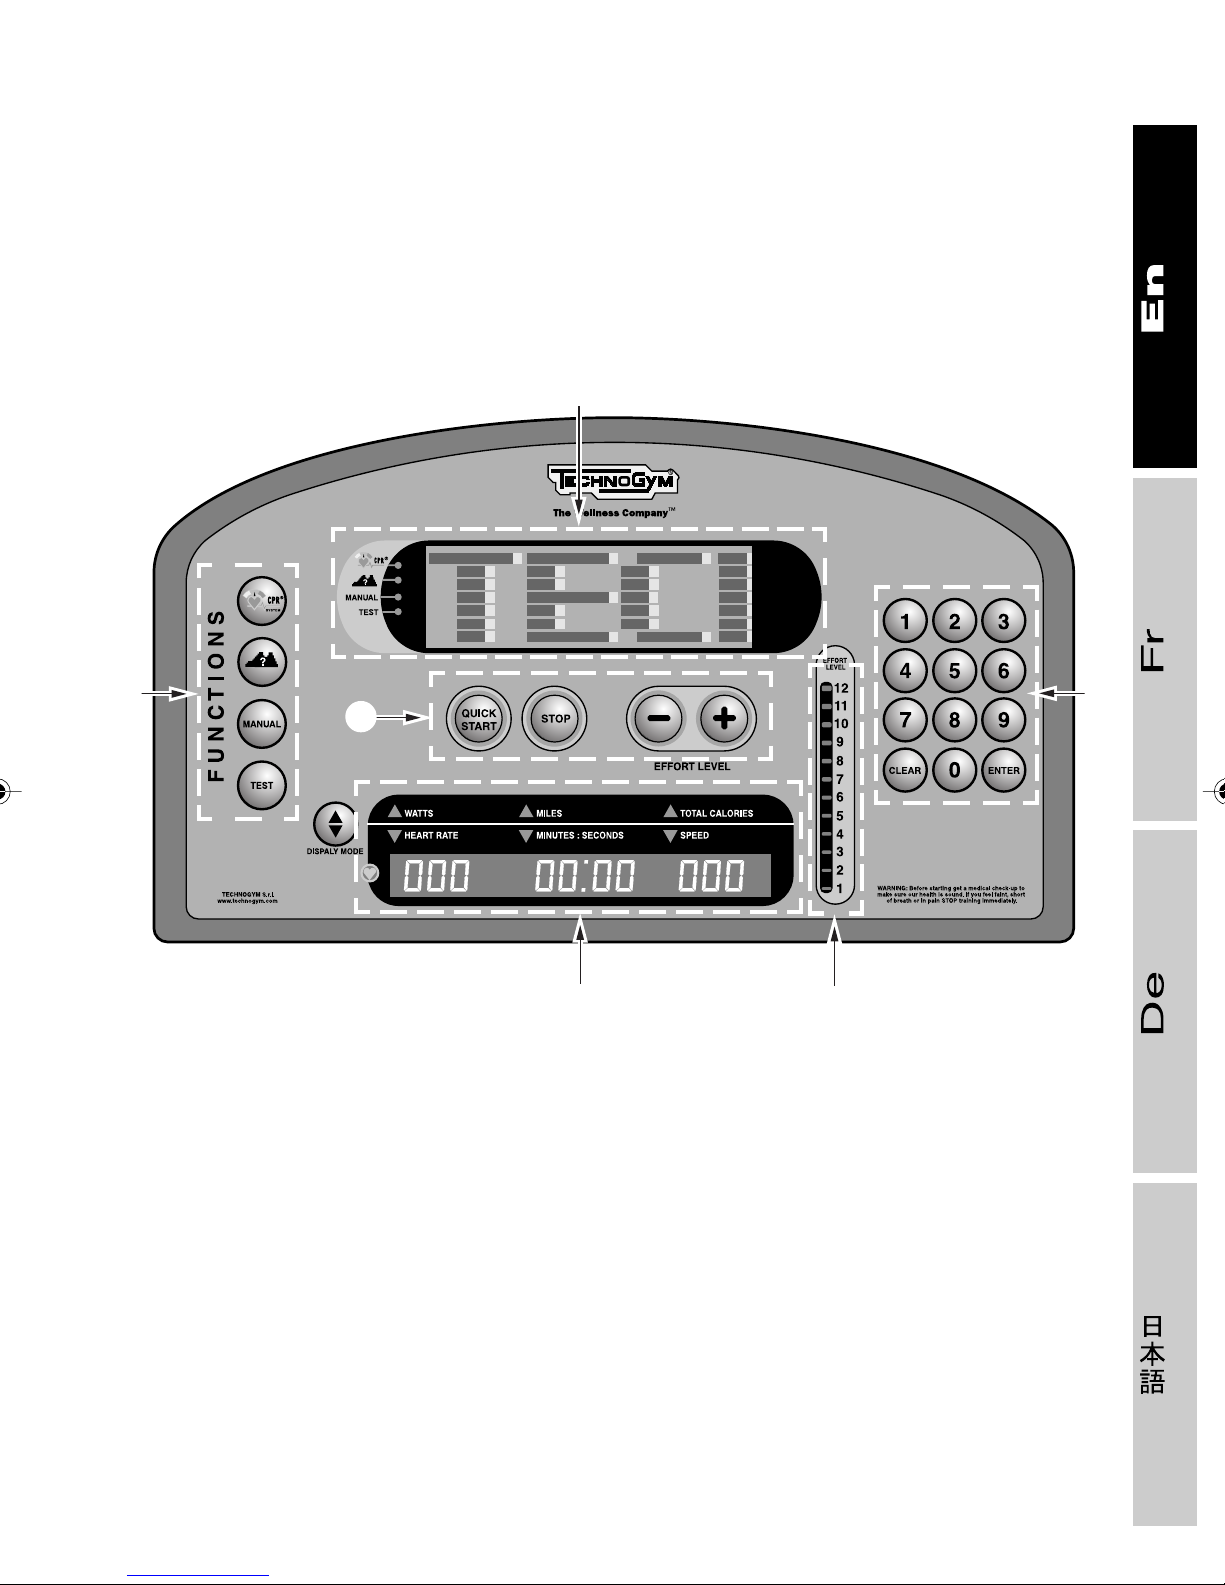
3 Control panel
The most important part of the equipment is the computerized system that lets you control the
available functions. It has been designed for easy use by everyone. The control panel consists
of the following instruments:
D
B
C
A - Right keypad: this contains the number
keys for data entry, the
ENTER key for
confirmation, and the CLEAR key, for
deleting entered information.
B - Left keypad: this contains the keys for
choosing the different available
functions.
C - Central keypad: this contains the keys
for varying the level of difficulty and the
QUICK START keys for starting exercise in
the selected mode or resuming a
function in pause, and STOP, to halt the
workout session.
A
01417001
EF
D - Alphanumeric display: area where all
messages and requested or entered
data are displayed; during exercise, this
area shows the profile for the current
session (level of difficulty). The lights
on the left side show the selected
function.
E - Digital display: area where the power,
elapsed miles (kilometers), calories
consumed, heart rate, time (elapsed or
remaining), and speed of the current
session are displayed.
F - Effort level indicator: this consists of
12 lights showing the effort level of the
current workout session.
Page 46
46
❒❒
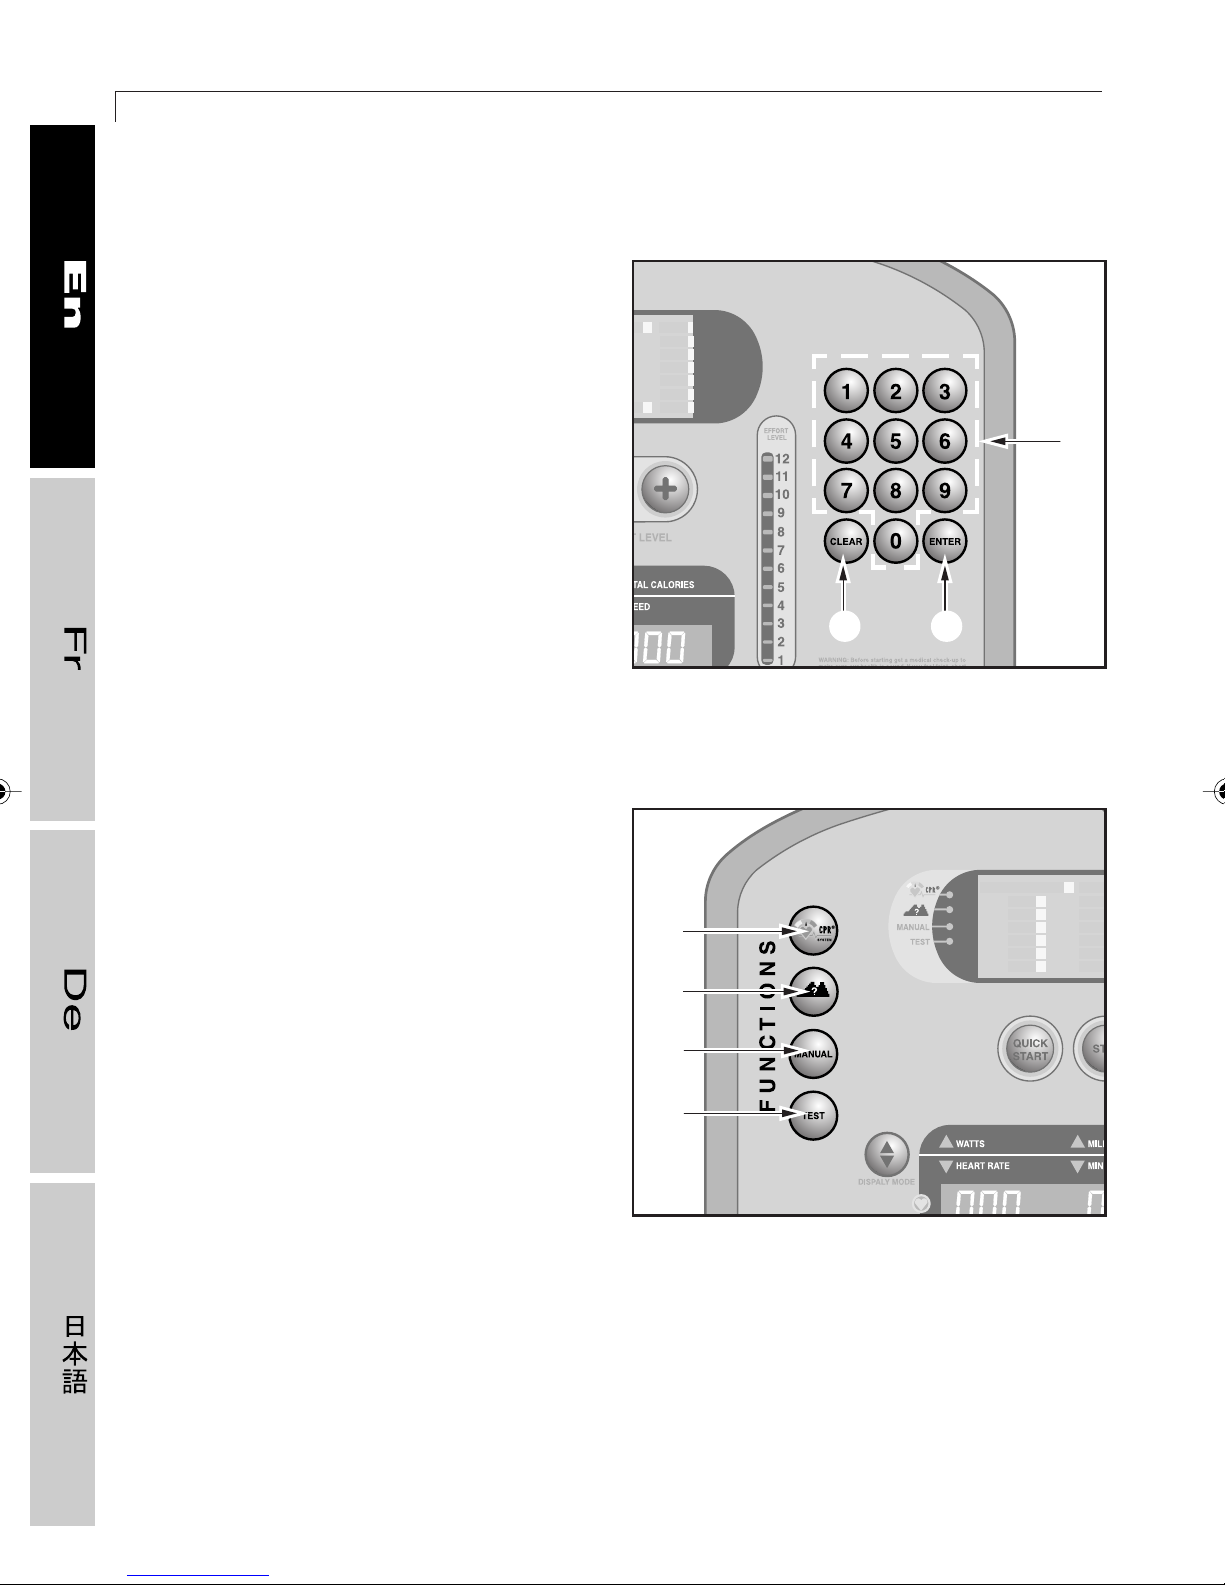
❒ Right keypad
❒❒
1 ENTER key: to confirm the number or
parameter appearing on the
alphanumeric display.
2 CLEAR key: to delete the last number
keyed in during entry of the parameters,
or to exit the selected function.
3 Number pad: to enter all the numerical
data requested during set-up of the
exercise program.
TOP 600 XT PRO
3
2 1
❒❒
❒ Left keypad
❒❒
4 CHR function key: for selecting an
exercise session at a constant heart rate.
5 PROFILE function key: for selecting one
of six different predefined workout
profiles.
6 MANUAL function key: for selecting
manual training, where the user enters
his or her own workout data and
parameters.
7 TEST function key: for selecting the level
test, which indicates the ideal effort level.
01417005
4
5
6
7
01417006
Page 47
3 CONTROL PANEL
❒❒
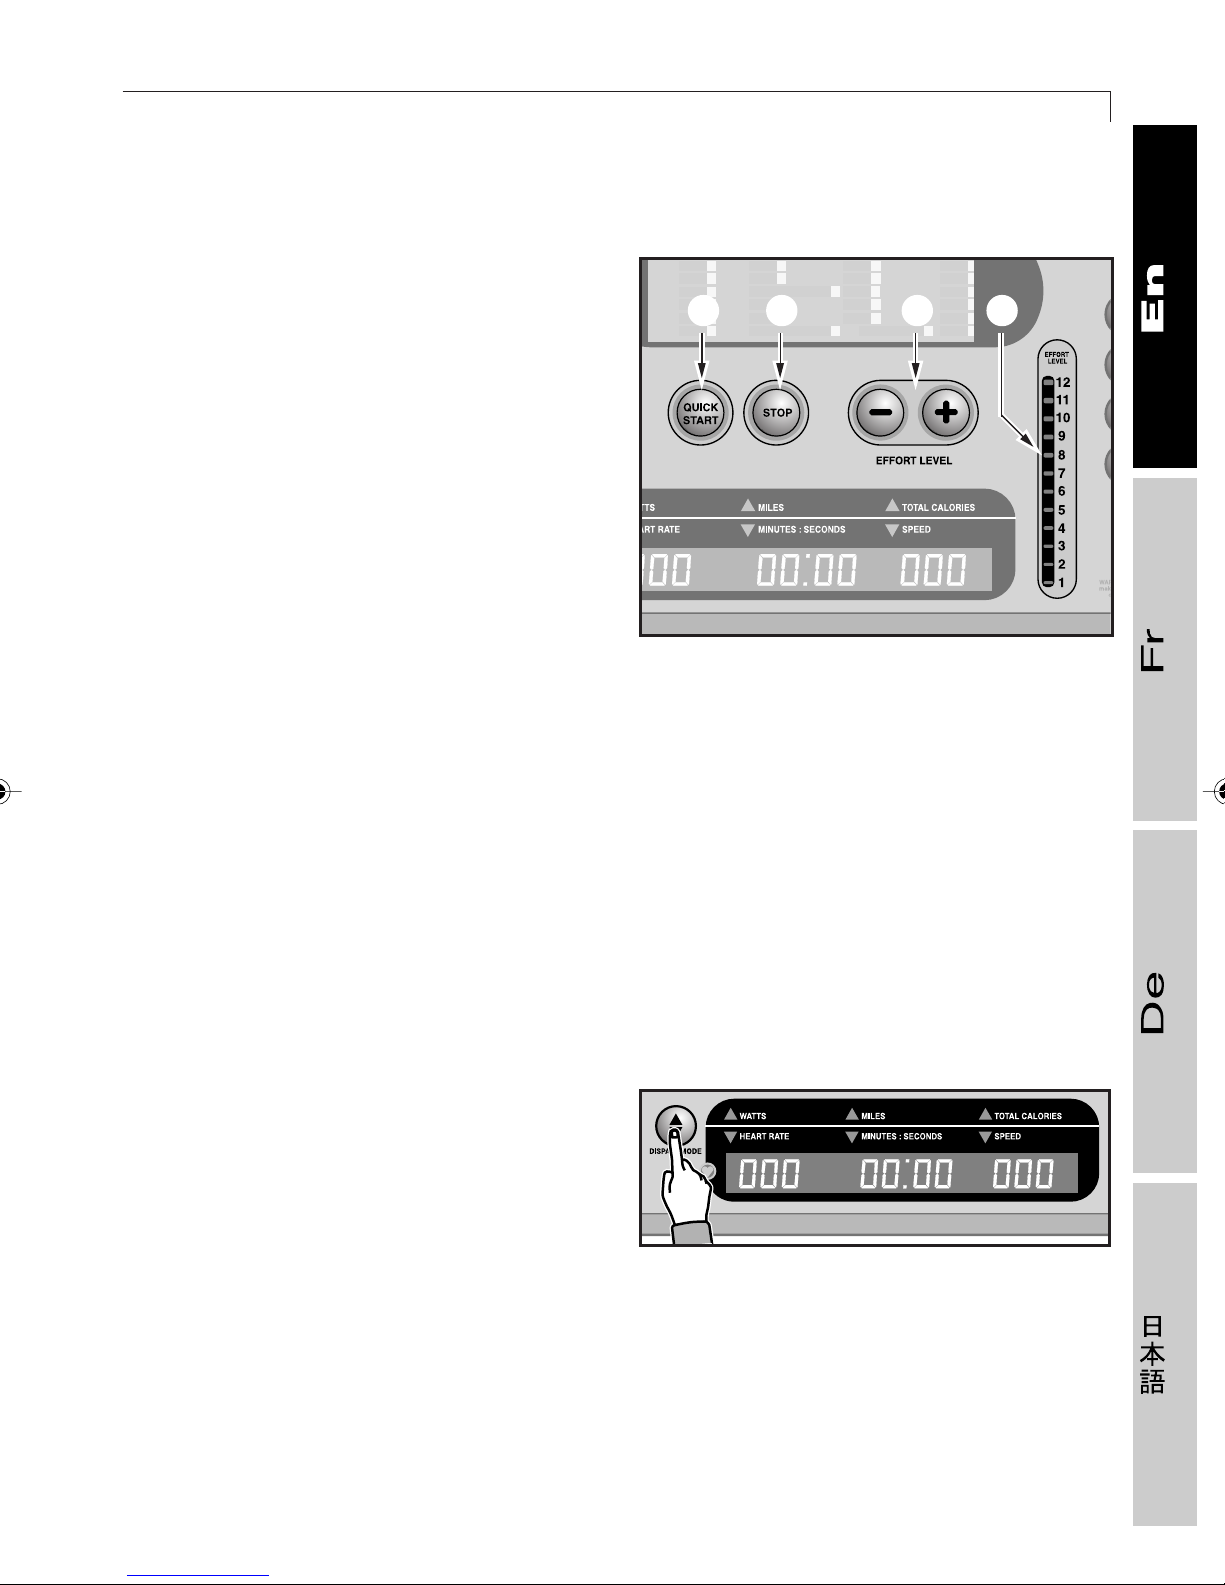
❒ Central keypad
❒❒
8 QUICK START key: to start a workout
session immediately without
programming, with display of time
elapsed and the option of changing the
effort level, or resume exercise after
stopping for a short break.
9STOP key: to halt the workout session.
10 EFFORT LEVEL keys: to increase (+) or
decrease (–) the effort level of the
exercise program. The level is displayed
on indicator F, which shows a range from
1 to 12. If the CHR function is activated
(see section 3.2), these keys let you vary
(in increments of one) the value of the
target heart rate.
47
8 9 10 F
01417007
❒❒
❒ Digital display
❒❒
The digital display lets you see all the values for the current workout session. These values
are divided into two sets of three, one with the power (watts), miles (kilometers) run, and total
calories burned; the other shows the heart rate, time, and speed. These two sets of values
are displayed in alternation during the workout at intervals of 5 and 15 seconds.
Nevertheless, if the equipment does not detect any heart rate signal, the first pair of values
does not alternate: the power value (watts) is constantly displayed.
The DISPLAY MODE key can be used to
vary which set of values is displayed. This
key also inverts the frequency (5 and 15
seconds) with which the two sets of values
are displayed and, if pressed for more than
2 seconds, freezes display of the current set
and disables the automatic alternation
01417008
display. To restore the alternating display
mode, press the DISPLAY MODE key once.
Page 48
48
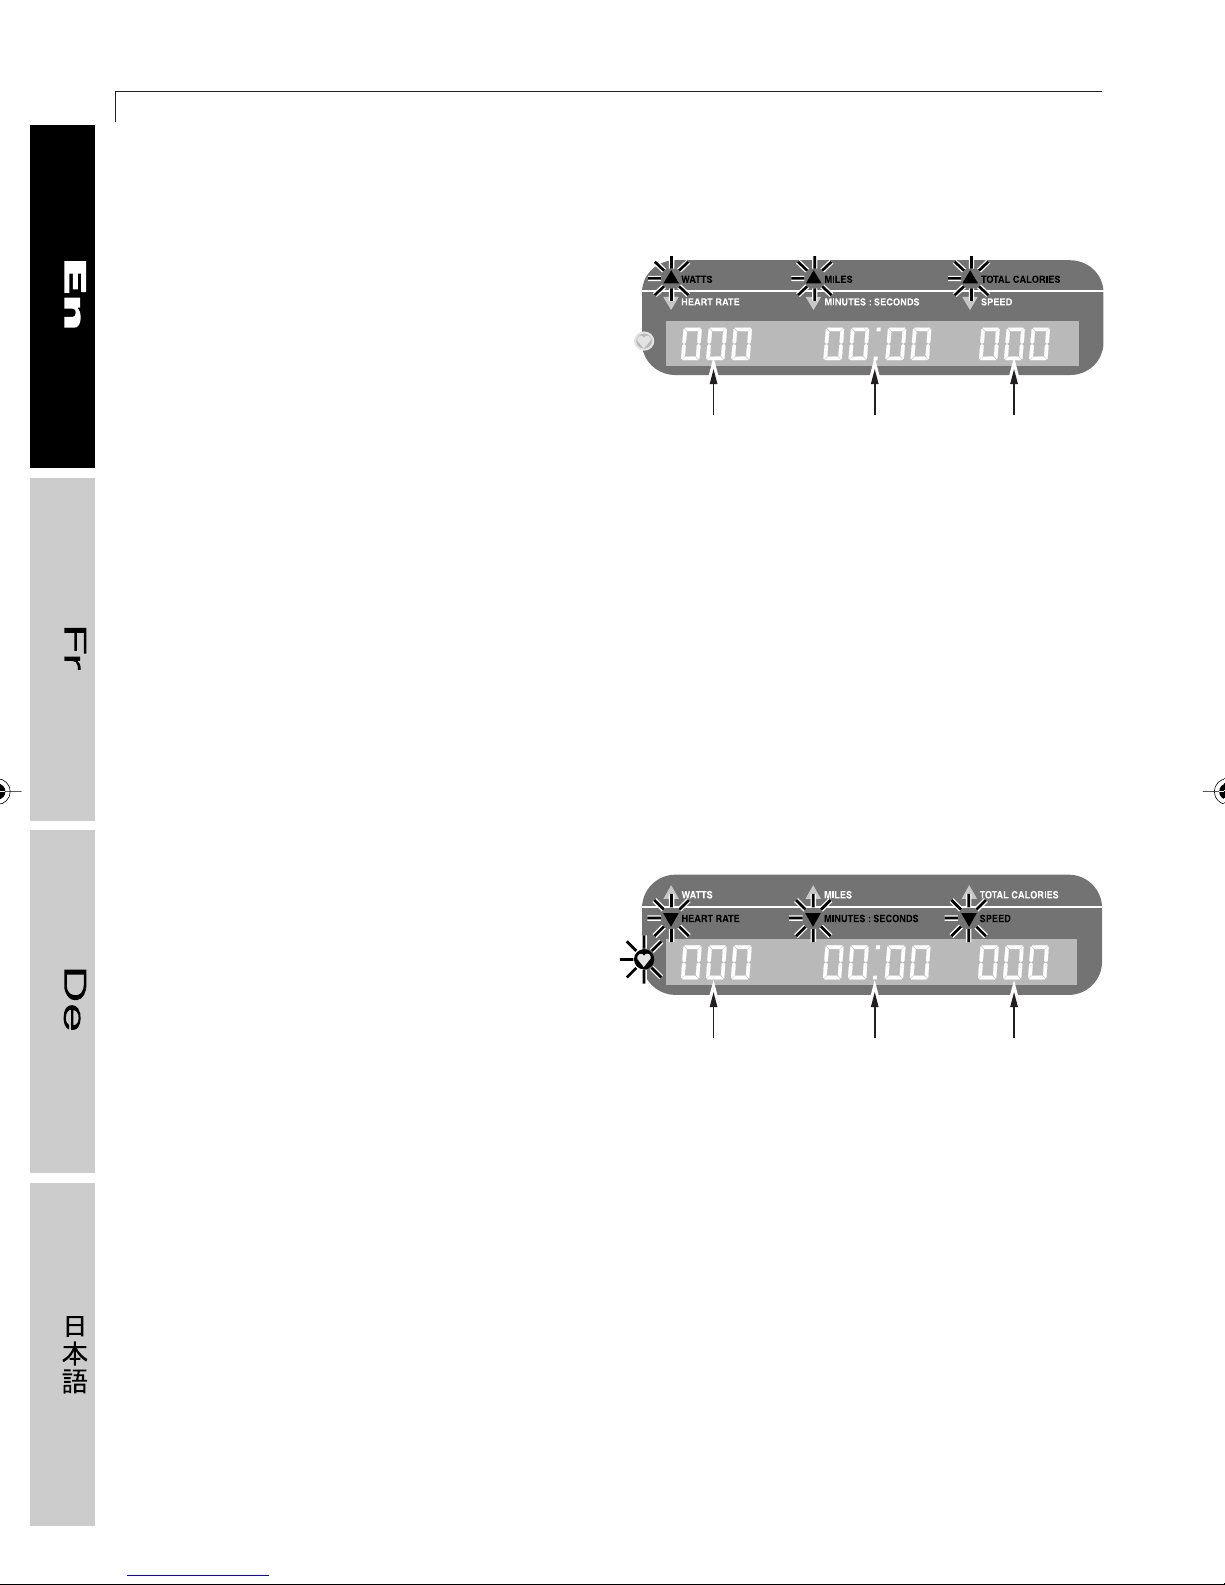
The top three figures display:
A WATTS: the first number shows the power
expressed in watts.
B Miles (km): the central number shows
the distance covered in miles
(kilometers). For long workout sessions,
if this value exceeds the maximum that
can be displayed, the equipment zeroes
out the values.
C Total calories: the last number represents
the kilocalories that have been
consumed up to that moment. In the case
of extended workouts, the value may
exceed the maximum that can be
displayed (999); the equipment will
continue to display the last three figures
of the real value (e.g. 1235 kcal
consumed displayed as 235).
TOP 600 XT PRO
01417043
A B C
The bottom three numbers show:
D Heart rate: the first number shows the
value of the heart rate (HR) in beats per
minute; this value is measured by the
heart rate meter (chest band). If the heart
shaped indicator light to the left of the
number turns on, the heart rate is being
measured. If the indicator light is off, the
heart rate is not being measured.
E Minutes:Seconds: the central number
shows the time elapsed since the
workout started or the time remaining
until it ends, in minutes and seconds. In
the case of long training sessions, if this
value exceeds the maximum that can be
displayed (99.59 minutes), it will be
shown in hours and minutes (e.g. if the
time is 1 hour and 34 minutes, it will be
displayed in the form 1H:34).
01417009
D E F
F Speed: the last number shows the
workout speed in terms of RPM (Rounds
Per Minute) (see section 3.11).
Page 49
3 CONTROL PANEL
49
❒❒
❒ Alphanumeric display
❒❒
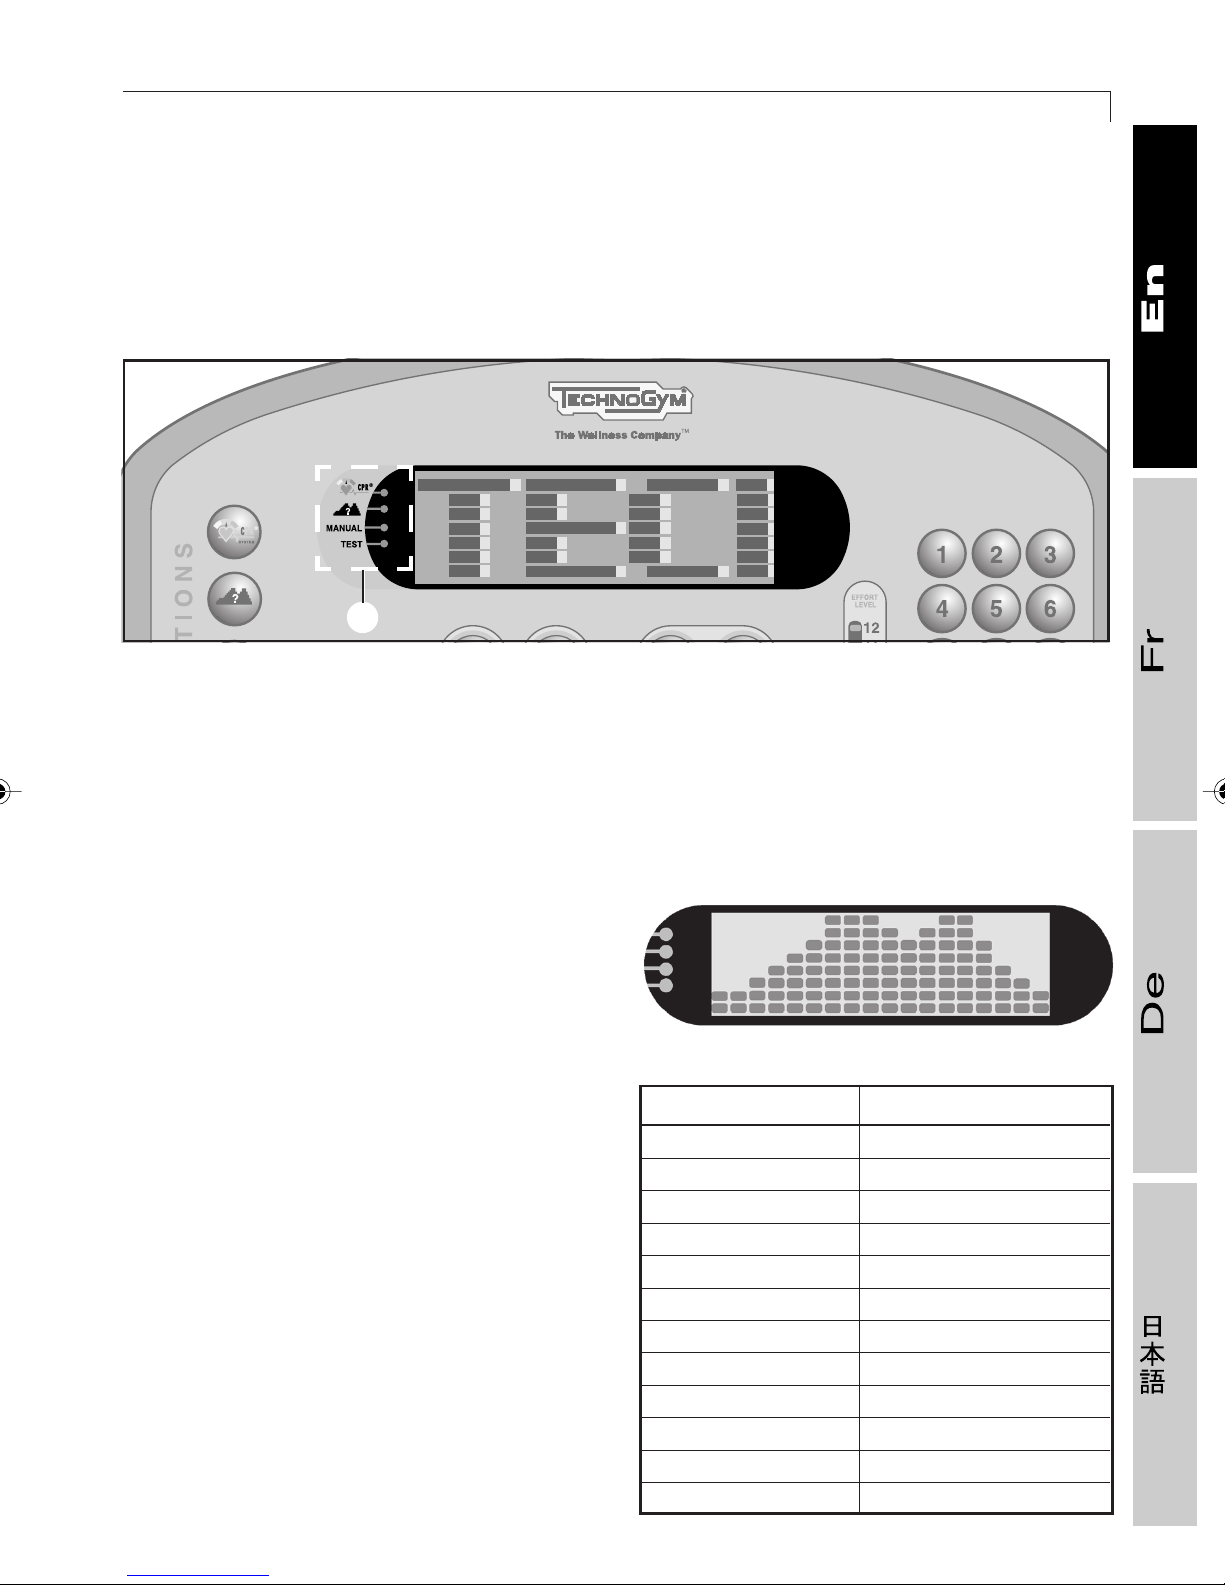
The alphanumeric display is the interface between the user and the equipment. It displays
messages and the current workout profile.
G
01417010
G The 4 lights (LED) on the left correspond
to the functions that can be selected with
the left keypad. During the workout
session, the light corresponding to the
selected function is illuminated.
During exercise, this display shows the effort
level: columns of LEDs light up,
proportionately corresponding in height to
the column of the effort level. The equipment
handles 12 effort levels, represented on the
display by 18 columns that are 8 LEDs high,
with their correspondence indicated in the
table to the side.
If the total exercise time is known from the
start (as in the case of workout sessions
corresponding to the 4 function keys), it is
subdivided by 18 columns. If, instead, the
total workout time is not known (as in the
case of “simplified mode” or
Quick Start
workouts), each column corresponds to 1
minute.
All messages on the alphanumeric display
are shown in marquee mode (running
display).
14-1
Effort level Number of LEDs lit
11
22
33
44
55
65
76
86
97
10 7
11 8
12 8
Page 50
50
3.1 Turning the equipment on and off
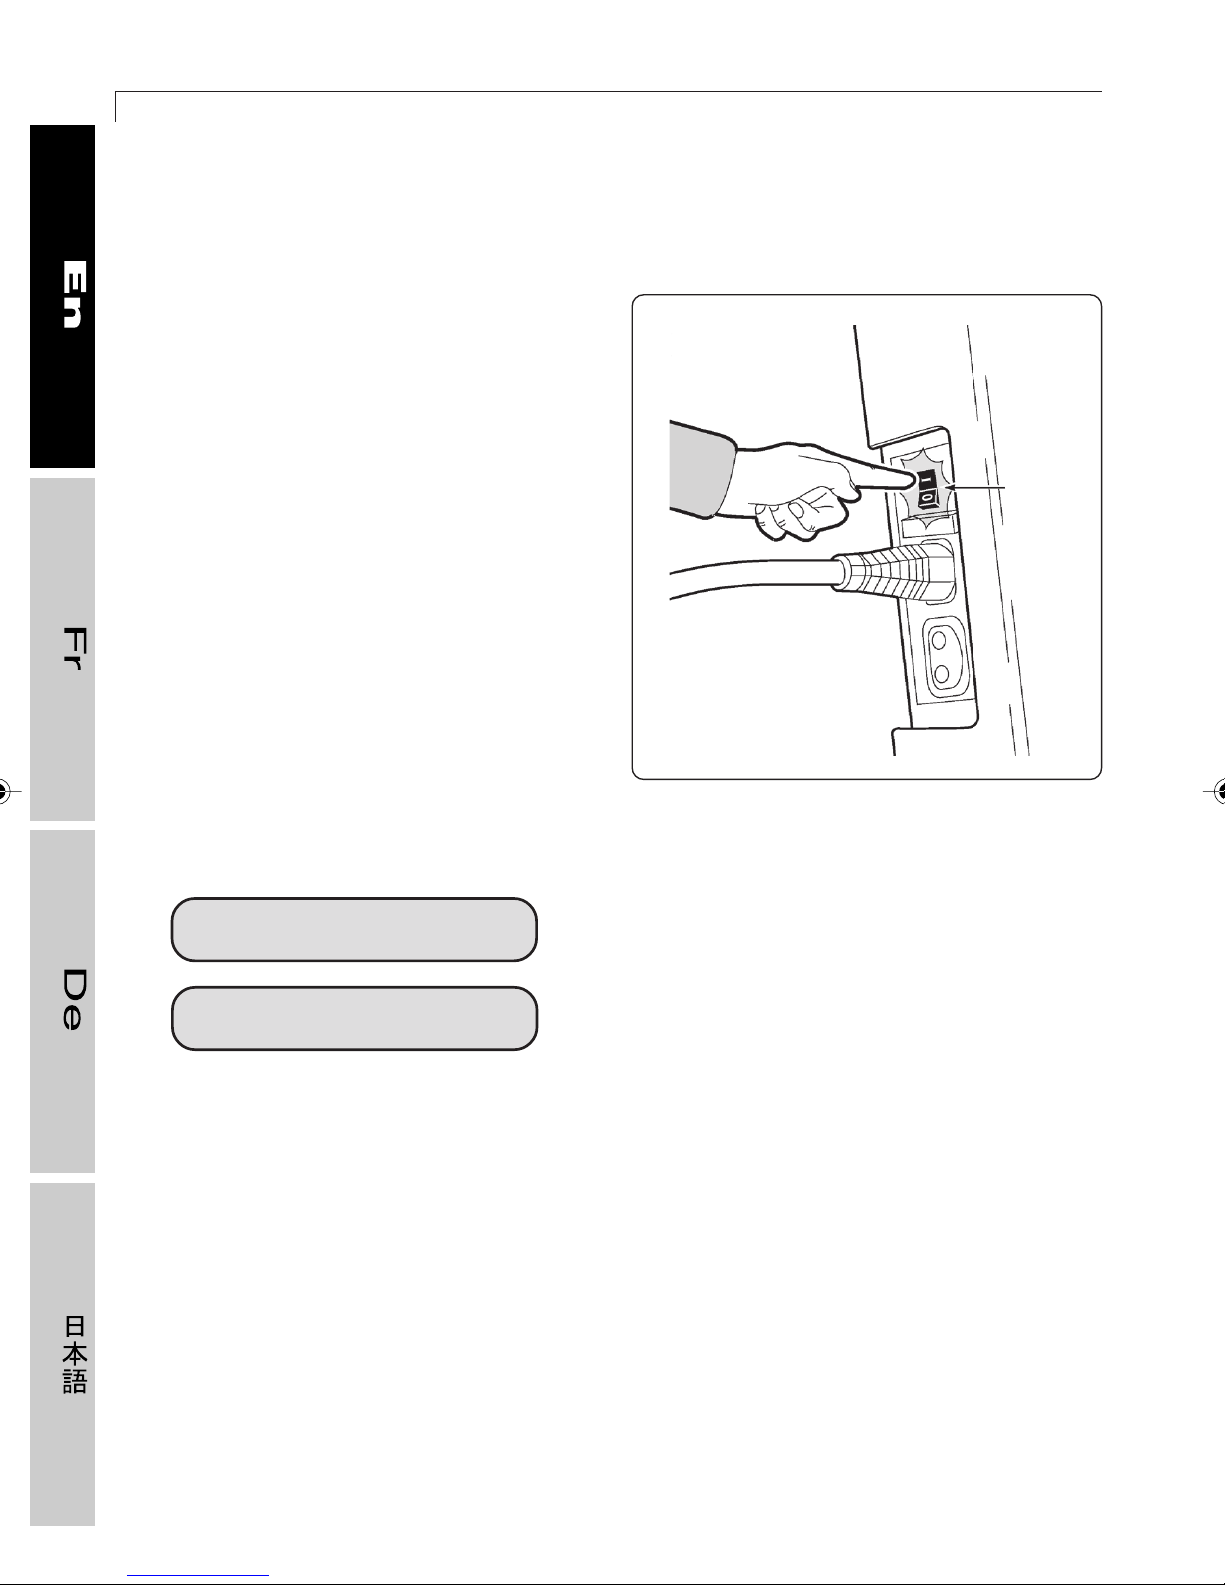
To power on the equipment, move the
switch (A) next to the power cord to the “|”
(on) position. When the equipment is turned
on, the alphanumeric display lights up for a
few seconds and a beep is sounded. Then
the following messages appear, in order:
TOP 600 XT PRO
- Top 600 XT PRO: indicates the name of
the equipment;
- 4.3: indicates the software version;
- TGS: indicates that the software is
enabled for the Smartkey*;
- ENGLISH: indicates the language;
- USA: indicates the unit of measurement
(in km or miles).
After performing a quick reset, the equipment
switches to the Standby mode, meaning it is
ready for use; the display shows the
following messages:
CHOOSE A FUNCTION
INSERT SMARTKEY
A
15
In the Standby mode, the following functions
are active:
- calculation of the heart rate and its
display;
- reading of access codes for technical
information (see section 3.12);
- the effort level can be changed with the
(+) and (–) keys.
The first message is not displayed if, during
the configuration phase (see section 3.2),
the function keys are disabled so that
workouts can be started only with the
Smartkey*.
On the other hand, the second message
does not appear if the Smartkey* reader is
not installed on the equipment.
Page 51
3.1 TURNING THE EQUIPMENT ON AND OFF
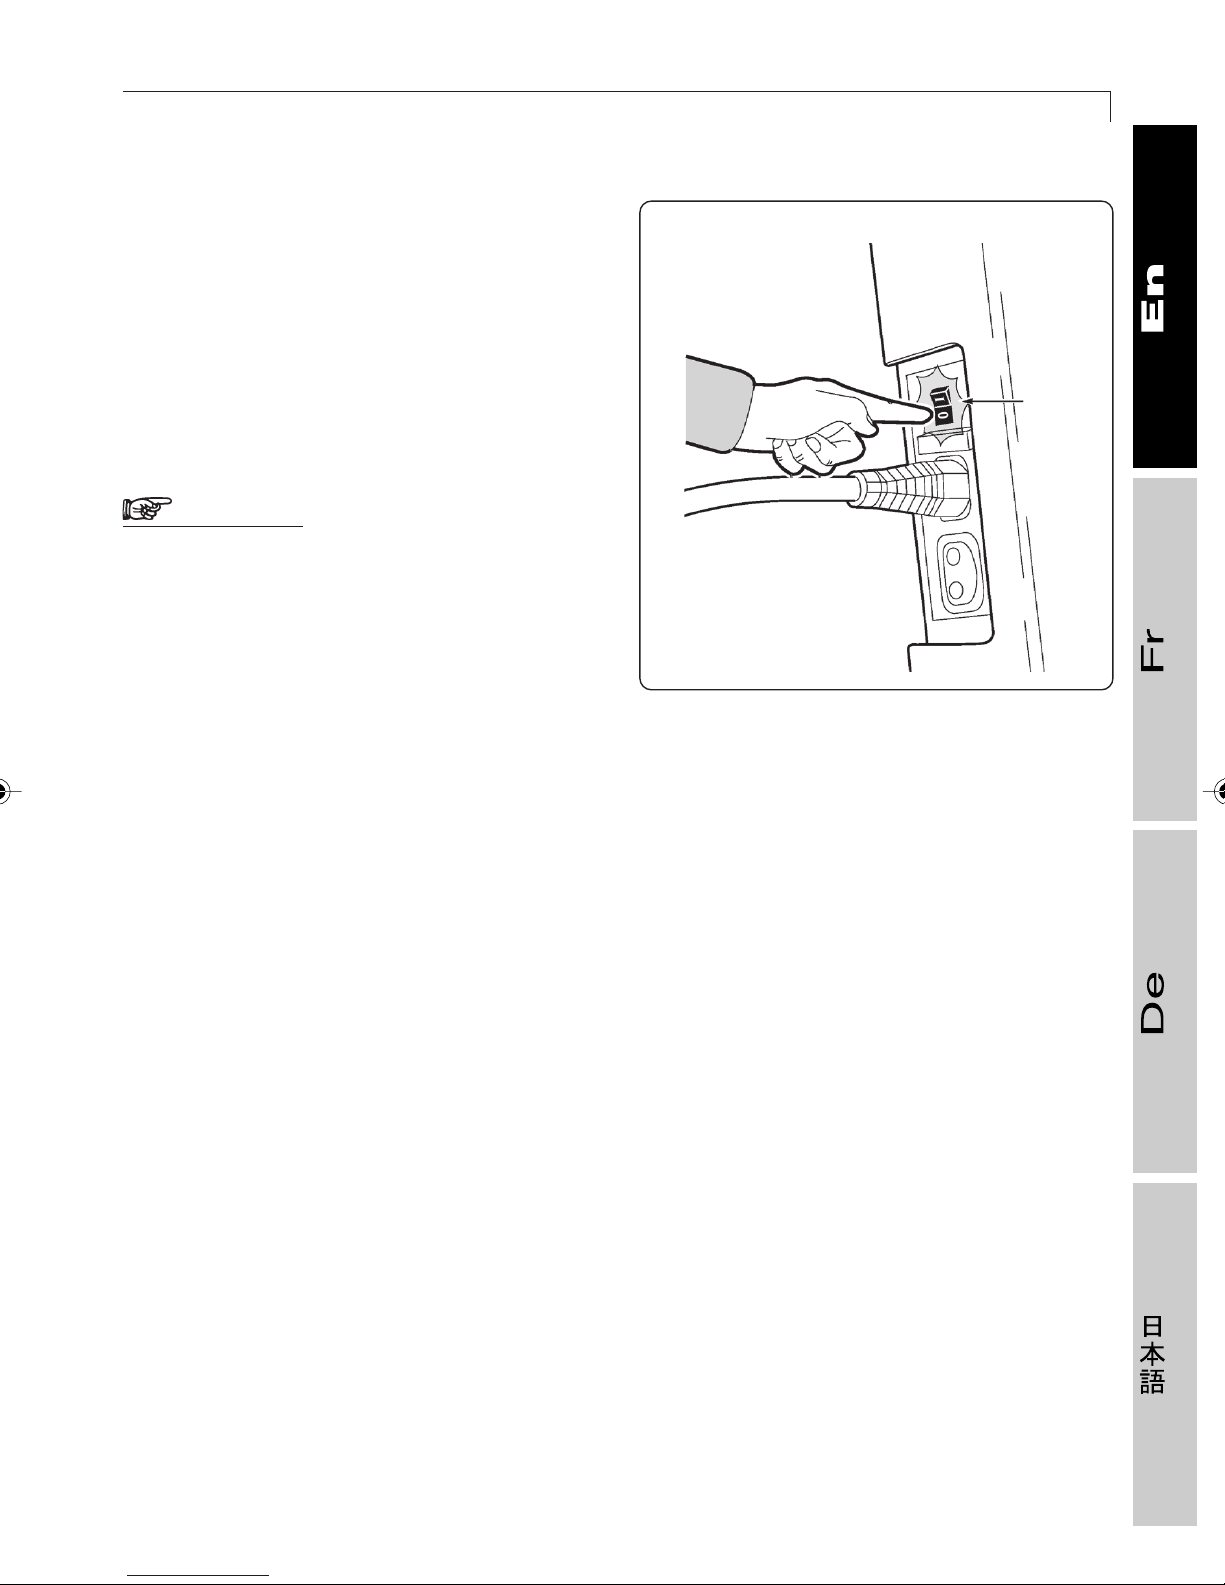
To turn off the equipment, move the switch (A)
next to the power cord to the “0” position.
Turn off the equipment only at the end of the
workout and when it is in Standby.
51
If the equipment is not used for an extended
period of time, it is advisable to unplug it from
the wall outlet after turning it off.
WARNING
The power switch is used to turn the
equipment on and off, but it does not
completely isolate it from network
current even when it is in the “0” (off)
position. To completely isolate the
equipment, the power plug must be
removed from the power outlet.
A
32
Page 52
52
3.2 How to change control panel settings
TOP 600 XT PRO
When the equipment is in Standby, the
following parameters can be selected and
modified:
- display language: different languages
can be chosen for the messages shown
on the alphanumeric display;
- unit of measurement: you can choose
the EUROPEAN (kg and km) or USA
(pounds and miles) unit of measurement;
- maximum time: you can vary the
maximum programmable time for each
exercise;
- enabling of (+) and (–) keys: you can
enable the (+) and (–) keys to vary the
value of the target heart rate for CHR type
workouts;
- disabling of function keys: you can
disable the function keys so that workouts
can be started only with the TGS
Smartkey*;
- enabling of the ENTER key: you can
enable the ENTER key to lengthen the
duration of the workout during Manual
or CHR type exercise.
key in the password code 2406 and press
ENTER.
The display will show the selected language:
USA ENGLISH
To select a language, press the
corresponding number key (from 1 to 3):
1 for ITALIANO
2 for DEUTSCH
3 for UK ENGLISH
or, depending on the country of destination
of the equipment, the following will be
available:
- USA ENGLISH
- FRANCAIS
- NEDERLANDS
- ESPAÑOL
- PORTUGUÊS
- JAPANESE
then, to save the selection, press ENTER.
The unit of measurement is chosen next:
To change the settings, with the equipment
in Standby, simultaneously press the
number keys 3 1 4. The alphanumeric display
will show:
PASSWORD = 0
USA
To select the unit of measurement, press the
corresponding number key:
1 for the EUR system (km and kg)
2 for the USA system (pounds and miles)
then, to save the selection, press ENTER.
Page 53
3.2 HOW TO CHANGE CONTROL PANEL SETTINGS
53
The maximum programable time for each
exercise is set next:
MAX TIME = 20
Key in the time in minutes. To save the
selection, press ENTER.
Then enable the (+) and (–) keys to modify
the value of the reference heart rate for CHR
type workouts:
+/- KEYS / CHR = ON
To select the setting, press the
corresponding number key:
1 to disable the “+” and “–” keys
(OFF appears)
2 to enable the “+” and “–” keys
(ON appears)
then, to save the selection, press ENTER.
The function keys are then disabled so that
the equipment can only be used with the
Smartkey*:
To choose the setting, press the
corresponding number key:
1 to disable the function keys
(OFF appears)
2 to enable the function keys
(ON appears)
then, to save the settings, press ENTER.
Next, activate the option of increasing the
duration of Manual and CHR workouts with
the ENTER key:
ENTER TO INCREASE TIME = ON
To choose the setting, press the
corresponding number key:
1 to disable the ENTER key
(OFF appears)
2 to enable the ENTER key
(ON appears)
Then, to save the setting, press the ENTER
key.
FUNCTION KEYS = ON
At this point return to Standby.
If the CLEAR key is pressed at any time, the
procedure is interrupted and the equipment
returns to Standby mode.
Page 54
54
3.3 Exercising in “simplified mode”
Each equipment can be used in “simplified
mode,” without activating the available
functions: the user mounts the equipment and
starts exercising. After 5 seconds the
equipment emits a beep and automatically
starts a workout where the elapsed time is
shown and the level of difficulty is the same
as during Standby.
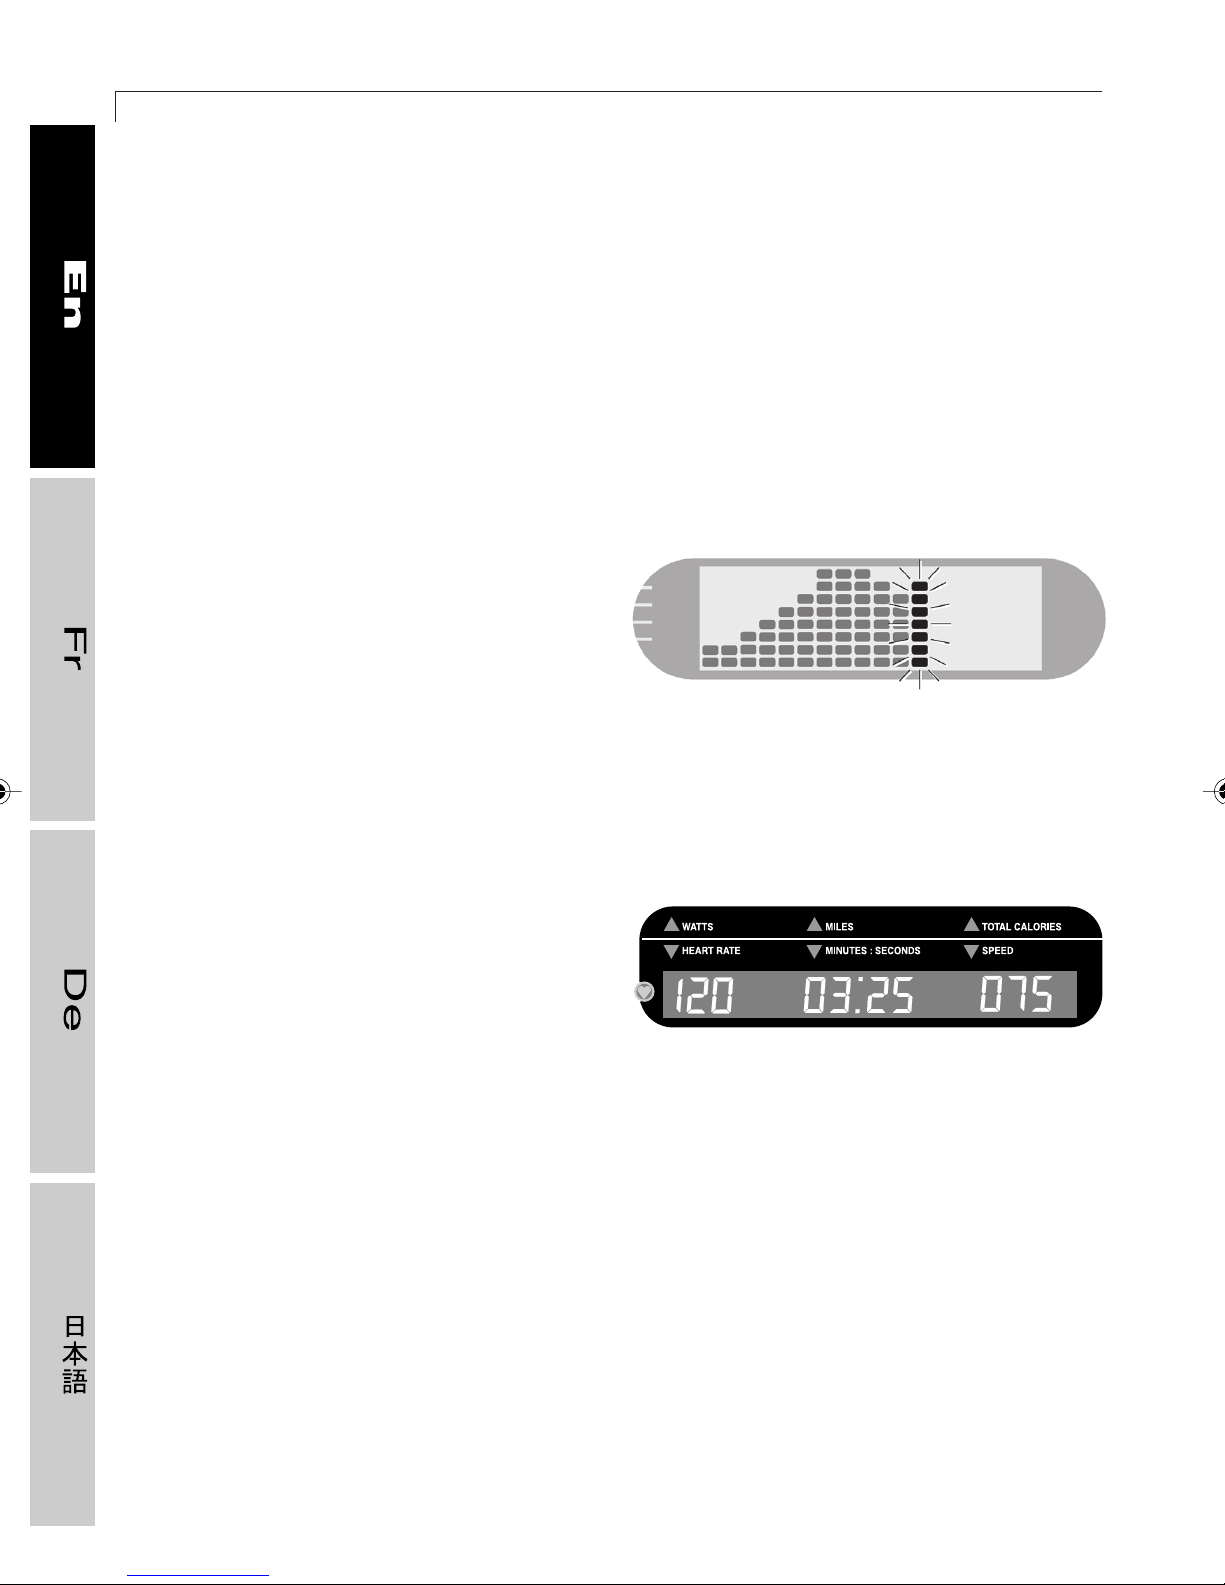
The graph on the alphanumeric display will
show a column for each minute. The last
illuminated column, corresponding to the
current minute, flashes. From the 19th minute
on, the columns will start moving towards
the left so that the column corresponding to
the current minute is always displayed.
TOP 600 XT PRO
19-2
One of the four available functions can be
selected during the first 60 seconds of the
workout.
The digital display will show all the figures
for the current workout; the time shown is the
time elapsed.
During the workout, you will be able:
- to adjust the effort level by using the
corresponding keys;
- to stop the workout with the STOP key.
At the end of the workout, you can insert the
Smartkey* to save the results.
01417011
Page 55
3.4 EXERCISING WITH QUICK START
3.4 Exercising with QUICK START
This function lets you start a workout with
display of the elapsed time, automatic setting
of the age and weight values by the software,
and the same initial effort level as during
Standby.
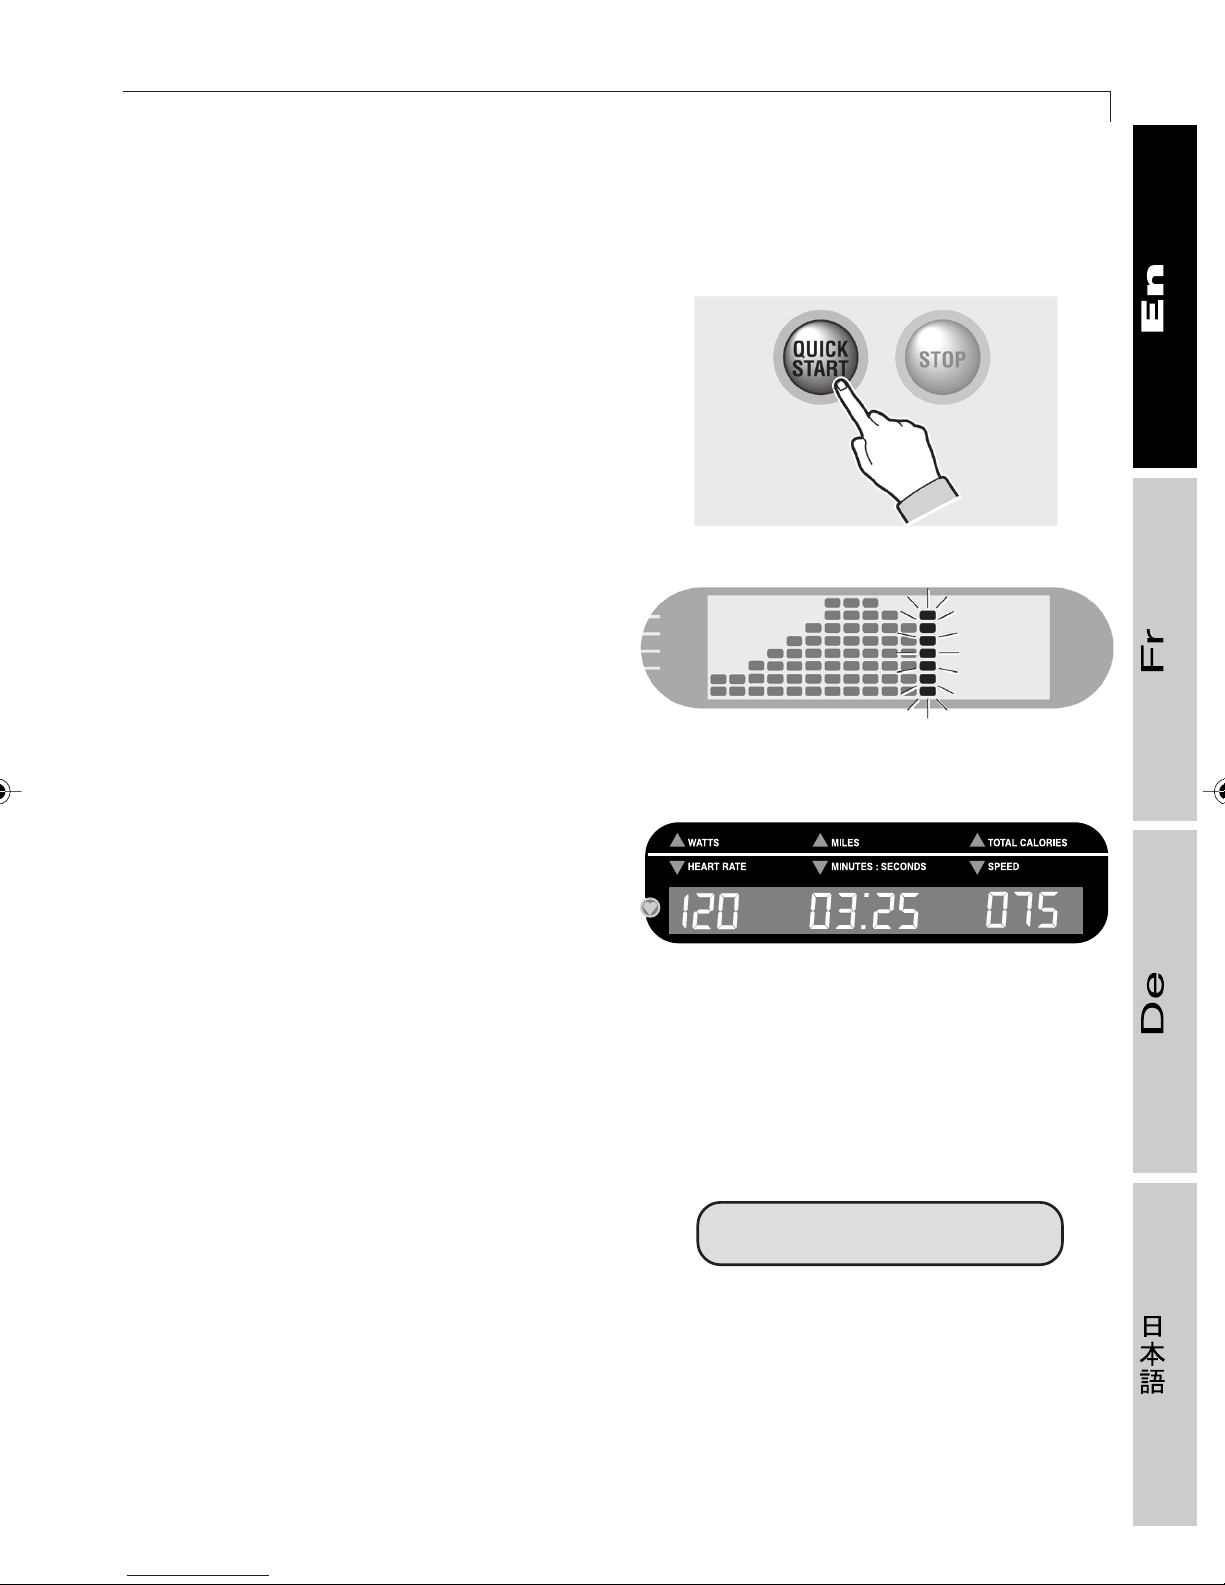
With the equipment in Standby, press the
QUICK START key. The equipment emits a
beep and the workout begins.
The graph on the alphanumeric display will
show a column for each minute. The last
illuminated column, corresponding to the
current minute, flashes. From the 19th minute
on, the columns will start moving towards
the left so that the column corresponding to
the current minute is always displayed.
55
41
19-2
During the workout, the digital display will
show: expressed power, miles (kilometers)
run, calories burned, heart rate, time elapsed,
and speed. You will also be able:
- to adjust the effort level by using the
corresponding keys;
- to stop the workout with the STOP key or
the CLEAR key.
At the end of the workout, you can insert the
Smartkey* to save the results.
If you have used the heart rate meter (chest
band) during the workout for at least 3
minutes, the Performance Index (P.I. see
section 3.10) will appear on the display at
the end of the workout.
01417011
P.I. = 6
Page 56
56
3.5 The level test
TOP 600 XT PRO
When you choose a predefined training
profile, the equipment needs to know the
effort level
specific, ideal effort level, i.e., the top level at
which to set the workout parameters you
have chosen, so they suit your physical
condition. This level is determined by the test.
The test is simple and lasts 10 to 11 minutes;
to take it, you must use the heart rate meter
(chest band).
Repeating this simple test lets you check
improvements over time, making it a useful
motivational tool.
before starting. This is your own
? INFORMATION
Take the test after at least two weeks
of light exercise; after that, test
yourself periodically to assess
improvements and adjust workout
intensity to the performance you
have reached.
The display will show:
WEIGHT-LBS = O
key in your weight (e.g. 155) and then press
ENTER.
At this point, if the equipment does not detect
the heart rate signal, the display will show
the following message:
WEAR CHEST BAND
But if the equipment does detect the heart
rate signal, the display will show:
START
With the equipment
in Standby, press
the TEST button.
The equipment asks for your age and weight:
AGE= 0
key in you age (e.g. 29) with the number keys
and then press ENTER.
The equipment then emits a beep and the
test begins.
The first 60 seconds are for warming up, at
effort level 1:
WARM UP
If your heart rate is high during the warm-up,
the test will be interrupted and the display
will show the following message:
INVALID TEST: HIGH HEART RATE
Page 57
3.6 MANUAL WORKOUT
57
If you press the STOP key to interrupt the
test, the display will show the following
message:
INVALID TEST: INTERRUPTED TEST
and the test will end.
After the warm-up, the test proceeds to effort
level 2. The effort level is gradually increased
until the user’s heart rate reaches 70% of
the maximum HR (see section 2.5.2).
The profile columns on the display are turned
off. The index corresponding to the effort level
and the indicator light for the TEST function
are lit.
At any time you can:
- interrupt the test with the STOP key; the
test itself is then invalidated;
- adjust the effort level.
At the end of the TEST, you will hear a beep
and the equipment will start a cooling down
period lasting 30 seconds. The display will
show the ideal effort level for the specific
user:
LEVEL = 6
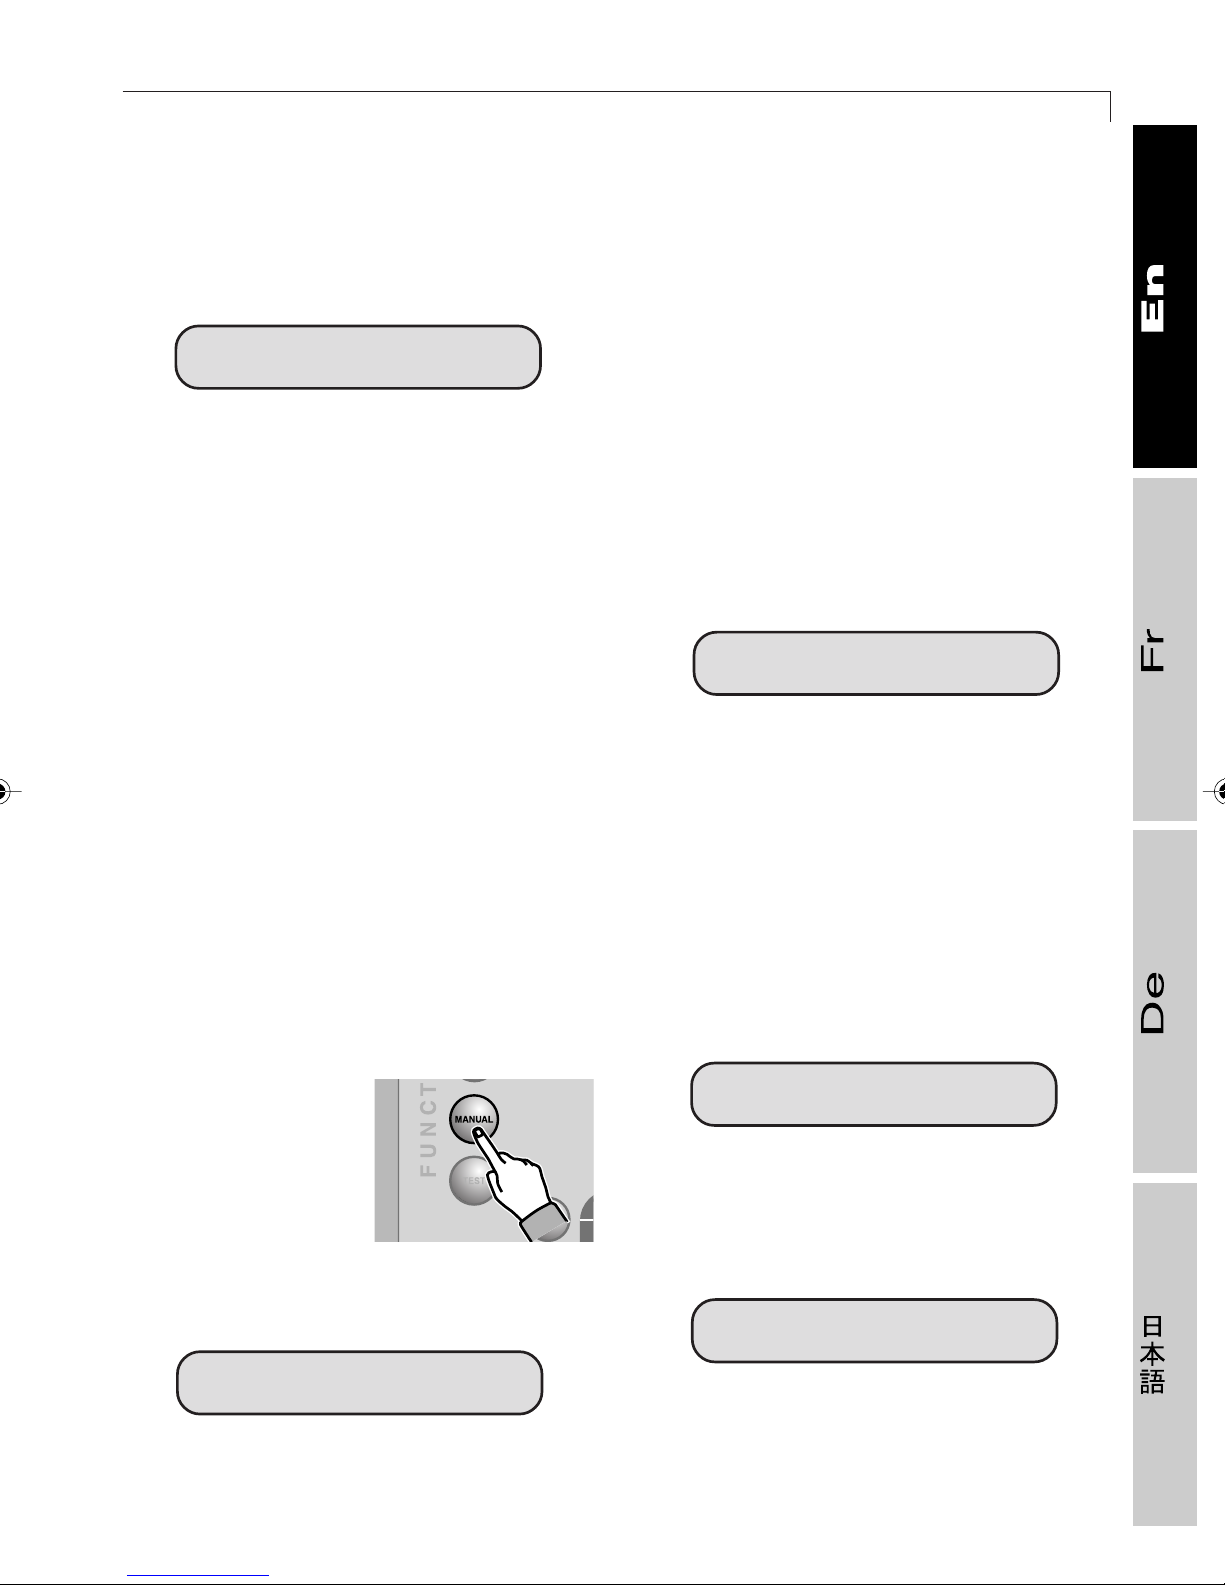
3.6 Manual workout
This function lets you set customized training
programs with a maximum duration equal to
the value set during configuration (see
section 3.2).
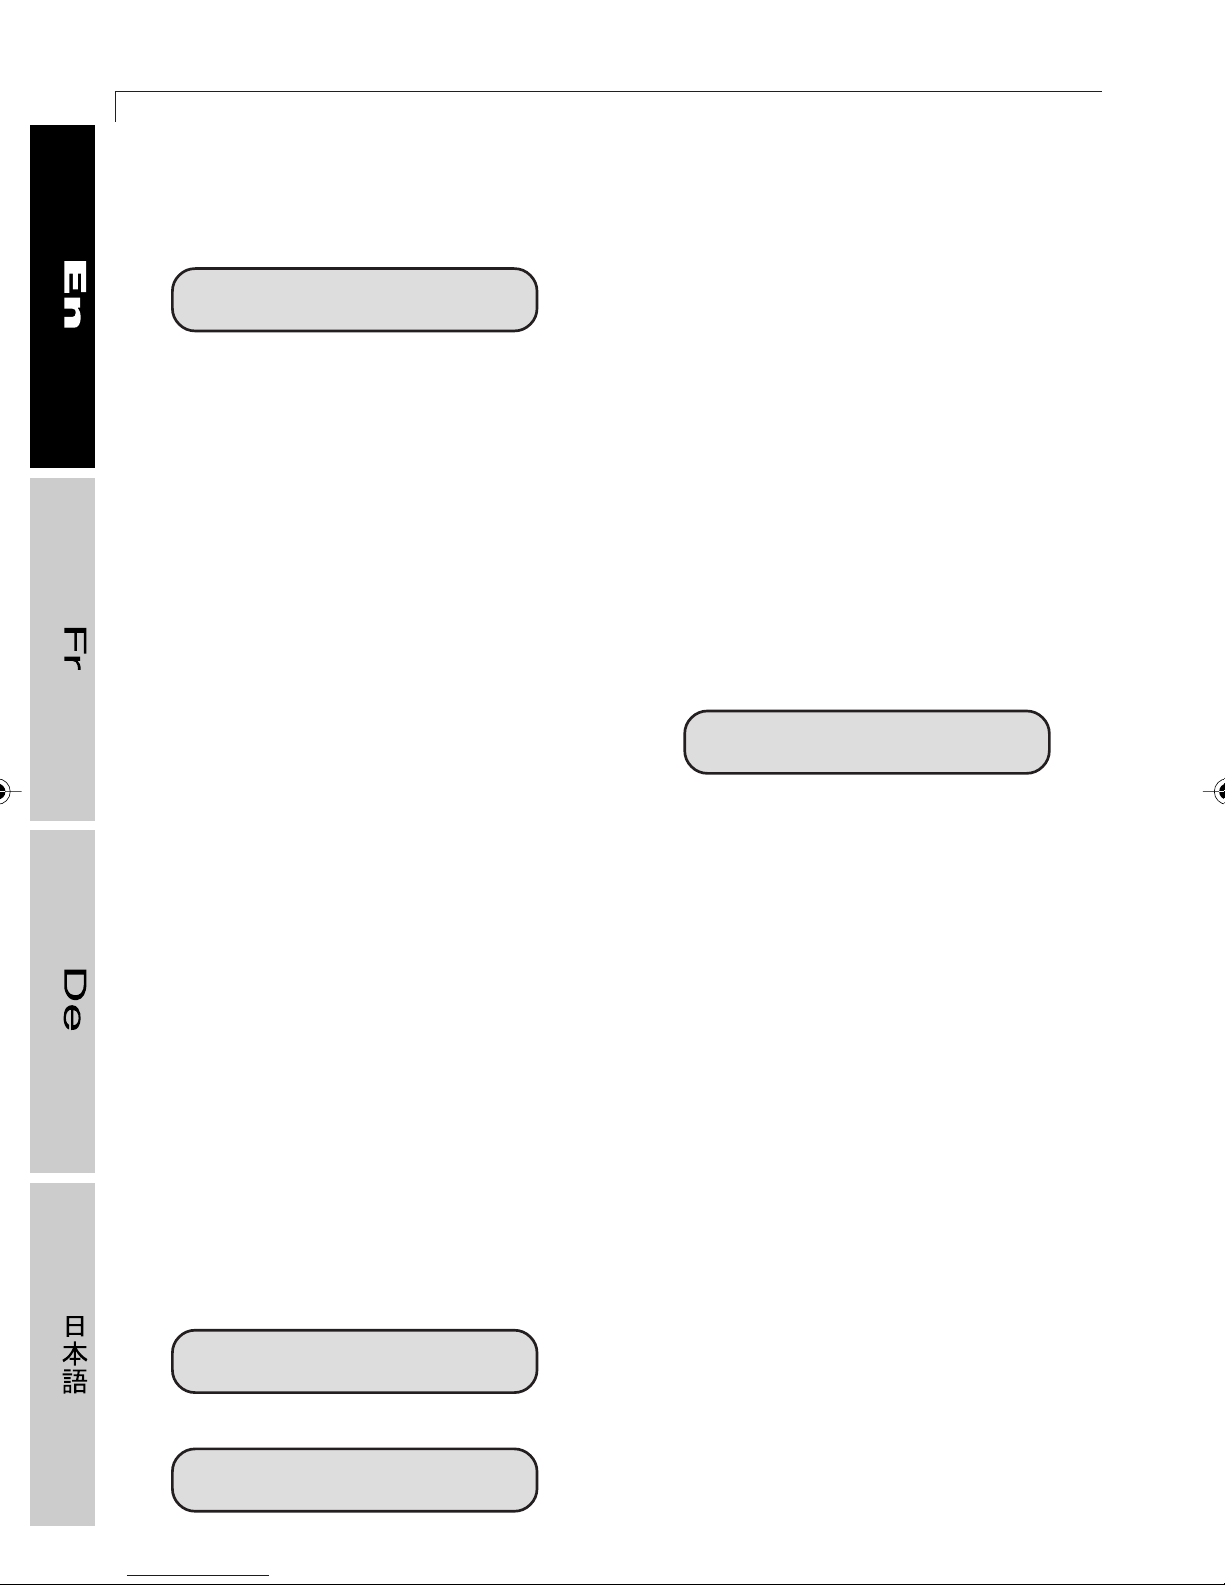
With the equipment
in Standby, press
the MANUAL
function key.
If you use the heart rate meter (chest band)
and the equipment detects your heart rate,
the display will show:
AGE = 0
key in your age (e.g. 30) with the number
keys and then press ENTER; the equipment
will then ask for your weight.
If you do not use the heart rate meter, the
equipment will immediately ask for your
weight and not age:
WEIGHT-LBS= 0
key in your body weight (e.g. 165) and then
press ENTER.
The display will show:
LEVEL = 0
use the number keys to key in the effort level
resulting from the level test (e.g. 7) and then
press ENTER.
Page 58
58
TOP 600 XT PRO
The display will show:
TIME = 0
use the number keys to key in the duration
of the workout in minutes (e.g. 15) and then
press ENTER.
The equipment emits a beep and the
workout begins.
The columns on the alphanumeric display
show the effort level in proportionate terms
with LEDs. They light up one after the other
until they cover the entire amount of time
set. The flashing column represents the
current level.
The index corresponding to the effort level
and the indicator light for the MANUAL
function are lit.
At the end of the workout, the ENTER key
lets you increase the remaining workout time
in increments of 1 minute for each time you
press the key (if the ENTER key has been
configured accordingly: see section 3.2).
At the end of the workout, the equipment
switches to the cooling down mode. This is
when you can insert the Smartkey* to save
the results.
If you have used the heart rate meter (chest
band) during the workout for at least 3
minutes, the Performance Index (P.I. see
section 3.10) will appear on the display at
the end of the workout:
P.I. = 6
At any time you can:
- adjust the effort level with the
corresponding keys;
- interrupt the workout for a pause with the
STOP or CLEAR key;
- end the workout by pressing the STOP
key twice.
If you pause, after pressing STOP or CLEAR,
and then press the QUICK START key, the
workout resumes. If you press STOP again,
the workout ends and the equipment returns
to Standby. The equipment guides the user
with the following two messages:
STOP: END
QUICK START: RESTART
Page 59
3.7 EXERCISING WITH PREDEFINED PROFILES
59
3.7 Exercising with predefined profiles
This function lets you exercise with one of the profiles preloaded on the equipment’s memory.
It is extremely useful when you perform circuit workouts, where the interval between one
exercise and another must be kept brief.
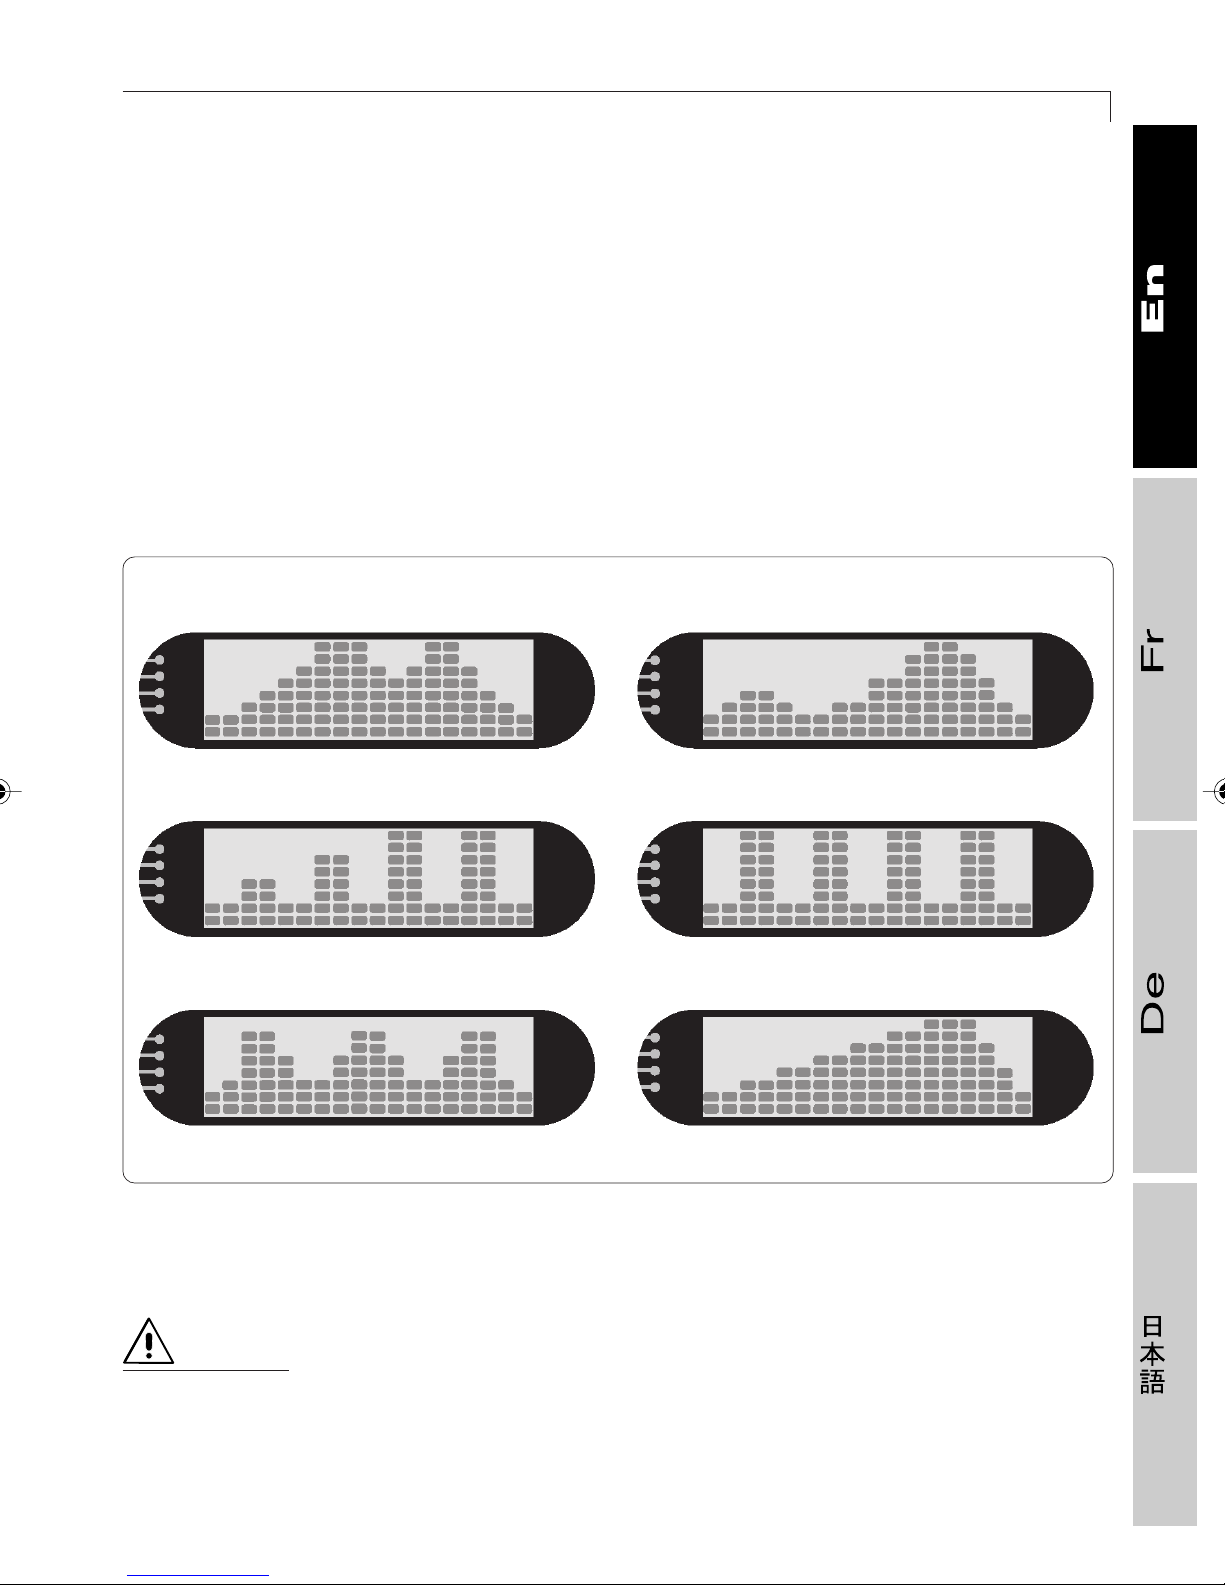
What characterizes workouts with the predefined profile is that you can choose one of the
profiles shown by the columns on the display: the height of the columns indicates the variation
in effort level throughout the workout.
There are 6 available profiles, as illustrated below:
Profile 1
Profile 2
Profile 3
Profile 4
Profile 5
Profile 6
01241027
Each column on the display corresponds to one step, which has a duration of 1/18 of the total
time.
DANGER
It is recommended that the exercise
the one indicated by the level test.
Always check to be sure that your heart rate does not exceed 85% of your maximum
rate (see section 2.5.2).
not
be performed at an effort level higher than
Page 60
60
TOP 600 XT PRO
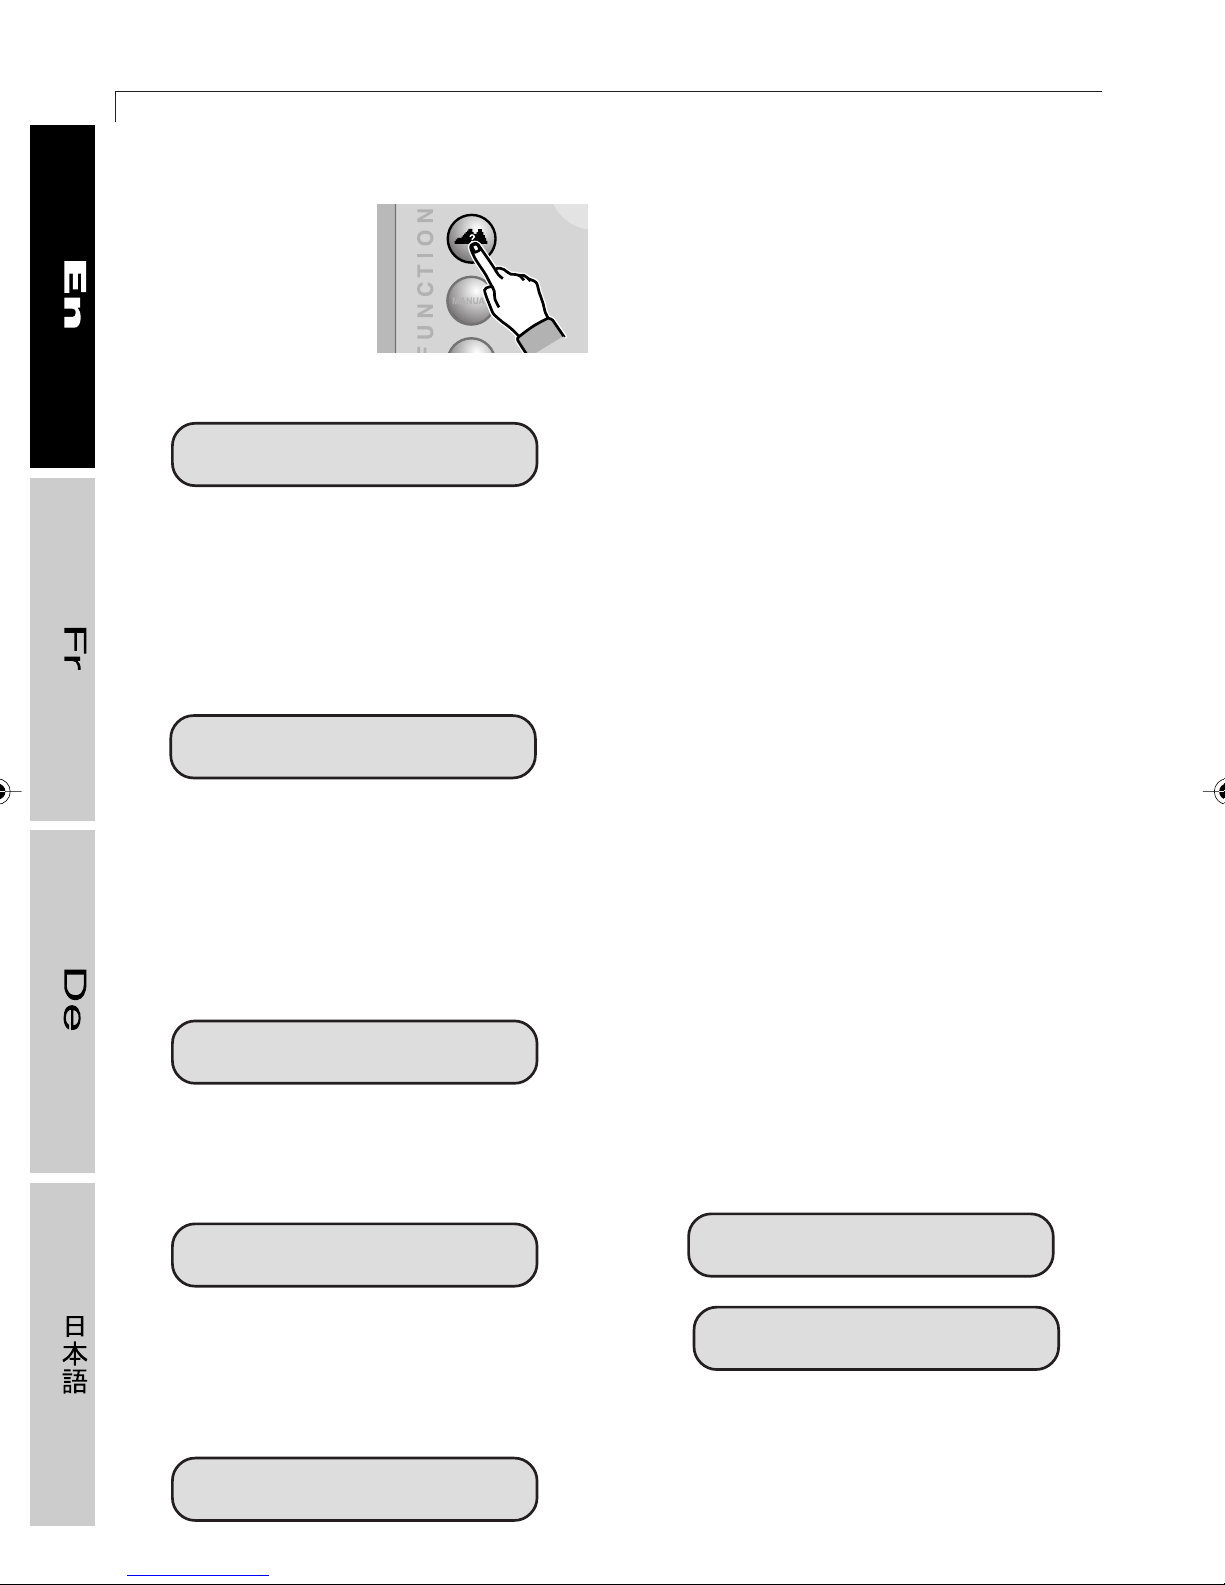
With the equipment
in Standby,
press the PROFILE
function key.
The display will show:
PROFILE 1-6 = 0
To select one of the profiles, press the
corresponding number key (e.g. 3) and then
press ENTER.
If you use the heart rate meter (chest band),
the equipment will detect your heart rate. The
display will show:
AGE = 0
key in your age (e.g. 30) with the number
keys and then press ENTER; the equipment
will then ask for your weight.
If you do not use the heart rate meter, the
equipment will immediately ask for your
weight and not age:
use the number keys to key in the duration
of the workout in minutes (e.g. 15) and then
press ENTER.
The equipment emits a beep and the workout
begins.
The columns of the altimetric profile
proportionately show the effort level in terms
of height. They light up one after the other
until they cover the entire amount of time set.
The flashing column represents the current
level.
The index corresponding to the effort level
and the indicator light for the PROFILE
function are lit.
At any time you can:
- adjust the effort level of the individual step
with the corresponding keys (the change
affects the current step only);
- interrupt the workout for a pause with the
STOP or CLEAR key;
- end the workout by pressing the STOP
key twice.
WEIGHT-LBS = 0
key in your body weight (e.g. 165) and then
press ENTER.
The display will show:
LEVEL = 0
use the number keys to key in the effort level
resulting from the level test (e.g. 7) and then
press ENTER.
The display will show:
TIME = 0
If you pause, after pressing STOP or CLEAR,
and then press the QUICK START key, the
workout resumes. If you press STOP again,
the workout ends and the equipment returns
to Standby. The equipment guides the user
with the following two messages:
STOP: END
QUICK START: RESTART
Page 61
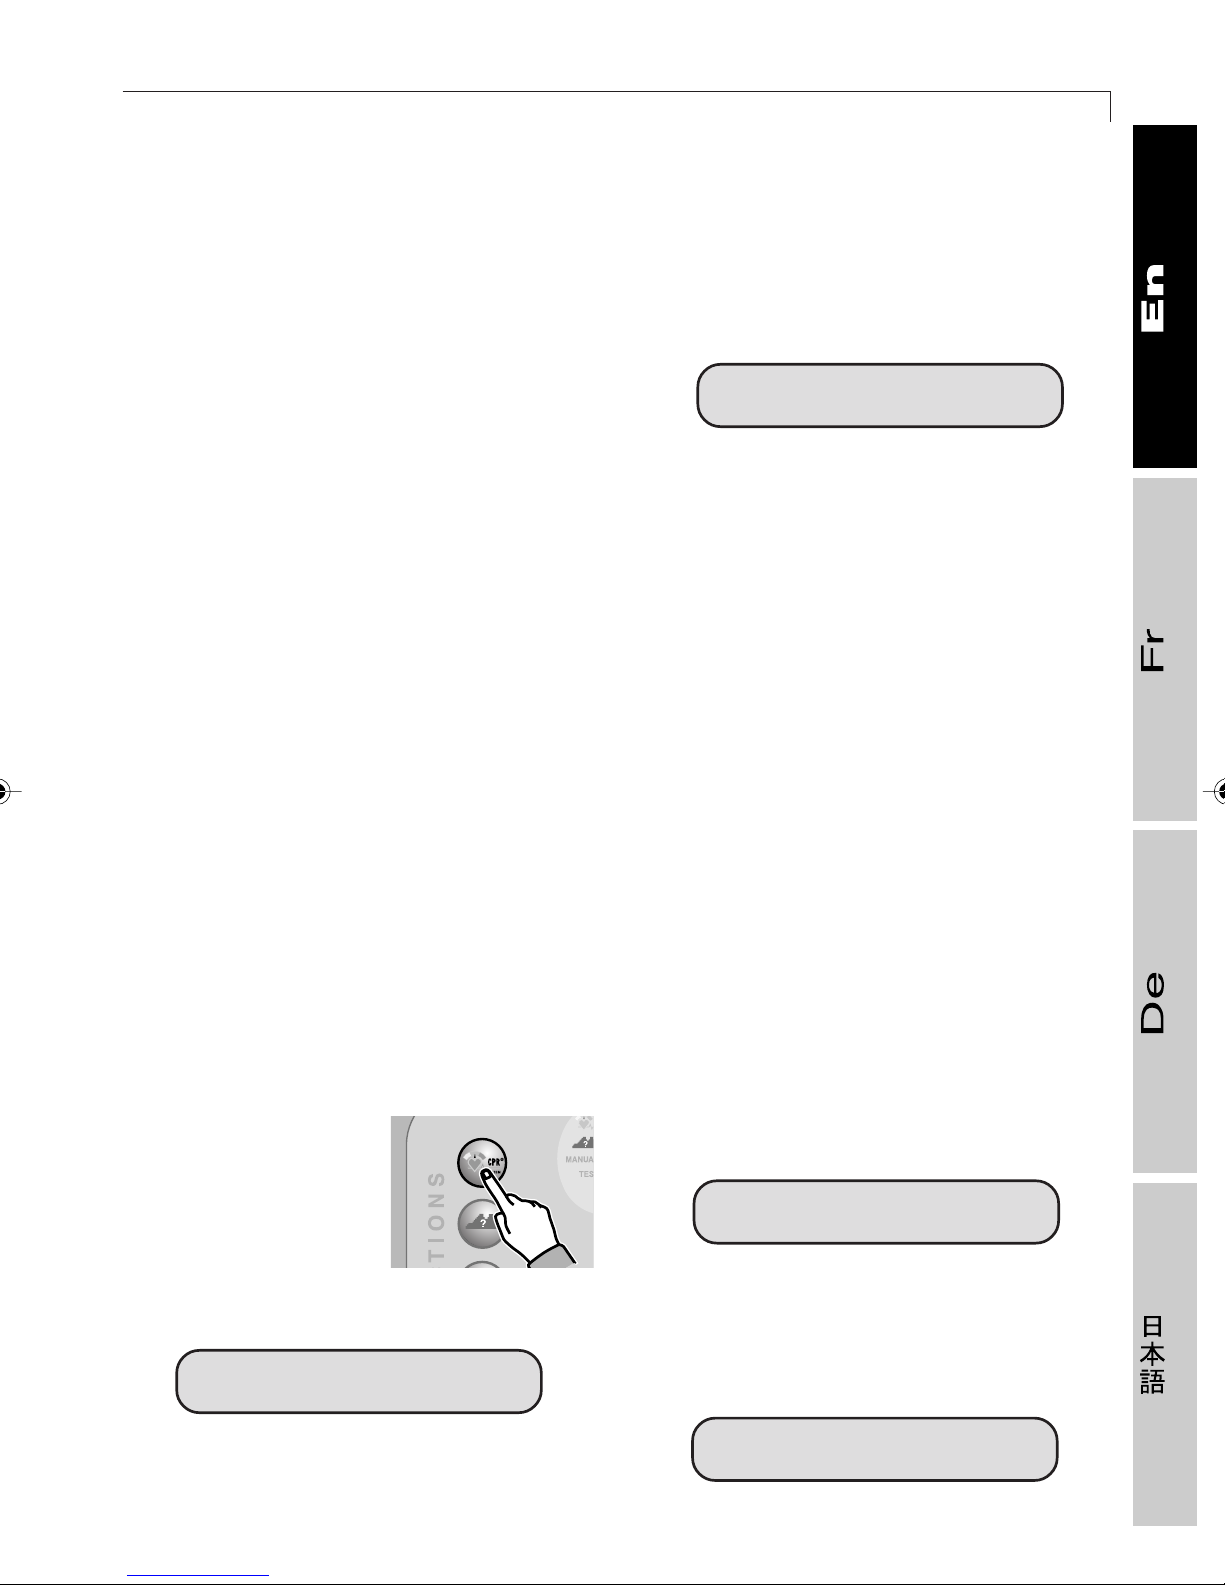
3.8 EXERCISING AT A CONSTANT HEART RATE (CHR)
At the end of the workout, the equipment
switches to the cooling down mode. This is
when you can insert the Smartkey* to save
the results.
If you have used the heart rate meter (chest
band) during the workout for at least 3
minutes, the Performance Index (P.I. see
section 3.10) will appear on the display at
the end of the workout:
61
P.I. = 6
3.8 Exercising at a constant heart rate (CHR)
This function lets you perform variable training programs with constant adjustments to the
effort level according to the defined heart rate: the device automatically adjusts the workout
parameters so that the heart rate is brought to the selected value and then kept there for the
duration of the workout.
The CHR system is thus a useful tool for programming specific workouts.
Exercising at a constant heart rate is highly important in all those situations where, for safety
reasons, specific heart rate levels must not be exceeded (e.g. persons with heart disease
and seniors). It is also important in weight loss aerobic training programs, where the heart
rate must remain below 70% of the maximum value (see section 2.5.2).
During this workout, you must use the heart rate meter (chest band).
With the equipment
in Standby,
press the CHR
function key.
The display will show:
WEIGHT-LBS = 0
The display will show:
AGE = 0
key in your age (e.g. 30) with the number
keys and then press ENTER.
key in your body weight (e.g. 165) then press
ENTER.
The display will show:
HEART RATE (135-155) = 0
Page 62
62
TOP 600 XT PRO
use the number keys to key in the value of
the heart rate that you want to keep constant
during the entire workout (e.g. 142) and then
press ENTER.
The display will show:
TIME = 0
use the number keys to key in the duration
of the workout in minutes (e.g. 15) and then
press ENTER.
The equipment emits a beep and the workout
begins.
The columns of the altimetric profile
proportionately show the effort level in terms
of height. They light up one after the other
until they cover the entire amount of time set.
The flashing column represents the current
level.
The index corresponding to the effort level
and the indicator light for the CHR function
are lit.
At any time, you can:
- interrupt the workout for a pause with the
STOP or CLEAR key;
- end the workout by pressing the STOP
key twice.
If you pause after pressing STOP or CLEAR,
and then press the QUICK START key, the
workout resumes. If you press STOP again,
the workout ends and the equipment returns
to Standby. The equipment guides the user
with the following two messages:
STOP: END
QUICK START: RESTART
At the end of the workout, the equipment
switches to the cooling down mode.
The display shows the performance index
(P.I. see section 3.10) value:
P.I. = 6
If they have been enabled during
configuration (see section 3.2), during the
workout:
- the (+) and (–) keys let you vary (in steps
of one) the value of the target heart rate;
- the ENTER key lets you increase the
remaining workout time in increments of
1 minute for each time you press the key.
you may now insert the Smartkey* to save
the results.
Page 63
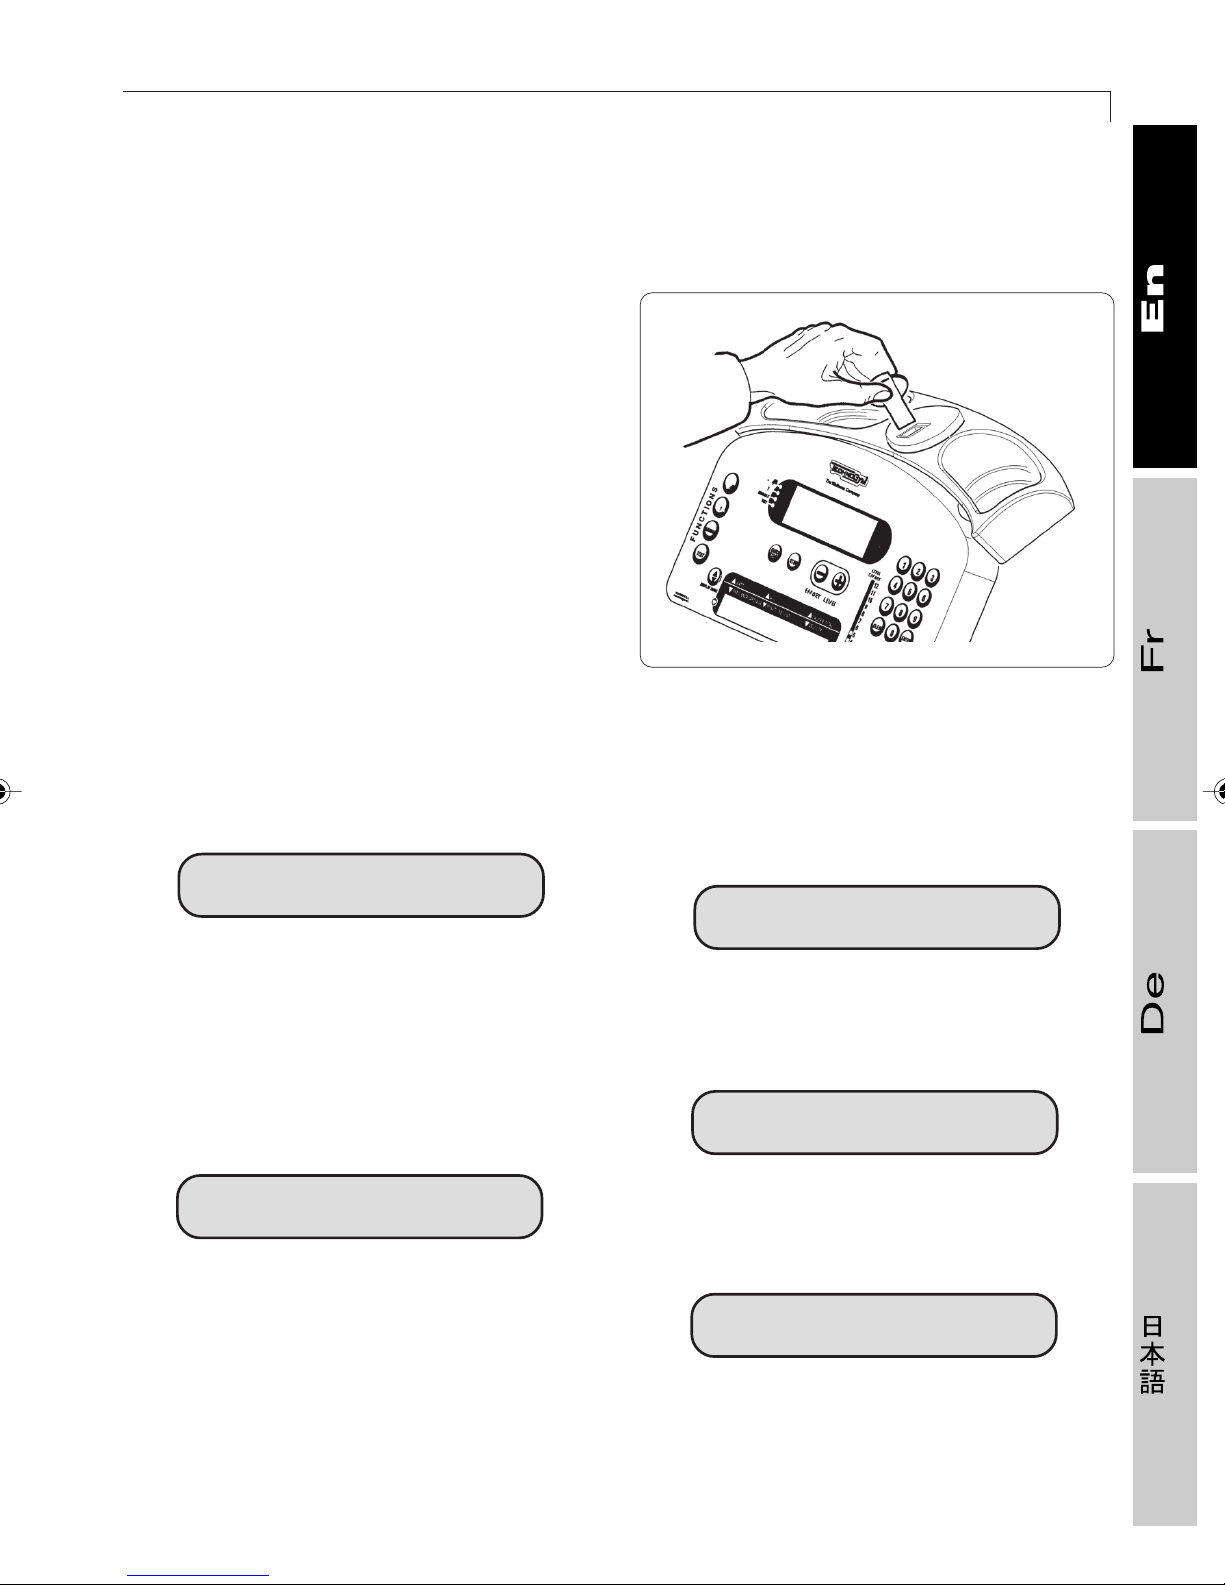
3.9 EXERCISING WITH THE SMARTKEY*
3.9 Exercising with the Smartkey*
The Smartkey* is especially useful when
you are doing circuit exercises consisting of
identical workout sequences.
The Wellness Trainer eliminates the need to
enter personal data and exercise
parameters each time, since it memorizes
them. To start the exercise just slip the
Smartkey* into its slot; the display will first
show the user’s name, then the type of
planned exercise with associated
parameters.
63
014170016
For example, if a CHR type workout is
planned, when you insert the Smartkey*, this
message appears:
H.R. = 138
where H.R. = 138 indicates the value (138)
of the constant heart rate (H.R.) which must
be maintained during the exercise.
If you perform a workout at constant power,
this message appears:
WATT = 110
Afterwards, the equipment behaves exactly
as if the workout had been selected and set
from the control panel.
At the end of the workout, if other exercises
are not planned on the workout chart saved
on the Smartkey*, the following message
appears:
END OF WORKOUT
However, if other exercises are planned, the
display shows this message:
NEXT: CARDIO
At this point it is possible to remove the
Smartkey*, as indicated on the display:
REMOVE SMARTKEY
Page 64
64
3.10 Performance Index (P.I.)
Technogym created the performance index
to provide a concise evaluation of the
finished workout in a form that can be easily
compared with others.
To have your performance index for any
workout shown on the display, all you have
to do is use the heart rate meter (chest band)
for at least three minutes.
TOP 600 XT PRO
P.I. = 56
The index is based on a rating of 0 to 99.
The better your performance, the higher your
aerobic capacity.
An increase in your performance index
means that, heart rate being equal, you are
able to exercise harder.
The criteria used to rate performance make
it possible to compare tests taken by people
of different ages. In any case, it is better to
compare the results of different tests taken
by the same person - or different people working out at the same intensity for the same
amount of time.
P.I. amount Rating
Up to 10 Poor
From11 to 20 Fair
From 21 to 30 Good
From 31to 40 Very good
Over 40 Excellent
Page 65
3.11 OTHER MESSAGES APPEARING ON THE DISPLAY
3.11 Other messages appearing on the display
65
During the workout, the display may show
the following messages:
❒ Increase workout time
During Manual or CHR workouts, you can
increase the set time at the end of the workout
by pressing the ENTER key (if the key has
been enabled accordingly during
configuration: see section 3.2). During the
last minute, the display will show:
ENTER TO INCREASE TIME
each time you press the ENTER key, the
duration of the workout increases by 1
minute. During the last minute of exercise,
the lower set of three values on the digital
display is shown, and includes the time
remaining.
❒ Cool down
At the end of each exercise, the equipment
suggests a cool down time. The display
shows:
COOL DOWN
❒ Check maximum heart rate value
If your heart rate exceeds 85% of the
maximum theoretical level, the equipment
emits a beep and this message appears on
the display:
HIGH HEART RATE
❒ Check presence of heart rate signal
If no heart rate signal is detected at the start
of a CHR or Test workout, this message
appears on the display:
WEAR CHEST BAND
If your heart rate still hasn’t been detected
after 1 minute, the workout is cancelled.
The same message appears if the heart rate
signal disappears during any workout started
with the chest band.
❒ Recommended speed
During the workout, the display shows the
recommended exercise speed at regular
intervals:
MAINTAIN 50-60 RPM
where the RPM (rounds per minute) are
indicated in the lower set of three figures on
the display as “speed.”
Page 66
66
TOP 600 XT PRO
❒ Workout with the Smartkey*
When you insert the Smartkey* in its slot,
- if the equipment does not recognize it,
the display will show this message:
INVALID DATA ON SMARTKEY
- if workouts are not memorized on the
Smartkey*, the display will show:
LOAD SMARTKEY
❒ Interruption of workout
A workout can be temporarily interrupted by
pressing the STOP key. The equipment is
placed in pause, during which time two
messages are displayed in alternation,
explaining what procedures to follow:
QUICK START: RESTART
❒ Calories and speed during the entire
workout
During the workout, these messages appear:
4’22” MILE (2’44’’/KM)
indicating the time taken to complete one
mile (kilometer);
87 KCAL/H
indicating the hourly rate of calorie
consumption in CHR and Manual type
exercises;
87 KCAL/EXERCISE
indicating the total expected calorie
consumption in the Profiles for the entire
workout.
The QUICK START key is used to resume
the workout.
STOP: END
The STOP key is pressed for a second time
to halt the workout once and for all.
If no key is pressed within 1 minute after the
pause begins, the equipment will definitively
conclude the workout session.
Page 67
3.12 ACCESS CODES FOR TECHNICAL INFORMATION
3.12 Access codes for technical information
67
In order to perform periodic maintenance
properly, the actual operating hours of the
equipment must be known. This number can
be shown on the display with an access code
or password.
While the equipment is in Standby,
simultaneously press 3 1 4 on the number
pad. The display will show:
PASSWORD = 0
key in the password code 1508 and press
ENTER.
The following messages will appear:
HOURS ON = 1512
indicates the total number of hours the
equipment has been turned on.
Press the ENTER key to continue:
HOURS OF USE = 342
indicates the number of hours of operation
of the equipment.
Press the ENTER key to continue.
After this last message, the equipment returns
to Standby.
Page 68
Page 69
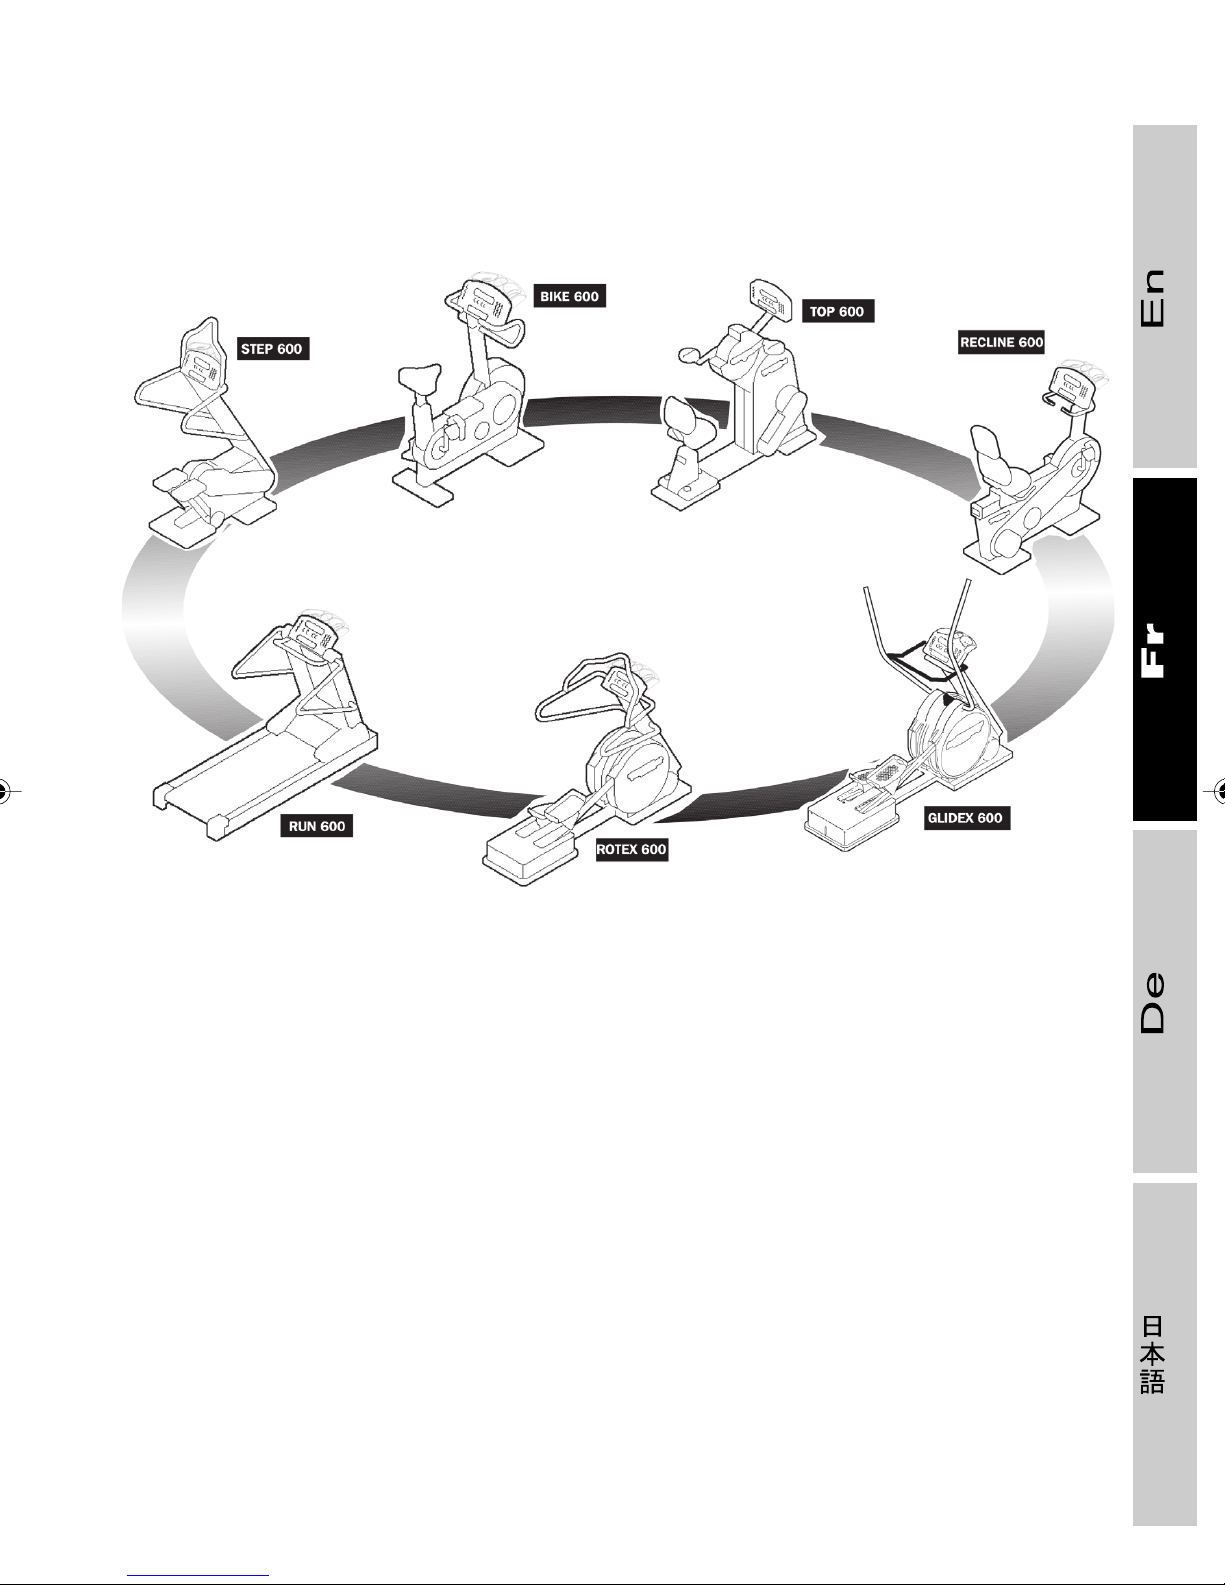
XT PRO
Manuel de l’utilisateur
Tutti gli attrezzi
La ligne XT PRO comprend 7 appareils sophistiqués pour l’entraînement cardio-vasculaire
et aérobie : Bike 600 ; Recline 600 ; Top 600 ; Step 600 ; Rotex 600 ; Run 600 ; Glidex 600.
Ces 7 machines offrent la possibilité d’effectuer différents types d’entraînements et permettent
donc à tous les sportifs, accomplis ou du dimanche, d’améliorer leurs performances ou tout
simplement de se maintenir en forme.
Il est désormais reconnu que la meilleure façon de prévenir toutes les pathologies liées aux
systèmes cardio-vasculaire, respiratoire et musculaire est d’effectuer régulièrement un travail
aérobie ; c’est pourquoi toutes les machines de la ligne XT PRO permettent de contrôler en
permanence la fréquence cardiaque pendant l’entraînement, grâce à un cardiofréquencemètre qui se présente soit sous la forme de capteurs (heart sensor) intégrés dans
le guidon de la machine, soit sous la forme d’un palpeur cardiaque (ceinture thoracique
munie d’un transmetteur), le rythme cardiaque étant visualisé sur le panneau de commande.
Page 70
Table des matières
TOP 600 XT PRO. ................................................................................................................................................................ 72
INTRODUCTION
1 INFORMATIONS TECHNIQUES
1.1 Identification du constructeur et de l’appareil
1.2 Description de l’appareil
. ................................................................................................................................................................. 74
. .......................................................................................................... 75
. ............................................................................. 75
. ............................................................................................................................. 76
1.2.1 Composants principaux. .............................................................................................................. 76
1.2.2 Données techniques. ..................................................................................................................... 77
1.2.3 Accessoires. ........................................................................................................................................... 78
1.2.4 Dispositifs et décalcomanies de sécurité
. ...................................................................... 80
1.3 Installation et montage. .................................................................................................................................. 82
1.3.1 Montage
1.3.2 Déplacement de l’appareil
1.3.3 Nivellement
1.3.4 Branchement électrique
. ................................................................................................................................................... 84
. ........................................................................................................ 85
. ........................................................................................................................................... 85
. .............................................................................................................. 86
1.3.5 Branchement électrique sur la prise d’un autre appareil ou dispositif... 87
1.4 Entretien. .................................................................................................................................................................... 89
1.4.1 Entretien ordinaire. ........................................................................................................................... 89
1.4.2 Entretien extraordinaire. .............................................................................................................. 91
1.4.3 Recherche des pannes. ............................................................................................................... 92
1.5 Assistance technique. ..................................................................................................................................... 94
1.6 Stockage. ................................................................................................................................................................... 95
1.7 Elimination de l’appareil. .............................................................................................................................. 95
2 UTILISATION DE TOP 600. ....................................................................................................................... 96
2.1 Recommandations pour l’utilisation correcte de l’appareil
2.2 La mesure de la fréquence cardiaque. ............................................................................................. 98
2.2.1 Comment mettre la ceinture thoracique. ......................................................................... 100
2.2.2 Utilisation correcte de la ceinture thoracique. ............................................................ 100
2.3 Réglages. .................................................................................................................................................................. 102
2.3.1 Utilisation pour les UFR. .............................................................................................................. 103
2.4 Position ergonomique sur l’appareil. .................................................................................................. 103
2.5 Informations et conseils médico-sportifs. ......................................................................................... 104
2.5.1 Importance et bienfaits de l’activité physique. ............................................................ 104
2.5.2 Comment choisir l’intensité de l’entraînement aérobie. ..................................... 105
2.5.3 Exercices de stretching. ............................................................................................................... 107
. ............................................. 96
Page 71
TABLE DES MATIÈRES
71
3 LE PANNEAU DE COMMANDE. ......................................................................................................... 109
3.1 Allumage et extinction de l’appareil
. ................................................................................................... 114
3.2 Comment changer les réglages du panneau de commande. ........................................ 116
3.3 Entraînement en “mode simplifié”. ........................................................................................................ 118
3.4 Entraînement avec QUICK START. ....................................................................................................... 119
3.5 Le test de niveau. ................................................................................................................................................ 120
3.6 Entraînement “manuel”
3.7 Entraînement avec profils préétablis
. ................................................................................................................................. 121
. ................................................................................................. 123
3.8 Entraînement à fréquence cardiaque constante (CPR). ..................................................... 125
3.9 Entraînement avec la clé TGS*. ............................................................................................................... 127
3.10 L’indice de performance (I.P.). ................................................................................................................... 128
3.11 Autres messages à l’écran. ........................................................................................................................ 129
3.12 Codes d’accès pour les informations techniques. ................................................................... 131
Page 72
Top 600 XT PRO
Top 600 est un appareil novateur qui fait partie de la ligne XT PRO Technogym ; une ligne
d’appareils pour l’entraînement cardio-vasculaire où biomécanique, fonctionnalité et
esthétique y trouvent tout particulièrement leur compte. Les appareils de la ligne XT PRO,
grâce au système exclusif CPR, développé et mis au point par Technogym, permettent à
l’utilisateur de maintenir constante la valeur de la fréquence cardiaque désirée pendant
toute la durée de l’exercice. Avec à la clé, un entraînement plus efficace et sûr quel que soit
le niveau de la condition physique du pratiquant.
Top 600 vient enrichir la ligne XT PRO, en s’intégrant parfaitement avec les autres machines
du fait qu’elle maintient inchangées les caractéristiques d’uniformité des fonctions et
d’utilisation. Pour preuve : l’entraînement de type manuel où le niveau de difficulté et la durée
de l’exercice peuvent être sélectionnés, les profils préétablis ou encore le test qui permet de
déterminer le niveau optimal et individuel de difficulté pour l’entraînement.
Avec Top 600, tous les muscles principaux des épaules, des bras et du thorax (l’ensemble
des muscles de la ceinture scapulo-hmérale, triceps, biceps, deltoïde, trapèze, dorsaux)
sont actifs, pour garantir un entraînement cardio-vasculaire optimal même pour les personnes
peu entraînées.
Top 600, par sa simplicité et sa sécurité d’emploi, tient compte des exigences d’un grand
nombre d’utilisateurs, des sportifs professionnels aux sédentaires, en passant par les
cardiaques et les personnes âgées ou devant faire de la rééducation physique.
Top 600 est équipé d’un panneau de commande convivial. De plus, il permet une lecture
aisée des données d’entraînement, qui sont mises à jour en permanence, et une adaptation
progressive du niveau d’entraînement à la forme de l’utilisateur et à son niveau de préparation
physique. Il est possible d’autre part d’établir et de mémoriser des programmes d’entraînement
personnalisés, ou bien de choisir un des profils préétablis, ou encore de s’entraîner librement
en variant à tout moment les paramètres de l’exercice.
AVERTISSEMENT
Le constructeur Technogym S.r.l. n’est responsable de son appareil que dans les
cas où les précautions indiquées ci-dessous sont respectées :
- l’appareil est utilisé conformément à ses spécifications ;
- l’utilisateur a soigneusement pris lecture de toutes les parties du manuel de
l’utilisateur ;
- le lieu d’installation est conforme aux exigences prescrites par le manuel de
l’utilisateur ;
- l’installation électrique est conforme aux prescriptions de la norme ou de la Loi
en vigueur dans le pays d’utilisation ;
Page 73
TOP 600 XT PRO
- l’installation, l’entretien et les étalonnages ont été effectués par du personnel
qualifié Technogym ou agréé par le constructeur ;
- le responsable de la salle ou du centre de rééducation a correctement formé les
utilisateurs de l’usage correct et des usages erronés de l’appareil ;
- l’habillement est approprié ;
- aucune serviette ou autre accessoire n’est positionné sur les appareils ;
- les exercices de rééducation sont exécutés en présence de personnel qualifié.
73
Page 74
Introduction
Ce manuel, rédigé dans la langue originale du constructeur et traduit dans la langue du
pays de l’utilisateur, fait partie intégrante de l’équipement de l’appareil qu’il devra toujours
accompagner ; même en cas de déménagement ou de changement de propriétaire, ce
manuel ne devra jamais être séparé de l’appareil. Il doit être conservé en un endroit facilement
accessible et connu et tenu à l’écart de toute source de chaleur et de l’humidité.
Le texte contient de précieuses informations et des conseils très utiles sur les méthodes
d’entraînement, ainsi que pour ce qui concerne l’aspect médico-sportif ; il constitue donc un
guide aussi bien pour l’utilisateur professionnel que pour le débutant qui n’a aucune
connaissance sportive.
Des symboles serviront de guide dans la lecture de ce manuel :
AVERTISSEMENT
Ce symbole annonce des informations importantes que l’on ne doive pas négliger.
ATTENTION
Ce symbole signale les règles à suivre scrupuleusement pour ne faire courir aucun
danger à l’utilisateur ou à l’appareil.
? INFORMATIONS
Sous ce symbole se trouve la réponse aux doutes les plus courants.
il convient de lire ce manuel attentivement et intégralement.
Avant de commencer toute opération,
Page 75
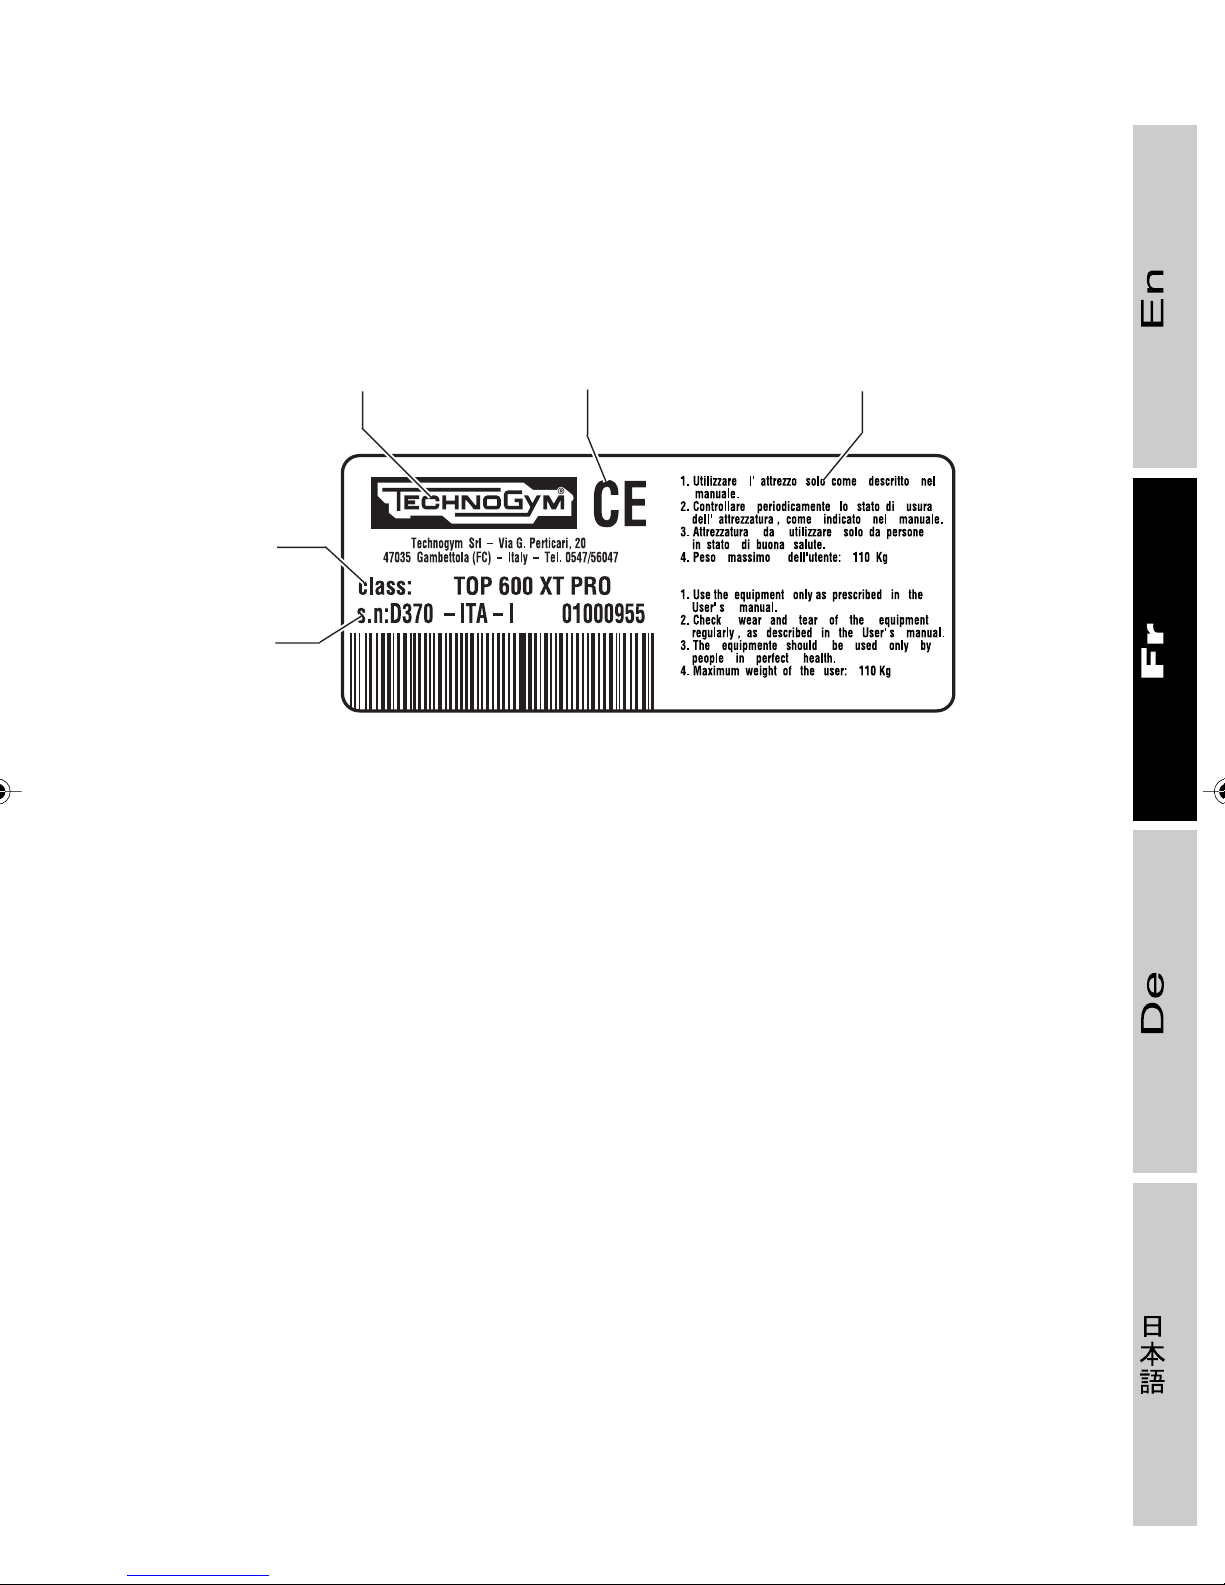
1 Informations techniques
1.1 Identification du constructeur et de l’appareil
A
E
C
A - Nom et adresse du constructeur
B - Marquage CE
C - Numéro de série
B
D
01327007
D - Recommandations
E - Classe d’appartenance de l’appareil
d’entraînement
Page 76
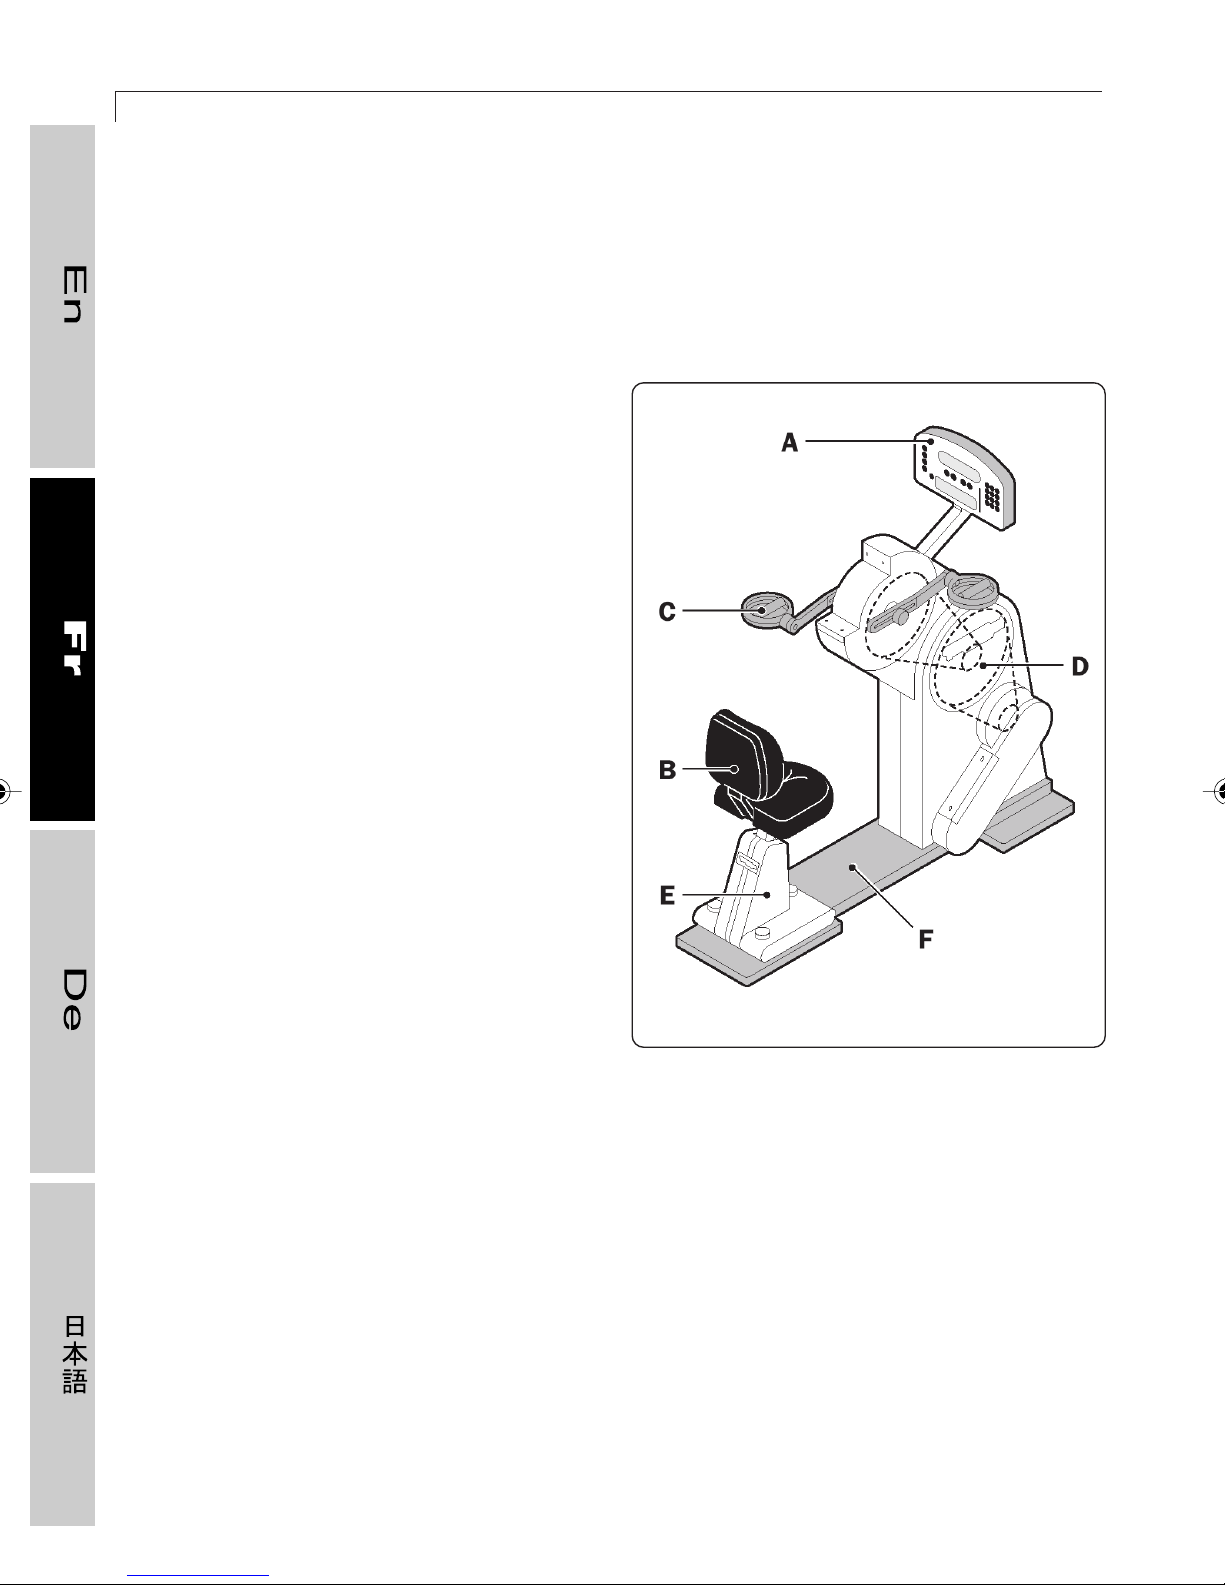
76
1.2 Description de l’appareil
1.2.1 Composants principaux
A Panneau de commande : il permet de
gérer toutes les fonctions disponibles, de
l’établissement des programmes
d’entraînement à la visualisation des
messages et des données de
l’entraînement concerné.
B Siège : réglable en hauteur, il est muni
d’un dossier pour bien caler le dos au
fond du siège.
TOP 600 XT PRO
C Poignées : réglables en longueur, elles
doivent être saisies pour exécuter le
mouvement.
D Courroie d’entraînement : à la
transmission par chaîne est relié
l’alternateur pour la régulation de la
résistance électromagnétique.
E Support de siège : il supporte le siège et
est facilement amovible pour permettre
l’utilisation de l’appareil aux UFR.
F Châssis : structure portante de l’appareil,
elle assure la solidité, la robustesse et la
durée de vie de l’appareil.
103
Page 77
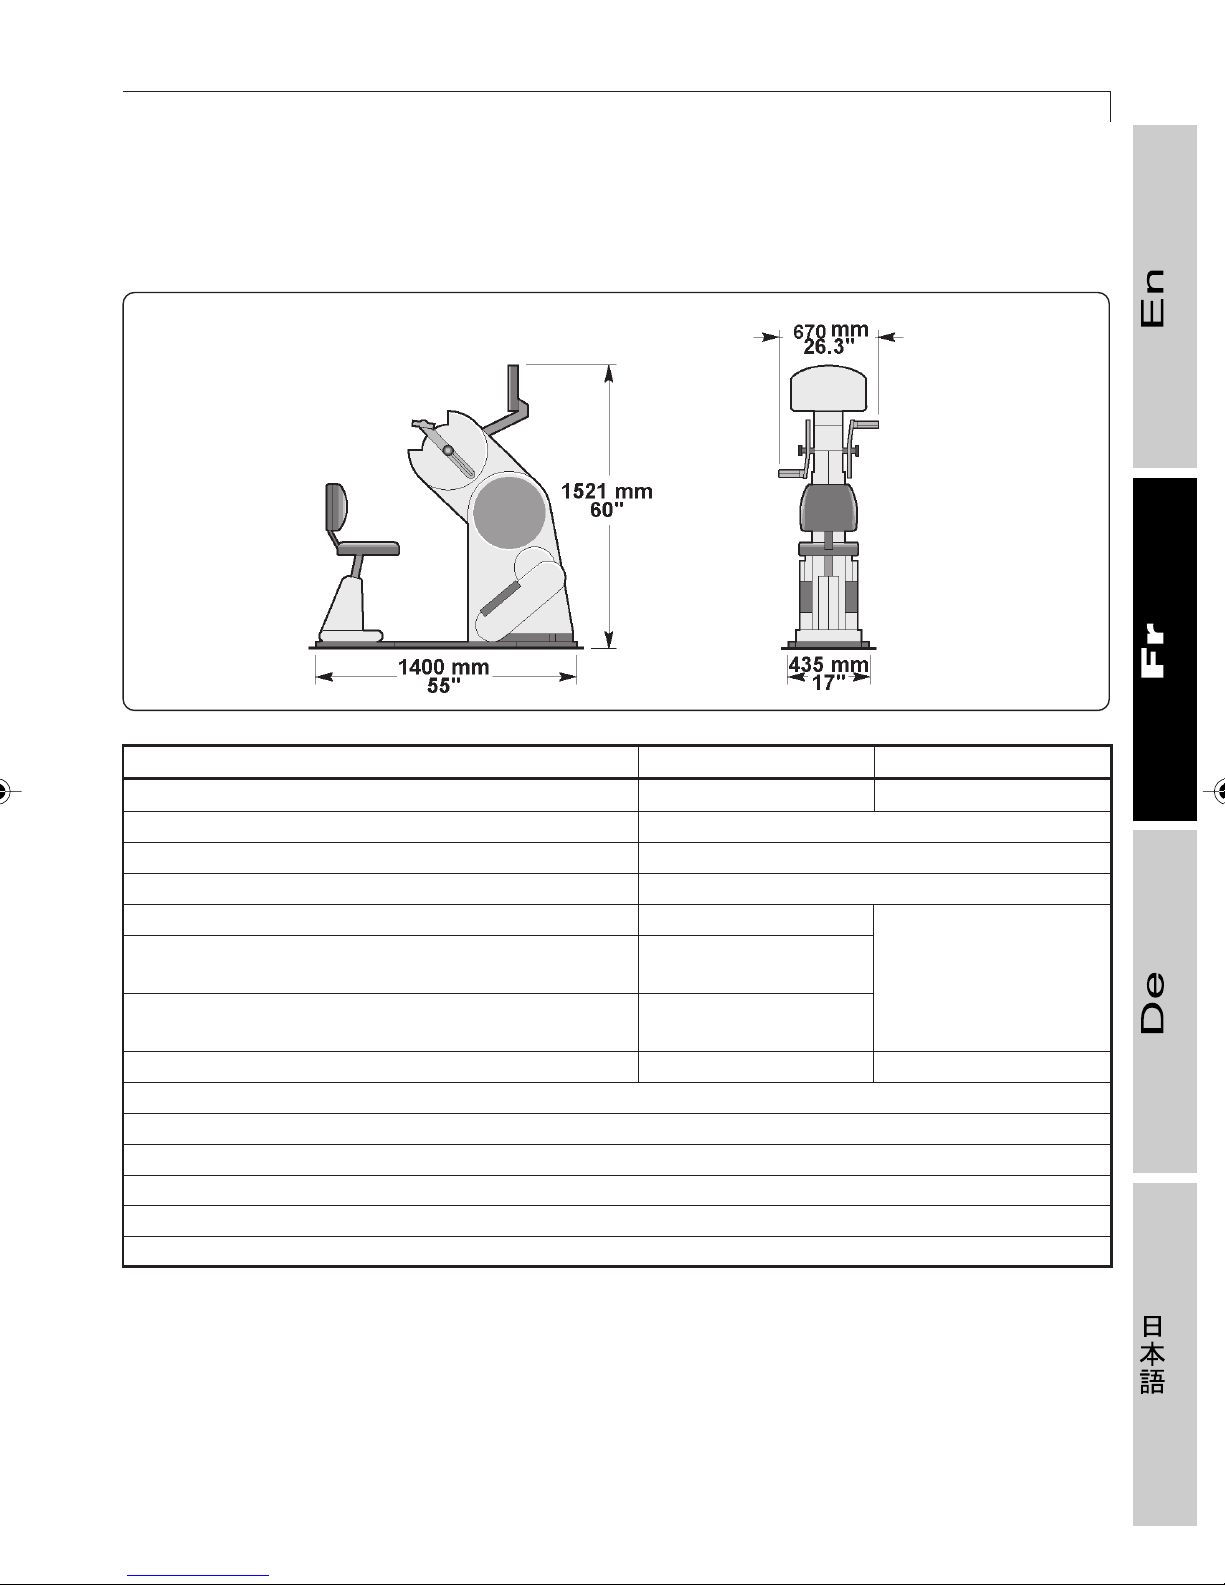
1.2 DESCRIPTION DE L’APPAREIL
1.2.2 Données techniques
77
106
Europe USA
Alimentation 110/230 V ~ 50/60 Hz 110~ Vac 50/60 Hz
Puissance absorbée 150 VA
Puissance mécanique maximum fournie par l’appareil 500 W
Fusibles 2 x F3A 5x20 mm
EMI EN 60601-1-2
Sécurité de machine EN 60601-1
EN 957-1 UL 2601-1
Directives 73/23 CEE
93/68 CEE
Poids 98 kg 216 lb
Vitesse conseillée : 50-60 RPM
Niveau de bruit inférieur à 70 dB
Système de résistance électromagnétique
Réglage de la résistance avec 12 niveaux d’intensité
Nombre de fonctions : 5
Poids maximum de l’utilisateur : 110 kg
L’appareil ne produit aucune interférence électromagnétique.
Appareil de Classe I, avec partie appliquée de Type B.
Appareil commun, non protégé contre la pénétration de l’eau.
Appareil non adapté à l’utilisation en présence d’un mélange anesthésique inflammable à
l’air, à l’oxygène ou au protoxyde d’azote.
Appareil pour fonctionnement continu.
Courant de fuite vers la terre en conditions normales maxi 250 µA.
Page 78
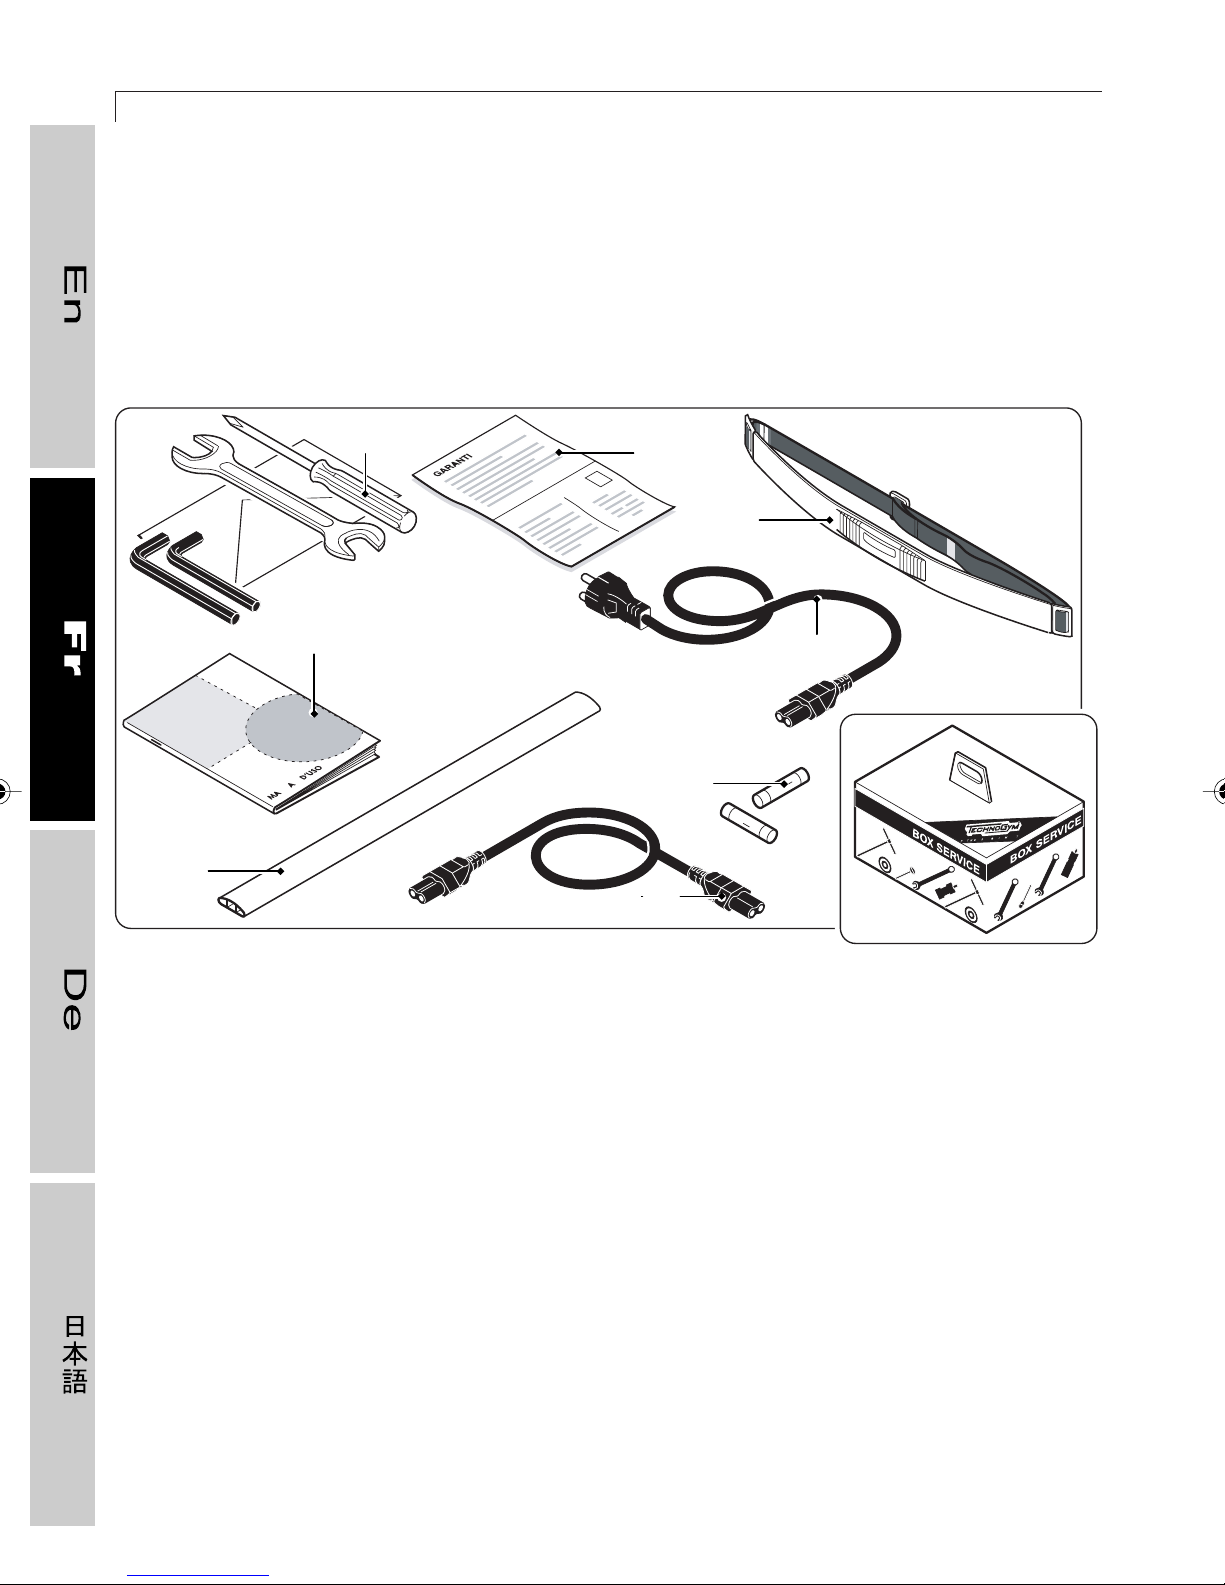
78
1.2.3 Accessoires
❒❒
❒ Accessoires fournis
❒❒
Les accessoires fournis sont contenus dans le “Service Box”:
TOP 600 XT PRO
F
01241002
A Un jeu de clés
B
A
C
E
H
G
D
B Un manuel d’utilisation
C Le certificat de garantie
D Cordon de liaison avec un autre appareil
E Ceinture thoracique avec transmetteur pour cardio-fréquencemètre
F Un protecteur de câble
G Des fusibles de rechange (F 3A, 5x20 mm)
H Un cordon d’alimentation
Page 79
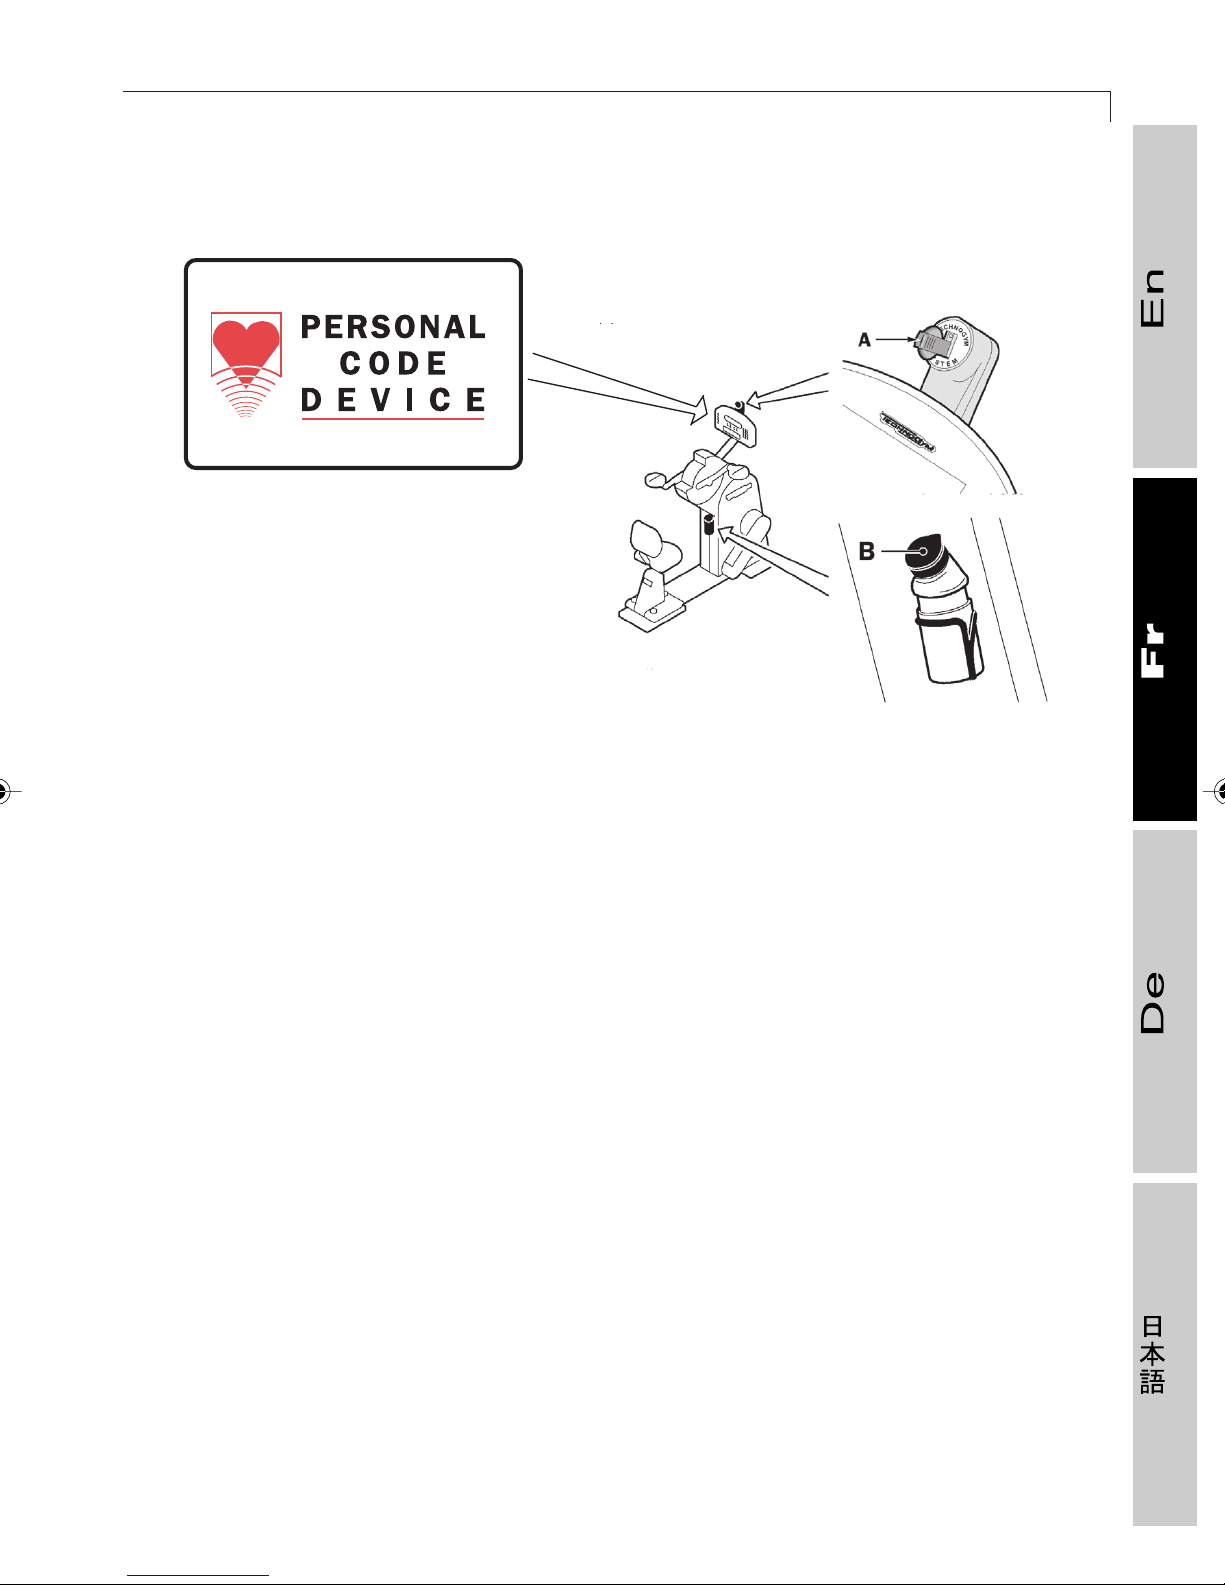
1.2 DESCRIPTION DE L’APPAREIL
❒❒
❒ Accessoires optionnels
❒❒
C
Pcd
79
104
A Clé TGS*, c’est l’interface utilisateur-appareil qui s’insère dans le lecteur TGS ; elle
permet d’enregistrer des programmes d’entraînement personnalisés, en fonction des
besoins et des objectifs spécifiques de l’utilisateur.
B Bidon et porte-bidon : est à disposition de l’utilisateur pendant l’exercice pour l’intégration
des liquides.
C Personal Code Device : système de mesure du rythme cardiaque grâce auquel l’appareil
se syntonise exclusivement avec la fréquence cardiaque de l’utilisateur ; il s’active en
portant une ceinture thoracique munie d’un émetteur de type codifié. La présence du
Personal Code Device sur l’appareil est signalée sur le panneau de commande de celuici par l’autocollant représenté sur la figure.
Page 80
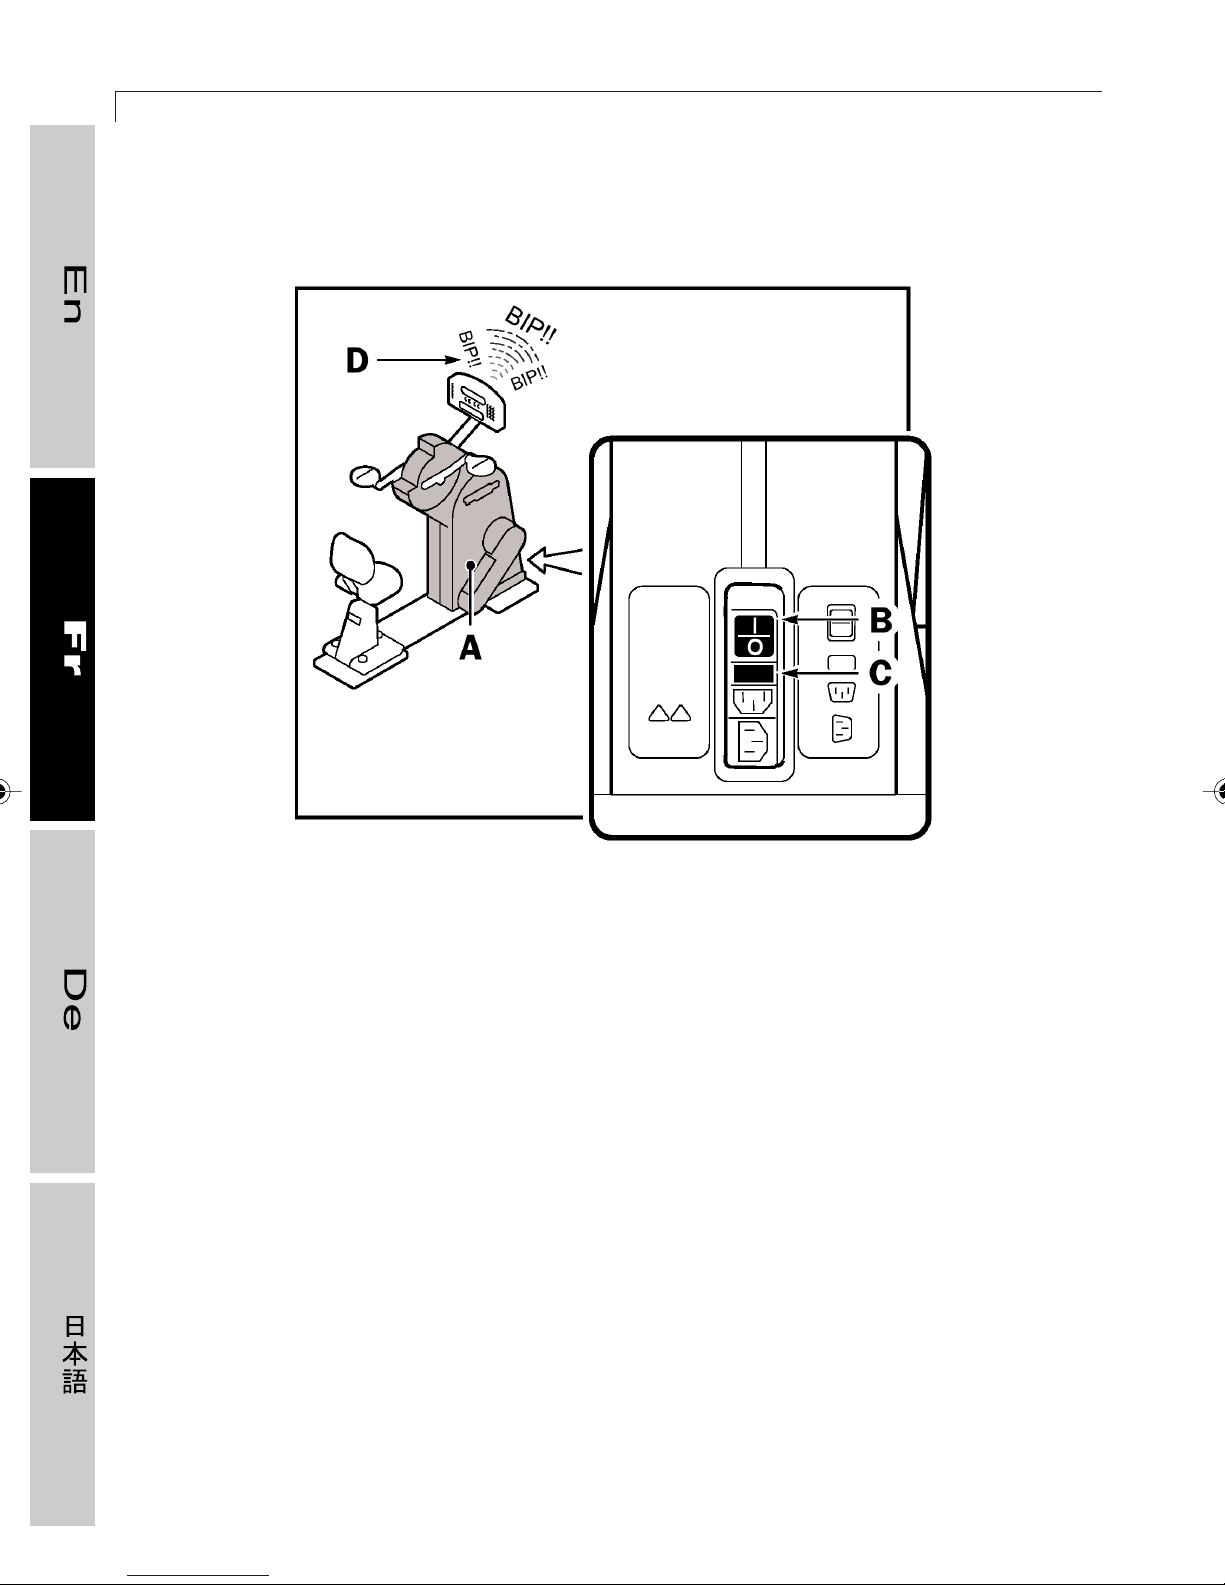
80
1.2.4 Dispositifs et décalcomanies de sécurité
TOP 600 XT PRO
105
A Carters fixes : ils protègent l’accès au mécanisme de la transmission.
B Interrupteur général : il établit et coupe l’alimentation en énergie électrique de l’appareil.
C Fusibles : ils protègent les parties électriques de l’appareil. Quand le courant atteint une
intensité excessive, les fusibles grillent pour empêcher l’électronique embarquée de
s’endommager. Des fusibles de rechange sont fournis avec l’appareil.
D Signale sonore : il signale à l’utilisateur la mise sous tension de Top 600 ou le début ou
la fin de l’exercice, ou encore que la fréquence cardiaque est élevée.
Page 81
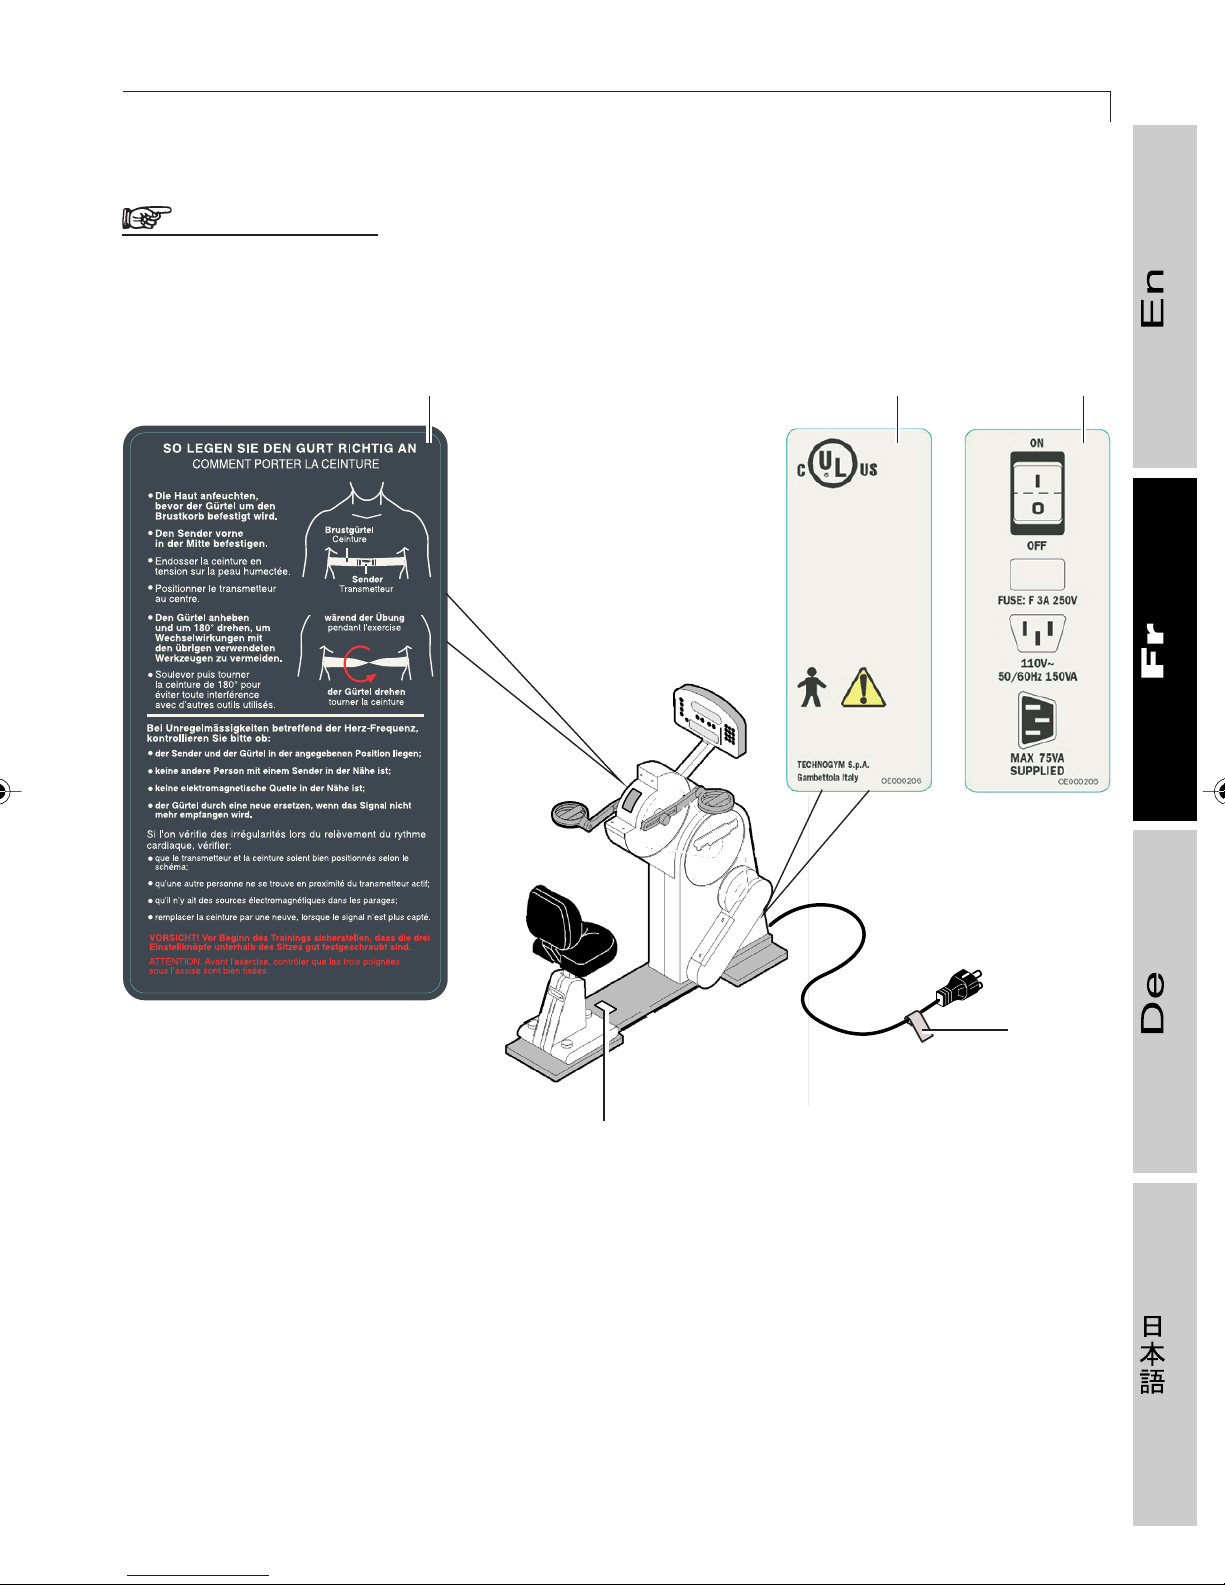
1.2 DESCRIPTION DE L’APPAREIL
AVERTISSEMENT
Il est vivement conseillé de faire très attention aux étiquettes autocollantes qui
sont apposées sur l’appareil, parce qu’elles contiennent des informations
concernant les risques et les dangers éventuels :
BAA
81
01327002
0ekd270c-ted-fra
01327001
C
D
A L’étiquette appliquée à proximité de l’interrupteur général fournit les indications pour le
branchement électrique de l’appareil.
B L’étiquette posée sous le panneau de commande illustre la façon de porter la ceinture
thoracique pour le cardio-fréquencemètre.
C L’étiquette posée sur le cordon d’alimentation indique les caractéristiques électriques.
D L’étiquette située sur le châssis signale qu’il est nécessaire de contrôler le serrage des
poignées du siège.
Page 82
TOP 600 XT PRO
82
1.3 Installation et montage
❒❒
❒ Local d’installation
❒❒
Pour que l’entraînement avec les appareils de la ligne XT PRO soit facile, profitable et sans
aucun risque pour les personnes, il faut les installer dans un local présentant certaines
caractéristiques ; en particulier, il est conseillé de s’assurer de la présence de :
- température comprise entre +10° et +25° ;
- renouvellement de l’air suffisant et pouvant contenir une valeur d’humidité, durant
l’exercice, oscillant entre 20% et 90% ;
- éclairage suffisant, de manière à ce que l’exercice physique soit effectué dans des
conditions agréables et reposantes ;
- un espace libre tout autour de l’appareil suffisamment ample, pour des raisons de
sécurité ;
- une surface plane, stable et sans vibrations, avec une capacité adéquate au poids à
supporter, en considérant aussi celui de l’utilisateur.
Si l’appareil doit être installé dans un lieu public, celui-ci devra présenter toutes les
caractéristiques exigées par les lois en vigueur.
Page 83
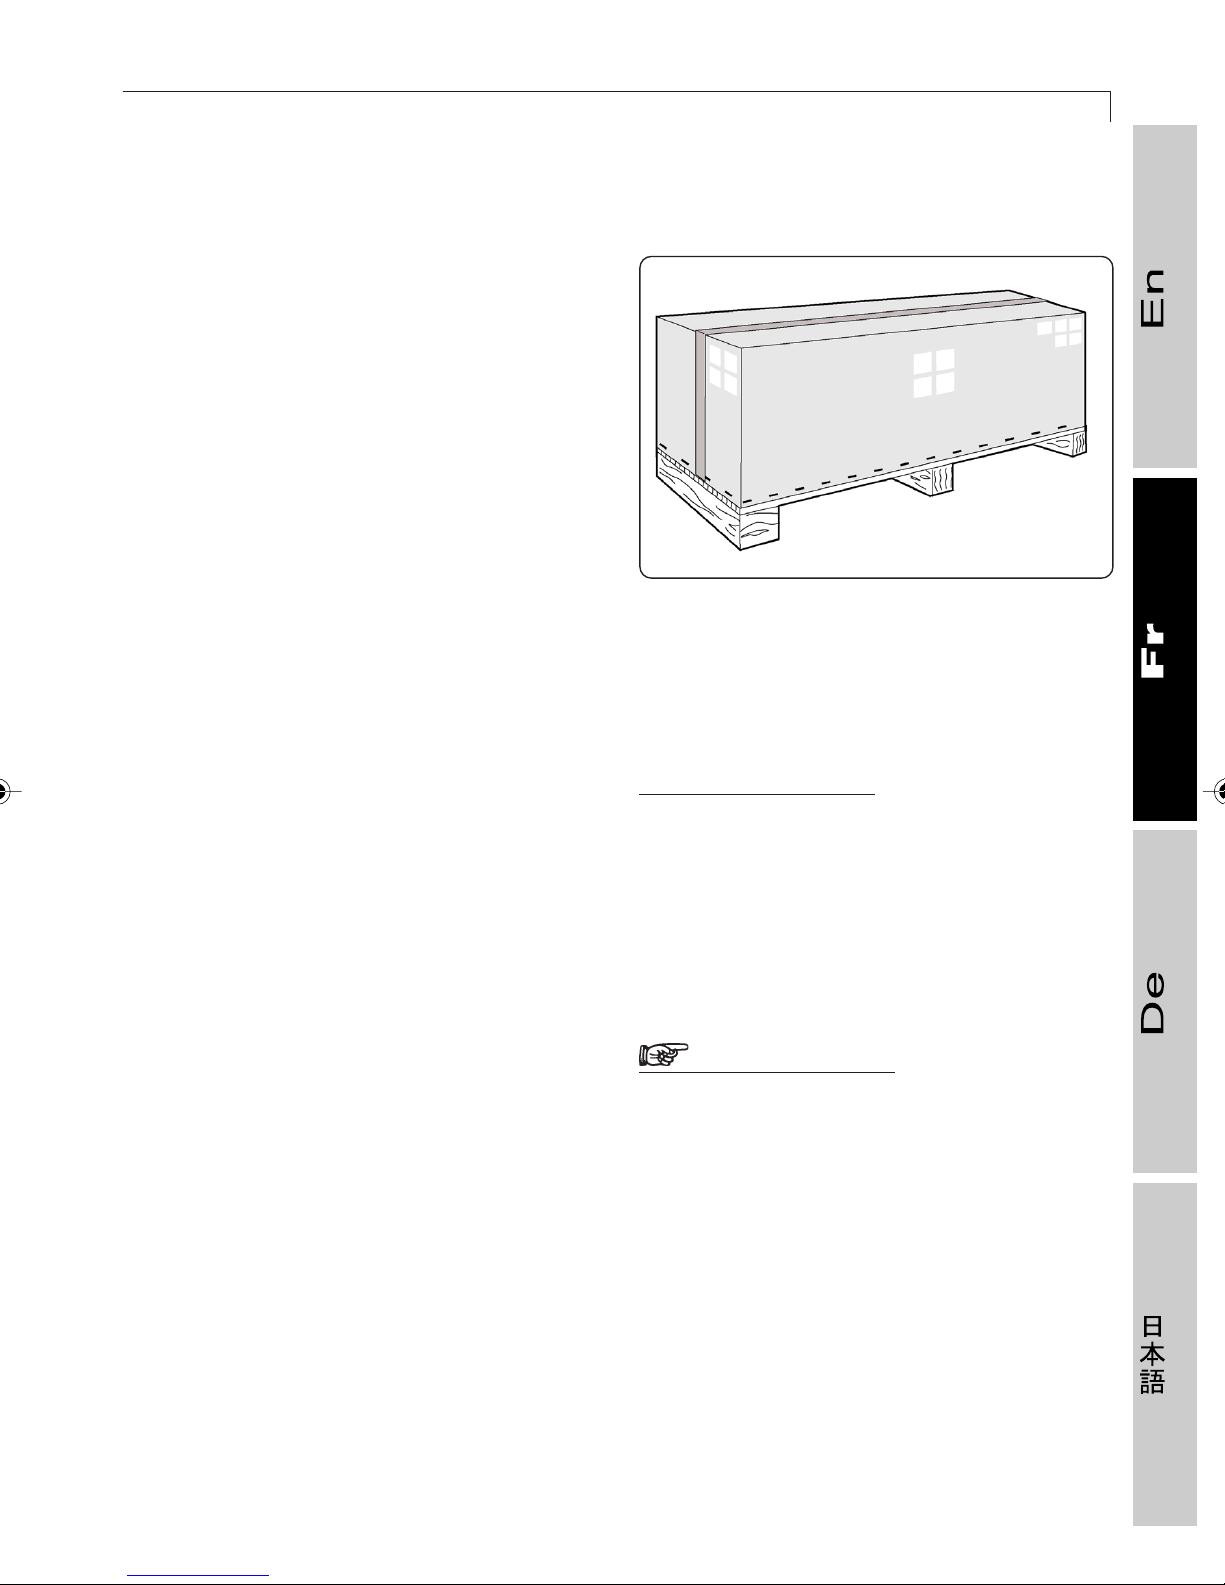
1.3 INSTALLATION ET MONTAGE
❒❒
❒ Déballage
❒❒
L’appareil est livré monté ; il est conditionné
sous housse transparente ou dans une
caisse carton, montée sur une palette,
suivant le lieu de destination.
Le levage et la manutention du matériel
emballé s’effectuent à l’aide d’appareils ou
d’engins traditionnels prévus à cet effet, les
instructions étant indiquées sur l’emballage
de ceux-ci.
Dans le but de protéger les personnes et les
objets, il faut choisir avec attention les
instruments de levage et de transport qui
seront utilisés en tenant toujours compte de
l’endroit où l’on désire installer l’appareil.
83
9
Comme indiqué sur la caisse carton, pour le
déballage de l’appareil, il faut d’abord
enlever les agrafes métalliques de fixation
de l’emballage sur la palette, puis soulever
la caisse carton.
Examiner bien l’emballage pour déceler
d’éventuels endommagements pendant le
transport.
Pour sortir le matériel, déposer les éléments
de fixation et poser au sol les composants
de l’emballage, à savoir :
- l’appareil muni des protections ;
- le coffret de service contenant les
accessoires fournis.
? INFORMATIONS
Il est conseillé de conserver
l’emballage pour pouvoir emballer de
nouveau l’appareil dans les mêmes
conditions lors d’un éventuel
déménagement.
AVERTISSEMENT
Ne pas jeter l’emballage dans la
nature ; respecter les procédures
d’élimination des déchets en
conformité avec la réglementation en
vigueur.
Page 84
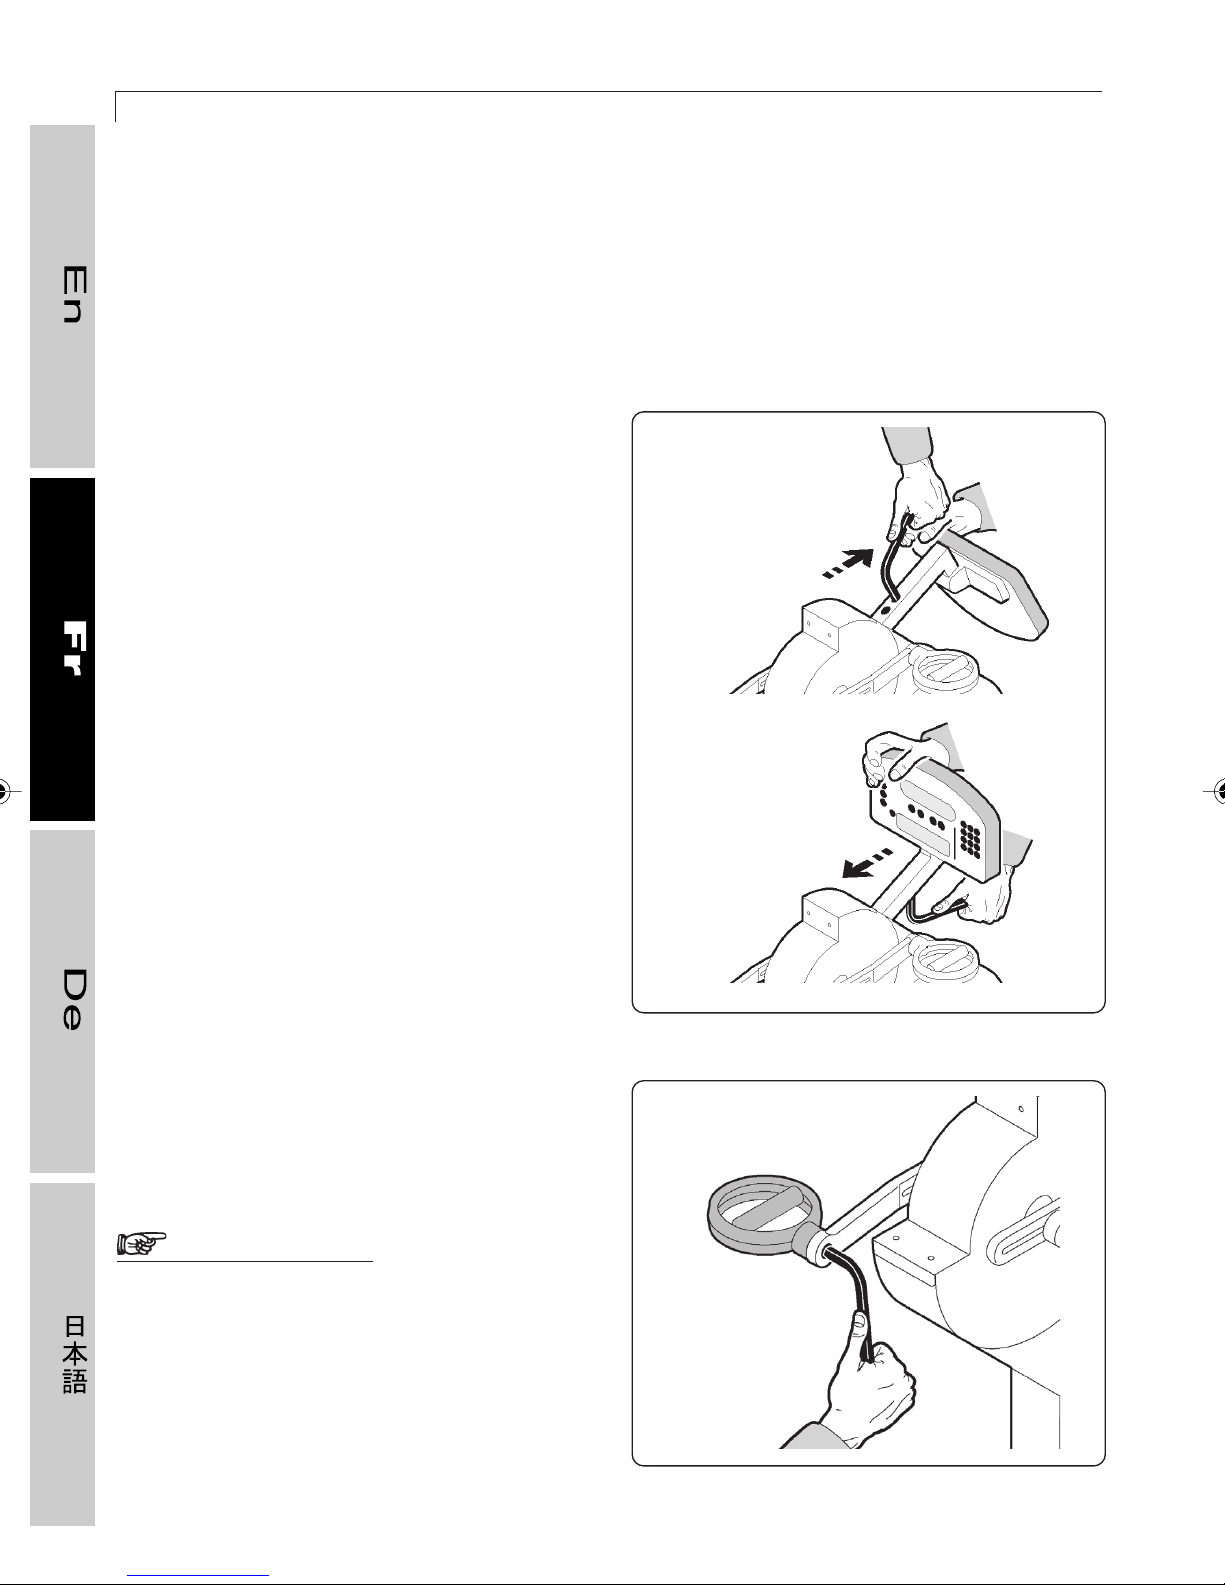
84
1.3.1 Montage
Déposer l’appareil de la palette et le poser
au sol en le faisant glisser jusqu’à l’endroit
d’installation choisi.
Le panneau de commande est retourné
vers le bas; pour le remettre en place,
desserrer les deux vis supérieures et le
dégager du châssis avec soin en veillant
aux câbles.
TOP 600 XT PRO
Faire pivoter le panneau de commande de
90°, le remettre en place sur le châssis et
serrer à fond les deux vis dans la partie
inférieure.
Visser les poignées à l’aide d’une clé
hexagonale et serrer à fond.
AVERTISSEMENT
Les opérations de montage doivent
être effectuées par des personnes
ayant au moins de bonnes
connaissances en mécanique.
107
107-2
Page 85
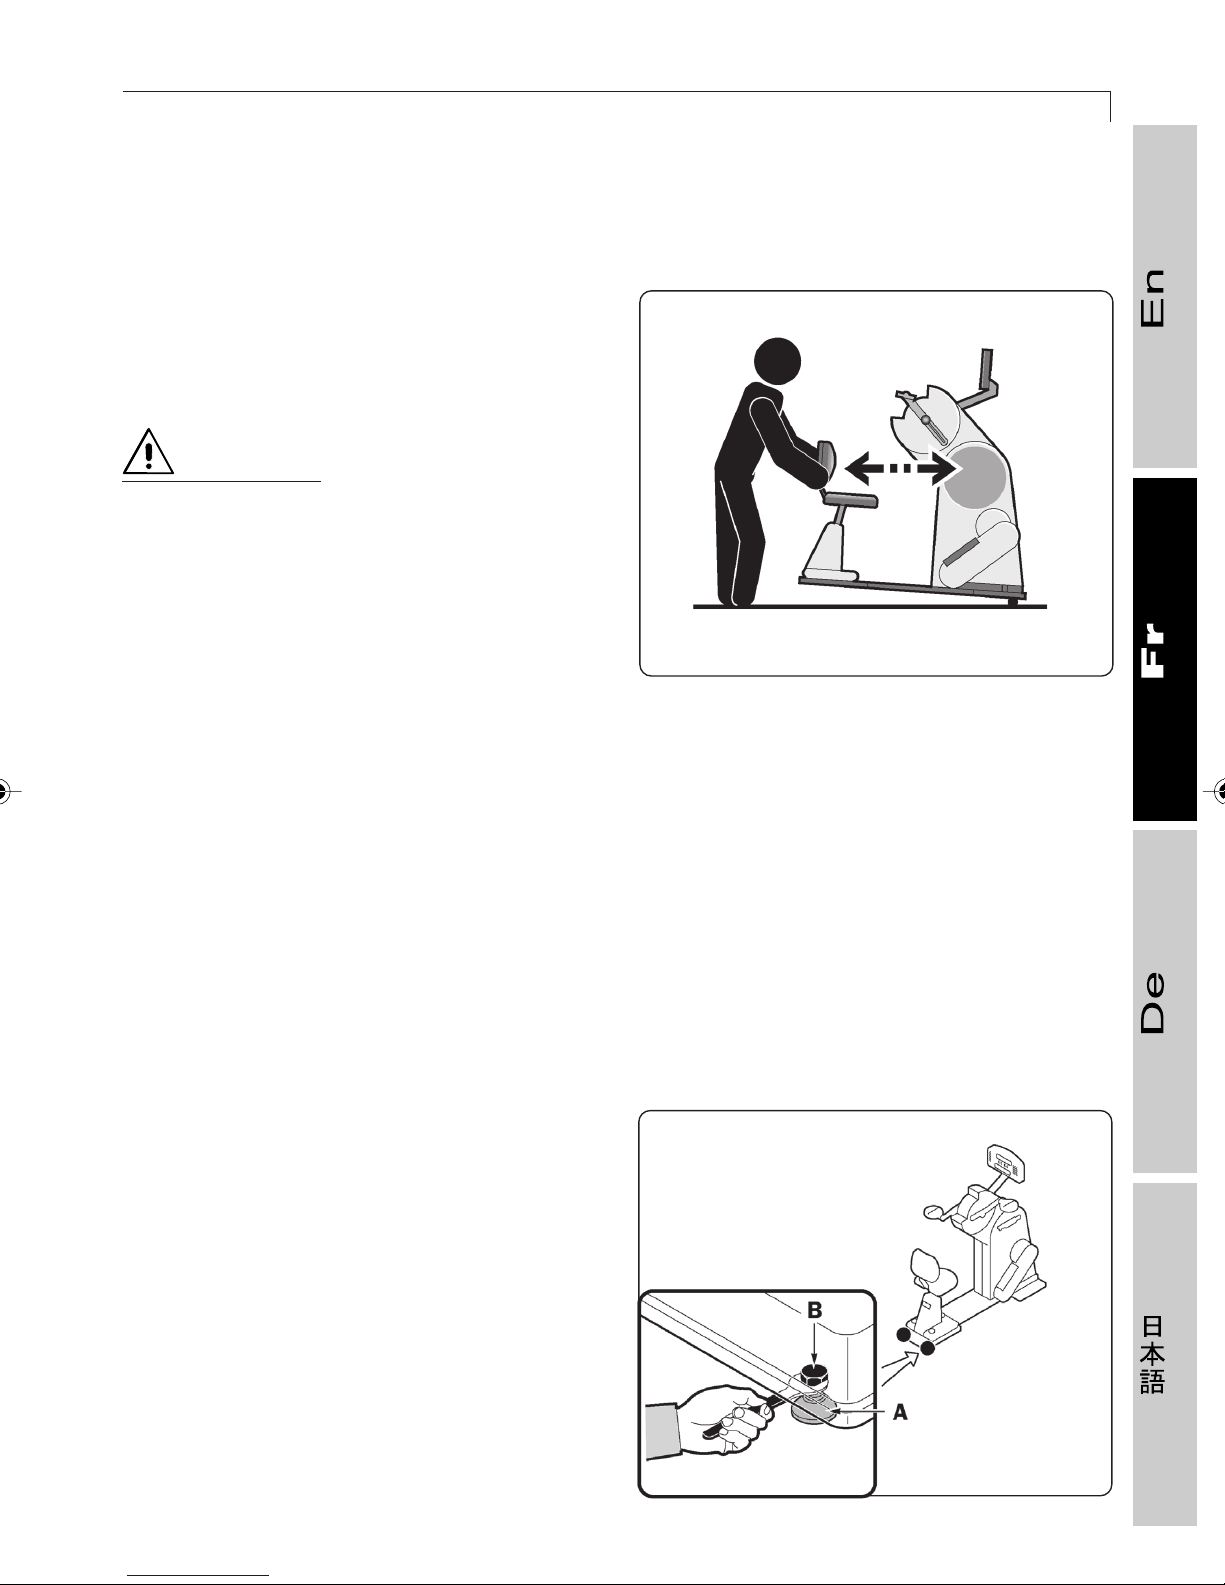
1.3 INSTALLATION ET MONTAGE
1.3.2 Déplacement de l’appareil
Pour soulever l’appareil de la palette et le
poser au sol en faisant glisser, voir la figure
ci-contre. Cette opération doit être effectuée
par 2 personnes.
ATTENTION
Déplacer et positionner au sol
l’appareil avec soin. Les arrêts
brusques, contraintes ou irrégularités
du plancher pourraient provoquer une
chute de l’appareil.
85
108
L’appareil est muni à l’avant de roulettes de
transport fixes. Pour déplacer l’appareil, le
saisir comme représenté sur la figure et le
pousser en avant ou en arrière.
Si l’état du plancher ne permet pas de
déplacer l’appareil avec les roulettes, cette
opération devra être effectuée en utilisant
des appareils de levage et de manutention
traditionnels.
1.3.3 Nivellement
Pour l’opération de nivellement, il faut régler
les pieds postérieurs :
A - visser ou dévisser les pieds de manière
à porter le châssis en position
horizontale.
B - après le réglage, serrer les contre-écrous.
107-1
Page 86
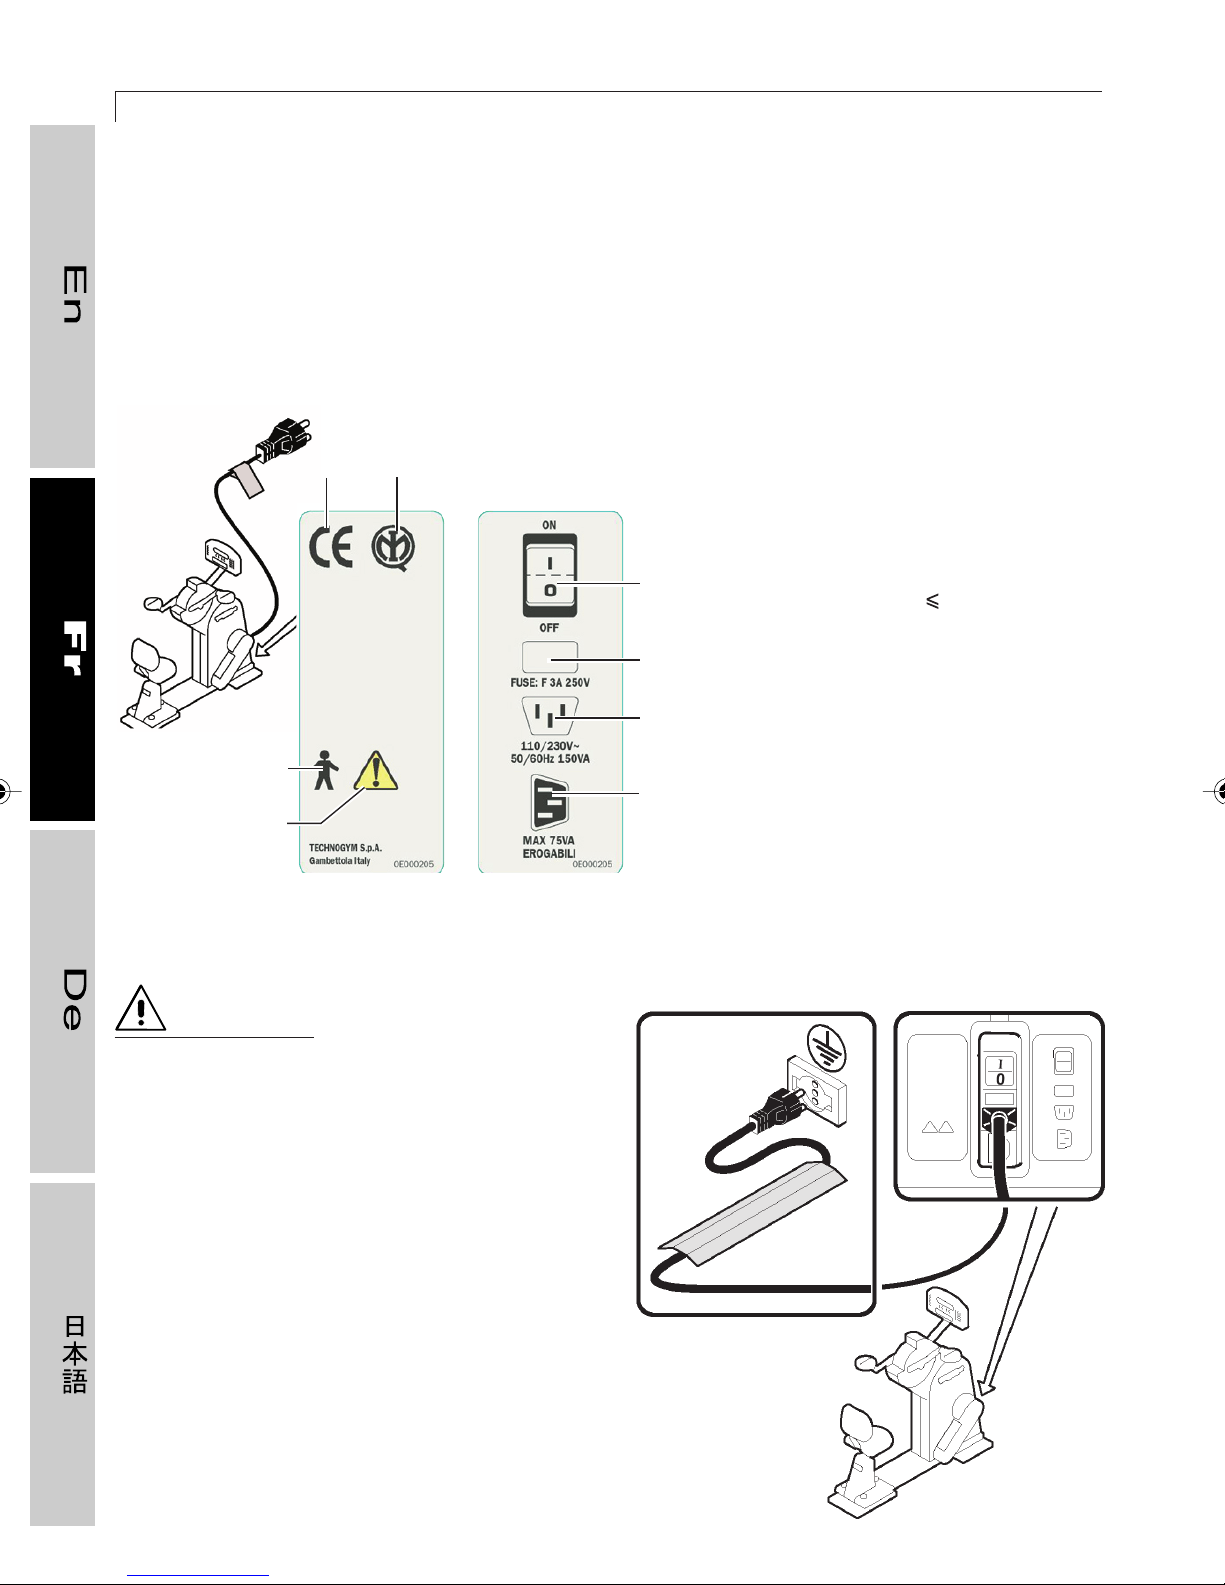
TOP 600 XT PRO
86
1.3.4 Branchement électrique
Avant de brancher l’appareil au réseau, il faut s’assurer que les caractéristiques de l’installation
électrique répondent à la législation en vigueur. Vérifier les données imprimées sur l’étiquette
appliquée près de la prise et sur le cordon d’alimentation :
1) Indique le type des fusibles : F 3A
5x20 mm
7
8
2) Indique les caractéristiques de
l’alimentation principale : 110/
230Vac~ 50/60 Hz 150 VA
01327003
5
6
01327002
ATTENTION
La prise murale doit être située dans
un endroit qui permette d’enlever et
de mettre la prise avec facilité et
sans provoquer aucun danger.
4
1
3) Indique les caractéristiques de la
prise auxiliaire :
75 VA
4) Représentation de l’interrupteur
général :
I= allumé ; 0 = éteint
2
5) Indique un appareil avec partie
appliquée de type B
3
6) Symbole indiquant de consulter
le manuel utilisateur
7) Indique la conformité aux
directives CE
8) Représente la marque IMQ,
organisme de certification
Lorsque l’on branche l’appareil,
l’interrupteur doit être sur la position 0
(l’appareil doit être éteint).
Brancher le cordon d’alimentation d’abord
au connecteur de l’appareil, puis à la prise
murale.
Si cela est possible, protéger le cordon
d’alimentation avec les protecteurs qui sont
fournis avec l’appareil afin d’éviter qu’il soit
endommagé.
109-1
Page 87
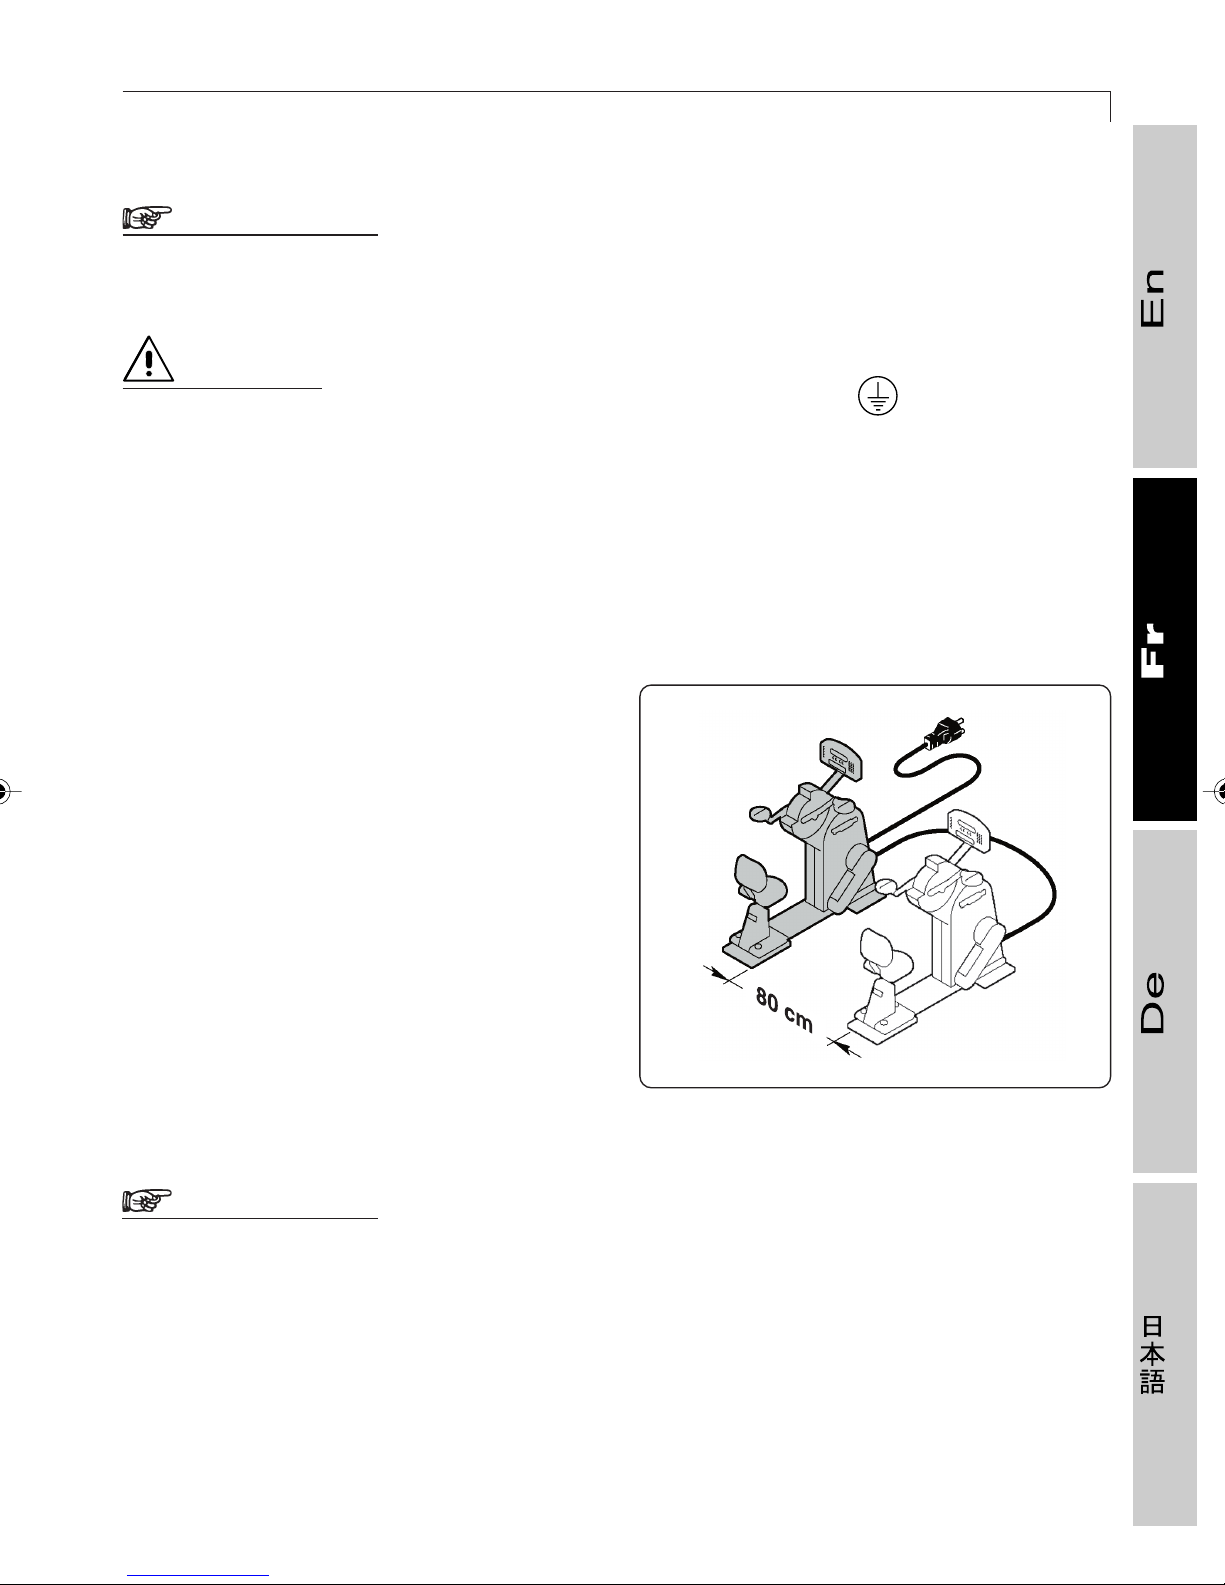
1.3 INSTALLATION ET MONTAGE
87
AVERTISSEMENT
Contrôler périodiquement le cordon d’alimentation.
ATTENTION
La prise de courant doit être pourvue d’une mise à la terre . Si ce n’est pas le
cas, celle-ci doit être installée par du personnel spécialisé avant d’effectuer le
branchement électrique de l’appareil.
1.3.5 Branchement électrique sur la prise d’un autre appareil ou dispositif
Les caractéristiques de Top 600 permettent
de brancher deux appareils entre eux.
Pour le branchement, utiliser le câble de
liaison fourni; insérer les fiches dans les
prises appropriées (à proximité des prises
de l’alimentation principale).
AVERTISSEMENT
Top 600 ne peut être branché que sur un autre appareil du même type, soit un autre
Top 600. La prise auxiliaire ne doit pas être utilisée pour d’autres usages. Par
raison de sécurité, s’assurer que le courant de fuite vers la terre sur le cordon
d’alimentation principale ne dépasse par 500 µA.
01237006
Page 88
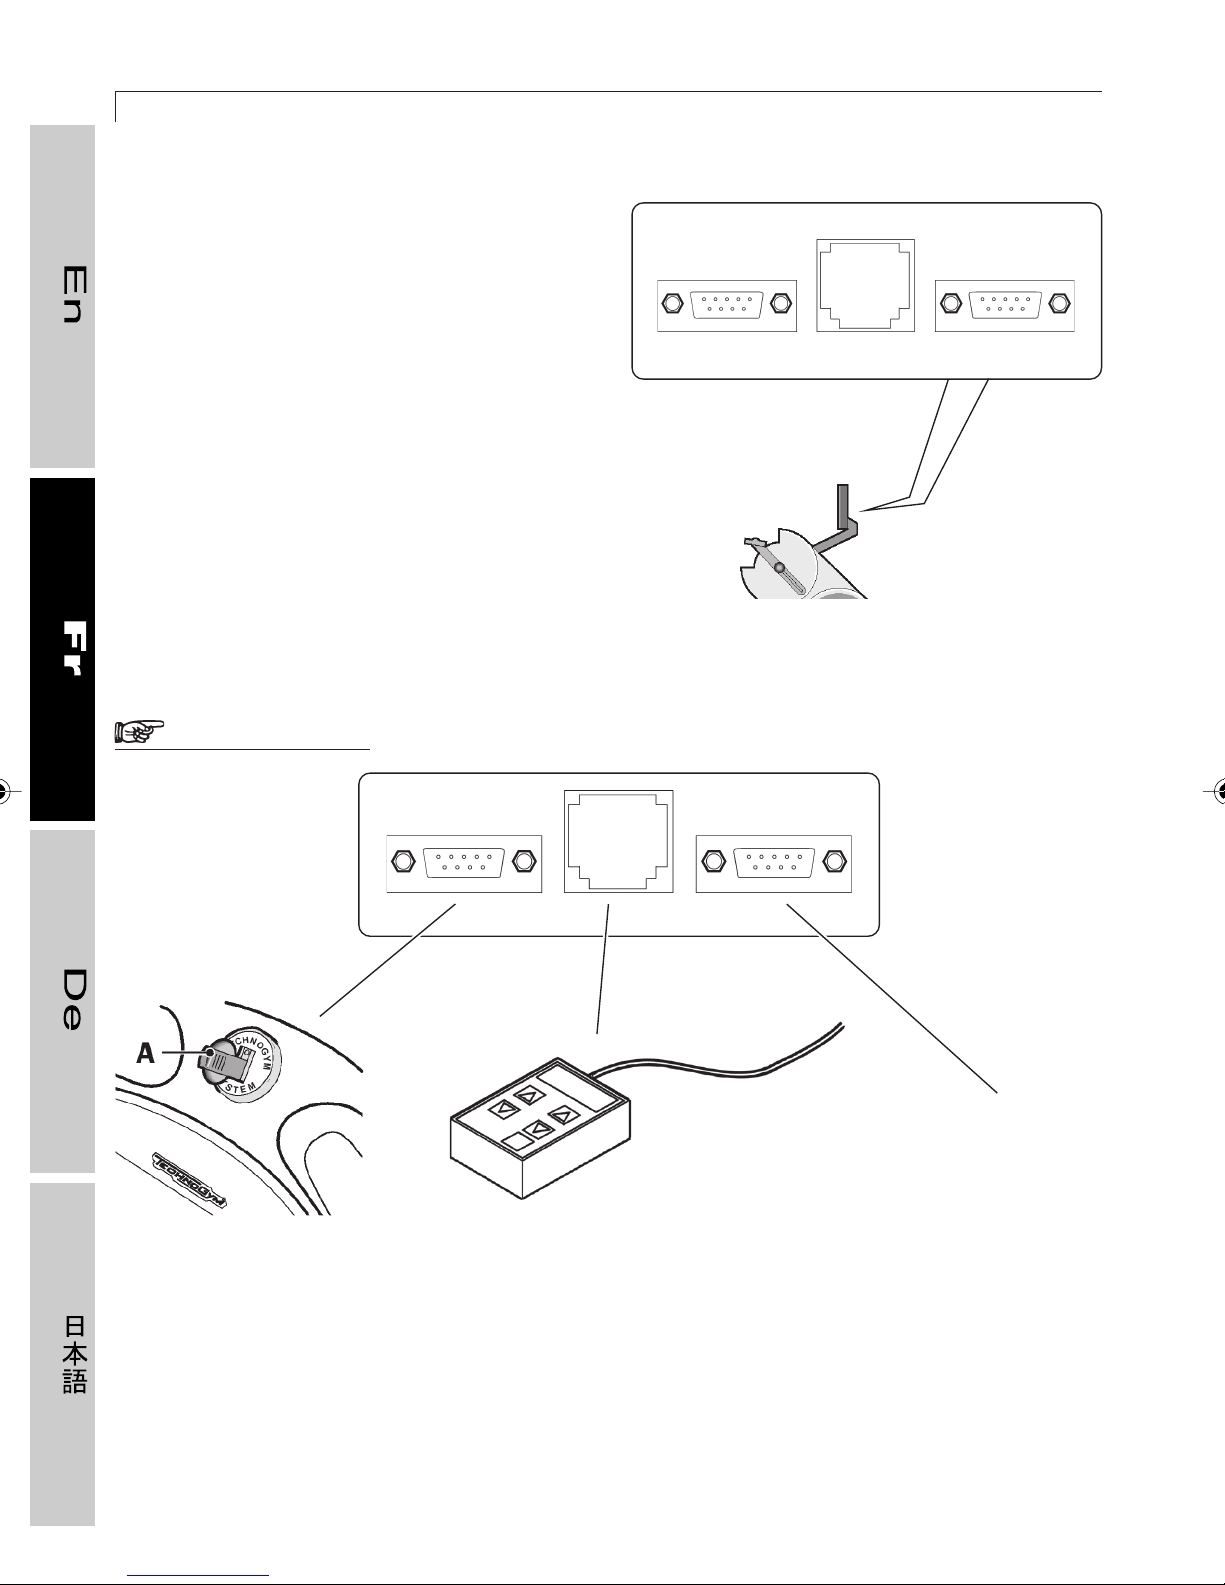
88
Les appareils de la ligne XT PRO, outre la
possibilité de raccordement entre eux,
peuvent être connectés à un dispositif de
réception audio/vidéo comme le Cardio
Theater et à un lecteur TGS.
Les raccordements à ces dispositifs
s’effectuent par les connecteurs implantés
au dos du panneau de commande; ces
connecteurs sont munis de capots de
protection qui ne doivent être en aucun cas
ôtés si la prise n’est pas utilisée.
Seul le personnel spécialisé du SAV
Technogym est habilité à enlever les capots
pendant l’installation. Les capots doivent
être ensuite conservés avec soin.
TOP 600 XT PRO
seriale
Particolare Top
AVERTISSEMENT
seriale
lettore TGS
Seul le lecteur TGS (IEC
950) peut être connecté à
la prise TGS.
Cardio_U
Seul le dispositif Cardio
Theater, conforme à la
norme internationale (IEC
950) peut être connecté à
la prise RJ45 (centrale).
AUX
Seuls les appareils
conformes à la norme IEC
950 peuvent être connectés
à la prise AUX. Ces appareils
doivent être placés à au
moins 2 mètres de hauteur.
Page 89
1.4 ENTRETIEN
1.4 Entretien
1.4.1 Entretien ordinaire
❒❒
❒ Soins et nettoyage de l’appareil
❒❒
L’appareil doit être toujours propre et sans
poussière, et l’on doit respecter les règles
hygiéniques et sanitaires les plus
élémentaires, surtout s’il est utilisé à l’intérieur
d’un centre sportif ou par plus d’une personne.
Pour nettoyer le panneau de commande
procéder de la manière suivante :
89
- éteindre l’appareil en plaçant
l’interrupteur sur la position 0 ;
- débrancher le cordon d’alimentation de
l’appareil de la prise murale ;
- nettoyer le panneau de commande avec
un chiffon humide mais non mouillé.
Nettoyer complètement l’appareil toutes les
semaines :
- avec l’appareil éteint, nettoyer les parties
externes avec une éponge humide ;
- déplacer l’appareil pour enlever la
poussière qui se serait éventuellement
accumulée à l’aide d’un aspirateur.
Si la ceinture thoracique doit être lavée,
utiliser de l’eau savonneuse ; laisser ensuite
sécher pendant quelques heures dans un
endroit chaud et sec, à l’écart de toutes
sources directes de chaleur.
Stériliser la ceinture thoracique avec un
désinfectant pour la stérilisation et la
conservation aseptique du matériel
chirurgical que l’on peut facilement trouver
en pharmacie.
AVERTISSEMENT
En cas d’utilisation médicale de
l’appareil, il est recommandé de
nettoyer la ceinture thoracique après
chaque utilisation.
AVERTISSEMENT
Faire attention à ne pas frotter trop
fort sur le panneau de commande,
sur les dessins et sur les
décalcomanies.
Pour nettoyer le bidon utiliser un produit
d’hygiène alimentaire ; éviter tout produit
chimique ou solvant.
Page 90
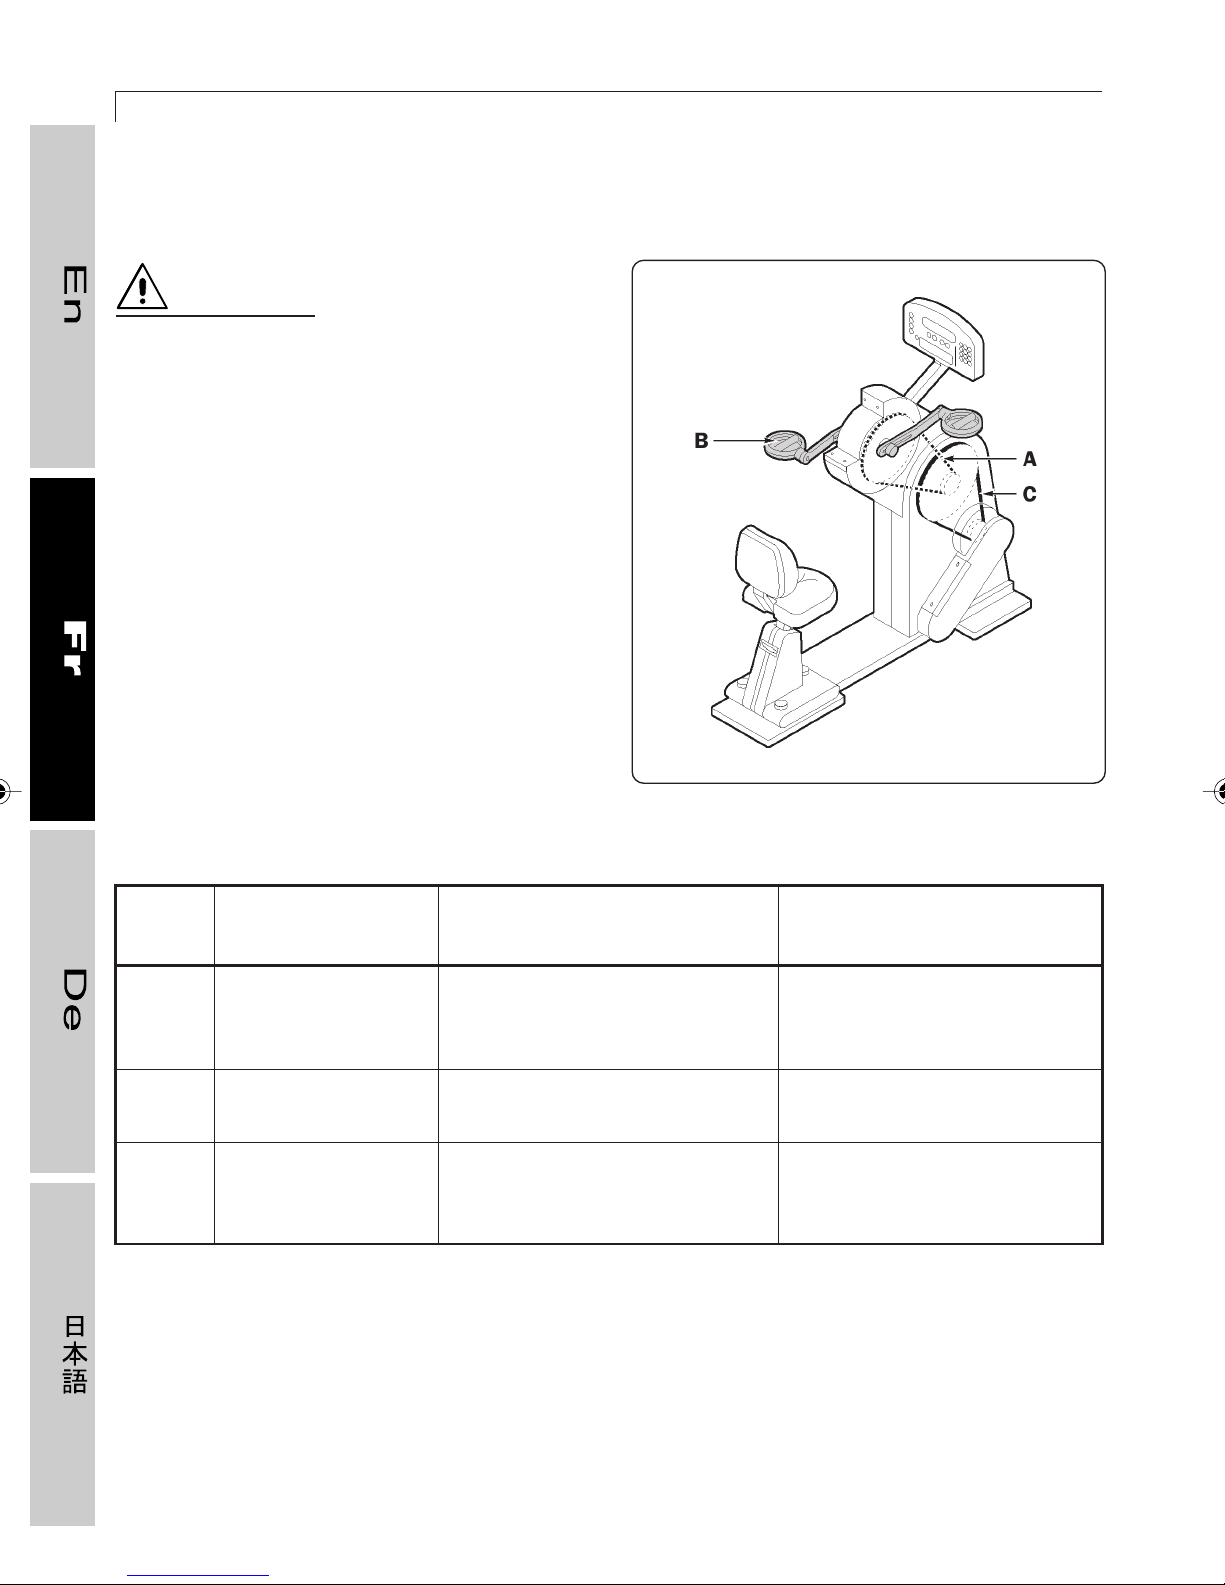
90
❒❒
❒ Graissage et contrôles
❒❒
ATTENTION
Les interventions d’entretien
périodique, de réglage et de
graissage doivent être effectuées
par le SAV Technogym.
TOP 600 XT PRO
Rép. Désignation
A Chaîne de
transmission
B Poignée
C Courroie
d’entraînement
Opération
Contrôle du graissage
Contrôle du jeu
Contrôle de l’usure
114
Périodicité
Tous les mois
Tous les mois
Tous les mois
Page 91
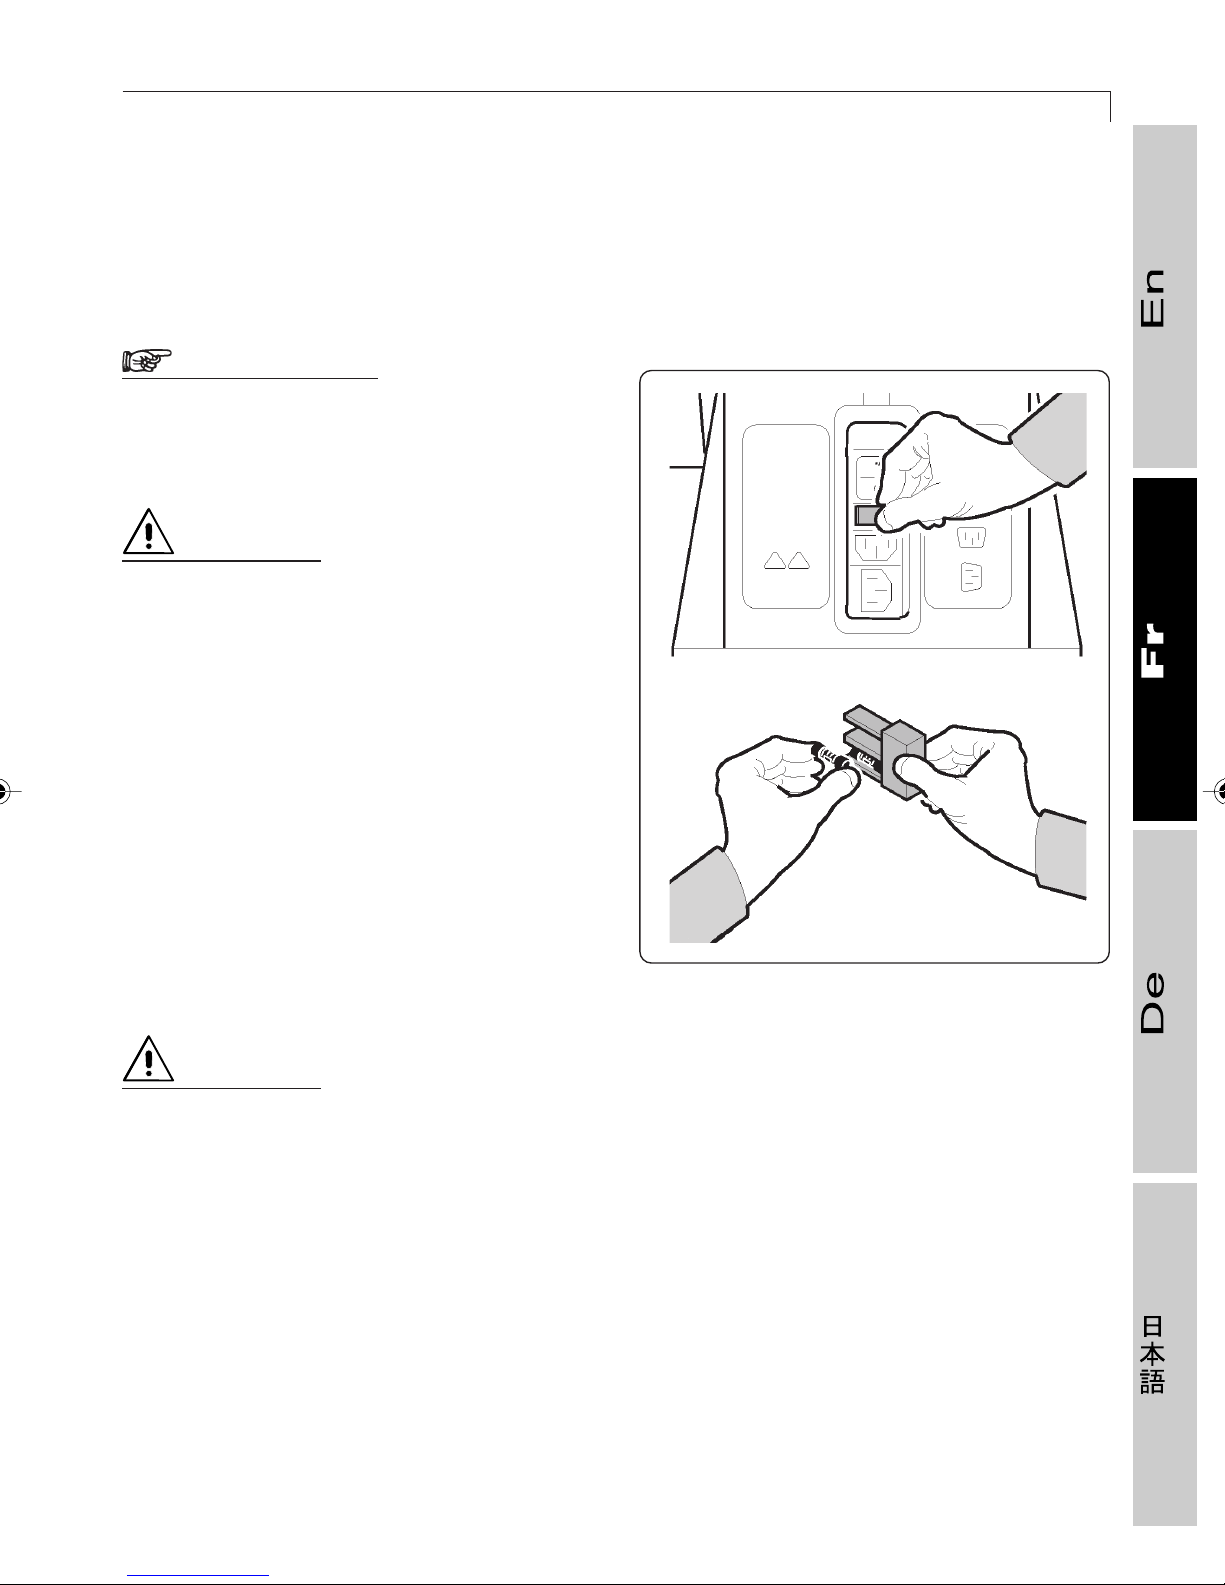
1.4 ENTRETIEN
1.4.2 Entretien extraordinaire
❒❒
❒ Remplacement des fusibles
❒❒
AVERTISSEMENT
Le remplacement des fusibles doit
être effectué par le Service
d’Assistance Technique Technogym.
ATTENTION
Avant d’effectuer le remplacement,
il faut éteindre l’appareil en mettant
l’interrupteur sur la position 0 et
débrancher le cordon d’alimentation
de la prise murale.
91
Enlever le boîtier porte-fusible, qui se trouve
à droite de l’interrupteur, en appuyant sur le
levier.
Remplacer le fusible qui a grillé par un des
fusibles neufs fournis avec l’appareil (F 3A).
Remettre le boîtier porte-fusible en place en
s’assurant de sa parfaite insertion à pression.
ATTENTION
Si tous les fusibles fournis avec
l’appareil ont été utilisés, utiliser un
fusible présentant des caractéristiques
électriques identiques, de même valeur
et certifiés : F 3A.
115
Page 92
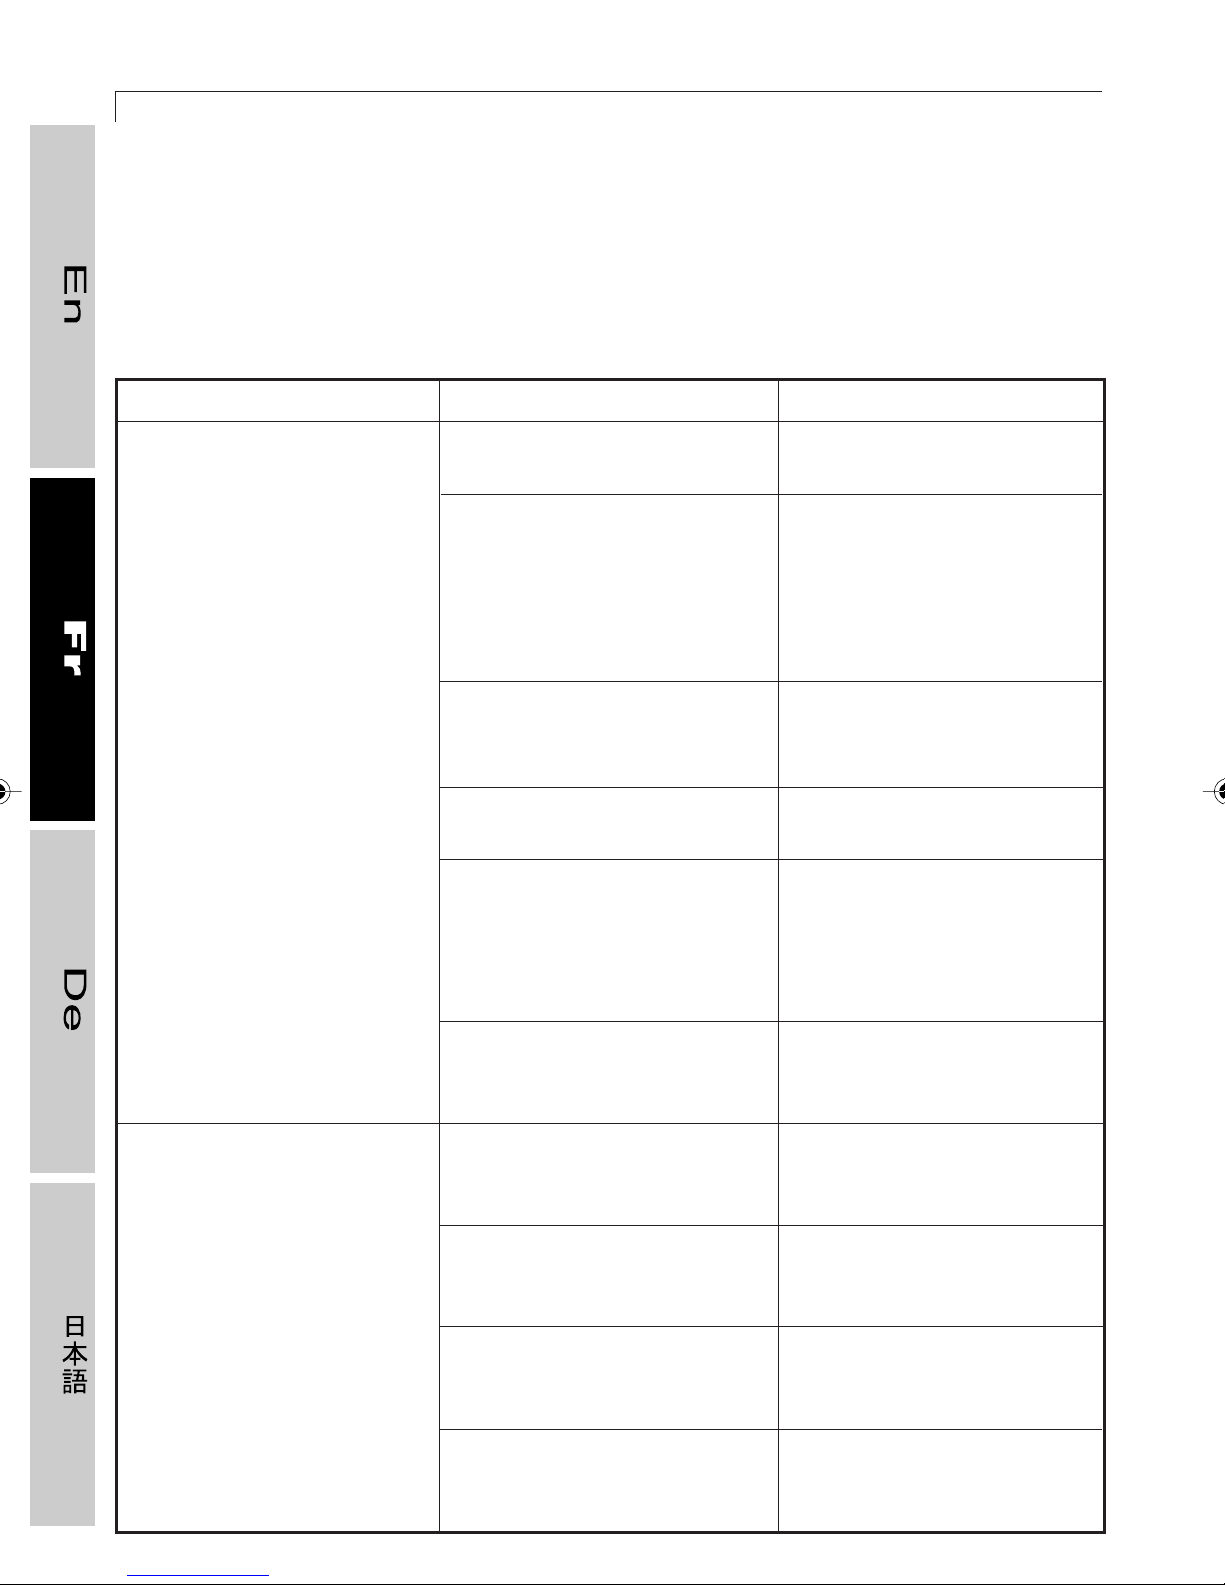
TOP 600 XT PRO
92
1.4.3 Recherche des pannes
Le tableau ci-dessous indique des anomalies de fonctionnement qui peuvent se manifester
pendant l’utilisation normale de l’appareil. Dans le cas où les solutions proposées ne
permettent pas de remédier à l’inconvénient, demander l’intervention du SAV Technogym.
Inconvénients
L’appareil ne s’allume pas
Causes
Le cordon d’alimentation
n’est pas branché.
Il n’y a pas de courant
d’alimentation.
Le cordon d’alimentation est
endommagé.
Le cordon d’alimentation n’est
pas correctement installé.
Les fusibles sont grillés.
Solutions
Brancher le cordon d’alimentation
dans la prise murale.
Contrôler la présence de
courant secteur à la prise à
laquelle l’appareil est
branché en connectant des
appareils dont vous êtes sur
du bon fonctionnement.
S’adresser au Service
d’Assistance Technique
Technogym.
Contrôler le branchement.
Pour remplacer le fusible
grillé par celui de rechange
(F 3A), s’adresser au
Service d’Assistance
Technique Technogym.
Mécanismes ou organes
interne bruyants
Le connecteur de liaison du
panneau de commande s’est
accidentellement débroché.
L’appareil ne repose pas au
sol de manière uniforme.
Les roulements son
endommagés.
L’alternateur est détérioré.
La courroie est usée.
S’adresser au Service
d’Assistance Technique
Technogym.
Contrôler et mettre de niveau
l’appareil en agissant sur les
pieds de réglage postérieurs.
S’adresser au Service
d’Assistance Technique
Technogym.
S’adresser au Service
d’Assistance Technique
Technogym.
S’adresser au Service
d’Assistance Technique
Technogym.
Page 93
1.4 ENTRETIEN
93
Inconvénients
Avec l’appareil
en marche, les données
ne sont pas correctes ou
crédibles
Défaut de mesure du
rythme cardiaque avec la
ceinture thoracique
Causes
Une touche du clavier est
bloquée.
L’appareil se trouve à
proximité de sources
de magnétisme (radios,
électroménagers, etc.).
Un connecteur interne s’est
accidentellement débroché.
Un contact interne s’est
produit dans le panneau de
commande.
La courroie de l’alternateur
est lâche.
D’autres émetteurs se
trouvent à proximité.
Solutions
Si l’inconvénient persiste,
s’adresser au Service
d’Assistance Technogym.
Déplacer l’appareil aux
sources de magnétisme.
S’adresser au Service
d’Assistance Technogym.
S’adresser au Service
d’Assistance Technogym.
S’adresser au Service
d’Assistance Technogym.
Déplacer l’appareil pour
prévenir le risque
d’interférence des signaux (la
distance minimale entre deux
appareils est de 80 cm).
Présence de parasite à
proximité.
La ceinture est usée.
Les contacts sur la peau de
l’émetteur de la ceinture ne
sont pas corrects.
Le panneau de commande ne
fonctionne pas correctement.
L’émetteur est détérioré.
Localiser la source de
perturbation (radios,
électroménagers, par
exemple) ou déplacer
l’appareil.
Remplacer la ceinture par
une neuve à commander
directement au Service
d’Assistance Technogym.
Humidifier avec de l’eau la
partie interne de la ceinture
thoracique.
S’adresser au Service
d’Assistance Technogym.
Remplacer la ceinture thoracique
par une neuve à commander
directement au Service
d’Assistance Technogym.
Page 94
94
1.5 Assistance technique
Le Service d’Assistance Technique
Technogym assure :
- des consultations téléphoniques ;
- une définition des interventions
d’assistance sous garantie et payante ;
- un service d’assistance à domicile ;
- l’envoi de pièces de rechange d’origine.
Lorsque l’on contacte le Service
d’Assistance Technique Technogym, il faut
toujours préciser :
TOP 600 XT PRO
- le modèle de l’appareil,
- la date d’achat,
- le numéro de série,
- l’origine ou la nature précise du
problème.
AVERTISSEMENT
Toute intervention sur l’appareil
effectuée par du personnel non
autorisé par Technogym en annulent
la garantie.
00350049
Page 95
1.6 STOCKAGE
95
1.6 Stockage
En cas de longue période d’inactivité, il est conseillé de stocker l’appareil :
- dans un endroit sec et propre, couvert par une bâche pour le protéger de la poussière ;
- dans un endroit ayant une température comprise entre 10° et 25° et une humidité comprise
entre 20% et 90%.
Pour une correcte conservation de l’appareil, utiliser son emballage d’origine.
1.7 Elimination de l’appareil
Il faut toujours faire bien attention à ce que l’appareil ne puisse en aucune manière être
dangereux, c’est pourquoi il faut empêcher les enfants jouer avec. Pour cela, durant les
longues périodes d’éventuelle inactivité ou au cas où l’on veuille se débarrasser de l’appareil,
il faut le désactiver en débranchant le câble d’alimentation.
Il est interdit d’abandonner l’appareil dans la nature, dans des lieux publics ou dans les lieux
privés destinés à l’usage public.
Top 600 est construit avec du matériel recyclable, comme l’acier, l’aluminium et le plastique,
qui doivent être éliminés selon les normes prévues par les lois en vigueur concernant les
déchets urbains et autres, en s’adressant à des entreprises spécialisées en hygiène urbaine
et environnementale.
❒❒
❒ Comment se débarrasser de la ceinture thoracique et du bidon
❒❒
Ne pas abandonner la ceinture thoracique pour la transmission des données de la fréquence
cardiaque et le bidon dans la nature, parce que ils sont composés de matériaux non
recyclables.
Pour s’en débarrasser, s’adresser à une entreprise spécialisée en hygiène urbaine et
environnementale.
Page 96
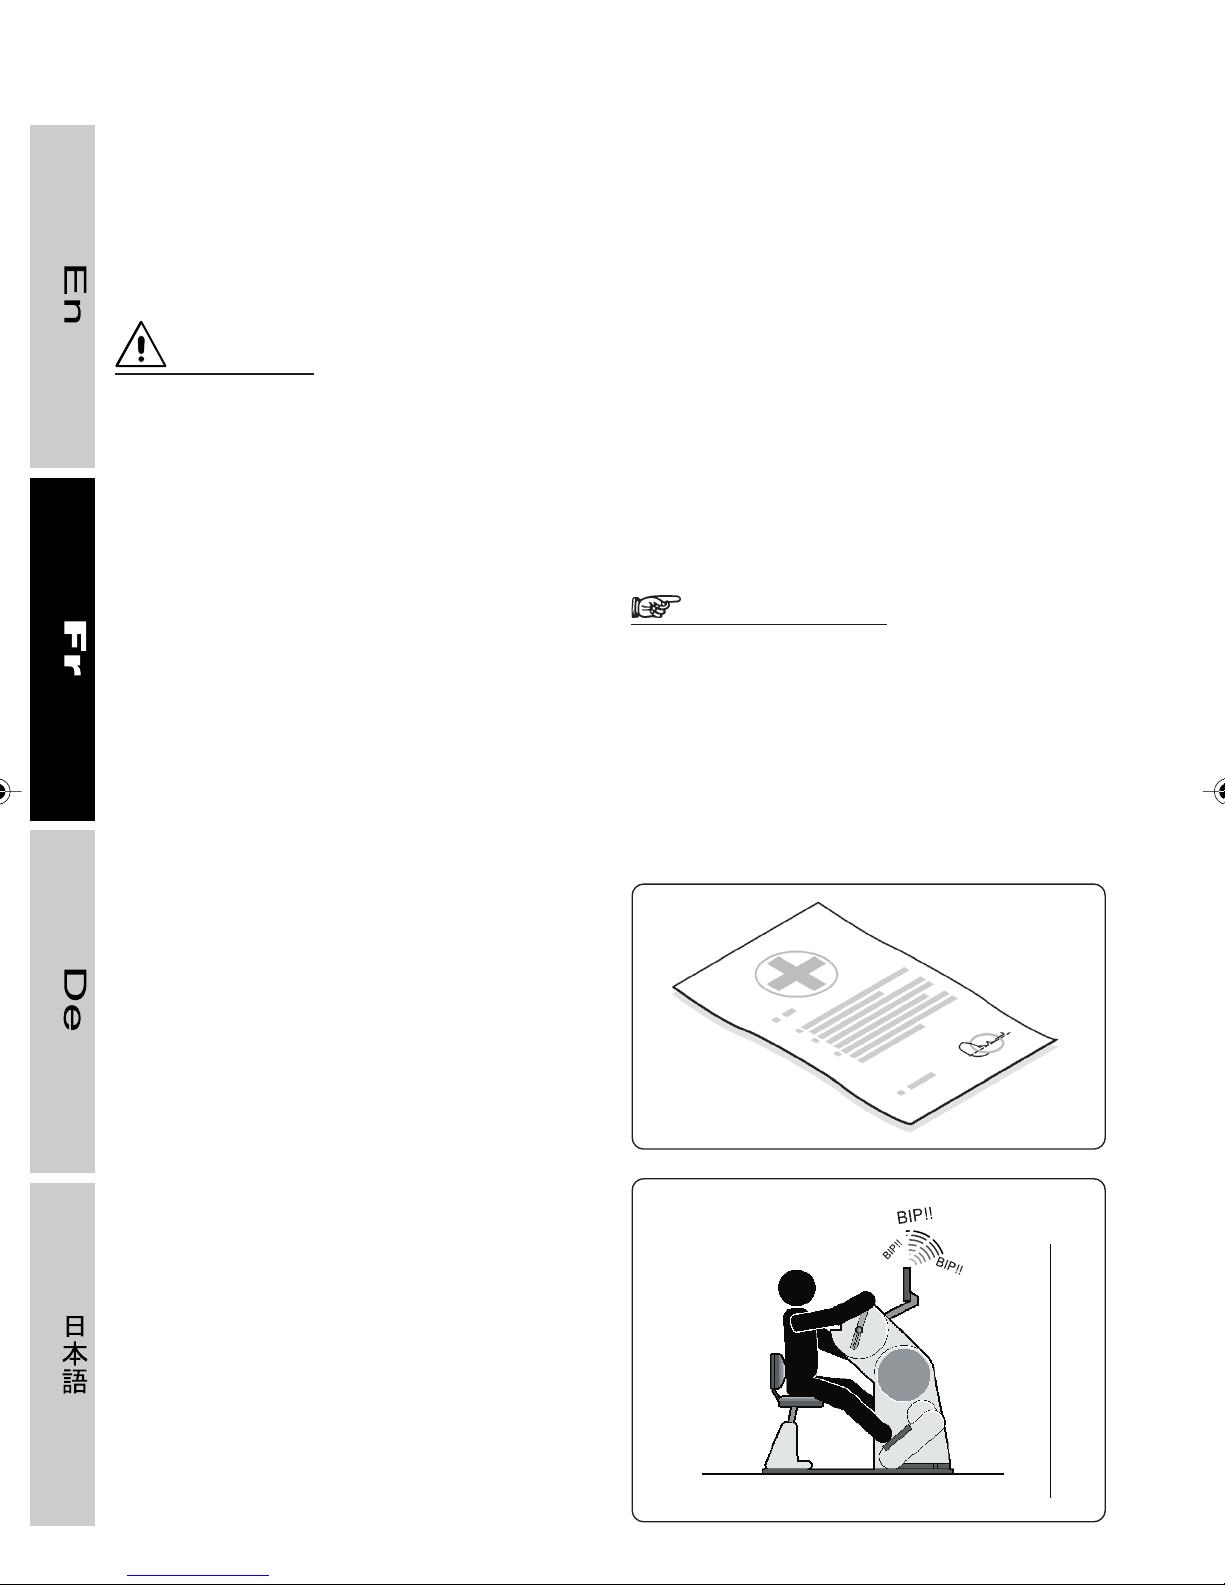
2 Utilisation de Top 600
2.1 Recommandations pour l’utilisation correcte de l’appareil
ATTENTION
Top 600 est destiné exclusivement à
l’usage pour lequel il a été conçu et
construit, c’est-à-dire pour
l’entraînement des muscles de
l’épaule et du bras. Tout autre usage
est à considérer comme impropre et
donc dangereux.
Ne faire que les exercices prévus pour ce
type d’appareil, de la manière et dans les
conditions indiquées dans ce manuel.
L’appareil ne pourra être utilisé qu’après un
contrôle médical visant à déterminer la
capacité de chacun d’effectuer l’exercice
choisi et dans le respect des conditions
d’utilisation prévues par le constructeur.
Avant de commencer un programme
d’entraînement, consulter un médecin pour
déceler d’éventuelles restrictions quant à
l’utilisation de l’appareil.
et que le message “
apparaît, la fréquence cardiaque est trop
élevée et il faut ralentir l’exercice.
Utiliser des chaussures de gymnastique et
des vêtements appropriés pour l’activité
physique ; ne pas porter de vêtements qui
empêchent la transpiration.
Attention FC élevée
AVERTISSEMENT
Avant de commencer n’importe quel
exercice, il convient de lire
attentivement et intégralement ce
manuel et de se familiariser avec les
commandes de l’appareil.
”
Programmer l’entraînement en fonction de
ses propres caractéristiques ergonomiques
et de son propre état de santé, en
commençant l’exercice avec des rythmes et
une vitesse appropriés.
Dans des conditions physiques particulières,
l’utilisation de l’appareil n’est autorisée que
sous l’étroite surveillance d’un médecin
ayant des compétences spécifiques en la
matière.
Si vous ressentez des malaises (vertiges,
douleurs thoraciques, etc.), durant
l’entraînement, interrompre immédiatement
l’exercice et consulter un médecin.
Si, durant l’exercice, vous entendez un
signal sonore pendant environ 5 secondes
4
01327004
Page 97
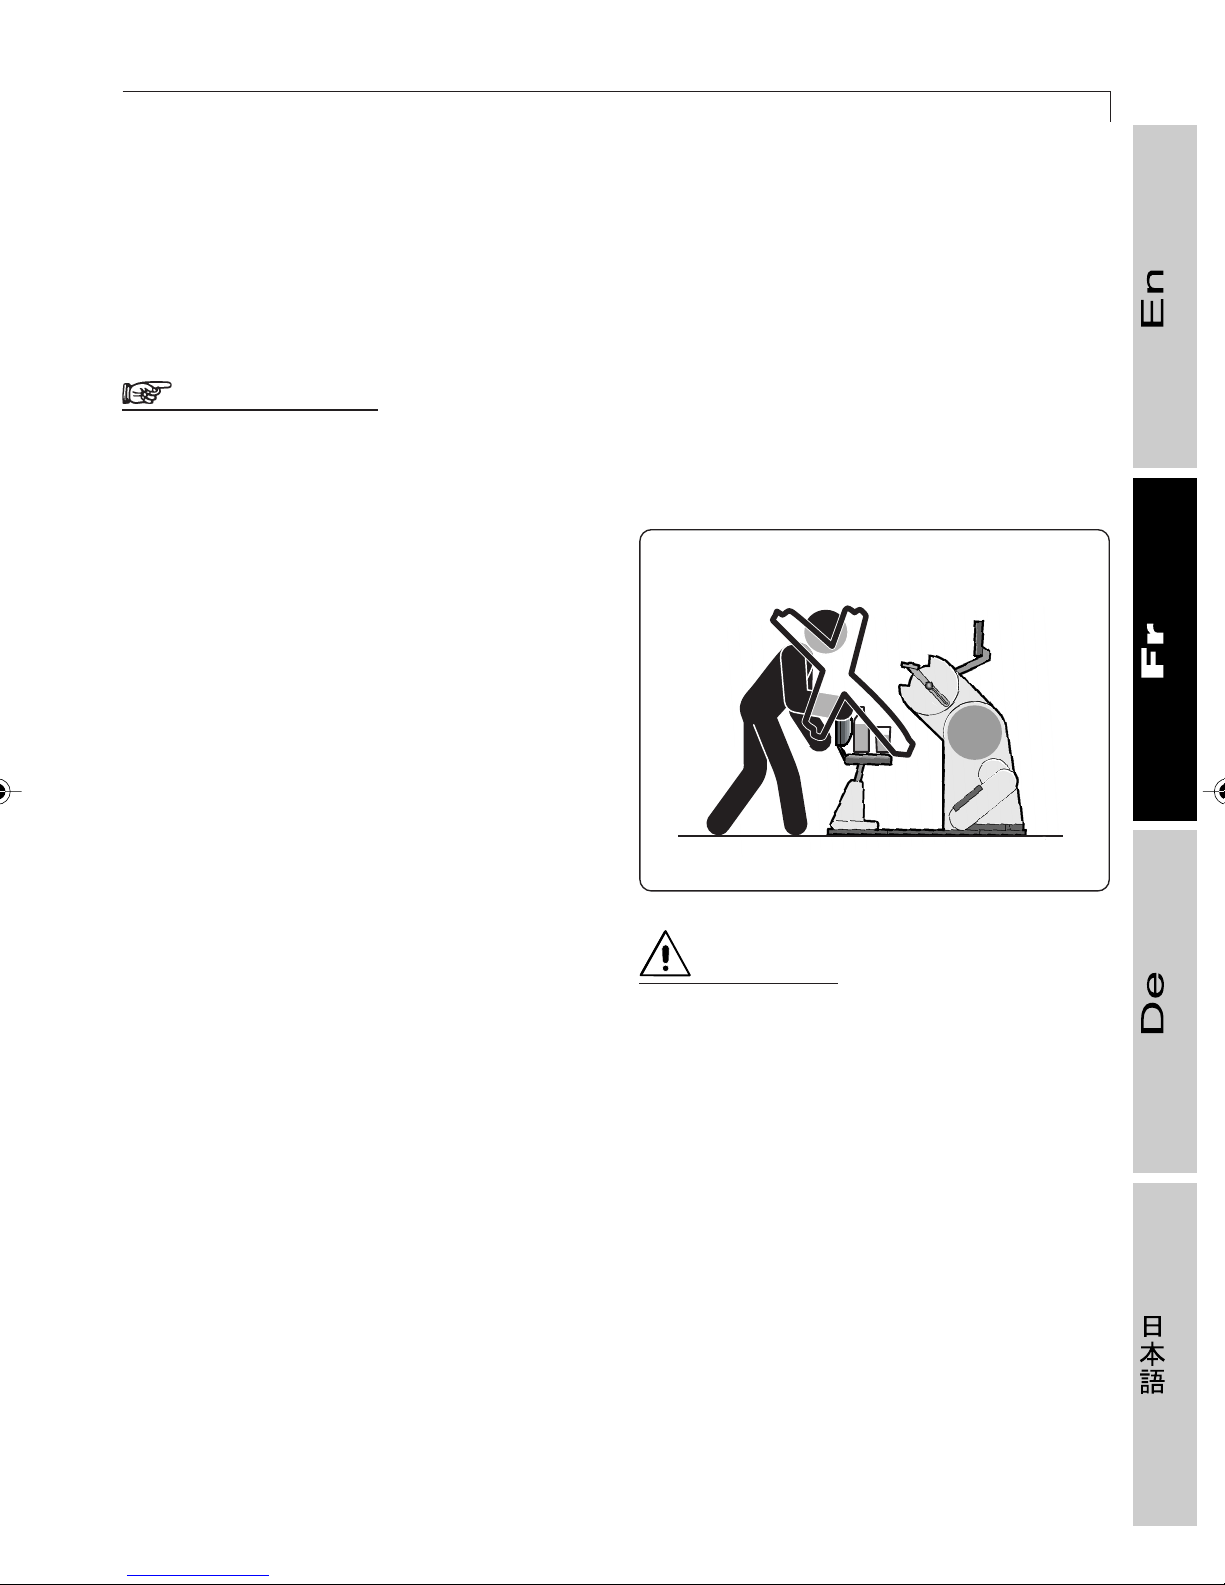
2.1 RECOMMANDATIONS POUR L’UTILISATION CORRECTE DE L’APPAREIL
Au début de chaque exercice, se placer
correctement sur l’appareil, en faisant bien
attention aux éléments qui peuvent
représenter un obstacle, pour éviter de
glisser ou de tomber.
AVERTISSEMENT
Contrôler le serrage des poignées du
siège.
Ne pas enfiler les pieds sous les parties en
mouvement pendant l’exercice.
Tenir les mains éloignées des parties en
mouvement pendant l’exercice.
97
Ne pas poser de boissons ou de liquides
sur l’appareil ou à proximité.
Eloigner des appareils vêtements et
serviettes qui pourraient entrer en contact
avec ses parties mobiles.
Ne pas utiliser l’appareil à proximité de
liquides ou de gaz inflammables pour éviter
les risques d’incendie que pourraient
provoquer les étincelles.
Ne pas exposer l’appareil à des jets d’eau.
Ne pas laisser l’appareil à l’extérieur, exposé
aux agents atmosphériques (pluie, soleil,
etc.)
L’appareil ne doit pas être placé près de
sources de chaleur, près de sources
électromagnétiques (comme les appareils
de télévision, les moteurs électriques, les
antennes, etc.), près d’un appareillage
médical, de dispositifs laser,
d’électrostimulateurs, etc.
Les appareils de la ligne XT PRO sont
principalement destinés à l’activité sportive
auprès des salles de sport ou autres centres
sportifs, exclusivement dans des locaux
fermés.
01327005
ATTENTION
Le courant circule à l’intérieur du
coffre moteur, c’est pourquoi le
carter ne peut être déplacé que par
du personnel autorisé.
L’usage de l’appareil à des personnes de
moins de 14 est interdit, sauf sous la
surveillance d’un adulte.
L’appareil a été conçu et construit selon les
exigences essentielles d’hygiène et de
sécurité des personnes ; toutefois, certaines
zones de ces appareils pourraient
engendrer des risques non évidents. Il est
donc recommandé de prêter attention au
risque d’écrasement éventuel des membres
supérieurs et inférieurs.
Page 98
98
2.2 La mesure de la fréquence cardiaque
Pour une excellente efficacité physique, les
conditions du système cardio-vasculaire et
du cœur sont primordiales. Un programme
d’entraînement est d’autant plus efficace
lorsque l’on peut contrôler constamment la
fréquence cardiaque.
Le contrôle direct et immédiat des battements
du cœur est important aussi bien pour des
athlètes d’élite que pour des sportifs
amateurs, parce qu’il permet de mieux
programmer les entraînements. TOP 600 XT
PRO permette à chaque utilisateur de
surveiller avec précision le rythme cardiaque
par une ceinture thoracique (palpeur
cardiaque) munie d’un émetteur.
TOP 600 XT PRO
L’émetteur intégré dans la ceinture envoie à
l’appareil les signaux correspondant au
rythme des pulsations ; ces signaux sont
traités et affichés sur le panneau de
commande ; l’utilisateur peut ainsi surveiller
la fréquence cardiaque à tout instant.
Le contrôle permanent du rythme des
pulsations par la ceinture thoracique
constitue un moyen très précieux pour
améliorer les performances et la sécurité
pendant l’entraînement, c’est pourquoi leur
utilisation est vivement conseillée.
ATTENTION
Il est très important que, durant
l’entraînement, le rythme cardiaque
ne dépasse jamais le 85% du rythme
maximum des pulsations (à moins
qu’il ne s’agisse de professionnels).
Pour calculer la valeur, utiliser le
tableau qui se trouve au point 2.5.2.
Page 99
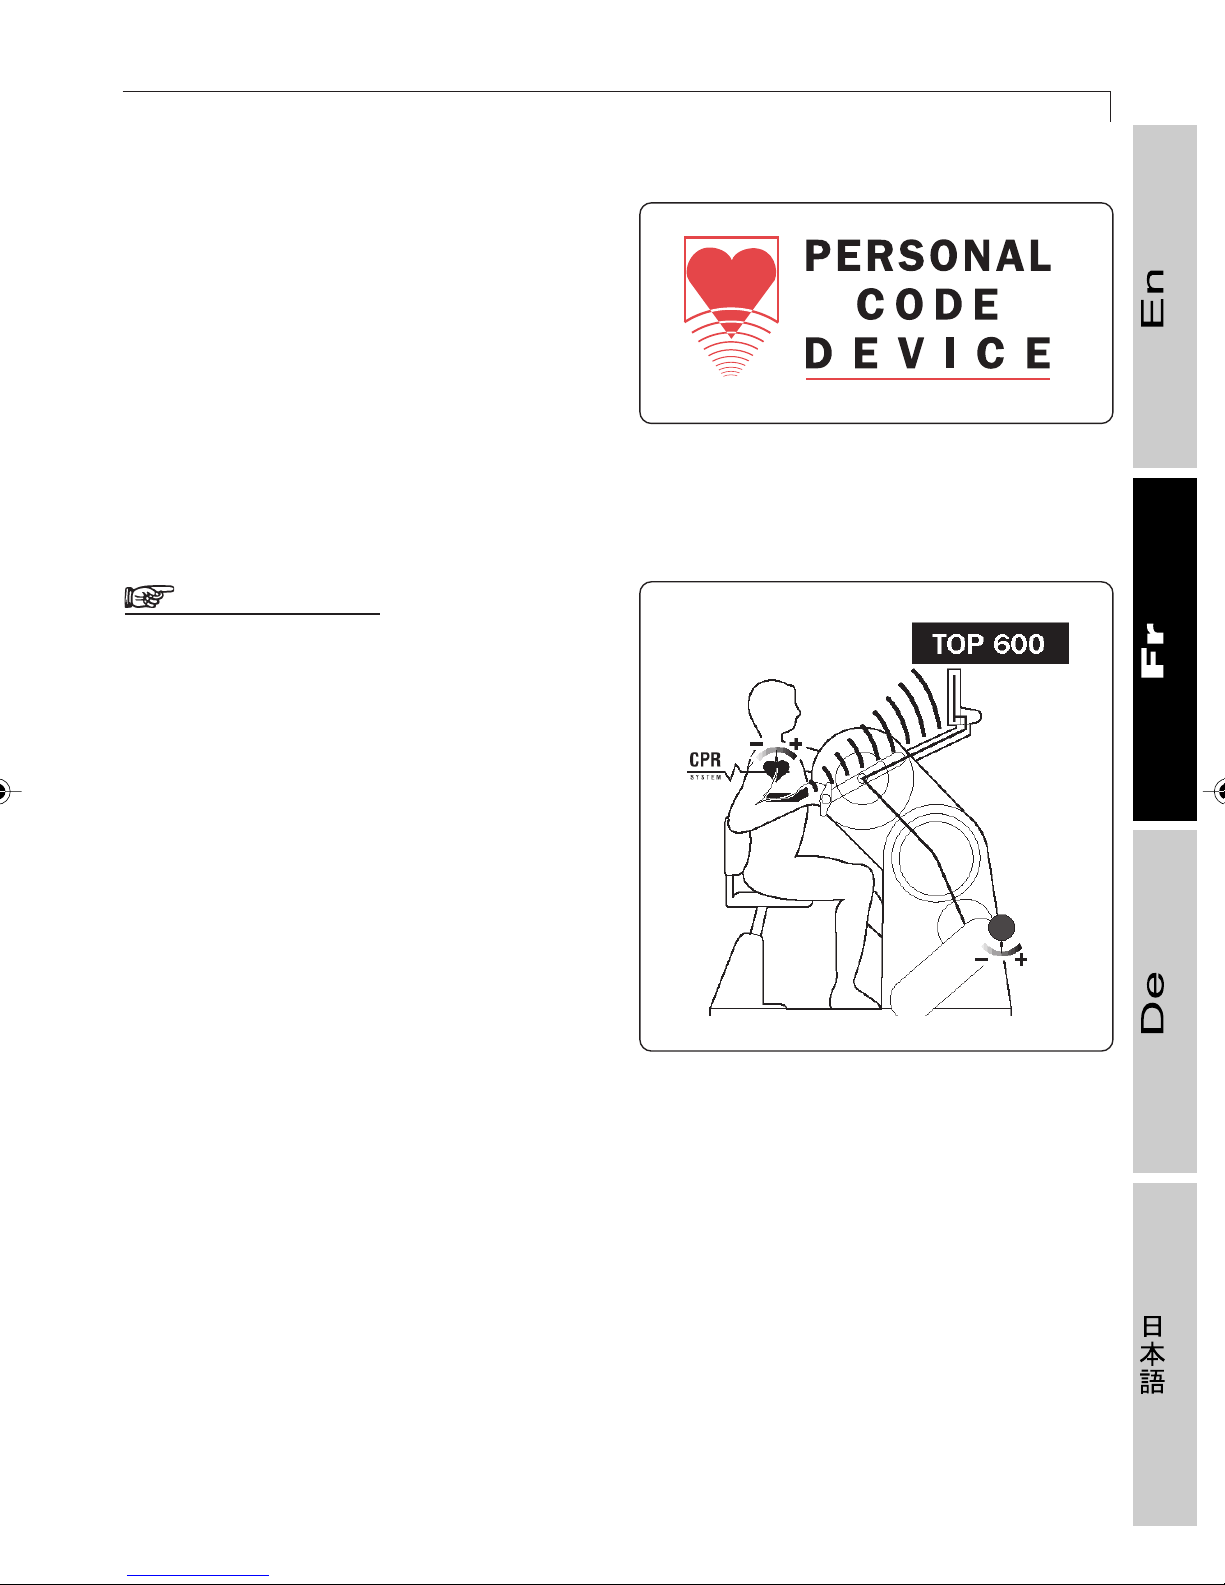
2.2 LA MESURE DE LA FRÉQUENCE CARDIAQUE
Si le dispositif de mesure de la fréquence
cardiaque est du type coded (voir parmi les
accessoires optionnels, au point 1.2.3), la
transmission des données de la ceinture
thoracique s’effectuera en mode
codifiée,
c’est-à-dire par une ceinture spécifique
exclusivement à l’appareil spécifique que
l’on est en train d’utiliser. Cela pour éviter
toute interférence entre appareils
rapprochés et une mesure plus précise du
rythme cardiaque.
AVERTISSEMENT
Le cardio-fréquencemètre a pour
seule fonction d’afficher les
battements du cœur pendant
l’exercice et il exclut toute utilisation
diagnostique à caractère médical ; il
ne sert donc pas à relever des
anomalies ou des problèmes
cardiaques. La fréquence cardiaque
indiquée sur l’écran a en effet valeur
purement indicative et elle ne doit
pas être considérée comme
définitive.
99
Pcd
58
Page 100
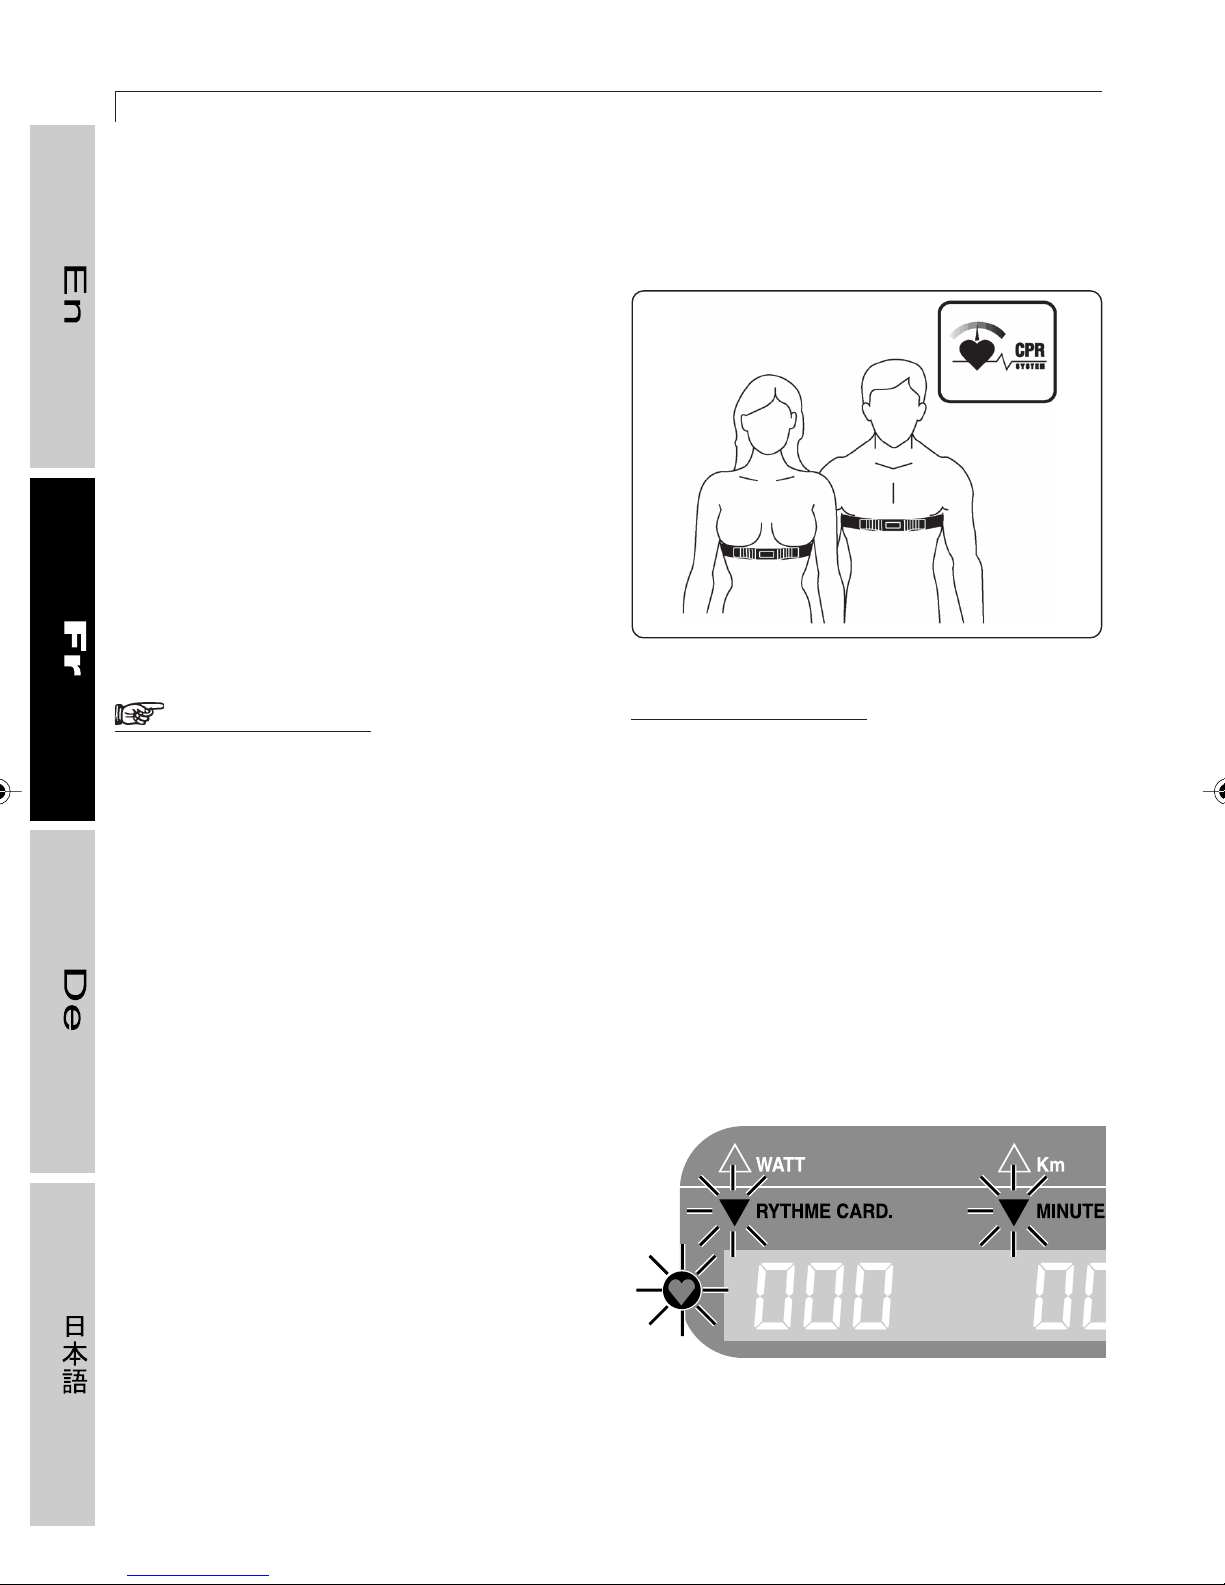
100
2.2.1 Comment mettre la ceinture thoracique
Avant de mettre la ceinture thoracique, il faut
en humidifier l’intérieur.
Il faut la porter directement sur la peau, dans
la région inférieure des pectoraux.
Régler la tension de l’élastique autour du
torse de manière à ce que la ceinture reste
dans la même position pendant toute la durée
de l’entraînement et vérifier sur le panneau
de commande la réception du signal (c’està-dire si le voyant lumineux en forme de cœur
clignote à gauche de la fonction CPR, sur le
panneau de commande).
TOP 600 XT PRO
60
? INFORMATIONS
AVERTISSEMENT
La batterie de la ceinture thoracique
a une durée approximative de 1000
heures. Après quoi il est vivement
conseillé de remplacer la ceinture
par une autre ceinture d’origine
fournie par Technogym.
2.2.2 Utilisation correcte de la ceinture thoracique
Pour que les données soient précises, il est
indispensable d’utiliser correctement la
ceinture, en respectant les avertissements
reportés, et d’y prendre soin tout comme
pour tout autre instrument de précision.
Pour des raisons d’hygiène,
Technogym conseille une utilisation
strictement personnelle de la
ceinture thoracique.
En cas d’irritations, il est possible de
mettre la ceinture sur un tricot, sans
oublier d’humidifier la zone de
contact.
Périodiquement, et surtout après
d’éventuelles chutes de la ceinture, il
convient de contrôler l’efficacité du cardiofréquencemètre de la manière suivante : on
compte les pulsations directement sur le
pouls et on compare avec la fréquence qui
apparaît sur le panneau de commande.
01417017
En cas de doute sur l’exactitude des
données, s’adresser au service d’Assistance
Technique Technogym.
 Loading...