

Page 1

SineUPS
Models S100a, S100a+, S100 and S200
User manual
Page 2
Introduction
SineUPS is an uninterruptible power supply, guaranteeing constant powering to the
electric loads connected. In case of mains failure (power cut or instability) SineUPS
generates pure sine wave and can work continuously until the battery runs out. The output
voltage has the same form as the mains voltage meaning that the connected loads will
work just as efficiently as being powered from the mains network.
When the device is powered by regular mains voltage, it keeps the battery fully charged so
it can provide its maximum capacity when needed.
Installation
Warning!
SineUPS works at high voltage and requires special attention when its being
connected!
The device is designed for home use only! Please make sure there is enough
space around it to vent properly, do not install it in a place exceeding the operating
temperature and humidity!
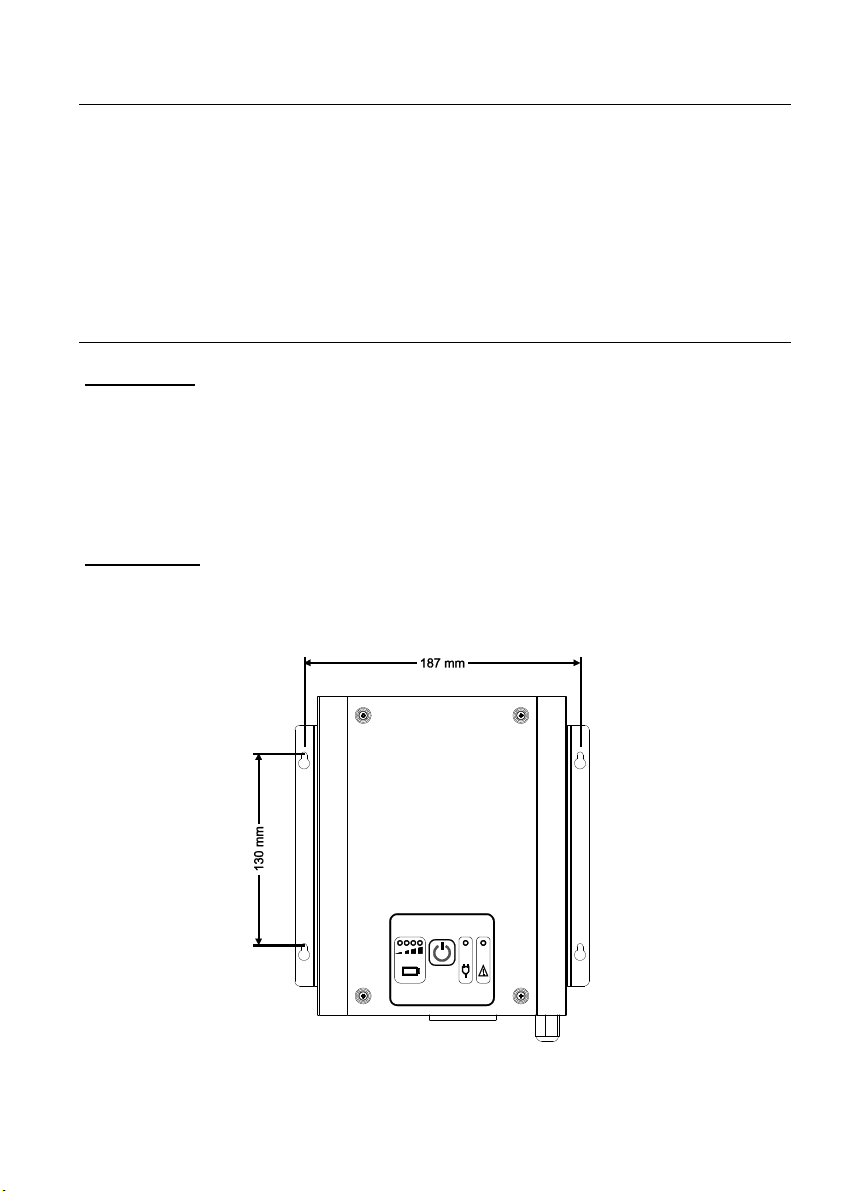
Mounting
The device can be mounted on a horizontal surface or vertically on a wall. In order to
mount it vertically, install 4 screws on the wall (3.5 x 35 mm), so the unit can be hanged as
depicted on the drawing below.
2
Page 3
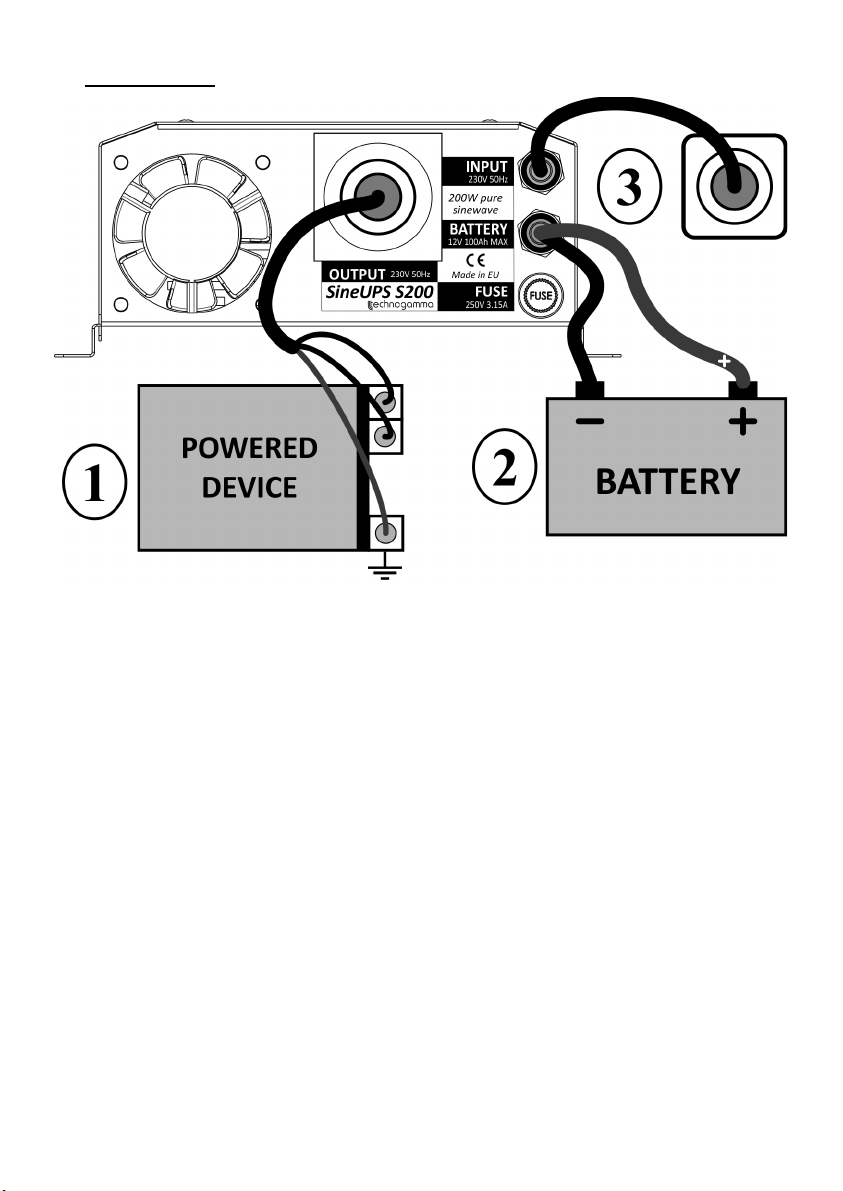
Connection
1. Connect the load's power plug to the OUTPUT socket of the UPS.
2. For models S100 and S200 an external battery has to be connected (models S100a
and S100a+ have integrated battery, so skip this step, as S100a+ has an option for
connecting external battery so the step is not mandatory). Connect the battery to the
BATTERY terminal, paying attention to the polarity – the + cable goes to the + terminal of
the battery. Depending on the particular type of installed battery, there is possibility that
some harmful gases can be released and in that case it is recommended to install the
device in a proper location.
3. Verify that the load and battery are properly connected. Plug the power plug of the
UPS (INPUT terminal) to mains socket. If mains is present, the device will start charging the
battery. If in the electrical installation a common neutral is used instead of protective
earth (PE), it is recommended to cut off the plug and power the device using hard wiring –
brown wire to phase and blue to neutral.
4. Turn on the device to power the load connected by pressing the power on button
(see next chapter Operation).
3
Page 4

Operation
Symbol Function Description
Power On / Off button
On Device is turned on.
Battery
Mains power
Error
Press and hold the power button for 0.5 sec to power the device and load connected.
The button LED lights on and a beeping sound is made.
Press and hold the button for 0.5 sec to turn
the device on or off.
4 levels of battery charge, each LED stands
for 25% charge.
Stable mains. The LED blinks if the mains
voltage is not within the limits.
An error occurred: overload, overheat or
internal error.
4
Page 5

Stable mains
Whenever stable mains is present, the device charges the battery and displays the current
charge on the panel.
If the device is turned on and the mains is off or unstable, it automatically switches to
battery powered mode.
If the mains is not available, the indicator goes off, if the mains voltage is not within the
specified limits the indicator blinks.
Battery power
Switching to battery powered mode a continuous sound is made in the time of transition
and then a short one every 30 sec.
The time to operate on battery power depends on the capacity, charge and condition of
the connected battery, as well as the power of the load connected. When the battery
charge goes below 10%, the device beeps every 2 sec until the battery voltage goes below
10.2 V, then the device automatically shuts down. When the mains is restored, the device
automatically turns on and starts charging the battery.
In case of connecting a load that is more powerful than the device rated output power or
short-circuit of the output, the LED lights up and the power to the load is cut off. The
UPS will attempt 10 retries in 10 sec to restore the power to the load and if the overload
condition is removed will go back to normal battery power operation.
5
Page 6

Troubleshooting
Problem Solution
The device is connected to
mains, but pressing the
button does not turn it
on.
The LED does not
indicate the presence of
mains.
The device does not function without a connected
battery!
If you are using a car battery, please check the
mounted terminals – some of them are painted on the
inner side and do not ensure proper electrical contact to
the battery contacts.
The battery should be in good condition. If the voltage
of the connected battery is under 10.5V, then the device
will not turn on /low voltage battery protection/.
Check the device connections and mains voltage.
Check the device fuse and replace it if necessary.
The device makes long
beep and turns itself of
during power up.
The LED is on and beeps
every 30 sec.
Inadequate work time in
battery mode.
Device internal error. Please contact the authorized
service center.
Normal work in battery powered mode, the device is
turned on and the mains is missing.
Check that the battery is fully charged (at least 10 hours).
With time the battery capacity decreases. Contact the
authorized service for internal battery replacement
(model S100a) or replace the external battery with a new
one (models S100 and S200).
6
Page 7

Technical parameters
Parameter S100a S100a+ S100 S200
Input Voltage 220 VAC
Frequency 50 Hz
Voltage to switch to
battery powered
mode
below 180 VAC
over 260 VAC
Protection Fuse, mounted on the housing
Output Voltage 220 VAC ± 4%
Frequency 50 Hz ± 1 Hz
Power 100 W 200 W
Voltage form Pure sine wave
Switching time < 5ms
Automatic resettable protection from overload and short
Battery
Protection
Type
Capacity
12V, lead-acid
Internal 7.2
Ah
Internal
7.2 Ah
External
circuit
1
External
20 – 70 Ah
20 – 70 Ah
Protection – Reverse polarity connection protection
Weight 4.1 kg 4.1 kg 2.1 kg 2.9 kg
1
External
20 – 100 Ah
1
Dimensions 200 x 200 x 70 mm
Ambient temperature
Relative humidity 0 – 95 %
1. External battery is not part of the product.
0 – 35 C
7
Page 8

Limited warranty
The warranty is valid for 24 months from the sale date. The warranty for the internal
battery for models S100a and S100a+ is 12 months.
Warranty is void if:
Incorrect installation
Alteration of the product and/or attempts to repair or modify
Visible damage of the housing and/or the inside of the device
Damage caused by lightning storms
Usage in inappropriate conditions (temperature and humidity)
Broken warranty stickers
Warranty Card
Sold (client/date):___________________________________________________
__________________________________________________________________
Invoice (Receipt):____________________________________________________
Signature:_________________________________________________________
Technogamma LTD
4004 Plovdiv, Bulgaria
9N Kuklensko Shose str. fl. 3, office 6
Phone: +359 32 699-240
E-mail: info@technogamma.bg
www.technogamma.bg
8
Rev 2.5
01/16
 Loading...