

Technivorm Moccamaster CDGT, Moccamaster KBT-741, Moccamaster KBTS-741, Moccamaster KB-741, Moccamaster KB-741-AO Instructions For Use Manual
...
INSTRUCTIONS FOR USE
www.technivorm.com

2
Handmade in the Netherlands
The Technivorm Moccamaster factory is
centrally located in the heart of the
Netherlands and serves customers all
over the world.
The philosophy of the inventor,
Gerard Clement-Smit, to produce highquality, long-lasting and reliable products,
has been guiding the manufacturing of
every coeemaker since 1964. Even today,
each coee brewer is handmade and
individually tested in a live situation, using
only the nest materials available. Energy eciency and recyclability
play an important role in the design of each Technivorm
Moccamaster Coeemaker.
Gerard Clement-Smit
Founder of the company
and designer of the products.
CONGRATULATIONS ON YOUR PURCHASE
OF THE WORLD’S FINEST FILTER COFFEE BREWER!
THE MOCCAMASTER STANDS OUT!
The Technivorm Moccamaster Coeemaker’s advanced brewing
technique has earned certications from the Specialty Coee
Associations of America and Europe (SCAA & SCAE) as well as the
European Coee Brewing Center (ECBC) Seal of Approval.
The ECBC approved seal is only awarded to products that have
passed the extensive quality control and laboratory testing of the
Norwegian Coee Association. Technivorm Moccamaster is the only
manufacturer with ECBC approval for all its household machines.
Good-looking, high-tech coee brewers with fancy features do
not necessarily brew better coee. Only coee brewers that make
“the perfect cup,” in compliance with the association’s strict
standards and regulations, are approved.
WHAT’S IMPORTANT WHEN SELECTING A COFFEE BREWER?
• Temperature (200° F) • Reliability
• Saturation Time (4 to 6 minutes) • Longevity
• Warranty (5 year) • Cleanability

3
IMPORTANT SAFEGUARDS
• READ ALL INSTRUCTIONS.
• Check to see if the voltage of the machine matches your main voltage.
The machine must be plugged into a socket with safety ground.
• Place the machine on a at surface in a frost-free room.
• Do not touch hot surfaces. Use handles or knobs.
• Do not place cord, plugs, or brewer in water or other liquids.
• This machine is not t for use by people (including children) with
physical, mental or sensory disabilities, or a lack of knowledge or
experience, unless supervised or instructed regarding the use of this
machine by a person who is responsible for their safety.
• Unplug from outlet when not in use and before cleaning.
Allow to cool before putting on or taking o parts, and before
cleaning the appliance.
• Do not operate brewer with a damaged cord or plug or if the
brewer malfunctions or is damaged in any way. Return appliance to
the nearest authorized service facility for examination, repair
or adjustment.
• Using an accessory not recommended by the manufacturer may
cause injury or re.
• Do not use outdoors.
• Do not let cord hang over edge of table or counter or touch
hot surface.
• Do not place on or near a hot gas or electric burner or in a
heated oven.
• To disconnect, turn power control to “o” position, then remove
plug from wall outlet.
• Do not use appliance for any purpose other than its intended use.
• Do not remove brew-basket or carafe while brewing.
• Do not pour any liquids other than water or recommended cleaning
product into water reservoir.
• Always place the lids in the correct position as shown in the
descriptive image. Scalding may occur if any of these parts are
removed during brewing cycles.
• Unwrap the coee maker with care and remove all packaging
materials. Keep packaging (plastic bags and cardboard) out of reach
of children.
• WARNING: Do not remove bottom panel of brewer; doing so will void
warranty. No user serviceable parts inside. Repair must be done by
authorized personnel only.
WHEN USING ELECTRICAL APPLIANCES,
BASIC SAFETY PRECAUTIONS SHOULD ALWAYS
BE FOLLOWED, INCLUDING THE FOLLOWING:
HOUSEHOLD TYPE
4
SAVE THESE INSTRUCTIONS
This symbol alerts you to the risk of re or
electric shock in the accompanying message.
This symbol alerts you to important
operating and service instructions.
RISK OF FIRE AND ELECTRICAL SHOCK
DO NOT OPEN
WARNING. TO REDUCE THE RISK OF FIRE OR ELECTRIC SHOCK,
DO NOT REMOVE COVER, NO USER-SERVICEABLE PARTS INSIDE.
REPAIRS SHOULD BE DONE BY AUTHORIZED SERVICE PERSONNEL ONLY.
READ INSTRUCTIONS CAREFULLY BEFORE USING
Glass Carafe
• The glass carafe is designed for use with this appliance.
• Do not set a hot carafe on a cold surface. Never place carafe over
open ame or hot range cook-top or other heat source.
• Do not use a cracked carafe or a carafe with loose handles.
• Do not clean carafe with abrasive cleansers, steel wool pads or
similar materials.
• Never place the carafe in an oven or microwave.
• NOT DISHWASHER SAFE.
Thermal Carafe
• Do not use the thermal carafe for storing dairy products or baby food,
as these will curdle if kept hot for a longer period of time.
• Do not use for carbonated beverages.
• Do not transport the carafe in a horizontal or upside-down position
as it can lead to leakage. Use the special transport lid.
• Do not drink directly from the thermal carafe! Liquid from the carafe
may be very hot.
• Never place the thermal carafe onto a hot/warm cooking ring, gas
cooker or other heat sources.
• Never place the carafe in an oven or microwave.
• Do not clean carafe with abrasive cleansers, steel wool pads or
similar materials.
• NOT DISHWASHER SAFE.
IMPORTANT SAFEGUARDS

5
BEFORE YOU USE
Before using your new coee brewer for the rst time, or if the
machine has not been used for some time, we recommend rst
rinsing the water receptacle. Fill the coee brewer with cold water
and operate once or twice without any coee.
POWER SUPPLY CORD
The short power supply cord is provided to reduce risks resulting from becoming entangled in or tripping over a longer cord.
If an extension cord is used, the marked electrical rating of the
extension cord must be at least as great as the rating of the coee
brewer. The extension cord must be a grounding type 3 cord.
The extension cord should be arranged so it doesn’t drape over
the counter or table top where it can be pulled over by children or
tripped over.
ENVIRONMENTAL RECOMMENDATIONS
• Please discard the lter and coee grounds by disposing them in an
organic waste container or compost heap. If not available, you may
dispose of lters and grounds in normal household waste.
• For environmental concerns, please recycle responsibly.
6
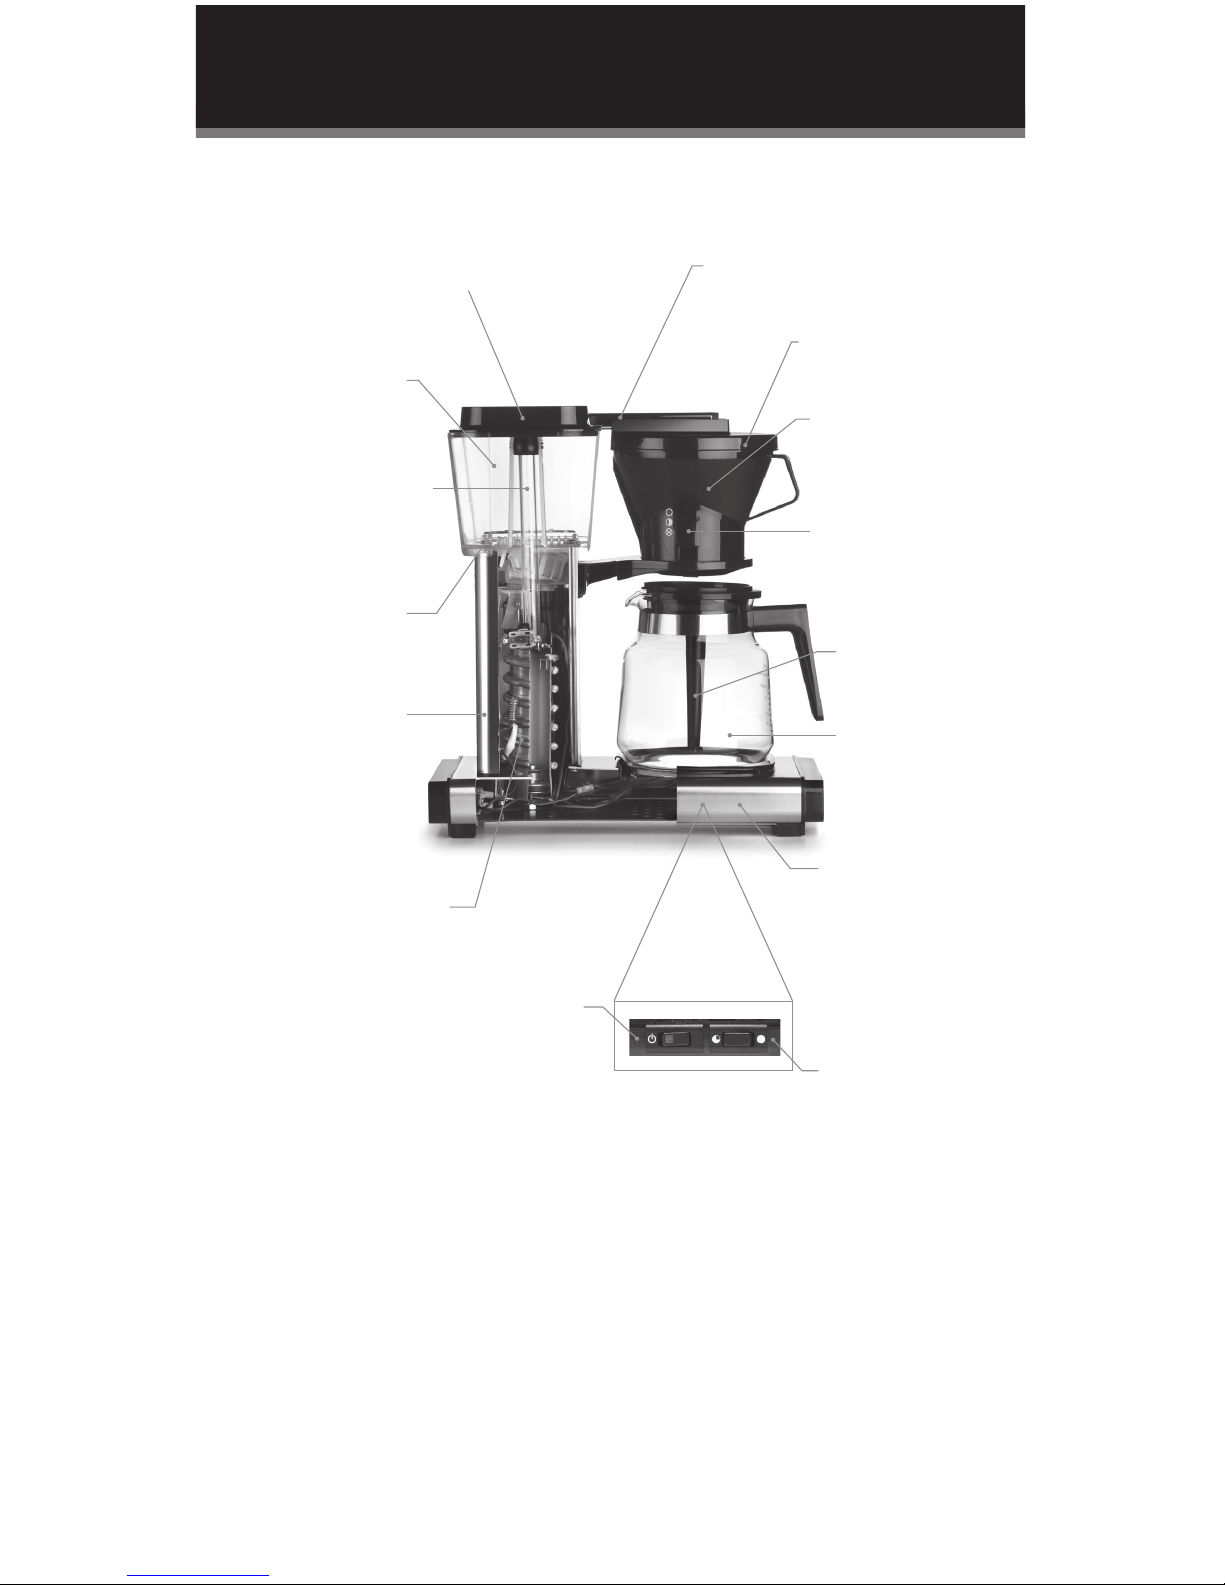
MOCCAMASTER
Copper
Heating Element
Brews at
196˚–205˚ Fahrenheit
Durable
Metal Housing
Float Activated
Brew Function
Switch
Clear Cool
Water Reservoir
Water Reservoir Lid
Clear Glass
Water Transfer Tube
9-Hole
Outlet Arm
Brew-Basket Lid
Brew-Basket
Manual Adjust
Drip-Stop Switch
(optional feature)
Destratification
Tub e
Glass Carafe
Brews a full carafe
in 5 to 6 minutes
Independent
Energy Efficient
Hotplate Element
Hot-plate holding
temperature at
175˚–185˚ Fahrenheit
On/O Switch
Hot-plate
Hi/Lo Switch
OPTIONAL FEATURE:
Auto shut-o at 100 minutes.
NOTE: Model shown is the Moccamaster KB-741AO.
The features on your Moccamaster may dier slightly.
PARTS
www.technivorm.com
7
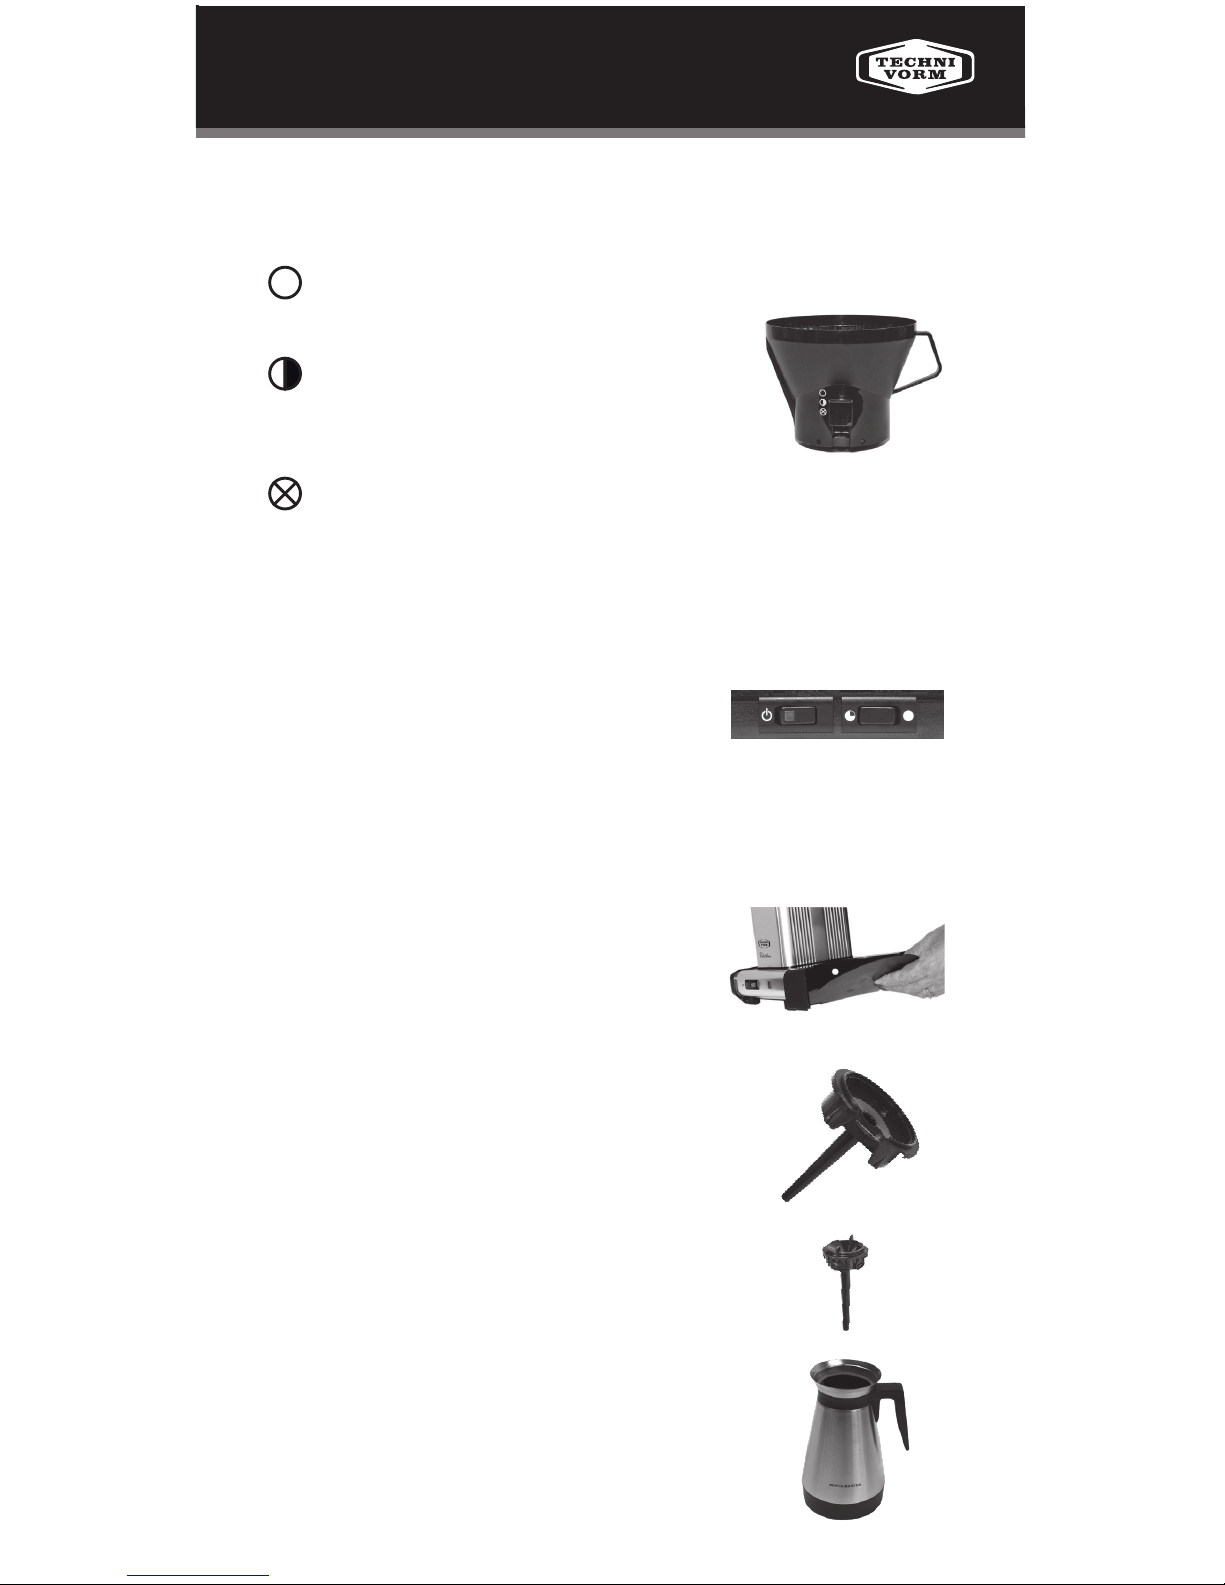
OPTIONAL FEATURES
Brew-Basket
• The Moccamaster manual-adjust brew-basket has three settings:
Open For brewing a full pot of coee, 6–10 cups.
This setting manually allows for
normal water ow over coee grounds.
½ Open For brewing a ½ pot of coee (2–5 cups)
or for use with brewing tea. This setting
manually slows the drip to allow for
longer saturation time.
Closed Stops ow of coee if you want a quick cup before
brew cycle
is complete (NOT recommended). This setting manually
stops
the ow to allow for a longer saturation time. This option
will allow for overow if not watched closely! This setting
also
stops coee drips at end of brew cycle for emptying the
brew-basket.
Hot-Plate Temperature Switch
• Glass carafe models: The hot-plate
temperature switch is explained with
a full circle and a ¾ circle which maintains
a holding temperature between 175-185° F
degrees. Models without selection switch
automatically hold at 180° F.
Locking the (optional) footplate in place
• Tilt coee brewer backwards slightly.
• Hook footplate’s vertical rim into the
cut away opening, then lower brewer.
Footplate is now locked in place.
• Place the thermal carafe on the footplate,
so it presses the white button on the inner base.
Destratication Tube
• The glass carafe with the destratication tube
lid and the thermal carafe “Brew-Thru-Lid”
make stirring of the coee unnecessary
before serving resulting in a
warmer, pre-mixed brew.
Brew-Thru-Lid
• Scientically designed for minimum heat loss
and maintains perfect temperature while brewing.
• Mixes coee automatically while brewing.
• Simply brew and pour—do not remove lid.
• Easy to clean.

8
DIRECTIONS FOR USE
1. Power switch should be in the o position.
2. Position 9-hole outlet arm as shown in the diagram.
· Attach snuggly to the silicone gasket at the top of the
cool water reservoir.
3. Fill cool water reservoir to the desired level, with fresh ltered
or bottled cool water. Replace cool water reservoir lid.
· Reservoir is marked with the number of European cups: 4 oz. each.
4. Place lter in brew-basket.
· Place a standard #4 white paper lter into the brew-basket.
5. Add the appropriate amount of coee.
· For a full 10 cups, we recommend 6 level scoops (2 Tbsp each).
· The SCAA approved industry standard for the perfect cup is
2 tablespoons to every 6 oz. of water.
· We caution against the use of a gold mesh reusable lter; they tend
to retain coee oils and clog very quickly, resulting in an overow of
the brew-basket and lter.
6. Place brew-basket on bracket, position outlet arm over center
of brew-basket.
· For manual adjust brew-basket models, adjust slide to open position.
CAUTION: Brew-basket will overow in a closed position.
· Replace brew-basket lid.
CAUTION: Scalding may occur if any of these parts are removed
during brew cycle.
7. Carafe placement:
· Place the glass carafe, with lid, on the hot-plate.
· Place thermal carafe, with the “brew-thru-lid” in brew position
beneath the brew-basket bracket. (Carafe should be placed to
depress the white button). We recommend warming the thermal
carafe with hot water before use.
9
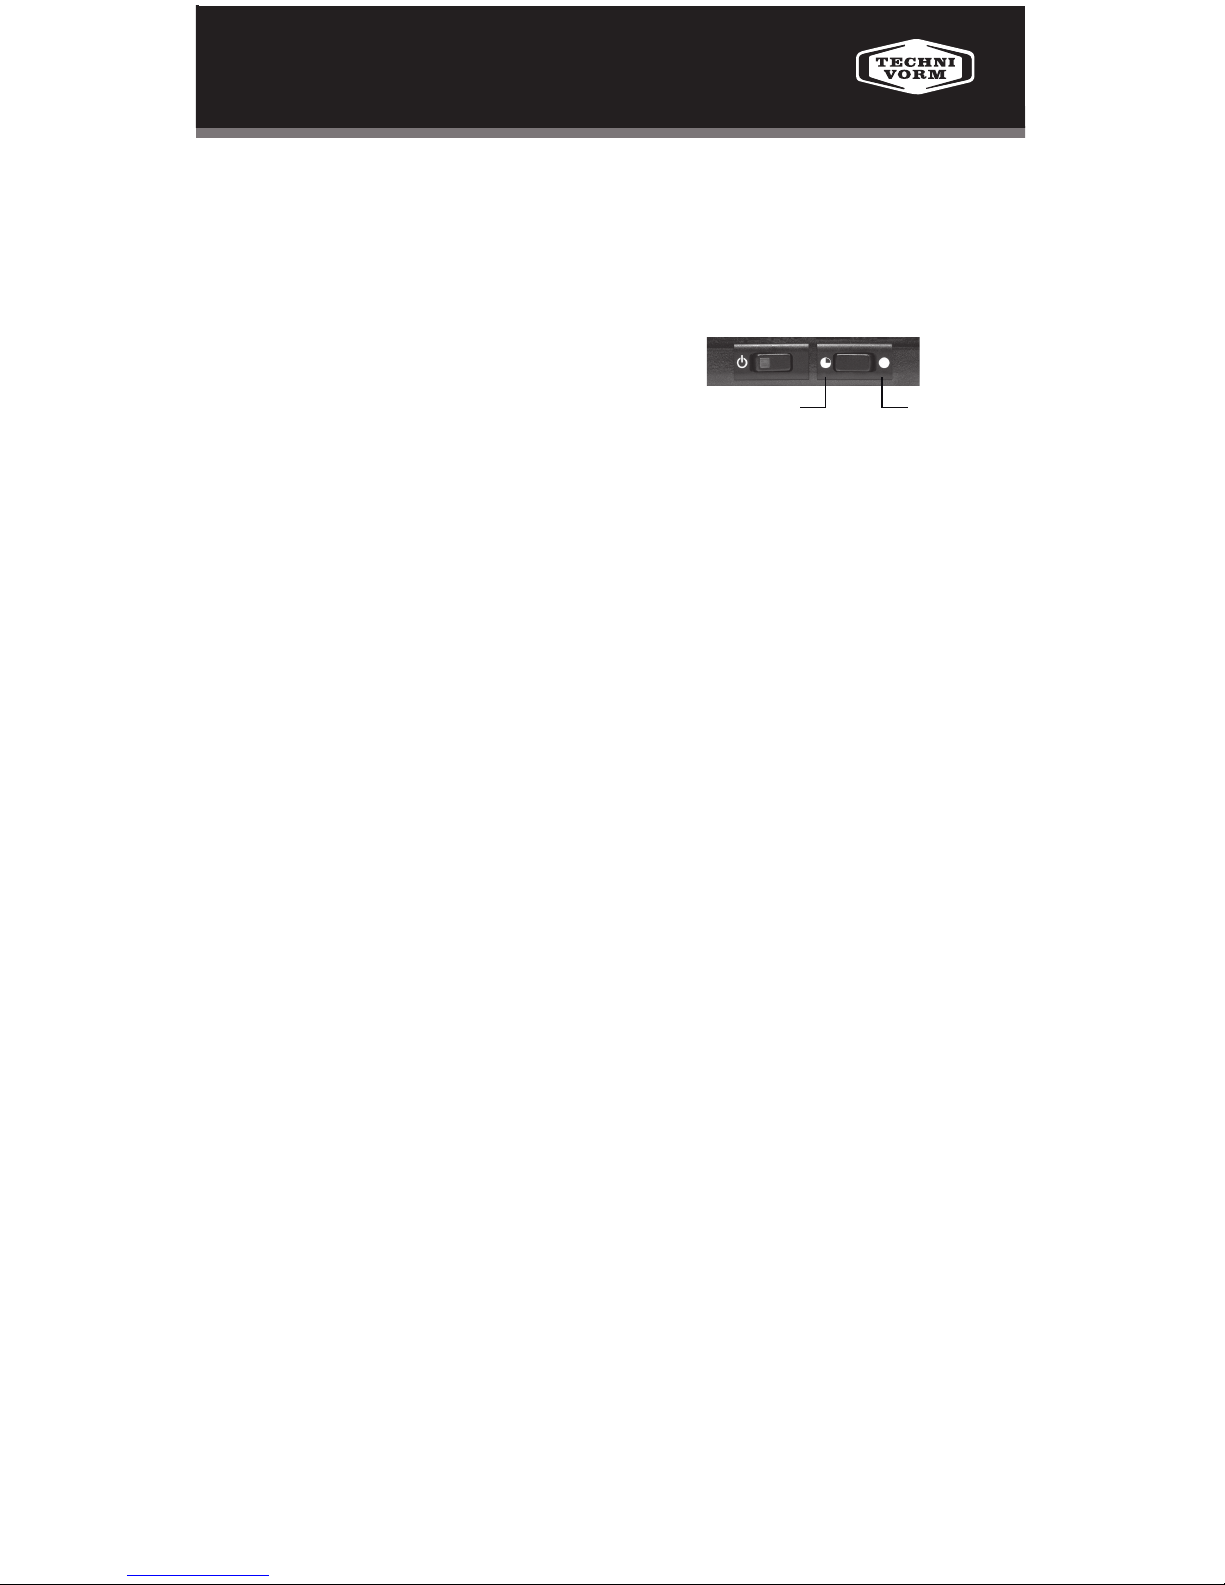
8. Switch the power switch to the “on” position.
· Thermal carafe model: The orange light will illuminate when the
thermal carafe is placed properly against the white button.
· Glass carafe models with a hot-plate adjustable switch:
Set hot-plate switch to the HI position,
lower when pot reaches ½ full, or if you
prefer a less warm holding temperature.
9. The brew process will quickly begin; water will be brought to a
boil, rising through the brewer across the outlet arm and into the
brew-basket. Brew process is complete in 4 – 6 minutes.
10. We recommend disposing of coee grounds once brew cycle
is complete.
· For models with adjustable brew-baskets: Move the slide to closed
position prior to emptying.
11. The brewer should be switched o after use.
• Thermal carafe models:
· The heating element is not receiving power unless the water
reservoir is full, engaging the ow-switch, and the white button is
depressed; the only power consumption is at the power switch itself,
resulting in a very energy-ecient brewer.
• Glass carafe models:
· Should be turned o when hot-plate use is no longer desired.
· Optional Auto-o models will automatically shut o in 100 minutes.
Now enjoy a perfect cup of coee, brewed to industry standards
with your new Technivorm Moccamaster!
Coee tastes best immediately after brewing!
HI
LO

10
CLEANING & MAINTENANCE
Basic Cleaning
• Clean the brewer regularly with a moist cloth and wipe dry. After each
use, hand wash the carafe and brew-basket with mild detergent.
Rinse thoroughly. Carafe is not dishwasher safe. Thermal carafe coee
oil stains may be removed by placing a small amount of dishwasher
detergent and water in carafe and allowing it to soak overnight or we
recommend the use of Cleancaf® by Urnex®.
• Do not submerge brewer in liquid.
Descaling Your Brewer
• Your coee maker must be descaled regularly to maintain
optimal performance.
• When mineral deposits build up in the heating element of your
Technivorm Moccamaster, it can clog the water ow and aect
the brew temperature and saturation time. If not descaled regularly,
the brewer can stop working.
• Descaling products are designed to break down the lime scale and
mineral buildup inside your brewer to ensure consistent brewer
functionality and great coee. We recommend the use of Dezcal™
by Urnex® for descaling your brewer.
• Vinegar may not eectively descale your brewer and can be dicult
to thoroughly rinse. Vinegar may also leave behind an odor that could
aect future brews.
• Technivorm Moccamaster recommends descaling your brewer every
100 cycles (easily remembered after every box of 100-count lters) or
a minimum of every 3 months.
• Cleaning powders are designed to remove coee oils from the
brew-basket, carafe, etc.
• After descaling, run two brew cycles with water.
Anti-Frost Protection and Extended Storage Guidelines
• Turn the brewer o and remove the electrical plug from outlet.
• Remove the 9-hole outlet arm.
• Empty any remaining water within brewer by holding it upside down
over the sink.
• Replace the 9-hole outlet arm before using the brewer again.

11
FREQUENTLY
ASKED QUESTIONS
Why is my brewer not heating to 200° F?
The Technivorm Moccamaster Coeemakers operate on the scientic
principle of bringing water to a boil. It is this boiling action that causes
the transfer of the water to the brew-basket. If the water is not heated
to the boiling point, it will not move to the brew-basket. The brewer
is designed to move the proper amount of water (40 oz.) in the
correct amount of time (5 minutes). This is the correct water contact
time needed for the proper extraction.
What is the total brewing time for my Technivorm?
The complete brewing cycle should take 4 – 6 minutes. However, if the
coee brewer is not descaled regularly, the scale/lime buildup could
result in a slower brew time or simply cease functioning—the lights will
be on, but the water transfer will not function until descaled with a
product such as Dezcal™ by Urnex®.
Why doesn’t the Technivorm have a timer?
A great cup of coee starts with cool, fresh, ltered or bottled water and
freshly ground or pre-ground packaged coee to achieve the perfect
cup. When water is left in water reservoir overnight, it is depleted of
oxygen, which is essential to brewing a perfect cup of coee.
NOTE: Technivorm Moccamaster is fast; it only takes 30 seconds to start
the brew process, with completion in 4 – 6 minutes.
Do the brewers automatically “shut o” after a set period?
The glass carafe models with the Auto-o option will shut o at
100 minutes. Glass and thermal carafe models without this option
will need to be manually shut o after each use.
NOTE: The heating element is not using power or activated
except during the brew cycle when the water reservoir oat switch
is engaged.
Why does this brewer have so many removable parts?
Parts that come in contact with coee have been designed to be removable
for cleaning and replacement purposes. Clean equipment is critical to
brewing good coee.
How do I order replacement parts?
Contact your local retailer for parts, which may also be ordered
online at www.boydscoeestore.com/parts or by calling
Boyds Customer Service at 1.800.223.8211.
See pages 14 –15 for replacement parts.
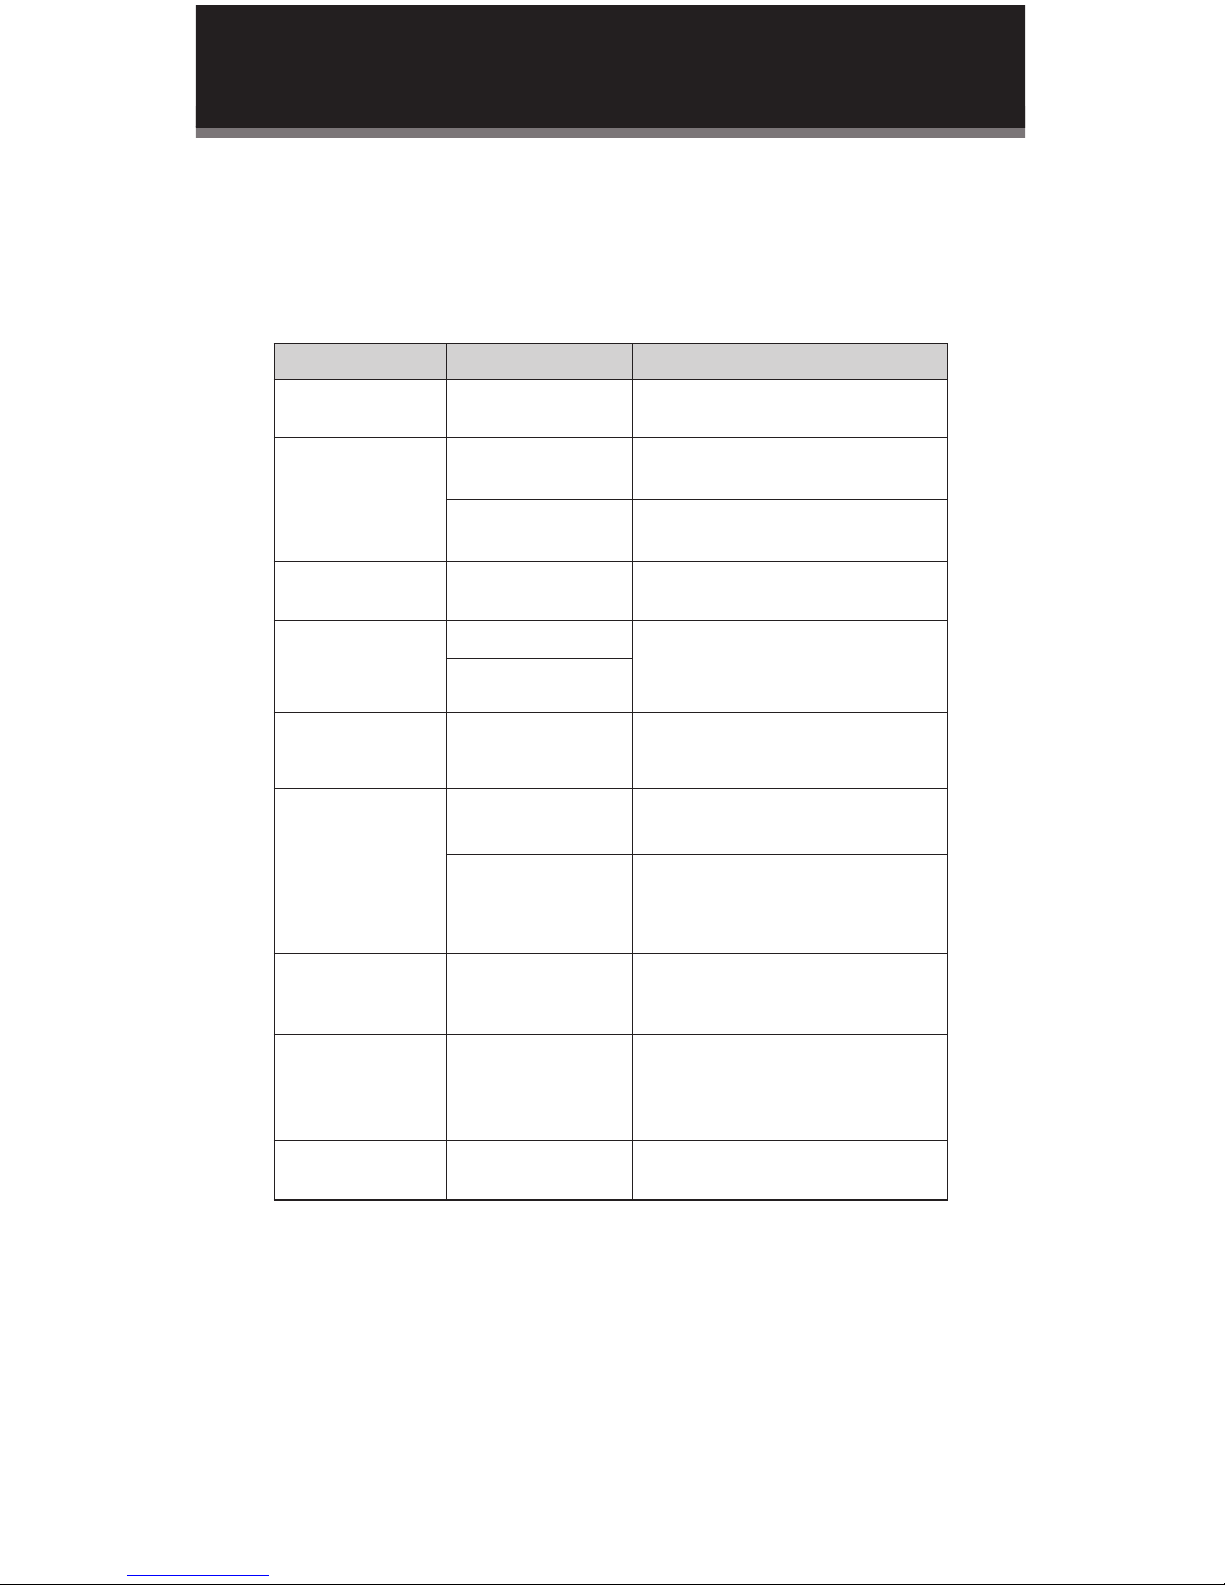
12
TROUBLE SHOOTING
The following table provides solutions for problems you may encounter
as you use your Technivorm Moccamaster. If you do not nd a solution
to your specic problem, or the problem persists after troubleshooting,
please contact Boyds Customer Service at 1.800.223.8211.
Problem Possible Cause solution
Brewer not working;
lights not illuminated
Power supply Check to ensure brewer is plugged into outlet.
Power light is on,
but coee maker is
not working
Thermal carafe is not
properly in place
Place carafe snugly against white button
at base.
Mineral buildup in
heating element
See descaling instruction in manual.
Brew basket is
overowing*
Manual drip-stop
is in closed position
Move switch on brew-basket to open position.
Thermal carafe is not
keeping coee hot
Defective thermal carafe
Contact authorized service center
for replacement.
Possible damage to carafe
vacuum seal
Hot-plate stays on after
brewing is complete
Your brewer has manual
power o switch
Manually turn power switch o. Some models
have optional “auto-o” where power switch
shuts o hot-plate in 100 minutes.
Coee tastes
weak or bitter
Incorrec t amount of
coee used in brewing
To brew to SCAA Gold Cup Standard use
2 Tbsp. coee for every 6 oz. cold water.
Incorrec t grind of coee
Technivorm Moccamaster ltered drip grind
should be on the coarser side. The grind
aects the extraction of coee soluables,
which aects the avor of your brewed coee.
Brew cycle is taking
more than 6 minutes
to complete.
Coee brewer needs
to be descaled
See descaling instruction in manual.
Water dripping out
very slowly.
The brewer may be
clogged with mineral
deposits and needs to
be descaled
See descaling instruction in manual.
Glass tube in water
reservoir is cloudy
Brewer needs
to be descaled
See descaling instruction in manual.
* NOTE: Clogging and backing up of water and/or coee in the lter basket can
occur under any or a combination of any of the following conditions: the use
of too nely ground coee, using two or more paper lters, using the gold mesh
lter in conjunction with a paper lter or not properly cleaning oils or grounds
from the gold mesh lter, or allowing coee grounds to spill over the lter.

13
MOCCAMASTER MODELS
THERMAL CARAFE
MODEL: KBTS-741
CAPACIT Y: 8 cup, 1L
FEATURES: Manual Drip-Sto p
MODEL: KBGT-741
CAPACITY: 10 cup, 1.25L
FEATURES: Auto Drip-Stop
MODEL: KBG-741-AO
CAPACITY: 10 cup, 1.25L
FEATURES: Auto Drip-Stop
Auto Shut-o Power
Switch
2 Hot-plate H eat Settings
MODEL: KB-741
CAPACITY: 10 cup, 1.25L
FEATURES: Manual Drip-Sto p
Manual Shu t-o Power
Switch
2 Hot-plate H eat Setti ngs
Keep this booklet for future reference. Record the model and
date code before using (located on the bottom of your brewer).
SAVE YOUR RECEIPT AS PROOF OF PURCHASE.
GLASS CARAFE
Type
Model
Serial NuMber
purchaSe daTe
purchaSe price
MODEL: KBT-741
CAPACIT Y: 10 cup, 1.25L
FEATURES: Manual Drip- Sto p
MODEL: CDT
CAPACITY: 10 cup, 1.25L
FEATURES: Manual Drip-Sto p
MODEL: KB-741-AO
CAPACITY: 10 cup, 1.25L
FEATURES: Manual Drip-Sto p
Auto Shut-o Power
Switch
2 Hot-plate H eat Setti ngs
MODEL: CDGT
CAPACITY: 10 cup, 1.25L
FEATURES: Auto Drip-Stop
MODEL: K-741-AO
CAPACITY: 10 cup, 1.25L
FEATURES: No Dr ip-Stop
Auto Shut-o Power
Switch
Non-adj ustable Hot-plate
Heat Set tings
14
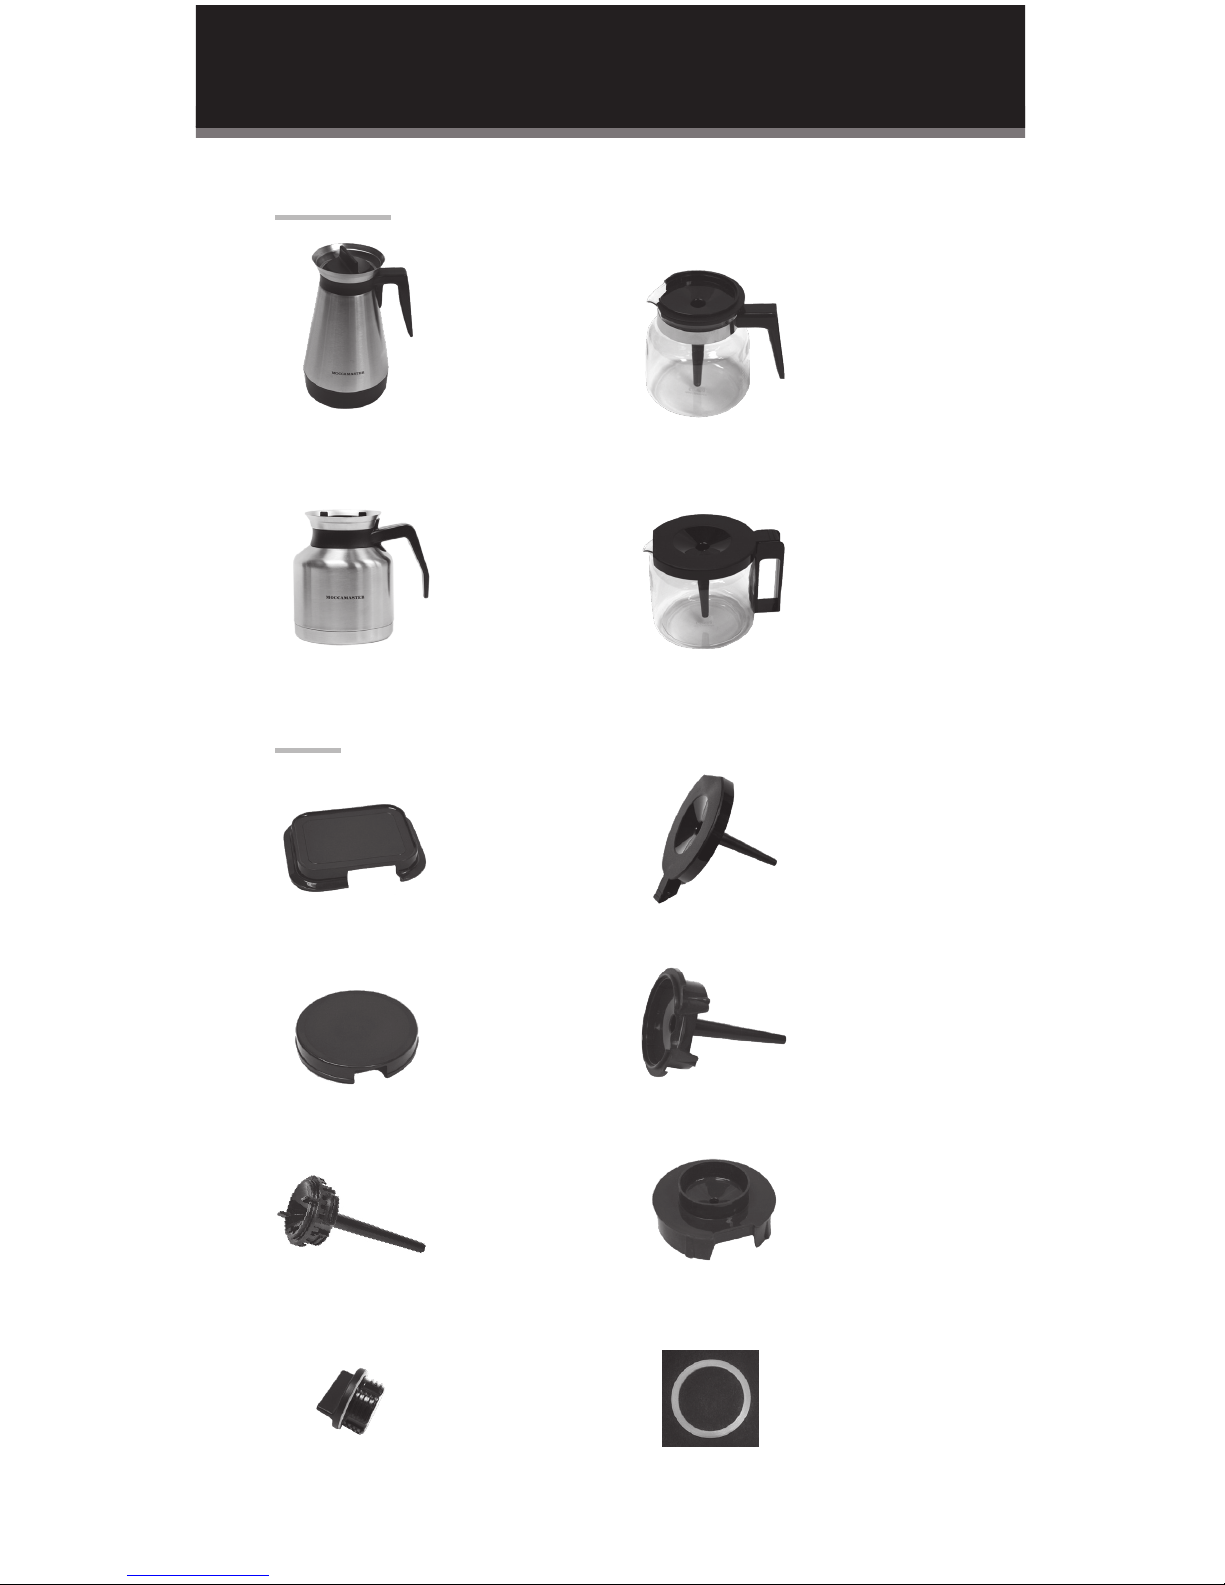
REPLACEMENT PARTS
CARAFES
LIDS
Thermal Carafe
for K and C models
Thermal Carafe
for KBTS models
Glass Carafe
for K and KB models
Glass Carafe
for KBG models
Cool Water
Reservoir Lid for
all K models
Cool Water
Reservoir Lid for
all C models
Glass Carafe Lid with
Destratification Tube
for KB models
Glass Carafe
Lid without
Destratification Tube
for K model
Thermal Carafe
Brew-Thru-Lid for
all K and C models
Thermal Carafe
Travel Lid Gasket
Thermal Carafe
Travel Lid
Glass Carafe Lid with
Destratification Tube
for KBG models
15
AVAILABILITY WHERE TO BUY
Replacement parts are available through your local retailer,
online at www.boydscoeestore.com/parts
or through Boyds Customer Service at 1.800.223.8211
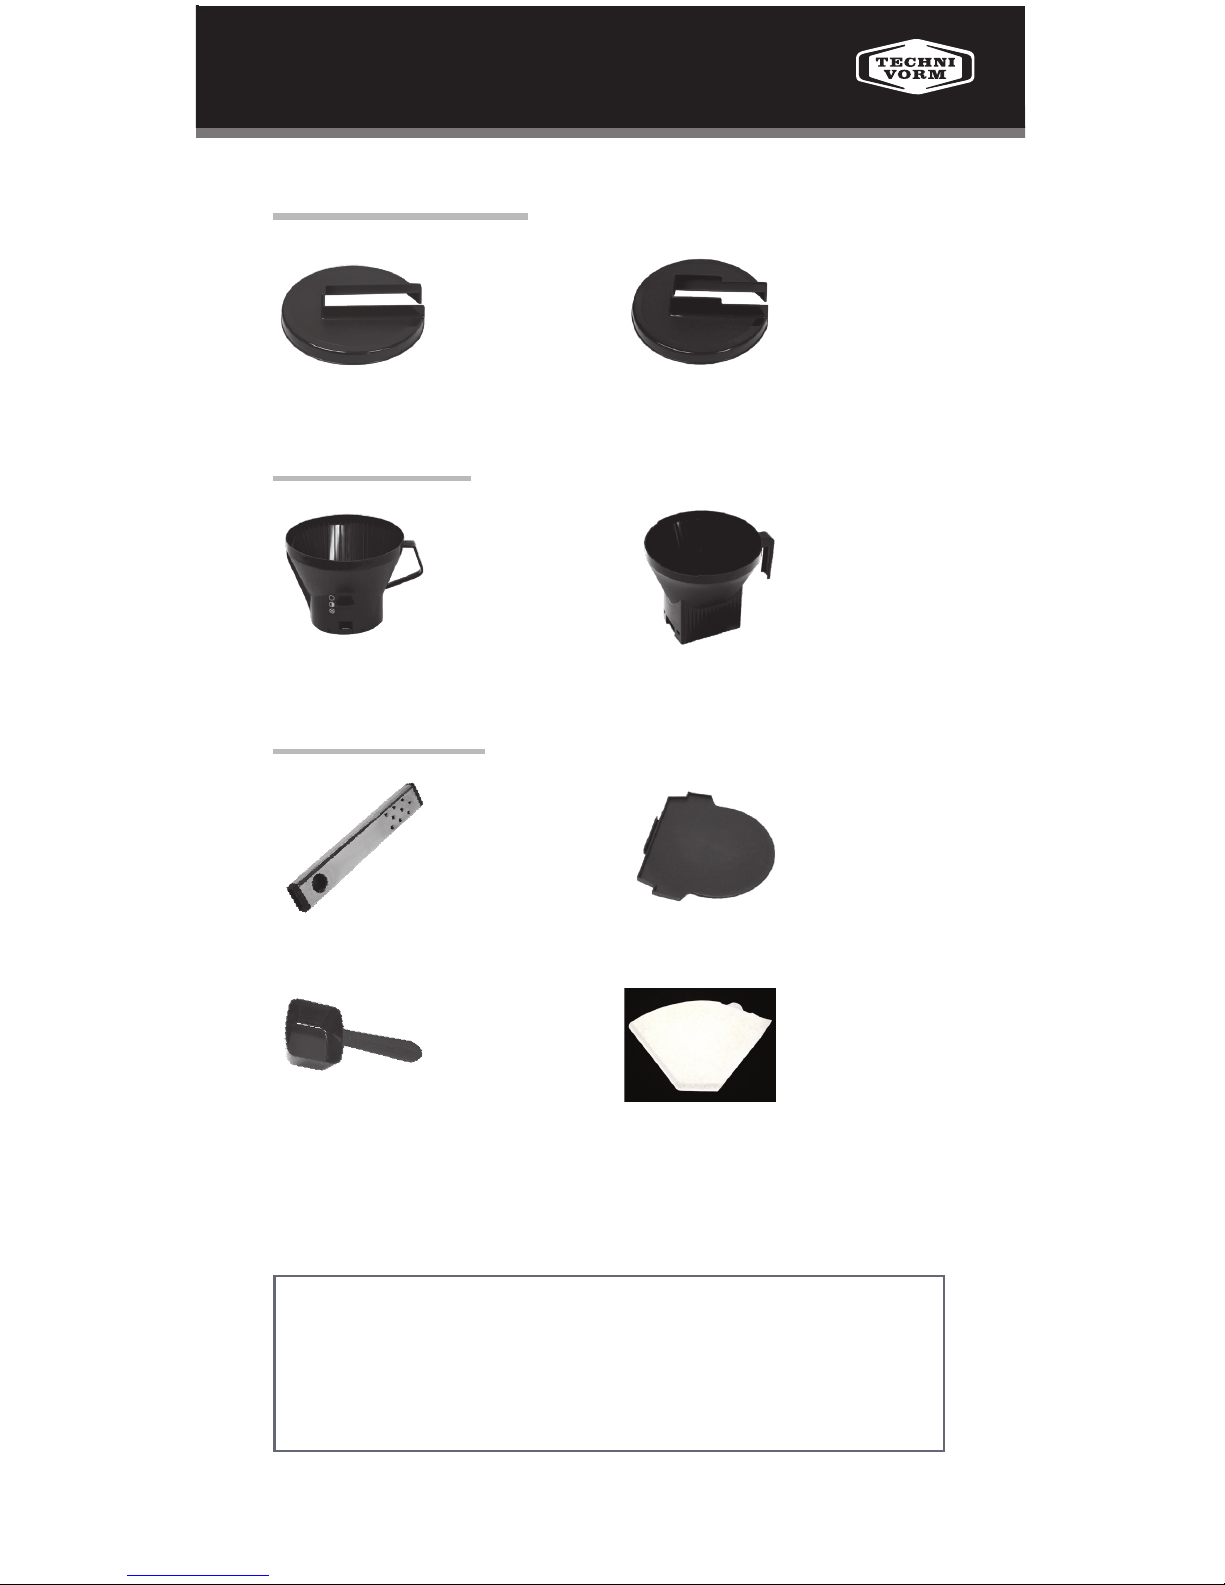
MISCELLANEOUS
Brew-Basket Lid for
all K models
Brew-Basket Lid for
all C models
Brew-Basket with
manual-adjust
drip-stop (for round
base bracket)
Brew-Basket with
auto-adjust
drip-stop (for
rec tangle base
bracket)
9-Hole Outlet Arm
for all models
Optional Footplate
for all Thermal
Carafe models
Measuring Spoon
(2 Tbsp)
Moccamaster #4
White Paper Filters
(recommended),
100 count
BREWBASKETS
BREWBASKET LIDS
 Loading...