


WNA
Version 2.00 EN
Wireless Router
Setup Guide
en

2
Package Contents
The following parts are shipped:
Wireless Router WNA (TL-MR3020)
Power cord and adapter
USB-Cord (Y-Port)
Ethernet-LAN-Cord
Quick Installation Guide (English, German, Spanish, Greek, French, Italian, Portuguese, Finn-
ish, Dutch, Swedish, Norwegian, Danish)
Indicators, Buttons, Ports
LED
Status
Meaning
Power
On
The router is receiving power.
Off
The router is not receiving power.
Internet
On
The router is connected to the internet via 3G/4G, but no data is being transmitted.
Flashing
The router is connected to the internet via 3G/4G and data is being transmitted.
Off
The router is not connected to the internet via 3G/4G
Wi-Fi
On
The Wi-Fi-port is in use.
Flashing
The Wi-Fi-port is in use and data is being transmitted.
Off
The Wi-Fi-port is not in use.
Ethernet
On
The ethernet port is connected.
Flashing
The ethernet port is transmitting data.
Off
The ethernet port is not in use.
WPS/Reset: Hold this button down for at least ten seconds to trigger a reset of the router. Hold the
button down for less than 5 seconds to activate the WPS-function.
Power
Internet
Wi-Fi
Ethernet
WPS/Reset

3
CMI
3G/4G-USB-Port: Port for 3G/4G sticks.
Mini-USB-Port: For power supply
RJ45 Ethernet-Port: For ethernet connection via LAN.
Mode Switch: To choose the mode of operation. Changing the mode while the device is in use
will trigger a restart.
A sticker on the side of the router contains data of the router: MAC-Address, Key, SSID and the
default settings of IP-Address, username and password.
This setup guide only covers the two modes of operation relevant for usage with the C.M.I.
3G/4G Router mode
This mode allows the router the connection of a 3G/4G modem/stick, broadcasting its mobile network
connection under its own Wi-Fi-SSID.
Depending on your Mobile Internet Service Provider, costs for usage may incur!
3G/4G-USB-Port
Mini-USB-Port (DC)
RJ45 Ethernet-Port
Mode Switch

4
Router configuration 3G/4G
1. Open a web browser and enter the address 192.168.0.254 into the address bar and hit enter.
2. The login window below will appear. Enter admin as both username and password. Click
Login or hit enter.
3. Before continuing the configuration, please check the status of the device by clicking status to
ensure that your 3G/4G modem can be identified.
4. Enter the menu Quick Setup and click Next.

5
5. The page Internet Access will appear. Choose the option 3G/4G Only (Recommended) and
click Next.
6. Enter your access data and click Next.
If your provider is not listed, tick Set the Dial Number, APN, Username and Password
manually to enter the data of your ISP (=Internet Service Provider) yourself.

6
7. The Wireless options are now being displayed.
You can leave the data as it is or change your Wireless Network Name and/or your Password. Either way, click Next to proceed.
8. Click Reboot to accept the changes to the Wi-Fi configuration and finish your Quick Setup. (If
no changes to the Wi-Fi configuration have been made, click Finish to close your setup.)
9. After the reboot, reconnect to the network.
10. Your C.M.I. can now be connected to the router. The C.M.I. will have to be restarted after-
wards.
AP (Access Point) Router mode
Configured as Client, the router behaves like a Wi-Fi router to bring non-Wi-Fi ethernet-devices into a
wireless network.
CMI
7
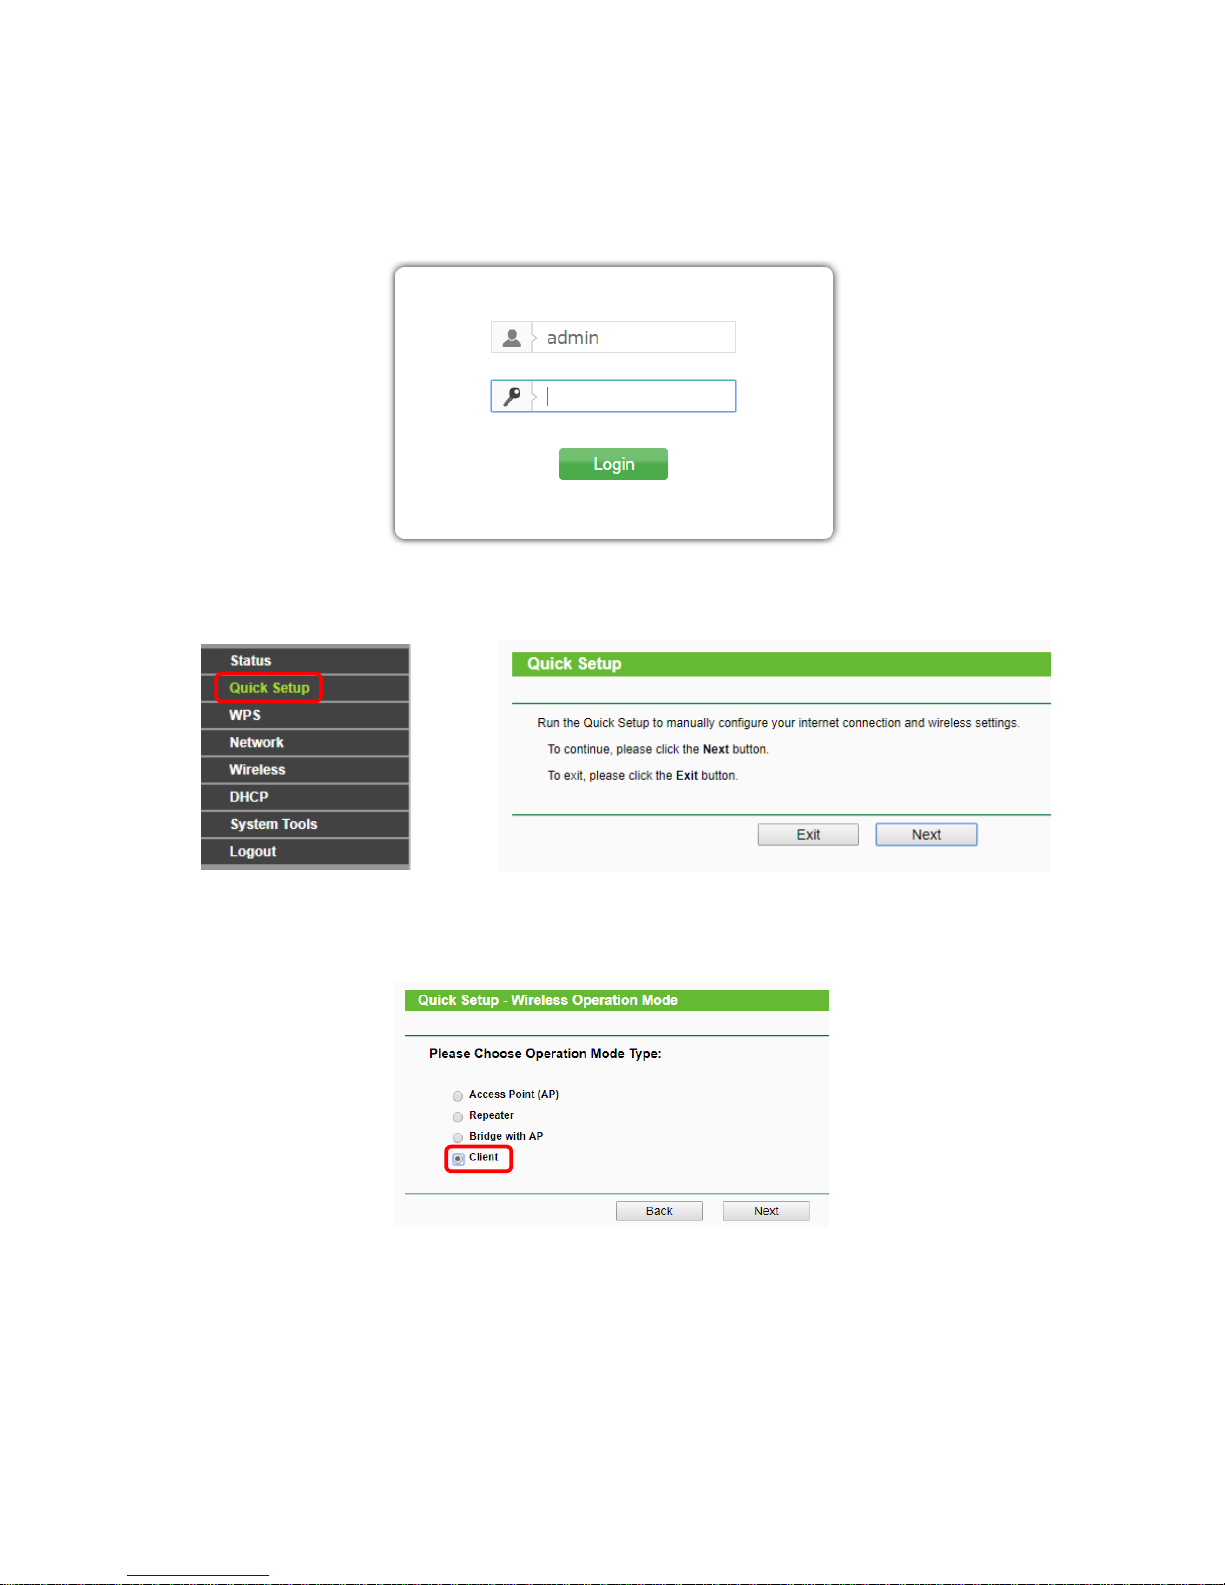
Router Configuration AP-Client
1. Open a web browser and enter the address 192.168.0.254 into the address bar, then hit enter.
2. Enter admin as both username and password. Click Login or hit enter.
3. Navigate to Quick Setup in the menu on the left and hit next in the window that follows.
4. Choose the Wireless Operation Mode Type “Client” and click Next.

8
5. The window pictured below will appear. Enter the Wireless Network Name (SSID) and
choose a Security Mode, then click next. Click Survey to scan for available networks, should
you not know your network’s name.
The Security Mode and its properties must be the exact same as the mode and properties of
the existing Wi-Fi network. None means that the router will work without being secured by a
password, allowing any device within reach to connect. Click Next once the required data has
been entered.
6. Click Reboot to restart your router and accept your changes. After the reboot, change your
computer’s settings back to Retrieve IP-Address automatically and Retrieve DNS-Server-
address automatically and connect to the network.
7. Your C.M.I. can now be connected to the router. The C.M.I. will have to be restarted after-
wards.
Technical Changes reserved. © 2017

9
EU Declaration of conformity
Document- Nr. / Date:
TA17058 / 02/02/2017
Company / Manufacturer:
Technische Alternative RT GmbH
Address:
A- 3872 Amaliendorf, Langestraße 124
This declaration of conformity is issued under the sole responsibility of the manufacturer.
Product name:
WNA
Product brand:
Technische Alternative RT GmbH
Product description:
Wireless Router
The object of the declaration described above is in conformity with Directives:
2014/53/EU,1999/519/EC, 2011/65/EU
Employed standards:
ETSI EN 300 328 V1.7.1: 2006, ETSI EN 301 489-1 V1.8.1:2008& ETSI EN 301 489-17
V2.1.1:2009, EN 55022:2010, EN 55024:2010, EN 61000-3-2:2006+A1:2009+A2:2009, EN 61000-33:2008, EN60950-1:2006+A11:2009+A1:2010+A12:2011, EN 62311:2008, EN 301 893, EN 302
502
Position of CE - label: On packaging, manual and type label
Issuer:
Technische Alternative RT GmbH
A- 3872 Amaliendorf, Langestraße 124
This declaration is submitted by
Dipl.-Ing. Andreas Schneider, General manager,
02/02/2017
This declaration certifies the agreement with the named standards, contains however no warranty of
characteristics.
The security advices of included product documents are to be considered.


11

Guarantee conditions
Note: The following guarantee conditions do not in any way limit the legal right to a guaran-
tee, rather expand your rights as a consumer.
1. The company Technische Alternative RT GmbH provides a two-year guarantee from the date
of purchase by the end consumer for all the devices and parts which it sells. Defects must be
reported immediately upon detection and within the guarantee period. Technical support
knows the correct solution for nearly all problems. In this respect, contacting us immediately
will help to avoid unnecessary expense or effort in troubleshooting.
2. The guarantee includes the free of charge repair (but not the cost of on-site fault-finding, removal, refitting and shipping) of operational and material defects which impair operation. In the
event that a repair is not, for reasons of cost, worthwhile according to the assessment of
Technische Alternative, the goods will be replaced.
3. Not included is damage resulting from the effects of overvoltage or abnormal ambient conditions. Likewise, no guarantee liability can be accepted if the device defect is due to: transport
damage for which we are not responsible, incorrect installation and assembly, incorrect use,
non-observance of operating and installation instructions or incorrect maintenance.
4. The guarantee claim will expire if repairs or actions are carried out by persons who are not authorised to do so or have not been so authorised by us or if our devices are operated with
spare, supplementary or accessory parts which are not considered to be original parts.
5. The defective parts must be sent to our factory with an enclosed copy of the proof of purchase and a precise description of the defect. Processing is accelerated if an RMA number is
applied for via our home page www.ta.co.at. A prior clarification of the defect with our technical
support is necessary.
6. Services provided under guarantee result neither in an extension of the guarantee period nor
in a resetting of the guarantee period. The guarantee period for fitted parts ends with the
guarantee period of the whole device.
7. Extended or other claims, especially those for compensation for damage other than to the device itself are, insofar as a liability is not legally required, excluded.
Legal notice
These assembly and operating instructions are protected by copyright.
Use outside the copyright requires the consent of the company Technische Alternative RT GmbH.
This applies in particular to reproductions, translations and electronic media.
Technische Alternative RT GmbH
A-3872 Amaliendorf Langestraße 124
Tel ++43 (0)2862 53635 Fax ++43 (0)2862 53635 7
E-Mail: mail@ta.co.at --- www.ta.co.at --- © 2017
 Loading...