

Page 1

Instruction Manual
for 100Hz Television sets
Colani-TV • Classic Line
Made in Germany
Page 2

Contents
1
Dear customer,
We would like to congratulate you for choosing a
TechniSat television set, which has been produced
according to the most modern, up-to-date technical standards.
The city of Stassfurt in the state of Sachsen-Anhalt has
been synonymous with the production of high-quality
radio and television equipment for decades, and today
guarantees you high quality made in Germany.
Our products are distributed by qualified specialist
TechniSat TV service points, who will provide you with
qualified guidance and professional service. Whenever
you have any questions or possible problems, be sure to
consult your local specialist retailer.
In order to operate the TV set immediately, turn to the
chapter Daily Operation on pages 4 to 7.
The Initial Operation procedure (automatic channel
scan) on page 3 is only necessary if you want to install
your TV set and attach it to the antenna without the assistance of a service technician. In this case, appropriate
instructions will be displayed on the screen the first time
you switch on the set. Should you wish to adjust picture,
sound or programme characteristics at a later stage, turn
to the chapter on Settings for guidance.
Before going any further, please read the notes on
Operation and Safety on page 2, to ensure that you will
enjoy problem-free TV viewing for a long time.
Page
Table of contents 1
Operation and Safety 2
Remote control/changing batteries 3
Initial Operation 3
Controls and features 4
Daily Operation 5
Switching on and off 5
Adjusting the volume 5
Selecting a channel 5
Displaying tips 5
Selecting sound features 6
Displaying time, date and information 6
Sound mute 6
Freeze frame 6
Zoom 6
Radio mode 6
Parental control 6
Video text 7
Settings 8
Picture settings 8
Contrast 8
Brightness 8
Sharpness 8
Adjusting picture format 8
Details 8
Noise suppression 8
Sound settings 9
Volume 9
Treble 9
Bass 9
Mono/Stereo/Dual 9
Balance 9
Sound characteristics 9
Headphones Mono/Stereo/Dual 9
Headphones volume 9
Page
Channel selection 10
Manual channel selection 10
Programming for terr. resp. cable channels 10
Programming for satellite channels 11
Initiating a TTS channel scan 14
Changing order of channels 14
Satellite outdoor installation 16
Selecting a satellite 16
LNB supply 17
DiSEqC 17
Operating Language 17
AV configuration 18
Connecting AV equipment 18
Connecting a video recorder (VHS/Video 8) 18
Copying with the aid of two video recorders 18
Viewing from camcorder 19
Copying from camcorder to video recorder 19
Viewing from SVHS/Hi8 video recorders 19
Installing a decoder,
and recording scrambled programmes 19
Connecting a video recorder to the antenna socket 19
Connecting equipment via RGB outlet 19
Timer/clock 20
Clock 20
Programme timer 20
Sleep timer 20
Headphone connection 21
Connecting hi-fi equipment 21
VGA/computer connection 22
ADR (ASTRA DIGITAL RADIO) 23
Table of audio types 24
Foreign terms 25
Technical terms 26
Tables of channels/programmes 27
Technical data 28
Contents
Page 3

➫ Connect to power supply 230V/50Hz AC
➫ The TV set is designed to receive and reproduce
only sound and video signals.
➫ The set is designed to be connected only to audio
and video equipment, antenna installations and
computers that comply with DIN standards, and
carry a CE certification.
➫ The set may be used for private and commercial
purposes, and must be operated inside a dry
room, and under supervision.
➫ Any other form of operation is specifically exclu-
ded.
This equipment complies with the following standards:
Radiation (X-Ray) regulations (RöV in Germany) of
08.01.1987,
EU guideline 73/23/EEC (low-voltage regulations)
- EN 60065
EU guideline 89/336/EEC (EMV guideline)
- EN 55013, EN 55020, EN 60555-2
And carries CE certification.
Spent batteries should not be discarded with domestic refuse. They can either be disposed of by separate channels, or they will collected by the dealer.
Should the TV set reach the end of its lifespan after
many years, specialist retailers will take it back for
environmentally-friendly disposal
TechniSat provides a coupon for an old TV set when
you purchase a new set.
The housing of a Colani-Line set can be cleaned with
a soft, slightly moist cloth.
The housing of a Classic Line set can be cleaned
with a soft, dry cloth.
Do not use spray cleaners or any aggressive chemical detergents for the housing, as this may damage
the high-quality surface.
The screen can be cleaned while the set is switched
off, using a dry or very slightly damp cloth.
➫ If the following safety precautions are ignored, the
manufacturer's responsibility ceases.
➫ Never open the housing!
It is extremely dangerous to touch parts carrying high-voltage current.
➫ Only trained personnel may carry out repairs.
➫ Should the set be delivered or transported during
cold weather, do not switch it on immediately, but
allow the set to adjust to room temperature first.
➫ Operate the set in an environment where it is safe
from humidity and damp, as well as splashes or
drops of water. If water gets into the housing,
immediately disconnect the power supply and call
a service technician.
➫ Do not place the set in very confined bookshelves
or cupboards, and allow at least 10cm space all
round for ventilation.
➫ Do not place the TV set near a heater or other
equipment that will cause the set to heat up more
than usual.
➫ Do not expose the set to strong sunlight, and
never cover up the ventilation slots, as this would
affect the cooling of the set.
➫ In case of electrical storms, disconnect both the
antenna and power connections, as power surges
can damage the set.
➫ Do not stick any objects into or through the ventila-
tion slots.
➫ If you notice a specific defect, or if there is a stran-
ge smell and smoke coming from the set, disconnect the power supply immediately, and call a
technician.
➫ If you are out of the house for an extended period
of time, the TV set should be switched off. This
saves energy, and prolongs the lifespan of the picture tube.
➫ If the set is kept in standby mode via the remote
control, power consumption is approximately 1
Watt.
Operating the equipment correctly
Manufacturer’s declaration
Safety advice
Disposal advice
Cleaning and care
2
Initial Operation
Page 4

3
Operation and Safety
➜ Apply slight pressure to the marked spot in order
to open the back cover of the remote control unit.
➜ Insert the batteries supplied with the set, ensuring
that their polarity complies with that indicated in
the battery compartment.
➜ Now, close the battery compartment again.
➜ Press the TV key, in order to switch over to TV
control level. If you forget this step, theTV set will
not respond to keyed instructions.
Note !
➫ The TV key must be pressed after each time
the batteries have been changed, in order to
reset the operating code for the set!
➫ If batteries have been in use for some time, and
are nearing the end of their life, there may be malfunctions of the remote control.
➫ We recommend that you use Micro AAA/R3 alkali-
ne batteries for the remote control.
➫ Spent batteries must be disposed of correctly, or
handed to your retailer.
➫ The remote control can be used to operate the TV
set, a video recorder as well as two satellite receivers, provided they utilise specific addresses of
the so-called "RC 5 code" (e.g. digital satellite
receivers from TechniSat -TV).
➫ The keys PIP, ZOOM, ? and INFO allow you to
operate the Rewind, Stop, Play and Fast Forward
functions of a video recorder.
➫ The EPG key on the remote control is of no signifi-
cance.
The set is set at the factory for a menu-driven
initial operation (programming channels). All
available channels are scanned, then sorted
and retained in memory in a logical order.
The following steps must be followed:
➜ Connect the antenna cable to the antenna socket
at the rear of the TV set.
➜ * Connect F-connector of the antenna cable to the
F-socket of the TV set (only if satellite module is
fitted).
➜ Connect power plug to the power supply.
➜ Switch on the TV set via the power switch on the
TV control panel.
The power control light will light up in green.
After a short time, a menu for selecting your prefer-
red language will be displayed on the screen.
➜ Use the Programme keys on the remote control
unit to select the language (e.g. English), and confirm by pressing OK.
The menu Land (Country) will now be displayed.
➜ Use the Programme keys to mark the country
(e.g. GERMANY), confirm by pressing OK this will
initiate the TTS scan.
TTS is an automatic scan and search for all programmes available.
The channels/stations found will be displayed in a
list.
* If the TV set is fitted with a satellite module, the satellite channels found will be added
to the list of terrestrial or cable channels
found, in accordance with the enclosed list of
channels in this manual.
* If the TV set is fitted with an ADR module,
the pre-programmed ADR stations will be
added above programme position 351 (first
ADR station slot = 351 plus the number of
terrestrial resp. cable channels.
At the end of the scan, all programmes have been
found.
The menu Change Order will be displayed.
➜ Pressing the RADIO / TV key will switch off the
menu.
➜ Pressing the Standby/on key will keep the TV set
in standby mode.
➜ Pressing the Standby/on key will switch on the TV
set.
Switching the set on at this time will lead to
the internal clock of the TV set being set to
the time of the tele text clock of the channel
on programme slot 1.
Your Initial Operation has been successfully concluded.
Remote control / changing batteries Initial Operation
Any characteristics marked with * are functions that are not available in all TV
models covered by this manual.
Page 5
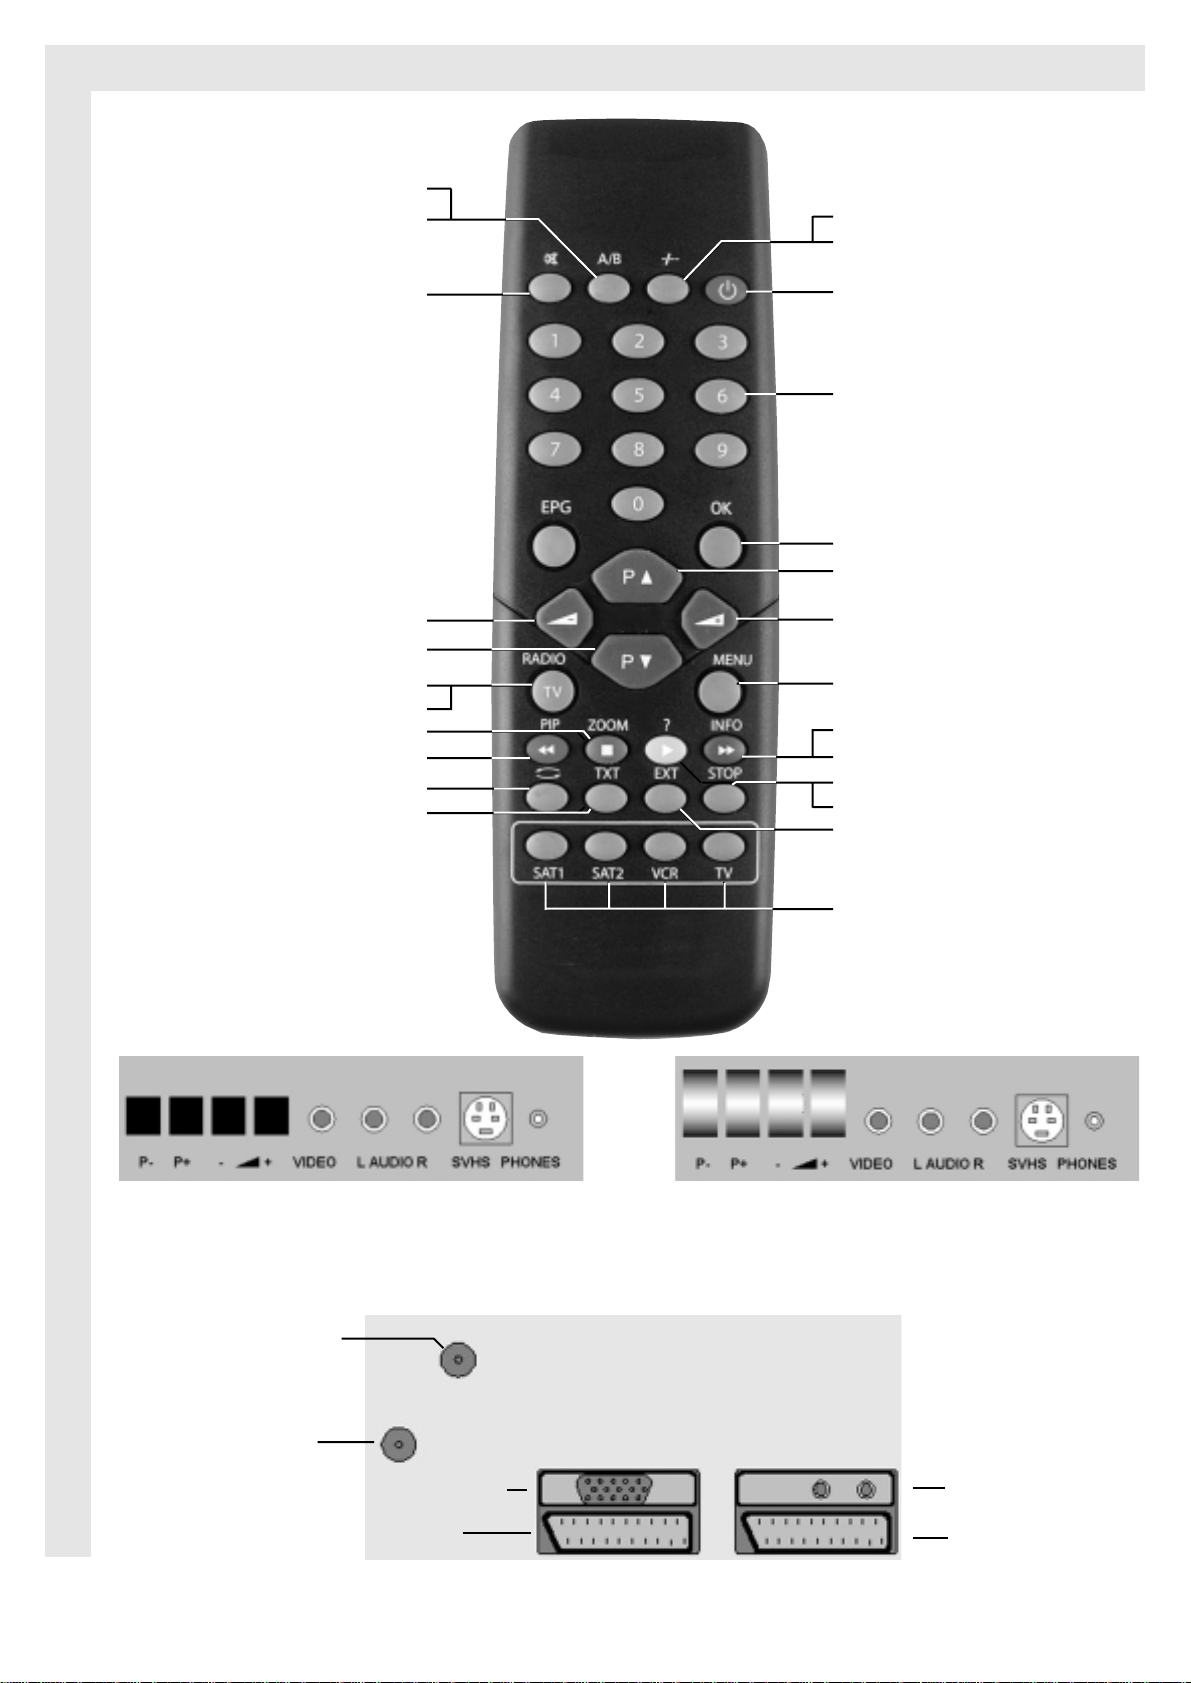
4
Control elements
Remote control
Sound selection
Channel A/B
Stereo/Mono/Dual Parental lock
* Format change (at 16:9)
Sound Mute (on/off) Standby/on
Numeric keypad
OKMultifunction key
Programme +
Volume - Volume +
Programme -
-
TV / Radio mode Menu on/off
Tele text off
Tele text page + Date, Time, Information
Tele text page - Tele text - next block
Switching key (programme) Hidden information
Tele text on Tele text - next group
EXT
Equipment code
Please note!
When using the remote
control for the first time, or
after changing batteries,
press the TV key at bottom
right!
Front panel controls “Classic Line” Front panel controls “Colani Line”
P-, P+ -keys for switching programmes
L-, L+ -Volume control
VIDEO -cinch socket, input VHS/ Video 8
AUDIO -cinch sockets (input stereo Sound)
SVHS -Hosiden socket (input SVHS/ Hi8)
PHONES -Headphone output (3,5 mm)
*Antenna socket
for satellite antenna
Antenna socket for
terrestrial Antenna or
cable connection Cinch sockets
Audio Out
for hi-fi connection
SCART2
Back panel
sockets
LR
*VGA-socket
SCART1
Page 6
Daily Operation
5
➜ To switch on, press the Power key on the front
panel of the TV set.
➜ Use either the Standby/ on key on the remote
control unit.
Or
➜ Use the Programme keys on the remote control
unit.
Or
➜ Use the keys 0 to 9 on the numeric keypad.
Or
➜ Use the two keys on the left of the panel behind
the cover on the TV set.
The mode display light will change from red to green.
➜ Use the Power key on the set, or the Standby/
on key on the remote control in order to switch off
the TV set.
If the Standby/ on key was used to switch off
the set, it will go into standby mode, and can
be switched on again using the Standby/ on
key.
The eco-standby mode ensures a very low
power requirement of only 1W.
Note:
The last switching command given by the
remote control, whether On or Off, will be stored in memory by the set.
Should the set have been switched of via the
Power button on the set while in this operational mode, repeated pressing of the Power
key will result in the set being switched on,
and not into standby mode.
Should you experience a power failure, we
recommend you switch the set off via the
Power key, so as to avoid the set switching itself on again unintentionally later.
Using the remote control
➜ Press the Volume keys to adjust the volume of the
built-in loudspeakers.
A bar representing the current volume level
will be displayed on-screen.
Using the controls on the TV set
➜ Press the marked area on the covering flap on the
front panel of the TV set.
➜ Use the two keys on the right to adjust the volume.
➜ Press the Programme keys to select a new chan-
nel.
In addition, the programme place in the list, the
channel logo and the status of sound reproduction
will be displayed.
The status of sound reproduction modes may be one
of the following:
mono stereo dual
➜ By pressing a number or several numbers within a
space of 3 seconds, a new channel can be selected directly.
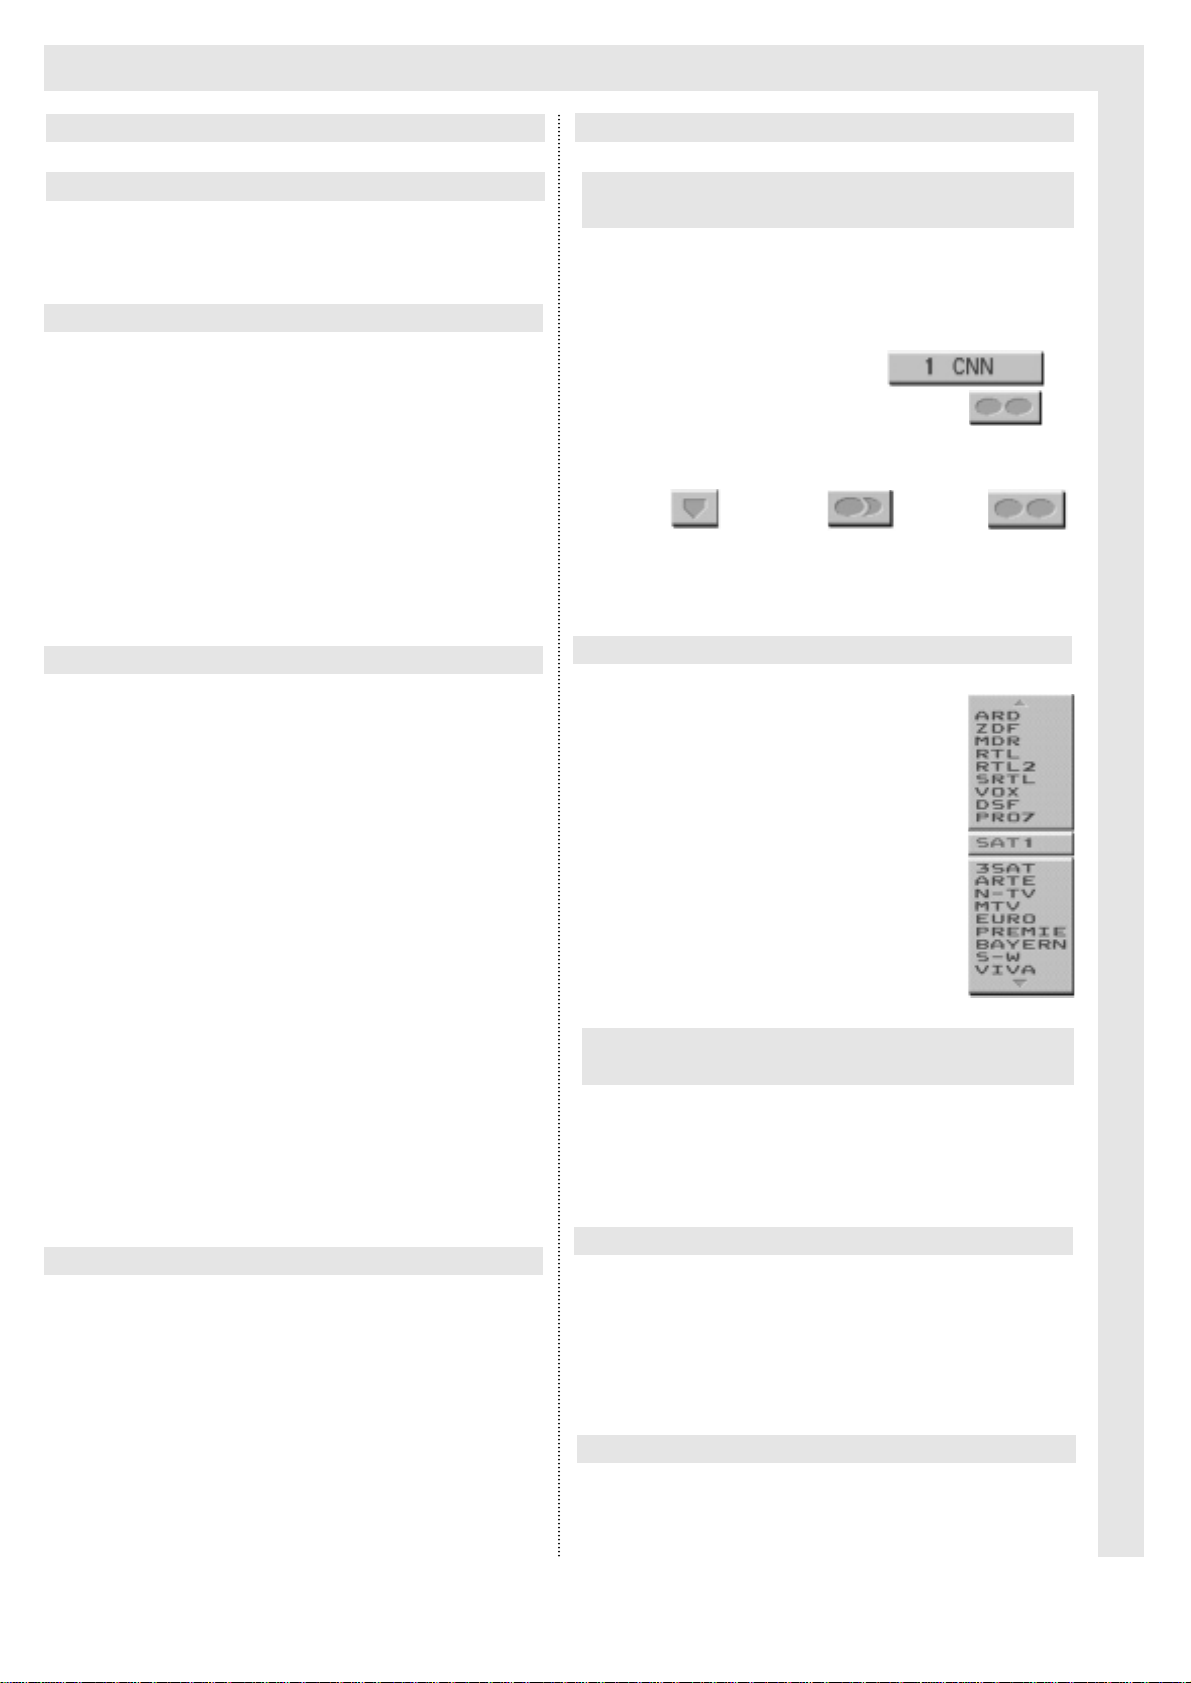
➜ Press the OK key to see the
list of programmes on screen.
➜ Use the Programme keys to
select a new programme, and
confirm by pressing the OK key.
Hint: In order to select the
programme more quickly,
use the Volume keys to
page through the list in
blocks of 19 programmes
at a time.
➜ Press the marked area on the covering flap on the
front panel of the TV set.
➜ Use the two keys on the left to select a new chan-
nel.
➜ Pressing the Switching key will switch to the pro-
gramme previously selected.
Each time the channel switch key is pressed,
the programme number, name of the channel
and status of sound mode will be displayed
briefly.
➜ Press the yellow ? key to display or hide a table of
hints.
Switching on via Power key on the TV set
Switching on from Standby mode
Direct channel selection using the
numeric keypad
Switching the set of
Selecting channel from the programme list
Exchange function with last channel selected
Selecting a channel with controls on the
TV set
Adjusting the volume
Showing Hints and Tips
Switching the TV on and off Channel Selection
Page 7
Daily Operation
6
➜ Press the A/B key to select the desired mode of
sound reproduction.
➜ If the programme selected has mono sound, the
A/B key has no function.
Sound reproduction of terrestrial or cable programmes
➜ In the case of stereo broadcasts, use the A/B key
to switch between MONO and STEREO.
➜ In the case of broadcasts with dual channel
sound, use the A/B key to switch between DUAL A
and DUAL B.
Sound reproduction of Satellite broadcasts
➜ In the case of stereo broadcasts, use the A/B key
to select STEREO, LEFT or RIGHT.
➜ In the case of broadcasts with dual channel
sound, use the A/B key to select STEREO, MONO
A or MONO B.
➜ Press the blue INFO key to display date and time,
programme number, channel logo and sound
mode on screen.
➜ If the INFO key is pressed again before the date
display is switched off again, this information is
taken off screen, and page 333 of the tele text function of the channel currently selected is shown (in
Germany, a number of channels use this page to
display information on current programmes).
➜ Pressing the INFO key yet again (i.e. for the third
time) will remove the display from the screen.
➜ Pressing the Stop key will freeze the current
image on screen, pressing the key again will
return to the normal programme picture.
➜ Pressing the Sound Mute key will switch off the
sound.
A loudspeaker symbol will be displayed on
screen.
➜ Press either the Programme keys or the Sound
Mute key to switch the sound back on again
The loudspeaker symbol will disappear from
the screen.
➜ Pressing the green ZOOM key increases the
picture size by 33%.
➜ Pressing the green key again moves the enlarged
picture up on the screen, allowing sub-titles to be
viewed at the bottom of the screen, when a zoomed 4:3 image is received.
➜ Pressing the key for a third time restores the origi-
nal setting.
In some 16:9 broadcasts (e.g.PALplus) the
TV set interprets a coded information sent
with the broadcast, and automatically adjusts
the image to fill the screen (automatic zoom).
If a 4:3 image is zoomed, the upper and
lower sections of the picture will not be visible. If you want to view the whole picture,
press the Format change key to adjust the
image to the screen dimensions.
➜ Pressing the Format change key increases image
width without changing the image height.
This setting will be retained even if you change channels, provided you do not change to a
16:9 broadcast with automatic zoom information.
If the TV set is fitted with an internal satellite
module, satellite radio stations will be stored
on a number of programme slots (see list of
satellite programmes)
➜ Press the RADIO/TV key to switch to radio mode;
the screen remains dark.
➜ Pressing the RADIO/TV key again will switch off
radio mode again.
After a short delay, the image will appear on the screen again.
The TV set can be blocked against unauthorised usage. When the lock is activated, the
TV set cannot be switched on without the
remote control.
Activating parental control:
➜ Press the Format change key until a message
appears on screen to confirm the parental control
has been activated.
➜ Use the Standby/on key to switch the TV set off.
➜ Switch the TV set off by means of the Power key.
➜ Store the remote control in a place not accessible
to children.
In this mode, the TV set can only be switched
on via the remote control.
Deactivating parental control:
➜ Press the Standby/on key to switch on the TV
set.
➜ Press the Power key to switch off the TV set.
Selecting Sound Mode
Zoom (only possible with 16:9 sets)
Switching to radio reception (radio mode)
Parental control
Displaying Time, Date and Information
Freeze Frame
Sound off (mute)
Page 8
Daily Operation
7
➜ Press the Tele text on key to call up video text.
If the channel provides tele text, page 100 (main
introduction) will be displayed by default.
All other pages will be available within a time
of 30 seconds maximum. This is the time
required by all channels to broadcast their
pages. As the TV set has a large memory,
sufficient for 512 pages, practically all available pages can be displayed from memory
without delay.
➜ Use the 0 to 9 keys to select a three-digit page
number.
The selected page of tele text will be called up, and
the page number displayed top left on screen.
Most TV channels broadcast tele text in the
form of TOP text. This provides for all pages
to be sorted thematically in groups and
blocks, so it is easier to obtain an overview of
the pages available.
Pages can be selected simply by means of four
coloured keys:
➜ The red key pages back one page at a time.
➜ The green key pages forward one page at a time.
➜ The yellow key selects the tele text group shown
in the yellow box in the bottom line.
➜ The blue key selects the tele text block shown in
the blue box in the bottom line.
The contents of the groups and blocks are shown at
the bottom of the screen by means of four coloured
text blocks, whose colours are allocated to the four
coloured keys, e.g.:
Where a page consists of several sub-pages,
these can be stored in the sub-page memory.
Tele text pages with sub-pages can be recognised by the two numbers separated by a
slash (currently viewed page/number of subpages) on screen.
➜ Pressing the OK key activates the sub-page
memory, and sub-pages will be downloaded into
memory.
The sub-page bar shown at left of the screen will
mark the sub-page being displayed in yellow. All
other sub-pages available in memory are shown in
white, and can be called up.
➜ Pressing the Programme keys will display
the selected sub-page immediately.
➜ Pressing the OK key will allow you to
leave the sub-page mode, all sub-pages
are deleted from memory and operation
returns to normal tele text mode.
➜ Pressing the Switching key switches the colou-
red keys to a second tele text operating level,
which provides four additional functions.
➜ Press the red key to stop paging through sub-
pages (STOP in headline).
➜ Repeated pressing of the key will allow paging to
continue.
➜ Press the green key to enlarge the upper half of
the tele text page.
➜ Repeated pressing of the green key will enlarge
the lower half of the tele text page.
➜ Pressing the green key a third time will again
show the tele text page in normal size.
➜ Press the yellow key to show hidden information
(e.g. solutions to a quiz, VPS times), repeated
pressing will cause the information to be hidden
again.
➜ Press the blue key to display the TV image,
repeated pressing will show the tele text again.
➜ Press the Switching key twice to display a blue
background to the symbol for tele text brightness.
➜ Pressing the Volume keys will adjust the brightn-
ess of the tele text image, the new setting will be
stored in memory.
➜ Press the RADIO/TV key to leave the tele text
mode.
Switching on tele text
1. Stop paging sub-pages
2. Enlarge text pages
3. Showing hidden information
Changing brightness of the tele text image
4. Viewing TV image without leaving tele
text mode
Switching off tele text
Additional tele text functions
Page selection via numeric keypad
Page selection with TOP tele text
Sub-pages
Tele text
Page 9

Settings
8
Numerous settings can be made and adjusted by means of on-screen menus, and new
settings can be stored in memory for permanent use.
The menus are arranged in such a way that,
starting with a main menu one can work
through sub-menus to arrive at all possible
settings. These can be changed and stored
as per your preference.
General procedure:
➜ Press the MENU key to call up the first menu
(main menu).
➜ Press the Programme keys to select the desired
menu item.
➜ Press the OK key to select marked menu items, or
to store settings.
➜ Press the MENU key in order to go back to the
previous menu.
➜ Press the ? key to display the Help table, press
again to switch it off again.
➜ Press theMENU key to call up the Main Menu.
➜ Press the Programme keys to mark the menu
item Picture Settings, and confirm and select by
pressing the OK key.
➜ Use the Volume keys to set the Contrast, and
store in memory by pressing the OK key.
➜ Use the Programme keys to select the menu item
Brightness.
➜ Use the Volume keys to adjust the brightness,
then press the OK key to store in memory.
➜ Use the Programme keys to mark the menu item
Colour.
➜ Use the Volume keys to adjust the colour, then
press the OK key to store in memory.
➜ Use the Programme keys to mark the menu item
Sharpness.
➜ Use the Volume keys to set the sharpness to
MINIMUM, NORMAL or MAXIMUM, then press the
OK key to store in memory.
➜ Use the Programme keys to mark the menu item
Format Adjustment.
➜ Use the Volume keys to select either 4:3 or 16:9
The adjustment of the format to 16:9 is
necessary only for those 16:9 signal sources
that do not indicate switching signals (e.g.
DVD players, D2-Mac decoders, PALplus
decoders, 16:9 decoders).
➜ Use the Programme keys to select the menu item
Detail (image sharpness in dark picture areas).
➜ Use the Volume keys to select either ON or OFF,
then press the OK key to store in memory.
The Detail should be set to ON only when
used in conjunction with noise-free antenna
signals.
➜ Use the Programme keys to mark the menu item
Noise Reduction.
➜ Use the Volume keys to select OFF, MEDIUM or
STRONG for this item, then press the OK key to
store in memory.
The factory default setting is MEDIUM.
➜ Use the RADIO/TV key to return to viewing the TV
image, or use the MENU key to return to the Main
Menu.
Picture settings
Colour
Picture Sharpness
Format Adjustment
Details
Noise Reduction
Contrast
Brightness
Page 10
Settings
9
This menu provides facilities to adjust the
sound reproduction to your individual preferences, and to store these in memory.
➜ Press the MENU key to select the Main Menu.
➜ Use the Programme keys to mark the menu item
Sound Settings, then press the OK key to select.
➜ Use the Volume keys to select the desired volu-
me, then press the OK key to store in memory.
➜ Use the Programme keys to mark the menu item
Treble.
➜ Use the Volume keys to adjust the level, then
press the OK key to store in memory.
➜ Use the Programme keys to mark the menu item
Bass.
➜ Use the Volume keys to adjust the level, then
press the OK key to store in memory.
➜ Use the Programme keys to mark the menu item
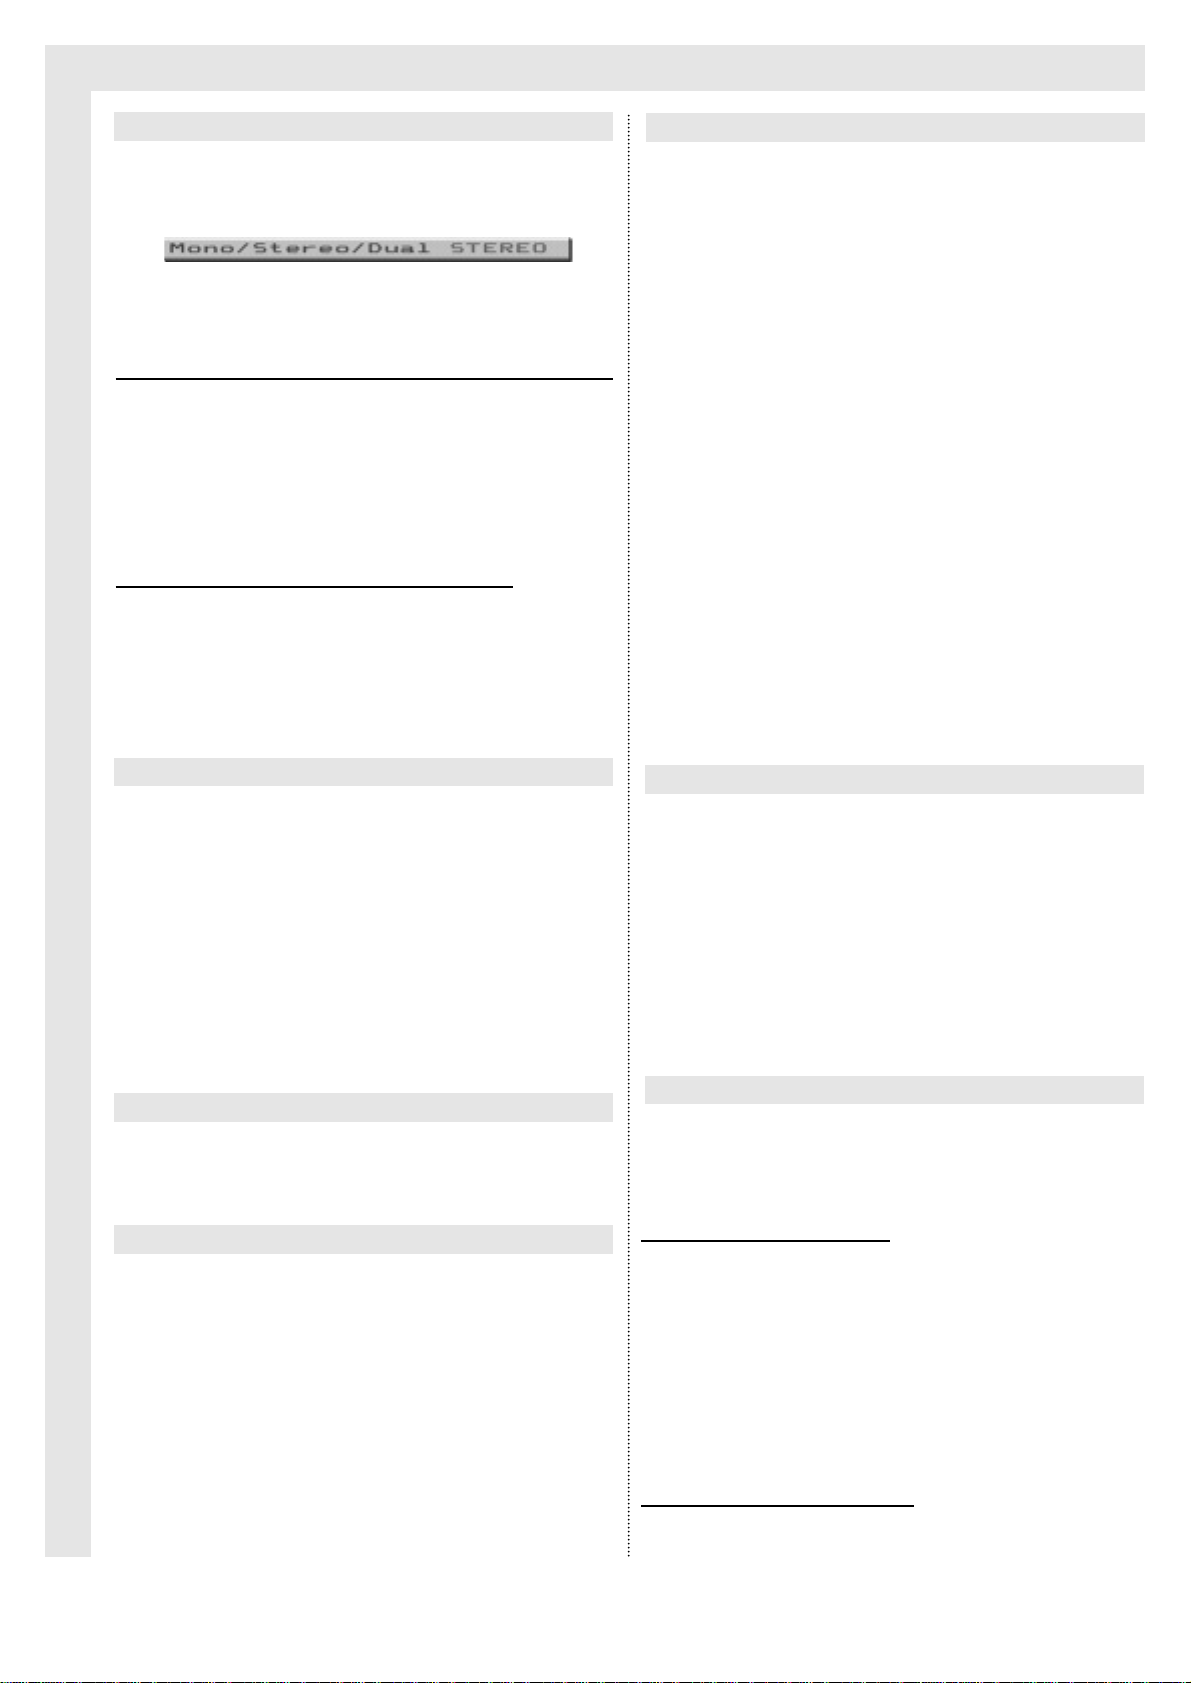
Mono/Stereo/Dual.
➜ Use the Volume keys to select the sound repro-
duction mode.
This facility is only active in AV-mode, or
when a programme is being broadcast in stereo or in dual channel mode.
It may be preferable to switch to "Mono"
when, for instance, a video camera is
connected that has only one sound channel.
If you do not switch to "Mono", the sound will
come out of one loudspeaker only.
➜ Use the Programme keys to mark the menu item
Balance.
➜ Use the Volume keys to achieve the desired
balance between left and right loudspeakers, then
press the OK key to store in memory.
Activating this function changes the spatial
sound picture.
➜ Use the Programme keys to mark the menu item
Spatial Effects.
➜ Use the Volume keys to switch spatial effects on
or off.
Activating AVL will limit extreme differences in
volume levels (e.g. for particularly loud advertising spots).
➜ Use the Programme keys to mark the menu item
AVL.
➜ Use the Volume keys to switch the function on or
off, then press the OK key to store in memory.
This menu item can be used, for instance, to
set the sound output in the case of dual
channel sound separately for headphones
and loudspeakers.
➜ Use the Programme keys to mark the menu item
HP Mono/Stereo/Dual.
➜ Use the Volume keys to set the selected output
mode.
This switch is only operational when a programme is broadcast in Stereo or in dual
channel sound.
➜ Use the Programme keys to mark the menu item
HP Volume.
➜ Use the Volume keys to make a setting, then
press the OK key to store in memory.
➜ Use the RADIO / TV key to return to the TV
image, or press the MENU key to return to the
Main Menu.
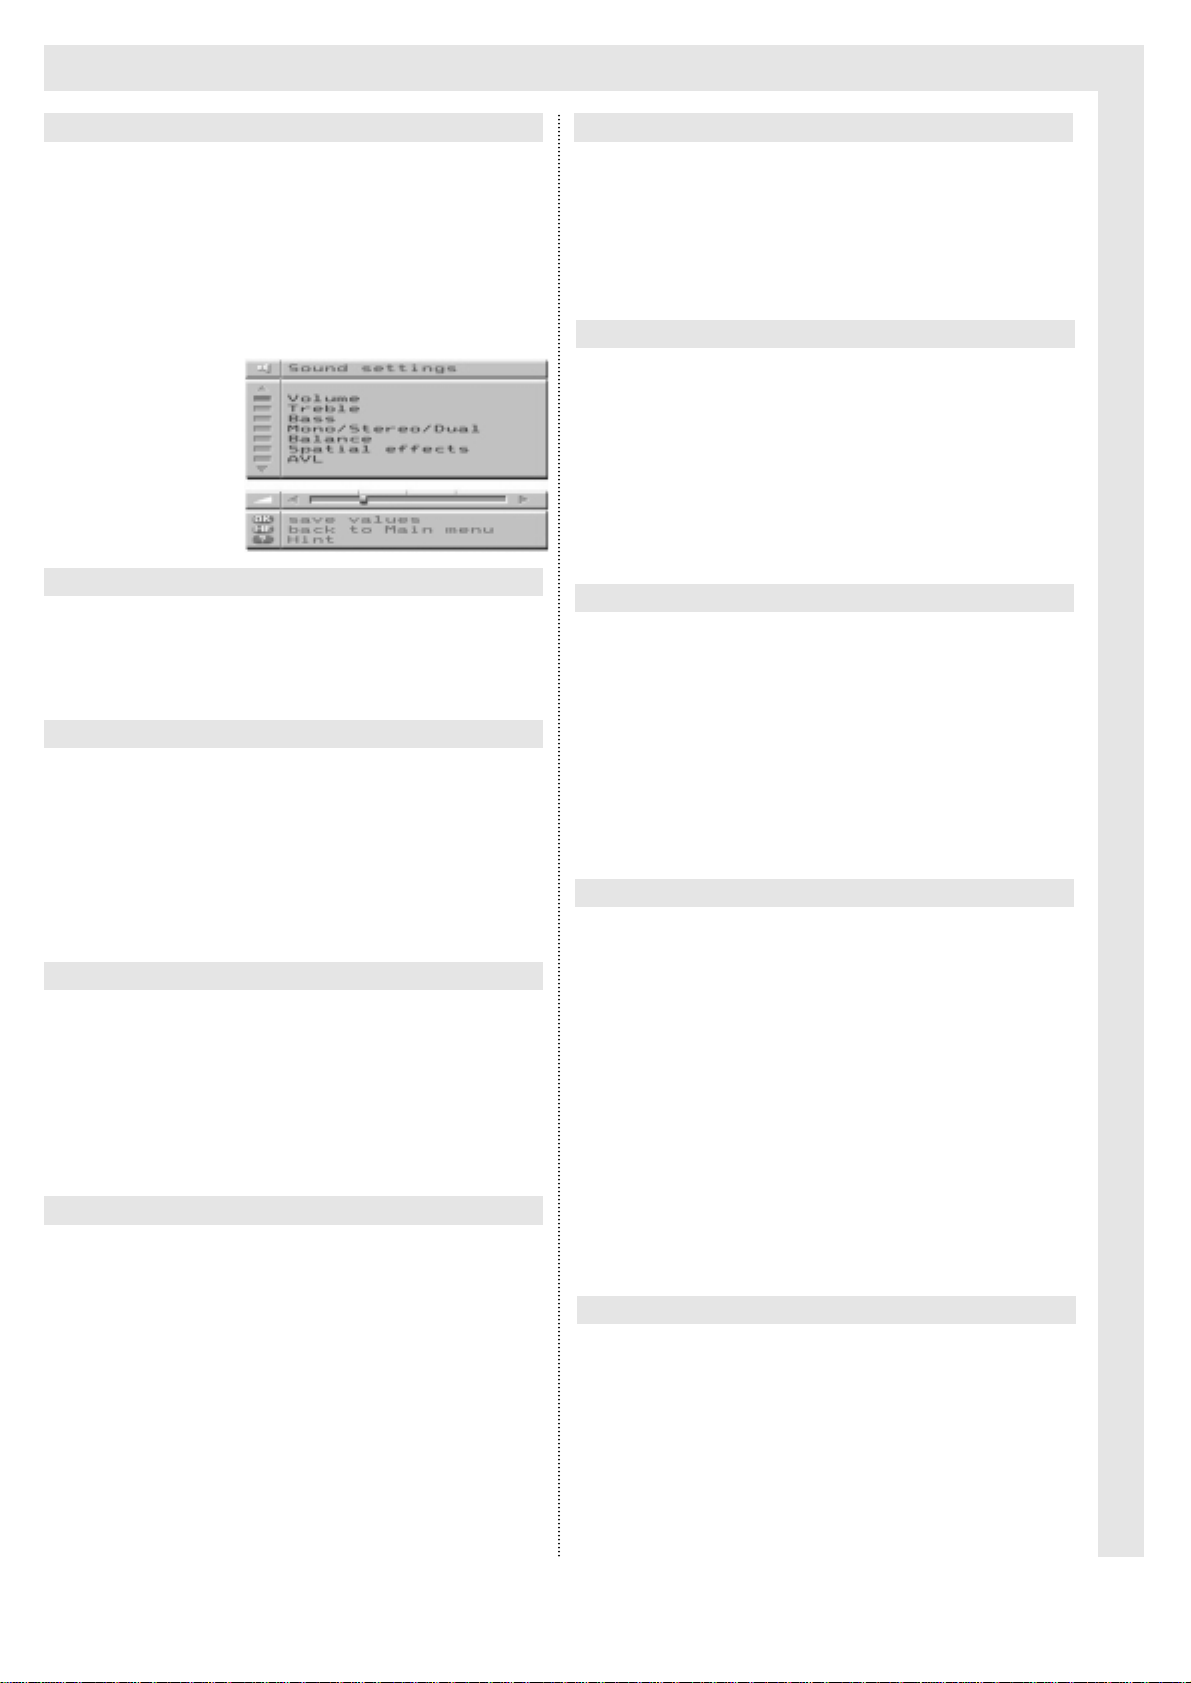
Sound Settings
Volume
Balance
Spatial Effects
AVL
Headphones Mono/Stereo/Dual
Headphone Volume
Treble
Bass
Mono/ Stereo/ Dual
Page 11

Settings
10
Although the automatic programme scan sets
all available channels/programmes, the menu
Programmes allows you to make changes in
the programme list.
The TV set provides for three options:
- manual setting of programmes
- Repeat automatic (TTS) scan
- Change order of channels
➜ Press the MENU key to display the Main Menu.
➜ Use the Programme keys to mark the menu item
Programmes, then press the OK key to select.
The menu Programme will be displayed.
➜ Use the OK key to select the menu item
Programme Settings.
A list of programmes stored in memory will be displayed.
➜ Use the Programme keys to mark the programme
slot you wish to change, then press the OK key to
select
Hint: Using the Volume keys, you can move aro-
und in the list in blocks of ten channels at a
time.
The programming menu of the selected channel will
be displayed.
This programming menu will contain varying
points, depending on whether a satellite
channel is selected via a built-in satellite
module, or whether a terrestrial or cable
channel has been selected.
The following programming instructions
should be used for channels supplied by a
terrestrial antenna, or by a cable network.
In order to adjust a terrestrial or cable channel, TER must be selected as the source.
➜ Use the Programme keys to mark the menu item
Source.
➜ Use the Volume keys to select TER, then press
the OK key to store in memory.
➜ Use the Programme keys to mark the menu item
Channeltype.
➜ Use the Volume keys to select the C- or S-chan-
nel, then press the OK key to store in memory.
Hint: Information on the channel availability at your
place of residence will be provided by your
local cable provider.
➜ Use the Programme keys to mark the menu item
Channel.
➜ Use the Volume keys or the 0 - 9 keys on the
numeric keypad to select the channel, then press
the OK key to store in memory.
➜ Use the Programme keys to mark the menu item
Fine Tuning.
➜ Use the Volume keys to determine the best image
quality on screen, then press the OK key to store
in memory.
Your retailer will be able to advise you on the
norms/standards used by foreign channels.
German channels generally utilise the B/G
norm.
D/K Eastern Europe
I(I+) Great Britain
L(L') France
➜ Use the Programme keys to mark the menu item
Norm.
➜ Use the Volume keys to select the norm, then
press the OK key to store in memory.
Channel settings
Manual setting of channels
Programming for terrestrial resp. cable
channels
Source
Channel Type
Channel
Fine Tuning
Norm (Standards)
Page 12
Settings
11
This menu item allows you to set a name of
your choice for each channel, with a maximum of 6 characters.
➜ Use the Programme keys to mark the menu item
Name, then press the OK key to confirm.
➜ Use the Volume keys to select the item to be
changed.
➜ Use the Programme keys to select a letter, num-
ber or symbol for that space.
➜ Repeat the last two steps for each space in the
name.
➜ Press the OK key to store this name in memory.
In order to receive a scrambled (encoded)
programme, a decoder may be connected to
the SCART1 socket. In this case, the following setting must be made:
➜ Use theProgramme keys to mark the menu item
Decoder EC1.
➜ Activate the Decoder EC1 setting by pressing the
Volume keys to select ON, then press the OK key
to store in memory.
For free-to-air channels (not encoded),
Decoder EC1 must be set to OFF.
The Tele Text language setting selects the set
of symbols available for tele text. The default
setting made at the factory is WEST. Should
you encounter problems with foreign channels (e.g. some letters are not displayed correctly), you can use this item to make corrections.
➜ Use the Programme keys to mark the menu item
VT Language.
➜ Use the Volume keys to select VT languages
WEST, EAST or WEST+TR, then press the OK
key to store in memory.
WEST Western Europe, including Germany
EAST Eastern Europe
WEST+TR Western Europe plus Turkey
➜ Use the RADIO/TV key to return to the TV picture,
or press the MENU key to return to the menu
Programmes Settings.
The following programming instructions are to
be used only for satellite channels received
via a built-in satellite module. It is a prerequisite that the characteristics of the external
installation must be in accordance with the
characteristics stored under the menu item
External Unit in the Programmes menu.
Hint: The enclosed list of satellite programmes
contains the required information.
➜ Use the MENU key to display the Main Menu.
➜ Use the Programme keys to mark the menu item
Programmes, then press the OK key to select.
The Programmes menu will be displayed.
➜ Use the Programme keys to mark the menu item
Programmes Settings, then press the OK key to
select.
A list of stored programmes will be displayed.
Hint: Use the Volume keys in order to page
through the list in blocks of ten programmes
at a time.
➜ Use the Programme keys to mark the programme
slot you wish to change, then press the OK key to
select.
The following programming menus of a channel will
be displayed, showing the details specific to that
channel.
➜ Use the Programme keys to go on to the second
menu table.
All menu items can be changed and stored in
memory as described below.
Name
Decoder EC1
Tele Text Language
Programming for Satellite Channels
Page 13
Settings
12
For satellite channels, the source SAT must
be selected.
➜ Use the Programme keys to mark the menu item
Source.
➜ Use the Volume keys to set SAT, then press the
OK key to store in memory.
This menu item allows you to set a name of
your choice for each channel, with a maximum of 6 characters.
➜ Use the Programme keys to mark the menu item
Name, then press the OK key to confirm.
➜ Use the Volume keys to select the item to be
changed.
➜ Use the Programme keys to select a letter, num-
ber or symbol for that space.
➜ Repeat the last two steps for each space in the
name. Press the OK key to store this name in
memory.
This menu item is used to select the satellite
via which the desired channel can be received.
➜ Use the Programme keys to mark the menu item
Sat.
➜ Use the Volume keys to select the desired
Satellite, then press the OK key to store in
memory.
A number of satellites is available for your
selection. The most usual ones are:
-19° Astra LB -13° Eutelsat LB
-19° Astra HB -13° Eutelsat HB
(Extensive current channel lists of satellite
broadcasts are published monthly, e.g. the
multimedia magazine "INFOSAT").
➜ Use the Programme keys to mark the menu item
Polarisation.
➜ Use the Volume keys to set Polarisation H or V,
then press OK to store in memory.
➜ Use the Programme keys to mark the menu item
Frequency.
➜ Set the frequency using the Programme keys or
the 0-9 keys on the numeric keypad, then press
the OK key to store in memory
➜ Use the Programme keys to mark the menu item
AFC.
➜ Use the Volume keys to switch the AFC on or off,
then press the OK key to store in memory.
➜ Use the Programme keys to mark the menu item
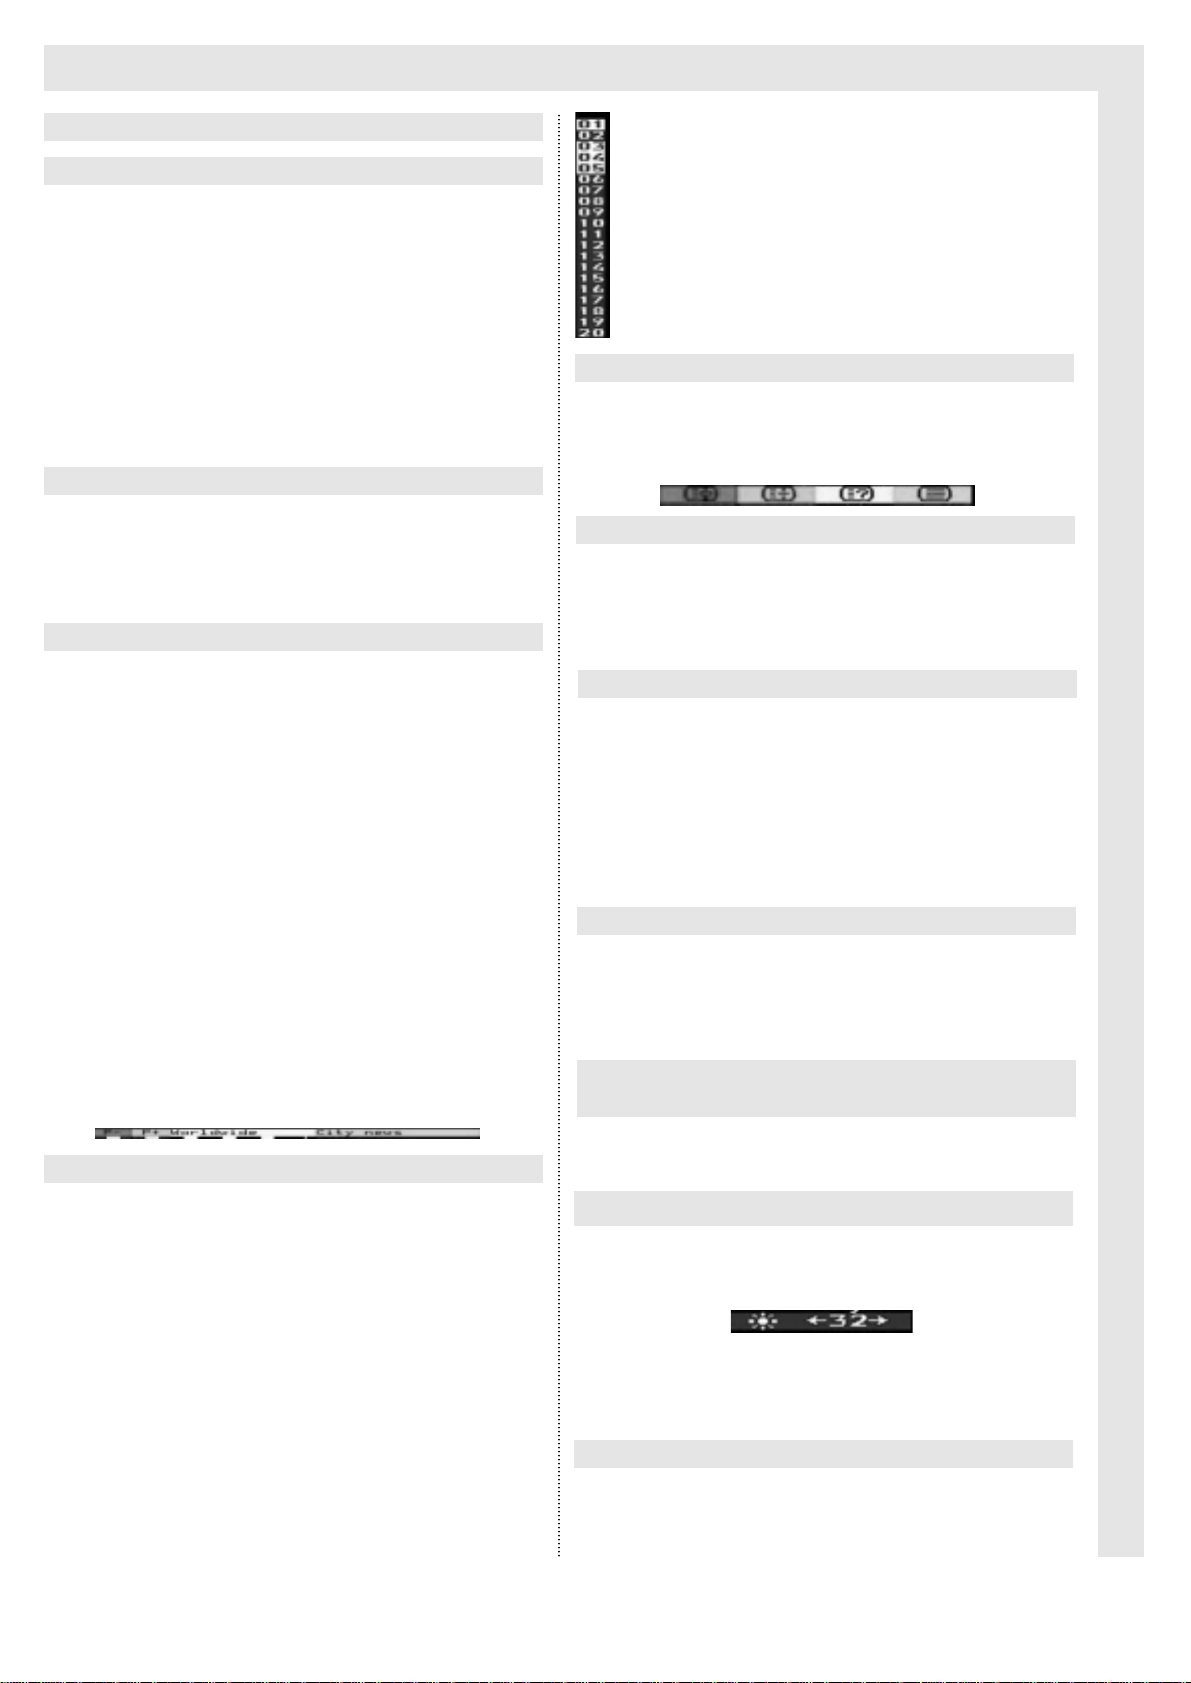
Audio Type
➜ Use the Volume keys to set the Audio Type 1 to
32
Hint: The correct audio type for each channel can
be found in the enclosed channel list.
➜ In order to store the data, use the Programme
keys to exit the menu line Audio Type, then press
the OK key to store in memory.
Hint: Pressing the OK key while you are in the
Audio Type menu line will take you to a further sub-menu which lists the parameters of
the Audio Type selected.
These parameters are fixed for Audio Types 1
to 16, and are listed purely for information
purposes. The parameters of Audio Types 17
to 32 can be adjusted, thus providing for
reception of sound tracks even of "exotic"
satellites. The data required for Frequency A
and B, band width and de-emphasis can be
obtained from your retailer.
If your TV set is fitted with a built-in ADR
module, you can, in addition, adjust the Audio
Types ADR1 to ADR 12 (see p. 24).
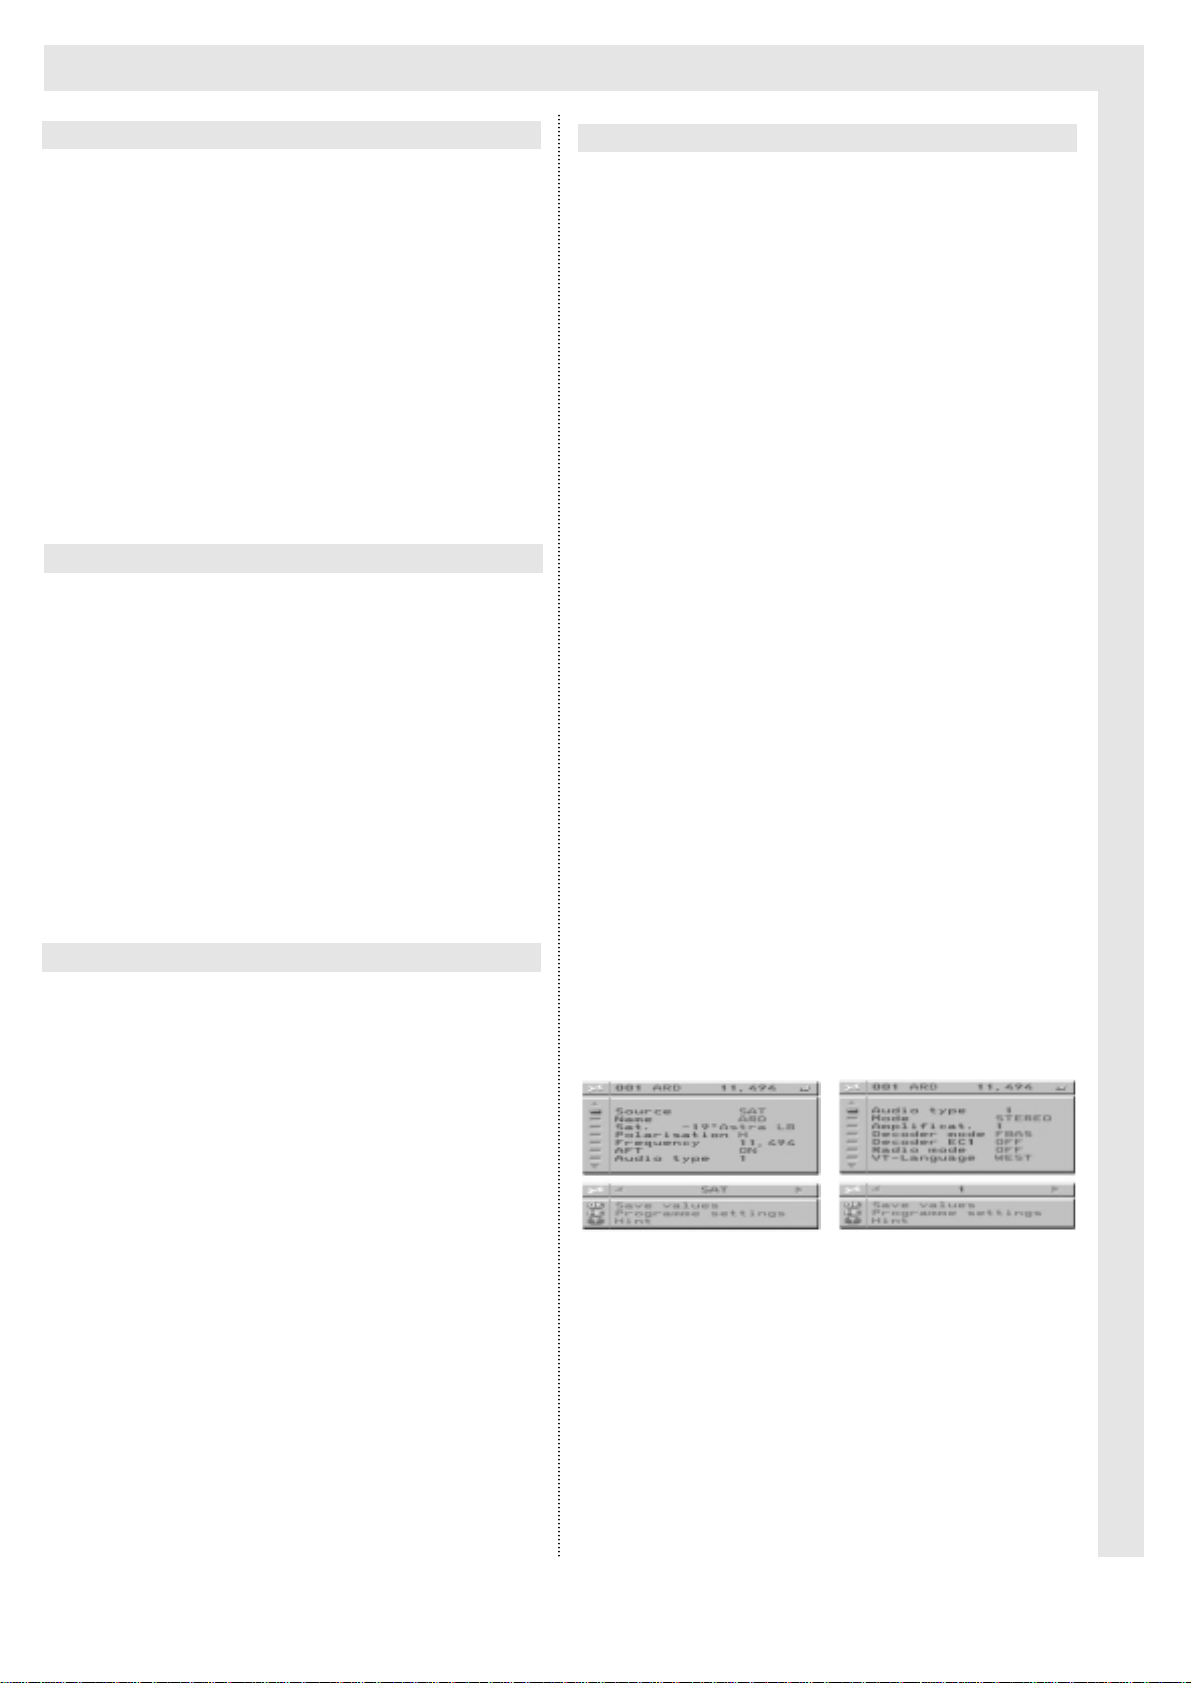
Source
Frequency
Name
AFC
Audio Type
Sat (Selecting Satellite)
Polarisation
Page 14

Settings
13
➜ Use the Programme keys to mark the menu item
Mode.
➜ Use the Volume keys to select STEREO, MONO
A or MONO B, then press the OK key to store in
memory.
Satellite channels broadcast with varying gain
(contrast). In order to avoid distortions in the
white areas of any picture, the contrast must
be adjusted.
Hint: Amplification 1 refers to high contrast, and
should be set, e.g., for the Astra satellite.
➜ Use the Programme keys to mark the menu item
Amplification.
➜ Use the Volume keys to select Amplification 1 or
2, then press the OK key to store in memory.
➜ Use the Programme keys to mark the menu item
Decoder Mode.
➜ Use the Volume keys to select Decoder Mode
FBAS or BB, then press the OK key to store in
memory.
Most decoders, such as Premiere, require the
FBAS setting.
In order to receive scrambled programmes, a
decoder may be connected to the SCART1
socket.
In this case, the following adjustment is required:
➜ Use the Programme keys to mark the menu item
Decoder EC1.
➜Use the Volume keys to enable the Decoder EC1,
then press the OK key to store in memory.
For free-to-air channels (not encoded), Decoder EC1
must be set to OFF.
When you select the radio mode, your TV set
is transformed into a high-quality radio receiver for analogue satellite radio programmes
or for ADR. In order to save energy, and to
conserve the picture tube, the RADIO/TV key
can be switched on for listening to the radio
in radio mode.
➜ Use the Programme keys to mark the menu item
Radio Mode.
➜ Use the Volume keys to switch the radio mode on
or off, then press the OK key to store in memory.
The Tele Text language setting selects the set
of symbols available for tele text. The default
setting made at the factory is WEST. Should
you encounter problems with foreign channels (e.g. some letters are not displayed correctly), you can use this item to make corrections.
➜ Use the Programme keys to mark the menu item
VT Language
➜ Use the Volume keys to select VT languages
WEST, EAST or WEST+TR, then press the OK
key to store in memory.
WEST Western Europe, including Germany
EAST Eastern Europe
WEST+TR Western Europe plus Turkey
➜ Use the RADIO/TV key to return to the TV picture,
or press the MENU key to return to the menu
Programmes Settings.
Mode Radio Mode
Amplification (Contrast)
Tele Text Language
Decoder Mode
Decoder EC1
Page 15

Settings
14
The scan will search for programmes, sort
them, and store them in memory automatically, beginning with programme slot 1. In this
process, any terrestrial or cable channels
found will be inserted in the lower programme
slots, with satellite channels (if a built-in satellite module has been fitted) will be added at
the end of the list of channels found. If the TV
set is fitted with a built-in ADR module, the
ADR stations will be stored in programme
slots from 351 upward.
➜ Use the MENU key to display the Main Menu.
➜ Use the Programme keys to mark the menu item
Programmes, then press the OK key to select.
The Menu Programmes will be displayed.
➜ Use the Programme keys to mark Execute TTS,
then press the OK key to select.
The Menu
Execute TTS
will be displayed.
➜ Use the Programme keys to mark the menu item
Save from.
➜ Use the Volume keys to specify a programme slot,
below which the programme list should remain
unchanged, then press the OK key to store this in
memory.
If you wish to change the old programme list
completely, enter 001 at this point.
➜ Use the Programme keys to mark the menu item
Country.
➜ Use the Volume keys to select the country, then
press the OK key to store in memory.
➜ Use the Programme keys to mark the menu item
TTS Start.
If the TV set is not fitted with a satellite module, the Volume keys can be used to choose
the options Repeat scan or Update.
➜ Press the OK key to start the scan.
➜ The scan is completed when the menu Change
Order is displayed.
➜ Use the RADIO/TV key to return to the TV picture,
or use the MENU key to select from Insert
Programme, Change Programme, Copy
Programme and Delete Programme.
➜ Use the MENU key to display the Main Menu.
➜ Use the Programme keys to mark the menu item
Programmes, then press the OK key to select.
The menu Change Order will be displayed.
The current programme will be highlighted in blue on
the left-hand list.
➜ Use the Programme keys to mark a programme,
then press the OK key to select.
➜ Use the Programme keys to mark the menu item
Insert, then press the OK key to select.
➜ Use the Programme keys to mark that program-
me in the right-hand programme list, above which
the selected programme is to be inserted.
➜ Press the OK key to perform the task Insert
Programme.
Note that no programmes are deleted in this
process!
➜ Press the RADIO/TV key to return to the TV pictu-
re, or use the MENU key to continue to change,
copy, or delete.
Insert Programme
Automatic scan of channels (TTS)
Change Order
Page 16

Settings
15
In this function, two programmes exchange
their slots in the programme list.
➜ Use the MENU key to display the Main Menu.
➜ Use the Programme keys to mark the menu item
Programmes, then press the OK key to select.
➜ Use the Programme keys to mark the menu item
Change Order, then press the OK key to select.
➜ Use the Programme keys to mark a programme,
then press the OK key to select.
➜ Use the Programme keys to mark the menu item
Change, then press the OK key to select.
➜ Use the Programme keys to mark the programme
in the right-hand programme list which is to be
exchanged with the specified programme.
➜ Use the OK key to execute the Change
Programmes command. The programmes will be
exchanged.
Note that no programmes are deleted!
➜ Use the RADIO/TV key to return to the TV picture,
or press the MENU key to continue with copying,
deleting.
When copying a programme, this will appear
additionally in a second programme slot.
The copy function can be used, for instance,
to facilitate the programming of new programmes: since most of the parameters of satellite
programmes are identical, you can first copy
all the data of an existing programme to a
free programme slot, then all you have to do
is change those parameters which are different for the new programme.
➜ Use the MENU key to display the Main Menu.
➜ Use the Programme keys to mark the menu item
Programmes, then press the OK key to select.
➜ Use the Programme keys to mark Change Order,
then press the OK key to select.
➜ Use the Programme keys to mark the programme
you wish to copy, then press the OK key to select.
➜ Use the Programme keys to mark Copy, then
press the OK key to select.
➜ Use the Programme keys to mark the slot in the
right-hand programme list, to which the selected
programme is to be copied.
➜ Use the OK key to execute the command Copy
Programme.
The programme will be copied!
➜ Use the RADIO/TV key to return to the TV picture,
or press the MENU key to continue with deleting.
Any programmes not required can be deleted
from the programme list. Any programmes
listed in slots behind a deleted programme
will move up by one programme slot.
➜ Use the MENU key to display the Main Menu.
➜ Use the Programme keys to mark the menu item
Programmes, then press the OK key to select.
➜ Use the Programme keys to mark the menu item
Change Order, then press the OK key to select.
➜ Use the Programme keys to mark the programme
to be deleted, then press the OK key to select.
➜ Use the Programme keys to mark the menu item
Delete, then press the OK key to select Delete
Programme.
The programme will be deleted!
➜ Use the RADIO/TV key to return to the TV picture,
or press the MENU key to return to the
Programmes menu.
Change Programmes
Copying a programme
Delete Programme
Page 17

Settings
16
No adjustments are necessary for a modern,
standardised external unit.
If the external unit has specific features, such
as multiswitches, mono-cable solutions, or
similar, the following procedures must be followed to make the necessary adjustments.
➜ Use the MENU key to display the Main Menu.
➜ Use the Programme keys to mark the menu item
Programmes, then press the OK key to select.
The Programmes menu will be displayed.
➜ Use the Programme keys to mark the menu item
SAT-outdoor unit, then press the OK key to sel-
ect.
The menu SAT-outdoor unit will be displayed.
➜ Use the OK key to mark the menu item Satellite.
The menu Satellite will be displayed, showing data
related to the satellite broadcasting the programme
selected.
➜ Use the Volume keys to mark the appropriate
satellite, then press the OK key to confirm.
If the external unit is fitted with a 22-kHz-controlled switch. Then this must be set to ON.
➜ Use the Programme keys to mark the menu item
22-kHz.
➜ Use the Volume keys to set 22-kHz switching to
ON or OFF, then press the OK key to store in
memory.
The video polarity of most satellites is negative
➜ Use Programme keys to mark the menu item
Polarity.
➜ Use the Volume keys to select Polarity NEGATI-
VE (or POSITIVE), then press the OK key to store
in memory.
The LOF (Local Oscillator Frequency) determines the receivable frequency range of the
LNB. The LOF required can be obtained from
the documentation of your external unit.
➜ Use the Programme keys to mark the menu item
LOF V (or LOF H).
➜ Use the Volume keys or the 0 - 9 keys on the
numeric keypad to select LOF V (or LOF H), then
press the OK key to store in memory.
The number of satellite positions that can be
accessed depends on whether the 22-kHz (2
positions) or DiSEqC options (4 positions)
have been activated.
If only the Astra -19° and Eutelsat -13° positions are to be received, the DiSEqC function
can remain switched off.
DiSEqC must be activated, if the external unit
is fitted with DiSEqC-controlled components
(multiswitches, LNB).
It is therefore relevant for the following settings whether the third menu item - DiSEqC of the Sat-outdoor unit menu is switched on
or off.
22 kHz Signal
Polarity
Setting LOF V/ LOF H
Satellite Settings
Position (Satellite Position)
Satellite Selection
External satellite unit
Select Satellite
Page 18

Settings
17
➜ Use the Programme keys to mark the menu item
Position.
➜ Use the Volume keys to select Position A or B,
then press the OK key to store in memory.
The Satellite menu will display the menu item Matrix
instead of Position, providing the subsidiary options
Position and Option.
➜ Use the Programme keys to select the menu item
Matrix.
➜ Use the Volume keys to select Matrix 1 to 4, then
press the OK key to store in memory.
➜ Use the RADIO/TV key to exit this menu, or use
the MENU key to return to the menu Sat-outdoor
unit.
The voltage of an LNB is usually 13/18V. If
you are using an installation with a star-form
distribution and multiswitches, the voltage
should be set to 14/19V. In the case of installations with serial distribution, so-called single
cable solutions, the LNB feed must be switched off.
➜ Use the MENU key to display the Main Menu.
➜ Use the Programme keys to mark the menu item
Programmes, then press the OK key to select.
➜ Use the Programme keys to mark the menu item
Sat-outdoor unit, then press the OK key to sel-
ect.
➜ Use the Programme keys to mark the menu item
LNB Supply.
➜ Use the Volume keys to set the LNB feed to
13/18V or 14/19V or OFF, then press the OK key
to store in memory.
➜ Use the RADIO/TV key to exit this menu, or press
the Programme keys to continue to the menu item
DiSEqC.
If the external unit is not fitted with DiSEqC
components, the DiSEqC function should be
switched off.
➜ Use the MENU key to display the Main Menu.
➜ Use the Programme keys to mark the menu item
Programmes, then press the OK key to select.
➜ Use the Programme keys to mark the menu item
Sat-outdoor unit, then press the OK key to sel-
ect.
➜ Use the Programme keys to mark the menu item
DiSEqC.
➜ Use the Volume keys to set the DiSEqC to OFF
or ON, then press the OK key to store in memory.
➜ Use the RADIO/TV key to exit this menu.
➜ Use the MENU key to display the Main Menu
➜ Use the Programme keys to mark the menu item
Language, then press the OK key to select.
➜ Use the Programme keys to mark the desired lan-
guage, then press the OK key to select and store
in memory.
➜ Use the RADIO/TV key to exit this menu.
Position DiSEqC off
Position DiSEqC on
DiSEqC
LNB Supply
Language
Page 19

Settings
18
AV equipment such as camcorders, video
recorders, DVD players, decoders, or satellite
receivers, can be connected to the TV set
using either the SCART sockets provided at
the back of the set, or via the sockets (cinch,
Hosiden) provided under the front flap of the
set. Wherever possible, AV cables with individually insulated wires should be used.
In order to reproduce the TV sound channels,
a hi-fi set may be connected to the cinch
sockets provided on the back panel.
Options for connenction:
SCART1: decoder, video recorder (VHS; Video
8). DVD player, satellite receiver
SCART2: video recorder (VHS; Video (; SVHS;
Hi8), DVD player, satellite receiver
Cinch Front: camcorder (VHS; Video 8)
Hosiden Front: camcorder (SVHS; Hi8)
Cinch-Audio out: hi-fi set
When the front sockets/connections are in
use, the audio signals are directed towards
the front panel cinch sockets (red - right,
white - left)
Activating AV-inputs:
➜ Press the EXT key to switch through the various
AV inputs in the following order:
EC1 ➩ EC2➩ FRONT ➩ EC2 SVHS
In case of equipment fitted with a VGA interface,
VGA will appear as a fifth switching option.
Hint: AV equipment operating on switching current
will automatically activate the appropriate
SCART input.
➜ Use a SCART cable to connect the SCART output
of the video recorder to the SCART1 socket of the
TV set.
Recording and playback (direct or via the
timer of the TV set) can be controlled via the
TV set.
The copying is achieved via the two SCART
sockets of the TV set.
➜ Use a SCART cable to connect the SCART socket
of video recorder 1 with the SCART1 socket of the
TV set.
➜ Use a SCART cable to connect the SCART socket
of video recorder 2 with the SCART2 socket of the
TV set.
➜ Press the MENU key to display the Main Menu.
➜ Use the Programme keys to mark the menu item
AV Configuration, then press the OK key to select.
The menu AV Configuration will be displayed.
➜ Use the Programme keys to mark Copy.
➜ Use the Volume keys to set the direction of copy-
ing.
Once the copy direction has been set (e.g.
EC1 ➜ EC2), the outputs of the appropriate
SCART sockets will switch to OFF.
If EC1 or EC2 are set to OFF, this means that
no TV output signals will be directed to the
SCART socket.
➜ Use the RADIO/TV key to exit from this menu.
This configuration allows you to make video
tape copies while at the same time viewing
television.
Use the EXT key to view either of the AV outputs at any stage in order to monitor the
copying process.
SVHS copies cannot be made using the copy
function.
Each time the TV set is switched off via the
Power switch, the Copy function is automatically reset to OFF, thus permitting recording
of TV programmes again.
Copying between two video recorders
Connecting a video recorder (VHS /Video 8)
AV Configuration
Connecting AV equipment
Page 20

Settings
19
Using the front input sockets behind the front
panel, playback of videos in VHS or Video 8
(Video) or in SVHS or Hi8 (S-Video) formats
is possible.
The sound signals are transmitted via the
white cinch socket (left sound channel) as
well as via the red cinch socket (right sound
channel), while the yellow cinch socket carries the video signal, and the four-pin
Hosiden socket should be used for S-Video.
The various video formats will automatically
be reproduced correctly.
➜ Use suitable cables to connect the video and
audio outputs of the camcorder to the front input
sockets of the TV set.
➜ Use the EXT key to select the FRONT AV input.
➜ Start playback on the camcorder.
➜ Use cinch cables to connect the audio and video
outputs of the camcorder to the front panel inputs
of the TV set (see above).
➜ Use a SCART cable to connect the video recorder
to one of the SCART sockets.
➜ Use the EXT key to select the FRONT-AV input.
➜ In order to copy, you must start the camcorder on
Playback, and the video recorder on Record.
It is possible to copy simultaneously from the
FRONT connection to two video recorders
connected to the two SCART sockets.
While copying via the FRONT panel, it is not
possible to view TV programmes at the same
time.
Copies can be made in video format.
When using a camcorder with only one sound
channel (mono), use the white cinch socket
for the left sound channel on the front panel
of the TV set. Use the A/B key to select
LEFT, to ensure that sound is reproduced via
both loudspeakers.
(When copying via the FRONT connections,
do not select the AV configuration Copy!)
Playback is possible via the SCART2 socket.
➜ Use a SCART cable to connect the SCART socket
of the video recorder with the SCART2 socket of
the TV set.
➜ Use the EXT key to select the AV input EC2
SVHS.
➜ Start Playback on the video recorder.
If the video recorder does not have a SCART
socket, playback can be effected by making a
connection via the antenna socket of the TV
set.
➜ Connect the video recorder to the antenna socket
of the TV set by means of antenna (co-axial)
cable.
➜ Go to the menu Setting Programmes, find the
programme slot to be used for video playback and
set the output channel of the video recorder to this
programme slot (see page 10 - manual selection
of programmes).
The instruction manual of your video recorder
will tell you, which output channel is being
used.
Generally , the output channel will be in the
UHF range (channels C21 to C50).
➜ Use a SCART cable to connect the decoder to the
SCART1 socket of the TV set.
➜ Go to the menu Selecting Programmes, set the
menu item Decoder EC1 to ON (see p. 11 or 13)
➜ Use a SCART cable to connect the video recorder
to the SCART2 socket of the TV set.
This configuration will allow you to watch
scrambled programmes, and to record them.
Components fitted with an RGB output, such
as digital satellite receivers, DVD players or
video disc players) can be connected to the
SCART1 socket.
➜ Use a SCART cable to connect the component to
the SCART1 socket of the TV set.
➜ Use the EXT key to select the AV input EC1.
Components with switching voltage will automatically switch to SCART1.
Hint: The switching to RGB will only be effected if
the component provides a second
switching voltage (approx. 1V) to pin 16 of
the SCART1 socket.
Playback from a camcorder
Connecting a video recorder to the
antenna socket
Copying from Camcorder to Video recorder
Playback from SVHS/ HI 8 video recorder
Connecting a component with RGB outputs
Connecting a decoder and Recording
scrambled (encoded) programmes
Page 21

Settings
20
The TV set has an internal clock, as well as
several timers.
You will generally not have to set the date
and time, as the internal clock is set automatically each time the set is switched on. The
correct time is downloaded from the tele text
information of whichever programme has
been stored in programme slot 1.
So that the timer function is available to you
even under unusual reception conditions,
(e.g. if your TV set is to be used in a distant
foreign country, or if the SCART connection is
used to supply the TV signal to the set), provision is made for this to be set manually in
the menu Clock.
The time setting is retained while the TV set
is in standby mode.
➜ Press the MENU key to display the Main Menu.
➜ Use the Programme keys to mark the menu item
Timer, then press the OK key to select.
➜ Use the Programme keys to mark the menu item
Clock, then press the OK key to select.
The menu Clock will be displayed.
Time and date can be set on this menu.
Menu Timer Menu Clock
➜ Use the Volume keys to move around the fields in
which you wish to enter data, and use the
Programme keys to change the values.
➜ Use the OK key to accept the time display.
➜ Press the MENU key to return to the menu Timer,
or press the RADIO/TV key to return to the TV pic-
ture.
Four timer blocks are available for automatic
video recordings; in each case, the programme slot, as well as the date and time for
beginning and end of the recording (switching
TV set on and off) can be entered. When a
timer has been set, the TV screen and sound
section are switched off, so that the TV set
draws less current than during regular operation. The times set for the various timers may
not overlap, i.e. each timer block must be
completed before the start of the next block.
As the internal clock may be slightly inaccurate, and as broadcast times for TV programmes may differ slightly from published times,
you should plan for a slight reserve in your
timer settings. The exact recording time will
be determined by the video recorder.
➜ Use the MENU key to display the Main Menu.
➜ Use the Programme keys to mark the menu item
Timer, then press the OK key to select.
➜ Use the Programme keys to mark the menu item
Programme Timer, then press the OK key to sel-
ect.
The menu Programme Timer will be displayed.
➜ Use the Volume keys to select on of the four
Timer No., then press the OK key to store in
memory.
➜ Use the Programme keys to mark the menu item
State, then use the Volume keys to set.
➜OFF Timer is deactivated
➜ONCE Timer switches on and off once
➜DAILY Timer switches on and off daily, inde-
pendent of the date
➜WEEKLY Timer switches on and off on the
same weekday
➜ Press the OK key to store in memory.
Timer / Clock
Clock (Time)
Programme Timer
Page 22

Settings
21
➜ Use the Programme keys to mark the menu item
Programm.
➜ Use the Volume keys to select the programme in
single steps, then press the OK key to store in
memory.
➜ Use the Programme keys to mark the menu item
Start Time, then press the OK key to confirm.
The current date and time will be displayed in the
Help-line.
➜ Use the Programme keys to select the fields for
entry, then use the Volume keys to enter the date
and starting time in single-digit steps, then press
the OK key to store in memory.
➜ Use the Programme keys to mark the menu item
Stop Time, then press the OK key to confirm.
➜ Use the Programme keys to select the fields for
entry, then use the Volume keys to enter the date
and end time in single-digit steps, then press the
OK key to store in memory.
➜ Use the Standby/on key to set the TV in standby
mode.
The current timer will set the TV set into "TIMER
ACTIVE" mode for the preselected period.
In order to monitor the video recording being
made, the Standby/on key can be used to
switch the TV on or off. In this mode, only the
volume can be adjusted (Volume keys and
Mute key).
The timer parameters entered will be deleted
from memory if the TV set is switched off via
the Power key (recording will be interrupted).
When a sleeptimer has been set, it will switch
the TV set to standby after a preselected
time.
➜ Use the MENU key to display the Main Menu.
➜ Use the Programme keys to mark the menu item
Timer, then press the OK key to select.
➜ Use the Programme keys to mark the menu item
Sleeptimer.
The menu Sleeptimer will be displayed.
➜ Use the Volume keys to select the desired time
period (1…240 minutes) in steps of one minute at
a time, then press the OK key to store in memory.
The Sleep Timer is deactivated in the OFF
position.
➜ Use the RADIO/TV key to return to the TV picture,
or press the MENU key to display the menu
Timer.
A standard socket for a set of headphones (3.5 mm
cinch plug, approx. 30 Ohm) is located behind the
front panel flap.
Sound quality can possibly be improved by
connecting a high-quality stereo or Dolby surround system.
➜ Cinch sockets (Audio out) at the back of the TV
set are available for connection via a stereo cinch
cable to the "Line In" sockets of a stereo amplifier.
Sleeptimer
Headphone Connection
Connecting a HI-FI system
Page 23

VGA/ Computer Connection
22
As the TV set is equipped with a VGA interface, a computer image in VGA mode (640x480
dots/ 60 Hz) can be shown as a full-screen
image.
To do this, you will require a monitor cable
with 2 x Sub-D 15-pin plugs, in order to
connect the monitor output of the graphics
card with the VGA input of the TV set.
Before the connection is made, you will have
to set the PC to the required resolution
(640x480 pixels) as well as picture frequency.
If you are using Windows 95/98, you will
need to follow the steps: Start > Settings >
System Settings> Display> Settings under
Monitor. The picture frequency can be set to
60 Hz under the option "Further Options".
The required procedure may vary slightly
according to the operating system.
➜ Connect the monitor output socket of the PC with
the VGA input socket of the TV set.
Both components are now ready for use.
➜ Use the EXT key and press repeatedly until VGA
is selected for the screen display.
➜ Use the RADIO/TV, Programme, EXT or the
numeric keys to return to the TV picture.
If you want to listen to PC sound via the TV
set, you can use an appropriate connection
cable with adapters to connect the output
from the sound card of the PC to the
SCART1 socket of the TV set.
In order for the sound transmitted via this
connection to be audible via the TV loudspeakers, the VGA mode must be selected from a
programme slot in which a TV programme is
also stored.
➜ Use the Volume keys to adjust the volume.
➜ Use the Sound Mute key to switch the sound off
(mute).
If your TV set is fitted with a satellite module,
you can listen to (analogue) satellite radio
while you are working at your PC. In this
case, you will have to go to the desired satellite radio programme slot, and switch into
VGA mode from there, using the EXT key.
If, in addition to a satellite module, your TV
set is also fitted with an ADR module, you
can listen to the sound of an ADR station by
switching into VGA mode from an ADR programme slot.
These settings are necessary only when you
are installing the combination of PC and TV
set for the first time.
Hint: It is helpful to display an empty Excel work-
sheet in order to assist in making the
settings.
General procedure:
➜ Press the MENU key while you are in VGA mode
to display the menu VGA Settings.
➜ Use the Programme keys to mark the required
menu items, use the Volume keys to adjust the
values.
➜ Use the OK key to store the selected values in
memory.
-Contrast
Set the VGA contrast for optimum picture reproduction under normal viewing conditions, then press the
OK key to store in memory.
-Brightness
Set the brightness to a level at which very dark areas
are reproduced on screen as black, then press the
OK key to store in memory.
Listening to Satellite Radio
Setting and storing the contrast, bright-
ness, size and geometry of a VGA image
Sound reproduction
Switching off VGA Mode
Switching on VGA Mode
Operation
Setup
VGA/ Computer Connection
Page 24

VGA Computer Connection - ADR
23
Horizontal Shift
➜ Set the image to be in the centre of the screen on
the horizontal plane, then press OK key to store in
memory.
Horizontal Size
➜ Set the width of the image so that all parts of the
PC image are visible on the left and right borders
of the image, then press the OK key to store in
memory.
Vertical Shift
➜ Set the image so that it is centred on the screen in
the vertical plane, then press the OK key to store
in memory.
Vertical Size
➜ Set the height of the image so that all parts of the
PC image are visible on the upper and lower borders of the image, then press the OK key to store
in memory.
Parabola
➜ Set vertical lines on the left and right borders of
the image so that they appear straight, then press
the OK key to store in memory.
Trapezoid
➜ Set the vertical lines on the left and right borders
of the image so that they appear to run parallel,
then press the
OK key to store
in memory.
➜ Use the RADIO/TV key to exit this menu.
If your TV set is fitted with an ADR module,
you have the opportunity to listen to the ADR
radio programmes broadcast all over Europe
via satellite in first-class CD quality.
The ADR programmes are stored in memory
at the factory, but you can, of course, update
this list whenever you wish. The exact position of the ADR programme package depends
on the number of programmes found by
means of TTS scan.
(The programme slot of the first ADR programme = 351 plus the number of terrestrial
and cable programmes).
➜ Select any ADR programme slot.
You will hear the sound tracks of the ADR
station selected. After a short time the ADR
display table will appear, showing additional
information provided by the station.
➜ Press the MENU key to deselect the display of the
ADR display table, and to return to normal operati-
on of the TV set.
Hint: The controls on the front panel of the TV set,
as well as the Switching, OK and EXT keys
are only functional when the ADR display
table is switched off.
➜ Selecting a different ADR programme will result in
the ADR display table being shown again.
➜ Press the RADIO/TV to switch into radio mode
(see page 6), i.e. the picture tube is switched off
completely.
You can listen to the sound of the ADR programme
selected. The volume control is functional.
The power consumption of the TV set is significantly reduced when radio mode is in use.
Operation
ADR (ASTRA DIGITAL RADIO)
Page 25

ADR (ASTRA DIGITAL RADIO)
24
Storing new ADR programmes in memory
Two possibilities exist for this:
A complete scan of all ADR programmes,
which will automatically find any new programmes.
Or
Storing individual programmes in memory, for
which you will need the information pertaining
to the programmes (see list station programming).
All satellite programmes stored in programme
slots 1 to 350 will be scanned for ADR programmes, and any new programmes found
will be added to the existing list of ADR programmes (updating of existing programme
list).
➜ Press the MENU key to display the Main Menu.
➜ Use the Programme keys to mark the menu item
Programmes, then press the OK key to select.
➜ Use the Programme keys to mark the menu item
ADR Search, then press the OK key to select.
The Menu ADR Search will be displayed.
➜ Press the OK key to start the ADR scan.
Any new ADR programme found will be listed in the
Search menu. The scan will be completed after about
25 minutes, and the menu Change Order will be displayed.
Any new ADR programmes will be appended
to the existing list of programmes, and will
initially be allocated names such as ADR_01,
ADR_02, etc. for OSD purposes. When the
programme is selected for the first time, the
actual programme name will be shown in the
ADR menu. This name can be entered in the
menu Setting Programmes (see page 12).
The menu Change Order can be used to sort
the ADR programmes into any of the 500 programme slots provided by the TV set.
Basically, a new ADR programme will be stored in the same way as a satellite TV programme (see page 11).
When entering the menu item "Audio type",
one of the types ADR1 to ADR12 must be
entered, these are to be found following on
after the audio types 1…32 in the list. An allocation of the various audio types to the corresponding sound sub-carrier frequency can be
found in the list "Audio types".
➜ Use the Programme keys to go to a different
menu line, then press the OK key to store in
memory.
➜ Press the RADIO/TV key to exit this menu.
Storing an ADR programme in memory
ADR-Scan
Stroring new ADR programmes in memory
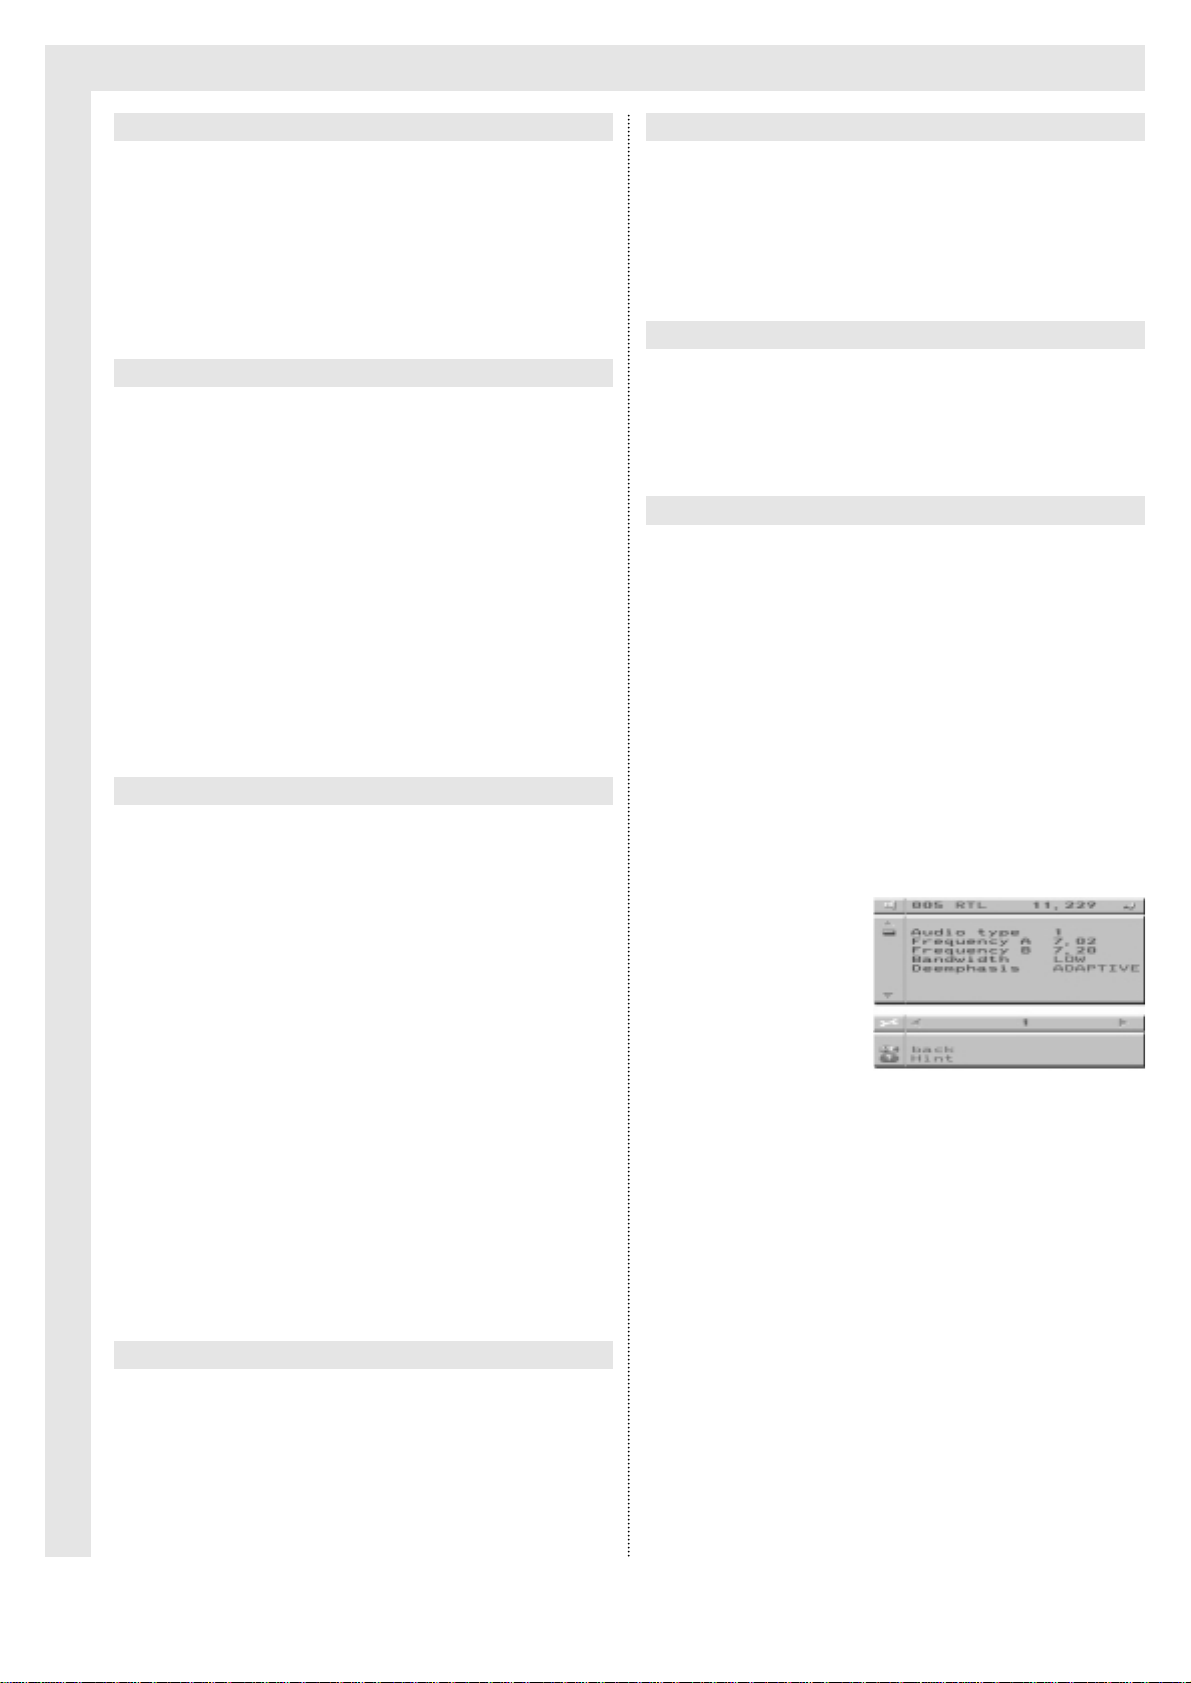
Audio Audio frequency Bandwidth Deemphasis
Type A MHz B
1 7.02 7.20 low adaptive
2 7,38 7.56 low adaptive
3 7.74 7.92 low adaptive
4 8.10 8.28 low adaptive
5 8.46 8.64 low adaptive
6 6.50 6.60 high 50µs
7 6.50 5.80 high 50µs
8 6.60 6.65 high 50µs
9 6.60 6.60 high 50µs
10 6.60 6.60 high J 17
11 5.80 6.60 high J 17
12 6.60 5.80 high J 17
13 6.40 7.75 high J 17
14 6.85 8.20 high J 17
15 7.25 8.20 high J 17
16 7.25 8.65 high J 17
17 6.20 6.80 high 50µs
18 6.80 7.20 high J 17
19 7.74 7.29 low 50µs
20 8.13 8.35 low 50µs
21 8.21 8.48 low 50µs
22 8.14 8.37 low adaptive
23 8.25 8.49 low adaptive
24 7.55 7.83 low 50µs
25 7.85 8.20 low adaptive
26 7.38 8.02 low adaptive
27 6.60 6.65 high adaptive
28 8.20 8.38 low 50µs
29 7.25 6.80 low adaptive
30 7.75 8.65 low adaptive
31 6.60 5.80 high off
32 7.20 7.20 low off
ADR 1 6.12
ADR 2 6.30
ADR 3 6.48
ADR 4 6.66
ADR 5 6.84
ADR 6 7.74
ADR 7 7.92
ADR 8 8.10
ADR 9 8.28
ADR 10 8.46
ADR 11 7.38
ADR 12 7.56
Audio Types
Page 26

Technical Terms (Glossary)
25
AFC- Automatic Frequency Control - tunes the programme
automatically
ADR- ASTRA DIGITAL RADIO - high quality radio reception via
satellite
Antenna cable- Cable connection between the modulator of the
satellite receiver and the antenna input of the TV set,
used as an alternative where no SCART connection is
provided.
Audio- Related to sound matters
Audio Type- Consecutively numbered settings for satellite sound
AV- a wide category of equipment suited for sound and image
reproduction and recording. See SCART
AV Configuration- Connecting several items of AV equipment
together
AVL- Automatic Volume Limiter - a function of the TV set that
allows volume differences between movies and advertising spots to be reduced
BB- Basic Band contains data and sound carriers in addition to
the FBAS signal
CE certification- Declaration by the manufacturer that the equip-
ment complies with the standards of the European Union
Channel- Frequency range within which a station/programme ope-
rates
Cinch socket-Connection socket for video or audio signals
Copy- Duplication of video recordings, using two video recorders
connected via the SCART connections
CTI- Colour Transient Improvement - provides better separati-
on of neighbouring colours on the screen
Decoder- Additional item of equipment required for receiving
scrambled (encoded) audio and video signals
DiSEqC- Digital Satellite Equipment Control - a digital control signal
used to control DiSEqC-compatible components of the
external unit via the antenna connection, enables reception of more than one satellite via a single cable.
Dual channel sound- Two different sound tracks are broadcast,
e.g. the original language plus one synchronised language
EC1- Euroconnector 1 - another name for SCART1
External unit- Description for the entire system mounted outdoors,
consisting of the parabolic dish antenna as well as one or
more LNBs, to receive signals from one or more satellites.
FBAS signal- German abbreviation for Colour Image Sensing
Synchronous Signal, this contains, among other data, the
complete picture information of the TV picture
Fine tuning- Fine tuning of station/programme - this optimizes the
image even in the presence of transmission errors from
the transmitter. It also influences the quality of video text
Format switching- Refers to the switching that is necessary for the
undistorted reproduction of 16:9 images on 16:9 TV sets.
This switching is usually automatic
FLOF tele text- A tele text format used by several programmes, but
not in Germany
Hi-Fi- High fidelity, refers to high quality sound reproduction
LNB/LNC (Low Noise Block converter)- Receiving unit at the
focal point of the parabolic dish antenna, converts the signal from the frequency range of the satellite to the intermediate frequency of the receiver.
LNB Supply- Power supply to the LNB
LOF- Local oscillator frequency, measured in MHz or GHz,
varies according to the LNB and the frequency range
received. Can be set via the menu "outdoor unit">
"Satellite"
Receiving frequency of the receiver = transmitting frequency of the satellite - LOF.
Megatext- Convenient form of tele text providing good graphics as
well as a large page memory, facilitating rapid access to
pages
Menu- Convenient form of display on screen, with tree-like struc-
ture, used to make settings for many functions, and to
store these, can be operated with relatively few keys (see
page 7)
Mode- Type of audio reception, determines whether a mono, ste-
reo or dual-channel programme will be received.
Modulation at 22 KHz- Apart from the 14/28 Volt switching mode,
this also serves to switch between 2 LNBs. In universal
LNBs it is used to switch into the High range.
Multiswitch- Additional component of antenna unit, permits
several satellite receivers to be connected to a single
satellite dish
NTSC Playback- Facilitates the reproduction of NTSC signals at
60 Hz, if these were first transcoded in PAL
OSD- On Screen Display - showing data on the screen
PAL- Internationally widespread method for transmitting colour
television
PALplus- Improved version of PAL designed for 16:9 format
Picture Format- Indicates the ratio between the height and the
width of the image. The most usual formats are 4:3 and
16:9
Polarisation plane- In order to better utilise the available fre
quency range, satellites will transmit neighbouring programmes with opposite polarisation (horizontal and vertical, or dextro-rotatory and laevo-rotatory). This must be
noted when setting and storing a satellite programme (see
page 12)
In order to receive both polarisation planes, either two
single LNBs or one V/H LNB are required.
Programme timer- Electronic clock used to switch the TV set on
and off for video recording of satellite transmissions
Radio mode- Used to listen to satellite radio programmes and
ADR while keeping the picture tube switched off in order
to save electricity
RGB Reproduction- The letters stand for red, green and blue -
the signals are generated by equipment such as DVD
players and computers, resulting in high-resolution images
Satellite module- An expansion module fitted in the TV set,
replaces a satellite receiver
SCART- Type of connector (21 pins) used in conjunction with TV
sets, video players, satellite receivers and other electronic
equipment in order to transmit audio and video signals
(AV).
Sleep timer- Internal clock in the TV set. The TV set switches it-
self into standby mode after a preselected period (max.
240 minutes)
Source- This delivers the television signal. In the menu Setting
Programmes, satellite (SAT) or terrestrial resp. cable
(Terr.) sources can be selected (see pp. 10 and 12)
Standby- Mode in which the TV set can be switched on fully via
the remote control, but in which it draws very little current
SVHS- Super VHS - recording protocol for video recorders, ensu-
res high picture quality. The black-and-white as well as the
colour portions of the picture signals are transmitted separately via the SCART or the Hosiden connection
S-Video- Super Video - another name for SVHS or Hi8
SVM- Speed Velocity Modulation - improves image sharpness
by providing a sophisticated switch for velocity modulation
of the electron rays in the picture tube
Tele text- Additional information provided free of charge by most
broadcasters, can be displayed on screen
Terrestrial programmes- Broadcast from earth-bound locations,
as opposed to satellite
Timer- Programmable clock, see sleep timer and programme
timer
TTS- TechniSat Tuning System - an automatic scan programme
that searches for, sorts and stores all programmes in a
sensible order. This order can be influenced by the country or language selected
TOP- Table of Pages - a German tele text protocol, in which all
pages are sorted in groups and blocks. All pages can be
addressed by means of four coloured keys on the remote
control, without having to know any page numbers
VGA- Video Graphics Array - quality standard for image repro-
duction in computers
VHS- Video Home System - conventional standard recording
system used by most video recorders
Video- Picture signal, description for VHS or Video 8
Y/C in- Input socket on front panel for SVHS or Hi8 camcorder
Zoom- Enlarging the TV image in all directions
Page 27

Index of keywords
Trouble-shooting guide
26
Page
16: 9 format 8
22 kHz signal 16
ADR module 3
ADR - store programmes 23ff
ADR - programme list 14
ADR - operation 23
AFC 12
Audio type (setting) 12
Audio type (table) 24
AV equipment 18
AVL - store 9
Camcorder - connecting 19
Changing batteries 3
Channel selection 10
Cinch socket 18ff
Computer connection 22ff
Copy function (video) 18
Date display 7
Decoder - setting EC1 11,13
DiSEqC 16ff
Dual channel sound broadcasts 6
DVD players 9,18
Fine tuning 10
Format adjustment 8
Freez frame function 6
Frequency of satellite programme 12
Front control panel 18ff
Gain control - set 13
Headphones - connecting 21
Headphones - store volume 9
Hi-fi system - connecting 4,18,21
Hosiden socket 18ff
LNB 16ff
LNB feed 17
LOF - setting 16ff
Main Menu 8ff
Matrix 17
Menu 8ff
Mute 6
Name of programme - setting 11ff
Noise suppression - set 8
Norm 10
On-screen menu 8ff
Operating a video recorder 3
PALplus decoder 8
Parental control 6
Polarisation of satellite transmissions 12
Polarity (video) 16
Position of a satellite 16ff
Programmes - insert, copy, delete, exchange 14ff
Programmes - receive scrambled/encoded 19
Programme settings - store 10ff
Programmes - source 10,12
Quiz solutions - display 7
Radio mode 13,23
Remote control 4
RGB reproduction 19
Satellite external unit 11,16
Satellite module 3
Satellite - selecting 12
Satellite - setting 16
Satellite receiver - connecting 18
SCART socket 18ff
Sleep timer - set 21
Sound reproduction in VGA mode 22
Sound settings 9
Standby 5
Stereo 6
SVHS/Hi8 reproduction 19
Tele text 7
Tele text - language 11,13
Time -clock 20
Time - clock display 6
Timer - setting 20ff
TOP tele text 6
TTS (automatic programme scan) 3,14
VGA - setting up connection 22ff
Video recorder - connecting 18
Volume - store setting 9
VPS times - display 7
Zoom function 6
What if the TV set cannot be switched on, or the picture tube does
not light up?
Switch on and off once using the Power key, if this does not
help, call a technician.
No picture, no sound, no indicator light
No current
Power plugged in?
Power switch on?
No picture, sound working
TV set is in radio mode (only when in satellite mode)
When switching on for the first time, the initial setup described on
page 3 is not shown
The initial setup is possible only once, and may have been deleted by the retailer. You can still set all programmes via the automatic scan (see pp. 10 ff)
Remote control not working, front panel controls okay
Check batteries of remote control
Remote control not working even with fresh batteries
Set operating code TV to remote control
Only noise received, no programme on screen
Check antenna
Ghost images, double contours on several programmes, or noise
interference (in cable configurations)
Try to improve with the aid of Fine Tuning
Black or white spikes in picture (with satellite reception)
Check external satellite unit (direction of dish, cable and multiswitch connections)
Correct satellite frequency (see page 12)
AFC switched on?
Strong rain or snowfall
If LOF of the LNB out of alignment due to temperature changes,
correct LOF
Satellite programmes with horizontal polarisation not received
LNB feed voltage too low, increase by 1V to 14/19V (see page
17)
Occasional stripes in picture
Cable setup may not be in order
Interference could be from other electrical appliances, or other
programmes
TV set switches itself on
Check whether sleep timer set
Picture suddenly dark, or sound off on all programmes
Call technician
Colour spots appear in picture after turning TV set, or through
magnetic influences
Remove sources of magnetic interference, e.g. move loudspeaker boxes further away
Switch set off and only switch on again after at least 10 minutes
Errors in tele text tables
Antenna signal weak or interrupted
Programme setting not accurate
Recording with programme timer not working
Internal clock not working, or not set correctly (clock can be set
by switching on and off)
Programme slot 1 is a programme that does not provide tele
text
Poor picture quality on programme slot 1
Check whether recording timer set correctly
Check video recorder connection (SCART cable)
No picture from computer in VGA mode
Break in VGA cable (TV image appears double and superimposed on screen)
Image from computer not legible in VGA mode
Check whether VGA resolution (640 x 480 pixels, 60 Hz) set in
computer
Boot computer in Safe Mode, then select resolution
Never try to repair a defective TV set yourself!
Opening the housing as well as incorrectly executed repairs can endanger your life!
Page 28

27
Use the following tables to record your individual
programme allocations
Programme Allocation Tables
1
2
3
4
5
6
7
8
9
10
11
12
13
14
15
16
17
18
19
20
21
22
23
24
25
26
27
28
29
30
31
32
33
34
35
36
37
1
2
3
4
5
6
7
8
9
10
11
12
13
14
15
16
17
18
19
20
21
22
23
24
25
26
27
28
29
30
31
32
33
34
35
36
37
Programme slot
Programme slot
Programme name
Programme name
Page 29

Technical Data
28
TV set Classic Line Classic Line Classic Line Classic Line Colani Colani
72-5004C 70-5001C 63-5001C 55-5002C 72-5000C 55-5003C
Tube
Tube type rectangular-invar Blackline S Blackline S Black Matrix Superflat Black Matrix
Screen size (diag.) 72cm 70cm 63cm 55cm 72cm 55cm
Screen size (visible) 68cm 66cm 59cm 51cm 68cm 51cm
Format switch 4:3/16:9 ++++++
Scan rate 100 Hz ++++++
Image sharpness 3-stage ++++++
Noise reduction 3-stage ++++++
Freeze frame/details ++++++
SVM ++++++
CTI improved colour contour ++++++
Zoom 33% +-----
Operation
Channel memory excl.sat 200 200 200 200 200 200
Channel memory incl.sat. 500 500 500 500 500 500
TTS aut.progr.syst. ++++++
OSD menu guide ++++++
Sleep-, Programme timer ++++++
Parental lock ++++++
Hotel mode ++++++
Audio
Stereo/dual channel ++++++
Power output in W (RMS) 2 x 12 2 x 12 2 x 12 2 x 8 2 x 12 2 x 8
No. of loudspeakers 4 4 2 2 4 2
Adj. Headphone amp. ++++++
Radio mode ++++++
Standards
BG stereo-DK mono-I-L/L'- ++++++
NICAM
PAL-SECAM ++++++
NTSC Playback (PAL 60 Hz) ++++++
E02-12/E 21-69/ S01-40
Connections
SCART1 (FBAS/RGB) ++++++
SCART2 (FBAS/YC) ++++++
Audio cinch in/cinch out ++++++
Y/C in front (Hosiden) ++++++
VHS in front (cinch) ++++++
Headphones 3.5mm jack ++++++
Video text
TOP/FLOF ++++++
Megatext 512 pages ++++++
Sub-page memory 79 pages ++++++
Power supply
Standby 1W ++++++
2.standby (copy, radio,timer) ++++++
Mains supply 230 V ++++++
Power consumption in Watt 120 120 120 100 130 100
Size, weight
Dimensions in cm (w x h x d) 87x49x49 81x57x48 73x52x45 66x46x47 85x67x54 68x55x50
Weight in kg 36 35 30 25 40 25
Optional extras
Satellite module ++++++
ADR module ++++++
VGA ++++++
+ standard - not provided
Page 30

Brief operating instructions
To switch the set on or off
➜ Press the Power key at the front of the TV
set
To switch on from standby mode
➜ Press the Standby/on key on the remote
control or
➜ Press the Programme keys on the remote
control or
➜ Press the numeric keys 0 to 9
To switch off into standby mode
➜ Press the Standby/on key on the remote
control
➜ Press the Programme keys to select a new
programme
➜ You may press a numeric key or keys to sel-
ect a different programme directly
➜ Press the OK key to display the programme
list
➜ Use the Programme keys to select a new
programme, then press the OK key to confirm
➜ Pressing the Switching key takes you back
to the last programme selected previously
➜ Use the Volume keys to adjust the volume of
the built-in loudspeakers
➜ Press the Sound Mute key to switch the
sound on or off
➜ Press the A/B key to select the sound mode
Stereo/ Mono/ Dual
➜ In the case of terrestrial broadcasts, use the
A/B key to select between mono and stereo
➜ In the case of dual channel broadcasts, use
the A/B key to switch between channels A
and B
➜ Press the TXT key to display tele text. Use
the numeric keys 0 - 9 to select individual
pages with their three-digit code
➜ Press the red key to page one page back
➜ Press the green key to move one page for-
ward
➜ Press the yellow key to select the tele text
group shown in the yellow box at the bottom
of the page
➜ Press the blue key to select the tele text
block shown in the blue box at the bottom of
the page
➜ Press the OK key to activate the sub-page
memory, this will initiate a download of subpages
➜ Press the Programme keys to display the
selected sub-page
➜ Press the OK key to exit the sub-page mode
➜ Press the Switching key to change the colou-
red keys to a second tele text level, in which
four additional functions are provided
1. Stop paging through sub-pages
➜ Press the red key to stop paging through sub-
pages - press again to continue paging
2. Enlarge text pages
➜ Press the green key to enlarge the upper or
lower half of the tele text page
3. Show concealed information
➜ Press the yellow key to show up concealed
information (e.g. solutions to a quiz, VPS
times), press again to conceal the information
again
4. Show TV picture without exiting tele text
➜ Press the blue key to display the TV picture,
press again to show tele text
➜ Press the RADIO/TV key to exit tele text
mode.
Switching the TV set on or off
Tele text
Page selection with TOP tele text
Selecting a programme via the remote control
Selecting a programme via the programme list
Switch key for previous programme
Adjusting volume
Sound off (mute)
Selecting sound mode
Exiting tele text
Tele text - Additional functions
Tele text sub-pages
Page 31
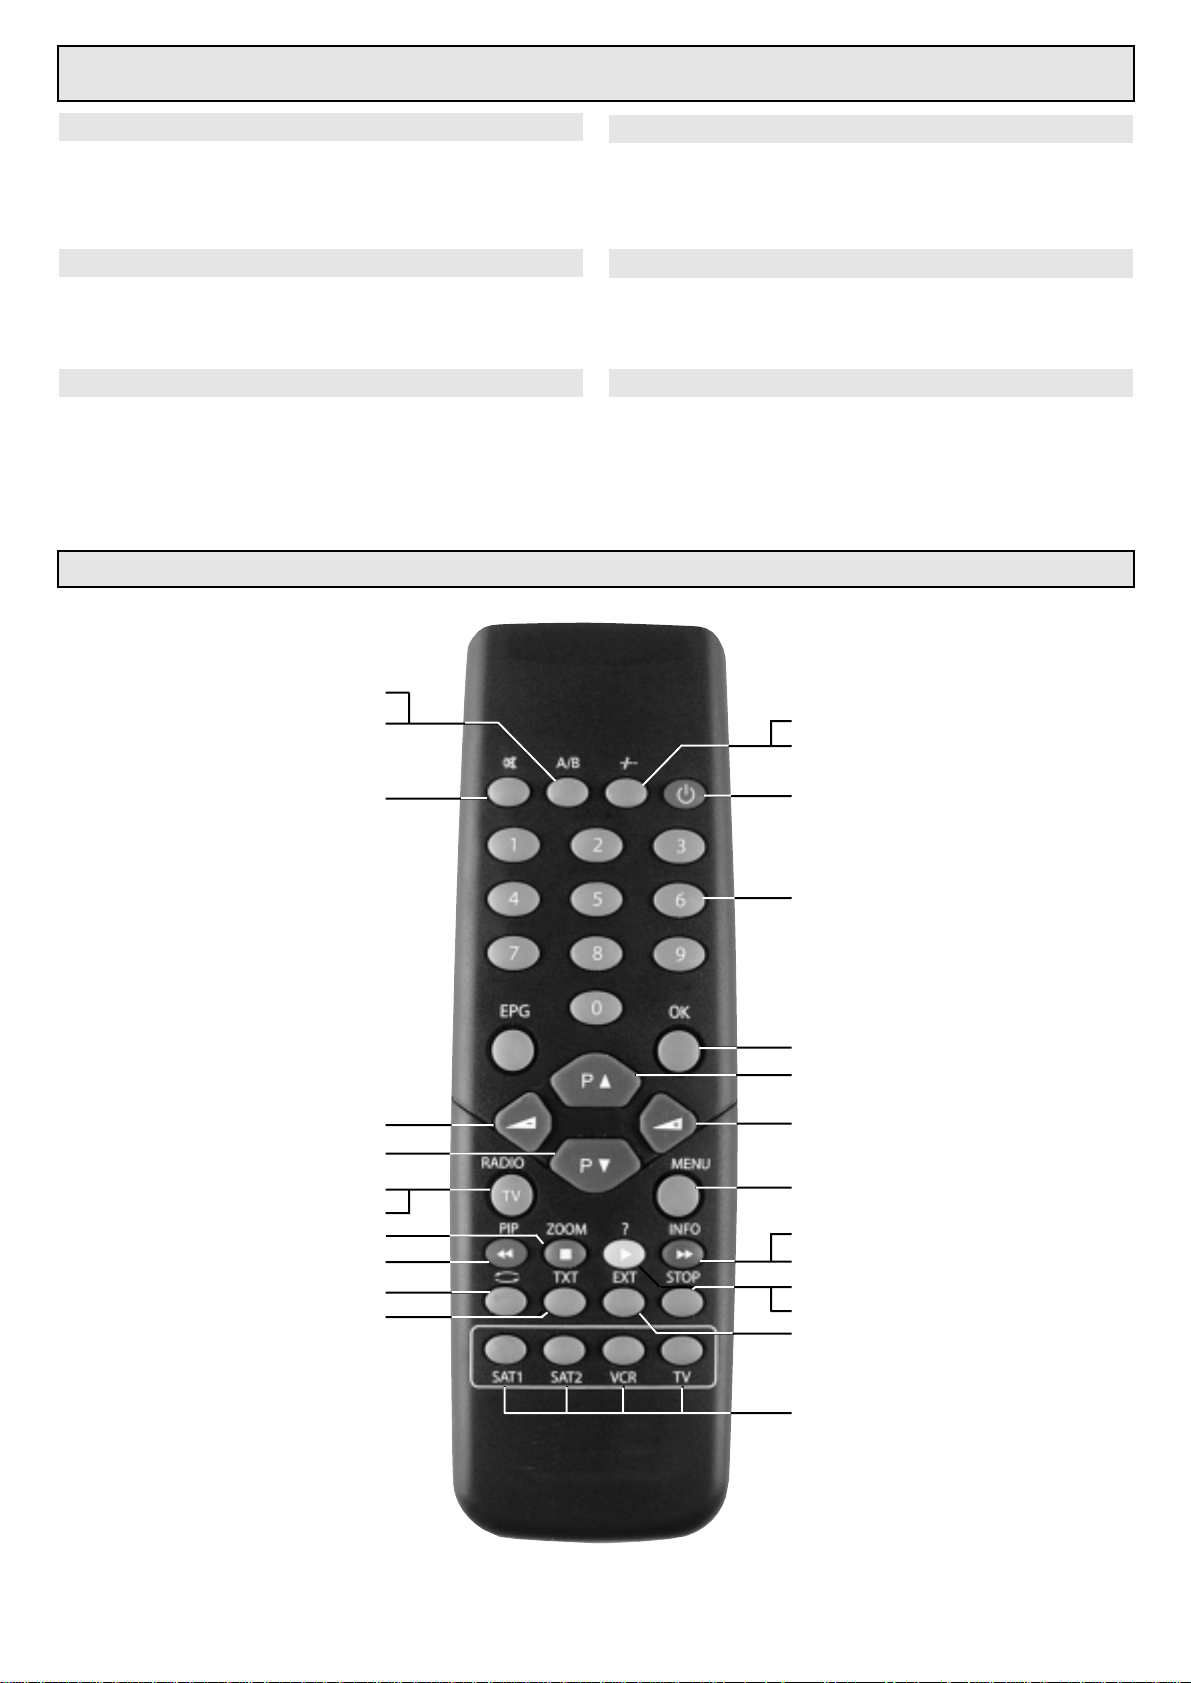
Brief operating instructions
➜ Press the yellow ? key to display or hide a
help table
➜ Press the blue INFO key to display the time
and other information
➜ Press the EXT key to switch trough the
various AV inputs in the following order:
EC1-EC2-FRONT-EC2 SVHS (-VGA)
➜ Press the STOP key to freeze the picture,
press again to continue with regular view
➜ Press the green ZOOM key to enlarge the
image by 33%
➜ Press the Format Change key to increase
picture width without changing the picture
height
Display hint
Freeze frame
Display clock time
Activate an AV and VGA input
* Zoom (only in 16:9 sets)
* Increase picture width (only in 16:9 sets)
Key functions of the remote control unit
Important! Press the TV key at bottom right after each time you have changed
the batteries!
Sound selection
Channel A/B
Stereo/Mono/Dual Parental lock
* Format change (at 16:9)
Sound Mute (on/off) Standby/on
Numeric keypad
OKMultifunction key
Programme +
Volume - Volume +
Programme -
-
TV / Radio mode Menu on/off
Tele text off
Tele text page + Date, Time, Information
Tele text page - Tele text - next block
Switching key (programme) Hidden information
Tele text on Tele text - next group
EXT
Equipment code
Page 32

www.technisat.de
 Loading...