

Page 1
MONTAGEANLEITUNG
INSTALLATION INSTRUCTION
NOTICE DE MONTAGE
TechniSat
ASTRAPLUS SATENNE
553/Engl./92
E
L
E
V
A
T
I
O
50°
170°
40°
N
30°
20°
10°
0°
A
Z
I
M
U
SÜD
180°
190°
200°
210°
270°
220°
230°
240°
250°
260°
WEST
T
OST
90°
100°
110°
120°
130°
90°
140°
80°
150°
70°
60°
160°
Page 2
INST ALLATION DER
TECHNISAT ASTRAPLUS
SATENNE
TechniSat hat für den Empfang des
Satellitensystems ASTRA die TechniSat
ASTRAPLUS SATENNE mit einer Kantenlänge von nur 47 x 47 cm entwickelt.
Gegenüber herkömmlichen Parabolantennen basiert die ASTRAPLUS
SATENNE auf einem völlig neuen Konzept. Kollektoren fangen die vom Satelliten ausgesandten Mikrowellen auf und
leiten sie über eine Platine zu dem auf
der Rückseite der ASTRAPLUS
SATENNE integrierten LNB weiter.
Durch die perfekte Konstruktion kann die
TechniSat ASTRAPLUS SATENNE
sehr schnell installiert werden. Sie ist
vormontiert und muß lediglich an die
zum Lieferumfang gehörende Masthalterung angeschraubt werden. Die ASTRA
Satelliten stehen auf der Position 19,2°
Ost und senden ihre Signale in linearer
Polarisation aus. Zum Empfang der
Radio- und TV-Programme sind alle
TechniSat Receiver geeignet.
NUTZUNGS- UND PFLEGEANLEITUNG DER
ASTRAPLUS SATENNE
VON TECHNISAT
1. Die ASTRAPLUS SATENNE von
TechniSat ist eine hochwertige Satellitenempfangsanlage, die vorsichtig
behandelt werden muß. Sie soll vor
Erschütterungen geschützt werden und
darf keinem starken Druck ausgesetzt
werden. Die ASTRAPLUS SATENNE
darf auf keinen Fall geöffnet werden, da
hierdurch Beschädigungen der Empfangselektronik eintreten können und die
Garantie verfällt.
2. Achten Sie darauf, daß an der Oberfläche keine Kratzer entstehen (und
schützen Sie die Antenne vor weiteren
Beschädigungen).
3. Sollte es erforderlich sein, die Techni-
INSTALLATION INSTRUCTIONS FOR THE TECHNISAT
ASTRAPLUS SATENNE
For the reception of the ASTRA satellite,
TechniSat has developed the TechniSat
ASTRAPLUS SATENNE which is 47cm
square. Different to the conventional
parabolic antenna, the ASTRAPLUS
SATENNE is based on a whole new
concept. Signals sent out from the satellite are picked up by small collectors and
are conducted further via silver tracks
to an integrated LNB which is on the
back of the ASTRAPLUS SATENNE.
Through its perfect construction the
ASTRAPLUS SATENNE can be quickly
installed. The ASTRA satellites are
situated at 19,2° east and they send out
their signals in linear polarisation beams.
All TechniSat receivers are suitable for
the reception of radio and television programmes.
USE AND CARE
INSTRUCTIONS FOR THE
ASTRAPLUS SATENNE
FROM TECHNISAT
1. The ASTRAPLUS SATENNE is a
high quality satellite reception unit, which
must be carefully handled. It should be
protected from shock/vibration and
should not be exposed to pressure. The
ASTRAPLUS SATENNE must not under
any circumstances be opened, as the
reception electronics can be damaged
and the guarantee will be invalid.
2. Please note, that the surface is not
scratched or damaged.
3. Should it be necessary to clean the
TechniSat ASTRAPLUS SATENNE,
firstly pull out the mains plug of the satellite receiver. You can clean the
ASTRAPLUS SATENNE with a soft
NOTICE DE MONTAGE
SATENNE TECHNISAT
ASTRAPLUS
Dans le cadre de la réception des satellites ASTRA 1A & 1B, TechniSat a développé la SATENNE ASTRAPLUS qui ne
fait que 47 x 47 cm. La SATENNE
ASTRAPLUS se distingue des antennes
paraboliques traditionnelles par un nouveau concept carrément révolutionnaire.
Des collecteurs captent les micro-ondes
émises par satellite et les dirigent par
l’intermédiaire d’une platine vers le LNB
intégré à l’arrière de la SATENNE
ASTRAPLUS. Grâce à une fabrication
parfaite, la SATENNE ASTRAPLUS
peut être installée très rapidement. Elle
est pré-montée et il suffit de la visser à
la fixation tubulaire sur laquelle elle sera
montée. Les satellites ASTRA (positionnés à 19,2° Est) émettent leurs signaux en polarisation linéaire. Tous les
récepteurs TechniSat conviennent pour
la réception des programmes TV et
Radio.
UTILISATION ET ENTRETIEN DE LA SATENNE
ASTRAPLUS DE
TECHNISAT
1. La SATENNE ASTRAPLUS de
TechniSat est un matériel de réception
satellite perfectionné qui nécessite un
soin particulier. Elle doit être protégée
des chocs et ne doit pas être soumise à
une forte pression. La SATENNE
ASTRAPLUS ne doit être ouverte sous
aucun prétexte sous peine d’entraîner
des dommages électroniques et l’annulation de la garantie.
2. Veillez à ne pas rayer la surface et à
protéger l’antenne d’éventuels dommages.
3.Pour nettoyer la SATENNE ASTRAPLUS de TechniSat, débranchez d’abord
la prise du récepteur satellite puis celle
D
GB
F
2
Page 3
D
GB
F
3
Sat ASTRAPLUS SATENNE zu reinigen, so ziehen Sie zuerst den Netzstecker des Satellitenreceivers und des
Fernsehgerätes. Hiernach können Sie
mit einem Tuch und lauwarmem Wasser
oder einem milden Reinigungsmittel die
ASTRAPLUS SATENNE reinigen. Auf
keinen Fall darf heißes Wasser, scharfes Lösungsmittel oder Scheuermittel zur
Reinigung verwendet werden. Wenn
nach starken Schneefällen Schnee auf
der ASTRAPLUS SATENNE liegen
bleibt, kann das vorübergehend zur Verschlechterung des Fernsehbildes führen.
Der Schnee kann entfernt werden. Allerdings sollte hier äußerst vorsichtig vorgegangen werden, damit die Antenne
nicht beshädigt wird.
4. Die ASTRAPLUS SATENNE von
TechniSat darf nicht von Gegenständen
bedeckt werden.
Zusammenbau und Einstellung der TechniSat
ASTRAPLUS SATENNE
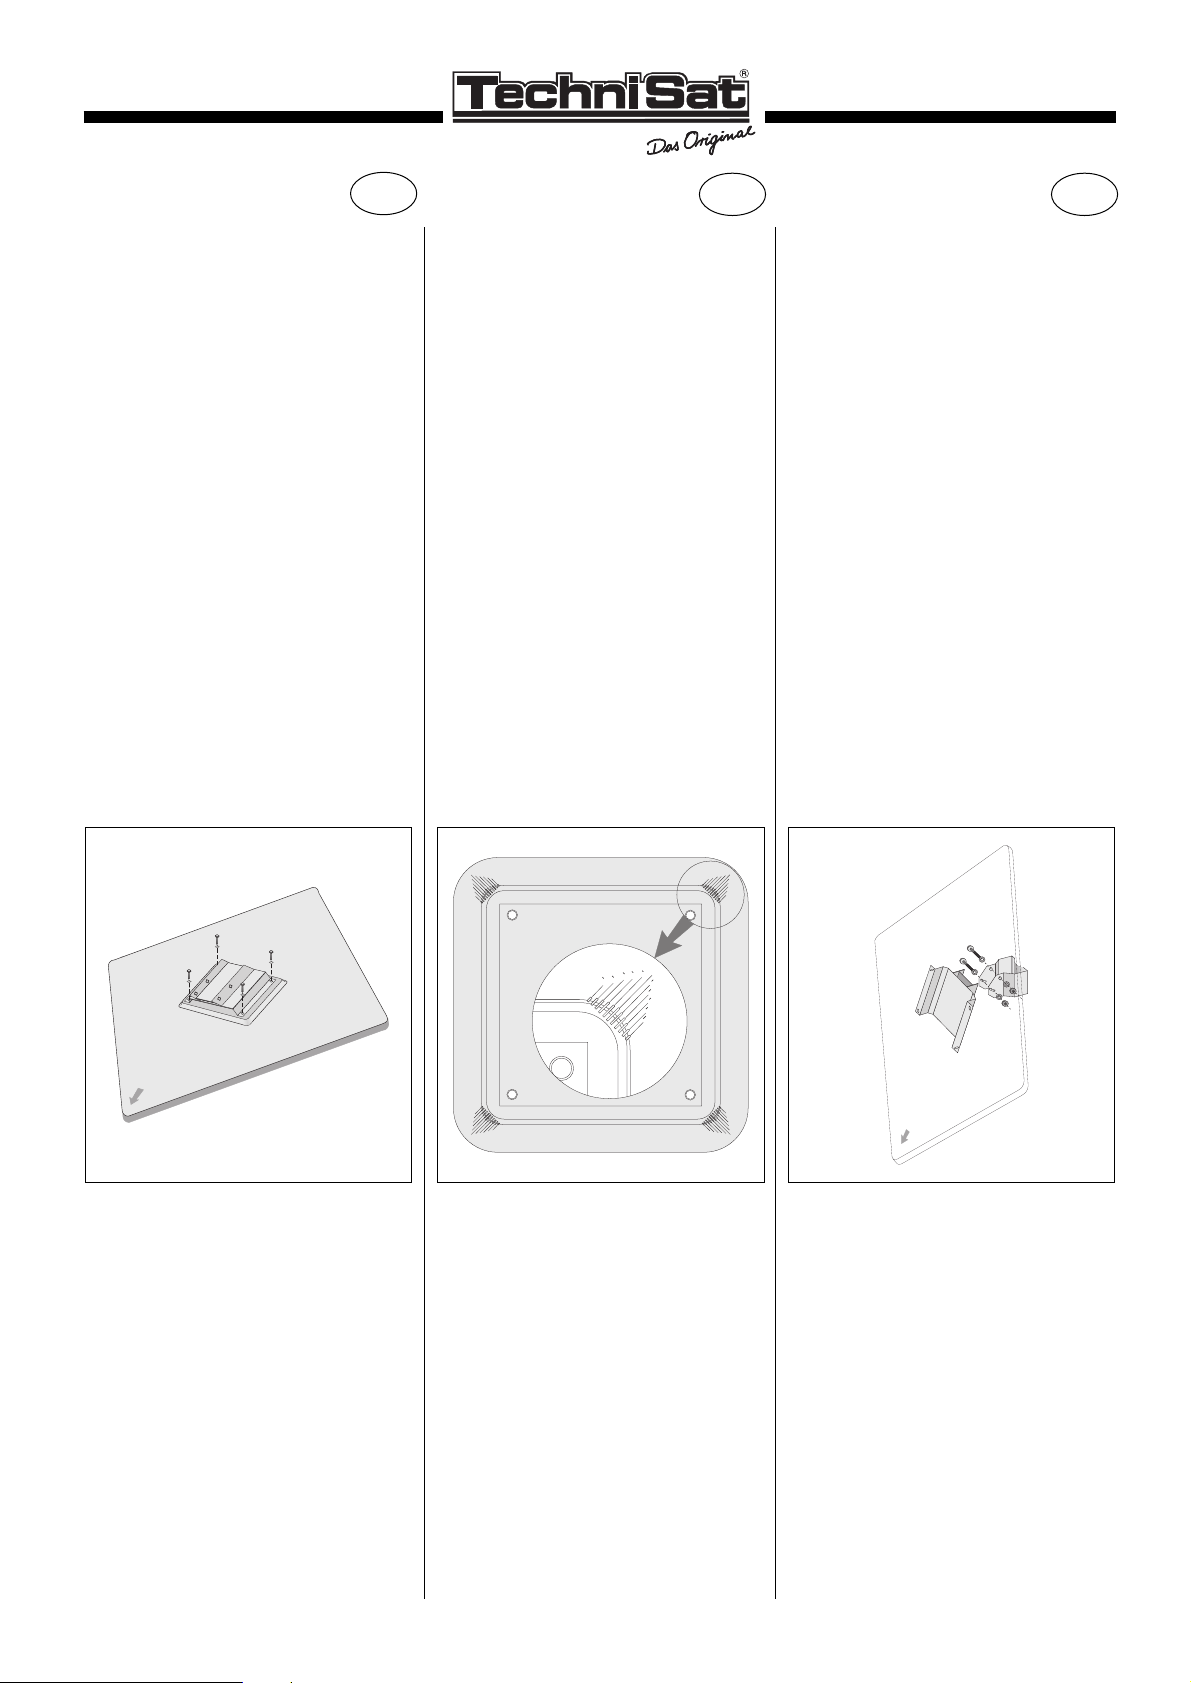
1. Montage der AZ/EL-Halterung
(Zeichnung 1)
Die Antennenhalterung setzen Sie wie
abgebildet zusammen und befestigen
sie mit den vier Imbusschrauben so, daß
hinterher noch ein leichtes Drehen möglich ist.
cloth and luke warm water or a mild
cleaning fluid. Under no circumstances
should hot water, strong solutions or a
scrubbing solution be used to clean the
antenna. When snow lies on the
ASTRAPLUS SATENNE it can cause
the television picture to deteriorate. The
snow can be removed. However you
must be extremely careful not to damage
the antenna, due to frozen ice etc.
4. The TechniSat ASTRAPLUS SATENNE should not be covered.
ASSEMBLY AND TUNING
OF THE TECHNISAT
ASTRAPLUS SATENNE
1. Mounting of the AZ/EL support
(picture 1)
Place the ASTRAPLUS SATENNE onto
a soft surface. Place the antenna support onto the antenna, such that the 4
slotted holes line up with the threads in
the SATENNE and also so that the other
du poste de télévision. Vous pourrez
alors nettoyer la SATENNE ASTRAPLUS avec un chiffon doux et de l’eau
tiède ou un produit nettoyant non agressif. Il ne faut en aucun cas utiliser de
l’eau chaude, un détergent ou de la poudre à récurer. S’il reste de la neige sur la
SATENNE ASTRAPLUS après une
importante chute de neige, il est possible
que l’image soit perturbée temporairement. On pourra enlever (la neige) à
condition de procéder avec beaucoup de
précautions afin de ne pas abimer
l’antenne.
4. Ne rien poser sur la SATENNE
ASTRAPLUS de TechniSat.
Assemblage et réglage de
la SATENNE ASTRAPLUS
de TechniSat
1. Montage de la fixation AZ/EL
(figure 1)
Poser la SATENNE ASTRAPLUS sur
une surface souple (ex. couverture, carton). Mettre en place la fixation de
l’antenne et serrer légèrement avec les 4
vis afin de permettre une légère rotation
0
1
2
3
4
5
-1
-2
-3
-4
-5
➀
➁ ➂
0
1
0
-1
-2
-3
-4
-5
1
2
3
4
5
-5
-4
-3
-2
5
-1
4
3
2
1
0
2
3
4
-1
5
-2
-3
-4
-5
5
4
3
2
1
-5
-4
-3
-2
-1
0
Page 4

4
Aachen 50 46 34 N 6 05 04 O 163.28 30.54
Augsburg 48 22 20 N 10 54 00 O 168.98 33.90
Berlin 52 31 20 N 13 17 51 O 172.60 29.81
Beucha 51 20 16 N 12 22 26 O 171.65 30.99
Bielefeld 52 01 21 N 8 31 59 O 166.58 29.67
Bonn 50 44 05 N 7 06 02 O 164.54 30.78
Braunschweig
52 16 09 N 10 31 16 O 169.10 29.69
Bremen 53 04 37 N 8 48 35 O 167.10 28.60
Chemnitz 50 50 10 N 12 55 20 O 171.95 31.48
Cottbus 51 45 33 N 14 20 07 O 173.84 30.61
Daun 50 11 45 N 6 50 10 O 164.09 31.29
Dippach 50 58 29 N 10 15 00 O 168.36 31.08
Dortmund 51 30 58 N 7 28 06 O 165.16 30.03
Dresden 51 03 15 N 13 44 20 O 173.02 31.32
Düsseldorf 51 13 32 N 6 46 59 O 164.25 30.21
Duisburg 51 26 17 N 6 45 43 O 164.26 29.98
Eisenach 50 58 33 N 10 19 15 O 168.65 31.03
Erfurt 50 58 38 N 11 01 30 O 169.54 31.12
Essen 51 27 25 N 7 00 38 O 164.58 30.01
Flensburg 54 47 05 N 9 26 12 O 168.13 26.89
Frankfurt/M 50 06 44 N 8 40 55 O 166.41 31.71
Frankfurt/O 52 20 40 N 14 33 22 O 174.17 29.99
Freiburg/Br. 47 59 48 N 7 51 11 O 164.90 33.79
Fürth 49 28 30 N 10 59 20 O 169.27 32.73
Gera 50 52 56 N 12 04 58 O 170.88 31.65
Görlitz 51 09 27 N 14 59 33 O 174.63 31.30
Göttingen 51 31 48 N 9 56 39 O 168.26 30.39
Greifswald 54 05 49 N 13 22 44 O 172.85 28.03
Halle/Saale 51 29 03 N 11 58 16 O 170.81 30.69
Hamburg 53 32 57 N 9 59 31 O 168.62 28.26
Hannover 52 22 15 N 9 44 25 O 168.14 29.48
Heidelberg 49 24 43 N 8 42 10 O 166.31 32.45
Heilbronn 49 08 34 N 9 13 12 O 166.92 32.82
Hildesheim 52 09 15 N 9 56 42 O 168.36 29.73
Kaiserslauten 49 26 40 N 7 46 20 O 165.12 32.25
Karlsruhe 49 00 20 N 8 24 20 O 165.84 32.83
Karlstadt 49 57 45 N 9 46 00 O 167.77 32.03
Kassel 51 19 06 N 9 30 08 O 167.67 30.56
Kempten/Allg. 47 43 30 N 10 19 10 O 168.92 27.46
Kiel 54 19 34 N 10 08 42 O 168.92 27.46
Koblenz 50 21 43 N 7 35 48 O 165.09 31.26
Köln 50 56 33 N 6 57 33 O 164.41 30.53
Krefeld 51 19 57 N 6 33 48 O 164.00 30.05
Landshut 48 32 30 N 12 09 30 O 170.66 33.88
Leipzig 51 20 16 N 12 22 26 O 171 31 30.89
Ludwigshafen 49 28 50 N 8 26 40 O 165.99 32.33
Lübeck 53 52 10 N 10 41 10 O 169.52 28.01
Lüneburg 53 14 57 N 10 24 50 O 169.10 28.63
Magdeburg 52 07 35 N 11 38 08 O 170.47 29.97
Mainz 49 59 48 N 8 16 10 O 165.87 31.76
Mannheim 49 29 02 N 8 27 46 O 166.01 32.33
München 48 08 20 N 11 34 30 O 169.83 34.24
Münster/Westf
51 57 56 N 7 37 25 O 165.44 29.58
Neubrandenbg
53 33 22 N 13 15 43 O 172.66 28.60
Neumünster 54 04 18 N 9 59 08 O 168.69 27.71
Nürnberg 49 27 10 N 11 04 40 O 169.38 32.76
Oberhausen 51 28 24 N 6 51 31 O 164.39 29.96
Oldenburg/Hol
54 17 30 N 10 53 10 O 169.82 27.58
Oldenburg/Old
53 08 21 N 8 13 03 O 166.38 28.45
Osnsabrück 52 16 44 N 8 02 44 O 166.02 29.32
Passau 48 34 30 N 13 28 10 O 172.40 33.98
Potsdam 52 23 52 N 13 03 46 O 172.29 29.82
Regensburg 40 01 10 N 12 06 00 O 170.65 33.35
Rostock 54 05 23 N 12 08 01 O 171.32 27.93
Saarbrücken 49 13 56 N 6 59 32 O 164.07 32.33
Salzgitter 52 02 56 N 10 22 26 O 168.88 29.90
Salzwedel 52 51 03 N 11 09 02 O 169.96 29.14
Schwerin 53 37 50 N 11 25 00 O 170.39 28.34
Solingen 51 10 23 N 7 05 08 O 164.61 30.32
Stendel 52 36 25 N 11 51 42 O 170.81 29.48
Stralsund 54 19 01 N 13 05 34 O 172.52 27.77
Stuttgart 48 46 39 N 9 10 44 O 166.80 33.20
Trier 49 45 26 N 6 38 38 O 163.75 31.71
Weimar 50 58 53 N 11 20 00 O 169.94 31.16
Wiedenbrück 51 50 15 N 8 18 50 O 166.27 29.83
Wiesbaden 50 03 25 N 8 14 45 O 165.85 31.69
Wilhelmshaven
53 31 08 N 8 07 20 O 166.33 28.03
Würzburg 49 47 50 N 9 56 00 O 167.96 32.24
Wuppertal 51 15 50 N 7 08 35 O 164.70 30.23
Zwickau 50 43 09 N 12 29 47 O 171.39 31.57
TABELLE 1 (für AZ/EL-Einstellung)
TABLE 1 (for AZ/EL-Tuning) TABLEAU 1 (AZ/EL)
Ort Breitengrad Längengrad ASTRA 1A/1B
Grad.Min.Sek Grad.Min.Sek. 19°Ost
AZ EL
TOWN Latitude Longitude ASTRA 1A/1B
Deg.Min.Sec Deg.Min.Sec 19°east
AZ EL
Aberystwth 52 25 0 N 04 06 0 W 151.72 26.35
Birmingham 52 30 0 N 01 55 0 W 154.29 26.92
Bournemouth 50 43 0 N 01 33 0 W 153.77 28.65
Brighton 50 50 0 N 00 09 0 W 155.89 29.04
Cambridge 52 13 0 N 00 08 0 W 156.63 27.75
Cardiff 51 28 0 N 03 11 0 W 152.48 27.53
Canterbury 51 17 0 N 01 05 0 W 157.51 28.93
Coventry 52 25 0 N 01 31 0 W 154.74 27.11
Croydon 51 18 0 N 00 05 0 W 156.11 28.60
Dover 51 07 0 N 01 19 0 W 157.74 29.15
Exeter 50 43 0 N 03 31 0 W 151.84 28.14
Gloucester 51 52 0 N 02 15 0 W 153.73 27.43
Guildford 51 14 0 N 00 34 0 W 155.51 28.53
Great Yarmouth
52 40 0 N 01 45 0 W 158.68 27.71
Greenwich 51 29 0 N 00 00 0 W 156.26 28.44
Hastings 50 51 0 N 00 36 0 W 156.80 29.23
Horsham 51 04 0 N 00 20 0 W 155.74 28.76
Ipswich 52 04 0 N 01 09 0 W 157.80 28.16
Kingston Upon Hull
53 43 0 N 00 25 0 W 156.48 26.13
Leeds 53 48 0 N 01 34 0 W 155.08 25.75
Leicester 52 39 0 N 01 09 0 W 155.24 26.98
London 51 30 0 N 00 05 0 W 156.17 28.40
Liverpool 53 25 0 N 03 05 0 W 153.21 25.70
Manchester 53 30 0 N 02 15 0 W 154.20 25.86
Middlesbrough 54 35 0 N 01 14 0 W 155.68 25.08
Northampton 52 14 0 N 00 54 0 W 155.41 27.46
Norwich 52 38 0 N 01 17 0 W 158.12 27.63
Nottingham 52 58 0 N 01 10 0 W 155.31 26.67
Oxford 51 45 0 N 01 15 0 W 154.85 27.83
Peterborough 52 35 0 N 00 15 0 W 156.28 27.29
Plymouth 50 23 0 N 04 10 0 W 150.96 28.24
Portsmouth 50 48 0 N 01 05 0 W 154.76 28.81
Salisbury 51 04 0 N 01 48 0 W 153.99 28.34
Sheffield 53 23 0 N 01 28 0 W 153.08 26.18
Southampton 50 54 0 N 01 23 0 W 154.43 28.62
Stoke on Trent 53 01 0 N 02 11 0 W 154.13 26.34
Stratford u. Avon
52 12 0 N 01 41 0 W 154.48 27.27
Swansea 51 38 0 N 03 57 0 W 151.64 27.13
Swindon 51 34 0 N 01 47 0 W 154.16 27.86
Winchester 51 04 0 N 01 19 0 W 154.56 28.48
Wolverhampton 52 36 0 N 02 08 0 W 154.07 26.76
Worcester 52 12 0 N 02 12 0 W 153.87 27.12
Workington 34 39 0 N 03 34 0 W 143.85 43.10
TOWN Latitude Longitude ASTRA 1A/1B
Deg.Min.Sec Deg.Min.Sec 19°Est
AZ EL
Amiens 49 54 0 N 2 18 0 E 158.56 30,62
Ajaccio 41 55 0 N 8 44 0 E 164.80 40.47
Angoulème 45 39 0 N 0 09 0 E 154.45 34.24
Angers 47 28 0 N 0 33 0 O 154.24 32.22
Bastia 42 42 0 N 9 27 0 E 166.04 39.78
Besançon 47 15 0 N 6 02 0 E 162.56 34.23
Biaritz 43 29 0 N 1 34 0 O 151.37 35.74
Bordeaux 44 50 0 N 0 34 0 O 153.22 34.79
Bourges 47 05 0 N 2 24 0 E 157.82 33.49
Brest 48 24 0 N 4 29 0 O 149.82 29.99
Brive La Grde 45 10 0 N 1 32 0 E 156.04 35.16
Caen 49 11 0 N 0 22 0 O 155.06 30.59
Cannes 43 33 0 N 7 01 0 E 162.85 38.34
Carcassonne 43 13 0 N 2 21 0 E 156.38 37.38
Chateauroux 46 49 0 N 1 42 0 E 156.84 33.56
Cherbourg 49 39 0 N 1 39 0 O 153.66 29.75
Clermont-Fd 45 47 0 N 3 05 0 E 158.27 35.00
Colmar 48 05 0 N 7 22 0 E 164.51 33.64
Dijon 47 19 0 N 5 01 0 E 161.26 33.93
Grenoble 45 10 0 N 5 43 0 E 161.56 36.33
Lille 50 38 0 N 3 04 0 E 159.71 30.07
Limoges 45 50 0 N 1 16 0 E 155.94 34.41
Lorient 47 45 0 N 3 22 0 O 150.90 31.00
La Rochelle 46 10 0 N 1 10 0 O 152.99 33.29
Lyon 45 45 0 N 4 51 0 E 160.58 35.51
Le Mans 48 00 0 N 0 12 0 E 155.36 31.93
Marseille 43 18 0 N 5 24 0 E 160.54 38.20
Metz 49 08 0 N 6 10 0 E 163.21 32.30
Montluçon 46 21 0 N 2 36 0 E 157.87 34.29
Montpellier 43 36 0 N 3 53 0 E 158.58 37.46
Mulhouse 47 45 0 N 7 20 0 E 164.39 33.98
Nancy 48 41 0 N 6 12 0 E 163.14 32.78
Nantes 47 13 0 N 1 33 0 O 152.91 32.14
Nice 43 42 0 N 7 15 0 E 163.21 38.24
Niort 46 19 0 N 0 27 0 O 153.94 33.38
Orléans 47 55 0 N 1 54 0 E 157.46 32.51
Paris 48 52 0 N 2 20 0 E 158.30 31.67
Pau 43 18 0 N 0 22 0 O 152.83 36.37
Périgeux 45 11 0 N 0 43 0 E 155.00 34.88
Poitiers 46 35 0 N 0 20 0 E 155.03 33.37
Reims 49 15 0 N 4 02 0 E 160.54 31.71
Rennes 48 05 0 N 1 41 0 O 153.07 31.25
Rodez 44 21 0 N 2 35 0 E 157.12 36.31
Rouen 49 26 0 N 1 05 0 E 156.92 30.76
Saint-Louis 47 35 0 N 7 34 0 E 164.65 34.21
Strasbourg 48 35 0 N 7 45 0 E 165.12 33.19
Toulon 43 07 0 N 5 56 0 E 161.21 38.53
Toulouse 43 36 0 N 1 26 0 E 155.31 36.70
Tours 47 23 0 N 0 41 0 E 155.75 32.69
Versailles 48 48 0 N 0 08 0 E 158.03 31.68
Page 5

D
GB
F
5
2. Skew Einstellung
(Zeichnung 2)
Die Satelliten ASTRA befinden sich auf
der Position 19,2° Ost. Bekanntlich wird
in zwei Polarisationsebenen gesendet,
nämlich horizontal und vertikal. Durch
die Krümmung der Erdoberfläche und
die Position der Satelliten treffen diese
Mikrowellen in einer leichten Schräglage
auf die Erde. Aus diesem Grund muß
die ASTRAPLUS SATENNE um diese
Schräglage korrigiert werden. Ermitteln
Sie bitte aus Tabelle (1) den geographischen Längen-und Breitengrad Ihres
Installationsstandortes. In der Tabelle (2)
können Sie den Skew-Winkel (Verdrehungswinkel) ablesen. Beispiel für Daun:
Längengrad 6 Grad 50 Minuten Ost,
Breitengrad 50 Grad 11 Minuten Nord,
Verdrehungswinkel -1. Anschließend
verdrehen Sie die Antennenhalterung
bis alle 4 Eckpunkte mit der Markierung
(-1) übereinstimmen. Danach können
Sie die Imbusschrauben fest anziehen.
3. Montage der Masthalterung
(Zeichnung 3)
Setzen Sie die Masthalterung wie in Zei-
chung (3) abgebildet zusammen. Die
vier Imbusschrauben stecken Sie von
der rechten Seite* in die dafür vorgesehenen Bohrungen und ziehen sie handfest an. Benutzen Sie für den Zusammenbau die beiliegenden Imbusschrauben, Unterlegscheiben und Sechskantmuttern.
4 holes in the support are to the top of
the antenna, lightly fastening the 4 screws with spring washers, so that it is
possible to lightly rotate it.
2. Skew Adjustment
(picture 2)
The ASTRA satellite is situated at 19,2°
east. As is already known, 2 polarisation
levels are used, ie. horizontal and vertical. Due to the curvature of the earth's
surface and the position of the satellite,
the microwaves meet in an oblique position to the earth. On this basis the
ASTRAPLUS SATENNE must be adjusted. Determine from table (1) the latitude and longitude of your location and in
table (2) look up to skew angle for your
location. Turn the antenna support until
all 4 corner points correspond with the
marking appropriate to the skew angle
(see figure 2). After this you can tighten
the screws.
3. Mounting of the “U” Bracket (4)
(picture 3)
Align the “U” bracket on the support
with slotted holes at the bottom position
(figure 3) and pass the two long bolts
through. Please note that the two holes
on the left side are threaded and the
bolts should be passed right to left when
viewed from the back with the arrow at
the top. The spring washers and nuts
should be put on and then loosely
fastened.
2. Réglage à l’aide du “SKEW”
(figure 2)
Les satellites ASTRA sont co-position-
nés à 19,2°. L’émission s’effectue dans
2 polarisations, soit horizontale, soit verticale. Du fait de l’inclinaison de la surface de la terre, les micro-ondes atteignent
la terre suivant une ligne légèrement diagonale. Pour cette raison, il faut orienter
la SATENNE ASTRAPLUS en fonction
de cet axe. Veuillez vous reporter au
tableau (1) pour trouver les longitudes et
latitudes géographiques de votre lieu
d’installation. Dans le tableau (2) vous
pourrez lire la correction d’angle SKEW.
Exemple pour Lyon:
Longitude 4 degrés 51 minutes Est, latitude 45 degrés 45 Nord
correspond à un angle SKEW +6
Tournez ensuite la fixation de l’antenne
jusqu’à ce que les 4 coins coïcident
avec le préperçage (voir schéma 2).
Vous pourrez ensuite serrer fortement
les vis.
3. Montage de la fixation
Fixer légèrement les 4 vis afin de permettre une légère rotation (voir schéma
3).
➃
30
20
➄
* (mit Blickrichtung auf die Antennenrückseite, Pfeil nach oben)
Page 6

D
GB
F
6
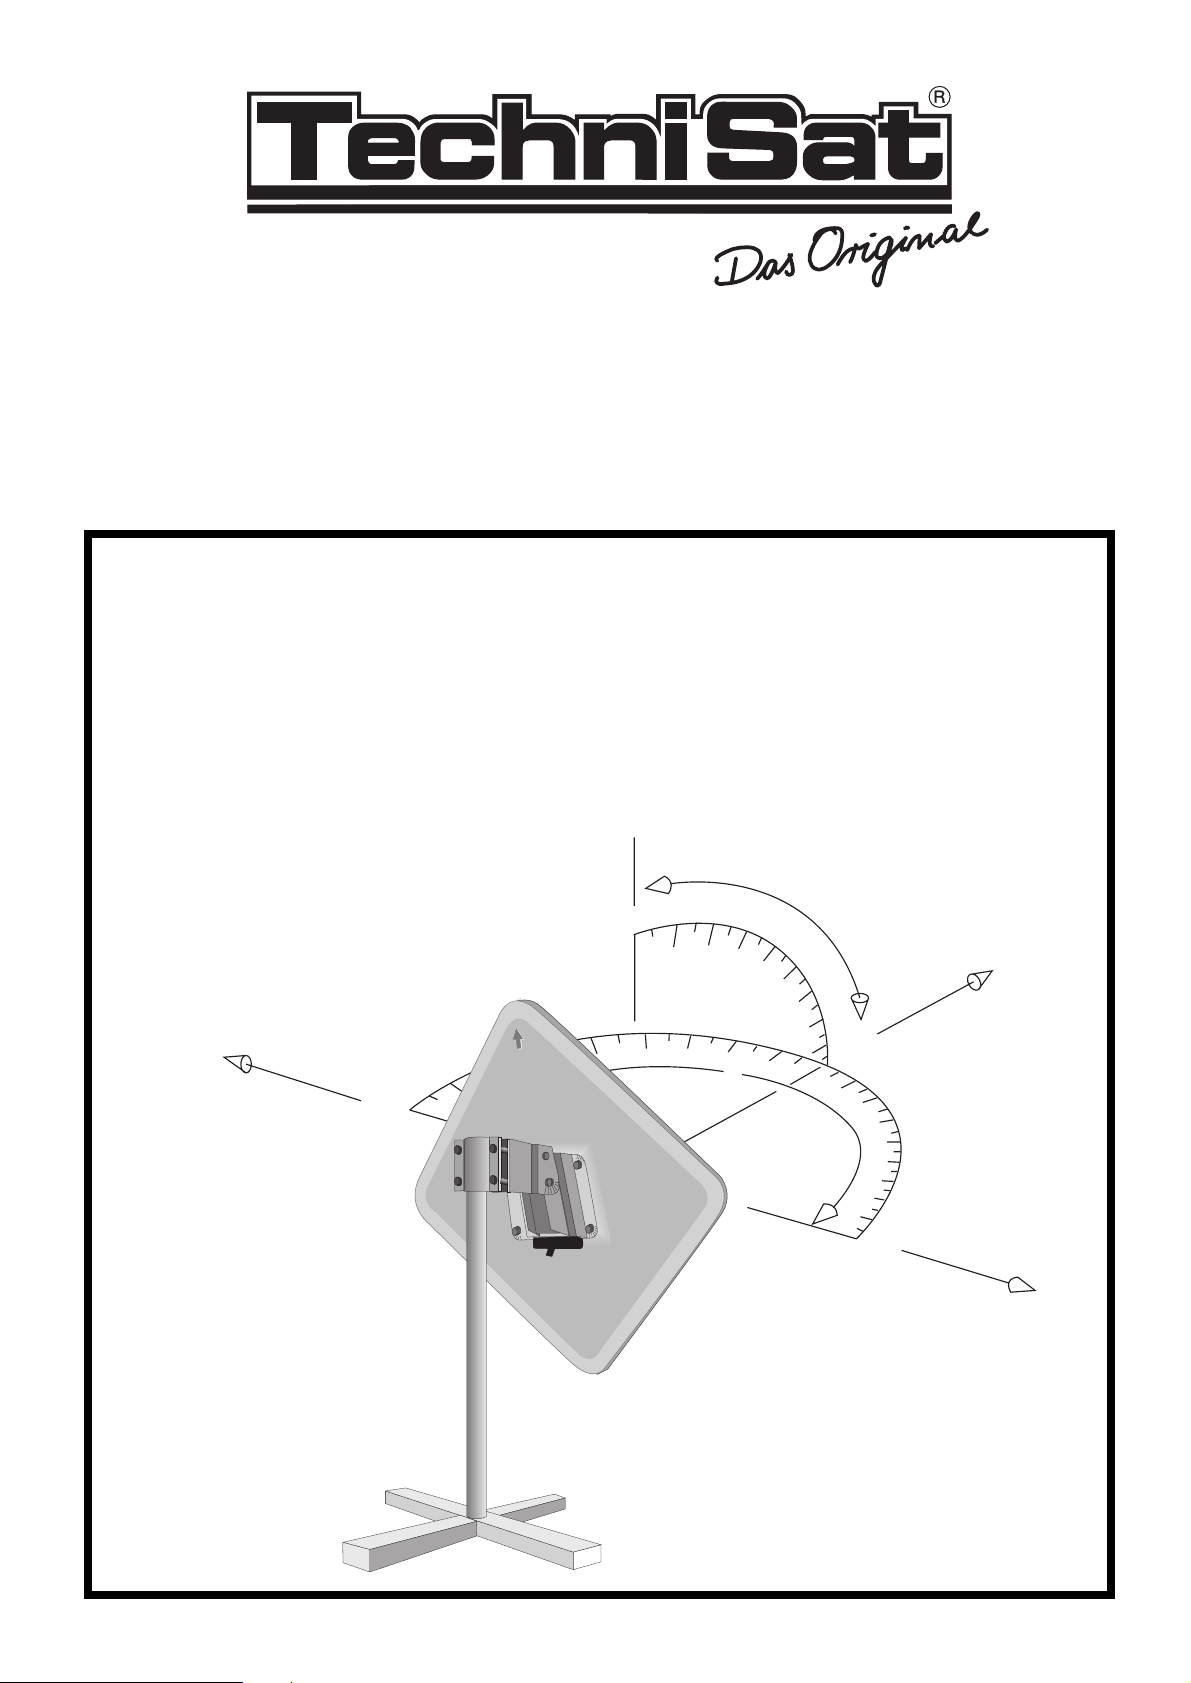
4. Auswahl des Installationsortes
Prüfen Sie vor der Montage der TechniSat ASTRAPLUS SATENNE, ob an
dem vorgesehenen Installationsort freie
Sicht zu dem gewünschten Satelliten
gewährleistet ist. Dieses kann mit Hilfe
eines Kompasses und eines Winkelmessers geschehen. In der Tabelle (1) dieser Anleitung können Sie die entsprechenden Elevations - und Azimut-Werte
für Ihren Ort entnehmen. Mit Hilfe eines
Kompasses ermitteln Sie den Azimut
(Himmelsrichtung), wobei Süden 180
Grad, Westen 270 Grad, Osten 90 Grad
ist. Die Elevation können Sie mit Hilfe
eines Winkelmessers ermitteln. Die Elevation ist der Höhenwinkel, wobei waagerecht 0 Grad und senkrecht 90 Grad
entspricht.
5. An-Rohr-oder An-Mast-Montage
(Zeichnung 4)
Kontrollieren Sie hierbei vorher, ob der
Antennenmast senkrecht montiert ist.
Ziehen Sie die 4 Schrauben an den
Befestigungsschellen nur so fest an, daß
eine Verdrehung noch möglich ist. Die
Antennenhalterung kann an Rohren von
25 bis 63 mm befestigt werden.
6. Einstellen des Elevationswinkel
(Zeichnung 5)
Entnehmen Sie aus Tabelle (1) den
Ihrem Wohnort entsprechenden Elevationswinkel (EL) und stellen Sie diesen
mit Hilfe der Gradeinteilung an der Befestigung ein.
4. Selection of the Installation Location
Check that the planned installation location has free visibility to the required
satellite before mounting the TechniSat
ASTRAPLUS SATENNE. This can be
done with the help of a compass and
protractor. In table (1) of this instruction
manual you can check the corresponding elevation and azimut angles for
your location. With the help of a compass you can determine the azimut
direction, whereby south is 180°, west is
270° and east is 90°. The elevation can
be determined with the help of a protractor. The elevation is the highest angle
whereby horizontal is 0° and vertical is
90°.
5. On a Pole or Mast Mounting
(picture 4)
You should control beforehand, if the
antenna mast is mounted vertically.
Lightly fasten the 4 screws onto the
fastening clamp/wall bracket, so that
adjustments can be made. The antenna
support can be secured onto poles from
25 to 63 mm.
6. Setting the Elevation
(picture 5)
Set the elevation for your location on the
graduated scale below the elongated
holes. Retighten the two bolts. To simplify the installation, the adjustment
should be carried out with a signal level
meter. If you do not have a level meter
you can make the adjustments using a
satellite receiver and a small television.
4. Choix de l’emplacement de l’installation
Avant de monter la SATENNE
ASTRAPLUS de TechniSat, vérifier qu’il
n’y ait pas d’obstacle entre l’emplacement prévu et le satellite à recevoir.
Pour ce faire, vous utiliserez un compas
et un mesureur d'angles. Vous trouverez
dans le tableau (1) des azimuts et élévations les valeurs qui correspondent à
votre région. Vous pouvez déterminer
l’azimut à l’aide d’un compas, le Sud
étant à 180°, l’Ouest à 270°, et l’Est à
90°. Vous pouvez déterminer de même
l’élévation à l’aide d’un mesureur
d'angles, sachant que l’élévation est
l’angle de hauteur où l’horizontale est à
0° et la verticale à 90°.
5. Montage sur tube ou sur mat
(figure 4)
Contrôlez que le mât d’antenne soit bien
vertical, puis attachez légèrement la fixation à l’aide des 4 vis, de façon à permettre une légère rotation. La fixation de
l’antenne peut être installée sur des
tubes de 25 à 63 mm.
6. Réglage de l’angle d’élévation
(figure 5)
Reportez-vous au tableau No. 1 pour
l’angle d’élévation (EL) correspondant à
votre situation géographique, puis faites
le réglage en fonction de la graduation
qui se trouve sur la fixation.
Lat. Longitude
Br.Gr. Längengrad
5° 4° 3,5° 3° 2° 1° 0 1° 2° 3° 4° 5° 6° 7° 8° 9° 10° 11° 12° 13° 14°
15°
56 4 4 3 3 3 2 1 1 0 0 -1 -2 -2 -3 -3 -4 -5 -5 -5 -5 -5 -5
54 5 5 4 4 4 3 2 2 1 1 0 -1 -2 -2 -3 -4 -5 -5 -5 -5 -5 -5
52 5 5 5 5 5 4 3 2 2 1 0 -1 -1 -2 -2 -3 -4 -5 -5 -5 -5 -5
50 5 5 5 5 5 5 4 3 3 2 1 0 -1 -1 -2 -3 -4 -5 -5 -5 -5 -5
48 5 5 5 5 5 5 5 4 4 3 2 1 0 0 -1 -2 -3 -4 -5 -5 -5 -5
46 5 5 5 5 5 5 5 6 5 4 3 2 1 1 0 -1 -2 -3 -4 -5 -5 -5
Tabelle/table/Tableau 2
WEST OST
Page 7
D
GB
F
7
7. Ausrichten der Antenne
Um die Installation zu vereinfachen, sollten Sie die Einstellung mit einem Meßgerät durchführen. Steht Ihnen ein solches nicht zur Verfügung, so können Sie
die Einstellung auch mit Hilfe eines
TechniSat Satellitenreceivers und eines
kleinen Fernsehgerätes vornehmen.
Nehmen Sie das entsprechende Gerät
mit zur Außeneinheit. Schließen Sie das
Sat-Koaxkabel an die Außenempfangseinheit und dann an den Satellitenreceiver an (gemäß beiliegender Beschreibung des Satellitenreceivers). Schließen
Sie den Satellitenreceiver gemäß der
Satellitenreceiverbeschreibung an Ihr
Fernsehgerät an und stellen Sie auf
dem Satellitenreceiver einen vorprogrammierten Kanal bzw. die 1. Zwischenfrequenz eines Programms ein.
Stellen Sie nun den Ihrem Wohnort entsprechenden Elevationswinkel ein.
Gehen Sie hierzu wie folgt vor: Legen
Sie einen Winkelmesser an die TechniSat ASTRAPLUS SATENNE an und
stellen Sie die für Ihren Wohnort zutreffende Elevation ein (Zeichnung 5). Drehen Sie nun die TechniSat Flachantenne langsam von Osten nach Westen bis
Sie von dem gesuchten Satelliten ein
Signal auf Ihrem Fernseher erhalten.
Wenn Sie ein Bild empfangen, ziehen
Sie die Befestigungsschauben (Schrauben 5 + 6 ) ordnungsgemäß an. Es kann
evtl. eine Feinjustierung erforderlich sein.
ACHTUNG: Bitte beachten Sie, daß
Sie im Freien bei Regen kein Fernsehgerät und keinen Satellitenreceiver zur Einstellung benutzen können.
®
TechniSat, ASTRAPLUS und SATENNE
sind eingetragene Warenzeichen der TechniSat
Satellitenfernsehprodukte GmbH, TechnicPark,
W-5568 Daun
Take the equipment to the outside unit.
Connect the Sat Coax cable to the outside reception unit and then to the satellite
receiver (in accordance with the enclosed instructions of the satellite receiver).
Also connect the satellite receiver (in
accordance with the satellite receiver
instruction manual) to your television
and set the satellite receiver to a preprogrammed channel. Turn the TechniSat ASTRAPLUS SATENNE slowly
from east to west until you receive a picture on the television screen from the
required satellite. When you have a picture, secure screws (5 & 6). It may be
necessary to make minor adjustments in
azimut or elevation to obtain the best
picture.
CAUTION: Do not carry out settings
using the satellite receiver/television
on a rainy day.
®
TechniSat, ASTRAPLUS and SATENNE
are registrated trademarks of TechniSat
Satellitenfernsehprodukte GmbH, TechnicPark, W-5568 Daun, Germany
7. Orientation de l’antenne
Un mesureur d’angles facilitera l’installation. A défaut d’un tel appareil, vous
pouvez aussi effectuer le positionnement
grâce au récepteur satellite TechniSat et
à un poste de TV. Amenez le récepteur
satellite près de l’antenne. Connectez
l’antenne et le récepteur satellite au
moyen d’un câble coaxial (suivant les
indications données dans le mode
d’emploi du récepteur).
Raccordez le récepteur satellite - selon
la description - à votre poste de TV et
appelez un canal préprogrammé sur votre récepteur satellite (suivant tableau du
mode d'emploi). Réglez à présent l'angle
d'élévation correspondant à votre lieu
d'habitation. Procédez comme suit:
Poser un mesureur d'angles contre la
SATENNE ASTRAPLUS et réglez
l’élévation correspondant à votre lieu
d’habitation. Tournez à présent l’antenne
plate TechniSat, lentement d’Est en
Ouest jusqu’à ce que vous receviez un
signal du satellite cherché sur votre
poste de télévision. Lorsque vous capterez l’image, serrer les vis de fixation (vis
5+6) dans l’ordre. Il faudra peut-être
enfin procéder à un réglage plus fin.
ATTENTION: Veillez à ne pas exposer le matériel (Téléviseur et récepteur satellite) à la pluie, le jour du
montage.
® TechniSat, ASTRAPLUS et SATENNE sont
des marques déposées de la Société TechniSat, fabricant de matériel de réception satellite, W-5568 Daun, Allemagne
Page 8

8
Der Pfeil zeigt nach
oben.
The arrow must point
upwards.
La flèche vers le
haut
Diese Punkte müssen beim Zusammenbau und der Montage der
TechniSat ASTRAPLUS SATENNE beachtet werden:
The following points must be observed when assembling and mounting the
TechniSat ASTRAPLUS SATENNE:
Veillez à observer les points énoncés ci-dessous lors du montage de la
SATENNE TechniSat ASTRAPLUS :
Die Gradeinteilung befindet sich am unteren Rand
der Masthalterung.
The degree setting is found at the lower edge of
the mount.
La graduation se trouve au bas de la fixation
Die Skew-Einstellung
sollte vor der Mastmontage anhand des
in der Anleitung zu
entnehmenden Skew-
Wertes verdreht wer-
den. Nach Montage und
optimaler Ausrichtung sollte
die optimale Skew-Feinein-
stellung mittels Pegelaus-
schlag des Meßgerätes vorge-
nommen werden.
The skew adjustment should be car-
ried out before mounting the antenna,
using the skew values given in the instruc-
tions. After mounting and optimal lining up,
the optimal skew angle setting is achieved by
means of reading the measuring instrument.
Le réglage du SKEW devra se faire à l’aide des
données du tableau après avoir procédé au réglage et à l’orientation optimale de l’antenne à l’aide
d’un appareil de mesure.
LNB-Ausgang zeigt nach unten.
The LNB output must point down-
wards.
La sortie du LNB vers le bas
●
●
●
●
 Loading...