

ЯННЫУЮФЗ ЧТНМОЛЭМЧСТН
УСЬЫФ
̸¿²µ- º±® °«®½¸¿-·²¹ ±²» ±º ±«® °®±¼«½¬-ò
д»¿-» ®»¿¼ ½¿®»º«´´§ ¬¸» ¿--»³¾´§ ·²-¬®«½¬·±²- ¾»º±®» ¬¸» ·²-¬¿´´¿¬·±²ò
д»¿-» -¿ª» ¬¸·- ³¿²«¿´ º±® º«¬«®» ®»º»®»²½»
ЙЯОТЧТЩж
ЬС ТСМ ЫИРСНЫ МШЫ НЛОЪЯЭЫН МС ЬЧОЫЭМ НЛТ ФЧЩШМт ЫИРСНЛОЫ ЙЧФФ ЬЯУЯЩЫ
ЧМ НЛОЪЯЭЫНф ЙШЧЭШ ЙЧФФ ТСМ ЮЫ ЭСКЫОЫЬ ЛТЬЫО МШЫ РОСЬЛЭМщН ЙЯООЯТМЗт
ОМЯуЮрпи
УСЬЫФ ОМЯуЮрпи

ОМЯуЮрпи Ðòí
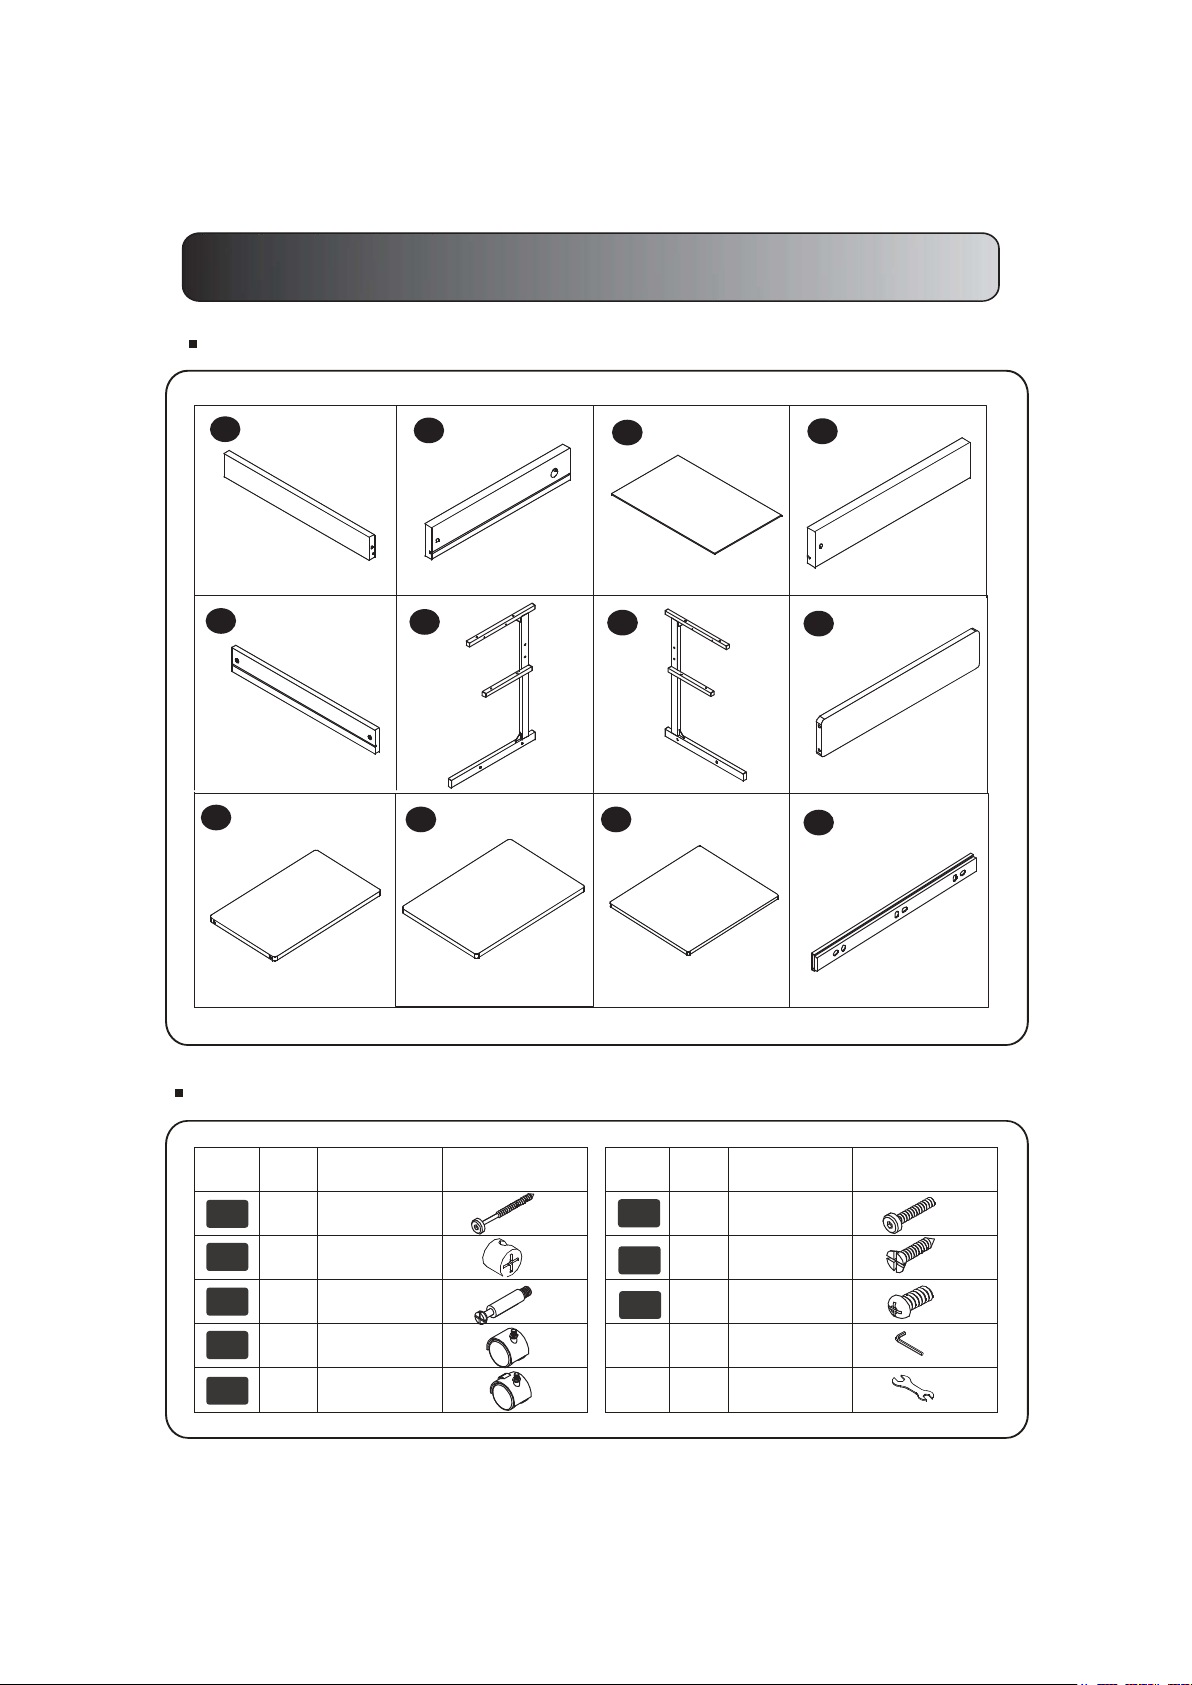
РЯОМН ФЧНМ
1
DRAWER BACK PANEL
5
DRAWER PANEL
9
BOTTOM PANEL
×1
×1
2
×1
DRAWER RIGHT SIDE
6
10
MIDDLE PANEL
×1
×1
LEFT SIDE FRAME
×1 ×1
3
DRAWER BTTOM PANEL
7
RIGHT SIDE FRAME
11
TOP PANEL
×1
×1
4
DRAWER LEFT SIDE
8
BACK PANEL
12
SLIDER
×1
×1
×2
НЭОЫЙН
ß
Þ
Ý
Ü
Û
ÏÌÇò
10
2
2
2
2
Ðß ÎÌ
×ÌÛÓ
M5x60
CAM LOCK
CAM BOLT
CASTER
CASTER
W/LOCK
Ðß ÎÌ
Ú
Ù
Ø
ÏÌÇò
8
4
4
×ÌÛÓ
M6x30
M4x12
M4x8
TOOLS
TOOLS

ОМЯуЮрпи Ðòì
AL IGNIN G TH E CAM LOCK
COR RE CT
Cam bolt
Cam lock
Lon ge r gr oo ve on c am l oc k mu st be poi ntin g to t he hole w he re t he c am bolt
ent er s in t he pane l.
Use t he s cr ewdrive r to t ur n to t he corr ec t po si ti on .
A1 . A2. A3 .
Scr ew t he c am b olt
to on e pa ne l
Þðïè
Ins er t an d al ig n cam loc k on t he o th er
pan el ,a nd s li de o ver pan el w it h ca m bolt
INC OR RE CT
Tur n cam lo ck c lo ckwise
to lo ck t he p an el s toget he r

ОМЯуЮрпи Ðòë
1
1
2
B
4
C
5
Utility drawer assembly. Take panels #2 and #4 and connect them with panel #5 using cam bolt
#C and tighten with cam lock #B. Then take drawer bottom panel #3 and insert it thru the side
channel of both panels #2 and #4. Take panel #1 and attach it to drawer frame with screws A.
3
A
2
H
6
Attach the sliders #12 to the top bars of the left side frame #6 and the right side frame #7 using
screws H. Then assemble the non-locking casters #D to the back of the frames, and the locking
casters #E to the front of the frames.
H
H
12
H
12
7
D
E

RTA-B018 P.6
3
4
8
x8
A
9
Connect both metal frames using back panel #8 and bottom panel #9 with screws #A.
x4
10
F
5
Attach shelf #10 to the metal frame with screws F.
x4
11
Place main desk panel #11 on top of metal frame and attach it with screws #F.
F

RTA-B018 P.7
x4
6
Pull out the sliders and attach to them the utility drawer with screws #G.
G
7
Your desk is completely assembled
DO NOT RETURN YOUR UNIT TO THE RETAILER
CONTACT US FIRST
WWW.RTAPRODUCTS.COM
1-866-782-8262
For immediate help with assembly, products information,
call our toll-free number. You may also contact us by email to:-
warranty@rtaproducts.com .If you need to order replacement
parts, please log on to our website and complete the section
NEED REPLACEMENT PARTS? .

 Loading...