


MODEL RTA - B002
Thanks for purchasing one of our products.
Please read carefully the assembly instructions before the installation.
Please save this manual for future reference.
MODEL RTA-B002
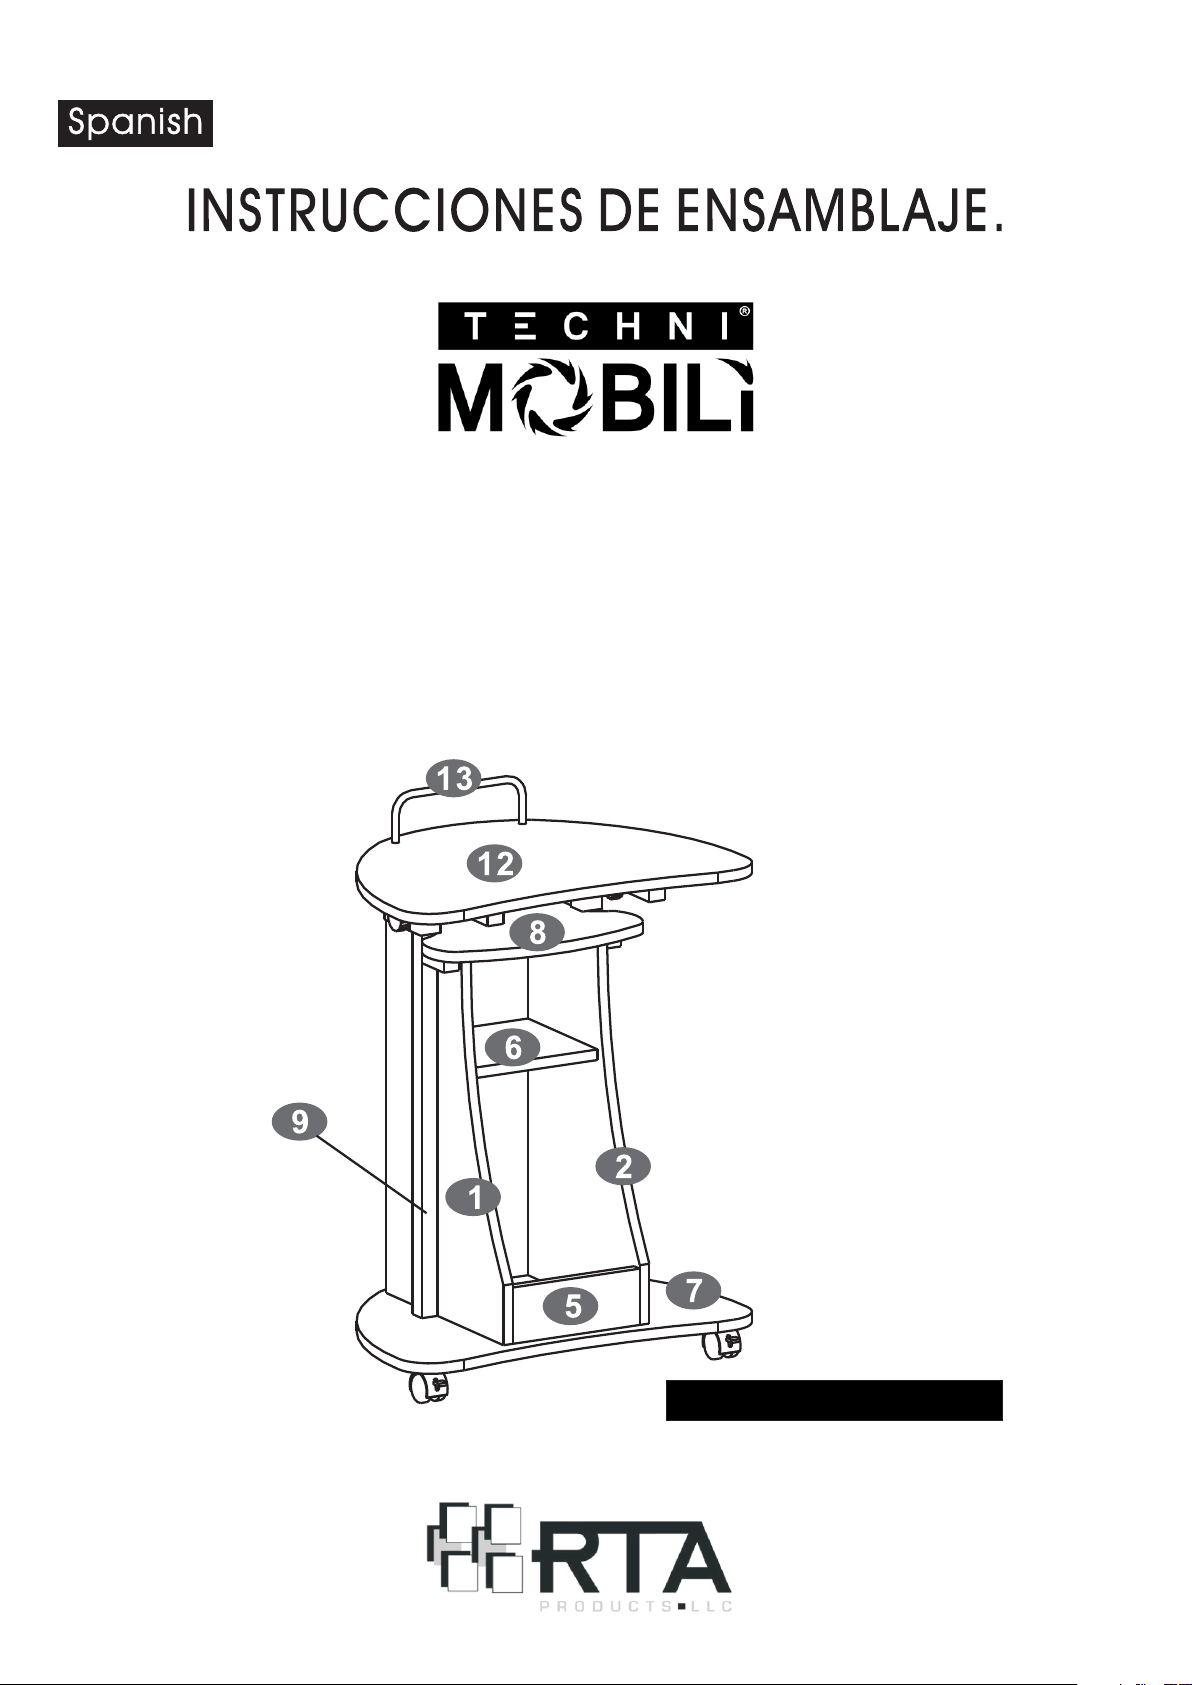
MODELO RTA - B002
Gracias por comprar uno de nuestros productos.
Por favor lea cuidadosamente las instrucciones de ensamblaje antes de
instalar la unidad.
Por favor guarde este manual para referencias futuras.
MODELO RTA-B002
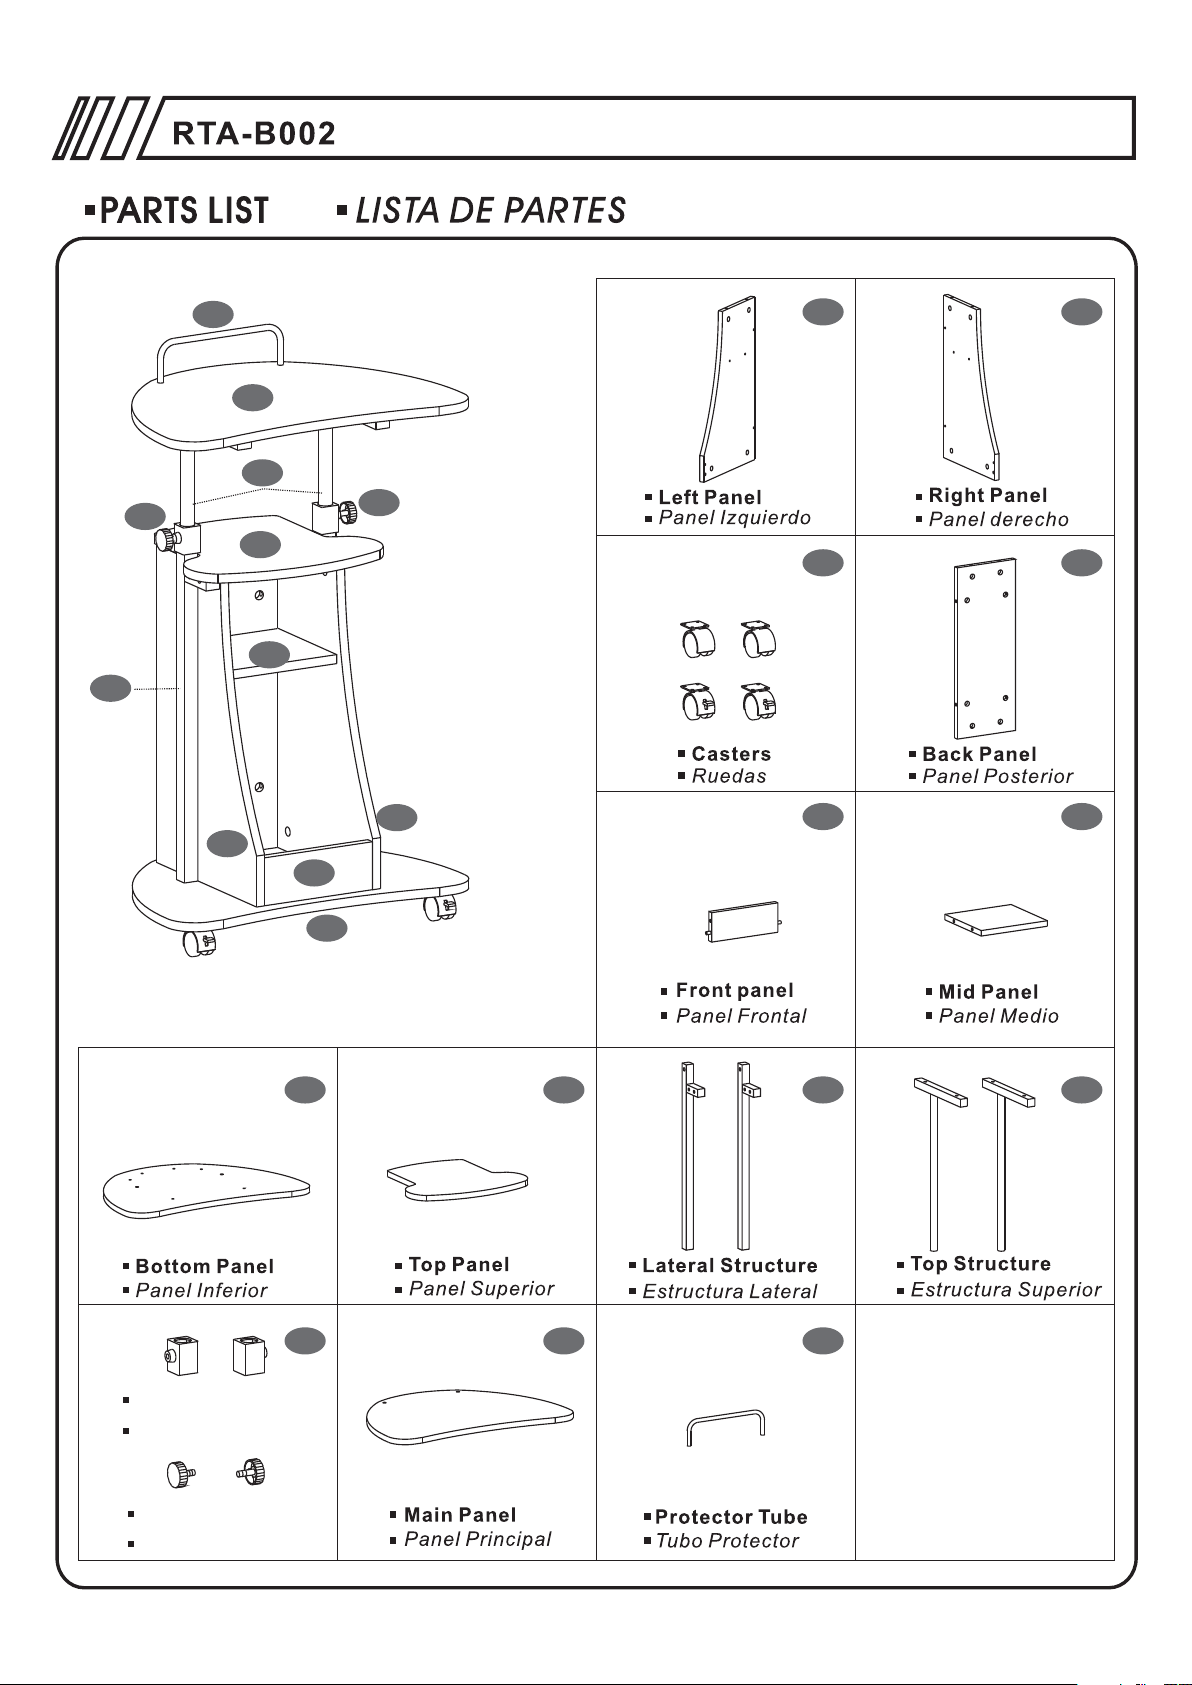
RTA-B002
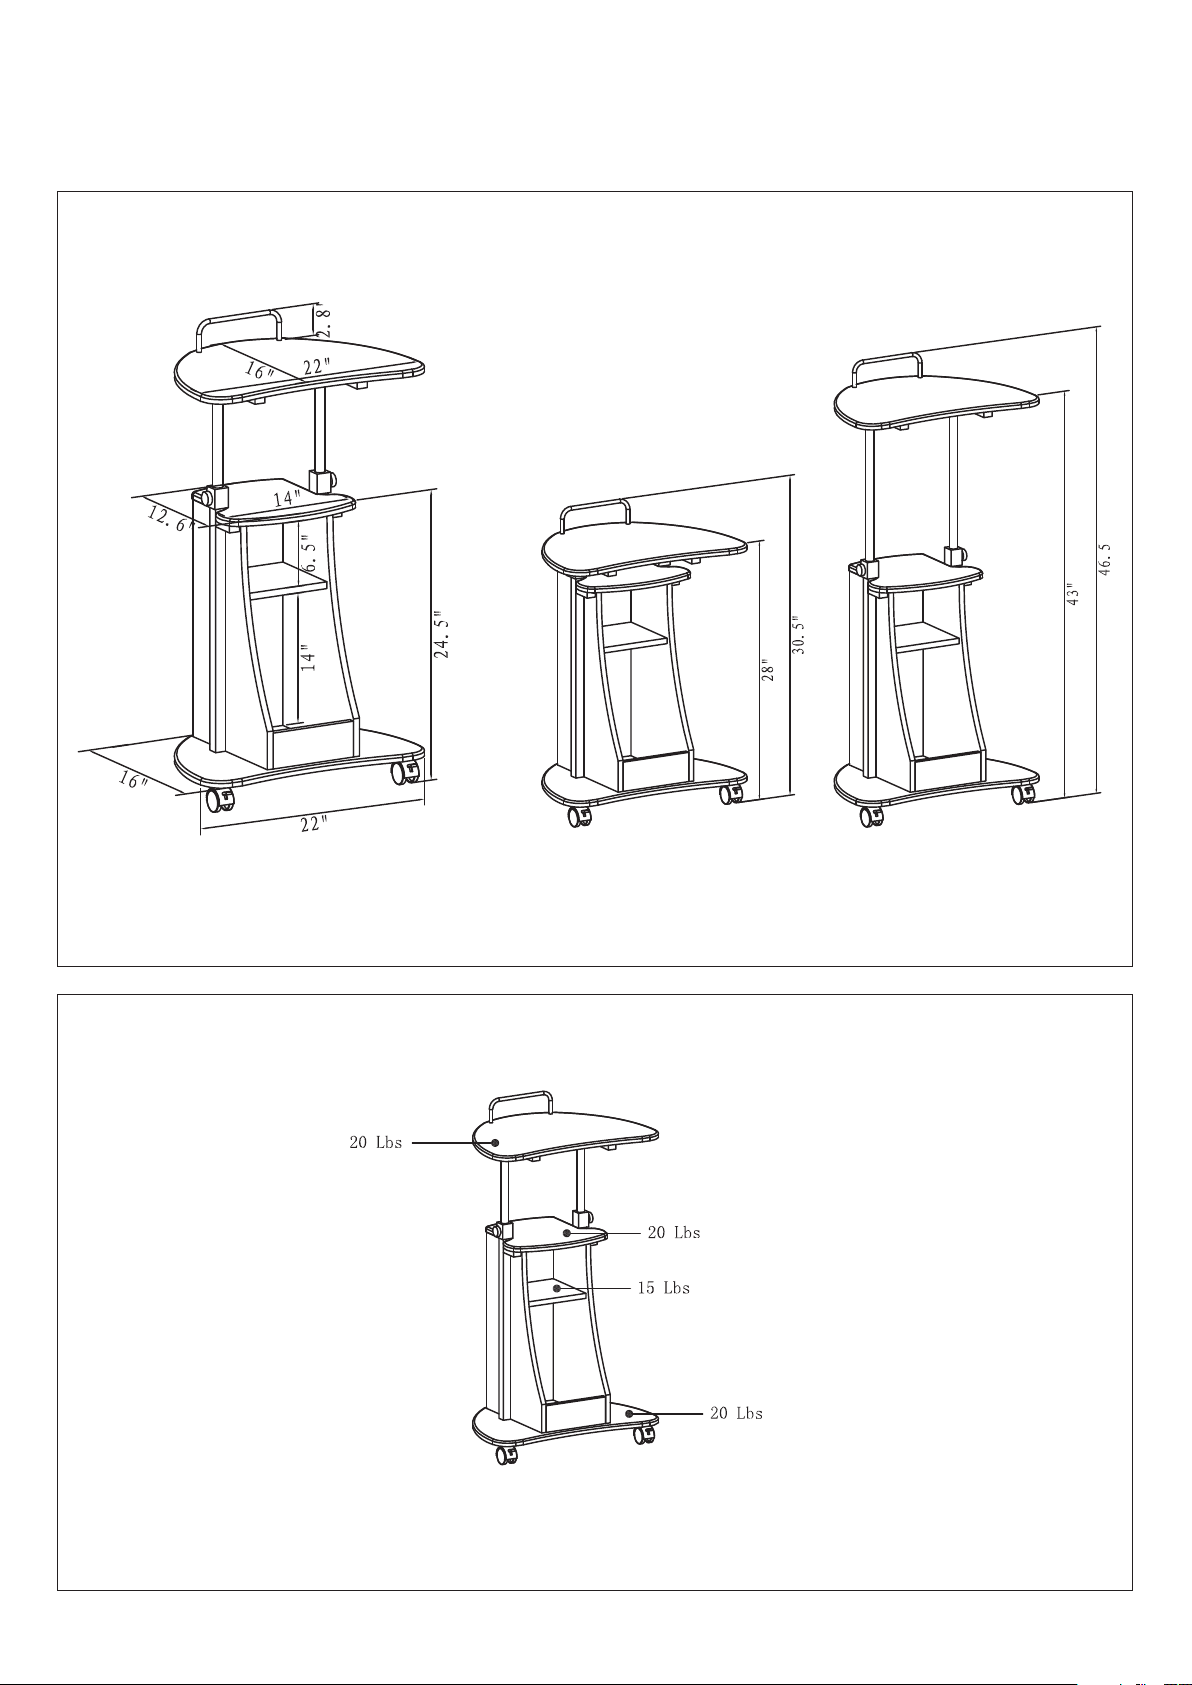
DIMENSIONS
Product Size: 22 "W x 16"D x 30.5~46.5"H
MAXIMUM WEIGHT CAPACITIES
Lowest positio n
Highest positi on
DO NOT ex ceed this limit
Please use care an d good judgement
when placing obj ects on wood surface
P.4
13
12
10
11
8
6
9
11
1
3
2
4
x4
2
1
5
5
6
11A
Plastic Cover
Pieza pl sticaá
11B
7
11
x2
7
8
9
10
x2 x2
12
13
Screw Knob
Tornillo de ajuste
x2

P.5

30mm
P.6

P.7

P.8
4
6
5
1
Use Bolts D to fix the Mid Panel (6), Back Panel (4) & Front Panel (5) to the Left Panel (1).
Make sure to tighten the cam locks on the inside face of the Panels (6,4&5) to secure the bolts.
Use los Pernos de Ajuste D para fijar el Panel Medio (6), Panel Posterior (4) y el Panel Frontal (5)
al Panel Izquierdo. Asegurese de ajustar los cerrajes en la cara posterior de los Paneles
(6, 4 y 5) para asegurar los Pernos.
2
4
Use Bolts D to fix the Right Panel (2) to the semi structure built in Step 1 making sure
to tighten the cam locks on the inside face of the Panels (6,4&5) to secure the bolts.
Use Pernos de Ajuste D para fijar el Panel derecho (2) a la semi estructura que ensablamos
en el paso 1 Asegurese de ajustar los cerrajes en la cara posterior de los Paneles (6. 4 y 5)
para asegurar los Pernos.
6
5

P.9
X2
3
X2
3
7
4
1
2
7
Use Bolts D to fix the Bottom Panel (7) to the semi structure built in Step 2 making
sure to tighten the cam locks on the inside face of the Panels (1,4&2) to secure the bolts.
Use Pernos de Ajuste D para fijar el Panel Inferior (7) a la semi estructura que ensablamos
en el paso 2 Asegurese de ajustar los cerrajes en la cara posterior de los Paneles (1. 4 y 2)
para asegurar los Pernos.

P.10
8
4
1
2
Use Bolts D to assemble the Top Panel (8) over the Back, Left and Right Panels (4,1,2).
Make sure to tighten the cam locks on the inside face of each panel.
Use Pernos de ajuste D para ensamblar al Panel Superior (8) sobre los paneles Derecho,
Izquierdo y Posterior (4,1,2). Asegurese de ajustar los cerrajes en la cara posterior de los
Paneles (1. 4 y 2) para asegurar los Pernos.
9
2
1
7

P.11
11A
9
Place the Plastic Cover (11A) on top of the
Lateral Structure Tubes (9).
Coloque la pieza plastica (11A) sobre los tubos
de la Estructura Lateral (9).
11B
10
11B
Insert the Top Structure Tubes (10) into the
Plastic Cover (11A), then screw in the Knob (11B)
into the Plastic Cover (11A).
Inserte los tubos de la Estructura Superior en la
Pieza Plastica (11A). Luego inserte los Tornillos de
Ajuste (11B).

12
P.12
10
10
13
12
Use Screws B to fix the Protector Tube (13) to the
Main Panel (12).
Use Tornillos B para fijar el Tubo Protector (13) al
Panel Principal (10).
Tighten all screws well and enjoy your
unit. You can adjust the height of the
main panel with the screw knobs.
Apriete bien todos los tornillos y disfrute
su unidad. Note que puede ajustar la
altura del panel principal con el Tornillo
de Ajuste.

CARE AND MAINTENANCE
English
- DO NOT EXPOSE THE SURFACES TO DIRECT SUNLIGHT, OR
EXTREME ENVIRONMENTAL CONDITIONS. EXPOSURE WILL
DAMAGE THE PRODUCT, WHICH IS NOT COVERED BY THE
WARRANTY.
- DO NOT USE SOLVENTS OVER SURFACES OR STRUCTURAL
TUBES. SURFACES MUST BE CLEANED WITH A SOLUTION OF
A SMOOTH SOAP AND WATER, THEN CLEARED WITH A DRY
TOWEL.
- PRODUCTS THAT ARE HEAVY SHOULD BE LIFTED OR MOVED
BY AT LEAST 2 PERSONS, AND ALL OBJECTS SHOULD BE
REMOVED FROM THE PRODUCT.
Spanish
- NO EXPONGA LAS SUPERFICIES A LA LUZ SOLAR DIRECTA,
O A CONDICIONES AMBIENTALES EXTREMAS. ESTE TIPO DE
DAÑOS NO SON CUBIERTOS POR LA GARANTÍA DEL PRODUCTO.
- NO USE SOLVENTES SOBRE LAS SUPERFICIES O TUBOS
ESTRUCTURALES. LAS SUPERFICIES DEBEN SER LIMPIADOS
CON UN JABÓN SUAVE Y AGUA, Y SECADOS IMMEDIATAMENTE
CON UNA TOALLA LIMPIA Y SECA.
- PRODUCTOS QUE SON PESADOS DEBEN LEVANTARSE O
MOVERSE POR AL MENOS 2 PERSONAS, Y TODOS LOS
OBJETOS DEBEN SER REMOVIDOS DEL PRODUCTO.
 Loading...