

Page 1
Introduction and safety informations page 1
Technical features and lamps page 2
Before using page 4
Main supply connection page 5
Lamp's installation, replacement and setting page 6
DMX signal connection page 7
Control panel and configuration (XS1200) page 8
Menu tree options (XS1200) page 10
Menu tree options (XS700/B) page 12
Use in DMX 512, 8 - 16 bit (XS1200) page 13
Use in DMX 512, 8 - 16 bit (XS700/B) page 14
DMX listing details (XS1200) page 15
DMX listing details (XS700/B) page 18
Fixture maintenance and cleaning page 20
ENGLISH INDEX
Rel • 3-10/03
... - ...
Page 2

INTRODUCTION
Thank you for using the XS, our moving head fixture completely manufactured in light alloy and plastic material, with an optic system
of incredible performance and a modern and reliable electronics, can be smartly used anywhere.
To make the most of its possibilites and for a correct functioning of this unit in the years to come, we suggest you to read carefully
this manual before connecting or putting the spot into use. By doing so you will gain experience with its commands and connections
and you will be easily able to use it.
YOUR REFERENCE
Always remember to give the serial number and to specify the model any time you address the seller for information or
assistance.
BASIC KIT (all versions)
•Projector
•Power connector
•User’s manual
•Studio Due warranty
•Metal fixing plate
•Lamp (upon request)
AVAILABLE VERSIONS
art. 03061: XS1200 • art. 0306: XS700/B
SAFETY INFORMATION
READ ALL CAUTIONS AND WARNINGS PRIOR TO OPERATE THIS EQUIPMENT.
INSTRUCTION TO PREVENT INJURY OR DAMAGE DUE TO ELECTRIC SHOCK, FIRE, MECHANICAL HAZARDS AND
UV RADIATION HAZARDS.
•PROTECTION AGAINST FIRE
1) This equipments are designed for use with the following lamps:
HTI 1200 S XS (XS1200)
HTI 700 DE XS (XS1200)
HMP 575 DE XS (XS1200 and XS700/B)
USE COMPLETELY EQUIVALENT LAMPS ONLY!
2) Maintain minimum distance of 0.3 meter from walls or any other type of flammable surfaces.
3) Maintain minimum distance to lighted objects of 1.0 meter.
4) Replace fuses only with the specified type and rating.
5) Do not install the spot close to heat sources. Do not lay the connection cable on the spot when it is warm.
•PROTECTION AGAINST ELECTRIC SHOCK
1) This equipment must be earthed.
2) Class I equipment. The power supply cord includes a protective earthing conductor as part of the cord. See page 5, pict.1.
3) For connection to the mains supply proceed as pict.1 page 5.
4) Disconnect power before lamp's replacement or servicing as page 6 (service personnel).
5) Do not install the spot outdoor, directly exposed to the rain or moisture.
•PROTECTION AGAINST MECHANICAL HAZARDS
1) Use safety chain when fixing this equipment (page 4).
2) Hot lamp explosion hazard. Do not open the equipment for five minutes after switching off.
3) Equipment surface may reach temperature up to 85°C. Allow about five minutes before handling.
4) Replace the lamp if it is damaged or thermally deformed and, in any case, do not exceed the lamp’s life.
•PROTECTION AGAINST UV RADIATION HAZARDS
1) Do not start on this equipment without lamp enclosure or if the protection screens, or ultraviolet screens are damaged.
2) The protection screens, the lenses, or the ultraviolet filters must be replaced if they are visibly damaged and their effectiveness
has been reduced, for example, by cracks or deep scratches.
3) Do not look directly at the lamp while lamp is on.
WARNING
!
... 1 ...
Page 3

XS 1200 TECHNICAL FEATURES
• LAMPS (OSRAM)
Remote lamp ON/OFF by DMX. Reset by DMX and/or panel
Automatic lamp re-strike
• PAN TILT
Movement: stepper motor 16 bit resolution:
460°, 360°, 180° Pan, 270°, 180° Tilt
Pan/Tilt excursion: 3 different by setting menu
Ramp: fast/slow by DMX
Encoder close loop with auto-repositioning
• COLORS
colors wheel A: 5 colors + 6 bicolors continuous position + rainbow
colors wheel B: 3 colors + 3 bicolors
2 conversion filters (similar to CTO and CTB)
• GOBOS
2 rotating indexable gobos wheels: 5 gobos + white (max gobo tickness 4mm)
3 static printed glass gobos
• DIMMER
100-60% electronic dimmer - 60-0% mechanical dimmer
• SHUTTER
Fast shutter with electronic dimmer function (-40% lamp power)
• STROBE
1-15 Flashes/sec.
• MOTORIZED ZOOM
continuous positioning (17°-27°)
• MOTORIZED FOCUS
1m-∞
• ROTATING PRISM
2 rotating prisms
• IRIS
continuous positioning
• FROST
2 frost filters +1 continuous frost
• SETTING
Built-in microprocessor with LED display and graphic LCD
• DISPLAY
graphic LCD with flip function (can be rotate through 180°)
• INPUT SIGNAL
DMX512-RS485 Opto-isolated
• LAMP SUPPLY
electronic ballast in 100Hz square wave with power lamp stabilizer
• POWER SUPPLY
electronic power factor corrector, 95÷260Vac, 47÷63Hz
• DMX CHANNELS (20 channels)
• AVAILABLE MODEL
03061: XS1200 electronic ballast
... 2 ...
ch1 = iris
ch2 = color
ch3 = gobo A
ch4 = strobe/shutter
ch5 = pan coarse
ch6 = pan fine
ch7 = tilt coarse
ch8 = tilt fine
ch9 = dimmer
ch10 = motor speed
ch11 = focus
ch12 = filters
ch13 = gobo B
ch14 = gobo B pos.rot.
ch15 = gobo A pos.rot.
ch16 = zoom
ch17 = glasses
ch18 = frost
ch19 = prisms
ch20 = reset/lamp off/PT ramp
Lamps HMI 1200W/S XS HMI 700W/DE XS HMP 575 DE XS
Colour temperature 6000° K 5.600° K 6.000° K
Lamp life 750 hours 500 hours 500 hours
Working voltage 95V 70V 90V
Working current 12.7A 10A 7.7A
Luminous flux 110.000 lm 56.000 lm 60.000 lm
Colour rendering index (Ra) > 90 (Ra) > 85 (Ra) > 85
Page 4

XS 700/B TECHNICAL FEATURES
• LAMP (OSRAM)
Remote lamp ON/OFF by DMX. Reset by DMX and/or panel
Automatic lamp re-strike
• PAN TILT
Movement: stepper motor 16 bit resolution:
460°, 360°, 180° Pan, 270°, 180° Tilt
Pan/Tilt excursion: 3 different by setting menu
Ramp: fast/slow by DMX
Encoder close loop with auto-repositioning
• COLORS
colors wheel A: 5 colors + 2 bicolors continuous position + rainbow
colors wheel B: 2 colors + 1 bicolor + 2 color filters conversion (similar to CTO / CTB)
• GOBOS
1 rotating indexable gobos wheels: 5 gobos + white + rainbow (max gobo tickness 4mm)
1 static gobos wheels: 5 gobos + white (max gobo tickness 4mm)
3 static printed glass gobo
• DIMMER
0-100% mechanical dimmer - fast shutter
• STROBE
1-15 Flashes/sec.
• MOTORIZED ELECTRONIC ZOOM
continuous positioning (17°-27°)
• MOTORIZED ELECTRONIC FOCUS
1m-∞
• IRIS
continuous positioning
• ROTATING PRISM
• FROST 1 fixed medium frost
• SETTING
Built-in microprocessor with LED display
• DISPLAY
with flip function (can be rotate through 180°)
• INPUT SIGNAL
DMX512-RS485 Opto-isolated
• LAMP SUPPLY
electronic ballast in 100Hz square wave with power lamp stabilizer
• POWER SUPPLY
electronic power factor corrector, 95÷260Vac, 47÷63Hz
• DMX CHANNELS (17 channels)
ch1 = iris
ch2 = color
ch3 = gobo A
ch4 = strobe/shutter
ch5 = pan coarse
ch6 = pan fine
ch7 = tilt coarse
ch8 = tilt fine
ch9 = dimmer
ch10 = motor speed
ch11 = focus
ch12 = filters
ch13 = gobo B
ch14 = gobo B pos.rot.
ch15 = prism/frost + colors
ch16 = zoom
ch17 = reset/lamp off/PT ramp
• AVAILABLE MODELS
0306: XS700/B
... 3 ...
Lamps HMP 575 DE XS
Colour temperature 6.000° K
Lamp life 750 hours
Working voltage 90V
Working current 7.7A
Luminous flux 60.000 lm
Colour rendering index (Ra) > 85
Page 5

BEFORE USING
1) Open the top of the box, take out the foam protection and the sides polystyrene and put it on a flat plane to operate.
Don't handle the fixture by taking it by the bracket or the head, but always by using the special handles on the base.
2) Read all cautions and warnings on the user's manual and particularly page 1 prior to install this equipment.
3) Release the Pan and Tilt lock mechanism. For your following requirement, lock the head in vertical or horizontal position.
4) For spot installation to a truss, check carefully that the security ring is well fixed with a chain to both truss and unit.
5) On the metal fixing plate (with 1/4 turn fasteners) you can rig the fixture with the aluminium clamps (optional).
STEP 1
STEP 2
WARNING
!
Check that the spot has not been damaged during transport.
If it has been damaged or it does not work, address the seller.
Whether the spot has been shipped to you directly, please contact the shipping company.
Only the consignee (person or company) can claim for these damages.
STEP 3
STEP 4
STEP 5
... 4 ...
Page 6
pict. 1
POWER INPUT
L = LIVE (Brown)
N = NEUTRAL (Blue)
= EARTH (Green yellow)
pict. 1/a
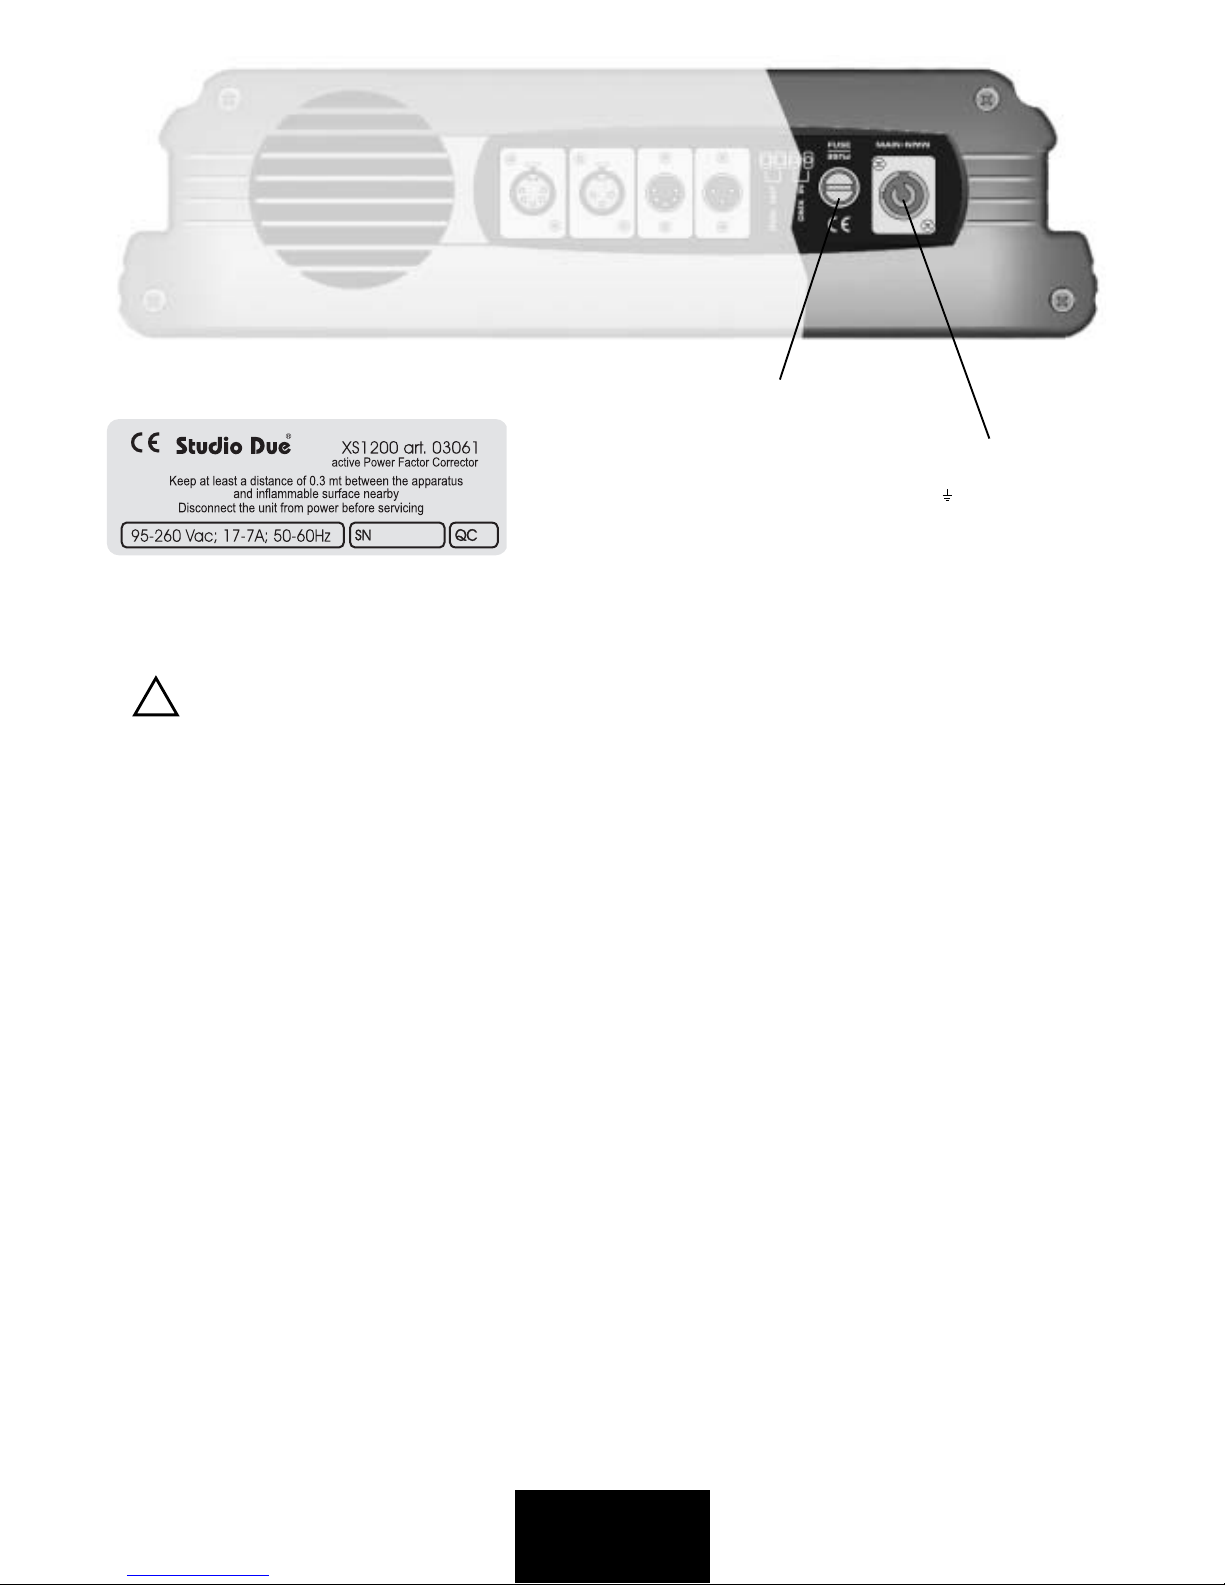
MAIN SUPPLY CONNECTION
Read all cautions and warnings on page 1 prior to install this equipment. Particularly, read the follow:
Before connecting the equipment to the power system:
Make sure that the mains voltage and frequency are in the right range (pict.1/a)
• tension from 95V to 260V
• frequency from 50Hz to 60Hz
The power supply connection is shown in pict.1.
1) Do not install the spot close to heat sources. Do not lay the connection cable on the spot when it is warm.
2) This unit must be positioned as to allow its ventilation. Be careful not to occlude the in-out air grilles.
3) The unit must be positioned at least 30cm. from walls or other flammable surfaces.
4) External surface temperature:
• After 5 minutes work; Tc=65°C.
• Once the thermic balance has been obtained; Tc=85°C.
5) The protection screens, the lenses, or the ultraviolet filters must be replaced if they are visibly damaged and their effectiveness
has been reduced, for example, by cracks or deep scratches.
6) Replace the lamp when the lamp life is exhausted (500....1000 hours) to avoid bad performances of the fixture or that the optic
system is damaged by the lamp explosion (see "LAMP'S INSTALLATION" chapter).
7) Clean regularly the in-out air grilles, the lenses and the gobos (see "MAINTENANCE AND PERIODICAL CLEANING" chapter).
8) In case of installation of the spot to a truss, check carefully that the security ring is well fixed with a chain to both truss and unit.
Do not handle the spot by taking it by the bracket, but always by the base with the special handles.
9) Do not install the spot outdoor, directly exposed to rain or moisture.
The equipment must be earthed. If this rule is not followed, the warranty will be void.
WARNING
!
MAIN FUSE - 6X30 TYPE 12A T (XS700/B)
MAIN FUSE - 2X5X20 TYPE 10A T (XS1200)
... 5 ...
Page 7

LAMP SETTING SCREW
pict.3
PAWL (A) TO OPEN THE LAMP HOLDER
pict. 2
LAMP'S INSTALLATION OR REPLACEMENT
1) Disconnect power before lamp’s installation, replacement or servicing (service personnel). Wear gloves and goggles.
2) Unscrew the pawls (A) on the back of the head fixture. (pict.2)
3) Open the lamp’s holder on the back of head fixture.
4) Insert the lamp into the lamp holder socket (pict.2a). Don't touch the quarz bulb with fingers. If this happens, clean the bulb
before use with cloth and alcohol. Polish with a dry cloth.
5) Taking care that the protuberance of the bulb is not set towars the mirror reflector and the condenser lens.
5) Close the lamp holder; one security switch will prevent the switching on.
In case of replacement of the lamp or maintenance, do not open
the fixture unless 5 minutes have passed from the switching off.
WARNING
!
LAMP ADJUST
Operate on the lamp setting nuts (lamp adjust) on the lamp holder (pict.3). So to have the maximum of the brightness and maximum
uniformity of the glow discharge.
pict. 2a
... 6 ...
Page 8

pict. 4/a
pict. 4
CONNECTION TO THE DMX SIGNAL
The connection of the DMX signal to the XS must be made by using the signal input XLR 5 pin or XLR3 pin connectors which are
located on the rear panel of the XS. (pict.4)
The pin nomenclature of the connectors for the connection to the DMX signal is listed in the table. (pict.4/a)
In order to avoid any problem in the signal transmission, it is warmly suggested to use a cable for high speed data transmission.
The usage of a normal microphonic or audio cable is suggested only for lines max 100 mts long. The best performances are with
microphonic cable of mm2x0.25 + ground or with cable for data transmission. If the lines have a total length over 150-200 mts it is
suggested to use our DMX Repeater Amplifier.
DMX OUT
DMX IN
PIN WIRE SIGNAL
1 SHIELD GROUND/RETURN/OV
2 INNER CONDUCTOR DATA COMPLEMENT (-, INVERTED)
3 INNER CONDUCTOR DATA TRUE (+, NON INVERTED)
4 N.C.
5 N.C.
DMX TERMINAL LINE
The wrong connection of the terminal line or its non-connection are probably the most frequent reasons for the defective functioning
of the DMX line. The terminator is a resistor fitted between the two “data” lines (pins 2 and 3 of an XLR 5 or XLR 3 pin connector)
at the end of the cable furthest from the transmitter. The terminator resistor should have the same value as the impedance of the
connection cable.
We supply a terminal with a 100 Ohm resistor.
It is recommanded that all DMX 512 systems have the termination resistor at the and of the line.
WARNING
!
... 7 ...
Page 9
SUMMARY OF THE PROGRAMMING FUNCTIONS OF THE XS1200
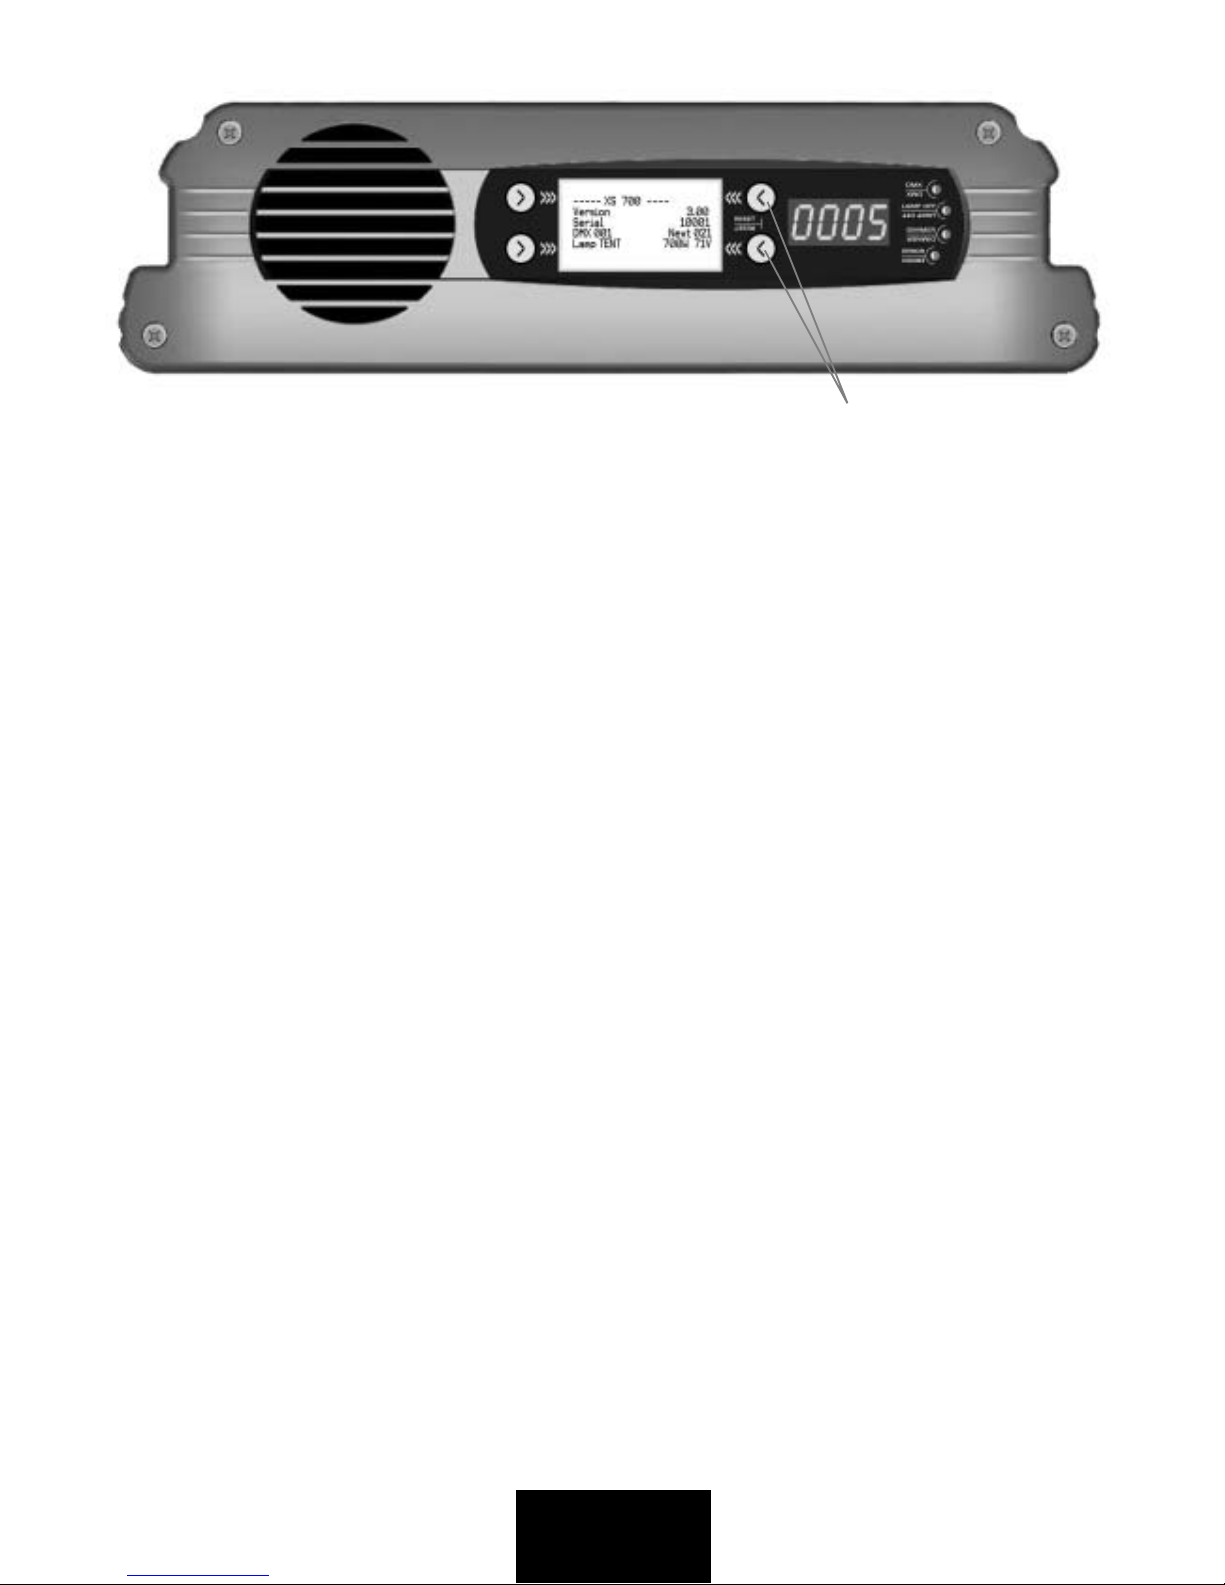
CONTROL PANEL OF THE XS 1200
To control the fixture, to setup it, to check the DMX line and the lamp, on the front panel of the fixture there are a graphic 128x64pixel
lcd display, 3 led BCD display, 4 led and 4 keys.
The keys are used into dynamic menus. Their functions change with the working contest and their options are displayed in the
external rows of the lcd display.
About some seconds after the switching on, the Studio Due’s logo be shown on the display. Afterwards the standard specifications
will appear:
Version 1.00 the release of the firmware
Serial 10001 the serial number of the fixture
DMX 001 Next 021 the start DMX address of the fixture and the next DMX free address
Lamp TENT 0 1200W 92V the tents to strikes the lamp and the working parameter of the lamp
press any key press any key to select one of the available menus
to reset the fixtures press simultaneously the two keys between the LCD display and the led BCD
AVAILABLE MENUS
• ADDRESS to assign the DMX-512 address
• PAN-TILT to control the pan and tilt parametres
• DIMM/SHUTT dimmer/shutter values
• HRS COUNT lamp and fixtures counters
• DISPLAY brightness and flip controls
• UTILITY DMX values controls/language selections/reset
• DMX SPEC remote reset/remote lamp switch off/ramp
• SERVICE initialization of the fixture/calibration of the wheels
• BALLAST parameters of the lamp/strikes control
To select any of the given options, press any key. The dynamic keys have the OK, ESC, Up and Down options.
Press the ESC key to go back to the main options without making any change; press OK to select the showed option, press
Up or
Down keys up to when the required one is shown
ADDRESS (to assign the first channel used by the fixture)
To select the DMX address press OK.
To modify the address press Down and Up buttons and, once the required address has been selected, press and press OK to confirm
the inserted value. To go back to the options without making any change, press the ESC button.
PAN-TILT (to select pan and tilt inversion, resolution 8/16 bit, feedback)
To select the pan and tilt options press OK.
It is possible to select the pan inversion, the tilt inversion, the bit of resolution (8/16 bit), the degrees of the pan revolution (MIN/MED/
MAX) , the degrees of the tilt revolution (MIN/MAX), the ramp (SLOW/FAST) and the swap between pan and tilt.
It is possible to set 20 (16 bit) or 18 channels (8 bit).
It is also possible possible to set the speed of the ramp. You can set SLOW RAMP and FAST RAMP. The slow ramp
is used when you want an extreme uniformity of the movements (live and television use), the fast ramp is used
when the very fast movement is the most important thing (disco use or with a particularly music).To go back to the
options without making any change, press the ESC button.
pict. 5
PRESS SIMULTANEOUSLY TO RESET THE FIXTURES
... 8 ...
Page 10

DIMM/SHUTT (to select dimmer mode, timeout)
To select the dimmer/shutter options press OK.
It is possible to select the dimmer mode (MOD1/MOD2) the shutter mode (MOD1/MOD2), the insertion of the shutter during the
color change and the shutter change, the time-out when the DMX signal it is not present. To go back to the options without making
any change, press the ESC button.
HRS COUNT (To visualize the values of the counters)
To visualise the number of hours of the fixture and of the lamp OK.
It is only possible to show the counters, all the keys is used to go back to the options without making any change.
DISPLAY (to flip the displays, to control the brightness)
To select the options of the display press OK.
It is possible to choice the FLIP option, the auto-shutdown of the display and to control the brightness of the control panel. To go
back to the options without making any change, press the OK button.
UTILITY (to visualize the DMX values, to select the demo mode, to choiche the language)
To visualise the utilities, to choice the language, the demo mode and the test of the fixture press OK.
Use Down and Up buttons to change the mode and, once the required one has been selected, press and keep ENTER pressed up to
when the display stops flashing (it flashes to indicate that the selected option is different from the pre-set one). It is possible to set:
no (normal) normal pan, PI (pan inversion). To go back to the options without making any change, press the MENU button.
DMX SPEC (to activate/deactivate the reset of the fixture, the control of the lamp control and to selct the ramp by the DMX con-
troller)
To choice the DMX options press OK.
It is possible to activate the remote reset of the fixture (Rese), the remote switch-off of the lamp and theremote selection of the ramp.
To go back to the options without making any change, press the OK button.
SERVICE (to calibration of the wheels)
To reset the counter of the lamp and to calibrate the wheels press OK.
The sub-menu will be showed: Format, reset lamps hours and calibration. The calibration has two possible choices: Calibrat 1 and
Calibrat 2. Ref. to page 9 for details. The offset is the value added to the reset position of the wheel so to change the position of the
wheel after the reset procedure. These values will be stored in the flash memory of the fixtures.
To go back to the options without making any change, press the MENU button.
BALLAST (to modify the options of the electronic ballast)
To verify the working parameters of the lamp and to change the type of the lamp press OK.
The showed parameters are: the voltage, the current, the PFC voltage, the effective power of the lamp, the number of the possible
tentative to strike the lamp and the lamp’s type.
In the advanced menu it is possible to modify the number of the strikes and the lamp’s type.
To go back to the options without making any change, press the OK button.
... 9 ...
Page 11

Menu Options of the XS 1200 (LCD graphic display)
———— XS 1200 ————
Version 1.00
Serial 10001
DMX001 Next 021
Lamp TENT 1200W 92V
Press any key
ADDRESS... Chan DMX 01
Next Ch 021
Channels 20
PAN-TILT Pan Inv Y/N
Tilt Inv Y/N
Resolution 8/16b
Advanced -> Range -> PAN MIN/MED/MAX
TILT MIN/MAX
Feedback Y/N
Swap Y/N
Ramp SLOW/FAST
DIMM/SHUTT Dimmer MOD1/MOD2
Shutter MOD1/MOD2
Rotation MOD1/MOD2
Advanced -> Shutter COL Y/N
Shutter GOBO Y/N
Time-Out Y/N
Time.... -> Time DMX
3 Sec
HRS COUNT Hours Counter
Lamp 0
Fixture 0
DISPLAY Flip Y/N
Advanced -> Auto Shut Y/N
Brightness ... Brightness
0 =============== MAX
UTILITY DMX Rd/Wr -> Parameters.... StCode ——-
Channels —— Time —— ms
Read.... 001 : - - - IRIS
002 : - - - COLOR
……
512 : - - -
Write.... IRIS : - - -
COLOR: - - ……
RESET: - - Advanced -> Demo -> Mode DMX/DEMOX
Speed … Demo Speed
01.0 sec
Language ENG/ITA
Test NO/YES
Fixture Reset
DMX SPEC Reset Y/N
Lamp Off Y/N
Ramp Sel Y/N
pict. 6
... 10 ...
Page 12

SERVICE Format
Reset Lamps Hours
Calibration -> Calibrat 1 -> C/E Wheel
Gobo Wheel
Prism Wheel
Calibrat 2 -> Focus
Shutter
Iris
Frost Calib YYYY
Offset +127
BALLAST Parameters … V Lampd V
I Lampd A
V PFC V
Power W
Tent Nr
Lamp xxxx
Advanced -> Strikes … Strikes Count
Strikes —-
Lamp Type ——-
NOTE
All the available lamp are:
• HMI 1200 S DE (Osram)
• HTI 700 DE (Osram)
• MSI 700 DE (Philips)
• HMP 575 DE - boosted to 700W (Osram)
• MSP 575 DE - boosted to 700W (Philips)
If on the ballast the power of 1200W is selected, the available lamp is only the lamp of 1200W:
• HMI 1200 S DE (Osram)
... 11 ...
Page 13

SUMMARY OF THE PROGRAMMING FUNCTIONS OF THE XS 700/B
... 12 ...
Default message ! CXXX (XXX= channel)
Press any key to access to the menu.
To select a menu and to change a numeric value press UP o DOWN.
To select a menu and to confirm the value/option selected press ENTER.
To go back to the options without making any change, press the ESC button.
Addr *** DMX address value ***
Addr ! XXX (Starting DMX address)
PT ! *** Pan/Tilt ***
Ipan ! Off/On (Pan Inversion)
Itilt ! Off/On (Tilt Inversion)
S-PT ! Off/On (Swap Pan – Tilt)
Prng ! High/Low/Mid (Pan – Pan Range Max Excursion)
Trng ! High/Low (Tilt – Tilt Range Max Excursion)
Fdbc ! Off/On (Encoder Selected/Deselected)
Reso ! 16-b/8-b (Pan Tilt Resolution – 8/16 Bit)
Ramp ! Fast/Slow (Ramp select)
Effs ! *** Effects ***
SH-C ! Off/On (Shutter on color change)
SH-G ! Off/On (Shutter on gobo change)
Dmmd ! Mod1/Mod2 (Dimmer 0 …255 Closed …Open / Open… Closed)
Shmd ! Mod1/Mod2 (Ch strobe 255 shutter closed / strobe max.)
Hscn ! *** Counters ***
Lhrs ! YYY (YYY = Lamp’s hours)
Fhrs ! ZZZ (ZZZ = Fixture’s hours) + UP DOWN ! Reset lamp’s hours
Disp ! *** Display ***
Flip ! Off/ON (Flip display)
Brgt ! br H (H = Brightness level)
Lshd ! Off/On (Auto shutdown display and leds after 30sec)
Demo ! *** Demo ***
Mode ! no/dm 1….dm n (n = max number of games in memory)
Spd ! AA”A ( AA”A = seconds delay time between scenes)
Dmsp ! *** DMX Special ***
Rset ! Off/On (reset of the fixture by DMX)
Lamp ! Off/On (shut-off the lamp by DMX)
Ramp ! Off/On (ramp’s PAN/TILT selection by DMX)
Srvc ! *** Service ***
Reset ! Reset of the fixture
Test ! T-on (Test of the fixture)
ColC ! VVV (VVV = Value of the calibration)
…..
Go2C ! VVV
Page 14

XS 1200: USE IN DMX 512
If you want it is possible to choose a reduced resolution (8 bit) for the PAN/TILT motion of the XS 1200 by occupying 18 DMX
chan nels, or a high resolution (16 bit) by occupying 20 channels.
8 or 16 BIT MODE SELECTION
From the main display, press a key, and use the Up and Dn keys up to when the option PAN/TILT is shown on the display, select it
by press ing OK and the sub-menu will appear (Pan Inv, Tilt Inv, Resolution, Adavnced ->). With the Up and Down keys put in evi-
dence the Resolution options, now press the SEL key. Choiche the 8b option and the press the ESC key for 8 bit performance To
exit from the selected option with out making any change press the ESC button.
When set to work at 8 or 16 bit the XS 1200 needs 18 or 20 channels to control the following functions and the cor re spond ence
chan nel/function is listed below. The complete listing of the DMX values is shown on appendix, page 15.
CHANNELS ASSIGNMENT IN DMX 512 (8 BIT)
ADDRESS SELECTION
From the main display, press a key, and use the Up and Dn keys up to when the option ADDRESS is shown on the display, select
it by press ing OK and the sub-menu will appear (Chan DMX, Next Ch, Channels). Use the Up and Down keys up to when the correct Address is shown on the display. Once you have set the required number store it by pressing the OK button. To exit from the
selected option without making any change press the ESC button.
The following picture shows the correct channels to be used to drive 4 XS (8 bit, 18 channels) in DMX 512 (pict. 7).
The following picture shows the correct channels to be used to drive 4 XS (16 bit, 20 channels) in DMX 512 (pict. 8).
Spot n° 1
Spot n° 2
Spot n° 3 Spot n° 4
Channels 1-18 Channels 19-36 Channels 37-54 Channels 55-72
00 1 0 19 037 055
8 BIT / 18 CHANNELS
Channel No. Spot Function
ch1 iris
ch2 color
ch3 gobo A
ch4 strobe/shutter
ch5 pan coarse
ch6 tilt coarse
ch7 dimmer
ch8 motors speed
ch9 focus
ch10 filters
ch11 gobo B
ch12 gobo B post. rot.
ch13 gobo A pos. rot.
ch14 zoom
ch15 glasses
ch16 frost
ch17 prism
ch18 reset/lamp off/PT ramp
16 BIT / 20 CHANNELS
Channel No. Spot Function
ch1 iris
ch2 color
ch3 gobo A
ch4 strobe/shutter
ch5 pan coarse
ch6 pan fine
ch7 tilt coarse
ch8 tilt fine
ch9 dimmer
ch10 motors speed
ch11 focus
ch12 filters
ch13 gobo B
ch14 gobo B post. rot.
ch15 gobo A pos. rot.
ch16 zoom
ch17 glasses
ch18 frost
ch19 prism
ch20 reset/lamp off/PT ramp
Spot n° 1
Spot n° 2
Spot n° 3 Spot n° 4
Channels 1-20 Channels 21-40 Channels 41-60 Channels 61-80
00 1 02 1 04 1 06 1
... 13 ...
Page 15

XS 700/B: USE IN DMX 512
If you want it is possible to choose a reduced resolution (8 bit) for the PAN/TILT motion of the XS 700/B by occupying 15 DMX
chan nels, or a high resolution (16 bit) by occupying 17 channels.
8 or 16 BIT MODE SELECTION
From the main display, press a key, and use the Up and Dn keys up to when the option PAN/TILT is shown on the display, select it
by press ing OK and the sub-menu will appear (Pan Inv, Tilt Inv, Resolution, Adavnced ->). With the Up and Down keys put in evi-
dence the Resolution options, now press the SEL key. Choiche the 8b option and the press the ESC key for 8 bit performance To
exit from the selected option with out making any change press the ESC button.
When set to work at 8 or 16 bit the XS 700/B needs 15 or 17 channels to control the following functions and the cor re spond ence
chan nel/function is listed below. The complete listing of the DMX values is shown on appendix, page 18.
CHANNELS ASSIGNMENT IN DMX 512 (8 BIT)
ADDRESS SELECTION
From the main display, press a key, and use the Up and Dn keys up to when the option ADDRESS is shown on the display, select
it by press ing OK and the sub-menu will appear (Chan DMX, Next Ch, Channels). Use the Up and Down keys up to when the correct Address is shown on the display. Once you have set the required number store it by pressing the OK button. To exit from the
selected option without making any change press the ESC button.
The following picture shows the correct channels to be used to drive 4 XS (8 bit, 15 channels) in DMX 512 (pict. 7).
The following picture shows the correct channels to be used to drive 4 XS (16 bit, 17 channels) in DMX 512 (pict. 8).
00 1 0 16 03 1 046
00 1 0 18 035 052
Spot n° 1
Spot n° 2
Spot n° 3 Spot n° 4
Channels 1-15 Channels 16-30 Channels 31-45 Channels 46-60
8 BIT / 15 CHANNELS
Channel No. Spot Function
ch1 iris
ch2 color
ch3 gobo A
ch4 strobe/shutter
ch5 pan coarse
ch6 tilt coarse
ch7 dimmer
ch8 motors speed
ch9 focus
ch10 filters
ch11 gobo B
ch12 gobo B post. rot.
ch13 prism/frost/colors
ch14 zoom
ch15 reset/lamp off/PT ramp
16 BIT / 17 CHANNELS
Channel No. Spot Function
ch1 iris
ch2 color
ch3 gobo A
ch4 strobe/shutter
ch5 pan coarse
ch6 pan fine
ch7 tilt coarse
ch8 tilt fine
ch9 dimmer
ch10 motors speed
ch11 focus
ch12 filters
ch13 gobo B
ch14 gobo B post. rot.
ch15 prism/frost/colors
ch16 zoom
ch17 reset/lamp off/PT ramp
Spot n° 1
Spot n° 2
Spot n° 3 Spot n° 4
Channels 1-17 Channels18-34 Channels 35-51 Channels 52-68
... 14 ...
Page 16

THE COMPLETE DMX VALUES LIST OF THE XS 1200 (art. 03061)
20 Channels - 16 bit
CHANNEL FUNCTION DESCRIPTION DECIMAL PERCENT
1 IRIS BEAM SIZE
Min beam size
Max beam size
0
255
0%
100%
2 COLOR COLOR WHEEL
Full beam
White/Green
Green
Green/Magenta
Magenta
Magenta/Yellow
Yellow
Yellow/Red
Red
Red/Cyan
Cyan
Cyan/White
Rainbow Slow
Rainbow Mid1
Rainbow Mid2
Rainbow Mid3
Rainbow Fast
0..8
12
29..35
46
61..70
81
95..104
116
130..136
149
164..172
179
180
196
212
228
244
0%..3%
4%
11%..13%
18%
23%..27%
31%
37%..40%
45%
51%..53%
58%
64%..67%
70%
71%
76%
83%
89%
95%
3 GOBO A GOBO WHEEL
Full Beam
Gobo 1
Gobo 2
Gobo 3
Gobo 4
Gobo 5
0..44
45..89
90..134
135..179
180..224
225..255
0%..17%
18%..34%
35%..52%
53%..70%
71%..87%
88%..100%
4 STROBE/SHUTTER STROBE
Full beam
Continuos strobe
Close
0..9
10..239
240..253
0%..3%
4%..93%
94%..100%
5 PAN COARSE
COARSE POSITIONING
450°/360°/180° 0..255 0%..100%
6 PAN FINE FINE POSITIONING 0..255 0%..100%
7 TILT COARSE CORSE POSITIONING
270°/180°
0..255
0%..100%
8 TILT FINE FINE POSITIONING 0..255 0%..100%
9 DIMMER DIMMER 256 STEPS
Close
Full beam
0
255
0%
100%
10 MOTOR SPEED SPEED MOVEMENT
Speed 1 (slow)
Speed 2 (mid1)
Speed 3 (mid2)
Speed 4 (fast)
0..63
64..127
128..191
192..255
0%..24%
25%..50%
51%..74%
75%..100%
11 FOCUS 256 STEPS
(proportional)
Min distance
Max distance
0
255
0%
100%
... 15 ...
Page 17

CHANNEL FUNCTION DESCRIPTION DECIMAL PERCENT
12 FILTERS White
Red
Light Blue
Dark Blue
Bicolor 1
Bicolor 2
Bicolor 3
0..41
42..83
84..125
126..167
168..209
210..251
252..255
0%..16%
17%..32%
33%..49%
50%..65%
66%..81%
82%..98%
99%..100%
13 GOBO B GOBO WHEEL
Full Beam
Gobo 1
Gobo 2
Gobo 3
Gobo 4
Gobo 5
0..44
45..89
90..134
135..179
180..224
225..255
0%..17%
18%..34%
35%..52%
53%..70%
71%..87%
88%..100%
14 GOBO B POS. ROT. POSITION-ROTATING
Position (indexed)
Rainbow slow (clockvise)
Rainbow mid1
Rainbow mid2
Rainbow mid3
Rainbow fast
Rainbow slow (anti-clockvise)
Rainbow mid1
Rainbow mid2
Rainbow mid3
Rainbow fast
0..149
150..160
161..171
172..182
183..193
194..204
205..216
216..226
227..237
238..248
249..255
0%..58%
59%..62
63%..67%
68%..71%
72%..75%
76%..80%
81%..84%
85%..88%
89%..92%
94%..97%
98%..100%
15 GOBO A POS. ROT. POSITION-ROTATING
Position (indexed)
Rainbow slow (clockwise)
Rainbow mid1
Rainbow mid2
Rainbow mid3
Rainbow fast
Rainbow slow (anti-clockwise)
Rainbow mid1
Rainbow mid2
Rainbow mid3
Rainbow fast
0..149
150..160
161..171
172..182
183..193
194..204
205..216
216..226
227..237
238..248
249..255
0%..58%
59%..62
63%..67%
68%..71%
72%..75%
76%..80%
81%..84%
85%..88%
89%..92%
94%..97%
98%..100%
16 ZOOM CONTINUOS POSITIONING
17°
27°
0
255
0%
100%
17 GLASSES FILTERS/GLASSES
Normal
Filter 1
Filter 2
Glass 1
Glass 2
Glass 3
0..42
43..85
86..128
129..171
172..214
215..255
0%..16%
17%..33%
34%..50%
51%..67%
68%..83%
84%..100%
18 FROST Normal
Full frost
Frost
Fixed frost 1
Fixed frost 2
0
200
201..224
225..249
250..255
0
78%
79%..87%
88%..97%
98%..100%
Continue XS 1200 DMX listing: 20 Channels - 16 bit
... 16 ...
Page 18

CHANNEL FUNCTION DESCRIPTION DECIMAL PERCENT
19 PRISM White
Prism 1 on
Rot. prism 1 slow (clockwise)
Rot. prism 1 (mid 1)
Rot. prism 1 (mid 2)
Rot. prism 1 (fast)
Prism 1 on
Rot. prism 1 slow (anti-clockwise)
Rot. prism 1 (mid 1)
Rot. prism 1 (mid 2)
Rot. prism 1 (fast)
Prism 2 on
Rot. prism 2 slow (clockwise)
Rot. prism 2 (mid 1)
Rot. prism 2 (mid 2)
Rot. prism 2 (fast)
Prism 2 on
Rot. prism 2 slow (anti-clockwise)
Rot. prism 2 (mid 1)
Rot. prism 2 (mid 2)
Rot. prism 2 (fast)
0..7
8..12
13..25
26..38
39..51
52..64
65..77
78..90
91..103
104..116
117..127
128..140
141..153
154..166
167..179
180..192
193..205
206..218
219..231
232..244
245..255
0%..2%
3%..4%
5%..9%
10%..14%
15%..20%
21%..25%
26%..30%
31%..35%
36%..40%
41%..45%
46%..50%
51%..55%
56%..60%
61%..65%
66%..70%
71%..75%
76%..80%
81%..85%
86%..90%
91%..95%
96%..100%
20 RESET/LAMP/RAMP DEFAULT VALUE
Force ramp slow
Force ramp fast
Default value
Reset
Normal
Lamp OFF
Normal
00.16
17..31
32..63
64..127
128..191
192..240
241..250
251..255
0%..6%
7%..12%
13%..24%
25%..49%
50%..74%
75%..94%
95%..98%
99%..100%
Continue XS 1200 DMX listing: 20 Channels - 16 bit
... 17 ...
Page 19

THE COMPLETE DMX VALUES LIST OF THE XS 700/B (art. 0306)
17 Channels - 16 bit
CHANNEL FUNCTION DESCRIPTION DECIMAL PERCENT
1 IRIS BEAM SIZE
Min beam size
Max beam size
0
255
0%
100%
2 COLOR COLOR WHEEL
Full beam
White/Green
Green
Green/Magenta
Magenta
Magenta/Yellow
Yellow
Yellow/Red
Red
Red/Cyan
Cyan
Cyan/White
Rainbow Slow
Rainbow Mid1
Rainbow Mid2
Rainbow Mid3
Rainbow Fast
0..8
12
29..35
46
61..70
81
95..104
116
130..136
149
164..172
179
180
196
212
228
244
0%..3%
4%
11%..13%
18%
23%..27%
31%
37%..40%
45%
51%..53%
58%
64%..67%
70%
71%
76%
83%
89%
95%
3 GOBO A GOBO WHEEL
Full Beam
Gobo 1
Gobo 2
Gobo 3
Gobo 4
Gobo 5
0..44
45..89
90..134
135..179
180..224
225..255
0%..17%
18%..34%
35%..52%
53%..70%
71%..87%
88%..100%
4 STROBE/SHUTTER STROBE
Full beam
Continuos strobe
Close
0..9
10..239
240..253
0%..3%
4%..93%
94%..100%
5 PAN COARSE COARSE POSITIONING
450°/360°/180° 0..255 0%..100%
6 PAN FINE FINE POSITIONING 0..255 0%..100%
7 TILT COARSE CORSE POSITIONING
270°/180°
0..255
0%..100%
8 TILT FINE FINE POSITIONING 0..255 0%..100%
9 DIMMER DIMMER 256 STEPS
Close
Full beam
0
255
0%
100%
10 MOTOR SPEED SPEED MOVEMENT
Speed 1 (slow)
Speed 2 (mid1)
Speed 3 (mid2)
Speed 4 (fast)
0..63
64..127
128..191
192..255
0%..24%
25%..50%
51%..74%
75%..100%
11 FOCUS 256 STEPS
(proportional)
Min distance
Max distance
0
255
0%
100%
... 18 ...
Page 20

Continue XS 700/B DMX listing: 17 Channels - 16 bit
CHANNEL FUNCTION DESCRIPTION DECIMAL PERCENT
12 FILTERS White
Red
Light Blue
Dark Blue
Bicolor 1
Bicolor 2
Bicolor 3
0..41
42..83
84..125
126..167
168..209
210..251
252..255
0%..16%
17%..32%
33%..49%
50%..65%
66%..81%
82%..98%
99%..100%
13 GOBO B GOBO WHEEL
Full Beam
Gobo 1
Gobo 2
Gobo 3
Gobo 4
Gobo 5
0..44
45..89
90..134
135..179
180..224
225..255
0%..17%
18%..34%
35%..52%
53%..70%
71%..87%
88%..100%
14 GOBO B POS. ROT. POSITION-ROTATING
Position (indexed)
Rainbow slow (clockvise)
Rainbow mid1
Rainbow mid2
Rainbow mid3
Rainbow fast
Rainbow slow (anti-clockvise)
Rainbow mid1
Rainbow mid2
Rainbow mid3
Rainbow fast
0..149
150..160
161..171
172..182
183..193
194..204
205..216
216..226
227..237
238..248
249..255
0%..58%
59%..62
63%..67%
68%..71%
72%..75%
76%..80%
81%..84%
85%..88%
89%..92%
94%..97%
98%..100%
15 PRISM/FROST/COLORS Full Beam
Color 1
Color 2
Color 3
Frost
Prism on
Rot. Prism speed (clockwise)
Prism on
Rot. Prism speed (anti-clockwise)
0..15
16..31
32..47
48..63
64..79
80..127
138..191
192..201
202..255
0%..5%
6%..12%
13%..18%
19%..24%
25%..30%
31%..49%
50%..74%
75%..78%
79%..100%\
16 ZOOM CONTINUOS POSITIONING
17°
27°
0
255
0%
100%
17 RESET/LAMP/RAMP
Default value
Force ramp slow
Force ramp fast
Default value
Reset
Normal
Lamp OFF
Normal
00.16
17..31
32..63
64..127
128..191
192..240
241..250
251..255
0%..6%
7%..12%
13%..24%
25%..49%
50%..74%
75%..94%
95%..98%
99%..100%
... 19 ...
Page 21

... 20 ...
MAINTENANCE AND CLEANING
It is recommended, to ensure the best performances of your fixture for a long time, to periodically clean the parts shown as follow. Excessive dust, smoke and moisture are cause of bad performances. Alwais take care that the air grid (on the back of the
cover) are clean.
Prior to operate inside the fixture:
a) Disconnect power before head cover opening or servicing.
b) Don't open the head cover before five minutes after the switching off.
c) The parts shown in picts. 3 and 4 requiring monthly cleaning.
d) Follow the steps here below to operate the lenses cleaning.
e) For gobos substitution remove the spring clip (S) and remove the gobo.
STEP 1
STEP 2
STEP 3
STEP 5
SPRING (S)
FOCUS
GOBOS
GOBOS
ZOOM
STEP 4
Page 22

... 21 ...
SPARE PARTS, TECHNICAL DRAWINGS and SCHEMATIC DIAGRAMS
PARTI DI RICAMBIO, DISEGNI TECNICI e SCHEMI ELETTRICI
XS 1200 SPARE PARTS
SP1 BASE BOX
SP2 LATERAL COVER
SP3 HANDLES
SP5 SAFETY HOOK
SP7 UNSHAPED BASE COVER
SP8 SHAPED BASE COVER
SP9 THERMAL SWITCH
SP11 BALLAST COOLING PLATE
SP12 EB 700 BOARD
SP13 BRIDGE 700
SP14 PFC BOARD
SP15 MICROSWITCH
SP16 POWER BOARD 700
SP17 BUSH
SP18 PAN PIN
SP19 ROLLER BEARING
SP20 HUB
SP21 BELT 160XL
SP22 ROLLER BEARING
SP23 PAN LOCK
SP24 PAN STOP SPACER
SP25 PAN STOP
SP26 SPACER
SP27 SCREW
SP28 BEARING
SP30 PACKING RING
SP31 BASE FAN P.C.
SP32 FAN
SP33 PACKING RING
SP34 SPIRAL SPRING
SP35 PAN IDLERS
SP36 CIRCUIT PLATE
SP37 PT 700 BOARD
SP38 PAN CABLE SUPPORT
SP39 PROTECTION WIRE PLATE
SP40 PAN PLATE
SP41 NUT
SP42 LOWER PAN BUSH
SP43 SPACER
SP44 PULLEY
SP45 MOTOR
SP46 ENCODER SUPPORT
SP47 ENCODER 250 P.C.
SP48 ENCODER 50/1
SP49 PAN FLYWHEEL
SP60 BRACKET
SP61A LATERAL BRACKET
SP61 LATERAL BRACKET
SP62 ADHESIVE
SP63 TILT CROWN
SP64 CROWN SUPPORT
SP65 GEAR
SP66 FIXING FLANGE
SP67 BEARING
SP68 TILT HUB
SP69 WIRE PROTECTION
SP70 PULLEY
SP71 TILT FLYWHEEL
SP72 SPRING
SP73 TILT IDLERS
SP74 BEARING
SP75 MICROSWITCH
SP76 BELT 250XL037
SP77 SPACER
SP78 WIRE CLIP
SP80 PACKING RING
SP81 MOTOR
SP83 HUB
SP84 ENCODER 50/1
SP85 HUB
SP86 BEARING
SP87 FIXING FLANGE
SP88 TILT GEAR
SP89 ENCODER 250 BOARD
SP90 CROWN SUPPORT
SP93 TILT STOP
SP94 PACKING RING
SP95 BAKELITE PLATE
SP96 IG7 EB BOARD
SP97 ENCODER SUPPORT PLATE
SP105 LOWER COVER PLATE
SP106 BASE LATERAL COVER
SP107 LATERAL BASE
SP108 LATERAL BASE
SP109 PANEL ADHESIVE
SP110 DISPLAY ADHESIVE
SP111 FIXING PLATE
SP112 PIN
SP112/a RETAINER
SP113 PIN LOCK
SP114 FAN
Page 23

... 22 ...
SP115 DMX BOARD
SP116 MAIN FILTER BOARD
SP117 FUSEHOLDER
SP118 POWER INPUT CONNECTOR
SP119 3 PIN MALE CONNECTOR
SP120 3 PIN FEMALE CONNECTOR
SP121 5 PIN MALE CONNECTOR
SP122 5 PIN FEMALE CONNECTOR
SP141 FRONTAL PANEL
SP142 SPACER
SP144 SCREW
SP146 ZOOM SLIDE
SP147 ZOOM GUIDE BUSHING
SP148 BLOCK
SP148A SPACER
SP149 ZOOM 700
SP150 LENS PLATE SUPPORT
SP151 LENS
SP152 GASKET
SP154 LENSHOLDER
SP155 HUB
SP157 SPRING
SP158 PIN
SP159 MOTOR
SP160 FLYWHEEL
SP161 MOTOR
SP162 P.C. ZOOM CONNECTER
SP163 MOTORHOLDER PANEL
SP164 SPACER
SP165 LOWER FROST BLADE
SP166 UPPER FROST BLADE
SP167 HUB
SP168 BUSH
SP169 BEARING
SP170 GEAR
SP171 PULLEY
SP172 BELT MXL
SP173 GEAR
SP174 HUB
SP175 FROST GLASS
SP176 PRISM
SP177 PRISM
SP178 LENS
SP179 PRISM WHEEL
S181 GLASS WHEEL
SP189 SHUTTER BLADE
SP190 HUB
SP191 MOTOR PLATE
SP193 SUPPORT PLATE
SP194 P.C. BOARD 700 HMB1
SP195 MOTOR
SP196 SHUTTER-ZOOM PANEL
SP197 TILT PLATE
SP198 BLOCK
SP199 GEAR
SP200 BRIDGE SUPPORT
SP201 PULLEY
SP202 BELT MXL
SP204 MOTOR
SP205 MOTOR
SP206 MOTOR
SP208 ZOOM FLYWHEEL
SP209 PACKING RING
SP210 ELEC. BOARD SUPPORT PLATE
SP212 BRIDGE SUPPORT
SP213 GOBO HOLDER
SP214 SPIRAL SPRING
SP215 ELECTRONIC BOARD
SP225 BEARING
SP226 BEARING HOLDER
SP227 BLOCK PLATE
SP228 BLOCK
SP230 FLANGE
SP231 LENS
SP232 GASKET
SP233 LENS HOLDER
SP234 SCREW
SP235 SCREW
SP236 SPACER
SP237 MOTOR
SP238 P.C. SENSOR
SP239 SPIRAL SPRING
SP240 FLYWHEEL
SP241 SPACER
SP242 MOTOR
SP244 MOTOR
SP245 GOBO PANEL
SP246 HUB
SP247 SHAPED RESET GOBO
SP249 MOTOR
SP251 P.C. SENSOR (DOWN)
SP253 P.C. SENSOR (UP)
SP254 MOTOR
SP255 IRIS HUB
SP256 BACK GEAR
SP258 PULLEY SUPPORT
SP259 UNSHAPED RESET GOBO
SP260 STOP IRIS HUB
SP261 BEARING HOLDER
SP262 BEARING HOLDER
SP263 BEARING
SP264 PULLEY
SP265 PULLEY
SP266 BELT MXL
SP267 IRIS
SP268 PULLEY
SP269 BELT MXL
SP270 BEARING
SP271 GEAR
SP272 SPIRAL SPRING
SP273 GOBO WHEEL
SP274 GEAR
SP276 BEARING
SP277 BEARING SUPPORT
SP278 BELT MXL
SP279 PULLEY
SP280 GOBO WHEEL
SP281 GLASS WHEEL
SP282 GEAR
SP284 WHEEL
SP285 HUB
SP287 COLOUR WHEEL
SP295 PACKING RING
SP296 SENSOR (DOWN)
SP297 PULLEY
SP298 BELT MXL
SP299 GEAR
SP300 BEARING
SP301 GEAR
SP302 BELT MXL
SP303 PULLEY
SP304 BEARING
SP305 HUB
SP306 MOTOR PANLE
SP307 SPACER
SP308 SPACER
SP309 MOTOR
SP310 MOTOR
SP312 PACKING RING
SP313 FAN PANEL
SP314 FAN
SP315 FAN DIAPHRAGM
SP316 PACKING RING
SP317 SPACER
SP318 LENS
SP319 SUPPORT FLANGE
SP320 ALUMINIUM SUPPORT LENS
SP321 LENS
SP322 LENSHOLDER PLATE
SP330 BARN DOOR
SP332 SUPPORT PLATE
SP333 REAR GROUP ASSEMBLE
SP334 SUPPORT PLATE****
SP335 FIXING BRACKET
SP337 BARN DOOR
SP338 P.C FAN CONNECTER
SP339 THERMAL SWITCH
SP340 MICROSWITCH
SP341 PACKING RING
Sè342 LAMP HOLDER
SP343 LAMP HOLDER
SP344 BARN DOOR
SP346 MORROR REFLECTOR
SP347 MIRROR SUPPORT PLATE
SP348 MIRROR
SP349 SPIRAL SPRING
SP350 INSULATOR
SP351 LAMP HOLDER
SP352 LAMP CABLES
SP353 BACK LAMP PANEL
SP355 POMMEL
SP356 HUB
SP357 PLASTIC HEAD COVER
SP358 SCREW
SP358A SPIRAL SPRING
SP359 ADHESIVE
Page 24

... 23 ...
94
34
95
86
80
71
62
60
73
72
70
94
107
106
114
83
97
81
84
89
67
77
78
66
63
64
76
75
75
74
65
61/a
7
68
69
8
85
1
37
2
3
36
110
105
115
111
114
116
113
96
87
90
88
93
119
117
109
61
112
112/a
108
106
121
122
118
120
9
49
48
44
45
46
47
43
35
38
32
42
39
13
31
40
41
24
27
33
28
30
23
18
17
19
20
21
25
22
15
14
26
12
5
3
11
2
98
TD • XS1200 Electr. (base)
Page 25

... 24 ...
358
358/a
359
357
358
359
357
358/a
157
148
146
142
144
155
147
147
146
149
151
161/b
161/b
158
152
151
154
161
161/a
164
162
163
155
148/a
148/a
175
159
159
164
165
166
168
170
169
167
174
176
171
172
173
159
179
178
190
177
196
194
191
195
193
194/a
197
206/a
195
199
202
198
169
197
200
201
204
237/b
205
210
208
206
209
213
214
gobo
271
308x6
264
240
238
225
226
227
228
230
141
150
237
246
238
231
232
232
231
240
233
232
235
234
236
237/a
237/b
249
245
241x4
239
275
253
242
244
237
254
251
247
259
262
261
263
260
270
255
256
265
266
269
258
160
268
272
181
189
274
310
330
333
332
328
329
334
334/a
278
282
267
276
277
279
280
284
281
299
339
304
295
337/a
338
307x6
305
312
301
302
303
306
337
335
343
347
347/a
340
342
344
346
313
314
352
341
348
349
349
351
353
356
350
355
355
317
300
298
285
273
295
287
297
296
316
305
309
315
314
318
319
321
320
322
215
212
TD • XS1200 Electr. (head)
Page 26

... 25 ...
TD • XS700/B (base)
PROVISIONAL
Page 27

... 26 ...
TD • XS700/B (head)
PROVISIONAL
Page 28

 Loading...