

Page 1
SH-1060
Digital Camera
User Guide
A/V OU
T
DC IN 5V
Page 2

Now you can organise and present your photos the professional way with
our photo books.
You can also create your own artwork with our gallery canvases and quality
frames, or just produce beautiful, personalised gifts from our wide selection
of items all available from www.tesco.com/photo
Page 3

3
Read First
Warning & Cautions
Before using the camera, please make sure that you read and understand
all the following safety precautions. Always ensure that the camera is
operated correctly. The safety precautions will instruct you in the safe and
correct operation of the camera and its accessories, preventing injury or
damage to yourself, other persons and equipment.
In the following pages, the term “equipment” refers mainly to the camera
and its power supply accessories.
* Microsoft, Windows and Windows logo are registered trademarks of
Microsoft Corporation incorporated in the United States and/or other
countries.
* All brand and product names appearing in this manual are registered
trademarks of their respective companies.
To prevent possible injury, please observe the following warnings when
using this product.
• Do not use the fl ash too close to eyes
Using the fl ash too close to your subject’s eyes can damage the
eyesight. Especially, remain at least one meter (39 inches) away from
infants when you use the fl ash.
• Do not place camera strap around neck
The strap could cause suffocation when accidentally wound around
neck.
• Do not open or disassemble
Disassembling the equipment may cause high-voltage electric shock.
Interior inspections, modifi cations and repairs should be conducted by
qualifi ed service staff. Please take the product to an authorized service
center for inspection.
WARNING
Page 4

4
Read First
• Turn off immediately when malfunction occurs
If you notice unusual smell or smoke coming from the equipment,
please unplug the AC adapter and remove the battery immediately.
Proceed swiftly but with caution to avoid being burnt. Take the
equipment to an authorized service center for inspection.
• Unplug the adapter when the camera is not in use
If you use the adapter as the power source, unplug the adapter when
the camera is not in use to prevent fi re and other dangers. Continuous
use over a period of time may lead to overheating, deformation and fi re.
Battery
Observe the following instructions when handling the battery used in this
product. Improper use of battery may lead to leakage or explosion.
• Recharge only Li-ion rechargeable batteries. Recharging batteries that
are not rechargeable may lead to leakage or explosion.
• Check battery polarity before inserting. Do not attempt to insert the
battery upside down or backward.
• Do not disassemble or short circuit the battery.
• Do not expose battery to fi re or excessive heat.
• Do not immerse or contact with water or other liquids.
• Stop using the battery immediately if you notice any deformation or
changes in color.
• Do not put the batteries together with metal objects such as coins, keys
or hairpins in your pocket.
• Keep battery out of the reach of children. Seek medical attention right
away if a child swallows a battery.
Page 5

5
CAUTIONS
Observe and exercise the following cautions to avoid damage and keep
your camera in an optimum working status.
• Keep Dry
This camera is not waterproof, and may malfunction if immersed in
water, or any liquids enter the interior of the camera.
• Keep away from Moisture, Salt or Dust
Wipe off salt or dust with a slightly dampened soft cloth after using
your camera at the beach or seaside, then, dry your camera thoroughly.
• Keep away from Strong Magnetic Fields
Never put the camera too close to any equipment producing strong
electromagnetic fi elds, such as electric motor. Strong electromagnetic
fi elds could lead to camera malfunctions or interfere with the data
recording.
• Avoid Intense Heat
Do not use or store the equipment under sunlight or high temperatures.
Such exposure could lead to the leakage of the batteries or deformation
of the casing.
• Avoid rapid temperature changes
Rapidly moving the equipment between hot and cold temperatures
may cause water droplets to form on its exterior and interior. To
prevent condensation, place the equipment in its carry case or a
plastic bag before exposing it to a rapid temperature change.
• Battery
In low temperature circumstances, the battery capacity may decrease
signifi cantly due to the inactive chemical reaction. When taking pictures
in cold weather, keep a warm backup battery on hand.
Should the battery terminals become dirty, wipe them with a dry, clean
cloth or use an eraser to remove the stains.
Page 6

6
• Handle the lens and all parts with care
Do not touch the lens or lens barrel. Be careful in handling the memory
card and battery. These parts are not designed to withstand force
greater than regular use.
• Do not unplug or remove the battery when processing data
When image data is being recorded or deleted from memory cards,
cutting off power could result in data loss or damage the internal
circuitry or memory.
• Do not drop
Strong shock or vibration of dropping could cause malfunction. Keep
the strap around your wrist when carrying the camera.
• Memory cards
Turn off the power before inserting or removing the memory card.
Otherwise, the memory card could become unstable.
Memory cards may get hot during use, so remove memory card from
the camera with care.
Read First
Page 7

7
Read First. ...............................................................................................3
Table of Contents ...................................................................................7
Quick Start ............................................................................................ 10
Chapter 1: Getting Started ................................................................... 11
Camera Parts ...................................................................................... 11
Set Up .................................................................................................12
Attaching the Wrist Strap ............................................................. 12
Charging the Battery ....................................................................12
Inserting the Battery and the Memory Card .................................13
Turning On for the First Time .......................................................14
Chapter 2: Taking Images & Recording Video Clips ......................... 15
Using the LCD Monitor........................................................................15
Capture Mode ..............................................................................16
Video Mode ..................................................................................17
Changing Mode ...........................................................................18
Using Zoom.........................................................................................19
Optical Zoom ...............................................................................19
Digital Zoom.................................................................................19
Taking Pictures .................................................................................... 20
Using Auto Focus.........................................................................20
Using Focus Lock ........................................................................21
Macro Mode (
)...........................................................................22
Using Self-timer (
) ....................................................................22
Setting EV (Exposure Value) ....................................................... 23
Using Flash (
) ............................................................................23
Mode Options......................................................................................24
Recording Video Clips ........................................................................ 25
Using the Capture/Video Menu ...........................................................26
Setting Image Size (Resolution) ..................................................27
Setting Quality .............................................................................28
Setting White Balance .................................................................29
Table of Contents
Page 8

8
Setting ISO .................................................................................. 30
Setting Focus ...............................................................................30
Setting Anti-shake ........................................................................ 31
Setting Exposure Area ................................................................. 32
Setting Color Style .......................................................................33
Setting Sharpness .......................................................................34
Setting Contrast ...........................................................................35
Setting Saturation ........................................................................36
Setting Drive Mode ......................................................................37
Setting Photo Frame ....................................................................38
Chapter 3: Reviewing Images & Video Clips ..................................... 39
Using the LCD Monitor........................................................................39
Playback Mode ............................................................................39
Using Playback ...................................................................................41
Using the Playback Menu ................................................................... 42
Activating Digital Enlargement ............................................................ 43
Using Index Display ............................................................................ 44
Deleting Images and Video Clips ................................................. 45
Protecting Images & Video Clips ................................................. 46
Adding Voice Memo to a Still Image ............................................ 47
Setting DPOF...............................................................................49
Playing a Slide Show ...................................................................51
Rotating the Still Images ..............................................................52
Chapter 4: Installing the Software ...................................................... 53
Windows System Requirements .........................................................53
Installing the Software.........................................................................53
Installing the Driver ......................................................................53
Installing the Application ..............................................................54
Using the Application .......................................................................... 55
VideoImpression ..........................................................................55
PhotoImpression ..........................................................................56
Contents
Page 9

9
Chapter 5: Uploading, Printing & Displaying Images..............................57
Uploading to a computer .....................................................................57
Printing Images ...................................................................................58
Displaying Images on a TV .................................................................59
Chapter 6: Adjusting the Camera Settings ........................................ 60
Using the Setup Menu .................................................................60
Setting Language.........................................................................60
Setting Date/Time ........................................................................60
Setting Digital Zoom ....................................................................61
Setting AF Illuminator...................................................................61
Setting Instant Review .................................................................62
Moving Images to Card................................................................62
Resetting the File Number ...........................................................63
Imprinting the Date & Time ..........................................................63
Formatting the Memory................................................................64
Setting LCD Brightness ...............................................................65
Setting Camera Sound ................................................................65
Setting Camera Volume ............................................................... 66
Setting TV System .......................................................................66
Setting Auto Power Off ................................................................67
Changing USB Mode ...................................................................67
Using PictBridge ..........................................................................69
Resetting Your Camera................................................................ 70
Trouble Shooting .................................................................................. 71
Warning Indicators and Messages ..................................................... 73
Specifi cations ....................................................................................... 75
Page 10
10
Quick Start
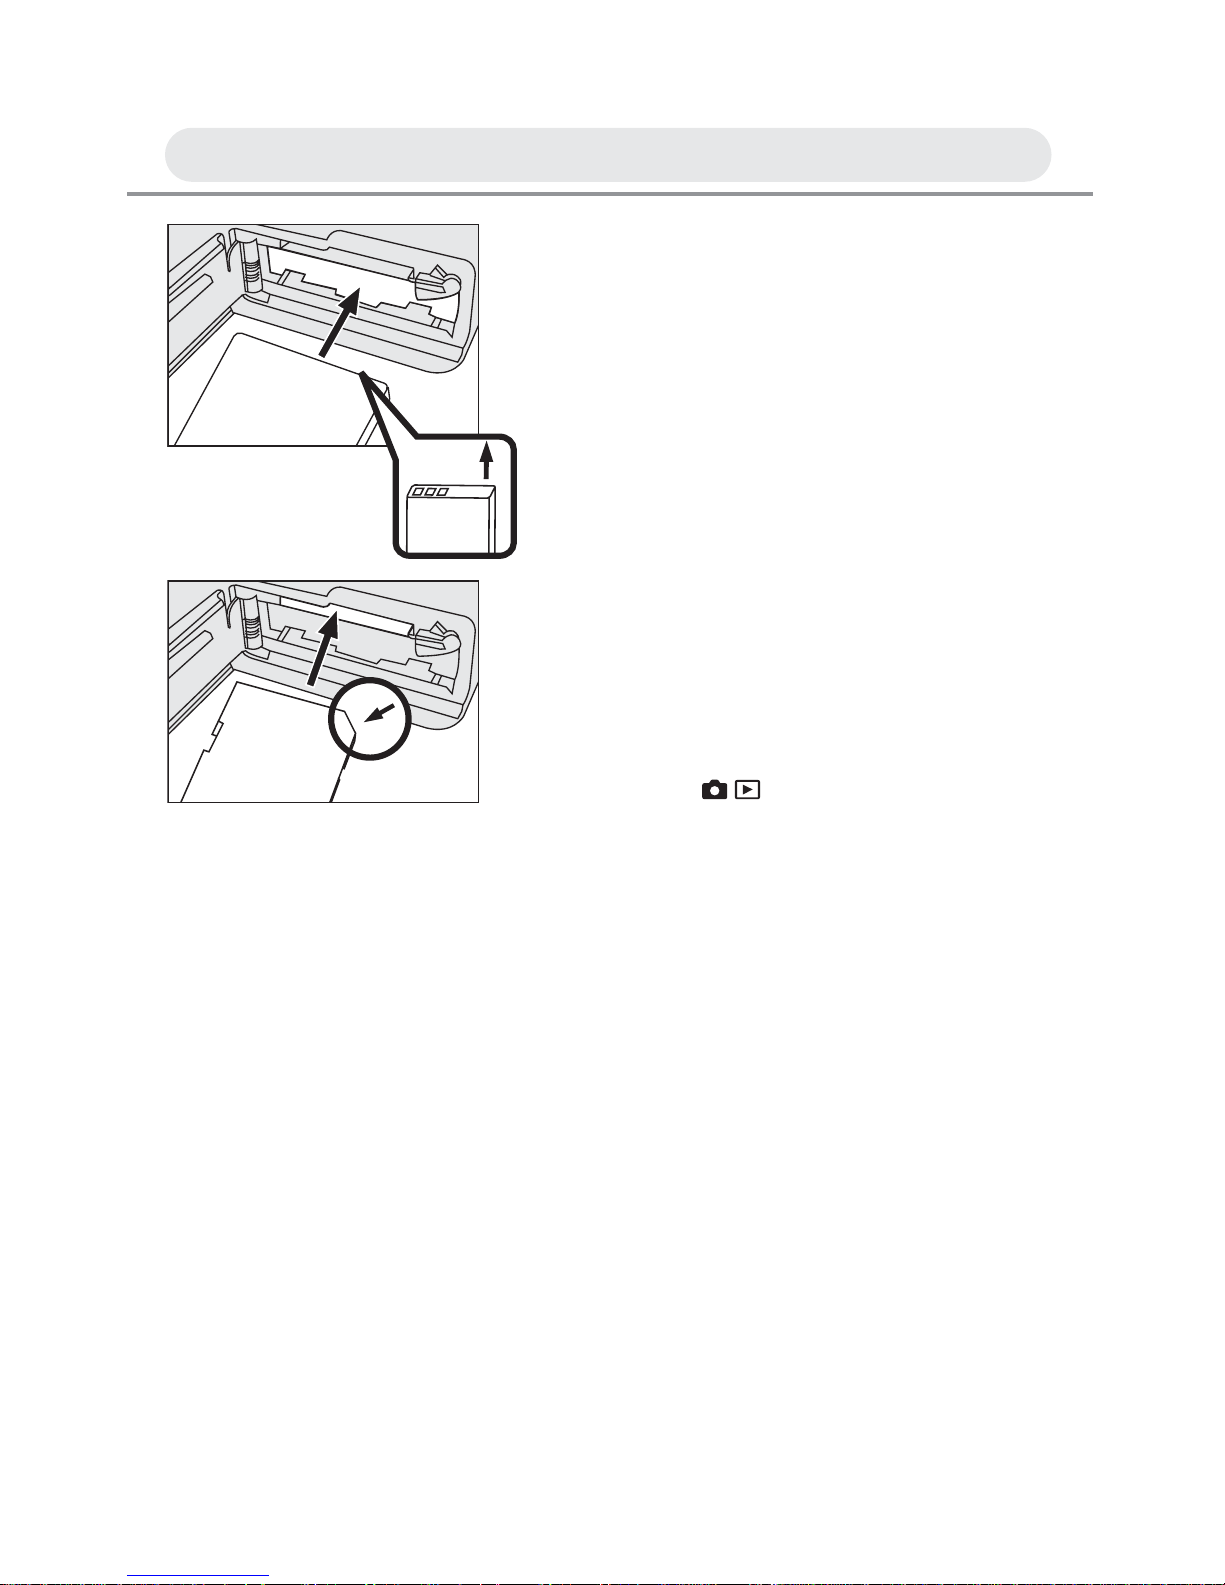
1 Insert a battery. See page 13.
2 Insert a memory card. See page 13.
3 Turn on the camera.
4 Press the / button to capture mode
and frame your subjects with the LCD
monitor.
5 Slightly press the shutter release
button half way down and hold it to set
the focus and exposure.
6 Press the shutter release button down
fully to take the picture.
Page 11
11
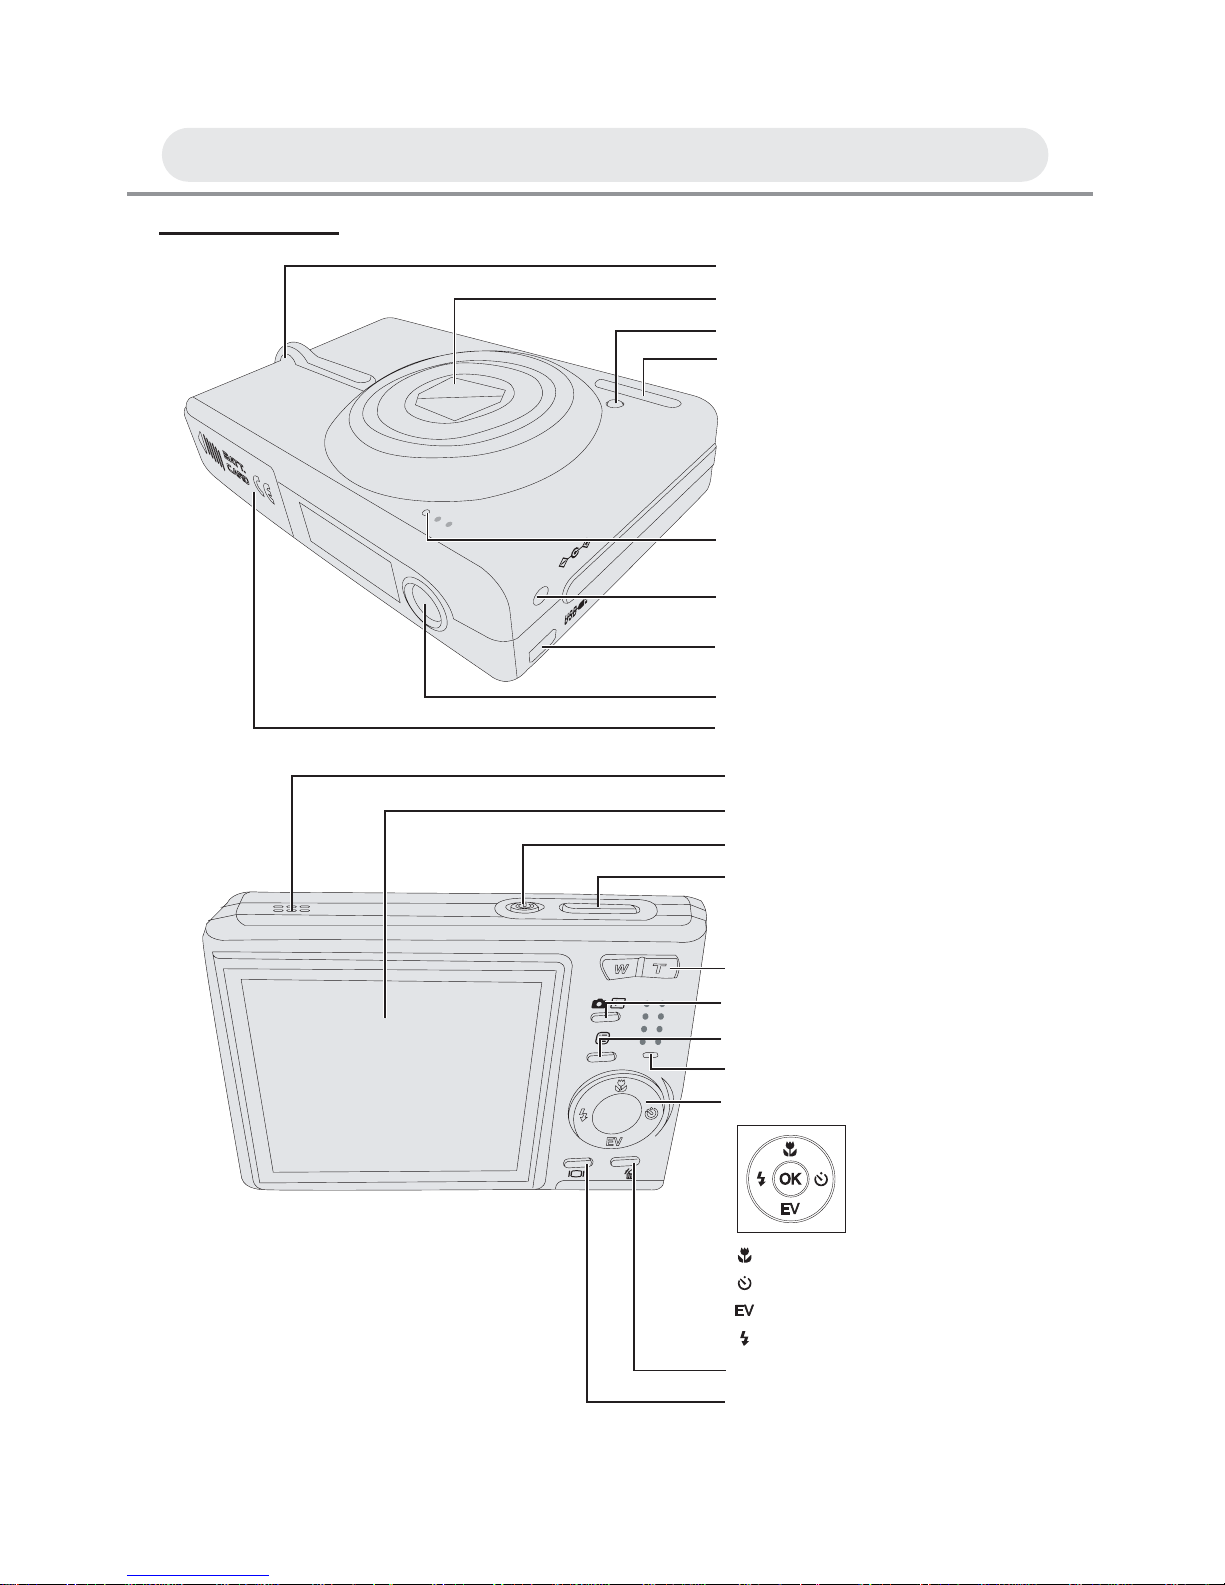
Camera Parts
Chapter 1: Getting Started
A/V OUT
DC IN 5V
Lens
Strap Mount
LED
Flash
USB Connecter/
A/V Out (Audio Video Output) Terminal
Tripod Mount
DC Terminal
Microphone
Memory Card Slot/Battery Cover
SP
OK
Shutter Release Button
Power Button
LCD Monitor
Speaker
Scene Program/Delete Button
Macro Button
Self-timer Button
Exposure Value Button
Flash Button
Capture/Playback Button
Display Button
Zoom Button
Power Lamp
Menu Button
Four-way +OK Button
Page 12
12
Set Up
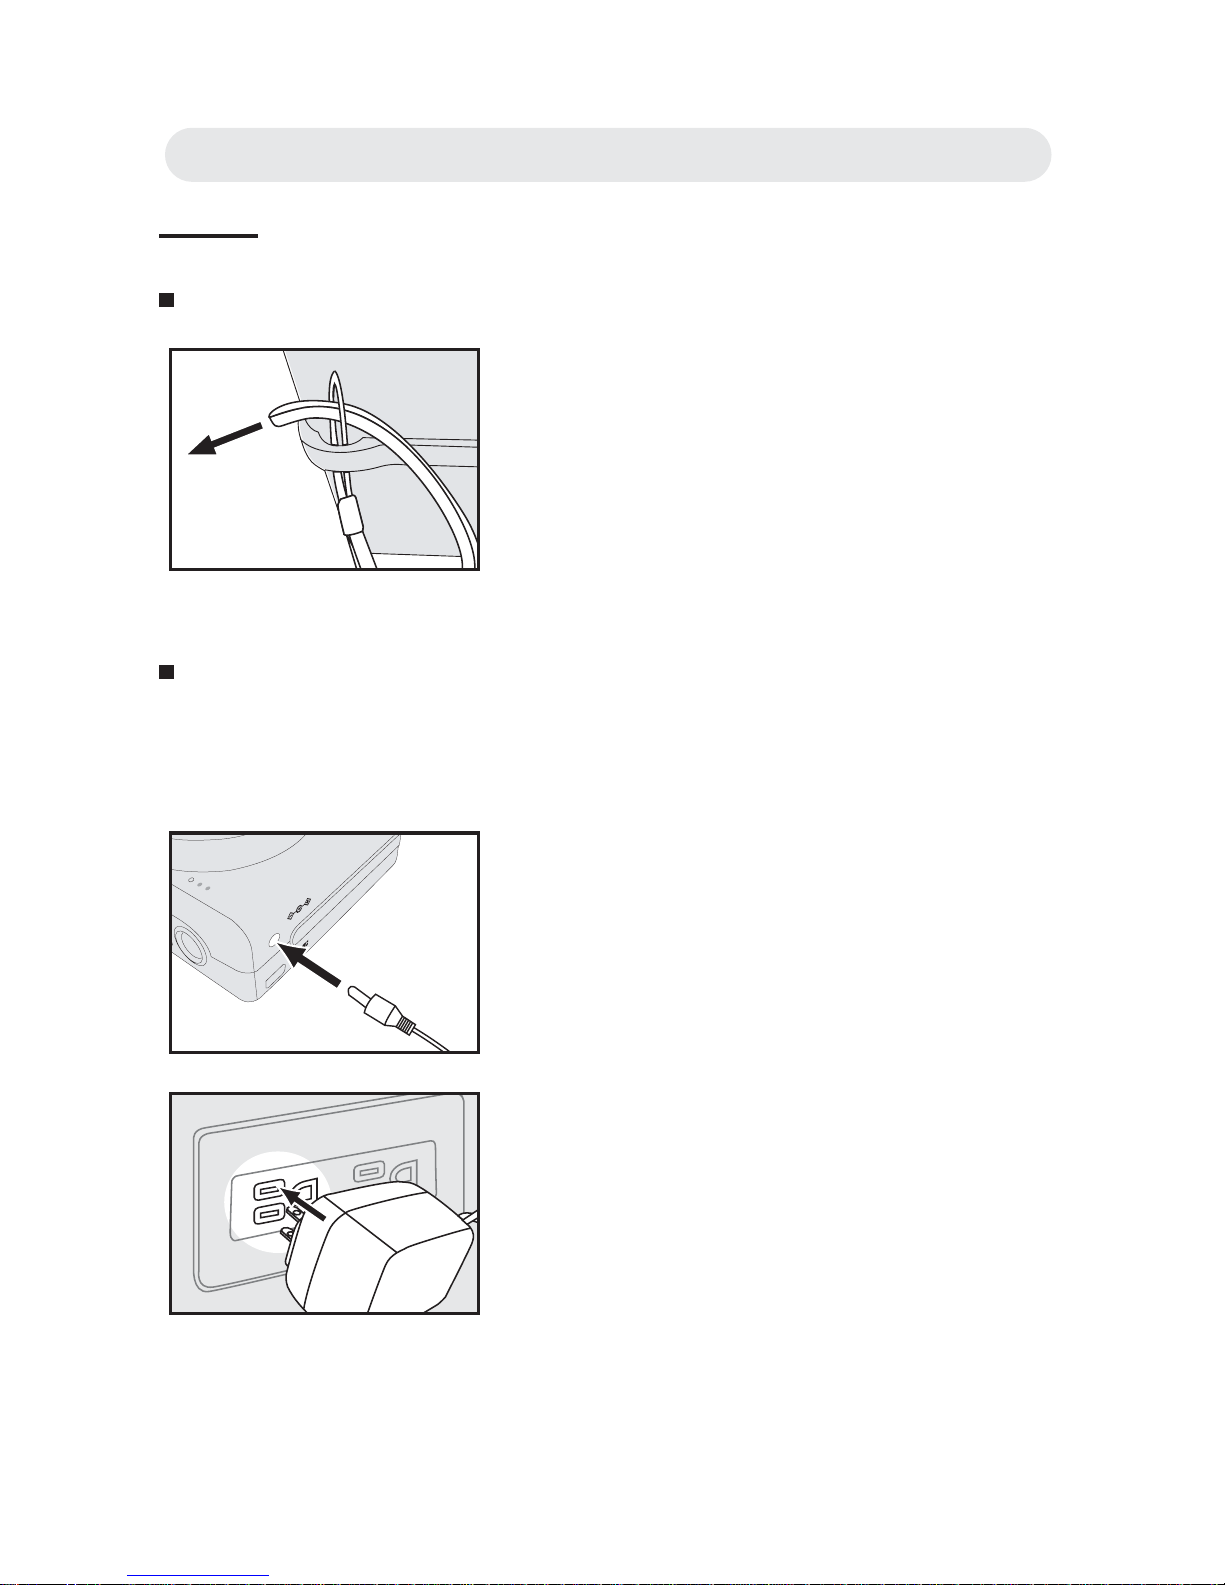
Attaching the Wrist Strap
Charging the Battery
The supplied rechargeable Li-ion battery pack should be charged before
use.
Insert the small loop of the wrist strap into
the strap eyelet. Insert the long loop of the
wrist strap into the small loop of the strap
and then tighten it.
1 Make sure that the camera is turned
off. Plug the AC adapter connecter
into the “DC IN 5V” socket on the
camera.
2 Plug the adapter into the main power
outlet.
3 The Power Access LED goes off when
charging is completed. Disconnect the
AC adapter after charging and remove
the camera.
A/V OUT
DC IN 5V
Chapter1: Getting Started
Page 13
13
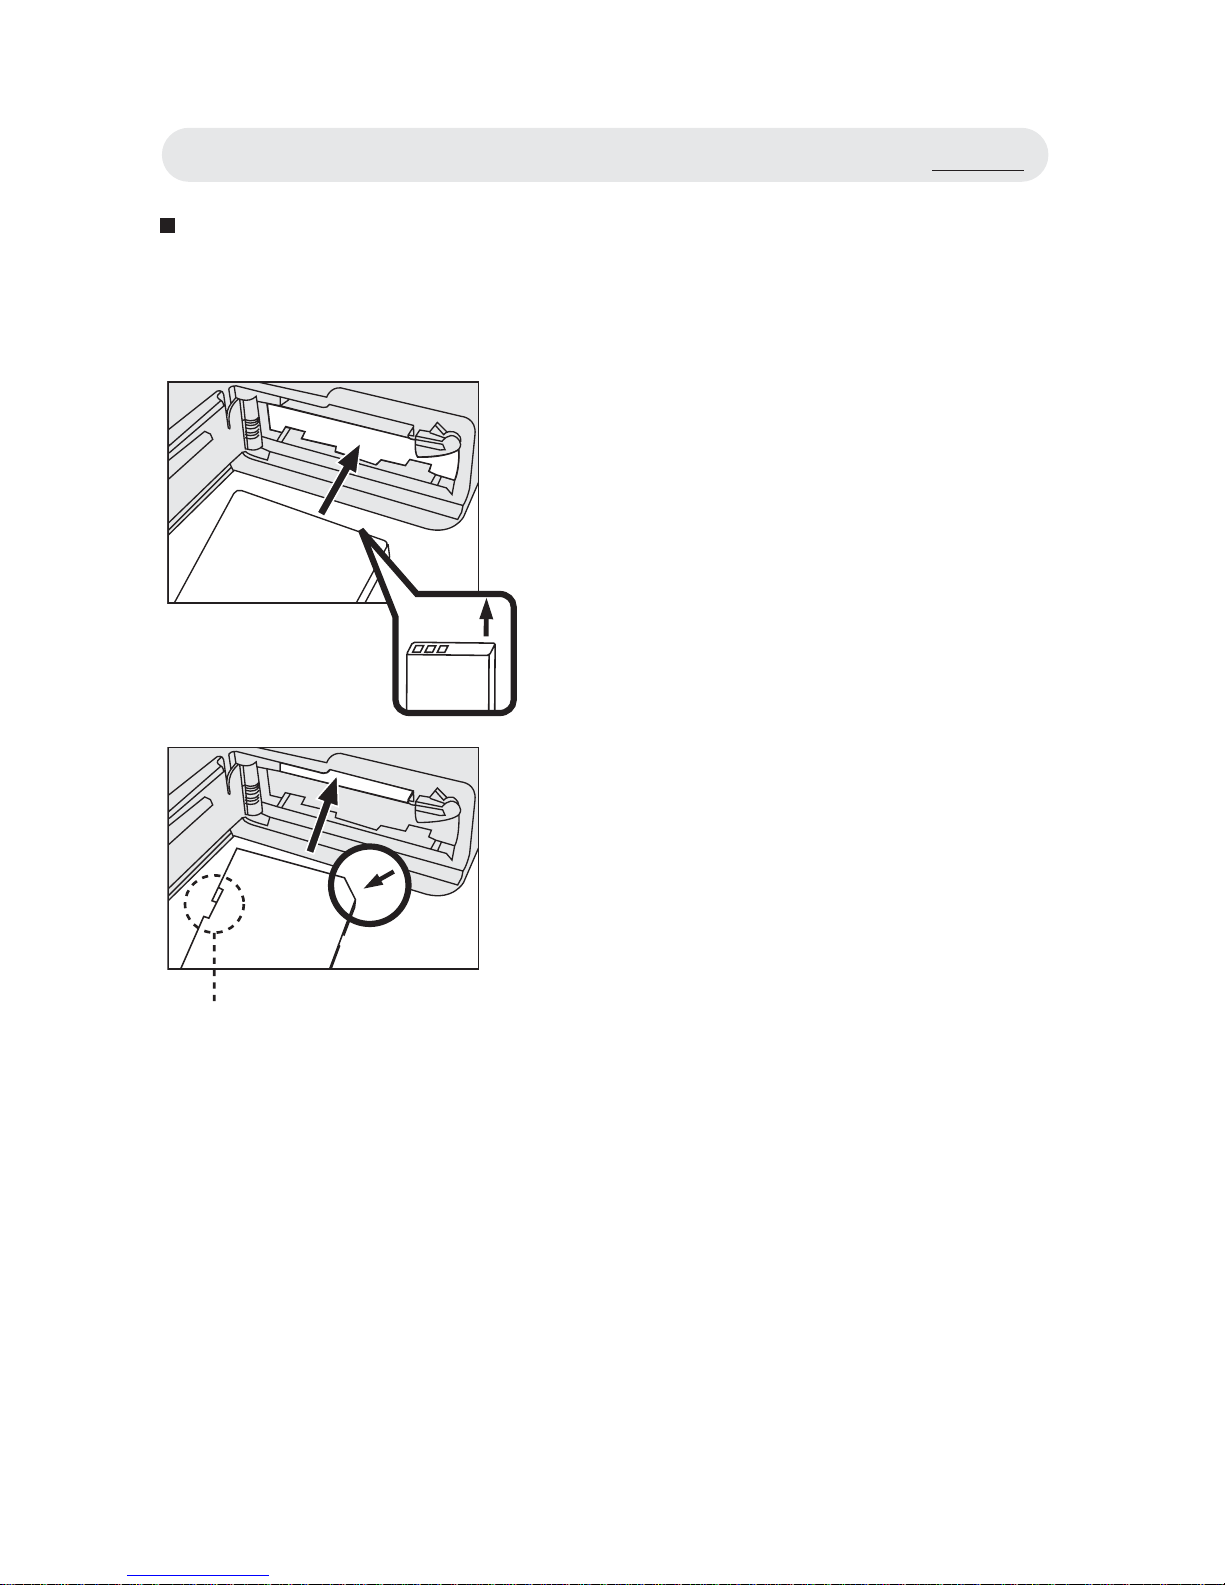
Inserting the Battery and Memory Card
1 Open the battery/memory card cover.
2 Insert the battery. Please check
whether the battery is inserted with the
correct polarity (+/-).
Note: Risk of explosion if battery is
replaced by an incorrect type.
Dispose of used batteries according
to the instructions.
3 Insert a SD memory card into the
memory card slot as shown.
Note 1: The write protect switch of the
memory card prevents fi les from
being deleted or formatted. Make
sure the switch is in the “unlock”
position before use.
Note 2: Please format memory card before
fi rst use.
4 Close the battery/memory card cover.
Write Protect Switch
Set Up
Page 14
14
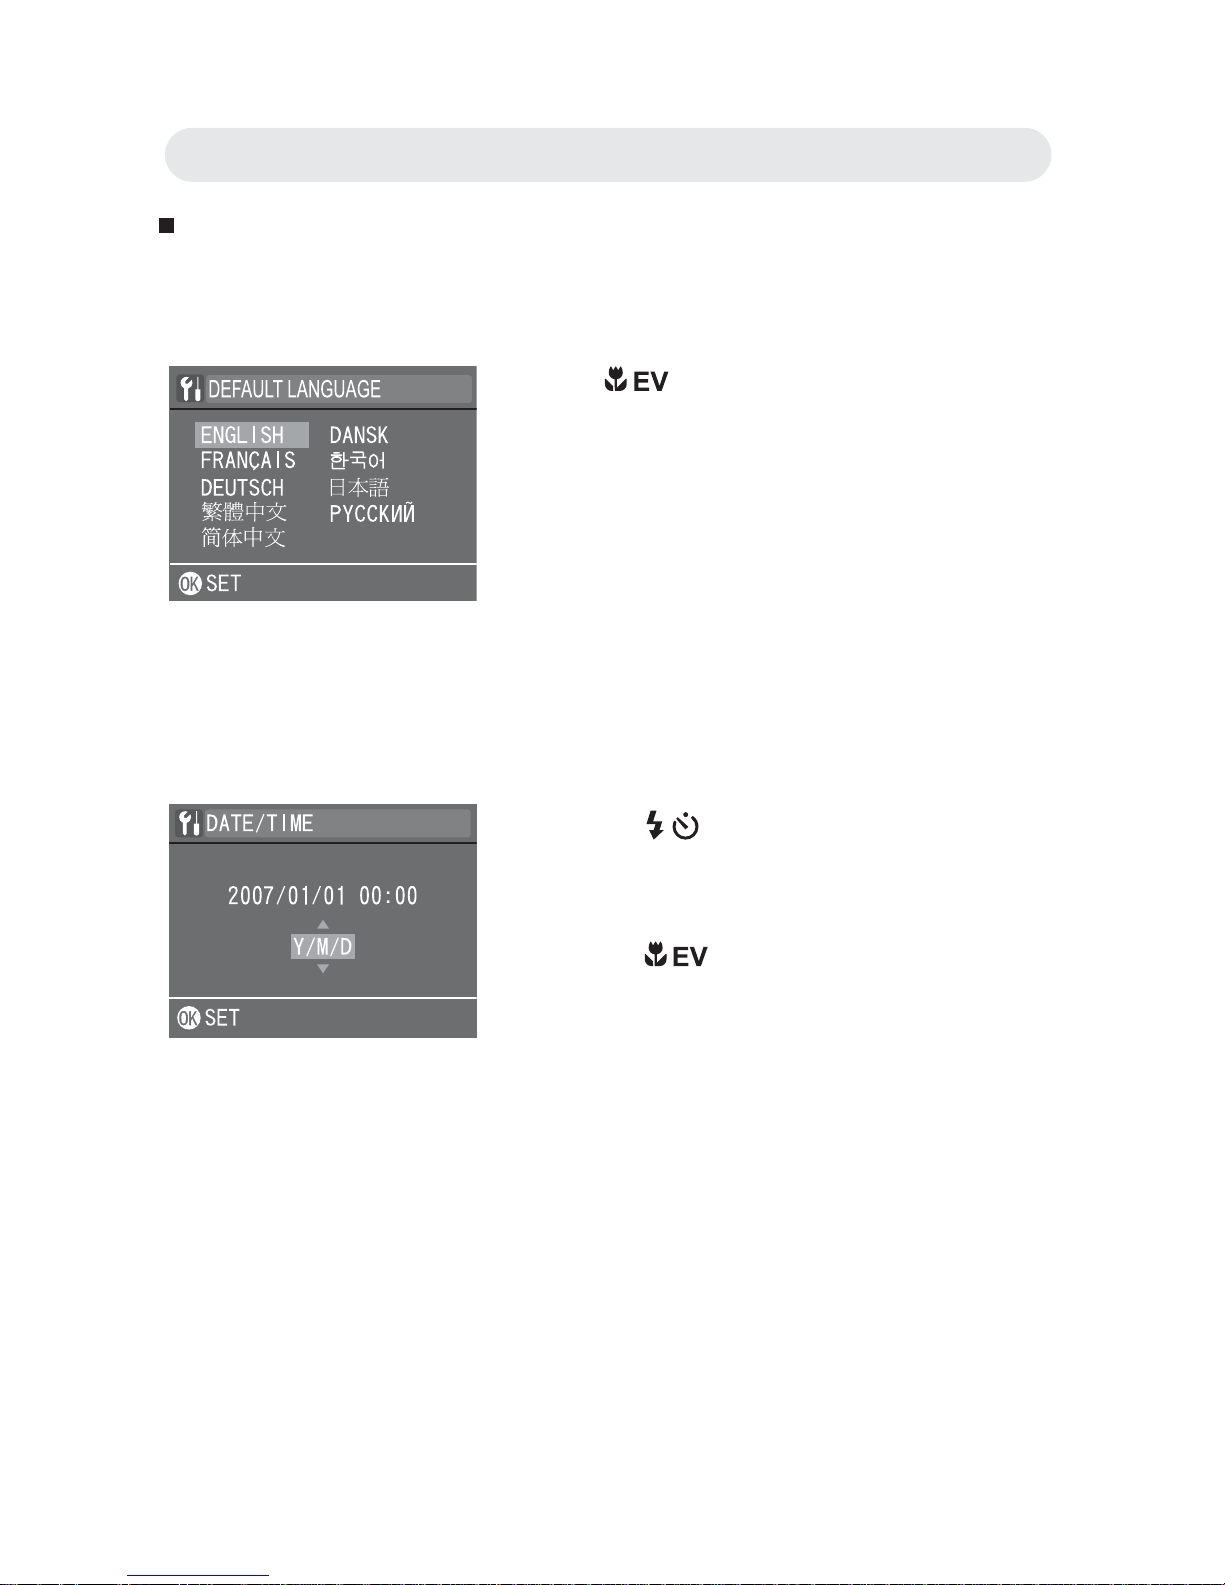
Turning On for the First Time
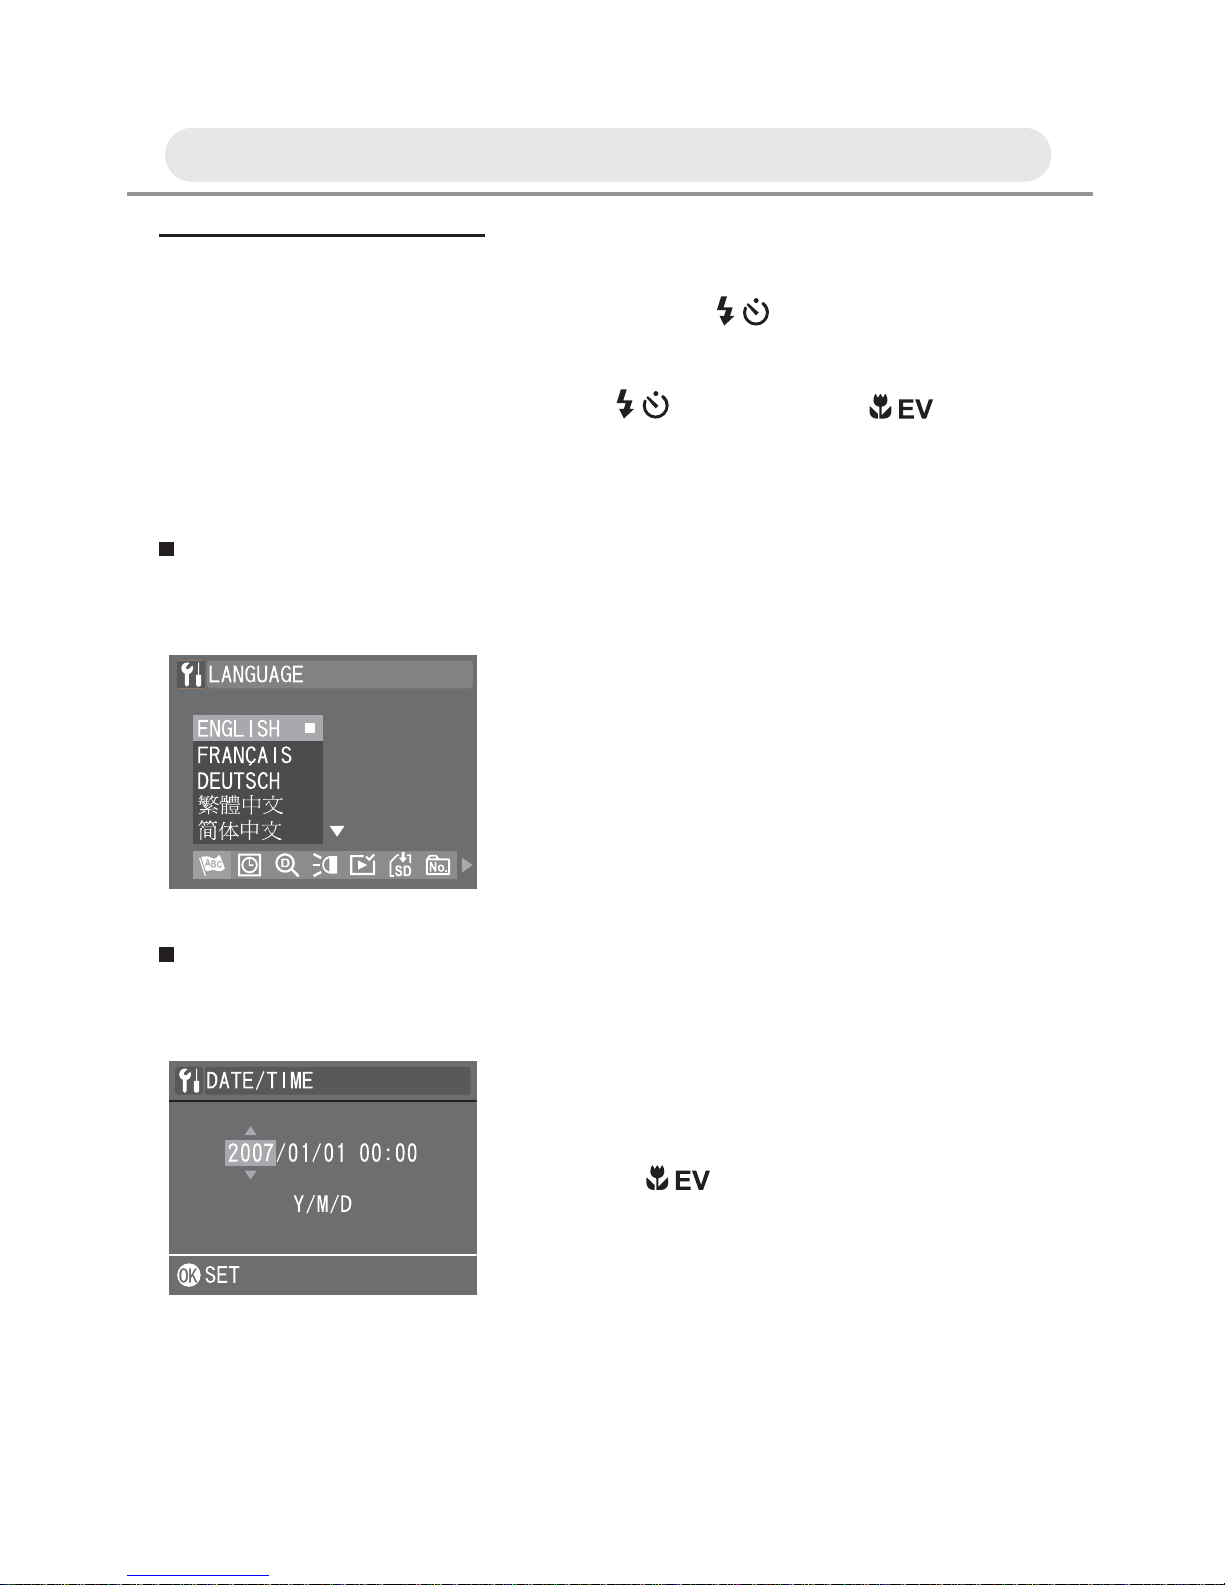
The language selection screen appears. Select the language you want
from the list.
The Date/Time setup screen will appear automatically after you have
selected a language. Set the date and time so they appear correctly
when reviewing images stored on your camera.
Note: To reset the default language and date & time, do the following:
• Press the POWER button to power up the camera.
• During power up, press and hold the OK button continuously.
• The language and date & time setup screens are displayed.
• Once you have confi gured these settings, the AUTO Live View will be
displayed.
Press
/ button to select the language
you need. Press the OK button to confi rm
all settings.
Note: To change the language after you
have performed confi guration for
the fi rst time, refer to “Setting
Language” on page 60.
1 Press / button to select each fi eld.
2 Press / button to make adjustments
to each fi eld. Press the OK button to
confi rm all settings.
Note: To change the date and time after
you have performed confi guration
for the fi rst time, refer to “Setting
Date and Time” on page 60.
Chapter1: Getting Started
Page 15

15
Using the LCD Monitor
When you turn on the camera, the LCD monitor turns on automatically.
With the LCD monitor you can frame the images or Video clips you want
to capture and record.
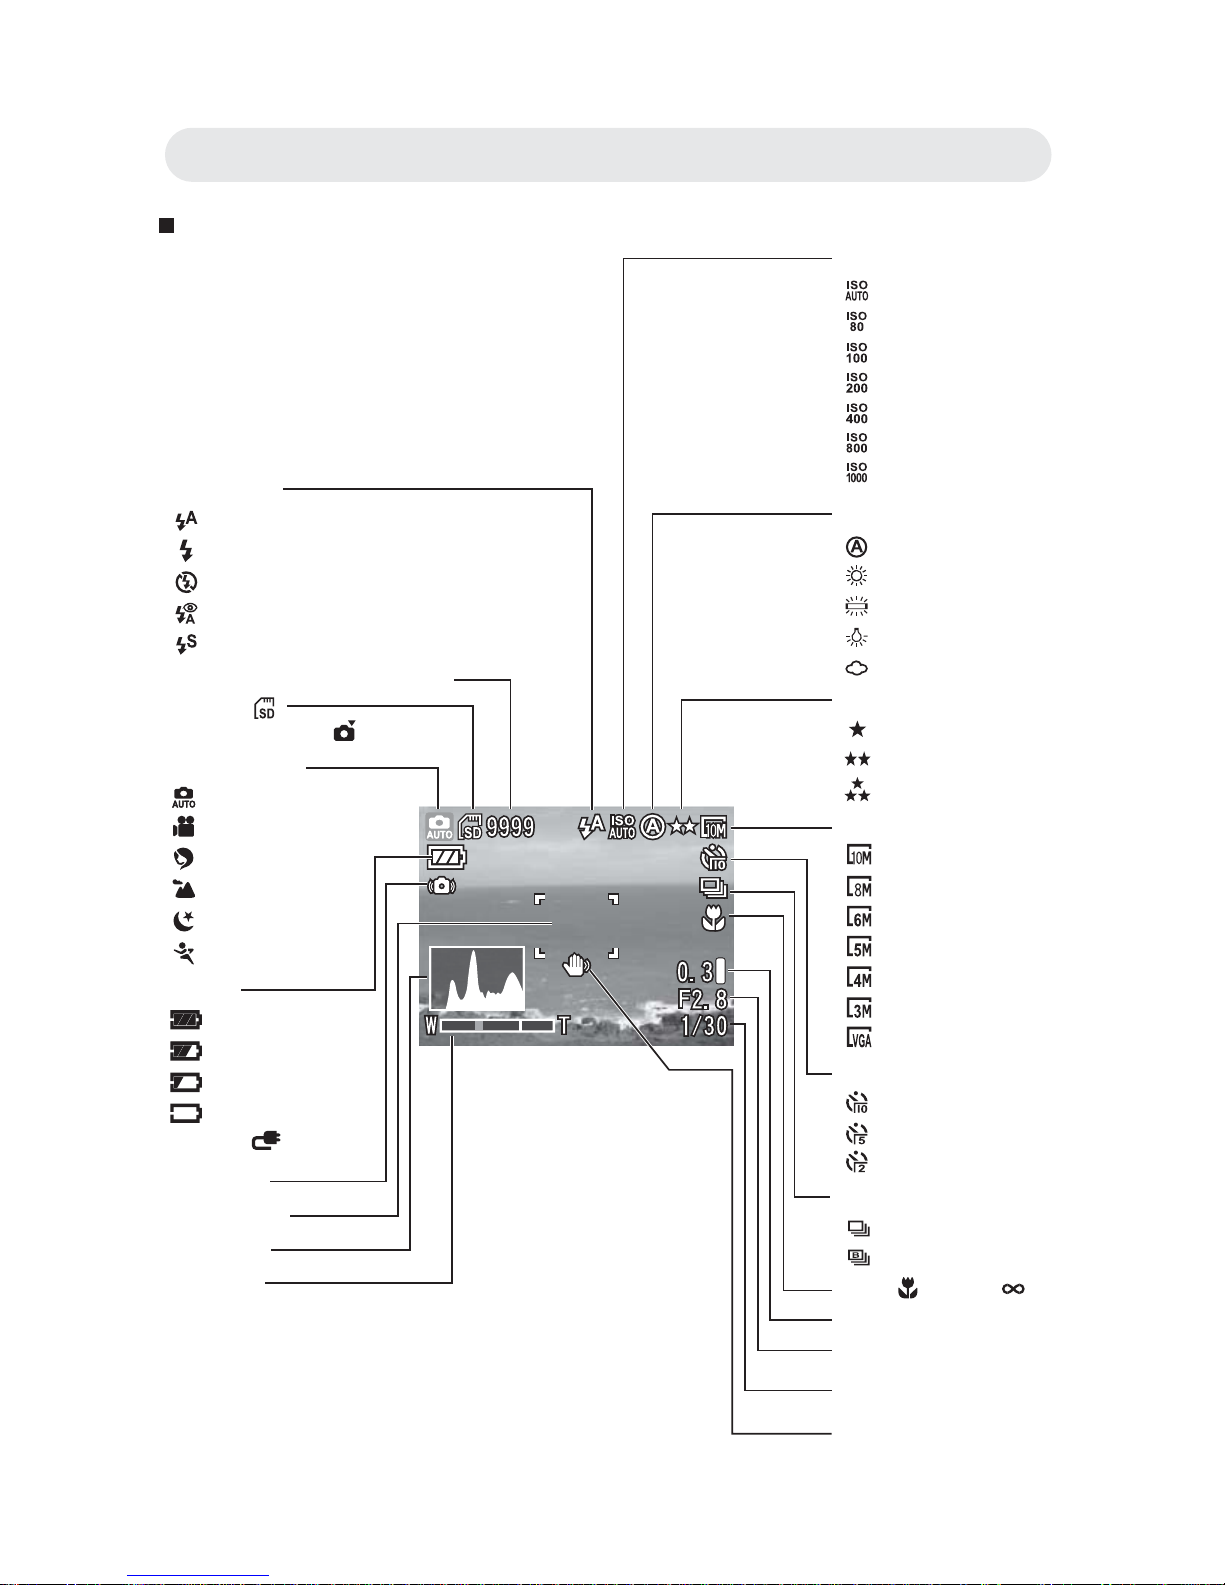
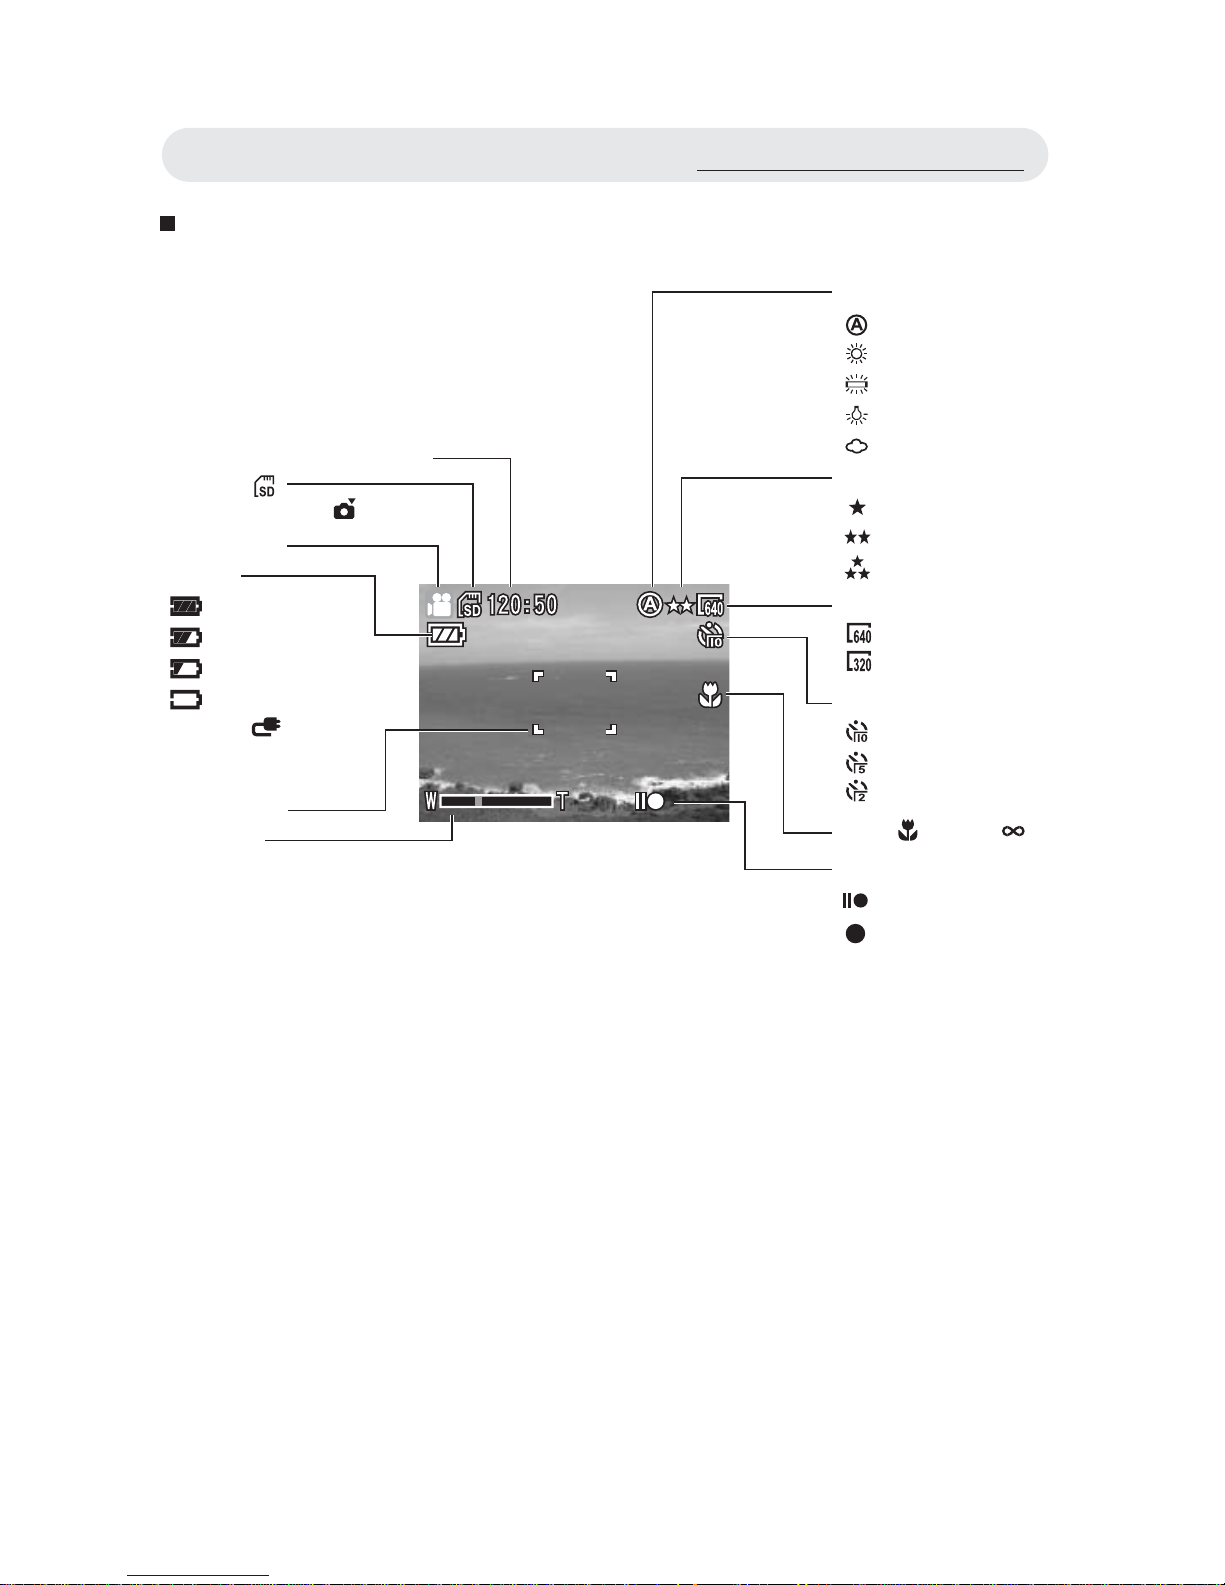
The following illustration shows the LCD monitor layout and descriptions
of all icons.
Note 1: You may not be able to see the LCD monitor clearly when using
the LCD monitor under intense light, such as sunlight. You can
adjust the LCD brightness to improve visibility. See page 65.
Note 2: Note that the following are for illustrative purposes only. They
may not exactly match the LCD monitor content actually
displayed on the camera.
Chapter 2: Taking Images and Recording Video Clips
Page 16
16
Capture Mode
Remaining number of Pictures
Flash mode
Auto flash
Fill in flash
Flash off
Flash with Red-eye reduction
Slow Sync. (Only in night scene mode)
ISO
Auto
80
100
200
400
800
1000
White Balance
Auto
Daylight
Fluorescent
Tungsten
Cloudy
Quality
Normal
Fine
Best
Size
3680x2760
3296x2472
2816x2112
2560x1920
2272x1704
2048x1536
640x480
Drive mode
Continuous
Burst
Macro / Infinity
Exposure compensation
Aperture value
Shutter speed
Camera shake warning
SD Card
/ Internal memory
Battery
Full capacity
Half capacity
Low capacity
Exhausted
/ DC IN
Capture Mode
Auto mode
Video mode
Portrait mode
Landscape
Night scene mode
Sports mode
Self-timer
10sec.
5sec.
2sec.
Zoom bar
Histogram
Focus frame
A
nti-shake
E
V
Chapter2: Taking Images and Recording Video Clips
Page 17
17
Video Mode
Remaining time of recording
White Balance
Auto
Daylight
Fluorescent
Tungsten
Cloudy
Quality
Normal
Fine
Best
Size
640x480
320x240
Self-timer
10sec.
5sec.
2sec.
Macro / Infinity
Recording indicator
Standby
On recording
SD Card
/ Internal memory
Battery
Full capacity
Half capacity
Low capacity
Exhausted
/ DC IN
Zoom bar
Focus frame
Video Mode
Using the LCD Monitor
Page 18
18
Changing Mode
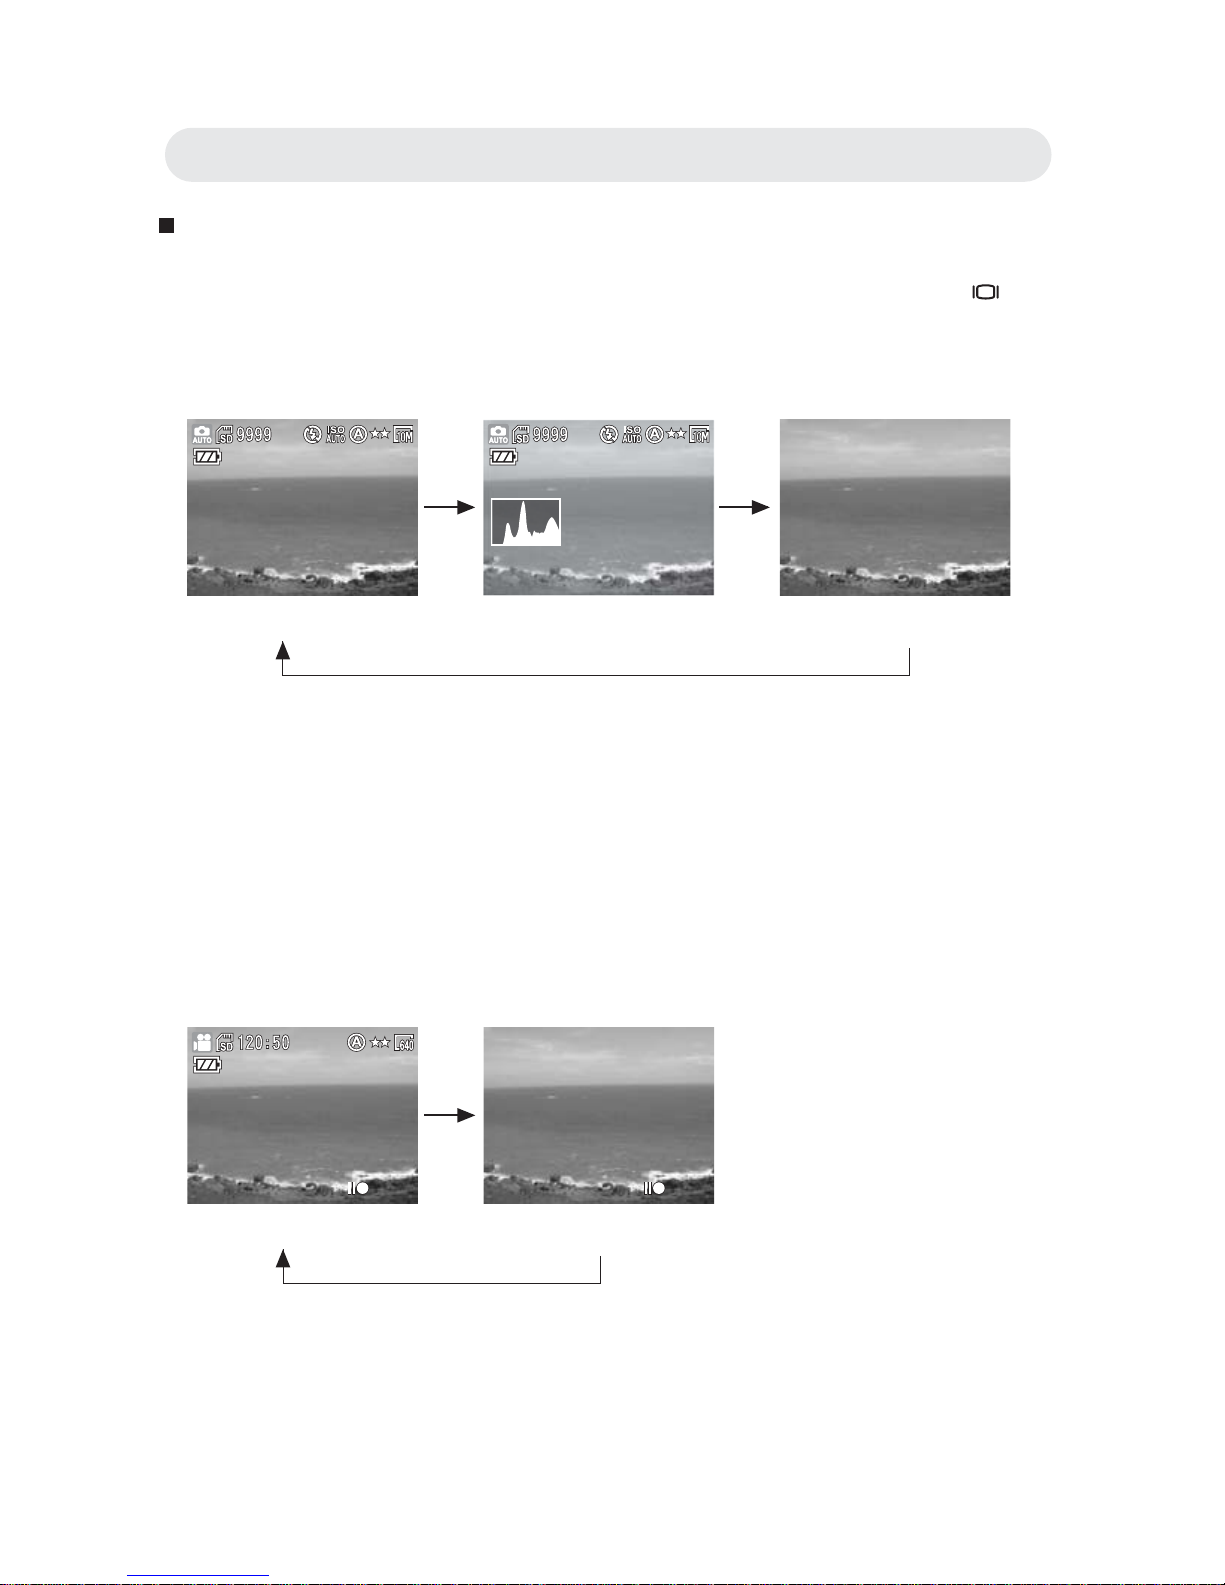
You can change the contents on the LCD monitor by pressing the
button to cycle through the available options.
• Capture Mode
* OSD stands for ‘on screen display’.
* Histogram: The histogram is a graph to judge the tonal range of the
image. The correct exposure of the image is the peak of the graph in the
middle. If the image is too dark, the peak slants to the left. If the image
is too bright, the peak slants to the right. You can adjust the exposure by
using EV(Exposure Compensation) .
• Video Mode
Note: If you do not use the camera over 1 minute, the LCD monitor will
turn off automatically. Press any button but power button to turn on
the LCD monitor.
OSD* On (Default) OSD On + Histogram* OSD Off
OSD On (Default) OSD Off
Chapter2: Taking Images and Recording Video Clips
Page 19
19
Using Zoom
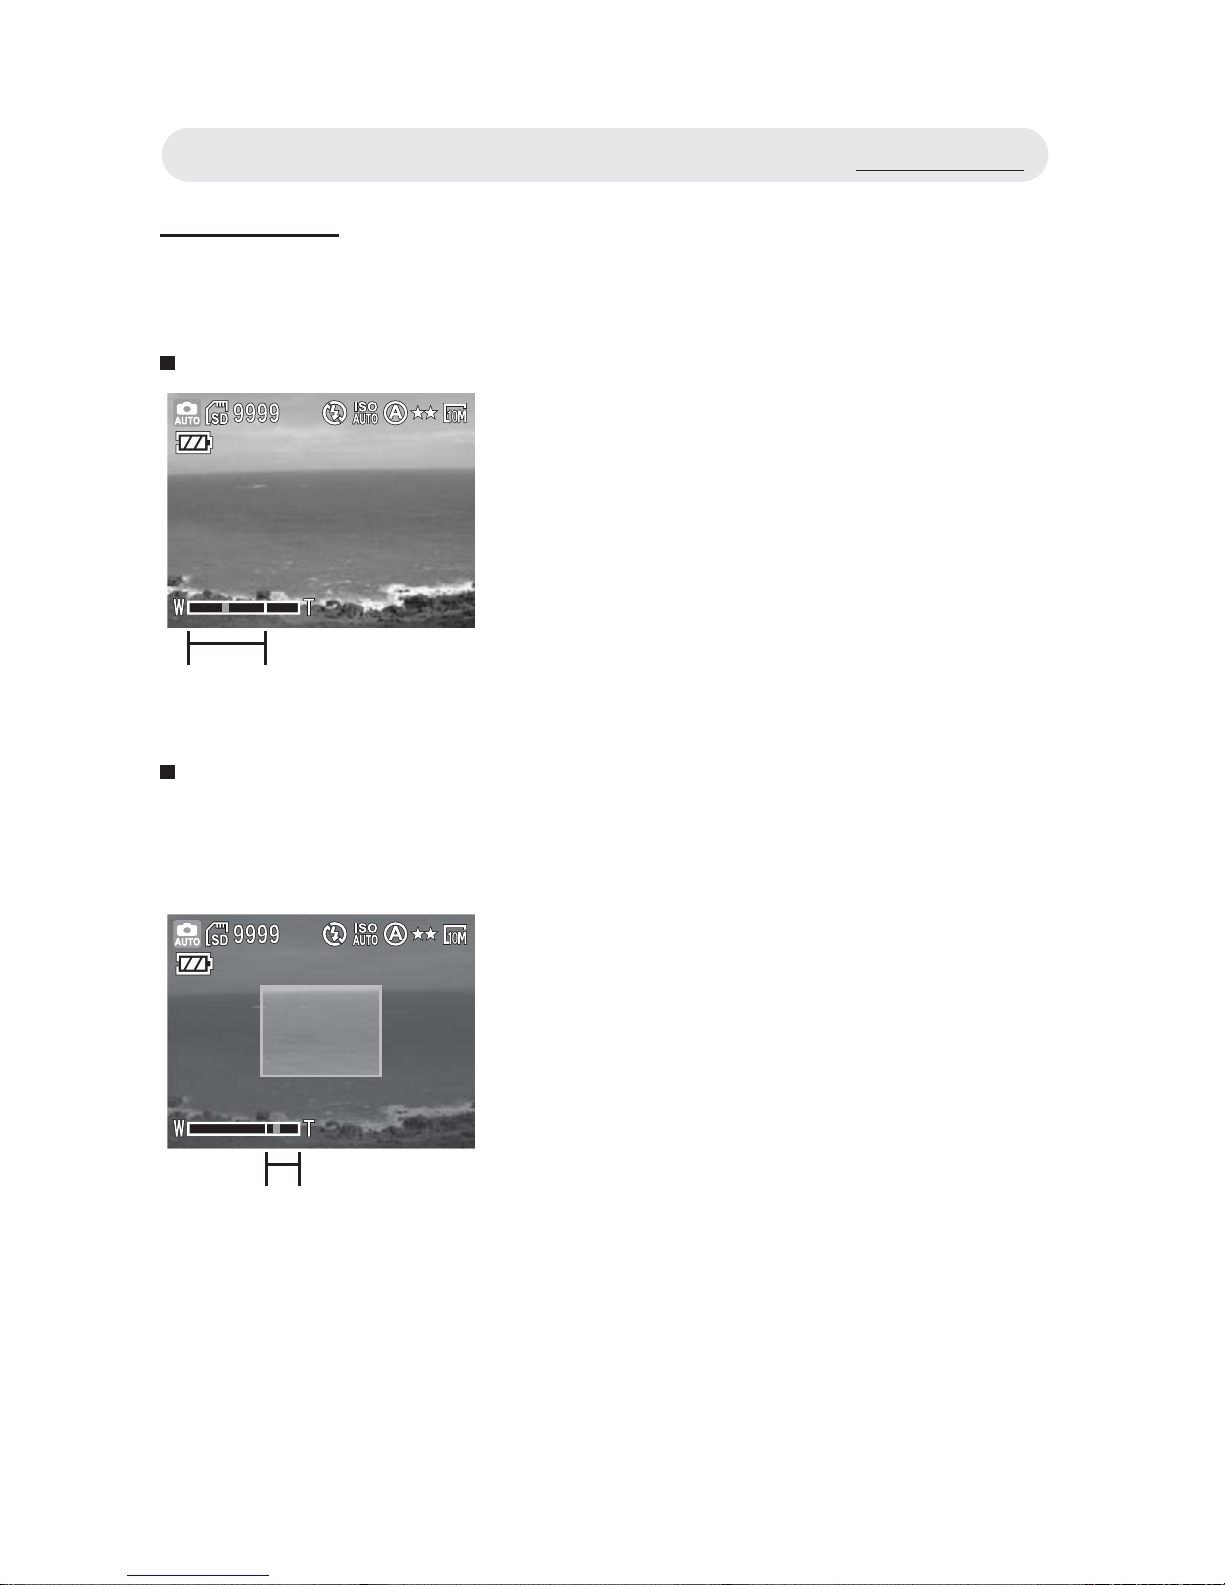
This camera features 3x optical zoom and 8x digital zoom.
Optical Zoom
Digital Zoom
To use the digital zoom, you must activate it through the settings menu.
See page 61 for instructions on how to do this.
1 Press the W/T button to zoom in and
out of an image.
2 The zoom indicator appears on the
LCD monitor.
Optical Zoom
1 Press the T button to optically zoom in
to the maximum magnifi cation.
Release the button and press it again
to activate the digital zoom function.
2 A frame surrounds the area of the
image to be captured. The rest of the
LCD monitor is dulled out.
Note: When recording video clips, you
can only change the optical zoom
setting. The digital zoom setting
cannot be adjusted during video
recording.
Digital Zoom
Using Zoom
Page 20

20
Taking Pictures
Using Auto Focus
The Auto Focus function makes taking still photos a straightforward
process. By pressing the shutter release button down halfway, the
camera will focus on your subject automatically and calculate all photo
settings, such as exposure and saturation. You can change the Auto
Focus area to Multi, Center or Face Tracking by using the Auto Focus
function. For information about Auto Focus, see "Setting focus" on page
30.
1 Frame your subject with the LCD monitor.
2 Press the shutter release button halfway down and hold it to set the
focus and exposure.
3 When the auto focus is set, you will hear a beep and the AF LED will
light up.
4 Press the shutter release button down fully to take the image.
Note: The Auto Focus function may fail under certain conditions:
• When shooting from behind glass.
• When shooting low contrast subjects (i.e. the sky, white walls, etc.).
• When shooting subjects that are far apart (the camera may focus on
the wrong subject).
• When there are only horizontal lines in the frame.
Chapter2: Taking Images and Recording Video Clips
Page 21
21
Using Focus Lock
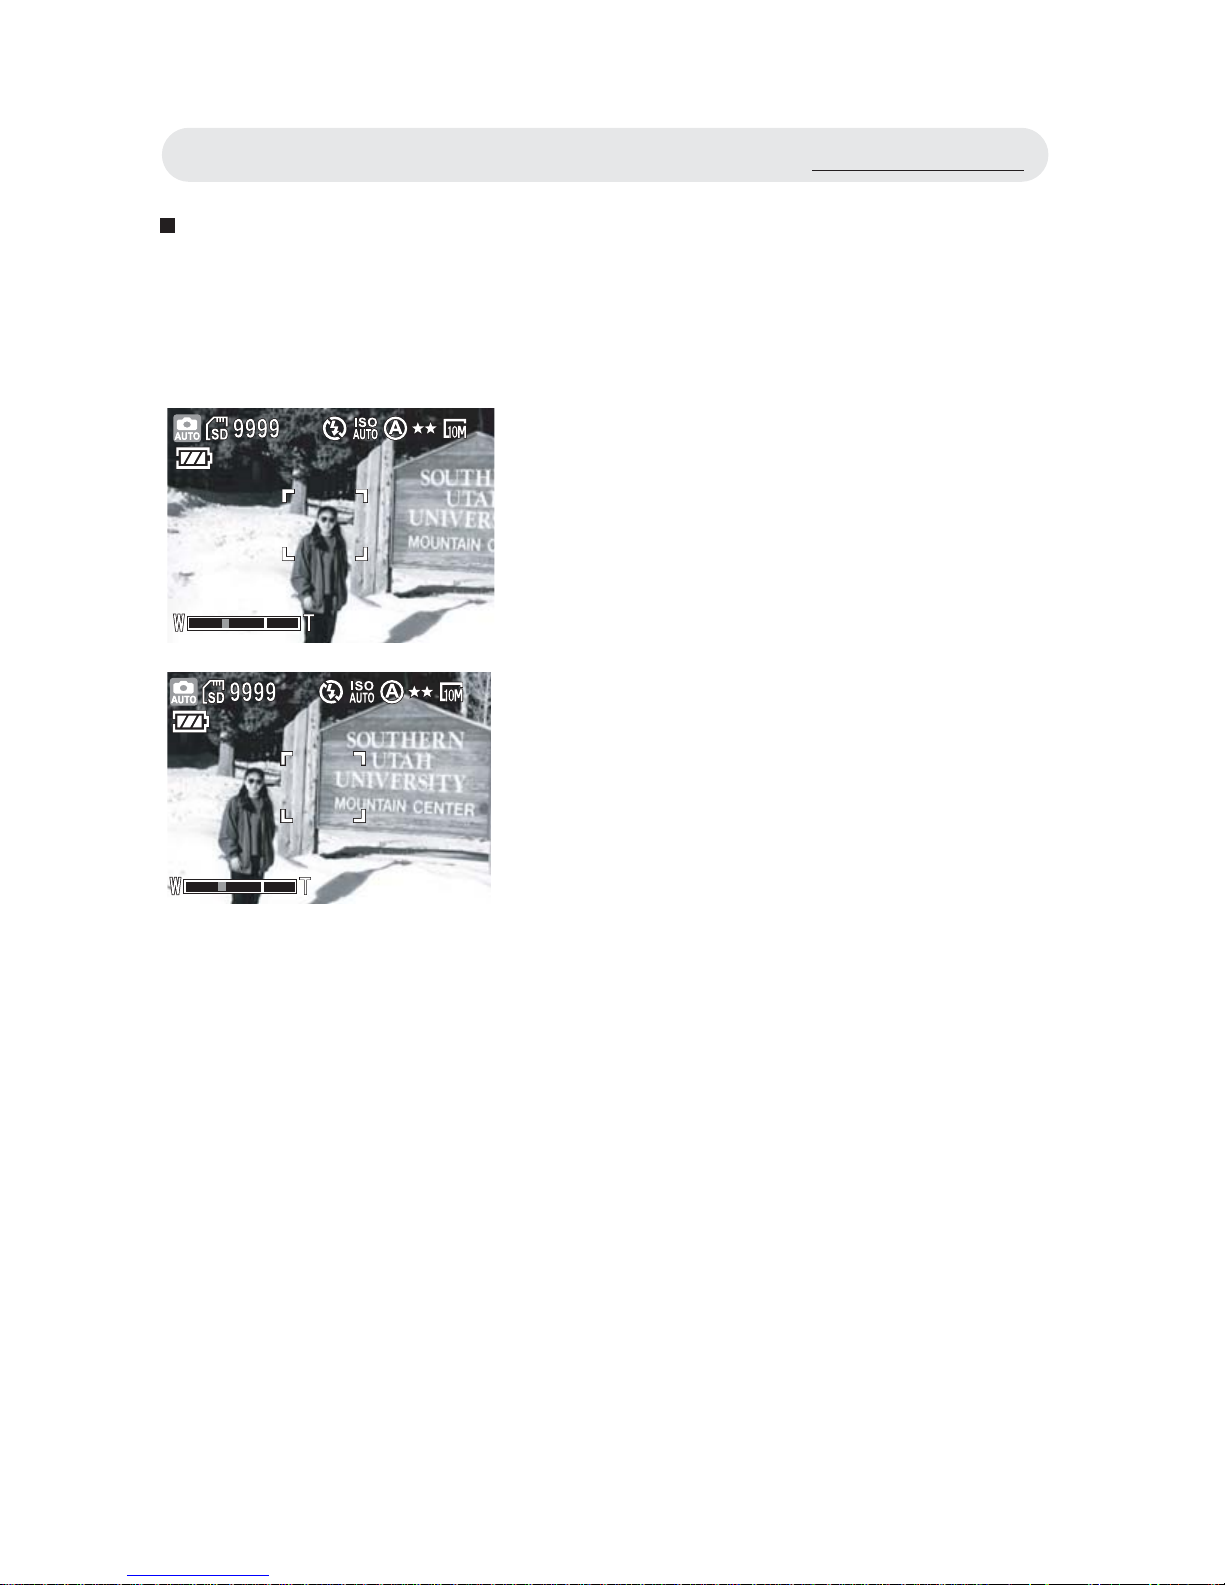
When taking a photo where your subject is off-center, the camera will
focus on the central area, resulting in your subject being out of focus.
Focus Lock allows you to focus on an off-center subject.
1 Frame your subject in the center of the
frame with the LCD monitor. Press the
shutter release button halfway down
and hold it to set the focus and
exposure.
2 Keep the shutter release button
pressed and recompose your picture,
with your subject positioned off-center.
3 Press the shutter release button down
fully to take the picture.
Note: The color of the focus bracket
indicates whether the camera has
focused successfully or not.
• AF success: The focus bracket turns
green.
• AF fail: The focus bracket turns red.
Taking Pictures
Page 22

22
Macro Mode ( )
Press the button to select “Macro” or “Infi nity” function. To shoot a
close-up image, use
“Macro” function to get the detail and sharpness
of the subject by fi xed focus.
To shoot infi nity shots, use “Infi nity” function to shoot landscapes and
distant objects. It can also be used for compositions combining both near
and distant objects.
Using Self-timer ( )
Self-timer function allows you to take pictures 2 sec, 5 sec or 10 sec later
after you press the shutter release button down fully. If you want to take
yourself into the image, you can use this function. We recommend you use
a tripod or place the camera on a steady surface when using self-timer.
1 Press button until the icon , or appears on the LCD
monitor.
2 After locking the focus and pressing the shutter release button
down fully, the self-timer lamp blinks. The camera will take the
image automatically after the time you set ends.
Note: The self-timer mode will not be cancelled after taking a
image. Use button again to turn off the self-timer function.
Chapter2: Taking Images and Recording Video Clips
Page 23
23
Setting EV (Exposure Value)
In some diffi cult lighting condition, the automatic exposure may be
misled into giving the wrong readings. Exposure compensation allows
you to adjust the exposure value and correctly expose your images.
1 In Capture mode, press button (EV value will be selected and light
red) .
2 Use / button to adjust the exposure value (from -2.0 ~ +2.0).
Press OK button to confi rm the setting.
Setting Flash ( )
When taking pictures in diffi cult lighting conditions, you may need the
fl ash to get correct exposure. The camera provides you with built-in fl ash
modes.
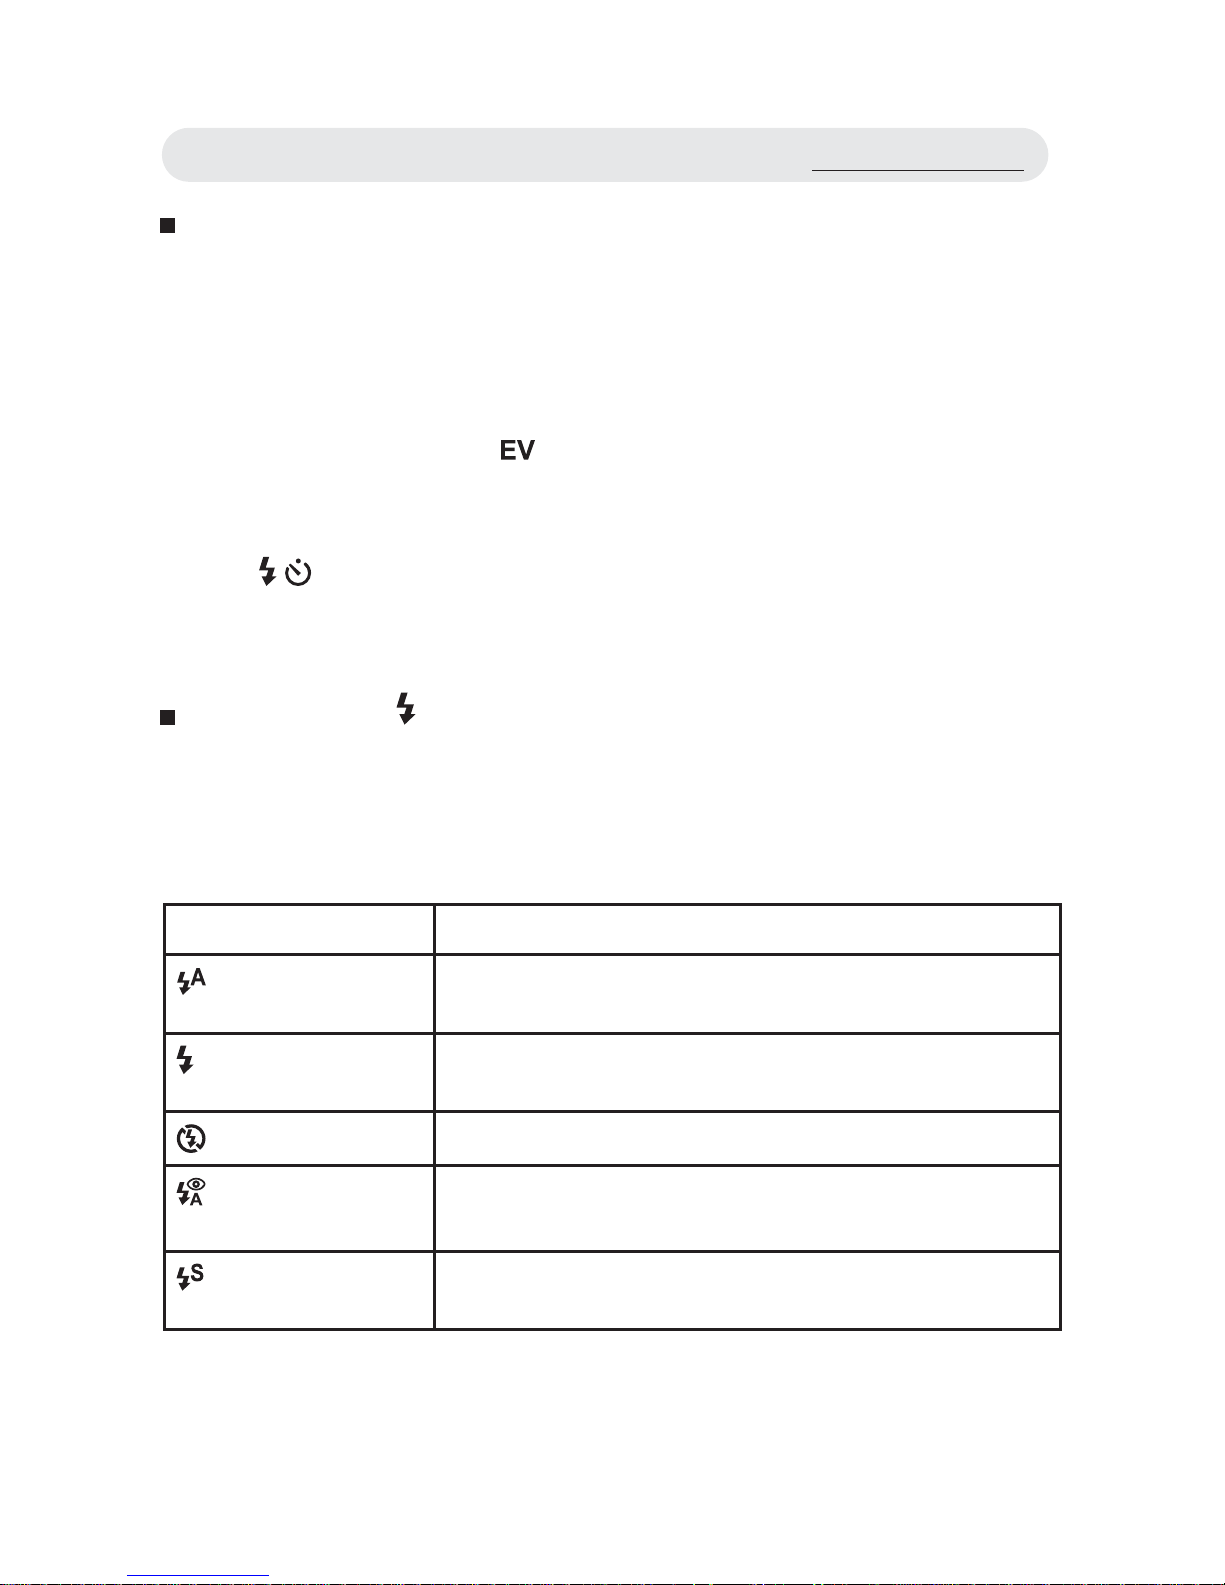
Mode Function
Auto Flash
Flash fi res automatically when the lighting
condition is dark.
Fill in Flash
Flash fi res whenever you take a shot, regardless
of the lighting condition.
Flash Off
Flash is turned off.
Auto Flash with
Red-eye Reduction
Reduces the “red-eye” effect resulting from the
fl ash.
Slow Sync
Flash fi res with slow shutter speed to get
natural exposure.
Taking Pictures
Page 24
24
Mode Options
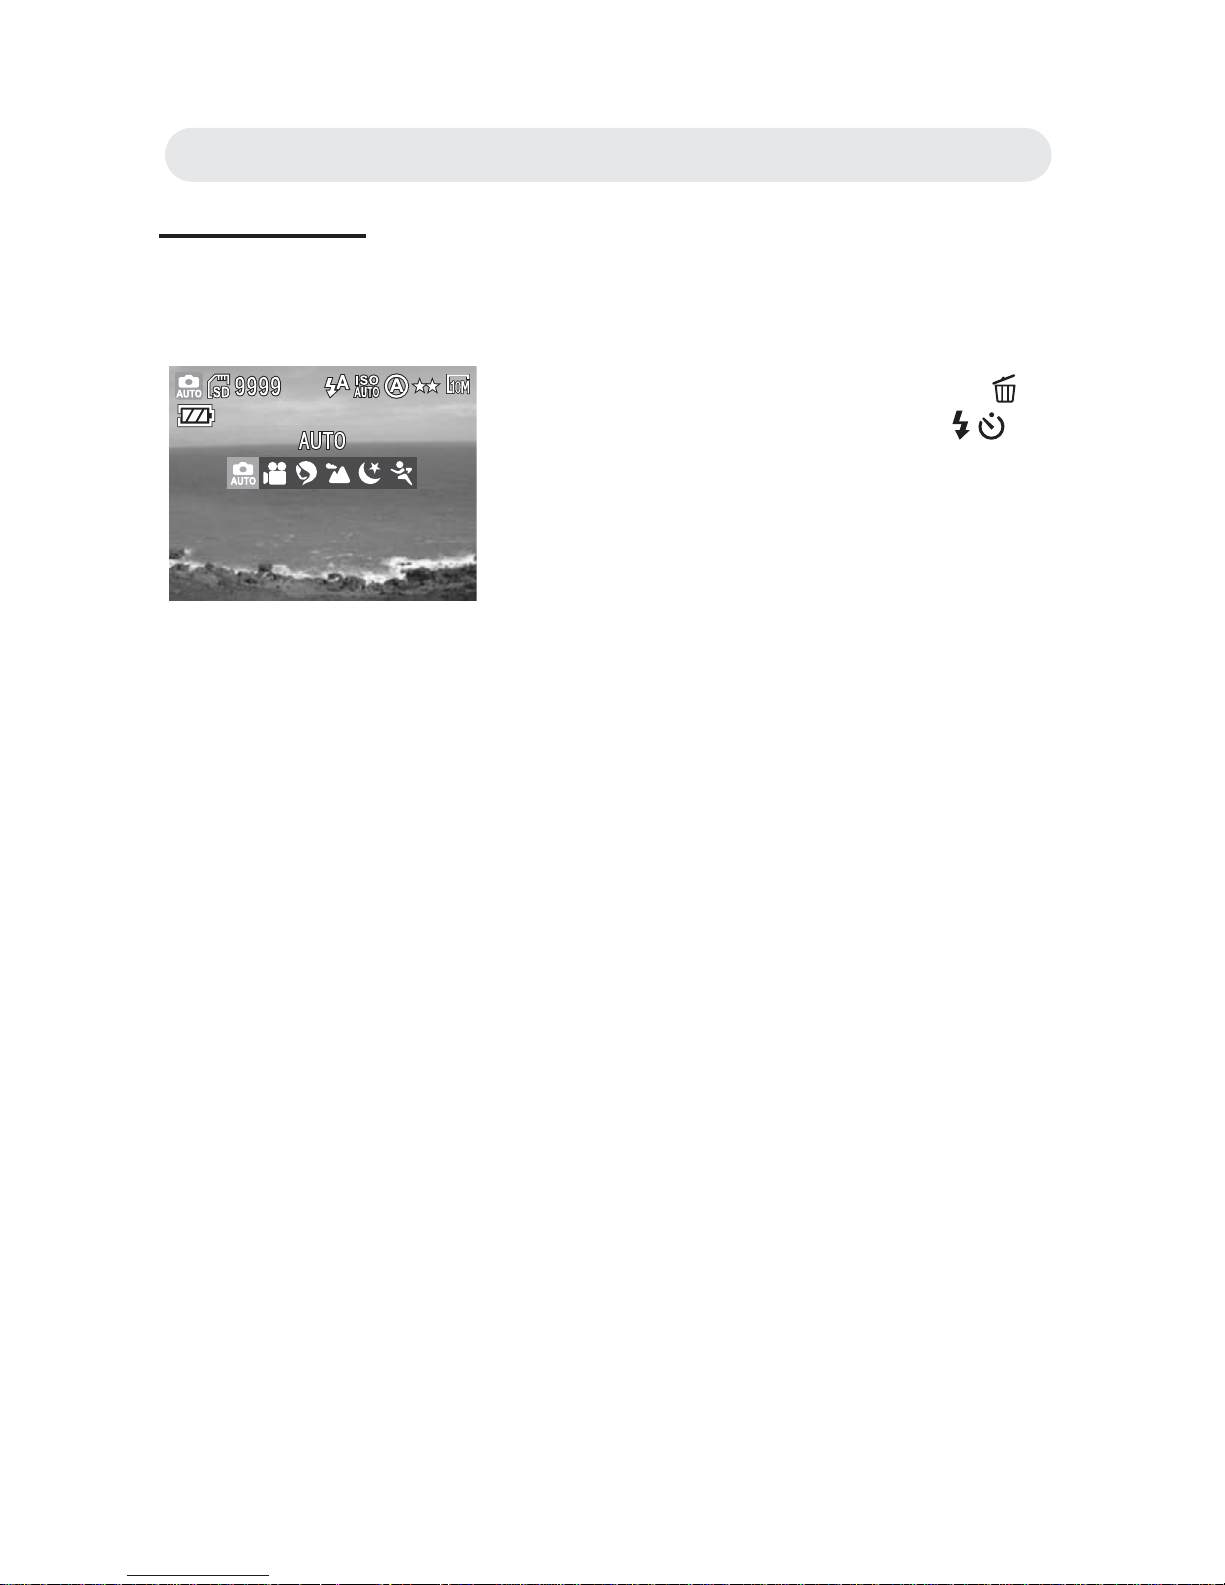
There are six scene mode options (Auto, Video, Portrait, Landscape,
Night scene and Sports modes) of this camera.
• Auto Mode
The simplest way to shoot basic images.
• Video Mode
To get the video clips.
• Portrait
You can take a natural person image.
• Landscape
To take the distant or outdoor scenes.
• Night Scene
The camera will decrease the shutter speed when taking images in the
dark conditions (i.e. at night). We recommend using a tripod.
• Sports
The camera will increase the shutter speed to capture fast-moving
subjects without blurring.
Note: The fl ash mode is “Flash Off” when the scene mode sets to
Landscape and Night.
1 In Capture live view, press the SP/
button to mode option and use
/
button to select the mode.
2 Press the OK button to confi rm all
settings.
Chapter2: Taking Images and Recording Video Clips
Page 25
25
Recording Video Clips
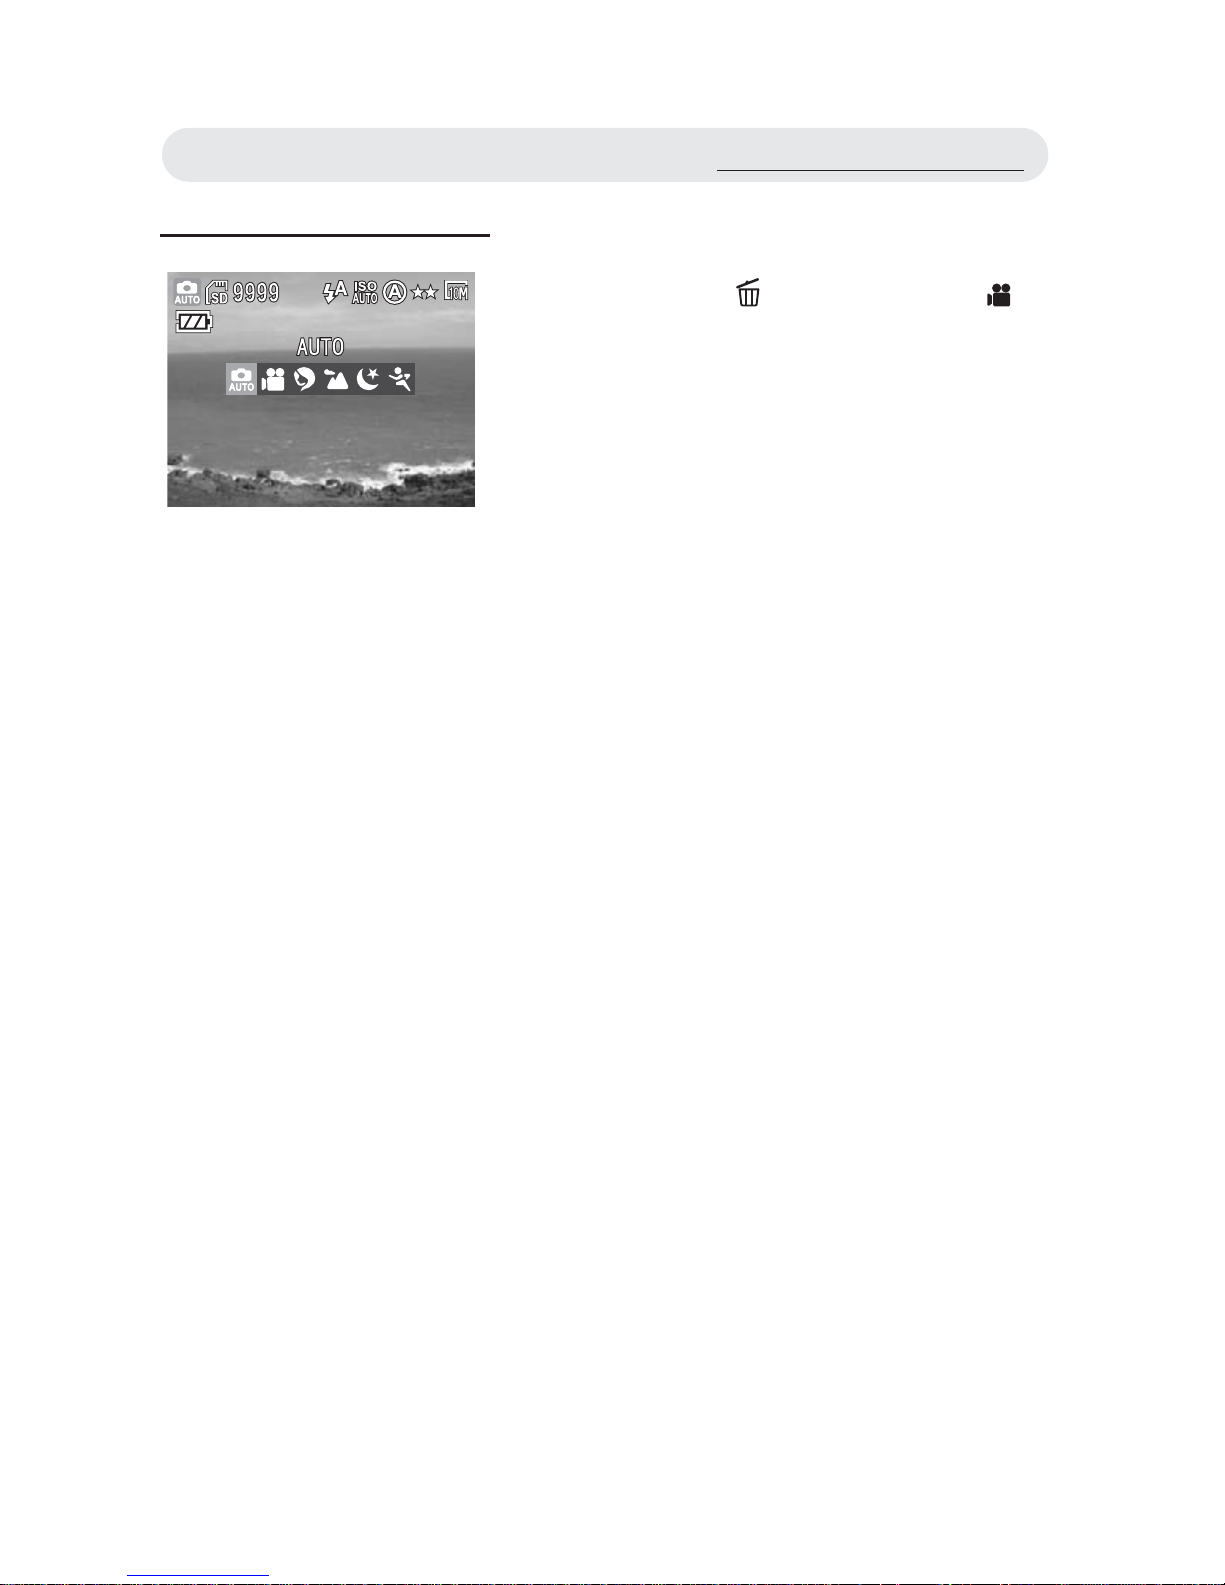
1 Press the SP/ button and select
Video mode.
2 Zoom in or out on your subjects by
pressing the W/T button before you
start recording.
3 Press the shutter release button halfway
down and hold it to set the focus and
exposure.
4 Press the shutter release button down
fully to start recording.
5 Press the shutter release button again
to stop recording.
Recording Video Clips
Page 26
26
Using the Capture/Video Menu
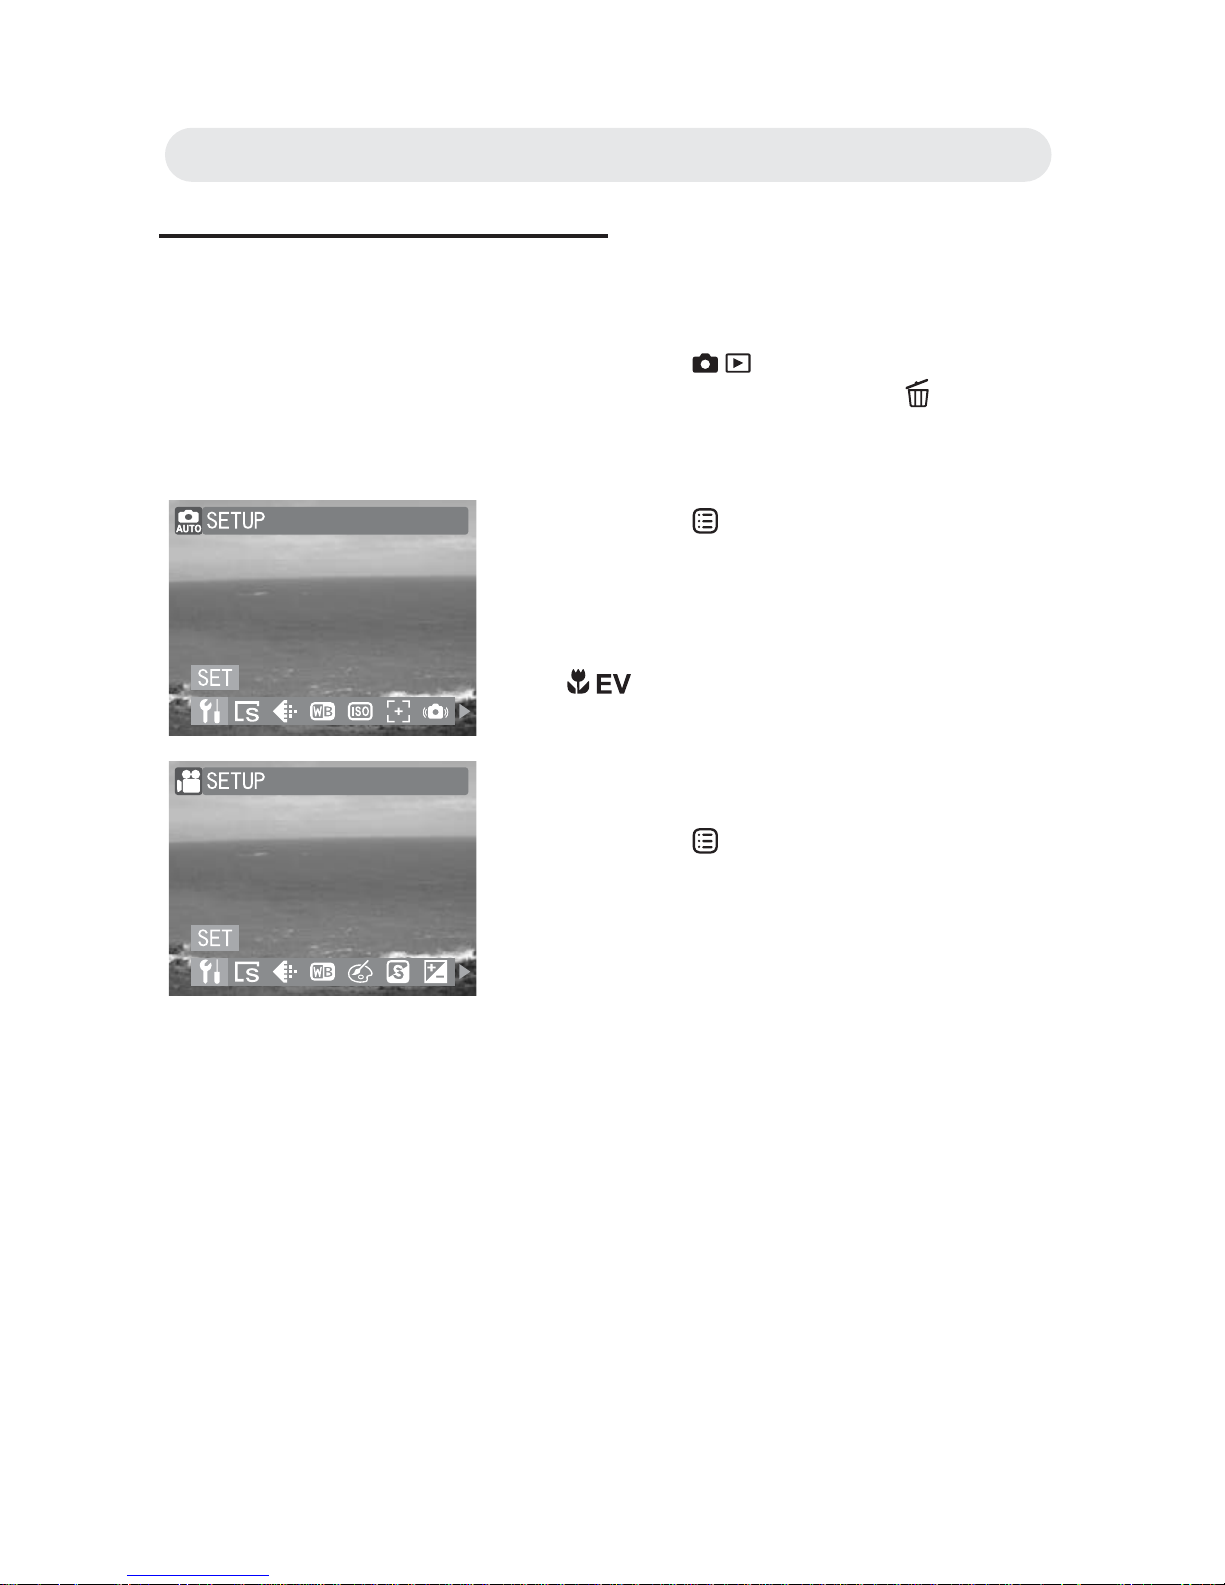
You can adjust image and video settings through the capture menu.
1 Press the / button to select
Capture mode or press SP/
button to
select Video mode.
2 Press the button to enter the capture
or video menu.
3 Scroll through the menu by pressing
/ button and highlight the option
you wish to select. Press the OK button
to confi rm all settings.
4 Press the button or shutter release
button halfway down to return to the
Capture or Video mode live view.
Chapter2: Taking Images and Recording Video Clips
Page 27
27
Setting Image Size (Resolution)
Changing the image size affects the number of images that can be stored
on your memory card. You can capture more detailed images with higher
resolutions. The higher the resolution, the more memory space will be
required.
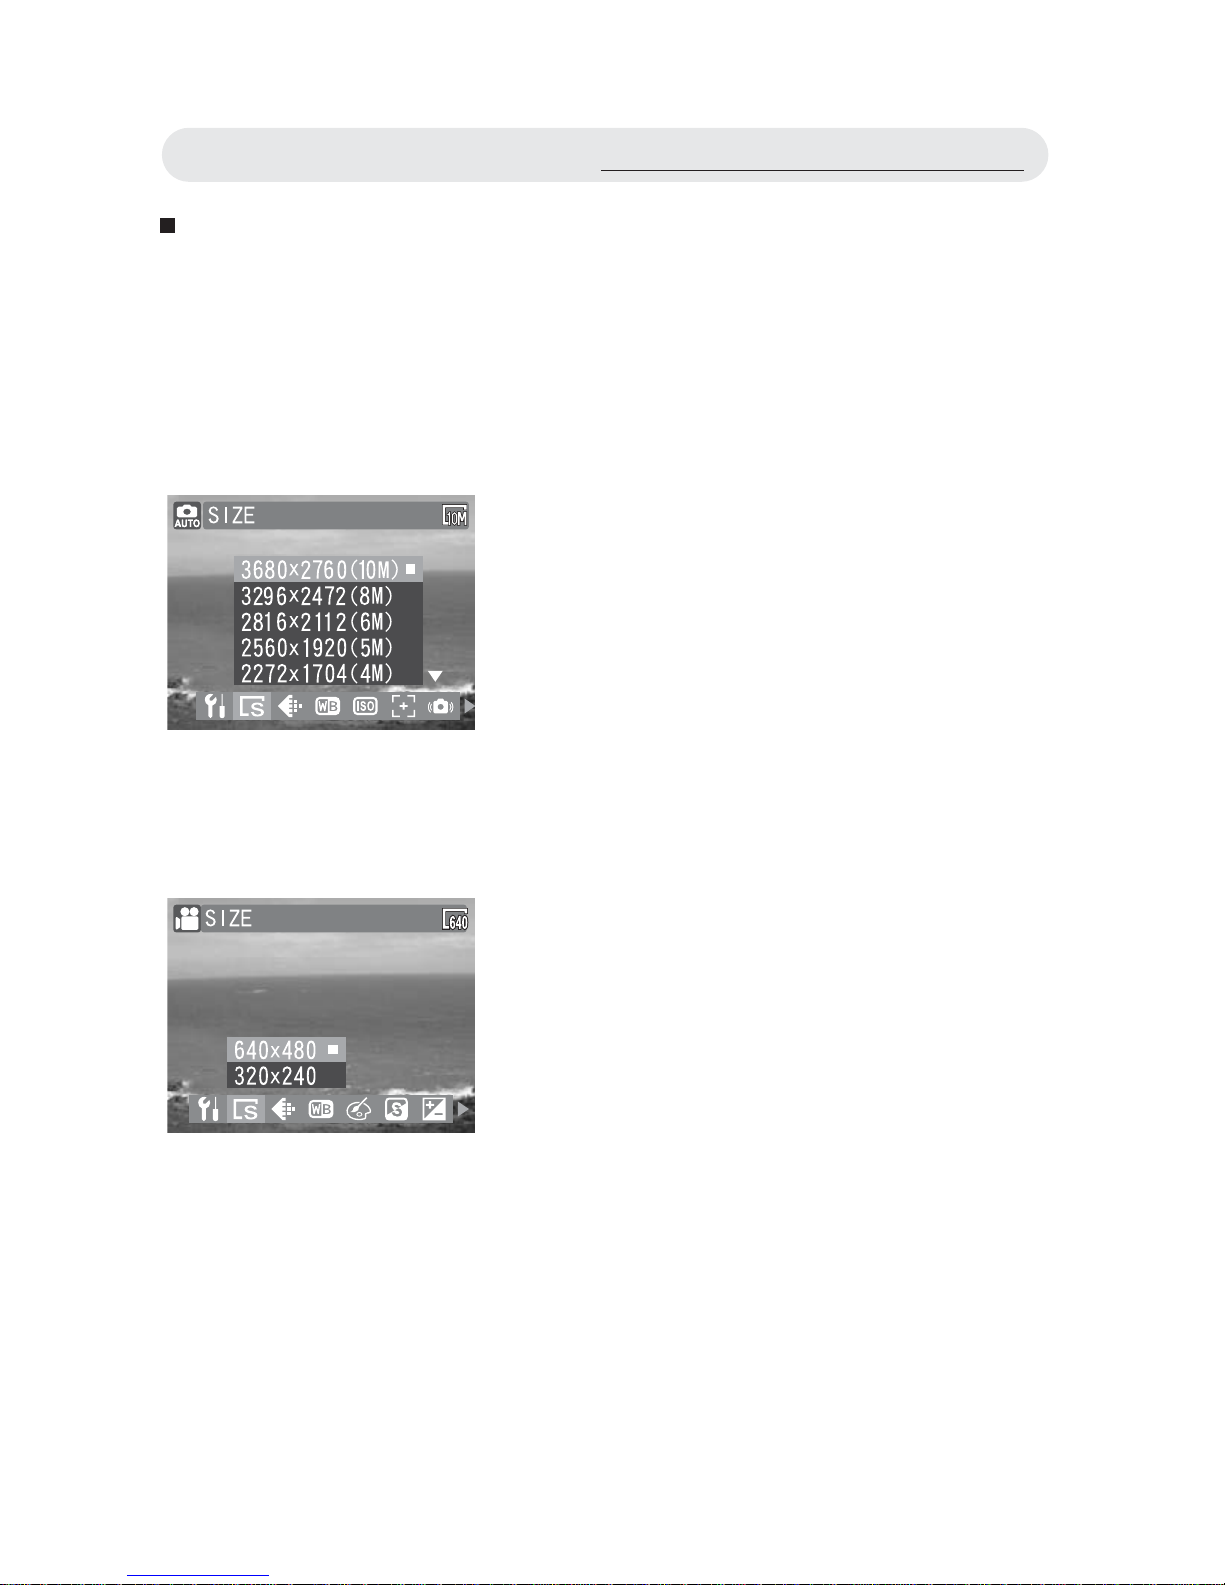
• Setting Size (for Still Images)
• Setting Size (for Video Clips)
1 In Capture menu, select “SIZE”.
2 Select “3680 x 2760(10M)”,
“3296 x 2472(8M)”, “2816x2112(6M)”,
“2560x1920(5M)”, “2272x1704(4M)”,
“2048x1536(3M)”, or “640x480(VGA)”.
3 Press OK button to confi rm the setting.
1 In Video menu, select “SIZE”
2 Select “640x480” or “320x240”.
3 Press OK button to confi rm the setting.
Using the Capture/Video Menu
Page 28
28
Setting Quality
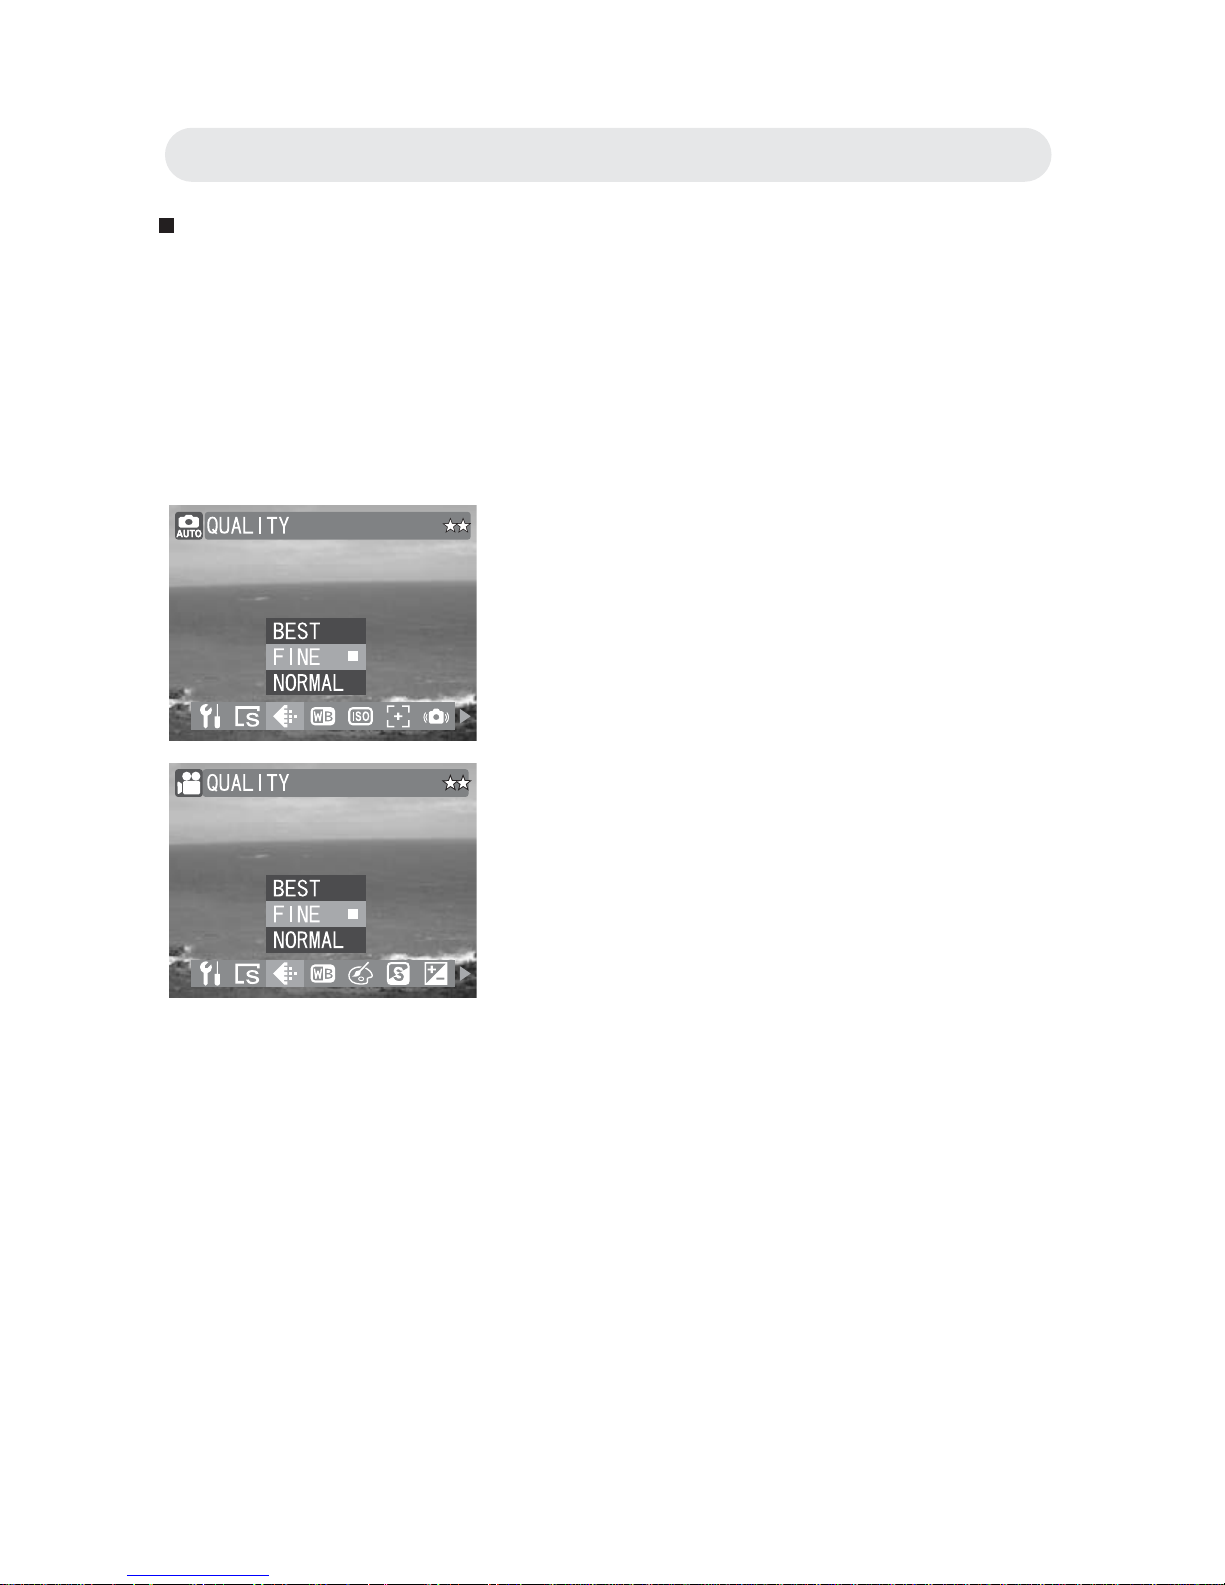
The camera features three quality settings. Image quality determines the
compression applied to your photo or video. The higher the quality, the
less the compression applied, resulting in a more detailed image. These
more detailed images require more memory space. The lower the quality,
the lower the compression and detail, and the less memory will be space
required.
1 In Capture/Video menu, select
“QUALITY”.
2 Select “BEST”, “FINE” or “NORMAL”.
3 Press OK button to confi rm the setting.
Chapter2: Taking Images and Recording Video Clips
Page 29
29
Setting White Balance
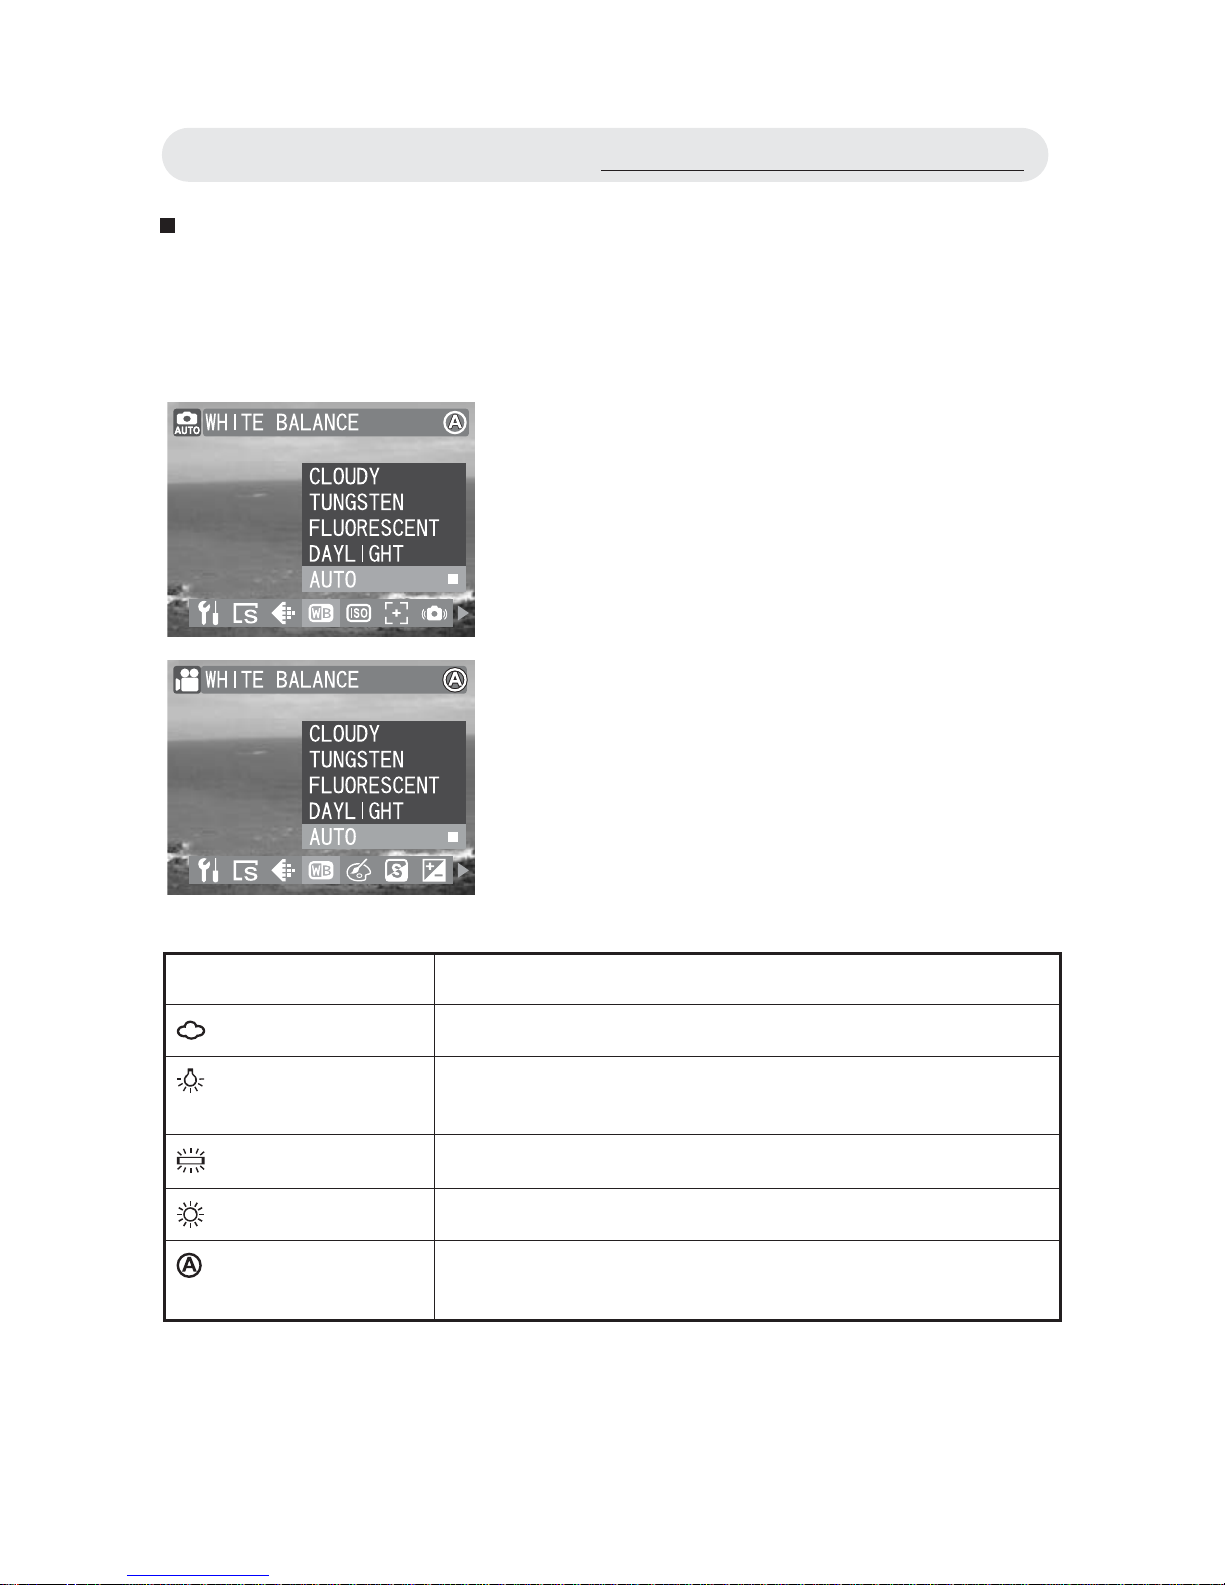
You can select the appropriate setting depending on the lighting
condition of your surroundings. White Balance will adjust color levels that
are affected by these lighting conditions.
1 In Capture/Video menu, select WHITE
BALANCE”.
2 Select “CLOUDY”, “TUNGSTEN”,
“FLUORESCENT”, “DAYLIGHT”, or
“AUTO”.
3 Press OK button to confi rm the setting.
Setting Function
CLOUDY
Setting for shooting in overcast condition.
TUNGSTEN
Setting for shooting in incandescent or halogen
condition.
FLUORESCENT
Setting for shooting in fl uorescent condition.
DAYLIGHT
Setting for shooting in sunny condition.
AUTO
The camera will automatically adjust settings
depending on the level of light available.
Using the Capture/Video Menu
Page 30
30
Chapter2: Taking Images and Recording Video Clips
Setting ISO (Sensitivity)
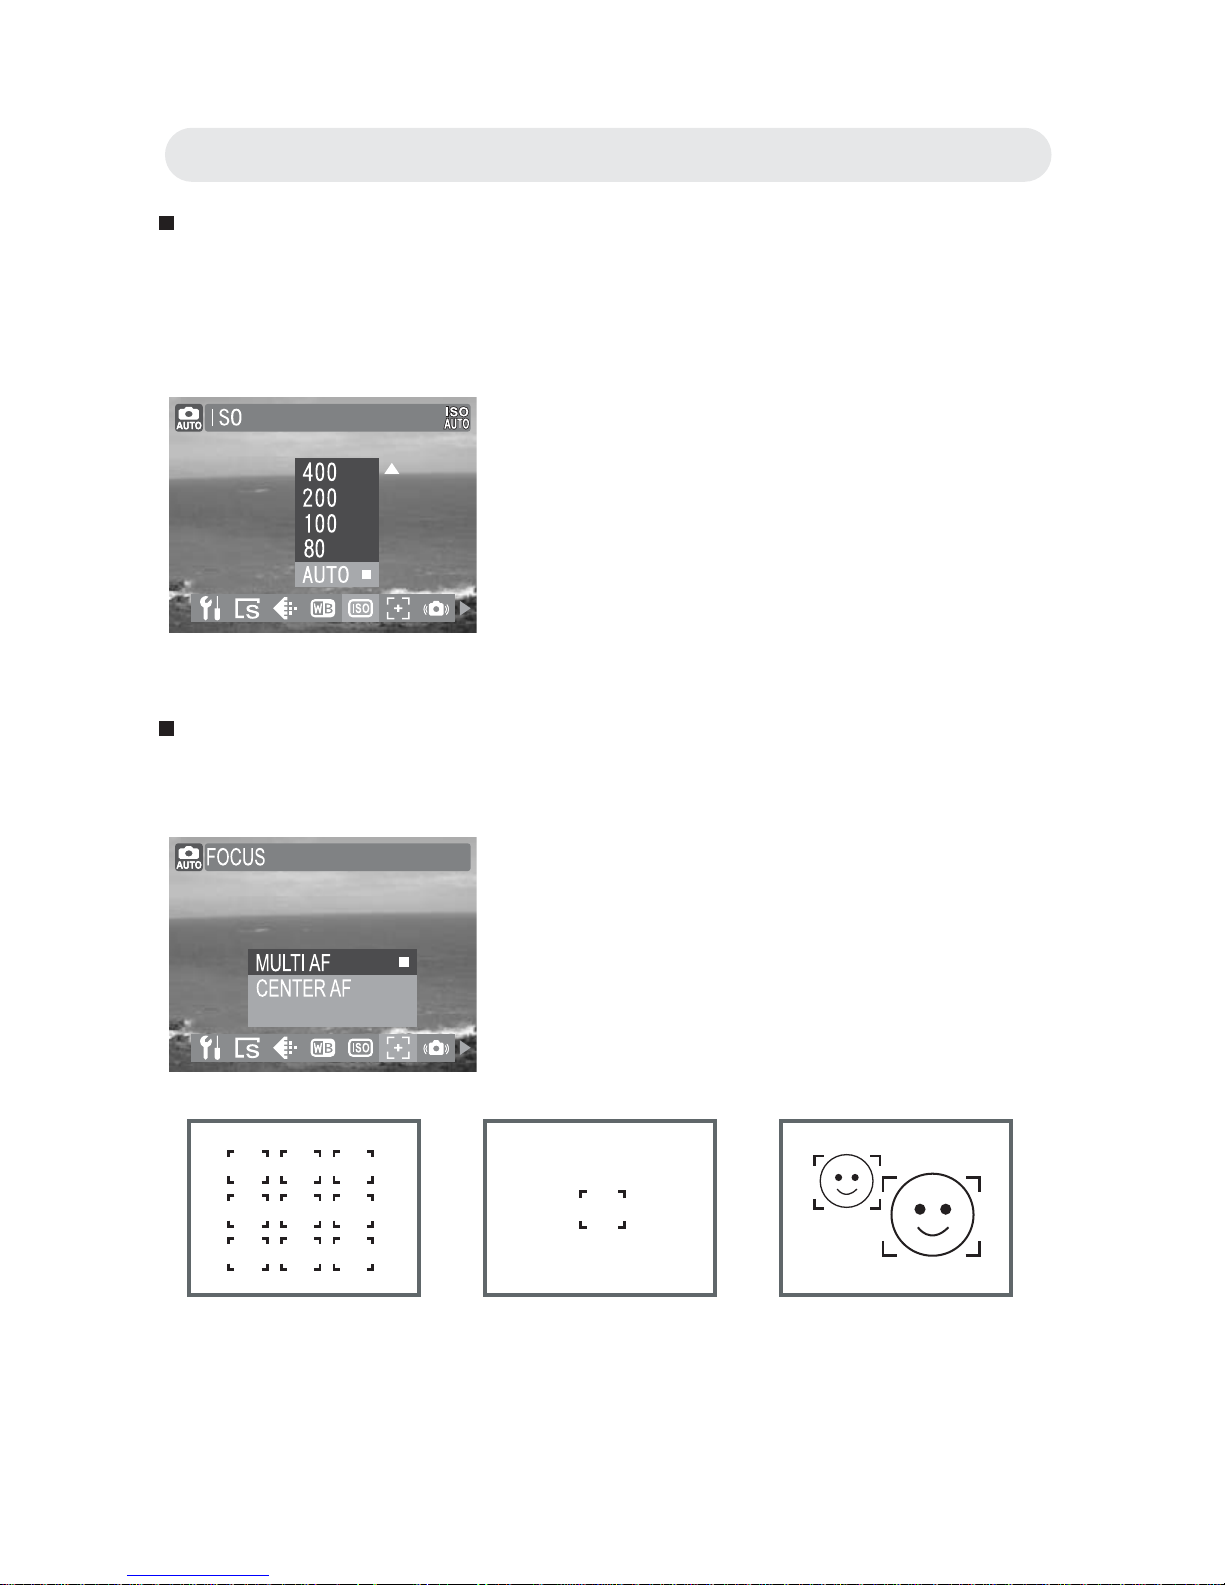
Adjust the ISO value depending on the lighting levels of your
surroundings; use a high ISO setting in dim conditions and a lower ISO
setting in brighter conditions.
Setting Focus
The AF frame helps you to get the area on which the camera focuses.
1 In Capture menu, select “ISO”.
2 Select “1000”, “800”, “400”, “200”, “100”
, “80”or “AUTO”.
3 Press OK button to confi rm the setting.
1 In Capture menu, select “FOCUS”.
2 Select “MULTI AF” , “CENTER AF” or
“FACE TRACKING” .
3 Press OK button to confi rm the setting.
FACE TRACKING
Muti AF Center AF Face Tracking
Page 31
31
Setting Anti-shake
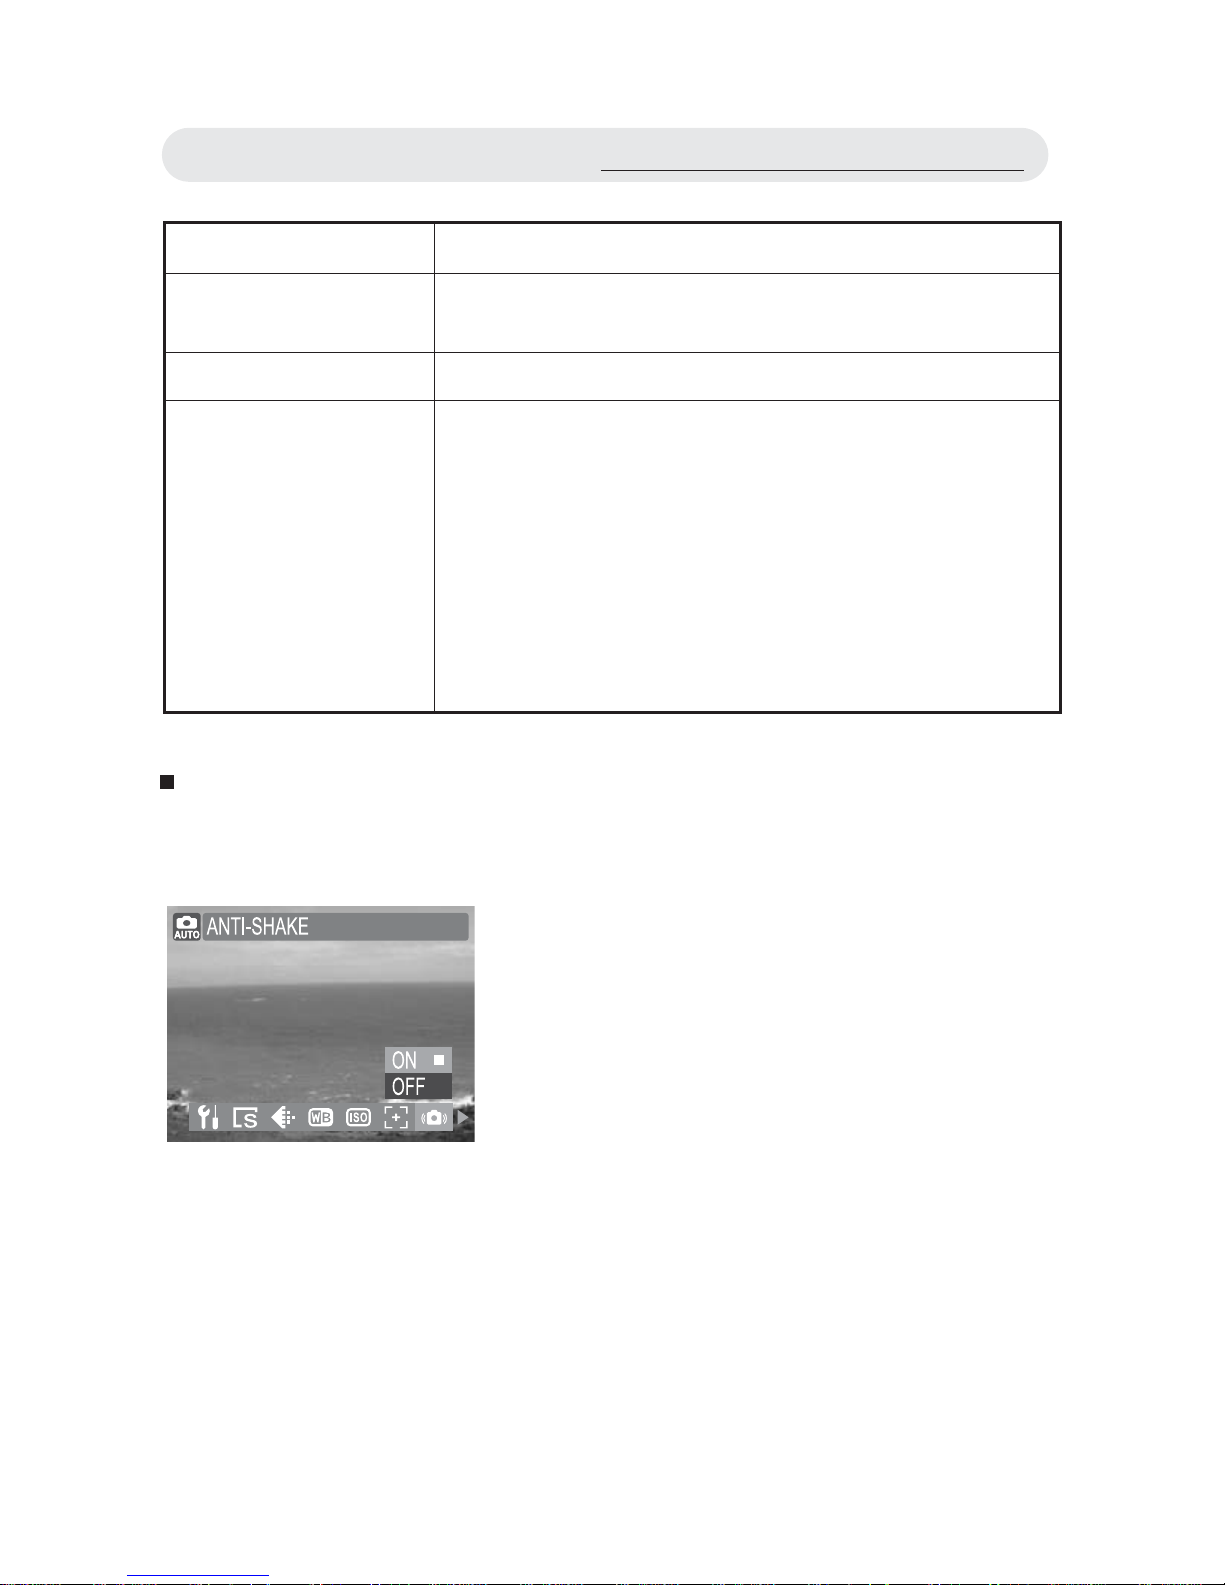
In a bad light, Anti-shake will help you to get a nice image without using
fl ash.
1 In Capture menu, select “ANTI-SHAKE”.
2 Select “ON” or “OFF”.
3 Press OK button to confi rm the setting.
Note: The Anti-shake is “OFF“ when the
ISO sets to “Auto“.
Using the Capture/Video Menu
Setting Function
MULTI AF The camera will see the shooting conditions and
select among the nine focus frames to focus on.
CENTER AF The camera uses the center focus frame to focus on.
FACE TRACKING The camera will detect and focus on faces
automatically.
Note 1: If no face is detected, the Focus mode
will automatically set to Multi AF.
Note 2: You can use the FACE TRACKING
function to take pictures of yourself. If
the AF LED lights up a solid red, your
face is in focus, if the AF LED fl ashes
red, your face is out of the focus.
Page 32
32
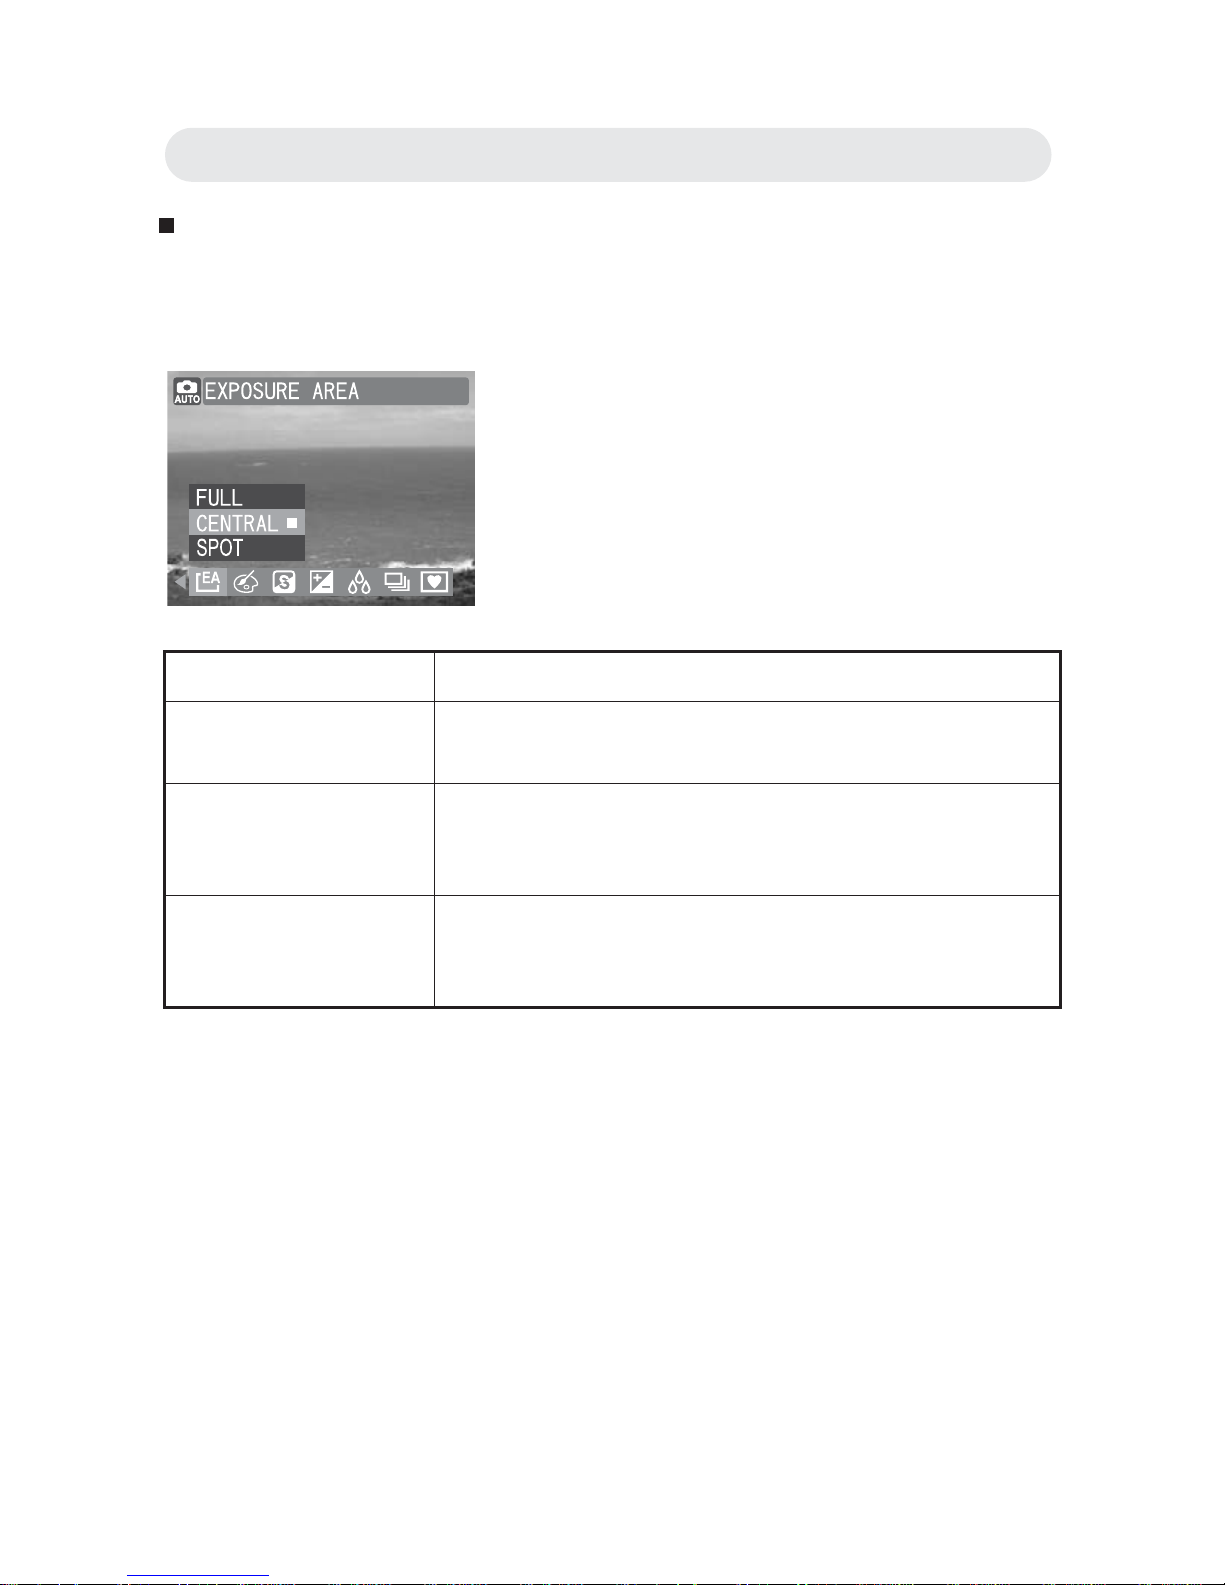
Setting Exposure Area
The camera will measure the brightness of the selected area in order to
determine the exposure level.
1 In Capture menu, select “EXPOSURE
AREA”.
2 Select “FULL” , “CENTRAL”or “SPOT”.
3 Press OK button to confi rm the setting.
Setting Function
FULL Measures brightness level from the entire
capture in order to determine exposure level.
CENTRAL Measures brightness level from the central area
of the capture in order to determine exposure
level.
SPOT Meters the exposure value from a very small
area in the center of screen only. Use this mode
to shoot pictures with a specifi c exposure area.
Chapter2: Taking Images and Recording Video Clips
Page 33
33
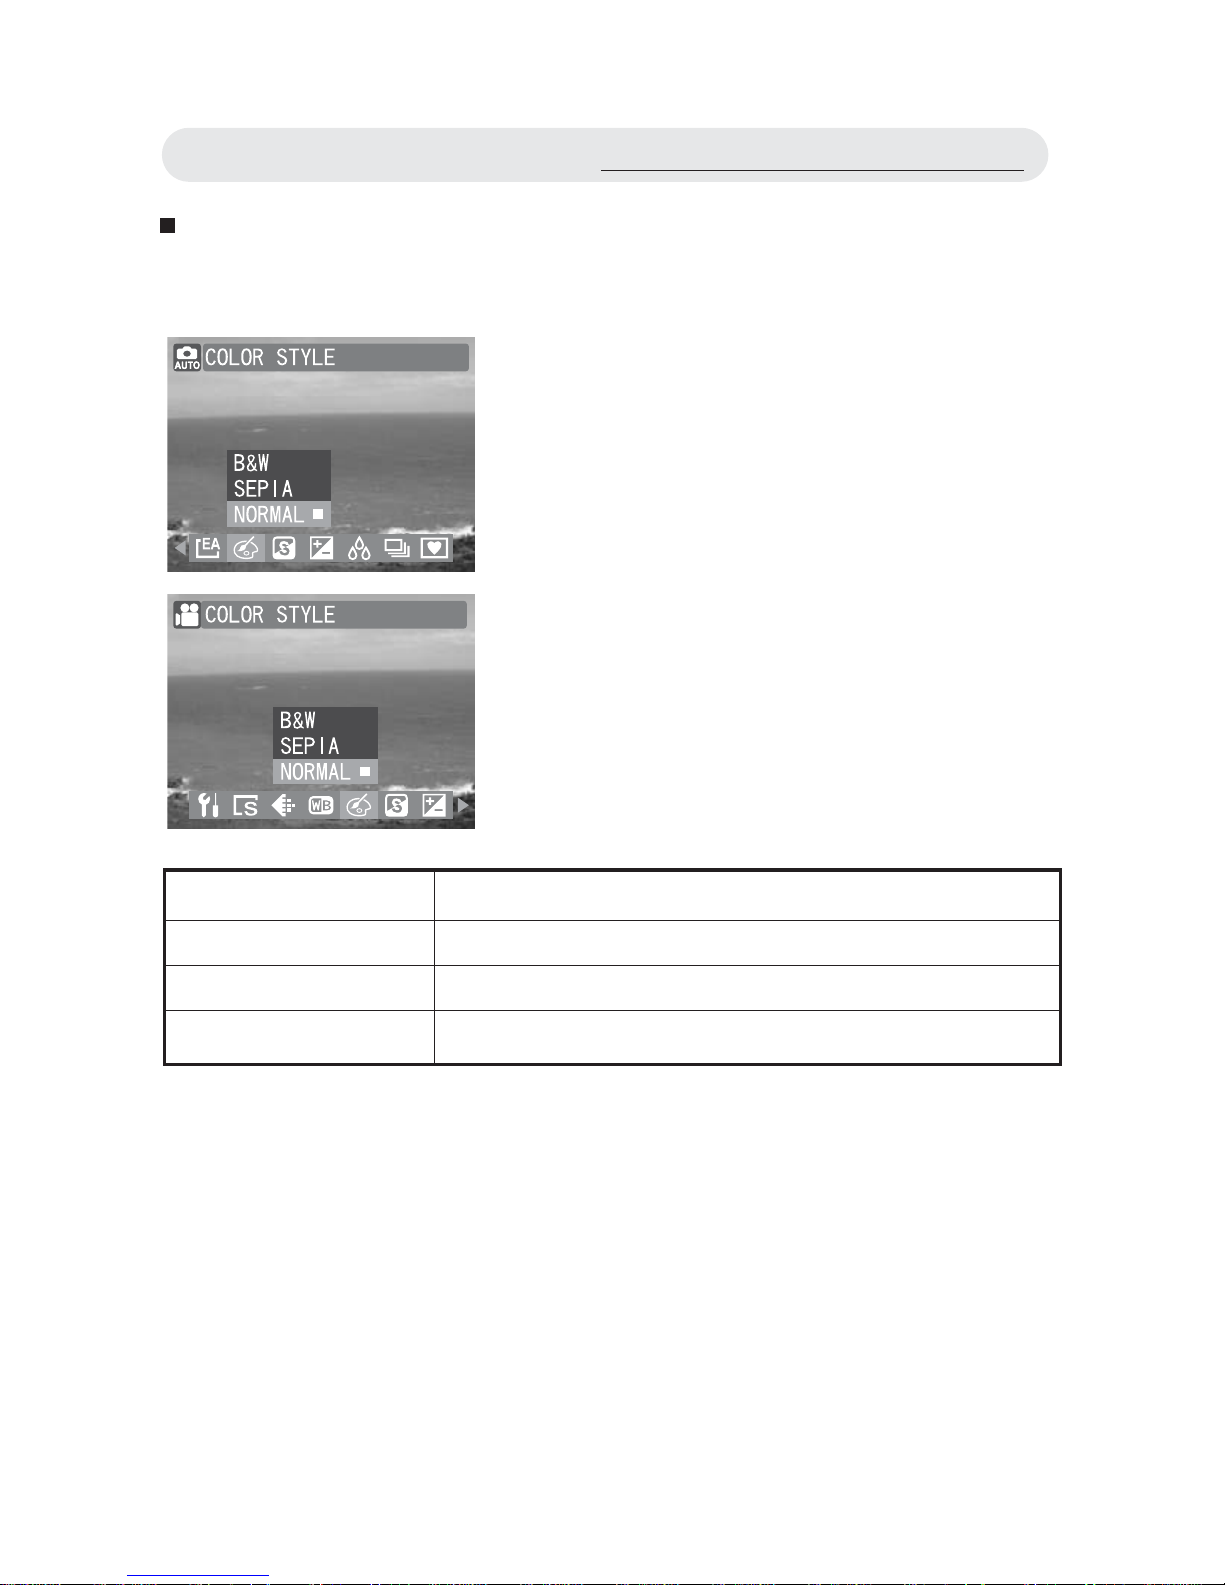
Color Style
Adjust the color style to change the color of the fi nal image.
1 In Capture/Video menu, select
“COLOR STYLE”.
2 Select “B&W”, “SEPIA” or “NORMAL”.
3 Press OK button to confi rm the setting.
Setting Function
B&W Takes the photo in black and white.
SEPIA Takes the photo in sepia (a vintage effect).
NORMAL Takes the photo without any special effects.
Using the Capture/Video Menu
Page 34
34
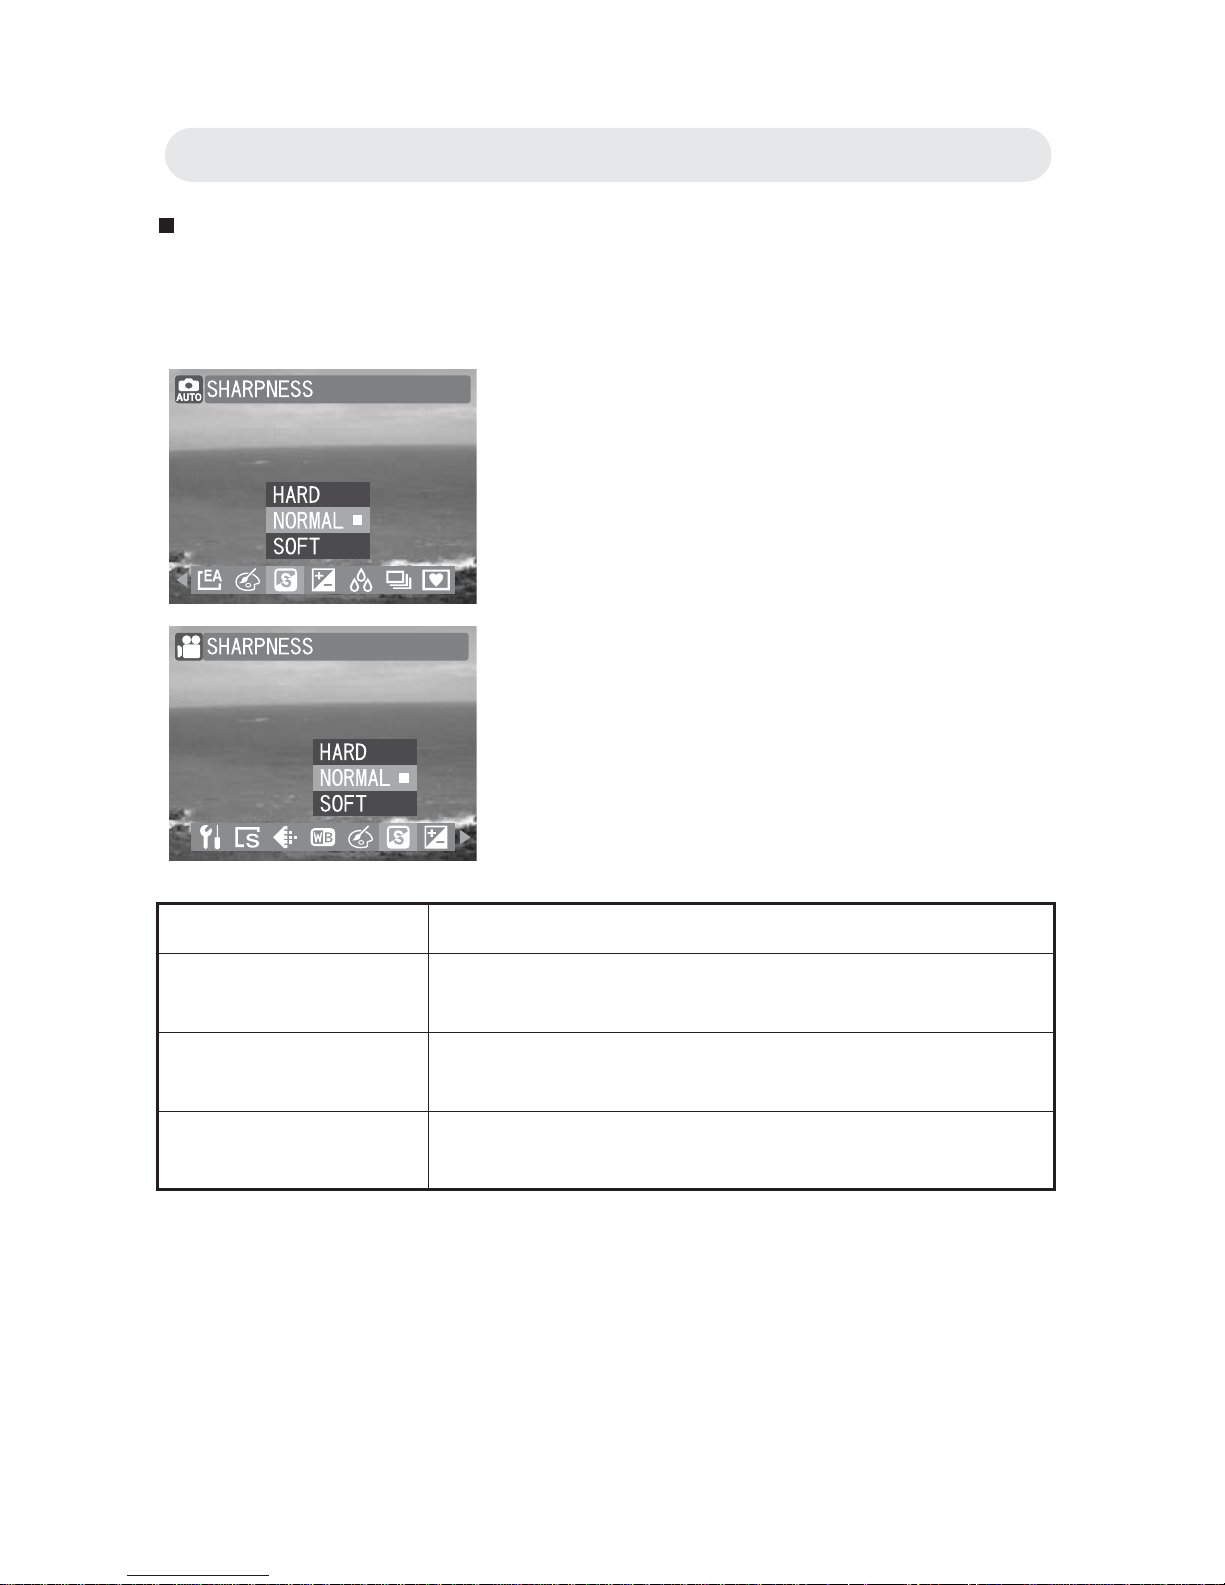
Setting Sharpness
Adjust the sharpness settings to emphasize or soften the overall appearance of the image.
1 In Capture/Video menu, select
“SHARPNESS”.
2 Select “HARD”, “NORMAL” or “SOFT”.
3 Press OK button to confi rm the setting.
Setting Function
HARD Emphasizes all subjects in the image. Outlines
and edges are emphasized and stand out.
NORMAL The image is captured without any adjustments
to sharpness levels.
SOFT Softens all subjects in the image. Outlines and
edges are softened.
Chapter2: Taking Images and Recording Video Clips
Page 35
35
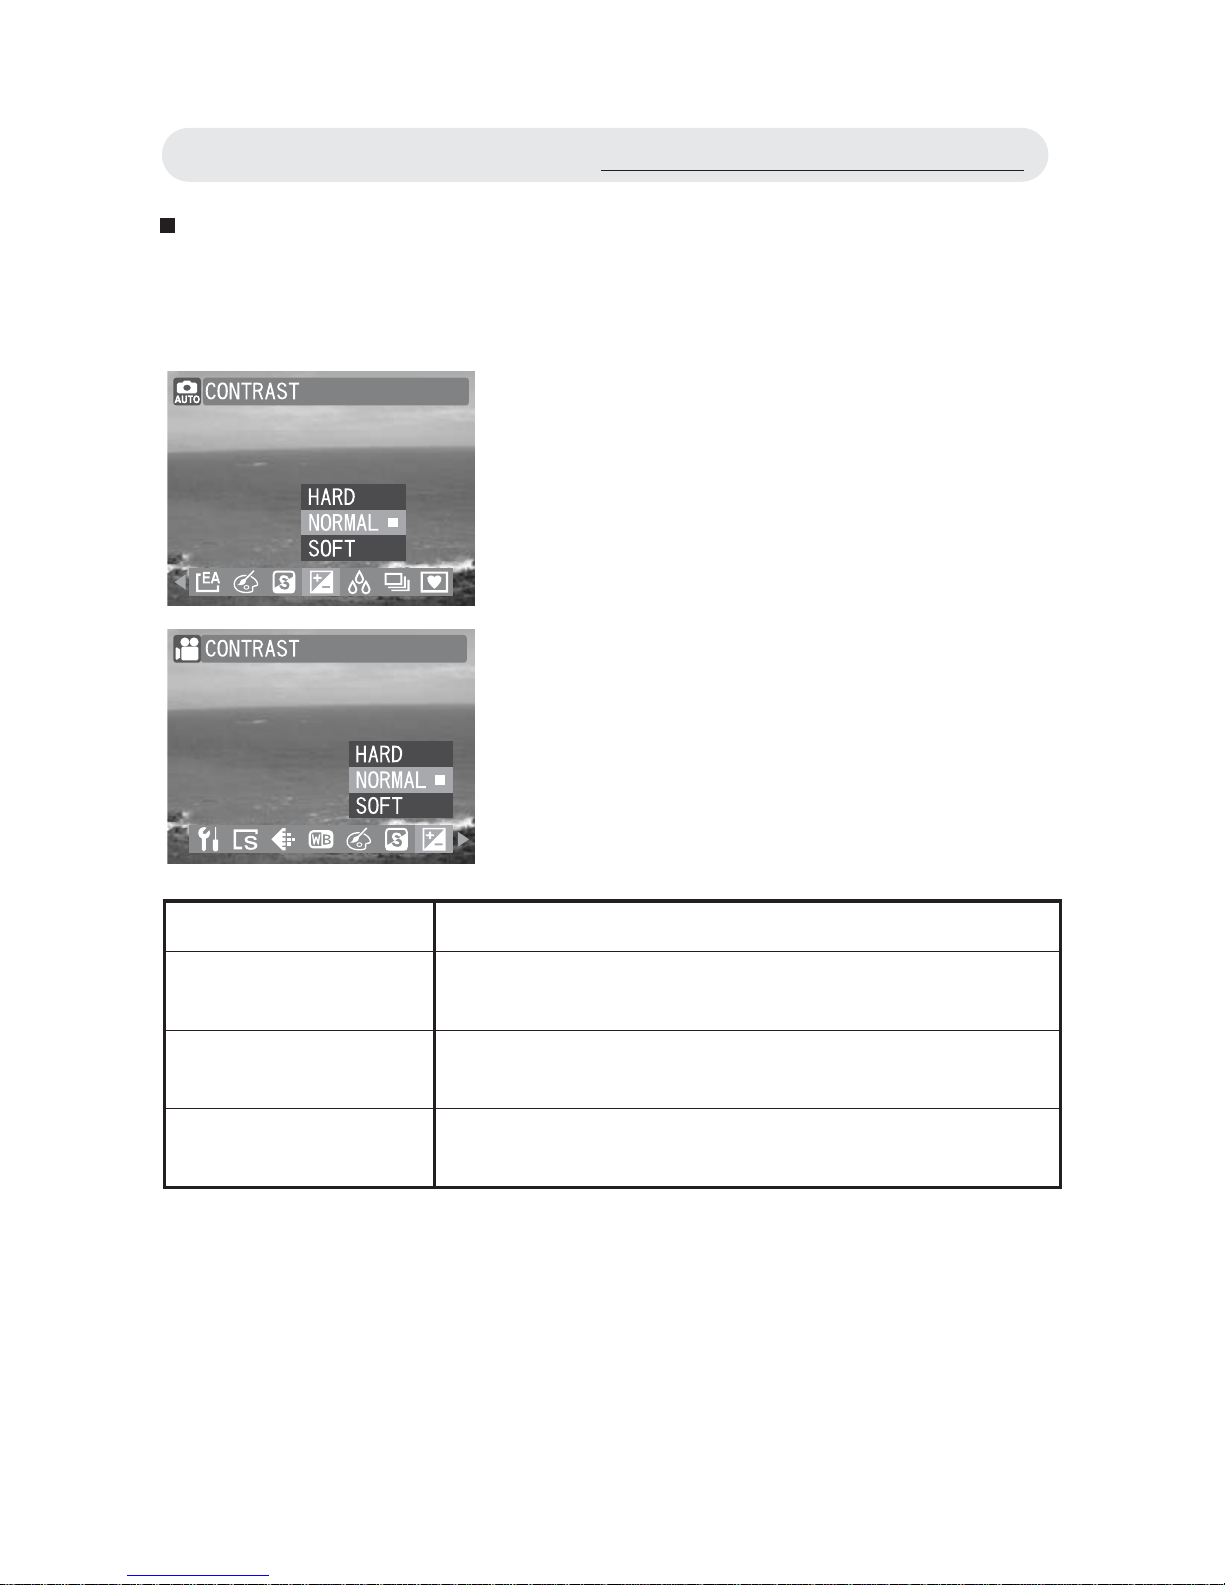
Setting Contrast
Adjust the Contrast setting to alter the distinction between light and dark
in the image; the result is a harder or softer appearance of the fi nal image.
1 In Capture/Video menu, select
“CONTRAST”.
2 Select “HARD”, “NORMAL” or “SOFT”.
3 Press OK button to confi rm the setting.
Setting Function
HARD The image is hardened, by defi ning light and
dark areas more clearly.
NORMAL The image is captured without any adjustments
to contrast levels.
SOFT The image is softened, by defi ning light and dark
areas less clearly.
Using the Capture/Video Menu
Page 36
36
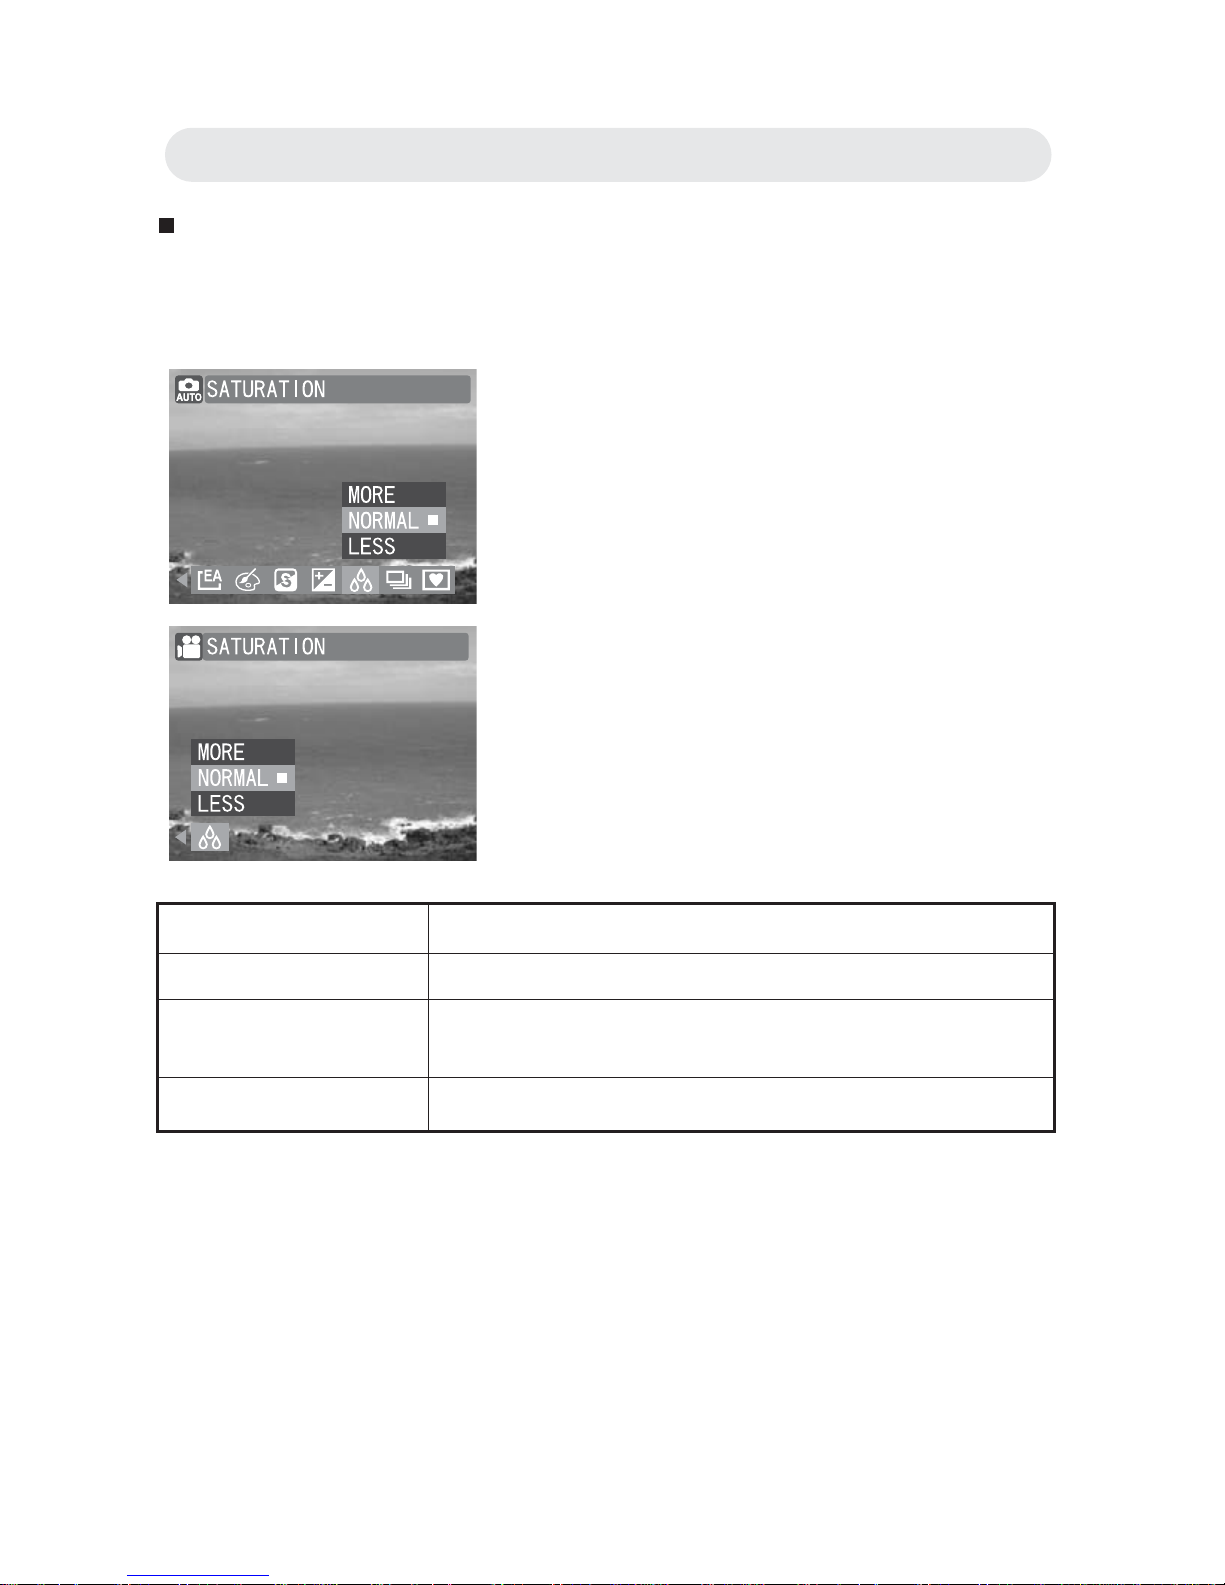
Setting Saturation
Adjust the Saturation setting to alter the intensity and purity of the color.
The higher the saturation setting, the more vivid the image is.
1 In Capture/Video menu, select
“SATURATION”.
2 Select “MORE”, “NORMAL” or “LESS”.
3 Press OK button to confi rm the setting.
Setting Function
MORE Makes images look more vivid.
NORMAL The image is captured without any adjustments
to saturation levels.
LESS Makes images look duller.
Chapter2: Taking Images and Recording Video Clips
Page 37
37
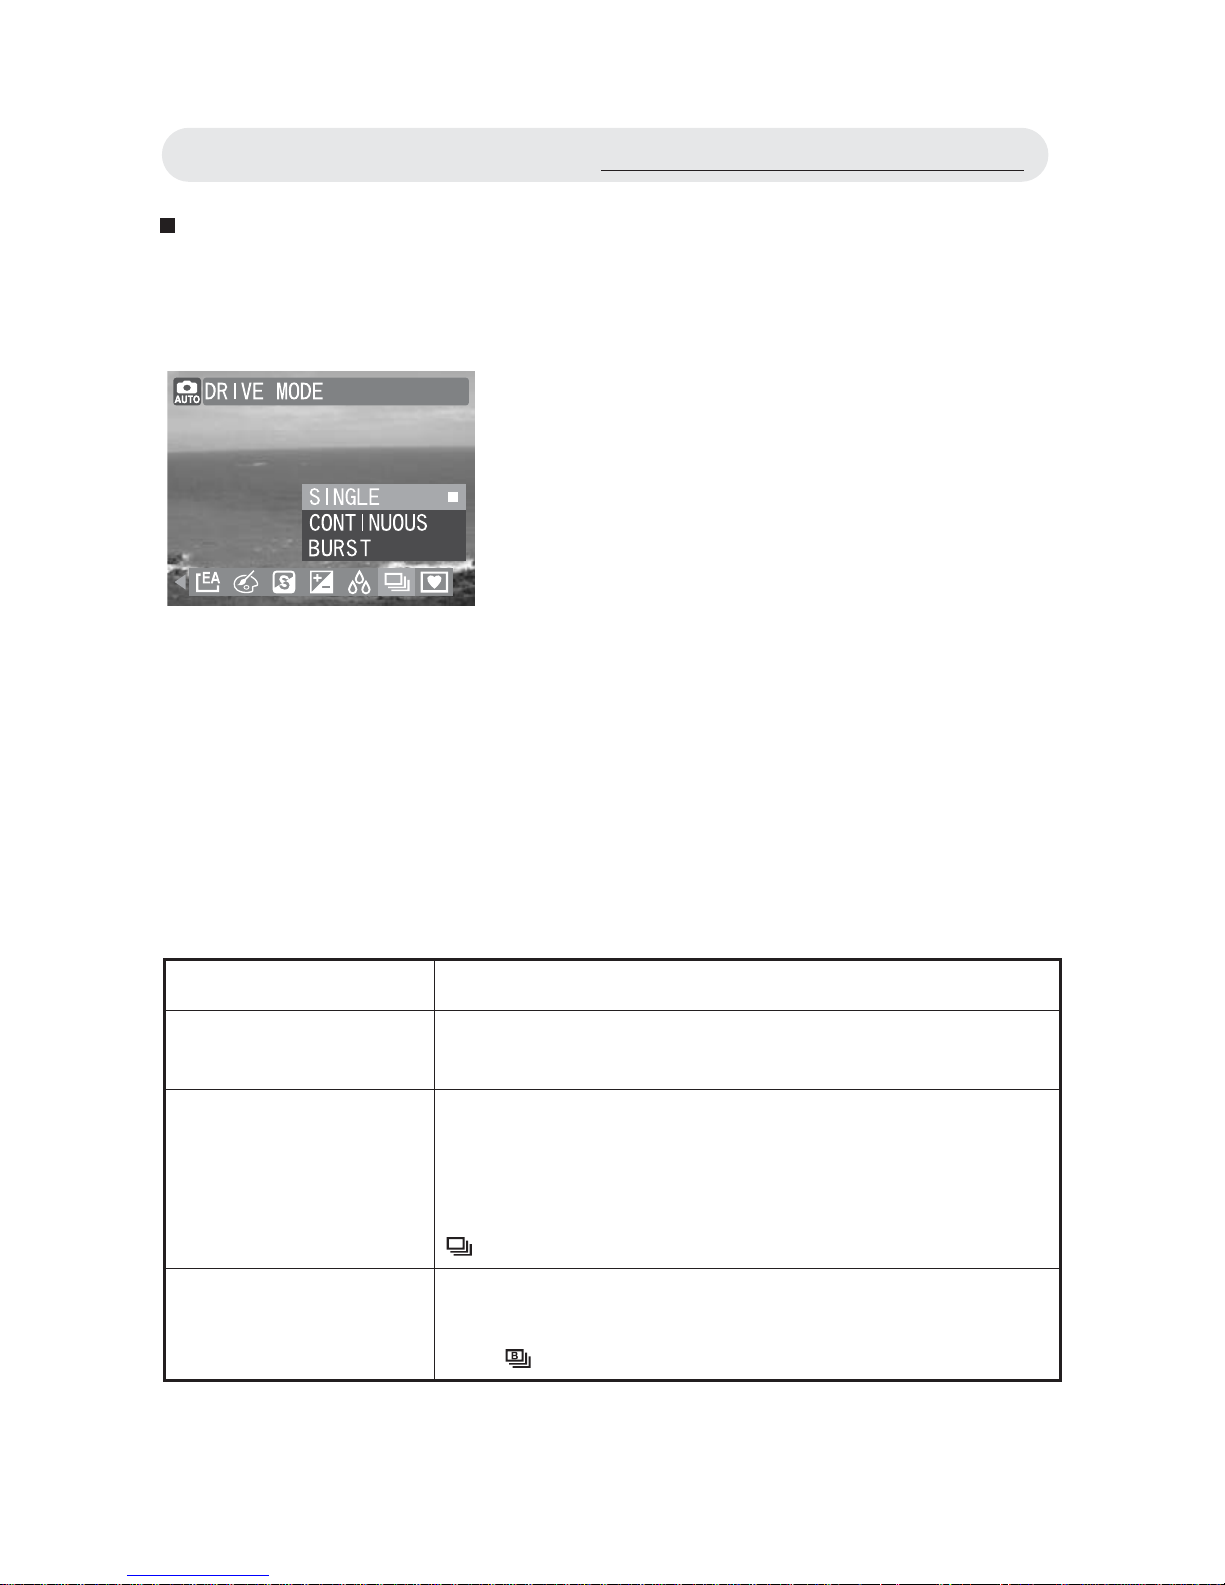
Setting Drive Mode
When you select DRIVE MODE in the capture menu, you can choose
from three shooting modes: Single, Continuous and Burst modes.
Note 1: The fl ash mode and self-timer is “Off” when using
“CONTINUOUS” and “BURST”.
Note 2: The CONTINUOUS mode will stopped when the SD card or the
internal memory is full. A “CARD FULL” warning appears on the
LCD .
1 In Capture menu, select “DRIVE
MODE”.
2 Select “SINGLE”, “CONTINUOUS” or
“BURST”.
3 Press OK button to confi rm the setting.
Setting Function
SINGLE Takes a single image. Press the shutter release
button once to capture the image.
CONTINUOUS
Takes a series of images when you press down
and hold the shutter release button. The camera
will continue to take images until you release the
shutter release button. When selected, the icon
appears on the LCD monitor.
BURST
Takes 5 images when you press down the
shutter release button once. When selected, the
icon
appears on the LCD monitor.
Using the Capture/Video Menu
Page 38
38
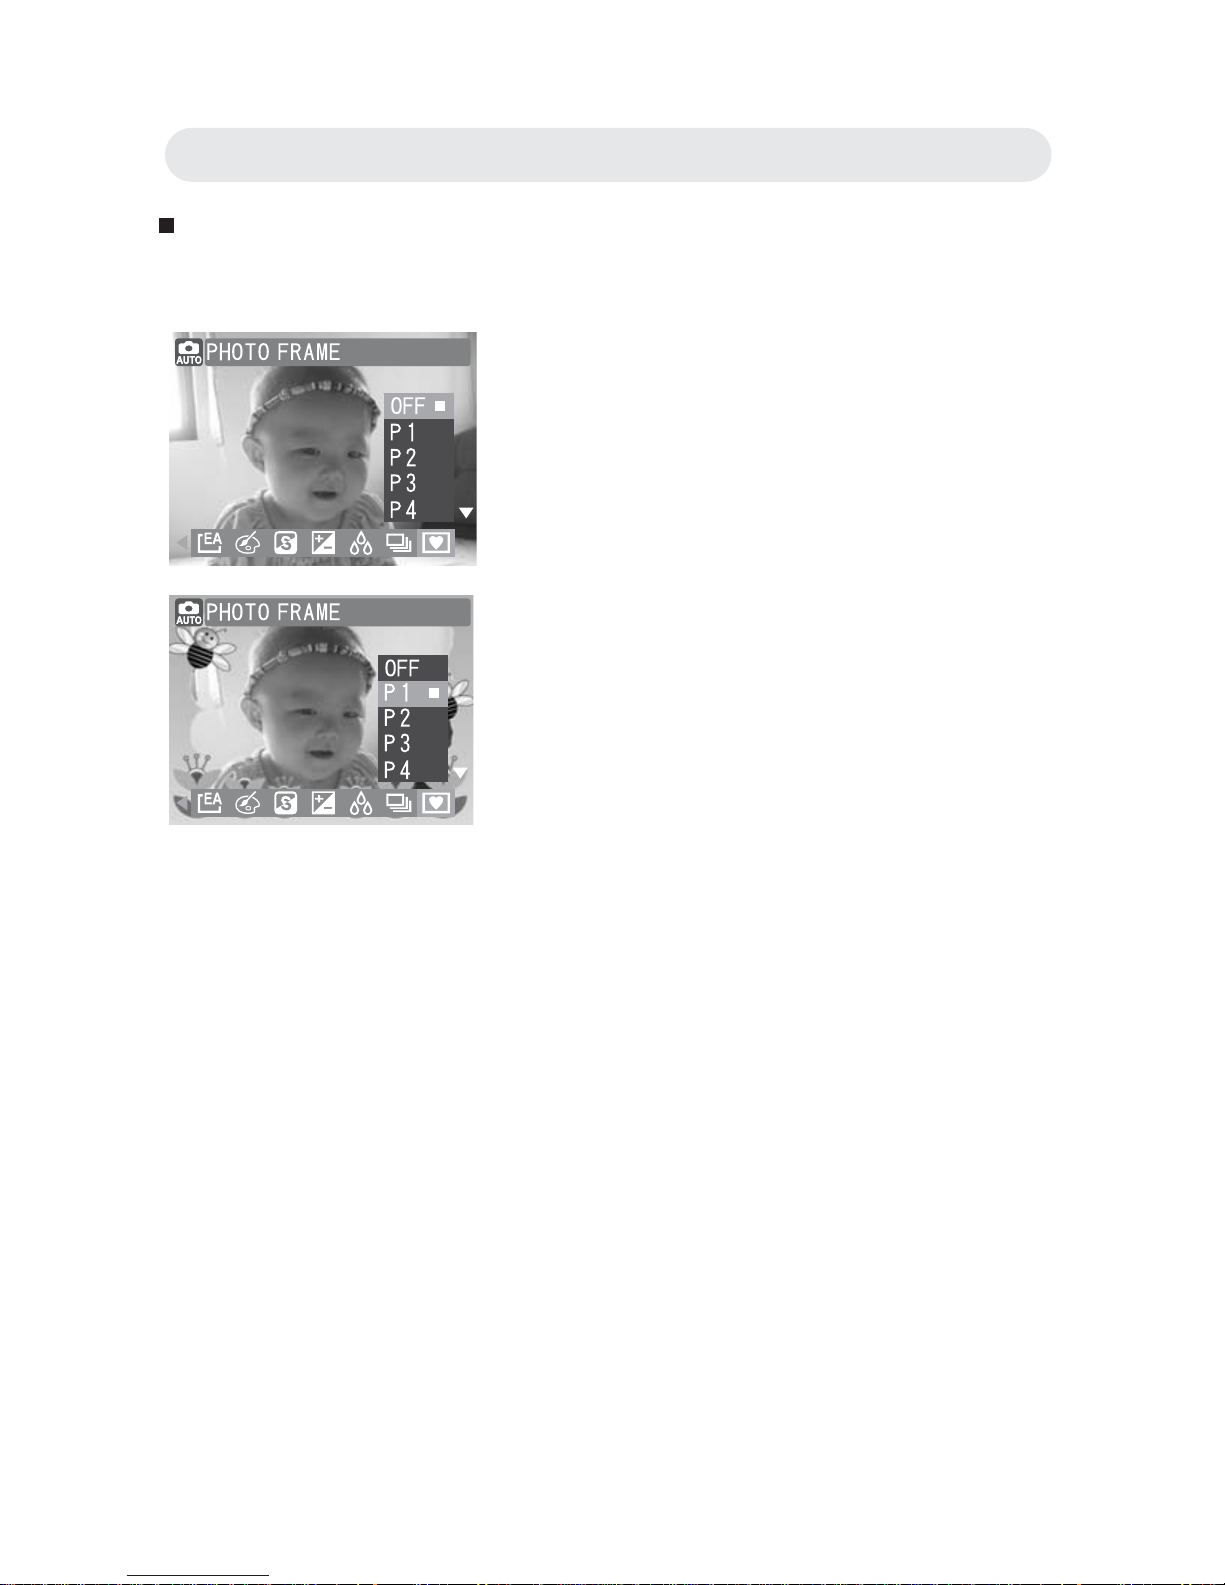
Setting Photo Frame
You can add frames to your photos by using Photo Frame.
1 In Capture menu, select “PHOTO
FRAME”.
2 Select “OFF”, “P1”, “P2”, “P3”, “P4”,
“P5”, “P6”, “P7”, “P8” or “P9”.
3 Press OK button to confi rm the setting
and take your picture with the Photo
Frame.
Note 1: The Digital zoom cannot be used
when using “Photo Frame”.
Note 2: When using “Photo Frame”,
Continuous and Burst cannot be
used.
Chapter2: Taking Images and Recording Video Clips
Page 39
39
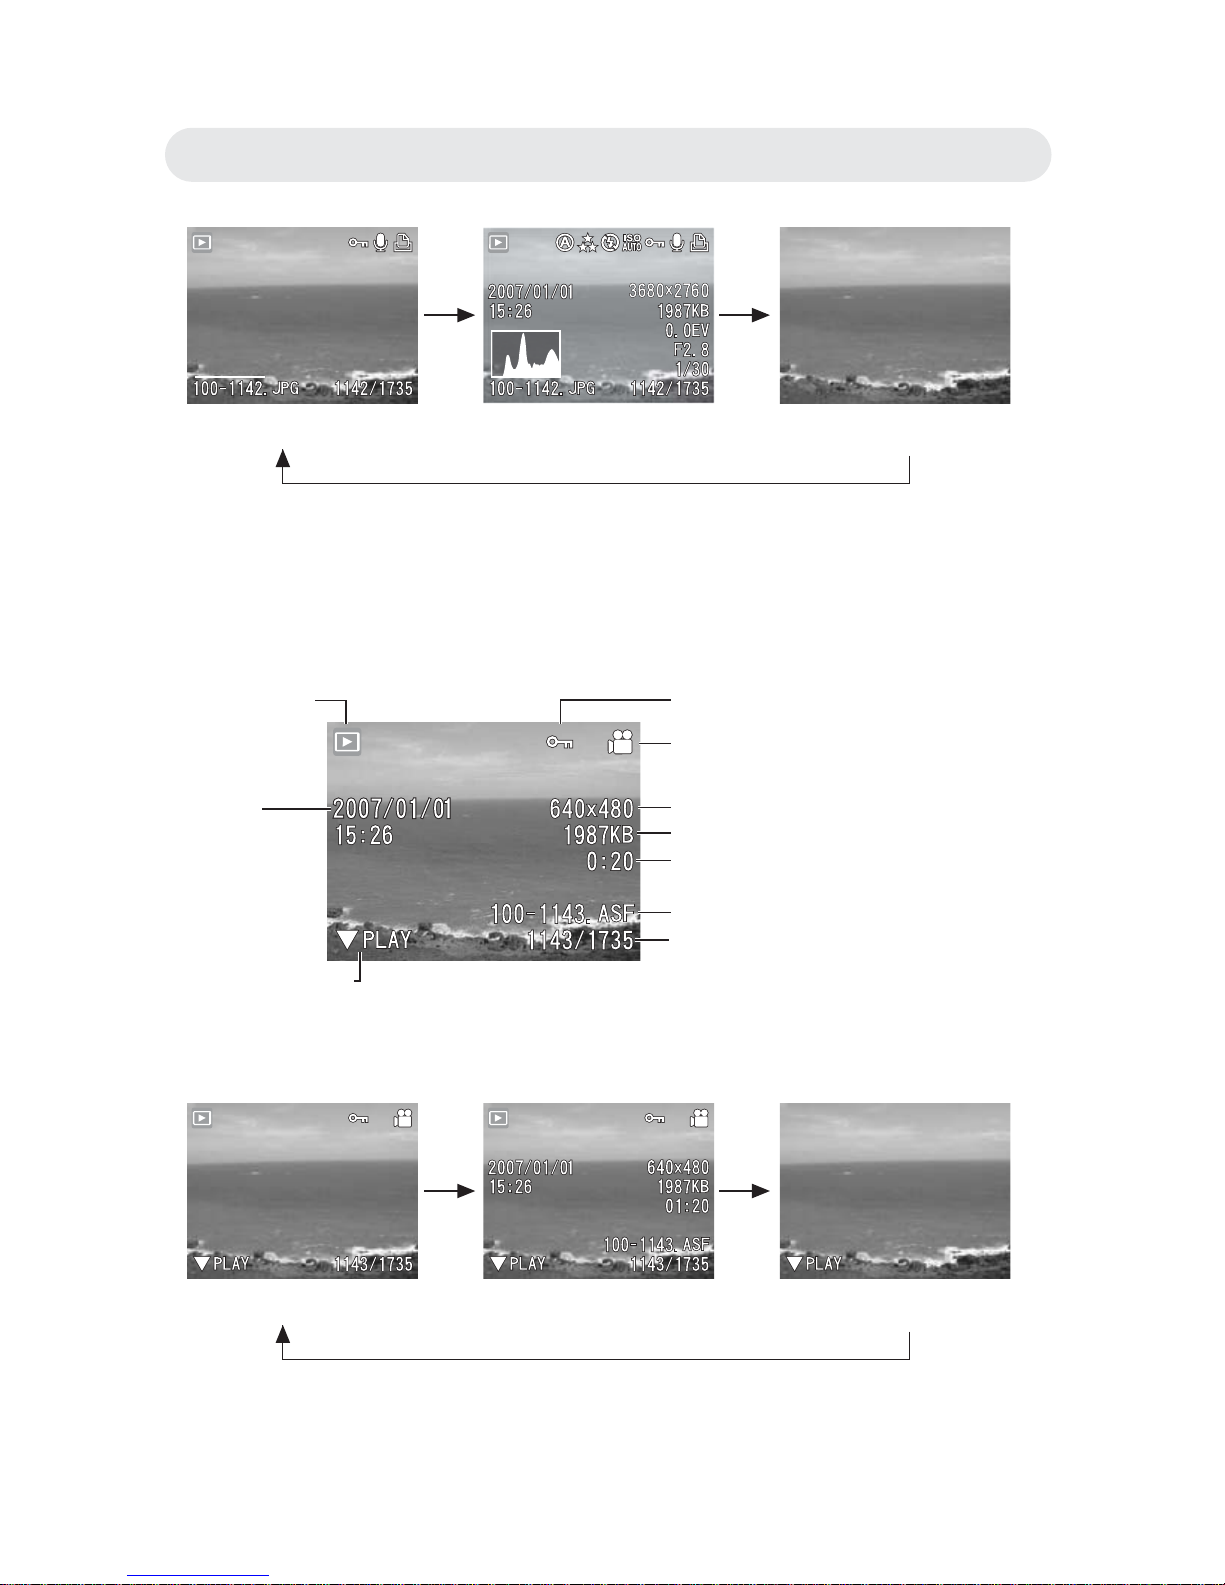
Using the LCD Monitor
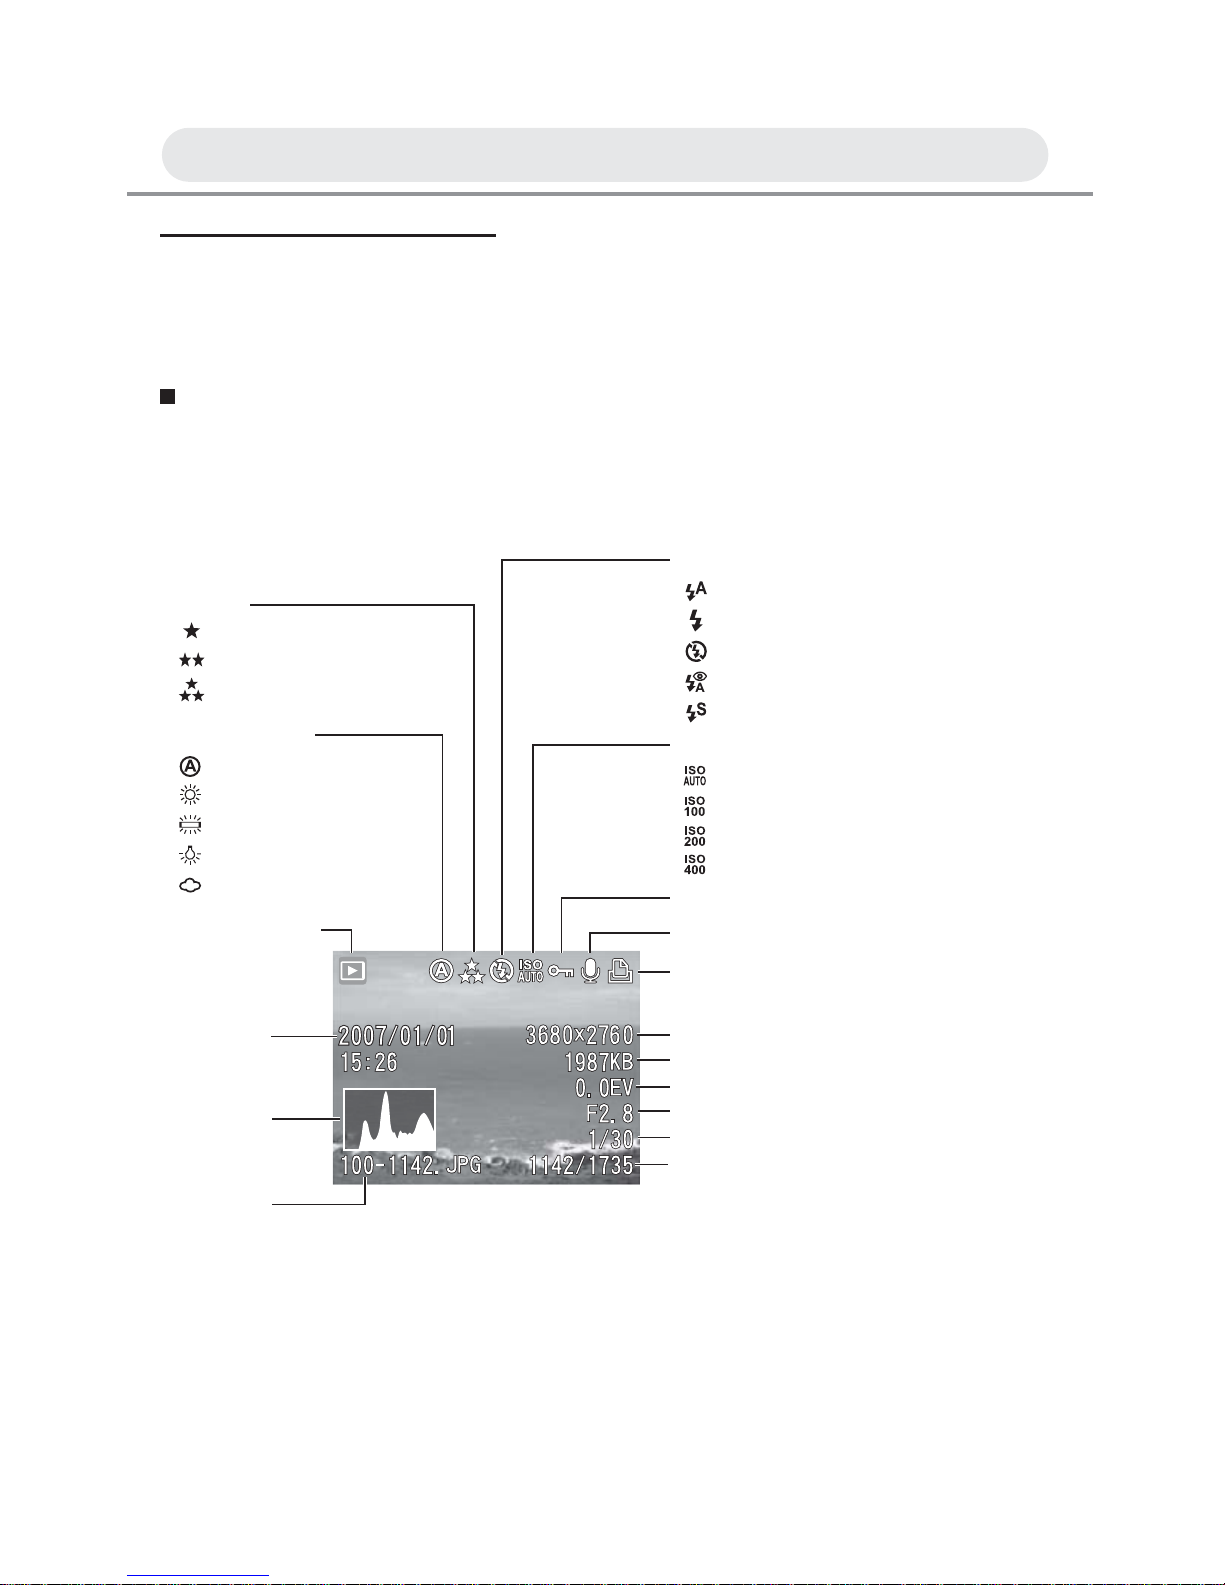
The following illustration outlines the layout and icons on the LCD
monitor in playback mode.
Playback Mode
• Capture
Flash mode
Auto flash
Fill in flash
Flash off
Flash with Red-eye reduction
Slow Sync. (Only in night scene mode)
ISO
Auto
100
200
400
Protection status
Image size
DPOF setting
Voice memo indicator
File size
Exposure compensation
Aperture value
Shutter speed
Displayed image number/
Total number of images
File Name
Histogram
Recorded
date/time
Playback Mode
White Balance
Auto
Daylight
Fluorescent
Tungsten
Cloudy
Quality
Normal
Fine
Best
Chapter 3: Reviewing Images and Video Clips
Page 40
40
• Video
OSD On (Default) OSD On + Histogram OSD Off
OSD On (Default) OSD On + Detaied Information OSD Off
Protection status
Image size
Movie clip
File size
Recording time
File name
Displayed image number/
Total number of images
Play/pause indicator
Recorded
date/time
Playback Mode
Chapter3: Reviewing Images and Video Clips
Page 41
41
Using Playback
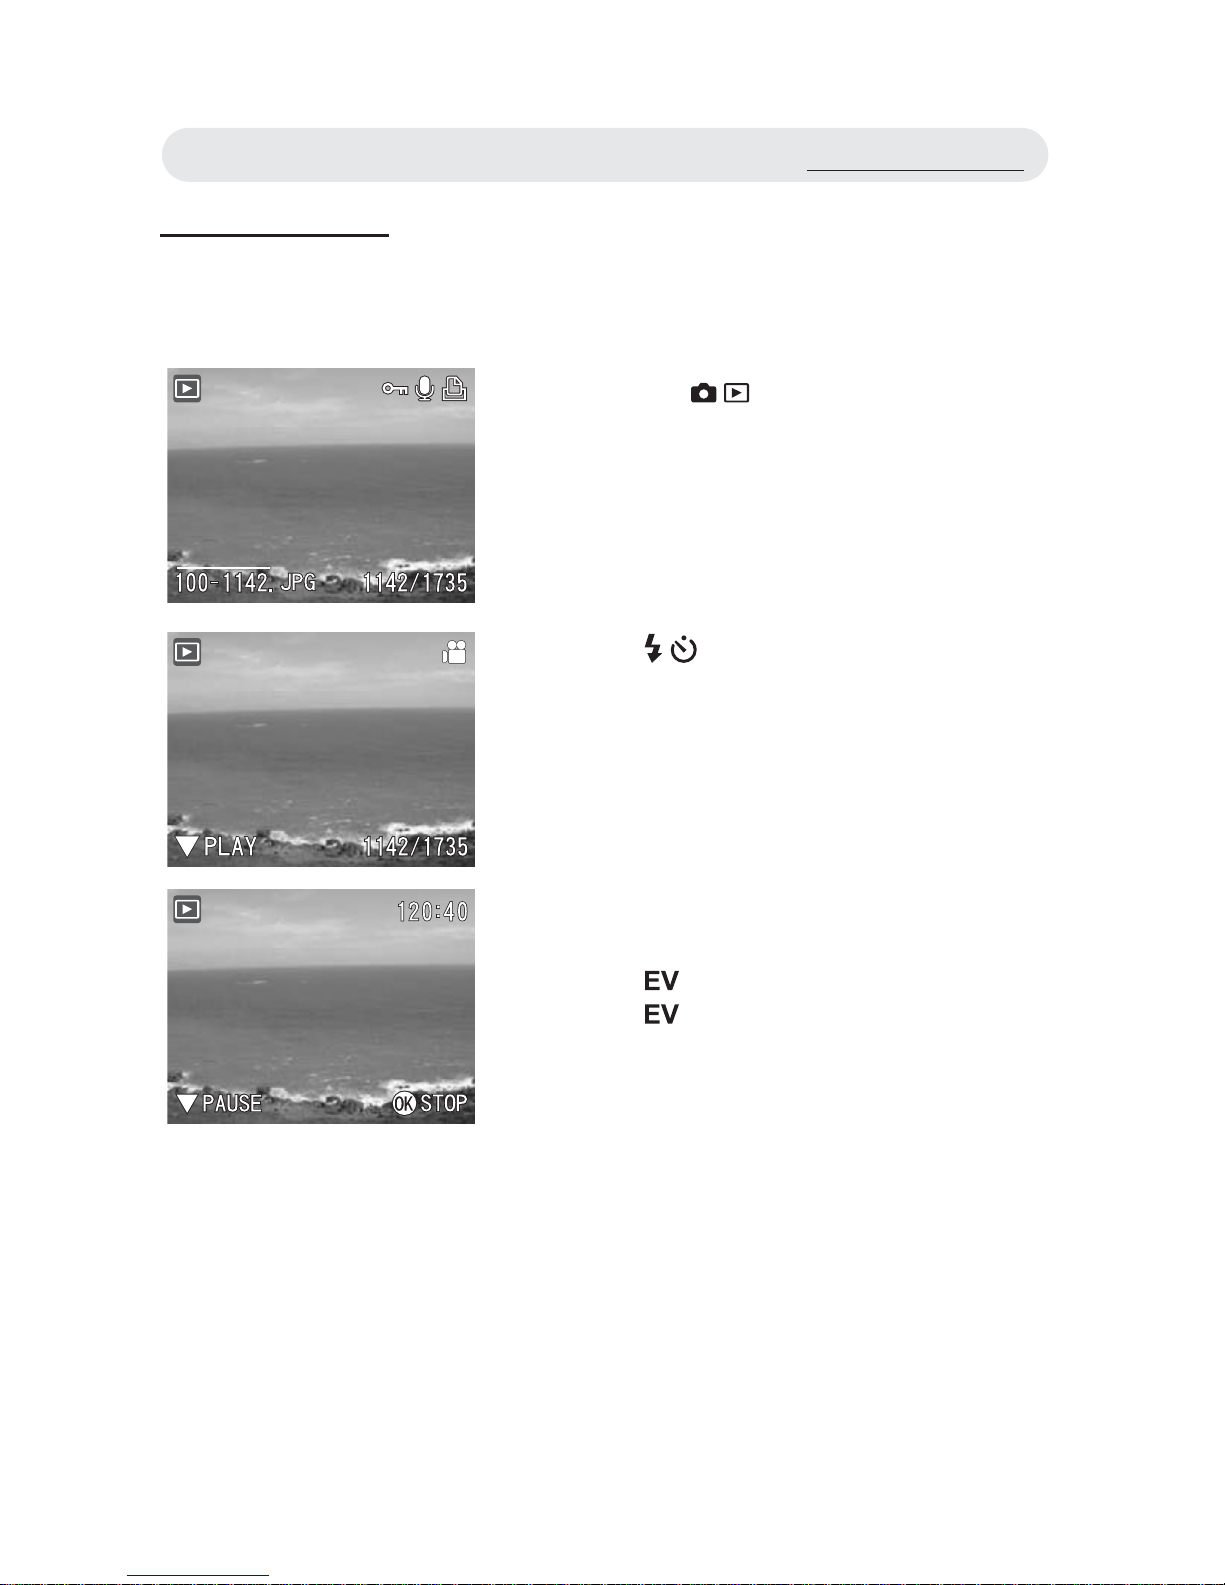
Playback mode allows you to review still images and video clips stored
on your camera.
1 Press the / button to select
Playback mode. The last taken image
or the fi rst frame of the videos appears
on the LCD monitor.
2 Press / button to the previous or
next fi le.
3 If you select a video clip, an operation
guide appears on the LCD monitor.
Press button to play the video clip.
Press button again to pause.
Press OK button to stop playing.
Using Playback
Page 42
42
Using the Playback Menu
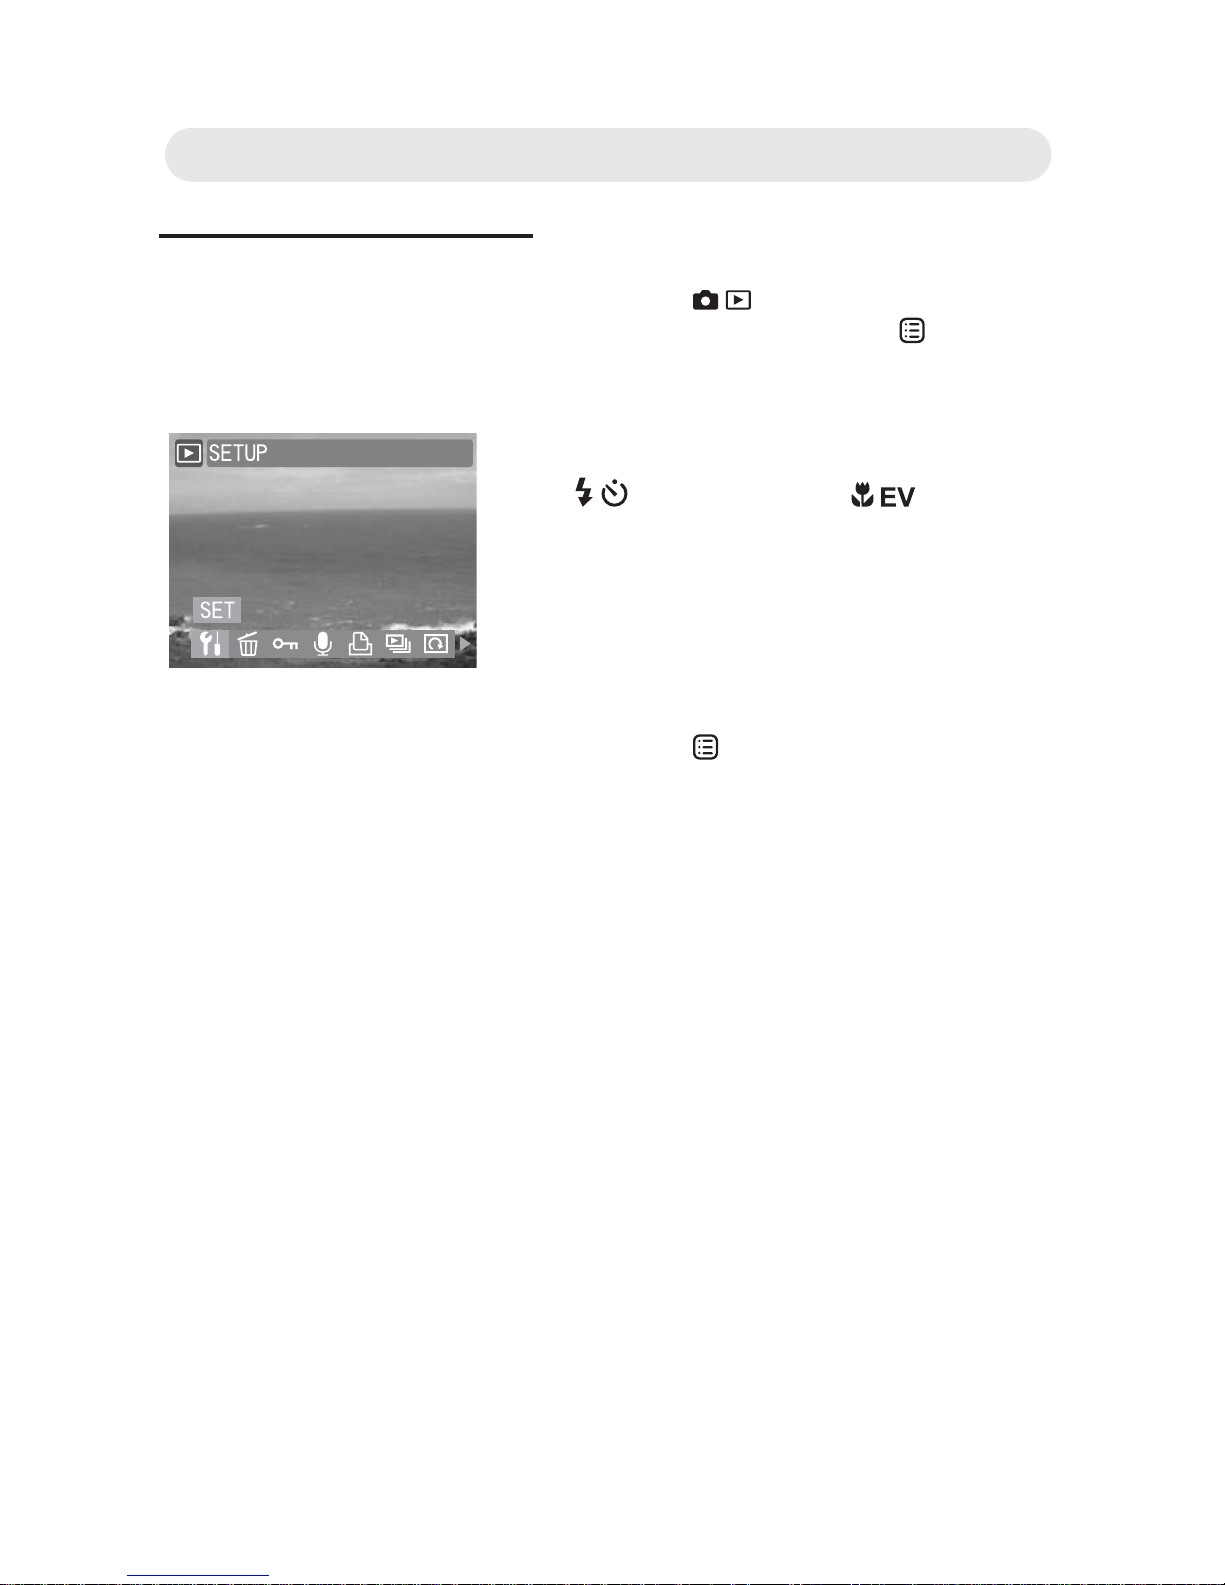
1 Press the / button to select
Playback mode. Press the
button to
enter the Playback menu.
2 Scroll through the menu by pressing
/ button and press / button to
highlight the option you want.
3 Press the OK button to confi rm all
settings.
4 Press the button to exit.
Chapter3: Reviewing Images and Video Clips
Page 43
43
Activating Digital Enlargement
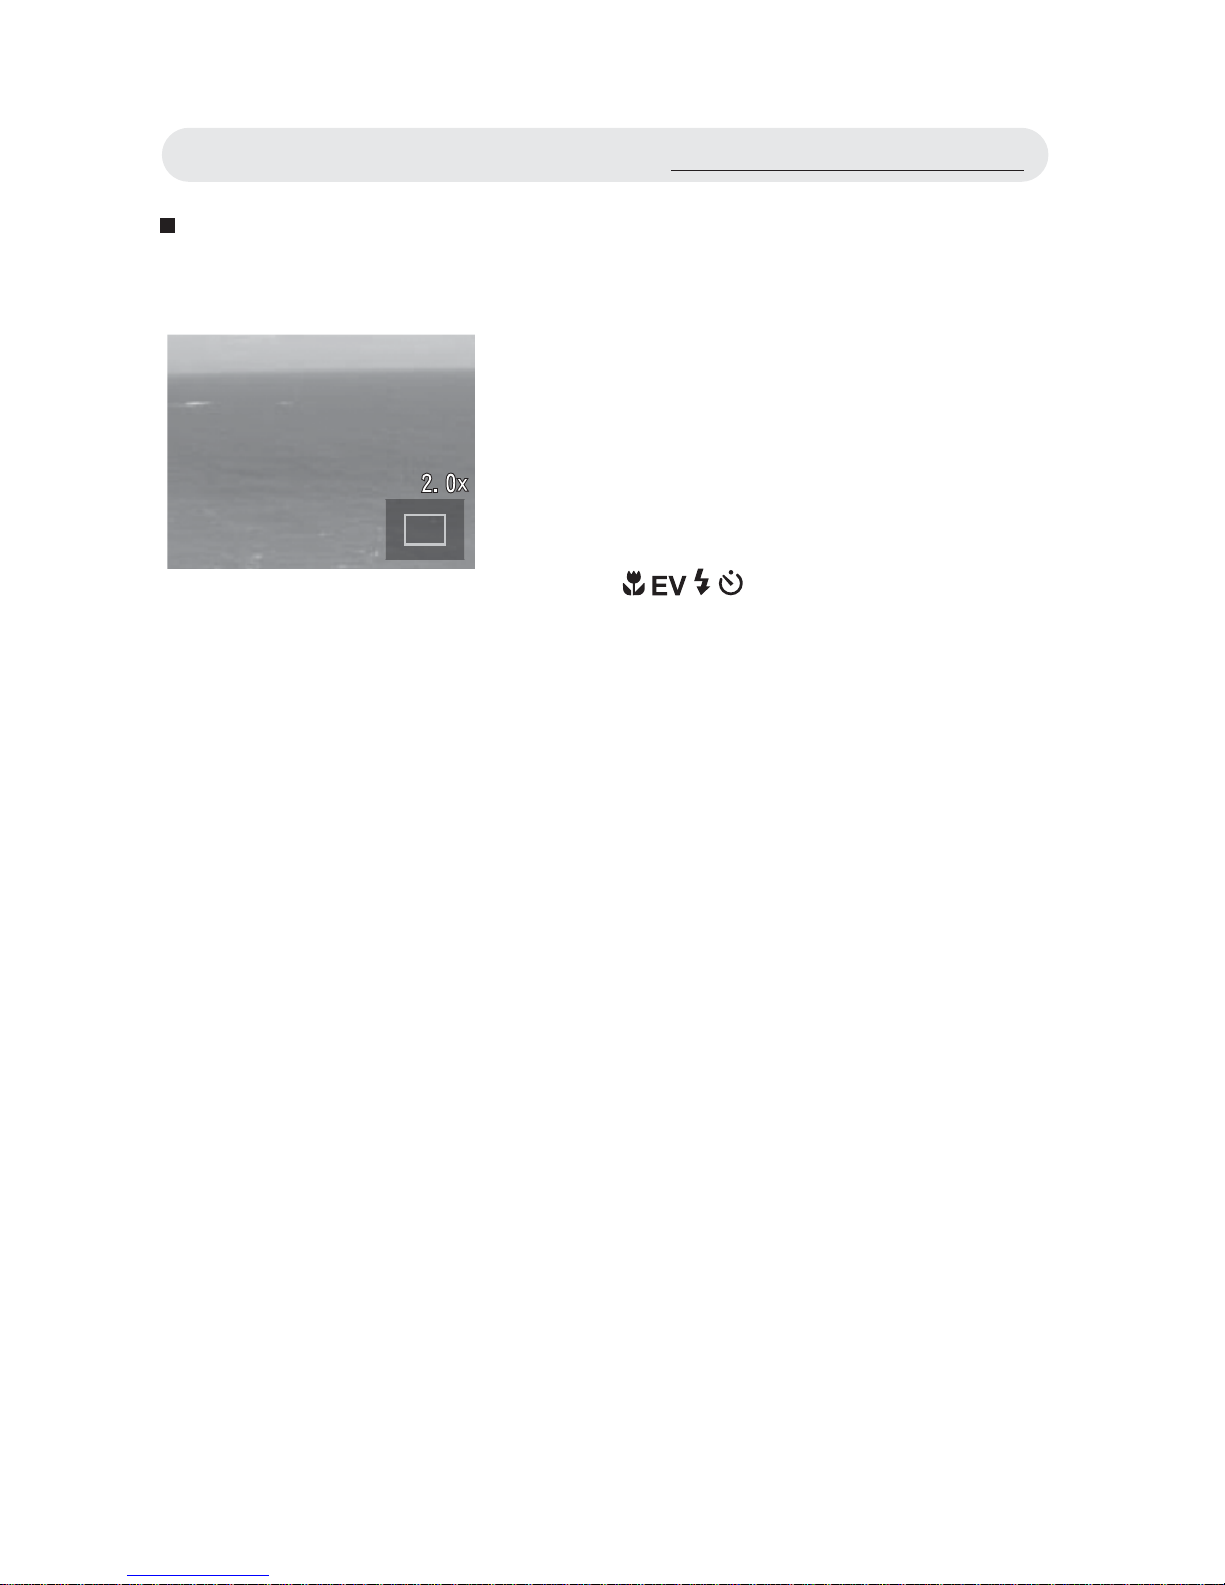
You can magnify images when reviewing images in playback mode.
1 When reviewing the image, press T
button to magnify. The icons on the
LCD monitor will disappear and the
approximate location of the area and
magnifi cation level will show.
2 Use / / / button to move around
the image.
3 Press the W button to decrease the
magnifi cation level. Press OK button to
cancel the magnifi cation.
Note: The video clips cannot be magnifi ed.
When reviewing the video clip, a
“CANNOT MAGNIFY” warning
appears on the LCD monitor.
Using the Playback Menu
Page 44
44
Using Index Display
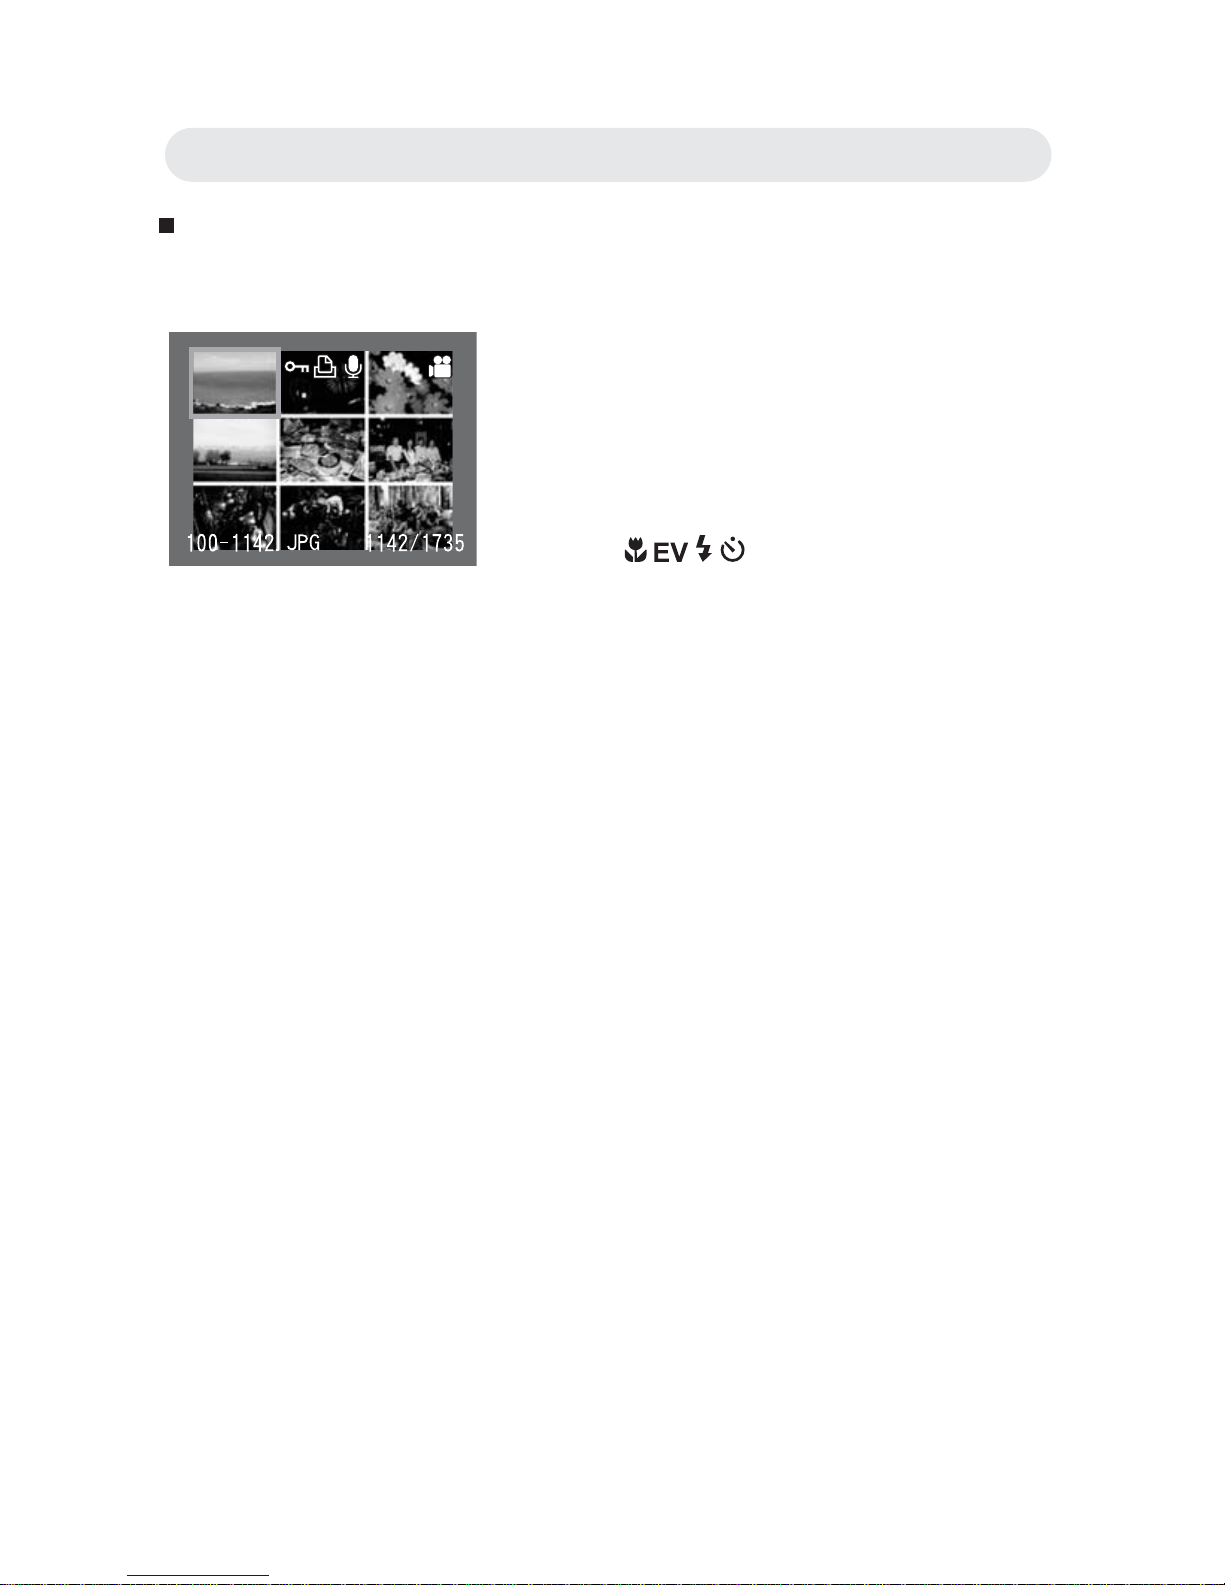
Index display allows you to view up to nine images at a time.
1 When reviewing the image, press W
button to show the index . Up to nine
images can be viewed at the same
time.
2 Use / / / button to change the
image selection.
3 Press the T button to return to single
image playback.
Chapter3: Reviewing Images and Video Clips
Page 45
45
Deleting Images and Video Clips
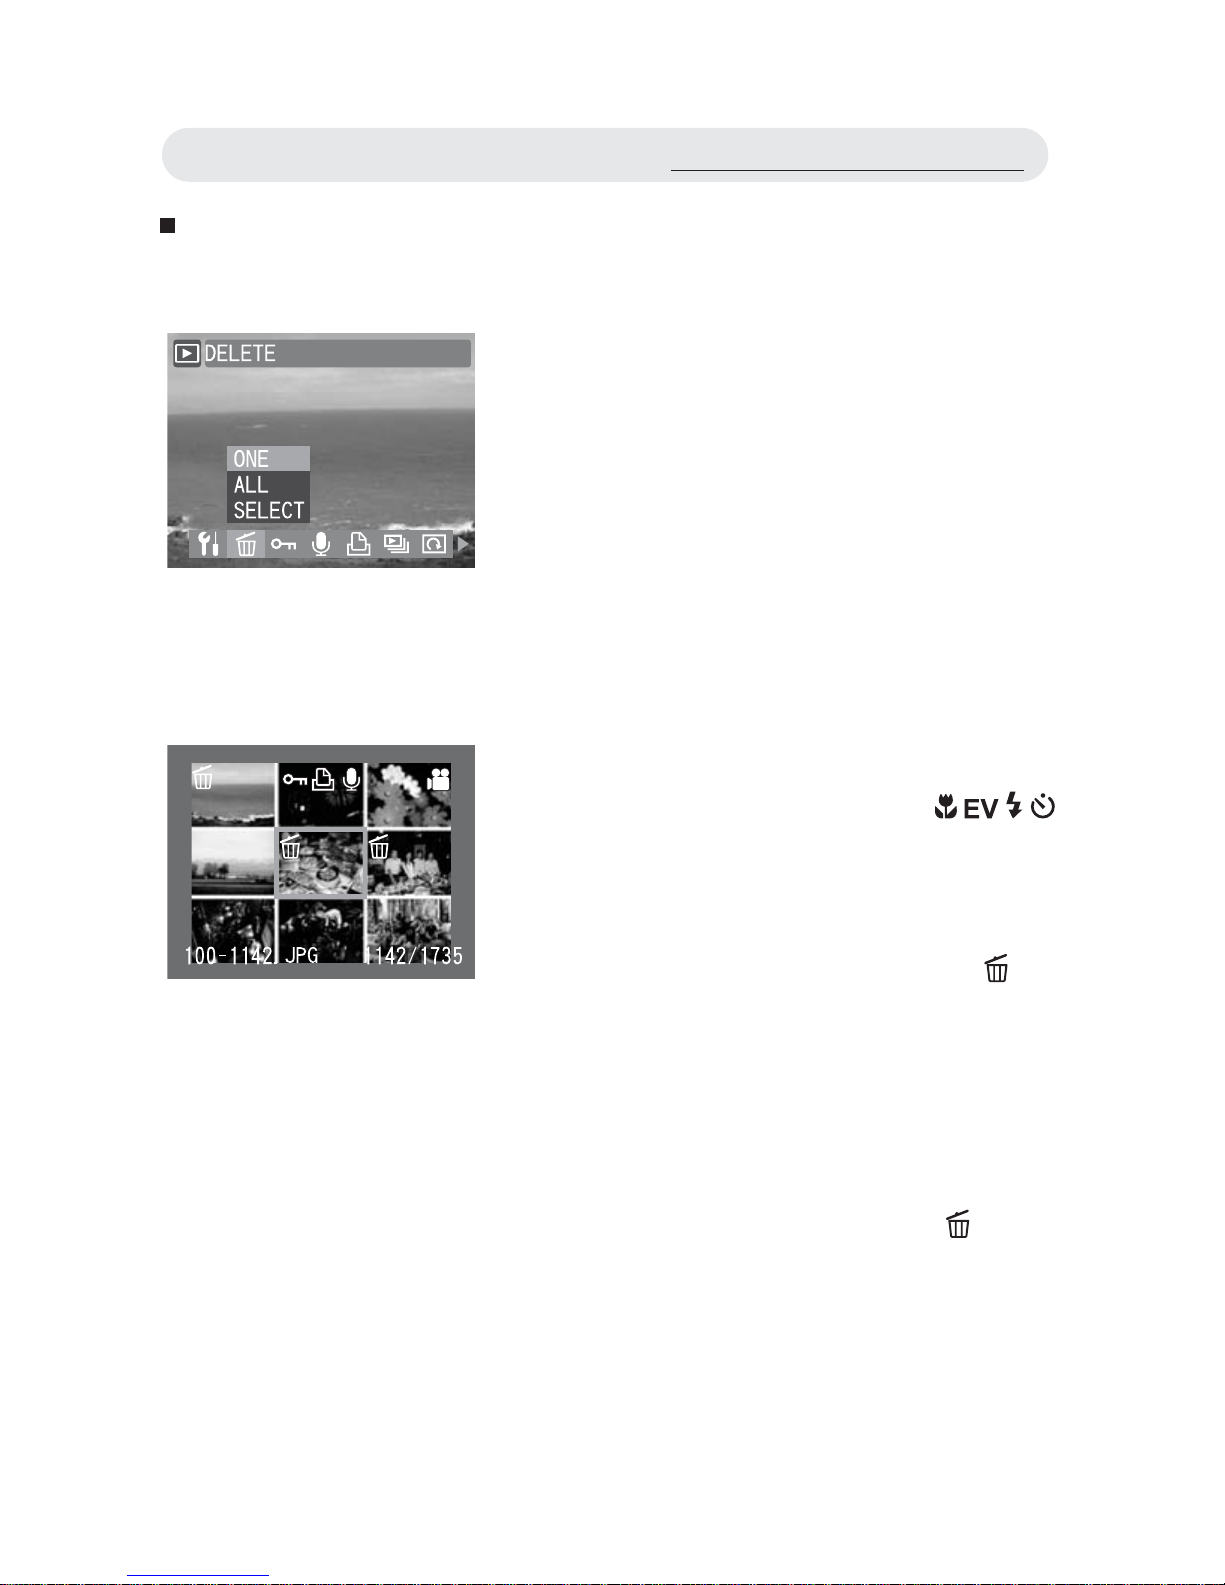
This function allows you to delete your images and video clips.
Note 1 : You can also delete a single image by pressing the SP/
button without entering the menu. Select OK and press the OK
button to delete the selected image.
Note 2 : If the image is protected, you must remove the protection before
you can delete it. See page 46 for more details.
1 In Playback menu, select “DELETE”.
2 Select “ALL” to delete all images and
video clips or select “ONE” to delete
the displayed one. Press the OK button.
3 A confi rmation dialogue will appear.
Select “OK” and press OK button to
delete images or video clips.
4 Select “SELECT” and a thumbnail
image gallery appears. Press
/ / /
button to select the image you want to
delete. Press the OK button.
5 After select the images, press SP/
button to delete. A confi rmation dialogue
appears, prompting “DELETE
SELECTED IMAGES?”. Select OK and
press the OK button to delete the selected
image.
Using the Playback Menu
Page 46
46
Protecting Images and Video Clips
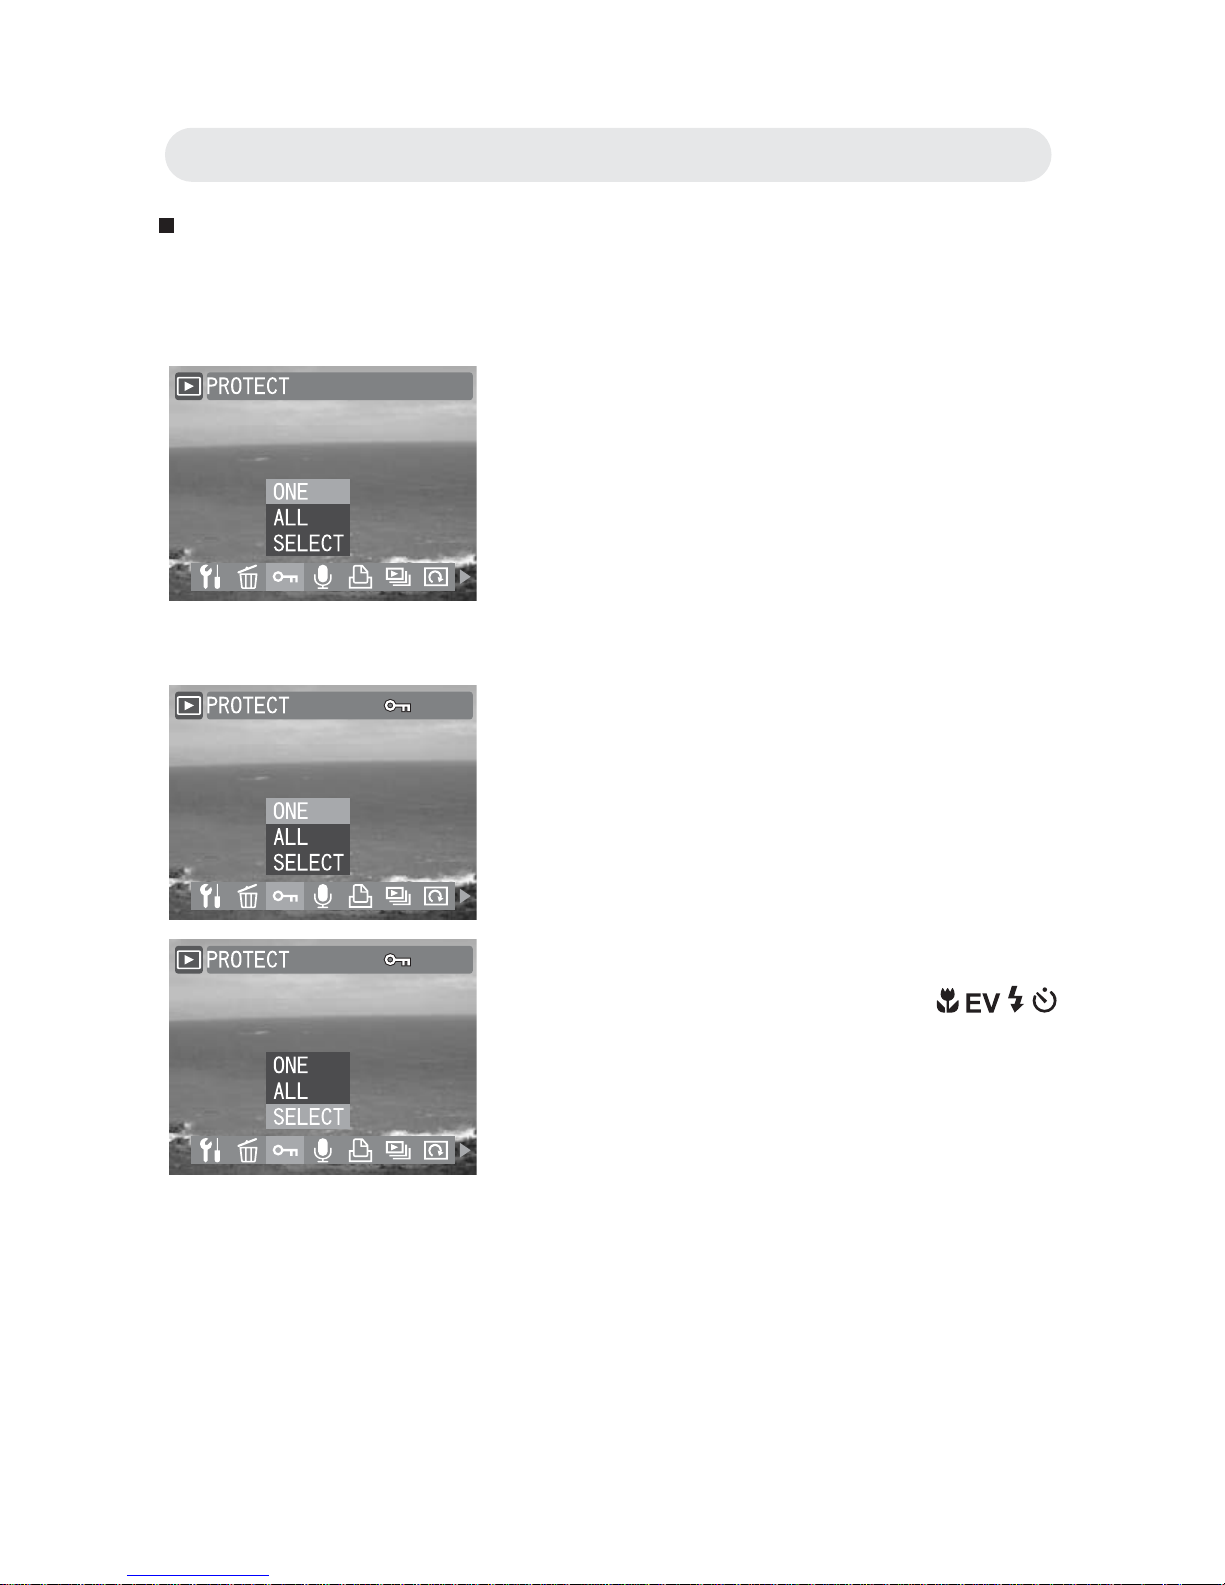
This function prevents images and video clips from being modifi ed or
deleted accidentally.
1 In Playback menu, select
“PROTECT”.
2 Select “ONE” to protect the selected
one or select “ALL” to protect all
images or video clips. Press the OK
button.
3 A protected fi le is indicated by the mark.
Follow step 1 and 2 again and then
press OK button to remove the
protection.
4 Select “SELECT” and a thumbnail
image gallery appears. Press
/ / /
button to select the image you want to
protect. Press the OK button.
5 A confi rmation dialogue appears, stating
“IMAGES PROTECTED!”. The selected
images and video clips are now protected.
Chapter3: Reviewing Images and Video Clips
Page 47
47
Adding Voice Memo to a Still Image
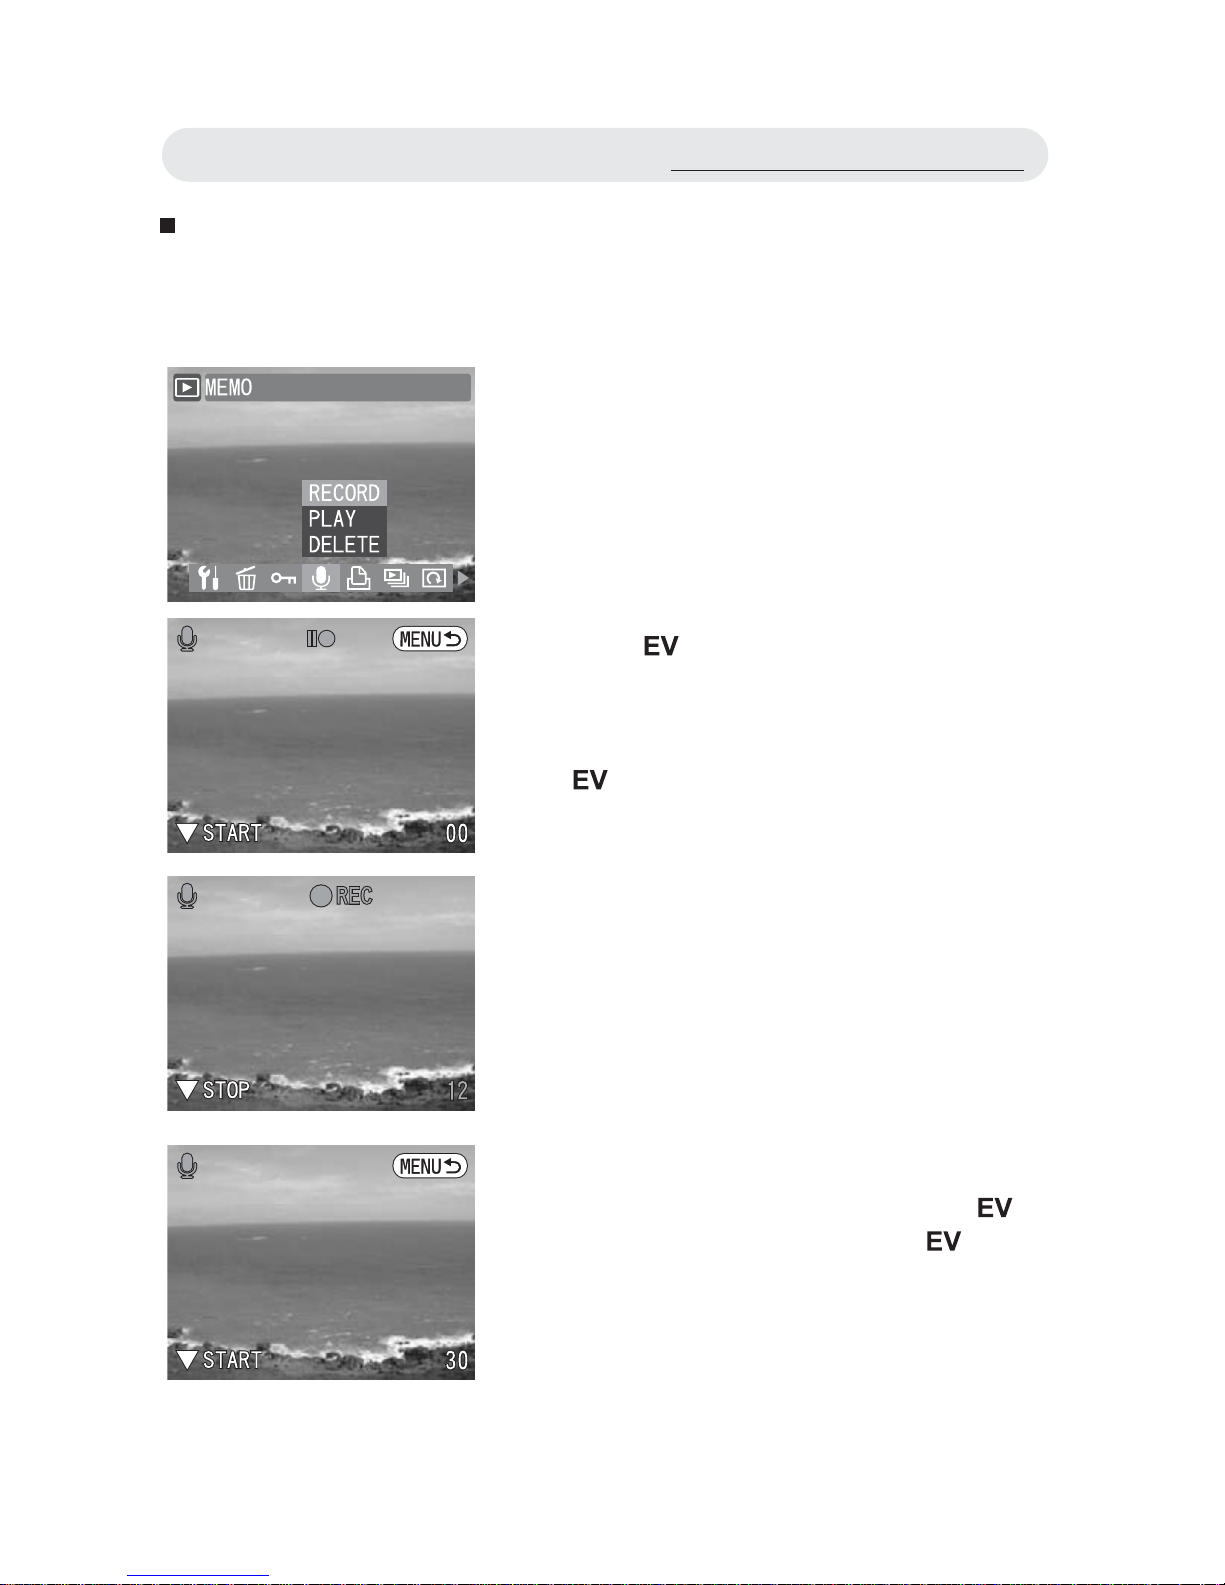
You can add a voice memo up to around 30 seconds in length for each
still image.
1 In Playback menu, select “MEMO”.
2 To record a voice memo, select
“RECORD” and then press OK button.
3 Press button to start recording.
When the voice memo recording starts,
the indicator icon on the LCD monitor
changes from (green) to (red). Press
button again to stop recording and
return to the previous menu.
4 To play a voice memo, select “PLAY”
and then press OK button. Press
button to start playing. Press button
again to stop playing and return to the
previous menu.
Using the Playback Menu
Page 48
48
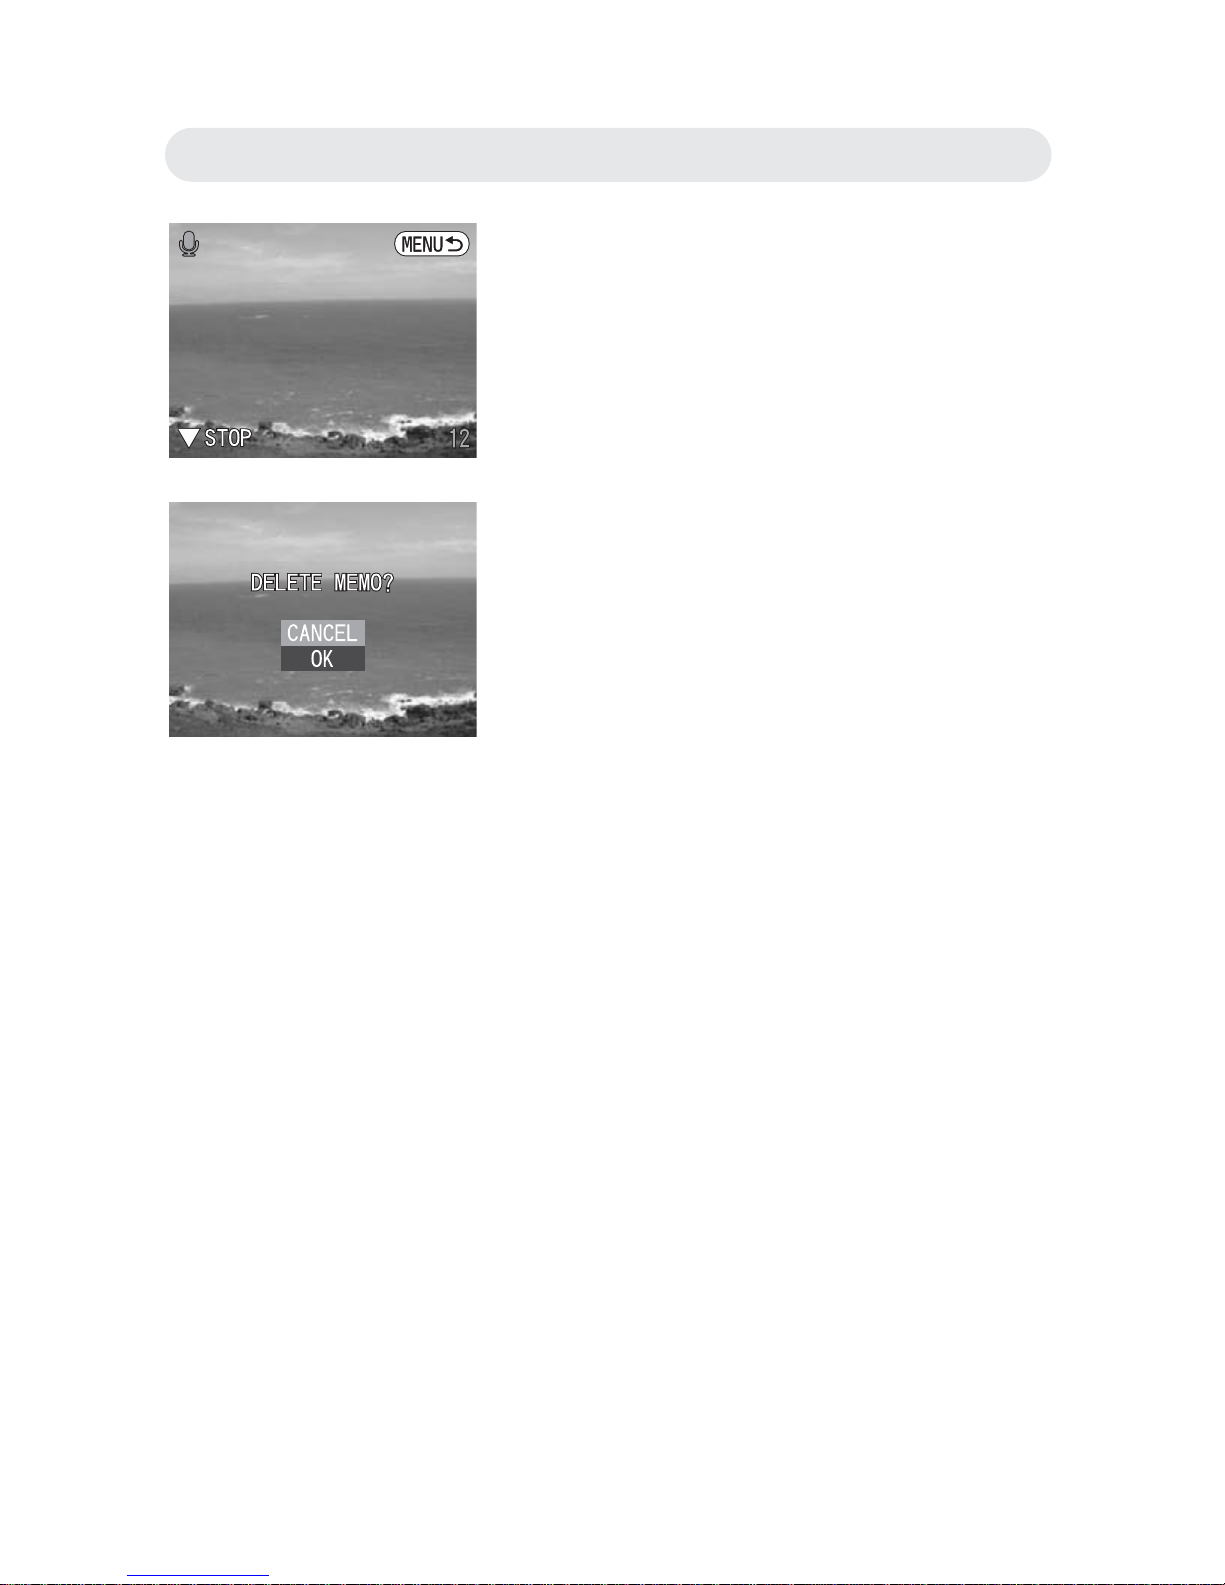
5 To delete a voice memo, select
“DELETE” and then press OK button. A
confi rmation dialogue will appear.
Select “OK” and press OK button to
delete memo.
Chapter3: Reviewing Images and Video Clips
Page 49
49
Setting DPOF
This function helps you to print out your images at a professional print
service or on a DPOF (Digital Print Order Format) compatible printer
directly.
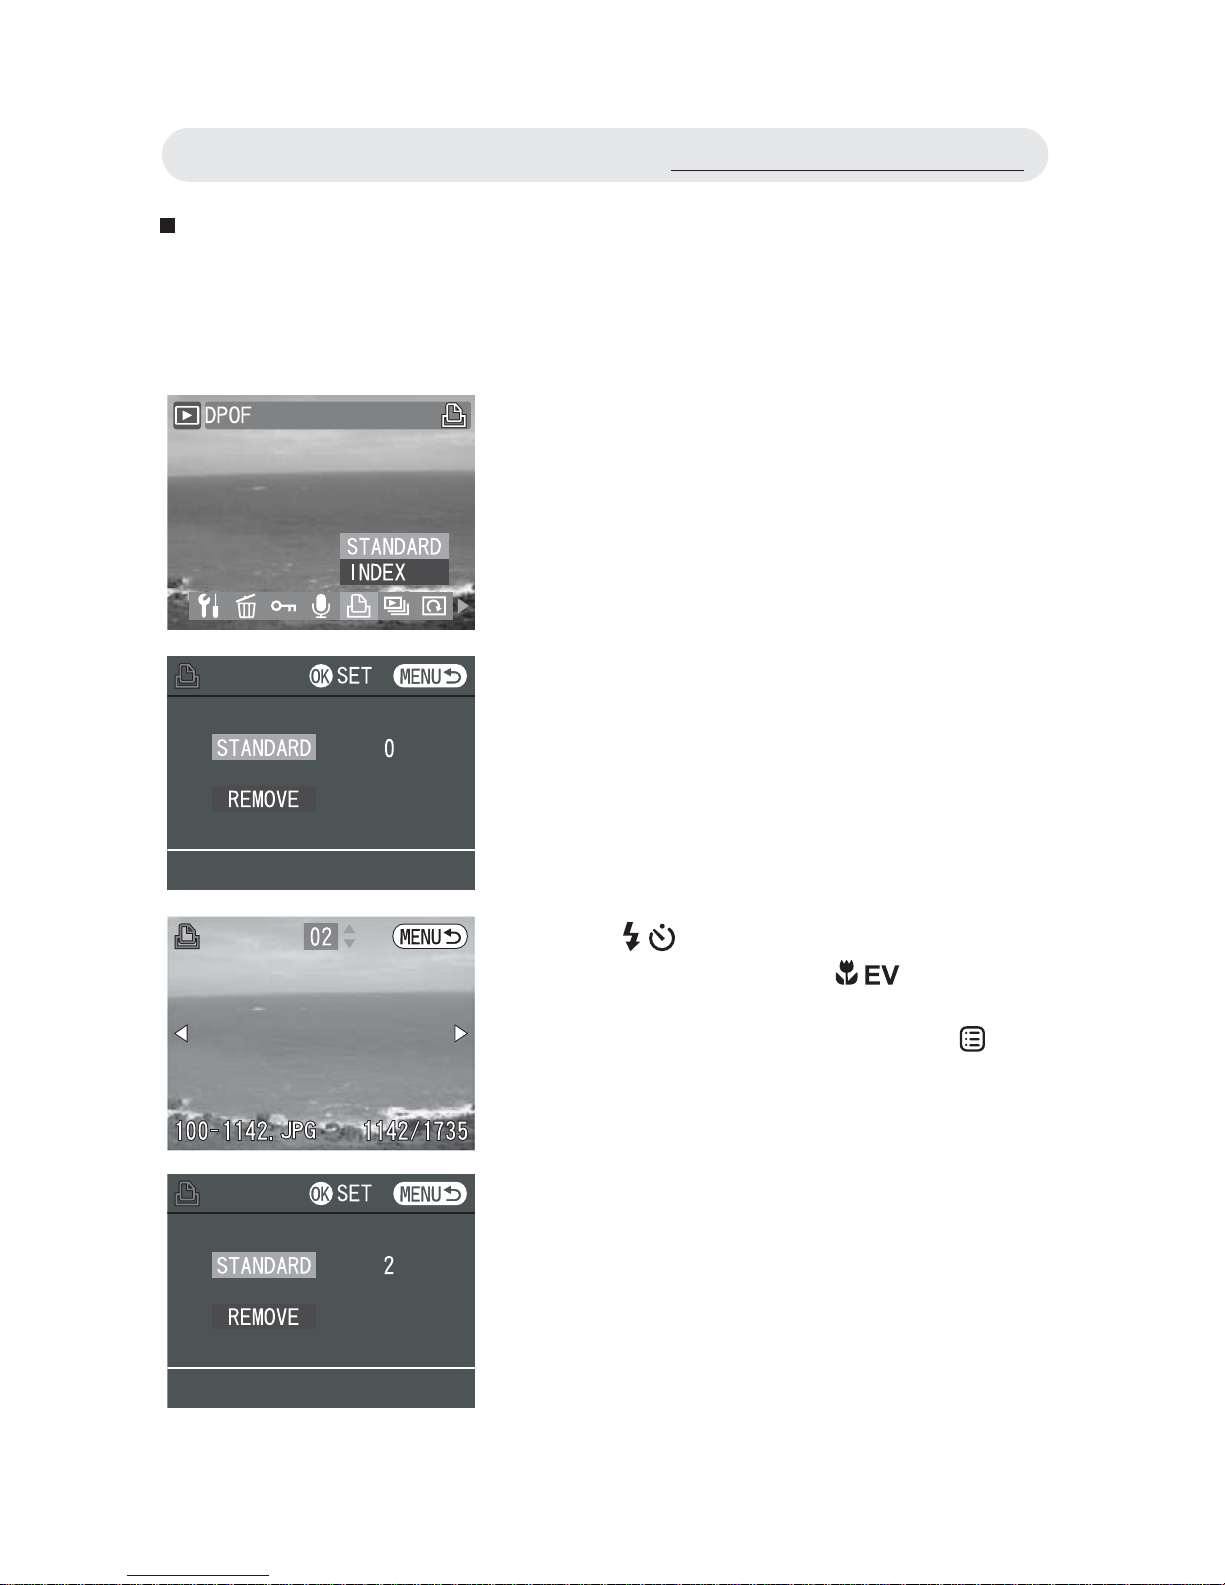
1 In Playback menu, select “DPOF”.
To decide which images are to be
printed and the number of copies,
select “STANDARD” and then press OK
button to enter the submenu.
2 In the submenu, select “STANDARD”
and then press OK button to start
setting.
3 Use / button to select the image you
want to print and use / button to
specify the number of copies. After all
the settings are selected, press
button to exit.
Using the Playback Menu
Page 50
50
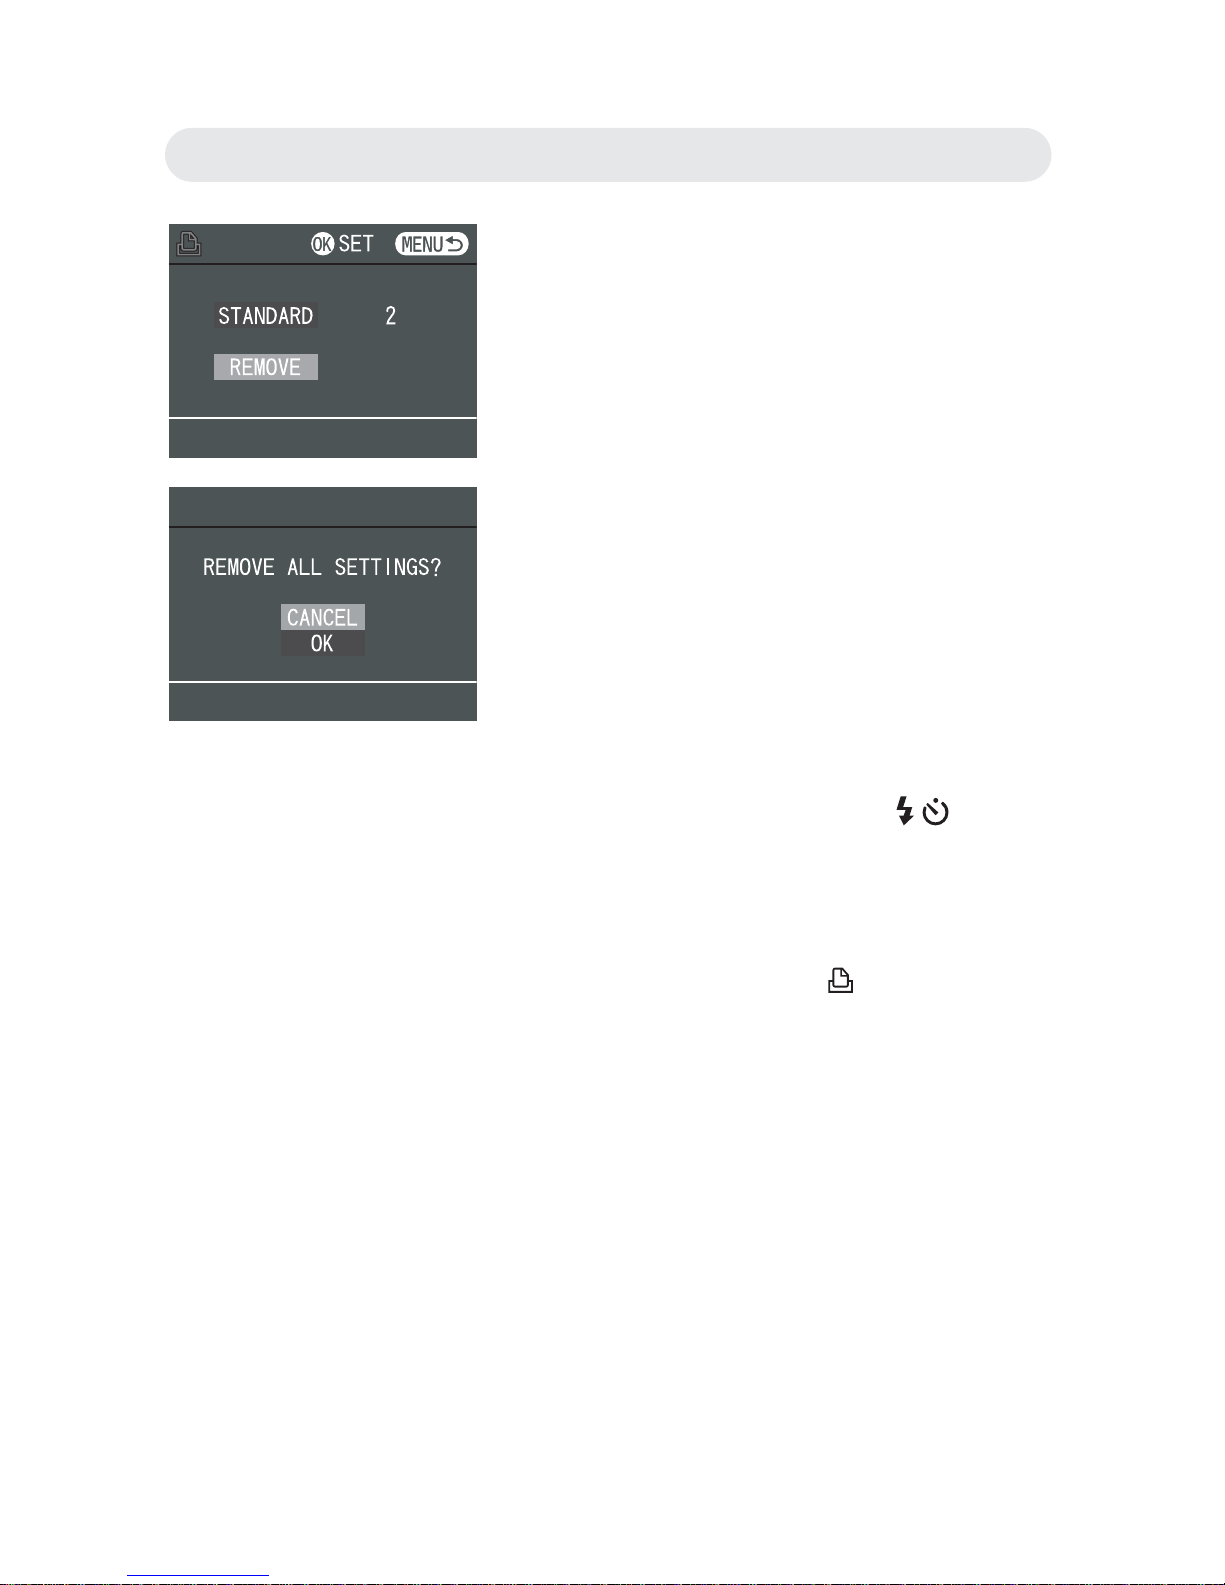
4 To cancel the setting of “STANDARD”,
select “REMOVE” and a confi rmation
dialogue will appear. Select “OK” and
then press OK button to remove print
settings.
5 To print index of images, select “INDEX”
and press OK button. Use
/ button
to select “ADD” or “REMOVE”. Press
OK button to complete DPOF setting.
Note: A still image that has DPOF settings
is indicated by the mark.
Chapter3: Reviewing Images and Video Clips
Page 51
51
Playing a Slide Show
This function allows you to automatically play back still images one by
one on the LCD monitor or a TV.
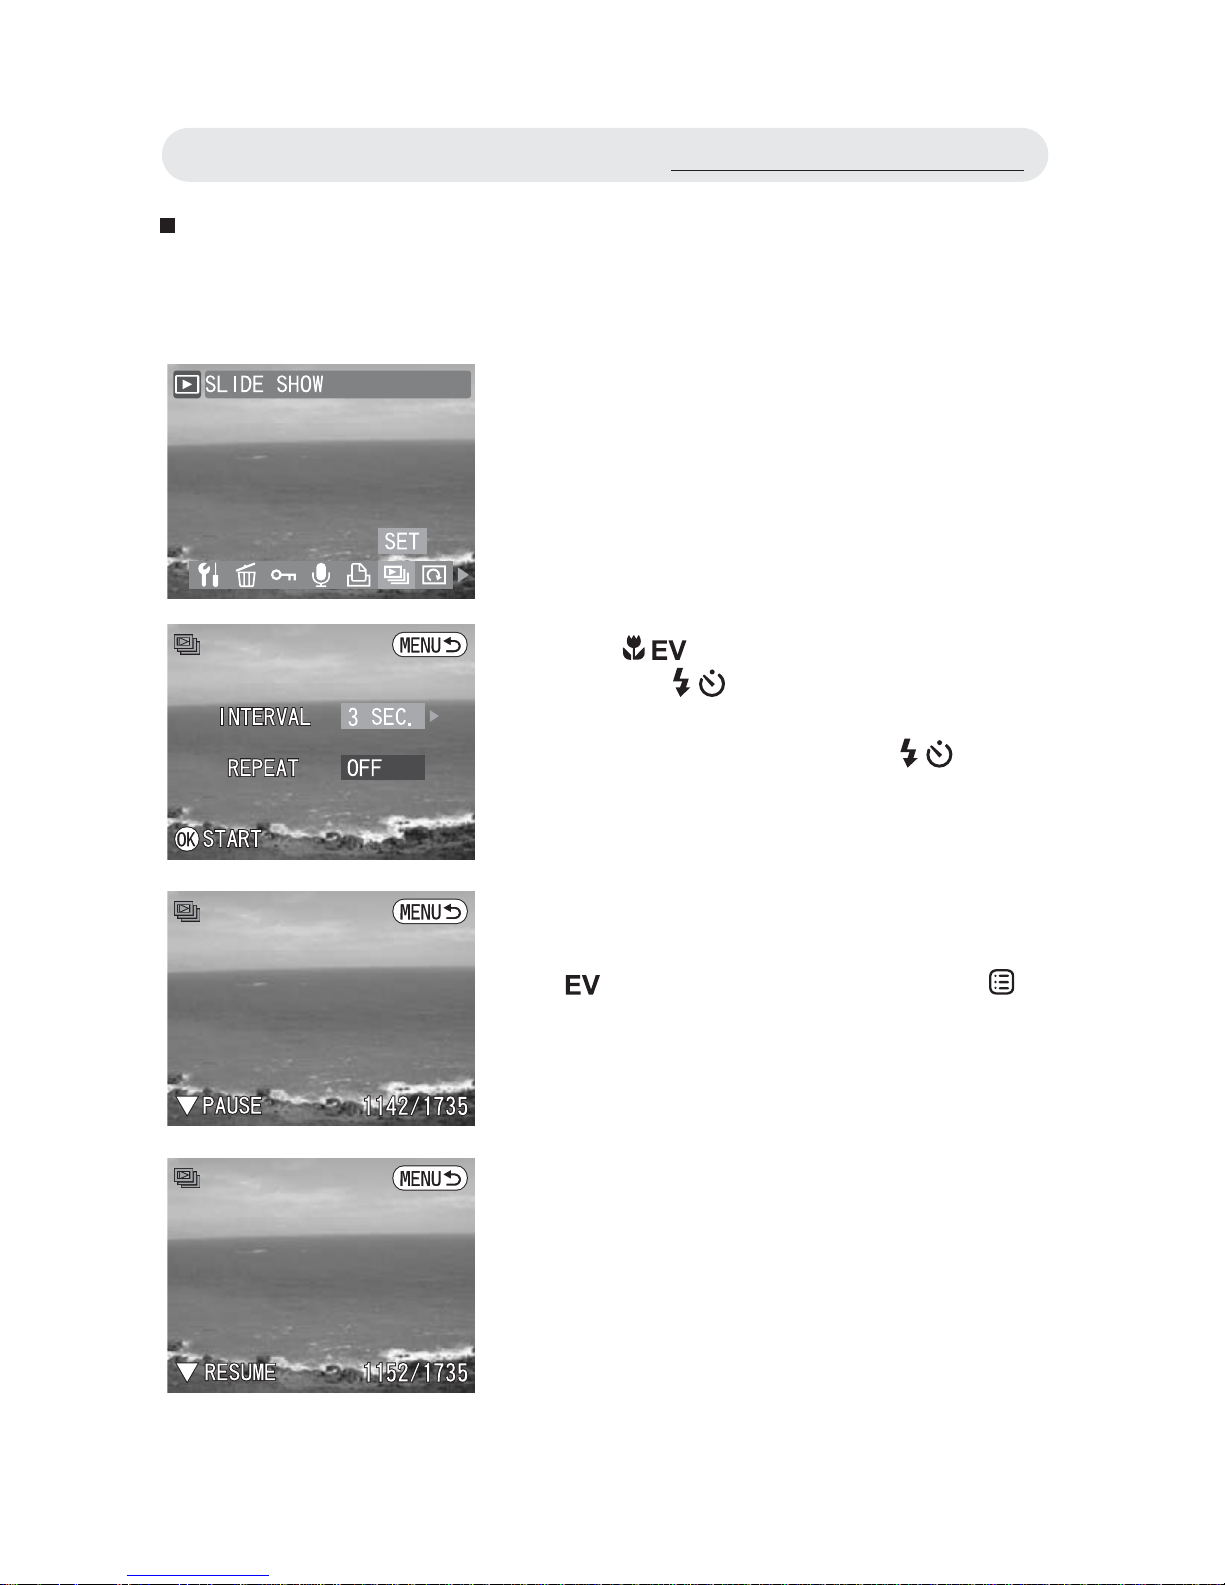
1 In Playback menu, select “SLIDE
SHOW”.
2 Use / button to select “INTERVAL”
and use
/ button to select the
interval setting (1~10sec).
Select “REPEAT” and use
/ button
to activate “REPEAT” function (“ON” or
“OFF”).
3 Press OK button to confi rm the setting
and start playing a slide show. Press
button to stop playing or press
button to return to the previous menu.
Using the Playback Menu
Page 52
52
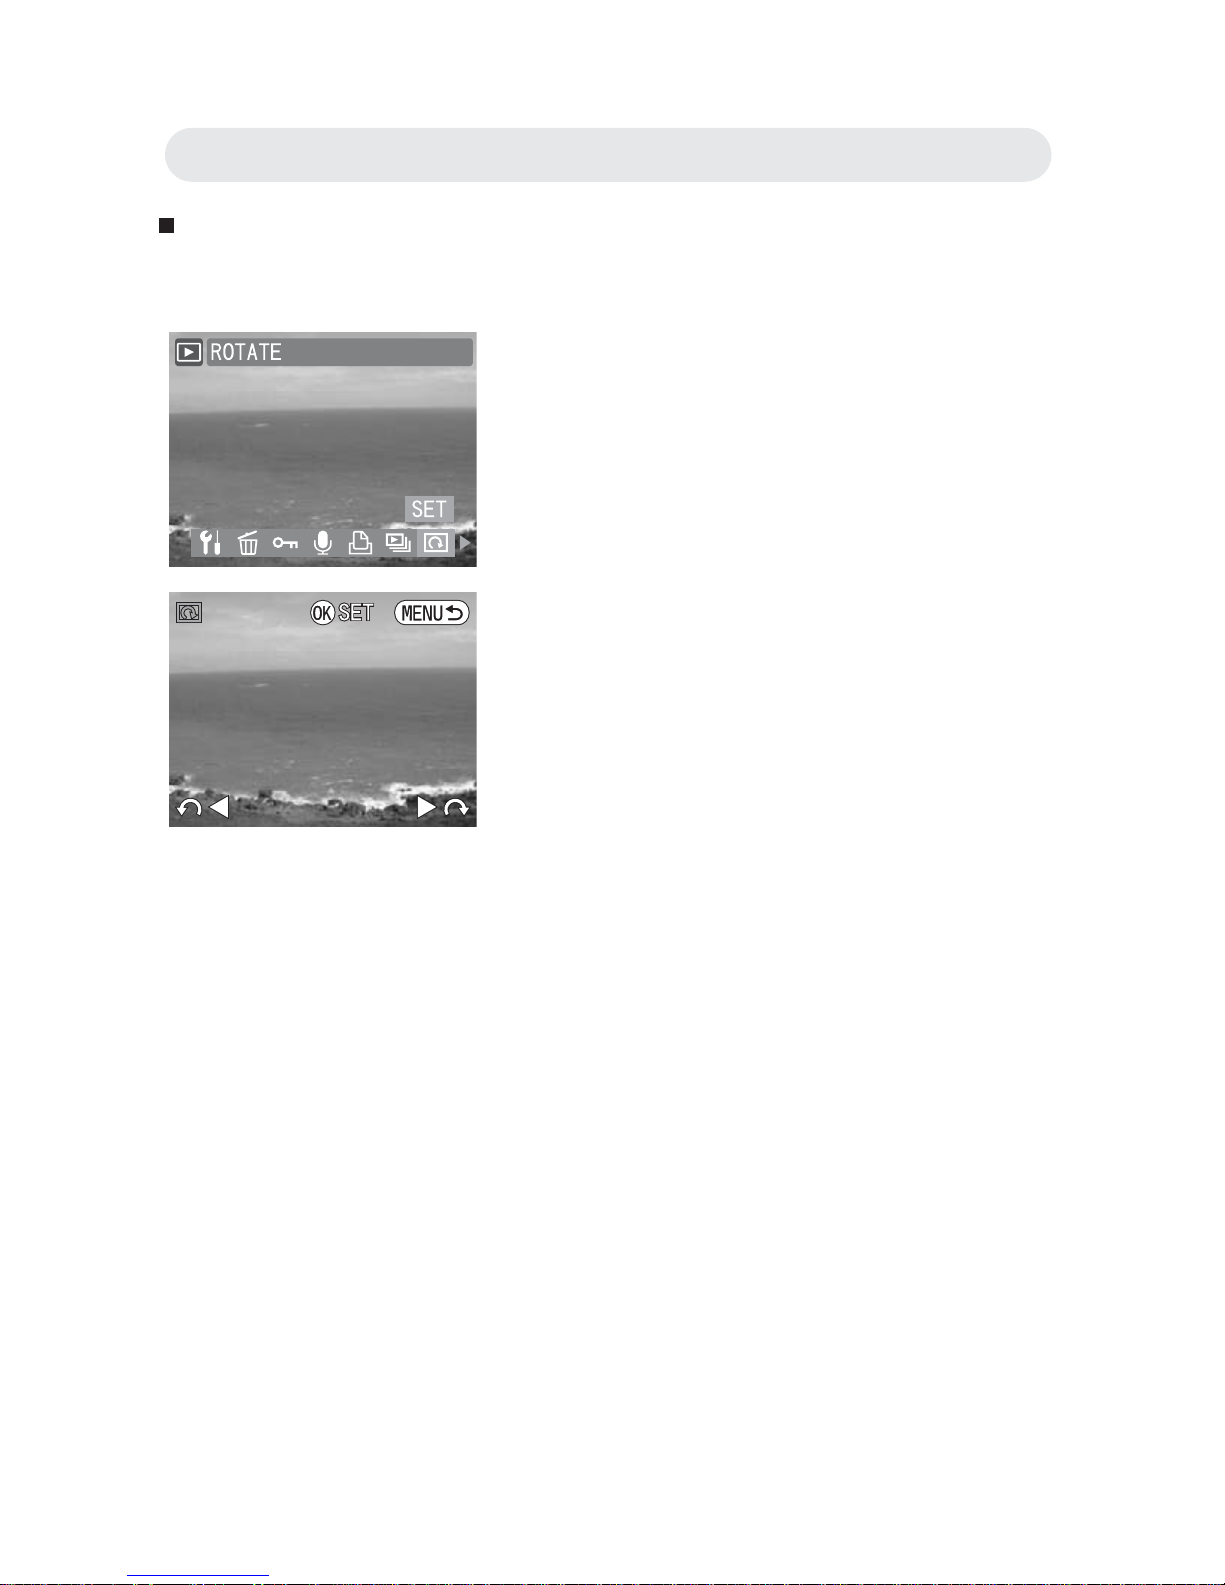
Rotating the Still Images
This function allows you to rotate still images.
1 In Playback menu, select “ROTATE”.
2 Press Left or Right button to rotate 90°
clockwise or counterclockwise. Press
OK button and return to the previous
menu.
Chapter3: Reviewing Images and Video Clips
Page 53
53
The software CD supplied with the camera includes the driver and the
application (PhotoImpression, and VideoImpression). The application
allows you to upload the images from the camera, view them, print them,
and e-mail them. You must install the software before you connect the
camera to computer.
Windows System Requirements
• Windows 98SE, ME, 2000, XP, and Vista
• Pentium II processor or more
• Minimum 64MB RAM
• 200MB of available hard disk space
• 1024x768 pixels, 16-bit color monitor
Installing the Software
Installing the Driver
If you use Windows 98 SE as the OS in your computer, be sure to install
the driver fi rst before connecting the camera to the PC.
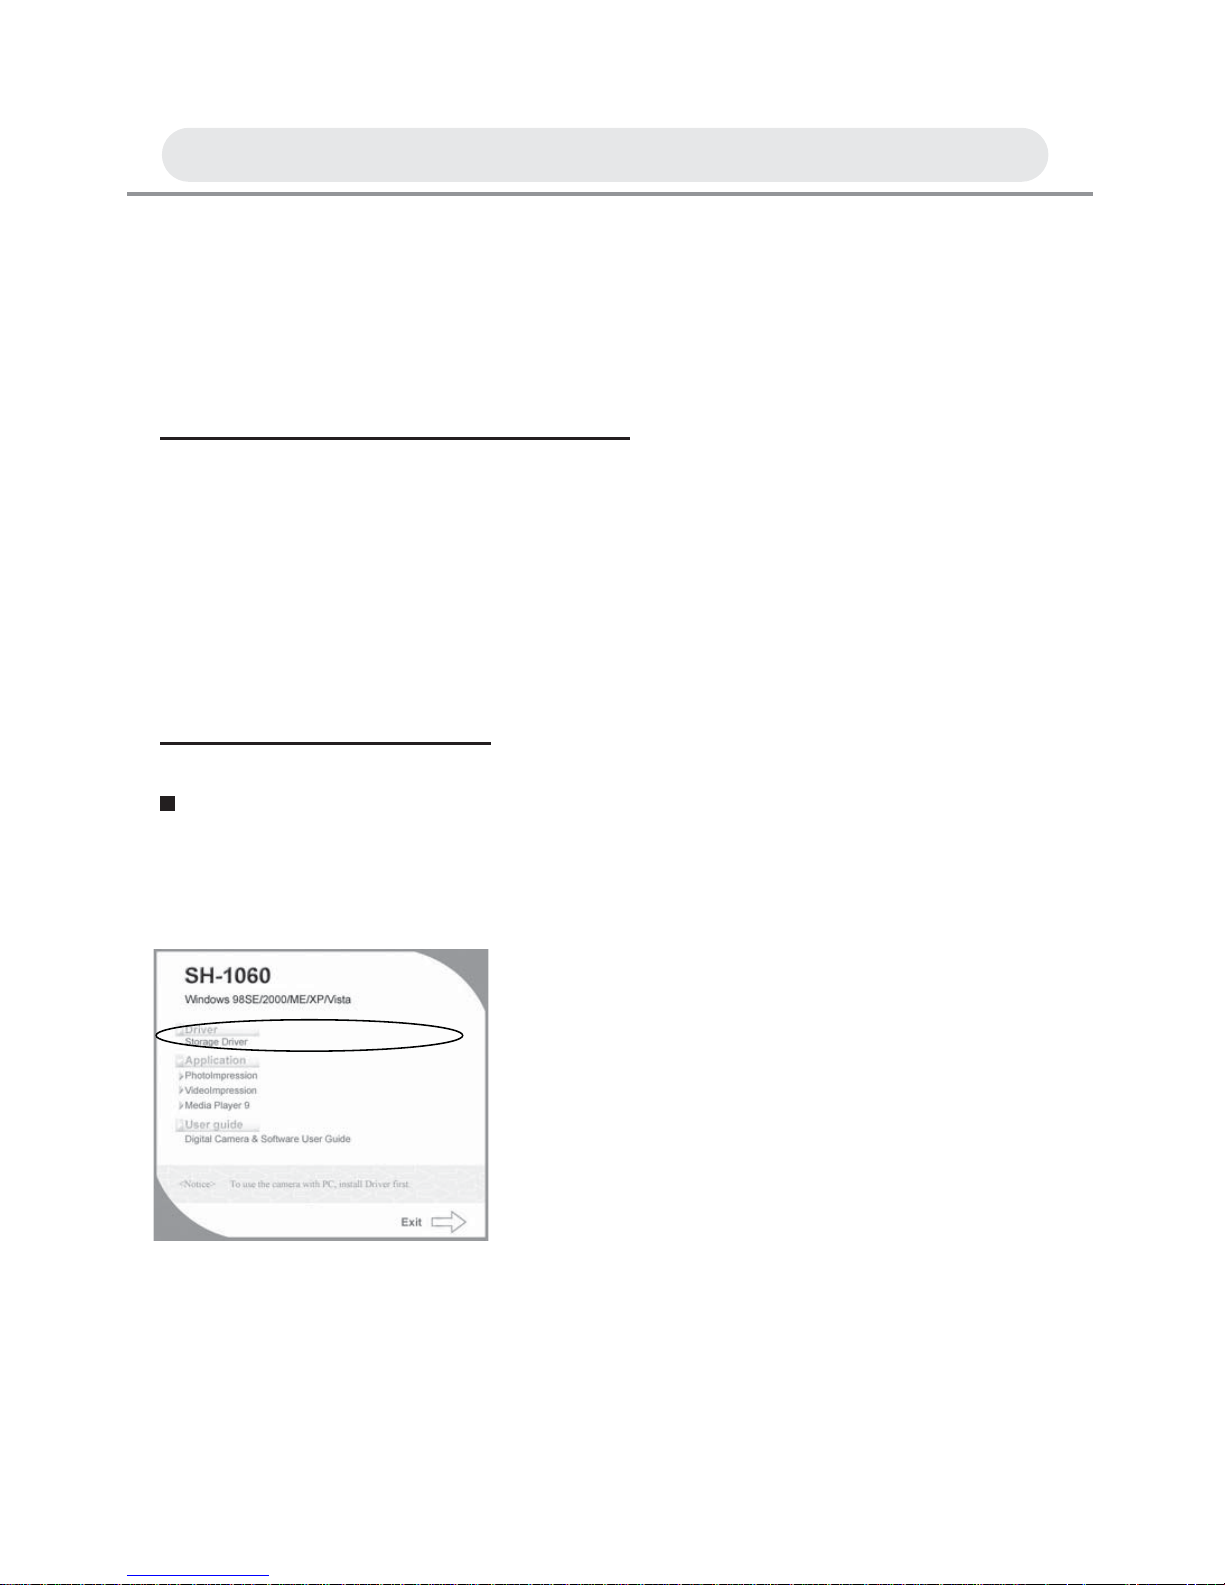
After you insert the CD into the CD-ROM
drive, the pop-up image will appear.
If the image does not appear, click “Start”
and then “Run”. Type “E:\Technika.exe”
Note: Windows ME, 2000, XP and Vista
don’t need the driver installed.
Chapter 4: Installing the Software
Page 54
54
Installing the Application
Note : Follow steps as PhotoImpression to install “VideoImpression” and
“Media Player 9” .
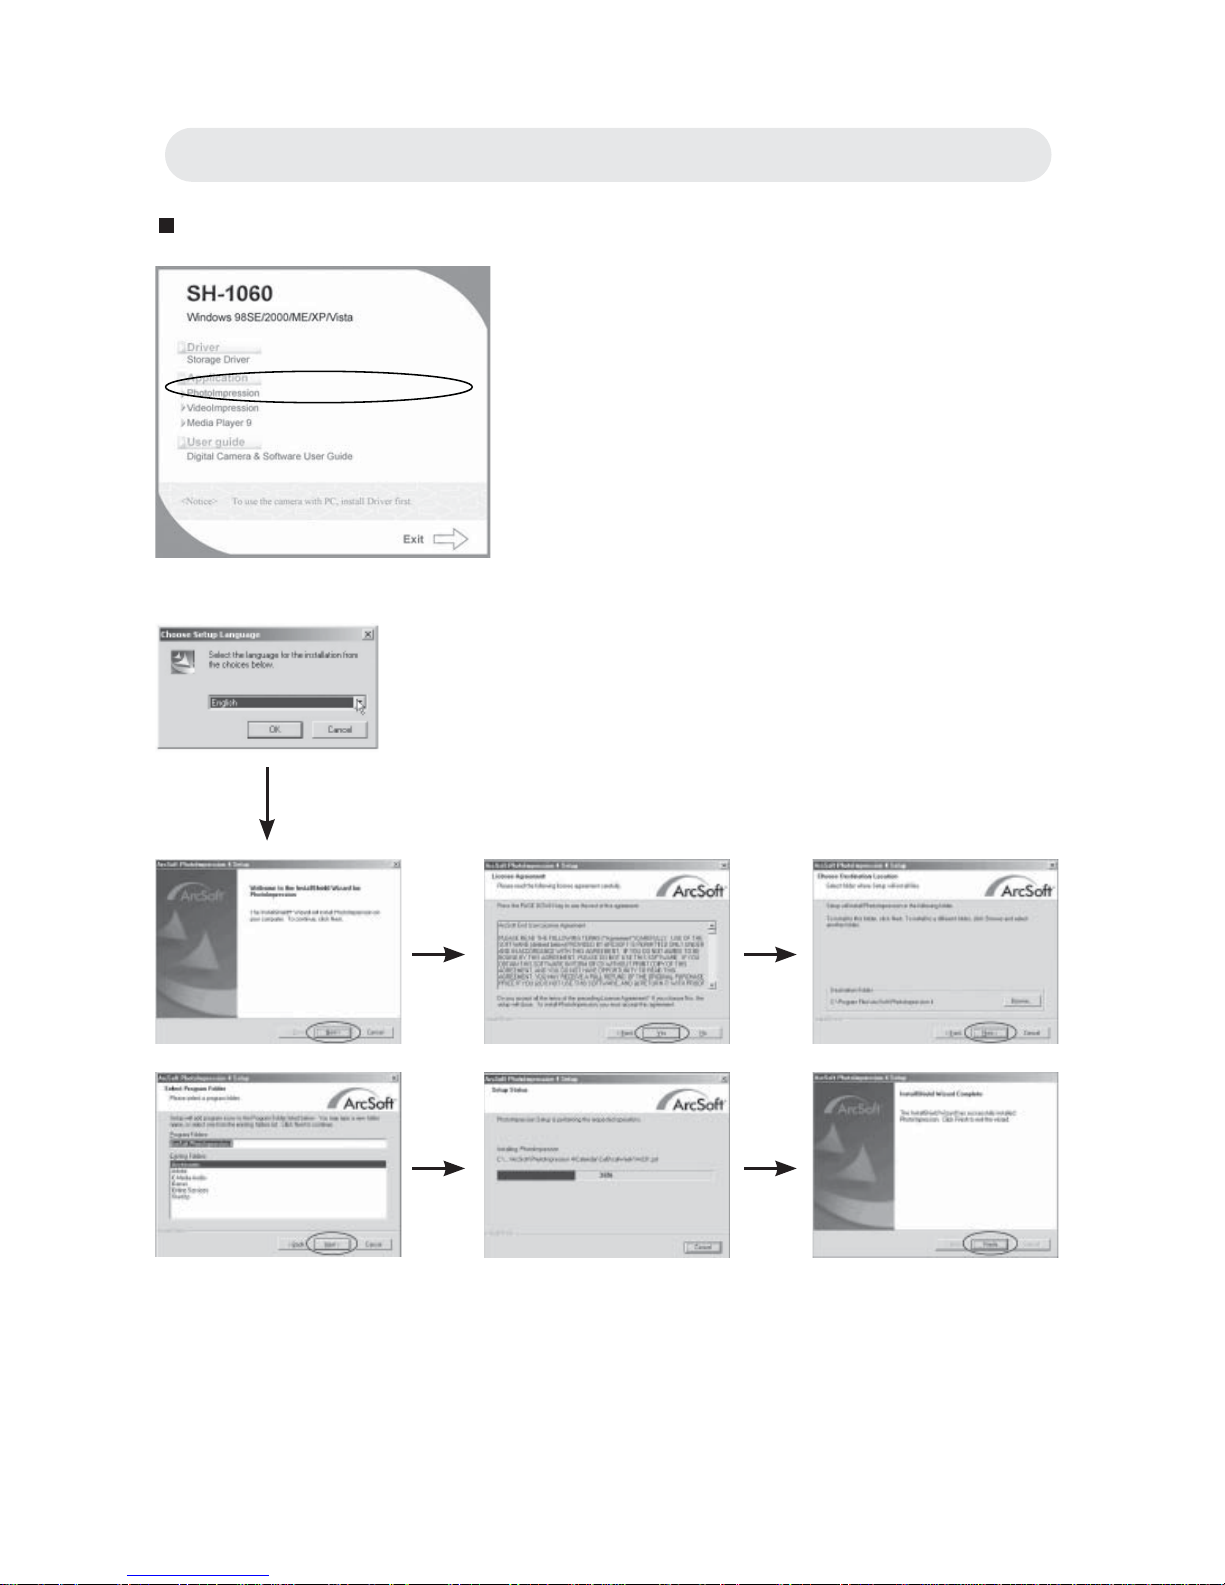
1 After you insert the CD into the CD-
ROM drive, the pop-up image will
appear. If the image does not appear,
click “Start” and then “Run”. Type
“E:\Technika.exe”.
Click “PhotoImpression”. The computer
proceeds to install PhotoImpression.
2 Select a language and click “OK”.
Follow the on-screen instruction to
continue the installation.
Chapter 4: Installing the Software
Page 55
55
Using the Application
PhotoImpression
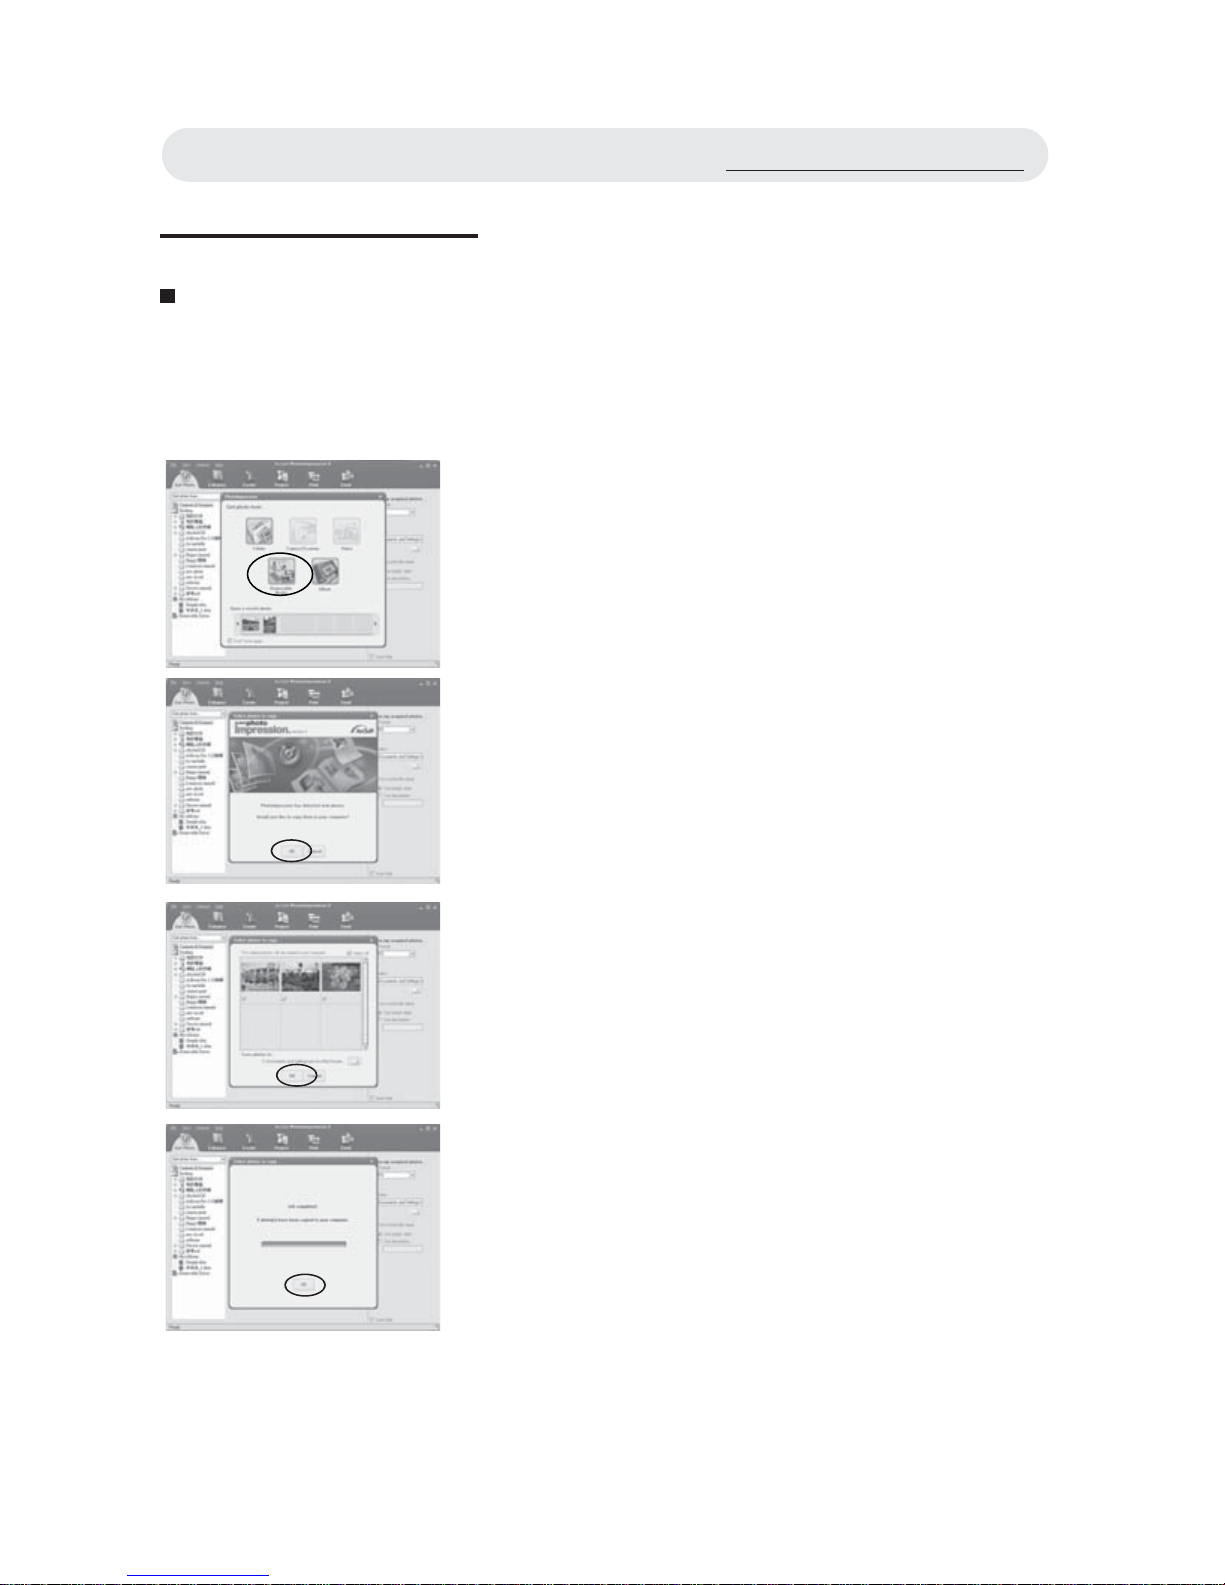
1 Connect the camera to the computer.
See page 57. Launch PhotoImpression.
2 To download the images from the
camera, select “Removable Media” .
3 Press “OK” and PhotoImpression will
detect new photos to your computer.
4 Press “OK” and the selected photos will
be copied to your computer.
5 Job completed and press “OK”.
Using the Application
Page 56
56
VideoImpression
We recommend you to install Windows Media Player 9 or later when you
play back the video clip on the computer. If you use Windows XP, you
also have to upgrade to Windows XP Service Pack 2(SP2).
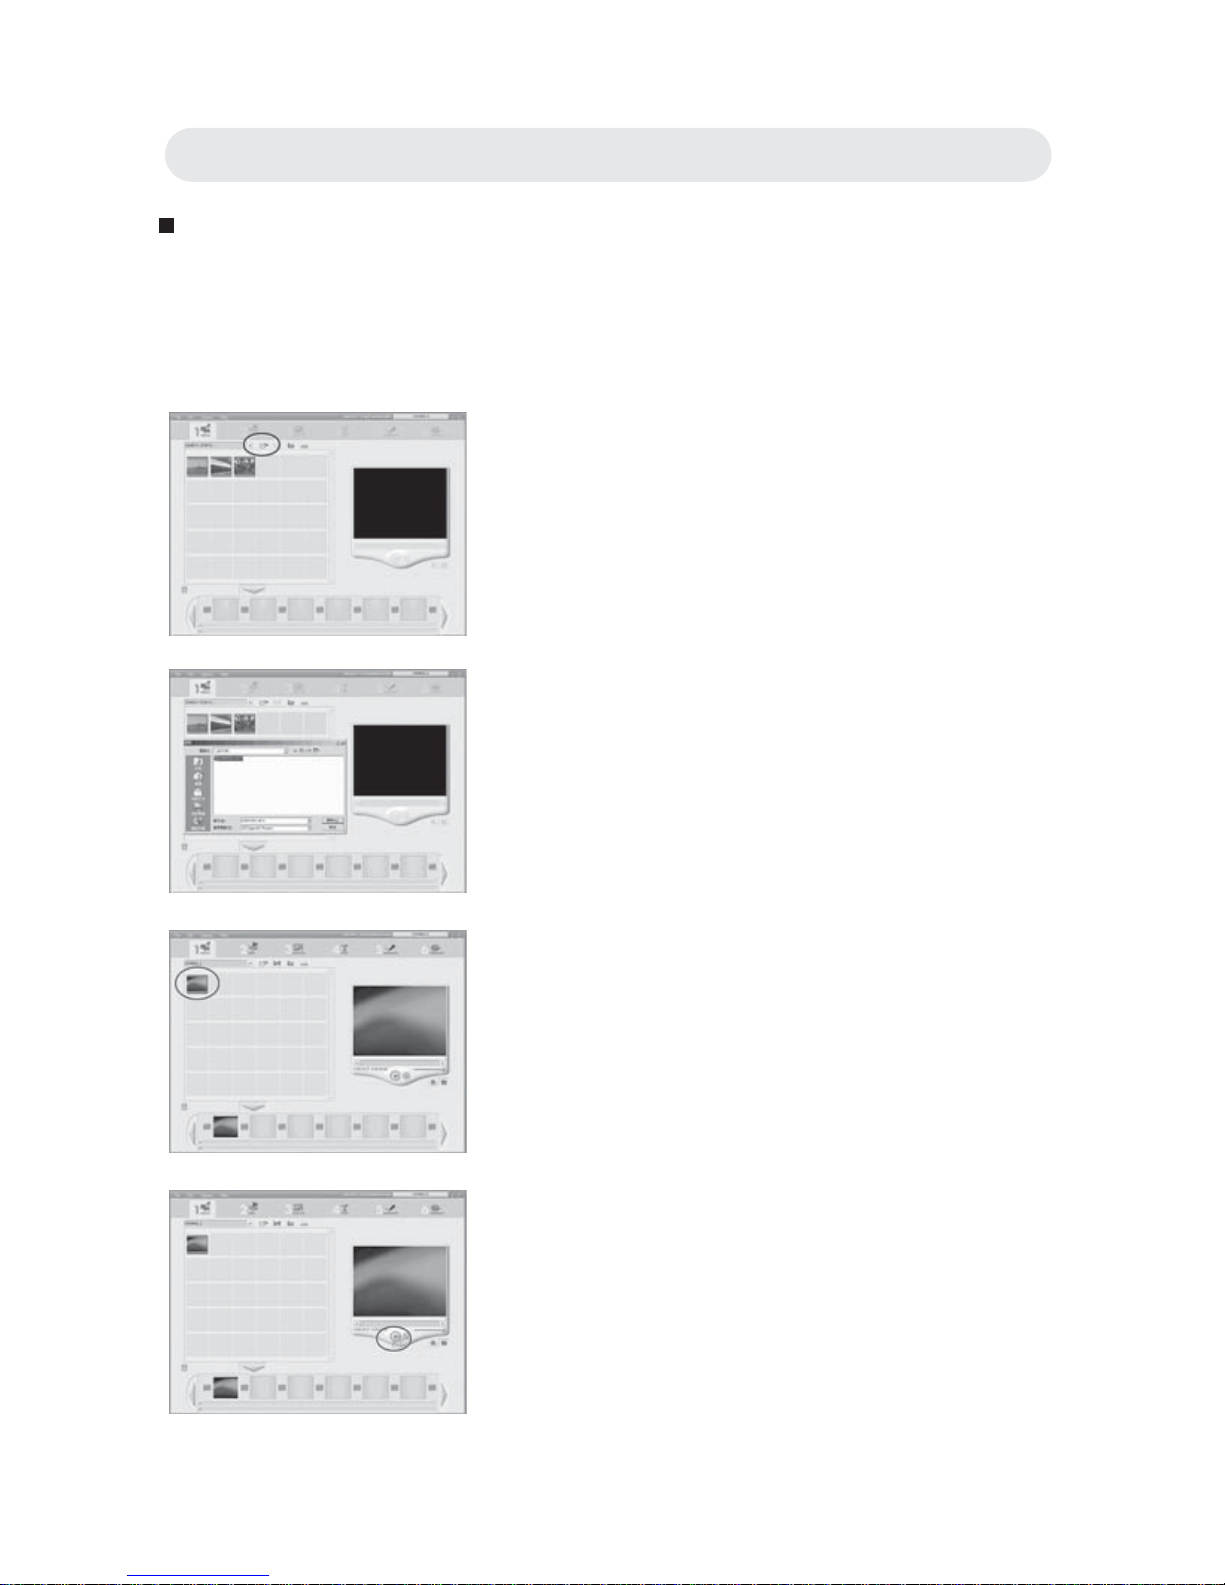
1 Launch VideoImpression and then
select “add”.
2 Select “DCIM” to download the video
clips from the camera.
3 Double-click to select the video clips.
4 Click “Play” to play the video clips.
Chapter 4: Installing the Software
Page 57
57
After you take images, you can upload images to a computer from your
camera, print them with a printer, and display them on a TV.
Uploading to a Computer
Note 1: When the camera is connected to a computer, the LCD monitor
is turned off.
Note 2: If you use Windows 98SE, you have to install the USB driver
from the software CD-ROM.
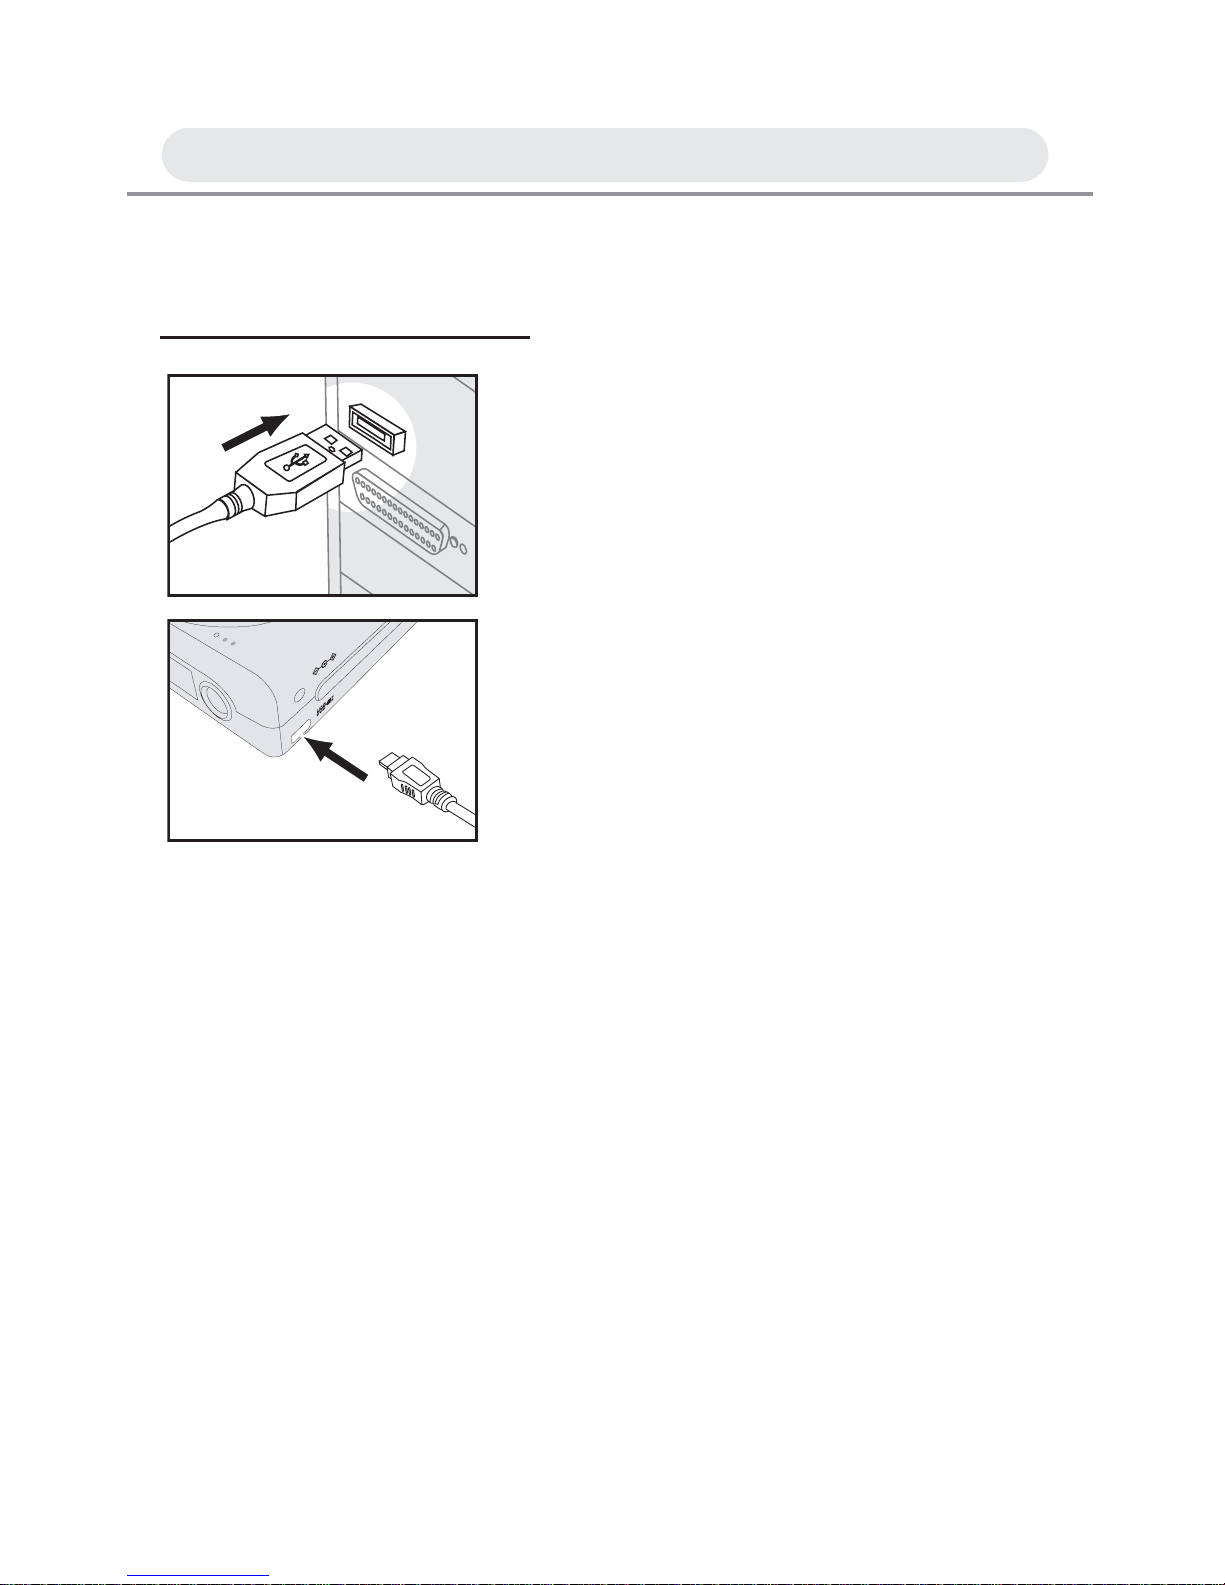
1 Connect the larger end of the USB
cable to the USB slot on your
computer. And connect the smaller end
of the USB cable to the USB connector
on the camera.
2 The computer automatically detects the
camera as a mass storage device so
you can copy image fi les from your
camera to your computer’s hard drive.
A/V OUT
DC IN 5V
Chapter 5: Uploading, Printing & Displaying Images
Page 58

58
Printing Images
There are three printing methods you can use to print out selected
images. This camera supports direct printing, Digital Print Order Format
(DPOF), and PictBridge. Direct printing allows you to print out images by
connecting the camera directly to some specifi c printers to print your
favorite images. Both DPOF and PictBridge printing function need a
printer that supports these functions.
• Printing with DPOF and PictBridge compatible printers
The camera’s DPOF feature allows you to specify which images you
want to print and how many copies of each you want. After you specify
your printing preference on the camera, then you can remove the
memory card from the camera and plug into a printer that supports
DPOF, or connect the camera through the USB cable to a PictBridge
compatible printer for printing. See page 49 for DPOF settings and
page 68 for PictBridge settings.
• Printing with a Computer
After uploading the images to a computer by the USB cable, you can
print images by using the software supplied with the camera. See page
53 on how to Install the software.
• Professional Print Service
Specify your printing preference by using the DPOF function in the
camera, then simply take the memory card to a professional print
service where they will print your images in accordance with your
specifi cations. See page 49 for DPOF settings.
Note 1 : You cannot print videos.
Note 2 : See the document that comes with your printer for information
about print quality and paper settings.
Note 3 : Contact your printer manufacturer for information about models
that support PictBridge function.
Note 4 : Never disconnect the USB cable, or perform any camera
operation while printing is in progress. Doing so may cause
printing errors.
Chapter 5: Uploading, Printing, & Displaying Images
Page 59
59
Displaying Images on a TV
By connecting your camera to a TV, you can view images as a slide show
and play video clips.
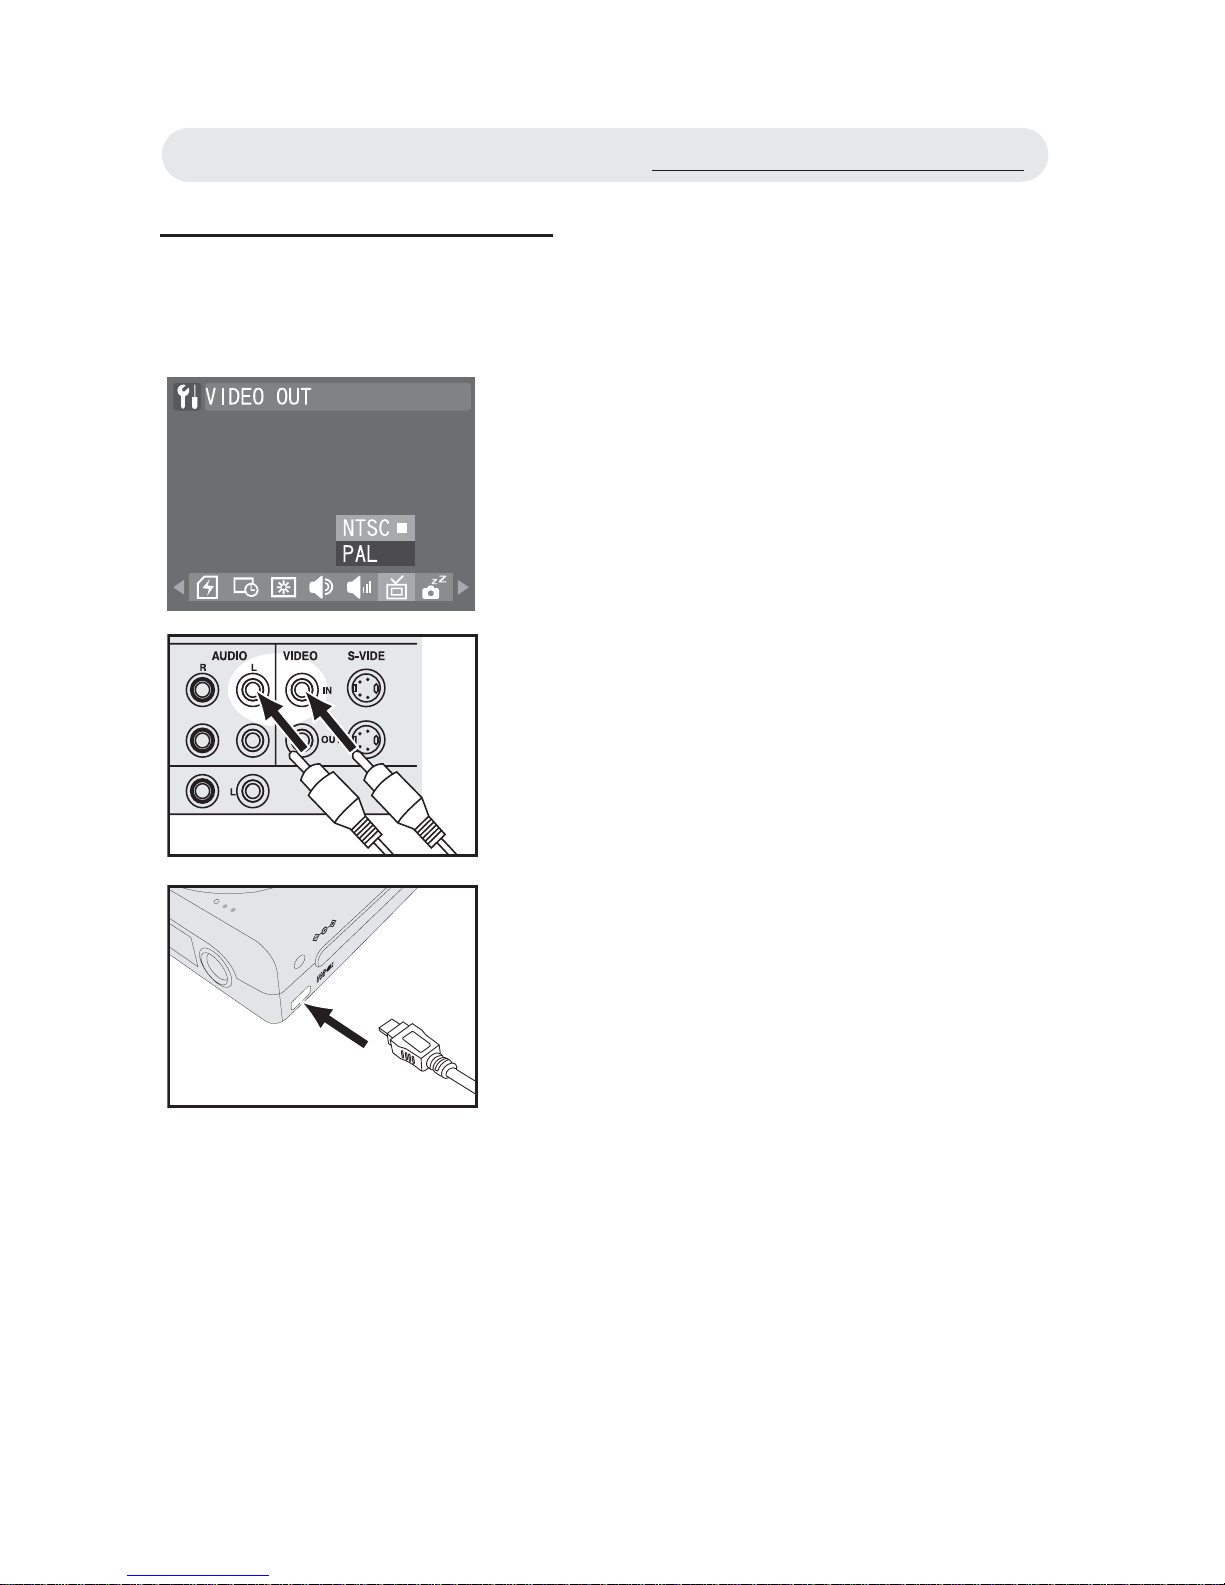
1 Select a compatible TV system in
“SETUP” menu.
2 Connect the A/V (Audio/Video) cable
to the A/V inputs of the TV, and connect
the A/V cable to the A/V connector of
the camera.
Note 1: When you connect your camera to
a TV, the LCD monitor turns off
automatically.
Note 2: The audio terminal is white and the
video terminal is yellow.
A/V OUT
DC IN 5V
Displaying Images on a TV
Page 60
60
Chapter 6: Adjusting the Camera Settings
Using the Setup Menu
1 In Capture, Video or Playback menu, use / button to select
“Setup” and press OK button to enter the menu.
2 Scroll through the menu by using / button and use / button to
highlight the option you want to select.
Setting Language
This function allows you to change the language.
Setting Date/Time
This function allows you to change the date and time.
1 In Setup menu, select “LANGUAGE”.
2 Select the language you want from the
list and press OK button to confi rm the
setting.
1 In Setup menu, select “DATE/TIME”.
2 Press / button to make
adjustments to each fi eld. Press the OK
button to confi rm all settings.
Page 61
61
Setting Digital Zoom
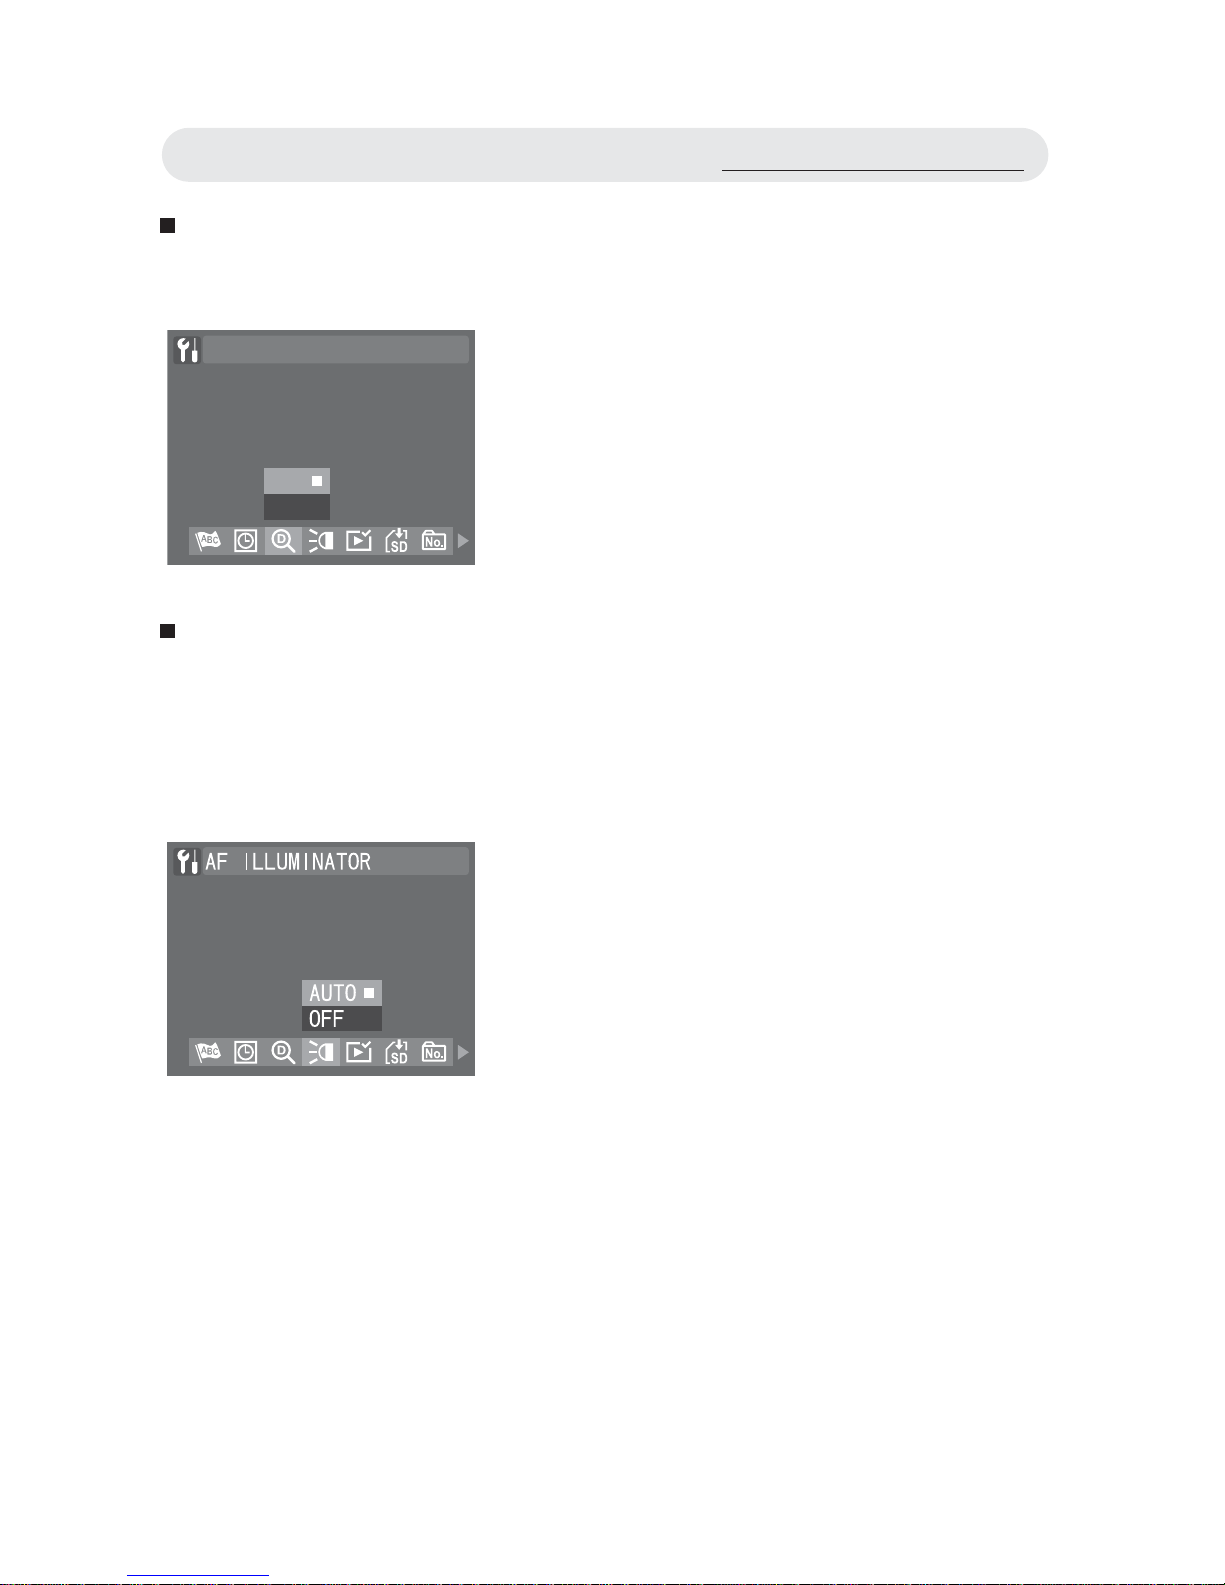
This function allows you to activate digital zoom function.
Setting AF Illuminator
This function allows you to turn on or off the AF illuminator at the front of
the camera. Turn on this function to aid focusing in low-light situations.
Turn off this function if you are capturing an image, which may be
distracted by the illuminator (wildlife, for example).
1 In Setup menu, select “DIGITAL
ZOOM”.
2 Select “ON” or “OFF”. Press OK button
to confi rm the setting.
DIGITAL ZOOM
OFF
ON
1 In Setup menu, select “AF
ILLUMINATOR”.
2 Select “AUTO” or “OFF”. Press OK
button to confi rm the setting.
Using the Setup Menu
Page 62
62
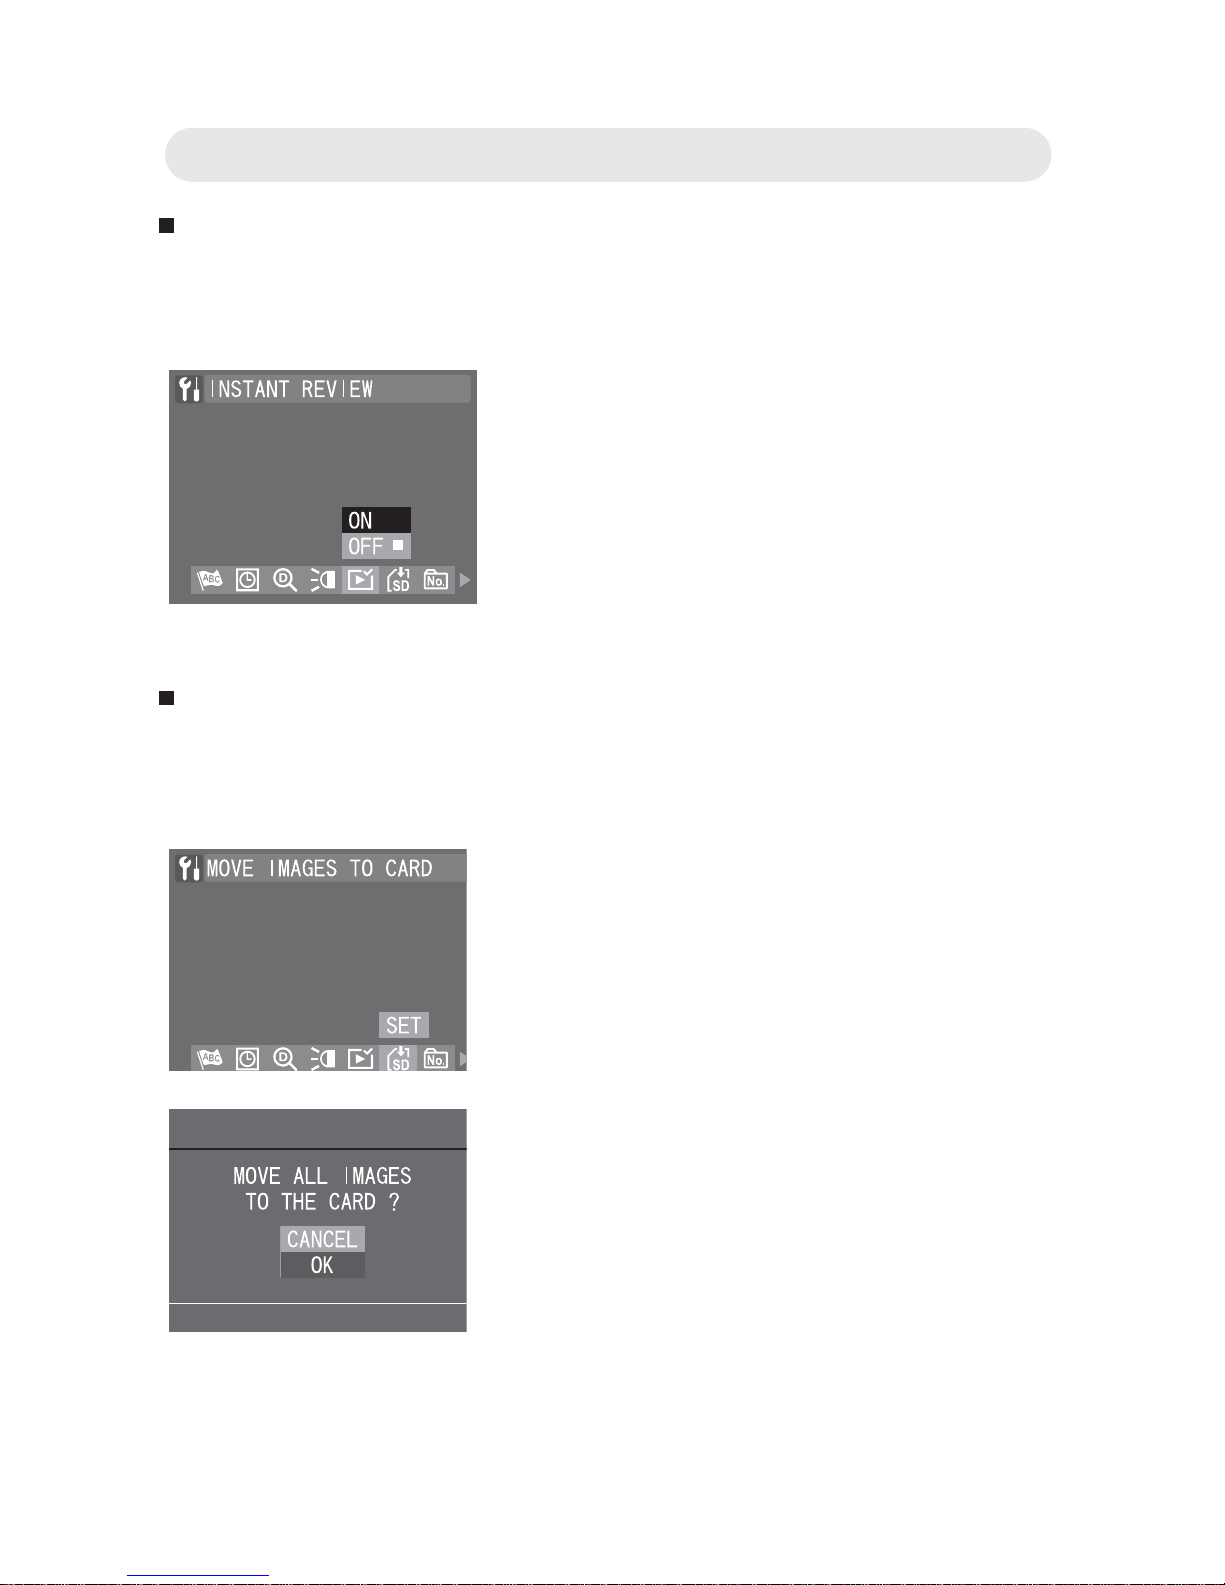
Setting Instant Review
This function allows you to review the image for 3 seconds after taking a
image.
Moving Images to Card
This function allows you to move images stored on the internal memory
to your memory card.
1 In Setup menu, select “INSTANT
REVIEW”.
2 Select “ON” or “OFF”. Press OK button
to confi rm the setting.
1 In Setup menu, select “MOVE IMAGES
TO CARD” and then press OK button.
2 A confi rmation dialogue will appear.
Select “OK” and press OK button to
move images to card.
Note: If the camera does not respond
when you select the “Move Images
to Card” function, either the memory
card is not inserted or the card may
be broken or locked.
Chapter 6: Adjusting the Camera Settings
Page 63
63
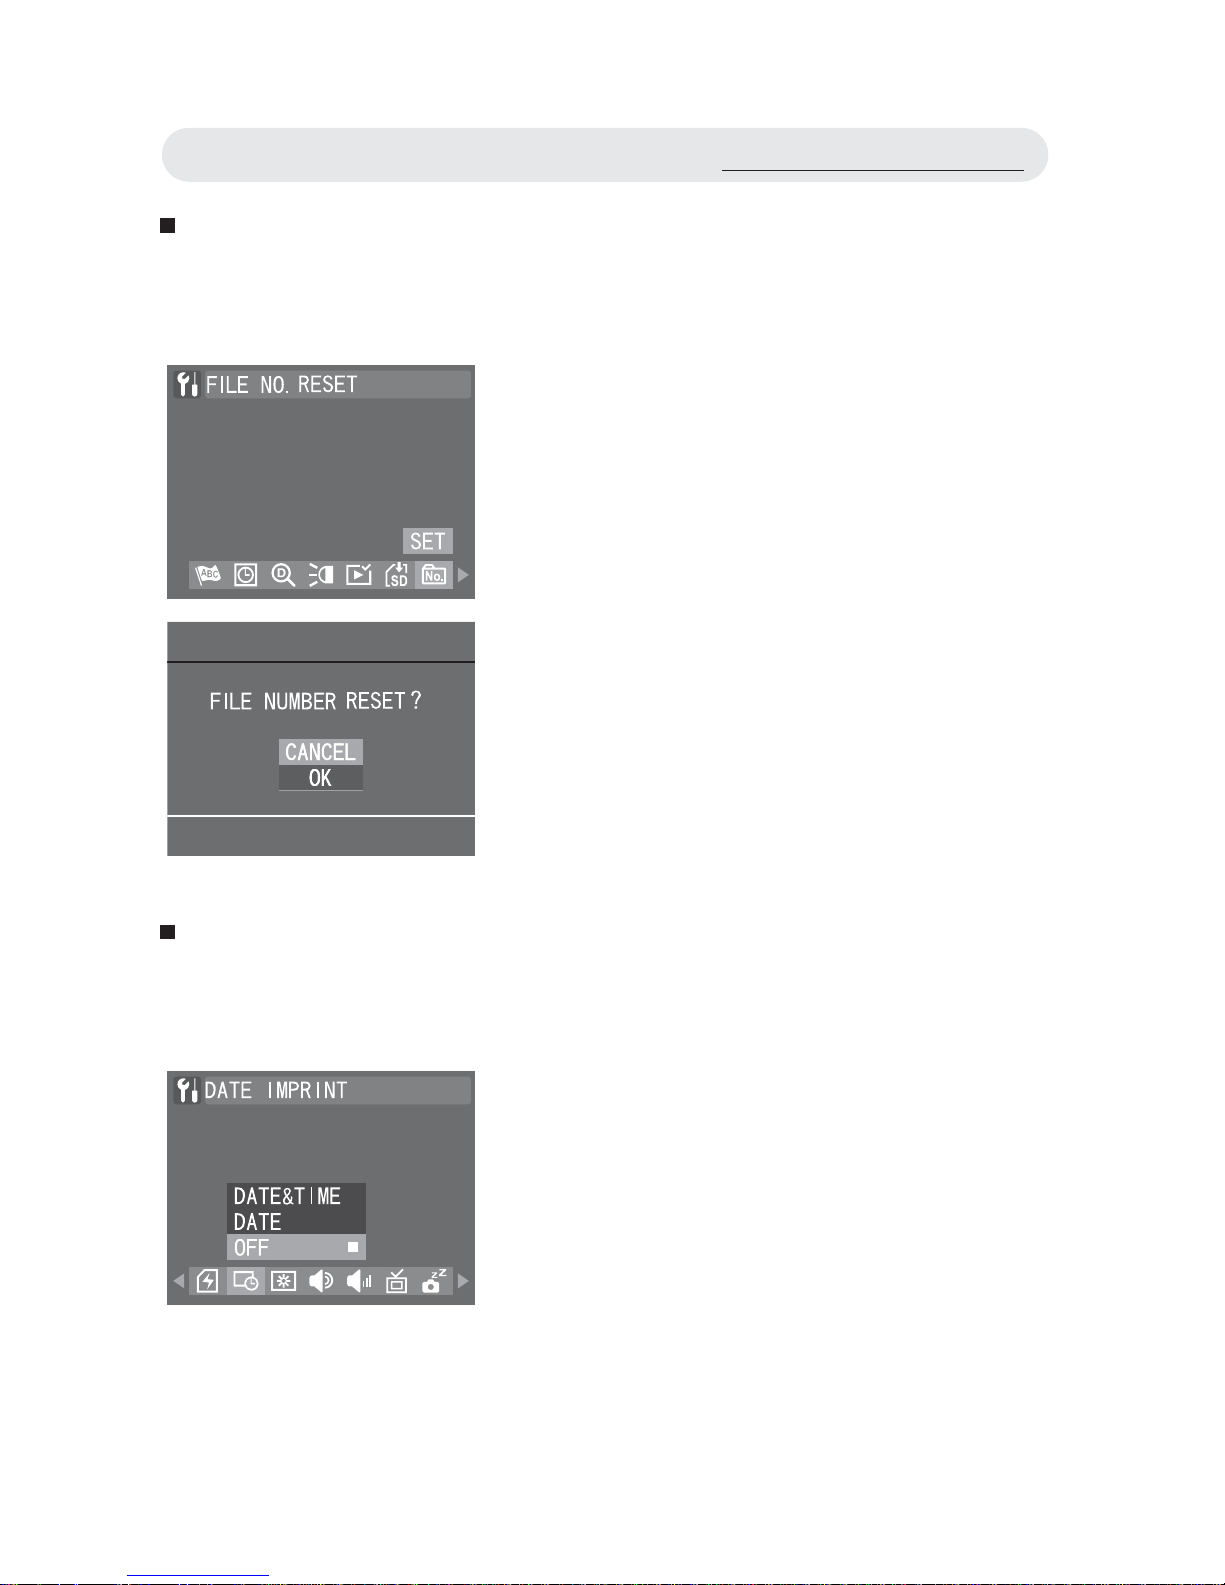
Resetting the File Number
This function allows you to reset the fi le numbers assigned to each
image or fi le.
Imprinting the Date and Time
When printing out or displaying images, you can decide whether to imprint the date and time on the images or not.
1 In Setup menu, select “FILE NO.
RESET” and then press OK button.
2 A confi rmation dialogue will appear.
Select “OK” and press OK button to
reset.
1 In Setup menu, select “DATE
IMPRINT”.
2 Select “DATE & TIME”, “DATE” or
“OFF”. Press OK button to confi rm the
setting.
Using the Setup Menu
Page 64
64
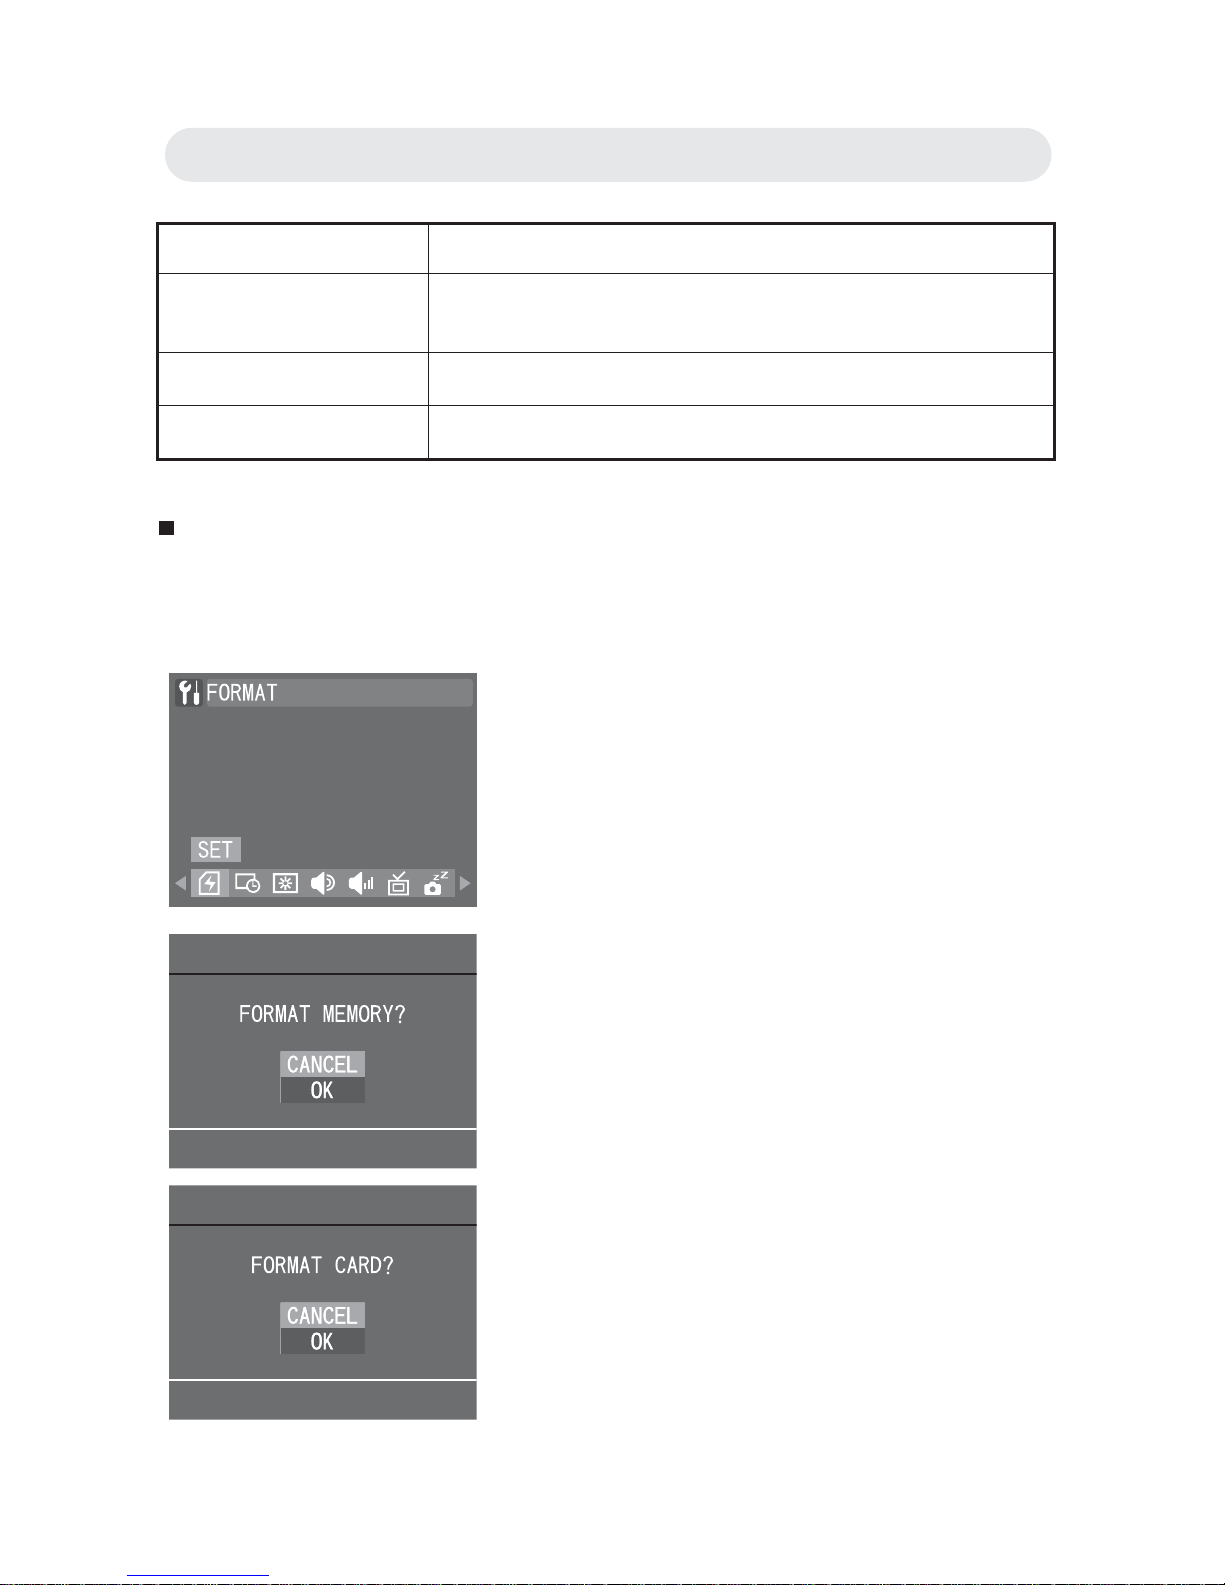
Formatting the Memory
This function allows you to delete all of the images, data, information,
and folders in your memory card or internal memory.
Setting Function
DATE & TIME The image is printed with the date and time it
was taken.
DATE The image is printed with the date it was taken.
OFF The image is printed without the date or time.
1 In Setup menu, select “FORMAT” and
then press OK button.
2 A confi rmation dialogue will appear.
Select “OK” and press OK button to
format.
Note: If a memory card is inserted, a
“FORMAT CARD?” prompt appears.
If there is no memory card inserted,
a “FORMAT MOMERY?” prompt
appears.
Chapter 6: Adjusting the Camera Settings
Page 65
65
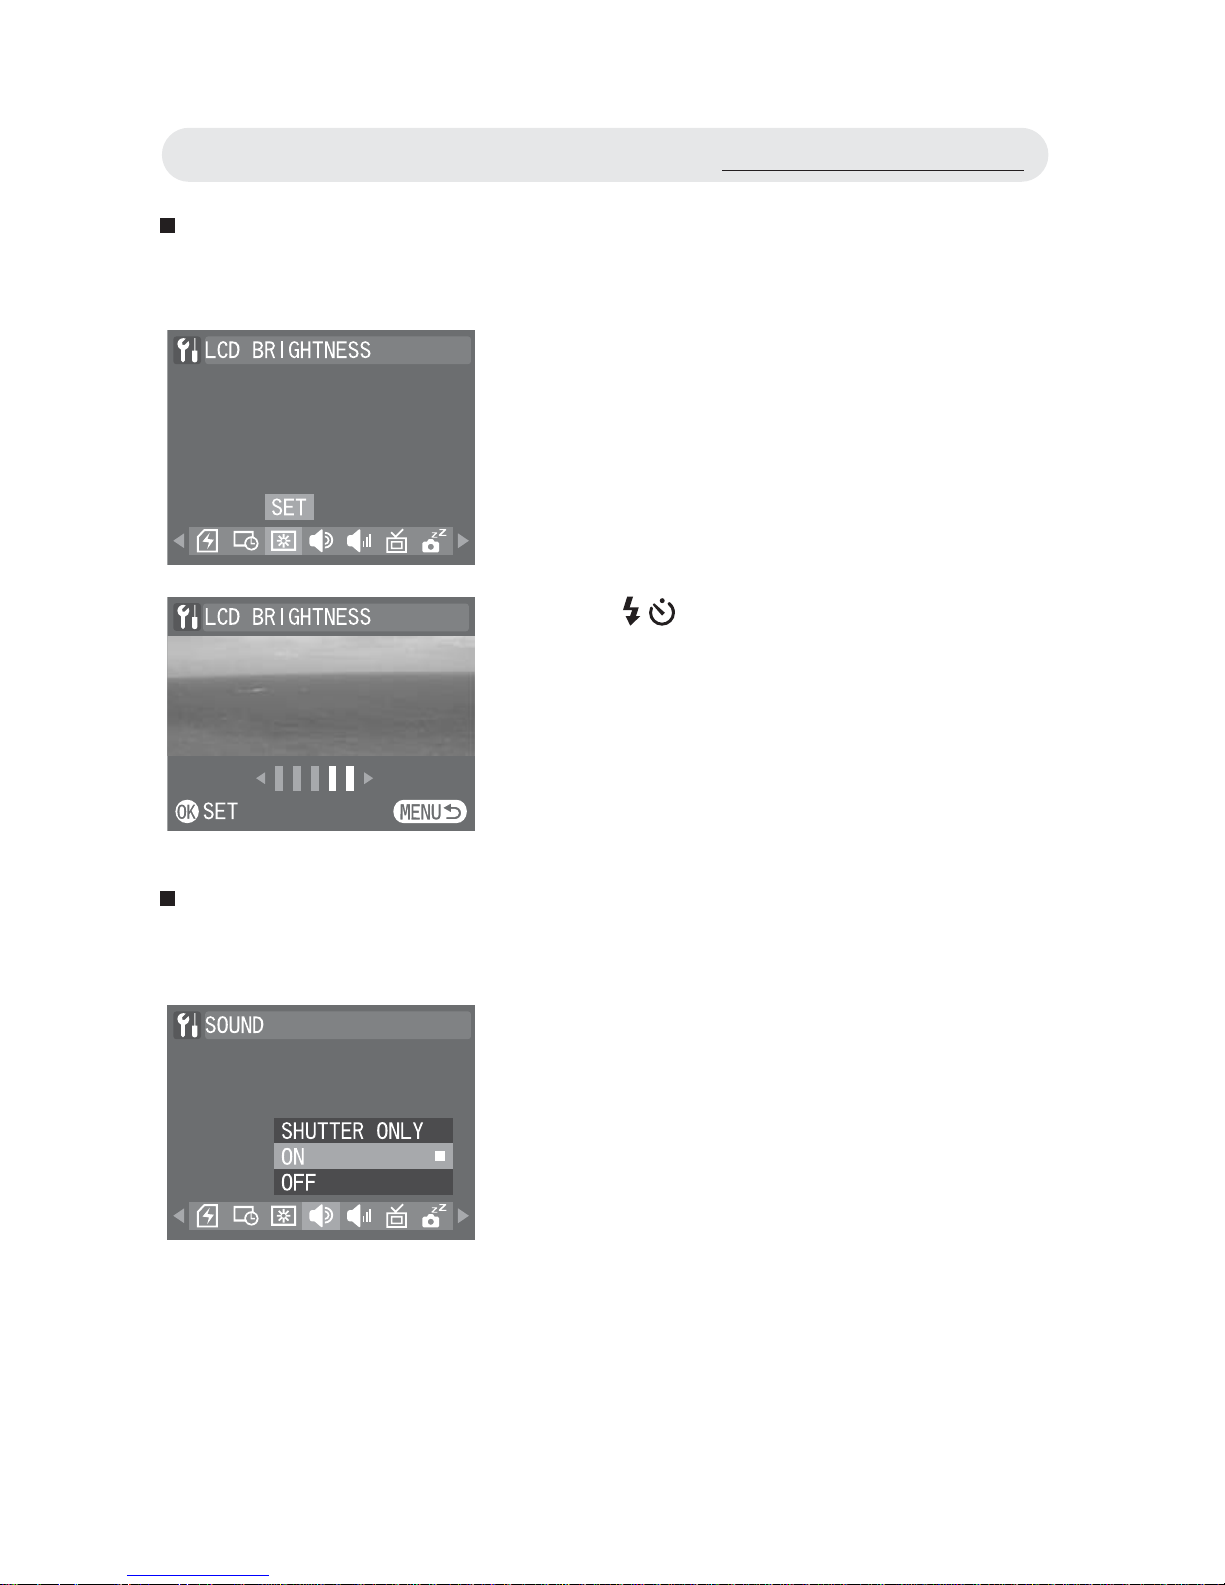
Setting LCD Brightness
This function allows you to adjust the brightness of the LCD monitor.
Setting Camera Sound
You can adjust the camera sound effect by setting camera sound.
1 In Setup menu, select “LCD
BRIGHTNESS”.
2 Use / button to adjust the brightness
value. Press OK button to confi rm the
setting.
Note: This setting is disabled when viewing
images or videos through your TV.
1 In Setup menu, select “SOUND”.
2 Select “SHUTTER ONLY”, “ON”, or
“OFF”. Press OK button to confi rm the
setting.
Using the Setup Menu
Page 66
66
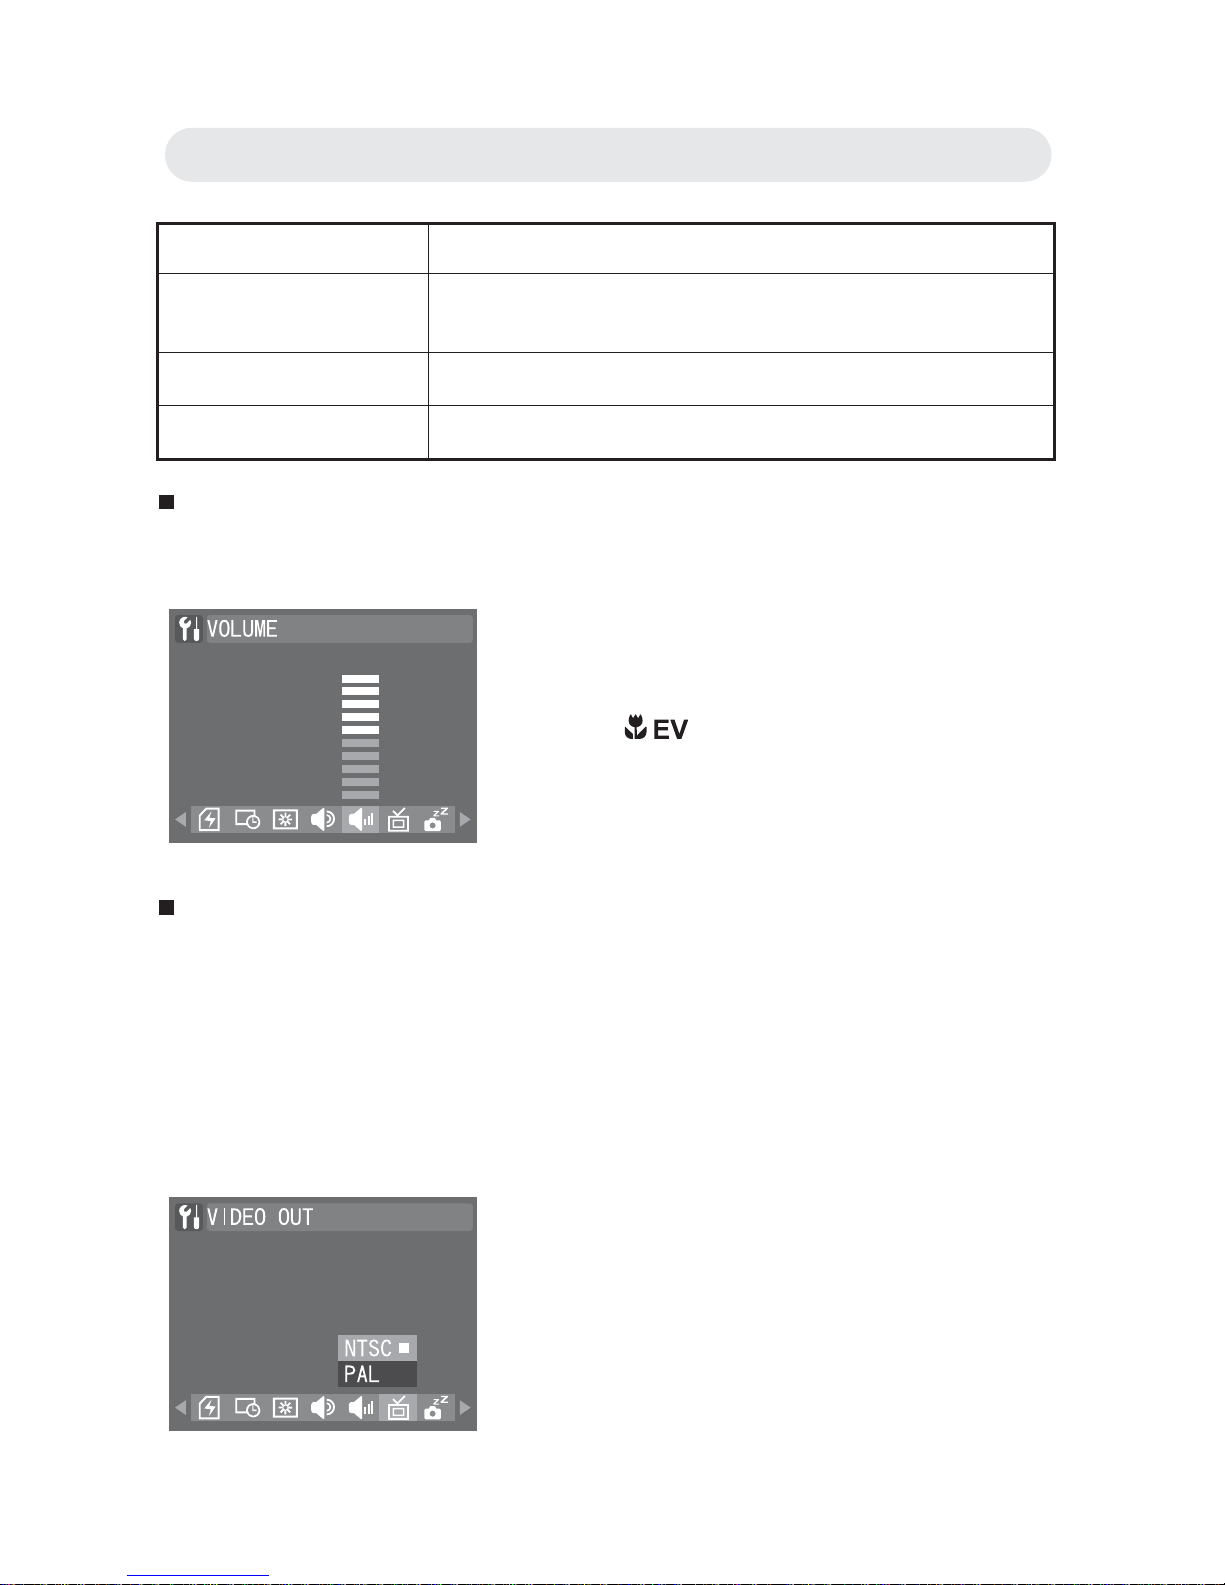
Setting Camera Volume
This function allows you to adjust the volume.
Setting TV System
Both NTSC and PAL are TV broadcast systems. The NTSC system is
used mainly in the USA, Japan, Canada, Mexico, the Philippines, Korea
and Taiwan. The PAL system is used in western European countries
such as Germany, the UK, Switzerland, Holland, Italy (except for France)
and Australia, Singapore, Thailand and China. As these systems are not
compatible, you cannot watch an NTSC system based TV in an area
where the PAL system is used.
Setting Function
SHUTTER ONLY All sound is off apart from a shutter sound when
an image is taken.
ON All camera sounds are turned on.
OFF All camera sounds are turned off.
1 In Setup menu, select “VOLUME”.
2 Use / button to increase or
decrease the volume. Press the OK
button to confi rm all settings.
1 In Setup menu, select “VIDEO OUT”.
2 Select “NTSC” or “PAL”. Press the OK
button to confi rm all settings.
Chapter 6: Adjusting the Camera Settings
Page 67
67
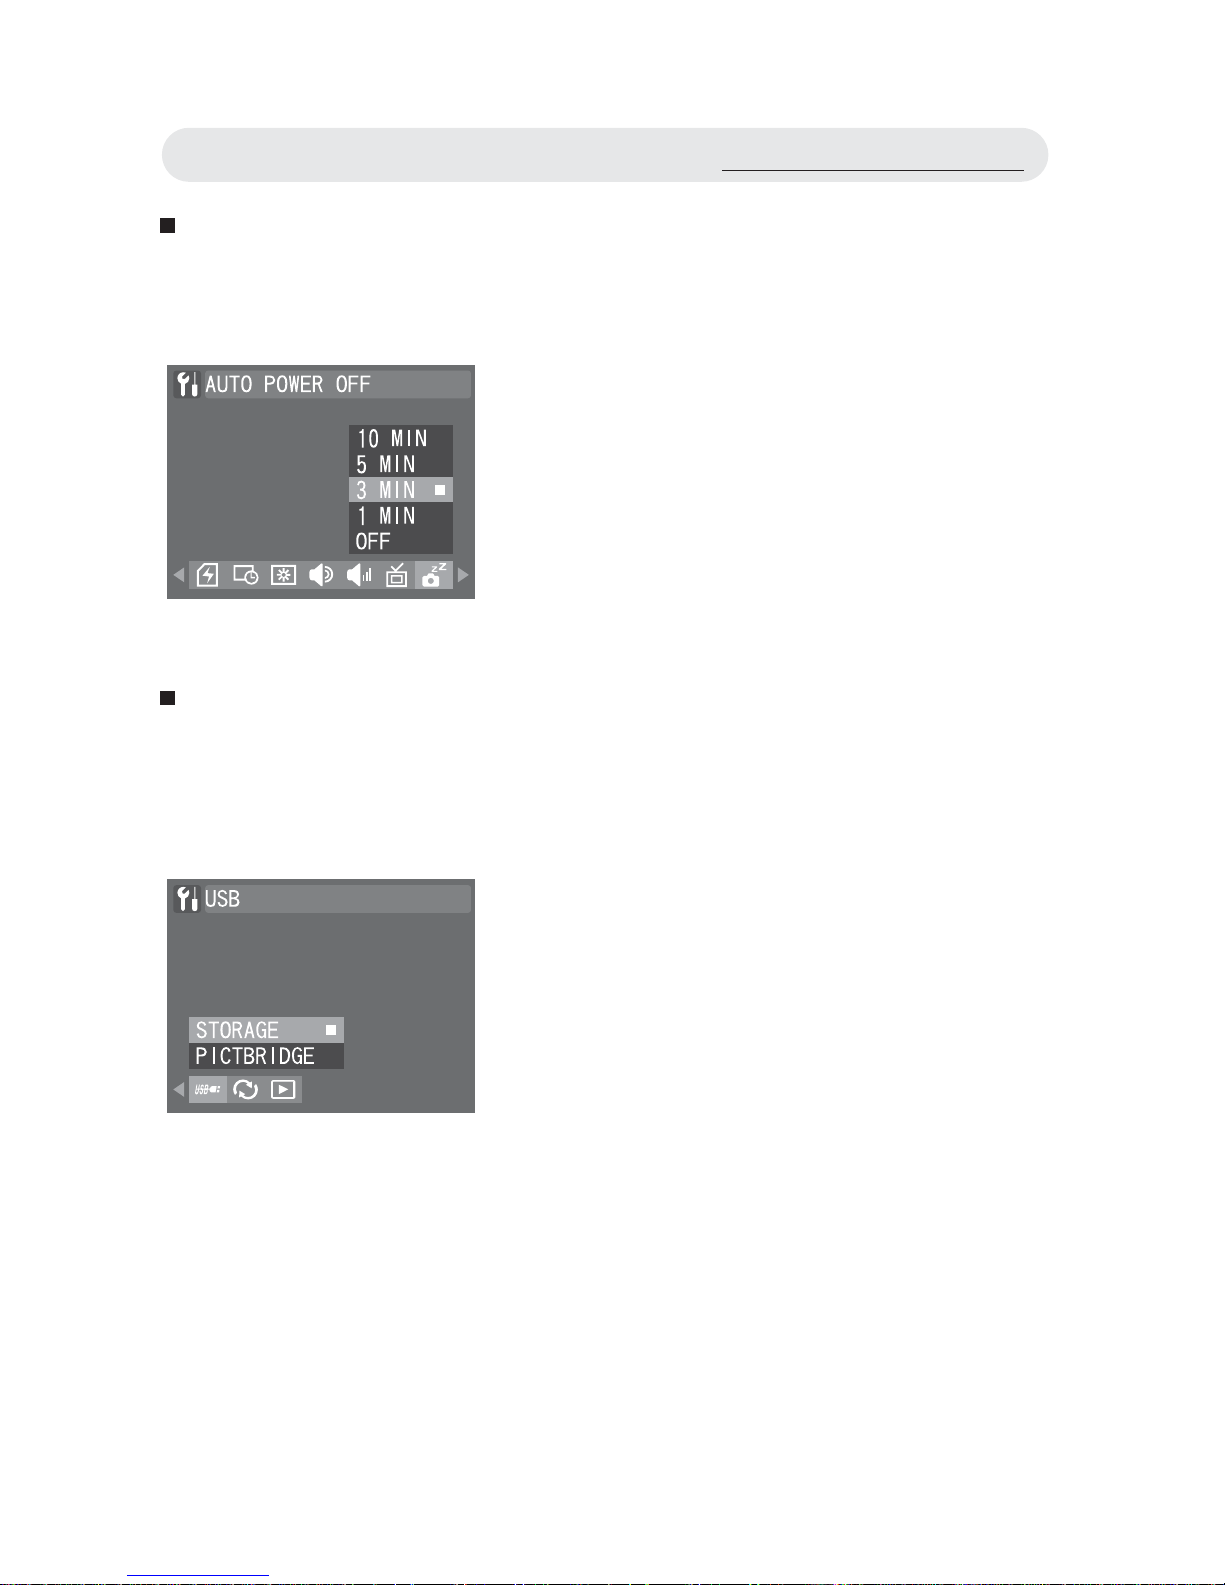
Setting Auto Power Off
To save battery power, you can set the camera to turn off automatically
when it is not in use for a fi xed time.
Changing USB Mode
You can change the USB connection mode depending on whether the
camera is to be connected to a computer (STORAGE) or a printer
(PICTBRIDGE).
1 In Setup menu, select “AUTO POWER
OFF”.
2 Select “10 MIN”, “5 MIN”, “3 MIN”, “1
MIN” or “OFF”. Press the OK button to
confi rm all settings.
1 In Setup menu, select “USB”.
2 Select “STORAGE” or “PICTBRIDGE”.
Press the OK button to confi rm all
settings.
Using the Setup Menu
Page 68
68
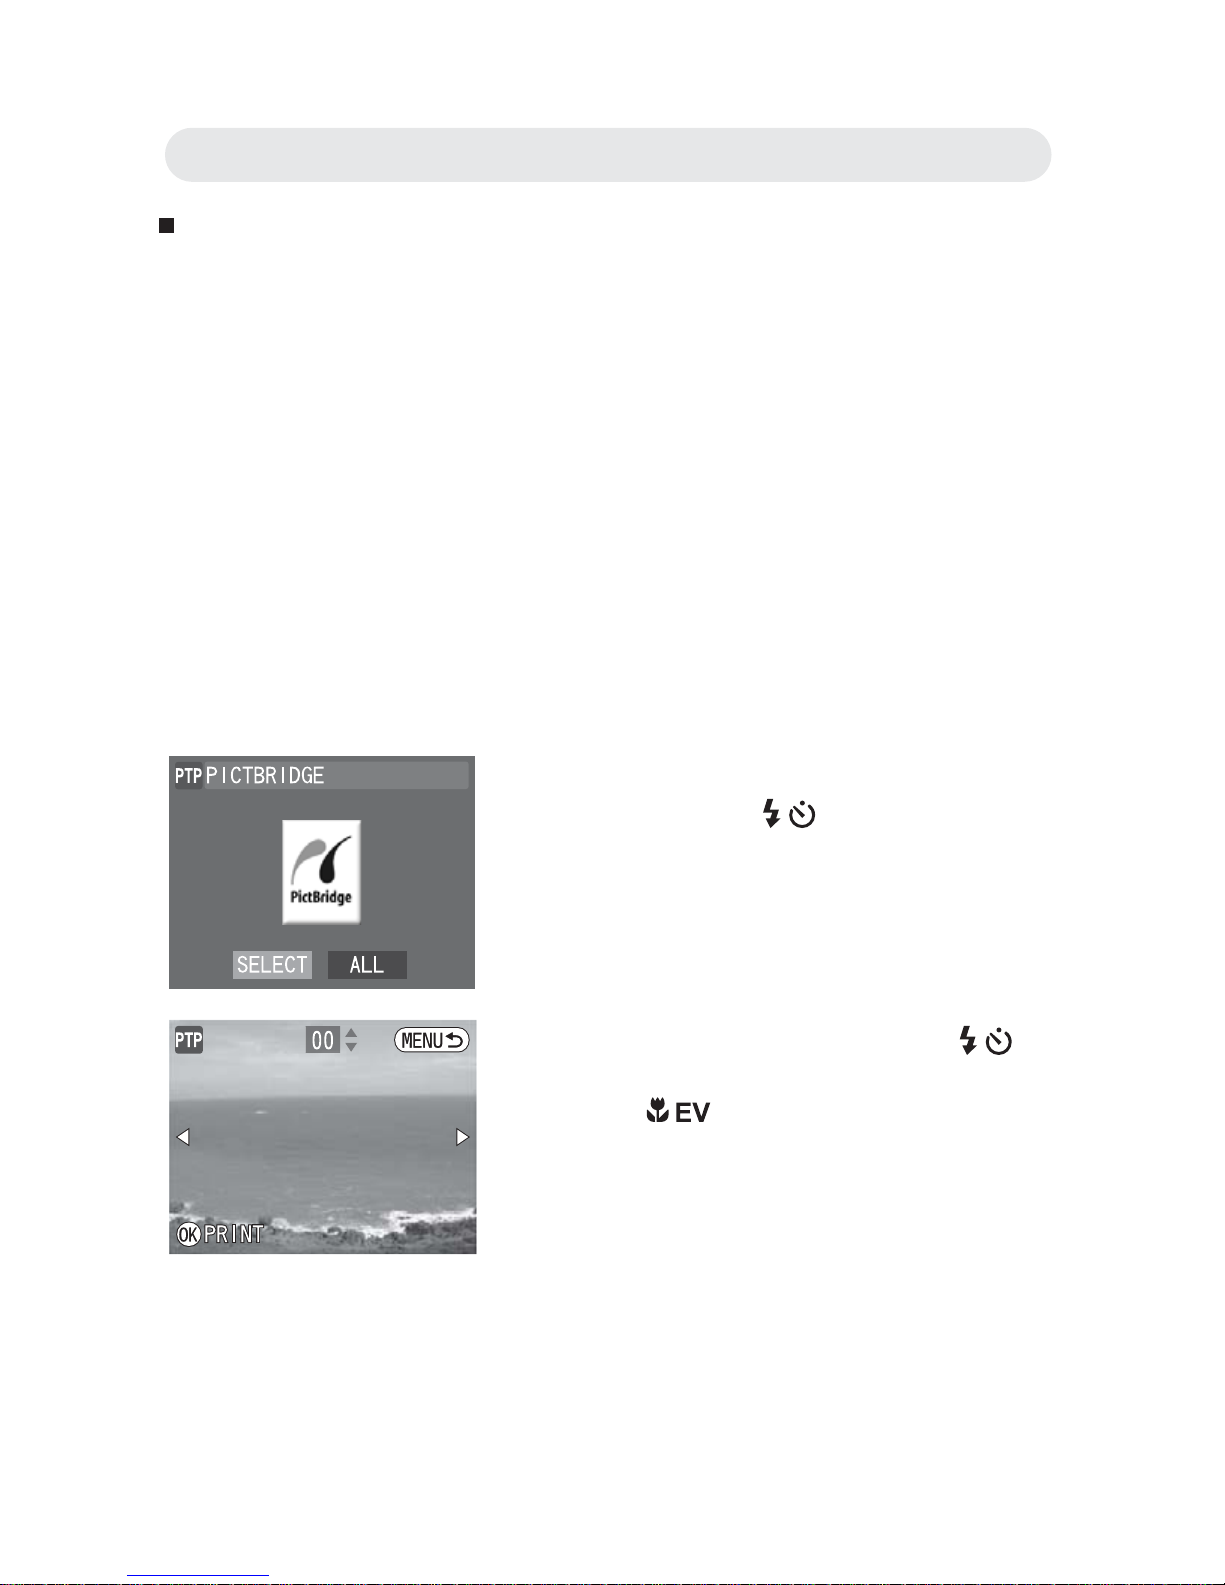
Using PictBridge
You can connect the camera directly to a printer that supports PictBridge,
and perform image selection and printing using the camera monitor
screen and controls.
PictBridge is a standard established by the Camera and Imaging Products
Association (CIPA).
1 In “SETUP” menu, change the USB
connection mode to “PICTBRIDGE”.
2 Use the USB cable that comes with the
package to connect the camera to a
PictBridge compatible printer.
3 Once connected, the PictBridge menu
appears. Press
/ button to choose
the option you want and press the OK
button to confi rm.
4 If you choose “SELECT”, press / to
select the images you want to print.
Press / to specify the number of
copies. Press the OK button to confi rm
all settings.
Chapter 6: Adjusting the Camera Settings
Page 69
69
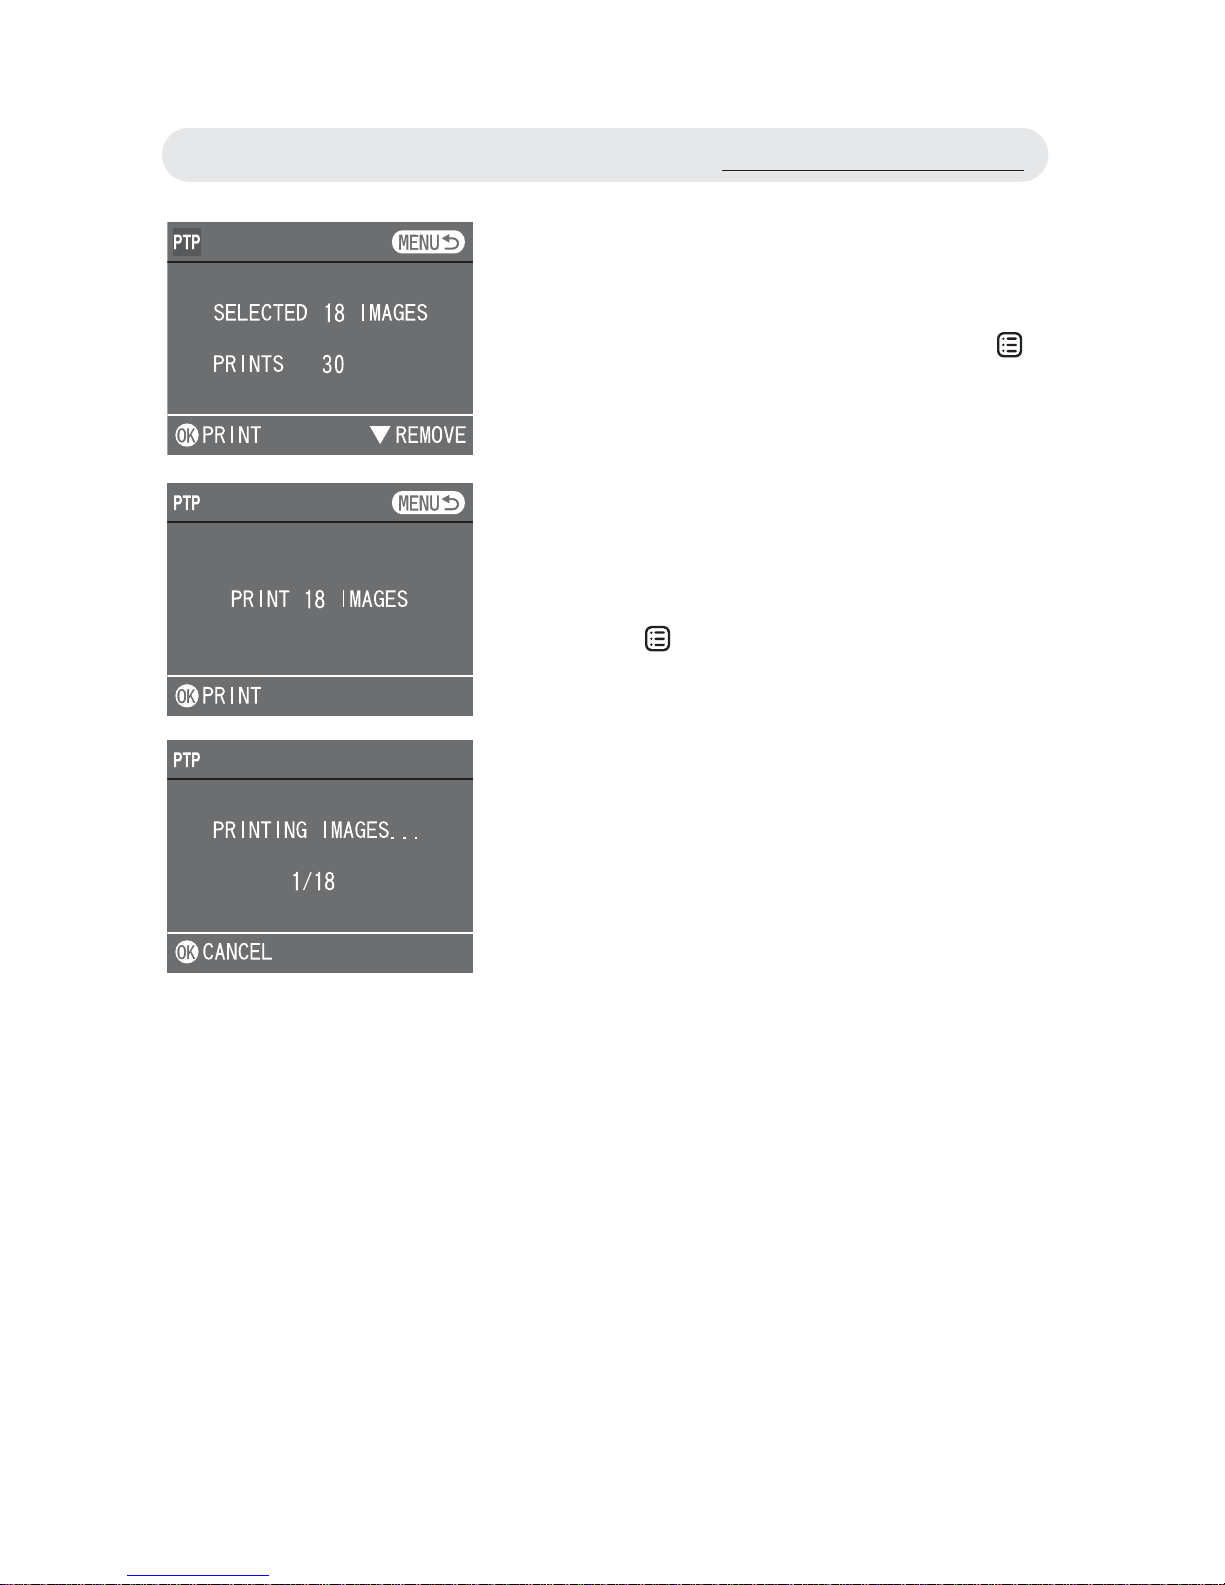
5 The total number of images you have
selected and the number of copies that
you have set appear on the screen.
Press the OK button to print or the
button to return to the PictBridge menu.
6 Select “ALL” to print all images and
press the OK button.
The total number of images appears on
the screen. Press the OK button to print
or the button to return to the
PictBridge menu.
7 Press the OK button to stop when the
printer is start to print the images.
Using the Setup Menu
Page 70
70
Resetting Your Camera
This function allows you to reset all camera settings to default.
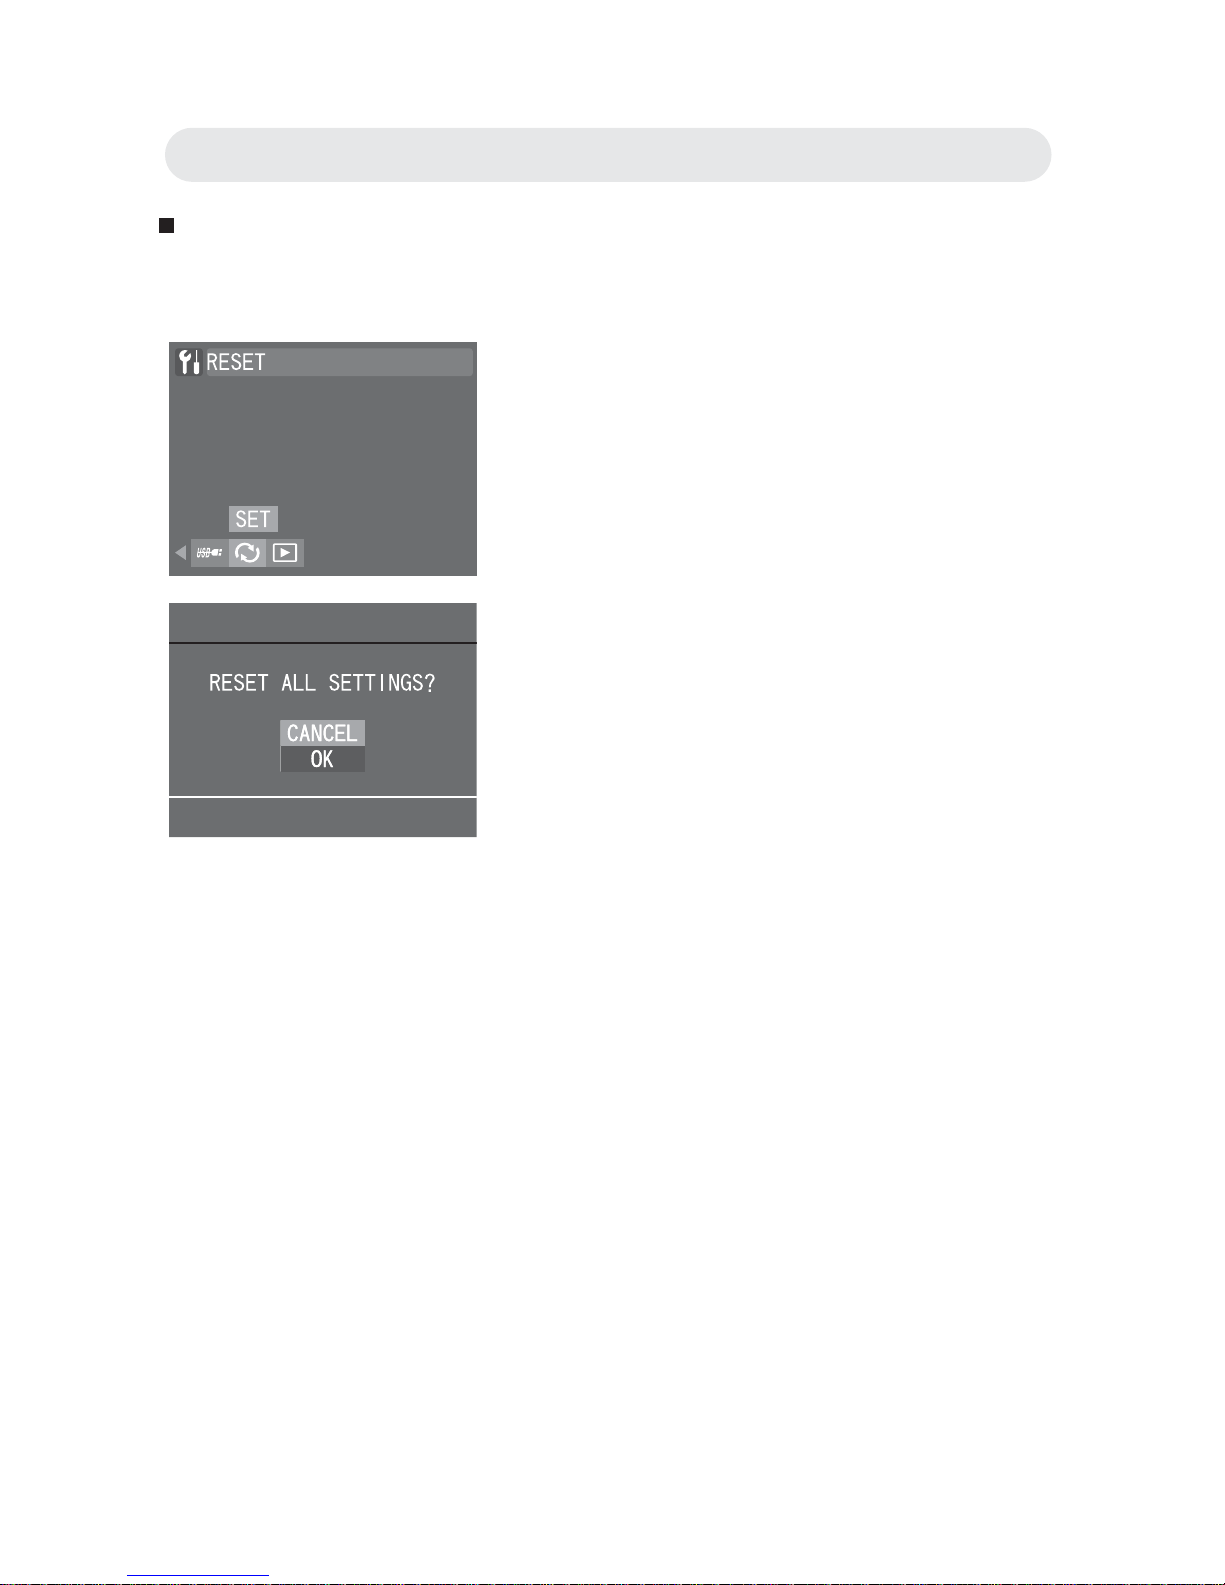
1 In Setup menu, select “RESET” and
press the OK button.
2 A confi rmation dialogue appears.
Select OK to reset your camera. Press
the OK button to reset all settings.
Chapter 6: Adjusting the Camera Settings
Page 71
71
Problem Possible Cause Solution
The camera does
not work.
The power is off. Press the power button to
turn it on.
The battery is inserted
incorrectly.
Reload the battery
correctly.
The battery power is
low or drained.
Replace battery with a new
one or charge the
battery. See Page 12.
The image can
not be taken
when I press the
shutter release
button.
The camera is not in
capture mode.
Press the mode switch to
capture mode.
You did not press the
shutter release button
down enough.
Press the shutter release
button down fully.
The memory card is
full.
Replace with another
memory card, upload the
images to a computer or
delete the images.
The camera is still
saving the last image
you took.
Wait until image storing of
the camera is fi nished.
The fl ash is still
recharging.
Wait for a few seconds
until the recharging is
completed.
The battery power is
low.
Replace battery with a new
one or charge the
battery. See Page 12.
You did not insert a
memory card.
Insert a memory card.
The fl ash does
not fi re.
The battery power is
low.
Replace battery with a new
one or charge the
battery. See Page 12.
The fl ash is off. Switch to other fl ash mode.
Trouble Shooting
Page 72
72
Problem Possible Cause Solution
The images are
blurry.
The camera is moving
when you press the
shutter release button.
Hold the camera steady or
use a tripod when taking
images.
The focus brackets are
not positioned on the
subject.
Position the focus brackets
on your subject.
Use macro mode to
shoot subjects within
normal focus, or vice
versa.
Set the camera to shoot
in normal focus or macro
focus and then take the
image again.
The light is dim and
the fl ash is off.
Use a tripod and turn on
the fl ash.
The lens is dirty. Gently clean the lens.
The images are
too bright.
The fl ash is on when
the subject is bright
enough.
Turn off the fl ash.
The camera is too close
to the subject when
taking images with the
fl ash on.
Move back from the subject
and take the image again.
Light sources other
than the fl ash provide
too much light.
Avoid pointing the camera
at bright light sources and
use exposure compensation.
The images are
too dark.
The fl ash is off and the
subject is in dark.
Turn on the fl ash.
The fl ash is on but the
subject is not within
the effective range of
the fl ash.
Move closer to the subject
(The effective range of
fl ash is 1.8M~2.5M).
The camera can
not playback.
The camera is not in
the playback mode.
Press
to switch to
playback mode.
No sound in
playback mode.
The volume is too low. Adjust the volume. See
page 66.
Trouble Shooting
Page 73
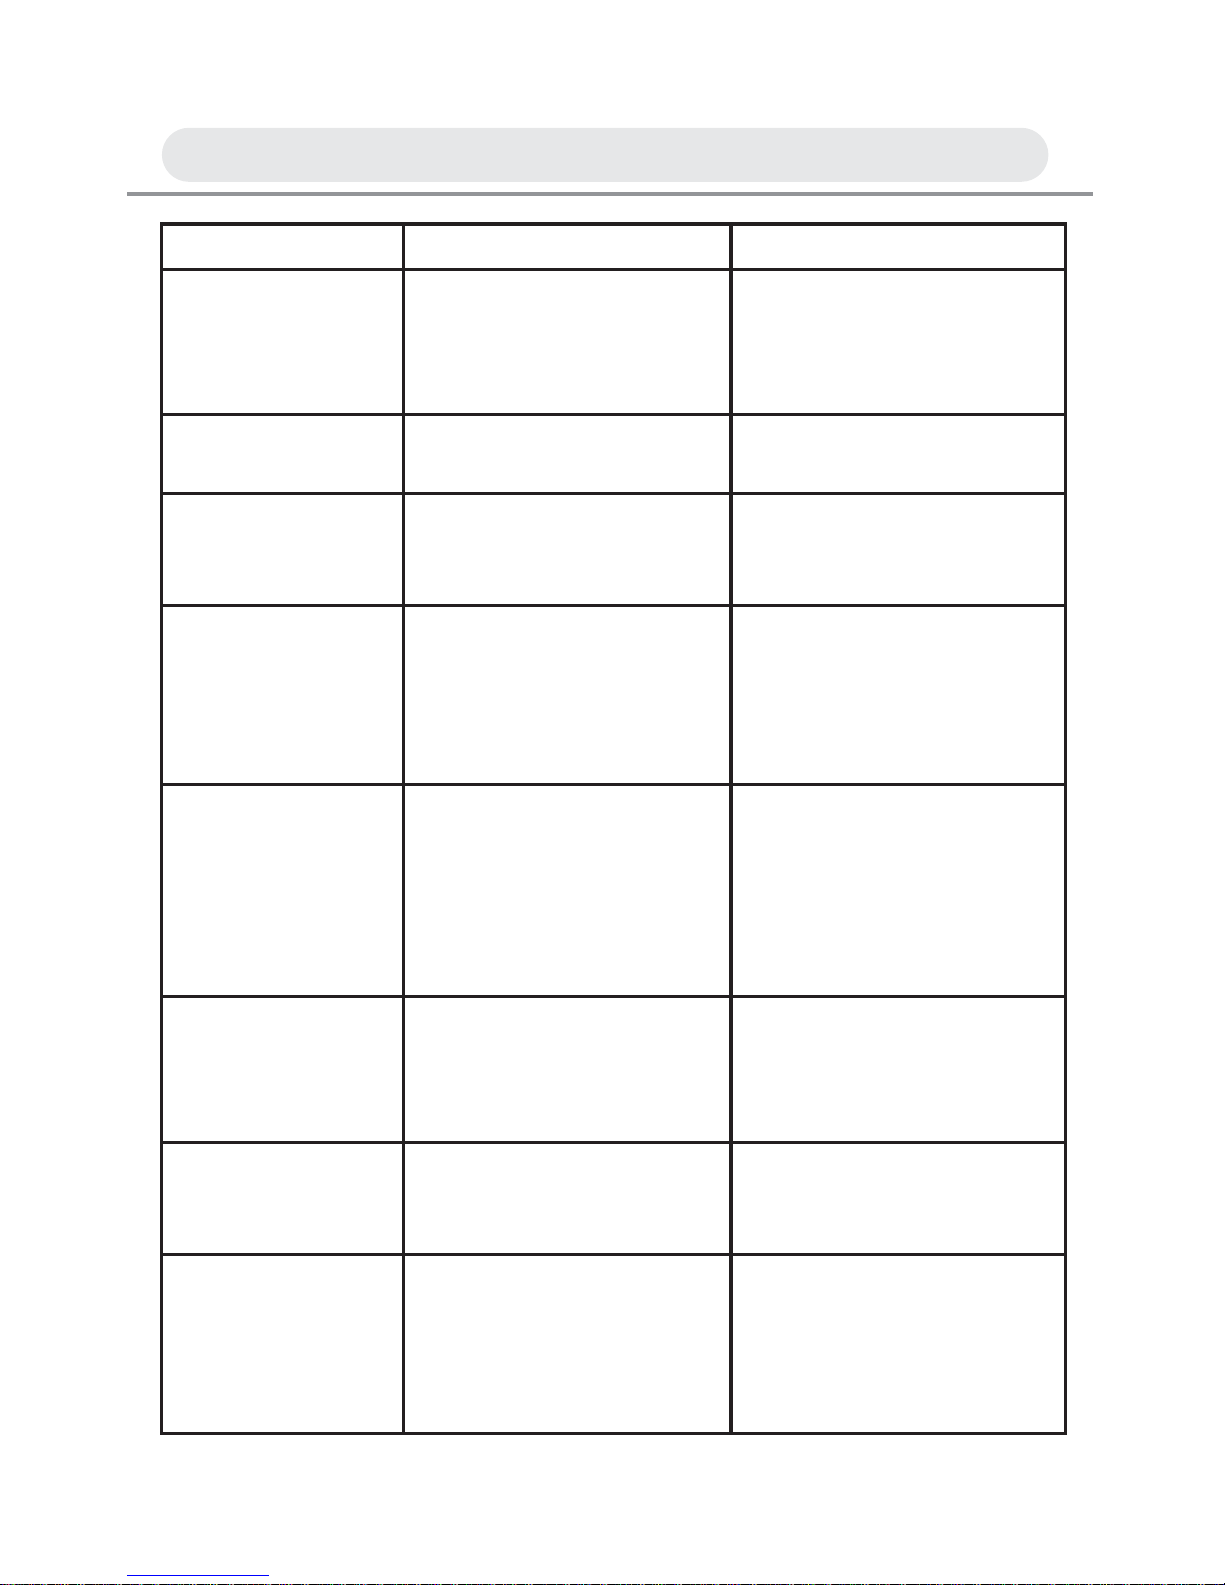
73
When ... Solution
Date/Time has
been lost. Please
reset it
The system detects that
the camera has lost
date/time after you turn
it on.
Reset the date/time. See
page 60.
Card locked! Memory card is locked. Slide the switch on the
memory card to unlock.
Change battery! Battery is empty. It will
turn off automatically
after 2 seconds.
Replace battery with a
new one or charge the
battery. See Page 12.
Memory full!
(Card full!)
There is insuffi cient room
to save more images in
internal memory or on the
memory card that is
inserted.
Replace another memory
card or erase unwanted
images. Before erasing,
upload all the images to a
computer .
Memory error!
(Card error!)
Some problem occurred
with the memory card or
internal memory.
Turn off the camera.
Remove and then insert
the memory card again.
If the same message
appears, format the
memory. See page 64.
No image There are no images
recorded in internal
memory or on the
memory card.
---
Image protected
(All images
protected).
You attempted to erase
the protected images.
You have to remove the
protection fi rst and then
delete it.
Cannot be
effected
The function you
attempted to perform
can not be effected for
the selected image was
in playback mode.
---
Warning Indicators and Messages
Page 74
74
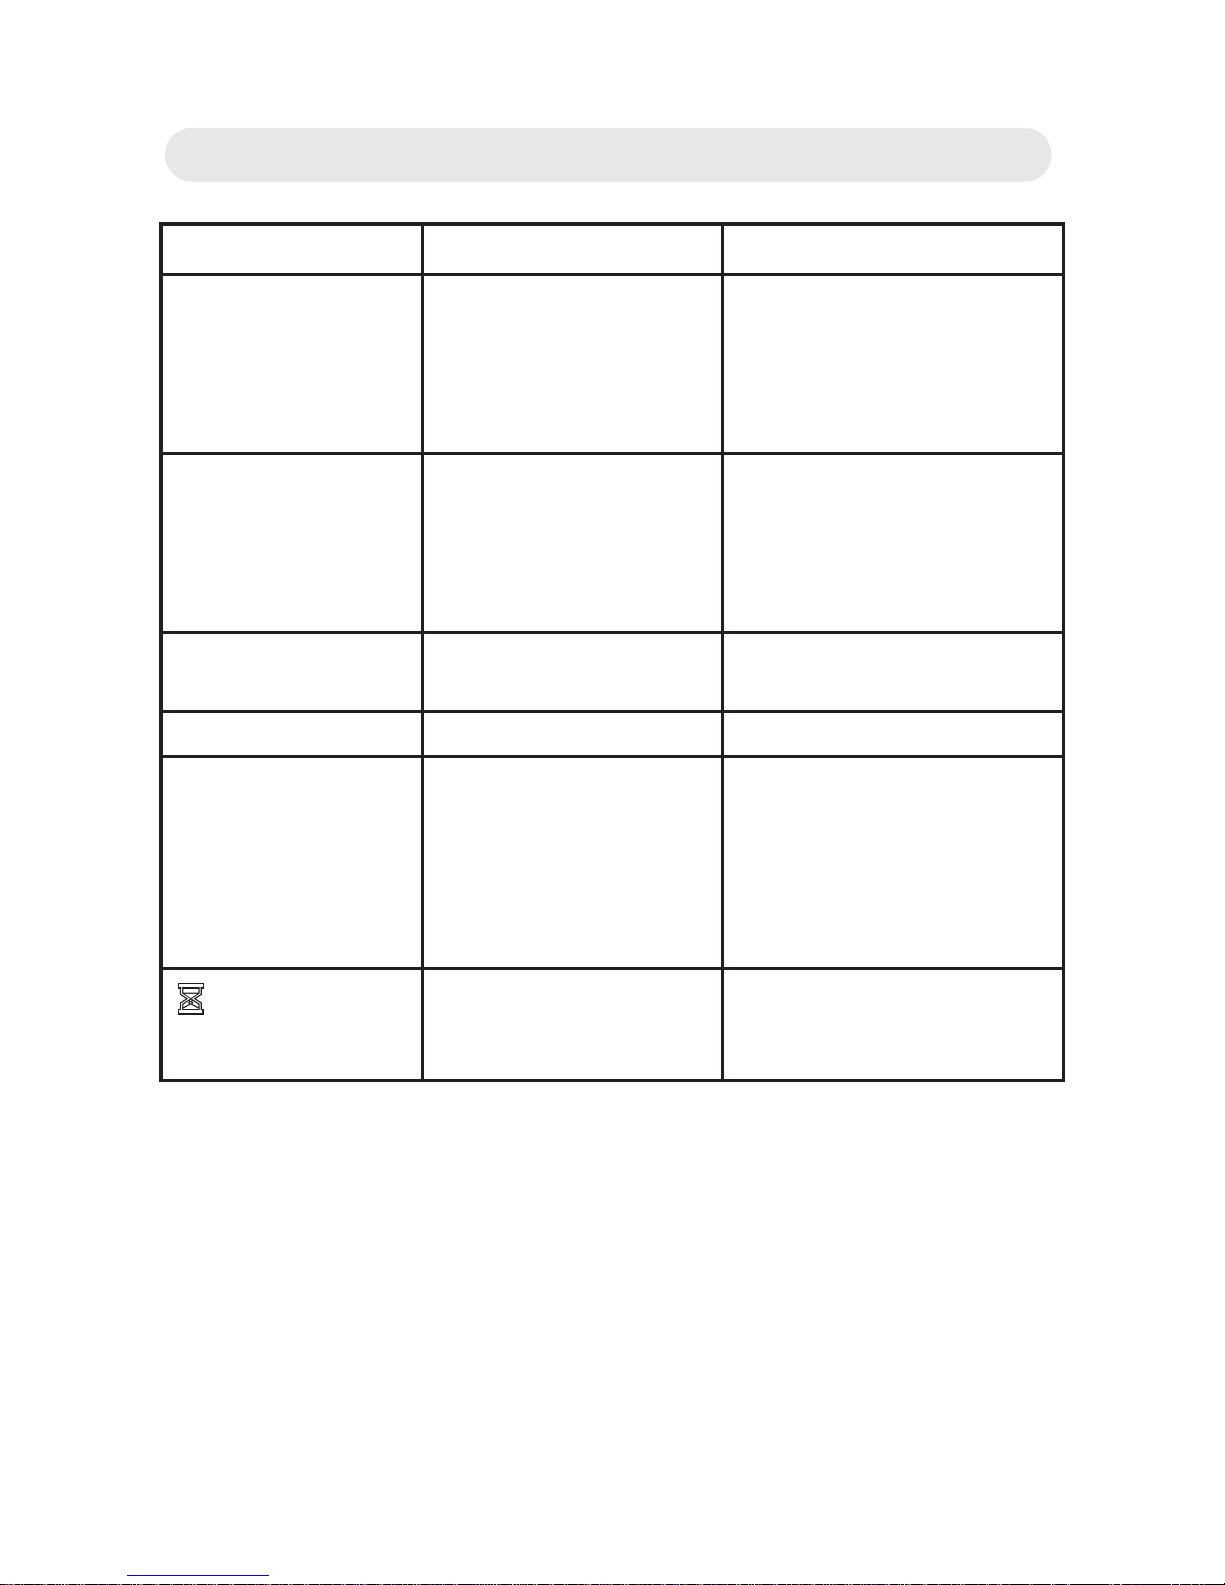
When ... Solution
Not support! The selected image
cannot be displayed
for playback due to an
unsupported type with
this image.
Ensure that images are
the proper type for your
camera.
Image error! ERR! The selected image
cannot be displayed
for playback due to a
problem with this
image.
Use image processing
software to view the
image on a computer. If
that cannot be done, the
image is damaged.
Cannot magnify! You attempted to
magnify a video clip.
Magnifi cation does not
work with video clips.
Format fail! Failed to format. --System error! Error has occurred in
the camera system.
Turn the camera off,
remove and reinsert the
battery, and turn the
camera on. If the same
message appears,
contact your retailer.
The camera is saving
data or turning off.
Wait a few seconds for
the camera to fi nish
saving or turning off.
Warning Indicators and Messages
Page 75

Image Sensor
• 1/1.8 inch-type CCD
• 10 Mega pixels
LCD Monitor
• 2.5”
Lens
• Focal length f=7.4-22.2mm (35mm fi lm equivalent : 35 -
105mm)
• Aperture range F 2.84 (Wide) - F 5.1 (Tele)
Focusing
• Distance Wide : 0.5m-infi nity
• Macro 0.1m - 0.6m (wide); 0.5m - 1m (tele)
Digital Zoom
• 8.0 x
Shutter Speed
• 2-1/2000
Exposure
• Exposure Compensation +/- 2.0 Ev (1/3 Ev Step)
Sensitivity
• ISO equivalent approximately 80, 100, 200, 400, 800, 1000 or Auto
Self timer
• 2, 5, 10sec selectable
Built-in Flash
• Auto control built-in type
• Range Wide: 2.5m
Tele: 1.8m
Specifi cations
75
Page 76

76
Storage
• Internal memory About 32 MB
• External memory SD card(Max. card size : 2GB)
• File format Still image : JPEG (DCF), Exif 2.2, DPOF 1.1,
PictBridge
Video clip : ASF (MPEG-4) ; Audio : WAV
• Image Size 3680x2760 [10M], 3296x2472 [8M],
2816x2112 [6M], 2560x1920 [5M],
2272x1704 [4M], 2048x1536 [3M],
640x480 [VGA]
I/O External
• DC input DC 5V adapter (regular plug)
• Video output NTSC and PAL(selectable)
• PC connection Mini-plug type USB, mini USB connector for serial
cable
Power Source
• Rechargeable Li-ion battery (NP60)
• Adapter (DC 5 volt)
Dimensions
• Size (WxHxD) 93.0mm x 58.0mm x 24.2mm
System Requirements: Windows
• CPU Pentium II or more
• Memory At least 32MB
• OS Windows 98SE/ ME/ 2000/ XP/ Vista
• Interface USB 1.0/1.1/2.0
• VGA color monitor
• CD-ROM
Specifi cations
Page 77

Warranty
Your Technika appliance is covered by a warranty for 12 months
from the date of purchase. 'If a fault develops during this period, or
for help and advice please contact the TESCO electrical helpline on
0845 456 6767. Please have your original purchase receipt with you
when you call. This warranty in no way affects your consumer rights.
Produced after 13th August 2005.
Waste electrical products should not be
disposed of with household waste. Please
recycle where facilities exist. Check with your
Local Authority or retailer for recycling advice.
Page 78

 Loading...