

Page 1
User Guide
Model LCD24-620
Page 2

Page 3

Contents
Introduction
HDMI 5
Safety is Important 5
In the box 5
Safety Information
Keep these instructions 6
Important 6
Electrical Information 7
Parts Identification
Front panel 8
Local keyboard panel 8
Left panel 9
Connecting the TV
Connecting the TV antenna 10
Connecting external devices 10
Connecting diagram 11
Common Interface slot
Common Interface 12
Wall Mounting
Wall Mounting 13
Remote Control
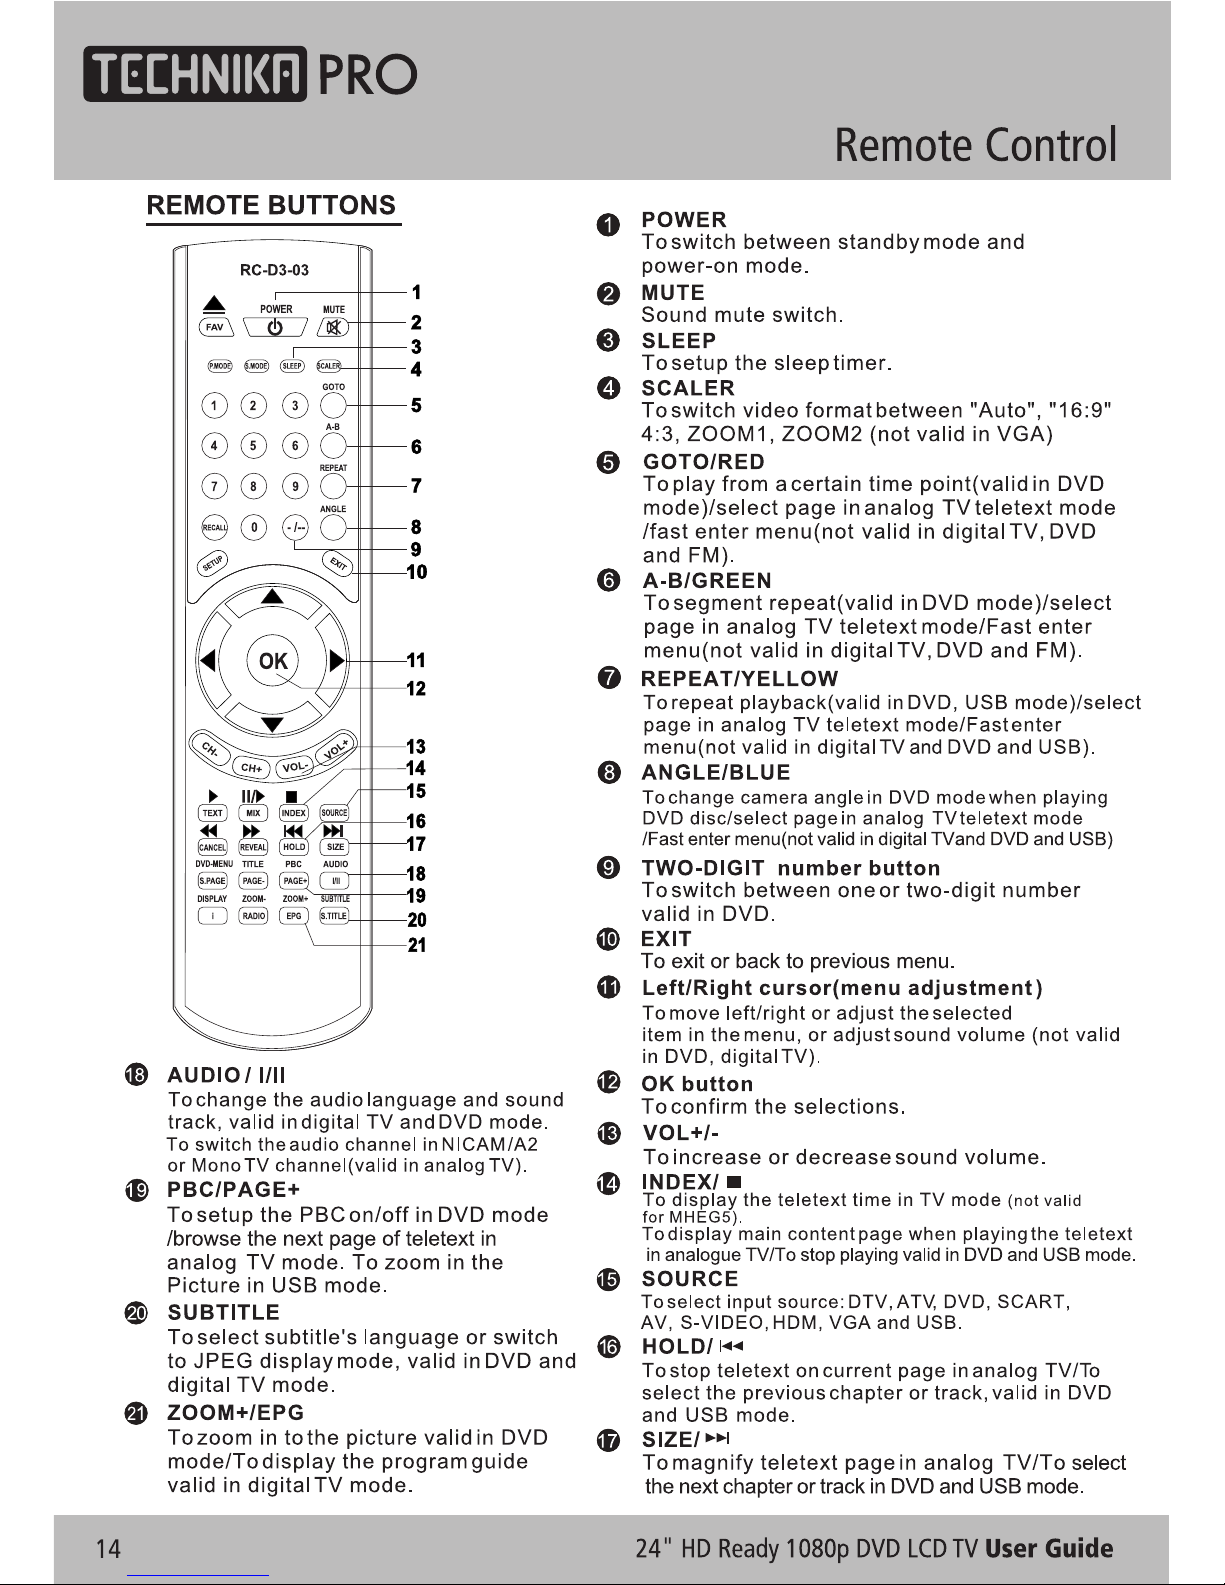
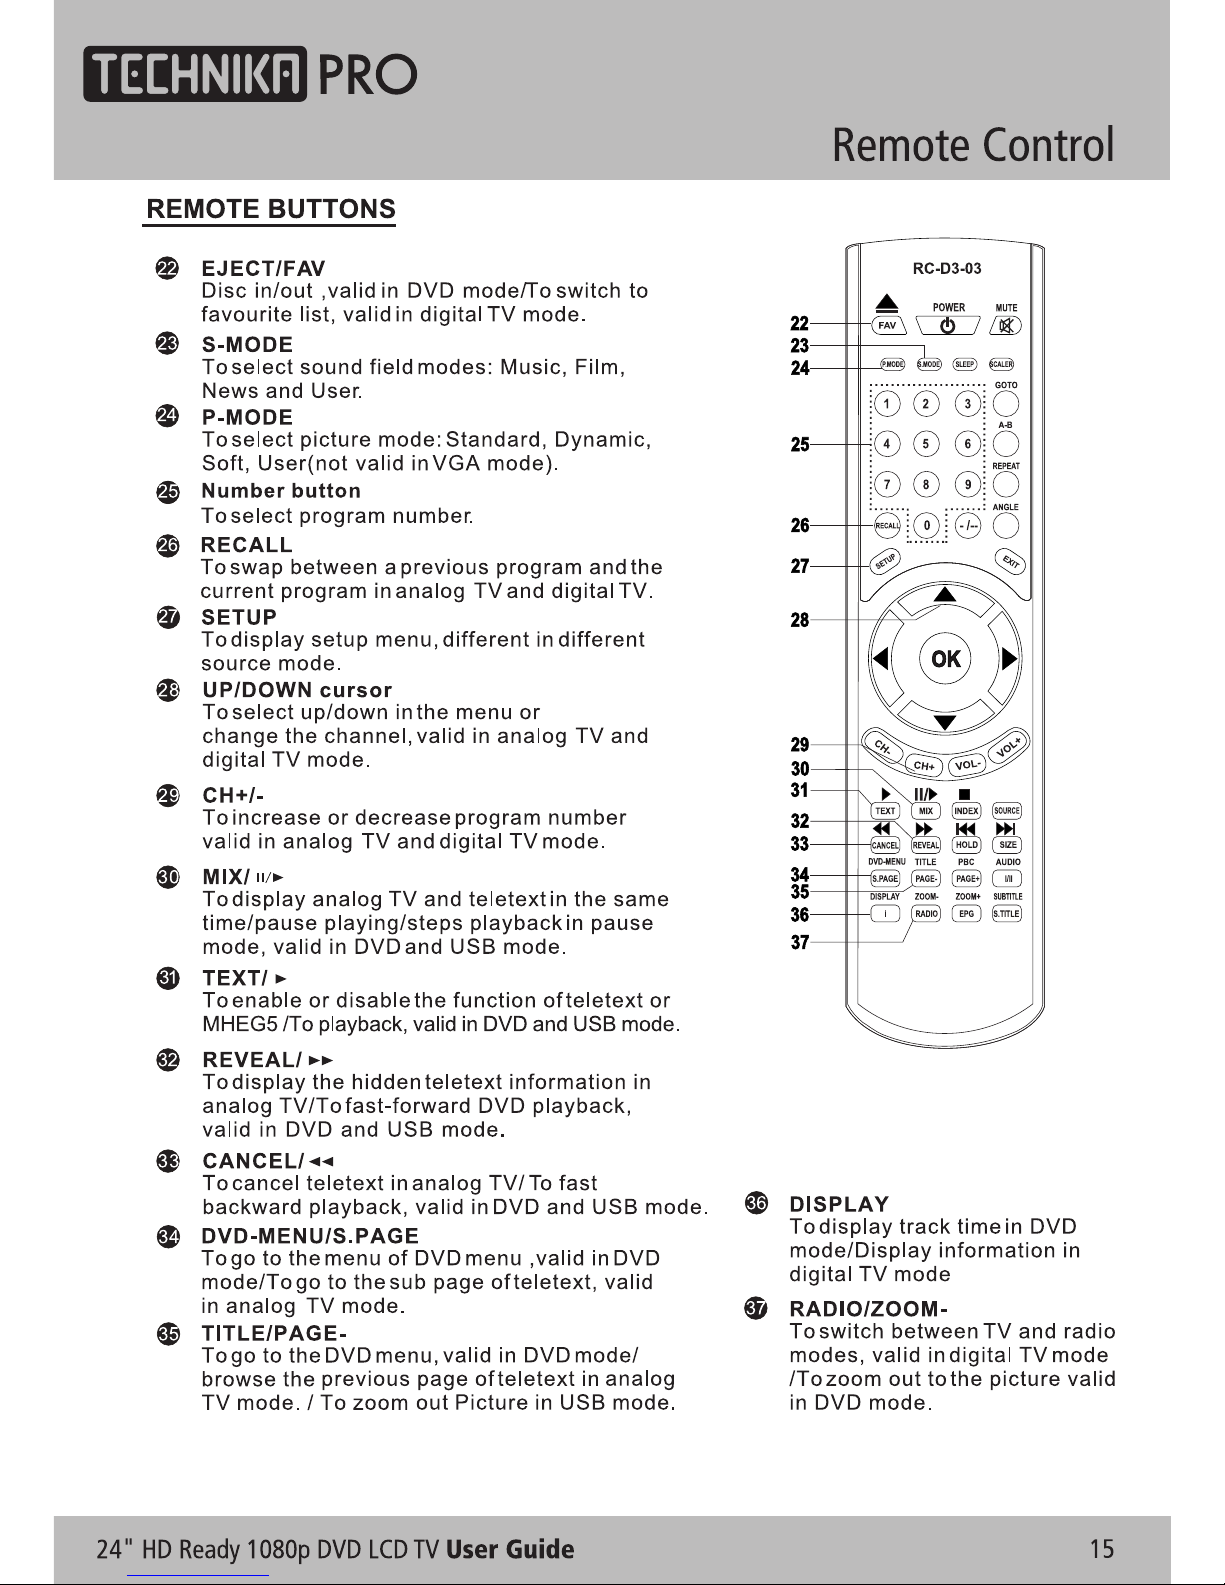
Remote buttons 14
Battery Installation 16
Let‘s Start
Switching on 17
Selecting source operation 17
DTV Menu Setup
DTV Setting 18
Picture 21
Sound 22
Function 22
ATV Menu Setup
ATV Setting 23
Picture 24
Sound 25
Function 25
Teletext Function
Teletext Function 26
SCART / S-VIDEO / HDMI Menu
Setup
Video Setting Menu 27
VGA Menu Setup
VGA Setting 28
Sound 28
Picture 29
Function 29
USB Operation
Playback 30
Play music 32
Play movie 32
Operate in full screen state 33
Play photo 34
Operate in full screen state 34
Page 4

Contents
DVD Function Setup
Picture
47
Sound
47
DVD Setting 47
Function
49
Troubleshooting
Display Troubleshooting
50
Sound and TV Troubleshooting
50
DVD Troubleshooting
51
Specifications
Specifications
52
Display Mode
Display Mode
53
Additional Information
Care and Maintenance
(
Handling Discs)
54
Disposal
54
Warranty
54
DVD Operation
Brief Introduction
35
Comparison between
DVD and other Discs
35
Function Introduction 35
Features
36
Compatible Disc types
37
Region code
37
Playback
38
Volume control
38
VCD, SVCD Menu Playback
39
Memory
39
Select track to play directly by
Number buttons
40
Select Language / Audio
40
Repeat Playback
41
Repeat Playback of
selected Segment
41
Fast Playback
42
Play from the Desired Position
42
Zooming the Displayed Frame
43
MPEG4 and JPEG file Playback
44
Page 5
Introduction
Thank you for purchasing this Technika PRO
HD Ready 1080p DVD LCD TV which has been
designed and manufactured to give you many
years of trouble-free service.
You may already be familiar with using a
similar product but please take time to read
these instructions which have been written
to ensure you get the very best from your
purchase.
Throughout the remainder of this user guide
the Technika PRO HD Ready 1080p DVD LCD TV
will be referred to as the ‘TV’.
HDMI
HDMI (High Defi nition Multimedia Interface)
is the next generation of digital interface.
Unlike conventional connections, it transmits
uncompressed digital and audio signals using
a single cable. This TV supports high-defi nition
video input (720p and 1080i) via the HDMI
sockets on the back of the TV.
Safety is Important
To ensure your safety and the safety of others,
please read the Safety precautions BEFORE
you operate this product.
Keep this information in a safe place for
future reference.
In the box
You will fi nd the following:
• 24" HD Ready 1080p DVD LCD TV
• User Guide
• Remote Control
• 2 x AAA Batteries
Note: If any of the items listed are
damaged or missing, please contact
the TESCO electrical help line on
0845 456 6767.
24" HD Ready 1080p DVD LCD TV User Guide 5
Page 6
Safety Information
IMPORTANT SAFETY INSTRUCTIONS READ CAREFULLY BEFORE USE
Take note of the following safety information
which appears on the back of this TV.
CAUTION! RISK OF ELECTRIC SHOCK
DO NOT OPEN.
TO REDUCE THE RISK OF ELECTRIC
SHOCK DO NOT REMOVE COVER (OR
BACK).
NO USER-REMOVABLE PARTS INSIDE
REFER SERVICING TO QUALIFIED
SERVICE PERSONNEL.
This symbol indicates that there are
important operating and maintenance
instructions in the literature
accompanying this TV.
This symbol indicates that dangerous
voltage constituting a risk of electric
shock is present within this TV.
Keep these instructions.
• Do not use this TV near water.
• Clean only with a slightly damp cloth.
• Do not block any ventilation openings.
• Install in accordance with the supplied
this User Guide.
• Do not install or operate near any heat
sources such as radiators, stoves, or other
apparatus that produce heat.
• Protect the power cord from being walked
on or pinched, particularly at plugs, and the
point where it exits from the TV.
• Do not allow the power cord to overhang
the edge of a table.
• Unplug this TV during lightning storms or
when unused for long periods of time.
• To avoid interference, switch this TV off
while operating other radio devices in the
immediate vicinity.
• Refer all servicing to qualifi ed service
personnel. Servicing is required when the TV
has been damaged in any way, such as the
power cord or plug being damaged, liquid
being spilled on or objects have fallen onto
the TV, the TV has been exposed to rain or
moisture, does not operate normally, or has
been dropped.
WARNING! TO REDUCE THE RISK
OF FIRE OR ELECTRICAL SHOCK,
DO NOT EXPOSE THIS TV TO RAIN
OR MOISTURE. THE TV MUST NOT
BE EXPOSED TO DRIPPING AND
SPLASHING AND NO OBJECTS FILLED
WITH LIQUIDS SHOULD BE PLACED ON
THE TV.
• No naked fl ame sources such as candles
should be placed on the TV.
Caution! Changes or modifi cations not
expressly approved by the manufacturer
could void the user’s authority to operate this
device.
Caution! Usage of controls or adjustments or
performance of procedures other than those
specifi ed herein may result in hazardous
exposure.
Important
This TV generates, uses and can radiate radio
frequency energy and, if not installed and
used in accordance with these instructions,
may cause harmful interference to radio
communication. However, this is no guarantee
that interference will not occur in a particular
installation. If the TV does cause harmful
interference to electrical devices, which can
be determined by turning the TV off and on,
6
24" HD Ready 1080p DVD LCD TV User Guide
Page 7

Safety Information
the user is encouraged to try to correct the
interference by one of the following measures:
• Re-orient or relocate the receiving antenna.
• Increase the separation between the
external device and the TV.
• Connect the external device into an outlet
on a circuit different from that to which the
TV is connected.
• Consult the dealer or an experienced radio/
TV technician for help.
Electrical Information
Mains Supply
The mains operating voltage is detailed on the
rating plate on the rear of the TV.
The mains lead on this equipment may be
supplied with a moulded plug incorporating
a fuse. Should the fuse need to be replaced,
an ASTA or BSI approved BS1362 fuse must
be used of the same rating. If the fuse cover
is detachable never use the plug with the
cover removed. If a replacement fuse cover
is required, ensure it is of the same colour
as that visible on the pin face of the plug. If
there is no alternative to cutting off the mains
plug, dispose of it immediately, having fi rst
removed the fuse, to avoid a possible shock
hazard by inadvertent connection to the mains
supply.
24" HD Ready 1080p DVD LCD TV User Guide 7
Page 8
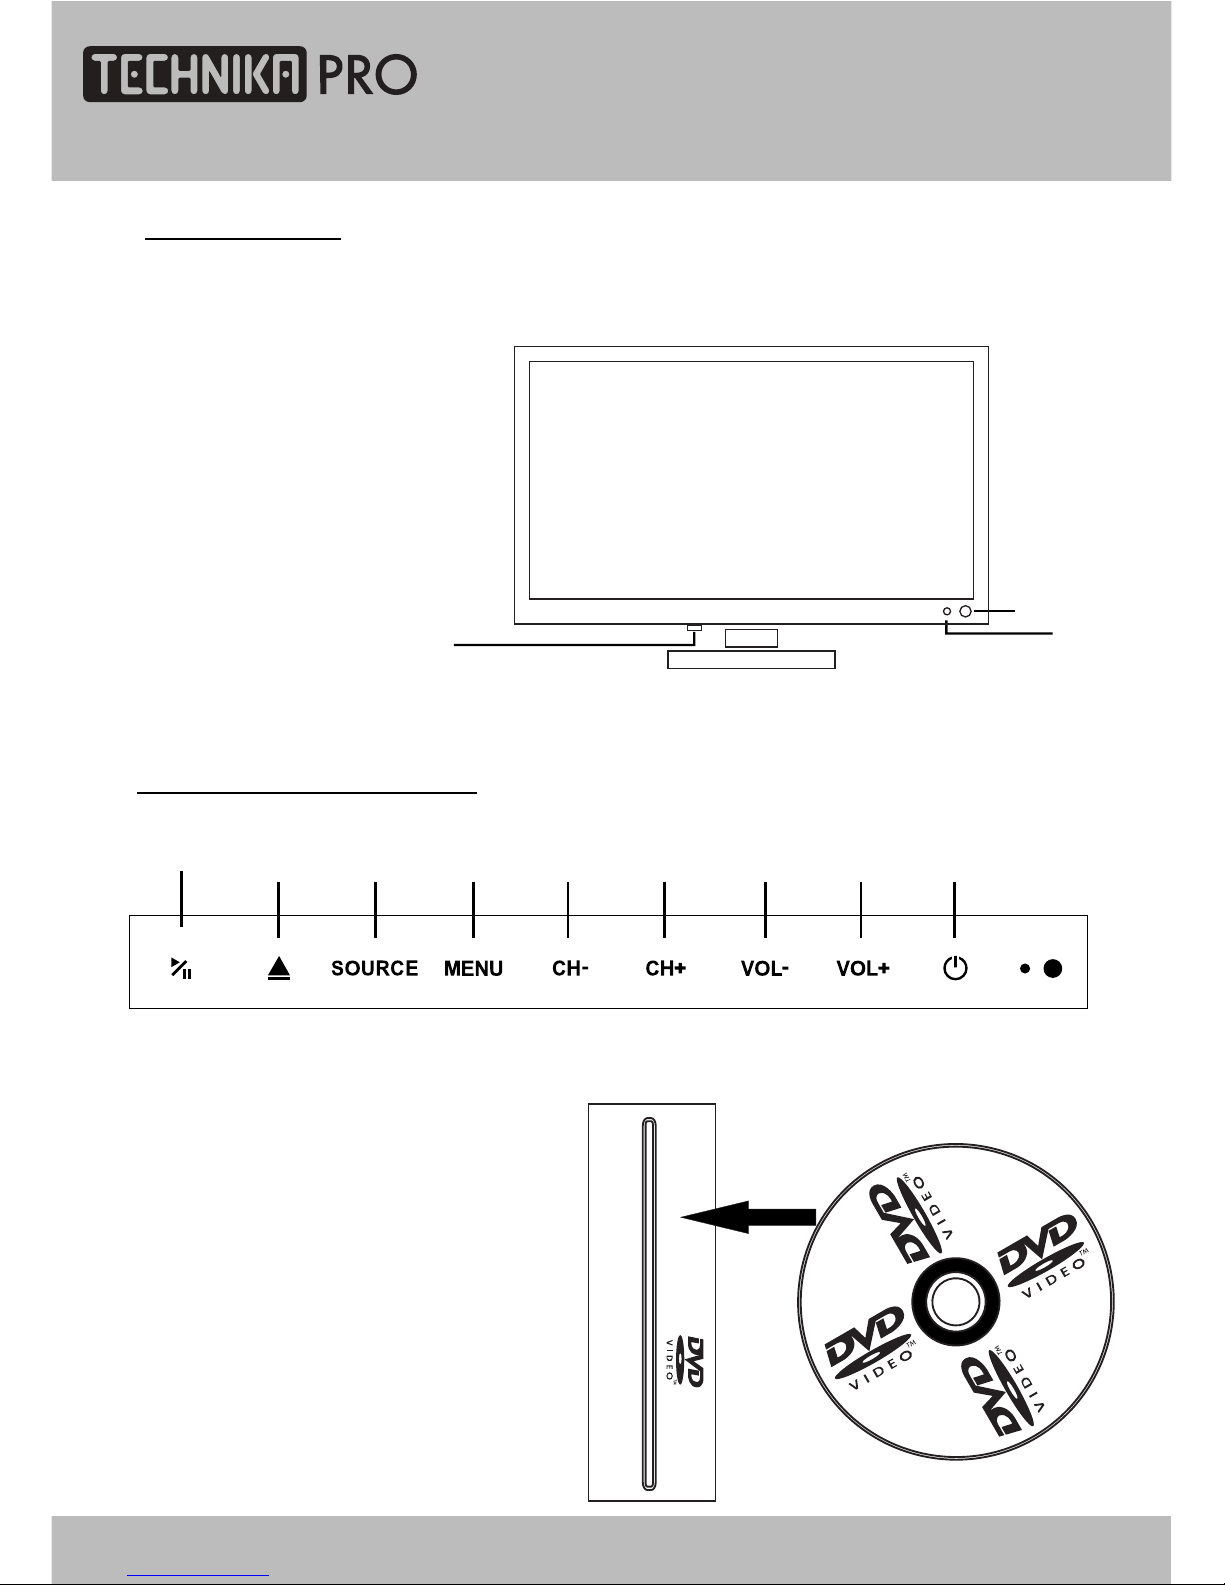
2. Indicator (the indicator is red when in standby mode, and blue when working normally).
1. IR sensor window
Parts Identification
FRONT PANEL
COVER SIDE TO BACK
8
LOCAL KEYBOARD PANEL
1. Start of play or pause of play
2. Take the disc out
3. Select input source
4. Enter or exit menu
5. Decrease channel number
6. Increase channel number
7. Decrease sound volume
8. Increase sound volume
9. Switch between standby
and power-on mode
123456
789
1
2
3
3. Mains Switch
24" HD Ready 1080p DVD LCD TV User Guide
Page 9
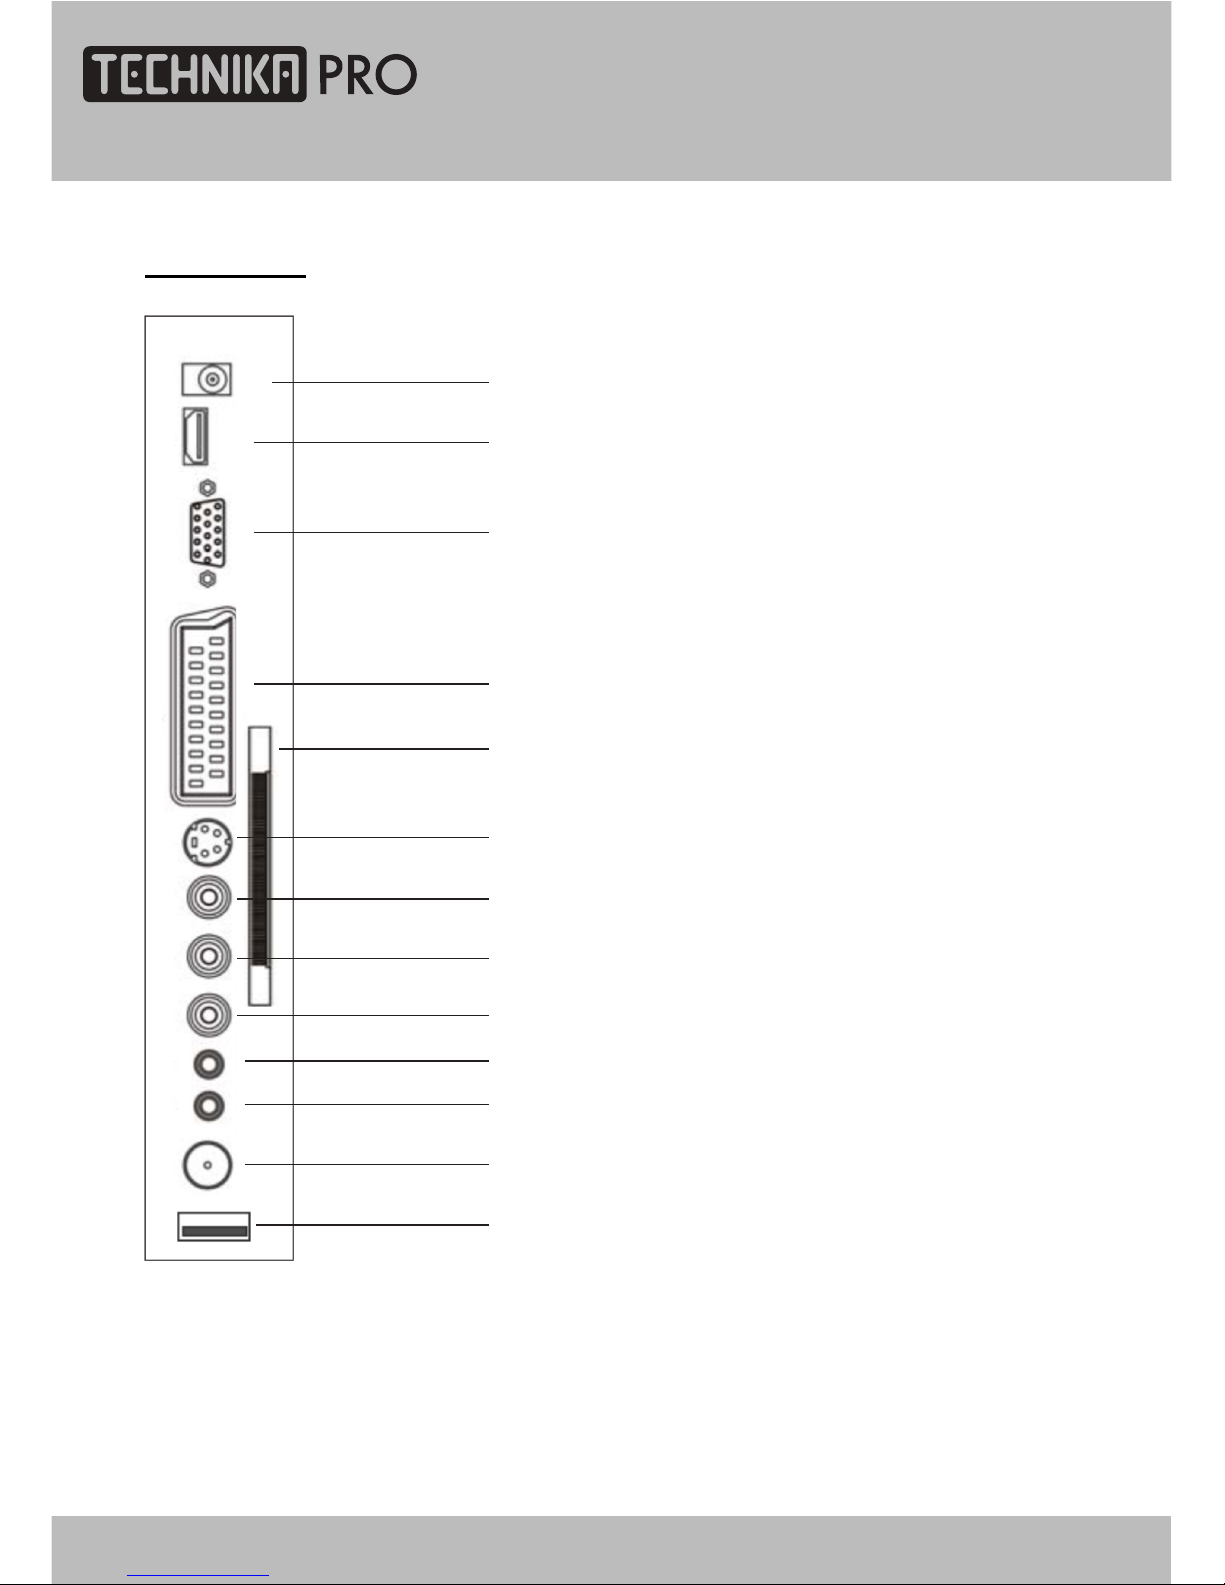
SIDE PANEL
Parts Identification
1. 12V DC power input (intended for feeding
to the TV using a car battery power or
external 12V DC power supply adapter)
2. HDMI input
3. PC VGA input
4. SCART connecting terminal
5. CI connector
6. S-VIDEO input
7. CVBS input
8. CVBS / S-Video Left audio input
9. CVBS / S-Video Right audio input
10. PC audio input
11. Audio Earphone output
12. TV signal input
13. USB connector
1
2
3
4
5
6
7
8
9
12
13
10
11
24" HD Ready 1080p DVD LCD TV User Guide 9
Page 10
Connecting the TV
WARNING! ENSURE THE TV AND
ALL ANCILLARY EQUIPMENT IS
UNPLUGGED FROM THE MAINS
BEFORE MAKING ANY CONNECTIONS!
Connecting the TV antenna
Connect the TV antenna to the aerial socket
with a 75 ohm co-axial plug. For best results
use a high gain TV aerial, preferably roof or
loft mounted.
• To improve picture quality in a poor signal
area, purchase and install a signal amplifier.
• If the antenna needs to be split for two
TV‘s, use a 2-Way Signal Splitter
(not supplied).
Connecting external devices
Note: The TV will connect through
the HDMI cable by default. Only use
the HDMI cable and one other option.
Connecting more than one option
may cause interference.
HDMI lead
You can connect this TV to a compatible
device using a HDMI lead. This method will
give the best picture.
Connect the cable from the HDMI equipment
to the TV HDMI socket.
SCART lead
You can connect this TV to a compatible
device using a SCART lead. The connection
uses component video signals, i.e. the red,
green and blue (RGB) content of the video are
sent on separate signals.
VGA cable
You can use your TV as a monitor for your
personal computer by using a VGA cable.
Sound from your personal computer may also
be played through the TV. This requires the
audio output of the personal computer to be
connected to the AUDIO IN connection of the
TV.
S-VIDEO lead
You can connect this TV to a compatible
device using an S-VIDEO lead.
Component Input
(CVBS cables)
You can connect this TV to a compatible
device using CVBS cables. Connect
the red, white and yellow outputs to
the matching coloured inputs on the
compatible device. An additional audio
input is required.
USB connector
This product has a USB 2.0 interface;
you can play music, movie and picture
files from USB equipment. USB refers
to Universal Serial Bus. Most of the USB
devices on the market are USB 1.1 or
USB 2.0. There are some types USB 1.1
devices:
Monitors Communication devices, Audio,
Human Input Device (HID), Mass storage,
Most flash memory, USB HDD etc.
Belongs to Mass Storage Class.
Mass Storage Class includes 2 transport
manners:
1. USB 1.1 Mass Storage Class
Control/Bulk/Interrupt (CBI) Transport
2. USB 1.1 Mass Storage Class
Bulk-Only Transport. This unit supports
USB 1.1 Mass Storage Class Bulk-Only
Transport, we are not sure that other USB
devices can be supported! So please
find out about the features of USB
equipments before using it.
10
24" HD Ready 1080p DVD LCD TV User Guide
Page 11
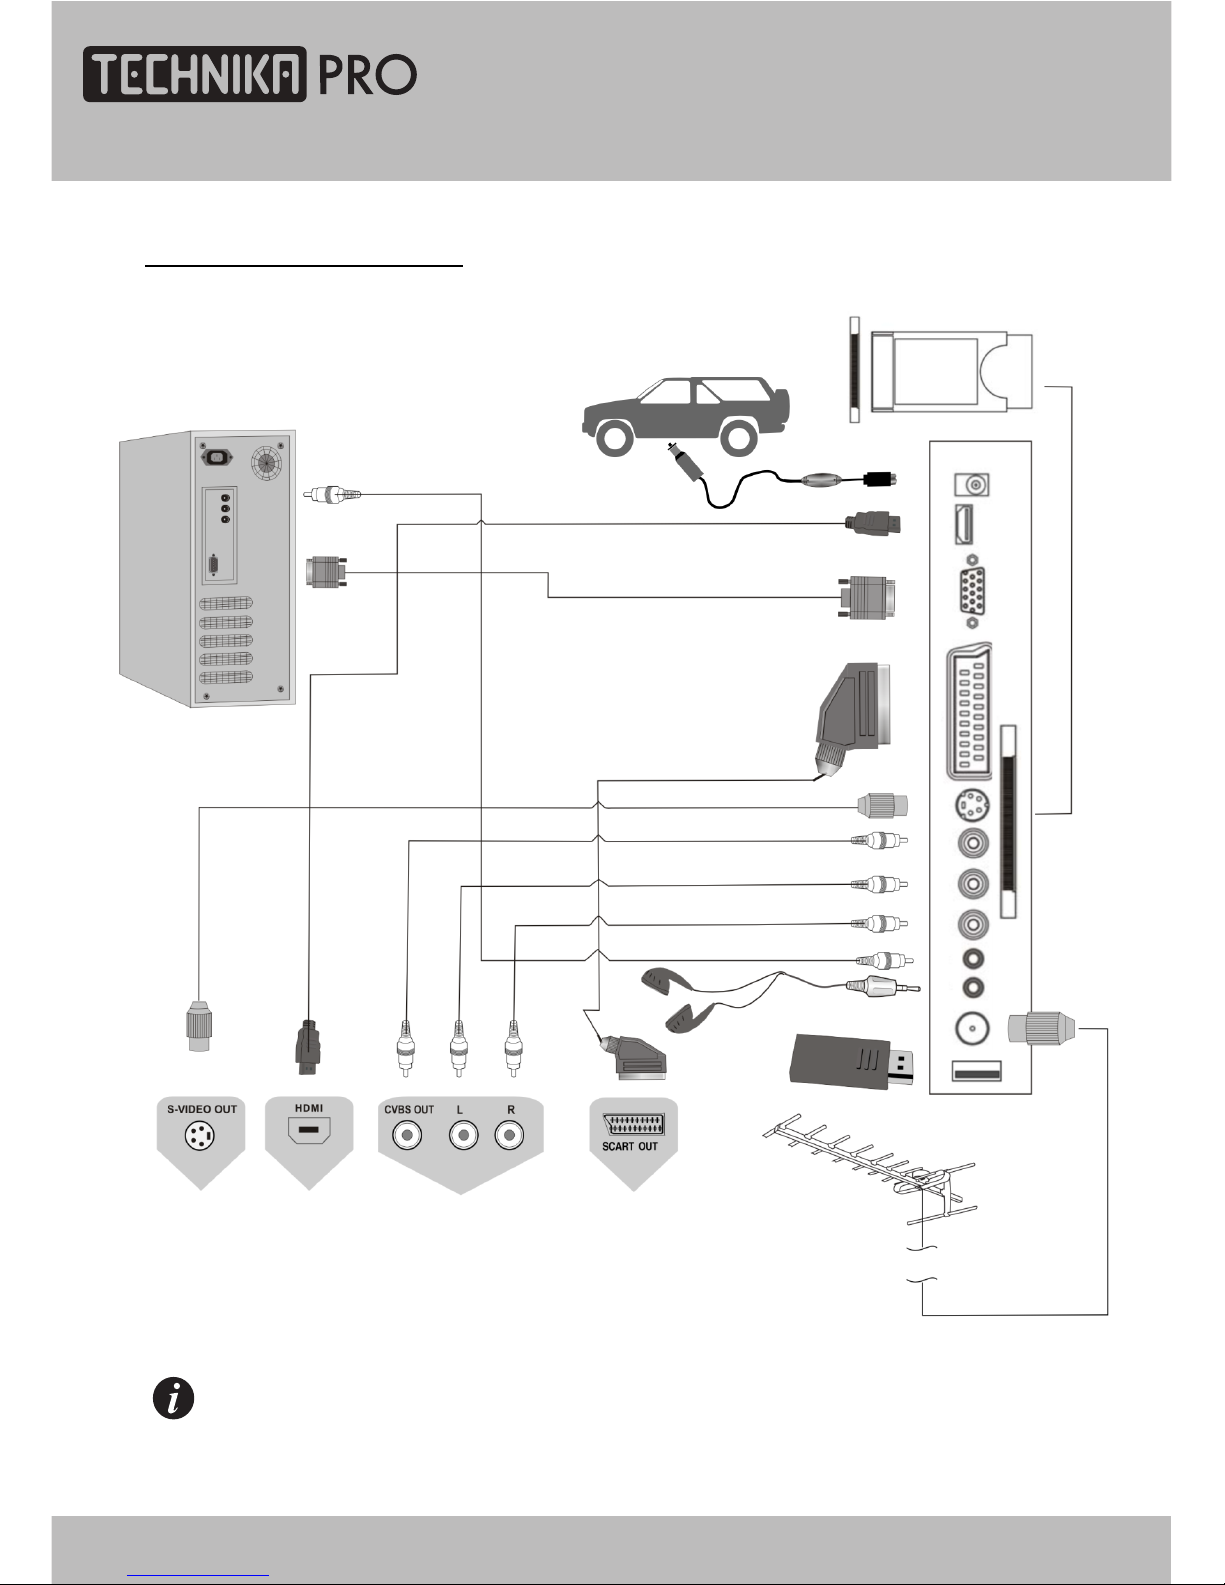
NOTE
You should insert all necessary cables BEFORE plugging in the power cord.
Connecting the TV
CONNECTING DIAGRAM
24" HD Ready 1080p DVD LCD TV User Guide 11
Page 12
Common Interface slot
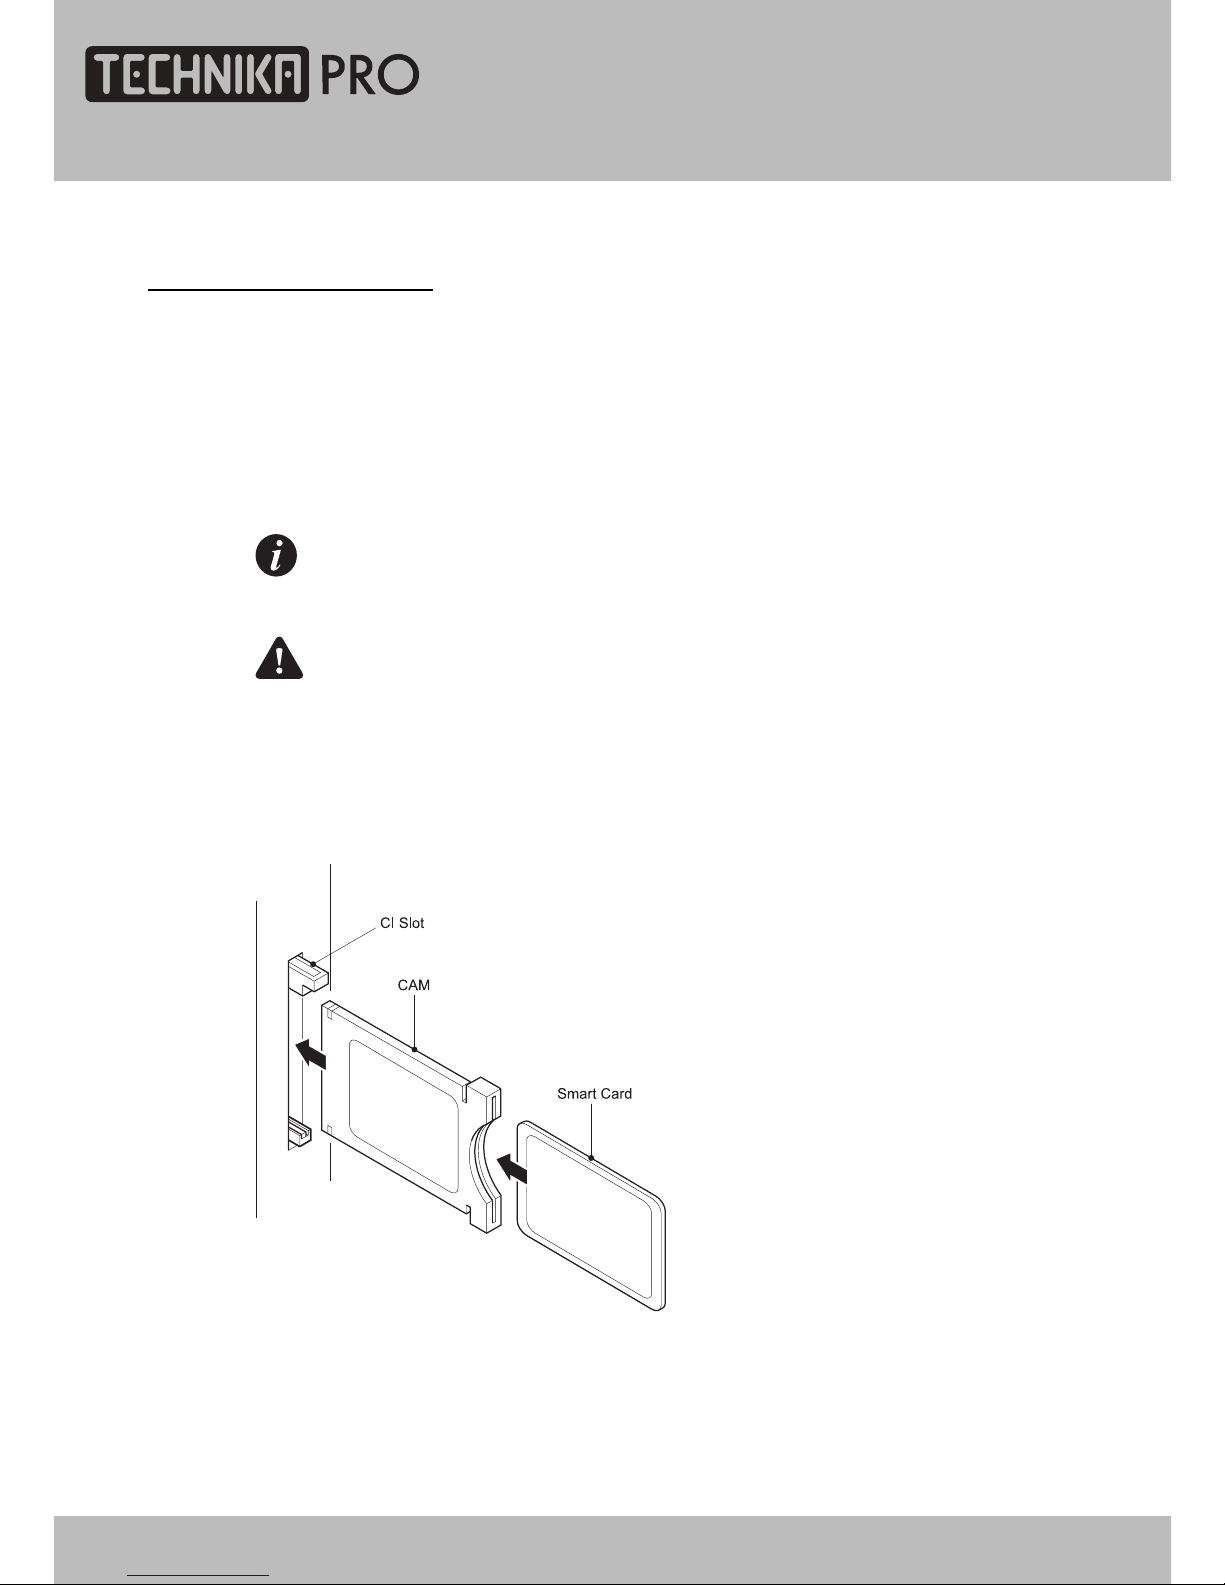
The Common Interface (CI) slot is designed to
accept the Conditional Access Module (CAM)
and Smart Card in order to view the pay TV
programmes and additional services. Contact
your Common Interface service provider to
get more information about the modules and
subscription.
Note: Conditional Access Modules and
Smart Cards are sold separately.
WARNING: SWITCH OFF YOUR TV
BEFORE ANY MODULE IS INSERTED IN
THE COMMON INTERFACE SLOT.
The CI slot is located on the side of your TV.
Insert the CAM correctly into the CI slot, then
add the Smart Card to the CAM.
COMMON INTERFACE
12
24" HD Ready 1080p DVD LCD TV User Guide
Page 13
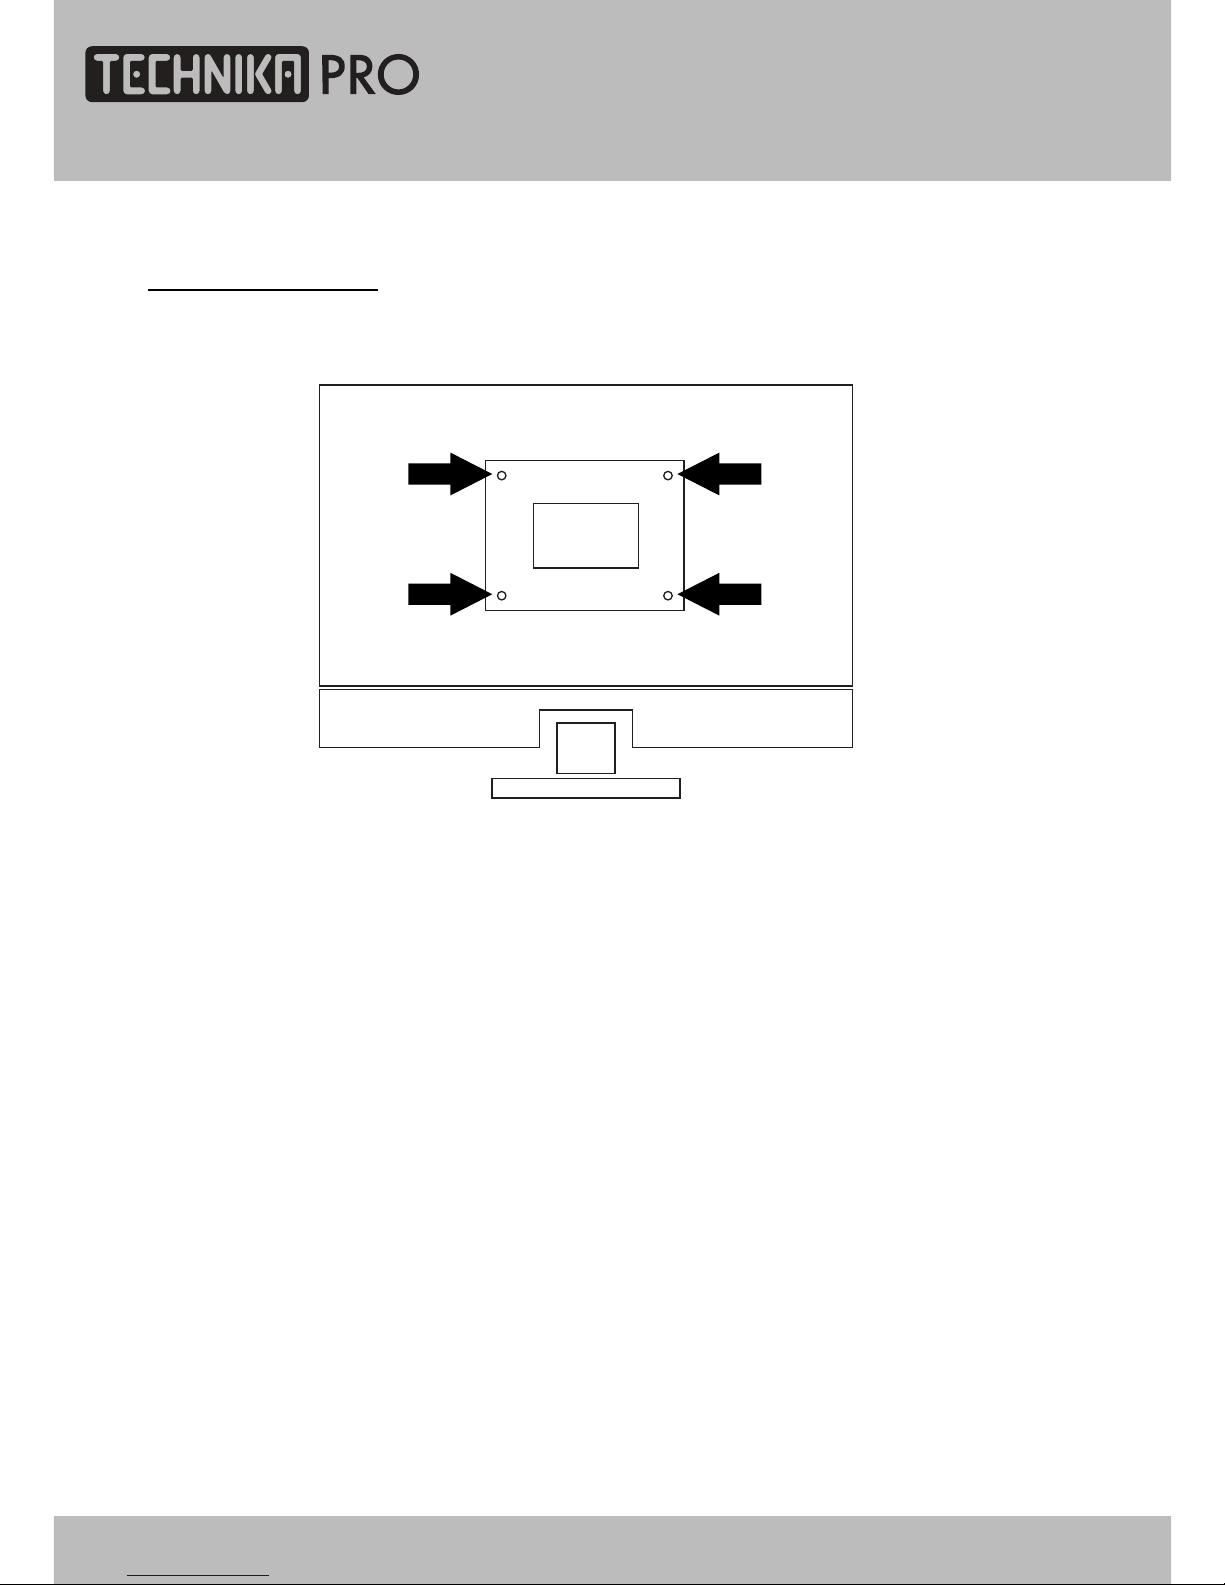
Wall Mounting
WALL MOUNTING
1. The base must first be removed. Place
the TV face down.
2. Remove the three screws holding the
base in position.
3. Remove and store the base and
screws.
4. Use four machine screws (M4 x 10 mm)
to mount the TV on the bracket.
Mounting the wall bracket - please refer
to the user instructions supplied with
the wall bracket (not supplied).
Suitable for wall mounting - VESA 100 x 100 mm
24" HD Ready 1080p DVD LCD TV User Guide 13
Page 14
Page 15
Page 16
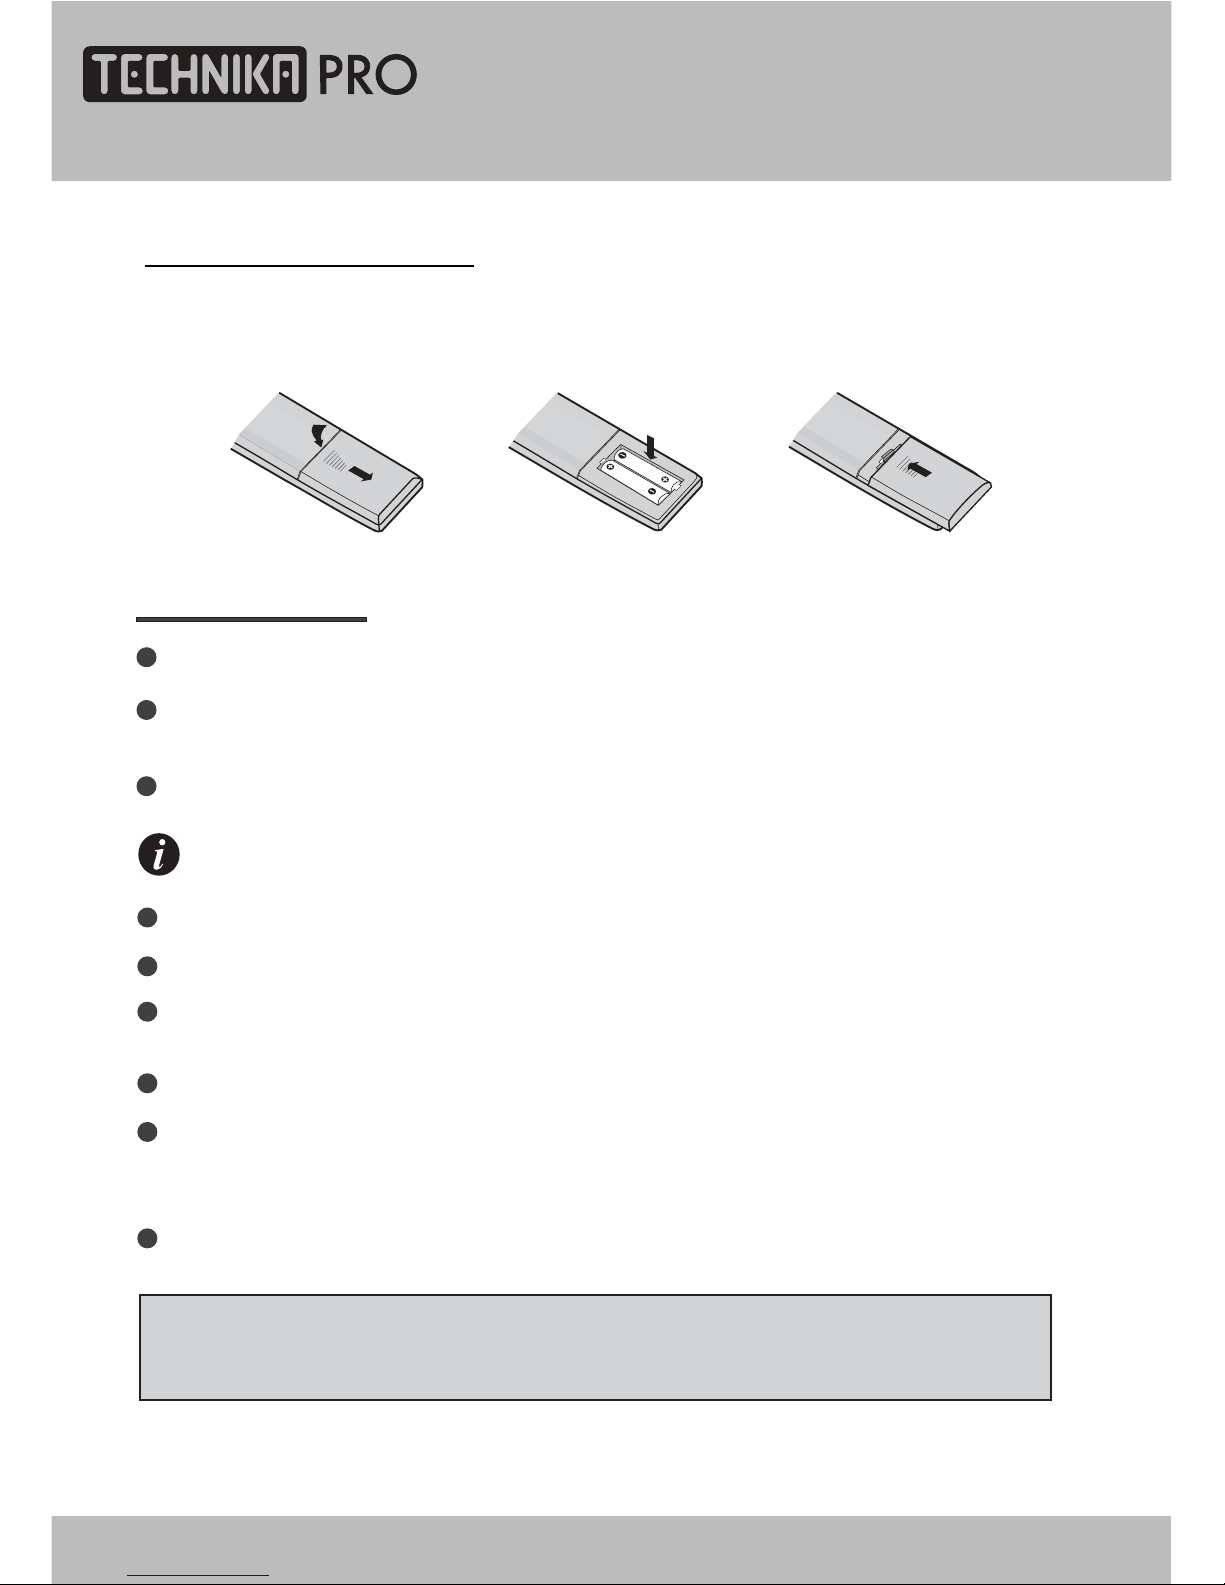
Remove the battery cover. Insert two SUM-4(AAA) batteries matching the -/+ polarities of
the battery to the -/+ marks inside the battery compartment, as follows:
BATTERY LIFE
Normally, battery can be used for one year.
Iftheremotecontrolisstillnot working, whenveryneartotheTV'sremotesensorwindow,
pleaseusenewbatterys.
Please use SUM-4(AAA) battery.
NOTES
Never use rechargeable battery.
Never charge, short-circuit, disassemble and heat the battery, or throw it into fire.
Pay attention not to fall or knock the remote controller, which will cause damage or
function failure to it.
Do not use a new and an old battery together.
If electrolyte splashes into the body, please clean it with water.
CAUTION:
Please put the battery into a place children cannot touch. If swallow by accident, please
contact your local doctor immediately.
Whennotusingtheremotecontrollerforalongtime,please take out the battery to avoid
liquidleakage.Beforereplacing a new battery,pleasecleantheelectrolyteintheremote
controller.
Remote Control
BATTERY INSTALLATION
16
24" HD Ready 1080p DVD LCD TV User Guide
Page 17
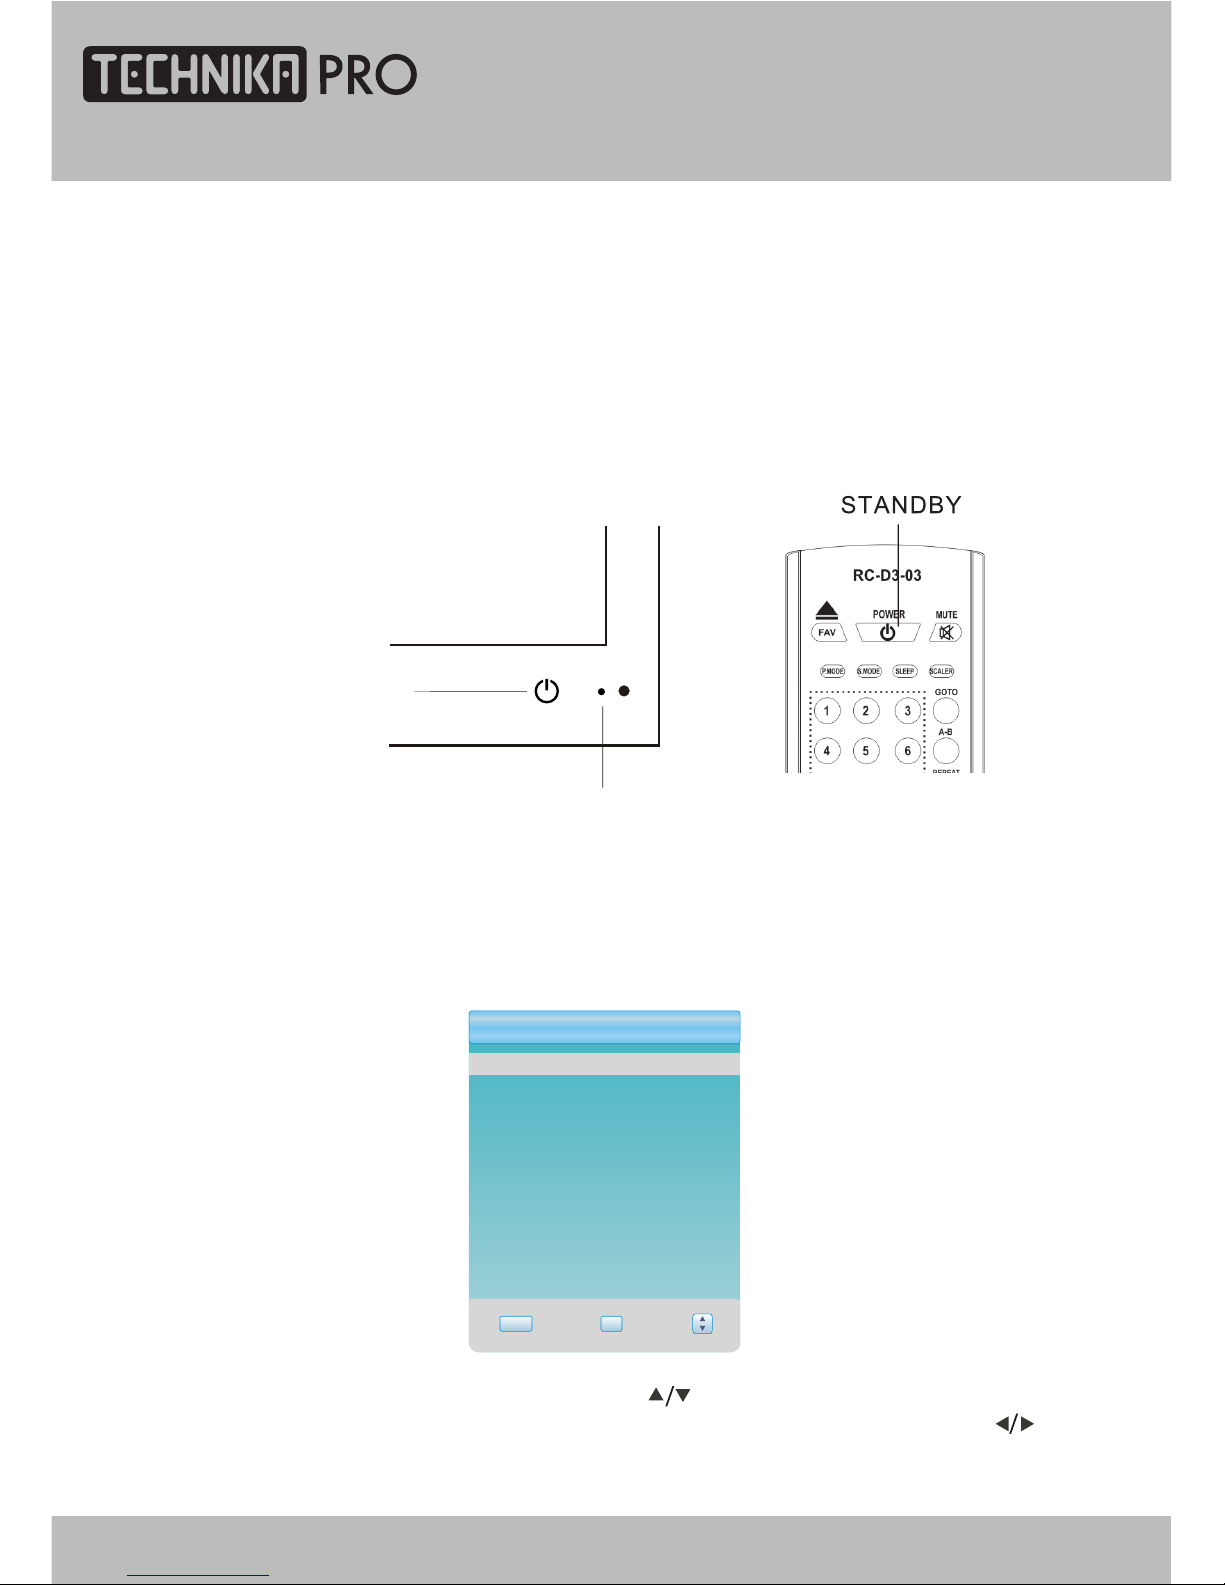
You can select input source by using source menu. Press [SOURCE] button to show the
menu as follows:
The current sourc
e item is highlighted. Press [ ] button on the remote control
or [ CH+/CH- ] key on the front of LCD TV to select your required source. Press [ ] button,
[VOL+/VOL-] key or [OK] button to confirm your choice .
SELECTING SOURCE OPERATION
INDICATOR
After the unit has been suitably placed / fixed, on the desk or on the wall, and all necessary
cables including the power have been connected,
Press the [STANDBY] button on the remote control to make the unit switch to power-on
mode - you will see the LED indicator turn blue. Now you can enjoy the many features of
your new TV.
the next you should do is:
Let's Start
SWITCHING ON
InputSource
ATV
SCART
AV
DVD
VGA
HDMI
EXIT OK
DTV
S-VIDEO
STANDBY
USB
24" HD Ready 1080p DVD LCD TV User Guide 17
Page 18
DTV Menu Setup
Select Return
SETUP
Adjust
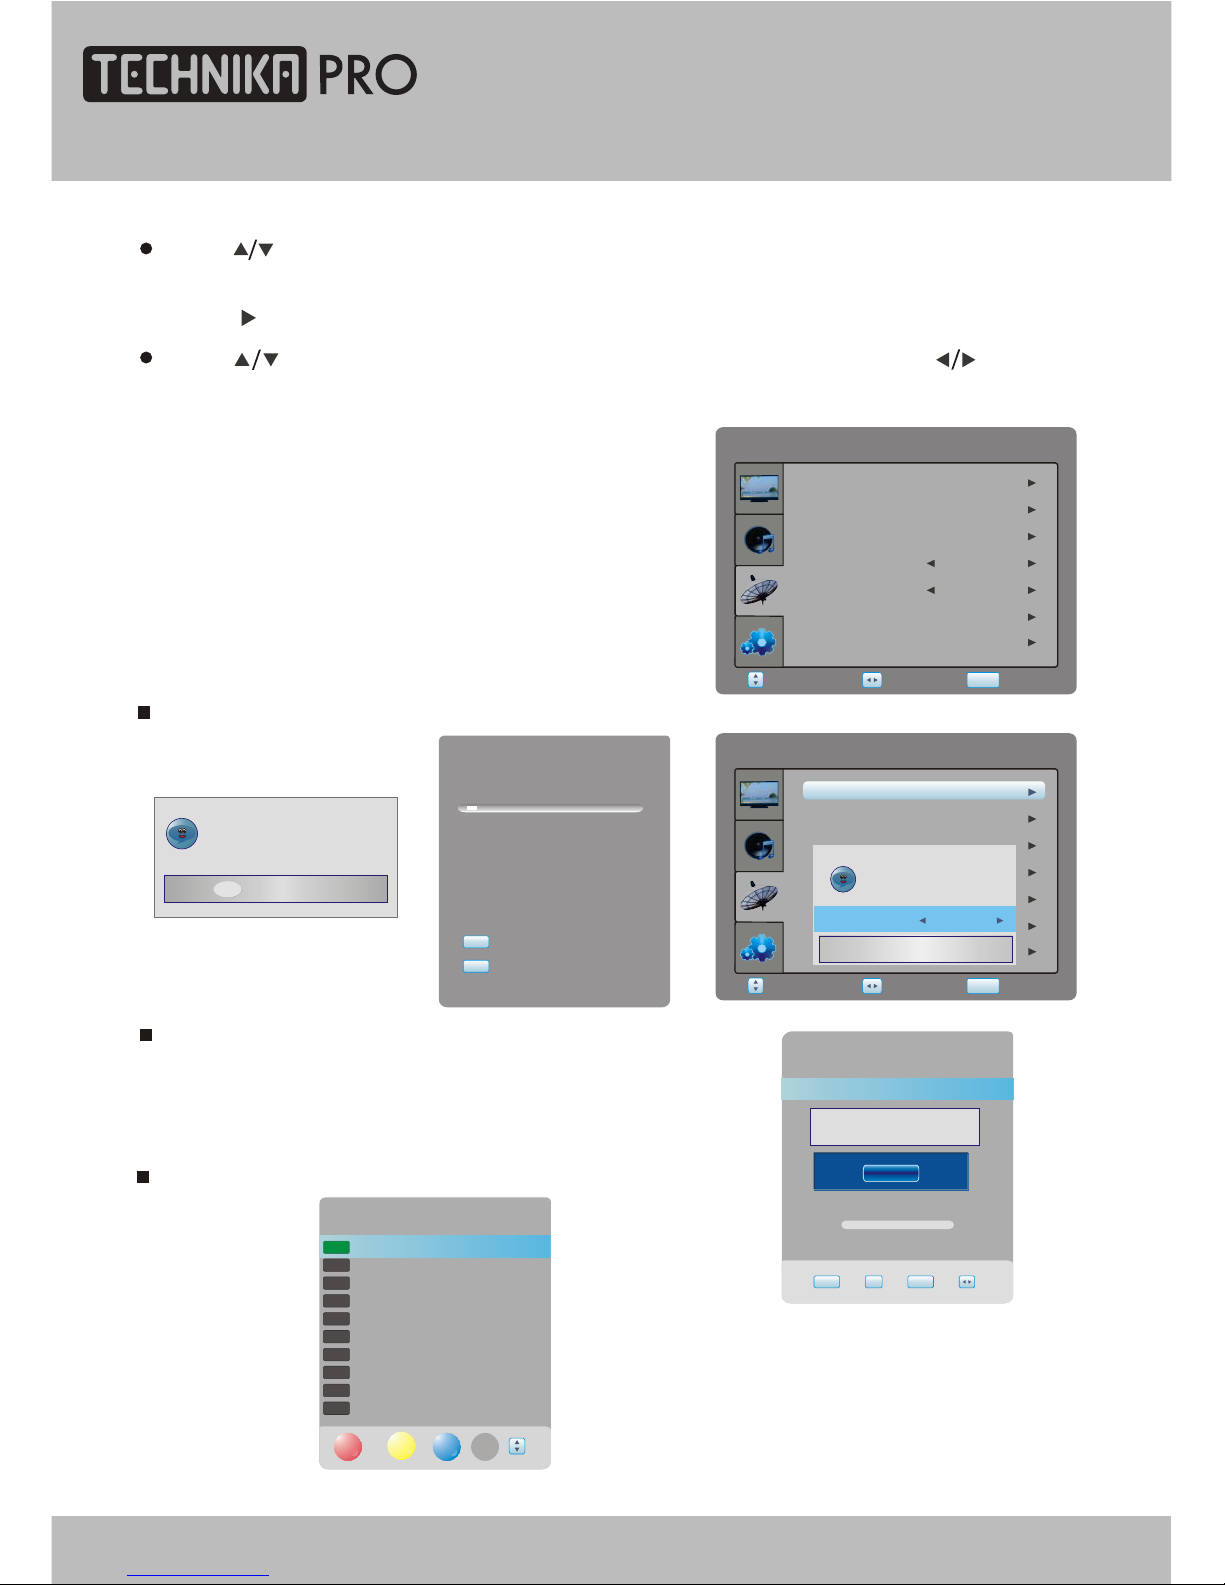
Manual Tuning item enables you to change channel settings.
Auto Tuning item enables you to adjust channel setting automatically.
Select Return
SETUP
Adjust
SubtitleLanguage
DTVSETTING
ManualTuning
AudioLanguage
ProgrammeEdit
Time
Preference
English
English
Off
AutoTuning
Pleaseselectcountryfirst,
ThenselectStarttoupdateinfo.
Countryselection
Australia
NewAddCancel
ManualTuning
VHF 5 104.50MHz
Pleaseselectchannelthen
PressOKtosearch
NO SIGNAL
BadNormalGood
EXIT OK SETUP
ChannelTuning
6 %... UHF 24
DTV : 0 Programme(s)
Radio : 0 Programme(s)
Select DTV SETTING item to adjust channels.
You may select auto Tuning, Manual Tuning,
Programme Edit, Audio Language, Subtitle
Language, Time and Preference.
Doyouwanttoexittuning?
Yes No
SETUP
exit
EXIT
exit
AutoTuning
Time
English
English
Programme Edit item enables you to enter submenu.
ProgrammeEdit
5 five
16 QVC
17 UK Gold
23 bid-up.tv
25 TCM
26 UK Style
27 Discovery
28 DiscoveryH&L
32 Cartoon Nwk
33 Boomerang
DELETE
SKIP FAV
DTV
DTV
DTV
DTV
DTV
DTV
DTV
DTV
DTV
DTV
MOVE
SubtitleLanguage
DTVSETTING
ManualTuning
AudioLanguage
ProgrammeEdit
Preference
DTV SETTING
In TV mode, press [SETUP] button into the main menu and the main menu will show as follows: D
Press [ ] button on the remote control, you can select main menu sections
(main menu sections consist of) .
Press [ ] or [OK] button to enter this menu section.
" DTV SETTING " , " PICTURE ", " SOUND " , " FUNCTION ")
Press [ ] button on the remote control to select the item, and then press [ ] button to
adjust parameter value. Press [SETUP] button to return to main menu sections.
18
24" HD Ready 1080p DVD LCD TV User Guide
Page 19
DTV Menu Setup
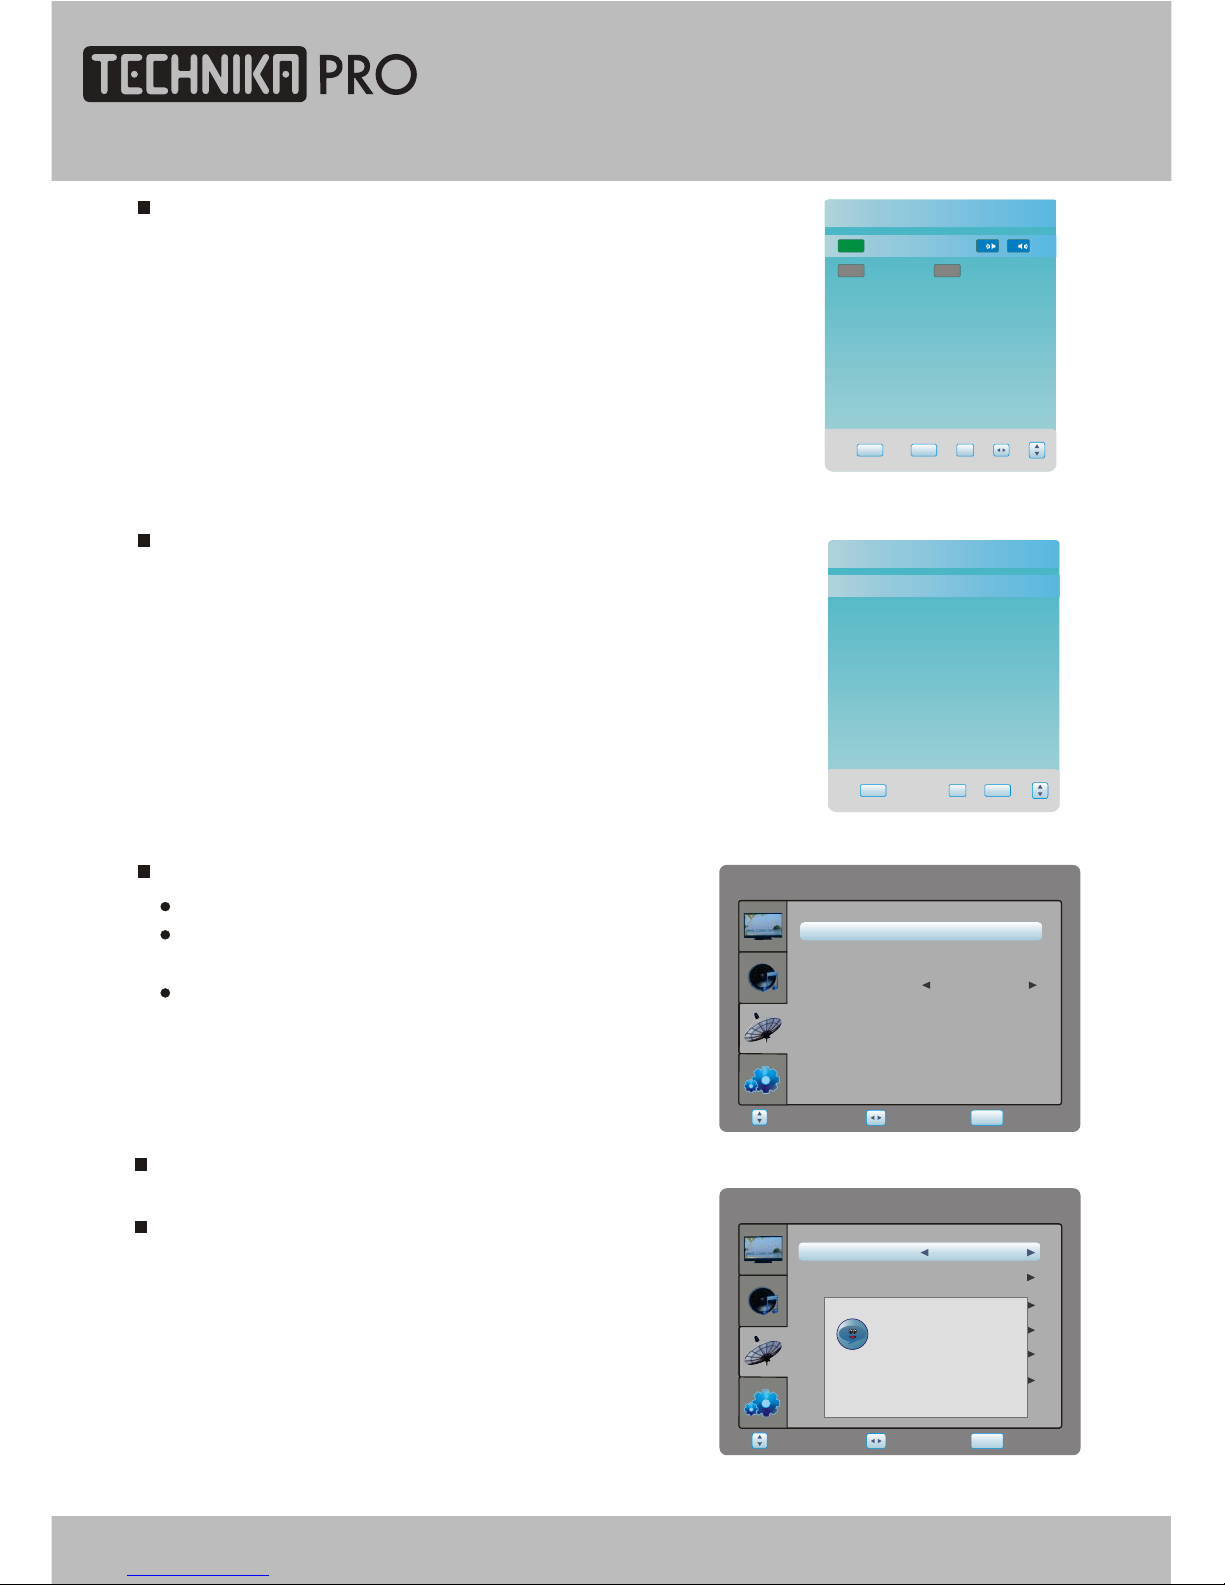
Lock System item enables you to lock the auto tuning,
manual tuning, programme edit and block
programme. if you want to change the lock
system, you must enter a password first.
Select Return
SETUP
Adjust
DTVSETTING
CIInfrormation
ChangePassword
ParentalGuidance
BlockProgramme
OffLockSystem
HearingImpairedOff
Off
Pleaseenterpassword
___
Preference item enables you to enter the lock system submenu.
EXIT OKSETUP
Audio Language
English
MPEG L R
English
MPEG VI
Audio Language item enables you to adjust audio language.
Time item enables you to enter submenu.
Clock to adjust the real time.
Time Zone to adjust the time zone from Canary
GMT to Berlin GMT+1.
Daylight to adjust summer time off o r on.
Select Return
SETUP
Adjust
DTVSETTING
TimeZone
Daylight
Clock
________
CanaryGMT
Off
EXIT OK SETUP
SubtitleLanguage
Off
English
Subtitle language item enables you toadjust subtitle language.
24" HD Ready 1080p DVD LCD TV User Guide 19
Page 20
DTV Menu Setup
EXIT OKSETUP
FAVOURITE LIST
5five
DTV
16QVC
DTV
17UKGold
DTV
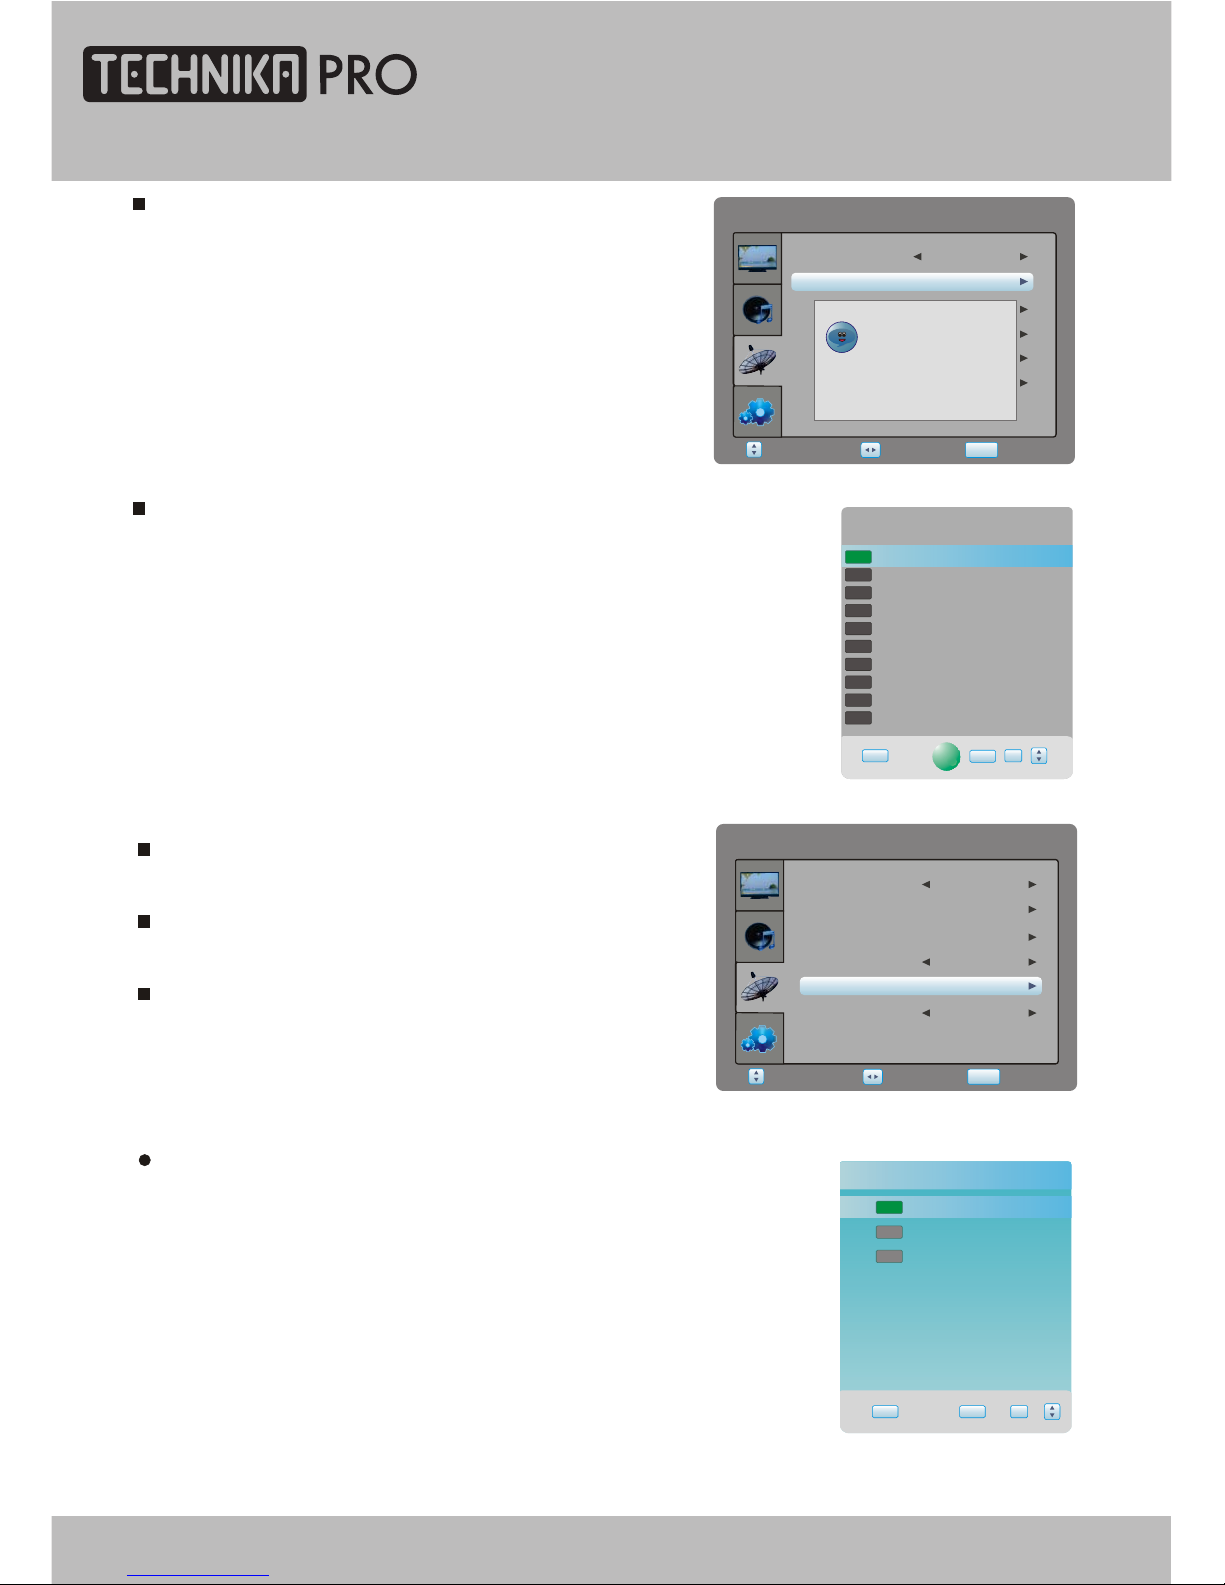
Favourite List item enables to display favourite channel and
select the current channel in the list.
Change password item enables you to change the
locked password.
Block Programme item enables you to set the lock
channel.
Blockprogramme
5 five
16 QVC
17 UK Gold
23 bid-up.tv
25 TCM
26 UK Style
27 Discovery
28 DiscoveryH&L
32 Cartoon Nwk
33 Boomerang
LOCK
DTV
DTV
DTV
DTV
DTV
DTV
DTV
DTV
DTV
DTV
EXIT OK
SETUP
Select Return
SETUP
Adjust
DTVSETTING
CIInformation
ParentalGuidance
BlockProgramme
OffLockSystem
Off
ChangePassword
HearingImpairedOff
Pleaseenterpassword
___
_
___
New
Confirm
Select Return
SETUP
Adjust
DTVSETTING
ParentalGuidance
BlockProgramme
OffLockSystem
Off
ChangePassword
CIInformation
HearingImpaired Off
Parental Guidance item enables to set guidance
(0ff, from 4 to 18).
CIInformationitemenablestoreadthecard
information.
SMART
Hearing Impaired item enables to set the hearing
impaired off or on.
20
24" HD Ready 1080p DVD LCD TV User Guide
Page 21
DTV Menu Setup
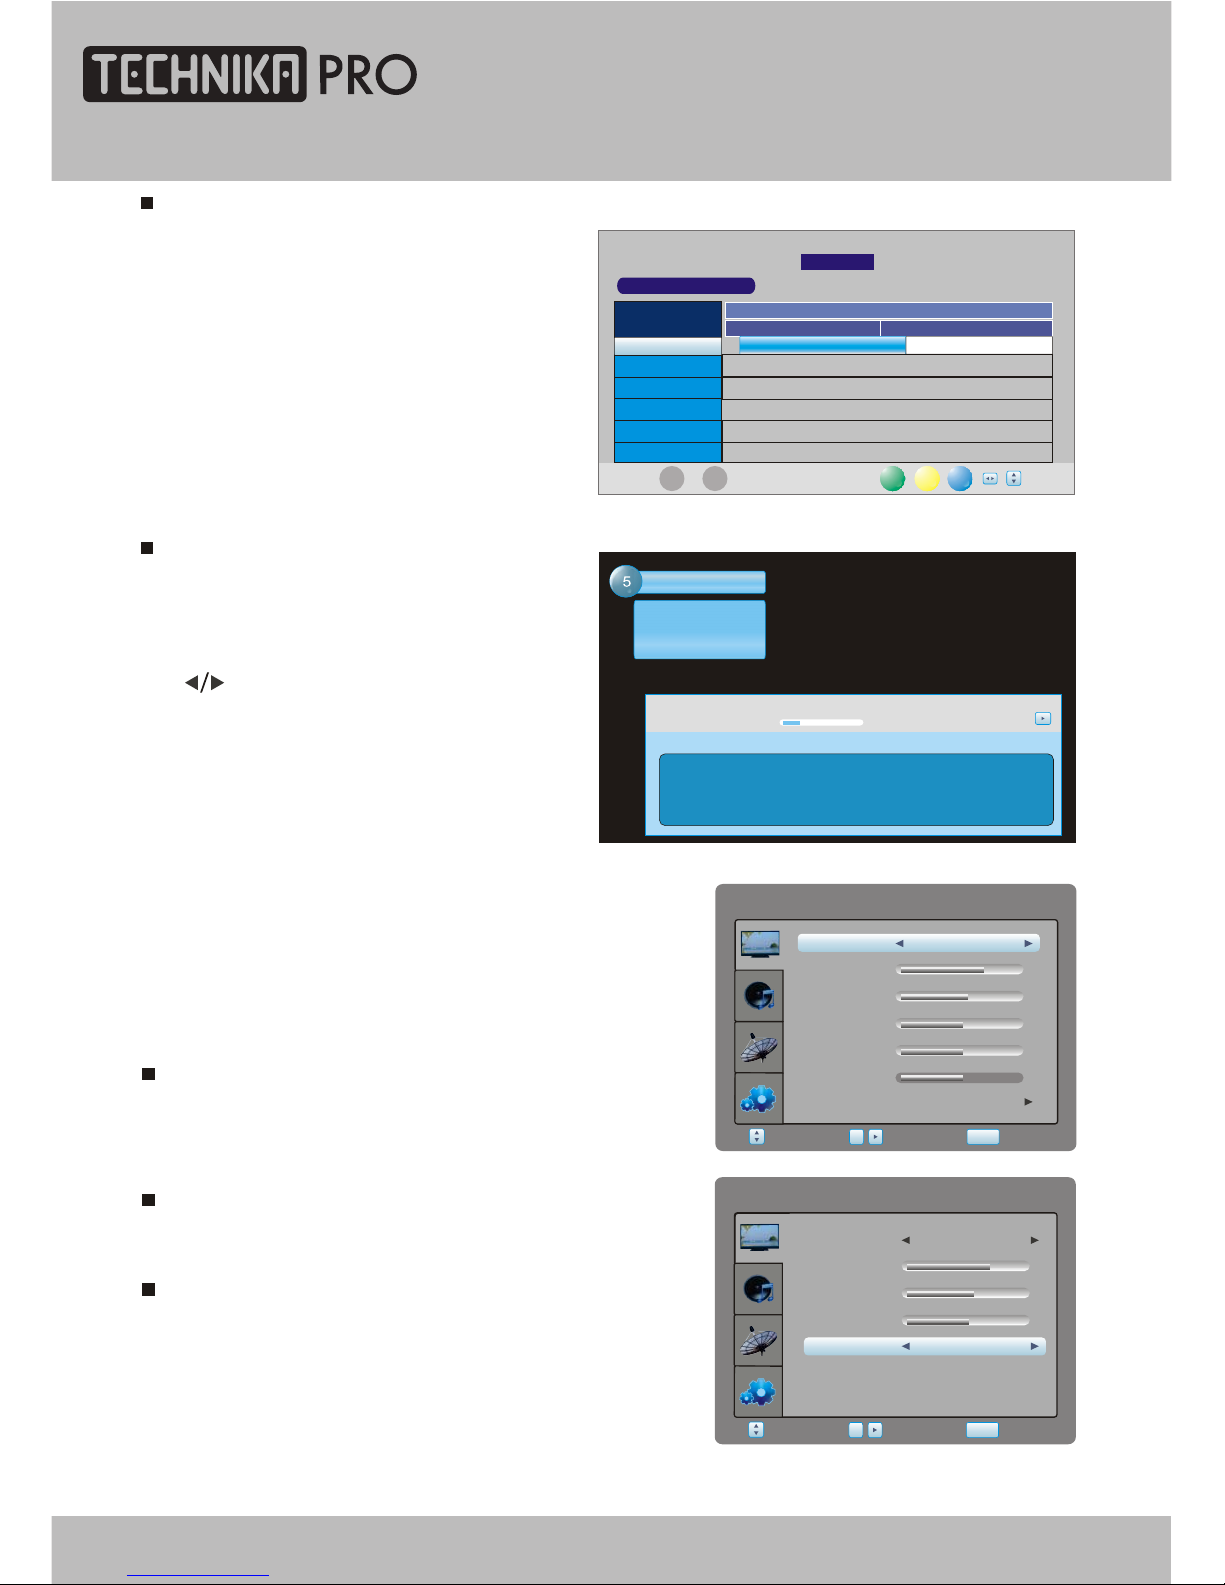
To obtain more information about present
and following events, you can press twice
[OK] button. Like previously, the
following event is displayed by pressing
the [ ] buttons (toggle between present
and following events):
five
DTV
576i
SD MPEG
The Streetsof San Francisco
Wed Mar 10 2004 14:35
Subtitle English MHEG5 576i
The casesof Detective MikeStone and hispartner Steve Keller.
15:38
14:54
Next
Entertainment
INFORMATION
ELECTRONIC PROGRAM GUIDE (EPG)
By pressing the EPG button, an Electronic
Program Guide is displayed. The EPG
supplies information, such as program
lists, start and end times of all available
channels. In addition, the detailed
information about the program is often
available in the EPG. (The availability
and the amount of program details will
vary depending on the broadcaster.)
PROGRAMMEGUIDE
10 Mar 2004 14:53
DTV
5 five
16 QVC
17 UK Gold
23 bid-up.tv
25 TCM
26 UK Style
DTV 5
14:35 -15:38
five
The Streetsof San Frandsco
14:30 15:30
10 Mar
The Streetsof San Francisco NoInformation
No Information
No Information
No Information
No Information
Gold WorkshopWith Jan Springer
L...
Schedule DATE
Reminder
OK
EXIT
PICTURE
Select Return
SETUP
Enter
OK
PICTURE
Contrast 70
Brightness
55
Colour
50
Sharpness
Tint
User
PictureMode
Preference
0
50
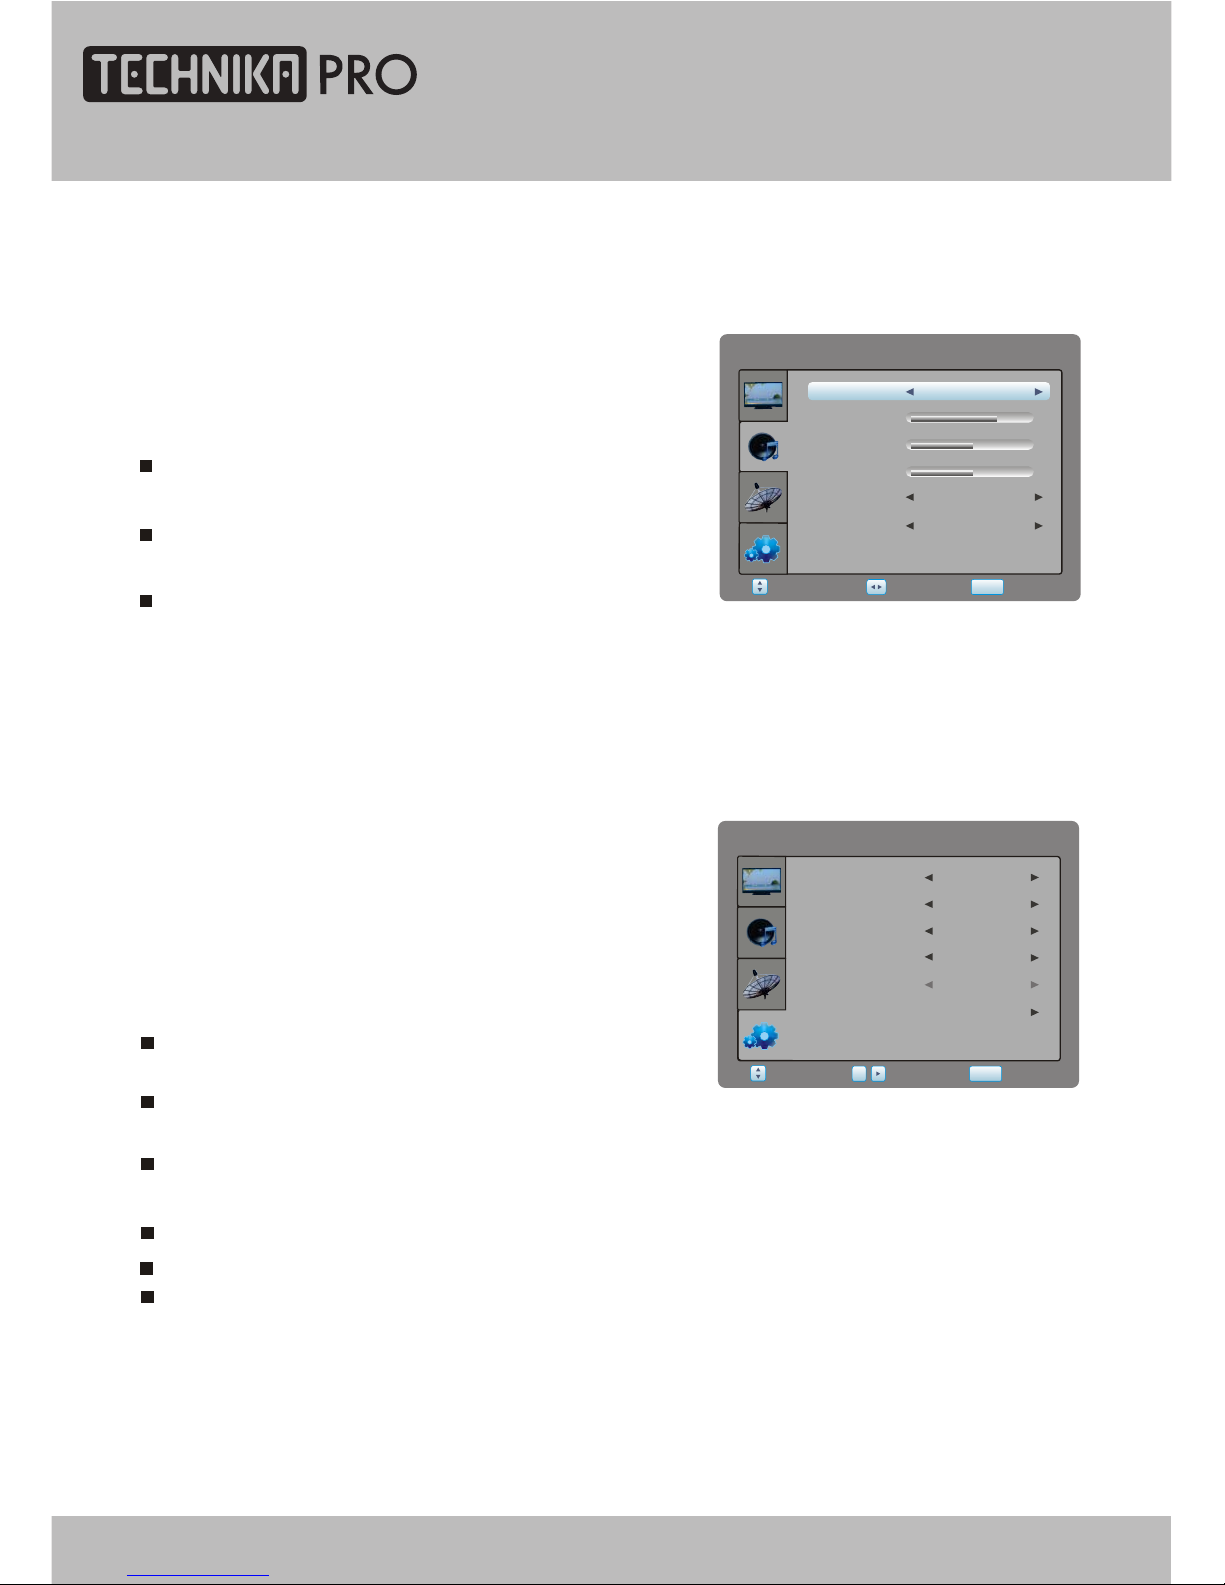
Picture mode item can be changed between
User, Standard, Soft, Dynamic
You may adjust Brightness, Contrast, Colour,
Sharpness, Tint for User mode.
Preference item enables you to enter the sub menu.
Select PICTURE item to adjust picture parameters.
You may adjust Picture Mode, Contrast, Brightness,
Colour, Sharpness, Tint and Preference.
Colour Temp. item can select colour temperature
mode: Standard, Warm, Cool and User.
Select Return
SETUP
Enter
OK
PICTURE
70
55
50
Normal
Middle
Red
Green
Blue
NoiseReduction
ColourTemp
Noise Reduction item can select reduce noise
mode: Off, Low, Middle, High.
24" HD Ready 1080p DVD LCD TV User Guide 21
Page 22
DTV Menu Setup
FUNCTION
Region
FUNCTION
SleepTimer
BlueScreen
AspectRatio
Select
Return
SETUP
Enter
Language
OK
English
Off
16:9
On
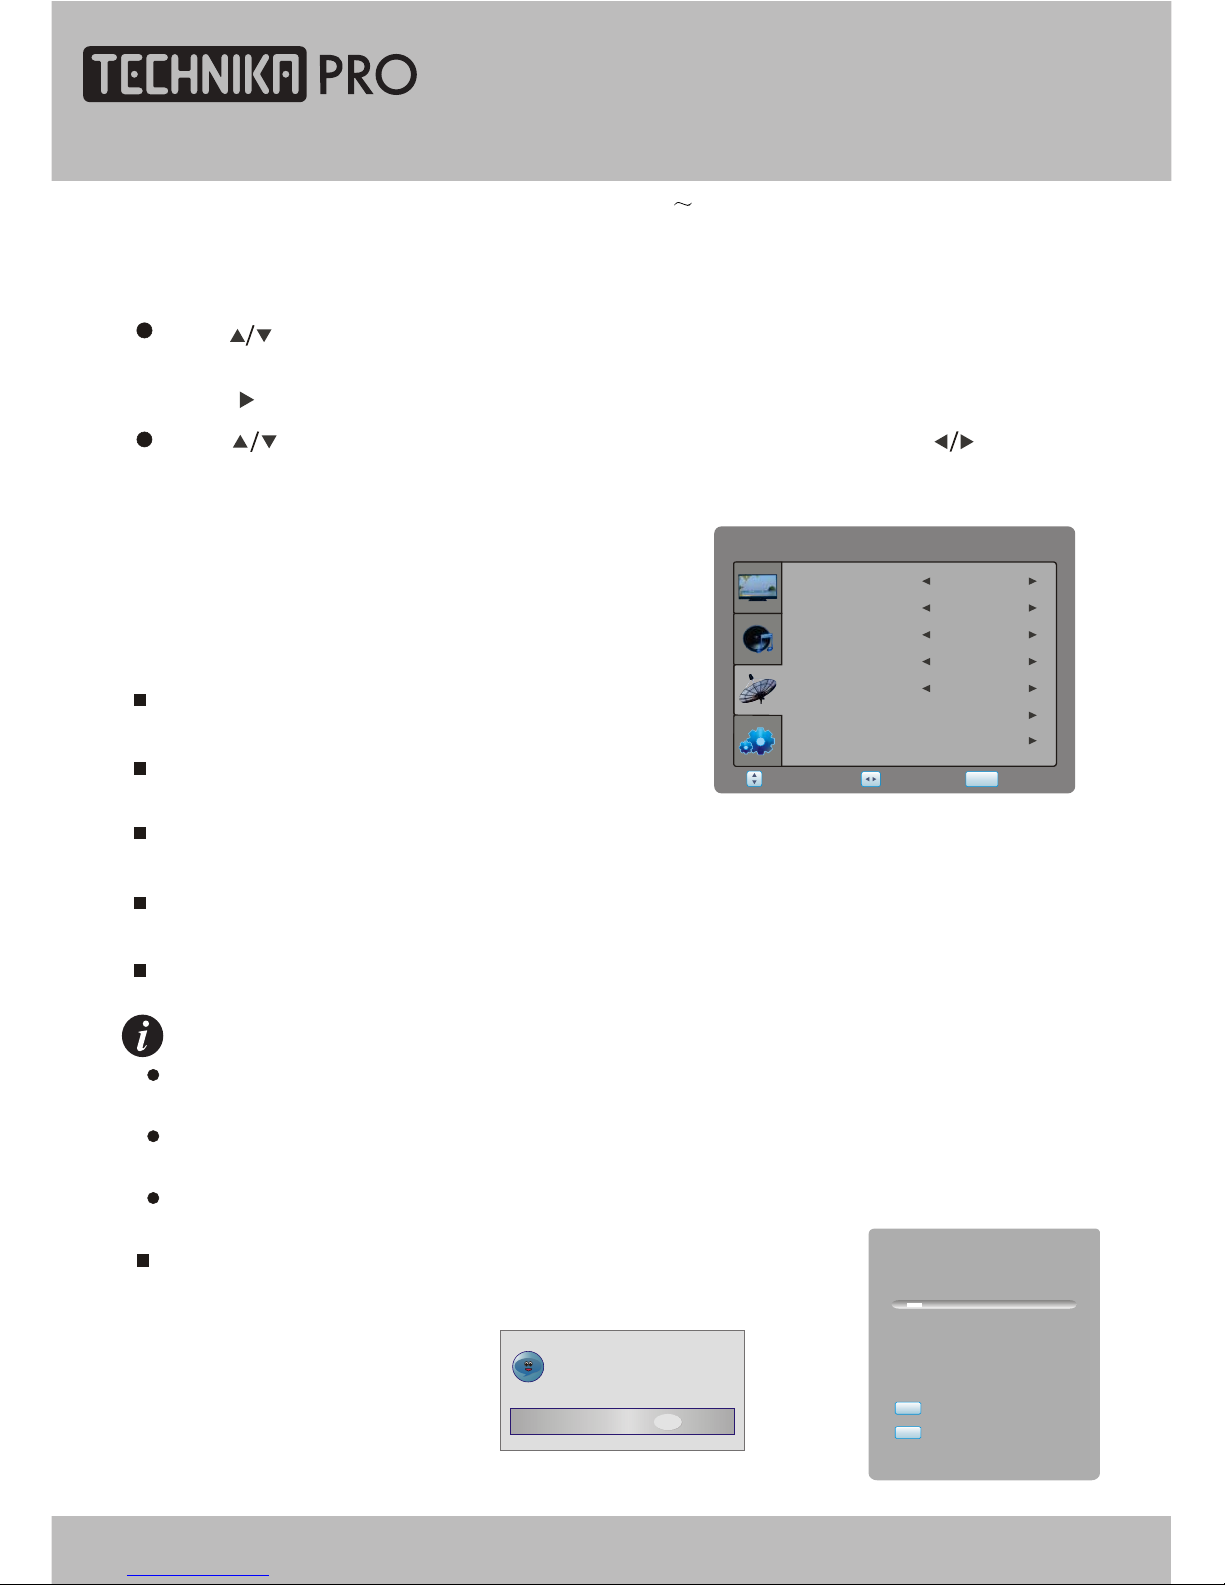
Language item enables you to select the OSD
language.
Sleep Timer item enables you to set the sleep timer
(Off,10min,20min,30min,60min,90min,120min,180min and 240min)
Aspect Ratio item can bechanged between: Auto,16:9, 4:3, ZOOM1, ZOOM2
Region item can change between different regions.
Blue Screen item can be changed between On and Off.
Select FUNCTION item to adjust function parameters.
You may select Language, Sleep Timer, Aspect
Ratio, Blue Screen and Restore Setting.
RestoreSetting
Other
Restore Setting item enables you to reset all values to default.
Auto,ZOOM1, ZOOM2 not valid for VGA mode.
Select Return
SETUP
Adjust
SOUND
Treble 75
Bass
50
Balance
50
AutoVolume
SurroundSound
User
SoundMode
Off
Off
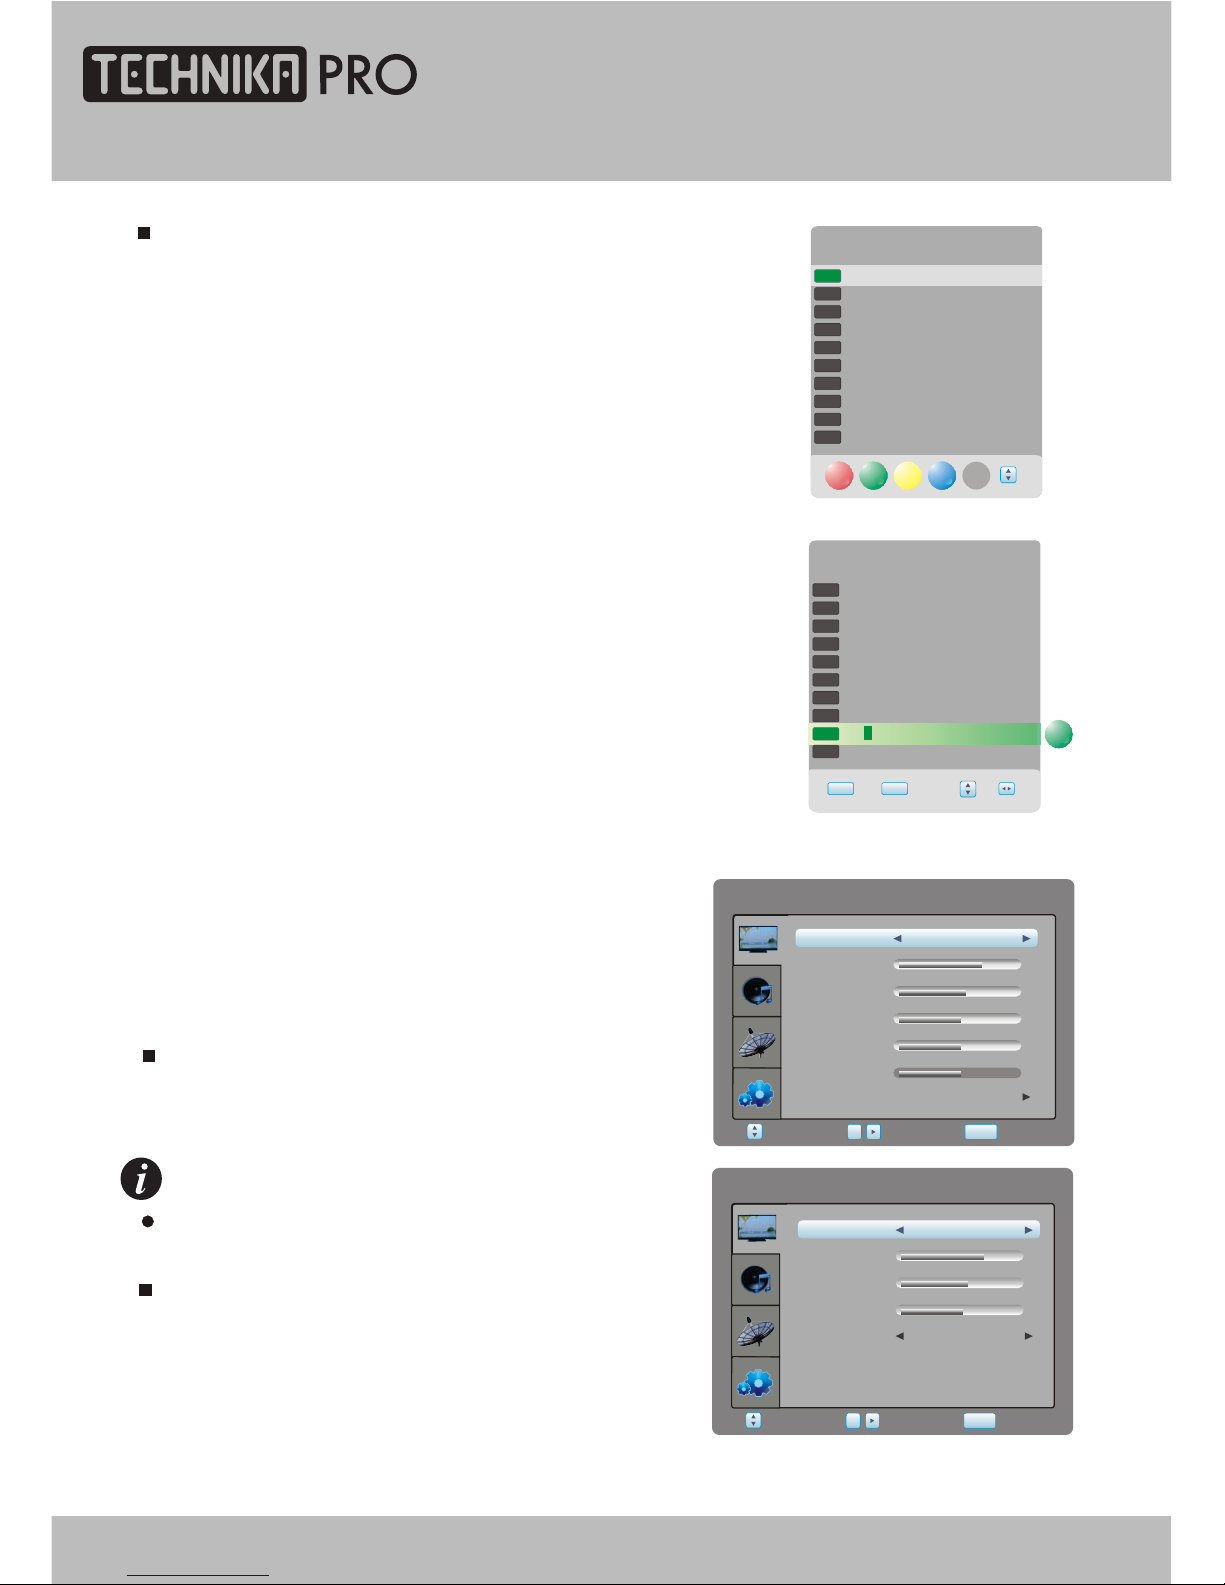
Sound Mode item can be changed between
Music, Film, News, User.
Auto Volume item enables you to adjust off or on
for control volume automatic.
Surround Sound item enables you to select off or
on for surround sound.
Select SOUND item to adjust sound parameters.
You may adjust Sound Mode, Treble, Bass,
Balance, Auto Volume and Surround Sound.
SOUND
22
24" HD Ready 1080p DVD LCD TV User Guide
Page 23
ATV Menu Setup
Auto Tuning item enables you to adjust channel setting automatically.
Channel Tuning
Doyouwanttoexittuning?
YesNo
9%...119.75MHz
TV:0Programme(s)
ChannelTuning
SETUP
exit
EXIT
exit
ATVSETTING
Select Return
SETUP
Adjust
ManualTuning
Coloursystem
Fine-Tune
Audiosystem
Channel
AutoTuning
ProgrammeEdit
224.25MHz
17
AUTO
DK
Channel items enables you to change the channel
number.
NOTES
Colour System item enables you to select the colour
system: "AUTO", "PAL" and "SECAM".
Audio System item enables you to select sound
system:"B/G","DK","I" and "L".
"COLOUR SYSTEM" and "AUDIO SYSTEM" mode are according to the local ATV
broadcasting system.
If the local system is SECAM L, set the "REGION" to "FRANCE",
please refer "Function" in P25.
System will set "AUDIO SYSTEM" automatically. In some special conditions, "AUDIO
SYSTEM" setting will be wrong, please adjust manually.
Fine-Tune item enables you to adjust the channel frequency accurately to make the sound
and picture effect better.
Manual Tuning item enables you to change channel settings.
Select ATV SETTING item to adjust channels.
You may select Channel, Colour System,
Audio System, Fine-Tune, Manual Tuning,
Auto Tuning and Programme Edit.
ATV SETTING
This product can store up to 99-channel programs (199). You can select your favourite
channel through pressing [CH+/-] or number buttons, and you can scan and store all of the
channels through manual or automatic mode.
In TV mode, press [SETUP] button into the main menu and the main menu will show as follows: A
Press [ ] button on the remote control, you can select main menu sections
(main menu sections consist of .
Press [ ] or [OK] button to enter this menu section.
" ATV SETTING " , " PICTURE ", " SOUND " , " FUNCTION ")
Press [ ] button on the remote control to select the item, and then press [ ] button to
adjust parameter value. Press [SETUP] button to return to main menu sections.
24" HD Ready 1080p DVD LCD TV User Guide 23
Page 24
ATV Menu Setup
Programme Edit item enables you to enter submenu to
set channel DELETE, RENAME, MOVE, SKIP, FAV.
ProgrammeEdit
1 S-42
2 C-04
3S-02
4 S-04
5 S-04
6 S-05
7 S-06
8 S-07
9 S-08
10 S-09
DELETE
SKIP FAV
TV
TV
RENAME
TV
TV
TV
TV
TV
TV
TV
TV
MOVE
ProgrammeEdit
TV
TV
TV
TV
TV
TV
TV
TV
TV
1 S-42
2 C-04
3 S-02
4 S-04
5 S-04
6 S-05
7 S-06
8 S-07
9 S-08
10 S-09
RENAME
EXIT SETUP
TV
Press RED button to delete channel.
Press GREEN button to rename channel.
Press YELLOW button to move channel.
Press CYAN button to SKIP channel.
Press FAV button to set favourite channel.
PICTURE
Select PICTURE item to adjust picture parameters.
You may adjust Picture Mode, Contrast, Brightness,
Colour, Sharpness, Tint and Preference.
Select Return
SETUP
Enter
OK
PICTURE
Contrast 70
Brightness
55
Colour
50
Sharpness
Tint
User
PictureMode
Preference
0
50
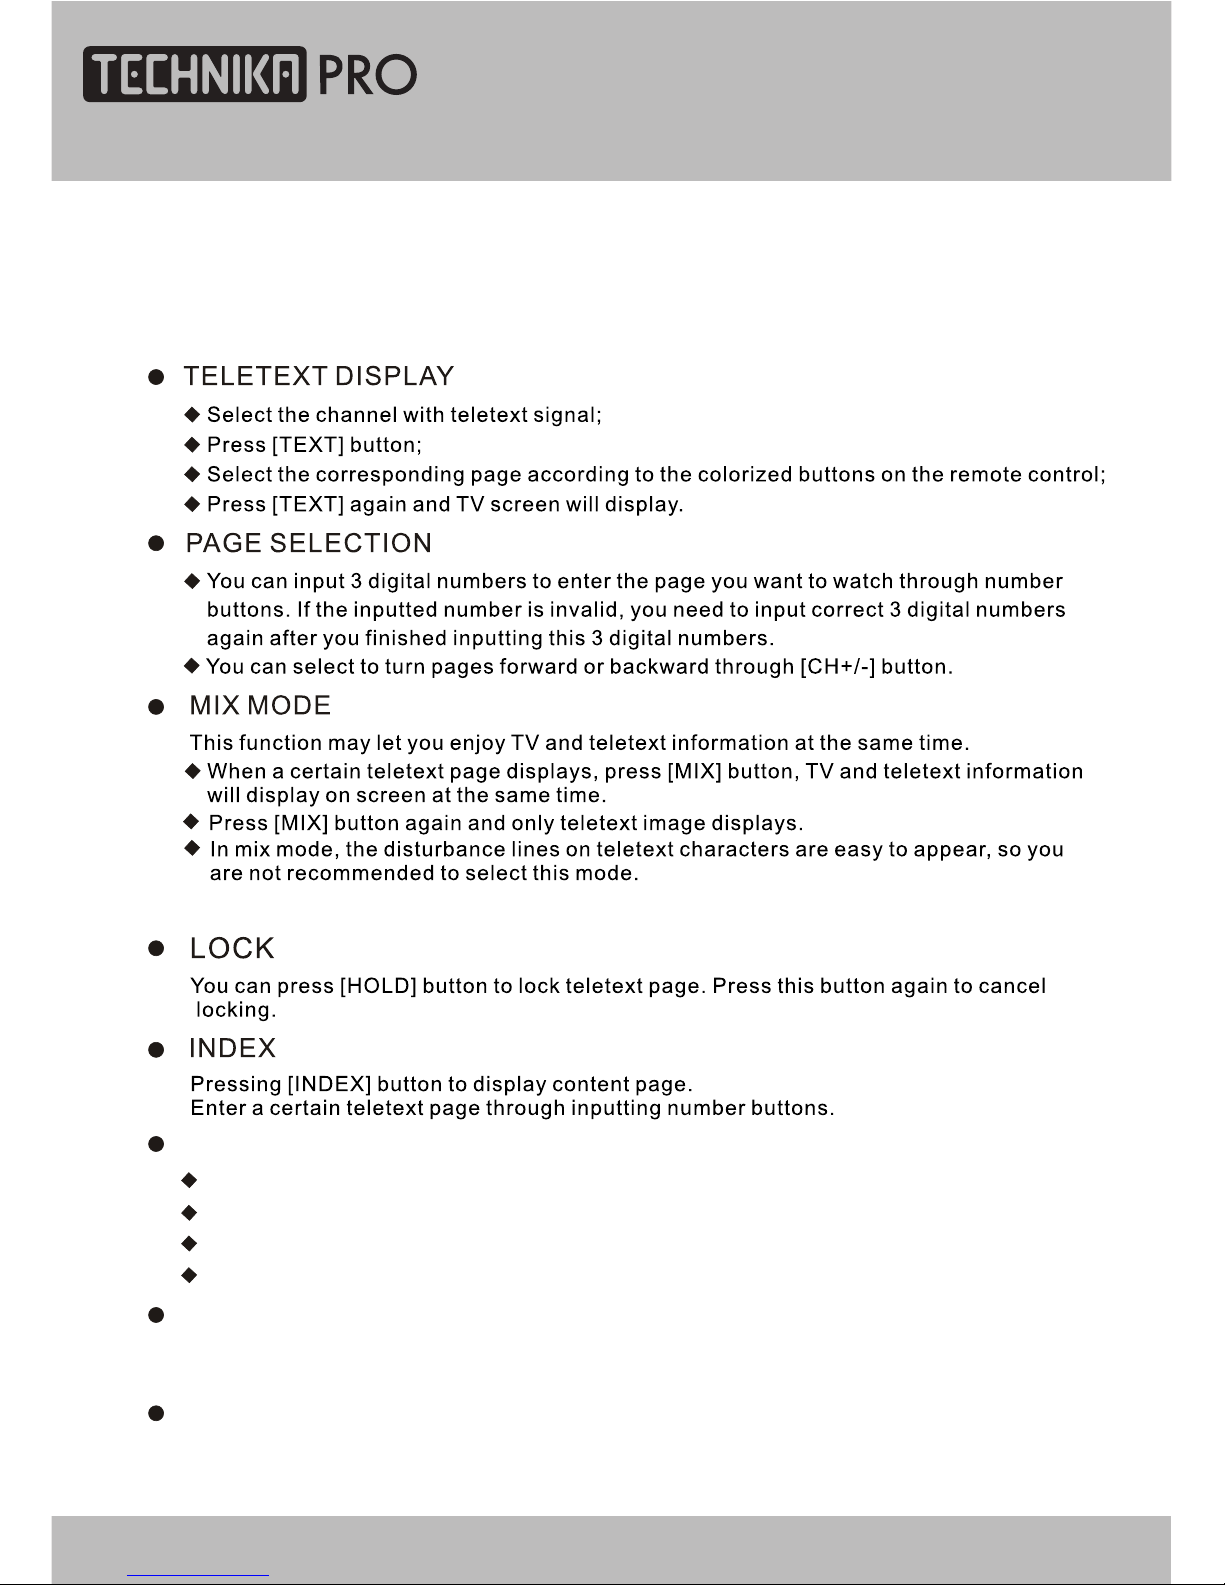
Picture Mode item can be changed between
User, Standard, Soft, Dynamic.
You may adjust Brightness, Contrast, Saturation,
Tint for user mode.
NOTES
You can't adjust TINT while watching TV channels.
Preference item enables you to enter the sub menu.
Colour Temp. item can select colour temperature
mode: Standard, Warm, Cool and User.
Select Return
SETUP
Enter
OK
PICTURE
Red 70
Green
55
Blue
50
NoiseReduction
Normal
ColourTemp
Middle
24
24" HD Ready 1080p DVD LCD TV User Guide
Page 25
ATV Menu Setup
FUNCTION
SleepTimer
BlueScreen
AspectRatio
Select
Return
SETUP
Enter
Language
OK
English
Off
16:9
On
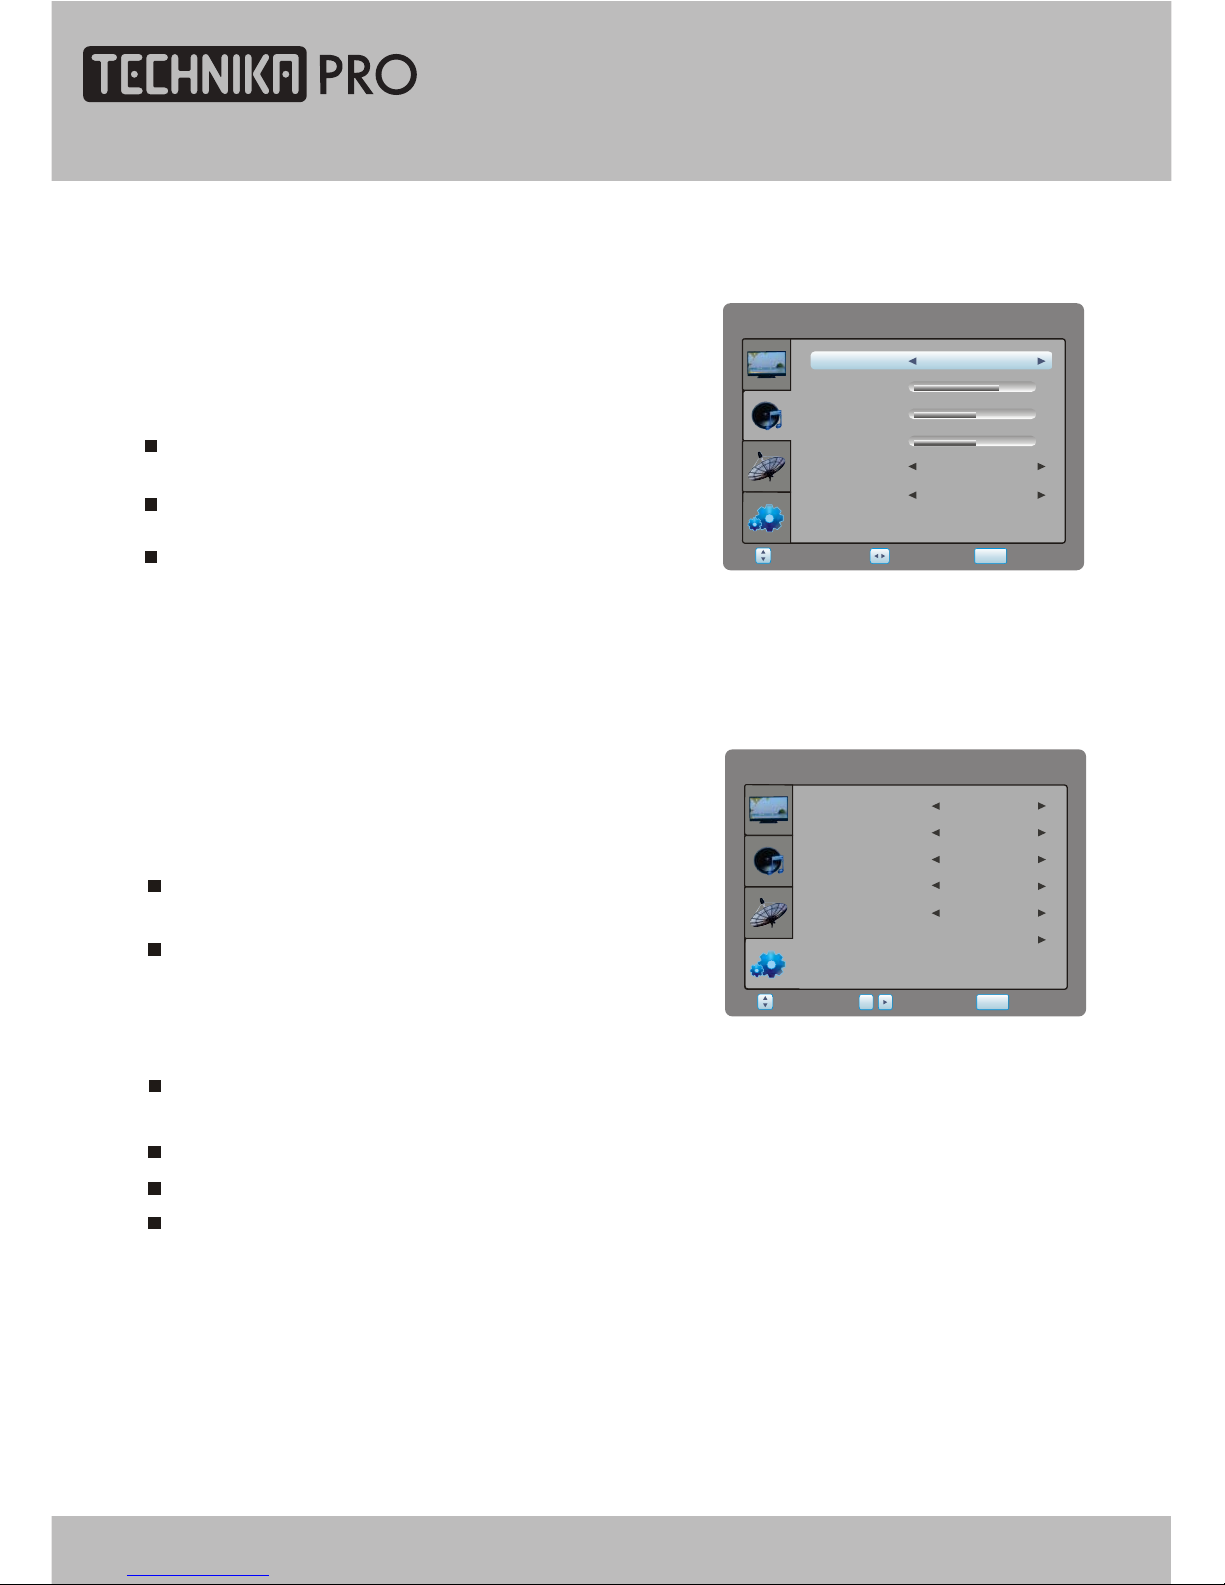
Select FUNCTION item to adjust function parameters.
You may select Language, Sleep Timer, Aspect Ratio,
Blue Screen and Restore Setting.
Language item enables you to select the OSD
language.
Sleep Timer item enables you to set the sleep timer
(.Off,10min,20min,30min,60min,90min,120min,180min
and 240min)
Restore Setting item enables you to reset all values to default.
Blue Screen item can be changed between On and Off.
Region
Other
RestoreSetting
Region item enables you to set the analogue TV region.
Aspect Ratio item can be changed between:Auto,16:9, 4:3, ZOOM1, ZOOM2
Auto, ZOOM1, ZOOM2 not valid for VGA mode.
FUNCTION
SOUND
Select Return
SETUP
Adjust
SOUND
Treble 75
Bass
50
Balance
50
AutoVolume
SurroundSound
User
SoundMode
Off
Off
Sound Mode item can be changed between
Music, Film, News, User.
Select SOUND item to adjust sound parameters.
You may adjust Sound Mode, Treble, Bass,
Balance, Auto Volume and Surround Sound.
Auto Volume item enables you to adjust off or on
for control volume automatic.
Surround Sound item enables you to select off or
on for surround sound.
24" HD Ready 1080p DVD LCD TV User Guide 25
Page 26
Note : Press [CANCEL] button to cancel teletext.
When teletext page shows, you may double zoom in to display this teletext page;
Press [SIZE] button to zoom in the upper half part of the teletext page;
Press [SIZE] button again to enter the lower half of the teletext page;
Press this button once more to return to the original display mode.
ZOOM IN TELETEXT
Press [REVEAL] button to display the hidden teletext information. Press this button
again to cancel .
DISPLAY MODE
COLOURIZED BUTTONS (RED, GREEN, YELLOW, BLUE)
Select the corresponding teletext page through colourized buttons.
Most TV stations provide cost-free teletext information, including the latest news, weather
information, TV program list and stock information etc. You just input the needed teletext
page according to the teletext content.
Teletext Function
26
24" HD Ready 1080p DVD LCD TV User Guide
Page 27

If no signal input in DTV, ATV, SCART/ AV / S-VIDEO/ HDMI, the screen will show as below.
NOTE
SCART
NO SIGNAL
4:50
VIDEO SETTING MENU
This unit will switch to standby mode automatically if there is no signal input more than 5 minutes.
The menu setup of SCART/ S-VIDEO/ HDMI modes is the same as that of the TV mode,
except the " "section . You can find it in preceding pages.
SCART / S-VIDEO / HDMI Menu Setup
24" HD Ready 1080p DVD LCD TV User Guide 27
Page 28
The VGA mode supported up to 1920X1080@75Hz(for 24"), you can use this unit as a
multimedia PC monitor. When this unit works in VGA mode, the following setup can
be done.
Press [SETUP] button to enter main section. Press [ ] button to select sections and then
press [ ] button or [OK] button to enter. If all is complete, please press [SETUP] button twice to
exit and your setup data will be saved automatically.
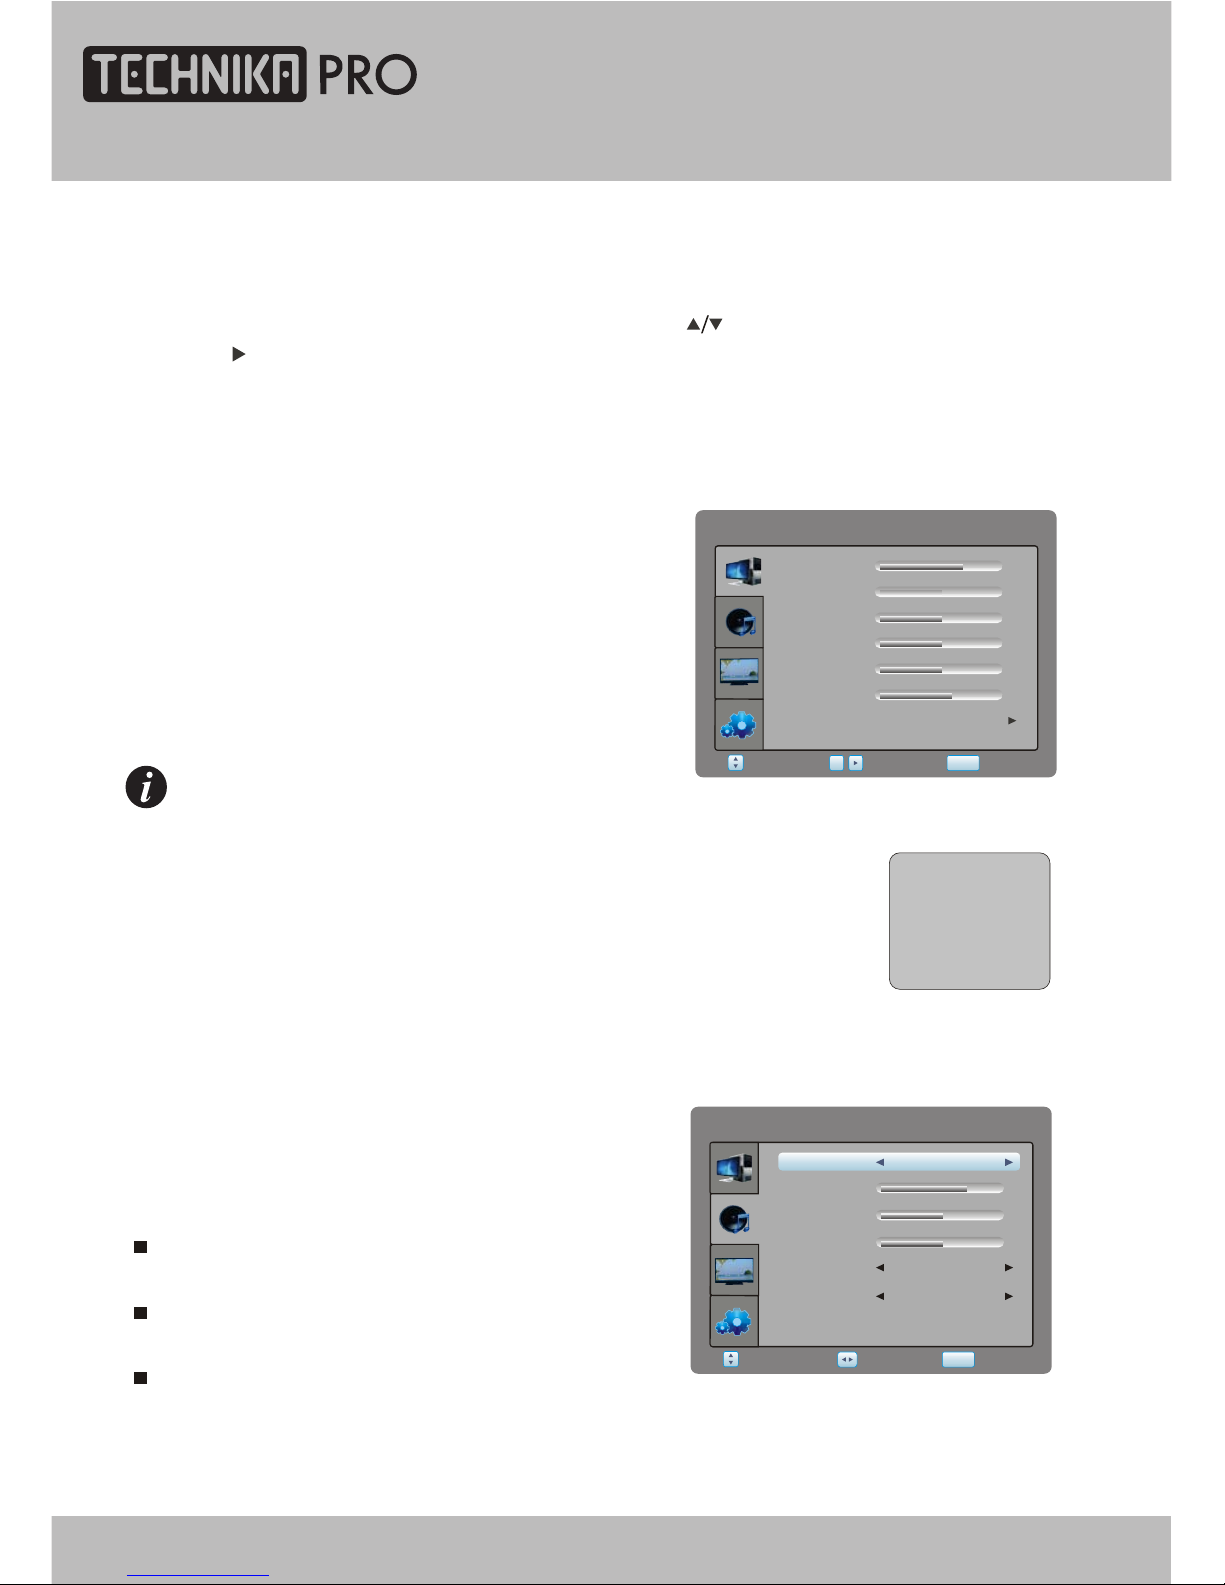
Select VGA SETTING item to adjust such
parameters as Contrast, Brightness,
H-offset, V-offset, Frequency, Phase,
Auto Adjust.
VGA SETTING
NOTE
When your PC goes into standby mode, the screen will show
as right side. This unit will go into sleep mode if no signal
input for 5 minutes. In this mode, the indicator will remain
green, and the screen will turn off. You can wake it up by
waking up your PC or pressing [SETUP] or [SOURCE]
button on the remote control.
VGA
NO SIGNAL
1: 50
VGASETTING
Brightness
V-Offset
H-Offset
Select
Return
SETUP
Enter
Contrast
OK
Frequency
Phase
AutoAdjust
75
50
50
50
0
60
SOUND
Sound Mode item can be changed between
Music, Film, News, User.
Select SOUND item to adjust sound parameters.
You may adjust Sound Mode, Treble, Bass,
Balance, Auto Volume and Surround Sound.
Auto Volume item enables you to adjust Off or On
for control volume automatic.
Surround Sound item enables you to select Off or
On for surround sound.
SOUND
Select Return
SETUP
Treble 75
Bass
50
Balance
50
AutoVolume
SurroundSound
Standard
SoundMode
Adjust
Off
Off
VGA Menu Setup
28
24" HD Ready 1080p DVD LCD TV User Guide
Page 29
FUNCTION
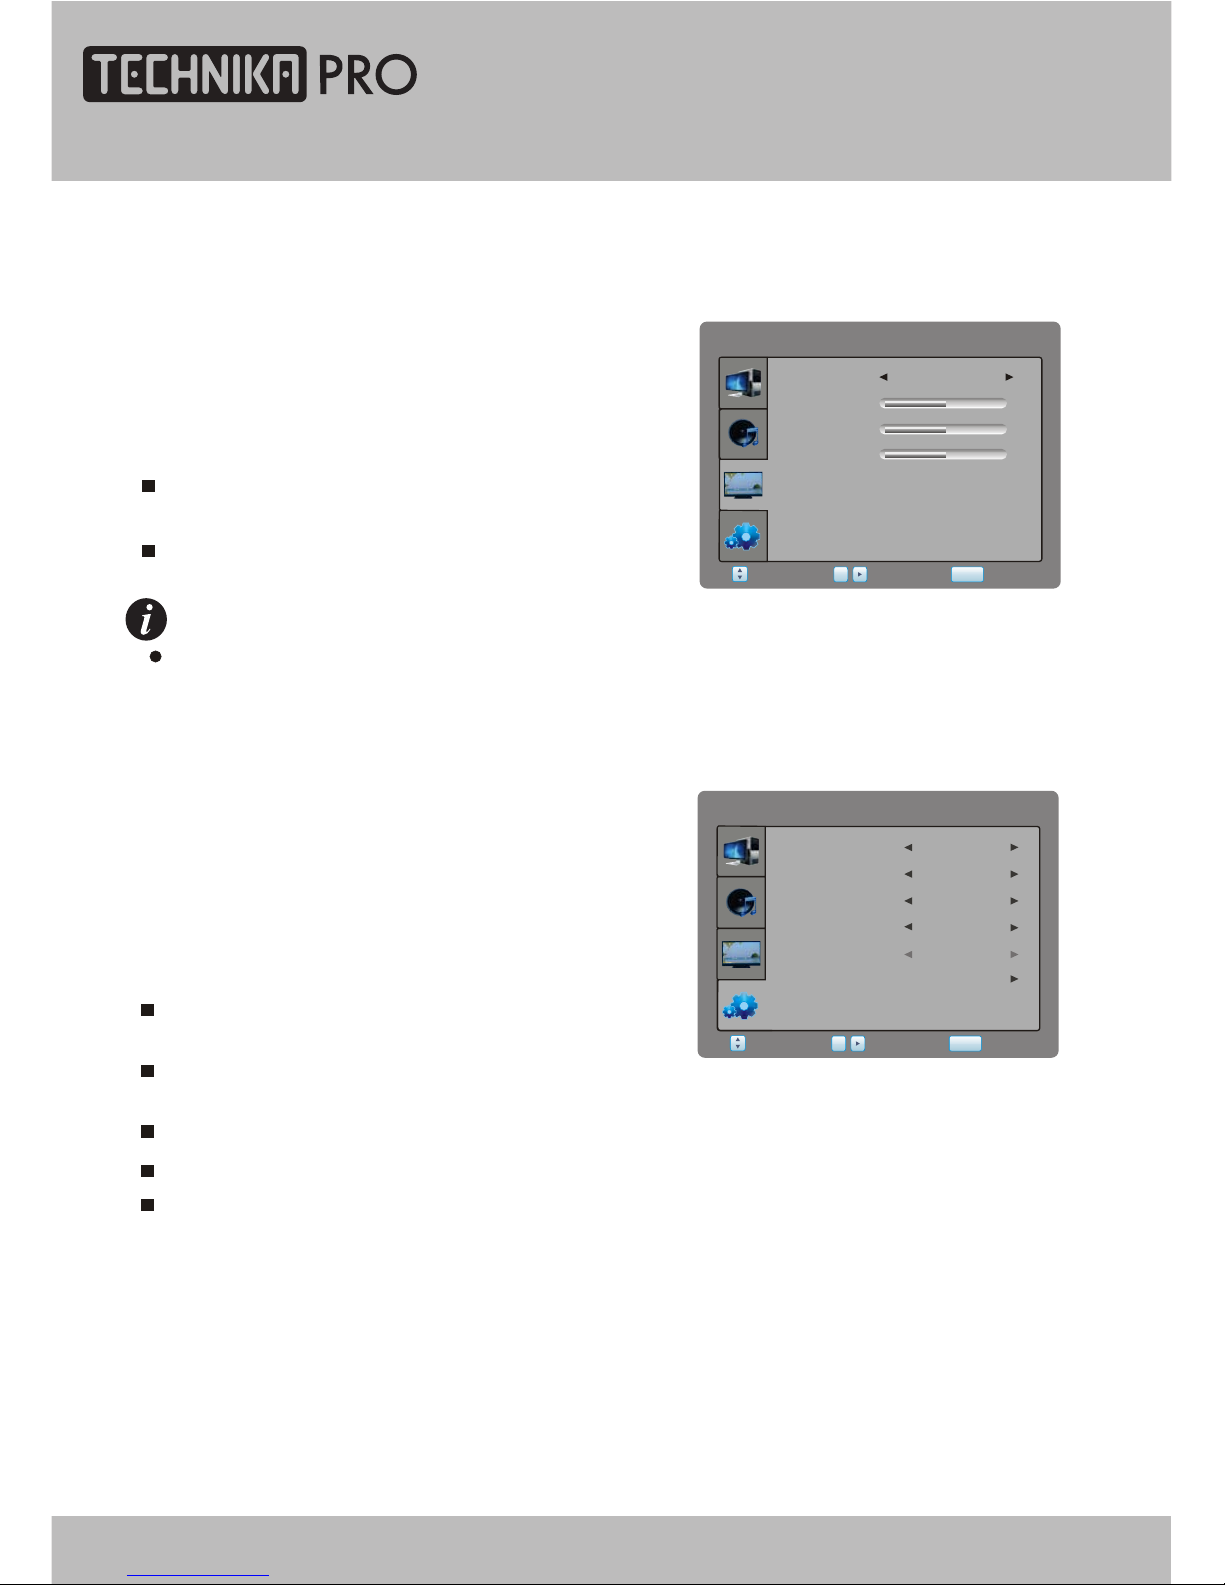
Select FUNCTION item to adjust function parameters.
You may select Language, Sleep Timer, Aspect Ratio,
Blue Screen and Restore Setting.
Language item enables you to select the OSD
language.
Sleep Timer item enables you to set the sleep timer
(.Off,10min,20min,30min,60min,120min,180min and 240min)
Aspect Ratio item can be changed between 16:9 and 4:3.
Restore Setting item enables you to reset all values to default.
Blue Screen item can be changed between On and Off.
FUNCTION
SleepTimer
BlueScreen
AspectRatio
Select
Return
SETUP
Enter
Language
OK
English
Off
16:9
On
Region
Other
RestoreSetting
PICTURE
Select PICTURE item to adjust such parameters
as Colour, Red, Green, Blue.
Colour item can be set to: User, Normal,
Warm and Cool.
Red, Green and Blue items enables you to adjust
RGB value of colour temperature.
The picture will be displayed incorrectly while adjusting.
NOTE
PICTURE
Red
Blue
Green
Select
Return
SETUP
Enter
Colour
OK
50
50
50
Normal
VGA Menu Setup
24" HD Ready 1080p DVD LCD TV User Guide 29
Page 30
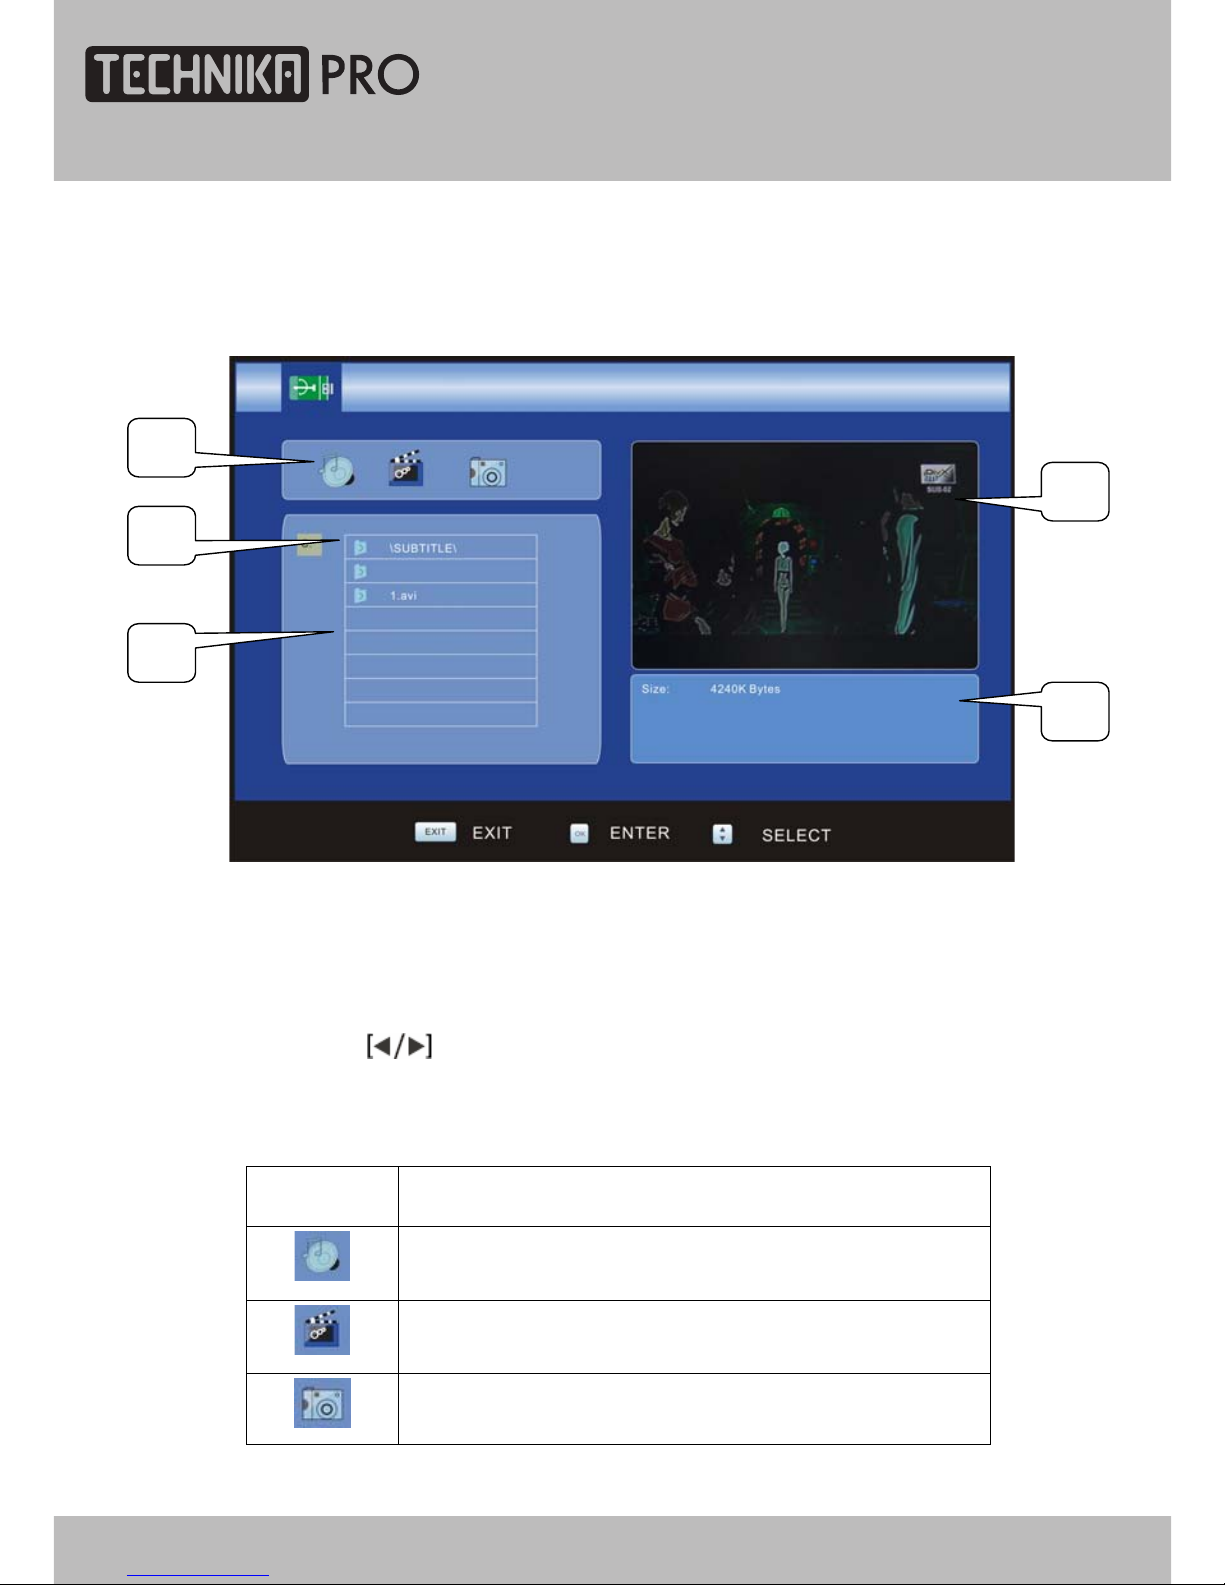
PLAYBACK
Press [SOURCE] button to select USB source and insert USB equipment,
the USB operation menu appears on screen as below.
1: State window Display the current playing mode.
2: DIR window Display the path.
3: File window Display the current path's file.
4: Preview window Movie playing or image preview window.
5: Information window Display the current file‘s information.
Press
to select playing mode and press [OK] button to enter.
Thus current playing mode is highlighted.
,,,,WHP
WHPWHP
WHP GHVFULSWLRQ
GHVFULSWLRQGHVFULSWLRQ
GHVFULSWLRQ
0XVLFPRGH
0RYLHPRGH
3KRWRPRGH
1
2
3
4
5
USB Operation
30
24" HD Ready 1080p DVD LCD TV User Guide
Page 31
Notes:
1. This product supports MP3, MPEG1, MPEG2, AVI, JPEG and BMP format
files.
2. The file system supports FAT16, FAT32 and NTFS.
3. MTP (Media Transfer Protocol) is not supported.
4. Please connect directly to the USB port of your TV. If you are using a
separate cable connection, there may be a USB compatibility problem.
5. Before connecting your device to the TV, please back up your files to
prevent them from damage or loss of data. The manufacturer is not
responsible for any data file damage or data loss.
6. Do not disconnect the USB device while it is loading.
7. If you want to change playing mode, firstly you have to exit current playing
mode through pressing [EXIT] button.
8. The higher the resolution of the image, the longer it takes to display on the
screen.
9.
For unsupported or corrupted files, the ‘Unsupported format’ message is
displayed.
USB Operation
24" HD Ready 1080p DVD LCD TV User Guide 31
Page 32
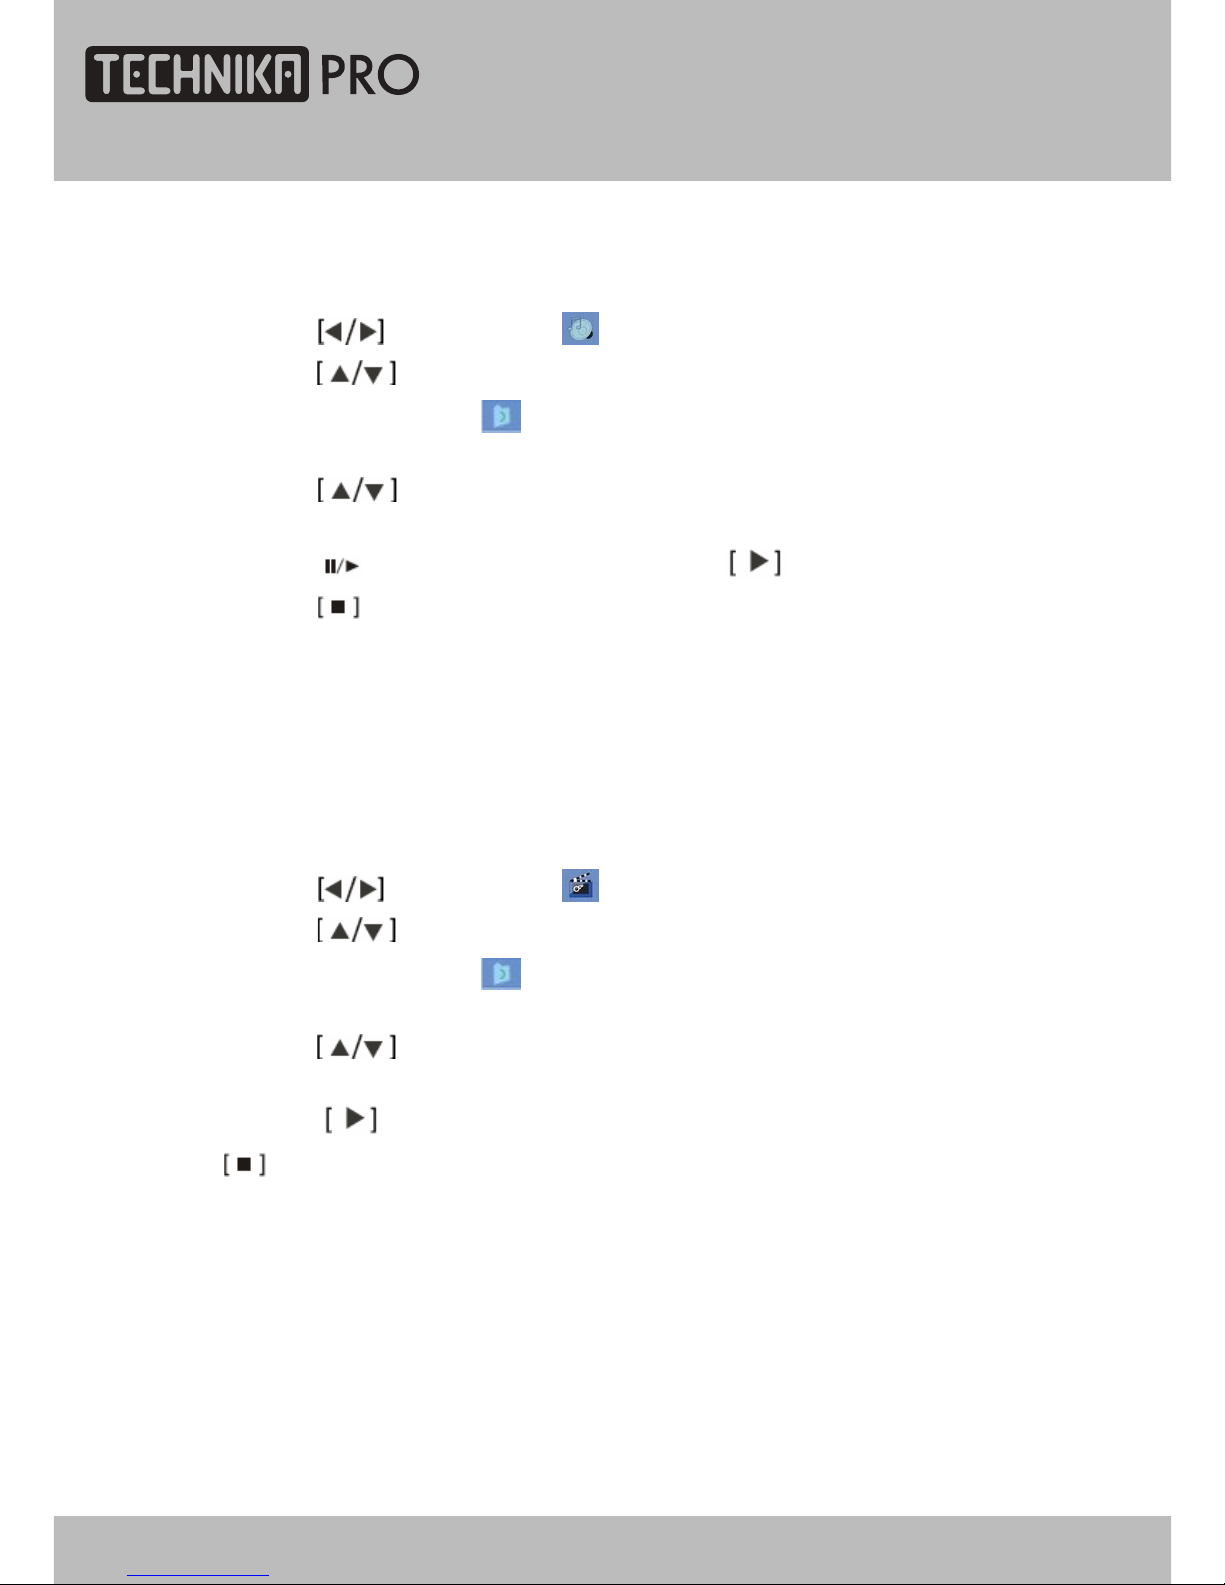
PLAY MUSIC
PLAY MOVIE
1. Press
button to select " "item and press [OK] button to enter.
2. Press
button to select the directory you desire and press [OK]
button to confirm. Select "
" item and press [OK] button to return previous
path.
3. Press
button to select the file you desire and press [OK] button to
confirm.
4. Press [
] button to pause playing and press button to resume.
5. Press
to stop
playing.
6. You can set the repeat mode. Press [REPEAT] button to set the mode: off,
repeat one or repeat all.
Press [EXIT] button to exit music mode.
1. Press
button to select " "item and press [OK] button to enter.
2. Press
button to select the directory you desire and press [OK]
button to confirm. Select "
" item and press [OK] button to return previous
path.
3. Press
button to select the file you desire and press [OK] button to
confirm.
4. Press
button to play full screen, and exit full screen by pressing
or [
EXIT
] button.
USB Operation
32
24" HD Ready 1080p DVD LCD TV User Guide
Page 33
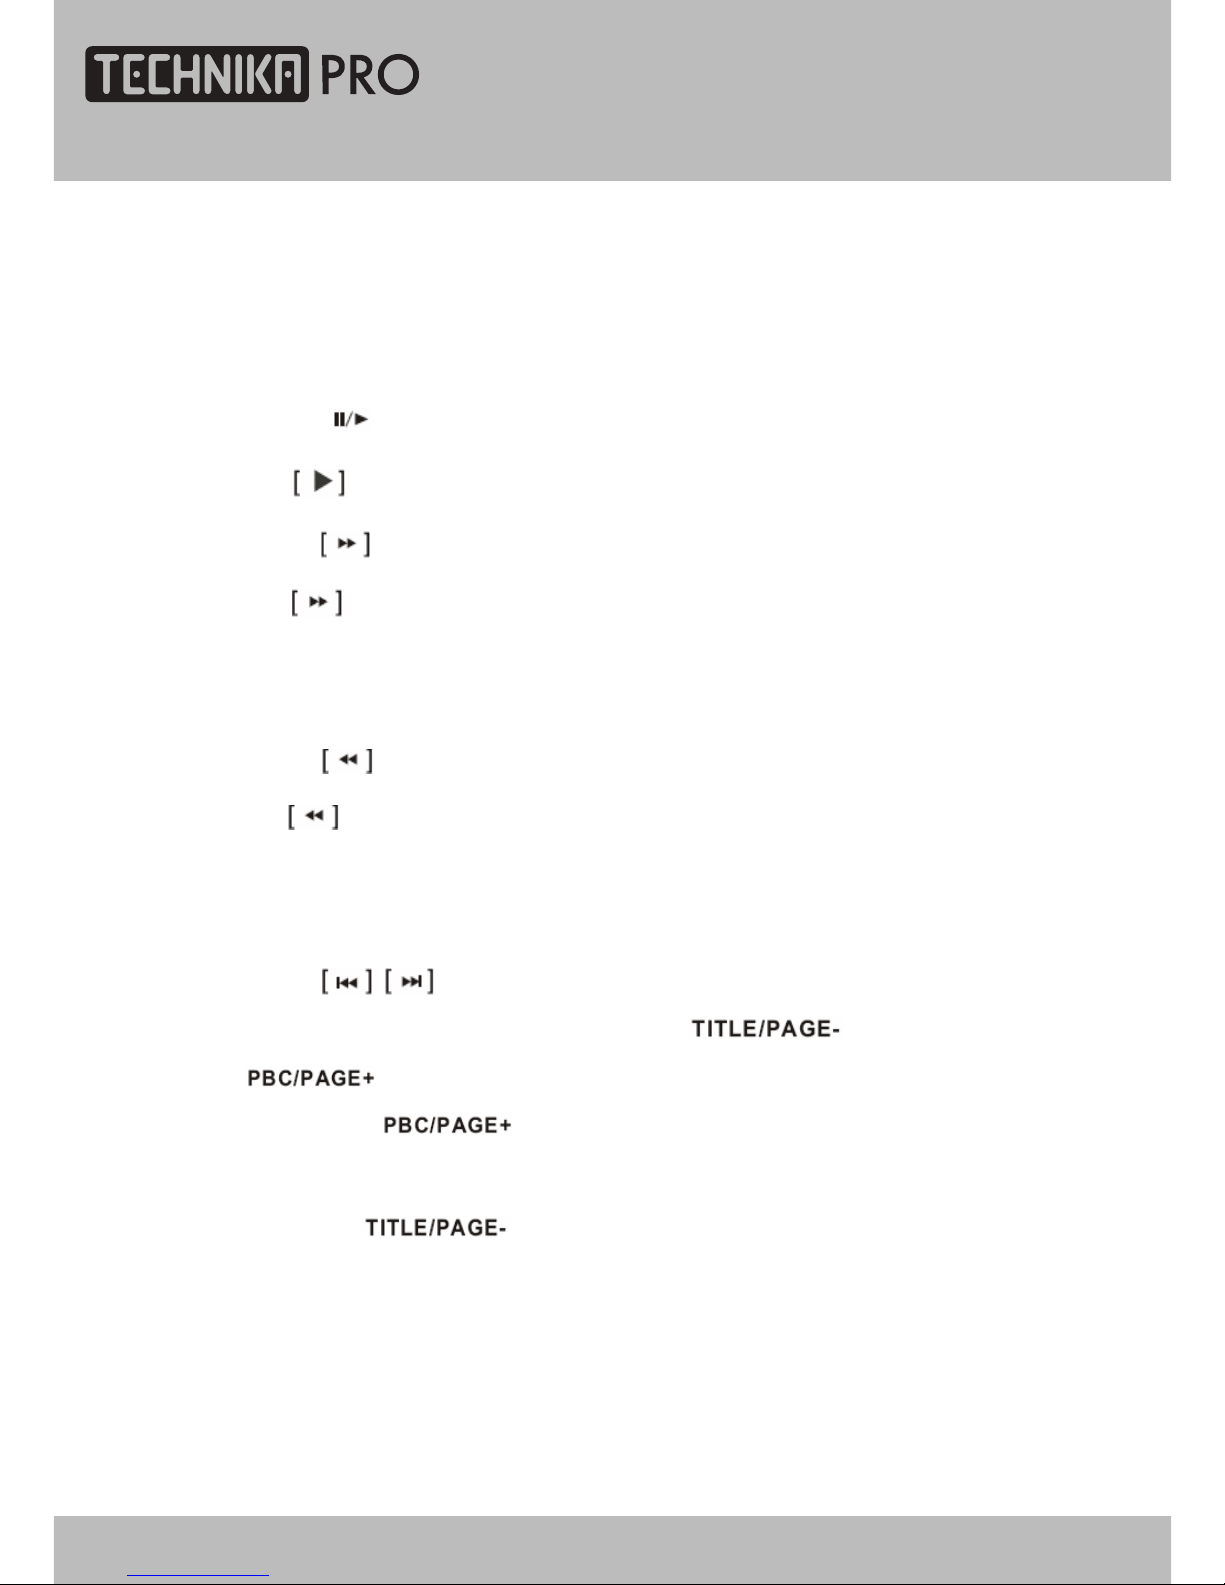
OPERATE IN FULL SCREEN STATE
1. Press [SETUP] button to enter into the main menu. The menu setup is the
same as AV mode. You can find it in preceeding pages.
2. Press [
] button to pause playing/steps playback in pause mode and
press
button to continue playback.
3. Press
button and the unit begins fast forward playback.
Press button each time and the program playback speed switches in the
following sequence circularly:
Play -> 2x fast forward ->4x fast forward->play
4. Press
button and the unit begins fast backward playback.
Press
button each time and the program playback speed switches in the
following sequence circularly:
Play -> 2x fast backward ->4x fast backward->play
5. Press
button can turn to the last or next page.
6. When playing a movie or photo, press the [
]/
[
] button can open the zoom in/out function
1. Press the [
] button continually, all the magnified modes
display on the screen in sequence.
2. Press the [
] button continually, all the minified modes display
on the screen in sequence.
Press [EXIT] button to exit movie mode.
USB Operation
24" HD Ready 1080p DVD LCD TV User Guide 33
Page 34
PLAY PHOTO
OPERATE IN FULL SCREEN STATE
1. Press
button to select " " item and press [OK] button to enter.
2. Press
button to select the directory you desire and press [OK]
button to confirm. Select “
“ item and press [OK] button to return previous
path.
3. Press
button to select the file you desire and press [OK] button to
confirm.
4. Press
button to play full screen, and quit full screen by pressing
or [EXIT] button.
1. Press [SETUP] button to enter into the main menu. The menu setup is the
same as AV mode. You can find it in preceding pages.
2. Press
button can turn to the last or next page.
3. When playing a movie or photo, press the [
]/
[
] button can open the zoom in/out function
.Press the [
] button continually, all the magnified modes
display on the screen in sequence.
ཱ.Press the [
]
button continually all the minimised modes
on the screen in sequence.
Press [EXIT] button to exit photo mode.
USB Operation
34
24" HD Ready 1080p DVD LCD TV User Guide
Page 35
DVD provides brand-new AV effect for consumers with its extraordinarily large capacity and
outstanding audio-video effects. Its capacity is as high as 4.7-17 GB (approximately 7-26 times the
CD capacity) and horizontal resolution of picture is above 500-line.
Function Introduction
Multiple languages and subtitles
DVD disc can support as many as 8 dubbing languages and 32 subtitle languages.
User can select to play the desired plots (the beginning, development or ending) of the same disc.
Multiple story plots
Multiple aspect ratios support various TV screens.
DVD
Digital/MPEG2
Recording Method
Capacity
Playback Time
Disc Diameter
Horizontal Resolution
Aspect Ratio
Subtitle
Sound Quality
Audio
Single
sided
1 layer
4.7G
133min
12CM
500 lines or more
Multiple
Linear PCM
48kHz 96kHz/16 20 24bit
32 types
CDROM
Digital
650MB
12CM
Double-
sided
1 layer
8.5G
242min
Single
sided
2 layers
9.4G
266min
Double-
sided
2 layers
17G
484min
VCD
Digital/MPEG1
650MB
44.1kHz
250 lines or more
12CM
74min
SVCD
Digital/MPEG2
650MB
350 lines or more
12CM
45min
CD
Digital
650MB
44.1kHz/16bit
Linear PCM
12CM
74min
LD
Analogue
44.1kHz/16bit
Linear PCM
FM modulation
One
Max. 16 types
430 lines or more
30CM
1 side 60min.
2 sides 120min.
Multiple aspect ratios
ComparisonbetweenDVDandotherDiscs
BRIEF INTRODUCTION
DVD Operation
24" HD Ready 1080p DVD LCD TV User Guide 35
Page 36
Brand-new AV Effects
Convenient Functions
1
Compatible with MPEG 4 format discs to produce wonderful pictures.
FEATURES
This player employs the new generation MTK decode chip with more convenient system
and more stable operation. Super error correction slot-in loader with twin laser with good
shockproof performance.
108MHz/12bit video DAC with more vivid and brilliant pictures.
2
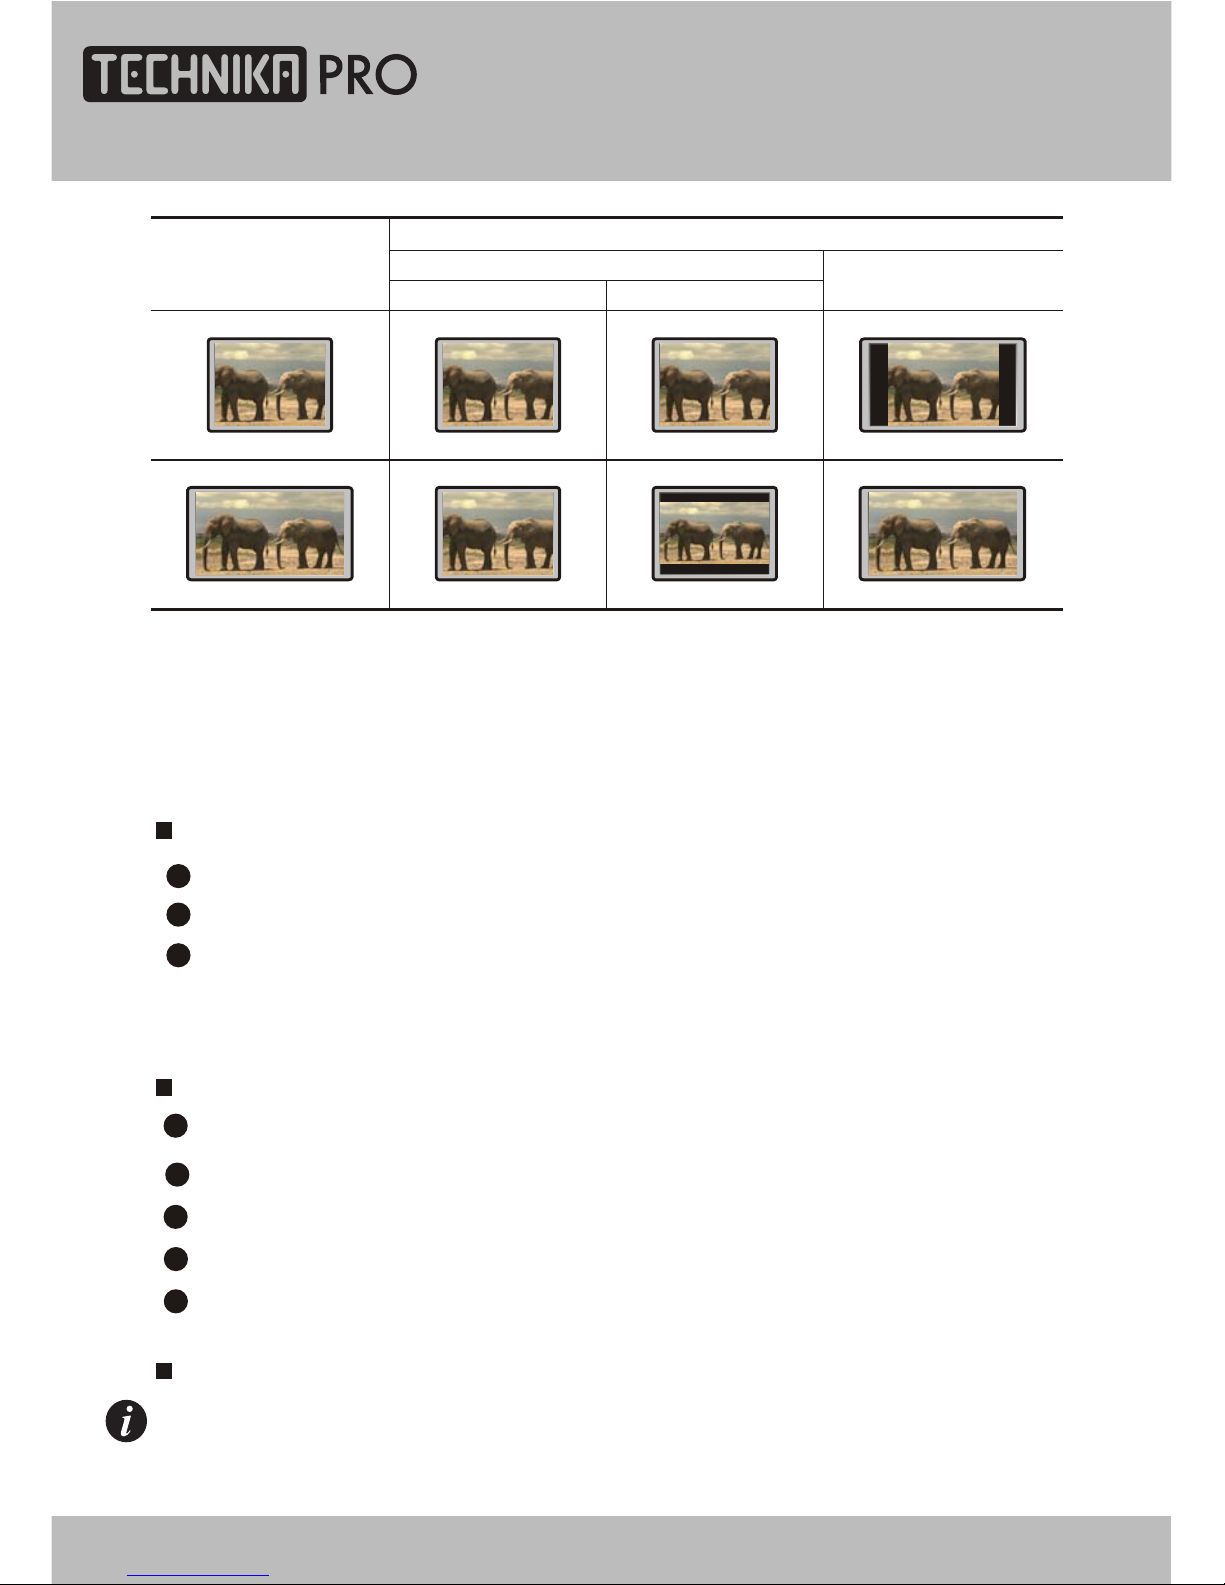
Progressive-scan video outputs to eliminate the flickers not rectified by
interlacing scan and therefore your eyesight will be well-protected. At the same time,
the pictures definition is sharply enhanced and the pictures will be finer, smoother
and more stable.
3
Disc Pictures
TV Screen
4:3
16:9
Pan-Scan
Letterbox
16:9
4:3
1
Direct entry into desired scenes (title/chapter/time/track search).
NOTE: * Some discs labelled with MPEG4 on the market actually are *.rm/*.ra/*.ram/*.rmm and others
which are not compatible. Please take care when buying discs.
Super compatible with VCD, SVCD, CD, HDCD, KODAK PICTURE CD etc.
Multi-levelzoom in/outplayback function to provide you with brand-new enjoyment method.
2
Multiple aspect ratios to fit TV sets of various screen ratios.
3
Parental lock function to prevent children from watching unsuitable discs.
4
Multiple dubbing languages and subtitle languages bring you the best entertainment status
all the time.
5
DVD Operation
36
24" HD Ready 1080p DVD LCD TV User Guide
Page 37
COMPATIBLE DISC TYPES
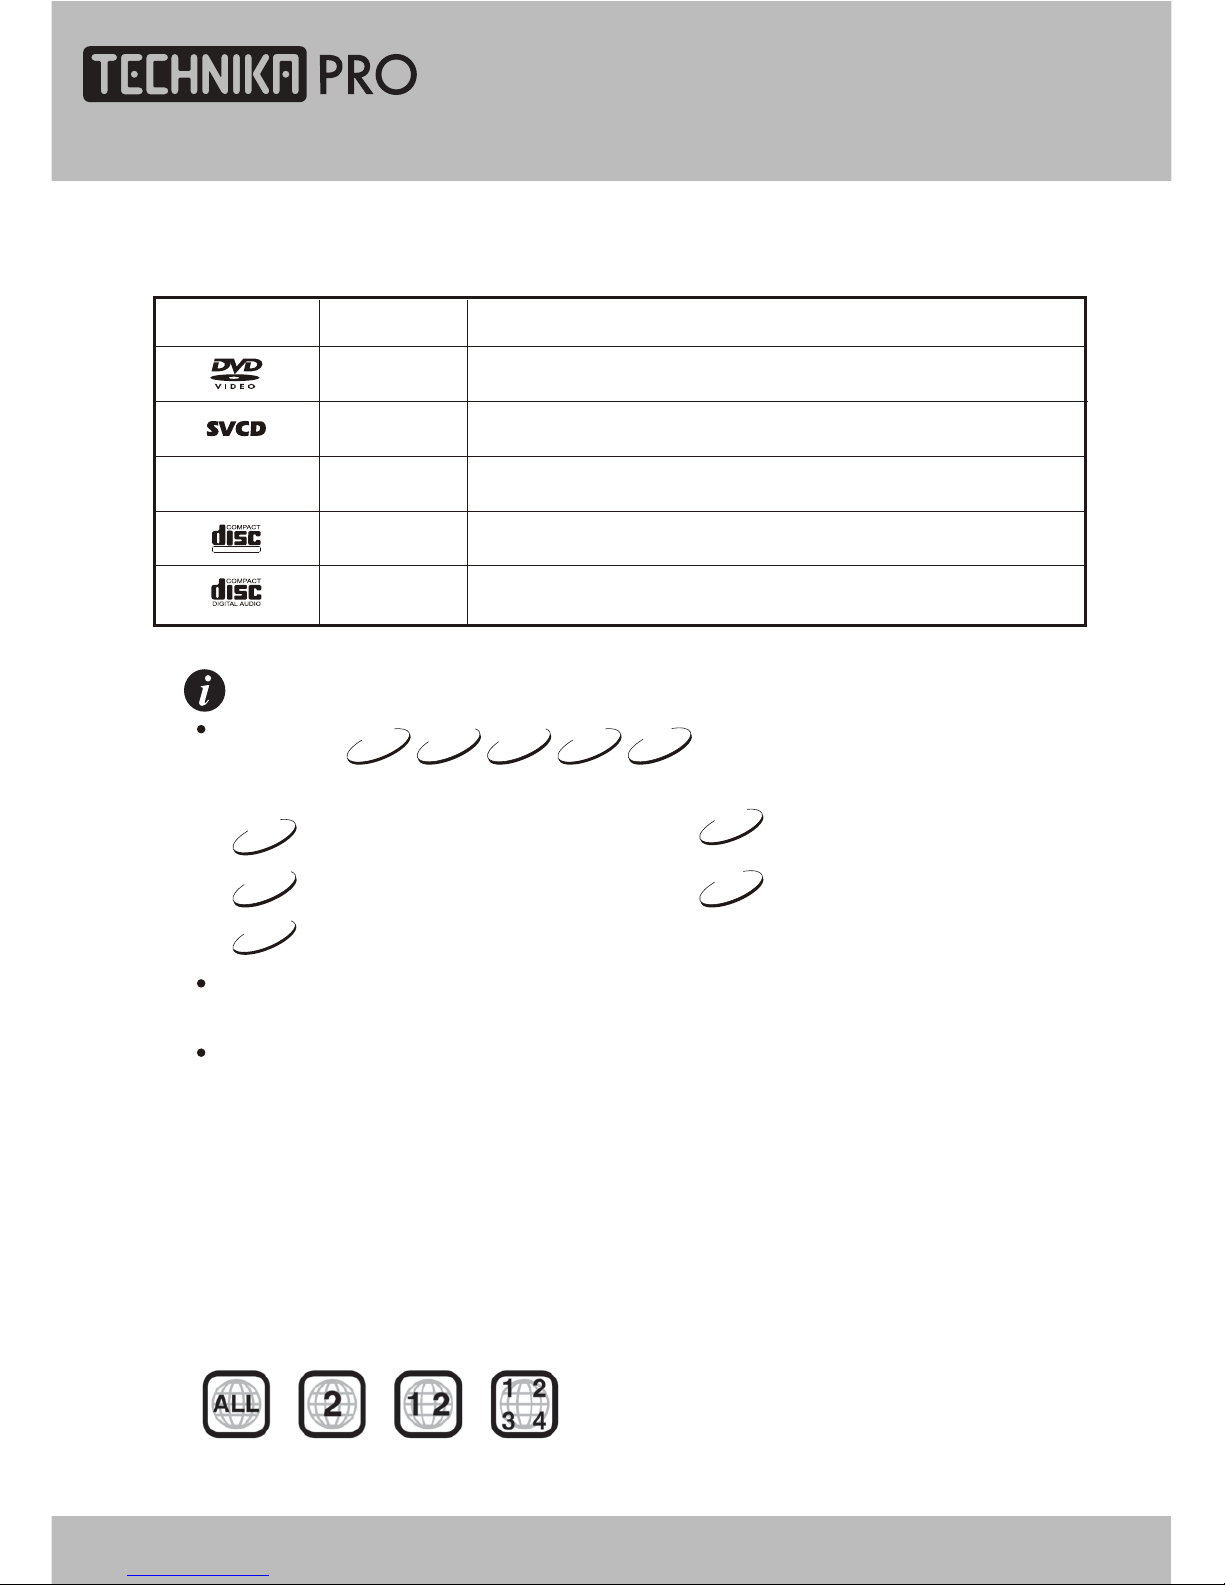
CD-DA: Digital audio
12cm
12cm
VIDEO CD: Compressed digital audio + compressed digital video (dynamic picture)
DIGITAL VIDEO
12cm
SVCD: Compressed digital audio + compressed digital video (dynamic picture)
12cm
DVD: Compressed digital audio + compressed digital video (dynamic picture)
12cm
MPEG4: Compressed digital audio + compressed digital video (dynamic picture)
MPEG4
NOTES
These icons on the top banner indicate the disc types that the function described in the section applies to.
Applies to VCD disc
VCD
Issues related to
CDVCDSVCDDVD
Applies to CD disc
CD
Applies to DVD disc
DVD
MPEG4
Applies to SVCD disc
SVCD
Applies to MPEG4 disc
MPEG4
Types
Sizes
Recorded Contents
This model does not support the 8cm disc. Do not insert that type of disc into this device
to prevent a disc jam.
This model supports DIVX playback, but with data rate of up to 10Mbps.
DVD Operation
Region code
If the region code of the disc being played
does not match the region code of this DVD
player then the disc cannot be played. If you
do try to do this a region violation notice will
appear on the screen.
The region code for this player is region 2
(refer to the symbols below).
24" HD Ready 1080p DVD LCD TV User Guide 37
Page 38
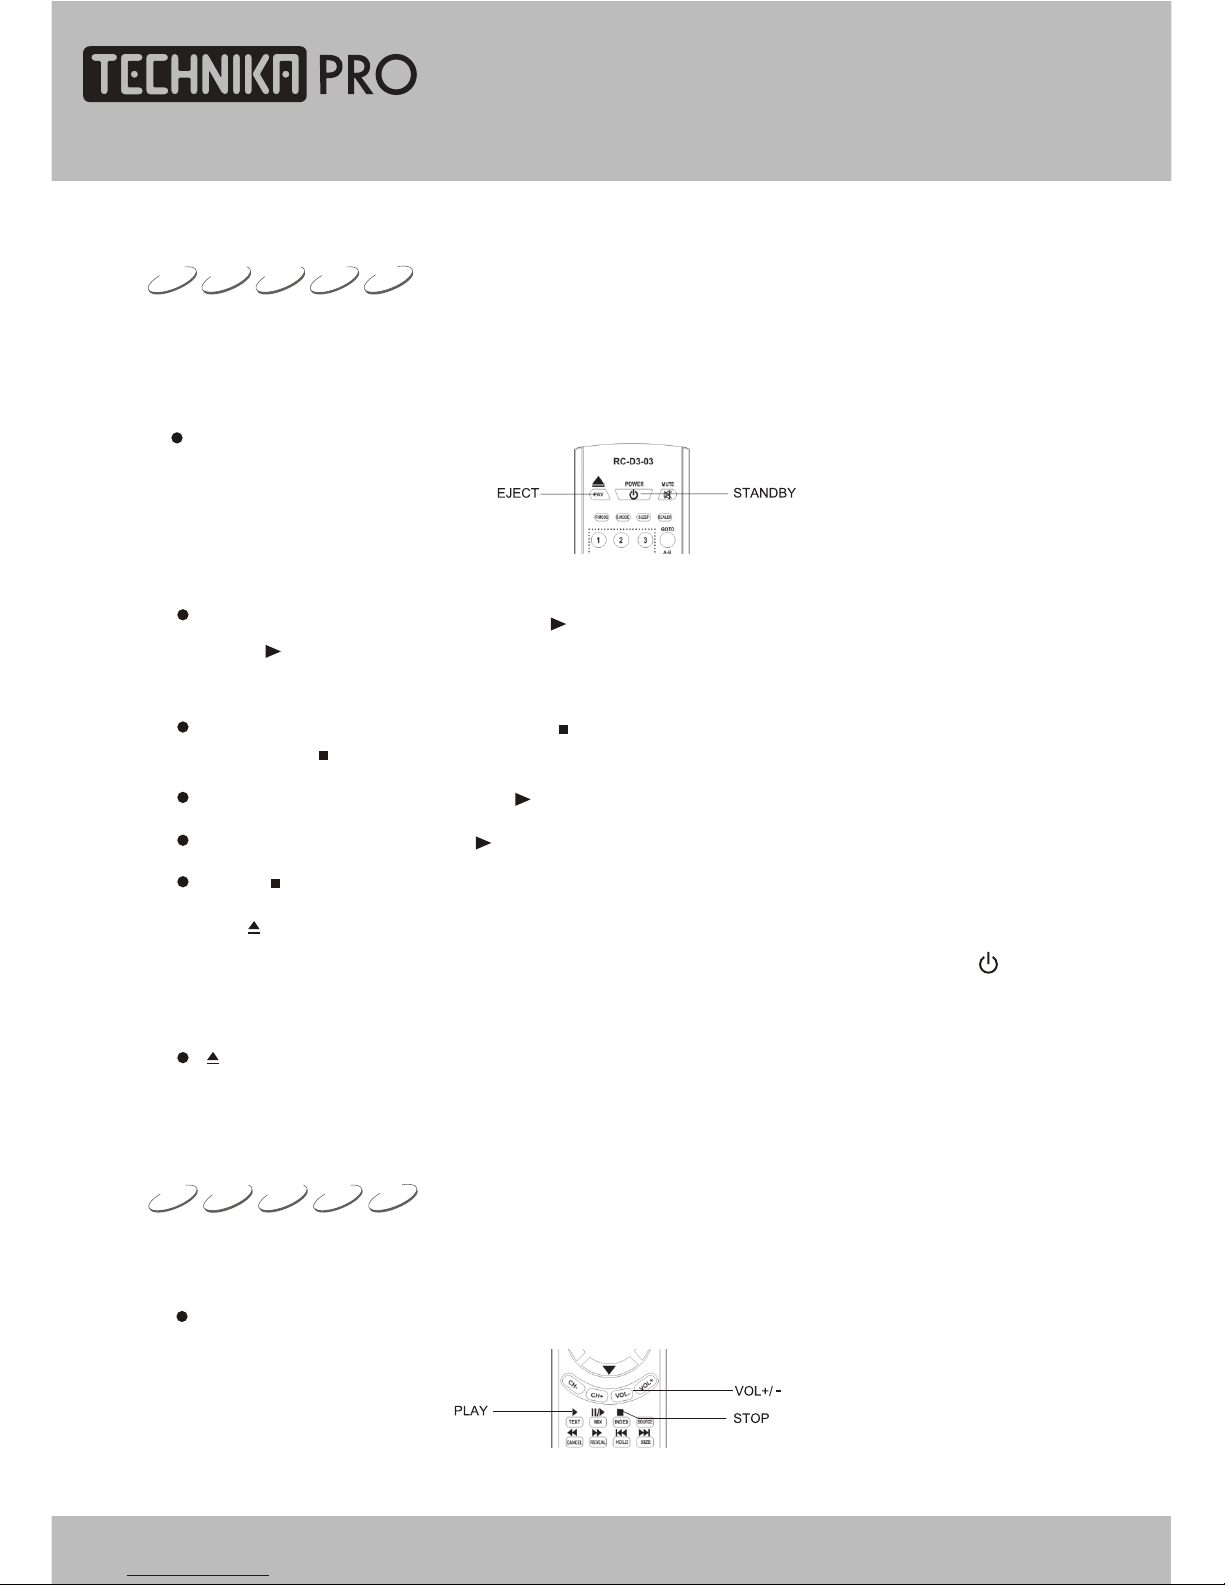
2.Place the disc (with labelside facing user)to the door and the unit willdraw in the disc
automatically.
1. Power on and switch signal source to DVD mode and the unit begins to work.
3. Press [PLAY] button to begin playing disc.
4. Press [STOP] button to stop playing.
6. When finishing playing, switch signal source to other working state and press [ ]
button to make the unit enter standby state. Please pull out the
power plug from power
socket when not using the unit for a long time.
PLAYBACK
The unit begins to read disc information.
CDVCDSVCDDVD
MPEG4
5. Press [ ] button to take out disc.
When the unit is playing a disc, press[ ] button the first time and the unit enters pause state, while
press [ ] button again and the unit resumes playback.
When the unit is playing a disc, press [ ] button the first time and the unit enters pre-stop state,
while press [ ] button again and the unit enters stop state.
At the pre-stop state, if you press [ ] button, the unit will continue to play from the stopped point.
At the stop state, if you press [ ] button, the unit will play from the beginning point of the disc.
Press [ ] button when playing MPEG4 discs and the unit enters stop state directly.
[ ] button is effective only when selecting DVD signal source. In other signal source ,such as TV,
AV, etc, this button is invalid.
2. Press [VOL+/VOL-] buttons on the remote control of this unit.
Press [VOL+] button to increase volume; press [VOL-] button to decrease volume; the
maximum volume is 100.
CDVCDSVCDDVD
1. Press [VOL+/VOL-] buttons to adjust volume.
MPEG4
VOLUME CONTROL
DVD Operation
38
24" HD Ready 1080p DVD LCD TV User Guide
Page 39
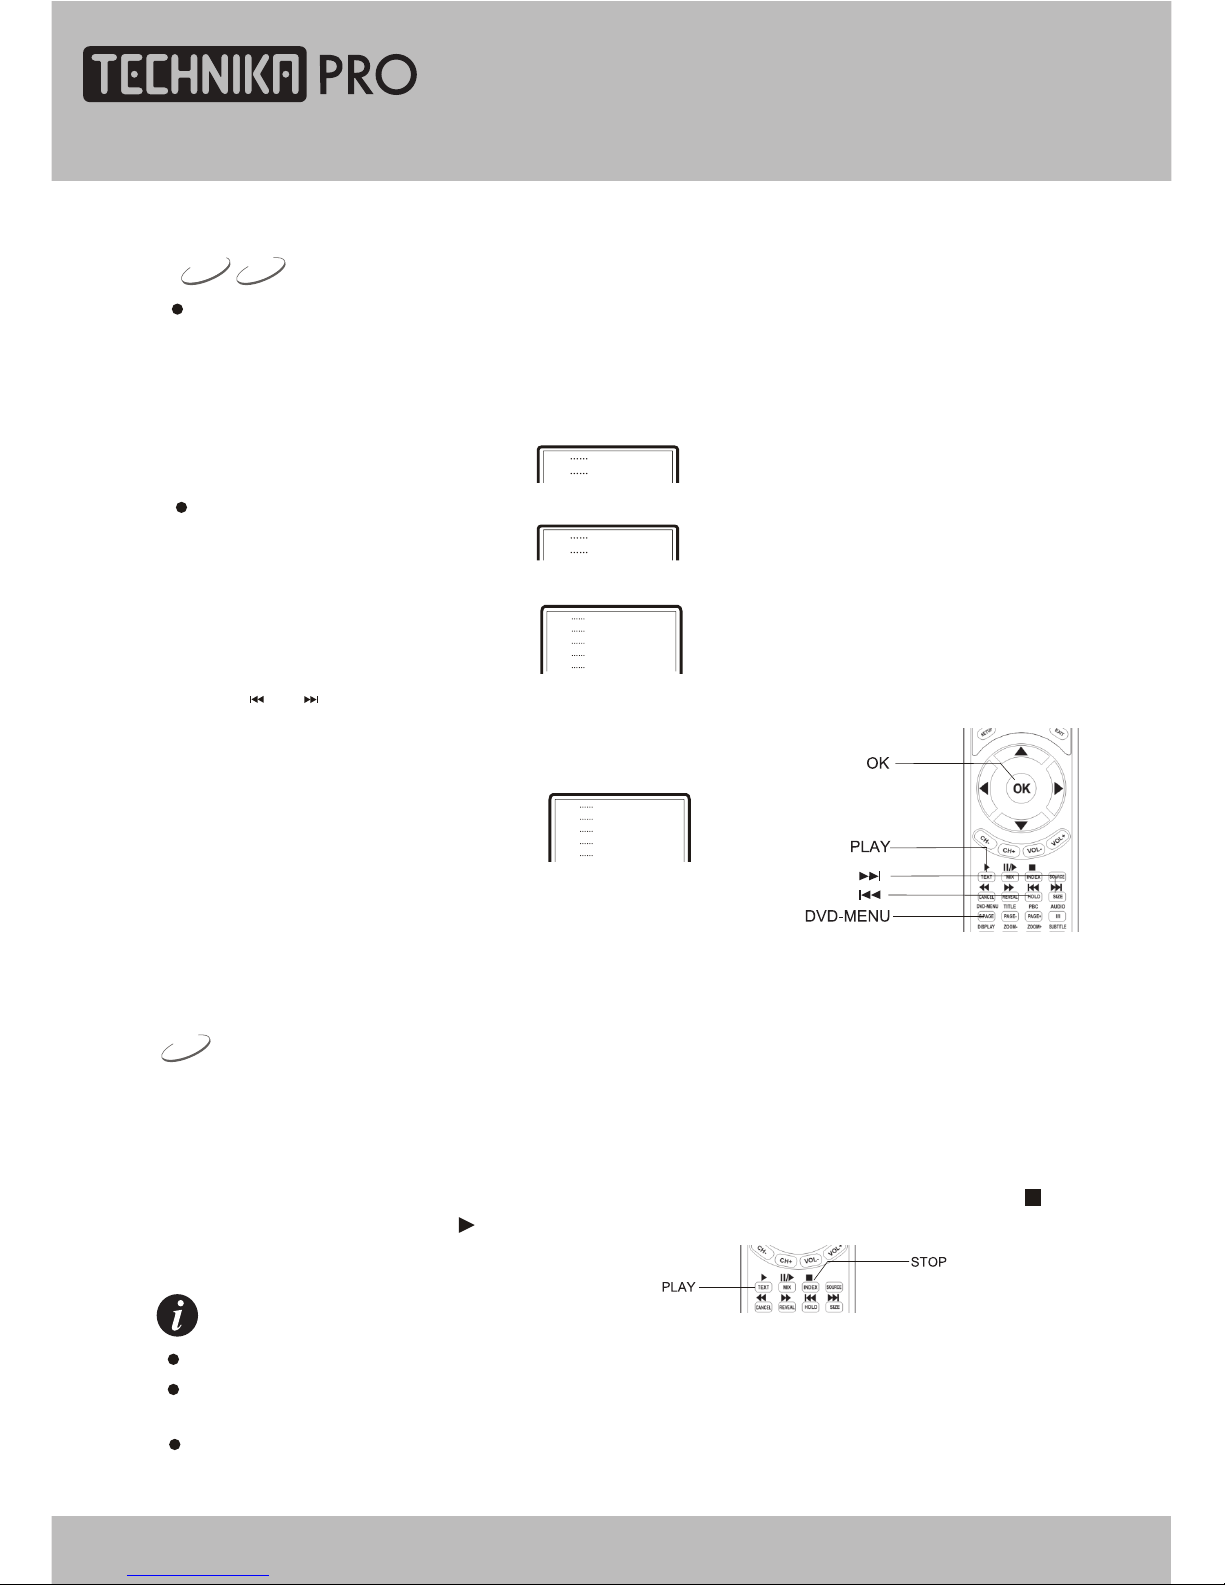
VCDSVCD
When playing SVCD, VCD2.0 discs with the menu playback function, you may enjoy simple
menu playback alternative function. You may set menu playback state in the setup
menu and select menu playback or sequence playback.
For instance, VCD 2.0 disc menu playback.
VCD, SVCD MENU PLAYBACK
2. After entering main menu 1, TV screen displays submenu.
2.
3.
4.
5.
1.
3. Press [ ], [ ] buttons to turn pages.
4. Press number buttons to select submenu content. For instance,
press number button 5 and the unit begins to play the fifth track.
2.
3.
4.
1.
5.
5. When playing, pressing [DVD-MENU] button to return to the
root menu.
1. TV screen displays main menu.
Press number buttons to select. For instance, press number button 1 to select main menu 1.
1.
2.
1.
2.
MEMORY
DVD
NOTE
1. This player can save the currently played time point automatically when you leave the current
DVD disc playback (switch from DVD to card read state, switch from DVD signal source to
other signal source, enter standby state in DVD mode).
2. When switching to DVD playback state again, this player can automatically search the time point
saved last time to continue playing. If you want to play from the beginning, please press [ ]
button twice and then press [ ] button.
This player may save one DVD disc for one time.
The DVD disc played the last time will be saved, and the former saved contents will be cleared
by new saved contents.
lf power is cut off unexpectedly, the DVD disc played currently will not be saved.
DVD Operation
24" HD Ready 1080p DVD LCD TV User Guide 39
Page 40
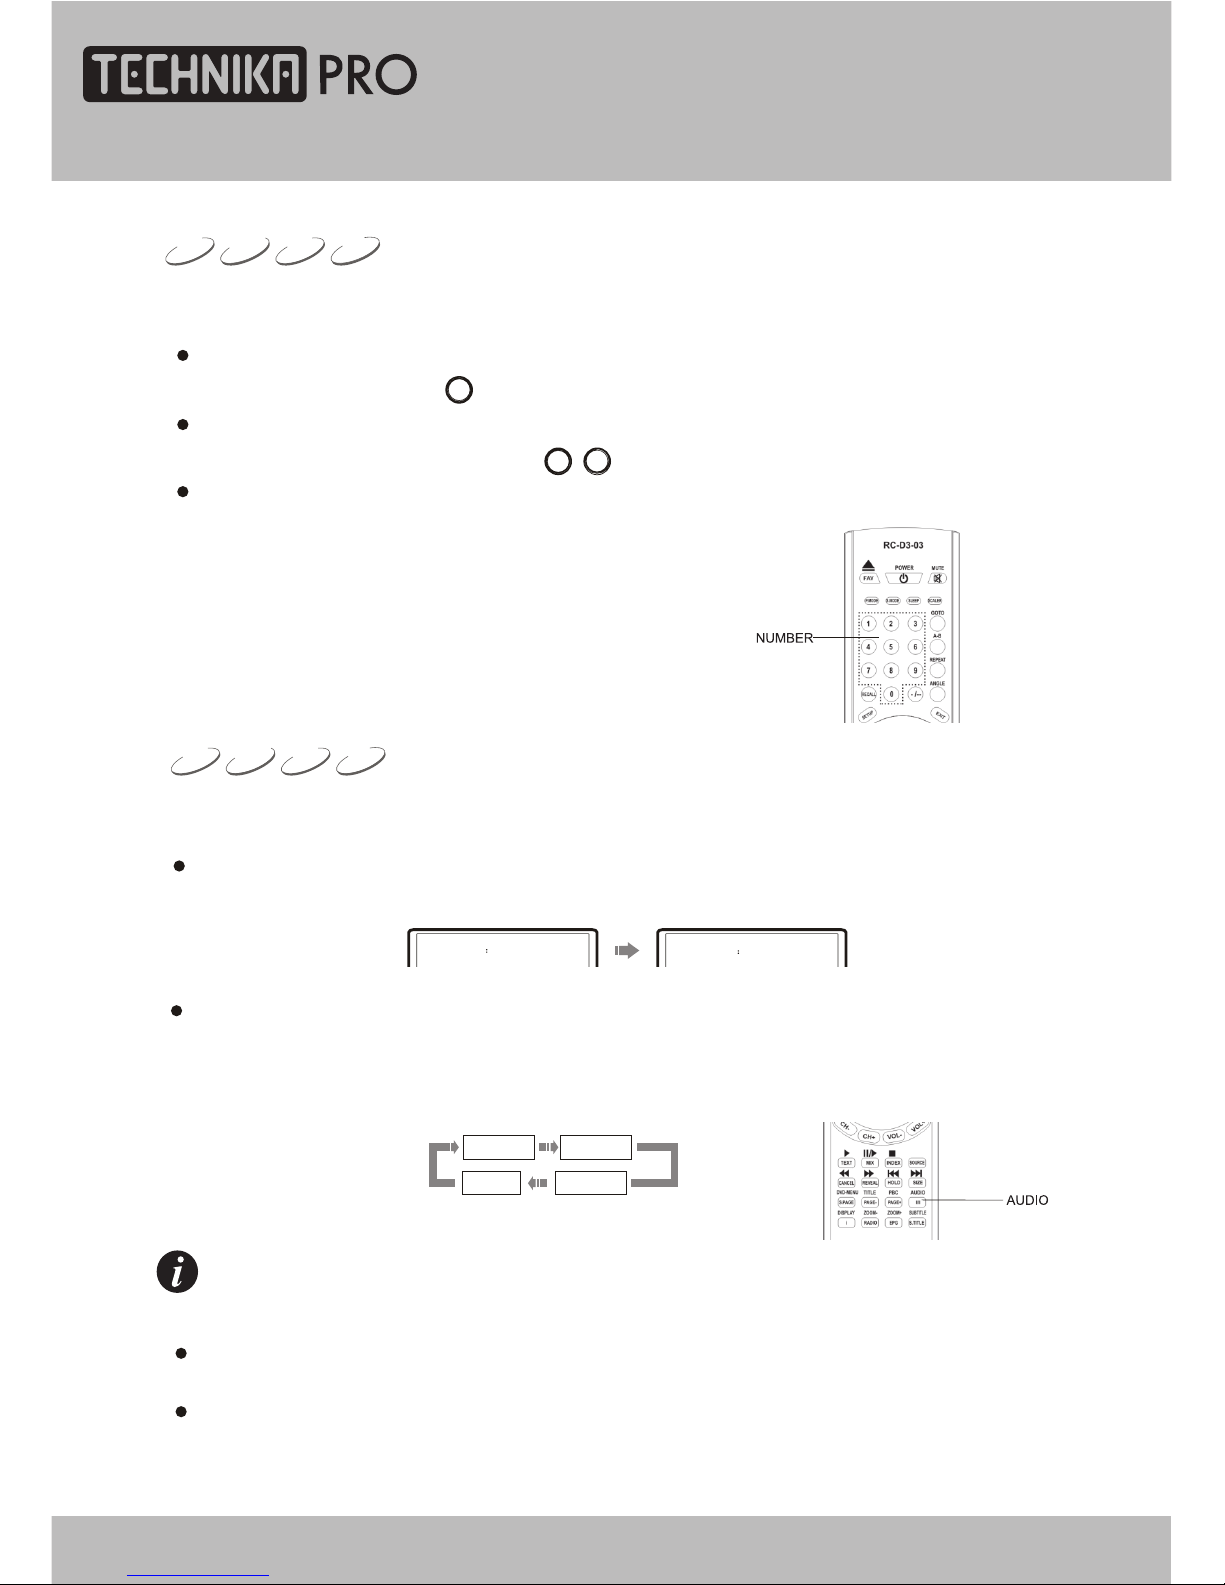
As for SVCD, VCD or CD disc with multiple channels, you may select audio output from
left or right channel or select stereo audio output. For VCD disc, left channel records
dubbing and right channel records singing, and you may select left channel for dubbing.
SVCD, VCD, CD disc:
Mono Right
Mono Left
Stereo
Language type varies with disc recording.
When playing some DVD discs, pressing [AUDIO] button to switch language may
result in playing the track from its beginning.
For VCD story disc with double languages, you may press [AUDIO] button to select
the desired language.
NOTE
DVD disc:
1. Press [AUDIO] button.
CDVCDSVCDDVD
As for DVD discs with multiple languages, you may select the desired language when playing.
Audio 1/2
French
Audio 2/2
Chinese
SELECT LANGUAGE/AUDIO
SELECT TRACK TO PLAY DIRECTLY BY NUMBER BUTTONS
CDVCDSVCDDVD
1. Insert disc, after disc reading and normal playback, press number buttons to select track
to play directly.
1 + 6
6
-/--
If track number is less than 10, press number buttons 1 to 9 to directly select. For instance,
select the seventh track:
7
For instance, select the 16th track
If track number is more than or equal to 10, press [-/- -] button and then number buttons 0 to 9.
If track number is more than or equal to 20, press [-/- -] button twice and then number buttons
0 to 9. The rest can be performed by analogue.
Mix-Mono
DVD Operation
40
24" HD Ready 1080p DVD LCD TV User Guide
Page 41
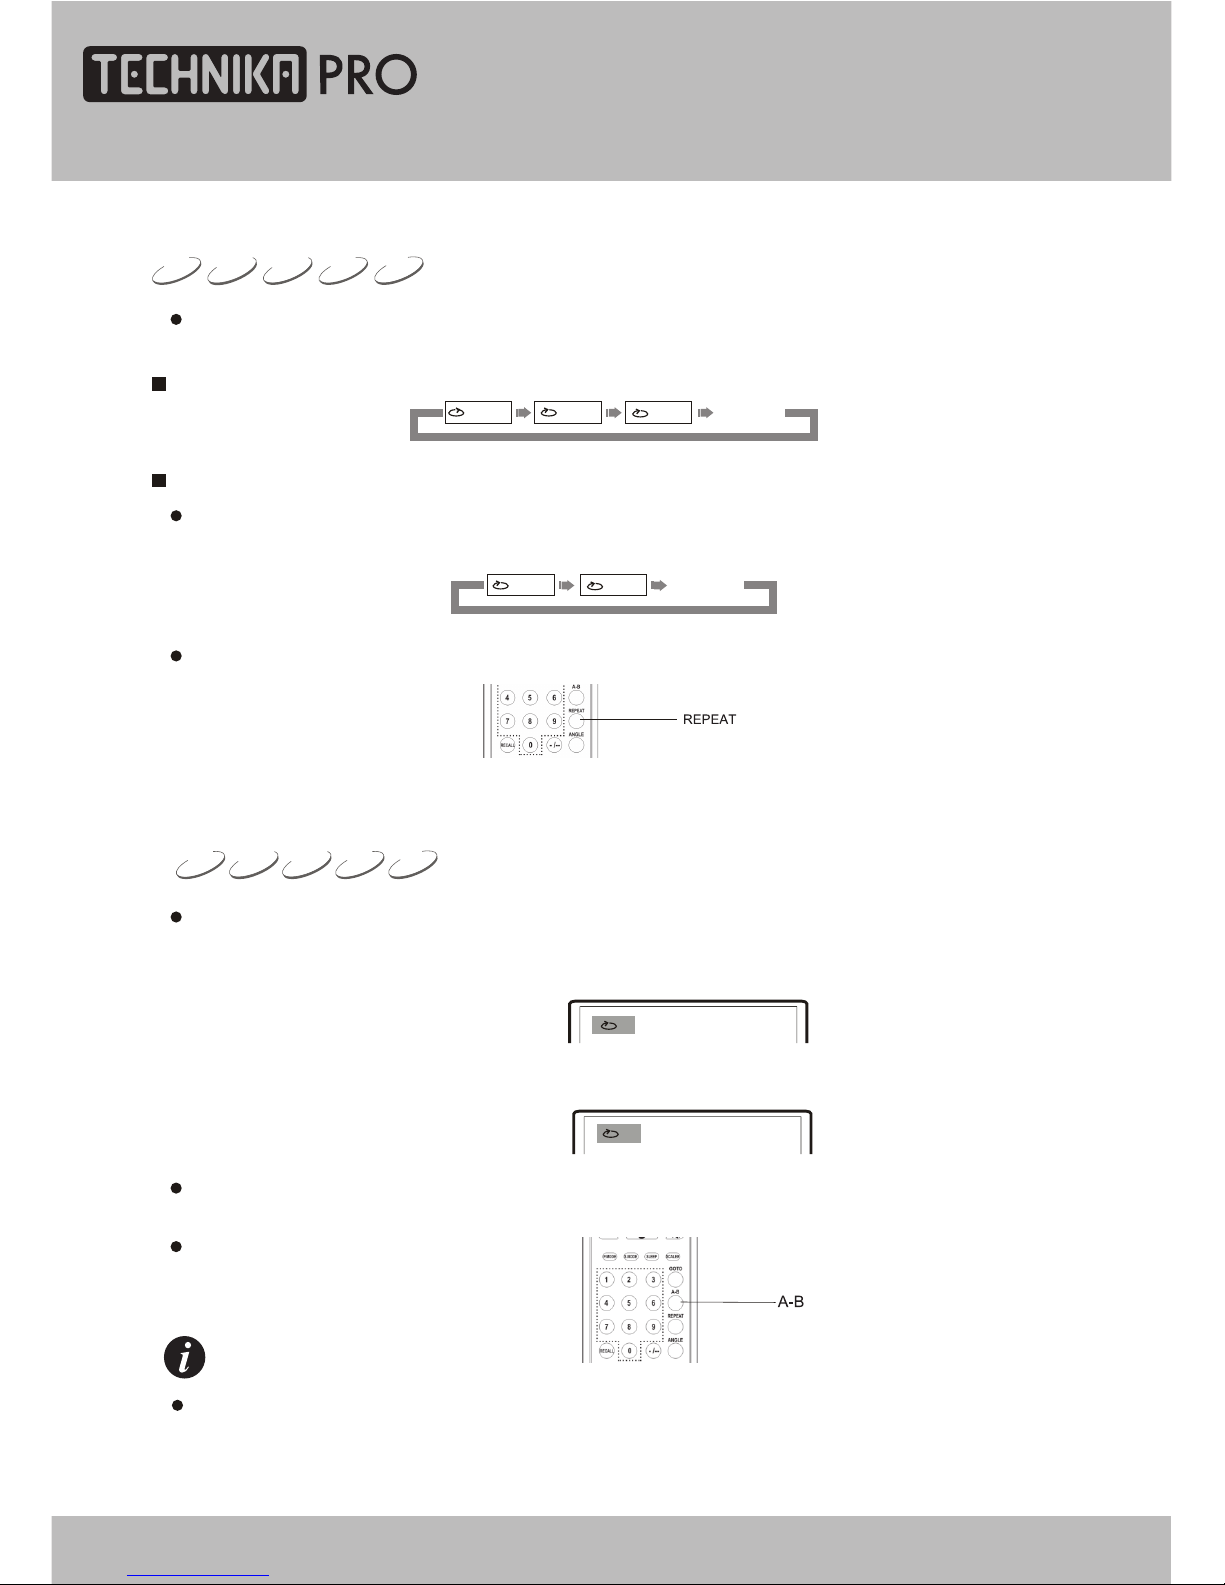
TheA-B repeatfunction may be invalid for some discs.In menu playback mode,the segment
can only be selected in the track.
3. Press [A-B] button for the third time.
The unit restores to normal playback.
NOTE
When playing disc, you may press [A-B] button to play your desired segment content repeatedly.
1. In normal playback, press [A-B] button at the beginning point (point A) of the segment that
you desire to play repeatedly.
TV screen displays:
A
2. In normal playback, press [A-B] button at the ending point (point B) of the segment that
you desire to play repeatedly.
TV screen displays:
AB
The unit automatically returns to point A and begins to play the selected segment (A-B).
CDVCDSVCDDVD
MPEG4
REPEAT PLAYBACK OF SELECTED SEGMENT
To SVCD,VCD2.0 discs,the repeatfunction cannotbe operated in menu playback mode.
1. Press [REPEAT] button. Each press of REPEAT button may realize different repeat functions.
The repeat playback function enables a certain title/chapter/track/disc repeated.
DVD DISC:
SVCD, VCD, CD discs:
To SVCD, VCD2.0 discs, the repeat function is effective in sequence playback mode; to VCD1.1,
CD discs, the repeat function may be directly operated.
Track Repeat Off
ALL
Repeat Off
TitleChapter
ALL
CDVCDSVCDDVD
MPEG4
REPEAT PLAYBACK
DVD Operation
24" HD Ready 1080p DVD LCD TV User Guide 41
Page 42
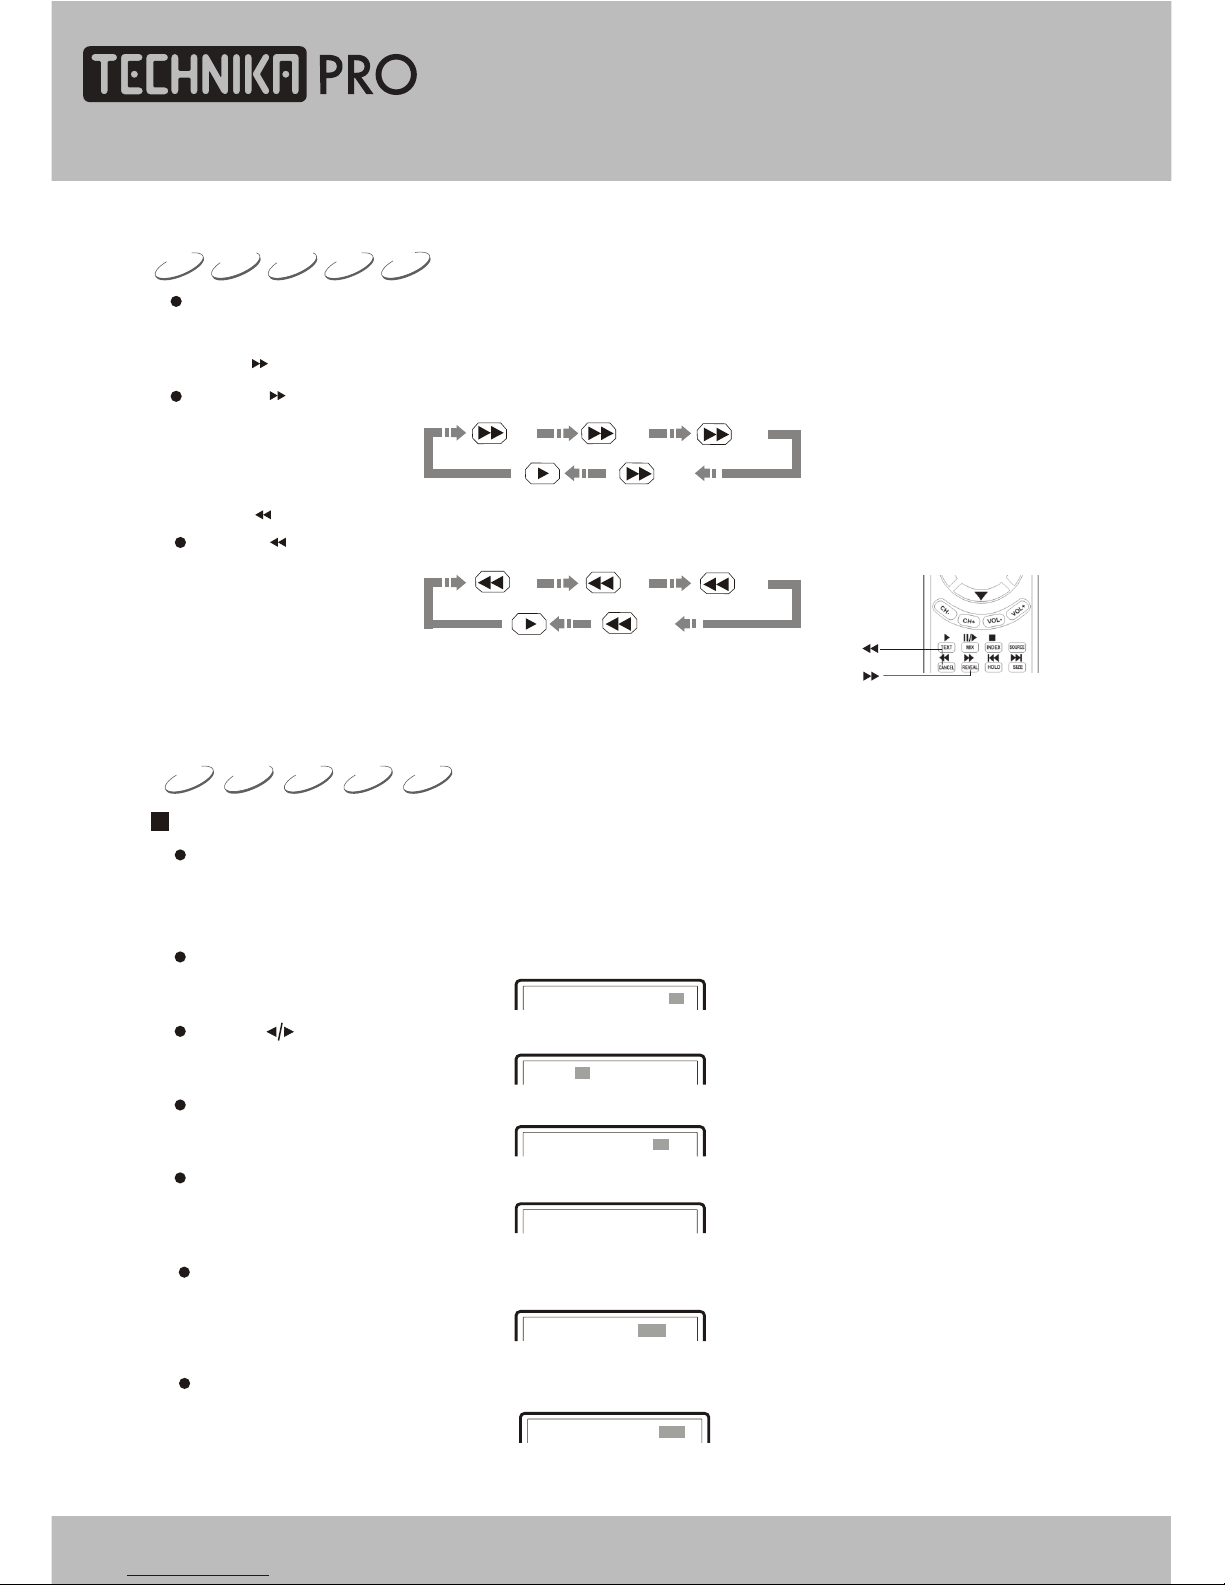
1. Search title and chapter. For instance, search the 2nd chapter in title 6.
Inputting a certain time,title numberorchapternumberdirectly may search the disc quickly and
then play forward from this position.
Play DVD disc
DVD SVCD VCD CD
MPEG4
1. Press [ ] button and the unit begins fast forward playback.
Press [ ] button each time and the disc playback speed switches in the following sequence
circularly:
2. Press [ ] button and the unit begins fast backward playback.
Press [ ] button each time and the disc playback speed switches in the following sequence
circularly:
PLAY FROM THE DESIRED POSITION
When playing discs,you may selectfastforward orfastbackward playback to search for a certain
point.
CDVCDSVCDDVD
MPEG4
FAST PLAYBACK
2X
16X
8X
4X
2X
16X
8X
4X
Then press number button 6 to select Title 6, shown in the figure:
Title 06 /30 Chapter /02
2. Search title time
Press [GOTO] button until TV screen displays the following figure. Then press number buttons to
input hour, minute and second.
Title 06/30 Time : :
Finally press number button 2 to select Chapter 2, shown in the figure:
Title 06 /30 Chapter 02/02
Press [GOTO] button and TV screen displays:
Press [ ] button to move cursor and lighten the title number, shown in the figure:
Title 03/30 Chapter /02
Title /30 Chapter 01/02
3. Search chapter time
Press [GOTO] button until TV screen displays the following figure. Then press number buttons to
input hour, minute and second.
Chapter 01/04 Time : :
DVD Operation
42
24" HD Ready 1080p DVD LCD TV User Guide
Page 43
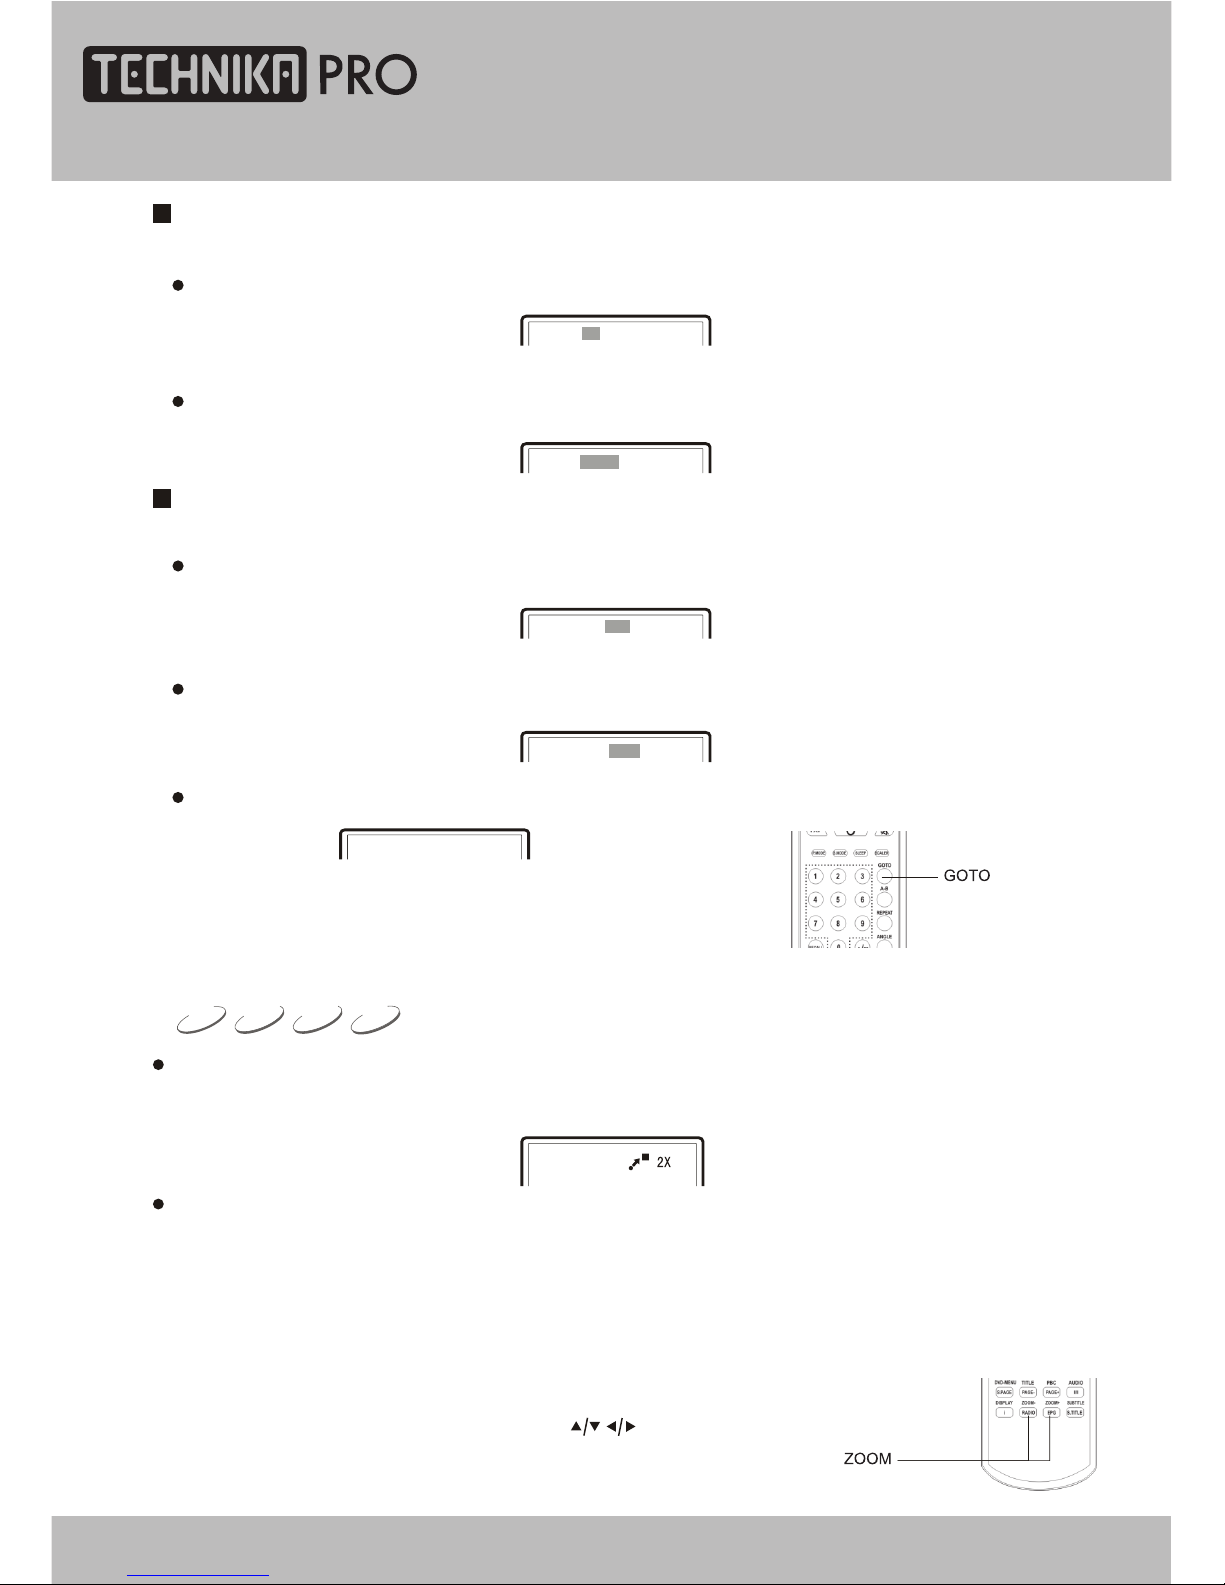
1. Search disc time
2. Search track time
Play SVCD, VCD and CD discs
Press [GOTO] button until TV screen displays the following figure. Then press number buttons to
input minute and second.
Disc Go To --:--
Press [GOTO] button until TV screen displays the following figure. Then press number buttons to
input minute and second.
Track Go To --:--
3. Select the track
1. Select track
2. Search track time
Play MPEG4 disc
Press [GOTO] button until TV screen displays the following figure. Then press number buttons to
input the track.
Select
Press [GOTO] button until TV screen displays the following figure. Then press number buttons to
input hour, minute and second.
-:--:--
Select Track -- /15
Press [GOTO] button until TV screen displays the following figure. Press number buttons to input
track.
ZOOMING THE DISPLAYED FRAME
VCDSVCDDVD
MPEG4
1. When playing a disc, press the [ZOOM+/-] button can open the zoom in/out function, and the TV
screen displays( take X2 mode as an example):
Zoom in/out the player frame.
The frame is magnified to 2 times of the normal size.
5. When the is magnified, press the [ ] buttons to move the frame.picture
2. Press the [ ZOOM + ] button continually, all the magnified/ minified modes display on the screen
in turn. The magnified/ minified modes includes:2X,3X,4X.
4. When the mode is on 4X, press [ ZOOM + ] button to close the zoom in/ out function, and the
frame restores normal size. When the mode is on 1/4,press [ ZOOM -] button.
Go To
3. Press the [ ZOOM - ] button continually, all the magnified/ minified modes display on the screen
in turn. The magnified/ minified modes includes:1/2,1/3,1/4.
DVD Operation
24" HD Ready 1080p DVD LCD TV User Guide 43
Page 44
JPEG(Joint Photographic Experts Group) is the most widely used picture compression and
storage format today. Utilizing high efficiency compression algorithm, JPEG compresses
the original picture 15 to 20 times with excellent picture quality. JPEG is featuring small
size data, convenient application and supported by most picture processing software, so
it is very fit to store photos.
The strong decoding capability of this unit can decode and play the files with the above
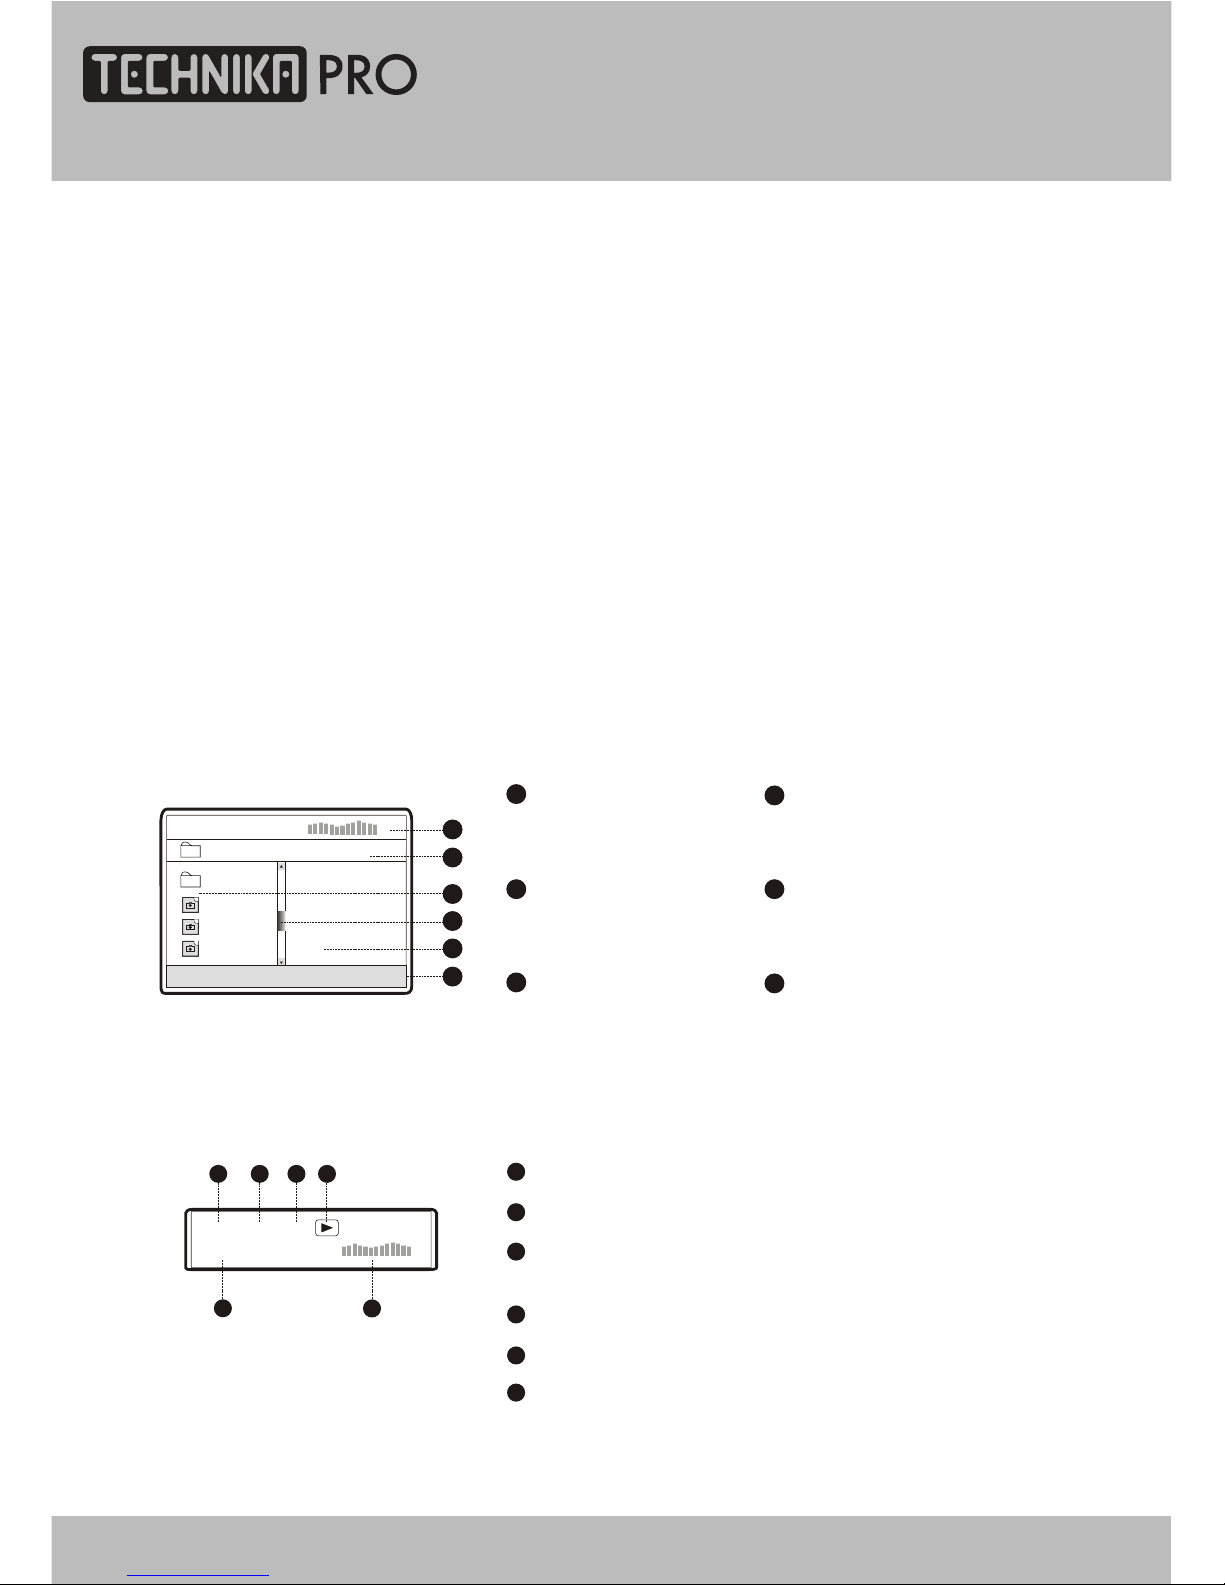
formats. In the course of playing, an operation menu will appear and its construction is
shown as follows.
2
DIR window
Display the current
path.
Display the current
state information.
1
State window
4
Scroll bar window
Indicate the current file's
position.
Display the current
path's file.
3
File window
5
Preview window
JPEG image preview.
6
Information window
Display the current operation
prompts.
The state information in state window is as follows:
4
00:57
002/073
03:31 128
2
1
3
5
6
Elapsed playback time
1
Total playback time
2
The audio bit rate (generally the bit rate is 128kbps,
sometimes it is VBR.)
3
Current playback mode indicator
4
Track indicator
5
6
Dynamic frequency spectrum indicator
00:00 00:00
004/369
\PIC\
Du000
Du001
Du002
..
1
2
3
4
5
6
MPEG4ANDJPEGFILEPLAYBACK
MPEG4 is the audio standard published by MPEG(Moving Pictures Experts Group) in
November,1998.As the discrepant parts between frames of picture are only processed and
the same parts are deleted, the data numbers are greatly decreased. The most distinct
feature of MPEG4 is the high compression and clear imaging. Furthermore, MPEG4 provides
elastic specifications to adjust the stream according to the used requirements. The larger
stream can be used when collecting private films; and the small stream can be used in
network transferring, which make MPEG4 use widely.
DVD Operation
44
24" HD Ready 1080p DVD LCD TV User Guide
Page 45
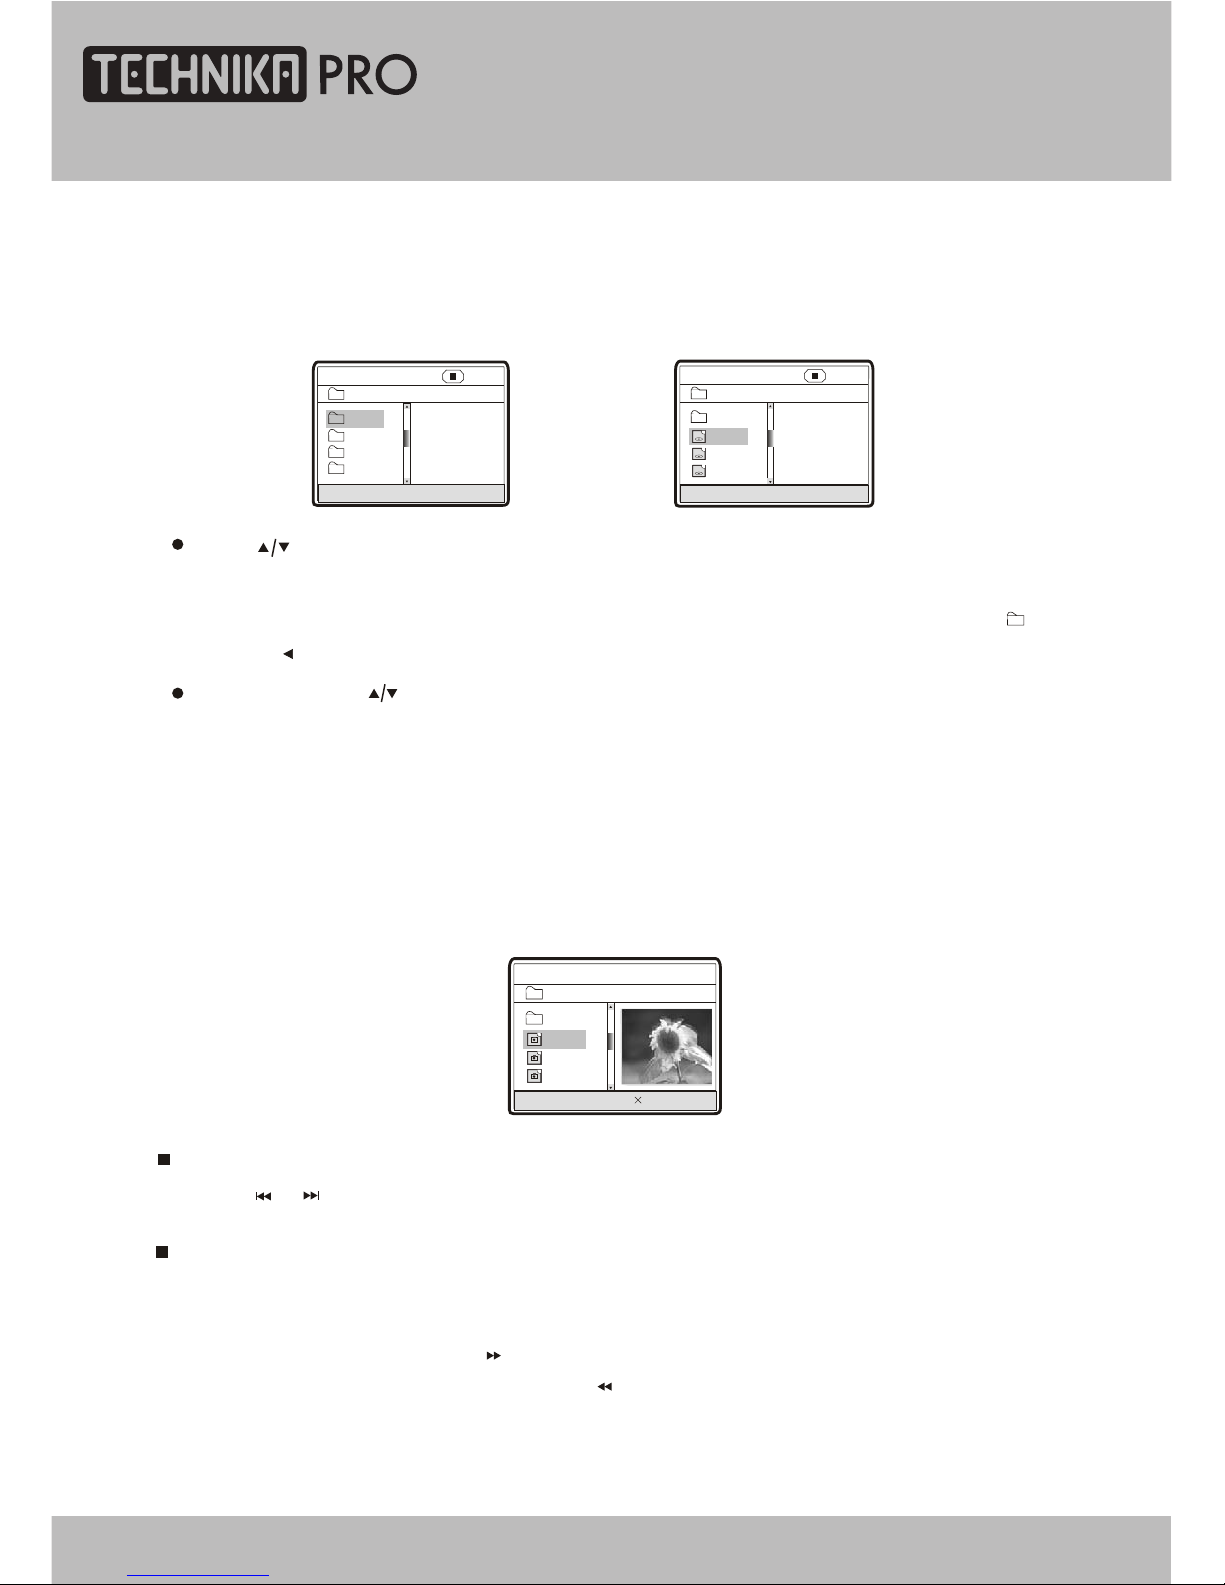
2. Play JPEG file
After you put an JPEG format file into the unit, it will search disc information and display the
operation menu as in the following figure. After selecting JPEG file, the preview window will appear
this file's preview image to facilitate you to select. After you select the JPEG file you desired and
press [OK] button to confirm, the picture will display in full screen.
00:00 00:00
004/369
\PIC\
Du000
Du001
Du002
RESOLUTION 640 480
..
In Figure B, press [ ] button to select the MPEG4 format file you desired and press [OK]
button to confirm. The unit begins to play MPEG4 format movie.
After you put an MPEG4 format file into the unit, it will search disc information and display the
operation menu as figure A (The displayed content varies with disc.).
1. Play MPEG4 file
A:
00:00 00:00
\
Du000
Du002
Du001
Du003
001/004
B:
00:00 00:00
001/369
\Du000\
MP000
MP001
MP002
..
A/V
A/V
A/V
Press [ ] button to select the directory you desired and press [OK] button to confirm.
For instance, you select the directory Du000 in Figure A, press [OK] button and TV screen
displays as in Figure B. The window returns to the previous directory when you select [ ....]
or press [ ] button.
1. Press [ ],[ ] button may turn to the next or last page.
Other basic operation methods
Other functions of JPEG file
1. When playing JPEG file, press [ZOOM] button to enter zoom in/out, and press it again to
stop this function.
2. When in zoom in/out, pressing [ ] button may magnify the picture and it can magnify the frame to
twice the size of the original one. Pressing [ ] button may minimise the picture and it can minimise
the frame to half the size of the original one.
DVD Operation
24" HD Ready 1080p DVD LCD TV User Guide 45
Page 46
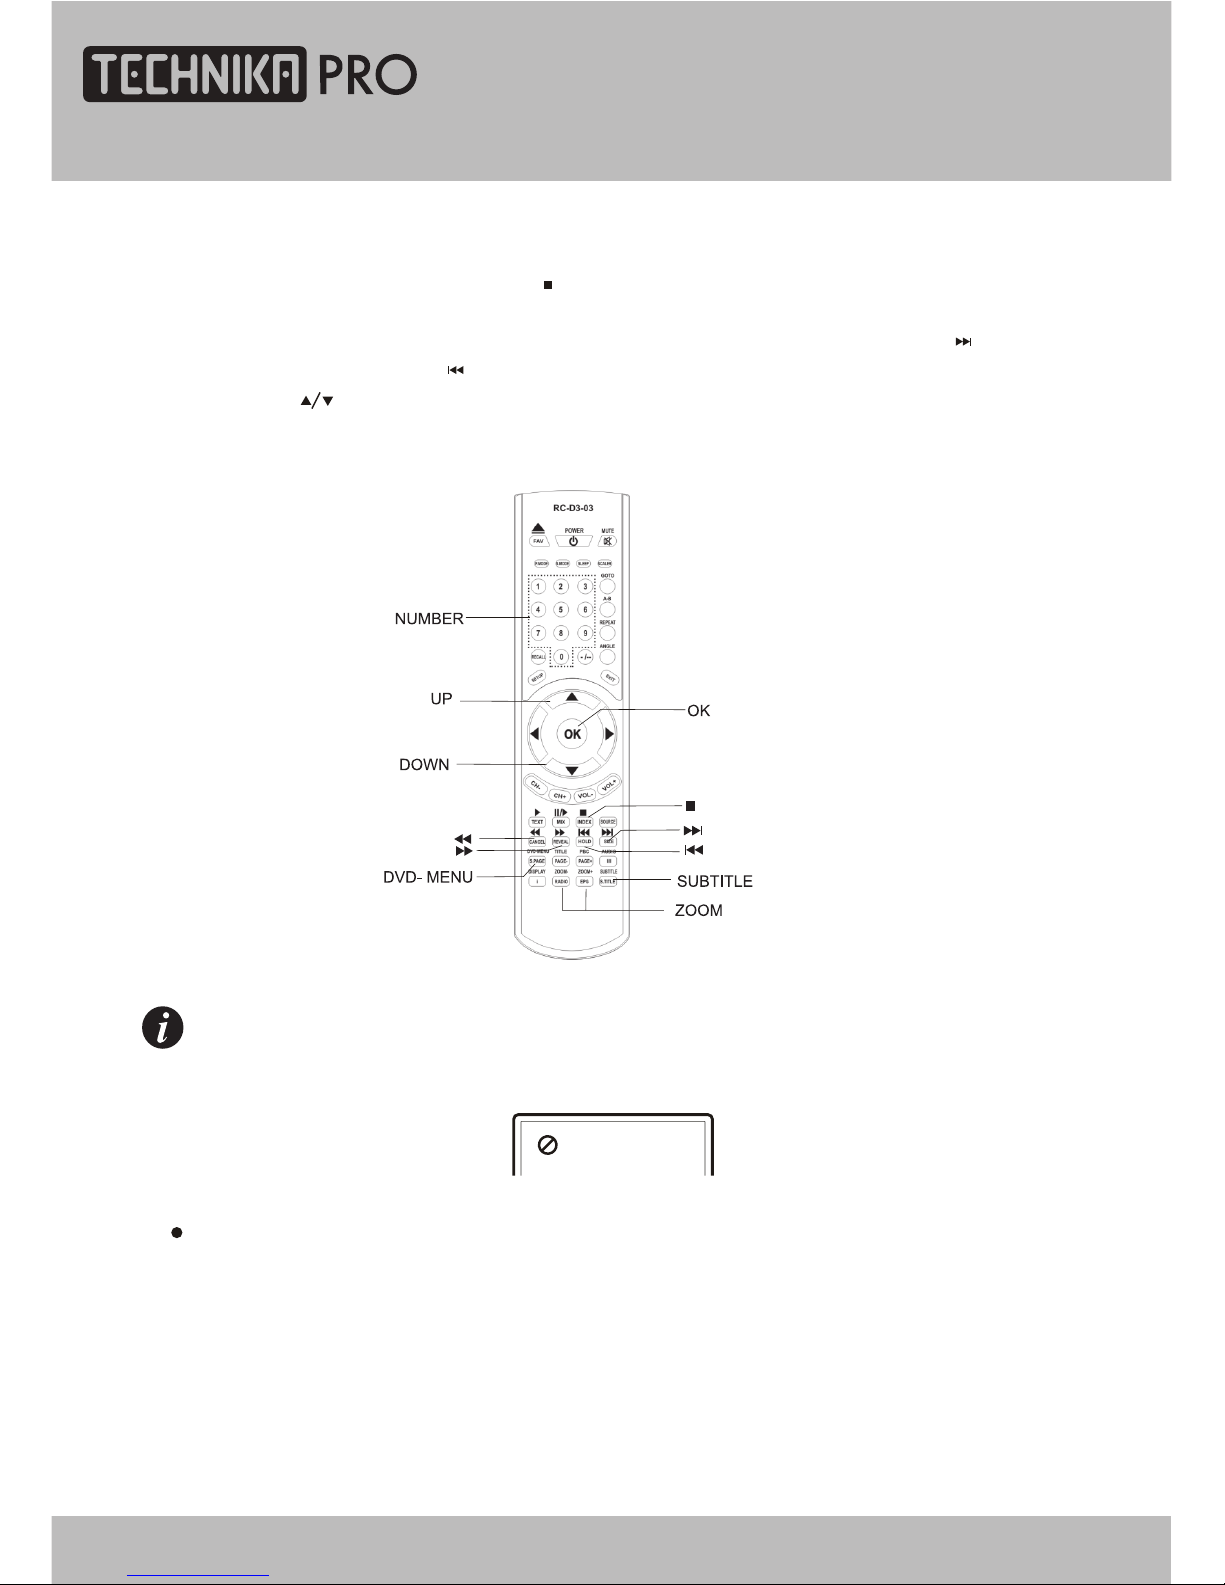
4. When in preview playback, pressing [DVD-MENU] button may exit preview playback function.
NOTE
When buttons are invalid, TV screen displays:
Please press effective button again.
3. When playing JPEG file, pressing [ ] button may realize preview playback function.
At the same time, all JPEG files are displayed on the TV screen. One frame can display up to
12 pictures at most. The other ones are shown on the next frame. Pressing [ ] button may
enter the next frame and [ ] button may enter the previous frame. You may press number
buttons or [ ] button to select the picture you desired and press [OK] button to confirm.
DVD Operation
46
24" HD Ready 1080p DVD LCD TV User Guide
Page 47
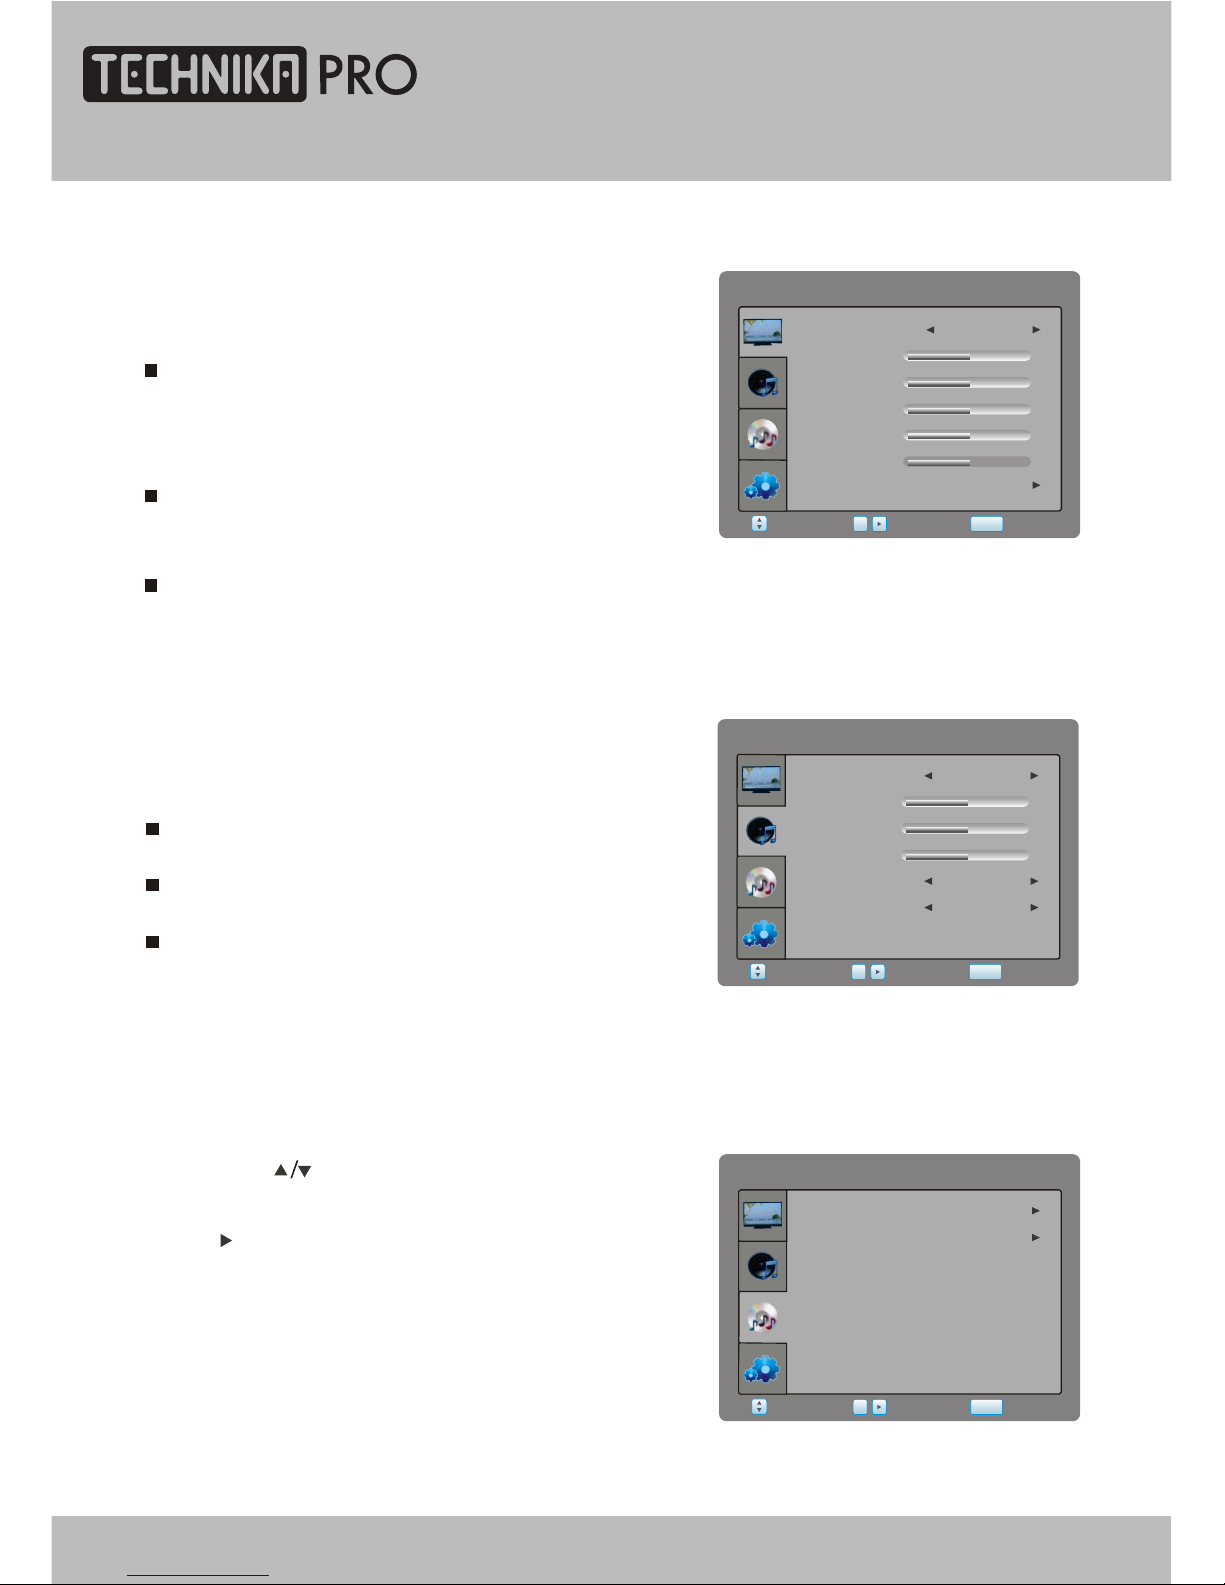
DVD SETTING
Press [SETUP] button , and the main menu will show as follows:
By pressing [ ] button on the remote control, you
can select the following
press []or[OK]
items, "General", "Preference",
button
to confirm.
DVDSETTING
Preference
Select
Return
SETUP
Enter
General
OK
PICTURE
PICTURE
Select Return
SETUP
Enter
OK
Tint
Contrast
Colour
Brightness
PictureMode Dynamic
Sharpness
50
50
50
Preference
50
0
SOUND
SurroundSound
SOUND
Treble
Balance
Bass
Select
Return
SETUP
Enter
SoundMode
OK
User
AutoVolume
Off
Off
50
50
0
Select SOUND item to adjust sound parameters.
You may select Sound Mode, Treble, Bass, Balance,
Auto Volume and Surround Sound.
Sound Mode item can be changed between
Music, Film, News, User.
Auto Volume item enables you to adjust Off or On
for control volume automatic.
Surround Sound item enables you to select Off or
On for surround sound.
Picture mode item can be changed between
User,, Soft, Dynamic. Standard
You may adjust Brightness, Contrast, Colour,
Sharpness, Tint for User mode.
Preference item enables you to enter sub menu.
Select PICTURE item to adjust picture parameters.
You may adjust Picture Mode, Contrast, Brightness,
Colour, Sharpness, Tint and Preference.
Colour Temp. item can select colour temperature
mode: Normal, Warm, Cool and User.
Noise Reduction item can select reduce noise
mode: Off, Low, Middle, High.
DVD Function Setup
24" HD Ready 1080p DVD LCD TV User Guide 47
Page 48
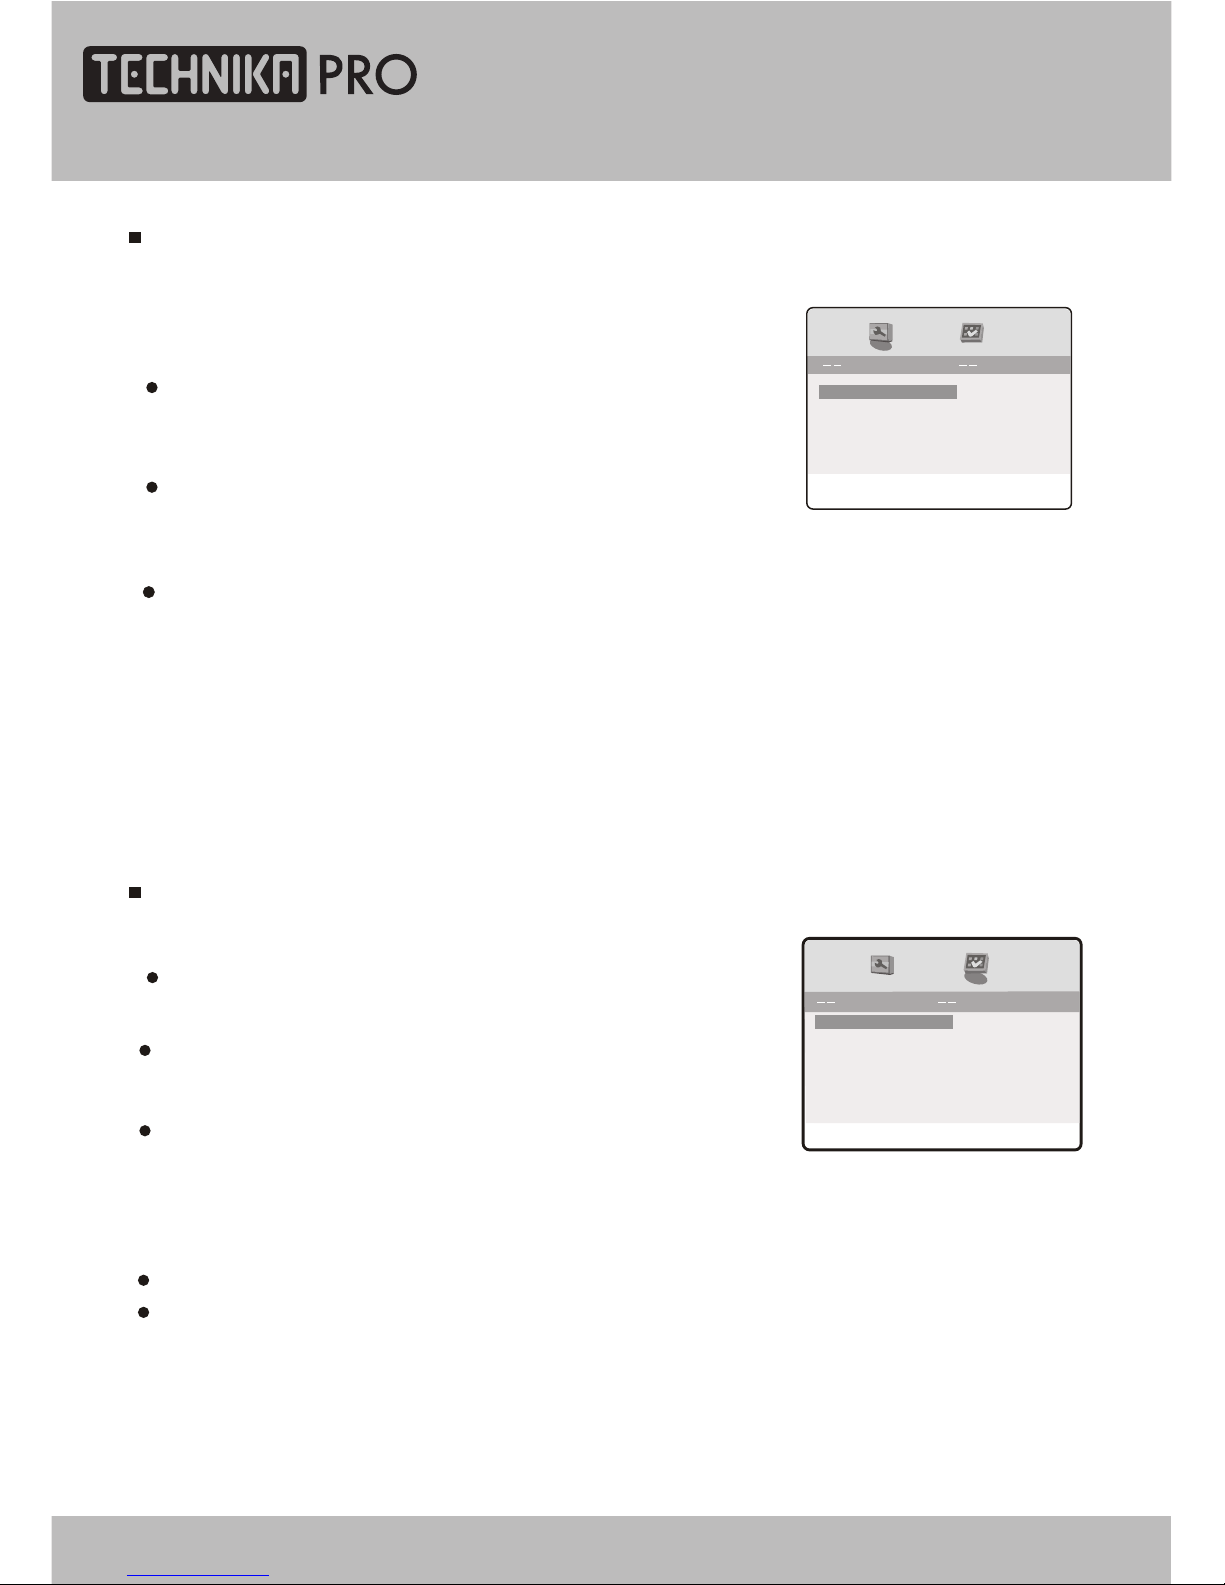
Downmix: this item is used to set this unit's DOWNMIX mode to change multi-channel audio into
2-channel audio output.
Optional settings: Default: StereoStereo, LT/RT;
GENERAL SETUP
TV display: this item is used to set the output picture ratio of this unit.
Optional settings: Normal/Pan-Scan, Normal/Letterbox, Wide
Screen; Default: Normal/Letterbox
Screen Save: Open or close the screen saver
Optional settings: Off, On; Default: On
General Setup Page
LB
Set TV Display Mode
Screen Save
On
Downmix
Stereo
PREFERENCE SETUP
TV Type:To setthe outputvideo system ofthis player.
Optionalsettings:Auto,PAL,NTSC;Default:PAL
Preference Page
Parental
Off
Subtitle
Disc Menu
PAL
Audio
ENG
PBC
On
Password
Default
Set TV Standard
ENG
ENG
TV Display
You may select TV DISPLAY, SCREEN SAVE and
DOWNMIX and Divx.
PBC:this item is used to setPBC state.
Optionalsettings:On,Off;Default:On
When playing SVCD, VCD2.0 discs, if PBC is set On, this unit
enters PBC playback mode; if PBC is set Off, the unit plays the
disc according to track sequence.
Audio: this item is used to set the preference audio language when playing.
Subtitle: this item is used to set the preference subtitle language when playing.
Disc menu language: this item is used to set the preference disc menu language when playing.
Default of disc menu language: English
Default of subtitle: English
Divx 1252
TV Type
Divx: this item is used to set the codepage )character encoding table) for MPEG-4 format subtitles.
1252 - West European Latin (used by Western European languages)
1250 - East European Latin (used by Central & Eastern European languages)
1251 - Cyrillic (used by Belarusian, Bulgarian, Macedonian, Russian, Serbian and Ukrainian languages)
DVD Function Setup
48
24" HD Ready 1080p DVD LCD TV User Guide
Page 49
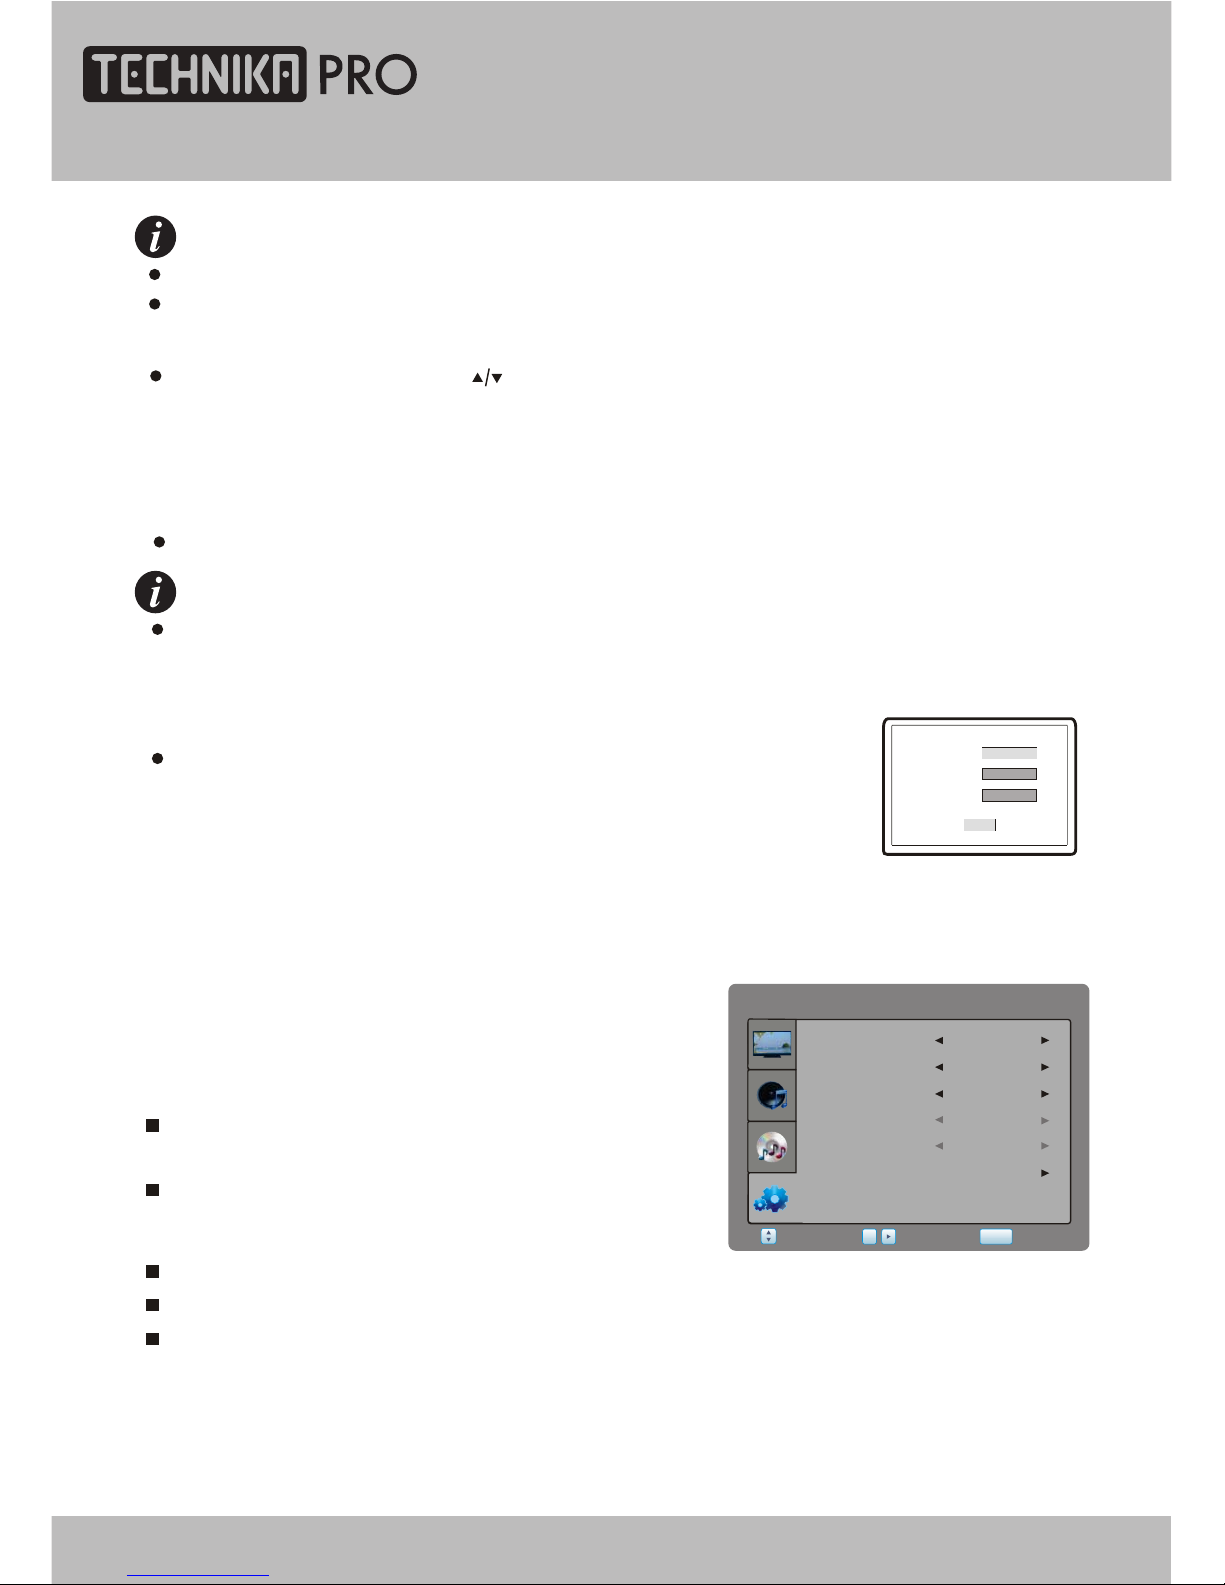
When changing the parental control ratings, a password is needed. Please refer to the
following password item for details.
Password: this item is used to set a four digital password to enable you to change the parental
control ratings.
Default: 7890
Default: this item is used to restore all settings to the default value
except "Parental control" and "Password" in the setup menu.
Old password
Confirm PWD
New password
FUNCTION
Language item enables you to select the OSD
language.
Sleep Timer item enables you to set the sleep timer
(.Off,10min,20min,30min,60min,120min,180min
and 240min)
Aspect Ratio item can be changed between: Auto,16:9 and 4:3 (Auto is invalid for VGA)
Restore Setting item enables you to reset all values to default.
Blue Screen item can be changed between On and Off.
Select FUNCTION item to adjust function parameters.
You may select Language, Sleep Timer, Aspect Ratio,
Blue Screen and Restore Setting.
RestoreSetting
FUNCTION
SleepTimer
BlueScreen
AspectRatio
Select
Return
SETUP
Enter
Language
OK
English
Off
16:9
Region
Other
Off
OK
NOTE
Audio, subtitle and disc menu language are only effective to DVD disc.
If the disc is not recorded with the language you appointed, the unit will apply the language
that the disc appointed to play.
NOTE
Parental: this item is used to set the parental control ratings to prevent children from watching
the restricted contents. (In case the disc supports this function)
Optional settings: KID SAFE, G, PG, PG 13, PGR, R, NC17, ADULT, Off; Default: Off
Select other languages: press [ ] button to move cursor to "OTHER" item, press [OK] button
andthen numberbuttons to inputthe language code you desire.Afterinputfinishes,press
[OK] button again.
DVD Function Setup
24" HD Ready 1080p DVD LCD TV User Guide 49
Page 50
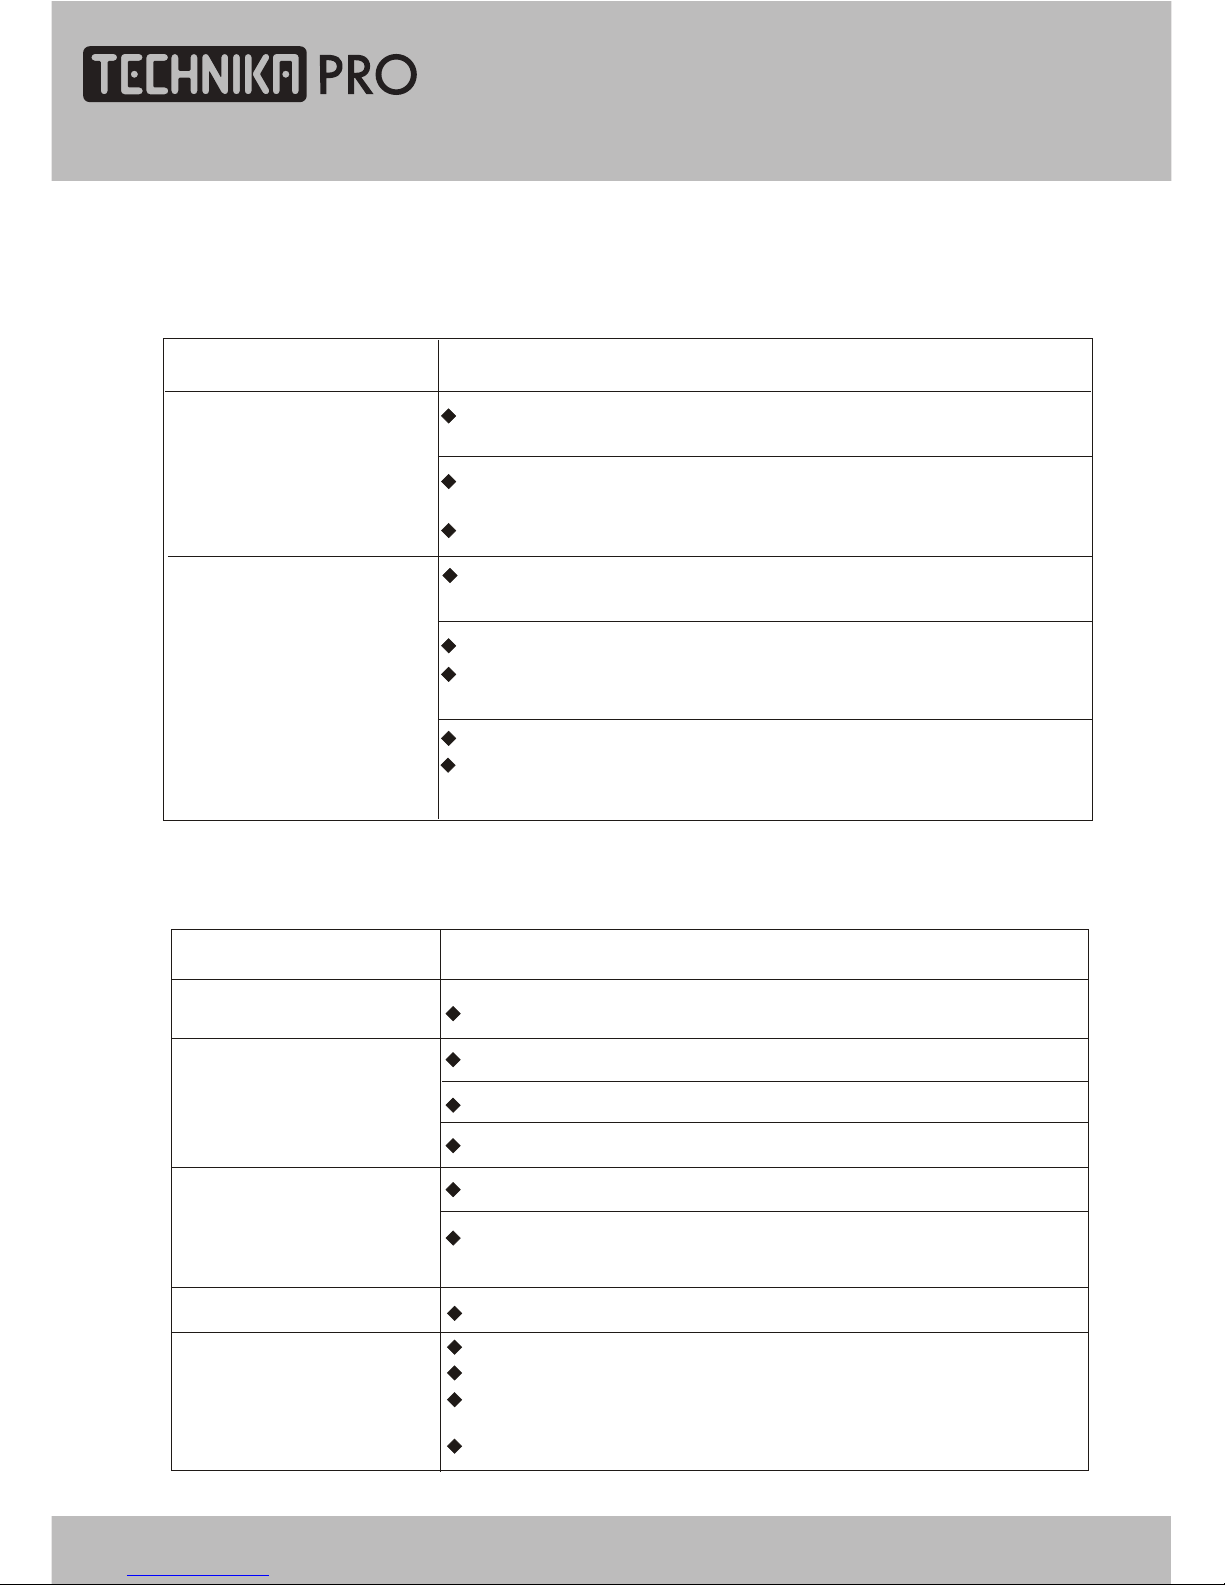
Please check for causes of problems in accordance with the following chart before contacting
any maintenance personnel.
Cannot power on
Please make sure the power cord is connected correctly.
No sound
Please make sure the audio cord is connected correctly.
Check volume.
Volume too low
Check volume.
If volume is still too low when adjusting volume to maximum,
please check whether the input device is correctly set.
Input antenna damaged or not correctly connected.
Remote control failure
Check whether remote control batteries are functioning.
Check the battery installation is correct.
Check whether an obstacle is between the remote control and the
unit's receiving window.
Check whether the receiving window has a strong light.
Symptom
Causes and Correction
Symptom
Causes and Correction
Black screen, power
indicator light off
Check whether power cord is correctly connected, and
whether this unit is in power on.
Check whether the signal cord of input device is correctly
connected.
Check whether input device is in power on mode.
Check whether the input device signal is in this unit's
specification
Check computer output mode: control panel-display-setup
If the setup does not accord with this unit's specification,
please change the display setup
Hor scanning frequency: 30kHz 75kHz
Image display flicker,
unstable
~
Ver scanning frequency: 50 Hz 75Hz
~
DISPLAY TROUBLESHOOTING
SOUND AND TV TROUBLESHOOTING
Snowy picture
Make sure there is nothing plugged into the headphone jack.
Troubleshooting
50
24" HD Ready 1080p DVD LCD TV User Guide
Page 51
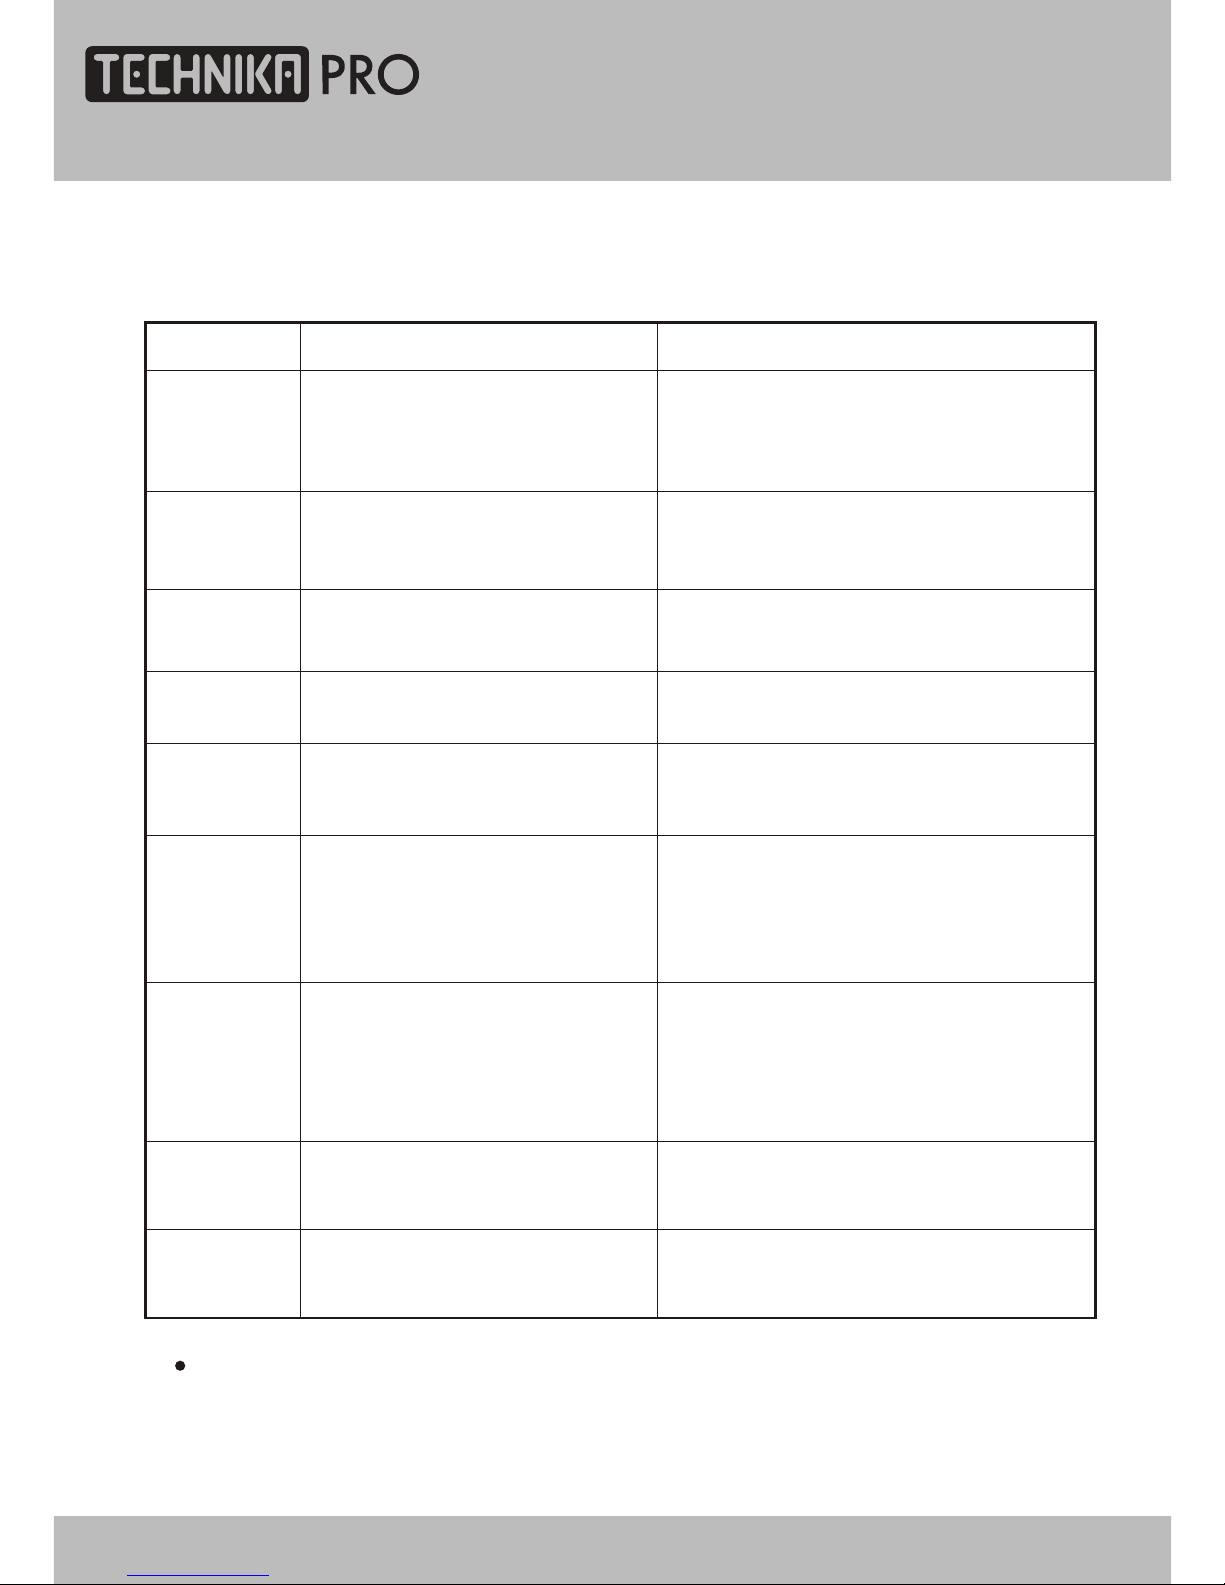
Troubleshooting
If the above methods still cannot solve the problems or the troubles are special, please
contact the local maintenance personnel.
Symptom
Causes
Correction
No sound
1. Disc warped or dirty
2. The unit in mute state
1. Clean the disc
2. Press MUTE button to cancel it.
No image
1. TV not set for proper system
1. Reset AV/TV state of TV
No colour
1.2.TV system not right
TV colour not well adjusted
1. Try to change the colour system
2. Reset the TV colour
No disc reading
1. Disc warped or dirty
2. Disc not correctly placed
3. Condensation on laser head
1. Clean the disc
2. Reload a disc with label side facing up
3. Switch on power, unload disc and leave
it for about 1 hour
Temporary
function failure
1. Mal-fabricated disc used
2. Wrong buttons pressed
3. Static leakage into the unit from
outside
1. Wait for 5 to 10 seconds to restore to
normality automatically
2. Operate again
3. Power off for 1 to 2 minutes to power
on again
Image rolling
1. System setup not suitable
for disc
1. Adjust system mode
Not play
1. Condensation on laser head
2. Disc not properly loaded
3. Disc not compatible with the unit
1. Switch on power and wait for 1 to 2 hours
2. Make sure label side of the disc is facing up
3. Confirm whether this unit compatible with
the inserted disc
Sound distortion
1. Too large volume of connected
device
2. Sound field mode not suitable for
disc
1. Adjust the device volume
2. Adjust appropriate sound field
No subtitle
1. No subtitle made in disc
2. The unit subtitle is turned off
1. Disc problem
2. Press Subtitle button to select it
DVD TROUBLESHOOTING
24" HD Ready 1080p DVD LCD TV User Guide 51
Page 52
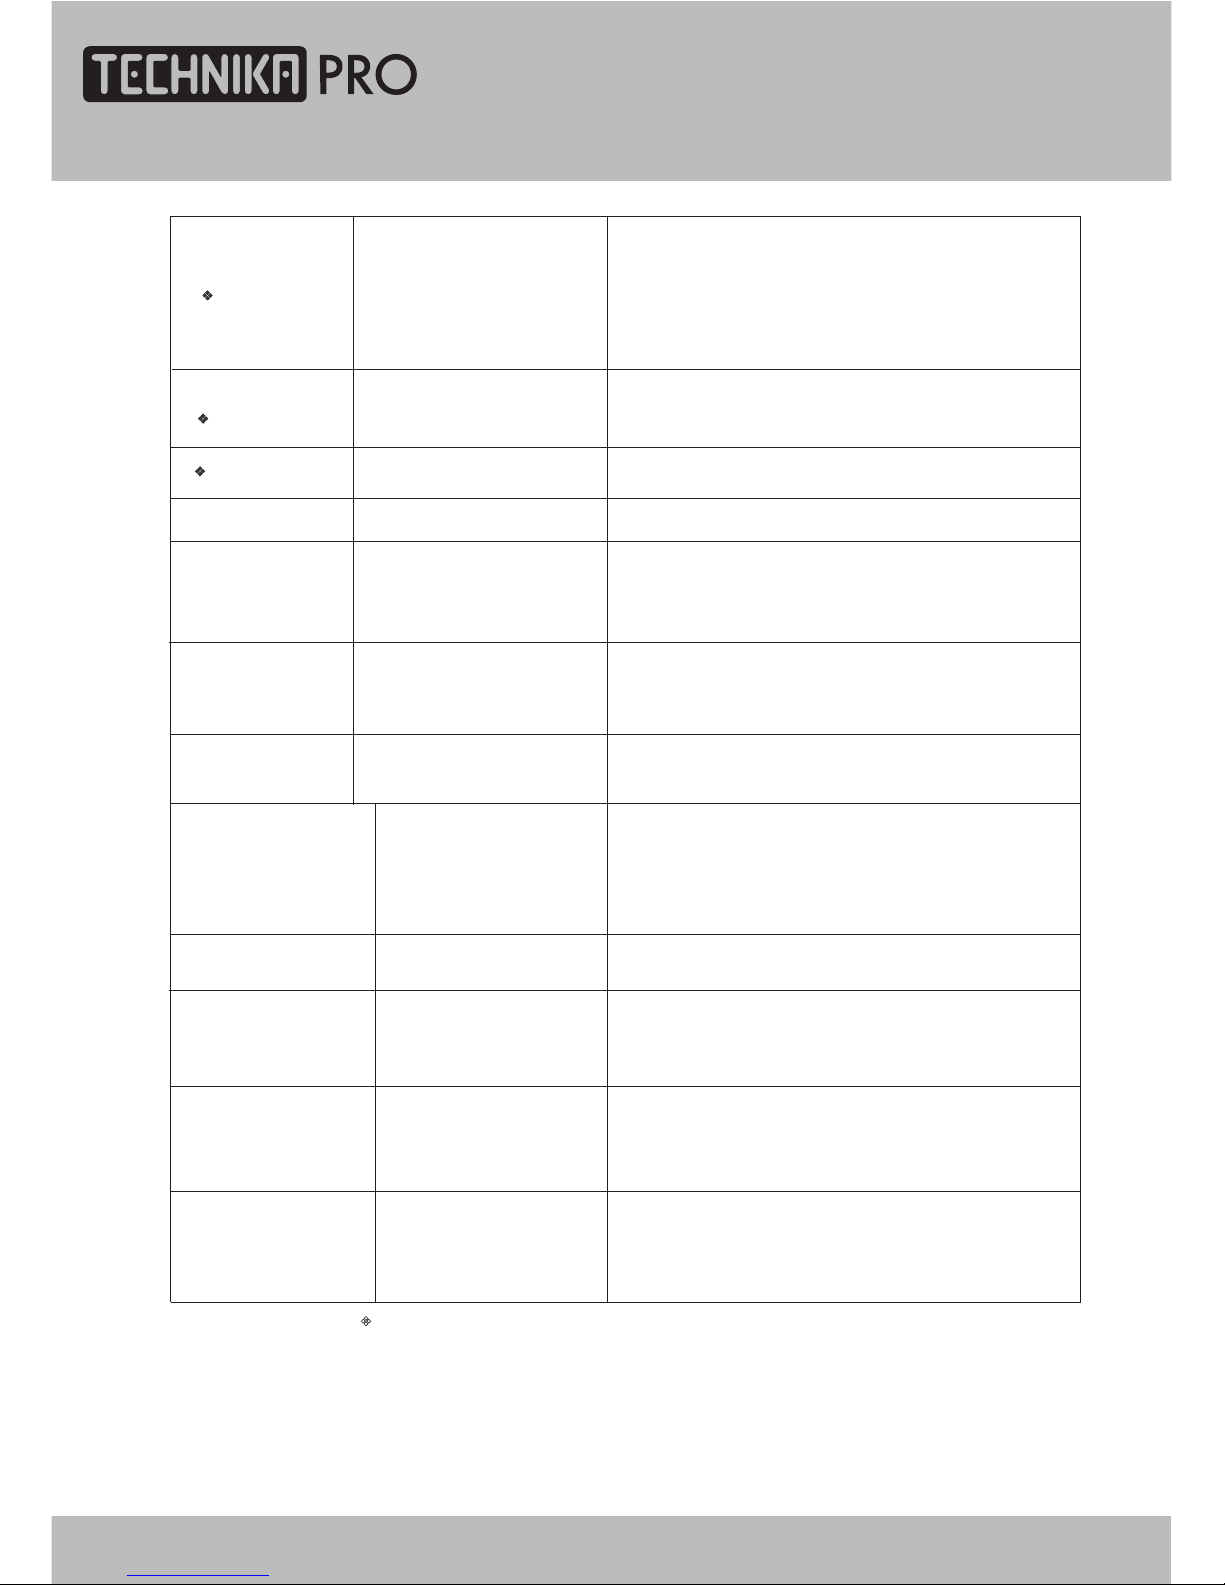
Specifications
LCD screen
Type
TFT colour
Frequency
Hor scanning frequency
Ver scanning frequency
Display colour
30 kHz 80 kHz
50 Hz 75 Hz
16.7M (colour)
Display mode
Recommended mode
Max mode
24": 1920 x 1080
Input signal
Synchronous signal
Video signal
H/V separation, TTL positive/negative;
H/V composite, TTL positive/negative
Green synchronous, 0.3Vp p,negative
0.7 Vp p@75ohm
TV/Video
Image system
Audio system
Video form
PAL/SECAM/NTSC(In video mode)
DK/I/BG/L
CVBS、
Environmental
factor
Working temperature
Working humidity
Storing temperature
Storing humidity
10 80%% ~
5 95%% ~
Audio parameter
Audio input
Frequency response
TV signal: 100 Hz 12 kHz(-3dB)~
AV: 100 Hz 15 kHz (-3dB)~
535~
。
C
。
C
-20 45
~
。
C
。
C
~
~
-
Disc type
DVD VIDEO
MPEG4 ;
*
SVCD
**
VCD1.0, 1.1, 2.0 version;
CD-DA
DVD
-
RGB, S-VIDEO ,VGA
Panel
Life
Hours
50,000
From DC (car) 12V/4.5A
_
___
φ3.5 jack(L,R),0.5±0.3Vrms
Hint: the items with " " symbol are related to LCD screen. Specifications and design are subject
o change without notice.
Some discs labelled with MPEG 4 on the market actually are * .rm/* .ram/* .rmm and others which
are not compatible. Please take care when buying discs.
This unit cannot play some SVCD discs with VCD format.
**
Because of disc quality and format difference, we cannot make sure smoothly read all discs; some
functions cannot be fulfilled for the disc speciality, but not machine trouble.
*
Digital TV
Input connector
Frequency range (VHF/UHF)
IEC-Type, IEC 169-2, Female
Channel range(VHF/UHF)
174MHz 858MHz
~
7&8Mhz
Size
24" - 60cm
~
~
-
File format MP3, MPEG1, MPPEG2, AVI, JPEG and BMP
Media play (USB)
52
Power From AC ~ 100V-240V (50 /60) Hz
24" HD Ready 1080p DVD LCD TV User Guide
Page 53
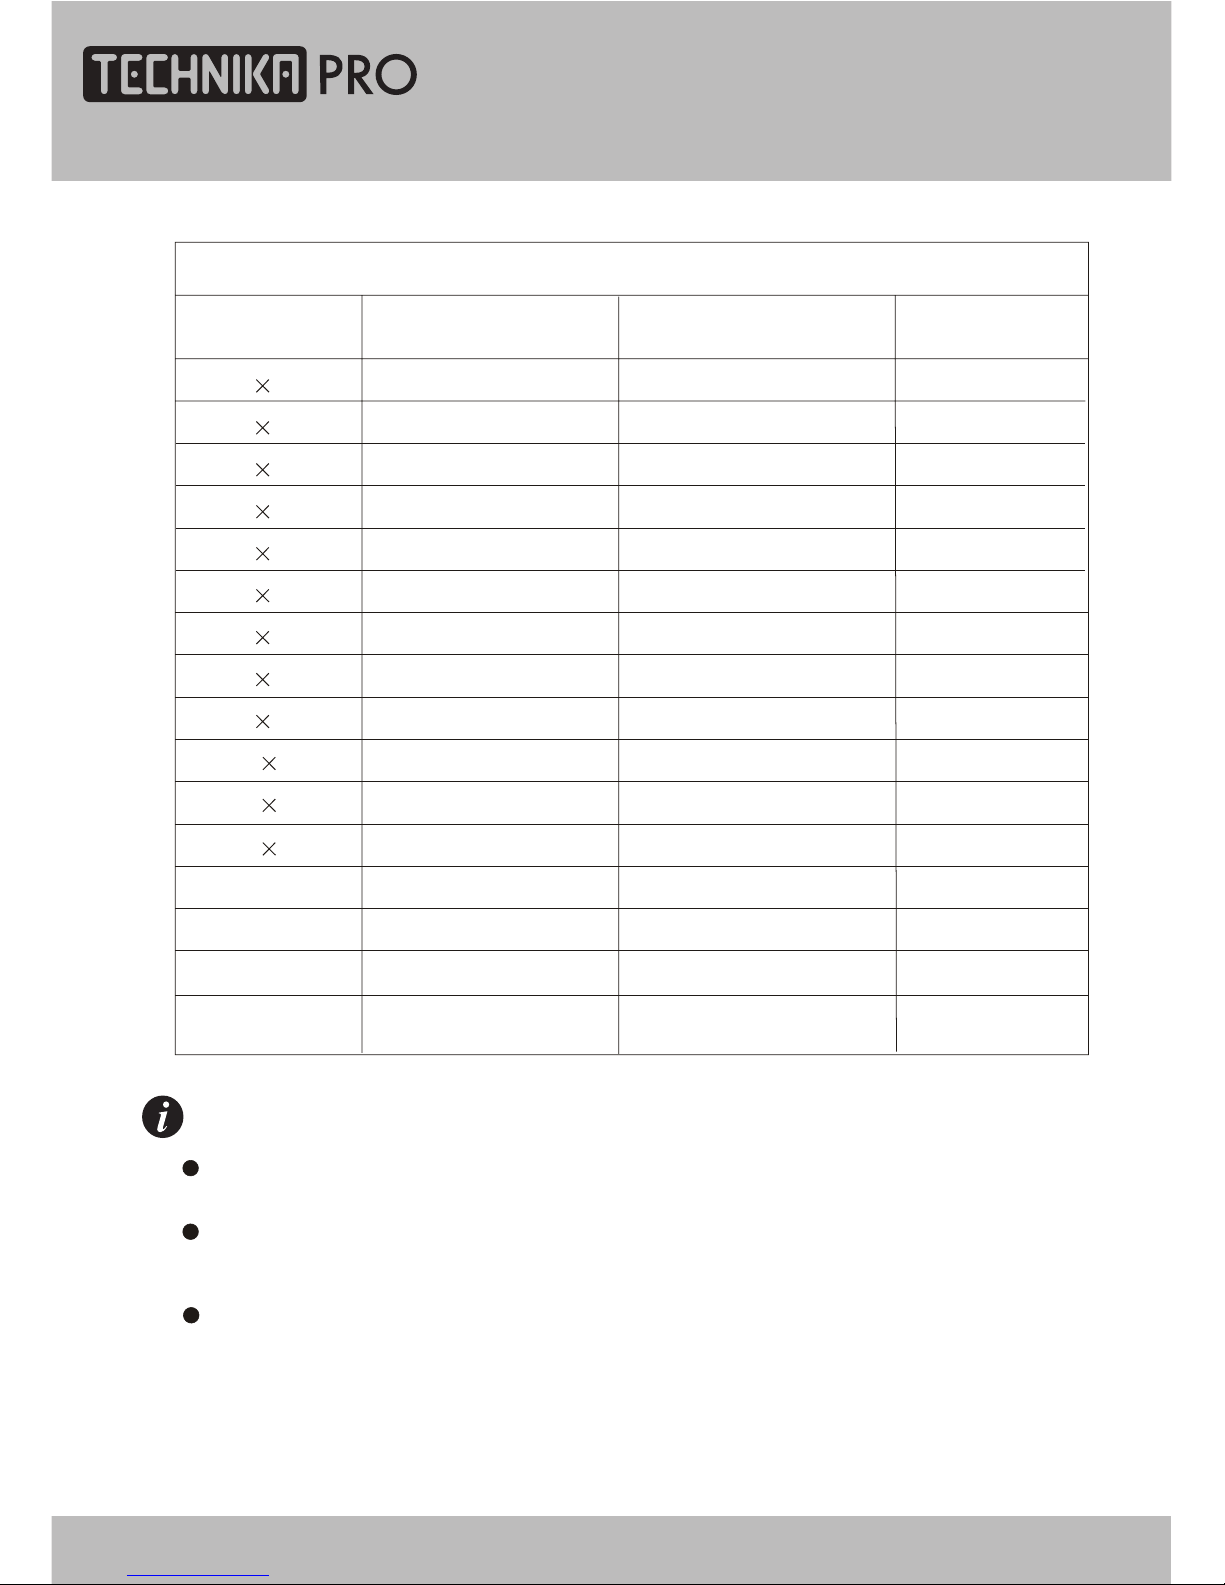
Format
(Hz )
Ver scanning frequency
SUPPORTED PC INPUT MODE
31.5
70.0
DOS
640 350
720 400
31.5
70.0
DOS
640 480
31.5
60.0
DOS
640 480
37.9
72.0
VESA
640 480
37.5
75.0
VESA
800 600
35.1
56.2
VESA
800 600
37.9
60.0
VESA
800 600 48.1 72.0
VESA
800 600 46.9 75.0
VESA
Hor scanning frequency
(KHz)
To prolong this unit's service life, you are suggested to use power management function
of computer.
Because of the difference of display card output signal (especially non-standard signal
output), the display image may appear with a little disturbance which can be adjusted through
" AUTO CONFIG " in the "PICTURE" menu by users.
This product does not support the display mode not listed above. In order to achieve
the best display effect, please select the above-listed 20 display modes input signal.
Resolution
1024 768 48.4 60.0
VESA
1024 768
VESA
56.5
70.11
VESA
1024 768 60.0
75.0
NOTES
81.3
1600X1200 65.0
VESA
75.01600X1200 60.0
VESA
85.01280X1024 75.0
VESA
64.0 1280X1024 60.0
VESA
Display Mode
24" HD Ready 1080p DVD LCD TV User Guide 53
Page 54
Additional Information
Care and Maintenance
Handling Discs
• To remove a disc from its storage case, press
down on the centre of the case and lift the
disc out.
• Discs should be returned to their cases after
use. This avoids serious scratches that could
cause the laser pickup to skip.
• Hold the disc by the edges, to avoid
touching the recorded side of the disc.
• Fingerprints and dust should be carefully
wiped from the disc’s surface with a soft
cloth.
• Never use chemicals such as record sprays,
antistatic sprays, benzene, or thinners
to clean the discs. These chemicals can
irreparably damage the disc’s surface.
• Audio discs and DVD discs have no grooves
to collect dust and microscopic debris so
gently wiping with a soft cloth should
remove most particles.
• Wipe in a straight line from the inside to
the outside of the disc. Small dust particles
and light stains should have no effect on
reproduction quality.
• Do not expose discs to direct sunlight,
high humidity, or high temperatures
for extended periods. Exposure to high
temperatures can warp the disc.
• Do not stick paper or write anything with a
ball point pen on the label side of the disc.
Disposal
UK: Waste electrical products should
not be disposed of with household
waste. Separate disposal facilities
exist, for your nearest facilities see
www.recycle-more.co.uk
or in-store for details.
ROI: Produced after 13th August 2005
Waste electrical products should not
be disposed of with household waste.
Please recycle where facilities exist.
Check with your Local Authority or
retailer for recycling advice.
Warranty
Your TESCO appliance is covered by a warranty
for 12 months from the date of purchase. If
a fault develops during this period, please
contact the TESCO electrical help line on
0845 456 6767. Please have your original
purchase receipt with you when you call. This
warranty in no way affects your consumer
rights.
54
24" HD Ready 1080p DVD LCD TV User Guide
Page 55

Page 56
TESCO Stores Ltd, Cheshunt, EN8 9SL, UK.
Tesco Electrical Helpline 0845 456 6767
 Loading...