

Page 1
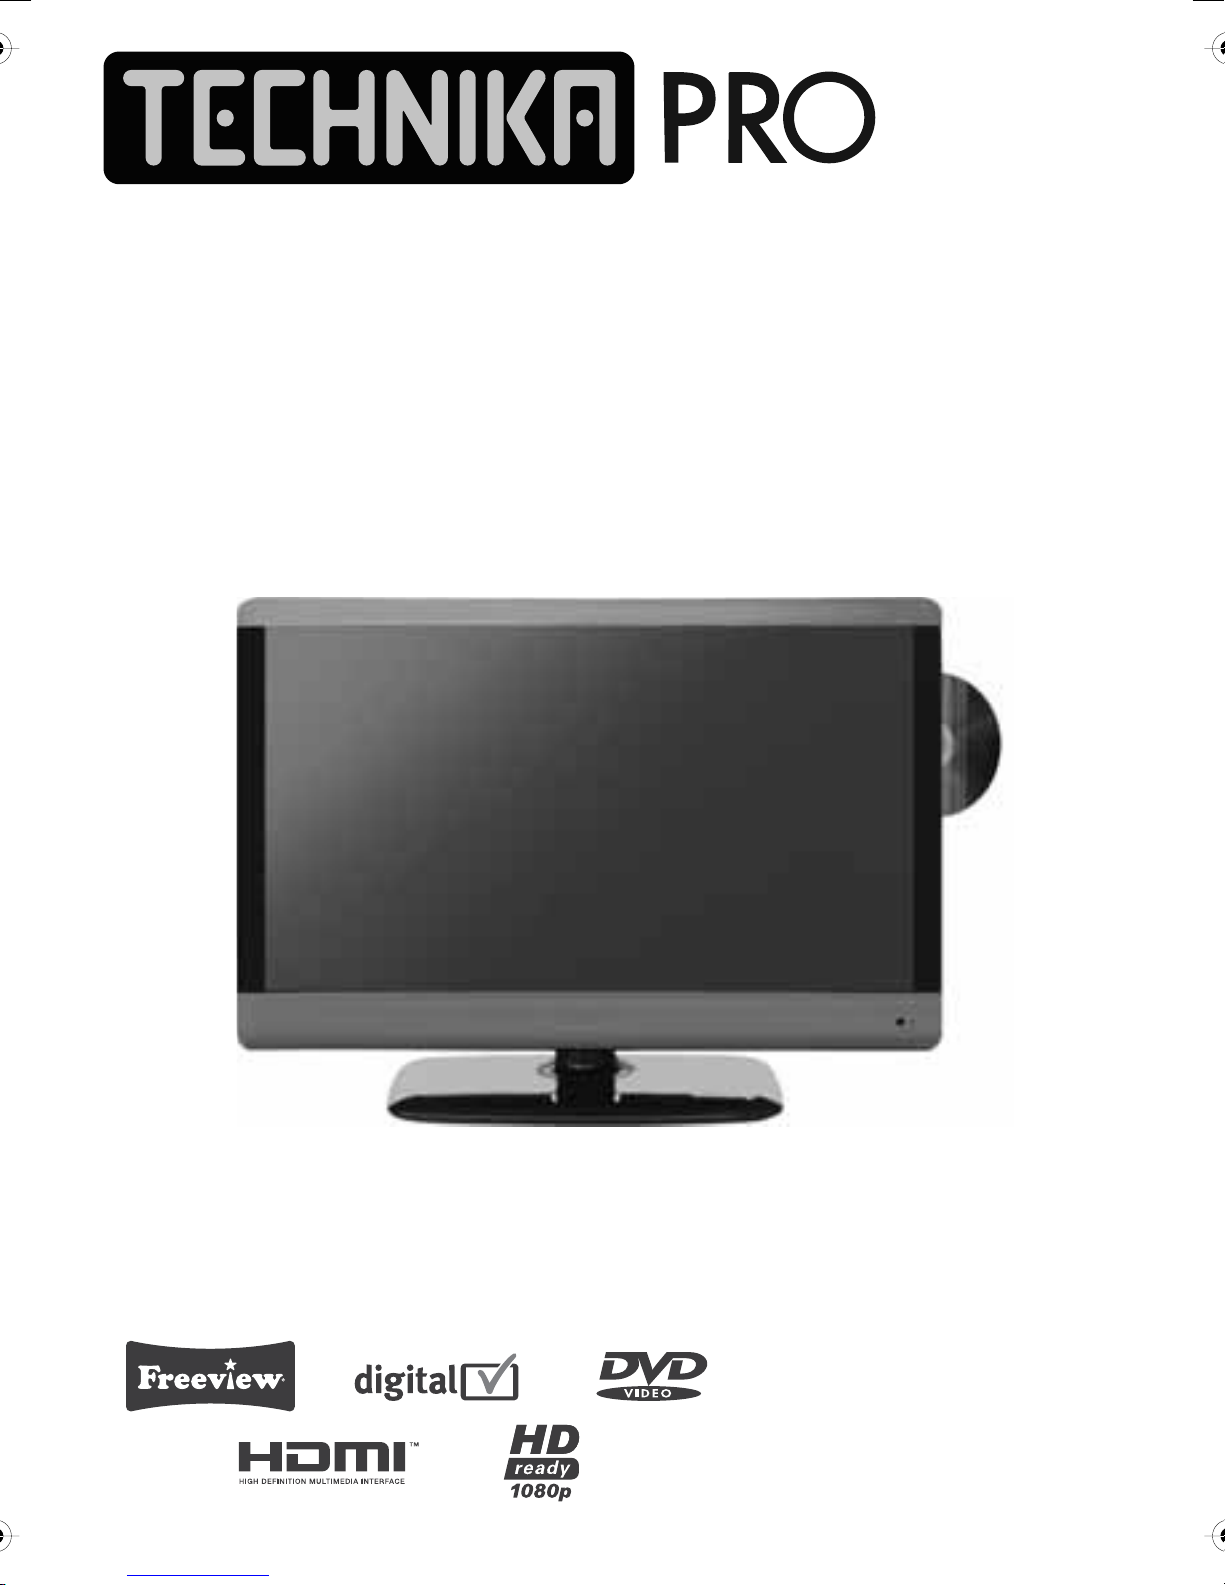
IDTV
User Guide
Model No. 23-230
Page 2

Page 3
User Guide
Important Guarantee Information.
Congratulations on purchasing this television. We hope you have many
years of trouble free enjoyment from your purchase.
Your product is covered under the manufacturers guarantee for 12 months
from date of purchase.
In the event of a fault being diagnosed, please refer to the frequently
asked questions/troubleshooting section at the rear of this user guide.
If you are still unable to remedy the fault, try resetting the TV
to factory settings, (details in this user guide) or contact the helpline.
In the event that a fault is diagnosed, the helpline will arrange to collect
the TV from your home or work address, return it to our service centre,
repair the item and then return it to you.
If we believe we cannot offer a permanent repair, we will replace the item.
Sky Media UK LTD – Helpline Information
Telephone UK 0871 2000 463 ROI 01443 3940
Email: [email protected]
The telephone opening hours are Monday to Friday 8.30am to 6pm, Saturday 9am – 5pm.
On the web site, you can register your product and guarantee, if you
do it within 7 days of purchase, you will also receive an extra
3 months warranty, making the warranty 15 months from date of purchase.
You must retain all packaging materials as you will need these in the event of
If you need to call the helpline, you will need the following information.
Model Number ___________________ (Can be found on the front of this user guide)
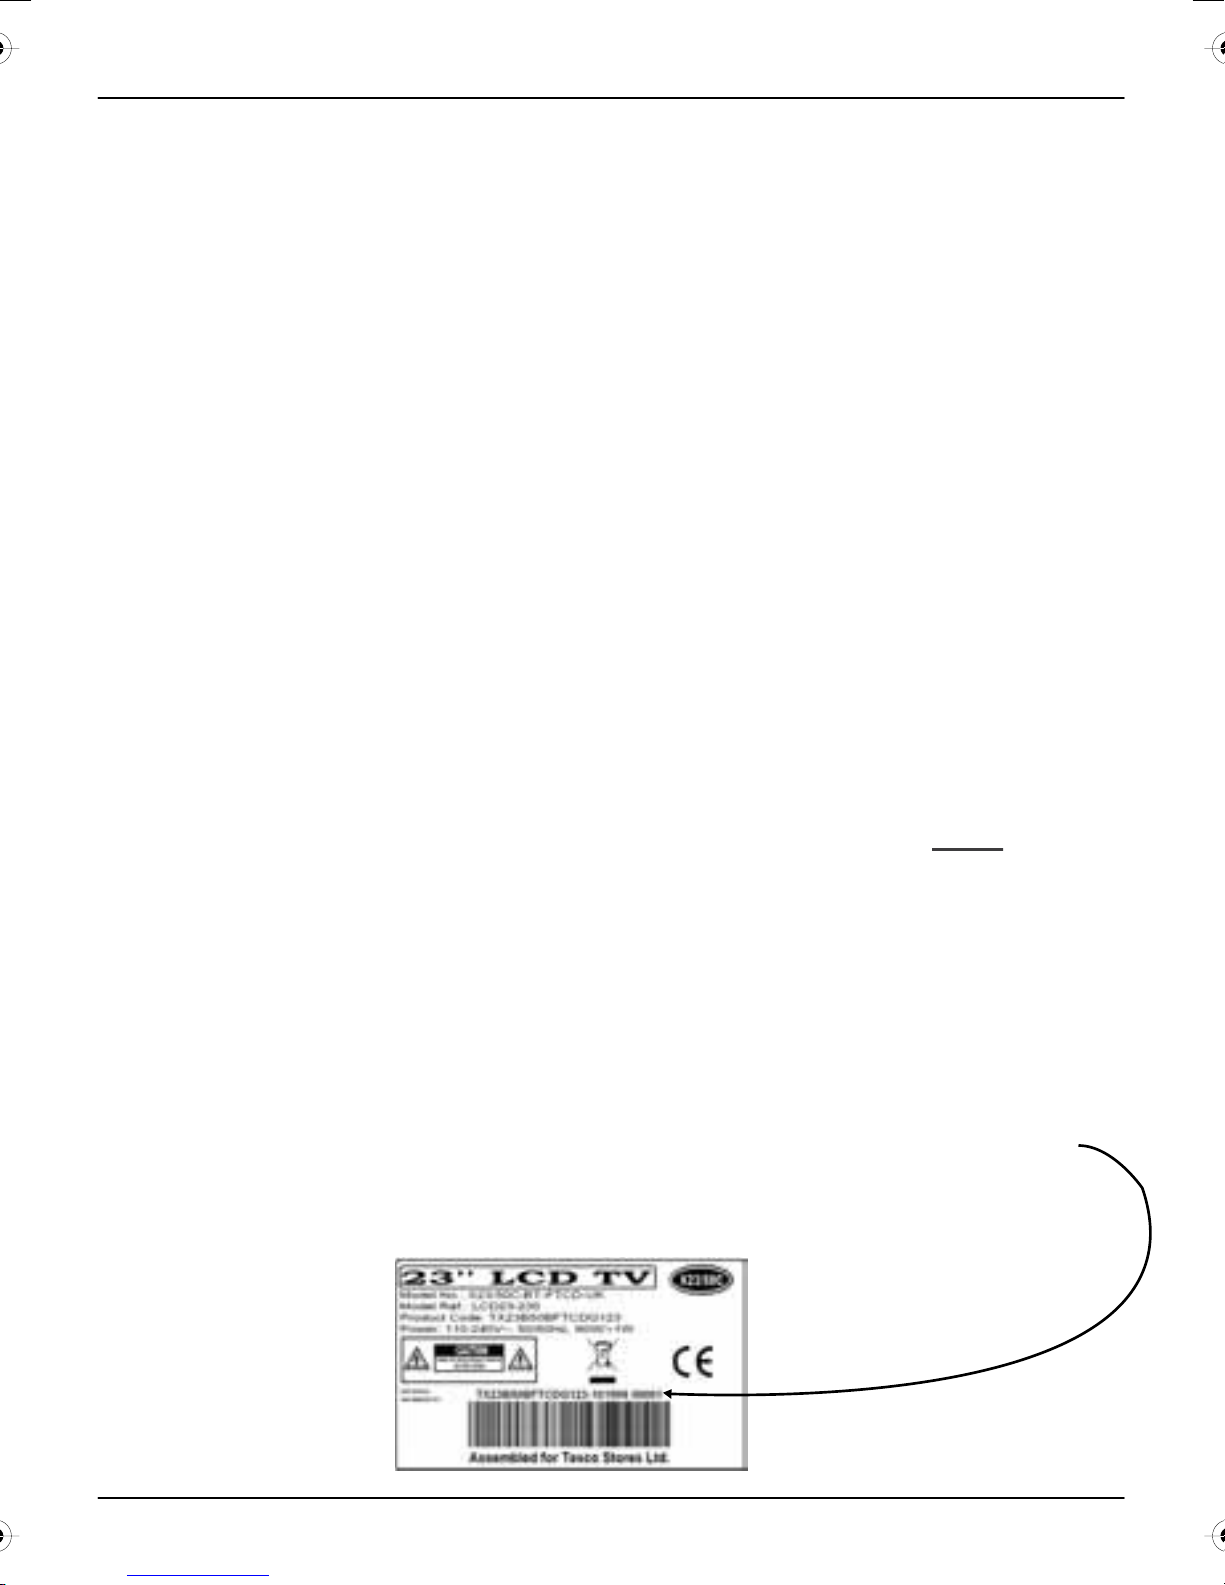
Serial Number __________________________ (Can be found on rear of TV)
Date of purchase __________________________ (Can be found on sales receipt)
Internet: www.skymediauk.co.uk
FREE
warranty/service support.
1
Page 4
IDTV
2
Page 5
User Guide
Important information regarding the digital TV switchover
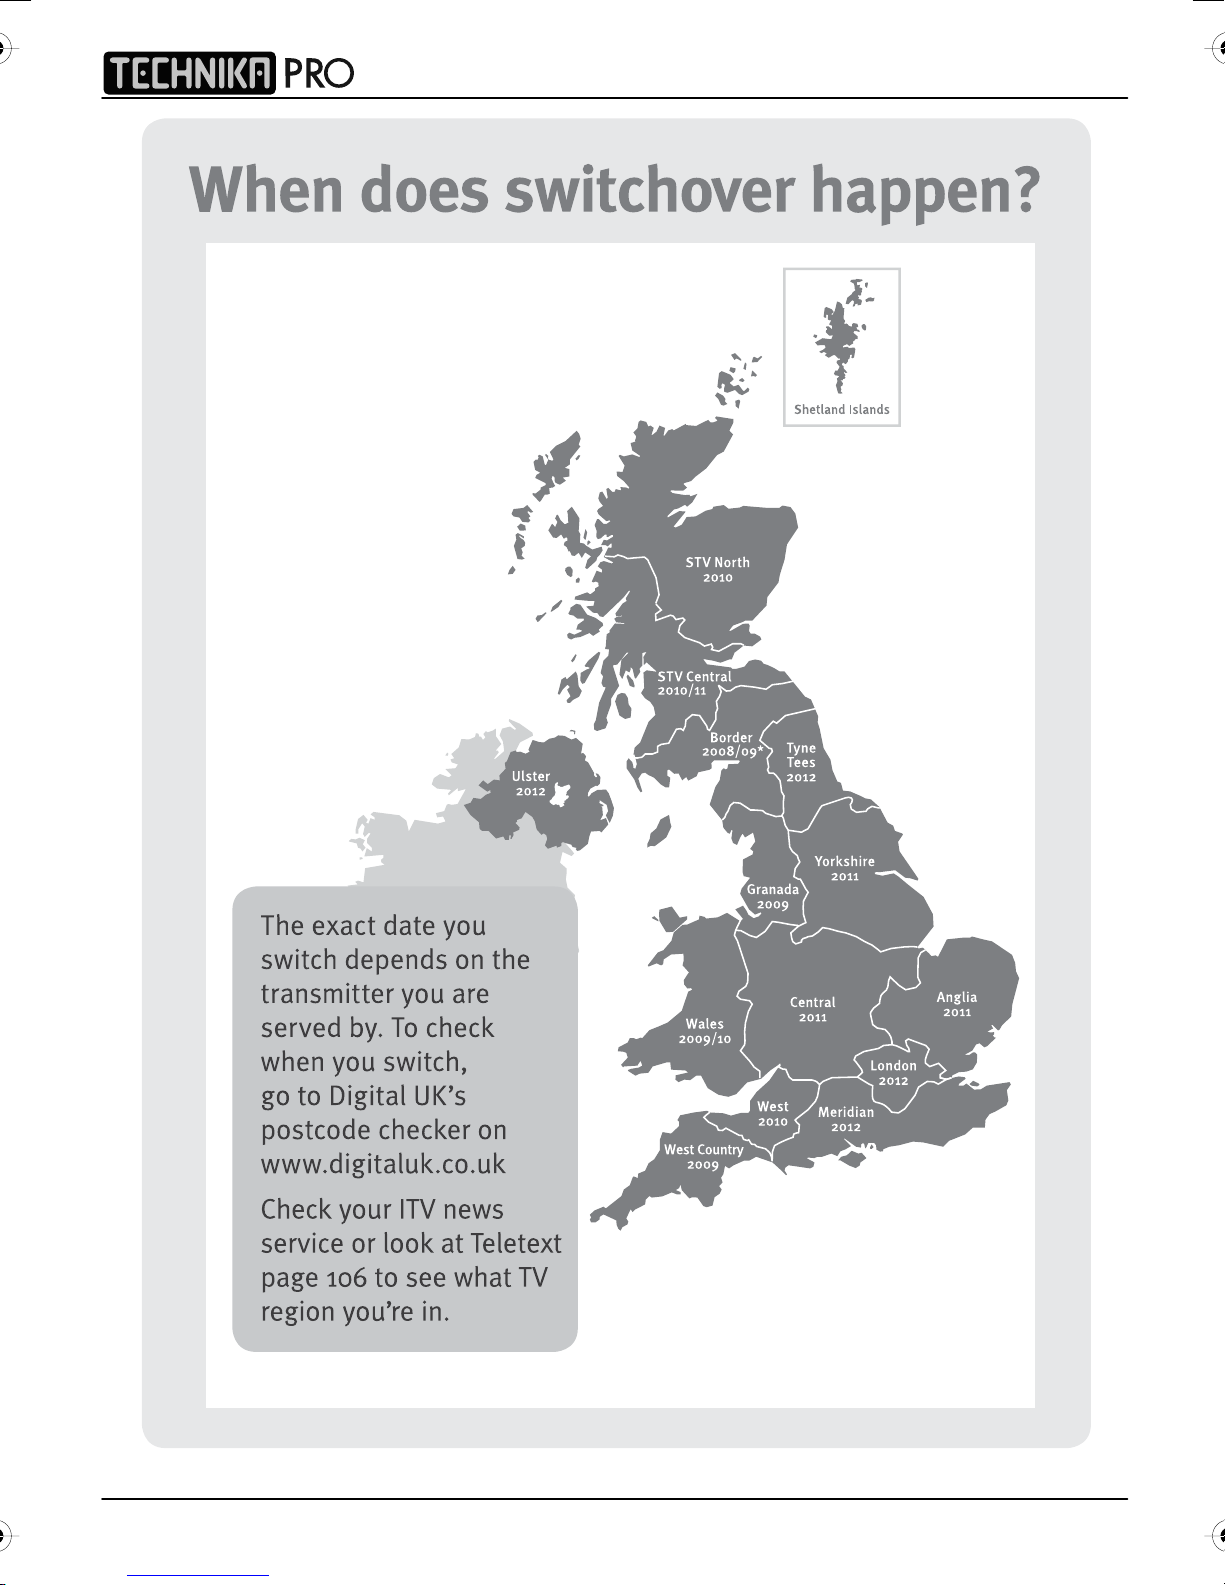
Television in the UK is going digital, bringing us all more choice and new services. Starting late
2007 and ending in 2012, television services in the UK will go completely digital, TV region by TV region.
How the switchover affects your TV equipment.
Your new TV has a digital tuner built in, which means it is ready to receive the Freeview signal by simply
connecting it into your aerial socket (you can check if you can get digital TV through your aerial now or
whether you will have to wait until the switchover at www.digitaluk.co.uk)
When the TV switchover happens in your area, there are at least two occasions when you will need to re-tune
your TV in order to continue receiving your existing TV channels and also to pick up new ones. Digital UK, the
body leading the digital switchover, will advise you when you need to retune during the switchover.
How to retune.
Retuning your TV is a very quick and simple process. We recommend that you retune
every few months to ensure you are receiving the very latest TV and radio channels
that are broadcast.
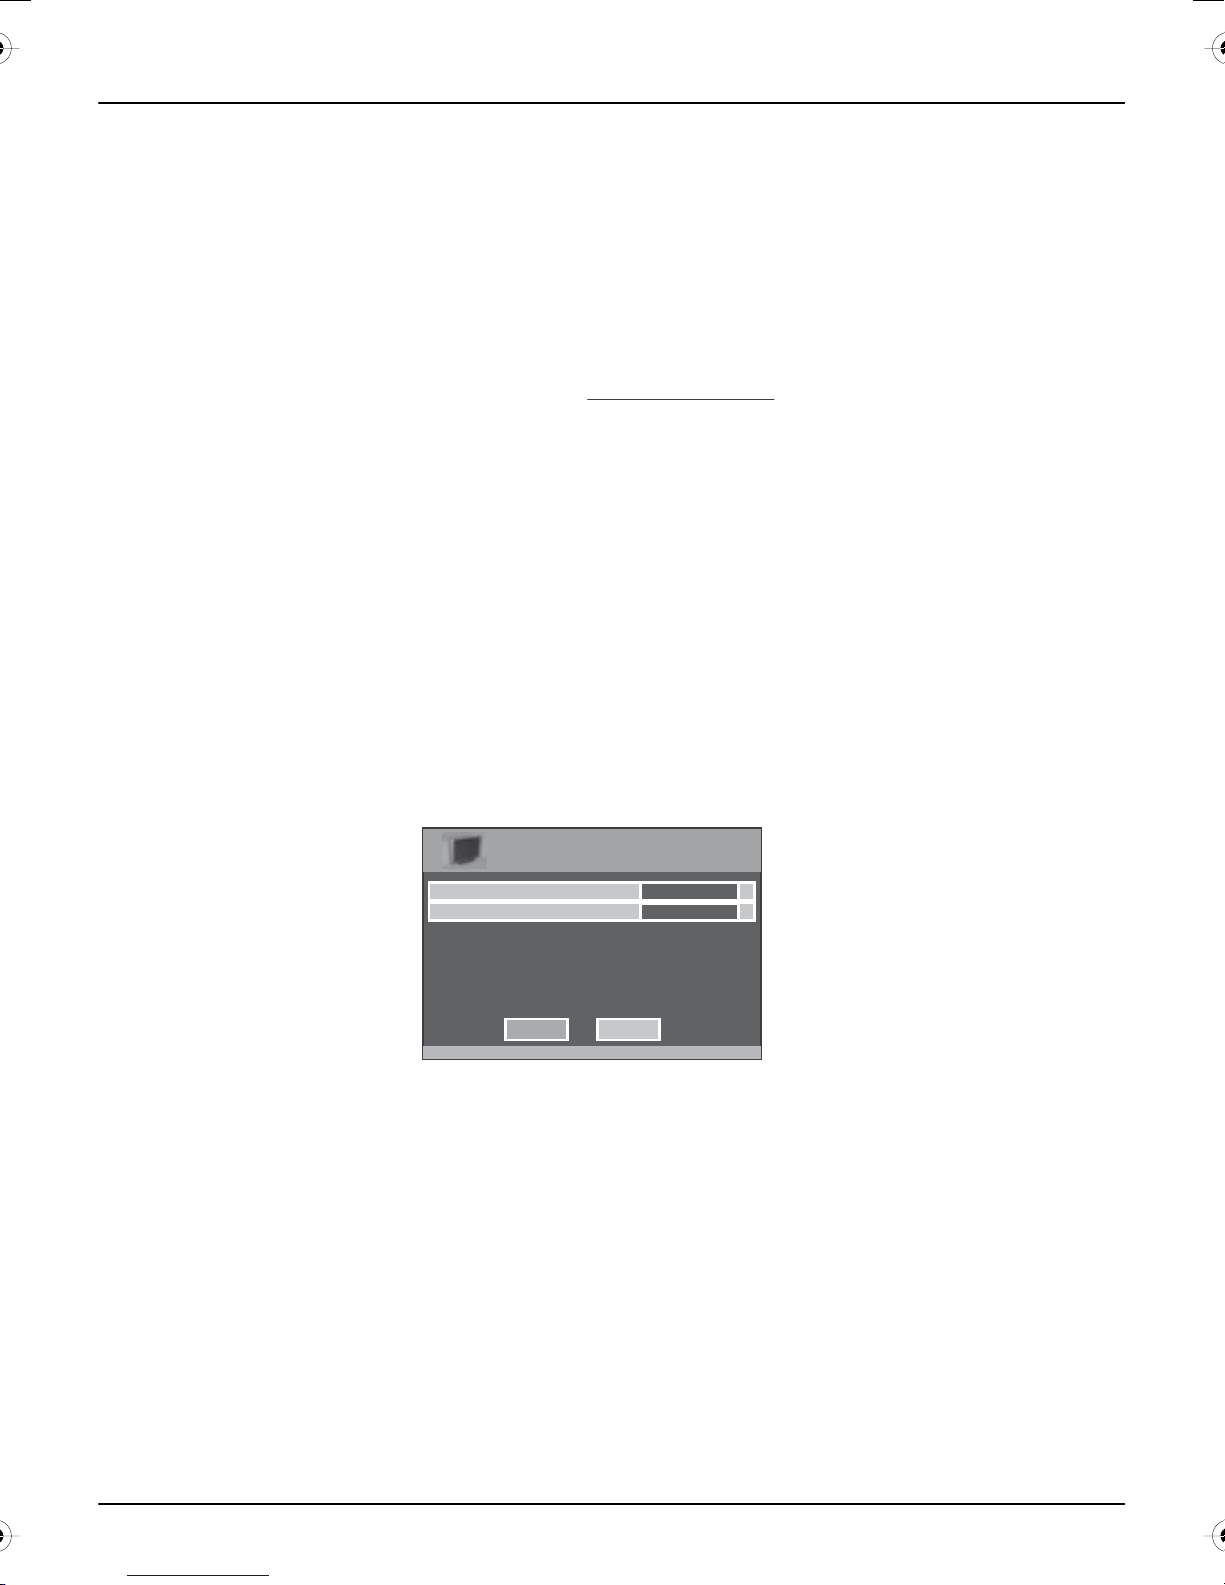
• In digital/freeview mode, on the remote control press ‘menu’ quickly followed by 8-8-8-8 (so
press the number 8 four times)
• You will now enter the ‘First time installation’ mode. (if you do not, please refer to the section
called ‘getting started’ later in this user guide)
First Time Installation
Country
Language
Please ensure that the aerial is connected to the connector
labelled ‘ RF In ’ on the rear of the TV .Ensure that OK is
highlighted in yellow and press ‘OK’ on your remote .If after
this scan ,not all digital channels are found ,your aerial may
require a signal booster .alternatively ,upgrade your aerial
to a high gain digital version .
OK Cancel
UK
English
• Simply press ‘OK’ or ‘Enter’ on the remote control and your TV will retune.
If you do not retune your TV when advised to do so by Digital UK, you may lose some or all of your channels
until you do re-tune.
If you are missing any channels, it may be that they are not available in your area, or that your TV aerial
needs upgrading.
For help and support regarding the digital switchover, plea
Telephone: 08456 50 50 50
(calls charged at local call rate, approx 3p per minute daytime or 1p per minute evenings from a BT landline)
Digital UK website: www.digitaluk.co.uk
If you require technical or warranty support on this television, please contact the manufacturer helpline, do
not contact Digital UK unless your query is regarding the digital switchover.
se contact Digital UK:
3
Page 6

IDTV
WARNINGS
Caution
This television contains no user serviceable parts. Please refer to the manufacturer
or authorised repair agent in the event of malfunction. Do not remove the back cover
from the television.
Warning
To reduce the risk of fire, electric shock or damage to the television, do not expose
it to dust, rain or moisture, or place any objects filled with liquids on or near the television.
Do not place the television in a confined space, ensure that nothing can obstruct
the ventilation openings at the rear of the television.
Do not place naked flames on or near the television.
Dispose of this television and any components including batteries in an environmentally
friendly manner. If in doubt, please contact your local authority for details of recycling.
Your LCD TV should be cleaned using a dry or slightly damp cloth. You should not use
an alcohol based cleaner
Safety
For your safety, this appliance is fitted with a fused moulded 3 pin mains plug. Should
the fuse need to be replaced, ensure that any replacement is of the same amperage
and approved with the BSI mark. ( )
Never try and replace the mai
legally authorised to do so. In the event that a replacement Mains cable is required,
contact the manufacturer for a suitable replacement.
Never use the television if it is damaged in any way.
Always place the television on a flat level surface avoiding anywhere which may
be subject to strong vibration. Ensure the television is not placed on top of the power
cable as the weight of the television may damage the cable and cause a safety hazard.
Never place mobile phones, speakers or any other device which may cause magnetic
or radio interference with the television. If interference is apparent, move the device
causing the interference away from the television.
Packaging
Please save the packaging for the television as you will need this in the event
of warranty/service repair or support. We are unable to carry out warranty/service
if you are unable to package it correctly. The safest way to package your item in the
event of warranty/service repair is in its original box/packaging
ns plug unless you have adequate qualifications and are
4
Page 7
User Guide
5
Page 8

IDTV
6
Page 9
CONTENTS
User Guide
SETTING UP YOUR TV
- Digital Switchover Re-Tune 2
- What is included in the box 8
Attaching/Detaching the
-
Stand & Wall mounting
- Tuning in TV 10
- Remote control buttons and their
functions 11
- TV buttons and their functions 12
- Inputs and Connections 13
TV MENU OPERATION
- Picture Settings Menu 14 - 15
- Sound Setttings Menu 16
- Tuning Settings Menu 17
- Common Inferface Slot 18
- Timer Settings Menu 18
- Sleep Timer 18
- On Screen Display Timer 18
- General Settings Menu 19
- On Screen Menu Language 19
- Adjusting Picture Format 19
- Blue Screen 19
- System Lock 19
- First Time Installation 20
- Reset Television to Factory Settings 20
9
CHANNEL SERVICES
- Using Electronic Program Guide 20
- Using Digital TV teletext 21
- Using Analogue TV teletext 21
PC OPERATION
- Using with a PC or Laptop 22 - 23
DVD MENU OPERATION
- System Setup 24
- Changing Regions 25
- Audio Setup 25
- Digital Setup 25
GENERAL INFORMATION
- Using with Sky Digital/Virgin Media 26
- Connecting a Games Console 27
- Frequently Asked Questions 28
- Technical Specifications 29
- Index 30
If you experience any problems with this Television,
Customer Support/Technical Helpline
Telephone UK ROI: 01443 3940: 0871 2000 463
Email: [email protected]
Please contact the helpline.
Sky Media UK LTD
7
Page 10
IDTV
Model No. 23-230
User Guide
IDTV
Quick Start Guide – Model 23-230
Onlinesupport: www.skymediauk.co.uk email: [email protected]
y@ypp
4
RF cable supplied, connect the TV to the TV Aerial
wall socket (Fig A) then connect the Power cable
to your TV and Electrical outlet (Fig B)
6
Insertthebatteries suppliedinto the Remotecontroland press
thePower/Standbybutton to poweron theTV
FigB
4
6
FigA
FigB
4
IMPORTANT:-If yourTV signal is inadequate to receive a
goodDigitalsignal, youwill needtoconnect a'Signal
booster' betweenyourTV andTV AerialSocket. See section
6.
6
7
You willnowbe welcomed withthe initialset-upscreen. Press
OK ontheremote controland tuningwillstart. Ifafter tuning
somechannelsare missing,please refertosection 6.
Remotecontrol
n
FigA
FigB
4
5
Switchonthe televisionusing thepoweron/off switch
locatedonthe sideor undersideofthe TV.
6
Connecta'Si
g
nal booster'asshown below.
7
Remotecontrol
buttons
FigA
FigB
4
5
6
8
7
Remotecontrol
buttons
FigA
FigB
On/OffSwitch
4
5
6
Oncethe'Signal booster' is connected,retune theTV inorder to
receiveallof thechannels.
8
7
Remotecontrol
buttons
FigA
FigB
On/OffSwitch
4
5
6
8
7
Remotecontrol
buttons
FigA
FigB
On/OffSwitch
2
3
4
6
5
Remotecontrol
buttons
FigA
FigB
On/OffSwitch
X23/MAN/0009
Fault Cause Solution
LED/Power on indicator light on TV not working No power being received to TV Ensure power outlet is switched on, check Power on/off switch on TV is switched on
No channels found or screen displays ‘no signal’ TV not receiving any signal Connect to loft/external aerial and retune TV
Some channels missing or picture appears ‘blocky’ Signal too weak If signal reception is below 85%, connect a signal booster (15-20Db) and retune (see
section 6). If signal reception below is 70%, an aerial upgrade may be necessary
If after checking the above you are unable to solve the problem, in the first instance contact the helpline as most problems
can be solved by the technical support team
TROUBLE SHOOTER:
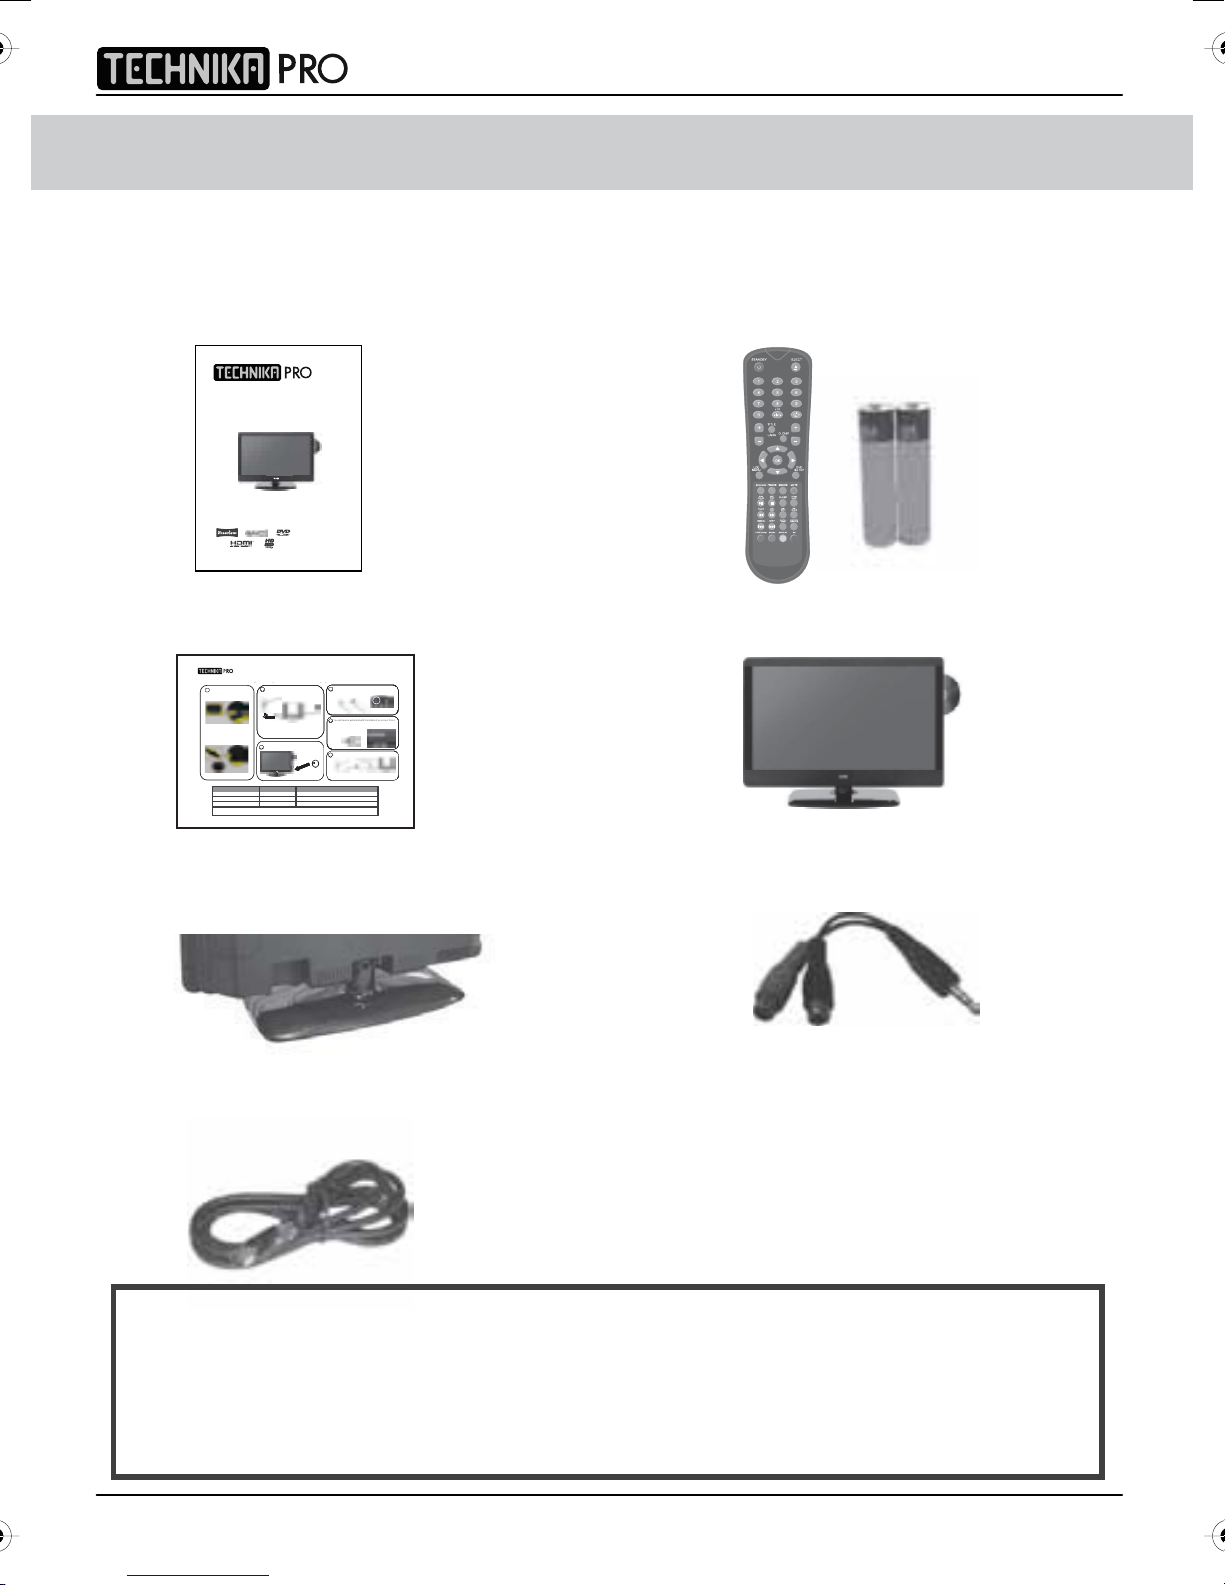
WHAT IS INCLUDED IN THE BOX
Accessories
Included with this TV are the following accessories:
1x - User Guide Book 1x - Remote control + AAA batteries
INFO
CH
VOL
GUIDE
PICTURE
FORMAT
1x - Quick Start Guide 1x - TV
UKTECHNICALSUPPORT HELPLINE
087
12000 463 (OpenMonday -Friday 8.30am- 6pm,Saturday9am -5pm)
ROI
1
Base of stand
A
Insert the TV into the stand
B
Twist the TV into the CLOSE position
until it clicks into place at 45 degrees
01443 3940
1x - Stand 1x - 3.5mm jack to phono cable
1x - RF lead
Please save your packaging as you will need this in the event
of warranty/service repair or support. We are unable to carry out
warranty/service if you are unable to package it correctly. The safest way
8
to package your item in the event of warranty/service repair
is in it’s original box/packaging.
Page 11
Attaching/Detaching the Stand & Wall mounting
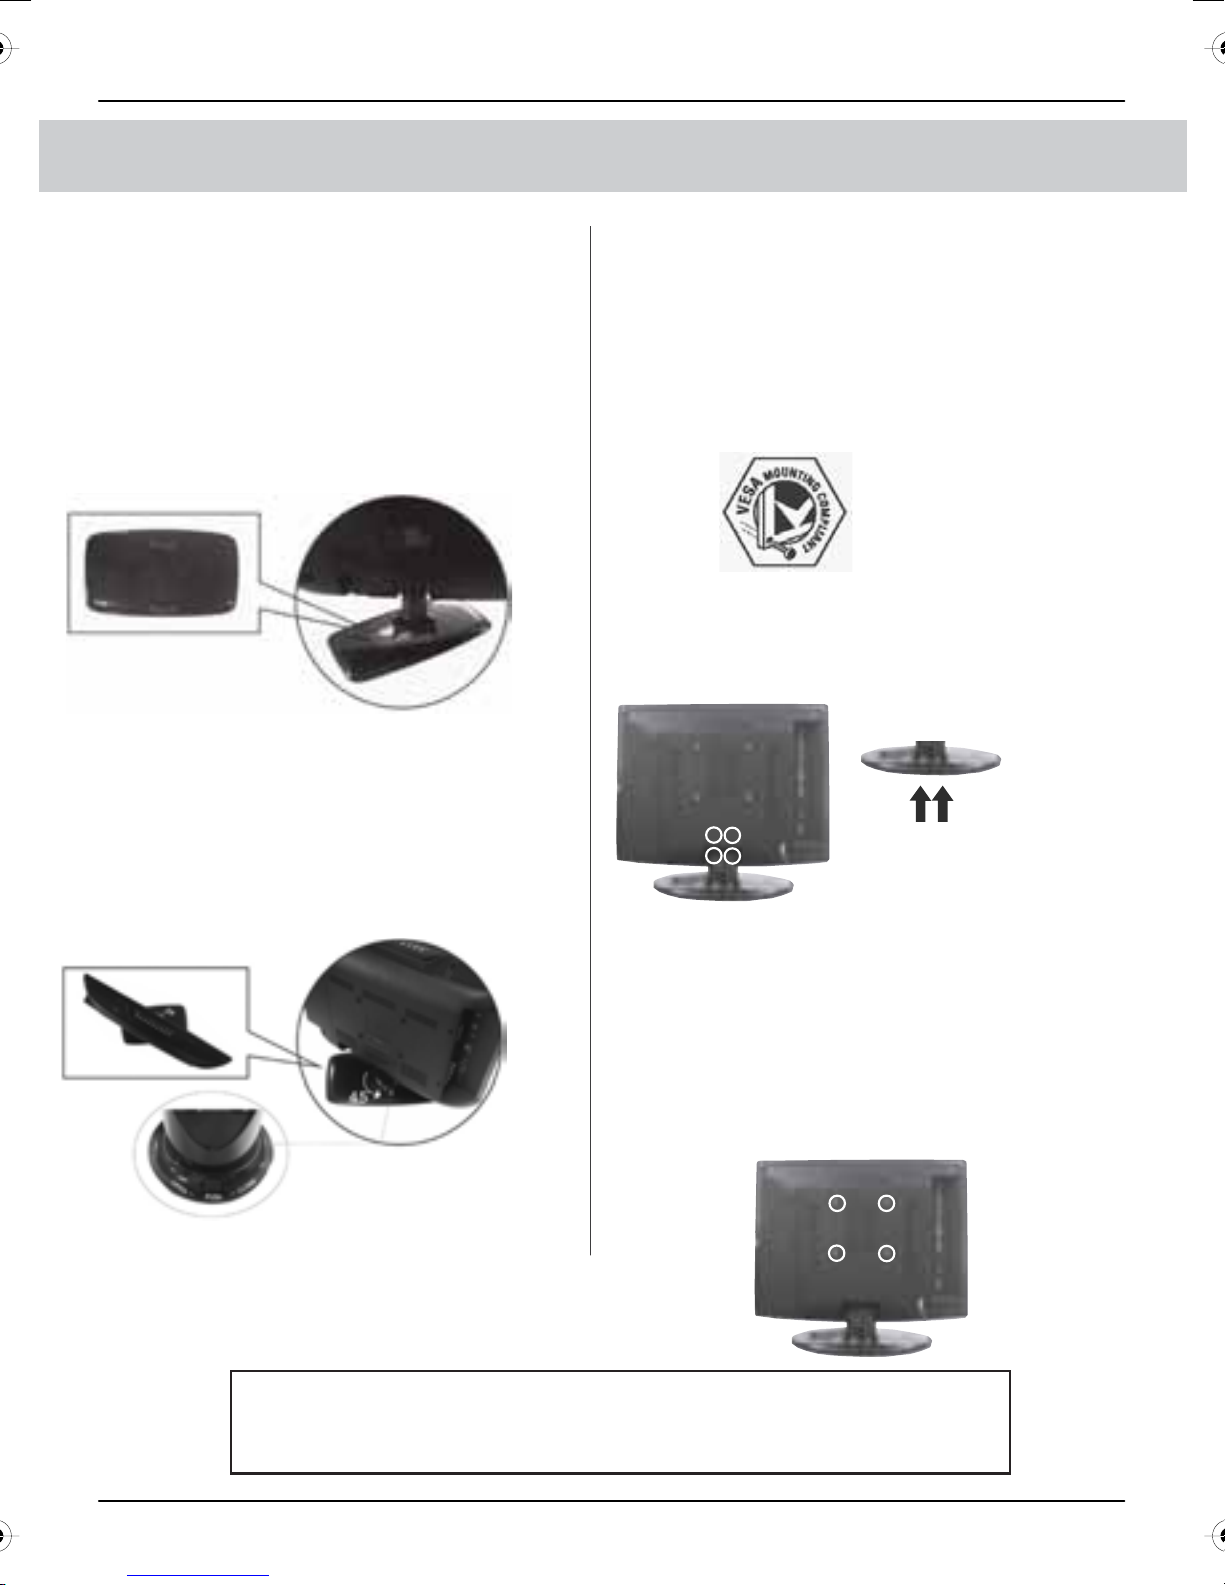
Attaching the Stand
Base of stand
Insert the TV into the stand
1)
User Guide
IMPORTANT— BEFORE DRILLING
ANY HOLES IN THE WALL ENSURE
YOU ARE NOT DRILLING WHERE
THERE COULD BE ANY ELECTRIC
WIRES, WATER OR GAS PIPES
THIS TV REQUIRES A VESA
100 WALL MOUNT, OR EQUIVALENT
100
To remove the stand
2)
Twist the TV into the CLOSE position
until it clicks into place at 45 degrees
1) Remove base as shown opposite
2) Re
move the four screws highlighted
below
3) Remove the two screws in
the neck of the stand.
4) The stand will now come off
Wall Mounting the TV.
1) Remove the four screws highlighted
below.
2) The wall mount can now be easily attached
to the mounting holes on the rear of the
These ho
les are indicated in the picture
TV.
Important – If wallmounting this TV, only use the screws already
provided in the wallmounting holes. Using other screws which are
longer could cause irreparable damage to internal parts.
9
Page 12
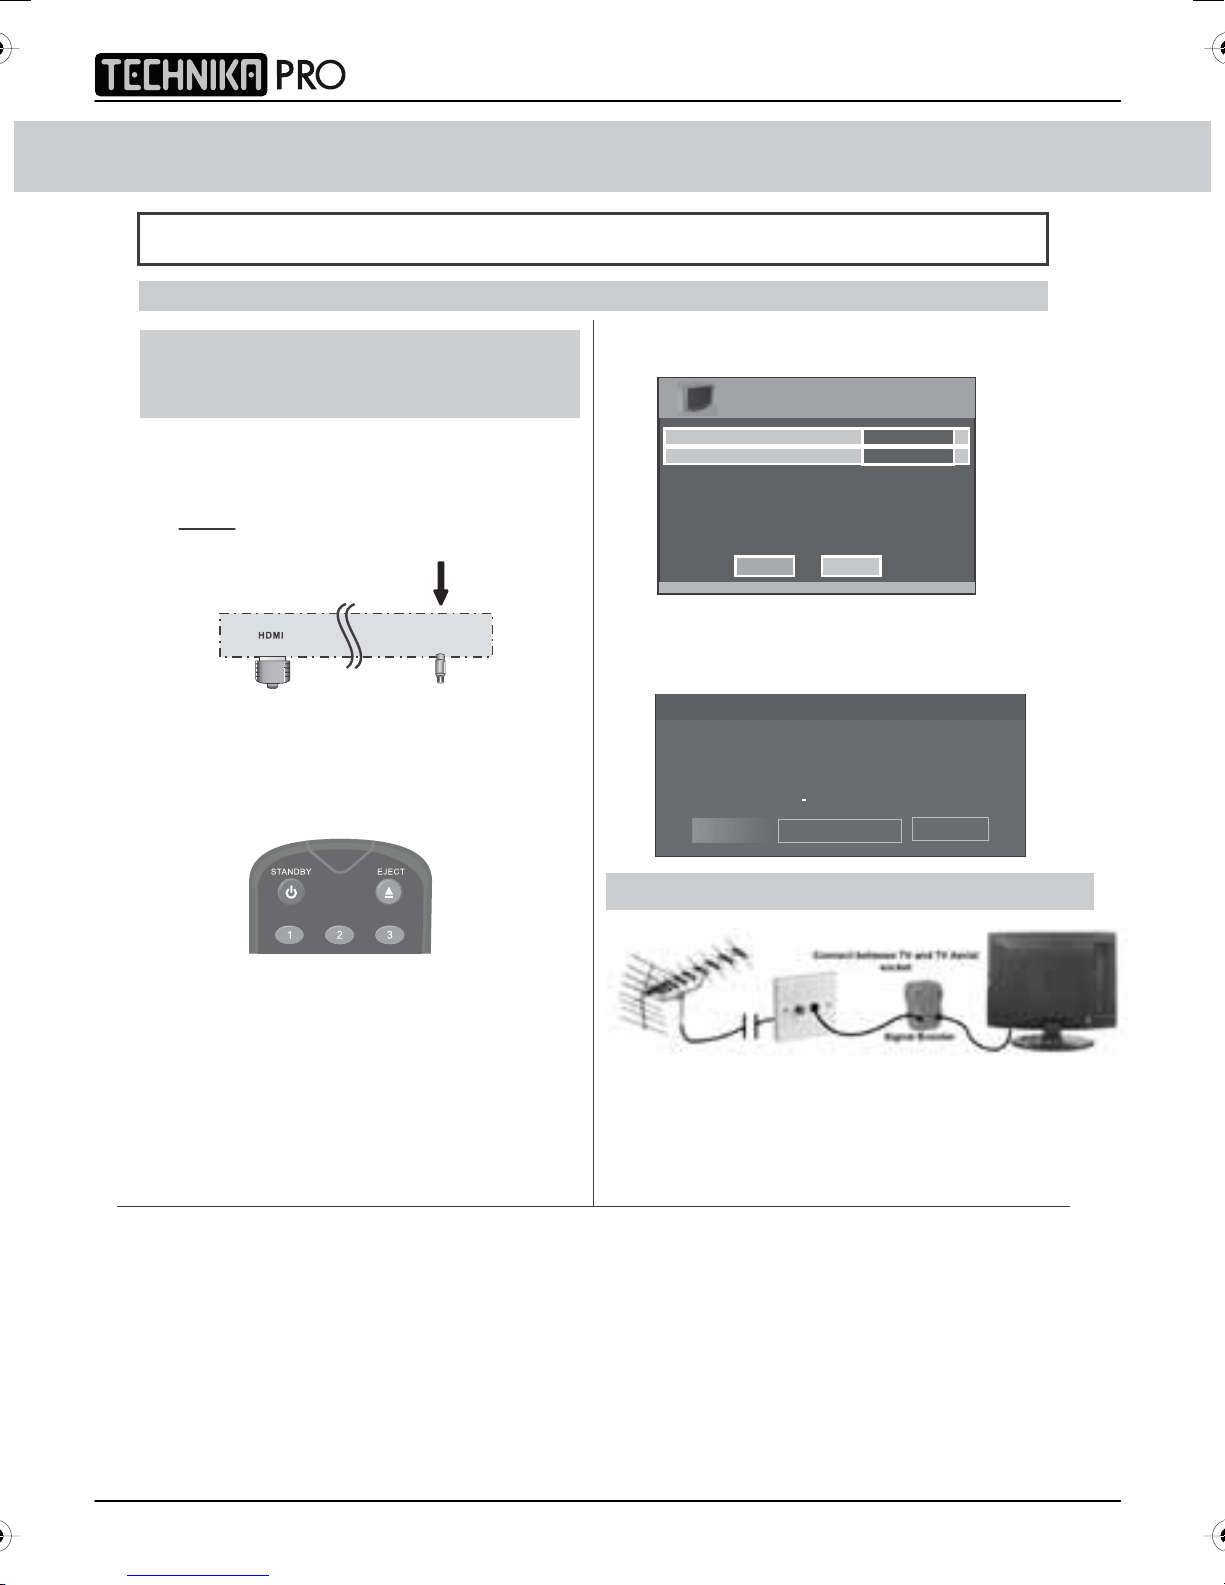
GETTING STARTED - INITIAL SET UP
IMPORTANT - AFTER TUNING DO NOT PRESS ANY BUTTONS FOR 20 SECONDS SO THE CHANNEL
INFORMATION CAN BE STORED.
TUNING IN
IDTV
IMPORTANT — Please ensure the TV has
reached room temperature before
connecting the power for the first time
1) Connect the mains lead to your electrical outlet
2) Connect the RF cable supplied to the
'RF IN' on the rear of the TV and connect
the other end of the cable to your TV Aerial outlet
RF IN
3) Switch on the television using the rocker switch
located on the side of the TV
4) Install batteries in the remote control and press
the [STANDBY] button to turn on the TV.
INFO
5) Press [OK] on the remote control whilst ‘OK’
is highlighted on screen.
First Time Installation
Country
Language
Please ensure that the aerial is connected to the connector
labelled ‘ RF In ’ on the rear of the TV .Ensure that OK is
highlighted in yellow and press ‘OK’ on your remote .If after
this scan ,not all digital channels are found ,your aerial may
require a signal booster .alternatively ,upgrade your aerial
to a high gain digital version .
OK Cancel
UK
English
Tuning will now take place.
If no channels are found the following screen will appear,
please refer to additional information below.
First Time Installation
Unfortunately the TV did not find any channels
Please check your aerial connection
and refer to the user manual
Do you wish to re tune your TV
Yes Do it next time
No
TYPICAL SET-UP
The ‘First Time Installation’ menu should
now appear. If it does not, please press
[LCD-MENU] then 8-8-8-8 and the menu will
appear.
Once you have connected a 'Signal booster' youwill need
to retune the TV in order to receive all of the channels.
If the TV finds some, but not all, of the Digital channels, the TV is
functioning correctly but the signal being received is not strong enough.
(The signal strength needs to be above 85% - you can see the signal strength
the TV is receiving when you change channels/ programmes) you will
need to increase the signal reception in order to recieve all of the channels
available. The most economical way to do this is by purchasing
and connecting a 'signal booster' in between the TV and the TV aer
ial socket.
If this does not solve the problem, you will need to upgrade the TV
aerial to a digital hi-gain compatible aerial
10
Page 13
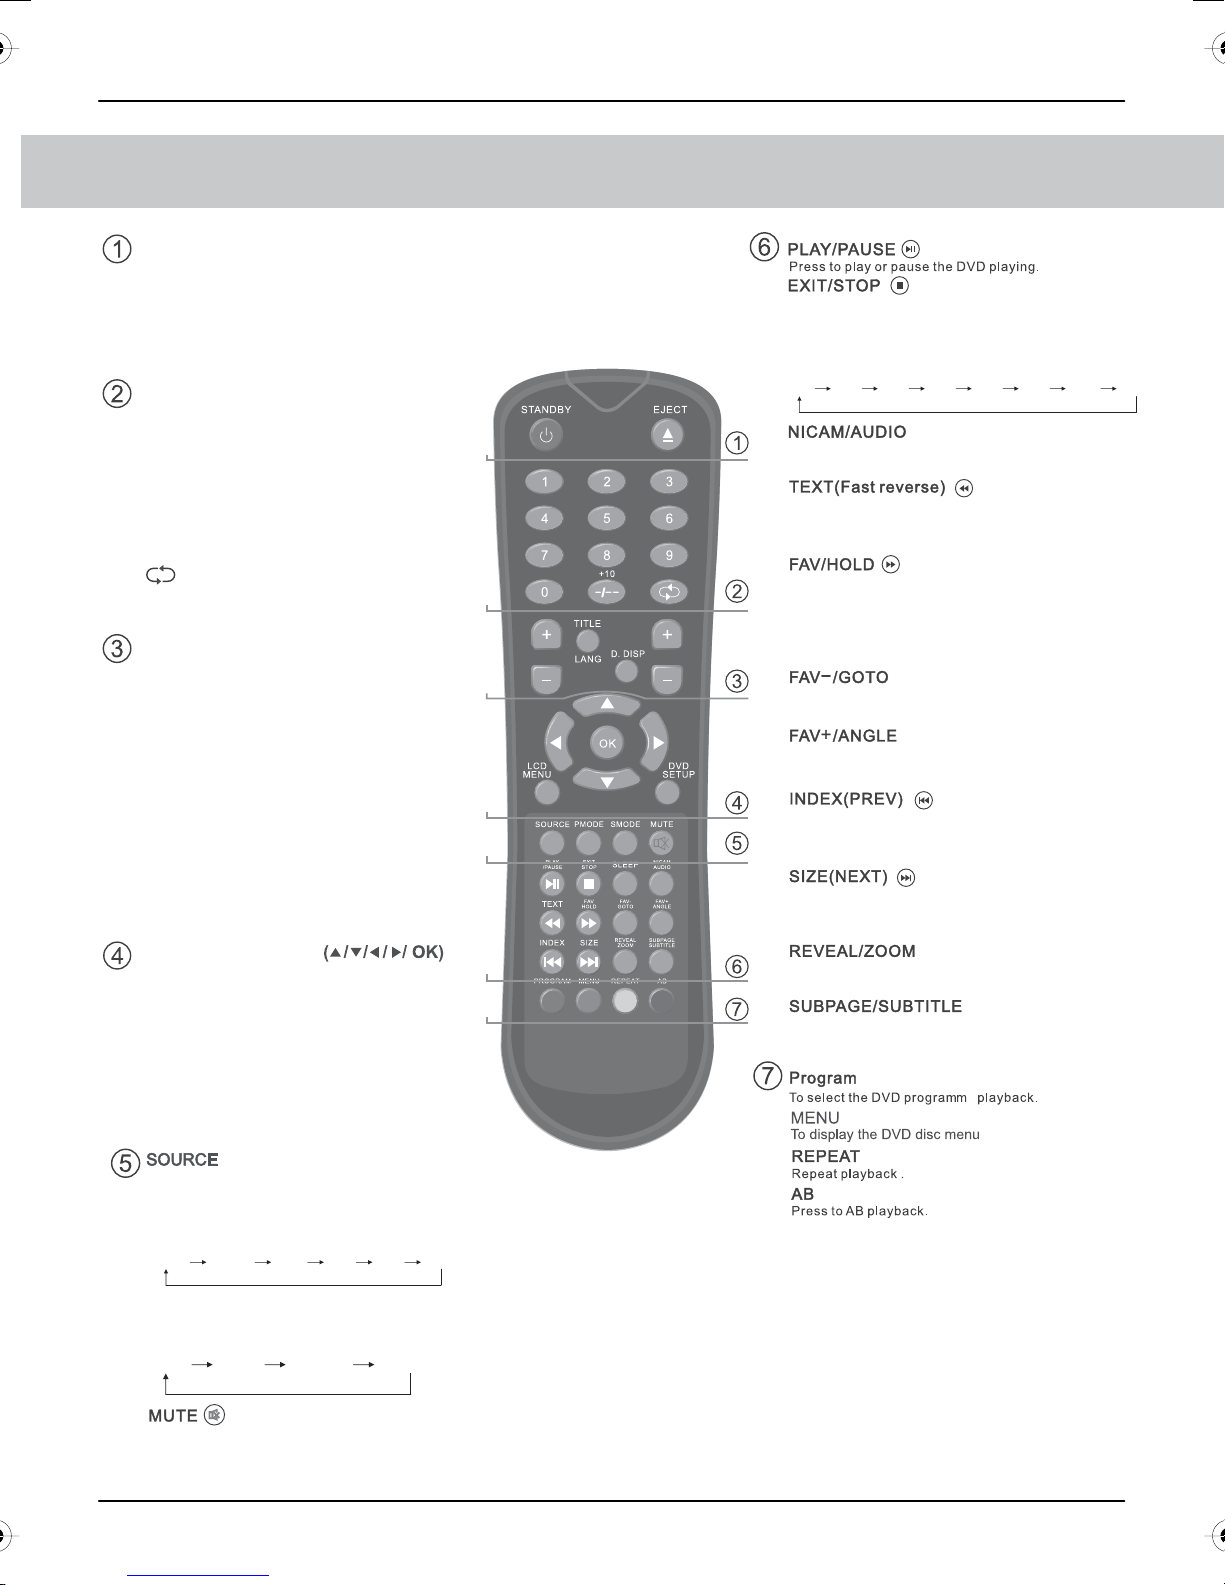
REMOTE CONTROL BUTTONS
STANDBY
Switch on TV when in standby or vice versa
EJECT / INFO
DVD mode: To eject disc
Digital/analogue mode: To display channel
information
NUMBER BUTTONS
Digital/analogue mode: 0 – 9 to select a
TV channel directly.
The channel will change after 2 seconds.
Teletext mode: To enter a page number
INFO
User Guide
Digital mode: Exit the Digital menu.
DVD mode: Stop the DVD playing.
SLEEP
Press repeatedly to cycle through the sleep options
15min 45min30min
Digital mode: press to select NICAM.
DVD mode: press to select DVD audio channels.
75min60min
90min 105min 120min
-/--
Analogue mode: To enter a channel of 2 digits
i.e. channel 15
Digital/analogue mode: To return to the previous
channel viewed
VOL+/-
To increase / decrease the sound level
TITLE/LANG
DVD mode: To display the DVD title menu
Digital mode: To change the audio language
(if available)
D.DISP/GUIDE
DVD mode: To display the current disc
information
Digital mode : To open the TV Guide menu
CH +/-
To increase or decrease the channel being
watched
NAVIGATION BUTTONS
Allows you to navigate the on-screen menus
and adjust the system settings to your preference
LCD MEN
U
To display OSD menu
DVD SETUP/PICTURE FORMAT
DVD mode: To display the DVD setup menu
All other modes: to switch the screen between
the different picture formats
- TV/AV
Press to display the source menu
PMODE
Press repeatedly to cycle through the available
picture modes
Standard MoviePersonal
MildSport
Game
VOL
TV/AV
GUIDE
PICTURE
FORMAT
CH
Teletext mode: press to enter the teletext mode.
fast
DVD mode: press to play a DVD programme
in
rewind mode.
Digital mode: press to display FAV menu.
Teletext mode: press hold on or off for c
urrent page
display.
DVD mode: press to play a DVD programme in fast
forward mode
Digital mode: decrease fav channel.
DVD mode: press to go to DVD.
Digital mode: increase fav channel.
DVD mode: select different angle of DVD
Teletext mode: request the index page.
DVD mode: press to replay the current programme from
the previous chapter.
Teletext mode: change the display size.
DVD mode: press to advance forward to the next
chapter.
Teletext mode: To reveal or hide the hidden words.
DVD mode: select the zoom to change picture size.
Teletext mode: Sub coded page acceses.
Digital mode: To switch the dialogue at the bottom
off the screen
SMODE
Press repeatedly to cycle through the available
sound modes
Voice
Music
Theatre
Personal
Press to mute the sound and press again to
restore
11
Page 14
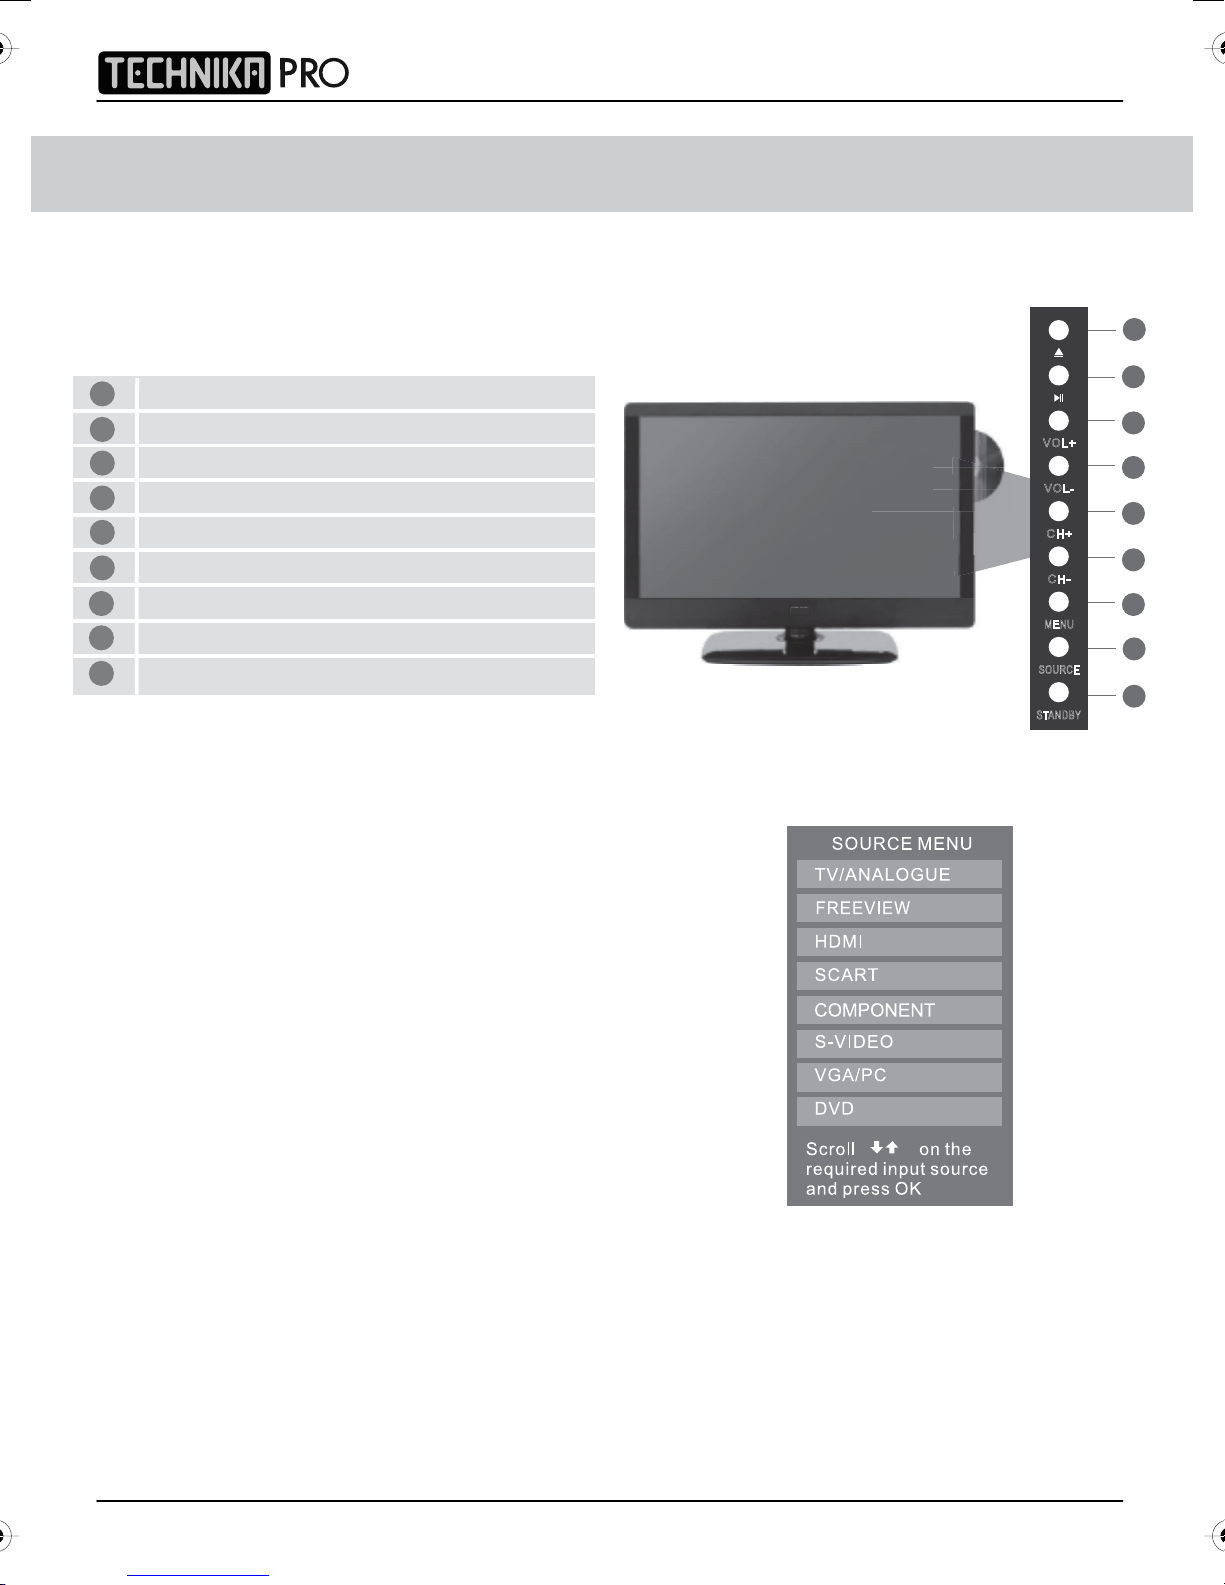
TV BUTTONS & THEIR FUNCTIONS
SIDE PANEL BUTTONS
IDTV
1
1
2
3
4
5
6
7
8
9
DVD - Eject
DVD – Play/Pause
Volume up and menu right
Volume down and menu left
Programme/Channel up and menu up
Programme/Channel down and menu down
Displays Menu/OSD
Select the input source
Standby Power On/Off
Choosing Mode/Source
To switch between the different connections is very easy.
Using the buttons on the remote control:
2
3
VOL+
4
VOL-
5
CH+
6
CH-
7
MENU
8
SOURCE
9
STANDBY
1) Press [SOURCE] - The following will appear
2) Press [\/] or [/\] to select the input you require.
3) Press [OK]
Using the buttons on the Television:
1) Press [SOURCE]
2) Scroll up / down using CH+/ CH- buttons to the
input/source you require
3) Press Vol+ to change input/source to the one selected.
12
Page 15
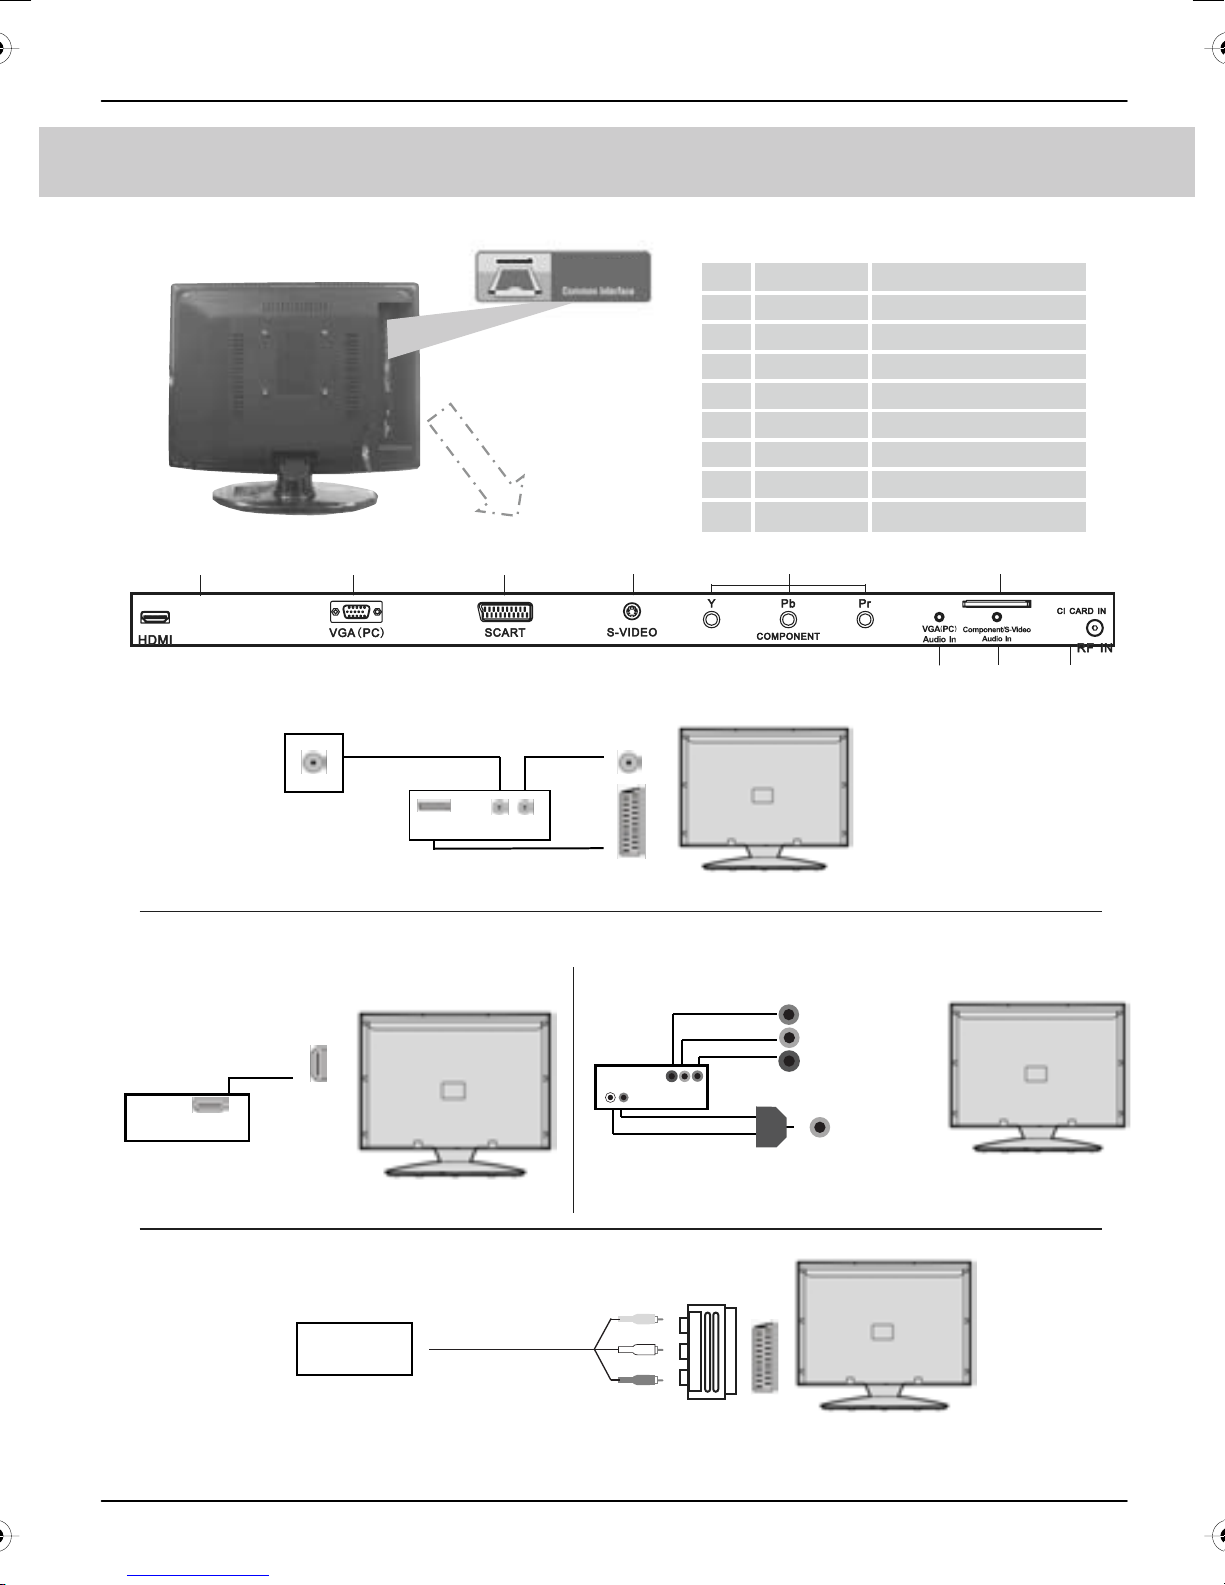
INPUTS & CONNECTIONS
REAR CONNECTIONS
User Guide
CI Port
A B C D E F
A
B
C
D
E
F
G
H
I
HDMI
VGA (PC)
SCART
S-VIDEO
YPbPr
CI CARD IN
VGA(PC) AUDIO IN
Component/
S-Video Audio In
RF IN
HDMI input
VGA-PC input
SCART input
S-Video input
Component input
CI Port input
3.5mm PC Audio input
3.5mm Component/S-Video Audio input
RF input
G H I
CONNECTING A DVD RECORDER OR VIDEO RECORDER
RF IN
DVD or VCR
Wall Aerial
Point
SCART
OUT
RF
RF
OUT
IN
SCART
Source should be set to SCART
CONNECTING A HIGH DEFINITION DEVICE
OPTION A – HDMI OPTION B – COMPONENT & AUDIO CABLES
HDMI
OUT
HDMI
Audio L/R
Component
Red
White
Red
Green
Blue
3.5mm Jack to phono
adapter or cable
Pr
Y
Pb
YPbPr/S-Video
3.5mm
Audio
Note – you will need the Phono
to 3.5mm Audio cable included
to connect into the 3.5mm Audio
Source should be set to HDMI Source should be set to YPbPr/COMPONENT
CONNECTING A CAMERA OR CAMCORDER
Camera or Camcorder
Source should be set to SCART
S
CART Adaptor
Yellow
White
Red
Note - SCART to AV Adaptor
– often included with some devices,
alternatively, these can be purchased
from the helpline/website
SCART
Input on the TV
13
Page 16
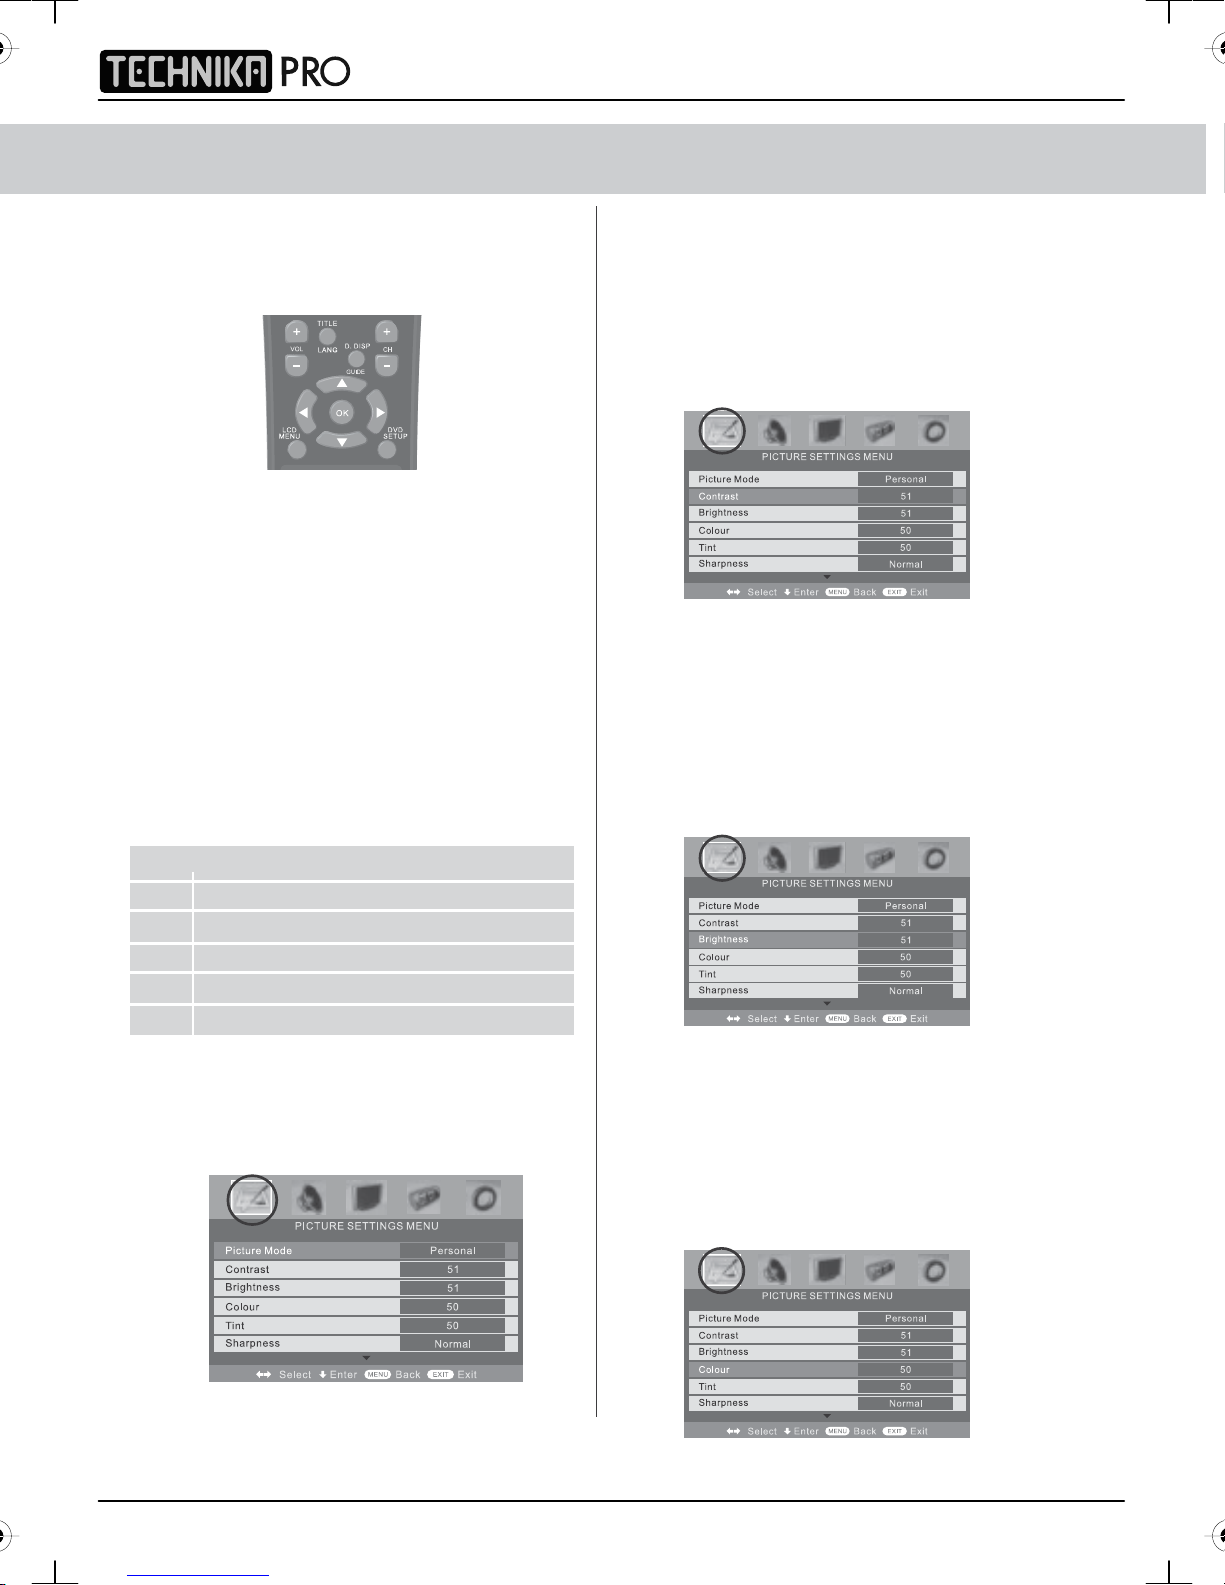
TV MENU OPERATION
IDTV
To access the OSD menu, press
‘LCD-Menu’ on the remote control.
Use the scroll up/down/right/left to
navigate through the menus.
PICTURE
FORMAT
PICTURE SETTINGS MENU
Lets you adjust picture mode, contrast,
brightness, colour, tint and sharpness
to enhance the viewing experience.
PLEASE NOTE – YOU CAN ONLY MAKE
ADJUSTMENTS TO CONTRAST,
BRIGHTNESS & COLOUR WHEN
PICTURE MODE IS SET TO ‘PERSONAL’.
Selecting Picture Mode Preset
Switch between different preset picture
options
Adjusting Contrast (Only available when
Picture Mode is set to Personal)
Switch the balance between black
and white
1) Press [LCD-MENU] to enter menu
2) Press [\/] to highlight Contrast
3) Press [>] to increase the contrast
or [<] to decrease the contrast
4) Press [EXIT] to exit
Adjusting Brightness (Only available
when Picture Mode is set to Personal)
Increase or decrease the brightness
of the picture
1) Press [LCD-MENU] to enter menu
2) Press [\/] to highlight Brightness
3) Press [>] to increase the brightness
or [<] to decrease the brightness
Standard Default settings
Personal Lets you manually alter all the settings
Movie Set to enhance when watching a movie
Sport Set to enhance when watching a sport
Mild Set to be lighter in colour and less bright
Game Set to enhance when playing a games console
1) Press [LCD-MENU] to enter menu
2) Press [\/] to highlight Picture Mode
3) Pre
ss [>] to navigate through
the various options
4) Press [EXIT] to exit
4) Press [EXIT
Adjusting Colour (Only available when
Picture Mode is set to Personal)
Increase the colour from black and white
to vivid
1) Press [LCD-MENU] to enter menu
2) Press [\/] to highlight Colour
3) Press [>] to increase the colour
or [<] to decrease the colour
] to exit
14
4) Press [EXIT] to exit
Page 17
TV MENU OPERATION
User Guide
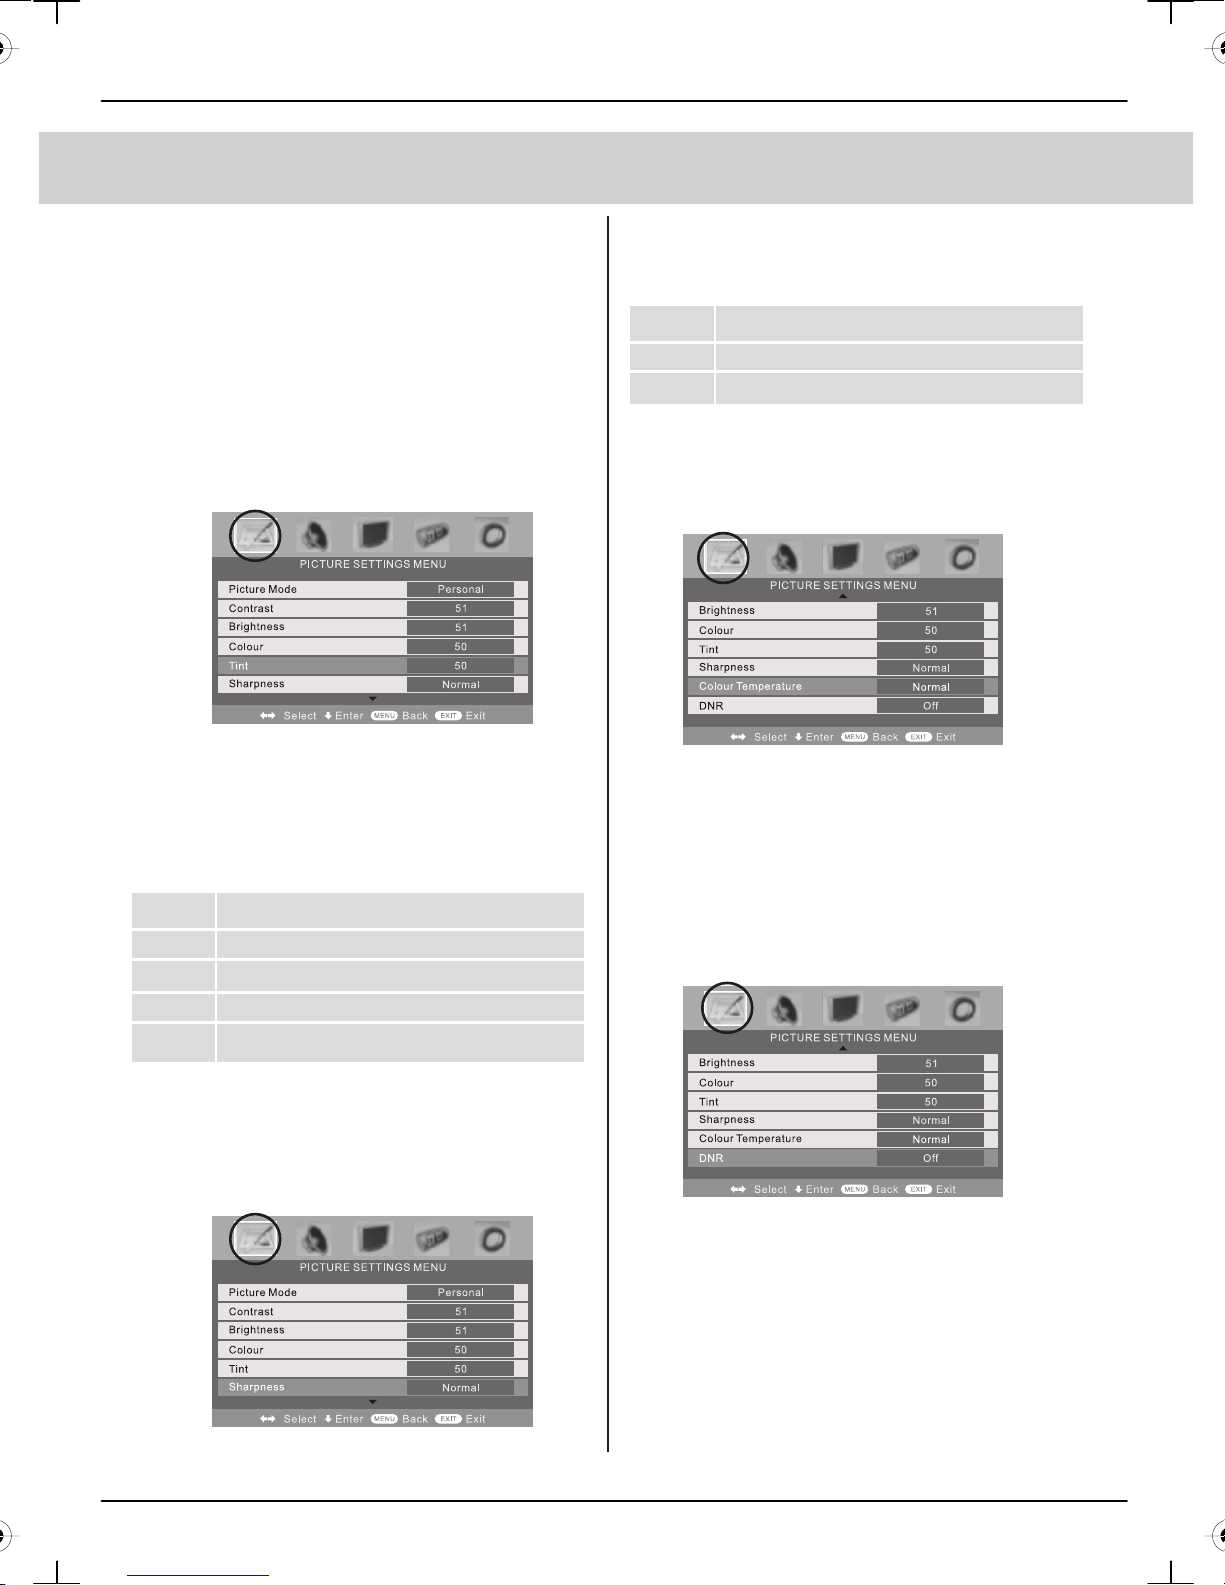
PICTURE SETTINGS MENU
Adjusting Tint (only available on some
sources)
Lets you increase or decrease the level
of tint within the picture
1) Press [LCD-MENU] to enter menu
2) Press [\/] to highlight Tint
3) Press [>] to increase the tint
or [<] to decrease the tint
4) Press [EXIT] to exit
Adjusting Sharpness
You can change the sharpness between
the different preset options
Adjusting Colour Temperature (only available
on some sources)
There are 3 presets for colour temperature
Normal Standard setting
Warm Increased red within the picture
Cold Increased blue within the picture
1) Press [LCD-MENU] to enter menu
2) Press [\/] to highlight Colour Temperature
3) Press [>] to navigate through the
various options
4) Press [EXIT] to exit
Dynamic Noise Reduction
Reduces the interference in the picture.
Normal For standard use
Sharp For pictures with little movement
Sharpest For pictures with nearly no movement
Soft For pictures with large amount of movement
Softest For pictures with lots of movement
1) Press [LCD-MENU] to enter menu
2) Press [\/] to highlight Sharpness
3) Press [>] to navigate through
the various options
4) Press [EXIT] to exit
1) Press [LCD-MENU] to enter menu
2) Press [\/] to highlight DNR
3) Press [>] to switch between OFF, LOW,
MID & HIGH
4) Press [EXIT] to exit
15
Page 18
TV MENU OPERATION
IDTV
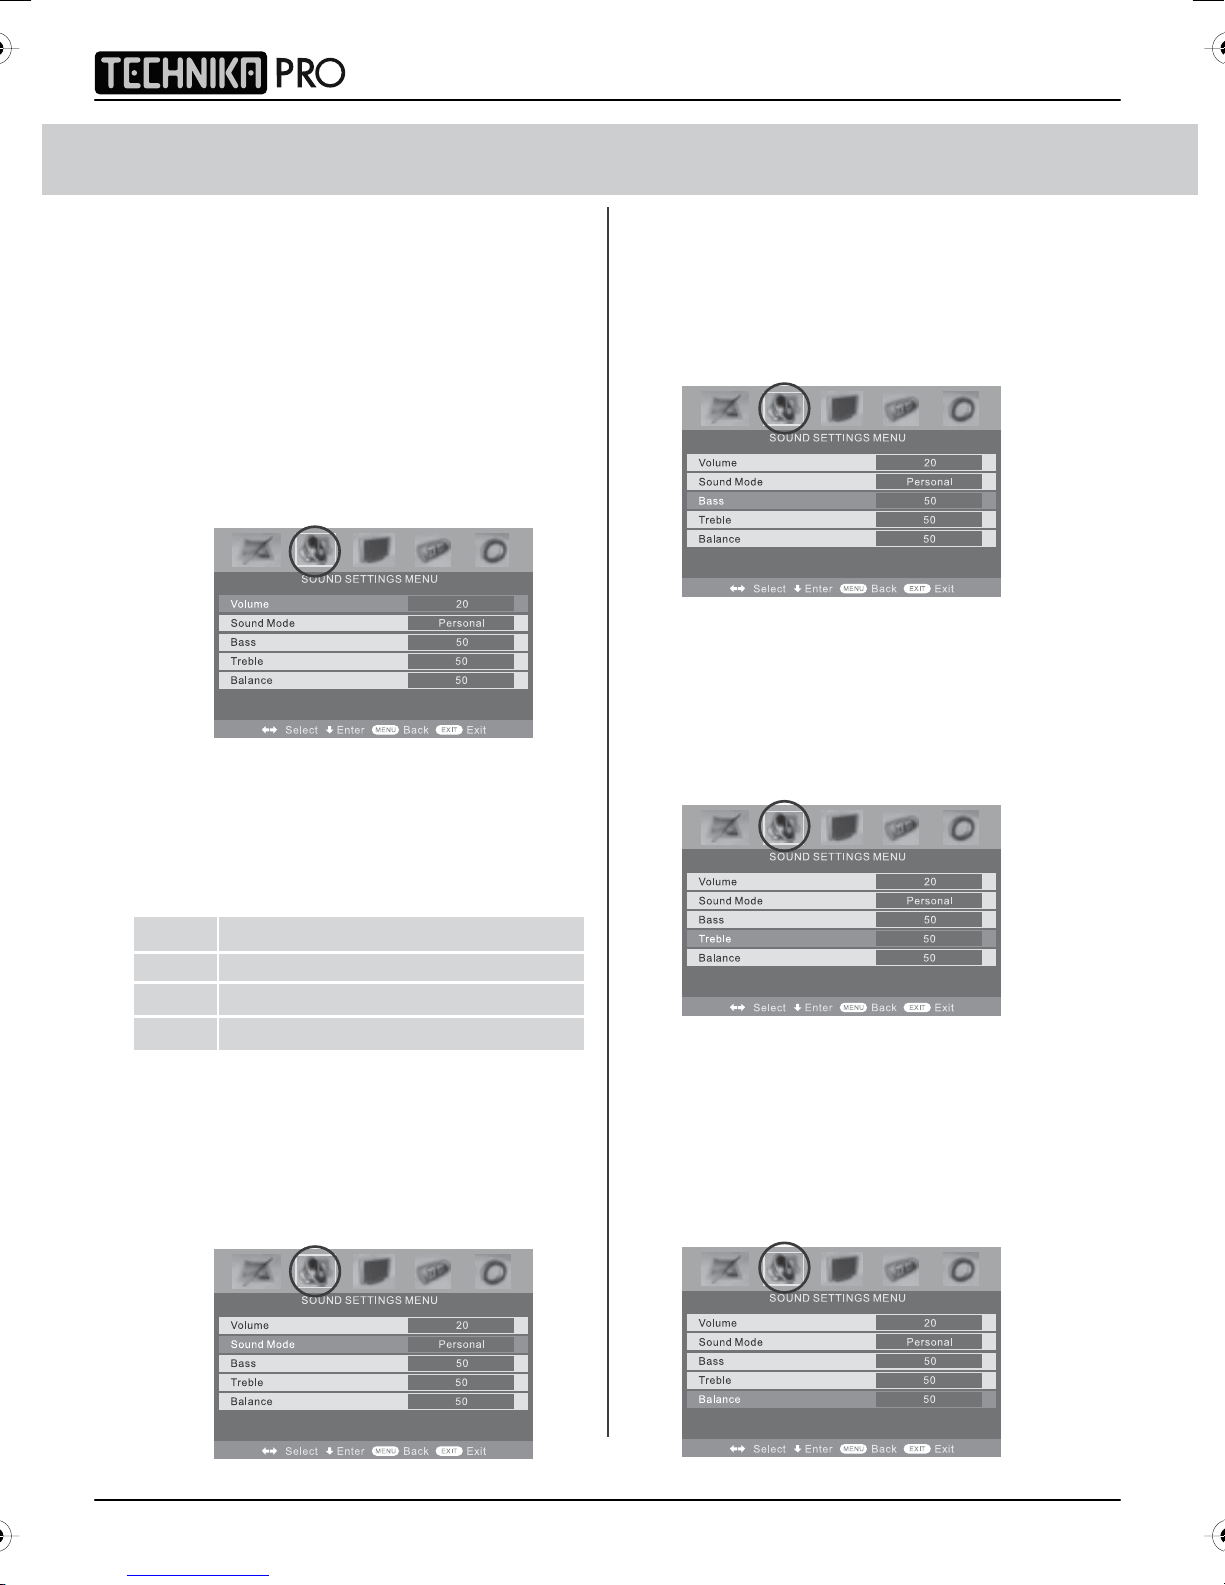
SOUND SETTINGS MENU
Adjusting Volume
Lets you adjust the volume
of the television
1) Press [LCD-MENU] to enter menu
2) Press [>] to move to Sound Settings
Menu
3) Press [\/] to highlight Volume
4) Press [>] to increase the volume
or [<] to decrease the volume
5) Press [EXIT] to exit
Selecting Sound Mode Preset
Switch between different preset sound
options
Adjusting Bass
To adjust the amount of bass within the sound
1) Press [LCD-MENU] to enter menu
2) Press [>] to move to Sound Settings Menu
3) Press [\/] to highlight Bass
4) Press [>] to increase the bass or [<]
to decrease the bass
5) Press [EXIT] to exit
Adjusting Treble
To adjust the amount of treble within the sound
1) Press [LCD-MENU] to enter menu
2) Press [>] to move to Sound Settings Menu
3) Press [\/] to highlight Treble
4) Press [>] to increase the treble or [<]
to decrease the treble
Voice Emphasises voice over other sounds
Music Emphasises music over voices
Theatre Provides liver and full sound for movies
Personal Selects your personal sound settings
1) Press [LCD-MENU] to enter menu
2) Press [>] to move to Sound Settings
Menu
3) Press [\/] to highlight Sound Mode
4) Press [>] to navigate through
the various options
5) Press [EXIT] to ex
it
5) Press [EXIT] to exit
Adjustin
To switch the sound between the left
and right speakers
1) Press [LCD-MENU] to enter menu
2) Press [>] to move to Sound Settings Menu
3) Press [\/] to highlight Balance
4) Press [>] to increase the balance or [<]
to decrease the balance
5) Press [EXIT] to exit
g Balance
16
Page 19
TV MENU OPERATION
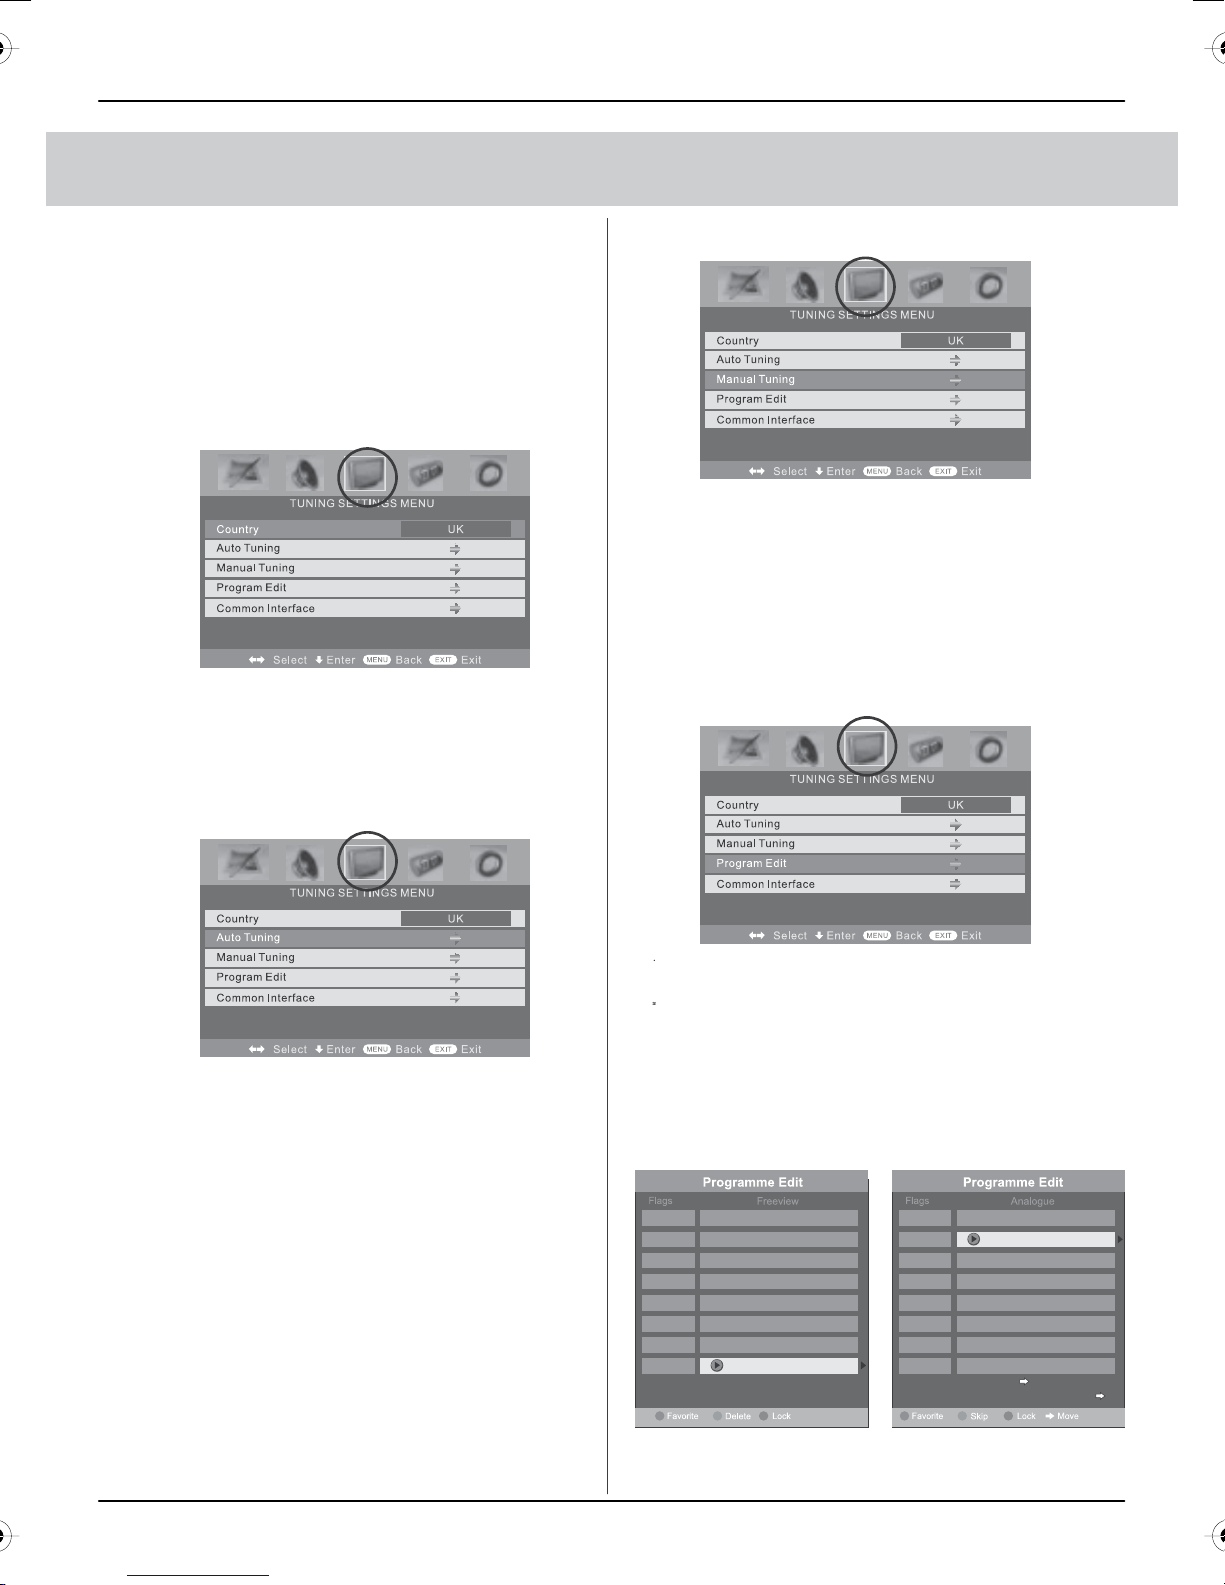
TUNING SETTINGS MENU
(Only Freeview & Analogue TV modes)
Adjusting Country
If you are moving country you may wish
to change the Country Settings
1) Press [LCD-MENU] to enter menu
2) Press [>] to move to Tuning Settings Menu
3) Press [\/] to highlight Country
4) Press [>] to alter the chosen country
User Guide
6) Press [>] to start
7) Press [EXIT] to exit
Programme Edit / Changing Channel Position
(Only Freeview & Analague TV modes)
You can change the analogue channel
position to suit your requirements.
5) Press [EXIT] to exit
Auto Tuning
Scan for all channels based on the current settings
1) Press [LCD-MENU] to enter menu
2) Press [>] to move to Tuning Settings Menu
3) Press [\/] to highlight Auto Tuning
4) Press [>] to enter Auto tuning
5) Press [OK] to start the tuning
6) Press [EXIT] to exit
Manual Tuning
You may wish to manual search if you
can’t find a
certain channel or if you wish to connect to a
Satellite/Cable box via RF/Aerial connector
1) Press [LCD-MENU] to enter menu
2) Press [>] to move to Tuning Settings Menu
3) Press [\/] to highlight Manual Tuning
4) Press [>] to enter manual tuning
5) Press [>] to highlight Start Screen
1) Press [LCD-MENU] to enter menu
2) Press [>] to move to Tuning Settings Menu
3) Press [\/] to highlight Programme Edit
4) Press [>] to enter the program edit menu
5a) Freeview mode – Press the [Green] button to add the
selected channel to your favorite, press it a second
time to remove. Press the [Yellow] to delete the channel
from the list. WARNING – this will remove the channel
complete from the TV. Press [Blue] to lock a channel (to
do this the Child Lock function must be set “ON”)
5b) Analogue TV mode – Press the [>] to select the change
you wish to move. Move to the new location and press
[OK]
715.Magic
716.Q
718.SMOOTH RADIO
722.Kerrang!
723.talkSPORT
725. Premier Radio
727.Absolute Radio
728.Heart
To swap channel press on remote
move to the desired location and press
1.
2.
3.
4.
5.
6.
7.
8.
6) Press [EXIT] to exit
17
Page 20
TV MENU OPERATION
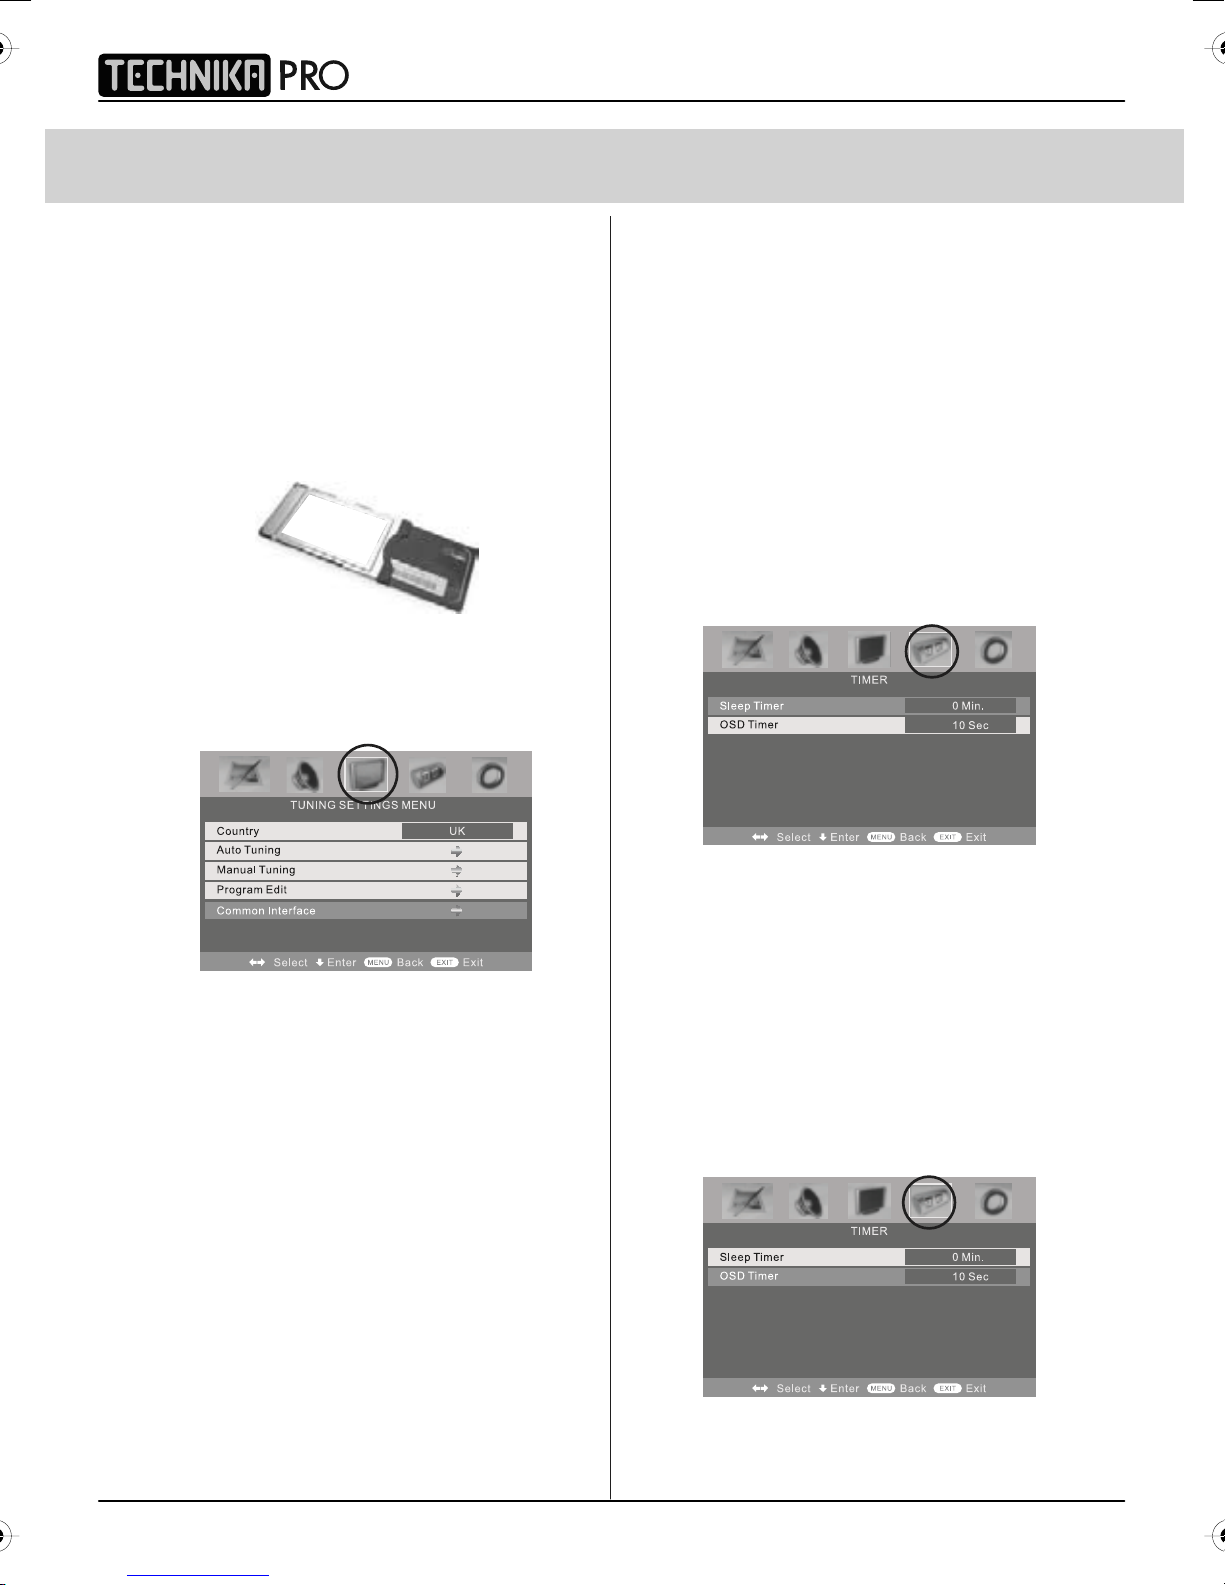
Common Interface Slot
(Only in Freeview Mode)
Pay per view services require a “smartcard” to
be inserted into the TV. If you subscribe to a
pay per view service the provider will issue you
with a ‘CAM’ and a “smartcard”. The CAM can
then be inserted into the COMMON
INTERFACE PORT. To access the card follow
the steps below.
CAM and smartcard
1) Press [LCD-MENU] to enter menu
2) Press [>] to move to Tuning Settings Menu
3) Press [\/] to highlight Common Interface
4) Press [>] to enter the menu
IDTV
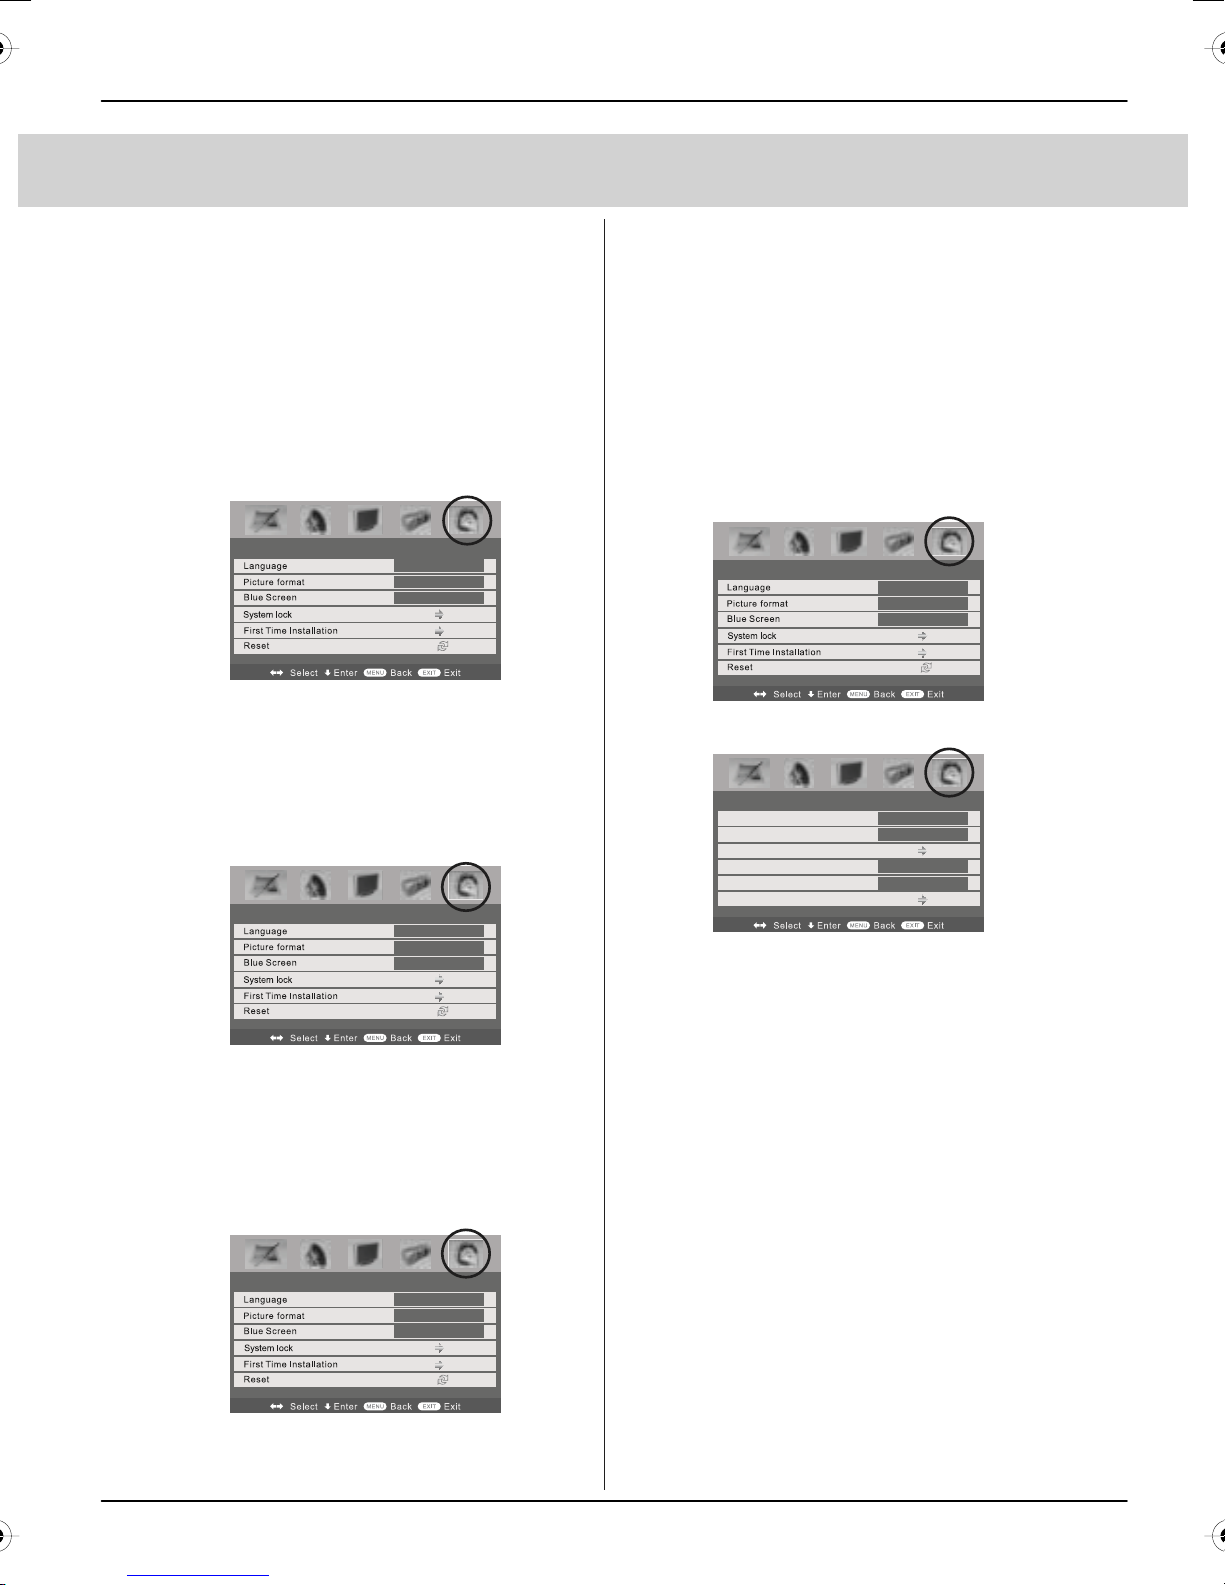
TIMER SETTINGS MENU
Lets you adjust the OSD timing and
the sleep timer
Sleep Timer
Lets you set the sleep timer so
the television automatically switches off
after a certain amount of time.
1) Press [LCD-MENU] to enter menu
2) Press [>] to move to Timer Settings
Menu
3) Press [\/] to highlight Sleep Timer
4) Press [>] to increase the time
to the required amount
5) Press [EXIT] to exit
5) Press [EXIT] to exit
On Screen Display Timer
Lets you adjust the amount of time the On
Screen Menu stays on the screen before
disappearing.
1) Press [LCD-MENU] to enter menu
2) Pre
3) Press [\/] to highlight OSD Timer
4) Press [>] to increase the time and [<] to
reduce the time
5) Press [EXIT] to exit
ss [>] to move to Timer Settings Menu
18
Page 21
TV MENU OPERATION
User Guide
GENERAL SETTINGS MENU
Lets you adjust the language, picture size,
blue screen, add child lock, complete first
time installation and reset the television.
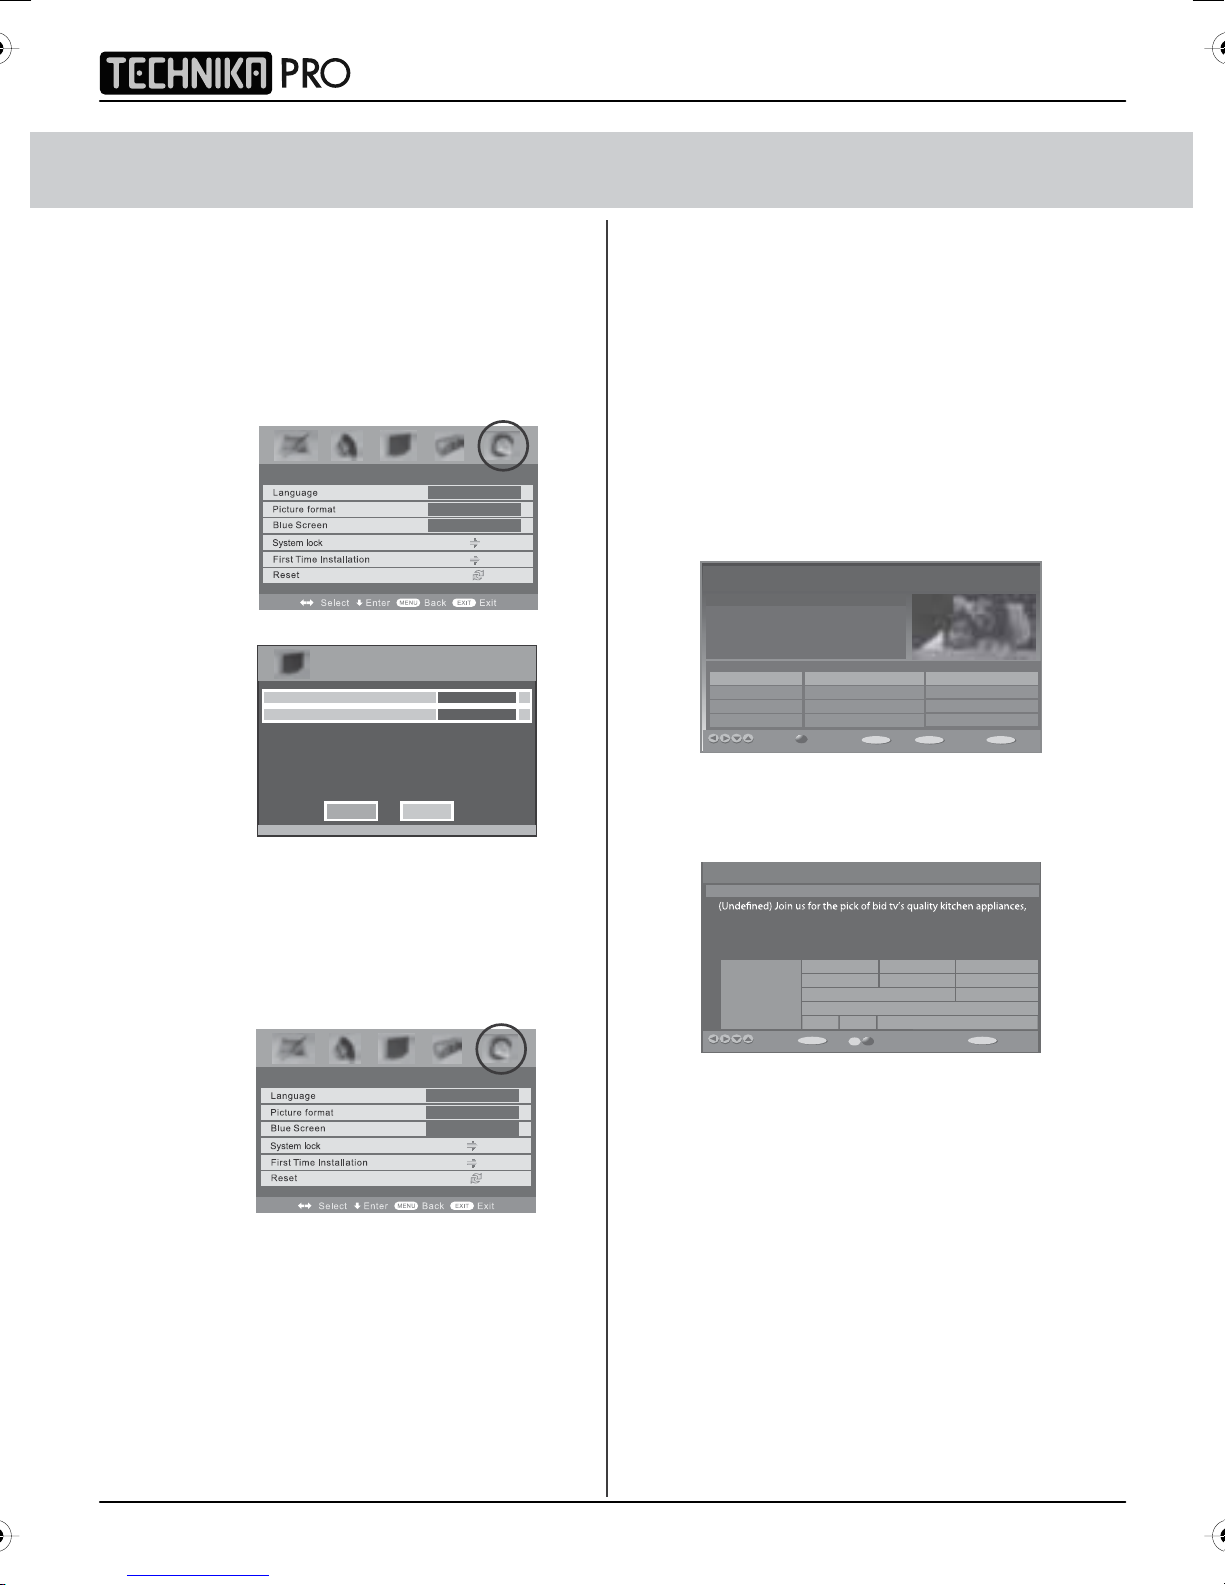
On Screen Menu Language
Lets you change the on screen menu language.
1) Press [LCD-MENU] to enter menu
2) Press [>] to move to General Settings
Menu
3) Press [\/] to highlight Language
4) Press [>] to change the language
GENERAL SETTINGS MENU
5) Press [EXIT] to exit
Picture Format
Lets you adjust the picture format
1) Press [LCD-MENU] to enter menu
2) Press [>] to move to General Settings Menu
3) Press [\/] to highlight Picture Format
4) Press [>] to chang
e the picture
format
GENERAL SETTINGS MENU
English
Auto
Off
English
Auto
Off
System Lock
This menu allows you to lock certain features of the
television so that they can not be used or viewed. For
example if you don’t want certain channels viewed by
children or if the television is to be used in a hotel and
you want to limit the volume.
You can lock any of the followin
g - TV buttons,
TV source, set default start up source and limit the
maximum volume.
1) Press [LCD-MENU] to enter menu
2) Press [>] to move to General Settings Menu
3) Press [\/] to highlight System Lock
GENERAL SETTINGS MENU
English
Auto
Off
4) Press [>] to enter System Lock menu
System Lock
Key Lock
Source Lock
Default Source
Max Volume
Change PIN Code
SYSTEM LOCK
Off
On
ATV
99
5) To enter this menu you will be asked for your pin code
(Default is blank so you just need to press [OK]).
6) To set locks you first need to switch System Lock to
ON, this will un grey the options.
5) Press [EXIT] to exit
Blue Screen
Changes the background when there is
no input between clear and a blue background
1) Press [LCD-MENU] to enter menu
2) Press [>] to move to General Settings Menu
3) Press [\/] to highlight Blue Screen
4) Press [>] to switch between on and off
GENERAL SETTINGS MENU
5) Press [EXIT] to exit
English
Auto
Off
You can now select the following:
Key Lock – Off/
On – This stops the buttons on the
television working.
Source Lock – Press [>] to enter then apply On to lock
the source so it can’t be used
Default Source – You can set the default start up source,
so when the television is turned on it goes to this source.
Maximum Volume – You can limit the maximum volume
Change Pin Code – Press [>] to enter, first enter the
current code (default is blank so just press OK), then
enter your new code.
7) Once you happy with the settings press [EXIT] to exit
menu.
Channel Lock – please refer to Programme Edi
t section to
select the channels that you require to lock. Once locked
you can temporarily unlock a channel by entering the pin
code, the lock will be re-applied by switching off the TV
to standby and then back on.
19
Page 22
TV MENU OPERATION & 7 DAY TV GUIDE
IDTV
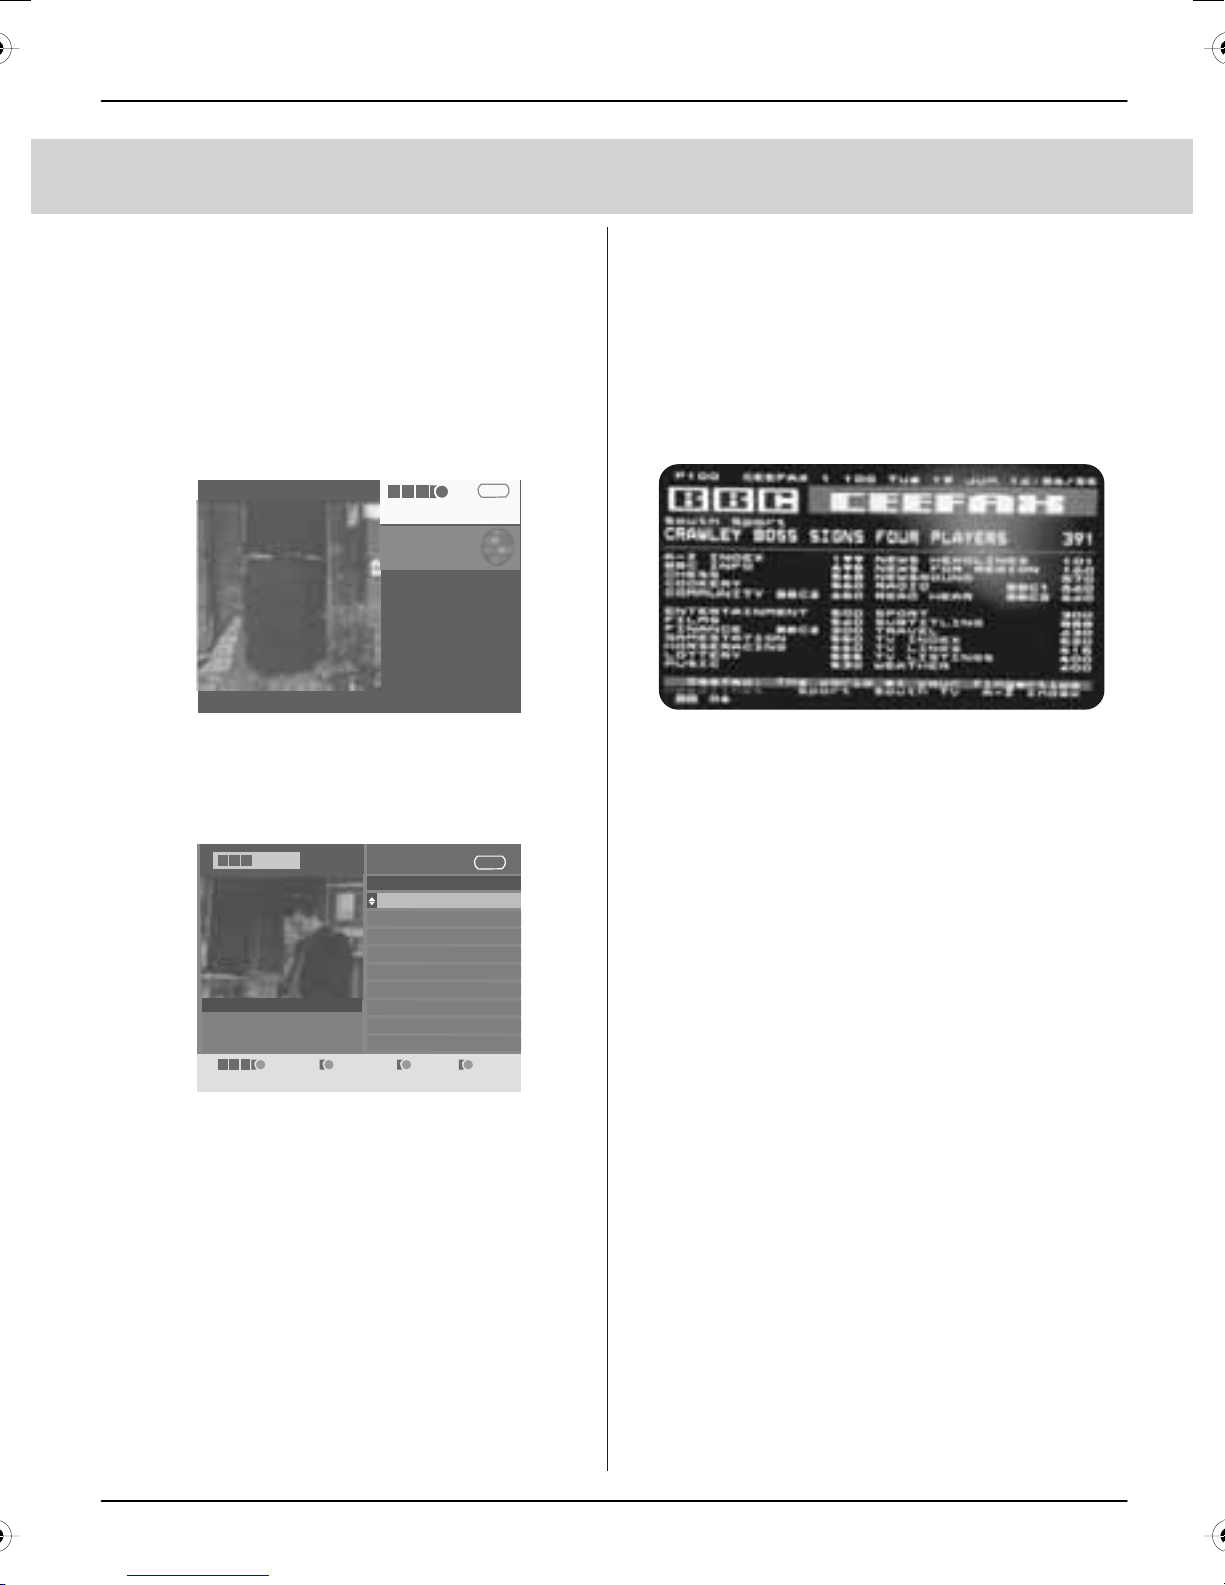
First Time Installation
Allows you to reset the television for first time
tuning.
1) Press [LCD-MENU] to enter me
nu
2) Press [>] to move to General Settings Menu
3) Press [\/] to highlight First Time Installation
4) Press [>] and First time install screen will
appear
GENERAL SETTINGS MENU
Welsh
Auto
Off
5) Press [OK] and tuning will commerce.
First Time Installation
Country
Language
Please ensure that the aerial is connected to the connector
labelled ‘ RF In ’ on the rear of the TV .Ensure that OK is
highlighted in yellow and press ‘OK’ on your remote .If after
this scan ,not all digital channels are found ,your aerial may
require a signal booster .alternatively ,upgrade your aerial
to a high gain digital version .
OK Cancel
UK
English
Reset television to factory settings
You may
wish to reset the menus to factory
settings e.g. if you have forgotten a changed
password
1) Press [LCD-MENU] to enter menu
2) Press [>] to move to General Settings Menu
3) Press [\/] to highlight Reset
4) Press [OK] to reset the television
7 DAY TV GUIDE
TV Guide is available in Digital TV mode.
It provides information about forthcoming
programmes (where supported by the
broadcasted channel).
You can view the start and end time of all
programs and on all channels for the next
7 days.
It is very simple to operate.
1) Press [GUIDE]. The following now and next menu
will appear.
TV Guide
(News/CA) Nick Knowles presents dramatic
events from the day-to-day work of the
emergency services, The series is out on call
with the dedicated crews, answering 999
calls as they protect the public. [S]
Channels
1. BBC ONE Real Rescues Put your Money Where Y...
2. BBC TWO
3. ITV 1
4. Channel 4
Current Event Next Event
Balamory
The Jeremy Kyle Show
Impressionism: Revenge...
Navigate
7 Day Guide
00:01-51:90seucseRlaeR
EXIT OK
Quit Watch Help
Tues 14/10 09:42
Little Red Tractor
This Morning
Freshly Squeezed Shorts
INFO
2) Navigate through the now and next menu using
the [>], [<], [V] and [/\] buttons
3) Press the [BLUE] button to enter the 7 day menu.
Reminders can now be added by pressing [OK].
7 Day TV Guide
Essential Electricals
vacuum cleaners, irons, home telephones and many other essential
electricals.
Thur 31/5 14:00 14:45 15:30
23. bid tv Essential Electric
24. price-drop tv
26. UKTV Style
33. Eurosport UK
34. Setanta SP...
Handbag Heaven
Extreme Makeover: Home Edition
Closedown
Top 14: SPL Sna NRL on Fox
Navigate
Quality Products
Quality Products Quality Products a
Quit Change Day Reminder
Tues 31/5 14:29
14:00-14:30
Extreme Makeove
KOEXIT
GENERAL SETTINGS MENU
5) Press [EXIT] to exit
Please note – If you have applied the sys
lock to reset the television you must press
[LCD-MENU] then 8-8-8-8, to start the first
time installation sequence.
20
Welsh
4) Press [EXIT] to exit the 7 day TV Guide.
Auto
Off
tem
Page 23
DIGITAL TELETEXT & ANALOGUE TELETEXT
User Guide
Digital TV Teletext
With Digital TV (Freeview) there is also
digital teletext
available on some channels.
Simply follow the on screen commands. Here is
an example of the BBC digital teletext service.
1) To start digital teletext press the RED button
(BBC channels) or the TEXT buttons (Other
channels)
B B C i
Tuesday 18 Dec
Press SELECT for
Live Crecket
Eng v SL
Radio Concert
News Multiscreen 1001
Sport 300
Weather 400
BBCi INDEX 199
Did Bee Movie Leave you
buzzing? BBC Movies - 540
To exit, press TEXT
100
2) To select the information you require you
can scroll using [\/] or [/\] and press [OK]
alternatively you can key the page number
for example [3][0][0] followed by [OK]
B B C
SPORT
Sport
BBC ONE
To exit, press TEXT
For full screen TV, press 0
HOME SHORTCUTS BACK INDEX
B B C i
11:15 18 Dec
Sport in Video
Main Headlines
Football
Cricket
Rugby Union
Rugby League
Tennis
Golf
more...
300
You can then navigate using the colours
buttons (Red, Green, Yellow, Blue), the [/\] [\/]
buttons and numbers.
If you wish to exit at anytime press [EXIT]
Teletext is a service offered by some
broadcasters.
Teletext Operation
1) Press [TEXT], after a few seconds
teletext page 100 should appear.
Here is an example of BBC1
2) You can now navigate to the page
you require in a number of ways:
a) Press the page you require using
the number buttons i.e. page 302,
by pressing [3][0][2]
b) Press the colour buttons, these will
take you to the page indicated
on screen for each colour
3) To exit Teletext press [TEXT] twice
at any time
Other buttons
[SIZE] this increases or decreases the
size of the text on screen
[INDEX] some pages are more than one
page long this button displays
the number of pages
[REVEAL] if there is an answer or
something hidden this will display it
[SUBPAGE] displays the sub page
if it exists
[HOLD] This stops the pages changing
when there are multiple pages
21
Page 24
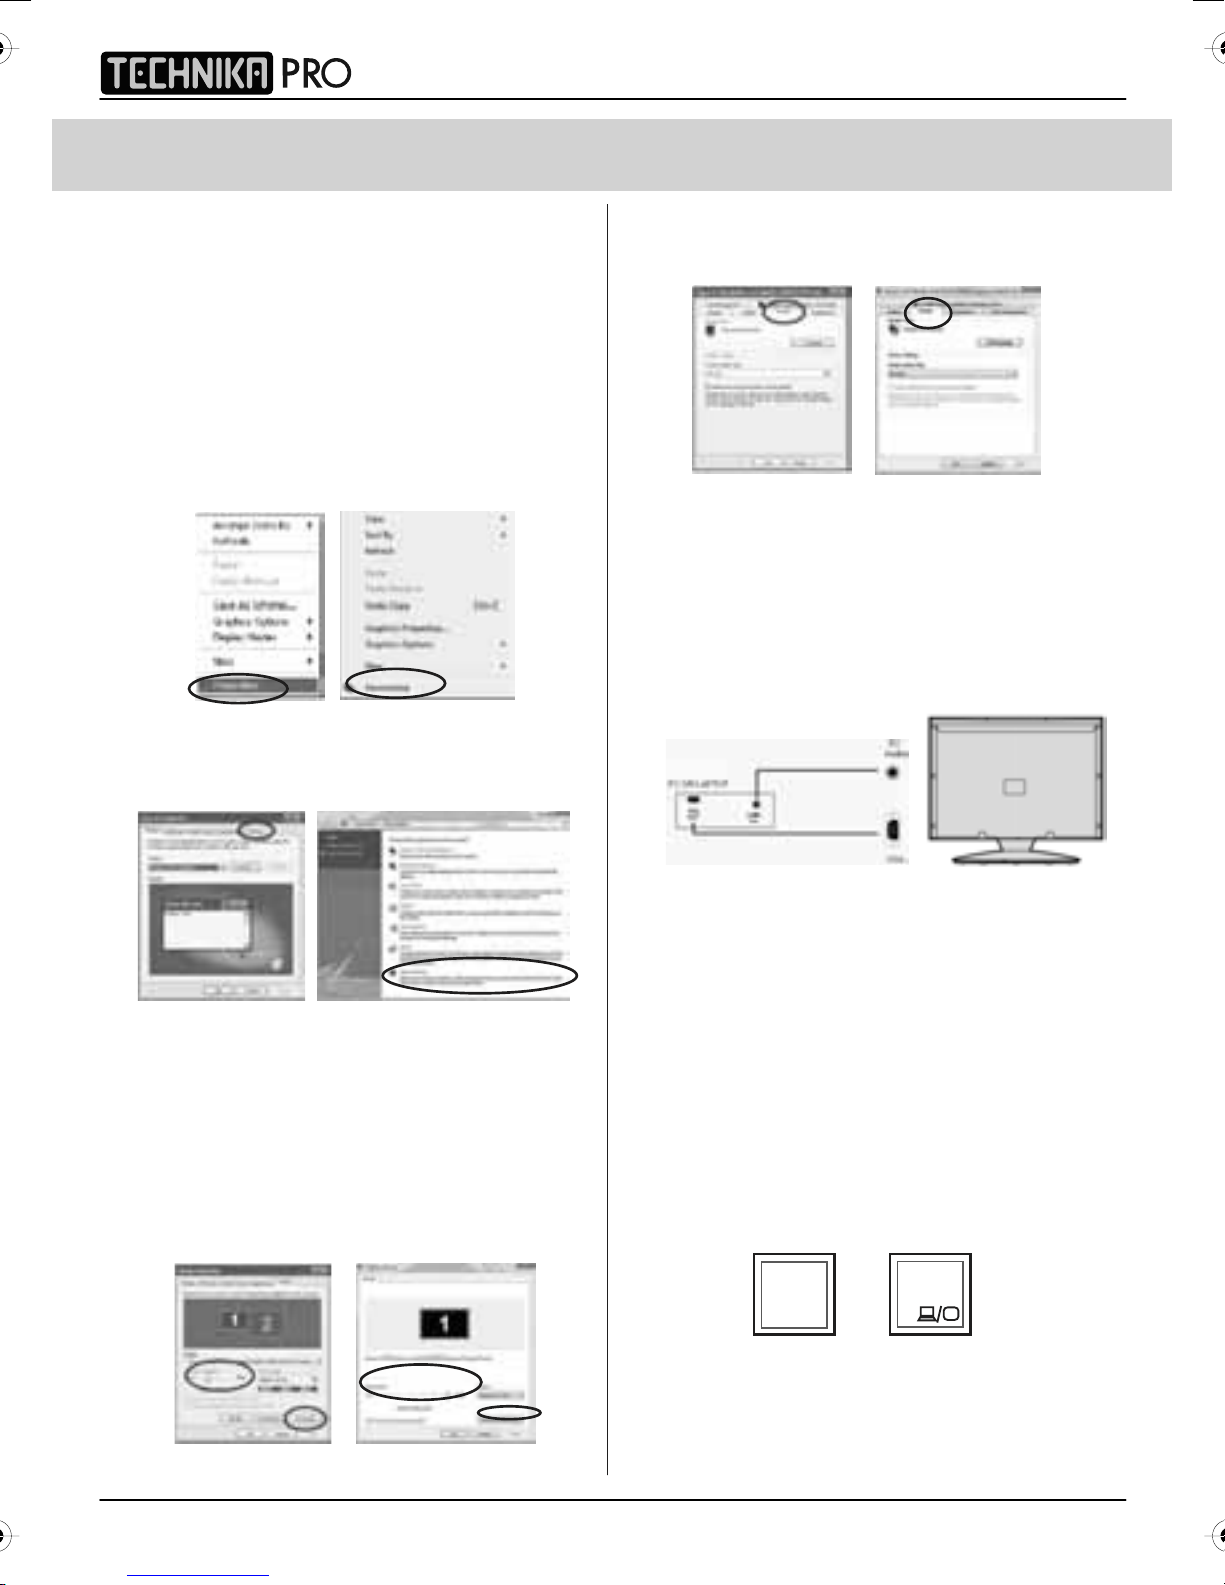
USING THE TELEVISION AS A COMPUTER MONITOR
IDTV
IMPORTANT – Before connecting the
computer to the television you must
ensure the computer settings are
correct for the television. You MUST do
this using your old monitor.
WINDOWS XP, WINDOWS VISTA
1) Switch on your computer
2) When finishing booting up right click
your mouse anywhere on the screen
XP Screen VISTA Screen
3) Left click your mouse on
Properties/Personalise
5) Left click your mouse on Advance/Advance
Settings and left click on Monitor
XP Screen VISTA Screen
6) Left click on the drop down for Screen refresh rate
and select 60 Hertz.
7) Click on Apply, then click Yes and the settings will
be saved.
8) Now switch off your computer and connect the
television (as shown below)
XP Screen VISTA Screen
4) Left click your mouse on Setting/Display
Settings. Ensure the screen resolution
is set to what is shown in the technical
specifications section toward the rear of
this user guide. To correct the
resolutio
the slider.
XP Screen VISTA Screen
n to that of the television move
9) Re-start your computer and switch the source
to VGA
CONNECTING A LAPTOP
In addition to the above if you are connecting a laptop
to the television you will also need to activate the VGA
connection on the laptop.
This can vary based on the brand of laptop you have.
1) Connect the laptop to the television
2) On the Laptop push buttons
Fn F5
+
The screen will now switch to the television.
22
Page 25
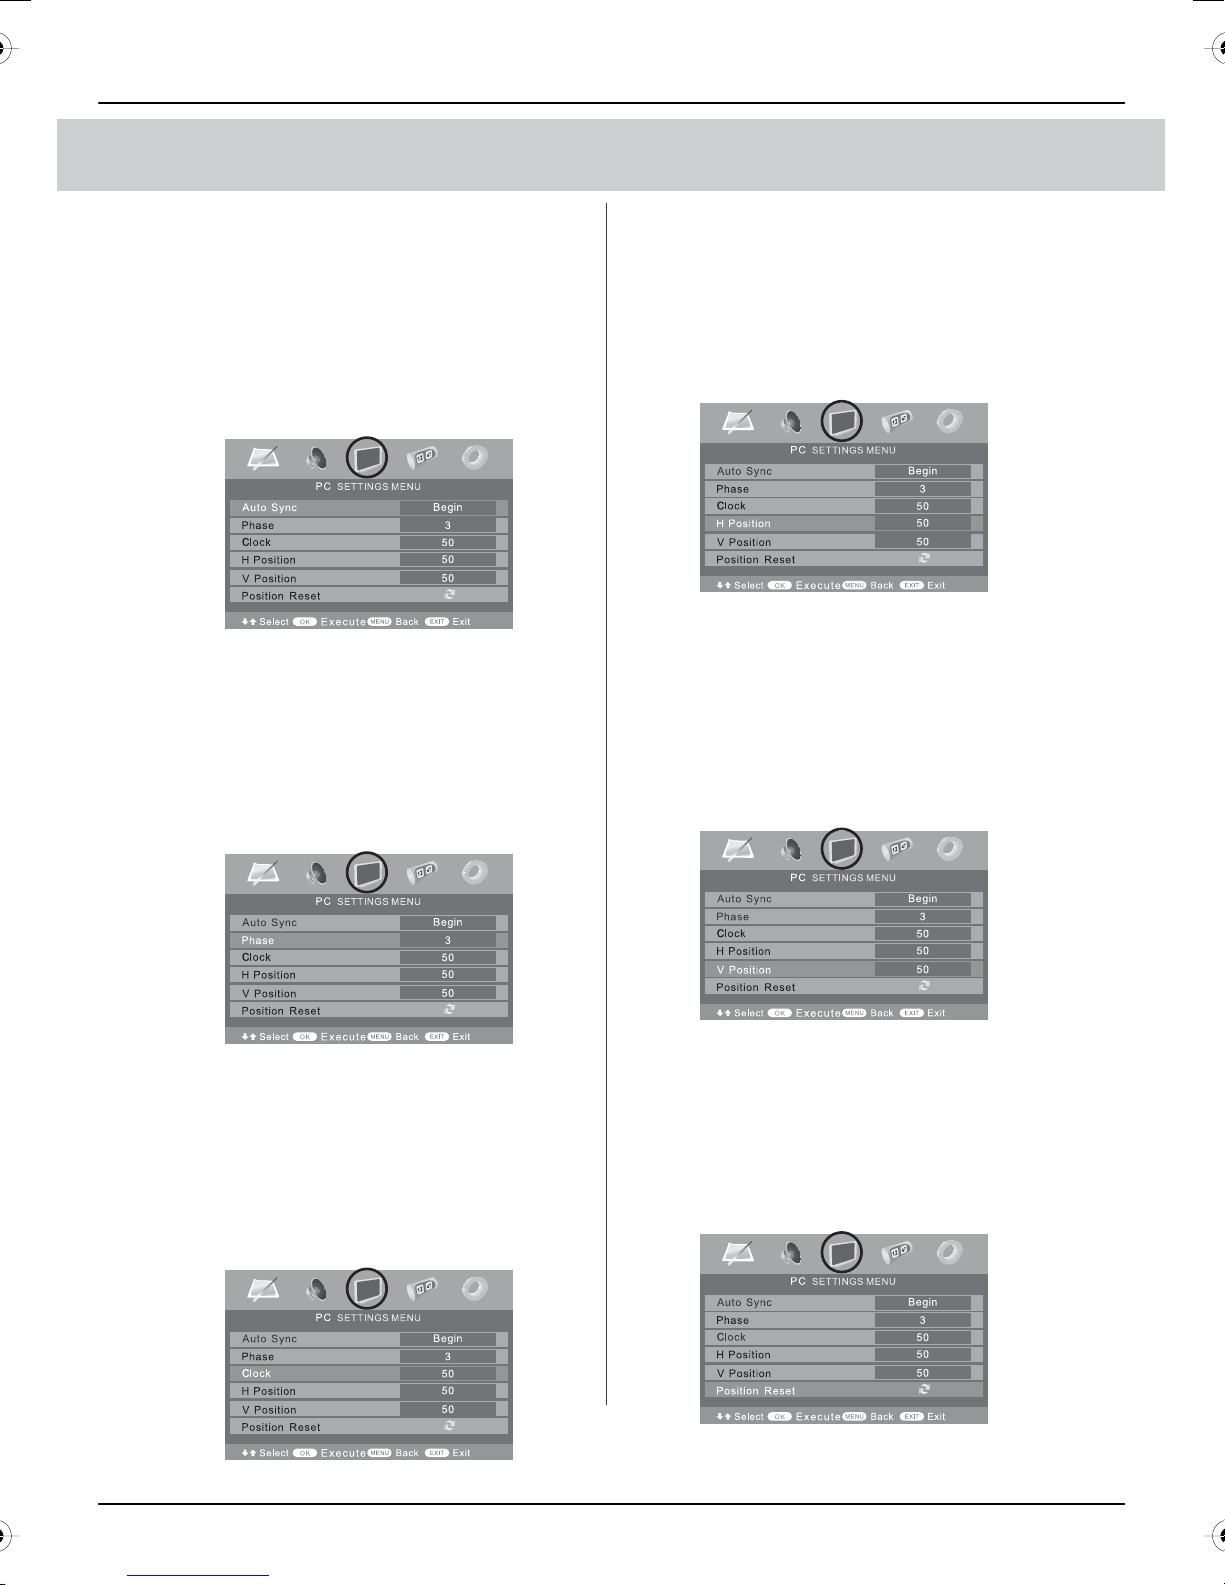
PC MENU OPERATION (VGA)
User Guide
VGA MENU
Auto Configuration of Screen
Lets you automatically configure the
television to be used as a computer monitor
1) Press [LCD-MENU] to enter menu
2) Press [>] to select PC settings
3) Press [\/] to select Auto Sync
4) Then press [>] for the TV to
automatically configure itself
5) Press [EXIT] to exit
Phase
To adjust delay time of phase in order to
reduce the noise of picture
1) Press [LCD-MENU] to enter menu
2) Press [>] to select PC settings
3) Press [\/] to select Phase
4) Then press [>] or [<] to increase or
decrease the phase
Horizontal Position
Changes the horizontal position of the picture
1) Press [LCD-MENU] to enter menu
2) Press [>] to select PC settings
3) Press [\/] to select H-Position
4) Then press [>] or [<] to move the
picture to left or right
5) Press [EXIT] to exit
Vertical Position
Changes the vertical position of the
picture
1) Press [LCD-MENU] to enter menu
2) Press [>] to select PC settings
3) Press [\/] to select V-Position
4) Then press [>] or [<] to move the
picture up or down
5) Press [EXIT] to exit
Clock
Alter this in order to reduce the noise
within the picture
1) Press [LCD-MENU] to enter menu
2) Press [>] to select PC settings
3) Press [\/] to select Clock
4) Then press [>] or [<] to increase or
decrease the clock
5) Press [EXIT] to exit
5) Press [EXIT] to exit
Position Reset
To position of the picture to the factory settings
1) Press [LCD-MENU] to enter menu
2) Press [>] to select PC settings
3) Press [\/] to select Position Reset
4) Then press [>] or [<] to move the
picture up or down
5) Press [EXIT] to exit
23
Page 26
DVD MENU OPERATION
IDTV
HOW TO PLAY DVD’S
The DVD player has an automatic DVD feature
which means when you insert a disc it will
automatically switch source and start to play.
If you disc does not play please refer to
frequently asked questions section of the user
guide.
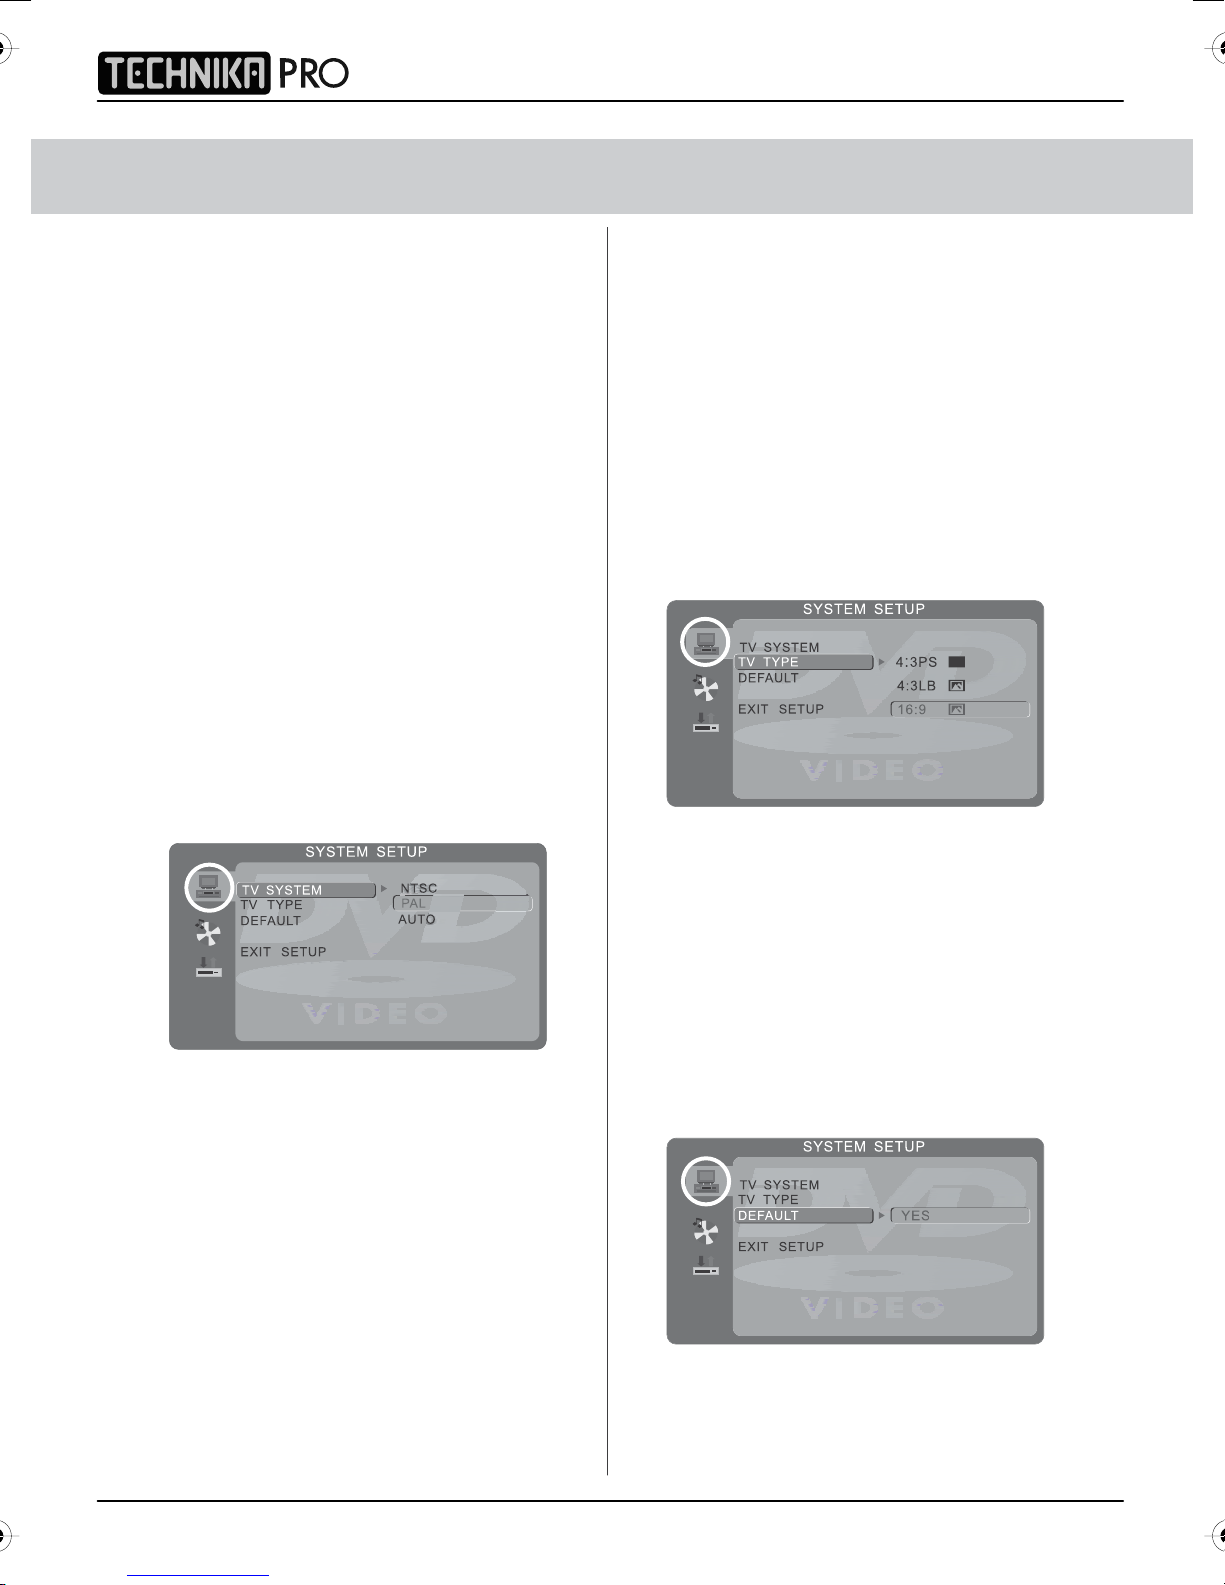
SYSTEM SET UP
Adjusting TV System
Lets you adjust between NTSC, PAL,
AUTO (PAL is default for the UK)
1) Press [DVD-SETUP] to enter menu
2) Press [>] to select TV System
3) Press [>] to enter menu
4) Press [\/] or [/\] to highlight NTSC, PAL
or AUTO
5) Press [OK] to confirm
Adjusting Picture Format
This lets you select the format of the picture
that is being shown between 16:9, 4:3
LetterBox and 4:3.
1) Press [DVD-SETUP] to enter menu
2) Press [>] to select TV System
3) Press [\/] to select TV Type
4) Press [>] to enter menu
5) Press [\/] or [/\] to highlight 4:3PS,
4:3LB or 16:9
6) Press [OK] to confirm
7) Press [DVD-SETUP] to exit
6) Press [DVD-SETUP] to exit
Returning to Default
This lets you switch the DVD menus show above
back to Default settings
1) Press [DVD-SETUP] to enter menu
2) Press [>] to select TV System
3) Press [\/] to select Default
4) Press [>] to enter menu
5) Press [>] to highlight Yes
6) Press [OK] to confirm
7) Press [DVD-SETUP] to exit
24
Page 27
DVD MENU OPERATION
[ ]
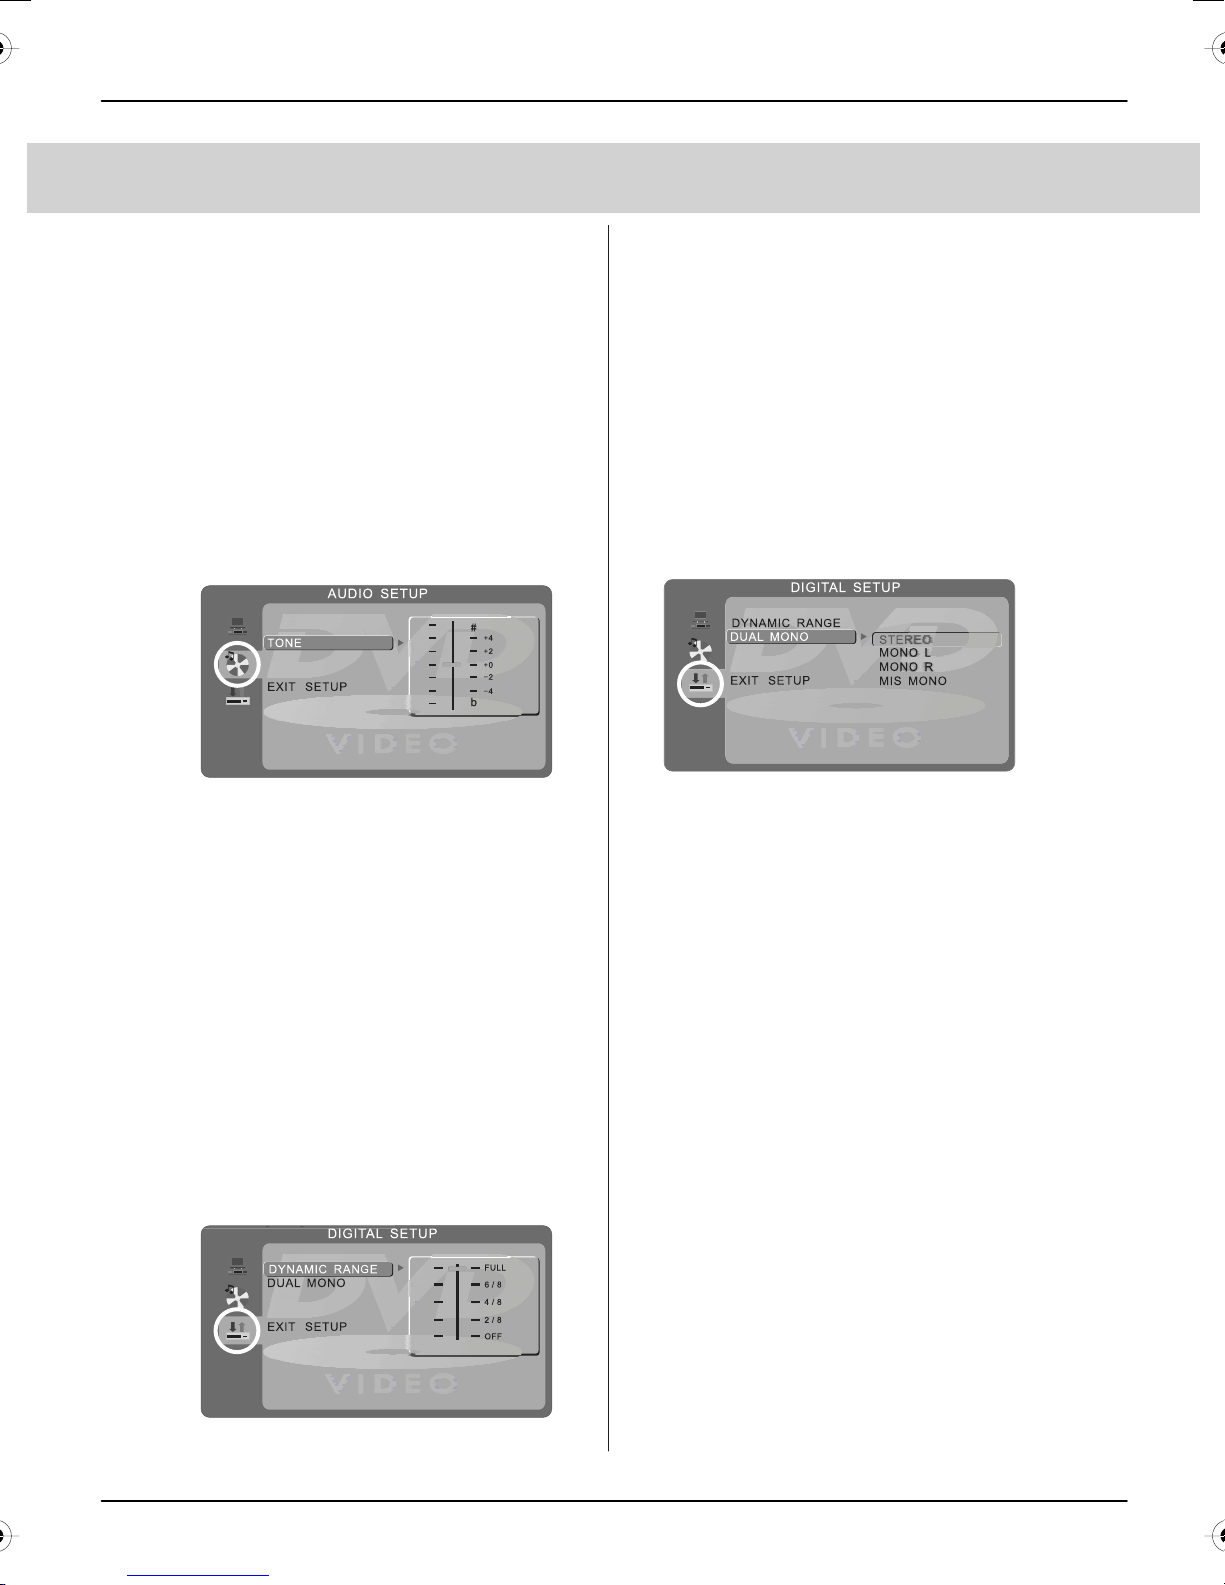
AUDIO SET UP
Adjusting Tone
Lets you increase or decrease the Tone
of the sound
1) Press [DVD-SETUP] to enter menu
2) Press [\/] to select Audio Set Up
3) Press [>] to enter menu
4) Press [\/] to select Tone
5) Press [>] to enter menu
6) Press [\/] or [/\] to increase or decrease
the tone
7) Press [OK] to confirm
User Guide
Adjusting the Sound
Lets you change the sound between Stereo,
Mono Left, Mono Right and Mixed Mono.
1) Press [DVD-SETUP] to enter menu
2) Press [\/] twice to select Digital Set Up
3) Press [>] to enter menu
4) Press [\/] to select Dual Mono
5) Press [>] to enter menu
6) Press [\/] or [/\] to switch between Stereo,
Mono L, Mono R and Mix Mono
7) Press [OK] to confirm
8) Press [DVD-SETUP] to exit
DIGITAL SET UP
Adjusting Dynamic Range
This is the difference between the quietest and
loudest sounds. This setting works only with
DVD discs recorded in Dolby digital.
FULL: Set this to listen with the range recorded
on the disc.
4/8: Set this to listen with a range equivalent
to a normal television.
2/8: Set this to listen with a smaller difference
between the maximum and minimum volume.
1) Press [DVD-SETUP] to enter menu
2) Press [\/] twice to select Digital Set Up
3) Press [>] to select Dynamic Range
4) Press [>] to enter menu
5) Press [\/] or [/\] to increase or decrease
the Dynamic range
6) Press [OK] to confirm
8) Press [DVD-SETUP] to exit
Changing Regions
This TV/DVD player is pre-set to play Region 2 DVDs.
In the event you wish to use the TV/DVD in another
country that uses different region discs, please visit
www.skymediauk.co.uk. Select ‘product support’,
‘Changing Region’
7) Press [DVD-SETUP] to exit
25
Page 28
USING WITH SKY DIGITAL / VIRGIN MEDIA
IDTV
You may wish to use your TV with Sky
Digital, Virgin Media or another cable
or Satellite box
There are a number of connection options,
the best being connecting via SCART
cable.
Connecting via SCART
1) Connect the SCART cable from the
Cable/Satellite Box to SCART of the TV
2) Press [SOURCE]
3) Press [\/] or [/\] to select SCART
4) Press [OK]
The channel your Cable/Satellite box is
displaying will now be shown on the TV.
You may wish to share your Sky Digital
signal around the home by using an RF
connection.
Connectin
g via RF
USING WITH SKY DIGITAL REMOTE CONTROL
(BSKYB) OR UNIVERSAL REMOTE CONTROL
You may wish to use your Sky Digital or a universal
remote control to operate some of the functions of this
TV. For this you require a ‘code’ that needs to be
programmed into your Sky Digital or universal remote
control.
For codes for universal remote controls, please visit
our website where you will find the very latest
information and codes.
For codes for Sky/Sky+Sky HD, please note that at the
point of manufacture, BSkyB have not launched the
code required for this model of TV. They are due to
launch a new remote control which should include the
necessary code to operate the functions of the TV
during 2010 (called revision 9).
Please check our website for updates, alternatively,
see some alternative options of remote controls
that are available.
1) Connect the RF cable from the RF
output socket of the sky/cable box to
the ‘RF IN’ of the TV.
2) Switch the TV to analogue TV mode
3) Press [LCD-MENU] to enter menu
4) Press [>] twice to select Tuning
Settings Menu
5) Press [\/] to select Manual Tuning
6) Press [>] to enter Auto tuning
7) Press [OK] to start tuning
Once tuning is complete the first channel
will appear. Press [CH+] to move through
the channel until you find the Sky channel.
The channel can then be moved if you
wish, please refer to the Tuning Setting
menu – Program Edit section of the manual.
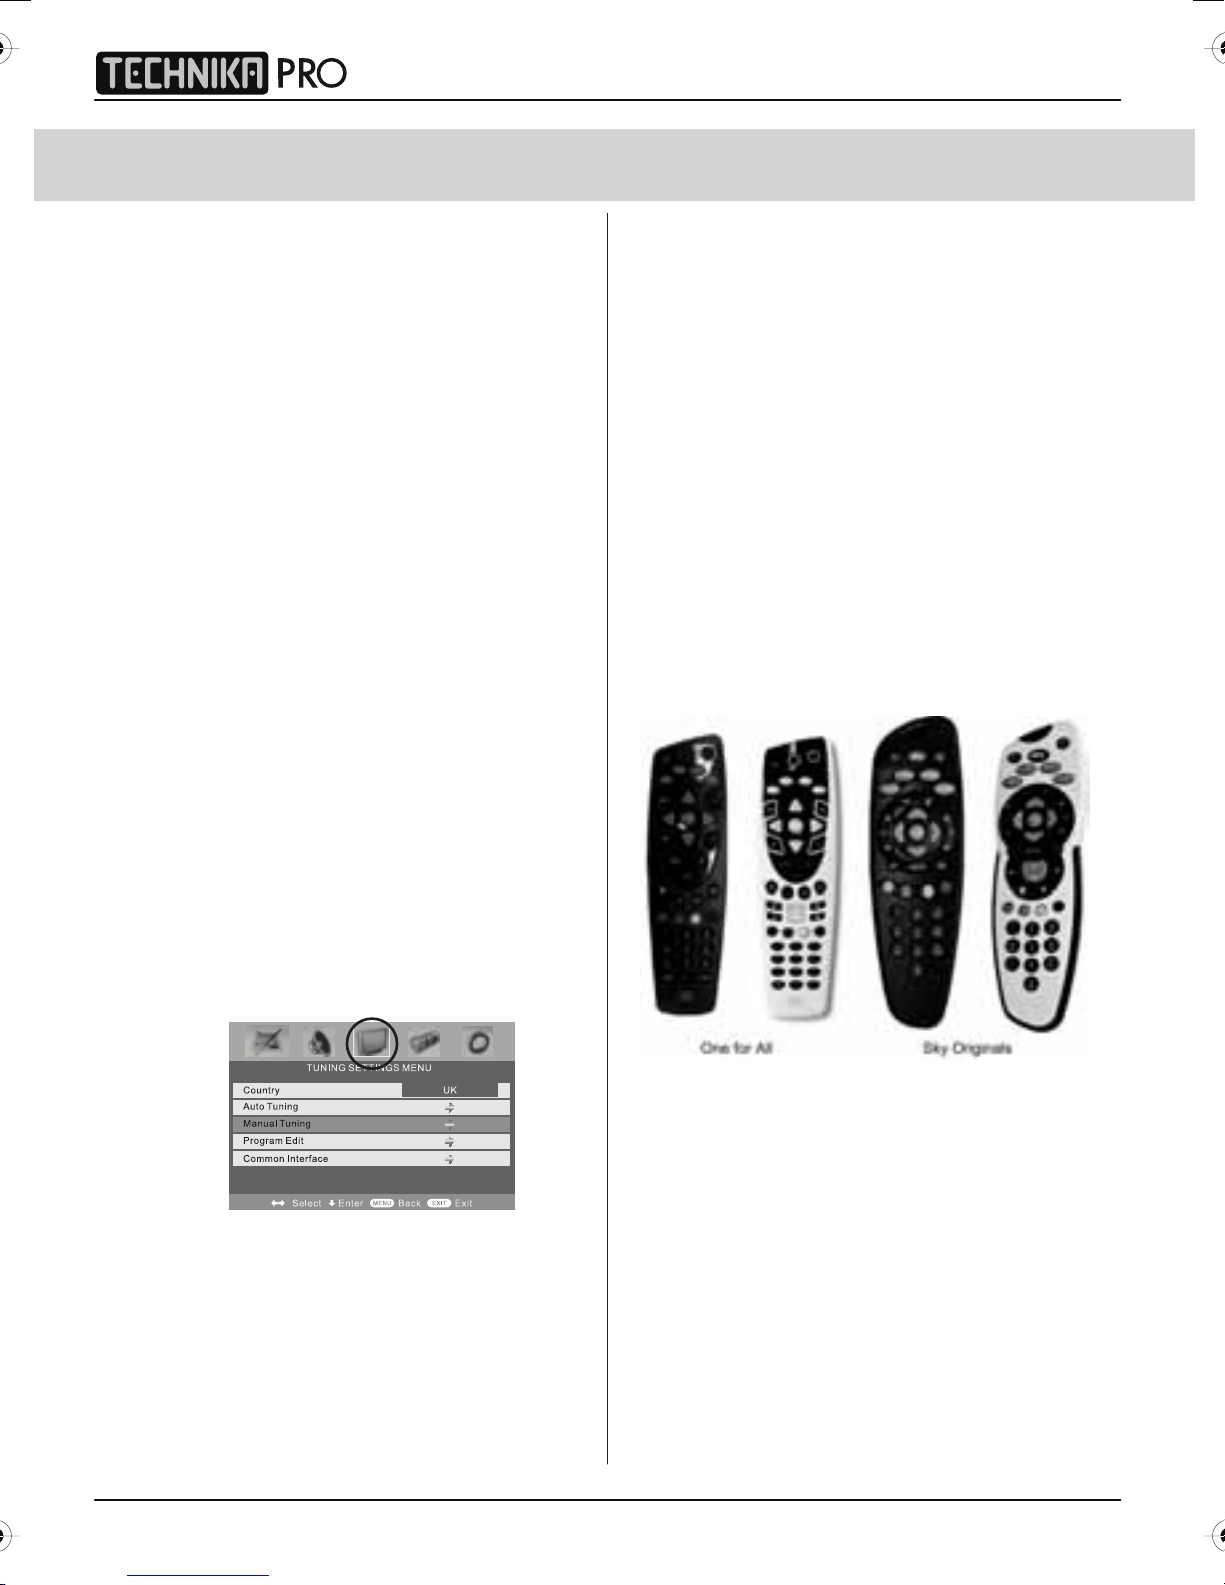
One for All Sky Originals
The One for All remote controls shown will operate
all of the functions of the Sky box in the same way the
original remote control will, in addition, they will also
operate the functions of this model of TV. The One for All
versions are available to purchase from
helpline/website. The original Sky remote controls are
shown for comparison purposes
If you require any further information, you can contact us:
the
www.skymediauk.co.uk
email - [email protected]
Tel
UK
ROI
-- 0871
2000 463
01443 3940
26
Page 29
CONNECTING A GAMES CONSOLE
User Guide
Connecting a games console can
sometimes seem very difficult. We have
simplified it to three options depending
on the cables that you have.
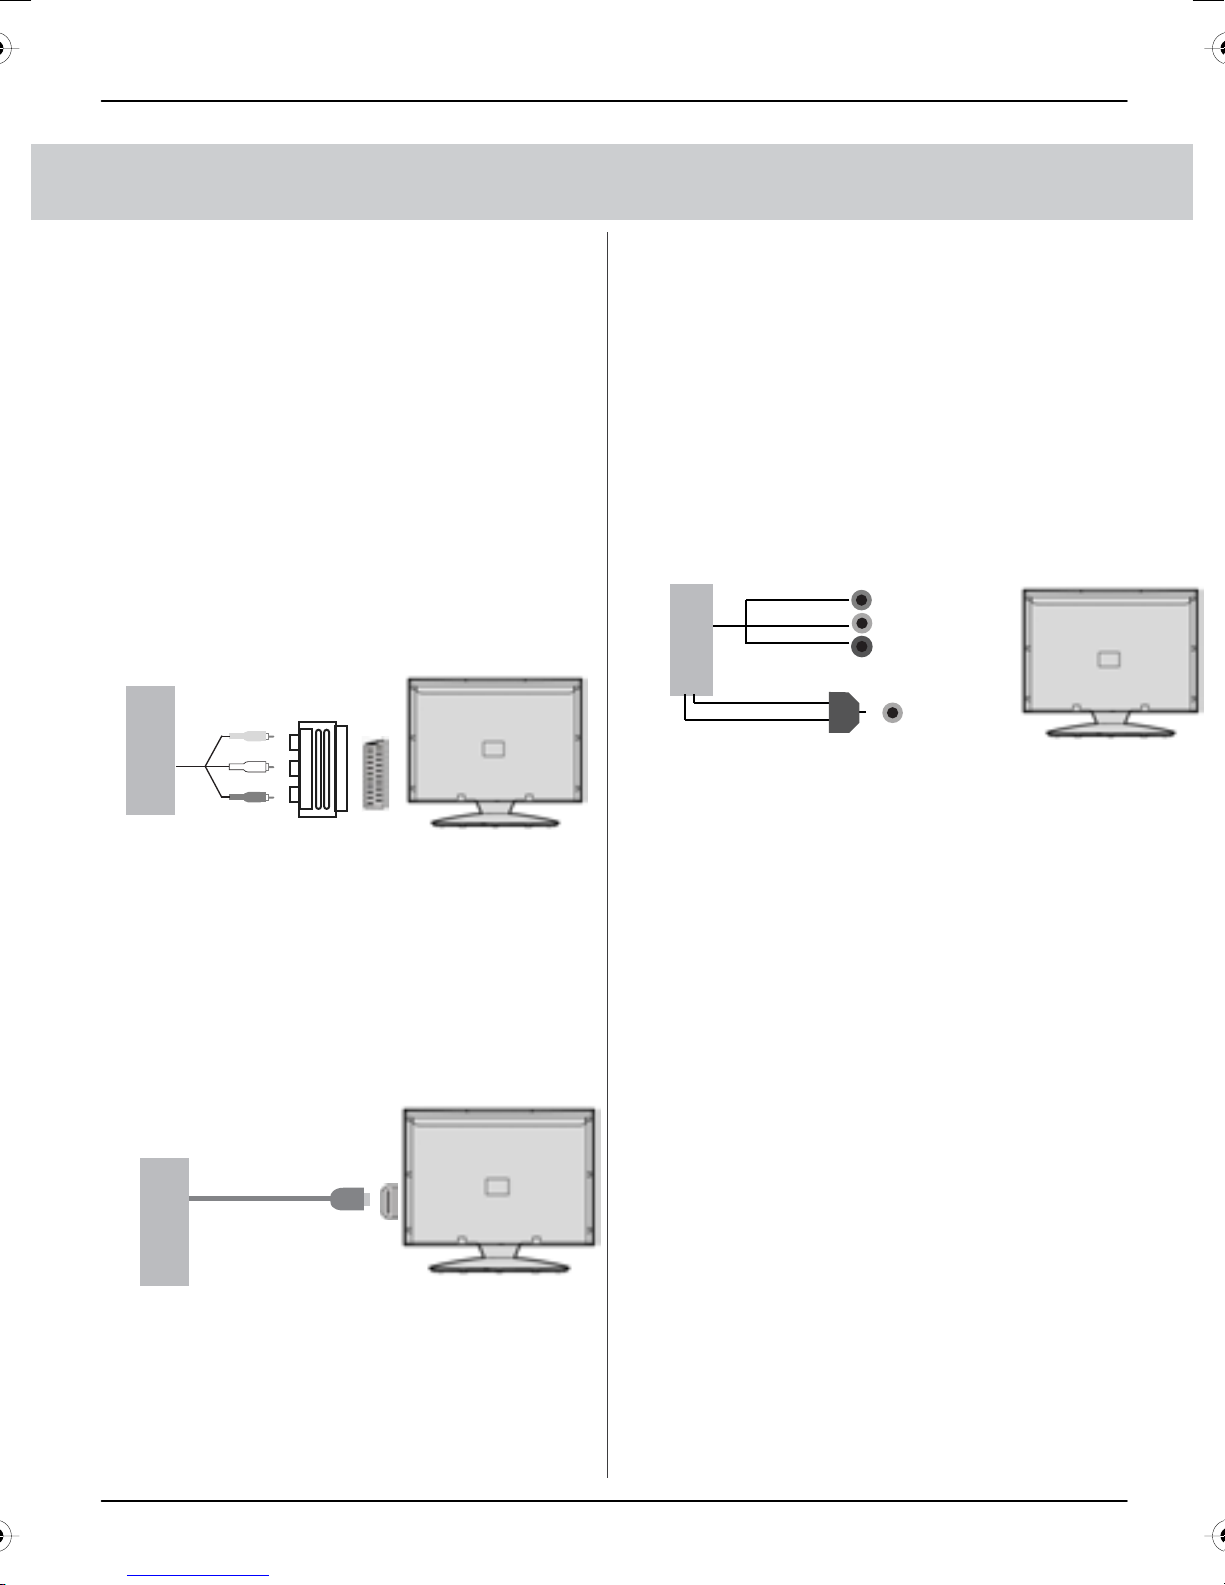
Option 1 – Connecting via Scart
to AV adapter
If you are supplied with a cable from the
console which has YELLOW,
RED & WHITE connectors you must
connect via a SCART to AV adapter
(Some consoles include this)
TV source should be set to SCART.
S
Console
Yellow
White
Red
CART Adaptor
SCART
Option 3 – Connecting via Component
cable
If you are supplied with a cable from the
console which has RED, GREEN, BLUE,
RED & WHITE connectors you must
connect via Component (for picture)
and by 3.5mm to phono cable (for sound).
TV Source should be set to Component.
Red
White
Red
Green
Blue
3.5mm Jack to phono
adapter or cable
Pr
Y
Pb
YPbPr/S-Video
3.5mm
Audio
Note – you will need the Phono
to 3.5mm Audio cable included
to connect into the 3.5mm Audio
Console
Option 2 – Connecting via HDMI cable
If you are supplied with a HDMI cable is
the easiest option. A HDMI cable can
tput both video and audio and enables
ou
you to enjoy digital-quality video and
audio with minimal loss of picture quality.
TV Source should be set to HDMI.
Console
HDMI
27
Page 30
FREQUENTLY ASKED QUESTIONS
IDTV
Question:
I have tuned in Digital TV but
I am not receiving any or all of the
channels and/or the channels I receive
are breaking up
The sound quality is high pitched?
Solution:
1) Check you are in an area that can
receive Freeview. Visit
www.freeview.co.uk or call
08701 111 270.
2) Check you are using an aerial that is
able to receive a good digital signal. In
most cases, you will need an outdoor
digital hi-gain/wideband aerial. In areas
that have excellent Freeview coverage,
you may be able to use a loft type aerial
but it is highly likely that you will also
need to connect a booster between the
back of the TV and the TV aerial wall
socket. Unfortunately, to receive a good
enough digital signal, it is not possible to
use a portable/indoor type aerial.
This may change once the analogue
signal is switched off in 2012 and the
Digital signal strength is increased.
Go into the sound settings menu as
shown earlier in the manual and increase
the level of the bass and decrease
the treble
I have inserted a disc but it is not playing
I have connected the TV to my VCR via
SCART but it is not recording
I have connected my PS3 to the TV via HDMI,
but I am not receiving any pictures or sound
on my Console
I have connected my Xbox 360 to the TV via
Component Cables (Red, Green & Blue) but I
am not receiving any sound
Why are some options in the menu
unavailable and greyed out
1) Ensure you have inserted put the disc
in facing the correct way
2) Ensure the
scratched
3) Some copied discs will not play.
4) Check the DVD is a region 2 disc – to change
the region of the DVD player, refer to section
‘Changing Regions’.
In addition to connecting via SCART, you
should connect the aerial cable from the
l socket to VCR and another aerial
wal
cable from the VCR to the TV
disc is clean and is not
1) Ensure the TVs source is on HDMI
2) Check your settings on your PS3 are as
per the PS3 instruction manual
Component cables only provide HD Pictures. For
the sound you will need to connect the Red &
White audio cables on the Xbox to the 3.5mm
YPbPR/S-video Audio in on the TV. Please refer
to the ‘Connecting a games console’ page.
Some options are only available in certain
sources, i.e. HDMI, PC/VGA. They are
unavailable in the other sources where they have
no affect.
28
Page 31
TECHNICAL SPECIFICATION
g
Panel
Input Signal
htness cd/m
Bri
FR
Video
Sound
BGRCP
)sehcnI(eziS
noituloseR
oitaRtsartnoC
2
User Guide
LCD23-230
3”2
0801x0291
1:0001
300
seY
7
1 x SCART, 1 x S-Video, 1 x Component
(YPbPr - 1080p)
1 x 3.5mm jack for PC audio input, 1 x 3.5mm
jack, shared for S-Video & YPbPr
(component) audio input
MACES-LAP/annetnAmho5
IMDH
tuOrekaepS
reyalpDVD
DVD
)SMR(sttaWtup
3x2
seY
)80p01otpu(1
Power Voltage 110-240v 50/60Hz 1.5A 90W (standby <1W)
Dimensions Inc Stand 561W x 402H x 178D
Weight
)sgK(teN
)sgK(ssorG
3,6
7,7
29
Page 32
INDEX
IDTV
Analogue TV teletext 21
Attaching/Detaching the
Stand & Wall mounting 9
Auto Tuning 17
Balance 16
Bass 16
Blue Screen 19
Brightness 14
Changing DVD Regions 25
Colour 14
Colour Temperature 15
Common Inferface Slot 18
Connecting to a PC 22
Connecting a Games Console 27
Contrast 14
Country Settings 17
Digital Switchover Re-Tune 2-3
Digital TV teletext 21
Dynamic Noise Reduction 15
Dynamic Range 25
First Time Installation 20
Frequently Asked Questions 28
Horizontal Position (PC) 23
Inputs and Connections 13
Manual Tuning 17
On Screen Display Timer 18
On Screen Menu Language 19
Phase (PC) 23
Picture Format 19
Picture Format - (DVD) 24
Picture Mode Preset 14
Position Reset (PC) 23
Program Edit / Changing Channel
Position 17
Remote control buttons and their
functions 11
Reset Television 20
Returning to Default (DVD) 24
Sharpness 15
Sleep Timer 18
Sound Mode Preset 16
System Lock 19
Technical Specifications 29
Tint 15
Tone (DVD) 25
Treble 16
Tuning in TV 10
TV buttons and
their functions
12
TV Guide 20
TV System (DVD) 24
Using with Sky Digital / Virgin Media 26
Vertical Position (PC) 23
Volume 16
What is included in the box 8
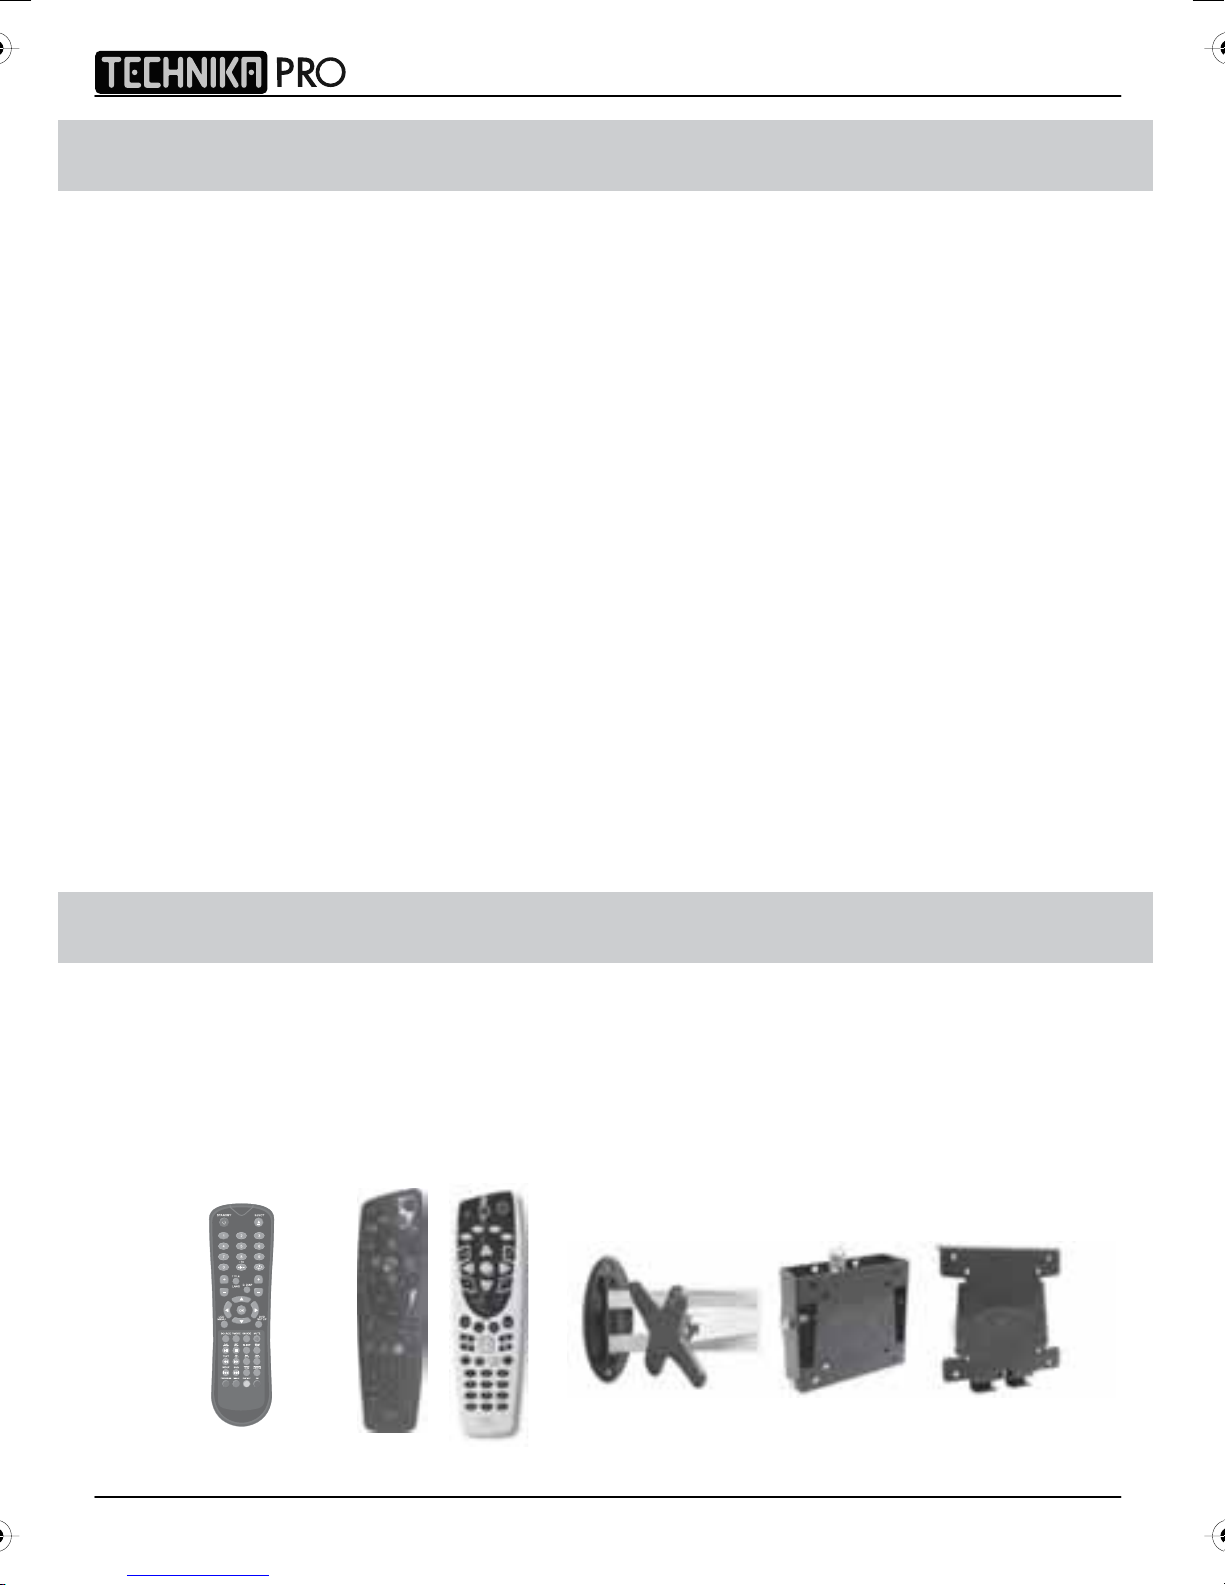
OPTIONAL ACCESSORIES AND REPLACEMENT PARTS
If you need to order replacement parts for your TV, please visit our web site or call the helpline.
If you wish to wall mount your TV, we have a range of fully tested and compatible wall mounts available
to order from the helpline or via our web site.
If you wish to purchase a Sky or Sky+
your Sky Box as well as this TV, these are available to order from the helpline or web site. Our Sky
remote controls operate your Sky or Sky+ box in exactly the same way your current Sky / Sky+ remote does
and our versions also look very similar to the Sky equivalent models, albeit slightly smaller in size, they will
also operate many of your TV’s functions including Power on/off, channel up/down, volume up/down as well
as many other functions.
INFO
CH
VOL
GUIDE
PICTURE
FORMAT
Replacement
remote control
remote control that includes the latest software/codes to operate both
/ Sky+
stnuoM llaW slortnoc etomeR +ykS/ykS ruO
30
Page 33

Page 34

Page 35

Page 36

X23/MAN/0008TESCO Stores Ltd, Cheshunt, EN8 9SL, UK.
 Loading...