

Page 1

T
TOMORROW’S TECHNOLOGY TODAY
2
Page 2

页码
The label and sign on the fabric can help you to choose the best way to launder your clothes.
Norma l was h
Gentl e was h
40
Hand wa sh
Do not wash
C
A
F
Bleac h
Do not bl eac h
Do not tu mbl e dry
Iron
Do not ir on
Dry cle an
Do not dr y cle an Dry fla t
Wash Care Symbols
Safety notes.................................................... ................................ .....................
Notes on disposal.................................. ................................................................
Useful advice for the user............... ........................................................................
Description of controls............. ..............................................................................
Quick start............................................................................................................
Programme selector............................................................. ................................ .
The main wash..................... .................................................................................
Programme table...................................................................................................
Special washing feature.........................................................................................
Cleaning and routine maintenance..........................................................................
Malfunctions and solutions.............................................................. ......................
1
2
2
3
4
5
5
6
7
8
9
10
11
11
12
1
Pages
Contents
Wash care symbols......... .......................................................................................
Malfunction display and remedies...........................................................................
Technical specificetions.........................................................................................
Installation Instruction...........................................................................................
War m was h
(max 40 )
C
Chlor ine b lea ch
may be us ed
Tum ble dry. Med ium
(max 150 )
Tum ble dry. Low h eat
(max 110 )
War m iron.me dium
(max 150 )
C
C
C
Cool iro n(m ax 110 )
C
Dry clea n nor mal cy cle
with any s olv ent
Dry clea n nor mal cy cle
petrol eum s olve nt on ly
Tum ble d ry normal
Drip dr y
Line dr y / han g to dr y
............................................................................................ ........
Testing methods
16
Page 3
Safety notes
Do not draw the power cable forcefully to pull out the mains plug.
Please do not plug/draw the mains plug with wet hands.
Do not damage the power cord and the power plug.
Electric shock hazard
Please do not forcefully open the door when the washing machine is at work.
Children are not allowed to play in the basket of the washing machine, and please pay attention
to prevent children's hand from being locked in the washing machine's door slot.
Please do not climb or sit on the coping of the washing machine.
Please do not lean on the opened door of the washing machine.
Please do not install the washing machine in the humid and drenching environment.
At the cleaning and maintenance, please pull out the power cable and do not directly wash
the washing machine with water.
Please do not wash over the regulated washing capacity.
Please do not expose the washing machine directly under the sun.
Please do not put some pyrotoxin like the candle mosquito coil electric cooker and etc. On
the washing machine.
Injury danger
Damage danger
To prevent any damage to your and others' life or property
you have to follow the safety notes
Poisoning danger
Explosion danger
Please put the detergent and softener out of children's reach.
Please do not wash the clothes with some flammable substan ces like the coal oil gas
alcohol and etc or there will be the explosion.
Notes on disposal
T
o p
r
e
v
e
n
t a
ny a
c
cide
n
ta
l e
l
e
ct
ri
c s
h
oc
k , p
le
a
s
e m
a
ke su
re t
h
e m
ai
n
s pl
u
g o
f the w
a
shin
g
ma
chi
n
e is e
a
r
th
ed w
e
ll.
2
When you want to dump the washing machine because it is not operable or not worth of
repairing, please pull out the mains plug and cut the power cable. Please ensure that the door
lock is rendered inoperable to prevent children from being trapped inside while playing. All the
material used for this machine is environmental-friendly and recyclable. Please help the disposal
of the material via environmental-friendly means.
!
Please do not dismantle and install the washing machine under no instruction or supervision.
If the power cable is damaged, it must be replaced by the manufacturer,
its service agent or similarly qualified persons in order to avoid a hazard.
This appliance is not intended for use by persons (including children) with reduced physical,
sensory or mental capabilities, or lack of experience and knowledge, unless they have been
given supervision or instruction concerning use of the appliance by a person responsible for
their safety.
Page 4
Useful advice for the user
Usage
Connect with cold water only.
This washing machine is suitable for washing-the fabric that can be washed in the water
with the detergent.
Plug the power . turn on the tap.
Put detergent in the compartments as indicated in the programme guide in this instruction
manual and push start/pause bu tton.
2
First wash
1
3
4
slect the self-clean programme.
The choice of the detergent
Main wa sh de ter gent Speci al ad dit ive Pre -wa sh detergent
The recom mende d main wash detergent and p re-wash detergent
for this front loa ding washing machine is l ow sups detergent suita ble
for the fro nt load ing washing machine.I t is forbidden to use high su ds
deterge nt unsu itable for the front load ing washing machine,i n case of
any damag e to the wa shing machine.
The dosag e of the de tergent lies on: 1. amoun t of laundry
2.the deg ree of so iling 3.water hardnes s 4. The washing a bility of the
deterge nt
Please ch eck the i nstruction of the deter gent before the wash.
You will get a better resu lt by using the detergent p roper ly.
Pre-was h deter gent-if there is any clot hing that needs the pre-w ash, pl ease add the pre-w ash det ergent
in the pre- wash co mpartment for the bette r effects duri ng the fo llowing wash procedur e. (At this time in
the main wa sh dete rgent compartment, th e liquid detergent shal l not be used, or the deserve d effects
cannot be r eache d.)
III
3
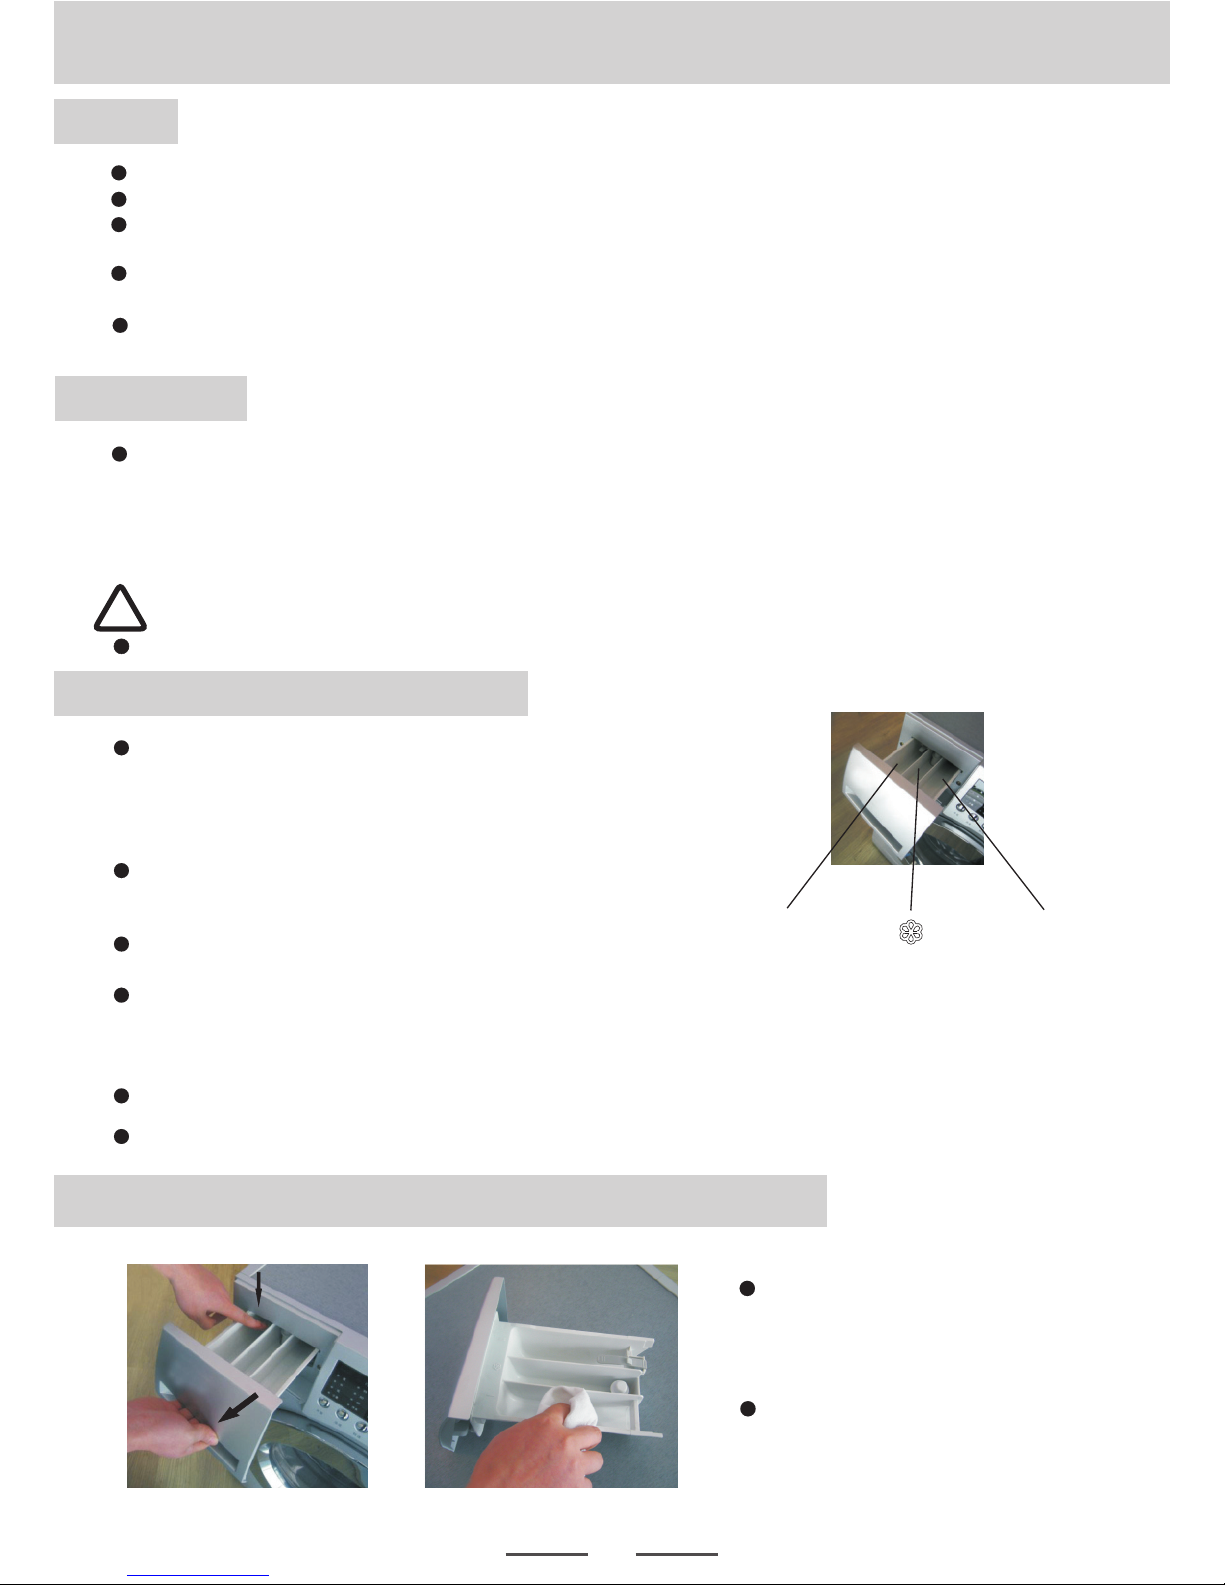
The cleaning of the detergent dispenser drawer
Clean
3
Press
1
Pull out at the same time
2
The detergent will deposit in the
compartment after a long usage,
so the detergent drawer needs to
be cleaned frequently.
Press the detergent box limit 1,
and pull out the drawer of
the detergent box and clean
the detergent compartment.
Notice:some fabric will fade when it is washed,please do not wash the faded fabric with other clothing.
Please wash the white fabric separately;
!
Bleach - if t he blea ch is needed, it shall be use d according to the bleach i nstructions in the
washing p roced ure.
Special r inse ad ditive is the softener. Pl ease dilute the softene r with water before
use if it is de nse.
Your machine solely designed for the domestic use.
Please select the detergent and clothing care detergent that is suita ble for the front loading
washing machine.
Before the first wash, you need to finish the high temperature self-clean cycle without
any laundry. Please follow the steps below:
The new hose-sets supplied with the appliance are to be used and that old hose-sets
should not be reused.
Page 5

This button is used
to delay wash. You
can set 0-24 hour to
press this key
continuously, it can
be switched within
0-24 hours. The delay
time means clothes
wash begins in xx
hours.
Delay
Spin
Cycle
Different wash cycle can be selected
according to the user's needs to match
the clothes being a cleaned for more
efficient washing.
Wat er
This button is used to
adjust the wash
temperature. You can
select different water
temperature or no
heating by pressing the
button repeatedly.
This button is used
to adjust the spin
speed of the wash
machine. You can
change the spin
speed by pressing
this button repeat-
edly.
Add garment
Super function
Digital LCD display
Only li ght ( pre -wash, wash, ri nse , spi n) relevant to the pha se th at is currently
being c arr ied o ut will remain li t dur ing t he washing process .
The de lay sta rt light will fla sh t o indicate the de lay time. It will sta rt t he
progr amm e af ter 】xx【 hours.
After the was h procedure begi ns, 】R EMAIN【will be ligh ten ed, to display
the re mai nin g time, that is , t he w ash closes in】xx【 tim e.
When the child lock function is selected,】CHILD LOCKED【will be lightened.
When t he d oor is at the lock sta te, 】D OOR LOCKED【 will be ali ght .
The do or c an b e opened only aft er t he light turns off.
You can select the two
functions of extra rinse or
pre-wash to improve your
wash .
Start/pause
】Start/Pause【button,has the
start and pause function. When this
button is pressed continuously, this
machine is switched between start
and pause.
tempe rat ure S election
speed s ele cti on
ed
s
Thi s bu tton is u sed to ad d th e
during the wash pro cedure. Whe n thi s bu tton
is push ed, the was h pro ced ure of th e wa sh
machin e wi ll pa use and the l ock will be
unlock ed a utom ati cally. Wh en th e us er has
added t he g arme nt a nd close d th e doo r,
】S tar t/Pause 【butto n wi ll be pus hed to
contin ue t he wa sh.
garmen t
Note: The logo may be inconsistent with the physical, for reference purposes only.
/90 0
/12 00
30
You can adjust
the water level for
washing and
rinsing according
to the amount of
laundry.
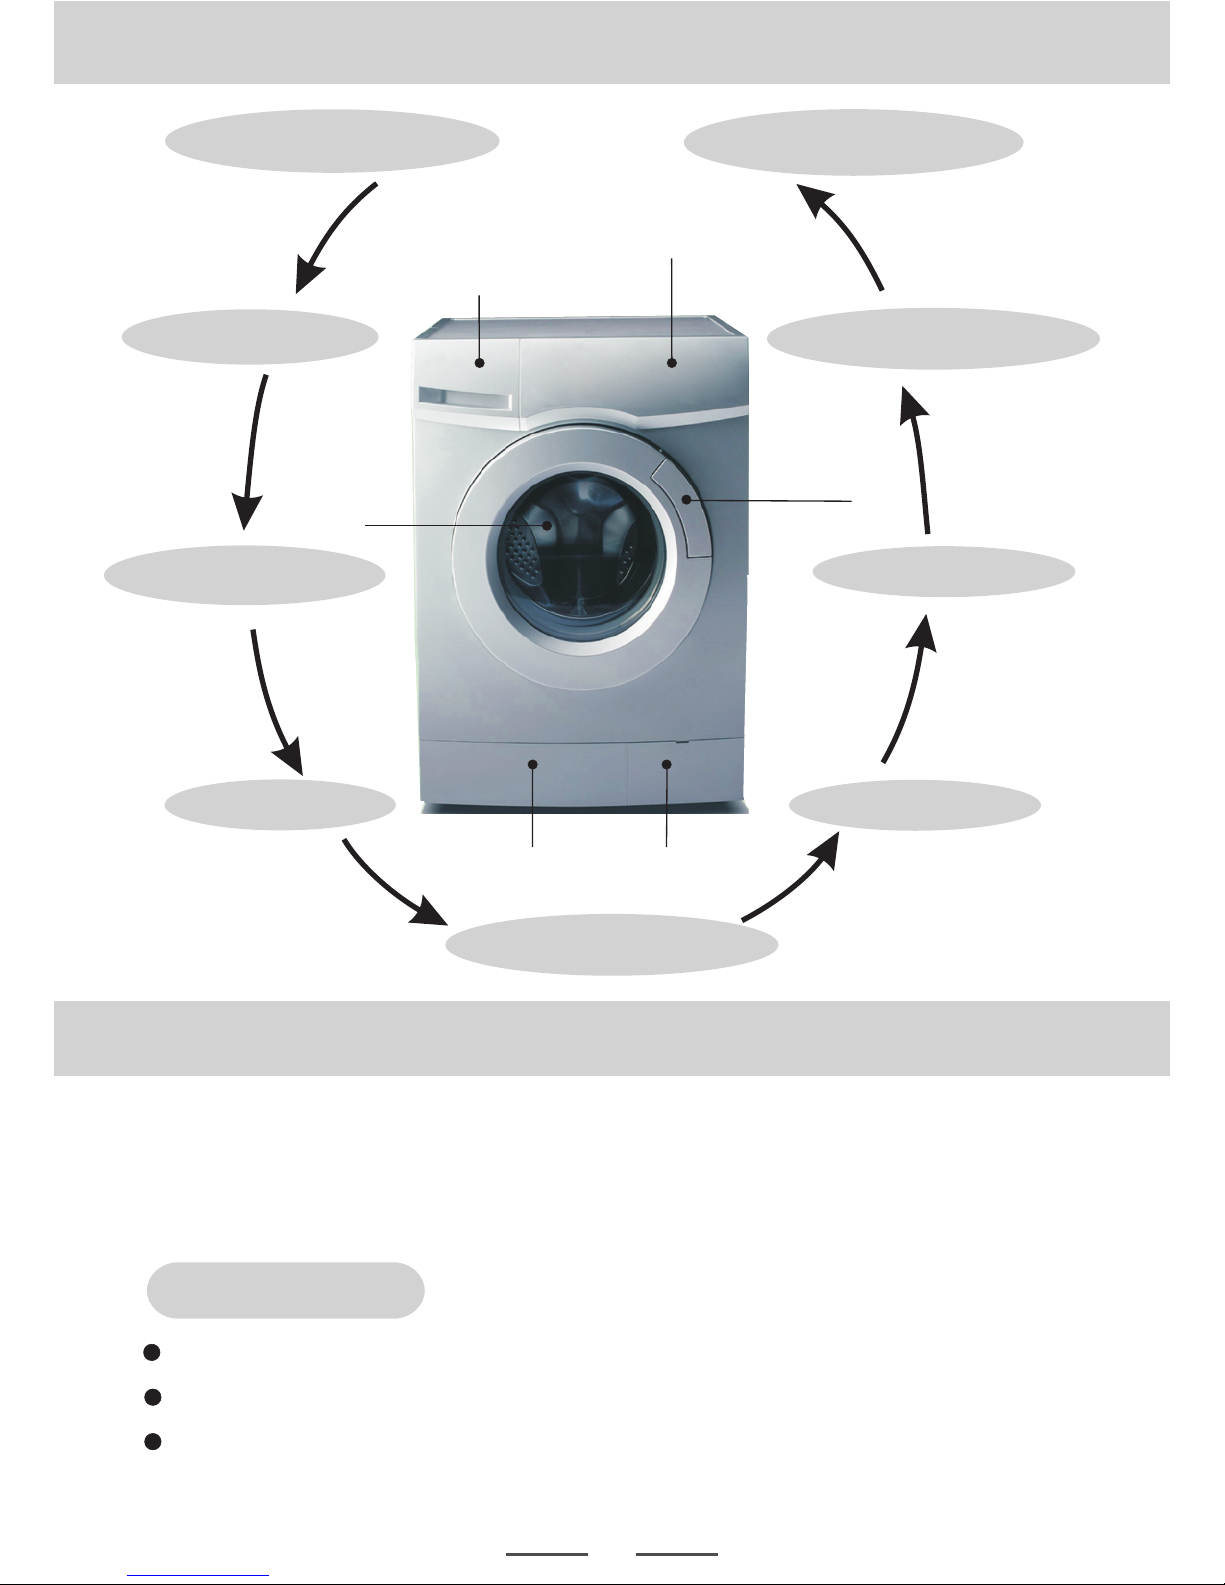
Description of controls
4
Water
level s ele cti on
Page 6
The wash stops
Programme selection
1 Install the washing machine
3 measure out the
detergent
7 Plug the power supply
6 Turn on the water tap
8 Select the desired programme
5 Put down (hang up) the drain pipe
The detergent compartment
Door handle
Filter doorService panel
The control panel
Quick start
1
Rotate the programme select dial to select the desired programme.
3
To press the start /pause key.
2
4 Close the machine door
9
Press the [start/pause] key
5
When the wash stops, music will prompt from the washing machine.
Turn off the water tap.
Rotate the programme selector to the OFF (stop)position, and pull out the power cable.
Select the proper water level, temperature, spin speed or other attached functions.
2 Load the laundry
Basket
Page 7

The program Cotton, 60deg C, Default rpm 1200 is the program to be used for a normally soiled
cotton load .
Page 8

Maximum
Maximum spin speed
The maximum washing
capacity (kilogram)
detergent box
Softener
Pre-wash
Main wash
Extra Rinse Pre-Wash
95
3:44
0:28
2:47
0:58
1:11
0:42
1:52
1:07
1:38
2:16
1:12
0:32
0:01
7.5
7.5
7.5
2
3.5
7.5
3.5
3.5
3.5
2.5
3.5
40
95
40
60
30
95
40
60
95
Optio nal
Optio nal
Optio nal
Optio nal
Optio nal
Optio nal
Optio nal
Optio nal
Optio nal Selec ted
Must
Optio nal
Optio nal
Non-o pti ona l
Non-o pti ona l
Non-o pti ona l
Non-o pti ona l
I
II
×
×
×
×
×
×
× ×
×
Programme table
Default
operation time
( )Default
( )Default
It mean s the d ete rgent or the softene r can not be added.
Compa rat ive ly thick
cloth es
The clothes that only
need the single wash
The clothes that don't
need the dehydration
Compa rat ive ly dirty
cloth es
temperature
(Centigrade)
(RPM)
Optio nal
Optio nal
Optio nal
Optio nal
Optio nal
Non-o pti ona l
Non-o pti ona l
Non-o pti ona l
Non-o pti ona l
60
95
Quick
Synthe tic s
Active
Not so dirty clothes
Ordinary clothes
No detergent
Clothes to be
washed (suggestion)
Wool fleece clo the s
Man mad e fib er cl othes
Silk cl oth es
Child ren 's un derwear
Ordin ary c hil dren's wear
Compa rat ive ly dirty
child ren 's we ar
Cycle
Jeans
Wool
Cotto n
Fabri c
Silk
Kids
w
e
a
r
Und er
C
olor
H
e
avy
Was h
Drain
Self-c lea n
7
The ope rat ion t ime of the wash machin e wil l change with the vari anc e of the water tempera tur e, wa ter level, clot hes , inl et water pressure an d dra in state.
!
wash
W
e
ar
enzyme
It mean s to ad d the d etergent or the soft ene r when it is needed.
It mea ns i t is necessary to add the detergent or the wa sh e ffe ct c annot be reached .
1200
1200
1200
1200
900
900
600
1200
1200
1200
0:21
Optio nal
× ×
The clothes after
the hand wash
Non-o pti ona l
Rin se + Spin
1200
0:12
×× ×
The clothes that only
need the bleaching wash
Non-o pti ona l Non-optional
Dra in and Sp in
1200
1200
600
Energy test program:Cotton 60 C
Page 9

C
C
Add garment
This operation can be executed during the washing procedure.
Close the door when the clothes needed are loaded, and repressed the start/pause button.
When the drum of the washing machine is still rolling and there is large amount of water with high
temperature in the drum, This state is unsafe; the door cannot be opened forcefully.
1
3
2
:
To press add garment , and start the clothes adding function, please follow the
steps below
The door lock is unlocked.
Special features
The extra rinse i s mainly used for the underwear and some clothes with the detergent
residue limitation. The laundry will u ndergo an extra rinse if you select this option. It will
rinse the laundry thoroughly.
Extra Rinse
High temperature self clean
Power off memory
Active enzyme
The self-clea n cycle is specially set in this machine to clean the drum and pipes. It
applys 95 high temperature sterilization to make the clothes washin g more green. When
this procedure is performed, the clothes or other washing cannot be add ed. When proper
amount of chlorine bleaching agent is used, the barrel cleaning effect will be better. The
customer can use this procedure regularly according to the need.
The washing machine does not respond to the add garment function under the high water level
state or the high temperature state of the wash.
!
You do not need to do any change if the washing machine gets power off at the running
state. The washing machine will continue the wash when it gets power again. Please do not
open the door by force during the power off. Please get help from the professional if you want
to open the door.
8
Wait until the drum stops rotation.
C
Active enzyme procedure, gives full play to the active enzyme of the detergent
powder, 40 pre-wash, 60 main wash (the wash machine only displays the main wash
temperature), and it is suitable for the clothes hard to wash.
Page 10

Cleaning of the filter of the drainage pump
Cleaning of the machine
The machine cannot be cleaned by using hard substances like the solvent or steel wool and
etc., and it can be cleaned with a the soft cloth and light detergent .
Cleaning and Maintenance of the washing machine
Every time when the washing is finished, it is necessary to open the machin e door, and mop
up the remaining water of the rubber seal ring, and to clean the dirt inside th e seal fold in
time, in order to prevent any mildew and rot. To open the machine door slightly, to discharge
the humidity inside the barrel.
Please clean the drainage pump regularly to prevent the sundries blocking the drainage pipe.
Close the water tap
If necessary,wait until the water
Empty the water from the pump to a container cautiously .
Screw the pump cover out and clean the filter
Install the pump cover
1
2
3
4
5
6
Pump co ver
Note: make sure to pull out the power plug before the cleaning and maintenance.
!
1
2
Screw the inlet water pipe out.
Clean with the tool (like the gauze
brush and etc.)
Cleaning of the inlet water valve
If the inlet water time is found to be too long, please clean the filter net of the inlet valve.
If the mac hine ca nnot wo rk n orm all y or filter net of the dr aina ge pump ca nnot be cle ane d,
ple ase foll ow the met hod[ 1] belo w:
9
Routine maintenance
Disconnect the power plug
!
has cooled down
If the machine has the emergency drainage
Rotate the programme selector dial to OFF(stop) position and to close the water tap.
1
If necessary, wait until the water has cooled down.
2
Place a container on the floor, pull out the emergency emptying hose, place it into the container.
remove its cap and wait until the remaining water naturally flows out.
3
Emerg enc y dra inage pipe
Drain age p ipe f errule
If the machine has the emergency drainage, please follow the methods be low when the
machine cannot work normally :
Open the filter's door
Turn the emergency
drain hose cap
Pull out the emergency
emptying hose
Remove the cap
!!
.If the machine doesn’t have Emergency drainage, please follow the methods[1] above .
Page 11

The washing machine does not work
Water leakage
The spin of the clothes is abnormal
There is the peculiar smell in the
No water is visible in the drum
There is the remaining water in the
softener's box
The remaining detergent is left on
the clothes
contact the nearest service centre.
If you cannot solve the above abnormal situations, would you please, 1. Turn
the procedure knob to 【OFF】, pull out the power plug; 2. Close the water tap,
and
Malfuction and solution
The washing machine does not fill
The washing machine fills and
empties at the same time.
No drainage of the washing machine
Vibration of the washing machine
The machine stops when the
procedure has not been finished
The bubble spills from the
detergent box
The drainage pump has noise
during the operation when the
water has just been drained
Reloa d and d ist ribute the laun dry e ven ly in the drum.
Run a Sel f-c lea n cycle without a ny cl oth es.
No faul t-w ate r is under the visible a rea .
No faul t- th e eff ect o f the s oftener will not be affected .
Close t he wa shi ng machine's do or.
Confi rm a nd p ress the start k ey.
Corre ctl y con nect the inlet water p ipe .
Open th e wat er ta p.
Check t he se lec tion of the proce dur e.
Put thr oug h the f eed-water.
Check t he wa ter
To check it the inlet water pipe is bent or blocked.
Close t he wa shi ng machine's do or.
Make su re th e end o f the drainage pi pe to b e hig her than the water lev el of t he
insid e the m ach ine .
Check i f the d rai nage pumps is blo cke d.
Check i f the d rai nage pipe is bent o r blo cke d.
Check t he he igh t of the drainage n ozz le, m ake sure it is 0.6-1 met er fr om the
botto m of th e was hing machine.
Level t he wa shi ng machine.
Faste n the f oot ing.
To check if t he in ter nal packing for t he tr ans portation have all b een r emoved.
Check i f the d ete rgent is excessive , if it i s the specialized de ter gent for the
cylin der w ash ing machine.
Reduc e the u sag e amount of the det erg ent i n the next time's wash .
Dip one s coo p of th e softener mixed wit h 1/2 l iter of water to the det erg ent box II.
Power f ail ure o r water cut.
The in ner bar rel water of the w ash ing machine has b een drained but there is
still a sm all amount of water i n th e drainage pump a nd p ipe. Th e drainage pump
conti nuo usl y operates an d ta kes in the air, and at t his time there is the noi se,
which is n orm al situation .
To stop for some time during
the wash procedure
The was hin g mac hine adds water a uto mat ically.
Becau se th ere i s too much bubble i n the t ube , the washing machin e is cl eaning
the bub ble .
The wat er- fas t component of the non -ph osphorus deterge nt wi ll be left on the
cloth es to f orm t he line scale. Plesa e sel ect 【rinse and spin 】pro gra mme or
brush a way t he fl eck with the brush whe n the c lothes is dried.
10
Check i f the d rai nage pipe and sew age h ave b een sealed, if they ha ve be en, there
will be t he po or ve ntilation to ca use t he si phonage effect.
washing machine
Press ure t o see if the water pressur e is in suffic ient.
Page 12
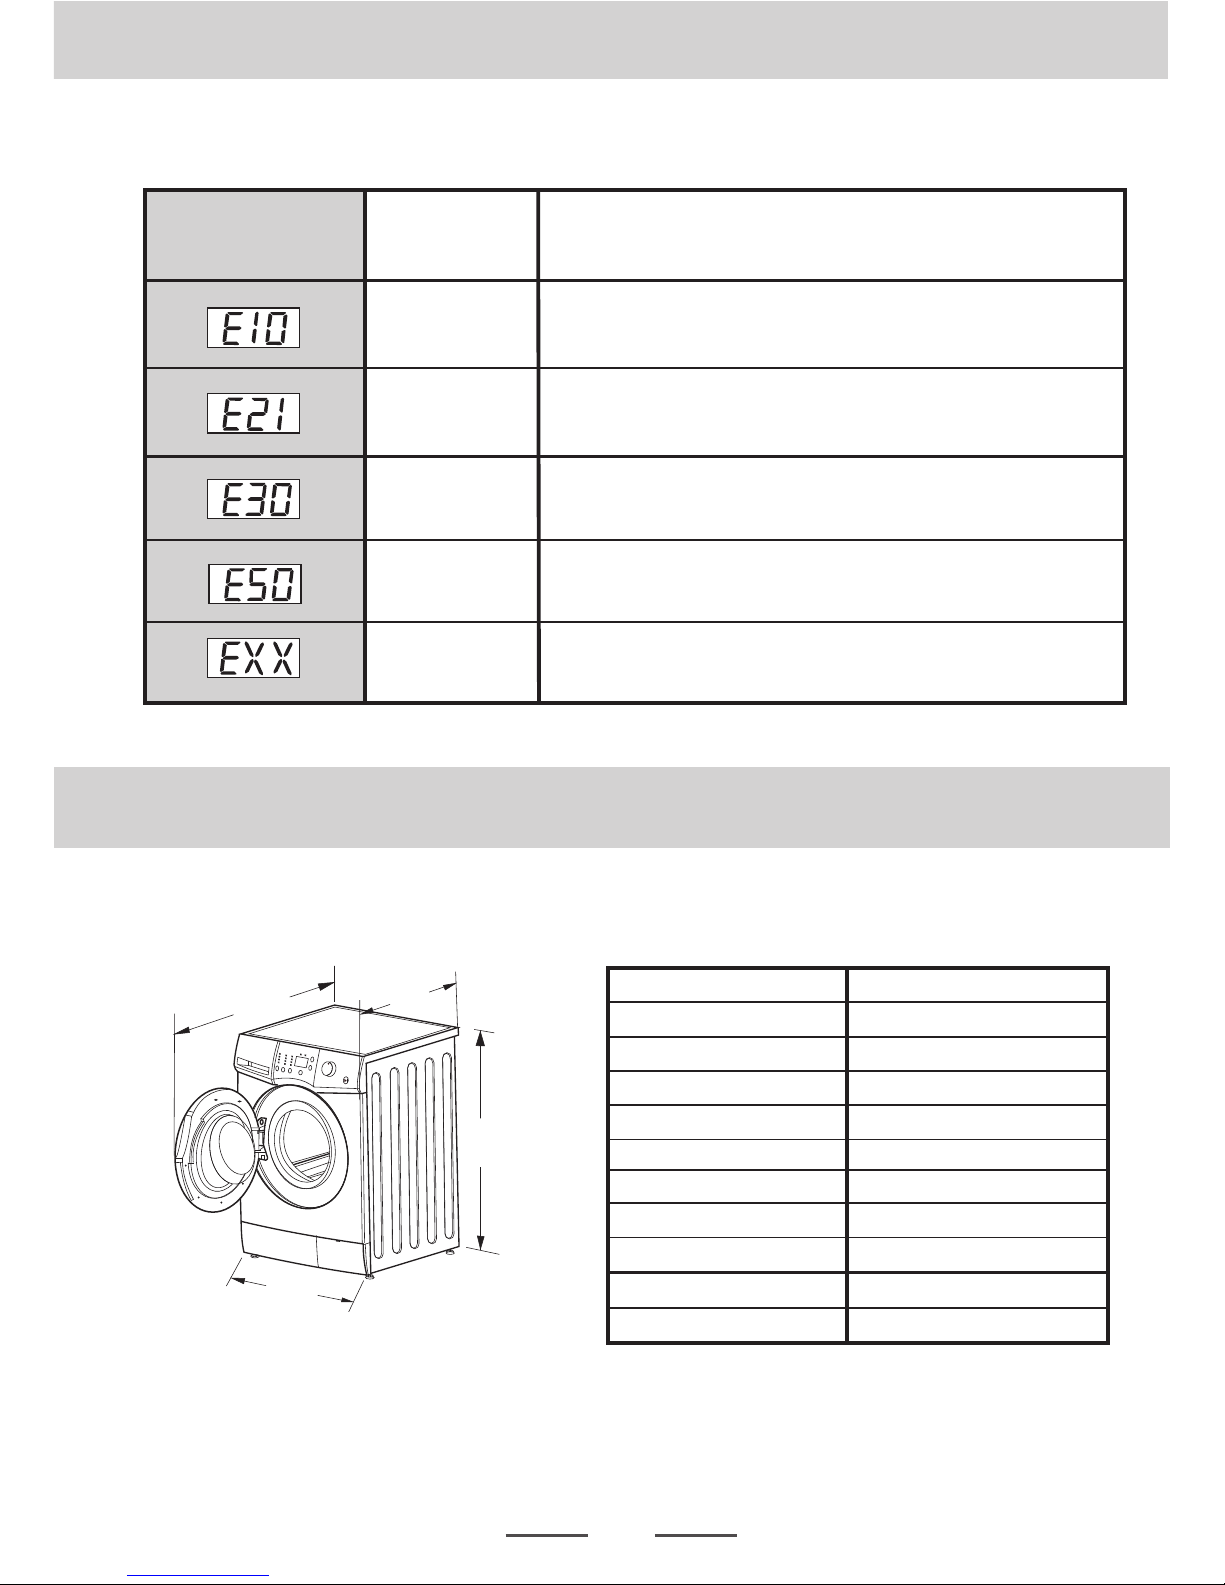
Display
Reason
Solutions
If the washing machine cannot operate normally, a alarm code appears on the
display. Please carry out the following checks.
Open the water tap, to check if the inlet hose is
squashed or kinked, check the filter in the inlet valve
is blocked or not; check if the water pressure is too low.
Check if the drain pump is blocked (see page 10).
Check if the voltage is too high if it is a need to add
the constant voltage device.
Inlet water
overtime
Overtime of
the drainage
The door has
not been closed
Voltage is
too high
Check if the door of the washing machine is closed
check if the clothes are pinned by the door.
Technical specifications
Try again. Please contact your local service center
if the problem persists.
Others
1018mm
565mm
855mm
595mm
Malfunction display and solutions
11
Power supply voltage
220-240V/ 50Hz
Water pressure
Net weight
75Kg
7.5Kg
1200
Drain method
Upper drain
Spin method
Washing capacity
Maxinum s pin spe ed rpm
Centrifugal
Wash power
Spin power
Heat power
Total power absorbed
2000W
200W
2200W
460W
MIN 0.05-MAX 800Kpa
Page 13
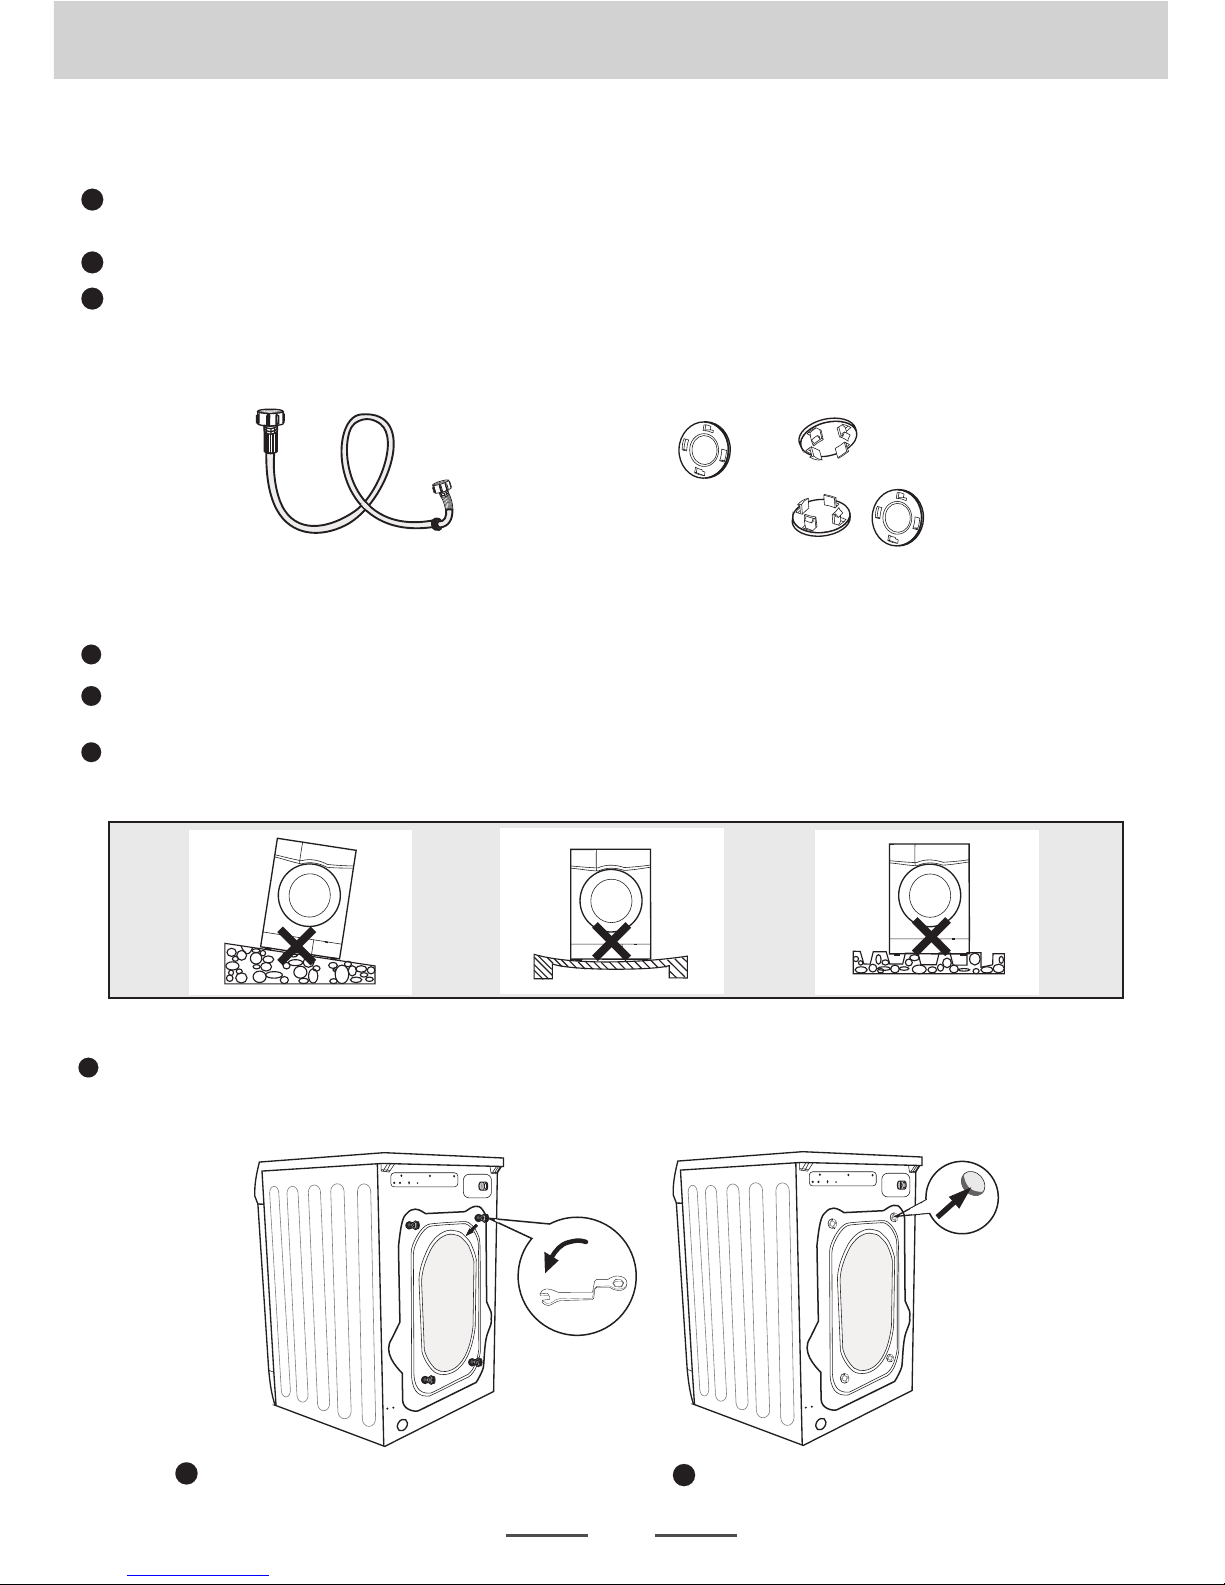
To dismantle the 4 transport bolts
Insert the hole cover of the attached
parts into the hole to close it
Before usage, the transport bolts shall be dismantled and kept for
further use. Please use spanner for operation.Be careful in operation,
to prevent any damage by slipping of spanner.
Installation Instruction
Guidelines
The transport bolts shall be installed on the machine by the professionals, and please
do not dismantle or install privately.
Please drain empty the water inside the machine.
Move cautiously. Do not grasp any salient parts of machine. The machine
door cannot be used as the handle for delivery.
In delivering the machine
:
2. 4 Hole Covers
1. 2 Inlet Hose
Washing Machine Accessories
Installation Position
Please install the washing machine on solid and flat ground.
Please do not place the washing machine on the slope, soft carpet or
wooden floor.
Please do not install the washing machine outdoors, to prevent the
washing machine from being frozen or damage to machine parts.
12
Removal of Transport Bolts
Page 14

Installation Instruction
By adjusting the height of the machine legs,
you can level the machine.
If the floor is obviously uneven, it needs to be adjusted, or the
washing bucket will incline. It vibrates the machine, punches
or causes machine to move from its position.
Level Adjusting
1
2
First, unscrew the adjusting nut 1 with
the spanner.
Next adjust the height of the legs by
the leg 2.
Last screw the nut 1 to lock the leg.
13
1 2
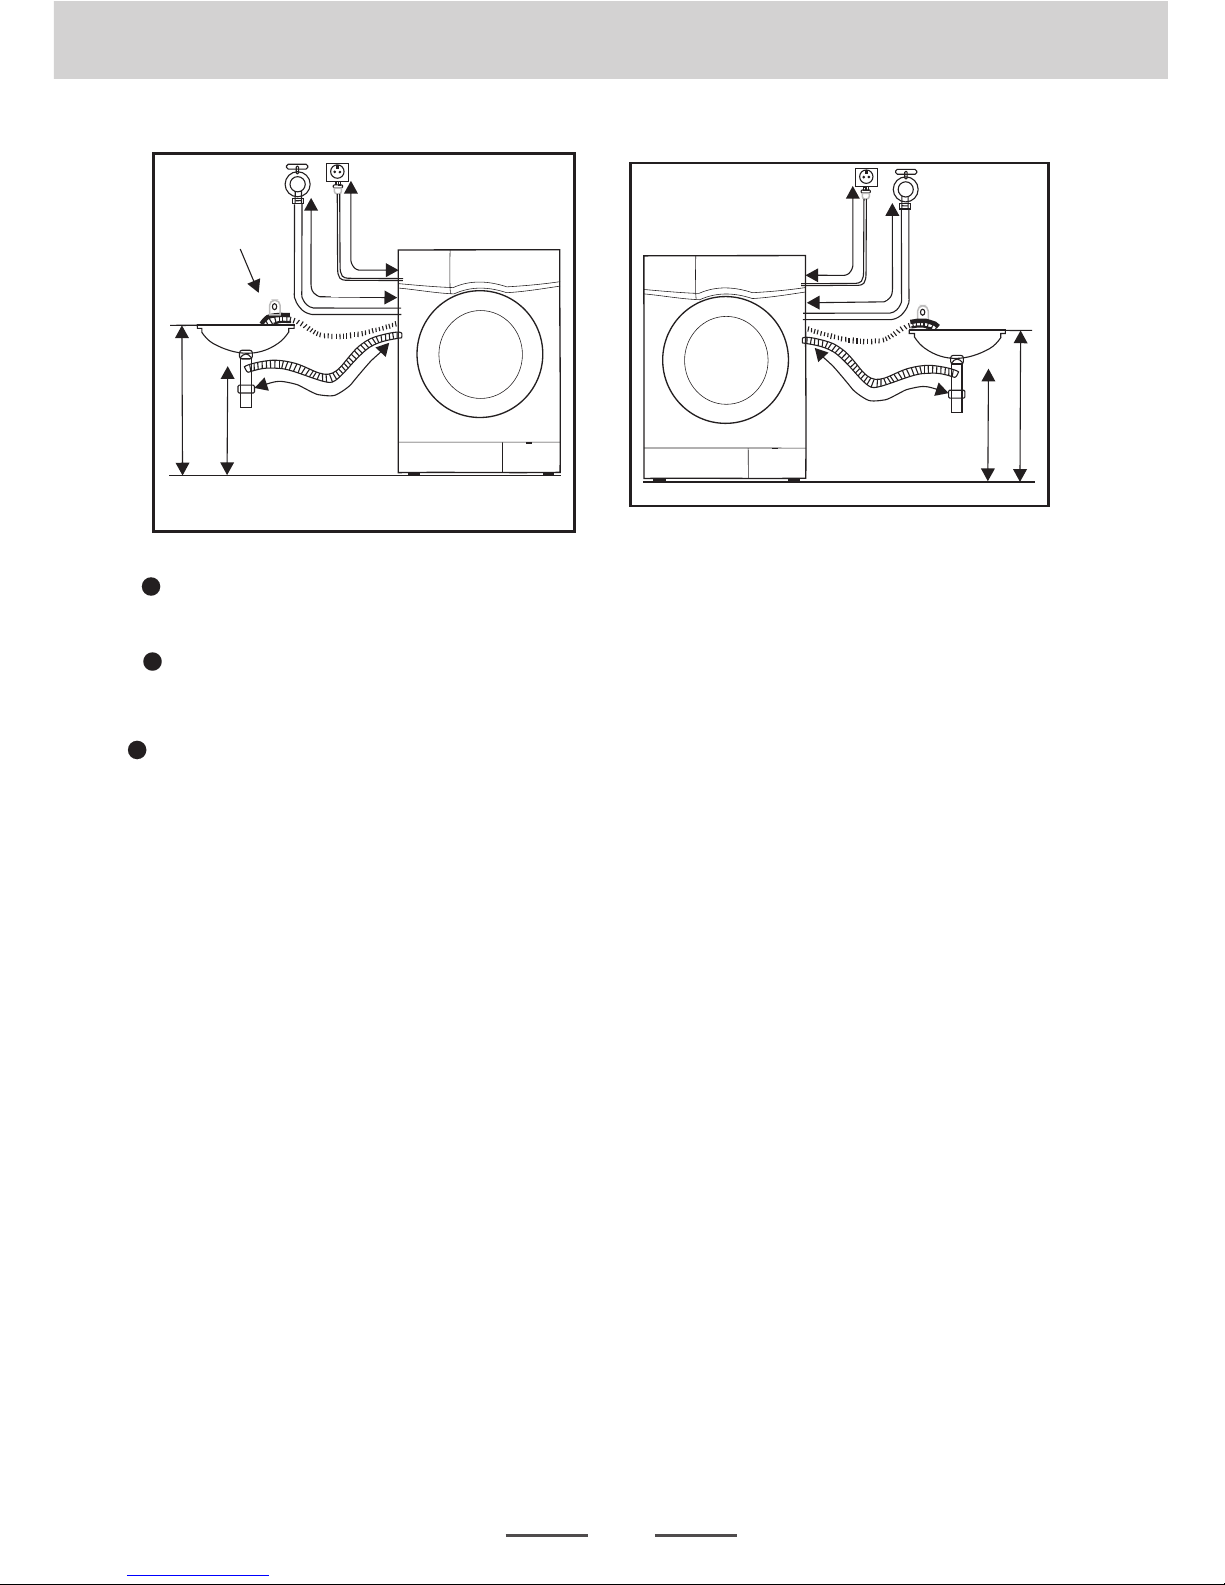
Take out the attached inlet hose.
Approach vertically one end
of the inlet hose to the spiral
tap specially for the washing
machine.
Inlet Hose Installation
Page 15

Avoid damage caused by the overbending of the
inlet hose .
When connecting the water hose and the water tap, do not
damage the screw thread.
Please check the inlet hose conditions regularly. Please
replace it in time if damaged.
When connecting the screw thread of the inlet hose and
the inlet valve, prevent the screw thread screwed
incorrectly or it will wear or leak.
3
Screw tight the tap in the
direction of screw thread
of the inlet hose.
Connect the hose to the water
inlet at the back of the washing
machine.
4
Installation Instruction
14
Please use 240V AC power point 10AMPS as per the data label.
Make sure that the voltage of the power supply is the same as the
electric specification of the washing machine.
Please do not connect it with the power connection board, the
universal plug or socket.
Please do not connect the power supply with wet hands.
If the power cable is damaged if must be replaced by a
qualified person.
Power Supply Connection
Please do not pull out the plug by pulling the power wire with force.
Page 16
15
Drain Hose Installation
Please fix the drain hose with a clamp to the spigot on the trap.
Ensure the spigot hole is drilled out fully.
The correct position of the drain hose can prevent the floor from
water leakage.
To prevent the siphon situation, the installation height of the drain
hose should be between Min 60cm - Max 100cm , and the end
of the drain hose cannot be immersed in the water.
Min im
u
m 6
0
c
m
M
ini mu
m 6
0
c
m
Ma
x
imu m 1
00c m
Ma
x
imu m 1
00c m
Elbow
Installation Instruction
Warranty Service
Technika Pty Ltd.
77 Fillo drive
Somerton 3062
Victoria
1800 333 244
service@technika.com. au
Page 17

Testing methods
16
Testing methods
 Loading...