


Digital Terrestrial Receiver
STB 9005
Operating Instructions
Technika STB 905.book Seite 1 Mittwoch, 27. September 2006 8:21 08

Tabel of Contents
2
1. Control elements and functional components . . . . . . . . . 3
2. Your DVB-T receiver introduces itself . . . . . . . . . . . . . . . . 6
3. Scope of delivery . . . . . . . . . . . . . . . . . . . . . . . . . . . . . . . . . 6
4. Safety warnings . . . . . . . . . . . . . . . . . . . . . . . . . . . . . . . . . . 7
5. Connecting the receiver . . . . . . . . . . . . . . . . . . . . . . . . . . 11
6. Commissioning . . . . . . . . . . . . . . . . . . . . . . . . . . . . . . . . . 14
7. Operation . . . . . . . . . . . . . . . . . . . . . . . . . . . . . . . . . . . . . . 16
Changing channel . . . . . . . . . . . . . . . . . . . . . . . . . . . . . . . . . . . . 16
Volume control . . . . . . . . . . . . . . . . . . . . . . . . . . . . . . . . . . . . . . 16
Info banner . . . . . . . . . . . . . . . . . . . . . . . . . . . . . . . . . . . . . . . . . 16
Showing the help text . . . . . . . . . . . . . . . . . . . . . . . . . . . . . . . . . 17
Using the channel list . . . . . . . . . . . . . . . . . . . . . . . . . . . . . . . . . 18
Blocking a channel (Parental lock) . . . . . . . . . . . . . . . . . . . . . . . 19
Adding a channel to your favourites . . . . . . . . . . . . . . . . . . . . . . 20
Extended installation . . . . . . . . . . . . . . . . . . . . . . . . . . . . . . . . . . 22
EPG . . . . . . . . . . . . . . . . . . . . . . . . . . . . . . . . . . . . . . . . . . . . . . . 24
Timer . . . . . . . . . . . . . . . . . . . . . . . . . . . . . . . . . . . . . . . . . . . . . . 25
Selecting the language . . . . . . . . . . . . . . . . . . . . . . . . . . . . . . . . 27
Use text/MHEG . . . . . . . . . . . . . . . . . . . . . . . . . . . . . . . . . . . . . . 28
Listening to the radio . . . . . . . . . . . . . . . . . . . . . . . . . . . . . . . . . . 28
Configuration . . . . . . . . . . . . . . . . . . . . . . . . . . . . . . . . . . . . . . . . 29
Software Upgrade . . . . . . . . . . . . . . . . . . . . . . . . . . . . . . . . . . . . 30
Parental Settings . . . . . . . . . . . . . . . . . . . . . . . . . . . . . . . . . . . . . 31
8. Diagnostics . . . . . . . . . . . . . . . . . . . . . . . . . . . . . . . . . . . . . 32
9. Technical data . . . . . . . . . . . . . . . . . . . . . . . . . . . . . . . . . . 34
Technika STB 905.book Seite 2 Mittwoch, 27. September 2006 8:21 08

Operation
3
1. Control elements and functional components
Front view of the receiver
A IR sensor with LED display
Green: device is switched on
Red: device in standby mode
No colour: device is not connected to the mains supply
Rear view of the receiver
B RF IN socket for antenna connection
C Analogue audio left L
D VCR/DVD SCART connection VCR
E Mains connection socket 12 V
F TV-SCART connection TV
G Analogue audio right R
H RF OUT socket for antenna output
(Loop-through socket)
A
B
CD
G
H
F
E
Technika STB 905.book Seite 3 Mittwoch, 27. September 2006 8:21 08

STB 9005
4
Remote control
1 On / Off
2 Mute
mute the sound, pressing again switches the sound back
on
3 TV/radio button
open the channel list
1
2
3
25
15
23
14
24
4-13
16
22
21
27
26
28
29
30-33
17-20
Technika STB 905.book Seite 4 Mittwoch, 27. September 2006 8:21 08

Operation
5
4-13 Numerical keys
- direct channel selection via the individual buttons
- edit timer settings
14, 21 Channel buttons Ch+ / Ch-
select next / previous channel
15, 22 Volume buttons Vol+ / Vol-
increase / decrease volume
16 OK button
- confirm selection
- open the channel list
17-20 Arrow buttons
- for navigation
- selection in menus
23 Info button
- show information banner
- show help in the menu
24 Exit button
- cancel procedure
-exit menu
25 Text button
open the MHEG (info guide)
26 EPG button
open the EPG
27 Swap button
change between the two channels last viewed
28 Menu button
open the main menu
29 OPT button
opens the configuration window
30-33 Colour buttons
EPG operation / MHEG
Technika STB 905.book Seite 5 Mittwoch, 27. September 2006 8:21 08

STB 9005
6
2. Your DVB-T receiver introduces itself
Welcome!
With your new digital receiver the whole world of digital
television is open to you - and in top quality!
These Operating Instructions help you to optimally use the
extensive functions and options of your new digital receiver.
Overview of the features
DVB terrestrial TV and Radio reception
Logical Channel Numbering (LCN) support
MHEG5 support
Easy-to-use graphical user interface
Automatic and manual channel scan
Electronic Program Guide (EPG)
Aspect ratio: 4:3, 16:9
Wide Screen Signalling (WSS) for AFD support
Context based help function
3. Scope of delivery
After unpacking the device, check the contents below are all
present and undamaged:
1 receiver
1 Operating Instructions (including Quick Start Guide)
1 remote control (battery already inserted)
1 SCART cable
1 pluggable power supply (AC/DC Adaptor)
Technika STB 905.book Seite 6 Mittwoch, 27. September 2006 8:21 08

Operation
7
4. Safety warnings
Basic notes
Intended use
This device serves to receive digital channels via an antenna.
The replay is effected via a TV connected to the receiver.
Every other use is not intended and is impermissible.
Only the functions described in these Operating Instructions
may be carried out with this device.
The receiver is designed for domestic use.
Notes regarding the Operating Instructions
If possible, keep the Operating Instructions ready at hand
near the appliance.
If you hand the receiver on to another person, please also
enclose these Operating Instructions.
Danger to children
Never leave children unattended with this device. Children
underestimate the danger associated with electric
appliances.
Keep children away from the packing material. When it is
swallowed, there is a risk of suffocation.
Batteries can be dangerous if they are swallowed. Therefore
keep batteries out of reach of babies. If a battery has been
swallowed, seek medical assistance immediately.
Technika STB 905.book Seite 7 Mittwoch, 27. September 2006 8:21 08

STB 9005
8
Danger caused by electricity
In the interior of the device there are hazardous voltages.
Never open the housing or insert objects through the
ventilation openings.
The device must not be exposed to dripping or splashing
water. Prevent liquids from entering into the device. If this
happens, immediately disconnect the power plug.
Do not place items filled with fluids, like vases or coffee mugs
on the device.
The device must not be used in damp locations (e. g.
bathroom) or rooms with heavy dust accumulation.
Only connect the pluggable power supply of the device to a
power outlet that is installed according to regulations.
The power outlet has to be easily accessible so that you are
able to disconnect the power plug immediately if necessary.
Check that the connector cables are not pinched or
squeezed.
Do not switch on the device if the device or the connector
cables show visible damage, or if the device has been
damaged.
If apparent damage occurs (e. g. smoke or similar) during
operation, immediately disconnect the power supply from the
power outlet. In doing this, always pull at the plug, never at
the cable.
Power outlets and extension cables must not be overloaded,
as this may create fire hazard!
In order to completely disconnect the device from the power
supply, the power supply has to be disconnected from the
power outlet.
Do not make any modifications to this device.
Technika STB 905.book Seite 8 Mittwoch, 27. September 2006 8:21 08

Operation
9
Have repairs to on your receiver carried out by qualified
skilled personnel only. The manufacturer accepts no liability
for accidents to the user if the device is opened. Incorrect
wiring of the connections can result in failures or malfunctions
on the device.
Use the provided cables and pluggable power supplies only.
During thunderstorms devices may be damaged by power
surges. Therefore, in the event of a thunderstorm always
disconnect the pluggable power supply from the power outlet
and remove the antenna connector.
If you do not use the receiver for a long period of time,
disconnect it from the power supply and antenna connection.
This also applies to devices connected to the receiver.
Danger of injuries by other causes
Check that nobody can trip over the connector cables.
Notes with regard to the installation location
Always place the device on a solid, even surface.
Do not expose this device to extreme temperatures.
Therefore:
- avoid direct sunlight and radiator heat,
- leave a minimum space of approx. 50 cm above and to the
sides,
- do not cover the device with magazines, table cloths or
similar. The heat may not build up in the device an create
a fire hazard!
The device must not be installed close to inflammable
material (e. g. curtains, flammable liquids, etc.).
Handling of batteries
Batteries must not be thrown into the fire, disassembled, or
short-circuited.
Replace the batteries at least one a year to prevent them
from leaking. If you do not use the device for a long period of
time, remove the batteries from the remote control.
Technika STB 905.book Seite 9 Mittwoch, 27. September 2006 8:21 08

STB 9005
10
Never try to reactivate a used battery by heat, charging, or by
other means.
Miscellaneous notes
Only switch the receiver on after the connections with the
antenna and the TV set have been established.
Do not place open fire sources, for example burning candles,
on the device.
Opening the device results in loss of warranty.
Condensation can be produced within the device, e. g. if the
device is brought in from a cold to a warm environment. In
such cases wait for approx. one hour before commissioning
the receiver. After this amount of time, the condensation has
usually evaporated.
Disposal of battery and device
Contact your local authority to establish the correct method of
disposal for both the device at end of life and spent batteries.
Technika STB 905.book Seite 10 Mittwoch, 27. September 2006 8:21 08

Operation
11
5. Connecting the receiver
Inserting the battery into the remote control
The battery (type CR2025 / 3 V) is already inserted in the
remote control. It is covered by an insulating plastic separator to
avoid premature discharge of the battery.
1. To remove the battery, extract it from the remote control as
showed above.
2. Simply re-insert the battery compartment into the remote
control.
The remote control is now ready for use.
Connecting the receiver
Note:
Observe the connection diagram, see page 13.
Connection to an antenna
Connect the antenna via a (not supplied) coaxial cable to the
receiver. First connect the coaxial cable to the antenna and
then to the RF IN socket of the receiver.
Caution!
Please be sure that all devices are switched off before you
connect them. Only plug in the power supply when all other
connections have been established. By this, possible damage
is avoided.
Technika STB 905.book Seite 11 Mittwoch, 27. September 2006 8:21 08

STB 9005
12
Connection to a Television
Connect the receiver and TV set by means of the SCART cable.
Connect the TV SCART socket and the corresponding
SCART socket of your TV set using a SCART cable.
Note:
If your TV set is provided with more than one SCART sockets,
consult the Operating Instructions of the TV set. This will advise
you which SCART socket is appropriate for the connection.
NOTE:
If you also want to receive analog channels in addition to the
digital channels, the analog signal of these channels has to be
"looped through“. For this purpose, connect the RF OUT socket
of the receiver to the antenna input socket of your TV set by
means of an additional coaxial cable.
Connection of a video or DVD recorder
Connect the receiver and video/DVD recorder to each other
using a further SCART cable.
Connect the VCR SCART socket and the corresponding
SCART socket of the other device using a SCART cable.
NOTE:
If your recorder is provided with more than one SCART socket,
consult the Operating Instructions of the device.
Caution!
Do not use the decoder input included on some TV sets. For
this, read the Operating Instructions of your TV set.
Technika STB 905.book Seite 12 Mittwoch, 27. September 2006 8:21 08

Operation
13
Connection diagram
Connection to a stereo
Connect the AUDIO OUT L and R output sockets to the
corresponding input sockets of your stereo using a cinch
cable (not included).
NOTE:
Observe the Operating Instructions of your stereo or audio
system.
Antenna
Mains Adaptor
VCR
TV
Stereo
Technika STB 905.book Seite 13 Mittwoch, 27. September 2006 8:21 08

STB 9005
14
Connecting the power cable
Connect the device and the power outlet using the power
supply.
1. First connect the power cable to the power connection of the
receiver.
2. Then plug the power supply into a power outlet.
6. Commissioning
Switching on the receiver
Switch on the receiver by pressing the Power button on the
remote control.
When you switch on your receiver for the first time, the “First
Time Installation“ assistant will guide you through all the
required steps.
The selection is carried out by the Arrow buttons
orand
the OK button.
NOTE:
You may have to set the AV channel on your TV set. Information
on this can be found in the Operating Instructions of your TV set.
First time installation
After the first switch-on, the following window appears:
Caution!
Only connect the device to a power outlet that is installed
according to regulations.
Only switch the device on after the connections with the
antenna and the SCART cable have been established.
Technika STB 905.book Seite 14 Mittwoch, 27. September 2006 8:21 08

Operation
15
1. Select the screen format of your TV using the Arrow buttons
or and press the OK button.
2. Press OK to start the automatic search.
NOTE:
If you do not press the OK button, the search is started
automatically after a few seconds.
The screen dialogue provides information on the progress of the
channel search. Furthermore you will see the channels that
have been found listed as below.
As soon as the search is completed, the first channel found will
be displayed.
Technika STB 905.book Seite 15 Mittwoch, 27. September 2006 8:21 08

STB 9005
16
7. Operation
Changing channel
You can change the channel in different ways:
By pressing the Ch + or Ch buttons.
By pressing the Swap button you skip between the two
channels last viewed.
By selecting the channel directly via the channel list, see
page 18.
By entering the memory number in the channel list. For this
purpose, enter the number via the numerical buttons. For
instance, if the memory has the number 80, press the
corresponding numerical buttons successively.
Volume control
Use the Volume buttons Vol + and Vol - to increase or
decrease the volume.
The volume selected is shown in the form of a bar on the screen.
Mute function
By pressing the Mute button, the sound reproduction is
stopped.
The sound is audible again if you ...
... press the Mute button again, or
... press one of the volume control buttons.
Info banner
At every channel change the info banner is displayed.
Technika STB 905.book Seite 16 Mittwoch, 27. September 2006 8:21 08

Operation
17
1. Press the INFO button to call up the information banner without
changing the channel.
The info banner displays the following information:
storage space number, channel, mode and time,
signal strength,
the current programme and the following programme
including their broadcasting times.
2. Press the Info button i again to have information on the current
and next programme, respectively, displayed.
3. Where required, use the Arrow buttons
=and= to have
further text displayed in the window.
NOTE:
You can also press the yellow or blue colour button to have
information on the current or next programme displayed.
4. Close the window by pressing the Info button i or the Exit
button once.
Showing the help text
If a window is opened, you show a window with a help text and
hide it again by using the Info button i. It informs you on the
respective operation of the functions.
Technika STB 905.book Seite 17 Mittwoch, 27. September 2006 8:21 08

STB 9005
18
Using the channel list
Selecting a channel
1. Press the TV/Radio button or the OK button to call the channel
list.
2. By means of the Arrow buttons you can navigate in the
channel list:
The current channel is displayed on the right while the
channel list is shown on the left.
Use the Arrow buttons =and= to select the desired
channel which is shown on the right.
3. After pressing OK you change to the desired channel.
4. Press Exit to close the channel list and view the selected
channel.
Deleting / editing the channels
By pressing the Arrow button orand the OK button, you
can delete channels and change the channel name in the
channel list.
1. Open the channel list.
Technika STB 905.book Seite 18 Mittwoch, 27. September 2006 8:21 08

Operation
19
2. Use the Arrow buttons and the OK button to select the
desired function.
3. When you change a channel name, use the Numerical buttons
of the remote control to change the channel name.
The following table shows you how to generate or enter the
different characters:
Blocking a channel (Parental lock)
The block function prevents access to a channel.
NOTE:
In order to be able to block channels, you must have carried out
the corresponding settings in the configuration window, see
page 29.
1. Open the channel list.
2. Highlight Lock and press the OK button.
3. Enter the code that consists of four digits via the buttons of the
remote control (standard code at delivery: 0000).
In the left half of the channel list a lock symbol is displayed next
to the channel name.
Remote Button 1234567890
Press once 1 A D G J M P T W
Press twice . B E H K N Q U X 0
Press three times , C F I L O R V Y +
Press four times : 23456S8Z-
Press five times ; a d g j m 7 t 9 *
Press six times ! behknpuw/
Press seven times ? c f i l o q v x $
Press eight times @ r y %
Press nine times / s z &
Technika STB 905.book Seite 19 Mittwoch, 27. September 2006 8:21 08

STB 9005
20
4. Press Exit to close the channel list.
Now the channel can only be selected after entering the four
digit lock code.
Adding a channel to your favourites
Favourites are usually channels that you frequently wish to
watch. If you have added channels to a favourite list, only
"favoured" channels are displayed when you change channels
using the Ch + or Ch buttons. There are a total of five favourite
lists available.
1. Open the channel list.
2. Select Favourites by means of the Arrow button
or and
press the OK button.
The favourite list is displayed.
Technika STB 905.book Seite 20 Mittwoch, 27. September 2006 8:21 08

Operation
21
3. Highlight the channel that you want to favour in the left window
half.
4. Highlight the desired list using the Arrow button
or and
press OK.
Behind the channel selected the number of the selected list is
displayed. A channel can be stored in several favourite lists.
5. Press Exit to close the favourite list.
Deleting a favourite
1. Open the favourite list (see previous section).
2. Highlight the desired channel on the left side using the Arrow
button
=or=.
3. Using the Arrow button
or highlight the list from which you
want to delete the favourite.
Technika STB 905.book Seite 21 Mittwoch, 27. September 2006 8:21 08

STB 9005
22
4. Press OK.
5. Where required, repeat the procedure by selecting another
favourites list and pressing OK again.
6. Press Exit to close the favourite list.
Extended installation
In the installation menu you can choose between Automatic
Search, Manual Search and First Time Installation.
The initial installation has already been described elsewhere,
see page 14.
After the initial installation it may be required to search for
channels again, or to add specific channels that are additionally
broadcasted.
To open the installation menu:
1. Press the MENU button. The main menu is opened.
2. Select Installation and press the OK button.
Technika STB 905.book Seite 22 Mittwoch, 27. September 2006 8:21 08

Operation
23
Automatic search
For the Automatic Search the search is started and your
current channel list is replaced when you confirm the channel
request with Yes.
Manual search
In the case of the Manual Search you can define the channel
on which the search is to be carried out. Channels that are found
are added to your current list.
1. Enter the channel number with the Numerical buttons.
2. Press the OK button to start the search.
Technika STB 905.book Seite 23 Mittwoch, 27. September 2006 8:21 08

STB 9005
24
EPG
1. Press the EPG button to open the electronic programme guide.
2. Use the Arrow buttons to navigate in the EPG.
The symbol of the currently selected channel is shown at the
top right.
At the bottom you see five channels of your channel list with
the current and the next programmes.
At the top left you see the duration and a short summary of
the programme selected.
Via the red and the green button you can browse the
channel list by four channels forwards or backwards,
respectively.
Via the blue button you can add a programme to the timer.
NOTE:
For detailed information on the subject "Timer“, see page 25.
3. Press the Exit or EPG button to close the electronic programme
guide again.
Technika STB 905.book Seite 24 Mittwoch, 27. September 2006 8:21 08

Operation
25
Timer
By using the timer you can switch your receiver on and off at
certain times, for instance to enable recording with a
videocassette recorder. The device then automatically switches
on from standby.
Adding programme to timer list
The timer function is accepted in the timer list via the EPG.
1. Open the EPG and press the blue colour button.
2. Select the desired channel on the left window half using the
Arrow button
=or=.
The contents of the right window half adjusts automatically.
3. Press the Arrow button to skip to the right window half with
the selection bar.
4. Select the programme using the Arrow button
=or=.
5. By means of the four colour buttons you can select a different
period.
red: two hours back
green: two hours ahead
yellow: one day back
blue: one day ahead
NOTE:
The period selected is displayed in the upper area of the right
window half. The colour buttons can be pressed again.
6. Press the OK button to add the programme selected to the
timer.
Behind the programme selected a small clock symbol is shown.
7. Press the Exit or EPG button to close the electronic programme
guide again.
Technika STB 905.book Seite 25 Mittwoch, 27. September 2006 8:21 08

STB 9005
26
Timer editing
1. Press the MENU button. The main menu is opened.
2. Select the entry Timers and press the OK button.
In the upper corner the symbol of the currently set channel is
shown; below all programmes that you have added to the timer
list are displayed.
Deleting (a) programme(s)
1. Select the desired programme.
2. Press the Arrow button
or to deactivate the programme
selected.
NOTE:
You can reactivate a deactivated timer, see next section.
Technika STB 905.book Seite 26 Mittwoch, 27. September 2006 8:21 08

Operation
27
Timer editing
1. Select the desired programme and press OK.
A further window with detail information on the timer programme
selected is opened.
2. Highlight the desired entry by using the Arrow button
=or=,
and alter the settings using the Arrow button
or and the
Numerical buttons.
You can then change the following settings:
the channel
the time (start and end time),
the date
the cycle (useful for series and regularly recurring
programmes)
3. Then press the Menu or Exit button repeatedly to close the
timer list.
Selecting the language
Using this option you can choose between available languages
and their mode (e. g. mono and stereo).
1. Press the MENU button. The main menu is opened.
Technika STB 905.book Seite 27 Mittwoch, 27. September 2006 8:21 08

STB 9005
28
2. Select Audio menu and press the OK button.
3. Highlight the desired entry using the Arrow button
=or= and
press the OK button.
NOTE:
The change is only temporary. As soon as you change the
channel, the unit reverts to the language set in the configuration
menu.
The availability of further languages or modes depends on the
corresponding channel and the corresponding programme.
Use text/MHEG
With the text key you can access certain Text and Multimedia
contents.
MHEG (Multimedia and Hypermedia Expert Group) is a
standard that offers you information about various contents like
news, life style, shopping or sports events and results.
1. Press the Text or red key to bring up the text menu for the
current channel.
2. Use the
=or= key to navigate through the menu.
3. Use the OK key to select an item.
Additionally you now have the four colour keys (red, green,
yellow and blue) to navigate through the content of the page.
How they will be used will vary for different stations; read their
meaning from the bottom line (usually) or wherever they appear
on the screen and use them as required.
4. Press the Text key again to leave Text/MHEG, or press the Exit
key.
Listening to the radio
1. Press the TV/radio button to receive the digital radio
programme.
Technika STB 905.book Seite 28 Mittwoch, 27. September 2006 8:21 08

Operation
29
2. In order to be able to watch TV again, press the TV/radio
button again.
Configuration
Via the configuration window you carry out settings with regard
to the device and channels.
1. Press the MENU button. The main menu is opened.
2. Select the entry Configuration and press the OK button.
NOTE:
Via the OPT button you can also open the configuration window
directly.
The operation:
Via the Arrow button =or= you select the desired option.
By means of the Arrow button or you alter a setting.
If an additional window is opened, confirm the selection by
pressing the OK button.
Audio Language
If a channel provides the broadcasting of more than one
language, you can select the language preferred here. It serves
as a presetting.
Technika STB 905.book Seite 29 Mittwoch, 27. September 2006 8:21 08

STB 9005
30
Subtitle Language
Select a language for the captions.
TV Type
Select your TV type: 4:3 or 16:9.
WideScreen Mode
Set your preferred mode for movies or programmes broadcast
in 16:9.
TV Out
Here the settings RGB, Video (CVBS) and S-Video (Y/C) are
provided. RGB provides the best picture performance if
supported by your TV.
VCR Out
Here you can choose between Video (CVBS) and
S-Video (Y/C).
Favourite Mode
Here you deactivate the favourite mode or assign a list to the
channel.
Only lists already containing at least one channel can be
selected, see page 20.
Receiver Upgrade
By means of this function you update the software of the
receiver, see page 30.
Parental Settings
By this, you restrict the access to a channel or to the device
yourself, see page 31.
Software Upgrade
1. Open the configuration window (press OPT button) and
highlight Receiver Upgrade.
2. Press the OK button to start the procedure.
Technika STB 905.book Seite 30 Mittwoch, 27. September 2006 8:21 08

Operation
31
At the end of the search an appropriate message is displayed.
Parental Settings
1. Open the configuration window (press OPT button) and
highlight Parental Settings.
2. Press the OK button.
3. Enter the four-digit code (standard code at delivery: 0000).
4. Carry out the further settings in the window that opens via the
Arrow buttons and the OK button:
You set:
the age range,
what is to be blocked,
a new password (recommended).
5. Press Exit to close the window again.
NOTE:
Please read the next chapter “Diagnostics“, if you have lost or
forgotten the password.
Technika STB 905.book Seite 31 Mittwoch, 27. September 2006 8:21 08

STB 9005
32
8. Diagnostics
All electronic devices may exhibit problems. Nevertheless this
does not always have to be a sign of a malfunction. Often the
causes are defective supply lines, plug connections, or
connection faults.
Before consulting a specialist, please check the following
points.
Caution!
Never try to repair the defective - or potentially defective device yourself.
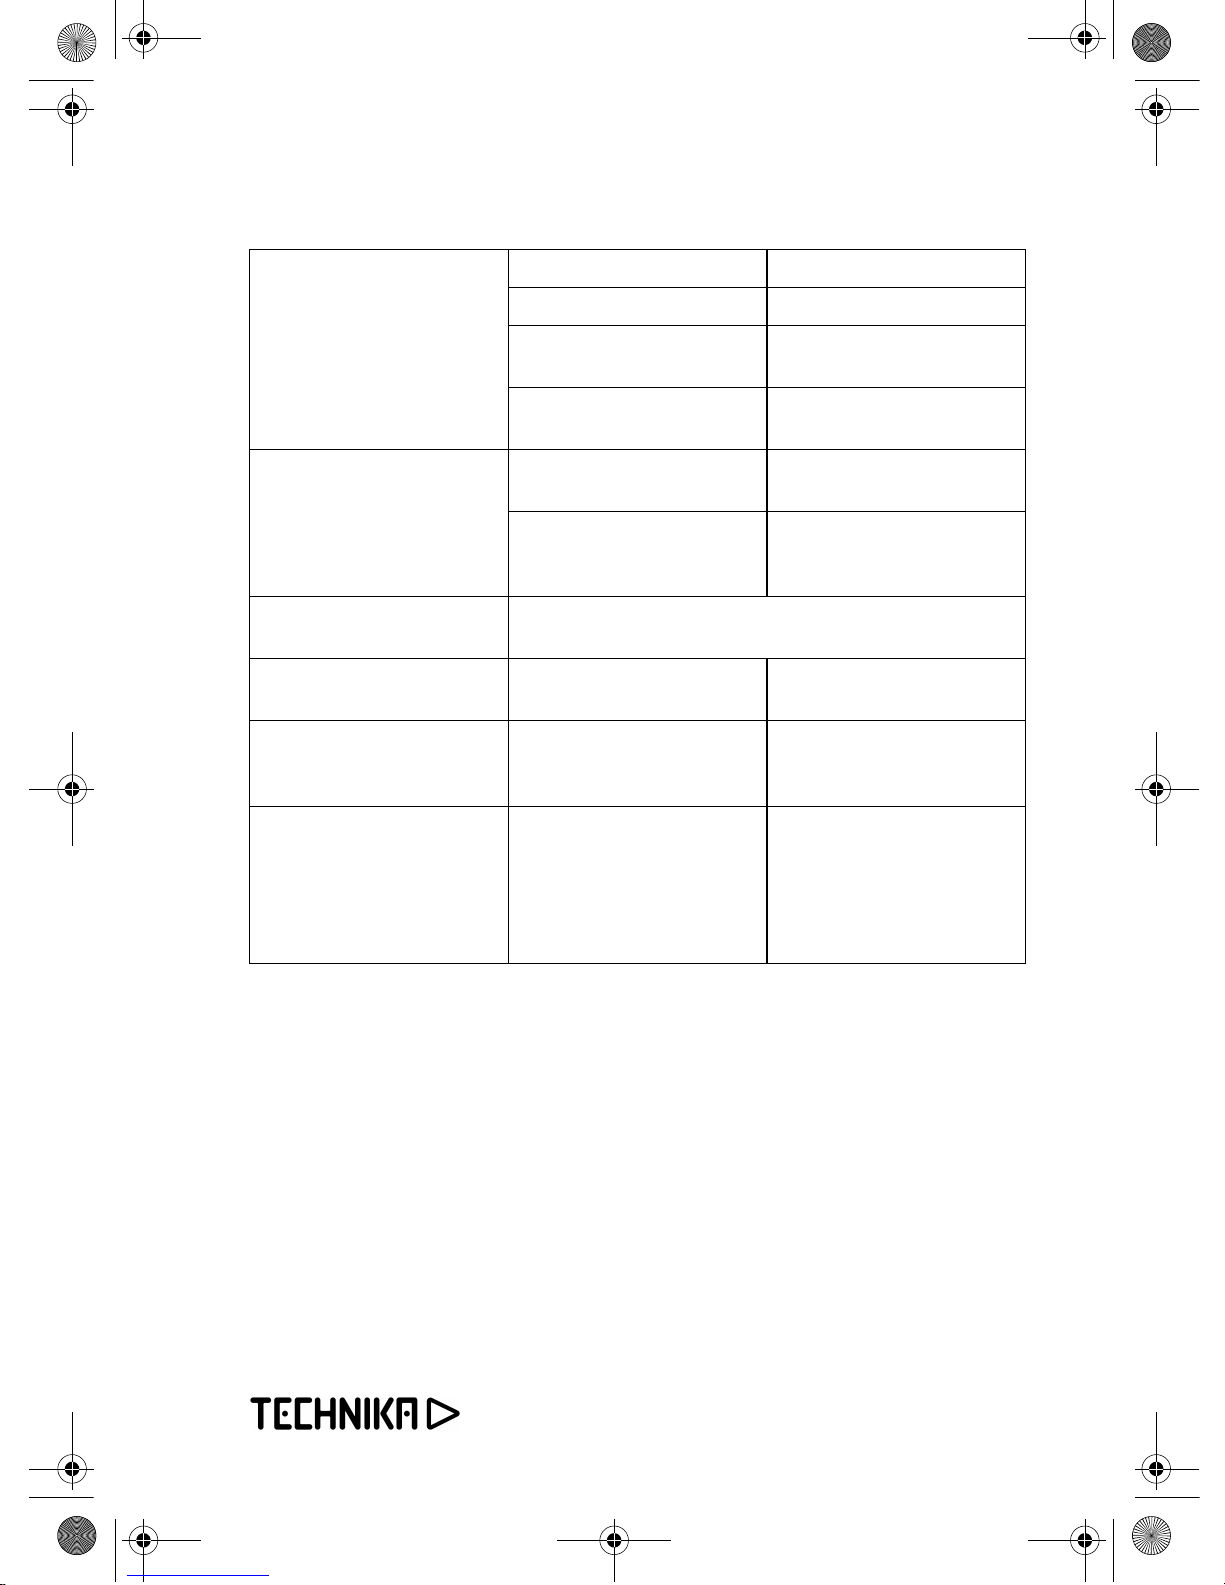
Fault Possible causes Remedies
No signal Open antenna cable Check antenna cable
No picture, no sound No mains voltage Check connector cable and
pluggable power supply
No channel list or incorrect
channel list
Do an automatic station
scan
Open / Short-circuit in the
antenna cable
Switch device off, eliminate
/ open short-circuit, switch
device on
Defective or missing cable
connection
Check all cable
connections
Antenna badly adjusted Readjust antenna
Lost connection, or cable
too long
Check connection, shorten
cable length
Remote control does not
work
Obstacle between remote
control and receiver
Eliminate obstacle
Transport stream defect
-> device blocked
Disconnect pluggable
power supply, re-establish
connection after 10
seconds
Battery discharged Replace battery
Technika STB 905.book Seite 32 Mittwoch, 27. September 2006 8:21 08
Operation
33
Sound available, no or bad
picture
Antenna too small Use bigger antenna
Antenna badly adjusted Readjust antenna
Channel is broadcast on a
different frequency
Carry out automatic scan
mode, see page 22
SCART plug not completely
connected
Check SCART connection
No reception of channels
that could be received
before
Channel is no longer
broadcast
None
Disturbance by DECT
telephone
Keep a distance between
the device and the
telephone
Several channels are not
received from time to time
These channels are not broadcasted 24 hours a day and
sometimes are not available. This is not a fault.
Device cannot be operated Obstacle between remote
control and receiver
Eliminate obstacle
Bad picture quality Incorrect TV SCART output
signal
Try to change from RGB to
CVBS, or vice versa, see
page 30
You have forgotten or lost
your PIN code
Reset from the Parental
Settings, see page 31. Use
the following four digit
code: 8421. Keep this code
secret to prevent others
from using it.
Technika STB 905.book Seite 33 Mittwoch, 27. September 2006 8:21 08

STB 9005
34
9. Technical data
Basics
DVB terrestrial Free-To-Air receiver compliant to EN 300 744
MHEG5 and LCN support
UHF frequency range support
Video and Audio out via 2x SCART
Audio out (left/right) via RCA jack
Fast channel search
Reed-Solomon decoding support (EN 300 744)
Automatic FEC selection (1/2, 2/3, 3/4, 5/6, 7/8)
MPEG2 Transport Stream support: ISO/IEC 13818 1
DVB Video/ Audio support: ISO/IEC 13818 2, 3
Update-Over-Air ability (OAD)
RF specification
QPSK / QAM16/64 demodulation compliant to DVB terrestrial
standard EN 300 744
COFDM 2k and 8k
UHF support (474…862 MHz)
8 MHz channel bandwidth
Guard Interval Modes: 1/32, 1/16, 1/8, 1/4 active symbol
duration
Fast PLL tuning speed: step size 62.5 kHz / 166.67 kHz
Input / Output specification
2x SCART out (EN 50049 1)
- TV SCART out: CVBS, Y/C, RGB, Audio
- VCR SCART out: CVBS, Y/C, Audio
- VCR SCART in (pass to TV SCART): CVBS, Y/C, RGB,
Audio
- Switching signal: at PIN8 0/6/12 V; at PIN16 0/1 3 V
Audio out via RCA jack
Technika STB 905.book Seite 34 Mittwoch, 27. September 2006 8:21 08

Operation
35
RF input
- connector IEC60169 2 female
- termination 75 Ohms
- Return loss: 6 dB (75 Ohms) at a minimum
Loop-Through of RF signals
Power Supply
Power supply 230VAC/50Hz to 12VDC (AC Adaptor)
Operation power consumption less 12 W
Standard and Regulation Compliance
DVB terrestrial standard EN 300 744
MPEG2 Transport Stream support to ISO/IEC 13818 1
DVB Video/ Audio support to ISO/IEC 13818 2, 3
Safety and EMC regulations:
- EN 55013
- EN 55020 and
- EN 60065
Technika STB 905.book Seite 35 Mittwoch, 27. September 2006 8:21 08

Technika STB 905.book Seite 36 Mittwoch, 27. September 2006 8:21 08
 Loading...