

Page 1

Tesco Stores Ltd, Delamare Road, Cheshunt, Herts, EN8 9SL
SH340T
3.1 MP Digital Camera
User Guide
Page 2

SH340T DIGITAL CAMERA - CONTENTS
USER INFORMATION Page 1
UNPACKING AND PREPARATION Page 2
CAMERA- LAYOUT Page 3
UNDERSTANDING YOUR CAMERA-MAIN MENU Page 4
MODES AND MENUS Page 5
USING THE CAMERA Page 6
TAKING A PICTURE Page 7
FLASH AND MACRO Page 7
ZOOM Page 8
ALTERING THE SCREEN DISPLAY Page 9
UNDERSTANDING THE PICTURE MENU Page 10
SETTING UP YOUR PICTURE MENU Page 11
USING YOUR CAMERA AS A VIDEO RECORDER Page 13
THE VIDEO CAMERA MENU Page 14
MAKING AN AUDIO RECORDING Page 15
VIEWING PICTURES AND VIDEOS Page 16
VIEWING PICTURES Page 17
VIDEO PLAYBACK SCREEN Page 18
VIDEO PLAYBACK Page 19
OPTIMISING DELETING & PROTECTING FILES-1 Page 20
CONNECTING THE CAMERA TO A TV Page 22
PLAYING BACK AUDIO RECORDINGS Page 23
ORGANISING AUDIO RECORDINGS Page 24
SETTING UP THE CAMERA Page 25
INSTALLING THE CAMERA SOFTWARE Page 29
TRANSFERRING FILES FROM CAMERA TO PC Page 30
INSTALLING THE CAMERA AS A WEBCAM Page 31
USING THE CAMERA AS A WEBCAM IN WIN XP Page 32
INSTALLING & USING PHOTO EXPLORER 8 Page 33
TROUBLESHOOTING Page 35
WARRANTY Page 38
SPECIFICATIONS Page 39
3.1 Mega pixel CMOS sensor
5.0 Mega pixels: (2560 x 1920) (Hardware Interpolation)
3.1 Mega pixels: (2048x1536)
2.0 Mega pixels: (1600 x 1200)
F/2.8 f=8.5mm
0.5m. ~ Infinity
11cm ~ 18cm
4x
Built-in (Auto/force/off)
1.5" real colour LTPS TFT
Auto/Sunny/Cloudy/Tungsten/Fluorescent
18-20fps@QVGA & 8-10fps@VGA
16MB Flash memory
5.0M: (2560 x 1920) -- 11 Pictures
3.1M: (2048 x 1536) -- 17 Pictures
SD card: supports up to 2GB
Picture: JPEG, Video: AVI, Voice: WAV
10 /15/20 seconds
USB 1.1
NTSC/PAL
2xAAA alkaline batteries
Sensor
Image resolution
Lens
Focus range
Macro mode
Digital zoom
Flash strobe
LCD display
White balance
Video mode
Internal memory
Internal memory capacity (approx)
External memory card
File format
Self timer
PC interface
TV-out
Power source
SPECIFICATIONS
Page 3

If you get a warning
This may be due to a conflict with another camera or capture device. If this is the case you should uninstall the
software you have just loaded and also any other camera software that may be on your PC.
Uninstalling old drivers and devices
The most common problem occurring during installation is the presence of a driver for a similar, old device. The best
solution is remove all the drivers related to the old devices before installing the new driver. Make sure you delete
programs and drivers relating to old, unused and similar devices and nothing else.
1. Enter Windows ‘Safe Mode’ (press F8 when starting Windows and then select ‘Safe Mode’ from the menu which
will be displayed).
2. Click on ‘Start – Settings – Control Panel’ and double-click on ‘Add/Remove Programs’ icon.
3. Find all the programs for similar, old devices and remove these by clicking on the ‘Add/Remove’ button. In
‘Safe Mode’, it is possible for some programs to appear twice - remove all programs which appear twice.
4. Remove the camera driver for this camera.
5.
Restart the computer.
Now re-install the camera driver following the instructions in the previous pages.
message: “Capture device was not detected” when trying to open the PC cam.
WARRANTY AND DISPOSAL
If you are in any doubt about carrying out this procedure, consult a competent computer technician!
Your camera is covered by a warranty for 12 months
from the date of purchase. If a fault develops during
this period, please contact the TESCO electrical help
line on 0845 456 6767. Please have your original
purchase receiptwith you whenyou call.This warranty
in noway affectsyour consumer rights.
Producedafter13th August2005.
Waste electrical products should not be
disposed ofwith householdwaste. Please
recycle where facilities exist. Check with
your Local Authority or retailer for
recycling advice.
36
IMPORTANTUSER INFORMATION
Before Using YourCamera
Please read the following notes before operating your camera:
Avoid using or placing the camera in the following locations:
• Thiscamera isa precisionelectronic device. Treatit withcare
• Do notattempt to servicethis camera.Opening or removingcovers mayexpose you todangerous voltagepoints or
other risksand youwill invalidate thewarranty.
• Donot exposethis camerato direct sunlightto avoidrisk of fire.
• Anyloss ordamage causedby the malfunctionof thisproduct is thesole responsibilityof theuser .
• Before takingpictures with thiscamera of anyimportant occasion testthe camera beforehandensure that itis fully
functioning, thatthe batteriesare charged andthat thereis sufficient spaceon theSD card.
• Damp and dusty places. Sealed
vehicles, places exposed to direct sunlightor high temperatures. Places subjectto severe vibration or physical shocks.
Locations fullof smoke,fumes, dust orsteam. Outdoorsin rainor snow.
• Toensure thecamera photographsnormally, donot drop, shakeor hitthe camera whentaking pictures.
• Donot openthe batterycover when thepower ison.
• If water has entered the camera,immediately turn the power OFF andremove the batteries. Takethe camera to
your dealerfor examinationand repairbefore usingit again.
Good Practice
• Ifthe lens,LCD monitoror viewfinder surfaceis dirty,use a lensbrush oroptical clothto wipethe surfaceclean.
• Do touchthelenswith yourfingers.
• Do useanysharpobject toavoid scratchingthelens,LCD monitoror viewfindersurface.
• Cleanthe bodyonly witha soft cloth.Do notuse detergents, solventsor abrasivecleaners onthe camera.
• Alwaystransport andstore thecamera in thesupplied pouch.
NOT
NOT
1
Page 4

UNPACKING
The packaging contains:
• The camera, carrying pouch, wrist strap, USB cable, A/V playback cable, 2xAAA batteries, software CD
• If any item is damaged or missing please contact your nearest Tesco store for a replacement. Please have your
receipt ready when you call.
PREPARING THE CAMERA FOR USE
You will need 2 AAA batteries. These can be Alkaline or
rechargeable. Do not mix battery types. If you use alkaline cells,
make sure that they are the same type and rating. Replace
batteries in sets. Do not mix new and used batteries
You will also need a standard SD card. The internal memory
is small and will hold only a very few pictures. The camera will
support SD cards up to 2GB.
Slide the battery cover back and it will spring open. Insert the
batteries with the polarities as shown. Close the cover
Insert the SD Card with the connectors facing upwards as shown. Push it in until it latches in place. Never touch the
connecting terminals of the card. (To remove the card press it in and the internal catch will release the card).
CAUTION
Handle batteries safely. Do not short circuit batteries with any metal objects. Dispose of used batteries safely in
accordance with relevant recycling provisions. Do not throw used batteries in water a fire or in the general rubbish.
LOADING THE CAMERA DRIVER (See Page 29 for full details)
Windows ME/2000/XP:
Windows 98 SE:
If you do not wish to use the webcam facility you need not install the camera driver. The
PC will recognise the camera as a USB drive on connection allowing you to upload and view your pictures.
Installation of the driver is necessary to upload to a PC and view your files. Refer to Page 29.
2
TROUBLESHOOTING
If your camera does not work as expected please run through this checklist before you contact Tesco.
Camera will not turn on
1. Batteries are not properly installed- remove and reinstall the batteries.
2. Insufficient battery voltage - Do not use old batteries or batteries with mixed battery life.
Do not use low voltage or low capacity rechargeable batteries
Flash will not fire
1. Flash set to OFF -Set the flash to Auto or On.
2. Flash has not been fully charged The flash takes a few seconds to charge -the Operation LED blinks. The Flas
h
light is fully charged when the Operation LED turns off.
3. Battery level low - the voltage is too low for the flash to work. Insert new batteries.
Image is blurred or out of focus
1. Subject is out of focal range. Ensure that there is at least 1.5m (5ft ) between the camera lens and subject.
2. The camera moved- Hold the camera steady while taking the picture.
The PC does not recognize the Camera.
In Windows 98SE, the camera driver has to be installed before downloading.
Subject in recorded image is too dark
Insufficient light for shooting Set the flash ON, or adjust the exposure value to a positive (+) setting.
Flickering on LCD screen or recorded image
Incorrect frequency setting. Check the anti-flicker frequency ( 50Hz or 60Hz ) under fluorescent light.
Flash card does not display images recorded.
The flash card is faulty or improperly formatted. Re-format the SD card and if necessary, replace it.
The SD card is locked. Move the switch at the side of the card to unlock it.
35
Page 5

SAVINGYOUR VIDEO
3. STOP
4. Save As
Pressthe icon tocapture thevideo.
A control panel will now open. Press the
appropriate icons to play, fast forward and
rewind themovie.
You canaslso edit themovie by determiningthe
start and stop positions. The manual on the
software disc has full instructions for editing
and manipulatingyour images.
Click the icon to give the
completed videoa title andsave it toa folderon
the PChard drive.
5. CloseClick to exitthe menu.
Now unplugthe camerafrom the PC
3
4
5
34
8
9
10
11
DISP
OK
19
2
0
21
18
22
7
12
13
14
15
16
17
23
24
CAMERA LAYOUT
1 Lens
2 Wrist Strap Hook
3 SHUTTER button
4 ON-OFF button
5 TIMER light
6 Flash Light
7 Battery door
8 SD card slot
9 Tripod connector
10 AV Socket
11 USB socket
12 MACRO switch
13 BUSY light
14 LCD Screen
15 Microphone
16 MENU button
17 MODE button
18 LEFT/DISPLAY ON-OFF button
19 UP/ZOOM IN
20 RIGHT/ FLASH ON-OFF
21
OK button
22 DOWN/ZOOM OUT
23 PLAY button
24 DELETE button
1
2
3
4
5
6
3
Page 6

UNDERSTANDING YOUR CAMERA - MODES AND MENUS
Switch the camera on by pressing the button.ON-OFF
Wait for the welcome screen to load.
Press the button. The MODE SCREEN will displayMODE
Navigate to the icon you want by pressing . Press to confirm.OK
The MODE screen allows you to choose an action
CAPTURE MODE allows you to capture an event. You can take a snapshot, record a video, make an audio recording.
Pressing the button when you are in a capture mode will take you into a menu related to that mode.MENU
This menu allows you to to set the camera up to make the perfect picture, video or sound recording.
The modes allow you to organise, view , replay pictures and recordings.REPLAY
The mode allows you to set global settings for the camera, such as the date and time, TV system, etc.SETTINGS
Audio Replay
Camera Settings
DISP
OK
MOVE UP
MOVE DOWN
MOVE
LEFT
MOVE
RIGHT
MODEMENU
DISP
OK
Snapshot Audio RecorderVideo Cam
CAPTURE MODE
MODE SCREEN
4
Installing andUsing UleadPhoto Explorer 8;
Photo Explorer 8 SE BASIC enables you to access, archive and catalogue all the images on your PC . It also has inbuil
t
Webcam Capture software that turns your camera into a digital video recorder with audio support.
Make sure the camera is not connected to the PC
• Launch the CD. Click on the Photo Explorer icon.
Follow the prompts and install the software.
• Connect your camera to the PC.
• Launch Photo Explorer
1 Click the " " icon.Capture Video
The Video Capture screen will open.
You will now see a video stream in the
capture window.
2. Click the toRed Record button
begin the video capture.
The capture will start and the progress
bar will begin to travel across the
window. You will also see the time
elapsed of your video movie.
Note: The Setup menu allows you to
change the video resolution and the
frame rate to give the ideal blend of
quality and file size. Refer to the
program help menu and the instruction
manual on the software disc for advice.
1
2
33
Page 7

USING THE CAMERA AS A WEBCAM IN WINDOWS XP
Using the camera as a Webcam in Windows XP
1. Connect your camera to the computer.
2. My ComputerNavigate to
3. STK014Click on the icon.
The video will now stream.
Camera Tasks
Take a new picture: Click on this to
capture a picture. The picture appears at
the bottom of the screen as a thumbnail.
You can now save the picture to your hard
drive.
Delete all pictures on camera: Click
this option to delete the captured video
images. This operation will deletenot
any pictures actually stored in the
camera memory.
When you have finished: Unplug the
camera from the PC.
32
Memory SD Card Inserted
Snapshot
Mode
Flash Mode
Flash Off
Flash On
Flash Auto
5M 0354
Battery capacity
Full
Empty
Image Size (2MP,3MP,5MP)
Number of pictures left.
Depends on SD card and
Image Size
If you do not see this icon and a card is
inserted, you should format the card.
SeeP26
Macro Mode (if selected)
Burst Snapshot (if selected)
Timed Snapshot (if selected)
25/01/2007
USING THE CAMERA
Switching On andOff
TAKINGA PICTURE-BASIC
• Press the button until the welcome screen appears.
• Whenthe camerais on,press the button Thecamera willthenshut off.
• When thecamera ispowered bythe battery, after afew seconds ofinactivity thecamera willshut
off. Thistime canbe set upin theMenu.
• Switchthe cameraon. Thecamera goes to The screenis overlaidwith icons
ON/OFF
ON/OFF
Auto ShutOff:
When thecamera isconnected to aPC, Auto ShutOff will notoperate.
Snapshot mode.
When you switch the camera on the camera will
always comeon insnapshot mode soyou canjust switch on,take apicture and switchoff.
(The black icons indicate the default operating mode. Icons described in grey are optional features. They will only
appear onthe screen whenyou specificallyselect themodes from thepicture menu. Whenyou switchthe cameraoff the
camera willrevert tothe default mode
5
Page 8

To take a picture:
• Line up the shot by looking at the image on screen.
• Keep the camera steady
• Press the shutter button gently
The camera will beep, momentarily go blank and begin to process the image. The picture
you have just taken appears on the screen. Let the camera to process the picture
before lining up the next shot. When the screen clears you can take another picture.
The indicator on the screen will decrease by one.‘pictures remaining'
Using Flash
• Press the FLASH key to select FLASH off/on/auto.
The indicator appears on the screen
During this period the monitor screen will turn off and the"busy"light blinks.
When the light stops blinking and the screen turns on again, charging is done.
• You are now able to take a flash photograph.
When the shutter is pressed :
The function will always fire the flash.FLASH ON
The function will fire automatically as conditions require.FLASH AUTO
NOTES:
Flash Mode
Flash Off
Flash On
Flash Auto
Wait for the light to go steady
before using the camera or
switching off!
BUSY
5M 03545M 0354
READY
BUSY
READY
5M 0354
5M 0354
Because the flash needs to be charged, the rate at which you take successive
pictures is reduced.
Battery life is reduced when using flash photographs.
If you are taking a photo of a distant object by night the flash has no effect.
When taking a shot of a very close object, the flash may "bounce" off the image
and the picture may be affected.
6
INSTALLING THE CAMERA AS A WEBCAM
Navigate to the page of the Setup MenuUSB Connection
Ensure that the camera is set to PC Cam!
• Connect the Camera to the PC via the supplied USB cord.
The camera driver will now be installed to the camera. There may be a short delay.
You will now see the download screen.
Downloading Files
All the files are visible in the window.
Jpeg files are pictures. View them with
standard image software.
Avi files are Video files
Wav files are audio recordings
These file types can be played in current
versions of Windows Media Player.
Click on the files you want to save
Select a folder to save the files in
Tip: If you select the desktop the utility
will create a folder for you
Click on Download
The utility will create and date the folder
USB Connection
PAL
PC Cam
OK
09-02-2007-
13-00
4
31
Page 9
TRANSFERRING FILES FROM CAMERA TO PC
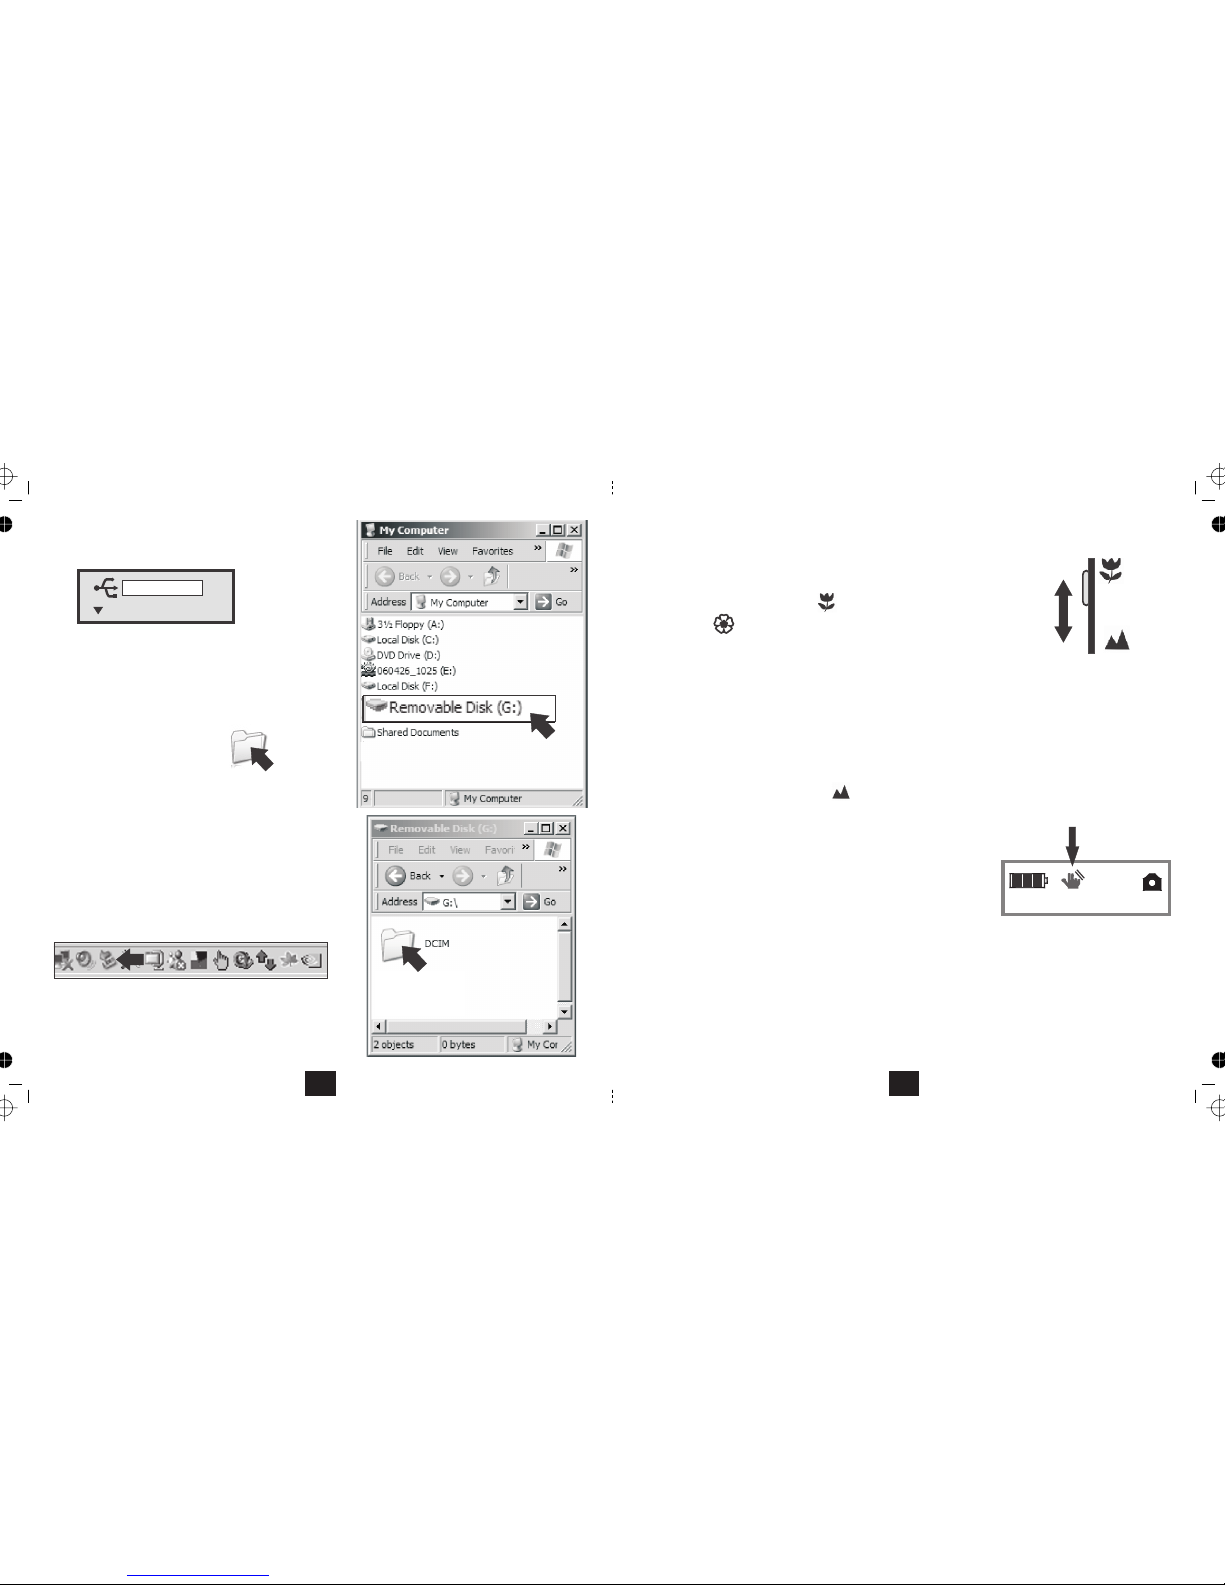
Set the Camera USB connection to Mass Storage!
• Plug the camera into the PC
• Navigate to My Computer
The camera appears as a removable hard drive.
• Click the Icon to open the driveRemovable Disc
• Click on the folder DCIM.
•
J
PEG files may be opened with a variety of programs.
The included software programs can be used to view and
manipulate your images.
WMA and AVI files Windows Media Playermay be played in
Unplugging the Camera from the PC
Click the Icon in the taskbar"Safely Remove Hardware"
Wait for the message ' 'safe to remove hardware
You may now unplug the camera.
Click on the folder "100CRECSI".
You can now access the contents of the hard drive.
Mass Storage
100CRECSI
30
TakingaClose Up Picture
The mode enables you to take close-up pictures with reduced blurring.MACRO
• Line up an object about 100mm from the camera. The fine detail is blurred.
• Slide the MACRO switch up to the
position.
The macro icon will appear on the screen beside the Camera icon.
Fine detail in the subject now comes up clearly.
• Keep the camera very steady. In Macro mode this is essential.
• Press the shutter button gently.
The camera processes the image and the picture you have taken appears on the screen.
After a while the screen clears and you may now take another picture. The ‘pictures
remaining' indicator on the monitor screen will decrease by one.
• Allow the camera to process the picture before lining up the next shot
• Always set the MACRO switch to OFF when you have finished.
Macro mode is especially useful for taking close up shots of flowers, insects and so on.
Screen Indications
Low Light: In daylight the camera flash should be set to OFF as this speeds
up processing and extends battery life. In low light a warning sign appears on
the screen. This is a prompt for you to set the flash to ON or AUTO. If the
indicator appears in daylight, re-site the camera so that the indicator is off.
If you take pictures without flash when the warning sign is on the picture may be very dark and underexposed.
No image on screen: The camera features automatic focus. If the screen is blank this indicates that a usable
picture cannot be taken. The screen will also blank when processing an image. It will also blank out briefly when
the camera is moved because the image sensor needs to adjust to the changed conditions.
Screen Illegible: In very bright sunlight you will not see the screen clearly. Shade the screen wherever possible.
MACRO mode switch
OFF
ON
25/01/2007
7
Page 10

2M 0354
2M 0354
1.50
The Zoom Function
The camera has a feature.Digital Zoom
Digital Zoom may be used on single snapshots and timer snapshots.
It may also be used in Camcorder Mode
Using Zoom with single shots
• Line up the camera on the subject
• Press the buttons to increase or decrease the zoom.
The current zoom level appears on the screen.
• Press the shutter to take the picture
(See P13)
The minimum zoom level is 1.0. The maximum Zoom is 4.0.
25/01/2007
What is DigitalZoom?
When using digitalzoom, thecamera enlargesthe area atthe centreof the frameand discards the outside edges.The
image looks closer becauseit has been enlarged, howeverthe image quality isalso reduced. In effect thepicture has
been expandedand cropped.
If youare unsureabout usingimage processingsoftware, digitalzoom offersyou agood methodof liningup a specific
image. If youare likely to usehigh zoom levels,use alarger resolution. High levels ofdigital zoom atlow resolutions
may resultin grainypictures.
The minimumzoom levelis 1.0. Themaximum Zoomis 4.0.
8
INSTALLING THE CAMERA SOFTWARE
The utilities disc supplied with this camera include:
• The camera driver
• Ulead Photo Express 5
SE;
Installing the Camera Driver
DO NOT CONNECT THE CAMERA TO THE PC
Load the CD into your CD Drive
The welcome screen will appear
Click "Install Camera Driver"
Follow the prompts.
Let the software install
Press to complete the installation.Finish
Ulead Photo Explorer 8 Cool 360
SE;
If the CD does not auto start:
Go to the menuSTART/RUN
Type D:autorun
(where D: is the letter of the CD drive)
The welcome screen will now appear
Windows ME/2000/XP:
If you have Windows 98
If you do not wish to use the webcam you need not install the camera driver. When you
connect the camera to the PC the SD disk in the camera will appear as a removable drive allowing you to upload
and download images. We recommend you install this software to enjoy the full functionality of your new camera.
installation of the camera driver is necessary.
The camera connects to the PC via the supplied USB2 cable. Images are stored on an SD card. If you have a card
reader you may download images to your PC from the card. You may also plug the card into a suitable printer for
direct printing.
29
Page 11

to select PressLight Frequency. OK.
Mains current -it rises and falls. Even ordinary lights flicker but withalternates
fluorescent lighting flicker is much more noticeable. This setting enables you
to compensate for indoor lighting. UK mains has a frequency of 50Hz.
to toggle between and50Hz 60Hz(UK frequency) (US etc.)
Loght Freq.
Default Setting
System Info
Light Frequency
The Default Setting
to select PressDefault Setting. OK.
This feature allows you to return the camera to
the setup it had when it left the factory. If there
is difficulty accessing some functions or the
camera responds erratically, restoring the
factory defaults will usually solve the problem.
Press to proceed and return to Setup orOK
Press to cancel and return to Setup.MENU
System Info
Press to select PressSystem Info. OK.
The software version will be displayed
Press OK
This action will return you to the Date and Time Setting at the head of the
Setup screen.
To exit the Setup Screen: MODEPress the button.
PC Cam
5 MIN
50
5 MIN
OK
5050
Restore default
System settings
Continue?
OK
OK
5050
O7.01.23.01
Press
Press
50 60
Press
Yes OK No MENU
28
Press to confirm and return to the list of items
Press to confirm and exit Setup.MODE
Altering the Screen Display
The screen display has three modes
When the camera is switched on the appears.normal mode
Normal Mode displays the image on screen and all the relevant icons
• Press the DISPLAY button once
The icons will clear but the picture subject will remain.
• Press the DISPLAY button once more
The screen will be blanked out but the camera is still operational.
If you press the shutter, the camera will take the picture. After processing, the
shot will briefly be displayed after which time the screen will go blank again.
This mode of operation can be useful
• When you want to preserve battery life
• When you want to leave the camera switched on so that it is ready to take a quick shot
• In very bright sunlight
• Press the DISPLAY button a third time to restore normal mode.
2M 0354
2M 0354
X2
X3
DISP
DISP
DISP
25/01/2007
9
Page 12

UNDERSTANDING THE PICTURE MENU
The PCTURE MENU enables you to set up your camera to take the best picture.
You can adjust: Picture Quality Exposure Value: White BalanceImage Size ( ): : Take pictures in singles or in
threes ( ): Set a Delayed picture ( r): Record the date and time of the picture ( ).burst mode Selftime Time Stamp
• Switch the camera on by pressing the button. Wait for the welcome screen to load.ON/OFF
•
Press the button, if necessary to select the Snapshot IconMODE
• Select the item you want to change with the
buttons. The highlight moves with each key press
• Select the new value with the with the
buttons. The highlight moves with each key press
• After making your changes press the key to exit.MENU
MODEMENU
DISP
OK
2M
5M
AWB
Picture Quality
2048x1536
3M
3M
Press the button. The PCTURE MENU will displayMENU
•
10
to select PressTV Output. OK.
PAL and NTSC.
NOTE: If you have a standard UK television, you must select PAL as the
TV may not be able to recognise the camera if set to NTSC.
to toggle between
Press to confirm and return to the list of items
Press to confirm and exit Setup.MODE
TV Output
USB Connection
Format Storage
Setting the TV System
Setting the USB Connection
to select PressUSB Connection. OK.
to toggle between andPC Cam Mass Storage
PC Cam: You can use the camera as a webcam by connecting the camera to a
USB port on your computer but you cannot upload or download files.
Mass Storage: In this mode you can upload and download files to your
computer but cannot use the camera as a webcam.
Check this setting before connecting the camera to the computer!
Auto Power Off
OK
OK
NTSC
PAL
PAL
PC Cam
OK
Mass Storage
PAL
PC Cam
1 MIN
Press to select PressAuto Power Off. OK.
Press to toggle between:
30 SEC 1 MIN 3 MIN 5 MIN
This setting governs how long the camera stays on. After the set period, if there
is no activity the camera will power off to conserve battery power.
Press
Press
Press
Press
27
Press to confirm and return to the list of items
Press to confirm and exit Setup.MODE
Press to confirm and return to the list of items
Press to confirm and exit Setup.MODE
Page 13
Press
to select Date & Time
to set the .day Then
to move to the month
Repeat the procedure to set the year and time.
The clock is 24 hr.- set 3:15 p.m. as 15:15:00
When you have finished: OKPress to confirm and return to the setup screen
Press The screen on the right displaysOK.
25/06/2006
20:15:20
dd/mm/yyyy
Set OK Exit MENU
Date & Time Setting
OK
OK
OK
Language
OK
OK
OK
Format Storage
OK
OK
OK
Setting the Date andTime
Setting the Language
to select Language
Press The OK symbol flashes.OK.
Formatting the SD Card
to select Format.
destroys all data but
At any time you can press MODE to cancel an operation and return to the Mode Screen
Press OK.
Formatting makes the disc
readable by the camera. Use this only if the disc
is not recognised by the camera.
To format the disc: OKPress
Format will
destroy all data
Continue?
Yes OK No MENU
To change the date setup: mm/dd/yyyy .Navigate to
Press to change between mm:dd:yy / dd:mm:yy / yy:mm:dd.
Press
Press
Press
No changes are possible because the screen is locked to English.
Press
To cancel and return to Setup: MENUPress
26
MENU
• Press the button.MENU
• The first item on the menu sets the picture size.
A
d
justing the Picture Quality
• Use the
keys to choose 2MP,3MP or 5MP.
WHAT IMAGE SIZE IS BEST?
Large resolutions offer higher picture definition but only if you are printing large pictures! The downside is that large
formats take up more space, and need more processing time which shortens battery life. They also take a long time
to e-mail. A 19” monitor will typically be set to 1024 x 768 pixels, so a very large picture may be larger than the
screen! If all you want is to view pictures on-screen use 2M. If you are unlikely to print greater than 6”x4”, use 3M.
The highest resolution offered by the camera is 5 Megapixels.
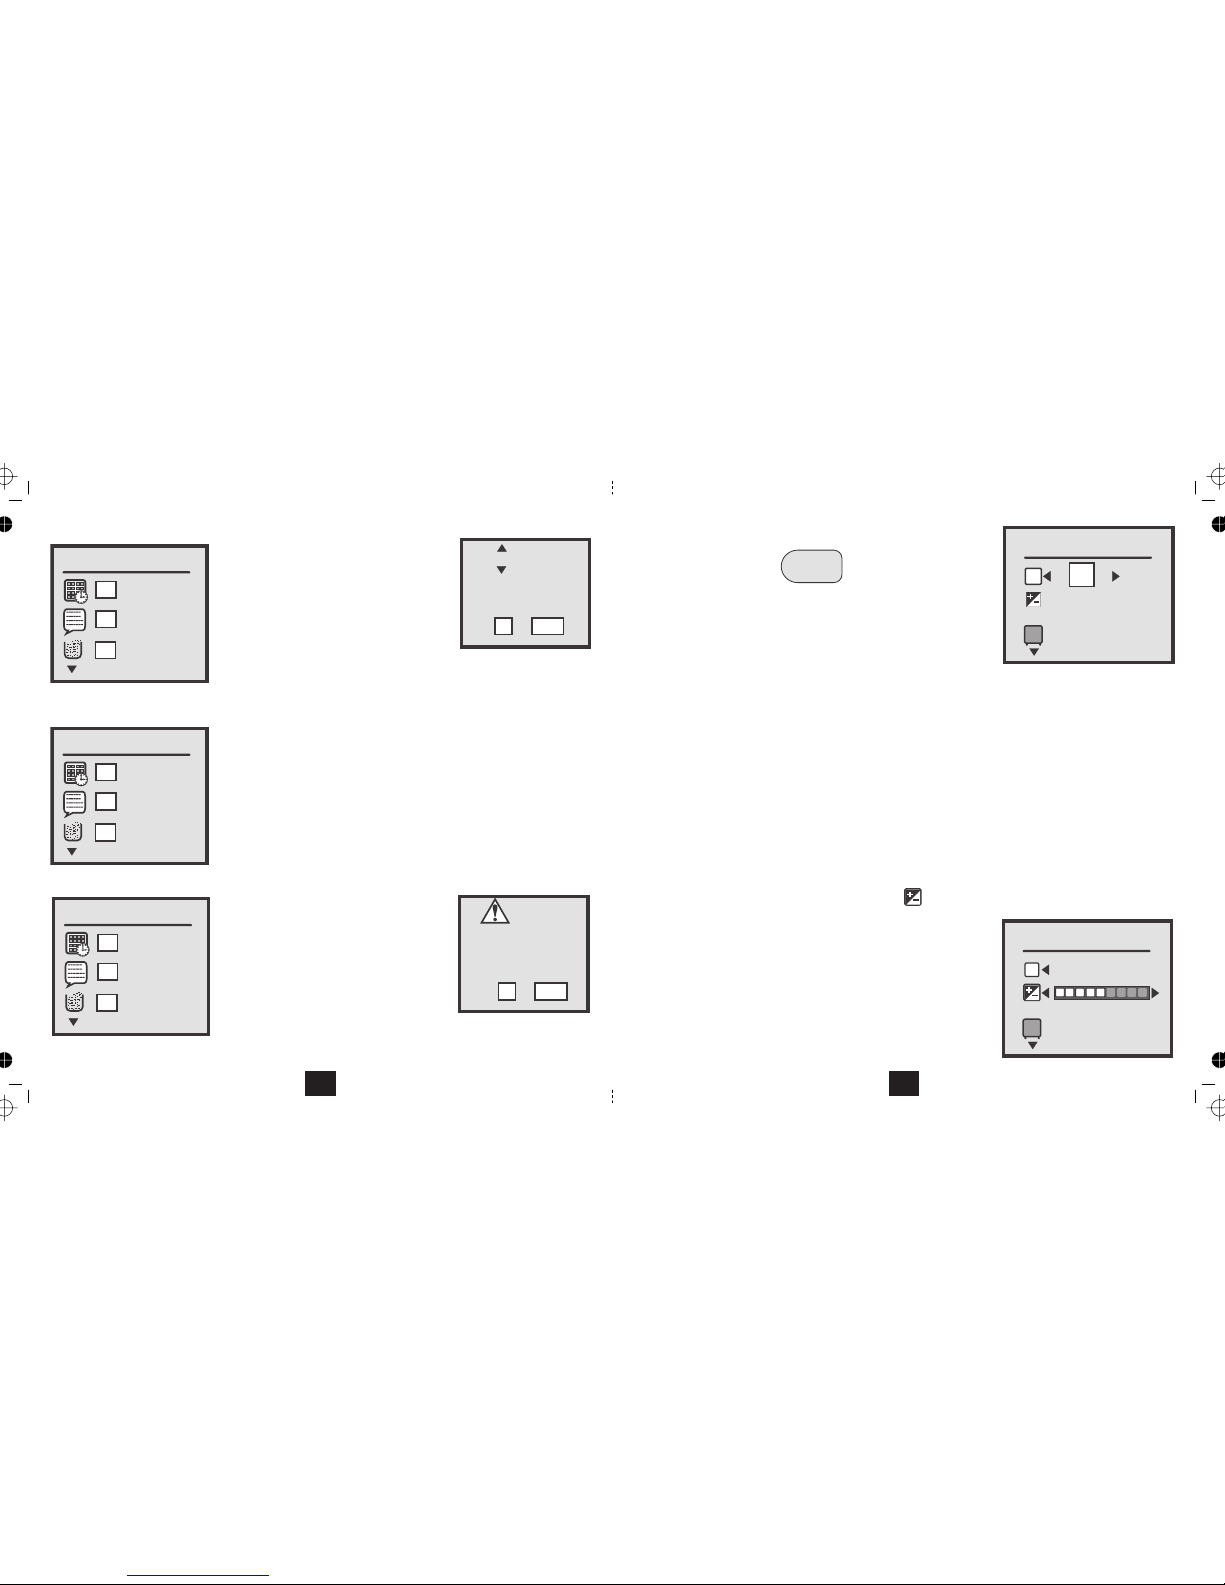
Adjusting the Exposure Value
• keys to alter the Exposure Value from -2.0 to+2.0
Where large areas of a photo are very bright, very dark or have high contrast,
you can adjust the exposure value to prevent the photo from being under
or over exposed
• For overexposed photos (too light), decrease exposure value.
• For underexposed photos (too dark), increase exposure value.
2M
5M
AWB
Picture Quality
2560X1920
3M
3M
AWB
Exposure Value
3M
OEV
Note: The NATIVE RESOLUTION of the camera is 3MP. This is the highest level the sensor in the camera can accept.
The 5MP setting is achieved by an electronic process whereby the camera increases the resolution byinterpolation -
"borrowing" nearby pixels and inserting them into the picture to increase the size. If the picture you are taking is
complex, increasing the resolution to 5MP may not necessarily give you a clearer picture.
• keys to navigate to Exposure Value
Use the
Use the
11
Page 14
A
djusting the White Balance
• Select with theWhite Balance
keys
White balance ensures that objects which are white in real life appear white in
your photo. Different lighting conditions can cause them to appear blue, green
yellow or even magenta. By setting the WB you can optimise colour accuracy
in a wide range of lighting conditions. (See for fluorescent settings)
Page 28
• Use the keys to set the White Balance to or alter it to adjust the WB to the actual conditions.Auto
The White balance will reset to Auto when you switch the camera off.
Burst Snapshot: Select with theBurst Snapshot keys.
You can either use the camera for single snaps or in bursts of three. Select
Burst for rapidly moving objects etc. The camera will take three snaps in
rapid succession and display them one after another.
Burst Snapshot will reset to Single when you switch the camera off.
Selftimer: Select with theSelftimer keys.
When you press the shutter, the on the front of the camera willTimer LED
flash and the camera will count down the seconds. The screen will display the
count. When the set time has elapsed the camera will take the picture.
The Selftimer will reset to Off when you switch the camera off.
Time Stamp: Select with theTime Stamp keys.
You can overprint your snaps with the Date, the Date and Time or you can
set this feature to OFF. ( )
To exit the Picture Menu screen at any time:
Press the MENU button a second time.
See Page 26 for setting the Date and Time
AWB
White Balance
Auto
AWB
Burst Snapshot
Single
AWB
Selftimer
10 SEC
Time Stamp
Date Only
MENU
12
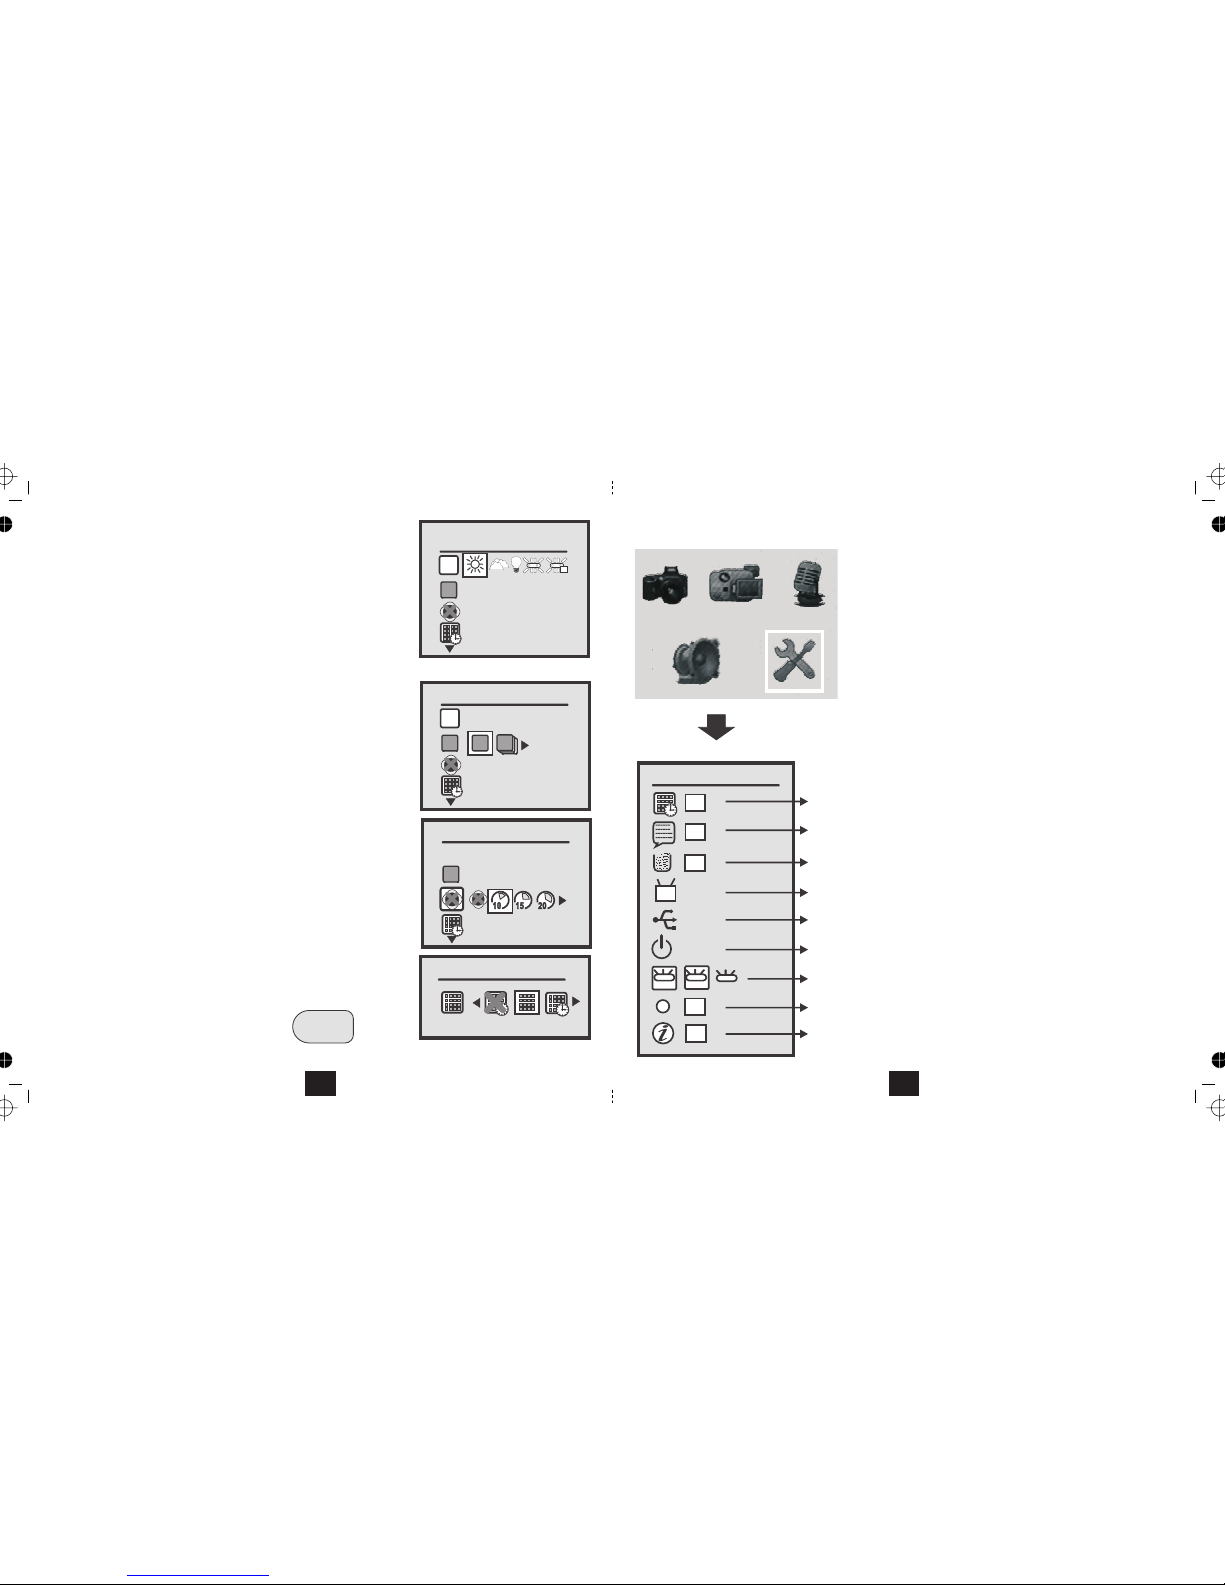
SETTING UP THE CAMERA
• Switch the camera on by pressing the button.ON/OFF
• Press the button. The main menu will displayMODE
•
Navigate to the iconSetup
• Press to confirmOK
Date & Time Setting
PAL
PC Cam
1 MIN
OK
OK
OK
OK
60
OK
50
Language
Format Storage
TV Output
USB Connection
Auto Power Off
Light Freq.
Default Setting
System INFO.
Date & Time
The Setup Menu
50
Navigating the Setup Menu
•.
• Press to select an item and enter the submen
u
OK
• Follow the prompts
The table on the left shows the factory presets. This is
how the camera arrives from the factory.
Most settings need not be adjusted unless you wish to
customise the camera.
Some settings must be adjusted
• Date & Time
• TV Output
• USB Connection
As a safeguard, at any time you can restore the factory
default settings.
Press to move up and down the list
25
Page 15

0002/0020
02:20
ORGANISING AUDIO RECORDINGS
• Delete: Select and delete a file
• Delete All: Delete all files
• Protect: Protect/Unprotect a file from deletion
• Auto Repeat: Continuously repeat one file
• Auto Next: When one file ends, start the next one
At any time: Press the button to return to the Mode ScreenMODE
Press MENU
Delete
OK
OFF
OK
OFF
OFF
Delete a file
Delete All Files
Protect a file
Auto Repeat
Auto Next
This menu can only be accessed from Stop mode
24
USING YOUR CAMERA AS A CAMCORDER
• Switch the camera on by pressing the button.ON/OFF
Wait for the welcome screen to load.
• Press the button. The main menu displaysMODE
• Navigate to the icon using theCamcorder
buttons.
• Press the button to confirm.OK
The Camera will now enter Camcorder mode.
• Line up your subject and press the Shutter
The Action Icon will display and the timer will begin running.
During recording:
• Move the camera slowly to avoid "trails"
• Press the buttons to Zoom in and out
In camcorder mode the microphone is operational.
To stop recording:
• Press the Shutter.
• Press the Shutter again to start a new recording
To Exit Camcorder mode:
• Press the Shutter to stop recording.
• Press the MODE button to return to the Mode Screen or
• Press the POWER button to switch the Camera off.
*You cannot switch off the icons or the display in this mode.
(See Page 8).
00:00:01
Camcorder Recording mode
Camcorder ready mode
Resolution
Set in Video Camera menu
25/01/2007
25/01/2007
13
Page 16

VIDEO CAMERA MENU
• Switch the camera on by pressing the button. Wait for the welcome screen to load.ON/OFF
•
Press the button.MODE
•
Select the Video Cam Icon with the
Press the keyMENU
•
buttons.
MODEMENU
DISP
OK
AWB
Video Resolution
320X240
VIDEO CAMERA SETTINGS
• The first menu item is Video Resolution.
• Use the keys to change the Resolution from 320x240 pixels to 640x480 pixels. The larger setting will
offer better quality especially if you choose to view the video on a TV. The downside is that the memory
requirement is far higher, and this should be borne in mind especially if your SD card is low capacity.
• The other items are and . Adjust these as the Picture MenuExposure Value White Balance (Page 11,12)
•
After making your settings: MENU MODEPress the key to return to the Video Camera mode, or press to exit.
14
PLAYING BACK AUDIO RECORDINGS
• SWITCH THE CAMERA AND THE HI FI (OR TV SET) OFF.
• Connect the jack plug of the supplied A/V lead to the camera.
• Connect the RCA phono plug to a line input of an audio amplifier, a Hi-Fi system or a TV set. If yourRED
equipment is stereo you will need a 'doubler' or 'splitter' cable.
• Switch the camera and Hi-Fi (or TV) ON.
• Press the button. The Mode Screen will displayMODE
• Navigate to the icon.Audio Replay
• Press the button to confirm.OK
The files display in Thumbnail Mode
• Select a file for replay
• Press to play the file. When the file reaches the end it will stop. You can now select another file to play.OK
During playback:
• to decrease the volume. to increase the volume
• Press to stop play.OK
At any time:
• Press the button to return to the mode screen.MODE
0002/0020
02:20
Press
Press
•
Press to stop play and go to the next or previous file.
23
Page 17

CONNECTING THE CAMERA TO A TV
• SWITCH THE CAMERA AND THE TV SET OFF.
• Connect the jack plug into the socket on the camera
• Connect the RCA phono plug to the of the TV set.YELLOW composite video input
• Connect the RCA phono plug to the matching audio input of the TV set. If your equipment is stereoRED
you may need a 'doubler' or 'splitter' cable. Most TV and Audio accessory stores stock suitable components.
• Switch the Camera and the TV set on.
• Select the on your TV set (follow your TV handbook for instructions)AV input
The camera screen will go blank and you will see the camera on the TV.
•
If your TV does not have a composite Video input you cannot use the TV as a screen.
Before you connect the camera, make sure
the TV system is set to PAL. See Page 27
A special A/V connecting lead is provided with the camera for
connection to external audio visual equipment.
Alternatively you can connect to one channel and listen in mono.
• To disconnect: Switch the camera and the TV off then unplug the connecting lead.
You can carry out all the functions of the camera using the TV screen. This includes taking and viewing still
and video images, recording and playing audio files and all aspects of camera setup and file management.
RED
CONNECT TO AUDIO INPUT
YELLOW
CONNECT TO COMPOSITE VIDEO INPUT
22
MAKING AN AUDIO RECORDING
To access the main menu:
• Switch the camera on by pressing the button.ON/OFF
Wait for the welcome screen to load.
• Press the MODE button. The main menu displays
• Navigate to the icon with theVoice Recorder
buttons.
• Press the button to confirm.OK
The Camera will now enter Voice Recorder mode.
• Press the Shutter to commence recording
The Action Icon will display and the timer will begin running.
To stop recording:
• Press the Shutter.
• Press the Shutter again to start a new recording
To Exit :
• Press the Shutter to stop recording.
• Press the MODE button to return to the Mode Screen or
• Press the button to switch the Camera off.ON/OFF
To switch the Display on and off press the buttonDISPLAY
00:00:01
Voice Recorder mode
Making a Recording
DISP
This mode has no associated settings menu.
25/01/2007
25/01/2007
15
Page 18

VIEWING PICTURES AND VIDEOS
• Switch the camera on by pressing the button. Wait for the welcome screen to load.ON/OFF
•
The t picture or video on the disc displays first. The numbering includes video and still pictures.most recen
Date/Time
of picture
Picture
Size
Number of picture/
Total pictures
Press to Zoom
25/01/2007
12:30
2048x1536
50/50
You can enter REPLAY mode from any screen on the camera. The REPLAY mode is common to Pictures and Video
but not to audio recordings which has its own playback interface.
Press the button to enter replay mode.REPLAY
Date/Time
of Video
Total Time
Number/Total
Play/Pause/
F/Fwd/F.Rev
Icons
Play Status
Picture Playback Screen
Video Playback Screen
The screens look very different so you can easily tell still pictures from video images.
25/01/2007
10:30
0011/0050
00:05:20
16
0006/0072
04:20
• Press the buttons to move to the Protect Screen
• Press to select ON/OFF (Protected or Not Protected)
• Press to return to the previous screenMENU
Protecting a vi
d
eo or a picture prevents itbeing erase
d
You can select which images on the SD card are to print. The card can
be taken to a print shop or printed out via a compatible home printer.
Selecting print files is easier from if you have many filesTHUMBNAIL MODE
• Press to select ON/OFF (Print or do not print)
• Press to return to the previous screenMENU
From Thumbnail View: MODEPress
• works as in Single ViewSlide Show
• works as in Single ViewDelete All
• Press UseDelete: OK. to select
the file. Press to delete the fileOK
• PressProtect ; Print to select ON/OFF.
• Press to return to the previous screenMENU
• Press to return to the Mode ScreenMODE
Protect
OK
OK
OK
ON OFF
Print
ON OFF
OK
OK
OK
Slide Show
OK
OFF
OK
OK
OFF
Protected files are greyed out in the delete menu
OK
Protected files have a key icon added to
25/01/2007
12:30
the display to show their status.
21
• Press to return to the Mode ScreenMODE
• Press to return to the Mode ScreenMODE
Page 19

Organising, Deleting and Protecting Your Files
From Single View
• Press MENU
• Press the button to view the slide showOK
• Press the button to return to single viewMENU
• Press the buttons to navigate up or down the list
• Press the MODE button to go to the Mode Screen.
In Slide Show view, only the first frame of a video file will appear.
To delete a file
• Press OK
• Press to delete the fileOK
• Press MENU to return to the previous screen
To delete all files on the disc
• Press OK
• Press to delete all the filesOK
• Press MODE to return to the previous screen
Delete this
file?
OK
YES
NO MENU
Delete
OK
OFF
OK
OK
Slide Show
OK
OFF
OK
OK
Delete All
OK
OFF
OK
OK
Delete all
files?
OK
YES
NO MENU
25/01/2007
12:30
2048x1536
50/50
20
Viewing one picture at a time
•
to move back a picture
• Press
to move forward one picture
Zoom and Pan
• to increase Zoom
• to decrease Zoom
• Press to the pictureOK Pan
To move to another picture:
• Press to decrease the Zoom to 1.0. The Zoom icons will disappear and the standard screen will be restored
•
25/01/2007
12:30
2048x1536
50/50
• Press to return to Zoom modeOK
VIEWING PICTURES
Press
When you have reached the last image of a set
•
to move to the first image
Press
Press
Press
When you are in Zoom mode:
• Press to move the picture around.
Press or move to the previous or next picture.to
01/50
1.5
OK
2048x1536
25/01/2007
OK
DELETING A PICTURE
• Select the picture (or video)you wish to delete
• Press the buttonDELETE
Delete this
file?
OK
YES
NO MENU
• Press to delete the pictureOK
• Press to return to the pictureMENU
17
Page 20

THUMBNAIL VIEW
• Navigate to the single view screen
• Press the buttonOK
The disc contents will now display in
groups of six thumbnails
• Press to move back or forward a picture
• Press to move up or down a set
From the top set, press display the previous set of 6
to
To view a picture
• Press the buttonOK
• Press the button to return to thumbnail view.OK
VIDEO AND AUDIO INDICATORS
indicates a Video file
25/06/2006
12:30
2048x1536
01/50
0005/0072
2048x1536
0006/0072
04:20
From the top set, press display the next set of 6to
indicates a Picture file
DELETING A FILE FROM THUMBNAIL MODE
• Select the file you wish to delete
• Press the buttonDELETE
OK
Delete
Exit MENU
• Press to delete the pictureOK
• Press to return to thumbnail view.MENU
18
Video Playback
• Press the button to begin play
• Press the button to pause
• Press the button to resume play
During Play:
• button to fast forward.
• Press
to increase the volume.
• button to pause the video once more.
From Pause Mode:
• button to fast reverse
• button to return to Pause
When the video has reached the end, it will stop.
• to move back a picture
• to move forward one picture
• Press the button to go to thumbnail view.OK
25/01/2007
10:30
0011/0050
00:05:20
The icons on screen mimic a video control panel
Pause
Play Fast Fwd.
Fast Rev.
Press the
• button to resume normal play.
Press the
• Press I
to decrease the volume.
You can only hear the sound when the camera
is connected to a TV or audio system!
Press the
Press the
Press the
Press I
Press
• Press the button to go to snapshot view.PLAYBACK
19
 Loading...