


19’’ LCD TV
Model: Q19/4 TC
USER GUIDE

WARNINGS
Thank you for purchasing this television. For your safety, please take time to read
these instructions carefully in order to familiarise yourself with the operation
of the appliance and the important safety information. We strongly recommend
that this product is installed by a competent person. If in doubt, refer to the retailer
or the manufacturer helpline.
Caution
This television contains no user serviceable parts. Please refer to the manufacturer
or authorised repair agent in the event of malfunction. Do not remove the back cover
from the television.
Warning
To reduce the risk of fire, electric shock or damage to the television, do not expose
it to dust, rain or moisture, or place any objects filled with liquids on or near the television.
Do not place the television in a confined space, ensure that nothing can obstruct
the ventilation openings at the rear of the television.
Do not place naked flames on or near the television.
Dispose of this television and any components including batteries in an environmentally
friendly manner. If in doubt, please contact your local authority for details of recycling.
Your LCD TV should be cleaned using a dry or slightly damp cloth. You should not use
an alcohol based cleaner
Safety
For your safety, this appliance is fitted with a fused moulded 3 pin mains plug. Should
the fuse need to be replaced, ensure that any replacement is of the same amperage
and approved with the BSI mark. ( )
Never try and replace the mains plug unless you have adequate qualifications and are
legally authorised to do so. In the event that a replacement Mains cable is required,
contact the manufacturer for a suitable replacement.
Never use the television if it is damaged in any way.
Always place the television on a flat level surface avoiding anywhere which may
be subject to strong vibration. Ensure the television is not placed on top of the power
cable as the weight of the television may damage the cable and cause a safety hazard.
Never place mobile phones, speakers or any other device which may cause magnetic
or radio interference with the television. If interference is apparent, move the device
causing the interference away from the television.
Packaging
Please save the packaging for the television as you will need this in the event
of warranty/service repair or support. We are unable to carry out warranty/service
if you are unable to package it correctly. The safest way to package your item in the
event of warranty/service repair is in its original box/packaging

WARNINGS
Screen Burn
A characteristic of Plasma and LCD TV Panels is that displaying the same image for
along time may cause apermanent after - image to remain on the screen. This is called
screen burn. Most pictures shown on your TV will be constantly moving and fill the screen.
How do I dispose of this product?
UK: Waste electrical products should not be disposed of with
household waste. Separate disposal facilities exist. For your nearest
facilities, please see www.recycle-more.co.uk or instore for details.
ROI: Produced after 13th August 2005. Waste electrical products
should not be disposed of with household waste. Please recycle
where facilities exist. Check with your Local Authority or retailer
for recycling advice.
Examples of images that you need to watch out for are as follows
(this is not an all-inclusive list):
TV Channel Logos: e.g. Shopping channel logos and pricing displays-especially
if they are bright and stationary. Moving or low-contrast graphics are less likely
to cause ageing of the screen.
Picture-in-Picture and Multi Picture-in-Picture: Do not view for long periods of time
using the Picture-in-Picture or Multi Picture-in-Picture functions.
Time Displays
Teletext: Do not view a stationary page for long periods of time.
TV/DVD Menus: e.g. Listings of DVD disk content.
Pause Mode: Do not leave the TV in pause mode for long periods of time,
e.g. When watching DVDs or videos.
Note: To prevent screen burn if viewing any of the above for long periods of time,
reduce contrast and brightness when viewing. Once burn-in occurs it will never
disappear completely.
EZ 0000003

CONTENTS
SETTING UP YOUR TV
- What is included in the box 4
- Tuning in Digital / Freeview Stations 5
- Tuning in Analogue
TV Stations (i.e. 1 - 5) 6
- Remote control buttons
and their functions 7
- TV buttons and their functions 7
- Connecting via HDMI 8
- Connecting via VGA (for PC mode) 8
- Connecting via SCART 8
- Connecting via TV In 8
- Connecting via YPbPr 8
- Changing Source 8
DIGITAL TV MENU OPERATION
- Reviewing the channel list 9
- Deleting unwanted channels 9
- Parental locking of channel 9
- Create/Edit favourite channel list 9
- Search for new channels 9
- Re-installation of channels 10
- Setting / Changing Pin Code 10
- Common Interface Port 10
- Using Electronic Program Guide 11
- Using Digital TV teletext 11
TV MENU OPERATION
PICTURE SETTINGS 12
- Adjusting Brightness 12
- Adjusting Contrast 12
- Adjusting Colour 12
- Adjusting Sharpness 12
SOUND SETTINGS 13
- Adjusting Balance 13
- Adjusting Audio Preset 13
- Adjusting Bass & Treble 13
TUNING SETTINGS 14
- Fine tuning 14
- Name/Rename Channels 14
- Deleting unwanted channels 14
- Manual tuning 14
- Changing channel position 15
- Changing country settings 15
- Auto search 15
TV MENU OPERATION - CONTINUED
GENERAL SETTINGS 16
- Adjusting Blue Screen 16
- Noise Reduction 16
- Adjusting Input Source 16
- Adjusting Zoom 16
- Reset to factory settings 16
TELETEXT OPERATION - TV MODE 17
PC OPERATION
- Connecting to a PC 18
PC PICTURE SETTINGS 19
- Adjusting Brightness 19
- Adjusting Contrast 19
- Adjusting Colour Settings 19
PC SCREEN SETTINGS 20
- Auto configuration of screen 20
- Adjusting Horizontal Position 20
- Adjusting Vertical Position 20
- Adjusting Phase 20
- Adjusting Clock 20
GENERAL INFORMATION
- Removing the stand 21
- Wall mounting the TV 21
- Using with Sky Digital 22
- Frequently Asked Questions 23
- Technical Specifications 24
- Helpline and Warranty Information 24
- Index 25
Customer Support/Technical Helpline
Sky Media UK LTD
Telephone: 0870 242 6292
www.skymediauk.co.uk
Email: service.uk@umc-slovakia.sk
If you experience any problems with this Television,
Please contact the helpline.
4
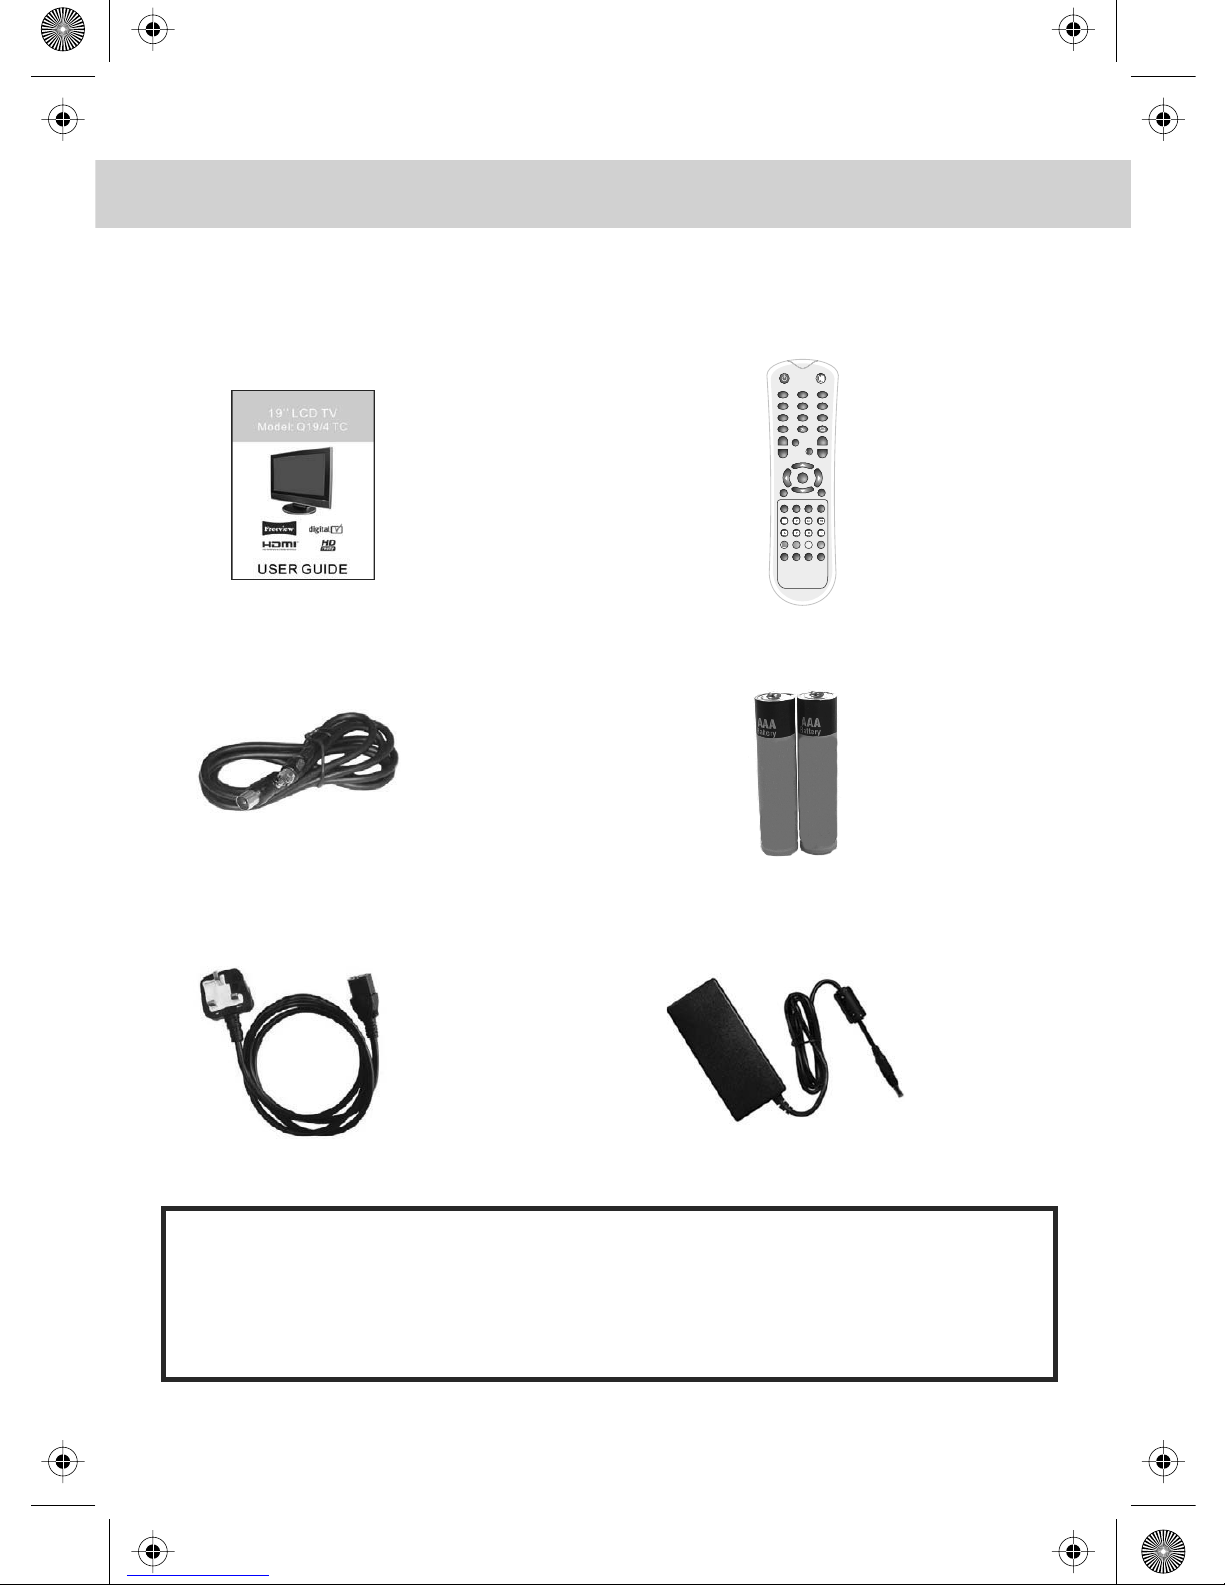
WHAT IS INCLUDED IN THE BOX
Accessories
Included with this TV are the following accessories:
1x - User Guide Book 1x - Remote control
1x - RF lead 2x - AAA batteries
1x - AC mains lead 1x - Transformer
Please save your packaging as you will need this in the event
of warranty/service repair or support. We are unable to carry out
warranty/service if you are unable to package it correctly. The safest way
to package your item in the event of warranty/service repair
is in it’s original box/packaging.
OK
+-+
-
VOL CH
NICAM
DVB
MENU
MENU
BACK
AV/TV
EPG
SUBT INFO
TEXT HOLD PGDN
PGUP
INDEX
SIZE
REVEALSUBPAGE
RED GREEN YELLOW
CYAN
FAV LAST
?
312
5
4
6
879
0
i
SLEEP P- MODE
5
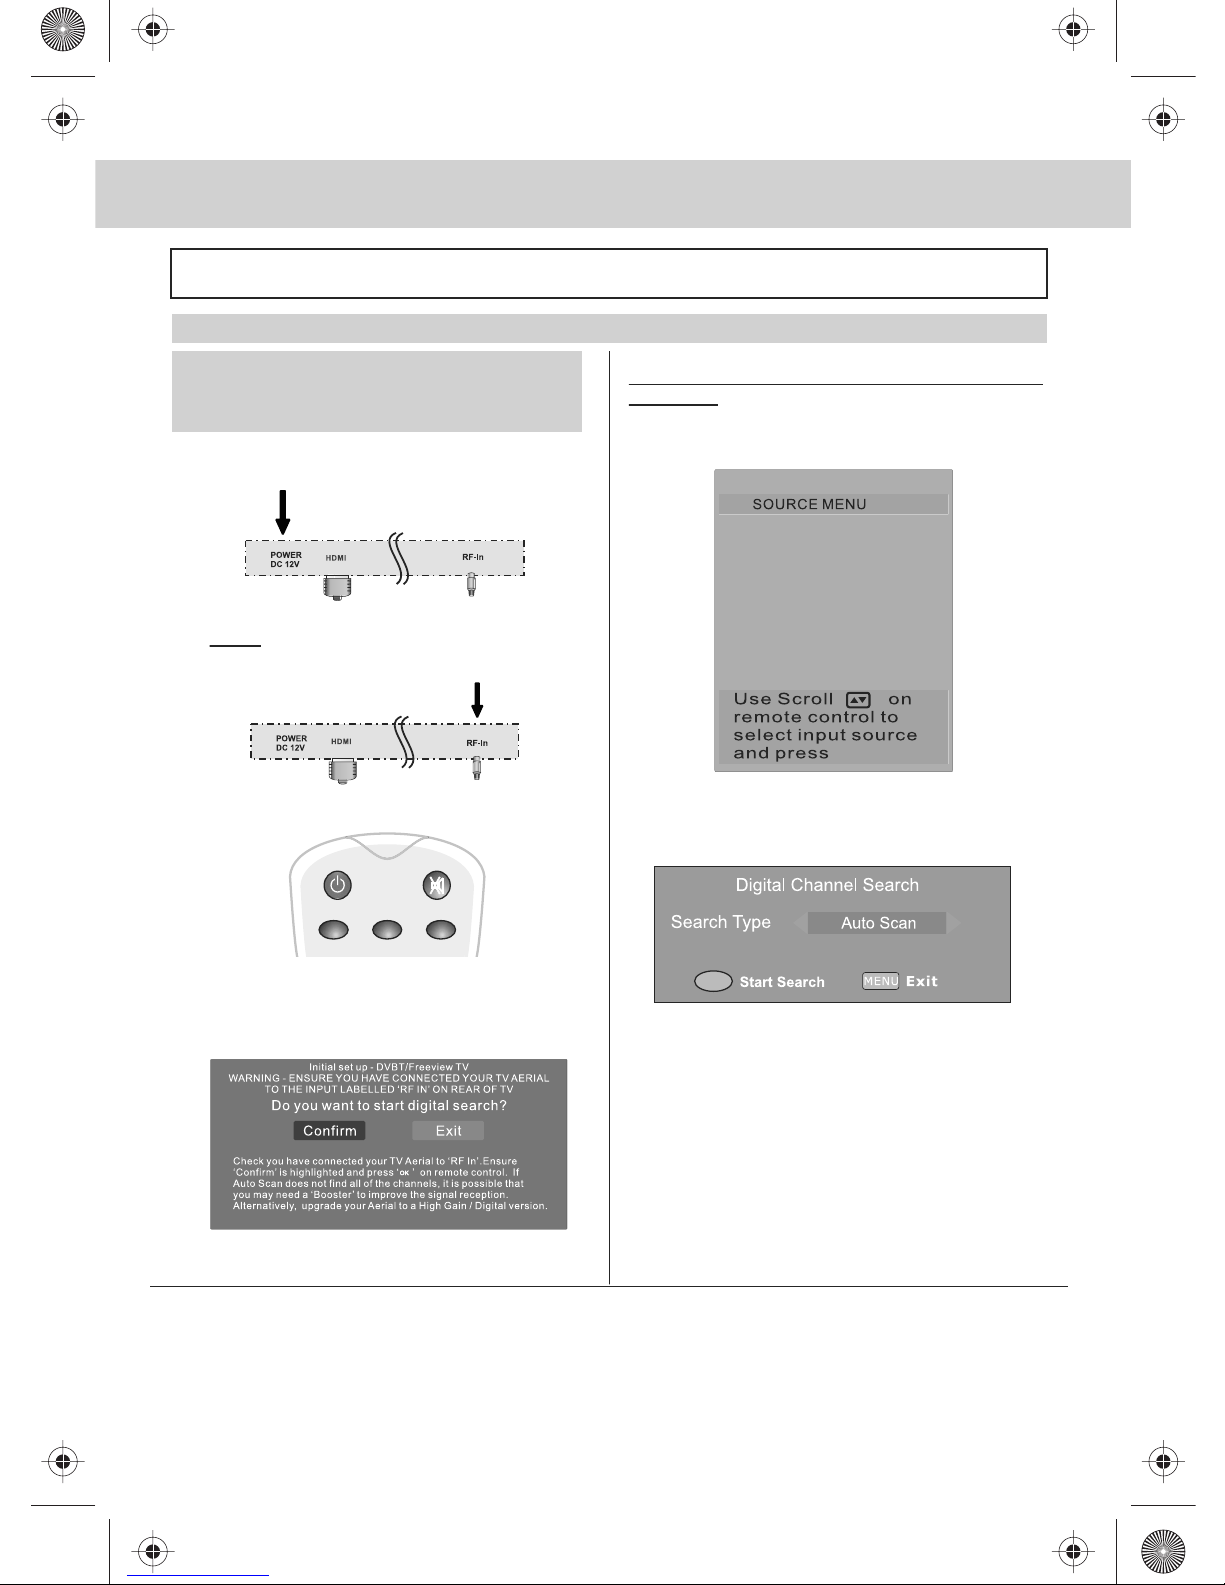
GETTING STARTED - INITIAL SET UP
TUNING IN DIGITAL TV (FREEVIEW)
IMPORTANT — Please ensure the TV has
reached room temperature before
connecting the power for the first time
1) Connect the mains lead to your electrical outlet
and connect the power adaptor to the television.
2) Connect the RF Cable supplied to the
'RF IN' on the rear of the TV and connect
the other end of the cable to your TV Aerial outlet
3) Install batteries in the remote control and press
the [POWER] button to turn on the TV.
The ‘Initial Set up-DVBT/Freeview TV’ menu should
now appear. If it does not, please go to step 5.
4) Press [OK] on the remote control whilst
‘confirm’ is highlighted on screen.
Tuning will now take place. Once it has finished
tuning is complete.
Important - Due to signal strength variations across the UK for Digital TV, please note that not all of the
channels/services may be available in your region.
Over the coming months as coverage increases, more services and channels may become available.
Every few months, follow point 5 to re-scan for new channels/services.
In the event of poor reception in either Analogue TV or Digital TV (DVB) it may be necessary to install a signal
‘booster’ to enhance reception. For Digital/Freeview TV (DVB) you may need to upgrade your aerial to a High
Gain Digital version.
IMPORTANT - AFTER TUNING DO NOT PRESS ANY BUTTONS FOR 20 SECONDS SO THE CHANNEL
INFORMATION CAN BE STORED.
If you do not see the Initial Setup Screen, follow
the below:
5) Ensure the TV is in DVB mode (press
[AV/TV] on remote control and select DVB)
6) Press the button labelled ‘DVB-MENU’ on remote
control to access settings menu,
Scroll to ‘Channel Search’ and press [OK].
7) The above will appear press [OK] to start search
Auto tune will now take place and set up is complete.
OK
DVB
TV
SCART
YPbPr
HDMI
PC-RGB
312
OK.
6
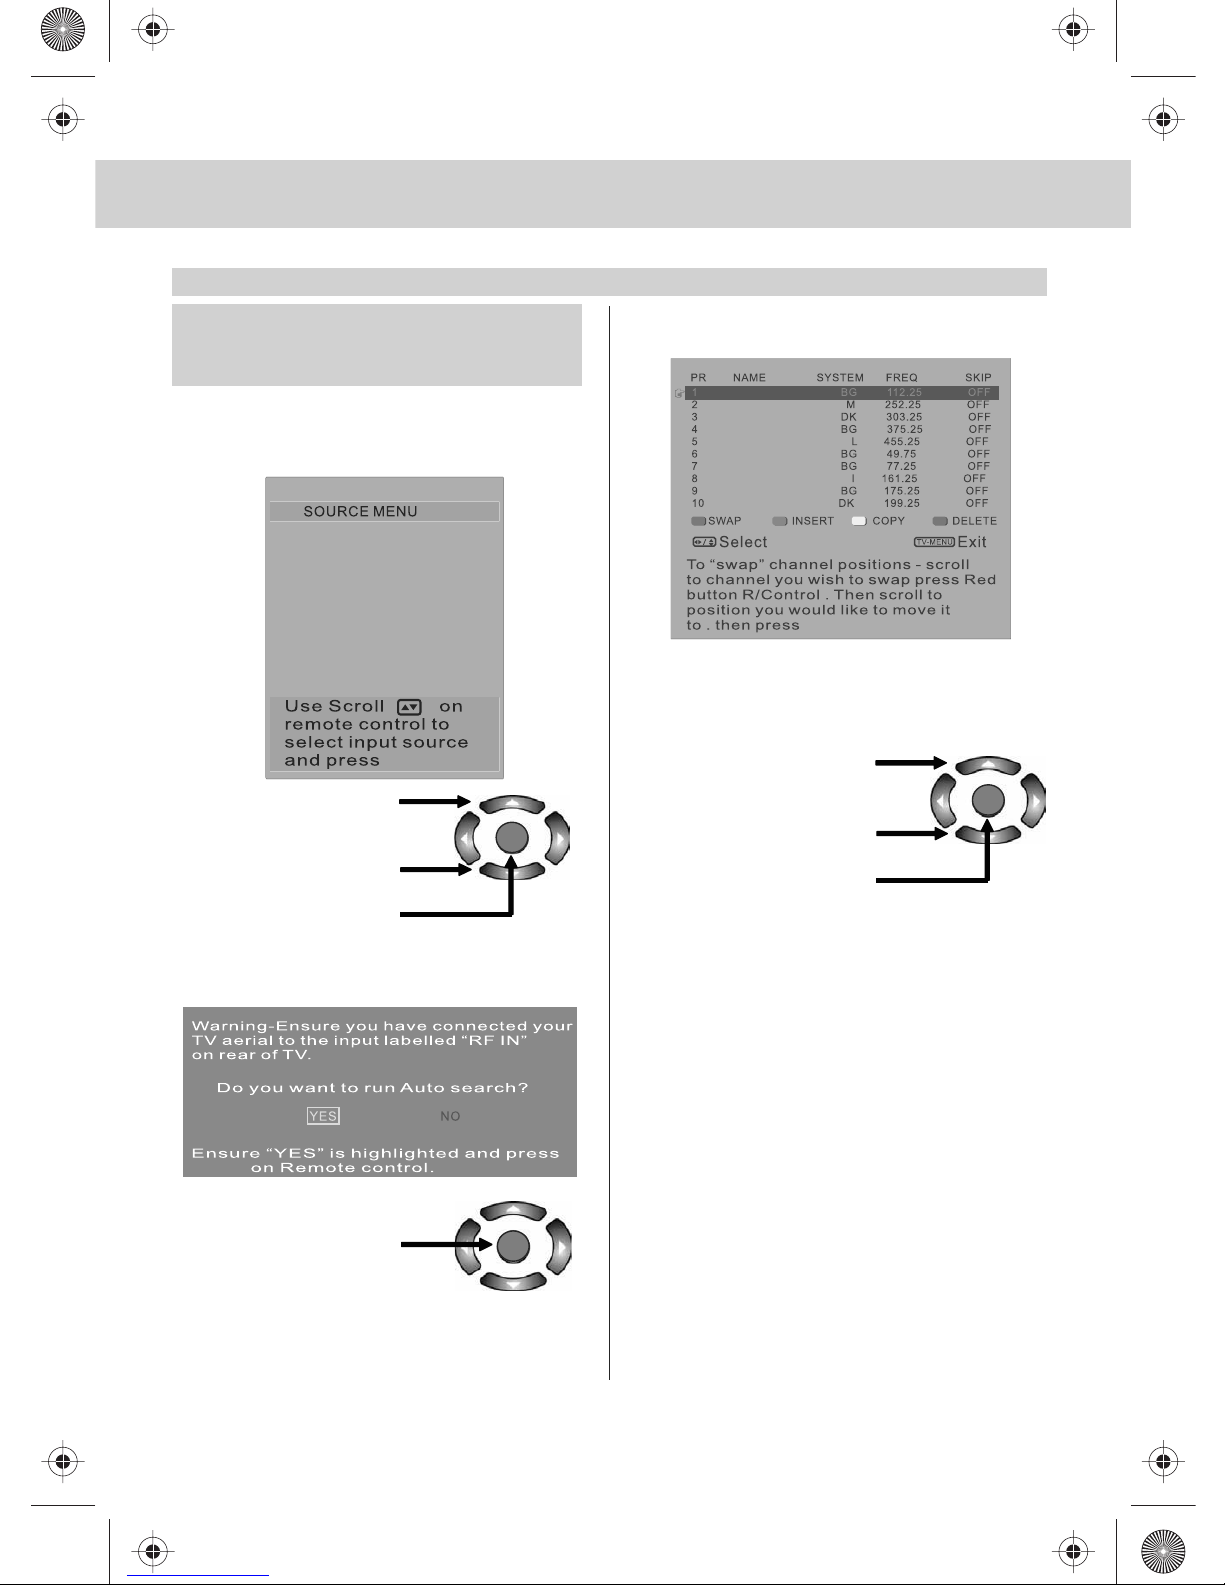
GETTING STARTED - INITIAL SET UP
TUNING IN ANALOGUE TV
IMPORTANT — If you do not have Digital TV
(Freeview) in your area or wish to tune in via
the analogue signal please follow the below.
1) First you must switch the TV to "TV" mode
Press [AV/TV]
The Source Menu will appear
2) Using these buttons
highlight 'TV'
3) Press [OK]
The following should now appear if it does not
please refer to the Manual
4) "Yes" should be highlighted
Press [OK]
The TV channels will now tune in.
After tuning is complete the below screen will appear.
You may wish to change the order of the channels.
5) Press [RED] button to select the channel you wish
to move.
6) Using these buttons
move to the location
where you would like
this channel
7) Press [OK] to confirm
location.
The channel is now moved.
Repeat this process until all the channels are in
the order which you would like them.
“OK”
OK
OK
OK
OK.
DVB
TV
SCART
YPbPr
HDMI
PC-RGB
OK.

7
REMOTE CONTROL BUTTONS & TV BUTTONS
SIDE PANEL BUTTONS
1
2
3
4
5
6
7
8
9
18 HOLD To hold a current page
on screen
19 PGDN To select TEXT for viewing
the previous page
20 PGUP To select TEXT for viewing
the next page
21 INDEX To select and return to the
main directory of TEXT
22 SIZE To zoom in and out for
the display of the TEXT
23 REVEAL To reveal an answer
or information
24 SUBPAGE To open the TEXT function
of sub-page
25 RED/GREEN/YELLOW/CYAN
To select the corresponsive TELETEXT
page after entering the homepage
of TELETEXT
26 FAV To select and store channels
of favorite program
27 LAST
28 SLEEP Applies sleep timer
29 P-MODE To adjust the picture mode
of the TV
30 DVB Menu Opens DVB Menu
1 POWER Turns the TV on and off from
standby mode
2 MUTE Mute On/Off
3 0 - 9 Number buttons
4 - / -- Press this button to select
channels of two or more numbers
5 VOL+/- Volume up and down buttonss
6 In TV mode, press this button to come
back to the previous TV channel
7 NICAM To select sound modes
8 CH+/- Channel up and down buttons
9 To move the cursor and select
the option needed
10 OK To confirm the selected option
To open the system setting menu
of the LCD Display
11 MENU Opens menu
12 BACK Return to previous screen
13 AV/TV To select the signal sources
like TV, video
14 EPG To open EPG menu
15 SUBT To display subtitles
16 INFO To display system information
17 TEXT To open the function of TELETEXT
OK
+
-
+
-
VOL CH
NICAM
DVB
MENU
MENU
BACK
AV/T V
EPG
SUBT INFO
TEXT HOLD PGDN
PGUP
INDEX
SIZE
REV EA L SUBPAGE
RED GREEN YELLOW
CYAN
FAV LAS T
?
312
5
4
6
8
7
9
0
i
SLEEP P- MODE
1
2
3
4
6
30
8
5
10
11
12
9
13
14
17
18
21
22
25
16
15
20
19
24
23
2726
2928
7
Volume up/Left orientation
Volume down/Right orientation
Channel up/Scroll down
Channel down/Scroll up

8
CONNECTIONS & CHOOSING MODE/SOURCE
REAR CONNECTIONS
Choosing MODE/SOURCE
To switch between the different connections
is very easy.
1) Press [AV/TV] - The following will appear
2) Press [\/] or [/\] to select the input you
require.
3) Press [OK]
Connecting HD Ready Devices
There are two options for HD.
1) By connecting via HDMI cable (not included)
– this provides both HD picture and sound.
2) By connecting via Component (YPbPr)
cable (not included) – this provides
HD picture. Input on TV should be set to YPbPr
Use to connect to TV
Aerial to receive
analogue TV or
Digital/Freeview
TV stations
I
DVB
TV
SCART
YPbPr
HDMI
PC-RGB
OK.
Audio Input for YPbPr
 Loading...