

Page 1

PCD 206
Personal CD Player
Tesco Stores Ltd, Delamare Road, Cheshunt, Herts, EN8 9SL
User Handbook
PCD206 User Manual
WARRANTY SPECIFICATIONS
Your Technika appliance is covered by a warranty for 12 months from the
AUDIO
date of purchase. If a fault develops during this period, please contact the
D/A conversion: DAC four times oversampling
TESCO electrical help line on 0845 601 2549. Please have your original
Frequency response : 20-20,000Hz (+1/-3 dB)
purchase receipt with you when you call. This warranty in no way affects
your consumer rights
Wow and flutter: Below measurable limits
No. of Channels: 2 Channel (Stereo)
Output level: Phones: 15 mW (32W)
Bass boost effect : +6 dB
(-20dB@100Hz)
GENERAL
Power requirements: 2x “AA” alkaline battery
DC input 6V 300 mA
Power consumption: 0.8W (DC 3V) under normal conditions
Dimensions mm: 140 (W) x 28.5 (H) x 144 (D)
Weight: Approx. 230g not including battery
Page 2
IMPORTANT SAFETY INFORMATION
5
Read these instructions.
WARNING: DANGER OF RADIATION INSTALLING BATTERIES
Keep these instructions.
These labels tell you that the unit contains a laser component.
1. Op en th e b att ery
Heed all warnings.
Opening the lid and defeating the safety interlocks will expose
compartment cover an d
the user to radiation from the laser beam. Do not stare into the
insert two "AA" alkaline
Follow all instructions.
laser while it is operating.
batteries in the battery
Clean only with dry cloth.
compartment. Follow the
Install in accordance with the manufacturer's instructions.
polarity as indicated in the
battery compartment.
Do not install near any heat sources such as radiators, or any
apparatus that produces heat.
2. Clo se th e b att ery
This equipment generates, uses and can radiate radio
compartment cover.
Use only atta chmen ts/ac cesso ries spe cifie d by the
frequency energy and, if not installed and used in accordance
manufacturer.
with the instructions, may cause harmful interference to radio
Refer all servicing to qualified service personnel. Servicing is
or television reception which can be determined by tuning the
required when the apparatus has been damaged in any way,
equipment off and on. The user is encouraged to try to correct
such as liquid has been spilled or objects have fallen into the
the interference by one or more of the following measures:
apparatus, the apparatus has been exposed to rain or
Re-orientate or re-locate the receiving antenna. Increase the
moisture, does not operate normally, or has been dropped.
separation between the equipment and the receiver. Connect
Warning: To reduce the risk of fire or electrical shock, do not
the equipment into an outlet on a circuit different from that to
expose this product to rain or moisture. The product must not
which the receiver is connected. Consult the dealer or an
LOW BATTERY ALERT. When the low battery indicator
be exposed to dripping and splashing and no object filled with
experienced radio/TV technician for help.
appears at the bottom right of the display panel the batteries
liquids should be placed on the product.
must be replaced as CD player will not function properly.
BATTERIES: Do not leave batteries for extended periods in
Caution: Changes or modifications not expressly approved by
the apparatus as they can leak or corrode causing damage to
AC OPERATION
the manufacturer could void the user's authority to operate
the unit. Exhausted batteries must be treated with care and
Use only an approved UK 6V DC
this device.
disposed of according to any safety or recycling regulations in
power adaptor (not supplied). Ensure
force in your area. NEVER throw batteries into the general
the polarity of the DC connector
rubbish, or a fire, or leave them lying around.
LISTENING TO MUSIC AT EXTREMELY HIGH
matches the player (see diagram).
LEVELS FOR EXTEND ED PER IODS C AN
Do not mix battery types. When inserting batteries, replace all
Plug the adaptor into the player and
SEVERELY DAMAGE YOUR HEARING.
at the same time. Do not mix old and new batteries.
then plug the adaptor into the mains
Weak batteries can leak and severely damage the unit.
supply before turning on the power.
POWER SOURCES
Approx. 8 hrs.
Alkaline “AA”
Aver age Pl aying Time
(Con tinu ous Pl ay)
Battery Type
Norma l Play Anti -Ski p Mode
Approx. 9 hrs.
Approx. 3.5 hrs. Approx. 2.5 hrs.
Ni-CAD Recharg eable
(min s pec. 1. 2V - 650mA)
Note: Zinc/Car bon, o r Zinc/ Chloride batte ries sh ould no t be
used a s their use will re sult in extrem ely sh ort pla ying ti mes.
BATT ERY GUI DE
+
–
DC6V
After Use
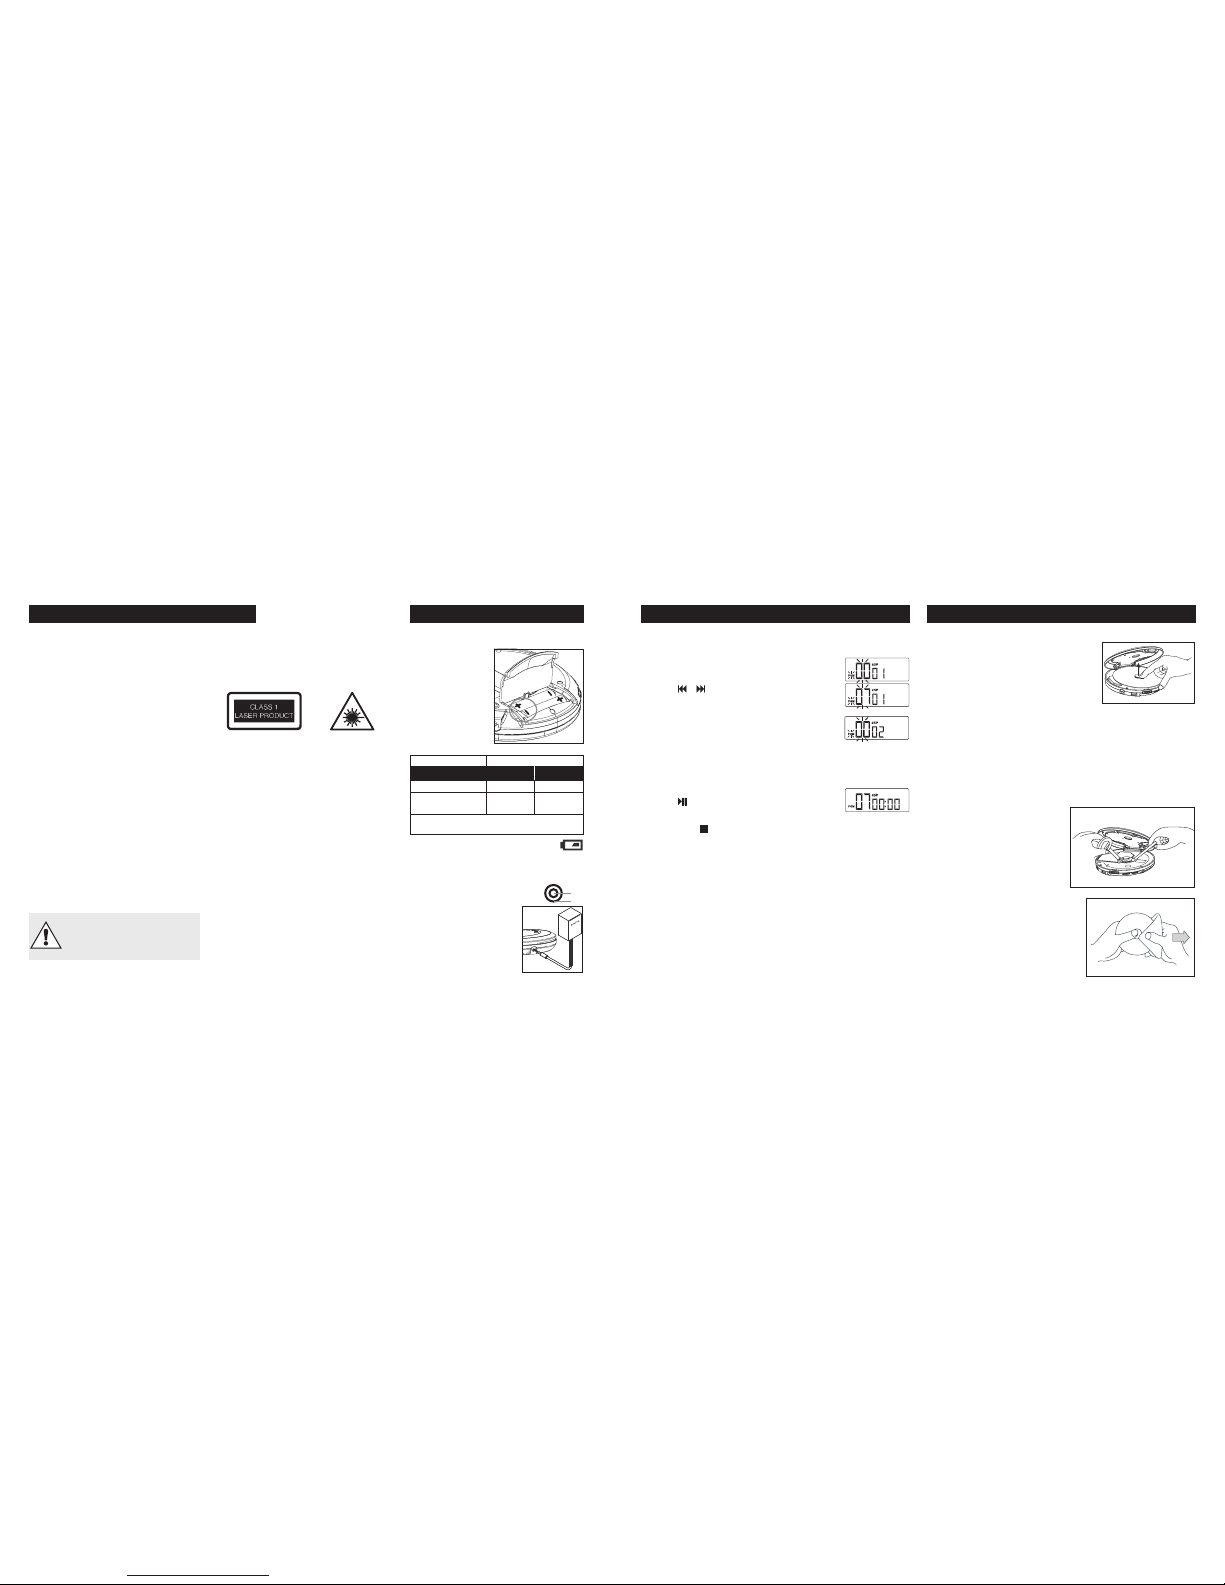
PROGRAM PLAY allows selected tracks on the disc to be played in any
desired order. Programming can be set in STOP mode or normal play mode.
Switch the CD player off. Wait for the disc to
To set up a program:
stop spinning. Hold the edge and gently press
$Press the PROG button . PGM starts flashing.
the centre pivot to pick up the disc.
$Press or to select the desired track.
Remove the disc and store it in its packing. Do
not leave a disc in the player for extended
$When the desired track is displayed: Press the
periods.
PROG button to enter the track into the program.
The track No. display changes to 00 again but the
Cleaning the Cabinet
program register has advanced to 02
Wipe with a soft cloth. If the cabinet is very dirty, dampen the cloth with a
$Repeat steps 2 and 3 to program the order of more
weak solution of neutral detergent and water, and then wipe clean.
tracks. Up to 20 tracks can be programmed into
Cleaning the Lens
memory.
A dirty lens will cause sound skipping and if the lens is very dirty, the CD may
To complete programming and start play
not work. Open the disc cover and clean the lens as shown.:
$Press The PGM stops flashing and play begins
Dust or Dry Particles: Using a camera
To clear programming
lens brush/blower, blow on the lens
$Press STOP
several times and wipe it lightly with
the brush to remove dust. Blow on the
lens one more time.
Fingerprints: If the lens cannot be
cleaned by using a brush/blower, use a
dry cotton swab starting from the
middle and working to the edge.
Fingerprints should be carefully wiped
from the surface of disc with a soft cloth.
Wipe in a straight motion from the centre
to the edge.
PROGRAM PLAY CARE AND MAINTENANCE
Page 3

1
4
FEATURES AND CONTROLS
INTRO SKIP
Every time the MODE button is pressed, the corresponding mode appears in
the display window. Each successive press brings up another mode. The
When the player is stopped:
actions and display icons are shown below.
$Press the MODE button three times. INT is
displayed.
$Press to start INTRO play from track 01
When a disc is playing:
$Press the MODE button three times. INT is
displayed and flashes.
$If you press the PLAY/PAUSE button: Flashing
stops and starts INTRO play from track 01.
$If you wish to play from the current track: Press .
INTRO play starts from the current track.
THE MODES ARE:
$If you wish to play from the next track: Press .
$REPEAT 1: Repeat one track continuously.
INTRO play starts from the next track
$REPEAT ALL: Repeat the entire CD continuously
$To cancel INTRO play: Press The INT icon
$INTRO SKIP: The player samples the first few seconds of each
switches off and the disc plays normally.
successive track on the disc.
RANDOM PLAY
$RANDOM: The Player plays all the tracks on a CD randomly.
When the player is stopped:
$NORMAL PLAY: (NO ICON)
$Press MODE four times. RND is displayed.
$Press The disc will play with a random selection
TO CANCEL A MODE
When a disc is playing:
$Cycle the MODE switch to NORMAL or press STOP .
$Press MODE four times. RND flashes on and off
$Press Flashing stops and he disc will play with a
random selection
$To choose another track at random: Press
NORMAL
REPEAT 1 REPEAT ALL
INTRO
RANDOM
5
1
2 3
4
PLAY MODES
Page 4

3
2
CD FORMATS LOADING AND PLAYING A CD-BASIC
$Open the CD Lid: Move the OPEN switch to the right. The lid will open
The player will accept regular CDs or CD singles. There is no need for an
adaptor when playing CD singles.
$Load a CD into the Disc compartment with the label side up. Line up
the centre of the CD over the spindle of the CD transport. Gently push
The player will play CDs bearing the CD logo and some CDRs
down on the CD in the centre of the disc, so that it is firmly in place.
that have been finalised and recorded to the CD standard.
To remove a CD: Wait for the disc to stop spinning, open the lid, hold
Other discs will not play. MP3 CDs may appear to play but you
the disc by the edge while pressing the spindle down and lift off the disc.
will hear no sound. Discs recorded on a home computer may
not play
$ Close the lid. Close it gently until the locking catch clicks shut
UNPACKING
$Turn the volume down to a low level. Rotate the VOL control to the
right to decrease the volume and to the left to increase the volume.
The packing contains:
$Switch the player ON. Press the PLAY/PAUSE/POWER ( )button to
$The CD player
switch the player on. The disc will spin and read the Table Of
$Stereo headphones
Contents(TOC). Most discs will begin playing immediately , a few won’t.
$Unpack all the items carefully. If any items are damaged or missing,
$ Press the button to start (if necessary). The disc plays from Track 1
return the unit to your nearest Tesco store for replacement, Please have
your receipt ready when you call.
$ increase the volume to a suitable level.
$Open the CD lid and remove any cardboard protection from the tray.
$To emphasise the bass sound: Set the BASS
BOOST switch to the ON position. The amount of
CONNECTING BATTERIES
bass boost depends on the VOLUME control setting.
$ You will need to purchase two AA alkaline batteries
$The HOLD switch disables all player functions in
$Connect two AA batteries as shown on Page XX. If you are using an AC
Playback or Stop mode. Moving the switch to the
adaptor, (not supplied) follow the instructions on Page XX
Right engages HOLD, moving it to the Left allows
CONNECTING HEADPHONES
the unit to return to normal operation.
$Remove the wire tie from the headphone
$To pause and re-start a disc: Press the button.
cable.
$ To stop a disc(STANDBY): Press the STOP/PWR OFF ( )button.
$Plug the jack into the headphone socket
$To turn the player off: Press the STOP/PWR OFF ( )button twice.
(green) on the player. Make sure you push
Auto power-off: When the unit is stopped (standby mode ) for
the plug firmly in.
approximately 30 seconds, the power will automatically turn off.
GETTING STARTED BASIC OPERATION
$When the TOC data has been read: the display
TO START PLAYING A CD FROM A SELECTED TRACK
briefly shows the TOC .
$Insert the CD. Press PLAY/PAUSE.
$STARTING PLAY FROM STOP MODE: Press the
$Let the CD load. Press STOP
button to start play from Track 1.
$Press SKIP/SEARCH or repeatedly to select the track.
$TO STOP: Press the STOP key . This will stop play
$Press to play the CD forward from this track.
and the TOC will be displayed.
$TO CHANGE TRACKS DURING PLAY
$TO PAUSE: Press . To re-start play press again.
$Press SKIP/SEARCH or repeatedly to select and play the CD
When a disc is paused, the display flashes.
forward from the desired track.
THE ANTI SHOCK PROTECTION SYSTEM “ESP”
$TO GO BACK TO THE START OF A TRACK DURING PLAY
The player uses solid state memory to prevent the
$Press SKIP/SEARCH once.
sound from skipping when the unit is subjected to
shocks and vibration. This function automatically turns
$TO SEARCH FOR A PASSAGE DURING PLAY
on when play is started. The data buffer is indicated by
$Press and hold SKIP/SEARCH or to quickly scan the disc so you
an icon ‘ESP’ at the top of the screen. A steady icon
can reach the passage.
indicates an empty buffer. When the icon flashes the
$Release SKIP/SEARCH or to resume normal play.
data buffer is full.
DISPLAY INDICATIONS
When ESP is operating, battery consumption is higher
Whenever a disc is loaded into the player when it is switched on, or when
because the disc rotates faster and the memory
the player is switched on with a disc in place:
circuitry is activated. In normal use we suggest you
switch this function off to conserve battery power.
$The player spins the disc and reads the TABLE of
CONTENTS (TOC). During this time–
$To switch ESP ON and OFF: press the ANTI SHOCK
button. The icon will switch on or off. When ESP is
$If there is no disc: “disc” is displayed. Insert a disc
switched “ON” or “OFF”, the sound will be
and close the lid. The player reads the disc.
temporarily interrupted. This is normal.
$If the lid is open(ed: , the display shows “OPEN”.
Conditions such as dirty, scratched or warped discs
Closing the lid starts auto adjustment.
may affect performance of the ESP. system. During
$If disc player cannot read the Table of Contents
active use, if you wish to use ESP and operate the player
(TOC): Er is displayed.
vertically, the OPEN switch should face upward.
ADVANCED OPERATION
BUFFER FULL
ESP OFF
BUFFER EMPTY
ESP ON
 Loading...