

Page 1

User Handbook
CD/TUNER Hi-Fi SYSTEM WITH MP3 AND USB FLASH DRIVE SUPPORT
MC 507
Page 2

apparatus has been exposed to rain or moisture,
- Reorient or relocate the receiving antenna.
does not operate normally, or has been dropped.
- Increase the separation between the equipment
Warning: To reduce the risk of fire or electrical
and receiver.
shock, do not expose this product to rain or
- Connect the equipment into an outlet on a circuit
moisture. The product must not be exposed to
different from that to which the receiver is
dripping and splashing and no object filled with
connected.
liquids such as a vase of flowers should be placed
- Consult the dealer or an experienced radio/TV
on the product.
technician for help.
No naked flame sources such as candles should
ELECTRICAL INFORMATION
be placed on the product.
Mains Supply: The mains operating voltage of this
Caution: Changes or modifications not expressly
unit is on the rating plate on the rear.
approved by the manufacturer could void the user's
The means of disconnecting the unit from the mains
authority to operate this device.
supply is the mains plug. This must be unobstructed
Caution: Usage of controls or adjustments or
and freely operable at all times.
performance of procedures other than those
Read these instructions.
Class II construction double insulated. This
specified herein may result in hazardous exposure.
Keep these instructions.
product must not be connected to earth.
These labels tell you that the unit contains a Laser
Heed all warnings.
component. Do not stare at the laser lens.
Follow all instructions.
Do not use this apparatus near water.
Clean only with a slightly damp cloth.
Do not block any ventilation openings.
Install in accordance with the manufacturer's
IMPORTANT
instructions.
This equipment generates, uses and can radiate
Do not install or operate near any heat sources such
radio frequency energy and, if not installed and
as radiators, stoves, or other apparatus that
used in accordance with the instructions, may cause
produce heat.
harmful interference to radio ommunication.
Unplug this apparatus during lightning storms or
However, this is no guarantee that interference will
when unused for long periods of time.
not occur in a particular installation. If this
Refer all servicing to qualified service personnel.
equipment does cause harmful interference to radio
Servicing is required when the apparatus has been
or television reception, which can be determined by
damaged in any way, such as the power-supply
turning the equipment off and on, the user is
cord or plug is damaged, liquid has been spilled or
encouraged to try to correct the interference by one
objects have fallen into the apparatus, the
of the following measures:
CAUTION!
RISK OF ELECTRIC SHOCK
DO NOT OPEN
TO REDUCE THE RISK OF ELECTRIC SHOCK DO
NOT REMOVE COVER (OR BACK)
This symbol indicates that there are important
operating and maintenance instructions in the
literature accompanying this unit.
This symbol indicates that dangerous voltage
constituting a risk of electric shock is present within
this unit.
IMPORTANT SAFETY INFORMATION
2
Page 3
Dirty, scratched or warped discs may cause
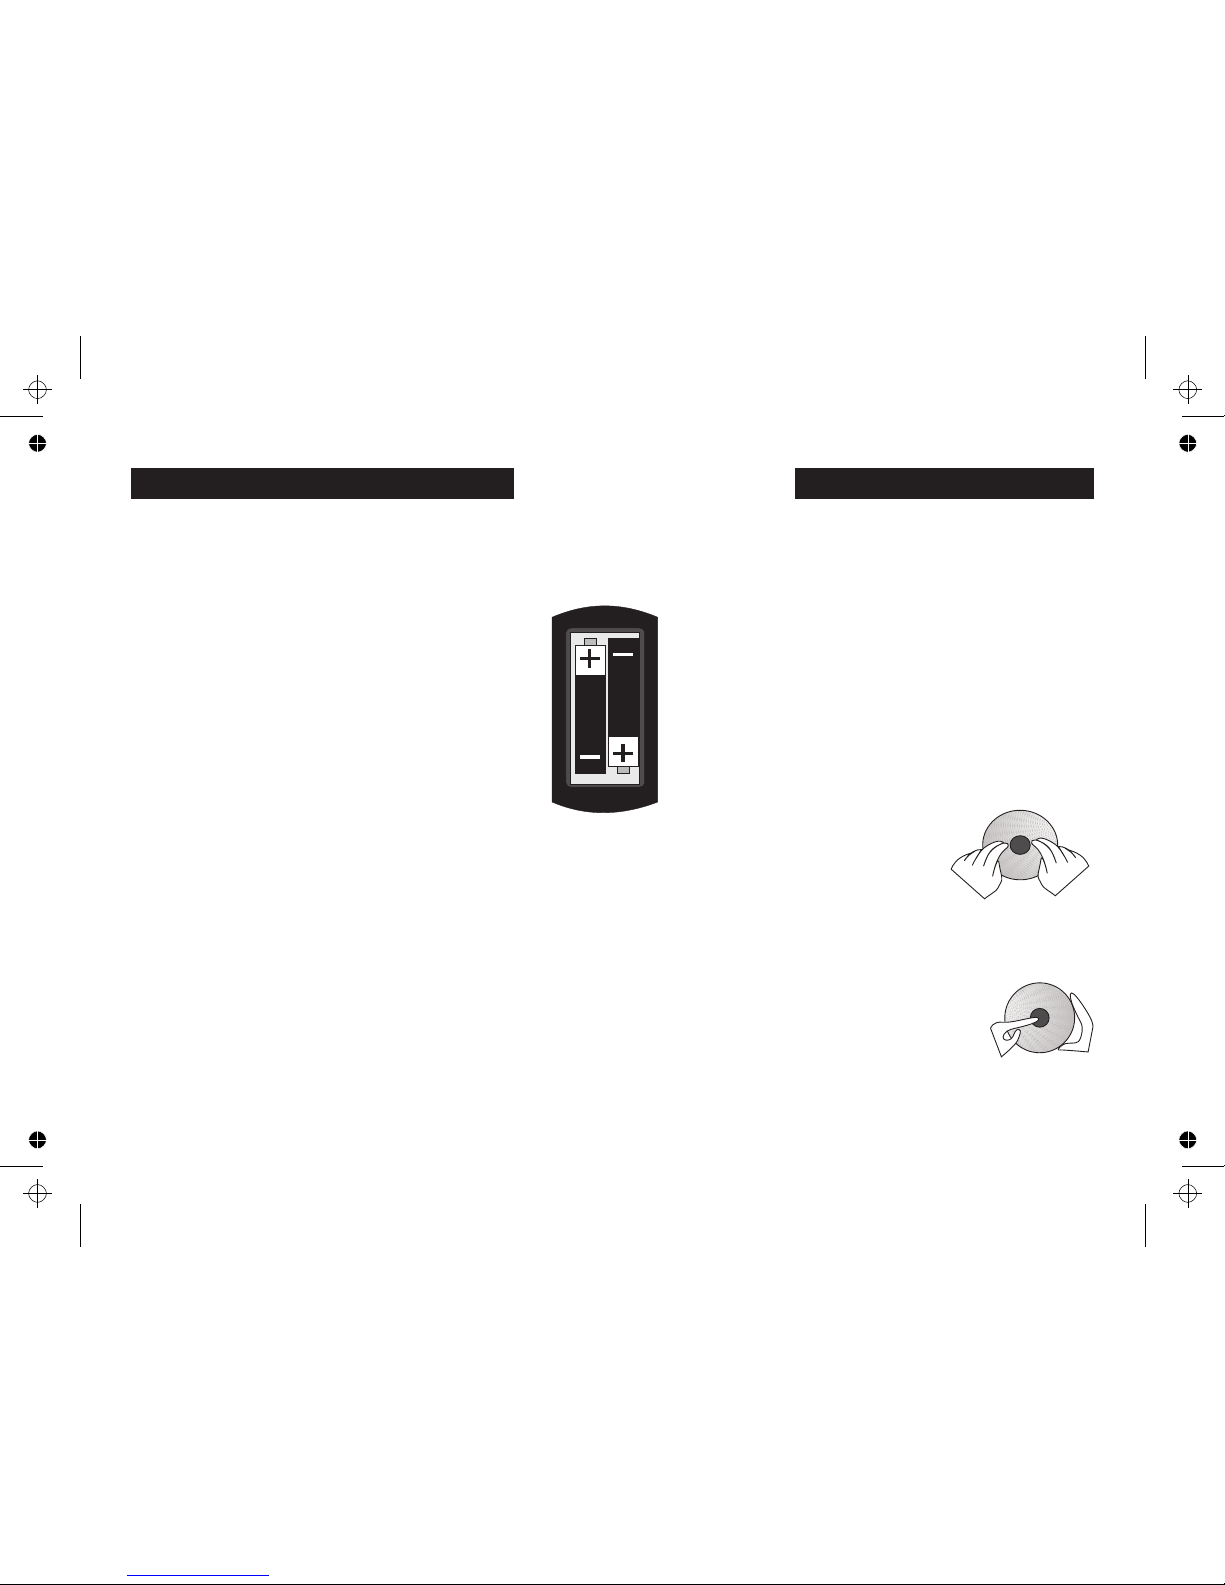
UNPACKING FITTING HANDSET BATTERIES
skipping or noise.
Slide the battery compartment cover down to
The carton contains:
Handle the disc only by the edges. To keep discs
remove it. Unwrap the batteries and insert them into
$ The MC507 AM/FM/CD receiver:
clean, do not touch the surface.
the battery compartment as shown. Replace the
$ Table stand:
cover.
Discs should be stored in their cases after use to
$ Remote Handset:
avoid scratches.
$ Wall mounting template and hardware.
Do not expose discs to direct sunlight, high humidity,
Unpack all the components carefully being
high temperature, dust, etc. Prolonged exposure to
especially careful not to damage the panels of the
extreme temperatures can warp the disc.
loudspeakers.
Do not stick or write anything on the disc. Sharp
Inspect the components carefully. If any item is
writing instruments or the inks used in some felt tip
damaged or missing, contact the Tesco store from
pens may damage its surface.
where you purchased this product, or if that is not
When loading a CD into the player:
possible, your nearest Tesco store. Please have your
receipt ready when you call.
Position the disc over the centre spindle
Retain the packaging. If you dispose of it, do so in
Make sure the printed side faces out
accordance with recycling regulations in your area.
Press the CD gently into place
Retain the User Handbook. If you pass the unit on to
Always use AAA batteries and replace them in pairs.
NEVER use force
a third party make sure you pass on the handbook.
Do not mix old and new batteries. If you are not
using the system for an extended period, remove
the batteries to avoid leakage and corrosion.
Never short circuit batteries or leave them lying
When removing a CD from the player:
around. When disposing of used batteries do not
Press lightly on the centre spindle
throw them into a fire, the general rubbish or water.
Gently ease the CD off by holding it at the edges.
Dispose of batteries having regard to the recycling
regulations in force in your area.
Do not touch the playing surface
NEVER use force
PRELIMINARIES
CD TOPICS
3
Page 4
Preliminaries
! Check that the mains voltage on the rating
plate which is located at the rear of the unit
matches the mains voltage in your area.
! Unwrap the power cord
! Uncoil the FM antenna and extend it fully.
The system can be used freestanding or wall
mounted
Ensure there is a suitable power point within easy
reach. The mains plug must not be obstructed
and must be freely operable at all times.
Make sure there is a least 150 mm (6”) of free
space above the unit so that the CD door can
open to its full height.
If you are free standing the system, site the system
on a stable surface (ideally a stout shelf) where it
is unlikely to fall or get knocked over.
Make sure that you position the unit where the
remote handset can easily be operated in direct
line of sight and no more than 15 metres away.
The radio performance of the system depends on
the aerial. If you plan to wall mount the unit make
sure that there is adequate signal strength in your
proposed location before drilling the wall.
The FM aerial should be moved around to get the
ENSURE THE WALL IS STABLE AND CAN SUPPORT THE WEIGHT OF THE UNIT. It is for the user to
optimum results. Do not extend or cut the FM
determine whether the supplied hardware is suitable for the wall and to provide proper alternative
antenna lead.
fixings if not. If you are unsure of how to proceed consult a qualified building expert.
The MW aerial is internal to the system, so if you
Apply the supplied template to the wall and mark the position of the holes. Ensure the template is
need good medium wave reception, try the
horizontal so that the unit sits level. This is most important. Drill two 6mm holes in the wall. Push the
system in different locations before making a final
wall plugs in and screw the two screws in leaving 7mm protruding. Align the keyhole slots in the unit
choice.
over the screws and pull gently down to hang the unit.
SITING AND PLACEMENT ATTACHING THE TABLE STAND
4
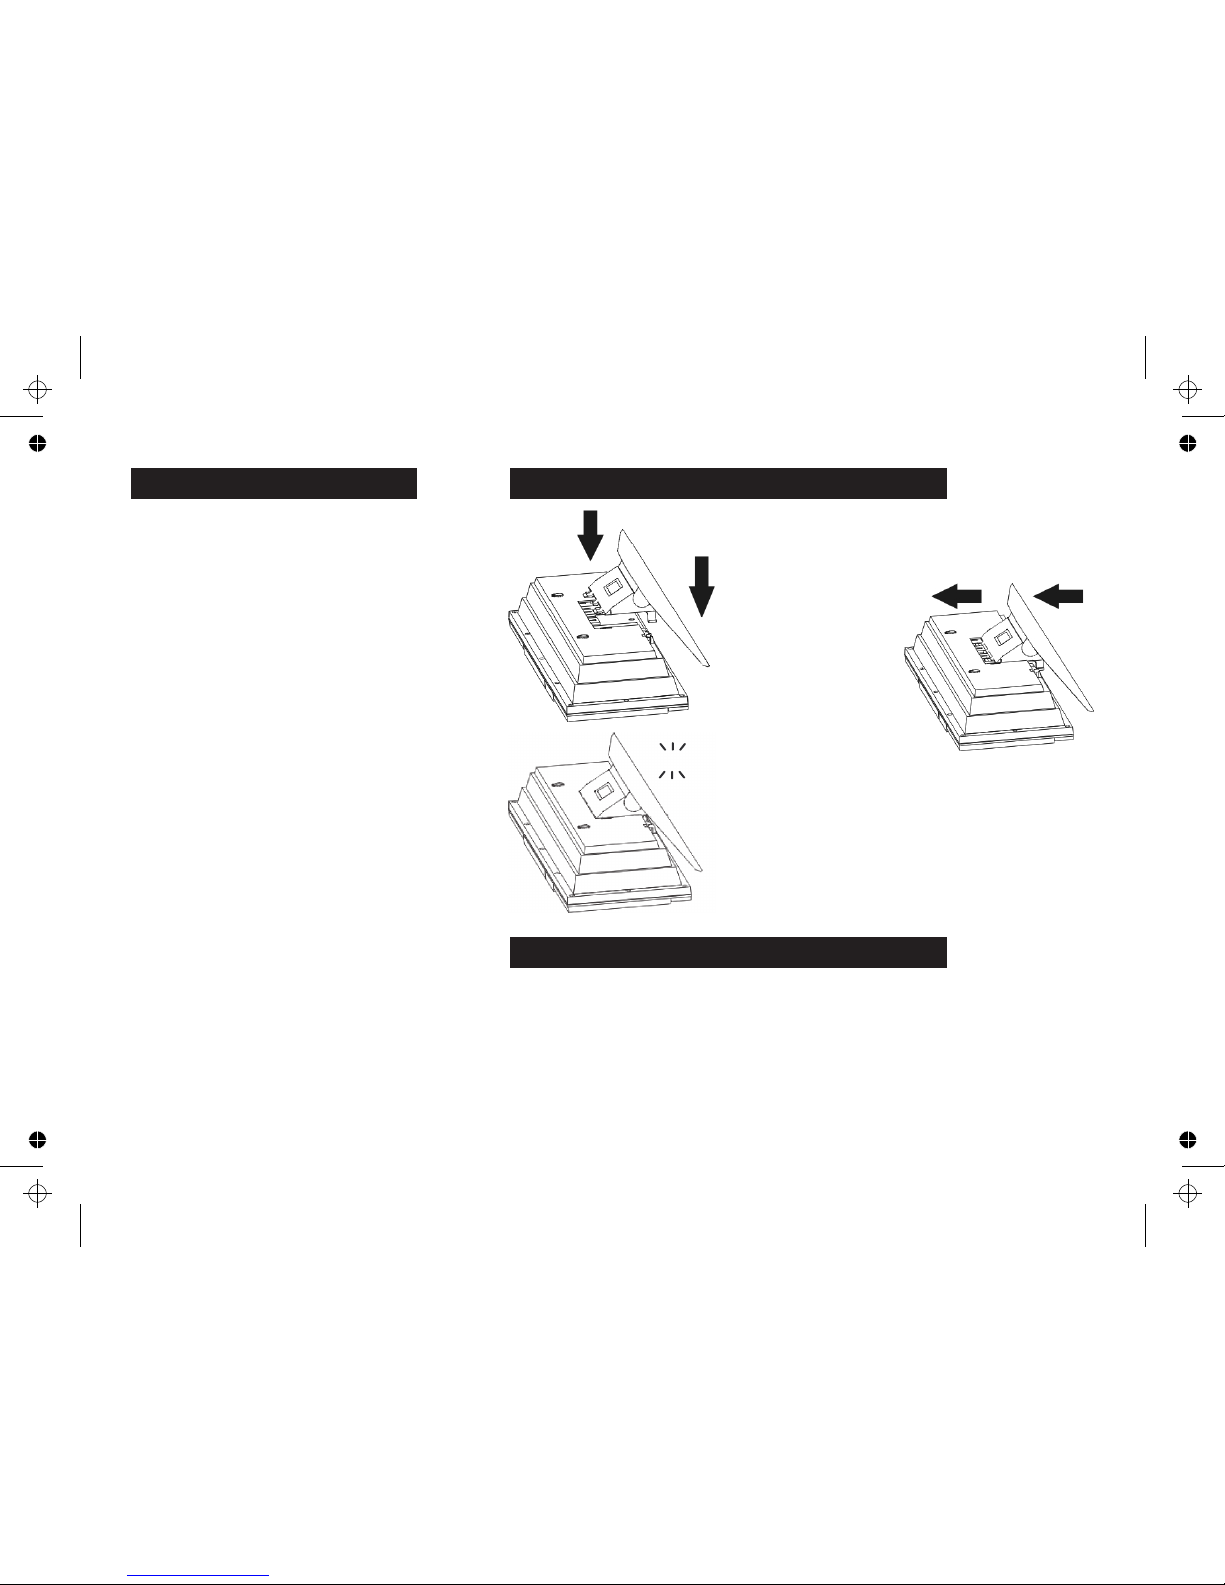
1: Place the unit face
down on a table. Place a
soft cloth under the unit
to avoid damaging it.
2: Align the tabs on the
stand over the slots in
the unit
3: Sl ide t he st and
forward and push the
tabs into place in the
unit.
4: When the tabs click into
place the stand is attached
5: Stand the assembly upright
and check that the stand firmly
supports the unit.
CLICK
WALLMOUNTING THE SYSTEM
Page 5

CONTROLS AND FUNCTIONS - OVERVIEW
LOADING A CD
PRINT
SIDE
FACING OUT
1: Select the CD input
2: Press OPEN/CLOSE to open the CD Door
3: Insert a CD as shown
4: Press OPEN/CLOSE to close the CD Door
Subwoofer Output Auxiliary Input
CD Door
Control Panel
Right
Loudspeaker
Left
Loudspeaker
Table
Stand
Battery
Compartment
BACKUP BATTERIES
The backup batteries store all
your system settings so if there
is an extended power failure or
you disconnect the unit from
the mains you do not have to
re-enter the settings.
Lift off the battery compartment cover. Insert two AA batteries
(not supplied) as shown. Replace the cover.
EXTERNAL CONNECTIONS
AUXILIARY INPUT: Connect any line source such as a DVD or MP3 player. You will need to purchase a suitable RCA phono interconnect.
SUBWOOFER: This is a single RCA connector for connection to a powered subwoofer. Refer to your subwoofer user manual for guidance.
Make external connections before the unit is stand or wall mounted, or you will need to dismount the unit to access the connectors!!
Power
Cord
FM Antenna
Wall mounting
keyhole slots
RIGHT
LEFT
1
CD
5
Page 6

CONTROLS AND FUNCTIONS - FRONT PANEL
6
1. EQ KEY: Choose from Pass (no Eq.); Classic;rock; Pop; Jazz
2. SLEEP KEY: Choose a time period after which the set switches off.
3. TIMER KEY: Program the unit to switch ON/OFF
4. PROGRAM KEY: Set p a program of tracks. Set the clock (in Standby).
5. PREVIOUS KEY:
6. CD STOP KEY: Stop a CD playing
7. MULTIFUNCTION DISPLAY
8. PLAY/PAUSE KEY: Press to Pause a CD: Press again to play
9. NEXT KEY
10. FIND/ESP DISPLAY KEY:
11. TUNER/BAND KEY: Select the radio - Select AM/FM
12. CD REPEAT KEY: Repeat a track or a whole CD
13. MEM (+) KEY: Choose the next memorised Radio station up
14. FUNCTION KEY: Press to select AUX/USB CARD/TUNER/CD
15. MEM ( - ) KEY: Choose the next memorised Radio station down
16. VOLUME ( - ) KEY
17. VOLUME (+) KEY
18. ON/OFF KEY: Switch the unit ON or to Standby.
19. HEADPHONE SOCKET
20. USB SOCKET: Connect a USB flash card.
21. REMOTE CONTROL SENSOR
22. OPEN/CLOSE KEY: Open/Close the CD door.
0
TIMER
PROGRAM
FIND/ESP
DISPLAY
TUNER
BAND
REPEAT
MEM+
MEM–
SLEEP FUNCTION
+
EQ –
VOLUME
ON/OFFOPEN/CLOSE
VOLUME
PHONESIR SENSOR
USB
Alter the Volume up or down
In CD mode, search a CD or skip a track
In Radio Mode, tune up or down the band
In CD mode, search a CD or skip
In Radio Mode, tune up or down the band
a track
c
b
d
e
f
g
h
i
j
1)
1!
1@
1#
1$
1%
1^
1&
1*
1(
2)
2!
2@
Find a named MP3 track
Switch the ESP function ON/OFF
09 64:57
ESP
Page 7

COMPARISON OF CONTROL PANEL
AND HANDSET FUNCTIONS
The figure below compares the Control Panel keys
with their direct handset equivalents. Most functions
are common to the Handset and Control Panel.
INTRO (2), MUTE (13) and NUMBER(7) keys are
available only on the handset.
The CD DOOR can only be operated from the
Control Panel.
FM Stereo/Mono reception can only be selected
via the FIND/MS key (18) on the handset.
CONTROLS AND FUNCTIONS - REMOTE HANDSET
7
c
b
d
e
f
g
h
i
j
1)
1!
1@
1#
1$
1%
1^
1&
1*
FIND
MS
BAND
TIMER
EQ
SLEEP
MEM
DOWN
MEM
UP
PLAY/PAUSE
BACK
TUNE
DOWN
VOLUME
TUNE
UP
INTRO
FUNC.
REPEAT
PROG
STOP
1 2
3
456
7 8
9
0
1. ON/OFF KEY: Switch the unit ON or to Standby.
2. BAND KEY: Select the radio - Select AM/FM
3. INTRO KEY: Sample the first 10 secs of every track on a CD
4. FUNCTION KEY: Press to select AUX/USB CARD/TUNER/CD
5. REPEAT KEY: Repeat a track or a whole CD
6. MEM UP KEY: Choose the next memorised Radio station up
7. NUMBER KEYPAD: Directly enter CD/MP3 track/album numbers
8. PROGRAM KEY: Set p a program of tracks. Set the clock .
9. PLAY/PAUSE KEY : Press to Pause a CD: Press again to play
10. PREVIOUS/NEXT KEYS:
11. CD STOP KEY: Stop a CD playing
12. VOLUME UP/DOWN KEYS: Alter the Volume up or down
13. MUTE KEY. Press to cancel/restore the sound.
14. MEM DOWN KEY: Choose the next memorised Radio station down
15. SLEEP KEY: Choose a time period after which the set switches off.
16. EQ KEY: Choose from Pass (no Eq.); Classic;rock; Pop; Jazz
17. TIMER KEY: Program the unit to switch ON/OFF
18. FIND/MS KEY:
0
CD mode, find a named Mp3 track/album
CD mode: set/cancel the ESP function
Radio Mode, set a FM station to Mono/Stereo
Search a CD or skip
Tune up or down a Radio band
a track
TIMER
PROGRAM
SLEEP
EQ
OPEN/CLOSE
VOLUME
IR SENSOR
FIND/ESP
DISPLAY
TUNER
BAND
REPEAT
MEM+
MEM–
FUNCTION
+
–
VOLUME
ON/OFF
PHONES
USB
09 64:57
ESP
1
2
4
5
6
8
9
10
11
12
14
15
16
17
18
10
Page 8

GETTING STARTED
Plug in the mains plug and switch the system on at the
mains point.
The system will respond and go into Standby. In
standby mode the display is off so it may appear as if
the unit is not working - it is!
Setting the Clock
When the system is in Standby the screen displays the
clock time. The clock can be set to display 24 or 12
hour (AM/PM mode)
1. Press and hold the PROGRAM key for 3 seconds
2.Press the or keys to toggle 12/24 hr mode.
3. Press the PROGRAM key to confirm
Setting the time 20:25 (24 Hour Mode)
4. Press to set the hour.
3. Press the PROGRAM key to confirm
The hour stops flashing and the minutes flash.
4. Press to set the minutes.
5. Press the PROGRAM key to confirm
The minutes stop flashing and the clock is set.
To set the clock to 12 hour format:
Select ‘12 HOUR ‘ and proceed as above.
• The clock can only be set when the unit is in Standby
The procedure may be carried out from the control
panel or the handset.
SWITCHING ON
Press the POWER switch on the handset or the
ON/OFF switch on the front panel. The unit switches
on. In normal use the system will revert to the mode and
volume it was in when last used.
SELECTING AN INPUT
Repeatedly press the FUNCTION key to select an
input - AUX/ USB CARD/ TUNER/ CD
PLAYING A CD
1. Select CD via the FUNCTION key : OR
Press the PLAY/PAUSE key.
If no disc is in the player you will see:
2. Press OPEN/CLOSE to open the CD door
3. Place a CD into the tray with the label facing
outwards.
4. Press OPEN/CLOSE to close the CD door.
5.The player will read the disc Table of Contents (TOC)
The display will register the disc information and stop.
(A very few CDs may begin playing from Track 1.)
If the disc is a standard audio CD the display will show
“CD”. Other formats will display the format type.
These behave differently and will be covered later.
ANTI SHOCK PROTECTION (ESP): The player uses
a memory buffer. The buffer memorises up to 40
seconds of information and reads from this memory to
prevent skipping when the unit is subjected to minor
shocks and vibration. If you the unit is in a location
where there is no likelihood of shock and where it will
not be moved during play, you may switch ESP off.
Press the FIND/ESP key to toggle ESP ON and OFF.
OPERATION PLAYING A CD
8
24 hour
20:00
12 hour
24 hour
20:25
20:25
Hello
O
D SC
CLOSE
CD READ
VOLUME
VOLUME
VOLUME
VOLUME
09 64:57
ESP
VOLUME
09 64:57
ESP
VOLUME
09 64:57
ESP
ESP ON
ESP OFF
OPE
VOLUME
Page 9

REPEAT MODE
Press the REPEAT button to cycle the repeat mode of
the player as follows:
NORMAL PLAY: (NO ICON)
REPEAT: Repeat one track continuously.
REPEAT ALL: Repeat the entire CD continuously
INTRO SKIP
Press INTRO on the handset
The player samples the first ten seconds of each
successive track on the disc. After sampling all the
tracks on the disc the player will stop.
When you want to play a track: Press INTRO again
INTRO mode can be selected when the CD is stopped
or playing.
The INTRO function cannot be combined with the
REPEAT function.
PROGRAM PLAY
PROGRAM PLAY allows selected tracks on the disc
to be played in any desired order.
1. Load a CD; Press STOP
2. Press the PROGRAM key
“PROGRAM” P-01 appears and the display prompts
you to enter a track
3. Press to locate the desired track OR.
Select the track number from the handset
4. Press PROG to confirm.
“00 P-02" appears
5. Repeat steps 3 and 4 to program more tracks. Up to
64 tracks may programmed.
6. Press to play the program.
To cancel a program before it plays:
Press STOP
To cancel a program during Program Play:
Press STOP . The disc will stop and display the tracks
on the disc but the program is retained in the memory.
Press to play the disc normally from the start.
To replay the program:
Press PROGRAM followed by the PLAY/PAUSE key
To erase the program completely:
Press PROGRAM and then press STOP twice.
Editing a Program
From STOP mode during program play:
1. Press PROG repeatedly until you reach the track you
want to replace.
2. Press to locate the desired new track.
3. Press PROG again to confirm.
4. Press to play the program.
The full program will now play but when it reaches P03, instead of track 8, track 4 will play.
CD MODE AND PROGRAM PLAY
9
03 o5:21
VOLUME
ESP
REPEAT ALL
03 o5:21
VOLUME
ESP
03 o5:21
VOLUME
ESP
REPEAT ALL
REPEAT
03 o0:01
VOLUME
ESP
INTRO
0 0 P - 0 1
VOLUME
VOLUME
09 64:57
ESP
0 5 P - 0 1
VOLUME
0 0 P - 0 2
VOLUME
VOLUME
09 64:57
ESP
VOLUME
01 01:01
ESP
0 5 P - 0 1
VOLUME
0 8 P - 0 3
VOLUME
0 4 P - 0 3
VOLUME
MEMORY
MEMORY
MEMORY
MEMORY
MEMORY
Page 10

Press PLAY/PAUSE to commence play
To change tracks:
Press repeatedly
The disc will go forward/back one track at a time
To repeat a track:
Press once.
The disc will replay the track from the beginning
To search at speed back or forward:
Press and hold .
The disc will search at speed and the sound will mute.
Release the button to revert to normal play.
To pause a disc:
Press .
The disc will pause. In pause mode the sound mutes
and the track number and time flash.
Press to resume normal play.
To stop the disc:
Press
The disc will stop and display the total tracks
To start a disc from a particular track
Press repeatedly to select the track no. OR
Enter the track number from the Number Keypad
Then press .
The disc will play from the start of the chosen track
You can also change tracks during play by selecting the
track from the number keypad and then pressing the
PLAY/PAUSE key.
ALTERING THE VOLUME
To increase /decrease the volume
Press VOLUME
The max. volume level is 30, the minimum is 0. The
volume level is indicated by the length of the bar
display at the bottom of the screen.
The volume level appears on the screen before
reverting to the track display.
Muting the sound
Press MUTE.
The Volume bar display flashes and the sound will
mute: In mute mode you can operate the player but the
sound remains muted
To cancel mute:
Press MUTE or VOLUME
Note: If you switch the player into Standby mode when
the Volume is set to maximum level (30) when you next
switch the player on the volume level will be reduced to
25.
If you set the volume to a level below 23 the player will
come on at the lower volume.
Sound Modes
Pressing EQ cycles the player through
PASS(No Eq), CLASSIC, ROCK, POP, JAZZ
The display indicates briefly the new mode.
To check the current mode: press EQ once.
CAUTION
Do not play the system at very high levels of
volume as you may damage your hearing.
PLAYING A CD CONTROLLING THE SOUND
10
03 o0:01
VOLUME
01 01:01
ESP
VOLUME
ESP
03 o5:21
VOLUME
ESP
03 o5:24
VOLUME
ESP
03 o5:25
VOLUME
09 64:57
ESP
VOLUME
07 64:57
ESP
VOLUME
07 00:01
ESP
OLUME 14
VOLUME
03 o5:21
VOLUME
ESP
03 o5:21
VOLUME
ESP
03 o5:21
VOLUME
ESP
Jazz
VOLUME
Page 11

MP3 discs take two basic forms.
The simplest MP3 disc is a collection of single tracks burned onto the disc rather
like a standard CD.
More often an MP3 disc will have a set of folders . The basic disc itself is called the
ROOT folder but a disc often has several additional folders. Each folder may
contain one or several songs. These may be arranged by performer, composer,
genre (Jazz, rock, etc.) and so on.
The system can play such discs and even read the full track information including
performer, song title, format, album - in fact everything that the company has
coded into the track. All this is much more comprehensive than that on a CD.
NAMING TRACKS AND FOLDERS
MP3 tracks use a tag naming system called ID3. Before you burn your tracks to a
CD you should name them on your PC. This name can simply be the title of the
song, or you can use any name that helps you to identify the track. This player is
able to read this information and you can search for a folder and then locate an
individual track by name.
GENERAL INFORMATION
Because of the amount of disc information the system has to read, starting and
stopping the disc can appear sluggish. Be patient!
If the formatting of the track is not very good (and many home recorded MP3s
aren’t), the song will not play.
For best results we advise you to burn the disc using software that will record a
proper MP3 formatted disc. Discs with a number of MP3 tracks in folders just
burnt as a PC data disc may not play.
ABOUT MP3 FORMATS
Load an MP3 disc
The player will load the disc and then stop. The basic
disc information will appear as in the illustration.
This tells you that the disc contains 4 folders with a total
of 24 songs. Of these 4 folders one of them will in all
probability be the basic disc or ROOT folder. This will
always play first.
To play the complete disc - Press
This display tells you that the first track of the first folder
is playing.
To change tracks: Press repeatedly
The disc will go forward/back one track at a time
To repeat a track: Press once.
The disc will replay the track from the beginning
To search at speed back or forward:
Press and hold .The disc will search at speed and
the sound will mute. Release the button to revert to
normal play.
To pause a disc: Press .
When all the tracks in the first folder have played the
next folder will play and so on until the entire disc has
played.
BASIC INFORMATION SEARCH
Select a track number from the handset. Say you select
track 22: The coded track information will now display.
Press to select the and play this track. The track
information appears. This tells you that the selected
track (22 of the disc) is the fifth track in Folder 4.
If you choose an invalid track number (say 200):
The track you are currently playing will continue.
PLAYING MP3 FORMATS
11
VOLUME
024 stop
04
VOLUME
001 00:01
01
ESP
ESP
VOLUME
001 00:01
02
ESP
VOLUME
HARD DAY’s NIg
O22
ESP
VOLUME
005 0:01
04
ESP
VOLUME
200
ESP
NONE
Page 12

QUICK FOLDER SELECTION
Load an MP3 disc
Press the MEM UP/DOWN key to select the folder
Press PLAY/PAUSE to commence play.
To browse by song:
Press and hold the MEM UP/DOWN key to scan the
files in the folder. The scan will then move to the next
folder and so on.
ADVANCED FOLDER SELECTION
Load an MP3 disc
Press the FIND/MS key twice. The FIND symbol
appears on the display. The first album to display will
be the ROOT.
Press PLAY/PAUSE to commence play
To return to Album Search: Press the FIND/MS key
twice.
Press repeatedly to select a different folder
Press PLAY/PAUSE to commence playing the
folder. When the contents have played the next album
will play until the disc reaches the end.
SELECTING A SONG WITHIN A FOLDER
Press the FIND/MS key twice.
Press repeatedly to select a folder
Press and hold the one of the keys
The ALBUM symbol disappears and the first song in the
folder appears.
Press repeatedly to scan the songs in the folder
When you have selected a song:
Press PLAY/PAUSE to commence playing.
ALPHABETICAL SEARCH
Load an MP3 disc
Press the FIND/MS key once.
The FIND symbol appears on the display.
The letter A also appears with the first song beginning
with A. The ‘11 ’ at the top of the display indicates this is
track 11 on the disc.
Press and hold the one of the keys. The letter A
flashes and the next song beginning with A appears.
Repeatedly press the keys to view all the songs
on the disc beginning with A.
When you have selected a song:
Press PLAY/PAUSE to commence playing.
To move through the alphabet:
Press the FIND/MS key once. The letter A appears
Repeatedly press the keys to view move to the
next alphabet. You can search all the letters of the
alphabet and the digits from 0-9.
If there are no songs beginning with a particular letter:
REPEAT: Press REPEAT to cycle the options
PROGRAM AND INTRO SKIP
These work as for CD replay.
SELECTING AND PLAYING A FOLDER
VOLUME
024 stop
04
ESP
VOLUME
001 00:01
03
ESP
VOLUME
001 00:01
03
ESP
VOLUME
003 00:01
04
ESP
VOLUME
ROOT
01
ESP
VOLUME
024 stop
04
ESP
ALBUM
VOLUME
001 00:01
01
ESP
VOLUME
ROOT
01
ESP
ALBUM
VOLUME
Beatles
04
ESP
ALBUM
VOLUME
001 00:01
04
ESP
VOLUME
Beatles
04
ESP
ALBUM
VOLUME
Let it be
003
ESP
VOLUME
029 stop
06
ESP
VOLUME
A- All ALONE
011
ESP
VOLUME
A- AMAZing gr
021
ESP
VOLUME
008 00:01
03
ESP
VOLUME
A- All ALONE
011
ESP
VOLUME
F none
011
ESP
REPEAT 1
REPEAT ALL
REPEAT ALBUM
NORMAL
VOLUME
005 00:01
03
ESP
12
Page 13

STEREO OR MONO
Stereo reception offers more realistic sound. In
poor reception areas Stereo can be noisy. Setting
the tuner to mono will greatly improve noise
performance in poor reception areas.
To set mono:
Tune in the wanted station
Press the FIND/MS key on the handset.
The Stereo light will extinguish
To restore Stereo
Press the FIND/MS key on the handset.
The Stereo light will return
The default setting for FM is stereo. It is not
possible to memorise a mono setting for a station
broadcasting in stereo
AUX MODE
Repeatedly press the FUNCTION key to select -
AUX MODE
You can now play external audio equipment
through the system. In this mode only the Volume
EQ and MUTE functions operate.
USING THE TUNER
Press TUNER/BAND
The tuner will switch on. In normal use the last used
band and station will be the one displayed.
Press TUNER/BAND to select MW or FM (The
default at first use is FM)
TUNING A STATION - Auto Tuning
Press and hold . the tuner will scan the band
looking for a station. When a usable station is
reached the tuner will stop and play the station.
To continue scanning, press and hold .
TUNING A STATION - Manual Tuning
Press and hold .
The tuner scans the band in increments of 50KHz
(FM) and 9KHz (AM) In this mode you may get
inter-station noise so please turn the volume down.
When a stereo station (FM) is detected the STEREO
beacon will light.
PRESETS
You can preset 30 FM and 10 MW stations
1. Tune the wanted radio station
2. Press the PROGRAM button
4. Press MEMUP/MEM DOWN to select a
program channel
5. Press PROG/MEM to save the station. This will
overwrite the preset with the new information.
6. Repeat steps 2 to 5 to store additional stations.
7. To recall a preset station: Press MEMUP/MEM
DOWN until you reach the preset no.
FM 87.50
MHz
FM 88.00
MHz
FM 92.50
MHz
<<ST>>
mw 522
KHz
mw 531
KHz
FM 90.50
MHz
FM 90.50
MHz
FM 90.50
MHz
FM 90.50
MHz
FM 97.30
MHz
<<ST>>
MEMORY
<<ST>>
<<ST>>
<<ST>>
<<ST>>
01
05
MEMORY
05
05
FM 97.30
MHz
<<ST>>
MONO
FM 97.30
MHz
STEREO
FM 97.30
MHz
<<ST>>
AUX
13
Page 14

Although the unit is fully compatibly with USB 1.1 &
2.0 standards, a small percentage of USB flash drives
might not be readable. Some MP3 players may play
into this input but most won’t. If you have a section on
your MP3 player formatted for memory storage you
can drag MP3 files to that partition and use it.
Repeatedly press the FUNCTION key to select the
USB input. Now plug a USB flash disk into the USB
port at the front of the unit. It is essential that the
input be selected before the drive is connected.
The unit will now read the contents of the drive:
To play the complete disc - Press
This display tells you that the first track of the first folder
is playing.
To change tracks: Press repeatedly
The disc will go forward/back one track at a time
To repeat a track: Press once.
The disc will replay the track from the beginning
To search at speed back or forward:
Press and hold .The disc will search at speed and
the sound will mute. Release the button to revert to
normal play.
To pause: Press .
When all the tracks in the first folder have played the
next folder will play until the entire drive has played.
All the other search functions and play modes
operate as for MP3 disc replay except that there is
no Alphabetical Search.
Card-usb
PLAYING USB FLASH DRIVES SLEEP AND ALARM MODE
14
VOLUME
024 stop
04
ESP
VOLUME
VOLUME
001 00:01
01
ESP
Sleep mode sets the system to Standby when the
preset sleep time is reached.
To set SLEEP mode:
Press the SLEEP key repeatedly to cycle the sleep time in
minutes. OFF bypasses the function
90 80 70 60 50 40 30 20 10 OFF
When you have set the time the display reverts to
program mode with the addition of the SLEEP icon.
To check the remaining time: Press SLEEP
When the clock has reached ‘00’:
ALARM MODE
You can operate the unit as an alarm clock:
To set the timer it is essential that you have set up
the clock. See P. 8 for details.
Press TIMER. The Alarm ON display appears
Set the alarm ON time: This is the time at which the
unit will switch on.
Press repeatedly to set the hours
Press TIMER
Press repeatedly to set the minutes
Press TIMER. The Alarm OFF display appears
Set the alarm OFF time: This is the time at which the
unit will switch off.
Press repeatedly to set the hours
Press TIMER
Press repeatedly to set the minutes
Press TIMER
The normal display will re-appear with the clock icon
Sleep
SLEEP
90
VOLUME
001 00:01
01
ESP
Sleep
56
SLEEP
VOLUME
00:00
On
VOLUME
07:00
On
VOLUME
07:15
On
VOLUME
00:00
Off
VOLUME
08:00
Off
VOLUME
08:30
Off
VOLUME
08:30
Off
Page 15

The unit will now prompt you to select the Tuner or CD
player as a wake up source.
Press to toggle between TUNER and CD
In this example the tuner is our wake up source.
Select TUNER. Press TIMER to confirm
You will now be prompted to set a volume level
Press repeatedly to set the Volume
Press TIMER to finalise the setting.
The unit will now play back your settings:
The display will revert to normal with the addition of a
clock icon to show the unit is operating in Timer Mode.
You may now set the unit to Standby if you wish.
The backlight will go out but the clock time will still
display the timer icon. At the appropriate time the unit
will wake up and play the radio (or CD). In the case of
radio wake-up the station played will be the one the set
was tuned into when the timer was set up. After the set
time the unit will again go into standby.
To cancel Timer mode: Press the Timer key.The timer
icon will disappear.
To restore Timer mode: Press the Timer key.
The unit will replay the timer settings to confirm.
To change the settings: Press and hold the TIMER key
and re-enter the new data.
VOLUME
001 00:01
01
ESP
VOLUME
TUNER
On
VOLUME
TUNER
VOLUME
Volume 18
VOLUME
07:15
On
VOLUME
08:30
Off
VOLUME
Volume 18
VOLUME
TUNER
VOLUME
001 00:01
01
ESP
If your system is not performing as well as you might expect please check
through this list before returning the unit to Tesco for attention.
SYMPTOM POSSIBLE CAUSE AND CORRECTIVE ACTION
No power Poor plug connection, re-insert plug, switch power on
No sound Volume too low
Headphone plugged in
Distorted sound Volume down, CANCEL EQ.
Faulty format on CDR
Timer doesn’t work Clock has not been set
Set the clock time first
CD will not play Wrongly loaded CD; re-load CD
Wrong format; load another CD
CD skips Dirty or scratched CD; clean the CD
Faulty formatting on CDR; try another disc
Lens dirty; clean lens
Player is being vibrated or shaken, relocate
Noisy FM reception Reposition aerial
You are not tuned to the correct station for your
area. Re-tune to the correct station.
Noisy AM reception Re-position the system
No handset response Do commands from the main unit operate?
Replace batteries in handset, reposition handset
USB drive won’t play No MP3 files on drive - incorrect forma or drive type.
TROUBLESHOOTING GUIDE
15
Page 16

Tesco Stores Ltd, Delamare Road, Cheshunt, Herts, EN8 9SL
Disconnect the unit from the mains supply before cleaning.
Wipe the housing gently with a soft, dry cloth. If the unit is heavily stained or
soiled, wipe with a moistened cloth. To avoid damage, do not use any cleaning
agents or abrasive cleaners.
CDS AND CD COMPARTMENT
DO NOT remove a CD until after the disc has stopped spinning.
Do NOT force a CD onto the spindle.
Do not put anything except one compact disc into the CD compartment.
Do not force the compartment open.
Keep the CD compartment closed when not in use to prevent dirt and dust from
settling inside.
Do NOT leave a CD in the compartment after use. Return it to its packing.
CD LENS
When the lens gets dirty, malfunctions may occur. Bring the system out of
Standby, open the CD door, and then switch off and unplug the system from the
mains. NEVER clean the lens with the system connected to the mains.
Blowing on the lens with a camera blower will get rid of most dust. Only in
exceptional cases will further cleaning be needed. The lens should be cleaned
using a commercially available CD lens cleaner. Follow the instructions explicitly. Waste electrical products should not be disposed of with
Immediately you have cleaned the lens, re-connect the system to the mains. household waste. Please recycle where facilties exist. Check with
Bring the system out of Standby and press OPEN/CLOSE to shut the door. Local Authority or retailer for recycling advice.
If you have not installed back-up batteries you may now need to reset the
clock and any timer settings.
CARE AND CLEANING
WARRANTY
Your Tesco appliance is covered by a warranty for 12 months from the date of
purchase. If a fault develops during this period, please contact the TESCO
electrical help line on 0845 456 6767. Please have your original purchase
receipt with you when you call. This warranty in no way affects your consumer
rights.
SPECIFICATIONS
Supply Voltage : AC 230-240V ~ 50Hz
Battery Back-up: 2x1.5V AA batteries
Power Consumption : 21W
Radio Frequency Range : FM 87.5 - 108 MHz
AM 530 - 1600 kHz
Amplifier Output Capacity: 3.2 W
UK: Waste electrical products should not be disposed of with
household waste. Separate disposal facilities exist, for your nearest
facilities see www. recycle-more.co.uk or in-store for details.
ROI: Produced after 13th August 2005
WARRANTY AND SPECIFICATIONS
 Loading...