

Page 1
MC-129
Owner’s
Handbook
CD/radio micro system
Page 2

Page 3

IMPORTANT SAFETY INFORMATION
CAUTION!
RISK OF ELECTRIC SHOCK
DO NOT OPEN
TO REDUCE THE RISK OF ELECTRIC SHOCK
DO NOT REMOVE COVER (OR BACK)
This symbol indicates that there are important operating and maintenance instructions
in the literature accompanying this unit.
This symbol indicates that dangerous voltage
constituting a risk of electric shock is present
within this unit.
Read these instructions.
Keep these instructions.
Heed all warnings.
Follow all instructions.
Do not use this apparatus near water.
Clean only with a slightly damp cloth.
Do not block any ventilation openings.
Install in accordance with the manufacturer’s
instructions.
Do not install or operate near any heat sources such
as radiators, stoves, or other apparatus that produce
heat.
Unplug this apparatus during lightning storms or when
unused for long periods of time.
Refer all servicing to qualied service personnel.
Servicing is required when the apparatus has been
damaged in any way, such as the power-supply cord
or plug is damaged, liquid has been spilled or objects
have fallen into the apparatus, the apparatus has been
exposed to rain or moisture, does not operate normally,
or has been dropped.
Warning: To reduce the risk of re or electrical shock,
do not expose this product to rain or moisture. The
product must not be exposed to dripping and splashing
and no object lled with liquids such as a vase of
owers should be placed on the product.
No naked ame sources such as candles should be
placed on the product.
Caution: Changes or modications not expressly
approved by the manufacturer could void the user’s
authority to operate this device.
Caution: Usage of controls or adjustments or
performance of procedures other than those specied
herein may result in hazardous exposure.
WARNING: DANGER OF RADIATION
These labels tell you that the unit contains a laser
component. Opening the CD compartment lid and
defeating the safety interlocks will expose the user to
radiation from the laser beam. Do not stare into the
laser while it is operating.
IMPORTANT
This equipment generates, uses and can radiate radio
frequency energy and, if not installed and used in
accordance with the instructions, may cause harmful
interference to radio communication. However, this
is no guarantee that interference will not occur in a
particular installation. If this equipment does cause
harmful interference to radio or television reception,
which can be determined by turning the equipment
o and on, the user is encouraged to try to correct the
interference by one of the following measures:
- Reorient or relocate the receiving antenna.
- Increase the separation between the equipment
and receiver.
- Connect the equipment into an outlet on a
circuit dierent from that to which the receiver is
connected.
- Consult the dealer or an experienced radio/TV
technician for help.
ELECTRICAL INFORMATION
Mains Supply: The mains operating voltage of this unit
is marked on a rating plate on the rear of the unit.
The means of disconnecting this appliance from
the mains supply is the mains plug. This should be
unobstructed and readily operable at all times.
1
Page 4

INDEX
INDEX
Important safety information ..................................1
Introduction ............................................................2
Unpacking ...............................................................2
Placement ...............................................................3
Connecting speakers ................................................4
Controls and connections .........................................5
Remote control ........................................................ 7
Connecting power ...................................................8
Power control ..........................................................8
Listening to the radio ..............................................8
Setting the volume .................................................. 8
Playing a CD .............................................................9
Aux in ....................................................................10
Headphones ..........................................................10
Troubleshooting ....................................................10
Care & Maintenance...............................................10
Specications ........................................................10
Warranty ...............................................................10
The MC-129I is a stylish micro system with built-in CD player
and 2 band radio.
The remote control (supplied) conveniently controls transpor t
functions for the CD player.
An Aux input is available for the connection of audio signals
from a personal audio player or a personal computer.
PRELIMINARIES INTRODUCTION
UNPACKING
Carefully unpack the unit. If it is damaged, please return it to
your nearest Tesco store for replacement. Remember to take
your purchase receipt with you.
Retain the User Handbook. If you pass the unit on to a third
party make sure you pass on the handbook.
We suggest you retain the packaging. If you dispose of it, do
so having regard to any recycling regulations in your area.
CONTENTS
The carton should contain:
The MC-129I CD/Radio microsystem•
Two loudspeakers•
Remote control with 2 x batteries•
Operating Manual•
If any items are missing or damaged, contact your nearest
TESCO store for a replacement. Have your receipt ready when
you call. Retain the packaging. If you dispose of it, do so
having regard to any recycling regulations in your area.
2
Page 5

PLACEMENT
PLACEMENT
Placement on a table or shelf:
The unit includes a stand to enable placement on a table or
shelf. Locate the stand in its position folded at on the back
panel and fold it down.
Place the unit on a sturdy table or shelf where it cannot get
knocked over and where there is a clear line of sight to the
remote handset.
NOTE: A protective mat is advised when the unit is standing
on furniture that may be scratched by the stand.
Make sure that there is a clearance of 10cm (4 inches) around
the unit for ventilation. There should also be a clearance of
17cm above the surface the unit stands on to allow the CD
loading door to open fully.
Keyhole slots
Stand
Optional wall-mounting:
The MC-129I system has back panel keyhole slot xings for
optional wall-mounting of the speakers and/or the main
system.
If you plan to wall-mount the speakers or system, you will
need to x one screw into the wall to hang each speaker and
a further four if wall-mounting the main system.
Before xing the screws, plan the location carefully, ensuring
that mains power is accessible, that the unit is mounted high
enough to allow access to the CD door, and ensuring that the
speaker cables will be long enough.
Once you have planned the location, you will need to x the
four screws into the wall to support the main unit. Measure
the screw spacing carefully, then x the screws so that the
unit will be level and at the height you require.
A further two screws will then be necessary, one to wallmount each speaker.
NOTE:- Most walls will require the use of wall-plugs when
mounting the xing screws. If you are in any doubt concerning
the type of xing required or the security of wall-mountings,
consult a building professional.
Important notes for wall-mounting:
Tesco accepts no liability for damages caused by incorrect •
assembly, installation or improper use.
Ensure that the wall is sucient strength to hold the •
weight of the system.
If there is any doubt regarding the condition or the load •
bearing of the wall, please consult a specialist from the
building trade.
The wall xings used must be suitable for the type of wall •
(materials, thickness, condition), so that the maximum
load bearing of the wall can be guaranteed.
Ensure that no electrical cables, water pipes or gas pipes •
are located within the wall.
Before mounting, check the location of the nearest •
mains socket. Use a spirit level when attaching the wall
bracket.
Wear safety g• oggles when drilling.
Keep small parts out of reach from children.•
Keyhole slots
3
Page 6
CONNECTING THE SPEAKERS
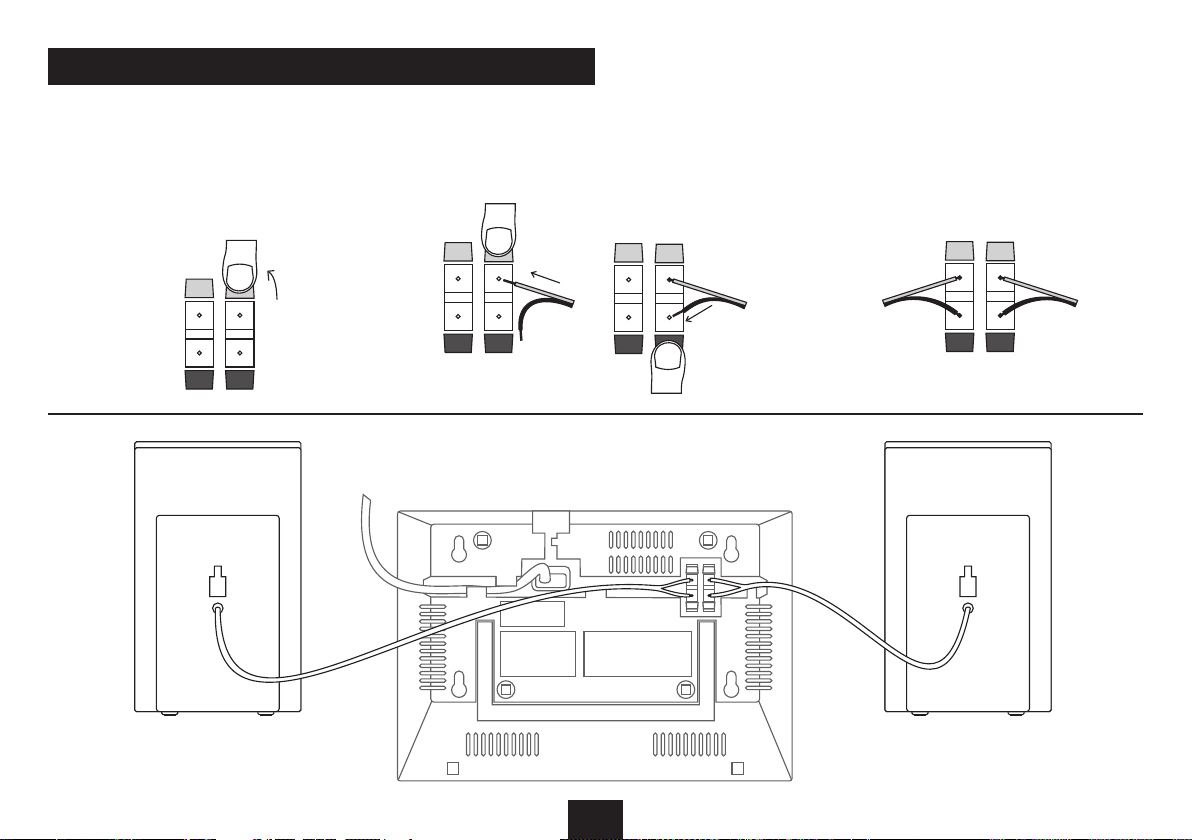
Connecting the speakers
Locate the block of 4 speaker terminals on the back of 1.
the unit.
Press the latch on the left channel red speaker terminal 2.
(located on the right of the block) as shown in the
drawing.
Feed the exposed end of the red wire from the left speaker 3.
into the terminal. Release the latch to grip the wire.
Press the latch on the black terminal and connect the 4.
black wire.
Connect the black and red wires for the right channel in 5.
the same way.
Check the nished wiring against the diagram below. 6.
Make sure there are no bare wires free to touch as this
will damage the unit.
4
Page 7
CONTROLS AND CONNECTIONS
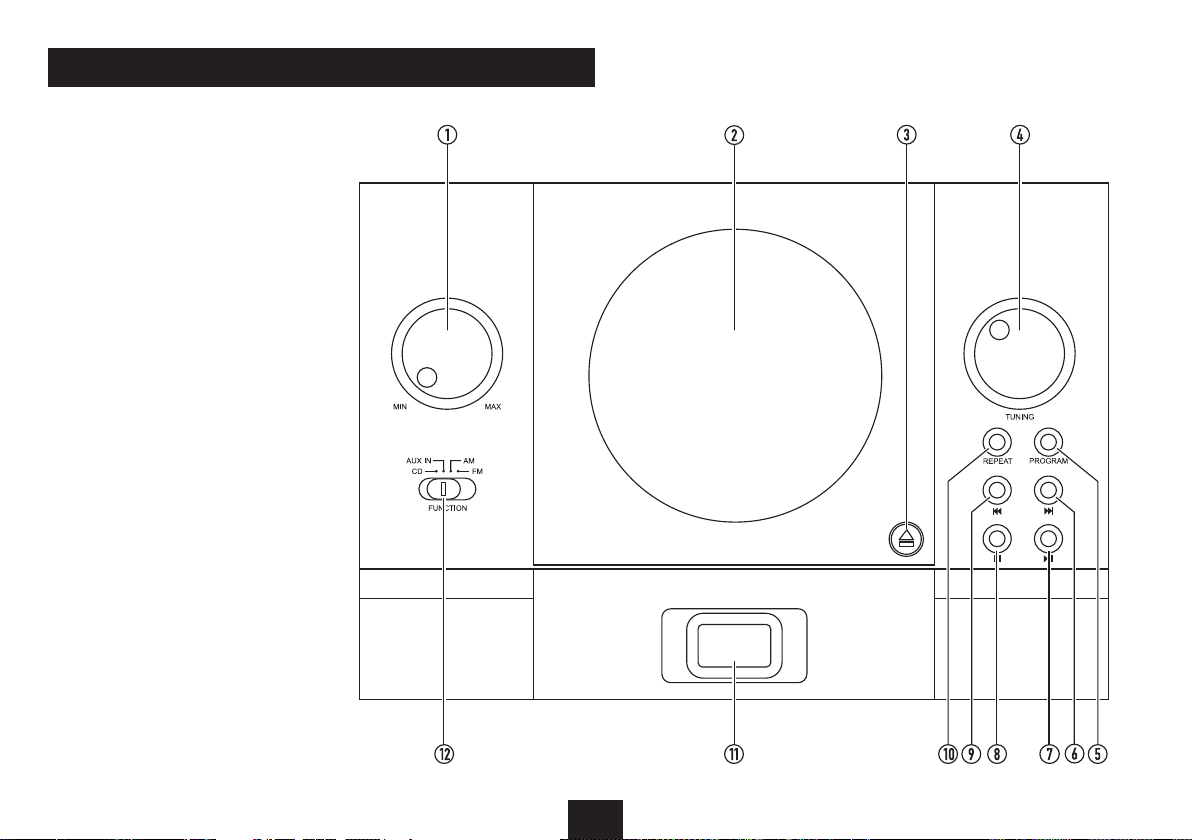
TOP VIEW
a Volume control
b CD loading door
c CD door catch
d Tuning control
e Program button
f Next/Search forward button
g Play/pause button
h Stop button
i Previous/Search backward button
1) Repeat button
1! Display window
1@ Function slide switch
5
Page 8
CONTROLS AND CONNECTIONS
TOP VIEW
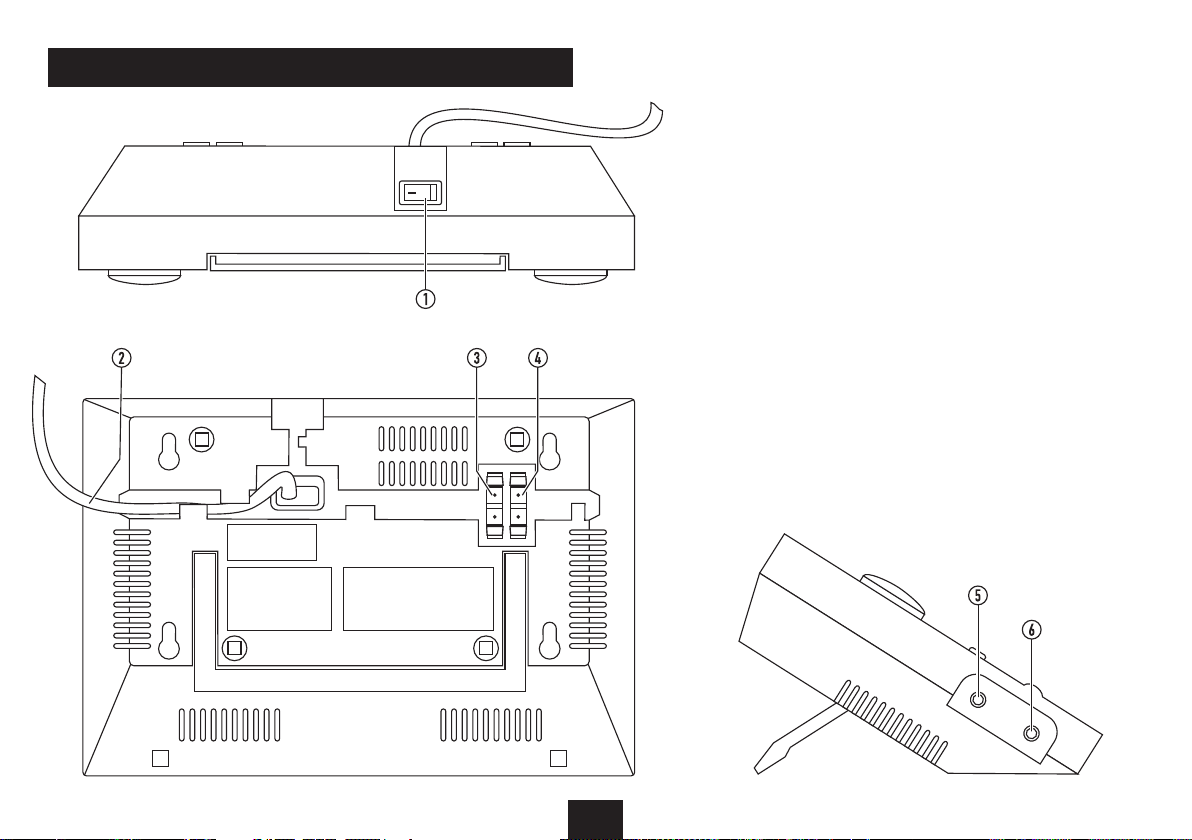
BACK VIEW
a Power switch
b AC mains cable
c Right channel speaker connections
d Left channel speaker connections
e Aux in jack
f Headphone jack
SIDE VIEW
6
Page 9
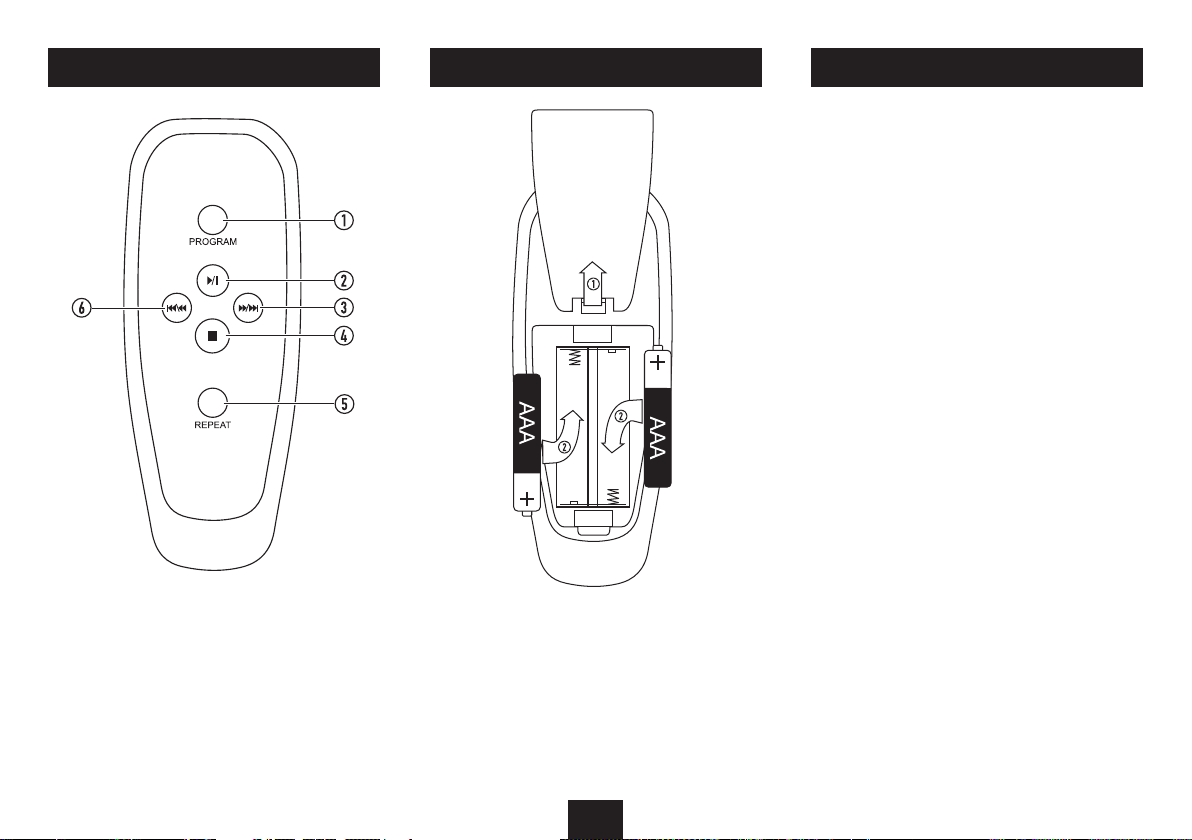
REMOTE CONTROL
REMOTE CONTROL BATTERIES
BATTERY DISPOSAL
Dispose of used batteries with regard to the recycling
regulations in your area. Do NOT short circuit batteries or
throw them into water, the general rubbish or in a re.
Weak batteries can leak and damage the remote control.
Replace them in good time!
a Program button
b Play/pause button
c Next/Search forward button
d Stop button
e Repeat button
f Previous/Search back button
FITTING/REPLACING THE BATTERIES
When replacing the batteries in the remote control, refer to
the diagram.
1. Press the door catch across. While holding the catch, lift
o the battery door.
2. Fit two AAA batteries into the battery compartment,
observing polarity as shown. When replacing the
batteries, use only the same AAA type specied.
7
Page 10

GETTING STARTED
POWER CONTROL
LISTENING TO AM RADIO
REMOVING THE PACKING FROM THE CD PLAYER
Before connecting power to your audio system, the protective
packing should removed from the CD compartment.
To remove the protective packing:
Open the CD compartment by pressing down on the • CD
DOOR CATCH marked at the front corner of the CD lid.
The lid will open.
Remove the cardboard protective packing from the CD •
compartment.
Close the CD lid.•
FM RADIO AERIAL
Before using your unit for FM reception, unwrap and fully
extend the aerial wire. You may need to adjust the position
of the aerial wire for maximum signal strength.
CONNECTING POWER
Check that the mains voltage marked on the rating plate •
on the back panel is the same as the voltage in your
area.
Plug the mains plug into the wall socket and switch the •
mains power on at the socket.
POWER CONTROL
The power is switched on and o with the rocker switch •
on the top panel.
The power is switched on when the switch ‘I’ position is •
pressed down.
ON
Always switch o the power switch after use.•
LISTENING TO FM RADIO
To listen to FM radio:
Move the • FUNCTION slide switch to select the FM
position.
Turn the • TUNING control to select the station you want
(the FM frequency scale is the inner scale, marked in
MHz).
Fine adjust the tuning so that the station plays clearly.•
If you can hear a lot of background noise when playing the
station, the signal may be weak.
You may be able to improve the signal strength by adjusting
the position of the FM aerial or moving the radio to a dierent
position.
To listen to AM radio:
Move the • FUNCTION slide switch to select the AM
position.
Turn the • TUNING knob to select the station you want
(the AM frequency scale is the outer scale marked in
kHz).
Fine adjust the tuning so that the station plays clearly.•
You may be able to improve the clarity of the sound by
rotating the radio slightly until the sound is clearest.
ADJUSTING THE VOLUME
To increase the volume:
Turn the • VOLUME control knob clockwise.
To decrease the volume:
Turn the • VOLUME control knob anti-clockwise.
8
Page 11

PLAYING A CD
PROGRAM PLAY
You can navigate a CD using the buttons on the remote
control or the front panel.
Selecting CD operation:
Move the • FUNCTION slide switch to select ‘CD’.
Loading a CD:
Open the CD compartment by pressing down on the • CD
DOOR CATCH area at the front corner of the CD lid.
Holding the disc by the edges, place the disc on the •
turntable in the centre of the CD loading bay with the
label uppermost, pressing the centre of the disc to click
it into place.
Gently close the CD door.•
The unit will read the disc and display the total number of
tracks on the disc.
Removing a CD:
Make sure that the disc is stopped.•
Open the CD compartment by pressing down on the • CD
DOOR CATCH area marked at the front corner of the CD
lid.
Gently lift the disc from the front left corner.•
The disc will click o the turntable.
Holding the disc by the edges, lift the disc o the •
turntable and place it back in the case.
Gently close the CD door.•
Playing a CD:
Press the • //, button.
The play symbol will appear on the display and the track
number playing will be shown.
Pausing a CD:
Press the • //, button while the CD is playing.
The display will ash.
Stopping CD play:
Press the • . button (or the STOP button on the remote
control) while the CD is playing.
The CD will stop.
Selecting tracks:
Press the • } or { button to select the next or previous
track.
NOTE:- When pressing { while playing a track, the rst press
will replay the current track.
Fast search:
Press and • hold the } or { button to fast search forward
or backward through a track.
The track will search at high speed.
Repeat play:
Press the • REPEAT button to c ycle through the available
repeat modes - ‘Repeat 1’, ‘Repeat all’ or ‘Repeat o’.
If a repeat mode is set, the mode selected will be shown on the
display.
Selecting ‘Repeat 1’ will continuously repeat the current track.
Selecting ‘Repeat all’ will repeat the entire disc continuously.
You can load a disc and store a programmed selection of up to
20 tracks to play from the disc in your preferred sequence.
To set a program:
Load a disc and wait for it to read.•
Press the • PROGRAM button.
The display will show 01 briey (the position of this track in the
program), then ash 00.
Select the track number you want to program by pressing •
the } or { button.
To save this track into the program sequence, press the •
PROGRAM button.
The display will show 02 briey, then ash 00.
Repeat these two steps until you have stored all the •
tracks in the program sequence.
Playing the program:
Press the • /, button to start the program playing.
The program will begin to play and PR OG will show on the
display to show that a program is being played.
Selecting tracks:
You can navigate through the tracks stored in the •
program by pressing the } or { button.
Clearing a program:
The program is cleared by opening the CD door or •
changing to another function.
9
Page 12

AUX IN
TROUBLESHOOTING
WARRANTY & SPECIFICATIONS
The AUX input may be used to connect sound sources with
a Line or Headphone analogue output to play through your
unit. These may include -
Personal audio players•
CD walkman players•
Tape walkman players•
Personal computers or laptops•
Connecting to the AUX jack
Connect a stereo 3.5mm jack cable (not supplied) •
between the headphone or LINE/AUX output of the
personal audio player and the AUX IN jack on the side
panel.
Playing the AUX source
Move the • FUNCTION slide switch to select ‘AUX IN’.
Set your personal audio player/computer to PLAY.•
Set the listening volume to the level you want with the •
volume control.
If there is no sound or if the volume level is not loud enough,
you may need to increase the volume setting on your personal
audio player/computer.
HEADPHONES
There is a headphone output socket on the side panel of the
unit. If headphones are connected to this socket for private
listening, the speakers will cut out automatically.
To avoid possible damage to your hearing, do not listen to
music at high levels through headphones.
Poor quality radio reception
The aerial signal may not be adequate. Try repositioning the
aerial wire (FM band) or rotating the unit (AM band).
Skipping when playing a CD
The CD playing surface may be dirty or marked with nger
prints. Try cleaning the CD with a CD cleaner.
CARE AND MAINTENANCE
CARE AND CLEANING
All care and cleaning operations should be carried out with
the unit unplugged from the mains power.
The sur face of the unit can be cleaned with a barely damp
cloth and then dried carefully. Never use abrasives, abrasive
cloths or chemical solvents .
Loudspeaker grilles can be cleaned carefully with a soft
brush.
SPECIFICATIONS
Supply Voltage: ............... 230V ~, 50Hz
Frequency range ............. 88-108MHz (FM)
540-1600kHz (AM)
Net Weight: ..................... 1.7kg
Class II construction double insulated.
This product must not be connected to earth.
UK: Waste electrical products/batteries should
not be disposed of with household waste.
Separate disposal facilities exist, for your
nearest facilities see www.recycle-more.co.uk
or in-store for details.
ROI: Produced after 13th August 2005. Waste
electrical products/batteries should not be
disposed of with household waste. Please
recycle where facilities exist. Check with your
Local Authority or retailer for recycling advice.
WARRANTY
Your Tesco appliance is covered by a warranty for 12 months
from the date of purchase. If a fault develops during this
period, please contact the TESCO electrical help line on 0845
456 6767. Please have your original purchase receipt with
you when you call. This warranty in no way aects your
consumer rights.
10
Page 13

Page 14

Te sco Stores Ltd,
Delamare Road, Cheshunt, Herts, EN8 9SL
Technika Helpline: 0845 456 6767 (Calls cost up to 4p per minute from a BT landline, other providers may vary)
MC129I V0.2
 Loading...