


Full HD LED TV with Freeview & USB PVR
User Guide
Model No
LED40-260
IMPORTANT SAFETY INSTRUCTIONS
Please read these instructions. All the safety and operating instructions should be read before the
appliance is operated.
Warnings
To reduce the risk of fi re, electric shock or damage to the television, do not expose it to •
dust, rain or moisture, or place any objects fi lled with liquids on or near the television.
Do not place the television in a confi ned space, ensure that nothing can obstruct the •
ventilation openings at the rear of the television.
Do not place naked fl ames on or near the television.•
Dispose of this television and any components including batteries in an environmentally •
friendly manner. If in doubt, please contact your local authority for details of recycling.
Safety
For your safety, this appliance is fi tted with a fused moulded 3 pin mains plug. Should •
the fuse need to be replaced, ensure that any replacement is of the same amperage and
approved with the BSI mark.
Never try and replace the mains plug unless you have adequate qualifi cations and are •
legally authorised to do so. In the event that a replacement Mains cable is required,
contact the manufacturer for a suitable replacement.
Never use the television if it is damaged in any way.•
Always place the television on a fl at level surface avoiding anywhere which may be subject •
to strong vibration.
Ensure the television is not placed on top of the power cable as the weight of the •
television may damage the cable and cause a safety hazard.
Never place mobile phones, speakers or any other device which may cause magnetic or •
radio interference with the television. If interference is apparent, move the device causing
the interference away from the television.
Maintenance
To clean this unit, wipe with a soft, dry cloth. If the surfaces are extremely dirty, use a soft cloth dipped •
in a soap and water solution or a weak detergent solution.
Use eyeglass cleaner to remove stubborn dirt from the LCD/LED Screen.•
Never use alcohol, paint thinner or benzene to clean this unit.•
Before using a chemically treated cloth, read the instructions that •
came with the cloth carefully.
CAUTION: If water or other liquid enters the television through the display panel
surface, a malfunction may occur.
Packaging
The safest way to transport your item is in the original box/packaging - please save your •
packaging for this.
You will need original box/packaging in the event of warranty/service repair or support. We are unable •
to carry out warranty/service if you are unable to package it correctly.
Helpline No UK. 0871 2000 463 ROI. 01443 3940
4
Web Support: www.skymediauk.co.uk
IMPORTANT SAFETY INSTRUCTIONS
Please read these instructions. All the safety and operating instructions should be read before the
appliance is operated.
Important Information Regarding Use of Video Games, Computers,
Captions or Other Fixed Image Displays
The extended use of fi xed image program material can cause a permanent “shadow image” on the LCD
panel.
This background image is viewable on normal programs in the form of a stationary fi xed image. This type
of irreversible LCD/LED panel deterioration can be limited by observing the following steps:
1. Reduce the brightness/contrast setting to a minimum viewing level.
2. Do not display the fi xed image for extended periods of time.
3. Turn the power off when not in actual use.
Examples of images that you need to watch out for are as follows (this is not an exhaustive list):
TV Channel Logos: e.g. Shopping channel logos and pricing displays-especially if they are •
bright and stationary. Moving or low-contrast graphics are less likely to cause ageing of the screen.
Time Displays•
Teletext: Do not view a stationary page for long period of time•
TV/DVD Menus: e.g. Listings of DVD disk content•
Pause Mode: Do not leave the TV in pause mode for long periods of time, e.g. When watching DVDs or •
videos.
Important - Once ‘shadow image/screen burn’ occurs, it will never disappear and is not repairable under
warranty.
How do I dispose of this product?
UK: Waste electrical products should not be disposed of with household waste. Separate
disposal facilities exist. For your nearest facilities, please see www.recycle-more.co.uk or in
store for details.
ROI: Waste electrical products should not be disposed of with household waste. Separate
disposal facilities exist. Check with your Local Authority or retailer for recycling advice.
Batteries
Observe the correct polarity when inserting batteries.•
Do not use different types of batteries together or mix old and new batteries.•
Dispose of batteries in an environmentally friendly way. •
Certain regions may regulate the disposal of batteries. •
Please consult your local authority.
IMPORTANT NOTE. Occasionally we may release new software/firmware
upgrades/enhancements for this television. Please check the ‘firmware
upgrade’ section of the website regularly.
Cd
55

Helpline No UK. 0871 2000 463 ROI. 01443 3940
6
Web Support: www.skymediauk.co.uk

CONTENTS
Manufacturers Guarantee Information . . . . . . . . . . . . . . . . . . . . . . . . . . . . . . . . . . . . . . 3
Important Safety Instructions . . . . . . . . . . . . . . . . . . . . . . . . . . . . . . . . . . . . . . . . . . . . . . 4-5
What is included in the box . . . . . . . . . . . . . . . . . . . . . . . . . . . . . . . . . . . . . . . . . . . . . . . 8
Detaching the stand and wall mounting . . . . . . . . . . . . . . . . . . . . . . . . . . . . . . . . . . . . . 9
Getting Started - Initial Set Up . . . . . . . . . . . . . . . . . . . . . . . . . . . . . . . . . . . . . . . . . . . . . 11
TV Buttons and Input Source Menu . . . . . . . . . . . . . . . . . . . . . . . . . . . . . . . . . . . . . . . . . 12
Remote Control . . . . . . . . . . . . . . . . . . . . . . . . . . . . . . . . . . . . . . . . . . . . . . . . . . . . . . . . . 13
Connections . . . . . . . . . . . . . . . . . . . . . . . . . . . . . . . . . . . . . . . . . . . . . . . . . . . . . . . . . . . . 14-15
TV Menu Operation . . . . . . . . . . . . . . . . . . . . . . . . . . . . . . . . . . . . . . . . . . . . . . . . . . . . . 16-21
Video Menu . . . . . . . . . . . . . . . . . . . . . . . . . . . . . . . . . . . . . . . . . . . . . . . . . . 16
Sound Menu . . . . . . . . . . . . . . . . . . . . . . . . . . . . . . . . . . . . . . . . . . . . . . . . . . 17
TV Menu . . . . . . . . . . . . . . . . . . . . . . . . . . . . . . . . . . . . . . . . . . . . . . . . . . . . . 18
Setup Menu . . . . . . . . . . . . . . . . . . . . . . . . . . . . . . . . . . . . . . . . . . . . . . . . . . 19
Time Menu . . . . . . . . . . . . . . . . . . . . . . . . . . . . . . . . . . . . . . . . . . . . . . . . . . . 20
Tools Menu . . . . . . . . . . . . . . . . . . . . . . . . . . . . . . . . . . . . . . . . . . . . . . . . . . . 21
PC Operation . . . . . . . . . . . . . . . . . . . . . . . . . . . . . . . . . . . . . . . . . . . . . . . . . . . . . . . . . . . 23-24
Using the television as a computer monitor . . . . . . . . . . . . . . . . . . . . . . . . 22
PC Settings Menu . . . . . . . . . . . . . . . . . . . . . . . . . . . . . . . . . . . . . . . . . . . . . . 24
USB Record / 7 Day TV Guide . . . . . . . . . . . . . . . . . . . . . . . . . . . . . . . . . . . . . . . . . . . . . . 25-27
USB Record . . . . . . . . . . . . . . . . . . . . . . . . . . . . . . . . . . . . . . . . . . . . . . . . . . . 25
7 Day TV Guide . . . . . . . . . . . . . . . . . . . . . . . . . . . . . . . . . . . . . . . . . . . . . . . . 26
USB Mode / Media Player . . . . . . . . . . . . . . . . . . . . . . . . . . . . . . . . . . . . . . . 27
General Information . . . . . . . . . . . . . . . . . . . . . . . . . . . . . . . . . . . . . . . . . . . . . . . . . . . . . 28-32
Using with Sky Digital/Virgin Media . . . . . . . . . . . . . . . . . . . . . . . . . . . . . . . 28
Frequently Asked Questions . . . . . . . . . . . . . . . . . . . . . . . . . . . . . . . . . . . . . 29
Technical Specifi cations . . . . . . . . . . . . . . . . . . . . . . . . . . . . . . . . . . . . . . . . . 30
Index . . . . . . . . . . . . . . . . . . . . . . . . . . . . . . . . . . . . . . . . . . . . . . . . . . . . . . . . 31
Digital Switch over . . . . . . . . . . . . . . . . . . . . . . . . . . . . . . . . . . . . . . . . . . . . . 31-32
IMPORTANT NOTE. Occasionally we may release new software/firmware
upgrades/enhancements for this television. Please check the ‘firmware
upgrade’ section of the website regularly.
77
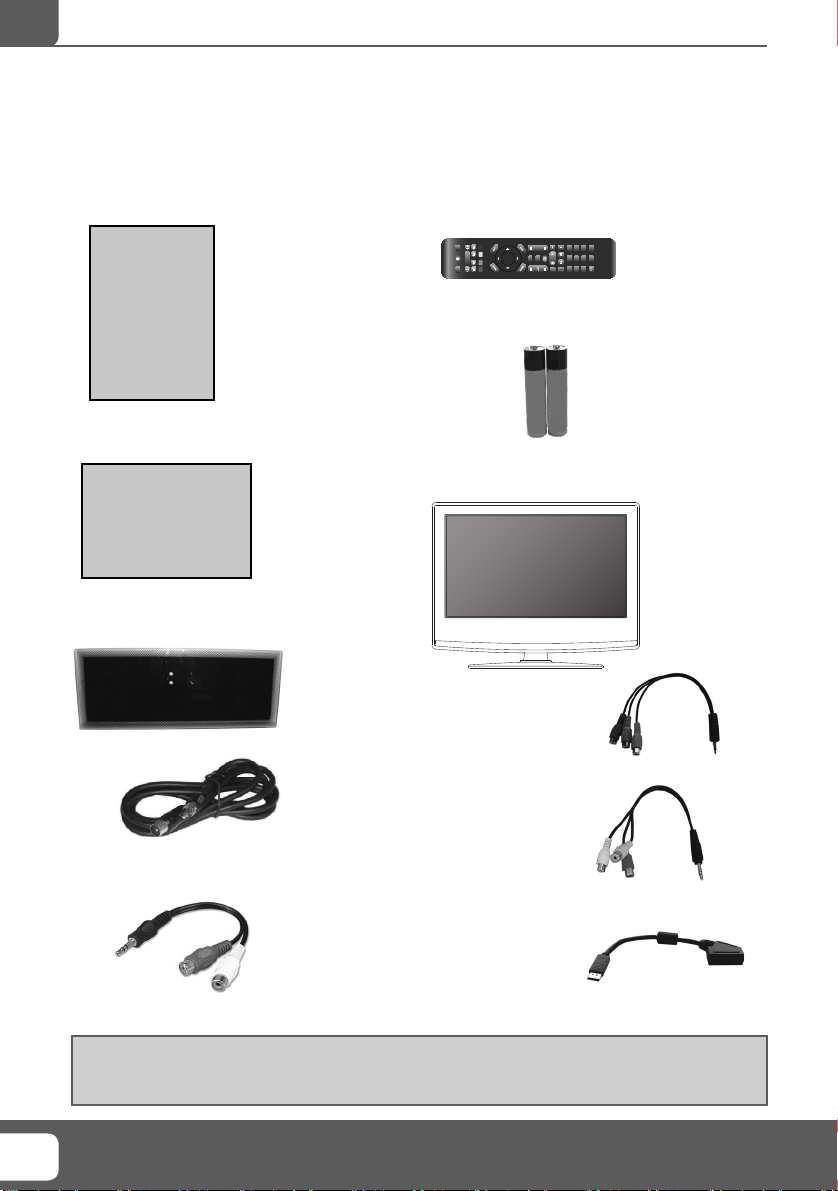
What is included in the box
WHAT IS INCLUDED IN THE BOX
Accessories
Included with this TV are the following accessories:
1 x User Guide
User Guide
1 x Quick Start Guide
Quick Start
Guide
1 x Stand
1 x RF Cable
1 x Remote Control
6
3
SLEEP
FREEZE
SUBTITLE
SOUND
PRESETS
PICTURE
OFF
AUDIO LANG ASPECT
DISPL
CH
5
FAV
OK
SOURCE
12
4
MEDIA
2 x AAA Batteries
1 x TV
1 x 3.5mm to component
adaptor cable
9
TV/
RADIO
8
0
7
1 x 3.5mm to video/audio
adaptor cable
1 x 3.5mm to L/R Phono
adaptor cable
1 x mini SCART to Standard
SCART adaptor cable
Please save your packaging as you will need this in the event of warranty/service repair or support. We
are unable to carry out warranty/service if you are unable to package it correctly. The safest way to
package your item in the event of warranty/service repair is in it’s original box/packaging.
Helpline No UK. 0871 2000 463 ROI. 01443 3940
8
Web Support: www.skymediauk.co.uk
Attaching/Detaching the stand and wall mounting
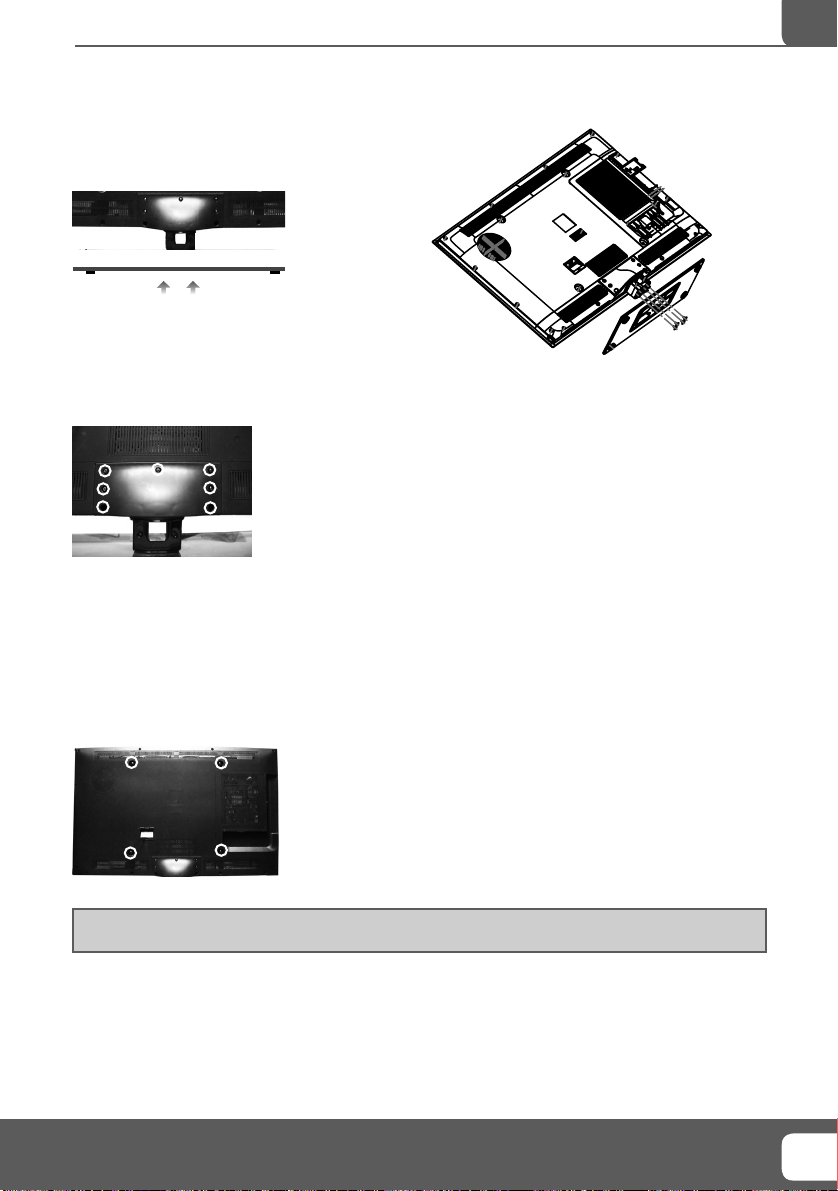
ATTACHING/DETACHING THE STAND
Attaching the Stand
Insert the four screws into the base of the stand
Detaching the Stand
1) Remove the 7 screws highlighted.
2) You should now be able to detach the stand.
IMPORTANT - Before drilling any holes in the wall ensure you are not drilling
where there could be any electric wires, water or gas pipes.
Wall mounting the TV
1) Firstly detach the stand as shown above then remove the four screws highlighted below.
2) The wall mount can now be easily attached to the mounting holes on the rear of the TV. These holes
are indicated in the picture below.
Important – If wall mounting this TV, only use the screws already provided in the wall mounting holes.
Using other screws which are longer could cause irreparable damage to internal parts.
IMPORTANT NOTE. Occasionally we may release new software/firmware
upgrades/enhancements for this television. Please check the ‘firmware
upgrade’ section of the website regularly.
99

10
Helpline No UK. 0871 2000 463 ROI. 01443 3940
Web Support: www.skymediauk.co.uk
Getting Started - Initial Set Up
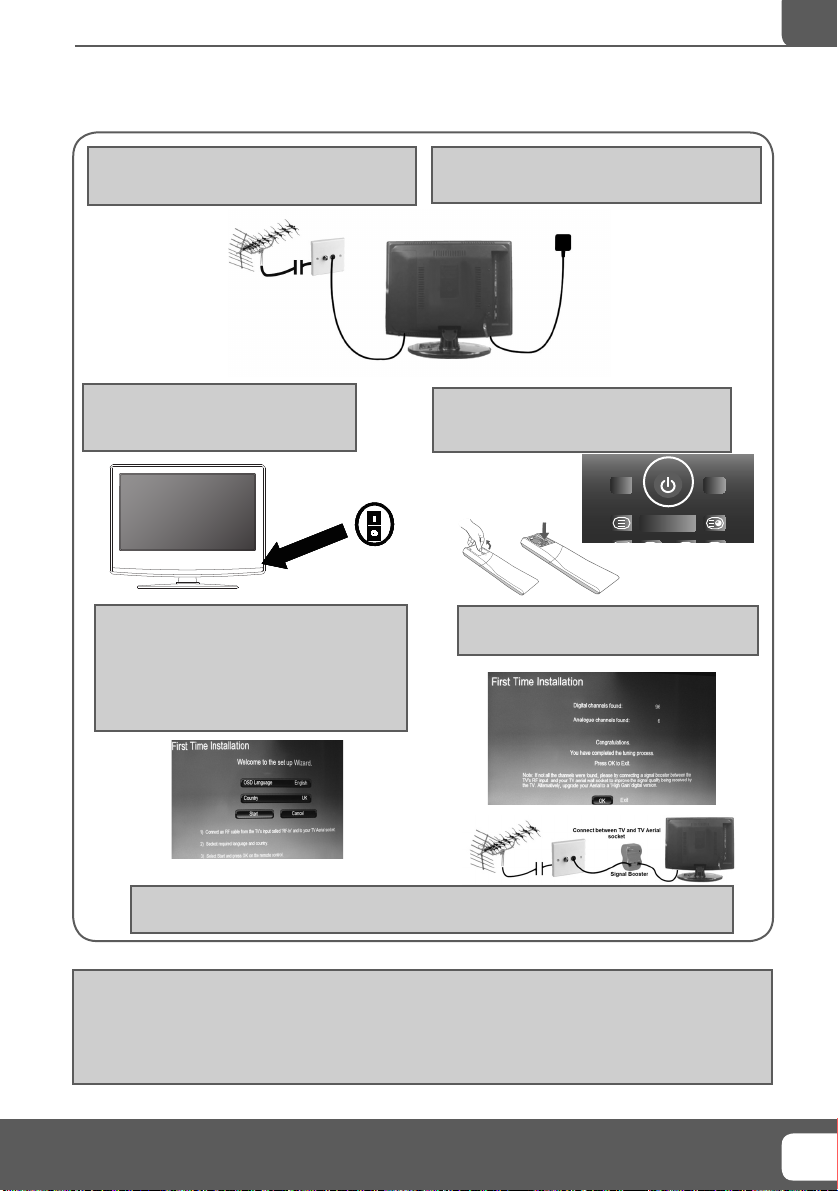
GETTING STARTED - INITIAL SET UP
1) Using the RF cable supplied, connect the TV
to the TV Aerial wall socket (Fig A)
Fig A
3) Switch on the television using the
power on/off switch located on the side
of the TV.
Power on/off
5) You will now be welcomed with the initial
set-up screen.
If it does not appear, on the remote control,
please press [MENU] then 8-8-8-8 and the
menu will appear.
Press OK on the remote control and follow
the steps to begin tuning.
2) Connect the power cable to the Electrical
outlet (Fig B)
Fig B
4) Insert the batteries supplied into the
Remote control and press the Standby
button to power on the TV
OFF
DISPL
PICTURE
AUDIO LANG ASPECT
PRESETS
SOUND
SLEEP
SUBTITLE
FREEZE
6) Once tuning has fi nished the following
screen will appear.
If you are missing channels, the reason for this is likely to be signal strength, you should
consider connecting signal booster and re-tuning the TV.
Tip: If the TV fi nds some, but not all, of the Digital channels, the TV is functioning correctly but the
signal being received is not strong enough. (The signal strength needs to be above 85% - you can see the
signal strength the TV is receiving when you change channels/ programmes) you will need to increase
the signal reception in order to receive all of the channels available. The most economical way to do
this is by purchasing and connecting a ‘signal booster’ in between the TV and the TV aerial socket. If this
does not solve the problem, you will need to upgrade the TV aerial to a digital hi-gain compatible aerial
IMPORTANT NOTE. Occasionally we may release new software/firmware
upgrades/enhancements for this television. Please check the ‘firmware
upgrade’ section of the website regularly.
1111

TV Buttons and Source Menu
TV BUTTONS & SOURCE MENU
Volume down and menu left
1
Volume up and menu right
2
Programme/Channel down and menu down
3
Programme/Channel up and menu up
4
Displays Menu/OSD
5
Displays the input source menu
6
Standby Power On/Off
7
PLEASE NOTE THESE ARE
TOUCH SENSITIVE BUTTONS.
1
2
3
Choosing Mode Input/Source
To switch between the different input/
connections.
A) Using the buttons on the remote control:
1) Press [SOURCE] - The source menu will
appear
2) Press [\/] or [/\] to select the input you
require.
3) Press [OK]
B) Using the buttons on the Television:
1) Press [TV/AV]
2) Scroll up / down using CH+/ CH- buttons to
the input/source you require
3) Press Vol+ to change input/source to the
one selected.
Helpline No UK. 0871 2000 463 ROI. 01443 3940
12
Web Support: www.skymediauk.co.uk
4
5
6
7
SOURCE
Freeview
Analogue
Video
SCART 1
SCART 2
COMPONENT
PC/VGA
HDMI 1
HDMI 2
HDMI 3
USB
MEDIA
DLNA

Remote Control
REMOTE CONTROL
1
DISPLAY - To switch off the screen when listening to radio
1
STANDBY - Switch on TV when in standby or vice versa
SLEEP - Press repeatedly to cycle through the sleep options
SOUND PRESETS - Scrolls through sound mode options
PICTURE PRESETS - Scrolls through picture mode option
SUBTITLE - To switch the dialogue at the bottom of the screen
(on/off)
AUDIO - Switches audio output from L - R and Mono - Stereo
LANG - Change subtitle language
ASPECT - To switch the screen between the different picture
formats
FREEZE - Teletext mode - Hold current page which is displayed
MENU - To display OSD menu
2
EXIT - To exit all menus
TV GUIDE - Opens the 7 Day TV Guide (Freeview mode)
INFO - Press once for now/next channel information
Press twice for programme information about current
programme
and adjust the system settings to your preference
VOL - To increase / decrease the sound level
3
CH To increase or decrease the channel being watched
SOURCE - To display the input/source menu
FAV - Displays Favourites list.
MUTE - Mute the sound or vice versa
USB - Switch to USB Source
- To Record what is currently on television
- To restart the current chapter
- To advance forward to the next chapter
- To stop the playback
- To play in fast rewind mode
- To play in fast forward mode
- To play/pause
NUMBER BUTTONS - 0 – 9 to select a TV channel directly.
4
TV/RADIO - Switch to Freeview and switch between TV and
radio in Freeview mode
- Allows you to navigate the on-screen menus
- To return to the previous channel viewed
OFF
DISPL
AUDIO LANG ASPECT
2
3
MEDIA
12
4
PICTURE
PRESETS
SOURCE
OK
FAV
SOUND
SLEEP
SUBTITLE
FREEZE
CH
3
4
5
7
8
0
IMPORTANT NOTE. Occasionally we may release new software/firmware
upgrades/enhancements for this television. Please check the ‘firmware
upgrade’ section of the website regularly.
6
9
TV/
RADIO
1313

CONNECTIONS
A
MINI SCART 2X Mini SCART input
B
VGA(PC) VGA-PC input
C
HDMI 3X HDMI input
D
RF IN RF / TV Aerial Input
E
HEADPHONES 3.5mm Headphone output
F
CI CARD IN Common Interface Card Input
G
COAX OUT Digital Coax output
H
USB USB port
Connections
I
DLNA Network Port
J
AV IN AV Input
K
Component HD Component HD Input
COMPONENT AUDIO Component audio input
L
VGA(PC) Audio In 3.5mm PC audio input
M
E
F
G
H
I
A
B
C
Connecting a DVD Player/Recorder, Video Recorder or
Cable/Satellite Box
TVs Input/Source should be set to SCART
RF I N
DVD or V CR
14
TV Aerial
Wall Socket
SCART
OUT
RF
RF
IN
OUT
SCART
MINI
Helpline No UK. 0871 2000 463 ROI. 01443 3940
Web Support: www.skymediauk.co.uk
J
K
L
M
D
HDMI
HDMI
OUT
Connections
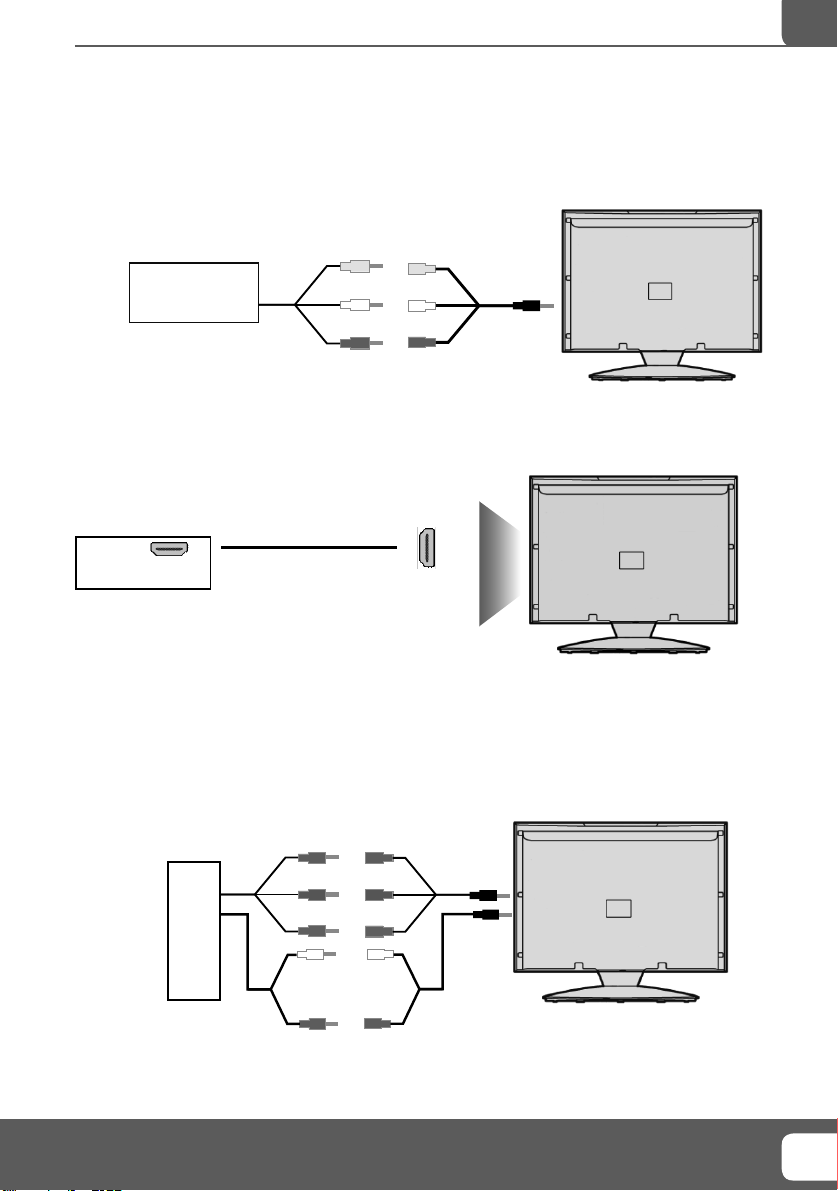
CONNECTIONS
Connecting a Camcorder, Camera or Games Console
Source should be set to Video
Ca mera or
Camcorder
Video
Yellow
White
Audio
In L/R
Red
Connecting a High Defi nition (HD) Device
Option 1 - via HDMI to HDMI cable
A HDMI cable can output both video and audio and enables you to enjoy digital-quality video and audio
with minimal loss of quality.
TVs Input/Source should be set to HDMI.
Option 2 - via Component cable
If you are supplied with a cable from the device which has RED, GREEN, BLUE, RED & WHITE connectors
you must connect via Component (for picture) and by phono cable (for sound).
TV Source should be set to Component.
Component (HD)
Red
Blue
Green
White
Audio
Red
In L/R
IMPORTANT NOTE. Occasionally we may release new software/firmware
upgrades/enhancements for this television. Please check the ‘firmware
upgrade’ section of the website regularly.
1515

VIDEO MENU
To access this menu, press [MENU] button on the remote control.
TV Menu Operation
OK
Use the
Once your chosen menu has been selected use the
To exit this menu at anytime, press [EXIT] button.
Brightness - Increase or decrease the brightness of the picture
Contrast - Increases the colour from black and white
Saturation - Increase the colourfulness of the picture
Sharpness - Increase or decrease the sharpness of the picture
Hue - Change the tint and shade of the picture
Picture Mode - Choose from the following presets
Custom Lets you manually choose your settings
Standard Default settings
Mild Makes the picture lighter and blue
Vivid Makes the picture more red
Colour Temperature - Choose from the following presets
Standard Default settings
Warm Increases red within the picture
Cool Increases blue within the picture
Noise Reduction/MPEG Noise Reduction - Choose from the following presets
Low Minimum reduction in interference
Medium Medium reduction in interference
High Maximum reduction in interference
Off Off
to navigate and press [OK] to select your chosen menu.
to navigate through the different menu items.
Cinema Mode - Various presets to optimise cinema viewing
Tip: If you do not press any buttons for 20 seconds, the menu will automatically exit. You can change the
length of time before the menu exits automatically - see ‘OSD Timer’ section.
Helpline No UK. 0871 2000 463 ROI. 01443 3940
16
Web Support: www.skymediauk.co.uk

TV Menu Operation
SOUND MENU
To access this menu, press [MENU] button on the remote control.
OK
Use the
Once your chosen menu has been selected use the
To exit this menu at anytime, press [EXIT] button.
Volume - To adjust how loud or quiet the sound is
Balance - To switch the sound between the left and right speakers
Treble - To adjust the amount of high frequency within the sound
Bass - To adjust the amount of low frequency within the sound
Sound Effects - Choose from the following presets
BBE improves the quality of amplifi ed sound
SRS creates an immersive 3D soundfi eld
Normal Standard settings
SPDIF Output - This is the digital COAX Audio output. Choose from the following options:
OFF Off
PCM Select this option if you are connecting to a Stereo Hi-fi via coax cable (Pulse-code
modulation (PCM) is a digital representation of an analogue signal)
RAW Raw is to be used when you have a receiver that can decode the signal
Equalizer- Choose from the following presets
Default
Custom
Rock
Country
Jazz
Classical
to navigate and press [OK] to select your chosen menu.
to navigate through the different menu items.
Tip: Treble and bass levels can only be adjusted when the sound mode ‘Custom’ is selected.
IMPORTANT NOTE. Occasionally we may release new software/firmware
upgrades/enhancements for this television. Please check the ‘firmware
upgrade’ section of the website regularly.
1717

TV MENU
TV Menu Operation
TV Guide
OK
To access this menu, press [MENU] button on the remote control.
Use the
Once your chosen menu has been selected use the
to navigate and press [OK] to select your chosen menu.
to navigate through the different menu items.
To exit this menu at anytime, press [EXIT] button.
Programme Edit - Allows you to lock channels, delete channels, add/remove channel skip and
move channel position.
Service Type
ATV
Network
ALL
Press color key to edit
Delete
Swap
Move
1
BBC ONE
2
BBC TWO
3
ITV1
4
Channel 4
5
FIVE
Move
OK E XIT Select Exit
Fav. Lock
Skip
TV Guide - Opens the 7day TV guide. Allowing you to browse, set reminders and record different
programmes.
Auto Search - You can select the country and then complete re-tune of the television
Manual Search - Select the start channel (which relates to the frequency) and search manually for a
channel.
Note - This only searches for channels in the current source. i.e. Freeview channels on Freeview source
18
Helpline No UK. 0871 2000 463 ROI. 01443 3940
Web Support: www.skymediauk.co.uk
TV Menu Operation
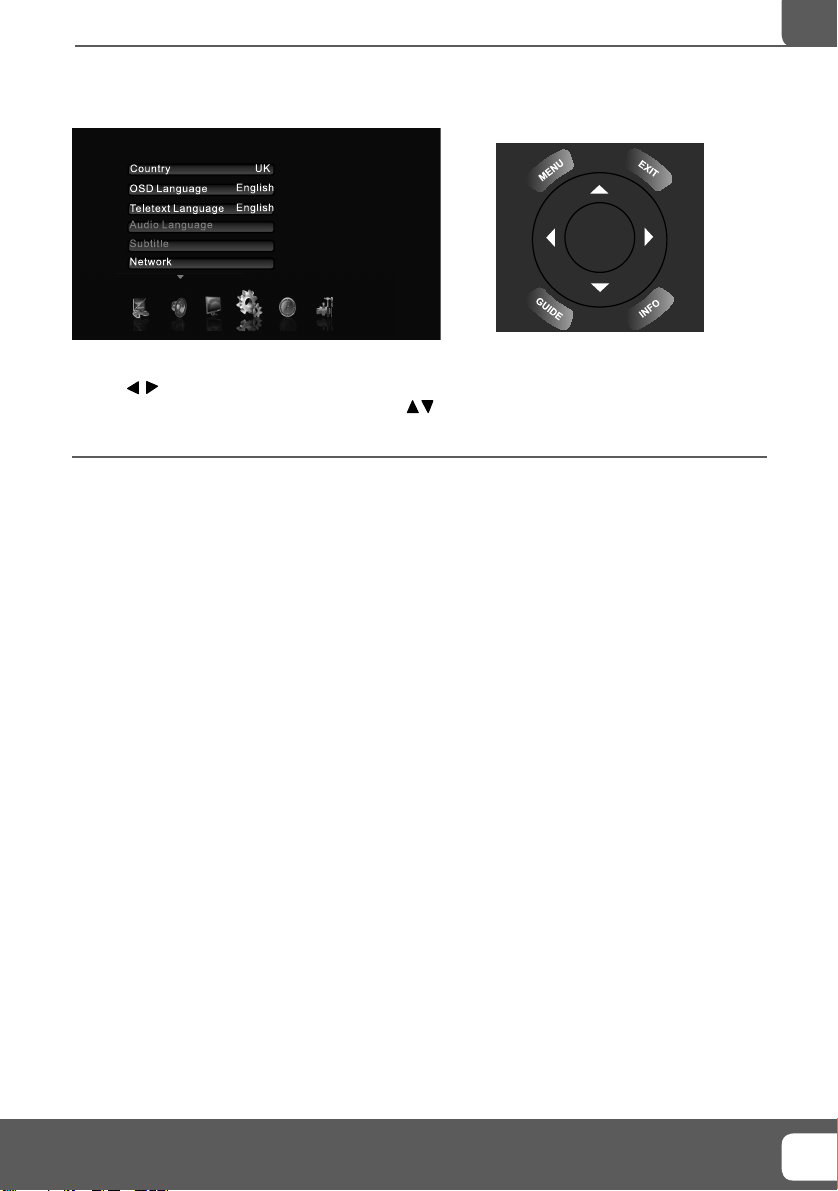
SETUP MENU
To access this menu, press [MENU] button on the remote control.
OK
Use the
Once your chosen menu has been selected use the
To exit this menu at anytime, press [EXIT] button.
Country - Set your country
OSD Language - Change the language of the OSD
Teletext Language - Change the teletext language
Audio Language - Allows you to change the language on AD ( Audio Description, where available)
Subtitle - Change subtitle settings such as mode and language.
Network - Opens the network menu giving you different options allowing you to connect to a
network via an Ethernet cable
Reset Menu - Resets the menu to it’s factory settings
to navigate and press [OK] to select your chosen menu.
to navigate through the different menu items.
IMPORTANT NOTE. Occasionally we may release new software/firmware
upgrades/enhancements for this television. Please check the ‘firmware
upgrade’ section of the website regularly.
1919

TIME MENU
TV Menu Operation
Time Mo de
Sleep Time
Current Time
Wakeup Timer
Programme Schedule
To access this menu, press [MENU] button on the remote control.
Use the
Once your chosen menu has been selected use the
To exit this menu at anytime, press [EXIT] button.
Time Mode - Change from Auto to Manual
Sleep Timer - Lets you set the sleep timer so the television automatically switches off after a certain
amount of time
Current Time - Displays the current time and date (as default the information is taken automatically from
the digital TV signal).
Wakeup Time - Set an exact time for the tv to turn on
Programme Schedule - Manually set a record time rather than using the 7day TV Guide.
to navigate and press [OK] to select your chosen menu.
Auto
Off
OK
to navigate through the different menu items.
20
Helpline No UK. 0871 2000 463 ROI. 01443 3940
Web Support: www.skymediauk.co.uk
21
TV Menu Operation
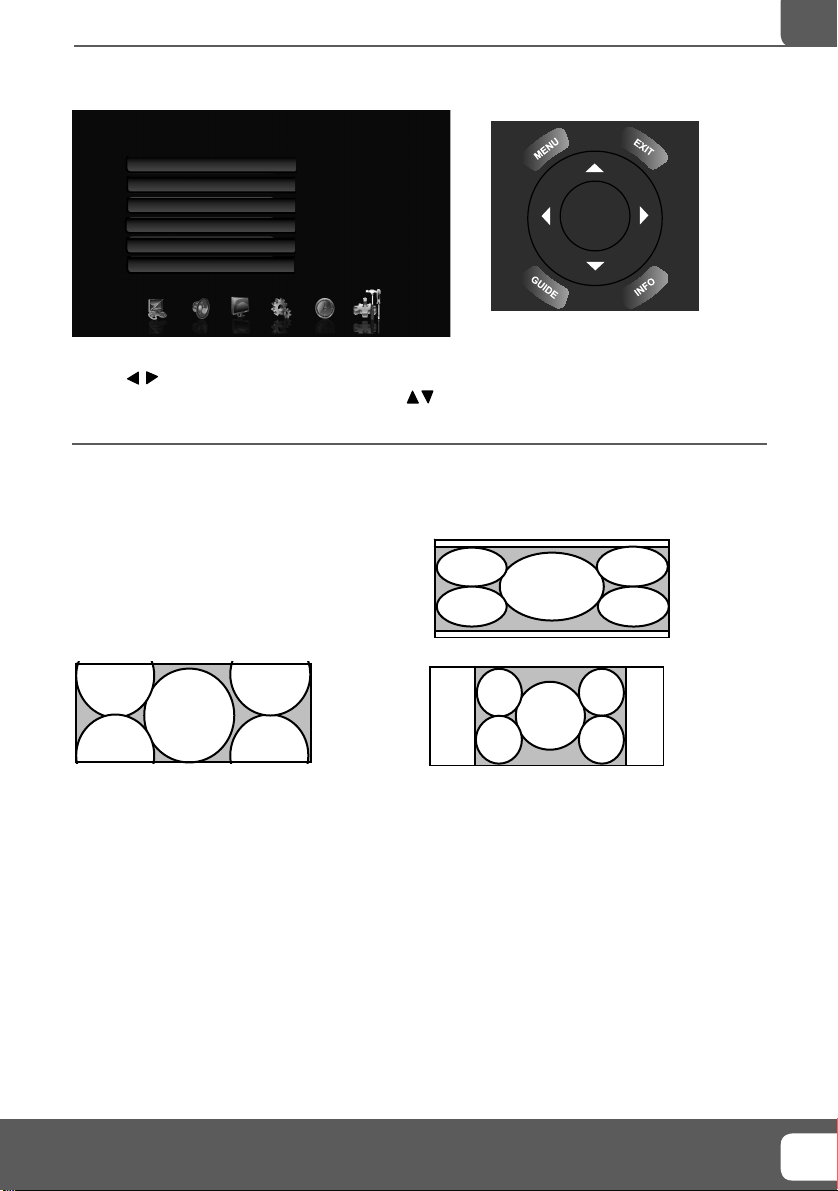
TOOLS MENU
Screen Mode
Parental Control
Blue Screen
PIP
PIP Position
USB
Auto
Off
Off
Off
Top Left
OK
To access this menu, press [MENU] button on the remote control.
Use the
Once your chosen menu has been selected use the
to navigate and press [OK] to select your chosen menu.
to navigate through the different menu items.
To exit this menu at anytime, press [EXIT] button.
Screen Mode - Within the UK the picture format varies depending on the channel/broadcast. There are a
number of different options to best meet your needs
Auto
Automatically displays the best picture format. So the
picture is in the correct position. May have black lines
At the top/bottom and/or sides.
16:9 Zoom
The picture
is the correct
proportion but
zoomed in to
fi ll the screen
16:9 Wide
4:3
Top and
bottom bars
are shown to
fi ll the 16:10
screen. 4:3
pictures will be
stretched
Displays the 4:3
picture in its
original size.
Side bars are
shown to fi ll the
16:10 screen
System Lock - This menu allows you to lock certain features of the television so that they cannot be used
or viewed. For example if you don’t want certain channels viewed by children or if the television is to be
used in a hotel and you want to limit the volume
Blue Screen - Changes the background when there is no input between clear and a blue background (Only
available on some sources)
PIP - Allows you to display a picture within a picture.
Note - The only sources available for this mode will be listed in the sub menu
Opens up the USB menu and displays information about the USB inserted. Also allows you to format
USB -
and view it’s contents.
Firmware Upgrade - From time to time we may release new fi rmware to improve the operation of
the television (available to download). This menu lets you install the new software/fi rmware onto the
television. Further details of how to do this will be issued with the fi rmware. Contact the helpline or refer
to the ‘product support’ section of the website.
Helpline No UK. 0871 2000 463 ROI. 01443 3940
Web Support: www.skymediauk.co.uk
21

22
Helpline No UK. 0871 2000 463 ROI. 01443 3940
Web Support: www.skymediauk.co.uk

PC Operation
USING THE TELEVISION AS A COMPUTER MONITOR
IMPORTANT – Before connecting the computer to the television you must ensure the computer settings
are correct for the television. You MUST do this using your old monitor.
How to set up for Windows XP & Windows Vista (connecting via VGA cable to the TV)
1) Switch on your computer
2) When fi nished booting up right click your
mouse anywhere on the screen
3) Left click your mouse on Properties/Personalise
4) Left click your mouse on Setting/Display Settings.
Ensure the screen resolution is set to what is shown
in the technical specifi cations section toward the
rear of this user guide. To correct the resolution to
that of the television move the slider.
6) Left click on the drop down for Screen refresh rate and select 60 Hertz, if you experience picture noise
or ‘fl ickering’, select 50 hertz or 70 hertz.
7) Click on Apply, then click Yes and the settings will be saved.
8) Now switch off your computer and connect the
Television (as shown)
9) Switch on the TV, select the input/source to
VGA/PC and re-start your PC.
Connecting a Laptop
In addition to the above if you are connecting a laptop to the television you will also need to activate the
VGA connection on the laptop. This can vary based on the brand of laptop you have, on many brands/
models, it is as per below.
1) Connect the laptop to the television
2) On the Laptop push buttons
The screen will now switch to the television.
5) Left click your mouse on Advance/Advance
Settings and left click on Monitor
IMPORTANT NOTE. Occasionally we may release new software/firmware
upgrades/enhancements for this television. Please check the ‘firmware
upgrade’ section of the website regularly.
2323

PC SETUP MENU
PC Operation
V. Position
H. Position
Phase
Clock
Auto Adjust
Auto Phase
Reset
To access this menu, press [MENU] button on the remote control.
Use the
Once your chosen menu has been selected use the
To exit this menu at anytime, press [EXIT] button.
Note: When the VGA/PC source mode is selected the Display menu will switch to the PC setup menu and
display a different set of options.
Auto Adjust
Horizontal Position - Changes the horizontal position of the picture
Vertical Position - Changes the vertical position of the picture
Phase - To adjust delay time of phase in order to reduce the noise of picture
Clock - Alter this in order to reduce the noise within the picture
Auto adjust - Automatically adjust the display to it’s optimum settings
Auto phase - Automatically adjust the phase to it’s optimum settings
Reset - Restores the pc setup menu to it’s factory settings
to navigate and press [OK] to select your chosen menu.
to navigate through the different menu items.
- Lets you automatically confi gure the television to be used as a computer monitor
AV
OK
Tip: If the computer is left in-active for a period of time, the television will switch into a ‘sleep’ state
(the screen will power off to save power). To switch back on press the standby button.
Helpline No UK. 0871 2000 463 ROI. 01443 3940
24
Web Support: www.skymediauk.co.uk
USB Record
USB RECORD - DIGITAL/FREEVIEW MODE
USB RECORD – DIGITAL/FREEVIEW MODE
Built into this television is a USB record facility. This function is available in Digital/Freeview mode when
used in conjunction with a compatible USB memory stick or USB Hard drive. The benefi ts of this are as
follows:
• One button record, if you decide you want to record the current programme
• Easy programmable recording from the 7 day TV Guide
• Record TV/Radio and watch/listen back on your computer/laptop
Due to the nature of the product, it is necessary to use a high speed USB memory stick (as the TV reads
from and writes to the memory stick at the same time, some memory sticks may not be suitable)
You can purchase high speed memory sticks from some computer stores, alternatively, we have a selection
of tested and compatible memory sticks available to purchase directly from the helpline/web site. These
are available in 4GB, 8GB and 16GB. (Please check the web site/helpline for latest specifi cations and prices)
Minimum Specifi cation - USB Memory Stick
Read Speed 20 MB/s (Mega Byte Per Second)
Write Speed 6 MB/s (Mega Byte Per Second)
If you wish to use a USB portable hard drive larger than 32GB, please refer to the FAQ section at the rear
of this user guide.
One Button Record
At any point in time you may decide to record the current channel that you are watching. To do this you
need to press the [REC] button.
Tip: This television contains one TV tuner, therefore it can only record the channel you are watching or
record one channel while the television is in standby mode.
Note: USB record function is only available in Digital/Freeview TV/Radio mode. Due to copyright laws
and illegal copying/recording it is not possible to record to/from any other input/output source.
IMPORTANT NOTE. Occasionally we may release new software/firmware
upgrades/enhancements for this television. Please check the ‘firmware
upgrade’ section of the website regularly.
2525

7 Day TV Guide
7 DAY TV GUIDE
TV Guide is available in Digital TV mode. It provides information about forthcoming programmes (where
supported by the Freeview channel). You can view the start and end time of all programmes and on all
channels for the next 7 days and set reminders.
1) Press [GUIDE]. The following 7 Day TV Guide will appear.
2) Navigate through the menu using
You can now:
Set a reminder by pressing BLUE
Record programmes by pressing RED (press repeatedly to record daily and weekly)
3) Press [EXIT] to exit the 7 day TV Guide.
The current program’s channel No.and channel name.
TV GUIDE
5
Five
16
QVC
17
UKTV Gold
23
bid tv
24
price-drop tv
Thu Fri Sa t Sun Mon Tu e Wed
09-06-18 22:00~23:25
09-06-18 23:25~00:25
Big-budget sci-fi remake starring Mark Wahlberg and Tim
adventures of a daring astronaut who crash-lands on a plan
by intelligent, talking apes.(2001)[AD,S]
Reminder Record
Planet of The Apes
Disorderly Conduct
Move
The current program’s broadcast date and start-stop time.
– –
The current program’s name.
Reminder iron.
The brief introduction of the
current program
OK E
EXI TSelect E
Playing Back Recorded Content
To view all your recordings press the [MEDIA] button and then navigate using the buttons.
Open the folder named PVR_File this is the default folder where all your recordings will be saved.
USB
File Name: La_lsla_Bonita-DVIX-3.11.avi
File Path: /mnt
All
Picture
Music
Movie
MYRECORD
La_lasla_Boni...
Music
PHOTO
00:02:12 00:04:24
La_lsla_..
1
Play
Note: This TV is designed to operate with USB memory sticks up to 32GB. It is possible to use either a
USB memory stick or a USB portable Hard Drive of a larger capacity, however, it must be formatted to
the FAT32 fi le system in order to operate correctly. At the time of printing this user guide, Windows
XP/Vista computers are only capable of formatting up to 32GB, therefore, you will need a software
programme/utility to format larger USB drives/hard drives to FAT32. Additional help and support is
available from the web site.
Helpline No UK. 0871 2000 463 ROI. 01443 3940
26
Web Support: www.skymediauk.co.uk

USB Mode / Media Player
USB MODE / MEDIA PLAYER
USB
File Name: MYRECORD
File Path: /mnt
All
Picture
MYRECORD
Music
Movie
blue.mp3 angle.mp3
DSC04633.JPG DSC04634.JPG La_lasla_Boni...
USB mode offers playback of various different types of content that you have saved on your USB Memory
Stick.
On switching to USB source the above menu screen will appear. The content will be divided into Movies,
Music and Picture.
You can navigate through the menus using the scroll
play/view press [OK] button.
Music
PHOTO
DSC04632.JPG
buttons. To confi rm the item you wish to
IMPORTANT NOTE. Occasionally we may release new software/firmware
upgrades/enhancements for this television. Please check the ‘firmware
upgrade’ section of the website regularly.
2727

General Information
USING WITH SKY DIGITAL / VIRGIN MEDIA
You may wish to use your TV with Sky Digital, Virgin Media or another cable or Satellite box. There are a
number of connection options, the best being connecting via SCART cable.
Connecting via SCART
1) Connect the SCART cable from the Cable/Satellite Box to SCART of the TV
2) Press [SOURCE]
3) Press [\/] or [/\] to select SCART
4) Press [OK]
The channel your Cable/Satellite box is displaying will now be shown on the TV.
Connecting via RF
You may wish to share your Sky Digital signal around the home by using an RF connection.
1) Connect the RF cable from the RF output socket of the sky/cable box to the ‘RF IN’ of the TV.
2) Switch the TV to analogue TV mode
3) Press [MENU] to enter menu
4) Press [>] twice to select Channel Menu
5) Press [OK] to enter menu
6) Press [\/] to select Auto Search
7) Press [OK] and then select Start
Once tuning is complete the fi rst channel will appear. Press [CH+] to move through the channel until you
fi nd the Sky channel. The channel can then be moved if you wish, please refer to the Channel Menu,
Channel Manager section of this user guide.
USING WITH SKY DIGITAL REMOTE CONTROL (BSKYB) OR UNIVERSAL
REMOTE CONTROL
You may wish to use your Sky Digital or a universal remote control to operate some of the functions
of this TV. For this you require a ‘code’ that needs to be programmed into your Sky Digital or universal
remote control.
For codes for universal remote controls, please visit our website where you will fi nd the very latest
information and codes. For codes for Sky/Sky+/Sky HD, please note that at the point of manufacture,
BSkyB have not launched the code required for this model of TV. They are due to launch a new remote
control which should include the necessary code to operate the functions of the TV during 2010 (called
revision 9).
Please check our website for updates, alternatively, see some
alternative options of remote controls that are available.
The One for All remote controls shown on the right will
operate all of the functions of the Sky box in the same way
the original remote control will, in addition, they will also
operate the functions of this model of TV. The One for All
versions shown are only available to purchase from the
helpline/website. When you order, we will need to know the
model and serial number of your TV in order that we can
include the necessary software/code for your particular TV.
The original Sky remotes are shown for comparison purposes
only.
Helpline No UK. 0871 2000 463 ROI. 01443 3940
28
Web Support: www.skymediauk.co.uk

General Information
FREQUENTLY ASKED QUESTIONS
General I would like to have louder
General Why are some options in
sound by connecting
additional speakers
the menu unavailable and
greyed out
There are 2 options:
1) Use Digital COAX output connected to an external amplifi er/surround
sound system
2) Use the 3.5mm headphone output and a 3.5mm to phono cable
(available separately) to connect to an amplifi er/surround sound system
Some options are only available in certain sources, i.e. HDMI, PC/VGA.
They are unavailable in the other sources where they have no affect.
TV I have tuned in Digital TV
TV I have re-tuned my television
VCR/DVD
Recorder
Game Consoles I have connected my PS3 to
Game Consoles I have connected my
USB Mode I have inserted a USB
USB Mode Using a USB portable hard
USB Record
/ TV
System Lock I have changed the password
but I am not receiving any
or all of the channels and/
or the channels I receive are
breaking up
but when I switch it off it is
not storing the channels
I have connected the TV to
my VCR or DVD Recorder via
SCART but it is not recording
the TV via HDMI, but I am
not receiving any pictures or
sound on my TV
Xbox 360 to the TV via
Component Cables (Red,
Green & Blue) but I am not
receiving any sound
Memory Key, but the TV
does not recognise it
drive
When using the USB to
record the picture ‘breaks
up’ or experience loss of
sound.
on the television and now
forgotten it
1) Check you are in an area that can receive Freeview. Visit www.freeview.
co.uk or call 08701 111 270.
2) Check you are using an aerial that is able to receive a good digital
signal. In most cases, you will need an outdoor digital hi-gain/wideband
aerial. In areas that have excellent Freeview coverage, you may be able
to use a loft type aerial but it is highly likely that you will also need to
connect a booster between the back of the TV and the TV aerial wall
socket. Unfortunately, to receive a good enough digital signal, it is not
possible to use a portable/indoor type aerial. This may change once the
analogue signal is switched off in 2012 and the Digital signal strength is
increased.
Complete a fi rst time installation, please refer to the set-up menu section
of the manual of how to do this
In addition to connecting via SCART, you should connect the aerial cable
from the wall socket to your VCR/DVD Recorder and another aerial cable
from the VCR/DVD Recorder to the TV
1) Ensure the TVs source is on HDMI
2) Check your settings on your PS3 are as per the PS3 instruction manual
Component cables only provide HD Pictures. For the sound you will need
to connect the Red & White audio cables on the Xbox to the Red & White
phono inputs on the rear of the TV. Please refer to the ‘Connections’
pages.
Ensure the USB Memory Key is formatted to type FAT32.
If you wish to use a portable hard drive larger than 32GB, please note
that it must be formatted to the FAT32 fi le system in order to operate on
this TV. Windows XP/Vista computers are only capable of formatting up
to 32GB, therefore, you will need a software programme/utility to format
larger hard drives. Please refer to the web site for more information.
Check the USB Memory Stick meet the minimum requirements of Read
Speed - 20 MB/s (Mega Byte Per Second), Write Speed - 6 MB/s (Mega Byte
Per Second)
There is a master password of 4711, to gain access to the TV menu and
reset the normal password
IMPORTANT NOTE. Occasionally we may release new software/firmware
upgrades/enhancements for this television. Please check the ‘firmware
upgrade’ section of the website regularly.
2929
General Information
TECHNICAL SPECIFICATION
Model W40/99F-GB-FHCPE-UK
Screen size (diagonal) 40”/102cm
Resolution 1920 x 1080
Contrast Ratio 5000:1
Brightness cd/m2 450
PC RGB Yes
RF 75 ohm Antenna / PAL-SECAM
Inputs 3 x HDMI, 1 x VGA/PC, 2 x SCART
Outputs 1 x 3.5mm Audio Out, 1 x COAX Digital Audio Out
Watts (RMS) 2 x 3
Voltage Rating: AC 110-240V ~ 50/60Hz 130/180W (std/max)
Dimensions including
stand (mm)
Net weight (Kgs) 20kg
Y Pb Pr (Component), AV Video and L/R audio
1 x USB, 1 x RJ45 (Ethernet/DNLA), 1 x 3.5mm Audio
Input (for PC/VGA), 1 x 3.5mm Audio Input
980(W) x 670(H) x 220(D) mm
30
Helpline No UK. 0871 2000 463 ROI. 01443 3940
Web Support: www.skymediauk.co.uk

General Information
INDEX
7day TV Guide .................................................................................. 26
Aspect Ratio ...................................................................................... 21
Attaching the base/stand ................................................................. 9
Audio Language ............................................................................... 19
Auto Confi guration of screen (PC) .................................................. 23
Auto Search ...................................................................................... 18
Balance ............................................................................................. 17
Bass ................................................................................................... 17
Blue Screen ...................................................................................... 21
Brightness ........................................................................................ 16
Channel Manager ............................................................................. 18
Cinema mode ................................................................................... 16
Clock (PC) .......................................................................................... 23
Clock .................................................................................................. 19
Colour .............................................................................................. 16
Colour Temperature ........................................................................ 16
Common Interface .......................................................................... 19
Connections ...................................................................................... 14-15
Contrast ............................................................................................ 16
Country ............................................................................................. 19
Current Time ..................................................................................... 20
Detaching the base/stand ................................................................ 9
Digital Output ................................................................................. 17
Digital Switch over ........................................................................... 31-32
Equalizer ........................................................................................... 17
Favourites Manager ......................................................................... 18
Firmware Update ............................................................................. 21
First Time Installation ...................................................................... 20
Frequently Asked Questions ............................................................ 29
Getting Started ................................................................................. 11
Hearing Impaired ............................................................................. 19
Horizontal Position (PC) ................................................................... 23
Hue .................................................................................................... 16
Language ......................................................................................... 19
Manual Search .................................................................................. 18
Network ............................................................................................ 19
Noise Reduction .............................................................................. 16
OSD Language .................................................................................. 19
PIP...................................................................................................... 21
Phase (PC) ......................................................................................... 23
Picture Mode ................................................................................... 16
Programme Schedule ....................................................................... 20
Programme edit ............................................................................... 18
Remote control ................................................................................ 13
Reset Menu ....................................................................................... 19
Reset to default ................................................................................ 21
SPDIF Output .................................................................................... 17
Saturation ........................................................................................ 16
Screen Mode ..................................................................................... 21
Setup Menu ...................................................................................... 19
Sharpness ......................................................................................... 16
Sleep Timer ....................................................................................... 20
Sound Menu ..................................................................................... 17
Sound Mode .................................................................................... 17
Source Menu ..................................................................................... 12
Subtitle .............................................................................................. 19
System Lock ..................................................................................... 18
System Lock ...................................................................................... 21
TV Guide ........................................................................................... 18
TV Guide .......................................................................................... 24
TV Menu ........................................................................................... 18
TV buttons ....................................................................................... 12
Technical Specifi cations ................................................................... 30
Teletext ............................................................................................. 19
Time Menu ........................................................................................ 20
Tools Menu ....................................................................................... 21
Treble ............................................................................................... 17
USB .................................................................................................... 21
USB Mode / Media Player ................................................................ 27
USB Record ....................................................................................... 25
Using with Sky Digital / Virgin Media ............................................ 27
Vertical Position (PC) .................................................................... 23
Video Menu ...................................................................................... 16
Volume .............................................................................................. 17
Wake up Time ................................................................................... 20
Wall mounting ................................................................................. 9
What is included in the box ............................................................ 8
DIGITAL SWITCHOVER
Television in the UK is going digital, bringing us all more choice and new services. Starting late 2007 and
ending in 2012, television services in the UK will go completely digital, TV region by TV region.
How the switch over affects your TV equipment.
Your new TV has a digital tuner built in, which means it is ready to receive the Freeview signal by simply
connecting it into your aerial socket (you can check if you can get digital TV through your aerial now or
whether you will have to wait until the switch over at www.digitaluk.co.uk)
When the TV switch over happens in your area, there are at least two occasions when you will need to
re-tune your TV in order to continue receiving your existing TV channels and also to pick up new ones.
Digital UK, the body leading the digital switch over, will advise you when you need to retune during the
switch over.
How to retune.
Retuning your TV is a very quick and simple process. We recommend that you retune every few months to
ensure you are receiving the very latest TV and radio channels that are broadcast.
1) On the remote control press [MENU] followed by 8 - 8 - 8 - 8 (so the number 8 button four times)
2) The First Time Installation menu will appear. Press [OK] and tuning will take place.
For help and support regarding the digital switch over, please contact Digital UK:
Telephone: 08456 50 50 50 (calls charged at local call rate, approx 3p per minute daytime or 1p per minute
evenings from a BT landline)
Digital UK website: www.digitaluk.co.uk
IMPORTANT NOTE. Occasionally we may release new software/firmware
upgrades/enhancements for this television. Please check the ‘firmware
upgrade’ section of the website regularly.
3131

W40/MAN/0003
 Loading...