

Page 1
WAVE EXPANSIO N BOARD
SY-EW04NX
Installat ion inst ruction s
CAUTION
Installation/removing should be CARRIED OUT BY
•
YOUR DEALER.
•Failure to turn off the power to the main unit before
installing /rem oving th is boar d m ay result in d ama ge to
the mai n unit or t his bo ard.
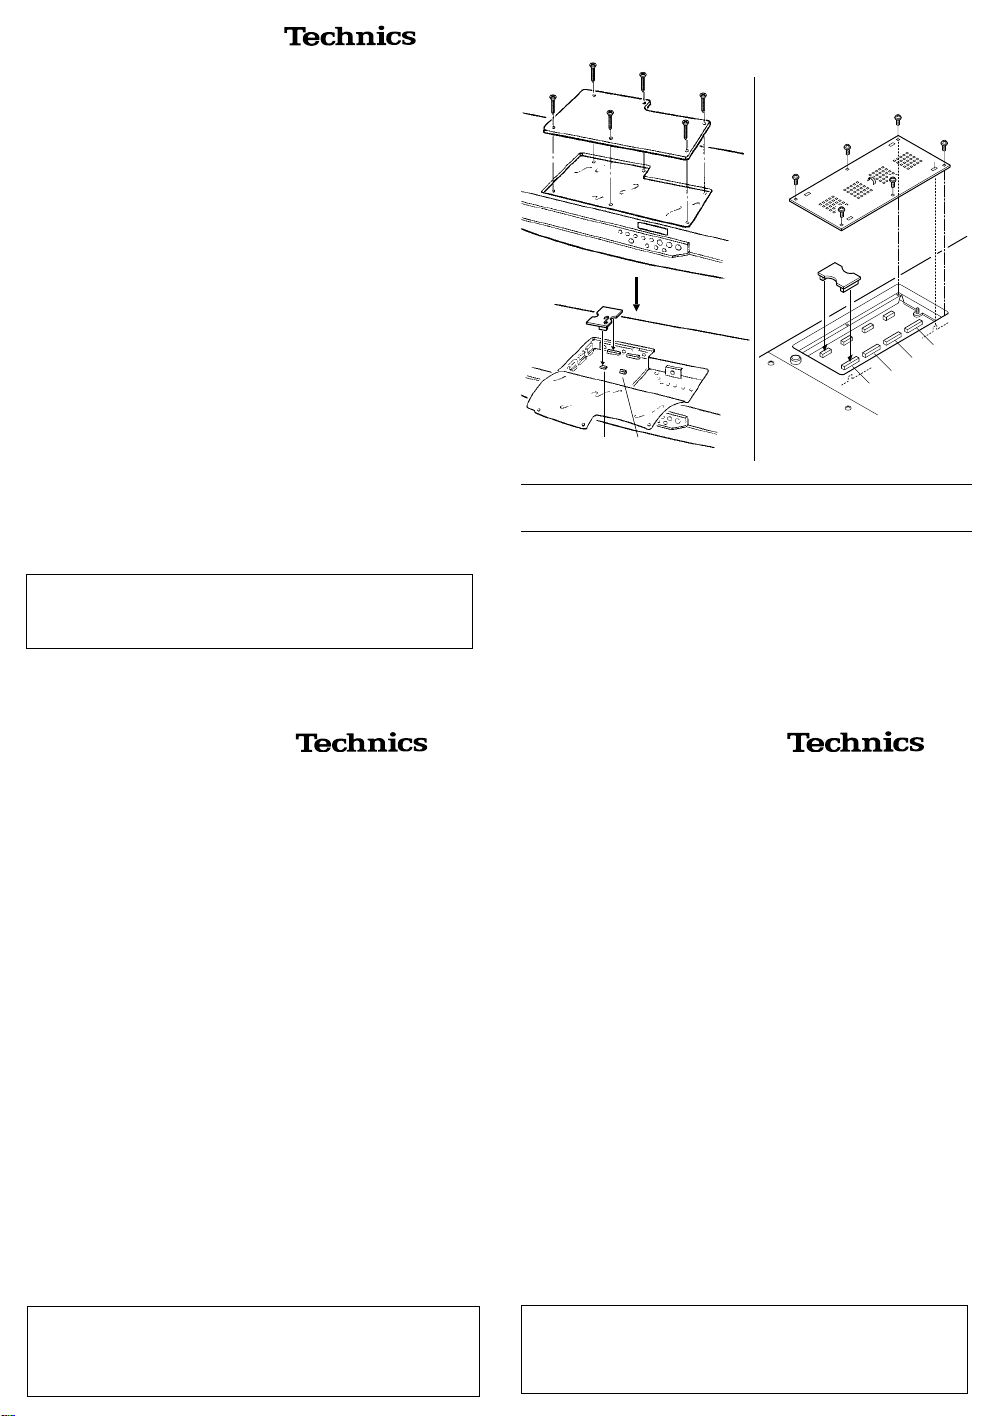
Installation procedure
1. Remove the cov er from the bottom of the main un it.
•Open the silver cover (KN6000/6500).
2. Insert the SY-EW04NX Wave Expa nsion Board int o a
slot.
•To ensure proper fu nctioning of the board, it must be
inserted firmly al l the way in .
•Do not insert two or m ore SY-EW04NXs in the slots.
3. Use the scr ews r emo ved in st ep 1 to repl ace the cov er
on the bottom of the main unit.
If the WAVE EXPANSION BOARD is installed by the customer, we cannot accept responsibility for any malfunction of th e WAVE EXPANSION BOARD or the main
<KN6000/6500>
Slot 1
Slot 2
(EXP1)
(EXP2)
Matsushita Electric I ndustrial Co., Ltd.
http://www.panasonic.co.jp/global/ (except fo r U.S.A.)
Panasoni c Consumer Ele ctronics Company
Division o f Matsushit a Electric Corpor ation of A merica
One Pan asonic Way, Se caucus , New Jer sey 07 094
E-mail: consumerproducts@panasonic.com
(U.S.A. only)
Printed in Japan
Imprimé au Japon
<KN7000>
EXP3
EXP4
QQTG0682A
EXP1
EXP2
Se0902S0
WAVE EXPANSIO N BOARD
SY-EW04NX
Einbauanweisungen
VORSICHT
•Es wird emp fohle n, d en Ei nbau oder Hera usne hmen VON
IHRER KUNDENDIENSTWERKSTATT VORNEHMEN
zu lass en.
•Wenn Sie Stromversorgung zu der Haupteinheit nicht vor
dem Einb au oder He rausnehme n der Leite rplatte ab geschealtet wird, kann dies zu einer Beschädigung der
Haupteinheit und/oder des Leiterplatte hühren.
Einbausch rit te
1. Nehmen Sie die Abdeckung von der Unterseite der
Hauptei nheit ab.
•Öffnen Sie die silberne Abdeckung (KN6000/6500).
2. Setzen Sie die SY-EW04NX-Platine in einen der Schlitze
(slot) ein.
•Um ein einwandfreies Funktionieren der Leiterplatte zu
gewährleisten, müß die Leiterplatte fest bis zum Anschlag
einges choben werden .
•Niemals zwei oder mehr SY-EW04NX-Platinen gleichzei-
tig in die Schlitze einsetzen.
3. Verwenden Sie die in Schritt 1 heraus gedrehten Schrau-
ben, um die untere Abdeckung wieder anzubringen.
Wenn die ses WAVE EXPANSION BOARD vom Kunden
selbst in stalliert wurde, k önnen wir keine Verantwertung
für F unkti onsstörungen des WAVE EXPANSION BOARD
oder der Haupteinheit übernehmen.
WAVE EXPANSI ON BOARD
SY-EW04NX
Instruc tions po ur l’insta llation
ATTENTION
•L’installation ou la désinstallation doit être CONFIÉE À
VOTRE REVENDEUR.
•Si v ous ne mett ez p as l’ap par eil bien hors tensio n avan t
d’insta lle r ou r e t irer la plaque, vou s risquez d ’endommager l’app areil e t/ou la p laque.
Opération d’installation
1. Retire z le couv ercle du bas d e l’ap pareil.
•O uvrez le couver cle arge nté (K N 6000/6500).
2. Insérez la plaque SY-EW04NX dans une fe nte (s lot).
•Pour garantir un fonctionnement correct de la plaque,
elle doi t être in sérée bien à fo nd.
•N’insérez pa s deux ou pl us de p laques SY-EW04NX dans
les fent es.
3. Utilisez les vi s retirée s lors d e l’éta pe 1 po ur reme ttre le
couver cle en pl ace sur le bas d e l’ap pareil.
Si la WAVE EXPANSION BOARD est installée par le
client, nous déclinons toute respo nsabilit é en ca s d’ano-
malie de la WAVE EXPANSION BOARD ou de l’apparei l.
Page 2

KN6000 Upg rade Disks (ver. 7.0)
Please use “Upgrade Disk” (Ver. 7.0) A and B to update
the KN6 000 af ter yo u instal l the SY-EW04NX.
•Do not update the instrument if the current version
number is already 7.0 or later. You can confirm the
curren t ve rsio n on the d is play by tu rnin g on th e pow er
while pressing the DIGITAL DRAWBAR, ACCORDION
REGISTER and SOUND EXPLORER buttons (in the
SOUND GROUP section) at the same time.
Bitte verwenden Sie die “Upgrade Disk” (Ver. 7.0) A und
B, um das KN6000 nach dem Einsetzen von SY-EW04NX
zu erweitern.
•Er weitern Si e das In strumen t nicht, we nn die ak tuelle
Version bereits 7.0 oder eine spätere Version sein
sollte. Wenn Sie das Instrument einschalten, während
Sie gleic hzeitig di e Tasten DIGITAL DRAWBAR, AC-
CORDION REGISTER und SOUND EXPLORER (im
Bereich SOUND GRO UP) dr ücken, könne n Sie au f dem
Bildschirm die aktuelle Version überprüfen.
Veuillez ut iliser l es “Upgr ade Disk” (Ve r. 7.0) A e t B pour
améliorer le KN6000 après avoir installé la plaque SY-
EW04NX.
•N’ a m éli or e z pas l’instrum ent si le numé r o de la vers ion
en cours es t déjà 7.0 ou ultér ieur. Vous pouv ez vous
assurer de la version en cours sur l’affichage en mettant
l’instrument sous tension tout en appuyant sur les
boutons DIGITAL DRAWBAR, ACCORDION REGI-
STER et SOUND EXPLORER (dans l a section SOUND
GROUP) en mê me te mps.
Update P rocedure
CAUTION: To prevent damaging your instrument, if instal-
ling the SY-EW04NX in an instrument model other than
the KN6 000, please d o not us e these U pgra de Disks .
Before updating, be sure to save any necessary
data to a disk.
1. Turn off the KN6000 po wer.
2. Insert “Upgrade Disk A” into the Disk Drive.
3. While pr es si ng a ll four PANEL MEMORY buttons (1 to
4) at the same tim e, turn on the powe r.
•“Flash Memory Update” is shown on the display, and
updating begins.
4. Follow the instructions on the display to update the
instrumen t .
•When “Change FD (2/2)” is indicated on the display,
replace the disk with “Upgrade Disk B”.
5. When “Completed!! TURN ON AGAIN!” is indicated on
the dis play, turn th e powe r off on ce.
6. While pressing the three buttons in the RHYTHM
GROUP section—LATIN, WORLD and CUSTOM—at
the same time, turn on the power.
•“ALL INITIAL SETTING” is shown on the display, con-
firming t hat the in strument is initializ ed.
Vorgehen sweise zur Erweiterung
VORSICHT: Um Sc häden an I h r em Instrument zu vermei-
den, verwenden Sie beim Einsetzen der SY-EW04NX
in einem anderen Instrumentenmodell als dem KN6000
zur Erweiterung des Instruments bitte nicht die genannten Di skett en.
Speiche rn Sie vor Erweiter ung des Instru ments bitte all e
wichtigen Daten auf einer Diskette.
1. Schalten Sie da s KN6000 aus.
2. Schieben Sie die “Upgrade Disk A” in das Disketten-
laufwer k ein.
3. Drücken Sie alle vier PANEL MEMORY-Tasten (1 bis
4) gleichzeitig und schalten Sie das Instrument ein,
wobei Sie die Tasten gedrückt halten.
•Au f d er Anze ig e ersc hein t “Fl as h Me mory Up date ” un d
der Erweiterungsvorgang beginnt.
4. Folgen Sie den Anw eisunge n auf der A nzeige, um die
Erweite rung d es Instr ument s durc hzuführ en.
•Sobald “Change FD (2/2)” auf der Anzeige erscheint,
wechseln Sie bitte die Diskette gegen “Upgrade Disk
B” aus.
5. Wenn “Completed!! TURN ON AGAIN!” auf der Anzeige
ersche int, sc halten S ie das Instru ment kurz aus .
6. Drücken Sie gleichzeitig die drei Tasten LATIN,
WORLD und CUSTOM des Bereichs RHYTHM
GROUP, und schalten Sie das Instrument ein, wobei
Sie die Ta sten gedrück t halte n.
•“A L L I NI T IA L SE TTING” ersc he int auf der Anzeige und
bestätigt Ihnen die Initialisierung des Instruments.
Procédur e de mise à jour
ATTENTION: afin de pré venir l’end omm ageme nt de votr e
instrument, si vous installez le SY-EW04NX dans un
modèle d’ instru ment aut re que le KN6000, veui llez n e
pas uti liser ces disques d’amél ioratio n.
Avant d e pr océd er à la m ise à jour , vei lle z à sa uveg ard er
toutes les donn ées n écessa ires s ur un d isque.
1. Mettez le KN6000 hors tension
2. Insér ez “Upg rade Di sk A” da ns le l ecteur de disq ue.
3. Tout en appuyant sur les quatre boutons (1 à 4) de
PANEL MEMORY en même temps, mettez l’alimentation so us ten sion.
•“Fl ash M emory U pdate ” s’affi ch e et la mise à jour com-
mence.
4. Suivez les instructions de l’affichage pour mettre l’in-
strume nt à jour .
•Lorsque “Change FD (2/2)” s’affiche, remplacez le
disque par le d isque “ Upgra de Disk B”.
5. Lorsque “Completed!! TURN ON AGAIN!” s’affiche,
mettez l’a limenta tion hors te nsion.
6. Tout en appuyant sur les trois boutons LATIN, WORLD
et CUSTOM de la section RHYTHM GROUP en même
temps, mett ez l’alimen tation sou s tension.
•“AL L INITIAL SETTING” s’affic he, confirmant l’initiali-
sation de l’instrument.
 Loading...