Page 1
Technics
Compact Disc Changer
SL-PD947
Operating Instructions
DIGITAL AUDIO
Before connecting, operating or adjusting this product, please
completely. :
{,/:
r_'r .
Page 2
Thank you |or purchasing this Technics product.
For optimum performance and safety, please read
these instructions carefully.
Table of Contents
I Before Use
Precautions .......................................... 3
Safety ................................................. 3
Installation ............................................. 3
Maintenance ........................................... 3
Service ................................................ 3
Preparations ......................................... 4
Supplied accessories .................................... 4
Connections ............................................ 4
Concerning the Remote Control ................. 5
Battery installation ...................................... 5
Use of batteries ........................................ 5
Operation notes ........................................ 5
Front Panel Controls and Functions ............ 6
Control section ......................................... 6
Display section ......................................... 8
[Listening ]
Basic Operating Procedure ....................... 9
Sequential Play ..................................... 10
When listening through headphone ....................... 11
Direct Access Play ................................. 12
From the main unit ..................................... 12
From the remote control ................................ 13
Program Play ........................................ 14
From the main unit ..................................... 14
From the remote control ................................ 16
Delete Play ........................................... 18
From the main unit ..................................... 18
From the remote control ................................ 20
Random Play ........................................ 22
One disc random play ................................... 22
Full random play ........................................ 23
Spiral Play ........................................... 24
Special Features .................................... 25
ID scan function ........................................ 25
Pitch control function ................................... 26
Auto cue function ....................................... 27
Repeat function ........................................ 28
Search function ........................................ 28
Skip function ........................................... 29
Time mode selection .................................... 30
Recording
CD Edit-Recording .................................. 31
Sequential-edit-recording ................................ 32
Program-edit-recording .................................. 34
I Reference I
Before Moving ....................................... 35
Quick Reference Table of
Remote Control Operation ........................ 36
Concerning Compact Discs ....................... 38
Handling precautions .................................... 38
Storage precautions .................................... 38
Technical Specifications .......................... 38
Troubleshooting Guide ............................ 39
Product Service ..................................... 39
Product information ..................................... 39
Index ....................................... Back Cover
The model number and serial number of this product can be
found on either the back or the bottom of the unit.
Please note them in the space provided below and retain them
for future reference.
MODEL NUMBER SL-PD947
SERIAL NUMBER
CAUTION:
TO PREVENT ELECTRIC SHOCK MATCH
CAUTION: TO REDUCE THE RISK OF ELECTRIC
CAUTION
SHOCK, DO NOT REMOVE SCREWS.
NO USER-SERVICEABLE PARTS
INSIDE.
REFER SERVICING TO QUALIFIED
SERVICE PERSONNEL.
WIDE BLADE OF PLUG TO WIDE SLOT,
FULLY INSERT.
,_The lightning flash with arrowhead symbol, within
WARNING:
TO REDUCE THE RISK OF FIRE OR
ELECTRIC SHOCK, DO NOT EXPOSE THIS
APPLIANCE TO RAIN OR MOISTURE.
an equilateral triangle, is intended to alert the user
to the presence of uninsulated "dangerous
voltage" within the product's enclosure that may
be of sufficient magnitude to constitute a risk of
electric shock to persons.
angle is intended to alert the user to the presence
of important operating and maintenance (ser-
vicing) instructions in the literature accompanying
The exclamation point within an equilateral tri-
the appliance.
2
Page 3
Precautions
Before using this unit please read these operating instructions
carefully. Take special care to follow the warnings indicated on the
unit itself as well as the safely suggestions listed below.
Afterwards keep them handy for future reference.
Safety
Power Source -- The unit should be connected to power supply
only of the type described in the operating instructions or as
marked on the unit.
2.
Polarization -- If the unit is equipped with a polarized AC power
plug (a plug having one blade wider than the other), that plug will
fit into the AC outlet only one way. This is a safety feature. If you
are unable to insert the plug fully into the outlet, try reversing the
plug. If the plug should still fail to fit, contact your electrician to
replace your obsolete outlet. Do not defeat the safety purpose of
the polarized plug.
Installation
Environment
1. Water and Moisture -- Do not use this unit near water--for
example, near a bathtub, washbowl, swimming pool, or the like.
Damp basements should also be avoided.
2. Condensation -- Moisture may form on the lens in the following
cases...
==immediately after a heater has been turned on.
ein a steamy or very humid room.
ewhen the unit is suddenly moved from a cold environment to a
warm one.
Placement
1. Ventilation -- The unit should be situated so that its location or
position does not interfere with its proper ventilation. Allow 10 cm
(4") clearance from the rear of the unit.
2. Foreign Material -- Care should be taken so that objects do not
fall into and liquids are not spilled into the unit. Do not subject this
unit to excessive smoke, dust, mechanical vibration, or shock.
3. Magnetism -- The unit should be situated away from equipment
or devices that generate strong magnetism.
4. Stacking -- Do not place heavy objects, other than system
components, on top of the unit.
3. Power Cord Protection -- AC power supply cords should be
routed so that they are not likely to be walked on or pinched by
items placed upon or against them. Never take hold of the plug or
cord if your hand is wet, and always grasp the plug body when
connecting or disconnecting it.
4. Nonuse Periods -- When the unit is not used, turn the power off.
When left unused for a long period of time, the unit should be
unplugged from the household AC outlet.
If moisture forms inside this unit, it may not operate properly. To
correct this problem, turn on the power and wait about one hour
for the moisture to evaporate.
3. Heat -- The unit should be situated away from heat sources such
as radiators and the like. It also should not be placed in
temperatures less than 5°C (41 °F) or greater than 35°C (95°F).
5. Surface -- Place the unit on a flat, level surface.
6. Carts and Stands -- The unit should be used only with a cart or
stand that is recommended by the manufacturer. The unit and
cart combination should be moved with care.
Quick stops, excessive force, and uneven
surfaces may cause the unit and cart combi-
nation to overturn.
7. Wall or Ceiling Mounting -- The unit should not be mounted to a
wall or ceiling, unless specified in this operating instructions.
Maintenance
Clean the cabinet, panel and controls with a soft cloth lightly
moistened with mild detergent solution.
Service
1. Damage Requiring Service -- The unit should be serviced by
qualified service personnel when:
(a) The AC power supply cord or the plug has been damaged; or
(b) Objects have fallen or liquid has been spilled into the unit; or
(c) The unit has been exposed to rain; or
CAUTION:
• This digital apparatus does not exceed the Class B limits for
radio noise emissions from digital apparatus set out in the
Radio Interference Regulations of the Canadian Department
of Communications.
Do not use any type of abrasive pad, scouring powder or solvent
such as alcohol or benzine.
(d) The unit does not appear to operate normally or exhibits a
marked change in performance; or
(e) The unit has been dropped, or the enclosure damaged.
2. Servicing -- The user should not attempt to service the unit
beyond that described in the operating instructions. All other
servicing should he referred to qualified service personnel.
• THIS PRODUCT UTILIZES A LASER.
USE OF CONTROLS OR ADJUSTMENTS OR PERFORMANCE
OF PROCEDURES OTHER THAN THOSE SPECIFIED HEREIN
MAY RESULT IN HAZARDOUS RADIATION EXPOSURE.
DO NOT OPEN COVERS AND DO NOT REPAIR YOURSELF.
REFER SERVICING TO QUALIFIED PERSONNEL.
3
Page 4
Preparations
Supplied accessories
Check the packing carton for these accessories.
AC power supply cord
(For USA: SJA172-1)
(For Canada: SJA172) ........... 1 pc.
Remote-control transmitter
(RAK-SL002WH) ................ 1 pc.
Connections
Before connecting the changer to your audio system, be sure that
the power of the changer and all other system components are
turned off.
Rear panel of
this changer
Stereo connection cable
(SJP2249-6) .................... 1 pc.
Batteries (UM-4, "AAA", R03)... 2 pcs.
, ,!
(red) (white) [_
(white)
(R)--_BW"
(red)
Connect the stereo /
connection cable.
1
Connect the stereo connection cable (includ-
ed) to CD or AUX terminals of the amplifier or
the receiver.
A
J
2 Connect the synchro edit cable (included with
the cassette deck) to SYNCHRO EDIT ter-
minal of Technics cassette deck.
4
nect the synchro
L edit cable.
r3conn.c,,he,Cpowe,]
L "u.p',c°,°. J
3
Connect the power supply cord (included) to
the household AC outlet (AC 120 V, 60 Hz) or
to AC OUTLET of Technics component.
Page 5
Concerning the Remote Control
Battery installation
fl Openthe ] f/'_ Insertthe I ft'_ Cl°sethe]
Be sure that you insert the batteries so that their positive (+)
Open the cover, and negative (-) polarities match the polarities indicated in
Press gently and slide the cover out. the compartment. Batteries installed with incorrect polarities
may leak and damage.
2
Insert the batteries Included with this unit.
When you need to replace these batteries, use two UM-4 AAA,
IEC R03 (1.5 V) or equivalent batteries.
Refer to "Use of batteries" for additional information.
3 c,o,e the cover.
Use of batteries
Do not try to mix old and new batteries or batteries of different
types (carbon and alkaline, etc.).
Always remove old, weak or worn-out batteries promptly and
dispose of them properly.
The average battery life is about one year. Although the battery life
varies depending on how often the device is used, you should
generally replace the batteries about once a year.
Replace the batteries if commands from the remote control
transmitter do not operate the unit even when the transmitter is
held close to the front panel.
Never subject batteries to excessive heat or flame; do not attempt
to disassemble them; and be sure they are not short-circuited.
Operation notes
If you will not use the remote control for a long period of time,
remove the batteries and store them in a cool, dark place.
If a battery leaks, remove all batteries and dispose of them proper-
ly. Thoroughly clean the battery compartment before inserting new
batteries. If the leaking electrolyte comes into contact with skin or
clothes, flush with water immediately.
Keep batteries out of reach of children.
Do not use rechargeable type (nickel-cadmium) batteries.
Do not attempt to recharge alkaline or carbon batteries.
B
(_) Aim the remote control transmission window toward the
changer's sensor. Avoid any obstacles.
(_) Use the remote control within a 60-degree angle of the
changer.
The reachable distance is within 7 meters (23 ft.) directly facing
toward the changer.
_Avoid d
(_) Be sure the transmission window and the changer's sensor are
free from dust. Excessive dust might prevent reception.
If direct sunlight or other strong light sources strike the remote con-
trol signal sensor of the changer, operation may be impaired. If
there is a problem, place the changer away from the light source.
5
Page 6
Front Panel Controls and Functions
l i T I
r "3
©
Control section
Numbers with black background (for example _]) ) indicate func-
tions available on the remote control.
Power switch (POWER)
Press ( .11 --, m ) to switch the power on.
Press again (a --, 111 ) to switch the power off.
(_ Pitch control buttonlindicator (OFFION)
Press to turn the pitch control effect on or off.
When the pitch control effect is on, the indicator illuminates.
(See page 26.)
Pitch control knob (-, +)
This is used to adjust the playback pitch (tempo and pitch of
the sound). (See page 26.)
O ID scan button (lid SCAN I )
Press to activate the ID (identify) scan function.
(See page 25.)
®
Tape length button (TAPE LENGTH)
When you attempt to record compact discs to tape, press to
select the tape length so that the changer can then
automatically calculate what tracks fit on each side of the
tape, in a sequential manner. (See pages 32-34.)
f
6_ Remote control signal sensor
(REMOTE SENSOR)
Loading drawer
You can load or unload discs when this drawer is open.
® Disc trays (1 -5)
You can load up to five discs, one disc per one tray.
O Search buttons (<1,< SEARCH IN_)
Press to move forward and backward through the tracks on
the disc. (See page 28.)
• Disc buttons (DISC 1 -5)
Use to select the desired disc.
With the remote control, by using disc button and numeric but-
ton (1-5). (See page 12.)
• Play button (1_ PLAY)
(See page 9.)
6
Page 7
...... :_T_' E "7 E "q
, /
Auto cue button (AUTO CUE)
Press to activate the auto cue function.
(See page 27.)
Spiral button (SPIRAL)
Press to play the first tracks on all the loaded discs in se-
quence, followed by the second tracks on all the discs, and so
on. (See page 24.)
• Random mode button (RANDOM MODE)
The mode changes as follows each time the button is pressed.
(See pages 22-23.)
i -+ sequential -+ one disc random --, full random -7
• Repeat button (REPEAT)
Press to activate the repeat function.
(See page 28.)
O Numeric buttons (1-10, 0, >10)
Press to select the track number.
(See page 12.)
O
Program mode button (PROGRAM MODE)
The mode changes as follows each time the button is pressed.
(See pages 14, 18.)
r sequential ---, program --, delete -7
O
Skip buttons (I<1<1 SKIP I_1_ )
Use to skip to the beginning of the track. (See page 29.)
• Stop button (11 STOP)
(See page 11 .)
• Pause button (11 PAUSE)
(See page 11 .)
• Disc skip button (DISC SKIP)
Use to rotate the disc tray. (See pages 10, 29.)
• Loading drawer openlclose button
(_A OPENICLOSE)
(_ Headphones jack (PHONES)
(See page 11.)
7
Page 8
Front Panel Controls and Functions
(continued)
m m ell
I I I
I
SPIRAL ONE FULL RANDOM
I I I
Display section
_) Disc indicators ((1)_(5))
The indicator corresponding to the playing disc flashes.
In the program play mode, programmed disc indicators will il-
luminate. In the delete play mode, disc indicators to be deleted
will go out.
@ Disc number/tape side display
Shows the number (1-5) of the current disc, or shows the
tape side (A or B) in the CD edit-recording mode.
(_ Track number display
Shows the current track number (up to 99), and also shows
"+" or "-" when you operate the pitch control knob.
@ ID scan indicator (SCAN)
Lights in the ID scan mode.
(_ Timelprogram sequencelpitch display
Shows the elapsed playing time of the track in play.
Also shows the program sequence in the program play mode,
and the sequence you entered in the delete play mode.
When you operate the pitch control knob, shows the pitch
percentage.
Program play indicator (PGM)
Lights in the program play mode.
Play mode indicators ( ._ ._ ._ ) (Fig. 1)
Each indicator points to the following play modes:
SPIRAL: Spiral play
ONE: One disc random play
FULL: Full random play
@ Repeat indicator ( _ )
Lights in the repeat mode.
_) Compact disc edit indicator (EDIT)
Lights in the CD edit-recording mode is activated.
Pause indicator (11)
Lights in the pause mode.
(_ Auto cue Indicator ( ._ )
Lights in the auto cue mode.
Delete play indicator (DEL)
Lights in the delete play mode.
8
Play indicator (1_)
Lights in the play mode.
Page 9
Basic Operating Procedure
on the disc l
3 Load the disc(s) 1
tray(s). J
DISC SKIP
PLAY
1 Press POWER to switch on the power.
2 Press OPENICLOSE to open the loading
drawer.
(Also available from the remote control.)
3
Load the disc(s) on the disc tray(s).
Do not load 3" (8 cm) and 5" (12 cm) discs on the same disc
tray.
The number (1-5) on the disc tray indicates the disc number.
Label
must face
upward. I Carousel
After loading discs on the two disc trays at the front position,
press DISC SKIP to move the carousel. A different two disc
trays will be at the front position each time DISC SKIP is press-
ed.
4
Press OPENICLOSE again to close the
loading drawer.
(Also available from the remote control.)
You can skip this step by pressing PLAY.
The loading drawer will be closed automatically then play will
start.
Do not attempt to close the drawer by hand. Be sure to press
OPEN/CLOSE.
5
Press PLAY.
(Also available from the remote control.)
CAUTION:
Do not move this changer with a compact disc inside the unit.
If a disc comes off the disc tray, it might be scratched or the
changer might become incapable of playing. Refer to page 35
before moving the unit.
Notes:
Do not touch the carousel nor the loading drawer while it is
moving.
Do not turn the carousel forcibly by hand because it may
fail to operate normally.
9
Page 10
Sequential Play
Sequential play involves playing all the five discs on the five-disc
tray in sequence beginning with the first track on the disc at the
playing position.
/
........... I----'-I [_]
0
, /
OPENICLOSE
Before operation, follow the steps 1 -4 of "Basic
Operating Procedure" on page 9.
Press DISC SKIP to select the desired disc.
(Also available from the remote control.)
Pressing DISC SKIP will move the carousel by one position.
Disc number at the playing position
I
1(,.(2.(3)(..(5) Smm n,_ ,-,n l .... olsc/_1/_1_= U LI./_t LI
MIN SEC
2
Press the play button.
(Also available from the remote control.)
The play indicator will illuminate and sequential play will start.
The disc indicator corresponding to the disc being played
flashes. I
(1_ (2)<[3)(4),_('_'_" I--
.... 1.'o,£
Play indicator
The changer plays all the tracks on all the discs in order and
stops automatically when the last track on the last disc
finishes playing.
The first disc will be at the playing position.
Track number in play
I
/ In. m ,11
IL/•/_l II
I_c_ I" I sECll
Elapsed play time
I
To exchange discs during play
Press OPENICLOSE to open the loading drawer.
(_) Press DISC SKIP to rotate the disc trays and exchange the
discs.
The carousel will move by one position. Pressing again moves
the carousel in the opposite direction by two disc trays.
Press OPENICLOSE to close the loading drawer.
10
If you play a disc with the loading drawer open, the changer will
stop when the last track on the current disc finishes playing.
Page 11
/
-
h II1 dl d] d _'_ _'_-'_"_
To temporarily stop play (A_,o .v.,eb_. from the remote control.)
Press PAUSE.
This switches the changer to the pause mode, and the pause in-
dicator illuminates.
The disc rotates while the changer is in the pause mode.
D
Headphones
(notincluded)
Press PLAY or PAUSE to resume play.
I I I
r "1
Q
(:1::) (:2:]1(3) (:4) _'_:: g.).', /_/ l'r_:K /--I. /._.I !
To
Press STOP.
The disc will stop rotating, and the display will show the total
number of tracks and the total playing time of the current disc.
- . . I? DISC MIN SEC
Pause indicator
stop play (A_.o ..,,eb,e from remote control.)
• I I-7"F_ / I
I
(::1)<2)(3)(4)(5) I_-" I I I I C "F F" I
- - . ._sc MI, SEC
The total playing time displayed includes the silent sections bet-
ween tracks. For this reason, it may be a few seconds longer than
the playing time indicated on the disc.
When listening through headphones
Connect the headphones (not included) to the
headphones jack.
Plug type: 114 inch phone plug, stereo type.
Because the volume for the headphones cannot be adjusted on
this unit, avoid listening for long periods of time if the volume of the
headphones is so loud that it is uncomfortable to the ears.
Total number of tracks Total playing time
I I
_1 i I..c_ -I _t. _l/.:1
r
11
Page 12
Direct Access Play
Direct access play involves starting play from a specific track on a
specific disc and playing all discs on the five-disc tray in sequence.
f
G g®,,,-0,
r 1
From the main unit
Before operation, follow the steps 1 -4 of "Basic
Operating Procedure" on page 9.
If you want to start with the disc at the playing position, proceed to
step 2.
1 Press the desired disc button (1 -5).
For example: To select disc 1, press the r'_ button.
The selected disc indicator will flash.
I
.... I_ DISC _
If the disc only is selected, play will begin its first track in
about ten seconds.
/
_s
©
, /
To select a track between 1 and 10:
Press the corresponding number on the keypad.
To select a two-digit track number over 10:
Press the >10 button then one of the buttons from 0-9 to
select the "tens" digit. Then press one of the buttons from 0
to 9 to select the "unit" digit.
For example;
To select track number 20:
Press > 10, then 2, and then O.
Play begins at the track selected and continues through the
end of the last disc.
12
If a disc is not on the selected disc tray, the changer plays the
disc at the next number.
2
Press the numeric button(s) to select the
track.
Track number
'_''{ "_''2"(3)'('4"_'5"1_T_C'' I I_l. l_ll--I" l--I I [I
- - - _ DISC _ K MIN SEC
The changer will stop automatically when the last track on the last
disc finishes playing.
If you play a disc with the loading drawer open, the changer will
stop when the last track on the current disc finishes playing.
Page 13
1 2 3 4 5
6 7 8 9 10
00OOO
DISC1 DISC2 DISC3 DISC4 DISC5
1 2 3 4 5
From the remote control
Before operation, follow the steps 1-4 of "Basic
Operating Procedure" on page 9.
If you want to start with the disc at the playing position, proceed to
step 3.
_] Press DISC.
Flashes
b 0 >10
OCD
Press the numeric button(s) to select the
track.
Track number
(1 .... • (2)(3) (4)(5)mc:L r
Press the numeric button (1 -5) to select the
disc.
For example: To select disc 1, press the _ button.
The selected disc indicator will flash.
,J,
_(1]_ (2) (3) (4) (5) I [
.... I_ o,sc I_
If the disc only is selected, play will begin its first track in
about ten seconds.
If a disc is not on the selected disc tray, the changer plays the
disc at the next number.
I ",_, i ', _, (2"'(3"(4"(5) 1 /J'7 I'1"1--11 l
.... I_ D,sc / ._-I_ U. LI I
To select • track between 1 and 10:
Press the corresponding number on the keypad.
To select • two.digit track number over 10:
Press the >10 button then one of the buttons from 0-9 to
select the "tens" digit. Then press one of the buttons from 0
to 9 to select the "unit" digit.
For example;
To select track number 20:
Press > 10, then 2, and then O.
Play begins at the track selected and continues through the
end of the last disc.
The changer will stop automatically when the last track on the last
disc finishes playing.
If you play a disc with the loading drawer open, the changer will
stop when the last track on the current disc finishes playing.
MIN SEC
13
Page 14
Program Play
You can program up to 32 selections from the five discs in any
order as you desire.
MODE
_1 PROGRAM _'_
_ r _
.... U ....... r----_ r----l
i
fa f4 .epeats,eps2 I
From the main unit
I I I
"f- I I I
OISC _ 1
1 2 3 4 5
I I I I I I
I I i
J
Before operation, follow the steps 1-4 of "Basic
Operating Procedure" on page 9.
In the stop mode, press PROGRAM MODE to 4
illuminate the program play indicator.
1 2 3 4 5 / [-7 I-7
P6M . _ _ D=SC No.
Program play indicator
2
Press the desired disc button (1-5).
For example: To select disc 3, press the _ button.
I
Specified disc number
I
2 ,_3) 4 5 _f-TI
P_M . - - DIS'_ /"7 / r.cK No.
The RL indication shows that all the tracks on the disc are
selected. Skip steps 3 and 4 if you want to enter only the disc
number.
3
Press the numeric button(s) to specify the
track number.
For example: To select track number 20, press > 10, then 2,
and then 0.
Repeat steps 2 and 3 until you have com-
pleted the desired entry.
If you enter non-existing disc(s) or track(s) soon after the
loading drawer is closed or when it is open, the corresponding
indicator illuminates and the entry is included in the count. In
the play mode, the changer will cancel the non-existing entry
and play the subsequent programmed disc or track.
If you attempt a 33rd selection, the -F (full)indication will
be displayed.
5 Press PLAY to start play.
To enter additional selections during play, repeat steps 2 and
3
Play the changer with the loading drawer closed.
While the loading drawer is open, if next programmed selection is
in one of the other discs, the changer will stop after the current
track finishes playing.
14
Specified track number Program order
2 (a_. 4 5 _-7-7
PGM _ _ . OJ_/_ /-I,.,c, .o
I
Page 15
l_. "/ (_r'_ PROGRAM _ _3 Startthe ]
cs:_r--r'lr-'r-lr-'r'lr-'r"lr'-r"lr-r"lr_'-l_ _ _
To change to the other play mode keeping the
programmed contents CA,so ava|lable from the remote control.)
J desired J
L play. J
PROGRAM
1 Press STOP during play. 3 Start the desired play (except delete play).
2
Press PROGRAM MODE twice.
The changer switches to sequential mode.
The program mode will be canceled but the changer still has
the programmed contents in its memory.
To resume program mode, press PROGRAM MODE in the stop
mode to illuminate the program indicator.
To clear the entire programmed contents without canceling
program mode (A,so available from the remote control.)
Press STOP in the program mode. The display will indicate as below.
Press once in the stop mode or twice during play.
This clears all programmed contents from memory. P6M _ . . D'SC /.__t_¢_ N=.
1 2 3 4 5 I /--_ I-_
To cancel program mode (AI,o ava.ab|, from the remote control.)
In this case, all programmed contents will also be cleared from
memory.
Press STOP in the program mode.
Press once in the stop mode or twice during play.
The display will indicate as below.
1 2 3 4 5 I [-7 I-1
_M_ . . DZSC Ll_,c_ .o.
t U
I
Press PROGRAM MODE twice.
The changer switches to sequential mode
Turning off the power will also cancel program mode.
15
Page 16
Program Play ,oon,,°..°,
'\
2 %
3
1 2 3 4 5
(DO(_ OO
Repeat steps
3 and 4 as
r5 i
desired.
From the remote control
Before operation, follow the steps 1 -4 of "Basic
Operating Procedure" on page 9.
In the stop mode, press PROGRAM MODE to
Illuminate the program play indicator.
Skip to step 4 if the disc number display shows the desired
disc number.
Disc number display
I
1 2 3 4
P_ . . °
5 i 17 m }
I L../_= .=.u
2 Press DISC.
3
Press the numeric button (1 -5) to specify the
disc number.
Skip to step 5 if you want to enter only the disc number.
4
Press the numeric button(s) to specify the
track number.
For example: To select track number 20, press > 10, then 2,
and then O.
5
Repeat steps 2, 3 and 4 until you have com.
pleted the desired entry.
If you enter non-existing disc(s) or track(s) soon after the
loading drawer is closed or when it is open, the corresponding
indicator illuminates and the entry is included in the count. In
the play mode, the changer will cancel the non-existing entry
and play the subsequent programmed disc or track.
J DISC
If you attempt a 33rd selection, the -F (full) indication will
be displayed.
6 Press PLAY to start play.
To enter additional selections during play, repeat steps 2, 3
and 4.
Play the changer with the loading drawer closed.
While the loading drawer is open, if next programmed selection is
in one of the other discs, the changer will stop after the current
track finishes playing.
16
Page 17
I CLEAR
o /
To confirm the program
i .... on
66666
666661
PI_Gn_M
REPEAT _ IO
r--] r--n r--1
44 SEARC_ I_" 144 SKIP I_ld
EO0 O0
• STOP IJ _E • pLAY
0 _ (---]
RECALL
CD
]
r--1
J
Press RECALL.
RECALL
%
Each time you press RECALL, the display shows the programmed
disc and track number in the sequence you have entered.
For example, the diagram on the right shows a program con-
sisting of tracks 3, 5 and 1 on disc 3.
To clear a program entry
Press CLEAR.
CLEAR
• Press RECALL.
1 2 (3)
. PGM ° . .
• Press RECALL again.
I 1 2 (3) 4
_ PCM...
Programmed
track 3 -_ ._
DI_SC
_3 _ 2
DISC NO.
Prog rammed
order
I
I
!
No.
,I,
• Press RECALL again.
. r6M... DiSC I_ No.
Each time you press CLEAR, you will cancel last entry in the order
you have entered.
%
To clear an entry in the middle of the program sequence, press
RECALL repeatedly until the display shows the selection to be
cleared; then press CLEAR.
17
Page 18
Delete Play
You can select up to 32 selections that you do not want to hear and
put them in the changer's memory. Then you can enjoy sequential,
one disc random, or full random play of only your favorite tracks.
From the main unit
Before operation, follow the steps 1 -4 of "Basic
Operating Procedure" on page 9.
1
In the stop mode, press PROGRAM MODE to
illuminate the delete play indicator.
. u_L - - - =sc --,_ ,o
/
Delete play indicator
2
Press the disc button (1-5).
For example: To delete disc 3, press the _ button.
Specified disc number
I
_ _ _ ol_c I l-i L. _c, ,o. a
The RL indication shows that all the tracks on the disc are
selected, Skip steps 3 and 4 if you want to delete all the tracks
on the disc.
3
Press the numeric button(s) to specify the
track number.
For example: To select track number 20, press > 10, then 2,
and then 0. Order you have
Specified track number entered
4
Repeat steps 2 and 3 until you have com-
pleted the desired entry.
If you enter non-existing disc(s) or track(s) soon after the
loading drawer is closed or when it is open, the corresponding
indicator illuminates and the entry is included in the count. In
the play mode, the changer will cancel the non-existing entry.
If you attempt a 33rd selection, the - F (full) indication will
be displayed.
5
Press to start play.
To activate sequential play, press PLAY.
To activate one disc random play, press RANDOM MODE.
To activate full random play, press RANDOM MODE twice.
To enter additional selections to be deleted during play,
repeat steps 2 and 3.
It you play a disc with the loading drawer open, the changer will
stop when the last track on the current disc finishes playing.
18
. l_t - - - o_/-_/._l_cK No. I
Page 19
MODE Start the
I2 PR°GRA I t 1
J
...... :,_,_ IZZ3 IZZ3
To change to the other play mode keeping the
contents to be deleted (A_so .v..ab_. from the remote control.)
desired
play.
1
Press STOP during play.
2
Press PROGRAM MODE.
The changer switches to sequential mode.
The delete mode will be canceled but the changer still has the
contents to be deleted in its memory.
3 Start the desired play (except program play).
To resume delete mode, press PROGRAM MODE twice in the stop
mode to illuminate the delete indicator.
To clear the entire contents to be deleted without canceling
delete mode (A,eo ..,ebb. from the remote control.)
Press STOP in the delete mode. The display will indicate as below,
Press once in the stop mode or twice during play. <::1) (2)(3)(4)(5) I I'_ I_ I
This clears all the contents to be deleted from memory. . EL . . . DISC No.
t /--I.*cK Lt
To cancel delete mode (A_ao available from the remote control.)
In this case, all the contents to be deleted will also be cleared from
memory.
Press STOP in the delete mode.
Press once in the stop mode or twice during play.
The display will indicate as below.
(1)(2)(3)(4)(5) I /--7 n
. DEL _ _ - D,SC
I l-/,,_ _.t.J
/_ Press PROGRAM MODE.
The changer switches to sequential mode.
Turning off the power will also cancel delete mode.
I
19
Page 20
Delete Play ,°on,,nu.°,
6
3 DISC2 DISC3 DISC4 DISCS
4
1 2 3 4 5
6 7 8 9 10
o >1o
3 and 4 as
5 epeat steps 2, 1
desired.
• PLAY
From the remote control
Before operation, follow the steps 1 -4 of "Basic
Operating Procedure" on page 9.
In the stop mode, press PROGRAM MODE to
illuminate the delete play indicator.
Skip to step 4 if the disc number display shows the disc
number you want to delete.
Disc number display
.1 ). (2_ <1_3;]) <E4),. 5;]P I f'_ /") ]
_ _L - - - omc /-./e.,_ No.
2 Press DISC.
3
Press the numeric button (1 - 5) to specify the
disc number.
Skip to step 5 if you want to enter only the disc number.
4
Press the numeric button(s) to specify the
track number.
For example: To select track number 20, press > t0, then 2,
and then 0,
I
I U
5
Repeat steps 2, 3 and 4 until you have com-
pleted the desired entry.
I! you enter non-existing disc(s) or track(s) soon after the
loading drawer is closed or when it is open, the corresponding
indicator illuminates and the entry is included in the count, tn
the play mode, the changer will cancel the non-existing entry.
/
If you attempt a 33rd selection, the - F F (full) indication will
be displayed.
6 Press to start play.
To activate sequential play, press PLAY.
To activate random play, press RANDOM.
To enter additional selections to be deleted during play,
repeat steps 2, 3 and 4.
If you play a disc with the loading drawer open, the changer will
stop when the last track on the current disc finishes playing.
2O
Page 21
D I OPEN/__0SE
_1 _2 _ISC3 _SC4 _5
6666o
cb cb cb cb 6 S
_PR0'_I CI.EAR RECALl. 0 >10
REPEAT MOOE I0 SCAN
r---n c_ r--l
• ST0P || _ • PLAY
D EZ] [----1
To confirm the selections to be deleted
Press RECALL.
RECALL
%
- L
TIME
r--1
• Press RECALL. Track to be deleted |
(1)(2)(3)(4)(5) --1-7 ,.._w,c_ I I
. EL - . . DISC NO.
oRECALL 1
Order you have entered
Each time you press RECALL, the display shows the selected disc
and track number in the sequence you have entered.
For example, the diagram on the right shows the contents when
you have entered track 3, 5 then 1 on disc 3.
To clear a selection to be deleted
Press CLEAR.
CLEAR
%
$
• Press RECALL again.
(1)(2)(3)(4)(5) __-I-_ __._ /---7 {
. EL - - - Disc _c_ No.
lr
• Press RECALL again.
(1) (2) (3) (4) (5) 7 I -7 {
. [}EL . . . omc .o.
Each time you press CLEAR, you will cancel last entry in the order
you have entered.
To clear a selection in the middle of the sequence, press RECALL
repeatedly until the display shows the selection to be cleared; then
press CLEAR.
I
21
Page 22
Random Play
One disc random play (Also availablefromtheremotecontrol.)
The changer will play all tracks on the current disc in a random
order. Then it will choose a. new disc randomly, excluding the discs
already pla'ted, and play all tracks in a random order.
Before operation, follow the steps 1 -4 of "Basic
Operating Procedure" on page 9.
Press RANDOM MODE so that the play mode in-
dicator points to ONE.
RANDOM
MODE
] • T_ I_ Dt_ t //_/7,,cK _1.1_I I
A MIN SEC
SPIRAL ONE FULL RANDOM
I " 1
I I J
In delete play mode, the change- wiil choose a disc and track ex-
cluding the selections to be deleted
The changer will stop automat cally when all the tracks on all discs
have played once.
Play the changer with the loading drawer closed.
While the loading drawer is open, the changer will stop after the
current d,sc fiaishes playing.
To cancel one disc random play mode
Press STOP.
22
The ONE play mode iqdicatoi" will go out• The changer will change
to stop mode
Page 23
RANDOM
MODE
I--
/
r_
F u II ra n d o m p I ay (.,...,,._,.,.om ,,. remote control.,
L__J
r "1
P_s
©
, S
The changer will randomly choose a track within a randomly
selected disc. Once the changer has played the selected track, it
will choose a disc then a track randomly again, excluding the
tracks already played.
Before operation, follow the steps 1-4 of "Basic
Operating Procedure" on page 9.
Press RANDOM MODE so that the play mode in-
dicator points to FULL.
RANDOM
MODE
-7 17-1-t /
Iw U.LJ t
MIN SEC
A
;" T ,
SPIRAL ONE FULL RANDOM
I " 1
o
I I I
In delete play mode, the changer will choose a disc and track ex-
cluding the selections to be deleted.
The changer will stop automatically when all the tracks on all discs
have played once.
Play the changer with the loading drawer closed.
While the loading drawer is open, if next track is in one of the other
discs, the changer will stop after the current track finishes playing.
To cancel full random play mode
Press STOP. The FULL play mode indicator will go out. The changer will change
to stop mode.
23
Page 24
Spiral Play
The changer plays the first tracks on all the loaded discs in se-
quence, followed by the second tracks on all the discs, and so on.
I I
I I I
T _ _- ,_ _
I I I i i i t
i = Jl
p_s
©
, f
The play mode indicator points to SPIRAL and spiral play will begin
with the first track on the disc at the playing position.
] ;(.'_ '),'(2) (3) (4> <5) I
-" /_-- • o,_J
'v
SPIRAL ONE FULL RANDOM
I- 1
I I I
I FI'/_ i ] i_ U.U I
MIN $EC
I
Before operation, follow the steps 1 -4 of "Basic
Operating Procedure" on page 9.
Press SPIRAL.
SPIRAL
To cancel spiral play mode
Press SPIRAL again.
SPIRAL
24
When the disc with less number of tracks finishes playing, that disc
will be skipped and the changer will continue playing with the other
discs having the tracks not played yet.
The changer will stop automatically when all the tracks on all discs
have played once.
Play the changer with the loading drawer closed.
While the loading drawer is open, the changer will stop after the
current track finishes playing.
The SPIRAL play mode indicator will go out. The changer will return
to sequential play mode from the current track on the current disc
which is playing.
Page 25
Special Features
[ ,DSC_ ]
P_,• J
L
g
ID scan function (Also available from the remote control.)
This function is convenient when searching for a desired track.
The function will search from the beginning of the track for a loud
section, and will play 10 seconds of the track centering around that
point.
The order of scanning is the same as for playback mode.
Press ID SCAN.
I IDSCAN I
I I
The ID scan indicator will illuminate and ID scan function will
operate.
When the desired track has been found:
Press PLAY.
PLAY
The track will then be played back from the beginning.
I I I I
' I " I ' I " ' ' ]
I.'i jJ
[--1
_s
©
, /
[ ,_' { _,' (23) (3) (4) (53) i,., msc f #r_/_ M_N/" 19 II sEc
ID scan indicator
To cancel ID scan
Press ID SCAN while this function is in operation.
I IDSCAN I
L--)5 _
The ID scan indicator will go out.
The changer will continue to play from the current track on the cur-
rent disc which has been playing.
25
Page 26
Special Features ,°o°,,n..°,
_) Pitch control
]
Pitch control function
The playback pitch can be changed as desired within a range of
+12.5%. (The tempo and the pitch of the sound will change
simultaneously.)
1 Press OFFION
The pitch control indicator will illuminate.
t_
L Turn the knob in the "+" or "-" direction.
The pitch will change while the knob is being held, and the
changed values will show on the display.
+: Pitch increases
-: Pitch decreases
I _1 )' "2:_" _:" 3: "4" "5"°_; / I'tL /'_" /=_7 I I
I
Pitch display
I "_*i ..... I I ' I ' I ' I ' I ' I
L__I
r--i
©
S
Pitch changing steps
The +5.9% position is a half tone sharp ( _ ).
The -5.6% position is a half tone flat ( _ ).
The pitch can be adjusted by turning the knob even if the pitch con-
trol indicator is switched off. The playback sound will not change if
this is done. To play back at the setting pitch, press OFF/ON to
make the pitch control indicator illuminate.
Fine adjustment is possible by turning the knob and then im-
mediately turning it back to the original position. In this case, the
pitch will change by 0.1% only.
While changing the pitch, the time display will show the playback
position only. This will not match the actual playback time.
if the knob is released, the pitch will stop changing, and after
approximately 2 seconds the pitch display will change back to
the time display.
To play in the 0% standard pitch
Press OFFION to switch off the pitch control in-
dicator.
OFF/ON
%
26
Even after the pitch control indicator has been switched off, the
pitch setting will remain in memory as long as the power of the
changer is not turned off.
Page 27
2.3
I I I I
r 1
_s
©
7
Auto cue function
The auto cue function allows the unit to wait in a standby condition
at the beginning of each track so as to start play right when you are
ready.
When each track finishes playing, the unit skips to the beginning of
the next track and switches to the play standby mode.
1
Press AUTO CUE.
The auto cue indicator will illuminate.
(1)' (2]D <E3) (4) (_5)' I I'-_ I"_ _ /7 • /7 t-_ l
IT " " " _' I-I L/_ L-I L'I" L' L'. sEc
Auto cue indicator
2
Press PLAY.
(Also availabte trom the remote control.)
The changer switches to the play standby mode at the begin-
ning of the track.
The pause indicator will illuminate, and the play indicator will
flash.
, /
3 Press PLAY again to start play.
(Also available from the remote control.)
Press PLAY at the beginning of each track.
I
The auto cue function may not cause the unit to wait exactly at the
beginning of a track if the track begins with a very soft passage or
if there is a tot of background noise.
• ' ' I /-I • /_1 sE/
Pause indicator Play indicator
/ /
To cancel auto cue
Press AUTO CUE.
AUTO CUE
I
The auto cue indicator will go out.
27
Page 28
Special Features ,.o°,,°u.o,
r 4t4 SEARCH I_b'.
Repeat function ,,..o,,.,..=. from the remota control.)
_s
©
/
You can use this function in all play modes.
Press REPEAT before or during play.
REPEAT
The repeat indicator will illuminate.
I <[1]) (2:1) (3) 4[4:> <(5) / I"_/"7 /-7 I-7 ' t"7/_
Repeat indicator
L/L/.
To cancel repeat function
Press REPEAT again.
REPEAT
Search function
(Also available from the remote
In sequential play mode:
All tracks of all discs will be played repeatedly.
In program play mode:
The changer plays only the programmed selections in the pro-
grammed sequence repeatedly.
In delete play mode:
The changer plays the discs and tracks excluding the selections to
be deleted repeatedly.
In random play mode:
When the changer has played all the tracks on all the loaded discs,
it will select a new random sequence and play continuously. The se-
quence differs each time.
In spiral play mode:
The changer plays all tracks of all discs repeatedly in the sequence
of spiral play.
The repeat indicator will go out.
control.)
28
You can search rapidly forward or backward on the disc for
specific sections.
In the play or pause mode, press and hold 44 or
SEARCH b_
I I J I_1_ " YOU can search forward.
4"4 " You can search backward.
Release the button when you reach desired point.
The changer moves slowly at first and then rapidly if the button is
held down for more than about three seconds.
In the play mode, the sound level decreases by 12 dB (1/4).
In the pause mode, no sound is heard. It remains at the point where
4141 or I_1_ is released.
In sequential play mode:
You can search forward over discs and backward within the cur-
rent disc.
In other play modes:
You can search forward or backward only within the current track.
Page 29
S k i p f u n ct i o n (,,.o ..,,.,,. ,.o. the remote control.,
To skip discs
Carousel
You can use this function in stop mode, sequential play, one disc
random play and delete play mode.
Press DISC SKIP to rotate the disc tray.
DISC SKIP
Disc number at the playing position
I
[ (1),<_2)(3)'(4),(5)' I- T /'_/'-7 /-7 I_ " /"7 I-_
.... MIN SEC
D,S'_ ! /.--J/._l_c_ U U. U u
To skip tracks
Press either SKIP ( I_1<1 or I_),1 ) until you reach
the desired track.
}4< SKIP IHH
I i I
In sequentlallprogramldelete play mode:
In sequential play mode, you can skip only within the current disc.
In program play mode, you can skip from one track to another in
the programmed sequence.
In delete play mode, you can skip tracks only within the current
disc excluding the tracks to be deleted.
I_IM : You can skip as many tracks as the number of times you
press the button.
I<1<1: You can skip to the beginning of the track being played. If
you press this button again quickly, you can skip to the
beginning of the previous track.
Remember that in a backward skip, the current track is in-
cluded in the count.
I_1_ " You can skip forward.
I<1<1: You can skip backward.
In stop mode:
When the loading drawer is closed, pressing DISC SKIP changes
the disc tray to the next one.
When the loading drawer is open, pressing DISC SKIP moves the
carousel by two disc trays.
In play mode:
When the loading drawer is closed, pressing DISC SKIP changes
the disc and the changer plays the track on next disc.
When the loading drawer is open, pressing DISC SKIP moves the
disc tray to the next one. Pressing again moves the carousel in the
opposite direction so that you can change all discs except the one
being played.
In random play mode:
I_),1 You can skip to the beginning of a next track in random man-
ner.
141<1: You can skip to the beginning of the current track.
In spiral play mode:
I_),1 : You can skip to the beginning of a track on next disc.
t41<1: You can skip to the beginning of a current track.
You can also skip tracks when the changer is in the pause mode or
stop mode.
29
Page 30
Special Features
O i OPEN/CLOSE
olsc1 D_SC2 DISC3 DISC4 [_sS_5
66660
66666
oo (56
(continued)
TIME
TIME MODE
QQ DD
II STOP II PAt_E • PLAY
Q F---n r----1
_ J
Time mode selection (Only available from the remote control.)
Press TIME MODE in the play or pause mode.
TIME MODE
In all play modes:
When track number 21 or greater is playing, display 3 shows
,,_.... ,,
%
The information will change (as described below) each time you
press the button.
4
1 Track number and elapsed play time of the current track.
(1)(2)(3)(4)_ .... --II-- --I,,,c,I- un _ / J
. . . _1_ DISC MIN SEC
In programldeletelrandomlspiral mode:
The displayed information will alternate between displays 1 and 3
each time the button is pressed.
In CO edit.recording mode:
The remaining play time on side A or side B will be shown in display
2, and the elapsed play time for side A or side B will be shown in
display 4.
3O
4r
Total remaining time on the disc.
<1 ) (:2) (3) (4) _5_ - .'lll-J_l IZI
I ..... s 28 1
Track number and remaining time of the current track.
(:1:)"(:2) (:3:)' (:4),_'.' 5_' 1-- LI" 19 I
Total elapsed play time on the disc.
I '(:1:)' (:2) (3:]) '(:4)'_::' ''_' I-. _ . II_' '" D,SC'_I I1"1"1"_11'_1 II N LI !._lsec
- - - _ DISC MIN SEC
... ;o,a II.:. =
When you stop playing and play again, the display will return to
display 1.
Page 31
CD Edit-Recording
Noted below are two methods for recording so that the tracks are
divided between Side A and B according to the length of the tape,
and the track is not cut off in the middle by the end of the tape.
Select the desired method and record.
About sequential-edit-recording
A method recording sequentially beginning with the first track by
selecting the disc (1 disc) you want to record from the discs set in
the changer.
When the length of the tape for recording is designated, the
microcomputer in the changer automatically calculates which
tracks will be entered onto sides A and B, and displays this in the
display. When recording of side A finishes, the reverse function of
the cassette deck operates and recording on side B begins. Then,
after the last track to be entered onto side B finishes playing, the
changer stops and the cassette deck returns to a paused condi-
tion.
(See pages 32-33.)
About program-edit-recording
A method for programming and recording the tracks you desire
from among the discs set in the changer (maximum of 5 discs).
When recording of side A finishes, the reverse function of the
cassette deck operates and side B automatically begins recording.
Then, when the next track to be recorded will not fit in the time re-
maining, the changer stops and the cassette deck returns to a
paused condition.
(See page 34.)
Specified disc
C-60
j°
Side A (30 rain.)
I TR C , I TRACK I TRACK 3
I I ' CKS I
f
silent space
Side B (30 min.)
I TRACK6 I TRACK7 L TRACK8 I TRACK9 I 1
f
silent space
DISC 1 DISC 2 DISC 3 DISC 4 DISC 5 C-60
JjjJJ°I J
Side A (30 min.)
DISC 3 DISC 2 / DISC 4 DISC 1 I
TRACK 9 TRACK 3 / TRACK 1 TRACK 1 1
silent space
Side B (30 min.)
DISC 5 DISC 3 DISC 2 DISC 4 /
TRACK 3 TRACK 7 TRACK 6 TRACK 2
silent space
$
J
31
Page 32
CD Edit-Recording ,co.,,.u..,
i i , _sK_ 11 (/'J Prepare the / IO 14 1 l/
| "-'-_,'_k_J | cassette deck for| | / /
L___ R..) J L recording. J _ "_ J _ _) J
0
h , f
Sequential-edit-recording
The changer automatically calculates how many tracks on the
specified disc will fit on a given tape side and programs them for
you.
Before operation, follow the steps 1-4 of "Basic
Operating Procedure" on page 9.
.4
/ Press DISC SKIP to select the disc to be ,J
recorded.
Specified disc number
1(f)(2)(3)(4)(5) [-nn i-i'-Illt-i Iz! UU.LILI
.... o,=:/_J L/T.= .,. s_c
2
Prepare the cassette deck for recording.
1. Insert the cassette tape into the cassette holder of the
deck for the synchro edit recording. (Be sure the tape is re-
wound.)
2. Select the noise-reduction system and the reverse mode
(C-'_).
3. Check to be sure that the forward-side indicator (1_) of the
deck to be used is illuminated.
4. Press PLAY of this changer.
5. Set the cassette deck on the recording standby mode.
6. Adjust the recording level.
7. Press STOP of this changer.
(Refer to the operating instructions for the cassette deck.)
I
Press TAPE LENGTH to select the tape
length.
Each time you press the button, the display showing the tape
length changes as follows. Choose the length of the tape you
will use.
I-C-46 _> c-80 _> c-9o ©
I,
C----]
I
(1) (2) (3) (4),_,' ,5),' /'_ l l-- - h I El ] J
The maximum allowable playing time for editing is 99 minutes.
To enter desired recording time other than 46, 60 or 90
minutes:
1 Select C---.
2 Enter the total recording time in minutes (1-99) using the
You can also specify the tape length pressing the skip button.
Press either I_1_1 or 141_1 from each step C-46, C-60, C-90 or
C---,
For example:
To use 52-minutes tape, select C-46 and press and hold I_1_1
until the display shows __.
._. ,_. o,oc IL .,,I
Compact disc edit indicator
numeric buttons on the remote control.
For example:
To use 52-minute tape, press 5 then 2.
/
32
Page 33
The display shows the data of the tracks to be recorded as
|ollows:
Number of tracks Tracks to be
to be recorded recorded
_, Remaining time on side A
. . _ BITe i.l." SECll
4
Number of tracks Tracks to be
to be recorded recorded
* 1 ]) .2) .3) (4]) ._' ,5_,' B
_, Remaining time on side B
. . . B)(TII I'MIN" _ECl I
In this example, disc 5 can be recorded with tracks 1 -5 on
side A and tracks 6-9 on side B of the cassette tape.
'-" ":-' '--711
4
Press PLAY.
Recording will begin from side A.
When the tracks programmed for tape side A have finished
playing, the changer searches for the beginning of the first
track to be recorded on side B and switches to the pause
mode. When the auto reverse mechanism of the cassette
deck works at the end of side A and the tape switches to side
B, recording for side B starts automatically.
During recording, the changer automatically makes approx-
imately 3-second silent gaps at the beginning of every track
(auto space function).
Depending on the disc, a little sound of the beginning of the
next track may be recorded onto the end of the track.
If a cassette deck to be used has no synchro edit
function
Start recording on the cassette deck at the same time you press
PLAY of this changer.
When the recording for side A is finished, the changer goes into the
pause mode. As soon as the cassette deck switches the tape side
to B, press PLAY of the changer.
When all the programmed tracks on the specified disc finishes play-
ing, the changer will automatically stop. The edit mode will be
cancelled at the same time.
To stop recording
Press STOP and then press the stop button on the
cassette deck.
33
Page 34
CD Edit-Recording ,oo.,,.uo°,
I f Prepare the / /_ TAPE LENGTH / Iz-! - I _,_ 1
tracks from the | / cassette deck for/ / / /
desired discs. J L recording. J ___ _ J _
P rog ra rn.edit.re cord i ng
Editing of the selections which you have programmed among the
five discs is available.
Note that you cannot get the information regarding the number of
tracks that will be recorded and the remaining time on side A and B
as in the "Sequential-edit-recording".
Before operation, follow the steps 1 -4 of "Basic
Operating Procedure" on page 9.
Enter the desired disc numbers and track
numbers following the programming pro-
cedure.
(See pages 14 - 17.)
For example:
When using a 46-minute tape, you should calculate the total
programming time to be recorded (including the 3-seconds
silent gap) for each tape side A/B (23 minutes) and program
the selections accordingly.
The changer can edit up to 32 selections.
2
Prepare the cassette deck for recording.
1. Insert the cassette tape into the cassette holder of the
deck for the synchro edit recording. (Be sure the tape is re-
wound.)
2. Select the noise-reduction system and the reverse mode
(c-'_).
3. Check to be sure that the forward-side indicator (1_) of the
deck to be used is illuminated.
4. Press PLAY of this changer.
5. Set the cassette deck on the recording standby mode.
6. Adjust the recording level.
7. Press STOP of this changer.
(Refer to the operating instructions for the cassette deck.)
3
Press TAPE LENGTH to select the
tape
length.
(See step 3 on page 32.)
For example, if you use a 46-minute tape:
The disc number programmed first
I
I <1"<2"_" '31p:'4"<5" "/ }-- - IJ5 I --I /._
PGM _ _ . B)fl'll msc MIN
4_
I (1 J, <2):<.' _:.4_. <_) _7
. PGM . . . EDffll o=_ I
The maximum allowable playing time for editing is 99 minutes.
I--1"1"71t--/ I
SEC
4 Press PLAY.
Recording will begin from side A.
When the tracks programmed for tape side A have finished playing,
the changer switches to the pause mode at the beginning of the
first track for side B. When the auto reverse mechanism of the
cassette deck works at the end of side A and the tape switches to
side B, recording for side B starts automatically.
Depending on the disc, a little sound of the beginning of the next
track may be recorded onto the end of the track.
To stop recording
Press STOP and then press the stop button on the
cassette deck.
34
Page 35
Before Moving
CAUTION:
Before moving this changer to another location, be sure that no
discs were left in the changer and that the changer was not switch-
ed off while in the play mode.
Failure to do so will expose the compact discs and the changer to
the risk of severe damage.
• OFF = ON • OFF a ON _ J
o o
\ X
Remove the
discs.
1 Press POWER to switch off the power.
2 Press POWER to switch on the power.
3 Press OPENICLOSE to open the loading
drawer.
4 Press DISC SKIP to rotate the disc trays and
remove the discs from all disc trays.
5 Press OPENICLOSE to close the loading
drawer.
6 Press POWER to switch off the power.
If you have pressed a wrong button by mistake, return to step 1
35
Page 36
Quick Reference Table of Remote
Control Operation
Before using the remote control transmitter, turn on the power
switch ol the main unit.
Sequential/direct access play
I:_SC SKIP_
olsc_ Bis¢_ Btsc30lS(;4 I_s5
©66©o
66666
O0
_PEAT _ to s6_
c_ _cD
,N SEARCH I'1" NI4 SKIP 14"1
GI_ [][]
II STOP II _US[ • PLAY
_ F---? r--7
L,_)
CD
To open and close the
loading drawer
To select the disc
To specify the disc
number
To specily the track
number
To start play
To stop play temporarily
To stop play
& OPEN/CLOSE
DISC SKIP
KD
1_ 1 2 3 4 5
(_ DISC1 DISC2 DISC3 DISC4 DISC5
DISC1 DISC2 DISC3 DISC4 DISC5
00000
6 2 3 oo66
66_ " ,0
• PLAY
II PAUSE
• STOP
DO
0 >10'
O0
5
(See page 13)
Random play
36
To start one disc
random play
To start full random play
To cancel random mode
RANDOM
MODE
CD
RANDOM
MODE
• STOP
0
Press once when in stop mode,
Press twice when in stop mode.
Page 37
Programldelete play
D_C 1 _SC 2 [_SC 3 BSC 4 [_SC S
06660 °
66666
oo 6
REP[AT MODE ID SCAN
_ CB_
_NOOM
(-7
S[AnCH I'_ _ SKO Idd
1_5 5Q
Nr r-
_J
,_. .J
To start programldelete
play
To check the entered
contents
To clear a single item of
the entered contents
To clear all entered con-
tents
To cancel
programldelete mode
PROGRAM
MODE
c:p ,, _::] * ooooo
Select program or olsc_ DISC2 DISC3 DISC4 DISC5
delete mode. 6 6 3
• PLAY
F-----I _. 6 cb s .
DISC1 DISC2 DISC3 DISC4 DISC5
1 2 3 4 5
4,
o6cb
oo6
0 >10
OO
(See pages 16, 20)
RECALL
0
RECALL CLEAR
O-_O
(in the stop mode)
• STOP
(See pages 17, 21)
5
(In the stop mode)
PROGRAM
MODE
0
Press twice in program mode.
Press once in delete mode.
Special features
BSC 1 DISC 2 {_SC 3 _SC 4 D_SC 5
6666o"
66666
"_- 66
o00
_EPEA_ MOOE IO SCAN
<,l SEARCH _ H4 SKIP I_1
DD QD
• STOP II PAUSE • pLAY
To repeat play
To start ID scan
To select time mode
To search for a desired
place
To skip a track
REPEAT
TIME
MODE
(in the play or pause mode)
<14 SEARCH I_
To cancel repeat mode, press
this button again.
To cancel ID scan, press this
button again.
QD
SKIP I"•1
DD
(See page 30)
(See page 28)
37
Page 38
Concerning Compact Discs
With this changer, you can only play compact discs having this
mark:
Handling precautions
To open the compact disc case, gently press the sides of the top,
holding the top at both sides and pull up.
To remove the disc from the case, press the center holder and lift
the disc, holding by the edges.
Center holder
To return the disc to the case, insert the clisc will label facing up
and press downward at the center.
Hold compact discs by the edges so you will not soil the surface
with fingerprints. Fingerprints, dirt and scratches can cause skipp-
ing and distortion.
Storage precautions
Do not use record cleaning sprays, benzine, thinneh static electrici-
ty prevention liquids or any other solvent on disc.
If the surface is soiled, wipe gently with a soft, damp (water only)
cloth.
Always move the cloth directly outward from the center of the disc,
not in a circular motion as with standard phonograph records.
(Correct)
If you are taking the disc from a cold to a warm environment,
moisture may form on the disc. Wipe this off with a soft, dry, lint-
free cloth before using the disc.
Do not write on the label side with a ball-point pen or other writing
instrument.
(incorrect)
Be sure to store discs in their cases to protect them from dust,
scratches, and warping.
Do not place or store discs in the following places:
1) Locations exposed to direct sunlight.
2) Humid or dusty locations.
3) Locations directly exposed to a heat vent or heating appliance.
4) In the glove compartment or rear deck of an automobile.
Technical Specifications
• AU DIO
No. of channels
Frequency response
Output voltage
Dynamic range
SIN
Total harmonic distortion
Wow and flutter
DA converter
Output Impedance
Load impedance
Headphone output level
2 (left and right, stereo)
2-20,000 Hz, +1 dB
2 V (at 0 dB)
92 dB
100 dB
0.007% (1 kHz, 0 dB)
Below measurable limit
MASH (1 bit)
Approx.1 k_
More than 10 k_
3 mW (32 Q)
•GENERAL
Power consumption
Power supply
Dimentlons (W x H x D)
Weight
Note:
Specifications are subject to change without notice.
Weight and dimentions are approximate.
13W
AC 120 V, 60 HZ
430x 130x 401 mm
(16-15116" x 5-1/8" x 15-25/32")
5.0 kg (11.0 lb.)
38
• PICKUP
Wavelength
780 nm [MASH Is a trademark of NTT. I
Page 39
Troubleshooting Guide
Before requesting service for this unit, check the chart below for a
possible cause of the problem you are experiencing. Some simple
checks or a minor adjustment on your part may eliminate the pro-
blem and restore proper operation.
I
Changer will not play.
The disc In the changer
does not play.
A certain music passage
can't be played correctly.
These is noise from the
tuner or disturbance on the
TV screen.
When program play is
started, an error message
(-E) appears on the
display.
An error message (-E)
appears on the display, and
the changer stops
operating.
The loading drawer stops in
the middle of opening.
Remote control does not
operate correctly.
Problem
The disc(s) or other foreign object(s) has fallen
inside of the changer.
Moisture has condensed in the changer.
The disc is upside down.
The disc is dirty.
The disc is scratched.
The disc is warped.
The disc is not within specified standards.
The disc is dirty.
The disc is scratched.
Caused by high-frequency signals of this changer.
Playback was started without a track being
programmed.
The mechanism of the changer has been
improperly adjusted.
The batteries are dead. • Replace batteries with new ones.
There is an obstruction between the remote • Remove the obstruction.
control and the changer.
The batteries are inserted incorrectly. • Reinsert batteries so that the polarities are cor-
[The (+) and (-) polarities are reversed.] rect.
Probable cause(s)
If you are in doubt about some ol the check points, or if the
remedies indicated in the chart do not solve the problem, refer to
the directory of authorized service centers (enclosed with this unit)
to locate a convenient service center, or consult your Technics
dealer for instructions.
(In U.S.A. consult MSC Authorized Servicenters for detailed instruc-
tions.)
Suggested remedy
• Open the loading drawer, then remove the object.
• Switch ON and allow the changer to dry out for
about one hour before using the changer.
• Be sure the label is facing upward.
• Wipe it with a soft cloth.
• Replace the disc with a new disc.
• Exchange the disc for another one.
• Wipe the disc with a soft cloth.
• Replace the disc with a new one.
• Use the changer farther away from the tuner or
TV.
• If the tuner's or TV's antenna is the indoor type,
use an outdoor one.
• Program a track.
• Turn the power switch OFF and then back ON
again.
However, if the loading drawer is fully open, take
out the compact discs (1 or 2) and then turn the
power switch OFF and then back ON again.
I
Product Service
Do not attempt to remove the cover(s) or repair the unit yourself.
Refer servicing to qualified personnel only.
Product information
For product service, product information or assistance in product
operation, refer to the servicenter directory.
39
Page 40
Index
Auto cue button (AUTO CUE) .............................. 27
Auto cue function ......................................... 27
CD edit-recording .................................... 31-34
Clear button (CLEAR) .................................. 17, 21
Compact disc edit indicator (EDIT) ......................... 32
Delete play .......................................... 18-21
Delete play indicator (DEL) ................................ 18
Direct access play .................................... 12-13
Disc buttons (DISC 1-5) ........................... 12, 14, 18
Disc indicators ((1) _ (5)) ............................. 12
Disc number/tape side display ............................... 8
Disc skip button (DISC SKIP) .............................. 10
Full random play ......................................... 23
Headphones jack (PHONES) .............................. 11
|g scan button ( _ ) .............................. 25
ID scan function .......................................... 25
ID scan indicator (SCAN) .................................. 25
Numeric buttons (1-10, 0, >10) ....................... 12, 13
One disc random paly ..................................... 22
Pause button (11 PAUSE) ................................. 11
Pause indicator (ll) ....................................... 11
Pitch control .............................................. 26
Pitch control button (OFFION) ............................. 26
Pitch control function ...................................... 26
Play button _ PLAY) ...................................... 9
Play indicator (_-) ......................................... 10
Play mode indicators ( .VV. V. ) ....................... 22-24
Program-edit-recording .................................... 34
Program mode button (PROGRAM MODE) .............. 14, 18
Program play ......................................... 14-17
Program play indicator (PGM) .............................. 14
Random mode button (RANDOM MODE) ............... 22, 23
Recall button (RECALL) ................................ 17, 21
Repeat button (REPEAT) .................................. 28
Repeat function ........................................... 28
Repeat indicator (_------_) ................................... 28
Search buttons (<1<1 SEARCH I_1_) ....................... 28
Search function ........................................... 28
Sequential-edit-recording .............................. 32 - 33
Sequential play ....................................... 10-11
Skip buttons ( 141_1 SKIP IN_ ) ............................. 29
Skip function ............................................. 29
Spiral button (SPIRAL) .................................... 24
Spiral play ................................................ 24
Stop button (Ill STOP) ..................................... 11
Tape length button (TAPE LENGTH) .................... 32, 34
Time mode button (TIME MODE) ........................... 30
Time mode selection ...................................... 30
Time/program sequence/pitch display ........................ 8
Track number display ..................................... 10
This device complies with Part 15 of the FCC Rules. Operation is interference received, including interference that may cause
subject to the following two conditions: (1)This device may not undesired operation.
cause harmful interference, and (2) this device must accept any
This equipment has been tested and found to comply with the
limits for a Class B digital device, pursuant to Part 15 of the FCC
Rules. These limits are designed to provide reasonable protec-
tion against harmful interference in a residential installation. This
equipment generates, uses and can radiate radio frequency
energy and, if not installed and used in accordance with the in-
structions, may cause harmful interference to radio communica-
tions. However, there is no guarantee that interference wilt not
occur in a particular installation. If this equipment does cause
harmful interference to radio or television reception, which can
be determined by turning the equipment off and on, the user is
Panasonic Company, Division of
Matsushita Electric Corporation of America
One Panasonic Way
Secaucus, New Jersey 07094
Panasonic Sales Company, Division of
Matsushita Electric of Puerto Rico, Inc.
San Gabriel Industrial Park
65th Infantry Ave. Km. 9.5
Carolina, P.R. 00630
Printed in Japan RQT1900-P
encouraged to try to correct the interference by one of the follow-
ing measures:
• Reorient or relocate the receiving antenna.
• Increase the separation between the equipment and receiver.
• Connect the equipment into an outlet on a circuit different from
that to which the receiver is connected.
• Consult the dealer or an experienced radiofTV technician for
help.
Panasonic Company (West) of America, Division of
Matsushita Electric Corporation of America
6550 Kate[la Ave.
"Cypress, CA 90630
Mstsushlta Electric of Canada Limited
5770 Ambler Drive, Mississauga,
Ontario L4W 2T3


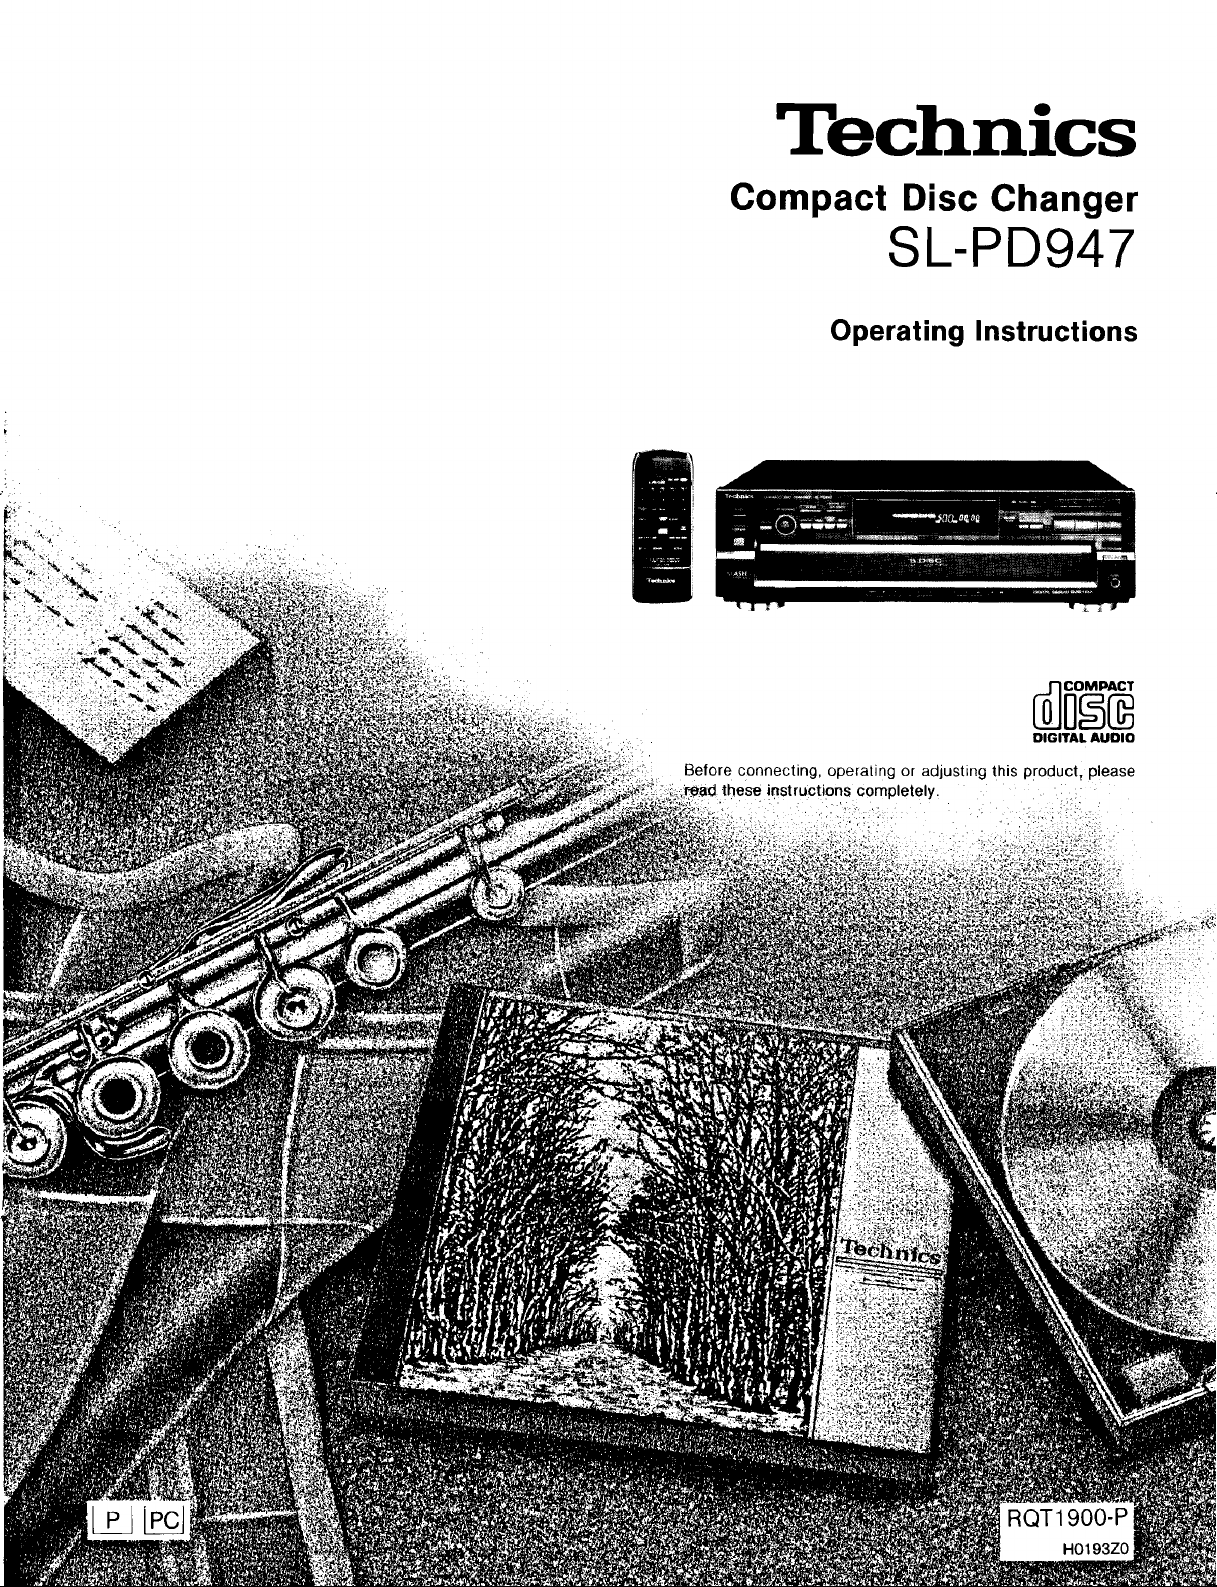

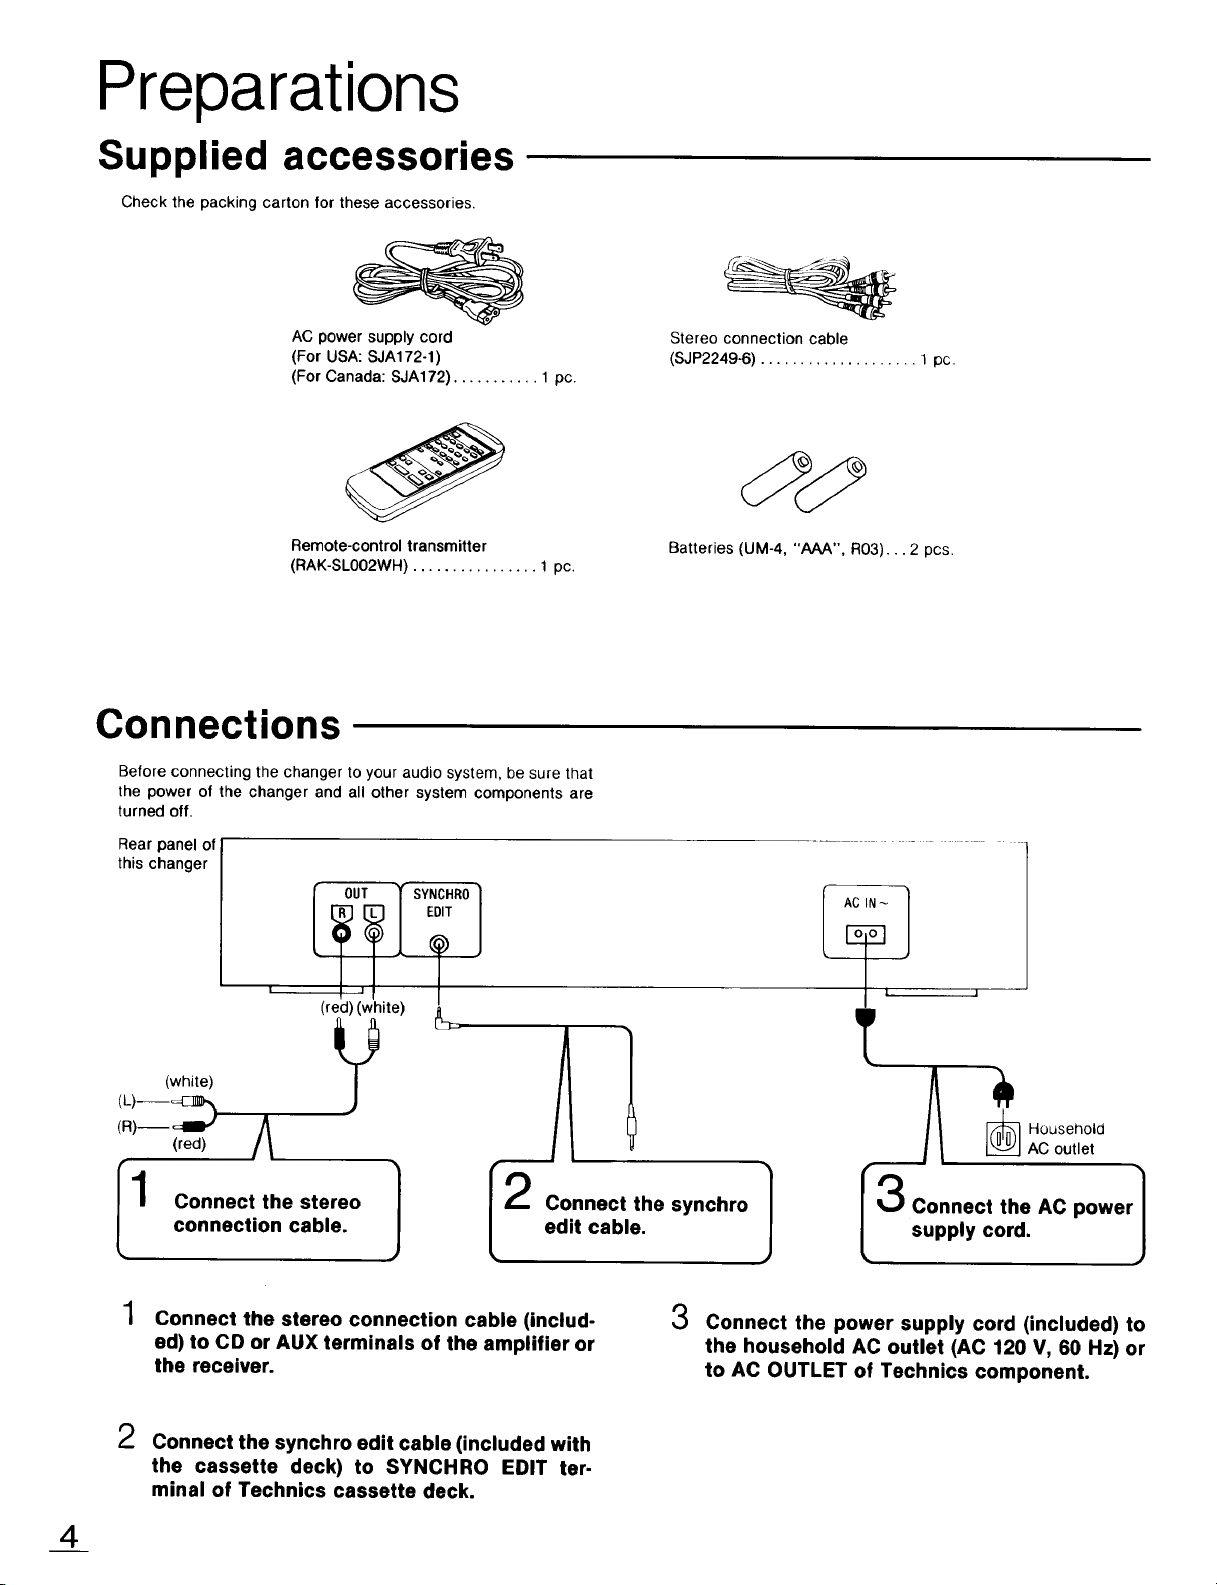

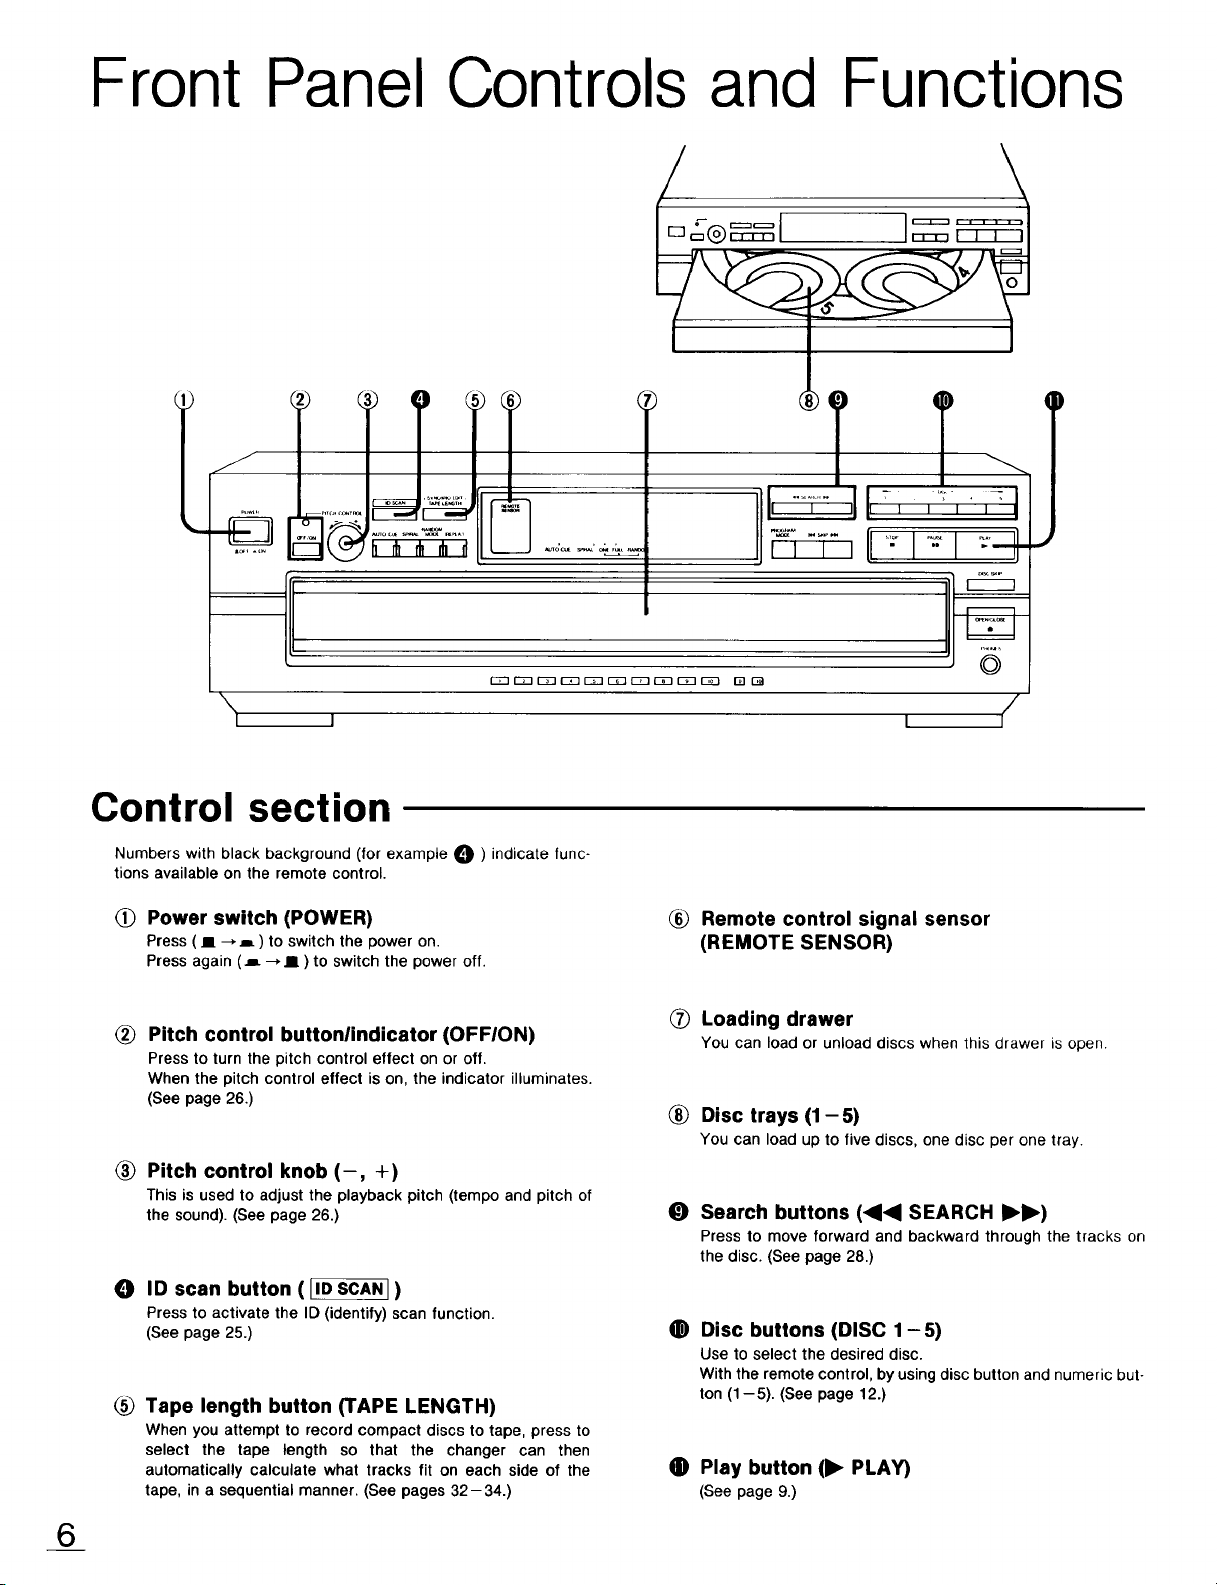
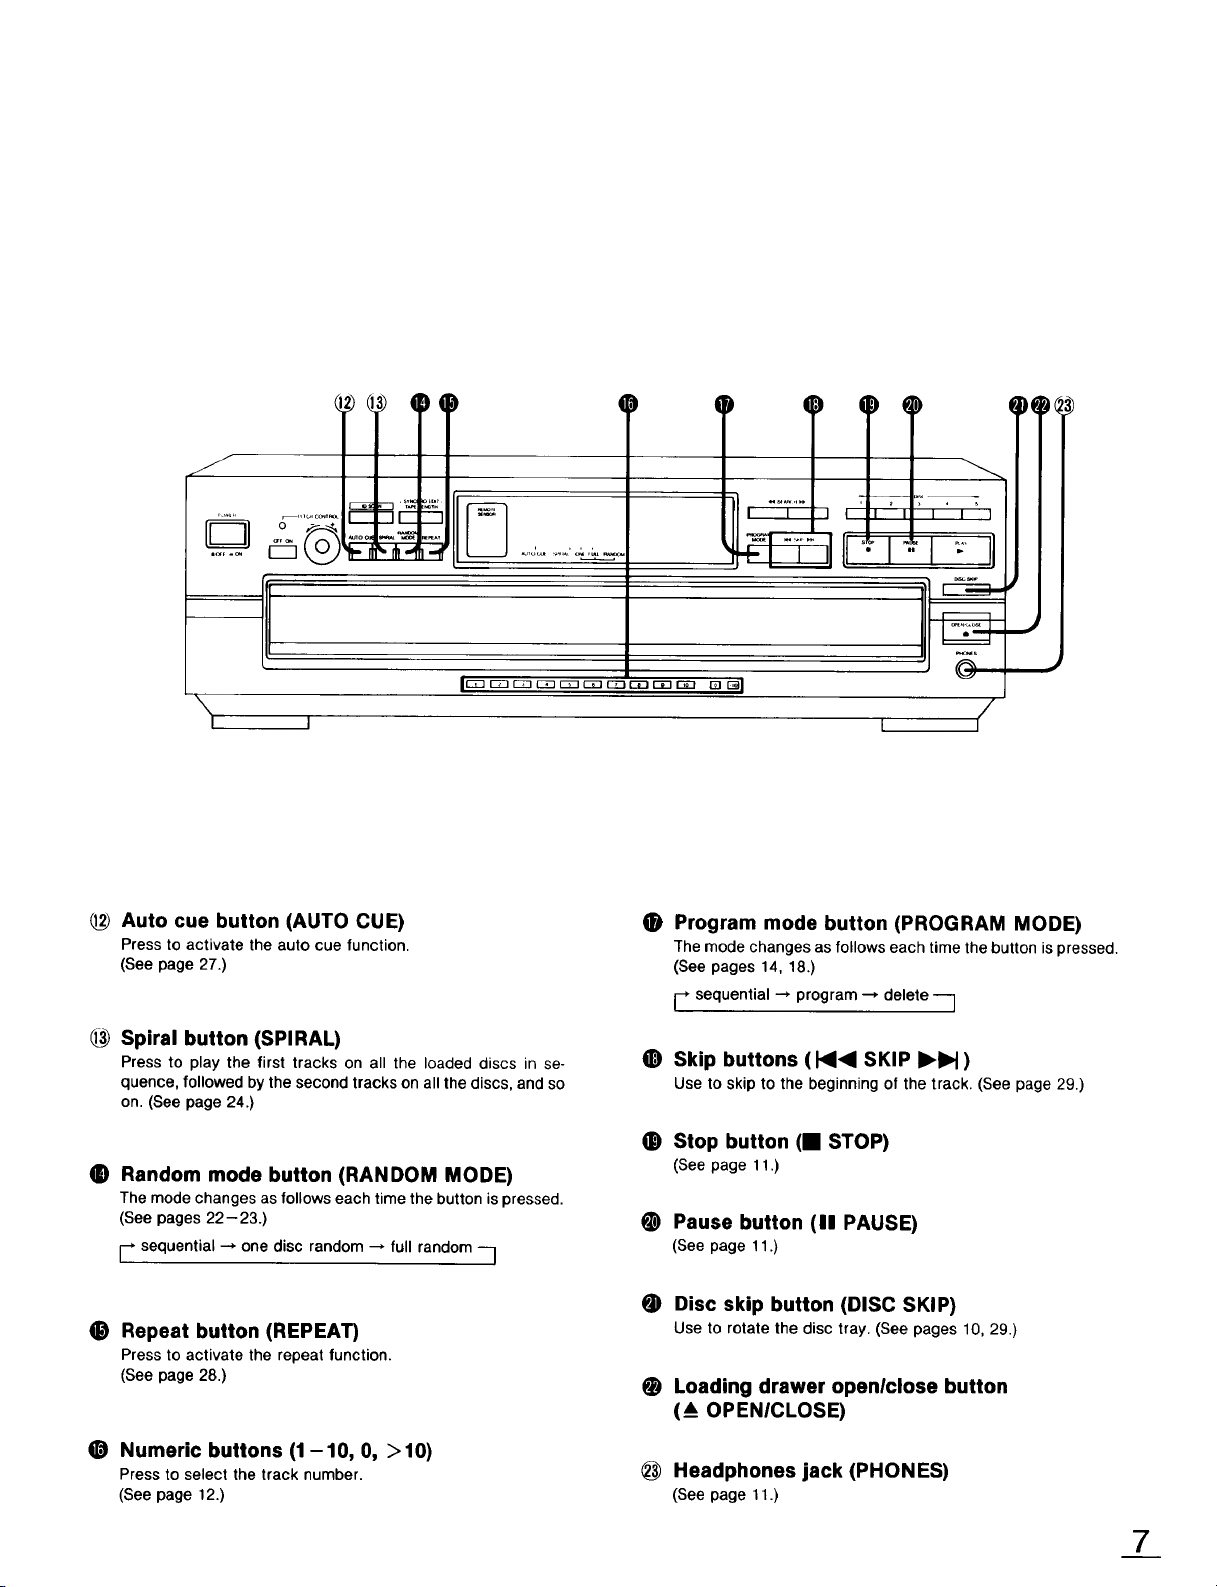


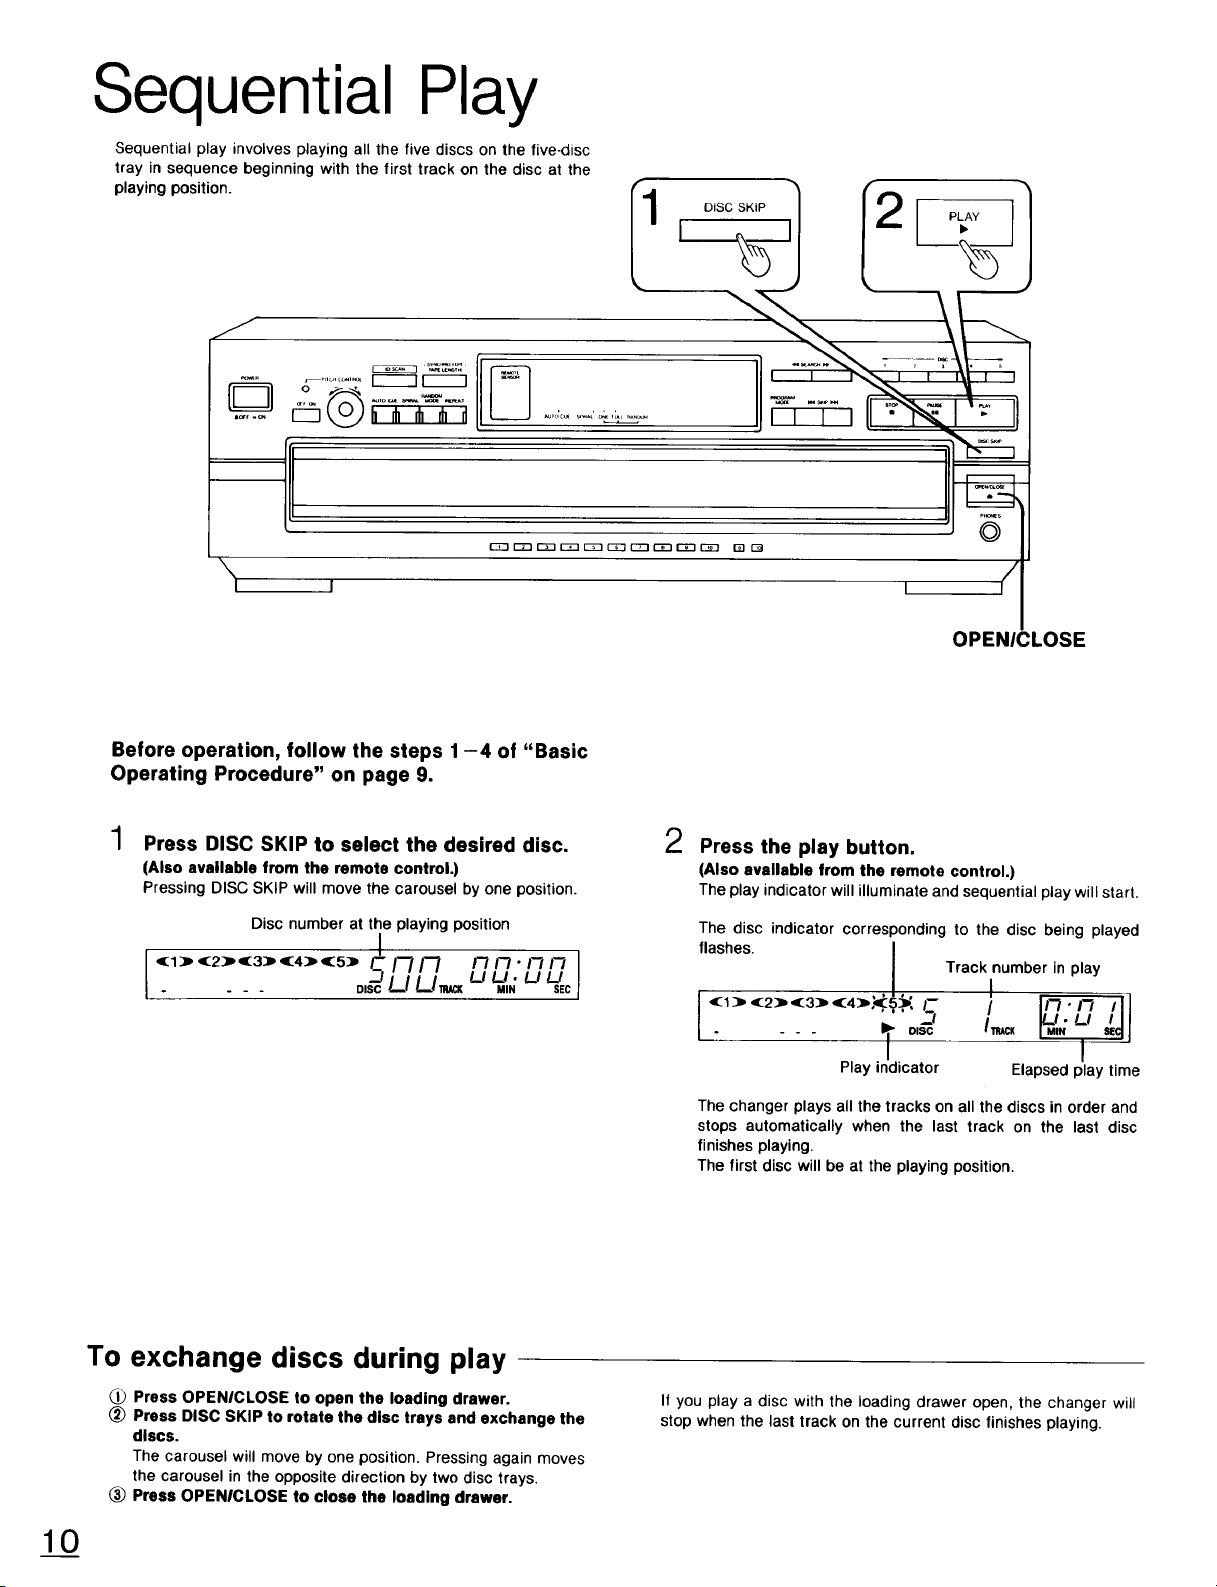
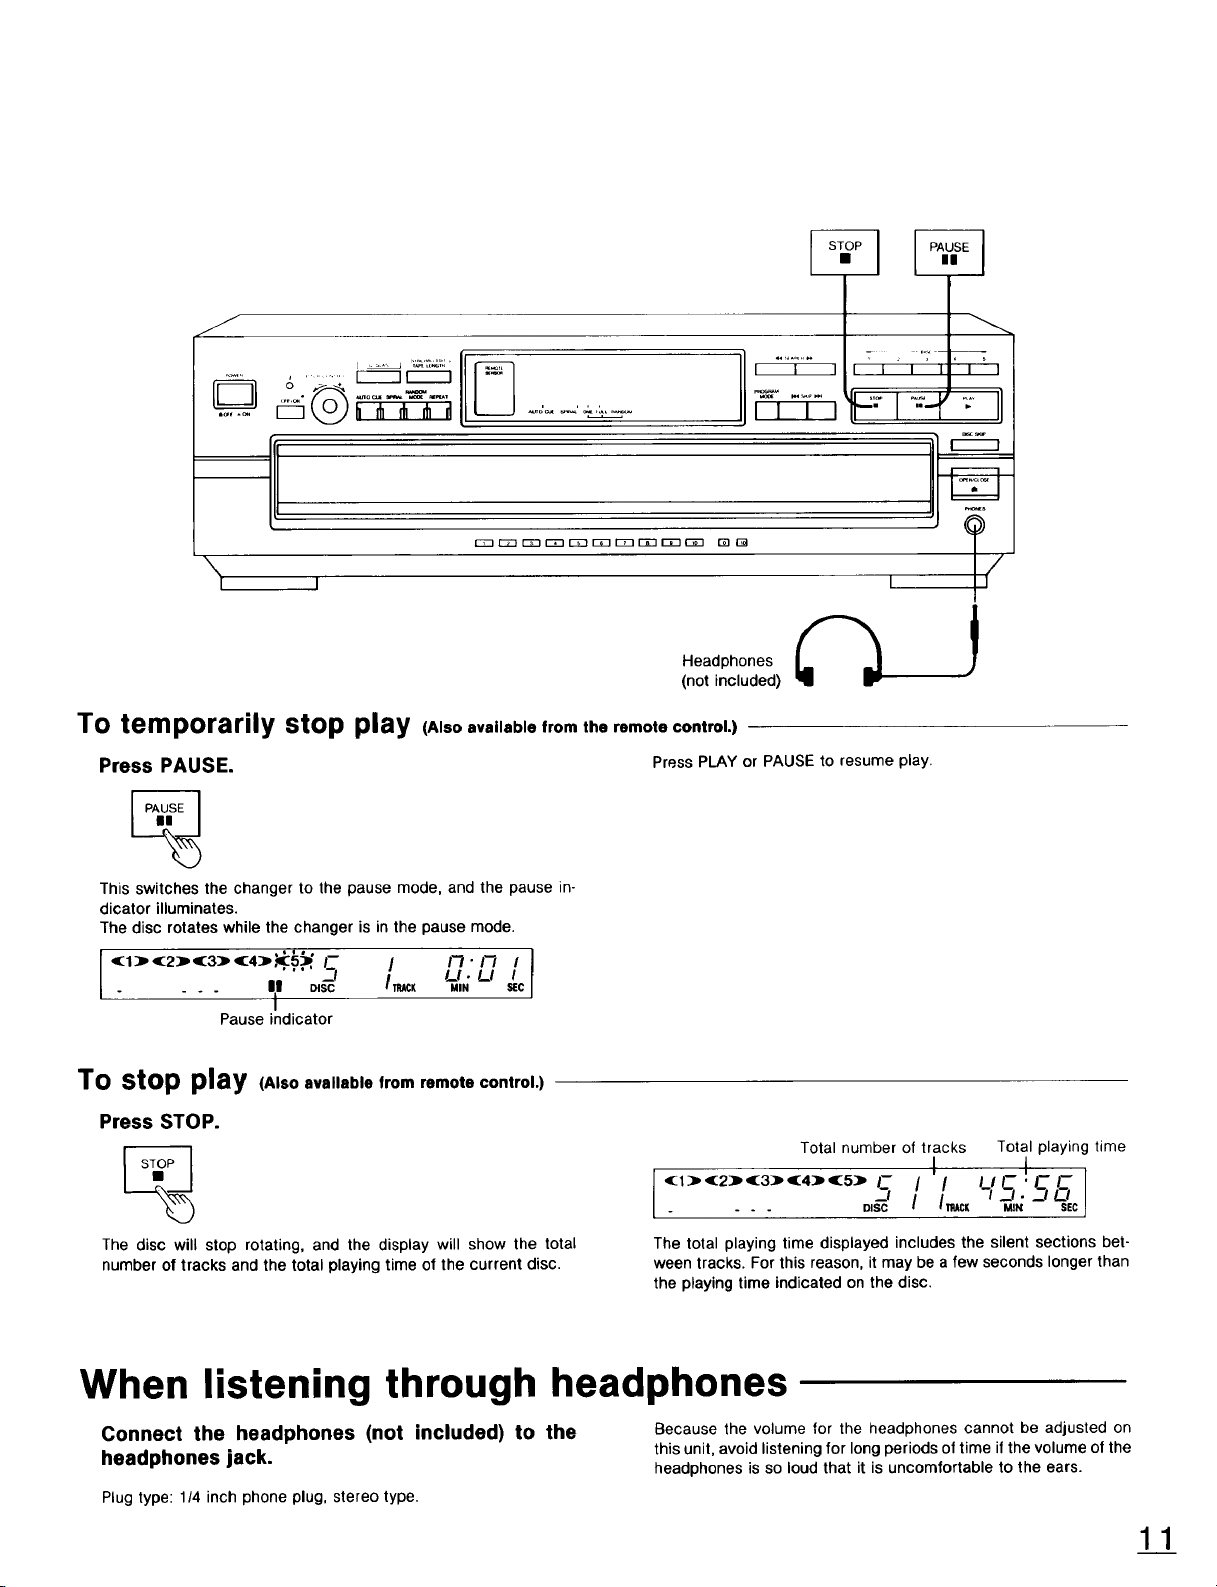
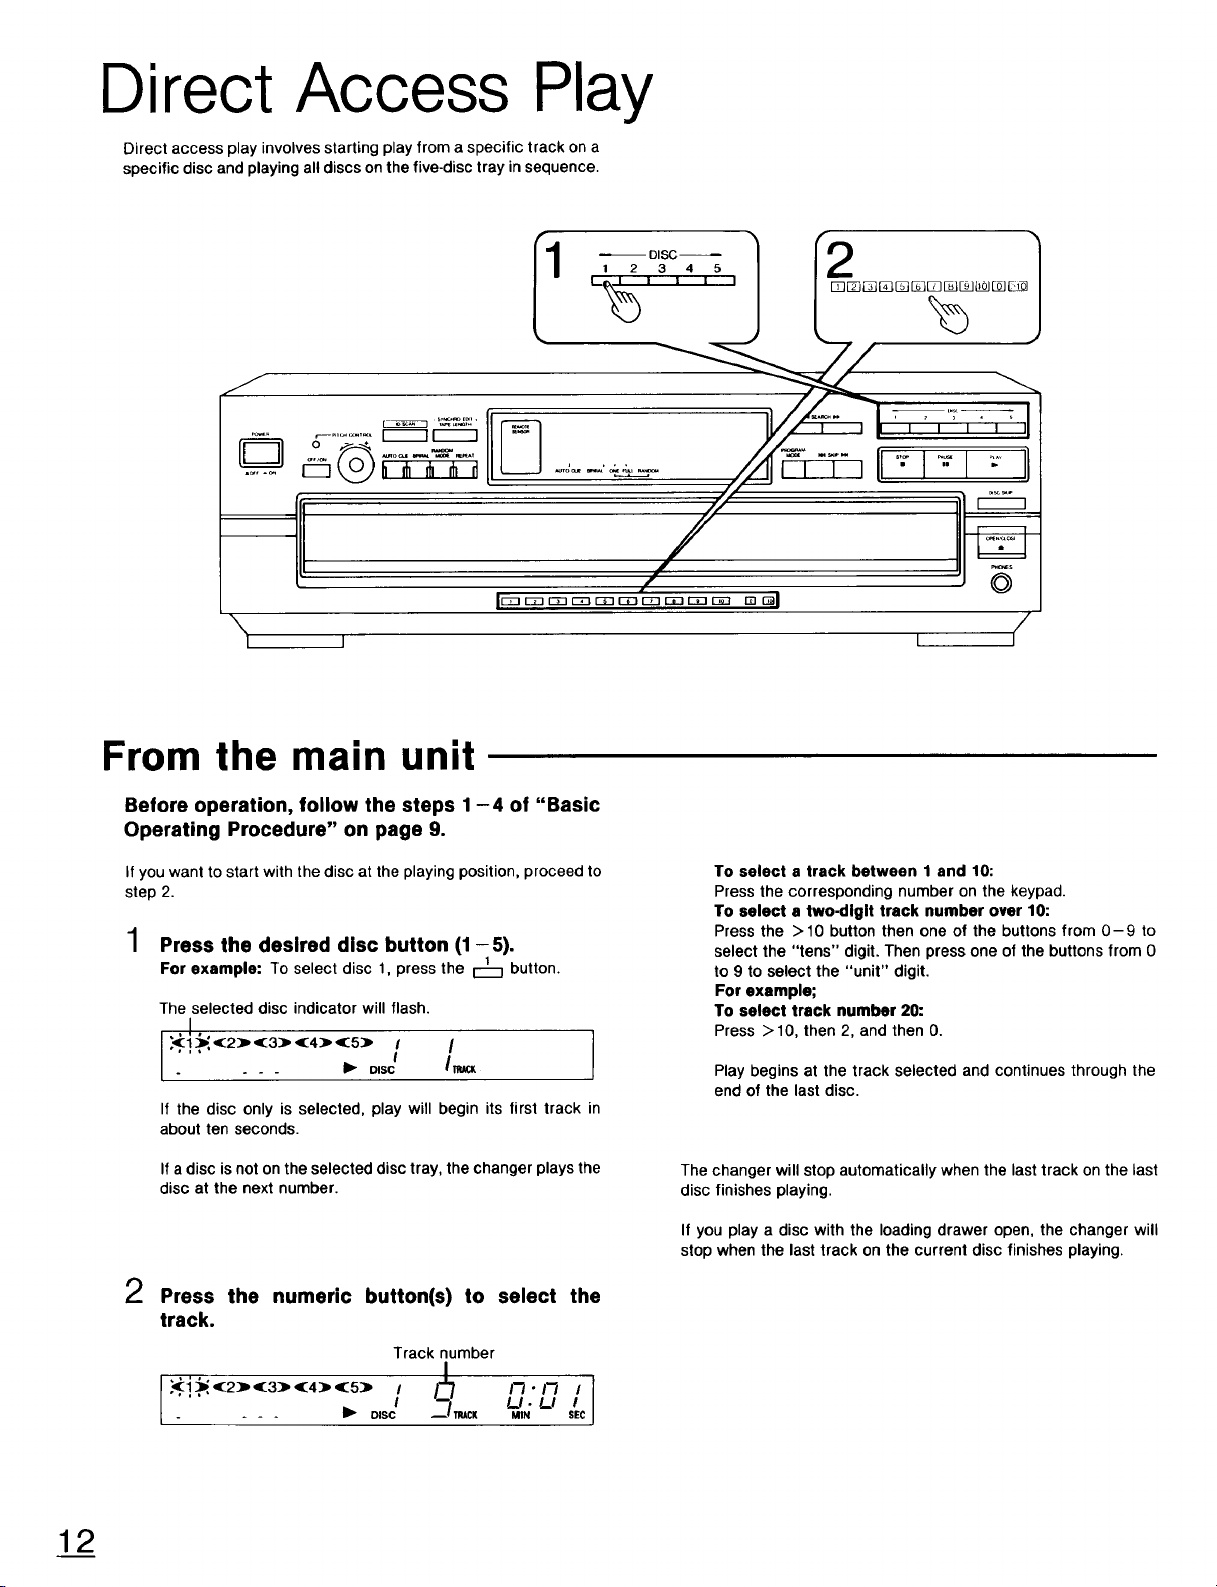


 Loading...