

Technics SL-PD-787 Owners Manual

Technics
Compact Disc Changer
SL-PD987/SL-PD887/
SL-PD787
Operating Instructions
. :The photograph.shows the 5L-PD88! model.
,g, operating or adjusting this product, please
l_Se instructions completely:
DIGITAL AUDIO
Dear Customer
Thank you for purchasing this Technics product.
For optimum performance and safety, please read
these instructions carefully.
These operating instructions are applicable to the SL-PD987, SL-
PD887 and SL-PD787 models.
These operating instructions, however, fundamentally explain the
operation of SL-PD987 model.
The model number and serial number of this product can be
found on either the back or the bottom of the unit.
Please note them in the space provided below and retain
them for future reference.
MODEL NUMBER
SERIAL NUMBER
Before use
Precautions ........................................ 4
Front panel controls .............................. 5
Connections ....................................... 6
Operations
Basic operations .................................. 7
Sequential play ........................................ 7
To directly access a desired track ...................... 8
To exchange discs during play .......................... 8
To temporarily stop play ............................... 8
To stop play .......................................... 8
Program play ....................................... 9
Using the remote control transmitter
i--i_ "JDI_;irJ$.lm "JD]:t:tl'm,],nL,. ............................ 10
Random play ....................................... 10
One disc random play ................................. 10
Full random play ...................................... 10
Delete play ......................................... 11
Using the remote control transmitter
Ik'lmllUI]t};Vi_.i_ rJii;i;ir--'01'nLI ............................ 12
Spiral play .......................................... 12
ID scan function ................................... 13
Search function ................................... 13
Skip function ....................................... 14
To skip discs .......................................... 14
To skip tracks ......................................... 14
Repeat function ................................... 15
Time mode selection ............................. 15
Edit guide function ............................... 16
Pitch control function _ ............ 17
Auto cue function _ ................. 18
Reference
Concerning compact discs ...................... 18
Troubleshooting guide ........................... 19
Product service .................................. 19
Cautions concerning the moving
of this unit ............................. Back cover
Technical specifications ............. Back cover
-THIS PHRASE IS APPLIED ONLY FOR U.S.A.:
This device complies with Part t 5 of the FCC Rules. Operation
is subject to the following two conditions: (1) This device may
not cause harmful interference, and (2) this device must ac-
cept any interference received, including interference that
may cause undesired operation.
CAUTION:
This equipment has been tested and found to comply with the
limits for a Class B digital device, pursuant to Part 15 of the
FCC Rules. These limits are designed to provide reasonable
protection against harmful interference in a residential in-
stallation. This equipment generates, uses and can radiate
radio frequency energy and, if not installed and used in accor-
dance with the instructions, may cause harmful interference
to radio communications. However, there is no guarantee that
interference will not occur in a particular installation. If this
equipment does cause harmful interference to radio or televi-
sion reception, which can be determined by turning the equip-
ment off and on, the user is encouraged to try to correct the in-
terference by one of the following measures:
• Reorient or relocate the receiving antenna.
• Increase the separation between the equipment and
receiver.
• Connect the equipment into an outlet on a circuit different
from that to which the receiver is connected.
• Consult the dealer or an experienced radio/TV technician for
help.
CAUTION!
THIS PRODUCT UTILIZES A LASER.
USE OF CONTROLS OR ADJUSTMENTS OR PERFORMANCE
OF PROCEDURES OTHER THAN THOSE SPECIFIED HEREIN
MAY RESULT IN HAZARDOUS RADIATION EXPOSURE.
DO NOT OPEN COVERS AND DO NOT REPAIR YOURSELF.
REFER SERVICING TO QUALIFIED PERSONNEL.
CAUTION:
TO PREVENT ELECTRIC SHOCK MATCH
WIDE BLADE OF PLUG TO WIDE SLOT,
FULLY INSERT.
WARNING:
TO REDUCE THE RISK OF FIRE OR
ELECTRIC SHOCK, DO NOT EXPOSE THIS
APPLIANCE TO RAIN OR MOISTURE.
CAUTION
Any unauthorized changes or modifications to this equipment
would void the user's authority to operate this device.
CAUTION: TO REDUCE THE RISK OF ELECTRIC
SHOCK, DO NOT REMOVESCREWS.
NO USER-SERVICEABLEPARTS
INSIDE.
REFERSERVICING TO QUALIFIED
SERVICE PERSONNEL.
The lightning flash with arrowhead symbol, within
an equilateral triangle, isintended to alert the user
to the presence of uninsulated "dangerous
voltage" within the product's enclosure that may
be of sufficient magnitude to constitute a risk of
electric shock to persons.
angle is intended to alert the user to the presence
of important operating and maintenance (ser-
vicing) instructions in the literature accompanying
The exclamation point within an equilateral tri-
the appliance.
Before using this unit please read these operating instructions
carefully. Take special care to follow the warnings indicated on
the unit itself as well as the safety suggestions listed below.
Afterwards keep them handy for future reference.
Power Source -- The unit should be connected to power sup-
ply only of the type described in the operating instructions or
as marked on the unit.
2. Polarization -- If the unit is equipped with a polarized AC
power plug (a plug having one blade wider than the other),
that plug will fit into the AC outlet only one way. This is a safe-
ty feature. If you are unable to insert the plug fully into the
outlet, try reversing the plug. If the plug should still fail to fit,
contact your electrician to replace your obsolete outlet. Do
not defeat the safety purpose of the polarized plug.
3. Power Cord Protection -- AC power supply cords should be
routed so that they are not likely to be walked on or pinched
by items placed upon or against them. Never take hold of the
plug or cord if your hand is wet, and always grasp the plug
body when connecting or disconnecting it.
4. Nonuse Periods -- When the unit is not used, turn the power
off. When left unused for a long period of time, the unit should
be unplugged from the household AC outlet.
6. Carts and Stands -- The unit should be used only with a cart
or stand that is recommended by the manufacturer.
The unit and cart combination should be mov-
ed with care.
Quick stops, excessive force, and uneven
surfaces may cause the unit and cart com-
bination to overturn.
T. Wall or Ceiling Mounting -- The unit should not be mounted
to a wall or ceiling, unless specified in this operating instruc-
tions.
Maintenance
Clean the cabinet, panel and controls with a soft cloth lightly
moistened with mild detergent solution.
Do not use any type of abrasive pad, scouring powder or solvent
such as alcohol or benzine.
Installation
Environment
1. Water and Moisture -- Do not use this unit near water-for ex-
ample, near a bathtub, washbowl, swimming pool, or the like.
Damp basements should also be avoided.
2. Condensation -- Moisture may form on the lens in the follow-
ing cases...
• immediately after a heater has been turned on.
• in a steamy or very humid room.
• when the unit is suddenly moved from a cold environment to
a warm one.
If moisture forms inside this unit, it may not operate properly.
To correct this problem, turn on the power and wait about one
hour for the moisture to evaporate.
3, Heat -- The unit should be situated away from heat sources
such as radiators and the like. It also should not be placed in
temperatures less than 5°C (41°F) or greater than 35°C
(95° F).
Placement
1. Ventilation -- The unit should be situated so that its location
or position does not interfere with its proper ventilation. Allow
10 cm (4") clearance from the rear of the unit.
2. Foreign Material -- Care should be taken so that objects do
not fall into and liquids are not spilled into the unit. Do not sub-
ject this unit to excessive smoke, dust, mechanical vibration,
or shock.
3. Magnetism -- The unit should be situated away from equip-
ment or devices that generate strong magnetism.
4. Stacking -- Do not place heavy objects, other than system
components, on top of the unit.
5. Surface -- Place the unit on a flat, level surface.
Service
1.
Damage Requiring Service -- The unit should be serviced by
qualified service personnel when:
(a) The AC power supply cord or the plug has been damaged;
or
(b) Objects have fallen or liquid has been spilled into the unit;
or
(c) The unit has been exposed to rain; or
(d) The unit does not appear to operate normally or exhibits a
marked change in performance; or
(e) The unit has been dropped, or the enclosure damaged.
2,
Servicing -- The user should not attempt to service the unit
beyond that described in the operating instructions. All other
servicing should be referred to qualified service personnel.
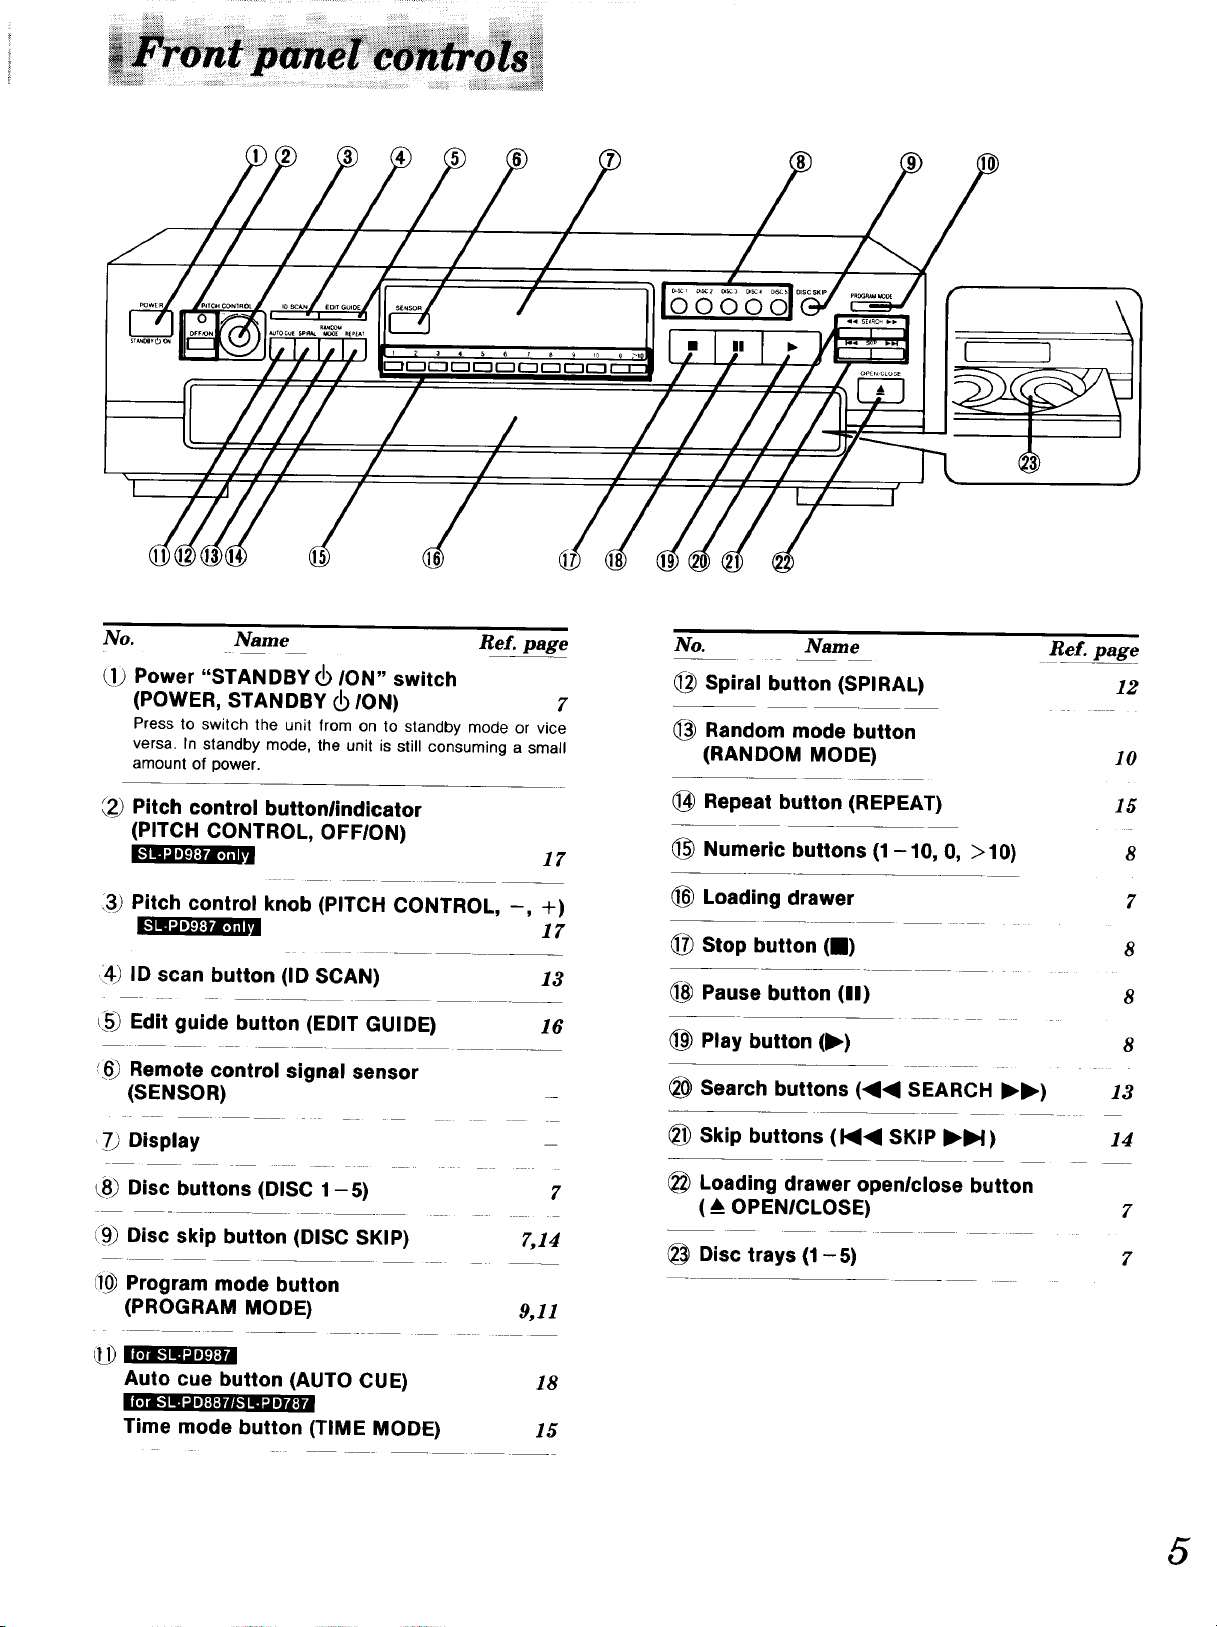
No. Name Re[. page
No. Name Re?. page
Power "STANDBY _ ION" switch
(POWER, STANDBY I_ ION) 2'
Press to switch the unit from on to standby mode or vice
versa. In standby mode, the unit is still consuming a small
amount of power.
{2_ Pitch control buttonlindicator
(PITCH CONTROL, OFFION)
3) Pitch control knob (PITCH CONTROL, -
_ra_l
_) ID scan button (ID SCAN)
c_5_Edit guide button (EDIT GUIDE)
_.6_Remote control signal sensor
(SENSOR)
'79 Display
Disc buttons (DISC 1 -5) 7
Disc skip button (DISC SKIP) 7,14
17
, +)
17
13
16
]_ Spiral button (SPIRAL) 12
1_ Random mode button
(RANDOM MODE)
Repeat button (REPEAT)
Numeric buttons (1-10, O, >10)
Loading drawer
1_ Stop button (I)
Pause button (11)
Play button (1_)
___Search buttons (<1<1 SEARCH I_1_)
Skip buttons (1<1<I SKIP I_IH)
Loading drawer openlclose button
( A_OPENICLOSE)
Disc trays (1 -5)
10
15
13
14
8
7
8
8
8
7
7
Program mode button
(PROGRAM MODE)
Auto cue button (AUTO CUE)
ilI'I!,.'! I! ".iil:t:llK'! IIl Iltll
Time mode button (TIME MODE)
9,11
18
15
5
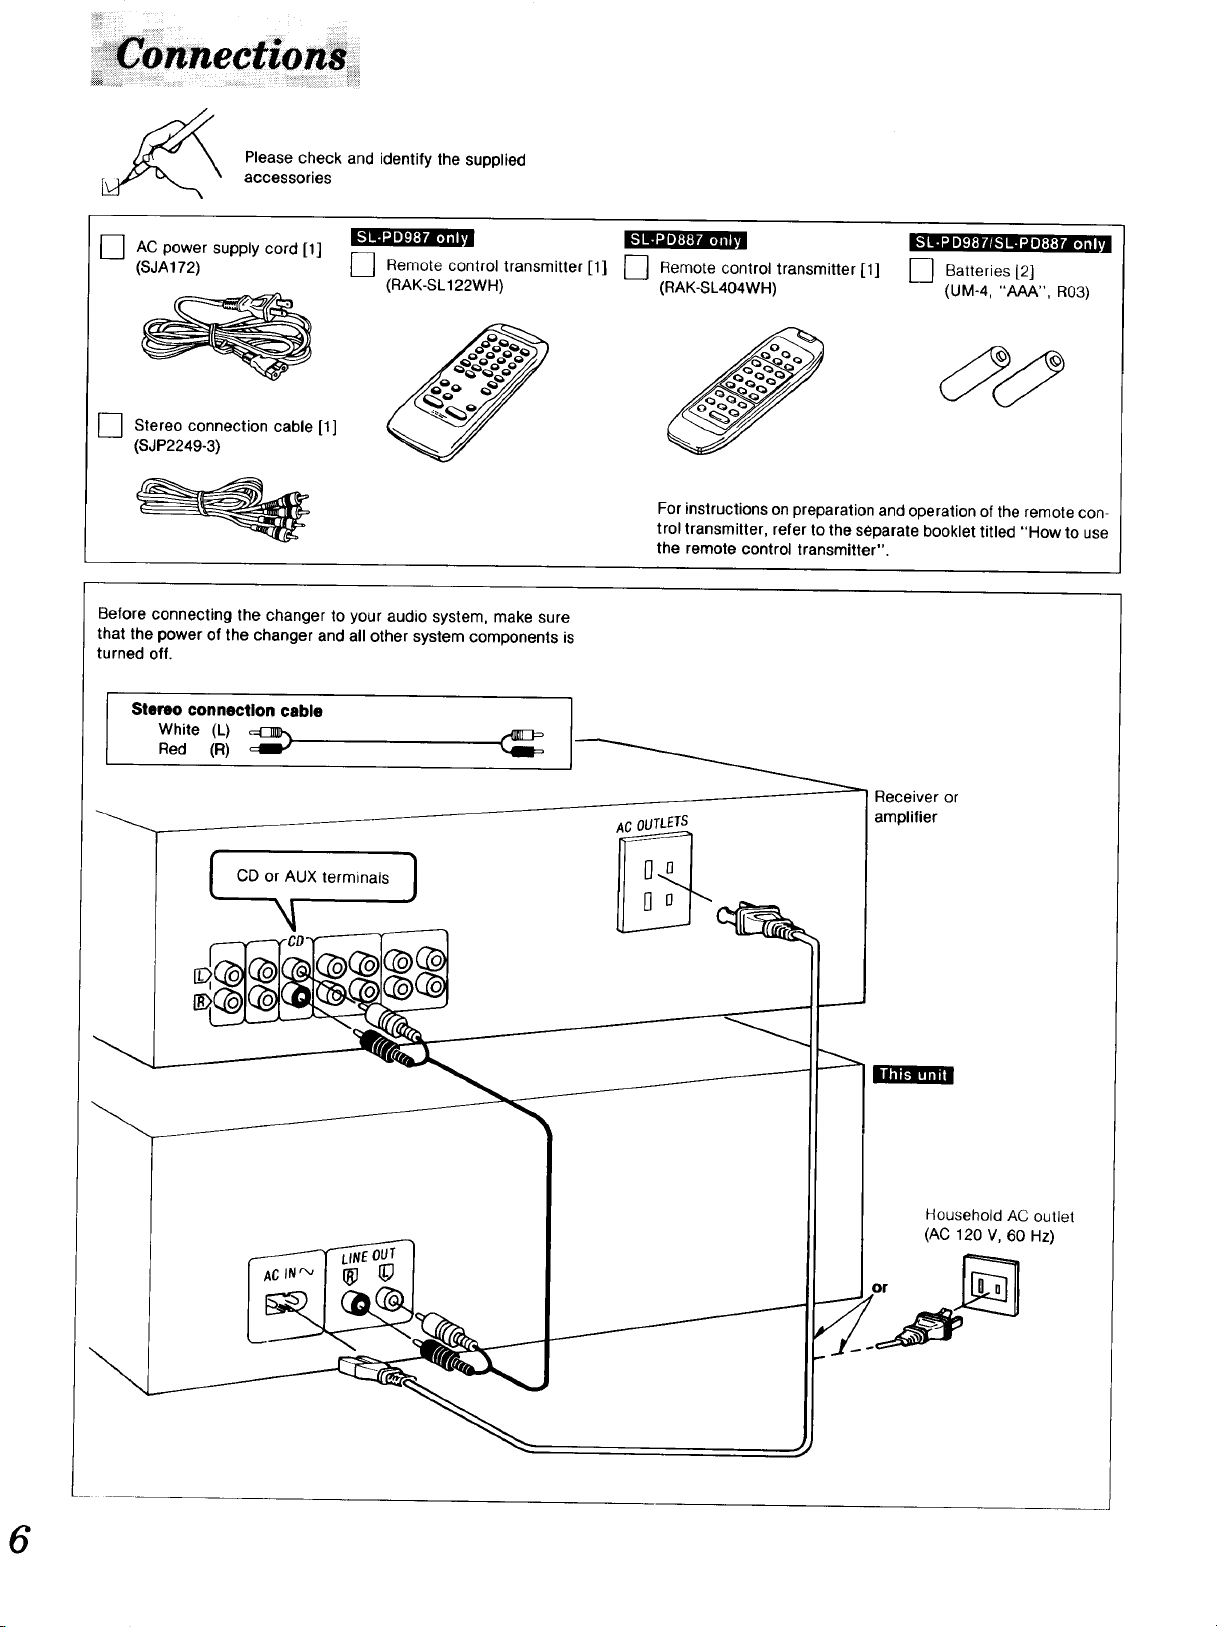
Please check and identify the supplied
accessories
AC
I_] power supply cord [1]
(SJA172)
---] Stereo connection cable
(SJP2249-3)
Before connecting the changer to your audio system, make sure
that the power of the changer and all other system components is
turned off.
White (L) _1 (_
r Stereo connection cable
Red (R)
_] Remote control transmitter
(RAK-SL122WH)
[1]
[1]
_] Remote control transmitter
(RAK-SL404WH)
For instructions on preparation and operation of the remote con-
trol transmitter, refer to the separate booklet titled "How to use
the remote control transmitter".
ACouTLETS
.'II :i J]tl=l'ik_! I -Jm};Fl'J';1"il I
[1]
D Batteries {2]
(UM-4, "AAA", R03)
Receiver or
amplifier
CD or AUX terminals }
N
I Household AC outlet
(AC 120 V, 60 Hz)
6
 Loading...