

Page 1
SB-G90
Speaker System
Enceinte acoustique
Lautsprecheranlage
Enceintes acoustiques
Cassa acustica
Cajas acústicas
Højttalersystem
Luidsprekersysteem
Högtalarsystem
Kaiutinjärjestelmä
Zestaw głośników
Owner’s Manual
Manuel d’utilisation
Bedienungsanleitung
Mode d’emploi
Istruzioni per l’uso
Instrucciones de funcionamiento
Betjeningsvejledning
Gebruiksaanwijzing
Bruksanvisning
Käyttöohjeet
Instrukcja obsługi
Page 2

Page 3

Music is borderless and timeless,
touching people’s hearts across cultures and generations.
Each day the discovery of a truly emotive experience
from an unencountered sound awaits.
Let us take you on your journey to rediscover music.
(03)
03
Page 4

04
(04)
Page 5

(05)
05
Page 6
Thank you for purchasing this product.
Please read these instructions carefully before using this product, and save this manual for future use.
If you have any questions, visit:
U.S.A.: www.shop.panasonic.com/support
Canada: www.panasonic.ca/english/support
Register online at www.shop.panasonic.com/register
(U.S. customers only)
Sales and Support Information
Customer Communications Centre
≥For customers within the UK: 0333 222 8777
≥For customers within Ireland: 01 447 5229
≥Monday–Friday 9:00 am – 5:00 pm, (Excluding public holidays).
≥For further support on your product, please visit our website: www.technics.com/uk/
Safety precautions
WARNING
≥ Do not disassemble or modify the product. Doing so may cause
damage or fire.
Do not place the speakers in unstable locations, such as on a wobbly
≥
table or sloping surface. Do not place the speakers on high or uneven
surfaces or on surfaces vulnerable to vibrations or shocks.
If the speakers tip over or fall, personal injury may result.
≥ Keep small accessories out of reach of children. If accidentally
ingested, there will be adverse physical effects. Should you
suspect that small acccessories have been ingested, consult your
physician immediately.
≥ Do not hang the speakers from the ceiling or on the wall. Doing so
may cause the speaker to fall off, causing personal injury.
≥ Do not insert objects into the holes of the bass reflex ports on the
rear side. Doing so may cause a fire or personal injury. Be extra
cautious when children are near.
CAUTION
≥ Do not stand on or hang down from the speakers. If the speakers
tip over or are damaged, personal injury may result.
≥ Do not use the speakers over a long period of time when the
sound is distorted. Doing so may cause the speakers to overheat,
resulting in a malfunction or fire.
≥ Do not place heavy or large items on the speakers. If the speakers
tip over or fall, personal injury may result.
≥ Do not touch the diaphragms. Doing so may deform the
diaphragms, and as a result, sound may not be output correctly.
≥ Keep the speakers out of reach of children, including infants. Not
doing so may cause personal injury if the speakers tip over.
Do not place the speakers in locations subject to extremely high
≥
temperatures. In particular, avoid locations exposed to direct
sunlight and near heating equipment. Please also note that doing so
may cause the outer casing or internal components to deteriorate.
≥ Do not place the speakers in locations subject to greasy fumes or
steam, or in humid or dusty locations. Doing so may cause
electricity to be conducted through oil, moisture or dust, resulting
in a fire or electric shock.
≥ Keep magnetic items away from the product. Powerful magnets
inside the speakers and speaker nets may damage debit cards,
travel cards (transit passes), clocks and other objects.
Do not insert a finger into the bass reflex ports on the rear of the speakers.
≥
Pay close attention to children as doing so may cause personal injury.
≥ Do not connect the speakers to an amplifier with an output greater
than their allowable input. Doing so may cause the speakers to
overheat, resulting in a fire.
≥ Each speaker must be carried and installed by at least two people.
Dropping it may cause injury.
Secure the speakers against tipping over. If they tip over in a disaster such
≥
as a powerful earthquake or in an accident, personal injury may result.
≥
Before use, be sure to attach the base plates and either the spikes or
the rubber foot. Otherwise, the product may tip over, causing injury.
06
Disposal of Old Equipment
Only for European Union and countries with recycling systems
This symbol on the products, packaging, and/or accompanying documents means that used electrical and electronic products
must not be mixed with general household waste.
For proper treatment, recovery and recycling of old products, please take them to applicable collection points in accordance
with your national legislation.
By disposing of them correctly, you will help to save valuable resources and prevent any potential negative effects on human
health and the environment.
For more information about collection and recycling, please contact your local municipality.
Penalties may be applicable for incorrect disposal of this waste, in accordance with national legislation.
(06)
Page 7
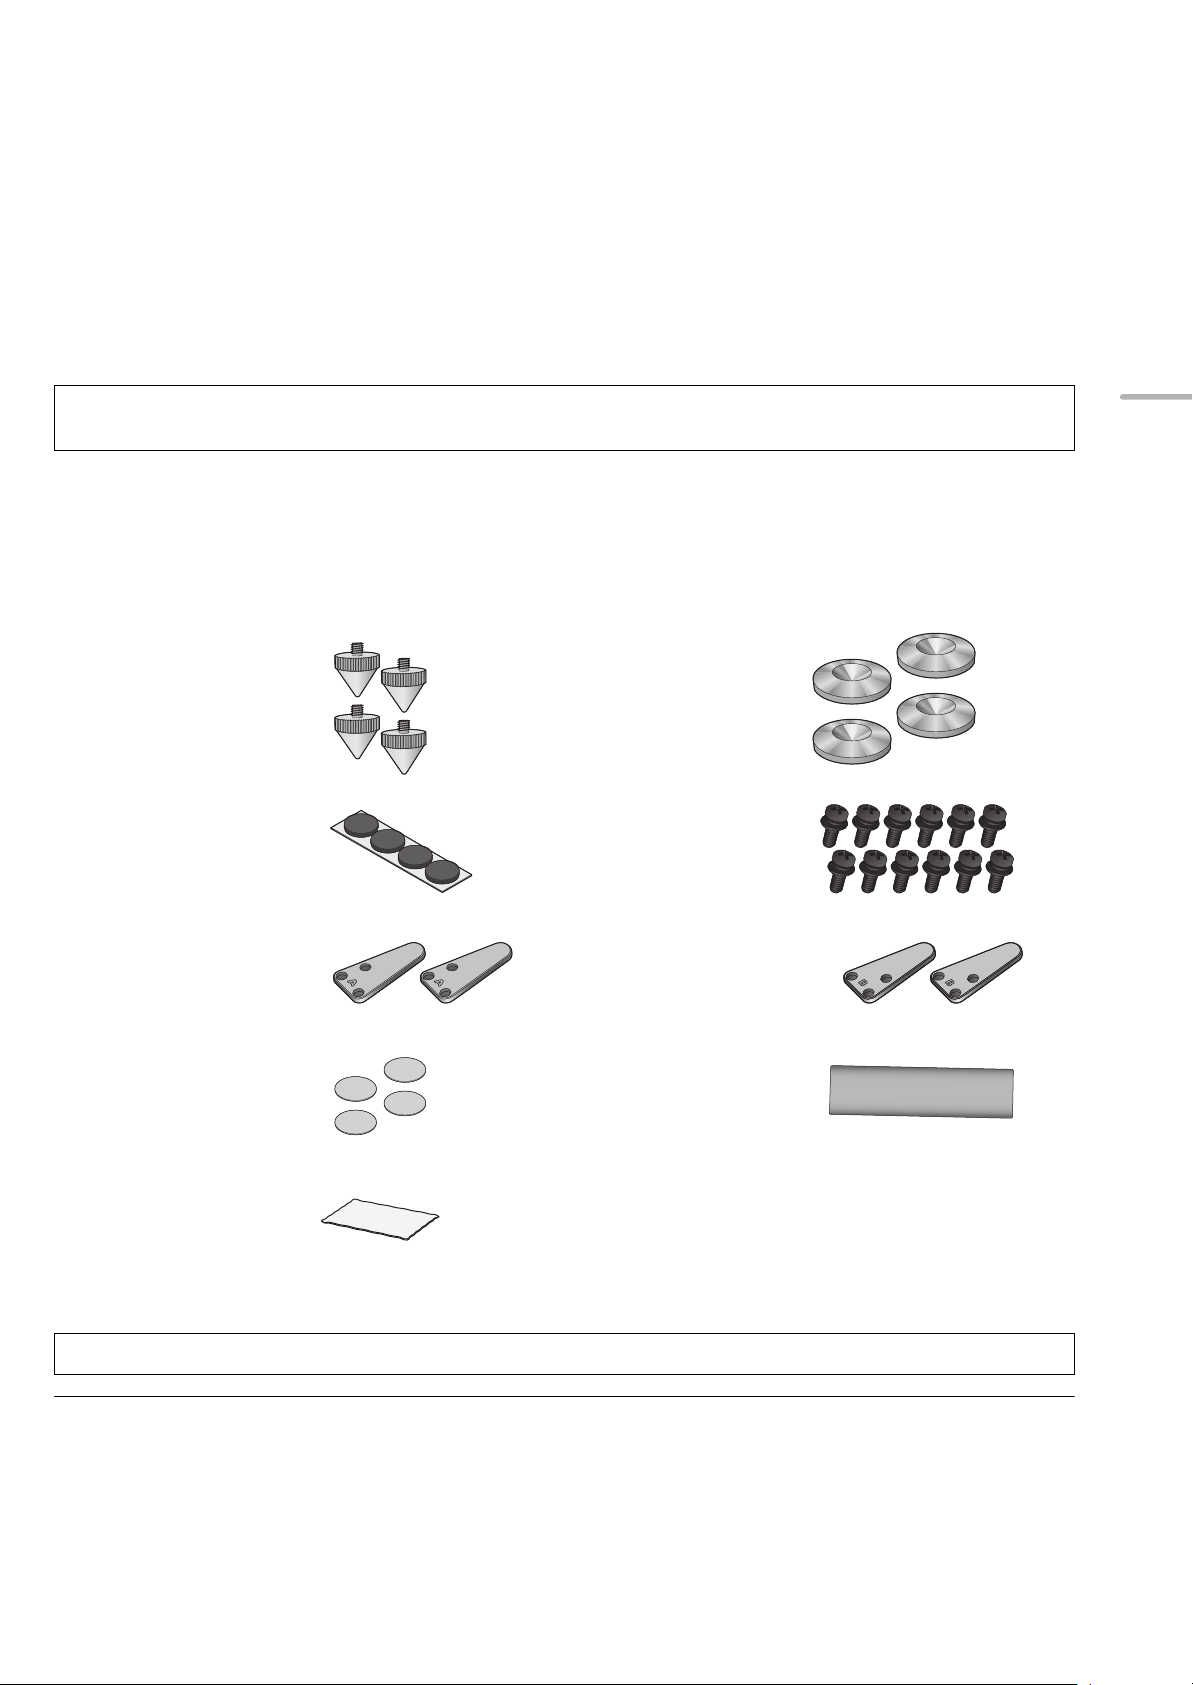
Table of contents
Safety precautions........................................................... 06
Accessories...................................................................... 07
About this unit.................................................................. 08
Installation ........................................................................ 09
Connections ..................................................................... 16
Attaching the speaker nets ............................................. 18
About descriptions in this Owner’s Manual
≥The illustrations shown may differ from your unit.
Accessories
∏ 4 Spikes
(TBLA40861)
Notes on use.....................................................................19
Unit care............................................................................19
Specifications...................................................................19
Limited Warranty (ONLY FOR U.S.A.)...........................160
Limited Warranty (ONLY FOR CANADA) ...................... 161
English
∏ 4 Spike shoes
(TYL0079)
∏ 4 Rubber feet
(TBLG32691)
∏ 2 Base plates A
(TBLA40852)
∏ 4 Spacers
(TMKK653)
∏ 1 Cleaning cloth
(TXFPE01LHUU)
Before use, be sure to attach the base plates and either the spikes or the rubber foot.
≥Keep small accessories out of reach of children to prevent swallowing.
∏ 12 Base plate screws
(THEL155Z)
∏ 2 Base plates B
(TBLA41091)
∏ 1 Speaker net
(TTJ0006-A)
≥ Product numbers provided in this Owner’s Manual are correct as of February 2017. These may be subject to change.
≥ The speakers are not supplied with speaker cables. For connection, use commercially-available speaker cables.
(07)
07
Page 8
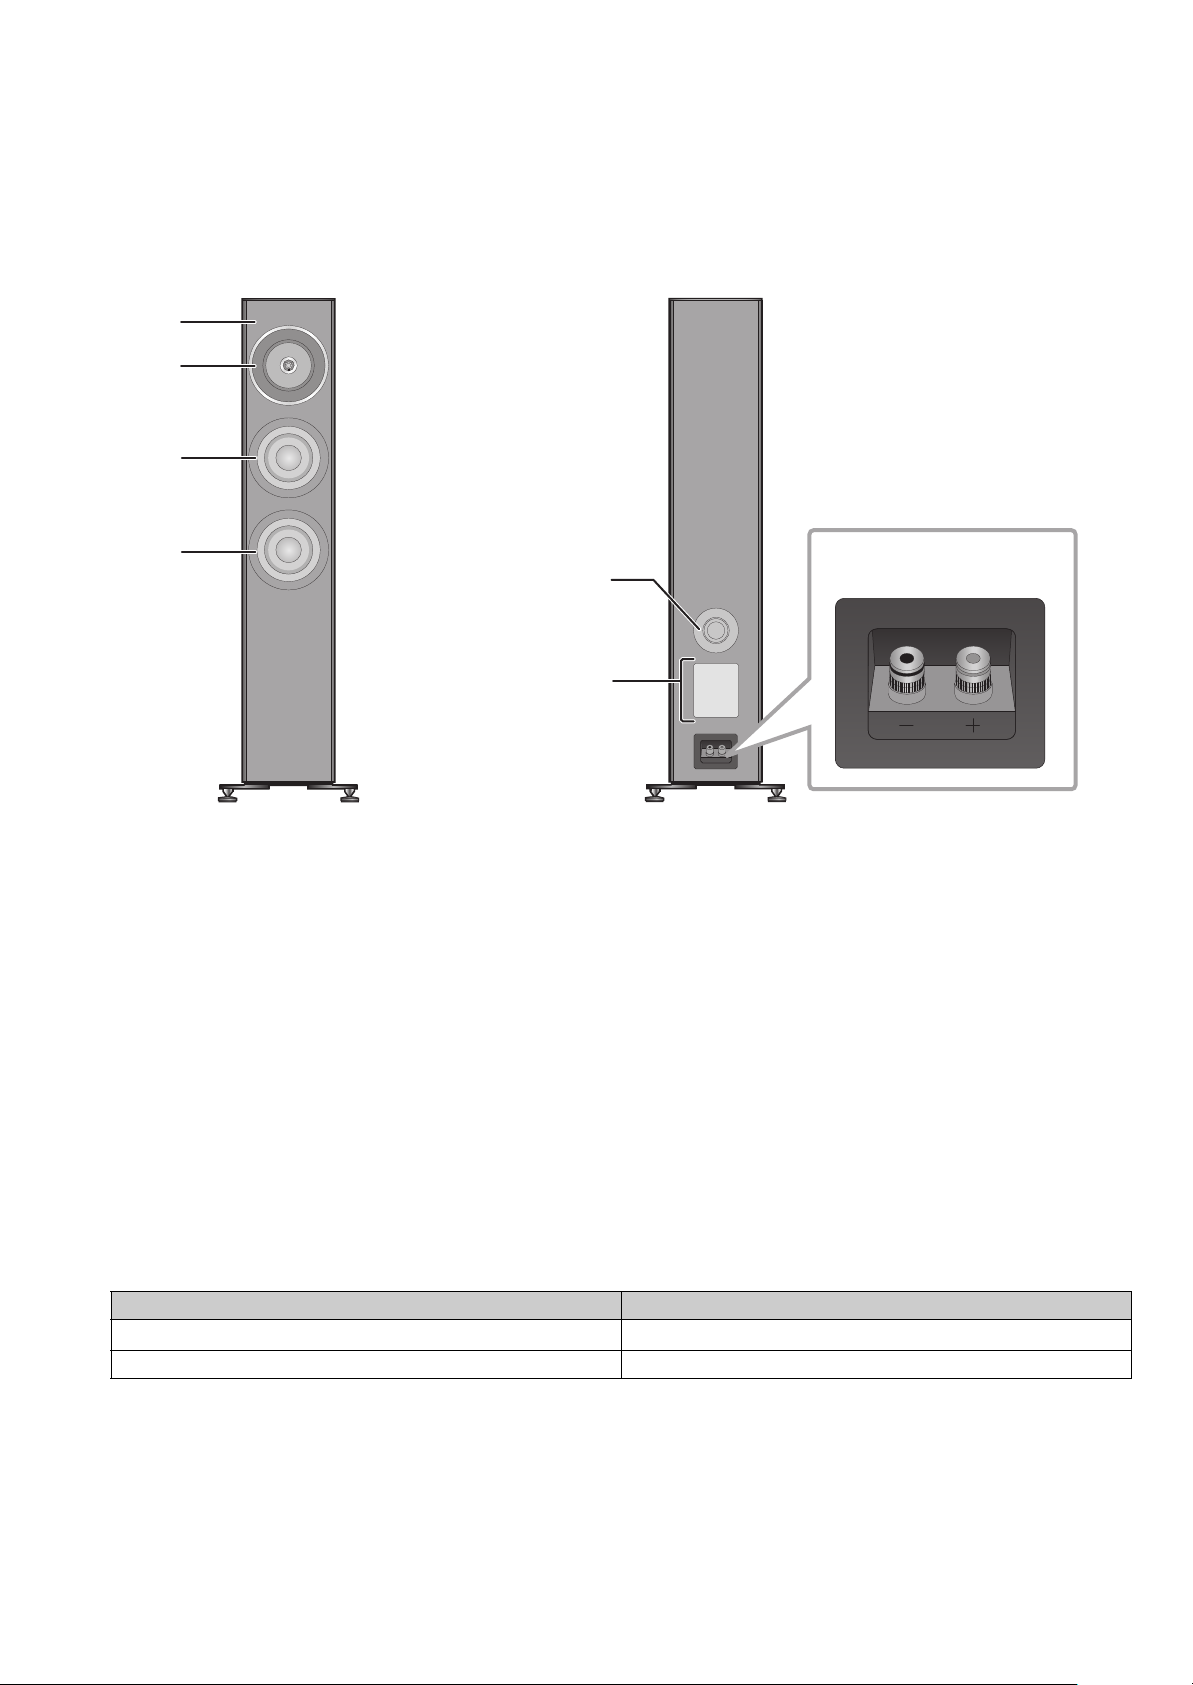
About this unit
ヒ
ビ
ピ
ピ
Front Rear
Bass reflex port
Speaker terminals
Product Identification
Marking
The model number is located on
the Product Identification Marking
on the rear of this unit.
∫ Names of parts and features of the speakers
Balanced Driver Mounting Architecture
1
The speaker unit, mounted on the sub-baffle inside the cabinet at its center of gravity, is designed to suppress the
vibration it generates. The speaker unit is not mounted on the front baffle to minimize the tranmission of unwanted
vibration from the speaker unit to the baffle. The result is a speaker that delivers a realistic, spacious soundstage made of
penetrating and crisp sound with frequencies ranging from low to super-high.
Coaxial Two-Way Unit
2
The newly developed mid-to-high frequency unit features a coaxial two-way system that inherits the design concepts
developed for our high-end models: a point sound source and linear phase reproduction. The system, which is designed
for accurate sound localization, allows the speaker to deliver various sounds produced by musical instruments with clarity
to recreate a three-dimensional soundstage.
Low Distortion Long Stroke Woofers
3
The speaker incorporates two woofers made of components such as double-magnets, long-voice coils, and copper rings.
As a result, the speaker can deliver bass sound that offers low distortion and superb response in reproducing frequencies
even with large amplitude.
∫ Recommended devices
We recommend using Technics devices (optional) for superior audio quality.
Product name Model number
Stereo Integrated Amplifier
Network Audio Amplifier SU-G30
SU-G700
08
(08)
Page 9
Installation
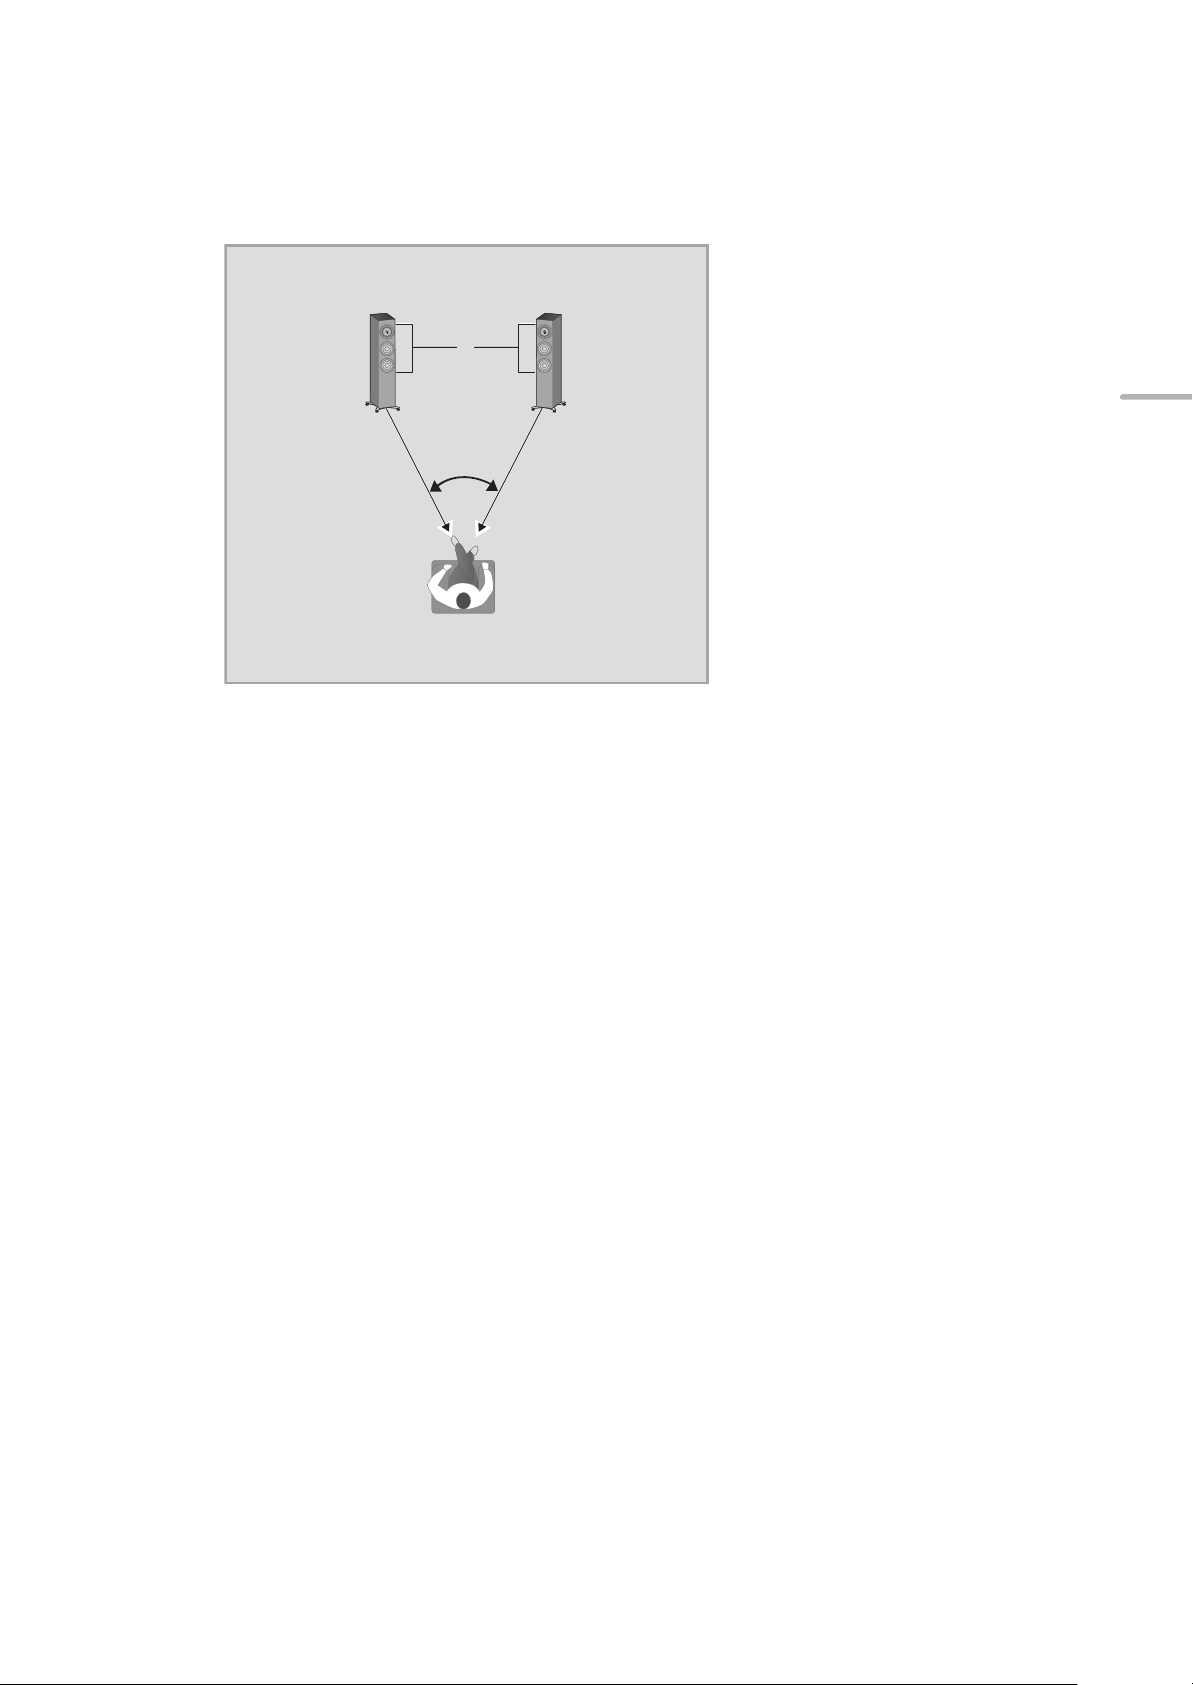
e.g.,
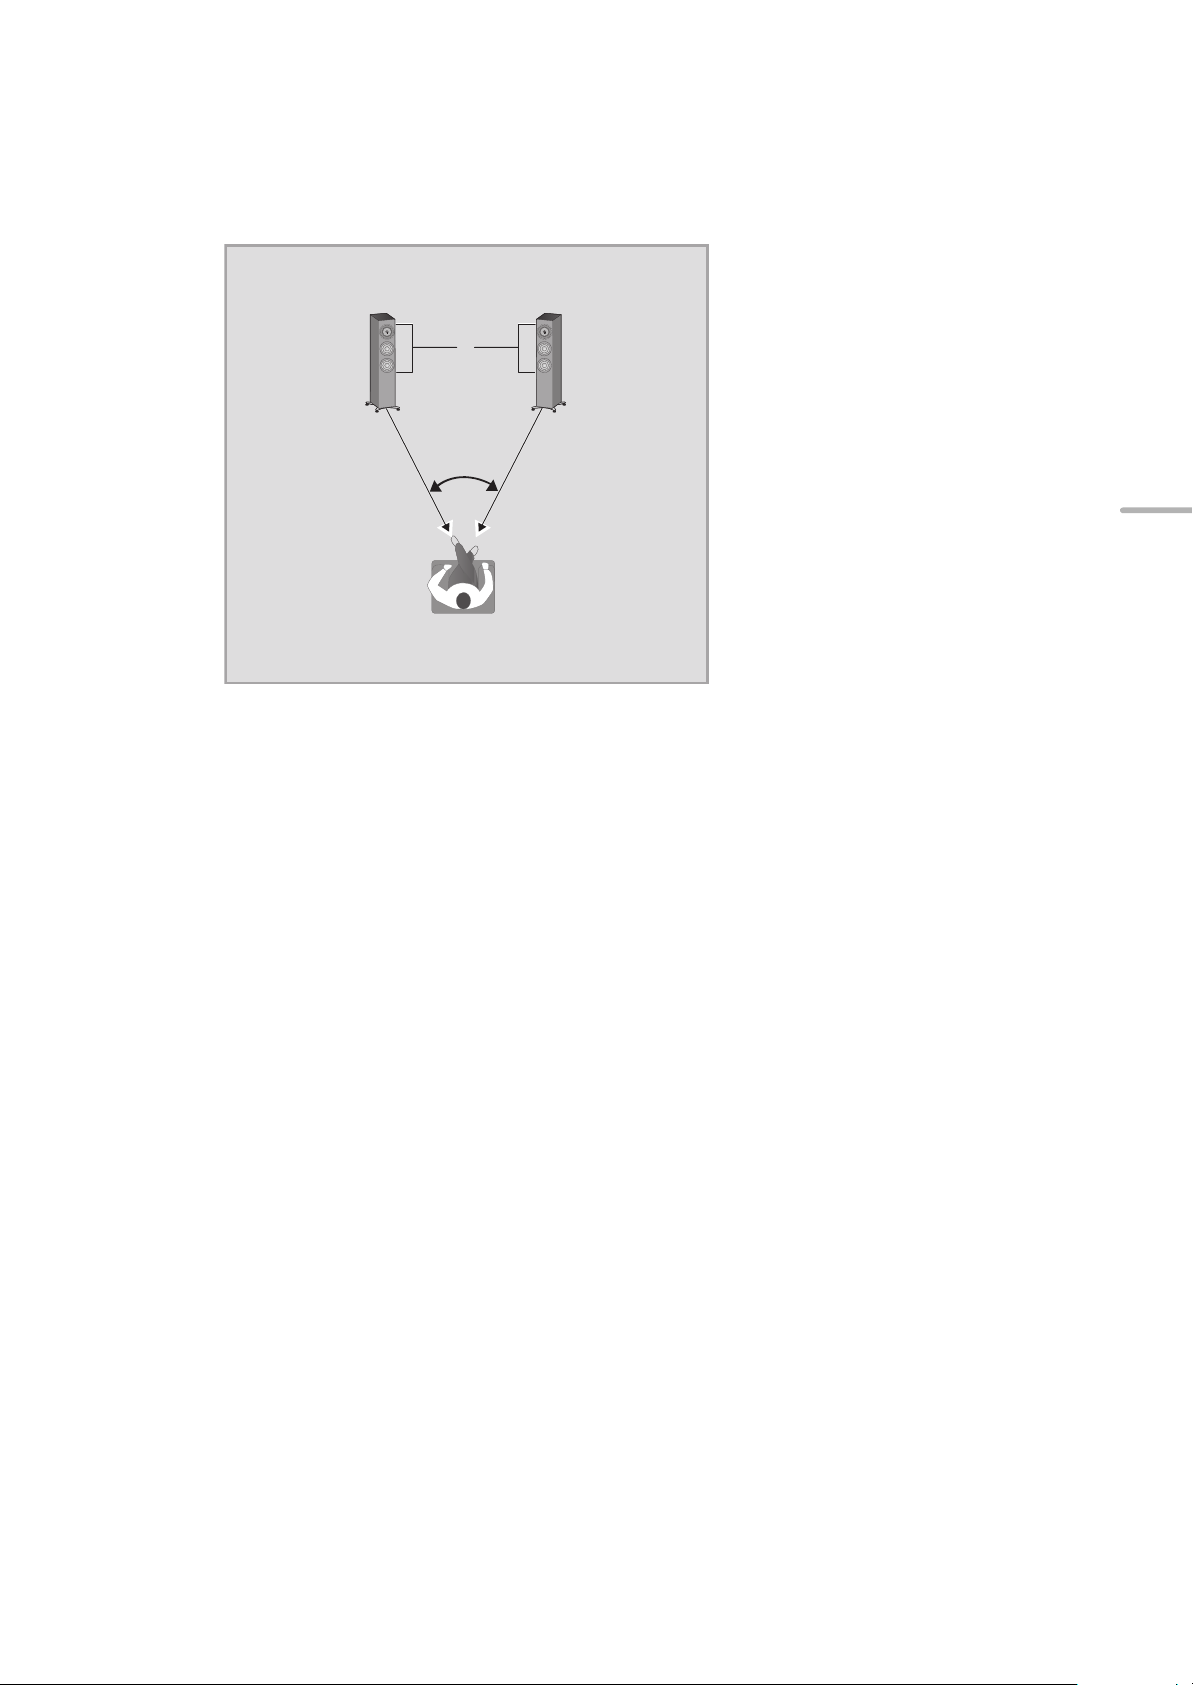
The angle is approximate.
※ Speaker units
※
60°
≥Each speaker must be carried and installed by at least two people.
≥Do not touch the speaker units. Doing so may result in incorrect audio quality.
≥Place the speakers at approximately the same distance from the listening position.
≥The speakers produce bass sound from the bass reflex ports on the rear as well as from the front. Install the speakers at least
5cm (2z) away from the walls so that they do not cover the bass reflex ports on the rear.
≥Keep the amplifier or any other device and the speakers at least 1 cm (
13
/32z) away from each other.
English
∫ For optimum position
The quality and volume of the bass sound, sound localisation performance, sound ambience, and other factors that determine the
audio quality vary depending on the installation location of this unit, listening position, room conditions, and other factors. Refer to
the information below when installing the speakers.
Determining an installation location.
≥Each speaker has a mass of approximately 32 kg (71 lbs). Check that the installation location is strong enough to bear this
mass.
≥If you need to secure the speakers against tipping over, consult an installation specialist. The strength of the floor and wall must
be verified. (> 15)
≥Put the speakers on a flat safe surface.
If the speakers wobble when placed, use the spacers. (> 13, 14)
≥To minimise the gap in audio quality between the left and right speakers, install them so that acoustic conditions (reflection and
absorption of sound) around them are the same.
Adjusting the distances between the rear of the speakers and the walls
If you install the speakers close to a wall or in a corner, the bass sound will be more powerful; however, when the speakers are
too close to it, sound localisation performance and sound ambience may deteriorate. If this occurs, adjust the distance between
the speakers and the front wall, which should be between 30 cm (12z) to 60 cm (24z). (Please note that the distance between the
speakers and the side walls should be greater than 60 cm (24z).)
≥Do not drag the speakers by force. Doing so may damage the speaker and the floor.
Adjusting the angle of the speakers
Angle the front side of the speakers toward the listener. Following these steps will help the speakers deliver more precise sound
localisation.
Adjusting the acoustics of the room and speaker layout
Depending on the room environment (including the size and shape of the room, distance to the walls and reverberation level),
certain sounds may be exaggerated or suppressed, making them difficult to hear. In such cases, adjusting the reverberation level
by moving the speakers, changing your listening position or covering the walls and windows with thick curtains may help resolve
the problem.
≥The spikes may enhance the audio quality. (> 12)
(09)
09
Page 10

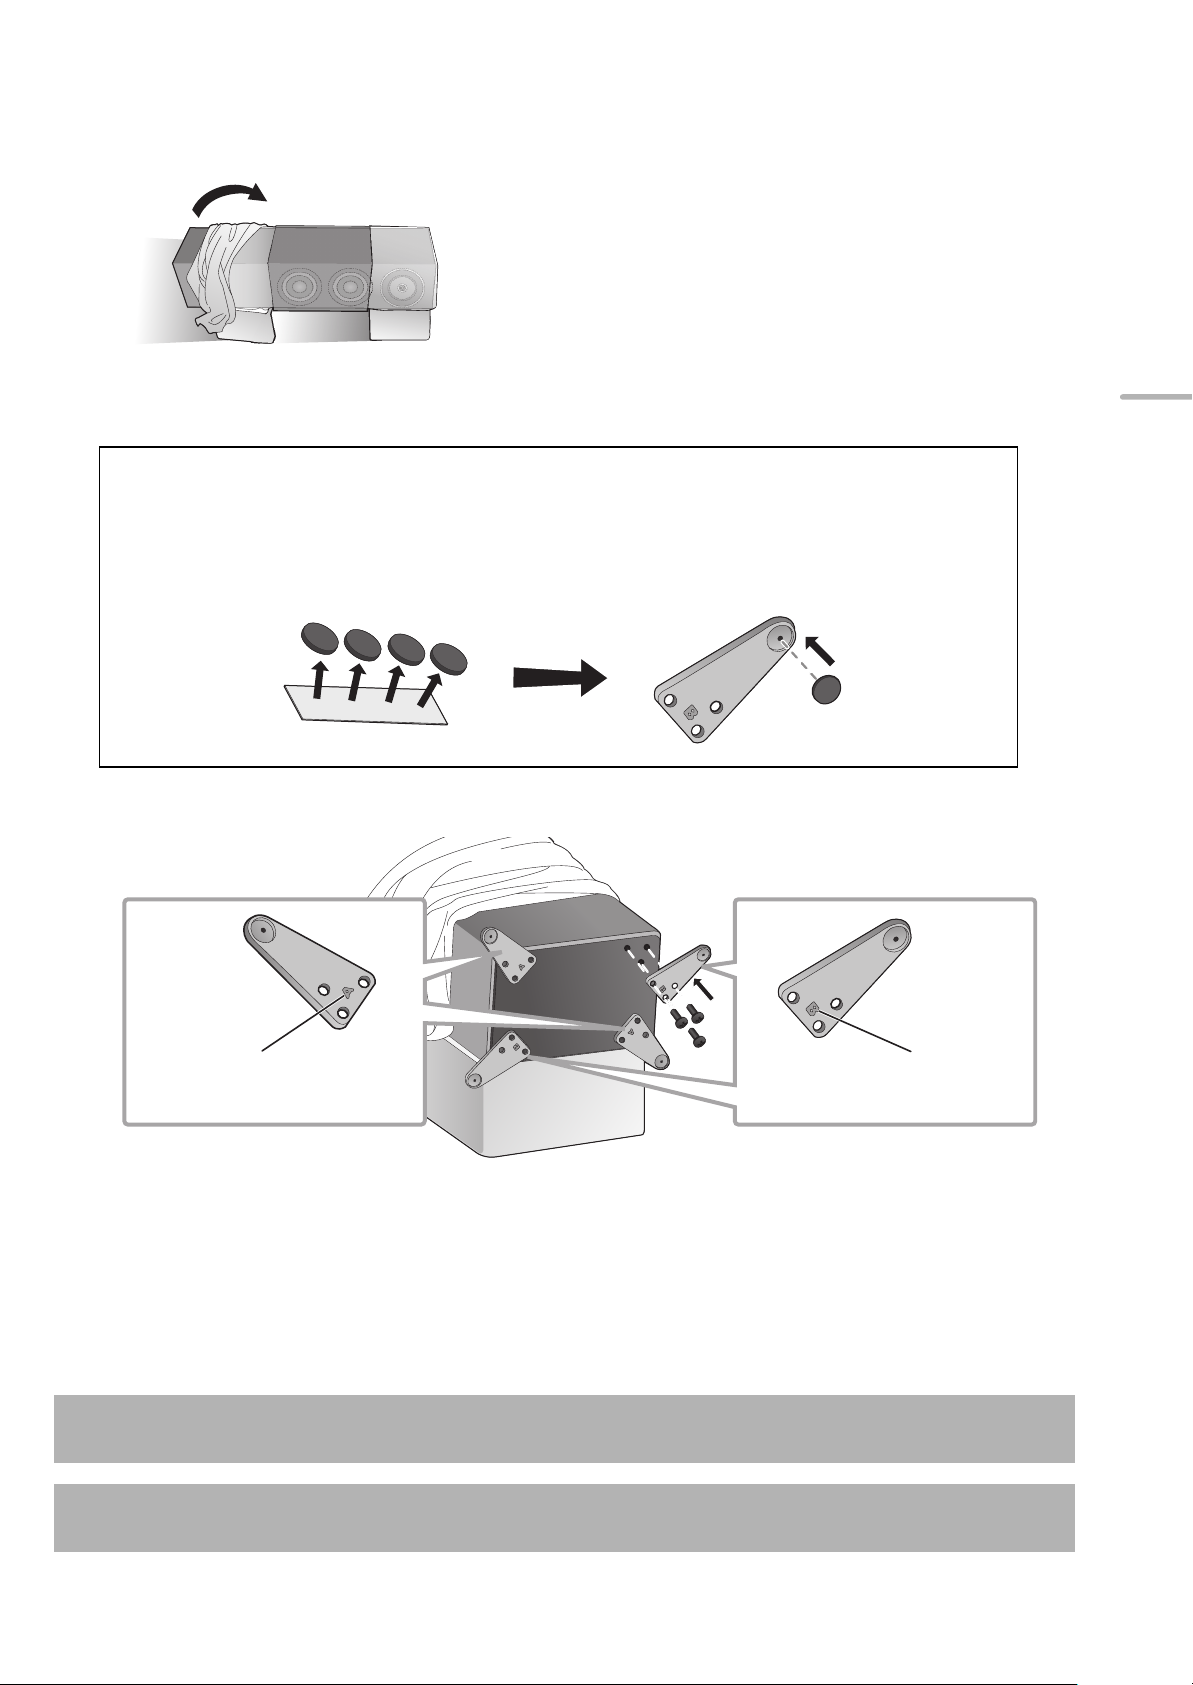
Attaching the base plates
②②
③
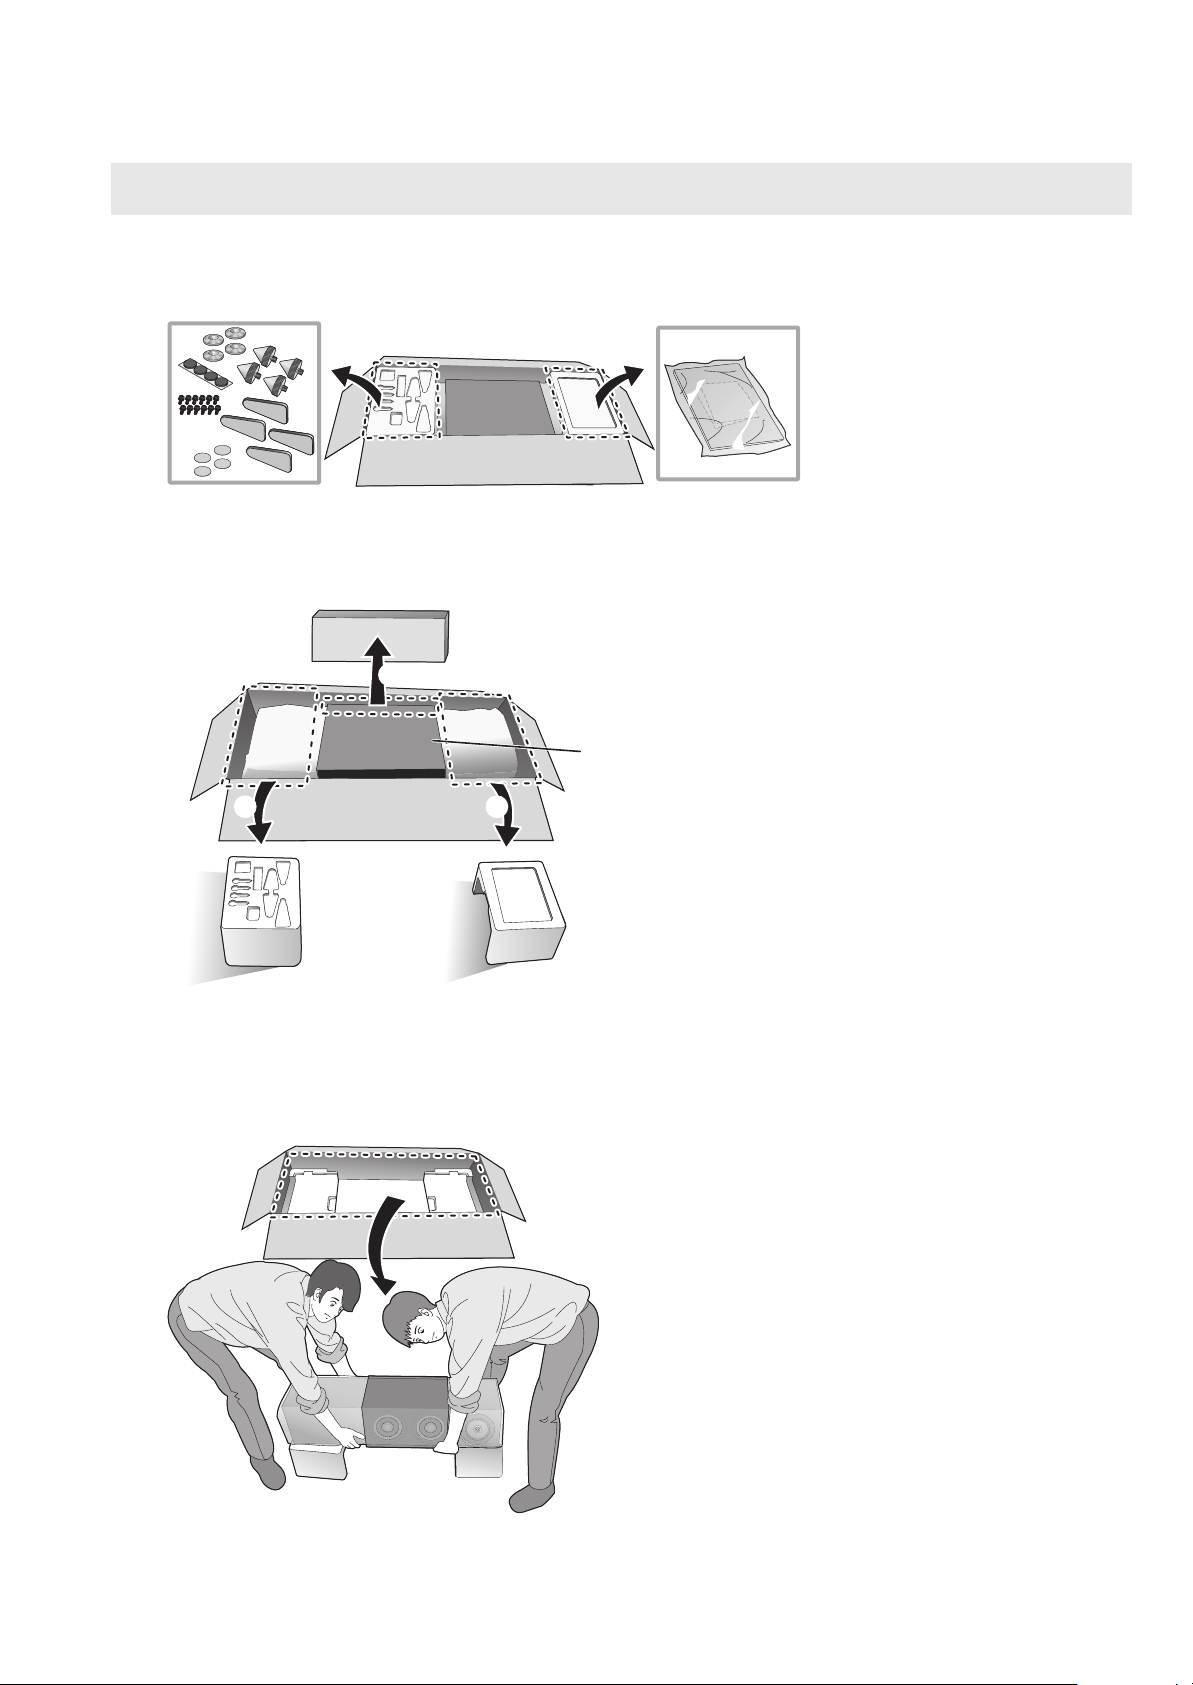
Leave the cardboard in place to
protect the speaker unit.
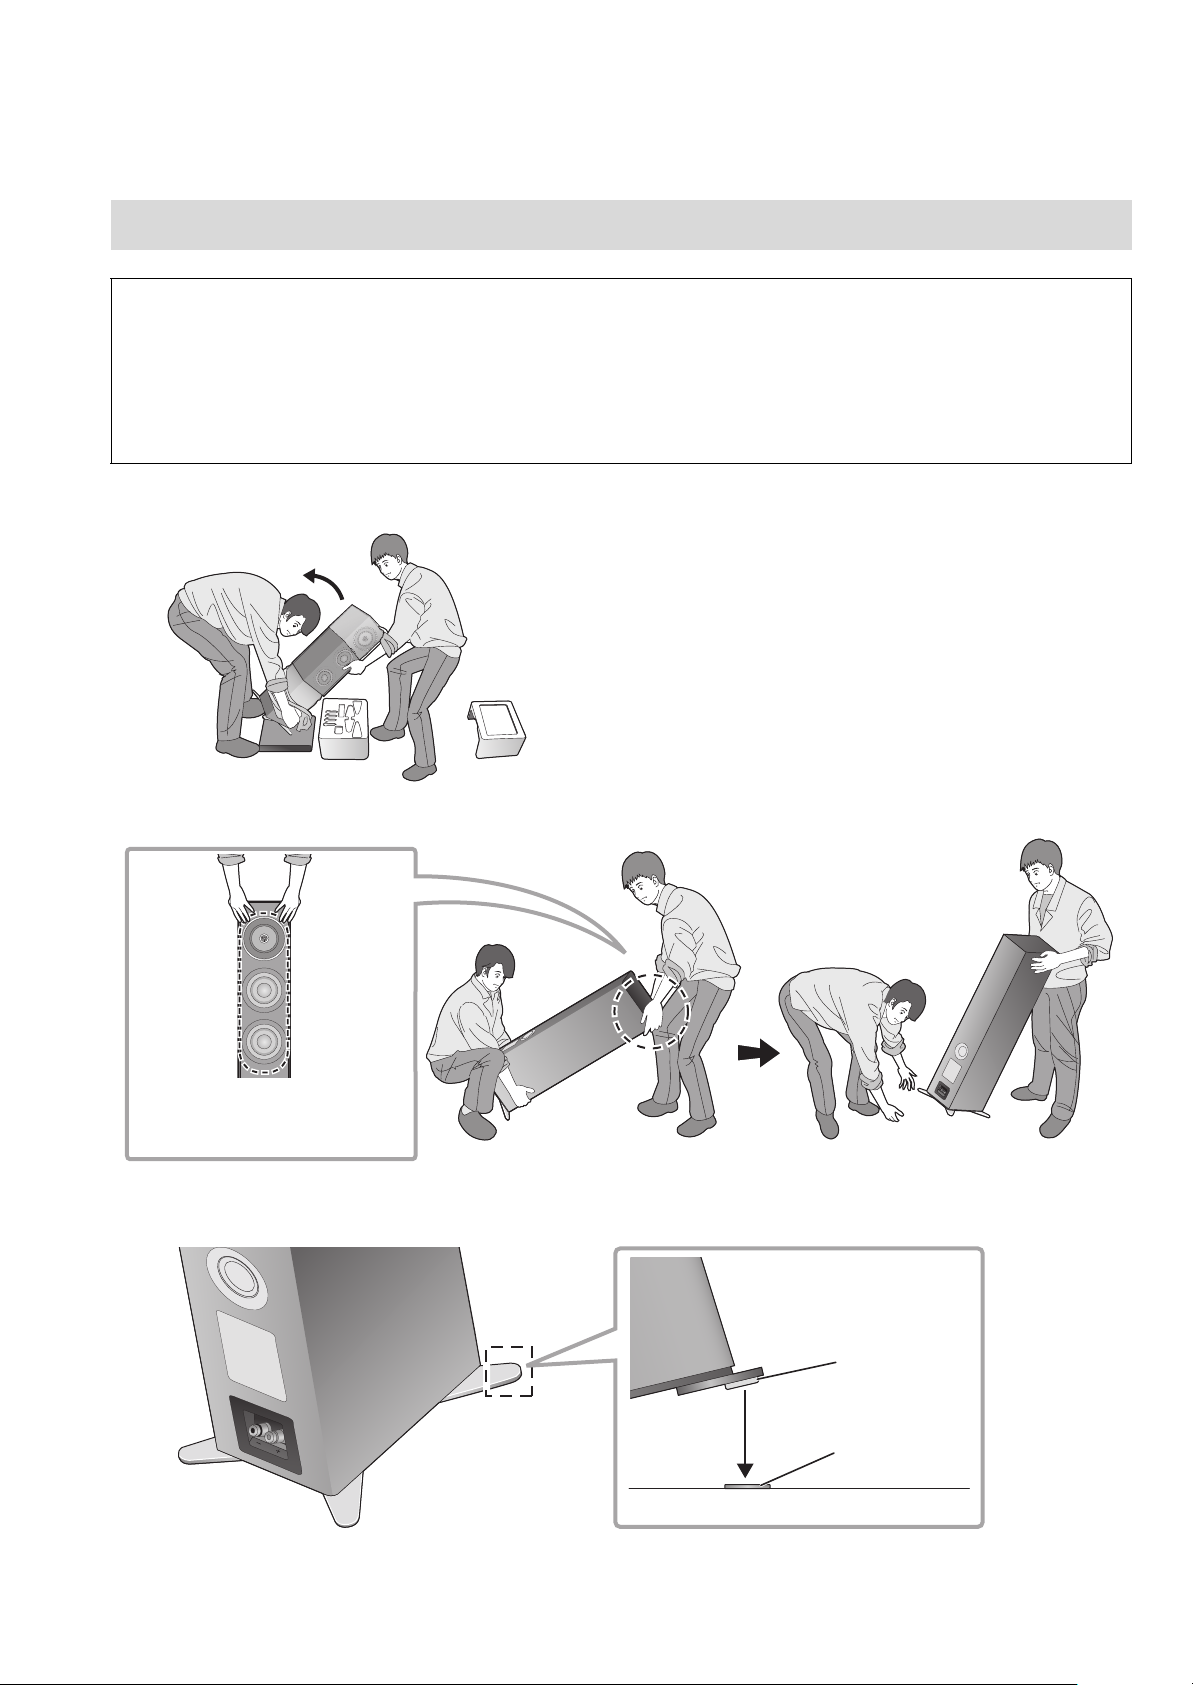
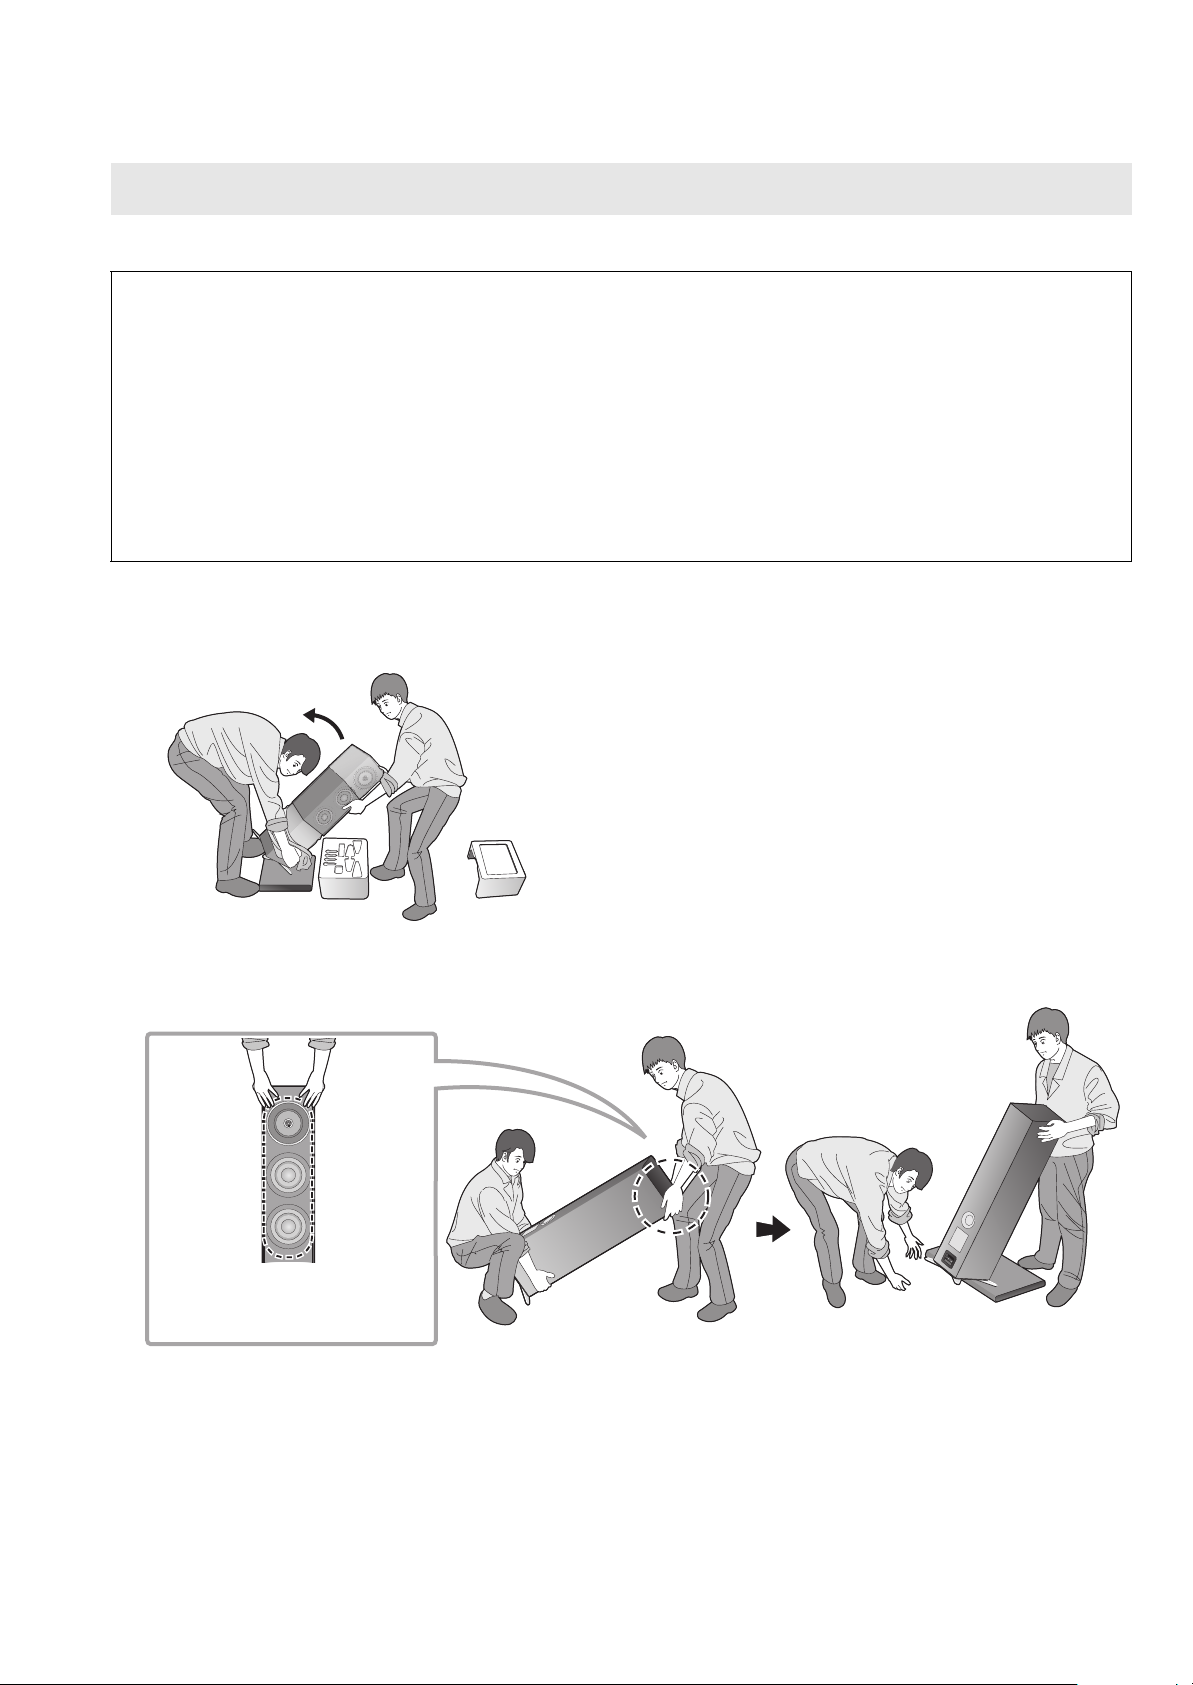
1 Remove the accessories.
≥Remove the accessories from the styrofoam blocks, and place them in a location away from children.
2 Place the styrofoam blocks in an area suitable for work.
3 Remove the packaging box of the speaker net.
10
4 Place the speaker on the styrofoam blocks removed in Step ② .
≥Keep the following points in mind when lifting up the speaker.
jHold the bottom so that your hands do not slip.
(10)
Page 11
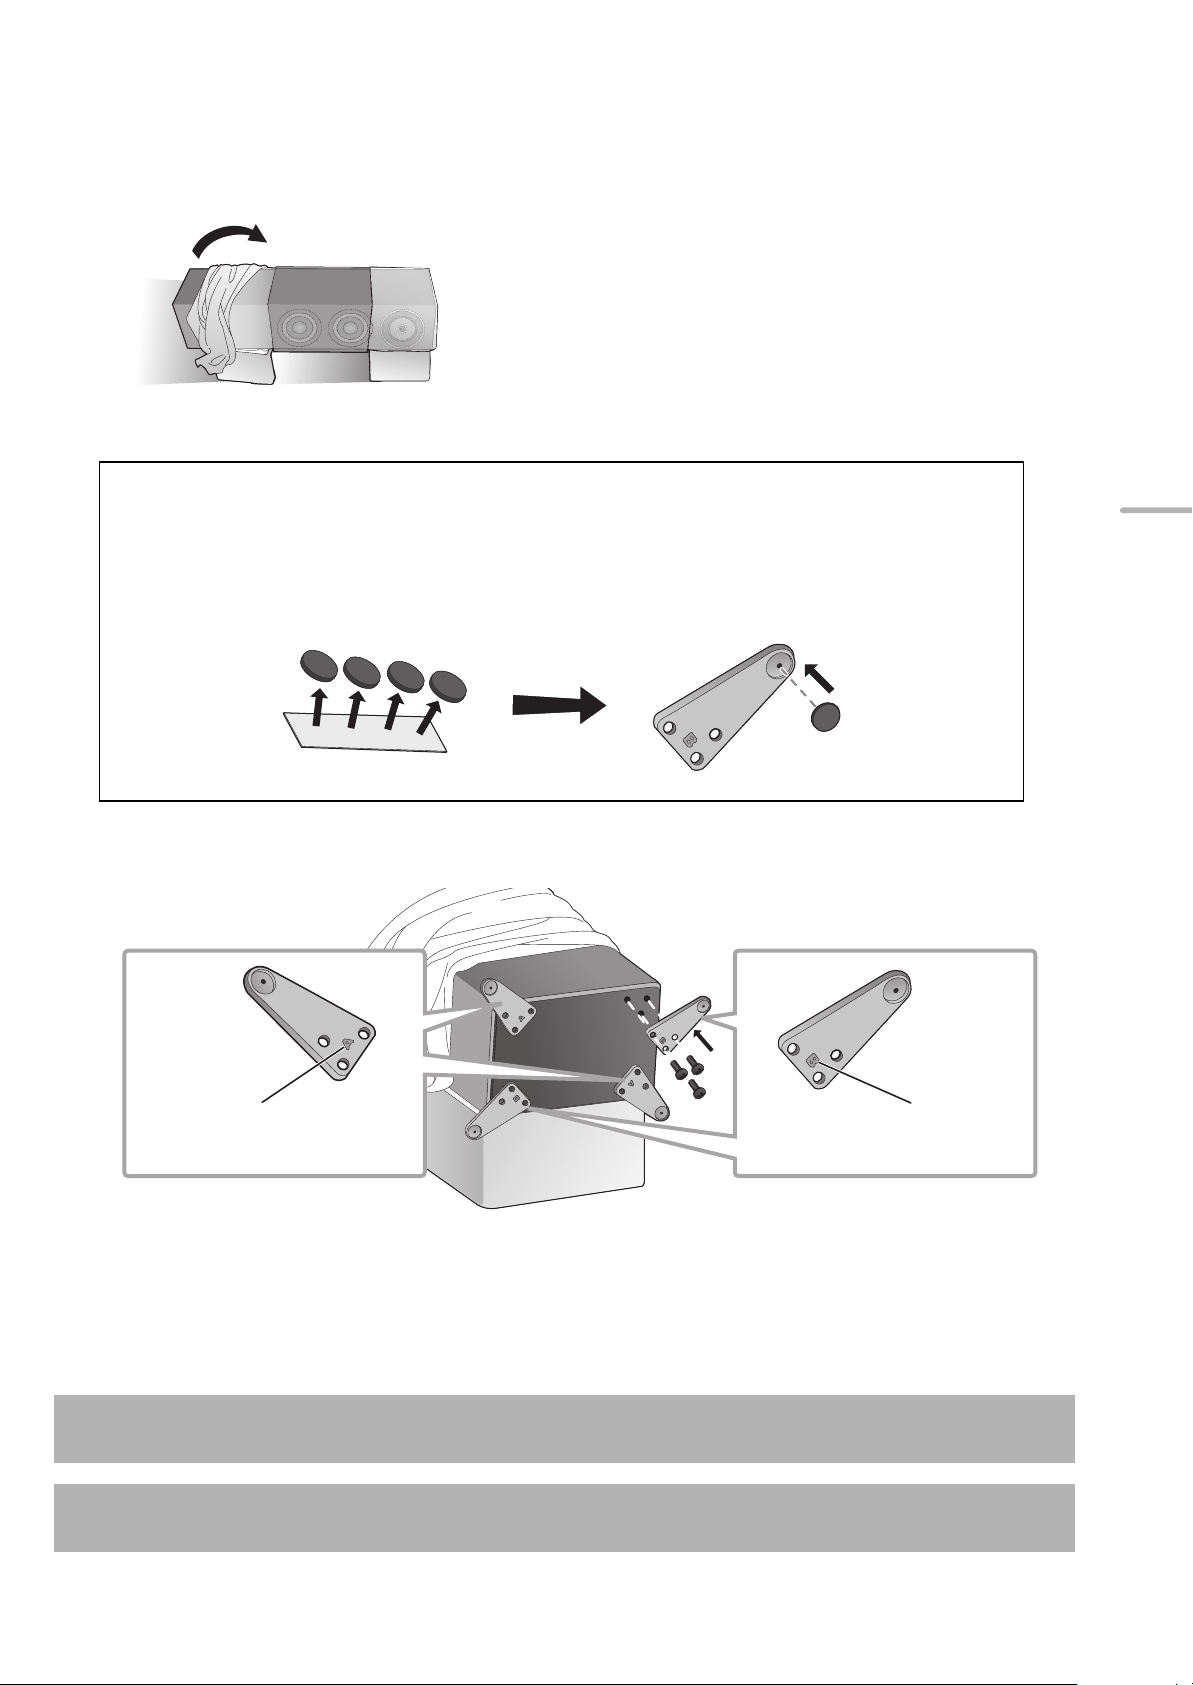
5 Roll up the protective bags (2 pcs) to uncover the bottom of the speaker.
Placing the speaker using the rubber foot
Attach the rubber feet (4 pcs) to the recesses on the base plates in advance.
≥ Peel off the backing paper from the rubber feet, and push them firmly into the base plates without touching
the adhesive surface of the rubber feet.
Attach so that the side A will
face the floor.
Attach so that the side B will
face the floor.
6 Attach the base plates (4 pcs) to the speaker securely with the supplied screws.
English
≥Loosely pre-mount the three screws with your hands first, and then tighten them with a screwdriver.
≥After attaching the base plates, ensure that they do not wobble.
Placing the speaker using the spikes (> 12)
Placing the speaker using the rubber foot (> 14)
(11)
11
Page 12
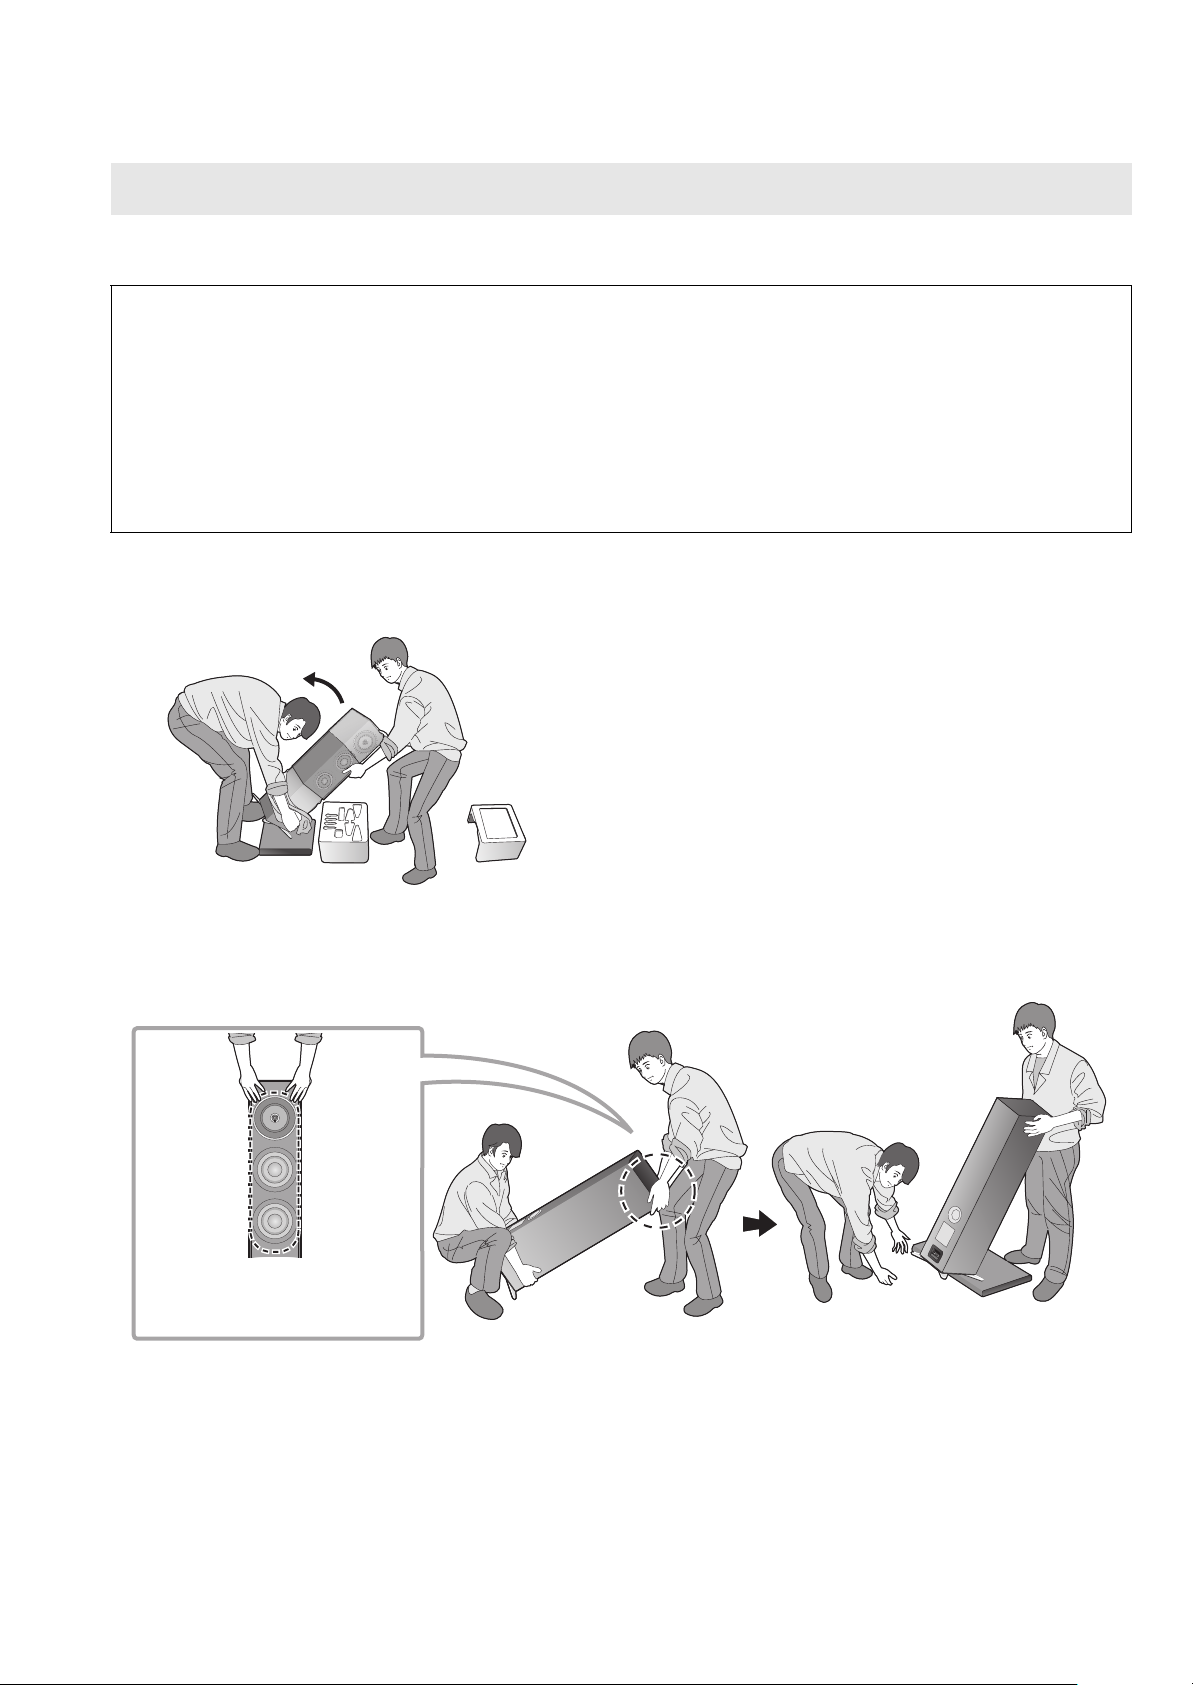
Placing the speakers using the spikes
Hold the speaker so that your
hands do not touch the
speaker unit.
The spikes may enhance the audio quality.
≥Panasonic is not responsible for any accidents or damage caused by improper assembly or handling of the product. Do
not attach the accessories in any other way than instructed in this Owner’s Manual.
≥Each speaker has a mass of approximately 32 kg (71 lbs). When tilting the speakers to attach the spikes, ensure that the
work is done by at least two people. When attaching the spikes, exercise caution to avoid catching your fingers or toes
between the speakers and floor or tipping the speakers over. In addition, ensure that you spread a thick mat or similar item
on the side of the floor where you will be tilting the speakers to prevent damage to the floor.
≥Since each spike supports a mass of at least approximately 8 kg (17.6 lbs), the spikes may leave marks and indentations
on the installation location. To prevent the spikes from damaging the area, use the supplied spike shoes or purchase spike
shoes with large contact surfaces and adequate strength.
≥Moving the speakers with the spikes attached may cause damage to the floor. Before changing the installation location,
remove the spikes.
To avoid floor damage, have two thick mats (or similar) available. Place them in the unpacking location and the installation
location in advance.
1 Place the speaker vertically on a thick mat (or similar).
2 Remove the protective bags (2 pcs) and the cardboard covering the speaker.
3 Carry the speaker to the installation location while tilting it forward, and place it on a thick mat (or similar).
(12)
12
Page 13
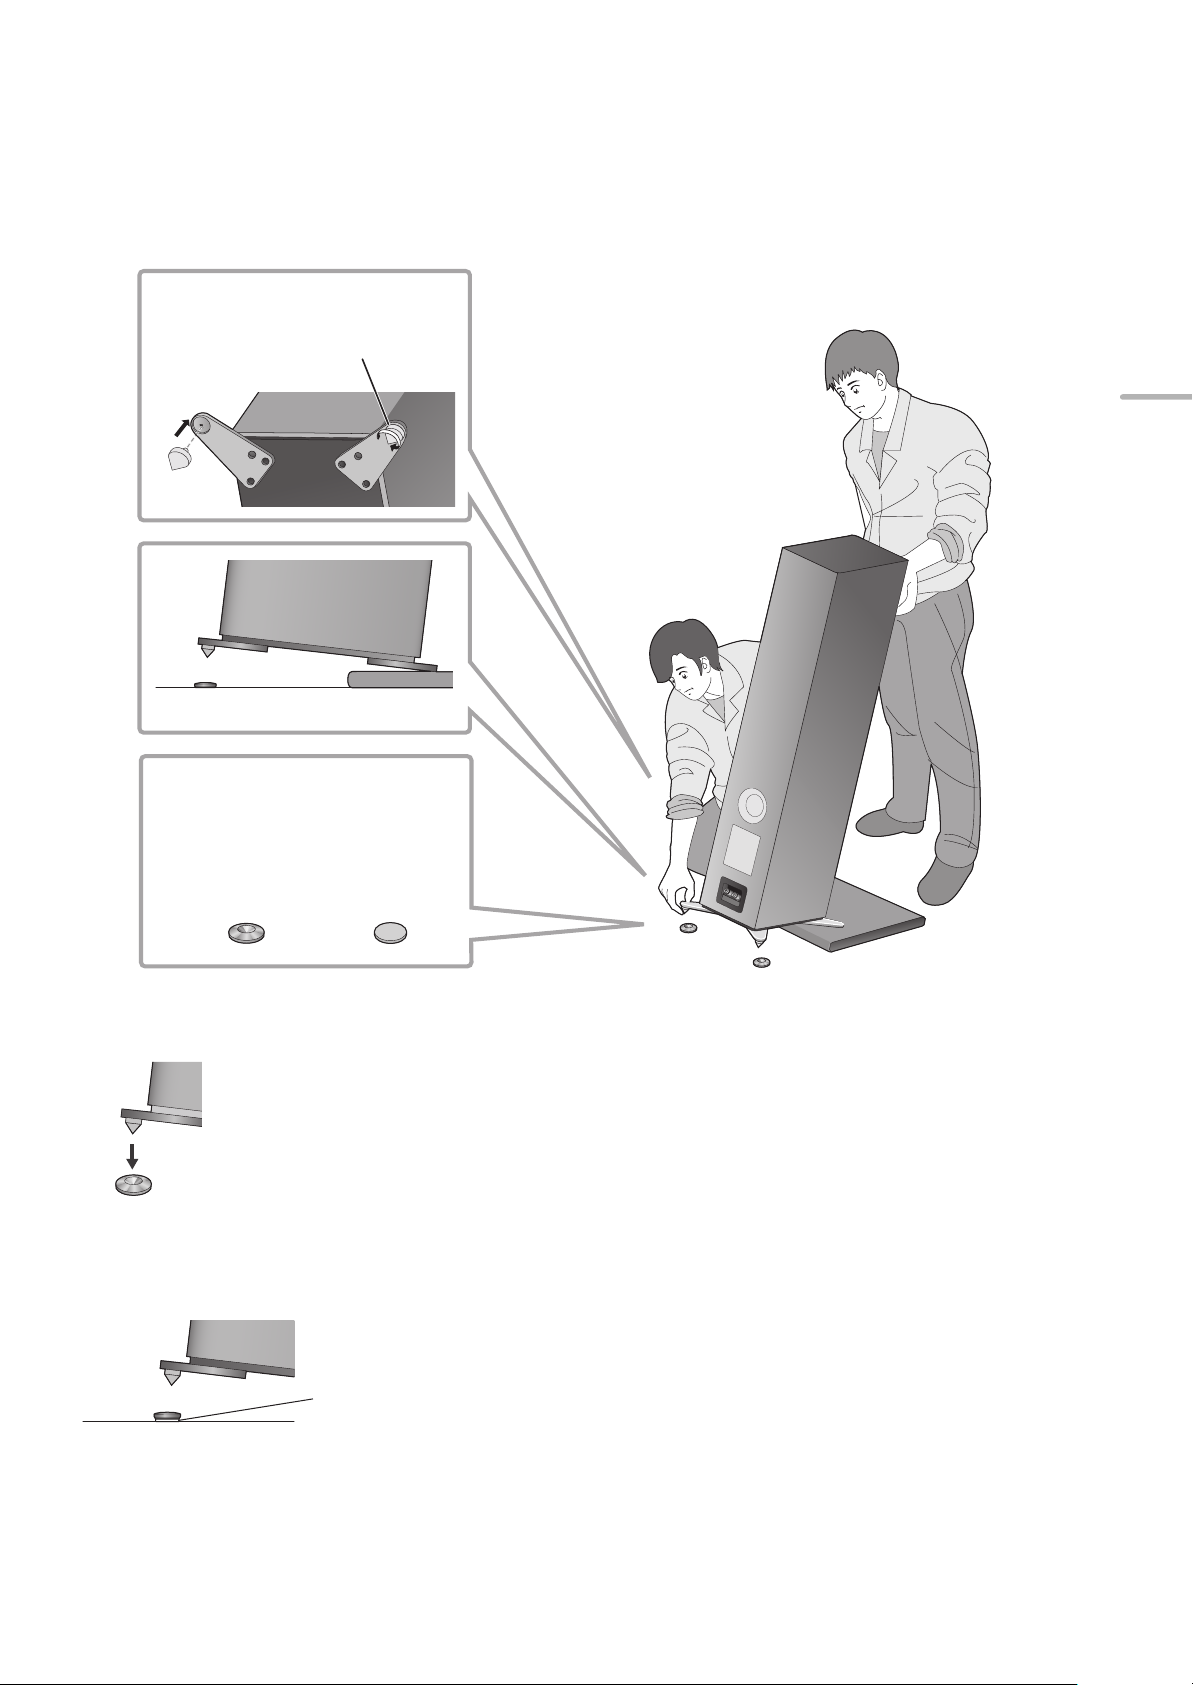
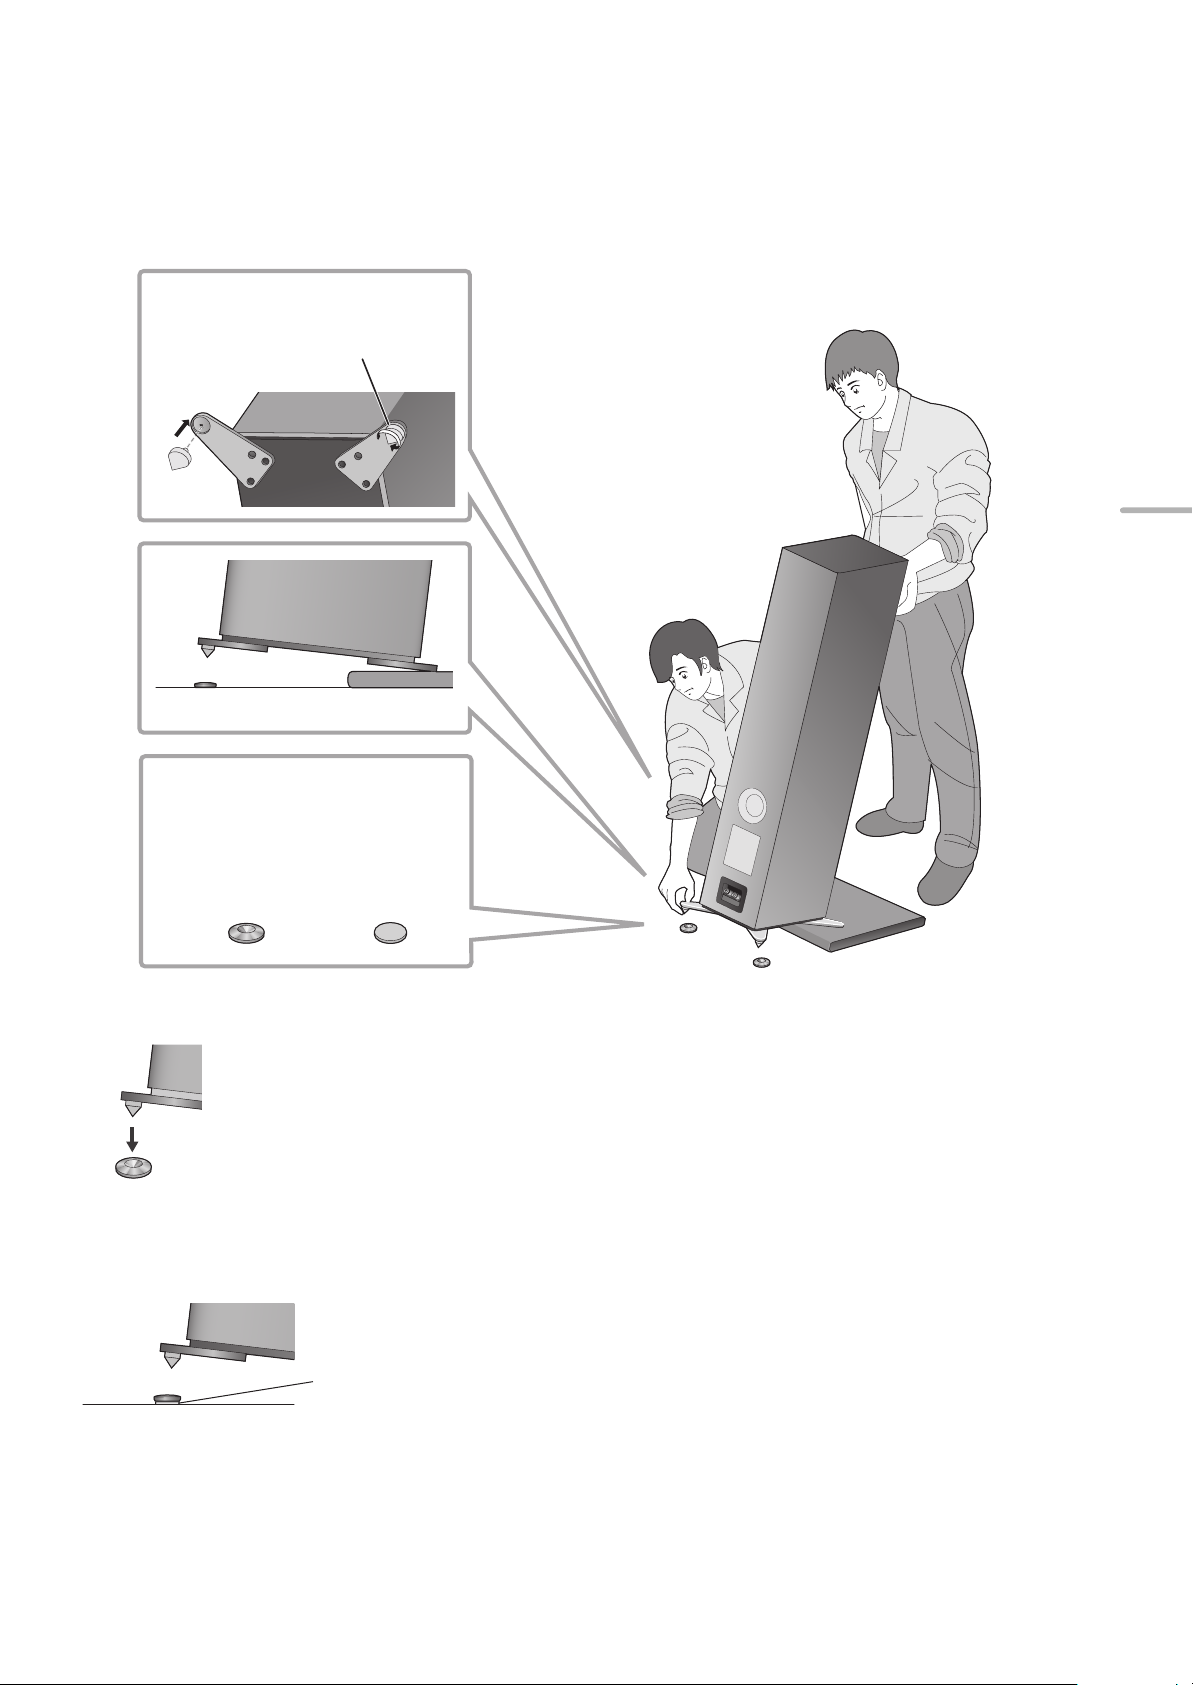
4 Tilt the speaker forward, and screw the spikes into the two rear-side base plates.
Spike shoes
Speaker (rear)
Thick mat, etc.
Screw the spikes firmly until
they stop.
Place each spike shoe so that the
side with an indented center faces
up.
DO NOT
DO
Spacer
When using the spike shoes, place them under the spikes.
English
5 While aligning the tips of the spikes with the indentations on the spike shoes, slowly bring the speaker back to the upright
6 In the same way as Step ④ , tilt the speaker backwards and remove the thick mat (or similar).
7 Screw the spikes into the two front-side base plates.
8 If the speakers wobble, place the spacers under the spike shoes.
position.
When using the spike shoes, place them under the spikes.
(13)
13
Page 14
Placing the speakers using the rubber feet
Hold the speaker so that your
hands do not touch the
speaker unit.
Rubber feet
Spacer
Attach the rubber feet (4 pcs) to the recesses on the base plates in advance. (> 11 )
≥Panasonic is not responsible for any accidents or damage caused by improper assembly or handling of the product. Do
not attach the accessories in any other way than instructed in this Owner’s Manual.
≥Each speaker weighs approximately 32 kg (71 lbs). Ensure that the work is done by at least two people. Be careful not to
catch your fingers or toes between the speaker and the floor or tip over the speaker.
≥Since each rubber foot supports a weight of at least approximately 8 kg (17.6 lbs), the rubber feet may leave marks and
indentations on the installation location.
≥Dragging the speaker along the floor may cause the rubber feet to peel off.
When changing the installation location of the speaker, always use at least two people to lift it.
To avoid floor damage, have a thick mat (or similar) available. Place it in the unpacking location in advance.
1 Place the speaker vertically on a thick mat (or similar).
2 Remove the protective bags (2 pcs) and the cardboard covering the speaker.
3 Hold the speaker so that it is tilted forward and move it to the installation location.
4 If the speakers wobble after being placed, place the spacers under the rubber feet. This will prevent the rubber feet from
wobbling on the installation surface.
(14)
14
Page 15
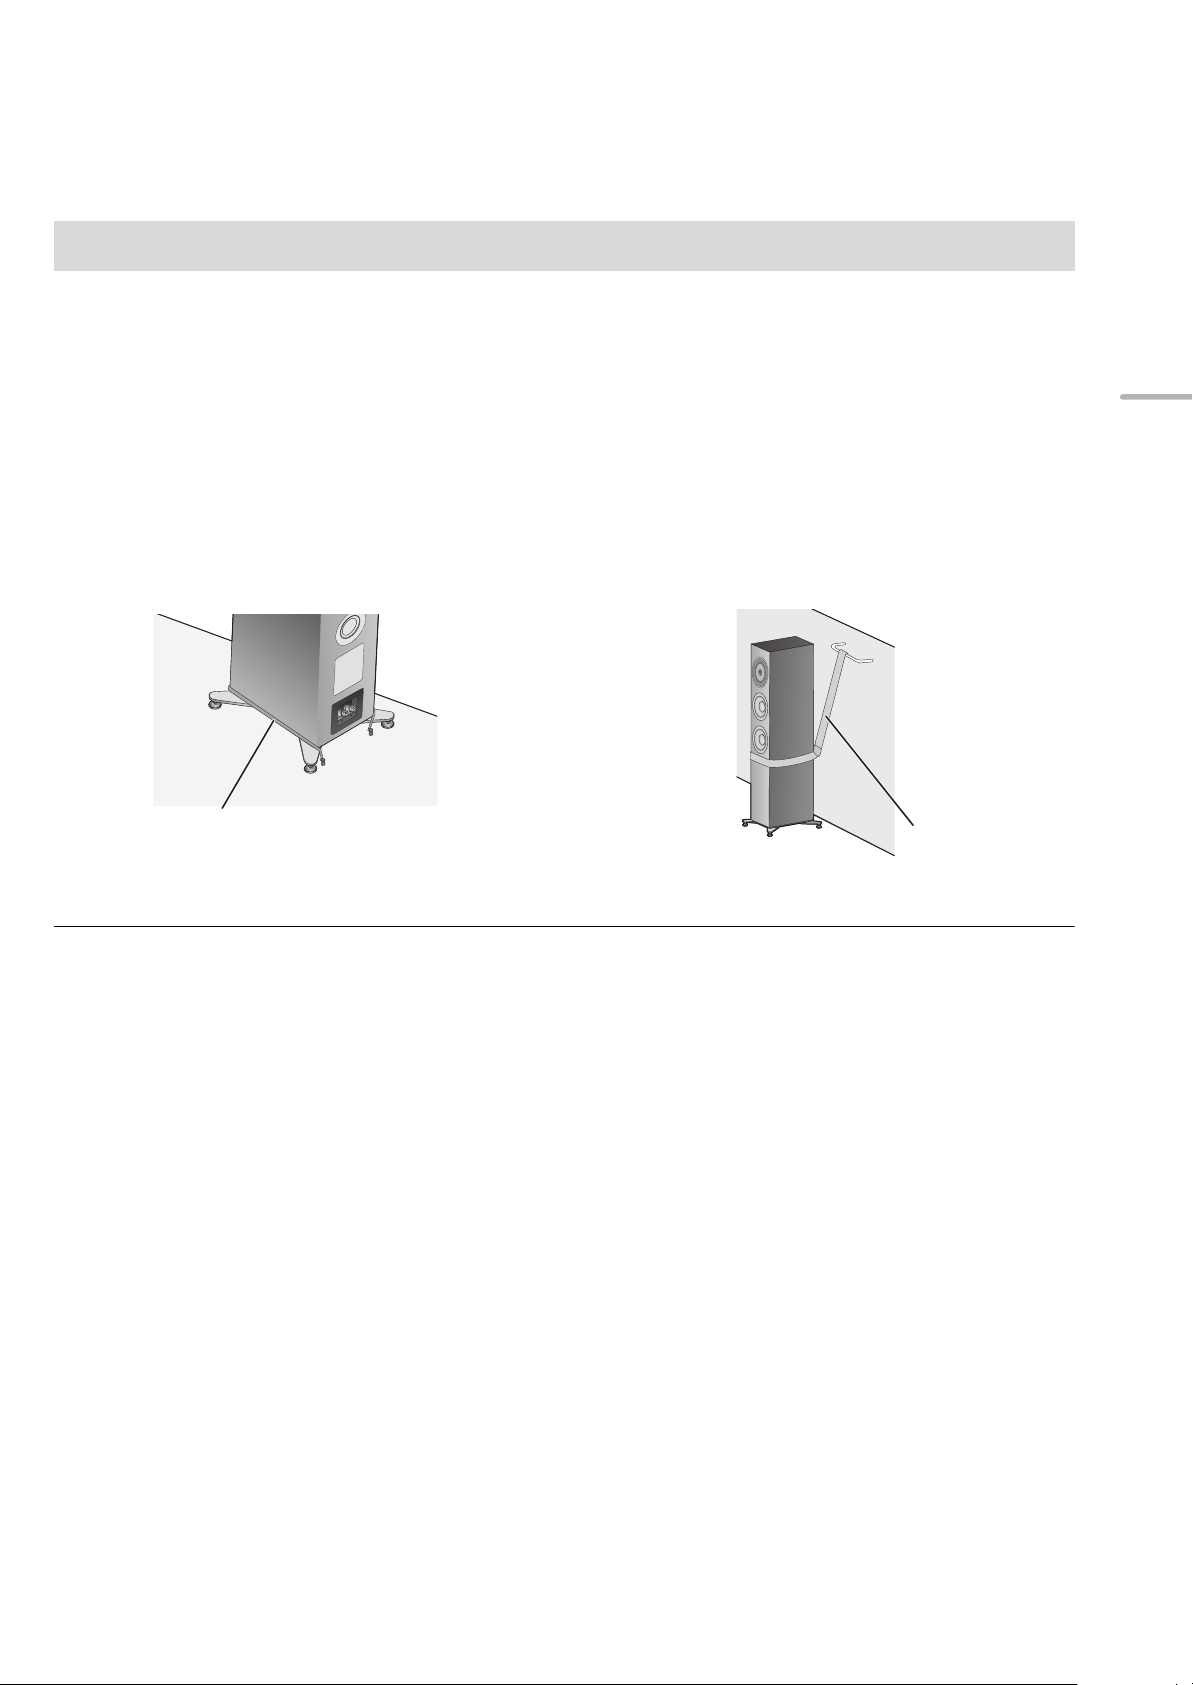
Preventing the speakers from tipping over
Belt
The speakers may tip over in a disaster such as a powerful earthquake or in an accident. For your safety, be sure to secure the
speakers against tipping over.
Each speaker weighs approximately 32 kg (71 lbs) in total. Verify that the speaker locations are strong enough to
withstand this weight.
For details, consult an installation specialist.
English
∫ When securing the speakers to a
horizontal surface (floor, etc.)
Secure each speaker to the floor with wires or similar items
as shown in the illustration.
Wire
∫ When securing the speakers to a vertical
suface (wall, etc.)
Loop a band or similar item around each speaker, and
connect it to a sturdy wall or column with a stout wire, chain
or similar item, as shown in the illustration.
≥The measures described above do not guarantee protection against all disasters and accidents, including earthquakes.
Please note that Panasonic is not responsible for any damage to the speakers, their installation locations or other objects
caused by the work performed to secure the speakers from tipping over.
≥Use of the spikes will make the speakers more vulnerable to tipping over.
(15)
15
Page 16
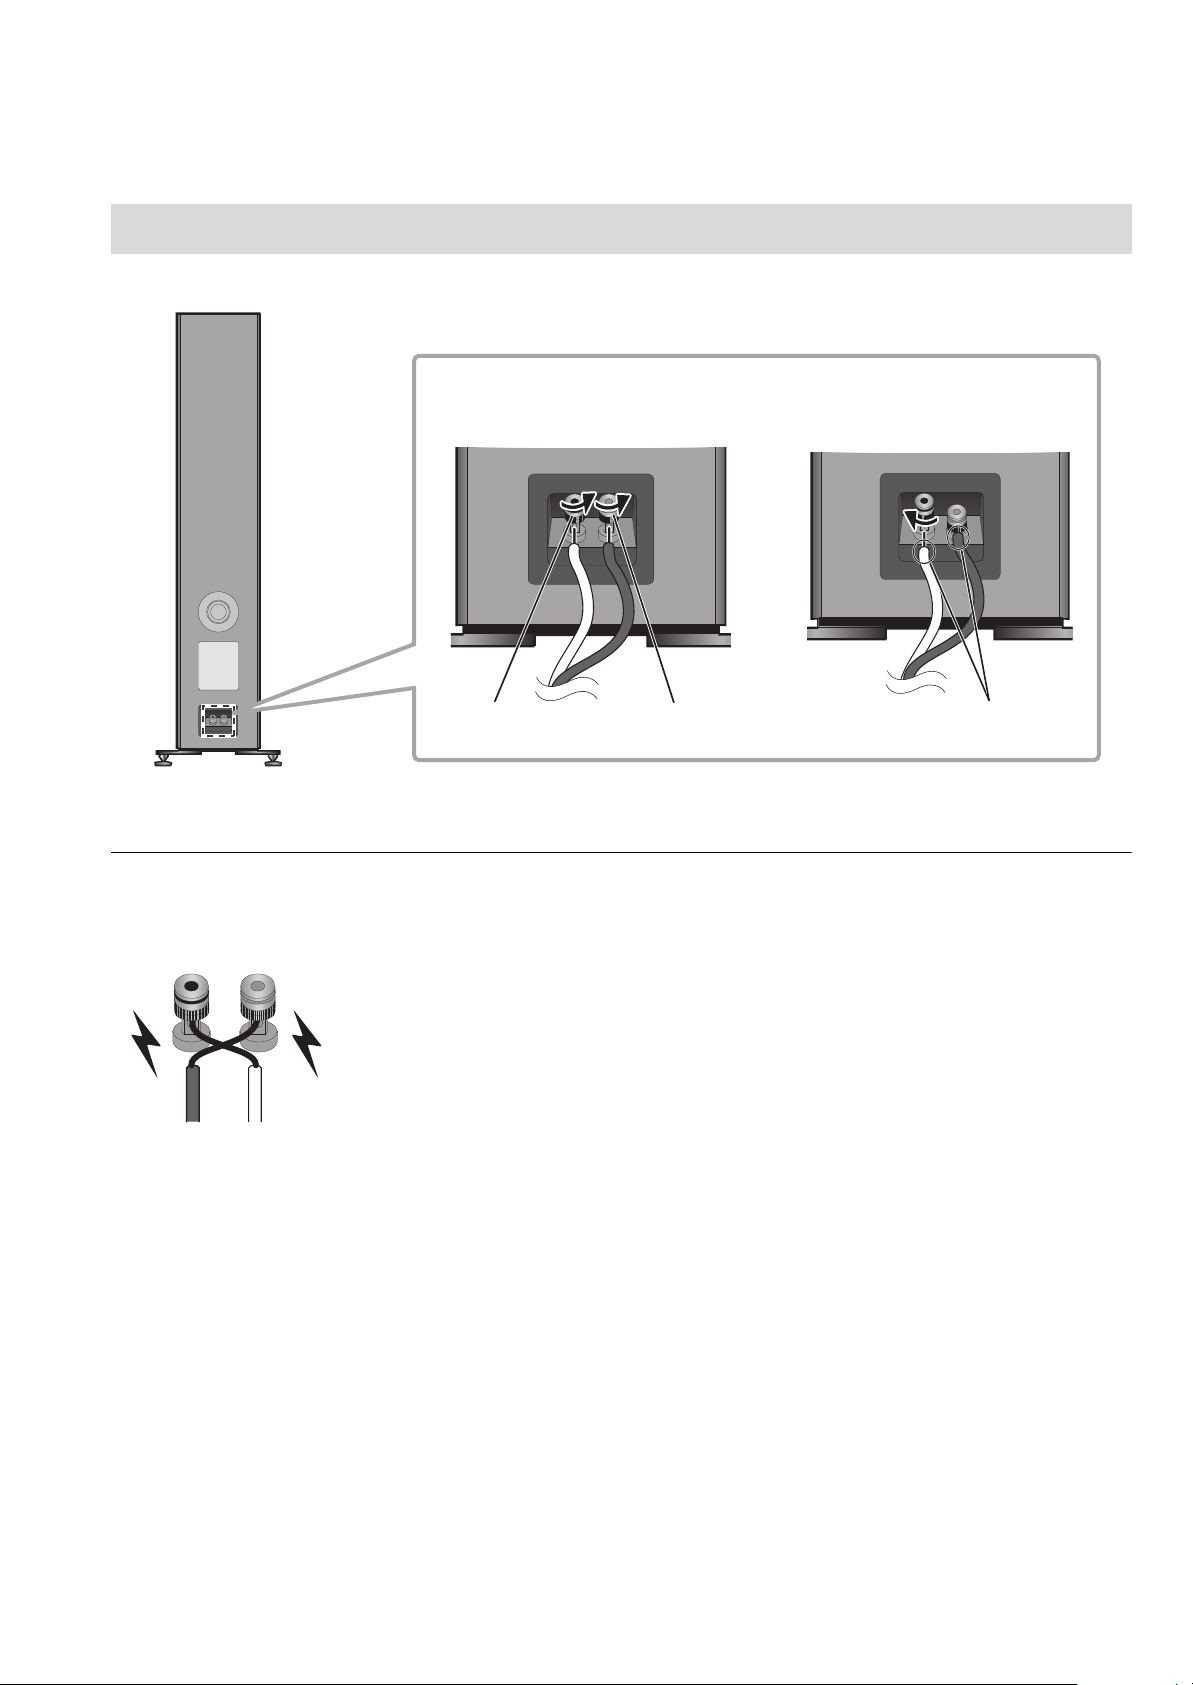
Connections
1 Turn the knobs to loosen them, and
insert the core wires into the holes.
2 Tighten the knobs.
- (Black)
+ (Red)
Do not insert the vinyl insulation.
Speaker (rear)
DO NOT
Connecting the speaker cables
The speakers are not supplied with speaker cables. For connection, use commercially-available speaker cables.
If it is difficult to connect the speaker cables, remove the knobs before connecting them.
≥ Be careful not to cross (short-circuit) or reverse the polarity of the speaker wires as doing so may damage the amplifier.
(16)
16
Page 17

Connecting with an amplifier
e.g.,
Amplifier (rear)
Speaker (left)
Speaker (right)
≥Before connection, turn off the amplifier and disconnect its power cord.
≥For details, refer to the operating instructions of the amplifier.
Connect the amplifier and speakers with speaker cables (commercially-available).
English
≥ Do not move the speaker while the speaker cables are connected. This may cause a short circuit.
≥ When the connections are completed, pull the speaker cables lightly to check that they are connected firmly.
≥ Wire the polarity (+/-) of the terminals correctly. Not doing so may adversely affect stereo effects or cause malfunction.
(17)
17
Page 18
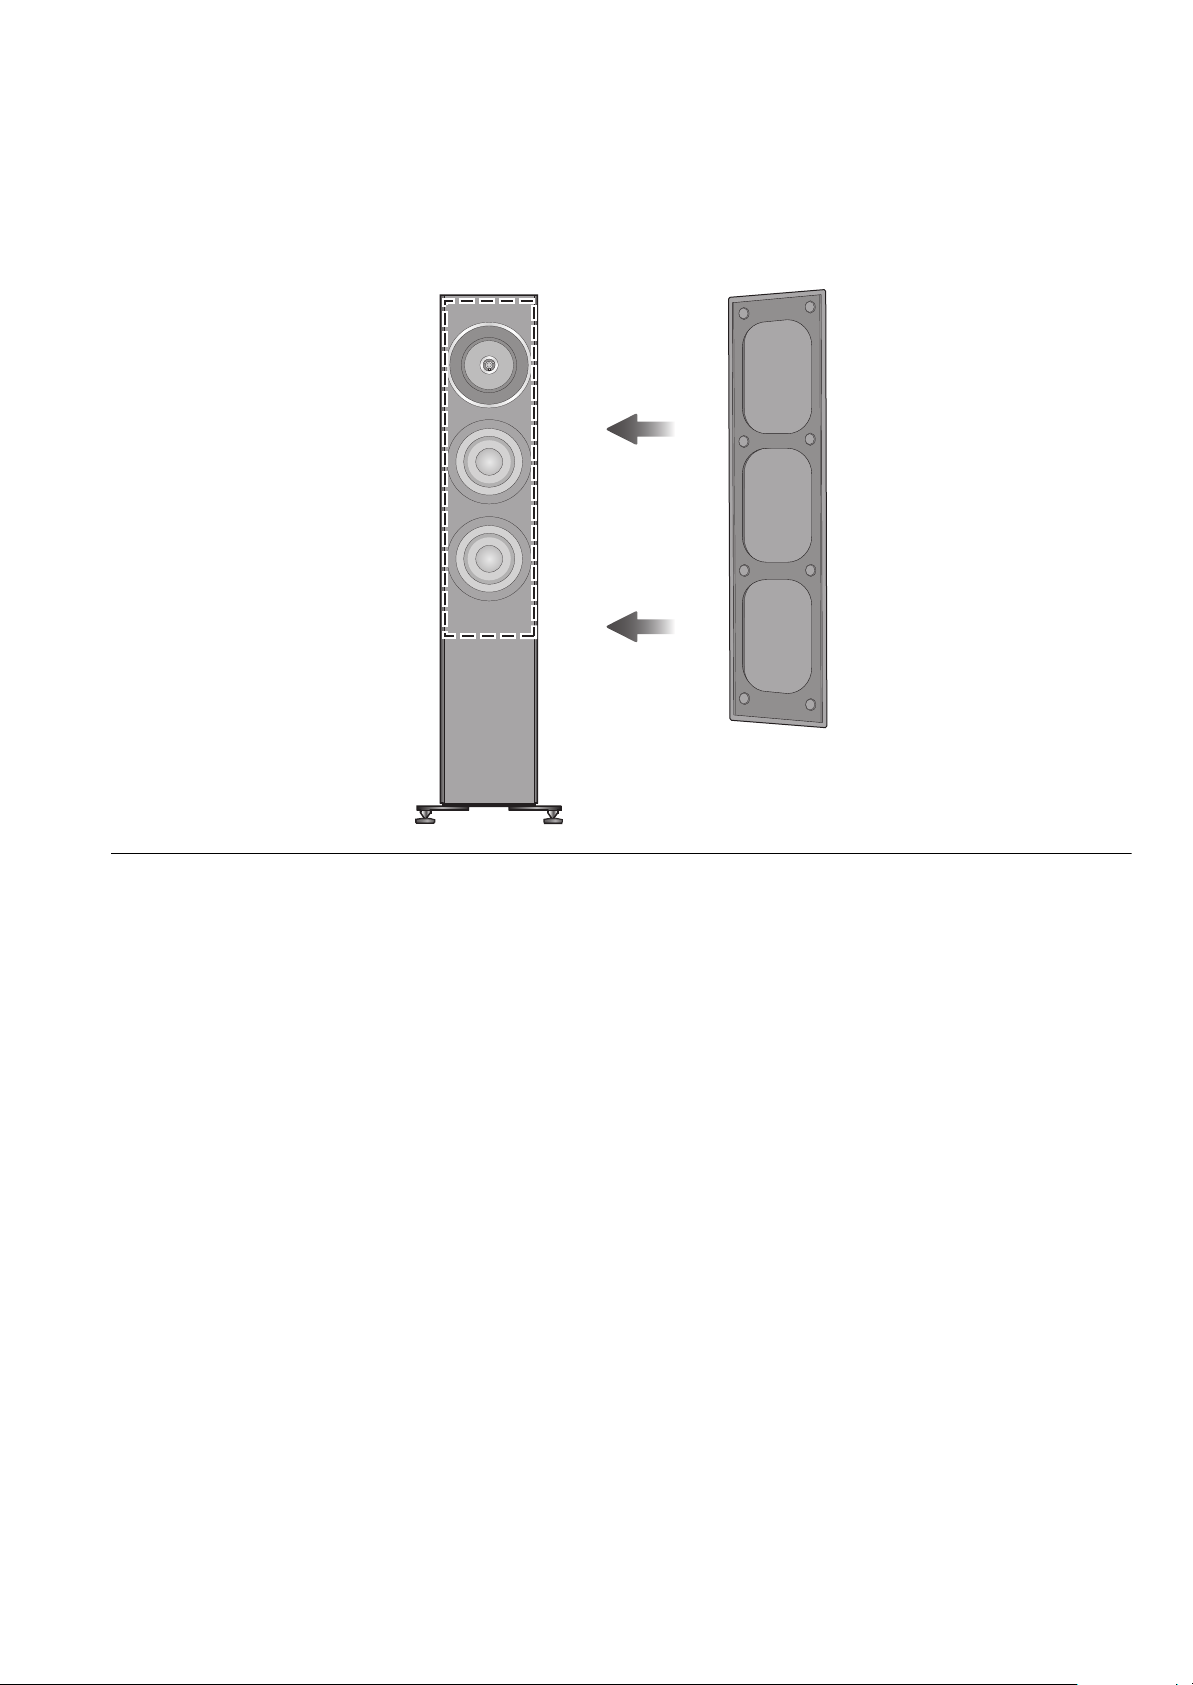
Attaching the speaker nets
Speaker (front)
Speaker net (rear)
The speakers are supplied with speaker nets, which protect the speaker units from dust.
Use the magnets to fix the speaker nets to the speaker units.
≥ You can enjoy superior quality audio by removing the speaker nets before playback.
18
(18)
Page 19

Notes on use
To protect the speakers from damage caused by excessive input, observe the following precautions:
≥Reduce the volume in the following cases to avoid damage:
jWhen playing distorted sound.
jWhen the speakers are receiving howling from a microphone or record player, noise from FM broadcasts, or continuous
signals from an oscillator, test disc, or electronic instrument.
jWhen adjusting the sound quality.
jWhen turning the amplifier on or off.
≥Avoid raising the volume level too much when enhancing the treble sound with a graphic equalizer or any other controls.
≥Avoid outputting excessively loud sound with a small power amplifier. Doing so will increase the amplifer’s harmonic distortion
and may damage the speakers.
≥You can damage your speakers and shorten their useful life if you play sound at high levels over extended periods.
≥Do not touch the speaker terminals with your hands or other objects while the speakers are in use. Depending on the conditions
of use, doing so may expose you to high voltage.
Unit care
Wipe the speakers with the supplied cleaning cloth.
≥When dirt is heavy, wring a wet cloth tightly to wipe the dirt, and then wipe it with a dry cloth.
≥Do not use solvents including benzine, thinner, alcohol, kitchen detergent, a chemical wiper, etc. This might cause the exterior
case to be deformed or the coating to come off.
English
Specifications
Type 3-way 4 speakers, bass-reflex type
(coaxial 2-way midrange/built-in tweeters)
Speaker unit
Woofer 16 cm (6
Midrange/Tweeter Coaxial 16 cm (6
Impedance 4 ≠
Input power (IEC) 200 W (MAX)
Sound pressure level 88 dB (2.83 V/m)
Frequency range 27 Hz to 100 kHz (-16 dB)
Crossover frequency 480 Hz, 3.2 kHz
Dimensions (WkHkD)
With the spikes
With the rubber feet
Mass (Weight) Approx. 32 kg (71 lbs)
Operating temperature range 0
Operating humidity range 20 % to 80 % RH (no condensation)
302 mmk1,114 mmk375 mm (11
302 mmk1,093 mmk375 mm (11
1
/2q) cone type k1 / 2.5 cm (1q) dome type k1
o
C to i40oC (i32oF to i104oF)
≥ Specifications are subject to change without notice.
≥ Mass and dimensions are approximate.
1
/2q) cone type k2
100 W (RATED)
85 dB (W/m)
32 Hz to 85 kHz (-10 dB)
7
/8qk4327/32qk143/4q)
7
/8qk43 1/32qk143/4q)
(19)
19
Page 20

Nous vous remercions d’avoir arrêté votre choix sur cet appareil.
Il est recommandé de lire attentivement ce manuel avant d’utiliser l’appareil et de le conserver pour consultation ultérieure.
Pour toute assistance supplémentaire, visiter :
www.panasonic.ca/french/support
IMPORTANTES MISES EN GARDE
AVERTISSEMENT
≥ Ne pas démonter ni modifier le produit. Cela pourrait causer des
dommages ou un incendie.
≥ Ne pas placer les enceintes sur des endroits instables, comme peut
l'être une table bancale ou une surface inclinée.
Ne pas placer les enceintes sur des surfaces élevées ou inégales ou
sur des surfaces vulnérables aux vibrations ou aux chocs.
Si les enceintes se renversent ou tombent, cela pourrait causer des
blessures.
≥ Conserver les petits accessoires hors de portée des enfants. En cas
d'ingestion accidentelle, il y aura des effets physiques indésirables.
En cas de doute d'ingestion de petits accessoires, consulter
immédiatement votre médecin.
≥ Ne pas suspendre les enceintes du plafond ou les installer au mur.
Les enceintes pourraient tomber et causer des blessures.
≥ Ne pas insérer d'objets dans les ouvertures des ports à évent réflex
à l'arrière des enceintes. Cela pourrait provoquer un incendie ou des
blessures. Porter une attention supplémentaire lorsque des enfants
se trouvent à proximité.
ATTENTION
≥ Ne pas monter sur les enceintes et ne pas s'y accrocher. Si les
enceintes se renversent ou sont endommagées, cela pourrait
causer des blessures.
≥ Ne pas utiliser les enceintes pendant une longue période lorsque le
son est déformé. Autrement les enceintes pourraient surchauffer,
causant un dysfonctionnement ou un incendie.
≥ Ne pas poser d'objets lourds ou de gros objets sur les enceintes. Si
les enceintes se renversent ou tombent, cela pourrait causer des
blessures.
≥ Ne pas toucher les diaphragmes.
Autrement, cela pourrait déformer les diaphragmes et, comme
résultat, le son pourrait ne plus être reproduit correctement.
≥ Conserver les enceintes hors de portée des enfants et plus
particulièrement des nourrissons. Si les enceintes se renversent,
cela pourrait provoquer des blessures.
≥ Ne pas placer les enceintes à des endroits où la température est
très élevée. Éviter plus particulièrement les endroits exposés
directement au soleil et ceux situés près d'un chauffage. Ne pas
respecter ces consignes pourrait causer la détérioration du
revêtement extérieur ou des composants internes.
≥ Ne pas placer les enceintes dans des endroits exposés à des
fumées grasses ou à la vapeur, ou bien dans des endroits humides
ou poussiéreux. Cela pourrait permettre à l'électricité d'être conduite
à travers l'huile, l'humidité ou la poussière, provoquant ainsi un
incendie ou une électrocution.
≥ Conserver les objets magnétiques loin du produit. Les puissants
aimants se trouvant à l'intérieur des enceintes et des treillis
d'enceinte pourraient endommager les cartes de crédit, les cartes de
voyage, les horloges et d'autres objets.
≥ Ne pas insérer un doigt dans l’ouverture du port à évent réflex à
l’arrière de l’enceinte. Porter une attention particulière aux enfants
car cela pourrait causer des blessures.
≥ Ne pas raccorder les enceintes à un amplificateur avec une sortie
upérieure à l'entrée admissible.
s
Autrement les enceintes pourraient surchauffer, causant un
incendie.
≥ Chaque enceinte doit être transportée et installée par au moins deux
personnes. Toute chute pourrait entraîner une blessure.
≥ Sécuriser les enceintes contre le renversement. Si celles-ci se
renversent durant une catastrophe comme un puissant tremblement
de terre ou un accident, des blessures peuvent être occasionnées.
≥ Avant utilisation, s’assurer de bien fixer les embases ainsi que les
pointes ou les pieds en caoutchouc. Autrement, le produit pourrait
se renverser et causer des blessures.
06
(20)
Page 21
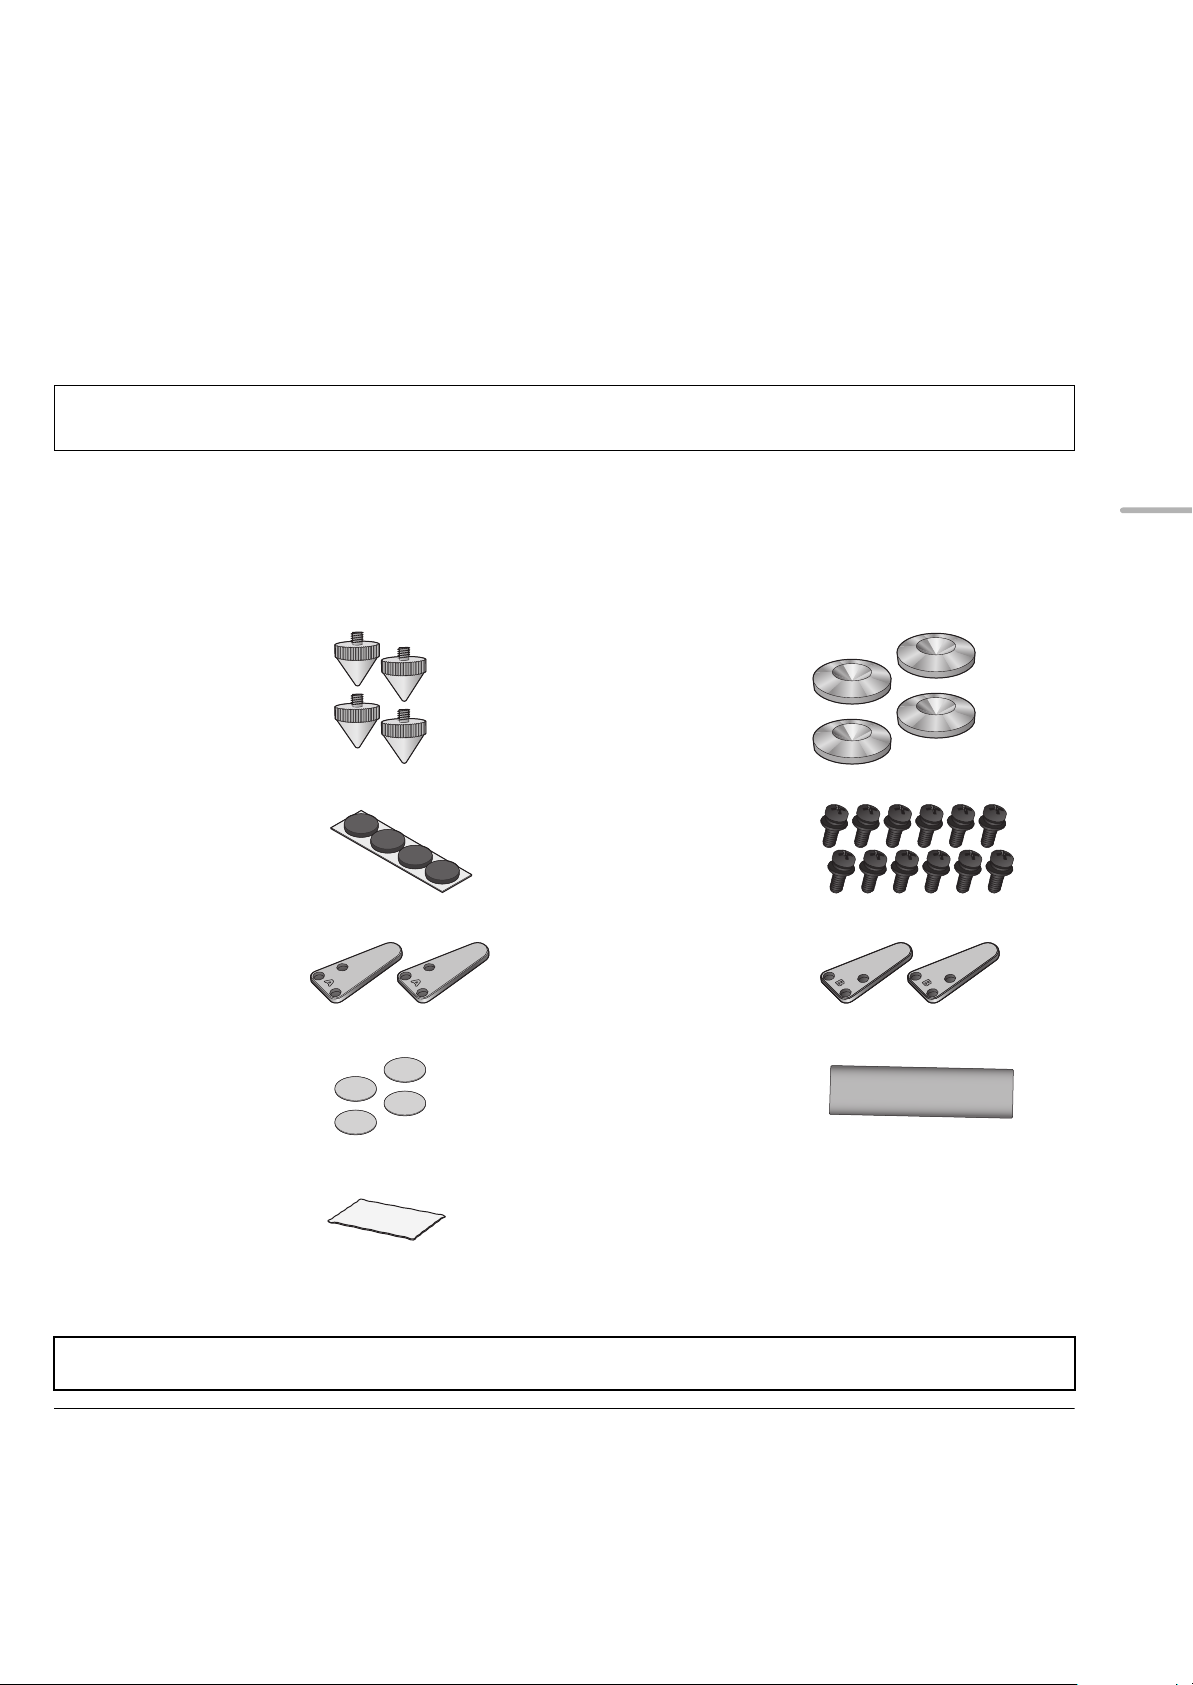
Table des matières
IMPORTANTES MISES EN GARDE................................. 06
Accessoires...................................................................... 07
À propos de cet appareil ................................................. 08
Installation ........................................................................ 09
Raccordements ................................................................ 16
Installation du treillis de haut-parleurs .......................... 18
À propos des illustrations dans le présent manuel
≥Les illustrations peuvent différer de votre appareil.
Accessoires
∏ 4 pointes
(TBLA40861)
Remarques sur l’utilisation.............................................19
Entretien de l’appareil......................................................19
Spécifications...................................................................19
Certificat de garantie limitée.........................................162
Français (Canada)
∏ 4 supports à pointe
(TYL0079)
∏ 4 pieds en
caoutchouc
(TBLG32691)
∏ 2 embases A
(TBLA40852)
∏ 4 espaceurs
(TMKK653)
∏ 1 chiffon de nettoyage
(TXFPE01LHUU)
Avant utilisation, s’assurer de bien fixer les embases ainsi que les pointes ou les pieds en caoutchouc.
≥Conserver les petits accessoires hors de portée des enfants pour éviter qu'ils les avalent.
∏ 12 vis pour embase
(THEL155Z)
∏ 2 embases B
(TBLA41091)
∏ 1 treillis de haut-
parleurs
(TTJ0006-A)
≥ Les numéros de produit fournis dans ce manuel d'utilisation sont corrects à compter de février 2017. Ceux-ci peuvent être sujets à des
changements.
≥ Les enceintes ne sont pas fournies avec des câbles d'enceintes. Pour le branchement, utiliser des câbles d'enceintes disponibles dans le
commerce.
(21)
07
Page 22

À propos de cet appareil
ヒ
ビ
ピ
ピ
Avant Arrière
Port à évent réflex
Prises de l'enceinte
Marque d'identification du
produit
Le numéro du modèle se trouve
sur la marque d'identification du
produit, située à l'arrière de cet
appareil.
∫ Noms des parties et fonctions des haut-parleurs
Architecture de montage haut-parleur équilibrée
1
Le haut-parleur, monté à l’arrière de l’écran acoustique à l’intérieur du coffret à son centre de gravité, est conçu pour
supprimer la vibration qu’il génère. Le haut-parleur n’est pas monté à l’avant de l’écran acoustique pour minimiser les
transmissions non désirées de vibrations provenant du haut-parleur vers l’écran acoustique. Le résultat est une enceinte
qui offre une scène sonore réaliste et spacieuse faite de sons pénétrants, nets et précis avec des fréquences allant de
faibles à très élevées.
Deux voies coaxiales
2
La nouvelle unité de fréquence moyenne à haute comporte un système coaxial à deux voies qui hérite des idées de
conception développées pour nos modèles haut de gamme : une source sonore ponctuelle et une reproduction en phase
linéaire. Le système, conçu pour la localisation précise du son, permet à l’enceinte de délivrer des sons variés produits
par des instruments de musique de façon nette pour recréer une scène sonore à trois dimensions.
Haut-parleurs des graves à faible distorsion et à longue portée
3
L’enceinte comprend deux haut-parleurs des graves faits de composants comme des doubles aimants, des bobines à
longue voix et des anneaux en cuivre. Ce qui fait que l’enceinte peut délivrer un son grave qui offre une faible distorsion et
une superbe réponse en reproduisant même les fréquences à haute amplitude.
∫ Dispositifs recommandés
Nous conseillons d'utiliser des dispositifs Technics (en option) afin d'obtenir une qualité sonore supérieure.
Nom du produit Numéro du modèle
Amplificateur intégré stéréo SU-G700
Amplificateur réseau audio SU-G30
08
(22)
Page 23
Installation
Ex. :
L'angle est approximatif.
※ Haut-parleurs
※
60°
≥Chaque enceinte doit être transportée et installée par au moins deux personnes.
≥Ne pas toucher les haut-parleurs. Cela pourrait rendre le son de mauvaise qualité.
≥Placer les enceintes environ à la même distance de la position d'écoute.
≥
Les enceintes produisent des sons des graves depuis les ports à évent réflex situés à l'arrière ainsi que depuis la partie avant des
enceintes. Installer les enceintes à au moins 5 cm (2 po) de distance des murs afin de ne pas bloquer les ports à évent réflex à l’arrière.
≥Garder l'amplificateur ou un autre dispositif et les enceintes à 1 cm (13/32 po) de distance minimum.
Français (Canada)
∫ Emplacement optimal
La qualité et le volume du son des graves, la performance de localisation du son, l’ambiance sonore et d’autres facteurs
déterminants de la qualité sonore varient selon l’emplacement des enceintes, la position d'écoute, les conditions de la pièce et
d'autres facteurs. Se référer aux informations ci-dessous lors de l'installation des enceintes.
Choix de l'emplacement de l'installation.
≥Chaque enceinte a une masse d'environ 32 kg (71 lb). Vérifier que l'emplacement de l'installation est assez solide pour
supporter cette masse.
≥Si vous devez prévenir le basculement des enceintes pour des raisons de sécurité, consulter un spécialiste pour l’installation.
La résistance du plancher et du mur doit être vérifiée. (> 15)
≥Installer les enceintes sur une surface plane en sécurité.
Si les enceintes vacillent lors de leur positionnement, utiliser les espaceurs. (> 13, 14)
≥Afin de réduire l’écart de qualité sonore entre l’enceinte de droite et celle de gauche, positionner les enceintes en assurant un
équilibre des conditions acoustiques (réflexion et absorption acoustique).
Réglage des distances entre l'arrière des enceintes et les murs
Si les enceintes sont installées à proximité d’un mur ou dans un coin, les graves seront plus puissants, mais si les enceintes en
sont trop proches, les performances de localisation du son et l’ambiance sonore seront perturbées. Dans un tel cas, régler la
distance entre les enceintes et le mur avant entre 30 cm (12 po) et 60 cm (24 po). (Il est à noter que la distance entre les
enceintes et les murs latéraux devrait être supérieure à 60 cm (24 po)).
≥Ne pas faire glisser trop violemment les enceintes. Cela pourrait endommager l’enceinte et le sol.
Réglage de l'angle des enceintes
Orienter la partie avant vers l’auditeur. Le fait d’observer ces recommandations permettra une localisation du son plus précise
aux enceintes.
Réglage de l'acoustique de la pièce et de la disposition des enceintes
Selon l'environnement (notamment la taille et la forme de la pièce, la distance aux murs et le niveau de réverbération), il est
possible que certains sons soient exagérés ou supprimés, ce qui les rendra difficiles à entendre. Dans de tels cas, il peut être
utile d'ajuster le niveau de réverbération en déplaçant les enceintes, en changeant de position d'écoute ou en recouvrant les
murs et fenêtres de rideaux épais afin de résoudre le problème.
≥Les pointes pourraient rehausser la qualité sonore. (> 12)
(23)
09
Page 24
Fixation des embases
②②
③
Garder le carton en place pour
protéger les haut-parleurs.
1 Retirer les accessoires.
≥Retirer les accessoires des blocs de polystyrène et les placer dans un endroit hors de portée des enfants.
2 Placer les blocs de polystyrène à l’endroit prévu pour le montage.
3 Retirer les treillis d’enceinte de la boîte d’emballage.
10
4
Poser l’enceinte sur les blocs de polystyrène retirés à l’étape ②.
≥Garder les points suivants à l’esprit en soulevant l’enceinte.
jLa tenir par en-dessous pour qu’elle ne puisse pas glisser des mains.
(24)
Page 25
5 Enrouler les sacs de protection (2 pièces) pour découvrir le bas de l’enceinte.
Positionnement de l’enceinte en utilisant les pieds en caoutchouc
Fixer préalablement les pieds en caoutchouc (4 pièces) dans les enfoncements des embases.
≥Décoller les pieds en caoutchouc du papier et les positionner aux endroits prévus sur les embases en
appuyant fermement et sans toucher leur surface adhésive.
Fixer de manière à ce que le
côté A soit contre le sol.
Fixer de manière à ce que le
côté B soit contre le sol.
6 Bien fixer les embases (4 pièces) à l’enceinte à l’aide des vis fournies.
Français (Canada)
≥Commencer par visser les trois vis à la main, puis les serrer à l’aide d’un tournevis.
≥Une fois les embases fixées, s’assurer qu’elles ne bougent pas.
Positionnement de l’enceinte en utilisant les pointes (> 12)
Positionnement de l’enceinte en utilisant les pieds en caoutchouc (> 14)
(25)
11
Page 26
Positionnement des enceintes en utilisant les pointes
Tenir l’enceinte de manière à ce
que les mains ne touchent pas
les haut-parleurs.
Les pointes pourraient rehausser la qualité sonore.
≥Panasonic n'est pas responsable d'accidents ou d'endommagements dus à un mauvais montage ou à la mauvaise
manipulation du produit. Ne pas installer les accessoires d'une façon autre que celle décrite dans ce manuel d'utilisation.
≥Chaque enceinte a une masse d'environ 32 kg (71 lb). Lorsque vous penchez les enceintes afin d'installer les pointes,
s'assurer que cette tâche est effectuée par au moins deux personnes. Lors de l'installation des pointes, faire attention à ne
pas coincer vos doigts ou orteils entre les enceintes et le sol et à ne pas renverser les enceintes. De plus, poser un tapis
épais ou tout autre objet similaire sur le côté du sol vers lequel vous pencherez les enceintes afin d'éviter d'endommager
le sol.
≥Comme chaque pointe supporte une masse d'au moins environ 8 kg (17,6 lb), il est possible que les pointes laissent des
marques et des rayures à l'emplacement de l'installation. Afin d'éviter que les pointes n'endommagent la zone, utiliser les
supports à pointe fournis ou acheter des supports à pointe disposant de grandes surfaces de contact et d'une force
adéquate.
≥Si vous déplacez les enceintes en laissant les pointes installées, vous risquez d'endommager le sol. Avant de changer
d'emplacement, retirer les pointes.
Pour éviter d’endommager le sol, avoir à disposition deux tapis épais (ou similaire). Les placer préalablement à l’endroit du
désemballage et à celui de l’installation.
1 Placer l’enceinte verticalement sur un tapis épais (ou similaire).
2 Retirer les sacs de protection (2 pièces) et le carton recouvrant l’enceinte.
3 Transporter l’enceinte à l’endroit de l’installation en l’inclinant vers l’avant et la placer sur un tapis épais (ou similaire).
(26)
12
Page 27
4 Incliner l’enceinte vers l’avant et visser les pointes dans les deux embases arrière.
Supports à pointe
Enceinte (arrière)
Tapis épais, etc.
Visser les pointes à fond.
Placer chaque support à pointe de
façon à ce que le côté ayant un
centre dentelé soit orienté vers le
haut.
À NE PAS
FAIRE
À FAIRE
Espaceur
Pour utiliser les supports à pointe, les placer sous les pointes.
Français (Canada)
5 Tout en alignant les pointes avec les marques sur les supports à pointe, ramener doucement l’enceinte en position verticale.
6 De la même manière qu’à l’étape ④ , incliner l’enceinte vers l’arrière et retirer le tapis épais (ou similaire).
7 Visser les pointes dans les deux embases avant.
8 Si les enceintes sont bancales, placer les espaceurs sous les supports à pointe.
Pour utiliser les supports à pointe, les placer sous les pointes.
(27)
13
Page 28

Positionnement de l’enceinte en utilisant les pieds en caoutchouc
Tenir l’enceinte de manière à
ce que les mains ne touchent
pas les haut-parleurs.
Pieds en
caoutchouc
Espaceur
Fixer préalablement les pieds en caoutchouc (4 pièces) dans les enfoncements des embases. (> 11)
≥Panasonic n'est pas responsable d'accidents ou d'endommagements dus à un mauvais montage ou à la mauvaise
manipulation du produit. Ne pas installer les accessoires d'une façon autre que celle décrite dans ce manuel d'utilisation.
≥Chaque enceinte pèse environ 32 kg (71 lb). S'assurer que cette tâche est effectuée par au moins deux personnes. Faire
attention à ne pas se coincer les doigts ou les orteils entre l’enceinte et le sol et à ne pas renverser l’enceinte.
≥Comme chaque pied en caoutchouc supporte un poids d’au moins 8 kg (17,6 lb) environ, il est possible que ceux-ci
laissent des marques et des rayures à l'emplacement de l'installation.
≥Trainer l’enceinte sur le sol peut causer le décollement des pieds en caoutchouc.
Pour changer le lieu d’installation de l’enceinte, toujours être au moins deux pour la soulever.
Pour éviter d’endommager le sol, avoir à disposition un tapis épais (ou similaire). Le placer préalablement à l’endroit du
désemballage.
1 Placer l’enceinte verticalement sur un tapis épais (ou similaire).
2 Retirer les sacs de protection (2 pièces) et le carton recouvrant l’enceinte.
3 Tenir l’enceinte de manière à ce qu’elle soit inclinée vers l’avant et la déplacer vers l’endroit de l’installation.
4 Si une fois positionnées, les enceintes sont bancales, placer les espaceurs sous les pieds en caoutchouc. Cela évitera que
les pieds en caoutchouc soient déséquilibrés sur la surface d’installation.
(28)
14
Page 29

Prévention contre le renversement des enceintes
Les enceintes peuvent se renverser durant une catastrophe comme un puissant tremblement de terre ou un accident. Pour votre
sécurité, s'assurer de sécuriser les enceintes contre le renversement.
Chaque enceinte pèse environ 32 kg (71 lb) au total. Vérifier que l'endroit où est positionnée l'enceinte est suffisamment
résistant pour supporter ce poids.
Pour plus de détails, consulter un installateur spécialisé.
∫ Pour sécuriser les enceintes sur une
surface horizontale (sol, etc.)
Sécuriser chaque enceinte au sol avec des fils ou quelque
chose de similaire comme illustré.
Fil
∫ Pour sécuriser les enceintes sur une
surface verticale (mur, etc.)
Passer l'enceinte dans la boucle d'une lanière ou quelque
chose de similaire, et accrocher cette dernière à un mur ou
une colonne robuste à l'aide d'un fil solide, d'une chaîne ou
similaire, comme illustré.
Courroie
≥Les mesures décrites ci-dessus ne garantissent pas la protection contre les catastrophes et les accidents, y compris les
tremblements de terre.
Prendre note que Panasonic n'est en aucun cas responsable des dommages causés aux enceintes, à l'endroit de leur
positionnement ou à d'autres objets, occasionnés par le travail effectué pour sécuriser les enceintes contre le renversement.
≥Utiliser les pointes rend les enceintes plus vulnérables au renversement.
Français (Canada)
(29)
15
Page 30

Raccordements
1 Dévisser les boutons, et insérer les
fils électriques dans les trous.
2 Revisser les boutons.
- (Noir)
+ (Rouge)
Ne pas insérer l'isolant en vinyle.
Enceinte
(arrière)
À NE PAS FAIRE
Raccordement des câbles de l'enceinte
Les enceintes ne sont pas fournies avec des câbles d'enceintes. Pour le branchement, utiliser des câbles d'enceintes disponibles
dans le commerce.
S’il est difficile de raccorder les câbles d’enceinte, retirer les boutons avant de le faire.
≥ Prendre garde à ne pas croiser (court-circuiter) ou inverser la polarité des câbles des enceintes car cela pourrait endommager l'amplificateur.
(30)
16
Page 31

Connexion à un amplificateur
Ex. :
Amplificateur (arrière)
≥Avant la connexion, mettre l'amplificateur hors marche et débrancher son câble d'alimentation.
≥Pour plus de détails, consulter les instructions de fonctionnement de l'amplificateur.
Raccorder l'amplificateur aux enceintes à l'aide des câbles d'enceintes (disponibles dans le commerce).
Français (Canada)
Enceinte (droite)
Enceinte (gauche)
≥ Ne pas déplacer l'enceinte lorsque les câbles d'enceinte sont connectés. Cela pourrait entraîner un court-circuit.
≥ Une fois les branchements effectués, tirer légèrement sur les câbles d'enceinte afin de vérifier qu'ils sont bien branchés.
≥ S'assurer de respecter la polarité (+/-) des prises. Le cas contraire, les effets stéréo pourraient en pâtir, ou l'appareil pourrait ne plus fonctionner
correctement.
(31)
17
Page 32

Installation du treillis de haut-parleurs
Enceinte (avant)
Treillis de haut-parleur (arrière)
Les enceintes sont fournies avec des treillis de haut-parleurs, qui protègent les haut-parleurs de la poussière.
Utiliser les aimants pour fixer le treillis de haut-parleur à l’enceinte.
≥ Vous pouvez bénéficier d'une qualité sonore supérieure en retirant les treillis d'enceinte avant l'écoute.
18
(32)
Page 33

Remarques sur l’utilisation
Afin de protéger les enceintes d'un endommagement causé par un voltage d'entrée trop fort, prendre les précautions
suivantes :
≥Afin de prévenir tout dommage aux enceintes, réduire le volume dans les conditions suivantes :
jLors de l’écoute avec distorsion.
jLors de la réception de sifflement à cause d’un micro ou d’une table tournante, d’émissions FM avec interférence, ou de
signaux continus en provenance d’un oscillateur, instrument électrique ou disque d’essai.
jLors du réglage de la qualité sonore.
jLors de la mise en ou hors contact de l’amplificateur.
≥Éviter de trop augmenter le volume lors du rehaut des aigus avec un égaliseur graphique ou toutes autres commandes.
≥Éviter de produire un son trop fort avec un petit amplificateur de puissance. Ceci augmenterait la distorsion harmonique de
l'amplificateur et pourrait endommager les enceintes.
≥Ne pas effectuer d’écoute à un niveau élevé pendant une période prolongée car cela pourrait endommager les enceintes et en
réduire leur durée de vie.
≥Ne pas toucher les prises de l'enceinte avec vos mains ou d'autres objets lorsque les enceintes sont en cours d'utilisation. En
fonction des conditions d'utilisation, cela pourrait vous exposer à une haute tension.
Entretien de l’appareil
Essuyer les enceintes à l'aide du chiffon de nettoyage fourni.
≥Si les surfaces de l’appareil deviennent souillées, les nettoyer avec un linge humide, puis les essuyer avec un linge sec.
≥Ne pas utiliser de solvants tels que la benzine, du diluant, de l'alcool, des détergents de cuisine, etc. Cela pourrait modifier
l'apparence du boîtier externe ou décoller son revêtement.
Français (Canada)
Spécifications
Type 4 haut-parleurs 3 voies, type à évent réflex
(Haut-parleur des moyennes fréquences coaxial bidirectionnel/haut-
parleur des aigus intégrés)
Haut-parleur
Graves 16 cm (6
Moyennes fréquences/aigus Coaxial 16 cm (6
Impédance 4 ≠
Puissance d'entrée (CEI) 200 W (MAX.)
Niveau de pression sonore 88 dB (2,83 V/m)
Gamme de fréquences 27 Hz à 100 kHz (-16 dB)
Fréquence de croisement 480 Hz, 3,2 kHz
Dimensions (LkHkP)
Avec les pointes
Avec les pieds en caoutchouc
Poids Environ 32 kg (71 lb)
Température de fonctionnement 0
Humidité relative 20 % à 80 % (sans condensation)
1
/2 po) de type cone k1/2,5 cm (1 po) de type dôme k1
302 mmk1114mmk375 mm (11
302 mmk1093mmk375 mm (11
o
C à i40oC (r32oF à r104oF)
≥ Spécifications sous réserve de modifications.
≥ Le poids et les dimensions sont approximatifs.
1
/2 po) de type cône k2
100 W (NOMINALE)
85 dB (W/m)
32 Hz à 85 kHz (-10 dB)
7
/8 pok4327/32 pok143/4 po)
7
/8 pok431/32 pok143/4 po)
(33)
19
Page 34

Wir möchten Ihnen dafür danken, dass Sie sich für dieses Gerät entschieden haben.
Bitte lesen Sie diese Anleitung vor der Inbetriebnahme dieses Produkts aufmerksam durch, und bewahren Sie dieses Handbuch
für spätere Bezugnahme griffbereit auf.
Vorsichtsmaßnahmen
WARNUNG
≥ Verändern oder zerlegen Sie das Gerät nicht. Anderenfalls kann
es zu Schäden oder Bränden kommen.
≥ Stellen Sie die Lautsprecher nicht auf instabile Unterlagen wie
wackelige Tische oder unebenen Böden.
Stellen Sie die Lautsprecher nicht auf hohe oder unebene
Oberflächen oder auf Oberflächen, die Vibrationen oder Stößen
ausgesetzt sind.
Wenn die Lautsprecher umkippen oder fallen, besteht
Verletzungsgefahr.
≥ Bewahren Sie alle Kleinteile außerhalb der Reichweite von
Kindern auf. Wenn die Spikes verschluckt werden, bestehen
Gesundheitsrisiken. Falls Sie den Verdacht haben, dass Kleinteile
verschluckt wurden, konsultieren Sie unverzüglich den Arzt.
≥ Hängen Sie die Lautsprecher nicht an die Decke oder an die
Wand. Der Lautsprecher kann sonst herunterfallen und
Verletzungen verursachen.
≥ Führen Sie keine Gegenstände in die Bassreflex-Ports auf der
Lautsprecherrückseite ein. Anderenfalls kann es zu Bränden oder
Verletzungen kommen. Seien Sie besonders vorsichtig, wenn sich
Kinder in der Nähe befinden.
ACHTUNG
≥ Stellen Sie sich nicht auf die Lautsprecher und hängen Sie sich
auch nicht daran. Wenn die Lautsprecher umkippen oder
beschädigt werden, besteht Verletzungsgefahr.
≥ Betreiben Sie die Lautsprecher nicht über einen längeren
Zeitraum, wenn der Ton verzerrt ist. Anderenfalls kann es zur
Überhitzung der Lautsprecher und in der Folge zu Fehlfunktionen
und Bränden kommen.
≥ Platzieren Sie keine schweren oder großen Gegenstände auf den
Lautsprechern. Wenn die Lautsprecher umkippen oder fallen,
besteht Verletzungsgefahr.
Entsorgung von Altgeräten
Nur für die Europäische Union und Länder mit Recyclingsystemen
Dieses Symbol, auf den Produkten, der Verpackung und/oder den Begleitdokumenten, bedeutet, dass gebrauchte elektrische
und elektronische Produkte nicht in den allgemeinen Hausmüll gegeben werden dürfen.
Bitte führen Sie alte Produkte zur Behandlung, Aufarbeitung bzw. zum Recycling gemäß den gesetzlichen Bestimmungen den
zuständigen Sammelpunkten zu.
Indem Sie diese Produkte ordnungsgemäß entsorgen, helfen Sie dabei, wertvolle Ressourcen zu schützen und eventuelle
negative Auswirkungen auf die menschliche Gesundheit und die Umwelt zu vermeiden.
Für mehr Informationen zu Sammlung und Recycling, wenden Sie sich bitte an Ihren örtlichen Abfallentsorgungsdienstleister.
Gemäß Landesvorschriften können wegen nicht ordnungsgemäßer Entsorgung dieses Abfalls Strafgelder verhängt werden.
≥ Berühren Sie nicht die Membranen. Anderenfalls können die
Membranen verformt werden, wodurch die Tonausgabe
beeinträchtigt wird.
≥ Halten Sie die Lautsprecher außerhalb der Reichweite von
Säuglingen und Kindern. Wenn die Lautsprecher umkippen,
besteht Verletzungsgefahr.
≥ Setzen Sie die Lautsprecher keinen hohen Temperaturen aus.
Vermeiden Sie vor allem Umgebungen mit direkter
Sonneneinstrahlung oder nahen Heizkörpern. Anderenfalls kann
es zu Schäden an den Gehäusen oder Bauteilen kommen.
≥ Stellen Sie die Lautsprecher nicht in Umgebungen mit fettigen
Dünsten, in feuchten oder staubigen Umgebungen auf.
Anderenfalls kann es zu elektrischen Stromflüssen durch Öl,
Feuchtigkeit oder Staub und in der Folge zu Bränden oder
elektrischen Schlägen kommen,
≥ Halten Sie magnetische Gegenstände von den Lautsprechern
fern. In den Lautsprechern und Lautsprechernetzen befinden sich
starke Magnete, die Kreditkarten, Netzkarten, Uhren und weitere
Gegenstände beschädigen können.
≥ Führen Sie keine Finger in die Bassreflex-Ports auf der Rückseite
der Lautsprecher ein. Achten Sie besonders auf Kinder, da dies zu
Verletzungen führen kann.
≥ Verbinden Sie die Lautsprecher nicht mit einem Verstärker, der
eine größere Ausgangsleistung hat als ihre zulässige
Eingangsleistung. Anderenfalls kann es zur Überhitzung der
Lautsprecher und in der Folge zu Bränden kommen.
≥ Jeder Lautsprecher muss von mindestens zwei Personen
getragen und aufgestellt werden. Wird ein Lautsprecher
fallengelassen, besteht Verletzungsgefahr.
≥ Sichern Sie die Lautsprecher gegen ein Umkippen. Wenn sie auf
Grund einer Katastrophe, wie bei einem starken Erdbeben oder in
einem Unfall umkippen, kann es zu Verletzungen kommen.
≥ Achten Sie darauf, vor dem Gebrauch die Bodenplatten sowie
entweder die Spikes oder die Gummifüße anzubringen.
Anderenfalls kann das Produkt kippen, und es kann zu
Verletzungen kommen.
06
(34)
Page 35

Inhaltsverzeichnis
Vorsichtsmaßnahmen...................................................... 06
Zubehör............................................................................. 07
Über dieses Gerät ............................................................ 08
Installation ........................................................................ 09
Anschlüsse....................................................................... 16
Anbringen der Lautsprechernetze.................................. 18
Hinweise zu Beschreibungen in dieser Bedienungsanleitung
≥Die gezeigten Abbildungen können sich von Ihrem Gerät unterscheiden.
Hinweise zur Nutzung......................................................19
Gerätepflege .....................................................................19
Technische Daten.............................................................19
Zubehör
∏ 4 Spikes
(TBLA40861)
∏ 4 Spike-Schuhe
(TYL0079)
Deutsch
∏ 4 Gummifüße
(TBLG32691)
∏ 2 Bodenplatten A
(TBLA40852)
∏ 4 Abstandhalter
(TMKK653)
∏ 1 Reinigungstuch
(TXFPE01LHUU)
Achten Sie darauf, vor dem Gebrauch die Bodenplatten sowie entweder die Spikes oder die Gummifüße anzubringen.
≥Bewahren Sie alle Kleinteile außerhalb der Reichweite von Kindern auf, um ein Verschlucken zu verhindern.
∏ 12 Schrauben für
Bodenplatten
(THEL155Z)
∏ 2 Bodenplatten B
(TBLA41091)
∏ 1 Lautsprechernetz
(TTJ0006-A)
≥ Stand der in dieser Gebrauchsanweisung aufgeführten Produktnummern ist Februar 2017. Änderungen vorbehalten.
≥ Die Lautsprecher werden ohne Lautsprecherkabel ausgeliefert. Verwenden Sie im Handel erhältliche Lautsprecherkabel, um die Lautsprecher
anzuschließen.
(35)
07
Page 36

Über dieses Gerät
ヒ
ビ
ピ
ピ
Vorderseite Rückseite
Bassreflex-Port
Lautsprecheranschlüsse
Produktkennzeichnung
Die Modellnummer befindet sich
auf der Produktkennzeichnung
unten an diesem Gerät.
∫ Namen der Lautsprecherteile und -funktionen
Ausbalancierte Treiberarchitektur
1
Die Lautsprechereinheit ist im Gehäuse auf der unteren Schallwand als Schwerpunkt montiert. Sie ist zum Unterdrücken
der eigenen Vibrationen ausgelegt. Die Lautsprechereinheit ist nicht auf der vorderen Schallwand montiert. So wird ein
Übertragen unerwünschter Vibrationen von der Lautsprechereinheit auf die Schallwand minimiert. Im Ergebnis liefert der
Lautsprecher realistische, profunde Tiefenstaffelung aus durchdringendem, klarem Klang mit tiefen bis extrem hohen
Frequenzen.
Zweiwege-Koaxialsystem
2
Die neuartige Mittel- bis Hochfrequenzeinheit verfügt über ein Zweiwege-Koaxialsystem mit den Designkonzepten, die für
unsere High-End-Modelle entwickelt wurden: punktförmige Schallquelle und lineare Phasenreproduktion. Das System ist
zur präzisen Klanglokalisierung ausgelegt und gestattet dem Lautsprecher, verschiedenste Klänge von
Musikinstrumenten mit hoher Klarheit in dreidimensionaler Tiefenstaffelung wiederzugeben.
Langhub-Woofer mit geringer Verzerrung
3
Der Lautsprecher beinhaltet zwei Woofer aus Komponenten wie Doppelmagneten, langen Schwingspulen und
Kupferringen. So kann der Lautsprecher Basstöne mit geringer Verzerrung und hervorragender Reaktion auch bei großen
Amplituden wiedergeben.
∫ Empfohlene Geräte
Wir empfehlen die Verwendung von Technics-Geräten (Sonderzubehör) für eine überragende Audioqualität.
Produktname Modellnummer
Stereo-Vollverstärker SU-G700
Netzwerkaudio-Vollverstärker SU-G30
08
(36)
Page 37

Installation
z.B.
Beim Winkel handelt es sich um eine
Naherungsangabe.
※ Lautsprecher
※
60°
≥Jeder Lautsprecher muss von mindestens zwei Personen getragen und aufgestellt werden.
≥Berühren Sie die Lautsprecher nicht. Anderenfalls kann die Audioqualität beeinträchtigt werden.
≥Stellen Sie die Lautsprecher in etwa derselben Distanz zur Hörposition auf.
≥Die Lautsprecher erzeugen Bassklänge über die Bassreflex-Ports auf der Rückseite sowie der Vorderseite. Installieren Sie die
Lautsprecher mindestens 5 cm von den Wänden entfernt, sodass diese nicht die Bassreflex-Ports bedecken.
≥Behalten Sie den Verstärker oder andere Geräte und die Lautsprecher mindestens 1 cm voneinander entfernt.
Deutsch
∫ Für eine optimale Positionierung
Die Qualität und Lautstärke des Bassklangs, die Leistung der Klanglokalisierung, die Klanglandschaft sowie andere Faktoren, die
die Audioqualität bestimmen, variieren je nach Installationsstandort dieses Geräts, der Hörposition, den Raumbedingungen
sowie anderen Faktoren. Beachten Sie bei der Installation der Lautsprecher die folgenden Informationen.
Bestimmung eines Installationsstandorts.
≥Jeder Lautsprecher hat etwa eine Masse von 32 kg. Vergewissern Sie sich, dass der gewünschte Installationsort die
entsprechende Tragfähigkeit aufweist.
≥Wenn Sie die Lautsprecher gegen Umkippen sichern müssen, wenden Sie sich an einen Installationsfachmann. Die Boden-
und Wandstärke muss überprüft werden. (> 15)
≥Stellen Sie die Lautsprecher auf eine sichere und ebene Oberfläche.
Wenn die Lautsprecher nach dem Aufbau wackeln, verwenden Sie die Abstandshalter. (> 13, 14)
≥Um die Lücke der Audioqualität zwischen dem linken und rechten Lautsprecher zu minimieren, installieren Sie diese so, dass
die akustischen Bedingungen (Sound-Reflexion und -Absorption) um diese herum dieselben sind.
Anpassung der Entfernungen zwischen der Rückseite der Lautsprecher und der Wände
Wenn Sie die Lautsprecher nahe an einer Wand oder in einer Ecke installieren, ist der Bassklang kraftvoller; befinden sich die
Lautsprecher jedoch zu nahe daran, können sich die Leistung der Klanglokalisierung und die Klanglandschaft beeinträchtigen.
Passen Sie in diesem Fall den Abstand zwischen den Lautsprechern und der Längswand an, der zwischen 30 cm und 60 cm
liegen sollte. (Beachten Sie, dass der Abstand zwischen den Lautsprechern und den Seitenwänden größer als 60 cm sein sollte.)
≥Ziehen Sie die Lautsprecher nicht mit Gewalt. Anderenfalls können Lautsprecher und Fußboden beschädigt werden.
Anpassung des Winkels der Lautsprecher
Richten Sie die Vorderseite der Lautsprecher in Richtung des Hörers aus. Durch das Befolgen dieser Schritte können die
Lautsprecher eine präzisere Klanglokalisierung erzielen.
Anpassung der Raumakustik und Lautsprecheranordnung
Je nach Raumumgebung (einschließlich der Größe und Form des Raums, der Entfernung zu den Wänden und dem Schallpegel),
können bestimmte Klänge überspitzt oder unterdrückt werden, sodass diese schwer zu hören sind. In solchen Fällen kann das
Anpassen des Schallpegels durch das Bewegen der Lautsprecher, das Ändern Ihrer Hörposition oder das Bedecken der Wände
oder Fenster mit dicken Vorhängen dabei helfen, das Problem zu lösen.
≥Die Spikes können die Audioqualität verbessern. (> 12)
(37)
09
Page 38

Anbringen der Bodenplatten
②②
③
Lassen Sie den Karton, wo er ist,
um den Lautsprecher zu schützen.
1 Entfernen Sie das Zubehör.
≥Nehmen Sie das Zubehör aus den Styroporblöcken und bewahren Sie es außerhalb der Reichweite von Kindern auf.
2 Platzieren Sie die Styroporblöcke beim gewünschten Aufstellungsort.
3 Entfernen Sie den Verpackungskarton des Lautsprechernetzes.
10
4 Platzieren Sie den Lautsprecher auf den Styropor-Blöcken, die Sie in Schritt ② entfernt haben.
≥Beachten Sie beim Anheben des Lautsprechers folgende Punkte:
jHalten Sie die Unterseite so, dass Ihre Hände nicht abrutschen.
(38)
Page 39

5 Rollen Sie die Schutzhüllen (2 Stück) auf, um die Unterseite des Lautsprechers freizulegen.
Aufstellen der Lautsprecher mithilfe der Gummifüße
Passen Sie zuvor die Gummifüße (4 Stück) in die entsprechenden Aussparungen der Bodenplatten ein.
≥Entfernen Sie das Schutzpapier von den Gummifüßen, vermeiden Sie ein Berühren der Klebeflächen und
pressen Sie die Gummifüße fest in die Bodenplatten.
Bringen Sie die Bodenplatte so
an, dass A nach unten zeigt.
Bringen Sie die Bodenplatte so
an, dass B nach unten zeigt.
6 Bringen Sie die Bodenplatten (4 Stück) mithilfe der mitgelieferten Schrauben sicher am Lautsprecher an.
Deutsch
≥Befestigen Sie die Schrauben zunächst provisorisch mit der Hand und ziehen Sie sie dann mit einem Schraubendreher an.
≥Vergewissern Sie sich nach dem Anbringen der Bodenplatten, dass die Platten nicht wackeln.
Aufstellen der Lautsprecher mithilfe der Spikes (> 12)
Aufstellen der Lautsprecher mithilfe der Gummifüße (> 14)
(39)
11
Page 40

Aufstellen des Lautsprechers mithilfe der Spikes
Halten Sie den Lautsprecher so,
dass Ihre Hände die
Lautsprechereinheit nicht berühren.
Die Spikes können die Audioqualität verbessern.
≥Panasonic übernimmt keinerlei Haftung für Unfälle oder Schäden durch unsachgemäßen Aufbau oder Umgang mit dem
Produkt. Bringen Sie das Zubehör ausschließlich entsprechend der Bedienungsanleitung an.
≥Jeder Lautsprecher hat etwa eine Masse von 32 kg. Wenn Sie die Lautsprecher kippen, um die Spikes anzubringen,
führen Sie diese Arbeit mit mindestens zwei Personen aus. Wenn Sie die Spikes anbringen, achten Sie darauf, dass Sie
Ihre Finger oder Zehen nicht zwischen Lautsprecher und Fußboden einklemmen und dass die Lautsprecher nicht
umfallen. Bedecken Sie den Boden außerdem dort, wo der Lautsprecher abgelegt werden soll, mit einer dicken Matte oder
einem ähnlichen Gegenstand, um Schäden am Fußboden zu vermeiden.
≥Jeder Spike trägt eine Masse von etwa 8 kg, daher ist es möglich, dass die Spikes Spuren bzw. Kerben am Installationsort
hinterlassen. Verwenden Sie die mitgelieferten Spike-Schuhe oder erwerben Sie Spike-Schuhe mit großen Kontaktflächen
und angemessener Stärke, um Schäden an der Umgebung durch die Spikes zu vermeiden.
≥Beim Bewegen der Lautsprecher mit angebrachten Spikes kann es zu Schäden am Fußboden kommen. Entfernen Sie die
Spikes, bevor Sie den Installationsort wechseln.
Halten Sie zwei dicke Matten o. ä. bereit, um Schäden am Fußbodenbelag zu vermeiden. Platzieren Sie sie vorab am Auspackund Aufstellungsort.
1 Platzieren Sie den Lautsprecher vertikal auf einer dicken Matte o. ä.
2 Entfernen Sie die 2 Schutzhüllen sowie den Karton, mit denen der Lautsprecher bedeckt ist.
3 Tragen Sie den Lautsprecher nach vorne gekippt zum Aufstellungsort und stellen Sie ihn auf einer dicken Matte o. ä. auf.
(40)
12
Page 41

4 Kippen Sie den Lautsprecher nach vorne und schrauben Sie die Spikes in die beiden rückseitigen Bodenplatten.
Spike-Schuhe
Lautsprecher
(Rückseite)
Dicke Matte etc.
Schrauben Sie die Spikes
fest, bis sie stoppen.
Platzieren Sie jeden Spike-Schuh
so, dass die Seite mit der
Einsenkung in der Mitte nach oben
weist.
FALSCH
RICHTIG
Abstandhalter
Wenn Sie die Spike-Schuhe verwenden, platzieren Sie sie unter den Spikes.
Deutsch
5 Während Sie die Enden der Spikes mit den Kerben an den Spike-Schuhen ausrichten, bringen Sie den Lautsprecher langsam
6 Entsprechend Schritt ④ kippen Sie den Lautsprecher nun nach hinten und entfernen die dicke Matte o. ä.
7 Schrauben Sie die Spikes in die beiden vorderen Bodenplatten.
8 Wenn die Lautsprecher wackeln, legen Sie die Abstandshalter unter die Spike-Schuhe.
in die aufrechte Position zurück.
Wenn Sie die Spike-Schuhe verwenden, platzieren Sie sie unter den Spikes.
(41)
13
Page 42

Aufstellen der Lautsprecher mithilfe der Gummifüße
Halten Sie den Lautsprecher so,
dass Ihre Hände die
Lautsprechereinheit nicht berühren.
Gummifüße
Abstandhalter
Passen Sie zuvor die Gummifüße (4 Stück) in die entsprechenden Aussparungen der Bodenplatten ein. (> 11)
≥Panasonic übernimmt keinerlei Haftung für Unfälle oder Schäden durch unsachgemäßen Aufbau oder Umgang mit dem
Produkt. Bringen Sie das Zubehör ausschließlich entsprechend der Bedienungsanleitung an.
≥Jeder Lautsprecher wiegt ca. 32 kg. Achten Sie darauf, die Arbeit mit mindestens zwei Personen auszuführen. Achten Sie
darauf, Ihre Finger und Zehen nicht zwischen Lautsprecher und Fußboden einzuklemmen und die Lautsprecher nicht
umfallen zu lassen.
≥Jeder Gummifuß trägt ein Gewicht von ca. 8 kg, daher ist es möglich, dass die Gummifüße Spuren bzw. Kerben am
Aufstellungsort hinterlassen.
≥Ziehen Sie den Lautsprecher nicht über den Boden, da sich ansonsten die Gummifüße lösen können.
Heben Sie den Lautsprecher stets nur mit zwei Personen an, wenn Sie den Installationsort des Lautsprechers ändern.
Halten Sie eine dicke Matte o. ä. bereit, um Schäden am Fußbodenbelag zu vermeiden. Platzieren Sie sie vorab am Auspackort.
1 Platzieren Sie den Lautsprecher vertikal auf einer dicken Matte o. ä.
2 Entfernen Sie die 2 Schutzhüllen sowie den Karton, mit denen der Lautsprecher bedeckt ist.
3 Halten Sie den Lautsprecher so, dass er nach vorne gekippt ist, um ihn zum Aufstellungsort zu bewegen.
4 Wenn die Lautsprecher nach dem Aufstellen wackeln, platzieren Sie die Abstandhalter unter den Gummifüßen. So wird ein
Wackeln der Gummifüße auf der Oberfläche des Aufstellungsorts vermieden.
(42)
14
Page 43

Verhindern der Lautsprecher gegen ein Umkippen
Die Lautsprecher können in einer Katastrophe, wie bei einem starken Erdbeben oder in einem Unfall umkippen. Vergewissern
Sie sich zu Ihrer eigenen Sicherheit, dass die Lautsprecher gegen ein Umkippen gesichert sind.
Jeder Lautsprecher wiegt insgesamt ca. 32 kg. Überprüfen Sie, ob die Lautsprecherorte stark genug sind, um diesem
Gewicht standzuhalten.
Wenden Sie sich für Details an einen Installationsfachmann.
∫ Bei der Sicherung der Lautsprecher an
einer horizontalen Oberfläche (Boden etc.)
Sichern Sie jeden Lautsprecher mit Drähten oder ähnlichen
Gegenständen am Boden, wie in der Abbildung angezeigt.
Draht
∫ Bei der Sicherung der Lautsprecher an
einer vertikalen Oberfläche (Wand etc.)
Schlingen Sie ein Band oder einen ähnlichen Gegenstand
um jeden Lautsprecher und verbinden Sie diesen mit Hilfe
eines kräftigen Drahts, einer Kette oder einem ähnlichen
Gegenstand mit einer stabilen Wand oder Säule, wie in der
Abbildung angezeigt.
Riemen
≥Die oben beschriebenen Maßnahmen gewährleisten keinen Schutz für alle Katastrophen und Unfälle, einschließlich Erdbeben.
Bitte beachten Sie, dass Panasonic nicht für Beschädigungen an den Lautsprechern, ihren Installationsstandorten oder
anderen Gegenständen verantwortlich ist, die durch die ausgeführten Arbeiten zur Sicherung der Lautsprecher gegen ein
Umkippen verursacht werden.
≥Durch die Nutzung der Spikes werden die Lautsprecher anfälliger für ein Umkippen.
Deutsch
(43)
15
Page 44

Anschlüsse
1 Drehen Sie die Knöpfe, um sie zu
lösen, und führen Sie die
Kerndrähte in die Löcher ein.
2 Ziehen Sie die Knöpfe fest.
- (Schwarz)
+ (Rot)
Führen Sie die Vinylisolierung nicht ein.
Lautsprecher
(Rückseite)
FALSCH
Anschließen der Lautsprecherkabel
Die Lautsprecher werden ohne Lautsprecherkabel ausgeliefert. Verwenden Sie im Handel erhältliche Lautsprecherkabel, um die
Lautsprecher anzuschließen.
Wenn Sie beim Anschließen der Lautsprecherkabel Schwierigkeiten haben, entfernen Sie zunächst die Knöpfe.
≥ Achten Sie darauf, die Polarität der Lautsprecherdrähte nicht zu überkreuzen (Kurzschluss) oder umzukehren, da dies zur Beschädigung des
Verstärkers führen kann.
(44)
16
Page 45

Anschluss über einen Verstärker
z.B.
Verstärker (Rückseite)
≥Schalten Sie den Verstärker aus und ziehen Sie dessen Netzkabel, bevor Sie den Verstärker anschließen.
≥Detaillierte Informationen finden Sie in der Bedienungsanleitung des Verstärkers.
Verbinden Sie den Verstärker und die Lautsprecher mit Lautsprecherkabeln (im Handel erhältlich).
Deutsch
Lautsprecher (rechts)
Lautsprecher (links)
≥ Bewegen Sie den Lautsprecher nicht, während die Lautsprecherkabel angeschlossen sind. Dies kann zu einem Kurzschluss führen.
≥ Wenn die Verbindungen hergestellt wurden, ziehen Sie leicht an den Lautsprecherkabeln, um sicherzustellen, dass diese fest verbunden sind.
≥ Verdrahten Sie die Polarität (+/-) der Anschlüsse richtig. Andernfalls können die Stereo-Effekte beeinträchtigt werden oder es kann zu
Fehlfunktionen kommen.
(45)
17
Page 46

Anbringen der Lautsprechernetze
Lautsprecher (Vorderseite)
Lautsprechernetz
(Rückseite)
Die Lautsprecher werden mit Lautsprechernetzen geliefert, welche die Lautsprechergeräte vor Staub schützen.
Verwenden Sie die Magnete, um die Lautsprechernetze an den Lautsprechereinheiten zu befestigen.
≥ Sie können eine hochwertige Audiowiedergabe genießen, wenn Sie zuvor die Lautsprechernetze entfernen.
18
(46)
Page 47

Hinweise zur Nutzung
Um die Lautsprecher vor Schäden durch eine übermäßige Eingabe zu schützen, beachten Sie folgende
Vorsichtsmaßnahmen:
≥Drehen Sie die Lautstärke in den folgenden Situationen zurück, um eine Beschädigung der Lautsprecher zu vermeiden:
jWenn eine Programmquelle mit verzerrtem Klang wiedergegeben wird.
jWenn die Lautsprecher Rückkopplungsheulen von einem Mikrofon oder Plattenspieler, Rauscheinstreuungen von einem
UKW-Sender oder Sinussignale auffangen, die von einem Oszillator, einer Test-Disc oder einem elektronischen
Musikinstrument erzeugt werden.
jBeim Einstellen des Klangcharakters.
jBeim Ein- und Ausschalten des Verstärkers.
≥Vermeiden Sie ein zu starkes Erhöhen der Lautstärke, wenn Sie Höhen mit einem Grafik-Equalizer oder einer anderen
Steuerung verstärken.
≥Vermeiden Sie die Ausgabe von übermäßig lauten Klängen mit einem Verstärker mit niedriger Leistung. Andernfalls erhöht sich
die harmonische Verzerrung des Verstärkers und die Lautsprecher können beschädigt werden.
≥Durch Wiedergabe mit hohem Lautstärkepegel über längere Zeiträume hinweg können die Lautsprecher beschädigt werden,
und ihre Lebensdauer verkürzt sich.
≥Berühren Sie die Lautsprecheranschlüsse nicht mit den Händen oder mit Gegenständen, während die Lautsprecher betrieben
werden. Anderenfalls besteht je nach Gebrauchsbedingungen das Risiko, dass Sie hohen Stromspannungen ausgesetzt sind.
Gerätepflege
Reinigen Sie die Lautsprecher mit dem mitgelieferten Reinigungstuch.
≥Wenn Schmutz hartnäckig ist, wringen Sie ein nasses Tuch gründlich aus, um den Schmutz abzuwischen und trocknen Sie es
mit einem trockenen Tuch ab.
≥Verwenden Sie keine Lösungsmittel wie Benzin, Verdünner, Alkohol, Haushaltsreiniger, einen chemischen Wischer etc. Diese
könnten dazu führen, dass sich das äußere Gehäuse verformt oder die Beschichtung abblättert.
Deutsch
Technische Daten
Typ 3-Wege-4-Lautsprecher, Bassreflex-Typ
(2-Wege-Koaxial-Mitten/integrierte Tweeter)
Lautsprechereinheit
Woofer 16 cm Konustyp k2
Mitten/Tweeter Koaxial-16 cm-Kegeltyp k1/2,5 cm-Kuppeltyp k1
Impedanz 4 ≠
Eingangsleistung (IEC) 200 W (MAX)
100 W (RATED)
Schalldruckpegel 88 dB (2,83 V/m)
85 dB (W/m)
Frequenzbereich 27 Hz bis 100 kHz (-16 dB)
32 Hz bis 85 kHz (-10 dB)
Übergangsfrequenz 480 Hz, 3,2 kHz
Abmessungen (BkHkT)
Mit Spikes
Mit Gummifüßen
Gewicht Ca. 32 kg
Betriebstemperaturbereich 0
Betriebsfeuchtigskeitsbereich 20 % bis 80 % Rel. Feuchte (keine Kondensbildung)
≥ Änderungen der technischen Daten bleiben ohne vorherige Ankündigung vorbehalten.
≥ Die Gewichtsangaben und Abmessungen sind ungefähre Werte.
302 mmk1.114 mmk375 mm
302 mmk1.093 mmk375 mm
o
C bis i40oC
(47)
19
Page 48

Merci d’avoir porté votre choix sur cet appareil.
Veuillez lire attentivement les présentes instructions avant d’utiliser ce produit, et conserver ce manuel pour utilisation ultérieure.
Consignes de sécurité
AVERTISSEMENT
≥ Ne pas démonter ni modifier le produit. Cela pourrait causer des
dommages ou un incendie.
≥ Ne placez pas les enceintes sur des endroits instables, comme peut
l'être une table bancale ou une surface en pente.
Ne placez pas les enceintes sur des surfaces élevées ou inégales
ou sur des surfaces vulnérables aux vibrations ou aux chocs.
Si les enceintes se renversent ou tombent, cela pourrait causer des
blessures.
≥ Conservez les petits accessoires hors de portée des enfants. En cas
d'ingestion accidentelle, il y aura des effets physiques indésirables.
Si vous pensez que des petits accessoires ont été ingérés,
consultez immédiatement votre médecin.
≥ N'accrochez pas les enceintes au plafond ou sur le mur. Celles-ci
pourraient tomber et causer des blessures corporelles.
≥ N'insérez pas d'objets dans les ouvertures des ports bass-reflex à
l'arrière des enceintes. Cela pourrait provoquer un incendie ou des
blessures. Portez une attention particulière aux enfants lorsque
ceux-ci se trouvent à proximité.
ATTENTION
≥ Ne montez pas sur les enceintes et ne vous y accrochez pas. Si les
enceintes se renversent ou sont endommagées, cela pourrait
provoquer des blessures.
≥ N'utilisez pas les enceintes pendant une longue période lorsque le
son est déformé. Les enceintes pourraient surchauffer, causant un
dysfonctionnement ou un incendie.
≥ Ne posez pas d'objets lourds ou de gros objets sur les enceintes. Si
les enceintes se renversent ou tombent, cela pourrait provoquer des
blessures.
≥ Ne touchez pas les membranes. Autrement, cela pourrait déformer
les membranes, et comme résultat, le son pourrait ne plus être
reproduit correctement.
≥ Conservez les enceintes hors de portée des enfants, et tout
particulièrement des nourrissons. Si les enceintes se renversent,
cela peut provoquer des blessures.
≥ Ne placez pas les enceintes à des endroits où la température est
très élevée. Évitez plus particulièrement les endroits exposés
directement au soleil et ceux situés près d'un chauffage. Ne pas
respecter ces consignes pourrait causer la détérioration du
revêtement extérieur ou des composants internes.
≥ Ne placez pas les enceintes dans des endroits exposés à des
fumées grasses ou à la vapeur, ou bien dans des endroits humides
ou poussiéreux. Cela pourrait permettre à l'électricité d'être conduite
à travers l'huile, l'humidité ou la poussière, provoquant ainsi un
incendie ou une électrocution.
≥ Conservez les objets magnétiques loin du produit. Les puissants
aimants se trouvant à l'intérieur des enceintes et des grilles des
enceintes pourraient endommager les cartes de crédit, les cartes de
voyage, les horloges et d'autres objets.
≥ Ne mettez pas les doigts dans le port bass-reflex situé à l'arrière des
enceintes. Portez une attention particulière aux enfants car cela peut
causer des blessures.
raccordez pas les enceintes à un amplificateur ayant une sortie
≥ Ne
supérieure à l'entrée admissible. Les enceintes pourraient
surchauffer, provoquant ainsi un incendie.
≥ Chaque enceinte doit être transportée et installée par au moins deux
personnes. Les faire tomber peut causer des blessures.
≥ Sécurisez les enceintes contre le renversement. Si celles-ci se
renversent durant une catastrophe comme un puissant tremblement
de terre ou un accident, des blessures peuvent être occasionnées.
≥ Avant utilisation, assurez-vous de bien fixer les embases ainsi que
les pointes ou les patins en caoutchouc. Autrement, le produit
pourrait se renverser et causer des blessures.
L’élimination des équipements usagés
Applicable uniquement dans les pays membres de l’Union européenne et les pays disposant de systèmes de
recyclage.
Apposé sur le produit lui-même, sur son emballage, ou figurant dans la documentation qui l’accompagne, ce pictogramme
indique que les appareils électriques et électroniques usagés, doivent être séparés des ordures ménagères.
Afin de permettre le traitement, la valorisation et le recyclage adéquats des appareils usagés, veuillez les porter à l’un des
points de collecte prévus, conformément à la législation nationale en vigueur.
En les éliminant conformément à la réglementation en vigueur, vous contribuez à éviter le gaspillage de ressources précieuses
ainsi qu’à protéger la santé humaine et l’environnement.
Pour de plus amples renseignements sur la collecte et le recyclage, veuillez vous renseigner auprès des collectivités locales.
Le non-respect de la réglementation relative à l’élimination des déchets est passible d’une peine d’amende.
06
(48)
Page 49

Table des matières
Consignes de sécurité..................................................... 06
Accessoires...................................................................... 07
A propos de cet appareil ................................................. 08
Installation ........................................................................ 09
Connexions....................................................................... 16
Installation des grilles de l'enceinte............................... 18
A propos des descriptions dans ce mode d’emploi
≥Les illustrations montrées peuvent être différentes de votre appareil.
Accessoires
∏ 4 Pointes
(TBLA40861)
∏ 4 Patins pour pointe
Notes sur l'utilisation....................................................... 19
Entretien de l’appareil......................................................19
Caractéristiques ...............................................................19
(TYL0079)
Français
∏ 4 Patins en
caoutchouc
(TBLG32691)
∏ 2 Embases A
(TBLA40852)
∏ 4 Boulons
d'espacement
(TMKK653)
∏ 1 Chiffon nettoyant
(TXFPE01LHUU)
Avant utilisation, assurez-vous de bien fixer les embases ainsi que les pointes ou les patins en caoutchouc.
≥Conservez les petits accessoires hors de portée des enfants pour éviter qu’ils les avalent.
∏ 12 Vis pour embases
(THEL155Z)
∏ 2 Embases B
(TBLA41091)
∏ 1 Grille pour enceinte
(TTJ0006-A)
≥ Les références des produits fournies dans ce Mode d'emploi sont correctes à compter de février 2017. Elles peuvent être soumises à des
changements.
≥ Les enceintes ne sont pas fournies avec les câbles d’enceinte. Pour effectuer le raccordement, utilisez des câbles d’enceinte disponibles dans
le commerce.
(49)
07
Page 50

A propos de cet appareil
ヒ
ビ
ピ
ピ
Devant Derrière
Port bass-reflex
Prises de l'enceinte
Marquage d'identification du
produit
Le numéro du produit est situé sur
le marquage d'identification du
produit à l'arrière de cet appareil.
∫ Noms des pièces et spécifications des enceintes
Architecture de montage haut-parleur équilibrée
1
Le haut-parleur, monté à l'arrière du baffle à l’intérieur du caisson à son centre de gravité, est conçu pour supprimer la
vibration qu'il génère. Le haut-parleur n’est pas monté à l’avant du baffle pour minimiser les transmissions non désirées
de vibrations provenant du haut-parleur vers le baffle. Le résultat est une enceinte qui offre une scène sonore réaliste et
spacieuse faite de sons pénétrants, nets et précis avec des fréquences allant de faibles à très élevées.
Deux voies coaxiales
2
La nouvelle unité de fréquence moyenne à haute comporte un système coaxial à deux voies qui hérite des idées de
conception développées pour nos modèles haut de gamme : une source sonore ponctuelle et une reproduction en phase
linéaire. Le système, conçu pour la localisation précise du son, permet à l’enceinte de délivrer des sons variés produits
par des instruments de musique de façon nette pour recréer une scène sonore à trois dimensions.
Haut-parleurs de graves à faible distorsion et à long débattement
3
L’enceinte comprend deux haut-parleurs de graves faits de composants comme des doubles aimants, des bobines à
longue voix et des anneaux en cuivre. Ce qui fait que l’enceinte peut délivrer un son grave offrant une faible distorsion et
une superbe réponse en reproduisant des fréquences même de large amplitude.
∫ Dispositifs recommandés
Nous vous recommandons l'utilisation de dispositifs Technics (en option) pour une qualité sonore supérieure.
Nom du produit Numéro du modèle
Amplificateur intégré SU-G700
Amplificateur lecteur réseau SU-G30
08
(50)
Page 51

Installation
ex:
L'angle est approximatif.
※ Haut-parleurs
※
60°
≥Chaque enceinte doit être transportée et installée par au moins deux personnes.
≥Ne touchez pas les haut-parleurs. Cela pourrait rendre le son de mauvaise qualité.
≥Placez les enceintes approximativement à la même distance de la position d'écoute.
≥Les enceintes produisent un son de basse provenant du port bass-reflex à l'arrière aussi bien qu'à l'avant. Installez les
enceintes à au moins 5 cm des murs pour qu'ils ne puissent pas couvrir les ports bass-reflex à l'arrière de celles-ci.
≥Gardez l'amplificateur ou un autre dispositif et les enceintes à 1 cm de distance minimum.
∫ Pour une disposition optimale
La qualité et le volume du son de basse, les performances de la localisation du son, l'ambiance sonore, et les autres facteurs qui
déterminent la qualité sonore, varient en fonction de l'emplacement d'installation de cet appareil, de la position d'écoute, de l'état
de la pièce et d'autres facteurs. Consultez les informations qui suivent pour installer les enceintes.
Déterminer un emplacement d'installation.
≥Chaque enceinte pèse environ 32 kg. Vérifiez que l'endroit de l'installation est assez résistant pour supporter ce poids.
≥Si vous avez besoin de sécuriser les enceintes contre le basculement, consultez un installateur spécialisé. La résistance du sol
et du mur doit être vérifiée. (> 15)
≥Placez les enceintes sur une surface plane en toute sécurité.
Si l'enceinte est bancale lorsqu'elle est installée, utilisez les boulons d'espacement. (> 13, 14)
≥Pour minimiser l'écart de qualité sonore entre l'enceinte de gauche et l'enceinte de droite, installez-les de telle manière que les
conditions acoustiques (réflexion et absorption du son) autour d'elles soient les mêmes.
Réglage de la distance entre l'arrière des enceintes et les murs
Si vous installez les enceintes près d'un mur ou d'un coin, le son de basse sera plus puissant; cependant, si les enceintes sont
trop près de celui-ci, les performances de la localisation du son et l'ambiance sonore peuvent en être amoindrie. Si cela survient,
réglez la distance entre les enceintes et le mur de devant, qui devrait être de 30 cm à 60 cm. (Veuillez noter que la distance entre
les enceintes et les murs latéraux devra être supérieure à 60 cm.)
≥Ne faites pas glisser l'enceinte trop violemment sur le sol. Cela pourrait endommager l’enceinte et le sol.
Français
Réglage de l'angle des enceintes
Dirigez l'avant des enceintes vers l'auditeur. Suivre ces étapes aidera les enceintes à reproduire des sons de localisation plus
précis.
Réglage de l'acoustique de la pièce et disposition des enceintes
En fonction de la pièce (taille et forme de la pièce, distance des murs et niveau de réverbération), certains sons peuvent être
exagérés ou supprimés, rendant leur écoute difficile. Dans ce cas, le réglage du niveau de réverbération en déplaçant les
enceintes, en changeant la position d'écoute ou en couvrant les murs et les fenêtres avec d'épais rideaux peut aider à résoudre
le problème.
≥Les pointes peuvent améliorer la qualité du son. (> 12)
(51)
09
Page 52

Fixation des embases
②②
③
Gardez le carton en place pour
protéger les haut-parleurs.
1 Retirez les accessoires.
≥Retirez les accessoires des blocs de polystyrène et placez-les dans un endroit hors de portée des enfants.
2 Placez les blocs de polystyrène à l’endroit prévu pour le montage.
3 Retirez les grilles des enceintes de la boite d'emballage.
10
4 Posez l’enceinte sur les blocs de polystyrène retirés à l’étape ② .
≥Gardez les points suivants à l’esprit en soulevant l’enceinte.
jTenez-la par en-dessous pour qu’elle ne puisse pas glisser des mains.
(52)
Page 53

5 Enroulez les sacs de protection (2 unités) pour découvrir le bas de l’enceinte.
Positionnement de l'enceinte en utilisant les patins en caoutchouc
Fixez préalablement les patins en caoutchouc (4 unités) dans les renfoncements des embases.
≥Décollez les pieds en caoutchouc du papier et positionnez-les aux endroits prévus sur les embases en
appuyant fermement et sans toucher leur surface adhésive.
Fixez de manière à ce que le
côté A soit contre le sol.
Fixez de manière à ce que le
côté B soit contre le sol.
6 Fixez solidement les embases (4 unités) sur l'enceinte à l'aide des vis fournies.
Français
≥Commencez par visser les trois vis à la main, puis serrez-les à l’aide d’un tournevis.
≥Une fois les embases fixées, assurez-vous qu’elles ne bougent pas.
Positionnement de l'enceinte en utilisant les pointes (> 12)
Positionnement de l'enceinte en utilisant les patins en caoutchouc (> 14)
(53)
11
Page 54

Positionnement des enceintes en utilisant les pointes
Tenez l’enceinte de manière à ce
que vos mains ne touchent pas les
haut-parleurs.
Les pointes peuvent améliorer la qualité du son.
≥Panasonic ne sera en aucun cas responsable des accidents ou des dommages causés par un montage ou une
manipulation incorrecte du produit. Pour installer les accessoires, suivez exclusivement les instructions de ce Mode
d’emploi.
≥Chaque enceinte pèse environ 32 kg. Pour incliner les enceintes afin de fixer les pointes, assurez-vous qu'au moins deux
personnes effectuent le travail. Lors de la fixation des pointes, faites attention à ne pas vous coincer les doigts ou les
orteils entre les enceintes et le sol ou en inclinant les enceintes. Par ailleurs, assurez-vous de poser un tapis assez épais
ou quelque chose de similaire au sol à l'endroit où vous inclinerez les enceintes pour ne pas endommager le plancher.
≥Étant donné que chaque pointe peut supporter un poids d'au moins 8 kg environ, celles-ci peuvent laisser des traces et
des marques à l'endroit de l'installation. Pour éviter que les pointes endommagent la zone, utilisez les patins pour pointe
fournis ou achetez des patins ayant une large surface de contact et une résistance adéquate.
≥Déplacer les enceintes alors que les pointes sont encore fixées peut endommager le plancher. Avant de changer l'endroit
d'installation, retirez les pointes.
Pour éviter d’endommager le sol, ayez à disposition deux tapis épais (ou similaire). Placez-les préalablement à l’endroit du
déballage et à celui de l’installation.
1 Placez l’enceinte verticalement sur un tapis épais (ou similaire).
2 Retirez les sacs de protection (2 unités) et le carton recouvrant l'enceinte.
3 Transportez l’enceinte à l’endroit de l’installation en l’inclinant vers l’avant et placez-la sur un tapis épais (ou similaire).
(54)
12
Page 55

4 Inclinez l’enceinte vers l’avant et vissez les pointes dans les deux embases arrière.
Patins pour pointe
Enceinte (Derrière)
Tapis épais, etc.
Vissez les pointes à fond.
Positionnez chaque patin pour
pointe de façon à ce que le coté
marqué soit dirigé vers le haut.
A NE PAS
FAIRE
A FAIRE
Boulon
d'espacement
Pour utiliser les patins pour pointe, placez-les sous les pointes.
Français
5 Tout en alignant les extrémités des pointes avec les indentations sur les patins pour pointe, remettez lentement l'enceinte
6 De la même manière qu’à l’étape ④ , inclinez l’enceinte vers l’arrière et retirez le tapis épais (ou similaire).
7 Vissez les pointes dans les deux embases avant.
8 Si l'enceinte est bancale, placez les boulons d'espacement sous les patins pour pointe.
droite.
Pour utiliser les patins pour pointe, placez-les sous les pointes.
(55)
13
Page 56

Positionnement des enceintes en utilisant les patins en caoutchouc
Tenez l’enceinte de manière à ce
que vos mains ne touchent pas les
haut-parleurs.
Patins en
caoutchouc
Boulon
d'espacement
Fixez préalablement les patins en caoutchouc (4 unités) dans les renfoncements des embases. (> 11)
≥Panasonic ne sera en aucun cas responsable des accidents ou des dommages causés par un montage ou une
manipulation incorrecte du produit. Pour installer les accessoires, suivez exclusivement les instructions de ce Mode
d’emploi.
≥Chaque enceinte pèse environ 32 kg. Assurez-vous que cette tâche est effectuée par au moins deux personnes. Faites
attention à ne pas vous coincer les doigts ou les orteils entre l’enceinte et le sol et à ne pas renverser l'enceinte.
≥Puisque chaque patin en caoutchouc supporte un poids d’au moins 8 kg environ, il est possible que ceux-ci laissent des
marques et des éraflures à l'emplacement de l'installation.
≥Trainer l'enceinte sur le sol peut causer le décollement des patins en caoutchouc.
Pour changer le lieu d'installation de l'enceinte, soyez toujours au moins deux pour la soulever.
Pour éviter d’endommager le sol, ayez à disposition un tapis épais (ou similaire). Placez-le préalablement à l’endroit du
déballage.
1 Placez l’enceinte verticalement sur un tapis épais (ou similaire).
2 Retirez les sacs de protection (2 unités) et le carton recouvrant l'enceinte.
3 Tenez l’enceinte de manière à ce qu’elle soit inclinée vers l’avant et déplacez-la vers l’endroit de l’installation.
4 Si après son installation les enceintes sont bancales, placez les boulons d'espacement sous les patins en caoutchouc. Ceci
empêchera les patins en caoutchouc d'être déséquilibrés sur la surface d'installation.
(56)
14
Page 57

Prévention contre le renversement des enceintes
Les enceintes peuvent se renverser lors d'une catastrophe comme un puissant tremblement de terre ou un accident. Pour votre
sécurité, sécurisez les enceintes contre le renversement.
Chaque enceinte pèse environ 32 kg au total. Vérifiez que l'endroit où est positionnée l'enceinte est suffisamment
résistant pour supporter ce poids.
Pour plus de détails, consultez un installateur spécialisé.
∫ Pour sécuriser les enceintes sur une
surface horizontale (sol, etc.)
Sécurisez chaque enceinte au sol avec des fils ou quelque
chose de similaire comme illustré.
Fil
∫ Pour sécuriser les enceintes sur une
surface verticale (mur, etc.)
Passez l'enceinte dans la boucle d'une lanière ou quelque
chose de similaire, et accrochez cette dernière à un mur ou
une colonne robuste à l'aide d'un fil solide, d'une chaine ou
similaire, comme illustré.
Courroie
≥Les mesures décrites ci-dessus ne garantissent pas la protection contre les catastrophes et les accidents, y compris les
tremblements de terre.
Veuillez prendre note que Panasonic n'est en aucun cas responsable des dommages causés aux enceintes, à l'endroit de leur
positionnement ou à d'autres objets, occasionnés par le travail effectué pour sécuriser les enceintes contre le renversement.
≥Utiliser les pointes rend les enceintes plus vulnérables au renversement.
Français
(57)
15
Page 58

Connexions
1 Tournez les boutons pour les
desserrer et insérez les fils
conducteurs dans les trous.
2 Serrez les boutons.
- (Noir)
+ (Rouge)
N'insérez pas l'isolant en vinyle.
Enceinte
(Derrière)
A NE PAS FAIRE
Pour connecter les câbles de l’enceinte
Les enceintes ne sont pas fournies avec les câbles d’enceinte. Pour effectuer le raccordement, utilisez des câbles d’enceinte
disponibles dans le commerce.
S'il est difficile de raccorder les câbles d'enceinte, retirez les boutons avant de le faire.
≥ Faites attention de ne pas croiser (court-circuit) ou inverser la polarité des fils de l'enceinte car cela peut endommager l'amplificateur.
(58)
16
Page 59

Raccordement d'un amplificateur
ex.:
Amplificateur (arrière)
Enceinte (gauche)
Enceinte (droite)
≥Avant le raccordement, éteignez l'amplificateur et débranchez son cordon d'alimentation.
≥Pour plus de détails, consultez le mode d’emploi de l'amplificateur.
Raccordez l'amplificateur et les enceintes avec des câbles d’enceinte (disponibles dans le commerce).
Français
≥ Ne déplacez pas l'enceinte lorsque ses câbles sont branchés. Ceci peut créer un court-circuit.
≥ Une fois les raccordements effectués, tirez légèrement sur les câbles d'enceinte pour vérifier qu'ils sont solidement branchés.
≥ Branchez correctement la polarité (+/-) des prises. Si non, cela pourrait nuire aux effets stéréo ou causer un dysfonctionnement.
(59)
17
Page 60

Installation des grilles de l'enceinte
Enceinte (Devant)
Grille pour enceinte (arrière)
Les enceintes sont fournies avec des grilles, qui protègent les haut-parleurs de la poussière.
Utilisez les aimants pour fixer les grilles aux enceintes.
≥ Vous pouvez bénéficier d'une qualité audio supérieure en retirant les grilles des enceintes avant la lecture.
18
(60)
Page 61

Notes sur l'utilisation
Pour protéger les enceintes des dommages causés par une entrée trop forte, suivez les précautions suivantes :
≥Pour éviter les dommages, réduisez le volume dans les cas suivants :
jLorsque le son est distordu.
jLorsqu’il y a une réaction acoustique sur les enceintes depuis un microphone ou un tourne-disque, des parasites d’émissions
FM ou l’émission continue de signaux par un oscillateur, un disque de test ou un instrument électronique.
jLors du réglage de la qualité sonore.
jLors de la mise sous ou hors tension de l’amplificateur.
≥Évitez de trop élever le niveau du volume pour améliorer les sons aigus avec un égaliseur graphique ou tout autre commande.
≥Évitez de reproduire des sons excessivement forts avec un amplificateur de faible puissance. Cela augmente la distorsion
harmonique de l'amplificateur et peut endommager les enceintes.
≥Vous risquez d’endommager les enceintes et de réduire leur durée de vie si vous laissez le son à un niveau élevé sur des
périodes prolongées.
≥Ne touchez pas les prises de l'enceinte avec les mains ou d'autres objets lorsque les enceintes sont en cours d'utilisation. En
fonction des conditions d'utilisation, cela pourrait vous exposer à une électrocution.
Entretien de l’appareil
Nettoyez les enceintes à l’aide du chiffon de nettoyage fourni.
≥Si la saleté est importante, utilisez un chiffon mouillé bien essoré pour nettoyer la saleté, puis essuyez-le à l’aide un chiffon sec.
≥N'utilisez pas de solvants, y compris essence, diluant, alcool, liquide vaisselle, lingette chimique, etc. Cela peut déformer le
boitier externe ou décoller le revêtement.
Français
Caractéristiques
Type 4 haut-parleurs 3 voies, type bass-reflex
(Médium coaxial 2 voies/tweeters intégrés)
Haut-parleur
Woofer (Haut-parleur des graves) 16 cm type cône k2
Médium/Tweeter Coaxial type conique 16 cmk1 / type dôme 2,5 cm k1
Impédance 4 ≠
Entrée alimentation (CEI) 200 W (MAX)
100 W (RATED)
Niveau de pression sonore 88 dB (2,83 V/m)
85 dB (W/m)
Gamme de fréquence 27 Hz à 100 kHz (-16 dB)
32 Hz à 85 kHz (-10 dB)
Fréquence Crossover 480 Hz, 3,2 kHz
Dimensions (LkHkP)
Avec les pointes
Avec les patins en caoutchouc
Poids Environ 32 kg
Plage de température en fonctionnement 0
Plage d’humidité de service 20 % à 80 % RH (sans condensation)
≥ Ces caractéristiques peuvent être soumises à des changements sans avis préalable.
≥ La masse et les dimensions sont approximatives.
302 mmk1.114 mmk375 mm
302 mmk1.093 mmk375 mm
o
C à i40oC
(61)
19
Page 62

La ringraziamo dell’acquisto di questo prodotto.
Leggere attentamente queste istruzioni prima di utilizzare il presente prodotto, e conservare questo manuale per usi futuri.
Precauzioni per la sicurezza
ATTENZIONE
≥ Non smontare o modificare il prodotto, perché si potrebbero
causare danni o sviluppare incendi.
≥ Non posizionare i diffusori su supporti instabili, come un tavolo
instabile o una superficie inclinata.
Non posizionare i diffusori su superfici elevate o irregolari o su
superfici vulnerabili a vibrazioni o colpi.
Se i diffusori si inclinano o cadono, potrebbero provocare lesioni
personali.
≥ Mantenere i piccoli accessori fuori dalla portata dei bambini. Se
ingeriti accidentalmente, provocano effetti avversi sul fisico. Se si
sospetta che siano stati ingeriti dei piccoli accessori, consultare
immediatamente un medico.
≥ Non appendere gli altoparlanti al soffitto o a una parete. In caso
contrario gli altoparlanti potrebbero cadere, procurando lesioni alle
persone presenti.
≥ Non inserire oggetti all'interno dei fori delle porte bass reflex nella
parte posteriore. Esiste il rischio che si sviluppi un incendio, o che
qualcuno rimanga ferito. Prestare grande attenzione ai bambini.
AVVERTENZA
≥ Non stare in piedi sopra ai diffusori e non appendersi ad essi. Se i
diffusori si ribaltano o si danneggiano, questo potrebbe causare
lesioni personali.
≥ Non usare a lungo i diffusori quando il suono è distorto. Farlo
potrebbe causare il riscaldamento eccessivo dei diffusori e
causare un malfunzionamento o un incendio.
≥ Non posizionare oggetti pesanti o di grandi dimensioni sui
diffusori. Se i diffusori si ribaltano o cadono, questo potrebbe
causare lesioni personali.
≥ Non toccare i diaframmi. I diaframmi potrebbero danneggiarsi, e di
conseguenza, il suono potrebbe non essere emesso
correttamente.
≥ Mantenere i diffusori fuori dalla portata dei bambini, altrimenti la
caduta dei diffusori potrebbe causare lesioni personali.
≥ Non posizionare i diffusori in posizioni soggette a temperature
estremamente elevate. In particolare, evitare posizioni esposte a
luce del sole diretta e vicino ad apparecchiature di riscaldamento.
Notare anche che questo potrebbe causare il deterioramento della
struttura esterna o dei componenti interni.
≥ Non posizionare i diffusori in posizioni soggette a fumi o vapori
grassi, o in posizioni umide o polverose. L'elettricità potrebbe
essere condotta attraverso olio, umidità o polvere, causando un
incendio o una scossa elettrica.
≥ Tenere lontano dal prodotto gli oggetti magnetici. I potenti magneti
che si trovano all'interno dei diffusori e sulle griglie dei diffusori
potrebbero danneggiare carte e schede con banda magnetica,
orologi ed altri oggetti.
≥ Non mettere le dita all'interno delle porte Bass reflex nella parte
posteriore degli altoparlanti. Prestare grande attenzione ai
bambini, perché potrebbero ferirsi.
≥ Non collegare i diffusori ad un amplificatore caratterizzato da una
potenza superiore a quella consentita dai diffusori. Potrebbe
provocare il riscaldamento eccessivo dei diffusori, con
conseguente principio di incendio.
≥ Ciascun diffusore deve essere trasportato ed installato da almeno
due persone. La caduta dei diffusori può provocare lesioni.
issare i diffusori per evitare che si ribaltino. Il ribaltamento, nel
≥ F
caso ad esempio di un potente terremoto o di un incidente, può
provocare lesioni personali.
≥ Prima dell'uso, installare le piastre base e le punte o il piedino in
gomma. Altrimenti, il prodotto potrebbe ribaltarsi, causando
lesioni.
Smaltimento di vecchie apparecchiature
Solo per Unione Europea e Nazioni con sistemi di raccolta e smaltimento
Questo simbolo sui prodotti, sull’imballaggio e/o sulle documentazioni o manuali accompagnanti i prodotti indica che i prodotti
elettrici, elettronici non devono essere buttati nei rifiuti domestici generici.
Per un trattamento adeguato, recupero e riciclaggio di vecchi prodotti vi invitiamo a portarli negli appositi punti di raccolta
secondo la legislazione vigente nel vostro paese.
Con uno smaltimento corretto, contribuirete a salvare importanti risorse e ad evitare i potenziali effetti negativi sulla salute
umana e sull’ambiente.
Per ulteriori informazioni su raccolta e riciclaggio, vi invitiamo a contattare il vostro comune.
Lo smaltimento non corretto di questi rifiuti potrebbe comportare sanzioni in accordo con la legislazione nazionale.
06
(62)
Page 63

Indice
Precauzioni per la sicurezza ........................................... 06
Accessori.......................................................................... 07
Informazioni su questa unità .......................................... 08
Installazione...................................................................... 09
Connessioni...................................................................... 16
Fissaggio delle griglie dei diffusori................................ 18
Descrizioni contenute in queste istruzioni per l’uso
≥L’aspetto dell’unità mostrata nelle illustrazioni potrebbe apparire diverso da quello dell’unità in dotazione.
Note sull'utilizzo...............................................................19
Cura dell’unità .................................................................. 19
Specifiche ......................................................................... 19
Accessori
∏ 4 punte
(TBLA40861)
∏ 4 sottopunte
(TYL0079)
∏ 4 Piedini in gomma
(TBLG32691)
∏ 2 Piastre base A
(TBLA40852)
∏ 4 distanziatori
(TMKK653)
∏ 1 panno per pulizia
(TXFPE01LHUU)
Prima dell'uso, installare le piastre base e le punte o il piedino in gomma.
≥Tenere i piccoli accessori fuori della portata dei bambini, per evitare che li possano ingerire.
∏ 12 Viti piastre base
(THEL155Z)
∏ 2 Piastre base B
(TBLA41091)
∏ 1 griglia dei diffusori
(TTJ0006-A)
Italiano
≥ I codici prodotto forniti in questo manuale per l'utente sono aggiornati a febbraio 2017. Possono essere soggetti a modifiche.
≥ I diffusori non sono muniti di cavi di potenza. Per il collegamento usare cavi di potenza disponibili in commercio.
(63)
07
Page 64

Informazioni su questa unità
ヒ
ビ
ピ
ピ
Parte anteriore Parte posteriore
Porta Bass reflex
Terminali diffusori
Marcatura di identificazione
del prodotto
Il numero del modello si trova sulla
marcatura di identificazione del
prodotto sul retro di questa unità.
∫ Nomi delle parti e caratteristiche degli altoparlanti
Architettura per il montaggio bilanciato degli altoparlanti
1
L'altoparlante, montato sul sottopannello all'interno del cabinet presso il suo centro di gravità, è progettato per sopprimere
le vibrazioni che genera. L'altoparlante non è montato sul pannello anteriore per minimizzare la trasmissione di vibrazioni
indesiderate dall'altoparlante al pannello. Il risultato è un altoparlante che fornisce un soundstage realistico ed ampio, con
un suono potente e cristallino e frequenze che vanno dai bassi ai super-acuti.
Unità coassiale a due vie
2
L'unità di nuova concezione per le frequenze medio-alte dispone di un sistema coassiale a due vie che eredita le idee
progettuali dei nostri modelli high-end: una fonte puntiforme e la linearità della fase durante la riproduzione. Il sistema,
progettato per una localizzazione precisa del suono, consente all'altoparlante di emettere con chiarezza i vari suoni
prodotti dagli strumenti musicali per ricreare un soundstage tridimensionale.
Woofer caratterizzati da bassa distorsione e lunga escursione
3
Il diffusore incorpora due woofer costruiti con componenti come doppi magneti, bobine mobili lunghe, ed anelli in rame. Il
risultato è che il diffusore può riprodurre bassi con distorsione ridotta ed ottima risposta nel riprodurre le frequenze anche
con elevata ampiezza.
∫ Dispositivi consigliati
Per una migliore qualità dell'audio si consiglia di utilizzare i seguenti dispositivi Technics (opzionali).
Nome del prodotto Numero modello
Amplificatore stereo integrato SU-G700
Amplificatore Network Audio SU-G30
08
(64)
Page 65

Installazione
es.
L'angolo e approssimativo.
※ Diffusori
※
60°
≥Ciascun diffusore deve essere trasportato ed installato da almeno due persone.
≥Non toccare i diffusori. In caso contrario si rischia di compromettere la qualità dell'audio.
≥Posizionare i diffusori all'incirca alla stessa distanza dalla posizione di ascolto.
≥diffusori emettono i suoni bassi dalle porte bass reflex sul retro dell'unità, oltre che dal davanti. Installare i diffusori ad una
distanza di almeno 5 cm dalle pareti, in modo che le porte bass reflex sul retro non risultino coperte.
≥Tenere l'amplificatore o qualsiasi altro dispositivo lontano dai diffusori almeno 1 cm.
Italiano
∫ Per un posizionamento ottimale
La qualità ed il volume dei bassi, la localizzazione del suono, l'ambiente sonoro e altri fattori che determinano la qualità dell'audio,
variano a seconda del punto in cui è installata questa unità, della posizione di ascolto, delle condizioni della stanza e di altri
fattori. Quando si installano gli altoparlanti, tenere conto di quanto segue.
Scelta del punto di installazione.
≥Ciascun diffusore ha una massa di circa 32 kg. Verificare che la posizione di installazione sia sufficientemente robusta da
sopportare questo peso.
≥Se è necessario assicurare i diffusori in modo che non si ribaltino, consultare un installatore specializzato. È necessario
verificare la robustezza del pavimento e della parete. (> 15)
≥Posizionare i diffusori su una superficie piana sicura.
Se i diffusori non sono stabili quando vengono posizionati, usare i distanziatori. (> 13, 14)
≥Per minimizzare la differenza della qualità sonora tra il diffusore sinistro e quello destro, installarli in modo che le condizioni
acustiche (riflessione ed assorbimento del suono) attorno ad essi siano le stesse.
Regolazione della distanza tra il retro degli altoparlanti e le pareti
Se si installano i diffusori vicino ad una parete o in un angolo, i bassi saranno più potenti; tuttavia, quando i diffusori sono troppo
vicini alla parete o all'angolo, la localizzazione e il soundstage possono peggiorare. In tal caso, regolare la distanza tra i diffusori
e la parete anteriore, che dovrebbe essere tra 30 cm e 60 cm. (Notare che la distanza tra i diffusori e le pareti laterali dovrebbe
essere superiore a 60 cm.)
≥Non trascinare i diffusori con forza. Farlo può danneggiare il diffusore ed il pavimento.
Regolazione dell'angolazione dei diffusori
Angolare il lato anteriore dei diffusori verso l'ascoltatore. In questo modo la localizzazione del suono dei diffusori migliorerà.
Regolazione dell'acustica della stanza e disposizione degli altoparlanti
A seconda delle caratteristiche dell'ambiente (tra cui le dimensioni e la forma della stanza, la distanza dalle pareti e il livello di
riverbero), alcuni suoni possono essere amplificati o soppressi, rendendo problematico l'ascolto. In tali casi, per provare a
risolvere il problema modificare il livello di riverbero spostando gli altoparlanti, cambiando la posizione di ascolto o coprendo le
pareti e le finestre con tende spesse.
≥Le punte possono migliorare la qualità audio. (> 12)
(65)
09
Page 66

Installazione delle piastre base
②②
③
Non rimuovere il cartone in quanto
protegge l'unità.
1 Rimuovere gli accessori.
≥Rimuovere gli accessori dai blocchi in polistirolo, e posizionarli lontano dai bambini.
2 Posizionare i blocchi in polistirolo in un'area adatta al lavoro.
3 Rimuovere la scatola dell'imballaggio della griglia del diffusore.
10
4 Posizionare il diffusore sui blocchi in polistirolo rimossi nel Passaggio ② .
≥Tenere conto dei seguenti punti quando si solleva il diffusore.
jTenere il fondo in modo che non scivoli dalle mani.
(66)
Page 67

5 Arrotolare verso l'alto gli imballi protettivi (2) per scoprire la parte inferiore del diffusore.
Posizionamento del diffusore usando il piedino in gomma
Fissare prima i piedini in gomma (4) alle aree rientranti sulle piastre base.
≥Rimuovere la carta protettiva dai piedini in gomma, e spingerli a fondo nelle piastre base senza toccare la
superficie adesiva dei piedini in gomma.
Fissare in modo che il lato A
sia rivolto verso il pavimento.
Fissare in modo che il lato B
sia rivolto verso il pavimento.
6 Fissare strettamente le piastre base (4) al diffusore con le viti in dotazione.
≥Per prima cosa fissare con le mani senza stringere le tre viti, quindi stringerle con un cacciavite.
≥Dopo aver fissato le piastre base, accertarsi che siano stabili.
Italiano
Posizionamento del diffusore usando le punte (> 12)
Posizionamento del diffusore usando il piedino in gomma (> 14)
(67)
11
Page 68

Posizionamento dei diffusori usando le punte
Tenere il diffusore in modo che le
mani non tocchino l'altoparlante.
Le punte possono migliorare la qualità audio.
≥Panasonic non è responsabile per incidenti o danni causati da montaggio o movimentazione inappropriata del prodotto.
Non montare gli accessori in modi diversi da quelli indicati in queste Istruzioni per l’uso.
≥Ciascun diffusore ha una massa di circa 32 kg. Quando si inclinano i diffusori per montare le punte, accertarsi che il lavoro
venga effettuato da almeno due persone. Quando si montano le punte, fare attenzione ad evitare che le dita delle mani o
dei piedi rimangano intrappolate tra i diffusori ed il pavimento o che i diffusori si ribaltino. Inoltre, accertarsi di posizionare
un tappetino spesso o un oggetto simile sul pavimento nel punto dove appoggerete i diffusori per evitare danni al
pavimento.
≥Poiché ciascuna punta supporta una massa di almeno 8 kg, le punte possono lasciare segni e indentazioni sul punto di
installazione. Per evitare che le punte danneggino l'area, usare le sottopunte in dotazione o acquistare sottopunte con
superfici di contatto estese ed adeguata robustezza.
≥Spostare i diffusori con le punte montate può causare danni al pavimento. Prima di modificare la posizione di installazione,
rimuovere le punte.
Per evitare danni al pavimento, munirsi di due tappetini spessi (o simile). Posizionarli in anticipo nel punto in cui è stato effettuato
il disimballaggio e nel punto di installazione.
1 Posizionare il diffusore verticalmente su un tappetino spesso (o simile).
2 Rimuovere gli imballi protettivi (2) e il cartone che coprono il diffusore.
3 Trasportare il diffusore nel punto di installazione inclinandolo in avanti, e posizionarlo su un tappetino spesso (o simile).
(68)
12
Page 69

4 Inclinare il diffusore in avanti, ed avvitare le punte nelle due piastre sul lato posteriore.
Sottopunte
Altoparlante
(Parte posteriore)
Tappetino spesso, ecc.
Avvitare le punte a fondo
sino al loro arresto.
Posizionare ciascuna sottopunta in
modo che il lato con un'indentazione
al centro sia rivolto verso l'alto.
NO
SI
Distanziatore
Quando si usano le sottopunte, posizionarle sotto le punte.
5 Mentre si allineano le estremità delle punte con le indentazioni sulle sottopunte, riportare lentamente il diffusore in posizione
6 Come nel Passaggio ④ , inclinare il diffusore indietro e rimuovere il materassino spesso (o simile).
7 Avvitare le punte nelle due piastre pase sul lato anteriore.
8 Se i diffusori non sono stabili, posizionare i distanziatori sotto le sottopunte.
eretta.
Quando si usano le sottopunte, posizionarle sotto le punte.
Italiano
(69)
13
Page 70

Posizionamento dei diffusori usando i piedini in gomma
Tenere il diffusore in modo che le
mani non tocchino l'altoparlante.
Piedini in
gomma
Distanziatore
Fissare prima i piedini in gomma (4) alle aree rientranti sulle piastre base. (> 11)
≥Panasonic non è responsabile per incidenti o danni causati da montaggio o movimentazione inappropriata del prodotto.
Non montare gli accessori in modi diversi da quelli indicati in queste Istruzioni per l’uso.
≥Ciascun diffusore pesa circa 32 kg. Accertarsi che l'operazione venga effettuata da almeno due persone. Fare attenzione
che le dita delle mani o dei piedi non rimangano schiacciate tra il diffusore ed il pavimento e a non rovesciare il diffusore.
≥Poiché ciascun piedino in gomma supporta un peso di almeno 8 kg circa, i piedini in gomma lasciano segni ed indentazioni
nel punto di installazione.
≥Trascinare il diffusore sul pavimento può causare il distacco dei piedini in gomma.
Quando si cambia la posizione di installazione del diffusore, usare sempre almeno due persone per sollevarlo.
Per evitare danni al pavimento, munirsi di un tappetino spesso (o simile). Posizionarlo in anticipo nel punto in cui è stato effettuato
il disimballaggio.
1 Posizionare il diffusore verticalmente su un tappetino spesso (o simile).
2 Rimuovere gli imballi protettivi (2) e il cartone che coprono il diffusore.
3 Tenere il diffusore in modo che sia inclinato in avanti e spostarlo nel punto di installazione.
4 Se i diffusori non sono stabili dopo essere stati posizionati, posizionare i distanziatori sotto ai piedini in gomma. Questo
eviterà che i piedini in gomma si muovano sulla superficie di installazione.
(70)
14
Page 71

Prevenzione del rischio di ribaltamento dei diffusori
Cinghia
I diffusori possono ribaltarsi nel caso ad esempio di un potente terremoto o di un incidente. Ai fini della sicurezza, accertarsi di
fissare i diffusori per evitarne il ribaltamento.
Ciascun diffusore pesa circa 32 kg in totale. Verificare che il punto dove vengono posizionati i diffusori sia
sufficientemente robusto da sopportare questo peso.
Per maggiori informazioni, consultare un installatore specializzato.
∫ Quando si fissano i diffusori ad una
superficie orizzontale (pavimento, ecc.)
Fissare ciascun diffusore al pavimento con cavi o dispositivi
simili come mostrato nell'illustrazione.
Filo
∫ Quando si fissano i diffusori ad una
superficie verticale (parete, ecc.)
Avvolgere una fascia o un dispositivo simile attorno a
ciascun diffusore, e fissarlo ad una parete o colonna robusta
con un cavo resistente, una catena o un dispositivo simile,
come mostrato nell'illustrazione.
≥Le misure descritte sopra non garantiscono la protezione da tutti i disastri ed incidenti, tra cui i terremoti.
Panasonic non è responsabile per eventuali danni ai diffusori, alle loro posizioni di installazione o ad altri oggetti causati dal
lavoro effettuato per prevenire il ribaltamento dei diffusori.
≥L'uso delle punte renderà i diffusori più vulnerabili al ribaltamento.
Italiano
(71)
15
Page 72

Connessioni
1 Ruotare le manopole per allentarle,
quindi inserire i fili centrali nei fori.
2 Serrare le manopole.
- (Nero)
+ (
Rosso)
Non inserire l'isolamento in vinile.
Altoparlante
(Parte
posteriore)
NO
Collegamento dei cavi degli altoparlanti
I diffusori non sono muniti di cavi di potenza. Per il collegamento usare cavi di potenza disponibili in commercio.
Se risulta difficile collegare i cavi di potenza, rimuovere i terminali prima di collegarli.
≥ Fare attenzione a non incrociare (cortocircuitare) o a non invertire la polarità dei fili dell'altoparlante, per evitare di danneggiare l'amplificatore.
(72)
16
Page 73

Collegamento con un amplificatore
es.
Amplificatore (retro)
Altoparlante (destra)
≥Prima di effettuare il collegamento, spegnere l'amplificatore e scollegare il relativo cavo dell'alimentazione.
≥Per ulteriori informazioni, vedere le istruzioni per l’uso dell'amplificatore.
Collegare l'amplificatore ai diffusori con cavi di potenza (disponibili in commercio).
Altoparlante (sinistra)
≥ Non spostare l'altoparlante mentre i relativi cavi sono collegati. In caso contrario potrebbe verificarsi un cortocircuito.
≥ Una volta ultimati i collegamenti, tirare leggermente i cavi dei diffusori per controllare che siano collegati saldamente.
≥ Rispettare la corretta polarità (+/-) dei terminali. In caso contrario la qualità dell'effetto stereo potrebbe risentirne, o potrebbe verificarsi un
malfunzionamento.
Italiano
(73)
17
Page 74

Fissaggio delle griglie dei diffusori
Altoparlante (Parte anteriore)
Griglia dei diffusori (retro)
Insieme ai diffusori vengono fornite delle apposite griglie, che li proteggono dalla polvere.
Utilizzare i magneti per fissare le griglie ai diffusori.
≥ È possibile ottenere una qualità audio superiore rimuovendo le griglie dei diffusori prima della riproduzione.
18
(74)
Page 75

Note sull'utilizzo
Per proteggere gli altoparlanti dai danni causati da un livello eccessivo dei segnali in ingresso, osservare le seguenti
precauzioni:
≥Per evitare danni, ridurre il volume nei casi seguenti:
jQuando il suono riprodotto è distorto.
jQuando i diffusori ricevono la controreazione da un microfono o giradischi, rumore da trasmissioni in FM o segnali continui da
un oscillatore, disco di test o strumento elettronico.
jQuando si regola la qualità del suono.
jQuando si accende o spegne l’amplificatore.
≥Evitare di alzare troppo il livello del volume quando si accentuano i suoni acuti con un equalizzatore grafico o eventuali altri
controlli.
≥Evitare di trasmettere suoni a volume troppo alto con un amplificatore di potenza ridotta. In caso contrario aumenterebbe la
distorsione armonica dell'amplificatore e gli altoparlanti potrebbero danneggiarsi.
≥Si potrebbero danneggiare i diffusori e ridurre la loro vita di servizio se si riproduce il suono agli alti livelli del volume per lunghi
periodi di tempo.
≥Non toccare i terminali dei diffusori con le mani o altri oggetti durante l'uso dei diffusori. A seconda delle condizioni di utilizzo,
questo potrebbe esporre a tensioni elettriche elevate.
Cura dell’unità
Pulire i diffusori con un panno asciutto e morbido.
≥Se l'unità è molto sporca, passare un panno inumidito e ben strizzato per rimuovere lo sporco, quindi un panno asciutto.
≥Non utilizzare solventi come benzina, diluenti, alcol, detergenti da cucina, panni chimici, ecc. In caso contrario l'involucro
esterno potrebbe deformarsi o il rivestimento potrebbe staccarsi.
Specifiche
Tipo 3 vie, 4 altoparlanti, tipo bass-reflex
(midrange a 2 vie coassiali/tweeter incorporati)
Unità diffusori
Woofer Tipo a cono 16 cm k2
Midrange/Tweeter Coassiale 16 cm a cono k1 / 2,5 cm a cupola k1
Impedenza 4 ≠
Potenza di ingresso (IEC) 200 W (MAX)
100 W (RATED)
Livello di pressione sonora 88 dB (2,83 V/m)
85 dB (W/m)
Gamma di frequenza 27 Hz a 100 kHz (-16 dB)
32 Hz a 85 kHz (-10 dB)
Frequenza di crossover 480 Hz, 3,2 kHz
Dimensioni (LkAkP)
Con le punte
Con i piedini in gomma
Peso Circa 32 kg
Temperatura di esercizio 0
Gamma di umidità tollerata 20 % a 80 % RH (nessuna condensa)
≥ Le specifiche possono essere modificate senza preavviso.
≥ La massa e le dimensioni sono approssimate.
302 mmk1.114 mmk375 mm
302 mmk1.093 mmk375 mm
o
C a i40oC
Italiano
(75)
19
Page 76

Gracias por comprar este producto.
Lea detenidamente estas instrucciones antes de usar este producto y conserve este manual para consultarlo en el futuro.
Normas de seguridad
AVISO
≥ No desarme o modifique el producto. Hacerlo podría provocar
daños o causar un incendio.
≥ No coloque los altavoces en ubicaciones inestables como sobre una
mesa tambaleante o una superficie inclinada.
No coloque los altavoces en superficies elevadas o irregulares o
sobre superficies vulnerables a las vibraciones o los golpes.
Si los altavoces se vuelcan o caen pueden provocar daños
personales.
≥ Mantenga los accesorios pequeños fuera del alcance de los niños.
Si se ingieren accidentalmente, provocarán efectos físicos
adversos. Si sospecha que los accesorios pequeños han sido
ingeridos, consulte con su médico inmediatamente.
≥ No cuelgue los altavoces del techo o de la pared. Esto podría
ocasionar que los altavoces se caigan y lesionen a alguien.
≥ No introduzca objetos en los agujeros de los puertos de reflexión de
los graves ubicados en la parte trasera. Esto podría ocasionar un
incendio o causar daños personales. Tenga especial cuidado con
los niños.
ADVERTENCIA
≥ No se ponga de pie sobre los altavoces o se cuelgue de ellos. Si los
altavoces se vuelcan o se dañan podrían provocar daños
personales.
≥ No use los altavoces durante un periodo prolongado de tiempo
cuando el sonido está distorsionado. Hacerlo podría causar que los
altavoces se calienten provocando un funcionamiento defectuoso o
causando un incendio.
≥ No coloque objetos grandes o pesados sobre los altavoces. Si los
altavoces se vuelcan o se caen podrían provocar daños personales.
≥ No toque los diafragmas. Hacerlo podría deformar los diafragmas y
como resultado el sonido podría no reproducirse correctamente.
≥ Mantenga los altavoces fuera del alcance de los niños, incluidos los
bebés. No hacerlo podría causar daños personales si los altavoces
se vuelcan.
≥ No coloque los altavoces en ubicaciones sometidas a temperaturas
extremadamente altas. Evite especialmente las ubicaciones
expuestas a la luz directa del sol o cercanas a instalaciones de
calefacción. Por favor, tenga también en cuenta que hacerlo puede
causar que la cubierta exterior o los componentes internos se
deterioren.
≥ No coloque los altavoces en ubicaciones cercanas a gases
grasientos o vapores, o en ubicaciones húmedas o polvorientas.
Hacerlo podría causar que la grasa, la humedad o el polvo
condujesen la electricidad provocando un incendio o una descarga
eléctrica.
≥ Mantenga los objetos magnéticos lejos del producto. Los imanes
potentes del interior de los altavoces y las rejillas de estos podrían
causar daños en tarjetas de crédito, tarjetas de viajes, relojes y otros
objetos.
≥ No introduzca los dedos en los puertos de reflexión de los graves,
ubicados en la parte trasera de los altavoces. Tenga especial
cuidado con los niños, ya que si introducen los dedos podrían
lastimarse.
≥ No conecte los altavoces a un amplificador con una salida mayor
que su entrada permitida. Hacerlo podría causar que los altavoces
se calentaran causando un incendio.
≥ Cada altavoz debe ser transportado e instalado por al menos dos
personas. Si el altavoz se cayera podría lesionar a alguien.
≥ Asegure los altavoces ante posibles vuelcos. Estos pueden
provocar daños personales
como un fuerte terremoto o un accidente.
≥ Antes de usar, asegúrese de poner las placas de asiento y los
pinchos o el pie de goma. De lo contrario, el producto podría
volcarse provocando lesiones.
si se vuelcan a causa de una catástrofe
Eliminación de Aparatos Viejos
Solamente para la Unión Europea y países con sistemas de reciclado.
Este símbolo en los productos, su embalaje o en los documentos que los acompañen significa que los productos eléctricos y
electrónicos usadas no deben mezclarse con los residuos domésticos.
Para el adecuado tratamiento, recuperación y reciclaje de los productos viejos llévelos a los puntos de recogida de acuerdo
con su legislación nacional.
Si los elimina correctamente ayudará a preservar valuosos recursos y evitará potenciales efectos negativos sobre la salud de
las personas y sobre el medio ambiente.
Para más información sobre la recogida u reciclaje, por favor contacte con su ayuntamiento.
Puede haber sanciones por una incorrecta eliminación de este residuo, de acuerdo con la legislación nacional.
06
(76)
Page 77

Índice
Normas de seguridad ...................................................... 06
Accesorios........................................................................ 07
Acerca de este aparato.................................................... 08
Instalación ........................................................................ 09
Conexiones....................................................................... 16
Colocar las rejillas de los altavoces............................... 18
Acerca de las descripciones en este Manual del propietario
≥Las ilustraciones que se muestran pueden ser distintas a las de su aparato.
Notas sobre el uso ...........................................................19
Cuidados de la unidad.....................................................19
Especificaciones ..............................................................19
Accesorios
∏ 4 pinchos
(TBLA40861)
∏ 4 bases para pinchos
(TYL0079)
∏ 4 Pie de goma
(TBLG32691)
∏ 2 Placas de asiento A
(TBLA40852)
∏ 4 espaciadores
(TMKK653)
∏ 1 paño de limpieza
(TXFPE01LHUU)
Antes de usar, asegúrese de poner las placas de asiento y los pinchos o el pie de goma.
≥Mantenga los accesorios pequeños fuera del alcance de los niños para evitar que los ingieran.
∏ 12 Tornillos de la
placa de asiento
(THEL155Z)
∏ 2 Placas de asiento B
(TBLA41091)
∏ 1 rejilla de altavoz
(TTJ0006-A)
Español
≥ Los números de producto proporcionados en este Manual del propietario son correctos a partir de febrero de 2017. Estos números podrían
estar sujetos a cambios.
≥ Los altavoces no se suministran con los cables de los altavoces. Para realizar la conexión, use los cables de los altavoces disponibles en
comercios.
(77)
07
Page 78

Acerca de este aparato
ヒ
ビ
ピ
ピ
Parte frontal Parte trasera
Puerto de reflexión de
graves
Terminales del altavoz
Marca de identificación del
producto
El número de modelo se
encuentra en la marca que
identifica el producto en la parte
trasera de este aparato.
∫ Nombres de las piezas y características de los altavoces
Arquitectura de montaje de driver equilibrado
1
La unidad de altavoz, montada sobre el sub-bafle del interior del armario en su centro de gravedad, está diseñada para
suprimir la vibración que genera. La unidad de altavoz no está montada en el bafle delantero para así minimizar la
transmisión de vibraciones indeseadas desde la unidad de altavoz al bafle. Como resultado, el altavoz proporciona un
entorno de sonido realista y espacioso y un sonido penetrante y preciso con frecuencias en un rango entre bajo y
superalto.
Unidad de dos vías coaxiales
2
La recientemente desarrollada unidad de frecuencia media-a-alta se caracteriza por un sistema de dos vías coaxiales
que hereda los conceptos de diseño desarrollados para nuestros modelos de alto nivel: una fuente de sonido puntual y
una reproducción de fase lineal. El sistema, diseñado para conseguir una localización del sonido precisa, permite que el
altavoz transmita con claridad varios sonidos producidos por instrumentos musicales para recrear un entorno de sonido
tridimensional.
Woofers de carrera larga y baja distorsión
3
El altavoz incorpora dos woofers fabricados con componentes como imanes dobles, bobinas móviles largas y anillas de
cobre. Como resultado, el altavoz puede proporcionar sonidos graves con baja distorsión y una respuesta magnífica
cuando se reproducen frecuencias incluso de gran amplitud.
∫ Dispositivos recomendados
Recomendamos usar dispositivos Technics (opcional) para obtener un audio de calidad superior.
Nombre del producto Número del modelo
Amplificador Estéreo Integrado SU-G700
Amplificador de audio de red SU-G30
08
(78)
Page 79

Instalación
p.ej.
El ángulo es aproximado.
※ Unidades de altavoz
※
60°
≥Cada altavoz debe ser transportado e instalado por al menos dos personas.
≥No toque las unidades de altavoz. Si lo hace, la calidad del audio podría ser incorrecta.
≥Coloque los altavoces aproximadamente a la misma distancia desde la posición donde los va a escuchar.
≥Los altavoces producen los sonidos graves desde los puertos de reflexión de los graves, ubicados tanto en la parte trasera
como en la parte frontal. Instale los altavoces al menos 5 cm alejados de las paredes para que no cubran los puertos de
reflexión de los graves.
≥Mantenga el amplificador o cualquier otro dispositivo y los altavoces a al menos 1 cm de distancia entre ellos.
∫ Para una posición óptima
La calidad y el volumen de los sonidos graves, el desempeño de la localización del sonido, el ambiente de sonido y otros
factores que determinan la calidad del audio varían dependiendo del lugar donde se instale este aparato, la posición desde la
que se escucha, las condiciones de la sala y otros factores. Cuando instale los altavoces, consulte la información que se
presenta a continuación.
Determinar el sitio para la instalación.
≥Cada altavoz tiene un peso de 32 kg aproximadamente. Compruebe que el sitio donde se realizará la instalación sea lo
suficientemente fuerte para aguantar este peso:
≥Si necesita asegurar los altavoces ante posibles vuelcos, consulte a un especialista de instalaciones. Se debe verificar la
resistencia del suelo y de la pared. (> 15)
≥Ponga los altavoces en una superficie plana segura.
Si el altavoz se tambalea estando colocado, use los espaciadores. (> 13, 14)
≥Para minimizar la brecha en la calidad del audio entre el altavoz derecho y el izquierdo, instálelos de tal forma que las
condiciones acústicas (reflexión y absorción del sonido) a su alrededor sean las mismas.
Ajustar la distancia entre la parte trasera de los altavoces y las paredes
Si instala los altavoces cerca de una pared o en una esquina, los sonidos graves serán más potentes. Sin embargo, si los
altavoces están muy cerca de las paredes o de las esquinas, el desempeño de la localización del sonido y el ambiente de sonido
pueden deteriorarse. En caso de que esto ocurra, ajuste la distancia entre los altavoces y la pared frontal, que debería ser de
30 cm a 60 cm. (Tenga en cuenta que la distancia entre los altavoces y las paredes laterales debería ser mayor a 60 cm.)
≥No arrastre los altavoces por la fuerza. Hacerlo podría causar daños en el altavoz y en el suelo.
Ajustar la altura y el ángulo de los altavoces
Dirija la parte frontal de los altavoces hacia el oyente. Si sigue estos pasos, los altavoces podrán ofrecer una localización de
sonido más precisa.
Ajustar la acústica de la sala y la distribución de los altavoces
Dependiendo del ambiente de la sala (incluyendo el tamaño y la forma de la sala, la distancia a las paredes y el nivel de
resonancia), ciertos sonidos podrían exagerarse o suprimirse, y podría ser difícil escucharlos. En esos casos, ajustar el nivel de
resonancia moviendo los altavoces, cambiando la posición del oyente o cubriendo las paredes y ventanas con cortinas gruesas,
podría ayudar a solucionar el problema.
≥Los pinchos pueden mejorar la calidad del audio. (> 12)
Español
(79)
09
Page 80

Cómo colocar las placas de asiento
②②
③
Deje el cartón puesto para
proteger la unidad de altavoz.
1 Saque los accesorios.
≥Saque los accesorios de los bloques de poliestireno y colóquelos en un lugar alejado del alcance de los niños.
2 Ponga los bloques de poliestireno en una área adecuada para trabajar.
3 Saque la caja de embalaje de la rejilla del altavoz.
10
4 Coloque el altavoz en los bloques de poliestireno retirados en el Paso ② .
≥Cuando levante el altavoz, tenga en cuenta lo siguiente.
jAgarre por abajo de modo que no se le resbalen las manos.
(80)
Page 81

5 Enrolle las bolsas protectoras (2 unidades) para destapar la parte inferior del altavoz.
Colocación del altavoz usando el pie de goma
Coloque los pies de goma (4 unidades) en los huecos de las placas de asiento con antelación.
≥Despegue el papel adhesivo de los pies de goma y métalos firmemente en las placas de asiento sin tocar
la superficie adhesiva de los pies de goma.
Móntelo de modo que el lado
A mire hacia el suelo.
Móntelo de modo que el lado
B mire hacia el suelo.
6 Monte las placas de asiento (4 unidades) en el altavoz firmemente con los tornillos suministrados.
≥Primero coloque manualmente los tres tornillos sin apretarlos y después apriételos con un destornillador.
≥Después de colocar las placas de asiento, asegúrese de que no se tambalean.
Español
Colocación del altavoz usando los pinchos (> 12)
Colocación del altavoz usando el pie de goma (> 14)
(81)
11
Page 82

Colocación de los altavoces usando los pinchos
Sujete el altavoz de modo que no
toque la unidad de altavoz con las
manos.
Los pinchos pueden mejorar la calidad del audio.
≥Panasonic no se hace responsable de ningún accidente o daño causado por un montaje o manejo inadecuado del
producto. No coloque los accesorios de otra forma que no sea la forma indicada en estas instrucciones de
funcionamiento.
≥Cada altavoz tiene un peso de 32 kg aproximadamente. Cuando incline los altavoces para colocar los pinchos, asegúrese
de que el trabajo se realice entre al menos dos personas. Cuando coloque los pinchos, tenga precaución de que sus
dedos de las manos o de los pies no se queden atrapados entre los altavoces y el suelo, también tenga cuidado de no
volcar los altavoces. Además, asegúrese de colocar una esterilla gruesa o algo similar en el lado del suelo donde inclinará
los altavoces para evitar dañar el suelo.
≥Debido a que cada pincho soporta un peso de al menos 8 kg aproximadamente, los pinchos podrían dejar marcas y
hendiduras en el sitio donde se instalen. Para evitar que los pinchos dañen la zona, use las bases para pinchos
suministradas o compre unas bases para pinchos con grandes superficies de contacto y la fuerza adecuada.
≥Mover los altavoces con los pinchos colocados podría dañar el suelo. Antes de cambiar la ubicación de la instalación,
retire los pinchos.
Para evitar daños en el suelo, tenga a su disposición dos alfombras gruesas (o similar). Colóquelas de antemano en el lugar del
desembalaje y en el lugar de la instalación.
1 Coloque el altavoz verticalmente sobre una alfombra gruesa (o similar).
2 Quite las bolsas de protección (2 unidades) y el cartón que cubre el altavoz.
3 Lleve al altavoz al lugar de instalación mientras lo inclina hacia adelante y colóquelo sobre una alfombra gruesa (o similar).
(82)
12
Page 83

4 Incline el altavoz hacia adelante y atornille los pinchos en las dos placas de asiento de la parte trasera.
Bases para pinchos
Altavoz
(Parte trasera)
Esterilla gruesa o algo similar.
Atornille los pinchos
firmemente hasta que se
detengan.
Coloque las bases para pinchos de
tal manera que el lado con la
hendidura en el centro quede boca
arriba.
NO
SÍ
Espaciador
Cuando use las bases para pinchos, colóquelas bajo los pinchos.
5 Mientras alinea las puntas de los pinchos con las hendiduras de las bases para pinchos, vuelva a colocar el altavoz
6 Del mismo modo que en el Paso ④ , incline el altavoz hacia atrás y retire la alfombra gruesa (o similar).
7 Atornille los pinchos en las dos placas de asiento de la parte delantera.
8 Si los altavoces se tambalean, coloque los espaciadores bajo las bases para pinchos.
lentamente en posición vertical.
Cuando use las bases para pinchos, colóquelas bajo los pinchos.
Español
(83)
13
Page 84

Colocación de los altavoces usando los pies de goma
Sujete el altavoz de modo que no
toque la unidad de altavoz con las
manos.
Pie de goma
Espaciador
Coloque los pies de goma (4 unidades) en los huecos de las placas de asiento con antelación. (> 11)
≥Panasonic no se hace responsable de ningún accidente o daño causado por un montaje o manejo inadecuado del
producto. No coloque los accesorios de otra forma que no sea la forma indicada en estas instrucciones de
funcionamiento.
≥Cada altavoz pesa aproximadamente 32 kg. Asegúrese de que el trabajo lo realizan al menos dos personas. Tenga
cuidado de no pillarse los dedos de las manos o pies entre el altavoz y el suelo y de no caerse sobre el altavoz.
≥Puesto que cada pie de goma soporta un peso de al menos 8 kg aproximadamente, puede que dejen marcas y
hendiduras en el lugar de la instalación.
≥Si arrastra el altavoz por el suelo, los pies de goma podrían pelarse.
Cuando cambie el lugar de instalación del altavoz, deberá recurrir como mínimo a dos personas para que lo levanten.
Para evitar daños en el suelo, tenga a su disposición una alfombra gruesa (o similar). Colóquela de antemano en el lugar del
desembalaje.
1 Coloque el altavoz verticalmente sobre una alfombra gruesa (o similar).
2 Quite las bolsas de protección (2 unidades) y el cartón que cubre el altavoz.
3 Sujete el altavoz de modo que esté inclinado hacia adelante y muévalo hasta el lugar de la instalación.
4 Si los altavoces se tambalean después de ubicarlos, coloque los espaciadores bajo los pies de goma. Esto evitará que los
pies de goma de tambaleen en la superficie de instalación.
(84)
14
Page 85

Evitar que se vuelquen los altavoces
Los altavoces pueden volcarse a causa de un desastre como un fuerte terremoto o un accidente. Para su seguridad, asegúrese
de proteger los altavoces ante posibles vuelcos.
Cada altavoz pesa aproximadamente 32 kg en total. Compruebe que la ubicación de los altavoces es lo suficientemente
robusta como para soportar este peso.
Para más detalles, consulte con un especialista en instalaciones.
∫ Al sujetar los altavoces a una superficie
horizontal (suelo, etc.)
Fije cada altavoz al suelo con cables o elementos similares
como se muestra en la ilustración.
Cable
∫ Al sujetar los altavoces a una superficie
vertical (pared, etc.)
Enrolle una cinta o un elemento parecido alrededor de cada
altavoz y amárrelo como se muestra en la ilustración a una
pared robusta o a una columna con un cable, cadena o
similar que sea fuerte.
Cinta
≥Las medidas descritas arriba no garantizan las protección ante todas las catástrofes y accidentes, incluidos los terremotos.
Por favor, tenga en cuenta que Panasonic no es responsable de los daños causados en los altavoces, en sus ubicaciones de
instalación o en otros objetos debido a las tareas realizadas para asegurar los altavoces ante posibles vuelcos.
≥El uso de los pinchos hará que los altavoces sean más vulnerables a los vuelcos.
Español
(85)
15
Page 86

Conexiones
1 Gire las perillas para aflojarlas e
inserte los núcleos de los cables en
los agujeros.
2 Apriete las perillas.
- (Negro)
+ (Rojo)
No inserte el aislamiento de vinilo.
Altavoz
(Parte trasera)
NO
Preparación de los cables y conexión
Los altavoces no se suministran con los cables de los altavoces. Para realizar la conexión, use los cables de los altavoces
disponibles en comercios.
Si resulta difícil conectar los cables del altavoz, quite los botones antes de conectarlos.
≥ Tenga cuidado de no cruzar (cortocircuito) o invertir la polaridad de los cables del altavoz, ya que eso puede dañar el amplificador.
(86)
16
Page 87

Conexión con un amplificador
p.ej.
Amplificador (trasero)
Altavoz (izquierda)
Altavoz (derecha)
≥Antes de realizar la conexión, apague el amplificador y desconecte su cable de alimentación.
≥Para obtener más información, consulte las instrucciones de funcionamiento del amplificador.
Conecte el amplificador y los altavoces con los cables de los altavoces (disponibles en comercios).
≥ No mueva el altavoz mientras los cables del altavoz estén conectados. Esto podría ocasionar un cortocircuito.
≥ Cuando las conexiones estén terminadas, tire de los cables del altavoz ligeramente para comprobar que estén conectados con firmeza.
≥ Conecte la polaridad (+/-) de las terminales correctamente. De lo contrario, podría repercutir de forma negativa en los efectos estéreo o
provocar un mal funcionamiento.
Español
(87)
17
Page 88

Colocar las rejillas de los altavoces
Altavoz (Parte frontal)
Rejilla de altavoz
(parte trasera)
Los altavoces se suministran con rejillas, que protegen las unidades de altavoz del polvo.
Use los imanes para fijar las rejillas de los altavoces a las unidades de altavoz.
≥ Puede disfrutar de una calidad de audio superior si quita las rejillas de los altavoces antes de la reproducción.
18
(88)
Page 89

Notas sobre el uso
Para proteger los altavoces del daño causado por una entrada excesiva, tome en cuenta las siguientes precauciones:
≥Para evitar daños, reduzca el volumen en los casos siguientes:
jCuando reproduzca sonido distorsionado.
jCuando los altavoces reciban aullido procedente de un micrófono o giradiscos, ruido de emisiones de FM o señales
continuas procedentes de un oscilador, disco de prueba o instrumento electrónico.
jCuando ajuste la calidad del sonido.
jCuando encienda o apague el amplificador.
≥Evite elevar demasiado el volumen cuando aumente el sonido de los agudos con un ecualizador gráfico u otros controles.
≥Evite emitir sonidos excesivamente altos con un amplificador de poca potencia. Esto aumenta la distorsión armónica del
amplificador y podría dañar los altavoces.
≥Si reproduce el sonido con niveles altos durante períodos de tiempo prolongados podrá estropear sus altavoces y reducir su
duración.
≥No toque los terminales de altavoz con las manos u otros objetos mientras estos están en funcionamiento. Dependiendo de las
condiciones de uso, hacerlo podría exponerle a altos voltajes.
Cuidados de la unidad
Limpie los altavoces con el paño de limpieza suministrado.
≥Cuando esté muy sucio, humedezca un paño en agua para limpiar el aparato; a continuación limpie otra vez con un paño seco.
≥No use solventes, como por ejemplo, bencina, disolvente, alcohol, detergente de cocina, limpiador químico, etc. Esto podría
provocar que la caja exterior se deforme o que el revestimiento se caiga.
Especificaciones
Tipo 3 vías, 4 altavoces, tipo de reflexión de los graves
(coaxial de dos vías de rango medio/tweeters integrados)
Unidad de altavoz
Woofer 16 cm Tipo cono k2
Rango medio/Tweeter (altavoz de alta frecuencia) Coaxial 16 cm tipo cono k1 / 2,5 cm tipo domo k1
Impedancia 4 ≠
Potencia de entrada (IEC) 200 W (MAX)
100 W (RATED)
Nivel de presión del sonido 88 dB (2,83 V/m)
85 dB (W/m)
Rango de frecuencia 27 Hz a 100 kHz (-16 dB)
32 Hz a 85 kHz (-10 dB)
Frecuencia de traspaso 480 Hz, 3,2 kHz
Dimensiones (AnkAlkProf)
Con los pinchos
Con los pies de goma
Masa Aprox. 32 kg
Gama de temperaturas de funcionamiento 0
Gama de humedades de funcionamiento De 20 % a 80 % RH (sin condensación)
≥ Las especificaciones se encuentran sujetas a cambio sin previo aviso.
≥ La masa y las direcciones son aproximadas.
302 mmk1.114 mmk375 mm
302 mmk1.093 mmk375 mm
o
C a i40oC
Español
(89)
19
Page 90

Tak fordi du har købt dette produkt.
Læs venligst disse instruktioner omhyggeligt igennem, før du anvender dette produkt, og gem vejledningen til fremtidig brug.
Sikkerhedsforskrifter
ADVARSEL
≥ Produktet må ikke afmonteres eller ændres. Det kan medføre en
skade eller brand.
≥ Anbring ikke højttalerne på et ustabilt sted, f.eks. på et bord, der
rokker, eller på en hældende flade.
Anbring aldrig højttalerne på en forhøjning eller ujævn flade eller på
overflader, som kan blive udsat for vibrationer eller stød.
Hvis højttalerne vælter eller falder ned, kan det medføre
personskade.
≥ Opbevar de små tilbehørsdele utilgængelige for børn. Hvis de
sluges ved en fejl, vil det have en skadelig fysisk virkning. Kontakt
straks lægen, hvis du har mistanke om, at de små tilbehørsdele er
blevet slugt.
≥ Hæng ikke højttalerne fra loftet eller direkte på væggen. Det kan
resultere i, at højttaleren falder ned, hvilket kan medføre
personskade.
≥ Anbring ikke genstande i basrefleksportene bag på højttalerne. Det
kan medføre brand eller personskade. Hold øje med børnene, hvis
de er i nærheden.
FORSIGTIG!
≥ Stå ikke ovenpå eller hæng ikke ned fra højttalerne. Hvis højttalerne
vipper forover eller bagover, kan det medføre personskade.
≥ Brug ikke højttalerne i længere tid, hvis lyden er forvrænget. Det kan
medføre, at højttalerne overopheder, som kan forårsage en fejl eller
en brand.
≥ Anbring ikke tunge eller store genstande på højttalerne. Hvis
højttalerne vælter eller falder ned, kan det medføre personskade.
≥ Rør aldrig membranerne. Det kan ødelægge membranerne, som
kan medføre, at lyden ikke udsendes korrekt.
≥ Opbevar højttalerne utilgængeligt for børn, også småbørn. I modsat
fald kan det medføre personskade, hvis højttalerne vælter.
≥ Anbring ikke højttalerne på steder, der kan blive udsat for meget
høje temperaturer. Undgå især steder, som er udsat for direkte
sollys eller ved siden af varmeapparater eller lignende. Bemærk
også, at hvis dette sker, kan yderbeklædningen eller de indvendige
dele blive forringet.
≥ Anbring ikke højttalerne på steder, som er udsat for fedtet røg eller
damp, eller på fugtige eller støvede steder. Det kan nemlig medføre,
at der føres elektricitet gennem olie, fugt eller støv, som kan
forårsage en brand eller elektrisk stød.
≥ Hold magnetiske genstande væk fra produktet. Kraftige magneter
inden i højttalerne og højttalernet kan ødelægge kreditkort, rejsekort,
ure og andre genstande.
≥ Sæt ikke fingeren i basrefleksportene bag på højttalerne. Pas især
på børn, da de kan komme til skade.
≥ Højttalerne må ikke tilsluttes en forstærker med et output på mere
end det tilladelige input. Dette kan medføre, at højttalerne
overopheder, som kan forårsage en brand.
≥ Hver højttaler skal bæres og installeres af mindst to personer. Hvis
man taber den, skal den blive beskadiget.
≥ Fastgør højttalerne, så de ikke vipper frem- eller bagover. Hvis de
vipper frem- eller bagover i en katastrofelignende situation, f.eks. et
kraftigt jordskælv, eller ved et uheld, kan det medføre personskade.
≥ Før brug skal du fastgøre grundpladerne og enten spidserne eller
gummifoden. Ellers kan produktet vippe forover og forårsage en
skade.
Indsamling af elektronikskrot
Kun for Den Europæiske Union og lande med retursystemer
Dette symbol på produkter, emballage og/eller ledsagedokumenter betyder, at brugte elektriske og elektroniske produkter ikke
må blandes med almindeligt husholdningsaffald.
For korrekt behandling, indsamling og genbrug af gamle produkter, skal du tage dem til indsamlingssteder i overensstemmelse
med den nationale lovgivning.
Ved at skaffe sig af med dem på korrekt vis hjælper du med til at spare værdifulde ressourcer og forhindre eventuelle negative
påvirkninger af menneskers sundhed og miljøet.
Ønsker du mere udførlig information om indsamling og genbrug skal du kontakte din kommune.
Usagkyndig bortskaffelse af elektronikskrot kan eventuelt udløse bødeforlæggelse.
06
(90)
Page 91

Indholdsfortegnelse
Sikkerhedsforskrifter....................................................... 06
Tilbehør............................................................................. 07
Om denne enhed.............................................................. 08
Installation ........................................................................ 09
Tilslutninger...................................................................... 16
Fastgørelse af højttalernet .............................................. 18
Om beskrivelserne i denne betjeningsvejledning
≥De viste illustrationer kan være forskellige fra dit apparat.
Tilbehør
∏ 4 spidser
(TBLA40861)
Bemærkninger om brug af højttalere .............................19
Vedligeholdelse af apparatet........................................... 19
Specifikationer..................................................................19
∏ 4 spidssko
(TYL0079)
∏ 4 Gummifødder
(TBLG32691)
∏ 2 Grundplader A
(TBLA40852)
∏ 4 afstandsholdere
(TMKK653)
∏ 1 rengøringsklud
(TXFPE01LHUU)
Før brug skal du fastgøre grundpladerne og enten spidserne eller gummifoden.
≥Hold små tilbehørsdele uden for børns rækkevidde for at forhindre, at de sluger dem.
∏ 12 Skruer til
grundplader
(THEL155Z)
∏ 2 Grundplader B
(TBLA41091)
∏ 1 højttalernet
(TTJ0006-A)
Dansk
≥ Korrekte produktnumre angivet i denne betjeningsvejledning gælder fra og med februar 2017. Ændringer kan ske.
≥ Der følger ikke højttalerkabler med højttalerne. Benyt højttalerkabler, som kan købes i handelen.
(91)
07
Page 92

Om denne enhed
ヒ
ビ
ピ
ピ
For Bag
Basrefleksport
Højttalerterminaler
Produktidentifikationsmærk
ning
Modelnummeret findes på
produktidentifikationsmærkningen
bag på denne enhed.
∫ Navne på højtalerdele og -funktioner
Monteringsarkitetktur til balanceret driver
1
Højttalerenheden, som er monteret på sub-baffle inden i kabinettet ved tyngdepunktet, er udviklet til at undertrykke den
vibration, der frembringes. Højttalerenheden monteres ikke på den forreste baffle for at minimere transmissionen af
uønsket vibration fra højttalerenhed til baffle. Resultatet er en højttaler, som leverer en realistisk, rummelig soundstage
med en gennemtrængende, skarp lyd med frekvenser fra de helt lave til de ultrahøje.
Koaksial tovejsenhed
2
Den nyeste midt-til-høj frekvensenhed har et koaksialt tovejssystem, der har samme designkoncept, som er udviklet til
vores high-end modeller: en punktlydkilde og lineær fasegengivelse. Systemet, som er udviklet for at give en nøjagtig
lydplacering, giver højttaleren mulighed for at levere forskellige lyde, der frembringes af musikinstrumenter med en
klarhed, som genskaber en tredimensionel soundstage.
Woofere med lav forvrængning og langt slag
3
Højttaleren har to indbyggede woofere, som er fremstillet af komponenter, såsom dobbelte magneter, lange
stemmespoler og kobberringe. Som et resultat heraf kan højttaleren levere en baslyd med lav forvrængning og fortræffelig
respons ved gengivelse af frekvenser, også dem med stor amplitude.
∫ Anbefalede anordninger
Vi anbefaler brugen af Technics-anordninger (ekstraudstyr) for en bedre lydkvalitet.
Produktnavn Modelnummer
Integreret stereoforstærker SU-G700
Netværksforstærker SU-G30
08
(92)
Page 93

Installation
f.eks.
Vinklen er omtrentlig.
※ Højttalerenheder
※
60°
≥Hver højttaler skal bæres og installeres af mindst to personer.
≥Højttalerenhederne bør ikke berøres. Det kan medføre en forkert lydkvalitet.
≥Anbring højttalerne i ca. samme afstand fra lytteposition.
≥Højttalerne frembringer baslyden fra basrefleksportene bagpå og foran. Installér højttalerne i en afstand på mindst 5 cm væk fra
væggene, så de ikke dækker basrefleksportene bagpå.
≥Hold forstærkeren eller andre enheder og højttalerne i en afstand på mindst 1 cm væk fra hinanden.
∫ For en optimal position
Lydstyrken og kvaliteten af baslyden, lydlokalisering, lydmiljø og andre faktorer, som bestemmer lydkvaliteten, varierer afhængigt
af denne enheds installationssted, lyttepositionen, rumforholdene og andre faktorer. Se informationen nedenfor ved installation af
højttalerne.
Sådan bestemmer du en installationsplacering.
≥Hver højttaler har en masse på ca. 32 kg. Kontrollér, at installationsstedet er tilstrækkeligt stærkt for at bære denne masse.
≥Hvis du skal sikre, at højttalerne ikke vipper over, skal du kontakte en installatør. Gulvets og væggenes styrke skal kontrolleres.
(> 15)
≥Placer højtalerne på en flad og sikker overflade.
Hvis højttalerne rokker, når de er placeret, skal du bruge afstandsholderne. (> 13, 14)
≥For at minimere forskellen i lydkvaliteten mellem venstre og højre højttaler, skal de installeres, så lydforholdene (lydrefleksion
og -absorption) omkring disse er den samme.
Justering af afstande mellem bagsiden af højttalerne og væggene
Hvis du installerer højttalerne tæt på en væg eller i et hjørne, bliver baslyden kraftigere. Men hvis højttalerne stilles for tætte på
væggen eller hjørnet, kan lydlokaliseringen og lydmiljøet blive forringet. Hvis dette sker, skal du justere afstanden mellem
højttalerne og frontvæggen, så den er mellem 30 cm til 60 cm. (Bemærk, at afstanden mellem højttalerne og sidevæggen skal
mindst være 60 cm.)
≥Brug ikke overdrevne kræfter til at trække i højttalerne. Det kan beskadige højttaleren og gulvet.
Justering af højtalernes højde og vinkel
Anbring forsiden af højttalerne på skrå mod lytteren. Følg disse trin, så højttalerne leverer en mere nøjagtig lydlokalisering.
Justering af rummets akustik og speaker-placering
Afhængigt af rummets miljø (herunder størrelsen og udformningen af rummet, afstand til vægge og genlydniveau), kan visse lyde
forekomme overdrevne eller dæmpede, så de bliver svære at høre. I sådanne tilfælde kan det afhjælpe problemet, hvis du
justerer genlydniveauet, ændrer lyttepositionen eller dækker vægge og vinduer til med tykke gardiner.
≥Spidserne kan fremhæve lydkvaliteten. (> 12)
Dansk
(93)
09
Page 94

Fastgøring af grundpladerne
②②
③
Lad pappet være, så højttalerenheden
holdes beskyttet.
1 Fjern tilbehøret.
≥Fjern tilbehør fra styroskumblokkene, og anbring dem uden for børns rækkevidde.
2 Anbring styroskumblokke i et område, der er velegnet til arbejde.
3 Fjern højttalernettets emballageæske.
10
4 Anbring højttaleren på blokkene af styroskum, som angivet under trin ② .
≥Husk følgende punkter, når du løfter op i højttaleren.
jHold fast i bunden, så dine hænder ikke slipper.
(94)
Page 95

5 Rul beskyttelsesposerne (2 stk.) op, så bunden af højttaleren fritlægges.
Anbring højttaleren ved hjælp af gummifoden
Fastgør gummifødderne på forhånd (4 stk.) i hullerne på grundpladerne.
≥Tag papiret bag på gummifødderne af, og skub dem helt ind i grundpladerne uden at røre
gummiføddernes klæbende overflade.
Fastgør den så A-siden peger
mod gulvet.
Fastgør den, så B-siden peger
mod gulvet.
6 Fastgør grundpladerne (4 stk.) korrekt til højttaleren med de medfølgende skruer.
≥Montér først de tre skruer løst med hænderne, og stram dem derefter med en skruetrækker.
≥Efter at du har fastgjort grundpladerne, skal du sikre dig, at de ikke rokker.
Dansk
Anbring højttaleren ved hjælp af spidserne (> 12)
Anbring højttaleren ved hjælp af gummifoden (> 14)
(95)
11
Page 96

Placering af højttalerne ved hjælp af spidserne
Hold højttaleren, så dine hænder
ikke rører ved højttalerenheden.
Spidserne kan fremhæve lydkvaliteten.
≥Panasonic er ikke ansvarlig for personskader eller beskadigelser, som skyldes forkert samling eller håndtering af
produktet. Man må ikke fastgøre tilbehør på andre måder end vist og anvist i denne betjeningsvejledning.
≥Hver højttaler har en masse på ca. 32 kg. Hvis du vipper højttalerne for at fastgøre spidserne, skal du sørge for, at arbejdet
udføres af mindst to personer. Når du fastgør spidserne, skal du passe på, at du ikke får fingrene eller tæerne i klemme
mellem højttalerne og gulvet, eller når du vipper højttalerne. Desuden skal du sørge for, at du lægger en tyk måtte eller
lignende på siden af gulvet, når du vipper højttalerne over for at forhindre, at gulvet bliver ødelagt.
≥Da spidserne understøtter en masse på mindst ca. 8 kg, kan spidserne efterlade mærker og nedtryk på installationsstedet.
For at forhindre, at spidserne ødelægger noget, skal du bruge de medfølgende spidssko eller købe spidssko med store
kontaktflader og af en passende styrke.
≥Når du flytter højttalerne med spidser på, kan det ødelægge gulvet. Før du ændrer installationssted, skal du flytte
spidserne.
For at undgå mærker i gulvet skal du have to tykke måtter (eller lignende) klar. Læg dem der, hvor du pakker kassen ud og på
installationsstedet på forhånd.
1 Sæt højttaleren lodret på en tyk måtte (eller lignende).
2 Fjern beskyttelsesposerne (2 stk.) og pappet, som beskytter højttaleren.
3 Bær højttaleren til installationsstedet, mens den vippes forover, og sæt den på en tyk måtte (eller lignende).
(96)
12
Page 97

4 Vip højttaleren forover, og skru spidserne ind i de to grundplader fortil.
Spidssko
Højttaler (Bag)
Tyk måtte osv.
Skru spidserne helt ind, til de
stopper.
Placér hver spidssko, så siden med
takker vender opad.
DU SKAL IKKEDU SKAL
Afstandsholder
Hvis du bruger spidssko, skal de anbringes under spidserne.
5 Mens du justerer spidserne med indhakkene på spidsskoenen, skal du langsomt bringe højttaleren tilbage til opretstående
6 Ligesom under trin ④ skal du vippe højttalerne bagover og fjerne den tykke måtte (eller lignende).
7 Skru spidserne ind i de to grundplader fortil.
8 Hvis højttalerne rokker, skal du anbringe afstandsholderne under spidsskoene.
position.
Hvis du bruger spidssko, skal de anbringes under spidserne.
(97)
Dansk
13
Page 98

Placering af højttalerne ved hjælp af gummifødderne
Hold højttaleren, så dine hænder
ikke rører ved højttalerenheden.
Gummifødder
Afstandsholder
Fastgør gummifødderne på forhånd (4 stk.) i hullerne på grundpladerne. (> 11)
≥Panasonic er ikke ansvarlig for personskader eller beskadigelser, som skyldes forkert samling eller håndtering af
produktet. Man må ikke fastgøre tilbehør på andre måder end vist og anvist i denne betjeningsvejledning.
≥Hver højttaler vejer ca. 32 kg. Sørg for, at arbejdet udføres af mindst to personer. Pas på, at dine fingre eller tæer ikke
sidder fast mellem højttaleren og gulvet, eller vip højttaleren.
≥Da hver gummifod understøtter en vægt på ca. 8 kg, kan gummifødderne efterlade mærker og fordybninger på
installationsstedet.
≥Hvis du trækker højttaleren langs gulvet, kan du risikere, at gummifødderne glider af.
Hvis du ændrer højttalerens installationssted, skal mindst to personer altid bære den.
For at undgå mærker i gulvet skal du have en tyk måtte (eller lignende) klar. Læg den der, hvor du pakker kassen ud.
1 Sæt højttaleren lodret på en tyk måtte (eller lignende).
2 Fjern beskyttelsesposerne (2 stk.) og pappet, som beskytter højttaleren.
3 Hold højttaleren, så den vippes forover, og flyt den til installationsstedet.
4 Hvis højttalerne rokker, når de er sat på plads, skal der anbringes afstandsholderne under gummifødderne. Det forhindrer, at
gummifødderne rokker på installationsoverfladen.
(98)
14
Page 99

Sådan forhindrer du, at højttalerne vipper frem- eller bagover
Højttalerne kan vippe frem- eller bagover i en katastrofelignende situation, f.eks. et kraftigt jordskælv, eller ved et uheld. For din
sikkerheds skyld bør du fastgøre højttalerne, så de ikke kan vippe frem- eller bagover.
Hver højttaler vejer ca. 32 kg i alt. Kontrollér, at højtalerplaceringerne er tilstrækkeligt stærke for at modstå denne vægt.
Kontakt en montør for yderligere oplysninger.
∫ Når højttalerne fastgøres på en vandret
overflade (gulv osv.)
Fastgør hver af højttalerne på gulvet med ledninger eller
lignende, som vist på illustration.
Ledning
∫ Når højttalerne fastgøres på en lodret
overflade (væg osv.)
Læg et bånd eller lignende omkring hver af højttalerne, og
forbind det til en solid væg eller søjle vha. en solid ledning,
kæde eller lignende, som vist på illustration.
Rem
≥Ovennævnte foranstaltninger garanterer ikke beskyttelse mod alle katastrofer og uheld, herunder jordskælv.
Bemærk, at Panasonic ikke er ansvarlig for eventuelle skader på højttalerne, installationsstederne eller på andre genstande
som et resultat af det arbejde, der udføres for at sikre, at højttalerne ikke vipper frem- eller bagover.
≥Brugen af spidser eller lignende nedenunder gør, at højttalerne lettere kan vippe frem- eller bagover.
(99)
Dansk
15
Page 100

Tilslutninger
1 Drej knopperne for at løsne dem, og
sæt kernetrådene ind i hullerne.
2 Stram knopperne igen.
- (Sorte)
+ (Røde)
Der må ikke isættes isolering af vinyl.
Højttaler (Bag)
DU SKAL IKKE
Tilslutning af højttalerkabler
Der følger ikke højttalerkabler med højttalerne. Benyt højttalerkabler, som kan købes i handelen.
Hvis det er vanskeligt at tilslutte højttalerkablerne, skal knopperne fjernes før, kablerne tilsluttet.
≥ Pas på ikke at krydse (kortslutte) højttalerledninger eller vende polariteten om, da forstærkeren kan blive beskadiget.
(100)
16
 Loading...