

Page 1
Operating Instructions
IC Recorder
The illustration shows RR-US470.
Dear customer
Thank you for purchasing this product.
For optimum performance and safety, please read these
instructions carefully.
Before connecting, operating or adjusting this product, please read
the instructions completely. Please keep this manual for future
reference.
PPP
PC
Model No.
RR-US490
RR-US470
RR-US450
RR-US430
If you have any questions contact
In the U.S.A.:1-800-211-PANA(7262)
In Canada:1-800-561-5505
For U.S.A. only
The warranty can be found
on pages 40 and 41.
For Canada only
The warranty can be found
on pages 42 and 43.
RQT8824-MP
Page 2
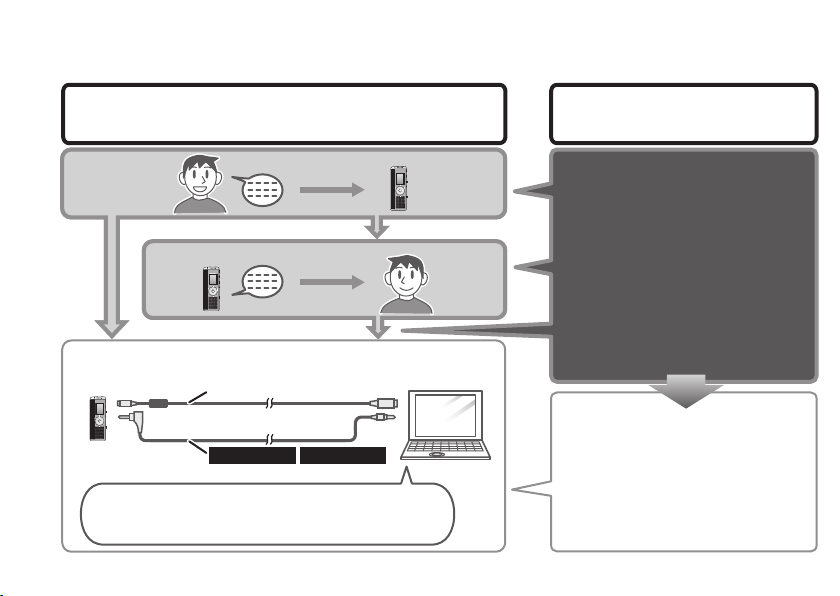
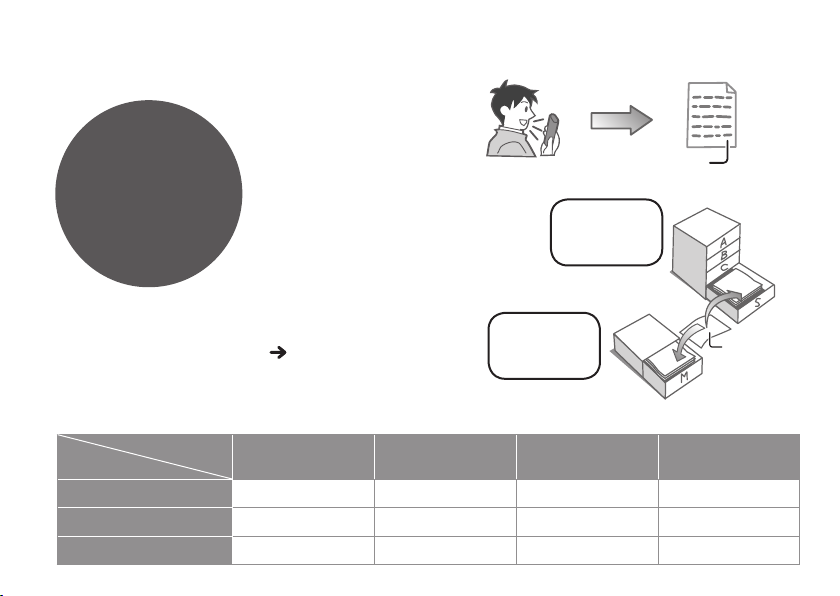
Instruction flow chart
Instruction flow chart
Recording
Playback
Connecting IC Recorder to a computer for editing/saving
USB cable (included)
RR-US490 RR-US470
D
ictation cord (included)
* Playback voice recording on computer
RQT8824
* Save on computer (backup)
* Edit voice recording etc.
2
This unit
Computer
The correct instruction
manual you should refer to
For IC Recorder operation…
F
or instructions on
connecting IC Recorder
to a computer, installing
instructions etc…
These Operating
Instructions
For Voice Editing
instructions…
Voice Editing Ver. 2.0
Operating Instructions
(PDF file)
Page 3

Table of contents
Preparation
Instruction flow chart ....................................... 2
Supplied accessories ....................................... 4
Inserting batteries ............................................ 4
Before use ......................................................... 5
Point 1
Point 2
Point 3
Part names ........................................................ 8
How to use the quick search dial .................... 9
List of menus .................................................... 10
Setting the time ................................................. 11
Canceling the operation beep ......................... 11
Recording .......................................................... 12
Other recording methods ................................ 14
Before operating, switch Hold off,
when finished, switch Hold on ....................... 5
Recordings become audio files
and the files are stored in folders.. ................. 6
Choose a recording method
that best suits the situation ............................ 7
Basic use
Meeting recording ....................................................... 12
Display during recording ............................................. 12
Dictation recording ...................................................... 13
Stop and pause ......................................................... 13
Confirming the remaining time .................................... 13
Zoom recording (recording target voice clearly) ......... 14
Recording through an external microphone ............... 14
Listening to the recording in progress ........................ 14
Preventing unnecessary recording (VAS) ................... 15
Timer recording .......................................................... 15
Playing ............................................................... 16
While a file is being played
* Adjusting the volume .............................................. 16
* Moving forward/moving backward .......................... 16
*
Making recorded sounds easier to catch (reducing noise)
Other playing methods .................................... 17
Searching points for listening (fast forward and fast backward)
Changing the playback speed .................................... 17
Playing files successively ........................................... 18
Listening with earphones ............................................ 18
... 16
..... 17
Advanced use
Organizing files ................................................. 19
Deleting ...................................................................... 19
Moving ........................................................................ 19
Lock (file protection) ................................................... 19
Security functions ............................................ 20
Security functions of this unit ...................................... 20
Folder S and password ............................................... 20
Setting the password .................................................. 20
Playback using the password ..................................... 21
When you forget the password ................................... 21
Recording to / from a cassette tape ................ 22
Reference
Using the unit with a computer ....................... 23
Troubleshooting guide ..................................... 30
Specifications ................................................... 33
Maintenance ...................................................... 34
Care and use ..................................................... 35
Product service ................................................. 38
Limited Warranty (ONLY FOR U.S.A.) .............. 40
Limited Warranty (ONLY FOR CANADA)
............ 42
Preparation
RQT8824
3
Page 4
Supplied accessories
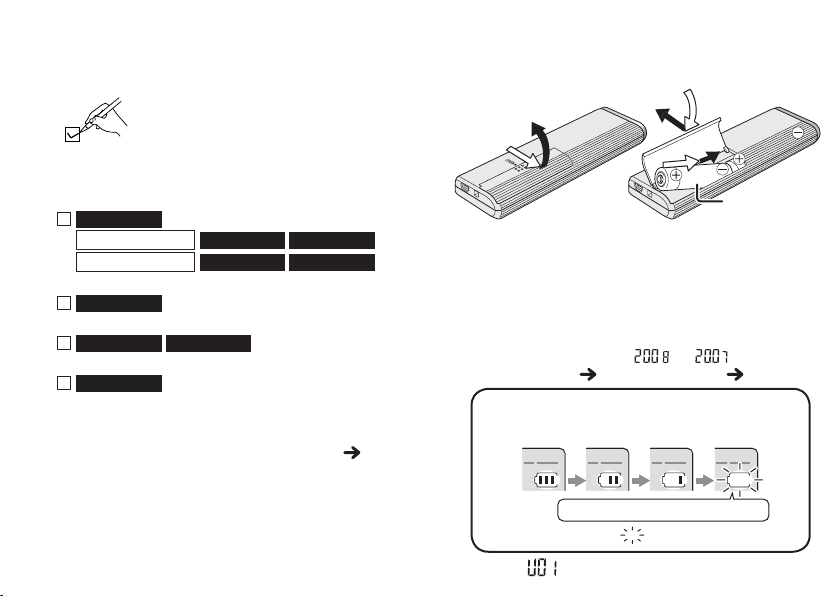
Inserting batteries
Please check and identify the supplied
accessories.
Use numbers indicated in parentheses
when asking for replacement parts.
(Product numbers correct as of March
2008. These may be subject to change.)
RR-US490
For the U.S.A.
For Canada
CD-ROM (Voice Editing Ver.2.0 Premium Edition)
RR-US430
CD-ROM (Voice Editing Ver.2.0 Standard Edition)
RR-US490 RR-US470
Dictation cord [K2KC2CB00001]
All models
USB cable [K2KZ4CB00012]
Only for the U.S.A.: To order accessories, refer to
Only for Canada:
RQT8824
: 2
RR-US470 RR-US450
RR-US470 RR-US450
: 1
: 1
: 1
“Accessory Purchases” ( page 41).
To order accessories, call the
dealer from whom you have
made your purchase.
4
: 1
: 2
1
3
2
AAA (LR03) batteries
Make sure the batteries face the right directions.
Replace the batteries within 30 seconds to preserve the
*
settings. (Recordings remain intact.)
*
The clock, however, will stop until the batteries have been inserted.
*
If rechargeable batteries are to be used, rechargeable
batteries manufactured by Panasonic are recommended.
* When batteries are inserted, “ ” or “ ” flashes on the
display. Set Hold off ( page 5) and set the time ( page 11).
The battery indicator
(Displayed during recording/playback)
Replace the batteries.
“ ” indicates flashing.
*
When “ ” is displayed, replace the batteries.
(not included)
Page 5
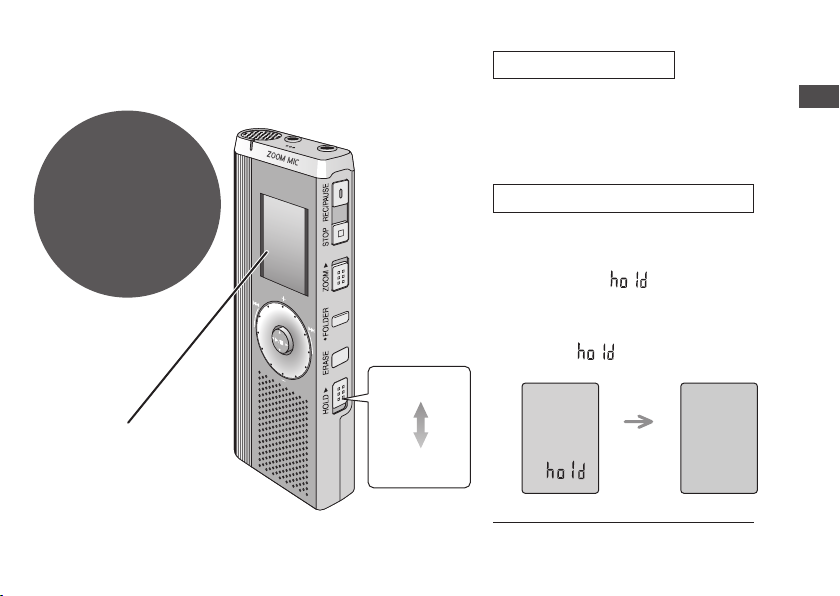
Before use
Point
1
Before operating,
switch Hold off,
when finished,
switch Hold on.
Hold
(Slide up)
Hold function
* This function prevents accidental
operation when you put the unit in
your pocket or bag. It also prevents
battery loss from accidental unit
operation.
When you set Hold on
* Button operations are ignored even if
you press buttons by mistake.
When you set Hold on while recording
*
or playing, “
seconds and the recording or playing
display reappears.
*
When you set Hold on while the unit is
stopped, “
and the display turns off.
” appears for 2
” appears for 2 seconds
Preparation
Remove the seal from
the display before use.
Hold off
(Slide down)
2 seconds
later
This unit has no power button.
* You can make batteries last longer
by setting Hold on and turning the
display off.
RQT8824
5
Page 6
Before use
Point
Recordings
become audio
fi les and the
fi les are stored
in folders.
2
A new audio file is
created each time
you record.
The created file is
stored in a folder.
File
MEETING
FOLDERS
(A, B, C and S)
* A maximum of 99 files can be stored in each folder.
* Remaining recording time ( page 13) may become
shorter than periods listed in this table.
Approximate total recording time of all folders
Recording mode
HQ (High quality)
FQ (Fine quality)
RQT8824
SP (Standard play)
6
Model
RR-US490 RR-US470 RR-US450 RR-US430
79 hours 10 minutes 39 hours 19 hours 10 minutes 9 hours 40 minutes
158 hours 30 minutes 78 hours 10 minutes 38 hours 30 minutes 19 hours 30 minutes
271 hours 30 minutes 134 hours 66 hours 33 hours 20 minutes
DICTATION
FOLDER
(M)
File
Page 7
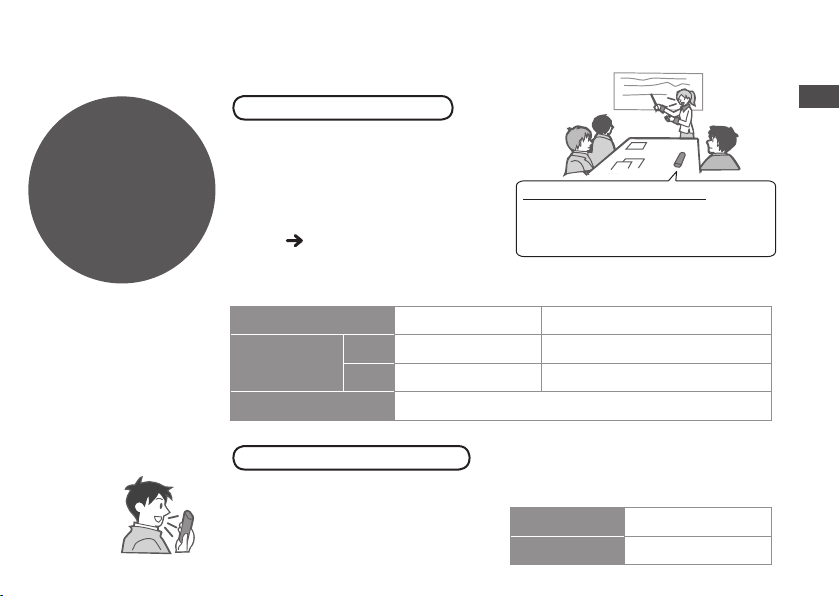
Point
3
Choose a
recording method
that best suits
the situation.
MEETING RECORDING
Using different combinations of
recording modes and microphone
sensitivity levels, you can adjust
audio quality according to recording
situations. Using the zoom function,
you can also record target voice
clearly (
page 14).
To record a low-level sound source…
•
Place the unit on a desk etc. closer to the source.
• Use “L” microphone sensitivity for close proximity
hand-held recording.
Meeting recording settings (no zoom recording for RR-US430)
Microphone sensitivity
Zoom
recording
Recording mode HQ (high quality)/ FQ (fine quality)/ SP (standard play)
[OFF] A normal meeting
[ON] A lesson, lecture An interview during a meeting
H (Far) L (Near)
A meeting held in a small room
DICTATION RECORDING
As the dictation recording settings
are all factory-set, dictation can be
recorded quickly and simply. Use
this mode when computer voice
recognition software is to be used.
Dictation recording settings
Microphone sensitivity Dictation Recording level (fixed)
Recording mode HQ (high quality) (fixed)
Preparation
RQT8824
7
Page 8
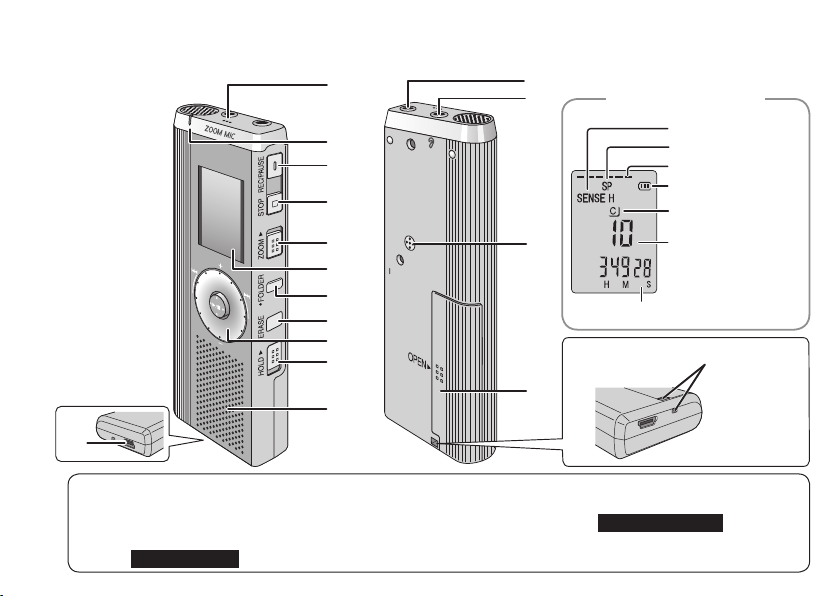
Part names
bm
1
2
3
4
5
6
7
8
9
bk
bl
MIC
(PLUG IN POWER)
MENU
bn
bo
(during recording)
bp
Recording elapsed time
Hand strap hole
bq
Display
Microphone sensitivity
Recording mode
Recording level
Battery indicator
Folder
File
1Built-in microphone
2Recording indicator
3Record/ pause
RQT8824
4Stop
5
8
Zoom
Not on RR-US430
6Display
7Folder/menu
8Erase
9Quick search dial
bkHold
blSpeaker
bmUSB jack
bnExternal
microphone jack
bo
Headphone/ earphone jack
bp
Zoom microphone (dented area)
Not on RR-US430
bqBattery cover
Page 9
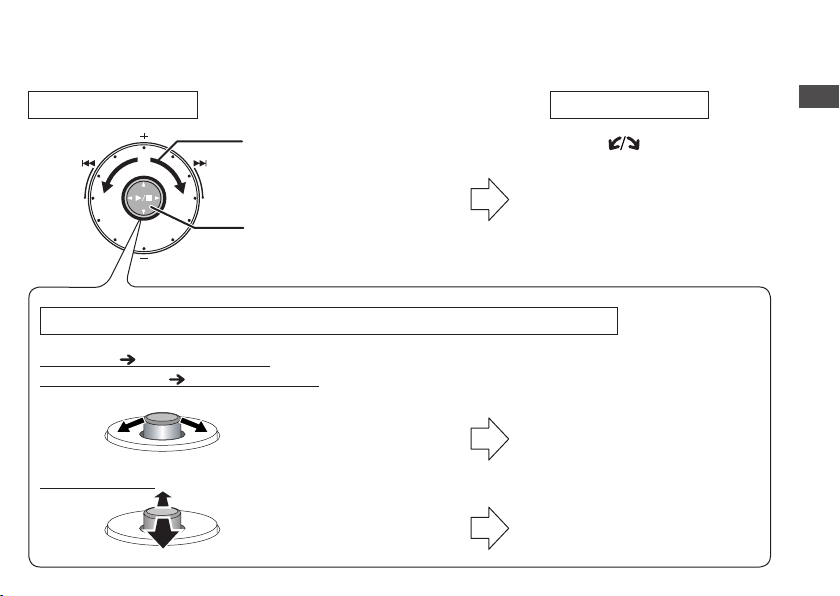
How to use the quick search dial
Basic operations
A: Dial:
Turn the dial to right or left
to select an item.
B: Joystick:
Press to confirm the item.
*Avoid pressing too much when you turn the quick search dial.
Joystick operations (see above B for the confi rming operation)
Playback ( pages 16 and 17)
Password entry ( pages 20 and 21)
C: Tilt the stick to left and
right.
Volume control
D: Tilt the stick up and
down.
Ú You can also select items by tilting the joystick. This
manual explains dial operations in most sections.
In this manual
A:Turn [ ].
B:Press [q/
C: Tilt the joystick to [p / o].
D: Tilt the joystick to [[
g] to confirm.
/
]].
Preparation
RQT8824
9
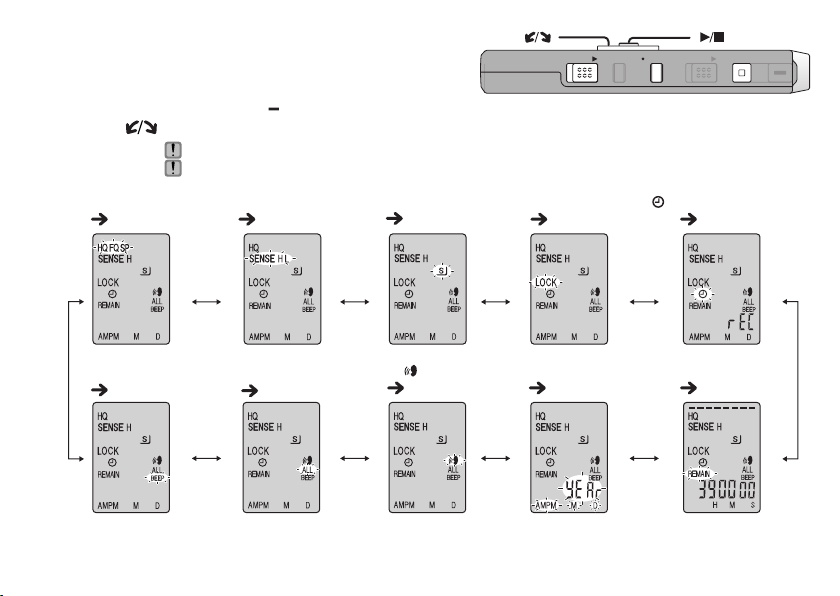
Page 10
List of menus
[]
ERASE FOLDER
[]
ZOOMHOLD
STOP
REC/PAU SE
1 Press and hold
2 Tu r n [ ] and press [q/
Recording mode
( page 12)
Operation beep
( page 11)
Ú1 Displayed only when a Meeting Recording folder (A, B, C or S) is selected.
RQT8824
Ú2 Displayed only when there is a recorded file.
10
Ú3 Displayed only when the clock is set.
[*FOLDER/ MENU]
for 1 second or longer (while stopped) to display menus.
g] to confirm.
Press [STOP] to stop an operation midway/cancel the setting.
If an operation is not started within 60 seconds, unfinished settings are canceled.
Ú1
Microphone sensitivity
( page 12)
Successive play
( page 18)
Ú1
Security
page 20)
(
VAS
( page 15)
Setting the time
Ú2
Lock
( page 19)
page 11)
(
Timer recording
( page 15)
Remaining recording time
( page 13)
Ú3
Page 11
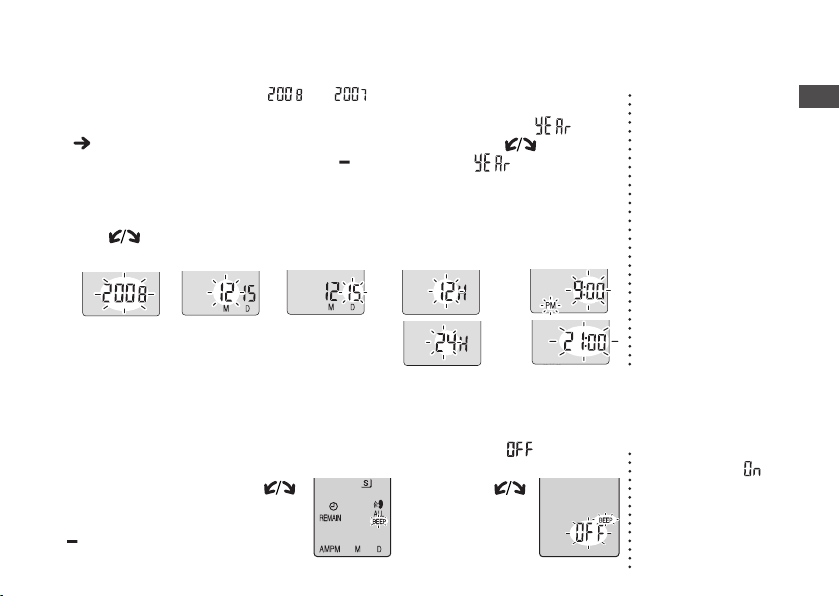
Setting the time
* When the year is flashing (e.g. “ ” or “ ” on the display), begin from step 4.
Set Hold off
1
( page 5)
Set the time
4
Tu r n [
] and
1Year 2Month 3Day 4
Display the menu
2
While stopped, press and
*
hold [
FOLDER/ MENU]
for 1 second or longer.
press
[q/
g]
to confirm. (Press [STOP] after confirming 5.)
Time display (12/24H)
→→ → →
→
Select “ ”
3
Tu r n [ ] to select
“ ” and press
[q/
g] to confirm.
→
5Time
Canceling the operation beep
Display
1
the menu
While stopped,
press and hold
[*FOLDER/
MENU] for 1
second or longer.
Select “BEEP”
2
Tu r n [ ]
and press
[q/ g] to
confirm.
Select “ ”
3
1 Tur n [
and
[q/
confirm.
2 Press [STOP].
press
g]
]
to
*
The clock operates
with the monthly
error margin of
+/– 60 seconds at
room temperature.
*
The clock returns
to standby when
you perform no time
setting operation
for 60 seconds. If
this happens restart
setting the time.
*
To use the operation
beep, select
step 3.
“ ” in
Preparation
RQT8824
11
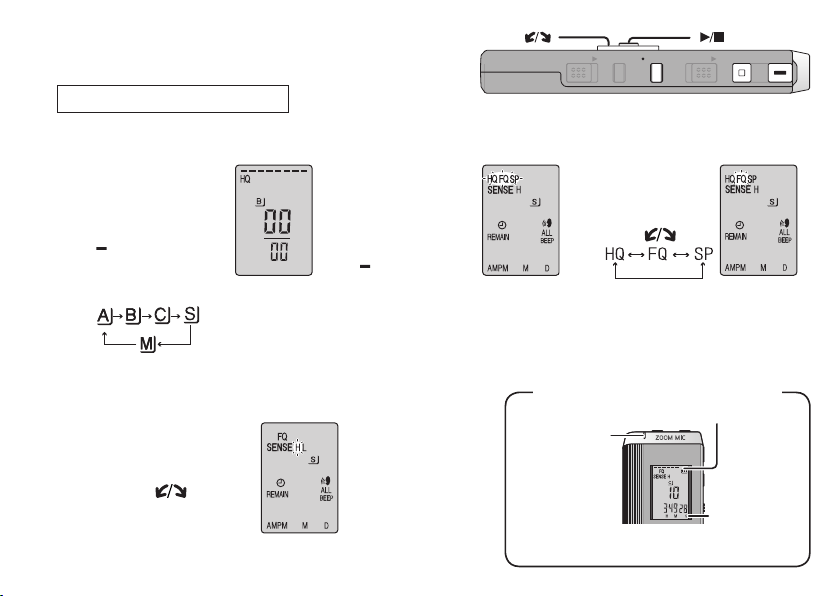
Page 12
Recording
[]
ERASE FOLDER
[]
ZOOMHOLD
Meeting recording
Using different combinations of recording modes and microphone sensitivity levels, you can adjust audio
quality according to recording situations.
12
Select a Meeting
1
Recording folder
(A, B, C or S)
Press [*FOLDER/
MENU].
Each time you
press
Select the microphone
4
sensitivity level
1
Press
[q/
display microphone
sensitivity.
2Tur n [ ] and
press
[q/
RQT8824
confirm.
3Press [STOP].
g]
g]
to
to
H: Far
L: Near
Display
2
the recording
mode menu
1
Press and hold
*
FOLDER/
[
MENU] for 1
second or longer.
2
After making sure
the display at
right, press
q/ g
[
Record
5
Press
[REC/PAUSE].
] to confirm.
Select
3
the recording
mode
1
Tu r n [ ].
2
Press
[q/
to confirm.
g]
Display during recording
Display changes depending on recording levels.
Light stays on
while recording.
(Flashes while
paused.)
STOP
REC/PAU SE
HQ: High quality
FQ: Fine quality
SP: Standard play
*
The factory
setting is “HQ”.
Recording
elapsed time
(Flashes while
paused.)
Page 13
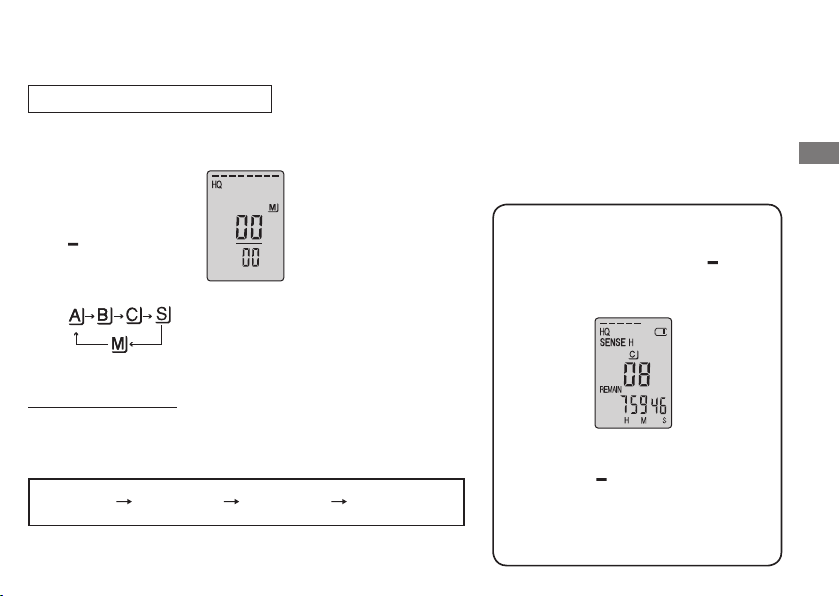
Dictation recording
As the dictation recording settings are all factory-set, dictation can be recorded quickly and simply.
Use this mode when computer voice recognition software is to be used.
Select folder
1
M
Press [*FOLDER/
MENU].
Each time you
press.
Stop and pause
Press [STOP] to stop recording.
*
* The following recording information is displayed when
recording is stopped
Recording
date
*
While recording, press
to resume recording. (Recording continues in the same file.)
.
Recording
start time
Recording
time
[REC/PAUSE]
Record
2
Press
[REC/PAUSE].
The number of
files in folder
to pause. Press it again
Confirming the remaining time
When you press [*FOLDER/ MENU
while recording, the remaining recording
time appears
* To return to the initial menu, press
*
FOLDER/ MENU] again.
[
*
Remaining recording time also
appears when the time becomes very
short.
.
]
Basic use
RQT8824
13
Page 14
Other recording methods
OWER)
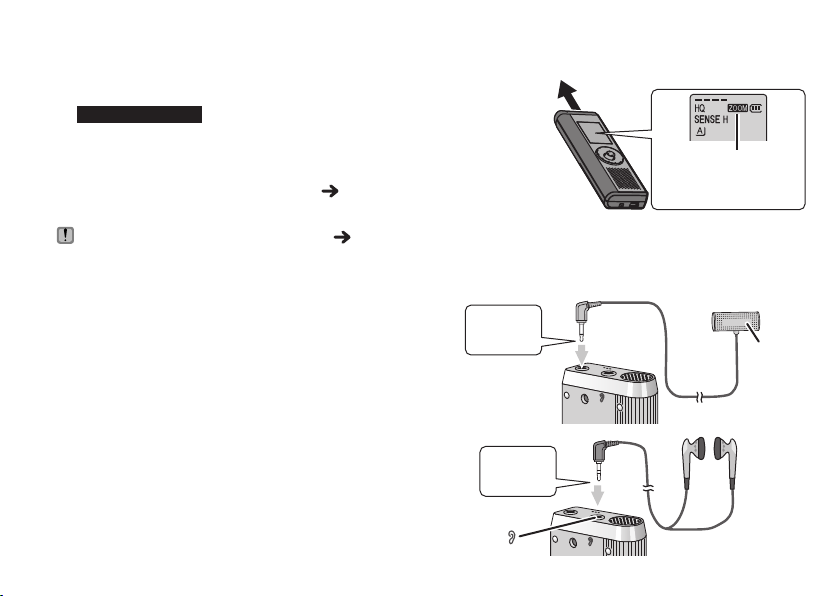
g Zoom recording (recording target voice clearly)
Not on RR-US430
Zoom recording enables you to clearly record sounds
coming from the direction this unit is aimed at. It is
suitable for recording lectures and interviews.
Select Meeting Recording folders ( page12).
Do not block the zoom microphone ( page 8) intentionally with your fingers or other items.
*
Zoom recording can be switched on and off even when Hold is on.
*
The zoom function does not work when you select folder M or when you use an external microphone.
g
Recording through an external microphone
* When you attach an external microphone, the
built-in microphone automatically goes off.
Plug type: ø3.5 mm (1/8 in.) monaural mini plug
g
Listening to the recording in progress
Connect earphones (not included).
(Sounds are monaural.)
Plug type: ø3.5 mm (1/8 in.) mini plug
* The volume is fixed for recording.
RQT8824
14
Aim this unit to the
sound you want to
record and slide
[ZOOM q] toward
the arrow.
Insert
securely
Insert
securely
(PLUG IN P
(PLUG IN POWER)
MIC
MIC
“ZOOM” is displayed
when zoom recording is
being used.
External
microphone
(not included)
Page 15

[]
ERASE FOLDER
[]
ZOOMHOLD
STOP
REC/PAU SE
g Preventing unnecessary recording (VAS: Voice Activated System)
Recording is automatically paused if there is no sound for more than 3 seconds.
Display
1
the menu
Press
and hold
[*FOLDER/
1 second or
longer.
MENU]
for
Select “ ”
2
Tu r n [ ] and
press
confirm.
[q/
g]
to
Select “ ”
3
1 Tu r n [ ]
and
[q/
g]
confirm.
2 Press
[STOP].
press
to
4
Record
( page 12)
“ ” flashes
when
the VAS
function is
active.
g Timer recording
Timer recording can be set to make 1 recording at a specified time. After setting the
timer, you can keep the unit on standby by setting hold on ( page 5).
Preparation: Select the folder to be recorded to and the recording settings ( page 12).
Display
1
the menu
Press
and hold
[*FOLDER/
1 second or
longer.
MENU] for
Select “ ”
2
Tu r n [
press
confirm.
[q/
] and
g]
3
to
Select “ ”
Tu r n [ ] and
press [q/ g] to
confirm.
Set the time
4
1Start time
Tu r n [ ] and
press [q/ g] to
confirm.
2Finish time
Tu r n [ ] and
press [q/ g] to
confirm.
Turn the function
off when recording
important files
*
To turn the function
off, select “
in step 3.
You can stop
timer recording
in progress, but
you cannot bring
it to a pause.
* To confirm the
recording start
and finish time,
perform step 2
*
To cancel the
timer, select
“
*
To close the menu,
press [STOP].
.
” in step 3.
”
Basic use
.
RQT8824
15
Page 16

Playing
[]
ERASE FOLDER
[]
ZOOMHOLD
[[/]][p/o]
STOP
REC/PAU SE
Select the folder
1
Press
[*FOLDER/ MENU].
Each time you press
g While a file is being played
Adjusting the volume
Tilt the joystick to [[ / ]]. (Volume range is 0 to 20. Factory setting is 13.)
Moving forward
Tilt the joystick to [o].
Tilt and hold to search ( page 17).
Moving backward
Tilt the joystick to [p].
Tilt it twice to play the previous file. (Tilting once starts the playback of the previous
file when it has been playing for less than 3 seconds.)
Tilt and hold to search ( page 17).
16
Making recorded sounds easier to catch (reducing noise)
1Press [
2
RQT8824
3Tu r n [ ] to select “ ” and press [
*To cancel, select “
*
FOLDER/ MENU] while playing.
Tu r n [ ] to select “ ” (“ ” flashes when selected) and press [q/g] to confirm.
” in step 3.
Select the file
2
Tu r n [ ].
*After selection,
ormation at the
inf
time of recording
is displayed.
] to confirm.
q/g
Play
3
Press
[q/
g].
* When you press
[q/
g] again,
playback pauses.
Press once
more to resume
playback.
Page 17

Other playing methods
g Searching points for listening (fast forward and fast backward)
Quick search
Tu r n [
* You can search forward/backward quickly without sound (except the operation beep).
* The fast forward and fast backward speed changes according to the dial turning speed.
* To return to normal playback, stop turning.
Slo
While playing, tilt the joystick to [p
* You can search slowly with sound.
* To return to normal playback, release your finger.
g Changing the playback speed
Playback is available at 5 different speeds.
Press
*
[
while
playing.
w search
FOLDER/
MENU]
] while playing.
/
o] and hold it in the position for 1 second or longer.
The playback speed rises as the flashing
bars move right. The illustration shows the
display for the normal speed playback.
Tu r n [
(“SPEED” flashes when selected),
press [q/ g] to confirm, and then
turn [ ] to select the playback
speed.
The unit performs playback at the
selected speed.
] to select “SPEED”
* The bar flashes when listening at a
yback speed other than normal.
pla
* To return to the
nor
When playing
back at the
double speed
speed, move the
flashing bars to the
center in the way
instructed at left.
Basic use
mal playback
RQT8824
17
Page 18

Other playing methods
g Playing files successively
Files stored in the same folder are played successively.
[]
ERASE FOLDER
[]
ZOOMHOLD
STOP
REC/PAU SE
Display
1
the menu
Press and hold
*
FOLDER/ MENU]
[
for 1 second or
longer.
* The unit plays all files in order from the selected one to the last one.
* When the last file finishes, playback stops automatically.
*
Press [STOP] twice to stop successive play midway.
* To cancel, select “
Select “ALL”
2
Tu r n [
[q/
” in step 3.
g]
to confirm.
] and
press
g Listening with earphones
Connect earphones (not included).
(Sounds are monaural.)
Plug type: ø 3.5 mm (1/8 in.) mini plug
* The speaker is automatically turned off
when earphones are used.
RQT8824
Insert
securely
MIC
18
Select “ ”
3
1Tur n [ ] and
press
confirm.
2
Press [STOP].
[q/
g]
to
4
Play
Press
[q/
g].
Page 19

Organizing files
g Deleting (a file/ all files in a folder/ all folders except S/ all folders)
Display the
1
deleting menu
Press [ERASE].
g Moving
Files can be moved both
ways among folders A, B
and C.
Files can be moved from
folder M to folders A, B, C
and S, but files cannot be
moved to folder M.
g Lock (file protection)
Display
1
the menu
Press and hold
[*FOLDER/
MENU] for 1
second or longer.
Select a file or folder
2
Tu r n [ ].
Selecting
a file
Preparation: Play the file to be moved (
Select “LOCK”
2
Tu r n [
and press
[q/g] to
confirm.
All files in
a folder
Display
1
the moving
menu
Press and hold
[*FOLDER/
MENU] for 1
second or longer.
Preparation: Select a folder containing a file to protect.
]
All folders
except S
Select the destination folder
2
Tu r n [ ].
3
All folders
Destination folder
Number of files in
the destination folder
Select the file you want to lock
1
Tu r n [ ] and
press [
q/g
confirm
.
2
Press [STOP].
3
*
page 16).
] to
Delete
Press and hold
[ERASE] for
1 second or
longer.
Deleted files cannot be recovered.
Protected fi les cannot be deleted.
When a file is deleted.
Move
3
Press and hold
[q/g] for 1 second
or longer.
Play will stop and the
file is moved to the end
of the selected folder.
* To unlock, select
the file you want
to unlock, then
confirm.
Basic use/Advanced use
RQT8824
19
Page 20

Security functions
Security functions of this unit
This unit has 2 security functions.
1Password set in this unit
2Authentication key set with Voice Editing (See Voice Editing Ver.2.0 Operating Instructions (PDF file).)
MEMO
Password (This unit)
Authentication key
(Voice Editing)
Folder S and password
* Folder S is used to secure files. Once set, a password is necessary for playing files in this folder.
* The password is a 4-digit number. You can set the password using any combination of numbers. To play
files in folder S, enter the password you set.
* You can move files in other folders to folder S, but you cannot move files in folder S to any of the other
folders unless the password matches.
Setting the password
Display
1
the menu
Press and hold
[*FOLDER/ MENU]
for 1 second or
longer.
Write down the password in the MEMO space (above) to keep it in memory.
RQT8824
* To initialize the password, select “
* To move among digits, tilt the joystick to [p/
20
Select “ ”
2
Tu r n
press [q/
confirm.
Select “ ”
3
[ ] and
g]
to
” in step 3 and enter the password you set.
Tu r n
press [q/
confirm.
o] in step 4.
[ ] and
g]
to
Set
4
the password
1Tur n [
select a number.
2
Press [q/ g] to
move to the next digit.
After entering the
fourth number, press
] to confirm.
[
q/ g
3Press [STOP].
] to
Page 21

[]
ERASE FOLDER
[]
ZOOMHOLD
[p/o]
STOP
REC/PAU SE
Playback using the password
Select folder S
1
1Press
*
[
FOLDER/
MENU].
2Select “ ”.
When the password matches, the security function using the password is suspended for 10 minutes.
When the password is released and no operation is performed for 10 minutes, the password is
automatically set and files in folder S become unplayable.
When wrong passwords are entered 5 times in succession, the unit stops accepting password entry for
15 minutes.
Select a file
2
to be played
1Tu r n [ ].
2
Press
[q/
to confirm.
g]
Enter
3
the password
1Enter the
4-digit
password.
2
Press
[q/
When you forget the password
Initialize the password by taking the steps below.
1Release all locks set on files in folder S (
2Delete all files in folder S. (Deleted files cannot be recovered.)
3Enter the security menu and set the password as “
* You can also keep the files in folder S and just delete the password. Connect this unit to a computer and
use the computer to delete the pass
This security function is only to limit a playback function for files by password, not by encryption. We do
not guarantee any kind of loss in case your password gets broken up.
page 19).
”.
word. (See Voice Editing Ver.2.0 Operating Instructions (PDF file).)
When the password matches
The password is temporarily
released and the selected file in
folder S is played.
When the password is wrong
The unit beeps twice ( page 11) and
g].
the password entry display reappears.
How folder S is displayed
Password is not set
Password is set
During password entry/ password release/playback
Password release to end in 10 seconds
Advanced use
RQT8824
21
Page 22

Recording to / from a cassette tape
Read the operating instructions for the connected equipment.
g Recording to a cassette tape recorder etc.
Select the file to copy and play Record
Audio cable (not included)
Monaural
mini plug
MIC
(PLUG IN POWER)
Monaural
mini plug
Audio cable (not included)
g Recording from a cassette tape recorder etc.
Start playing
Audio cable (not included)
Stereo
mini plug
Monaural
Headphone
jack
RQT8824
* The recorded sound may differ from the original recording.
* Adjust the recording volume on the source to the desired level.
22
mini plug
udio cable (not included)
A
Stereo
mini plug
Monaural
mini plug
Monaural
mini plug
Monaural
mini plug
Stereo
MIC jack
Monaural
MIC jack
Record
Press [REC/PAUSE]
MIC
(PLUG IN POWER)
Page 23

Using the unit with a computer
*
Voice Editing Ver.2.0 Premium Edition (hereinafter ) is included for RR-US490, RR-US470 and RR-US450.
*
Voice Editing Ver.2.0 Standard Edition (hereinafter ) is included for RR-US430.
RR-US490
*
There are 2 CD-ROMs for .
RR-US470 RR-US450 RR-US430
*
There are 2 CD-ROMs for for Canada. for the U.S.A. and for both countries occupy 1 CD-ROM only.
Installing Voice Editing
1
1Start Windows.
2Insert the included CD-ROM (or CD-ROM #1) into your computer’s CD-ROM drive.
The program installer starts automatically.
• When the installer does not automatically start
(1) From the “Start” menu click “Run”.
(2) Type “Ú:\Launcher\VEdV1Launcher.exe” and click “OK”. Ú is the CD-ROM drive ID.
3Click “Voice Editing Ver.2.0”.
Installation starts. Follow on-screen instructions for any subsequent operations.
For the U.S.A. For Canada
• The voice recognition engine and text to speech/translation engine should start installing while
Voice Editing is being installed. (Alternatively, you can install them afterwards.)
RR-US490
• Change the CD-ROM #1 for #2 according to the message that will appear in the middle of
installation. Installation continues automatically.
•
Change the CD-ROM #2 for #1 according to the message that will appear when the installation of #2 is complete.
4Click “Finish” from the InstallShield Wizard Complete screen.
Selecting “Yes, I want to restart my computer now” automatically re-starts the computer and completes installation.
RR-US470/RR-US450 for Canada
Advanced use / Reference
RQT8824
23
Page 24

Using the unit with a computer
Connecting this unit to a computer with the USB cable
2
You cannot operate the unit while it is connected to a computer.
• Do not use any other USB connection cables except the supplied one.
Slanted
Align the jack
orientation.
24
Insert straight in
with USB symbol
facing downward.
Connect one IC Recorder only. This software does not support simultaneous use of multiple IC recorders.
Caution: Use only the included USB cable with a ferrite core when connecting to computer.
RQT8824
• When connected to a computer, “
Do not disconnect the USB cable while this is flashing.
USB cable
(included)
” appears. When transferring data, “ ” flashes.
Upside down
(USB symbol facing
upward)
Page 25

Starting Voice Editing
3
1
Double-click the “Voice
Editing” icon on the desktop.
After double clicking, a dialog box for entering
the authentication key appears.
2Enter the “authentication key”.
• Enter an “authentication key” that has 1 to
128 characters.
•
We recommend that you use a phrase that is
easy to remember for the “authentication key”.
Example:
•
Write down the authentication key in the MEMO
space ( page 20) to keep it in memory.
3
Click “Settings” in the “IC Recorder
Authentication Key Settings” dialog box
4
Click “Yes” in the confirmation dialog box.
See Voice Editing Ver. 2.0 Operating Instructions (PDF file) for how to use Voice Editing and other
information not provided in this manual.
Good morning, this is Panasonic
Corporation. How can I help you?
.
g Using the Operating Instructions (PDF file)
In the Windows “Start” menu, click “All Programs” “Panasonic” “Voice Editing”
“Voice Editing Operating Instructions” or in the “Help (H)” menu in the Voice Editing main screen,
click “Operating Instructions (H)”.
Reference
RQT8824
25
Page 26

Using the unit with a computer
System requirements (through page 29)
g
You will need an IBM PC/AT computer with the following attributes or equivalent, and the following software and
hardware in order to use this application.
OS: Microsoft® Windows® 98 Second Edition
Microsoft® Windows® Millennium Edition
Microsoft® Windows® 2000 Professional
Microsoft® Windows® XP Home Edition/Professional
Ú
Only available when the user is logged in as the system administrator. Cannot be used by multiple users.
(Windows® 2000 / Windows® XP only)
• Not compatible with Microsoft Windows® 3.1, Windows® 95, Windows® 98 (except for Windows® 98 SE)
and Windows NT®.
• Operation is not guaranteed on an upgraded OS.
• Not compatible with Mac OS.
Hardware:
CPU: Windows
®
98 SE / Windows® Me: Intel® Pentium® II 333 MHz or higher
Windows® 2000 / Windows® XP: Intel® Pentium® III 500 MHz or higher
RAM: Windows® 98 SE / Windows® Me: 128 MB or more
Windows® 2000 / Windows® XP: 256 MB or more
Free hard disk space:
70 MB or more (
•
Additional free hard disk space may be necessary depending on the Windows® version and voice file being used.
•
Additional free space is required to install Acrobat
For the U.S.A.
) or 150 MB or more (
engines (all included), as well as “Voice Editing Launcher”(Office Add-In and Internet Explorer Contextual Menu Add-In).
•
Additional free space is temporarily required for sound waveform display, voice recognition, text-to-speech conversion,
translation, sound recording, CD-R recording (Windows® XP only), and “Voice Editing Launcher”.
•
Installing all Voice Editing functions and engines for all languages requires approximately 650 MB
RQT8824
(
For the U.S.A.
) or 1.5 GB (
RR-US490
26
Ú
®
Reader®, DirectX® 9.0c, and voice recognition/text-to-speech/translation
RR-US470/RR-US450 for Canada
Ú
RR-US490
RR-US470/RR-US450 for Canada
) of free space.
)
Page 27

60MB or more (
• Additional free hard disk space may be necessary depending on the Windows® version and voice file
being used.
• Approximately 25MB of additional free hard disk space when installing Acrobat® Reader® (included).
• Approximately 50MB of additional free hard disk space when installing DirectX® 9.0c (included).
For the U.S.A.
) or 120MB or more (
RR-US490
RR-US470/RR-US450 for Canada
)
Drive: CD-ROM drive (for installation)
CD-R/RW drive (required to use the CD-R writing function in Windows
Sound: Windows compatible sound device
Display: High Color (16 bit) or more. Desktop resolution of 800 ȿ 600 pixels or more.
(1024 ȿ 768 pixels or more recommended)
Interface:
Other requirements:
Mouse or equivalent pointing device
Note
The following hardware limitations should be noted.
• Not compatible with multiprocessor computers or multiboot environments.
• Operation not guaranteed on user-built computers.
• Operation not guaranteed on 64-bit computers.
• Even if the system requirements mentioned in these operating instructions are fulfilled, some personal
The following limitations should be noted.
• Voice recognition, text-to-speech, and translation engines are installed on the same drive as the
USB port (Operation cannot be guaranteed if you use a USB hub or extension cable.)
computers cannot be used.
operating system (usually the C drive).
®
XP)
Reference
RQT8824
27
Page 28

Using the unit with a computer
•
The operating system must support the languages of the voice recognition, text-to-speech, and translation engines.
• Before voice recognition, the speaker’s voice must be registered in a training process. Sound files of
speakers whose voices have not been registered in training cannot be converted to text correctly.
About Windows Vista
• Visit the following website for information about Voice Editing and using it on Windows Vista.
http://panasonic.net/support/
Necessary software:
•
Microsoft and its logo as well as Windows, Windows Vista, Windows NT and DirectX are either registered
trademarks or trademarks of Microsoft Corporation in the United States and/or other countries.
•
IBM and PC/AT are registered trademarks of International Business Machines Corporation of the U.S.
• Intel, Pentium and Celeron are registered trademarks or trademarks of Intel Corporation in the
United States and other countries.
• Nuance, the Nuance logo, the Dragon logo, Dragon, NaturallySpeaking, and RealSpeak are
trademarks and/or registered trademarks of Nuance Communications Inc., or its affiliates in the
United States and/or other countries.
• Noise cancellation features of this software incorporate technology of ANIMO LIMITED.
• Adobe and its logo, Acrobat, and Acrobat Reader are trademarks of Adobe Systems Incorporated.
• FineSpeech(TM).
• Other system names and product names appearing in this document are in general the registered
RQT8824
trademarks or trademarks of the respective developer companies.
28
Note that the “TM” mark and “®” mark do not appear in this document.
®
DirectX
Microsoft Office 2000/XP/2003 (support for Word, Excel, and PowerPoint is required when using
the Office Add-in)
8.1 or later / Internet Explorer 6.0
These features are not available in
.
Page 29

Install and use Voice Editing Ver.2.0 Premium Edition with RR-US490, RR-US470 and RR-US450.
Uninstall the following before installing this software.
You cannot install two versions of Sound File Management Software on the same computer.
- Voice Editing Ver.1.0 Premium Edition - Voice Editing Ver.1.0 Light Edition for D-snap Audio
- Voice Editing Ver.1.0 Professional Edition - Voice Editor 3
- Voice Editing Ver.1.0 Standard Edition - Voice Editor 2
- Previous versions of Voice Editing software (for Panasonic IC Recorder RR-US360/RR-US361)
- SD Voice Editor Ver. 1. x
Install Voice Editing Ver.2.0 Standard Edition when you use RR-US430. Previous versions do not work
with RR-US430.
already installed.
If you install it on the same computer, note that the new desktop icon is as shown at right.
To use only one edition, uninstall both editions and then reinstall the desired edition.
• Translation (and interpretation) results are merely one example, and accuracy cannot be
guaranteed. We cannot be liable for the translation results in any way. Additionally, please refrain
from publishing, selling, or distributing unedited translation results, which may violate copyright law.
• Noise cancellation may not be effective in some cases, depending on the recording environment.
Choosing stronger noise cancellation in the available range (1–5) may lower the volume of the
recorded voice and may change its sound characteristics.
• Recording and operating problems may occur on some computer systems. Please note that
Panasonic and Panasonic dealers cannot be held liable for any lost audio data or other direct or
indirect damage except in cases of intentional or gross negligence.
Includes features for use in conjunction with Dragon, NaturallySpeaking dictation software (sold separately, from
Nuance Communications, Inc.). For details on Dragon, NaturallySpeaking, visit the Nuance Communications website:
http://www.nuance.com/dragon/
Standard Edition can be installed on the same computer on which a previous version is
Reference
RQT8824
29
Page 30

Troubleshooting guide
Before requesting service, make the following checks. If you are in doubt about some of the check points, or if the
remedies indicated in the chart do not solve the problem, refer to “Customer Services Directory” ( page 41)
if you reside in the U.S.A., or refer to “Product information” ( page 38) if you reside in Canada.
Symptom Checkpoints
“U01” appears on the display. • The battery has run down.
No operation. • Make sure the batteries are correctly inserted.
Operation is not possible when
“hold” appears on the display.
“2008” or “2007”, “12:00” flashes. • Set the time (
“EE:EE” is displayed. • This can occur after repeatedly recording and deleting files.
Available recording time does not
increase correspondingly after
deleting files.
There is no sound from the earphone or
it is difficult to hear or noisy.
Recording stops. • VAS may be functioning (
“-- --” appears instead of the
recording date.
Playback speed is too fast or slow.
“FULL” appears. • There are 99 files in the folder.
RQT8824
30
• You cannot operate when the unit is connected to a computer
(
page 23).
• The Hold function is on (
page 11).
-Unlock all your files, then delete all folders to remedy this
(
page19).
• Ensure the plug is inser ted firmly.
• Wipe the plug clean.
• Set the time (
• Set the play speed to normal ( page 17).
• There is no remaining recording time.
-Delete unneeded files (
page 11).
page 5).
page 15).
page 19).
Page 31

Symptom Checkpoints
No sound from the speaker • There is no sound when you have connected earphones.
Cannot delete a file or folder. • The file is protected (
Cannot move a file. • You cannot move files to folders that already contain 99 files.
Cannot play •
A recording disappeared. •
Cannot set timer recording. • The timer covers 24 hours from the present time only.
Timer recording does not work. •
Files created through timer recording are
shorter than periods set with the timer.
Cannot use a battery that can be
used on other equipment.
Recorded sounds contain noise
that makes them difficult to catch.
• The folder is already empty.
•
You cannot move files from folder A, B, C or S to the dictation folder.
•
You cannot move files from folder S unless the password matches.
You tried to play secured files in folder S. You must enter a password
set on this unit to play files in folder S ( pages 20 and 21)
Recordings can disappear if the unit receives a shock (e.g. it is dropped), or the batteries go out during recording.
•
You cannot set a recording period longer than 24 hours using the timer.
• Set the time ( page 11).
•
You cannot set the timer if there is less than 1 minute of available recording time.
The settings are canceled if the batteries are removed and the clock settings are cleared.
•
Timer recording does not work if the unit is used for playback or another operation at a set time.
• Timer recording setting is canceled once timer recording is
performed. Set the timer again when necessary ( page 15).
• VAS may be “On” ( page 15).
•
This unit considers the battery as empty even if there is actually
power left in it. This is to preserve the clock and other memory items.
•
Reduce noise ( page 16). Noise is reduced and listening becomes easier.
Recording in the HQ mode is recommended. (This unit is designed for extended
recording of human voice. It is not suited for recording music.)
page 19).
.
Reference
RQT8824
31
Page 32

Troubleshooting guide
Symptom Checkpoints
Sound is distorted. • Non-voice recordings such as music on CDs may become
Sound is distorted when listening
to the recording in progress with
earphones.
Message appears when connecting
to a computer.
I hear noises. • Move the mobile telephone away from this unit when you use the
Voice Editing does not start or does
not work correctly.
I
used the “Dictation cord” supplied
with the unit, but microphone
sensitivity did not improve. Computer
voice recognition level is still low.
Cannot successfully convert audio
to text with Voice Editing.
RQT8824
32
distorted in playback.
• Keep earphones and the microphone you are using separate.
• A message appears when you connect this unit to a computer
for the first time. It asks you to enter an authentication key. The
key is used for authenticating the unit and the computer.
two in the same area.
• Make sure that “PC” is on this unit’s display, and that this unit is
recognized as a drive in Voice Editing.Set the USB cable in and
out of IC Recorder’s USB jack several times when the unit is not
recognized as a drive.
• The connection may not work if you connect via a USB hub or a
USB extension cable.
• Depending on your computer, you may also be able to improve
the sensitivity by reversing the “Straight mini plug” and the
“L-shaped mini plug” connections.
• You should use IC Recorder in the dictation recording mode. You
can make better recordings for voice recognition in this recording
mode ( page 7). (Refer to the Voice Editing Operating
Instructions (PDF fi le).)
Page 33

Specifications
Power requirement: DC 3.0 V (2 AAA size/LR03 batteries)
Power output: 300 mW (max.)
Frequency response: 300 Hz to 5,000 Hz (HQ mode), 300 Hz to 3,400 Hz (FQ/SP mode)
S/N: 37 dB (HQ mode)
Output jack: Earphone, ø 3.5 mm (1/8 in.); 0.5 mW 16 Ω
Input jack: Mic, ø 3.5 mm (1/8 in.); 0.56 mV plug in power
Speaker: 20 mm (
Dimensions (W x H x D):
Max dimensions; 39.3 mm x 105.5 mm x 17.2 mm (1 9/16 in. x 4 5/32 in. x 11/16 in.)
Cabinet dimensions; 38.8 mm x 105 mm x 14 mm (1 17/32 in. x 4 1/8 in. x 9/16 in.)
Mass (Weight):
With dry cell batteries;
Approx. 62 g or 2.17 oz. (RR-US490/RR-US470)/61 g or 2.13 oz. (RR-US450)/60 g or 2.11 oz. (RR-US430)
Without batteries;
Approx. 39 g or 1.37 oz. (RR-US490/RR-US470)/38 g or 1.33 oz. (RR-US450)/37 g or 1.31 oz. (RR-US430)
Operational temperature range: 0 °C to 40 °C (32 °F to 104 °F)
Memory capacity (MB means one million bytes. Usable capacity will be less.):
Operating Humidity: 20 % to 80 % (non-condensing)
Battery life: [When used at 25 °C (77 °F) on a flat, stable surface]
The battery life may be less depending on the operating conditions.
Batteries Recording mode Playback Recording
Panasonic alkaline batteries
• Specifications are subject to change without notice.
512 MB (RR-US490)/256 MB (RR-US470)/128 MB (RR-US450)/64 MB (RR-US430)
Monaural
HQ 12 hours
FQ/SP 15 hours
Product ldentification Marking is located on
the bottom of unit.
21 hours (When not zoom recording)
30 hours (When not zoom recording)
25
/32 in.) 8 Ω
Reference
RQT8824
33
Page 34

Maintenance
Do not use such solvents as benzine, paint thinner and alcohol for cleaning.
• Solvents may cause casing to deform and coating to go off.
• Wipe dust and fingerprints off using a soft, dry cloth. Soak the cloth in water, wring it thoroughly and
use it for cleaning when the unit is very dirty. Wipe moisture off with a dry cloth after removing tough
dirt.
• Do not use kitchen detergents or chemically-enhanced cleaning cloths.
-If you see this symbol-
Information on Disposal in other Countries outside the European Union
This symbol is only valid in the European Union.
If you wish to discard this product, please contact your local authorities or dealer and
ask for the correct method of disposal.
CAUTION
Danger of explosion if battery
is incorrectly replaced. Replace
only with the same or equivalent
type recommended by the
manufacturer.
Dispose of used batteries
according to the manufacturer’s
RQT8824
instructions.
34
Page 35

Care and use
To reduce risk of radio interference caused by headphone-, earphone- or microphone cables, only use
adequate accessories with the cable length less than 3 m (9.8 ft.).
g Unit
• Avoid using or placing this unit near sources of heat.
• To avoid product damage, do not expose this product to rain, water or other liquids.
• The unit’s speaker does not have magnetic shielding. Do not place the unit near televisions, personal
computers, magnetized cards (bank cards, commuter passes) or other devices easily influenced by a
magnet.
g Batteries
• Do not peel off the covering on batteries and do not use the batteries if the covering has been peeled
off.
• Align the poles ( and ) correctly when inserting the batteries.
• Do not mix different types of batteries or old and new batteries.
• Remove the batteries if you do not intend to use the unit for a long time.
• Do not heat or expose to flame.
• Do not leave the batteries in an automobile exposed to direct sunlight for a long period of time with
doors and windows closed.
• Do not attempt to recharge dry cell batteries.
• Battery mishandling can cause electrolyte leakage which can damage items the fluid contacts and may
cause a fire. If electrolyte leaks from the batteries, consult your dealer. Wash thoroughly with water if
electrolyte comes in contact with any part of your body.
• Keep batteries out of reach of children to prevent swallowing.
When carrying batteries in a pocket or bag, ensure no metal objects such as necklaces are placed
•
together with them. Contact with metal may cause short-circuiting which can cause a fire. For safety,
carry the rechargeable batteries in the battery carrying case.
Reference
RQT8824
35
Page 36

Care and use
g Allergies
Discontinue use if you experience discomfort with the earphones or any other parts that directly contact
your skin.
Continued use may cause rashes or other allergic reactions.
g Listening caution
Do not play your headphones or earphones at a high volume. Hearing
experts advise against continuous extended play.
You should use extreme caution or temporarily discontinue use in potentially hazardous situations.
Even if your headphones or earphones are the open-air type designed to let you hear outside sounds,
don’t turn up the volume so high that you can’t hear what’s around you.
RQT8824
36
If you experience a ringing in your ears, reduce volume or discontinue use.
Do not use while operating a motorized vehicle. It may create a traffic
hazard and is illegal in many areas.
Page 37

Sound can be deceiving. Over time your hearing “comfort level” adapts to higher volumes of sound. So
what sounds “normal” can actually be loud and harmful to your hearing.
Guard against this by setting your equipment at a safe level BEFORE your hearing adapts.
To establish a safe level:
• Start your volume control at a low setting.
• Slowly increase the sound until you can hear it comfortably and clearly, and without distortion.
Once you have established a comfortable sound level:
• Leave it there.
This product may receive radio interference caused by mobile telephones or other products during
operation. If such interference is apparent, please increase separation between the product and the
mobile telephone or other product.
Reference
RQT8824
37
Page 38

Product service
1. Damage requiring service – The unit should be serviced by qualified service personnel if:
(a) Objects or liquids have gotten into the unit; or
(b) The unit has been exposed to rain; or
(c) The unit does not operate normally or exhibits a marked change in performance; or
(d) The unit has been dropped or the cabinet damaged.
2. Servicing – Do not attempt to service the unit beyond that described in these operating instructions.
Refer all other servicing to authorized servicing personnel.
3. Replacement parts – When parts need replacing ensure the servicer uses parts specified by
the manufacturer or parts that have the same characteristics as the original parts. Unauthorized
substitutes may result in fire, electric shock, or other hazards.
4. Safety check – After repairs or service, ask the servicer to perform safety checks to confirm that the
unit is in proper working condition.
Product information
For product information or assistance with product operation:
In the U.S.A., refer to “Customer Services Directory” ( page 41).
For assistance in the continental U.S.A. in obtaining repairs please ship the product to:
Panasonic Service and Technology Company- Customer Servicenter
Suite B 4900 George McVay Drive
McAllen, TX 78503
In Puerto Rico contact the Panasonic Puerto Rico, Inc.
Tel. (787) 750-4300 Fax. (787) 768-2910
RQT8824
38
Page 39

When shipping the unit carefully pack and send it prepaid, adequately insured and preferably in the
original carton. Include a letter detailing the complaint and provide a day time phone number where you
can be reached.
IF REPAIR IS NEEDED DURING THE WARRANTY PERIOD THE PURCHASER WILL BE REQUIRED
TO FURNISH A SALES RECEIPT/PROOF OF PURCHASE INDICATING DATE OF PURCHASE,
AMOUNT PAID AND PLACE OF PURCHASE, CUSTOMER WILL BE CHARGED FOR THE REPAIR
OF ANY UNIT RECEIVED WITHOUT SUCH PROOF OF PURCHASE.
Also, the purchaser will be responsible for shipping the unit to the address on page 38.
In Canada, contact the Panasonic Canada Inc. Customer Care Centre at 1-800-561-5505, or visit the
website (www.panasonic.ca), or an authorized Servicentre closest to you.
The model number and serial number of this
product can be found on either the back or the
bottom of the unit.
Please note them in the space provided below
and keep for future reference.
MODEL NUMBER
SERIAL NUMBER
_______________________
_______________________
User memo:
DATE OF PURCHASE
DEALER NAME
DEALER ADDRESS
TELEPHONE NUMBER
Reference
RQT8824
39
Page 40

Limited Warranty (ONLY FOR U.S.A.)
Panasonic Consumer Electronics Company,
Division of Panasonic Corporation of North America
One Panasonic Way Secaucus, New Jersey 07094
Panasonic Portable Audio Products Limited Warranty
Limited Warranty Coverage
If your product does not work properly because of a defect in
materials or workmanship, Panasonic Consumer Electronics
Company or Panasonic Puerto Rico, Inc. (collectively referred
to as “the warrantor”) will, for the length of the period indicated
on the chart below, which starts with the date of original
purchase (“warranty period”), at its option either (a) repair your
product with new or refurbished parts, or (b) replace it with a
new or a refurbished product. The decision to repair or replace
will be made by the warrantor.
Product or Part Name Parts Labor
All Portable Audio Products
except item listed below
Rechargeable batteries (in
exchange for defective item)
During the “Labor” warranty period there will be no charge
for labor. During the “Parts” warranty period, there will be
no charge for parts. You must mail-in your pro duct during
the warranty period. This Limited Warranty excludes both
parts and labor for batteries, antennas, and cosmetic parts
(cabinet). This warranty only applies to products purchased
and serviced in the United States or Puerto Rico. This
RQT8824
warranty is extended only to the original purchaser of a
new product which was not sold “as is”.
40
One (1) Year One (1) Year
Ten (10)
Days
Not
applicable
Panasonic Puerto Rico, Inc.
Ave. 65 de Infantería, Km. 9.5
San Gabriel Industrial Park, Carolina, Puerto Rico 00985
Mail-In Service
For assistance in the continental U.S.A. in obtaining repairs
please ship the product to:
Panasonic Service and Technology Company
Customer Servicenter
Suite B
4900 George McVay Drive
McAllen, TX 78503
For assistance in Puerto Rico call Panasonic Puerto Rico,
Inc. (787)-750-4300 or fax (787)-768-2910.
When shipping the unit carefully pack and send it prepaid,
adequately insured and preferably in the original carton.
Include a letter detailing the complaint and provide a day
time phone number where you can be reached.
IF REPAIR IS NEEDED DURING THE WARRANTY
PERIOD THE PURCHASER WILL BE REQUIRED TO
FURNISH A SALES RECEIPT/PROOF OF PURCHASE
INDICATING DATE OF PURCHASE. AMOUNT PAID
AND PLACE OF PURCHASE. CUSTOMER WILL BE
CHARGED FOR THE REPAIR OF ANY UNIT RECEIVED
WITHOUT SUCH PROOF OF PURCHASE.
Page 41

Limited Warranty Limits And Exclusions
This warranty ONLY COVERS failures due to defects in materials
or workmanship, and DOES NOT COVER normal wear and tear
or cosmetic damage. The warranty ALSO DOES NOT COVER
damages which occurred in shipment, or failures which are
caused by products not supplied by the warrantor, or failures
which result from accidents, misuse, abuse, neglect, mishandling,
misapplication, alteration, faulty installation, set-up adjust ments,
misadjustment of consumer controls, improper maintenance,
power line surge, lightning damage, modification, introduction of
sand, humidity or liquids, commercial use such as hotel, office,
restaurant, or other business or rental use of the product, or
service by anyone other than a Factory Servicenter or other
Authorized Servicer, or damage that is attributable to acts of God.
THERE ARE NO EXPRESS WARRANTIES EXCEPT AS LISTED
UNDER “LIMITED WARRANTY COVERAGE”.
THE WARRANTOR IS NOT LIABLE FOR INCIDENTAL OR
CONSEQUENTIAL DAMAGES RESULTING FROM THE USE
OF THIS PRODUCT, OR ARISING OUT OF ANY BREACH OF
THIS WARRANTY. (As examples, this excludes damages for lost
time, travel to and from the servicer, loss of or damage to media
or images, data or other memory or recorded content. The items
listed are not exclusive, but are for illustration only.)
ALL EXPRESS AND IMPLIED WARRANTIES, INCLUDING THE
WARRANTY OF MERCHANTABILITY, ARE LIMITED TO THE
PERIOD OF THE LIMITED WARRANTY.
Some states do not allow the exclusion or limitation of incidental
or consequential damages, or limitations on how long an implied
warranty lasts, so the exclusions may not apply to you.
Service in Puerto Rico
Panasonic Puerto Rico, Inc.
Ave. 65 de Infanter
Park, Carolina, Puerto Rico 00985
Phone (787)750-4300, Fax (787)768-2910
ía
, Km. 9.5, San Gabriel Industrial
This warranty gives you specific legal rights and you may also
have other rights which vary from state to state. If a problem with
this product develops during or after the warranty period, you may
contact your dealer or Servicenter. If the problem is not handled
to your satisfaction, then write to the warrantor’s Consumer Affairs
Department at the addresses listed for the warrantor.
PARTS AND SERVICE, WHICH ARE NOT COVERED BY
THIS LIMITED WARRANTY, ARE YOUR RESPONSIBILITY.
Customer Services Directory
Obtain Product Information and Operating Assistance;
locate your nearest Dealer or Servicenter; purchase Parts
and Accessories; or make Customer Service and Literature
requests by visiting our Web Site at:
http://www.panasonic.com/consumersupport
or, contact us via the web at:
http://www.panasonic.com/contactinfo
You may also contact us directly at:
1-800-211-PANA (7262),
Monday-Friday 9 am-9 pm; Saturday-Sunday 10 am-7 pm, EST.
For hearing or speech impaired TTY users, TTY: 1-877-833-8855
Accessory Purchases
Purchase Parts, Accessories and Instruction Books online
for all Panasonic Products by visiting our Web Site at:
http://www.pstc.panasonic.com
or, send your request by E-mail to: npcparts@us.panasonic.com
You may also contact us directly at:
1-800-332-5368 (Phone) 1-800-237-9080 (Fax Only)
(Monday – Friday 9 am to 9 pm, EST.)
Panasonic Service and Technology Company
20421 84th Avenue South, Kent, WA 98032
(We Accept Visa, MasterCard, Discover Card, American
Express, and Personal Checks)
For hearing or speech impaired TTY users, TTY: 1-866-605-1277
Reference
RQT8824
41
Page 42

Limited Warranty
PANASONIC PRODUCT – LIMITED WARRANTY
Panasonic Canada Inc. warrants this product to be free from defects in material and workmanship and agrees to remedy any
such defect for a period as stated below from the date of original purchase.
Technics Audio Product One (1) year, parts and labour
Panasonic Portable / Clock Radio (without Tape, CD, MD) One (1) year, parts and labour
Panasonic Audio / SD Audio Product One (1) year, parts and labour
Panasonic DVD Product One (1) year, parts and labour
Panasonic Combination DVD Player / VCR One (1) year, parts and labour
Panasonic Combination DVD Recorder / VCR One (1) year, parts and labour
Accessories including rechargeable batteries Ninety (90) days
LIMITATIONS AND EXCLUSIONS
This warranty does not apply to products purchased outside Canada or to any product which has been improperly installed,
subjected to usage for which the product was not designed, misused or abused, damaged during shipping, or which has
been altered or repaired in any way that affects the reliability or detracts from the performance, nor does it cover any product
which is used commercially. Dry cell batteries are also excluded from coverage under this warranty.
This warranty is extended to the original end user purchaser only. A purchase receipt or other proof of date of original
purchase is required before warranty service is performed.
THIS EXPRESS, LIMITED WARRANTY IS IN LIEU OF ALL OTHER WARRANTIES, EXPRESS OR IMPLIED,
INCLUDING ANY IMPLIED WARRANTIES OF MERCHANTABILITY AND FITNESS FOR A PARTICULAR PURPOSE.
IN NO EVENT WILL PANASONIC CANADA INC. BE LIABLE FOR ANY SPECIAL, INDIRECT OR CONSEQUENTIAL
DAMAGES.
RQT8824
In certain instances, some jurisdictions do not allow the exclusion or limitation of incidental or consequential damages, or the
exclusion of implied warranties, so the above limitations and exclusions may not be applicable.
42
(ONLY FOR CANADA)
Panasonic Canada Inc.
Page 43

WARRANTY SERVICE
FOR PRODUCT OPERATION ASSISTANCE, please contact:
Our Customer Care Centre: Telephone #: (905) 624-5505
1-800 #: 1-800-561-5505
Fax #: (905) 238-2360
Email link: “Customer support” on www.panasonic.ca
FOR PRODUCT REPAIRS, please loca te your nearest Authorized Servicentre at www.panasonic.ca :
Link : "Servicentres
TM
locator" under "Customer support"
Reference
Carefully pack and send prepaid, adequately insured and preferably in the original carton.
Include details of the defect claimed, and proof of date of original purchase.
IF YOU SHIP THE PRODUCT TO A SERVICENTRE
RQT8824
43
Page 44

THE FOLLOWING APPLIES ONLY IN THE U.S.A.
FCC Note:
This equipment has been tested and found to comply with the limits for a Class B digital device, pursuant to Part 15 of the FCC Rules. These limits are
designed to provide reasonable protection against harmful interference in a residential installation. This equipment generates, uses, and can radiate
radio frequency energy and, if not installed and used in accordance with the instructions, may cause harmful interference to radio communications.
However, there is no guarantee that interference will not occur in a particular installation. If this equipment does cause harmful interference to radio or television reception,
which can be determined by turning the equipment off and on, the user is encouraged to try to correct the interference by one or more of the following measures:
• Reorient or relocate the receiving antenna.
• Increase the separation between the equipment and receiver.
• Connect the equipment into an outlet on a circuit different from that to which the receiver is connected.
• Consult the dealer or an experienced radio/TV technician for help.
FCC Caution: To assure continued compliance, follow the attached installation instructions and use only
Any changes or modifications not expressly approved by the party responsible for compliance could void the user’s authority to operate this equipment.
Declaration of Conformity
Trade Name: Panasonic
Model No.: RR-US490/RR-US470/RR-US450/RR-US430
Responsible party: Panasonic Corporation of North America One Panasonic Way, Secaucus, NJ 07094
Support Contact: Panasonic Consumer Electronics Company 1-800-211-PANA (7262)
This device complies with Part 15 of the FCC Rules. Operation is subject to the following two conditions: (1) This device may not cause harmful
interference, and (2) this device must accept any interference received, including interference that may cause undesired operation.
THE FOLLOWING APPLIES ONLY IN CANADA.
This Class B digital apparatus complies with Canadian ICES-003.
Panasonic Consumer Electronics Company,
Division of Panasonic Corporation of North America
One Panasonic Way Secaucus, New Jersey 07094
http://www.panasonic.com
Panasonic Puerto Rico, Inc.
Ave. 65 de Infantería, Km. 9.5 San Gabriel Industrial Park,
Carolina, Puerto Rico 00985
shielded interface cables with ferrite core when connecting to computer or peripheral devices.
Panasonic Canada Inc.
5770 Ambler Drive, Mississauga, Ontario L4W 2T3
www.panasonic.ca
© Panasonic Corporation 2008
Printed in Malaysia
RQT8824-MP
H1206WW2088
En
 Loading...