

Page 1
Manuel d’utilisation
Bedienungsanleitung
Manuale di utilizzazione
User manual
Gebruiksaanwijzing
Manual de utilización
Manual de utilização
Eγχειρίιο χρήσης
®
Page 2
FRANCAIS . . . . . . . . . . . . . . .
1
1
1
1
2
3
1
I
mpor
tant
F
F
1
0
c
m
7
c
m
1
0
c
m
1
0
c
m
7 c
m
A
p
ro
p
os
d
e c
ette
n
o
tic
e
- C
e
do
c
u
m
e
n
t
est
co
m
m
u
n
à
plu
sieu
rs
m
od
è
le
s
d
e m
ag
n
é
to
sc
op
e
.
P
a
r
co
n
sé
q
u
en
t
ce
rta
in
es
fo
n
ction
s
o
u
ce
rta
in
s
rég
la
ge
s
pe
u
v
en
t
ê
tre
a
b
sen
ts
d
u
m
o
d
è
le
q
ue
vo
u
s
a
v
ez
a
ch
eté
.
!
Avant
de
comm
en
cer
. .
.
. .
.
.
.
. . .2
Brancher
. . . .
.
.
. . . . . . .
. . . . .
.
.
.
3
Prépar
erle
magnétoscope
. . . . . .
.
4
Préparerle
téléviseur
. .
.
. .
.
.
.
. . .4
Installer
les
chaînes
.
.
.
.
.
.
.
.
.
.
. . .5
Installation
automatique
. . .
.
. . . . .5
C
lasserles
chaînes
.
.
.
.
.
.
.
.
.
.
. . .5
Com
pléter
l'in
stallation
. . .
.
. . . . .6
Régler
l'horloge
.
. . . .
.
.
. .
.
. . . . . .
6
Nouvelle chaîne
.
. . . .
.
.
. .
.
. . . . . .
6
R
écepteur
satellite
/câble . .
.
. . . . .7
Branchem
ents
. .
. . . . .
.
. .
.
. . . . . .7
R
églage du
magnétoscope
. .
.
. . . . .8
Cod
es satellites/câble
. .
.
. .
.
.
.
. .
.9
Autres appar
eils
.
. .
. . . . . . . .
. . .
11
Prises AV
1 /
AV2
.
. .
. . . . . . . .
. . .11
P
rise
AV3 . . . . . .
.
.
.
. . .
.
.
. . . .
.
.11
Prise A
V
4
. . .
.
.
.
.
. . .
.
.
.
.
.
.
. . . .12
Utiliserle
télécomm
ande
. .
.
.
.
. . .
13
C
ontrôler
le
fonctionnem
ent
.
.
. . .
14
R
egarder
. . .
.
.
.
.
. . .
.
.
.
.
.
.
. . . .
15
Enregistr
er
.
.
.
.
.
. . .
.
.
.
.
. . .
.
.
.
16
Programm
er
un enr
egistr
em
ent
. .
17
Contrôle
de band
e
. . .
. . .
.
. .
.
.
. .
18
Contrôle
d'images
. . .
. . .
.
. .
.
. . .19
Contrôle du son
. . . .
.
.
.
.
.
. .
.
.
.
.
20
R
églage des préfér
ences
. .
.
.
.
.
.
.21
Au
tr
es fonctio
ns
. . .
.
.
.
.
.
. .
.
.
.
.
22
Plus d'infos
.
.
.
.
.
. . .
.
.
.
. . . .
.
.
.
23
Caractéristiques
techniques
.
.
. . .
25
Le certificat
de garantie
livré
avec
votre
magnétoscope
porte
le type
et le num
éro
de fabrication de
votre
appareil.
Conservez-le
avec
la facture.
Ils constituent
les
docum
ents
indispensables
pour
faire
valoir vos
droits à
la
garantie.
T
oute
réparation
pendant
la période de
garantie
doit être
ef
fectuée par un technicien
agréé
représentant
notre m
arque.
T
oute
dérogation
à cette
règle entraîne
l'annulation de
vos droits à la
garantie. N'ouvrez
jam
ais
votre appareil
vous-mêm
e.
Cela peut
être
dangereux pour
vous,
ou pourrait
endom
mager
l’appareil.
Th
om
son
Multimédia
dégage sa
responsabilité en
cas d’utilisatio
n
no
n
conform
e
aux
indications
de
cette
notice.
Garantie
I
N
S
T
A
L
L
A
T
I
O
N
- Assurez-vous
que la
tension-secteur
d
e votre hab
itation
est
conform
e
à
celle indiquée
sur l'étiquette
d'identification, située
à l'arrière de
votre
appareil.
Installez
le
magnétoscope
horizontalem
ent,
loin
de toute source
de
chaleur
im
portante
(chem
inée...)
ou
d'appareils produisant
des
champs
m
agnétiques
ou électriques
élevés.
Les composants
de
cet appareil
sont
sensibles
à la
chaleur. La
températur
e m
aximale
ambiante
ne
doit pas
dépasser 35
°
Celsius. L
aissez
suffisam
ment
d’espace
autour pour
assurer une ventilation
correcte.
Laissez 10 cm
minimum
de chaque
côté
ainsi qu’à l’arrière
de l’appareil
et
7
cm
minimum
au
dessus.
L’humidité
des
locaux où est placé
l’appareil
ne doit
pas
dépasser un taux hygrométrique
de 85
%
.
Si vous
devez utiliser
votre
appareil
à l’extérieur
,
évitez
de l’exposer
à l’eau de
pluie
ou aux
éclaboussures.
Le
passage
d’une
atm
osphère
froide
à
une am
biance
chaude peut
provoquer
de
la
condensation
sur l’écran (et sur
certains
com
posants
à
l’intérieur de
l’appareil).
Laissez-la disp
araître
d’elle-mêm
e
avant de rem
ettre
l’appareil
en
m
arche.
U
T
I
L
IS
A
T
I
O
N
Si votre appareil,
ou
si une
cassette,
a séjourné
dans
une atmosphère
froide quelque
temps,
com
me
par exemple
après un transport
l’hiver,
attendez
environ 2
heures
avant
d’utiliser
votre magnétoscope.
Les ouvertures
situées
au-
dessus
et en-dessous
sont prévues
pour
la
ventilation.
Elles ne doivent
pas
être
obstruées.
En cas d’orage,
il est recom
mandé
d’isoler
l’appareil
du réseau
électrique et
de l’antenne
afin
de ne pas
le soum
ettre
à
des
surchar
ges électriques
ou
électrom
agnétiques
qui
peuvent
l’endom
mager
.
Acette
fin,
laissez
la fiche
secteur
et
la fiche d’antenne
accessibles
pour les
débrancher
.
En cas d’
absence
p
rolongée
,
éteignez l’appareil avec
l’interrupteur
marche/arrêt. Mêm
e
à
l’arrêt,
certains
composants restent
en contact
avec le réseau
électrique.
P
our
l’isoler
complètement
vous devez débrancher
la fiche
d’alim
entation
de
la
prise secteur.
Déb
ranchez
immédiatem
ent
l’appareil
si vous
constatez
qu’il dégage
une
odeur
de
brûléou de
la fum
ée.
En
aucun
cas
vous ne
devez o
uvrir
l’appareil
vous-
mêm
e,
vous risquez
l’électrocution.
Cet
appareil
ne
doit
en aucun
cas
être utilisé
à des
fins
industrielles.
Il
est
uniquement
prévu
pour
un
usage domestique.
La
recopie
totale
ou partielle d’enregistrem
ents
protégés
par
la
législation
sur les
droits
d’au
teur
,
sans
autorisation
explicite
du
titulaire
des droits,
contrevient
à la
législation
en vigueur
. E
N
T
R
E
T
I
E
N
Utilisez
un chiffon doux,
sec
et
propre, en
excluant tout produ
it
décapant,
solvant, abrasif,
etc... D
époussiérez
régulièrem
ent
les ouvertures
de ventilation à
l’arrière ou
sur le côté.
L’utilisation
de
solvants,
de
produits
abrasifs
ou
de
produits
à base
d’alcool
risque
d’endommager
l’appareil.
Si
un
objet
ou
un liquide pénètre
dans l’appareil,
débranchez-le
imm
édiatement
et
faites-le
vérifier
par un
technicien agréé.
Pour ne pas
endom
m
ager
les
têtes de
votre
magnétoscope,
n’utilisez jamais de
cassette
de
nettoyage.
Précautions
Sommaire
Installatio
n
Utilisation
A
vantd’utiliser
votre
magnétoscope
vous
devez
suivre
la
procédure
d’installation et de réglages
décrite
dan
s
les pages
2 à
8.
F
F
DEUTSCH . . . . . . . . . . . . . . . .
ITALIANO . . . . . . . . . . . . . . . . .
ENGLISH . . . . . . . . . . . . . . . . .
NEDERLANDS . . . . . . . . . . . .
ESPAÑOL . . . . . . . . . . . . . . . .
PORTUGUÊS . . . . . . . . . . . . .
EΠΠHNIKA . . . . . . . . . . . . . . .
D
D
I
I
GB
GB
NL
NL
E
E
P
P
GR
GR
F
Page 3
vps
showview
status
text
ok
exit
menu
s.o.s. rec
sp/lp
0000
1
2
3
4
5
6
7
8
9
0/--
AV
pr+
pr-
14
index
mark
10
13
15
11
12
18
16
17
19
20
21
22
26
28
9
2
4
5
6
7
8
1
3
23
25
24
27
Page 4
1
1
1
2
1
3
Page 5
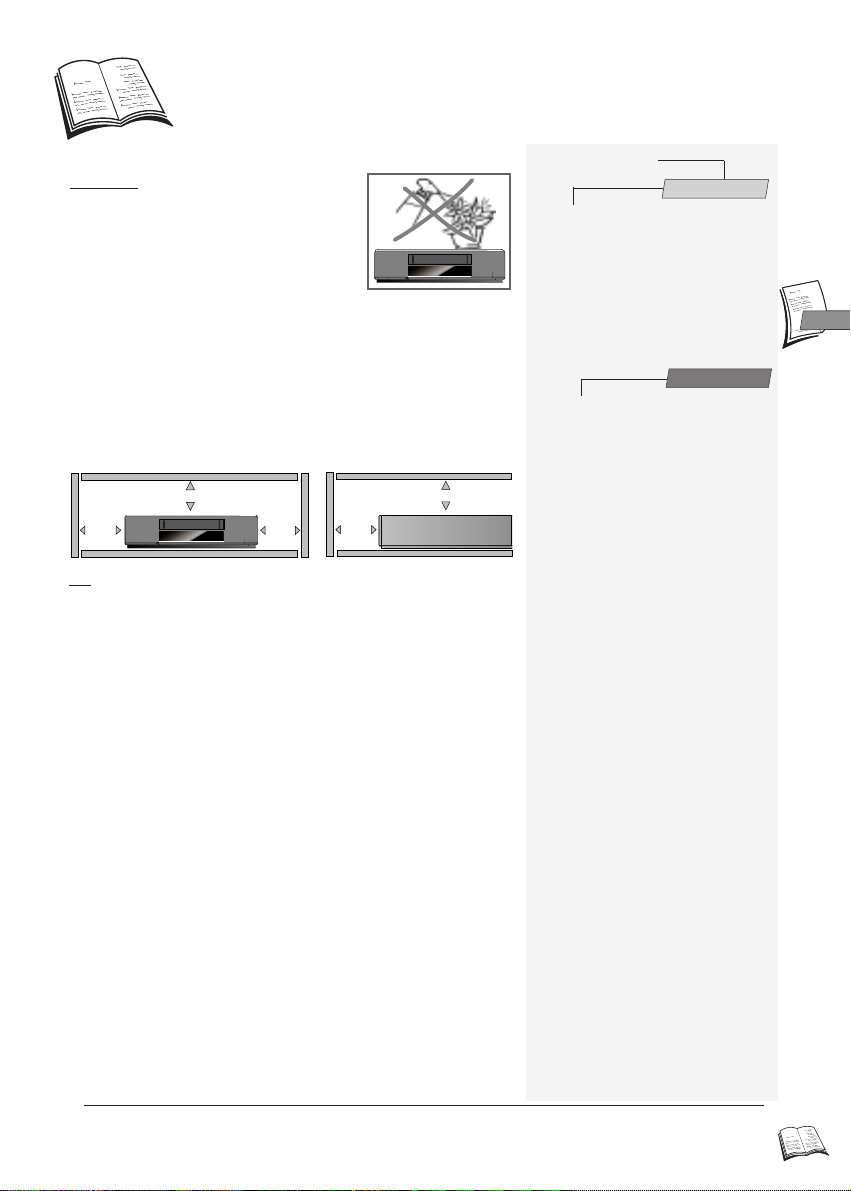
Important
10 cm
7 cm
10 cm
10 cm
7 cm
Precautions
SETTING UP - Ensure that the mains supply in
your house complies with that indicated on the
identification sticker located on the back of your
appliance. Install the video recorder
horizontally, away from any source of heat
(fireplace) or appliances creating strong
magnetic or electric fields. The components of
this video recorder are sensitive to heat. The maximum ambient
temperature should not exceed 40° Celsius. Leave sufficient space
around the video recorder to allow adequate ventilation: 10 cm on either
side and at the rear, as well as 7 cm above the top are minimum
requirements. The humidity of the room should not exceed 80%. If you
have to use the video recorder outdoors, do not expose it to water from
rain or splashing. Moving it from a cold atmosphere into a warm one is
likely to cause condensation on some components inside the video
recorder. Let the condensation disappear by itself before turning the
video recorder on again.
USE - If your appliance, or a cassette, has been stored in a very cold
atmosphere for a certain amount of time (transported during winter for
example), wait approximately 2 hours before using your video recorder.
The openings located on the top and the bottom are for ventilation
purposes. They should not be obstructed. During thunder storms, we
recommend that you disconnect the video recorder from the mains and
aerial so that it is not affected by electrical or electromagnetic surges that
could damage it. For this reason, keep the mains socket and aerial socket
accessible so they can be disconnected. When the unit is on standby,
some components remain connected to the mains. To fully disconnect
your set, you have to unplug the mains connector from the mains socket.
Immediately disconnect the video recorder if you notice it giving off a
smell of burning or smoke. Under no circumstances whatsoever must
you open the video recorder yourself. You risk electrocution if you do so.
CLEANING – Use a soft, dry and clean cloth. Regularly dust the vents at the
back or sides. Using solvents, abrasive or alcohol based products risks
damaging the set. If an object or liquid enters inside the appliance, unplug
it immediately and have it checked by an authorised technician. To avoid
deterioration of your video recorder’s heads, never use a cleaning tape.
Guarantee
The type and production number of your appliance are printed on the
guarantee certificate delivered with your video recorder. Keep this
certificate as well as the invoice. These documents are indispensable for
claiming your guarantee rights. All repairs during the guarantee period
must be carried out by an authorised technician representing our brand. If
this condition is not met, your rights will no longer be valid. Never open
the appliance yourself, since this may be dangerous for you or damage the
equipment. Thomson Multimedia is not liable if the video recorder is used
other than in accordance with this manual.
Prior to using your video recorder, you'll have to follow the set-up
procedure and make the settings described on pages 2 to 7.
ON THIS USER MANUAL: This user manual being common to several VCR models, some
J
functions or settings may not be available on the model you have bought.
Contents
Installation
Before you start . . . . . . . . . . . . . . . . . . . .2
Making the connections . . . . . . . . . . . . .3
Initial installation . . . . . . . . . . . . . . . . . .4
Auto installation - New or encoded channel Sorting the channels - Clock setting
Satellite / cable receiver . . . . . . . . . . . . .6
Recommended connection scheme Video recorder settings
Other sets . . . . . . . . . . . . . . . . . . . . . . . . .8
Sockets AV1 / AV2 / AV3 / AV4
GB
GB
Use
Using the remote control . . . . . . . . . . . . .9
Controlling the video recorder - Programming the
code of another set - Controlling the television set
Controlling the operation . . . . . . . . . . .10
On the display - On the screen
Viewing a tape
Watching a channel via the video recorder Viewing a tape - Play - Accelerated play Still image - Pause - Variable slow motion - Stop
Rewind or Fast forward - Ejection of the tape
Recording
Preparing the recording - Simple recording, with
automatic stop, "S.O.S. record" - Mark a scene with
an index
NAVICLICK
Before using NAVICLICK - Consulting TV
programmes with NAVICLICK - Programming a
recording with NAVICLICK - Updating
NAVICLICK
Programming a recording . . . . . . . . . . .14
With the S
S
HOWVIEW
programmed - Deleting a programmed recording Recording programmed by an external connected
unit - Error messages likely to occur when
programming
Tape library . . . . . . . . . . . . . . . . . . . . . .16
New tape - Organising recordings on a tape Looking for a recorded programme
Tape control . . . . . . . . . . . . . . . . . . . . . .18
Index search - Introduction search - Clear index Access to counter - Access to remaining time Tape type – Auto Sequence Memory
Sound adjusting . . . . . . . . . . . . . . . . . . .19
Adjusting the sound in the play mode
Setting the type of sound to be recorded
Picture adjusting . . . . . . . . . . . . . . . . . .20
Tracking - Sharpness - Stability - Format S cassette - VHS - TVNTSC - Copy - Black and
white - Colour system
Adjusting preferences . . . . . . . . . . . . . .22
Audio dubbing - Auto Sequence
Memory
Other functions . . . . . . . . . . . . . . . . . . .25
Electronic key - Continuous play / recording VPS/PDC system - Concerning video tapes
More information . . . . . . . . . . . . . . . . .26
TV set and video recorder code lists
Technical features . . . . . . . . . . . . . . . . .27
. . . . . . . . . . . . . . . . . . . . . . . .11
. . . . . . . . . . . . . . . . . . . . . . . . . . . .12
. . . . . . . . . . . . . . . . . . . . . . . . .13
®
HOWVIEW
numbers - Without the
numbers - When the video recorder is
.24
1
GB
GB
Page 6
Installation
-
+
S
I
Z
E
A
A
1
,
5
V
0
%
M
E
R
C
U
R
Y
G
R
E
E
N
E
L
L
E
X
T
R
A
H
E
A
V
Y
D
U
T
Y
-
+
S
I
Z
E
A
A
1
,
5
V
0
%
M
E
R
C
U
R
Y
G
R
E
E
N
E
L
L
E
X
T
R
A
H
E
A
V
Y
D
U
T
Y
VCR
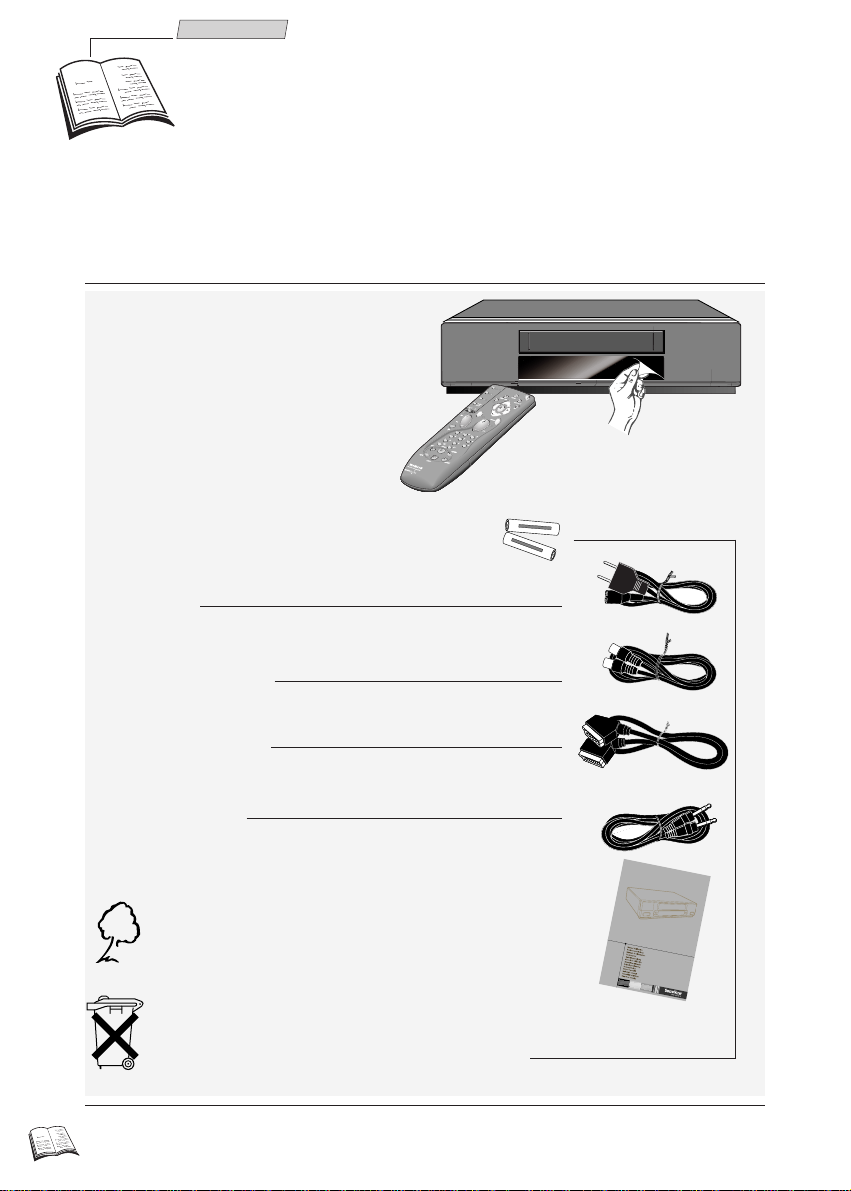
Before you start
Thank you for purchasing one or our videos. Unpack the set completely and tear off the
J
protection films.
Video recorder
Remote control
2 non-rechargeable batteries, type AA
Power cord
Coaxial cable (75 Ω)
Scart cable
(21 pins connected)
Connection cable
Set-up and user manual
To respect the environment, we have printed
this document on unbleached recycling paper.
Please respect the environment and prevailing regulations. Before you dispose of batteries
or accumulators, ask your dealer whether they are subject to special recycling and it they
will accept them for disposal.
2
Page 7
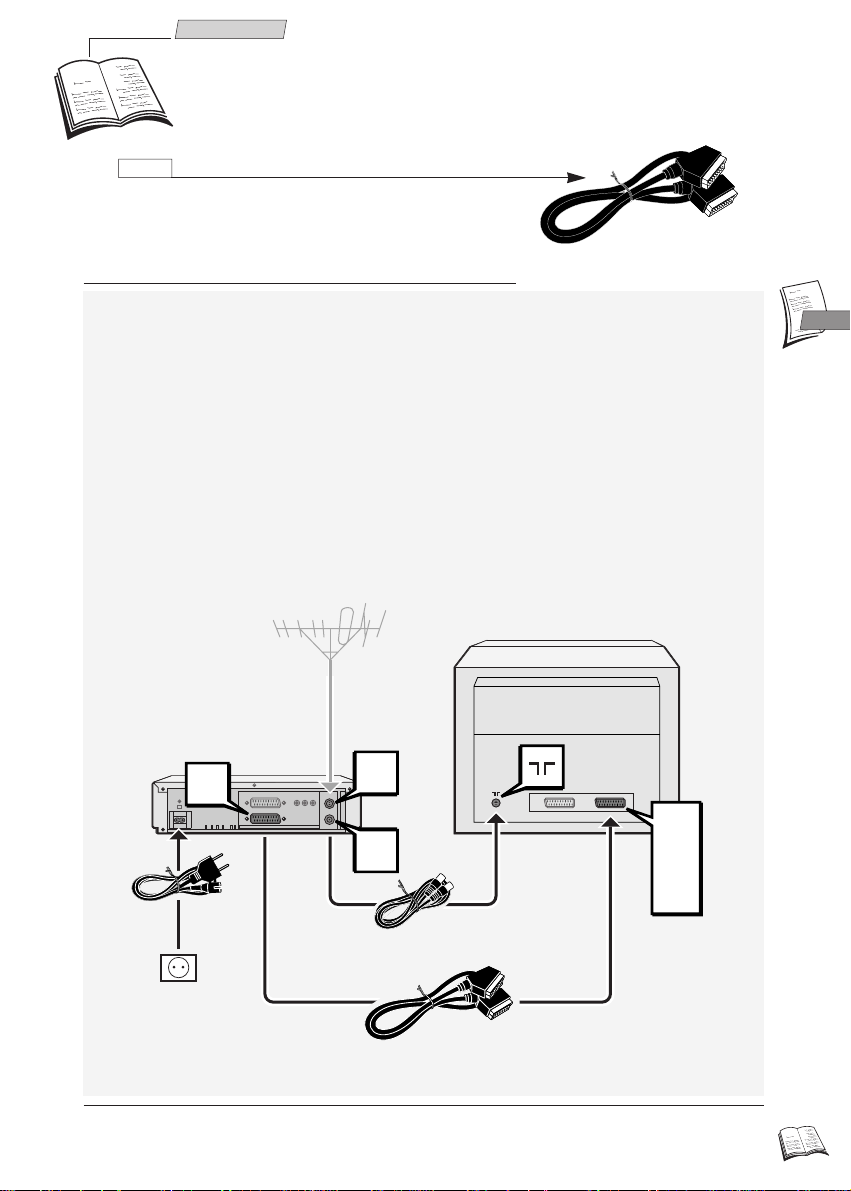
Installation
Making the connections
Connecting the video recorder and television set with this
J
cable simplifies set-up and subsequent use, and
considerably improves the pictures and sound reproduction
quality.
1 Disconnect the aerial cable from your TV set and reconnect it to the IN socket of your
video recorder.
2 By means of the coaxial cable supplied, connect the video recorder's OUT socket to the
television's aerial socket gg.
3 With the SCART cable supplied, connect the video recorder's AV 1 socket
(audio/video 1) to the television's SCART socket (AV 1, EXT 1, AUX 1
depending on the make).
Your television socket should be compatible with for the RGB signals (21 pins connected).
J
If this is not the case, use the AV4 socket on the video recorder (yellow cinch socket).
See your retailer for the appropriate cable.
4 Connect the video recorder to the mains with the power cord supplied by first plugging
in the connector at the video recorder rear.
1
AV1
2
IN
OUT
AV1
EXT1
AUX1
GB
GB
4
3
220V/240V - 50Hz
Other possible connection schemes are shown on page 6 and 8.
J
3
Page 8

Installation
Initial Installation
As the video recorder has not been preset to receive channels from your region, you have to install
J
the channels yourself by carrying out the automatic channel installation procedure described
below.
Auto Installation
1 Switch on the television.
2 Set vcr/dvd/tv on the remote control to vcr a.
3 Switch on your video recorder with button
ð When switching on the video recorder for the first time, a language selection menu
comes up. Should it not appear, press key menu (13).
4 With keys ▲ (7) and ▼ (9), select the language you prefer to display the menus on the
screen, then validate your choice with the key ok (11).
ð A welcoming message appears. Validate with ok (11) key.
5 The I
6 Press key ▲ (7) and ▼ (9), ) to select the country where you usually live, then validate
7 Press key ok (11) to confirm your channels.
8a If the proposed channel number matches the displayed picture, press ok (11) to pass on
8bIf the proposed channel number does not correspond to the picture that you see, scroll
9 When all the channels have been confirmed, press exit (12) to leave the menu.
NSTALLATION menu appears. The Auto installation line has already been selected.
Validate with ok (11) key.
with the ok (11) key.
Your video recorder comes with the NexTView Link feature. This function simplifies the channel
J
installation procedure, dowloading them from a TV set fitted with the NexTView Link or similar
feature (Easy Link, Smart Link, Megalogic, etc.) and already installed. The channels downloaded in
this way preserve the same properties as your TV set (same number, same name, etc.).
ð If your TV set is fitted with the NexTView Link function or similar, the video
recorder automatically initiates channel download once you have selected the country.
You can view channel download on the video recorder display (Pr1, Pr2,...). On
completion of download, the video recorder switches over to standby. Channel
installation is finished.
ð When your television set is not fitted with the NexTView Link or any similar feature,
a message tells you that your video recorder is searching and storing the channels you
can receive in your region. Keep patient until a message informs you that your
channels are stored.
to the next channel.
the channels with the CC(10) or
BB
New or encoded channel
To complete the installation of your video recorder when the automatic channel installation has not
J
stored all of the channels or when you wish to store a new channel.
1 With the menu (13) key, call up the SUMMARY menu.
2 Press the
3 The Manual set up line is already selected. Press ok (11).
ð The M
4 Press C (10) or B (8) to choose the reception standard.
▼
key to select the Installation line, then validate with ok (11) key.
ANUAL SET UP menu comes up. The Standard line is selected.
B (1).
(8) keys. Validate with ok (11) key.
4
When the picture of a channel is of poor quality or encoded, try out the fine tuning feature.
L
Refer to New or encoded channel, step 7.
Page 9

Installation
-
+
S
I
Z
E
A
A
1
,
5
V
0
%
M
E
R
C
U
R
Y
G
R
E
E
N
E
L
L
E
X
T
R
A
H
E
A
V
Y
D
U
T
Y
-
+
S
I
Z
E
A
A
1
,
5
V
0
%
M
E
R
C
U
R
Y
G
R
E
E
N
E
L
L
E
X
T
R
A
H
E
A
V
Y
D
U
T
Y
5 Press ▼ (9) to select Reception then choose Aerial (for channels received via roof
aerial) or Cable (for cable channels) with C (10) or B (8).
6 Press ▼ (9) to select the Autosearch line, then press C (10) or B (8) several times to
search for the programme channel, or you may also directly enter a number with keys 0
to 9 (21).
ð When a channel is found, the pictures come up on the screen.
7 When the picture is poor, select the Fine tuning line, then press C (10) or B (8) to
adjust the picture.
8 When the channel name is incorrect, select the Name line and with keys C (10) or B
(8),select a name, or you may also enter a name by choosing the characters with the
keys 1 and 2 and press B (8) to move on to the next character.
9 If the channel is encoded, press key ▼ (9), to select Decoder and check the box with
key ok (11).
10 Position the cursor on Store on Pr and assign a channel number with keys C (10) or B
(8), or you may also enter the number with keys 0 to 9 and press on ok (11) .
11 If you wish to continue with TV channels installation, repeat steps 5 to 10. Otherwise,
press exit (12).
Sorting the channels
The automatic channel installation assigns numbers to the channels in a pre-defined order.
J
These numbers may therefore not match the actual channel numbers. Should this be the case,
change these numbers by carrying out the instructions below. For easy channel identification, we
suggest that you have a TV magazine at hand.
1 With the menu (13) key call up the SUMMARY menu.
2 With key ▼(9), select the Installation line, then validate with ok (11).
3 Select the Organizer line from the I
NSTALLATION menu and validate with ok (11).
4 Select the Select Pr line, and choose a channel by entering its number or by scrolling
with keys CC(10) or
5 If you wish to change the name of the channel, call up the Name line and with keys
(10) or
BB
(8), scroll the names available, or you may enter the name with keys 1 and 2
BB
(8).
CC
and press B (8) to pass on to the next character.
6 Call up the Swap with Pr line to exchange two channels and enter the channel number
you wish to exchange with the channel which presently appears on the Select Pr line.
Validate with ok (11).
7 To delete the currently selected channel, call up the Delete Pr line and validate with ok
(11), reconfirm with ok (11).
Clock setting
Your video recorder is fitted with an automatic clock setting feature that detects the clock setting
J
signals sent by some channels. If your video recorder clock is not right, you can set it right by
carrying out the steps below.
1 With key menu (13) call up the SUMMARY menu.
2 With key ▼(9), select the Installation line, then validate with ok (11).
3 With key ▼(9), select the Clock set line and confirm with ok (11).
ð The C
4 If the displayed time is incorrect, select Auto clock line, then validate with ok (11).
5 If the displayed time is still incorrect, change clock in the following order: day, month,
time or year by means of keys ▲ (7) and ▼ (9), and press keys CC(10) or
change them.
6 Validate with ok (11), then press exit (12) to leave clock setting.
LOCK SET menu comes up.
BB
(8) to
GB
GB
For detail instructions, see inside the cover.
Did you insert the batteries in the remote control ?
J
5
Page 10
Installation
AV2
TV
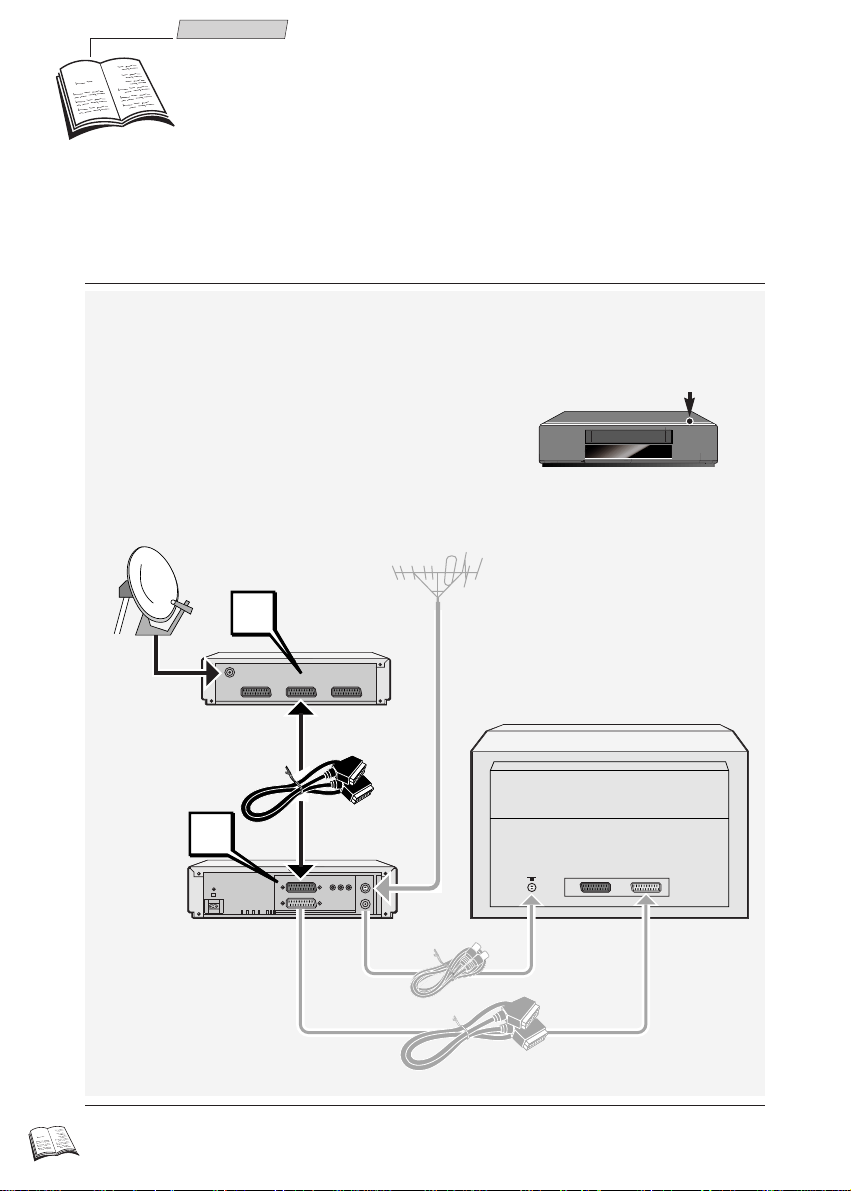
Satellite/cable receiver
The connection schemes you may adopt for your satellite receiver depend on the available
J
sockets and cables in your possession. Prior to connecting your satellite receiver to the
video recorder, make sure that the former is capable of properly receiving the cable
programmes.
Recommended connection scheme
To give the video recorder priority over the satellite receiver, connect your satellite receiver
to the AV2 of the video recorder by means of a SCART cable.
J
Position the satellite receiver on top of the video recorder
and see that you leave the infrared windows uncovered.
6
For the other possible connection schemes, refer to the set-up manual of your satellite receiver.
J
Page 11

Installation
Video recorder settings
1 Switch on your satellite/cable receiver and select channel 1.
2 Set vcr/dvd/tv button on the remote control to vcr a.
3 With key menu (13), call up the S
4 With key ▼ (9) select the Installation line and confirm with ok (11).
5 With key ▼ (9) select the Satellite and cable box line and confirm with ok (11).
6 Select the country where you live or the country from which you wish to receive the
channels, in the case of living on the border, from the list of countries which appears
on the screen and press ok (11).
ð The S
7 With keys C (10) or B (8), select the socket to which your satellite receiver is
connected:
- either RF or Coax (mono sound); validate with ok (11). The satellite receiver
communication channel search screen appears; press C (10) or B (8) to start the search,
then validate with ok (11) on completion of the search.
- either AV1 or AV2 and validate with ok (11), then select No decoder (the other options
are rarely used in Europe) and revalidate with ok (11).
8 Enter your satellite code number (see the code table at the end of this user manual),
then validate with ok (11).
J
ð Via the infrared window, the video recorder transmits a signal to your satellite
receiver. A confirmation menu comes up while the satellite receiver positions itself on
channel 12 (check whether channel 12 is indicated by the display on satellite receiver occasionally in a slow manner -, even if there is no image to be seen on the television
screen).
9 Should the satellite receiver not use channel 12, select NO with the exit (12) key. Your
video recorder then starts a new search (depending on the make of your satellite
receiver, several attempts are possible).
10 If the satellite receiver uses the channel 12, select YES with the ok (11) key.
11 Press ok (11) key again. Wait for quite a long time (up to 15 minutes) until a message
tells you that the storage of your satellite channels is completed.
12 Press exit (12) key to leave menu.
ð Your video recorder now controls your satellite receiver.
13 Refer to page 5 to sort your satellite channels and check their names.
ATELLITE AND CABLE screen appears
If the make or model of your satellite/cable receiver is not on the list, try out other model
numbers. If no code works, repeat the procedure described on this page by entering the
00; the video recorder then tries out all the codes stored in its memory.
UMMARY menu.
GB
GB
J
If you should wish to change your satellite receiver, select the
SUMMARY menu then the Satellite and cable line and finally the New installation line.
If you should wish to rearrange your satellite receiver channels, select the Satellite channel
identification line from the SATELLITE AND CABLE menu.
When connecting the video recorder to a television set with integrated satellite receiver, you
J
must select the socket AV1 during set-up.
Installation line from the
7
Page 12

Installation
AV1 - AV2
Other sets
Press the status key (
J
and select the socket AV1, AV2, AV3 or AV4 with key
AV (
22
) of the remote control.
4
) to call up the control screen
Sockets AV1 / AV2 / AV3 / AV4
AV2 AV4AV1 / AV2 / AV4
Decoder
TV set
The pictures from another set operating in the play mode and
connected to AV2 are conveyed to the socket AV1. When your
television is connected to this socket, you can watch the pictures
from the set connected.
AV3
DVD
Other video recorder
Video disk player
Camcorder
Satellite receiver
Audio/Video or Dolby Pro
Logic amplifier
The four cinch sockets
AUDIO IN/OUT (red and
white) and the two VIDEO
IN/OUT cinch sockets
(yellow) enable you to
connect your video recorder
to an Audio/Video
amplifier.
8
Hi-Fi system
Camcorder
Connect your camcorder to the sockets AUDIO L (left), AUDIO R
(right), VIDEO IN and CAM/PAUSE and select socket AV3 on
your video recorder.
With compatible camcorders, the PAUSE socket facilitates copying by
J
triggering the recording mode of the video recorder as soon as the
camcorder switches over from PAUSE to PLAY. The video recorder
must be switched on Record Pause.
“DOLBY”, “Prologic” and the double-D symbol are trademarks of DOLBY Laboratories
J
Licensing Corporation.
The four cinch sockets
AUDIO IN/OUT (red and
white) enable you to
connect your video recorder
to the HiFi stereophonic
system. Thus, you will be
able to reproduce all the
sound effects of your tapes
(musicals, films...) on your
HiFi system.
Page 13

Use
The remote control
Y our remote control enables you to both control the video
J
recorder and the television set depending on the
vcr/dvd/tv button position. There is a risk that the remote
control may not be compatible with the television set
depending on the model or also that some functions may
not be available.
Brand of your TV set: Brand code
BRANDT . . . . . . . . . . .001-000-010-020
FERGUSON . .001-003-004-000-010-020
NORDMENDE . . . . . . .001-010-020-000
SABA . . . . . . .001-000-005-010-019-020
TELEFUNKEN . . .001-002-000-010-020
THOMSON . . . . . .001-000-002-010-020
Other makes see page 26
Controlling the video recorder
Remember to set the button to vcr before trying to use the video recor der remote control.
J
To switch the video recorder on and off.
1
To select the VPS/PDC function.
2
To call up the SHOWVIEW menu.
3
4
To call up the information screen.
To call up the NAVICLICK menu.
5
6
To call up the sub-titles.
710
à
To navigate through the menus.
11
To validate a choice.
To exit a menu.
12
To call up the SUMMARY menu.
13
To start immediate recording of what you are
14
watching on the screen.
To double the recording time of the video
15
tape with LP.
16
To remove an index.
To add an index.
17
To change channel.
19
To choose a channel. For two-digit
21
channels, first press 0/--.
To select sets connected to the Audio/Video
22
sockets.
23
24
25
Rewind
Play
Fast forward
Record
26
27
Stop
Pause/Still image
28
Programming the remote control with the TV, other video recorder or a THOMSON DVD code.
Your remote control may also be used to control various other televisions, video recorders, and
J
THOMSON DVD players. In order to be able to do this, you must programme the remote control
with one of the codes provided above or on page 26.
1 Set vcr/dvd/tv button to tv, vcrb or dvd, depending on the appliance you wish to control.
2 Hold down menu key (13) and enter the three-digit code corresponding to the make of your television
set or the other video recorder. In the case of a THOMSON DVD, enter the code 000.
3 Release key menu (13) and try to control the television set.
Should the code which you have entered not work, try another code proposed for this make. When
J
you replace batteries of the remote control, you should re-enter the three-digit code.
GB
GB
Controlling the television set
1
To switch the television set on or off.
These keys have the same function as the
4
keys corresponding to your television set
to
remote control (when the latter is of our
15
make).
7
20
* Key for switching the television on and off depending on the models.
J
Inactive.
9
and
Mute
The main functions of your remote control can be found on the vcr front panel.
To zoom in/
8
zoom +
To zoom out/
10
zoom To switch on* the television
21
set or choose a channel
22
To select a SCART socket and watch the
pictures of the set connected to this socket.
These two functions are
only available on
television sets of our
make.
9
Page 14

Use
Controlling the operation
On the display
Stop - Tape in stop
position - Presence of a
tape in the video recorder
Pr TV channel sound and pictures
Au 1-2 AV1-AV2 - Sound and pictures of a unit
connected to the Scart sockets at the rear of
the video recorder
Play.
Accelerated play
(forward or backward).
Pause
Variable slow motion
(forward or backward).
Au 3 AV3 - Sound and pictures of a unit
connected to the video recorder front side
Au 4 AV4 - Sound and pictures of a unit
connected to the cinch sockets at the rear of
the video recorder
0 23 SA Pictures and sound of a satellite channel.
H15M35S Tape counter.
01
09:53 Time.
SP Play/recording at standard speed
(Standard Play).
Fast forward.
Rewind.
LP Play/recording at half speed (Long Play).
SLP (Super Long Play).
VIDEO The video recorder transmits the pictures
Record Pause (flashing).
VPS The current telecast is in the VPS mode.
and the sound to the television set.
PDC The current telecast is in the PDC mode.
Recording under way.
Programmed recording.
HIFI Hi-Fi sound
ii
Stereo
1 Left channel
2 Right channel
LL
Mono track
The sound type available
on the channel or the tape.
Display of clock or time: the time elapsed from the beginning of the tape in play or record mode, the
time remaining (r) before end of tape on STOP.
On the screen
With key status (4), you can display the information concerning video
recorder operation (tape type, time remaining before end of tape, type of
sound, image format, tape speed, channel, time, etc.).
Press this key repeatedly to visualise:
ð The television pictures, the pictures of the video recorder including
display of the operating status, the television pictures...
10
LL
AV2
AV2
counter
counter
00h00m30s
00h00m30s
Stereo
Stereo
remainingSPSP
remaining
1h24m
1h24m
E240
E240
15:20
15:20
Page 15

Use
Viewing a tape
To view a tape and explore the recordings, to view a still
J
image and retrieve particular scenes in the accelerated
play mode, to rewind to the beginning or wind fast
forward to the end of the tape.
To view a channel via the video recorder
1 Switch the television set and the video recorder on.
2 Set the vcr/dvd/tv button to tv, then press the key AV (22). The channel picture which
has been selected on the video recorder is displayed on the television screen.
3 Use keys 0 to 9 to change channel or the key pr+/pr- (19).
Viewing a tape
Play
1 Load a tape
2 Press key PLAY (24).
J
When the picture is poor, adjust the phase (page 20). If the colour is not reproduced
properly, try another standard (PAL, SECAM or MESECAM) selectable in the PICTURE
menu (page 21).
Accelerated play
In play mode, press key REW. (23) or F.FWD. (25) repeatedly to change the speed
and direction of accelerated play.
J
You may also use the SHUTTLE (outer ring) which is situated on the front side of the video
recorder to manipulate accelerated play.
Still image - Pause
In play mode, press key PAUSE (28) to pause a picture, and press repeatedly to wind
forward image by image.
Variable slow motion
1 Press the PAUSE (28).
2 Press key REW. (23) or F.FWD. (25) to change the speed and direction of slow
motion.
J
The inner knob JOG fitted to the front of the video recorder may also be used to explore an
image by image sequence in both forward or backward play.
Stop
Press key STOP (27) to stop play.
Rewind or Fast Forward
1 Press the key STOP (27).
2 Press the keys REW. (24) or F.FWD. (26).
Ejection of the tape
1 Switch the video recorder to STOP.
2 Press the key EJECT on the front of the video recorder.
J Jog & Shuttle (outer ring)
(on the front side of the video recorder)
GB
GB
11
Page 16

Use
Recording
You can record the pictures and the sound of the TV
J
programmes or the pictures and the sound of the unit
connected to one of the available AV sockets.
Preparing the recording
1 Load a tape and position it to the desired section where you wish to begin the recording
with keys REW., F.FWD., STOP, PLAY (23, 25, 27, 24).
2 Select the channel to be recorded with the key pr+ / pr- (19) or the keys 0 to 9 (21), or
else select the AV socket to which the unit is connected with key AV (22).
For two-digit channels, first press 0/-- (21) before entering the two digits.
J
3 Select standard play (SP) or long play (LP) with the key sp/lp (15).
J You may also use the inner knob JOG fitted to the front of the video recorder to explore an image
by image sequence.
Simple recording
1 Press the key REC (26).
ð The video recorder switches on record-pause.
2 Press the key PLAY (24).
ð The video recorder starts the recording.
Recording with automatic stop
1 Press key REC (26) twice.
2
Enter current programme end time with keys 0 to 9 on the remote control
ð The recording will automatically stop at the programmed time.
S.O.S. Record" (Snap On-Screen) recording
The S.O.S. Record function enables you to record the programme you are watching on the TV at any
J
time provided that your television set is fitted with the function NexTView Link (or similar) and that
you have a tape loaded in the video recorder. This function is not available if the video recorder has
already been programmed or is in play mode.
Press the key s.o.s. rec (14).
ð The video recorder switches on and automatically changes over to the same channel as the
television set to start recording.
Mark a scene with an index
Key index mark (17) of the remote control allows you to mark a scene by setting an invisible
J
electronic index while recording or playing a tape.
1 Start play or recording.
2 Press key index mark (17) to add an index
J To erase the indices, refer to page 18.
(21)
.
12
You can't mark or retrieve any index? Check whether the protection tab of the tape is not
L
broken. Should this be the case, cover the opening with a piece of thick adhesive tape.
Is recording impossible? Check whether the video recorder is switched to Record Pause
(indicated on its display) or to Play.
Page 17

Use
The NAVICLICK function memorises the TVguide pages listed every
J
morning by Teletext or NexTView and therefore enables you to display
every channel’s programme on your screen and to programme your
recordings for the day with a simple click.
Before using NAVICLICK
NAVICLICK functions from the day following the first installation of the video recorder.
J
Your video recorder must be on standby at 3 a.m. or 8 a.m. (depending on the option chosen
from the P
NAVICLICK to download the information from the Teletext. Should this not be the case,
you can however use NAVICLICK but it will take longer to display the programmes and
you will not have the possibility of changing from one channel to another.
REFERENCES menu) without programmed recording in order to enable
Consulting TV programmes with NAVICLICK
1 Press the key NAVICLICK to display the NAVICLICK page.
2 Use key pr+ / pr- (19) or CC(10) or
This function is available on most of the channels displaying the Teletext (for satellite channels
J
previously select SA with key AV). In the case of satellite channels, it is not possible to change
channels.
BB
(8) ) to change from one channel to another.
Programming a recording with NAVICLICK
1 Select a channel on your video recorder.
2 Press key NAVICLICK and wait until the NAVICLICK page appears.
3 Press keys ▲ (7) and ▼ (9) to select the programme you wish to record. Use keys
pr+ / pr- (19) or CC(10) or
4 Press ok (11) to validate your choice.
5 The T
6 Switch off the video recorder to put it into standby mode.
IMER REVIEW menu appears. Verify your programming and press exit (12) to exit
the menu.
BB
(8) to change from one channel to the other.
Updating NAVICLICK
In the event of some channels modifying their teletext structure, except in the case of a total
J
modification of the structure, you can update the number of the first page of the teletext of the
programme guide.
1 Press menu (13) key to display SUMMARY menu.
2 Select Installation line.
=> I
3 Select the NAVICLICK set up line.
4 The menu which appears indicates 3 numbers of the Teletext page channel by channel:
5 In order to update information, set the channel to be modified, set page number to be
NSTALLATION menu appears.
those of the current day's programmes, those of the following day's programmes and
finally those of the page reserved for sub-titles.
corrected with keys CC(10) or
Validate with ok (11).
BB
(8), and enter your corrections with keys 0 to 9 (21).
GB
GB
13
Page 18

Use
1
6
.2
5
16.25
FUNNY TIMESFUNNY TIMES
film
D
ra
m
a
-c
o
m
e
d
y
5862458624
TUESDAY
Programming a
recording
You can programme a recording with the SHOWVIEW®programming
J
numbers indicated in your TV magazine or by means of timer
programming if you don't know these numbers. Your video recorder
has 8 programming memories. Thus, you'll be able to programme 8
recordings over a 1-year period.
Load a tape and position it to the desired section with keys REW., F.FWD., STOP,
PLAY (23, 25, 27, 24).
With the SHOWVIEW¨programming
numbers
When programming for the first time, the video recorder positions
J
itself on channel number so that you can confirm or enter the
channel number.
1 Call up the SHOWVIEW menu with key showview (3).
2 Enter the number of the programme you wish to record, which you will find in your
TV programme, and validate with ok (11).
ð The T
IMER menu appears. The Stop time line is selected.
3 You can complete your programming by selecting a recording triggered by VPS/PDC
signals, recording frequency (single, daily, weekly), recording speed (SP/LP), recording
sub-titles (from Teletext) at the same time as the programme.
4 Press ok (11) to verify your recording time on the Timer review line : if not, press key
exit (12).
5 Switch the video recorder on standby-record with key BB(1).
If the recording is through a satellite receiver, leave this switched on.
J
Without the ShowView¨numbers
If you don't know the SHOWVIEW number of the programme
J
you wish to record, you'll have to use the RECORD TIMER
menu.
1 Display the SUMMARY menu with the key menu (13)
2
Select Record Timer line with key
validate with ok (11).
ð The R
ECORDTIMER
menu comes up.
3 With the keys 0 to 9 (21) or keys (10) or
enter the channel number you wish to record or if not
select an AV socket.
4 Enter the following information by selecting the corresponding line with the ▼ (9) key,
then with the keys 0 to 9 (21) or keys CC(10) or
▼ (9) and
BB
(8), to
BB
SHOWVIEW programming number
Return
imer No. CC❙❙BB77
TTimer No.
Programme No. Pr
Start time --:--
Stop time --:--
Date 20/07
VPS/PDC No...
How often Once...
Speed SP...
Subtitle Yes...
Clear timer 7
Timer review
RECORD TIMER
(8) :
- ----
14
SHOWVIEWis a registered trademark of Gemstar Development Corporation.
The SHOWVIEWsystem is manufactured under licence from Gemstar Development Corporation.
Page 19

Use
• start time of the programme,
• end time of the programme,
• the date, if the recording is not to take place on the same day.
ð You can complete your record timer by selecting the following options: recording
triggered by VPS or PDC signals, daily or weekly repeated recording, recording
speed, sub-title recording.
5 Switch off the video recorder to put it into standby mode.
When the video recorder is programmed
When the video recorder is on standby waiting for the time at which the recording shall be
triggered, a special indication ( ) is to be seen on its display. Then, you cannot operate the
video recorder any longer unless you quit this mode by pressing key B (1).
Deleting a programme recording
1 Display the SUMMARY menu with key menu (13), then select the Record Timer line
with
▼ (9). Validate with ok (11).
2 Press ▼ (9) to select the Timer Review list, then validate with ok (11).
3 With keys ▲ (7) and ▼ (9), select the programming to be deleted then press key 0000
(16).
ð Programming is deleted.
Recording programmed by a connected external unit
The recording of a programme can be triggered by a satellite receiver or any other unit supporting
J
this feature and connected to socket AV1 or AV2 by means of a Scart cable. This connection scheme
prevents you from having to programme both units.
1a Programming by external Timer : tick off the External timer box in the menu
P
REFERENCES (page 22) to trigger the recording via socket AV1.
1bProgramming by the R
video recorder R
indicating start and end times.
2 Switch the video recorder to standby with key B (1).
ECORD TIMER menu : programme the connected unit and, in the
ECORD TIMER menu, only select either socket AV1 or AV2, without
GB
GB
Error messages likely to occur when programming
L No timer available
You need to free one of the memories in order to programme again.
L When you programme two recordings with overlapping time periods, the menu TIMER REVIEW
comes up and makes the programmed recordings flash.
Delete the programme recordings with the key 0000 (16).
L Incomplete programming
Check that you have completed all the requirements for the recording (start time, end time,
etc.).
15
Page 20

Use
Tape library
TAPE LIBRARY
BB
jj
jj
(8) to
004
004
The Tape library enables you to create and manage a
J
library of 200 tapes, and to automatically find and
play a programme you have recorded yourself.
DOC Aventures en Montgol
Return
BB
Play back title
Play back title
❙❙
Go to title
Edit title
Delete title
Add title to the library
New tape
1 Load the tape.
2
Select New tape in the menu which is displayed then press ok
Should a message appear to inform you that the tape library is full, you will not be able to add a
L
new tape.
3 The video recorder gives this new tape a number which is now recorded in its memory.
Press exit (12) to leave menu.
4 When you eject the tape, don’t forget to label it with the number given by the video
recorder.
Tick Tape library option in the PREFERENCE menu so that the TAPE LIBRARY menu will
J
systematically appear when you load a cassette.
Managing recordings on a tape
When you have de-activated the Tape library in the
J
PREFERENCE menu, you can call up the TAPE LIBRARY
menu by selecting the Tape Library option in the
SUMMARY menu.
1 Load the cassette, enter the cassette number into the
menu which appears, then press ok (11).
2 With ▲ (7) and ▼ (9), select a title of one of the programmes recorded on the cassette,
then validate with ok (11).
3
To organise the tape contents, select one of the following functions:
• Playback title: the video recorder automatically searches and plays the selected
recording.
• Go to title: the video recorder positions itself at the start of the selected recording.
• Edit title: to change the programme's title. Press
select the letter, then press ok (11) to validate your choice: the letter appears in the
title situated on top of the screen.
• Delete title: to delete the title of the referenced recording on the tape.
• Add title to the library: set the tape at the beginning of the recording and validate
with
ok (11);
set the tape at the end of the recording and validate with
enter the name of the programme.
▲ (7), ▼ (9), CC(10) or
(11).
TAPE LIBRARY
Return
DOC Aventures en Montgol
❙❙BB
A B C D E F G H I J K L M .
N O P Q R S T U V W X Y Z È
a b c d e f g h i j k l m ,
n o p q r s t u v w x y z é
1 2 3 4 5 6 7 8 9 0 - ? :
à â ä ç é ê ë î ï ñ ô ö û ü
ok (11). Now
16
The Tape library function is only available if you record for more than 10 minutes.
J
Page 21

Use
Looking for a recorded programme
1 Eject the cassette which is in the video recorder.
2 Select the Tape library line from the S
menu.
3a Tape library
Tape library enables you to display the programme
titles recorded in the memory of the video recorder
in alphabetical order.
Identify the cassette number which contains the
programme you are looking for with keysV (7) and
▼ (9) to scroll the titles from A to Z or from Z to A,
or press keys CC(10) or
BB
(8) to scroll pages (this
process can be quickened by holding down these
keys).
3bTape number
Choose the Tape number option to display contents
of tapes which are stored in the memory. Press keys
▲ (7) and ▼ (9) to scroll the titles contained in a
tape; press keys CC(10) or
BB
(8) to change from
one cassette to another (this process can be
quickened by holding down these keys).
4 Once you have found the recorded programme
required, go to the corresponding line and press ok (11).
UMMARY
TAPE LIBRARY
Return
BB TT
ape Library
ape Library
❙❙
Tape number
TAPE LIBRARY
jj
jj
006
TITLE LIST
ARD-Frühstücksbuffet 002
BBC World News 001
BBC world News 006
Bericht aus Berlin 012
Brisant 012
CNN This Morning 011
COUSIN WILLIAMS 007
Die schönsten Bahn- 010
DOC Aventures en Montgol 004
DOC L’aile et la bête 004
TAPE LIBRARY
TAPE LIST
❙❙BB
World News 30m
BBC world News 10m
Protector - Das Recht im 50m
GB
GB
5 Select one of the two following options proposed:
• Edit title: to modify its title,
• Delete title: to delete it from the memory.
J
The video recorder will automatically give the exact name to the programme you have recorded if
this programme is shown on a channel where the NAVICLICK function works.
17
Page 22

Use
VHS
Tape control
counter
remainingSPSP
counter
The tape control function enables you to erase an index,
J
or to go or return to a particular tape position. Tape
control also informs you of the overall length of the tape
and remaining time.
1 Load a tape, then display the SUMMARY menu with key
LL
Return
Index search CC
Index search
Intro search
Clear index
Go to counter --h--m
Go to remaining --h--m
Cassette type E240
Auto Seq. Memory
menu (13).
2 Select Tape controls with keys ▲ (7) and ▼ (9), then validate with ok (11).
Index search
Press key C (10) or B (8) to have access to the precedent or following index. The video
recorder immediately returns to the required position and starts to play at this place if you
have finished your entry by pressing PLAY (24).
Intro search
Intro search displays all the indices in the tape. It explores the tape in fast forward mode with
J
temporarily accelerated play mode of all the indices.
Select Intro search line and press ok (11) to start the search.
Clear an index
1 Select the index as described above.
ð The video recorder stops at the index.
2 Select the Clear index function with ▼ (9) key, then validate with ok (11).
remaining
00h00m30s
00h00m30s
1h24m
1h24m
TAPE CONTROLS
BB
❙❙
E240
E240
Go to counter
Thanks to the time counter you can access a particular position from the beginning of the tape or
J
the 00h00m00s position.
Enter a value with keys C (10) or B (8), then validate with ok (11).
ð The video recorder immediately rewinds to the required position and starts to play at this
point if you have ended your entry by pressing PLAY (24).
Go to remaining time
Thanks to the time counter, you can access a particular position according to its position relative to
J
the end of the tape.
Enter a value with keys C (10) or B (8), then validate with ok (11).
ð The video recorder immediately rewinds to the required position and starts to play at this
point if you have ended your entry by pressing PLAY (24).
Cassette type
The video recorder detects the type of any standard tape when it corresponds to a standard time
J
(E60, E120, E180, E240 for 60, 120, 180 and 240 minutes of recording times). For all other tapes
(hired films for example), you must enter the cassette type. The video recorder will then be able to
accurately calculate and display the elapsed and remaining time of your tape.
To enter the recording time of the tape, press keys C (10) or B (8), or the keys 0 to 9.
Auto sequence memory
Refer to page 24.
18
It's impossible to use the index marks ? Check whether the protection
L
tab of the tape is not broken. Should this be the case, cover the
opening with a piece of thick adhesive tape.
Page 23

Use
Adjusting the sound
Your video recorder receives and records the digital NICAM sound broadcast by some channels
J
in Europe. This sound remains compatible with the analogue stereo sound system broadcast in the
other European countries.
Adjusting the sound in Play mode.
You can modify the sound adjustment when you view a
J
HiFi tape. However, in the case of a mono tape, it is not
possible to adjust sound.
L
-50------20------10------0------10-
R
Return CC
Return
Level
Sound mode Stereo ..
HIFI CONTROLS
Stereo
❙❙
1 Load tape and press PLAY (24).
2 Display the S
UMMARY menu with key menu (13).
3 Select HiFi controls with key ▼ (9), then validate with ok (11).
ð The H
4 With key
IFI CONTROLS menu appears.
C
(10) or B(8) select the sound track(s):
- STEREO: stereo sound of the Hi-Fi tracks,
- MONO: mono sound of the linear track,
- TRACK 1: sound of the left track,
- TRACK 2: sound of the right track,
- MIX: sound of the mixed Hi-Fi and mono tracks.
When viewing a HI-FI STEREO tape, you may select the sound tracks with key AV (22).
J
Readjusting the recording
HIFI CONTROLS
The sound level varies with each channel. The sound can
J
be adjusted before recording
1 Load tape and press key REC (26).
2 Display S
UMMARY menu with key menu (13).
L
-50------20------10------0------10-
R
Return CC
Return
Sound mode Stereo ..
3 Select HiFi controls with key ▼ (9), then validate
with ok (11).
ð The H
IFI CONTROLS menu appears.
4 In the case of a stereo or bilingual programme, select Sound mode line, then display
Stereo, Mono, Sound 1 or Sound 2 with keys C (10) ou B (8).
5 Then, select Level line and adjust the recording level yourself with keys C (10)
or B (8).
Stereo
❙❙
GB
GB
19
Page 24

Use
Adjusting the picture
Through the PICTURE menu, you can adjust the video
J
recorder for a better picture quality, a particular colour
system detection or recording.
1 Display the SUMMARY menu with key menu (13).
2 Select Picture with keys ▲ (7) and ▼ (9), then validate with ok (11).
Return
Format CC❙❙BB
Format
S-VHS cassette
NTSC TV
Copy mode
Black & white
Standard Mesecam
PICTURE
4:3...
4:3...
❑
❑
❑
❑
Tracking
Thanks to tracking, you can reduce interference and
J
picture flickering.
Tracking mode Manual ...
racking CC❙❙BB
TTracking
Sharpness
1 During play, select Tracking from the PICTURE menu.
2 With keys
C
(10) or B(8), adjust tracking.
3 Press key 0000 (16) to return to standard tracking or select Tracking line and display
Auto with keys
C
(10) or B(8).
Sharpness
To improve picture clearness in play.
J
1 During play, select the Sharpness line from the PICTURE menu.
2 Adjust with keys
C
(10) or B(8).
3 Press key 0000 (16) to return to standard tracking.
Stability
Stability CC❙❙BB
Stability
To improve the picture stability in frozen image mode.
J
Sharpness
1 Pause cassette, and select Stability from the PICTURE menu.
2 Adjust with keys
C
(10) or B(8).
3 To return to standard adjustment, press key 0000 (16).
Format
1 Select Format from PICTURE menu.
2 Choose an option with keys
J Automatic: for automatic recognition of a 16:9 recording format.
16:9: to record or read in 16:9 (D2 MAC, Visiopass, PAL+ decoder, numerical television, DVBS),
connected to an AV2 or AV1 socket.
4:3: to record or read in another picture format.
C
(10) or B(8).
20
Page 25

Use
S-VHS cassette
If you should wish to read a cassette recorded in a S-VHS format, tick a box with the key
ok (11) (þ).
NTSC TV
To view a cassette recorded in the NTSC 3.58 format on a NTSC TV connected to AV1.
J
Tick the box on the NTSC TV line with the key ok (11) (þ).
Copy mode
To improve the copy mode quality from another video recorder or from a camcorder
J
1 Select the sockets AV1 or AV2.
2 Press key REC (26).
3 Tick the box on the Copy mode line with the key ok (11) (þ).
4 Start recording by pressing the key PLAY (24).
Black and white
When recorded pictures are not of good quality (Scrambling), when the film is in black and white,
J
or when you wish to give an old film effect to your recording.
Tick the box on the Black and white line with the key ok (11) (þ).
Standard
Your video recorder comes with an automatic colour standard detection system (PAL, SECAM,
J
MESECAM, PAL/SECAM, PAL/MESECAM) that works in both play and record mode.
When playing a tape causes problems (scrambled pictures or black and white), you will have to
force the play mode by selecting one of the available options (PAL, SECAM, MESECAM).
If you wish to record a tape in a particular colour standard, choose one of the options displayed.
For example, if you wish to exchange tapes with people living in the Middle East, you must record
and play in MESECAM.
GB
GB
Select one of the options with keys C(10) or B(8).
21
Page 26

Use
Preference
adjustments
To personalise your video recorder, automate certain
J
functions, complete your programming or modify
settings.
1 Display the SUMMARY menu with the key menu (13)
2 Select Preferences with key ▼ (9), then validate with
Return
TTape library
Beep sound
Auto AV link
ShowView + 10 mins
Auto clock
VPS/PDC
Subtitle record
External timer
Eco mode
Auto LP
NextView station Pr 2 FR2
Naviclick update 03:00
Language English..
ok (11).
ð The P
REFERENCES menu appears
Tape library
Tick the box in the Tape library line with the key ok
of the T
APE LIBRARY menu when you load a cassette (see page 16 for more information on
the tape library functions).
(11) (þ) to have a systematic display
Beep sound
Tick this box to obtain a beep sound every time you press a key on the remote control.
PREFERENCES
ape library CC❙❙BB
✓✓
❑❑
✓
❑
✓
❑
❑
✓
❑
❑
✓
❑
❑
✓
❑
✓
❑
Auto AV link
Some television sets send a signal to your video recorder at regular intervals thus often putting the
J
latter into operation mode.
In order to avoid these spontaneous operations, the Auto AV link (o) function can be de-
activated with the ok (11) key.
SHOWVIEW + 10 (minutes)
Thanks to this option, you can systematically add 10 minutes to the end of your recordings
J
programmed with the SHOWVIEW system. Thus you will avoid defective recordings due to programme
time shifting or programmes exceeding the scheduled time (within the 10-minute limit).
Auto Clock
When the automatic daily clock setting feature does not match the time of your region.
J
De-activate this function (o) and manually adjust the clock on your video recorder.
VPS / PDC
Some channels telecast their programmes with VPS (Video Programme System) or PDC
J
(Programme Delivery Control) signals. These signals which are recognised by your video recorder
allow accurate triggering and stopping of a recording, whatever the delay of the programmes.
In order to have the possibility of recording at the very moment when a programme begins,
tick this option as long as the channel telecasts their programmes in VPS or PDC signals
(information available on the video recorder display).
22
Page 27

Use
Subtitle record
Some programmes are available with sub-titles. Press on the button text (
J
also possible to record these sub-titles when you are recording a programme. Select Yes at the
Subtitle option in the RECORD TIMER menu (see page 14) in order to automatically record them for
a given programme.
To systematically record the sub-titles broadcasted by the programmes which you record,
tick the box in the Subtitle record line (þ) in the P
REFERENCES menu .
6
) to display them. It is
External timer
Recording of a programme can be triggered by a satellite receiver or another programmed unit.
J
Activate this function (þ) so that you only have to programme the unit connected to the
socket AV1 of the video recorder.
Eco mode
Tick this box to activate the eco mode which enables your video recorder to save energy
while in standby mode where only the red indicator is on.
Auto LP
The LP function enables you to double the recording time of a video tape. Thus, an E180 tape with
J
a three-hour recording time in SP mode can have a 6-hour recording time in LP mode.
Select one of the options with keys C(10) or B(8) :
- Auto: the video recorder automatically goes into LP mode in the event of not having
enough time on the tape in SP mode.
- Always: all recordings are in LP mode.
- Never: all recordings are in SP mode.
GB
GB
NexTView
NexTView is only available in certain countries; normally you do not need to change the preset
J
condition.
With keys C(10) or B(8) select one of the channels to download the TV guide pages in
the scope the NAVICLICK function.
NAVICLICK
Thanks to this function you can decide when to update and memorise the TV guide pages displayed
J
by your video recorder.
With keys C(10) or B(8), select one of the options (3 a.m., 8 a.m. or never).
Language
To change the menu language displayed on the screen
J
Press keys C(10) or B(8) to scroll the different languages available.
23
Page 28

Use
Audio Dubbing Ð
Auto Sequence Memory
Audio Dubbing
The sound dubbing enables you to replace the recorded sound on the mono track of a VHS tape
J
whilst keeping the recorded sound on the HiFi tracks. A unit connected to the AV1, AV2, AV3, or
AV4 sockets, or even a microphone connected to the MICRO socket on the front of the video
recorder can provide means of dubbing your recordings.
1 Rewind the cassette to the start of the sequence to be dubbed and pause the picture using
the PAUSE (28) key.
2 Press the key AV on the remote control (22) or AUDIO DUBBING on the front of the
video recorder to activate the dubbing function.
3 Select the connected unit (Au3 for white, red and yellow cinch sockets on the front of
the video recorder; Au1, Au2 or Au4 for the sockets at the back of the unit; MIC for a
microphone connected to the front of the video recorder) to monitor the sound.
4 Press PLAY(24) to start dubbing, PAUSE (28) to interrupt the dubbing and STOP
(27) to stop. It is possible to connect a headphone to the HEADPHONE socket on the
front of the video recorder to monitor the sound.
Insert editing
Thanks to Insert editing, you can replace part of an existing recording precisely without disturbance
J
at the edit points.
It is possible to insert from another video recorder, from a camcorder, or from another unit (TV set,
another video recorder).
1 Load the cassette and press key status (4).
2 Select unit or source of the sequence which is to be placed on the tape.
3 Fast forward the tape to the end of the sequence to be replaced and press STOP (27).
4 Press key 0000 (16) to reset the counter.
5
Rewind the tape to the beginning of the sequence to be replaced and press key PAUSE (28).
6 Press on REC (26) then on INSERT and finally start playing from the source so as to
begin the insertion.
7 The insertion will automatically stop when the counter reaches 0000.
Auto Sequence Memory
Thanks to Auto Sequence Memory, you can choose different sequences from a tape and
J
consecutively view them. If you are connected to another video recorder fitted with a compatible
PAUSE socket, it is possible to copy these sequences and to automatically carry out the editing.
1 Connect the CAM/PAUSE sockets of the two video recorders with the assembly cable.
2
Using a SCART/Peritelevision cable, connect the AV1 socket of this video recorder
(master) and the AV2 socket of a second video recorder (slave), which is, in turn
connected to the television by the AV1 socket.
3 Load the tape to be copied.
4 Load the blank tape in the other video recorder and select the AV2 socket.
5
Display the S
line.
6 Find the beginning of the first sequence, validate with ok (11), then press key B(8).
7 Find the end of the first sequence and validate with ok (11).
8 Repeat this process for the other sequences. Select the Start assembling line to begin
the editing and validate with ok (11).
UMMARY
menu, select Tape controls option, then the Auto seq. Memory
24
This video recorder is not as precise as professional editing equipment.
J
Page 29

Use
VHS
VHS
VHS
Other functions
The functions explained on this page enable you to lock
J
the video recorder, play or record continuously.
Electronic lock
J To prevent the video recorder from being used, keys on the front can be locked.
1 Hold down the standby key B (3) on the remote control for 10 seconds and put it in a
safe place.
2 Press the standby key B (3) on the remote control to unlock the video recorder.
Continuous play/recording
J You can select endless playback or recording of a tape. When the end of the tape is reached, it is
automatically rewound until the beginning and play or recording is resumed. This function, used in
combination with the LP feature, provides you with a recording of 8 hours when using an E240 tape.
Continuous play: press PLAY (24) for 6 seconds.
Continuous recording: press REC (26), for 6 seconds and then press PLAY(24).
VPS/PDC system
J The VPS or PDC indication is displayed when the programme you are watching is broadcasted with
VPS or PDC. In such a case, you can use the functions outlined below.
VPS auto stop : press the key vps (2) during recording of a VPS programme.
ð The recording automatically stops when the programme has finished in real time.
VPS next : set the video recorder in pause-record mode then press key vps (2).
ð The video recorder starts recording as soon as the programme begins.
Concerning video tapes
J To avoid erasing one of your tapes by accident, we recommend that you to protect them by breaking
the security tab. To reuse a protected tape, just stick a piece of adhesive tape on this place.
Unprotected Protected re-recordable
Tapes are sensitive to utilisation and storage conditions. Keep them away from dust, humidity or
excessive heat. Do not place them next to appliances producing strong magnetic or electrical fields
(electro-magnet, motor, etc.). Tapes may vary in quality. The difference in quality not only concerns
the tape itself but also the different mechanical elements of the video cassette. A poor quality tape
can damage your video recorder. You should therefore use quality brand tapes.
GB
GB
25
Page 30

Use
More information
This remote control is a MULTI brand TV model which is compatible with a large
J
number of television sets and video recorders. Select the three-digit code from the
charts below which corresponds to the make of your television or another video
recorder and refer to the instructions on page 9 before controlling one or the other
unit.
TV code list
BRAND OF
YOUR TV SET
AKAI . . . . . . . . . . . . . . . . . . . . . .008-020
AKARI . . . . . . . . . . . . . . . . . . . . . . . .028
BANG & OLUFSEN . . . . . . . . . .009-019
BLAUPUNKT . . . . . . . . . . . . . . . . . .023
BRANDT . . . . . . . . . . .001-000-010-020
BRIONVEGA . . . . . . . . . . . . . . . . . . .019
BLUESKY . . . . . . . . . . . . . . . . . . . . .020
CGE . . . . . . . . . . . . . . . . . . . . . . . . . .016
CONTINENTALEDISON . . . . . . . . .004
DAEWOO . . . . . . . . . . . . . . . . . .020-025
ELBE . . . . . . . . . . . . . . . . . .005-015-023
FERGUSON . .001-003-004-000-010-020
FINLUX . . . . . . . . . . . . . . . .020-024-019
FISHER . . . . . . . . . . . . . . . . . . . . . . .008
FORMENTI . . . . . . . . . . . . . . . . . . . .019
GOLDSTAR . . . . . . . . . . . . . . . . . . . .020
GRUNDIG . . . . . . . . . . . . . .023-024-016
HITACHI . . . . . . . . . . . . . . . . . . . . . .007
IMPERIAL . . . . . . . . . . . . . . . . . . . . .016
JVC . . . . . . . . . . . . . . . . . . . . . . . . . . .013
BRAND
CODE
BRAND OF
YOUR TV SET
KNEISSEL . . . . . . . . . . . . . . . . . .020-025
LOEWE . . . . . . . . . . . . . . . . . . . . . . .020
LOEWE OPTA . . . . . . . . . . . . . . .019-020
LUXOR . . . . . . . . . . . . . . . . . . . . . . .005
METZ . . . . . . . . . . . . . . . . . .013-019-023
MITSUBISHI . . . . . . . . . . . .017-018-020
MIVAR . . . . . . . . . . . . . . . . . . . . . . . .016
NOKIA . . . . . . . . . . . . . . . . . . . . . . . .005
NORDMENDE . . . . . . .001-010-020-000
ORION . . . . . . . . . . . . . . . . . . . .005-020
PANASONIC/national . . . . . .012-005-026
PHILIPS . . . . . . . . . . . . . . . .019-020-021
PHONOLA . . . . . . . . . . . . . .019-020-021
PIONEER . . . . . . . . . . . . . . . . . .001-005
POLYTRON . . . . . . . . . . . . .020-027-029
RADIOLA . . . . . . . . . . . . . .019-020-021
RADIOMARELLI . . . . . . . . . . . . . . . .019
REX . . . . . . . . . . . . . . . . . . . . . . . . . .005
SABA . . . . . . .001-000-005-010-019-020
SALORA . . . . . . . . . . . . . . . . . . . . . .005
Video recorder code list
BRAND OF
YOUR VCR
AIWA . . . . . . . . . . . . . . . . . . . . . . . . . . . . . . . . . . . . . . . . .167-168
AKAI . . . . . . . . . . . . . . . . . . . . . . . . . . . . . .103-104-105-106-107
BLAUPUNKT . . . . . . . . . . . . . . . . . . . . . . . . . . . . . . .108-109-162
BRANDT . . . . . . . . . . . . . . . . . . . . . . . . . . . . . . .101-102-112-156
DAEWOO . . . . . . . . . . . . . . . .140-141-142-143-144-145-146-147
FERGUSON . . . . . . . . . . . . . .101-102-112-153-155-156-157-160
FISHER . . . . . . . . . . . . . . . . . . . . . . . . . . . . . . . . . . . .135-136-137
FUNAI . . . . . . . . . . . . . . . . . . . . . . . . . . . . . . . . . . . . . . . . . . .130
GOLDSTAR . . . . . . . . . . . . . . . . . . . . . . . . . . . . . . . . . . . .123-134
GRUNDIG . . . . . . . . . . . . . . . . . . . . . . . . . . . . . . . . .161-169-170
HITACHI . . . . . . . . . . . . . . . . . . . . . . . . . . . . . . .110-112-122-123
JVC . . . . . . . . . . . . . . . . . . . . . . . . . . . . . . . .106-110-111-112-113
MITSUBISHI . . . . . . . . . . . . . . . . . . . . . . . . . . . . . . . . . . .148-149
NEC . . . . . . . . . . . . . . . . . . . . . . . . . . . . . . . . . . . . . . . . . . . . .139
NOKIA . . . . . . . . . . . . . . . . . . . . . . . . . . . . . . . . .103-110-135-138
BRAND
CODE
BRAND OF
YOUR VCR
NORDMENDE . . . . . . . . . . . . . . . .101-102-112-154-156-157-158
ORION . . . . . . . . . . . . . . . . . . . . . . . . . .124-125-126-127-128-129
PANASONIC . . . . . . . . . . . . . . . . . . . . . . . . . . . . . . . .108-109-162
PHILIPS . . . . . . . . . . . . . . . . . . . . . . . . .161-162-163-164-165-166
RADIOLA . . . . . . . . . . . . . . . . . . . . . . . .161-162-163-164-165-166
SABA . . . . . . . . . . . . . . . . . . . .101-102-112-153-155-156-157-158
SAMSUNG . . . . . . . . . . . . . . . . . . . . . . . . . . . . . . . . . . . . . . . .133
SANYO . . . . . . . . . . . . . . . . . . . . . . . . . . . . . . . . . . . .119-120-121
SCHNEIDER . . . . . . . . . . . . . . . . . . . . . .161-162-163-164-165-166
SHARP . . . . . . . . . . . . . . . . . . . . . . . . . . . . . . . . . . . . . . . .131-132
SONY . . . . . . . . . . . . . . . . . . . . . . . . . . . . . . . . . .115-116-117-118
TELEAVIA . . . . . . . . . . . . . . . . . . . . . . . . . . .101-102-112-155-156
TELEFUNKEN . . . . . . . . . . . . . . . . . . .101-102-112-155-156-159
THOMSON . . . . . . . . . . . . . . . . . . .101-102-112-154-156-157-158
TOSHIBA . . . . . . . . . . . . . . . . . . . . . . . . . . . . . . . . . . .110-111-114
BRAND
CODE
BRAND OF
YOUR TV SET
SAMSUNG . . . . . . . . . . . . . . . . .020-030
SANYO . . . . . . . . . . . . . . . . . . . .008-018
SCHAUB-LORENZ . . . . . . .005-016-020
SCHNEIDER . . . . . . . . . . . .019-020-021
SELECO . . . . . . . . . . . . . . . . . . . . . . .005
SHARP . . . . . . . . . . . . . . . . . . . .022-018
SIEMENS . . . . . . . . . . . . . . . . . . . . . .023
SINGER . . . . . . . . . . . . . . . .001-002-019
SINUDYNE . . . . . . . . . . . . . . . . . . . .019
SONITRON . . . . . . . . . . . . . . . . . . . .008
SONY . . . . . . . . . . . . . . . . . . . . .014-018
TELEAVIA . . . . . . . . . . . . . .001-010-020
TELEFUNKEN . . .001-002-000-010-020
THOMSON . . . . . .001-000-002-010-020
TOSHIBA . . . . . . . . . . .006-018-024-016
WEGA . . . . . . . . . . . . . . . . . . . . . . . .019
YOKAN . . . . . . . . . . . . . . . . . . . .020-025
YOKO . . . . . . . . . . . . . . . . . . . . . . . . .020
BRAND
CODE
BRAND
CODE
26
Page 31

Use
Technical data
In our efforts to improve the quality of our products, we reserve the right to change their features.
J
The information contained in these instructions are therefore liable to change and are not
contractual.
Mains supply 200 to 240 V ±10% - 50/60 Hz
Consumed power 23 W when ON
3 W in the eco mode
Clock autonomy approx. 30 minutes
Weight approx. 5.0 kg
Functioning conditions +5°C à + 40°C
Surrounding humidity: 80 % maximum
Tape heads video - 4 rotary heads
audio - 2 rotary heads (HiFi)
1 fixed head (mono linear track)
HiFi pass-band 20 to 20 000 Hz
Dynamic 80 dB
Tuner PLL, VPS/PDC Type
Reception band I-III-IV Hertzian (aerial)
Inter-band (cable network)
Hyper-band (cable network)
Frequency ranges 45 to 855,25 MHz
Colour systems PAL - SECAM - MESECAM
Playing and recording in NTSC 3.58
Playing of NTSC tapes on TV PAL 60 Hz
Playing of S-VHS tapes
Reception standards LL’- BG - I - DKK'
Number of storable channels 99
Remote control Infrared 33 Khz - Batteries 2 x 1,5 V (AA)
Menu language French, English, German, Italian, Spanish, Hungarian,
Dutch, Polish, Portuguese, Swedish, Czech.
GB
GB
Automatic functions On (using any key)
Play (with protected tape)
Rewinding (at the end of the tape)
Long Play (LP) - Super Long Play (SLP)
Tapes VHS format
Rewinding time: 130s with E 180
R9000 - Pack 3 / GB - EP / 05-2000
27
Page 32

AKAÏ SX 1000 13
ALBA 333, 550, 555, 666, SAT200, SAT300, SAT400, SAT500 01
ALDES 02
ALLSAT 04
AMSTRAD SAT100, SAT200, SAT300, SAT520, SR150, SRD400 03
ARMSTRONG 06
BEST 07
B.TELECOM SVS200 08
BUSH SR2000 01
CANAL SATELLITE NUMERIQUE (1) 20
CAMBRIDGE ARD200, RD480, RD 13
CHANNEL MASTER 11
CHAPARRAL 18
CITIVISION 10
CITYCOM CCS150, CSS140, CSS190 26
COLUMBUS 35
CONNEXIONS 14
DISKEXPRESS 07
DNT 15
DRAKE 16
EXATOR EXA111N 37
FERGUSON SRA1, SRD6, SAP5S, SRV1, SRD5, SRD16 , FSP10 12
FINLUX TV5000 (3) 34
FUBA ODE540, ODE543, ODE545 (4) 37
GOODMANS ST700 19
GRUNDIG GIRD3000 19-21
HIRSCHMANN 22
HITACHI SR2070D, SR1050D 19
JOHANSSON 25
JVC 08
KATHREIN UFD41, UFD70, UFD89, UFD90, UFD91, UFD92, UFD93 26
MANHATTAN 7700 25
MASPRO SRE90R, SRE90S, SRE250S, SRE350 27
MATSUI RD600 21
MIMTECH Nimbus 48C(5) 28
MINERVA MSR200, MSR250, SAT500, SAT5000 21
MITSUBISHI SSTPB10, ST-PB10 19
MORGAN 06
NAGAI 29
NEC 3022, 4012 30
NETWORK 31
NIKKO 32
ISR7000 01-13
SRD 500, SRD510/SRD520, SRD540, SRD545, SRD550
SRD600IRD, SRD600E, SRD650E, SRD700, SRD2000
SRX20016Ch, SRX20048Ch, SRX300, SRX310, SRX320
SRX330, SRX340, SRX345, SRX350, SRX360
SVS300 13
SR3000 19
IRD155 09
480EXTRA (2) 13
RX580S, ARX200, ARK200
SYSTEM 11
ODE550, ODE622
ODE642 35
GIRD2000, GRD150, GRD200, GRD250, GRD280
GRD300, STR-1, STR211, STR212, STR311, STR312
STR315, STR322, STR511, STR512, CSR10 21
TU-AD1000 19
UFD94, UFD95, UFD200, UFD210, UFD211, UFD220,
UFD230, UFD232
NOKIA 5918(6), 1100(6), 1500(6), 1600, 1602(6), 1700(6), 1800
NORDMENDE SR120ST, SR990IMC, SR600 33
OXFORD 08
ORBITECH X100, X100PLUS 47
PACE APOLLO, MSS100, MSS200, MSS300/1, MSS500/1
PALADIUM LC200E 21
PALCOM ML-200, ML-72002, SL-300, SL-4000RP, SL-650R 35
PALSAT 29
PANASONIC TUS200D 36
PHILIPS STU330(6), STU350(6), STU430, STU560, STU660 20
PROSAT 19
QUADRAL 38
REDIFFUSION 39
RFT SAT1000, SAT1100, SAT1200, SAT1500, SAT2000 21
SABA ASR315 49
SABRE 58
SAKURA SR800ER, SR8685 41
SALORA 5902 23
SAMSUNG/JUPITER 42
SEEMANS 43
SENTRA 44
SONY SAT300, SAT301 46
SUNSTAR 06
TATUNG 32
TECHNISAT VC2001, VC2002 48
TELECIS 19
TELEDIREKT 43
TELEFUNKEN ARD1-K, SR950Z, SR900Z, SR1050Z, SR1050V 49
TELEPIU 59
TELEVES 56
THOMSON 50
THORN SAT120, SAT99 58
TOSHIBA 51
TPS 67
UNIDEN 7007 52
UNIVERSUM LC200E 21
WINERSAT 25
WISI OR31, OR48, OR49, OR52, OR53, OR54, OR55 53
WOSLEY (TANDY) 54
CABLESTAR 60
CABLETIME 60
GI 61
IMPULSE 61
JERROLD 61
MACOM 62
OAK 63
SCIENTIFIC ATLANTA 64
VISIOPASS 20-67
VIDEOTRON 66
VIDEOWAY 66
2200, PRD900 (6), SAT750, SAT800, SAT800+, SAT820S
SAT1201, SAT1202, SAT1202E, SAT1202T, SAT2202
SAT8003CS 23
SRD1000 19
MSS 1000, PRD 800, PRD 800 IRD, PRD 800+
PRD690IRD, PRD900, PRD900IRD, PRD900+
PSR800, PSR800+, PSR900, SBR99, SS-600, SS-9000
SS-9000IRD, SS-9200, SS-9200IRD, SS-9210IRD
SSR806, SSR902, SSR906 19
SL-750R, SL-7900RP, SL-8000RP
TUSD250 19
STU801(6), STU802, STU804(6), STU812(6), STU824
STU904, STU901, STU909, STU1400, STU3310(7)
STASSFURT SAT1(6)
SAT3000 26-20
SSR290, SSR299, SSR399, SSR420, SSR430, SSR500 40
SSR880, STR200
SSR700(8) 02-05
SR1000Z 19
TSR610V,TSR710VT 50
ASR11T 49
TS540 19
OR58, OR59
Page 33

THOMSON MULTIMEDIA
46 quai A. Le Gallo
92648 Boulogne
Cedex France
RCS NANTERRE B 322 019 464
http://www.thomson-multimedia.com
DAE Communication - 95000 Cergy
21063020
© Copyright THOMSON multimedia 2000
R9000 - Pack 3 / R9089PE1
 Loading...