

Page 1

Table of Contents
Connections and Setup
Some points to check before you connect..................2
Accessories provided ....................................................2
Front panel controls......................................................3
Front panel display ........................................................3
The remote control ......................................................4
Basic connections (DVD/VCR + TV) ............................6
Basic connections (DVD/VCR + TV + satellite or
cable receiver) ..............................................................6
Other connection options ............................................6
Tuning in a video channel on your TV..........................9
Tuning in TV channels ................................................10
VCR mode
Basic playback operations
Description of the VCR main menu ..........................12
Playback........................................................................12
Stopping playback........................................................12
Accelerated play..........................................................12
Fast forward / Rewind ................................................13
Variable playback ........................................................13
Still image ....................................................................13
Frame Advance ............................................................13
Ejecting the tape..........................................................13
Recording
Recording options........................................................14
Instant recording ........................................................14
Instant timer recording ..............................................14
Ending a recording ......................................................14
Programming a recording ..........................................15
Copying from DVD to VCR ........................................15
Advanced functions
Language selection......................................................18
Auto tracking ..............................................................18
Setting the clock..........................................................18
Colour standards ........................................................18
Video doctor ................................................................19
Sound settings..............................................................19
On screen display ........................................................19
Format..........................................................................20
Decoder........................................................................20
OPR ..............................................................................20
NICAM ........................................................................20
Resetting the tape counter ........................................21
Child lock......................................................................21
Playing NTSC tapes ....................................................21
DVD mode
EN
Basic playback operations
Compatible discs ........................................................22
Compatible formats....................................................22
Regional coding............................................................22
Operating the DVD player..........................................22
Using the menus..........................................................22
Playback........................................................................22
Accelerated play..........................................................23
Still image ....................................................................23
Frame advance ............................................................23
Variable slow motion ..................................................23
Changing chapter / track ............................................23
Zoom ............................................................................23
Scene replay ................................................................24
Play modes ..................................................................24
Program playback........................................................24
Screen fit ......................................................................24
Info menu
Using the Info menu....................................................25
Title/Chapter / Track ..................................................26
Direct access ................................................................26
Audio ............................................................................26
Subtitles........................................................................27
Camera angle ..............................................................27
Sound............................................................................27
Audio CDs, mp3,WMA, Divx and JPEG
discs
Playing an audio,mp3 or WMA CD ..........................28
Displaying JPEG files....................................................29
Playing JPEG and mp3 or WMA files at the same time 30
Playing DivX files....................................................................30
Player Menus
Using the player menus ..............................................31
The Language menu....................................................31
The Display menu........................................................32
The Audio menu..........................................................33
The Lock menu............................................................34
The Others menu........................................................35
VCR and DVD modes
Additional Information
Tr oubleshooting ..........................................................36
Precautions ..................................................................37
Guarantee ....................................................................38
Technical data ..............................................................39
Discs you can play........................................................39
1
Page 2
Connections and Setup
EN
Some points to check before you connect
• Ensure that the mains supply in your house complies with that indicated on the identification
sticker located on the back of your appliance.
• Install your appliance horizontally, away from any source of heat (fireplace) or appliances
creating strong magnetic or electric fields.The components of this appliance are sensitive to
heat.The maximum ambient temperature should not exceed 35° Celsius.
• Leave sufficient space around the appliance to allow adequate ventilation: 10 cm on either side
and at the rear, as well as 7 cm above the top are ideal.
• The humidity of the room should not exceed 75%. If you have to use the appliance outdoors,
do not expose it to rain or splashing water.The apparatus should not be exposed to dripping
or splashing and no objects filled with liquids, such as vases, should be placed on the apparatus.
•Moving it from a cold environment to a warm one is likely to cause condensation on some
components inside the appliance. Let the condensation disappear of its own accord before
turning the appliance on again.
• Before moving the player, make sure the disc tray is empty.
Other important use and cleaning information at the end of the booklet.
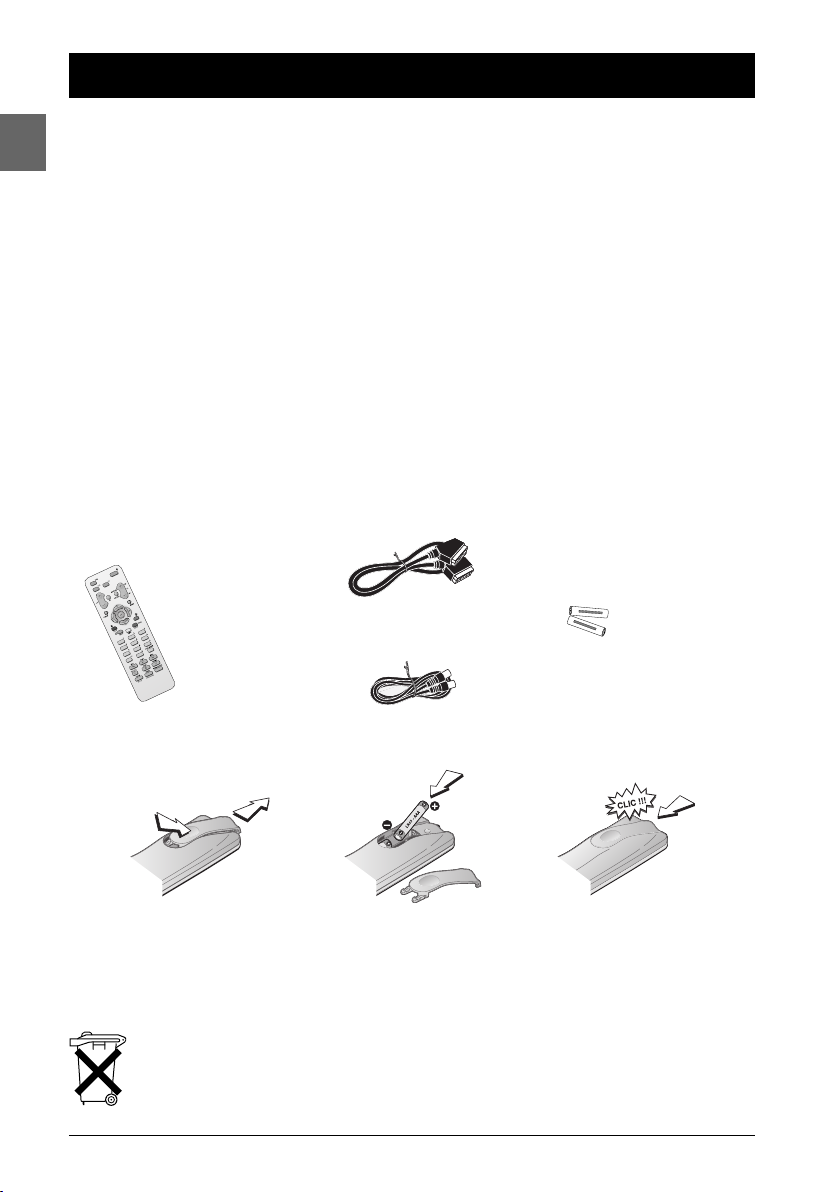
Accessories provided
SCART lead
+
Remote control 2 non-rechargeable
Coaxial cable
-
-
+
batteries, type AAA
Inserting batteries in the remote control
1
• Do not mix different types of batteries or new and old batteries. Do not use rechargeable batteries.
• In order to avoid any risk of explosion, observe the polarities indicated inside the battery
compartment. Replace only with the type of batteries specified above. Do not dispose of them in a
fire or recharge them.
• If you are not using the remote control for a long period of time, remove the batteries.
• Please respect the environment and prevailing regulations.Before you dispose of
batteries or accumulators, ask your dealer whether they are subject to special
recycling and if they will accept them for disposal.
2
2
3
Page 3
Connections and Setup
PP
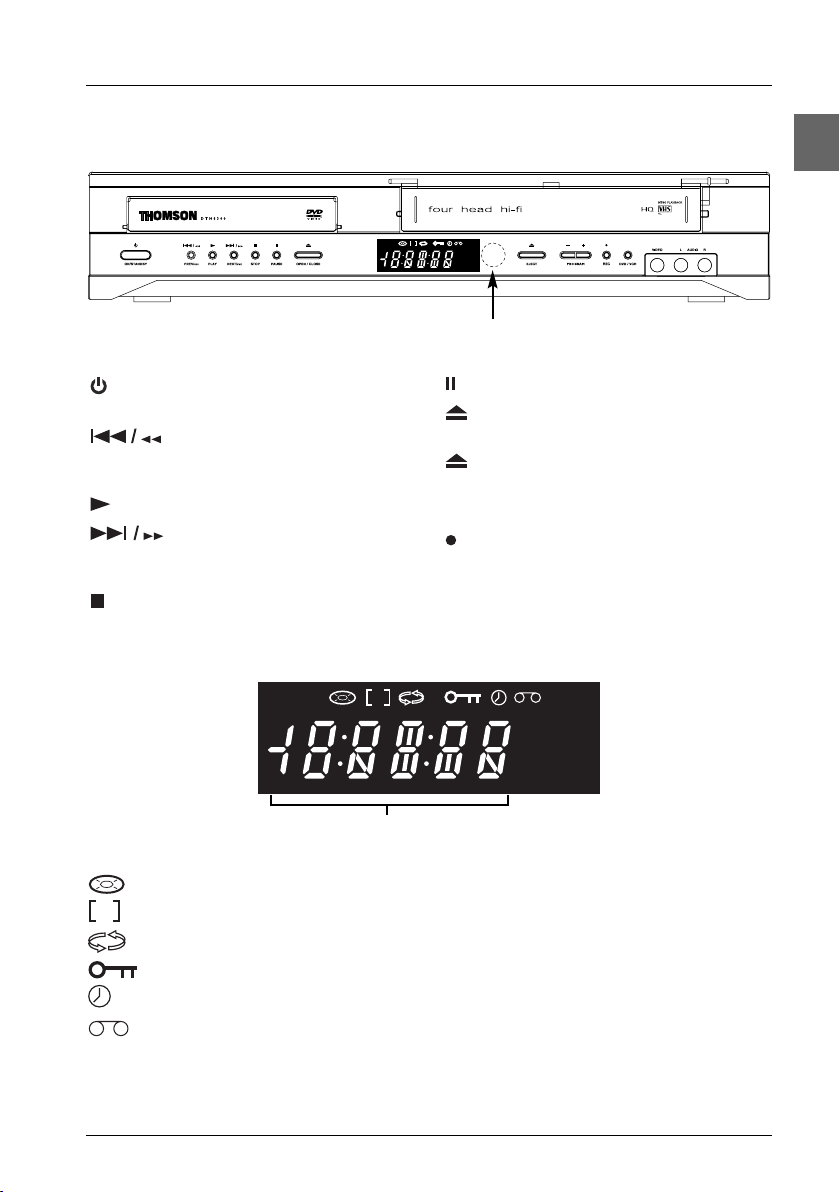
Front panel controls (buttons appear left to right below)
DVD
Point the remote control here.
ON/STANDBY- Switch the appliance on
and off.
PREV/REV - Directly access the
previous chapter or track; start fast reverse
search; rewind the tape.
PLAY - Start playing a disc or a cassette.
NEXT/FWD - Directly access the
next chapter or track; start fast forward
search; wind the tape.
STOP - Stop disc or cassette playback.
VCR
P
REC
TV
Remote sensor
PA USE - Pause playback; frame advance.
OPEN/CLOSE - Open and close the
DVD player's disc tray.
EJECT - Eject the cassette from the video
recorder.
- PROGRAM + - Change channel in VCR mode.
REC - Start recording in VCR mode.
DVD/VCR - Change from DVD mode to VCR
mode and vice versa.
Front panel display
DVD
P
VCR
REC
EN
TV
Indicates total playing time/elapsed time/current time.
DVD Appears when the appliance is in DVD mode.
Appears when a disc is loaded.
Indicates the Progressive Scan is set to On.
Appears when the appliance is in repeat mode.
Indicates that the child lock is On.
Indicates that a recording is programmed or a timer recording is in progress.
Appears when a tape is inserted in the video recorder.
VCR Appears when the appliance is in VCR mode.
REC Appears when a recording is in progress.
TV Appears in TV mode.
3
Page 4
Connections and Setup
EN
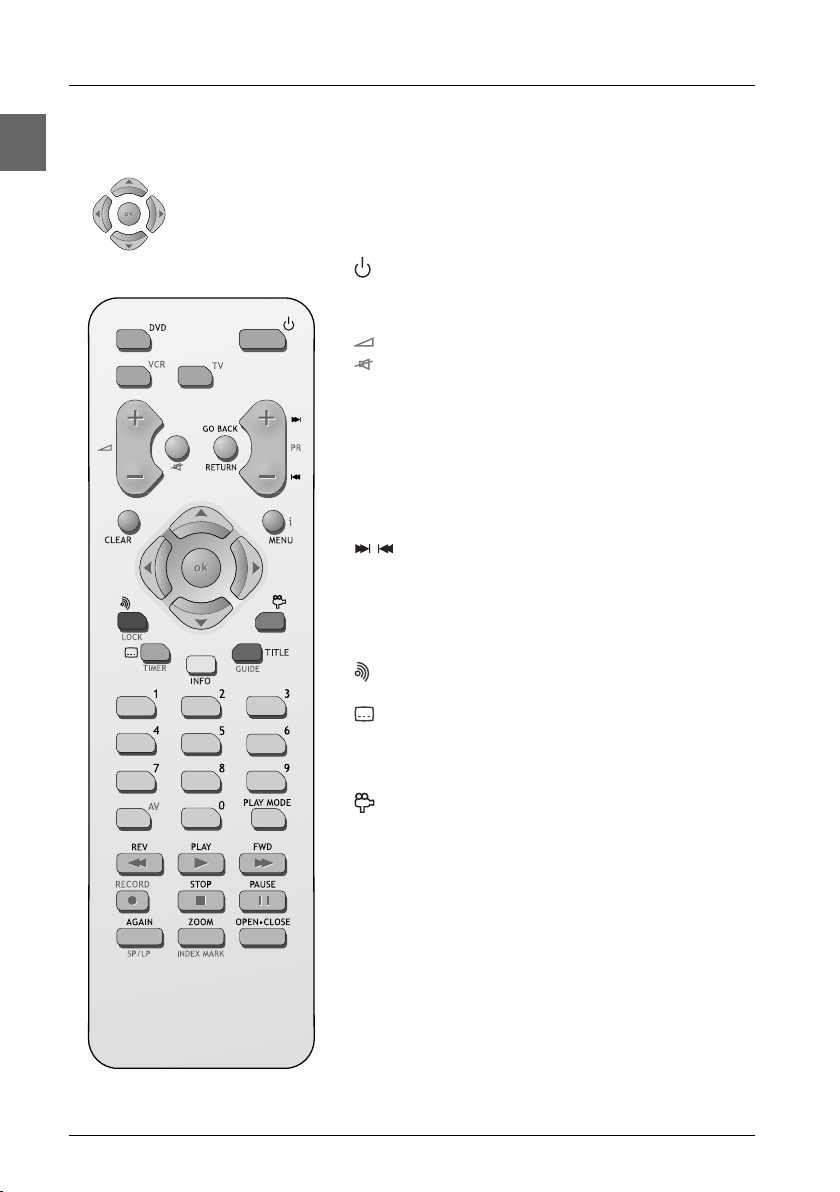
The remote control
Navigating through menus
Use the direction buttons to navigate through the menus. Press the OK button
on the remote control to confirm any selection you make.
General functions
Switch the appliance on and off.
DVD Select the DVD player.
VCR Select the video recorder.
Adjust the sound volume of the television set.
(mute) Mute and restore the sound of the television set.
LOCK (red) Lock the appliance. Press again LOCK to unlock
the appliance.
0-9 Number entry.
PLAY Start playing a disc or a tape.
Functions in DVD mode
GO BACK Return to the previous menu.
Directly access the next or previous chapter or
track.
CLEAR Remove a track from a program list. Cancel the
zoom function.
MENU Access and hide the disc menu during play.
Display the player’s main menu (see page 22).
(red) Access the audio function of the
Info
menu (see
page 26).
(green) Access the subtitle function of the
Info
menu
(see page 27).
INFO (yellow) Access the
TITLE (blue) Switch between music and photo menus (see page 30).
(purple) Access the camera angle function of the
Info
menu (see page 25).
Info
menu (see page 27).
PLAY MODE Access the play mode function (see pages 24 and
28).
REV Start fast reverse, reverse accelerated play or
reverse slow motion (see page 23).
FWD Start fast forward, forward accelerated play or
forward slow motion (see page 23).
STOP Stop play, accelerated search or slow motion.
PAUSE Freeze frame, frame advance or slow motion (see
page 23).
AGAIN Move backwards approximately 10 seconds dur-
ing disc playback (DVD) (see page 24).
ZOOM Access the Zoom function (see page 23).
OPEN.CLOSE Open and close the disc tray.
4
Page 5

Connections and Setup
Functions in VCR mode
PR+ / PR- Change channel.
CLEAR Set the counter to zero.
Access the VCR main menu. Exit a menu.
TIMER (green) Display the SHOWVIEW menu (see page 15).
0-9 Select a channel, enter numbers.
AV Select the devices connected to the Audio/Video sockets (AV1,AV2, ...).
PLAY MODE Watch one TV channel whilst recording another one.
REV Start fast reverse, reverse accelerated play (see pages 12 and 13).
FWD Start fast forward, forward accelerated play (see pages 12 and 13).
STOP Stop play, accelerated search,slow motion or recording.
PAUSE Freeze frame, frame advance (see page 13).
RECORD Start recording (see page 14).
SP/LP Double the recording time of a tape with the LP function (see page 14).
OPEN.CLOSE Eject the tape.
Functions in TV mode
This remote control can be used with some recent models of televisions:Thomson, Saba, Brandt,
Ferguson,Telefunken and Nordmende.
Note:The buttons described below operate as specified, provided that the relevant function is available on the
television.
TV Select the television.
Adjust the sound volume.
(mute) Mute and restore the sound.
PR+ / PR- Change channel.
GO BACK Return to the channel watched before last.
CLEAR Exit a menu.
MENU Access the television's main menu.
Use the Zoom function (with a 16/9 television only).
INFO (yellow)
GUIDE (blue) Display the programme guide.
Obtain information about the channel.
Note:The coloured buttons can also be used to access the Teletext topics indicated in colour (if your television
has the Teletext function available).
0-9 Select a channel. For 2-digit channels, first press
0
.
EN
5
Page 6
EN
Connections and Setup
Television
set
United Kingdom,
Ireland
Continental
Europe
1
4
DVD/VCR
3
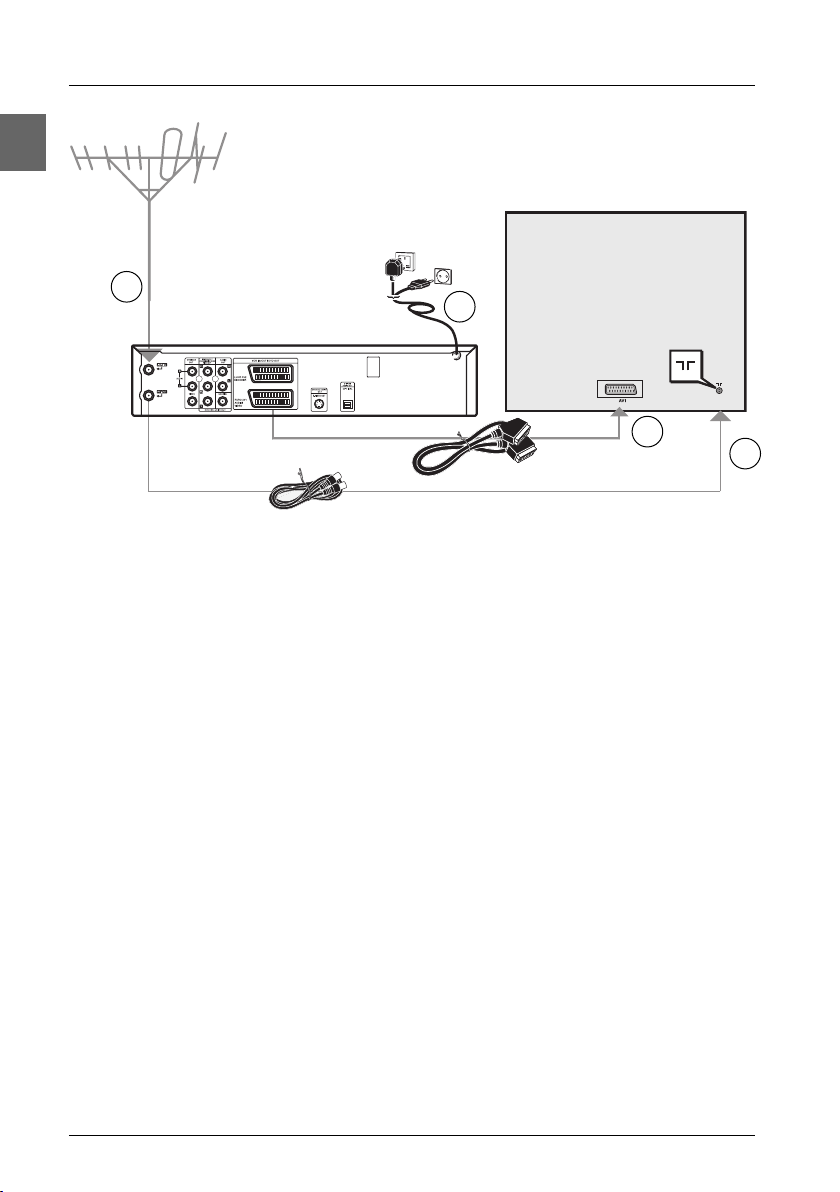
Basic connections (DVD/VCR + TV)
1. Disconnect the aerial cable from your television set and reconnect it to the AERIAL socket
of the DVD/VCR.
2. Using the coaxial cable supplied, connect the RF OUT socket of the DVD/VCR to the aerial
socket of the television set.
3. A Scart lead connection between the appliance and your television set makes it easier to use
and improves picture and sound quality. Connect the DVD/VCR’s Scart socket (EURO AV1
AUDIO/VIDEO) to the television set’s Scart socket (AV1, EXT1, AUX1, according to the
make) using the Scart lead (provided).
4. Connect the DVD/VCR to the mains socket using the mains lead.
Note: If you connect the DVD/VCR to the television set using a Scart lead, set the TV Output Select
option in the Display menu to RGB (see page 32).
2
Basic connections (DVD/VCR + TV + satellite or cable receiver)
1. Connect the DVD/VCR to the television set as described above (step 1 to 3).
2. Connect the satellite or cable receiver scart socket to the DVD/VCR’s second Scart socket
(EURO AV2 DECODER) using a Scart lead (not provided).
3. Connect the DVD/VCR to the mains socket using the mains lead.
Note: If one of the devices is not working, check that all the cables have been inserted properly into the
sockets which they should be connected to.
Other connection options
The basic connections (described above) are for standard-quality sound and high-quality picture
reproduction. There are other connection options available, which can produce pictures and sound
of better or poorer quality:
6
Page 7
DVD/VCR AUDIO R
and L sockets
Coaxial cable
Optical cable
DVD EXCLUSIVE
AUDIO R and L
sockets
Audio cables (red
and white)
Coaxial digital
audio output
Optical digital audio
output
Connections and Setup
EN
Back of
DVD /VCR
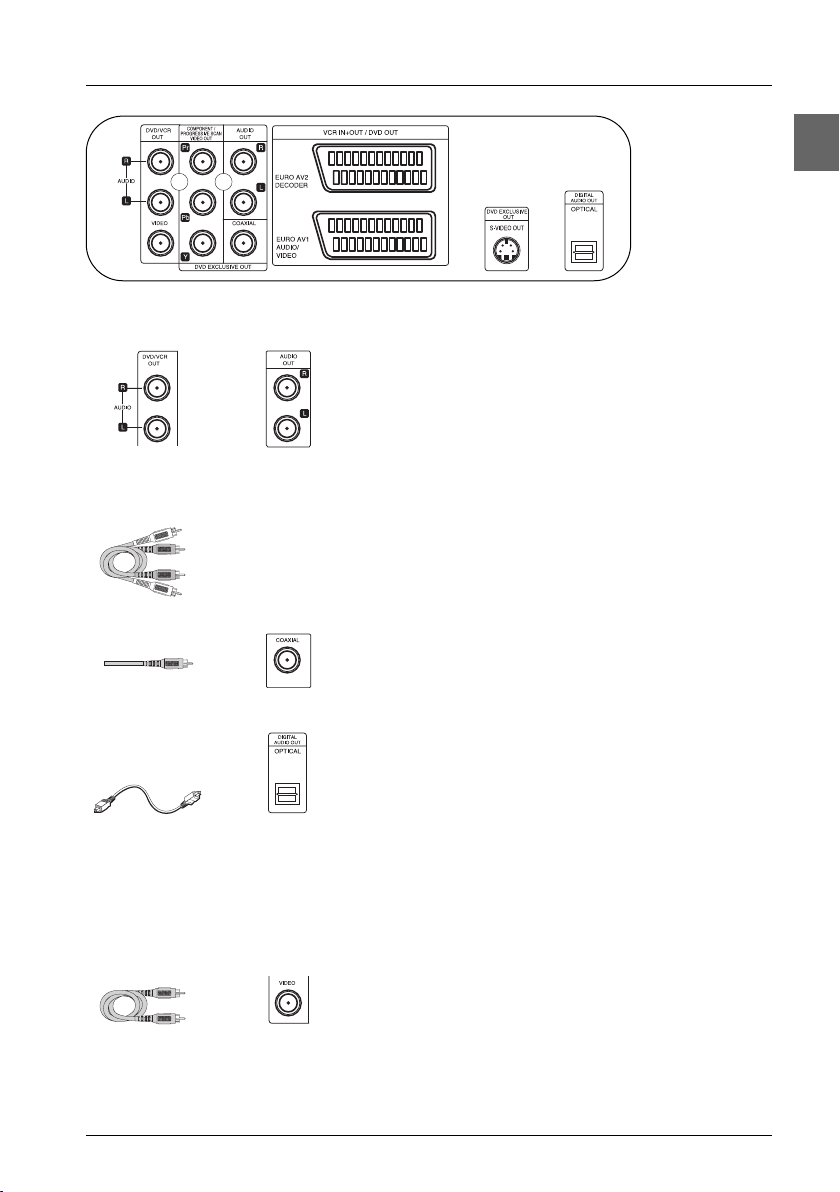
Back panel audio sockets
DVD/VCR AUDIO OUT L (left) and R (right) sockets DVD EXCLUSIVE AUDIO OUT L (left) and R (right) sockets
These are analogue audio output sockets.The AUDIO L
socket and cable are white, while the AUDIO R socket
and cable are red. Connect the DVD/VCR AUDIO L and
R sockets to the television set’s AUDIO L and R sockets
using audio cables (not provided).
Note: If your television set only has one audio socket connect it
to the DVD player’s left socket (white).
The DVD exclusive sockets are dedicated to the DVD
player and offer a higher level of sound quality than the
DVD/VCR ones.
Coaxial digital audio output (COAXIAL) /
Optical digital audio output (OPTICAL)
These sockets offer a higher level of sound quality
compared to that provided using an analogue audio
connection. Use one of these sockets to connect your
DVD Player to an amplifier equipped with two-channel
digital stereo (PCM) or to an Audio/Video receiver
equipped with a multi-channel decoder (Dolby Digital,
MPEG 2 or DTS) using a digital coaxial or optical cable
(not supplied).
Video cable
DVD/VCR VIDEO
OUT socket
Back panel video sockets
DVD/VCR VIDEO OUT socket
This socket (yellow) is also known as a composite video
socket. The video cable (not supplied) usually comes with
two audio cables (black and white). The picture quality
obtained using a video connection is poorer compared to
that obtained using a Scart connection.
Note: Remember to connect the audio cables because the
video cable carries only the picture signal, not the sound.
7
Page 8
EN
Connections and Setup
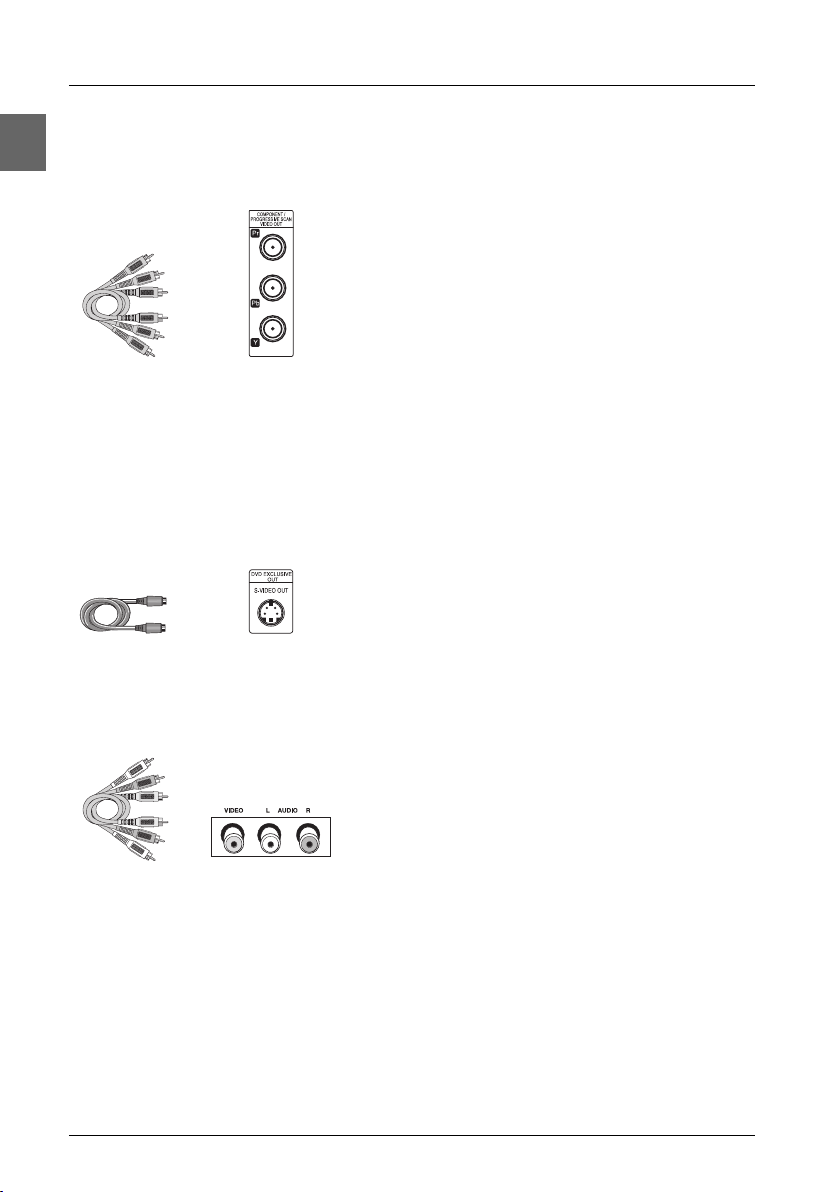
DVD EXCLUSIVE COMPONENT/PROGRESSIVE SCAN
VIDEO OUT socket
The Y, Pb, Pr sockets provide optimum picture quality
because the video signal is separated into three parts.To
ensure maximum picture quality, use three video-grade
cables (yellow) for the connection.You can also buy
bundled component video cables that are colour-coded
to match the Y, Pb, Pr sockets (red, green and blue).
Notes:
Remember to connect the audio cables because the
component cable carries only the picture signal, not the sound.
Component cable
S-Video cable
COMPONENT/
PROGRESSIVE
SCAN VIDEO OUT
socket
S-VIDEO OUT
socket
If you use the YPbPr socket to connect the DVD/VCR to the
television set, set the TV Output Select option in the
Display menu to YPbPr (see page 32).
If your television is a high definition television, you may take
advantage of the DVD player’s progressive scan output to get
the highest possible video resolution. In that case you need to
set the Progressive Scan option in the Display menu to
On (see page 32).
S-VIDEO OUT socket
The S-VIDEO OUT (separate video) socket provides
better picture quality than composite video (the VIDEO
OUT socket) because the colour is kept separate from
the black and white part of the video signal. If your TV has
an S-Video socket, connect the DVD/VCR to the TV with
an S-Video cable.
Note: Remember to connect the audio cables because the SVideo cable carries only the picture signal, not the sound.
Audio/video cable
Front panel audio and video sockets
Connect your camcorder to the AUDIO L (left),AUDIO
R (right) and VIDEO sockets located at the front of the
DVD/VCR using an audio/video cable (not supplied).
VIDEO IN and
AUDIO IN L and R
sockets
8
Page 9
Connections and Setup
Tuning in a video channel on your TV
If your television is not fitted with a Scart socket, you were unable to connect it to the AV1 socket
of the DVD/VCR using a Scart cable as shown on page 6, step 3. In this case, you must make below
settings before you start the automatic channel set-up (page 10).
The output frequency of this appliance is set at UHF channel 36.
If channel 36 is already used by another TV channel, or if the picture is distorted, you can change
the transmitter channel of your VCR. Stages 7 ~ 13 will show you how to change the output
frequency of your DVD/VCR.
Make sure that you have correctly installed the appliance as described earlier in this book.
1. Turn on your TV.
2. Press to turn on the appliance and then press the VCR button on the remote control.
3. Insert a pre-recorded video tape into the VCR and press PLAY on the remote control.
4. Select a TV channel number on which you wish to watch videos.
Don’t worry if you don’t have a video tape to play at this stage! If you switch the appliance on
and continue stages 5 ~ 6, instead of seeing video playback tune your TV until you see a bright
blue screen.
5. Tune this channel until the video picture is sharp and the sound is clear.
6. Store this channel on your TV.
You will need to look at the TV instruction book if you do not know how to do this.
Note: Only carry out stages 7 ~ 13 if you cannot obtain clear video playback as described in stages 1 ~ 6.
7. Select a TV channel number on which you wish to watch videos. Make sure that the DVD/VCR
is in standby by pressing on the remote control (only the clock will be displayed).
EN
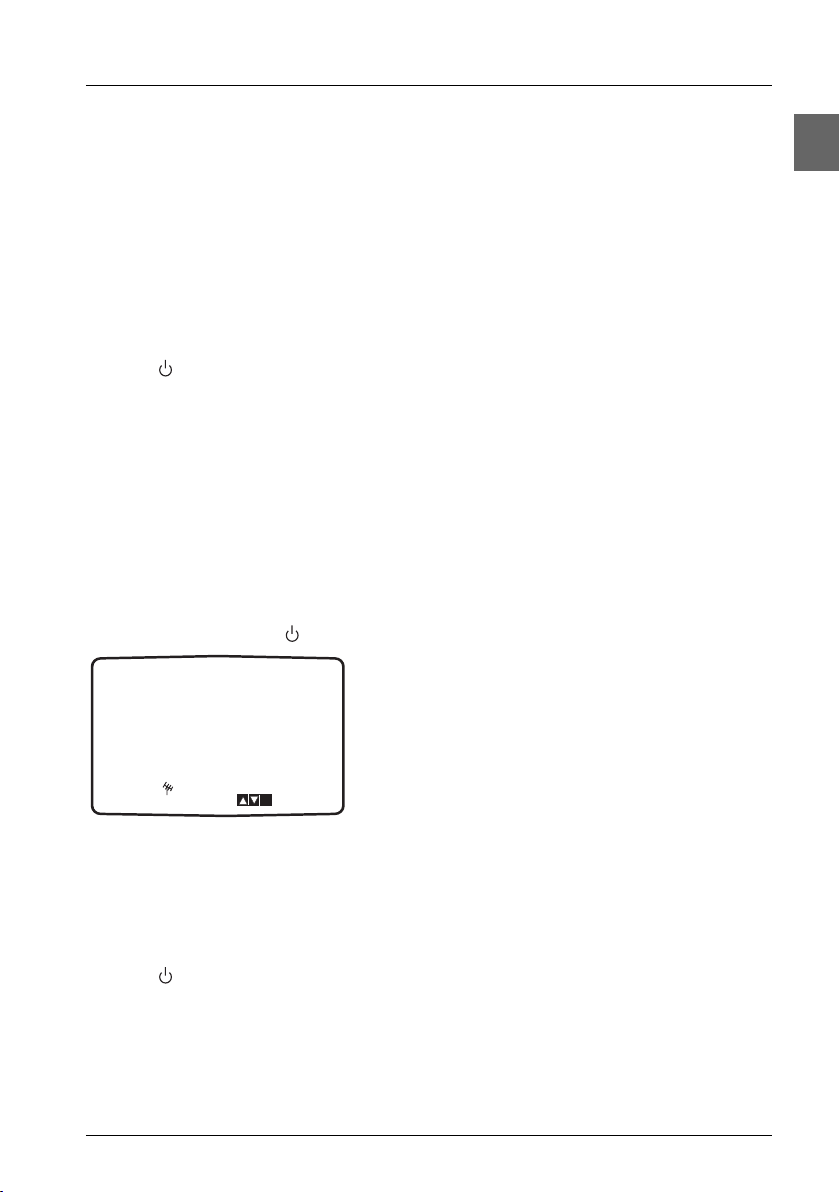
8. Press PROGRAM - or PROGRAM + on the front of
the appliance for more than 4 seconds. RF36 will
appear on the front display.The picture opposite will
RF CHANNEL 36
P
SET
R
i
be displayed on the TV screen.
9. Press PROGRAM - or PROGRAM + to select another video channel.You may select any
channel number between 22 and 68.
10. Select a TV channel number on which you wish to watch videos.
11. Tune this channel so that a bright blue screen appears.
12. Store this channel on your TV.
13. Press on the front of your appliance when you have finished.
Make sure that you have correctly installed the appliance and successfully tuned in a dedicated
video channel on your TV. If you do not tune in a dedicated video channel on your TV you will be
unable to view and record video tapes!
9
Page 10
Connections and Setup
EN
Tuning in TV channels
The first time you use the DVD/VCR,you will see the ACMS (Automatic Channel Memory
System) displayed on the screen.This system automatically tunes and stores TV channels. If you
want to return to ACMS after your initial set-up, access it via the menu (ACMS ).
Automatic channel search
Switch the television set on.
1.
2. Press the button to turn the appliance on and then press the VCR button on the remote
control.
3. Select the AV channel on the television set.The
ACMS menu screen appears. Use the and
buttons on the remote control to select a country
code: A: Austria, B: Belgium, CH: Switzerland,D:
A
B D DK E F I
CH
NNLPSSFOTHERS
Pr-12
ACMS
OK
i
Germany, DK: Denmark, E: Spain, F: France, I:Italy, N:
Norway, NL: Netherlands, P:Portugal, S:Sweden, SF:
Finland, OTHERS.
4. Press OK to start the automatic tuning process.
5. When the automatic channel search is completed a screen showing all the channels that have
been found and the positions they have been placed in is displayed.
Note: If the station transmits VPS/PDC signals, the station name will be added automatically.
6. The automatic channel set-up assigns the numbers to the channels in a predefined order.
These numbers may therefore not match the actual channel numbers. Should this be the case,
change these numbers by carrying out the instructions below (see "Sorting the channels").
7. Press to store the settings.
Note:After the automatic channel search has taken place, the time and date will set automatically. If the time is
shown as --:-- on the display window, it means that the signal was too weak to allow the clock to be set
automatically. If you wish to manually set the clock, see "Setting the clock" on page 18.
ACMS
Pr-12
Sorting the channels
For easy channel identification, we suggest that you have a TV magazine at hand.
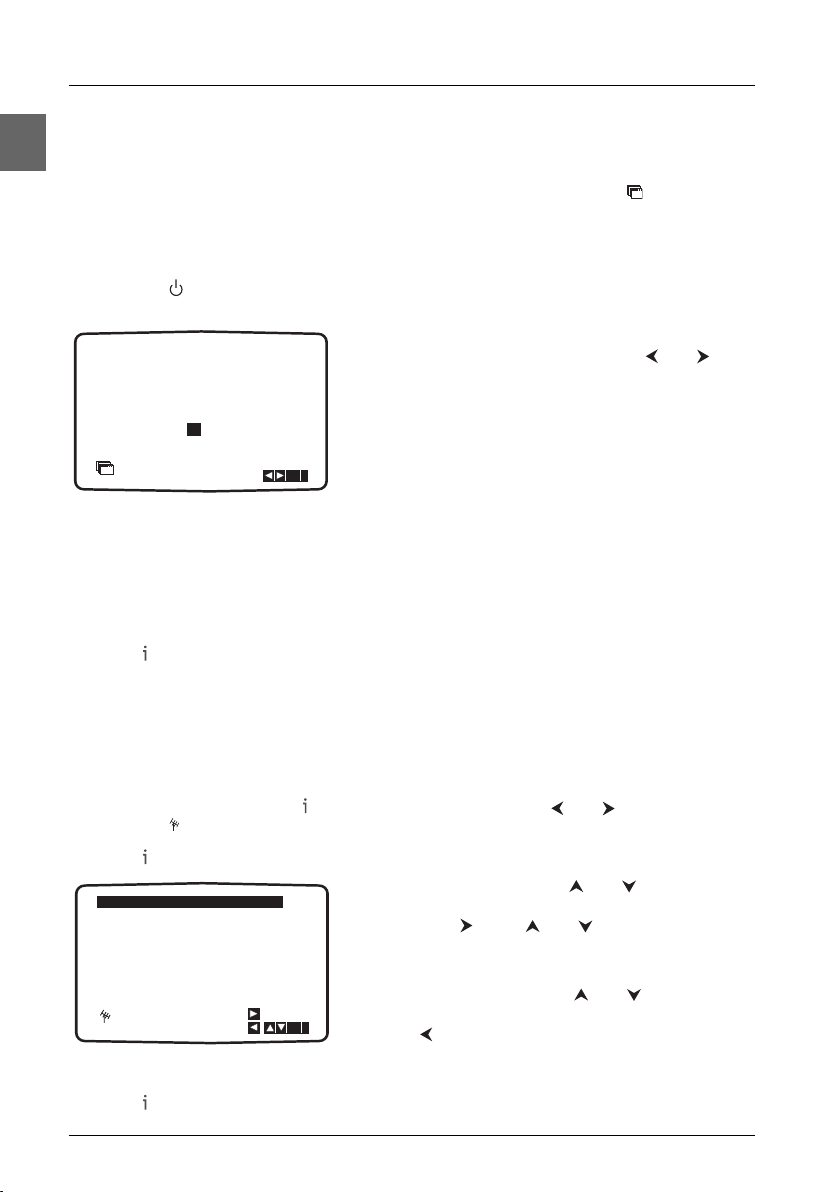
1. Press the VCR button. Press to access the main menu. Use the and buttons to select
PR SET then press
P
SET
R
OK.
2. Press again.
01 C02 00 PR-01
02 C03 00 PR-02
03 C04 00 PR-03
04 C05 00 PR-04
05 C06 00 PR-05
06 C07 00 PR-06
07 C08 00 PR-07
08 C09 00 PR-08
P
SET
R
MOVE :
,DELETE :
3. To move a channel, use the and buttons to
select the programme number that you wish to move.
Then press . Press and until you reach the
position you wish to store the channel in. Press
The channel will move to the new position.
4. To delete a channel, use the and buttons to
OK
i
select the channel number you wish to delete and
press .After a short while the selected channel will
OK.
be deleted.The remaining channels are resorted
automatically.
5. Press to leave the menu.To move or delete other channels, repeat the above process.
10
Page 11

Connections and Setup
Manual installation
To complete the set-up of your video recorder when the automatic channel set-up has not stored
all the channels or when you wish to store a new channel.
1. Turn on your television and your DVD/VCR.Select the AV channel on your television, press
VCR button and then press to access the main menu.
the
P
2. Press the and buttons to select PR SET then press OK.
SET
R
3. Press again and the television channel table appears.
4. Use the and buttons to select the programme number you want to tune, then press OK.
5. Press the AV key to select C (for channels received
via your roof aerial) or S (for cable network
PR CH STATION
09 - - - - - -
C - -
MFT
channels).
6. Press OK, and then use the and buttons to
search for the channel of a programme or enter the
P
SET
R
CHANNEL/CABLE : AV
i
channel number using the numbered buttons.
7. The station can be fine tuned to improve picture quality. Select MFT (Manual Fine Tuning)
using the and buttons. Use the and buttons to adjust the picture.
8. Select STATION by pressing the button. You can then name your station.
9. Press OK to reveal the television channel name list.
Use the and buttons to choose a channel name
from the list. Press
OK to select it.
10. If the station name you require is not listed you can
insert one manually. Press the button. A flashing bar
appears beneath the first letter. Use the and
i
buttons to select letters and numbers for the new
channel name up to a maximum of 5. Press the and
PR CH
C40
06 00
P
SET
R
MFT
ARD
ZDF
WDR3
BR3
HR3
N3
NDR3
SWF3
OK
buttons to pass on to the previous or next
character. Press
OK.
11. Press to confirm.
12. Press again to remove the menu.
13. The new channel is now stored into your video recorder.
If you wish to install manually other channels you should repeat the above procedure.
To sort the new channel, see “Sorting the channels” on page 10.
Note: If it is necessary for you to tune all the channels manually you may find it easier if you write the CH
numbers down for each channel as you find them.You can then select each channel from the main menu and
type the CH numbers in directly. Each channel will then be in the correct position so there is no need to sort
them later.
EN
11
Page 12
Basic playback operations
-
EN
VCR
Description of the VCR main menu
VCR
12
Pr-12
P
SET
REC
R
f
OSD
OSD
ON
AUDIO
OFF
1. Turn on your television and your DVD/VCR.Select the AV channel on your television, press
VCR button and then press to access the main menu.
the
2. The VCR main menu includes the following options:
REC :Timer recording settings (see page 16)
P
PR SET : Manual installation (see page 11)
ACMS : Automatic channel installation (see page 10)
TIME DATE : Date and clock setting (see page 18)
SYSTEM : Colour standard selection (see page 18)
Dr.:Status of various features of the VCR (see page 19)
AUDIO :Audio output channel selection (see page 19)
F. O S D ON/OFF :Activation or deactivation of the on-screen displays (see page 19)
16:9/4:3 : Aspect ratio selection (see page 20)
DECODER : Must be activated when a decoder is connected to your VCR (see page 20)
OPR : Improvement of the playback picture (see page 20)
NIC :Activation or deactivation of the NICAM function (see page 20).
SET
R
Pr-12
ACMS
12
TIME
DATE
SYS-
TEM
VCR
Dr.
OPR
AUDIO
16:9
4:3
NIC
+
DECO
DER
f
OSD
OSD
ON
-
3. Use the direction buttons and to select an option. Press OK to confirm your selection
and use the and buttons to select an option within the menu.
4. Press to leave the menu.
ACMS
16:9
4:3
TIME
DATE
+
DECO-
DER
SYS-
Dr.
TEM
-
NIC
OPR
OK
REC
i
Playback
Load a tape and press PLAY.
Note: Check that the window on one side of the tape is facing upwards.The label
should be facing you with the arrow next to the window pointing twoards the
appliance.
Stopping playback
Press the STOP button on the remote control to stop playback.
Accelerated play
While a video tape is playing you can search the tape forward and backward to look for a specific
position on the tape. Press
The picture will be shown at seven times normal play speed.
REV or FWD to make the tape play rapidly backwards or forwards.
12
Page 13

Basic playback operations
Fast Forward / Rewind
Press STOP then press either REV for rewind or FWD for fast forward.
Whilst you are rewinding or fast forwarding you can view the section you are passing. Press and
hold (for a few seconds) either
to normal rewind or fast forward operation.
REV or FWD. Releasing the button will return the video recorder
Variable playback
Use the and buttons to adjust playback speed during playback or for freeze frame. Below is a
list of available speeds:
x 1 = slow motion x 5 = reverse playback 7x speed
x 2 = freeze frame
x 3 = reverse playback
x 4 = reverse playback 3x speed
To resume normal playback, press
Note: During slow motion, noise bars may appear on the picture according to the status of tape. If distortions
can be seen in the picture, reduce them with the and buttons.
PLAY.
x 1 = playback 2x speed
x 2 = playback 7x speed.
Still image
Press the PAUSE button for freeze frame.This picture may display some interference in the form
of black and white horizontal lines.This is perfectly normal and does not mean that the video tape
is damaged.
Notes:
Freeze frame cannot exceed five minutes.After five minutes, the video recorder automatically stops.
You can use the and buttons to reduce any vertical movement seen on the still picture.
EN
VCR
Frame Advance
1. Press PAUSE repeatedly to advance forward image by image.
Note:You can use the and buttons to reduce any vertical movement seen on the still picture.
2. Press PLAY to return to playback.
Ejecting the tape
Press OPEN
Note: If the end of the tape is reached, the video recorder automatically stops, rewinds, ejects the tape and
goes into standby mode.
.
CLOSE on the remote control or EJECT on the front panel to eject the tape.
13
Page 14

Recording
EN
VCR
Recording options
Recording from an AV socket
If you wish to record from the AV2 socket located on the back panel of the DVD/VCR or from the
AV3 sockets located on the front panel, press the
mode (AV2 or AV3).
AV button to select the appropriate audio/video
SP (Standard Play) /LP (Long Play)
The video recorder includes the Long Play (LP) feature.This means you can record twice the
amount of information on each recordable video tape. For example on a three hour (E180) tape
you can record six hours worth of programmes. Press the
Depending on your selection, SP or LP is displayed on your television screen.
SP/LP button to switch from SP to LP.
Instant Recording
1. Turn the DVD/VCR and television on. Insert a video tape into the video recorder. Select the
AV channel on your television.
2. Press the VCR button and use the PR+/- button to select the programme you wish to record.
The currently selected programme are displayed on screen.You can also select the programme
number using the remote control number buttons.
3. Press the SP/LP button to select the recording speed (SP or LP).
4. Press the RECORD button to start recording. RECORD appears on the television screen
and REC is displayed on the front display.
The video recorder starts recording until the end of the tape is reached or it is manually stopped.
Instant Timer Recording
1. To set the length of time you want to record for, press the RECORD button twice.The
television screen shows 0H30.
2. Press the RECORD button again to increase the recording time by another thirty minutes to
a maximum of nine hours.
If you press
and the set period of time is cancelled.
1. Press PAUSE to interrupt recording.
2. Press PAUSE again to resume recording.
Notes:
Tapes can be paused for up to five minutes. RECP will be displayed on the television screen while a tape is
paused. After five minutes the video recorder automatically goes into STOP mode.
To view one channel whilst recording another, press the
display.Then switch to the channel you want to watch using the remote control.
PA USE during instant recording, the video recorder switches to record pause mode
PLAY MODE button. TV appears on the front
Ending a recording
Press the STOP button.
Note:When the end of the tape is reached the VCR automatically stops recording, rewinds, stops, ejects the
tape and goes into standby mode.
14
Page 15

Recording
Programming a recording
Programming a recording can be done up to one month in advance with up to seven recordings being
pre-programmed. Ensure the television channels have been tuned and stored correctly and that the
clock is set to the correct time.
Programming a recording using the S
HOWVIEW
Each television broadcast has its own SHOWVIEW number guide which can be found in your TV
magazine.To programme the recording of a broadcast,all that is required is for you to enter this
number in the S
HOWVIEW menu; it contains the date, start and end time and the number of the
channel broadcasting the programme.
SHOWVIEW is a registered trademark of Gemstar Development Corporation. The SHOWVIEW system is
manufactured under licence from Gemstar Development Corporation.
1. Press the VCR button and then the TIMER button to access the SHOWVIEW menu.
2. Select the the frequency of the recording using the
and buttons: ONCE (recording of a single
programme), DAILY (daily recording from Monday to
Friday) or WEEKLY (recording of a weekly
programme).
3. Use the number buttons to enter the SHOWVIEW
number of the broadcast you want to record.
Note: If you make a mistake, press then enter the correct
REC
ONCE
SHOWVIEW NO.
- - - - - - - - -
0~9,
OK
i
number.
4. Press OK.
The data corresponding to the entered S
PR DATE TIME
CH4 12
- - - -
- - - -
- - - -
- - - -
- - - -
- - - -
10
11 11 55~::
- - - - - - - -~::
- - - - - - - -~::
- - - - - - - -~::
- - - - - - - -~::
- - - - - - - -~::
- - - - - - - -~::
SP
SP
SP
SP
SP
SP
SP
number are displayed.
• If PLEASE CHECK appears, check the number and re-
enter it.
• If - - appears, enter the programme number of the
channel. It will automatically be stored in the internal
HOWVIEW channel map.
S
i
5. To change one of the settings, select it using the
and buttons.Then press and to enter the
correct information.
6. Press the button to select the VPS/PDC function and activate or deactivate it using and
.
Note: Some channels telecast their programmes with VPS (Video Programme System) or PDC (Programme
Delivery Control) signals.These signals detected by the video recorder allow accurate triggering and stopping
of a recording, whatever the delay of the programmes.
7. Press to select the recording speed. Use the and buttons to scroll options: Standard
Play (SP), Intelligent Play (IP) and Long Play (LP).
Notes:
The IP feature adjusts the recording speed to quantity of video tape left. It switches speed from SP to LP if
there is not enough tape left to record the whole programme in SP mode.
The IP feature is not available when VPS/PDC is on.
®
numbers
HOWVIEW
EN
VCR
15
Page 16

EN
VCR
Recording
8.
Press the button to store your settings. If the message PLEASE CHECK appears, you have
entered a wrong data. Please correct the data.
9. Press the button to exit the menu.
10. Put the DVD/VCR into standby mode by pressing the button on the remote control.
appears on the front display to show that the video recorder is set to record.
To watch a DVD during timer recording standby mode, press and then the
switch to DVD mode.
Programming a recording without the SHOWVIEW numbers
Insert a video tape.
1. Press the VCR button and then to access the main menu.
2. Use and to select REC .
3. Press OK.Press OK again to enter the timer recording menu.
PR DATE
- -
- - - - SP
- - - - SP
- - - - SP
- - - - SP
- - - - SP
- - - - SP
- -
- - - - - - - -~::
- - - - - - - -~::
- - - - - - - -~::
- - - - - - - -~::
- - - - - - - -~::
- - - - - - - -~::
- - - - - - - -~::
T I M E
SP
4. To enter the programme number that you wish to
record, scroll through the available options using the
and buttons or enter the numbers directly. For
single digit numbers, remember to press
Note: If you wish to record from one of the AV sockets, press the
AV button to select the appropriate AV input.
5. Press and enter the date of the programme you
i
want to record. If you want to record a programme
on a regular basis, press
OK before entering a date in
order to choose one of the available options:
(daily recording from Monday to Friday), or weekly
MO for Monday) to record at the same
OK to confirm.
PR DATE
FR2
- - - -
- - - - SP
- - - - SP
- - - - SP
- - - - SP
- - - - SP
26
10 00 00~::
- - - - - - - -~::
- - - - - - - -~::
- - - - - - - -~::
- - - - - - - -~::
- - - - - - - -~::
- - - - - - - -~::
T I M E
11
recording (e.g.
time every week. Press and to select one of the
SP
SP
two options, then press
6. Enter the time of the start and end time of the
programme you wish to record.
7. Press the button and activate or deactivate the
i
VPS/PDC function using the and buttons.
8. Press to select the recording speed. Use the
and buttons to scroll options: Standard Play (SP),
Intelligent Play (IP) and Long Play (LP).
9. Check that the timer recording details are correct, and press to save your settings.If
PLEASE CHECK is displayed you have entered incorrect information. Check the details on
the television screen and reenter it. If you want to enter more timer recordings,repeat the
above process from step 3.
10. Press to remove the menu.
11. Put the DVD/VCR in standby mode by pressing the button on the remote control.
appears on the front display.The video recorder is now ready to record at the time you have
specified.
To watch a DVD during timer recording standby mode, press and then the
switch to DVD mode.
DVD button to
0 first.
DVD button to
DLY
16
Page 17

Recording
Changing or deleting timer events
To change a recording event:
1. Press to access the main menu.
2. Use and to select REC .
3. Press OK.
4. Press and to select the timer slot that you wish to change.
5. Press to delete an entry.
6. Press OK to edit that entry. Use the and buttons to select the section you wish to
change and the and buttons to change those sections.
7. Press to save your settings.
8. Press again to remove the menu.
9. Put the DVD/VCR in standby mode by pressing the button on the remote control.
appears on the front display.The video recorder is now ready to record at the time you have
specified.
Note: If timer events overlap, the earlier programme will be given priority.
Copying from DVD to VCR
This unit allows you to copy the contents of a DVD to a video tape using the REC button.
Notes:
Be sure to set the Progressive Scan option to Off in the Display menu (see page 32).
If the DVD you are attempting to copy is copy protected, you may not be able to copy the disc.
1. Insert the disc you wish to copy in the DVD player and close the disc tray.
2. Insert a blank videotape into the VCR.
3. Press the RECORD button on the remote control or the REC button on the front panel.The
DVD player goes into Play mode and the VCR goes into Record mode.
Notes:
If the DVD disc menu appears, you may need to press the
If you copy from DVD to VCR, make sure that the DVD/VCR is in DVD mode.
4. When playback is completed, press STOP to end the recording.
Note:You must stop the copying process manually when the disc playback is completed, or the unit may
replay and record over and over again.
PLAY button to begin copying.
EN
VCR
17
Page 18

Advanced functions
EN
VCR
Language selection
To change the language of the VCR menus, please refer to the Language menu of the DVD player
on page 31.
Auto tracking
The video recorder automatically adjusts the tracking to provide the best picture quality.The
message A.TRACKING is displayed when this function is in operation.
If the quality of the recording is poor, repeatedly press the and buttons on the remote
control to manually adjust the tracking until all distortions have been removed. Press the
0 button
on the remote control to restore the standard setting.
Setting the clock
The video recorder uses a 24 hour clock.To enter a single digit number,first press the 0 button
(e.g. 01 for 1).
AUTO ADJUST
- -
12
TIME
DATE
HH MN DD MM YY
:..- -
- - - -
12
TIME
DATE
- -
ON:
- - - - -
1. Press to access the main menu.Use the and
buttons to select TIME DATE then press
2. To set the clock manually, set the AUTO ADJUST
function on OFF using and . Press
the date and time.
3. Use the numbered buttons on the remote control to
i
OK
enter the HH (hours), MN (minutes), DD (day), MM
(month) and YY (year).The day of the week is
automatically displayed once the date has been entered.
If you make a mistake use and to select the
item and re-enter the details.
4. When you are finished, press to store your settings.
The new time is displayed on the front display.
Note: If Auto Adjust is on and the signal is sufficiently strong, the
clock settings will be automatically checked against teletext and
i
adjusted as necessary.
12
TIME
DATE
OK.
OK to adjust
Colour standards
The video recorder comes with an automatic colour standard detection system.When playing a
tape causes problems (scrambled pictures or black and white), you must force the play mode by
selecting one of the available options (PAL, SECAM, MESECAM).
If you wish to record a tape in a particular colour standard, choose one of the displayed options.
1. Press to access the main menu.
SYS-
TEM
AUTO
PAL
SECAM
MESECAM
SYS-
2. Use and to select SYSTEM then press
OK.
3. Use and to select a colour system.
4. Press and to select RF AUDIO.
TEM
5. Use and to select I/I, B/G or D/K.
i
6. Press to exit the menus.
18
Page 19

Advanced functions
Video Doctor
The video doctor will show the status of various features of the video recorder.
1. Press to access the main menu.
2. Select Dr. with the and buttons.
VCR
Dr.
3. Press OK.
4. Use the and buttons to check the following features:
HEAD STATUS
VCR
VIDEO DOCTOR
Dr.
HEAD STATUS
TAPE STATUS
NO. OF TIMER PROGRAMME
NEXT TIMER PROGRAMME
OK
PLEASE CLEAN:The tape heads need cleaning.
TAPE STATUS
NOT RECORDABLE: The protection tab of the tape
loaded the video recorder is broken; insert a tape suitable
for recording.
NO. OF TIMER PROGRAMME: Shows the number of
i
timer recordings programmed.
NEXT TIMER PROGRAMME: Shows the date and
time of the next recording.
5. Press to remove the menu from the television screen.
Sound settings
The video recorder can record and play back stereo sound.You can select the way sound is played
back.
1. Press to access the main menu.
2. Select AUDIO with the and buttons.
3. Press OK.
4. Use the and buttons to choose between: STEREO, LEFT (left channel only), RIGHT
(right channel only), MONO.
5. Press to exit the menu.
AUDIO
EN
VCR
On screen display (OSD)
This function is used to display the current time, tape counter, tape remaining, date, day of week,
channel and operational mode of your video recorder on your television screen. If a recording is
taking place, the on screen displays will not be recorded onto tape.
1. Press INFO to show the OSD.
2. Press INFO repeatedly to scroll the various display options. The tape counter and amount of
tape left will appear only if a tape is loaded.
3. After 3 seconds most parameters are cleared leaving only the clock or the tape counter and
the amount of tape left on the television screen.
4. Press INFO again to remove all OSD’s from the television screen.
To turn off the on screen displays completely:
1. Press to enter the main menu.
19
Page 20

EN
-
VCR
Advanced functions
f
OSD
OSD
+
DECO
DER
ON
2. Use the and buttons to select 16:9/4:3 and
OK.
press
16:9
4:3
3. Use the and buttons to select one of the
available options:
AUTO automatically selects the format best suited
16:9
4:3
i
4:3 to play back and record in 4:3 format.
to the content.
16:9 to play back and record in 16:9 format.
-
2.
Select fOSD ON OFF using the and buttons and then press OK.
3. Select OFF using the and buttons. Press to save the setting.
Format
For 16:9 screen playback the video recorder must be connected to your television using a SCART
cable.
1. Press to enter the main menu.
AUTO
4:3
16:9
4. Press to save your settings.
Decoder
1. Press to access the main menu.
2. Select DECODER with the and buttons and press OK.
3. Select ON using the and buttons if a decoder is connected to the AV2 socket.
4. Press to exit the menus.
OPR (Optimum Picture Response)
This feature enhances the picture from the video tape by adjusting to the condition of the video
tape. If you feel that the picture needs adjusting you can manually change the OPR setting.
You can only set OPR when a tape is playing in the video
recorder.
1. Press to enter the main menu.
OFF
SOFT
SHARP
2. Use and to select OPR then press OK.
3. Use the and buttons to select one of the
OPR
i
available options: OFF, SOFT or SHARP.
OPR
4. Press to exit the menus.
NICAM
This VCR has a stereo NICAM digital sound decoder. It allows you to record and playback the
sound in several different ways. Press the
of sound received:
STEREO NICAM:The sound is automatically recorded on the Hi-Fi stereo and mono tracks of
the video tape;
INFO button to display briefly on the TV screen the type
20
Page 21

Advanced functions
BIL NICAM: Both audio channels are recorded on the Hi-Fi stereo tracks.The primary language
channel (left) is recorded on the mono track of the video tape.
MONO:The sound is recorded on the Hi-Fi tracks and the mono track of the video tape without
any separation.
1. Press to access the main menu.
2. Select NIC with the and buttons to set the NICAM function and press OK.
NIC
3. Select AUTO to operate the NICAM function automatically or OFF to turn it off.
4. Press to exit the menu.
Resetting the tape counter
You can display the tape counter on the front display by pressing the INFO button on the remote
control.The tape counter displays the play or recording time elapsed in hours, minutes and
seconds.
CLEAR to reset the counter. Then when you press STOP and then REV, the video
Press
recorder will stop rewinding at 0:00:00.
Child lock
To prevent the video recorder from being used, buttons on the front of the appliance can be
locked.
1. Press the LOCK button on the remote control.
and SAFE appear on the front display. Buttons on the front panel are locked. If one of
the front panel buttons is pressed, SAFE starts blinking on the front display.
2. Store the remote control is a safe place.
3. Press again the LOCK button to unlock the appliance.
OFF appears on the front display.
EN
VCR
Playing NTSC tapes
NTSC is the colour television standard used in the United States, in Japan and other countries.
Your video recorder can play VHS-NTSC tapes, but you must have a television set compliant with
the PAL standard. Most PAL television sets provide proper reproduction of the pictures from
NTSC tapes.
21
Page 22

Basic playback operations
EN
DVD
Compatible discs
•DVD
•DVD-R, DVD+R,DVD-RW, DVD+RW
•CD
• CD-R, CD-RW
Note: Do not try to play irregularly-shaped CDs (e.g. heart-shaped or octagonal).
Compatible formats
•DVD,VCD (Video Compact Disc), SVCD (Super Video Compact Disc), JPEG, Kodak Picture CDs.
•CD, mp3,WMA, DivX.
More information about discs and compatible formats at the end of the booklet.
Regional coding
Your DVD player has been designed to process regional management information that is stored on
DVD discs. DVD discs that have different regional codes to that of your player cannot be played.
The regional code for your player is 2 (Europe, the Middle East, South Africa, Japan). ALL means all
regions.When you buy a disc check that it bears the correct logo.
Operating the DVD player
1. Switch on your television set.
2. Press the button on the remote control or the ON/STANDBY button located on the
appliance’s front panel. Press the
DVD button on the remote control.
Using the menus
• Disc menu – The appearance and contents of this menu vary according to the type of disc you
have inserted and are independent of the player’s menus. When the disc is playing press the
MENU button to display and hide this menu.
• Info menu – The player’s Info menu appears as a bar on the left of the screen while the disc is
playing. During this time, press the
Info menu.
• Player menu – When the disc is playing, press the
to display this menu. In Stop mode or if no disc has been inserted, press the
access this menu.
Note: A function is only available if it features on the disc you have inserted. For instance, if you select the
Subtitles function from the Info menu subtitles will only appear if subtitles have actually been provided on
the disc. If a menu or icon is not followed by a small arrow () this means that this menu or the associated
function is not available.
INFO button on the remote control to display and hide the
STOP button and then the MENU button
MENU button to
Playback
Switch the DVD/VCR and the TV set on.
1. Press the DVD button and press the OPEN/CLOSE button on the front of the appliance or
OPEN.CLOSE button on the remote control to open the disc tray.
the
2. Put the disc in with the printed side upwards (in the case of a single-sided disc).
22
Page 23

Basic playback operations
3.
Press OPEN
• Play starts automatically, or
• The disc menu appears. One of its options can be selected to start playing the disc. Select it
and press
•Press the
4. Press STOP to stop playback.
Notes:
The player stores the point where playback was interrupted. If you press
this point.To stop playback completely or to start again from the beginning, press STOP twice.
If the player is left in STOP mode for more than two minutes without any user interaction, a screen saver is
activated.
.
CLOSE again to close the disc tray.
OK, or else
PLAY button.
PLAY again, playback resumes from
Accelerated play
1. While the disc is playing, press the REV or FWD button one or more times to vary the speed
and direction of the accelerated play.
2. Press PLAY to resume normal playback.
Still image
While the disc is playing, press PA USE once for freeze frame.
Note: After 30 seconds in PAUSE with no user interaction, the player goes into screen saver mode.
Frame advance
1. Press the PAUSE button a number of times to advance forward image by image.
2. Press PLAY to resume normal playback.
EN
DVD
Variable slow motion
1. While the disc is playing, press the PA USE button once.
2. Press the REV or FWD button a number of times to vary the speed and direction of the slow
motion.
Note: Reverse slow motion is not possible with a Video CD.
3. Press PLAY to resume normal playback.
Changing chapter / track
While the disc is playing, press the or button to go immediately to the next chapter or
track, or to the beginning of the current chapter or track. Press the button twice to go to the
previous chapter or track.
Zoom
1. While a disc is playing, press the ZOOM button until you reach the zoom size you require.
2. Move from one area to another using the , , and buttons.
3. To resume normal playback press ZOOM repeatedly or press the CLEAR button.
Note:The zoom function may not work on some discs.
23
Page 24

Basic playback operations
EN
DVD
Scene replay (DVD)
While the disc is playing, press the AGAIN button on the remote control to replay the last seconds of the film or sequence shown.
Play modes
While the disc is playing, press the PLAY MODE button repeatedly to select a play mode:
DVD play modes: Chapter, Title, Off,
karaoke DVD play modes: Title, Off, Random, Normal,
VCD play modes: Random, Normal, Track repeat, Repeat all.
Note: On a Video CD with PBC (Playback Control), set the PBC option to Off in the Others menu (see
page 35).
Program playback (VCD)
With this option, you choose and program the playback order. You can store up to 30 tracks.
1. Insert a disc.
2. In Stop mode, press and hold the PLAY MODE button for a few seconds to enter the
Playbacl list mode.An mark appears next to Program on top of the screen.
Notes:
On a Video CD with PBC (Playback Control), set the PBC option to Off in the Others menu (see page 35).
Press and hold
VIDEO CD
List
TRACK01
TRACK02
TRACK03
TRACK04
PLAY MODE again to exit the Playback list mode.
6. To remove a track from the playback list, select the track using the , and buttons and
press the
CLEAR button.
To erase the complete playback list, press to move to the playback list, select Clear All and
OK.
press
Note:The playback list is erased when the CD is removed from the player.
TRACK1
TRACK2
TRACK3
TRACK4
Program
Clear All
E
3. Select a track in the list using the and buttons and
OK to add the track to the playback list. Repeat
E
press
this step to add other tracks to the playback list.
4. Then press and select the track you want to start
playback from.
5. Press PLAY or OK to start playback.Tracks are
played in the order of the playback list. Playback stops
once all tracks have been played.
Screen Fit (DVD)
To reframe the DVD image according to the screen format of your TV set, press the and
buttons to select a screen format: Normal, Enhanced or Maximum.
24
Page 25

Info menu
Using the Info menu
You can display information about the disc during playback using the Info menu.It will also allow
you to access certain functions.
To display the menu, press
remote control.Select the various options using the and buttons. Then follow the instructions
which appear on the screen and use the and buttons on the remote control to scroll through
the options, or the numeric buttons if appropriate, or the
Press the
INFO button again to exit the Info menu.
Note:When one of the icons is not followed by a small arrow (), this means that the relevant function is not
available on the disc being played.
The invalid symbol indicates that the function selected or the button used is not available
at this stage.
DVD Info menu
VCD Info menu
PLAY to start playback and then press the INFO button (yellow) on the
OK button to execute the setting.
Title
Chapter
Time
Audio
Subtitle
Angle
Sound
Track
Time
Audio
1 / 3
1 / 12
0:20:09
C
B
A
1 ENG
1 / 3
3D SUR
Title
Move 0-9 Input OK Enter
1 / 3
0:20:09
3D SUR
Sound
EN
DVD
DivX Info menu
Track
Time
Audio
Subtitle
Sound
25
Track
Move 0-9 Input OK Enter
1 / 3
0:20:09
MP3
2/0
C
B
A
1 ENG
3D SUR
Track
Move 0-9 Input OK Enter
Page 26

Info menu
EN
DVD
Up
Left
Down
Title/Track
Chapter
Time
1 / 3
1 / 12
0:20:09
Press the INFO button on the remote control while a
disc is playing to display the Info menu.
OK
Use the and buttons on the remote control to
select the icon you want.Then use the and buttons
to select an option, or the numeric buttons if appropriate,
Right
OK button to execute the setting.
or the
Title/Chapter (DVD) / Track (VCD and DivX)
To directly access a title or a chapter (DVD),a track (VCD and DivX), press
INFO button, then select one of these icons with the and buttons,
the
and then choose a number using the and buttons or enter a number
directly with the numeric buttons.
Note: Many discs only have one title.
Direct access
To directly access a location on the disc which does not correspond to the
start of a title, chapter or track:
1. Press the INFO button, then select the Time icon with the and
buttons.
2. Enter a time with the numeric buttons (format hh:mm:ss).
Note: If you make a mistake, press CLEAR to remove numbers and then input the
correct numbers.
3. Press OK to confirm.
Audio (DVD)
Audio (VCD)
MP3
2/0
Audio (DivX)
Audio
Some discs have several audio tracks used for different languages or different
audio formats.
To change the language or audio format during playback:
-press the
buttons and choose a language or an audio format with the and
buttons, or
-press the button repeatedly to select a language or an audio channel.
Notes:
This option is only available if the disc offers a number of dialogue languages or of
audio formats.
When you change the dialogue language using the Info menu, your choice of
language is only applicable to the disc being played.When you eject the disc or switch
off the player, the dialogue language will revert to the one you selected in the
Language menu (see page 31).
INFO button, then select the Audio icon with the and
26
Page 27

Info menu
C
B
A
1 ENG
Subtitle
Angle
3D SUR
Sound
Subtitles (DVD and DivX)
Subtitles are disabled by default.To enable the subtitle function while the disc
is playing:
-press the
INFO button, then select the Subtitle info using the and
buttons. Select a language using the and buttons, or
-press the button repeatedly to select the subtitle language.
Note:When you change the language of the subtitles using the Info menu your
choice of language only applies for the disc currently being played.When you eject the
disc and switch off the player, the subtitles will be displayed again in the subtitle
language you selected in the Language menu (see page 31).
Camera angle (DVD)
1 / 3
Some discs offer different camera angles for specific scenes.To change the
camera angle during playback:
-press the
INFO button, then select the Angle icon with the and
buttons, and choose the angle with the and buttons, or
-press the button several times to view the different camera angles
available.
Notes:
If the disc was recorded using a single camera angle, this function is not available.
There are very few discs offering more than one angle.
Sound
To create a 3D surround effect that simulates multi-channel audio from two
stereo speakers:
1. Press the INFO button during playback, then select the Sound option
using the and buttons.
2. Use the and to select 3D SUR.
3. To turn off the 3D Surround effect, select Normal.
EN
DVD
27
Page 28

Audio CDs, mp3, WMA, DivX and JPEG discs
EN
DVD
Playing an audio, mp3 or WMA CD
mp3 is an audio file format which compresses recorded music. It was developed in collaboration
with .The main advantage of the mp3 format is that it means CD-quality music
tracks can be stored on a personal computer in user-friendly compressed files.
WMA (Windows Media Audio) is another audio file format developed by Microsoft.
Before inserting a disc, check that it is compatible with the player.
1. Open the tray by pressing the OPEN•CLOSE button.
2. Place the disc with the printed side facing up and close the tray.
AUDIO CD
0:00:00
List
TRACK01
TRACK02
TRACK03
TRACK04
TRACK05
TRACK06
TRACK07
TRACK08
MUSIC
0:00:00
List
List
1-Music1
1-Music1
2-Music2
2-Music2
3-Music3
3-Music3
4-Music4
4-Music4
5-Music5
5-Music5
6-Music6
6-Music6
7-Music7
7-Music7
1 / 12
Program
Clear All
1 / 104
Program
Clear All
Audio CD
A menu appears on the TV screen. Select a track using
3.
the and buttons on the remote control, then
PLAY or OK to start playback.
press
mp3 / WMA CD
Select a folder using the and buttons on the remote
3.
control, then press
OK to see the folder’s contents.
4. Select a track using the and buttons on the remote
control, then press
Notes:
In the file list, select and press
Press and hold the
previous page of the list.
During playback press the
information about the track.
PLAY or OK to start playback.
OK to go back to the folder list.
MENU key for a few seconds to display the
INFO button (yellow) to display
Pause
1.
Press the PAUSE button during playback.
2. Press PLAY, OK or PAUSE again to resume playback.
Changing track
While the disc is playing, press the or button to go immediately to the next track, or to the
beginning of the current track. Press the button twice to go to the previous track.
Note: For audio CDs, enter the track number using the numeric buttons to directly access any track.
Play modes
Press the PLAY MODE button repeatedly to select a play mode: Random, Random off, Track
repeat, Repeat all.
Note: If you press the button during random playback, the player selects another track and resumes
random playback.
28
Page 29

Audio CDs, mp3, WMA, DivX and JPEG discs
Program
List
TRACK01
TRACK02
TRACK03
TRACK04
TRACK05
TRACK06
TRACK07
TRACK08
AUDIO CD
0:00:00
1 / 12
TRACK01
TRACK02
TRACK03
TRACK04
TRACK05
TRACK06
Clear All
E
Accelerated play
While the disc is playing, press the REV or FWD button one or more times to vary the speed
1.
and direction of the accelerated play.
2. Press PLAY to resume normal playback.
Program playback
With this option, you choose and program the playback order. You can store up to 30 tracks.
1. Insert a disc.
2. Press and hold the PLAY MODE button for a few
seconds to enter the Playback list mode.An mark
E
appears next to Program on top of the screen.
Note: Press and hold PLAY MODE again to exit the Playback
list mode.
3. Select a track in the list using the and buttons and
OK to add the track to the playback list. Repeat
Example for an Audio CD
press
this step to add other tracks to the playback list.
4. Then press and select the track you want to start playback from.
5. Press PLAY or OK to start playback.Tracks are played in the order of the playback list.
Playback stops once all tracks have been played.
6. To remove a track from the playback list, select the track using the , and buttons and
press the
CLEAR button.
To erase the complete playback list, press to move to the playback list, select Clear All and
OK.
press
Notes:
The playback list is erased when the CD is removed from the player.
PLAY MODE button to access the available play modes during program play.
Press the
EN
DVD
Displaying JPEG files
JPEG files are image files.
Note:The time taken for the contents of the disc to be displayed varies according to the size and number of
JPEG files actually on the disc. If nothing is displayed after a few minutes, it is likely that certain files are too
large. In this case, reduce the files’ resolution to less than 2,760 x 2,048 pixels and write another disc.
1. Open the tray by pressing the OPEN•CLOSE button.
2. Place the disc with the printed side facing up and close the tray.
PHOTO
List
JPEG Folder 1
JPEG Folder 2
JPEG Folder 3
JPEG Folder 4
JPEG Folder 5
JPEG Folder 6
JPEG Folder 7
JPEG Folder 8
Preview
>
3. A menu appears on the TV screen. Select a folder
using the and buttons on the remote control,
then press
4. Select a file using the and buttons on the
remote control.
Note: In the file list, select and press OK to go back to the
folder list.
29
OK to see the folder’s contents.
Page 30

EN
DVD
Audio CDs, mp3, WMA, DivX and JPEG discs
To choose a projection speed, select the icon using the , , and buttons and
5.
then select one of the available options using the and buttons: Fast (>>>), Normal (>>)
and Slow (>). Press and then to move back to the list.
6. Press PLAY, OK to display the selected file or select the icon to start the slide show. The
slide show starts from the selected file.
Notes:
During the slide show, you can use the
magnify the picture, the and buttons to rotate the picture clockwise or counter clockwise, the or
buttons to go back to the previous picture or go on to the next one.
During the slide show hide the file information using the
Playing JPEG and mp3 or WMA files at the same time
You can display JPEG files while listening to mp3 or WMA music files recorded on the same disc.
1. Insert the disc containing the two types of file in the player.
2. Press the TITLE button (blue) to display the Photo menu.
Note: Use the TITLEbutton to display the Music and Photo menu in turn.
3. Select a JPEG file using the and buttons.
4. Select the icon using the button, and then press OK.The simultaneous playback of
music and pictures starts.
Playing DivX files
This DVD player is an Official DivX Certified™ product that allows you to play DivX®5, DivX®4,
®
3, XviD, MP43 and 3ivX video content in compliance with DivX Certified™ technical
DivX
requirements.Apart from mp3, the audio formats recognised by the player are AC3, DTS,PCM and
WMA.
Note:The audio must be sampled at sampling frequencies between 8 and 48kHz for mp3 and between 32
and 48kHz for WMA, with an average bit rate of 8 to 320kbps for mp3 and 32 to 192kbps for WMA.
1. Open the tray by pressing the OPEN•CLOSE button.
2. Place the disc with the printed side facing up and close the tray.
MOVIE
0:00:00
List
Movie Folder 1
Movie Folder 2
Movie Folder 3
Movie Folder 4
Movie Folder 5
Movie Folder 6
Movie Folder 7
Movie Folder 8
Note: On a CD including mp3,WMA or JPEG and DivX files, use the TITLE button to display the Music,
Photo and Movie menus in turn.
PA USE button to pause the slide show, the ZOOM button to
RETURN button.
3. A menu appears on the TV screen. Select a folder
using the and buttons on the remote control,
then press
OK to see the folder’s contents.
4. Select a file using the and buttons on the
remote control.
Note: In the file list, select and press OK to go back to the
folder list.
5. Press OK or PLAY to start playback.
6. Press STOP to stop playback.
30
Page 31

Player Menus
Using the player menus
1. Press the MENU button to display the player’s main menu.When a disc is playing, press the
STOP button first.
2. Select a menu option using the and buttons, then press the button to access the
submenu.The submenu shows the current setting and the alternate setting(s).
3. Select a submenu option using the and buttons, then press the button to access the
submenu.
4. Select an option using the and buttons and press OK to confirm your selection.
5. Press MENU again to exit the main menu.
The Language menu
LANGUAGE
Menu Language
Disc Audio
Disc Subtitle
Disc Menu
English
Original
Off
Original
Move
Menu language
To change the language of the player menus, choose the language using the and buttons and
OK to confirm.
press
Disc Audio (DVD)
To change the dialogue language, choose the language using the and buttons and press OK
to confirm.
Note:To change the language during play, display the audio icon by pressing the button on the remote
control (see page 26).
With this menu, you can set the language for player
menus, dialogue, subtitles and the disc menus.
1. Select the Language option in the main menu
using the and buttons and press button to
access the submenu.
2. Select one of the options using the and
buttons, and press button to access the various
Select
options.
EN
DVD
Disc Subtitle (DVD)
To change the subtitle language, choose the language using the and buttons and press OK to
confirm.
Note:To change the language of the subtitles during playback, display the subtitle icon by pressing the
button on the remote control (see page 27).
Disc Menu (DVD)
To change the language of the disc menus, choose the language using the and buttons and
OK to confirm.
press
Notes:
The Original option refers to the original language in which the disc was recorded.
The Other option allows you to select a language which is not in the list: refer to the language code list at
the end of the booklet, enter the 4-digit code corresponding to the chosen language and press
OK.
31
Page 32

Player Menus
EN
DVD
The Display menu
DISPLAY
TV Aspect
Display Mode
TV Output RGB
16 : 9
Widescreen
OffProgressive Scan
Move
TV Aspect (DVD)
1.
Select a format using the and buttons: 4:3 or 16:9 depending on the type of TV
connected to the player.
2. Press OK to confirm.
Display mode (DVD)
Note:This option is available only when the TV Aspect mode is set to 4:3.
1. Select a display mode using the and buttons:
Letterbox: displays a wide picture with horizontal bands on the upper and lower portions of
the screen,
Panscan: automatically displays wide pictures on the entire screen and cuts off portions
which do not fit.
2. Press OK to confirm.
Progressive Scan
Progressive Scan provides high quality pictures with less flickering.Turn on Progressive Scan if you
used the Component Video sockets of the player to connect a TV or monitor compatible with a
progressive scan signal.
1. Select On using the and buttons and press OK to confirm.
2. A confirmation screen appears. Cancel is highlighted by default. Use the button to high-
light Enter and press
Note: If your TV does not accept the Progressive Scan function, the picture will appear scrambled if you select
Progressive Scan on the DVD player.
Caution! Once Progressive Scan has been activated, an image will only be visible on a progressive scan TV or
monitor. If you activate Progressive Scan by mistake, you should follow below procedure to reset the unit:
Remove any disc from the unit and close the disc tray. Check that “No Disc” appears on the TV screen. Then
STOP button and hold it for five seconds. The video output will be restored to the standard setting
press the
and a picture will once again be visible on a conventional analog TV or monitor.
OK to confirm.
1. Select the Display option in the main menu
using the and buttons and press button to
access the submenu.
2. Select one of the options using the and
buttons, and press button to access the various
options.
Select
TV Output
1.
Select the option corresponding to the TV connection type using the and buttons:
YPbPr: if your TV is connected to the COMPONENT/PROGRESSIVE SCAN VIDEO OUT
socket of the player,
RGB: if your TV is connected to the Scart socket of the player.
2. Press OK to confirm.
32
Page 33

Player Menus
The Audio menu
AUDIO
Dolby Digital
DTS
MPEG
Sample Freq.
DRC
Bitstream
Bitstream
PCM
48KHz
On
OnVoc al
Move
Dolby Digital / DTS / MPEG (DVD and DivX)
Select an option using the and buttons and press OK to confirm:
Bitstream: Select this option if you connect the DVD Player’s DIGITAL
PCM (for Dolby Digital / MPEG): Select this option when connected to a two-channel digital
Off (for DTS): If you select Off, the DTS signal is not output through the
Notes:
DTS is a digital sound compression technique developed by Digital Theater Sound Systems for digital
multichannel audio signals. “DTS” and “DTS Digital Out” are trademarks registered by Digital Theater Systems Inc.
Dolby and the double-D symbol are trademarks of Dolby Laboratories Licensing Corporation.
Dolby Digital is a sound compression technique developed by Dolby Laboratories for digital audio multichannel
signals.The Dolby Digital system supports any audio channel configuration, from stereo sound (2 channels) up
to the digital “surround” sound 5.1.
You can adapt your player to other equipment and access
specific functions with the Audio menu.
1. Select the Audio option in the main menu using
the and buttons and press button to access
the submenu.
2. Select one of the options using the and
Select
buttons, and press button to access the various
options.
OUT socket to an amplifier or other equipment with a
Dolby Digital, DTS or MPEG decoder.
stereo amplifier. DVDs encoded in Dolby Digital or MPEG
will be automatically downmixed to two-channel PCM audio.
DIGITAL OUT jack.
EN
DVD
Sample Frequency (DVD)
Select an option using the and buttons and press OK to confirm:
48kHz: Select this option if your receiver or amplifier is not capable of handling 96 kHz
signals. In that case, the player automatically converts any 96 kHz signals to 48 kHz so
your system can decode them.
96kHz: Select this option if your receiver or amplifier is capable of handling 96 kHz signals.
Note: Check the documentation of your amplifier to verify its capabilities.
DRC (Dynamic Range Control) (DVD and DivX)
Compressing the dynamic range of the audio output (the difference between the loudest sounds and
the quietest ones) allows you to listen to a movie at a lower volume without losing clarity of sound.
Select On using the and buttons to enable the DRC option and press
OK to confirm.
Vocal (DVD)
Set this option to On only when a multi-channel karaoke DVD is playing.That way, the karaoke
channels on the disc mix into normal stereo sound.
Select On using the and buttons and press
OK to confirm.
33
Page 34

Player Menus
LOCK
Rating
New
G B
Unlock
Password
Country Code
Move
Select
EN
DVD
The Lock menu
You can control access to the player and the type of discs
your family can watch with the lock function.There are
eight levels of parental control.
1. Select the Lock option in the main menu using
the and buttons and press button to access
the submenu.
2. Select one of the options using the and
buttons, and press button to access the various
options.
Note:To access the Rating, Password and Country code submenus, you must input a four-digit password. If you
have not chosen one yet, you are prompted to do so when you tr y to access these submenus.
Rating (DVD)
The disc publisher is responsible for coding scenes according to the rating limits. In Europe, very
few discs have coded scenes.
1. Enter the four-digit password and press OK.If you have not chosen one yet, you are prompted
to enter it again and press
2. For the rating limit, select the level using the and buttons, then press OK to confirm.
Note: Select Unlock to unlock the player.
Password
This option allows you to set or change the password.
To set a password:
Select the New option and press
prompted to enter it again to confirm and press
To change the password:
Select the Change option and press
Then enter the new password and press
OK.
press
OK.
OK. Enter the four-digit password and press OK.Then you are
OK.
OK. Enter the current four-digit password and press OK.
OK.You are prompted to enter it again to confirm and
Country code (DVD)
This option allows you to enter the code of the country whose standards were used to rate the
DVD (see country code list at the end of the manual).
1. Enter the four-digit password and press OK.If you have not chosen one yet, you are prompted
to enter it again and press
OK.
2. Scroll through the alphabet using the and buttons to display the first character of the
country code.Then press button to move to the second character.
3. Scroll through the alphabet using the and buttons to display the second character of the
country code.
4. Press OK to confirm.
34
Page 35

Player Menus
PBC
Off
Move
Auto Play
OTHERS
On
Select
The Others menu
1. Select the Others option in the main menu
using the and buttons and press button to
access the submenu.
2. Select one of the options using the and
buttons, and press button to access the various
options.
PBC (PlayBack Control) (VCD)
The PlayBack Control function offers scenes and information which can be selected interactively
via a menu. It can also be used to display high-resolution pictures, if the disc contains any.
Press the and buttons to enable or disable this function and press
Note:This option may not be available on all VCDs.
Auto Play (DVD)
This option automatically starts playback a DVD disc as soon as it is loaded. If the Auto Play mode
is set to On, the DVD player automatically searches for the longest title on the DVD disc and
starts playing back that title.
Press the and buttons to enable or disable this function and press
Note:This option may not be available on all DVDs.
OK to confirm.
OK to confirm.
EN
DVD
35
Page 36

Additional information
EN
Tr oubleshooting
The appliance does not switch on.
•Make sure it is plugged into a mains
socket.
•Press the button on the remote
control or the
the front of the appliance.
The remote control does not work or
works only intermittently.
• Check that batteries are inserted or
change them.
• Aim the remote control at the appliance.
The infrared beam must not be blocked or
interrupted.
• Check that the remote control is
configured to control the device you are
trying to operate with it. Press the
button if you want to operate the DVD
player, the
television set and the
operate the video recorder (see pages 4
and 5).
There is no picture.
• Check you have switched on the TV set.
•Check the connections (see pages 6,7 and 8).
• Select the AV input assigned to the player
on the TV.
• DVD - Turn off the
option (Display menu, page 32) if your
player is connected to a standard television.
• VCR - Try a different video tape. If the
problem is solved, the problem may be
caused by the tape itself.
DVD
It is impossible to read the disc.
• Insert the disc with the printed side facing up.
•Check that the disc can actually be played
by this device (see page 39).
• If you are trying to play a disc containing
JPEG files, check that the files have a
resolution of less than 2,760 x 2,048 pixels.
• Check that the disc’s regional code
matches the player’s regional code.This
player’s regional code is 2.
•Clean the disc (see page 38).
ON/STANDBY button on
DVD
TV button to operate a
VCR button to
Progressive Scan
• The DVD player is locked. Unlock the
player or change the rating level (see page
34).
The picture is of poor quality (with
snow or lines).
•Check the connections (see pages 6,7 and 8).
There is no sound or the sound is of
poor quality.
•Check the connections (see pages 6,7 and 8).
• It may be necessary to modify the setting
selected for the Digital Output option
(
Audio menu, page 33).
•Turn on the audio equipment connected
to the player, if any.
The subtitles do not appear.
• Check that the DVD disc provides
subtitles.
• Refer to the section on how to display
subtitles (see page 27).
The disc menu language is not the
correct one.
• The disc menu language has not been set
up (see page 31).
• The language of your choice is not
available on the disc (see page 31).
You have forgotten your password
(Parental control).
• When the main menu of the DVD player
is displayed,enter the 6-digit number
210499. The password is cancelled.
VCR
The picture is of poor quality (with
snow or lines).
•Try to correct tracking using the and
buttons to reduce the amount of
visible interference.
It is impossible to record a TV
programme.
• Check the reception on your television
set. If you cannot receive a picture through
the aerial, the video recorder will be
unable to record television broadcasts.
•Check the connections (see pages 6,7 and 8).
36
Page 37

Additional information
•Check that channels are tuned on the
video recorder.
•Check the protection tab of the tape is
not broken.
• Check the quality of the signal received by
the television.
It is impossible to insert a tape.
• Check a cassette is not already inserted in
the video recorder.
• Is the video cassette the right way round?
The window should be at the top and the
arrow should be pointing towards the
video recorder.
NICAM sound is not being recorded.
• Check that AUTO has been selected in
the
NICAM menu.
• Consult a TV guide to check that the
broadcast is in stereo.
• Check in your television's user manual
that your television has the NICAM
stereo feature.
No Hi-Fi sound.
•Check in the Audio menu that the
STEREO option has been selected.
• Check in your television's user manual
that your television has the stereo feature.
Autoplay does not work.
• If the protection tab of the tape has not
been broken this function will not work.
Precautions
EN
Use
• If your appliance has been stored in a cool
place for any length of time, during a
journey for example, wait for about 2
hours before using it.
• The openings located on the top and
bottom are for ventilation and must not
be obstructed.
• During thunderstorms, we recommend
that you isolate the appliance from the
electrical supply so that it is not damaged
by electrical or electromagnetic surges.
• This appliance is designed for continuous
use. Switching off the appliance to standby mode does not disconnect it from the
mains supply.To completely isolate the
equipment, remove the plug from the
mains socket as some components remain
connected to the electrical supply.
• If you notice any burning or smoke,
disconnect the appliance immediately to
avoid any risk of electrocution.
• Do not attempt to look inside the
appliance through the disk tray opening or
any other opening.You may be
electrocuted or exposed to laser
radiation.
• This appliance is for domestic use only and
must not be used for industrial purposes.
•Total or partial copying of recordings
protected by copyright legislation,without
the explicit permission of the holder of
the rights, contravenes current legislation.
Copying or downloading music files for
sale or any other business purpose
constitutes or could constitute a violation
of copyright law.
Cleaning
• Use a soft, dry, clean cloth. Regularly dust
the vents at the back or sides.
• Using solvents, abrasive or alcohol-based
products risks damaging the appliance.
• If an object or liquid enters inside the
appliance, unplug it immediately and have it
checked by an authorised engineer.
37
Page 38

Additional information
VHS
VHS
VHS
EN
Handling and caring for discs
• Handle your discs with care. Hold the disc
with your fingers at the edges or through
the hole.
• Insert the disc with the label facing up (for
a single-sided disc).
• Place the disc properly into the tray in the
allotted holder.
• Use a soft cloth to clean discs if necessary,
always wiping from the centre to the edge.
•Always put discs back in their cases after
use and store in a vertical position.
• Do not close the tray with two discs in it
or with a disc not sitting correctly in the
holder.
•Do not play cracked,chipped or warped
discs nor try to repair them with adhesive
tape or glue.
•Do not write on a disc.
• Do not move the player when a disc is
being played.
• Do not scratch discs or store them in
places exposed to direct sunlight, high
humidity or high temperatures.
• Do not use aerosol cleaners, benzene,
anti-static liquids or any other solvent for
cleaning discs.When cleaning, wipe gently
with a soft damp (water only) cloth from
the centre to the edge, avoiding circular
motions, which could cause scratches and
interference during playback.
Guarantee
• The type and production number of your
appliance are printed on the guarantee
certificate delivered with your appliance.
Keep this certificate as well as the invoice.
These documents are required in the
event of claiming your guarantee rights.
•All repairs during the guarantee period
must be carried out by an authorised
engineer representing our brand. If this
condition is not met, your rights will no
longer be valid.
•Never open the appliance yourself, since
this may put you at risk or damage the
equipment.THOMSON does not accept
any liability if the appliance is used in any
way other than in accordance with this
manual.
DISCLAIMER OF WARRANTIES: TO THE
MAXIMUM EXTENT PERMITTED BY
APPLICABLE LAW, DECLARATIONS AND
WARRANTIES OF NON-INFRINGEMENT
OF COPYRIGHTS OR OTHER
INTELLECTUAL PROPERTY RIGHTS
RESULTING FROM THE USE OF THE
PRODUCT IN CONDITIONS OTHER
THAN THOSE SPECIFIED ABOVE ARE
HEREBY DISCLAIMED.
Concerning video tapes
•Tapes are sensitive to environmental storage conditions. Keep them away from dust,
humidity or excessive heat. Do not place them next to appliances producing strong
magnetic or electrical fields (electro-magnet, motor,etc.).Tapes may vary in quality, the
difference in quality not only concerns the tape itself but also the different mechanical
elements of the video cassette.A poor quality tape can damage your video recorder.You
should therefore only use quality brand tapes.
unprotected protected re-recordable
•To avoid erasing one of your tapes by accident, we recommend you protect them by
breaking the security tab.To reuse a protected tape, just stick a piece of adhesive tape on
this place.
38
Page 39

Additional information
Technical data
General
Power requirements:AC 200-240V, 50 Hz Power consumption: 19W - Dimensions
(approx.): 430 x 78.5 x 270 mm (w/h/d) - Mass
(approx.): 4.2 kg - Operating temperature: 5˚C
to 35˚C (41˚F to 95˚F) - Operating humidity: 5 %
to 90 %
System
Laser: Semiconductor laser, wavelength 650 nm
- Video Head system: Double azimuth 4 heads,
helical scanning - Signal-to-noise ratio: More
than 100dB (ANALOG OUT connectors only)
- Harmonic distortion: Less than 0.008% Dynamic range: More than 100 dB (DVD),
More than 95 dB (CD)
DVD copy protection
In accordance with the DVD standard, your DVD player is
equipped with a Copy Protection system, which can be
switched on and off by the DVD disc itself, in order to make
any recording of the relevant DVD disc onto a videotape of
very poor picture quality, or even impossible.“This product
incorporates copyright protection technology that is
protected by method claims of certain U.S. patents and
other intellectual property rights owned by Macrovision
Corporation and other rights owners. Use of this copyright
protection technology must be authorized by Macrovision
Corporation, and is intended for home use only unless
otherwise authorized by Macrovision Corporation. Reverse
engineering or disassembly is prohibited.”
Note on DivX files
Before making use of DivX files, please make sure that you
have legally purchased or rented the content. Pirate copying
is illegal and may result in sanctions. Private copies of your
own material for your own use may be legal in some
countries. Make sure you are aware of applicable laws.
Discs you can play
In spite of progress made to ensure playability of all
discs types , it is not possible to guarantee playback of
discs which are not in conformity with DVD,CD, VCD or
SVCD standards.This unit may not play some recordings
or files on CD-R, CD-RW,DVD-R, DVD-RW, DVD+R,
DVD+RW due to differences in recording formats,
software used & Disc types.
DVD-Video
Digital video discs - 12 cm and 8 cm, single or double
sided, single or dual layer. DVDs are high-density optical
discs on which high quality picture and audio are
recorded by means of digital signals.
DVD-R,DVD-RW, DVD+R,
DVD+RW
Most DVD-R and DVD+R (one recording only),DVDRW and DVD+RW discs (rewritable). Depending on
DVD+Rewritable
the DVD writer and discs used. Recordings using DVD-R
and DVD-RW discs must be made in Video DVD mode.
Recordings using DVD+RW discs must be made in
accordance with the specifications for DVD+RW discs
with a 4.7 GB capacity.
VCD - Video Compact Disc
CD on which you can record up to 74 min. of VHSquality video associated with still images, audio tracks
and interactive menus.
SVCD - Super Video Compact Disc
Most SVCDs comply with the IEC62107 standard.
SVCDs can be used to record up to 70 minutes of
digital sound and images in accordance with MPEG-2
standards for video and MPEG-1 standards for audio.
Audio CDs
Audio CDs (8 and 12 cm).
CD-R, CD-RW
Most CD-R (one recording only) and CD-RW discs
(rewritable).
This player can play most CD-R discs. CD-Rs written
during a multisession recording can also be played,
provided that the session has ended before the disc is
played (depending on the write software). However,
depending on the condition of the CD-writer, computer
and the disc used, you may find that not all discs will play
successfully.When playing a CD-R disc, it is completely
normal for the unit to take up to 20 seconds to
recognise the disc before starting to play. If the disc is
not recognised after a period of 20 seconds, remove the
disc, and then insert it again.
• Irrespective of the actual recording capacity of the
CD-R, do not use its full capacity. • CD-Rs should be
preferably used instead of CD-RWs (rewritable CDs) as,
in certain cases, CD-RW playback may be faulty. • Use
reliable, good-quality CD write software. • Close all
other applications on the computer to ensure reliable
CD-R disc recording.
EN
39
Page 40

Additional information
EN
DivX files
DivX is the name of a revolutionary new video codec
which is based on the new MPEG-4 compression
standard for video. The correct playback of DivX files on
this player depends on the preparation and production
of the audio and video files, the codec used, the type of
recording equipment used and the parameters of your
computer.It may therefore happen that you cannot play
a DivX file or that part or all of it is defective.
DivX disc compatibility with this player is limited as
follows: • The maximum resolution of the DivX file is
below 720x576 (W x H) pixel. • DivX filenames should
not exceed 56 characters. • If the video and audio
structure of recorded file is not interleaved, either video
or audio is outputted. • If the file is recorded with GMC,
the unit supports only 1-point GMC . GMC is the
acronym for Global Motion Compensation. It is an
encoding tool specified in MPEG4 standard. Some
MPEG4 encoders, like DivX or XviD, have this option.
There are different levels of GMC encoding, usually
called 1-point, 2-point, or 3-point GMC.
mp3 files
CD-R and CD-RW discs containing audio files in mp3
format. As for CD-R mp3 discs, please follow all the
recommendations for CD-R above, along with the
comments below:
• Your mp3 files should be ISO 9660 or JOLIET format.
ISO 9660 format and Joliet mp3 files are compatible with
Microsoft’s DOS and Windows, as well as with Apple Mac.
These two formats are the most widely used. • mp3
filenames should not exceed 8 characters, and should end
with the “.mp3” extension. General name format:
Title.mp3. When composing your title ensure that you use
8 characters or less, have no spaces in the name, and
avoid the use of special characters including (. , / ,\ , =
,+).• The total number of files on a disc should be less
than 650.• Use a decompression transfer rate of at least
128 kB/sec (kilobytes/second) when recording mp3 files.
Sound quality with mp3 files basically depends on the rate
of compression/decompression you choose. Obtaining
audio CD quality sound requires an analog/digital sampling
rate, that is conversion to mp3 format, of at least 128
kB/sec and up to 160 kB/sec. Choosing higher rates, such
as 192 kB/sec or more, only rarely produces even better
sound quality.Conversely, files with sampling rates below
128 kB/sec will not play properly.• Do not try recording
copyright-protected mp3 files.“Securized” files are
encrypted and code-protected to prevent illegal copying.
You must not copy such files.
Important:The above recommendations cannot be
taken as a guarantee that the DVD player will play
mp3 recordings, or as an assurance of sound quality.
You should note that certain technologies and
methods for mp3 file recording on CD-Rs prevent
optimal playback of these files on your DVD player
(i.e. degraded sound quality and even, in some
cases, inability of the player to read the file).
WMA (Windows Media Audio) files
CD-R with WMA files.
• WMA filenames should not exceed 8 characters, and
should end with the “.wma” extension. General name
format:Title.wma. When composing your title ensure
that you use 8 characters or less, have no spaces in the
name, and avoid the use of special characters including (.
,/ , \ , = ,+).• The total number of files on a disc should
be less than 650.
JPEG files
CD-R and CD-RW with JPEG files. Certain JPEG files,
including progressive JPEG files, cannot be read by this
player.
The total number of files and folders on the disc should
be less than 650. Make sure that files have the “.jpg”
extension. Files without the “.jpg” extension will not be
able to be read by the player - even though the files are
shown as JPEG images on your computer.
Kodak Picture CDs
HELPLINE
You can contact THOMSON by dialling: 0871 712 1312
(for United Kingdom, £0.10/mn inc VAT)
www.thomson-europe.com
In the interest of improving the quality of our products, we reserve the right to modify their features.The
information in this manual is, therefore, subject to change and does not represent any kind of contract.
40
 Loading...