

Page 1

ENGLISH
Safety Warnings
Important Recommendations .........................................2
Introduction
Connection to the mains................................................4
Controls of the Monitor ..................................................5
Remote control and Monitor ..........................................8
Remote control and other devices.................................9
Installation
Installation of the Monitor.............................................10
External Equipment Viewing Setups ............................11
Displayable Monitor Specification................................14
Operation
Using the remote control..............................................15
Turning on the Monitor.................................................15
On-Screen Menu Language Selection (option) ...........15
Picture Menu Options
PSM (Picture Status Memory).....................................16
Adjusting Auto Colour Control......................................16
Manual Colour Temperature Control............................16
Manual Picture Control ................................................16
Film Mode....................................................................17
Sound Menu Options
SSM (Sound Status Memory)......................................17
AVL(Auto Volume Leveler) ..........................................17
Adjusting Sound Control..............................................17
Time Menu Options
Setting the Clock..........................................................18
Setting the On/Off Timer ..............................................18
Auto Sleep ...................................................................18
Sleep Timer..................................................................18
Special Menu Options
Child Lock....................................................................19
ISM (Image Sticking Minimization) Method .................19
Low Power...................................................................19
Screen Menu Options
Auto adjustment...........................................................20
Setting Picture Format.................................................20
Picture Size Zoom........................................................20
Screen Position ............................................................21
Manual Configure.........................................................21
Screen Adjustments.....................................................21
Initializing .....................................................................22
Selecting Wide VGA mode ..........................................22
Luminance Noise Reduction........................................22
PIP (Picture In Picture) Feature
Watching PIP...............................................................23
Selecting a Input Signal Source for the PIP..................23
PIP Size .......................................................................23
Moving the PIP.............................................................23
PIP Aspect Ratio ..........................................................23
Miscellaneous
External Control Device Setup.....................................24
Programming your remote control...............................30
Controlling another device...........................................31
Troubleshooting Checklist............................................32
Product Specifications .................................................33
Contents
Contents
Owner’s Manual 1
If you encounter difficulties:
Advisors are at your disposal to help you solve your
problems at this telephone number:
Page 2
2 Plasma Monitor
Safety Warnings
Important Recommendations
Important Recommendations
Warning :your monitor is heavy and its weight centred towards the top.
Handle it with care. Unpacking and installation requires at least two people.
For the installation to be correct, we strongly advise you to contact a
registered and qualified THOMSON dealer.
When you choose a specific support, read through the supplied notice for
details on fixing and attaching your equipment.
Installation
This monitor requires a mains voltage of 220 - 240~ 50Hz. Any lengthy use
with a higher voltage may damage your monitor or even provoke a fire. In
case of thunderstorms, it is recommended to disconnect the mains plug. If
you notice any smell or smoke coming out of your monitor, disconnect the mains plug immediately. To do so, leave the
mains plug accessible to allow an easy and quick disconnection. During long absences, we recommend you to turn off your
monitor through the Main power button and even to disconnect it from the mains.
Safety
Ensure that the vents located at the rear are not covered and install your monitor far from any source of heat or dust. Do
not expose it to direct sunlight.
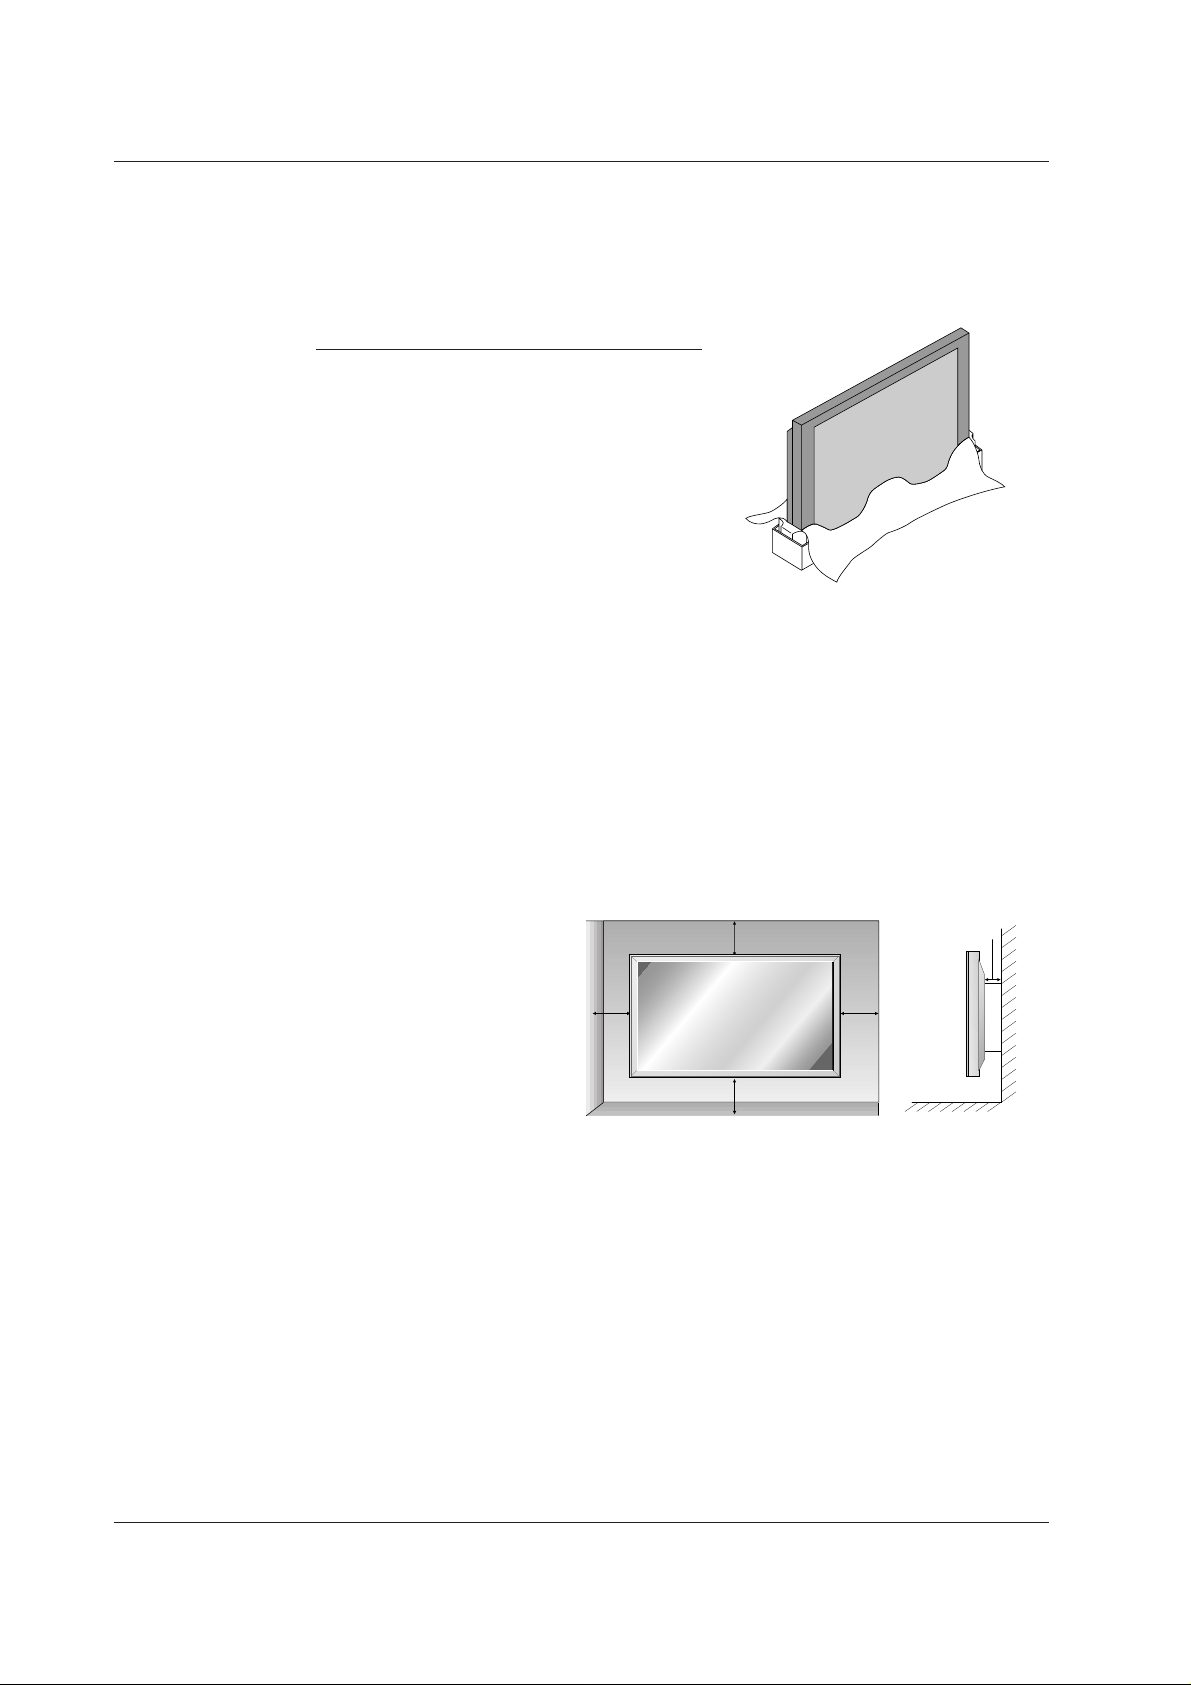
If you need to embed your monitor, leave sufficient
space around it for air circulation. Do not install it
directly near heating. The maximum ambient
operating temperature is 35° Celsius.
Your monitor has been designed to be used in dry
premises. If, exceptionally, you have to use it outside
(balcony, veranda etc.), make sure that it is
protected against humidity (dew, rain splashing). The
maximum operational humidity ratio is 85%.
Before using your monitor, if cold, in a warm room,
wait until any possible condensation found on the
screen has evaporated by itself.
Avoid any intrusion of liquid or small metallic objects
inside the monitor. If such an incident were to occur,
disconnect immediately your monitor from the mains
and call THOMSON after-sales service for help.
Ventilation - Heat - Humidity
Clean the screen with liquid products meant for glass. Never use abrasive products.
Clean front and cabinet using a soft cloth impregnated with a neutral detergent. Use of an alcohol-based solvent or
product may damage your monitor.
Regularly dust the air vents located at the rear of your device.
This monitor must be installed and used in compliance with this notice. It should not be used for other purposes.\,
including industrial purposes.
Maintenance
10cm
10cm10cm
10cm
3cm
Page 3
Owner’s Manual 3
Safety Warnings
ENGLISH
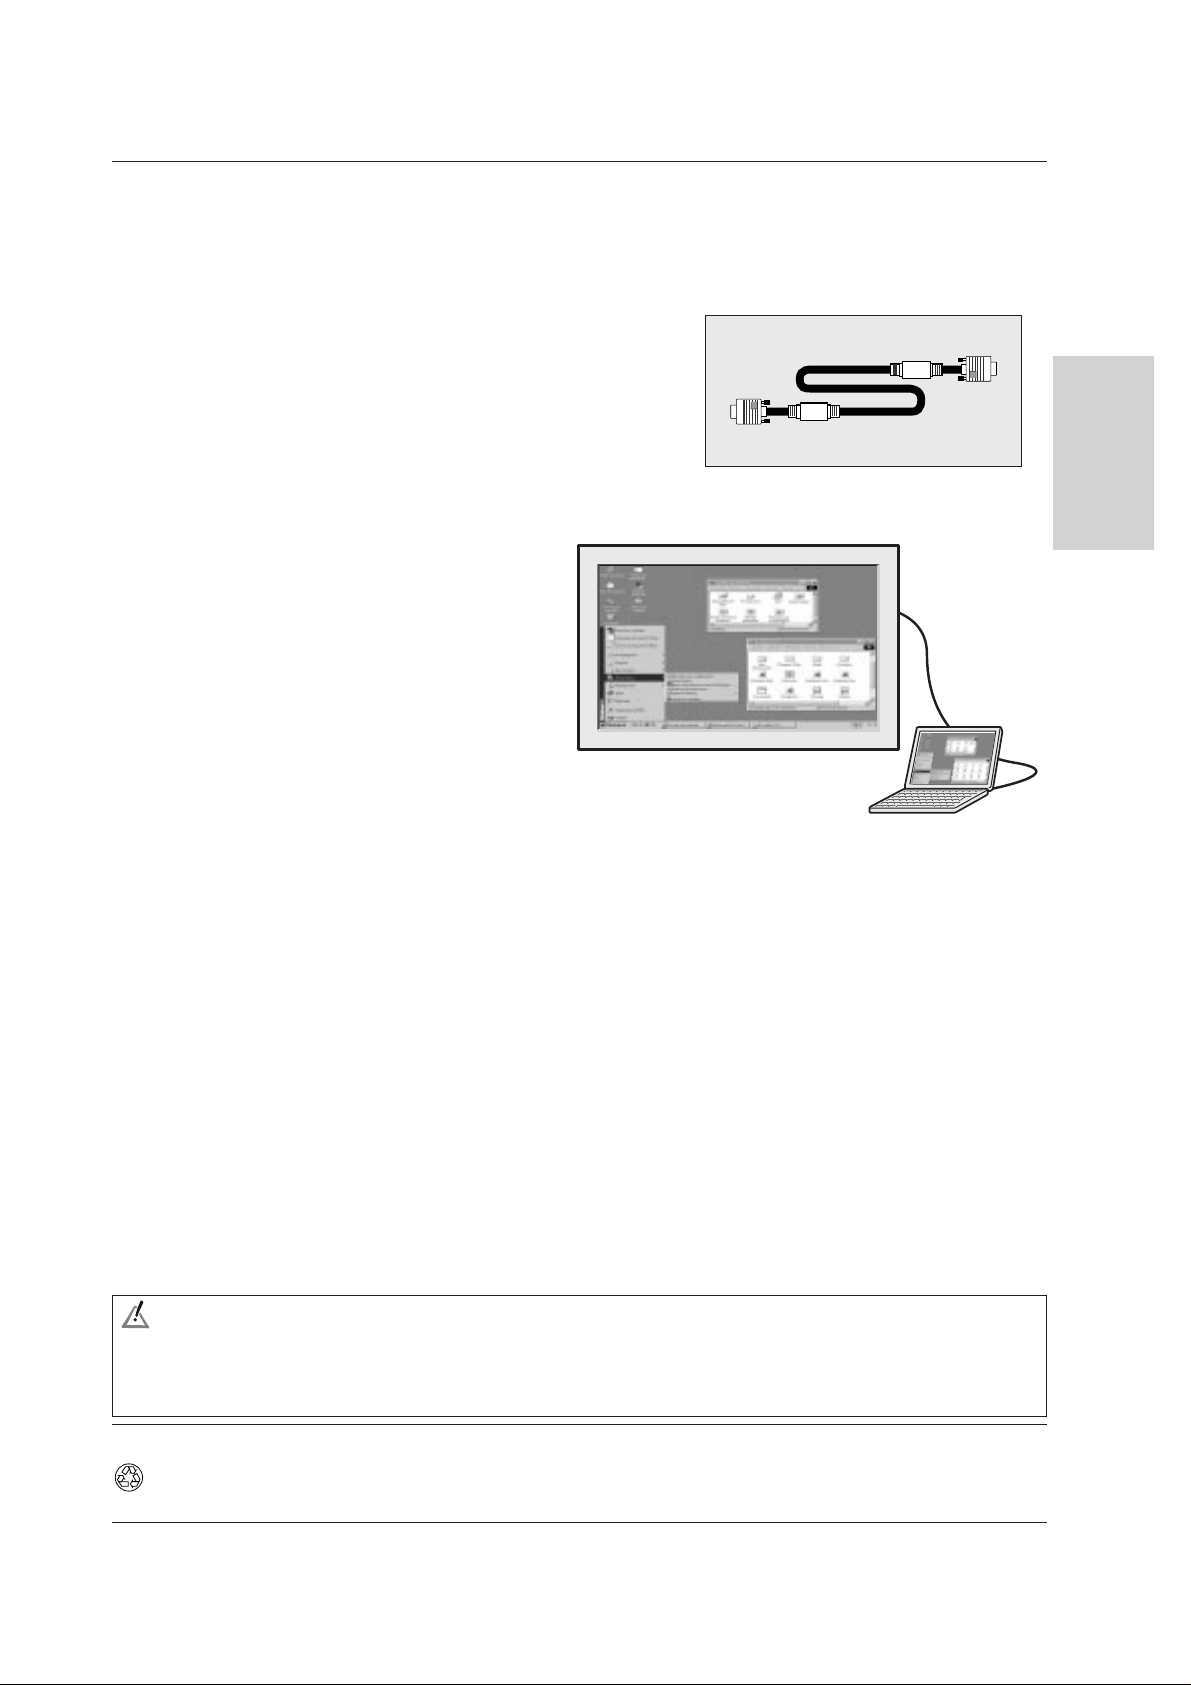
If your connect a computer to your monitor, use the supplied D-sub
15 pin cable.
Computer
As is the case for any phosphorus-based screen
(cathode-ray or other tube), the screen brightness of
your monitor will gradually fade with the passing of
time.
Like any monitor with a phosphorus- or plasma gasbased screen, your monitor risks screen burn in
under certain circumstances. The lengthy display of
a fixed picture provoke screen burn in.
To protect your monitor, we recommend the following measures:
• As often as possible, display moving pictures.
• Switch your monitor to standby mode if you do not need to display pictures.
For your presentations, when displaying tables, graphics...
• Decrease the contrast and brightness of the picture as much as possible.
• Display pictures presenting numerous colours and gradations of colours (photographs).
• Adjust contrast to obtain the least noticeable transition between dark and light areas (White characters on a black back-
ground).
• Avoid displaying pictures presenting few colours or neat and clear outlines between colours.
Contact registered or affiliated THOMSON dealer for other precautions to be taken to accommodate specific uses as well as
possible.
Screen burn in is not covered by the warranty.
Your monitor complies with Class B requirements. If you experience radio or HF interference under operation contact your THOMSON dealer.
THOMSON shall not be responsible if the monitor is not used according to this manual.
To preserve your screen
WARNING
TO REDUCE ALLRISKS OF FIRE OR ELECTROCUTION DO NOT EXPOSE YOUR MONITOR TO RAIN OR HUMIDITY. DO
NOT USE EXTENSION CABLES OR MULTIPLE CONNECTORS FOR CONNECTING YOUR EARTH-SHIELDED 3-PIN
POWER CORD, ALL PINS SHOULD BE FULLY LOCATED. DO NOT OPEN HOUSING - CONTAINS HIGH VOLTAGE
COMPONENTS.
The pages of this publication are printed on recycled paper.
Page 4
4 Plasma Monitor
Introduction
Connection to the mains
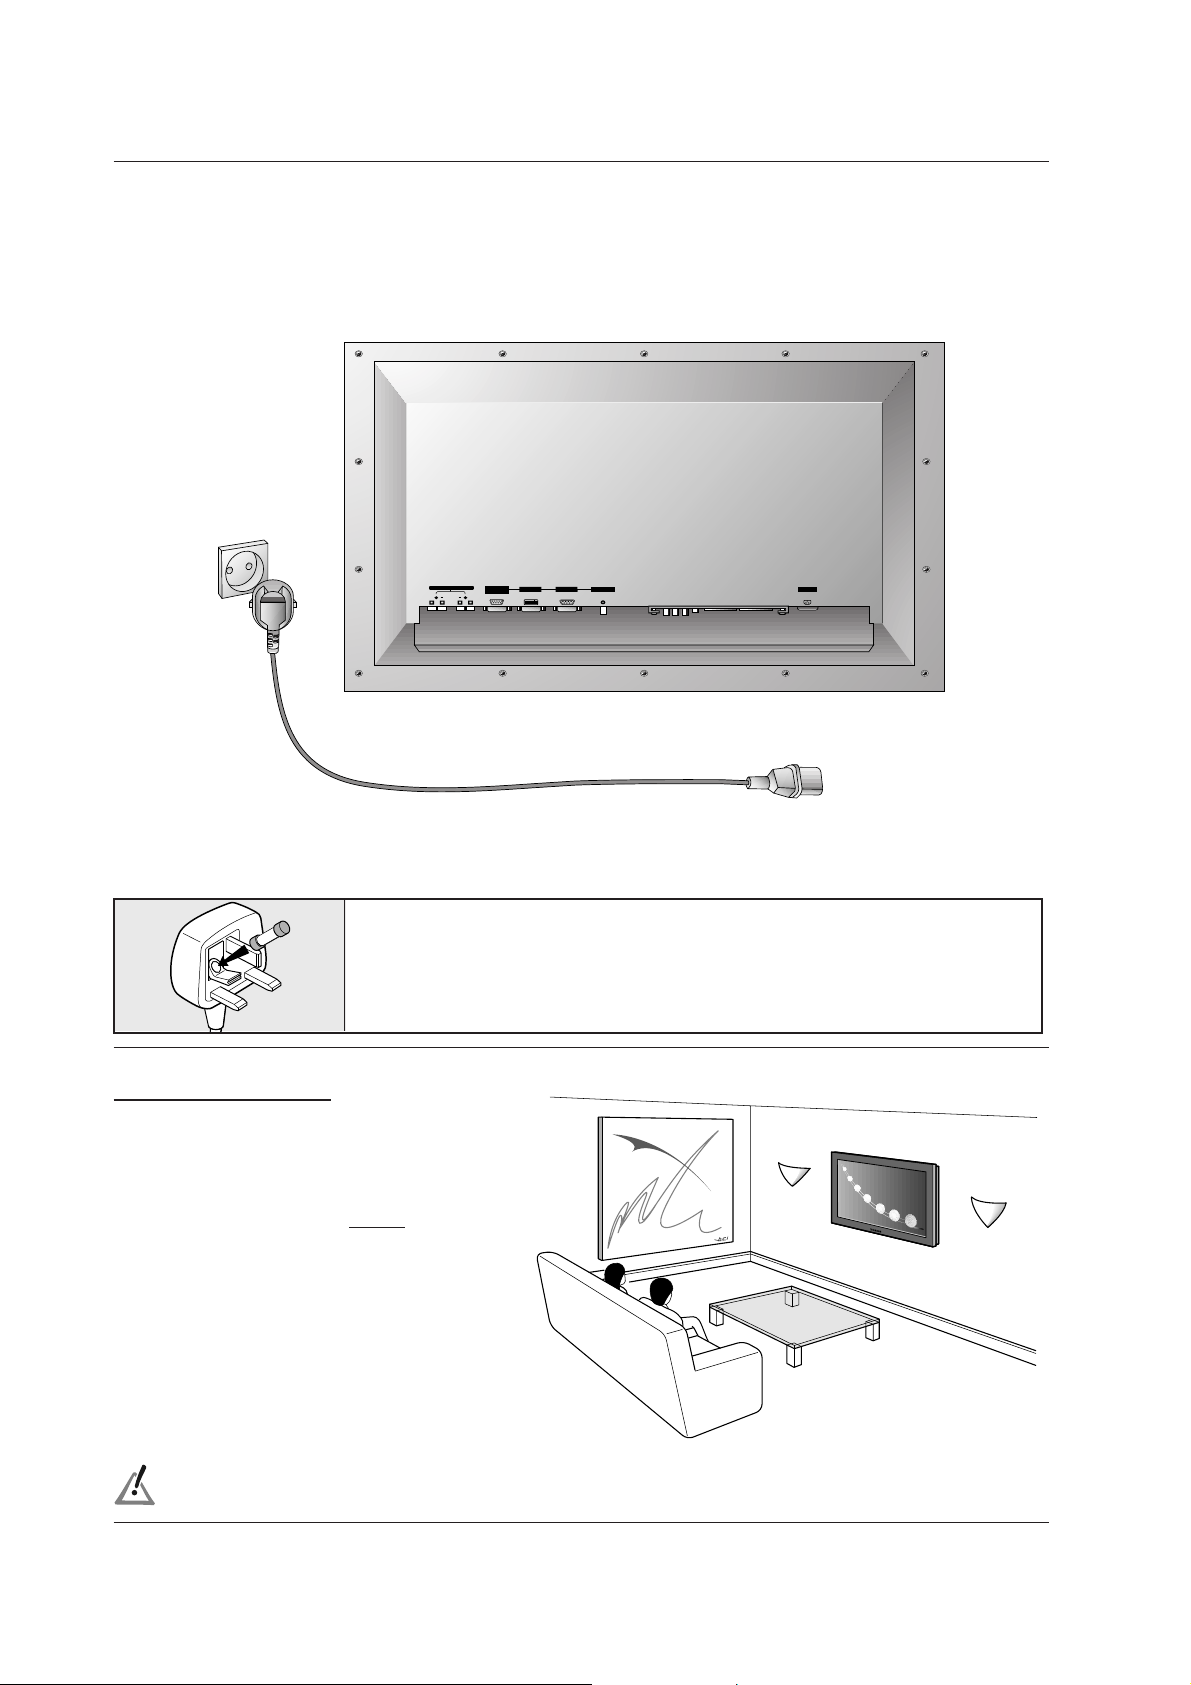
Connection to the mains
- Use the the mains cord delivered with your set and connect it to a 220 - 240V~ 50Hz socket. Switching on is done through the
Main power button located on the front of your set.
(+) ( ) (+)( )
EXTERNAL SPEAKER (8Ω)
R
L
DVI INPUT RGB INPUT
AUDIO INPUT AC INPUT
RS-232C INPUT
(CONTROL/SERVICE)
Your set must be connected to the mains through an earthed wall socket (l). Use the delivered mains lead exclusively. Under no
circumstances must an electrical extension lead be used.
Your set can be located on a wall allowing you
a wide-angle view of those persons who are
present in a large-area room. To do this without
the kit, fix appropriate metal attaching parts to
the wall and rear of your set. The optional
wallfixing kit is supplied separately with a specific
installation notice.
Wall mounting
The TV monitor system is suitable for use on a.c. mains supply, 220 - 240V, 50 Hz only. It must
not be connected to a d.c. supply. If your monitor system fails to operate, the fuse of the plug
may have blown. Replace it by an ASTA or BSI-approved fuse of the same type.
For safety reasons, it is recommended to leave the mains plug free and accessible.
220-240V~ 50Hz
Page 5
Owner’s Manual 5
Introduction
ENGLISH
Controls of the Monitor
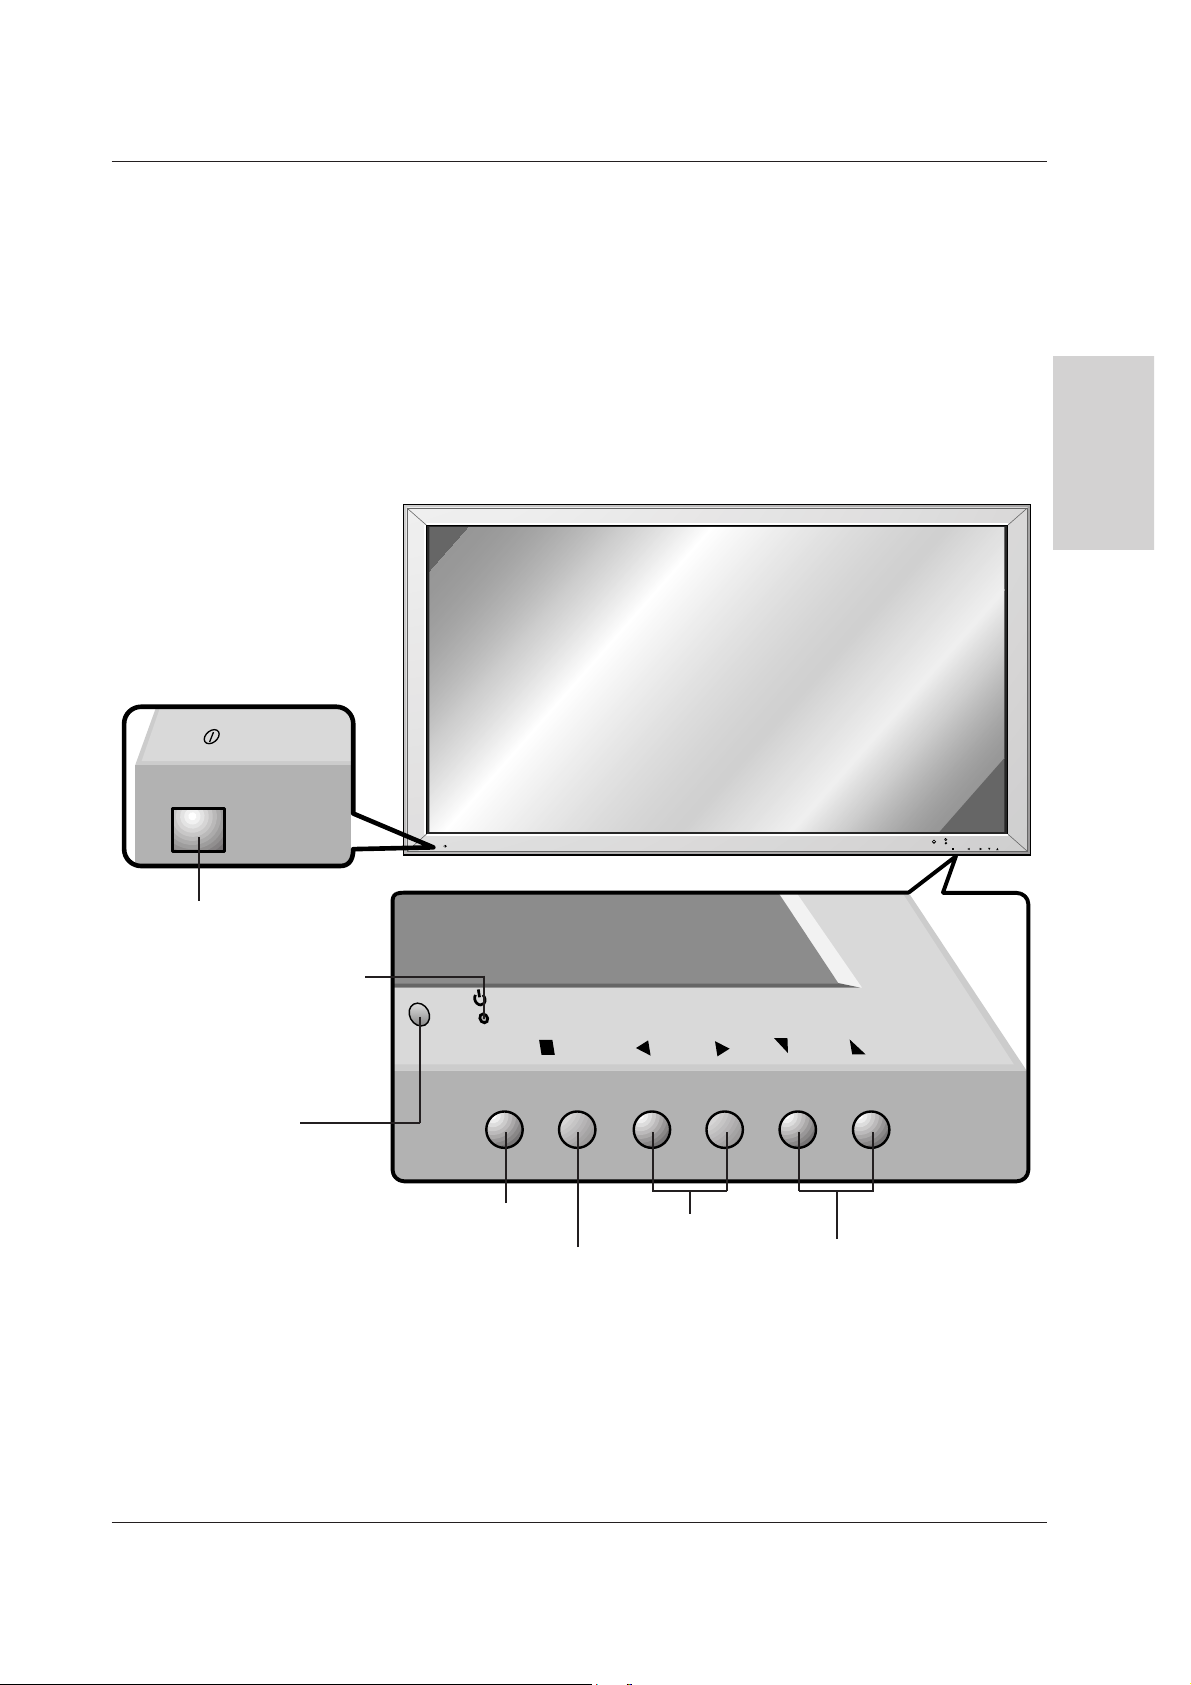
Controls of the Monitor
<Front Panel Controls>
ON/OFF
ON/OFF
MENU VOL.
INPUT
SELECT
VOL.
MENU
INPUT
SELECT
Main Power Button
Switches On or Off
INPUT SELECT Button
VOLUME (
FF,GG
) Buttons
Remote Control Sensor
Power Standby Indicator
Illuminates red in standby mode,
Illuminates green when the
Monitor is turned on
DD,EE
Buttons
MENU Button
To preserve your set screen
Your set could be damaged if a bright fixed picture is displayed on its screen for too long. The plasma screen of your set, like any
television or computer monitor screen, could be permanently imprinted with this fixed image. It is therefore recommended to avoid
displaying the same fixed picture (like a DVD or a VCR menu) for more than 10 minutes.
Page 6
6 Plasma Monitor
Introduction
Controls of the Monitor
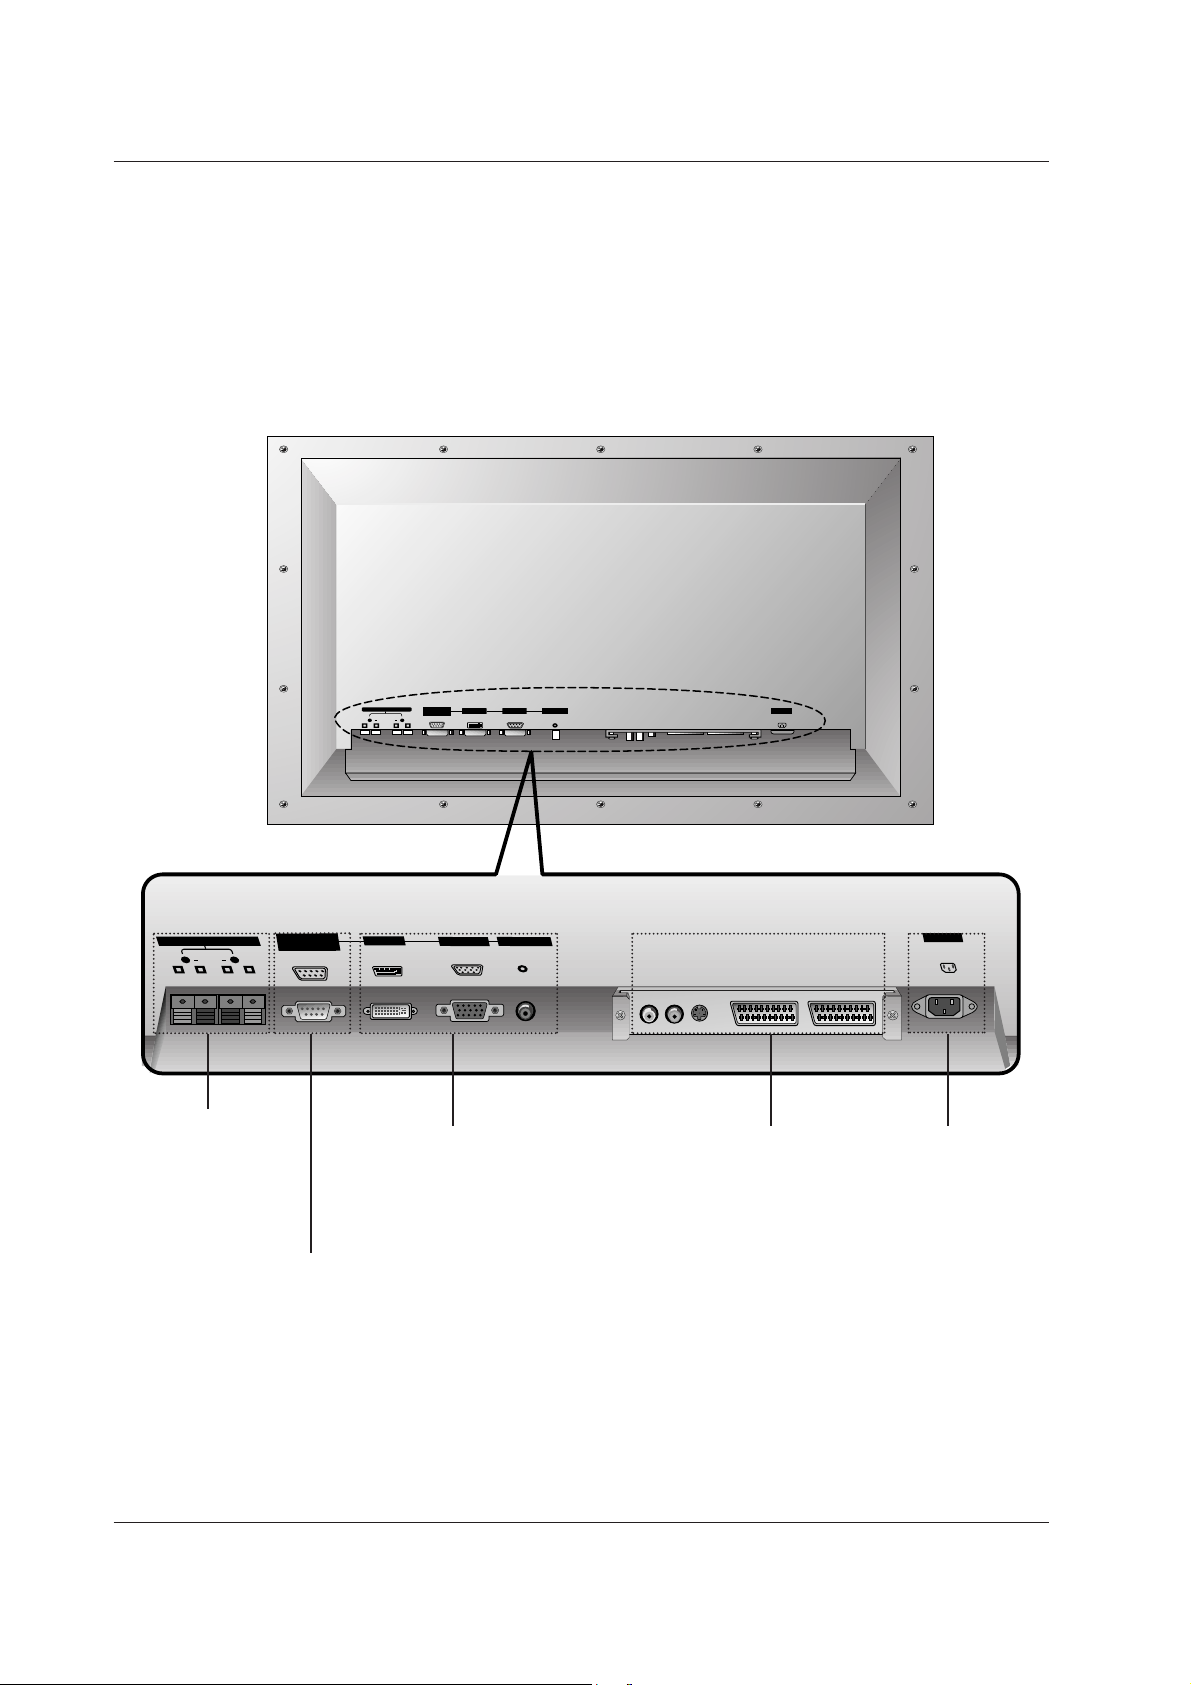
Controls of the Monitor
<Back Panel>
(+) ( ) (+)( )
EXTERNAL SPEAKER(8Ω)
R L
AUDIO INPUTRGB INPUT
AC INPUT
RS-232C INPUT
(CONTROL/SERVICE)
DVI INPUT
(+) ( ) (+)( )
EXTERNAL SPEAKER (8Ω)
R
L
DVI INPUT RGB INPUT
AUDIO INPUT AC INPUT
RS-232C INPUT
(CONTROL/SERVICE)
EXTERNAL
SPEAKER
Connect to optional
external speaker(s).
DVI INPUT / RGB INPUT /
AUDIO INPUT SOCKETS
Connect the monitor output
socket of the PERSONAL
COMPUTER to this socket.
AUDIO INPUT / S-VIDEO INPUT
SOCKETS
EURO SCART SOCKET
POWER CORD
SOCKET
This Monitor operates
on an AC power. The
voltage is indicated on
the Specifications
page. Never attempt
to operate the Monitor
on DC power.
RS-232C INPUT
(CONTROL/SERVICE) PORT
Connect to the
RS-232C port on
a PC.
Page 7
Owner’s Manual 7
ENGLISH
Introduction
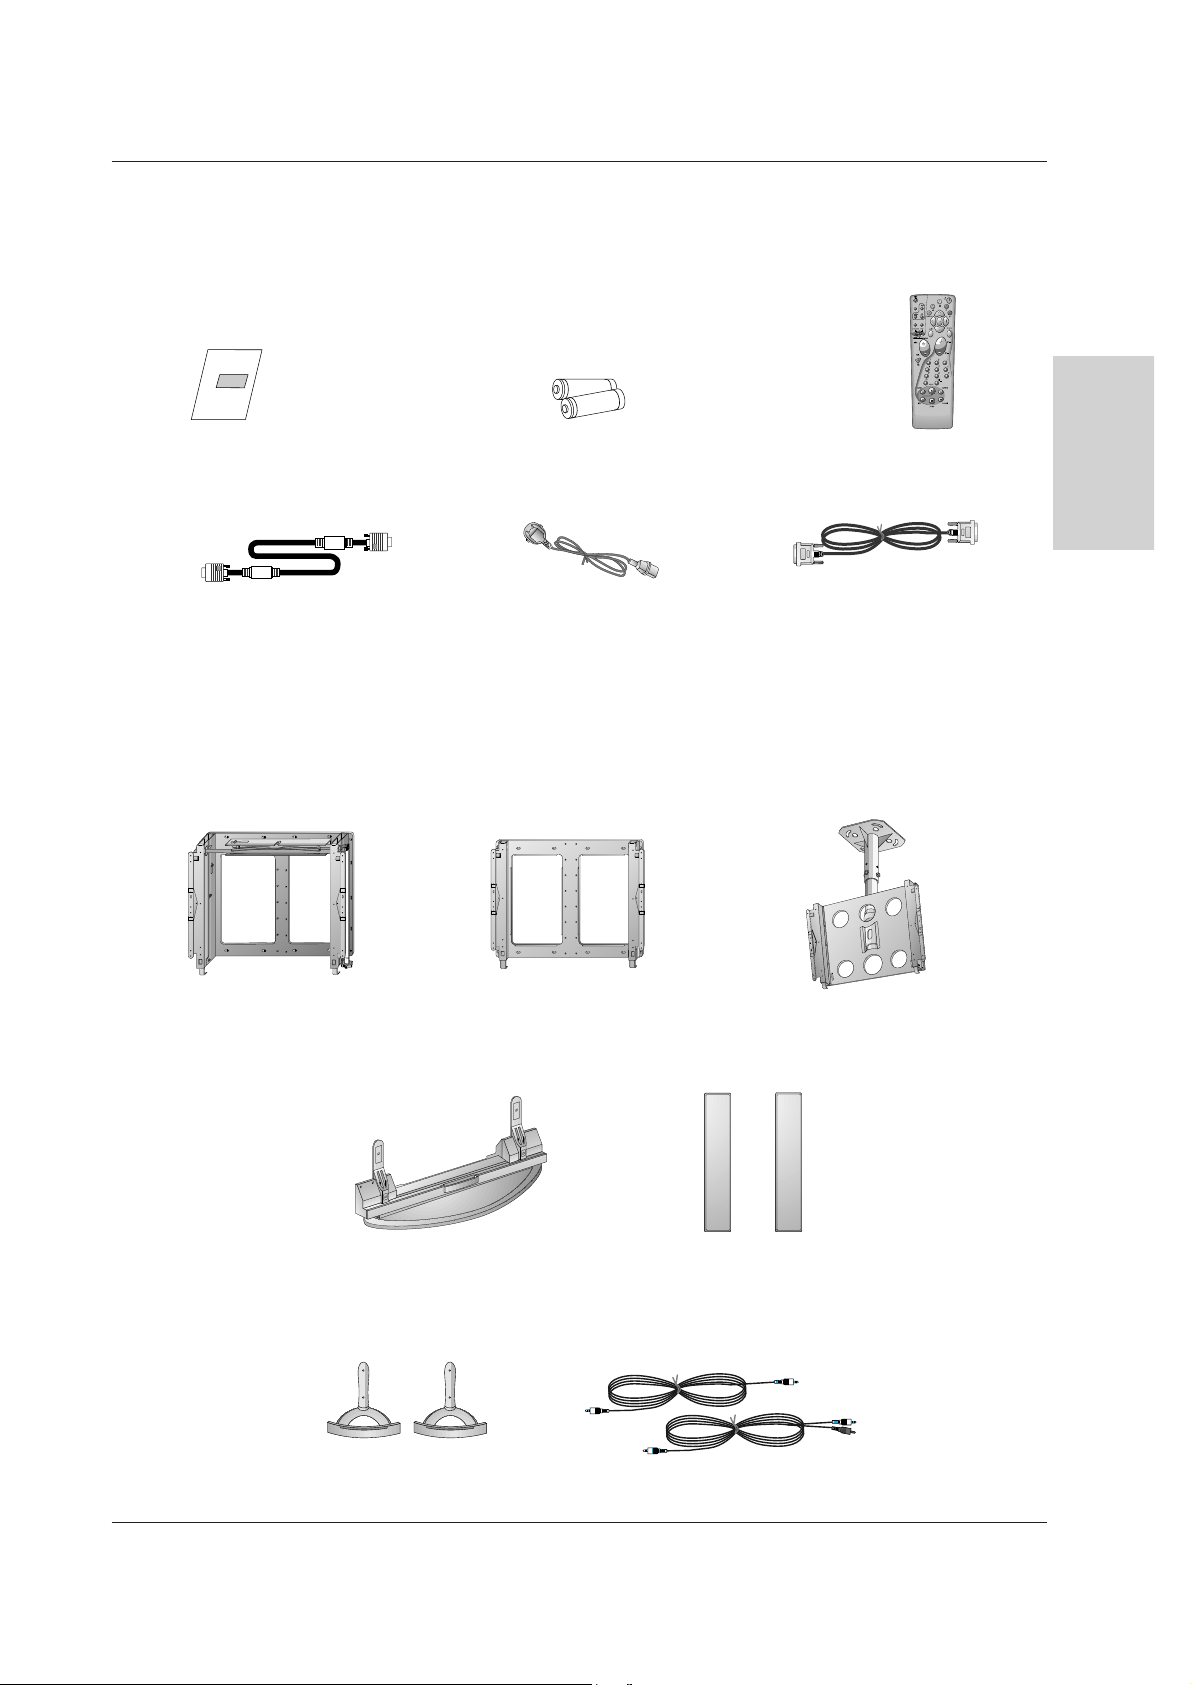
D-sub 15 pin cable
Owner's Manual
Owner’s Manual
1.5V
1.5V
Alkaline batteries
Power Cord
Remote Control handset
DVI-D Cable
Accessories
- Optional extras can be changed or modified for quality improvement without any notification new optional extras can be
added.
- Contract your dealer for buying these items.
Optional Extras
Desktop stand
Desktop Speaker stand
Speakers
Audio cables
Ceiling mounting bracket
Tilt wall mounting bracket
Wall mounting bracket
Page 8
Navigating Up in a menu.
Navigating Down in a menu.
16/9 4/3
Zoom 14/9
8 Plasma Monitor
Introduction
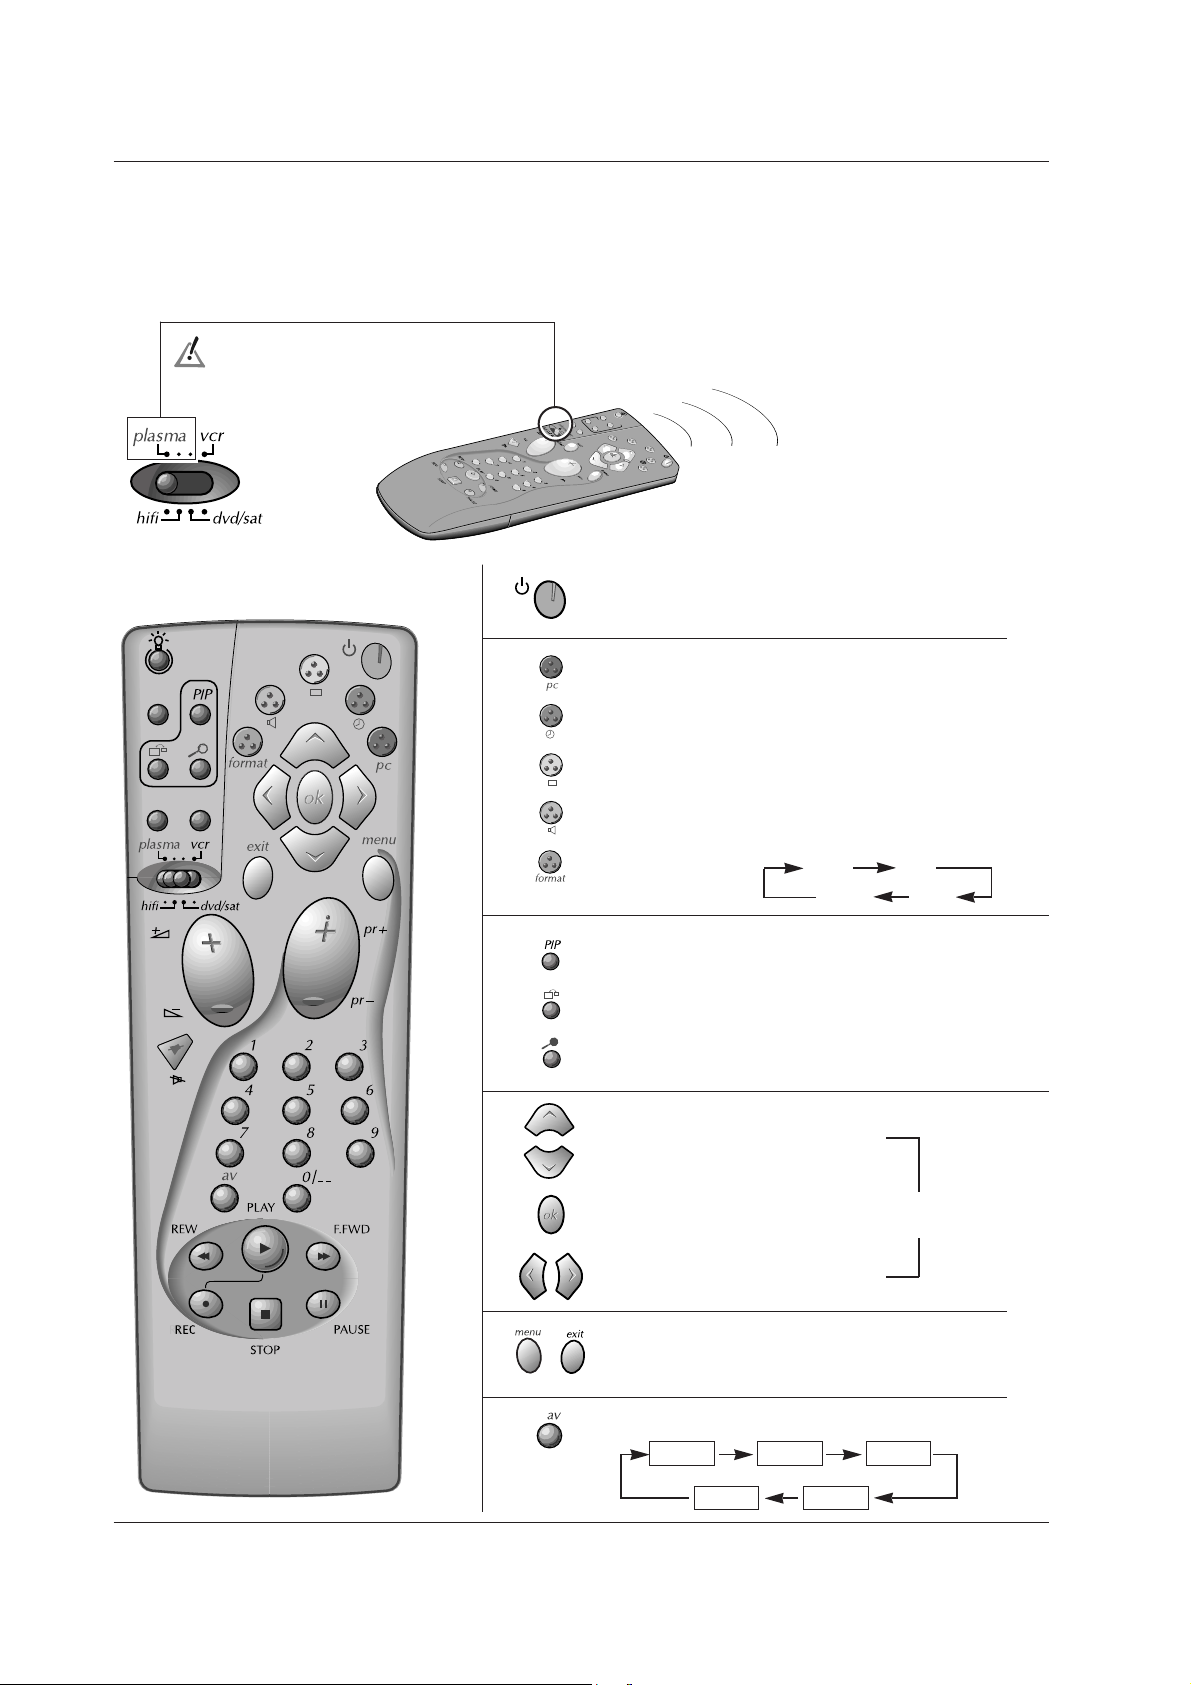
Remote control and Monitor
Remote control and Monitor
The remote control of your set controls your monitor as well as the
functions of other devices described on page 9.
Selection of connected devices (connectors).
To control the monitor, switch this key to the
plasma position.
AV1 AV2 S-Video
DVI RGB
To select pictures from a PC.
Standby (Long Pressure)
Start (Short Pressure)
To select the Sleep Timer.
To go back to your prefered Picture settings.
To go back to your prefered Sound settings.
Format control.
To switch the sub picture on or off.
To alternate between main and sub picture.
To adjust the sub picture size.
Validation. adjusts menu settings.
Right / Left selection in the menus.
Accessing (
menu
) and quitting (
exit
) the menus.
Page 9

Owner’s Manual 9
ENGLISH
Introduction
Remote control and other devices
Remote control and other devices
Amplifier
VCR
When the switch is on the plasma position, some of the keys control the devices indicated on this page. For other devices
(Amplifier, DVD, Satellite and VCR), refer to pages 31.
Programming:
You can program these two keys to adjust the sound volume of
your monitor or amplifier. Hold the
menu
key down and key in
"001" for the monitor or key in "000" to return to the amplifier
functions.
Direct access to the channels and input
of the digital values in the menus.
Channel setting.
Sound muting and recovery (Mute)
Volume setting
Amplifier
(or Monitor if programmed)
VCR
REW = fast rewind
PLAY = play
F.FWD = fast forward
REC = record
STOP = stop
PAUSE = still frame
Page 10
10 Plasma Monitor
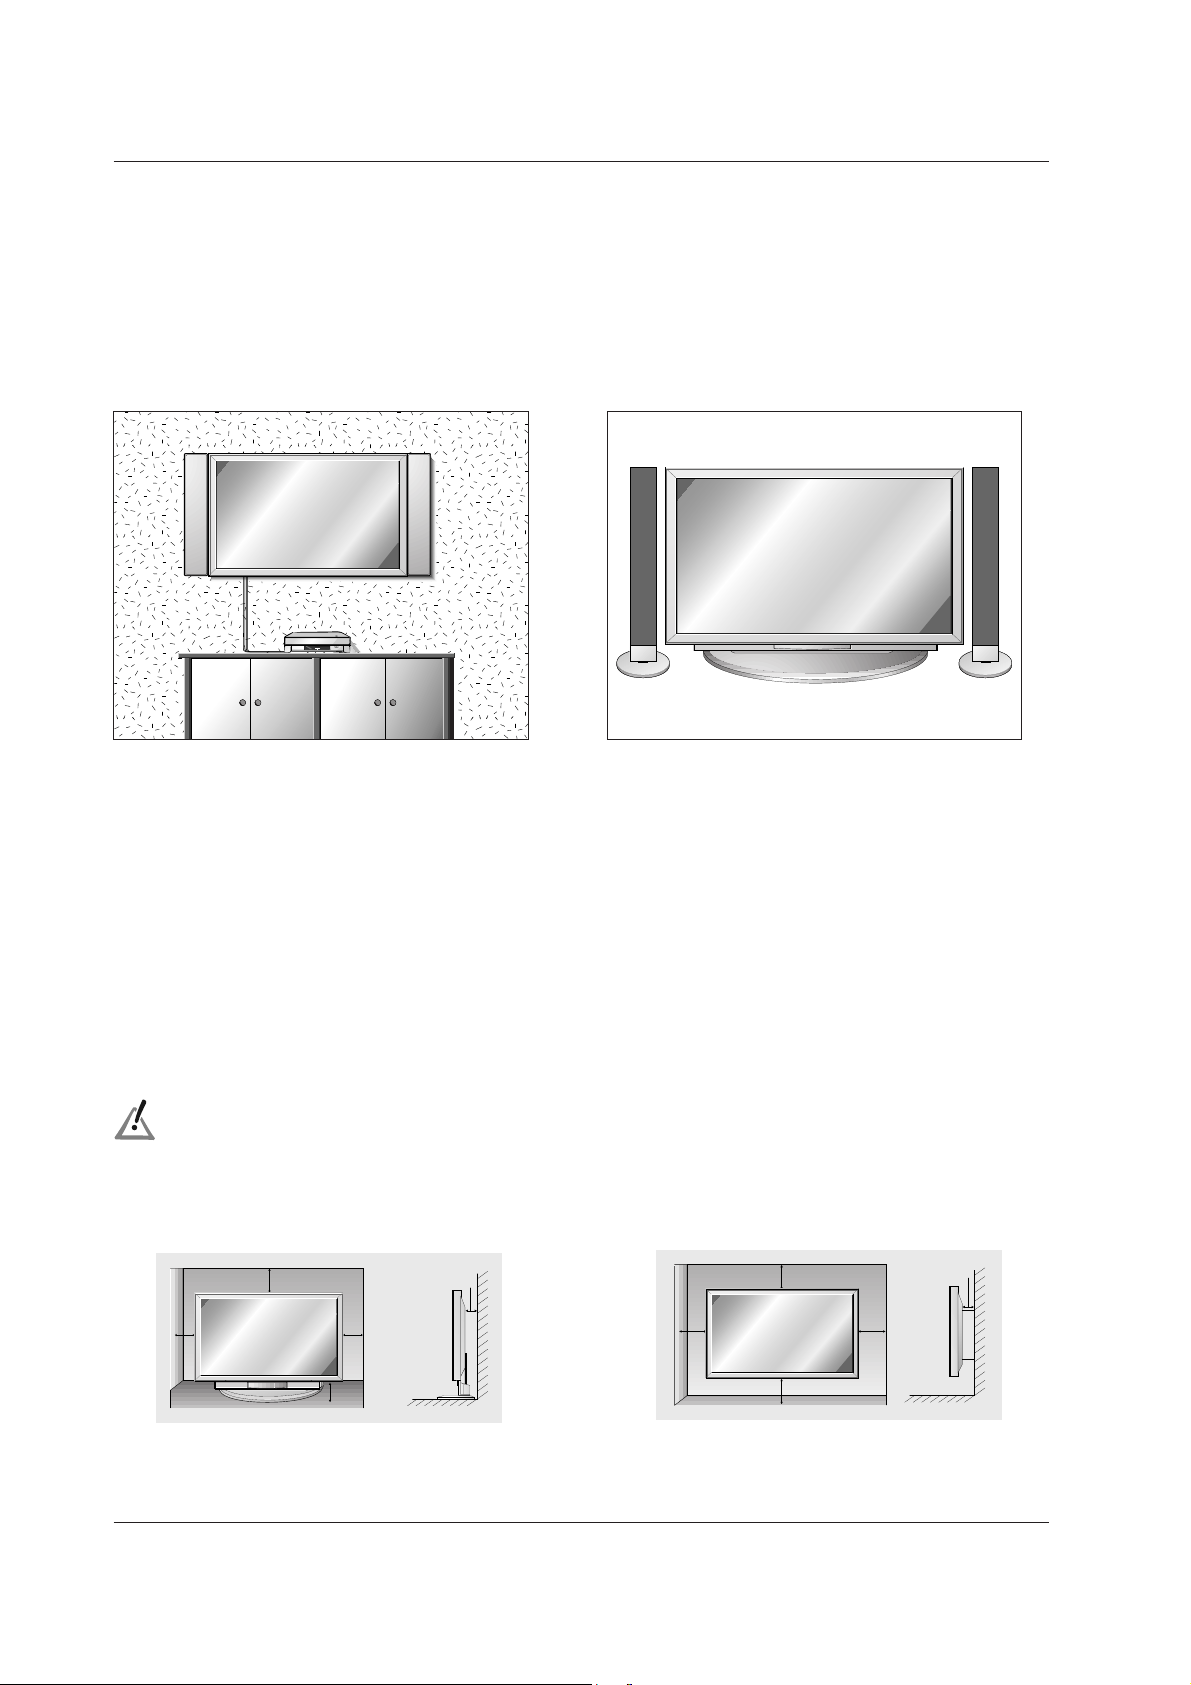
Desktop Pedestal Installation
• The Monitor can be mounted on a desk as shown
above. (For further information, refer to the optional
'Desktop Stand Installation and Setup Guide'.)
- The Monitor can be installed in various ways such as wall mounting type, desktop type, etc..
To install as wall mounting type (optional)
• The monitor can be installed on a wall as shown
above. (For further information, refer to the optional
‘Wall Mounting Bracket Installation and Setup Guide’.)
Installation
Installation of the Monitor
Installation of the Monitor
To Mount on a Wall
Wall mount minimum allowable clearances for
adequate ventilation.
To Install on a Desktop
Pedestal mount minimum allowable clearances for
adequate ventilation.
Install this monitor only in a location where adequate ventilation is available.
10cm
10cm
3cm
10cm
6cm
10cm
10cm10cm
10cm
3cm
Page 11

Owner’s Manual 11
ENGLISH
Installation
External Equipment V
External Equipment V
iewing Setups
iewing Setups
Watching Cable TV
- After subscribing to a cable TV service from a local provider and installing a converter, you can watch cable TV programming.
Watching VCR
- Avoid having a fixed image remain on the screen for a long period of time. Typically the fixed image of a frozen still picture from
a VCR, of the 4:3 or 14:9 picture format or of a CH label may remain visible on the screen.
To watch VCR
1. Press
av
button on the remote control and select AV1 or AV2.
(When connecting with S-Video, select the
S-Video.)
2. Insert a video tape into the VCR and press the PLAY button on the VCR. (See VCR owner’s manual)
To watch cable TV
1. Press
av
button on the remote control and select AV1 or AV2.
2. Tune to cable service provided channels using the cable box.
( )
( )
R
( )
( )
L
RS-232C INPUT
(CONTROL/SERVICE)
EXTERNAL SPEAKER
AC INPUT
AUDIO INPUTRGB INPUTDVI INPUT
< VCR >
< Back panel of the Monitor >
< Back panel of the Monitor >
( )
( )
R
( )
( )
L
RS-232C INPUT
(CONTROL/SERVICE)
EXTERNAL SPEAKER
AC INPUT
AUDIO INPUTRGB INPUTDVI INPUT
< Cable box >
To avoid picture noise (interference), leave an adequate distance between the VCR.
For further information regarding cable TV service, contact your local cable TV service provider(s).
Page 12

12 Plasma Monitor
Installation
External Equipment V
External Equipment V
iewing Setups
iewing Setups
Watching external AV source
- When connecting the Plasma Monitor with external equipments, match the colours of connecting ports : Video = yellow, Audio
(Left) = white, Audio (Right) = red.
To watch external AV source
1. Press
av
button on the remote control to select AV1, AV2.
(When connecting with S-Video, select the
S-Video.)
2. Operate the corresponding external equipment. (See external equipment operating guide.)
< Back panel of the Monitor >
( )
( )
R
( )
( )
L
RS-232C INPUT
(CONTROL/SERVICE)
EXTERNAL SPEAKER
AC INPUT
AUDIO INPUTRGB INPUTDVI INPUT
R L
AUDIO VIDEO
R
Camcorder
Video game set
Watching DVD
How to connect
Connect DVD Video or S-Video output to VIDEO or S-VIDEO input and DVD Audio outputs to AUDIO INPUT of the Monitor.
How to use
1. Press
av
button on the remote control of the monitor to select AV1, AV2 or S-Video.
2. Turn on the DVD player.
< Back panel of the Monitor >
( )
( )
R
( )
( )
L
RS-232C INPUT
(CONTROL/SERVICE)
EXTERNAL SPEAKER
AC INPUT
AUDIO INPUTRGB INPUTDVI INPUT
R
R
< DVD player >
Note : If your DVD is fitted
with a scart socket, you can
also connect it to the monitor
using a SCART cable.
Page 13
Owner’s Manual 13
Installation
ENGLISH
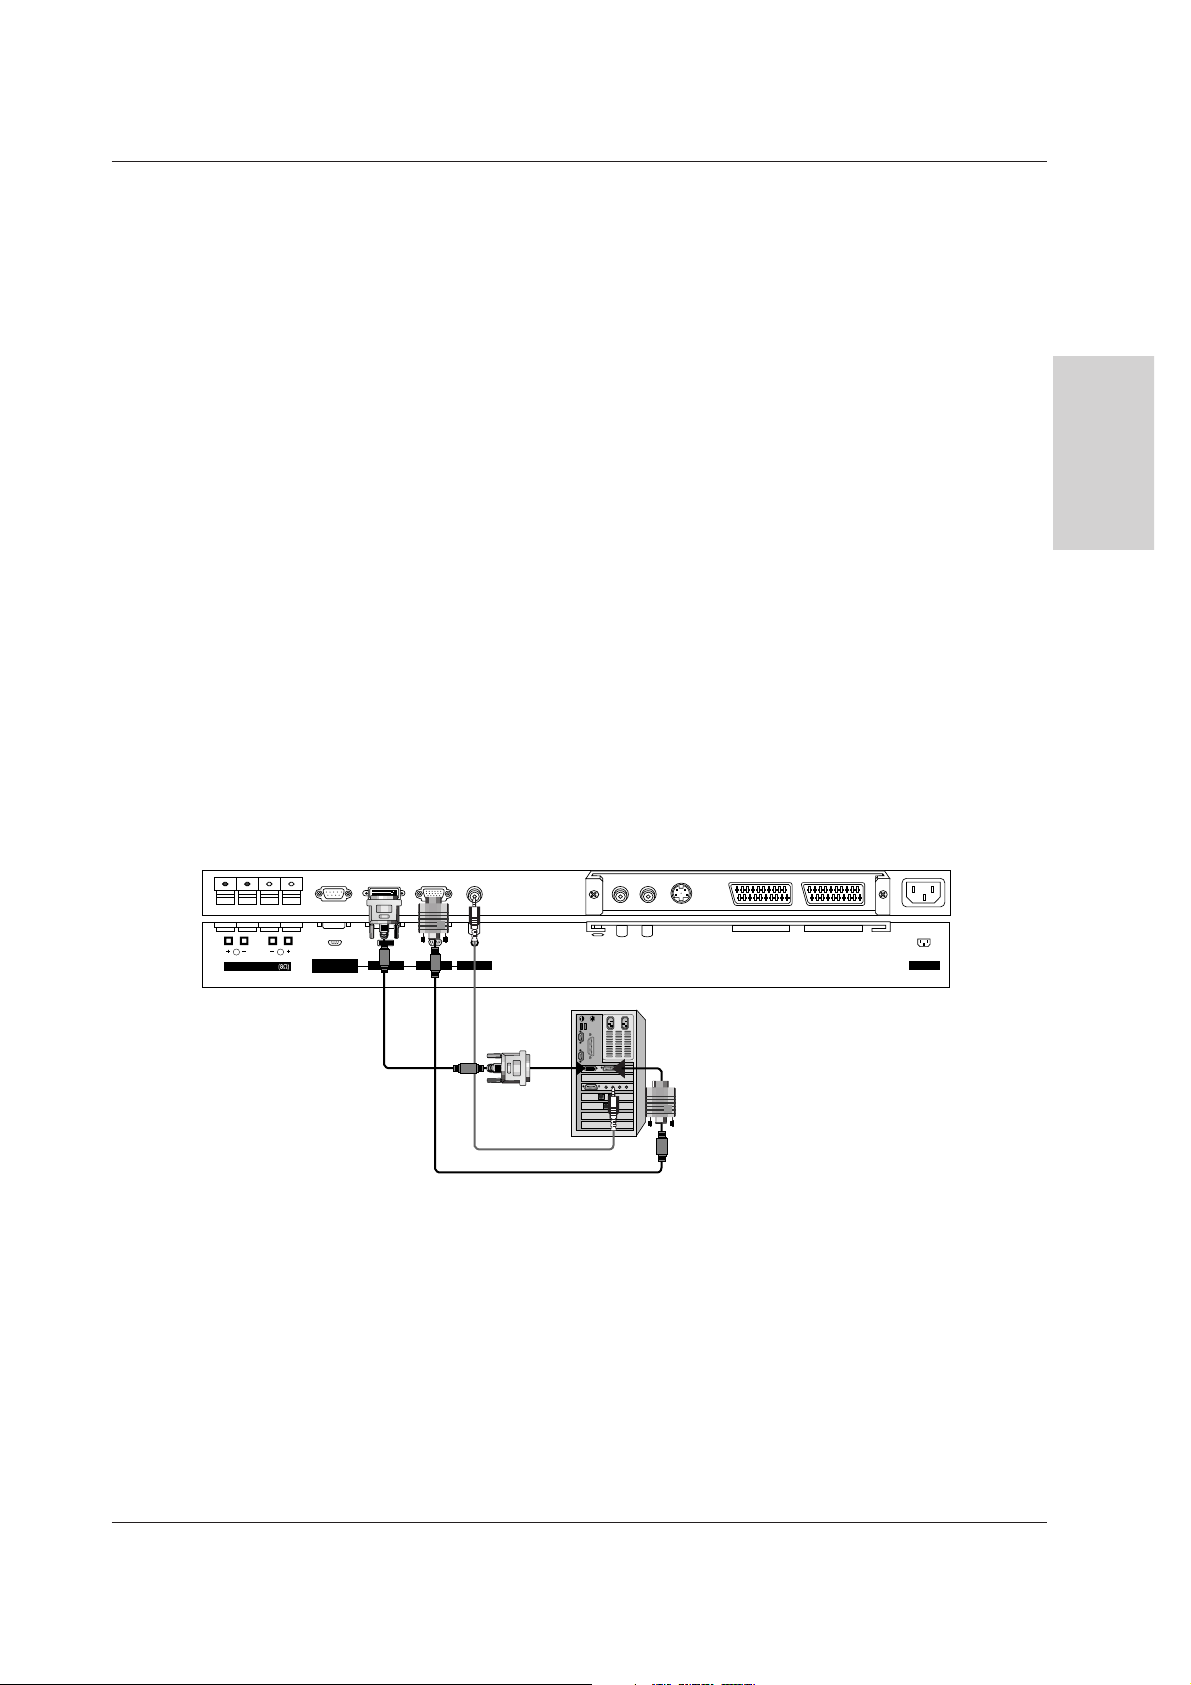
Connecting the PC
- To enjoy vivid picture and sound, connect a PC to the Monitor.
- Avoid keeping a fixed image on the monitor’s screen for a long period of time. The fixed image may become permanently imprinted on the screen; use a screen saver when possible.
- Connect PC to the RGB INPUT or DVI INPUT port of the Monitor; change the resolution output of PC accordingly.
- There might be a noise according to some resolution, vertical pattern, contrast or brightness in PC mode. Then change the PC
mode into other resolution or change the refresh rate into other rate or adjust the brightness and contrast on the menu until the
picture is clean. If the refresh rate of the PC graphic card can not be changed, change the PC graphic card or consult it to the
manufacturer of the PC graphic card.
- The synchronization input form for Horizontal and Vertical frequencies is separate.
Setup Instructions to Connect a PC to your Monitor
- We recommend using 640x480, 60Hz for the PC mode, they provide the best picture quality.
- If the resolution of PC is over UXGA, there will be no picture on the Monitor.
- Connect the signal cable from the monitor output port of the PC to the RGB INPUT port of the Monitor or the signal cable from
the DVI output port of the PC to the DVI INPUT port on the Monitor.
- Connect the audio cable from the PC to the Audio input on the Monitor. (Audio cables are not included with the Monitor).
- If using a sound card, adjust PC sound as required.
- This monitor apply a VESA Plug and Play Solution. The monitor provides EDID data to the PC system with a DDC protocol. The
PC adjusts automatically to use this monitor.
- DDC protocol is preset for RGB (Analog RGB), DVI (DVI, Digital RGB) mode.
- If required, adjust the monitor settings for Plug and Play functionally.
- If graphic card on the PC does not output analog and digital RGB simultaneously, connect only one of both RGB INPUT or DVI
INPUT to display the PC on the monitor.
If graphic card on the PC does output analog and digital RGB simultaneously, set the monitor to either RGB or DVI; (the other
mode is set to Plug and Play automatically by the monitor.)
- DOS mode may not work depending on video card if using a DVI-I cable.
- To see a normal picture, match the VGA mode and DVI signal (640x480, 848x480, 852x480). (See page 14)
How to use
1. Turn on the PC and apply power to the Monitor.
2. Turn on the display by pressing the POWER button on the Monitor’s remote control.
3. Use the avor pcbutton on the remote control to select the RGB or DVI input source.
4. Set the resolution output of the PC to SXGA or under (1280 x 1024, 60Hz).
< Back panel of the Monitor >
( )
( )
R
( )
( )
L
RS-232C INPUT
(CONTROL/SERVICE)
EXTERNAL SPEAKER
AC INPUT
AUDIO INPUTRGB INPUTDVI INPUT
Page 14

14 Plasma Monitor
Installation
Displayable Monitor Specification
Displayable Monitor Specification
Synchronization input form : separate
Depending on the resolution, video card and brightness, a noise can come out in PC mode. If a noise comes out in low
resolution, reset the PC mode into high resolution.
RGB / DVI mode
Resolution
640x350
720x400
640x480
848x480
800x600
Horizontal
Frequency(KHz)
31.468
37.861
31.469
37.927
31.469
35.000
37.861
37.500
43.269
31.500
35.000
37.500
31.500
37.799
39.375
35.156
37.879
48.077
46.875
53.674
49.725
48.363
54.476
60.023
54.348
63.995
67.500
68.681
60.000
63.981
70.09
85.08
70.08
85.03
59.94
66.66
72.80
75.00
85.00
60.00
70.00
75.00
60.00
70.00
75.00
56.25
60.31
72.18
75.00
85.06
74.55
60.00
70.06
75.02
60.05
70.01
75.00
75.06
60.00
60.02
Vertical
Frequency(Hz)
852x480
832x624
1024x768
1152x864
1152x870
1280x960
1280x1024
Page 15

Owner’s Manual 15
Operation
ENGLISH
TTurning on the Monitor
urning on the Monitor
- When using the remote control, aim it at its sensor on the Monitor.
Turning on the Monitor just after installation
Turning on the Monitor (power cord is still connected)
1. Connect power cord correctly.
2. Press the ON/OFF button on the Monitor. At this moment, the Monitor is switched to standby mode. Press
the INPUT SELECT button on the Monitor or press the POWER (long press),
av
button on the remote control
and then the Monitor will switch on.
• Press the ON/OFF button on the Monitor to turn the Monitor on.
1. If the Monitor was turned off with the ON/OFF button on the Monitor
2. If the Monitor was turned off with the remote control and the ON/OFF button on the Monitor
• Press the ON/OFF button on the Monitor and then press the INPUT SELECT button on the Monitor or press the
POWER (long press), avbutton on the remote control to turn the Monitor on.
On-Screen Menu Language Selection (option)
On-Screen Menu Language Selection (option)
- The menus can be shown on the screen in the selected language. First select your language.
1. Press the
menu
button and then use
DD/ EE
button to select the SPECIAL menu.
2. Press the GGbutton and then use
DD/ EE
button to select Language.
3. Press the GGbutton and then use
DD/ EE
button to select your desired language.
From this point on, the on-screen menus will be shown in the language of your choice.
4. Press the
menu
button.
Using the remote control
Using the remote control
- Your remote control has been factory-set to allow the control of most devices, be they from THOMSON or from other associated
brands*. All its functions are not always equivalent to those or the remote control delivered with the device, depending on the age
of the device.
- To control devices of other brands, see page 30 how to programme your remote control.
1. Remove the cover.
2. Inset the 2 batteries according to the polarities (- and +).
3. Replace the cover.
Setting up the batteries
If you have programmed your remote control to command other makes than THOMSON; it may be necessary to re-program it after
having changed the batteries.
Do not mix different types of batteries or new and old batteries. Do not use rechargeable batteries. In order to avoid any risk of
explosion, observe polarities indicated inside the battery compartment. Replace only with the type of batteries specified above. Do
not throw them into fire, do not recharge them. If you are not using the remote control for a long period of time, remove the batteries.
Please respect the environment and prevailing regulations. Before you dispose of batteries or
accumulators, ask your dealer whether they are subject to special recycling and if they will accept
them for disposal.
* Brands associated with THOMSON: Brandt, Telefunken, Ferguson and Saba.
Page 16

16 Plasma Monitor
Operation
Picture Menu Options
Picture Menu Options
1. Press the
menu
button and then use
DD/ EE
button to select the PICTURE menu.
2. Press the
GG
button and then use
DD/ EE
button to select the desired picture option.
3. Press the
GG
button and then use
FF/ GG
button to make appropriate adjustments.
4. Press the
menu
button.
1. Press the Yellow ( ) button.
PSM (Picture Status Memory)
Manual Picture Control (User option)
• Each press of the Yellow ( ) button changes the screen display as shown below.
• You can also select Dynamic, Standard, Mild or User in the PICTURE menu.
• Picture options Dynamic, Standard and Mild are preset and programmed for good picture quality at
the factory and cannot be changed.
Dynamic Standard Mild User
- This function adjusts the Monitor to the best picture appearance.
- When adjusting picture options (contrast, brightness, colour, sharpness and tint (NTSC input only)) manually, PSM
is automatically changed to User.
- You can adjust picture contrast, brightness, colour, sharpness and tint to the levels you prefer.
- To initialize values (reset to default settings), select the
Normal
option.
- When adjusting color temperature options (red, green, or blue) manually, CSM is automatically changed to
User
.
1. Press the
menu
button and then use
DD/ EE
button to select the PICTURE menu.
2. Press the
GG
button and then use
DD/ EE
button to select CSM.
3. Press the
GG
button and then use
DD/ EE
button to select the desired colour tempera-
ture.
4. Press the
menu
button.
Adjusting Auto Colour Control
PSM
CSM
Colour Temp.
Contrast 100
Brightness 60
Colour 50
Sharpness 50
Film Mode
Prev.
PICTURE
Normal
Cool
Warm
User
- You can adjust red, green, or blue to any colour temperature you prefer.
1. Press the
menu
button and then use
DD/ EE
button to select the PICTURE menu.
2. Press the
GG
button and then use
DD/ EE
button to select Colour Temp..
3. Press the
GG
button and then use
DD/ EE
button to select a colour.
4. Use the
FF/ GG
button to make appropriate adjustments.
5. Press the
menu
button.
• The adjustment range of Red, Green and Blue is -10~+10.
Manual Colour Temperature Control (User option)
CSM
GG
MENU
PSM
CSM
Colour Temp.
Contrast 100
Brightness 60
Colour 50
Sharpness 50
Film Mode
Prev.
PICTURE
Colour Temp.
GG
MENU
PSM
CSM
Colour Temp.
Contrast 100
Brightness 60
Colour 50
Sharpness 50
Film Mode
Prev.
PICTURE
Contrast 100
GG
MENU
Red
Green
Blue
+5
0
-5
Page 17

Owner’s Manual 17
Operation
ENGLISH
Sound Menu Options
Sound Menu Options
1. Press the Green ( ) button.
2. Press the Green ( ) button to select your desired sound.
SSM (Sound Status Memory)
1.
Press the
menu
button and then use
DD/ EE
button to select the SOUND menu.
2. Press the
GG
button and then use
DD/ EE
button to select the desired sound item.
3. Press the
GG
button and then use
FF/ GG
button to make appropriate adjustments.
4. Press the
menu
button.
Adjusting Sound Control (User option)
• You can also select Flat, Speech, Movie, Music, or User in the SOUND menu.
Flat Speech Movie Music User
- This function lets you enjoy the best sound without any special adjustment because the Monitor automatically selects
the appropriate sound option based on the program content.
- When adjusting sound options (treble, bass, and balance) manually, SSM is automatically changed to
User
.
- This feature maintains an equal volume level; even if you change channels.
1. Press the
menu
button and then use
DD/ EE
button to select the SOUND menu.
2. Press the
GG
button and then use
DD/ EE
button to select AVL.
3. Press the
GG
button and then use
DD/ EE
button to select On or Off.
4. Press the
menu
button.
AVL (Auto Volume Leveler)
SSM
AVL
Treble 50
Bass 50
Balance 0
Prev.
SOUND
On
Off
AVL
GG
MENU
SSM
AVL
Treble 50
Bass 50
Balance 0
Prev.
SOUND
Treble 50
GG
MENU
1. Press the
menu
button and then use
DD/ EE
button to select the PICTURE menu.
2. Press the
GG
button and then use
DD/ EE
button to select Film Mode.
3. Press the
GG
button and then use
DD/ EE
button to select On or Off.
4. Press the
menu
button.
Film Mode
- When you watch the movie, this function adjusts the Monitor to the best picture appearance.
PSM
CSM
Colour Temp.
Contrast 100
Brightness 60
Colour 50
Sharpness 50
Film Mode
Prev.
PICTURE
Film Mode
GG
MENU
On
Off
Page 18

18 Plasma Monitor
Operation
TTime Menu Options
ime Menu Options
a. To check the remaining sleep time, press the Blue ( ) or okbutton once.
b. To cancel the sleep time, repeatedly press the Blue ( ) button until the display --- Min appears.
c.If you turn the monitor off after setting the sleep timer, the setting will be erased.
Sleep Timer
- Sleep timer turns the Monitor off at the preset time.
- Press the Blue ( ) button to select the number of minutes. The display --- Min will appear on the screen, fol lowed by 10, 20, 30, 60, 90, 120, 180 and 240. The timer begins to count down from the number of minutes selected.
zzz
z
- Timer function operates only if current time has been already set.
- Off Timer function overrides on Timer function if they are set to the same time.
- The monitor must be in standby mode for the On Timer to work.
- To cancel Off/On Time function
Press the
DD/ EE
button to select Off in step 3.
Setting the On/Off Timer
1. Press the
menu
button and then use
DD/ EE
button to select the TIME menu.
2. Press the GGbutton and then use
DD/ EE
button to select Off Time or On Time.
3. Press the GGbutton and then use
DD/ EE
button to select On.
4. Press the GGbutton and then use
DD/ EE
button to adjust the hour.
5. Press the GGbutton and then use
DD/ EE
button to adjust the minute.
6. Only On Time function; Press the GGbutton and then use
DD/ EE
button to adjust vol-
ume level.
7. Press the
menu
button.
Auto Sleep
- If there is no input signal, the monitor turn off automatically after 10 minutes.
1. Press the
menu
button and then use
DD/ EE
button to select the TIME menu.
2. Press the
GG
button and then use
DD/ EE
button to select Auto Sleep.
3. Press the
GG
button and then use
DD/ EE
button to select On or Off.
4. Press the
menu
button.
Setting the Clock
- If current time setting is erased by a power failure, if TV is unplugged or if the monitor is turned off with the ON/OFF
button on the monitor, reset the clock.
1. Press the
menu
button and then use
DD/ EE
button to select the TIME menu.
2. Press the
GG
button and then use
DD/ EE
button to select Clock.
3. Press the
GG
button and then use
DD/ EE
button to adjust the hour.
4. Press the
GG
button and then use
DD/ EE
button to adjust the minute.
5. Press the
menu
button.
Clock
Off Time
On Time
Auto Sleep
Prev.
TIME
Clock
GG
MENU
:- - - -
Clock
Off Time
On Time
Auto Sleep
Prev.
TIME
On Time
GG
MENU
:12 00
30
On
Off
Vol.
Clock
Off Time
On Time
Auto Sleep
Prev.
TIME
Auto Sleep
GG
MENU
On
Off
Page 19

Owner’s Manual 19
Operation
ENGLISH
Special Menu Options
Special Menu Options
Child Lock
- The monitor can be set up so that it can only be used with the remote control.
- This monitor programmed to remember which option it was last set to event if you turn the monitor off.
- In Child Lock ‘On’, if the monitor is turned off, press the INPUT SELECT button on the monitor or POWER and
av
button on the remote control.
- With the Child Lock On, the display ‘ Child Lock’ appears on the screen if any button on the front panel is
pressed while viewing the monitor.
1. Press the
menu
button and then
DD/ EE
button to select the SPECIAL menu.
2. Press the GGbutton and then
DD/ EE
button to select Child Lock.
3. Press the GGbutton and then
DD/ EE
button to select On or Off.
4. Press the
menu
button.
ISM (Image Sticking Minimization) Method
- Frozen still picture from a PC/video game displayed on the screen for prolonged periods will result in an ghost
image remaining even when you change the image. Avoid allowing a fixed image to remain on the Monitor's
screen for a long period of time.
1. Press the
menu
button and then use
DD/ EE
button to select the SPECIAL menu.
2. Press the GGbutton and then
DD/ EE
button to select ISM Method.
3. Press the GGbutton and then
DD/ EE
button to select either Normal, White Wash,
Orbiter or Inversion. If you unnecessary to set this function, set
Normal
.
•
White Wash :
White Wash removes permanent images from the screen. Note: An excessive permanent image may be impossible to clear entirely with White Wash. To return to normal
viewing, press the any button.
•
Orbiter :
Orbiter may help prevent ghost images. However, it is best not to allow any fixed
image to remain on the screen. To avoid a permanent image on the screen, the
screen will move every 2 minutes.
• Inversion :
This is the function to invert the panel color of monitor. The panel color is automatically inverted every 30 minutes.
4. Press the
menu
button.
Language
Child lock
ISM Method
Set ID
Low Power
Prev.
SPECIAL
Child Lock
GG
MENU
On
Off
Language
Child Lock
ISM Method
Set ID
Low Power
Prev.
SPECIAL
ISM Method
GG
MENU
Normal
Orbiter
Inversion
White Wash
- This is the function to reduce the power consumption of the monitor.
Low Power
1. Press the
menu
button and then use
DD/ EE
button to select the SPECIAL menu.
2. Press the GGbutton and then use
DD/ EE
button to select Low Power.
3. Press the GGbutton and then use
DD/ EE
button to select On or Off.
4. Press the
menu
button.
Language
Child Lock
ISM Method
Set ID
Low Power
Prev.
SPECIAL
Low Power
GG
MENU
On
Off
Page 20

20 Plasma Monitor
Operation
Screen Menu Options
Screen Menu Options
Auto adjustment (RGB [PC] mode only)
- Automatically adjusts picture position and minimizes image shaking.
- Although the image is still not correct, your Monitor is functioning properly but needs further adjustment.
- The Auto Configure and the Manual config. functions don’t need to be run for DVI mode.
- This function doesn’t work in RGB-Digital broadcast.
1. Press the
menu
button and then use
DD/ EE
button to select the SCREEN menu.
2. Press the GGbutton and then use
DD/ EE
button to select Auto Configure.
3. Press the GGbutton to start Auto Configure.
• When Auto Configure has finished, OK will be shown on screen.
• If the position of the image is still not correct, try Auto adjustment again.
4. If picture needs to be adjusted more after Auto adjustment in RGB (PC), you can adjust
the Manual config..
Setting Picture Format
- You can watch the screen in various picture formats; 16:9 (Wide), 4:3, 14:9 and Zoom.
- You can repeatedly press the
format
button to select your desired picture format.
- You can also select 16:9 (Wide), 4:3, 14:9 and Zoom in the SCREEN menu.
16:9
Following selection will lead you to adjust the picture horizontally, in a linear proportion, to fill the
entire screen (useful for viewing 4:3 formatted DVDs).
4:3
Following selection will lead you to view a picture with an original 4:3 aspect ratio, with black bars
appearing at both the left and right sides.
14:9
You can enjoy the picture format of 14:9 or general TV programme through the 14:9 mode. The
screen 14:9 is viewed just like that the screen 4:3 is magnified to the left / right.
Zoom
Following selection will lead you to view the picture without any alternation, while filling the entire
screen. However, the top and bottom portions of the picture will be cropped.
Auto Configure
ARC
Zoom In/Out
Position
Manual Config.
Screen adj.
Reset
VGA Mode
Prev.
SCREEN
Auto Configure
GG
MENU
To Set
Auto Configure
ARC
Zoom In/Out
Position
Manual Config.
Screen adj.
Reset
VGA Mode
Prev.
SCREEN
Zoom In/Out
GG
MENU
- When enlarging or reducing the picture, the screen may be display unnatural picture.
1. Press the
menu
button and then use
DD/ EE
button to select the SCREEN menu.
2. Press the GGbutton and then use
DD/ EE
button to select Zoom In/Out.
3. Press the GGbutton and then use FF/ GGbutton to enlarge or reduce the picture size.
4. Press the
menu
button.
Picture Size Zoom
100
%
FF GG
Page 21

Owner’s Manual 21
Operation
ENGLISH
Manual Configure (RGB [PC] mode only)
- If the picture isn’t clear after auto adjustment and especially that characters are still trembling, adjust the picture
phase manually.
- To correct the screen size, adjust Clock.
1. Press the
menu
button and then
DD/ EE
button to select the SCREEN menu.
2. Press the GGbutton and then
DD/ EE
button to select Manual config..
3. Press the GGbutton and then
DD/ EE
button to select Phase or Clock.
4. Press the
FF/ GG
button to make appropriate adjustments.
• The adjustment range of Phase is 0 ~ 31.
• The adjustment range of Clock is -50 ~ +50.
5. Press the
menu
button.
Screen Position (RGB mode only)
1. Press the
menu
button and then
DD/ EE
button to select the SCREEN menu.
2. Press the GGbutton and then
DD/ EE
button to select Position.
3. Press the GGbutton and then
DD/ EE
or FF/
GG
button to adjust the position.
4. Press the
menu
button.
Screen Adjustments (AV1, AV2 and S-Video mode only)
- Use this function to correct jittering or picture instability while viewing a video tape.
1. Press the
menu
button and then use
DD /EE
button to select the SCREEN menu.
2. Press the GGbutton and then use
DD /EE
button to select Screen adj..
3. Press the GGbutton and then use
DD /EE
button to select TV or VCR.
• Select the VCR option if watching a VCR.
• Select the TV option for other equipment.(Except VCR)
4. Press the
menu
button.
Auto configure
ARC
Zoom In/Out
Position
Manual Config.
Screen adj.
Reset
VGA Mode
Prev.
SCREEN
Position
GG
MENU
DD
FF
GG
EE
Auto Configure
ARC
Zoom In/Out
Position
Manual Config.
Screen adj.
Reset
VGA Mode
Prev.
SCREEN
Manual config.
GG
MENU
Phase
Clock
- -
- -
Auto Configure
ARC
Zoom In/Out
Position
Manual Config.
Screen adj.
Reset
VGA Mode
Prev.
SCREEN
Screen adj.
GG
MENU
TV
VCR
Page 22

22 Plasma Monitor
Operation
Screen Menu Options
Screen Menu Options
Selecting Wide VGA mode (RGB, DVI mode only)
- To see a normal picture, match the resolution of RGB mode and selection of VGA mode.
1. Press the
menu
button and then use
DD /EE
button to select the SCREEN menu.
2. Press the GGbutton and then use
DD /EE
button to select VGA Mode.
3. Press the GGbutton and then use
DD /EE
button to select the desired VGA resolution.
4. Press the
menu
button.
Initializing (Reset to original factory value)
- To initialize the adjusted value, select Reset with the
DD / EE
button and then press the GGbutton.
Auto Configure
ARC
Zoom In/Out
Position
Manual Config.
Screen adj.
Reset
VGA Mode
Prev.
SCREEN
VGA Mode
GG
MENU
640x480
848x480
852x480
Luminance Noise Reduction (AV1, AV2 and S-Video mode only)
- You can select Onor
Off
to reduce the picture noise which may appear on the screen during watching the TV.
1. Press the
menu
button and then use
DD /EE
button to select the SCREEN menu.
2. Press the GGbutton and then use
DD /EE
button to select YNR.
3. Press the GGbutton and then use
DD /EE
button to select On or Off.
4. Press the
menu
button.
Auto Configure
ARC
Zoom In/Out
Position
Manual Config.
Screen adj.
Reset
YNR
Prev.
SCREEN
YNR
GG
MENU
On
Off
Page 23

Owner’s Manual 23
Operation
ENGLISH
PIP
PIP
(Picture-in-Picture) Feature
(Picture-in-Picture) Feature
PIP Aspect Ratio
1. Press the
menu
button and then use
DD/ EE
button to select the PIP menu.
2. Press the GGbutton and then use
DD/ EE
button to select PIP ARC.
3. Press the GGbutton and then use
DD/ EE
button to select 4:3 or 16:9.
4. Press the
menu
button.
Input
PIP
PIP Input
Win. Size
Win. Position
PIP ARC
Prev.
PIP
PIP ARC
GG
MENU
4:3
16:9
Watching PIP
- PIP lets you view 2 different inputs (sources) on your monitor screen at the same time. One source will be large,
and the other source will show a smaller inset image.
Press the
PIP
button to show the sub picture.
• Each press of
PIP
button changes the screen display as shown below.
Selecting a Input Signal Source for the PIP
1. Press the
menu
button and then use
DD/ EE
button to select the PIP menu.
2. Press the GGbutton and then use
DD/ EE
button to select PIP Input.
3. Press the GGbutton and then use
DD/ EE
button to select the input source for the sub pic-
ture.
4. Press the
menu
button.
PIP Size
Press the button and then FF/ GGbutton to adjust the sub picture size.
Win. Size
FF GG
Moving the PIP
1. Press the
menu
button and then use
DD/ EE
button to select the PIP menu.
2. Press the GGbutton and then use
DD/ EE
button to select Win. Position.
3. Press the GGbutton and then use
DD/ EE
or FF/ GGbutton until desired position is
achieved. The sub picture moves up/down or left/right.
4. Press the
menu
button.
Off
PIP
RGB
Video
10:30
Input
PIP
PIP Input
Win. Size
Win. Position
PIP ARC
Prev.
PIP
Win. Position
GG
MENU
DD
FF GG
EE
Page 24

24 Plasma Monitor
Miscellaneous
No. Pin name
1 No connection
2 RXD (Receive data)
3 TXD (Transmit data)
4 DTR (DTE side ready)
5 GND
6 DSR (DCE side ready)
7 RTS (Ready to send)
8 CTS (Clear to send)
9 No Connection
1
5
6
9
2
3
5
4
6
7
8
RXD
TXD
GND
DTR
DSR
RTS
CTS
TXD
RXD
GND
DSR
DTR
CTS
RTS
PC
7-wire configuration
(Standard RS-232C cable)
D-Sub 9
3
2
5
6
4
8
7
PDP
D-Sub 9
2
3
5
4
6
7
8
RXD
TXD
GND
DTR
DSR
RTS
CTS
TXD
RXD
GND
DTR
DSR
RTS
CTS
PC
3-wire configuration
(Not standard)
D-Sub 9
3
2
5
4
6
7
8
PDP
D-Sub 9
External Control Device Setup
External Control Device Setup
- Connect the RS-232C input jack to an external control device (such as a computer or an A/V control system)
and control the Monitor’s functions externally.
How to connect external control equipment
• Connect the serial port of the control device to the RS-232C jack on the Monitor back panel.
• RS-232C connection cables are not supplied with the Monitor.
• The Monitor remote control and front panel controls (except main power) will not be functional if the Monitor is controlled by a
PC computer or other external device.
Type of connector; D-Sub 9-pin male
RS-232C configurations
Page 25

Owner’s Manual 25
Miscellaneous
ENGLISH
Transmission
*
[Command 1] : First command to control PDP set.
(j or k)
*
[Command 2] : Second command to control PDP set.
*
[Set ID] : You can adjust the set ID to choose
desired monitor ID number in special
menu. See previous page.
Adjustment range is 1 ~ 99.
When selecting Set ID ‘0’, every
connected PDP set is controlled.
Set ID is indicated as decimal (1~99) on
menu and as Hexa decimal (0x0~0x63)
on transmission/receiving protocol.
*
[DATA] : To transmit command data.
Transmit ‘FF’ data to read status of
command.
*
[Cr] : Carriage Return
ASCII code ‘0x0D’
*
[ ] : ASCII code ‘space (0x20)’
[Command1][Command2][ ][Set ID][ ][Data][Cr]
OK Acknowledgement
* The Monitor transmits ACK (acknowledgement) based on
this format when receiving normal data. At this time, if the
data is data read mode, it indicates present status data. If
the data is data write mode, it returns the data of the PC
computer.
[Command2][ ][Set ID][ ][OK][Data][x]
Error Acknowledgement
* The Monitor transmits ACK (acknowledgement) based on
this format when receiving abnormal data from
non-viable functions or communication errors.
[Command2][ ][Set ID][ ][NG][Data][x]
Transmission / Receiving ProtocolCommand Reference List
*
When setting the 27 ~ 31, a menu doesn’t display on screen.
Data 1: Illegal Code
2: not support function
3: Wait more time
01. Power k a 0 ~ 1
02. Input Select k b 0 ~ 4
03. Aspect Ratio k c 0 ~ 4
04. Screen Mute k d 0 ~ 1
05. Volume Mute k e 0 ~ 1
06. Volume Control k f 0 ~ 64
07. Contrast k g 0 ~ 64
08. Brightness k h 0 ~ 64
09. Colour k i 0 ~ 64
10. Tint k j 0 ~ 64
11. Sharpness k k 0 ~ 64
12. OSD Select k l 0 ~ 1
13.
Remote control lock mode
k m 0 ~ 1
14. PIP k n 0 ~ 1
15. PIPAspect Ratio k o 0 ~ 1
16. PIP Position k q 0 ~ 3
17. Treble k r 0 ~ 64
18. Bass k s 0 ~ 64
19. Balance k t 0 ~ 64
20.
Colour Temperature (CSM)
k u 0 ~ 2
21. Red Adjustment k v 0 ~ 64
22. Green Adjustment k w 0 ~ 64
23. Blue Adjustment k $ 0 ~ 64
24. PIP input Source k y 0 ~ 4
25. SSM Mode k x 0 ~ 4
26. Abnormal Status k z 0 ~ a
27. ISM Method j p 0 ~ 3
28. Low Power j d 0 ~ 1
29. Orbiter Time Setting j r 1 ~ FE
30. Orbiter Pixel Setting j s 0 ~9
31. Auto Configure j u 1
COMMAND 1 COMMAND 2 DATA
(Hexadecimal)
Set ID
- Use this function to specify a monitor ID number.
- Refer to ‘Real Data Mapping 1’. See page 29.
1. Press the
menu
button and then use the
DD /EE
button to select the SPECIAL menu.
2. Press the GGbutton and then use
DD /EE
button to select Set ID.
3. Press the GGbutton and then use F / G button to adjust Set ID to choose the desired
monitor ID number.
• The adjustment range of Set ID is 1 ~ 99.
• Baud rate : 115200 bps (UART)
• Data length : 8 bits
• Parity : None
* Use a crossed (reverse) cable.
• Stop bit : 1 bit
• Communication code : ASCII code
Communication Parameters
Language
Child Lock
ISM Method
Set ID
Low Power
Prev.
SPECIAL
Set ID
GG
MENU
1
Page 26

26 Plasma Monitor
Miscellaneous
05. Volume Mute (Command 2 : e)
G To control volume mute on/off.
You can also adjust mute using the MUTE button on
remote control.
Transmission
Data 0 : Volume mute on (Volume off)
1 : Volume mute off (Volume on)
[k][e][ ][Set ID][ ][Data][Cr]
Ack
[e][ ][Set ID][ ][OK][Data][x]
03. Aspect Ratio (Command 2 : c) (Main Picture Size)
G To adjust the screen format. (Main picture format)
You can also adjust the screen format using the ARC
(Aspect Ratio Control) button on remote control or in the
SCREEN menu.
Transmission
Data 0 : Wide screen (16:9)
1 : Normal screen (4:3)
2 : Full screen (Zoom)
3 : 14:9
[k][c][ ][Set ID][ ][Data][Cr]
Ack
* Using the PC input, you select either 16:9 or 4:3 screen
aspect ratio.
[c][ ][Set ID][ ][OK][Data][x]
04. Screen Mute (Command 2 : d)
G To select screen mute on/off.
Transmission
Data 0 : Screen mute off (Picture on)
1 : Screen mute on (Picture off)
[k][d][ ][Set ID][ ][Data][Cr]
Ack
[d][ ][Set ID][ ][OK][Data][x]
06. Volume Control (Command 2 : f)
G To adjust volume.
You can also adjust volume with the volume buttons
on remote control.
Transmission
Data Min : 0 ~ Max : 64
*
Refer to ‘Real data mapping 1’. See page 29.
[k][f][ ][Set ID][ ][Data][Cr]
Ack
[f][ ][Set ID][ ][OK][Data][x]
07. Contrast (Command 2 : g)
G To adjust screen contrast.
You can also adjust contrast in the PICTURE menu.
Transmission
Data Min : 0 ~ Max : 64
*
Refer to ‘Real data mapping 1’. See page 29.
[k][g][ ][Set ID][ ][Data][Cr]
Ack
[g][ ][Set ID][ ][OK][Data][x]
08. Brightness (Command 2 : h)
G To adjust screen brightness.
You can also adjust brightness in the PICTURE menu.
Transmission
Data Min : 0 ~ Max : 64
*
Refer to ‘Real data mapping 1’. See page 29.
[k][h][ ][Set ID][ ][Data][Cr]
Ack
[h][ ][Set ID][ ][OK][Data][x]
02. Input Select (Command 2 : b)
G To select input source for the Monitor.
You can also select an input source using the INPUT
SELECT button on the Monitor's remote control.
Transmission
Data 0 : RGB
1 : AV1
2 : AV2
3 : S-Video
4 : DVI
[k][b][ ][Set ID][ ][Data][Cr]
Ack
[b][ ][Set ID][ ][OK][Data][x]
01. Power (Command 2 : a)
G To control Power On/Off of the Monitor.
Transmission
Data 0 : Power Off 1 : Power On
[k][a][ ][Set ID][ ][Data][Cr]
Ack
[a][ ][Set ID][ ][OK][Data][x]
G To show Power On/Off.
Transmission
[k][a][ ][Set ID][ ][FF][Cr]
Ack
* In like manner, if other functions transmit ‘0xFF’ data
based on this format, Acknowledgement data feed back
presents status about each function.
[a][ ][Set ID][ ][OK][Data][x]
Page 27

Owner’s Manual 27
Miscellaneous
ENGLISH
13. Remote control lock mode (Command 2 : m)
G To lock the front panel controls on the monitor and remote
control.
Transmission
[k][m][ ][Set ID][ ][Data][Cr]
Ack
Data 0 : Lock off 1 : Lock on
* If you’re not using the remote control, use this mode.
When main power is on/off, external control lock is
released.
[m][ ][Set ID][ ][OK][Data][x]
12. OSD Select (Command 2 : l)
G To select OSD (On Screen Display) on/off when con-
trolling remotely.
Transmission
[k][l][ ][Set ID][ ][Data][Cr]
Ack
Data 0 : OSD off 1 : OSD on
[l][ ][Set ID][ ][OK][Data][x]
14. PIP (Command 2 : n)
G To control the PIP (Picture In picture).
You can also control the PIP using the PIP button on the
remote control or in the PIP menu.
Transmission
Data 0: PIP off
1: PIP
[k][n][ ][Set ID][ ][Data][Cr]
Ack
[n][ ][Set ID][ ][OK][Data][x]
15. PIP Aspect Ratio (Command 2 : o)
G To select the PIPpicture format.
You can also adjust the screen format for PIPin the PIP
menu.
Transmission
[k][o][ ][Set ID][ ][Data][Cr]
Ack
Data 0: Normal screen (4:3)
1: Wide screen (16:9)
[o][ ][Set ID][ ][OK][Data][x]
09. Colour (Command 2 : i)
G To adjust the screen colour.
You can also adjust colour in the PICTURE menu.
Transmission
Data Min : 0 ~ Max : 64
*
Refer to ‘Real data mapping 1’. See page 29.
[k][i][ ][Set ID][ ][Data][Cr]
Ack
[i][ ][Set ID][ ][OK][Data][x]
10. Tint (Command 2 : j) (option)
G To adjust the screen tint.
You can also adjust tint in the PICTURE menu.
Transmission
Data Red : 0 ~ Green : 64
*
Refer to ‘Real data mapping 1’. See page 29.
[k][j][ ][Set ID][ ][Data][Cr]
Ack
[j][ ][Set ID][ ][OK][Data][x]
G To adjust the screen sharpness.
You can also adjust sharpness in the PICTURE menu.
Transmission
11. Sharpness (Command 2 : k)
Data Min : 0 ~ Max : 64
*
Refer to ‘Real data mapping 1’. See page 29.
[k][k][ ][Set ID][ ][Data][Cr]
Ack
[k][ ][Set ID][ ][OK][Data][x]
16. PIP Position (Command 2 : q)
G To select sub picture position for PIP.
You can also adjust the sub picture position in the PIP
menu.
Transmission
Data 0 : Right down on screen
1 : Left down on screen
2 : Left up on screen
3 : Right up on screen
[k][q][ ][Set ID][ ][Data][Cr]
Ack
[q][ ][Set ID][ ][OK][Data][x]
17. Treble (Command 2 :r)
G To adjust treble.
You can also adjust treble in the SOUND menu.
Transmission
Data Min : 0 ~ Max : 64
*
Refer to ‘Real data mapping 1’. See page 29.
[k][r][ ][Set ID][ ][Data][Cr]
Ack
[r][ ][Set ID][ ][OK][Data][x]
Page 28

28 Plasma Monitor
Miscellaneous
26. Abnormal State (Command 2 : z)
G To recognize an abnormal state.
Transmission
Data 0: Normal (Power on and signal exist)
1: No signal (Power on)
2: Turn the monitor off by remote control
3: Turn the monitor off by sleep time function
4: Turn the monitor off by RS-232C function
5: 5V down
6: AC down
7: Turn the monitor off by Fan Alarm function
8: Turn the monitor off by off time function
9: Turn the monitor off by auto off function
a: Turn the monitor off by AV board detect
* This function is “read only”.
[k][z][ ][Set ID][ ][FF][ ][Cr]
Ack
[z][ ][Set ID][ ][OK][Data][x]
19. Balance (Command 2 : t)
G To adjust balance.
You can also adjust balance in the SOUND menu.
Transmission
Data Min : 0 ~ Max : 64
*
Refer to ‘Real data mapping 1’. See page 29.
[k][t][ ][Set ID][ ][Data][Cr]
Ack
[t][ ][Set ID][ ][OK][Data][x]
20. Colour Temperature (Command 2 : u)
G To adjust colour temperature.
You can also adjust CSM in the PICTURE menu.
Transmission
Data 0: Normal 1: Cool 2: Warm 3: User
[k][u][ ][Set ID][ ][Data][Cr]
Ack
[u][ ][Set ID][ ][OK][Data][x]
21. Red Adjustment (Command 2 : v)
G To adjust red in colour temperature.
Transmission
Data Min : 0 ~ Max : 64
*
Refer to ‘Real data mapping 2’. See page 29.
[k][v][ ][Set ID][ ][Data][Cr]
Ack
[v][ ][Set ID][ ][OK][Data][x]
22. Green Adjustment (Command 2 : w)
G To adjust green in colour temperature.
Transmission
Data Min : 0 ~ Max : 64
*
Refer to ‘Real data mapping 2’. See page 29.
[k][w][ ][Set ID][ ][Data][Cr]
Ack
[w][ ][Set ID][ ][OK][Data][x]
23. Blue Adjustment (Command 2 : $)
G To adjust blue in colour temperature.
Transmission
Data Min : 0 ~ Max : 64
*
Refer to ‘Real data mapping 2’. See page 29.
[k][$][ ][Set ID][ ][Data][Cr]
Ack
[$][ ][Set ID][ ][OK][Data][x]
24. PIP Input Select (Command 2 : y)
G To select input source for sub picture in PIP picture
mode. You can also adjust input source for sub picture in the PIP menu.
Transmission
Data 0 : RGB
1 : AV1
2 : AV2
3 : S-Video
4 : DVI
[k][y][ ][Set ID][ ][Data][Cr]
Ack
[y][ ][Set ID][ ][OK][Data][x]
25. SSM Mode (Command 2 : x)
G To select sound mode.
Transmission
Data 0 : Flat
1 : Speech
2 : Movie
3 : Music
4 : User
[k][x][ ][Set ID][ ][Data][Cr]
Ack
[x][ ][Set ID][ ][OK][Data][x]
18. Bass (Command 2 : s)
G To adjust bass.
You can also adjust bass in the SOUND menu.
Transmission
Data Min : 0 ~ Max : 64
*
Refer to ‘Real data mapping 1’. See page 29.
[k][s][ ][Set ID][ ][Data][Cr]
Ack
[s][ ][Set ID][ ][OK][Data][x]
Page 29

Owner’s Manual 29
Miscellaneous
ENGLISH
28. Low Power
(Command 1 : j, Command 2 : q)
G To reduce the power consumption of the monitor. You
can also adjust Low Power in SPECIAL menu.
Transmission
Data 0 : Off
1 : On
[j][q][ ][Set ID][ ][Data][ ][Cr]
Ack
[q][ ][Set ID][ ][OK][Data][x]
*
Real data mapping 1
0 : Step 0
A : Step 10 (Set ID 10)
F : Step 15 (Set ID 15)
10 : Step 16 (Set ID 16)
64 : Step 100
*
Real data mapping 2
0 : -10
5 : -9
A : -8
2D: -1
32: 0
37: +1
5F: +9
64: +10
27. ISM Method
(Command 1 : j, Command 2 : p)
G To control the ISM method. You can also adjust ISM
Method in SPECIAL menu.
Transmission
Data 0 : Normal Mode
1 : Orbiter
2 : Inversion
3 : White Wash
[j][p][ ][Set ID][ ][Data][Cr]
Ack
[p][ ][Set ID][ ][OK][Data][x]
29. Orbiter Time Setting
(Command 1 : j, Command 2 : r)
G To adjust orbiter operation time term.
Transmission
Data Min: 1 ~ Max: FE
• Refer to ‘Real data mapping 1’. See page 29.
[j][r][ ][Set ID][ ][Data][Cr]
Acknowledgement
[r][ ][Set ID][ ][OK][Data][x]
30. Orbiter Pixel Setting
(Command 1 : j, Command 2 : s)
G To adjust pixel number in orbiter function.
Transmission
Data Min: 0 ~ Max: 9
• Refer to ‘Real data mapping 1’. See page 29.
[j][s][ ][Set ID][ ][Data][Cr]
Acknowledgement
[s][ ][Set ID][ ][OK][Data][x]
31. Auto Configure
(Command 1 : j, Command 2 : u)
G To adjust picture position and minimize image shaking
automatically. It works only in RGB (PC), DVI (PC)
mode.
Transmission
Data 1: To set
[j][u][ ][Set ID][ ][Data][Cr]
Acknowledgement
[u][ ][Set ID][ ][OK][Data][x]
Page 30

30 Plasma Monitor
Miscellaneous
Programming your remote control
Programming your remote control
To control other devices
You can program your remote control for it to control other devices. Before following the adjustment procedure below, look for the 3digit code number(s) corresponding to the make of the device(s) to be controlled in the list of codes enclosed separately, then insert
them in the table below.
Apparatus Codes
Amplifier
VCR
Programming Volume and Mute keys
Your remote control has been factory-set to control the
Volume +/-
and
Mute
( ) functions on the THOMSON DPL 2000 amplifier.
If you wish to control the
Volume +/-
and
Mute
( ) functions on your set, you
must change the factory-settings as follows:
1. Slide the key to the
plasma
position.
2. While maintaining the key pressed, key in the code "001".
3. Release the
menu
button.
Volume +/-
and
Mute
( ) keys are now configured to control the set. To control the amplifier, place the key on the
hi-fi
position.
To return to factory-settings, repeat the above procedure, keying in "000".
1. Position the switch on the device that you want to control.
2. Keep the key down and enter the 3-digit code.
3. Release the
menu key.
• Try to control the device by turning it off, then on with the key
(the above key being on the corresponding position).
• If this does not work, repeat the process from step 2 with another 3-digit code.
• Some devices cannot be controlled by the universal remote control supplied.
• Test the functions that you can control by using this remote control.
• According to the devices and the date they were put on the market, all the functions may not be available.
•
If you have programmed you remote control to control other makes than Thomson, it may be necessary to
reprogram it when you change the batteries.
Satellite receiver
DVD or LD unit
Amplifier Monitor
Code Code
000 001
Page 31

Owner’s Manual 31
Miscellaneous
ENGLISH
Controlling another device
Controlling another device
- Slide the button to the position of the device that you wish to control;
DVD, LD player or
satellite receiver.
Video-cassette recorder
Ampli or audio system
VPS
ShowView
Information
NAVICLICK
Display of information on-screen
and navigation in the menus
Dialogue
*
Sub-title *
Information *
Summary *
Angle *
Coaxial or
digital DTS inputs
Stereo
Sound effects
(cinema, stadium, theatre, etc)
Delay
Selection of the speaker to be
adjusted
Access to Menus
Menu exit
Access to Menus
*
PTY Stations
Surround
*
Change of channel
Cassette
= for THOMSON devices only
*
= If the function is available on the controlled device
Disc
(Rec = Zoom)
Cassette
Change of radio stations
(if memorised)
Change of chapter (DVD)
ffw/backw*
Change of
channels (SAT)
Direct access to channels
and input of numerical values
Selection of radio stations
Direct Access to chapters (DVD)
or
to a channel (SAT)
Up / down navigation
in the menus
Confirmation
Selection Right / Left
in the menus
Level Adjustment
of the Speaker Sound
PR +/- *
Confirmation
VOL +/- *
AV connectors selection
Station memory access
Lighting of keys Lighting of keys Lighting of keys
Sound muting
Sound volume
of amplifier,
depending on
your
programming.
TH
TH
TH TH TH
TH
TH
TH
TH
DVD
only
Putting into standby /start mode
Only makes of apparatus of the THOMSON group benefit from the actions of all the keys.
Page 32

32 Plasma Monitor
Miscellaneous
TTroubleshooting Checklist
roubleshooting Checklist
No output from one of the
speakers
• Adjust Balance in the SOUND menu. (Refer to p.17)
Unusual sound from
inside the monitor
• A change in ambient humidity or temperature may result in an unusual noise
at the time of switching off or on of the monitor and does not indicate a fault
with the monitor.
No picture &
No sound
• Check whether the Monitor is turned on.
• Power cord inserted into wall outlet?
• Plug another product’s power cord into the wall outlet where the Monitor’s
power cord was plugged in.
No or Poor colour
or Poor picture
• Select Colour in the PICTURE menu and press the (G) button.
(Refer to p.16)
• Keep a certain distance between the Monitor and the VCR.
• Activate any function to restore the brightness of the picture.
(If still picture is on the screen for more than 5 minutes, the screen gets dark.)
The remote control
doesn’t work
• Check to see if there is any object between the Plasma Display and the
remote control causing obstruction.
• Check to see if the batteries are installed with the correct polarities.
(Refer to p.15)
• Install new batteries. (Refer to p.15)
Picture OK &
No sound
• Press the Volume +/- button.
• Sound muted? Press Mute ( ) button.
Picture appears slowly,
after switching on
• This is normal as the image is muted during the startup process of the monitor. Please contact your service centre, if the picture has not appeared after
five minutes.
Horizontal/vertical bars
or picture shaking
• Check for local interference such as an electrical appliance or power tool.
Page 33

Owner’s Manual 33
ENGLISH
Miscellaneous
Product Specifications
Product Specifications
MODEL
Width (inches / mm)
Height (inches / mm)
Depth (inches / mm)
Weight (pounds / kg)
Power requirement
Resolution
Colour
Operating Temperature Range
Operating Humidity Range
42 WM 03 L
40.7 / 1033
24.5 / 622
3.2 / 81
75 / 34
AC100-240V, 50/60Hz
852 x 480 (Dot)
16,770,000 (256 steps of each R, G and B)
32 ~ 104°F (0 ~ 40°C)
Less than 80%
• The specifications shown above may be changed without notice for quality improvement.
 Loading...