

Page 1

User
manual
User
manual
User
manual
14MS15UT
Page 2
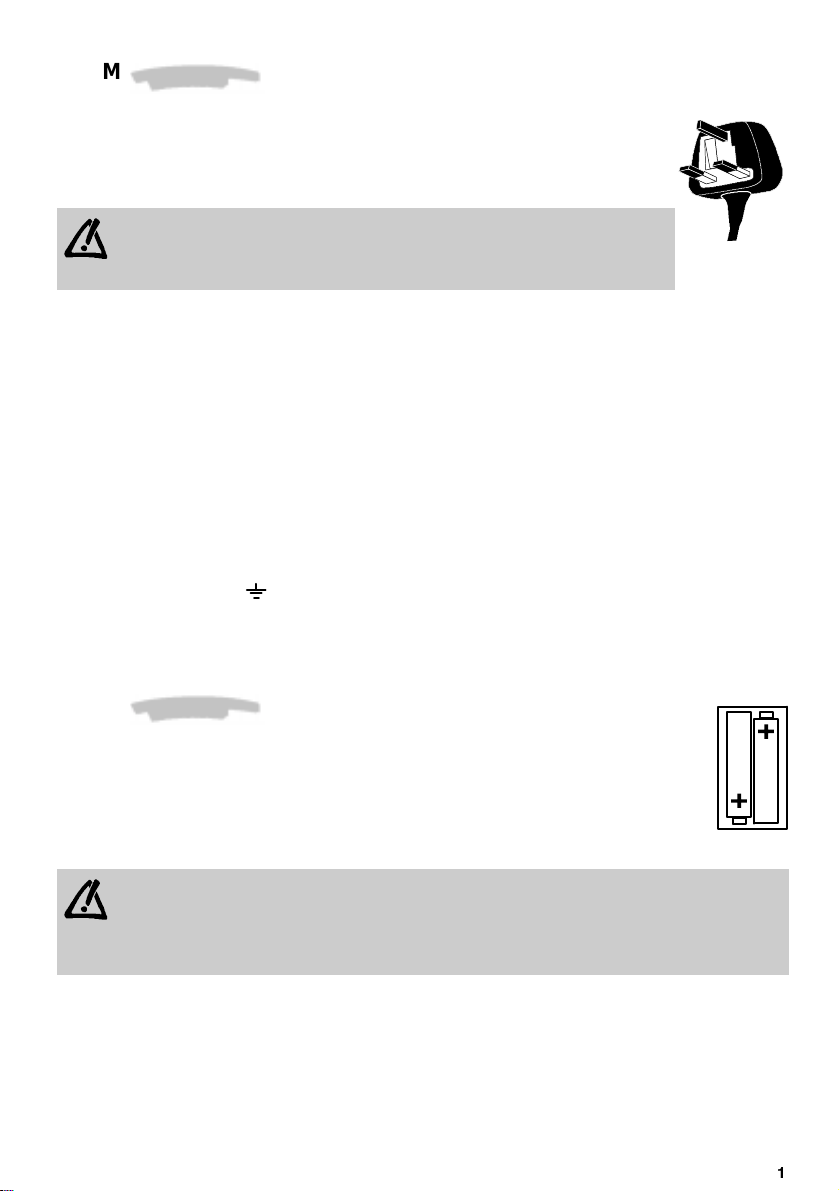
Mains connection
The TVis suitable for use on a.c. mains supply, 220-240V, 50 Hz only.
It must not be connected to d. c. mains.
ThemainsleadoftheTVisfittedwith a moulded plug.If themains
sockets are not compatible or if for any reason the plug is
removed please follow these directions:
The moulded plug cannot be rewired and if removed must be disposed of safely.
DO NOT under any circumstances plug the severedplug into any mains socket as this could
resultin electricshock.
IMPORTANT:Ifthe plug isremovedrewirenew plugas follows:The wiresin themains plug are
coloured in accordance with the followingcode: BLUE - NEUTRAL / BROWN- LIVE.
As the colours of the wires in the mains lead of this apparatus may not correspond with the
coloured markings identifying the terminals in yourplug, proceed as follows:
- BLUE wireto the terminal coded N (Neutral) or coloured black.
- BROWN wire to the terminal coded L (Live)or coloured red.
DO NOT make any connection to the terminal in the plug whichis marked bythe letter E or by
the safety earth symbol
Afused plugmust befittedwitha 5A fuseapprovedbyASTAorBSI toBS 1362andfuse covers
must always be securely replaced.
or coloured green or green and yellow.
Remote control batteries
The remote control requires two batteries size AA as supplied with the unit.
Unclip the cover at the rear and insert the batteries the correct way round as
shown. The ends are usually market+ and -.
Replace the batteries when the unit no longer operates at normal viewing distances.
When replacing batteriesdo not mix oldand new - donot mix makes andtypes.
alkalinetypes are recommended for long life. Never risk damage to the remote
controlby extreme heat -do not leave closeto a radiatoror on a windowledge
in direct sunshine.
Page 3
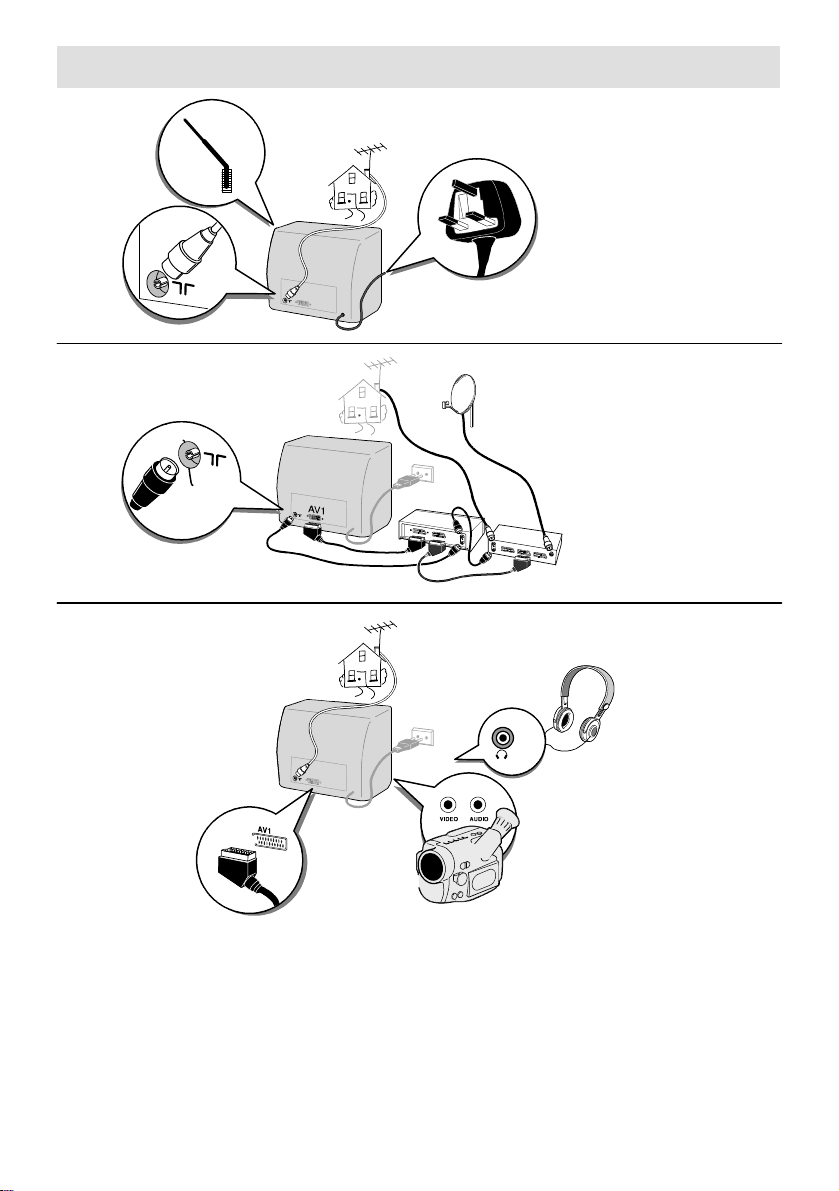
Connections
2
Page 4

1. Aerial Socket
Enables connection of the aerial and, if required, a video recorder (see manual for latter).
To tune the channel reserved for your video recorder, start up the recorder then carry out
MANUAL CHANNEL SETTING operations.
Store at any programme ending with a 9 (9,19,29, etc.)
Each time you use the video recorder, switch to the channel assigned to it.
2. SCART Socket
This is used to connect:
– a VHS, 8 MM, S–VHS or Hi–8 video recorder or camcorder,
– a PA Y TV decoder,
– a video games console.
To use the connected device, select the audiovis ual programme by pressing the
This selection is automatic for some devices.
AV is displayed at the bottom of the screen.
IfyouhaveanS-VIDEOdevice,pressthe
of the screen for a few seconds.
When you switch off the de vice and if you have not changed channel during play , the TV set
automatically returns to the previous channel.
If the TV set has been switched on by the video recorder, it will be placed on stand–by when the
video recorder is switched off.
buttonagain. S-VIDEO is then displayed at the bottom
button.
3. Audio / Video CINCH Sockets
These are used to connect a VHS or 8 mm camcorder .
Press the
When you switch off the connected de vice, the TV set remains in audiovisual (AV) mode.
Call up the channel you wish to watch using the numerical keypad on the remote control.
In order to maintain the optimum sound and picture quality of your TV set,avoidconnecting2 devices
to the SCART socket and the A UDIO/VIDEO sockets simultaneously .
button to select the audiovisual programme to view your recordings.
Page 5
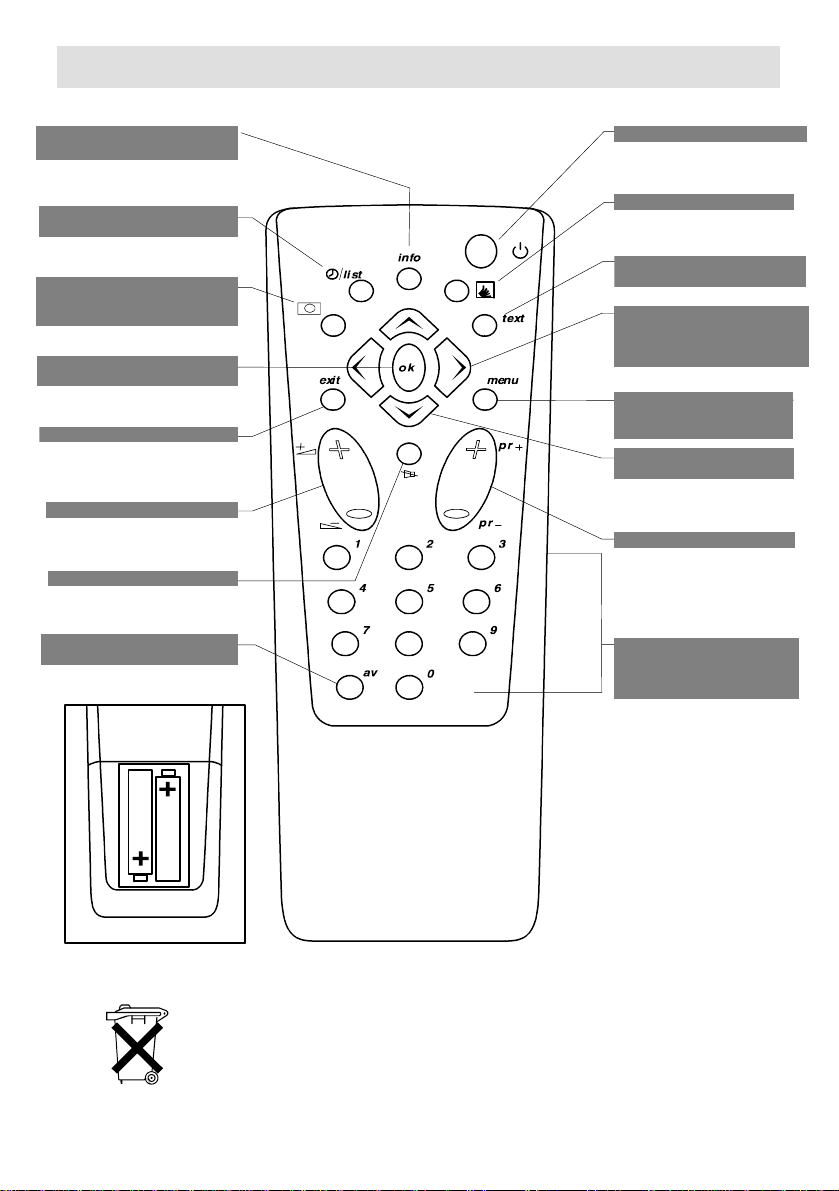
Remote Control
Display programme No. and
sleep timer
validatea menu option
To switch to connected
equipment
(Yellow button)
Display Timer Menu
(Green button)
Call up personal
adjustments
(Red button)
Confirm an action or
Toleaveamenu
Volume level
Sound mute
(e.g.: video recorder)
Stand-by
Inactive
Call upTeletext/Fastext (pur-
ple key)
Adjustment: move to
Right/Left in menus and
select one of the proposed
options
To go to Picture and
Channel Adjustment
menus
Move Up and Down in
the menus
To change programme
8
Direct access to
programmes and entering
numerical values in
menus
The red, yellow, green and
blue buttons are also used for
teletext.
Batteries: Remove the lid at the back of the remote control and insert two 1.5
V, LR06 (AA) batteries.
”Please respect the environment! Before throwing any batteries away, consult
your distributor who may be able to them back for specific recycling..”
4
Page 6

Automatic Channel Setting
This set is equipped with an automatic search system which will search for and store all
channels available in your region. To help identi f y the program mes, we suggest that you have to
hand a TV guide or daily newspaper.
Ensure that the aerial lead is connected to the TV set.
Check that any equipmentconnected only via the aerial (video recorder or satellite equipment)is
operating.
Switch off any equipment connected via the SCART socket.
Installation
Press the ON/OFFbutton, the indicator lamp lights up.
If the television set remains on stand–by, pressone of
the buttons on the remote control numerical keypad.
When the television set is turned on f orthe first ti me, the
Install at i on menu appears automatically.
If this is not the case, you can call it up by:
– pressi ng the
button on the remot e control three
times.
Press
to confirm.
A new menu appears. Automatic search begins. The cursor moves from left to right on the VL line, then on the VH
line and then on the U line. The channels found are stored
in memory in order start i ng from programme PR 01.
You can stop the automati c search at any time by pressing
the
button.
The search stops automati cal l y at the end of the U band
or when 99 channels have been found.
The Program me Organizer menu then appears automatical ly.
The channel stored on programme PR 01 is selected (see next page).
AUTO INSTALL.
UK
AUTO INSTALL.
UK
VL
PR01
Page 7

Changing a Programme Number
Select the channel number to be changed using the
button.
Using the numerical keypad on the remote control, enter the
new programme number.
You can also use the
buttons on the remote control .
AUTO INSTALL.
UK
VL
PR01
Press the
button to confirm the change.
The program mes stored under the old and new numbers are then swapped.
Repeat this operation to change other programme numbers.
Erasing a Programme
Select the programme to be erased using the button.
Enter 0 or 00 on the numerical keypad of the remote control.
Press
Check that all the programmes are in the required order using the
to confirm. The programme is erased.
to leave the menu.
button, then press
6
Page 8

Manual Channel Setting
Press the button twice to call up the channel setting menu.
Select the broadcasting standard using the
buttons.
1. Channel Search
Select the 2nd line of the menu using the button.
Start the search by pressing:
– the button for a forw ar d search,
– the button for a backward search.
The search fullycovers the VL, VH and U bands starting
UK
VL
PR
from the channel on the screen. The cursormoves and
as soon as a channel is found, the picture appears on
the screen.
Wait for the menu to go to the bottom of the screen for optimum reception.
If the picture corresponds to the channel required, go to the 4th line (PR), otherwise
continue the search.
If you wish to stop the automatic search, press the button.
2. Programme Number a nd Storing in Memory
Select the 4th line of the menu using the butt on.
If fine tuning is necessary, see Fine Tuning
Enter a programme number using the numerical buttons of the
remote control.
You can also use the
buttons
.
UK
VL
PR
Store the programme number you have allocated to the channel by pressing the button.
The 2nd line of the menu is then selected again.
Restartthe search using
the buttons
.
Page 9

3. Fine Tuni ng
Only necessary in the event of interference
If fine tuning is necessary, select the 3rd line of the menu
using the
If necessary, adjust the picture using the
button.
buttons.
UK
VL
PR
Select the 4th line (PR)usingthe
button to allocate a programme number to the channel
and store it in memory (see Programme Number and Storing in Memory)
If a channel has required fine tuning, it will be stored in memory with the AFC (Automatic
Frequency Control) deactivated.
Press the button to leave the menu.
8
Page 10

Picture Adjustments
Press the button to call up the Picture Menu.
Select the function to be adjusted using the
The tintfunction is only active in NTSC mode.
Adjust as required using the
buttons.
SHARPNESSCONTRASTCOLOURBRIGHTNESS TINT
buttons.
Storing Personal Adjustments
You can stor e the adjustments you have just made and call
them up at a later stage.Caution: these personal adjustments
will replace and delete the standard setti ngs made at the
factory .
With the Picture Menu displa yed, press the red
Press the
button to leave the menu.
button.
Sleep Timer
Press the green button to call up the Stand–by
Menu.
Set the stand–by time in10–minute steps (up to 4 hours) using
the the
buttons
Press the
The television set is child locked when the programmed time
period has elapsed. The stand–by indicatorwill flash (see Day to
Day Operation).
To cancel the sleep time function:
–pressthegreen
–pressthe
When the display indicates –:––, the sleep timer function is deactivated.
The sleep timer function is also deactivat ed when the television set is switched to stand–by fr om
themainON/OFFswitch.
The television is then child locked and the stand–by indicator flashes (see Day to Day
Operation).
button to leave the menu
button to call up the menu.
button once or several times to return to: –:––
Page 11

Day to Day Operation
Switching On - Selecting Programmes
Switch on the televi sion set using the main ON/OFF switch if the indicator is off.
If it is on, enter the desired programme number.
For programmes 1 to 9:
Press the corresponding number on the remote control.
For programmes 10 to 99 (e .g. 24) :
Press and hold the decimal (tens) number (2): 2-
then press the units (4) number briefly: 24
Volume Adjustment - Sound Mute
Press the buttons to turn the sound up or down.
Press the
The sound returns if the button is pressed again.
Zapping
Press the buttons to scroll through the programmes stored in memory .
Personal Adjustments
Press the red button to call up your personal adjustm ent s (See Picture Adjustments).
Display
Press the yellow button to display the programme number and stand–by tim e (if sleep
timer command is activated).
If the channel has been fine tuned, the
This information disappears automati cal l y after a few seconds. Press the yellow
again to delete this informat i on.
button to turn the sound off.
symbol is also displayed.
button
Stand-by - Sleep Timer
Press the button to switch the tele vi si on set to stand–by mode.The Stand–by lightturns red.
The television set will automati cal l y switch to Stand–by after a few minutes if there is no signal
on the channel being watched.
Child Lock
You can pre vent the use of your television set using the keypad.
To do this,switch off the tele vision by pressing and holding down the stand–by button of the
remote control for more than 4 seconds.
The TV set is also child locked:
- after the sleep timer function
- if it has been swit ched to stand–by or swi t ched off when the sleep timer funct i on has been
programmed.
The stand–b y light flashes to indicate that the child lock is activated. The set can only be
switched on again using the numerical keys of the remote control.
10
Page 12

Teletext and Fastext
Press the purple button to call up the Index page (page 100).
Page Selection
Enter the number of the desir ed page (this must hav e 3 digits)using the numerical keys on the
remote control
As soon as the page has been found, it is displayed on the screen.
Press the button to call the next page.
Press the button to call the last page.
– E.g. for page 170, enter 1, 7, 0.
When a teletext page is displayed, you can switch off the sound using the
the volume using the
button.
button or adjust
Standard Functions
Scrolling Pages
Press the Red button to stop scrolling pages.
The page number becomesSTOP.
Press the button again to continue scrolling.
Reveal
Press the Green button to reveal a hidden answer.
Press it again to hide the answer again.
Zoom
Press the Yellow button to double the size of the upper half of the screen.
Press the same button again to double the size of the lower half of the screen.
Press the same button a third time to return to the normal screen.
Mixed Display
Press the Blue button to superimpose the teletext page on the TV picture.
Press again to return to teletext only.
STOP ? ZOOM MIX
Fastext Functions
If the teletext is Fastext, a sub–menu appears.This allows you to select one of the 4 options
indicated by colour. Press the corresponding colour key to select the option you require. Once
an option has been selected, other titles can appear.
Press the buttons briefly to switch from the standard sub–menu to the Fastext
sub–menu and vice versa.
Press the
button to leave the menu.
11
Page 13

SAFE USE OF EQUIPMENT
This equipment has been designed and
manufactured to meet international safety
standards but, like any electrical equipment, care
must be taken if you are to obtain the best results
and safety is to be assured.
Do read the Operating Instructions before you
attempt to use the equipment.
Do ensure that all electrical connections (including
the mains plug, extension leads and
interconnections betweenpieces of equipment) are
properly made and in accordance with the
manufacturer’s instructions. Switch off and
withdraw the mains plug whenmaking or changing
connections.
Do consultyour dealerif you areeverin doubt about
the installation, operation or safety of your
equipment.
Don’tcontinuetooperatethe equipment ifyou arein
any doubt about it working normally or if it is
damaged in any way-switch off, withdraw the mains
plug and consult your dealer.
Don’t remove any fixed cover as this may expose
dangerous voltages.
Don’t obstruct the ventilation of the equipment, for
example with curtains or soft furnishings.
Overheating will causedamage and shorten the life
of the equipment.
Don’t listen to headphones at highvolume, as such
use can permanently damage your hearing.
Don’tuse makeshiftstandsand NEVER fix legs with
wood screws-to ensure complete safety always fit
the manufacturer’s approved standor legs, withthe
fixings provided, according to the instructions.
Don’t allow electrical equipment to be exposed to
rain or moisture.
Above all
NEVER let anyone especially children push
anything into holes, slots or any otheropeningin the
case, this could result in a fatal electric shock.
NEVER guess or take chances with electrical
equipment of any kind-it is better to be safe than
sorry.
WARNING: Do not use cleaning agents containing
ethyl alcohol, such as methylated
spirits.
Thisequipmentshould be switched to standbywhen
it is unattended for a few hours. This can be done
using the remote control. However, for longperiods
ofabsence, switchoffattheon/offswitch on thefront
of the TV so that the red indicator light goes out.
Make sure that your family know how to do this.
Special arrangements may need to be made for
infirm or handicapped people.
Page 14

PERITELEVISON (SCART) PIN CONNECTIONS
VIDEO INPUTS
Composite video or sync: Pin 20 (pin 17 return).
RGB:
Red Pin 15 (pin 13 return).
Green Pin 11 (pin 9 return).
Blue Pin 7 (pin 5 return).
VIDEO OUTPUT
Composite video: Pin 19 (pin 17 return).
AUDIO INPUTS
A: Pin 6 (pin 4 return).
B: Pin 2 (pin 4 return).
AUDIO OUTPUTS
A: Pin 3 (pin 4 return).
B: Pin 1 (pin 4 return).
FAST BLANKING (INPUT)
Pin 16, + 1 V to + 3 V for fast blanking switching,
75
W
.
NOTE: If an unsynchronisedTV picture results after
viewing an external source (with a fast
blankingsignal)connected toAV, thisvoltage
must be removed to return to TV mode.
SIGNAL SELECTION
Facilities are provided for automatic switching when
the equipment connected provides switching voltages as follows:
Pin8:+9.5Vto+12V
Auto switching to auxiliary O/AUX channel.
Pin 16: + 1 V.to + 3 V. Auto switching to RGB.
SIGNAL LEVEL
Composite video: 1 Vp -pá3dB
(in/out) positive going, 75
Sync: 0.3 Vp -p - 3 dB +
RGB (input): 0.7 Vp -p
Audio (in/out): 0.5 V r .m.s.
(nominal)
Input impedance:
Output impedance:
10 dB, negative
going, 75
positive going, 75
10 kW.
(20Hz -20 kHz)
1kW
.
(20Hz -20 kHz)
W
.
W
.
á
3dB,
W
.
SCART socket connections
The socket is shown as viewed from the rear of the
TV.
Thedescriptionsandcharacteristics given hereareofinformativesignifianceonly, and noncommittal. Infact,
to keep up the high quality of our products, we reserve the right to make changes or improvements without
previous notice.
Page 15

THOMSON
multimedia
Sales UK Limited
Crown road
Enfield Middl esex
EN 1 1DZ
208 610 70
 Loading...