

Page 1

Page 2

Table of Contents
Chapter 1: Product Overview ...................................................................... 4
1.1 Features ................................................................................................................ 4
1.2 Package Contents ................................................................................................. 4
1.3 Product Overview ................................................................................................. 5
1.3.1 Front Panel ............................................................................................ 5
1.3.2 Power Plug ............................................................................................ 6
1.3.3 How to Reset......................................................................................... 7
1.4 Modes ................................................................................................................... 8
1.4.1 Access Point........................................................................................... 8
1.4.2 Repeater ................................................................................................ 8
Chapter 2: Repeater Mode .......................................................................... 9
2.1 Setting as Repeater .............................................................................................. 9
2.2 Connecting Wireless Clients ............................................................................... 12
2.3 Modifying Extended Wi-Fi Settings ................................................................... 13
Chapter 3: AP Mode ................................................................................... 14
3.1 Using as Access Point ......................................................................................... 14
3.1.1 Connecting Wireless Devices .............................................................. 14
3.1.2 Wireless Settings of Your Device ....................................................... 16
3.2 Using as Station .................................................................................................. 17
3.2.1 Setting Your Device as AP Station ..................................................... 17
3.2.2 Connecting a Network ....................................................................... 19
Chapter 4: System Configuration .............................................................. 21
4.1 Login ................................................................................................................... 21
4.2 Using the Menu .................................................................................................. 22
4.3 Operation Menu ................................................................................................ 23
4.4 Network Menu ................................................................................................... 23
4.4.1 Lan Setting .......................................................................................... 23
4.4.2 IPV6 Setting ........................................................................................ 24
4.5 Wireless Menu .................................................................................................... 25
4.5.1 Repeater Mode ................................................................................... 25
4.5.2 AP Mode - Access Point ...................................................................... 28
Power Wall Plug Repeater 2
Page 3

4.5.3 AP Mode – Station .............................................................................. 32
4.6 Administrator Menu .......................................................................................... 33
4.6.1 Management ...................................................................................... 33
4.6.2 Upload Firmware ................................................................................ 34
4.6.3 Settings Management ........................................................................ 35
4.6.4 Status ................................................................................................... 36
Appendix .................................................................................................. 37
A. Configure the Computer .................................................................................... 37
B. Wireless Considerations ..................................................................................... 39
C. Regulatory & Safety Information....................................................................... 40
D. Specifications ...................................................................................................... 43
Power Wall Plug Repeater 3
Page 4

Product Overview
Power Plug
Chapter 1: Product Overview
Thank you for choosing Technicolor Power Wall Plug Repeater. You can use your
device as a Repeater to leverage your existing wireless network by repeating the
wireless network signal so that coverage range is extended. Or, use as an Access Point
to allow wireless clients to connect to a wired network. The various security features,
such as WPS, WPA2, and WPA protect your data and privacy online. The web-based
utility allows you to configure your Repeater easily.
1.1 Features
• Wireless AC gives high-speed wireless connectivity to devices
• Wireless 802.11n/g/b/a/ac backward compatibility
• Wireless speed of up to 750Mbps (300 2.4Ghz / 433 5Ghz)
• Dual-band connectivity for greater flexibility and reduced interference
• 1x 10/100Mbps Auto-MDIX port
• WPA2/WPA wireless encryption to keep wireless communication secure
• Wi-Fi Protected Setup (WPS) for secure setup with simple press of a button
• Web-based configuration tools and management via Web Browser
• Supports statistics information
• Supports Station/AP/Repeater mode
1.2 Package Contents
Check if the package contains the following items. If any item is missing or appears
damaged, contact your dealer.
Power Wall Plug Repeater
Power Wall Plug Repeater 4
Note: Plug type may differ depending on the location
where the device is purchased
Page 5
Product Overview
1
2
4
5
3
No.
LED
Description
Power LED
Wireless LED
Link LED
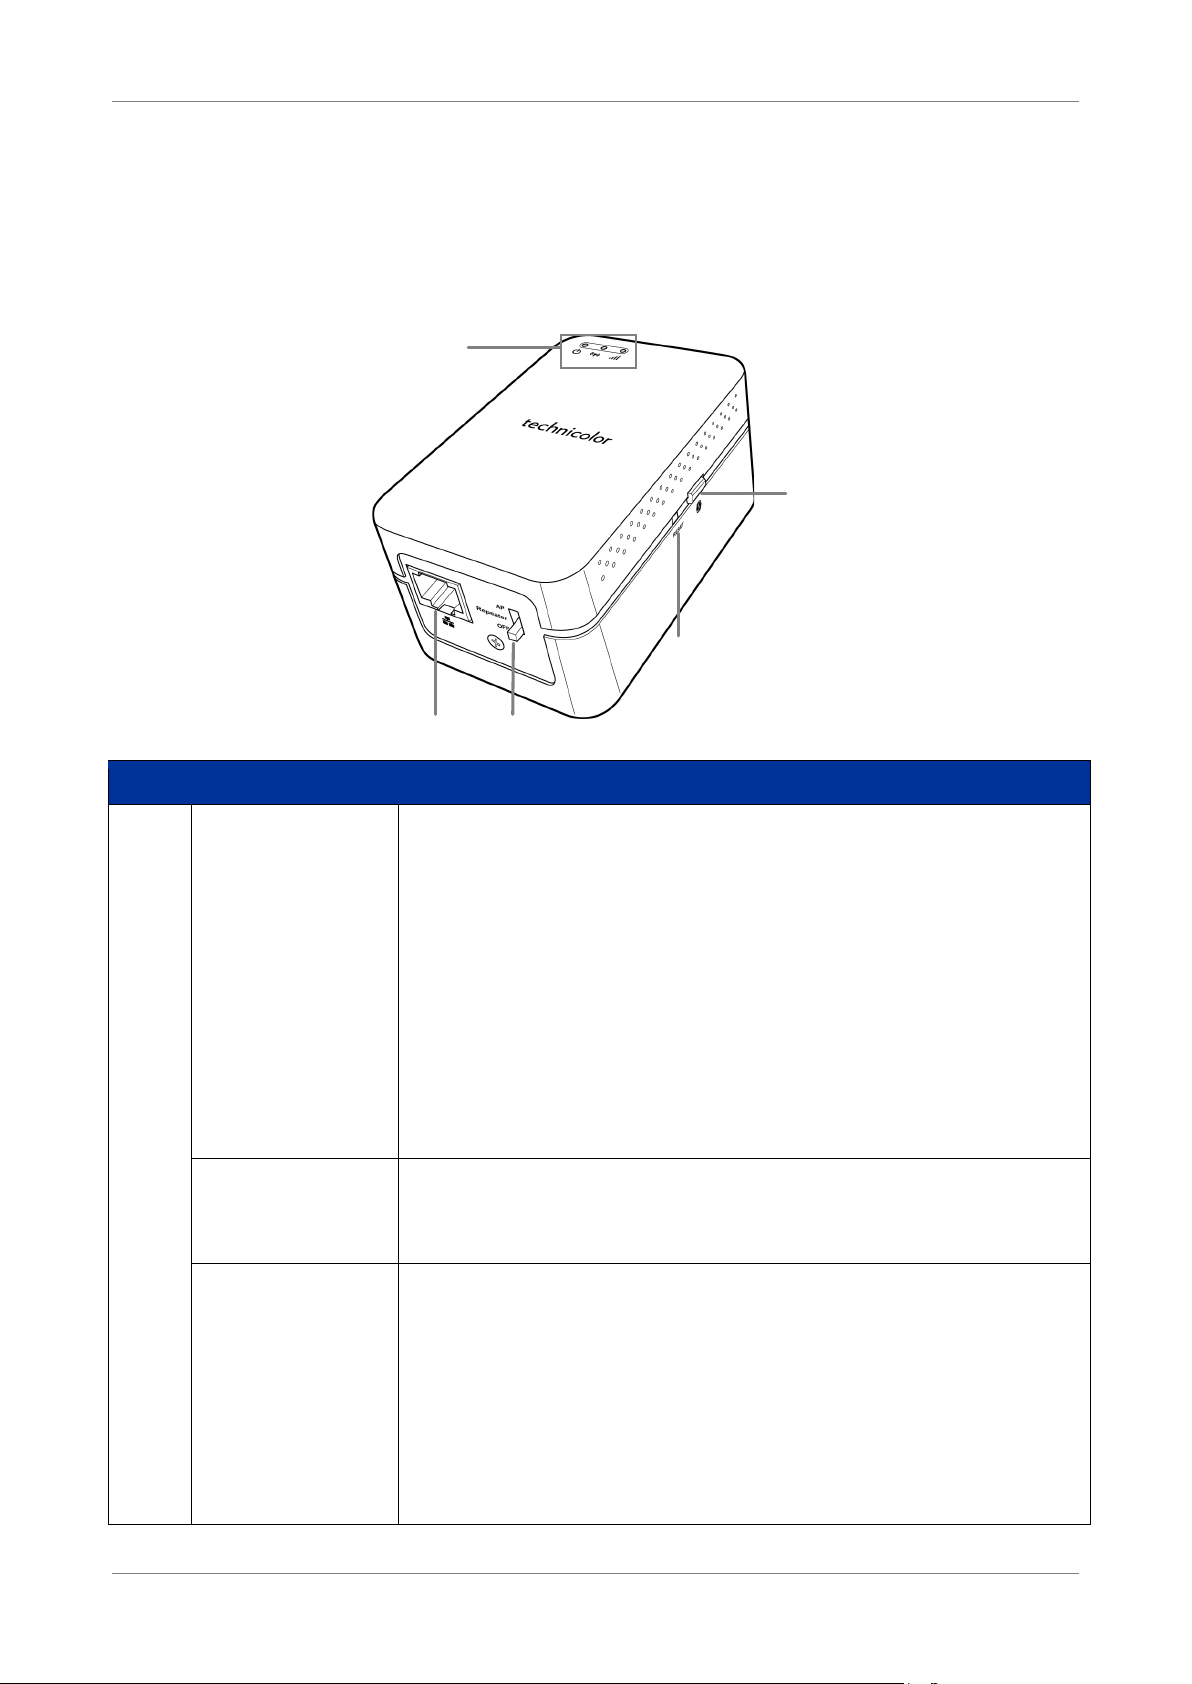
1.3 Product Overview
1.3.1 Front Panel
Lights up when the device is powered on.
• Solid GREEN – Indicates the device is powered ON and
operating normally
• Flashing GREEN – Indicates Ethernet traffic in progress
• Solid RED – Indicates the device is powering ON or the
system is defective.
• Flashing RED – The device is in recovery mode or the
device has malfunctioned.
• Flashing ORANGE – Cannot connect or be assigned an IP
address from the router
• Off – The device is powered off.
1
Lights up to indicate wireless connection.
• Solid GREEN – A wired connection is established.
• Flashing GREEN – Data transmission is in progress.
Lights up to indicate link activity.
• Solid GREEN – Wireless link between the Repeater and
the AP is above -55dBm RSSI
• Solid ORANGE – Wireless link between the Repeater and
the AP is above -75dBm and
-55dBm RSSI
• Solid RED – Wireless link between the Repeater and the
AP is below -75dBm RSSI
Power Wall Plug Repeater 5
Page 6
Product Overview
No.
LED
Description
Ethernet port
Power/ Mode
Switch
Reset button
WPS Button and
LED
2
Connects a computer and other Ethernet network devices to
the Repeater using RJ-45 cables.
Use the switch to select:
3
• AP – AP mode
• Repeater – Repeater mode
• Off – Turn off the device
4
Press and hold this button for at least 10 seconds to restore
your device to its original factory default setting.
Press and hold for at least 5 seconds to enable WPS. The LED
lights up to indicate:
5
• Flashing GREEN – WPS connection in progress
• Solid GREEN – WPS connection is established
• Flashing ORANGE – WPS connection failed
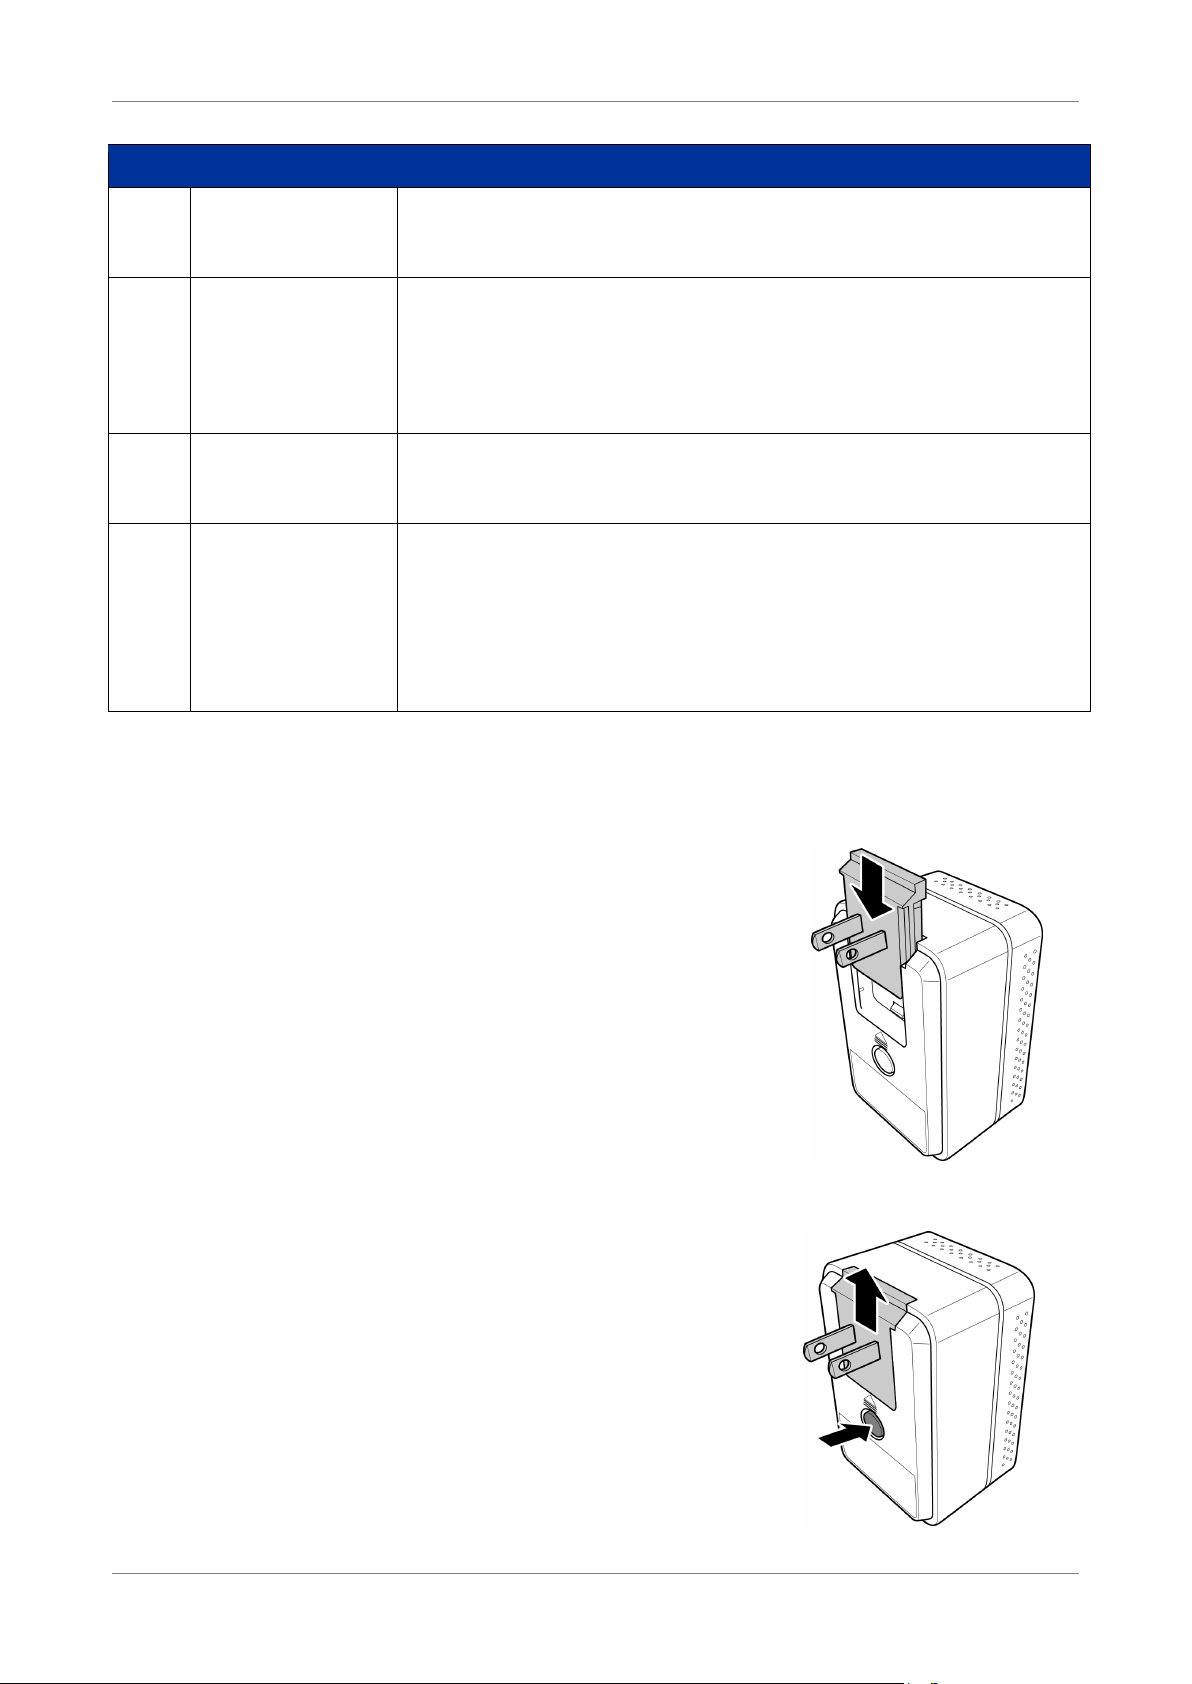
1.3.2 Power Plug
Slide the bundled power plug into your device. The plug
type that comes with your device may vary depending on
the location where the device is purchased.
In case there is a need to replace the plug, press the lock
button and slide the plug upwards to remove the plug
from the device.
Power Wall Plug Repeater 6
Page 7

Product Overview
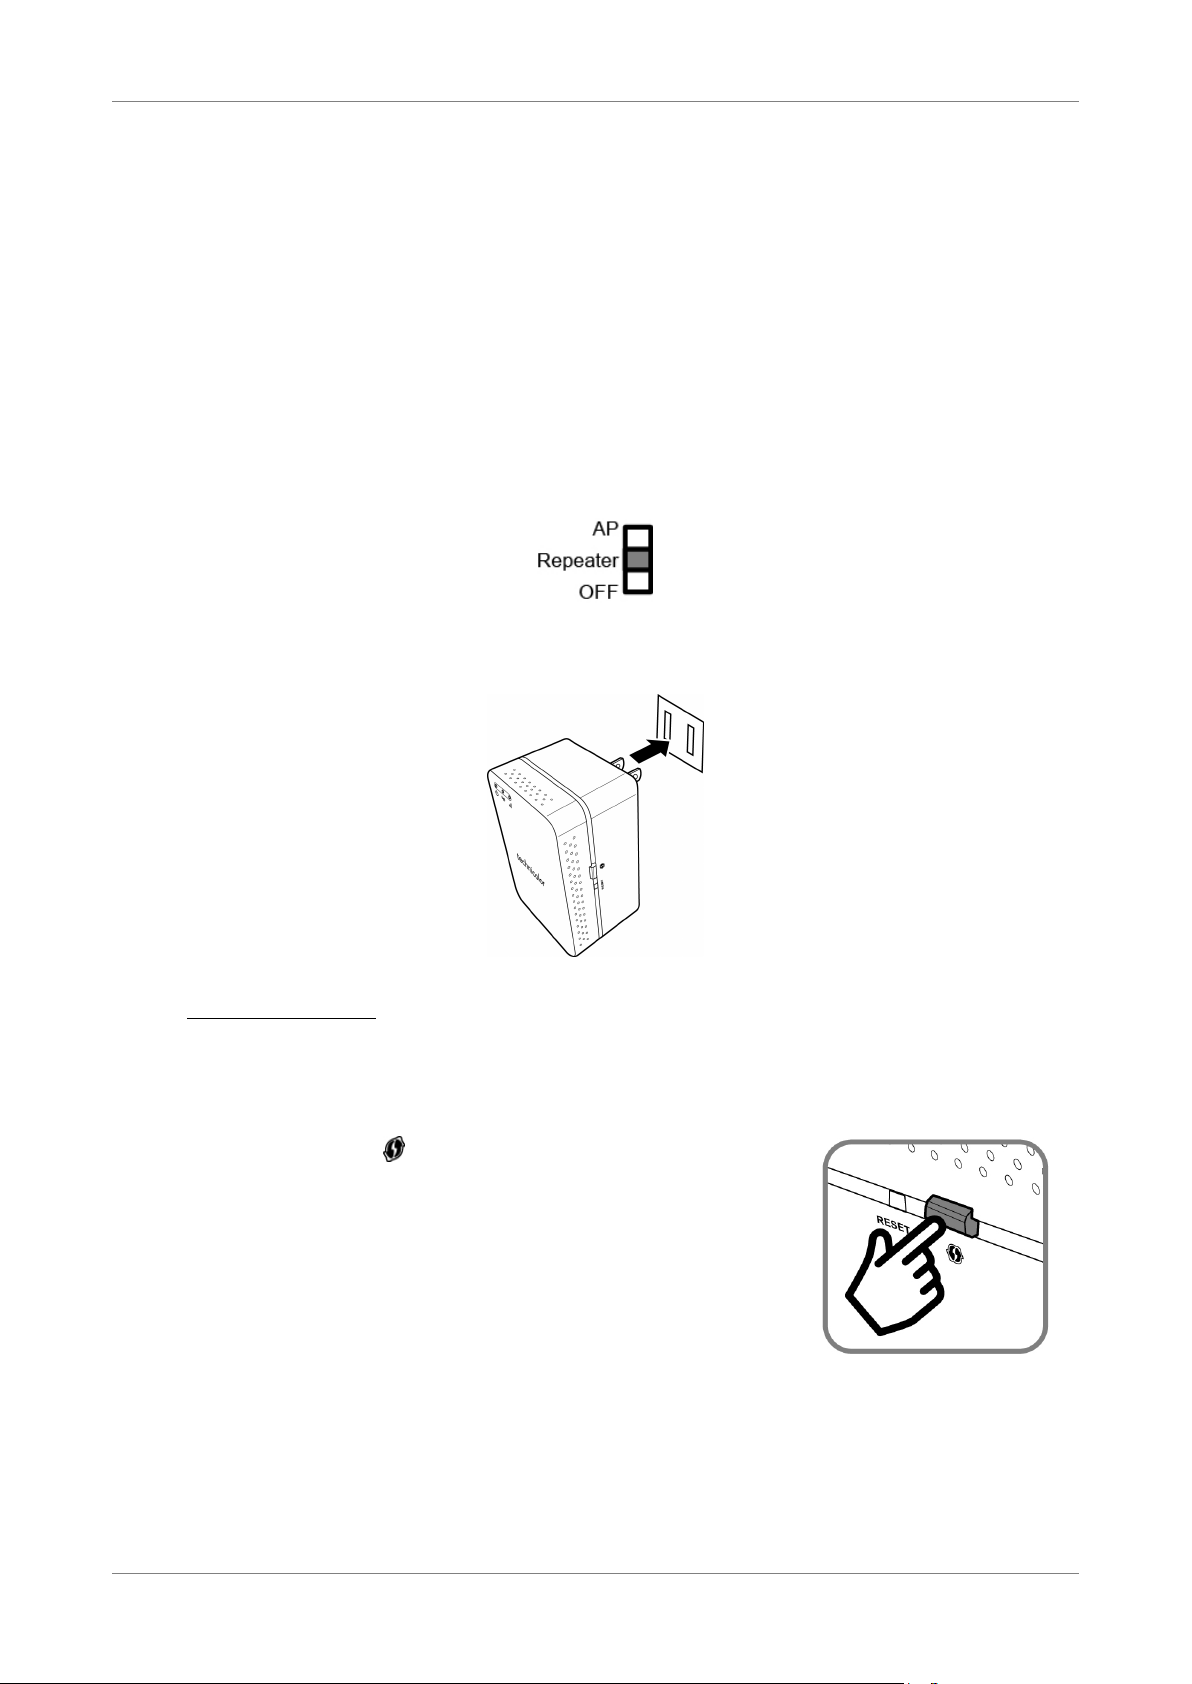
1.3.3 How to Reset
Use the Reset button in case there is a need to reset the device and restore the
factory default settings.
Using a pointed object, press and hold the Reset button for at least 5 seconds to reset
the device.
Power Wall Plug Repeater 7
Page 8
Product Overview
1.4 Modes
Your device can be used as:
• Access Point
• Repeater
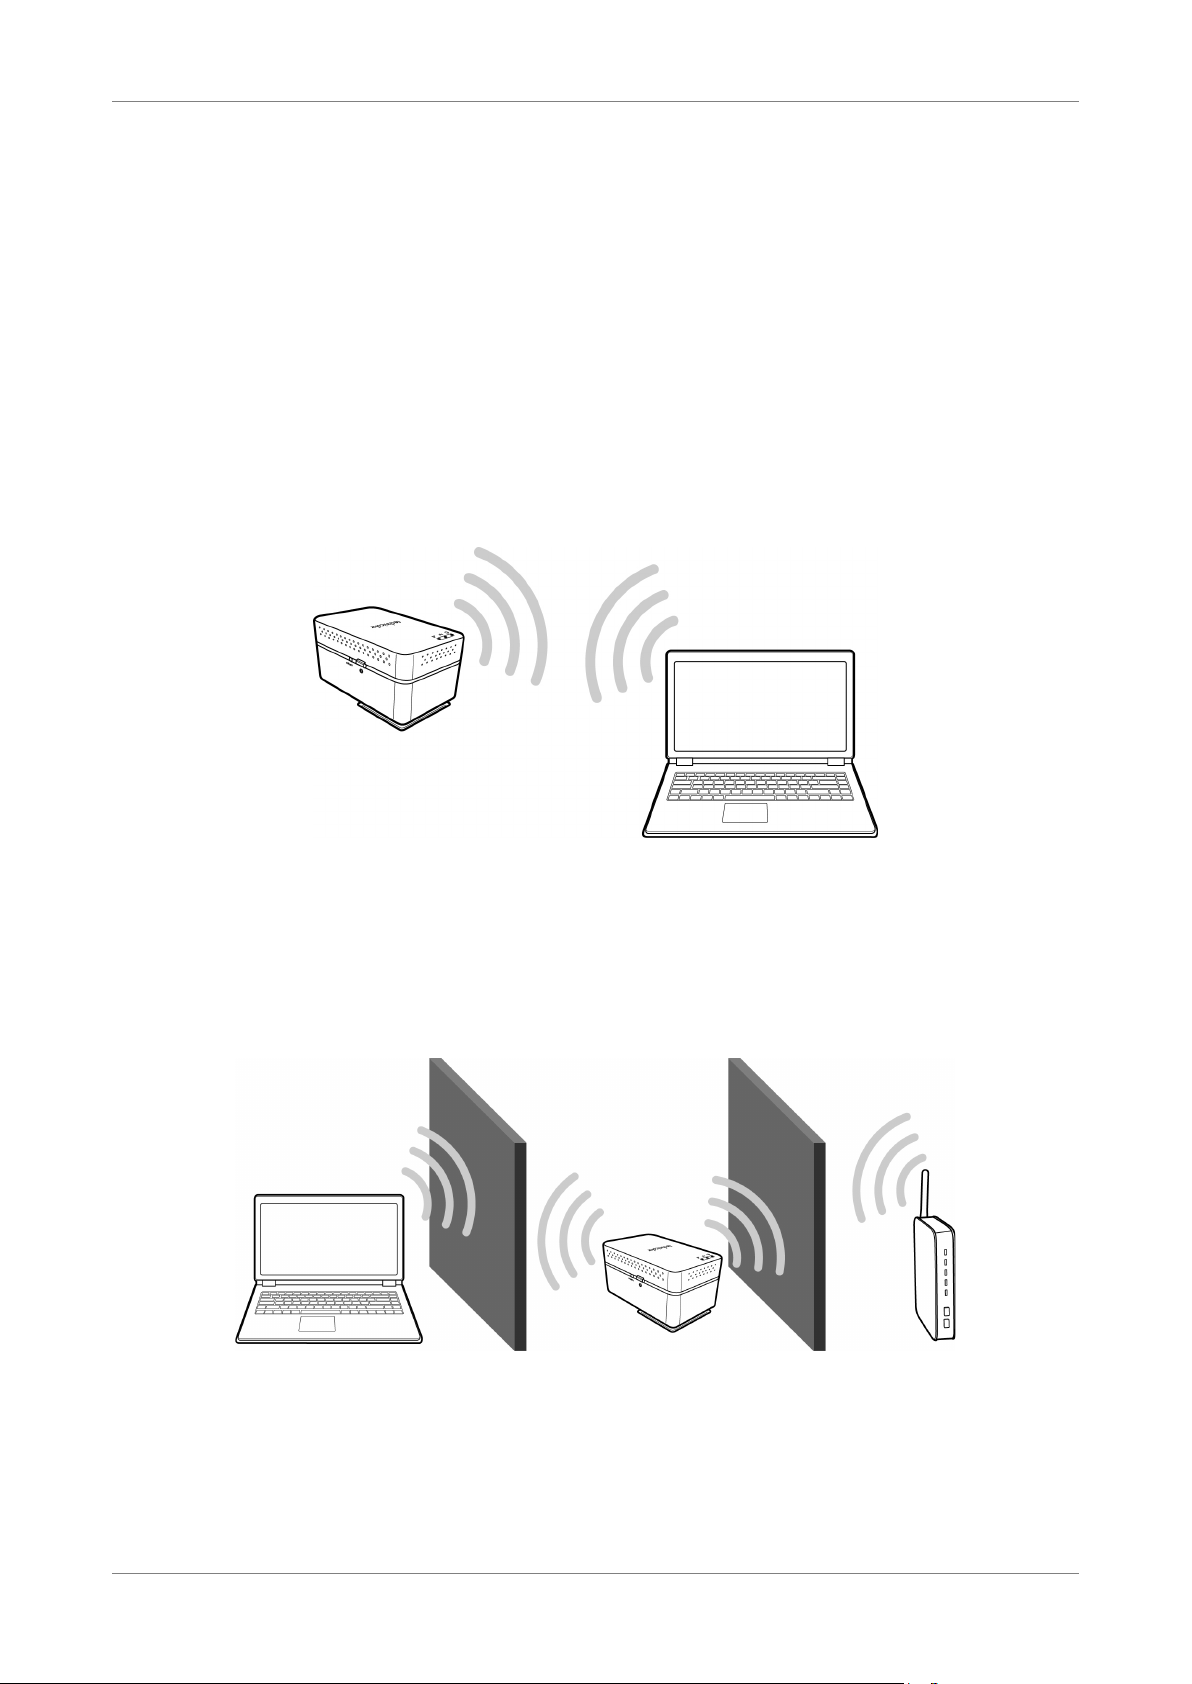
1.4.1 Access Point
Use the AP (Access Point) mode to connect your device to a wired network and allow
other clients to connect to the network wirelessly.
1.4.2 Repeater
Use the Repeater mode to extend the coverage range of an existing wireless network.
Power Wall Plug Repeater 8
Page 9
Home Network
Chapter 2: Repeater Mode
Use the Repeater mode to extend the coverage range of your existing wireless
network.
2.1 Setting as Repeater
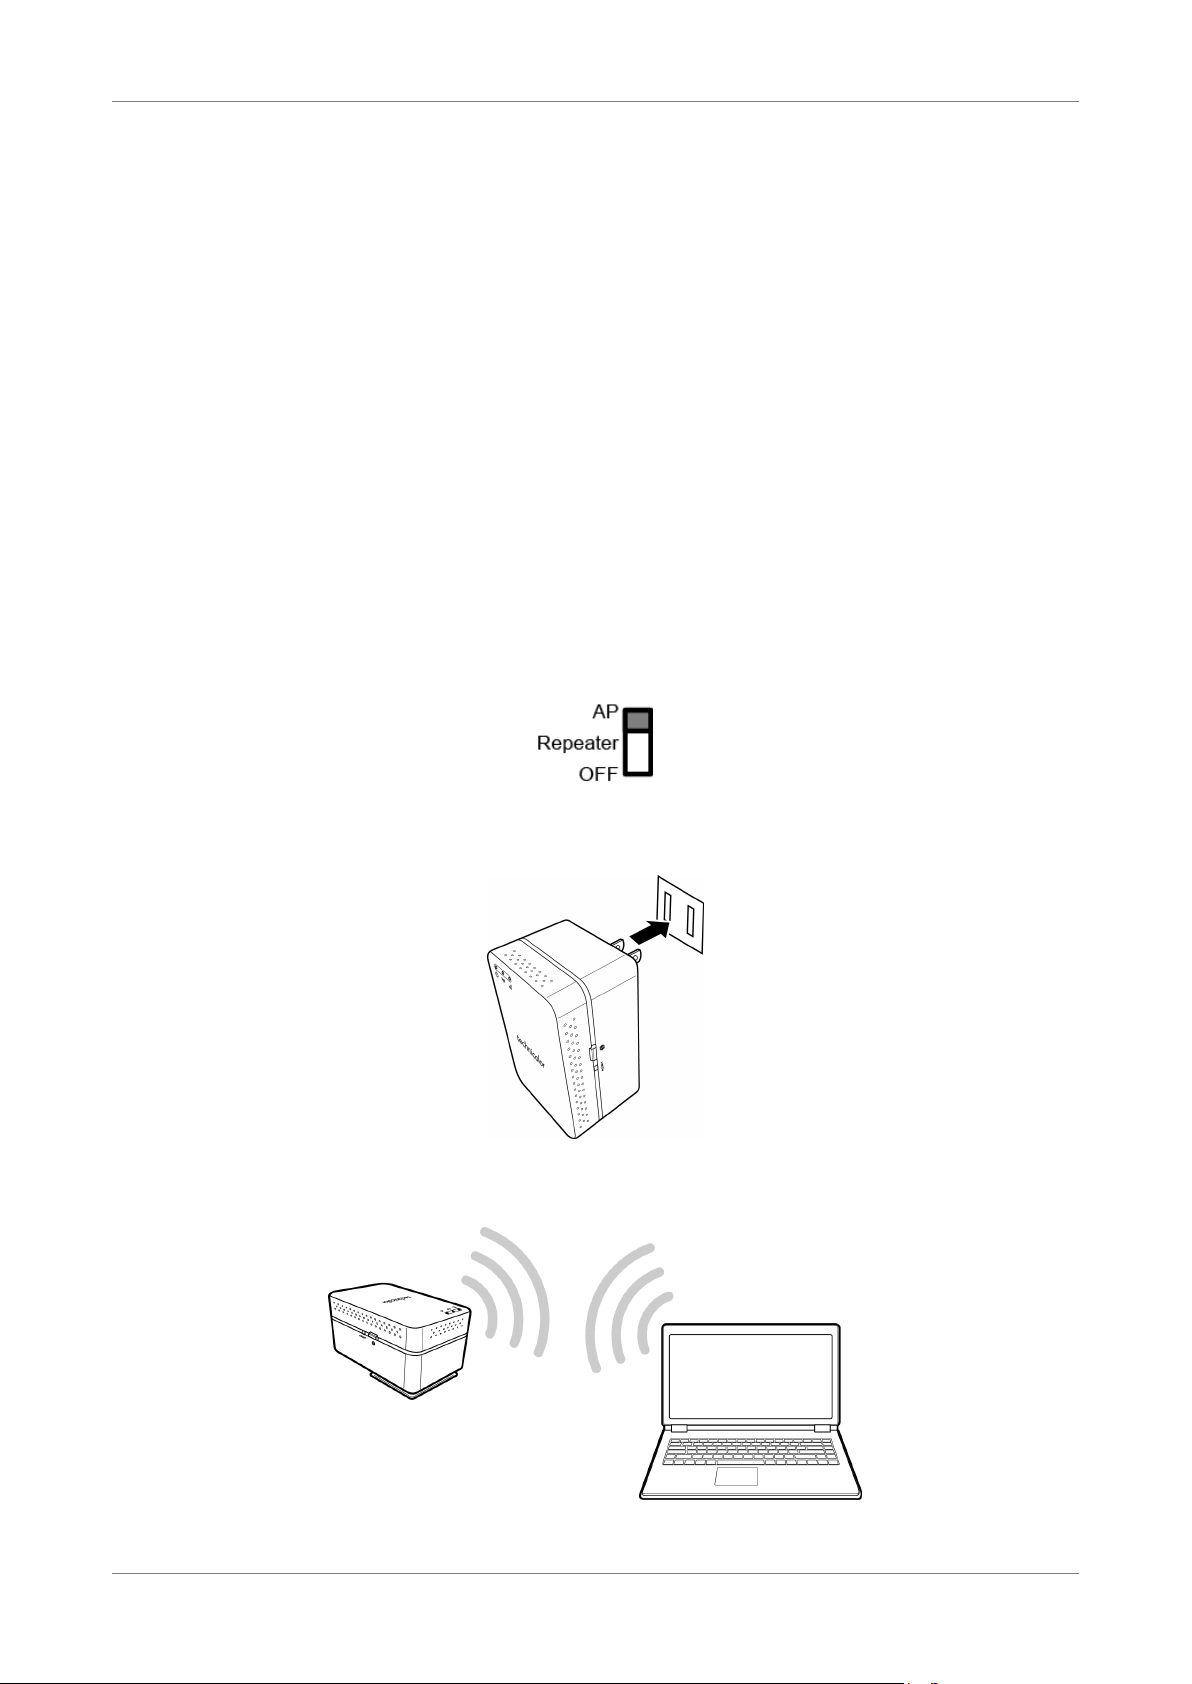
1. Press the Power/Mode switch to Repeater.
2. Plug your device to a power outlet.
3. Connect by WPS: The easiest way to setup your device in Repeater mode is to
connect to a router or access point using Wi-Fi Protected Setup (WPS). This
feature is used only if the WPS pairing process is available on the router or
access point. Otherwise, skip to step 4.
a. Press the WPS ( ) button on your wireless router or
access point.
b. Push the WPS button on your Repeater device.
The WPS LED will blink green while pairing is in
progress. When pairing is successful, the WPS LED
turns solid green.
c. After pairing, skip to “Connecting Wireless Clients” on page 12 to start
connecting wireless clients to your device.
Power Wall Plug Repeater 9
Page 10
Home Network
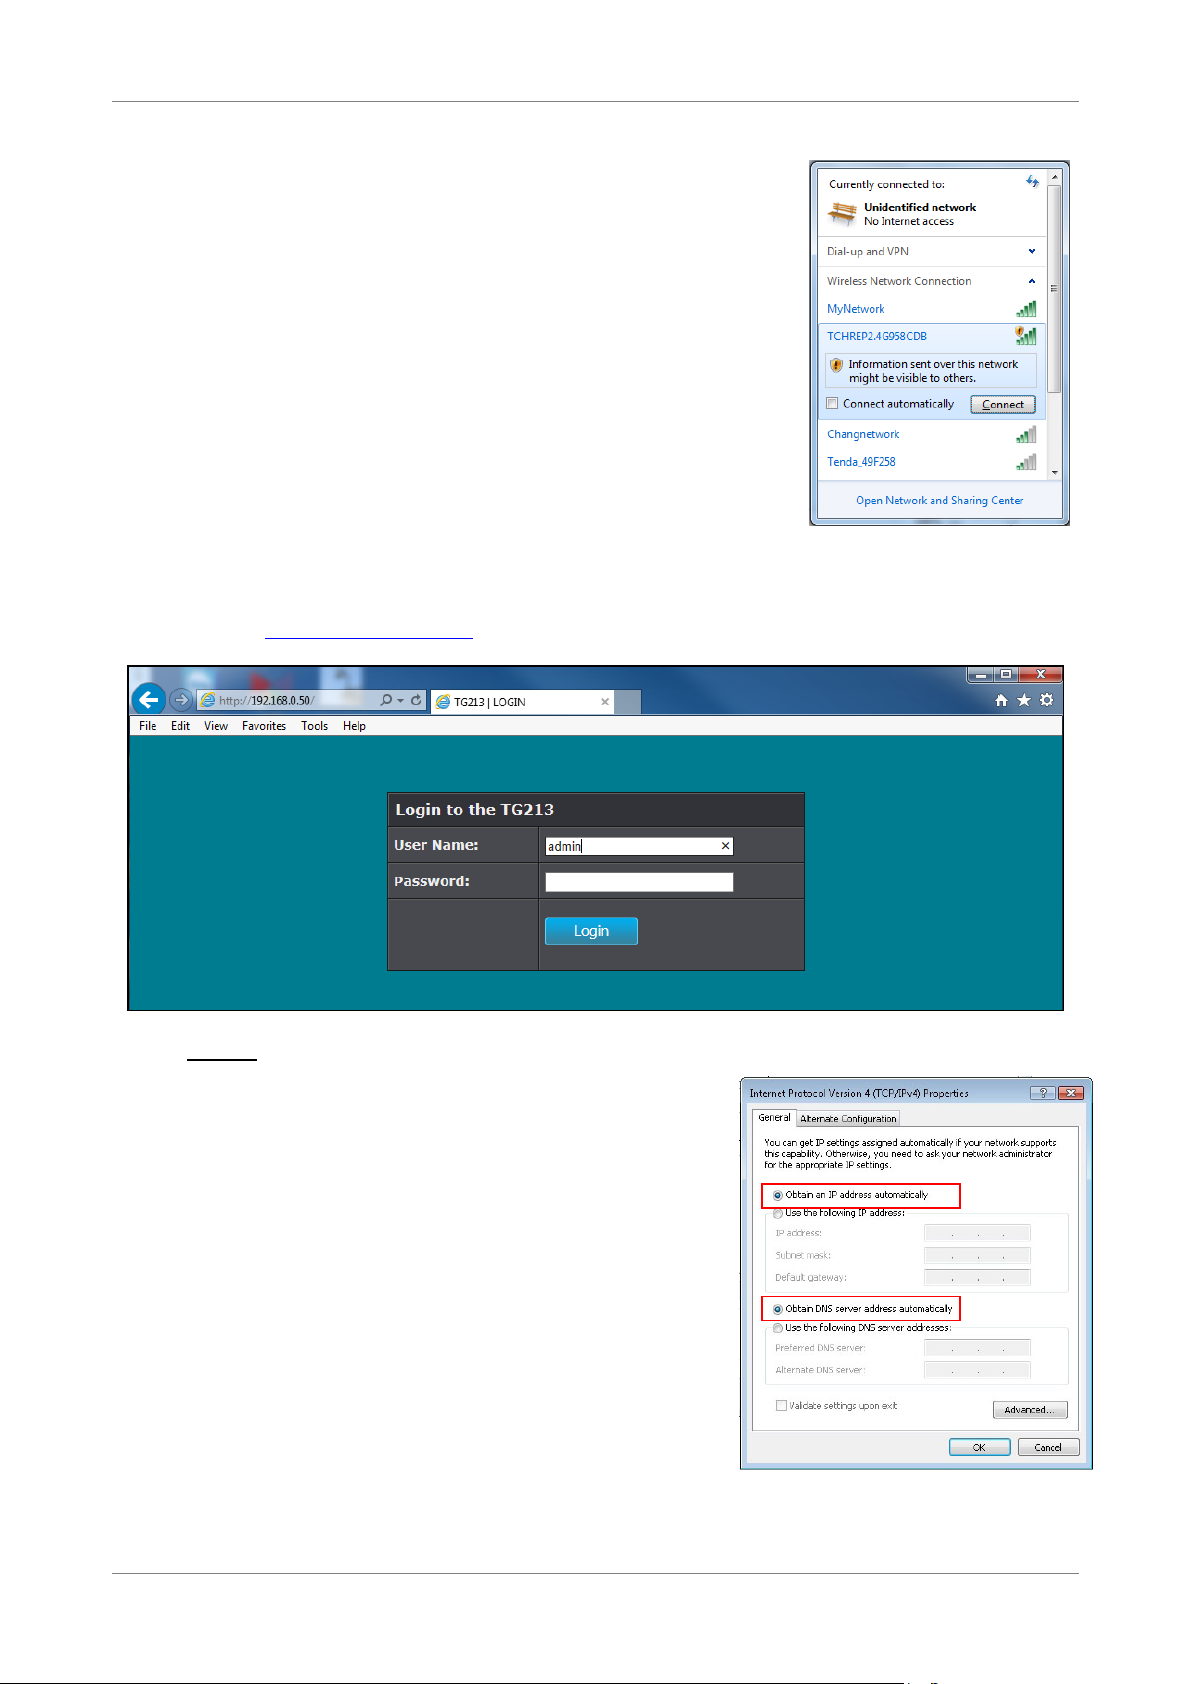
4. On your PC, search for available wireless networks.
The default SSID of your device is
“TCHREP2.4G958CD8” (2.4Ghz) or
“TCHREP5G958CD8” (5Ghz).
By default, the password is empty.
5. Once connected, open a web browser and type the default IP address of your
device http://192.168.0.50 on the URL address bar. The Login page appears.
NOTE:
• If you cannot connect to the web
configuration page, make sure your PC
belongs to the same network segment as
your device.
The easiest way to do this is to set the
Internet Protocol (TCP/IP) properties of
your PC to automatic. If not, configure it
accordingly.
See “Configure the Computer” on page 37
for more information.
Power Wall Plug Repeater 10
Page 11

Home Network
6. Type the Username “admin” and leave the Password empty.
NOTE:
• The default user name is “admin” and password is an empty field. It is
advised to change the password see “Management” on page 33.
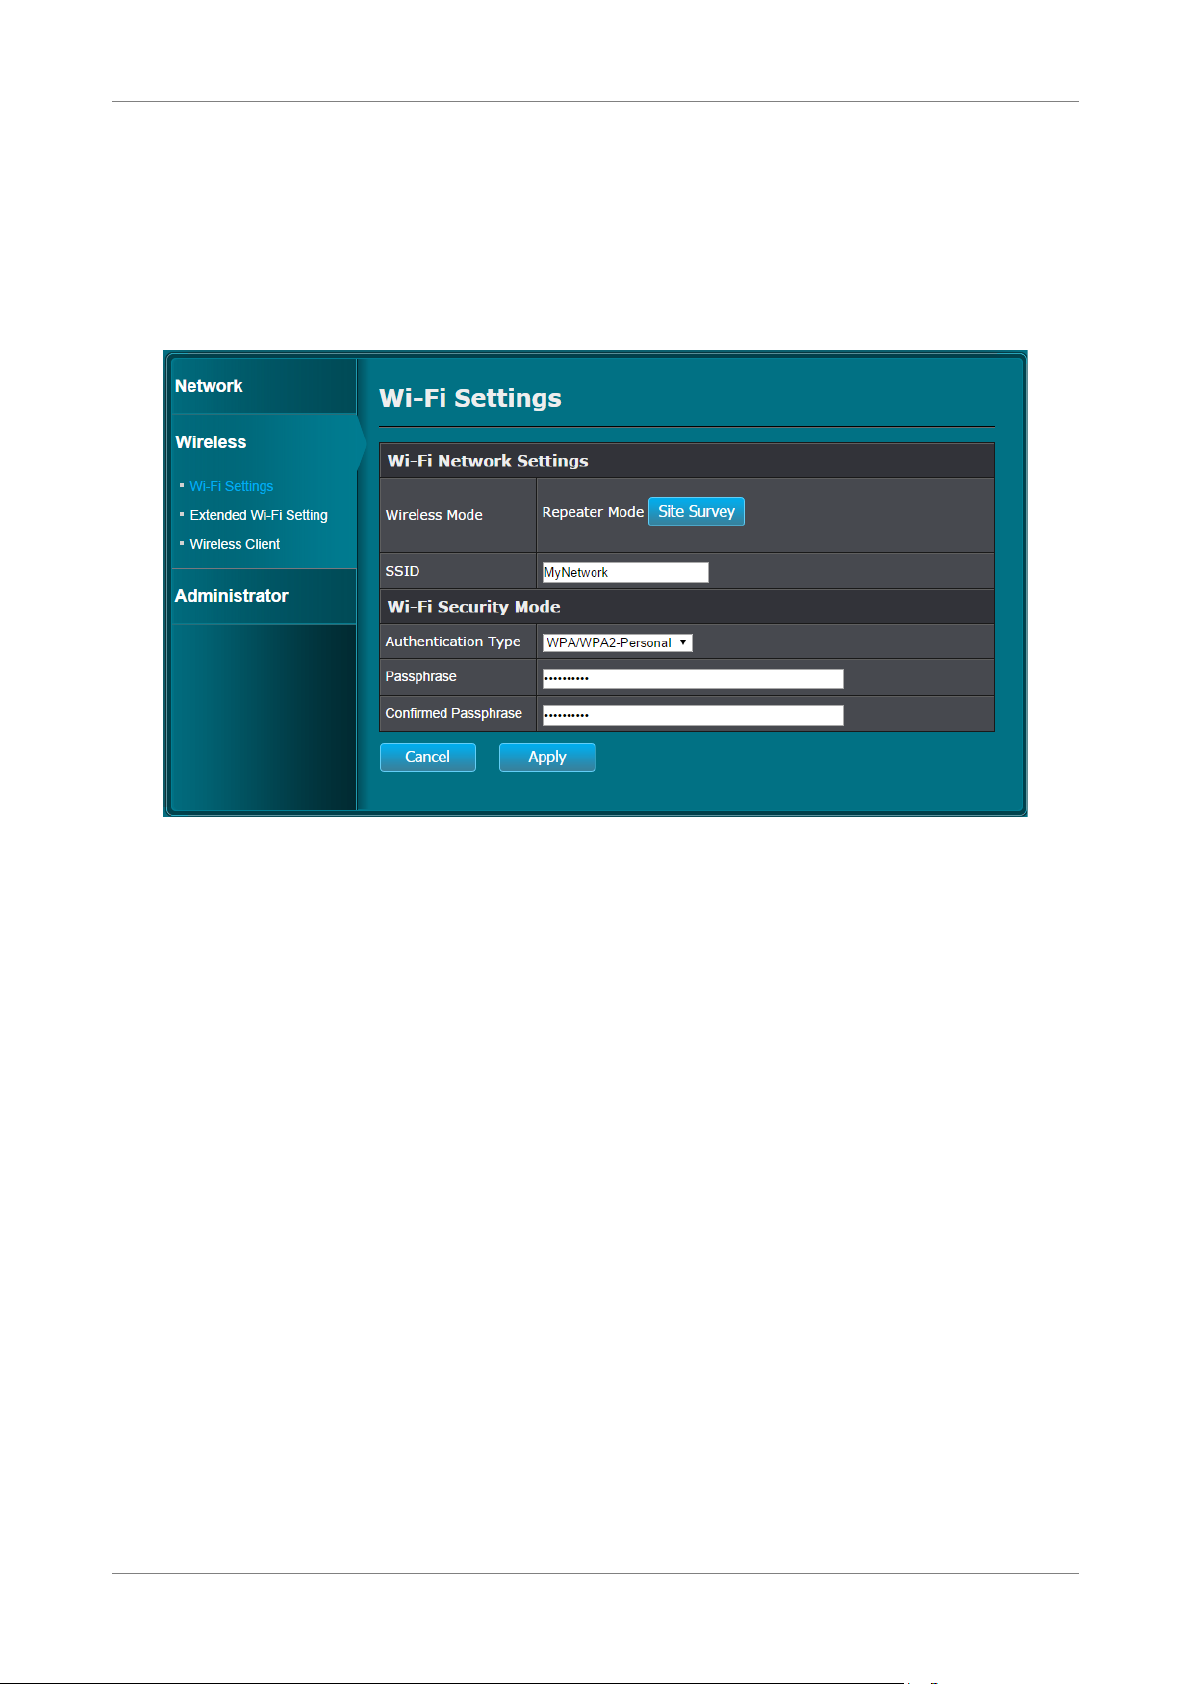
7. Once logged in, the Wi-Fi Settings screen appears. If you know the SSID of the
wireless network, type it on the SSID box and fill in the Authentication Type
and Password (if any). Otherwise, skip to step 3.
TIP:
• By default, the extended wireless network names (SSIDs) of your device are:
“TCHREP2.4G958CD8” (2.4Ghz) or “TCHREP5G958CD8” (5Ghz). It is
recommended to modify these SSIDs or set the security settings of these
SSIDs from the Extended Wi-Fi Setting page before connecting to the
wireless network you wish to extend. See “Extended Wi-Fi Setting” on page
26 for more information.
8. To scan for the wireless network to extend, click Site Survey. A list of available
networks is shown.
Power Wall Plug Repeater 11
Page 12

Home Network
9. Click the Select button of the network, and click Connect. The screen will
revert back to previous page.
10. Enter the Authentication Type and Password (if any), then click Apply. The
device will reboot and establish your connection.
NOTE:
• Once your device is connected to the router, it will be assigned a new IP
address based on the router DHCP settings. See your router documentation
to determine the new IP address of your device. This address will be used to
access the web configuration page of your device, if needed.
2.2 Connecting Wireless Clients
To connect wireless devices, open the wireless utility on your wireless device and
select the default SSID of your device is “TCHREP2.4G958CD8” (2.4Ghz) or
“TCHREP5G958CD8” (5Ghz). By default, the password is empty.
Power Wall Plug Repeater 12
Page 13
Home Network
2.3 Modifying Extended Wi-Fi Settings
Login to the web configuration page. The Wi-Fi Settings screen appears.
To access other wireless settings, click the menu on the left panel:
• Wi-Fi Settings – Allows you to connect to a router/network and extend its signal
to allow wireless clients to connect to the network via your device. See “Wi-Fi
Settings” on page 25 for more information.
• Extended Wi-Fi Setting – Allows you to modify the default SSIDs assigned to your
device and configure its authentication and password settings to protect it from
unauthorized access. See “Extended Wi-Fi Setting” on page 26 for more
information.
• Wireless Client – Allows you to view the wireless clients connected to your device.
See “Wireless Client” on page 27 for more information.
Power Wall Plug Repeater 13
Page 14
Home Network
Chapter 3: AP Mode
The AP mode of your device can be further configured as: Access Point or Station.
As an Access Point, you can use your device to connect to a wired network and allow
other clients to connect to the network wirelessly.
You can also use your device as a Station, wherein you can connect your device to a
non-wireless client via RJ-45 and allow other clients to connect to that client through
your device wirelessly.
3.1 Using as Access Point
3.1.1 Connecting Wireless Devices
1. Press the Power/Mode switch to AP.
2. Plug your device to a power outlet.
Below is a sample wireless connection illustration.
Power Wall Plug Repeater 14
Page 15

Home Network
3. Open the wireless utility of the PC and select the
wireless network name (SSID) of your deivce:
“TCHREP2.4G958CDB” (for 2.4Ghz band) or
“TCHREP5G958CDB” (for 5Ghz band). Click Connect.
4. Open a web browser and type the default IP address of your device
http://192.168.0.50 on the URL address bar. The Login page appears.
NOTE:
• If you cannot connect to the web
configuration page, make sure your PC
belongs to the same network segment as
your device.
The easiest way to do this is to set the
Internet Protocol (TCP/IP) properties of
your PC to automatic. If not, configure it
accordingly.
See “Configure the Computer” on page 37
for more information.
Power Wall Plug Repeater 15
Page 16

Home Network
5. Type the Username “admin” and leave the Password empty.
NOTE:
• The default user name is “admin” and password is an empty field. It is
advised to change the password, see “Management” on page 33.
3.1.2 Wireless Settings of Your Device
Once logged in, the Wireless Basic page appears. This page allows you to configure
the basic wireless settings.
To access other wireless settings, click the menu on the left panel:
• Basic – Allows you to modify the SSID and select the channel, 802.11 mode, and
channel width of both the 2.4Ghz and 5.0Ghz band network. See “Basic” on page
28 for more information.
• Security – Allows you to configure the authentication and password settings of
your device to protect it from unauthorized access. See “Security” on page 29 for
more information.
• WiFi Protected Setup – Allows you to enable/disable the WPS function of your
device and allow wireless clients to connect to your device using the Push Button
(PBC). See “Wi-Fi Protected Setup” on page 30 for more information.
• Wireless Client – Allows you to view the wireless clients connected to your device.
See “Wireless Client” on page 31 for more information.
Power Wall Plug Repeater 16
Page 17

Home Network
3.2 Using as Station
3.2.1 Setting Your Device as AP Station
1. Press the Power/Mode switch to AP.
2. Connect your device to a computer using an RJ-45 cable.
3. Plug your device to a power outlet.
Power Wall Plug Repeater 17
Page 18

Home Network
4. The default IP address of your device is 192.168.0.50. Make sure your PC
belongs to the same network segment as your device.
The easiest way to do this is to set the Internet Protocol (TCP/IP) properties of
your PC to automatic. If not, configure it accordingly. See “Configure the
Computer” on page 37 for more information.
5. Open a web browser and type http://192.168.0.50 on the URL address bar. The
Login page appears.
6. Type the Username “admin” and leave the Password empty.
Once logged in, the Operation screen appears.
NOTE:
• The default user name is “admin” and password is an empty field. It is
advised to change the password, see “Management” on page 33.
Power Wall Plug Repeater 18
Page 19

Home Network
3.2.2 Connecting a Network
After setting your device as an AP Station, now you can connect to a wireless router.
1. Click the Wireless from the left panel menu.
2. If you know the SSID of the wireless network, type it on the SSID box and fill in
the Authentication Type and Password (if any). Otherwise, skip to step 3.
Power Wall Plug Repeater 19
Page 20

Home Network
3. To scan for a wireless network in range, click Site Survey. A list of available
networks is shown.
4. Click the Select button of the network, and click Connect. The screen will
revert back to previous page.
5. Enter the Authentication Type and Password (if any), then click Apply. The
device will reboot and establish your connection.
NOTE:
• Once your device is connected to the router, it will be assigned a new IP
address based on the router DHCP settings. See your router documentation
to determine the new IP address of your device. This address will be used to
access the web configuration page of your device, if needed.
Power Wall Plug Repeater 20
Page 21

Home Network
Chapter 4: System Configuration
Use the Web Configurations utility to configure your Repeater.
4.1 Login
1. On your PC, launch the web browser.
2. On the address bar, type the default IP address http://192.168.0.50 then press
Enter. The Login screen appears.
3. Type the Username “admin” and leave the Password empty.
Once logged in, the Operation screen appears.
NOTE:
• The default user name is “admin” and password is an empty field. It is
advised to change the password, see “Management” on page 33.
Power Wall Plug Repeater 21
Page 22

Home Network
4.2 Using the Menu
Click a menu from the left panel to access the functions of your Repeater.
The following menu items are available:
• Operation — Allows you to select the device mode: Access Point or Station.
• Network — Allows you to configure the LAN and IPV6 settings.
• Wireless — Allows you to remotely configure the wireless settings.
• Administrator — Allows you to configure more advanced functions, such as
managing the admin and user passwords, setting of device name, upgrading the
firmware, restoring configuration settings, and others.
Power Wall Plug Repeater 22
Page 23

Home Network
Properties
Description
Connection Type
Select the connection type:
Static IP
IP Address, Subnet Mask, Gateway
DNS 1
DNS 2
4.3 Operation Menu
The Operation menu is available only when the Power / Mode switch is set to AP
mode. Select Access Point or Station, then click Apply.
4.4 Network Menu
The Network menu allows you to manually configure the LAN and IPV6 settings of
your device.
4.4.1 Lan Setting
This page allows you manually configure the LAN connection of your device.
Power Wall Plug Repeater 23
•
device. If Static IP is selected, the following properties
must be configured:
: Select to assign a specific IP address to your
, and
.
,
Page 24

Home Network
Properties
Description
NOTE: Ask your network service provider for these
DHCP Client
Properties
Description
My IPv6 Connection is
Select IPv6 connection:
Link-local only
Static IPv6
Static IPv6
IPv6 Address, Subnet
Prefix Length, Default Gateway, Primary DNS Server
Secondary DNS Server
Autoconfiguration
information.
•
: Select to allow the router to assign a
dynamic IP address to your device.
After modifying any of the above properties, click Apply to save and apply changes.
4.4.2 IPV6 Setting
This page allows you to configure the IPV6 settings of your device.
•
IPv6 address is used. If selected, the IPv6 local address is
shown.
•
of your device. If
properties must be configured:
•
the IPv6 address to your device and automatically or
After modifying any of the above properties, click Apply to save and apply changes.
manually assign the IPv6 DNS servers.
Power Wall Plug Repeater 24
: Select to link to local network only when
: Select to manually configure the IPv6 settings
is selected, the following
, and
.
: Select to allow the router to assign
Page 25

Home Network
Properties
Description
Wireless Mode
Click Site Survey to search for the wireless network you wish
Connect
SSID
Site
Survey
Authentication Type
Select the authentication type needed to connect to the
Disable
WEP
WEP, Mode
WEP Key
Key
• WPA/WPA-2Personal: Select if the network uses the
4.5 Wireless Menu
The Wireless menu varies depending on the selected mode.
4.5.1 Repeater Mode
Wi-Fi Settings
The Wi-Fi Settings page allows you to connect to a router/network and extend its
signal to allow wireless clients to connect to the network via your device.
to extend. The list of available network appears, select and
click
Displays the SSID of the wireless network selected from
or the last connected network.
wireless network.
•
connect to the wireless network.
Power Wall Plug Repeater 25
•
Select
on the allotted box.
.
: Select if authentication is not required to
: Select if the network uses the WEP security setting.
, and
, and then type the
Page 26

Home Network
Properties
Description
WPA/WPA-2 security setting. Then, type the Passphrase
Properties
Description
2.4g Extended
Wi-Fi Setting
If you wish to modify the default SSID assigned to the
2.4g Wi-Fi
Security Mode
To prevent unauthorized access to the network, select and
Disable
WEP
WEP, Mode
WEP Key
Key
WPA/WPA-2Personal
Passphrase on the allotted boxes. Connecting devices
on the allotted boxes.
After modifying any of the above properties, click Apply to save and apply changes.
Extended Wi-Fi Setting
The Extended Wi-Fi Setting menu allows you to modify the default SSIDs assigned to
your device and configure its authentication and password settings to protect it from
unauthorized access.
2.4Ghz band, type the preferred network name on this box.
configure the authentication type for your device.
•
: Select if you will not require authentication to
connect to the wireless network.
•
: Select if you wish to use the WEP security for
authentication. Select
then type the
on the allotted box. Connecting
devices must enter the correct WEP key to establish
connection.
Power Wall Plug Repeater 26
•
WPA/WPA-2 security for authentication. Then, type the
, and
, and
: Select if you wish to use the
Page 27

Home Network
Properties
Description
must enter the correct WPA/WPA-2 passphrase to
5g Extended
Wi-Fi Setting
5g Wi-Fi
Security Mode
To prevent unauthorized access to the network, select and
Disable
WEP
WEP, Mode
WEP Key
Key
WPA/WPA-2Personal
Passphrase
establish connection.
If you wish to modify the default SSID assigned to the 5Ghz
band, type the preferred network name on this box.
configure the authentication type for your device.
•
: Select if you will not require authentication to
connect to the wireless network.
•
: Select if you wish to use the WEP security for
authentication. Select
then type the
on the allotted box. Connecting
, and
, and
devices must enter the correct WEP key to establish
connection.
•
: Select if you wish to use the
WPA/WPA-2 security for authentication. Then, type the
on the allotted boxes. Connecting devices
must enter the correct WPA/WPA-2 passphrase to
establish connection.
After modifying any of the above properties, click Apply to save and apply changes.
Wireless Client
This page allows you to view the wireless clients connected to your device.
Power Wall Plug Repeater 27
Page 28

Home Network
Properties
Description
2.4g Basic
SSID
If you wish to modify the default SSID assigned to the
AutoChannel
Check the box to select auto channel option.
Channel
AutoChannel
Channel
802.11 Mode
Limit the type of wireless clients that can connect to your
Channel Width
Select the channel width.
5g Basic
SSID
If you wish to modify the default SSID assigned to the 5Ghz
AutoChannel
Check the box to select auto channel option.
4.5.2 AP Mode - Access Point
Basic
The Basic page allows you to configure the basic wireless settings.
2.4Ghz band, type the preferred network name on this box.
If
is not selected, you may select the
from this box.
device by selecting the 802.11 protocol.
band, type the preferred network name on this box.
Power Wall Plug Repeater 28
Page 29

Home Network
Properties
Description
Channel
If AutoChannel is not selected, you may select the Channel
802.11 Mode
Channel Width
Select the channel width.
Properties
Description
2.4g Security
Authentication Type
To protect your device from unauthorized access, select and
Disable
WEP
WEP, Mode
WEP Key
Key
WPA/WPA-2Personal
Passphrase
from this box.
Limit the type of wireless clients that can connect to your
device by selecting the 802.11 protocol.
After modifying any of the above properties, click Apply to save and apply changes.
Security
The Security page allows you to configure the authentication and password settings
of your device to protect it from unauthorized access.
configure the authentication type that connecting devices
must use to connect to the 2.4Ghz band.
•
connect to your device.
•
: Select if you will not require authentication to
: Select if you wish to use the WEP security for
authentication. Select
then type the
on the allotted box. Connecting
devices must enter the correct WEP key to establish
connection.
•
WPA/WPA-2 security for authentication. Then, type the
on the allotted boxes. Connecting devices
must enter the correct WPA/WPA-2 passphrase to
Power Wall Plug Repeater 29
establish connection.
, and
, and
: Select if you wish to use the
Page 30

Home Network
Properties
Description
5g Security
Authentication Type
To protect your device from unauthorized access, select and
Disable
WEP
WEP, Mode
WEP Key
Key
WPA/WPA-2Personal
Passphrase
Properties
Description
WPS Configuration
Wi-Fi Protected Setup (WPS) allows wireless clients to
connect to your device by pressing the WPS button on your
configure the authentication type that connecting devices
must use to connect to the 2.4Ghz band.
•
: Select if you will not require authentication to
connect to your device.
•
: Select if you wish to use the WEP security for
authentication. Select
then type the
on the allotted box. Connecting
, and
, and
devices must enter the correct WEP key to establish
connection.
•
: Select if you wish to use the
WPA/WPA-2 security for authentication. Then, type the
on the allotted boxes. Connecting devices
must enter the correct WPA/WPA-2 passphrase to
establish connection.
After modifying any of the above properties, click Apply to save and apply changes.
Wi-Fi Protected Setup
The Wi-Fi Protected Setup page allows you to enable/disable the WPS function of
your device and allow wireless clients to connect to your device using the Push
Button (PBC).
Power Wall Plug Repeater 30
Page 31

Home Network
Properties
Description
device and the WPS button on the connecting device. Once
Enable
Disable
Apply
PushButton
Configuration (PBC)
Instead of pressing the WPS button on your device
Start PBC
connected, the wireless connection settings, such as SSID,
password, etc., are automatically sync on both devices.
Select
the function, then click
physically, you may click
to enable WPS function or
.
to activate the WPS
to disable
function of your device and start pairing with a wireless
client.
Wireless Client
The Wireless Client page allows you to view the wireless clients connected to your
device.
Power Wall Plug Repeater 31
Page 32

Home Network
Properties
Description
Wireless Mode
Click Site Survey to search for the wireless network you wish
Connect
SSID
Displays the SSID of the wireless network selected from Site
Survey
Authentication Type
Select the authentication type needed to connect to the
Disable
WEP
WEP, Mode
WEP Key
Key
WPA/WPA-2Personal
Passphrase
4.5.3 AP Mode – Station
The AP-Station mode is used when a client device, for example a PC, has no wireless
function but wish to connect to a wireless network. Connect the PC to your device
using an RJ-45 cable and access the web configuration page of your device.
The Wireless Settings page on AP - Station mode allows your PC to connect to a
wireless network.
to connect to. The list of available network appears, select
and click
.
or the last connected network. If you know the SSID
of the wireless network that you want to connect to, you
can also directly type it on this box.
wireless network.
•
: Select if authentication is not required to
connect to the wireless network.
•
: Select if the network uses the WEP security setting.
Select
on the allotted box.
•
WPA/WPA-2 security setting. Then, type the
on the allotted boxes.
After modifying any of the above properties, click Apply to save and apply changes.
, and
, and then type the
: Select if the network uses the
Power Wall Plug Repeater 32
Page 33

Home Network
Properties
Description
Administrator
There is only one administrator account for your device. The
New Password
Type a password to access the administrator account.
Confirm Password
Re-type the administrator account password to confirm.
User
There is only one user account for your device. The user
New Password
Type a password to access the user account.
4.6 Administrator Menu
The Administrator menu allows you to configure more advanced functions, such as
managing the admin and user passwords, setting of device name, upgrading the
firmware, restoring configuration settings, and others.
4.6.1 Management
The Management page allows you to set the administrator and user password and
configure the device name setting.
administrator account has all the rights to modify all o the
device settings. The default name is “admin”. The
administrator account name cannot be modified. By default,
the administrator account’s password is blank.
account can only view the device settings, modification of
any setting is not allowed. The default name is “user”. The
administrator account name cannot be modified. By default,
the user account’s password is blank.
Power Wall Plug Repeater 33
Page 34

Home Network
Properties
Description
Confirm Password
Re-type the user account password to confirm.
Device Name Settings
Host Name
Type the preferred name for your device.
After modifying any of the above properties, click Apply to save and apply changes.
4.6.2 Upload Firmware
The Upload Firmware page allows you to upgrade the firmware of your device.
1. Download the latest firmware from the website and save it to your PC.
2. On the Upload Firmware page, click Browse and select the firmware.
3. Click Upload to start the upgrade.
Power Wall Plug Repeater 34
Page 35

Home Network
Properties
Description
Save Configuration
Settings
Save
Restore Configuration
Settings
Browse
Load
Restore Factory
Default Settings
Click Restore to restore the device to its default factory
System Reboot
Restart
4.6.3 Settings Management
To save the current device configuration settings, click
Use this setting to restore a previously saved configuration
settings. Click
file and click
settings.
Click
to reboot the device.
to browse for the saved configuration
to start the restoration process.
.
Power Wall Plug Repeater 35
Page 36

Home Network
4.6.4 Status
The Status page allows you to view all the device information.
Power Wall Plug Repeater 36
Page 37

Configure the Computer
Internet Protocol (TCP/IP)
Properties
Appendix
A. Configure the Computer
This chapter will guide you on how to configure your computer according to the
operating system you are using.
Windows XP, see below.
Windows Vista, see page 16.
Windows 7, see page 16.
Windows XP
If you are using Windows XP, follow the instructions below to configure your
computer.
1. Click Start > Control Panel > Network
Connections.
2. Right-click Local Area Connection, then click
Properties.
3. On the network components list, make sure
that
not, check it to enable the
button.
4. Select Internet Protocol (TCP/IP), and then
click Properties.
5. On the General tab, select Obtain an IP
Address automatically and Obtain DNS
server address automatically.
6. Click OK.
is checked. If
General Page
Power Wall Plug Repeater 37
Page 38

Configure the Computer
Internet
Protocol (TCP/IP)
Properties
Internet Protocol (TCP/IP)
Properties
Windows Vista
If you are using Windows Vista, follow the instructions below to configure your
computer.
1. Click Start > Control Panel > Network and
Internet Connections > Network
Connections.
2. Right-click Local Area Connection, then click
Properties.
3. On the General tab, make sure that
is checked. If not, check it
to enable the
4. Select Internet Protocol (TCP/IP), and then
click Properties.
5. Select Obtain an IP Address automatically
and Obtain DNS server address
automatically.
6. Click OK.
button.
General Page
Windows 7
If you are using Windows 7, follow the instructions below to configure your
computer.
1. Click Start > Control Panel > Network &
Sharing Center.
2. Click Local Area Connection.
3. Click Properties.
4. On the network components list, make sure
that
not, check it to enable the
button.
5. Select Internet Protocol (TCP/IP), and then
click Properties.
6. On the General tab, select Obtain an IP
Address automatically and Obtain DNS
server address automatically.
7. Click OK.
is checked. If
General Page
Power Wall Plug Repeater 38
Page 39

Appendix
B. Wireless Considerations
Connection Performance
A number of factors affect wireless connections. To ensure high-range and stable
connectivity, do the following:
1. Keep the Repeater and other wireless devices away from obstructions, such as
walls or buildings. Each obstruction can reduce the range of a wireless device.
2. Keep the Repeater and other wireless devices away from devices that produce
radio frequency (RF) noise, such as microwave ovens or radios.
3. Keep the Repeater and other wireless devices away from any device operating
on the 2.4GHz frequency, such as cordless phones or remote controls.
Security Checklist
Wireless network signals can be intercepted easily. To prevent unauthorized users
from connecting to your wireless network, follow the guidelines below.
1. Change the default wireless network name.
Your device has a default Service Set Identifier (SSID) which is the wireless
network name. Change the SSID with a unique name to identify your network.
The SSID can be up to 32 characters in length.
2. Change the default password.
Your device has a default password. You have to enter this password to
change your network settings. Change the password to prevent unauthorized
users from hacking into your network and changing the settings.
3. Enable MAC address filtering.
Your device supports Media Access Control (MAC) address filtering. You can
assign a MAC address on each computer that you want to connect to your
wireless network. When MAC address filtering is enabled, only the computers
with the specified MAC addresses are allowed access.
4. Enable encryption
Your device supports Wired Equivalent Privacy (WEP), and Wi-Fi Protected
Access (WAP/WPA2) encryption. To ensure a high level of security, enable the
highest security encryption and use strong passphrases, avoid using words that
can be found in the dictionary.
Power Wall Plug Repeater 39
Page 40

Appendix
C. Regulatory & Safety Information
Wireless LAN, Health and Authorization
Radio frequency electromagnetic energy is emitted from Wireless LAN devices. The
energy levels of these emissions however are far much less than the electromagnetic
energy emissions from wireless devices like for example mobile phones. Wireless LAN
devices are safe for use frequency safety standards and recommendations. The use of
Wireless LAN devices may be restricted in some situations or environments for
example:
Onboard airplanes, or
In an explosive environment, or
In case the interference risk to other devices or services is perceived or identified as
harmful
In case the policy regarding the use of Wireless LAN devices in specific organizations
or environments (e.g. airports, hospitals, chemical/oil/gas industrial plants, private
buildings etc.) is not clear, please ask for authorization to use these devices prior to
operating the equipment.
Disclaimers
Installation and use of this Wireless LAN device must be in strict accordance with the
instructions included in the user documentation provided with the product. Any
changes or modifications made to this device that are not expressly approved by the
manufacturer may void the user’s authority to operate the equipment. The
Manufacturer is not responsible for any radio or television interference caused by
unauthorized modification of this device, of the substitution or attachment.
Manufacturer and its authorized resellers or distributors will assume no liability for
any damage or violation of government regulations arising from failing to comply
with these guidelines.
FCC (Federal Communications Commission) Statement
This equipment has been tested and found to comply with the limits for a Class B
digital device, pursuant to Part 15 of the FCC Rules. These limits are designed to
provide reasonable protection against harmful interference in a residential
installation. This equipment generates, uses and can radiate radio frequency energy
and, if not installed and used in accordance with the instructions, may cause harmful
interference to radio communications. However, there is no guarantee that
interference will not occur in a particular installation. If this equipment does cause
harmful interference to radio or television reception, which can be determined by
turning the equipment off and on, the user is encouraged to try to correct the
interference by one of the following measures:
• Reorient or relocate the receiving antenna.
• Increase the separation between the equipment and receiver.
Power Wall Plug Repeater 40
Page 41

Appendix
• Connect the equipment into an outlet on a circuit different from that to which
the receiver is connected.
• Consult the dealer or an experienced radio/TV technician for help.
FCC Caution: Any changes or modifications not expressly approved by the party
responsible for compliance could void the user’s authority to operate this equipment.
This device complies with Part 15 of the FCC Rules. Operation is subject to the
following two conditions:
1. This device may not cause interference, and
2. This device must accept any interference, including interference that my
cause undesired operation of this device.
Operation of this device is restricted to indoor use only.
IMPORTANT NOTE:
FCC Radiation Exposure Statement:
This equipment complies with FCC radiation exposure limits set forth for an
uncontrolled environment. This equipment should be installed and operated with
minimum distance 20cm between the radiator & your body.
This transmitter must not be co-located or operating in conjunction with any other
antenna or transmitter.
The availability of some specific channels and/or operational frequency bands are
country dependent and are firmware programmed at the factory to match the
intended destination. The firmware setting is not accessible by the end user.
RF Exposure Notice:
To comply with FCC/IC RF Exposure Limits set forth for an uncontrolled environment,
the product must be installed and operated with a minimum separation distance
(between nearby person(s) and radiating antenna) according to the following
scenarios:
1. 20cm minimum when the product is operated alone without co-transmitting
with a plug-in 3G USB dongle device.
2. 45cm minimum when the product is operated with a plug-in 3G USB device
which has a maximum of 7W ERP output power.
3. For co-transmission scenario which is not covered above, please consult the RF
technician or device supplier.
Power Wall Plug Repeater 41
Page 42

Appendix
CE statement
Europe – EU Declaration of Conformity
This device complies with the essential requirements of the R&TTE Directive 1999/5/EC.
The following test methods have been applied in order to prove presumption of
conformity with the essential requirements of the R&TTE Directive 1999/5/EC:
EN60950-1: 2006
Safety of Information Technology Equipment
EN 50385: 2002
Product standard to demonstrate the compliance of radio base stations and fixed
terminal stations for wireless telecommunication systems with the basic restrictions or
the reference levels related to human exposure to radio frequency electromagnetic
fields (110MHz - 40 GHz) - General public
EN 300 328 V1.7.1 (2006-10)
Electromagnetic compatibility and Radio spectrum Matters (ERM); Wideband
transmission systems; Data transmission equipment operating in the 2,4 GHz ISM
band and using wide band modulation techniques; Harmonized EN covering essential
requirements under article 3.2 of the R&TTE Directive
EN 301 489-1 V1.8.1 (2008-04)
Electromagnetic compatibility and Radio Spectrum Matters (ERM); ElectroMagnetic
Compatibility (EMC) standard for radio equipment and services; Part 1: Common
technical requirements
EN 301 489-17 V2.1.1 (2009-05)
Electromagnetic compatibility and Radio spectrum Matters (ERM); ElectroMagnetic
Compatibility (EMC) standard for radio equipment; Part 17: Specific conditions for
Broadband Data Transmission Systems.
This device is a 2.4 GHz wideband transmission system (transceiver), intended for use
in all EU member states and EFTA countries, except in France and Italy where
restrictive use applies.
In Italy the end-user should apply for a license at the national spectrum authorities in
order to obtain authorization to use the device for setting up outdoor radio links
and/or for supplying public access to telecommunications and/or network services.
This device may not be used for setting up outdoor radio links in France and in some
areas the RF output power may be limited to 10 mW EIRP in the frequency range of
2454 – 2483.5 MHz. For detailed information the end-user should contact the
national spectrum authority in France.
Power Wall Plug Repeater 42
Page 43

Appendix
Interface
•
• On/Off Switch
LEDs
•
• WPS LED
Standards
Transmission
Rate
•
• 802.11ac: up to 433Mpbs
Receiver
Sensitivity
• 11ac VHT80 MCS9: Typical - 51dBm @ 10% PER
• 11b 11Mbps: Typical - 83dBm @ 8% PER
Wireless LAN
Frequency Range
•
• 2.4GHz: FCC: 2.412 – 2.462, ETSI:2.412 – 2.472 GHz
Modulation
Schemes
Media Access
Protocol
Transmit Power
D. Specifications
LAN: 1 x 10/100Mpbs Auto-MDIX Ethernet port
• Reset Button
• WPS Button
Power LED
• Wireless LED
• Link LED
IEEE 802.11ac/n/g/b/a
802.11a: up to 54Mpbs
• 802.11b: up to 11Mpbs
• 802.11g: up to 54Mpbs
• 802.11n: up to 300Mpbs (for 2.4GHz)
• 802.11n: up to 150Mpbs (for 5GHz)
• 11a/n HT40 MCS7: Typical - 61dBm @ 10% PER
• 11a/n HT20 MCS7: Typical - 64dBm @ 10% PER
• 11a/g 54Mbps: Typical - 65dBm @ 10% PER
5GHz: FCC 5.180 – 5.240 + 5.745 – 5.825, ETSI: 5.180 – 5.725
GHz
• DBPSK/DQPSK/CCK for DSSS technique
• BPSK/QPSK/16-QAM/64-QAM/256-QAM for OFDM technique
• CSMA/CA with ACK
2.4G Mode
• FCC:20dBm,ETSI:16.5dBm (max) @ 802.11b
• FCC:20dBm,ETSI:16.5dBm (max) @ 802.11g
• FCC:20dBm,ETSI:13.5dBm (max) @ 802.11n HT20
• FCC:17dBm,ETSI:13.5dBm (max) @ 802.11n HT40
5G Mode
• FCC:20dBm,ETSI:18dBm (max) @ 802.11a
• FCC:20dBm,ETSI:18dBm (max) @ 802.11n HT20 / 802.11ac
VHT20
Power Wall Plug Repeater 43
• FCC:18dBm,ETSI:18dBm (max) @ 802.11n HT40 / 802.11ac
VHT40
• FCC:14dBm,ETSI:14dBm (max) @ 802.11ac VHT80
Page 44

Appendix
Antenna Type
Protocol
Network
Management
Channel
Security
Range Coverage
Power
Temperature
Humidity
Dimensions
• 2.4G 2dBi Single Band PIFA antenna x 1
• 2.4G & 5G 3dBi Dual Band PIFA antenna x 1
TCP/IP
Web base configuration utility via Ethernet
2.4Ghz
• Channel 1 ~ 11(FCC)
• Channel 1 ~ 13(ETSI)
5Ghz
• Channel 36, 40, 44, 48, 149, 153, 157, 161 and 165(FCC)
• Channel 36, 40, 44, 48(ETSI)
• 64/128-bits WEP Encryption
• WPA, WPA2
• WPA-PSK, WPA2-PSK
• MAC address filtering
• Indoor: Up to 100 meters (depends on environment)
• Outdoor: Up to 300 meters (depends on environment)
Power Input: AC 100~240V
Max. Power Consumption: 3.2W (Full load)
Operating: 0°C ~ 40° C
Storage: -10°c ~ 70°C
Operating: 10% ~ 95%, RH, no condensation
87 x 56 x 47 mm (plug excluded)
Power Wall Plug Repeater 44
Page 45

 Loading...