

Page 1

TouchScreen for XFINITY Home
Getting Started Guide
TCA300 Install
Page 2

Compliances
FCC
This device complies with part 15 of the FCC Rules. Operation is subject to the following two
conditions:
1. This device may not cause harmful interference.
2. This device must accept any interference received, including interference
that may cause undesired operation.
CAUTION:
for compliance could void the user’s authority to operate the equipment.
This equipment has been tested and found to comply with the limits for a Class B digital device,
pursuant to part 15 of the FCC Rules. These limits are designed to provide reasonable protection
against harmful interference in a residential installation. This equipment generates, uses and can
radiate radio frequency energy and, if not installed and used in accordance with the instructions,
may cause harmful interference to radio communications. However, there is no guarantee that
interference will not occur in a particular installation. If this equipment does cause harmful
interference to radio or television reception, which can be determined by turning the equipment
o and on, the user is encouraged to try to correct the interference by one or more of the following
measures:
Reorient or relocate the receiving antenna.
Increase the separation between the equipment and receiver.
Connect the equipment into an outlet on a circuit dierent from that to
which the receiver is connected.
Consult the dealer or an experienced radio/TV technician for help.
RF Exposure information: At least 20cm (8 inches) of separation distance between the touchscreen
and the user’s body should be maintained to ensure compliance with FCC RF Exposure
Requirements.
Changes or modications not expressly approved by the manufacturer responsible
Safety
This device complies with UL 985, UL1023, UL1635.
WARNING:
battery needs to be replaced, contact your service operator to arrange for replacement.
The rechargeable battery is only available through your service operator. If your
Evacuation Plan
Develop an emergency evacuation plan for use in the event of re.
Here are some recommendations from the National Fire Protection Association.
Make an evacuation plan for how to leave your home in the case of re
or other emergency. Sketch a map of your home that shows all the doors
and windows. Discuss the plan with everyone in your home so that
everyone will know what to do.
Have at least two ways to exit each room. Make sure that windows and
doors open easily.
Discuss with your family and agree on a single meeting location outside
your home.
In the event of re, get out and stay out. Don’t go back inside for people,
pets or possessions.
Do not open a door if the handle is hot.
If there is smoke stay low to the ground and go under the smoke.
Escape your home before calling the re department. Call the re
department and police from the outside meeting place using your cell
phone or call from a neighbor’s phone.
Practice your home evacuation plan.
Device Purpose
Fire/Alarm Central Panel
2 3TouchScreen TCA 300 Getting Started Guide – Installation TouchScreen TCA 300 Getting Started Guide – Installation
Page 3
Using the TouchScreen
The TouchScreen is the center of your home security system. This device allows you to perform
actions such as arming and disarming your security system, monitoring the status of your security
sensors, and sending emergency alarms.
This guide provides an overview of the TouchScreen and its basic operation. NOTE:
This guide assumes the TouchScreen has been activated and you have assigned a Keypad
Code. For more information, see the TouchScreen User’s Guide and the Home System
Installation Guide.
The follow diagram shows the major components of the TouchScreen:
Speaker
Understanding the Screen
The TouchScreen communicates with your security system. It combines security and home
connectivity into a graphical interface that provides a real time view of your security devices and
tools to manage your security system.
The rst screen displayed is the Home screen. Through interaction with this screen you can access
the functions you desire, including:
Arming and Disarming your Security System
Accessing and Managing System Troubles, Recent Activity, and Settings
Accessing the Dashboard Screen
Initiating a Panic Alarm
The screen is divided into the following operational sections:
System Header for Navigation and Reference
Security Status Content Area
Footer Area
LED light
4 5TouchScreen TCA 300 Getting Started Guide – Installation TouchScreen TCA 300 Getting Started Guide – Installation
Home button:
Press this button to go to
the Home (main) screen of
the user interface.
Page 4
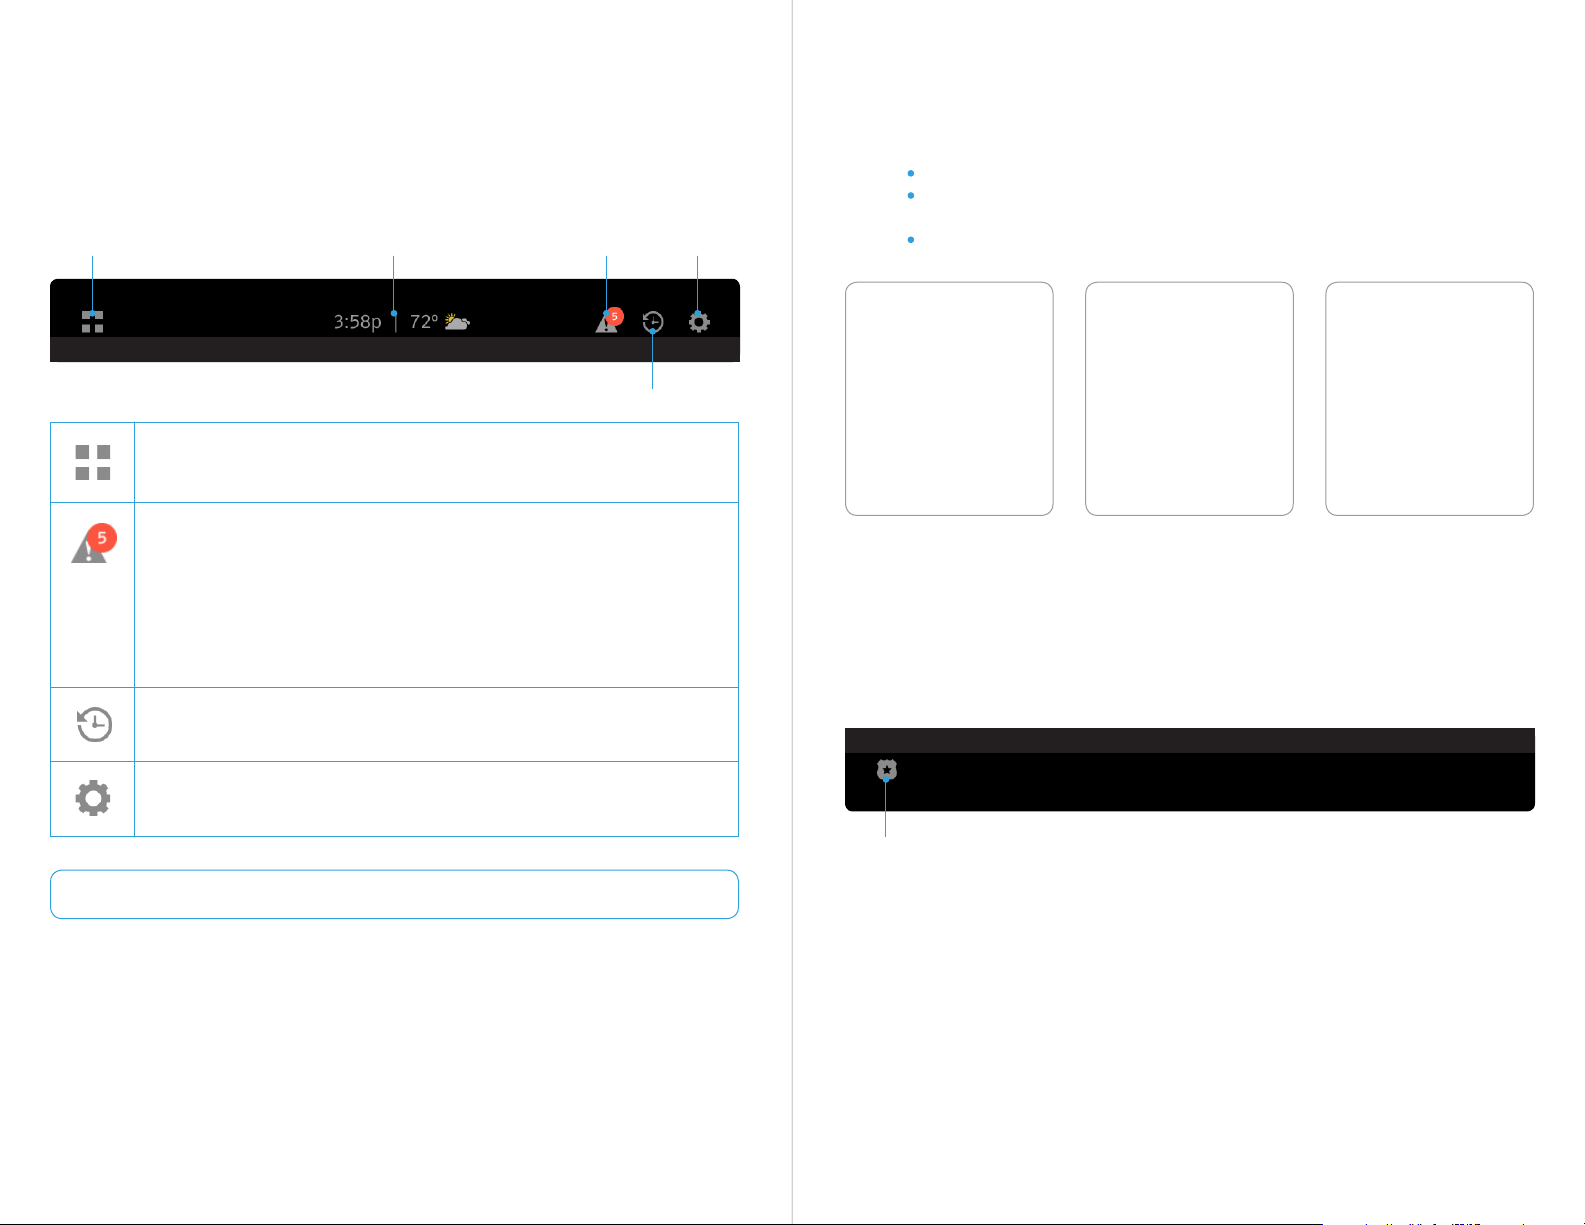
System Navigation and Reference Header Security Status Content Area
The System Navigation and Reference header displays at the top of the TouchScreen. On the left
side, it provides a navigation icon allowing you to access the Dashboard screen. Centrally it provides
the current time and basic weather information. The right side provides a trouble indicator, when
system troubles are present, access to recent System Activity, and access to System Settings.
Dashboard
Navigation Icon
Tapping the Dashboard Navigation icon will allow you to access the Dashboard
screen which provides additional zone information.
The Trouble icon will appear when a system trouble is present. The system
will also sound an audible alert regularly to ensure that you are aware of the
problem. Tapping the icon will open a list of all the current troubles with the
TouchScreen and Sensors. A red badge with a number on the trouble icon
indicates the total number of trouble alerts that have not been snoozed. If
troubles are snoozed without resolving them, the trouble indicator will still
appear but the red badge will not be present.
Tapping the Activity icon will allow you to review recent zone activity for your
security system.
Current Time
Basic Weather
Troubles Settings
Activity
The centrally displayed Security Status Content area contains the current status of your
TouchScreen Security System. The various statuses displayed will tell you if your system is:
Ready – (Green) Disarmed and ready to be armed
Not Ready – (Grey) Disarmed and not ready to be armed due to an
arm-blocking event or trouble
Armed – (Red) Armed in Away, Stay, or Night mode
Footer Area
The Footer section contains the Panic Alarm icon, located in the bottom left of the screen. Tapping
this icon will provide you the ability to sound an immediate audible alarm and send an alert to the
Central Monitoring Station that a Panic Alarm has been initiated.
Tapping the Activity icon will allow you to review recent zone activity for your
security system.
Panic Icon
Settings access is disabled when the Security System is armed. NOTE:
6 7TouchScreen TCA 300 Getting Started Guide – Installation TouchScreen TCA 300 Getting Started Guide – Installation
Page 5

Understanding Arming Modes Arming and Disarming the System
You can arm the system for multiple scenarios:
Arm Away – Best for leaving your home unattended
Arm Stay – Ideal for hanging out at home
Arm Night—Best for when everyone is in bed
Dierent arming modes use dierent rules for when sensors are tripped and for Entry/Exit delays.
An Exit delay is a short period of time after the system is armed for you to leave the premises. Entry
delay gives you time to disarm the system when you reenter the premises. You must enter a valid
keypad code within the Entry delay period to avoid sounding an alarm.
Arm Away Mode
The Arm Away mode is used when everyone is leaving the house. The following rules apply:
Alarm trips immediately if a monitored Perimeter zone (non-entry/exit
door or window) is opened.
Interior motion detectors are armed.
Entry/Exit zones start an Entry Delay.
Exit Delay starts when the system is armed.
Arm Stay Mode
The Arm Stay mode is used to arm the system when there are people in the premises. The following
rules apply:
The Security status of your security system is displayed in the Security Status content area.
Ready
When your security system is disarmed and ready to be
armed, the security status will be shown as “Ready” with a
green shield background. Tap the big green circle to arm
your system.
Armed
When your security system is armed, the security status will
be shown as “Armed Away”, “Armed Stay”, or “Armed Night”
based on the arming mode selected when the system was
armed. The status will also show you the date and time that
the security system was armed.
Alarm trips immediately if a monitored Perimeter zone (non-entry/exit
door or window) is opened.
Interior motion detectors are armed.
Entry/Exit zones start an Entry Delay.
Exit Delay starts when the system is armed.
Exit Delay does not beep and is twice the length of Alarm Away mode.
Arm Night Mode
The Arm Night mode, is used when everyone is going to bed.
This mode works the same as Arm Stay except that there is no Entry Delay period. If an entry/exit
zone is opened, an alarm sounds immediately.
There is still an Exit Delay period that works the same as in Arm Stay mode.NOTE:
8 9TouchScreen TCA 300 Getting Started Guide – Installation TouchScreen TCA 300 Getting Started Guide – Installation
Not Ready
Not Ready is displayed, and the Security Shield background
is grey, when your security system is disarmed, but unable
to be armed due to an Open Zone or Zone Fault that
prevents arming. The status below “Not Ready” will advise
how many zones are preventing you from arming your
system and whether the status is caused by an open zone, a
troubled zone, or both!
Page 6

Tapping the grey Security Shield will open a Bypass Options screen which will allow you to see
the current status of all of your security zones, and give you the option to bypass all Arm-Blocking
Zones, or bypass any zone individually. If the aected zones are closed or troubles are resolved the
status will automatically update to Ready.
Arming the System from the TouchScreen
To arm the system from the TouchScreen:
Zones that are currently preventing you from arming the system are easily distinguished by the
dierent row color.
Tapping the button will temporarily turn o, or “bypass” the aected
zones so you can arm your security system.
Bypassed Zones are NOT armed and will not trigger an alarm if IMPORTANT NOTE:
tripped while the system is armed.
1
Tap the Security Status shield when it is in
Disarmed (Ready) state.
3
The TouchScreen will begin the Exit Delay
period and the screen changes
to display a countdown timer.
2
The Arm State selection screen is displayed
with a keypad and “Away” selected as the
default Arm State.
Select the desired Arm State (not required
for Away) and enter your keypad code.
4
The LED turns red when the system is
armed. The text of the message will vary,
depending on which arming mode you
selected.
Special Rules
If you selected the Arm Away mode, you have until the Exit Delay is over to exit the premises.
Otherwise, the system is automatically armed in Arm Stay mode. There is still an Exit Delay
period for the other Arming modes, but they do not require that the door open and close during
the period.
If you open and shut an Entry/Exit door during the Exit Delay and then re-enter the premise, the
Exit delay restarts at 120 seconds for Arm Stay and Arm Night or 60 seconds for Arm Away. It will
only do this one time.
If an Entry/Exit door is left open at the end of Exit Delay, the Entry Delay immediately starts and,
if the system is not disarmed, an alarm will sound.
10 11TouchScreen TCA 300 Getting Started Guide – Installation TouchScreen TCA 300 Getting Started Guide – Installation
Page 7

Arming the System from the TouchScreen
When you arm the system, the Security Status Content area displays a countdown of the number of
seconds until the Exit Delay is over. You can choose to cancel the arming process.
Panic alarms and smoke alarms are reported without an Alarm IMPORTANT NOTE:
Transmission delay or an Entry Delay. Consult Customer Care to understand the number of
seconds congured for the Alarm Transmission Delay on your system.
To cancel the arming process:
1
Tap the button located below
the countdown timer and Arming Mode.
2
The TouchScreen displays the countdown
timer along with a keypad.
Enter your Keypad Code to stop the
arming process.
Disarming the System
When you enter an armed premises, an Entry Delay period starts:
1
During the Entry Delay, the TouchScreen
display changes to announce the number
of seconds before the alarm goes o.
2
The TouchScreen beeps audibly once every
second, until the last 10 seconds when it
beeps twice a second.
To disarm the system from the TouchScreen:
Tap the Security Status shield when it is an
1
Armed State.
If an alarm was triggered prior to entering
3
your Keypad Code, an alarm Summary
Report will be displayed after disarming
your Security System.
2
Enter your Keypad Code.
If a valid keypad code is not entered by the end of the Entry Delay period, an alarm sounds. From
the time an alarm sounds, for most reasons, you have 30 seconds to enter a valid keypad code to
disarm the system and prevent an alarm being sent to the central monitoring station. This is called
the Alarm Transmission delay or the Abort Window.
The Alarm Transmission Delay is a required period that prevents a report to the central station if an
alarm was triggered innocently.
12 13TouchScreen TCA 300 Getting Started Guide – Installation TouchScreen TCA 300 Getting Started Guide – Installation
Page 8

Sending An Emergency Alarm
TouchScreen Installation and Maintenance
You can manually trip an alarm in the event of an emergency by tapping the Panic button.
Emergency alarms are reported without an Entry delay or Alarm Transmission delay.
To manually trip an alarm:
1
Press the Panic button located in the
lower left corner of many screens.
2
The Panic Conrmation screen appears.
Press the button to send an
alarm for police assistance.
3
The TouchScreen will immediately issue a
continuous audible alarm and display an
Alarm in Progress screen which includes a
keypad for disarming the system if desired.
Installing the Technicolor TouchScreen
1
Remove the TouchScreen
from its packaging.
2
Remove the back plate from
the back of the TouchScreen
by pulling the center of the
bottom edge upward, then
sliding the top tabs out of
the slots.
3
Unwrap the 4 volt battery from
its packaging and insert the
end with the +/– contacts rst.
Snap the opposite end down
in the battery compartment to
complete battery installation.
The rechargeable battery that came WARNING:
BATTERY
14 15TouchScreen TCA 300 Getting Started Guide – Installation TouchScreen TCA 300 Getting Started Guide – Installation
with your TouchScreen is only available through
your service operator. If your battery needs to be
replaced, contact your service operator to arrange for
replacement.
Page 9

Table 1: AC Power Supply Ratings
4
Feed the AC power cable through the circular hole on
the back plate and connect to the power port on the
back of the TouchScreen.
5
Snap the back plate to the back of the TouchScreen by inserting the top tabs into the slots rst,
then pressing the bottom into place. Ensure all slack from the AC power cable is pulled through
the back plate.
Rating
Voltage
Current
Frequency
9
Plug the TouchScreen’s AC adapter into the wall outlet, and replace the center screw through
the bracket hole.
After a few seconds, the Installation Welcome screen is displayed on the TouchScreen.
10
TouchScreen is beyond most practical limits. However, the distance can be limited
occasionally by the materials for the walls, electrical interference, and other conditions.
Value
12V DC
1.5A
60 Hz
The minimum distance for the sensors to communicate with the IMPORTANT NOTE:
6
Connect the stand to the back of the TouchScreen.
7
Position the TouchScreen near an un-switched wall outlet (not controlled by a light switch).
8
(Optional) – If encountering networking issues, connect an Ethernet cable to the TouchScreen
and the iControl-dedicated router.
16 17TouchScreen TCA 300 Getting Started Guide – Installation TouchScreen TCA 300 Getting Started Guide – Installation
Page 10

Figure 1: Activation: Installation Welcome Screen
If the TouchScreen does not display the Installation Welcome screen, you must reset it NOTE:
to factory default.
Battery Requirements
Table 2: Device Batteries
Replacing the Battery
The rechargeable battery that came with your TouchScreen is only available WARNING:
through your service operator. If your battery needs to be replaced, contact your service operator
to arrange for replacement.
1
Remove the back plate from
the back of the TouchScreen
by pulling the center of the
bottom edge upward, then
sliding the top tabs out of the
slots.
2
Disconnect the battery from
the TouchScreen by lifting it
out of the compartment using
the battery pull tab.
Device
TouchScreen
Door/ Window Sensor 2450 coin cell 1
Motion Detector Sensor CR123A 3
Glass Break Detector CR123A 1
Smoke/Heat Detector CR123A 2
18 19TouchScreen TCA 300 Getting Started Guide – Installation TouchScreen TCA 300 Getting Started Guide – Installation
Device Type Batteries
Central Controller
Sensors
GETAC
U46P313.00
4 volt Lithium Polymer
2520mAh/10.08Wh
3 volt Lithium
1
3
Unwrap the 4 volt battery from
its packaging and insert the
NEW BATTERY
4
Snap the back plate to the back of the TouchScreen by inserting the top tabs into the slots rst,
then pressing the bottom into place.
end with the +/– contacts rst.
Snap the opposite end down
in the battery compartment to
complete battery installation.
Page 11

Recommendations for Sensor Installation and Placement Evacuation Plan
Door/Window Sensors and Glass Break Detectors
Install door/window sensors and/or glass break detectors at every possible location of entry, both
upstairs and down.
Glass Break Detectors
For best detector performance, select a mounting location that is:
Within 7.6 m (25 ft) of the protected glass
Within clear view of the protected glass
On the same wall as the protected glass
At least 2 m (6.5 ft) from the oor
At least 1 m (3 ft) from forced-air ducts
At least 1 m (3 ft) from sirens or bells greater than 5 cm (2 in.) in diameter
On a window frame if any heavy window covering is present
Avoid mounting the detector in the following locations:
In a corner
On free standing post or pillars
In rooms with noisy equipment such as air compressors, bells/ door bell, and power tools
In bathrooms (a slamming toilet seat will easily fault a glass break detector)
Motion Detectors
When placing motion detectors, anticipate trac patterns:
The lanes of trac most used by people in your home are also those most likely to be used by
intruders.
Foyers, stairways, hallways, and entrance-ways are excellent locations for a motion detector.
Do not place motion detectors at the end of hallways where an intruder will be walking
directly toward or away from the detector. For best coverage, mount the motion so that the
likely direction of intruder motion is across the motion detector’s pattern.
A motion detector facing the following can cause false-alarms or failures in detection:
Direct sunlight
Cold drafts
Windows
Uninsulated walls
Heat sources such as replaces and heating vents
Moving objects such as fans
Air conditioning vents
Glass furniture
Obstructions such as curtains, plants, large furniture, doors
Develop an emergency evacuation plan for use in the event of re. Here are some
recommendations from the National Fire Protection Association.
Make an evacuation plan for how to leave your home in the case of re or other emergency.
Sketch a map of your home that shows all the doors and windows. Discuss the plan with
everyone in your home so that everyone will know what to do.
Have at least two ways to exit each room. Make sure that windows and doors open easily.
Discuss with your family and agree on a single meeting location outside your home.
In the event of re, get out and stay out. Don’t go back inside for people, pets or possessions.
Do not open a door if the handle is hot.
If there is smoke stay low to the ground and go under the smoke.
Escape your home before calling the re department. Call the re department and police
from the outside meeting place using your cell phone or call from a neighbor’s phone.
Practice your home evacuation plan.
Additional Emergency Preparations
Do not wait until an emergency occurs to make a plan. Talk to each other about what each
person should do in dierent types of emergency.
Learn your security system. Get to know how to arm and disarm it and what to do when the
authorities or central monitoring calls.
Make sure everyone (who should know) knows the Secret Word, when to use it, and that it
should not be shared.
Understand the dierence between your keypad code and the duress code.
Understand that you should never enter the premises if you hear an alarm. Call police from a
cell phone or a neighbor’s phone.
Free roaming pets pose special problems for motion detectors. Your installer has NOTE:
been trained to help you congure your installation to address your specic pet needs.
20 21TouchScreen TCA 300 Getting Started Guide – Installation TouchScreen TCA 300 Getting Started Guide – Installation
Page 12

Smoke Detector Installation Recommendations
The National Fire Protection Association (NFPA) recommends the following for the number and
placement of smoke detectors.
Place smoke alarms as follows:
In every bedroom, in hallways, and on every level of the premises, including the attic and
basement.
High on a wall or on a ceiling (because smoke rises).
If a smoke detector is placed on a ceiling, position at least 4 inches (10.2 cm) from the wall.
Be careful about placing smoke detectors within 20 feet of a cooking appliance.
Smoke alarms are an important part of a home re escape plan.
For maintaining your smoke detector:
Test alarms at least monthly by pushing the test button.
Replace batteries in all smoke alarms at least once a year. If an alarm “chirps,” warning the
battery is low, replace battery right away.
Replace all smoke alarms when they are ten years old or sooner if they do not respond
properly when tested.
Additionally we recommend:
Maintain a 3 foot (about 1 meter) distance from air supply and return vents.
DO NOT install smoke detectors in a garage or near furnaces.
Install at least 6 m (20 ft) away from kitchens or other areas where combustion particles are
present.
Install smoke detectors at least 2.5 m (8 ft) away from bathrooms.
DO NOT install in dirty, dusty, or insect infested areas.
DO NOT install near areas fresh air inlets or returns or excessively drafty areas. Heating and
air conditioning vents, fans, and fresh air intakes can drive smoke away from smoke detectors.
Remember that dead air spaces may prevent smoke from reaching a smoke detector.
Camera Installation Recommendations
Camera views are accessible to TouchScreen users and family members who log into the Subscriber
Portal. When placing cameras, consider whether what they are monitoring poses any privacy issues.
22 TouchScreen TCA 300 Getting Started Guide
Issued Date: April18, 2016
 Loading...