

Page 1

Technic
al Solutions Australia
109 Ferndale Rd. Silvan
PH (03) 9737 9000
Fax (03) 9737 9111
service@tecsol.com.au
www.tecsol.com.au
Ca
t. No:
URC
-
AIRCON
-
ECU
ABN 14 063 349 502
Information Sheet
VIC Australia 3795
Technical Solution’s air conditioner interface will be a link between your
Environmental Control Unit (ECU) and your air conditioner. The
interface incorporates the Ultra Plus universal remote which is compatible
with virtually all Australian Air Conditioners and the Interface is also
compatible with most ECUs – Those that can reproduce Gewa PROG
codes.
Setup
1. Setting the Ultra Plus Code
It’s easy; you can input model codes directly or search automatically.
Once selected, the code is stored until changed. Features include:
Timer ON and Timer OFF with accurate 24 hour clock display. Please read this user’s guide
carefully before using, don’t forget, when all else fails read the manual!
AC Ultra Air Conditioner
ECU Interface
(Firmware: 2009-2013)
Direct Entry of Code
a) Start by making sure that your air conditioner is in standby – Do this by turning it
ON with the existing remote then press the power button so that it turns OFF and
goes into standby. It will now be ready to turn ON again when it receives correct code
from the Ultra Plus
b) Plug the Ultra Plus power supply into a power outlet and turn it on
c) Find the model from Brand Code List. If there is more that one code for one brand,
you will have to try them one by one. e.g. for FUJITSU, try model codes 127 to 137
then 464 etc.
d) To Program: Press the “SELECT” key, the model code on LCD will begin flashing.
e) Press “TIME/CODE” + or – until the number before required brand code appears.
f) Then aim at air-conditioner and press the “SELECT” key, the brand code steps to the
next number and sends the ON command
g) If your air conditioner responds to the signal and produces beep sound, press the
“Enter” key – the code stops flashing and the Ultra is programmed
h) If not, select the next number and test again.
• For our FUJITSU example we want to try model codes 127 to 137
• Start by stepping to code 126 (the no. before 127)
• Make sure the air conditioner is OFF
• Keep the remote pointed at the air conditioner and press “SELECT” repeatedly
• With each press the next code (127 to 137) will be transmitted
• Observe the Air conditioner after each press to see if it responds
• When it does respond, press “Enter” to save the code
• If it does not respond, use the + key to step on to code 463 and continue as above
• If it does not respond after testing all the codes listed for your brand, try a code
search – as follows
Find us on the web. www.tecsol.com.au
P:\IR-Relay\Construction-Air-Cond\Docs-pics\AC-Ultra-aircon-ECU-
INTERFACE.doc
Page 2

Code Search
If you don’t know the brand of your air-conditioner or you cannot find the brand from
brand code list, please use the following procedure to quickly step through and try every
one of the 1000 or more codes:
a) Again, make sure you start with the air conditioner OFF
b) Press the “SELECT” key, model code on LCD will begin flashing
c) Point the remote control at the air conditioner, press “SELECT” key again and
again. Each time the brand code adds 1 automatically and emits an ON signal.
d) Observe the air conditioner after each press to see if it responds
e) Press “SELECT” repeatedly until air conditioner responds to the signal and
produces beep sound. Then press the “Enter” key.
f) After turning on the air conditioner, try the other function keys. If they do not
work, repeat above steps until it works correctly.
Find us on the web. www.tecsol.com.au
P:\IR-Relay\Construction-Air-Cond\Docs-pics\AC-Ultra-aircon-ECU-
INTERFACE.doc
Page 3
2. Programming your ECU and/or the Air Conditioner Interface
The Interface comes programmed to respond to the default codes for a Gewa PROG ECU as
shown below in the table.
a) If you have a new Gewa ECU the relevant codes are built in and it will operate “straight
out of the box”
b) If you have recorded other signals into these buttons on your PROG, you will need to
reset the buttons to the default (refer to the PROG user’s manual) OR re-program the
Interface to respond to other PROG codes (see next page)
c) If you have another ECU you will need to read your manual to find out how to load the
relevant Gewa Link codes into it. Note that many ECUs such as the Possum Primo and
HouseMate (p.t.o) have Gewa Link codes built in
d) If your ECU does not have built in Gewa codes, Technical Solutions can supply a
Universal Remote that we have preloaded with codes as shown below
PROG
Level
PROG
Key
Gewa
links
PRIMO
codes
Universal
Remote
(DVD Button)
Air Conditioner
Function
3 9 40 E7D51 Power ON/OFF
3 * 42 E7D55 Chan + TEMPERATURE UP
3 0 41 E7D53 Chan - TEMPERATURE
DOWN
3 # 43 E7D57 Mute FAN
Operation
To use the air conditioner interface, place it in a location where the top of the remote is pointing
in the general direction of the air conditioner. Plug the power supply into a power point. At this
stage, the green Led will show. At this stage the air conditioner should respond to the Ultra Plus
buttons. If it is not possible to locate the unit so it is pointing directly at the air conditioner, try
reflecting the signals. (Think of the remote as being a torch flashing invisible Morse code
signals.) You can attach aluminium foil to the top of the remote to direct the infrared beam. If the
air conditioner does not respond, see ‘Setting the Code’ - previous page.
• Once you have the air conditioner responding to the Ultra Plus buttons, try sending the
relevant PROG signals from your ECU
• When the interface receives infrared PROG signals the red Led will blink.
• The air conditioner interface activates the air conditioner one second after it receives the
signal from the PROG. This is to avoid the infra red signals from the PROG and air
conditioner remote getting mixed up.
• Check all four functions – Power, Temp Up, Temp Down and Fan
Find us on the web. www.tecsol.com.au
P:\IR-Relay\Construction-Air-Cond\Docs-pics\AC-Ultra-aircon-ECU-
INTERFACE.doc
Page 4
Setting up the ClickToPhone HouseMate with Prog codes to control the Air
Conditioner Interface
• With Click2phone version 77 on you can load the pre-formatted Air conditioner
page with IR code set into HouseMate.
o Create a new Housemate page > Long press on vacant cell and choose
Open another grid
o On the new grid, Menu > Signals > TSA Air Con > Menu > Wizard > OK
o The Air Conditioner Interface should respond to these buttons ‘out of the
box’ but if not, you can follow the procedure below to record the new Prog
codes into your Air Conditioner Interface
• Otherwise you can create a HouseMate page with 4 new buttons and load them
with any 4 PROG Codes – From the new HouseMate page press
Menu/Signals/Gewa Codes
o Then follow the procedure below to record the new Prog codes into your
Air Conditioner Interface
Recording new Prog codes into the Air Conditioner Interface
The Air Conditioner Interface can learn Prog Infra Red codes for each function, and
store them in permanent memory. If the factory default codes listed above are not
suitable you can follow this procedure to make the unit respond to different signals.
1. Choose the PROG level and the four keys that you want to
use. Make sure these keys have been reset to the default
code, as explained above.
2. Choose an area away from direct light to avoid interference to
the learning process.
3. Plug the Air Conditioner Interface to the power in the normal
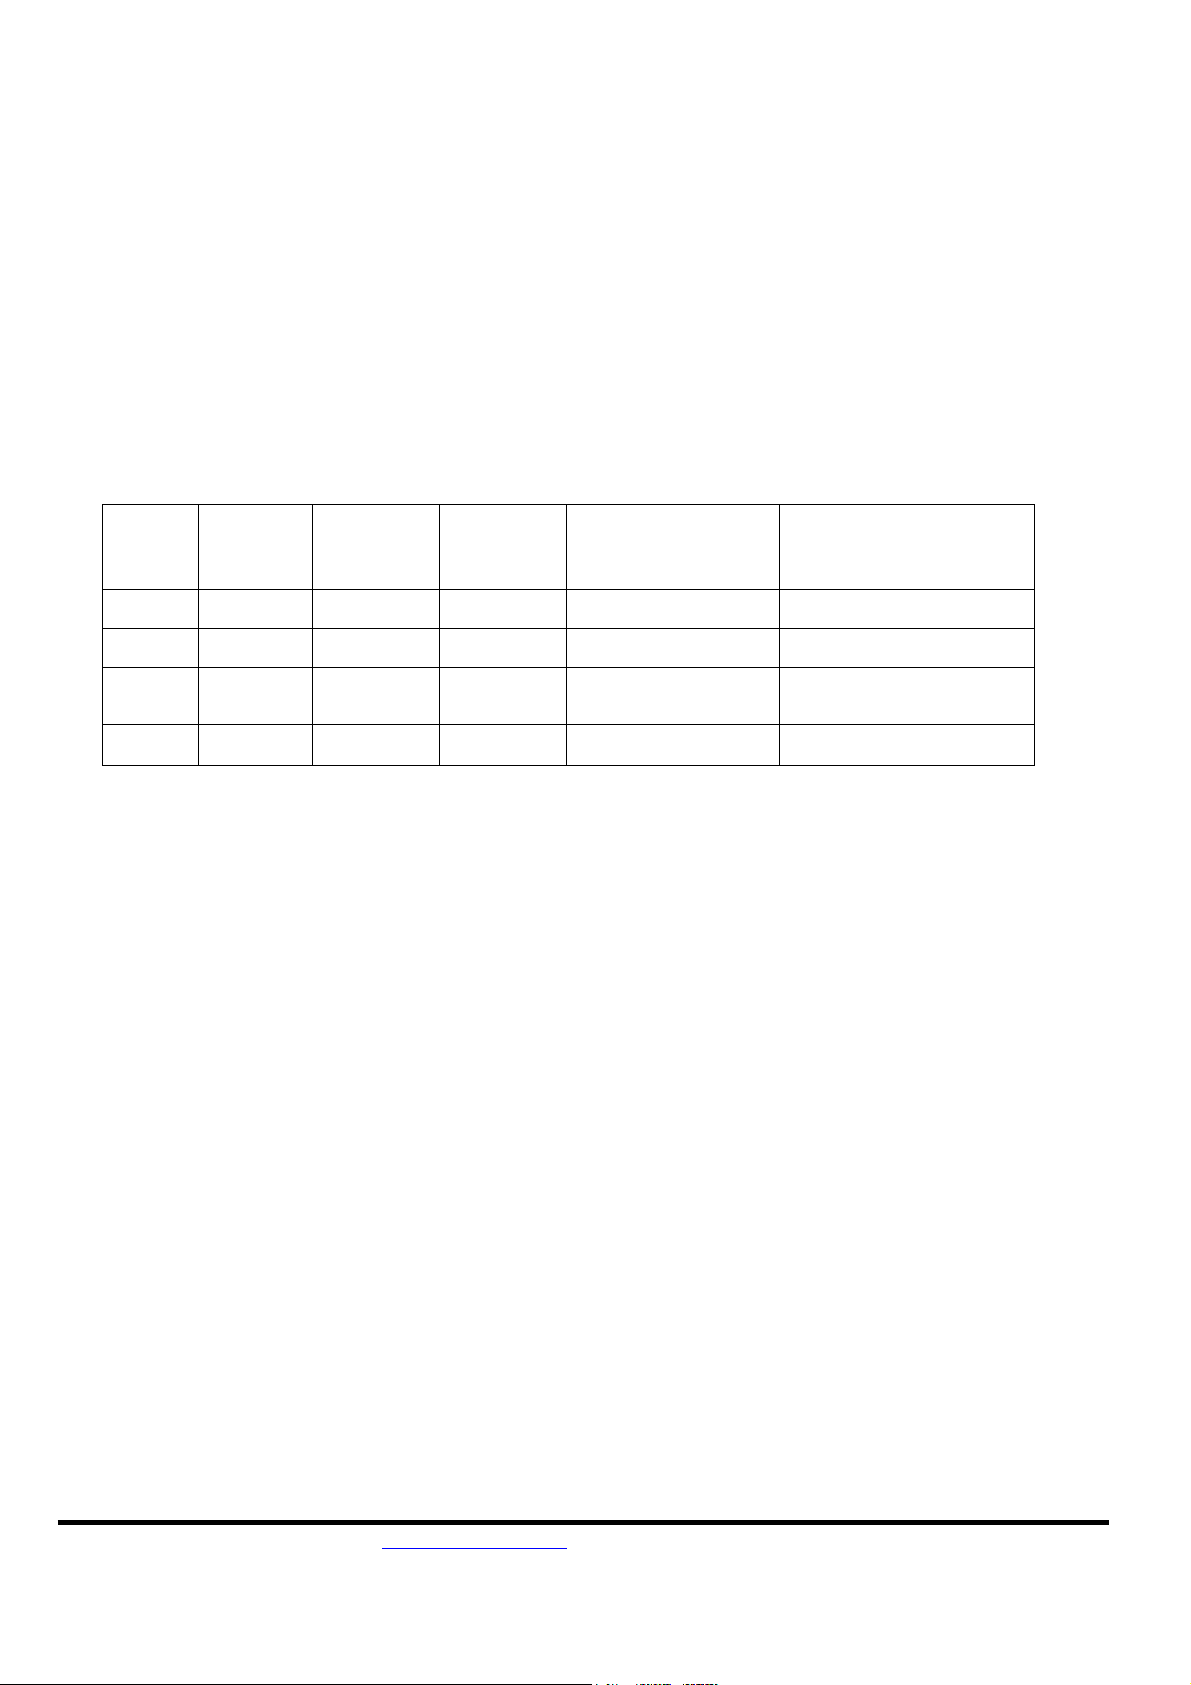
way, and using a pen, press and hold the recessed button on
the back of the unit corresponding to the key you want to
reprogram. (Sometimes it’s easier to do this with two people!)
4. Place the Prog at a distance of about 20cm and point it
towards the front of the interface, press the button on the
Prog you want to associate with the air conditioner function for about 2
seconds.
5. Repeat the process for the remaining buttons.
You can retrain or change the codes as many times as you want. The Air Conditioner
Interface stores the codes in permanent memory, and will not loose the settings if
power is removed.
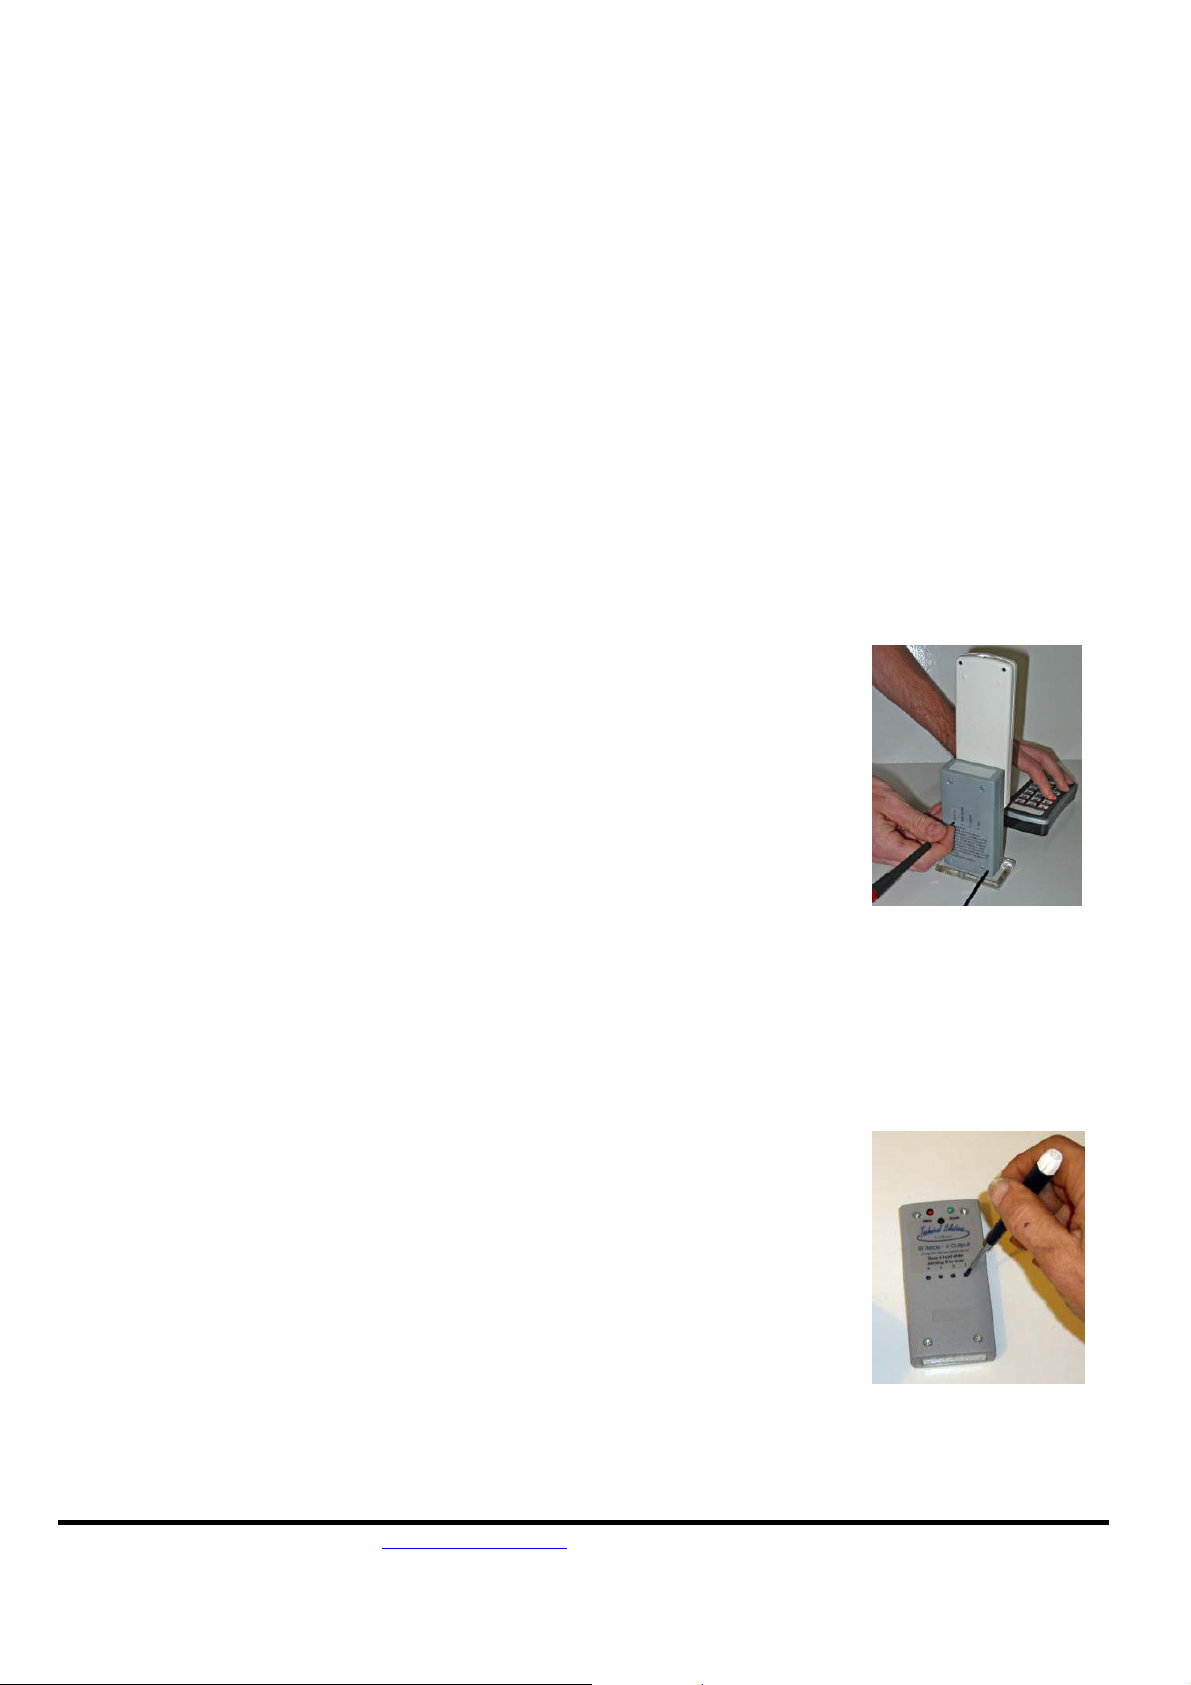
OPTIONAL: Setting the “Relay Off Delay”
The “Relay off Delay” is the length of time that the relay will stay
operated after the IR signal ends.
The “Relay off Delay” can be set any where between 1 & 20 seconds.
1. Turn OFF the power to the IR Relay unit
2. Press and hold press the button you wish to adjust
3. Turn ON the power to the IR Relay unit
4. Release button after your desired time
(1 to 20 sec)
5. Repeat steps 1-4 for each relay for which you wish to set the delay
Eg. If you hold the button pressed for 5 seconds the relay will release 5 seconds after
the IR signal stops.
Find us on the web. www.tecsol.com.au
P:\IR-Relay\Construction-Air-Cond\Docs-pics\AC-Ultra-aircon-ECU-
INTERFACE.doc
 Loading...