

Technibel MCA 120C, MCA 135C, MCA 127C, MCA 127R, MCA 135R Operating Instructions Manual
...Page 1
MCA 120C
MCA 127C
MCA 135C
MCA 120R
MCA 127R
MCA 135R
COOL / DRY / FAN
COOL / DRY / HEAT / FAN
37.4163.173 .0 01/2001
EG
I
F
E
P
GR
OPERATING INSTRUCTIONS • ISTRUZIONI D’USO
NOTICE D’UTILISATION • INSTRUCCIONES DE USO
MANUAL DE INSTRUÇÕES •
Ο∆ΗΛΙΕΣ ΧΡΗΣΕΩΣ
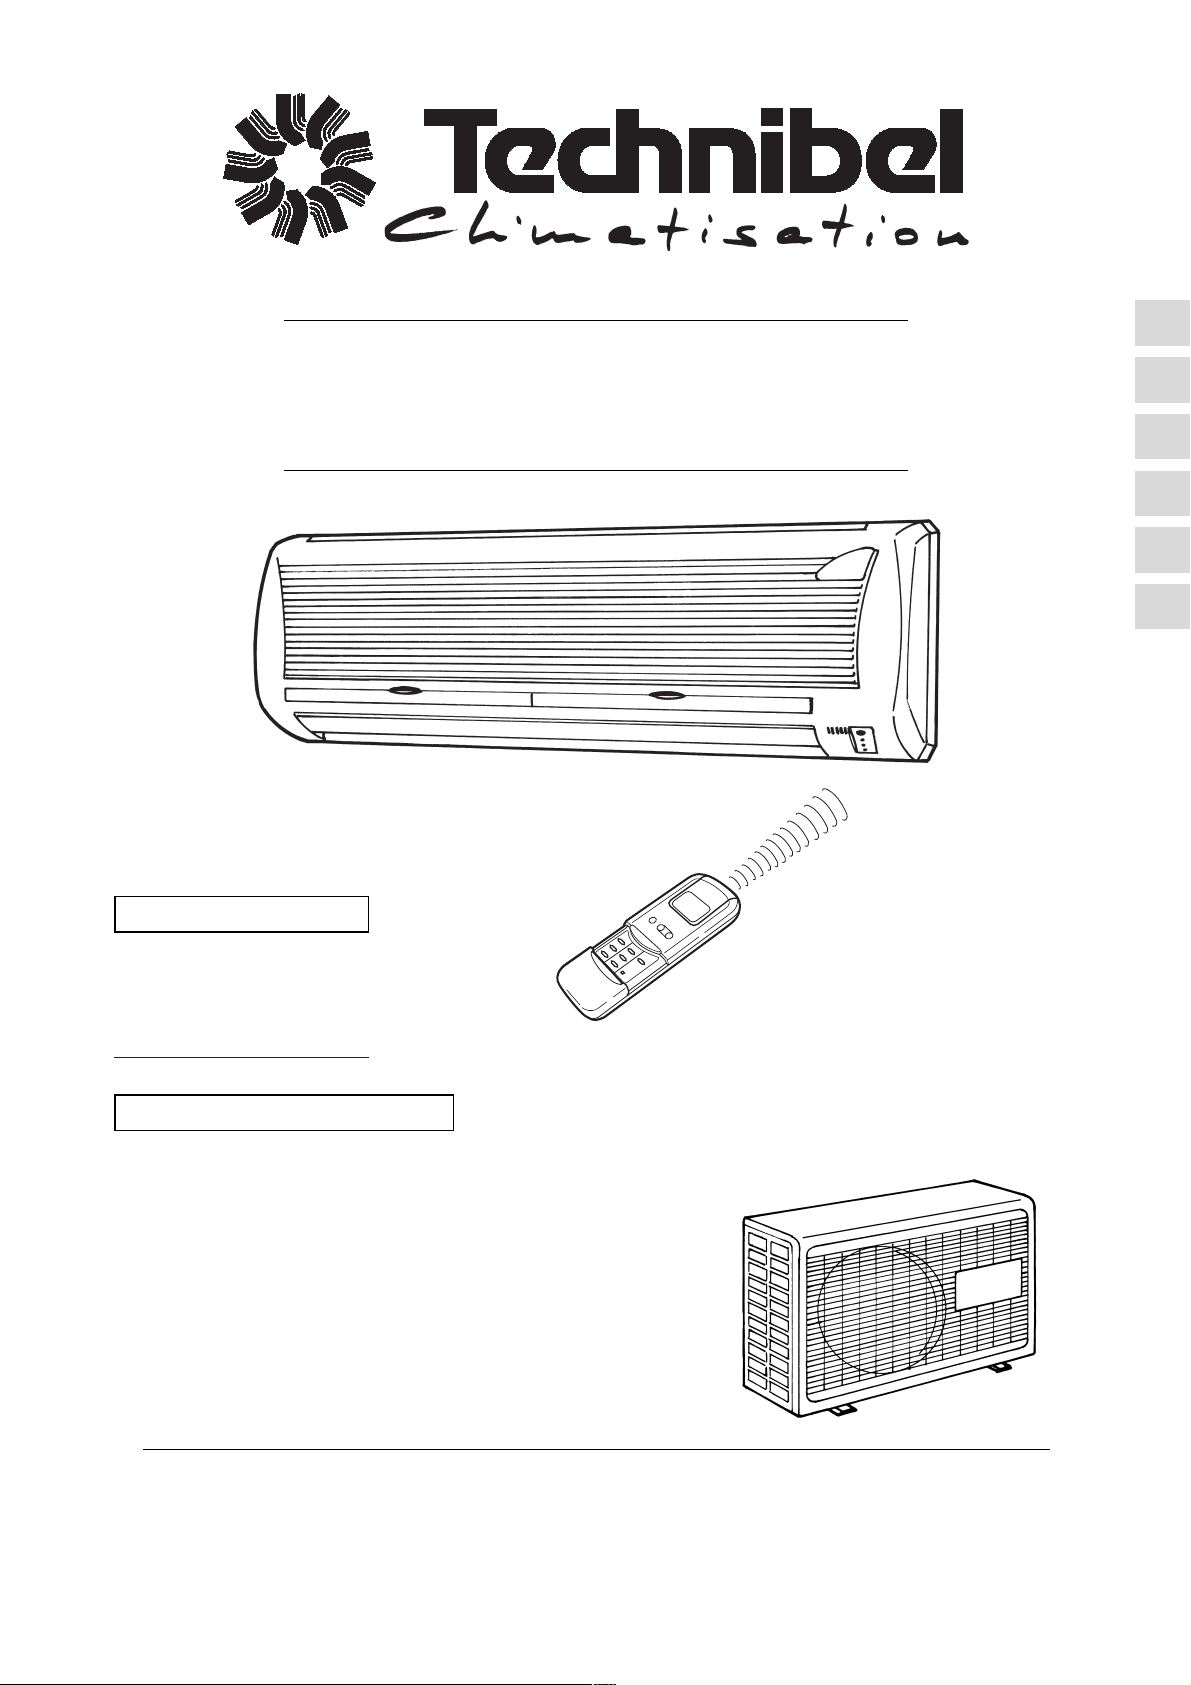
Split air conditioner system • Condizionatore d’aria split system
Climatiseurs split • Acondicionador de aire de consola partida sistema split
Aparelho de ar condicionado-Sistema Split
•
∆ΙΑΙΡΟΥΜΕΝΕΣ ΜΟΝΑ∆ΕΣ ΚΛΙΜΑΣΜΟΥ
Page 2

This air conditioner is equipped with cooling, drying and fan only functions , cooling, drying, heating and fan
only functions . . Details on these functions are provided below; refer on these descriptions when using the air
conditioner.
CONTENTS
2
COOL/DRY/FAN
COOL / DRY / HEAT / FAN
NAME OF PARTS AND OPERATION SELECTOR SWITCH 3
INSTALLATION LOCATION 4
ELECTRICAL REQUIREMENTS 4
SAFETY INSTRUCTIONS 4
USING THE REMOTE CONTROL UNIT 5
REMOTE CONTROL UNIT 6
HOW TO SET THE PRESENT TIME 7
COOLING 7
HEATING 7
AUTOMATIC OPERATION 7
DEHUMIDIFYING (DRY) 8
FAN ONLY 8
ADJUSTING THE FAN SPEED 8
SLEEP MODE 8
SETTING THE TIMER 9
ADJUSTING THE AIR FLOW DIRECTION 9
OPERATION WITHOUT THE REMOTE CONTROL UNIT 10
CARE AND CLEANING 10
TIPS FOR ENERGY SAVING 11
TROUBLESHOOTING 11
DECLARATION OF CONFORMITY
This product is marked as it satisfies Directives:
– Low voltage no. 73/23 EEC and 93/68 EEC.
– Electromagnetic Compatibility no. 89/336 EEC, 92/31 EEC and 93/68 EEC.
This declaration will become void in case of misusage and/or from non observance though partial of Manufacturer's installation
and/or operating instructions.
NOTE
PRODUCT INFORMATION
If you have problems or questions concerning your Air Conditioner,
you will need the following information. Model and serial numbers
are on the nameplate on the bottom of the cabinet.
Model No.
Serial No.
Date of purchase
Dealer’s address
Phone number
The following symbols used in this manual, alert you to potentially
dangerous conditions to users, service personnel or the appliance:
This symbol refers to a hazard or unsafe practice
which can result in severe personal injury or death.
ALERT SYMBOLS
This symbol refers to a hazard or unsafe practice
which can result in personal injury or product or
property damage.
EG
WARNING
CAUTION
Page 3

3
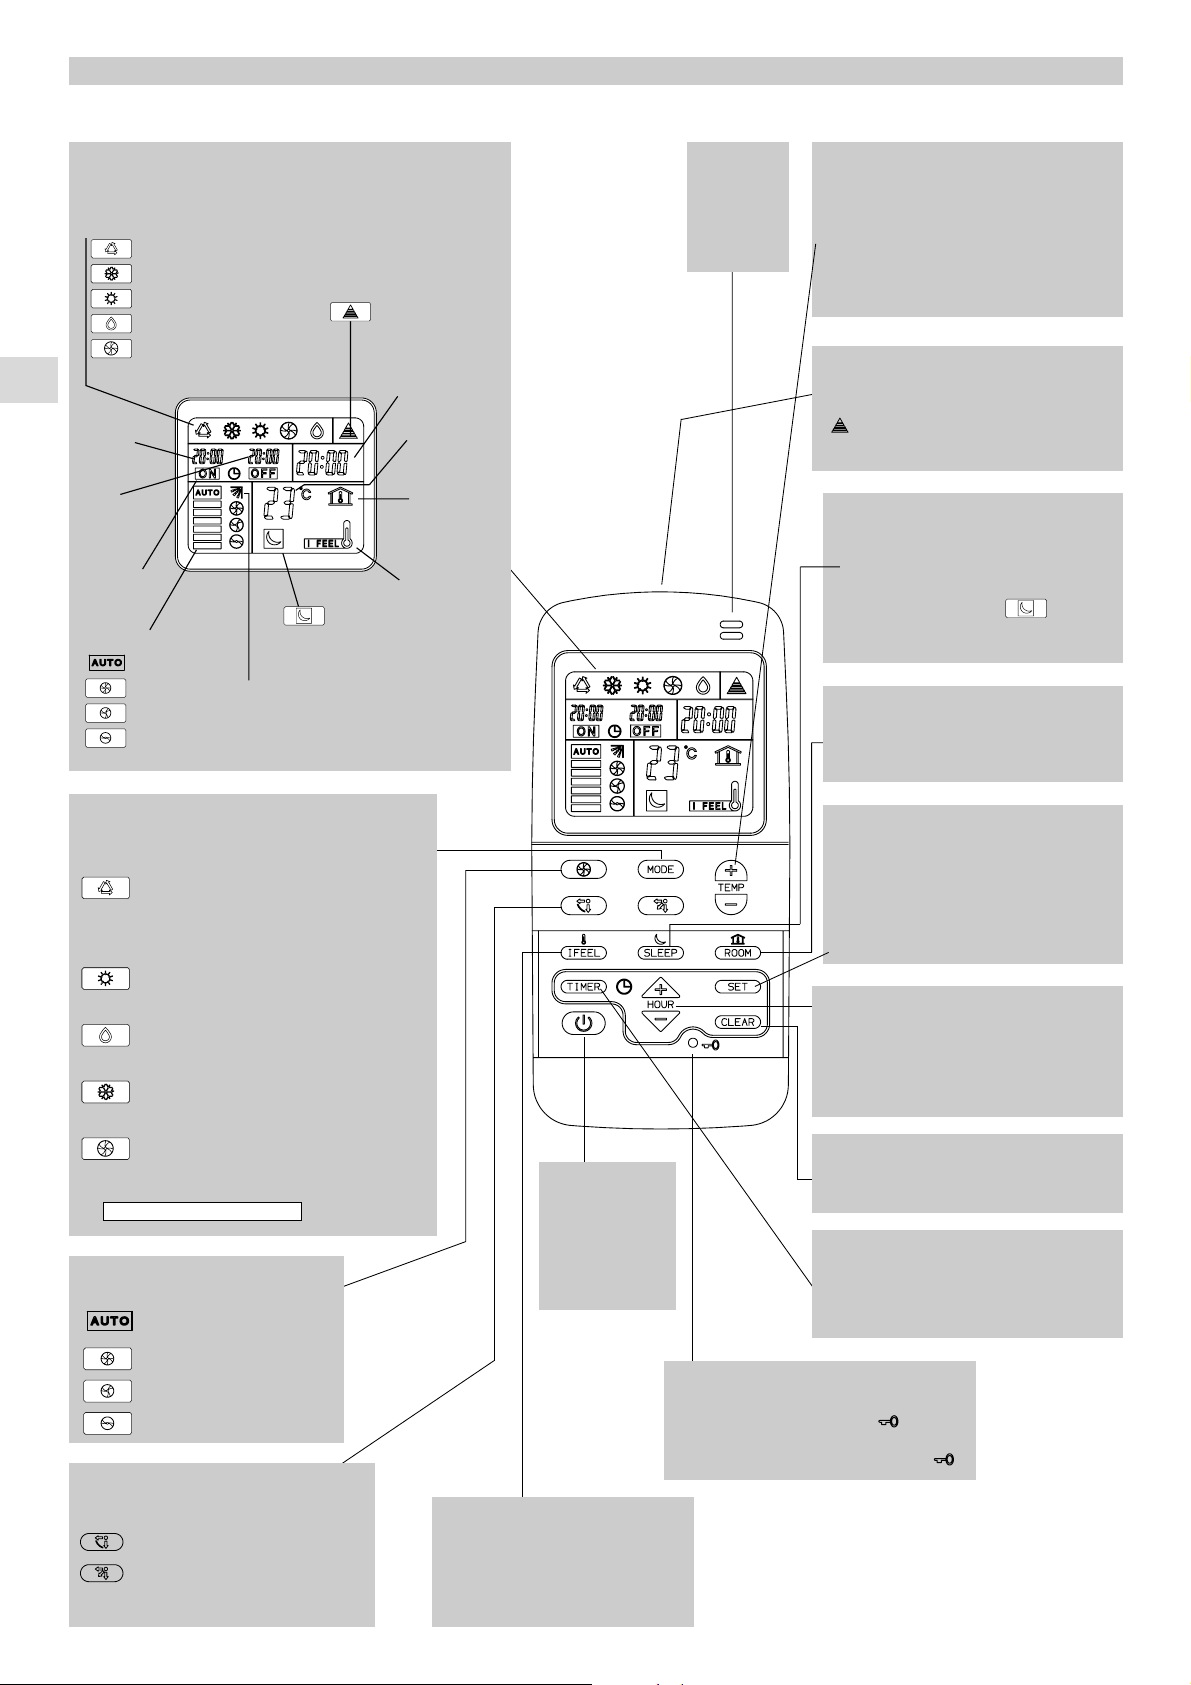
NAME OF PARTS AND OPERATION SELECTOR SWITCH
1. Remote control unit.
2. Sensor: Detects the room temperature around the remote
control unit, the air conditioner is controlled accordingly.
3. Air outlet : distributes filtered and treated air into the room.
4. Air inlet : room air is sucked in through filters.
5. Receiver : receives signals transmitted from the remote control.
6. Flexible drain tube: removes condensate.
7. Refrigerant tubes: convey refrigerant between the indoor
and outdoor unit.
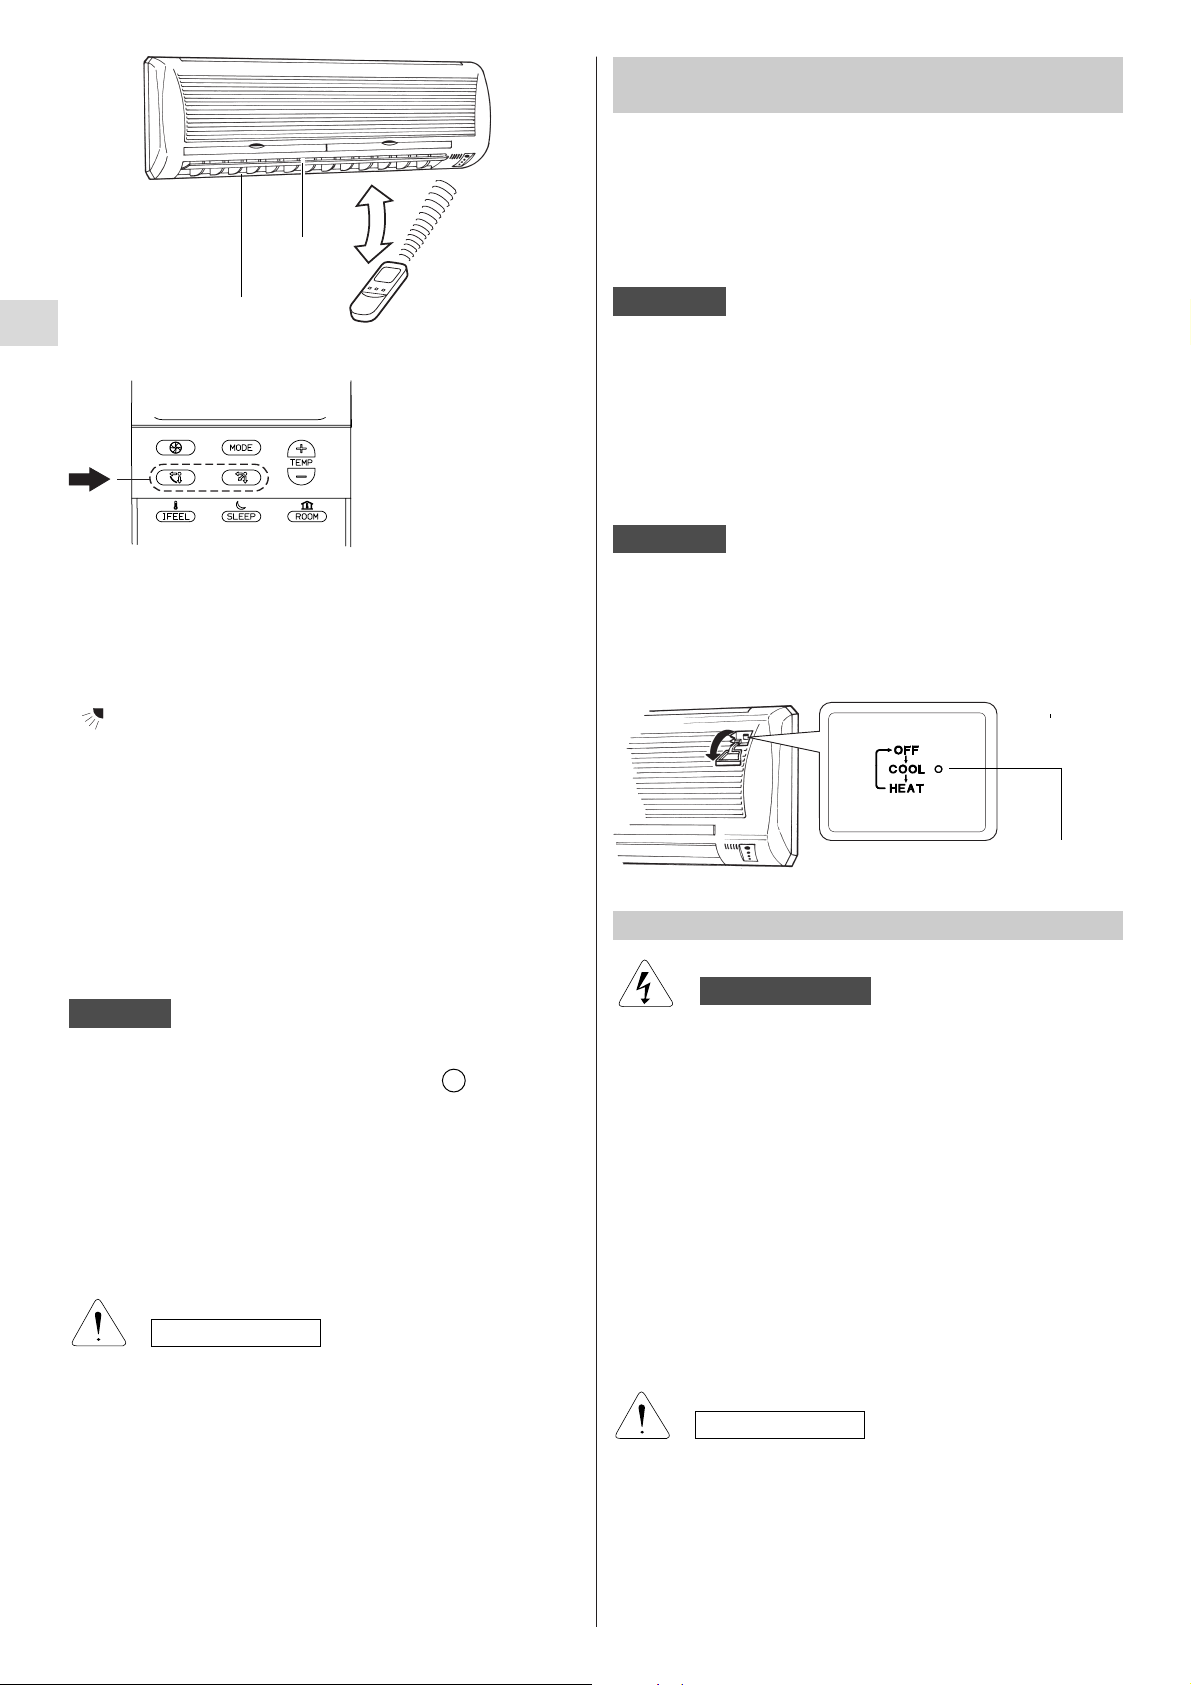
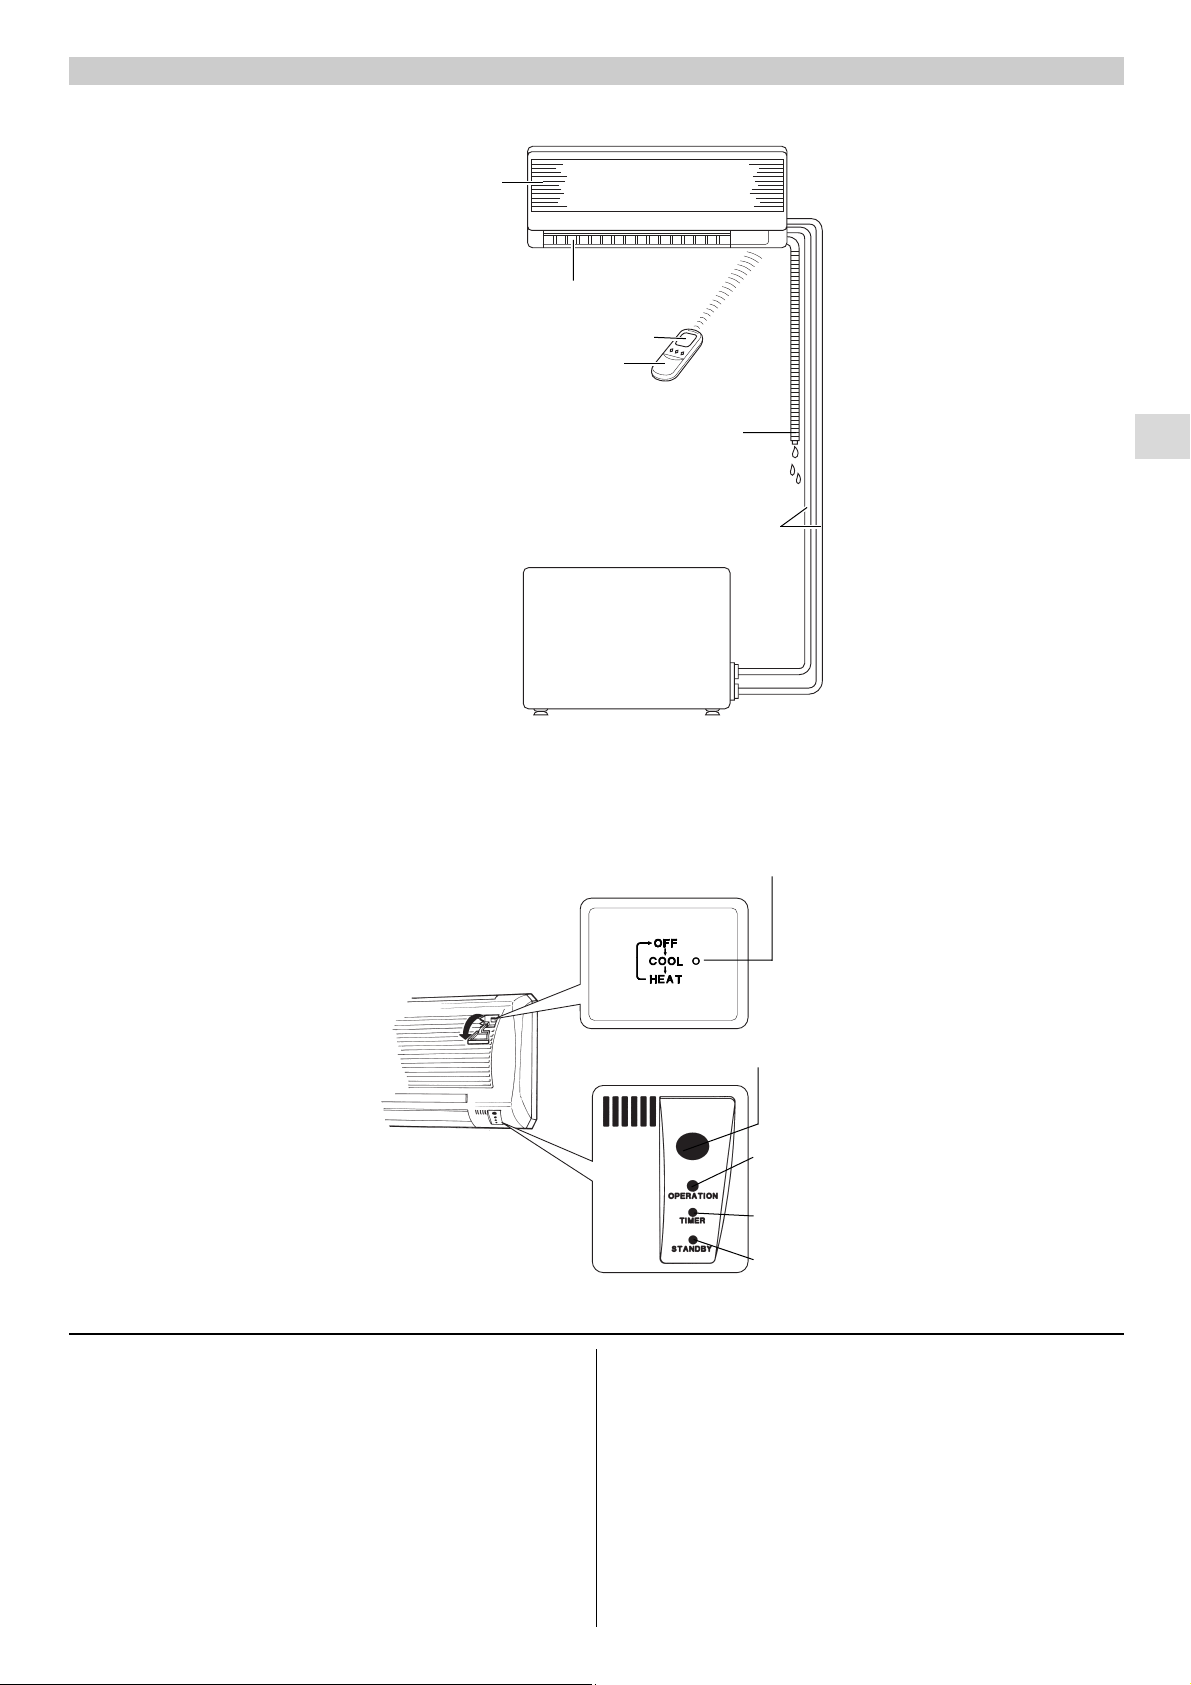
8. Operation selector (without remote control): Push the
button to walk through the OFF, COOL and HEAT operation
modes.
4
3
6
INDOOR UNIT
OUTDOOR UNIT
7
1
2
INDOOR UNIT
8
OPERATION lamp
TIMER lamp
STANDBY lamp
5
EG
Page 4

ELETRICAL REQUIREMENTS
INSTALLATION LOCATION
●
Before installation, check that the voltage of the electric supply
in your home or office is the same as the voltage shown on the
nameplate.
●
All wiring must conform to the local electrical codes. Consult
your dealer or a qualified electrician for details.
●
Each unit must be properly grounded with a ground (or earth)
wire or through the supply wiring.
●
Wiring must be done by a qualified electrician.
SAFETY INSTRUCTIONS
●
Read this booklet carefully before using this air conditioner.
If you still have any difficulties or problems, consult your
dealer for help.
●
This air conditioner is designed to give you comfortable
room conditions. Use this only for its intended purpose as
described in this Instruction Manual.
●
Never use or store gasoline or other flammable vapor or liquid
near the air conditioner. It is very dangerous.
●
Never install electrical equipment, which is not protected
with IPX1 protection (protection against vertical water drop),
under the unit.
●
The manufacturer assumes no responsabilities if the safety
regulations or local codes are not observed.
●
Never use the power main switch to start or stop the air
conditioner: always use the ON/OFF button on the remote
control unit or the selector switch on the unit.
●
Do not stick anything into the air outlet of the air conditioner.
This is dangerous because the fan is rotating at high speed.
●
Do not let children play with the air conditioner.
●
Do not cool the room too much if babies or invalids are
present.
●
We recommend this air conditioner to be installed properly
by qualified installation technicians in accordance with the
installation instructions provided with the unit.
●
Do not install this air conditioner where there are fumes
or flammable gases, or in an extremely humid space
such as a green house.
●
Do not install the air conditioner where excessively high
heat-generating objects are placed.
●
Do not install the air conditioner where the atmosphere
is extremely damp or humid (e.g. greenhouse or laundry)
it could be wetted by drops of water (i.e. in laundries).
Avoid
To protect the air conditioner from heavy corrosion, avoid installing
the outdoor unit where salty sea water can splash directly onto
it or in sulphurous air near a spa.
The OFF position does not disconnect the power. Use the
main power switch to turn off power completely.
WARNING
CAUTION
OPERATION lamp: This lamp lights up during operation.
It blinks once to announce that the remote control signal has been
received and stored. It blinks continuously during the protection
modes (defrosting, etc.).
STANDBY lamp: This lamp lights up when the air conditioner is
connected to the power and ready to receive the remote control
command.
TIMER lamp: This lamp lights up when the system is being
controlled by the timer or sleep mode.
4
EG
WARNING
WARNING
CAUTION
Page 5

5
TEMPERATURE SENSOR SELECTOR
●
Under normal conditions the room temperature is detected and
checked by the temperature sensor placed in the air conditioner.
●
Press the remote control I FEEL button to activate the
temperature sensor placed in the remote control. This function
is designed to provide a personalised environment by transmitting
the temperature control command from the location next to you.
Therefore, in using this function, the remote control should
always be aimed, without obstruction, at the air conditioner.
The remote control unit sends the
temperature signal to the air
conditioner regularly at two
minute intervals. If the signal from
the remote control unit stops for
more than five minutes due to
some troubles, the air conditioner will switch to the
temperature sensor which is built into the indoor unit and
controls the room temperature. In these cases, the
temperature around the remote control unit may differ from
the temperature detected in the air conditioner position.
REMOTE CONTROL UNIT
DISPLAY
OPERATION WITH THE REMOTE CONTROL UNIT
Check that the circuit breaker on the power panel is turned ON
and the the STANDBY lamp is light up.
When using the remote control unit, always point the unit
transmitter head directly at the air conditioner receiver.
HOW TO TURN ON THE AIR CONDITIONER
Press the ON/OFF button to turn the air conditioner on. The
indicator OPERATION will light up, indicating the unit is in
operation.
INDOOR UNIT
RECEIVER
(TRANSMITTER HEAD)
REMOTE CONTROL UNIT
HOW TO INSTALL BATTERIES
●
Remove the lid in the rear part of the remote control unit.
●
Insert two AAA alkaline batteries of 1,5 V-DC.
Make sure the batteries point in the direction marked in the
battery compartment.
●
The batteries last about six months. Depending on how much
you use the remote control unit.
Remove the batteries if you do not use the remote control unit
for more than one month.
Press the +, -, SET and CLEAR buttons together after batteries
replacement.
(This operation allows you to reset correctly all the programs.
The remote control unit is to be set up again).
Replace the batteries when the remote control unit lamp fails
to light, or when the air conditioner does not receive the remote
control unit signals.
●
The batteries of the remote control contain polluted substances
exhausted batteries must be disposed according to the laws
in force.
USING THE REMOTE CONTROL UNIT
EG
NOTE
CAUTION
Page 6

SLEEP BUTTON
For details, see "Sleep mode".
When you press this button in the COOL, HEAT or
DRY mode, the mark appears on the display
and the microcomputer in the remote control unit will
adjust the set temperature to save energy.
6
MODE SELECTOR BUTTON
Press this button to modify the air conditioner mode.
(automatic)
When this setting is selected, the air conditioner calculates the
difference between the thermostat setting and the room temperature
and automatically switches to the "cool" or "heat" mode.
(heating)
The air conditioner makes the room warmer.
dehumidification (dry)
The air conditioner reduces the humidity in the room.
(cooling)
The air conditioner makes the room cooler.
(fan)
The air conditioner circulate the air.
COOL / DRY / HEAT / FAN
REMOTE CONTROL UNIT
TRANSMITTER
When you press the buttons of the remote control unit,
the mark appears on the display to transmit the setting
changes to the receiver in the air conditioner.
TEMPERATURE SETTING BUTTONS
— (cooler)
Press this button to decrease the set temperature.
+
(warmer)
Press this button to increase the set temperature.
FLAP SPEED SELECTORS
SENSOR
A temperature
sensor inside the
remote control unit
detects the room
temperature.
SET BUTTON
Push this button to select the functions:
• set the present time
• set the ON-OFF timer
For detail see “HOW TO SET THE PRESENTTIME”
and “SETTING THE TIMER”.
LOCKING THE REMOTE CONTROL
Pushing this button freezes the last operation setting.
When is activated the remote control will not be
able to control the air conditioner. To release the lock
status push again.
DISPLAY
Information are displayed when the remote control unit is switched on.
TEMPERATURE SENSOR
SELECTOR
Push IFEEL button to activate the temperature
control in the remote control unit. This function
provides a more confortable temperature control.
Press this button to select the desidered flap sweep
function.
: The flap moves up and down
automatically.
: Every time you push the button
the flap moves one step.
FAN SPEED SELECTOR BUTTON
Fan speed is automatically
selected by the microcomputer.
High speed.
Medium speed.
Low speed.
Operation Mode
Automatic
Cooling
Heating
Fan speed indication
High speed
Automatic fan
speed
Medium speed
Low speed
Dehumidification (dry)
Displayed when data trasmitted
Or remote control unit lock
Clock
(hours and minutes)
Set temperature or
room temperature
Displayed when the
temperature is the
room temperature
Indicate that the air
conditioner is operating
in I FEEL mode
Fan only
Displayed in Sleep
Mode Operation
Automatic flap oscillation
switched on
Displayed
when the timer
on is set and
activated
Displayed
when the timer
off is set and
activated
Displayed
when daily
program is set
and activated
TIMER AND PRESENT TIME SETTING
BUTTONS
Pushing + or - buttons the setting of the time and timer
can be activated. For detail see “HOW TO SET THE
PRESENT TIME” and “SETTING THE TIMER”.
TIMER RESET
Push the CLEAR button to cancel all timer setting.
ROOM TEMPERATURE
Push the ROOM button to show the actual room
temperature around the remote control.
ON/OFF
OPERATION
BUTTON
This button turns the
air conditioner ON
and OFF.
TIMER BUTTON (timer setting)
Push the TIMER on the display starts the timer ON and
OFF setting procedure.
For detail see “SETTING THE TIMER”.
EG
Page 7

AUTOMATIC OPERATION
HEATING
COOL / DRY / HEAT / FAN
HEATING PERFORMANCE
A heat pump conditioner heats a room by taking heat from outside
air. The heating efficiency will fall off when the outdoor temperature
is very low. If enough heat is not obtained with this air conditioner,
use another heating appliance in conjunction with it.
For several minutes after the start of heating operation, the indoor
fan will not run until the indoor heat exchanger coil has warmed
up sufficiently. This is because the COLD DRAFT PREVENTION
SYSTEM is operating.
DEFROSTING OF HEAT EXCHANGER
OUTDOOR UNIT “STANDBY”
When the outdoor temperature is low, frost or ice may appear on
the heat exchanger coil, reducing the heating performance. When
this happens, a microcomputer defrosting system operates. At
the same time, the fan in the indoor unit stops and the OPERATION
lamp is flashing until defrosting is completed. Heating operation
restarts after several minutes. (This interval will vary slightly
depending on the room and outdoor temperature).
HOW TO SET THE PRESENT TIME
1. Press the SET button for five seconds. The time indication
alone flashes.
2. Press the + or - buttons until the present time is displayed.
3. Press the SET button to stop the indication flashing.
COOLING
Verify that the unit is connected to the main
power and the STANDBY lamp is light up.
1.Set the MODE selector to COOL .
2.Press the ON/OFF button and switch the air
conditioner ON.
3.Press the TEMP. buttons to set the desired
temperature (the temperature range is
between 30 °C max. and 16 °C min.).
NOTE
THE DISPLAY SHOWS THE SELECTED
TEMPERATURE.
4. Press the FAN SPEED button to select the fan speed.
5.Press the FLAP buttons and adjust the air flow direction as desired
(see adjustment of air flow). Make sure that the remote control is
switched on. Press the FLAP button to select automatic swing or
one of the six manual settings.
1.Set the MODE selector to HEAT .
2.Press the ON/OFF button and switch the air condioner ON.
3.Press the TEMP. buttons to set the desired temperature (the
temperature range is between 30 °C max. and 16 °C min.).
4. Press FAN SPEED selector button to the setting you want.
5. Press the FLAP button and adjust the air flow direction as desired
(see adjustment of air flow). Make sure that the remote control is
switched on. Press the FLAP button to select automatic swing or
one of the six manual settings.
THE DISPLAY SHOWS THE SELECTED TEMPERATURE.
1
5
4
3
2
1.Set the MODE selector to AUTO .
2.Press the ON/OFF button and switch the air condioner ON.
3.Press the TEMP. buttons to set the desired temperature (the
temperature range is between 30 °C max. and 16 °C min.).
THE DISPLAY SHOWS THE SELECTED
TEMPERATURE.
When this setting is selected, the air conditioner calculates the
difference between the thermostat setting and the room temperature
and automatically switches to the COOL or HEAT mode as
appropriate.
4.Switch the FAN SPEED selector button to the setting you want.
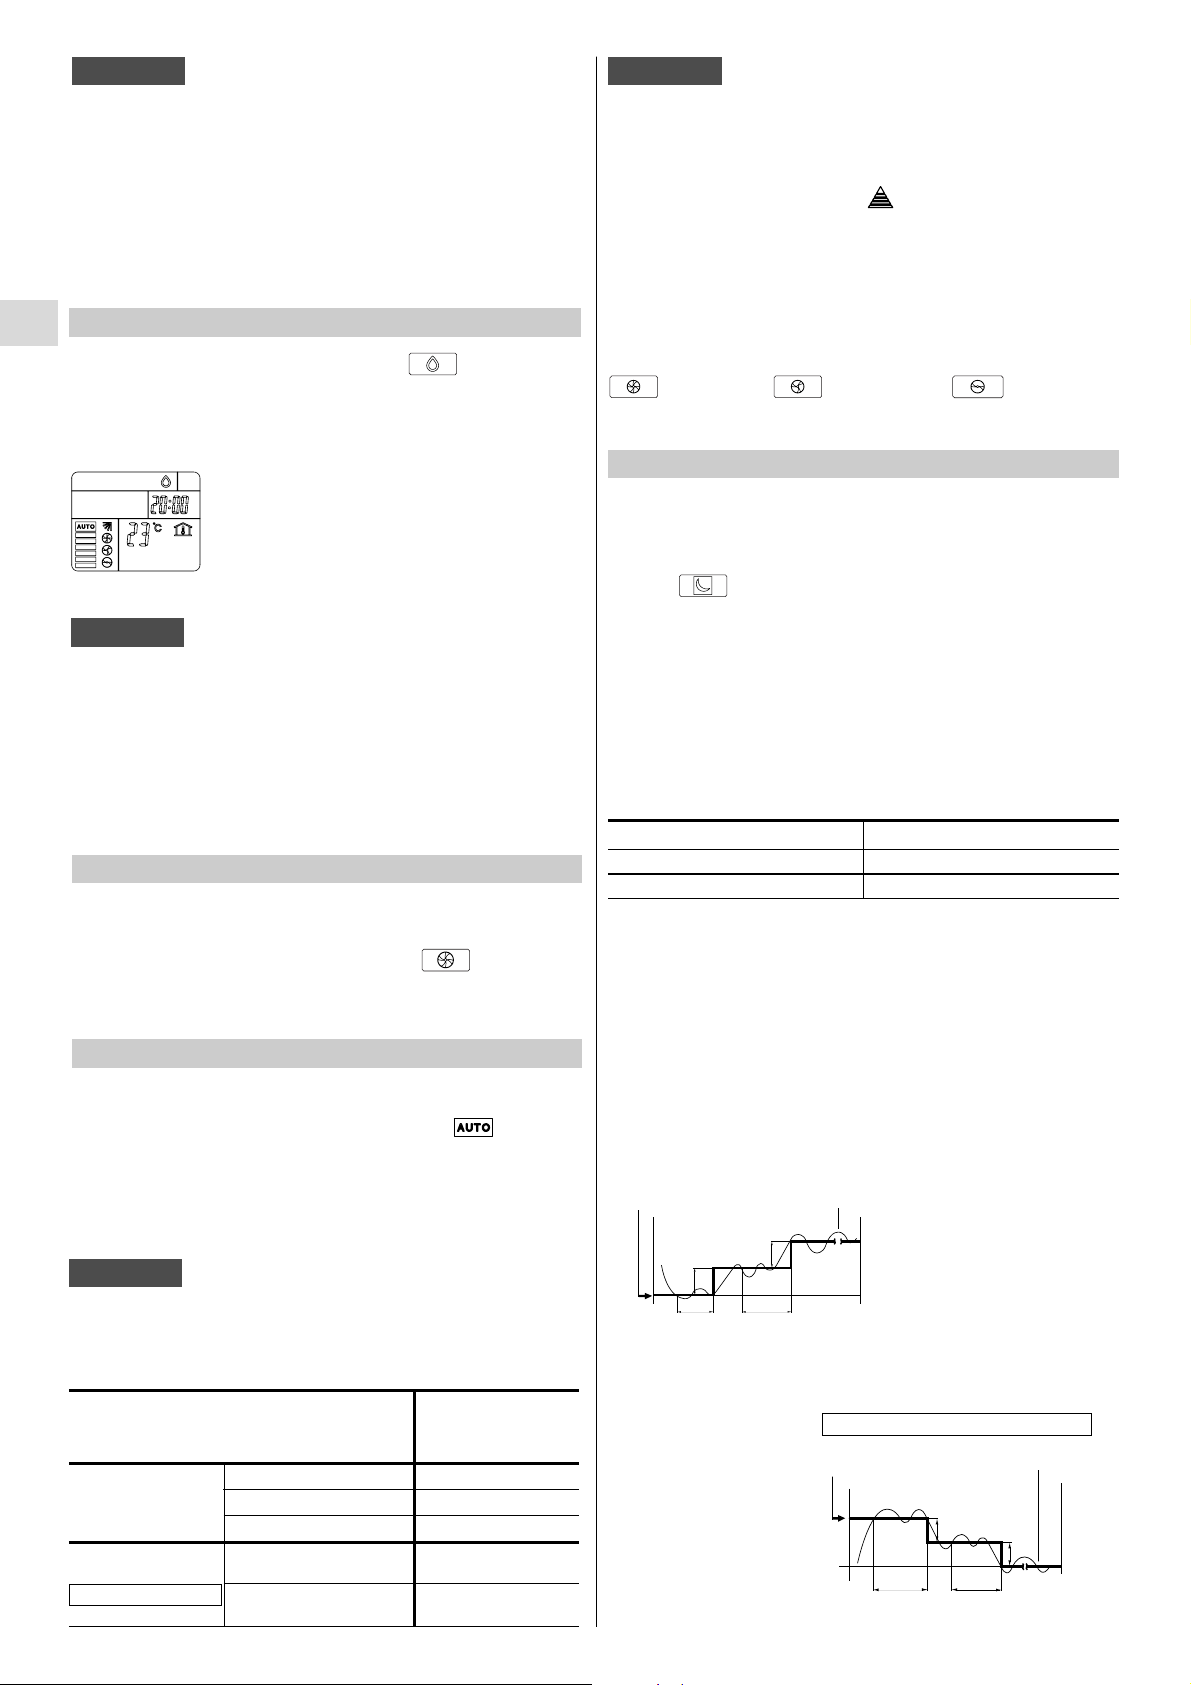
Example of operation diagram in the (Auto) mode with the set
room temperature at 23°C.
ONON ON
∆ 1 H ∆ 1 H
MIN. MAX.
A
B
C
C
B
A
27
26
25
24
23
22
21
20
19
COOL / DRY / HEAT / FAN
7
EG
NOTE
Page 8
The above mentioned data make reference to the conditioner
operating when the sensor on the remote control unit is ON. (Refer
to temperature sensor selector). If the sensor on the indoor unit
is being used then actual operation will slightly differ from that
described in the above tables. ( ) Sign shown on the remote
control unit display).
ADJUSTING THE FAN SPEED
AUTOMATIC
Simply set the FAN SPEED selector to the position
. Amicrocomputer automatically controls the fan speed when the
AUTO mode is selected. When the air conditioner starts operating,
the difference between the room temperature and the set
temperature is detected by the microcomputer which then
automatically switches the fan speed to the most suitable level.
WHEN DIFFERENCE BETWEEN
ROOM TEMPERATURE AND SET FAN SPEED
TEMPERATURE IS
Cooling and
2 °C and over High
dehumidifying modes:Between 2 and 1 °C
Medium
Below 1 °C Low
2 °C and over High
Heating mode:
Below 2 °C Medium
High speed Med. speed Low speed
MANUAL
If you want to manually adjust speed just set the FAN SPEED
selector as desired.
NOTE
1 hour
1 hour TIME
Setting temperature
Room temperature
COOLING AND DEHUMIDIFYING
1 hour
1 hour. TIME
Setting temperature Room temperature
HEATING
SLEEP MODE
●
The SLEEP mode enables you to save energy.
1. Set the MODE selector to cool, dry or heat.
2. Press the SLEEP button.
3. The mark appears on the display. Press the SLEEP
button again to release the SLEEP function.
What does the SLEEP mode mean?
In this mode, the air conditioner will cool or heat the room to the
set temperature, and then the thermostat will make the unit pause.
After about 1 hour, the air conditioner will automatically reset the
set temperature as follows (also refer to graphs).
OPERATING MODE SET TEMPERATURE CHANGE
Heating Lowered by 1 °C
Cooling and Dehumidifying Raised by 1 °C
When the room temperature reaches the new set value, the
thermostat will cause the unit to pause. After about 1 hour the
temperature will be raised by 1 °C in cooling, or lowered by 1 °C
in heating. This enables you to save energy without sacrificing
your comfort.
COOL / DRY / HEAT / FAN
8
EG
DEHUMIDIFYING (DRY)
1.Set the MODE selector switch to “DRY” .
2.Press the ON/OFF button and switch the air condioner ON.
3.Press the TEMP. buttons to set the desired temperature (the
temperature range is between 30 °C max. and 16 °C min.).
THE DISPLAY SHOWS THE SELECTED TEMPERATURE.
NOTE
●
Use DRY operation when you want to reduce the humidity in the
room.
●
Once the room temperature reaches the set level, the unit
repeats the cycle of turning on and off automatically.
●
During DRY operation, the fan speed is automatically set to low
or stops to prevent overcooling.
●
Dry operation is not possible if the indoor temperature is 15 °C
or less.
NOTE
The air conditioner changes the operation mode (from cool to heat
or vice versa, if one of the following conditions occurs:
- ZONE A: changes if the difference between the room temperature
and the temperature set on the remote control unit is at least 3°C..
- ZONE B: changes if the difference between the room temperature
and the temperature set on the remote control unit is at least 1°C,
one hour after the compressor stop.
- ZONE C: never changes if the difference between the room
temperature and the temperature set on the remote control unit is
no more than 1°C.
FAN ONLY
If you want to make air circulate without any temperature control,
follow these steps:
1. Set the MODE selector switch to “FAN” .
2. Press the ON/OFF button and switch the air conditioner ON.
NOTE
In FAN Only mode the fan speed is adjusted automatically as in
cooling mode.
COOL / DRY / HEAT / FAN
1°C
1°C
1°C
1°C
Page 9
9
VERTICAL (with remote control unit)
The remote control gives you the possibility to control the flap in
two way:
1. Push the button to start the flap sweep. If you push
again the flap stops immediately.
2. Push the button to move the flap step by step.
HORIZONTAL (manual)
The horizontal air flow can be adjusted by moving the vertical
vanes to the left or right, as indicated in the following figures.
ADJUSTING THE AIR FLOW DIRECTION
Set vertical vanes to the front position during COOLING/DRY
operation if humidity is high.
If the vertical vanes are set to the left-most or right-most
position, condensation will form around the air outlet and
drip off.
Do not move the flap with your hands when the air conditioner
is running.
Left
Vertical vane
Right
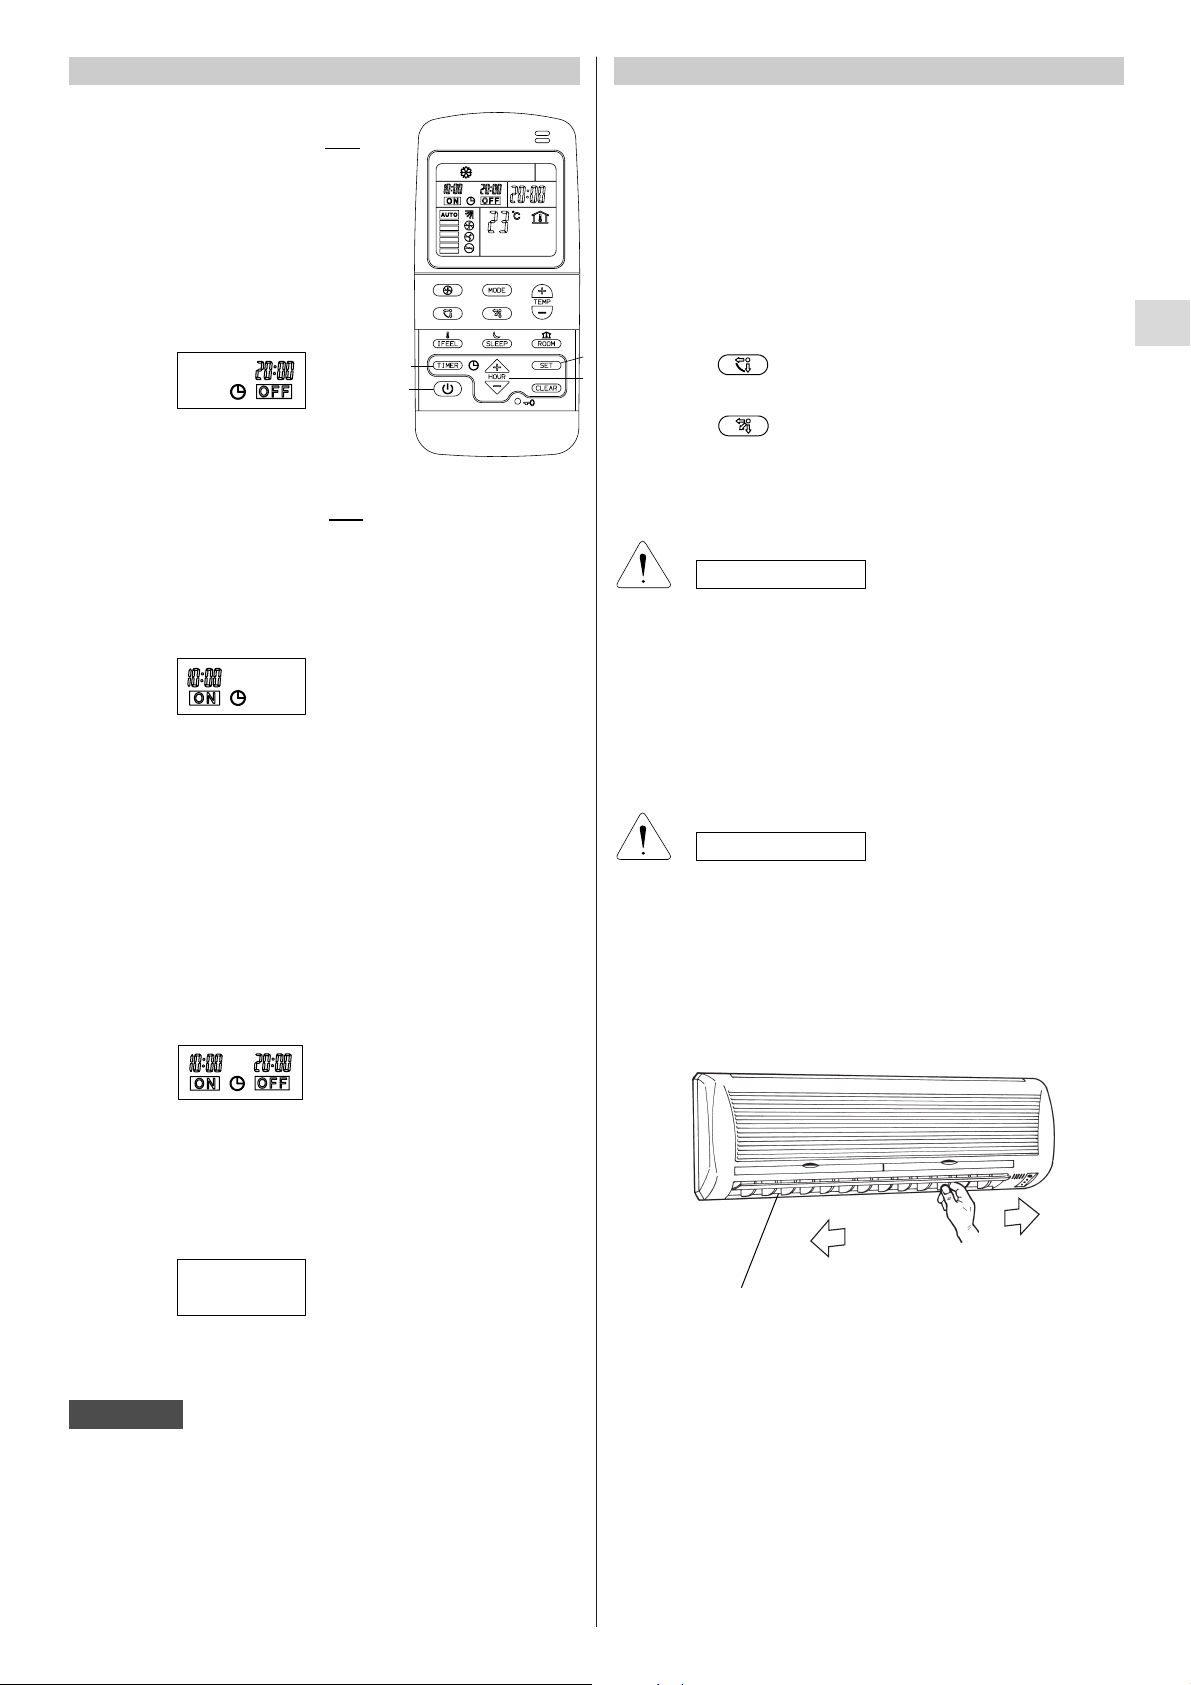
A) HOW TO SET THE OFF TIME
1. Press the ON/OFF button to start the air
conditioner.
2. Press the TIMER button till the OFF sign
blinks.
3. Press the + or - (HOUR) button until the
desired value is displayed.
4. Press the SET button to activate the
timer.
B) HOW TO SET THE ON TIME
1. Press the ON/OFF button to stop
the air conditioner.
2. Press the TIMER button till the ON sign blinks.
3. Press the + or - (HOUR) button until the desired value is
displayed.
4. Press the SET button to activate the timer.
C) HOW TO SET APROGRAM FOR DAILY ON/OFF OPERATION
(OR VICEVERSA)
1. Press the TIMER button till the ON sign blinks.
2. Press the + or - (HOUR) button until the desired value is
displayed.
3. Press the TIMER button again, the OFF sign blinks.
4. Press the + or - (HOUR) button until the desired value is
displayed.
5. Press the TIMER button, then the SET button to activate the
timer.
D) HOW TO CLEAR THE TIMER
Press the CLEAR button if you want that every timer operation will
be cleared.
SETTING THE TIMER
3
1
4
2
EG
NOTE
If the procedure to set the timer is not completed, by pushing the
SET button, within 15 seconds the timer operation will be cancelled
and the last set-up is restored.
CAUTION
CAUTION
Page 10
10
2. WHEN THE AIR CONDITIONER IS RUNNING
If you want to turn off the air conditioner push the button with a
pen until the OPERATION lamp is turned off.
CARE AND CLEANING
●
For safety, be sure to turn the air conditioner off and also to
disconnect the power before cleaning.
●
Do not pour water on the indoor unit to clean it. This will damage
the internal components and cause an electric shock hazard.
CASING AND GRILLE (INDOOR UNIT)
Clean the casing and grille of the indoor unit with a vacuum cleaner
brush, or wipe them with a clean, soft cloth.
If these parts are stained, use a clean cloth moistened with a mild
liquid detergent.
When cleaning the grille, be careful not to force the vanes out of
place.
The air intake grille can be removed in order to wash it
with water.
●
Never use solvents, or harsh chemicals when cleaning the indoor
unit. Do not wipe the plastic casing using very hot water.
●
Some metal edges and the vanes are sharp and may cause
injury if handled improperly; be especially careful when you
clean these parts.
●
The internal coil and other components of the outdoor unit must
be cleaned every year. Consult your dealer or service centre.
Power failure during operation.
In the event of power failure, the unit will stop. When the power
is resumed, the unit will restart automatically after 3 minutes.
NOTE
Operation
selector
EG
NOTES
If you have lost the remote control unit or it has troubles, follow
the steps below.
1. WHEN THE AIR CONDITIONER IS STOPPED
If you want to turn on the air conditioner push the button with a
pen to select the desired mode (COOL or HEAT).
OPERATION WITHOUT THE REMOTE
CONTROL UNIT
The air conditioner will start in automatic fan speed and flap
sweep operation. The temperature setting is 22°C for cooling
mode and 26°C for heating mode.
NOTE
Sweep function
The flap starts moving up and down to deliver air
over the sweep range.
• The flap automatically closes when the unit is off.
• During the heating operation, the fan speed
will be very low and the flap will be in the
horizontal position (position 6 ) until the air
being blown out of the unit begins to warm.
Once the air warms up, the flap position and
fan speed change to the settings specified
with the remote control.
• Use the FLAP button on the remote control to adjust
the position of the flap. If you move the flap by hand,
the factual flap position and the flap position on the
remote control may no longer match. If this should
happen, shut off the unit, wait for the flap to close,
and then turn on the unit again; the flap position will
now be normal again.
• Do not have the flap pointed down during cooling
operation. Condensation may begin to form around the
air vent and drip down.
Up
Down
Flap
Air outlet
grille
WARNING
CAUTION
CAUTION
Page 11

11
TIPS FOR ENERGY SAVING
DO NOT:
●
Block the air intake and outlet of the unit.
If they are obstructed, the unit will not work well, and may be
damaged.
●
Let direct sunlight into the room. Use sunshades, blind or
curtain.
DO:
●
Always try to keep the anti-mold filter clean. Aclogged filter will
impair the performance of the unit.
●
To prevent conditioned air from escaping, keep windows, doors
and any other openings closed.
TROUBLESHOOTING
WARNING
The use of portable telephones near the air-conditioner may cause
disturbance to its normal operation and must be avoided. In case
abnormal operation is noticed, to restore normal operation turnoff electric supply for 60 seconds at least, by disconnecting the
main switch or the wall plug, then start again the air conditioner.
If your air conditioner does not work properly, first check the
following points before requesting service.
If it still does not work properly, contact your dealer or service
centre.
Trouble: the air conditioner does not run at all.
Possible cause:
1. Power failure.
2. Leakage breaker tripped.
3. Line voltage is too low.
4. Operation button on the remote control is OFF.
5. Batteries of the remote control unit have run down.
Remedy:
1. Restore power.
2. Contact service centre.
3. Consult your electrician or dealer.
4. Press the ON/OFF button on the remote control.
5. Replace batteries.
Trouble: STANDBY lamp flashes and the air conditioner does
not operate.
Possible cause:
1. Trouble in wiring system.
Remedy:
1. Contact service centre.
Trouble: TIMER lamp flashes and the air conditioner does not
operate.
Possible cause:
1. power failure during timer operation.
Remedy:
1. Press ON/OFF button on remote control.
Trouble: Compressor runs but soon stops.
Possible cause:
1. Obstruction in front of condenser coil.
Remedy:
1. Remove obstruction.
Trouble: Poor cooling or heating performance.
Possible cause:
1. Dirty or clogged air filter.
2. Heat source or many people in room.
3. Doors and/or windows are open.
4. Obstacle near air intake or air discharge port.
5. Thermostat is set too high (for cooling) or too low (for heating).
6. Outdoor temperature is too low (heat pump version).
7. Defrosting system does not work (heat pump version).
Remedy:
1. Clean air filter to improve airflow.
2. Eliminate heat source if possible.
3. Shut them to keep the heat or cold out.
4. Remove it to ensure good airflow.
5. Set the temperature lower (or higher).
6. Try to use a back-up heater.
7. Consult your dealer.
Trouble: Clicking sound is heard from the air conditioner.
Possible cause:
1. In heating or cooling operation, any plastic parts may expand
or shrink due to a sudden temperature change. In this event,
a clicking sound may occur.
Remedy:
1. This is normal, and the sound will soon disappear.
AIR FILTER
The filter behind the air intake grille should be checked and cleaned
at least once every two weeks.
HOW TO REMOVE THE FILTER
1.Grab the filter handle and pull it down towards you gently.
FILTER CLEANING
HOW TO REPLACE THE FILTER
Use a vacuum cleaner to remove light dust. If there is sticky
dust on the filter, wash the filter in lukewarm, soap water,
rinse it in clean water, and dry it.
1. Pay attention not to invert the two filters: note the
overhang on the right and on the left side.
2. Slide the filter into the guides up to the end.
Left filter
Right filter
EG
Page 12
NOME DELLE PARTI E SELETTORE DI FUNZIONAMENTO 3
LUOGO DI INSTALLAZIONE 4
REQUISITI ELETTRICI 4
ISTRUZIONI DI SICUREZZA 4
USO DEL TELECOMANDO 5
TELECOMANDO 6
COME REGOLARE L’OROLOGIO 7
RAFFREDDAMENTO 7
RISCALDAMENTO 7
FUNZIONAMENTO IN AUTOMATICO 7
DEUMIDIFICAZIONE 8
VENTILAZIONE 8
SCELTA VELOCITÀ VENTILATORE 8
PROGRAMMA NOTTURNO 8
REGOLAZIONE DEL TIMER 9
REGOLAZIONE DEL FLUSSO D’ARIA 9
FUNZIONAMENTO SENZA TELECOMANDO 10
CURA E MANUTENZIONE 10
CONSIGLI PER IL MASSIMO CONFORT E IL MINIMO CONSUMO 11
IDENTIFICAZIONE E SOLUZIONE PROBLEMI DI FUNZIONAMENTO 11
Questo condizionatore d’aria è dotato delle funzioni di raffreddamento, deumidificazione e ventilazione , di raffreddamento, deumidificazione, riscaldamento e ventilazione . I dettagli su queste funzioni sono forniti
di seguito; riferitevi a queste descrizioni quando usate il condizionatore d’aria.
INDICE
DICHIARAZIONE DI CONFORMITÀ
Questo prodotto è marcato in quanto conforme alle Direttive:
– Bassa Tensione n. 73/23 CEE e 93/68 CEE.
– Compatibilità Elettromagnetica n. 89/336 CEE, 92/31 CEE e 93/68 CEE.
Questa dichiarazione sarà nulla nel caso di impiego diverso da quello dichiarato dal Fabbricante e/o di mancata osservanza, anche solo
parziale, delle istruzioni d'installazione e/o d'uso.
2
NOTA
In caso di difficoltà o se si hanno dei dubbi riguardo al condizionatore d’aria,
sono necessarie le seguenti informazioni. I numeri del modello e di serie si
trovano sulla targhetta del nome, sulla parte inferiore del mobile.
No. del modello
No. di serie
Data di acquisto
Indirizzo del rivenditore
Numero di telefono
INFORMAZIONI RIGUARDANTI IL PRODOTTO
I seguenti simboli sono usati in questo manuale per mettere in guardia l’utente
e il personale di servizio sulle condizioni potenziali di pericoli personali o di
danni al prodotto.
Questo simbolo si riferisce a pericoli o a interventi
che possono causare ferite gravi o la morte.
SIMBOLI DI AVVERTIMENTO
Questo simbolo si riferisce a pericoli o a interventi
che possono causare ferite o danni al prodotto.
I
COOL/DRY/FAN
COOL / DRY / HEAT / FAN
AVVERTIMENTO
PRECAUZIONE
Page 13

NOME DELLE PARTI E SELETTORE DI FUNZIONAMENTO
1. Telecomando.
2. Sensore: rileva la temperatura ambiente attorno al
telecomando; il condizionatore è regolato dalla temperatura
rilevata.
3. Uscita aria: distribuisce nel locale l’aria trattata.
4. Entrata aria: l’aria ambiente viene aspirata e filtrata per mezzo
di appositi filtri.
5. Ricevitore: riceve i segnali inviati dal telecomando.
6. Tubo flessibile di scarico: scarica l’umidità condensata.
7. Tubi del refrigerante: sono percorsi dal gas refrigerante e
collegano unità esterna e interna.
8. Selettore funzionamento (senza telecomando): Premere
questo tasto per passare da una funzione all’altra (OFF, COOL
e HEAT).
3
4
3
6
UNITÀ INTERNA
UNITÀ ESTERNA
7
1
2
UNITÀ INTERNA
5
Spia funzionamento
(OPERATION)
8
Spia TIMER
Spia attesa (STANDBY)
I
Page 14

REQUISITI ELETTRICI
LUOGO DI INSTALLAZIONE
●
Prima dell’installazione assicuratevi che la tensione
dell’alimentazione elettrica di rete sia uguale a quella indicata
sulla targhetta del condizionatore d’aria.
●
Tutti gli allacciamenti elettrici devono essere conformi alle
normative elettriche locali. Per i dettagli consultare il rivenditore
o un elettricista.
●
Ciascuna unità deve essere collegata correttamente a massa,
con un filo di terra.
●
Gli allacciamenti elettrici devono essere eseguiti da un elettricista
specializzato.
ISTRUZIONI DI SICUREZZA
●
Leggete attentamente questo manuale prima di usare il
condizionatore d’aria. In caso di dubbi o problemi rivolgetevi
al rivenditore o al centro assistenza autorizzato.
●
Questo condizionatore d’aria è stato progettato per creare
condizioni climatiche ideali nella vostra stanza. Usatelo
soltanto per questo scopo specifico e come descritto in
questo manuale.
●
Mai usare o conservare benzina o altri liquidi infiammabili vicino
al condizionatore. È molto pericoloso.
●
Non installare sotto l’unità apparecchiature elettriche non
protette con grado di protezione IPX1 (protezione all’acqua
a caduta verticale).
●
Il costruttore non si assume responsabilità alcuna nel caso in
cui le norme di sicurezza e antinfortunistiche non vengano
rispettate.
●
Non accendete e spegnete il condizionatore d’aria mediante
l’interruttore generale. Usate sempre il pulsante ON/OFF
sul telecomando o il selettore di funzionamento sull’unità.
●
Non inserite oggetti nel condizionatore. È molto pericoloso
perché il ventilatore gira ad alta velocità.
●
Non lasciate giocare i bambini con il condizionatore d’aria.
●
Non raffreddate eccessivamente la stanza se ci sono
bambini molto piccoli o degli invalidi.
●
Si raccomanda di far installare questo condizionatore d’aria
da un tecnico qualificato seguendo le istruzioni di installazione
allegate.
●
Non installare questo condizionatore d’aria dove ci sono
fumi, gas infiammabili o molta umidità, come in una serra.
●
Non installare il condizionatore dove ci sono
apparecchiature che generano un calore eccessivo.
●
Non installare l'unità interna in locali dove potrebbe essere
investita da spruzzi d'acqua (es. lavanderia).
Evitare
Per proteggere il condizionatore d’aria dalla corrosione eccessiva,
non installate l’unità esterna dove può essere esposta direttamente
agli spruzzi d’acqua marina o a vapori solforosi nelle stazioni
climatiche.
La posizione OFF non interrompe l’alimentazione elettrica.
Usate l’interruttore principale per isolare il condizionatore
d’aria.
AVVERTIMENTO
PRECAUZIONE
Spia funzionamento (OPERATION): si accende quando l’unità
è in funzione.
Lampeggia una volta per avvisare che il segnale del telecomando
é stato ricevuto e memorizzato. Lampeggia continuamente durante
le funzioni di protezione (sbrinamento, ecc.).
Spia attesa (STANDBY): Si accende quando il condizionatore é
collegato alla corrente ed é pronto a ricevere il segnale dal
telecomando.
Spia TIMER: si accende quando l’unità è controllata dal timer o
dal programma notturno.
4
I
AVVERTIMENTO
AVVERTIMENTO
PRECAUZIONE
Page 15

SELETTORE DEL SENSORE DI TEMPERATURA
●
In condizioni normali la temperatura ambiente viene rilevata e
controllata dal sensore di temperatura posizionato all’interno
del condizionatore.
●
Premere il pulsante I FEEL per attivare il sensore di temperatura posizionato nel telecomando. Questa funzione permette
di creare una temperatura ambiente ottimale perché il telecomando trasmette la temperatura dalla posizione in cui vi trovate. Quindi, usando questa funzione, il telecomando deve
sempre essere indirizzato verso il condizionatore.
Il telecomando trasmette il segnale della temperatura al condizionatore d'aria regolarmente a intervalli di due minuti. Se il segnale dal telecomando si arresta per
più di cinque minuti a causa di inconvenienti, il condizionatore d'aria si commuta automaticamente sul sensore della temperatura, incorporato nell'unità
interna, che controlla la temperatura ambiente. In questi casi la temperatura vicino al telecomando può differire dalla
temperatura rilevata nella posizione del condizionatore d'aria.
INSERIMENTO DELLE BATTERIE
●
Rimuovere il coperchio sul retro del telecomando.
●
Inserire due batterie da 1,5 V-DC tipo AAA alcaline.
Rispettare la polarità come indicato sul telecomando.
●
La durata media delle batterie è di sei mesi e dipende dalla
frequenza con cui si usa il telecomando.
Rimuovere le batterie nel caso di lungo inutilizzo del telecomando
(oltre un mese).
Premere contemporaneamente i pulsanti +, -, SET e CLEAR
dopo aver sostituito le batterie.
(Questa operazione permette di azzerare correttamente tutti i
programmi. Il telecomando va nuovamente impostato).
Sostituire le batterie quando la spia di trasmissione dati del
telecomando non lampeggia oppure quando il condizionatore
non risponde ai comandi del telecomando.
●
Le batterie del telecomando contengono sostanze inquinanti.
Terminata la loro vita utile, devono essere smaltite secondo le
vigenti normative.
USO DEL TELECOMANDO
NOTA
VISORE TELECOMANDO
FUNZIONAMENTO CON IL TELECOMANDO
Controllare che l’interruttore generale sull’alimentazione sia su
ON e che la spia STANDBY sia accesa.
Indirizzare il telecomando con la testina del trasmettitore rivolta
verso il ricevitore posto sul condizionatore d’aria.
COME ACCENDERE IL CONDIZIONATORE
Premere il tasto ON/OFF per accendere il condizionatore. La spia
OPERATION si accenderà, ad indicare che l’unità é in funzione.
UNITÀ INTERNA
RICEVITORE
TESTINA DEL
TRASMETTITORE
TELECOMANDO
5
I
PRECAUZIONE
Page 16
Pulsante SLEEP
(programma notturno)
Per i dettagli vedere “Programma notturno”.
Quando si preme questo pulsante nella modalità
RAFFREDDAMENTO, RISCALDAMENTO o
DEUMIDIFICAZIONE il segno appare sul
visore, e il microprocessore del telecomando regolerà la
temperatura selezionata per risparmiare energia.
6
PULSANTE MODO DI FUNZIONAMENTO
Premere questo pulsante per modificare il funzionamento del
condizionatore.
(automatico)
Quando viene scelta la posizione “automatico” il microprocessore sceglie
automaticamente tra raffreddamento e riscaldamento in base alla differenza
tra la temperatura ambiente e quella impostata sul telecomando.
(riscaldamento)
Il condizionatore riscalda il locale.
(deumidificazione)
Il condizionatore riduce l’umidità dell’aria ambiente.
(raffreddamento)
Il condizionatore raffredda l’aria abbassando la temperatura del locale.
(ventilazione)
Il condizionatore funziona solo come ventilatore.
COOL / DRY / HEAT / FAN
TELECOMANDO
TRASMETTITORE
Quando vengono premuti i pulsanti del telecomando, il simbolo si accede sul visore per trasmettere i cambiamenti della
regolazione al ricevitore del condizionatore.
PULSANTI SELEZIONE TEMPERATURA
—
(più freddo)
Premere questo pulsante per diminuire la temperatura
selezionata.
+
(più caldo)
Premere questo pulsante per aumentare la temperatura
selezionata.
SELETTORI VELOCITÀ DEFLETTORE
SENSORE
Un sensore di temperatura all’interno
del telecomando rileva la temperatura ambiente.
PULSANTE SET
Premere questo pulsante per selezionare le funzioni:
• impostazione dell’ora
• impostazione del timer ON/OFF
Per dettagli vedere le sezioni “COME REGOLARE
L’OROLOGIO” e “REGOLAZIONE DEL TIMER”.
BLOCCAGGIO TELECOMANDO
Premendo questo pulsante il telecomando si blocca
all’ultima impostazione. Quando è attiva il
telecomando non è in grado di controllare il condizionatore.
Per sbloccare il telecomando premere di nuovo .
VISORE
Visualizza le informazioni quando il telecomando è acceso.
SELETTORE SENSORE DI
TEMPERATURA
Premere il pulsante I FEEL per attivare il sensore
di temperatura posizionato nel telecomando.
Questa funzione permette di creare una
temperatura ambiente ottimale.
Premere questi pulsanti per selezionare la funzione
deflettore desiderata
: il deflettore oscilla automaticamente
: ogni volta che premete questo tasto
il deflettore si sposta di
una posizione.
PULSANTE FAN SPEED
(velocità ventilatore)
La velocità del ventilatore viene scelta
automaticamente dal microprocessore.
Alta velocità ventilatore.
Media velocità ventilatore.
Bassa velocità ventilatore.
Modo di funzionamento
Automatico
Raffreddamento
Riscaldamento
Velocità ventilatore
Alta velocità
Automatico
Media velocità
Bassa velocità
Deumidificazione
Conferma trasmissione dati
al condizionatore o bloccaggio
telecomando
Orologio (ore o minuti)
Temperatura impostata
o temperatura ambiente
Appare se la
temperatura è la
temperatura ambiente
Indica che il
condizionatore funziona
in modalità I FEEL
Ventilazione
Programma
notturno
Oscillazione automatica
deflettore inserito
Timer inserito
su acceso
Timer
inserito
su spento
Timer inserito
su programma
giornaliero
PULSANTI REGOLAZIONE OROLOGIO E
IMPOSTAZIONE ORARIO TIMER
Premendo i pulsanti + o - viene attivata l’impostazione
dell’ora e del timer. Per dettagli vedere le sezioni
“COME REGOLARE L’OROLOGIO” e “REGOLAZIONE
DEL TIMER”.
AZZERAMENTO TIMER
Premere il pulsante CLEAR per annullare tutte le
impostazioni del timer
TEMPERATURAAMBIENTE
Premere il pulsante ROOM per visualizzare la
temperatura ambiente vicino al telecomando
PULSANTE
ON/OFF
(acceso/spento)
Il pulsante serve per
mettere in funzione o
arrestare il
condizionatore.
PULSANTE TIMER (impostazione timer)
Premendo il pulsante TIMER sul display viene attivata
la procedura per l’impostazione ON/OFF del timer.
Per dettagli vedere esempio “REGOLAZIONE DEL TIMER”.
I
Page 17

FUNZIONAMENTO IN AUTOMATICO
Quando la temperatura esterna scende sotto lo zero sulla batteria
esterna si forma del ghiaccio che riduce la potenzialità in riscaldamento.
Quando questo accade il microprocessore comanda un’inversione
del funzionamento del condizionatore (sbrinamento).
Con questa funzione operativa il ventilatore dell’unità interna si ferma e la spia OPERATION lampeggia.
Il funzionamento in riscaldamento riprende dopo alcuni minuti in
relazione alle temperature ambiente ed esterna.
SBRINAMENTO DELLO SCAMBIATORE DI
CALORE UNITÀ ESTERNA “STANDBY”
FUNZIONAMENTO E CAPACITÀ DI UN
SISTEMA IN “POMPA DI CALORE”
Un condizionatore in versione pompa di calore riscalda l’ambiente
sottraendo il calore all’aria esterna. La capacità (efficienza) del
sistema si riduce quando la temperatura esterna scende sotto lo zero.
Se il condizionatore non riesce a mantenere un valore sufficiente
della temperatura si dovrà integrare il riscaldamento con un’altra
apparecchiatura.
Dopo l’attivazione della funzione riscaldamento, il ventilatore dell’unità
interna si fermerà. Questo perché è operativa una protezione
“Prevenzione corrente aria fredda” che abiliterà il funzionamento
del ventilatore solo dopo che lo scambiatore di calore dell’unità
interna sarà sufficientemente caldo. Durante questo periodo la spia
STANDBY rimarrà accesa.
COME REGOLARE L'OROLOGIO
RAFFREDDAMENTO
Verificare che l’unità sia collegata alla corrente
e che la spia STANDBY sia accesa.
1.Premere il pulsante MODE (modo di
funzionamento) fino a far apparire sul visore
il simbolo RAFFREDDAMENTO .
2.Premere il pulsante ON/OFF e mettere in
funzione il condizionatore.
3.Premere i pulsanti TEMP. per impostare la
temperatura desiderata (il campo di
regolazione varia tra 30 °C massimo e 16 °C
minimo).
NOTA
RISCALDAMENTO
1.Premere il pulsante MODE (modo di funzionamento) fino a far
apparire sul visore il simbolo RISCALDAMENTO .
2.Premere il pulsante ON/OFF e mettere in funzione il
condizionatore.
3.Premere i pulsanti TEMP. per impostare la temperatura desiderata
(il campo di regolazione varia tra 30 °C massimo e 16 °C minimo).
IL VISORE INDICHERÀ IL VALORE DELLA
TEMPERATURA SELEZIONATA.
1.Premere il pulsante MODE (modo di funzionamento) fino a far
apparire sul Visore il simbolo AUTOMATICO .
2.Premere il pulsante ON/OFF e mettere in funzione il
condizionatore.
3.Premere i pulsanti TEMP. per impostare la temperatura
desiderata (il campo di regolazione varia tra 30 °C massimo e
16 °C minimo).
IL VISORE INDICHERÀ IL VALORE DELLA
TEMPERATURA SELEZIONATA.
Il condizionatore automaticamente funzionerà passando dal
funzionamento riscaldamento in raffreddamento (o viceversa) in
modo da mantenere la temperatura impostata.
4.Premere il pulsante FAN SPEED per impostare la velocità
ventilatore.
4.Premere il pulsante FAN SPEED per impostare la velocità
ventilatore.
5.Premere il pulsante FLAP e regolare la direzione del flusso d’aria
nel modo desiderato. (V. “Regolazione del flusso d’aria”).
IL VISORE INDICHERÀ IL VALORE DELLA
TEMPERATURA SELEZIONATA.
4.Premere il pulsante FAN SPEED per impostare la velocità
ventilatore.
5.Premere il pulsante FLAP e regolare la direzione del flusso d’aria
nel modo desiderato. (V. “Regolazione del flusso d’aria”).
Esempio: schema funzionamento in modalità (Auto) con
temperatura ambiente impostata a 23 gradi.
ONON ON
∆ 1 H ∆ 1 H
MIN. MAX.
A
B
C
C
B
A
27
26
25
24
23
22
21
20
19
7
COOL / DRY / HEAT / FAN
COOL / DRY / HEAT / FAN
1. Premere il pulsante SET per cinque secondi. Lampeggia solo
l’indicazione dell’ora.
2. Premere i pulsanti + o - finché viene visualizzata l’ora attuale.
3. Premere il pulsante SET e l’indicazione smette di lampeggiare.
1
5
4
3
2
I
NOTA
Page 18

I valori precisati sulla tabella si riferiscono al funzionamento del
condizionatore quando è abilitato il sensore sul telecomando (v.
selettore del sensore di temperatura).
I valori precisati variano leggermente nel caso sia abilitato il sensore
posizionato nell’unità interna. (Simbolo evidenziato sul visore del
telecomando).
SCELTA VELOCITÀ VENTILATORE
AUTOMATICO
Impostare con il pulsante FAN SPEED
Il microprocessore controllerà automaticamente la velocità del
ventilatore. Quando il climatizzatore comincia a funzionare il
sensore temperatura rileva la differenza tra la temperatura
ambiente e la temperatura impostata e la trasmette al
microprocessore che automaticamente sceglie la velocità del
ventilatore più idonea.
DIFFERENZA TRA
TEMPERATURAAMBIENTE VELOCITÀ VENTILATORE
E TEMPERATURA IMPOSTATA
Raffreddamento 2 °C e oltre Massima
e deumidificazione Tra 2 e 1 °C Media
Meno di 1 °C Minima
2 °C e oltre Massima
Riscaldamento
Meno di 2 °C Media
Alta velocità Media velocità Bassa velocità
MANUALE
Per regolare manualmente la velocità del ventilatore agire sul pulsante
FAN SPEED scegliendo la velocità desiderata:
NOTA
1 ora 1 ora TEMPO
Temperatura impostata
Temperatura ambiente
RAFFREDDAMENTO E DEUMIDIFICAZIONE
1 ora
1 ora
TEMPO
Temperatura impostata
Temperatura ambiente
RISCALDAMENTO
PROGRAMMA NOTTURNO
●
Il programma notturno serve per risparmiare energia elettrica.
1. Premere il pulsante MODE per predisporre il condizionatore in
raffreddamento, deumidificazione o riscaldamento.
2. Premere il pulsante SLEEP.
3. Il simbolo appare sul visore. Per rilasciare il programma
premere nuovamente il pulsante SLEEP.
Cos’è il Programma Notturno?
All’inizio il condizionatore raffredda o riscalda il locale fino alla
temperatura impostata (SET TEMP), quindi si arresta. Dopo circa 1
ora la temperatura impostata viene automaticamente modificata come
segue (v. grafici).
MODO DI FUNZIONAMENTO MODIFICA TEMPERATURA IMPOSTATA
Riscaldamento Diminuzione di 1 °C
Raffreddamento e Deumidificazione Aumento 1 °C
Il condizionatore funziona fino alla nuova temperatura impostata,
quindi si arresta. Dopo circa 1 ora la temperatura impostata viene
nuovamente aumentata di 1°C in raffreddamento e diminuita di 1 °C
in riscaldamento. In questo modo si risparmia energia senza
pregiudicare il comfort notturno nel locale.
8
COOL / DRY / HEAT / FAN
COOL / DRY / HEAT / FAN
DEUMIDIFICAZIONE
1.Premere il pulsante MODE (modo di funzionamento) fino a far
apparire sul visore il simbolo DEUMIDIFICAZIONE .
2.Premere il pulsante ON/OFF e mettere in funzione il
condizionatore.
3.Premere i pulsanti TEMP. per impostare la temperatura desiderata
(il campo di regolazione varia tra 30 °C massimo e 16 °C minimo).
IL VISORE INDICHERÀ IL VALORE DELLA TEMPERATURA
SELEZIONATA.
●
Usare la funzione deumidificazione quando volete ridurre l’umidità
dell’aria ambiente.
●
Quando la temperatura ambiente raggiunge il valore impostato
sul telecomando (termostato) il condizionatore ripete in automatico
dei cicli di acceso o spento.
●
Con la funzione deumidificazione impostata, il ventilatore
automaticamente gira alla velocità bassa o si ferma per evitare
di raffreddare troppo.
●
La funzione deumidificazione non può essere attivata quando la
temperatura interna è inferiore a 15 °C.
NOTA
NOTA
Il climatizzatore cambia il modo di funzionamento (da freddo a caldo
o viceversa) al verificarsi di una delle seguenti condizioni:
- ZONA A: cambia se la temperatura varia di almeno 3°C da quella
impostata sul telecomando.
- ZONA B: cambia se la temperatura varia di almeno 1°C da quella
impostata sul telecomando dopo un’ora dallo stop del compressore.
- ZONA C: non cambia mai se la temperatura non varia più di 1°C
rispetto a quella impostata sul telecomando.
I
VENTILAZIONE
Se si vuole soltanto far circolare aria nel locale senza modificare la
temperatura, operare come segue:
1.Premere il pulsante MODE (modo di funzionamento) fino a far
apparire sul visore il simbolo VENTILAZIONE .
2.Premere il pulsante ON/OFF e mettere in funzione il
condizionatore.
NOTA
In modalità VENTILAZIONE la velocità del ventilatore é regolata
automaticamente come in modalità raffreddamento.
1°C
1°C
1°C
1°C
Page 19

A) COME REGOLARE L’ORA DI FERMATA
(OFF)
1. Premere il pulsante ON/OFF per accendere
il condizionatore.
2. Premere il pulsante TIMER fino a quando
l’indicazione OFF lampeggia.
3. Premere i pulsanti + o - (ORA) finché viene
visualizzato il valore desiderato.
4. Premere il pulsante SET per attivare il timer.
B) COME REGOLARE L’ORA DI PARTENZA (ON)
1. Premere il pulsante ON/OFF per spegnere
il condizionatore.
2. Premere il pulsante TIMER fino a quando l’indicazione ON
lampeggia.
3. Premere i pulsanti + o - (ORA) finché viene visualizzato il valore
desiderato.
4. Premere il pulsante SET per attivare il timer.
C) COME REGOLARE IL PROGRAMMA GIORNALIERO
ACCESO/SPENTO (O VICEVERSA)
1. Premere il pulsante TIMER fino a quando l’indicazione ON
lampeggia.
2. Premere i pulsanti + o - (ORA) finché viene visualizzato il valore
desiderato.
3. Premere di nuovo il pulsante TIMER, il segnale OFF lampeggia.
4. Premere i pulsanti + o - (ORA) finché viene visualizzato il valore
desiderato.
5. Premere il pulsante TIMER, poi il pulsante SET per attivare il timer.
C) COME AZZERARE IL TIMER
1. Premere il pulsante CLEAR se volete cancellare tutte le impostazioni
del timer.
REGOLAZIONE DEL TIMER
VERTICALE (con telecomando)
Con il telecomando si può regolare il deflettore in due modi:
1. Premere il pulsante per fare oscillare il deflettore.
Premendo ancora, il deflettore si ferma immediatamente.
2. Premere il pulsante per muovere il deflettore passo
per passo.
ORIZZONTALE (manuale)
Il flusso d’aria può essere regolato orizzontalmente spostando le
alette verticali verso sinistra o verso destra come indicato nelle
figure successive.
REGOLAZIONE DEL FLUSSO D'ARIA
Durante il raffreddamento o la deumidificazione, specialmente
in presenza di alta umidità in ambiente, orientare frontalmente
le alette verticali.
Orientamenti delle alette all'estrema sinistra o destra
potrebbero causare la formazione di condensa e
gocciolamenti dalla griglia di uscita aria.
PRECAUZIONE
PRECAUZIONE
Non muovete il deflettore con le mani durante il funzionamento
9
Sinistra
Alette verticali
Destra
I
Se la procedura di impostazione del timer non viene completata,
entro 15 secondi premendo il pulsante SET, sarà annullata e rimarrà
in memoria l’ultima impostazione.
NOTA
3
1
4
2
Page 20

2.CONDIZIONATORE IN FUNZIONE
Se volete fermare il condizionatore premere il tasto con una penna
fino allo spegnimento della spia OPERATION.
CURA E MANUTENZIONE
●
Per la vostra sicurezza accertarsi che il condizionatore sia
spento e che la corrente elettrica sia disinserita prima di
procedere con le operazioni di pulizia.
●
Non versate acqua sull'unità interna durante la pulizia. Questa
potrebbe danneggiare le parti interne dell'unità e provocare un
corto circuito.
COPERTURA E GRIGLIA (UNITÀ INTERNA)
Pulire la copertura e la griglia dell’unità interna con la spazzola di
un aspirapolvere, o con un panno morbido e asciutto.
Se queste parti fossero macchiate usate un panno inumidito con
un detergente leggero.
Nel pulire la griglia fare attenzione a non spingere le alette fuori
dalla loro sede.
●
Non usate solventi, detergenti o forti sostanze chimiche. Non usate
acqua bollente per pulire l’unità interna.
●
Alcuni spigoli metallici e le alette del condensatore sono taglienti;
prestate molta attenzione quando pulite queste parti.
●
Lo scambiatore e altri componenti dell’unità esterna devono essere
puliti almeno una volta all’anno. Consultate il Servizio Assistenza.
Interruzione di corrente durante il funzionamento.
Se si verifica
un’interruzione di corrente, il condizionatore d’aria si arresta.
Quando l’alimentazione elettrica viene ripristinata il condizionatore
riparte automaticamente dopo 3 minuti.
NOTA
10
Selettore di
funzionamento
Se il telecomando non funziona o è stato smarrito, operare come segue.
1. CONDIZIONATORE FERMO
Se volete avviare il condizionatore premere il tasto con una penna
per selezionare la modalità desiderata (COOL o HEAT).
Il condizionatore si avvierà con la velocità automatica del
ventilatore e con il deflettore in oscillazione.
L’impostazione della temperatura é di 22°C per la modalità
raffreddamento e di 26°C per il riscaldamento.
NOTA
FUNZIONAMENTO SENZA TELECOMANDO
Funzione di indirizzamento dell’aria
Il deflettore comincia il movimento oscillatorio per
diffondere l’aria entro la zona di indirizzamento.
Su
Giù
Deflettore
Griglia
uscita aria
NOTA
• Il deflettore si chiude automaticamente
quando il sistema è spento.
• Durante il funzionamento di riscaldamento,
la velocità della ventola è bassa e il
deflettore è in posizione orizzontale
(posizione ) finché l’aria che è soffiata
dal sistema comincia a riscaldarsi. Quando
l’aria si è riscaldata, la posizione del
deflettore e la velocità della ventola
cambiano secondo le regolazioni specificate
con il telecomando.
• Usate il pulsante FLAP sul telecomando per regolare la
posizione del deflettore. Se spostate il deflettore a mano,
la posizione del deflettore secondo il telecomando e la
posizione reale potrebbero non corrispondere. Se ciò
accadesse spegnete il sistema, aspettate che il deflettore
si chiuda e poi accendete di nuovo il condizionatore; ora
la posizione del deflettore è di nuovo normale.
• Non orientare il deflettore verso il basso durante il
funzionamento di raffreddamento. La condensa può iniziare
a formarsi attorno all’uscita dell’aria causando un
gocciolamento.
I
AVVERTIMENTO
PRECAUZIONE
PRECAUZIONE
Page 21

FILTRO ARIA
PULIZIA FILTRO
CONSIGLI PER IL MASSIMO COMFORT E
IL MINIMO CONSUMO
COME RIMETTERE IL FILTRO
I filtri aria dietro la griglia di aspirazione devono essere puliti
almeno una volta ogni due settimane.
COME TOGLIERE I FILTRI
1.Afferrare l’impugantura del filtro aria, tirate verso di voi e verso
il basso.
EVITARE
●
Di ostruire le griglie di mandata e aspirazione
dell’unità; se
queste sono ostruite l’unità non lavora correttamente e potrebbe
danneggiarsi.
●
L’irraggiamento diretto in ambiente usando tende parasole
esterne oppure tirando le tende interne.
VERIFICARE
●
Che i filtri aria siano sempre puliti. Un filtro sporco diminuisce
il passaggio dell’aria e riduce la resa dell’unità.
●
Che porte e finestre siano tenute chiuse
per evitare infiltrazione
di aria non condizionata.
IDENTIFICAZIONE E SOLUZIONE
PROBLEMI DI FUNZIONAMENTO
AVVERTENZA
L’uso di telefoni cellulari in prossimità del condizionatore deve
essere evitato perché può causare disturbi al regolare
funzionamento dello stesso. Qualora fosse notato questo
funzionamento anomalo, ripristinare il normale funzionamento
togliendo l’alimentazione elettrica per circa 60 secondi, (tramite
l’interruttore generale o la spina), quindi rimettete in funzione il
condizionatore.
Se il vostro condizionatore non funziona regolarmente, prima di
chiamare il Servizio Assistenza eseguite i controlli sottoelencati.
Se il problema permane contattare il Rivenditore o il Servizio
Assistenza.
Difetto: Il condizionatore è completamente fermo.
Possibile causa:
1. Alimentazione interrotta.
2. Interruttore automatico aperto o fusibile interrotto.
3. Tensione di linea troppo bassa.
4. Il pulsante di avviamento sul telecomando è nella posizione
OFF.
5. Batterie del telecomando scariche.
Rimedio:
1. Ripristinare l’alimentazione.
2. Contattare il Servizio Assistenza.
3. Consultare il vostro elettricista.
4. Premere il pulsante di avviamento ON/OFF sul telecomando.
5. Sostituire le batterie.
Difetto: La spia STANDBY lampeggia e il condizionatore non
funziona.
Possibile causa:
1. Problemi sul collegamento elettrico.
Rimedio:
1. Contattare il Servizio Assistenza.
Difetto: La spia TIMER lampeggia e il condizionatore non funziona.
Possibile causa:
1. Interruzione di corrente durante la modalità timer.
Rimedio:
1. Premere il pulsante ON/OFF sul telecomando.
Difetto: Il compressore si mette in moto, ma dopo pochi minuti
si arresta.
Possibile causa:
1. Batteria condensatore ostruita (Unità esterna).
Rimedio:
1. Rimuovere l’ostruzione.
Difetto: Il condizionatore non raffredda o non riscalda a sufficienza.
Possibile causa:
1. Filtro sporco o ostruito.
2. Carico raffreddamento eccessivo.
3. Porte o finestre aperte.
4. Ostruzione in prossimità della ripresa o della mandata d’aria.
5. Taratura del termostato troppo alta (raffreddamento) o troppo
bassa (riscaldamento).
6. Temperatura aria esterna molto bassa (versione pompa calore).
7. Il sistema di sbrinamento sull’unità esterna in riscaldamento
non funziona (versione pompa calore).
Rimedio:
1. Pulire il filtro.
2. Eliminare sorgenti di calore in eccesso.
3. Chiudere porte e finestre.
4. Rimuovere le ostruzioni per ripristinare una corretta circolazione
d’aria.
5. Ritarare il termostato.
6. Usare un’altra fonte di calore aggiuntiva.
7. Contattare il Servizio Assistenza.
Difetto: Il condizionatore emette dei leggeri scricchiolii.
Possibile causa:
1. In riscaldamento o in raffreddamento con il variare della
temperatura le parti in plastica subiscono delle dilatazioni che
causano questo inconveniente.
Rimedio:
1. Situazione da ritenersi normale; i leggeri scricchiolii percepiti
scompariranno entro breve tempo.
11
Filtro sinistro
Filtro destro
Pulire il filtro con un aspirapolvere.
In presenza di polvere oleosa, lavate con acqua tiepida saponata,
risciacquate e lasciate asciugare.
1. Fare attenzione a non invertire i filtri tra loro, notare la
sporgenza dell’impugnatura sul lato destro e sinistro.
2. Inserire il filtro nella scanalatura, fate scorrere verso
l’alto fino ad alloggiare l’impugnatura nella sede.
I
Page 22

NOM DES DIFFERENTES PARTIES ET SELECTEUR DE FONCTIONNEMENT 3
EMPLACEMENT D’INSTALLATION 4
PRECAUTIONS ELECTRIQUES 4
INSTRUCTIONS DE SECURITE 4
UTILISATION DE LATELECOMMANDE 5
TELECOMMANDE 6
REGLAGE DE L’HEURE 7
REFROIDISSEMENT 7
CHAUFFAGE 7
FONCTIONNEMENT AUTOMATIQUE 7
DESHUMIDIFICATION 8
VENTILATION 8
REGLAGE DE LA VITESSE DU VENTILATEUR 8
PROGRAMME NOCTURNE 9
REGLAGE DU TEMPORISATEUR 9
REGLAGE DU FLUX D’AIR 9
FONCTIONNEMENT SANS LA TELECOMMANDE 10
ENTRETIEN ET NETTOYAGE 10
CONSEILS POUR LE CONFORT ET L’ECONOMIE DE L’ENERGIE 11
GUIDE DE DEPANNAGE 11
Ce climatiseur est doté des fonctions de refroidissement, déshumidification et ventilation , de refroidissement, déshumidification, chauffage e ventilation . Vous trouverez ci-après des détails à leur sujet. Veuillez vous
référer à ces explications lors de l’utilisation de ce climatiseur.
SOMMAIRE
DECLARATION DE CONFORMITÉ
Ce produit est marqué puisque il est conforme aux Directives:
– Basse Tension n° 73/23 CEE et 93/68 CEE.
– Compatibilité Electromagnétique n° 89/336 CEE, 92/31 CEE et 93/68 CEE.
Cette déclaration sera nulle en cas d'une utilisation différente de celle déclarée par le Constructeur et/ou de la non-observation, même
partielle des instructions d'installation et/ou d’utilisation.
2
REMARQUE
Pour tout problème ou toute question relatifs au climatiseur, il faudra les
informations ci-dessous. Les numéros de série et de modèle figurent sur la
plaque signalétique placée sur le fond du coffret.
No. de modèle
No. de série
Date d’achat
Adresse du vendeur
Numéro de téléphone
INFORMATIONS SUR LE PRODUIT
Les symboles suivants utilisés dans ce manuel avertissent d’un danger potentiel
pour l’utilisateur, le personnel d’entretien ou l’appareil proprement dit:
Ce symbole signale un danger ou des opérations
dangereuses qui risquent d’entraîner des
blessures physiques graves, ou mortelles.
SYMBOLES D’AVERTISSEMENT
Ce symbole signale un danger ou des opérations
dangereuses qui risquent d’entraîner des
blessures physiques ou des dommages
matériels, notamment du produit.
F
COOL/DRY/FAN
COOL / DRY / HEAT / FAN
AVERTISSEMENT
ATTENTION
Page 23
NOM DES DIFFERENTES PARTIES ET SELECTEUR DE FONCTIONNEMENT
1. Télécommande.
2. Sonde de température: elle détecte la température de la
pièce où se trouve la commande et donc du climatiseur.
3. Sortie d’air : distribue l’air traité et filtré dans le local.
4. Entrée d’air : l’air ambiant est aspiré et filtré à travers des
filtres spéciaux.
5. Récepteur : reçoit les signaux de la télécommande
6. Tuyau flexible d’évacuation : évacue l’humidité
7. Tuyaux du gaz réfrigérant : parcours du gaz réfrigérant; ces
tuyaux relient l’unité extérieure avec l’unité intérieure
8. Sélecteur de fonctionnement (sans télécommande):
Appuyer ce bouton pour sélectionner le fonctionnement OFF,
COOL et HEAT.
3
4
3
6
UNITE INTERIEURE
UNITE EXTERIEURE
7
1
2
UNITE INTERIEURE
5
Voyant de
fonctionnement
(OPERATION)
8
Voyant du
temporisateur
(TIMER)
Voyant d’attende
(STANDBY)
F
Page 24

PRECAUTIONS ELECTRIQUES
EMPLACEMENT D’INSTALLATION
●
Avant l’installation, s’assurer que la tension du reseau
d’alimentation de votre maison ou de votre bureau est la même
que celle indiquée sur la plaque signalétique du climatiseur.
●
Tous les branchements électriques devront être conformes aux
normes et réglementations en vigueur. Consulter éventuellement
le revendeur ou un technicien qualifié.
●
Chaque unité doit être correctement raccordée à la terre avec
une prise de terre.
●
Le branchement électrique doit être fait par un technicien qualifié.
INSTRUCTIONS DE SECURITE
●
Avant d'utiliser le climatiseur, consultez avec soin ce manuel
d'instructions. En cas de doutes ou de problèmes, adressez-vous
au revendeur, ou au Service Après-Vente.
●
Le climatiseur a été étudié pour créer des conditions climatiques
confortables.
Ne l'utilisez que dans le but pour lequel il a été prévu et en
suivant les indications indiquées dans ce manuel.
●
Ne jamais utiliser d'essence ou d'autres liquides inflammables
près du climatiseur. Cela serait extrêmement dangereux.
●
De plus, ne pas installer sous l’unité des appareillages
électriques qui ne sont pas protégés avec la protection
IPX1 (protection à l’eau avec chute verticale).
●
Le constructeur décline toute responsabilité pour le non respect
des normes de sécurité et des mesures pour la prévention des
accidents.
●
Ne jamais utiliser l’interrupteur général pour mettre en
route ou arrêter le climatiseur. Utiliser seulement la touche
ON/OFF de la télécommande ou le sélecteur placé sur
l'unité.
●
Ne rien introduire dans les entrées et sorties d'air du
climatiseur. Cela est très dangereux car le ventilateur tourne
à grande vitesse.
●
Ne pas laisser les enfants jouer avec le climatiseur.
●
Ne pas refroidir excessivement la pièce en présence des
bébés ou des malades.
●
Il est recommandé de faire installer le climatiseur par un
technicien qualifié en suivant les instructions d’installation
fournies avec l’appareil.
●
Ne pas installer le climatiseur dans un local où l’on détecte
des émanations gazeuses ou des gaz inflammables, ni à un
endroit extrêmement humide, une serre par exemple.
●
Ne pas installer le climatiseur aux endroits où se trouvent
des appareils dégageant une chaleur excessive.
●
Ne pas installer le climatiseur dans un local, où il pourrait
être mouillé par des jets d'eau (par exemple dans la
buanderie).
Eviter
Pour protéger le climatiseur de toute corrosion, ne pas exposer
directement l’unité extérieure à des embruns d’eau de mer ou à
des vapeurs sulfureuses.
La position OFF ne coupe pas l’alimentation électrique. Pour
éteindre complètement l’appareil, utiliser l’interrupteur
principal d’alimentation.
AVERTISSEMENT
ATTENTION
Voyant de fonctionnement (OPERATION): Il s’allume quand le
climatiseur est en marche.
Il clignote une fois pour indiquer que le signal de la télécommande
a été reçu et mémorisé. Il clignote continuellement pendant les
modes de protection (dégivrage, ecc.).
Voyant d'attente (STANDBY) : Il s’allume quand le climatiseur
est connecté à la courant et peut recevoir le signal de la
télécommande.
Voyant du temporisateur (TIMER): Ce voyant s'allume lorsque
l'unité est contrôlée par le temporisateur ou par le programme
nocturne.
4
F
AVERTISSEMENT
AVERTISSEMENT
ATTENTION
Page 25

INSTALLATION DES PILES
●
Enlever le couvercle au dos de la commande.
●
Placer deux piles alcalines du format AAAde 1,5V-DC. S’assurer
que les piles sont bien installées dans le compartiment en
respectant les pôles.
●
Les piles ont une autonomie d'environ six mois, en fonction de
la fréquence d'utilisation de la télécommande. Enlever les piles,
si vous prévoyez de ne pas utiliser la commande à distance
pendant plus d'un mois.
Appuyer au même temps sur les boutons +, -, SET et CLEAR
après avoir remplacé les piles.
(De cette façon le temporisateur (TIMER) peut être mis
correctement à zéro et par la suite à nouveau réglé). Remplacer
les piles lorsque le voyant de le télécommande ne clignote plus
ou lorsque la commande à distance ne permet plus de modifier
les réglages du climatiseur.
●
Les piles de la télécommande contiennent des agents polluants.
Une fois usées, les jeter en respectant la réglementation locale
concernant les déchets.
UTILISATION DE LA TELECOMMANDE
SELECTEUR DE LA SONDE DE TEMPERATURE
●
En conditions normales, la température ambiante est détectée
et contrôlée par la sonde de température placée dans le
climatiseur.
●
Appuyer sur le bouton I FEEL pour mettre en service la sonde
de température placée dans la télécommande. Cette fonction
permette de personnaliser la temperature ambiante en
transmettant le signal de une position près vous. Donc, en
utilisant cette fonction, la télécommande doit toujours être
dirigé vers le climatiseur, sans obstacles.
La télécommande transmet
régulièrement un signal de
température au climatiseur à
intervalles de deux minutes. Si la
transmission du signal de la
télécommande cesse pendant
plus de cinq minutes par suite
d'une perte de la télécommande ou pour une autre raison, le
climatiseur, utilisera la sonde de température placée dans
l’unité intérieure et il contrôlera ainsi la température. Dans ce
cas, il se peut que la température autour de la télécommande
soit différente de celle qui est détectée à l'endroit où se trouve
AFFICHAGE SUR LA
TELECOMMANDE
FONCTIONNEMENT AVEC LA TELECOMMANDE
Vérifier que le disjoncteur du panneau d’alimentation est sur ON
et que le voyant STANDBY est allumé.
Diriger l’émetteur de la commande à distance vers le récepteur
placé sur le climatiseur.
COMMENT METTRE EN MARCHE LE CLIMATISEUR
Appuyer sul le bouton ON/OFF pour mettre en marche le
climatiseur. Le voyant OPERATION s’allume, en indiquant que
l’unité est en marche.
UNITE INTERIEURE
RECEPTEUR
TETE DE
L’EMETTEUR
TELECOMMANDE
5
F
REMARQUE
ATTENTION
Page 26

Bouton NIGHT SETBACK
(Programme nocturne)
Pour les détails, voir "Programme nocturne".
Quand l'on appuie sur ce bouton en mode
REFROIDISSEMENT, CHAUFFAGE ou
DESHUMIDIFICATION, le signal s'affiche et
le microprocesseur de la télécommande régle
automatiquement la température sélectionnée de
façon à économiser l'énergie.
6
BOUTON MODE DE FONCTIONNEMENT
Appuyer sur ce bouton pour choisir le mode de fonctionnement du
climatiseur.
(auto)
Sur cette position le microprocesseur calcule automatiquement la différence
entre le réglage du thermostat et la température de la pièce, puis il commuté
automatiquement sur le mode réfroidissement ou chauffage.
(chauffage)
Le climatiseur réchauffe la pièce.
(deshumidification)
Le climatiseur réduit l’humidité de l’air de la pièce.
(refroidissement)
Le climatiseur refroidit la pièce.
(ventilation)
Le climatiseur functionne uniquement en ventilation.
COOL / DRY / HEAT / FAN
TELECOMMANDE
EMETTEUR
Lorsque l'on appuie sur les boutons de la télécommande,
le voyant clignote pour transmettre la modification
des réglages au récepteur du climatiseur.
BOUTONS DE REGLAGE DE LA TEMPERATURE
— (plus froid)
Appuyer sur ce bouton pour réduire la température.
+
(plus chaud)
Appuyer sur ce bouton pour augmenter la température.
SELECTEURS VITESSE DU VOLET
CAPTEUR
(SENSOR)
Le capteur de
température incorporé
à la télécommande
détecte la température
de la pièce.
BOUTON SET
Appuyer sur ce bouton pour sélectionnes les fonctions:
• réglage de l’heure
• réglage du temporisateur ON/OFF
Pour les détails voir “REGLAGE DE L’HEURE” et
“REGLAGE DU TEMPORISATEUR”.
BLOC DE LA TELECOMMANDE
En appuyant ce bouton la télécommande se bloque avec le
dernier réglage. Quand est activé la télécommande
ne peut pas contrôler le climatiseur. Pour débloquer la
télécommande appuyer de nouveau .
AFFICHAGE
Les informations sur le mode de fonctionnement s’affichent lorsque la télécommande
est en fonction.
SELECTEUR DE LA SONDE DE
TEMPERATURE
Appuyer le bouton I FEEL pour activer la sonde
de température placée dans la télécommande.
Cette fonction permît de personnaliser la
température ambiante.
Appuyer sur ces boutons pour choisir la fonction du
volet désirée
: le volet balaye automatiquement
: chaque foi vous appuyez ce bouton
le volet se déplace de une position.
BOUTON FAN SPEED
(Vitesse de ventilation)
Le microprocesseur choisit
automatiquement la vittesse de ventilation.
Grande vitesse de ventilation.
Moyenne vitesse de ventilation.
Petite vitesse de ventilation.
Mode de fonctionnement
Auto
Refroidissement
Chauffage
Vitesse de ventilation
Grande vitesse
Auto
Moyenne vitesse
Petite vitesse
Deshumidification
Confirme la transmission
des données au climatiseur et
bloc de la telecommande
Horloge
heures/minutes
Température réglé
ou température
ambiante
Apparaît quand la
température est la
température
ambiante
Indique que le
climatiseur fonctionne
en mode I FEEL
Ventilation
Programme
nocturne
Bayalage volet
automatique
Temporisateur
allumé (ON)
Temporisateur
allumé (OFF)
Temporisateur
allumé pour
programme
24 h.
BOUTONS POUR LE REGLAGE DE
L’HEURE ET DU TEMPORISATEUR
En appuyant les boutons + ou - est activée le réglage
de líheure et du temporisateur.
Pour les détails voir “REGLAGE DE L’HEURE” et
“REGLAGE DU TEMPORISATEUR”.
ANNULATION DU TEMPORISATEUR
Appuyer sur le bouton CLEAR pour annuler tous les
opérations du temporisateur.
TEMPERATURE AMBIANTE
Appuyer le bouton ROOM pour visualiser la température
ambiante près la télécommande.
BOUTON
ON/OFF
(en marche/arrêt)
Ce bouton permet de
mettre le climatiseur en
marche et de l'arrêter.
BOUTON TIMER (programmation du
temporisateur)
En appuyant sur le bouton TIMER on active sur l’affichage
la proceure pour le réglage ON/OFF du temporisateur.
Pour les détails, voir “RÉGLAGE DU TEMPORISATEUR”.
F
Page 27

FONCTIONNEMENT AUTOMATIQUE
Lorsque la température extérieure descend au-dessous de zéro, de la
glace se forme sur la batterie extérieure; ceci réduit la puissance en
chauffage. Dans ce cas le microprocesseur commande un changement
dans le fonctionnement du climatiseur (dégivrage). Lorsque cette fonction
est activée, le ventilateur de l’unité intérieure s’arrête et le voyant
OPERATION clignote pendant le dégivrage.
Le fonctionnement en chauffage reprend après quelques minutes en
fonction de la température ambiante et de la température extérieure.
DEGIVRAGE DE L’ECHANGEUR DE
CHALEUR UNITE EXTERIEURE “STANDBY”
FONCTIONNEMENT ET RENDEMENT D'UN
SYSTEME "REVERSIBLE"
Un climatiseur en version "Reversible" rechauffe l'air ambiance en prélevant
la chaleur de l'air extérieur. La capacité (rendement) du système diminue
donc lorsque la température extérieure descend au-dessous de zéro.
Si le climatiseur ne reussit pas à maintenir une valeur suffisante de la
température, on devra compléter le chauffage avec un autre appareil.
Après la mise en marche en chauffage, le ventilateur de l’unité intérieure
ne fonctionnera pas, grâce à une protection “prévention courants air
froid” qui permettra le fonctionnement du ventilateur seulement lorsque
l’échangeur de chaleur de l’unité intérieure sera suffisamment chaud.
Pendant cette période le voyant STANDBY sera allumé.
REGLAGE DE L'HEURE
REFROIDISSEMENT
Vérifier que l’unité est connecté à l’alimentation
électrique et que le voyant STANDBY est allumé.
1. Appuyer sur le bouton MODE (Mode de
fonctionnement) jusqu'à l’affichage du signal
REFROIDISSEMENT .
2. Appuyer sur le bouton ON/OFF pour mettre en
marche le climatiseur.
3. Appuyer sur les boutons TEMP. pour choisir la
température (la plage de réglage de la
température est entre 30 °C max. et 16 °C min.).
REMARQUE
CHAUFFAGE
1. Appuyer sur le bouton MODE (Mode de fonctionnement) jusqu'à
l’affichage du signal CHAUFFAGE .
2. Appuyer sur le bouton ON/OFF pour mettre en marche le climatiseur.
3. Appuyer sur les boutons TEMP. pour choisir la température (la plage de
réglage de la température est entre 30 °C max. et 16 °C min.).
LA VALEUR DE LA TEMPERATURE SELECTIONNEE
S’AFFICHE.
1. Appuyer sur le bouton MODE (Mode de fonctionnement) jusqu'à
l’affichage du signal AUTOMATIQUE .
2. Appuyer sur le bouton ON/OFF pour mettre en marche le climatiseur.
3. Appuyer sur les boutons TEMP. pour choisir la température (la plage de
réglage de la température est entre 30 °C max. et 16 °C min.).
LA VALEUR DE LA TEMPERATURE SELECTIONNEE
S’AFFICHE.
Le climatiseur change automatiquement le mode de fonctionnement
de chauffage en refroidissement (ou vice versa) pour maintenir la
température sélectionnée.
4. Appuyer sur le bouton FAN SPEED pour régler la vitesse de ventilation.
4. Appuyer sur le bouton FAN SPEED pour régler la vitesse de ventilation.
5. Appuyer sur le bouton FLAP et régler la direction du flux d’air. (cf.
réglage du flux d’air)
LA VALEUR DE LA TEMPERATURE
SELECTIONNEE S’AFFICHE.
4. Appuyer sur le bouton FAN SPEED pour régler la vitesse de ventilation.
5.Appuyer sur le bouton FLAP et régler la direction du flux d’air. (cf. réglage
du flux d’air)
Exemple de schema de fonctionnement en mode (Auto) avec la
température ambiante sélectionneé a 23°C.
ONON ON
∆ 1 H ∆ 1 H
MIN. MAX.
A
B
C
C
B
A
27
26
25
24
23
22
21
20
19
7
F
COOL / DRY / HEAT / FAN
COOL / DRY / HEAT / FAN
1. Appuyer sur le bouton SET pendant cinq seconds. L’indication de
l’heure seule clignote.
2. Appuyer sur les boutons + ou - jusqu’a ce que l’heure courante
s’affiche.
3. Appuyer sur le bouton SET jusqu’a ce que l’indication ne clignote
pas.
1
5
4
3
2
REMARQUE
Page 28
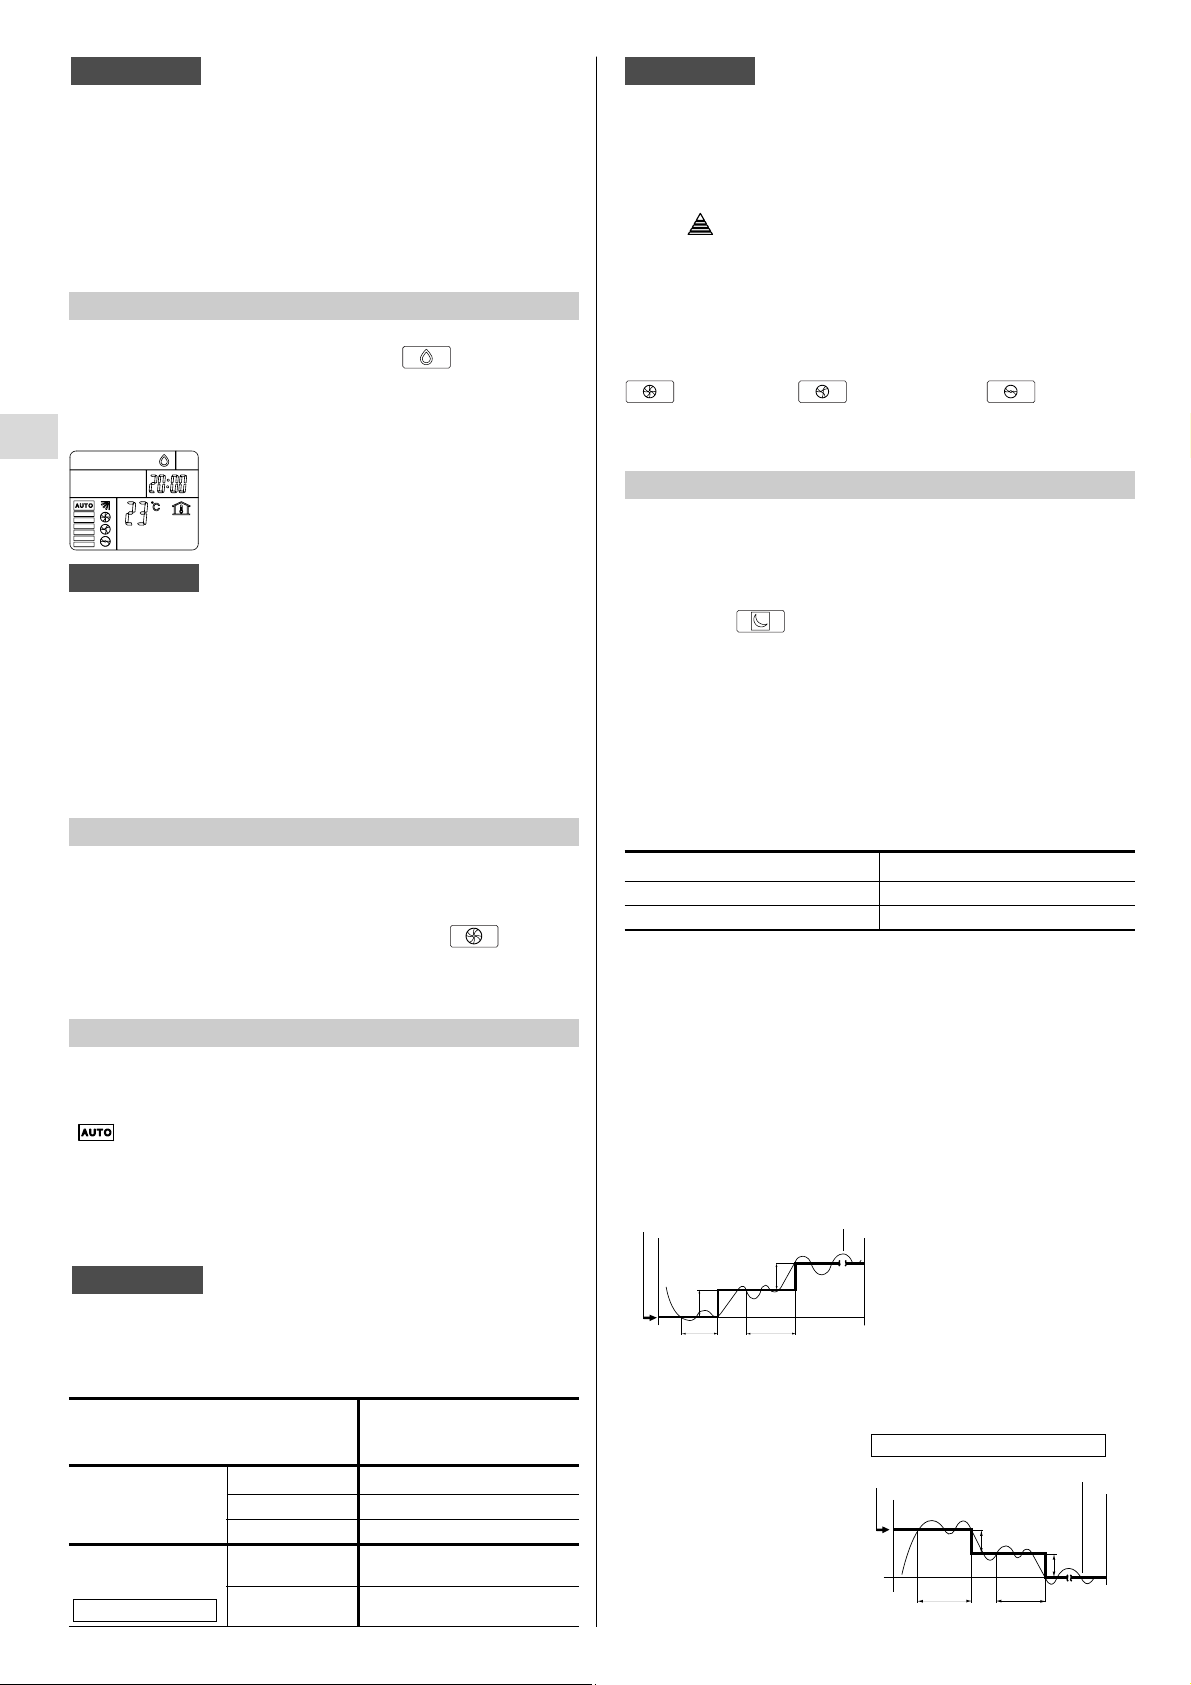
Les valeurs précisées sur le tableau concernent le fonctionnement
du climatiseur lorsque le capteur de la télécommande est choisi (voir
sélecteur du capteur de température, page 31).
Les valeurs précisées changent légèrement dans le cas où le capteur
placé dans l’unité intérieure est selectionné.
(Signal affiché sur la commande à distance).
REGLAGE DE LA VITESSE DU VENTILATEUR
AUTOMATIQUE
Mettre le sélecteur FAN SPEED (vitesse du ventilateur) en position
. Le microprocesseur du climatiseur règle automatiquement la
vitesse du ventilateur. Quand le climatiseur commence à fonctionner,
la différence entre la température de la pièce et la température
sélectionnée est détectée par le microprocesseur qui règle alors
automatiquement le ventilateur sur la vitesse qui convient.
DIFFERENCE ENTRE
TEMPERATURE AMBIANTE ET VITESSE DU VENTILATEUR
TEMPERATURE SELECTIONNEE
Refroidissement 2 °C et plus Maximum
et Déshumidification Entre 2 et 1 °C Moyenne
Moins de 1 °C Minimum
2 °C et plus Maximum
Chauffage
Moins de 2 °C Moyenne
Grande vitesse Moyenne vitesse Petite vitesse
MANUEL
Pour régler la vitesse du ventilateur manuellement, il suffit de mettre
le sélecteur FAN SPEED (vitesse du ventilateur) sur la position
désirée.
REMARQUE
1 heure 1 heure TEMPS
Température sélectionnée
Température ambiante
REFROIDISSEMENT ET DESHUMIDIFICATION
1 heure
1 heure
TEMPS
Temp. sélectionnée
Temp. ambiante
CHAUFFAGE
PROGRAMME NOCTURNE
●
Le programme nocturne permet d'économiser l’énergie électrique.
1. Appuyer sur le bouton MODE pour choisir le mode de
fonctionnement refroidissement, déshumidification ou chauffage.
2. Appuyer sur le bouton SLEEP.
3. Le signal s'affiche. Pour libérer la fonction d'économie
nocturne, appuyer à nouveau sur le bouton SLEEP.
Définition du programme nocturne
En mode d’économie nocturne, le climatiseur refroidit ou réchauffe la
pièce à la température sélectionnée (SET TEMP), puis le thermostat
commute le climatiseur en mode d’attente. Environ 1 heure plus tard, la
température sélectionnée est automatiquement modifiée comme suit.
(Voir graphique).
MODE DE FONCTIONNEMENT MODIFICATION TEMP. SELECTIONNEE
Chauffage Diminution 1 °C
Refroidissement et Déshumidification Augmentation de 1 °C
Le climatiseur reste en marche jusqu’à ce que la température de la
pièce atteigne la nouvelle valeur sélectionnée, puis il est commuté
en mode d’attente. Environ 1 heure plus tard, la température
selectionnée est à nouveau relevée de 1 °C en refroidissement et
abaissée de 1 °C en chauffage. Ceci permet d’économiser l’énergie
sans sacrifier le confort dans la pièce.
8
COOL / DRY / HEAT / FAN
DESHUMIDIFICATION
1. Appuyer sur le bouton MODE (Mode de fonctionnement) jusqu'à
l’affichage du signal DESHUMIDIFICATION .
2. Appuyer sur le bouton ON/OFF pour mettre en marche le climatiseur.
3. Appuyer sur les boutons TEMP. pour choisir la température (la plage de
réglage de la température est entre 30 °C max. et 16 °C min.).
LA VALEUR DE LA TEMPERATURE SELECTIONNEE
S’AFFICHE.
●
Utilisez la fonction déshumidification quand vous voulez réduire
l’humidité de l’air ambiant.
●
Lorsque la température ambiante atteint la valeur sélectionnée sur la
télécommande (thermostat), le climatiseur répète automatiquement
les cycles de marche/arrêt.
●
Avec la fonction déshumidification sélectionnée, la vitesse du ventilateur
est périodiquement faible ou s’arrêt pour éviter le trop refroidissement.
●
La fonction déshumidification ne peut pas être activée quand la
température extérieure est au-dessous de 15 °C.
REMARQUE
REMARQUE
Le climatiseur change automatiquement le mode de fonctionnement (de
refroidissement en chauffage, ou vice versa) quand se verifie une des
conditiones suivantes:
- ZONE A: change si la difference entre la température ambiante et la
température selectionneé sur la telecommande est au moins 3°C.
- ZONE B: change si la difference entre la température ambiante et la
température selectionneé sur la telecommande est au moins 1°C, une
heure aprés l’arret du compresseur.
- ZONE C: ne change jamais si la difference entre la température ambiante
et la température selectionneé sur la telecommande n’est pas plus de 1°C.
F
VENTILATION
Si l'on désire que l'air circule dans la pièce sans modifier la
température, effectuer les opérations suivantes:
1. Appuyer sur le bouton MODE (mode de fonctionnement)
jusqu’à l’affichage du signal VENTILATION .
2. Appuyer sur le bouton ON/OFF pour mettre en marche le
climatiseur.
REMARQUE
En mode VENTILATION la vitesse du ventilateur est réglée
automatiquement comme en refroidissement.
COOL / DRY / HEAT / FAN
1°C
1°C
1°C
1°C
Page 29

A) REGLAGE DE L’HEURE D'ARRET
(OFF).
1. Appuyer sur le bouton ON/OFF pour mettre
en marche le climatiseur.
2. Appuyer sur le bouton TIMER jusqu’à ce que
OFF clignote.
3. Appuyer sur les boutons + ou - jusqu’à ce
que le valeur désiré s’affiche.
4. Appuyer sur le bouton SET pour activer le
temporisateur.
B) REGLAGE DE L’HEURE DE MISE EN MARCHE (ON)
1. Appuyer sur le bouton ON/OFF pour arrêter
le climatiseur.
2. Appuyer sur le bouton TIMER jusqu’à ce que ON clignote.
3. Appuyer sur les boutons + ou - jusqu’à ce que le valeur désiré
s’affiche.
4. Appuyer sur le bouton SET pour activer le temporisateur.
C) REGLAGE DE MISE EN MARCHE/ARRET QUOTIDIEN
1. Appuyer sur le bouton TIMER jusqu’à ce que ON clignote.
2. Appuyer sur les bouton + ou - (HEURE) jusqu’à ce que le valeur
désiré s’affiche.
3. Appuyer de nouveau sur le bouton TIMER et OFF clignote.
4. Appuyer sur les bouton + ou - (HEURE) jusqu’à ce que le valeur
désiré s’affiche.
5. Appuyer sur le bouton TIMER, puis le bouton SET pour activer le
temporisateur.
D) ANNULATION DU TEMPORISATEUR
Appuyer sur le bouton CLEAR si vous voulez annuler tous les
opérations du temporisateur.
REGLAGE DU TEMPORISATEUR
Si la procédure de réglage du temporisateur n’est pas terminé dans
15 seconds, en appuyant sur le bouton SET, sera annulé et restera
mémorisé le dernier réglage .
REMARQUE
VERTICALEMENT (avec télécommande)
La télécommande permet de régler le volet de deux façon:
1. Appuyer sur le bouton pour faire le volet balayer. Si
on appui de nouveau le volet s’arrêt tout de suite.
2. Appuyer sur le bouton pour déplacer le volet de une
position en la autre.
HORIZONTALEMENT (manuel)
Le flux de l’air peut être réglé horizontalement en déplaçant les
ailettes verticales vers la gauche ou vers la droite, comme indiqué
dans les figures de chaque modèle.
REGLAGE DU FLUX D’AIR
Pendant le refroidissement ou la déshumidification, surtout
avec beaucoup d'humidité dans la pièce, régler les ailettes
verticales droites.
Si les ailettes sont réglées extrêmement vers la gauche ou
vers la droite, des goutelettes de condensation sur la grille
de sortie d'air pourraient se former.
Ne pas déplacer le volet à la main pendant le fonctionnement
9
Gauche
Ailettes verticales
Droite
F
3
1
4
2
ATTENTION
ATTENTION
Page 30
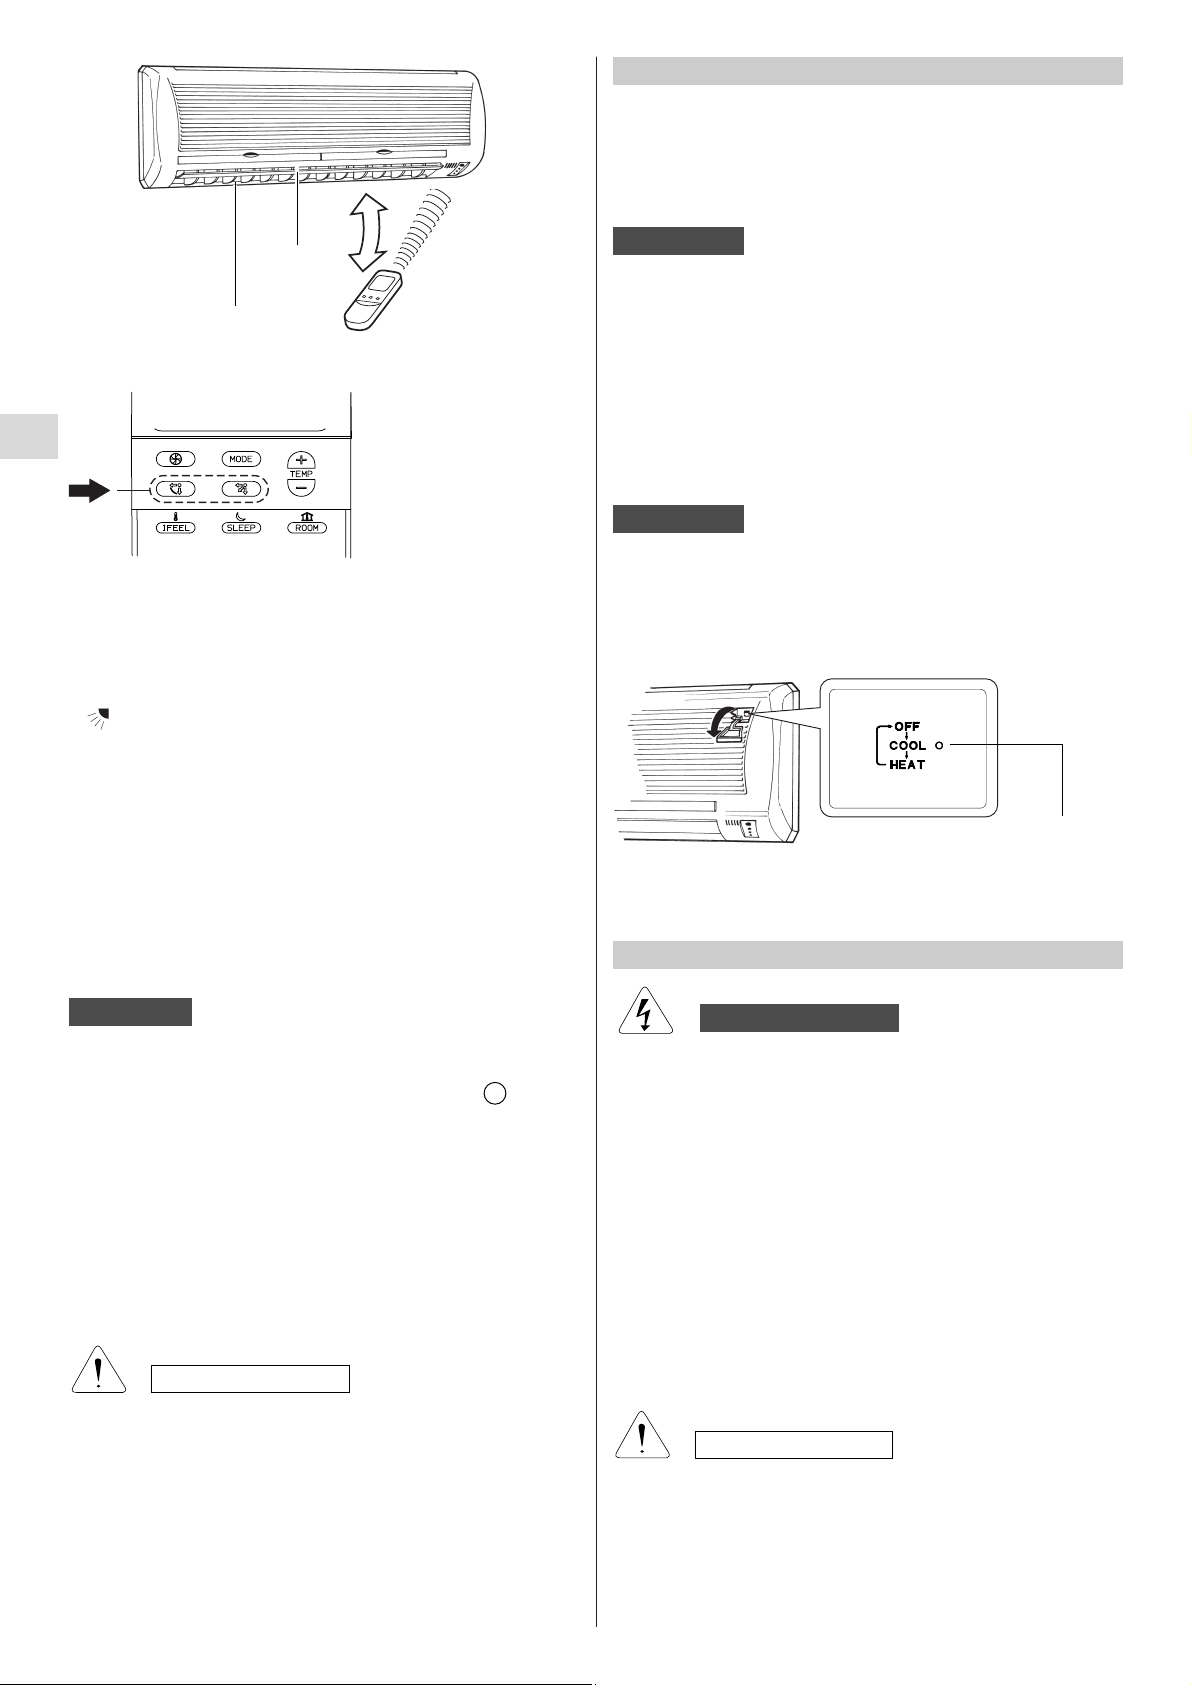
Balayage
Le volet commence à se déplacer de haut en bas
pour fournir l’air dans la plage de balayage.
2. CLIMATISEUR EN MARCHE.
Pour éteindre le climatiseur, appuyer le bouton avec un plume
jusqu’à ce que le voyant OPERATION s’étende.
ENTRETIEN ET NETTOYAGE
●
Pour toute sécurité, éteindre le climatiseur et le débrancher de
la prise secteur, avant de commencer le nettoyage.
●
Ne pas verser de l’eau sur l’unité intérieure pour la nettoyer.
Cela pourrait abîmer les composants internes et provoquer des
décharges électriques.
BOITIER ET GRILLE (UNITE INTERIEURE)
Nettoyer le boîtier et la grille de l’unité intérieure avec la brosse
d’un aspirateur ou avec un chiffon propre et doux.
Si ces parties sont sales, les nettoyer avec un chiffon propre
humecté d’un détergent liquide doux.
Quand on nettoie la grille, faire attention de ne pas modifier la
place des ailettes en frottant.
●
Ne jamais utiliser de dissolvants ni de produits chimiques puissants.
Ne pas nettoyer l’unité intérieure avec de l’eau très chaude.
●
Certains bords métalliques et les ailettes de l’échangeur, étant
coupants, doivent être manipulés avec precautions lors du nettoyage
sous peine de provoquer des blessures.
●
L’échangeur et les autres composants de l’unité extérieure doivent être
nettoyés tous les ans. Consulter le Service Après Vente.
Coupure de courant pendant le fonctionnement.
En cas de coupure de courant, l’appareil s’arrête.
Quand l’alimentation est rétablie, l’appareil se redénarre
automatiquement après 3 minutes.
REMARQUE
10
Sélecteur de
fonctionnement
Si la télécommande a été perdue ou si elle ne fonctionne pas,
procéder comme suit:
1. CLIMATISEUR ARRETE.
Pour mettre le climatiseur en marche, appuyer le bouton avec
une plume pour sélectionner le mode désiré (COOL ou HEAT).
Le climatiseur se mettra en marche avec la vitesse
automatique du ventilateur et le volet en balayage. Le réglage
de la température est de 22°C pour le mode refroidissement
y 26°C pour le chauffage.
REMARQUE
FONCTIONNEMENT SANS LA TELECOMMANDE
Vers le haut
Vers le bas
Volet
Grille
d’admission d’air
REMARQUE
• Le volet se referme automatiquement
quand l’appareil est mis hors tension.
• Pendant le chauffage, la vitesse du
ventilateur est très basse et le volet reste
en position horizontale (position ) jusqu’à
ce que l’air soufflé par l’appareil commence
à se réchauffer. Une fois que l’air est
réchauffé, la position du volet et la vitesse
du ventilateur passent aux réglages
spécifiés par la télécommande.
• Utiliser le bouton FLAP de la télécommande pour
ajuster la position du volet. Si l’on déplace le volet
de la main, il y aura un décalage entre la position
préconisée par la télécommande et la position réelle.
Dans ce cas, mettre l’appareil hors tension, attendre
que le volet se referme, puis remettre l’appareil sous
tension. La position du volet sera à nouveau normale.
• Ne pas diriger le volet vers le bas pendant le
refroidissement car une condensation risque de se
produire autour de la sortie d’air et de s’égouter.
6
F
AVERTISSEMENT
ATTENTION
ATTENTION
Page 31

FILTRE A AIR
NETTOYAGE DES FILTRES
CONSEILS POUR LE CONFORT
ET L’ECONOMIE DE L’ENERGIE
REMISE EN PLACE DES FILTRES
Les filtres à air situés derrière la grille d’arrivée d’air doivent être
nettoyés au moins une fois toutes les deux semaines.
RETRAIT DES FILTRES
1.Saisir la poignée du filtre à air, puis tirer le filtre vers l’extérieur
et le bas.
EVITER
●
D’obstruer les grilles d’arrivée et de sortie d’air de l’appareil.
Si elles sont bouchées, l’appareil ne fonctionnera pas de façon
satisfaisante et il risque d’être endommagé
.
●
De laisser le soleil pénétrer à plein dans la pièce. Utiliser des
persiennes ou des rideaux.
VERIFIER
●
Que les filtres à air soient toujours propres. Un filtre colmaté
diminuence les performances de l’appareil
●
Que toutes les portes, les fenêtres et autres ouvertures soient
fermées pour éviter des infiltrations d’air non réfrigéré
.
GUIDE DE DEPANNAGE
AVIS IMPORTANT
Ne pas utiliser de téléphone portable près du climatiseur, pour
éviter des perturbations au fonctionnement de celui-ci. Dans le
cas où un fonctionnement anormal est remarqué, rétablir le
fonctionnement normal en coupant l'alimentation électrique pendant
au moins 30 secondes, au moyen du disjoncteur général ou de
la fiche, ensuite remettre en marche le climatiseur.
Si le climatiseur ne marche pas correctement, effectuer les
vérifications suivantes avant d'appeler le Service Après Vente.
Si le problème persiste, prendre contact avec le vendeur ou le
Service Après Vente.
Panne: Le climatiseur ne fonctionne pas du tout.
Cause possible:
1. Coupure de courant.
2. Disjoncteur activé.
3. Tension de ligne trop basse.
4. La touche marche/arrêt sur la télécommande est positionné
sur OFF.
5. Les piles de la télécommande sont usées.
Remède:
1. Rétablir l’alimentation.
2. Prendre contact avec un service après-vente.
3. Consulter un électricien ou le vendeur.
4. Appuyer à nouveau sur la touche.
5. Remplacer les piles.
Panne: Le voyant STANDBY clignote et le climatiseur ne
fonctionne pas.
Cause possible:
1. Anomalie dans le câblage.
Remède:
1. Prendre contact avec un service après-vente.
Panne: Le voyant TIMER clignote et le climatiseur ne fonctionne
pas.
Cause possible:
1. Coupure de courant pendant la fonction timer.
Remède:
1. Appuyer le bouton ON/OFF sur la télécommande.
Panne: Le compresseur se met en marche mais il s’arrête aussitôt.
Cause possible:
1. Il y a un obstacle devant l’échangeur extérieur.
Remède:
1. Retirer ce qui fait obstruction.
Panne: Refroidissement ou chauffage insuffisant.
Cause possible:
1. Filtre à air sale ou obstrué.
2. Source de chaleur ou trop de monde dans la pièce.
3. Portes et/ou fenêtres ouvertes.
4. Obstacle devant l’arrivée ou la sortie d’air.
5. Le thermostat est réglé trop haut (pour le refroidissement) ou
trop bas (pour le chauffage).
6. La température extérieure est insuffisante (version réversible).
7. Le système de dégivrage ne fonctionne pas (version
réversible).
Remède:
1. Nettoyer le filtre à air afin d’améliorer la circulation d’air.
2. Si possible, éliminer la source de chaleur.
3. Les fermer pour empêcher la pénétration d’air froid ou chaud.
4. Retirer l’obstacle pour assurer une bonne circulation d’air.
5. Régler la température plus bas (ou plus haut).
6. Essayer d’utiliser un chauffage d’appoint.
7. Consulter le concessionnaire.
Panne: Le climatiseur émet desuaquements.
Cause possible:
1. A la suite d’un changement de température provoqué par
chauffage ou par refroidissement, les pièces en plastique de
l’appareil se dilatent ou se rétrécissent, ce qui provoque un
léger craquement.
Remède:
1. C’est normal et le bruit disparaît après quelques instants.
11
Filtre gauche
Filtre droit
Se servir d’un aspirateur pour enlever la poussière légère. Si de
la poussière adhère au filtre, laver celui-ci dans de l’eau tiède
et savonneuse, puis le rincer dans de l’eau propre et le sécher.
1. Faire attention à ne pas intervenir les filtre: observer la
saille de la poignée sur les côtés droit et gauche.
2. Inserer le filtre dans la rainure et puis le glisser vers le
haut jusqu’à loger la poignée dans sa place.
F
Page 32
COMPONENTES Y SELECTOR DE FUNCIONAMIENTO 3
LUGAR DE INSTALACION 4
REQUISITOS ELECTRICOS 4
INSTRUCCIONES DE SEGURIDAD 4
USO DEL MANDO A DISTANCIA 5
MANDO A DISTANCIA 6
REGULACION DEL RELOJ 7
REFRIGERACION 7
CALEFACCION 7
FUNCIONAMIENTO EN AUTOMATICO 7
DESHUMIDIFICACION 8
VENTILACION 8
SELECCION DE LA VELOCIDAD DEL VENTILADOR 8
PROGRAMA NOCTURNO 9
REGULACION DEL TEMPORIZADOR 9
REGULACION DEL FLUJO DE AIRE 9
FUNCIONAMIENTO SIN MANDO A DISTANCIA 10
CUIDADO Y MANTENIMIENTO 10
CONSEJOS PARA OBTENER MAXIMO CONFORT CON MINIMO CONSUMO 11
PROBLEMAS DE FUNCIONAMIENTO IDENTIFICACION Y SOLUCIONES 11
INDICE
2
Este aparato de aire acondicionado dispone de las funciones de refrigeración, deshumidificación y ventilación o
de refrigeración, deshumidificaciónm calefacción y ventilación . Estas funciones se describen detalladamente a continuación; consultar el manual cada vez que se utiliza el aparato.
NOTA
Si surgen dudas o problemas con su acondicionador de aire,
Ud necesita conocer las siguientes informaciones.
Los números del modelo y de la serie se encuentran en la tarjeta del nombre,
en la parte inferior del mueble.
No. del modelo
No. de serie
Fecha de compra
Dirección del distribuidor
Número de teléfono
INFORMACIONES SOBRE EL PRODUCTO
Los símbolos descritos a continuación son utilizados en el presente manual
para avisar al usuario y al personal de servicio sobre situaciones de peligro
para personas o para el producto.
Este símbolo indica peligros u operaciones que
pueden causar heridas graves o incluso la muerte.
SIMBOLOS DE ADVERTENCIA
Este símbolo indica peligros u operaciones que
pueden causar heridas o daños al producto.
DECLARACION DE CONFORMIDAD
Este producto lleva la marca que indica conformidad con las Directivas:
- Baja Tensión n. 73/23 CEE y 93/68 CEE. -Compatibilidad Electromagnética n. 89/336 CEE, 92/31 CEE y 93/68 CEE.
Esta declaración se considerará nula si el aparato no se usa para las finalidades indicadas por el Fabricante y/o si se ignoran, total o
parcialmente, las instrucciones de instalación y/o uso.
E
COOL/DRY/FAN
COOL / DRY / HEAT / FAN
PELIGRO
PRECAUCION
Page 33

COMPONENTES Y SELECTOR DE FUNCIONAMIENTO
1. Mando a distancia.
2. Sensor: detecta la temperatura del ambiente que rodea al
mando a distancia; el acondicionador se regula a partir de
esta temperatura.
3. Salida de aire: distribuye en el local el aire tratado.
4. Entrada de aire: el aire del ambiente es aspirado y filtrado
mediante filtros.
5. Receptor: recibe las señales enviadas por el mando a distancia.
6. Tubo flexible de descarga: descarga la humedad
condensada.
7. Tubos del refrigerante: el gas refrigerante circula por estos
tubos, que conectan la unidad externa y la interna.
8. Selector de funcionamiento (sin mando a distancia): Pulsar
este botón para elejir los modos de funcionamiento OFF,
COOL y HEAT.
3
4
3
6
UNIDAD INTERNA
UNIDAD EXTERNA
7
1
2
UNIDAD INTERNA
5
Testigo de
funcionamiento
(OPERATION)
8
Testigo del
temporizador
(TIMER)
Testigo de espera
(STANDBY)
E
Page 34

REQUISITOS ELECTRICOS
LUGAR DE INSTALACION
●
Antes de realizar la instalación verificar que la tensión de
alimentación de la red eléctrica corresponde con la indicada
en la tarjeta del acondicionador de aire.
●
Todas las conexiones eléctricas deben realizarse de conformidad
con las normativas eléctricas locales. Para más información
dirigirse al distribuidor o a un electricista.
●
Todas las unidades deben estar correctamente conectadas a
tierra.
●
Las conexiones eléctricas debe realizarlas un electricista
especializado.
INSTRUCCIONES DE SEGURIDAD
●
Leer atentamente este manual antes de usar el
acondicionador de aire. En caso de dudas o problemas
dirigirse al distribuidor o al centro de asistencia autorizado.
●
Este acondicionador de aire ha sido diseñado para crear
las condiciones climáticas ideales en habitaciones. Debe
ser usado con este fin, tal como describe este manual.
●
Es muy peligroso usar o conservar gasolina u otros líquidos
inflamables cerca del acondicionador de aire.
●
No instalar debajo de la unidad aparatos eléctricos que no
tengan protección de grado IPX1(protección contra la caída
vertical de agua).
●
El constructor no se hace responsable de los daños producidos
por no respetar las normas de seguridad y contra accidentes.
●
No apagar ni encender el acondicionador de aire con el
interruptor general. Usar siempre el pulsador ON/OFF sobre
el mando a distancia o el selector de encendido/apagado
sobre la unidad.
●
No introducir objetos en el acondicionador de aire. Es muy
peligroso; el ventilador gira a gran velocidad.
●
No dejar que los niños jueguen con el acondicionador de aire.
●
No refrigerar excesivamente las habitaciones en las que
hay niños pequeños o personas discapacitadas.
●
Es importante que la instalación del acondicionador de
aire sea realizada por un técnico autorizado siguiendo las
instrucciones de instalación del aparato.
●
No instalar el acondicionador de aire en lugares donde
haya humos, gases inflamables o mucha humedad, como
por ejemplo en un invernadero.
●
No instalar el acondicionador de aire si en el mismo ambiente
existen otros aparatos que generan excesivo calor.
●
No instalar la unidad interna en locales donde puede ser
alcanzada por chorros de agua (por ejemplo, una
lavandería).
Evitar
Para proteger el acondicionador de aire de la corrosión, no exponer
la unidad externa directamente a chorros de agua marina o vapores
sulfurosos (por ejemplo, en estaciones termales).
La posición OFF no interrumpe la alimentación eléctrica.
Para cortar la corriente es preciso usar el interruptor principal.
PELIGRO
PRECAUCION
Testigo de funcionamiento (OPERATION): se enciende cuando
la unidad está funcionando.
El parpadea una vez para indicar que el señal del mando a
distancia a sido recibido y memorizado. El parpadea continuamente
durante las modalidades de protección (descongelación, ecc.).
Testigo de espera (STANDBY): Se enciende cuando el
acondicionador está conectado a la corriente y listo para recibir
el señal del mando a distancia.
Testigo del temporizador (TIMER): se enciende cuando la
unidad es controlada por el temporizador o por el programa
nocturno.
4
E
PELIGRO
PELIGRO
PRECAUCION
Page 35

COMO COLOCAR LAS PILAS
●
Remover la tapa detrás del mando a distancia.
●
Colocar dos pilas alcalinas tipo AAA de 1,5 V-DC. Respetar
la polaridad indicada en el mando a distancia.
●
La duración media de las pilas es de seis meses y varía según
la frecuencia de uso del mando a distancia. Quitar las pilas si
el mando a distancia no va a ser utilizado durante un período
de tiempo prolongado (más de un mes).
Presionar al mismo tiempo los pulsadores +, -, SET y CLEAR
después de haber sustituido las pilas.
(Esta operación permite poner a cero todos los programas y
volver a programar el mando a distancia). Sustituir las pilas
cuando el testigo de transmisión de datos no parpadea o cuando
el acondicionador de aire no responde al mando a distancia.
●
Las pilas del control contienen elementos contaminantes.
Cuando se descarguen deben tirarse según los requisitos
locales.
USO DEL MANDO A DISTANCIA
SELECTOR DEL SENSOR DE TEMPERATURA
●
En condiciones normales la temperatura ambiente es detectada
y controlada por el sensor del acondicionador.
●
Pulsar el botón I FEEL del mando a distancia para activar el
sensor de temperatura del mando a distancia. Esta función
tiene el objetivo de personalizar la temperatura ambiente porque
el mando a distancia transmite la temperatura desde el lugar
cerca de ustedes. Por eso, utilizando esta función, el mando a
distancia debe ser dirigido siempre al acondicionador, sin
obstrucciones.
Normalmente el mando a
distancia transmite la señal de
temperatura al acondicionador de
aire cada dos minutos. Si por
algún problema la señal del
mando a distancia se para durante
más de cinco minutos, el
acondicionador de aire se conmuta automáticamente al
sensor de temperatura incorporado a la unidad interna que
controla la temperatura ambiente. En estos casos la
temperatura cercana al mando a distancia puede variar con
respecto a la seleccionada en el acondicionador de aire.
NOTA
VISOR DEL MANDO A
DISTANCIA
FUNCIONAMIENTO CON MANDO A DISTANCIA
El interruptor general de alimentación debe estar ubicado en ON
y el testigo STANDBY debe ser encendido.
Dirigir el cabezal del transmisor del mando a distancia hacia el
receptor colocado en el acondicionador de aire.
COMO PONER EN MARCHA EL ACONDICIONADOR
Pulsar el botón ON/OFF para poner en marcha el acondicionador.
El testigo OPERATION se encenderá para indicar que la unidad
está en marcha.
UNIDAD INTERNA
RECEPTOR
CABEZAL DEL
TRANSMISOR
MANDO A DISTANCIA
5
E
PRECAUCION
Page 36

6
PULSADOR MODO DE FUNCIONAMIENTO
Presionar este pulsador para modificar el funcionamiento del
acondicionador.
(automático)
Al seleccionar la posición “automático” el microprocesador selecciona
automáticamente entre refrigeración y calefacción en base a la diferencia entre
la temperatura ambiente y la temperatura introducida en el mando a distancia.
(calefacción)
El aire acondicionado calienta el local.
(deshumidificación)
El aire acondicionado reduce la humedad ambiente.
(refrigeración)
El acondicionador refrigera el aire haciendo disminuir la temperatura del local.
(ventilación)
Sólo se activa la función de ventilacón.
COOL / DRY / HEAT / FAN
MANDO A DISTANCIA
TRANSMISOR
Al presionar los pulsadores del mando a distancia, el símbolo
se enciende en el visor para transmitir los cambios
de regulación al receptor del acondicionador de aire.
PULSADORES DE SELECCION
TEMPERATURA
— (más frío)
Presionar este pulsador para disminuir la temperatura
seleccionada.
+
(más calor)
Presionar este pulsador para aumentar la temperatura
seleccionada.
SELECTOR VELOCIDAD DEFLECTOR
SENSOR
Este sensor de
temperatura interna
detecta la temperatura
ambiente.
PULSADOR SET
Presionar este pulsador para seleccionar las
funciones:
• regulación de la hora
• regulación del temporizador ON/OFF
Para mas información ver “REGULACION DEL
RELOJ” y “REGULACION DEL TEMPORIZADOR”.
BLOQUEO DEL MANDO A DISTANCIA
Presionando este pulsador el mando a distancia se bloquea
a la ultima regulación. Cuando es activa el mando a
distancia no logra controlar el acondicionador. Para
desbloquear el mando a distancia presionar de nuevo .
VISOR
Visualiza las informaciones cuando el mando a distancia está encendido.
SELECTOR DEL SENSOR DE
TEMPERATURA
Presionar el pulsador I FEEL para activar el
sensor de temperatura dentro del mando a
distancia. Esta función permite de personalizar
la temperatura ambiente.
Presionar estos pulsadores para seleccionar la
función deflector deseada
: el deflector oscila automáticamente
: cada vez que presionáis este
pulsador el deflector se desplaza
de una posición
PULSADOR FAN SPEED
(velocidad del ventilador)
La velocidad del ventilador es seleccionada
automáticamente por el microprocesador.
Velocidad alta.
Velocidad media.
Velocidad baja.
Modo de funcionamiento
Automático
Refrigeración
Calefacción
Vitesse de ventilation
Velocidad alta
Automática
Velocidad media
Velocidad baja
Deshumidificación
Confirmación de la transmisión
de los datos al acondicionador o
bloqueo del mando a distancia
Reloj
horas/minutos
Temperatura regulada
o temperatura
ambiente
Aparece cuando la
temperatura es la
temperatura
ambiente
Indica que el
acondicionador funciona
en modo I FEEL
Ventilación
Programa
nocturno
Oscilación automatica
deflector conectado
Programador
en ON
(activado)
Programador
en OFF
(activado)
Programador
en función
diaria
Pulsador SLEEP
(programa nocturno)
Para más información ver el apartado “Programa
nocturno”. Cuando se presiona este pulsador en la
modalidad REFRIGERACION, CALEFACCION O
DESHUMIDIFICACION la señal aparece en el
visor y el microprocesador del mando a distancia regula
la temperatura seleccionada para ahorrar energía.
PULSADORES PARALA REGULACION
DEL RELOJ Y DEL TEMPORIZADOR
Presionando los pulsadores + o - se activa la regulación
del reloj y del temporizador.
Para mas información ver “REGULACION DEL RELOJ”
y “REGULACION DEL TEMPORIZADOR”.
CANCELACION DEL TEMPORIZADOR
Presionar el pulsador CLEAR para cancelar todas las
programaciones del temporizador.
TEMPERATURAAMBIENTE
Presionar el pulsador ROOM para visualizar la
temperatura ambiente cerca del mando a distancia.
PULSADOR
ON/OFF
(encendido/
apagado)
Pone en marcha el
acondicionador o lo
para.
Pulsador TIMER (ajuste del temporizador)
Presionando el pulsador TIMER en el visor se activa el
procedimiento para la regulación ON/OFF del temporizador.
Para más información ver el ejemplo “Regulación del
temporizador”.
E
Page 37

FUNCIONAMIENTO EN AUTOMATICO
Si la temperatura externa desciende por debajo de 0 °C la formación de
hielo en la batería externa reduce la capacidad de calefacción. Cuando esto sucede el microprocesador ordena la inversión del funcionamiento del
acondicionador de aire (descongelación). Con esta función activada el
ventilador de la unidad interna se para y el testigo OPERATION parpadea mientras dura la descongelación. Después de unos segundos, el funcionamiento en modo calefacción inicia de nuevo en relación con la temperatura ambiente y la temperatura externa.
DESCONGELACION DEL INTERCAMBIADOR
DE CALOR DE LA UNIDAD EXTERNA
“STANDBY”
FUNCIONAMIENTO COMO “BOMBA DE
CALOR”
Un acondicionador de aire que funciona como bomba de calor calienta el
ambiente absorbiendo calor del aire exterior. La capacidad (eficiencia) del
sistema disminuye cuando la temperatura externa desciende por debajo de
0 °C. Si el acondicionador de aire no consigue mantener un valor de temperatura
suficientemente alto se debe complementar la calefacción con la instalación
de otro aparato.
Una vez activada la función de calefacción el ventilador de la unidad interna
se parará. Esto se debe a la protección “Prevención corriente aire frío”,
que habilita el funcionamiento del ventilador cuando el intercambiador de
calor de la unidad interna se ha calentado lo suficiente. Durante este período
el testigo STANDBY permanece encendido.
REGULACION DEL RELOJ
REFRIGERACION
Verificar que la unidad está conectada a la
alimentación eléctrica y que el testigo STANDBY
está encendido.
1. Presionar el pulsador MODE (modo de
funcionamiento) hasta que aparezca en el visor
el símbolo REFRIGERACIÓN .
2. Presionar el pulsador ON/OFF y poner en marcha
el acondicionador de aire.
3. Presionar los pulsadores TEMP. para introducir
la temperatura deseada (el campo de regulación
varía entre 30 °C máximo y 16 °C mínimo).
NOTA
CALEFACCION
1. Presionar el pulsador MODE (modo de funcionamiento) hasta que
aparezca en el visor el símbolo CALEFACCIÓN .
2. Presionar el pulsador ON/OFF y poner en marcha el acondicionador
de aire.
3. Presionar los pulsadores temp. para introducir la temperatura
deseada (el campo de regulación varía entre 30 °C máximo y 16 °C
mínimo).
EL VISOR INDICARAEL VALOR DE LATEMPERATURA
SELECCIONADA.
1. Presionar el pulsador MODE (modo de funcionamiento) hasta que
aparezca en el visor el símbolo AUTOMATICO .
2. Presionar el pulsador ON/OFF y poner en funcionamiento el
acondicionador de aire.
3. Presionar el pulsador TEMP. para introducir la temperatura deseada (el campo
de regulación varía entre 30 °C máximo y 16 °C mínimo).
EL VISOR INDICARA EL VALOR DE LA TEMPERATURA
SELECCIONADA.
El acondicionador de aire pasará automáticamente del modo calefacción al
modo refrigeración (o viceversa) para mantener la temperatura introducida.
4. Presionar el pulsador FAN SPEED para introducir la velocidad del
ventilador.
4. Presionar el pulsador FAN SPEED para introducir la velocidad del
ventilador.
5. Presionar el pulsador FLAP y regular la dirección del flujo de aire en el
modo deseado. (Ver “Regulación del flujo de aire”).
EL VISOR INDICARA EL VALOR DE LA
TEMPERATURA SELECCIONADA.
4. Presionar el pulsador FAN SPEED para introducir la velocidad del ventilador.
5. Presionar el pulsador FLAP y regular la dirección del flujo de aire en el
modo deseado. (Ver “Regulación del flujo de aire”).
Ejemplo: esquema de funcionamiento en modo (Auto) con temperatura
ambiente seleccionada de 23 grados.
ONON ON
∆ 1 H ∆ 1 H
MIN. MAX.
A
B
C
C
B
A
27
26
25
24
23
22
21
20
19
7
E
COOL / DRY / HEAT / FAN
COOL / DRY / HEAT / FAN
1. Presionar el pulsador SET durante cinco segundos. La indicación de
la hora solamente parpadea en el visor.
2. Presionar los pulsadores + o - hasta que se visualiza la hora
corriente.
3. Presionar el pulsador SET y la indicación deja de parpadear.
1
5
4
3
2
NOTA
Page 38

Los valores indicados en la tabla hacen referencia al funcionamiento
del acondicionador de aire cuando está habilitado el sensor del
mando a distancia (ver selector del sensor de temperatura). Los
valores indicados varían ligeramente si está habilitado el sensor de
la unidad interna. (El símbolo aparece en el visor del mando a
distancia).
SELECCION DE LA VELOCIDAD DEL VENTILADOR
AUTOMATICO
Activar con el pulsador FAN SPEED la posición
. El microprocesador controlará automáticamente la velocidad
del ventilador. Cuando el climatizador comienza a funcionar el sensor
de temperatura detecta la diferencia entre la temperatura ambiente
y la temperatura introducida y la transmite al microprocesador, que
automáticamente selecciona la velocidad idónea del ventilador.
DIFERENCIA ENTRE
TEMPERATURAAMBIENTE VELOCIDAD DEL VENTILADOR
Y TEMPERATURA INTRODUCIDA
Refrigeración 2 °C y superiores Máxima
y deshumidificación Entre 2 y 1 °C Media
Menos de 1 °C Minima
2 °C y superiores Máxima
Calefacción
Menos de 2 °C Media
Velocidad alta Velocidad media Velocidad baja
MANUAL
Para regular manualmente la velocidad del ventilador utilizar el
pulsador FAN SPEED y seleccionar la velocidad deseada.
NOTA
1 hora 1 hora TIEMPO
Temperatura introducida
Temperatura ambiente
REFRIGERACION Y DESHUMIDIFICACION
1 hora
1 hora
TIEMPO
Temperatura introducida
Temperatura ambiente
CALEFACCION
PROGRAMA NOCTURNO
●
El programa nocturno sirve para ahorrar energía eléctrica.
1. Presionar el pulsador MODE para poner el acondicionador de aire
en refrigeración, deshumidificación o calefacción.
2. Presionar el pulsador SLEEP.
3. El símbolo aparece en el visor. Para abandonar el programa
presionar nuevamente el pulsador SLEEP.
¿Qué es el Programa Nocturno?
El acondicionador refrigera o calienta el local hasta alcanzar la
temperatura introducida (SET TEMP) y luego se para. A la hora
aproximadamente la temperatura introducida se modifica
automáticamente como se describe a continuación (ver gráficos).
MODO DE FUNCIONAMIENTO MODIFICACION TEMPERATURA
Calefacción Disminuye 1 °C
Refrigeración y Deshumidificación Aumenta 1 °C
El acondicionador funciona hasta alcanzar la nueva temperatura
introducida y luego se para. Ala hora aproximadamente la temperatura
introducida aumenta de nuevo automáticamente 1°C en refrigeración
y disminuye 1 °C en calefacción. De este modo se ahorra energía sin
perjudicar el confort nocturno del local.
8
COOL / DRY / HEAT / FAN
DESHUMIDIFICACION
1. Presionar el pulsador MODE (modo de funcionamiento) hasta que
aparezca en el visor el símbolo DESHUMIDIFICACION .
2. Presionar el pulsador ON/OFF y poner en marcha el acondicionador
de aire.
3. Presionar el pulsador temp. para introducir la temperatura deseada (el
campo de regulación varía entre 30 °C máximo y 16 °C mínimo).
EL VISOR INDICARA EL VALOR DE LA TEMPERATURA
SELECCIONADA.
●
Usar la función de deshumidificación para reducir la humedad ambiente
del aire.
●
Cuando la temperatura ambiente alcanza el valor introducido en el
mando a distancia (termostato) el acondicionador de aire repite en
automático los ciclos de encendido o de apagado.
●
Con la función de deshumidificación accionada, el ventilador gira a
velocidad baja o se para para evitar la demasiada refrigeración .
●
La función de deshumidificación no puede ser activada si la temperatura
interna no supera los 15 °C.
NOTA
NOTA
El climatizador cambia el modo de funcionamiento (de frío a calor o
viceversa) al verificarse alguna de las siguientes condiciones:
- ZONAA: cambia si la temperatura varía como mínimo 3°C con respecto
a la introducida en el mando a distancia.
- ZONA B: cambia si la temperatura varía como mínimo 1°C con respecto
a la introducida en el mando a distancia una hora después de que se
para el compresor.
- ZONA C: no cambia mientras la temperatura no varíe mas de 1°C con
respecto a la introducida en el mando a distancia.
E
VENTILACION
Si desea hacer circular el aire sin modificar la temperatura, proceda
como sigue:
1. Presionar el pulsador MODE (modo de funcionamiento) hasta que
aparezca en el visor el símbolo VENTILACION .
2. Presionar el pulsador ON/OFF y poner en marcha el acondicionador
de aire.
En la modalida VENTILACION la velocidad del ventilador está
regulada automáticamente como en la modalidad refrigeración.
NOTA
COOL / DRY / HEAT / FAN
1°C
1°C
1°C
1°C
Page 39

A) COMO REGULAR LA HORA DE PARADA
(OFF)
1. Presionar el pulsador ON/OFF para poner
en marcha el acondicionador.
2. Presionar el pulsador TIMER hasta que la
indicación OFF parpadea.
3. Presionar los pulsadores + o - (HORA) hasta
visualizar el valor deseado.
4. Presionar el pulsador SET para activar el
temporizador.
B) COMO REGULAR LA HORA DE INICIO (ON)
1. Presionar el pulsador ON/OFF para parar
el acondicionador.
2. Presionar el pulsador TIMER hasta que la indicación ON parpadea.
3. Presionar los pulsadores + o - (HORA) hasta visualizar el valor
deseado.
4. Presionar el pulsador SET para activar el temporizador.
C) COMO REGULAR EL PROGRAMA DIARIO
ENCENDIDO/APAGADO (O VICEVERSA)
1. Presionar el pulsador TIMER hasta que la indicación ON parpadea.
2. Presionar los pulsadores + o - (HORA) hasta visualizar el valor
deseado.
3.Presionar de nuevo el pulsador TIMER y la indicación OFF
parpadea.
4; Presionar los pulsadores + o - (HORA) hasta visualizar el valor
deseado.
5; Presionar el pulsador TIMER, después el pulsador SET para activar
el temporizador.
D) COMO CANCELAR EL TEMPORIZADOR
1.Presionar el pulsador CLEAR si queréis cancelar todos las
programaciones del temporizador.
REGULACION DEL TEMPORIZADOR
Si la procedimiento de programación del temporizador no a sido
completada entre 15 segundos presionando el pulsador SET, será
cancelada y la última programación se quedará memorizada.
NOTA
VERTICAL (con mando a distancia)
El mando a distancia permite de regular el deflector de dos
maneras:
1. Presionar el pulsador para hacer oscilar el deflector.
Presionando de nuevo el mismo pulsador el deflector se para
enseguida.
2. Presionar el pulsador para desplazar el deflector
desde una posición a la otra.
HORIZONTAL (manual)
Para regular horizontalmente el flujo de aire, dirigir las aletas
verticales hacia la izquierda o hacia la derecha como puede verse
a continuación.
REGULACION DEL FLUJO DE AIRE
Durante la refrigeración o la deshumidificación, sobre todo
con un alto nivel de humedad en el ambiente, orientar
frontalmente las aletas verticales. Si se orientan hacia la
derecha o hacia la izquierda el vapor se puede condensar y
formar gotas que saldrán por la rejilla de salida del aire.
No quitar el deflector con las manos mientras funciona el
aparato.
9
Izquierda
Aletas verticales
Derecha
E
3
1
4
2
PRECAUCION
PRECAUCION
Page 40

Función de direccionamiento del aire
El deflector comienza el movimiento oscilatorio para
difundir el aire en la zona de direccionamiento.
2.ACONDICIONADOR DE AIRE EN MARCHA
Para parar el acondicionador de aire presionar el pulsador con una
pluma hasta apagar el testigo OPERATION.
CUIDADO Y MANTENIMIENTO
●
Como medida de seguridad comprobar que el acondicionador
está apagado y la corriente eléctrica desconectada antes de
realizar cualquier operación de limpieza.
●
No mojar la unidad interna durante la limpieza. El agua podría
dañar las partes internas de la unidad y provocar un cortocircuito.
TAPA Y REJILLA (UNIDAD INTERNA)
Limpiar la tapa y la rejilla de la unidad interna con el cepillo de un
aspirador o con un paño suave y seco. Las manchas pueden
limpiarse con un paño húmedo y detergente neutro. Al limpiar la
rejilla no descolocar las aletas.
●
No usar disolventes, detergentes o sustancias químicas corrosivas.
No usar agua hirviendo para limpiar la unidad interna.
●
Algunas aristas metálicas y las aletas del condensador son cortantes;
limpiarlas con cuidado.
●
Limpiar como mínimo una vez al año el intercambiador y los demás
componentes de la unidad externa. Consultar al Servicio de Asistencia.
Corte de corriente durante el funcionamiento.
Si se produce un corte de corriente el acondicionador de aire se
para. Cuando se restablece la alimentación eléctrica el
acondicionador de aire reinicia automáticamente a los 3 minutos.
NOTA
10
Selector de
funcionamiento
Si el mando a distancia no funciona o se ha perdido, actuar como se indica
a continuación.
1. ACONDICIONADOR DE AIRE PARADO
Para poner en marcha el acondicionador de aire presionar el pulsador
con una pluma y seleccionar la modalidad deseada (COOL o HEAT).
El acondicionador se pondrá en marcha con la velocidad
automática del ventilador y con el deflector en oscilación.
La programación de la temperatura es 22°C para la modalidad
de refrigeración y 26°C para la calefacción.
NOTA
FUNCIONAMIENTO SIN MANDO A DISTANCIA
Arriba
Abajo
Deflector
Rejilla de salida
del aire
NOTA
• El deflector se cierra automáticamente
cuando el sistema se apaga.
• Durante la función de calefacción, el
ventilador funciona a baja velocidad y el
deflector está en posición horizontal
(posición ) hasta que el aire que sale del
sistema empieza a calentarse. Cuando el
aire se calienta, la posición del deflector y
la velocidad del ventilador cambian
dependiendo de los datos introducidos con
el mando a distancia.
• Usar el pulsador FLAP del mando a distancia para regular la
posición del deflector. Si se regula a mano, la posición en
el mando a distancia podría no corresponder con la
posición real. Cuando esto ocurre, apagar el sistema,
esperar a que el deflector se cierre y volver a encender el
acondicionador de aire; el deflector vuelve a su posición
normal.
• No orientar el deflector hacia abajo durante la función de
refrigeración. El vapor de aire puede condensarse y las
gotas saldrán por la rejilla.
E
PELIGRO
PRECAUCION
PRECAUCION
Page 41

FILTRO DE AIRE
LIMPIEZA DEL FILTRO
CONSEJOS PARA OBTENER MAXIMO
CONFORT CON MINIMO CONSUMO
COMO VOLVER A COLOCAR EL FILTRO
Limpiar los filtros de aire colocados detras de la rejilla de aspiración
uma vez cada dos semanas como mínimo.
COMO QUITAR LOS FILTROS
1.Sujetar la empuñadura del filtro de aire, tirar hacia afuera y
hacia abajo.
EVITAR
●
Obstruir las rejillas de envío y de aspiración
de la unidad; en
caso contrario la unidad no trabaja correctamente y podría
llegar a dañarse.
●
La radiación solar directa usando toldos o cerrando las cortinas.
VERIFICAR
●
Que los filtros de aire esten siempre limpios. Un filtro sucio
disminuye el paso del aire y reduce el rendimiendo de la
unidad.
●
Que las puertas y ventanas están cerradas
para evitar
infiltraciones de aire no acondicionado.
PROBLEMAS DE FUNCIONAMIENTO
IDENTIFICACION Y SOLUCIONES
PELIGRO
No utilizar teléfonos celulares cerca del acondicionador de aire ya
que podría interferir en el funcionamiento del mismo. En este
caso, restaurar el funcionamiento cortando la alimentación eléctrica
60 segundos aproximadamente (mediante el interruptor general
o el enchufe) y a continuación volver a encender el acondicionador
de aire.
Si el acondicionador no funciona correctamente, antes de llamar
al Servicio de Asistencia realizar los controles que se indican a
continuación. Si el problema persiste avisar al Distribuidor o al
Servicio de Asistencia.
Defecto: El acondicionador está completamente parado.
Posibles causas:
1. Corte de alimentación.
2. Interruptor automático abierto o fusible fundido.
3. Tensión de la línea muy baja.
4. El pulsador de puesta en marcha sobre el mando a distancia
está en la posición OFF.
5. Las pilas del mando a distancia están descargadas.
Remedio:
1. Restablecer la alimentación.
2. Avisar al Servicio de Asistencia.
3. Avisar al electricista.
4. Presionar el pulsador de puesta en marcha ON/OFF sobre
el mando a distancia.
5. Sustituir las pilas.
Defecto: El testigo de espera STANDBY parpadea y el
acondicionador de aire no funciona.
Causa posible:
1. Problemas en la conexión eléctrica.
Remedio:
1. Avisar al Servicio de Asistencia.
Defecto: El testigo TIMER parpadea y el acondicionador de aire
no funciona.
Causa posible:
1. Corte de alimentación durante la función del temporizador.
Remedio:
1. Presionar el pulsador ON/OFF del mando a distancia.
Defecto: El compresor se pone en movimiento, pero a los pocos
minutos se para.
Causa posible:
1. La batería del condensador está obstruida (Unidad externa).
Remedio:
1. Eliminar la obstrucción.
Defecto: La refrigeración o la calefacción son insuficiente.
Causa posible:
1. Filtro sucio u obstruido.
2. Carga de refrigeración excesiva.
3. Puertas o ventanas abiertas.
4. Obstrucción cerca de la toma o del envío de aire.
5. Regulación del termostato muy alta (refrigeración) o muy baja
(calefacción).
6. Temperatura del aire externo muy baja (versión bomba de
calor).
7. El sistema di descongelación de la unidad externa en modo
calefacción no funciona (versión bomba de calor).
Remedio:
1. Limpiar el filtro.
2. Eliminar las fuentes intensas de calor.
3. Cerrar puertas y ventanas.
4. Eliminar cualquier obstáculo en la circulación correcta del
aire.
5. Volver a regular el termostato.
6. Añadir otra fuente de calor.
7. Avisar al Servicio de Asistencia.
Defecto: El acondicionador de aire chirría ligeramente.
Causa posible:
1. Este inconveniente se debe a la dilatación de las partes de
plástico, producida por las variaciones de temperatura entre
calefacción y refrigeración.
Remedio:
1. Es una situación normal. Al poco tiempo el problema
desaparece.
11
Filtro izquierdo
Filtro derecho
Limpiar el filtro con un aspirador. Si el polvo fuese grasoso,
lavar el filtro con agua jabonosa templada, aclarar y dejar secar.
1. Hacer atención a no invertir los filtros, notar el saliente
de la empuñadura en el lado derecho y izquierdo.
2. Introducir el filtro en la ranura, hacer deslizar hacia
arriba hasta alojar la empuñadura en su lugar.
E
Page 42
Este aparehlo de ar condicionado está equipado com as funções de arrefecimento, desumidificação e ventilação,
, , de arrefecimento, aquecimento, desumidificação e ventilação . Detahles sobre
estas funções são indicados abaixo; refira-se a estas descrições quando utilizar o aparehlo de ar condicionado.
NOMENCLATURA DAS PEÇAS E SELECTOR DE OPERAÇÃO 3
LOCALIZAÇÃO DA INSTALAÇÃO 4
REQUISITOS ELÉCTRICOS 4
INSTRUÇÕES DE SEGURANÇA 4
UTILIZAÇÃO DA UNIDADE DE CONTROLE REMOTO 5
UNIDADE DE CONTROLE REMOTO 6
COMO AJUSTAR O RELÓGIO 7
ARREFECIMENTO 7
AQUECIMENTO 7
OPERAÇÃO AUTOMÁTICA 7
DESUMIDIFICAÇÃO 8
VENTILAÇÃO 8
AJUSTE DA VELOCIDADE DO VENTILADOR 8
PROGRAMA NOTURNO 9
AJUSTE DO ‘“TIMER” 9
AJUSTE DA DIREÇÃO DO FLUXO DE AR 9
OPERAÇÃO SEM A UNIDADE DE CONTROLE REMOTO 10
CUIDADOS E MANUTENÇÃO 10
SUGESTÕES PARA GARANTIR O MÁXIMO CONFORTO E O MÍNIMO CONSUMO 11
POSSÍVEIS CAUSAS E REPARAÇÃO DE AVARIAS 11
INDICE
2
N.B.
Se tem alguma questão ou problema respeitante ao seu aparehlo
de ar condicionado vai necessitar da informação que se segue. O
número do modelo e da série encontram-se na placa identificadora
na parte inferior do aparehlo.
Número do modelo
Número de série
Data da compra
Endereço do representante
Telefone
INFORMAÇÕES SOBRE O PRODUTO
Os símbolos que se seguem são utilizados neste manual para o
alertar para condições potencialmente perigosas para os
utilizadores, manutenção ou o próprio aparehlo:
Este símbolo refere-se a um perigo ou
mau manuseamento que pode resultar
em danos pessoias severos ou morte.
SIMBOLOS DE ALERTA
Este símbolo refere-se a um perigo ou
mau manuseamento que pode resultar
em danos pessoias, do produto ou dos
objectos que o cercam.
DECLARAÇÃO DE CONFORMIDADE
Este produto tem a marca porque responde as Directrizes:
– Baixa tensão N° 73/23/CEE, 93/68/CEE.
– Compatibilidade eletromagnetica n° 89/336/CEE, 92/31/CEE e 93/68/CEE.
Esta declaração será considerada nula se a sua utilização for diferente da do fabricante e/ou se não forem seguidas, mesmo que
parcialmente, as instruções de instalação e/ou de modo de emprego.
P
COOL/DRY/FAN
COOL / DRY / HEAT / FAN
ADVERTÊNCIA
PRECAUÇÃO
Page 43

NOMENCLATURA DAS PEÇAS E SELECTOR DE OPERAÇÃO
1. Unidade de controle remoto.
2. Sensor de temperatura: Este sensor indica a temperatura
próxima à unidade de controle remoto. O ajuste da temperatura
do condicionador é feito a partir desta temperatura.
3. Saída do ar : distribui no local o ar tratado filtrado.
4. Entrada do ar: o ar do ambiente é aspirado e filtrado através
de filtros apropriados
5. Receptor : recebe os sinais enviados pelo controle remoto
6. Tubo flexível de descarga: descarga da humidade
7. Tubos do refrigerante: são percorridos pelo gás refrigerante
e ligam a unidade externa e interna
8. Selector de operação (sem a unidade de controle remoto):
Pressione o botão para selecionar os modos de operação
OFF, COOL e HEAT.
3
4
3
6
UNIDADE INTERIOR
UNIDADE EXTERIOR
7
1
2
UNIDADE INTERIOR
5
8
Lâmpada TIMER
Lâmpada STANDBY
P
Lâmpada OPERATION
Page 44

REQUISITOS ELÉTRICOS
LOCALIZAÇÃO DA INSTALAÇÃO
●
Antes da instalação, assegure-se que a voltagem da corrente
corresponda àquela indicada no aparelho de ar condicionado.
●
Todas as ligações devem estar de acordo com os requisitos
elétricos locais. Consulte o seu concessionário ou um eletricista
qualificado para maiores detalhes.
●
Cada unidade deve ser adequadamente ligada à terra mediante
um fio de terra.
●
Todas as ligações devem ser feitas por un eletricista
qualificado.
INSTRUÇÕES DE SEGURANÇA
●
Leia este manual de instruções com muita atenção antes
de usar este aparelho de ar condicionado. Se ainda tiver
algumas dúvidas ou difficuldades, consulte o seu
representante.
●
Este aparelho tem por finalidade oferecer-lhe condições
climáticas ideais no seu aposento. Utilize-o apenas para
esse fim como descrito neste Manual de Instruções.
●
Nunca armazene ou utilize gasolina ou outros líquidos inflamáveis
perto do aparelho de ar condicionado. É muito perigoso.
Não instale outros aparelhos elétricos (não protegidos con
grau de proteção IPX1 - contra água em caída vertical) nas
proximidades deste aparelho.
●
O construtor não assume nenhuma responsabilidade se as leis
vigentes de Segurança do Trabalho não forem respeitadas.
●
Não ligue e desligue o aparelho de ar condicionado
utilizando o interruptor principal. Utilizar somente o botão
ON/OFF do unidade de controle remoto ou o selector
incorporado no aparelho.
●
Não coloque nada no aparelho (objetos, ...). É muito perigoso
visto che o ventilador gira a uma velocidade muito alta.
●
Não deixe che crianças brinquem com o aparelho.
●
Não resfriar excessivamente o ambiente em presença de
recém-nascidos e/ou pessoas com handicap.
●
Recomenda-se que este aparelho de ar condicionado seja
adequadamente instalado por um técnico de instalação
qualificado segundo as Instruções de Instalação fornecidas
com o aparelho.
●
Não coloque este aparelho de ar condicionado num local
com fumos ou gases inflamáveis, ou num local
extremamente húmido tal como uma serra.
●
Não coloque este aparelho de ar condicionado perto de
fontes de calor.
●
Não colocar a unidade interior em locais onde possa ser
atingido por água (tal como una lavanderia).
Evite:
Para proteger o aparelho de ar condicionado de alta corrosão, não
instale a unidade exterior onde possa ser atingida por água do mar
ou por água sulfurosa perto de termas, por exemplo.
A posição OFF não desliga o aparelho da alimentação motriz.
Para desligar o aparelho completamente, utilize o interruptor
da alimentação motriz.
ADVERTÊNCIA
PRECAUÇÃO
Lâmpada OPERATION: Esta lâmpada acende-se quando o
sistema está em funcionamento.
Lampeja uma vez para avisar que o sinal do controle remoto
foi recebido e memorizado. Lampeja seguidamente durante
as funções de proteção (descongelamento, etc.).
Lâmpada STANDBY: Esta lâmpada acende-se quando o
condicionador está conectado à corrente e está pronto para
receber o sinal pelo controle remoto
–
Lâmpada TIMER: Esta lampada acende-se quando controlada
pelo timer ou pelo modo SLEEP.
4
P
ADVERTÊNCIA
ADVERTÊNCIA
PRECAUÇÃO
Page 45
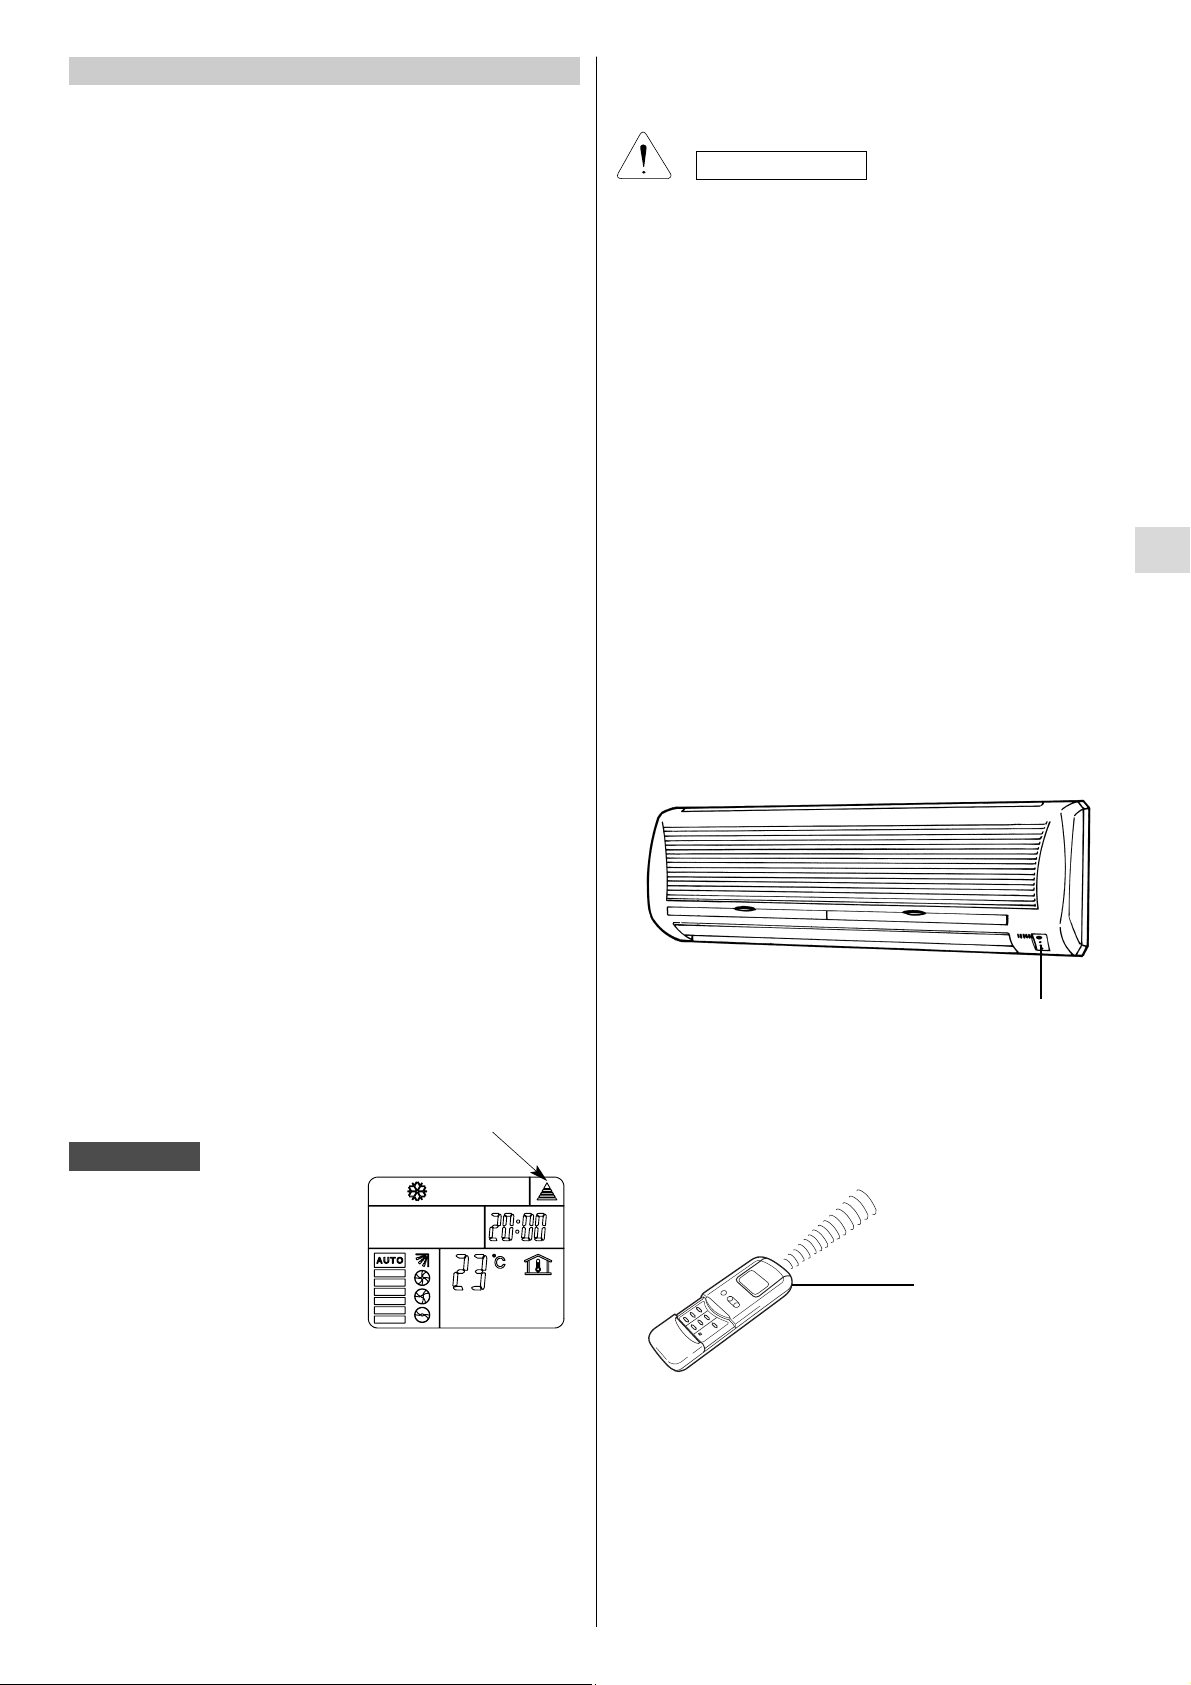
COLOCAÇÃO DAS PILHAS
●
Remover a tampa na parte traseira do controle remoto.
●
Coloque duas pilhas AAA alcalinas de 1,5 V - DC cada.
●
As pilhas duram cerca 6 meses dependendo do uso da unidade
de controle remoto.
Retire as pilhas se a unidade não for utilizada por mais de um
mês.
Pressionar simultaneamente os botões +, -, SET e CLEAR
após ter substituído as baterias.
Esta operação serve para azerar corretamente todos os
programas. A unidade de controle remoto terá que ser
reprogramada. Substituir as pilhas quando o visor na unidade
de controle remoto deixar de acender ou quando não for possível
utilizar o controle remoto para mudar os ajustes no aparelho de
ar condicionado.
●
As pilhas do comando contém elementos poluentes. quando
ficarem descarregadas devem destruir-se em locais próprios e
segundo as normais locais em vigor.
UTILIZAÇÃO DA UNIDADE DE CONTROLE REMOTO
SELECTOR DO SENSOR DE TEMPERATURA
●
Em condições normais, a temperatura ambiente é registrada e
controlada através do sensor que é colocado no aparelho de
ar condicionado.
●
Pressionar o botão I FEEL para ativar o sensor de temperatura
posicionado no controle remoto. Esta função permite de criar
uma temperatura ambiente ótima pois o controle remoto transmite
a temperatura da posição onde nos encontramos. Então, usando
esta função, o controle remoto deve sempre ser direcionado
para o condicionador.
A unidade de controle remoto manda o sinal indicando a temperatura ao aparelho de ar condicionado a cada 2 minutos. Se o sinal
proveniente do sensor parar por
mais de 5 minutos (por exemplo
devido a qualquer inconveniência), o aparelho passa automaticamente a receber os dados de temperatura provenientes
do sensor, incorporado na unidade interna, que controla a
temperatura ambiente. Nesses casos, a temperatura próxima à cabeça da unidade de controle remoto pode ser diferente daquela que esta próxima ao aparelho de ar condicionado.
N.B.
VISOR DE CONTROLE
REMOTO
OPERAÇÃO COM A UNIDADE DE CONTROLE REMOTO
O interruptor deve estar na ON à rede no painel da corrente
elétrica e lâmpada STANDBY deve estar acesa.
Aponte sempre a cabeça da unidade transmissora diretamente
para o receptor no aparelho de ar condicionado.
COMO LIGAR O APARELHO DE AR CONDICIONADO
Pressione o botão ON/OFF para ligar o aparelho de ar condicionado.
A lâmpada OPERATION acende-se e indica o funcionamento da
unidade
UNIDADE INTERIOR
RECEPTOR
CABEÇA DO
TRANSMISSOR
UNIDADE DE
CONTROLE REMOTO
5
P
PRECAUÇÃO
Page 46

6
BOTÃO SELECTOR DO MODO DE OPERAÇÃO
Pressionar este botão para mudar o modo de funcionamento do aparelho
de ar condicionado.
(Operação automatica)
Quando esta função é selecionada, o microprocessor escolhe
automaticamente entre aquecimento e arrefecimento segundo a differença
de temperatura entre o ambiente e a temperatura desejada.
(Aquecimento)
Nesta função, o aparelho aquece o ambiente.
(Desumificação)
Nesta função, o aparelho reduz a humidade esistente no ambiente.
(Arrefecimento)
Nesta função, o aparelho esfria o ar e abaixa a temperatura do ambiente.
(Ventilação)
Nesta função, o aparelho funciona somente como ventilador.
COOL / DRY / HEAT / FAN
UNIDADE DE CONTROLE REMOTO
TRANSMISSOR
Quando é acionado o botão da unidade de controle remoto,
o símbolo aparece no visor e os dados para o reajuste
do aparelho de ar condicionado são transmitidos ao receptor.
BOTÕES DE AJUSTE DA TEMPERATURA
—
(mais frio)
Pressione este botão para diminuir a temperatura selecionada.
+
(mais quente)
Pressione este botão para aumentar a temperatura
selecionada.
SELECTORES DE VELOCIDADE DEFLETOR
SENSOR DE
TEMPERATURA
Este sensor é
posicionado na parte
interior da unidade de
controle remoto e serve
para a leitura da
temperatura ambiente.
BOTÃO SET
Pressionar este botão para selecionar as funções:
• Programação da hora
• Programação do timer ON/OFF
Para detalhes ver as seções “COMO REGULAR O
RELÓGIO” e “REGULAGEM DO TIMER”.
BLOQUEIO DO CONTROLE REMOTO
Pressionado este botão o controle remoto se bloqueia na
última programação. Quando está ativa o controle
remoto não é capaz de controlar o condicionador. Para
desbloquear o controle remoto pressionar de novo .
VISOR
Mostra informações relativas às condições de operação quando a unidade de controle
remoto está ligada.
SELECTOR SENSOR DE
TEMPERATURA
Pressionar o botão I FEEL para ativar o sensor
de temperatura posicionado no controle remoto.
Esta função permite de criar uma temperatura
ambiente ótima.
Pressionar estes botões para selecionar a função
defletor desejada
: o defletor oscilla automaticamente
: toda vez que esta tecla for
pressionada o defletor se desloca de
uma posiçao
BOTÃO “FAN SPEED”
(Velocidade do ventilador)
A velocidade do ventilador é selecionada
automaticamente pelo micro processor.
Alta velocidade.
Velocidade média.
Velocidade baixa.
Modos de operação
Operação automatica
Frio
Quente
Velocidade do ventilador
Alta
Operação automatica
Média
Baixa
Seco
Confirma trasmissão de dados
ou controle remoto bloqueado
Relógio
(horas/minutos)
Temperatura
programada ou
temperatura ambiente
Aparece quando a
temperatura indicada
é a temperatura
ambiente
Indica que o
condicionador funciona
na modalidade I FEEL
Ventilaçao
Programa
noturno
Oscilaçao do defletor
ativada
Timer
"ativado"
(ON)
Timer
"ativado"
(OFF)
Timer ativado
no programa
"Dia"
BOTÃO “SLEEP”
(programa noturno)
Veja “Programa Noturno” para maiores detalhes.
Quando se pressiona este botão nas funções de
Arrefecimento, Aquecimento e Desumificação, o sinali
mm aparece no visor e a unidade de controle
remoto ajusta automaticamente a temperatura
selecionada para poupar energia.
BOTÕES DE REGULAGEM RELÓGIO
E PROGRAMAÇÃO HORÁRIO TIMER
Pressionado os botão + o - é ativada a programação da
hora e do timer. Para detalhes ver as seções “COMO
REGULAR O RELÓGIO” e “REGULAGEM DO TIMER”.
COMO ZERAR O TIMER
Pressionar o botão CLEAR se desejar cancelar todas
as programações do timer.
TEMPERATURAAMBIENTE
Pressionar o botão ROOM para visualizar a temperatura
ambiente próxima ao controle remoto.
BOTÃO DE
OPERAÇÃO
(ON/OFF)
Este botão serve para
ligar e desligar o
aparelho.
Botão TIMER (programação timer)
Pressionado o botão TIMER no display é ativado o
procedimento para a programação ON/OFF do timer
.
P
Page 47
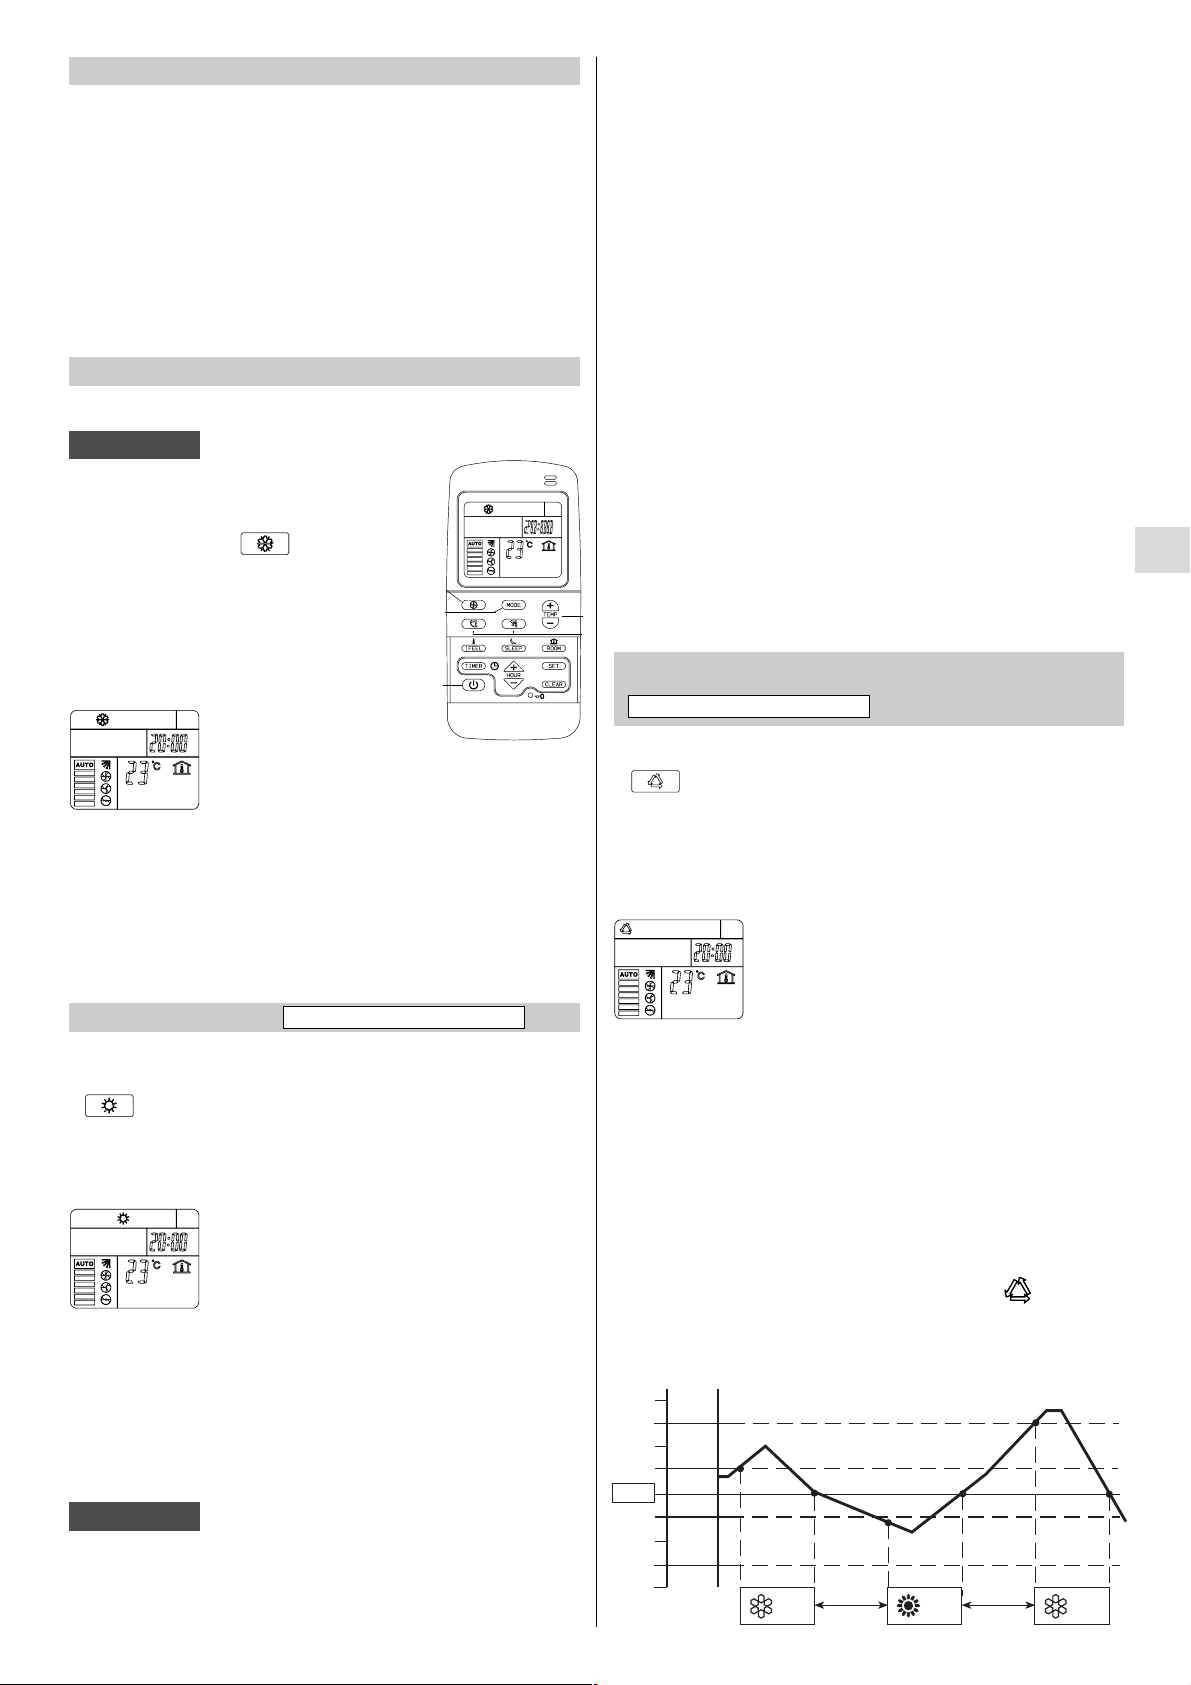
OPERAÇÃO AUTOMÁTICA
Quando a temperatura externa for muito baixa, pode formar-se gelo ou
geada na serpentina do trocador de calor, reduzindo o rendimento do
aquecimento.
Quando isto acontece, um sistema de descongelação controlado por
microcomputador entra em função.
Ao mesmo tempo, o ventilador na unidade interior para e a lâmpada
“OPERATION” pisca até que a descongelação seja completa. A operação
de aquecimento recomeça passados alguns minutos. Este intervalo varia
ligeiramente dependendo da temperatura exterior e do modo como a
formação do gelo ocorreu.
DESCONGELAÇÃO DO TROCADOR DE
CALOR EXTERNO “STANDBY”
FUNCIONAMENTO E RENDIMENTO DE UM
SISTEMA COM BOMBA DE CALOR
O modelo de aparelho de ar condicionado com bomba de calor enquenta
o ambiente tirando calor do ar externo. A efficiencia desse sistema diminui
ao passo que a temperatura do ar externo diminua, especialmente se
atingir temperaturas abaixo de zero. Se o aquecedor não conseguir manter
uma temperatura sufucientemente estável, utilize, em simultaneo, outro
aparelho de aquecimento.
Após a ativação da função “AQUECIMENTO” o ventilador da unidade interior
no funciona. Isto porque estará ativada uma proteção de prevenção de
corrente de ar frio que permitirá o funcionamento do ventilador somente
depois que o dispositivo de troca térmica se esquente. Durante este periodo
de tempo, a lâmpada STANDBY ficará acesa.
COMO AJUSTAR O RELÓGIO
ARREFECIMENTO
Verifique se a unidade está ligada à rededa corrente
elétrica e se a lâmpada STANDBY está acesa.
1. Pressione o botão “MODE” e selecione a função
“ARREFECIMENTO” .
2. Pressione o botão de operação ON/OFF para
ligar o aparelho.
3. Pressione os botões de ajuste da temperatura
“TEMP” para mudar o ajuste da temperatura até
a temperatura desejada. Gama de temperatura
ajustável: 30 ° Max - 16 ° Min.
N.B.
AQUECIMENTO
1. Pressione o botão “MODE” e selecione a função “AQUECIMENTO“
iiiiiiiiiiiiii.
2. Pressione o botão de operação ON/OFF para ligar o aparelho.
3. Pressione os botões “TEMP” para selecionar a temperatura desejada.
Gama de temperatura ajustável: 30 ° Max - 16 ° Min.
O VISOR INDICARÀ O VALOR DA TEMPERATURA
DESEJADA.
1. Pressione o botão “MODE” e selecionar a função “AUTOMÁTICO”
iiiiiiiiiiiiii.
2. Pressione o botão ON/OFF para ligar o aparelho
3. Pressione os botoes “TEMP” para selecionar a temperatura desejada.
Gama de temperatura ajustável: 30 ° Max. - 16 ° Min.
O VISOR INDICARÀ O VALOR DA TEMPERATURA
DESEJADA.
O aparelho de ar condicionado passa automaticament de funçao de
aquecimento à de arrefecimento (ou vice-versa) mantendo, assim,
constante a temperatura slecionada.
4. Pressione o botão “FAN SPEED”‘ para o ajuste da velocidade do
ventilador.
4.Pressione o botão “FAN SPEED”‘ para o ajuste da velocidade
do ventilador.
5.Aperte o botão FLAP e regule a direcção do fluxo do ar no
modo desejado. (v. regulação do fluxo de ar)
O VISOR INDICARÀ O VALOR DA
TEMPERATURA DESEJADA.
4.Pressione o botão “FAN SPEED”‘ para o ajuste da velocidade
do ventilador.
5.
Aperte o botão FLAP e regule a direcção do fluxo do ar no
modo desejado. (v. regulação do fluxo de ar)
Exemplo esquema funcionamento en modalidade (Auto) com
temperatura ambiente fixada em 23 graus.
ONON ON
∆ 1 H ∆ 1 H
MIN. MAX.
A
B
C
C
B
A
27
26
25
24
23
22
21
20
19
7
P
COOL / DRY / HEAT / FAN
COOL / DRY / HEAT / FAN
1. Pressione “SET”. O indicador da hora somente pisca.
2. Pressione os botãos + ou - até ver a hora desejada.
3. Pressione o botão SET e o indicador retornará automaticamente ao
normal.
1
5
4
3
2
N.B.
Page 48

Os valores indicados na tabela se reférem ao funcionamento do
aparelho quando é ativado o sensor na unidade de controle remoto
(veja selector do sensor de temperatura na pag. 5).
Tais valores variam ligeiramente no caso for ativado o sensor na
unidade interna. (Simbolo indicado no visor da unidade de controle
remoto ).
AJUSTE DA VELOCIDADE DO VENTILADOR
AUTOMÁTICO
Coloque simplesmente o selector de “FANSPEED” na posição .
Um microcomputador, no aparelho de ar condicionado, controla a
velocidade de ventilação quando o modo “AUTOMATICO” é
selecionado. Quando o aparelho de ar condicionado começa a
funcionar, o microcomputador detecta a diferença entre a temperatura
ambiente e a temperatura pré-ajustada e automaticamente muda a
velocidade do ventilador para o nível apropriado.
QUANDO A DIFERENÇA ENTRE A
TEMPERATURAAMBIENTE E A VELOCIDADE DO VENTILADOR
TEMPERATURA PRÉ-AJUSTADA É
Arrefecimento e 2 °C ou mais Alta
Desumidificaçao Entre 2 e 1 °C Média
Abaixo de 1 °C Baixa
2 °C ou mais Alta
Aquecimento
Menos de 2 °C Média
Alta velocidade Média velocidade Baixa velocidade
MANUAL
Se desejar ajustar a velocidade do ventilador manualmente durante
a operação, coloque a selector “FAN SPEED” na posição desejada.
N.B.
1 hora 1 hora TEMPO
Temperatura pré-selecionada
Temperatura ambiente
ARREFECIMENTO E DESUMIDIFICAÇAO
1 hora 1 hora TEMPO
Temperatura pré-selecionada Temperatura ambiente
AQUECIMENTO
PROGRAMA NOTURNO
●
Esta função serve para poupar energia.
1. Pressione o botão “MODE” e selecione a função
“ARREFECIMENTO”, “AQUECIMENTO” ou “DESUMIDIFICAÇAO”.
2. Pressione o botão “SLEEP”.
3. O símbolo aparecerà no visor. Para desativar o programa,
pressione novamente o botão “SLEEP”.
O que é o Programa Noturno?
Inicialmente o aparelho aquece ou resfria o ambiente até a
temperatura desejada (SET TEMP) e depois se desativa. Após cerca
1 hora, a temperatura é automaticamente modificada no seguinte
modo:
MODO DE FUNCIONAMENTO VARIAÇAO DA TEMPERATURA PRÉ-SELECIONADA
Aquecimento Diminuiçao de 1 °C
Arrefecimento ou desumidificaçao Aumento de 1 °C
O aparelho funciona até atingir a temperatura desejada e depois
pára. Após 1 hora a temperatura é automaticamente aumentada de
1° C (se estiver resfriando o ambiente) ou diminui de 1° C (se estiver
aquecendo). Isto lhe permite de poupar energia sem sacrifício de
conforto.
8
COOL / DRY / HEAT / FAN
DESUMIFICAÇÃO
1. Pressione o botão “MODE” e selecione a função “desumificaçao”
.
2. Pressione o botão “ON/OFF” para ligar o aparelho.
3. Pressione os botões “TEMP” para o ajuste da temperatura desejada.
Gama de temperatura ajustável: 30° Max. - 16° Min.
O VISOR INDICARÀ O VALOR DA TEMPERATURA
DESEJADA.
●
Use esta função quando quiser reduzir a humidade do ambiente.
●
Quando a temperatura ambiente atinge a mesma do termostato, o
aparelho repete a ciclo de ativação/desativação automaticamente.
●
Durante esta operação, a velocidade do ventilador é automaticamente
reduzida, e o ventilador muda a baixa velocidade ou pára para impedir
congelamento.
●
A operação “DESUMIFICAÇAO” não pode ser ativada quando a
temperatura interior é de 15° ou menos.
N.B.
N.B.
O climatizador muda o modo de funciona mento (de frio para quente e viceversa) quando se verifica uma das seguintes condições:
– ZONA A: muda se a temperatura varia de pelo menos 3°C em relação
à fixada no telecomando.
– ZONA B: muda se a temperatura varia de pelo menos 1°C em relação
à fixada no telecomando apòs 1 hora da paragem do compressor.
– ZONA C: nunca muda se a temperatura não varia de mais de 1°C em
relação à fixada no telecomando.
P
VENTILA
ÇÃO
No caso quiser somente arejar o ambiente sem modificar a
temperatura, opere da seguinte maneira:
1.
Pressione o botão “MODE” e selecione a função
“VENTILAÇÃO”
2.
Pressione o botão “ON/OFF” para ligar o aparelho.
N.B.
Na função “
VENTILAÇÃO
” a velocidade do ventilador é selecionada
automaticamente como na função “COOL”
COOL / DRY / HEAT / FAN
1°C
1°C
1°C
1°C
Page 49

A)
COMO PROGRAMAR A HORA DE
DESATIVAÇÃO (OFF).
1. Pressione o botão “ON/OFF” para ligar o
aparelho.
2. Pressione o botão “TIMER” até a indicação
“OFF” pisca.
3. Pressione os botãos + ou - (HORA) até ver
a hora desejada.
4. Pressione o botão “SET” para activar o timer.
B)
COMO PROGRAMAR A HORA DE ATIVAÇÃO (ON).
1. Pressione o botão “ON/OFF” para desligar o aparelho.
2. Pressione o botão “TIMER” até a indicação “ON” pisca.
3. Pressione os botãos + ou - (HORA) até ver a hora desejada.
4. Pressione o botão “SET” para activar o timer.
C) COMO AJUSTAR O PROGRAMA DIÁRIO ACESO/APAGADO
(OU VICE-VERSA)
1. Pressione o botão “TIMER” até a indicação “ON” pisca.
2. Pressione os botãos + ou - (HORA) até ver a hora desejada.
3. Pressione o botão “TIMER” e a indicação “OFF” pisca.
4. Pressione os botãos + ou - (HORA) até ver a hora desejada.
5. Pressione o botão TIMER, depois o botão SET para activar o timer.
D) COMO ZERAR O TIMER
Pressionar o botão CLEAR se desejar cancelar todas as
programações do timer
AJUSTE DO TIMER
VERTICAL (Com uso da unidade de controle remoto)
Com o controle remoto pode-se regular o defletor de duas
maneiras:
1. Pressionar o botão……….para fazer oscilar o defletor.
Pressionando ainda o defletor pára imediatamente.
2. Pressionar o botão……….para movimentar o defletor passo
a passo.
HORIZONTAL (MANUAL)
O fluxo de ar horizontal pode ser ajustado movendo as palhetas
verticais para a direita ou para a esquerda como indicado nos
seguintes diagramas.
AJUSTE DA DIREÇÃO DO FLUXO DE AR
Durante a função de arrefecimento ou desumificação,
especilamete, as palhetas devem estar na posição vertical.
Se estiverem completamente para a esquerda ou para a
direita, pode-se formar condensação na zona da saída do ar
e pingar ao chão.
Não direcione as palhetas manualmente durante o
funcionamento.
9
Esquerda
Palhetas verticais
Direita
P
3
1
4
2
Se o procedimento de programação do timer não é completado
em 15 segundos pressionando o botão SET, será anulada e
permanecerá na memória a última programação.
N.B.
PRECAUÇÃO
PRECAUÇÃO
Page 50

Função de varrimento
A placa começa a movimentar-se para cima e para baixo
lançando ar para toda a área de varrimento.
2.APARELHO DE AR CONDICIONADO LIGADO
Se quiser desligar o aparelho, pressione o bot
ão através de uma
caneta até a lâmpada OPERATION se apaga.
CUIDADOS E MANUTENÇÃO
●
Por motivos de segurança, desligue o aparelho de ar
condicionado e desligue-o também da rede antes de proceder
à sua limpeza.
●
Não derrame água sobre a unidade interior para limpa-la.
Poderá danificar os componentes internos e causar descargas
elétricas.
A CAIXA E A GRELHA (UNIDADE INTERIOR)
Limpe a caixa e a grelha da unidade interior com um aspirador
ou com um pano macio e limpo. Se estas partes estiverem muito
sujas utilize um pano limpo humedecendo-o em um líquido
detergente suave. Quando limpar a grelha, tenha cuidado para
não mover as palhetas do seu lugar de instalação.
●
Nunca utilize solventes ou produtos químicos fortes quando limpar a unidade
interior. Não esfregue a caixa de plástico com água muito quente.
●
Algumas bordas metálicas e as pás do condensador são pontiagudas e
podem causar ferimentos se não forem manuseadas com cuidado; tenha
cuidado especial ao limpar essas partes.
●
A serpentina interna e outros componentes da unidade exterior devem ser
limpos todos os anos. Contate o seu concessionario ou centro de reparações.
Se houver uma perda de corrente elétrica durante o
funcionamento do aparelho, este se desliga. Uma vez
restabelecida a condição original, o aparelho se ativa
automaticamente após 3 minutos.
N.B.
10
Selector de
operação
Em caso de perda, dano do controle remoto, siga os seguintes
conselhos:
1. APARELHO DE AR CONDICIONADO DESLIGADO
Se quiser ligar o aparelho, pressione o bot
ão através de uma caneta
para selecionar a função desejada (COOL ou HEAT)
O aparelho de ar condicionado começa a funcionar com
velocidade automatica do ventilador e o deflector oscilador.
O ajuste da temperatura é 22°C para a função “arrefecimento”
e 26°C para a função “aquecimento”.
N.B.
OPERAÇÃO SEM A UNIDADE DE CONTROLE REMOTO
Para
cima
Para
baixo
Placa
Grelha de
saída de ar
N.B.
• A placa fecha-se automaticamente quando o
aparelho está desligado.
• Durante a operação de aquecimento, a
velocidade do ventilador pode ser muito baixa
e a placa estará na posição horizontal (posição
) até que o ar expelido pelo aparelho comece
a aquecer. Quando o ar está quente, a posição
da placa e a velocidade do ventilador muda para
os ajustes especificados com a unidade de
controle remoto.
• Utilize o botão FLAP na unidade de controle remoto para
ajustar a posição da placa.
Se movimentar a placa com as mãos, a posição da placa na
unidade de controle remoto e a posição actual da placa pode
não ser a mesma. Se isto acontecer, desligue o aparelho,
espere que a placa feche e em seguida ligue o aparelho outra
vez; a posição da placa será normal outra vez.
• Não tenha a placa dirigida para baixo durante a operação de
arrefecimento. Pode formar -se condensação à volta da saída
do ar e pingar para o chão.
P
ADVERTÊNCIA
PRECAUÇÃO
PRECAUÇÃO
Page 51
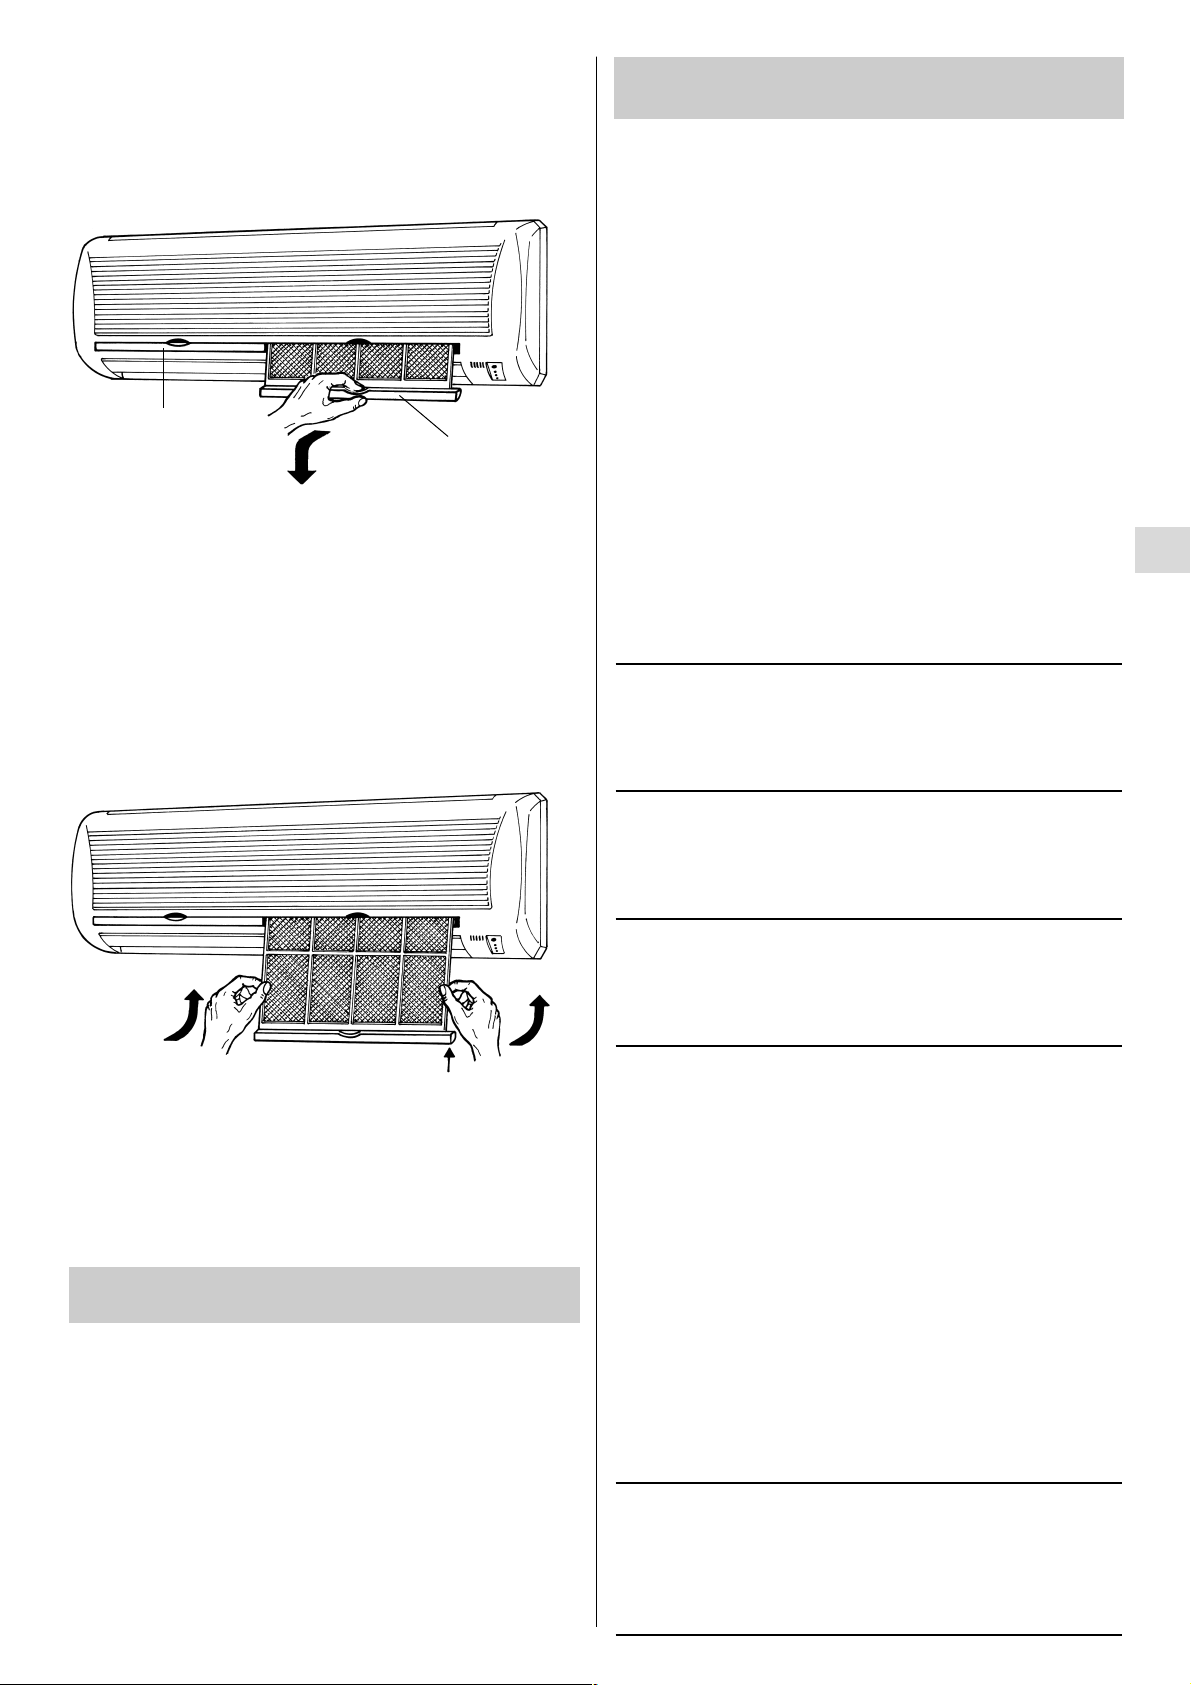
FILTRO DE AR
LIMPEZA DOS FILTROS
SUGESTÕES PARA GARANTIR O MÁXIMO
CONFORTO E O MÍNIMO CONSUMO
COLOCAÇÃO DOS FILTROS
Os filtros de ar, situados atrás da grelha de retorno, devem ser
limpos pelo menos ima vez de 2 em semanas.
REMOÇÃO DOS FILTROS
1. Agarrar a pega do filtro de ar para assim puder tirar o filtro para
baixo e para fora.
NÃO FAÇA
●
Bloquear a entrada e saída de ar do aparelho. Se estiverem
obstruídas, o aparelho não funcionará adequadamente e
poderá estragar-se
.
●
Deixar luz solar direta na habitação. Use cortinas, venezianas,
etc.
FAÇA
●
Procure manter os filtros de ar sempre limpos. Um filtro sujo
diminui as performances do aparelho.
●
Para evitar a saída do ar condicionado, mantenha janelas,
portas e outras aberturas fechadas
.
POSSÍVEIS CAUSAS E REPARAÇÃO
DE AVARIAS
ADVERTÊNCIA
O uso de telefones celulares nas proximidades do aparelho de ar
condicionado deve ser evitado porque pode causar interferências
e portanto um malfuncionamento do aparelho. Quando essa
anomalia acontecer, recomece o procedimento de operação após
ter eliminado a corrente do aparelho por cerca 60 segundos
através do interruptor principal.
Se o seu aparelho não funciona corretamente, verifique primeiro
os seguintes pontos antes de solicitar assistência.
Se não conseguir solucionar o problema, contate o seu
concessionário ou o serviço de assistência.
Defeito: O aparelho não funciona de maneira nenhuma.
Possível causa:
1. Falha de alimentação.
2. Disjuntor ativado.
3. Tensão da rede demasiado baixa.
4. O botão de operação no unidade de controle remoto está
posicionado em OFF.
5. As pilhas do unidade de controle remoto estão gastas.
Possível solução:
1. Reponha a alimentação.
2. Contate o serviço de assistência.
3. Consulte um eletricista.
4. Pressione o botão de operação no unidade de controle remoto
outra vez.
5. Substitua as pilhas.
Defeito: Alâmpada “STANDBY” está a piscar e o aparelho não
funciona.
Possível causa:
1. Problema no sistema de ligação.
Possível solução:
1. Contate o serviço de assistência.
Defeito: Alâmpada “TIMER” está a piscar e o aparelho não
funciona.
Possível causa:
1. Falha de alimentação durante a função timer.
Possível solução:
1. Pressione o botão ON/OFF no unidade de controle remoto.
Defeito: O compressor começa a funcionar, mas pára pouco
depois.
Possível causa:
1. Obstrução em frente da serpentina do compressor.
Possível solução:
1. Retire a obstrução.
Defeito: Rendimento de arrefecimento (ou aquecimento)
deficiente.
Possível causa:
1. Filtro de ar sujo ou obstruído.
2. Fonte de calor ou demasiadas pessoas na habitação.
3. Portas e janelas abertas.
4. Obstáculos perto da entrada ou saída de ar.
5. Termostato programado demasiadamente alto (para
arrefecimento) ou demasiadamente baixo (para aquecimento).
6. Temperatura exterior muito baixa (modelo com bomba de
calor).
7. O sistema de descongelação não funciona (modelo com
bomba de calor).
Possível solução:
1. Limpe o filtro de ar.
2. Elimine a fonte de calor.
3. Feche-as.
4. Retire os obstáculos para assegurar uma boa circulação de
ar.
5. Coloque a temperatura mais baixa (ou mais alta).
6. Tente utilizar outra unidade de aquecimento.
7. Consulte o seu concessionário.
Defeito: Ouve-se estalido no aparelho de ar condicionado.
Possível causa:
1. Na operação de aquecimento ou arrefecimento, as partes
plásticas podem expandir ou encolher devido à uma mudança
súbita de temperatura. Neste caso, pode-se ouvir um estalido.
Possível solução:
1. Isto é normal e o som desaparecerá em breve.
11
Filtro esquerdo
Filtro direito
Deverá ser utilizado um aspirador para retirar as poeiras. Se
as poeiras tiverem aderido ao filtro, deverse-á lavá-lo com água
tépida e sabonete, e depois passá-lo por água limpa e secá-lo.
1. Cuidado para não inverter a posição do filtro: atenção
á pega no lado direito e no lado esquerdo.
2. Inserir o filtro na ranhura e deslizá-lo para cima até
colocar a pega no seu devido lugar.
P
Page 52

ONOMASIA TMHMATWN KAI EPILOGEAS LEITOYRGIAS
3
EGKATASTASH
4
HLEKTROLOGIKES APAITHSEIS
4
ODHGIES GIA ASFALEIA
4
CRHSH TOU THLECEIRISTHRIOU
5
THLECEIRISTHRIO
6
RÁQMISH WROLOGIOÁ
7
YUXH
7
QERMANSH
7
AUTOMATH LEITOURGIA
7
AFUGRANSH
8
MONO ANEMISTHRAS
8
ÁQMISH TACÁTHTAS ANEMISTHRA
8
NUCTERINO PROGRAMMA
9
RUQMISH TOU CRONODIAKOPTH
9
RUQMISH THS ROHS TOU AERA
9
LEITOURGIA CWRIS THLECEIRISTHRIO
10
SUNTHRHSH KAI FRONTIDA
10
SUMBOULES GIA MEGISTH ANESH KAI ELACISTH KATANALWSH
11
EXAKRIBWSH KAI LUSH PROBLHMATWN LEITOURGIAS
11
PPERIECOMENA
2
To klimatistikov autov eivnai exoplismevno me ti" leitourgive" yuvxh", afuvgransh" kai monov aerismouv yuvxh",
afuvgransh", qevrmansh" kaiv movno aerismouv . Perissovtere" leptomevreie" giav ti" leitourgive" autev" akolouqouvn
pio kavtw. Anaferqeivte sti" periyrafev" autev" ovtan crhsimopoieivte to klimatistikov.
COOL /DRY/HEAT/FAN
COOL /DRY/FAN
SHMEIWSH
Σε περπτωση δυσκολασ ταν υπρχουν αµφιβολεσ σχετικ µε το
κλιµατιστικ, εναι αναγκαεσ οι παρακτω πληροφορεσ.Οι αριθµο σειρσ
κα µοντλου βρσκονται στην ετικτα µε το νοµα, στο κτω µροσ τησ
συσκευσ.
Αρ. µοντλου
Αρ. σειρσ
Ηµεροµηνα αγορσ
∆ιεθυνση του πωλητ
Αρ. τηλεφνου
ΠΛΗΡΟΦΟΡΙΕΣ ΣΧΕΤΙΚΕΣ ΜΕ ΤΟ ΠΡΟΙΟΝ
Τα ακλουθα σµβολα σαυτ το εγχειρδιο χρησιµεουν γι να ενηµερσουν
τον αγοραστ κα το προσωπικ υπηρεσασ σχετικ µε τουσ προσωπικοσ
κινδνουσ µε τισ ζηµισ του προϊντοσ.
Το σµβολο αυτ αναφρεται σε κινδνουσ σε
επεµβσεισ που µπορον να προκαλσουν
τραυµατισµοσ κα θνατο.
ΣΥΜΒΟΛΑ ΠΡΟΕΙ∆ΟΠΟΙΗΣΗΣ
Το σµβολο αυτ αναφρεται σε κινδνουσ σε
επεµβσεισ που µπορον να προκαλσουν ζηµισ
στο προϊν.
DHAWSH SUMMORFWSHS
To proi>ovn autov fevrei to shvma diovti antapokrivnetai sti" apaithvsei" twn akovlouqwn odhgiwvnÚ
- Camhlhv tavsh ariq.
73/23
EOK kai
93/68
EOK
.
- Hlektromagnhtikhv sumbatikovthta ariq.
89/336
EOK,
92/31
EOK kai
93/36
EOK
.
H parouvsa dhvlwsh eivnai avkurh se perivptwsh crhvsh" diaforetikhv" apov authvn pou endeivknutai apov ton Kataskeuasthv kaiÉhv
mh thvrhsh", akovmh kai en mevrei, twn odhgiwvn egkatavstash" kaiÉh v crhvsh".
GR
PROEIDOPOIHSH
PROSOCH
Page 53

ONOMASIA TMHMATWN KAI EPILOGEAS LEITOYRGIAS
1.
Thleceiristhvrio.
2.
Aisqhthvra"Ú
Mevsa sto thleceiristhvrio o mhcanismov" autov"
antilambavnetai th qermokrasiva tou dwmativou.
3.
Exodo" aevraÚ
O klimatismeno" aevra" bgaivnei evxw apov th
monavda apov autov to shmeivo.
4.
Eivsodo" aevraÚ
O aevra" tou dwmativou antleivtai mevsa se autov
to tmhvma kai pernav apov evna filtro pou sugkrateiv.
5.
Deivkth" thleceiristhrivouÚ
O deivkth" autov" lambavnei thn
uperiwvdh aktivna apov to thleceiristhvrio kai qetei se
leitourgiva thn monavda.
6.
Euvkampto" swlhvna" apocevteush"Ú
adeiavzei thn ugrasiva.
7.
Swlhvne" yuktikouÚ
diascivzontai apov to yuktikov aevrio kai
sundevoun thn exwterikhv movnavda me thn eswterikhv
8.
Epilogeva" leitourgiva" (cwriv" thleceiristhvrio)Ú
Pathvste
autov to plhvktro gia na peravsete apov thn miva leitourgiva
sthn avllh (
OFF, COOL
kai
HEAT
).
3
4
3
6
ΕΣΩΤΕΡΙΚΗ ΜΟΝΑ∆Α
ΕΞΩΤΕΡΙΚΗ ΜΟΝΑ∆Α
7
1
2
ESWTERIKH MONADA
5
Λυχνα λειτουργασ
(OPERATION)
8
Λυχνα
χρονοδιακπτη
(TIMER)
Λυχνα αναµονσ
(STANDBY)
GR
Page 54

HLEKTROLOGIKES APAITHSEIS
EGKATASTASH
●
Prin thn egkatavstash kavnte evlegco an h tavsh th" hlektrikhv"
egkatavstash" sto spivti hv sto grafeivo sa" eivnai h ivdia pou
anagravfetai sthn pinakivda tou mhcanhvmato".
●
∆Ole" oi hlektrikev" sundevsei" prevpei na eivnai suvmfwne" me
tou" topikouv" hlektrikouv" kanonismouv". Gia leptomevreie"
apeuqunqeivte ston pwlhthv hv se evnan hlekrolovgo.
●
Kavqe monavda prevpei na geiwqeiv kanonikav me evna kalwvdio
geivwsh".
●
Oi hlektrikev" sundevsei" prevpei na givnoun apov evnan
exeidikeumevno hlektrolovgo.
ODHGIES ASFALEIAS
●
Diabavste autov to fullavdio prosektikav prin crhsimopoihvsete
to klimatistikov. An exakolouqeivte na evcete duskolive" hv
problhvmata apotanqeivte ston antiprovswpo hv sto egkekrimevno
kevntro tecnikhv" uposthvrixh".
●
To klimatistikov evcei scediasteiv gia na sa" prosfevrei avnete"
sunqhvke" dwmativou. Crhsimopoihvste to movno gia ton skopov
pou proorivzetai. VOpw" perigravfetai se autov to egceirivdio
odhgiwvn.
●
Mh crhsimopoieivte hv apoqhkeuvete benzivnh hv avlla euvlekta
kontav sto mhcavnhma. Eivnai poluv epikivnduno.
Epiplevon, mhn egkatasthvsete kavtw apov th monavda hlektrikev"
suskeuev" pou den prostateuvontai me baqmov prostasiva"
IPX1
(prostasiva apov kavqeth ptwvsh nerouv).
●
O kataskeuasthv" den fevrei kammiva euquvnh sthn perivptwsh
katav thn opoiva den throuvntai oi kanonismoiv asfaleiva" gia
thn provlhyh twn atuchmavtwn.
●
Mhn crhsimopoieivte potev ton kentrikov diakovpth gia na anoivgete
hv na kleivnete to mhcavnhmaÚ Crhsimopoieivte to koumpiv
ON/OFF
ap to ceiristhvrio hv ton diakovpth pavnw sto mhcavnhma.
●
Mh bavzete tivpote mevsa sto klimatistikov. Eivnai epikivnduno
giativ o anemisthvra" peristrevfetai me megavlh tacuvthta.
●
Mhn afhvnete paidiav na paivzoun me to klimatisti≈ov.
●
Mhn yuvcete uperbolikav to cwvro an upavrcoun poluv mikrav
paidiav hv avtoma me eidikev" anavgke".
●
Proteivnoume to klimatistikov na topoqeteivtai apov eidikeumevno
tecnikov kai suvmfwna me ti" odhgive" egkatavstash" pou parevcontai
me to mhcavnhma.
●
Mhn topoqeteivtai autov to klimatistikov ovpou upavrcoun
anaqumiavsei" ugraerivou hv uperbolikhv ugrasiva ovpw" se
qermokhvpia.
●
Mhn topoqeteivtai autov to klimatistiko se mevrh ovpou upavrcoun
antikeivmena pou paravgoun uperbolikav ufhlhv qermovthta.
●
Mhn topoqeteivte thn eswterikhv monavda se cwvrou" ovpou mporeiv
na petacteiv nerov (p.c. pltvnuhrio).
Apofuvgete
:
Gia na prostatevyete to klimatistikov apov thn oxeivdwsh, mhn
topoqethvsete thn exwterikhv monavda se mevro" ovpou mporeiv na
petacteiv almurov qalassinov nerov hv se aevra me qeiavfi kontav se
iamatikhv phghv.
Sth qevsh OFF den diakovptetai h hlektrikhv trofodosiva.
Crhsimopoihvste ton kentrikov diakovpth gia na apomonwvsete to
klimatistikov.
PROEIDOPOIHSH
PROSOCH
Λυχνα λειτουργασ
(
OPERATION
)Ú
anavbei ovtan h monavda se
leitourgiva. Anabosbhvnei miva forav gia na proeidopoihvsei
ovti elhvfqh kai katacwrhvqhke h shvmannsh tou
thleceirithrivou. Anabosbhvnei sunecwv" katav thn diavrkeia
twn leitourgiwvn prostasiva" (apovyuxh, klp).
Λυχνα αναµονσ
(
STANDBY)Úanavbei ovtan to klimatistikov
eivnai sundedemevno sto reuvma kai eivnai evtoimo na decteiv thn
shvmansh tou thleceiristhrivou.
Λυχνα χρονοδιακπτη
(
TIMER)Úanavbei ovtan h monavda
elevgcetai apov to timer hv to nucterinov provgramma.
4
GR
PROEIDOPOIHSH
PROEIDOPOIHSH
PROSOCH
Page 55

GR
TOPOQETHSH MPATARIWN
●
Afairevste to skevpastro sto mevro" tou thleceiristhrivou.
●
Bavlte duvo mpatarive" tou
1,5 V-DC
tuvpou
AAA
alkalikev".
Thrhvste thn polikovthta suvmfwna me ti" endeivxei" sto
thleceiristhvrio.
●
H mevsh diavrkeia twn mpatariwvn eivnai evxi mhvne" exartavtai ovmw"
kai apov th sucnovthta me thn opoiva
crhsimopoieivtai to
thleceiristhvrio.
Bgavlte ti" mpatarive" se perivptwsh pou den
crhsimopoieivte to thleceiristhvrio gia poluv kairov (pavnw apov
evna mhvna). Pathvste to plhvktro
ACL
me evna leptov antikeivmeno gia
paravdeigma me th muvth enov" molubiouv hv enov" stulouv afouv prwvta
antikatasthvsete ti" mpatarive". Pathvste tautovcrona ta plhvktra
+, -, SET
kai
CLEAR
afouv allavxete ti" mpatarive". (H ergasiva
authv divnei th dunatovthta na mhdenistouvn swstav ovla ta
progravmmata. To thleceiristhvrio qa prevpei na ruqmisteiv xanav).
Antikatasthvste ti" mpatarive" ovtan h lucni va metavdosh"
dedomevnwn tou thleceiristhrivou den anabosbhvnei plevon hv ovtan
to klimatistikov den antapokrivnetai sti" entolev" tou
thleceiristhrivou.
●
Oi mpatarive" pon brivskontai sto thleceiristhvrio, perievcoun
ulikav pou moluvnoun to peribavllon. Otan creiasteiv na ti"
allavxete, petavxte ti" se mevro" gia thn apomavkrunsh tevtoiwn
ulikwvn.
CRHSH THLECEIRISTHRIOU
EPILOGEAS TOU AISQHTHRA QERMOKRASIAS
●
Upov kanonikev" sunqhvke" h qermokrasiva tou peribavllonto"
metravtai kai elevgcetai apov ton aisqhthvra qermokrasiva"
pou upavrcei sto klimatistikou.
●
Pathvste to plhvktro
I FEEL
gia na energopoihvsete ton aisqhthvra
qermokrasiva" pou brivsketai topo@ethmevno" sto thleceiristhvrio.
H leitourgiva authv bohqav thn epivteuxh mia" tevleia" qermokrasiva"
th" atmovsfaira" diovti to thleceiristhvrio metadivdei thn
qermokrasiva apov thn qevsh sthn opoiva brivskeste. vAra loipovn,
gia na crhsimopoihvsete thn leitourgiva authv, to thleceiristhvrio
prevpei na kateuquvnetai pavnta pro" to klimatistikov.
To thleceiristhvrio stevlnei shvma
gia th qermokrasiva sto
klimatistikov se diasthvmata duvo
leptwvn. Eavn to shvma apov to
thleceiristhvrio stamathvsei gia
perissovtero apov pevnte leptav lovgw
apwvleia" tou thleceiristhrivou hv
lovgw avllou problhvmato", to klimatistikov qa gurivsei ston
aisqhthvra qermokrasiva" pou eivnai enswmatwmevno" sthn
eswterikhv monavda gia na elevgcei th qermokrasiva dwmativou.
SV autev" ti" periptwvsei", h qermokrsiva guvrw apov to
thleceiristhvrio mporeiv na diafevrei apov th qermokrasiva sth
qevsh tou klimatistikouv.
SHMEIWSH
OQONH THLECEIRISTHRIOU
LEITOURGIA ME TO THLECEIRISTHRIO
Elevgxte an o genikov" diakovpth" trofodosiva" eivnai kleistov" kai
an o epilogeva" leitourgiva" th" eswterikhv" monavda" brivsketai
sth qevsh ON.
PWS CRHSIMOPOIEITAI TO THLECEIRISTHRIO
Kateuquvnate to thleceiristhvrio me thn kefalhv tou anametadovth
pro" ton apodevkth pou eivnai topoqethmevno" sto klimatistikov.
Σστηµα κλιµατισµο
(Eσωτερικ µονδα)
∆κτησ
(Κεφαλ του ποµπο)
Tηλεχειριστριο
5
PROSOCH
Page 56
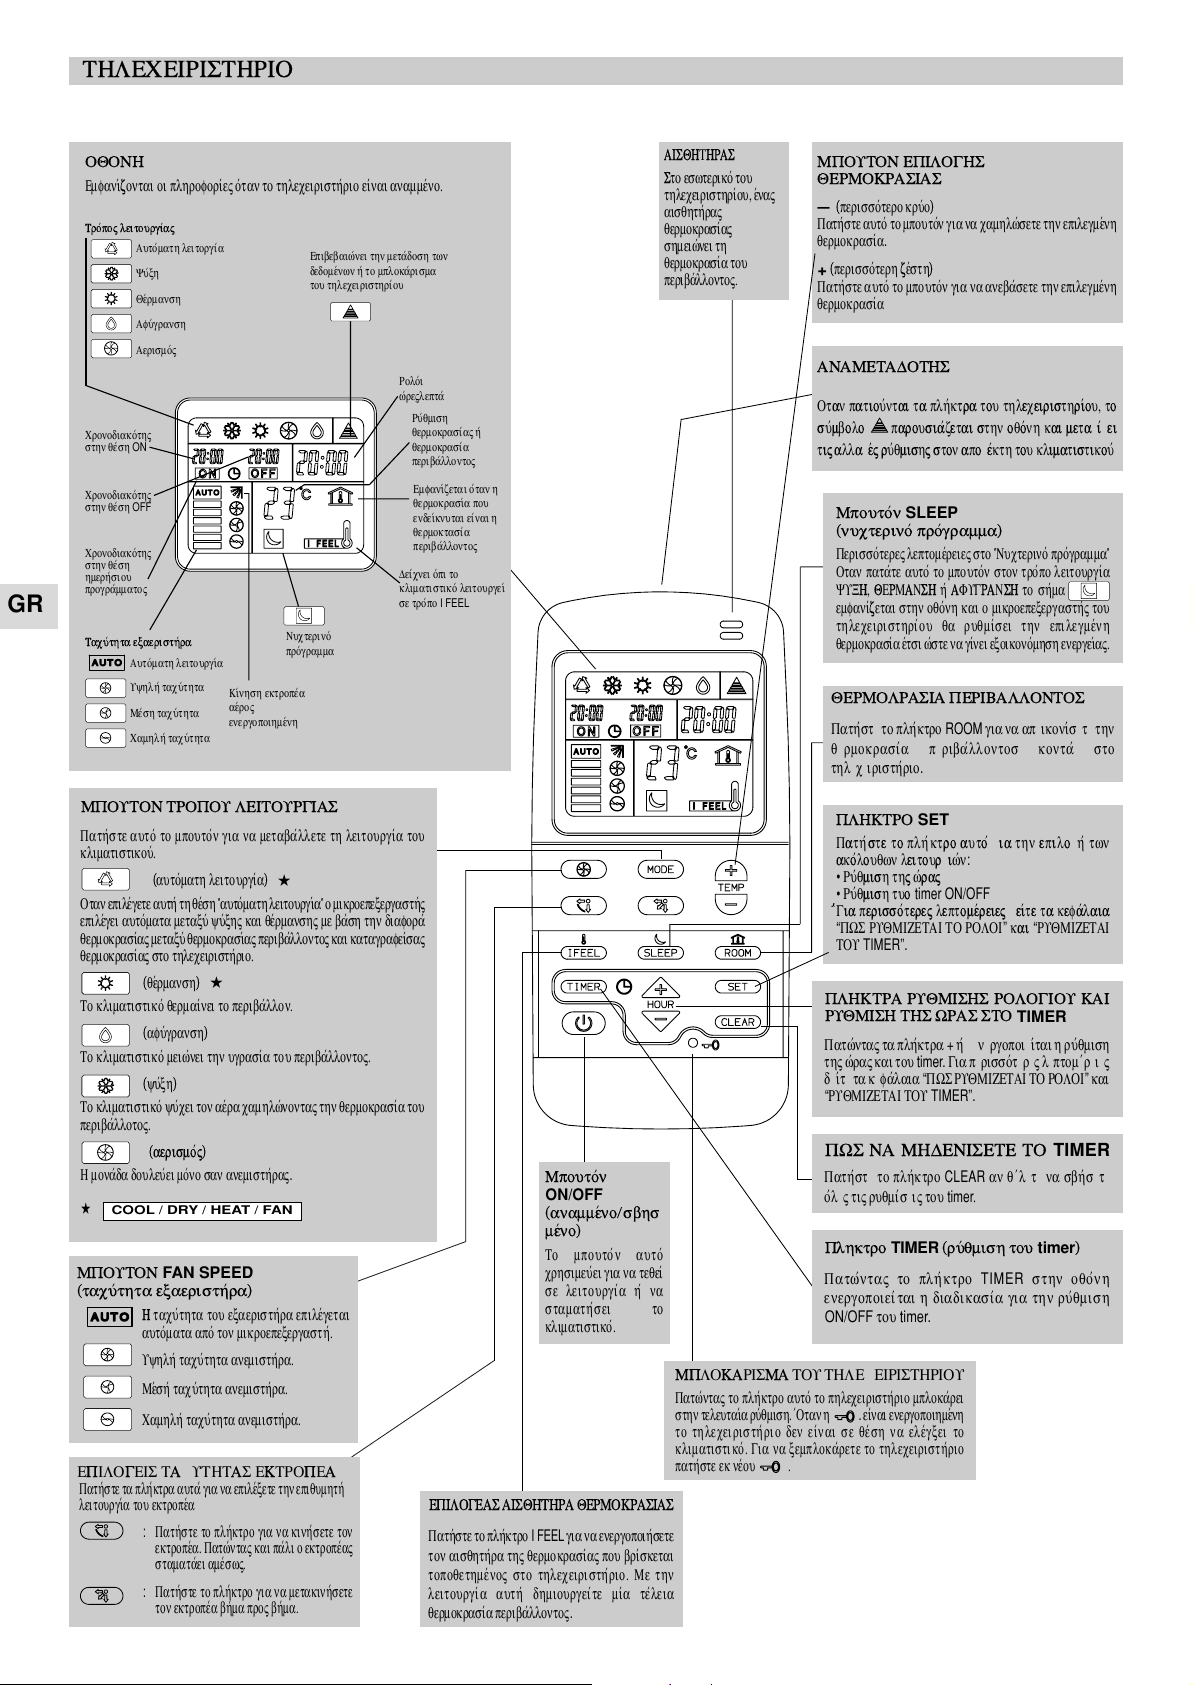
6
MPOUTON TROPOU LEITOURGIAS
Pathvste autov to mpoutovn gia na metabavllete th leitourgiva tou
klimatistikouv.
(autovmath leitourgiva)
Otan epilevgete authv th qevsh Æautovmath leitourgivaÆ o mikroepexergasthv"
epilevgei autovmata metaxuv yuvxh" kai qevrmansh" me bavsh thn diaforav
qermokrasiva" metaxuv qermokrasiva" peribavllonto" kai katagrafeivsa"
qermokrasiva" sto thleceiristhvrio.
(qevrmansh)
To klimatistikov qermaivnei to peribavllon.
(afuvgransh)
To klimatistikov meiwvnei thn ugrasiva tou peribavllonto".
(yuvxh)
To klimatistikov yuvcei ton aevra camhlwvnonta" thn qermokrasiva tou
peribavlloto".
(aerismov")
H monavda douleuvei movno san anemisthvra"
.
COOL / DRY / HEAT / FAN
THLECEIRISTHRIO
ANAMETADOTHS
Otan patiouvntai ta plhvktra tou thleceiristhrivou, to
suvmbolo
iiiiiii
parousiavzetai sthn oqovnh kai metadivdei
ti" allagev" ruvqmish" ston apodevkth tou klimatistikouv.
MPOUTON EPILOGHS
QERMOKRASIAS
—
(perissovtero kruvo)
Pathvste autov to mpoutovn gia na camhlwvsete thn epilegmevnh
qermokrasiva
.
+
(perissovterh zevsth)
Pathvste autov to mpoutovn gia na anebavsete thn epilegmevnh
qermokrasiva
EPILOGEIS TACUTHTAS EKTROPEA
AISQHTHRAS
Sto eswterikov tou
thleceiristhrivou, evna"
aisqhthvra"
qermokrasiva"
shmeiwvnei th
qermokrasiva tou
peribavllonto".
PLHKTRO
SET
Pathvste to plhvktro autov gia thn epiloghv twn
akovlouqwn leitourgiwvn
:
•
Ruvqmish th" wvra"
•
Ruvqmish tuo
timer ON/OFF
?????Gia perissovtere" leptomevreie" deivte ta kefavlaia
“
PWS RUQMIZETAI TO ROLOI
”
kai “RUQMIZETAI
TOU
TIMER”.
MPLOKARISMA TOU THLECEIRISTHRIOU
Patwvnta" to plhvktro autov to phleceiristhvrio mplokavrei
sthn teleutaiva ruvqmish. vOtan h. eivnai energopoihmevnh
to thleceiristhvrio den eivnai se qevsh na elevgxei to
klimatistikov. Gia na xemplokavrete to thleceiristhvrio
pathvste ek nevou .
OQONH
Emfanivzontai oi plhroforive" ovtan to thleceiristhvrio eivnai anammevno.
EPILOGEAS AISQHTHRA QERMOKRASIAS
Pathvste to plhvktro
I FEEL
gia na energopoihvsete
ton aisqhthvra th" qermokrasiva" pou brivsketai
topoqethmevno" sto thleceiristhvrio. Me thn
leitourgiva authv dhmiourgeivte miva tevleia
qermokrasiva peribavllonto"
.
Pathvste ta plhvktra autav gia na epilevxete thn epiqumhthv
leitourgiva tou ektropeva
:
Pathvste to plhvktro gia na kinhvsete ton
ektropeva. Patwvnta" kai pavli o ektropeva"
stamatavei amevsw".
:
Pathvste to plhvktro gia na metakinhvsete
ton ektropeva bhvma pro" bhvma.
MPOUTON
FAN SPEED
(tacuvthta exaeristhvra)
H tacuvthta tou exaeristhvra epilevgetai
autovmata apov ton mikroepexergasthv.
Uyhlhv tacuvthta anemisthvra.
Mevshv tacuvthta anemisthvra.
Camhlhv tacuvthta anemisthvra.
Trovpo" leitourgiva"
Autovmath leitorgiva
Yuvxh
Qevrmansh
Tacuvthta exaeristhvra
Uyhlhv tacuvthta
Autovmath leitourgiva
Mevsh tacuvthta
Camhlhv tacuvthta
Afuvgransh
Epibebaiwvnei thn metavdosh twn
dedomevnwn hv to mplokavrisma
tou thleceiristhrivou
Rolovi
wvre"/leptav
Ruvqmish
qermokrasiva" hv
qermokrasiva
peribavllonto"
Emfanivzetai ovtan h
qermokrasiva pou
endeivknutai eivnai h
qermoktasiva
peribavllonto"
Deivcnei ovpi to
klimatistikov leitourgeiv
se trovpo
I FEEL
Aerismov"
Nucterinov
provgramma
Kivnhsh ektropeva
aevro"
energopoihmevnh
Cronodiakovth"
sthn qevsh
ON
Cronodiakovth"
sthn qevsh
OFF
Cronodiakovth"
sthn qevsh
hmerhvsiou
progravmmato"
Mpoutovn
SLEEP
(nucterinov provgramma)
Perissovtere" leptomevreie" sto ÆNucterinov provgrammaÆ
Otan patavte autov to mpoutovn ston trovpo leitourgiva
YUXH, QERMANSH hv AFUGRANSH to shvma
emfanivzetai sthn oqovnh kai o mikroepexergasthv" tou
thleceiristhrivou qa ruqmivsei thn epilegmevnh
qermokrasiva evtsi wvste na givnei exoikonovmhsh energeiva".
PLHKTRA RUQMISHS ROLOGIOU KAI
RUQMISH THS WRAS STO
TIMER
Patwvnta" ta plhvktra+ hv- energopoieivtai h ruvqmish
th" wvra" kai tou
timer.
Gia perissovtere" leptomevreie"
deivte ta kefavlaia “PWS RUQMIZETAI TO ROLOI
”
kai
“
RUQMIZETAI TOU
TIMER”.
PWS NA MHDENISETE TO
TIMER
Pathvste to plhvktro
CLEAR
an qevlete na sbhvsete
ovle" ti" ruqmivsei" tou
timer
.
QERMOLRASIA PERIBALLONTOS
Pathvste to plhvktro
ROOM
gia na apeikonivsete thn
qermokrasiva peribavllontos kontav sto
thleceiristhvrio
.
Mpoutovn
ON/OFF
(anammevnoÉsbhs
mevno)
To mpoutovn autov
crhsimeuvei gia na teqeiv
se leitourgiva hv na
stamathvsei to
klimatistikov.
Plhktro
TIMER
(ruvqmish tou
timer
)
Patwvnta" to plhvktro
TIMER
sthn oqovnh
energopoieivtai h diadikasiva gia thn ruvqmish
ON/OFF
tou
timer.
GR
Page 57

AUTOMATH LEITOURGIA
VOtan h exwterikhv qermokrasiva pevftei kavtw apov to mhdevn sthn
exwterikhv mpatariva schmativzetai pavgo" pou meiwvnei thn ikanovthta
qevrmansh". VOtan sumbaivnei autov o mikroepexergasthv" divnei entolhv
gia antivstrofh leitourgiva tou klimatistikouv (apovyuxh). M∆ authvn th
leitourgiva o anemisthvra" th" eswterikhv" monavda" stamatav kai h
lucniva
OPERATION
anabosbhvnei gia ovlh th diavrkeia th" apovyuxh".
H leitourgiva qevrmansh" epanevrcetai metav apov livga leptav se scevsh
me thn qermokrasiva tou peribavllonto" kai thn exwterikhv.
APOYUXH TOU ENALLAKTH QERMOTHTAS
EXWTERIKH MONADA
“STANDBY”
LEITOURGIA KAI APODOSH ENOS
SUSTHMATOS ME QERMOANTLIA
VEna klimatistikov sthn evkdosh me qermoantliva qermaivnei to peribavllon
apospwvnta" th qermovthta tou exwterikouv aevra. Katav sunevpeia h
apovdosh (apotelesmatikovthta) tou susthvmato" meiwvnetai ovtan h
exwterikhv qermokrasiva pevftei kavtw apov to mhdevn. An to klimatistikov
den katorqwvnei na diathrhvsei mia ikanopoihtikhv qermokrasiva h
qevrmansh qa prevpei na oloklhrwqeiv me mia avllh suskeuhv.
Metav thn energopoivhsh th" leitourgiva" qevrmansh" o anemisthvra" th"
eswterikhv" monavda" qa parameivnei stamathmevno". Autov givnetai diovti
upavrcei h prostasiva ÆProvlhyh reuvmato" yucrouv aevraÆ me bavsh thn opoiva
qa energopoihqeiv h leitourgiva tou anemisthvra movno ovtan o enallakthv"
qermovthta" th" eswterikhv" monavda" qa eivnai arketav zestov". Katav th
diavrkeia authv" th" periovdou h lucniva
STANDBY
paramevnei anammevnh.
RÁQMISH WROLOGIOÁ
YUXH
Epalhqeuvste an h monavda eivnai sundedemevnh sto
reuvma kai an h fwteinhv evndeixh
STANDBY
eivnai
anammevnh.
1.
Pathvste to mpoutovn
MODE
(trovpo"
leitourgiva") mevcri pou sthn oqovnh na
emfanisteiv to suvmbolo YUXH .
2.
Pathvste to mpoutovn
ON/OFF
kai qevste se
leitourgiva to klimatistikov.
3.
Pathvste ta mpoutovn
TEMP.
gia na
katagravyete thn epiqumhthv qermokrasiva (o
tomeva" ruvqmish" eivnai metaxu
30 °C
mevgisto
kai
16 °C
elavcisto).
SHMEIWSH
QERMANSH
1.
Pathvste to mpoutovn
MODE
(trovpo" leitourgiva") mevcri pou sthn
oqovnh na emfanisteiv to suvmbolo YUXH .
2.
Pathvste to mpoutovn
ON/OFF
kai qevste se leitourgiva to klimatistikov.
3.
Pathvste ta mpoutovn
TEMP.
gia na katagravyete thn epiqumhthv
qermokrasiva (o tomeva" ruvqmish" eivnai metaxu
30 °C
mevgisto kai
16 °C
elavcisto).
STHN OQONH QA EMFANISTEI H EPILEGMENH
QERMOKRASIA
1.
Pathvste to mpoutovn
MODE
(trovpo" leitourgiva") mevcri pou sthn oqovnh
na emfanisteiv to suvmbolo
AUTOMATICO
.
2.
Pathvste to mpoutovn
ON/OFF
kai qevste se leitourgiva to klimatistikov.
3.
Pathvste ta mpoutovn
TEMP.
gia na katagravyete thn epiqumhthv qermokrasiva
(o tomeva" ruvqmish" eivnai metaxu
30 °C
mevgisto kai
16 °C
elavcisto).
STHN OQONH QA EMFANISTEI H EPILEGMENH
QERMOKRASIA
To klimatistikov qa leitourghvsei autovmata pernwvnta" apov th leitourgiva
qevrmansh" sthn yuvxh (hv antivqeta) evtsi wvste na diathrhvsei thn
kategrammevnh qermokrasiva.
4.
Pathvste to mpoutovn
FAN SPEED
gia na epanaruqmivsete thn tacuvthta
tou exaeristhvra.
4.
Pathvste to mpoutovn
FAN SPEED
gia na epanaruqmivsete thn tacuvthta
tou exaeristhvra.
5.
Pathvste to plhvktpokai ruqmivste th dieuvqunsh kukloforiva"
tou aevra ovpw" epiqumeivte (bl. ruvqmish kukloforiva" tou aevra)
STHN OQONH QA EMFANISTEI H
EPILEGMENH QERMOKRASIA
4.
Pathvste to mpoutovn
FAN SPEED
gia na epanaruqmivsete thn tacuvthta
tou exaeristhvra.
5.
Pathvste to plhvktpokai ruqmivste th dieuvqunsh kukloforiva"
tou aevra ovpw" epiqumeivte (bl. ruvqmish kukloforiva" tou aevra)
LEITOURGIA METO THLECEIRISTHRIO
Paravdeigma schvma leitourgiva" sth qevsh me th qermocrasi va
peribavllonto" ruqmismevnh stou"
23
baqmouv"
.
ONON ON
∆ 1 H ∆ 1 H
MIN. MAX.
A
B
C
C
B
A
27
26
25
24
23
22
21
20
19
7
GR
COOL / DRY / HEAT / FAN
COOL / DRY / HEAT / FAN
1
5
4
3
2
1
Pathvste to plhvktro
SET
gia pevnte deuterovlepta. Anabosbhvnei movno
h evndeixh th" wvra".
2
Pathvste ta plhvktra + hv- mevcri na emfanisteiv h swsthv wvra.
3
Pathvste to plhvktro
SET
kai h evndeixh qa antamathvsei na
anabosbhvnei.
SHMEIWSH
Page 58

Oi timev" tou pivnaka anafevrontai sth leitourgiva tou klimatistikouv
ovtan eivnai energopoihmevno" o aisqhthvra" sto thleceiristhvrio
(blevpe epilogeva aisqhthvra qermokrasiva" sel. 73).
Oi timev" allavzoun elafrav sthn perivptwsh pou o aisqhthvra" pou
upavrcei sthn eswterikhv monavda eivnai energopoihmevno".
(Suvmbolo sthn oqovnh tou thleceiristhrivou).
EPILOGH TACUTHTAS EXAERISTHRA
AUTOMATH LEITOURGIA
Me to mpoutovn
FAN SPEED
phgaivnete sth qevsh . O mikroepexergasthv"
qa elevgxei autovmata thn tacuvthta tou exaeristhvra. vOtan to klimatistikov
arcivsei na leitourgeiv o aisqhthvra" qermokrasiva" katagravfei th diaforav
qermokrasiva" tou peribavllonto" kai th" qermokrasiva" pou evcete katagravyei
sto thleceiristhvrio kai afouv thn metadwvsei ston mikroepexergasthv epilevgei
autovmata thn idanikhv tacuvthta tou exaeristhvra.
DIAFORA METAXU
QERMOKRASIAS PERIBALLONTOS TACUTHTA ANEMISTHRA
KAI RUQMISMENHS QERMOKRASIAS
2 °C
hv uyhlovterh Mevgisth
Yuvxh kai afuvgransh Metaxu2 kai
1 °C
Mevsh
Camhlovterh apov
1 °C
Elavcisth
2 °C
hv uyhlovter Mevgisth
Qevrmansh
Camhlovterh apov
2 °C
Mevsh
Uyhlhv tacuvthta Mevsh tacuvthta
Camhlh tacuvthta
CEIROKINHTH RUQMISH
Gia na ruqmivsete me ceirokivnhto trovpo ton exaeristhvra pathvste
to mpoutovn
FAN SPEED
epilevgonta" thn epiqumhthv tacuvthta.
SHMEIWSH
1 wvrav1 wvra
v CRONOS
Epilecqeivsa qermokrasiva
Qermokrasiva peribavllonto"
YUXH KAI AFUGRANSH
1 wvra
v
1 wvra
v CRONOS
Epilecqeivsa qermokrasiva
Qermokrasiva peribavllonto"
QERMANSH
NUCTERINO PROGRAMMA
●
To nucterinov provgramma crhsimeuvei gia thn exoikono vmhsh
hlektrikhv" enevrgeia".
1.
Pathvste to mpoutovn
MODE
gia na prodiatavxete to
klimatistikov sthn yuvxh, afuvgransh hv qevrmansh.
2.
Pathvste to mpoutovn
SLEEP
.
3.
To suvmbolo emfanivzetai sthn oqovnh. Gia na bgeivte apov to
provgramma pathvste ek nevou to mpoutovn
SLEEP.
Ti eivnai to provgramma nucterinhv" leitourgiva"
?
Sthn archv to klimatistikov yuvcei hv qermaivnei mevcri na ftavsei
sthn qermokrasiva pou evcei epilecqeiv me ton epilogeva 3 kai metav
stamatav. Metav apov 1 wvrav perivpou h qermokrasiva pou evcei
epilecqeiv metabavlletai me ton akovlouqo trovpo.
TROPOS LEITOURGIAS METABOLH EPILECQEISAS QERMOKRASIAS
Qevrmansh Meivwsh kata
1 °C
Yuvxh kai afuvgransh Auvxhsh kata
1 °C
To klimatistikov leitourgeiv mevcri thn kainouvrgia epilecqeivsa
qermokrasiva kai stamatav. Metav apov
1 wvra
v h epilecqeivsa
qermokrasiva auxavnetai ek nevou katav 1¡Ç sthn yuvxh kai meiwvnetai
katav 1¡Ç sth qevrmansh. M∆ autovn ton trovpo exoikonomeivtai enevrgeia
cwriv" autov na ephreavzei th nucterinhv qermokrasiva tou cwvrou.
8
COOL / DRY / HEAT / FAN
AFUGRANSH
1.
Pathvste to mpoutovn
MODE
(trovpo" leitourgiva") mevcri na emfanisteiv
sthn oqovnh to suvmbolo AFUGRANSH .
2.
Pathvste to mpoutovn
ON/OFF
kai qevste se leitourgiva to klimatistikov.
3.
Pathvste ta mpoutovn
TEMP
. gia na katagravyete thn epiqumhthv
qermokrasiva (o tomeva" ruvqmish" eivnai metaxu
30 °C
mevgisto kai
16
°C
elavcisto).
STHN OQONH QA EMFANISTEI H EPILEGMENH
QERMOKRASIA
●
Crhsimopoihvste th leitourgiva afuvgransh" ovtan qevlete na meiwvsete
thn ugrasiva tou peribavllonto".
●
Otan h qermokrasiva peribavllonto" ftavnei thn katagrammevnh timhv
sto thleceiristhvrio (qermostavth") to klimatistikov epanalambavnei
autovmata tou" kuvklou" anammevno hv sbhsmevno.
●
Me ruqmismevnh th leitourgiva afuvgransh" o anemisthvra"
peristrevfetai autovmata me camhlhv tacuvthta hv stamatav gia na
apofuvgei thn uperbolikhv yuvxh.
●
H leitourgiva afuvgransh" den mporeiv na energopoihqeiv ovtan h
eswterikhv qermokrasiva eivnai kavtw apo
15 °C
.
SHMEIWSH
SHMEIWSH
To climatisticov allavzei trovpo leitourgiva" (apov zestov se cruvo aevra
hv kai antivstrofa) ovtan parousiavzetai miva apo v ti" paracavtw
periptwvseiÚ
-
ZWNH AÚ
Allazei an h qermokrasia diaforopoieitai kata
toulaciston
3° C
apo ekeinh poy exei ruqmistei sto
thleceirishrio.
-
ZWNH BÚ
Allazei an h qermokrasia diaforopoieitai kata
toulaciston
1° C
wra apo to stamathma tou sumpiesth.
-
ZWNH CÚ
Den allazei pote an h qermokrasia dendiaforopoihqei
perissotero apo
1° C
apo ekeinh poy exei ruqmistei sto
thleceirishrio.
COOL / DRY / HEAT / FAN
GR
MONO ANEMISTHRAS
SHMEIWSH
∞Otan
qevlete movno kuklofovriva aevro", hv provgramma auxomeivwsh"
th" qermokrasiva" tovteÚ
1.
Pathvste to mpoutovn
MODE
(trovpo" leitourgiva") mevcri na emfanisteiv
sthn oqovnh to suvmbolo
MONO ANEMISTHRAS
2.
Pathvste to mpoutovn
ON/OFF
kai qevste se leitourgiva to klimatistikov.
Sthn qevsh AERISMOS h tacuvthta tou anemisthvra ruqmivzetai autovmata, ovtw"
sthn qevsh yuvxh.
1°C
1°C
1°C
1°C
Page 59

A)
PWS NA RUQMOSETE THN WRA THS
PAUSHS (
OFF)
1.
Pathvste to plhvktro
ON/OFF
gia na
anavyete
toklimatistikov.
2.
Pathvste to plhvktro
TIMER
mevcri pou
na anabosbhvnei h evndeixh
OFF
.
3.
Pathvste to plhvktra + hv -(WRA) mevcri
pou na parousiasteiv h epiqumhthv timhv.
4.
Pathvste to plhvktro
SET
gia na
energopoihvsete to
timer
.
B)
PWS NA RUQMOSETE THN WRA THS PAUSHS (
ON)
1
.
Pathvste to plhvktro ONgia na anavyete to klimatistikov.
2.
Pathvste to plhvktro
TIMER
mevcri pou na anabosbhvnei h
evndeixh ON.
3.
Pathvste to plhvktra + hv -(WRA) mevcri pou na parousiasteiv
h epiqumhthv timhv.
4.
Pathvste to plhvktro
SET
gia na energopoihvsete to
timer
.
C)
PWS NA RUQMOSETE
TO KAQHMERINO PROGRAMMA
ANAMMATOSÉSBHSIMATOS
( vH ANTIQETWS)
1.
Pathvste to plhvktro
TIMER
mevcri pou na anabosbhvnei h
evndeixh ON.
2.
Pathvste to plhvktra + hv -(WRA) mevcri pou na parousiasteiv
h epiqumhthv timhv.
3.
Pathvste ek nevou to plhvktro
TIMER,
h evndeixh
OFF
anabosbhvnei.
4.
Pathvste to plhvktra + hv -(WRA) mevcri pou na parousiasteiv
h epiqumhthv timhv.
4.
Pathvste to plhvktro
TIMER,
evpeita to plhvktro
SET
gia na
energopoihvsete to
timer
.
D)
PWS NA MHDENISETE TO
TIMER
Pathvste to plhvktro
CLEAR
an qevlete na sbhvsete ovle" ti"
ruqmivsei" tou
timer
.
RÁQMISH CRONODIAKOPTH
An h diadikasiva ruvqmish" tou
timer
den oloklhrwqeiv mevsa se
15 deuterovlepta patwvnta" to plhvktro
SET
, qa akurwqeiv kai
qa parameivnei sthn mnhvmh h teleutaiva ruvqmish.
SHMEIWSH
ORIZONTIA (ceirokivnhth ruvqmish)
Ruqmivste allavzonta" th qevsh twn persivdwn aristerav hv dexiav
ovpw" faivnetai oti" eikovne" pou akolouqouvn gia kavqe montevlo
.
RÁQMISH THS ROHS KAI KATEÁQÁNSHS TOÁ AERA
Katav thn yuvxh hv thn afuvgransh, eidikav parousiva uyhlhv"
ugrasiva" ston cwvro, strevyte ta kavqeta pteruvgia wvsta na
evlqoun se metwpiaiva qevsh.
An stevyete ta pteruvgia entelwv" aristerav hv entelwv" dexiav mporeiv
na prokalevsoun ton schmatismov udratmwvn kai stagovnwn apov
thn grivlia th" exovdou tou aevro".
Mh metakineivte ta diafravgmata me to cevri katav th diavrkeia
leitourgiva"
9
Αριστερ
Κθετεσ πτρυγεσ
∆εξι
GR
3
1
4
2
KAQETA (me thleceiristhvrio gia)
Me to thleceiristhvrio mporeivte na ruqmivsete ton ektropeva katav
duvo trovpou"
:
1.
Pathvste to plhvktro gia na kinhvsete ton ektropeva.
Patwvnta" kai pavli o ektropeva" stamatavei amevsw".
2.
Pathvste to plhvktro gia na metakinhvsete ton ektropeva.
bhvma pro" bhvma.
PROSOCH
PROSOCH
Page 60
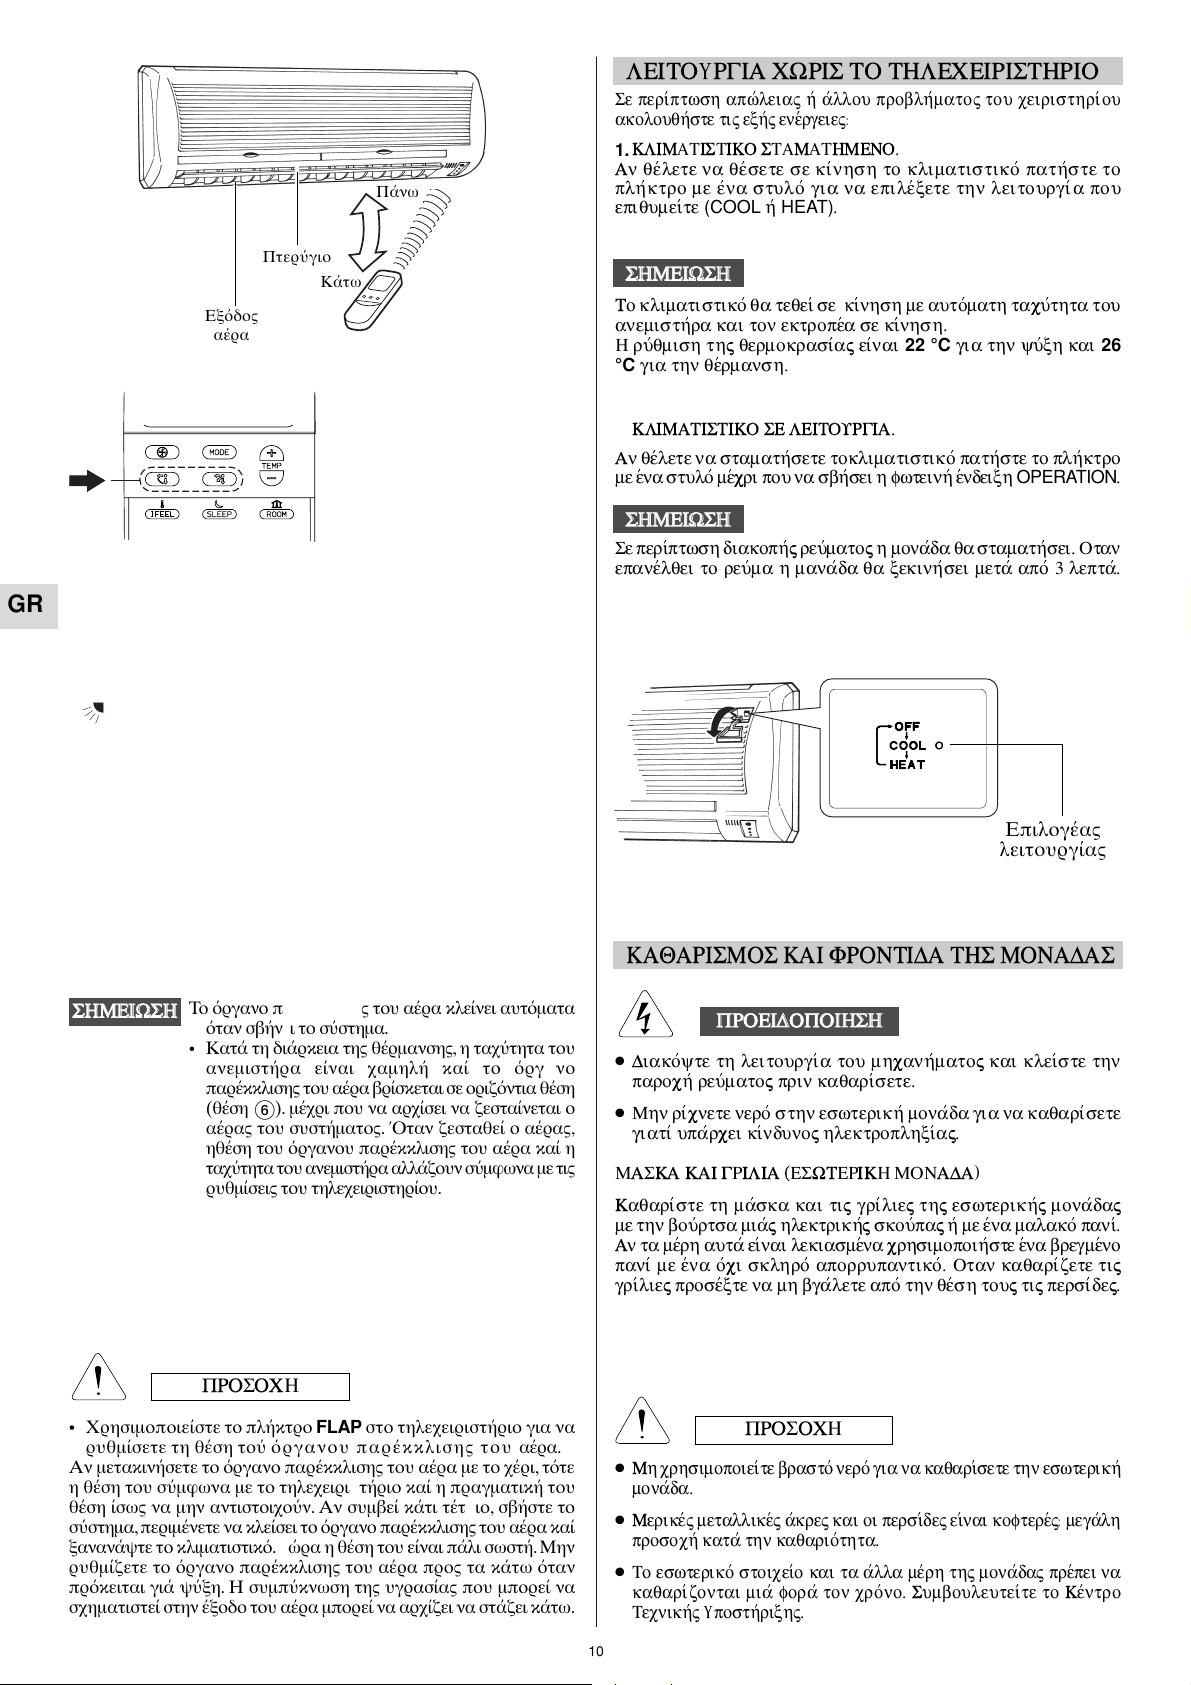
Λειτουργα κατεθυνσησ αρα
Το ργανο παρκκλισησ αρχζει να κινεται πνω κτω γι
να διασκορπσει τον αρα στο χρο που χει ρυθµιστε.
2.
KLIMATISTIKO SE LEITOURGIA.
An qevlete na stamathvsete toklimatistikov pathvste to plhvktro
me evna stulov mevcri pou na sbhvsei h fwteinhv evndeixh
OPERATION
.
KAQARISMOS KAI FRONTIDA THS MONADAS
●
Diakovyte th leitourgiva tou mhcanhvmato" kai kleivste thn
parochv reuvmato" prin kaqarivsete.
●
Mhn rivcnete nerov sthn eswterikhv monavda gia na kaqarivsete
giativ upavrcei kivnduno" hlektroplhxiva".
MASKA KAI GRILIA (ESWTERIKH MONADA)
Kaqarivste th mavska kai ti" grivlie" th" eswterikhv" monavda"
me thn bouvrtsa miav" hlektrikhv" skouvpa" hv me evna malakov paniv.
An ta mevrh autav eivnai lekiasmevna crhsimopoihvste evna bregmevno
paniv me evna ovci sklhrov aporrupantikov. Otan kaqarivzete ti"
grivlie" prosevxte na mh bgavlete apov thn qevsh tou" ti" persivde".
●
Mh crhsimopoieivte brastov nerov gia na kaqarivsete thn eswterikhv
monavda.
●
Merikev" metallikev" avkre" kai oi persivde" eivnai kofterev"Ú megavlh
prosochv katav thn kaqariovthta.
●
To eswterikov stoiceivo kai ta avlla mevrh th" monavda" prevpei na
kaqarivzontai miav forav ton crovno. Sumbouleuteivte to Kevntro
Tecnikhv" Áposthvrixh".
Se perivptwsh diakophv" reuvmato" h monavda qa stamathvsei. Otan
epanevlqei to reuvma h manavda qa xekinhvsei metav apov 3 leptav.
SHMEIWSH
10
Επιλογασ
λειτουργασ
Se perivptwsh apwvleia" hv avllou problhvmato" tou ceiristhrivou
akolouqhvste ti" exhv" enevrgeie"Ú
1.
KLIMATISTIKO STAMATHMENO.
An qevlete na qevsete se kivnhsh to klimatistiko v pathvste to
plhvktro me evna stulov gia na epilevxete thn leitourgiva pou
epiqumeivte
(COOL
hv
HEAT)
.
To klimatistikov qa teqeiv se kivnhsh me autovmath tacuvthta tou
anemisthvra kai ton ektropeva se kivnhsh.
H ruvqmish th" qermokrasiva" eivnai
22 °C
gia thn yuvxh kai
26
°C
gia thn qevrmansh.
SHMEIWSH
LEITOÁRGIA CWRIS TO THLECEIRISTHRIO
Πνω
Κτω
Πτεργιο
Eξδοσ
αρα
SHMEIWSH
Το ργανο παρκκλισησ του αρα κλενει αυτµατα
ταν σβνει το σστηµα.
•
Κατ τη διρκεια τησ θρµανσησ, η ταχτητα του
ανεµιστρα εναι χαµηλ κα το ργανο
παρκκλισησ του αρα βρσκεται σε οριζντια θση
(θση
). µχρι που να αρχσει να ζεστανεται ο
αρασ του συστµατοσ. Οταν ζεσταθε ο αρασ,
ηθση του ργανου παρκκλισησ του αρα κα η
ταχτητα του ανεµιστρα αλλζουν σµφωνα µε τισ
ρυθµσεισ του τηλεχειριστηρου.
• Χρησιµοποιεστε το πλκτρο FLAP στο τηλεχειριστριο για να
ρυθµσετε τη θση το ργανου παρκκλισησ του αρα.
Αν µετακινσετε το ργανο παρκκλισησ του αρα µε το χρι,ττε
η θση του σµφωνα µε το τηλεχειριστριο κα η πραγµατικ του
θση σωσ να µην αντιστοιχον. Αν συµβε κτι ττοιο, σβστε το
σστηµα, περιµνετε να κλεσει το ργανο παρκκλισησ του αρα κα
ξανανψτε το κλιµατιστικ.Τρα η θση του εναι πλι σωστ.Μην
ρυθµζετε το ργανο παρκκλισησ του αρα προσ τα κτω ταν
πρκειται γι ψξη. Η συµπκνωση τησ υγρασασ που µπορε να
σχηµατιστε στην ξοδο του αρα µπορε να αρχζει να στζει κτω.
GR
PROEIDOPOIHSH
PROSOCH
PROSOCH
Page 61
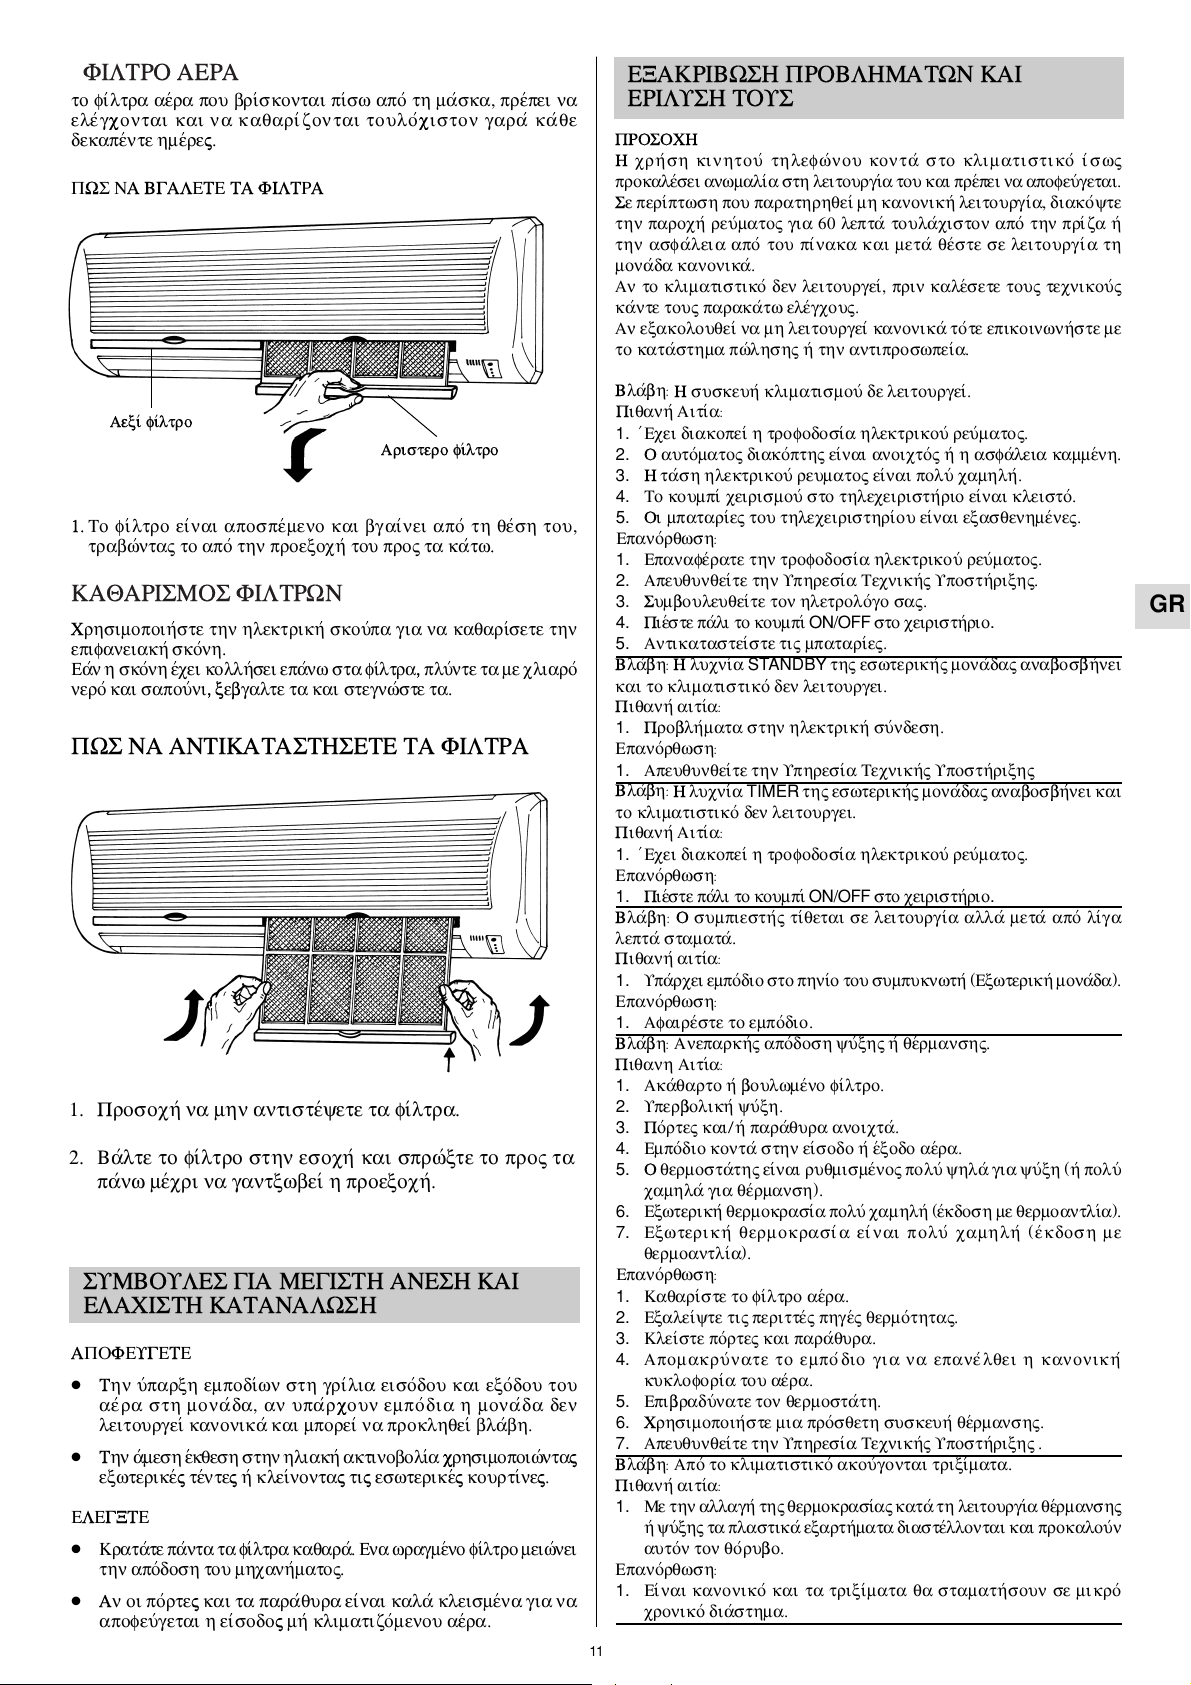
FILTRO AERA
KAQARISMOS FILTRWN
SUMBOULES GIA MEGISTH ANESH KAI
ELACISTH KATANALWSH
PWS NA ANTIKATASTHSETE TA FILTRA
to fivltra aevra pou brivskontai pivsw apov th mavska, prevpei na
elevgcontai kai na kaqarivzontai toulovciston garav kavqe
dekapevnte hmevre".
PWS NA BGALETE TA FILTRA
1.
To fivltro eivnai apospevmeno kai bgaivnei apov th qevsh tou,
trabwvnta" to apov thn proexochv tou pro" ta kavtw.
APOFEUGETE
●
Thn uvparxh empodivwn sth grivlia eisovdou kai exovdou tou
aevra sth monavda, an upavrcoun empovdia h monavda den
leitourgeiv kanonikav kai mporeiv na proklhqeiv blavbh.
●
Thn avmesh evkqesh sthn hliakhv aktinoboliva crhsimopoiwvnta"
exwterikev" tevnte" hv kleivnonta" ti" eswterikev" kourtivne".
ELEGXTE
●
Kratavte pavnta ta fivltra kaqarav. Ena wragmevno fivltro meiwvnei
thn apovdosh tou mhcanhvmato".
●
An oi povrte" kai ta paravqura eivnai kalav kleismevna gia na
apofeuvgetai h eivsodo" mhv klimatizovmenou aevra.
EXAKRIBWSH PROBLHMATWN KAI
ERILUSH TOUS
PROSOCH
H crhvsh kinhtouv thlefwvnou kontav sto klimatistikov ivsw"
prokalevsei anwmaliva sth leitourgiva tou kai prevpei na apofeuvgetai.
Se perivptwsh pou parathrhqeiv mh kanonikhv leitourgiva, diakovyte
thn parochv reuvmato" gia 60 leptav toulavciston apov thn privza hv
thn asfavleia apov tou pivnaka kai metav qevste se leitourgiva th
monavda kanonikav.
An to klimatistikov den leitourgeiv, prin kalevsete tou" tecnikouv"
kavnte tou" parakavtw elevgcou".
An exakolouqeiv na mh leitourgeiv kanonikav tovte epikoinwnhvste me
to katavsthma pwvlhsh" hv thn antiproswpeiva.
BlavbhÚ
H suskeuhv klimatismouv de leitourgeiv.
Piqanhv AitivaÚ
1.
vEcei diakopeiv h trofodosiva hlektrikouv reuvmato".
2.
O autovmato" diakovpth" eivnai anoictov" hv h asfavleia kammevnh.
3.
H tavsh hlektrikouv reumato" eivnai poluv camhlhv.
4.
To koumpiv ceirismouv sto thleceiristhvrio eivnai kleistov.
5.
Oi mpatarive" tou thleceiristhrivou eivnai exasqenhmevne".
EpanovrqwshÚ
1.
Epanafevrate thn trofodosiva hlektrikouv reuvmato".
2.
Apeuqunqeivte thn Uphresiva Tecnikhv" Uposthvrixh".
3.
Sumbouleuqeivte ton hletrolovgo sa".
4.
Pievste pavli to koumpiv
ON/OFF
sto ceiristhvrio
.
5.
Antikatasteivste ti" mpatarive".
BlavbhÚ
H lucniva
STANDBY
th" eswterikhv" monavda" anabosbhvnei
kai to klimatistikov den leitourgei.
Piqanhv aitivaÚ
1.
Problhvmata sthn hlektrikhv suvndesh.
EpanovrqwshÚ
1.
Apeuqunqeivte thn Uphresiva Tecnikhv" Uposthvrixh"
BlavbhÚ
H lucniva
TIMER
th" eswterikhv" monavda" anabosbhvnei kai
to klimatistikov den leitourgei.
Piqanhv AitivaÚ
1.
vEcei diakopeiv h trofodosiva hlektrikouv reuvmato".
EpanovrqwshÚ
1.
Pievste pavli to koumpiv
ON/OFF
sto ceiristhvrio
.
BlavbhÚ
O sumpiesthv" tivqetai se leitourgiva allav metav apov livga
leptav stamatav.
Piqanhv aitivaÚ
1.
Upavrcei empovdio sto phnivo tou sumpuknwthv (Exwterikhv monavda).
EpanovrqwshÚ
1.
Afairevste to empovdio.
BlavbhÚ
Aneparkhv" apovdosh yuvxh" hv qevrmansh".
Piqanh AitivaÚ
1.
Akavqarto hv boulwmevno fivltro.
2.
Uperbolikhv yuvxh.
3.
Povrte" kaiÉhv paravqura anoictav.
4.
Empovdio kontav sthn eivsodo hv evxodo aevra.
5.
O qermostavth" eivnai ruqmismevno" poluv yhlav gia yuvxh (hv poluv
camhlav gia qevrmansh).
6.
Exwterikhv qermokrasiva poluv camhlhv (evkdosh me qermoantliva).
7.
Exwterikhv qermokrasiva eivnai poluv camhlhv (evkdosh me
qermoantliva).
EpanovrqwshÚ
1.
Kaqarivste to fivltro aevra.
2.
Exaleivyte ti" perittev" phgev" qermovthta".
3.
Kleivste povrte" kai paravqura.
4.
Apomakruvnate to empovdio gia na epanevlqei h kanonikhv
kukloforiva tou aevra.
5.
Epibraduvnate ton qermostavth.
6.
Crhsimopoihvste mia provsqeth suskeuhv qevrmansh".
7.
Apeuqunqeivte thn Uphresiva Tecnikhv" Uposthvrixh" .
BlavbhÚ
Apov to klimatistikov akouvgontai trixivmata.
Piqanhv aitivaÚ
1.
Me thn allaghv th" qermokrasiva" katav th leitourgiva qevrmansh"
hv yuvxh" ta plastikav exarthvmata diastevllontai kai prokalouvn
autovn ton qovrubo.
EpanovrqwshÚ
1.
Eivnai kanonikov kai ta trixivmata qa stamathvsoun se mikro v
cronikov diavsthma.
11
Aexiv fivltro
Aristero fivltro
Crhsimopoihvste thn hlektrikhv skouvpa gia na kaqarivsete thn
epifaneiakhv skovnh.
Eavn h skovnh evcei kollhvsei epavnw sta fivltra, pluvnte ta me cliarov
nerov kai sapouvni, xebgalte ta kai stegnwvste ta.
1. Prosochv na mhn antistevyete ta fivltra.
2. Bavlte to fivltro sthn esochv kai sprwvxte to pro" ta
pavnw mevcri na gantxwbeiv h proexochv.
GR
Page 62

R.D. 28 Reyrieux BP 131 - 01601 Trévoux CEDEX France
Tél. 04.74.00.92.92 - Fax 04.74.00.42.00
R.C.S. Bourg-en-Bresse B 759 200 728
In order to carry on a constant improvement, our products can be modified without prior notice.
Per garantire un costante miglioramento dei nostri prodotti, ci riserviamo di modificarli senza preavviso.
Par souci d’amélioration constante, nos produits peuvent être modifiés sans préavis.
Unsere Produkte werden laufend verbessert und können Vorankündigung abgeändert Werden.
En el interés de mejoras constantes, nuestros productos pueden modificarse sin aviso prévio.
S.A.C. - Printed in italy
 Loading...