

Page 1
Page 2

CONTENT
1. Getting to know your camera...........................................................3
1.1 Functional parts of the camera.............................................................3
1.2 Monitor screen display..........................................................................4
1.3 Main menu description.........................................................................5
2. Prepare for use....................................................................................5
2.1 load batteries........................................................................................5
2.2 Insert the memory card.......................................................................6
2.3 Taking pictures and AVI function..........................................................6
2.4 Playback function.................................................................................7
2.5 Enlarging photos................................................................................10
2.6 Deleting the photo..............................................................................10
3. Setting ................................................................................................11
4. Downloading ......................................................................................18
5. PC camera function ...........................................................................19
6. How to maintain the camera .............................................................20
7. Specifications & system configure...................................................23
8. Common problems and solving solution.........................................25
Page 1 of 31
Page 3

Introduction:
Thanks for purchasing our digital camera. Please read through this
manual carefully before using the camera and follow the instructions to
avoid any damages that may be caused to camera by improper operation.
Please try to take pictures before you perform the formal recording or to
take photos of any important occasion. Please do test the camera
beforehand to ensure that it functions well. Any additional loss
photography or any loss of benefit generated by the photography is not
the responsibility of our company and no compensation will be given for it.
Page 2 of 31
Page 4
1.Getting to know your camera
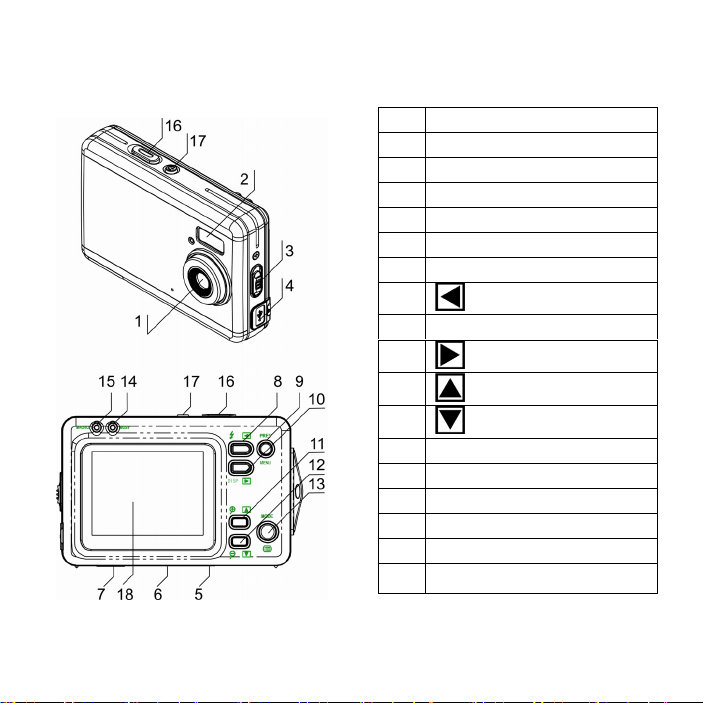
1.1 Functional parts of the camera
Page 3 of 31
1 Lens
2 Flash light
3 MACRO button
4 USB jack
5 Battery cover
6 SD card slot
7 Tripod socket
8
LEFT/flash
9 MENU button
10
11
12
RIGHT/DISP
UP
DOWN
13 MODE button
14 BUSY light
15 MACRO light
16 SHOOT/OK button
17 POWER button
18 TFT monitor screen
Page 5
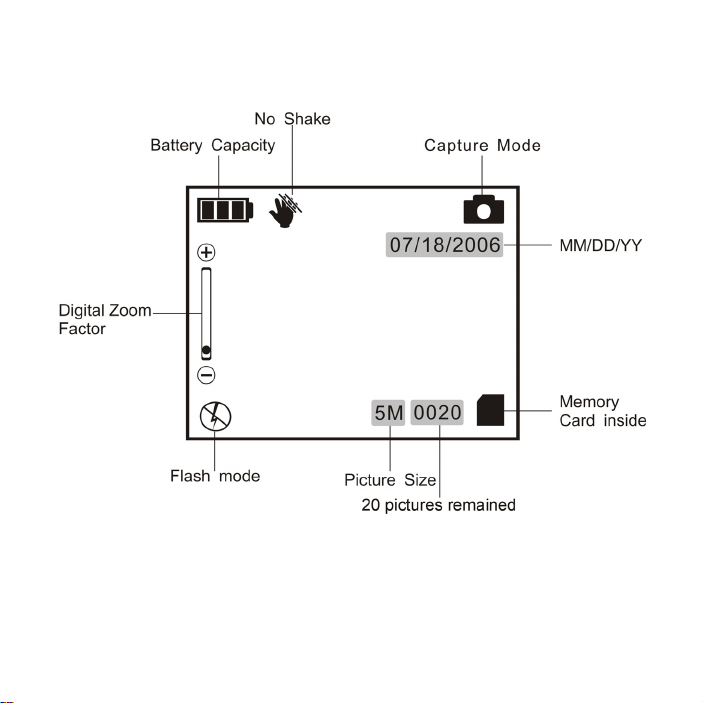
1.2 Monitor screen display
Page 4 of 31
Page 6
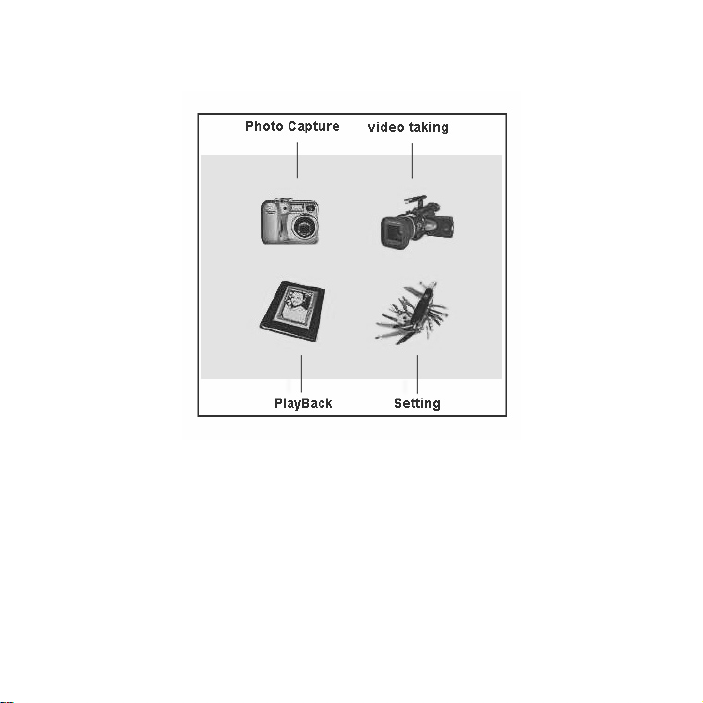
1.3 Main menu description
2. Prepare for use
2.1 load batteries
It’s optional to use AAA alkaline batteries, rechargeable batteries.
Open the battery cover and put in batteries according to the polarity
indicated on the battery door.
Page 5 of 31
Page 7

2.2 Insert the memory card
Make the front side of the card facing the front face of the camera, then
insert the card inside softly. Please note the insert marking on the card.
Attention: If you can not insert the SD card, Put it out and re-insert again.
2.3 Taking pictures and AVI function
capture※
(1). Press the POWER button to turn on the camera, then into the capture
mode automatically
(2). If not in the capture mode, press the MENU button to select the
capture mode, then press the OK button to enter
(3). Press the SHOOT button
Attention:
●While saving the photos into the camera, don’t open the battery cover
and put out the batteries, or else, it will fail to save or damage will be
caused to the images being saved.
●If the camera is inactive for sometime, it will automatically turn OFF
Taking video※
(1). Press the POWER button to turn on the camera;
Page 6 of 31
Page 8

(2). Press the MENU button into the main menu, select the video mode,
press the OK button to confirm;
(3). Press the SHOOT button to start recording;
(4). Press the SHOOT button again to stop.
Attention:
The time of video recording depends on the available memory capacity.
2.4 Playback function
You can playback photos and video through TFT screen, or by connecting
the camera to the TV.
※reviewing the photo
You can review the photos saved in the camera or in the memory card
through LCD screen. During this process, you can enlarge or delete them.
(1). Press the MENU button into the main menu, select the playback
mode, then press the OK button to enter;
(2). Press the LEFT/RIGHT button
(3). Press the DOWN/UP button
to enlarge or dwindle the photo.
Page 7 of 31
to review the item;
Page 9

The largest is 4 times of the actual size.
※playing the video
You can play the video saved in the camera or the memory card through
the LCD. During this process, you can enlarge or delete the item.
(1), Press the MENU button into the main menu, select the playback
mode, then press the OK button to confirm;
(2), Press LEFT/RIGHT button
(3), Press the UP button to play the video, press it again to
forward
(4), press the DOWN button to stop playing;
(5). Press the OK button to come back to the preview menu.
playing the video by TV※
You can play the video by connecting the camera to the TV.
(1). Press the POWER button to turn on the camera, connect its TV
output jack to the input port of the TV with a video cable;
(2). Turn on the TV, and change it to the AV mode;
(3). Press LEFT/RIGHT button to select the Item
to select the item;
play fast
Page 8 of 31
Page 10

(4) Press UP/DOWN button to select to play the video, play fast forward
or play slow.
Attention:
While connecting the camera to the TV, ensure to press the DISP button
to turn OFF the TFT screen.
It will consume the battery voltage to connect the camera to the TV.
The TV mode may effects the picture quality. Please adjust the camera
output mode in accordance with the TV mode (PAL and NTSC to be
selected)
The image may not be displayed in the Starting of TV screen. It is caused
by settings of the TV, But not by the fault of camera.
Set the camera mode:
(1)、Press the MENU button into the main menu, then select the setting
mode ,then press the OK button to enter;
(2)、Press the UP/DOWN button
(3)、Press LEFT/RIGHT button
Page 9 of 31
to roll to the TV-OUT window;
to select the required NTSC
Page 11

mode or PAL mode;
(4)、press the MENU button to quit;
2.5 Enlarging photos
While reviewing the photo, you can enlarge or dwindle it.
(1). Press MENU button into the main menu, select the playback mode to
enter;
(2). Press LEFT/RIGHT button
, select the item;
(3). Press UP button to enlarge the item;then press the OK button to
confirm the image size;
(4). Press LEFT/RIGHT/DOWN/UP button
to move the
item;
(5). Press the OK button to come back the preview mode.
2.6 Deleting the photo
The images can be deleted from the camera or the memory card.
Delete one:
Page 10 of 31
Page 12

(1). Press the MENU button into the main menu, then select the playback
mode to enter;
(2). Press LEFT/RIGHT button
to select the item;
(3). Press the MODE button,then press the UP button to select the
“delete” window
(4). Press the OK button to confirm deleting. And then come to the next
photo;
(5). Repeat the above process to delete the photos one by one.
Delete all:
(1). Press the MODE button,then press the UP button to select the
“delete” window
(2). Press the UP button
, roll to “delete all” window;
(3). Press the OK button to confirm deleting all.
3. Settings
You can adjust the camera settings in the setting mode
Page 11 of 31
Page 13

3.1 Self-timer
(1).Press the power button to turn on the camera, then press the MODE
button, and press the UP button to change to “Self-timer” window
(2). Press the LEFT/RIGHT button
(10”/15”/20” to be selected) ;
(3). Press the MODE button to come back, then the camera will stay in
the self-timer mode.
Attention: If want to cancel, just set self-timer off.
3.2 Flash light
Flash off: always keeping off
Auto: turn on/off auto according to the light
Flash on: always keeping on
The flash light needs to be charged between two times snapshots. Until it
is fully charged, then you can snapshoot the next one.
If snapshot in a bright light ,visible facular may be caused to the image,
and incorrect exposure may be not obtained.
The workable rage of flash light is 1.8m to 2.5m.
Page 12 of 31
to select the needed time
Page 14

3.3 White balance
You can select the correct balance to get the best quality of photos.
(1). Press the POWER button to turn the camera ON;
(2). Press the MODE button, Press DOWN/UP button ,roll to the
“white balance” window;
(3).Press LEFT/RIGHT button
to select the needed (5 modes to
be selected);
(5). Press the MODE button to quit.
3.4 Picture size
The size to be selected:2048X1536(3Mega pixels), 2560X1920(5Mega
pixels by interpolation), 4032x3024(12Mega pixels by interpolation)
(1).Turn on the camera, then press the MODE button;
(2). Press the DOWN/UP button
, and roll to “picture quality”
window;
(3). Press the LEFT/RIGHT button
Page 13 of 31
to select the required picture
Page 15

size ;
(4). Press the MODE button to quit
3.5 Digital zoom
This camera is with digital zoom function.
Use LCD to review the image to check the effect of digital zoom.
Attention:Digital zoom will affect the picture quality .Bigger the zoom,
quality will be worse. The maximum is 4X zoom.
(1). Press DOWN/UP button
to adjust the focal range of camera
while it is in working in the capture mode.
(2). Then start to capture.
3.6. Date and Time
This camera is with the clock function, to record the date and the time of
snapshot and recording.
(1).Turn on the camera, press the MENU button,and then change to the
settings mode;
(2). Press the OK button to confirm;
(3). Press the DOWN/UP button
Page 14 of 31
, roll to the “Date &Time
Page 16

Setting” window, then press the OK button;
(4). Press the DOWN/UP button
to adjust the date and the
time;
(5). Press the OK button to confirm setting.
3.7 The other settings
You can also set the other function in the menu。
3.8. USB (storage) & PC camera mode
PC-CAM mode: this camera can be used as a webcam.
Storage mode: In this mode, you can download, delete and upload files.
This camera can also be used as a removable disk.
Changing the USB connection mode※ :
(1). Turn camera on, press the MENU button into main the menu, and
change to the setting mode.
(2). Press the DOWN/UP button
roll to “USB Connection”
window;
(3). Press the LEFT/RIGHT button to select the required USB
Page 15 of 31
Page 17

mode (PC Cam or Mass storage to be selected);
(4). Press the MENU button to come back the main menu.
Change the USB connection mode:※
NTSC and PAL to be selected
(1). press the MENU button into main the menu, then change to the
setting mode;
(2). Press the DOWN/UP button
(3). Press the LEFT/RIGHT button
,roll to “TV output” window;
, roll to the required TV mode;
(4). Press the MENU button to come back the main menu
3.9 Auto power off
You can set the time to auto power off in the menu.
(1). turn on the camera, press the MENU button, and change to the
setting mode;
(2). Press the DOWN/UP button
, roll to “Auto Power Off”
window;
Page 16 of 31
Page 18

(3). Press the LEFT/RIGHT button to select the time to auto
power off;
(4). Press the MENU button to come back the main menu.
3.10 Language
(1). press the MENU button, and then change to the setting mode;
(2). Press DOWN/UP button
,roll to “language” window;
(3). press the OK button to confirm;
(4). Press DOWN/UP button
to select the required language;
(5). Press the OK button to confirm.
3.11 Power
The battery shows on the LCD screen:
empty low
Factors affecting the battery’s life:
□the frequency and the time to use the LCD
Page 17 of 31
full
Page 19

□the frequency and the time to use the flash light
□quantity of pictures taken
□temperature (the battery life shortens in low- temperature environment)
Attention:
●Do not use manganese battery;
●While the camera is turning ON, do not put out the battery or re-install it,
or else, the settings and the function will be affected.
●The following factors will consume the battery:
●While turning on the LCD screen,
●LCD screen stays in re-play mode,
●Connecting the camera to the computer.
4. Downloading
Turn the camera on, and then connect to the computer with a USB cable.
Then you can download and copy pictures, files and other data from the
camera to your computer or from the computer to the memory card.
If you are running Window 98, please install the camera driver first.
After finishing downloading or uploading, ensure to disconnect the
camera from the computer in a safety way.
Page 18 of 31
Page 20

5. PC camera function
This camera can be used as a PC camera after the camera driver is
installed on your computer.
5.1 How to install the camera driver
(1). put the accompanying CD into the CD-ROM;
(2). click “Install camera driver”;
(3). the system will indicate when finishing ;
(4)If you want to use PC-camera function, copy the “AMCAP2.EXE” to
your computer from the CD;
(5). restart your computer(if needed);
Attention : While installing the driver, ensure that the camera isn’t
connected to the computer.
5.2 How to use PC camera:
(1). Press the POWER button to turn on the camera;
(2). Press the MENU button, then change to the settings menu;
(3).Press DOWN/UP button
(4). press LEFT/RIGHT button
,roll to the “USB Connection” window
,roll to “PC-CAM”;
Page 19 of 31
Page 21

(5) .press the MENU button to come back;
(6). Connect the camera to the computer with USB cable, A picture will
appear saying “camera is connected
(7). Click “Exit” in the picture;
(8). Run the “AMCAP2.EXE”;
(9).click the “preview” in options window to start video capture
6. How to maintain the camera
It is recommended always to maintain your camera and accessories.
6.1 For camera
Keep the lens clean, If LCD monitor or viewfinder surface is dirty, please
use a lens brush or soft cloth to wipe the surface clean instead of
touching the lens with your fingers.
Do not use any solid object to hit the camera to avoid scratching the lens,
Page 20 of 31
Page 22

LCD monitor or viewfinder surface.
Do not keep the camera under the sun or scorching environment for a
longtime (e.g.: tropical tool bag)
While bringing the camera from cold environment to the warm
environment, please hold on for 5 minutes before using, to have the
existing temperature.
6.2 For battery
When the battery is low, please change new batteries of the same type
according to instructions on the batteries.
Please put out the batteries if not in use for a long time.
Ensure that no leaking, corroded and expanding batteries used in the
camera.
Attention: If rechargeable batteries are used, ensure to put it out from
camera for recharging.
6.3 Memory card
In the following conditions, the memory card needs to be formatted:
□non-formatted card
□while the formatted card doesn’t work in the camera normally, please
Page 21 of 31
Page 23

re-format it again.
□ while the same card used in different cameras, it’s recommended to
format it for the best effect.
Attention: ensure the SD card being formatted is in unlocked mode.
Formatting will delete all the data, so please backup the data in the card
before format.
Formatting th※ e memory card:
(1). ensure the card is unlocked;
(2). insert it into the camera, and turn on the camera;
(3). press the MENU button to enter the main button, then change to the
settings mode;
(4). press the DOWN/UP button
,roll to “Format storage”;
(5). press the OK button to confirm ;
(6). Press the MENU button to come back the main menu.
Attention: while the process is being done, ensure not to open the cover
and not to put out the battery, or else damages may be caused to the
memory card.
Page 22 of 31
Page 24

SD card can be used in this camera:
●Normal SD card (8MB-1GB)
●3V(3.3V)card(8MB-1GB)
●5V SD card can not be used in this camera.
The camera may not be able to distinguish nonstandard cards and cards
formatted in other cameras. So make sure to format the memory card
before use.
6.4 Safety
To avoid the risk of electric shock, do not take apart or repair the camera
by yourself.
Keep the camera dry. Damage may be caused in watery environment.
Once water or steam goes into the camera, stop using the camera at
once and dry it completely before restarting.
7. Specifications & system configure:
7.1 Specifications of the camera
sensor 3 Mega pixels
Image
resolution
2048X1536(3Mega pixels), 2560X1920(5Mega
pixels by interpolation), 4032x3024(12Mega pixels
by interpolation)
Page 23 of 31
Page 25

storage
photo format
function
snapshot
Self timer
zoom 4 x digital zoom
white balance
exposure
flash mode
illumination Auto
PC-Camera
interface USB1.1
TV output NTSC/PAL
TFT monitor 2” TFT LCD monitor screen
power
External SD card(8 MB – 1GB)
JPEG、AVI
Capture: single、continuous [(1280X960)3 pics]
Video: Upon 320X240 mode,the time lies in the
storage
Electronic shutter:1/2 ~ 1/2,000 sec
10、15、20sec for option
Auto、sunny、cloudy、
fluorescent 2
automatically
flash off , Auto,flash on,
VGA:640x480:15f/sec;QVGA:320x240:15f/sec
2 AAA alkaline batteries、rechargeable batteries
* Manganese batteries can not be used in this
camera.
Page 24 of 31
tungsten、fluorescent 1、
Page 26

OSD
language
English、French、German、Spanish、Netherlands、
Italian、Portuguese
focal range f=8.35mm
aperture F=3.0
Auto poweroff
30Sec、1/3/5Min
System WIN98SE /2000/ME/XP
Note: The product design and the specifications are subject to change
without prior notice.
7.2 PC specification required:
Windows 98SE/2000/ME/XP
CPU: Pentium III 800MHz and upper
Memory:64 Mb and upper memory
Disk space:At least 100 Mb space free
8. Common problems and solving solution
8.1 Operation doesn’t work
The camera function fail to response
causation solution
The camera turns off Press the power button to turn it on
Batteries installed improperly Re-install batteries properly
Page 25 of 31
Page 27

Insufficient battery Change new batteries
Camera in standby mode Restart the camera
Water or steam inside the
Dry the camera ,then restart
camera
The camera being connected
Disconnect from the PC
to the computer
Pressing the shutter button fails to snapshot
causation solution
The camera turns off
Flash light is not fully
charged
Press the power button to turn it on
Take seconds to charge up while LED
is blinking until fully charged when LED
turns off
The image is being saved on
Please wait until finishing
the card
Memory card is full Delete unwanted files or change a new
card.
Battery level is low Change a new battery
Memory card is protected Change a new card or unlock it
Problems with the card Re-format it
Page 26 of 31
Page 28

The flash doesn’t fire
g
causation solution
Flash off
Too much light to the object
for shootin
Turn on flash light (if needed)
Set flash light to flash on(if needed)
Set to AVI the mode Turn off the flash light while in AVI mode
The LCD screen is illegibility
causation solution
Object is out of focal range
LCD screen exposed to
sunshine
Ensure that there is at least 1.5m (5ft)
between the camera lens and object.
Protect it from sunshine
The images taken fail to show on the LCD screen
causation solution
The camera turns off
The camera stays in the
capture mode
Press the power button to turn the
camera ON
Press the SHOOT button to change to
review mode
Page 27 of 31
Page 29

Problems with the memory
The camera connects to TV
Change a new card or format
Disconnect it from the TV cable(LCD
screen doesn’t work while the camera
connected to the TV
Can not delete、protect and format the card
causation solution
Memory card is protected Change it to unprotected
8.2 bad picture quality
Image is too bright
causation solution
Flash light is set to flash on Adjust it to flash auto or flash off
The object is too bright Change the white balance, or make the
camera face to the object in a better
direction
Image is too dark
causation solution
Flash light is sheltered by your
fingers
Hold the camera properly, keep
fingers from the camera
Page 28 of 31
Page 30

The object taken is out of the
g
g
g
p
g
g
workable ran
e of flash light
Please take in the workable range
Flash light is set to off Adjust it to the other mode
The object for shooting is too
Set the flash light to flash on
small or in poor light
Using the AVI mode While in the AVI mode, snapshot in a
fast speed may makes the image
darker
The image color is unnatural
causation solution
The light effects the image Set the while balance
Incorrect white balance
settin
Adjust the while balance setting
accordin
to the light condition
The image edge is illegibility
causation solution
Your finger or the hand trip
sheltered
arts of lens
Hold the camera properly ,keep your
fin
ers away from the lens
object is out of focal range Check the image range in the LCD
screen before shootin
If the lens is dirty Use a lens brush to wipe the surface
softly
Page 29 of 31
Page 31

The image departure from the focus
causation solution
Camera moved Hold the camera steady while taking
picture
Flash light is set to flash
off while needed flash on
Set the flash light to flash on
Page 30 of 31
 Loading...