

Page 1
0
Page 2

Table of Contents
1. Camera Precautions……………………………….. 4
2. Preparation………………………………………….. 7
z S tandard Accessories……………………….. 7
z Parts Names……………… ………………….. 8
z Charging the Battery Pack…..……………... 9
z Loading the SD/ MMC card..……………….. 11
z Attaching the Strap………..…………………. 12
3. Quick Start…………………………………………… 13
z Powering the camera On/ Off………………. 13
z Taking Picture…………………………………. 14
Capturing Still Images……………………. 14
Recording Video Clips....…………………. 14
z Basic Shooting Functions…………………… 15
Using the Zoom…………………………… 15
Adjust Exposure…………………………… 15
Flash Setting………………………………. 16
Self-timer…………….…………………….. 16
Burst……………………………………….. 17
2N1………………………………………… 17
4. Advance Mode……………………………………… 18
z Still Mode……………………………………… 18
Image Quality….………………………….. 18
Resolution……….…………………………. 19
White Balance……………………………… 19
Effect……………………………………….. 20
Self-timer…………………………………… 20
Burst………………………………………… 21
Metering……………………………………. 21
1
Page 3

Table of Contents
Sharpness………………………………….. 22
Fame………………………………………… 22
Date Stamp………………………………… 23
z Movie Mode…………………………………… 24
Movie Format……………………………… 24
Movie Quality…..…………………………. 25
Resolution….……………………………… 25
White Balance…………………………….. 26
Effect……………………………………..… 26
Metering……….…………………………… 27
Sharpness………………………………… 27
z Voice Mode……………………………………. 28
z Playback Mode……………………………….. 28
Picture Playback…………………………… 28
Delete Pictures……………………………. 32
Movie Playback…….…………………….. 33
Delete Movie……….……………………… 36
Voice Message Playback………..………. 37
Delete Voice Message……………………. 39
5. Setting………………………………………………… 40
z Date & Time…….…………………………….. 40
z Auto Power Off….…………………………….. 41
z Language………………………………………. 41
z Buzzer………………………………………….. 42
z Sound………………………………………….. 43
2
Page 4

Table of Contents
z Information……………………………………. 43
z TV System…………………………………….. 44
z Memory Status………………………………… 44
z Startup Screen……………………………….. 45
z Default Setting……………………………….. 45
z Reset Counter………………………………… 46
6. Making Connections ………………....................... 47
z Install TotalMedia.……………………………. 47
z Connecting to PC……………….……………. 51
z Download Pictures, Movies, Voice message. 52
z Connecting to TV for review………………… 53
z PictBridge Function………………………….. 54
7. Appendix…………………………………………….. 55
z Specifications…………………………………. 55
z Computer System Requirement……………. 57
z Icons & Indicators…………………………….. 58
z Standard Number of Avail able Pictures/
Recording Reference Table…………………. 60
3
Page 5

Welcome
Thank you for choosing the Camera to pursue your DSC
with PMP adventure s. Whether you are creating
memories of your friends and family or exploring the great
outdoors to get the utmost satisfaction from your DSC,
please take a moment to read through this manual. Its
contents will send you on an educational journey into your
camera's multiple capabilities.
1. Camera Precaution
Before using the camera, please ensure that you read
and understand the safety precautions described below.
Always ensure that the camera is operated correctly.
• Never operate the camera inside of an aircraft or
anywhere else whe re operation of such devices is
restricted. Improper use creates the risk of serious
accident.
• Do not aim the camera directly into the sun or other
intense light sources which could dama ge your
eyesight.
• Do not try to open the case of the camera or attempt
to modify this camera in any way. High-voltage
internal components create the risk of electric shock
when exposed. Maintenance and repairs should be
carried out only by authorized service providers.
• Do not fire the flash too close to the eyes of animals
or people, especially for young children. Eye
damage may result. In particular, remain at least
one meter away from infants when using flash.
4
Page 6

• Keep the camera away from water and other liquids.
Do not use the camera with wet hands. Never use
the camera in the rain or snow. Moisture creates the
danger of fire and electric shock.
• Keep the camera and its accessories out of the
reach of children and animals to prevent accidents
or damage to the camera.
• If you notice smoke or a strange odor coming from
the camera, turn the power off immediately. Take
the camera to the nearest authorized service ce nter
for repair. Never attempt to repair the camera on
your own.
• Use only the recommended power accessories. Use
of power sources not ex pressly recommended for
this equipment may lead to overheating, distortion of
the equipment, fire, electrical shock or other
hazards.
• Never apply too much force when cleaning the
surface of the lens. Doing so can scratch the lens
surface and cause malfunction?
• The camera may become slightly warm during use.
This does not indicate malfunction.
• If the exterior of the camera needs cleaning, wipe it
with a soft, dry cloth.
5
Page 7

FCC Notice
This equipment has be en tested and fou nd to com ply with
the limits for a Class B digital device, pursuant to Part 15
of the FCC Rules. These limits are designed to provide
reasonable protection against harmful interference in a
residential installation. This equipment generates, uses
and can radiate radio frequency energy. If not installed
and used in accordance with the instruction, it may cause
harmful interference to radi o communication. Howeve r ,
there is no guarantee that interference will not occur in a
particular installation. If this equipment does cause
harmful interference to radio or television receptio n, which
can be determined by turning the equipment on the off,
the user is encouraged to try to correct the interference by
one or more the following suggestion.
z Reorient or relocate the receiving antenna.
z Increase the distance between the equipment and
the receiver.
z Connect the equipment to a different power outlet
other than the one where the receiver is connected.
z Consult an experienced television or radio
technician for help.
CAUTION
To comply with the limits for a Class B digital device,
pursuant to Part 15 of the FCC Rules, this device must
only be installed on computer equipment certified to
comply with the Class B limits.
6
Page 8
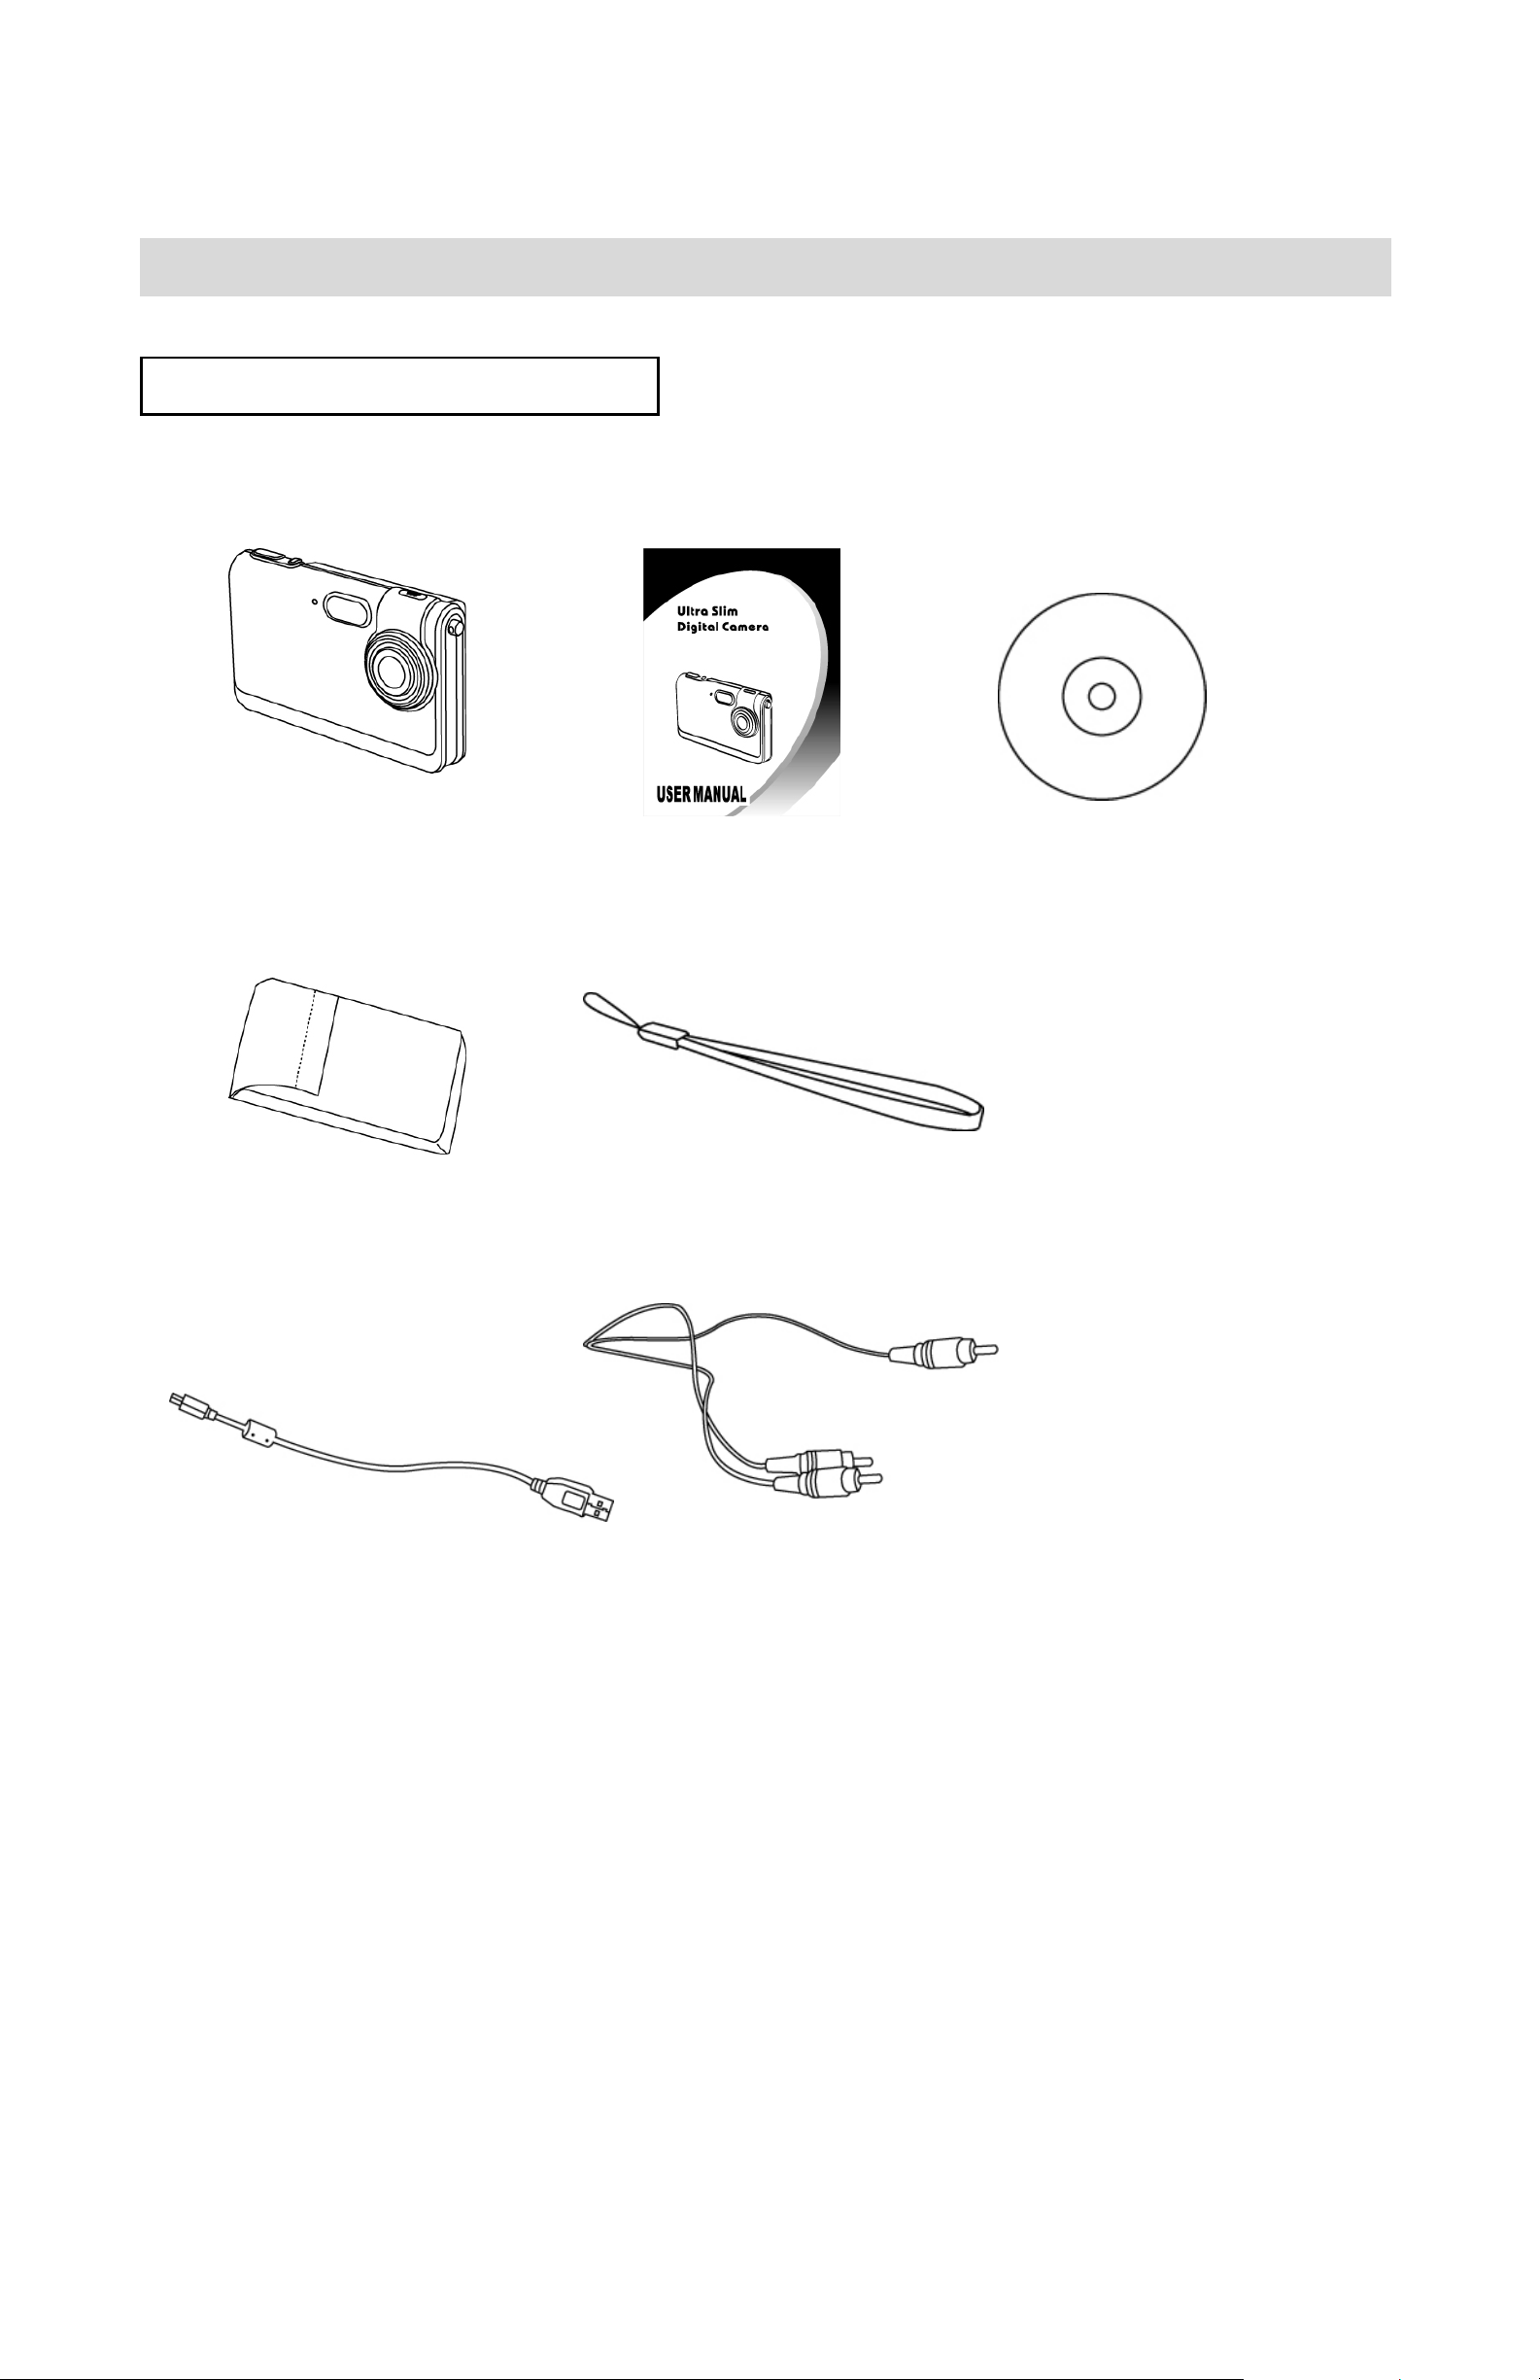
2. Preparation
St andard Accessories
Camera Manual CD
Carry Bag Strap
USB cable TV cable
7
Page 9
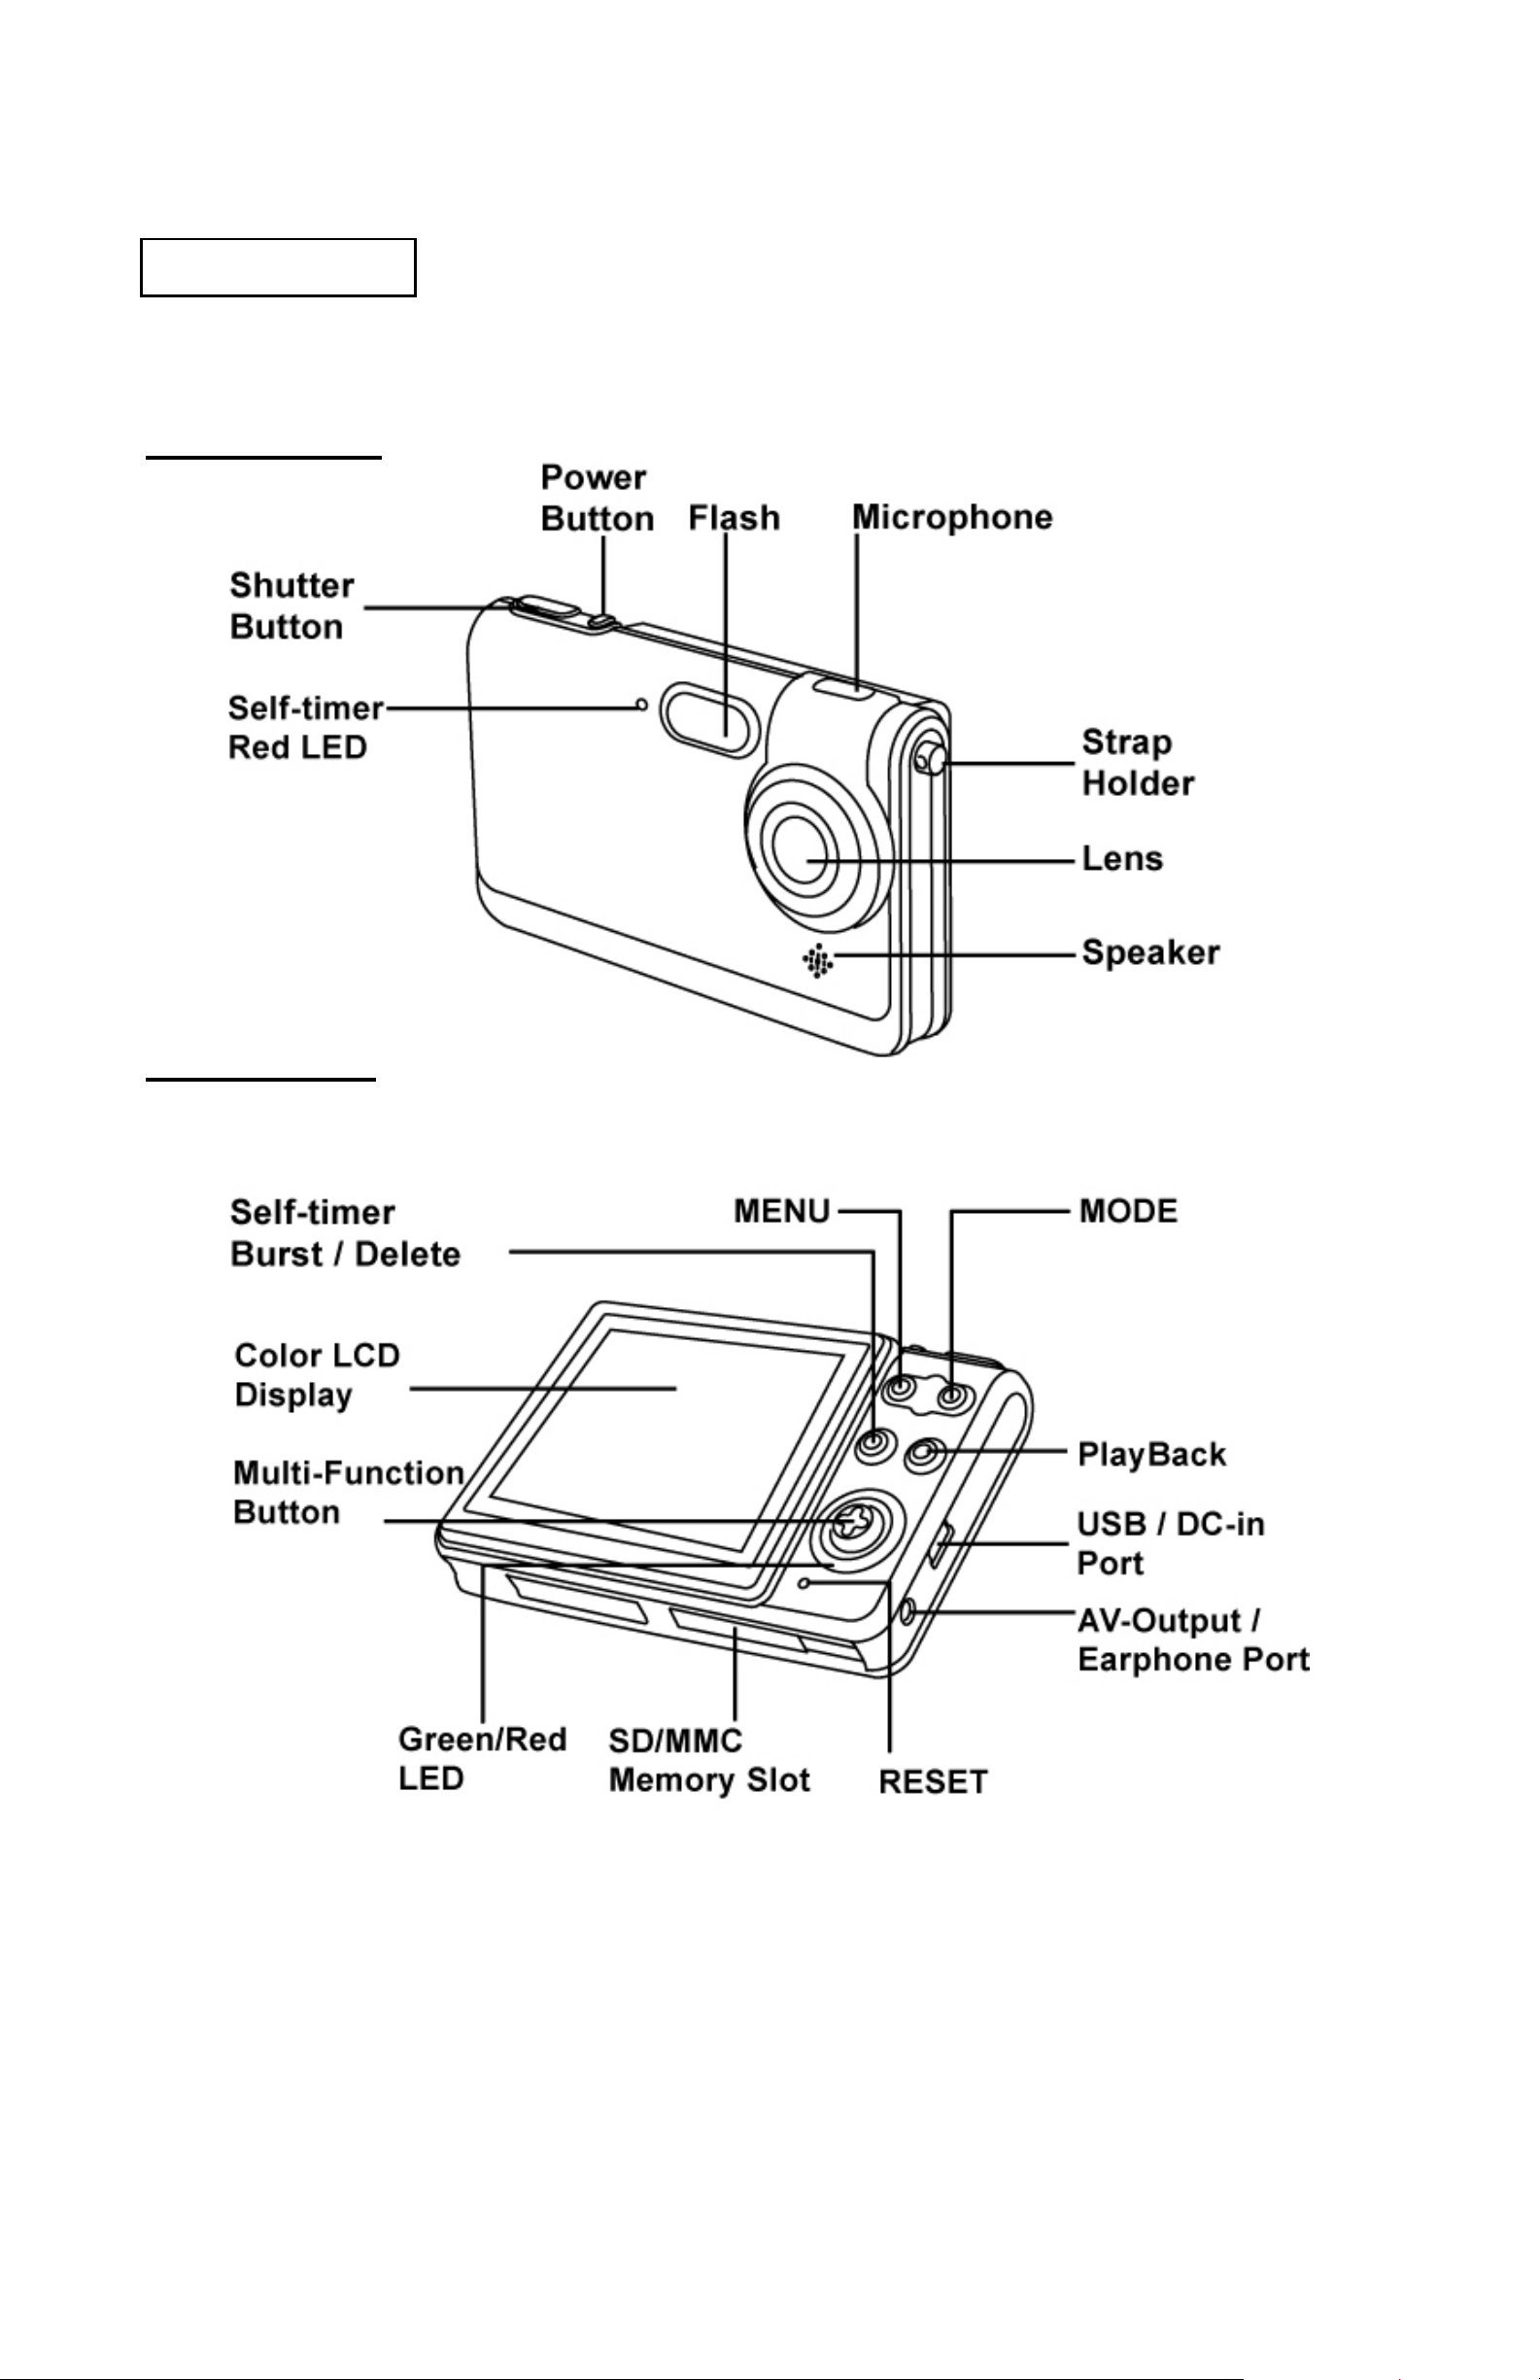
Part Names
Front View
Back View
8
Page 10
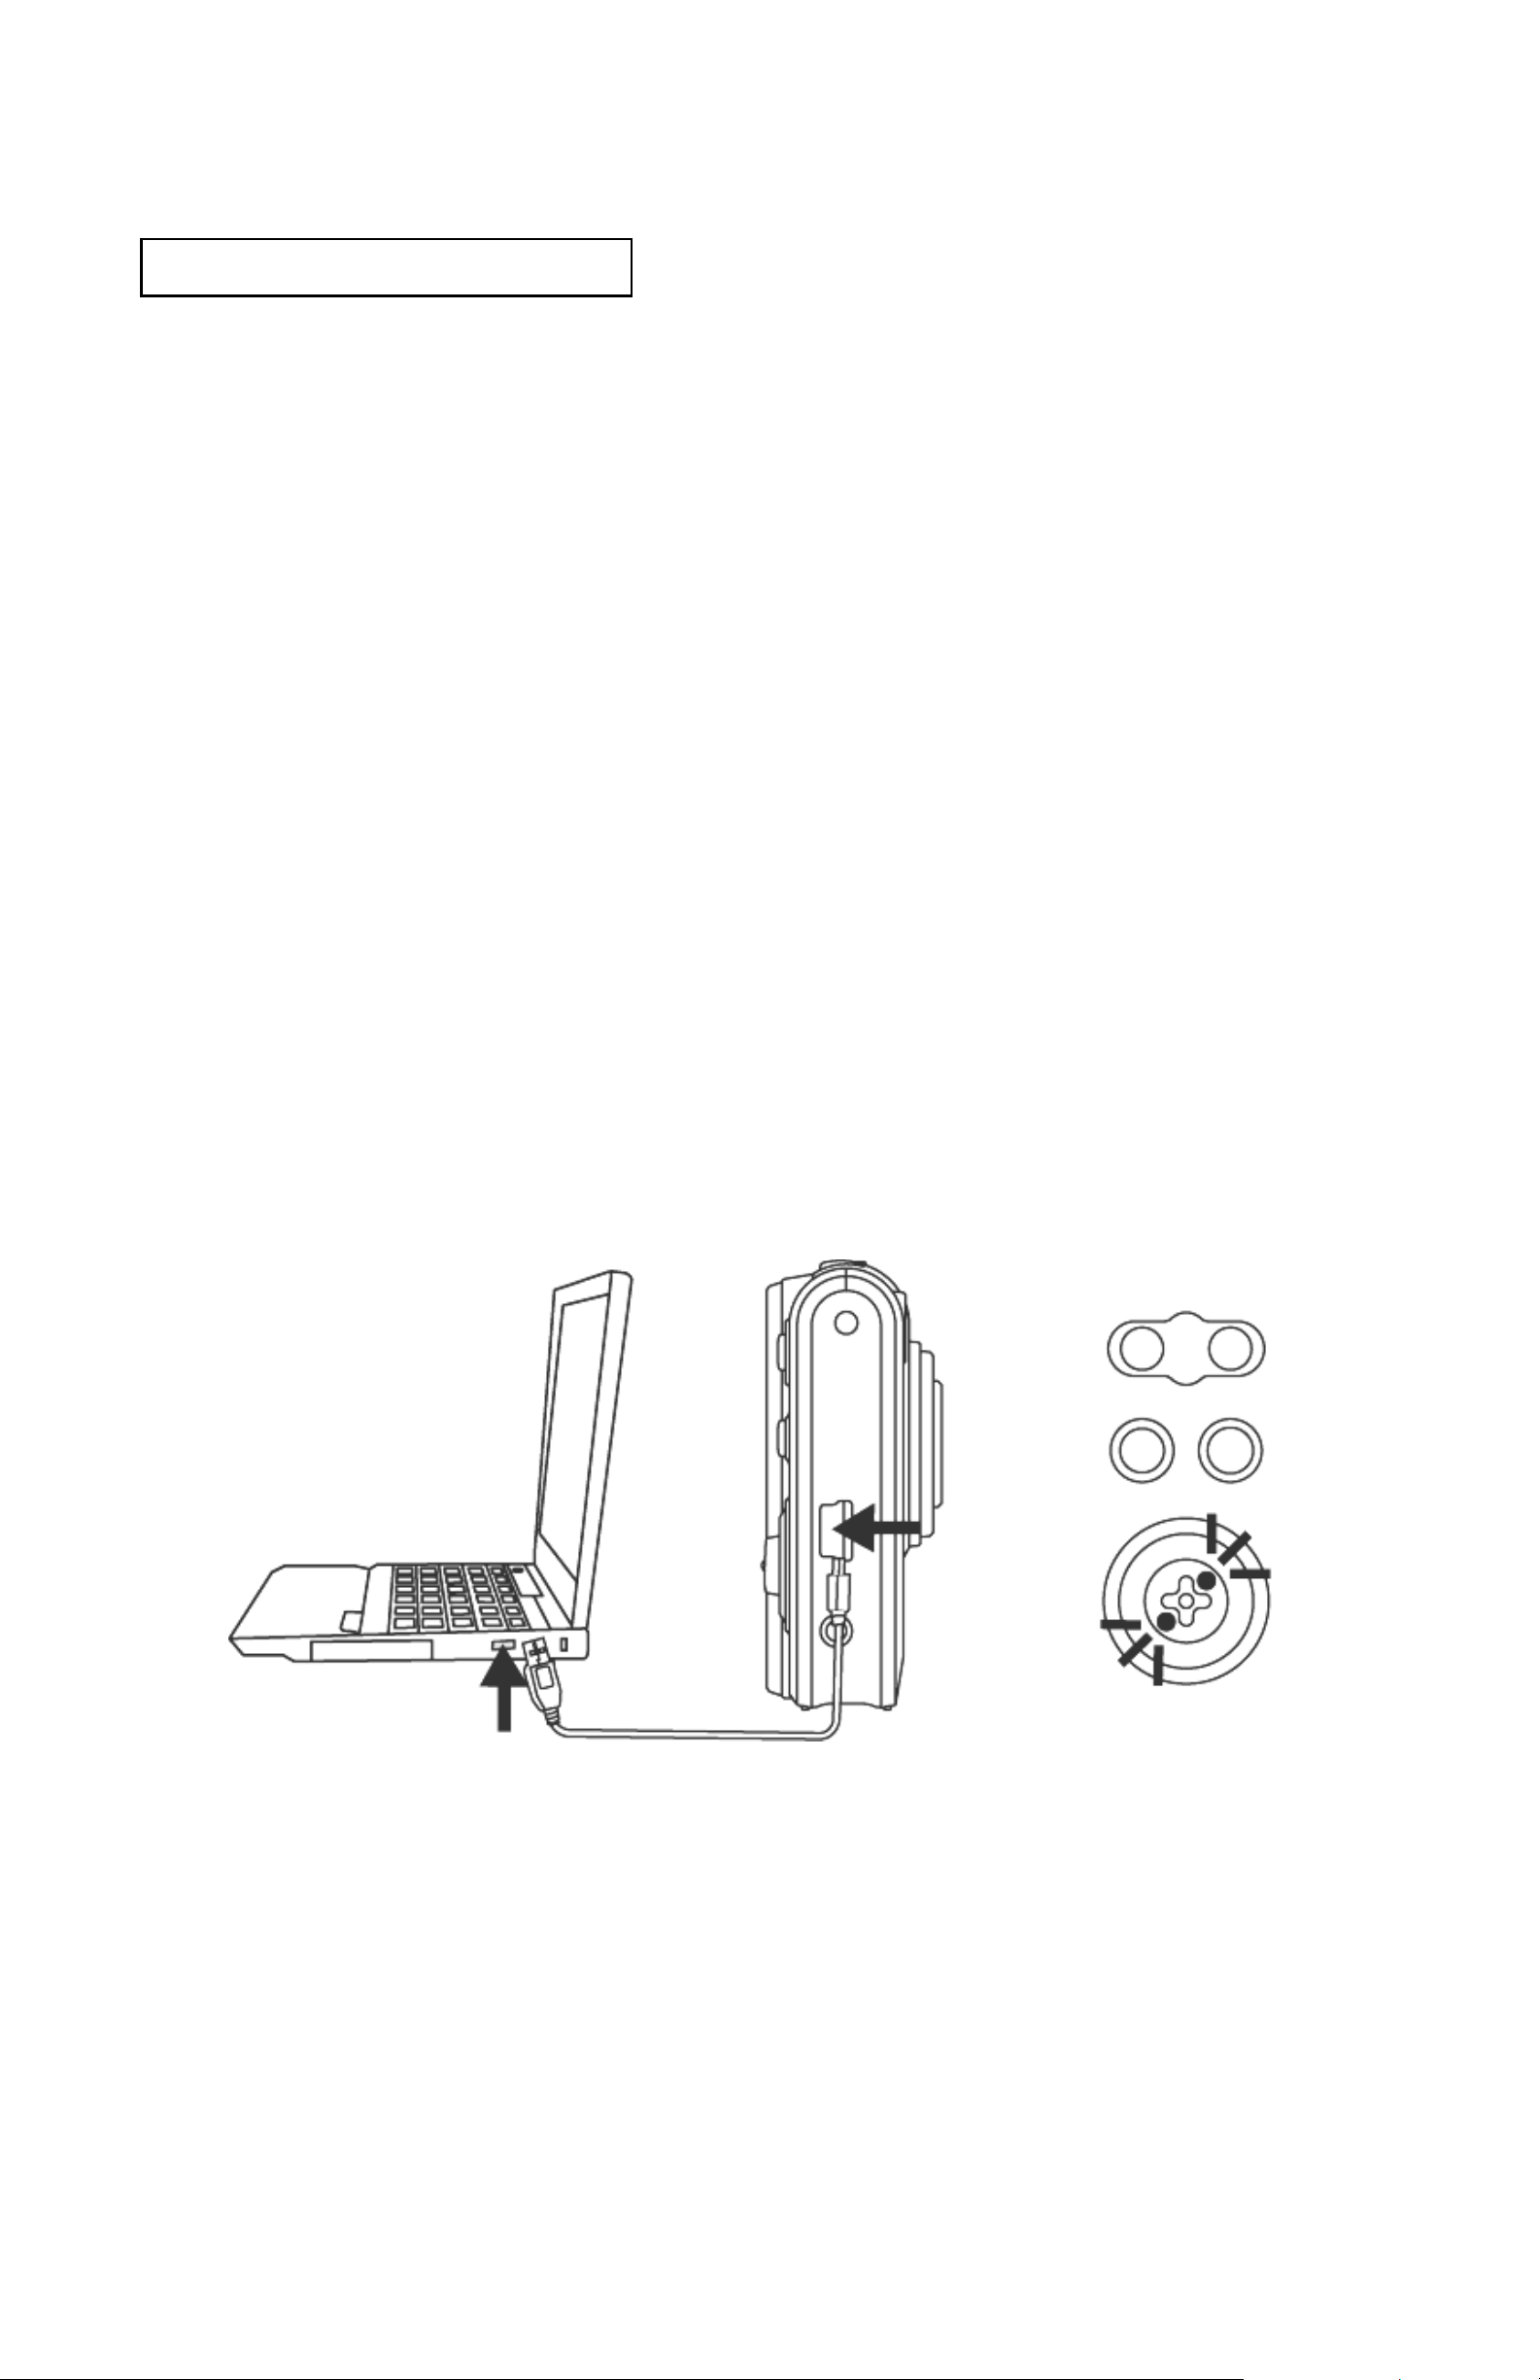
Charging the Battery
Long battery life is one of the key benefits of this product
compared to others. Your camera battery has already
been charged prior to shipment, you should be able to
take pictures without recharging it. However, just to be
safe, you may want to follow the instructions below to
make sure that your camera is fully charged before
leaving home.
The lithium-ion battery used in the camera recharges
automatically when the camera is plugged into a PC via
the USB cable. In order to charge the battery the first time,
first install into your computer using the provided US B
cable. When the battery is charging, the red LED will light
up. When charging is complete, the red LED will be off.
9
Page 11
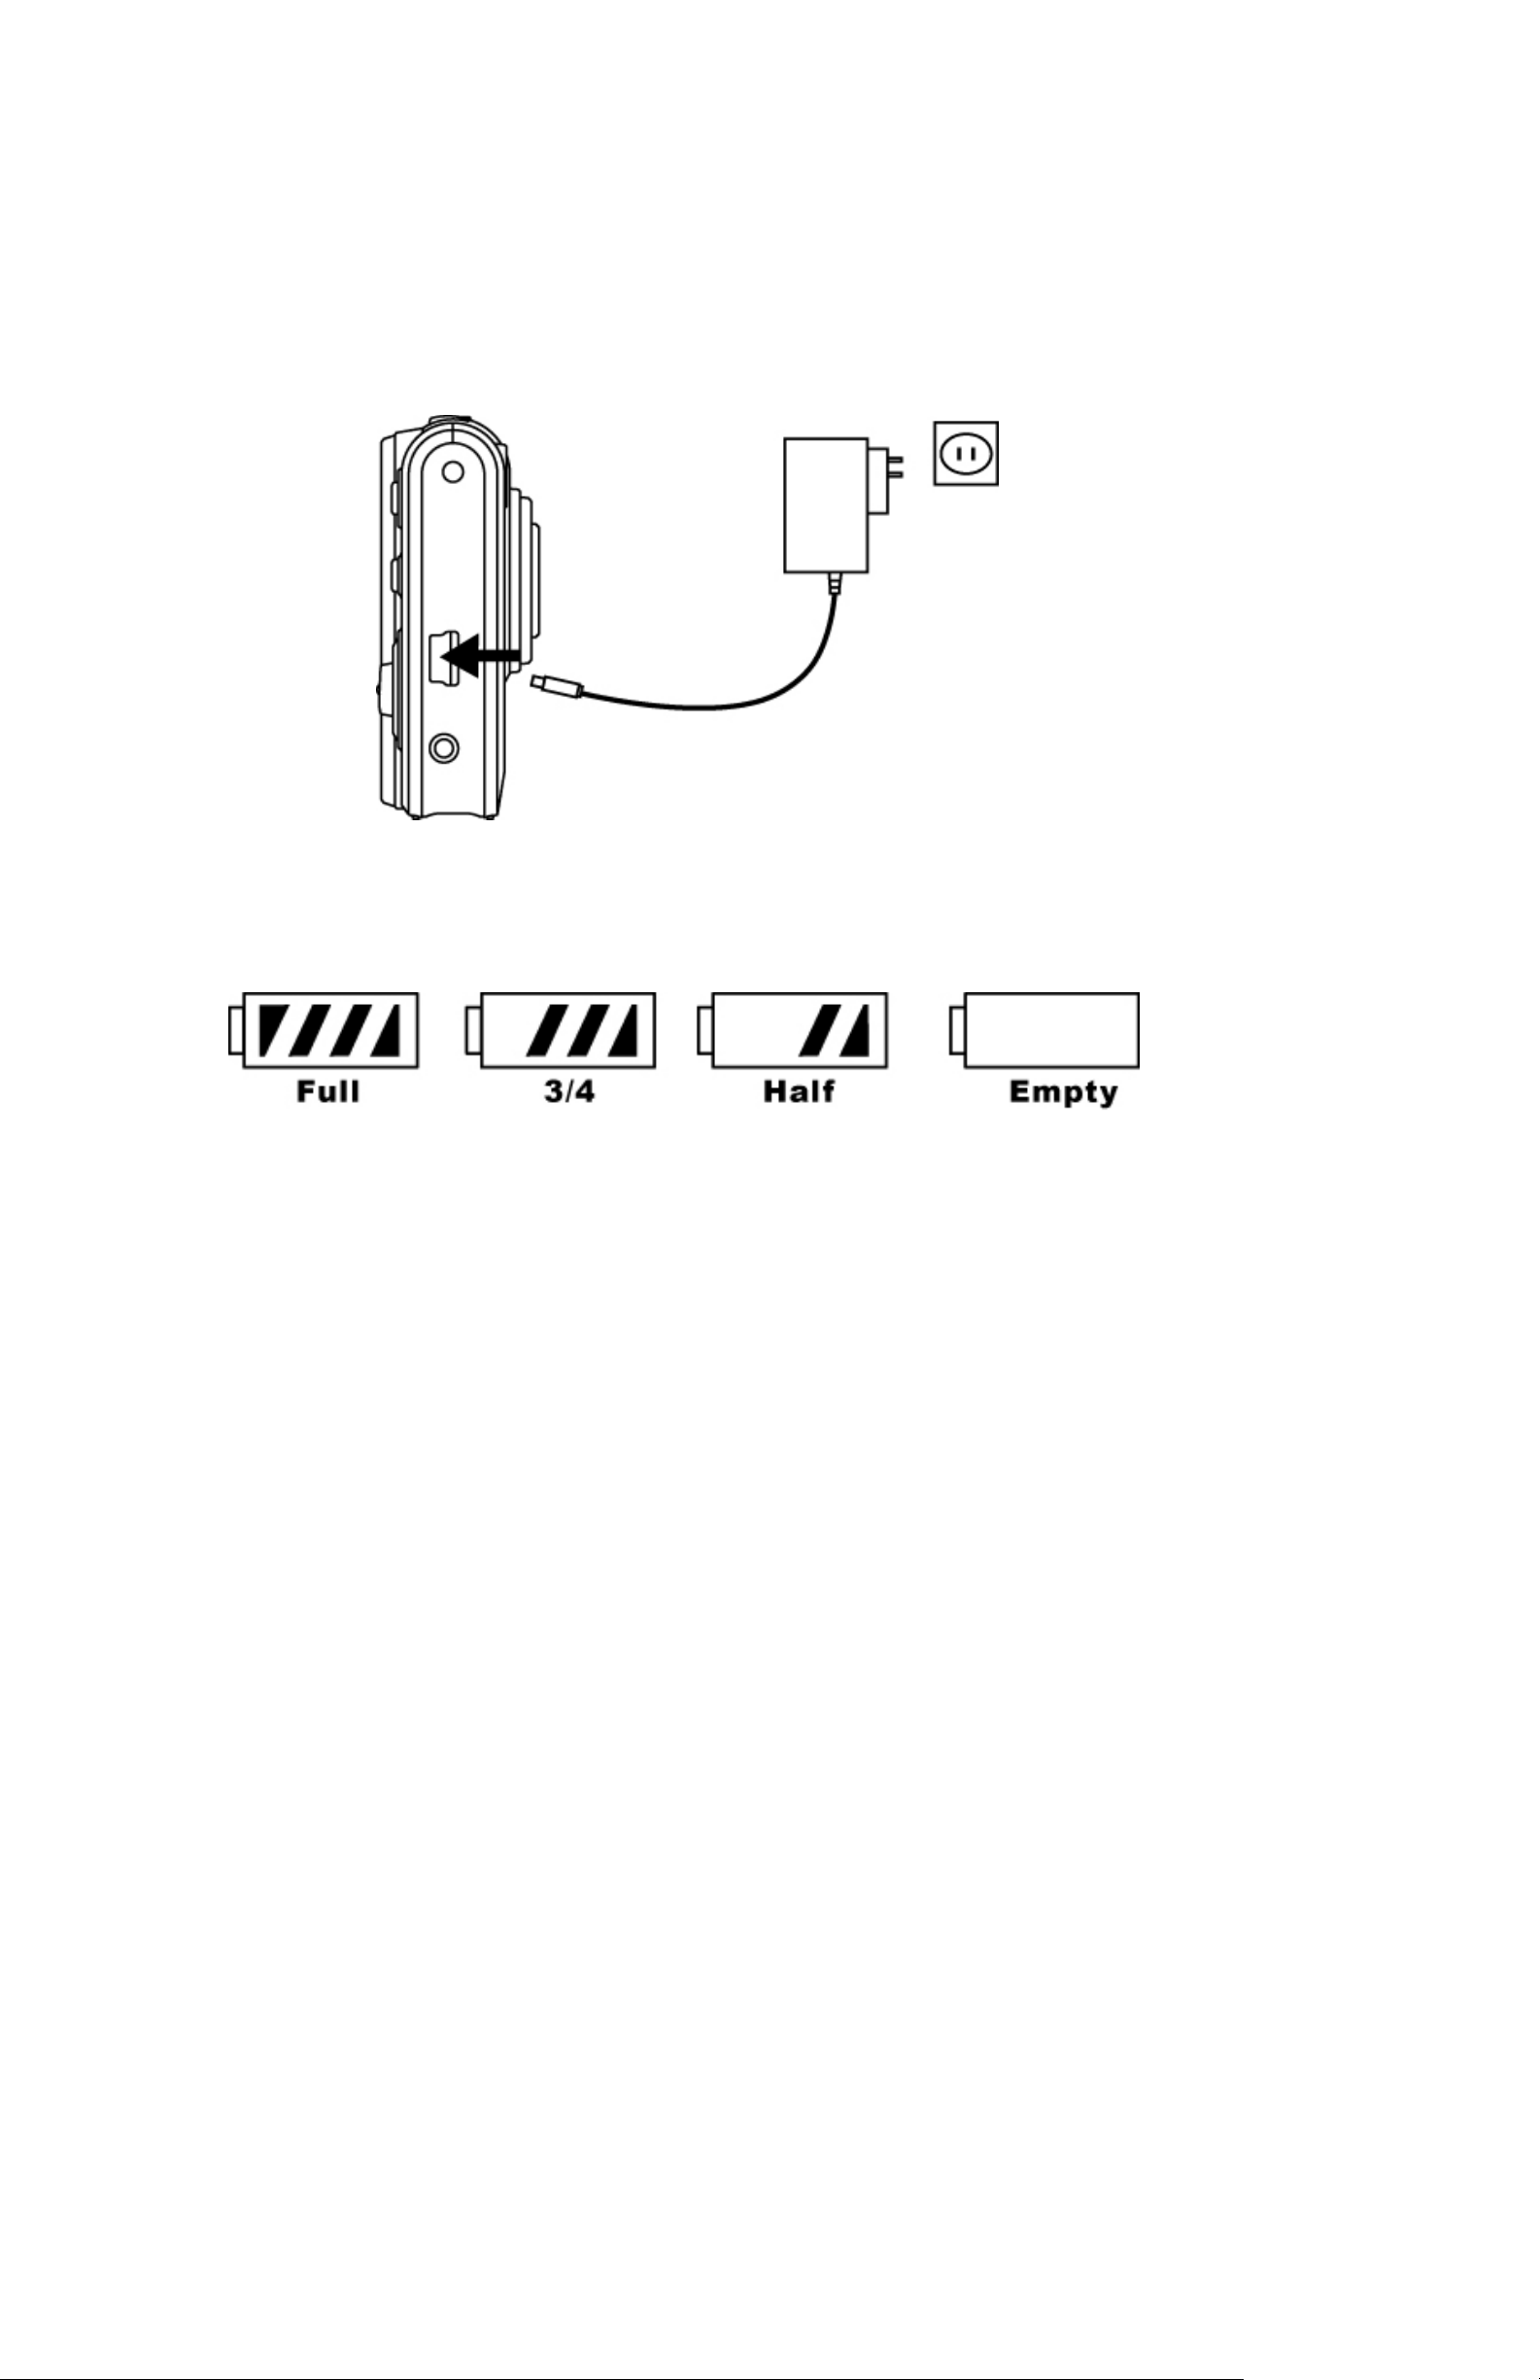
Or you could charge the battery by AC adaptor (optional
accessory) to a power outlet.
Battery power status
CAUTION
* It takes approximately 4 hours to fully charge a depleted battery.
* The camera can be charge at ambient temperatures between 0℃
(32℉) and +40℃ (104℉).
* The battery does not need to be fully discharge or exhausted before
being recharged.
* Lithium-ion battery loses their charge even when not used. So, be sure
to charge the battery before taking pictures.
* To ensure that your battery lasts as long as possible, switch the
camera off when you are not using it.
* The number of available shots will be lower at low temperatures. You
can increase the amount of power produced by putting the camera in
your pocket or another warm place to heat it just before taking pictures.
If you are using a heating pad, take care not to place the camera
directly against the pad.
10
Page 12

Loading SD/MMC Card
Insert SD/ MMC card into memory card slot and push it all
the way in.
When the optional SD card is installed:
* All images by default will be automatically stored in
SD/MMC card
* With SD/MMC card installed, the images/ movies/ audio
clips in built-in memory cannot be played back. To
playback the images/ movies/ audio clips in built-in
memory, remove SD/MMC card first.
* When you format camera, it would format the images/
movie/ audio clips on SD card only. To format the
images/ movies/ audio clips which on built-in memory,
remove SD card.
11
Page 13

Attaching the Strap
1. The small loop goes through the strap holder.
2. Then the small loop goes through one clutch of the
loop again and pulls tightly.
12
Page 14
3. Quick Start
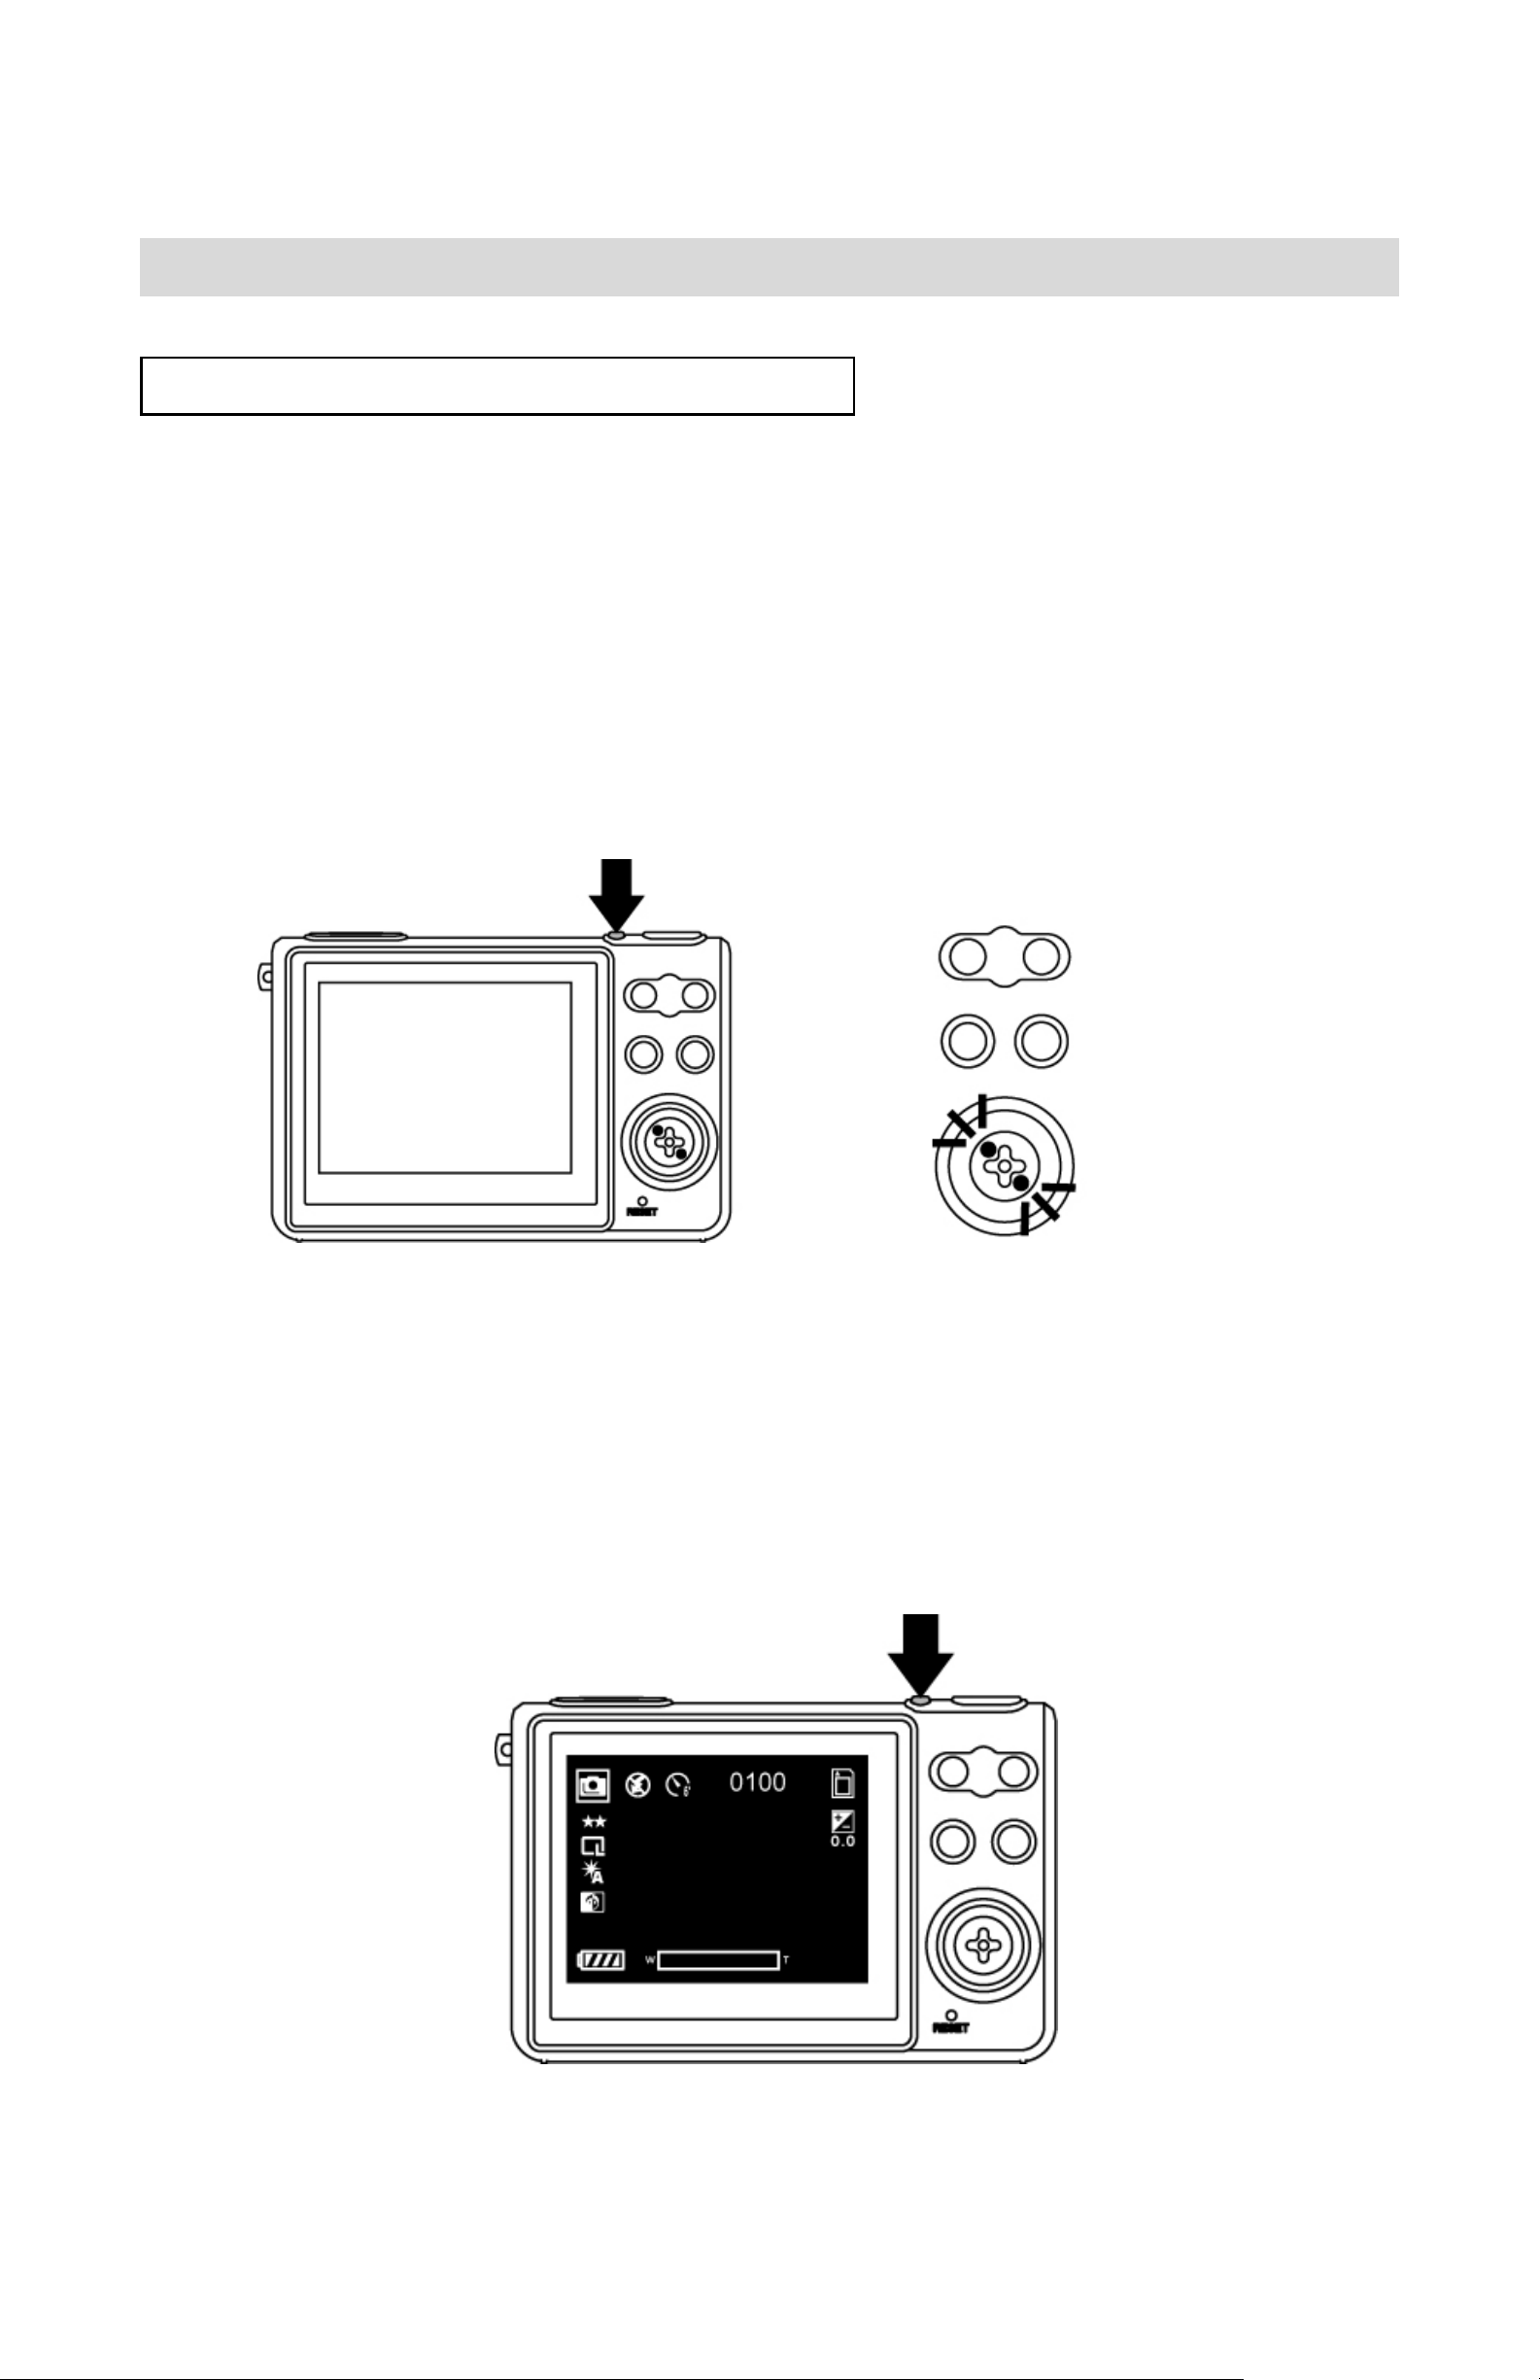
Powering the camera ON/ OFF
Power ON
1. Press the Power Button to turn on or open the LCD
Monitor to turn on. The green LED light up indicate
power is on.
2. When the LCD Monitor has been activated, the
camera is ready to use and the green LED will be off.
Power OFF
1. Press the Power Button again to turn the camera off.
2. The camera also turns off automatically for power
save reason. To set the Auto Power Off , please refer
to page 44.
13
Page 15

Taking Picture
Capturing Still Images
1. Power on the camera.
2. Press the Shutter Button to take a picture.
Recording Video Clips
1. Power on the camera.
2. Press the Mode Button and press the
Movie Mode.
3. Press the Shutter Button to start recording a movie.
to switch to
4. Press the Shutter Button again to stop recording.
14
Page 16
Basic Shooting Functions
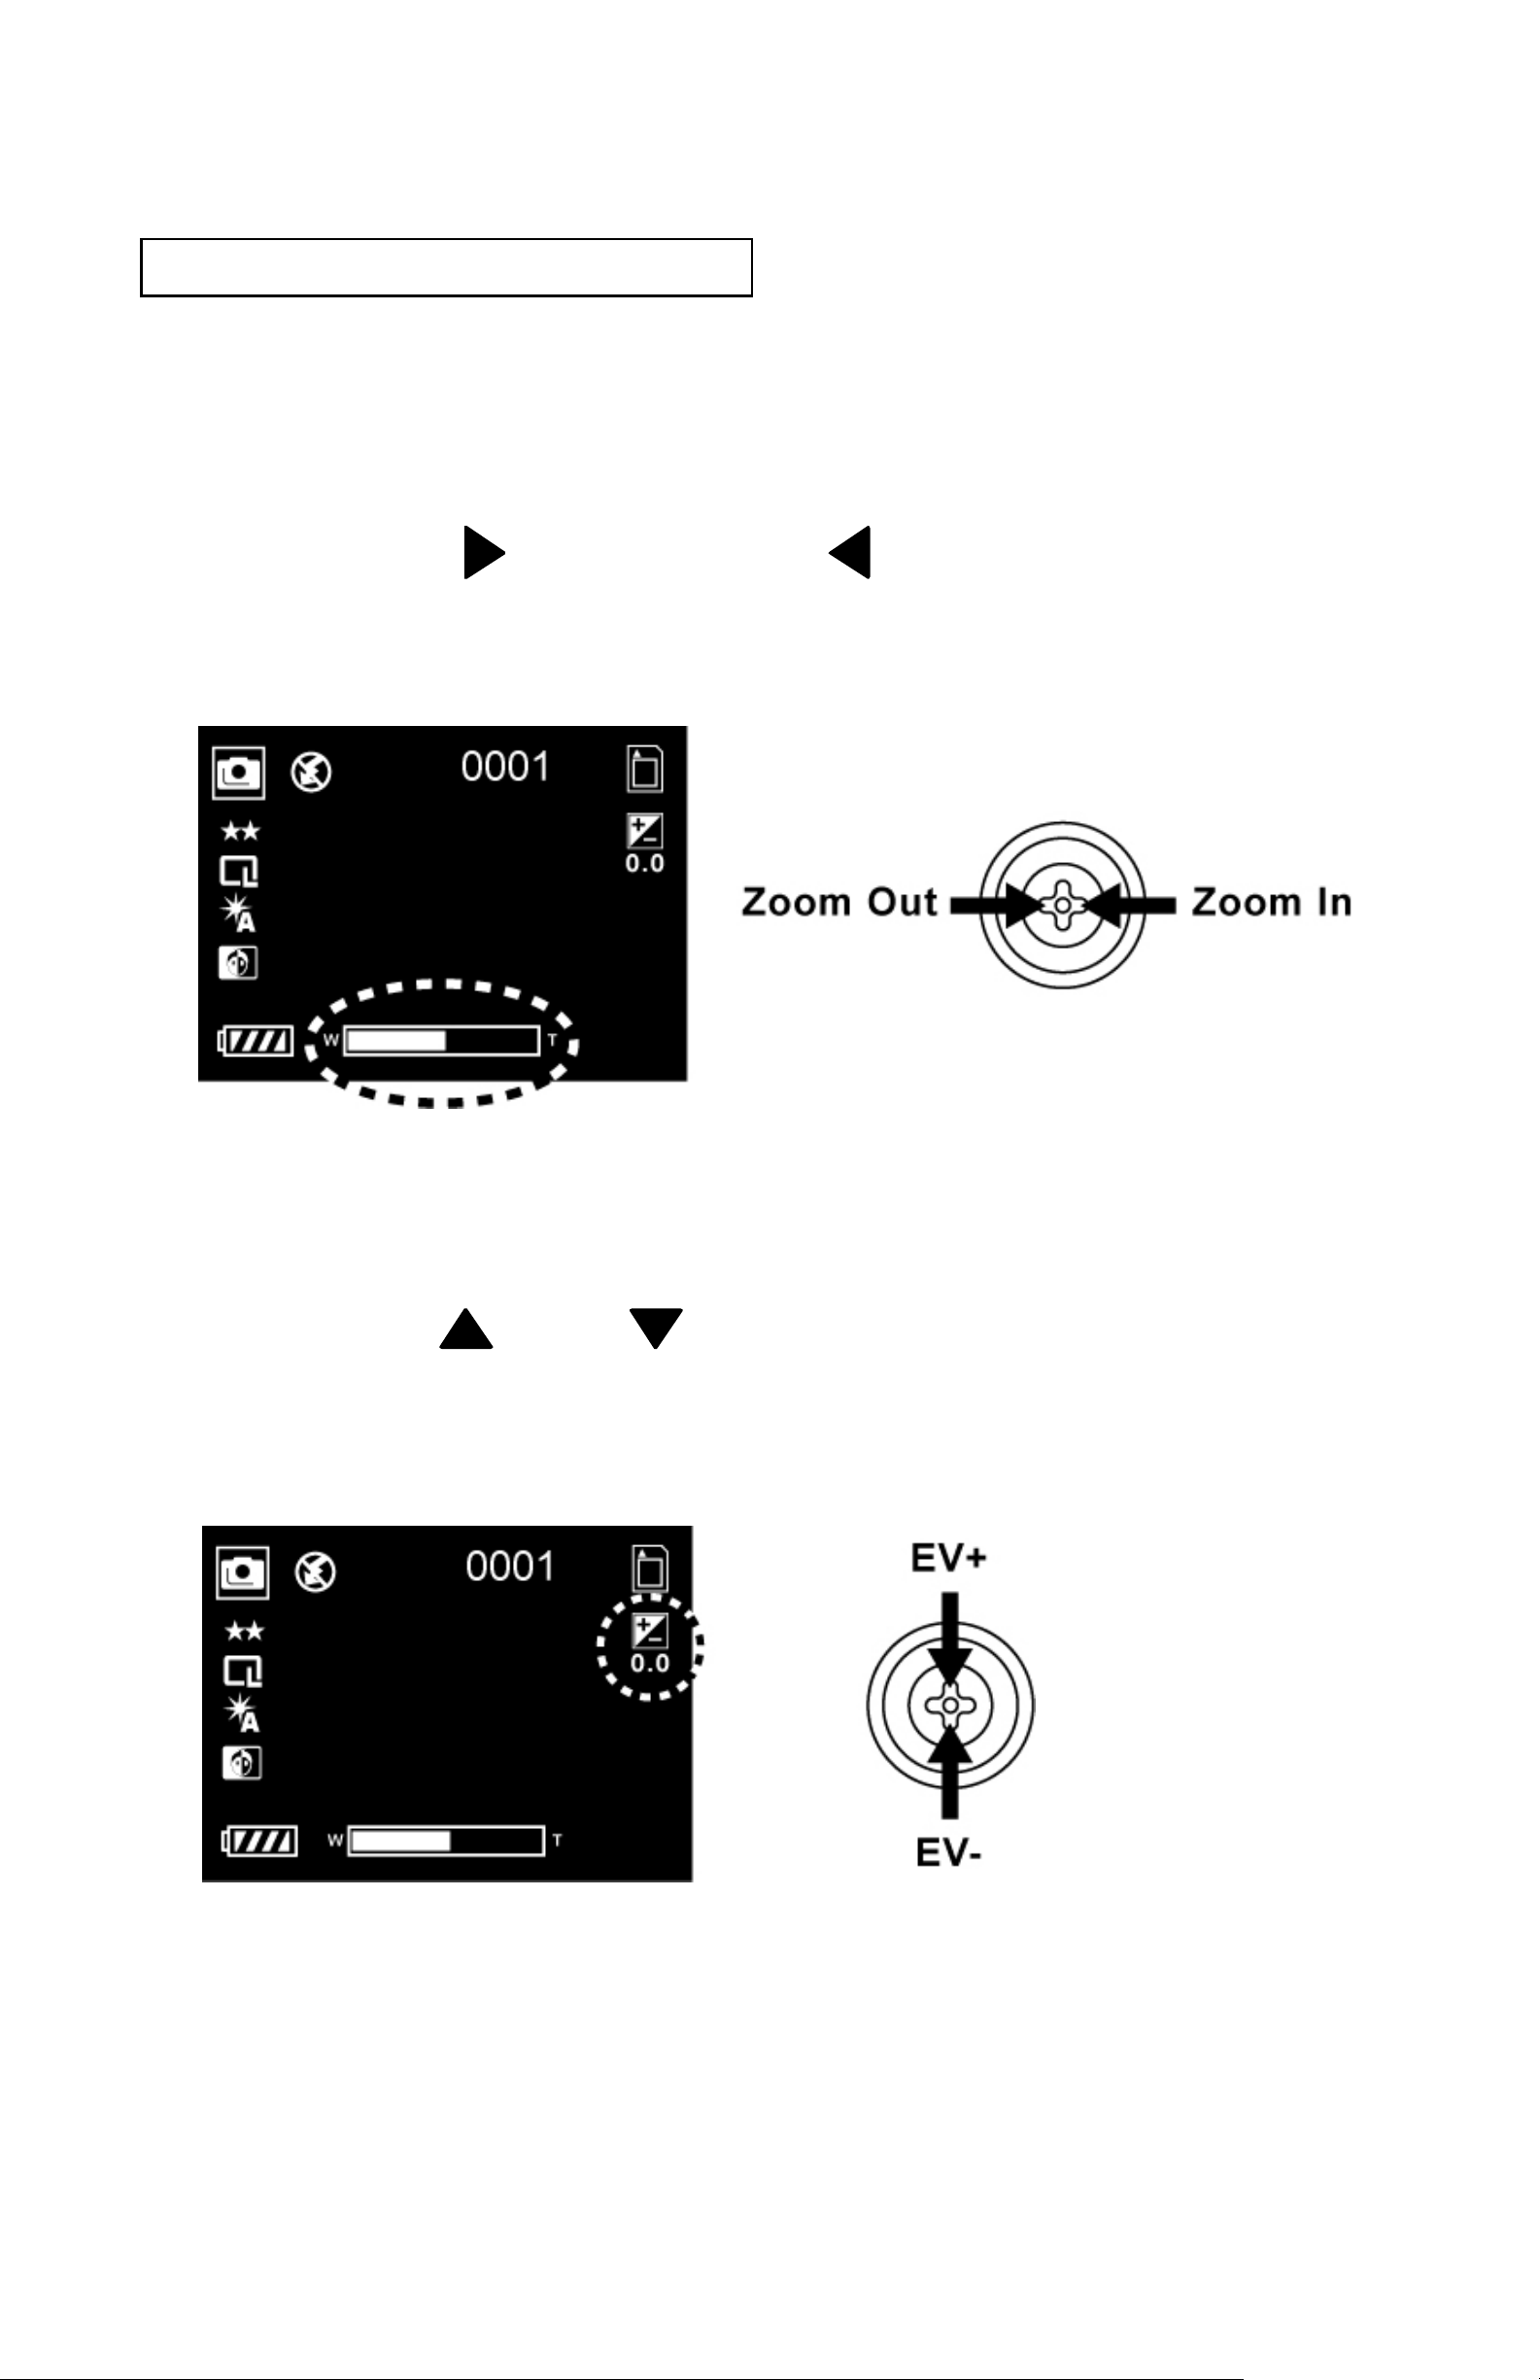
Using the Zoom
1. Under Still mode and Movie mode.
2. Use the LCD monitor to frame your subject.
3. Press the
picture or record a movie clip.
zoom in and zoom out to take a
Adjust Exposure Compensation
1. Under Still Mode and Movie mode.
2. Press the
compensation.
and to adjust the exposure
15
Page 17
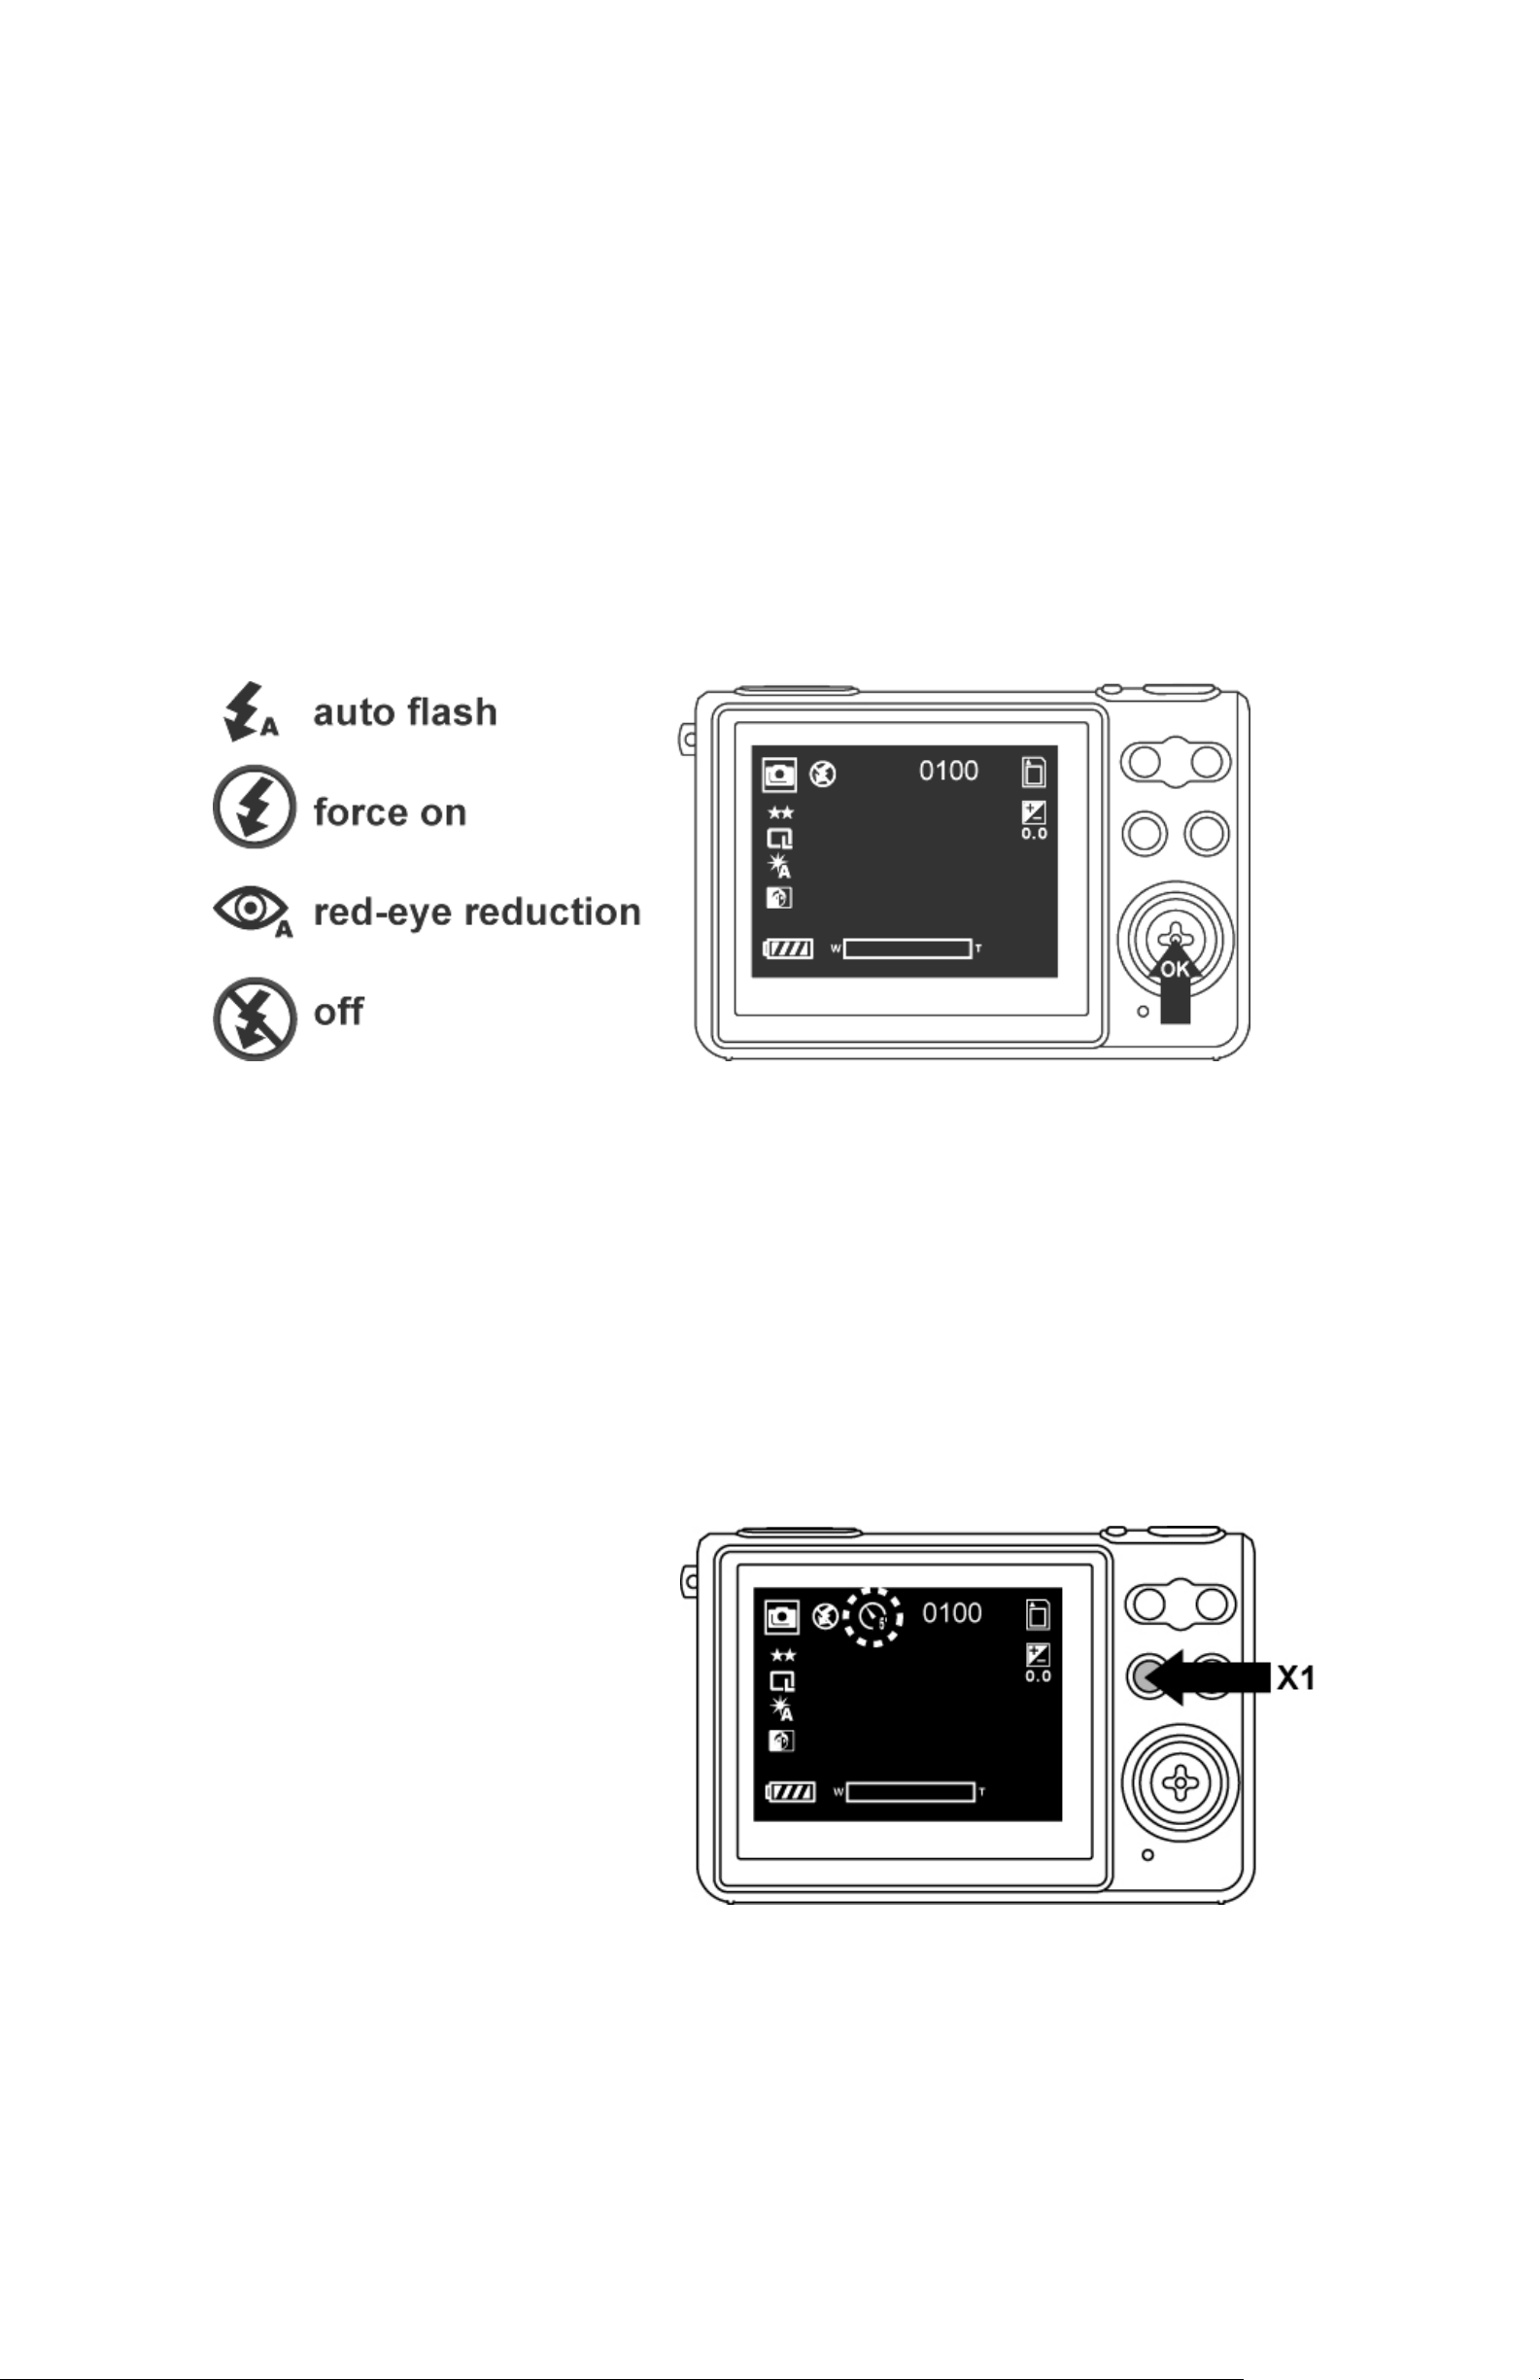
Flash Setting
1. Under Still mode.
2. Press OK button directly to change the flash modeauto/ red-eye reduction/ off/ force on.
The green LED light would quick blinking until the
flash is fully charged.
Self-timer
1. Under Still mode,
2. Press Self-timer Button once to active Self-timer
function, the self-timer icon will be shown on TFT
display and press Shutter button to capture images by
seconds delay time.
16
Page 18
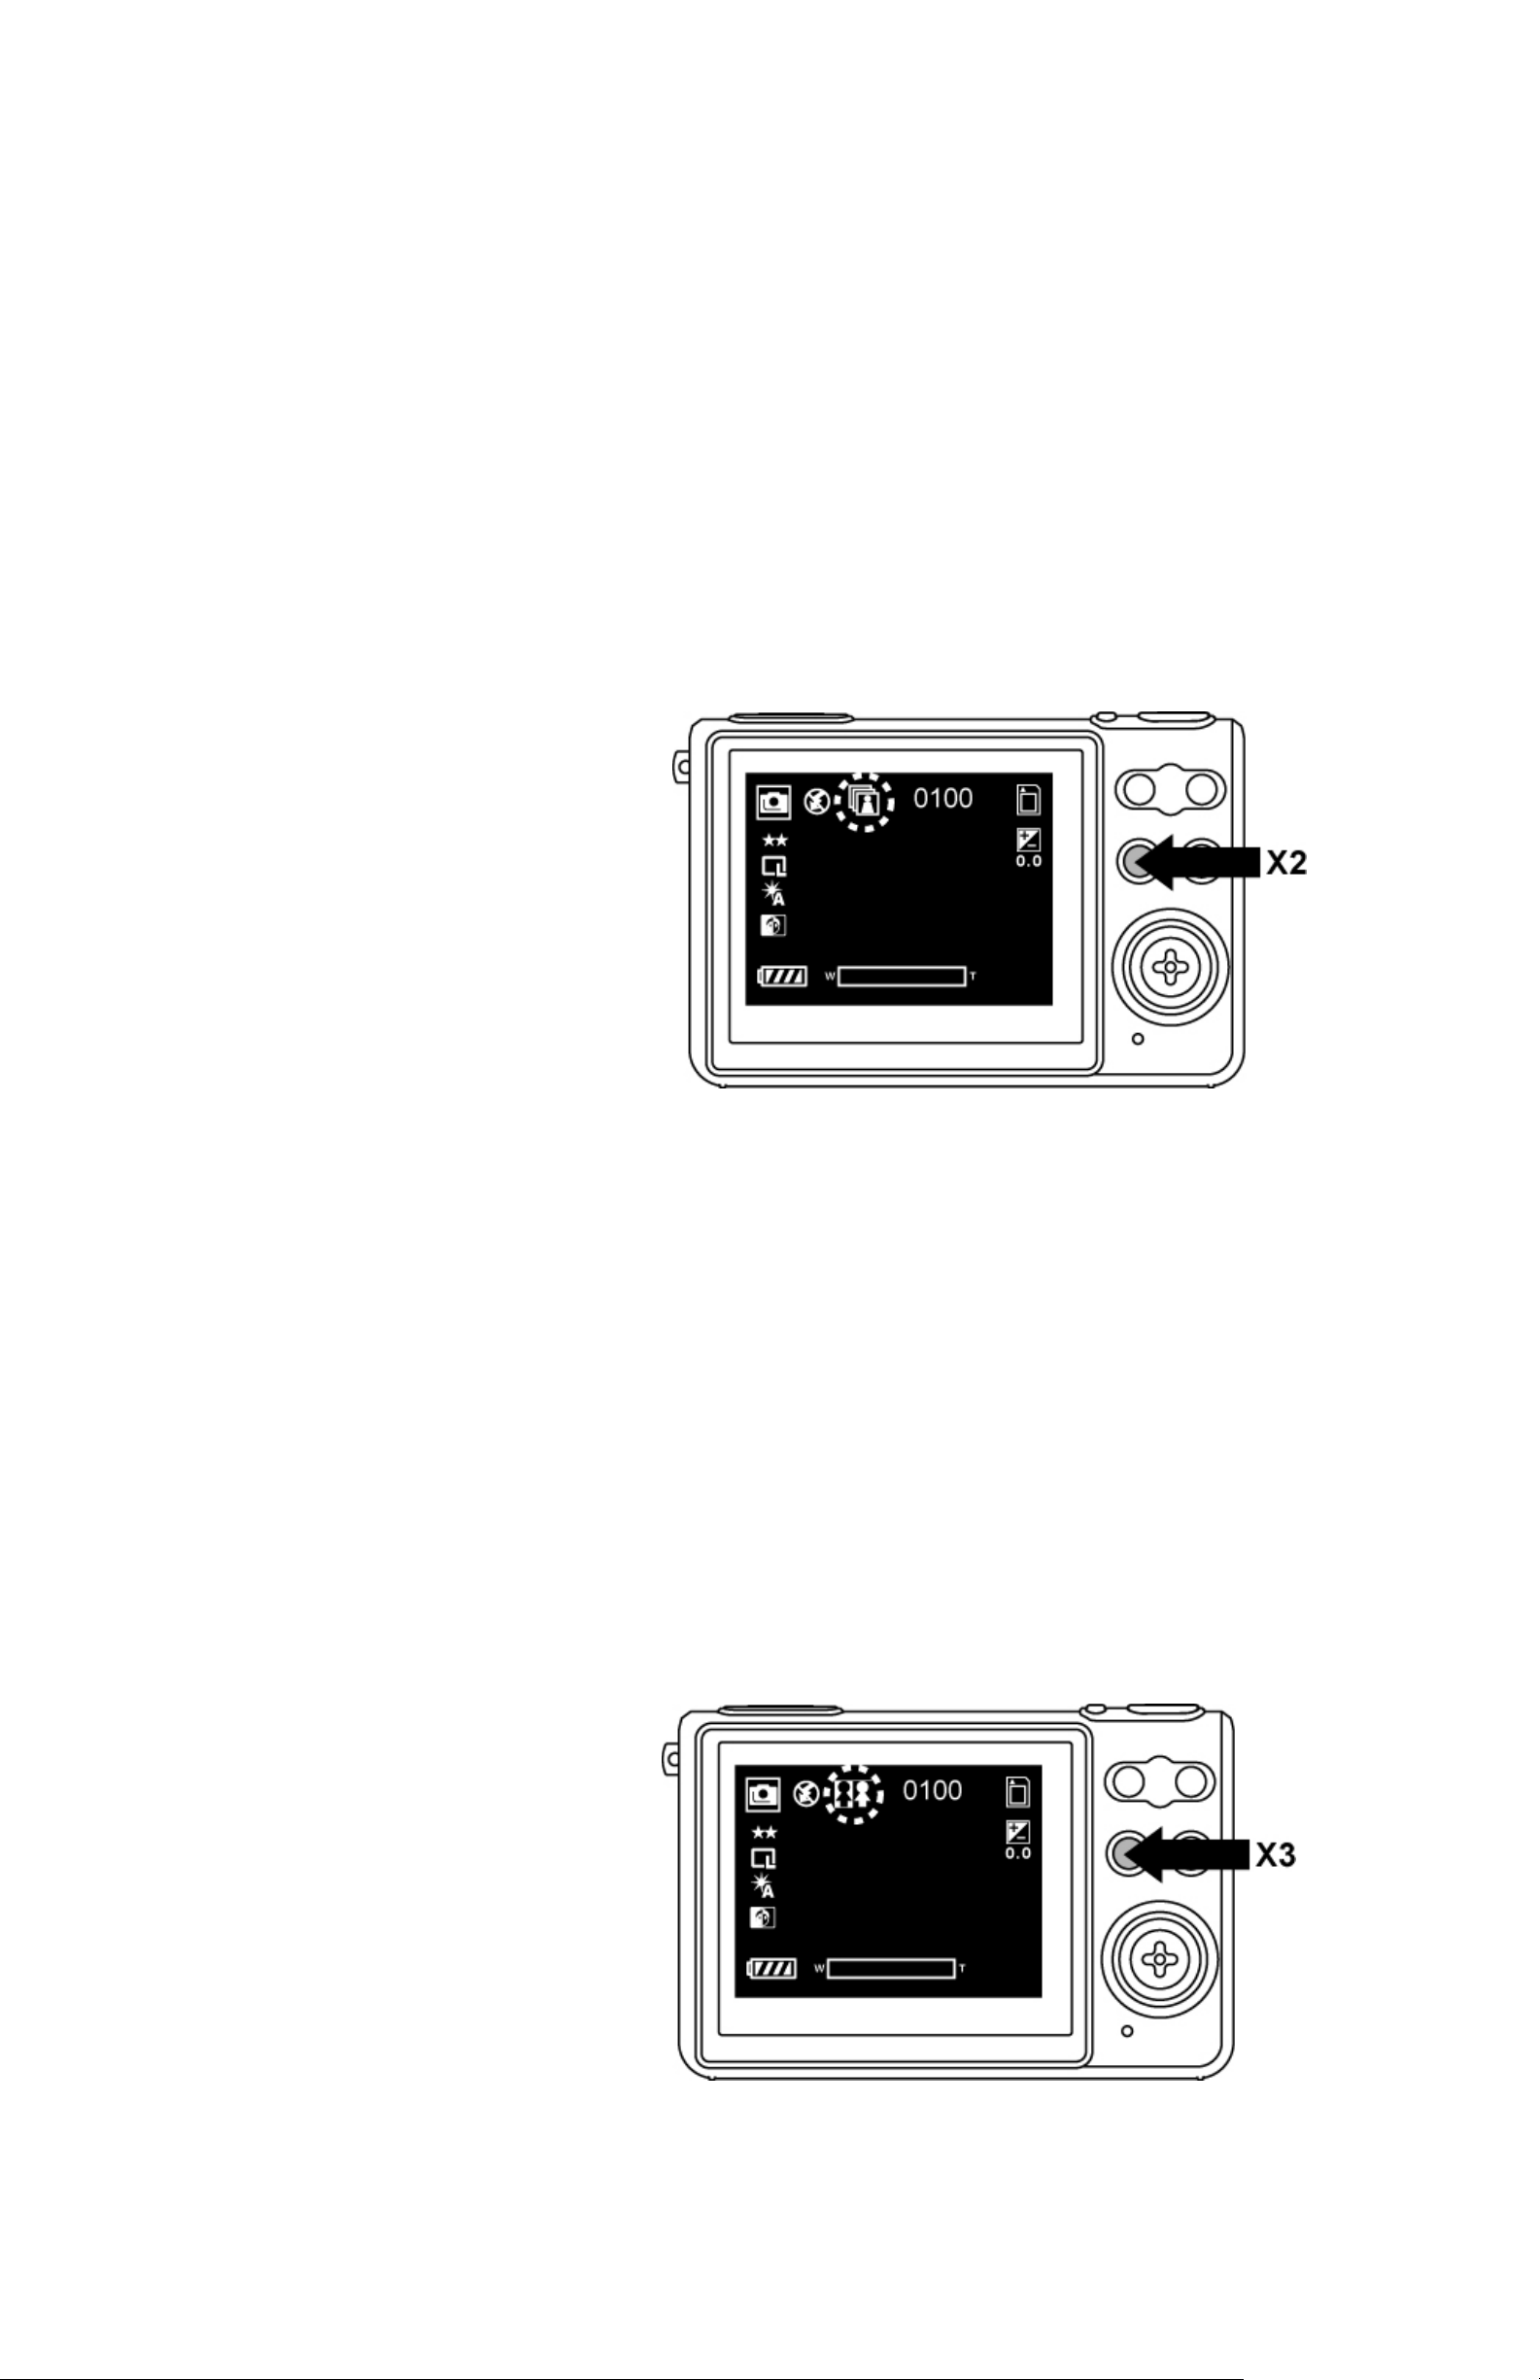
Burst
1. Under Still mode,
2. Press Self-timer Button twice to active Burst function,
the icon on TFT will be changed to burst symbol, and
then press Shutter button to capture images
continuously.
3. There is not burst function by XL resolution
(interpolation).
2N1
1. Under Still mode.
2. Press Self-timer Button three times to active 2N1
function, the icon on TFT will be changed to 2N1
symbol. When the subject s can not in TFT display
totally, you may use this function. To aim the subject
on the left side, press Shutter button to take a picture
first and then aim the subject on the right side, press
Shutter button again to take a picture. The two
pictures will be combined to one.
17
Page 19
4. Advance Mode
Still Mode
The Camera is default on Still Mode. To press Menu
Button for modes setting, press Menu Button again to
return to capture mode.
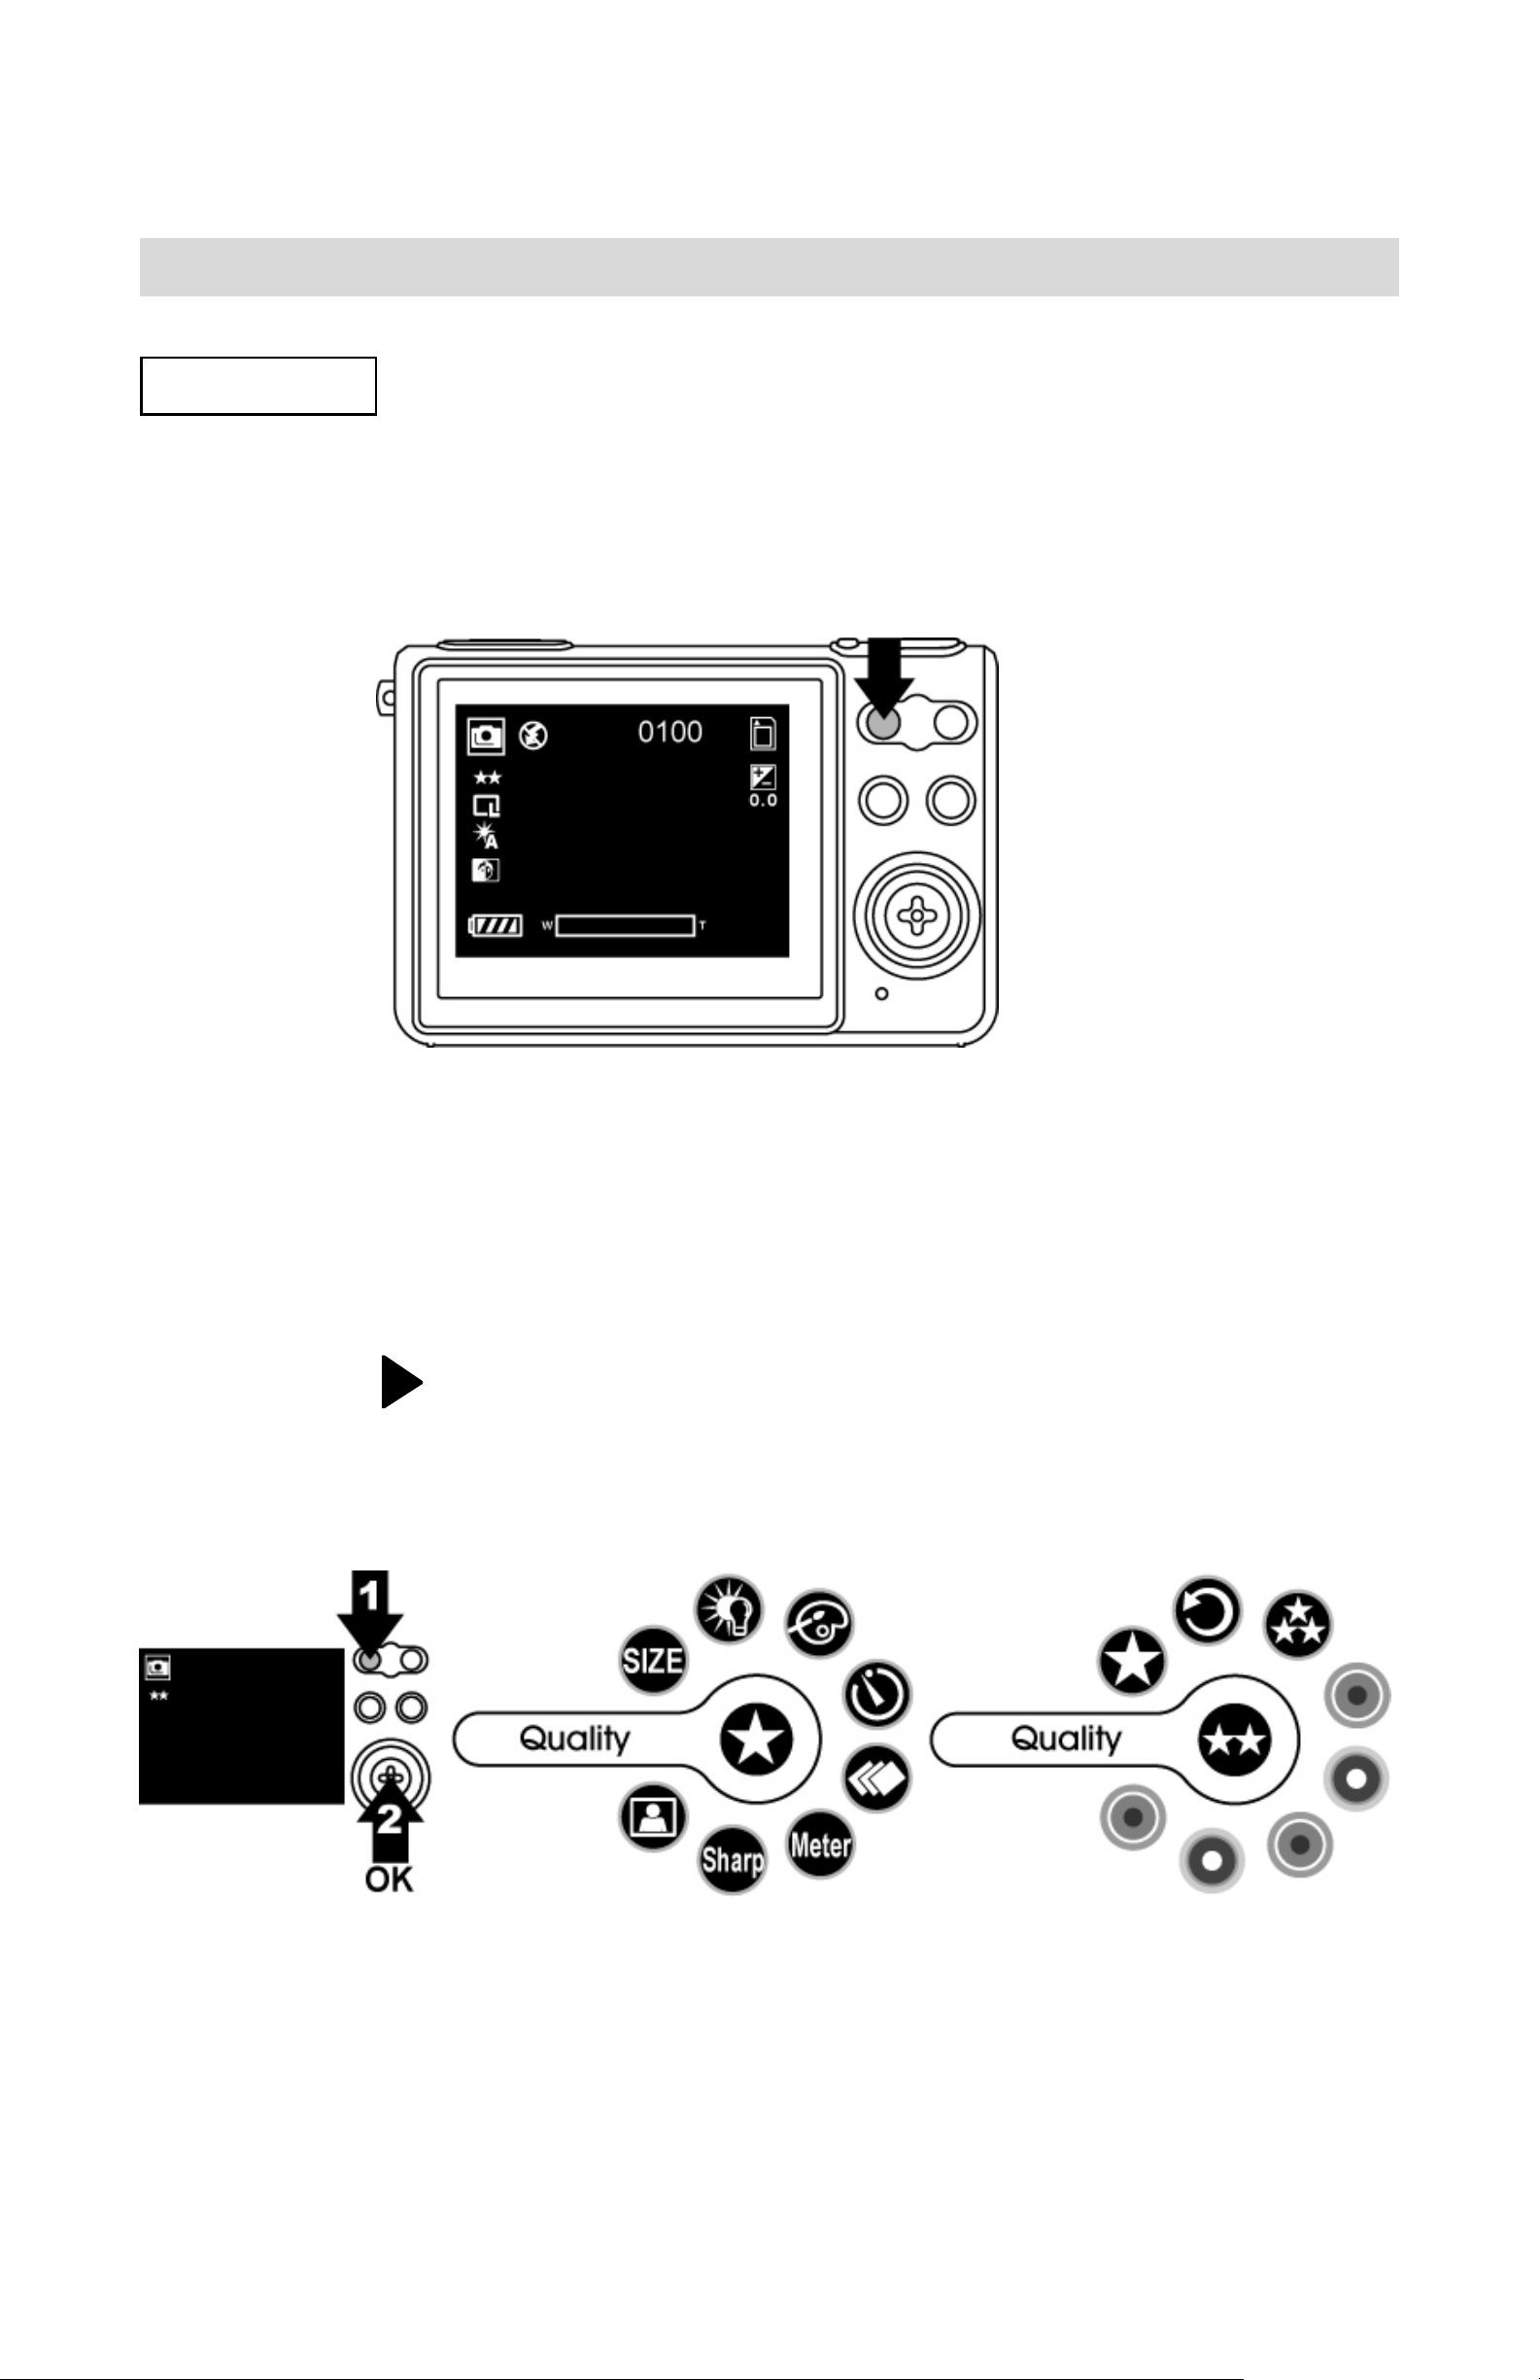
Image Quality
1. Under Still Mode
2. Press Menu Button and select Quality, press OK
button to confirm.
3. Press
to select Super High/ High/ Normal you
want to change, and press OK button to set.
18
Page 20
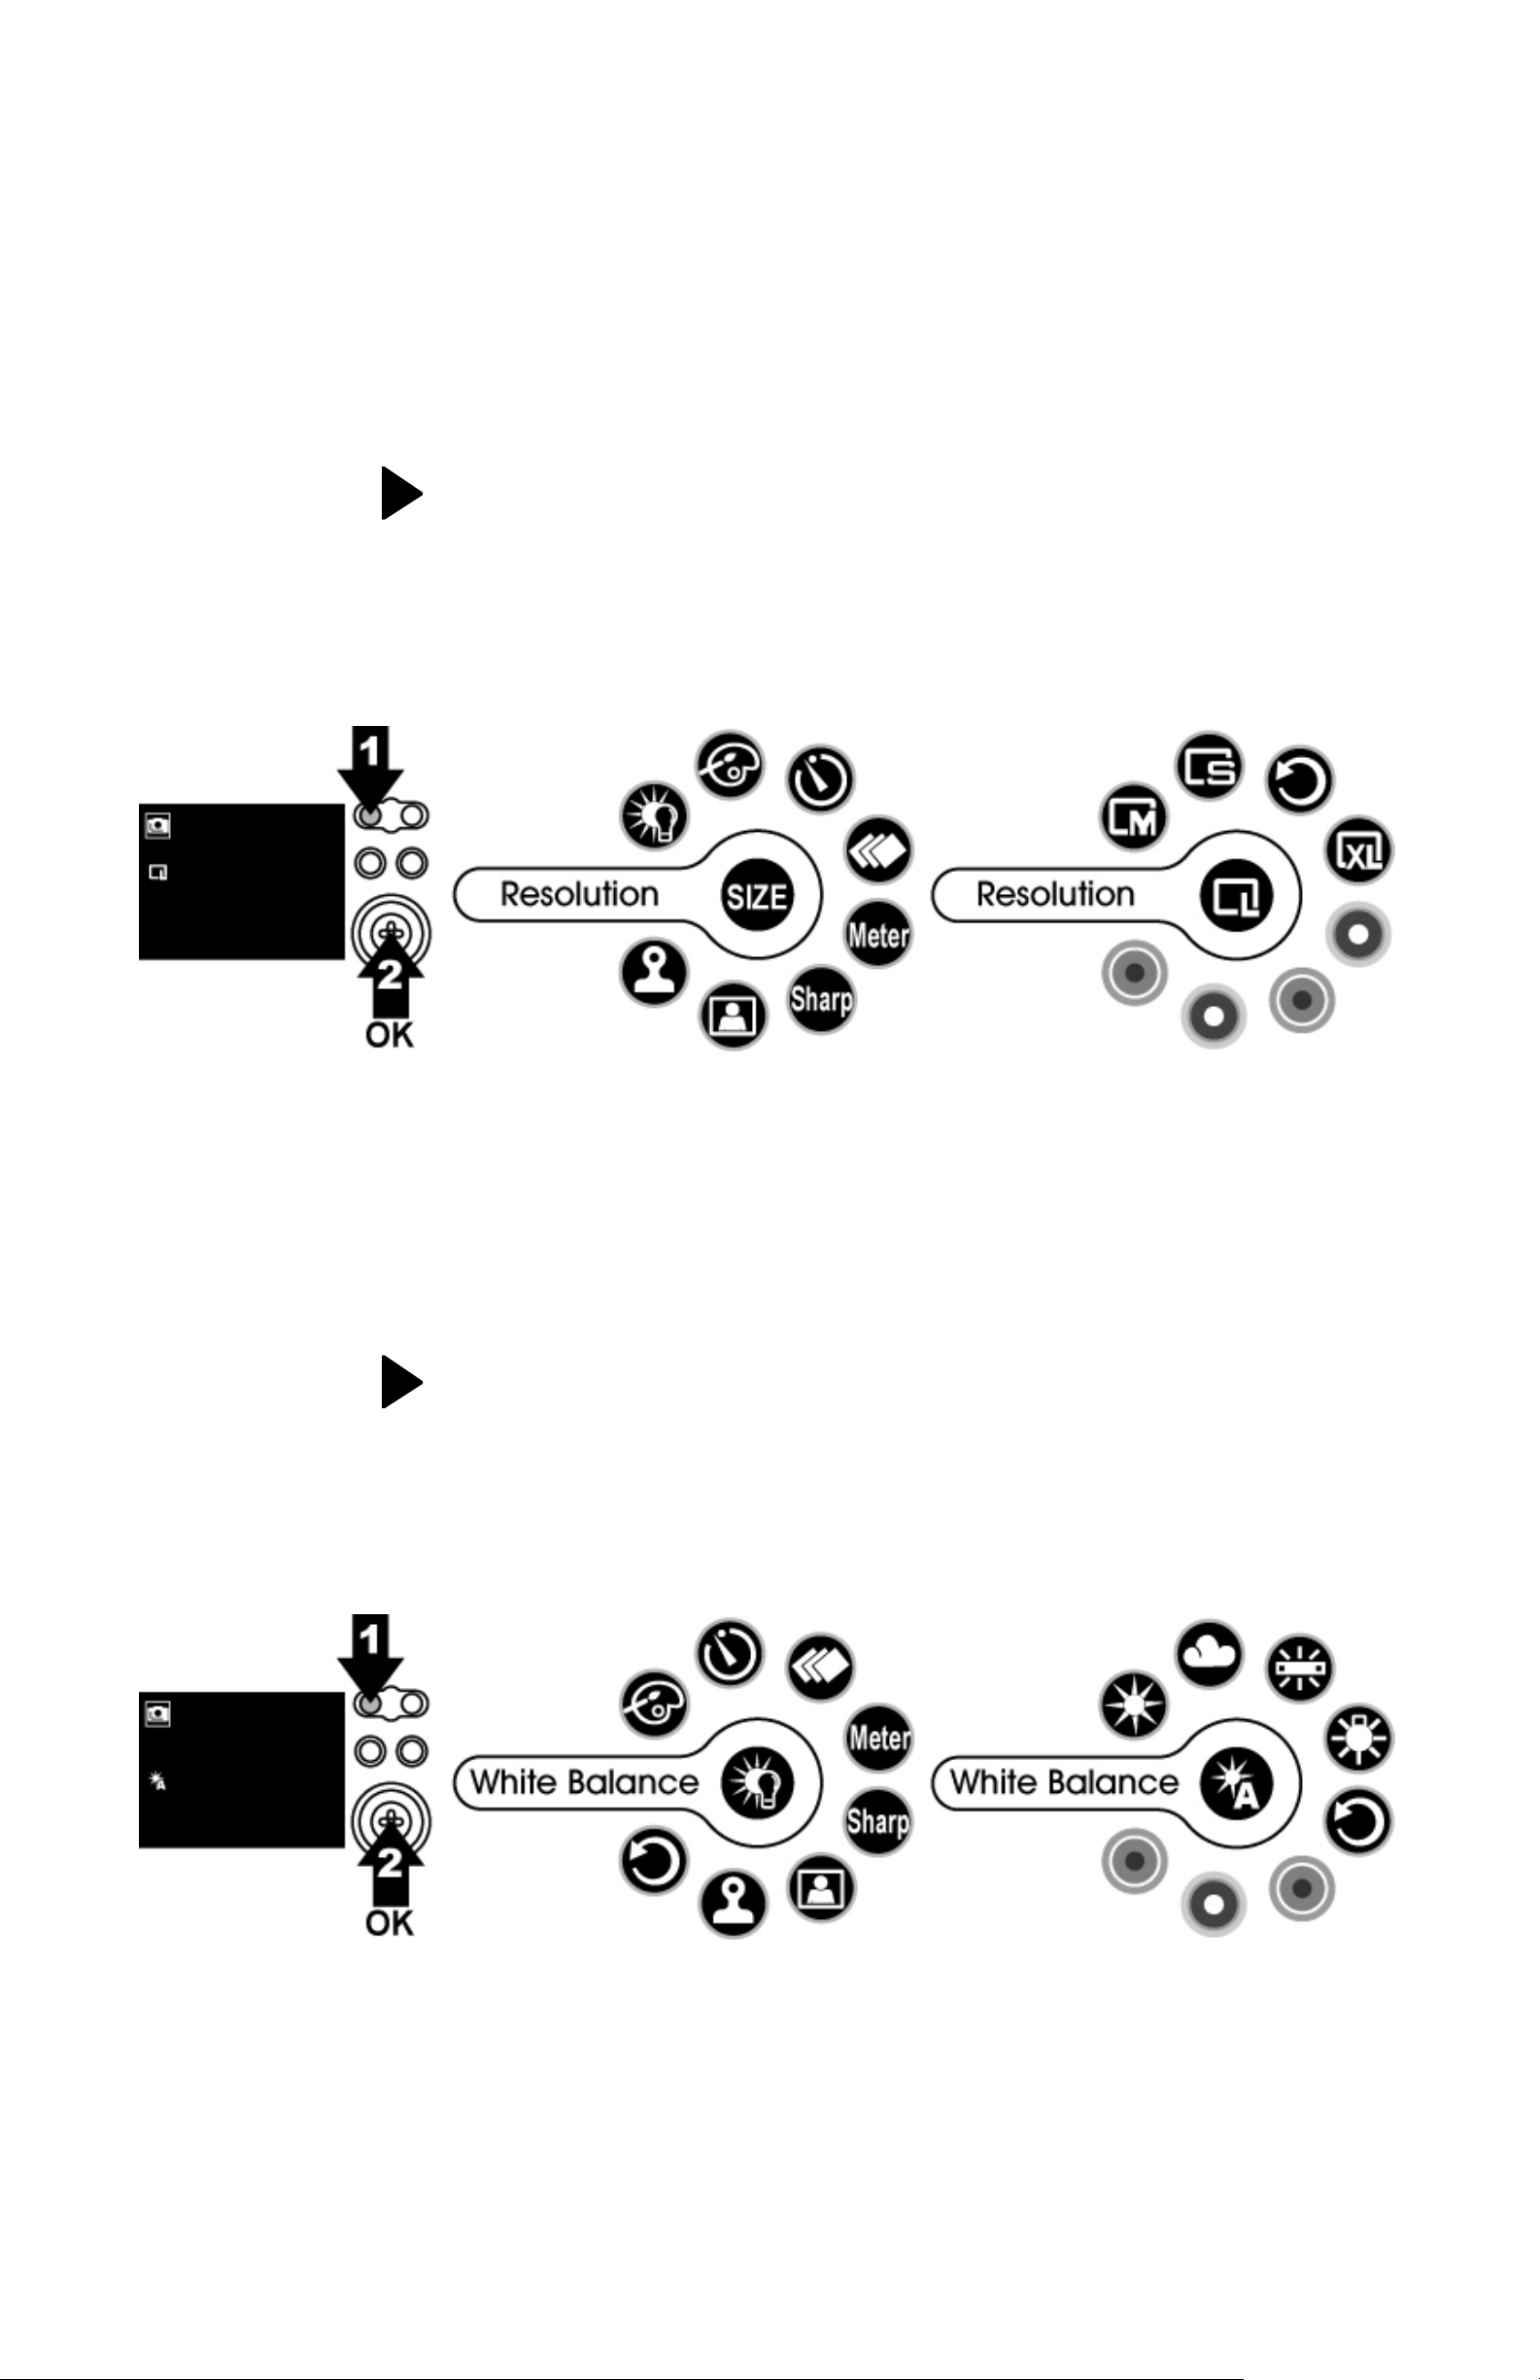
Resolution
1. Under Still Mode
2. Press Menu Button and select Resolution, press OK
button to confirm.
3. Press
M(1600x1200)/ S(1280x960) you want to change,
and press OK button to set.
to select XL (4000x3000)/ L(2048x1536)/
White Balance
1. Under Still Mode.
2. Press Menu Button and select White Balance, press
OK button to confirm.
3. Press
T ungsten you want to change, and press OK button to
set.
to select Auto/ Daylight/ Shade/ Fluoresce/
19
Page 21

Effect
1. Under Still Mode.
2. Press Menu Button and select Effect, press OK
button to confirm.
3. Press
Sepia you want to change, and press OK button to
set.
to select Vivid/ Normal/ Black & White/
Self-timer
1. Under Still Mode.
2. Press Menu Button and select Self-timer, press OK
button to confirm.
3. Press
want to change, and press OK button to set.
to select 5sec./ 10sec./ 30sec./ Off you
20
Page 22

Burst
1. Under Still Mode.
2. Press Menu Button and select Burst, press OK
button to confirm.
3. Press
or 5 images and press OK button to set.
to select to continue shooting for 3 images
Metering
1. Under Still Mode.
2. Press Menu Button and select Metering, press OK
button to confirm.
3. Press
you want to change, and press OK button to set.
to select Center/ Average/ Weighted Aver
21
Page 23

Sharpness
1. Under Still Mode.
2. Press Menu Button and select Sharpness, press OK
button to confirm.
3. Press
change, and press OK button to set.
to select Soft/ Normal/ Sharp you want to
Frame
1. Under Still Mode
2. Press Menu Button and select Frame, press OK
button to confirm.
3. Press
and press OK button to set.
4. Please note the frame template you choose will stay
on the TFT until you enter to Menu mode to cancel
this function.
to select Frame1/ Frame2/ Frame3 you like,
22
Page 24

Date S tamp
1. Under Still Mode
2. Press Menu Button and select Date Stamp, press OK
button to confirm.
3. Press
stamp date o n your image s, and press OK button to
set.
to select YMD/ MDY/ DMY/ Off you want
23
Page 25

Movie Mode
Press Mode Button once to enter to Movie Mode.
To press Menu Button for modes setting, press Menu
Button again to return to recording mode.
Movie Format
1. Under Movie Mode.
2. Press Menu Button and select Movie Format, press
OK to confirm.
3. Press
to select AVI/ ASF/ MOV movie format, and
press OK button to set.
24
Page 26

Movie Quality
1. Under Movie Mode
2. Press Menu Button and select Quality, press OK
button to confirm.
3. Press
want to change, and press OK button to set.
to select Super high/ High/ Normal you
Resolution
1. Under Movie Mode
2. Press Menu Button and select Resolution, press OK
button to confirm.
3. Press
you want to change, and press OK button to set.
to select 640 (640x480) or 320 (320x240)
25
Page 27

White Balance
1. Under Movie Mode.
2. Press Menu Button and select White Balance, press
OK button to confirm.
3. Press
T ungsten you want to change, and press OK button to
set.
to select Auto/ Daylight/ Shade/ Fluoresce/
Effect
1. Under Movie Mode.
2. Press Menu Button and select Effect, press OK
button to confirm.
3. Press
Sepia you want to change, and press OK button to
set.
to select Vivid/ Normal/ Black & White/
26
Page 28

Metering
1. Under Movie Mode.
2. Press Menu Button and select Metering, press OK
button to confirm.
3. Press
you want to change, and press OK button to set.
to select Center/ Average/ Weighted Aver
Sharpness
1. Under Movie Mode.
2. Press Menu Button and select Sharpness, press OK
button to confirm.
3. Press
change, and press OK button to set.
to select Soft/ Normal/ Sharp you want to
27
Page 29

Voice Mode
1. Press Mode Button twice to enter to Voice Mode.
2. Press the Shutter Button to start recording
3. Press the Shutter Button again to stop recording.
Playback Mode
Picture Playback
1. Press Playback Button and then press Mode Button
to Still Mode.
28
Page 30

2. Press or to select the pictures you want to
review.
3. Press Shutter Button to lock current pictures.
Press Shutter Button again to unlock.
29
Page 31

4. Press to pan the center of the picture to view.
Press
and to zoom in and zoom out.
Press OK Button to fix the zoom frame from purple to
blue. Press
specific area you want to zooming inward and press
OK button again.
and or and to move to a
30
Page 32

5. Press to enter Thumbnail to show 9 pictures at
the same time on TFT display. To press OK Button to
return the original picture playback status.
6. Under Playback Mode, press Menu Button, you can
select Slides show, Protect, or DPOF functions by
pressing
shown on the TFT display.
Press Menu Button again to return picture playback
status.
or and OK button, the icon will be
7. Press Playback Button again to return taking pictures
status.
31
Page 33

Delete Picture
1. Under Picture Playback Mode and press Delete
Button once. Press
Button to delete current review picture.
to select “V” and press OK
2. Press Delete Button twice. Press
press OK Button to delete all pictures.
to select “V” and
32
Page 34

Movie Playback
1. Press Playback Button and then press Mode Button
to Movie Mode.
2. Press
playback.
or to select the movie you want to
3. Press OK Button to playback selected movie, press
OK Button can pause, press again to release.
33
Page 35

4. Press Shutter Button to lock current pictures.
Press Shutter Button again to unlock.
5. Press
same time on TFT display. To press OK Button to
return the original movie playback status.
to enter Thumbnail to show 9 movies at the
34
Page 36

6. Press Menu Button, you can select Play, Protect
functions by pressing
icon will be shown on the TFT display.
Press Menu Button again to return movie playback
status.
or and OK Button, the
7. Press Playback Button again to return recording
movie status.
35
Page 37

Delete Movie
1. Under Movie Playback Mode and press Delete Button
once. Press
delete current review movie.
to select “V” and press OK Button to
2. Press Delete Button twice. Press
press OK Button to delete all movies.
to select “V” and
36
Page 38

Voice Message Playback
1. Press Playback mode and then press Mode Button to
Voice Mode.
2. Press
press OK Button to playback.
Press OK Button again to stop.
or to select your voice message and
37
Page 39

3. Press or to adjust the volume.
4. Press Menu Button, you can select Play current,
Repeat single or Repeat all, the icon will be shown
on the TFT display.
5. Press Playback Button to return recording voice
message status.
38
Page 40

Delete Voice Message
1. Under Voice Playback Mode and press Delete Button
once. Press
delete current voice message.
to select “V” and press OK Button to
2. Press Delete Button twice. Press
press OK Button to delete all voice messages
to select “V” and
39
Page 41

5. Settings
Press Mode Button three times to enter Setting Mode and
then press
forward to select setting modes.
Date & T ime
1. Under Setting Mode.
2. Press OK Button to enter into Date & Time Mode
setting.
3. Press the
Hour/ Minute, and then press OK Button to set.
and to adjust Year/ Month/ Day/
40
Page 42

Auto Power Off
1. Under Setting Mode.
2. Press
OK Button.
3. Press
change, and press OK Button to set.
to select Auto Power Off Mode and press
to select the 1min/ 3min/ 5min you want to
Language
1. Under Setting Mode.
2. Press
Button.
3. Press
and press OK Button to set.
to select Language Mode and press OK
to select languages you want to change,
41
Page 43

4. Language reference table
EG English TC Traditional Chinese
DE German SC Simplified Chinese
FR French JP Japanese
ES Spanish KR Korea
IT Italian TH Thailand
PT Portuguese RU Russia
NL Dutch AB Arabian
PL Polish
Buzzer
1. Under Setting Mode.
2. Press
Button
3. To select “V” to turn on, “X” is turn off the buzzer
function.
to select Buzzer Mode and press OK
42
Page 44
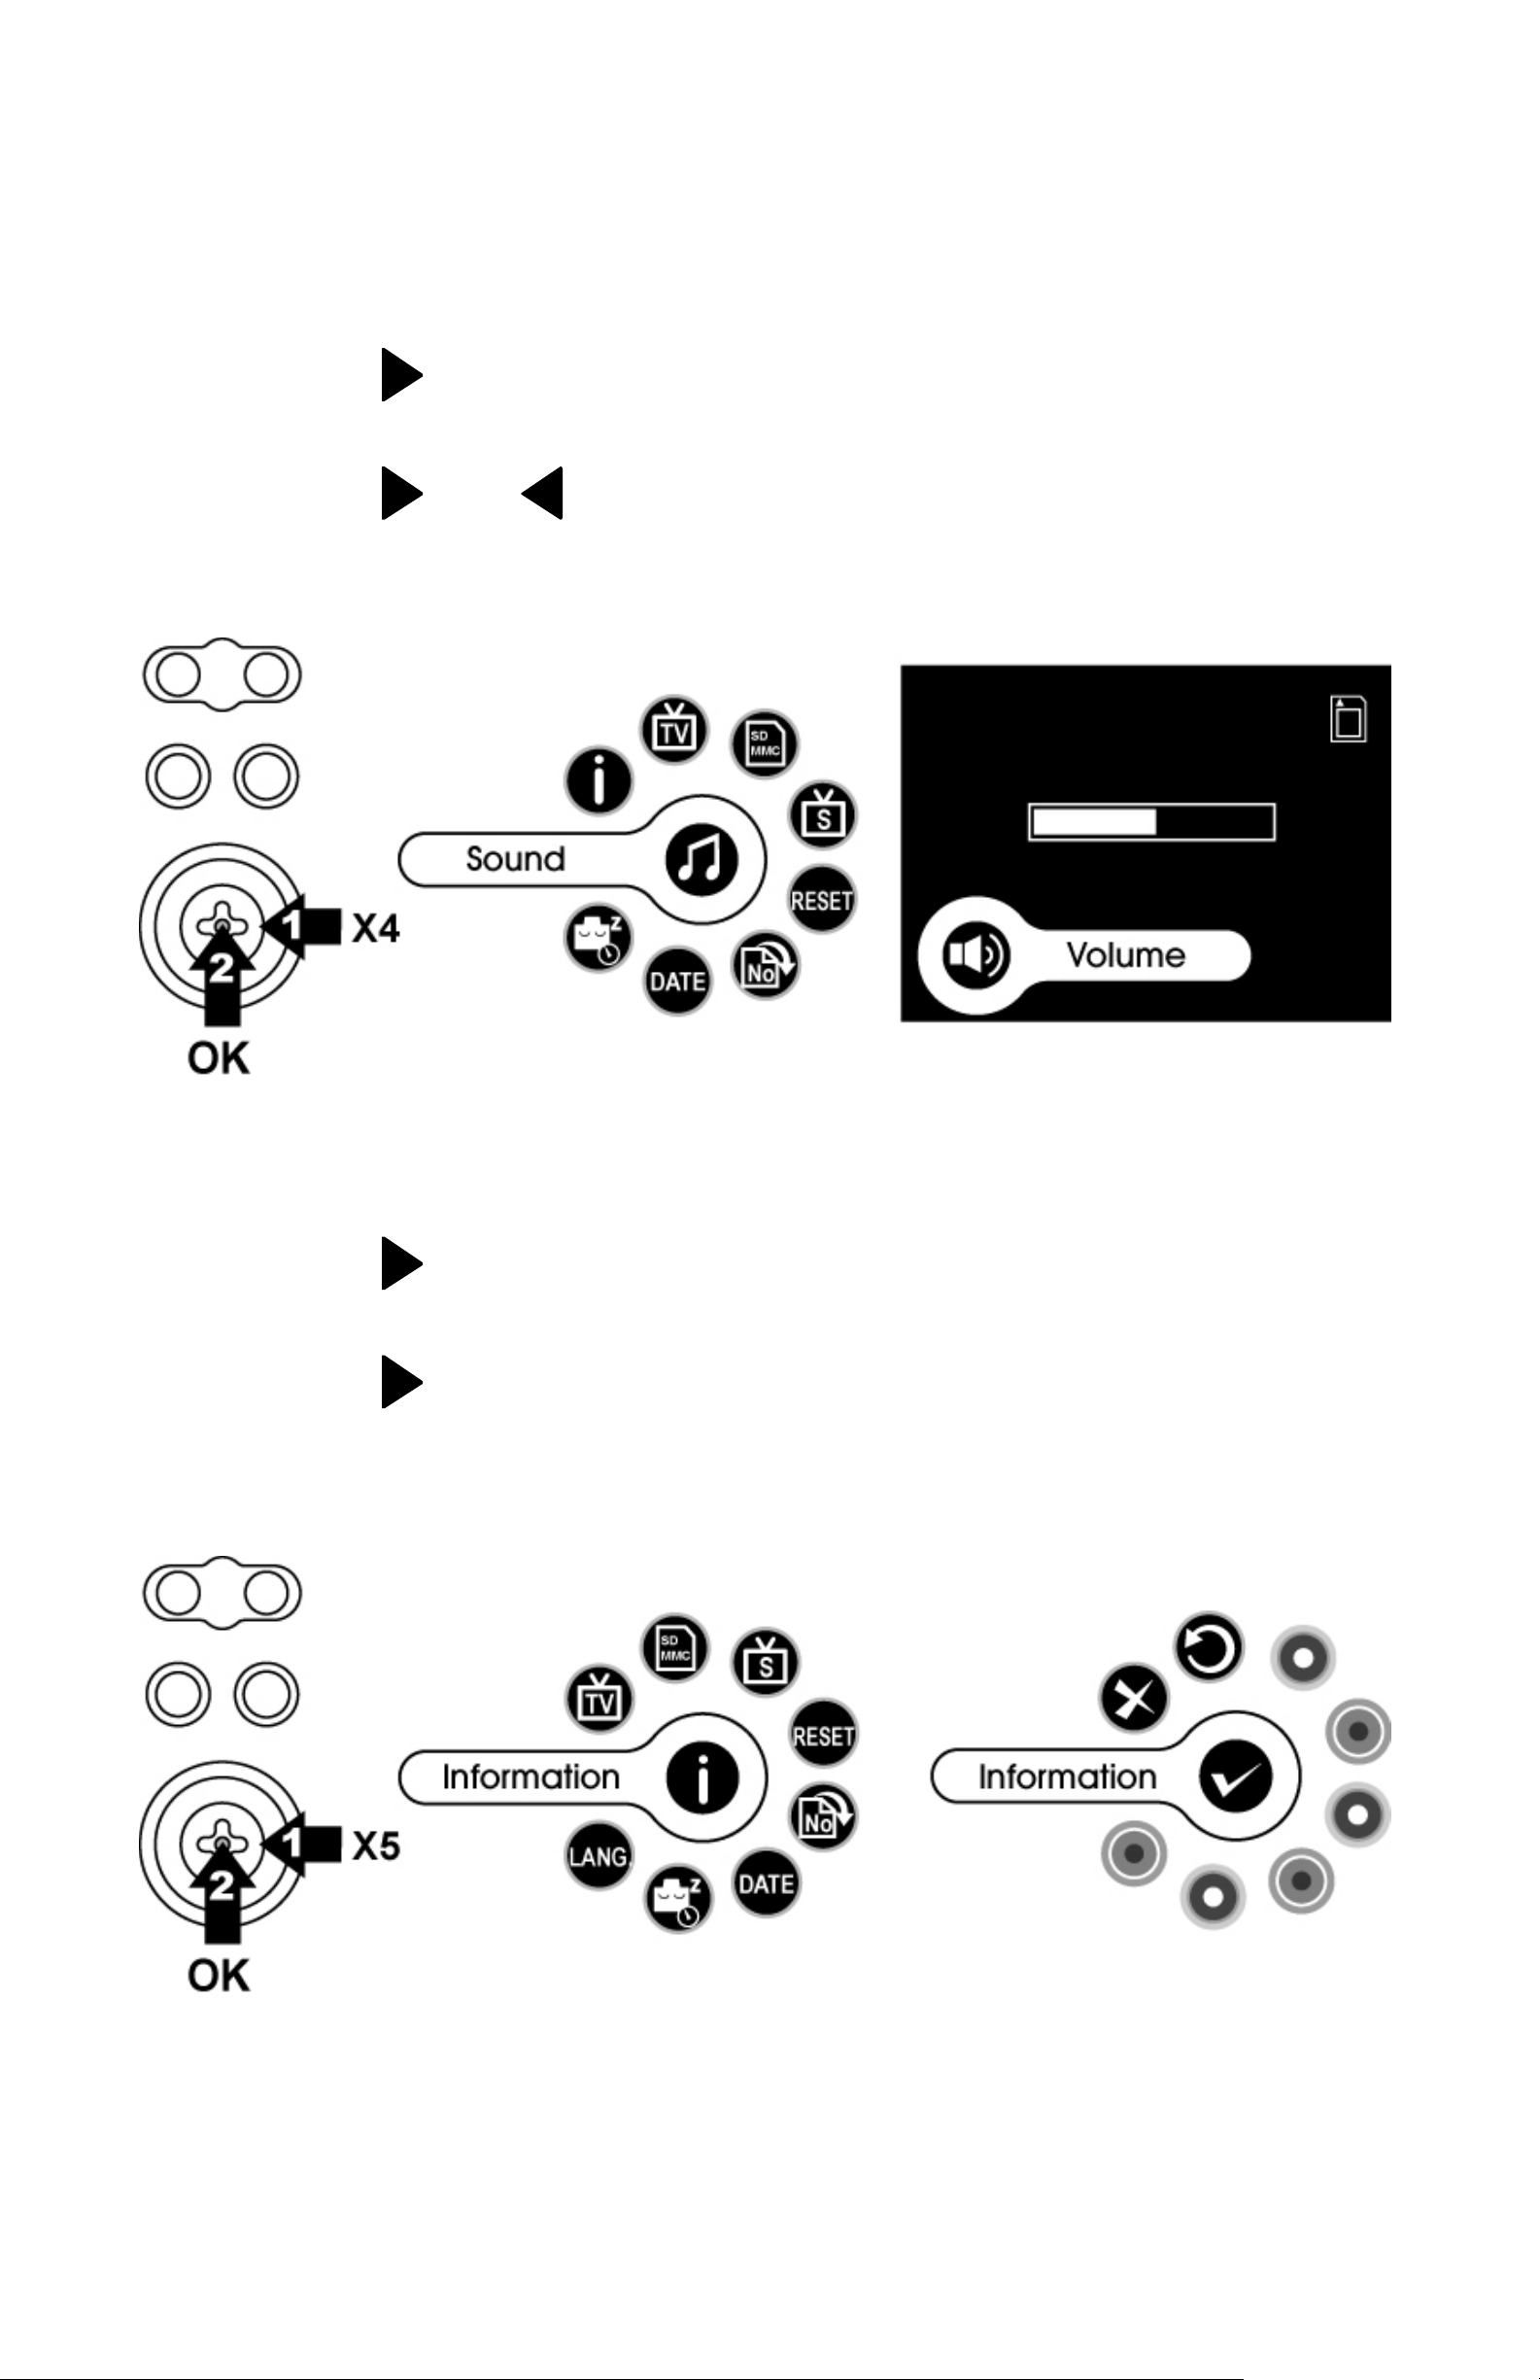
Sound
1. Under Setting Mode.
2. Press
to adjust the volume.
3. Press
change, and press OK Button to set.
to select Sound Mode and press OK Button
or to adjust the volume you want to
Information
1. Under Setting Mode.
2. Press
Button.
3. Press
is shown icons/ indicators on TFT LCD screen.
to select Information Mode and press OK
to turn on or turn off the information which
43
Page 45

TV system
1. Under Setting Mode.
2. Press
Button.
3. Press
and press OK Button to set.
to select TV sy stem Mode and press OK
to select NTSC/ PAL you want to change,
Memory Status
1. Under Setting Mode.
2. Press
OK Button.
3. Press
WAV)/ Format (format memory card)/ Memory Status
(display internal or external memory status), and
press OK Button to set.
to select Memory Status Mode and press
to select Delete All (delete all JPEG, AVI,
44
Page 46

Startup Screen
1. Under Setting Mode.
2. Press
OK Button.
3. Select “C” icon, you can choose one of your still
images to be startup screen.
4. Select “D” icon, it is default startup screen.
to select Startup Screen Mode and press
Default Setting
1. Under Setting Mode.
2. Press
OK Button.
3. To select “V” to change to the default setting.
to select Default Setting Mode and press
45
Page 47

Reset Count er
1. Under Setting Mode.
2. Press
OK Button.
3. To select “V” to reset the counter number.
to select Reset Counter Mode and press
46
Page 48
6. Making Connection
Inst all TotalMedia
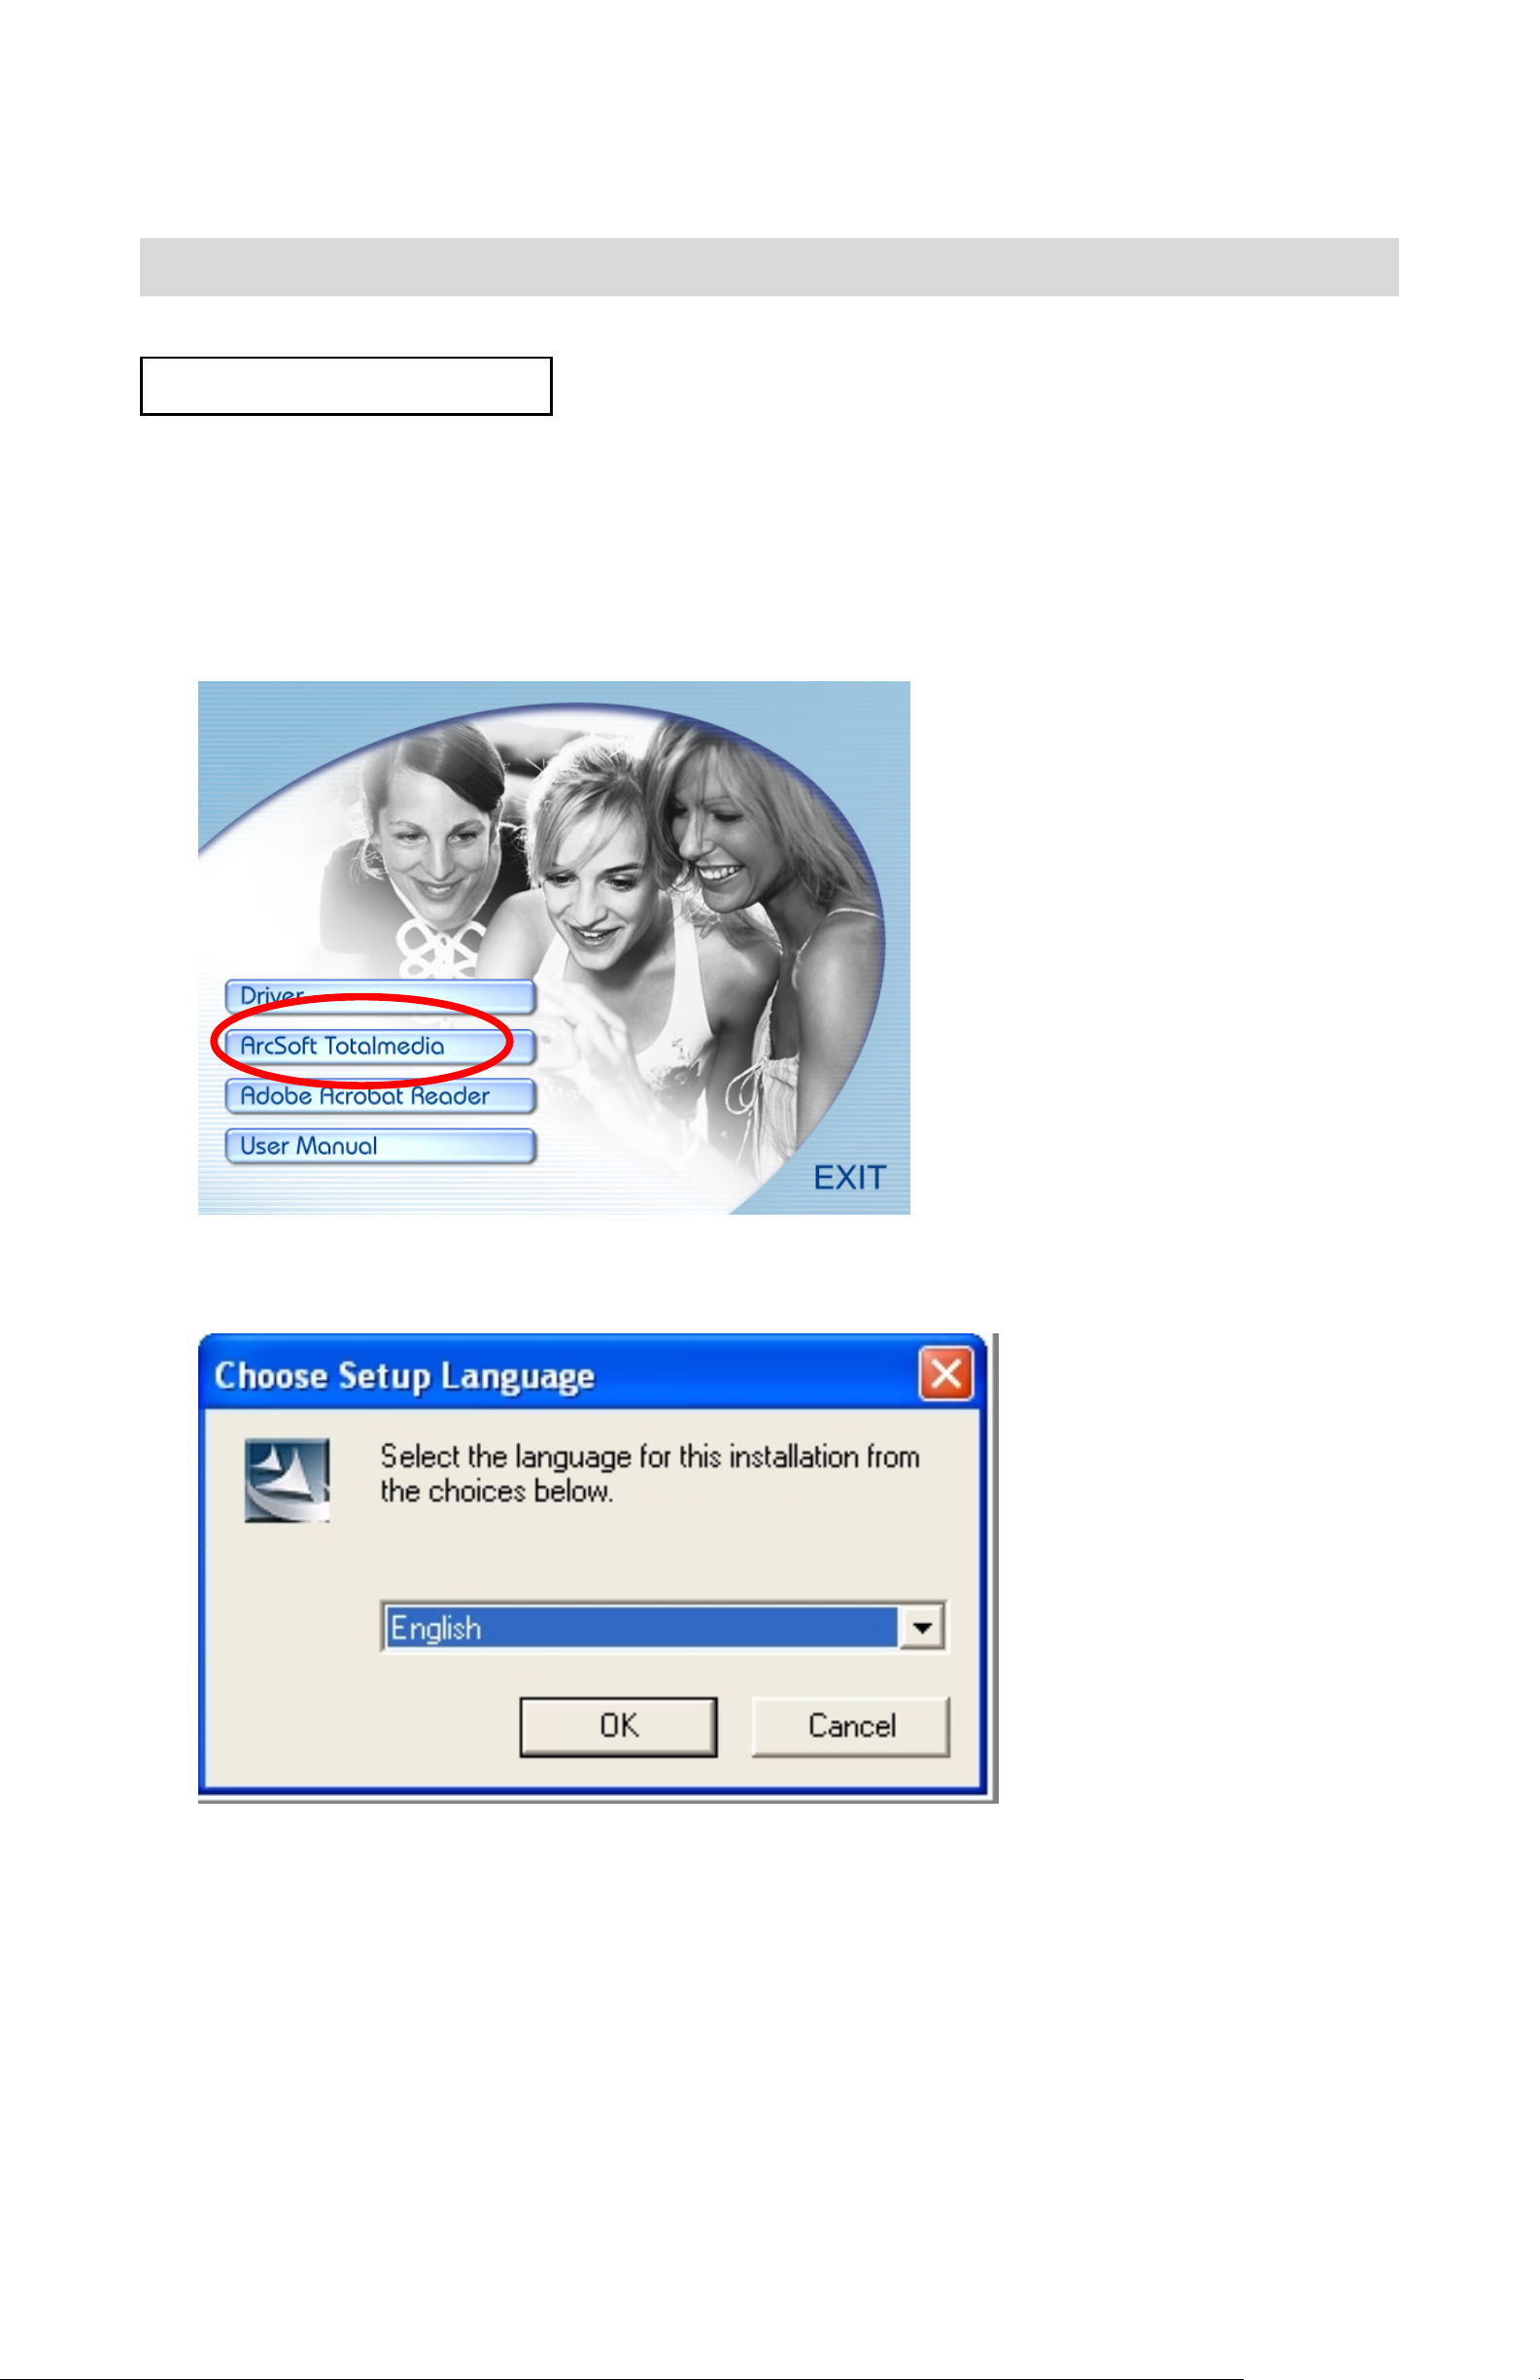
1. Insert the install at ion CD into your P C’ s CD-ROM drive.
2. The introduction screen will appear automatically.
3. Click “ArcSoft TotalMedia”
4. Choose setup language
47
Page 49

5. Click “NEXT”
6. Click ”YES”
7. Click “NEXT”
48
Page 50

8. Click “NEXT”
9. Click “Finish”
10. Setup Direct X 9.0, click “Next”
49
Page 51

11. Click “Next”
12. Click “Finish”
Note: To find out more about TotalMedia or how to use it,
consult online help by clicking ”
bar or website www.acrosoft.com
? “ icon on the top menu
50
Page 52

Connecting to PC
Window ME/ 2000/ XP- No Driver Required:
1. Power on the camera first.
2. Plug the USB cable to the camera and computer
properly.
Window 98SE- Driver Required:
1. Put the install at ion CD in your CD-Rom driver
2. Follow the On-screen instructions for installation.
3. Reboot the PC.
4. Power on the camera.
5. Plug the USB cable to the camera and computer
properly.
51
Page 53

Download Pictures, Videos, Voice messages
1. Power on the camera first and plug in USB cable
2. For Windows 98SE/ ME/ 2000:
Double click “My Computer” icon on the Windows
Desktop.
For Windows XP:
Select “Open Folder view files using Windows Explorer”
and click “OK”
3. Select MSDC symbol from the TFT screen and press
OK button to set.
4. Double click on the DCIM folder to open.
5. Double click on the
100PHOTO folder for pictures
200MOVIE folder for movies
300VOICE folder for voice messages to open.
6. You can copy the videos, pictures and voice messages
to your designated folder or album
52
Page 54

Connecting to TV for review
1. Before you connect to TV, please make sure the correct
video signal standard (NTSC or PAL) first.
2. Plug the provided TV cable (the black end) into the AV
port of camera and connect TV cable to your TV.
Red to red (audio-in), yellow to yellow (video-in).
3. Turn on the camera and TV. Select “TV output” symbol.
You can review the pictures and movies on TV.
53
Page 55

PictBridge Function
When a printer that supports PictBri dge is available,
images can be printed by connecting the camera directly
to the PictBridge-compatible printer without using a PC
1. Plug the USB cable to the camera and compute r
properly.
1. Power on the camera, sele ct PictBridge symbol and
press OK button to set.
2. Press
print out, press
number.
3. Press MENU button to choose the printing size which
is default from printer.
4. Press OK button to start to printing,
or to choose the picture you want to
or to choose the printing
54
Page 56

7. Appendix
Specifications
Image Sensor CMOS 2592 x 1944 pixels
Built-in Memory 16MB Flash memory
External Memory SD/ MMC card memory slot
Lens Specification F3.0, f=8.54mm
Flash Strobe Auto, Flash off, Red-eye reduction
with flash
White Balance Auto, Day light, Shade, Tungsten,
Fluorescent
Exposure Auto, ±2.0 EV, 0.5 EV steps
S till Image Res. 4000x3000, 2592x1944, 2048x1536,
1280x960
Video Mode 640x480@ 25~30fps,
320x240@30fps with audio
Compression Still- JPEG
Movie- MPEG 4(AVI/ ASF/ MOV)
Audio- WAV
Zoom 8X digital zoom for still 12mega
16X digital zoom for st ill 3mega
4X digital zoom for movie 640x480
Lens Focus Fixed, mechanical shutter
Display 2.4” TFT color display
PC Interface USB 2.0
Microphone/ Speaker Built-in
Connector USB & DC-in (combination) ja ck,
AV-out & Earphone (combination)
jack
55
Page 57

Specifications
Video Output NTSC/ PAL
O/S Window 98SE/ 2000/ ME/ XP
Power Rechargeable Li-ion battery,
built-in charger
Dimension 88.9 x 58.7x 15.3 mm
Weight 94 g
Bundled software ArcSoft TotalMedia
Specifications are subject to change without prior notice.
56
Page 58

Computer System Requirement
z Windows 98SE, 2000, ME or XP
z Pentium III 700MHz CPU
z 500MB free HDD space
z 128MB RAM internal memory minimum
z VGA video card
z CD ROM driver
z Color monitor
z Available USB 2.0 port
57
Page 59

Icons & Indicators
With Card Resolution- XL
Card lock Resolution- L
Battery Full Resolution- M
Battery Half Resolution- S
Battery Empty Quality- high
Still Mode Quality- Medium
Movie Mode Quality- Low
Playback Auto Flash
Exposure Flash Off
Sharpness Red-eye with Flash
Sound Auto White Balance
2 N 1 Sun light
Burst Cloudy
Self-timer Tungsten
MSDC Fluorescent
58
Page 60

TV output Shanking hand
AV in No images
PC cam Play single
Earphone Play all
PicBridge PDOF
59
Page 61

Standard number of available pictur es/ recording time
reference table
The number of available pictures/ re cording time
depending on the subjects photographed.
Still Image
RES.
Size
S
Quality
★
★★
★★★
# of Available Shots
Internal SD card
16
MB
115 1991 4020 7937 15886
80 1385 2795 5519 11047
46 797 1609 3176 6358
256
MB
512
MB
1G 2G
M
L
★
★★
★★★
★
★★
★★★
★
45 778 1570 3100 6205
31 541 1092 2156 4315
18 311 628 1240 2483
28 485 980 1935 3874
19 337 681 1346 2693
11 194 392 774 1150
11 203 411 812 1626
XL
★★
★★★
8 141 286 565 1131
4 81 164 325 651
60
Page 62

Movie
Format RES.
Size
320
AVI
Quality
★
★★
★★★
★
# of Available Recordin g
Internal SD card
16 MB 256 MB 512 MB
00:03:58 01:13:19 02:28:19
00:02:39 00:48:53 01:38:52
00:01:19 00:24:26 00:49:26
00:00:59 00:18:19 00:37:04
ASF
640
320
640
★★
★★★
★
★★
★★★
★
★★
★★★
00:00:39 00:12:13 00:24:43
00:00:19 00:06:07 00:12:22
00:03:58 01:13:19 02:28:19
00:02:39 00:48:53 01:38:52
00:01:19 00:24:26 00:49:26
00:00:59 00:18:19 00:37:04
00:00:39 00:12:13 00:24:43
00:00:19 00:06:07 00:12:22
MOV
320
640
★
★★
★★★
★
★★
★★★
00:03:58 01:13:19 02:28:19
00:02:39 00:48:53 01:38:52
00:01:19 00:24:26 00:49:26
00:00:59 00:18:19 00:37:04
00:00:39 00:12:13 00:24:43
00:00:19 00:06:07 00:12:22
61
Page 63

Movie
Format RES.
Size
320
AVI
Quality
★
★★
★★★
★
# of Available Recordin g
SD card
1G 2G
04:53:07 09:46:58
03:15:24 06:31:18
01:37:42 03:15:39
01:13:16 02:26:44
ASF
640
320
640
★★
★★★
★
★★
★★★
★
★★
★★★
00:48:51 01:37:49
00:24:28 00:49:00
04:53:07 09:46:58
03:15:24 06:31:18
01:37:42 03:15:39
01:13:16 02:26:04
00:48:51 01:37:49
00:24:28 00:49:00
MOV
320
640
★
★★
★★★
★
★★
★★★
04:53:07 09:46:58
03:15:24 06:31:18
01:37:42 03:15:39
01:13:16 02:26:04
00:48:51 01:37:49
00:24:28 00:49:00
62
Page 64

Voice Message
# of Available Recording
Internal SD card
16 MB 256 MB 512 MB 1G 2G
00:12:24 03:44:56 07:34:48 14:58:37 29:59:15
63
 Loading...