

Page 1

Technaxx®
Wireless Video Door Phone TX-59+
Table of Contents
Introduction ..........................................................................................1
Safety Warning & Attentions.................................................................2
Features...............................................................................................3
Technical specifications........................................................................4
Product Overview.................................................................................4
Key introduction....................................................................................5
Installation Guide..................................................................................5
Installation Steps & Battery Installation ................................................6
Unlock Setting (Installation door opener) .............................................7
Attentions during Installation................................................................8
Installation of MicroSD card..................................................................8
Functions and Applications...................................................................9
Outdoor Unit Starting Up...................................................................9
Indoor Monitor Starting Up ................................................................9
Outdoor Unit Call Indoor Monitor.......................................................9
Indoor Monitor View the Camera.....................................................10
Indoor Monitor CALL Indoor Monitor (Intercom)..............................10
Night-vision .....................................................................................11
Bright/Colour/Volume Adjustment....................................................11
Tamper Alarm Function...................................................................11
Indoor Monitor Menus ........................................................................11
Battery and Charge............................................................................14
Accessories........................................................................................14
Statement...........................................................................................14
General faults and solutions...............................................................15
It is not possible to connect TX-59 devices with TX-59+
devices. Please be aware of this.
Important Hint regarding the User Manuals:
All languages of the user manual are on the CD enclosed. The English
and German version of the user manual is also as printed version
Introduction
The manufacturer Technaxx Deutschland GmbH & Co.KG hereby declares that
this device, to which this user manual belongs, complies with the essential
requirements of the standards referred to the Directive RED 2014/53/EU. The
Declaration of Conformity you find here: www.technaxx.de/ (in bar at the bottom
“Konformitätserklärung”). Before using the device the first time, read the user
Service phone No. for technical support: 01805 012643 (14 cent/minute from
German fixed-line and 42 cent/minute from mobile networks). Free Email:
If you drill a hole in the wall, please make sure that power cables, electrical cords
and/or pipelines are not damaged. When using the supplied mounting material,
we do not take the liability for a professional installation. You are entirely
responsible to ensure that the mounting material is suitable for the particular
masonry, and that the installation is done properly. When working at higher
altitudes, there is danger of falling! Therefore, use suitable safeguards.
Keep this user manual for future reference or product sharing carefully. Do the
same with the original accessories for this product. In case of warranty, please
contact the dealer or the store where you bought this product.
Warranty 2 years
enclosed.
manual carefully.
support@technaxx.de
Page 2

Safety Warning & Attentions
Do not place the device on an uneven or unstable table-board to prevent failure
or damage caused by falling.
Only the battery and charger designated by the Company can be used on the
device. Application of other products may lead to leakage, overheating, blowout
and fire of the battery.
Do not violently strike, shake or toss the device to prevent failure and fire
caused to the wireless video door phone.
Do not place the device, battery or charger near or in fire or in a place with
flammable and explosive gas; otherwise, damage and fire of electrical circuit and
other accidents may be caused.
Do not place the device in a place with high temperature, high humidity or large
amount of dust; otherwise, product failure may be caused.
Keep the device away from children.
Attentions for operation of this product
Do not apply force on LCD screen or knock other objects with it, otherwise,
breakage and damage of LCD panel and seepage of crystalline liquid will be
caused. If the crystalline liquid enters your eyes, there will be danger of ablepsia.
Wash your eyes (be sure not to rub your eyes) and go to see a doctor
immediately
Do not dismantle or remodel this product, otherwise, damage, creep age and
electrical fault may be caused to this product.
Do not press the keys with a pin, stump of pen/pencil and other keen-edged
objects; otherwise, damage or disoperation will be caused.
Place tiny metal objects such as drawing pin at a place far away from the
speaker. As the speaker has magnetic property while working, it will attract these
tiny metal objects, which may lead to personal injuries or damage of the speaker.
Do not project the lens at strong light source, such as the sun; otherwise,
damage of the image sensor may be caused.
Do not press the terminal of lens with much force; otherwise, personal injury or
damage of the device may be caused.
Attentions for operation of charger
You may charge the device with a charger or through a USB data line
connected to the computer.
Charge with matched alternate current; creep age, fire and damage of the door
phone and charger may be caused if other voltage is used.
It is forbidden to short circuit the charger, otherwise, electrical shock, smoke
and damage of the charger will be caused.
Do not use the charger at the time when the power cord is damaged, otherwise,
fire and electrical shock will be caused.
Clear away the dust accumulated on power outlet ASAP.
Do not place a vessel used to retain water beside the charger to prevent
overheating, creep age and failure of charger caused by spilling water.
If the charger is in contact with water or other liquids, disconnect the power
supply immediately to prevent overheating, fire, electrical shock and failure of the
charger.
Do not dismantle or remodel the charger, otherwise, personal injury, electric
shock, fire and damage of charger may be caused.
Do not use the charger in places with high humidity such as bathroom,
otherwise, electric shock, fire and damage of the charger will be caused.
Do not touch the charger, electrical line and power outlet with wet hand(s),
otherwise, electric shock may be caused.
Do not place heavy objects on the electrical line or refit the electrical line,
otherwise, electric shock and fire will be caused.
Before cleaning and maintenance, first pull the plug off the power outlet.
Grasp the charger while pulling off the plug, as pulling the electrical line will
lead to damage of electrical line, electric shock and fire.
Page 3

Operation and maintenance
Keep this product dry, as rainwater, moisture, humidity and liquids or moisture
content may contain mineral matters that erode the circuit.
Do not keep this product in any place with high temperature. As high
temperature may shorten the lifespan of electronic device, damage the battery
and cause deformation or melting of certain plastic parts and components.
Do not keep this product in any place with low temperature. As when being
moved from a place with low temperature to a place with normal temperature, it
may generate humidity inside, which may cause damage of circuit board.
Do not attempt to dismantle this product. As improper handling by
nonprofessional personnel may cause damage of the device.
Do not toss, knock or shake this product, as tough operation mode may
damage the motherboard inside the device.
If this product is made wet by mistake, shut it down, remove the battery, and
restart the product after confirming it complete dry after 24 hours.
Do not have the metal parts (specially configured interfaces of charger and
data line excluded) in contact with charger interface to avoid short circuit.
Use clean and dry soft cloth to clean the lens, infrared lamp and light sensor.
Warning: Improper operation will void warranty.
Features
Fashion appearance: European design, full of modern science and technology
feeling, suitable for houses of various decorative styles.
Hidden antenna: built-in antenna design, protect the antenna effectively.
Extra large range of vision: 120° wide viewing angle
High-resolution color LCD screen: 7” mainstream TFT digital LCD screen,
achieve outstanding clarity.
More stable transmission between outdoor unit and indoor monitor.
Camera is adjustable.
Digital camera with 0.3MP, image focusing vivid and clear.
Infrared Night-Vision: under the environment of insufficient outdoor light, the
indoor monitor can activate the infrared Night-Vision to clearly display and record
the outdoor scenes.
Automatical detection: a photo/video is taken automatically when a visitor come
close to the door.
One-key display: simple and convenient to use, view the outdoor scenes and
take photos or record videos under manual or automatically mode just by
pressing down one key.
Intercom function: can choose one-way or both-way talkback function.
Video is stored on an extended MicroSD memory card up to 32GB. Photos are
stored into the internal storage of the monitor (up to 180).
Charge-and-record supported: without the need to worry that the operation will
be affected due to depletion of electrical quantity.
Auto circulating memory: without the need to worry that real-time recording is
unachievable due to insufficient space of storage card.
Multifunction holder: wall-hung type or table type provided.
Multi machine extended function: support two outdoor units and three indoor
monitors at most.
Long distance transmission: communication distance can reach 100m in open
space.
Frequency range: 2.4G ISM digital public frequency range: 2402~2483.5MHz
Adaptive frequency hopping technique: AFH (Adaptive Frequency Hopping
Technique), produce communication frequency and Auto-Sync frequency
randomly.
Page 4
Technical specifications
Outdoor unit
External power 9~16V DC / AC
Consumption 400mA
Power Lithium battery 3400mAh
Working time ~5-6 hours continuously
Standby time ~60 days
Charging time ~6.5 hours
Outline dimension 134 x 74 x 31 mm
Weight 138 g
Environmental temperature –10°C ~ +50°C
Waterproof grade IP55
Placement Hang on out wall
Surface material ABS & hardware accessories
Camera 300000 pixels (0.3MP)
View angle 120° wide angle
Night vision 2x IR lamp
Transmitting frequency 2.4GHz (2.4-2.483GHz)
Radiated output power 100mW maximum
Indoor monitor
External power DC 9V / 2A
Consumption 600mA
Battery Lithium battery 4000mAh
Working time ~5-6 hours continuously
Standby time ~60 days
Charging time ~6.5 hours
Outline dimension 200 x 150 x 27 mm
Weight 387 g
Environmental temperature 0°C ~ +40°C
Placement Wall hung type or table style
LCD size 7" TFT color screen
Display resolution 640 x 480
Application distance ~100m in open space
Transmitting frequency 2.4GHz (2.4-2.483GHz)
Radiated output power 100mW maximum
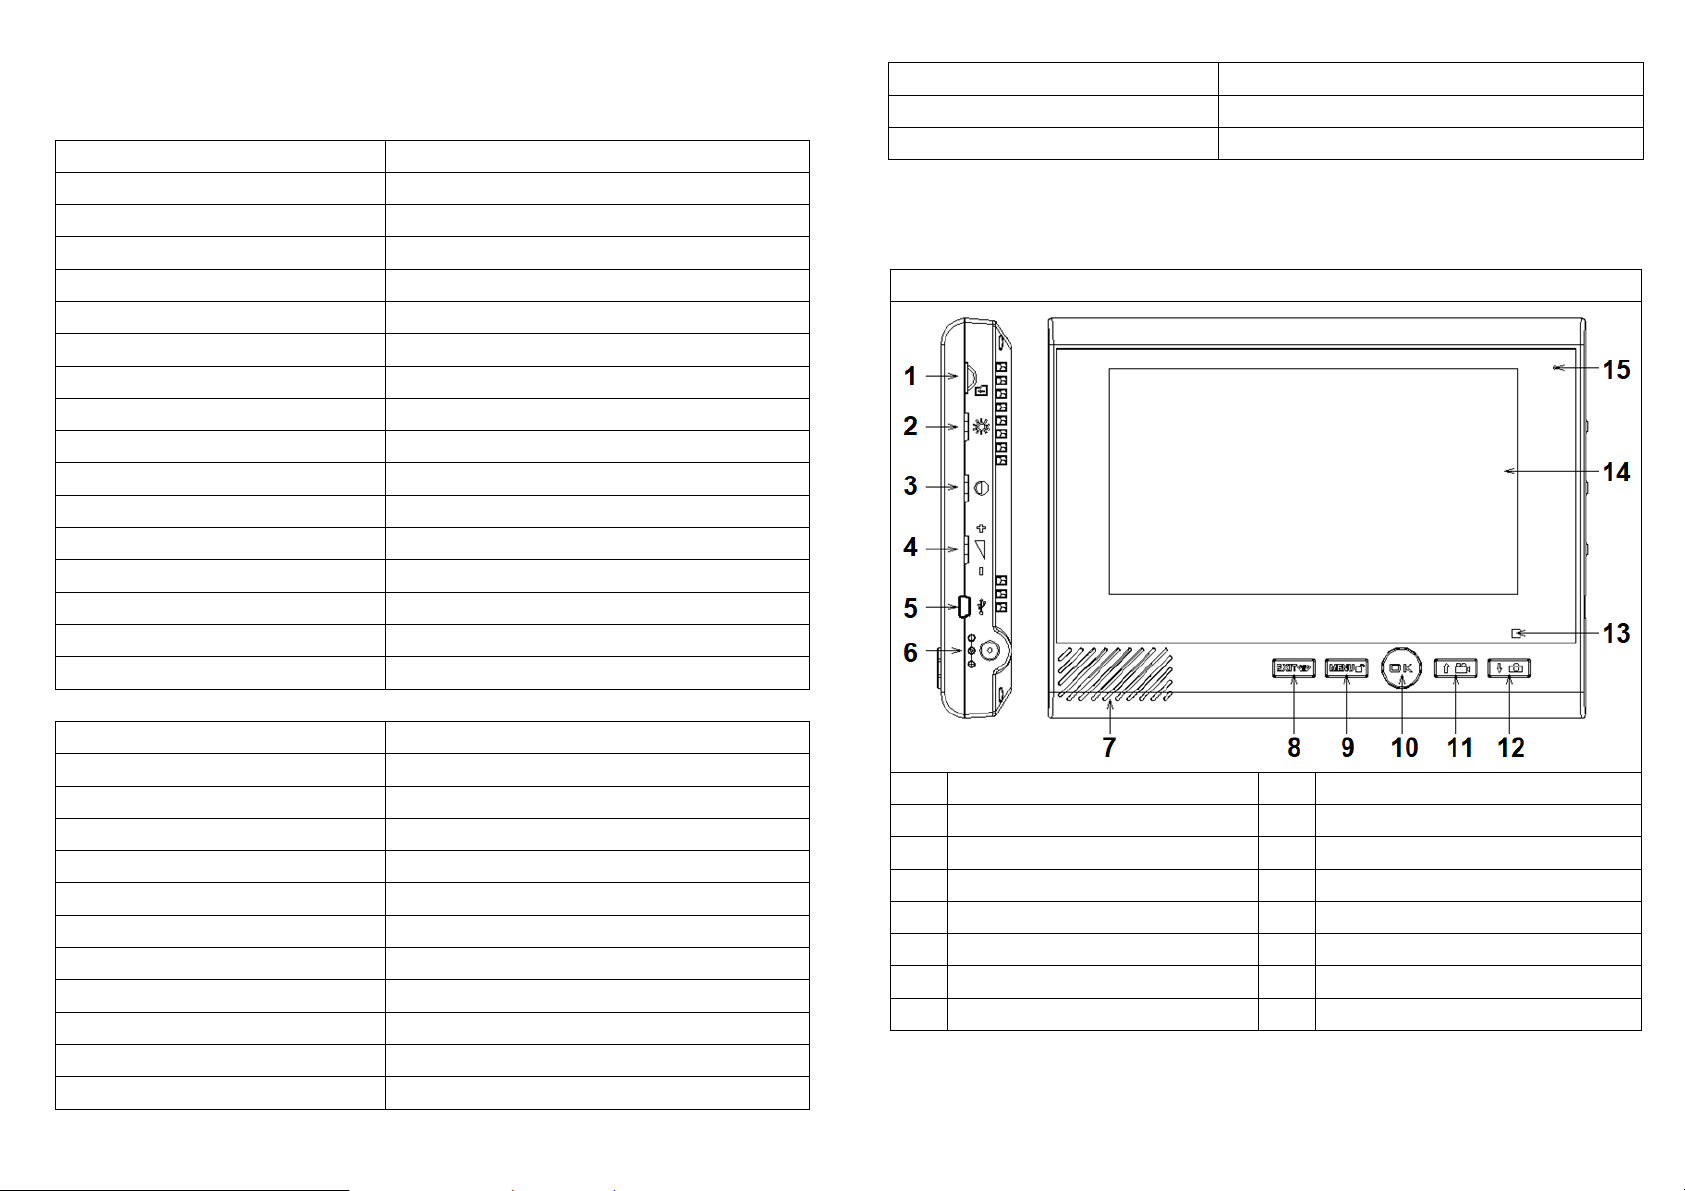
Product Overview
Indoor monitor (A.)
MicroSD card slot
1
Colour
3
Mini-USB
5
Speaker
7
Menu/ Unlock/ Right
9
Video/ Up
11
Status LED
13
Microphone
15
Brightness
2
Volume
4
DC 9V power connector
6
Exit/View
8
On/ Off/ OK
10
Photo/ Down
12
LCD monitor (7 inch)
14
Reset on the backside
Page 5
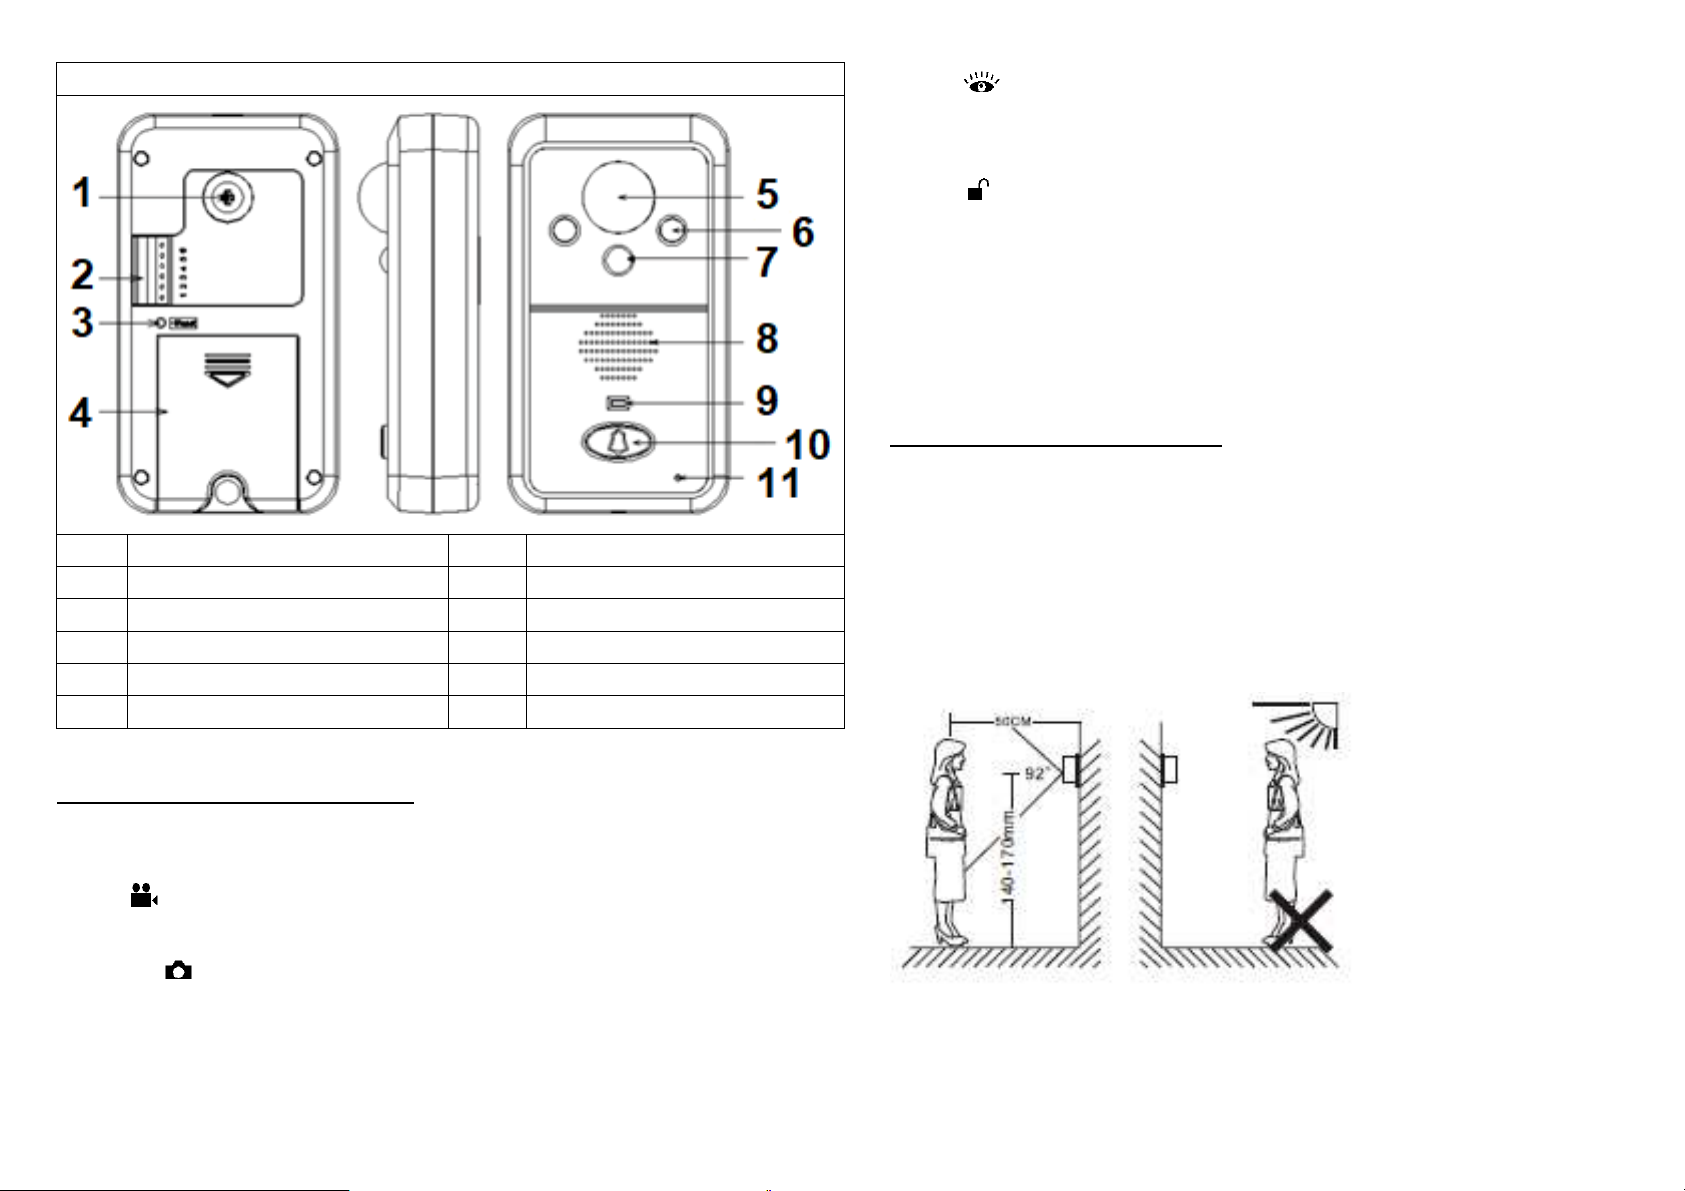
Outdoor unit (B.)
1
3
5
7
9
11
Camera angle adjustment
Reset
Camera
PIR
LED
Microphone
2
4
6
8
10
Connector
Battery cover
Infrared
Speaker
Call
EXIT / Monitor: work as monitor key for standby mode * as exit key for
MENU
MENU / unlock: work as unlock key when communicating with outdoor unit *
as right moving key for MENU.
Brightness: increase and reduce for adjustment.
Colour: increase and reduce for adjustment.
Volume: increase and reduce for adjustment.
B. Outdoor unit keys (2 keys)
Doorbell Call: ring the bell and trigger video taking when pressed.
Reset: on the rear side of the outdoor unit; erase the communication code
Installation Guide
Outdoor unit shall be installed at 1.4-1.7meter above the floor, and the camera
shall avoid facing the sunlight directly.
Description of the keys
A. Indoor monitor keys (8 keys)
OK: ON/OFF * Talking * work as confirm key for MENU
↑ UP / Video: work as option key for MENU * as video key when calling or
monitoring * as option key when calling extension monitor.
↓ DOWN / Photo: work as option key for MENU * as photo key when calling
or monitoring * as entrance key for exposure adjust * as option key when calling
extension monitor.
Camera angle can be adjusted by the joystick behind the lens.
Page 6

1 = Camera Angle adjustment joystick
Camera viewing angle is 120°. If you adjust the camera to the left, right, up or
down you can change the angle by 15°
Horizontal viewing angle Vertical viewing angle
Drill a hole refer to the dimension, put the screw rubber plug in, then fix the
rainproof cover on the wall by screws.
Connect the charging line according to the wiring diagram(the hole for wire
getting through suggested 16~30mm), if charging line comes from indoor, lead
the charging line pass through the hole, if charging line comes from outdoor,lead
the charging line pass through the bottom of rainproof cover and connect the line.
Install rechargeable lithium battery to outdoor unit, the unit starts up
automatically.
Put the top part of outdoor unit into the rainproof cover like the picture, push the
bottom part, make sure its steady and fix it from the bottom by screw, then fit on
the screw cover.
Installation Steps & Battery Installation
Page 7

Power supply (charger)
1
Connect the RED (+) cable to 1 and the BLACK (-) cable to 2 on the
2
outdoor unit’s connector.
To connect each cable with the connector of the outdoor unit:
3
Press the the button to open the connector holes
a
Insert the powerline and release
b
Unlock Setting (Installation door opener)
Contact 4 and 6 is a potential-free normally open contact.
Contact 5 and 6 is a potential-free normally closed contact.
Method 1 (one transformer)
Info methode 1:
If the door opener is pressed and the outdoor unit switches off, then the battery
must be inserted for buffering. Meaning: The transformer is supplying too little
power for the activation of both devices at the same time.
Check the voltage required by the door opener.
Method 2 (two transformer)
Bell transformer (power supply
1
1
3
Bell transformer
Connector (outdoor unit)
2
Release buzzer
outdoor unit)
Connector (outdoor unit)
3
Release buzzer
2
Transformer (power supply release
4
buzzer)
Page 8

Info method 2:
When the door opener is pressed, the outdoor unit can be operated without a
battery.
The voltage of the door opener should be equal to the used bell transformer.
Attentions during Installation
The outdoor photosensitive sensor should not be hidden or blocked by other
objects. Do not face outdoor unit to sunlight directly. Do not stick label on the
speaker, otherwise, the sound effect of doorbell will be affected. Install the
connection line correctly; otherwise, door phone disabled may be caused.
Wall holder Installation
Installation of MicroSD card
Insert the storage card in the way as shown in the diagram until you hear a
clicking sound. Improper insertion of storage card may cause system failure,
please confirm the inserting direction of the card. Take out of the storage card.
Push in the storage card until you hear a clicking sound, then the storage card will
pop out.
Table holder Installation
Storage Card Introduction
This product adopts MicroSD card as external storage device, when there is no
storage card in the product, videos can not be recorded. Photos are taken to the
internal storage in general.
If a self-provided storage card is used: Use a storage card with Class 4 or
above. Up to 32GB storage card supported. This machine has automatic cyclic
storage function, when the storage card is full, the original file will be overwritten.
Or take out the MicroSD card and connect to computer by card reader.
ATTENTION: Do not distort, extrude or strike the storage card, otherwise
the audio-video material recorded on it may be damaged.
Page 9

Functions and Applications
Outdoor Unit Call Indoor Monitor
Outdoor Unit Starting Up
Connect to external power to start up. If the power source is only battery, main
MCU is waken about every one second. Sleep mode saves power (Monitor and
alarm functions could be realized in both two power supply conditions.).
When external power and battery supply power simultaneously, the effect is
same to external power supports the unit only, when battery is in low power, the
external power will charge the battery automatically, it recovers to its previous
state when the battery is full.
Indoor Monitor Starting Up
Plug in 9VDC power, long press OK key about 3 seconds to start up (about 1
second after shutdown), logo shall be displayed on screen with a sound of “Beep”.
Turn into standby mode.
Display: standby picture, signal sign, power sign, time & date
Blue LED flashes every 4 seconds.
In this mode, the screen shall be dimmed after some seconds and turns into
power saving mode.
If there is any calling record under this mode, red LED flashes every 1 second
and stops flashing after checking.
In standby mode, long press OK key about 3 seconds, Shutdown shall be
displayed on screen with a sound of “Beep”, the unit switches off.
In standby time mode, press Door bell key to call, the blue LED of the outdoor
unit lights up with a sound of “Du Du”. Blue LED of indoor monitor lights up, the
screen shows image and the unit rings for maximum 30 seconds. If there is no
reply signal from indoor monitor, the outdoor unit stops the Call and recall is
allowed.
Intercom: press OK on indoor monitor ring stop and the unit turns into
intercom mode, red LED of indoor monitor is off as well as blue LED is on,
intercom time is maximum 90 seconds.
Monitor: press monitor key on indoor monitor red LED lights up,
monitor outdoor voice without being discovered by the visitors. (One or both way
intercom could be changed over by pressing and OK, and it will time again
till 90 seconds.).
Unlock: in OK on-state mode press unlock key after successful
unlocking, it shows unlock icon.
Take a photo: in OK on-state mode press photo taking key one
press one photo, the photos will be stored in MicroSD card.
Video Recording: in OK on-state mode press video taking key
start taking video press video taking key again to stop, the videos will be
stored in MicroSD card.
Exit: in OK on-state mode press OK key, the unit turns into standby mode
with a sound of “Beep”.
Automatic video: if nobody answers the call in 5 seconds, indoor monitor
starts taking video automatically (Default is automatic video. If setting is manual
video, once connected, the indoor unit will take video manually) till being stopped
or maximum taking time.
Page 10

Indoor Monitor View the Camera
In standby mode, press monitor key on indoor monitor to view live bild of
outdoor unit. In this mode, the blue LED lights up. If outdoor unit receives signal in
5 seconds, then it connects to indoor monitor, indoor machine turns into normal
monitor mode and shows image and speaks voice of outside. There is no voice
speaking for outdoor unit. If outdoor unit doesn’t receive signal in 5 seconds, then
it shows “User not online” and exits monitor calling mode automatically and turns
into standby mode.
Video Recording: in monitor mode press video taking key start
taking video press video taking key again to stop, the videos will be
stored in MicroSD card.
End: in monitor mode press OK key end monitor and turn back to
standby mode.
NOTE: in monitor mode, red LED lights up, in intercom mode, red LED shuts
down.
Indoor Monitor CALL Indoor Monitor (Intercom)
Two sets of outdoor units (Code connected successfully):
Press monitor key on indoor monitor to turn into monitor selection menu
press ↑/↓ key to choose code of outdoor units press OK to turn into monitoring
call mode, blue LED lights up (During selection, press “Exit” to turn into standby
mode ).
Intercom: in monitor mode, red LED lights up, there is voice speaking for
indoor monitor but not for outdoor unit press monitor key to turn into
both-way communication, blue LED shuts down press monitor key
again to turn back to one way voice monitor mode. (One or both-way voice could
be changed over repeatedly). Intercom time is 90 seconds and shall be timed
again after changing over.
Unlock: in OK on-state mode press unlock key after successful
unlocking, it shows unlock icon.
Take a photo: in monitor mode press photo taking key one press
one photo, the photos will be stored in MicroSD card.
(Only can realize when there are 2 and more indoor monitors.)
In standby mode, if there are only two indoor monitors in system, press OK to
call another indoor monitor.
In standby mode, if there are three indoor monitors in system, press ↑ to call
small code indoor monitor. Ppress ↓ to call large code indoor monitor.
If the CALLED indoor monitor does not receive the signal in 4 seconds, the
CALL monitor shows “User not online”, it turns back to standby mode with a
sound of “Beep”.
If the CALLED indoor monitor receives the signal, two monitors play music, red
LED lights up.
If the CALLED indoor monitor doesn’t reply, the monitors turn into standby
mode after 30 seconds.
If the CALLED indoor monitor replies by pressing OK, music stops, red LED
shuts down, blue LED lights up to both of the monitors, and both monitors turn
into intercom mode, communication time is max. 90 seconds.
The CALL indoor monitor has initiative hang up function.
During communication, if any end in the communication presses OK, then both
two ends hang up with a sound of “Beep” and turn to standby mode.
Page 11

Night-vision
With night-vision function, even under the environment of extremely poor visibility,
the outdoor unit can activate infrared lamps and recognize clearly objects or
people within the distance of 1.5meter (the best focus of this product is 0.8 meter).
In addition, under complete black condition, it displays black and white effects.
NOTE: Please keep the lens of infrared lamps clean.
Bright/Colour/Volume Adjustment
In image communication mode.
Push Brightness key up/down to adjust brightness, every press adjusts one
grade.
Push Color key up/down to adjust color, every press adjusts one grade.
Push Volume key up/down to adjust volume, every press adjusts one grade.
Tamper Alarm Function
It shall alarm if outdoor unit is detached from the shell. The indoor monitors shall
alarm as well as display image once the outdoor unit alarms, and the indoor
monitors shall produce an alarm file. The indoor monitors alarms for maximum 2
minutes. Press OK key to stop alarm.
NOTE: The outdoor unit only could work when it is repowered on and
reinstalled into the shell.
Indoor Monitor Menus
In standby mode, press MENU to turn into main menu.
Choose submenu by pressing ↑/↓ and MENU, press OK to confirm.
REMARK: Turn back to previous menu by pressing EXIT in submenu, turn
back to standby mode by pressing EXIT in main menu.
Video
If there is no MicroSD card, screen displays “No MicroSD Card” and turns back
to main menu.
If there is MicroSD card but no video record, screen displays “No File!” and
turns back to main menu.
Automatically cover the earliest video when memory is full.
If there is MicroSD card and video record, screen displays video list by time
order, newest file is listed on the top.
Choose operating command “Play”, “Delete”, “Delete All” by pressing “↑/↓”
press OK to turn into operating.
In Play mode press OK to pause and play press EXIT to exit.
After operation, exit automatically or by pressing EXIT to turn back to video
operation menu.
Photo
The photos will be saved into the internal storage of the indoor monitor. It can
store up to 180 pictures. Automatically cover the earliest photo when memory is
full.
If there is no photo record, screen displays “No File!” and turns back to main
menu.
If there are photo records, screen displays photo list by time order, newest file
is listed on the top.
Choose operating command “View”, “Delete”, “Delete All” by pressing “↑/↓”
press OK to turn into operating.
In View mode press ↑ to view the last photo, press ↓ to view the next photo
After operation, press EXIT to turn back to photo operation menu.
Turn into video menu and operate.
Turn into photo menu and operate.
Page 12

Message
If there is no call history, screen displays “No files”.
Choose operating command “Play”, “Delete” or “Delete All” by pressing “↑/↓”,
press OK to turn into operating
If there is no MicroSD card, choose command “Play”, the screen displays “No
Video File!” and turns back to Call History menu.
In Play mode press OK to pause and play press EXIT to exit
When choose Play and if there is no MicroSD card, screen displays “No Video
File!” and turns back to Call History Menu.
In Play mode press OK to pause and play press EXIT to exit.
Can store 10 messages maximal. Message with photo (auto record off) or
video (auto record on). Automatically cover the earliest message. Messages will
be deleted if indoor unit is shutdown or power off.
After operation, press EXIT to turn back to call history operation menu.
NOTE: Unplug the power and reset, all the call history will disappear.
Ring
Press MENU key increase and reduce volume 1 (lower volume) & 6 (higher
volume), there are a total of 6 volume levels press OK key to set up and return
to menu.
Choose between 4 standard ringtone or use a customized audio MP3 file.
Copy audio MP3 files (maximum 128kbit) to the MicroSD card and you are able
to select the ringtone from those copied audio mp3 files on the monitor.
Notice: Customized ringtone will only play the first 30 seconds of the MP3 file.
Important: When auto record is activated it is not possible to use customized
ringtone. Than only the 4 standard rintones are available.
Press EXIT key to turn back to standby mode
Turn into “Message” to check call history.
Enter into Ring menu.
Time
Press MENU key to choose figure of time or date.
Press ↑/↓ key to adjust the figure
Press OK key to set up and return to Date Setup menu
Press EXIT key to enter into the standby mode
Setup
Press ↑/↓ key Select item press OK key to confirm
Choose: Motion Detection, Backlight time, Unlock duration, Alarm settings,
Language, Pairing, Auto record, Format MicroSD, Restore Setting or Version
Note: Each function is explained below.
Press EXIT key to turn back to standby mode
Motion Detection
Press ↑/↓ key choose “off (disabled)” or “on (enabled)” press OK key to
connect to outdoor unit you see on display „Connecting…”. press OK key to
confirm and exit
Screen displays “success” when it finish
Enter into Time and Date Setup menu.
Enter into Setup menu.
Page 13

Backlight time (Standby)
standby time, exit menu automatically after setup.
Press ↑/↓ key increase and reduce standby time (10-60 seconds) press
OK key to setup and return to Setup menu.
Press EXIT key to enter into the standby mode.
Unlock duration
Select from 3s, 6s or 8s & confirm with OK.
Tamper alarm
Enable or disable the tamper alarm. It is suggested to enable it to be informed
when the outdoor unit is removed.
Language
Press ↑/↓ key set up “Language” press OK key to confirm and exit.
Choose between German, Englisch, Spanish, French, Italian or Czech.
Press EXIT key to turn back to standby mode.
Enter into Language menu.
Enter into unlock duration menu.
Enter into Alarm settings menu.
Enter into Backlight Time menu to set up
Pairing
1V1 Match code (put outdoor unit next to the Indoor monitor)
Select “Creating a network” on indoor monitor press OK key enter into
the match code mode.
Meanwhile, long press the Reset on the outdoor unit, until you hear one “Beep”
sound, then release the reset.
Indoor monitor displays “Success”, outdoor unit makes “Beep- Beep-Beep”
sounds, means matching successfully.
If matching failed in 16 seconds, indoor monitor shows “failed”, the outdoor unit
makes ”Beep” sound. Try steps from before again.
NOTE: By default, the monitor is paired with the outdoor unit.
1V2 - Match code
Choose “Give code (Start the network)” on the first indoor monitor press OK
key enter into “Start the network” mode.
On the new (second) indoor monitor enter into the network menu choose
“receive code” (Connect to network) press OK key.
1V3 - Match code
Choose “Give code (Start the network)” on the second indoor monitor press
OK key enter into “Start the network” mode.
On the new (third) indoor monitor enter into the network menu choose
“receive code (Connect to network) press OK key.
Add one more outdoor unit - Match code
Choose “Give code (Start the network)” on any one indoor monitor in system -》
press OK key enter into “Start the network” mode.
On the new (second) outdoor unit: Long press the “reset” until you hear “Beep,
Beep” sound. If match successfully, outdoor unit make three “beep” sounds, and
as No. 2 outdoor unit.
After all units receive code finished, please use the No. 2 outdoor unit call all
indoor monitors, if all code matched, receive code successfully; if not, repeat the
steps from before.
NOTE: Inform function: after match code, give code, receive code, please
inform. Inform: tell all units the pieces and ID numbers in the system. Method of
inform: outdoor unit calls all the indoor monitors (all indoor monitors should be
matched), if there are two outdoor units, use the No. 2 outdoor unit to inform.
NOTE: The video door phone system support 2 outdoor units with 3 indoor
units at most (2V3). Giving code among indoor units should do from the 1st to
the 2nd, then the 2nd give code to the 3rd. Any indoor unit can give code to the
outdoor unit.
Page 14

Auto Record
Enable or disable the Auto Record.
Auto record is enabled: If nobody replies in 5 seconds after connection, the
indoor monitor starts up auto video till being stopped or maximum record time.
Important: Only the four standard ringtones can be used.
Auto record disabled: When nobody answers the call at the indoor monitor than
a photo with 5 seconds delay is taken. Important: you are able to use your
customized mp3 ringtone.
Press EXIT key to turn back to standby mode step by step.
Format MicroSD
Press ↑/↓ key set up “Yes”, all files on MicroSD card will be erased or “No”,
you go back to the main menu without any changes press OK key to confirm
and exit.
Press EXIT key to turn back to standby mode.
Enter into Auto record to set up video.
Enter into MicroSD format menu.
Restore Setting
If you restore the device following settings will be reset:
restore the default ringtone
restore the default brightness, contrast and volume
restore the default language
restore the default auto record to automatic photo
Version
Press OK key to view version, return to setup menu.
Press EXIT key to turn back to standby mode step by step.
Enter into Version menu.
Battery and Charge
Under the connection mode, when the outdoor unit is at low power, the indoor
monitor will show “out low power” to remind you to charge for outdoor unit.
This product can be charged by charger or by USB date line connected to
computer, or remove the lithium battery, charge by the universal charger, support
working while charging.
Battery type: this product with high-quality battery.
Charging and battery attentions, please reference the chapter “Warms and
attentions” in this manual.
NOTE: Under the low power, video-recording and photo-taking cannot work
normally.
Accessories
Manual, Waterproof case, Outdoor unit, Indoor monitor, Wall hung holder, 2x
Charger (DC 9V/2A), DC line, Lithium battery 3400mAh, Lithium battery
4000mAh, 2x Screw M3, 7x Screw for waterproof case and holder
Statement
The standard configuration for TECHNAXX door phone is one indoor monitor and
one outdoor unit. The door phone has finished code match and can be used
directly. If you need more pieces of indoor monitors or outdoor units, please
contact your local distributors (Maximum 2 outdoor units to 3 indoor monitors
supported). For the added units, please reference the Give Code and Receive
Code in the Pairing Menu.
Page 15

General faults and solutions
Distance between outdoor unit and
Cause(s)
Can not start up
Neglected to press switch button
Lithium battery is not installed
Low battery
No connection to power adapter when
battery runs out
Cannot charge
Adapter connector does not connect to
charging port of machine correctly
Adapter does not connect to 110V- 240V
alternating current
Outdoor unit cannot call or connect to indoor monitor
Code match failed
Indoor monitor cannot call Indoor monitor
Code match failed
Image has noisy point or flickers
Handset is placed near to TV player,
microwave oven, daylight lamp or mobile
phone which produces electromagnetic
wave interference
No signal for indoor monitor
Outdoor unit does not connect to the
power
Indoor monitor is too far
Disturbed by magnetic field around Keep handset far away from
Solution(s)
Press switch button
Install lithium battery
Charge up lithium battery
Connect to power adapter
Reconnect correctly
Plug into the socket to connect to
alternating current
Re-match code
Re-match code
Keep handset far away from the
interference items
Connect to the power
Adjust to appropriate distance
magnetic field
Security and Disposal Hints for Batteries: Hold children
off batteries. When a child swallowed a battery go to a
doctors place or bring the child into a hospital promptly!
Look for the right polarity (+) and (–) of batteries! Always
change all batteries. Never use old and new batteries or
batteries of different types together. Never short, open,
deform or load up batteries! Risk of injury! Never throw
batteries into fire! Risk of explosion!
Hints for Environment Protection: Packages materials
are raw materials and can be recycled. Do not disposal old
devices or batteries into the domestic waste. Cleaning:
Protect the device from contamination and pollution (use a
clean drapery). Avoid using rough, coarse-grained materials
or solvents/aggressive cleaner. Wipe the cleaned device
accurately. Important Notice: Should battery fluid leak from
a battery, wipe the battery case with a soft cloth dry.
Distributor: Technaxx Deutschland GmbH & Co.KG,
Kruppstr. 105, 60388 Frankfurt a.M., Germany
 Loading...