

Page 1

Technaxx® * User Manual
Action Cam FullHD 360° TX-96
The manufacturer Technaxx Deutschland GmbH & Co.KG hereby declares that this
device, to which this user manual belongs, complies with the essential requirements
of the standards referred to the Directive RED 2014/53/EU. The Declaration of
Conformity you find here: www.technaxx.de/ (in bar at the bottom
“Konformitätserklärung”). Before using the device the first time, read the user
manual carefully.
Service phone No. for technical support: 01805 012643 (14 cent/minute from
German fixed-line and 42 cent/minute from mobile networks).
Free Email: support@technaxx.de
Keep this user manual for future reference or product sharing carefully. Do the same
with the original accessories for this product. In case of warranty, please contact the
dealer or the store where you bought this product. Warranty 2 years
Contents
1. Features ....................................................................................................................... 2
2. Device overview and button function ............................................................................ 2
Top ................................................................................................................................... 2
Bottom .............................................................................................................................. 2
Left side ............................................................................................................................ 3
Right side ......................................................................................................................... 3
3. Getting started .............................................................................................................. 3
Start-up and shutdown ..................................................................................................... 4
4. Function Menu: Navigate through the camera menu. ................................................... 4
5. Recording Modes.......................................................................................................... 5
6. Video mode................................................................................................................... 8
7. Snapshot mode ............................................................................................................. 9
8. Playback mode ........................................................................................................... 10
Folder select ................................................................................................................... 10
Delete File ...................................................................................................................... 10
Delete folder ................................................................................................................... 10
9. General setting ........................................................................................................... 10
10. WiFi Connection ...................................................................................................... 11
11. Additional functions ................................................................................................. 17
Check the file on the computer ....................................................................................... 17
HDMI TV-viewing function (optional) .............................................................................. 17
12. Technical Specifications .......................................................................................... 17
1
Page 2
Top
Bottom
Left side
Right side
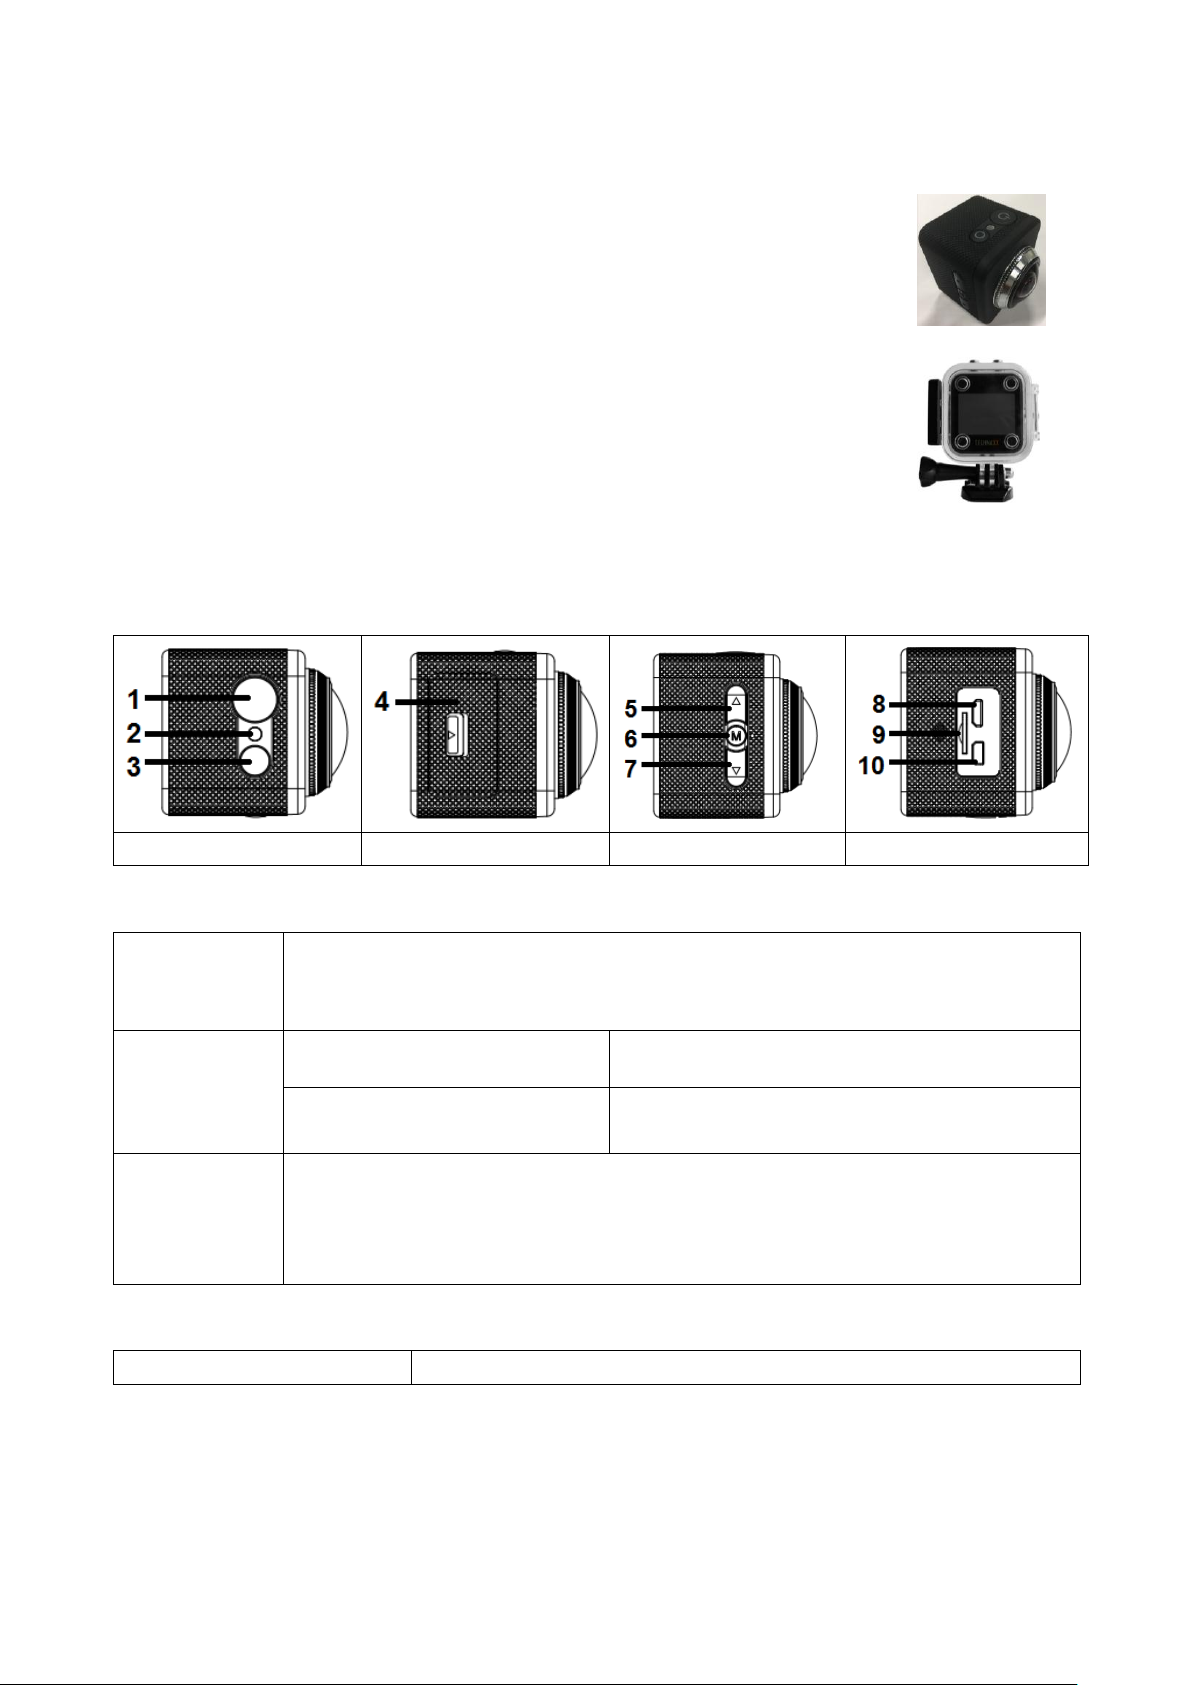
1. Power
(On/Off)
Long press (2 seconds) the power button to power “ON”, press the
power button long again to power “OFF” the camera.
Under working mode, a short press will close or wake up the screen.
2. Indicator
Status indicator (Blue)
1. Recording, blue light blinking
2. Device On, blue light on
Charging indicator (Red)
1. Charging, red light on
2. Red light off when charging finished
3. OK button
Short press to start or stop recording under recording mode.
Short press to setup function, press again to confirm.
Short press to take photo under photo taking mode.
Short press to play or pause video under playback mode.
4. Battery compartment
Insert the rechargeable battery to the camera.
1. Features
360° Action Cam for VR & FullHD panorama recordings
Well suited for sports & outdoor activities
Panorama objective with 360° horizontal & 180° vertical viewing angle
Live view wireless via WiFi connection to your Smartphone (~10m)
Free iOS and Android APP
MicroSD** card up to 64GB (**not included)
Loop Function, Time Lapse, Photo Burst
G-Sensor for automatic recording after shocks
Waterproof case* protection class IP68 up to 30m depth (*included)
Versatile brackets for various installation & mounting options
2. Device overview and button function
Top
Bottom
2
Page 3

Left side
5. Up (WiFi)
Short press to the previous page under Menu and playback mode
Long press to open or close WiFi function
6. Menu
Short press to Menu setup and short press it under recording
menu/taking photo menu/play back menu to System setup
Long press MODE button to switch recording, photo taking and
playback.
7. Down
(Mic
On/Off)
Short press to the next page under Menu and playback mode
Short press to close or open voice recording under recording mode
8. Micro USB
Charging by connected to charger with USB cable
Connecting to PC (“U disk mode” to manage files, “charging mode”
to charge)
9. MicroSD
card Slot
Insert a MicroSD Card (max.64GB) to save recordings and
snapshots.
10. Micro HDMI
Connecting to HDTV with HDMI cable (optional), output video and
audio to TV.
Right side
NOTE: Do not expose the Action Cam to rain without a waterproof housing!
3. Getting started
Charging the battery: Connect the camera with the included MicroUSB cable to the
computer or to an USB adapter* (DC5V/1A *not included) or a mobile device like a power
bank. The charging indicator LED lights up RED (when camera OFF). This will indicate that
the camera is charging and will shut off when the battery is fully charged. The battery can
be fully charged within 3-4 hours (used Power adapter DC 5V/1A).
Insert/Remove the battery: Place your thumb on little extension on the bottom and
pull it back. Allow the door to pop out. You are now able to remove the battery from the
camera.
Note: It is also possible to record while charging cable is connected (with or without battery).
Then the Blue & Red LED will light up. Make sure the power supply delivers 1A or more.
Insert memory card: Insert the MicroSD card correctly into the card holder as indicated
near the card holder.
Remove memory card: Remove the MicroSD card by pressing gently on the end of
the memory card, the card will be ejected.
3
Page 4

Long press the “Menu” button (6) to change between
Video, Snapshot or Playback mode.
Record video
Record Snapshot
Playback
Short press “Menu”
button (6)
Short press “Menu”
button (6)
Short press “Menu”
button (6)
Video setting
Snapshot setting
Playback setting
Short press “Menu”
button (6)
Short press “Menu”
button (6)
Short press “Menu”
button (6)
General Settings
Generall Settings
General Settings
Note: The camera is not equipped with built-in memory. Please insert a pre-formatted
memory card before use or format it over the settings of the camera. Format MicroSD
cards with less than 32GB to FAT32 and format 64GB with exFAT. Normally MicroSD cards
are formatted when you buy them.
Start-up and shutdown
Start-up: Press & Hold the “Power” (1) button for 2 seconds, the camera will show a
start-up screen and will power on.
Shut down: Press & Hold the “Power” (1) button for 2 seconds, the camera will power off.
Auto shut down device (power off): By default there is no shut down time set. Activate
Power Off under general settings the camera automatically shuts down after the selected
time. The timer starts after the last time a button was used, to save power.
Shut down with low power: When the battery power is low, the LCD will show Power Off
and shuts down the camera automatically. Please charge the battery.
Note: The system will keep the last data after the device automatically shut down; video will
be saved automatically in the case of low-power.
4. Function Menu: Navigate through the camera menu.
4
Page 5
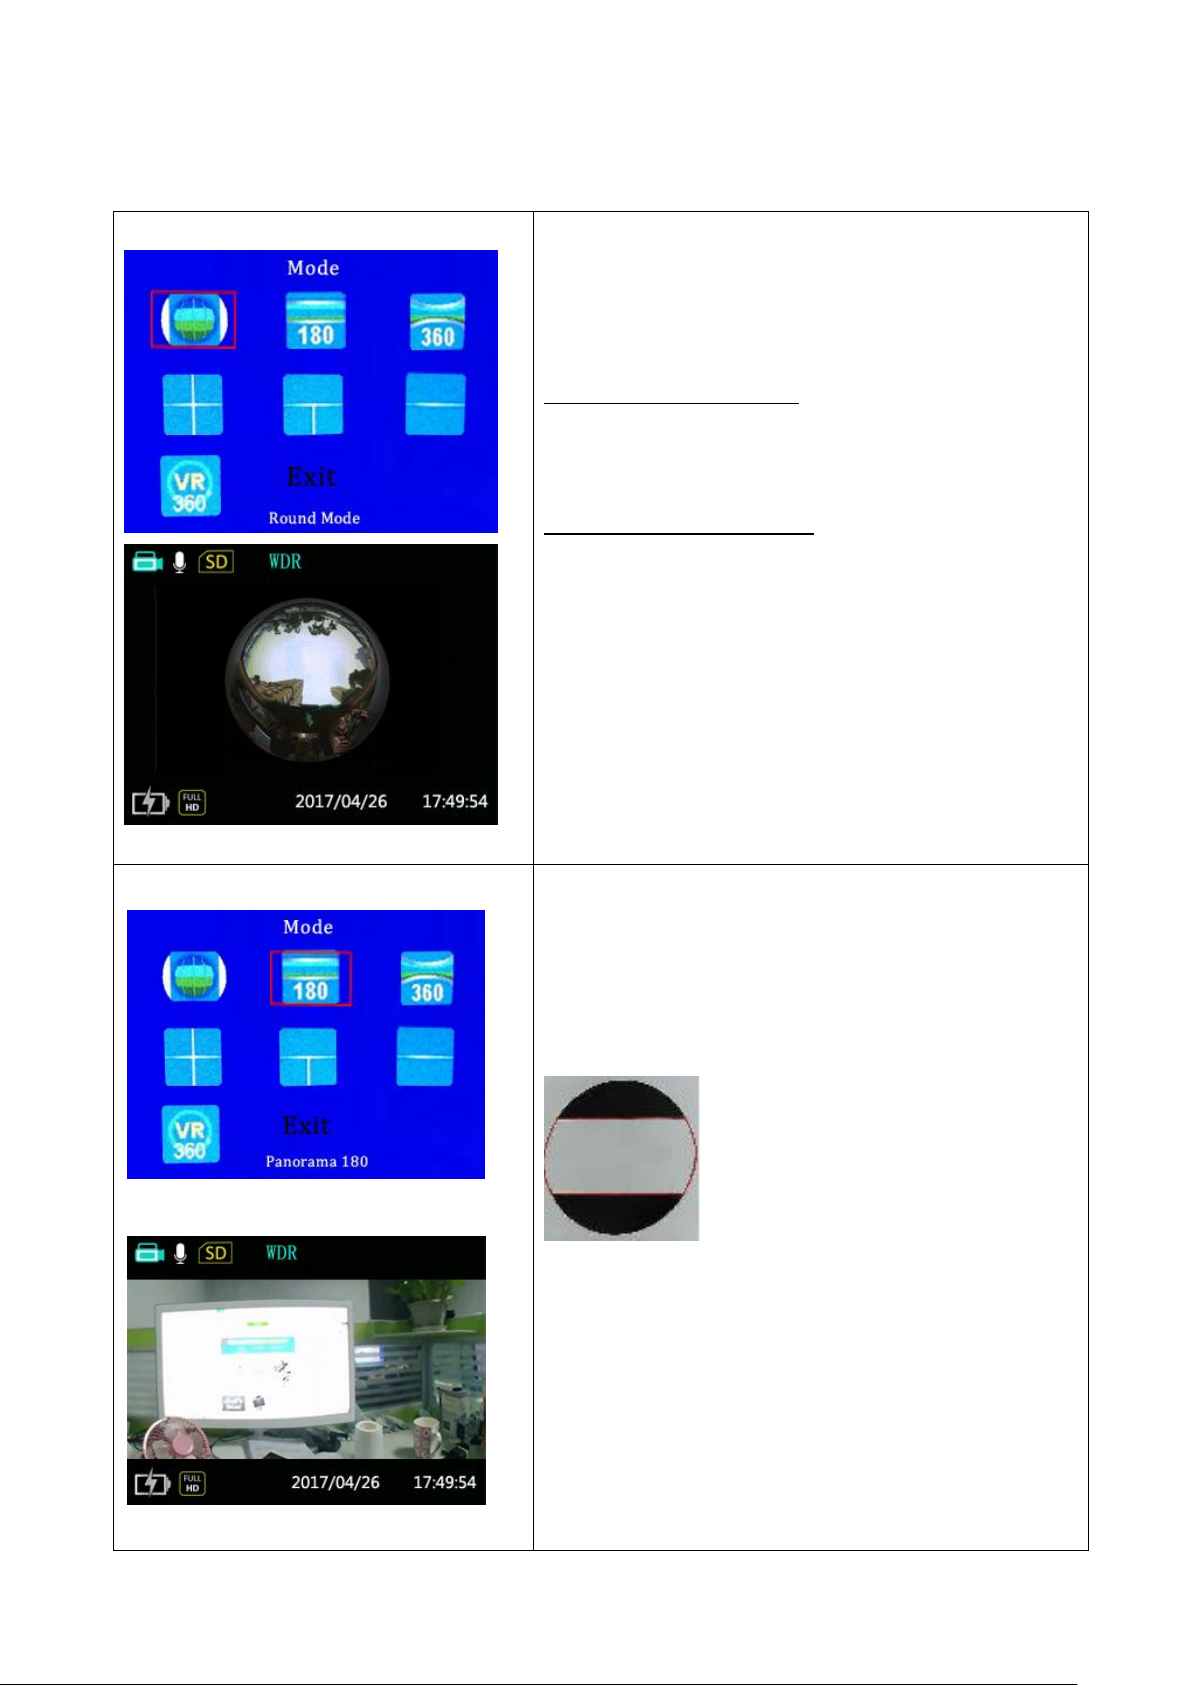
1. Round mode (Fisheye)
Round mode captures the original image output
with no dewarping for the shown/recorded image.
Video mode resolution: 1344x1344 30fps
Information:
No dewarping (distorted) means to show the pure,
original image (fish-eye) that the lens
shows/records.
Dewarping (straightened) means that the selected
image area for the viewer is converted into the
original dimensions and the selected viewing
angle - and thus equalized.
2. Panorama 180° mode
Panorama 180° mode captures a straightened
image of the shown/ recorded image. The
dewarped area is shown in the picture below in
white.
Video mode resolution: 1920x1080 30fps
5. Recording Modes
5
Page 6
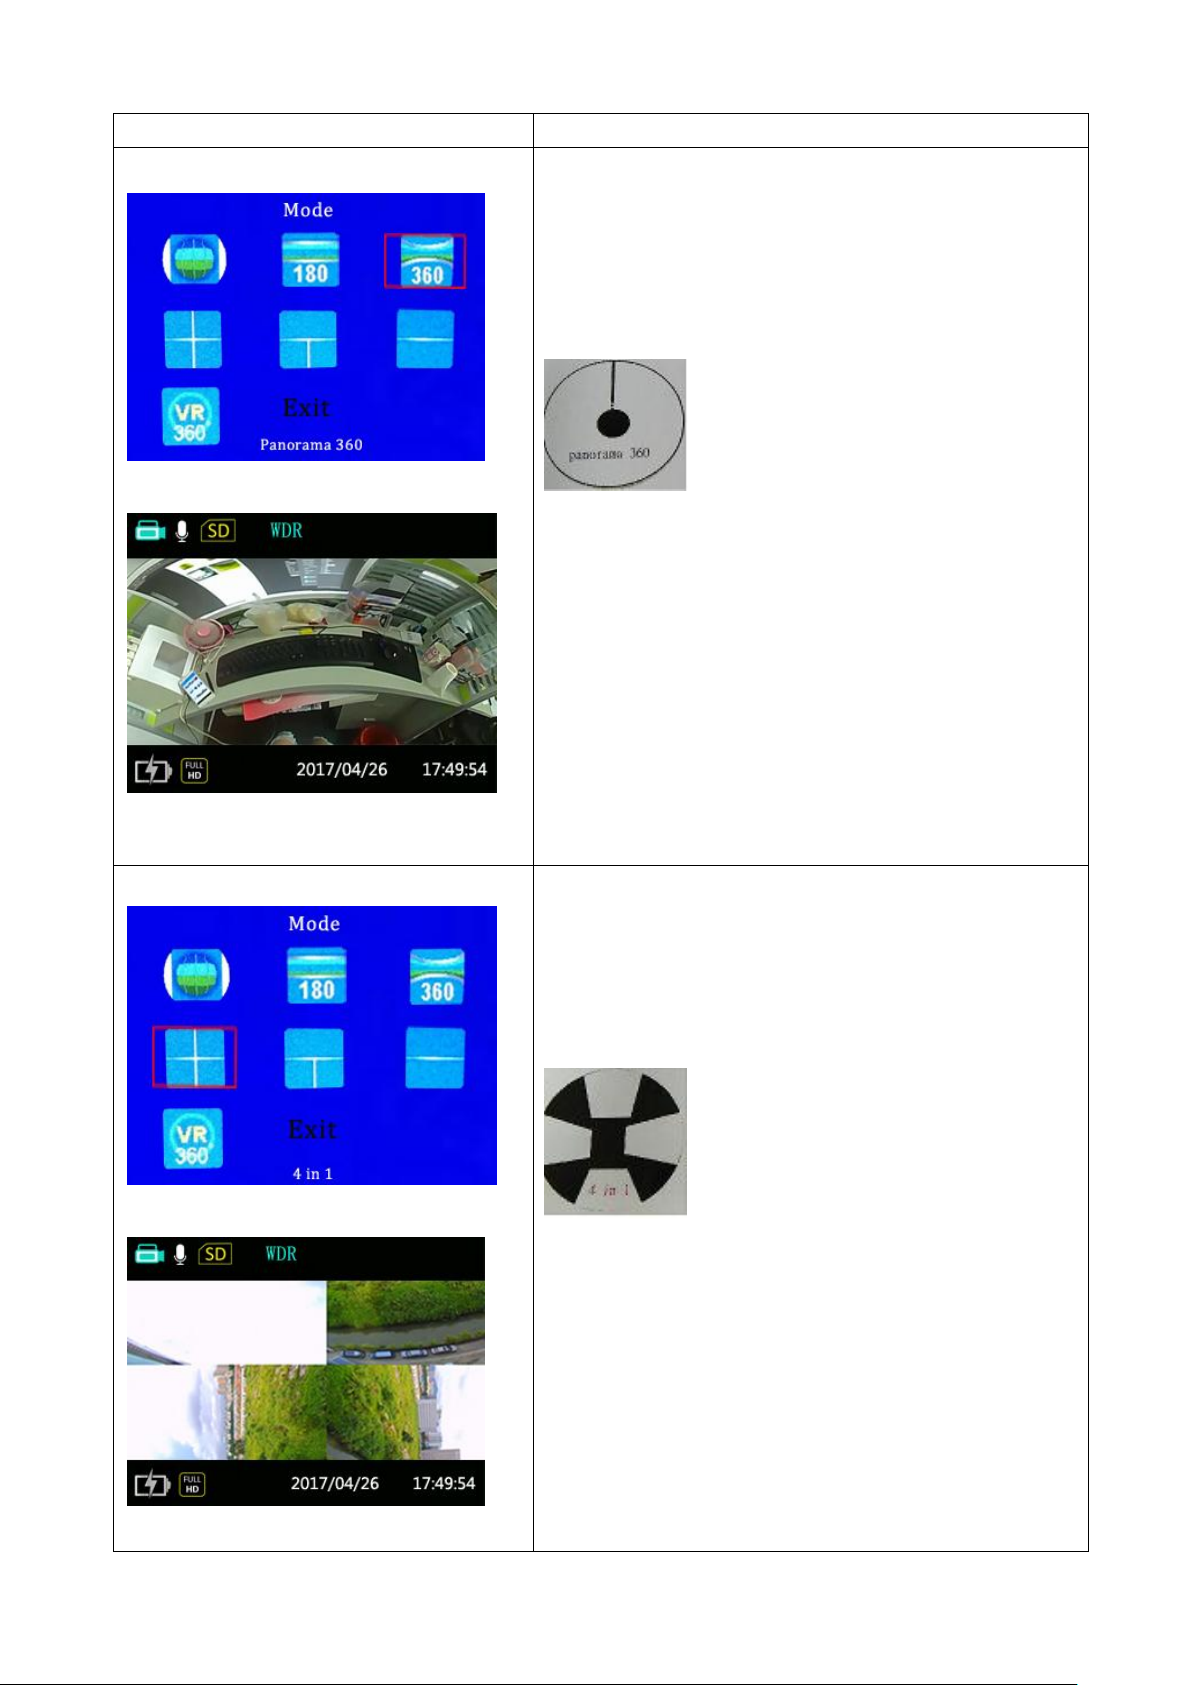
3. Panorama 360° mode
Panorama 360° mode captures raw data image
of what is 360° around the camera. Like you see in
the picture below. The black dot is where the
camera is standing.
Video mode resolution: 2048x416 30fps
4. 4 in 1 Mode
4 in 1 mode captures a 360° image split into 4
windows. The top right image is right side up and
the top left image is upside down. The bottom
images are rotated 90° The picture below shows
the dewarped areas in white. Video mode
resolution: 1280x960 30fps
6
Page 7

5. 3 in 1 Mode
3 in 1 mode captures a 360° image split into 3
windows. The top image is upside down, the left
bottom image is rotated 90° and the right bottom
image is rotated 90° too. The picture below shows
the dewarped areas in white. Video mode
resolution: 1280x960 30fps
6. 2 in 1 Mode
2 in 1 mode captures a 360° image split into 2
windows. The top image is upside down and the
bottom image is right side up. The picture below
shows the dewarped areas in white. Video mode
resolution: 1280x960 30fps
7
Page 8

7.360 VR Mode
360° VR mode captures raw data image of what is
360° around the camera. To watch videos in 360
VR mode, swipe and rotate the video, you need to
download a third party software to your PC, like
GoPro VR Player” or uploaded the video file with
injected meta data to YouTube.
On mobile devices, you can download third party
APP like “Homido 360 VR player”, or upload to
YouTube via your PC and watch in YouTube APP
on your Smartphone.
To inject the raw data recorded by the camera with
the metadata, please Google how to upload 360°
or a 360° VR video to Youtube. Youtube has
instructions prepared for that.
Video mode resolution: 1920x960 30fps
6. Video mode:
Long press the “Menu” button to enter the video mode. See chapter 4. Function Menu
Introduction.
Mode: Select between one of the recording modes from chapter 5. above: Round mode
(Fisheye) / Panorama 180/ Panorama 360/ 4 in 1/ 3 in 1/ 2 in 1/ 360 VR mode/ Exit
Loop recording mode: Loop recording is set to “OFF” as default. The length of Loop
recording can be set for 1, 3, or 5 minutes. After these times the recording is set to be as a
new file. Loop recording allows recording of independent segments of movies, according to
the selected time length. The product will continually record movies of the length selected
until the record button is pressed to end recording. When the memory card is full, the
product will overwrite the recorded files starting from the first movie circularly.
Attention: Loop recording functionality can only be activated when a memory card is
inserted.
Time Lapse: enables the recording of an interval of time and splices the frames together
to present a condensed video which usually requires a long period of time. Select between
OFF, 1 second, 2 seconds, 5 seconds, 10 seconds, 30 seconds, 60 seconds.
Attention: Sound cannot be recorded in this mode.
8
Page 9

WDR (Wide Dynamic Range): is a technique for image processing in bad or extreme light
or contrast ratios. The Wide Dynamic Range can be set to OFF (default)/ON
Motion detection: means that if the product detects moving objects entering into the
view, it will automatically start recording. During the recording process, if there is no moving
object detected for 10 continuous seconds, the recording will pause automatically. Can be
set to OFF/ON. There are 2 options:
Off (default) On
Enter the Motion detection menu, select “On”, and return to the main screen.
The display will show the icon in the top row of the display. If the product detects
moving objects, it will automatically start recording. You will see in the top row of the display
a red flashing dot . The product will stop recording when there is no change in the
image within 10 seconds. When the image changes again, the product will start recording
automatically, and a new video file will be generated after each pause and restart.
Time stamp: If time stamp is enabled the time is shown on the recorded file.
G-Sensor: This function is manly used in the car while driving. When an accident
happens it automatically starts recording. There are 4 level (LV1, LV2, LV3 or LV4) to select
how hard the impact has to be to start the record.
LV1: High sensitivity, just slight impact, G-sensor works (Not recommended).
LV4: Low sensitivity, if there's intense collision happened, the G-sensor function works, the
video will be locked.
Default setting is OFF.
Sound recording: Set the microphone ON/OFF. Can be done in video mode by short
pressing the down button.
7. Snapshot mode:
Long press the “Menu” button to enter the snapshot mode. See chapter 4. Function Menu
Introduction.
Mode: Select between one of the recording modes from chapter 5. Round mode
(Fisheye)/ Panorama 180/ Panorama 360/ 4 in 1/ 3 in 1/ 2 in 1
Resolution: 12M (Default) / 8M / 5M / 3M
Quality: High (Default) / Middle / Normal
Brightness: -2/-1.7 /-1.3 /-1 / -0.7 / -0.3 / 0 / 0.3 /0.7 / 1 /1.3 / 1.7 / 2
Self Snapshot: OFF (Default) / 3 seconds / 5 seconds / 10 seconds
Photo burst: OFF (Default) / Triple Shoot / Five shoot / Ten shoot / Exit. Enable 3, 5 or
10 photos to be captured continuously before auto pause.
Time Stamp: OFF / Date &Time (Default) / Date
9
Page 10

Folder
select
Normal
All taken video/snapshot files are selected by the mode you have
chosen: Normal, Event, Snapshot or Motion. You find either all
recordings in one folder or recordings sorted by date. By pressing
the “OK” (3) button and the “Up” (5) or “Down” (7) button you
navigate through the folder. To change the page, use the arrows on
the screen. Select them with the “OK” (3) button. Navigate through
the folder until you find the desired file.
To watch the file (Folder select): First press “OK” (3) button to
select the file. After that press “OK” (3) button, a second time to
start playing the video.
To delete the file/folder (Delete file/folder): First press “OK” (3)
button to select the file/folder. You will see a window which asks if
you really want to delete the file/folder. If you want to delete press
“OK” (3) button, a second time. If you do not want to delete the
selected file/folder change with the “Up” (5) or “Down” (7)” button to
“Cancel” and press “OK” (3) button.
Event
Delete
File
Snapshot
Delete
folder
Motion
8. Playback mode:
Long press the “Menu” button to enter the playback mode. See chapter 4. Function Menu
Introduction.
9. General setting:
From every menu (Video, Snapshot or Playback) you will get to General setting by just
pressing the “Menu” button shortly. See chapter 4. Function Menu Introduction.
Date & Time: Set the date and time by using the “OK” (3) button and the “Up” (5) or
“Down” (7). Note: If you put out the battery or the battery is empty before charging you have
to set the date and Time again. Year / Month / Day / Hour / Minute / Date Format
Power save: Set Power save mode, the device will turn off after the set amount of time.
OFF / 1 minute / 3 minutes / 5 minutes.
Key sounds: Set the key sound of the device OFF or ON.
Screen setting: Change the setting of the Screen. Enable Screen Save and choose
the time 1 minute, 3 minutes, 5 minutes. The device will turn the screen off to save energy.
Enable Rotate Screen to rotated the screen by 180°.
Delay Power Off: OFF (Default) / 30 seconds / 1 minute
Picture frequency: Set the right frequency for your location. Europe (PAL) 50Hz /
USA (NTSC) 60Hz.
10
Page 11

Apple App Store
“OTCam360” APP
Google Play Store
Format: By pressing YES you are going to format the inserted MicroSD card and delete
all recordings/snapshots stored on the card.
Language: Set the language: Czech / English / German / French / Italian / Polish /
Spanish (CZ / EN / DE / FR / IT / PL / ES)
System information: Default Setting / Firmware version and MicroSD Card capacity
10. WiFi Connection
This device can connect to Android and iOS Smartphone’s by WiFi over the “OTCam360”
APP, for connection operate as below:
Install “OTCam360” APP from Google Play or Apple APP store.
APP functions: Operate nearly all options of the Action Cam by remote-control via WiFi
connection. Review the real-time images, video & snapshot taking and file download
management. Max. distance between cam and Smartphone about 10m.
Power on the Action Cam. Press the “Up” (5) button to enable WiFi function, LCD will
display WiFi hotspot and password.
SSID: Technaxx360Cam-Wifi; Password: 87654321
Note: WiFi can only be activated from Video or Snapshot mode.
11
Page 12

iOS device
Android device
If the device is not connected automatically press the
connection button you see on the right. The camera is going to
connect with your phone and you will see the live view.
Note: If you do not see the “camera list” press the right button
on the right in the second image below.
Connect
Open
Camera list
By pressing the button on the right you can quit the connection
between your Smartphone and the camera.
Disconnect
Find the WiFi hotspot of the Action Cam in your Smartphone and input the password
displayed on the LCD, camera will be connected with your Smartphone via WiFi. Note:
Under Android you get a message: “Do you want to change to other available network? If
you select “No” then you stay connected to the current network”. Please select “No”!
Open the “OTCam 360” APP on the Smartphone. The camera should be
connected automatically.
12
Page 13

Connection interface (Camera list)
Live View interface
iOS device
Android device
13
Page 14

All saved files (video & photo) on the MicroSD card of the camera.
Recorded Videos saved on the MicroSD card of the camera.
iOS device
Android device
14
Page 15

Taken photos saved on the MicroSD card of the camera.
Local folders (iOS)/ APP folders (Android): Here you find the files you downloaded from
the camera.
Technaxx360Cam-Wifi: Here you can find the files saved on the MicroSD card.
Download the video/photo to your Smartphone by pressing on the download button.
iOS device
Android device
15
Page 16

Open the menu by pressing the icon shown on the right:
Select the mode you want to record in; also open the extended settings by
pressing the gear icon. Scroll down for more settings.
Extended settings, scroll down for more settings. For explanation see the camera settings
above.
iOS device
Android device
16
Page 17

CMOS Sensor
1/3" CMOS sensor 3MP (AR0330)
Mode
Video resolution
Fisheye (circle) (1344x1344, 30fps), Panorama-180° (1920x1080,
30fps), Panorama-360° (2048x416, 30fps), 4-in-1 (1280x960, 30fps),
3-in-1 (1280x960, 30fps), 2-in-1 (1280x960, 30fps), 360°-VR
(1920x960, 30fps
Image quality
12M / 8M / 5M / 3M
Lens
180° super-large panoramic lens (Ø ~27mm)
Exposure
-2, -1.7, -1.3, -1, -0.7, -0.3, 0, 0.3, 0.7, 1, 1.3, 1.7, 2
White balance
Auto setting
Photo mode
normal, self-timer, burst shooting
Video mode
normal, loop recording, time-lapse, motion detection, G-sensor
Playback modes
Fisheye (circle), Panorama-180°, Panorama-360°, 4-in-1, 3-in-1,
2-in-1, 360°-VR
Screen
1.5” LCD display (320x240)
Picture format
JPEG
Video format
Format: MP4; Compression Format: H.264
Data connection
Micro USB2.0, Micro HDMI** (**not included)
External memory
MicroSD** card up to 64GB class 10 (**not included)
Power / Consumption
DC 5V/1A / DC 5V/600mA
LED indicator
Blue is status indicator, Red is charging indicator
Built-in Microphone & built-in Speaker
Speaker 8Ω / 1W
G-Sensor
ST-LIS3DH
WIFI
Support
Battery
Rechargeable & replaceable 900mAh Lithium-ion battery 3.7V/3.33W
11. Additional functions
Check the file on the computer
Connect the MicroUSB cable (included) to the computer and Action Cam. Either mass
storage will open by itself or you have to open it manually, to view the stored
video/snapshot files. If the camera has not powered itself up while inserting the Micro USB
cable, turn the camera on. You will see a blue display, select USB mode by pressing “OK”
(3) button. Now you will see three folders, event folder, motion folder and snapshot folder.
Choose any folders to check the corresponding files.
Note: The manually taken videos are in no folder.
HDMI TV-viewing function
Connect the Action Cam port (10) with a Micro HDMI** (**not included) cable to your HDTV.
The TV needs to be adjusted to the HDMI input port. Then the camera operation will be
displayed on TV with max resolution 1080p 30fps.
Note: The Action Cam display will go black.
12. Technical Specifications
17
Page 18

Charging time
~3–4 hours (used power adapter** DC 5V/1A)
Recording time
with 1080P ~60 minutes
Language
EN, DE, IT, FR, ES, PL, CZ
Operating System
Windows 7 / 8 / 8.1 / 10 and Mac 10.5 or above
Weight & Dimensions
(without case)
80g (with battery) / (L) 4.8 x (W) 4.3 x (H) 5.0cm
Working temperature
–10°C up to +55°C
Storing temperature
– 20°C up to +70°C
Water-proof
only with water-proof case ~30m depth
Protection class
IP68 (case)
Package
contents
Action Cam FullHD 360° TX-96, Micro USB to USB charging cable,
Waterproof case, Fixed base & Bicycle bracket, 2x pedestals & 2x
helmet pedestals, 2x supports for tripod, Back clip & 3x conntection
pieces, 3x ribbons with velcro closure, 2x 3M stickers & cable ties,
Cleaning cloth, User Manual
Warnings
Do not attempt to disassemble the device, it may result in short-circuit or even damage.
Do not drop or shake the device, it may break internal circuit boards or mechanics.
Keep the device in dry and ventilated environment. Avoid high humidity and high
temperature. Also batteries should not be exposed to excessive heat or direct sunlight.
Keep the device away from little children.
The device will be hot after using for too long time. This is normal.
Please use the accessory provided by our factory.
Security and Disposal Hints for Batteries: Hold children off batteries.
When a child swallowed a battery go to a doctors place or bring the child
into a hospital promptly! Look for the right polarity (+) and (–) of batteries!
Always change all batteries. Never use old and new batteries or batteries of
different types together. Never short, open, deform or load up batteries!
Risk of injury! Never throw batteies into fire! Risk of explosion!
Hints for Environment Protection: Packages materials are raw materials
and can be recycled. Do not disposal old devices or batteries into the
domestic waste. Cleaning: Protect the device from contamination and
pollution (use a clean drapery). Avoid using rough, coarse-grained
materials or solvents/aggressive cleaner. Wipe the cleaned device
accurately. Important Notice: Should battery fluid leak from a battery, wipe
the battery case with a soft cloth dry. Distributor: Technaxx Deutschland
GmbH & Co.KG, Kruppstr. 105, 60388 Frankfurt a.M., Germany
18
 Loading...