

Page 1

Technaxx
®
* User Manual
Desk Clock with PIR & FullHD Camera TX-76+
The Declaration of Conformity for this device is under the Internet link: www.technaxx.de/
(in bottom bar “Konformitätserklärung”). Before using the device the first time, read the user
manual carefully.
Service phone No. for technical support: 01805 012643 (14 cent/minute from German
fixed-line and 42 cent/minute from mobile networks). Free Email: support@technaxx.de
IMPORTANT HINTS: Before the first use make sure you have charged the device.
Only use battery type 18650 lithium-ion which is included in package contents. For
other batteries we do not overtake any guarantee. Insert a MicroSD card first,
otherwise the function of the described indicator lights does not fit the description.
Keep this user manual for future reference or product sharing carefully. Do the same with
the original accessories for this product. In case of warranty, please contact the dealer or
the store where you bought this product. Warranty 2 years
Enjoy your product * Share your experience and opinion on one of the
well-known internet portals.
Features
Digital desk clock with PIR & built-in FullHD camera Home and office
surveillance Digital time display also while recording Set up 2 alarm times
(alarm clock) Video recording with sound by motion detection (PIR ~8m)
36 IR LED for night vision up to ~6–8m Recording while charging
Temperature & date display Anti-scratch shell & anti-slippery rubber foot
Note: This device supports VGA/1080p video. Use high speed memory card
because video file size with 15 seconds recording are up to 30–70MB big.
With FullHD video recording on MicroSD 32GB you can store ~1 hour of
footage. With VGA video recording on MicroSD 32GB you can store in ~4.5
hours of footage.
Please notice that this will not be a permanently recording! It is just the
amount of time that can be saved on MicroSD with 32GB.
Page 2
Technical specifications
Resolution 1920x1080 interpolated / VGA (640x480) /
Video
Photo resolution 1920x1080 interpolated / JPG format
Sensor CMOS sensor / 3MP / 65° viewing angle
Trigger time 0.6–1.2 seconds
PIR angle / distance 100° / ~8m
IR LED /-distance 36 pieces / 6–8m
Alarm 2 alarms can be set
AVI format / 25-30fps / Length: 15 seconds fix / Loop
recording / Built-in microphone
Storage medium
Supports MicroSD(HC) cards up to 64GB (Class 6 an
higher)
Playback software VLC Player / Windows Media player / KM Player
Rechargeable replaceable 2x 2000mAh lithium ion
Power supply
batteries type 18650 3.7V
Or DC 5V/1A power adapter* (*not included)
8–10 hours / PIR video + IR: 2–2.5 hours, PIR
Charging / Working time
video: 22–25 hours
Standby time 90 days (clock with screen auto off)
160mA/3.7V (video only)
Power consumption
1200mA/3.7V (IR only)
30mA/3.7V (clock only)
Operation systems Windows 7 / 8 / 8.1 / 10; MAC OS
269g (with batteries), 181g (without batteries) /
Weight / Dimensions
(L) 15.2 x (W) 7.2 x (H) 3.9cm
Desk Clock with PIR & FullHD Camera TX-76+, 2x
Package contents
batteries (type 18650 3.7V), Micro USB cable (for
charging & data transfer to the PC), User Manual
Security and Disposal Hints for Batteries: Hold children off
batteries. When a child swallowed a battery go to a doctors place or
bring the child into a hospital promptly! Look for the right polarity (+)
and (–) of batteries! Always change all batteries. Never use old and
new batteries or batteries of different types together. Never short,
open, deform or load up batteries! Risk of injury! Never throw
batteries into fire! Risk of explosion!
Hints for Environment Protection: Packages materials are raw
materials and can be recycled. Do not disposal old devices or
batteries into the domestic waste. Cleaning: Protect the device from
contamination and pollution (use a clean drapery). Avoid using rough,
coarse-grained materials or solvents/aggressive cleaner. Wipe the
cleaned device accurately. Distributor: Technaxx Deutschland
GmbH & Co.KG, Kruppstr. 105, 60388 Frankfurt a.M., Germany
Page 3
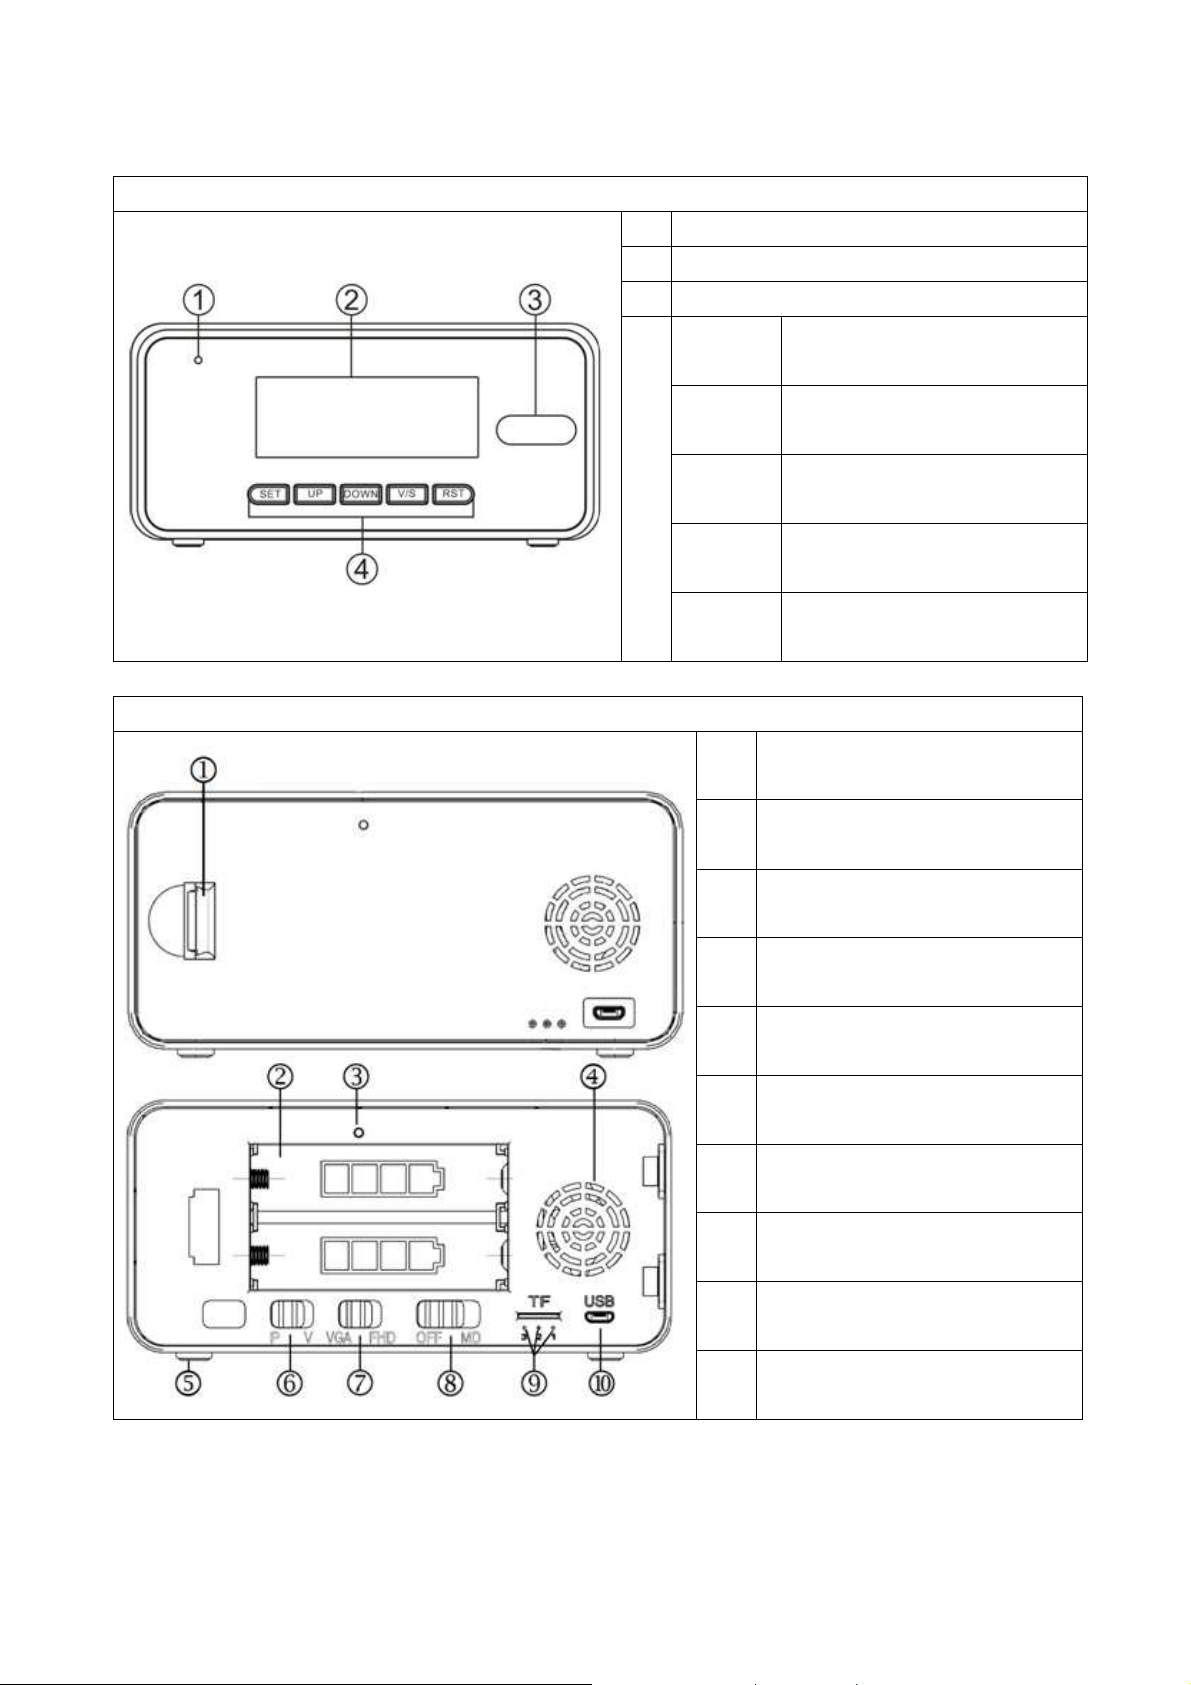
Product overview
Front side
1 Camera
2 LED screen
3 PIR sensor
Rear side
SET
UP
4
DOWN
V/S
RST
1 Open here (back cover)
2
3 Temperature sensor
Set up functions of
clock.
Set up time & date &
alarms.
Set up time & date &
alarms.
Control screen
ON/OFF.
Reset: time, date &
alarm from clock
Battery compartment
(Battery type 18650)
Loudspeaker (for alarm
4
sound)
5 Rubber feet
6 Switch 3
7 Switch 2
8 Switch 1
Working indicator lights
9
LED 1, 2, 3
Micro USB port (power
10
supply)
Page 4

Insert & charge the batteries
Open the back cover of the device. Install the batteries (type: 18650 2000mAh
3.7V) and ensure their correct polarity. After that, close the battery
compartment cover by replacing the back cover. To charge the batteries, use
the attached Micro USB cable. During charging process the LED 1 (RED light)
is steady on. The LED turns off if the device is fully charged.
Insert the memory card
NOTE: Format the memory card (up to 64GB) first in FAT32 before using
it for the first time (use free Software from die Internet). A MicroSD
memory card must be installed before operating the camera function of the
desk clock. Press the memory card into the MicroSD card slot until you hear a
click tone. To remove the memory card, push it. Then it will slide partially out
of the desk clock.
Note: When the MicroSD card is replaced you need to set the date and time
again.
Clock setting
(not video /photo time stamp setting)
Current date & time setting
Long press SET to set up date, press UP/DOWN
to select current year. Short press SET to set up
month, press UP/DOWN to select current month.
Press SET to set up day, press UP/DOWN to
select current day. Press SET to set up time, press
UP/DOWN to select current hour. Press SET to set
up minutes, press UP/DOWN to select current
minutes. Press SET to select 12H/24H, press
UP/DOWN to select 12H or 24H (see images on
the right).
Year setting
Month setting
Day setting
Time mode
Hour setting
Minute setting
12H
Note: The time & date (month.day) & temperature
will be displayed in order in every 5 seconds. This
cannot be changed. When setting year & date &
time, if there is no operation during 10 seconds,
the device returns back to time display mode.
24H
Page 5

OWN once/twice to check
Under time mode
Press UP to choose the temperature
format: Fahrenheit (°F) or Celsius (°C).
Press D
ON/OFF of alarm one/two.
Press V/S to change from screen steady
ON (ON:SD) to screen auto off (–:SD).
When the screen is off, slightly knock on the
clock, the screen will turn on. The time &
date & temperature will be displayed in
order for 2 times. Then the screen turns off
again.
Alarm setting
Fahrenheit
Celsius
Alarm ON
Alarm OFF
Screen
steady on
Screen off
Settings
①
Alarm
②
Alarm
Under time mode, press DOWN 1x, then
press SET, enters into ① Alarm setting
mode.
Press UP/DOWN to turn on/off alarm.
Press SET to set hour firstly by using the
UP and DOWN button.
Press SET the second time to set Alarm
minute by using the UP and DOWN
button.
After finish ① alarm, press SET into ②
alarm setting, same way as ①.
Note: Alarm clock with "beep" lasting for 1
minute, press any button to stop it when
ringing.
This clock has snooze function, defaulted
Alarm
hour
Alarm
minute
Alarm On
Alarm Off
mode
mode
interval is 5 minutes. When setting alarms,
if there is no operation during 10 seconds,
the device returns back to time display
mode.
Page 6

Use of the device
Open back cover, insert MicroSD card.
Note: If no MicroSD card is inserted or the MicroSD card cannot read, the
Indicator LED 3 will be steady on.
Switch & indicator LED description
Motion detection video recording
Set switch 3 to V and set switch 2 to VGA (640x480) or FHD (1920x1080) to
choose video resolution, then set switch 1 to MD (LED 2 / BLUE light flashes
6x then off).
The camera turns on and videos will be recorded according to your setting.
Set switch 1 to OFF, the camera turns off and stops taking videos.
Note: Maximum file length of video recording is 15 seconds for VGA and FHD
resolution, after that a new file is created.
Motion detection picture taking
Set switch 3 to P, then set switch 1 to MD (Led 2/blue light flashes 6 times
then off), the camera will take photos (no matter of the position of switch 2).
Picture will be taken in every second motion is detected.
Set switch 1 to OFF, the camera turns off and stops taking pictures
Infra-Red Mode (IR)
the infrared light turns on automatically if the illumination is less than 10
LUX under video recording or pictures taking mode.
If the automatic IR light is on, it will remain on until the brightness is higher
than 70LUX, then the IR light turns off automatically.
If the automatic IR light is off, it will remain off until the brightness is below
10 LUX, then it turns on automatically.
So when the lumen is between 11–69 LUX, the state of the automatic IR light
depends on the initial automatic infrared switching state.
Recording while charging
5 seconds after this device is connected with an adapter, the same
operations are valid as for battery use.
Page 7

Loop recording
If the memory card is full, the first videos will be deleted automatically and
recording will be continued.
Connecting with PC
Set switch 1 in middle, connect it with PC using USB cable.
Then set switch 1 to OFF and camera will be recognized as a removable
Disk Drive. If the device is not read by PC, charge the batteries then
reconnect.
Reset
The reset button on the front of the device will reset time, date and set alarm
clock. Press and hold it until a countdown occurs. After reset you need to set
time, date and alarm clock again.
If the video/photo is stuck or not working properly: set the switch 1 to OFF
and wait for about 1 minute; take out the batteries. After one minute
reinstall them.
Set Date & Time stamp
The date and time will be changed for video or photo in next recording.
Insert a MicroSD card and set switch 1 to OFF.
Connect the device with PC using MicroUSB cable.
Go to <<My Computer>>, find the CD drive called Date/Time Set and
double left click on it.
A folder will open. According to your computer system, Mac OS or
Windows double left click on the corresponding folder.
Double left click on DSC Clock and then click on Time
synchronization.
Right click on the device to eject the CD drive and the storage
from your Windows PC. Under MacOS put the CD drive and the storage into
trash to eject it.
The device now has the current date and the current time.
Page 8

Windows: Step
USB drive/storage (F:) CD drive (E:) Date/Time Set
0 Bytes free of 724 KB
MacOS: Step
CD drive “Date/Time Set”
USB drive/storage “NO NAME”
Warnings
Do not attempt to disassemble the device, it may result in short-circuit or
even damage. Do not drop or shake the device, it may break internal circuit
boards or mechanics.
Use it under normal temperature and normal humidity.
Do not put it in a moist working environment since it is not waterproof.
Do not use it directly against strong light, to avoid damage optical device.
Do not use under high dust density environment, to avoid the lens and other
components stain dust and affect the camera quality.
Do not make its strong shock, vibration, do not use under high magnetic
field.
Keep the device away from little children.
 Loading...