

Page 1

® *
Technaxx
User Manual
Wireless Door Viewer TX-75
Digital do or viewer with built-in camera
and 3.5" desk monitor
This device complies with the requirements of the standards referred to the Directive
R&TTE 1999/5/EC. The Declaration of Conformity you find here: www.technaxx.de/
(in bar at the bottom “Konformitätserklärung”). Before using the device the first time,
read the user manual carefull y.
This device has a rechargeable battery. It must be fully charged before first
use. NOTE: Charge the battery of the device every 2–3 month if it is not used!
Service phone No. for technical support: 01805 012643 (14 cent/minute from
German fixed-line and 42 cent/ mi nu te fro m m obil e networks).
Free Email: support@technaxx.de
Features
Doorbell function Photo taking & Photo preview Data backup up to 100
photos (built-in storage) Portable desk monitor with 3.5" screen Camera with
300000 pixel & 170° wide angle view 2.4GHz wireless transmission ~200m open
areas Power saving function USB charging function IP32 camera protection
class (dripping water & <2.5mm impurity) "Do-it-yourself" installation, camera
placement in peephole
Battery and Charge
● Be sure of the activity of the battery, please fully charge the new battery. ● When
the outdoor unit is at low power, the lamp of emitter would flash. It remains you to
charge. ● The battery of outdoor emitter can be changed or charged by USB. The
green light keeps bright. ● When the handset is at low power (≤ one bar), the red
indicator lamp will flash every second, please charge immediately. ● The handset
can be charged by the USB line, green light keeps bright. ● Charge-and-work
supported. When the battery is charged fully, it auto stops charging. ● Always use the
speccified battery type if needs replac e men t.
Note: Under low power, display, photo-taking functions cannot work properl y.
Page 2

Technical specifications
Outdoor Camera & Emitter
Camera / Lens
300000 pixels & 170° wi de-angle
Power supply
Replaceable rechargeable lithium battery 7800mAh
(type 18650)
Charging time
~12 hours
Working ti me
~39 hours continuously
~52 days (monitoring mode)
charge the battery min. every 6 month
Power Consumption
160mA
External power
DC 5V / 1A
Operating temperature
–10°C up to +50°C
Material
Metal / ABS
Weight / Dimensions
280g / outline dim ensions 3.6 x 0.8cm
Desk Monitor (Handset)
Screen
3.5" TFT colour LCD screen
Picture format
JPEG
2.4GHz wireless connection mode
Wireless transmission ~200m in open areas
Power supply
Replaceable rechargeable lithium battery 1100mAh
(type BP-6M)
Charging time
~3 hours
Working ti me
~5 hours continuously
Standby time
~6 days
Power Consumption
200mA
External power
DC 5V / 1A
Desk charger for the monitor
Operating temperature
0°C up to +40°C
Weight / Dimensions
110g / outline dim ensions 12.6 x 8.4 x 2.0cm
Camera (wireless transmission), Emitter (providing the camera with
power), 3.5" desk monitor (wireless reception), Desk charger for the
Lithium 7800mah battery
6M, Screw M4, Steel
board, Round steel board, User Manual
Standby time
Radio transmission
~1 year (power saving mode)
Package
Contents
monitor, USB cable, Power charger DC 5V,
type 18650, Lithium 1100mAh battery type BP-
Page 3

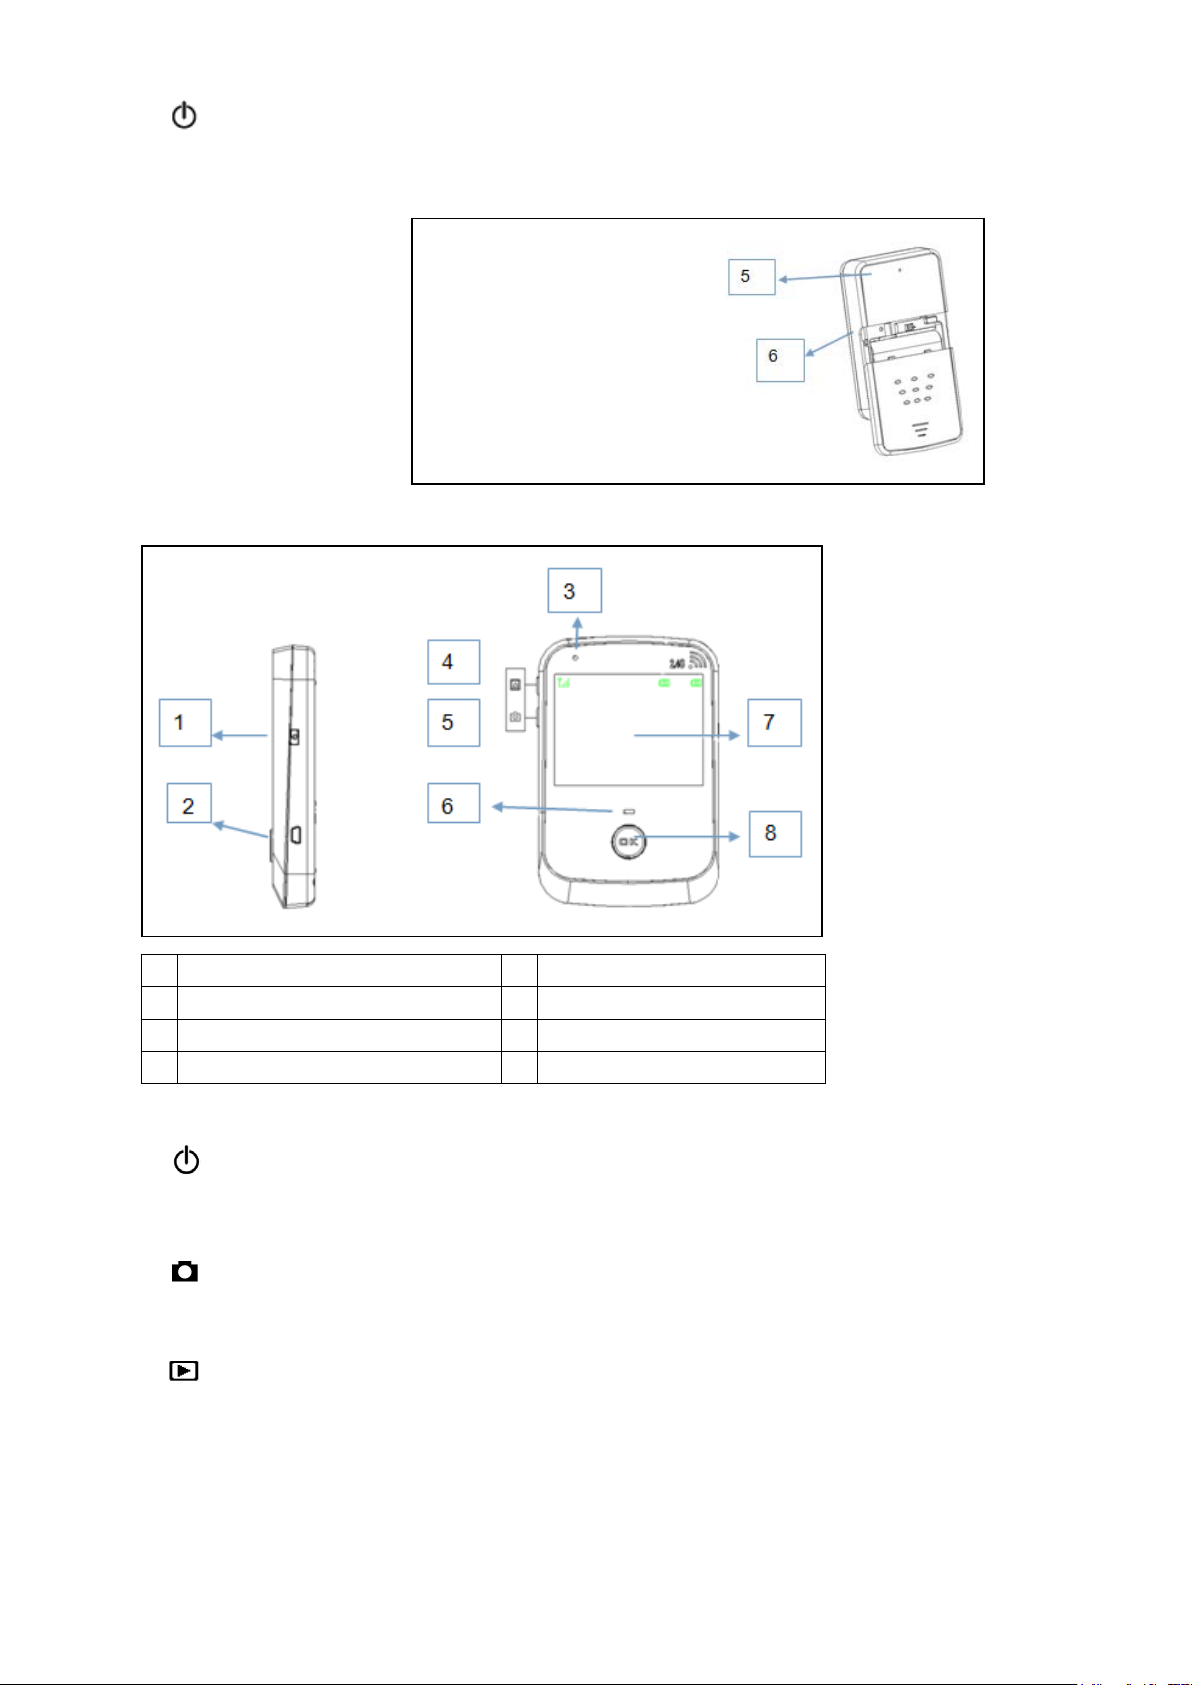
Product Overview
1
USB charging Port
4
Connector
2
5
LED
(see following picture)
3
Monitoring mode
Non-monitoring mode (Power saving mode)
6
Code match key
(see following picture)
1
Camera
3
Back side adhesive tape
2
Doorbell button
4
Connection Cable
Outdoor Camera (installation in peephole)
1 doorbell button of the outdoor camer a: Press this button to call. (BLUE LED:
shall be on when ring the bell)
Emitter
Start
3 keys of the Emitter:
1. ON/OFF (Power saving or non-saving power)
Mode select key: ON: Monitor mode (Can monitor outside from handset). OFF: Nonmonitor mode (Power saving mode, cannot monitor from handset by pressing “OK”
button. After choosing mode, please start up the emitter to confirm.
Page 4
2. Start up key: Insert battery, press this button to confirm mode.
1
Switch on/off, match code
5
Photo shooting/Delete
2
USB port
6
Working indicator
3
Charge indicator
7
3.5 inch display
4
Preview
8
OK
3. Match code key “Reset”: To match code with the indoor handset, incorrect using
this button may make device work improperly.
Indoor Monitor (Indoor Handse t )
4 keys of the indoor monitor (handset):
1. Turn on/ off key: Hold press to switch on or off handset; Press once to match
code when screen is on.
2. Photo shooting / Delete key: Press once to take a photo. Hold and press to
delete all photos.
3. Preview: Press to preview the photo(s).
4. OK Monitor key: In standby mode, press once, screen on. When screen is on,
press again, screen off. In monitoring mode, press to monitor outside from ha nds e t.
Page 5

Before installation
Choose a screw (Screw
length should be, at least,
5mm less than door
thickness.)
Insert into both devices the right rechargeable battery (Handset: BP-6M; Emitter:
battery pack type 18650), charge both devices (see chapter Battery and Charge) and
test the device. For charging the monitor with the table charger, pop up the stand of
the handset and insert it into the table charger. Otherwise the handset will not be
charged. Also you have to connect the table charger with included USB cable or the
included charger.
Installation Guide
1. Outdoor unit shall be installed at 1.4m~1.7m above the floor.
2. The product is applicable to t he door hol e Ø 14~ 3 0m m, door thi ckness 40~95mm.
3. The outdoor camera should not be hidden or blocked by other objects.
4. Do not face outdoor unit to sunlight directly.
5. Install the connection wire correctly, otherwise, normal use shall be failure.
Installation Steps
Warning: Flexible connection wire is a kind of flexible material, be sure to install it
carefully. Do not pull it with force and avoid being injured by sharp metal parts.
Mount screw.
Tear adhesive front paper.
Page 6

board if door peephole is
bigger than camera.
Wire goes through
rd on
screw.
Tighten screw to fix steel
board.
Tighten screw to fix steel
board.
connection base (emitter).
able before fixing
emitter.
Buckle up emitter.
Please use the round steel
peephole
Adjust and fix camera.
Hang steel boa
Connect cable socket to
Cover back.
Protect c
Page 7

1
Door
2
Screw
3
Outdoor camera
4
Emitter
5
Connection wire
Battery Installation
In the picture you see on the left side the Emitter and on the right side the monitor
(indoor handset). 1 = Connector for the battery, 2 = Battery
Handset switch on/off
Put battery into the handset, press and hold "switch” button (1) for about 3 seconds
to start up.
Screen shows the starting page and enters into standby mode.
Display: The standby image, signal icon, power icon. Press “OK” button to turn off
the screen.
Page 8

Modes setting
1
Switch on/off
2
USB port
3
Signal
4
Emitter battery indicator
5
Handset battery indicator
6
OK
1. and 2. with ARROW UP: Non-power saving setting: Switch to “ON” to select nonpower saving mode, and press “Start” to confirm. In this mode, you can monitor
outside by pressing “OK” button on the monitor.
1. and 2. with ARROW DOWN: Power saving setting: Switch to “OFF” to select
power saving mode, and press “Start” to confirm. In this mode, you cannot monitor
outside by pressing “OK” button on the monitor.
Page 9

Doorbell: Press doorbell, indoor monitor shows live video from outside and rings
1
Preview
2
Photo taking / Delete
3
OK
for 30s. Press “OK” to stop ringing; Press “OK” again to turn off screen.
Photo taking: Start taking photos: Monitor is ON and live video is shown Press
to take one photo one press one photo. End taking photos: Press “OK” to turn
off screen.
Photo Preview (in standby mode and whe n screen is on):
Preview: Press , show the latest photos. Press again to check previous photo. Exit: Press to exit.
Photo Delete (in standby mode and when screen is on): Delete: Press
and hold till display shows “Erase”. When “Erase” disappears, all photos are
deleted. Press “OK” to turn off screen. Important: All photos will be deleted!
Match code: Insert battery into the emitter, press “Start” once, RED LED indicator
turns on. Switch on indoor monitor, when screen is on, press “switch” key quickly for
4 times, monitor displays “Pairing start”. At the same time, press “Reset” on emitter
once, red indicator flashes. Till indoor monitors shows outdoor image, match code
succeeds.
This product supports 1 outdoor unit to 1 ha ndset. The door peephole viewer
has finished code match and can be used directly.
Page 10

1
Power Switch
2
Reset
3
Start
Left side: Monitor (indoor
handset)
Right side: Emitter
Hazard, safety and warning notices
► Incorrect use of the device and accessories can be dangerous for you and others
and can damage or destroy your device. We therefore ask you to read and strictly
observe the following Hazard, safety and warning notices.
► This device has been designed for private use and is not suitable for
commercial purposes.
► The device and accessories may only be used by persons physically and mentally
able to operate it safely. Children should be supervised to ensure that they do not
play with the device. Hazards for children and persons with limited ability to
operate electronic equipment. Always keep accessories and packaging away f rom
children, because the is the danger of electrocution, poisoning and suffocation.
► Do not place any containers filled with liquid, such as vases or glasses on top or
immediately next to the device. Danger of fire and electrocution.
► Do not dismantle, modify or repair your device Danger of fire and electrocution.
► Switch off the device and remove batteries if a foreign object or liquid has entered
the device. Let all parts dry thoroughly. Otherwise danger of fire or electrocution.
► Switch off the device and remove batteries if device has been dropped or housing
is damaged. Otherwise danger of fire or electrocution.
► Do not leave your device in places that are susceptible to considerable increases
in temperature. The housing and internal parts may be damaged, which in turn could
cause a fire.
► Do not cover your device or place it on textiles. This could produce a buildup of
heat in the device that can cause deformation of the housing and may represent a
fire hazard.
► Do not aim your device at strong sources of light like car headlights, street lights or
the direct sunlight.
► W hen moving your device from a cold into a warm environment, wait at least 3
hours before using it. The device can condense moisture that can damage the
electronics when the device is used before it is acclimatised.
► Only place your device on sturdy surfaces. Your device could otherwise fall or
topple over, causing damage or injury. Do not place any open ignition sources such
as burning candles on or near the device.
Page 11

► Do not drop or bump device and always handle it with due care. Otherwise it can
be damaged.
► Do not operate your device whilst running or driving. You could fall or cause a
traffic accident.
► Damage to the electronics or lens caused by extraneous effects such as
knocks, falls or others are not covered by the guarantee.
Special attention for ope ration of charger
You may charge the device with a charger or through a USB data line connected to
the computer. Charge with matched alternate current; creepage, fire and damage of
the door phone and charger may be caused if other voltage is used. It is forbidden to
short circuit the charge, otherwise, electrical shock, smoke and damage of the
charger will be caused. Do not use the chager at the time when the power cord is
damaged, otherwise, fire and electrical shock will be caused. Do not place a vessel
used to retain water beside the charger to prevent overheating, creepage and failure
of charger caused by spilling water. If the charger is in contact with water or other
liquids, disconnect the power supply immediately to prevent overheating, fire
electrical shock and failure of the charger. Do not dismantle or remodel this product,
otherwise, damage, creepage and electrical fault may becaused to this product. Do
not use the charger in places with high humidity such as bathroom, otherwise,
electric shock, fire and damage of the charger will be caused. Do not touch the
charger, electrical line and power outlet with wet hand(s), otherwise, electric shock
may be caused. Do not place heavy objects on the electrical line or refit the electrical
line, otherwise, electric shock and fire will be caused. Before cleaning and
maintenance, first pull the plug off the power outlet. Grasp the charger while pulling
off the plug, as pulling the electrical line will lead to damage of electrical line, electric
shock and fire.
Security and Disposal Hints for Batteries: Hold children off batteries.
When a child swallowed a battery go to a doctors place or bring the child
into a hospital promptly! Look for the right polarity (+) and (–) of batteries!
Always change all batteries. Never use old and new batteries or batteries of
different types together. Never short, open, deform or load up batteries!
Risk of injury! Never throw batteries into fire! Risk of explosion!
Hints for Environment Protection: Packages materials are raw materials
and can be recycled. Do not disposal old devices or batteries into the
domestic waste. Cleaning: Protect the device from contamination and
pollution (use a clean drapery). Avoid using rough, coarse-grained materials
or solvents/aggressive cleaner. Wipe the cleaned device accurately.
Important Notice: Should battery fluid leak from a battery, wipe the battery
case with a soft cloth dry. Distributor: Technaxx Deutschland GmbH &
Co.KG, Kruppstr. 105, 60388 Frankfurt a.M., Germany
 Loading...