

Page 1

Technaxx
®
IP-Security Camera HD 720P TX23+
for indoor use
User Manual
Important Hint regarding the User Manuals:
All languages of the user manual you find on the CD enclosed.
The english and german version of the user manuals you also find as printed version
enclosed. Before using the device the first time, read the user manual carefully.
Wichtiger Hinweis zu den Bedienungsanleitungen:
Alle Sprachen der Bedienungsanleitung finden Sie auf der beiliegenden CD. Die englische
und die deutsche Version der Bedienungsanleitung finden Sie auch beiliegend in
gedruckter Form. Vor erster Benutzung die Bedienungsanleitung sorgfältig durchlesen.
Remarques importantes sur le mode d'emploi :
Toutes les langues du manuel d’utilisation sont disponibles sur le CD fourni. La version
anglaise et allemande du manuel d’utilisation est fournie au format papier. Lisez
attentivement le mode d'emploi avant la première utilisation.
Consejo importante relacionado con los manuales de usuario:
Encontrará el manual de usuario en todos los idiomas en el CD incluido. También
encontrará incluidas copias impresas de las versiones del manual en inglés y alemán.
Antes de utilizarla por primera vez, lea atentamente este manual.
Ważna wskazówka odnośnie Instrukcji użytkowania:
Instrukcje we wszystkich językach znaleźć można na załączonej płycie CD. Angielska i
niemiecka wersja instrukcji użytkowania znajdują się również na dołączonej wersji
drukowanej. Przed pierwszym użyciem urządzenia należy dokładnie zapoznać się z
instrukcjami użytkowania.
Důležité poznámky týkající se Uživatelského manuálu:
Další jazykové verze uživatelského manuálu naleznete na přiloženém CD. Anglická a
německá verze manuálu je přiložena v tištěné formě. Před prvním použitím kamery si
pečlivě přečtete uživatelský manuál.
Page 2

I Table
I TABLE................................................................................................................................2
1. FEATURES......................................................................................................................4
3. INSTALLATION GUIDE....................................................................................................6
3.1 W
3.2 WIFI S
3.3 C
IRED CONNECTION TO
ETUP VIA
ONNECTING TO
WEB B
WAN......................................................................................................9
LAN.............................................................................................6
ROWSER
.......................................................................................8
4. OPERATION OF BROWSER.........................................................................................10
4.1 V
IEW VIDEO
4.2 D
EVICE BASIC INFORMATION
....................................................................................................................10
............................................................................................13
4.2.1 Device information....................................................................................................13
4.2.2 Alias setting...............................................................................................................13
4.2.3 Device date and time settings...................................................................................13
4.2.4 Local recording path .................................................................................................13
4.2.5 MicroSD Card Record Schedule...............................................................................14
4.2.6 Voice setting .............................................................................................................14
4.3 A
LARM SETTINGS
...........................................................................................................15
4.3.1 Alarm service setting.................................................................................................15
4.3.2 Mail Service Setting..................................................................................................17
4.3.3 FTP Service Setting..................................................................................................17
4.3.4 Log............................................................................................................................18
4.4 N
ETWORK CONFIGURATION
..............................................................................................18
4.4.1 Basic network settings..............................................................................................18
4.4.2 Wireless Lan settings................................................................................................19
4.4.3 DDNS Service setting...............................................................................................19
4.5 PT
4.6 U
CONFIGURATION
SER AND DEVICE SETTING
........................................................................................................20
..............................................................................................21
4.6.1 Multi-device Setting...................................................................................................21
4.6.2 User Settings ............................................................................................................21
4.6.3 Maintain....................................................................................................................22
5. PC SOFTWARE INSTRUCTIONS.................................................................................23
5.1 A
DD CAMERA
6. M
OBILE PHONE SOFTWARE (SECURITY ADVANCED
6.1 APP
DOWNLOAD
..................................................................................................................23
)..............................................................27
.............................................................................................................27
6.1.1 Android APP download .............................................................................................27
6.1.2 iOS APP download....................................................................................................27
6.2 A
DD CAMERA TO THE
APP...............................................................................................27
6.2.1 One key to add..........................................................................................................27
6.2.2 Scan the QR code on the device ..............................................................................29
6.2.3 Search device via the LAN to add camera................................................................30
Page 3
6.3 WIFI
6.4 U
SER SETTING
SETTING
................................................................................................................31
...............................................................................................................33
7. TECHNICAL SPECIFICATIONS....................................................................................34
This device complies with the requirements of the standards referred to the Directive
R&TTE 1999/5/EC. The Declaration of Conformity you find here: www.technaxx.de/ (in
bar at the bottom “Konformitätserklärung”). Before using the device the first time, read the
user manual carefully.
Service phone No. for technical support: 01805 012643 (14 cent/minute from German
fixed-line and 42 cent/minute from mobile networks).
Free Email: support@technaxx.de
If you drill a hole in the wall, please make sure that power cables, electrical cords and/or
pipelines are not damaged. When using the supplied mounting material, we do not take the
liability for a professional installation. You are entirely responsible to ensure that the
mounting material is suitable for the particular masonry, and that the installation is done
properly. When working at higher altitudes, there is danger of falling! Therefore, use
suitable safeguards.
Package Contents:
IP-Security Camera HD 720P TX-23+, Power adapter DC 5V/2A, Bracket and 3 screws,
Installation CD with all user manuals, User Manual (printed english and german version)
Security and Disposal Hints for Batteries: Hold children off batteries. When a
child swallowed a battery go to a doctors place or bring the child into a hospital
promptly! Look for the right polarity (+) and (–) of batteries! Always change all
batteries. Never use old and new batteries or batteries of different types together.
Never short, open, deform or load up batteries! Risk of injury! Never throw
batteries into fire! Risk of explosion!
Hints for Environment Protection: Packages materials are raw materials and
can be recycled. Do not disposal old devices or batteries into the domestic waste.
Cleaning: Protect the device from contamination and pollution (use a clean
drapery). Avoid using rough, coarse-grained materials or solvents/aggressive
cleaner. Wipe the cleaned device accurately. Distributor: Technaxx Deutschland
GmbH & Co.KG, Kruppstr. 105, 60388 Frankfurt a.M., Germany
Page 4
1. Features
Video resolution 1280 x 720 HD with 5-25fps Brilliant 1/4" CMOS colour sensor (1
megapixel) Motion & Sound Detection ~10m 10x IR LED and IR night vision ~10m
Built-in microphone & speaker Rotatable camera head: 120° vertical & 355° horizontal
Supports MicroSD cards up to 64GB Direct Smartphone connection via QR-code / P2P
Alarm function (automatic E-mail with picture) H.264 / MJPEG dual video stream
Rapid installation & Password setting
● Powerful high-speed video protocol processor
● Multi-level user management and password settings
● WEB browser to access the embedded Web server
● Support wireless network (Wi-Fi/802.11/b/g/n)
● Connection via Smartphone APP (Security Advanced)
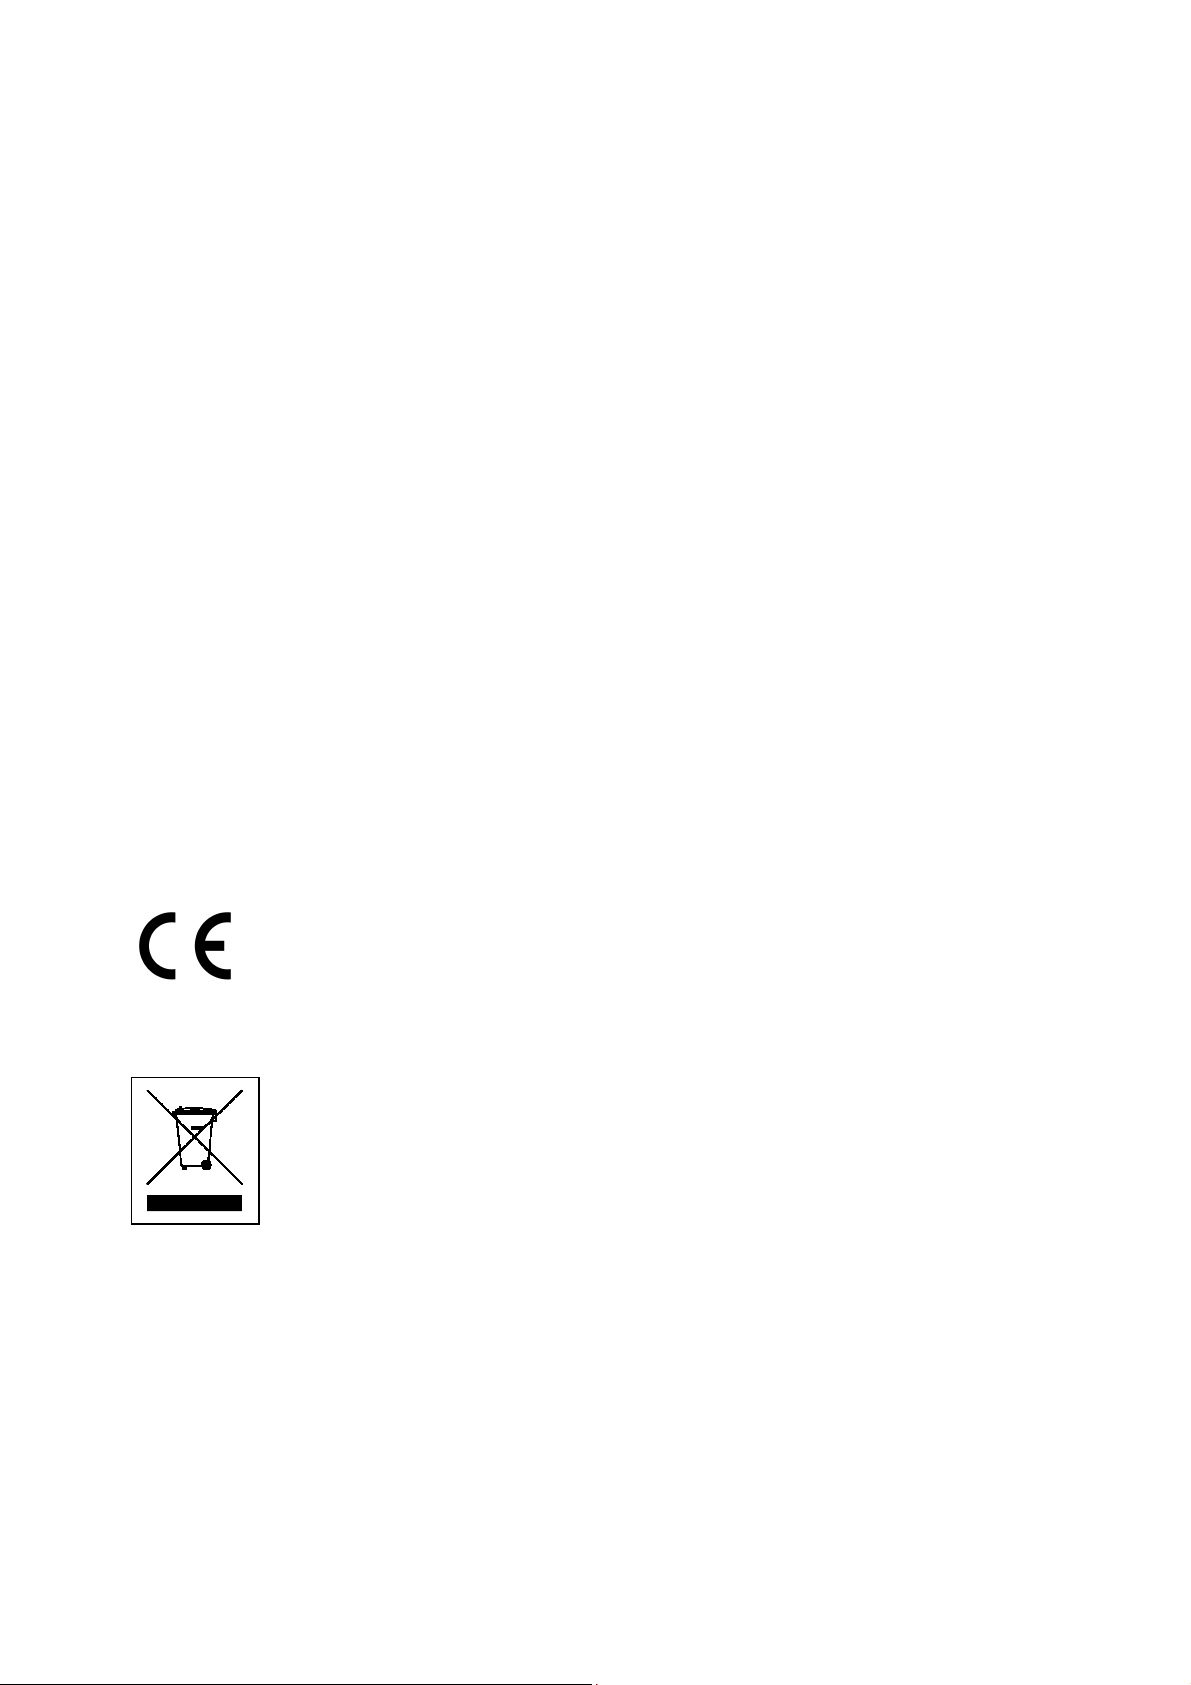
2. Device Structure
Figure 2-1
1
2
3
4
Antenna
Photoresistor
IR LED
Lens
5
6
7
Adjust sharpness
Indicator light
Microphone
Page 5
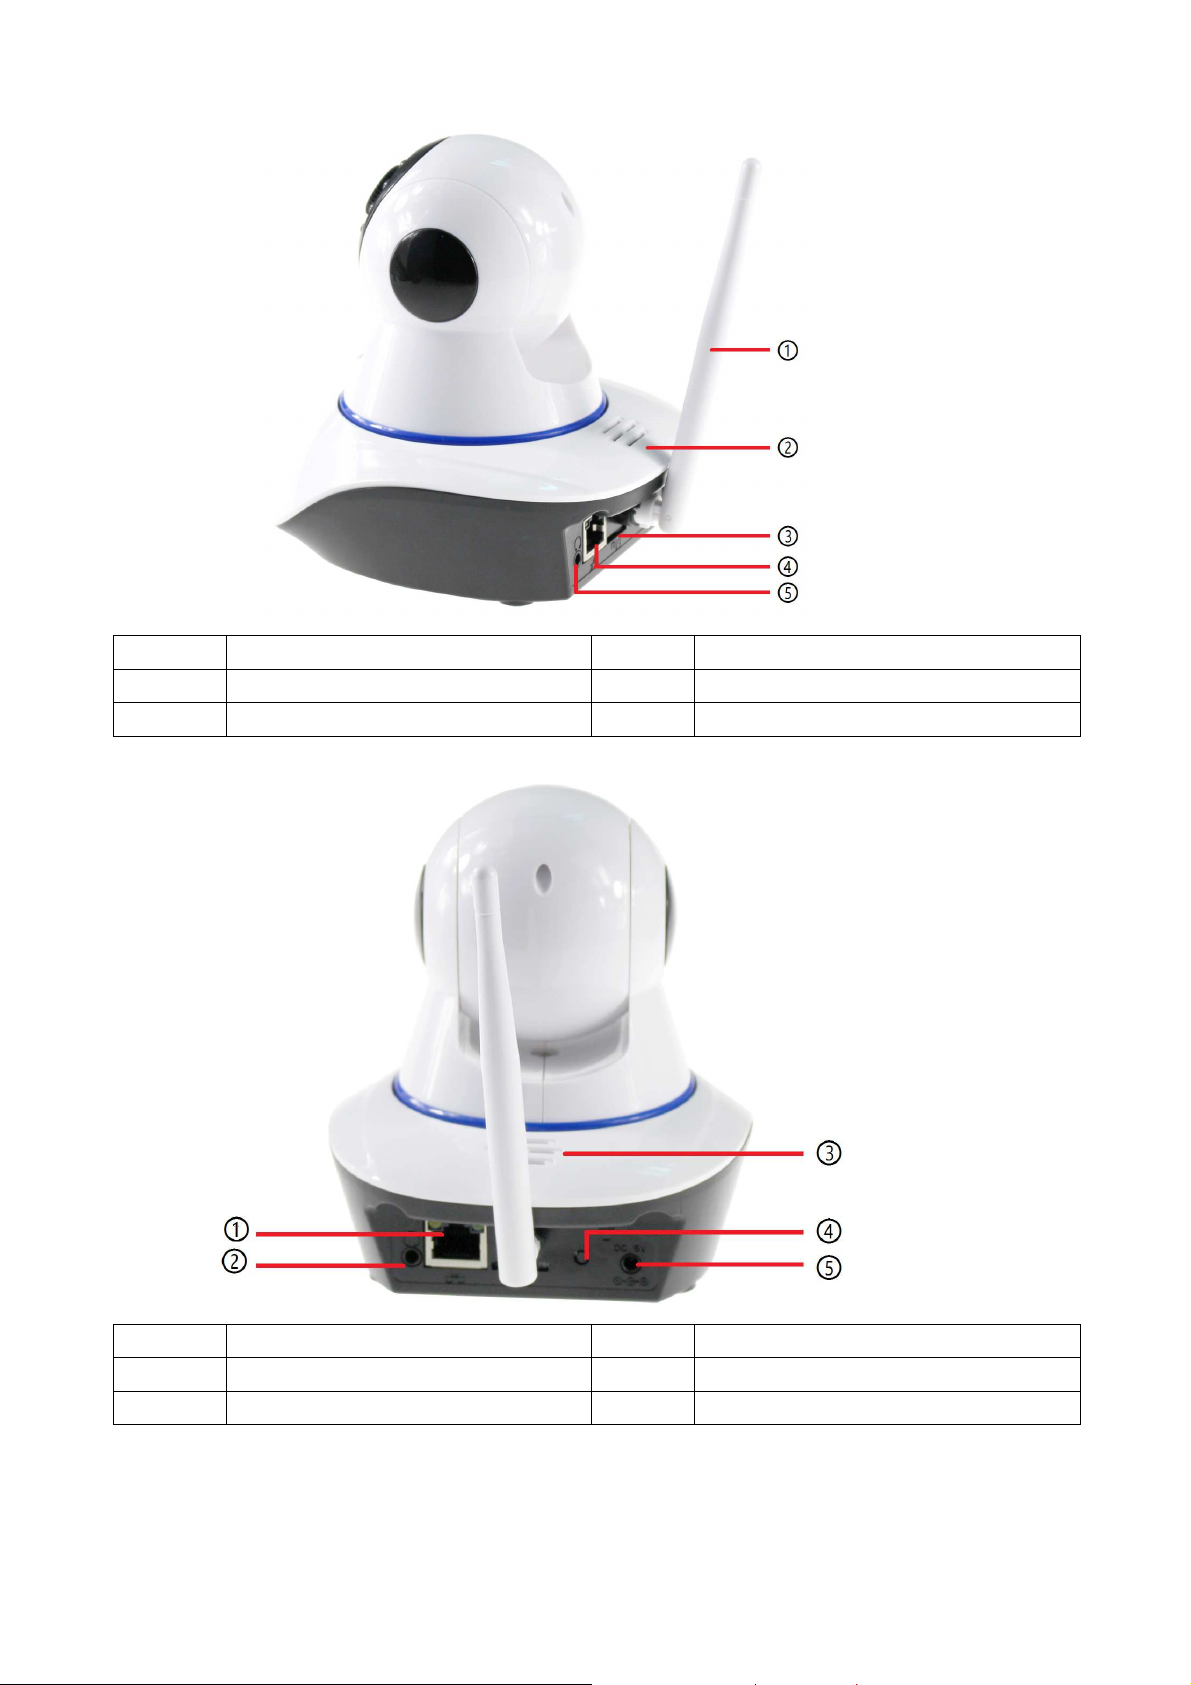
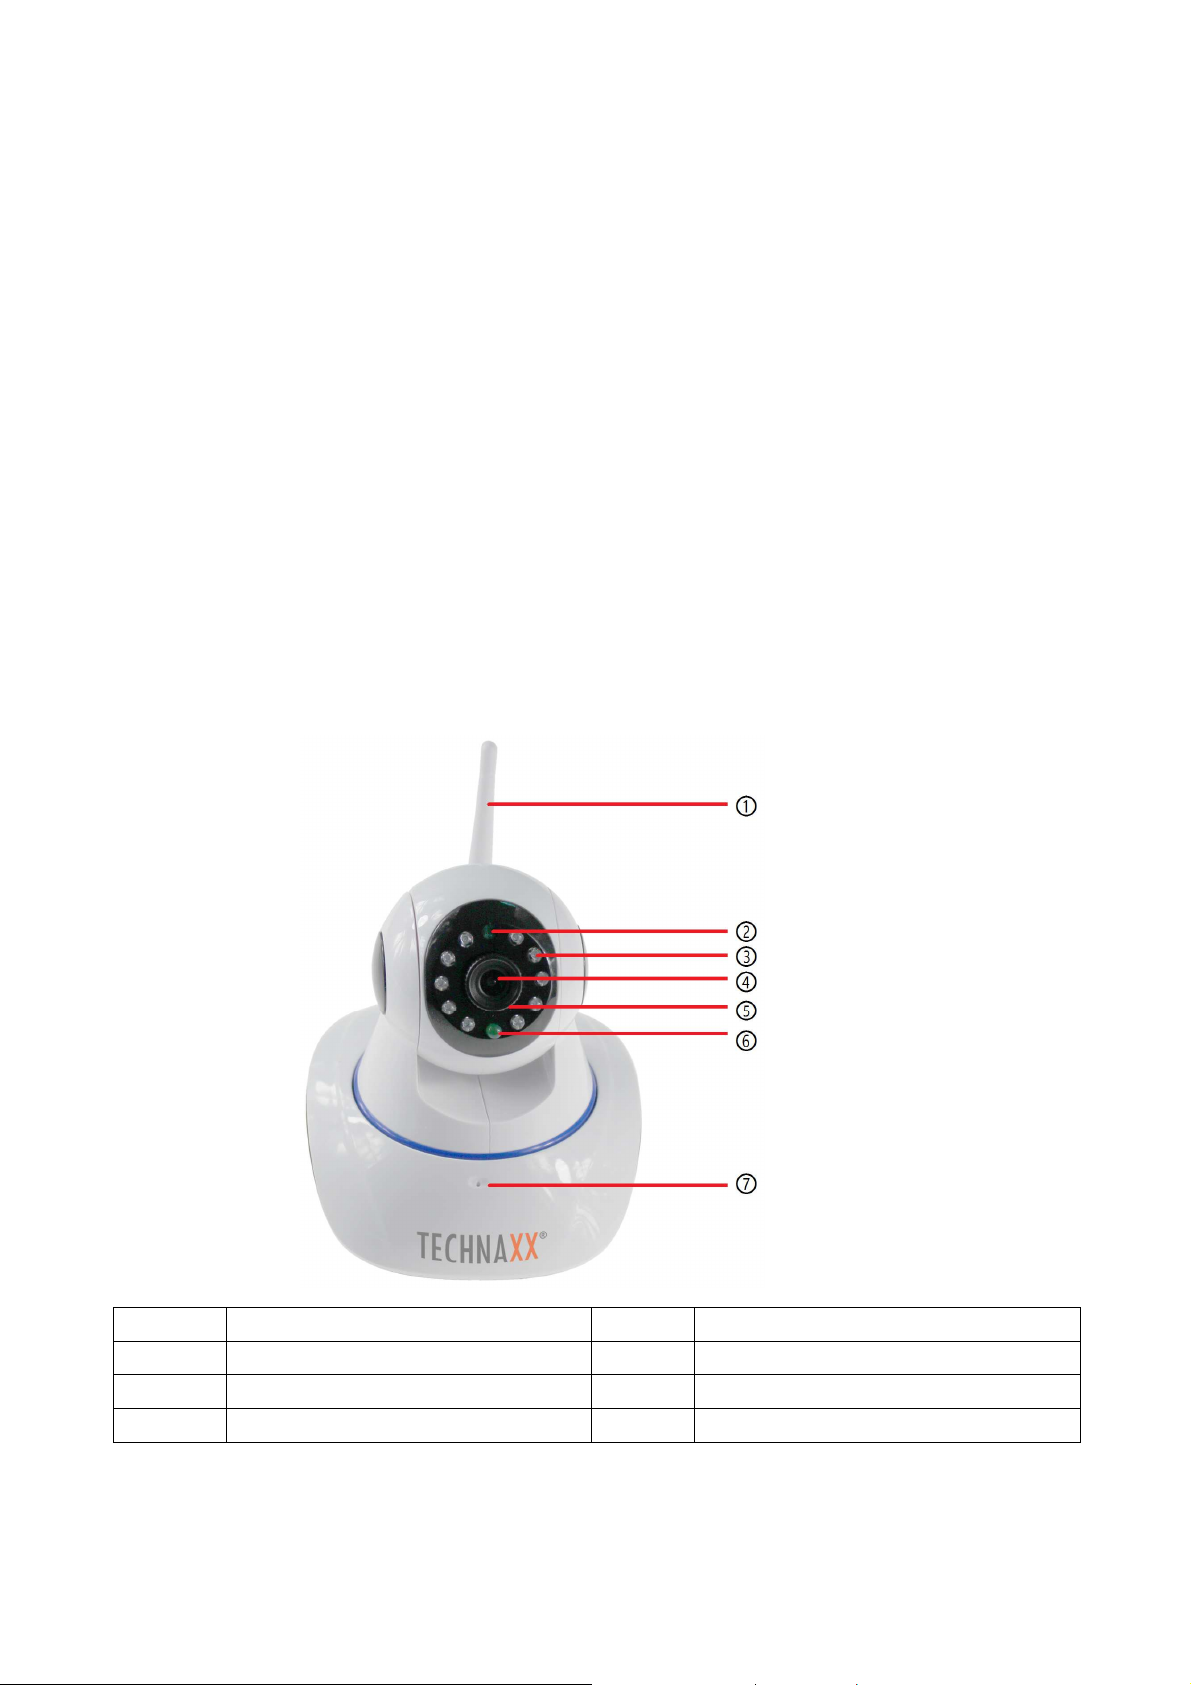
Figure 2-2
1
2
3
Antenna
Speaker
MicroSD card slot
4
5
LAN port (RJ-45)
Audio out
Figure 2-3
1
2
3
LAN port (RJ-45)
Audio out
Speaker
4
5
Reset button
Power input DC5V/2A
Page 6
3. Installation Guide
3.1 Wired connection to LAN
Power on the IP camera, connect IP camera to router by network cable, meanwhile,
connect computer to the same router, example of figure 3-1.
Figure 3-1
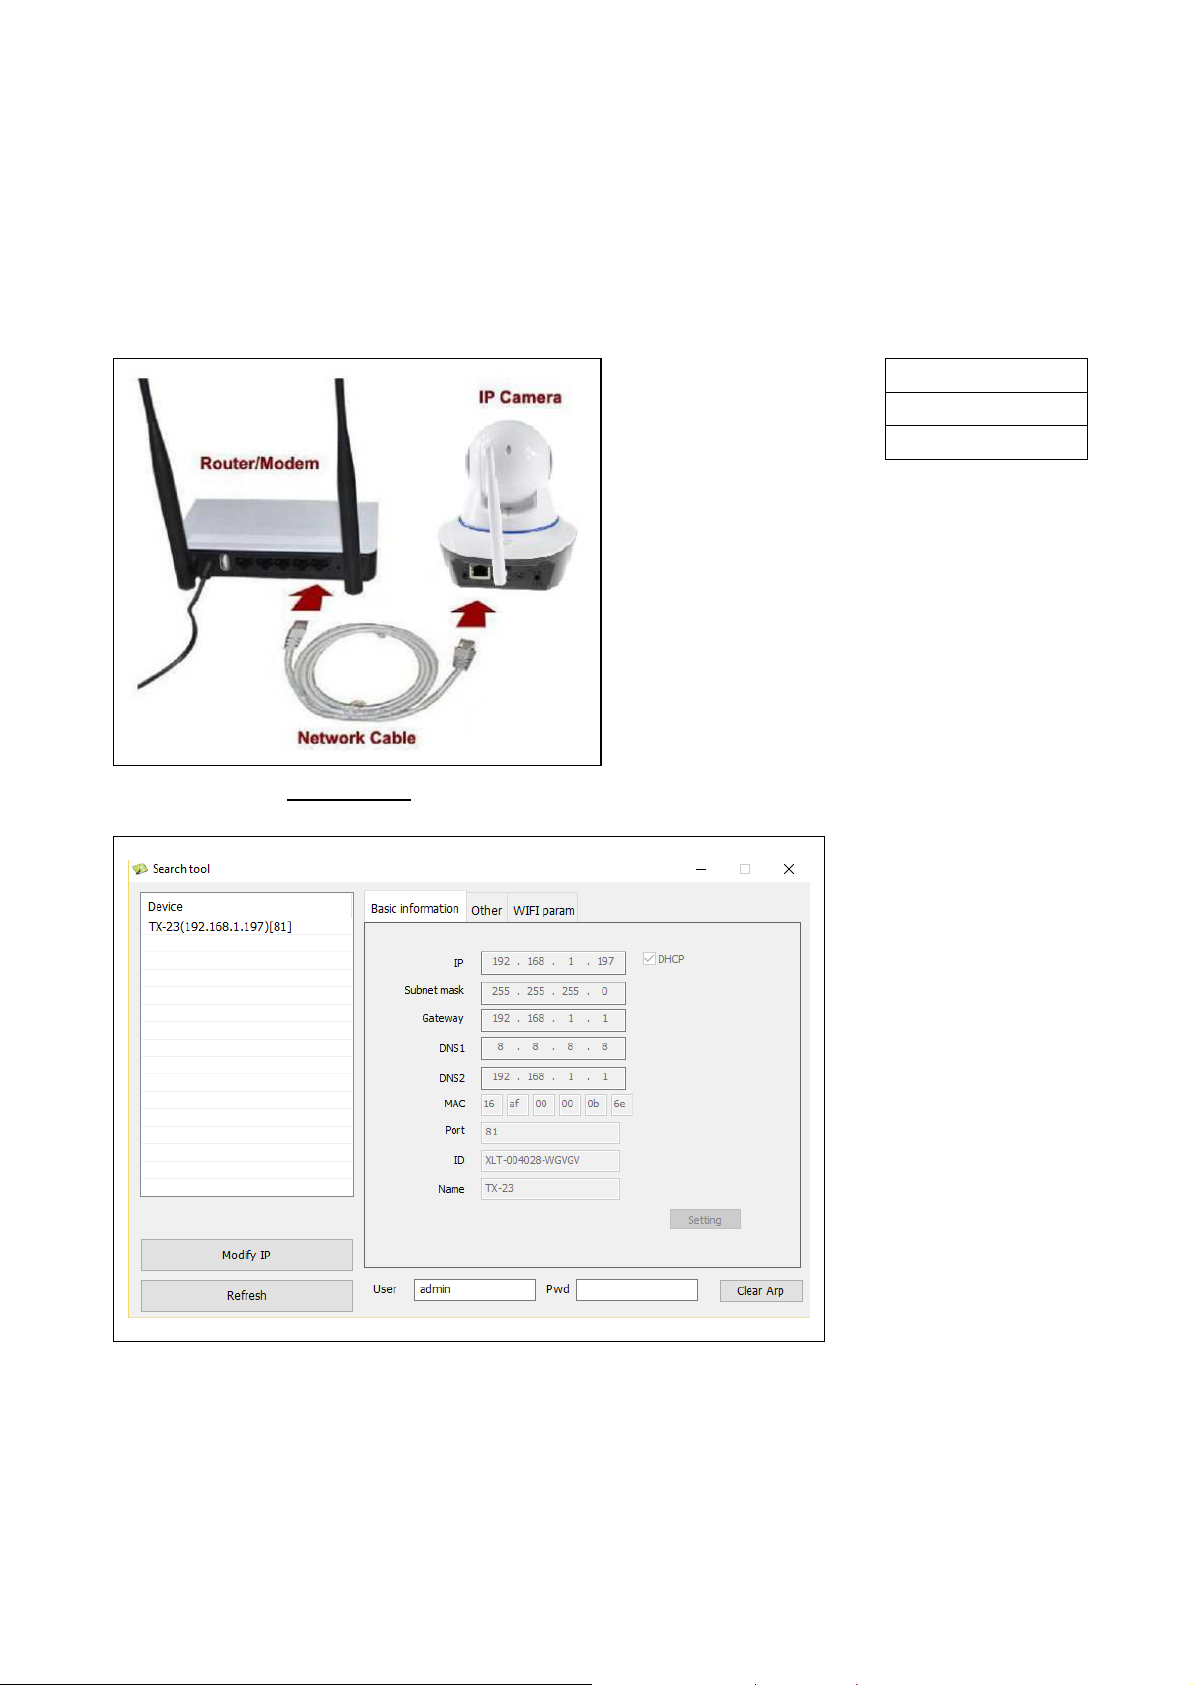
Insert CD to computer driver, double click
on the folder “Search Tools” in the CD and
then double click on “IPCameraSearch”.
After the software has started, click
“Refresh” (bottom left), select the wanted
device, double click on the device IP to
open browser. You also can enter the
device IP manual into the browser.
Example: http://IP of device:81. See figure 3-2.
It will pop up user login dialog, enter default user name (admin) and password will be
empty to login the camera as figure 3-3. Important: After first login change the password!
(Chapter 4.6.2 User settings)
Router / Modem
Network cable
IP Camera
Figure 3-2
Page 7

Benutzername User Name
Kennwort Password
Figure 3-3
After you logged in you will see options like in figure 3-4 below.
Figure 3-4
We suggest using Internet Explorer 11 please select “Livestream mode (for Internet
Explorer)” as browser to view the video (it can provide more functions), but user needs to
install video player before viewing the video. Click “OCX Download ” to download OCX and
install it. You can also find it on CD. Except IE browser, you can visit the camera by Firefox,
Safari, Chrome, Opera browser etc., please select “videostream mode (for Firefox)” for
operating (not all functions supported)
Notice: (1) If you installed the firewall software in your PC, when you run the
“IPCameraSearch”, it may pop up a window to say “whether you want to block this program
or not”, then you should choose not to block. (2) You can hold on reset button on the
camera for 10 seconds to restore factory default if you forget user name and password,
during the process, don’t disconnect the power, otherwise the camera maybe damaged.
Page 8
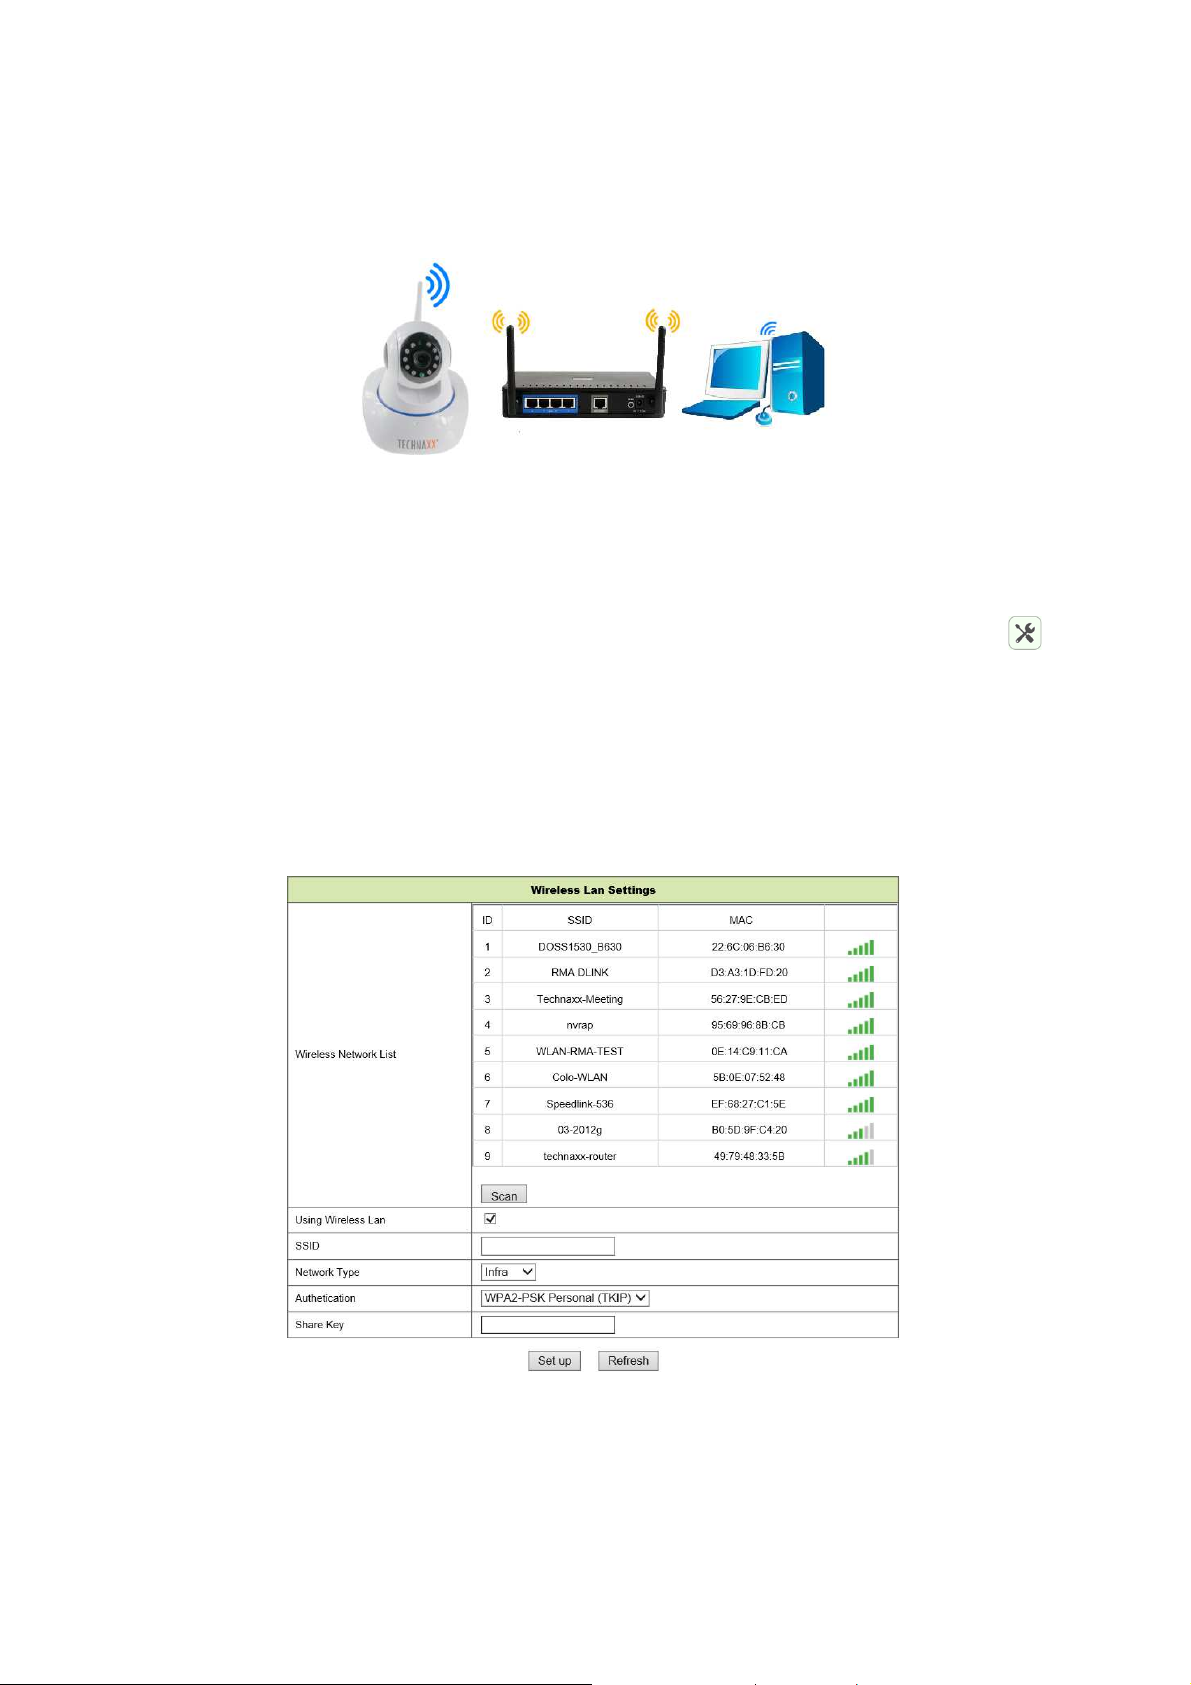
3.2 WIFI Setup via WEB Browser
You can connect the camera with router by wireless connection, as figure 3-5 shows. To
connect the camera via Smartphone directly got to chapter 6.2.
Figure 3-5
To set the WIFI connection the camera has to be connected via network cable to the router.
To connect the camera via WIFI you need to follow the steps under chapter 3.1 first. After
entering the Livestream mode (for Internet Explorer), click on the following icon to
enter settings. Under “Network Configuration” “WLAN/LAN Settings” press “Scan”. Then
choose the SSID (name) of your WIFI router. Enable Using Wireless Lan. Select the
authentication of your router and enter the password of your router. By clicking on
Submit/Set up the settings are saved and the camera is going to reboot. After rebooting is
successful you can unplug the network cable (wait about 3minutes). The camera is
connected via WIFI.
Figure 3-6
Notice: When the device is connected both WIFI and wired, it will firstly connect to the
wired network. If the camera enables DHCP to obtain IP address automatically, so the IP
address is not same in wired connection and WIFI connection.
Page 9
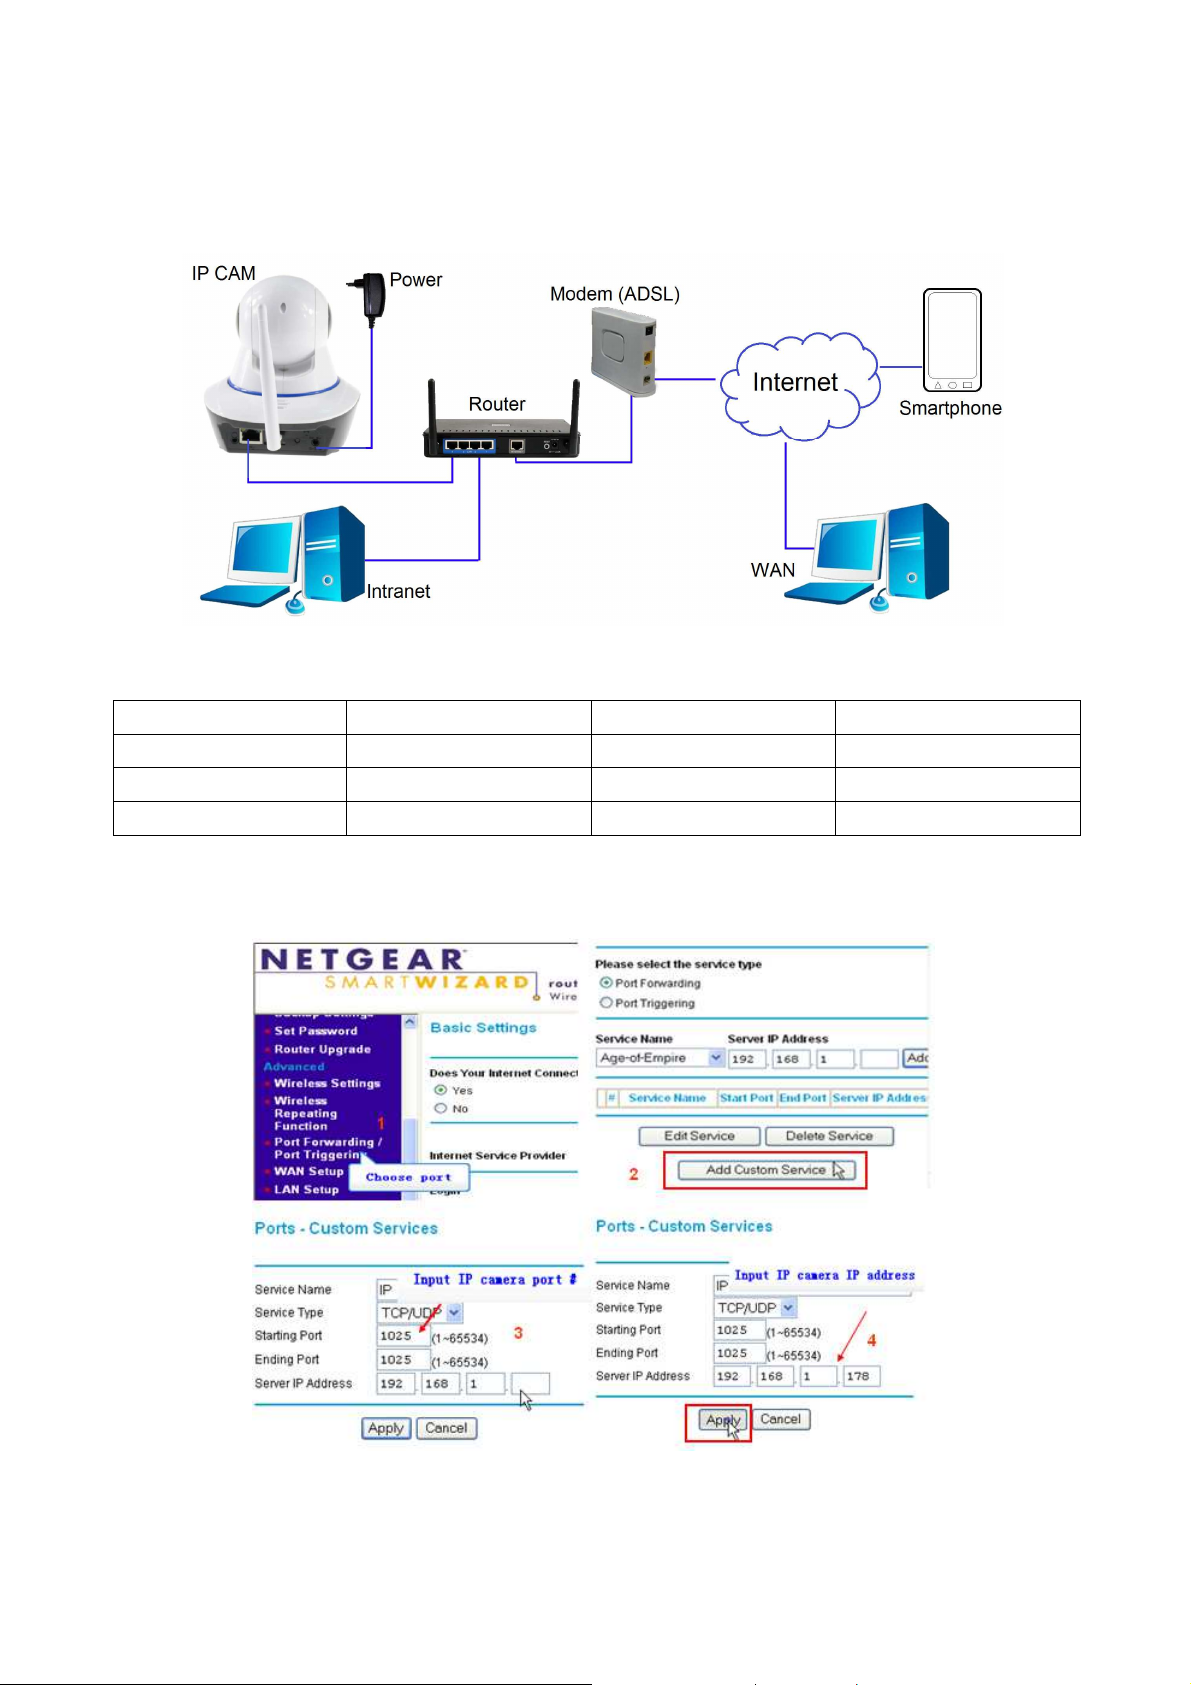
3.3 Connecting to WAN
You should connect the LAN network to WAN first and do the port forwarding, connect as
figure 3-7.
Figure 3-7
IP Cam Modem (ADSL)
Power Internet
Intranet Smartphone
Router WAN
If visit IP Camera from WAN, you must do port forwarding on the router. Example of figure
3-8.
Figure 3-8
Page 10
Operation Steps:
1) After login the interface of the router, choose “Port Forwarding”;
2) Choose “Add custom Service”;
3) Input IP camera http port;
4) Input IP address of IP camera, click “Apply”.
After finishing the port forwarding, you can use WAN IP address of router and http port of
camera to visit the camera by remote computer as figure 5.
Notice: Because the routers are different, so the interface and setting method of router are
also different, how to do the port forwarding for various routers, please refer to the user
manual of your router or consult with router manufacturer.
4. Operation of Browser
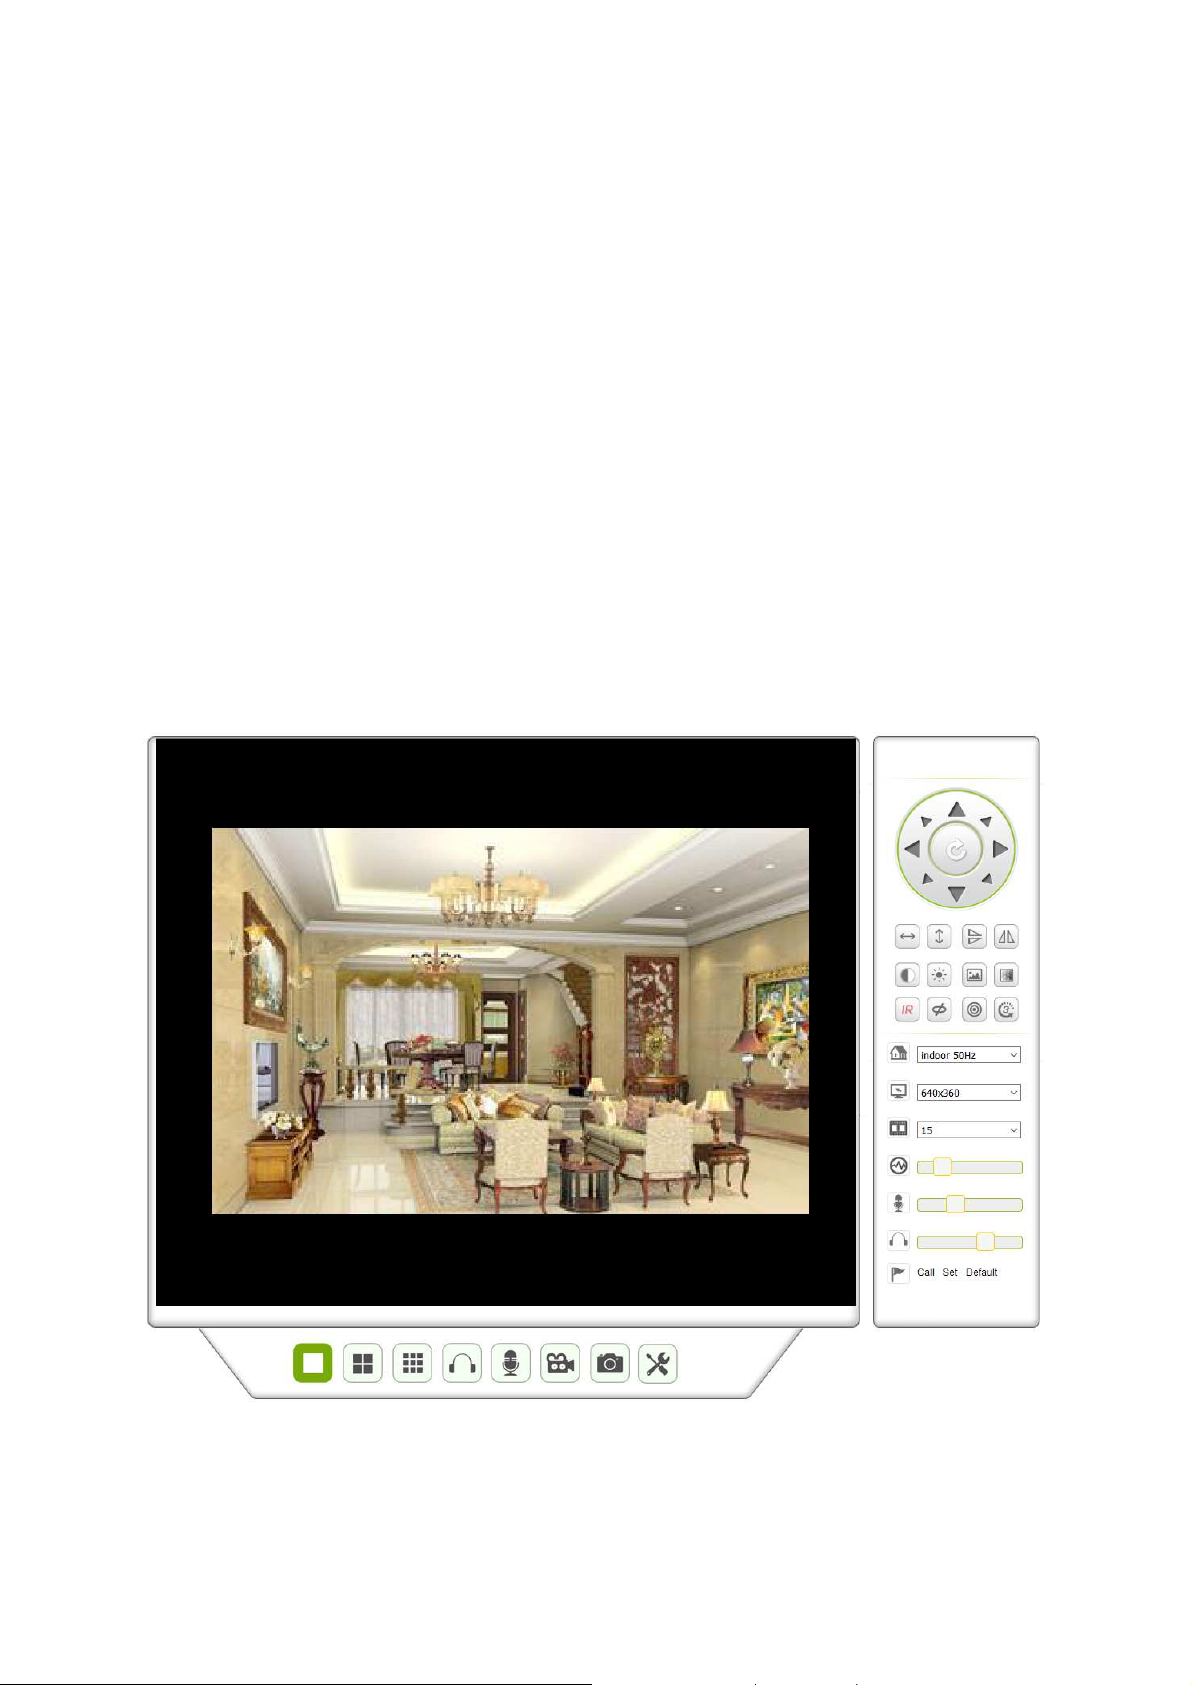
4.1 View video
After installing the plug-in, click “livestream mode (for Internet Explorer),” as Figure 3-4 to
view the video. Your display should look similar to figure 4-1.
Figure 4-1
Page 11
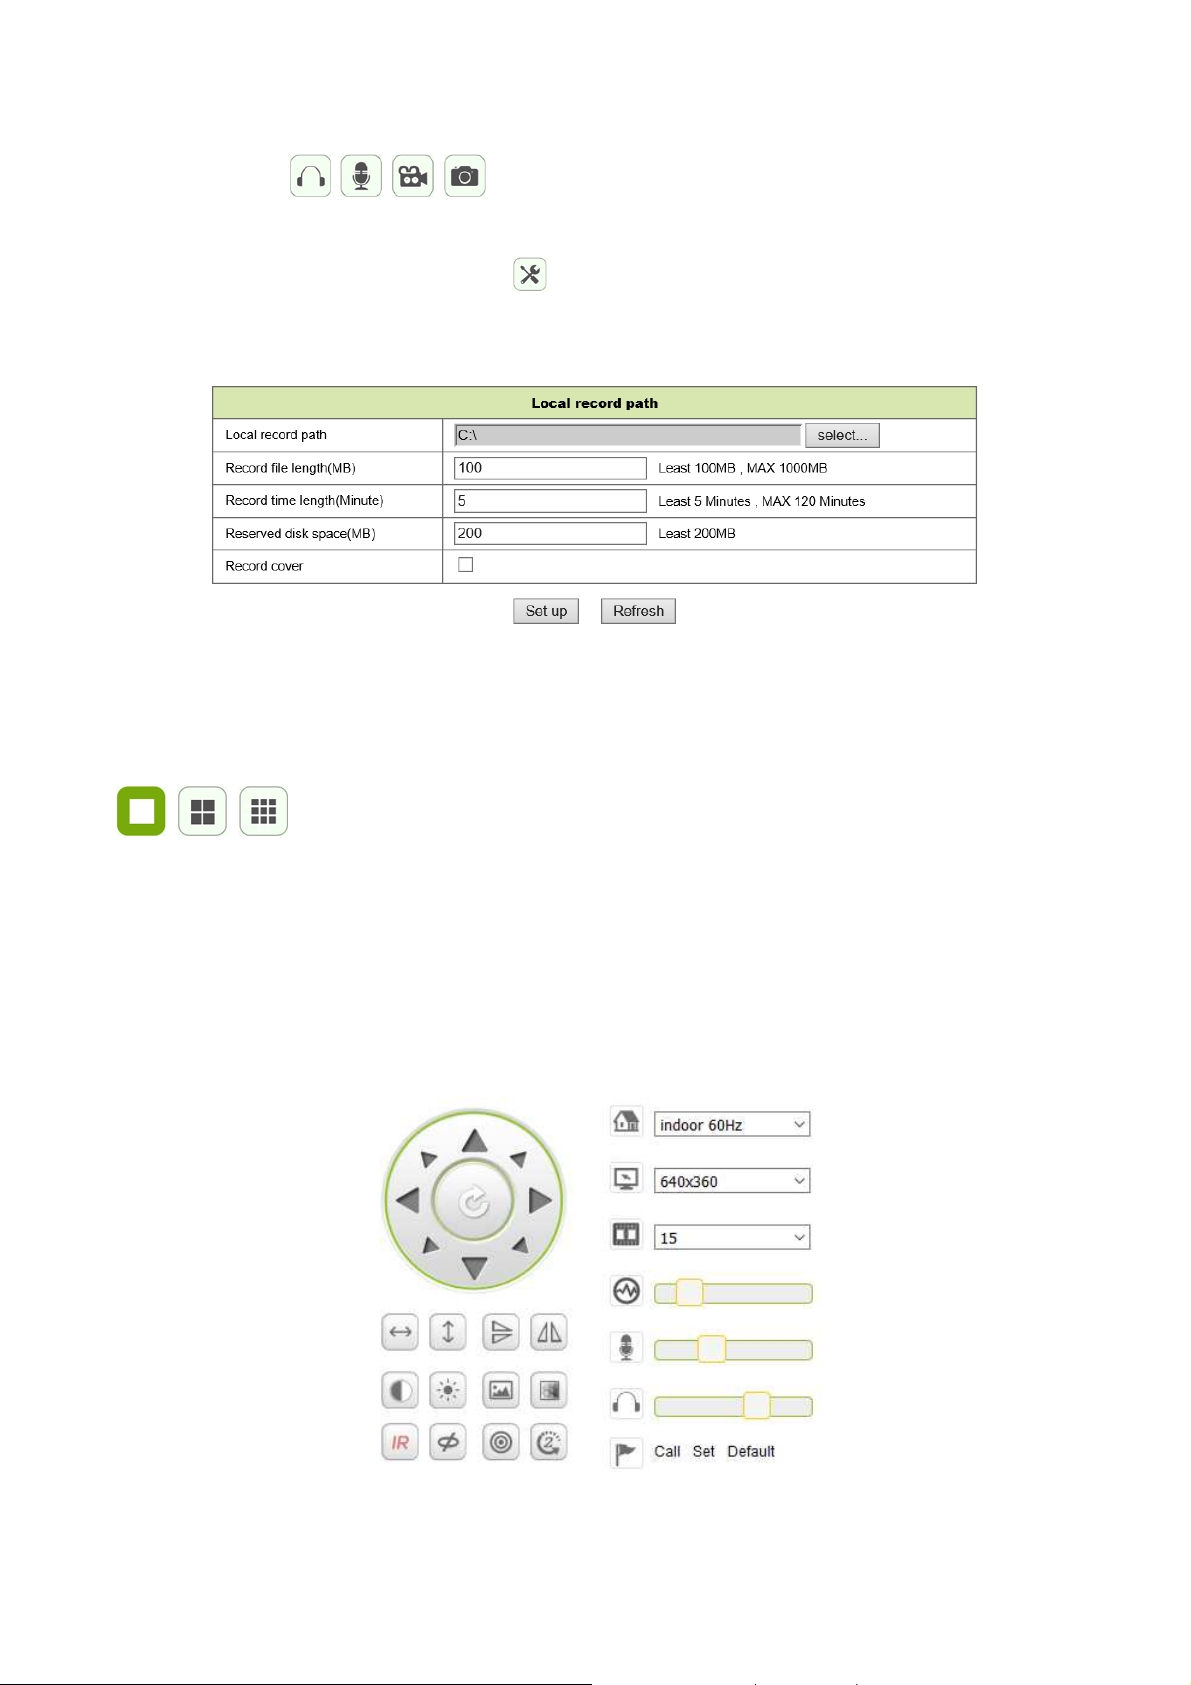
Audio, Talk, Record, Snapshot
You can click these buttons to perform audio, talk, record and
snapshot functions.
Notice: About recording path, click button to enter setting interface. Under Device
basic information you can set “Local Recording Path” for saving manual taken snapshots
and recordings, as seen in figure 4-2.
Figure 4-2
Multipicture change button
If you add multiple devices in chapter 4.6.1 “multi-device settings”, it will connect other
device to display pictures automatically when changing to 4, 9 split screen
. In playing video area, you can select a picture to control audio, talk,
record, snapshot, PT control and etc.
Viewing control area
You can control PT moving, picture reversal, mirroring and etc. when viewing video. See
figure 4-3. Adjusting picture parameters includes resolution, brightness, contrast, chroma
and etc. The camera supports 16 preset points. You can set a as preset point by moving
the camera via PT to the wanted place. You also can call a set preset point by selecting it.
The camera moves to the selected preset point.
Figure 4-3
Page 12
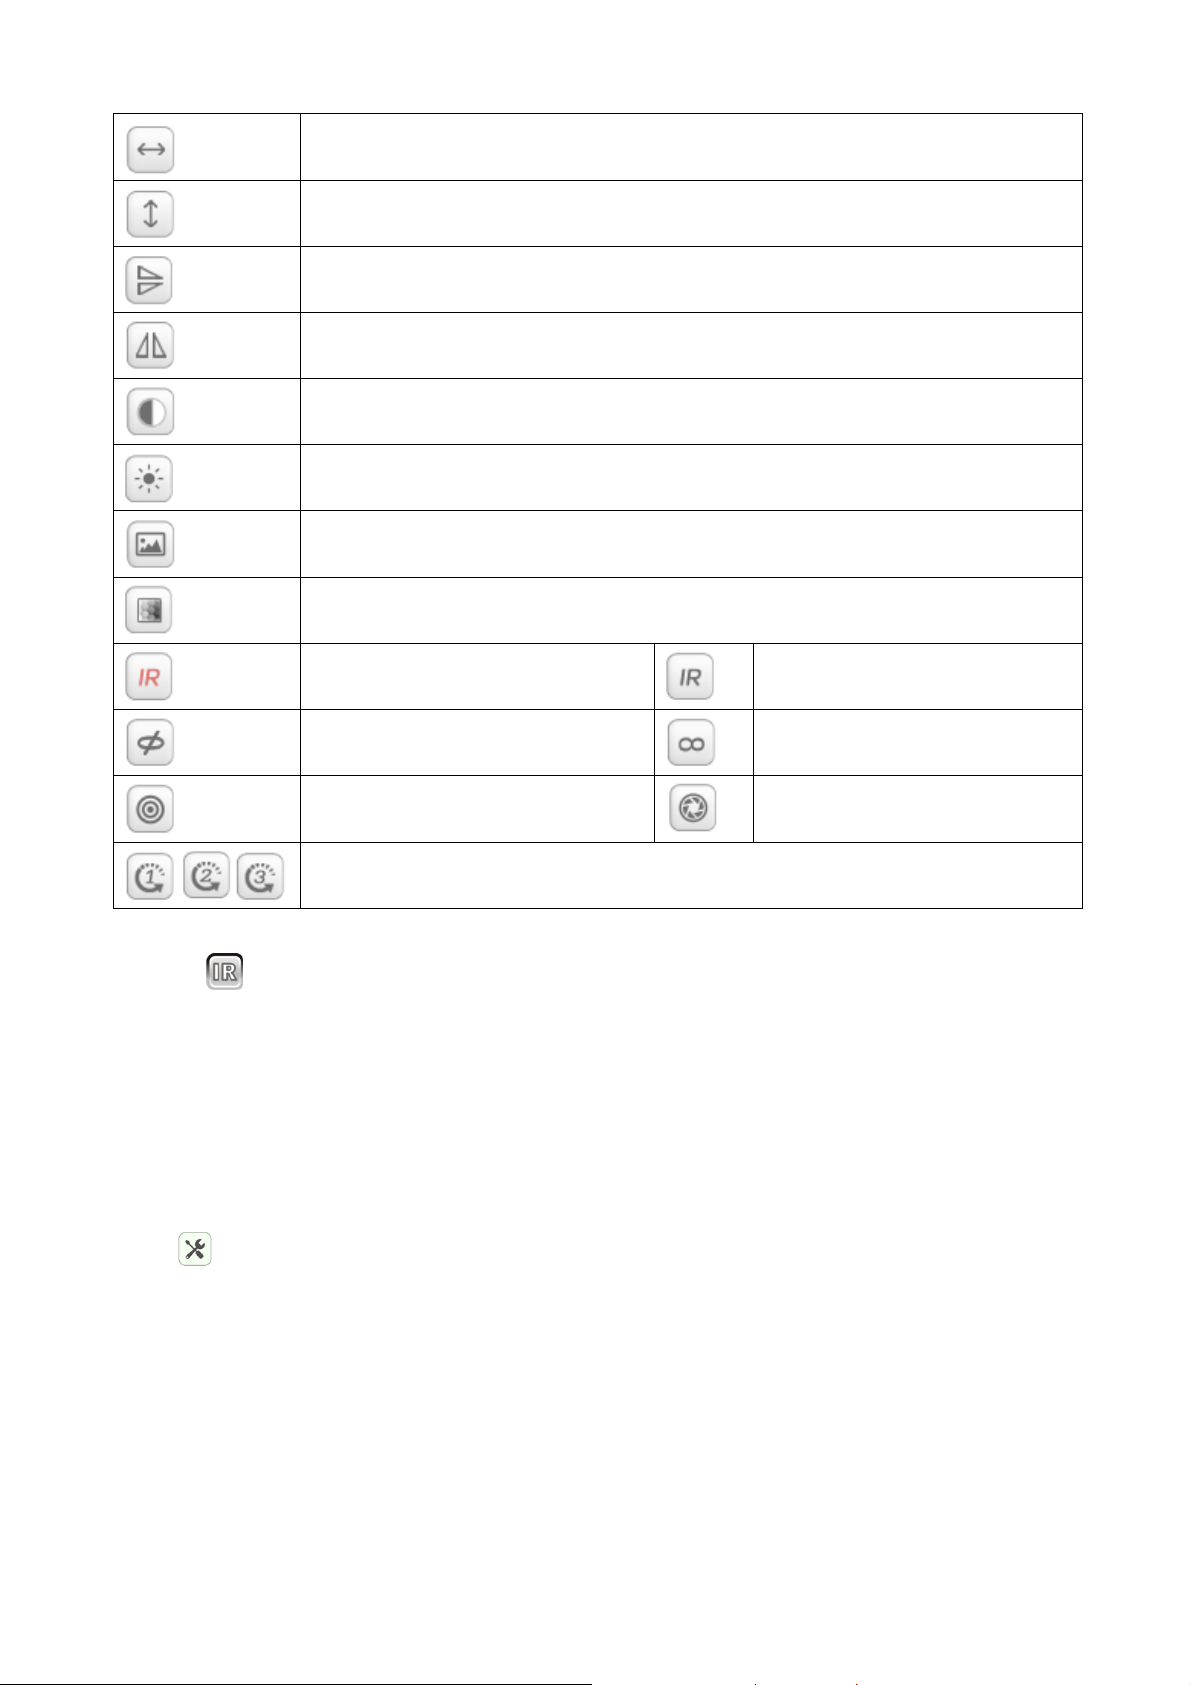
Horizontal patrol
Vertical patrol
Reversal
Mirror
Contrast
Brightness
Chroma
Saturation
IR LED switched ON /Auto
Switched OFF
IR LED Switched OFF
Switched ON
Resolution: CBR
Resolution: VBR
PT speed setting: Slow, Medium, Fast
Notice: button can control work mode of IR LED. IR LED may have auto, forced close
two mode, the IR LED will power on or off according to environment light in auto mode; the
IR LED always power off in forced close mode. Some of the buttons above have no
function with this camera model.
Important: If your live view isn’t sharp enough, try to adjust it by turning the black ring in
front of the lens. See chapter 2, figure 2-1, point 5.
Setting device parameters
Click button to enter setting interface, you can set all parameters of the camera
described in chapter 4.2 to 4.6. Only administrator can login to set these parameters.
Page 13
4.2 Device basic information
4.2.1 Device information
The user can obtain “Device firmware version”,” Web UI version”, “Alias”, “MAC” and etc.
You also can change the language here. The UPnP setting of the camera is always
activated.
4.2.2 Alias setting
The user can name the camera, example for home, office etc.
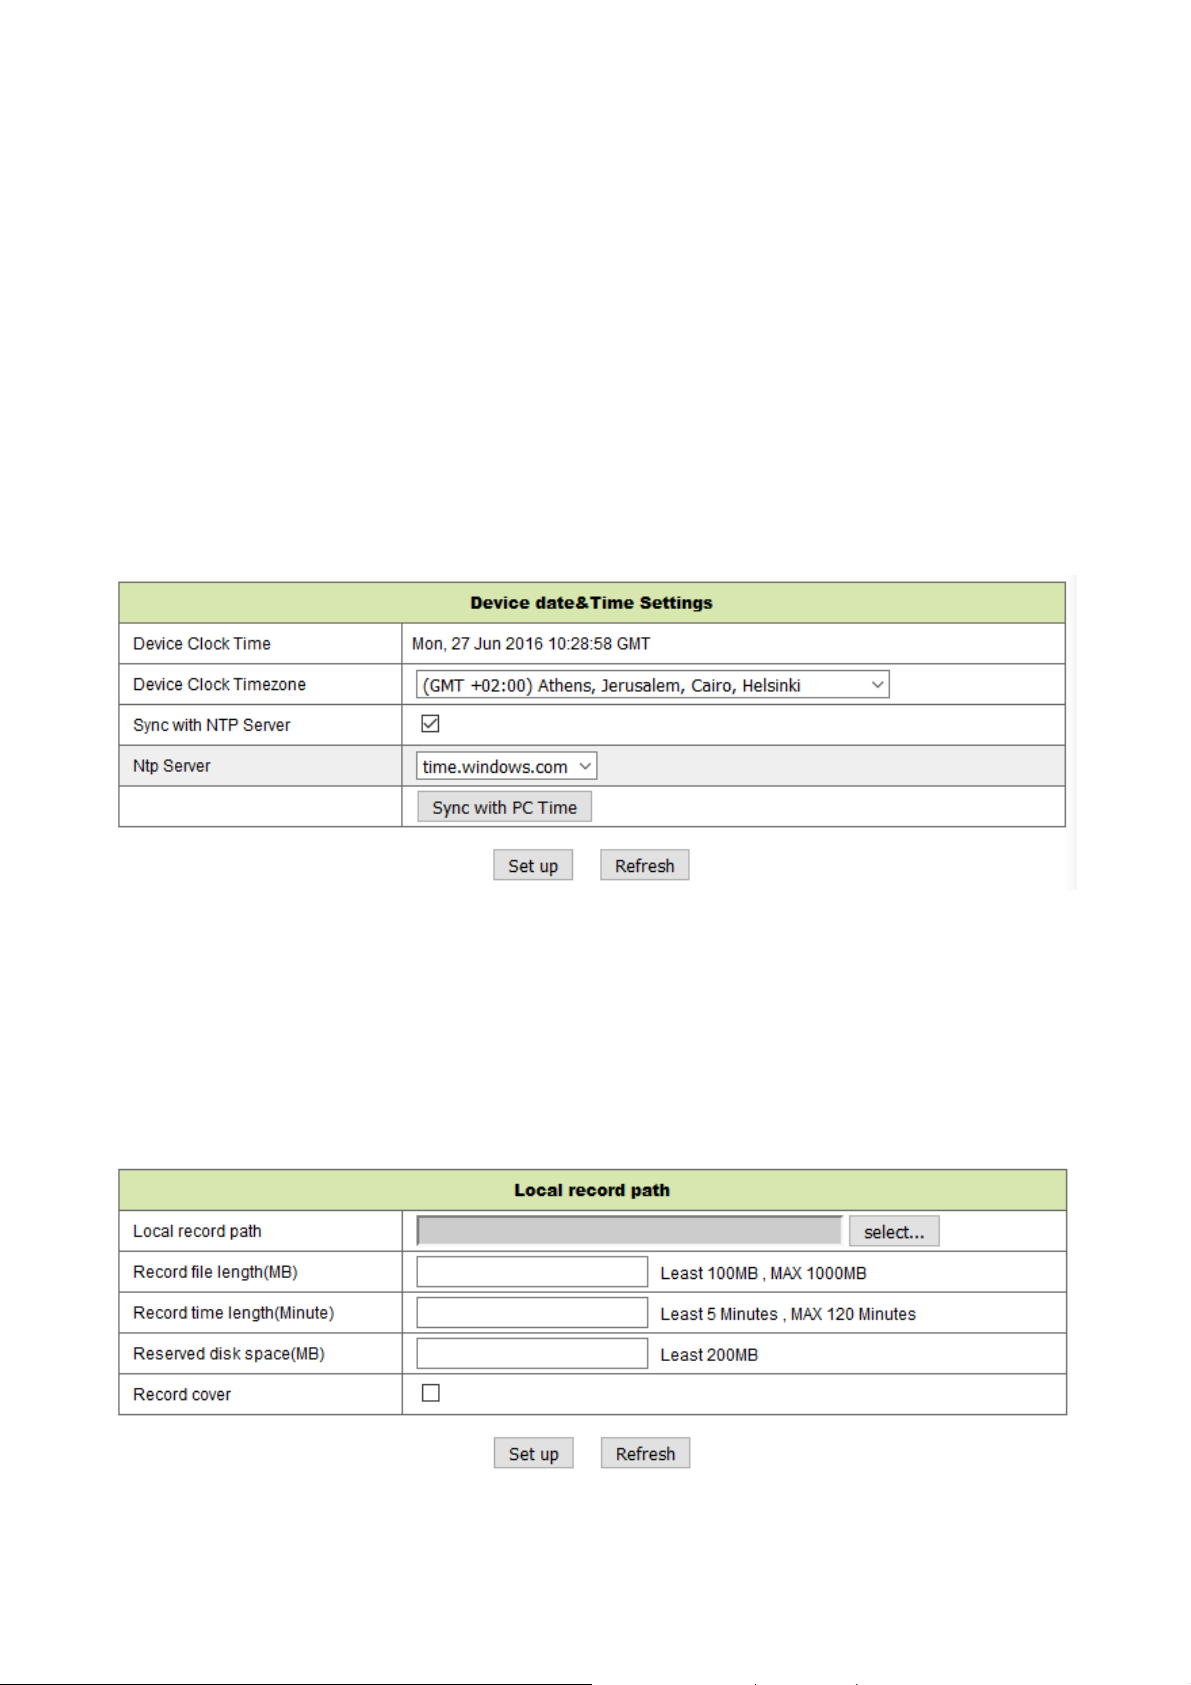
4.2.3 Device date and time settings
You can enable “Synch with NTP Server” when the device is connected via WLAN or LAN,
but you need to select the correct time zone where the camera is located, otherwise select
“Sync with PC time” (we suggest this option).
Figure 4-4
Remark: Please carefully check the camera time, so it can be sure the alarm accuracy.
4.2.4 Local recording path
The camera will be automatically create a file folder named “Record files” when the user
set “local recording path” function. Here only manual taken snapshots and recording files
will be saved. To select the path click on “select…” and choose by clicking with the mouse
the right directory. See figure 4-5.
Figure 4-5
Page 14

4.2.5 MicroSD Card Record Schedule
Here you can see the total capacity of the MicroSD card in MB. Also you can format the
MicroSD card. Record coverage can be checked to automatically overwrite the oldest file
(loop recording). After checking the Timer recording box you can set the time schedule. By
clicking on the schedule the activated part turns blue. Every hour is separated into 4 part of
15 minutes.
Figure 4-6
4.2.6 Voice setting
Under voice setting you can select the language (German or English) in which the camera
is telling you its status. You also can disable this function by muting.
Page 15
4.3 Alarm Settings
4.3.1 Alarm service setting
If user need to monitor a fixed area, when there is any motion, it will detect the motion and
trigger the alarm. In the motion detect sensibility, the smaller the value, the more sensitivity.
After enable the alarm, you can adopt several alarm mode in armed time.
• Link to the Preset when alarming: Need to set preset point of the camera;
• Send alarm info by email (email includes a picture); every alarm trigger one email;
• Upload the picture to the FTP server, user can also set the amount of the pictures.
Device only triggers alarm when it detects any motion in armed time. User can set
schedule time to be “all the time”, also assign the armed time. Before you set “Time
Schedule”, please go to Date and Time settings to set the correct time
Figure 4-7
Page 16

After enabling Motion Detect Armed you can see the following options.
Motion Detect Sensibility Set the sensibility fro 1 to 10 (The smaller the value,
the more sensitivity.)
Alarm Audio Sensibility Choose to get alarmed if noise is detected (low,
medium, high or forbid).
Infrared alarm (not supported) Check the box to activate the PIR sensor
Alarm Input Armed (not supported) Check the box for external alarm
Trigger Level (not supported) Set up an external alarm input low or high
Alarm Preset Linkage Choose a preset here. When motion is detected the
camera will go to the selected preset position.
I/O Linkage on Alarm (not
Check the box for exporting control alarm signal
supported)
Output Level (not supported) Set up the output level to low or high
Send Alarm Notification by Mail Check the box to get informed by E-mail when
motion is detected. The E-mail is with a picture
attached.
Note: You have to set the E-mail settings first.
Upload Image of Alarm Check the box. When motion is detected and the
FTP server is set the picture will be uploaded to the
set FTP server.
Upload picture number Set the amount (1-10) of pictures that should be
saved on the FTP server.
Alarm recording Check the box. The camera will record video with
audio.
Scheduler Check the box to activate the Schedule.
Select all Check the box to select the complete schedule.
Page 17

4.3.2 Mail Service Setting
When alarming is detected, it can send email to your appointed email box, but you need to
set email service parameters correctly. Example of figure 4-8, click “Set up” to save these
parameters, and then you can click “Test” to check if the setting is successful. To enter the
information about SMTP server search your email provider on the internet and choose the
right settings to fill in figure 4-8. Our WEB Plug-IN will support you.
Figure 4-8
4.3.3 FTP Service Setting
When alarming, the device will snap local picture and send them to FTP server, but need to
set the FTP setting correctly. As figure 4-9, after the setting is finished, click “Test” to check
your settings are correct or not.
Figure 4-9
Notice: For using the FTP function, you need to apply a user with authority that you can
write and create submenu and some memory space. For FTP server just insert the IP
address.
Page 18

4.3.4 Log
You can inquire when the device performs alarm in alarm log.
Figure 4-10
4.4 Network configuration
4.4.1 Basic network settings
The user can also enter the Basic Network Settings to set the IP address except using the
search software “IPCameraSearch”. Default setting here is DHCP. See figure 4-11 below.
Figure 4-11
Remark: The router connected to camera need to enable DHCP when the user uses
“obtain IP from DHCP server”; the routers enable DHCP by default.
Page 19

4.4.2 Wireless Lan settings
Please refer to chapter 3.2.
First scan your environment. Then choose your Wireless network. Check the box, select
network type, select the authentication of your router and insert the password of the router.
Press Set up to save the settings.
Figure 4-12
4.4.3 DDNS Service setting
User can also use DDNS, such as www.dyndns.com, User must apply a free domain name
from this website and fill the info into the below blanks (Figure 4-13) and save the settings.
Then the domain name can be used.
Figure 4-13
Notice: Using the domain name, if the http port is not 80, the port number should be adding
to the domain name with colon. Example: http://btest.dyndns.biz:81.
Also you have to register a new account for the DDNS service by yourself.
Page 20

4.5 PT configuration
Signal lamp Set open /close to turn the Indicator light ON /OFF
against pre-bit Check the box to disable the preset function.
Call Preset on boot Select the preset position that the camera should move to after the
reboot/ power failure of the camera.
PT Speed Set the speed for the camera movement low, high or fast.
Cruise Views Select the amount of cruises from the dropdown menu. The
camera will cruise for the selected amount of cruises. When you
set cruise views to always camera turns all the time but will
automatically stop after cruising one hour.
Figure 4-16
Page 21

4.6 User and device setting
4.6.1 Multi-device Setting
Like Figure 4-17 user can add maximum 9 devices to view video simultaneously. Click
“refresh” button to check the device in the LAN. First choose a device on the left, like “The
2nd Device” and click on it. The setting dialogues will popup. Now enter the device info
manual (or by clicking on the device you want to be added) fill in user and password. Click
“Add” to add device. After that, you must click “Set up” button to save device.
Figure 4-17
4.6.2 User Settings
Visitor It is only allowed to view the live stream.
Operator You can additionally set PT, bidirectional talk, change resolution, set
contrast, brightness and etc.
Administrator You can set up every setting as administrator.
Figure 4-18
Page 22
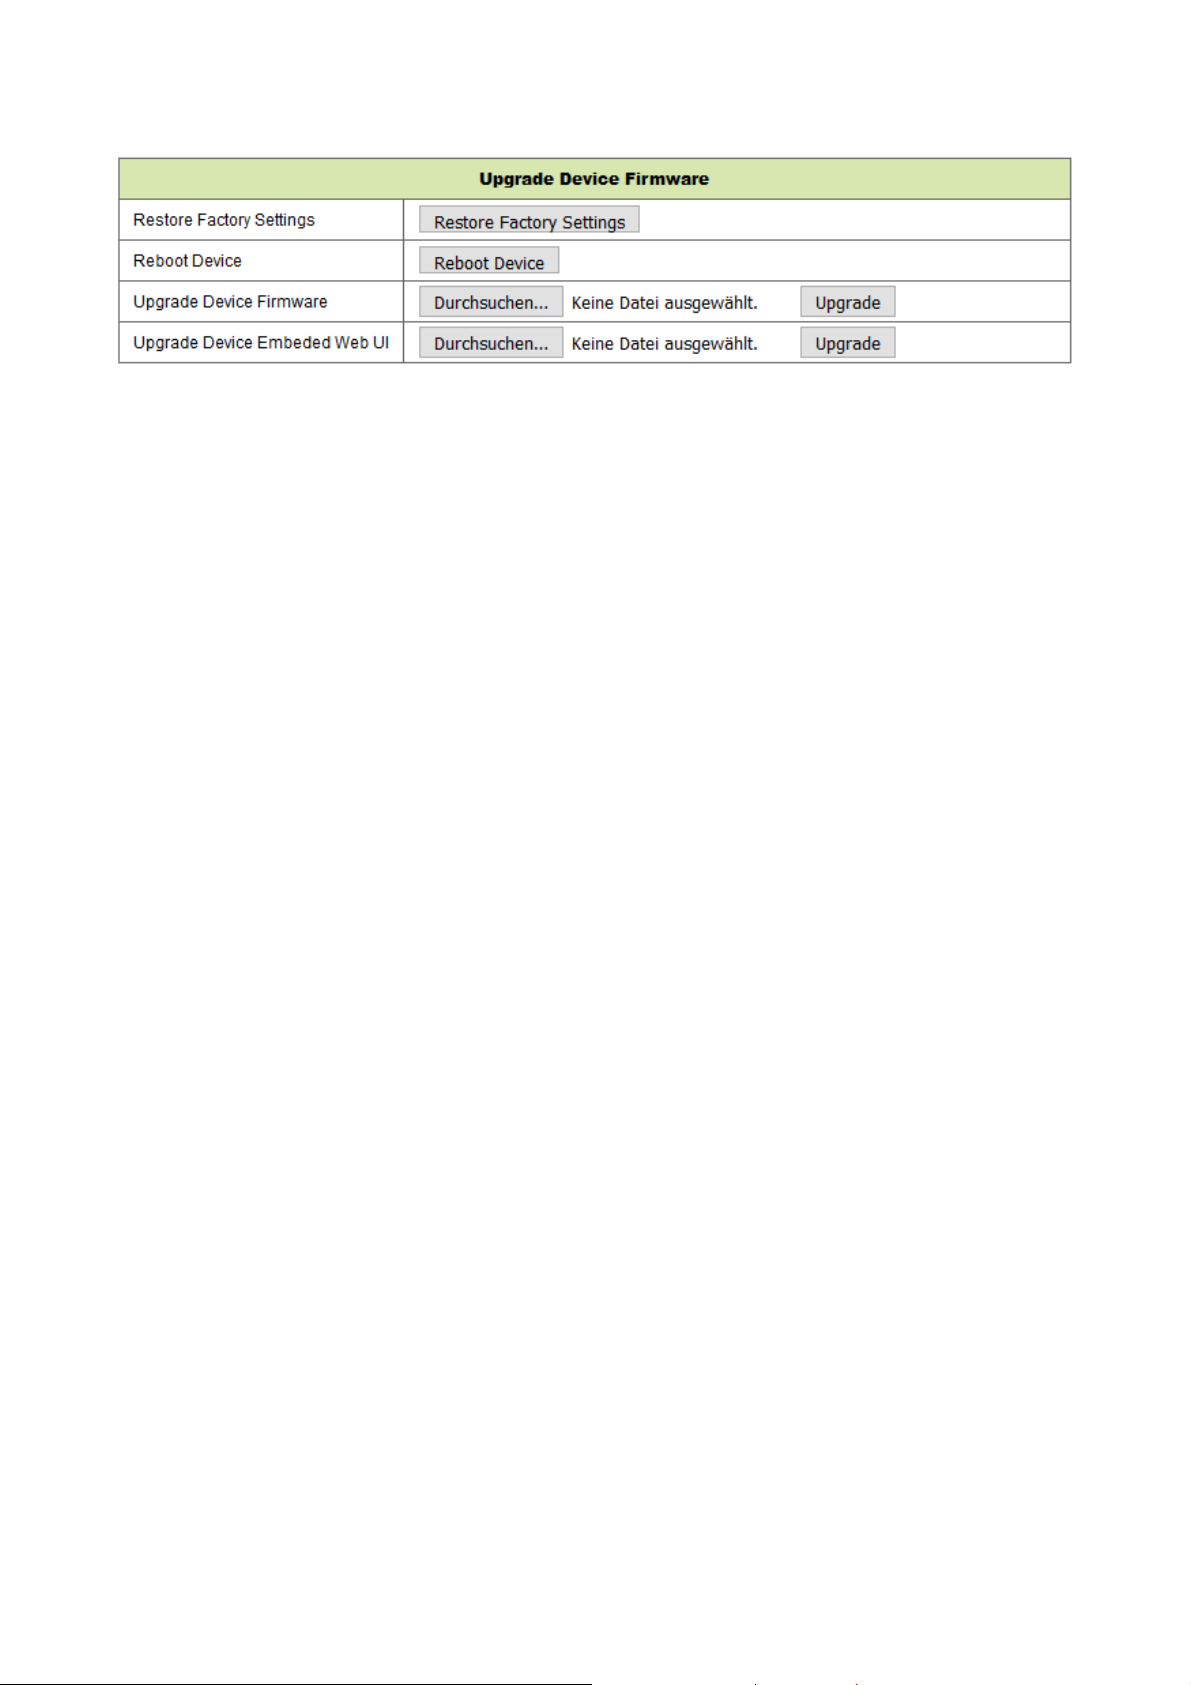
4.6.3 Maintain
Figure 4-19
Click “Restore factory settings”, it will pop up a dialog to ask you if restore to factory
settings, the camera will restore factory settings and reboot after you confirmed.
If there is any issue with the camera you also can reboot the camera by clicking on Reboot
Device.
There are two types of software in the camera, one is the device firmware, another is Web
UI and you can upgrade them respectively.
Page 23

5. PC software instructions
PC software can realize the function of monitoring, setting, viewing the remote records and
other functions on the PC.
Power on the IP camera, connect IP camera to router by network cable, meanwhile,
connect computer to the same router. Startup the computer, open the CD disk on the
computer, and choose Security Advanced PC Client from the CD, install the software and
run it. After starting the Software the following window will appear, figure 5-1.
Figure 5-1
To login enter the username and the password you set the camera.
5.1 Add camera
To add a camera click on “Manage” like seen in figure 5-2.
Page 24

Figure 5-2
In the new window that has opened, click “search” on the bottom. See figure 5-3.
Figure 5-3
The LAN will be scanned for devices. When a device is found it will be listed. See figure
5-4.
Figure 5-4
Page 25

Double click on the device name you want to add. See figure 5-5. Enter password and click
“OK”, then finish the camera adding. When it is the first time adding the camera and the
password wasn’t modified, no need to enter the password, because the factory default
value of the password is empty.
Figure 5-5
In the main interface of computer software, click the camera in the list and drag it to a
channel on the left.
Figure 5-6
Page 26

Click next to the camera name (Figure 5-7), and enter the camera setting list you see
in figure 5-8.
Figure 5-7
Figure 5-8
Page 27

Notice: For your own safety please customize the password before you make any further
settings. Go to User setting (figure 5-8) and set a customized user and password. For
different user class refer to chapter 4.6.2.
6. Mobile phone software (Security Advanced)
6.1 APP download
6.1.1 Android APP download
Search the software “Security Advanced” in the Google Play Store, and install
it to your Smartphone. Click on the APP icon “Security Advanced” to run it.
6.1.2 iOS APP download
Search the software “Security Advanced” in the Apple App Store on your iPhone, download
it and install it on your iPhone. Click on the APP icon “Security Advanced” to run it.
6.2 Add camera to the APP
There are 3 ways for adding camera:
1. One key to add
2. Scan the QR on the device
3. Search device in the LAN
6.2.1 One key to add
Connect the camera to the included power supply to startup the camera, wait for 90
seconds. Connect your Smartphone to the WIFI and open the Security Advanced APP.
Operate according to the following steps. See figure 6-1 and figure 6-2:
(1) Click “Add device” to enter the adding device interface.
(2) Click “One key to add” to enter the interface of one key to configure the WIFI.
(3) Enter the WIFI password which the Smartphone is connected with.
(4) First turn up or on the volume of the Smartphone, aim the speaker of the Smartphone at
the microphone of the camera. Press “Start Configuration”
Page 28
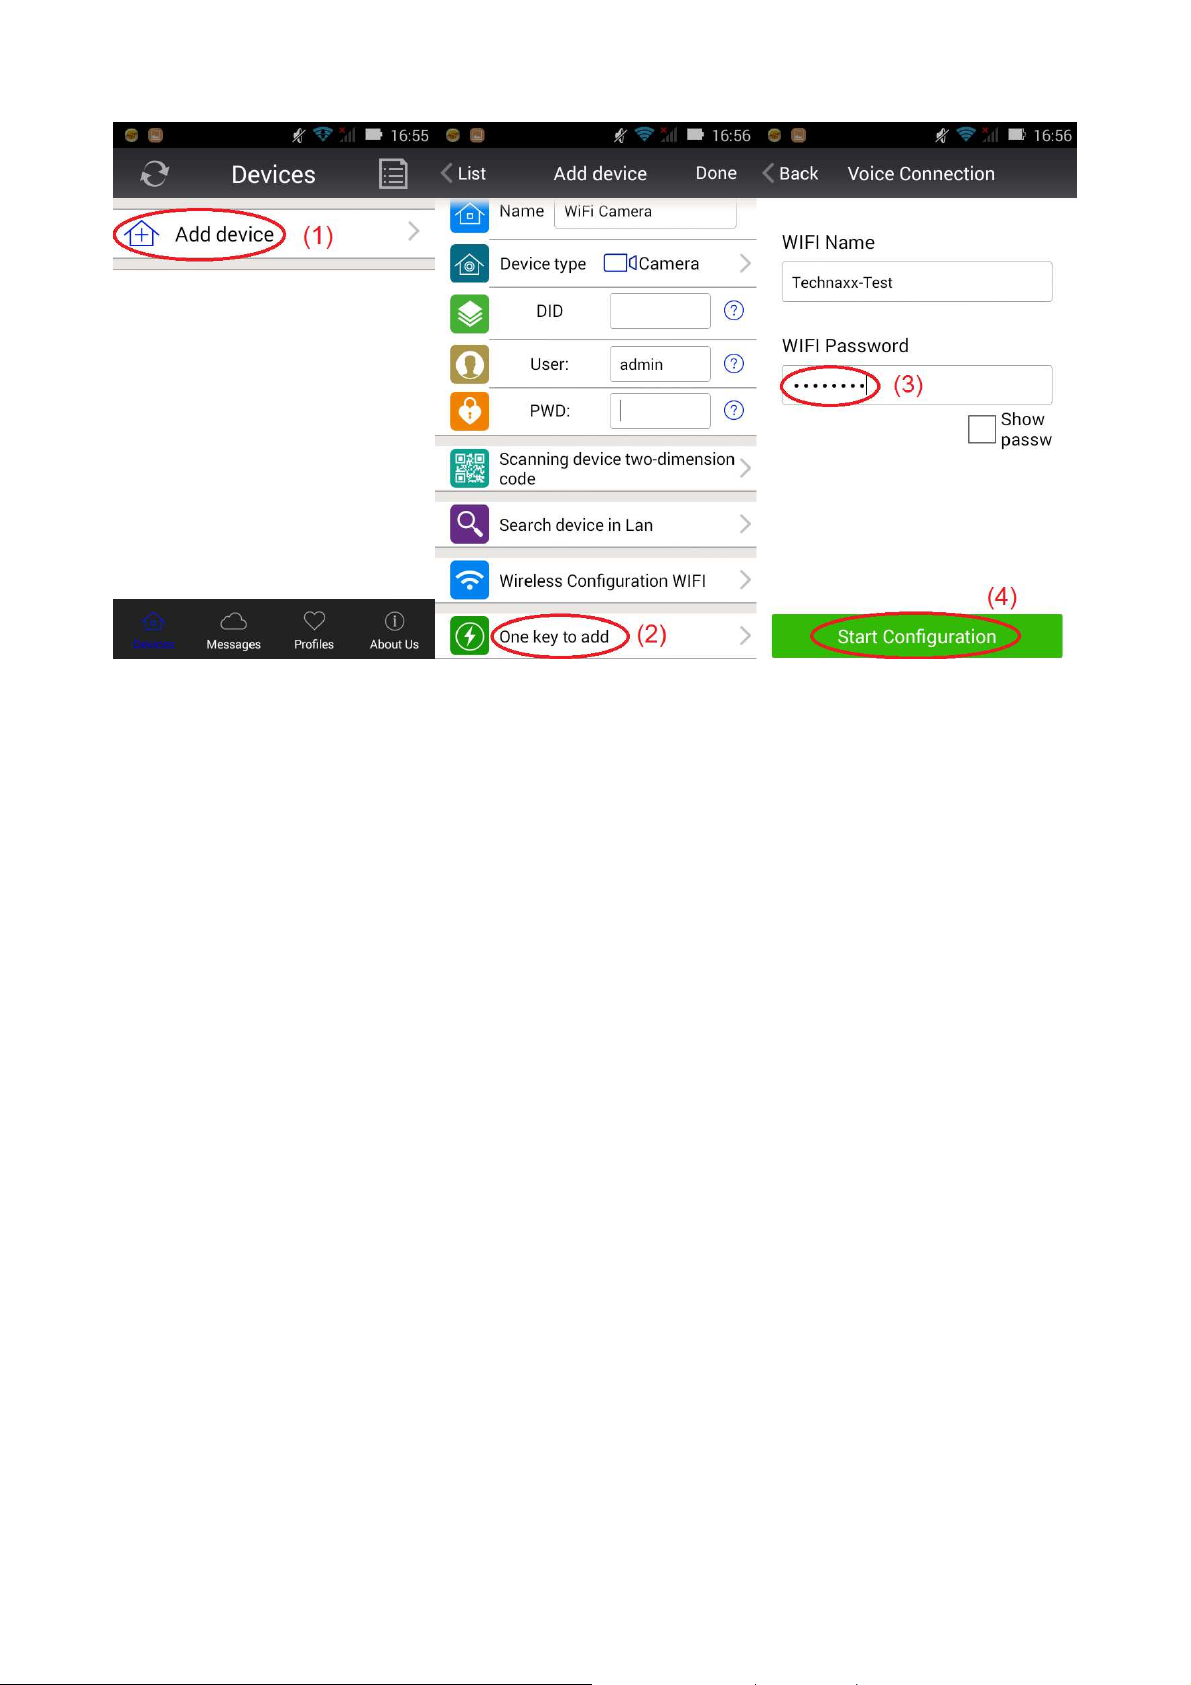
Figure 6-1
(5) After camera configuration was successful, the APP can search out the camera
DeviceID and show it out. Click on the DeviceID in the list and enter the adding camera
interface. (if point (5) isn’t shown go back and search camera per LAN)
(6) Enter the camera password
(7) Click “Done”, then the adding of the camera is finished.
Notice: The camera initial password is empty, when first using, no need to enter the
password and by clicking “Done” directly the setting will be ok.
Important: After first login change the password! (Chapter 4.6.2 User settings)
Page 29

Figure 6-2
6.2.2 Scan the QR code on the device
Connect the camera to the router through the network cable and plug in the power supply to
startup the camera.
Figure 6-3
Router/Modem
Network cable
IP Camera
Page 30

Open the APP Security Advanced and operate according to the steps below:
Figure 6-4
(1) Open the APP and click “Add device” to enter the adding device interface. (2) Click
“Scan QR code” (QR= two dimension) to enter the QR scanning status (Notice: If a pop-up
window shows up authorizing the APP to use the mobile phone camera, please select
YES.) (3) Aim the Smartphone camera at the QR code on the camera and scan it. (4) Enter
the camera password and click “Done”, than the adding of the camera is finished.
Note: The camera initial password is empty, when first using, no need to enter the
password and by clicking “Done” directly the setting will be ok. Important: After first login
change the password! (Chapter 6.4 User settings)
6.2.3 Search device via the LAN to add camera
Connect the camera to the router through the network cable and plug in the power supply to
startup the camera. Open the APP Security Advanced and operate according to the steps
below:
Figure 6-5
Page 31

(1) Open the APP, and click “Add device” to enter the adding device interface. (2) Click
“LAN search” to enter the interface which is searching the camera DeviceID in the LAN.
(Notice: The Smartphone and the camera should be connect to the same network) (3) If
DeviceID is found, you can directly click on it to add the camera into the list. (4) Enter the
camera password (5) Click “Done”, then the adding of the camera is finished.
Notice: The camera initial password is empty, when first using, no need to enter the
password and by clicking “Done” directly the setting will be ok. Important: After first login
change the password! (Chapter 6.4 User settings)
6.3 WIFI setting
To set or change the WIFI settings for your camera via your Smartphone follow the steps
shown in the figures below:
(1) Open the APP Security Advanced, click the gear shape icon on the right side to enter
the camera setting interface. (2) Click “WiFi setting” enter the WIFI setting interface. (3)
Click “WiFi Manager” to search for WIFI nearby.
Figure 6-6
Page 32

Figure 6-7
(4) Select WIFI which need to add, and click it.
(5) Enter the WIFI password under password.
(6) Click “Done”, the WIFI connection setting is finished.
Remark: If need help, please click on “About” “Help” in the Security Advanced APP, there
is detailed description for each icon. The Android and IOS interface styles are basically the
same, both of them can be operated according to this instructions.
Page 33
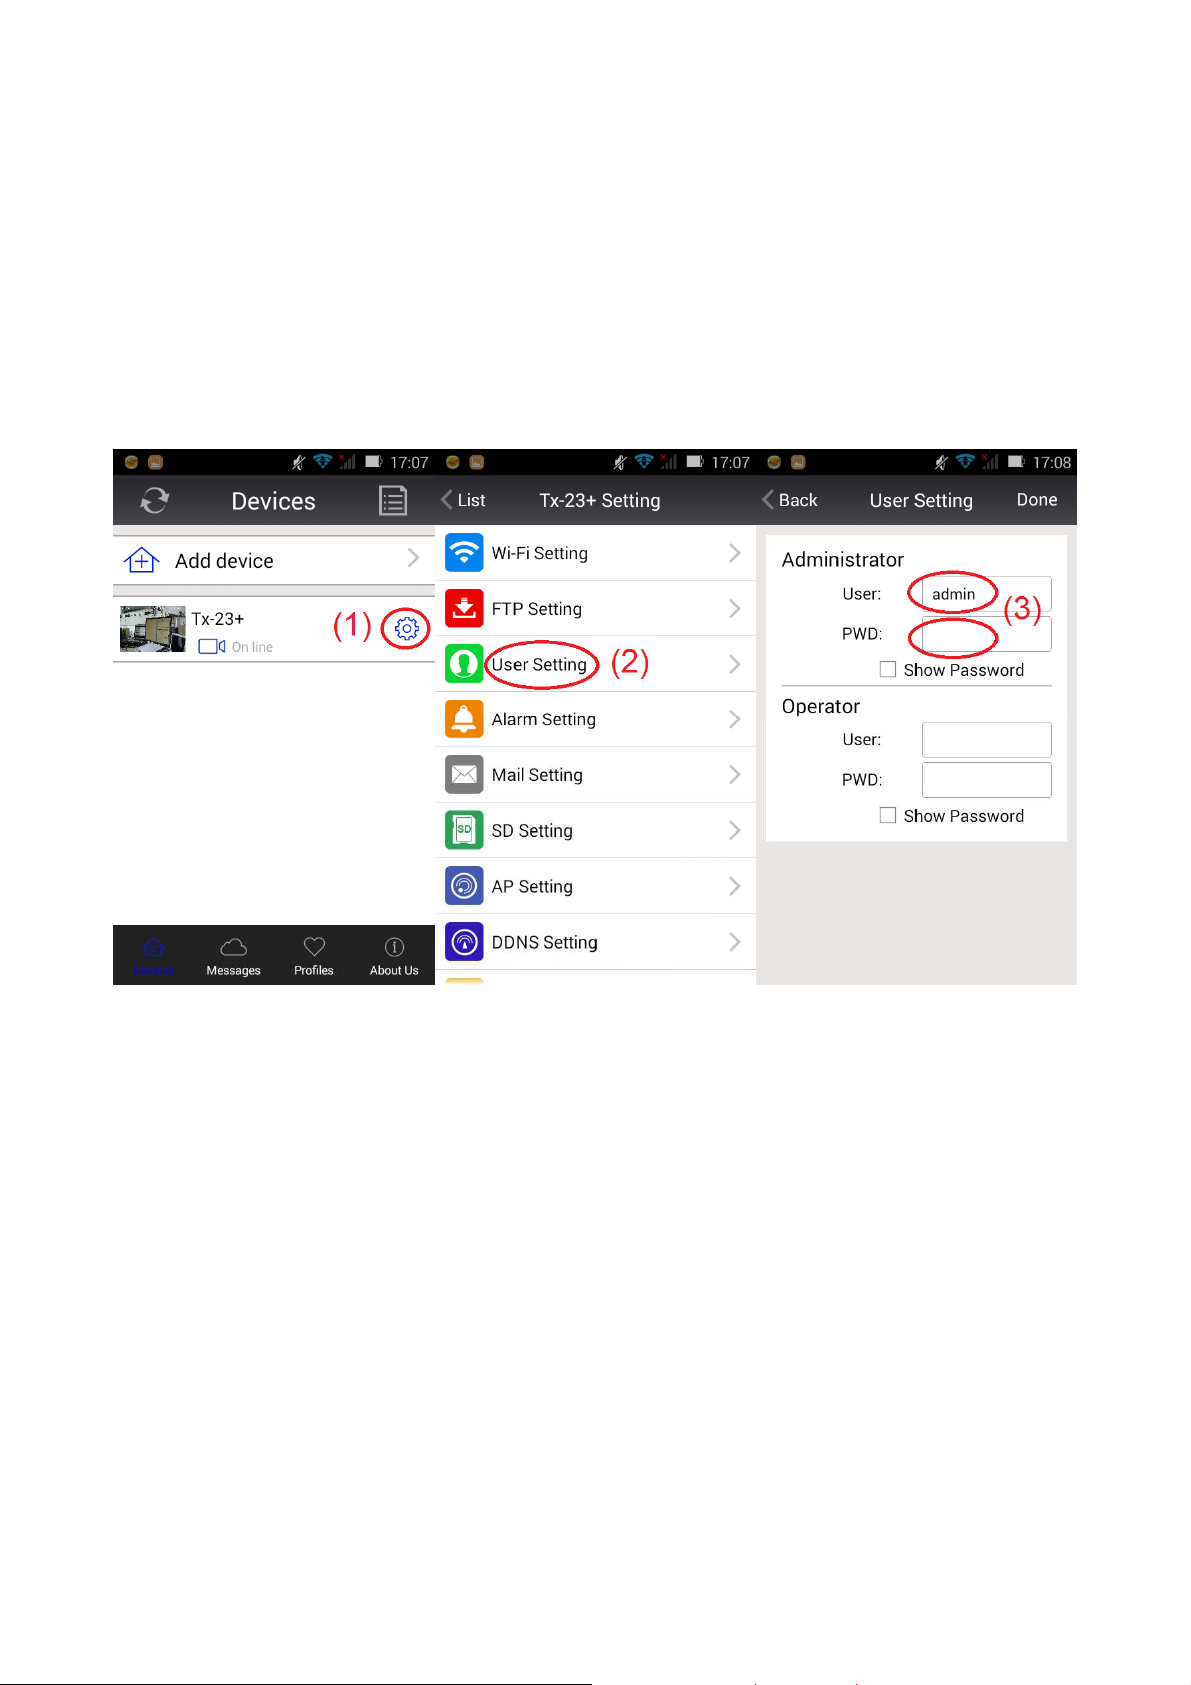
6.4 User setting
To change the user name /password for Administrator or Operator via your Smartphone
follow the steps shown in the figure 6-8 below:
(1) Open the APP Security Advanced, click the gear shape icon on the right side to enter
the camera setting interface.
(2) Click “User setting” to enter the User setting interface.
(3) Enter User name and Password
(4) Click “Done”, the User setting is finished.
Figure 6-8
Remark: Remember or write down the user settings. If you forget the user data you have
to reset (factory reset) the camera.
Page 34

7. Technical Specifications
Video
Audio
Video
Audio i
Audio
Camera
Image sensor 1/4" 1Megapixel CMOS
Signal system PAL/NTSC
Min. illumination 0.1Lux @ (F1.2,AGC ON), 0 LUX with IR
Shutter 1/50(1/60)s ~1/100000s
Lens f=3.6mm@ F1.2 Horizontal field of view: 62.6°
Lens mount M12
Rotation 120° vertical, 355° horizontal
Day/Night built-in IR-CUT
Sync mode internal synchronous
S/N ratio > 40dB
Compression
compression H.264 /MJPEG dual video stream
Bite rate 128 Kbps ~ 4 Mbps
compression G.711
Image
resolution 1280 x 720 HD maximum
Frame Rate 5–25fps @1280x720 / 640x480
Image Setting
Brightness, Contrast, Sharpness, Saturation adjustable through
Web server
Network
Intelligent alarm Motion detect & Sound detection ~10m
Sensitivity Sound detection 60dB minimum
Protocol TCP/IP, HTTP, DHCP, DNS, DDNS, SMTP, NTP, etc.
Wifi 802.11/b/g/n
Basic Reset button, Anti-flicker, Dual stream, Password protection
Interface
nput Built-in microphone
output 1ch, 3.5mm audio interface. Built-in speaker
Communication interface 1 RJ45 10M/100M self-adaptive Ethernet interface
Local storage Supports MicroSD card up to 64GB
General
Power Supply DC 5V±10%
Power Consumption 5W maximum
IR distance ~10m
Operating Condition –10°C~60°C, humidity 90% or less (non-condensing)
Weight / Dimension 350g / (L) 11.5 x (W) 13.0 x (H) 13.5cm
Page 35

This product includes software developed by third parties, including software which
is released under the GNU General Public License Version 2 (GPL v2). This program
is free software; you can redistribute it and/or modify it under the terms of the GNU
General Public License as published by the Free Software Foundation; either
version 2 of the License, or (at your option) any later version. You may obtain a
complete machine-readable copy of the source code for the above mentioned
software under the terms of GPL v2 without charge except for the cost of media,
shipping, and handling, upon written request to Technaxx GmbH & Co. KG,
Kruppstraße 105, 60388 Frankfurt am Main, Germany.
This program is distributed in the hope that it will be useful, but WITHOUT
ANY WARRANTY; without even the implied warranty of MERCHANTABILITY or
FITNESS FOR A PARTICULAR PURPOSE. See the GNU General Public License for
more details. You should have received a copy of the GNU General Public License
along with this program; if not, write to the Free Software Foundation, Inc., 51
Franklin Street, Fifth Floor, Boston, MA 02110-1301, USA. (Notice from Technaxx: A
copy of the GPL is included below).
GNU GENERAL PUBLIC LICENSE: Version 2, June 1991 / Copyright (C) 1989, 1991
Free Software Foundation, Inc. / 51 Franklin Street, Fifth Floor, Boston, MA
02110-1301, USA. Everyone is permitted to copy and distribute verbatim copies of this
license document, but changing it is not allowed.
Preamble
The licenses for most software are designed to take away your freedom to share and
change it. By contrast, the GNU General Public License is intended to guarantee your
freedom to share and change free software--to make sure the software is free for all its
users. This General Public License applies to most of the Free Software Foundation's
software and to any other program whose authors commit to using it. (Some other Free
Software Foundation software is covered by the GNU Lesser General Public License
instead.) You can apply it to your programs, too.
When we speak of free software, we are referring to freedom, not price. Our General
Public Licenses are designed to make sure that you have the freedom to distribute copies of
free software (and charge for this service if you wish), that you receive source code or can
get it if you want it, that you can change the software or use pieces of it in new free
programs; and that you know you can do these things.
To protect your rights, we need to make restrictions that forbid anyone to deny you
these rights or to ask you to surrender the rights. These restrictions translate to certain
responsibilities for you if you distribute copies of the software, or if you modify it.
For example, if you distribute copies of such a program, whether gratis or for a fee,
you must give the recipients all the rights that you have. You must make sure that they, too,
receive or can get the source code. And you must show them these terms so they know their
rights.
We protect your rights with two steps: (1) copyright the software, and (2) offer you this
license which gives you legal permission to copy, distribute and/or modify the software.
Also, for each author's protection and ours, we want to make certain that everyone
Page 36

understands that there is no warranty for this free software. If the software is modified by
someone else and passed on, we want its recipients to know that what they have is not the
original, so that any problems introduced by others will not reflect on the original authors'
reputations.
Any free program is threatened constantly by software patents. We wish to avoid the
danger that redistributors of a free program will individually obtain patent licenses, in effect
making the program proprietary. To prevent this, we have made it clear that any patent must
be licensed for everyone's free use or not licensed at all.
The precise terms and conditions for copying, distribution and modification follow.
TERMS AND CONDITIONS FOR COPYING, DISTRIBUTION AND MODIFICATION
0. This License applies to any program or other work which contains a notice placed by the
copyright holder saying it may be distributed under the terms of this General Public License.
The "Program", below, refers to any such program or work, and a "work based on the
Program" means either the Program or any derivative work under copyright law: that is to
say, a work containing the Program or a portion of it, either verbatim or with modifications
and/or translated into another language. (Hereinafter, translation is included without
limitation in the term "modification".) Each licensee is addressed as "you".
Activities other than copying, distribution and modification are not covered by this
License; they are outside its scope. The act of running the Program is not restricted, and the
output from the Program is covered only if its contents constitute a work based on the
Program (independent of having been made by running the Program). Whether that is true
depends on what the Program does.
1. You may copy and distribute verbatim copies of the Program's source code as you
receive it, in any medium, provided that you conspicuously and appropriately publish on
each copy an appropriate copyright notice and disclaimer of warranty; keep intact all the
notices that refer to this License and to the absence of any warranty; and give any other
recipients of the Program a copy of this License along with the Program. You may charge a
fee for the physical act of transferring a copy, and you may at your option offer warranty
protection in exchange for a fee.
2. You may modify your copy or copies of the Program or any portion of it, thus forming a
work based on the Program, and copy and distribute such modifications or work under the
terms of Section 1 above, provided that you also meet all of these conditions:
a) You must cause the modified files to carry prominent notices stating that you changed the
files and the date of any change.
b) You must cause any work that you distribute or publish, that in whole or in part contains or
is derived from the Program or any part thereof, to be licensed as a whole at no charge to all
third parties under the terms of this License.
c) If the modified program normally reads commands interactively when run, you must
cause it, when started running for such interactive use in the most ordinary way, to print or
display an announcement including an appropriate copyright notice and a notice that there
Page 37

is no warranty (or else, saying that you provide a warranty) and that users may redistribute
the program under these conditions, and telling the user how to view a copy of this License.
(Exception: if the Program itself is interactive but does not normally print such an
announcement, your work based on the Program is not required to print an announcement.)
These requirements apply to the modified work as a whole. If identifiable sections of
that work are not derived from the Program, and can be reasonably considered independent
and separate works in themselves, then this License, and its terms, do not apply to those
sections when you distribute them as separate works. But when you distribute the same
sections as part of a whole which is a work based on the Program, the distribution of the
whole must be on the terms of this License, whose permissions for other licensees extend to
the entire whole, and thus to each and every part regardless of who wrote it.
Thus, it is not the intent of this section to claim rights or contest your rights to work
written entirely by you; rather, the intent is to exercise the right to control the distribution of
derivative or collective works based on the Program.
In addition, mere aggregation of another work not based on the Program with the
Program (or with a work based on the Program) on a volume of a storage or distribution
medium does not bring the other work under the scope of this License.
3. You may copy and distribute the Program (or a work based on it, under Section 2) in
object code or executable form under the terms of Sections 1 and 2 above provided that you
also do one of the following:
a) Accompany it with the complete corresponding machine-readable source code, which
must be distributed under the terms of Sections 1 and 2 above on a medium customarily
used for software interchange; or,
b) Accompany it with a written offer, valid for at least three years, to give any third party, for
a charge no more than your cost of physically performing source distribution, a complete
machine-readable copy of the corresponding source code, to be distributed under the terms
of Sections 1 and 2 above on a medium customarily used for software interchange; or,
c) Accompany it with the information you received as to the offer to distribute corresponding
source code. (This alternative is allowed only for noncommercial distribution and only if you
received the program in object code or executable form with such an offer, in accord with
Subsection b above.)
The source code for a work means the preferred form of the work for making
modifications to it. For an executable work, complete source code means all the source
code for all modules it contains, plus any associated interface definition files, plus the scripts
used to control compilation and installation of the executable. However, as a special
exception, the source code distributed need not include anything that is normally distributed
(in either source or binary form) with the major components (compiler, kernel, and so on) of
the operating system on which the executable runs, unless that component itself
accompanies the executable.
If distribution of executable or object code is made by offering access to copy from a
designated place, then offering equivalent access to copy the source code from the same
place counts as distribution of the source code, even though third parties are not compelled
to copy the source along with the object code.
Page 38

4. You may not copy, modify, sublicense, or distribute the Program except as expressly
provided under this License. Any attempt otherwise to copy, modify, sublicense or distribute
the Program is void, and will automatically terminate your rights under this License.
However, parties who have received copies, or rights, from you under this License will not
have their licenses terminated so long as such parties remain in full compliance.
5. You are not required to accept this License, since you have not signed it. However,
nothing else grants you permission to modify or distribute the Program or its derivative
works. These actions are prohibited by law if you do not accept this License. Therefore, by
modifying or distributing the Program (or any work based on the Program), you indicate your
acceptance of this License to do so, and all its terms and conditions for copying, distributing
or modifying the Program or works based on it.
6. Each time you redistribute the Program (or any work based on the Program), the recipient
automatically receives a license from the original licensor to copy, distribute or modify the
Program subject to these terms and conditions. You may not impose any further restrictions
on the recipients' exercise of the rights granted herein. You are not responsible for enforcing
compliance by third parties to this License.
7. If, as a consequence of a court judgment or allegation of patent infringement or for any
other reason (not limited to patent issues), conditions are imposed on you (whether by court
order, agreement or otherwise) that contradict the conditions of this License, they do not
excuse you from the conditions of this License. If you cannot distribute so as to satisfy
simultaneously your obligations under this License and any other pertinent obligations, then
as a consequence you may not distribute the Program at all. For example, if a patent license
would not permit royalty-free redistribution of the Program by all those who receive copies
directly or indirectly through you, then the only way you could satisfy both it and this License
would be to refrain entirely from distribution of the Program.
If any portion of this section is held invalid or unenforceable under any particular
circumstance, the balance of the section is intended to apply and the section as a whole is
intended to apply in other circumstances.
It is not the purpose of this section to induce you to infringe any patents or other
property right claims or to contest validity of any such claims; this section has the sole
purpose of protecting the integrity of the free software distribution system, which is
implemented by public license practices. Many people have made generous contributions
to the wide range of software distributed through that system in reliance on consistent
application of that system; it is up to the author/donor to decide if he or she is willing to
distribute software through any other system and a licensee cannot impose that choice.
This section is intended to make thoroughly clear what is believed to be a
consequence of the rest of this License.
8. If the distribution and/or use of the Program is restricted in certain countries either by
patents or by copyrighted interfaces, the original copyright holder who places the Program
under this License may add an explicit geographical distribution limitation excluding those
Page 39

countries, so that distribution is permitted only in or among countries not thus excluded. In
such case, this License incorporates the limitation as if written in the body of this License.
9. The Free Software Foundation may publish revised and/or new versions of the General
Public License from time to time. Such new versions will be similar in spirit to the present
version, but may differ in detail to address new problems or concerns.
Each version is given a distinguishing version number. If the Program specifies a
version number of this License which applies to it and "any later version", you have the
option of following the terms and conditions either of that version or of any later version
published by the Free Software Foundation. If the Program does not specify a version
number of this License, you may choose any version ever published by the Free Software
Foundation.
10. If you wish to incorporate parts of the Program into other free programs whose
distribution conditions are different, write to the author to ask for permission. For software
which is copyrighted by the Free Software Foundation, write to the Free Software
Foundation; we sometimes make exceptions for this. Our decision will be guided by the two
goals of preserving the free status of all derivatives of our free software and of promoting the
sharing and reuse of software generally.
NO WARRANTY
11. BECAUSE THE PROGRAM IS LICENSED FREE OF CHARGE, THERE IS NO
WARRANTY FOR THE PROGRAM, TO THE EXTENT PERMITTED BY APPLICABLE
LAW. EXCEPT WHEN OTHERWISE STATED IN WRITING THE COPYRIGHT HOLDERS
AND/OR OTHER PARTIES PROVIDE THE PROGRAM "AS IS" WITHOUT WARRANTY
OF ANY KIND, EITHER EXPRESSED OR IMPLIED, INCLUDING, BUT NOT LIMITED TO,
THE IMPLIED WARRANTIES OF MERCHANTABILITY AND FITNESS FOR A
PARTICULAR PURPOSE. THE ENTIRE RISK AS TO THE QUALITY AND
PERFORMANCE OF THE PROGRAM IS WITH YOU. SHOULD THE PROGRAM PROVE
DEFECTIVE, YOU ASSUME THE COST OF ALL NECESSARY SERVICING, REPAIR OR
CORRECTION.
12. IN NO EVENT UNLESS REQUIRED BY APPLICABLE LAW OR AGREED TO IN
WRITING WILL ANY COPYRIGHT HOLDER, OR ANY OTHER PARTY WHO MAY
MODIFY AND/OR REDISTRIBUTE THE PROGRAM AS PERMITTED ABOVE, BE LIABLE
TO YOU FOR DAMAGES, INCLUDING ANY GENERAL, SPECIAL, INCIDENTAL OR
CONSEQUENTIAL DAMAGES ARISING OUT OF THE USE OR INABILITY TO USE THE
PROGRAM (INCLUDING BUT NOT LIMITED TO LOSS OF DATA OR DATA BEING
RENDERED INACCURATE OR LOSSES SUSTAINED BY YOU OR THIRD PARTIES OR A
FAILURE OF THE PROGRAM TO OPERATE WITH ANY OTHER PROGRAMS), EVEN IF
SUCH HOLDER OR OTHER PARTY HAS BEEN ADVISED OF THE POSSIBILITY OF
SUCH DAMAGES.
END OF TERMS AND CONDITIONS
Page 40

HOW TO APPLY THESE TERMS TO YOUR NEW PROGRAMS
(1) If you develop a new program, and you want it to be of the greatest possible use to the
public, the best way to achieve this is to make it free software which everyone can
redistribute and change under these terms.
(2) To do so, attach the following notices to the program. It is safest to attach them to the
start of each source file to most effectively convey the exclusion of warranty; and each file
should have at least the "copyright" line and a pointer to where the full notice is found.
<one line to give the program's name and an idea of what it does.>
Copyright (C) <yyyy> <name of author>
(3) This program is free software; you can redistribute it and/or modify it under the terms of
the GNU General Public License as published by the Free Software Foundation; either
version 2 of the License, or (at your option) any later version.
(4) This program is distributed in the hope that it will be useful, but WITHOUT ANY
WARRANTY; without even the implied warranty of MERCHANTABILITY or FITNESS FOR
A PARTICULAR PURPOSE. See the GNU General Public License for more details.
(5) You should have received a copy of the GNU General Public License along with this
program; if not, write to the Free Software Foundation Inc; 51 Franklin Street, Fifth Floor,
Boston, MA 02110-1301, USA.
(6) Also add information on how to contact you by electronic and paper mail.
(7) If the program is interactive, make it output a short notice like this when it starts in an
interactive mode: Gnomovision version 69, Copyright (C) year name of author
Gnomovision comes with ABSOLUTELY NO WARRANTY; for details type `show w'.
(8) This is free software, and you are welcome to redistribute it under certain conditions;
type `show c' for details.
(9) The hypothetical commands `show w' and `show c' should show the appropriate parts of
the General Public License. Of course, the commands you use may be called something
other than `show w' and `show c'; they could even be mouse-clicks or menu
items--whatever suits your program.
(10) You should also get your employer (if you work as a programmer) or your school, if any,
to sign a "copyright disclaimer" for the program, if necessary. Here is a sample; alter the
names:
(11) Yoyodyne, Inc., hereby disclaims all copyright interest in the program `Gnomovision'
(which makes passes at compilers) written by James Hacker.
<signature of Ty Coon>, 1 April 1989 [Ty Coon, President of Vice]
(12) This General Public License does not permit incorporating your program into
proprietary programs. If your program is a subroutine library, you may consider it more
useful to permit linking proprietary applications with the library. If this is what you want to do,
use the GNU Lesser General Public License instead of this License.
 Loading...