

Page 1

Technaxx®
IP Cámara de seguridad HD 720P TX-23+
para uso en interiores
Manual de usuario
Important Hint regarding the User Manuals:
All languages of the user manual you find on the CD enclosed.
The english and german version of the user manuals you also find as printed version
enclosed. Before using the device the first time, read the user manual carefully.
Wichtiger Hinweis zu den Bedienungsanleitungen:
Alle Sprachen der Bedienungsanleitung finden Sie auf der beiliegenden CD. Die englische
und die deutsche Version der Bedienungsanleitung finden Sie auch beiliegend in
gedruckter Form. Vor erster Benutzung die Bedienungsanleitung sorgfältig durchlesen.
Remarques importantes sur le mode d'emploi :
Toutes les langues du manuel d’utilisation sont disponibles sur le CD fourni. La version
anglaise et allemande du manuel d’utilisation est fournie au format papier. Lisez
attentivement le mode d'emploi avant la première utilisation.
Consejo importante relacionado con los manuales de usuario:
Encontrará el manual de usuario en todos los idiomas en el CD incluido. También
encontrará incluidas copias impresas de las versiones del manual en inglés y alemán.
Antes de utilizarla por primera vez, lea atentamente este manual.
Ważna wskazówka odnośnie Instrukcji użytkowania:
Instrukcje we wszystkich językach znaleźć można na załączonej płycie CD. Angielska i
niemiecka wersja instrukcji użytkowania znajdują się również na dołączonej wersji
drukowanej. Przed pierwszym użyciem urządzenia należy dokładnie zapoznać się z
instrukcjami użytkowania.
Důležité poznámky týkající se Uživatelského manuálu:
Další jazykové verze uživatelského manuálu naleznete na přiloženém CD. Anglická a
německá verze manuálu je přiložena v tištěné formě. Před prvním použitím kamery si
pečlivě přečtete uživatelský manuál.
Page 2

I Índice
I ÍNDICE...............................................................................................................................2
1. CARACTERÍSTICAS.......................................................................................................4
2. ESTRUCTURA DE DISPOSITIVO...................................................................................4
3. GUÍA DE INSTALACIÓN..................................................................................................6
3.1 C
ONEXIÓN
3.2 C
ONFIGURACIÓN
3.3 C
ONECTARSE A
LAN
POR CABLE
WIFI
...............................................................................................6
MEDIANTE NAVEGADOR
WEB...........................................................8
WAN........................................................................................................9
4. FUNCIONAMIENTO DEL NAVEGADOR.......................................................................10
4.1 V
ER VÍDEO
4.2 I
NFORMACIÓN BÁSICA DEL DISPOSITIVO
.....................................................................................................................10
............................................................................13
4.2.1 Información de Dispositivo........................................................................................13
4.2.2 Configuración de Alias..............................................................................................13
4.2.3 Configuración de Fecha y Hora de Dispositivo.........................................................13
4.2.4 Ruta Local de Grabación..........................................................................................13
4.2.5 Tabla de Grabación en Tarjeta MicroSD....................................................................14
4.2.6 Configuración de Voz................................................................................................14
4.3 C
ONFIGURACIÓN DE ALARMA
...........................................................................................15
4.3.1 Configuración de Servicios de Alarma......................................................................15
4.3.2 Configuración del Servicio de Correo .......................................................................17
4.3.3 Configuración del Servicio FTP.................................................................................17
4.3.4 Registro ....................................................................................................................18
4.4 C
ONFIGURACIÓN DE RED
................................................................................................18
4.4.1 Configuración Básica de Red ...................................................................................18
4.4.2 Configuración de Lan inalámbrico.............................................................................19
4.4.3 Configuración del Servicio DDNS.............................................................................19
4.5 C
ONFIGURACIÓN DE INCLINACIÓN Y ROTACIÓN
4.6 C
ONFIGURACIÓN DE USUARIO Y DISPOSITIVO
...................................................................20
...................................................................21
4.6.1 Configuración de Dispositivos Múltiples....................................................................21
4.6.2 Configuración de Usuario .........................................................................................21
4.6.3 Mantenimiento ..........................................................................................................22
5. INSTRUCCIONES PARA EL SOFTWARE DE PC.........................................................23
5.1 A
ÑADIR CÁMARA
6. S
OFTWARE PARA TELÉFONO MÓVIL (SECURITY ADVANCED
6.1 D
ESCARGA DE LA
............................................................................................................23
) .................................................27
APP....................................................................................................27
6.1.1 Descarga de la APP para Android.............................................................................27
6.1.2 Descarga de la APP para iOS...................................................................................27
6.2 A
ÑADIR CÁMARA A LA
APP ..............................................................................................27
6.2.1 Añadir con una Tecla.................................................................................................27
6.2.2 Escanear Código QR en el Dispositivo.....................................................................29
Page 3
6.2.3 Buscar Dispositivo en LAN para Añadir Cámara.......................................................30
6.3 C
ONFIGURACIÓN
6.4 C
ONFIGURACIÓN DE USUARIO
WIFI....................................................................................................31
.........................................................................................33
7. ESPECIFICACIONES TÉCNICAS.................................................................................34
Este dispositivo cumple con los requisitos de las normativas a las que hace referencia la
Directiva R&TTE 1999/5/CE. Aquí encontrará la Declaración de Conformidad:
www.technaxx.de/ (en la barra inferior “Konformitätserklärung”). Antes de utilizar el
dispositivo por primera vez, lea atentamente este manual de usuario.
Número de teléfono de ayuda técnica: 01805 012643 (14 céntimos/minuto desde
líneas fijas en Alemania y 42 céntimos/minuto desde redes móviles).
Email gratuito: support@technaxx.de
Si taladra un agujero en la pared, asegúrese de no dañar cables de corriente, cables
eléctricos y/o tuberías. Cuando utilice el material de montaje suministrado, no
aceptaremos la responsabilidad de una instalación profesional. Usted es absolutamente
responsable de asegurar que el material de montaje sea adecuado para la albañilería
particular y de que la instalación se hace correctamente. Cuando trabaje a grandes alturas,
existe peligro de caída. Por lo tanto, utilice protecciones adecuadas.
Contenidos del paquete:
IP Cámara de seguridad HD 720P TX-23+, Adaptador de CC 5V/2A, Soporte y 3 tornillos,
Manual de usuario (versiones en inglés y alemán), Manual de usuario (impreso en las
versiones inglesa y alemana).
Consejos de seguridad y eliminación de pilas: Mantenga los niños alejados de
las pilas. Si un niño se traga una pila, acuda al médico o lleve al niño a un hospital
inmediatamente. Siga la polaridad correcta (+) y (–) de las pilas. Cambie todas las
pilas simultáneamente. No utilice nunca pilas nuevas y viejas, ni de diferentes
tipos al mismo tiempo. ¡No cortocircuite, abra, deforme ni cargue las pilas!
¡Riesgo de lesiones! ¡No tire nunca las pilas al fuego! ¡Riesgo de explosión!
Consejos para la protección del medio ambiente: No elimine los dispositivos
antiguos junto con los residuos domésticos. Limpieza: Proteja el dispositivo
contra la contaminación y la polución. Limpie el dispositivo solo con un paño
suave o similar, evitando utilizar materiales rugosos o de grano grueso. NO utilice
disolventes ni otros productos de limpieza agresivos. Pase un paño por el
dispositivo después de limpiarlo. Distribuidor: Technaxx Deutschland GmbH &
Co.KG, Kruppstr. 105, 60388 Frankfurt a.M., Alemania
Page 4
1. Características
Resolución de vídeo 1280 x 720 HD con 5-25fps Sensor de color brillante de 1/4”
CMOS (1 megapíxeles) Detección de movimiento & de sonido ~10m 10x LED
infrarrojos y IR visión nocturna ~10m Micrófono & Altavoz incorporado Cabeza de la
cámara giratoria: 120° vertical & 355° horizontal Admite las tarjetas MicroSD de hasta
64GB Conexión directa con el Smartphone a través del QR código / P2P Función de
alarma (E-mail automática con imagen) H.264 / MJPEG flujo de vídeo dual Instalación
rápida & configuración de contraseña
● Potente procesador de protocolo de vídeo a alta velocidad
● Gestión de usuarios a varios niveles y configuraciones de contraseña
● Navegador WEB para acceder al servidor web integrado
● Compatible con red inalámbrica (Wi-Fi/802.11/b/g/n)
● Conexión a través smartphone APP (Security Advanced)
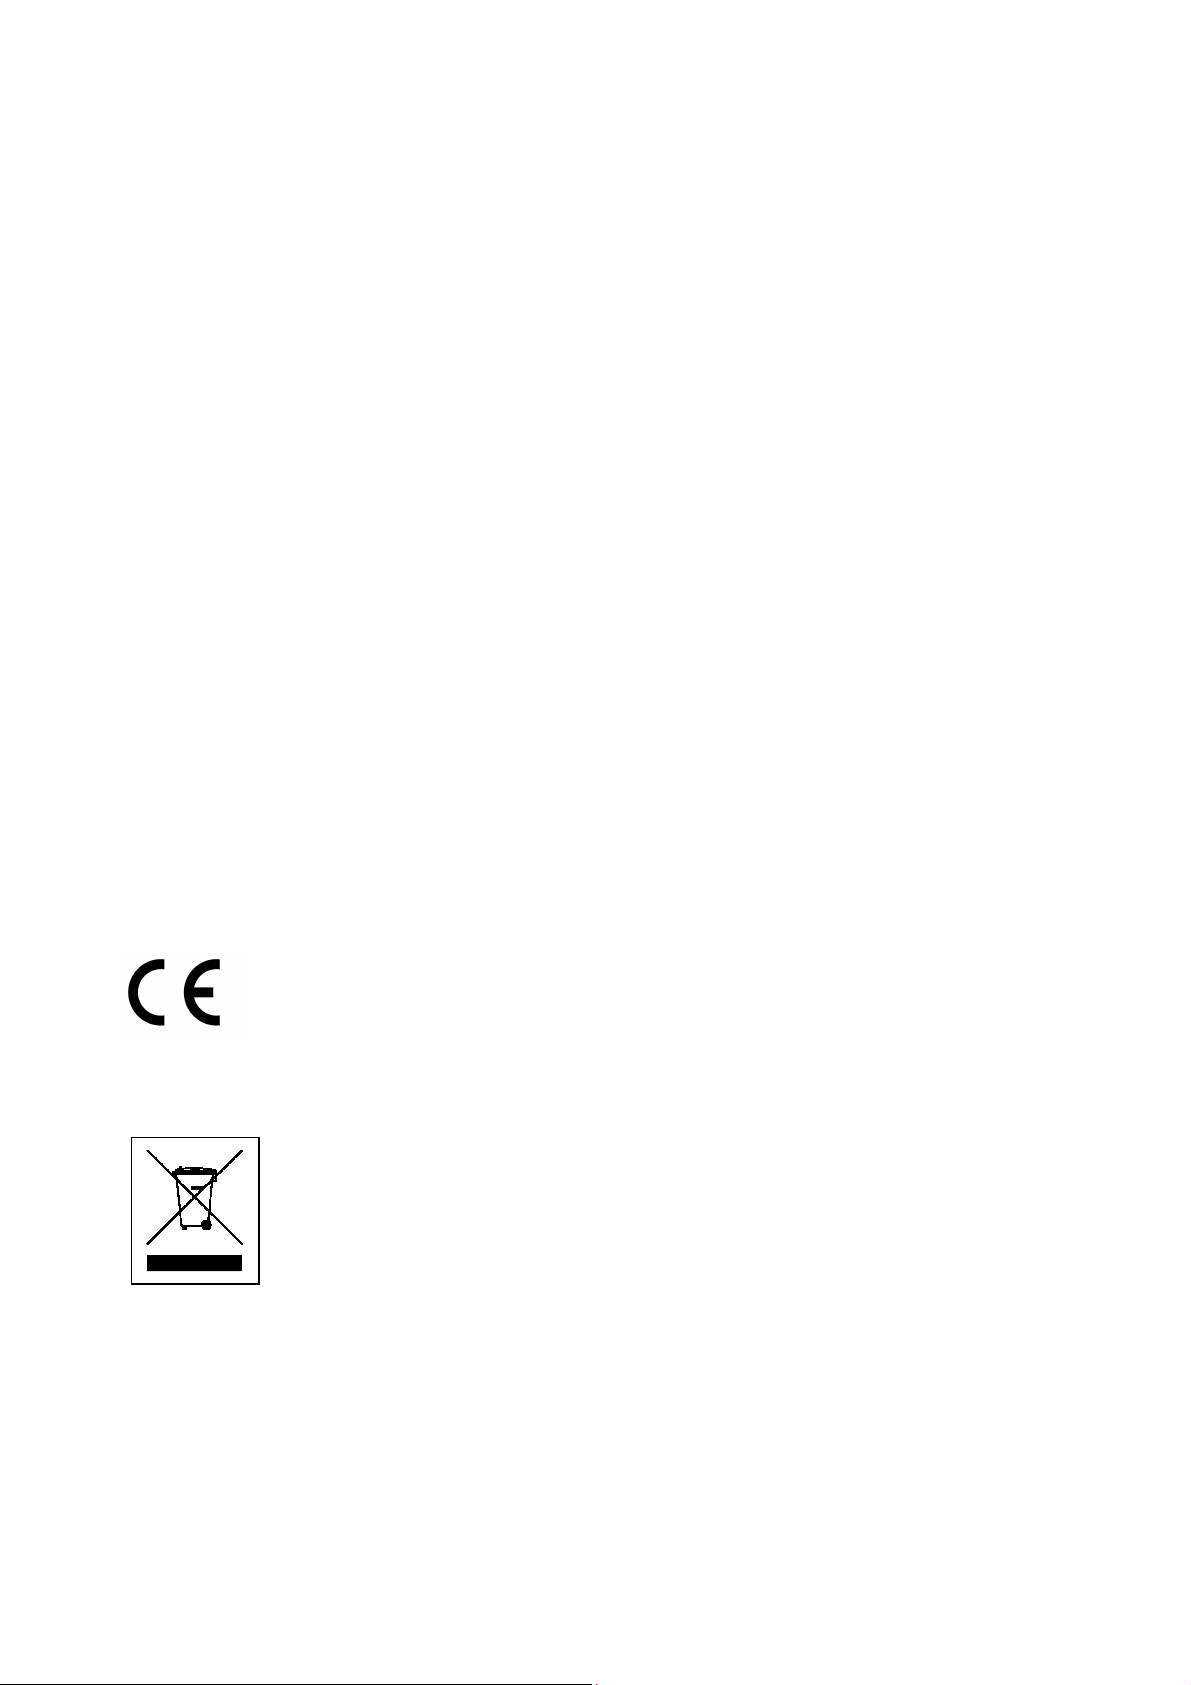
2. Estructura de dispositivo
Figura 2-1
1
2
3
4
Antena
Fotorresistor
LED IR
Objetivo
5
6
7
Regular nitidez
Indicador luminoso
Micrófono
Page 5
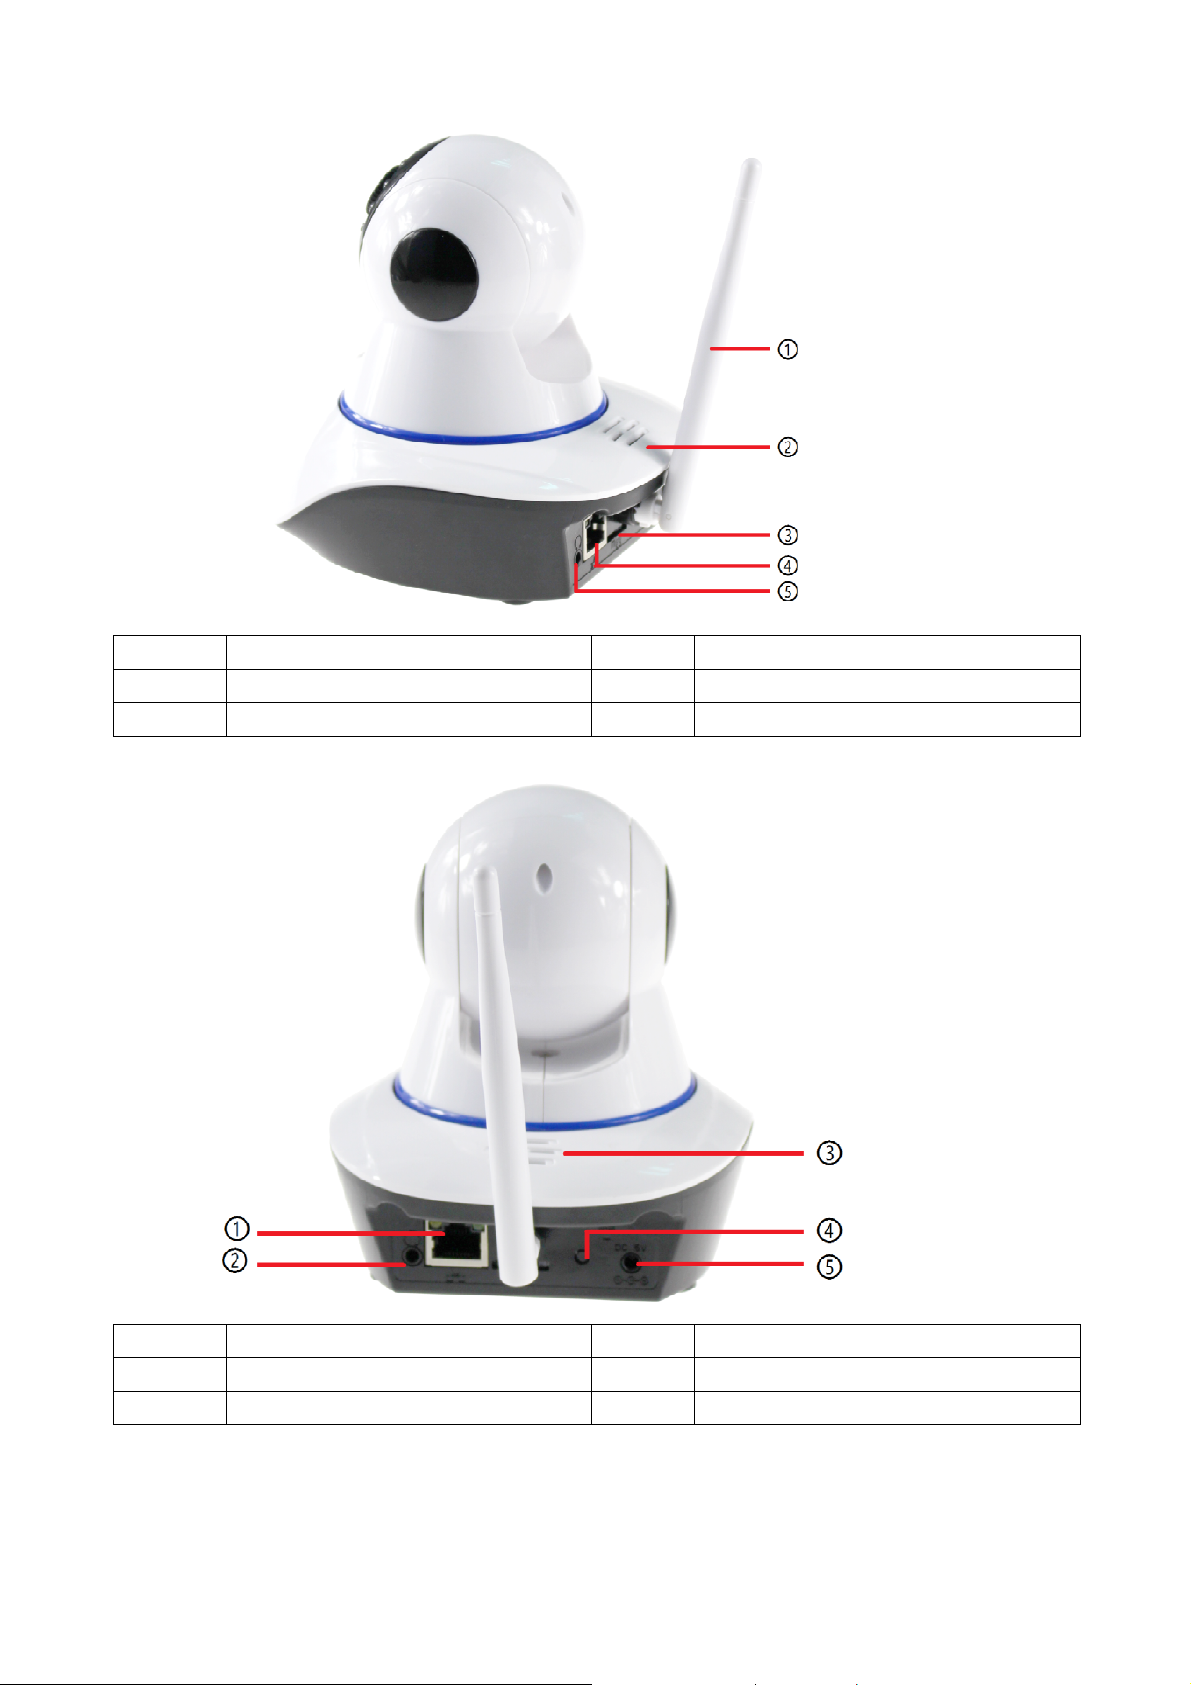
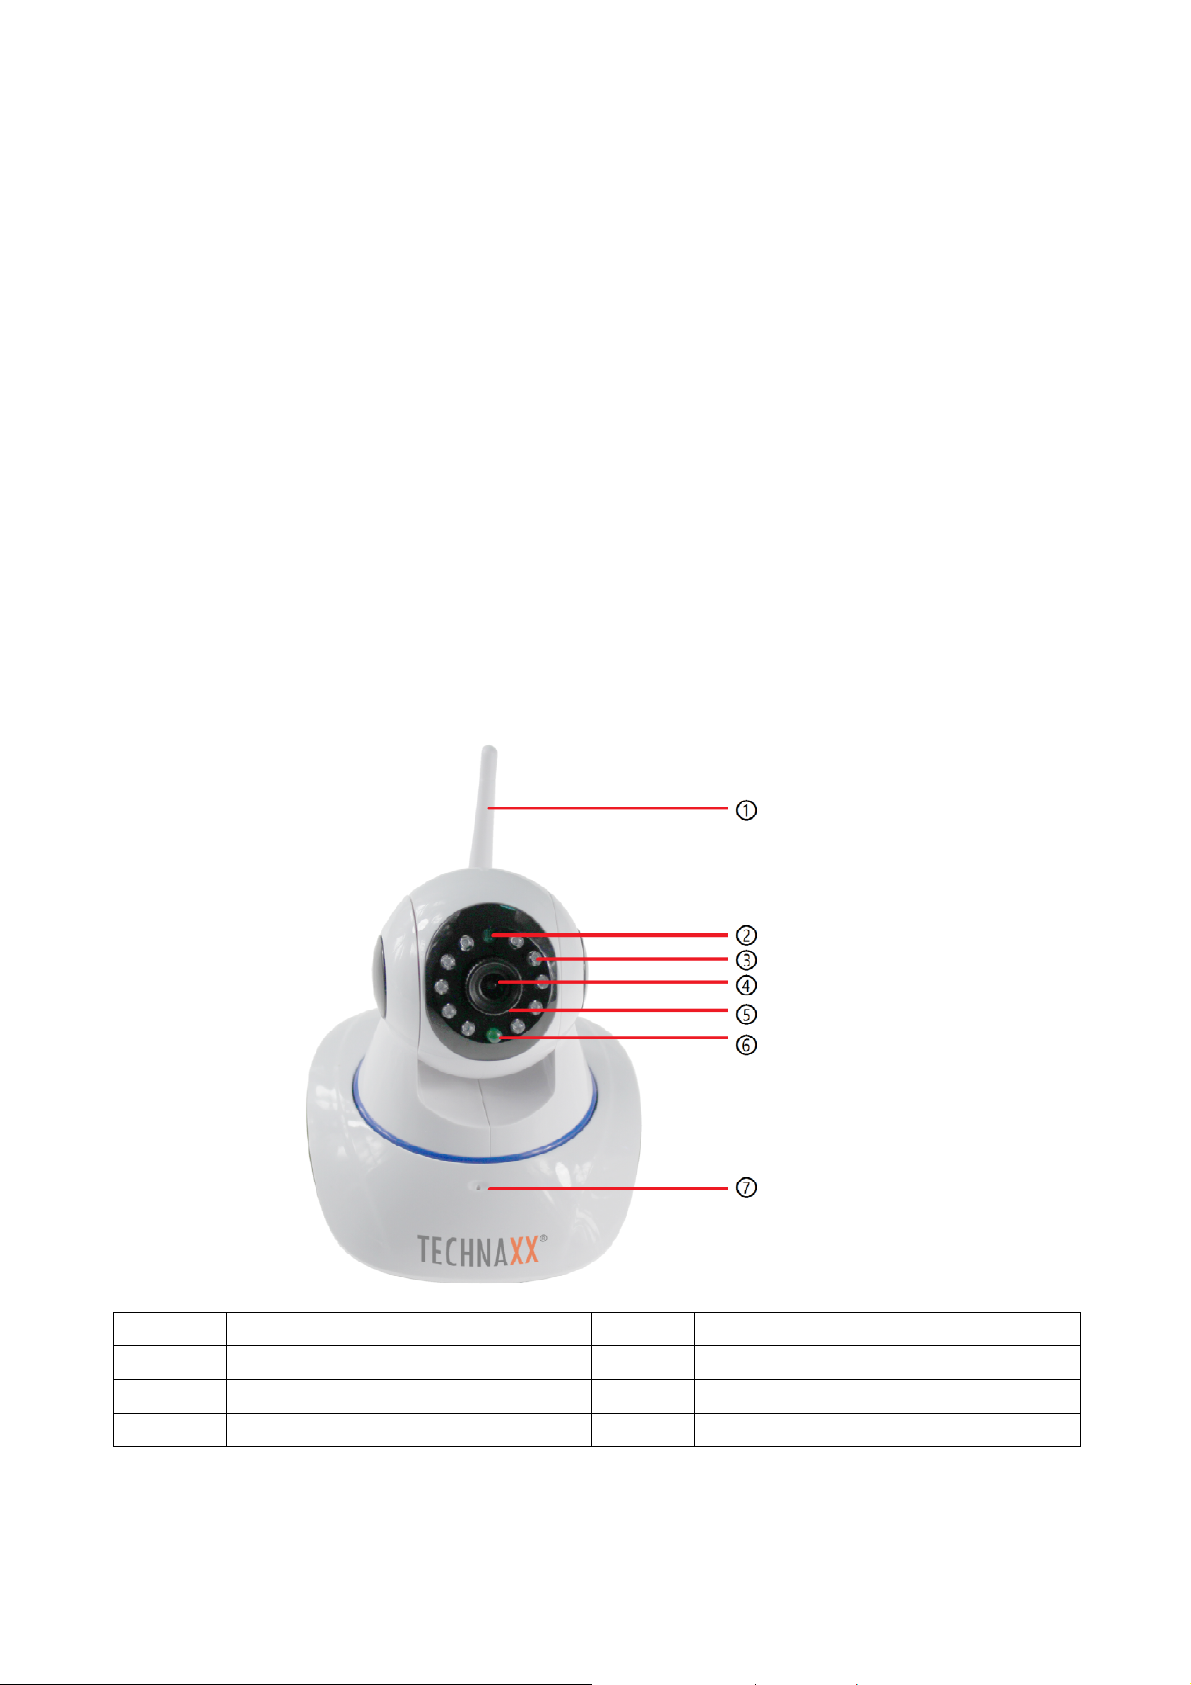
Figura 2-2
1
2
3
Antena
Altavoz
Ranura de tarjeta MicroSD
4
5
Puerto LAN (RJ-45)
Salida de audio
Figura 2-3
1
2
3
Puerto LAN (RJ-45)
Salida de audio
Altavoz
4
5
Botón de restablecimiento
Potencia de entrada DC5V/2A
Page 6
3. Guía de instalación
3.1 Conexión LAN por cable
Encienda la cámara IP y conéctela al router con el cable de red. Por otro lado, conecte su
ordenador al mismo router. Ejemplo en figura 3-1.
Figura 3-1
Router / Modem Router / Módem
Network cable Cable de red
IP Camera Cámara IP
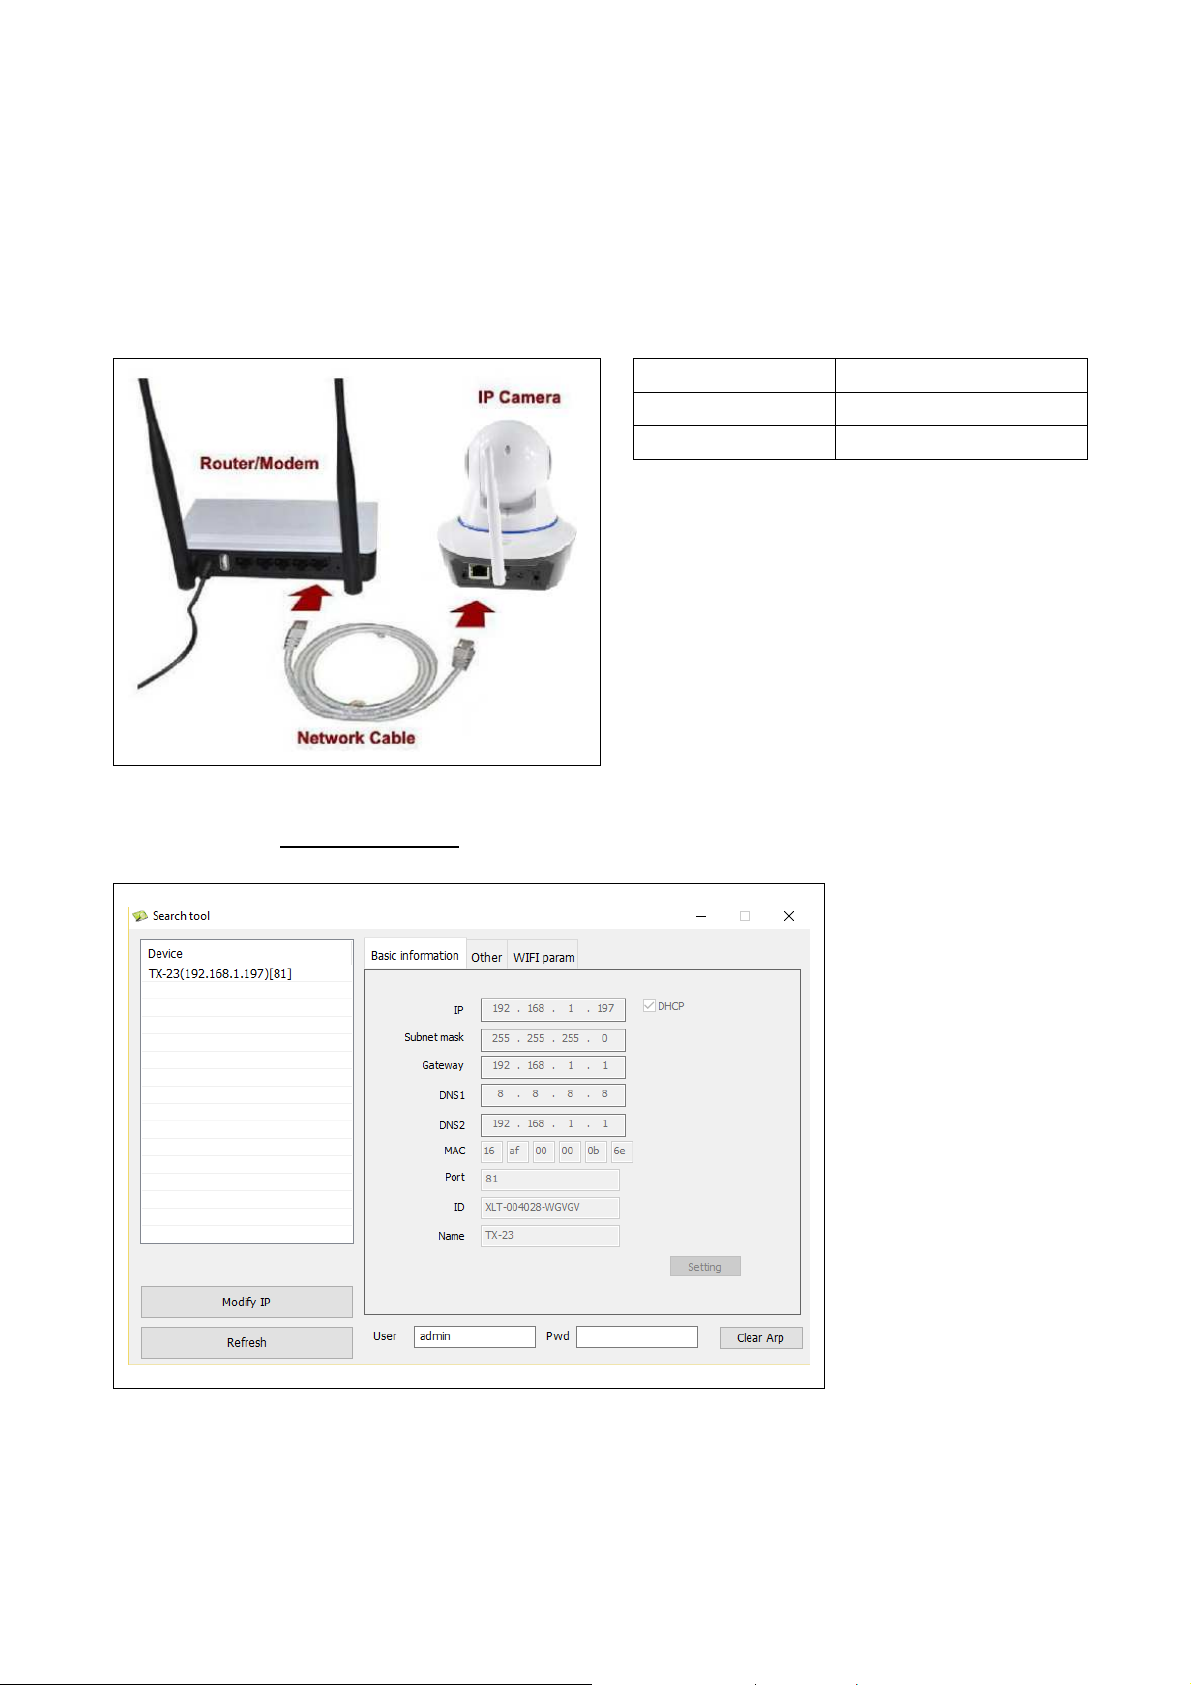
Introduzca el CD en la unidad del
ordenador, haga doble clic en la carpeta
“Search Tools (Herramientas de
Búsqueda)” en el CD y luego haga doble
clic en “IPCameraSearch (Búsqueda de
Cámara IP)”. Una vez arrancado el
software, haga clic en “Refresh
(Actualizar)” (parte inferior izquierda),
seleccione el dispositivo deseado y haga
doble clic en la IP del dispositivo para abrir
el navegador. También puede introducir manualmente la IP en el navegador.
Ejemplo: http://IP del dispositivo:81. Vea la Figura 3-2.
Figura 3-2
Aparecerá el diálogo de inicio de sesión de usuario. Introduzca el nombre de usuario de
fábrica (admin) y deje la contraseña en blanco para iniciar sesión, como se muestra en la
figura 3-3. Importante: Tras iniciar sesión por primera vez, ¡cambie la contraseña!
(Capítulo 4.6.2 Configuración de Usuario)
Page 7
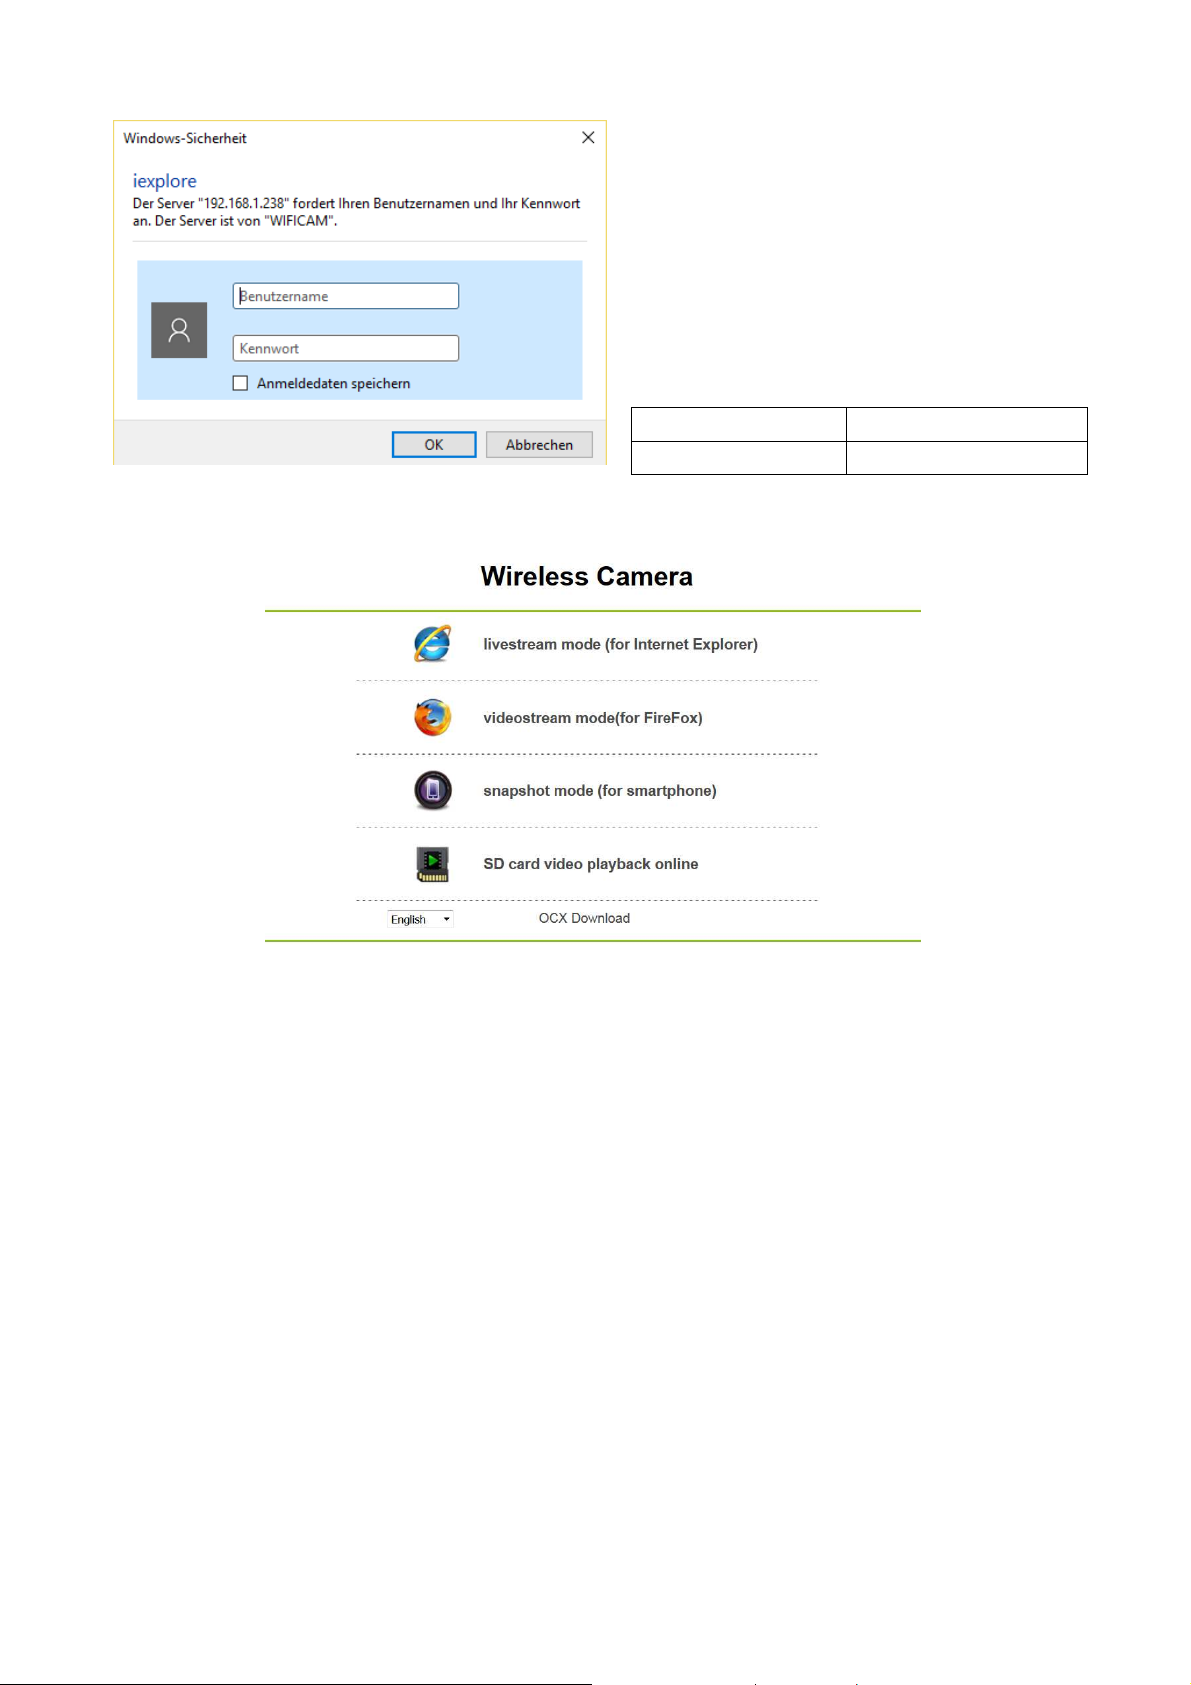
Benutzername Nombre de usuario
Kennwort Contraseña
Figura 3-3
Después de iniciar sesión, verá opciones similares a las de la figura 3-4.
Figura 3-4
Le recomendamos utilizar Internet Explorer 11. Seleccione “Livestream mode(Modo
Livestream )(para Internet Explorer)” como navegador para ver el vídeo (puede
proporcionar más funciones), aunque el usuario tendrá que instalar el reproductor de vídeo
antes de poder verlo. Haga clic en “OCX Download (Descargar OCX)” para descargar
OCX e instalarlo. También podrá encontrarlo en el CD. Además de con el navegador IE,
podrá acceder a la cámara con los navegadores Firefox, Safari, Chrome, Opera, etc.
Puede seleccionar “videostream mode (for Firefox)(Modo de retransmisión de vídeo
(para Firefox)” (no es compatible con todas las funciones)
Nota: (1) Si ha instalado software cortafuegos en su PC, al ejecutar “IPCameraSearch
(Búsqueda de Cámara IP)”, puede que aparezca una ventana indicando “whether you
want to block this program or not (si desea bloquear este programa)”. En ese caso, deberá
seleccionar que no se bloquee. (2) Puede mantener pulsado el botón de restablecimiento
de la cámara durante 10 segundos para restablecer la configuración de fábrica si olvida el
nombre de usuario y la contraseña. Mientras dura el proceso, no desenchufe de la
alimentación, ya que podría dañarse la cámara.
Page 8
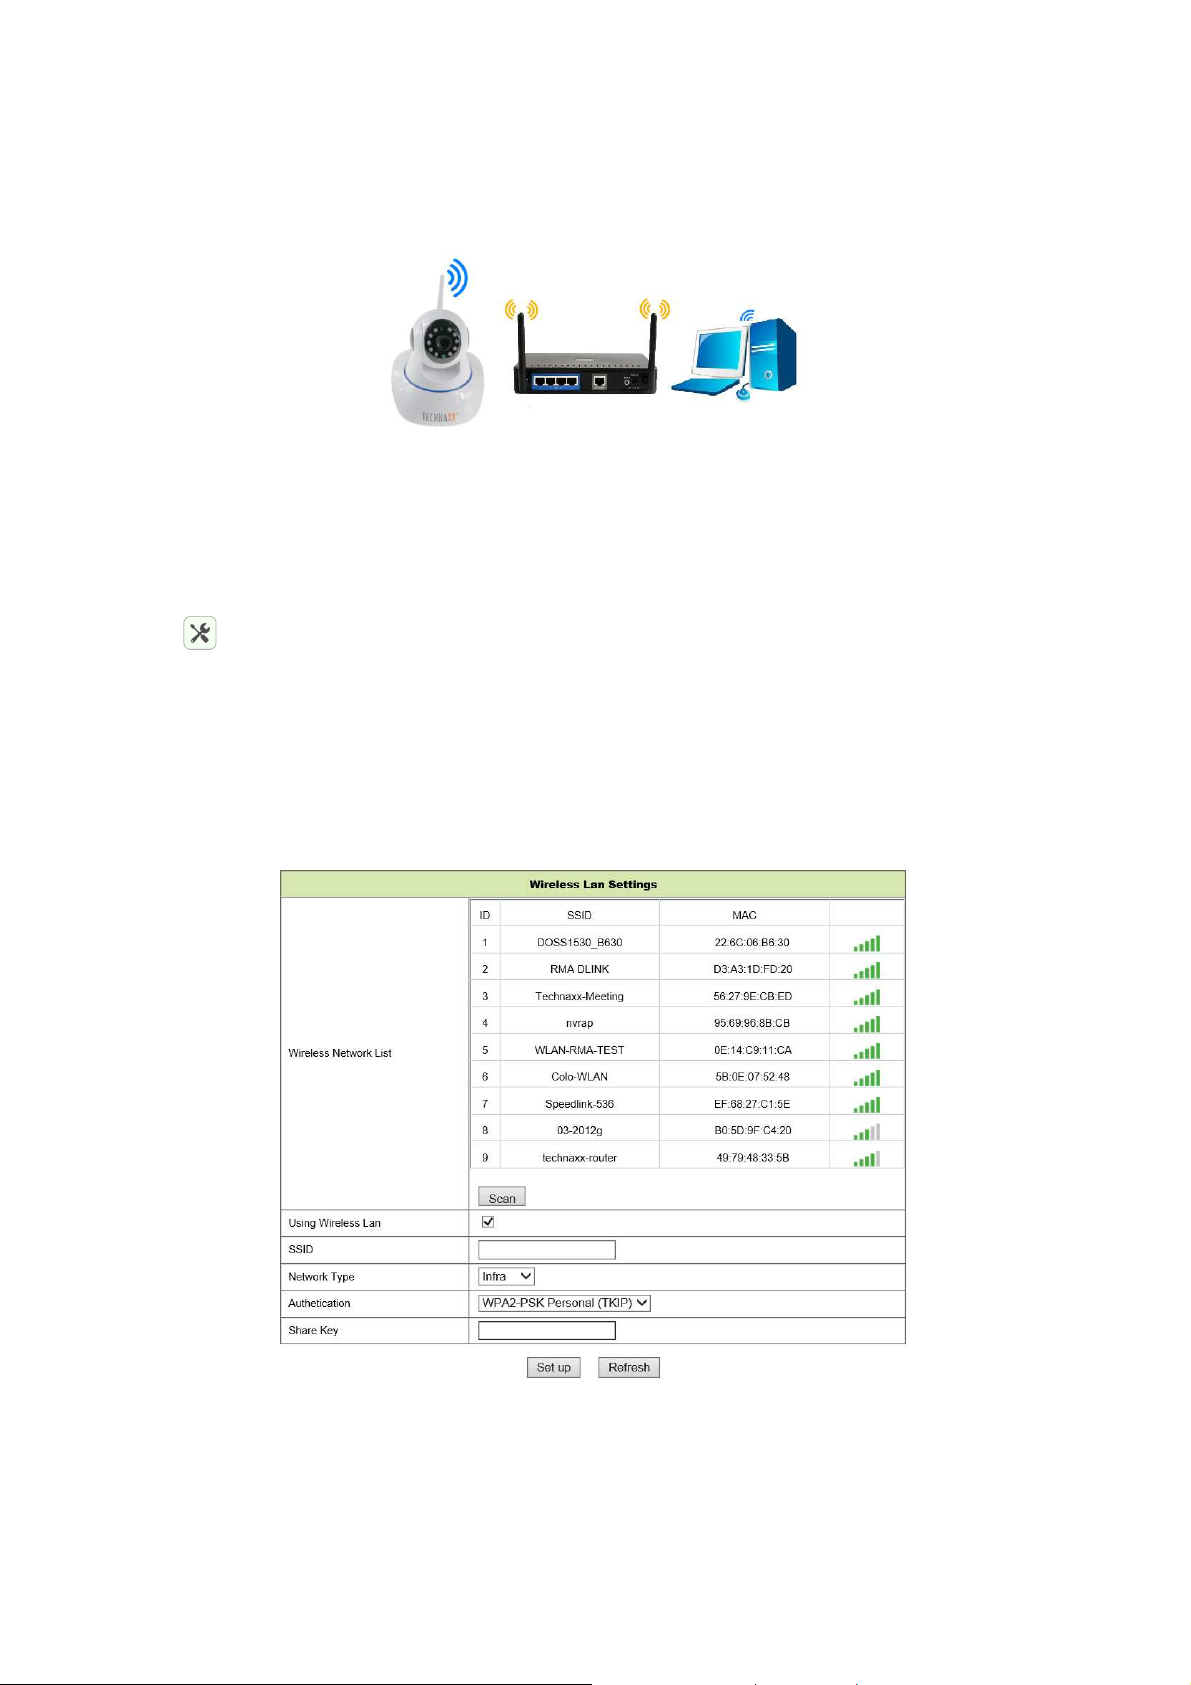
3.2 Configuración WIFI mediante navegador WEB
Puede conectar la cámara con router mediante conexión inalámbrica, como se indica en la
figura 3-5. Para conectar la cámara mediante Smartphone directamente (capítulo 6.2.)
Figura 3-5
Para establecer la conexión WIFI, la cámara debe estar conectada por cable de red al
router. Para conectar la cámara por WIFI deberá seguir los pasos del capítulo 3.1 primero.
Tras acceder al Modo Livestream (para Internet Explorer), haga clic en el siguiente
icono para acceder a la configuración. En “Network Configuration (Configuración de
Red)” “Wireless Lan Settings (Configuración de Lan Inalámbrico)”, pulse “Scan
(Buscar)”. A continuación, elija la SSID (nombre) de su router WIFI. Habilite Usar Lan
Inalámbrico. Seleccione la autenticación de su router e introduzca la contraseña de su
router. Al hacer clic en Enviar/Configurar, se guarda la configuración y se reinicia la cámara.
Tras reiniciarse correctamente, podrá desenchufar el cable de red (espere unos 3 minutos).
La cámara está conectada mediante WIFI.
Figura 3-6
Nota: Cuando el dispositivo esté conectado tanto por WIFI como por cable, primero se
conectará por cable. Si la cámara tiene habilitado DHCP para obtener una dirección IP
automáticamente, la dirección IP de la conexión por cable no será la misma que la de la
conexión WIFI.
Page 9
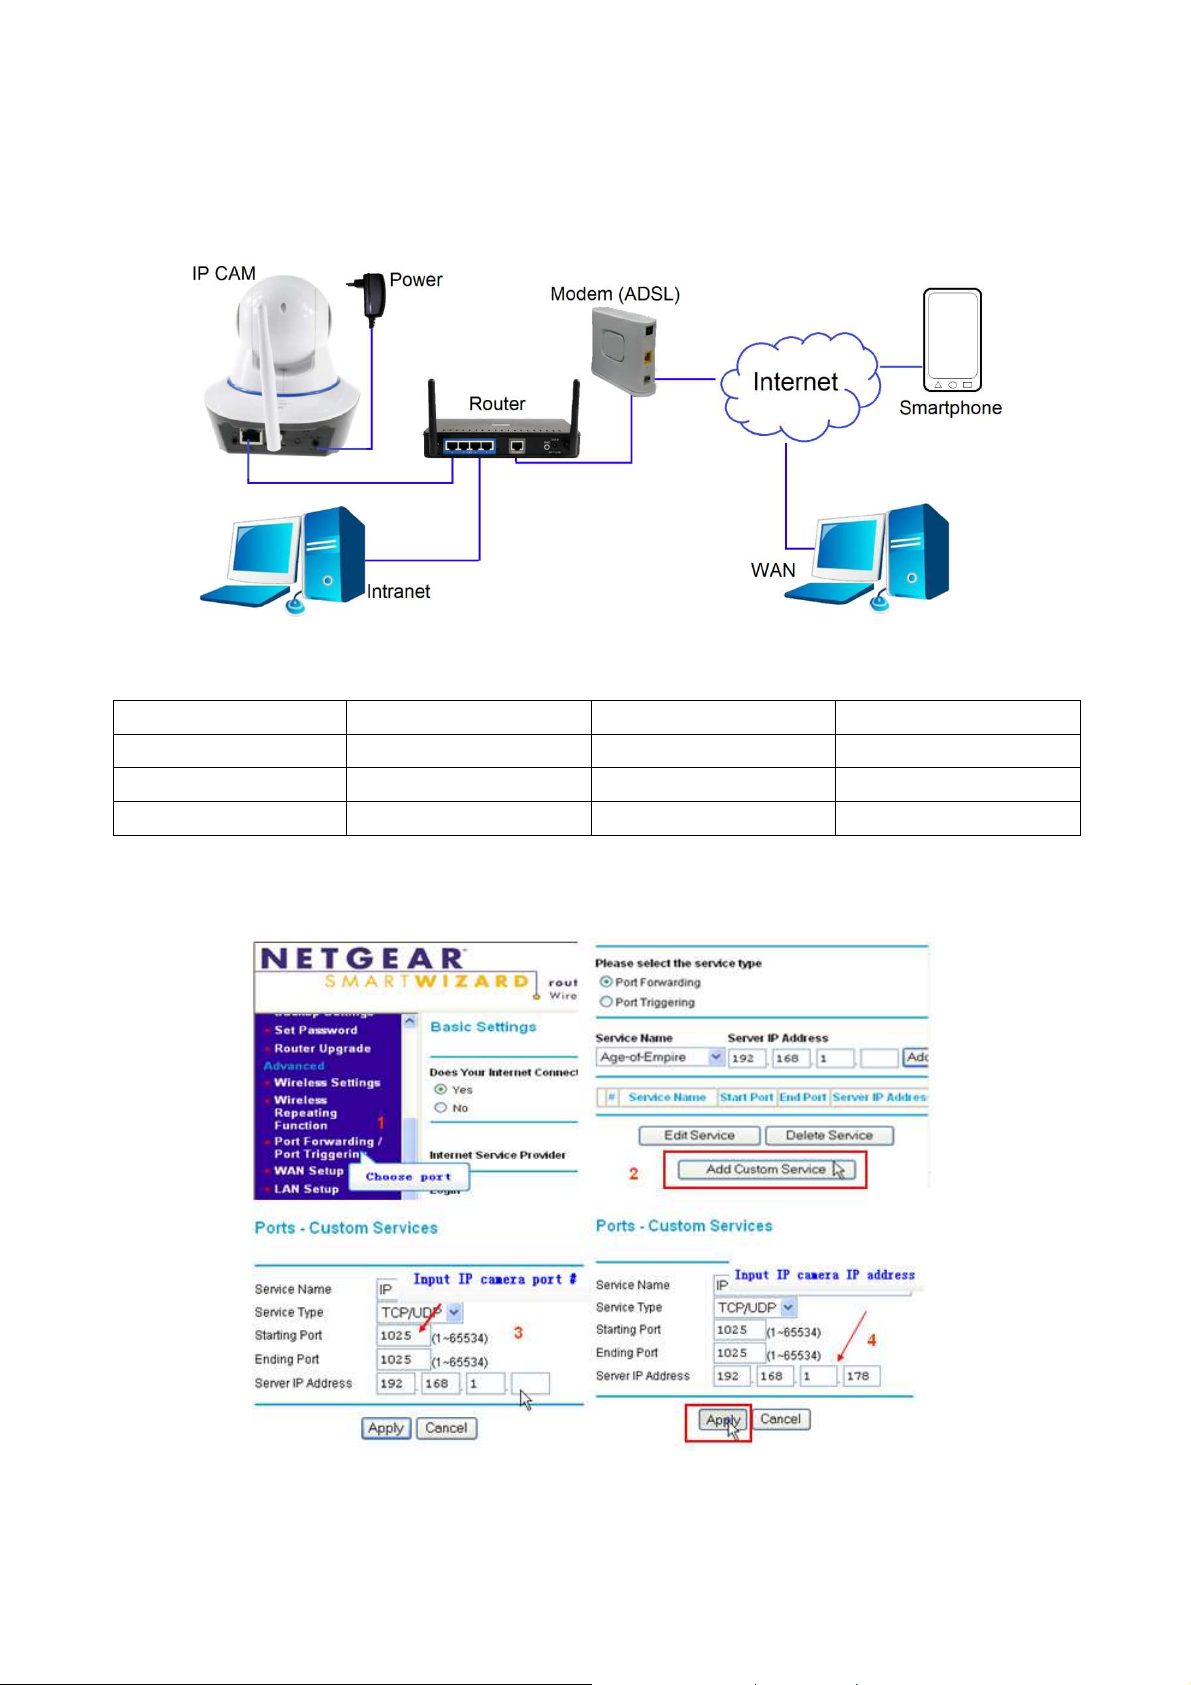
3.3 Conectarse a WAN
Deberá conectar la red LAN a WAN primero y hacer la redirección de puertos. Conecte
como ilustra la figura 3-7.
Figura 3-7
IP Cam Cámara IP Modem (ADSL) Modem (ADSL)
Power Alimentación Internet Internet
Intranet Intranet Smartphone Smartphone
Router Router WAN WAN
Si accede a la cámara IP desde WAN, debe hacer la redirección de puertos en el router.
Ejemplo en la figura 3-8.
Figura 3-8
Page 10

Pasos a seguir:
1) Tras iniciar sesión en la interfaz del router, elija “Port Forwarding (Redirección de
Puertos)”;
2) Elija “Add custom Service (Añadir Servicio Personalizado)”;
3) Introduzca el puerto http de la cámara IP;
4) Introduzca la dirección IP de la cámara IP, y haga clic en “Apply (Aplicar)”.
Tras finalizar la redirección de puertos, podrá utilizar la dirección IP WAN del router y el
puerto http de la cámara para acceder a la cámara desde un ordenador remoto, como se
indica en la figura 5. Nota: Ya que los routers son diferentes, también lo serán las
interfaces y métodos de configuración. Para consultar cómo realizar la redirección de
puertos, consulte el manual de usuario de su router o contacte con el fabricante.
4. Funcionamiento del Navegador
4.1 Ver Vídeo
Tras instalar el complemento (plug-in), haga clic en “Livestream mode (for Internet
Explorer)(Modo Livestream (para Internet Explorer))”, como en la Figura 3-4, para ver
vídeo. Deberá visualizar algo parecido a la figura 4-1.
Figura 4-1
Page 11
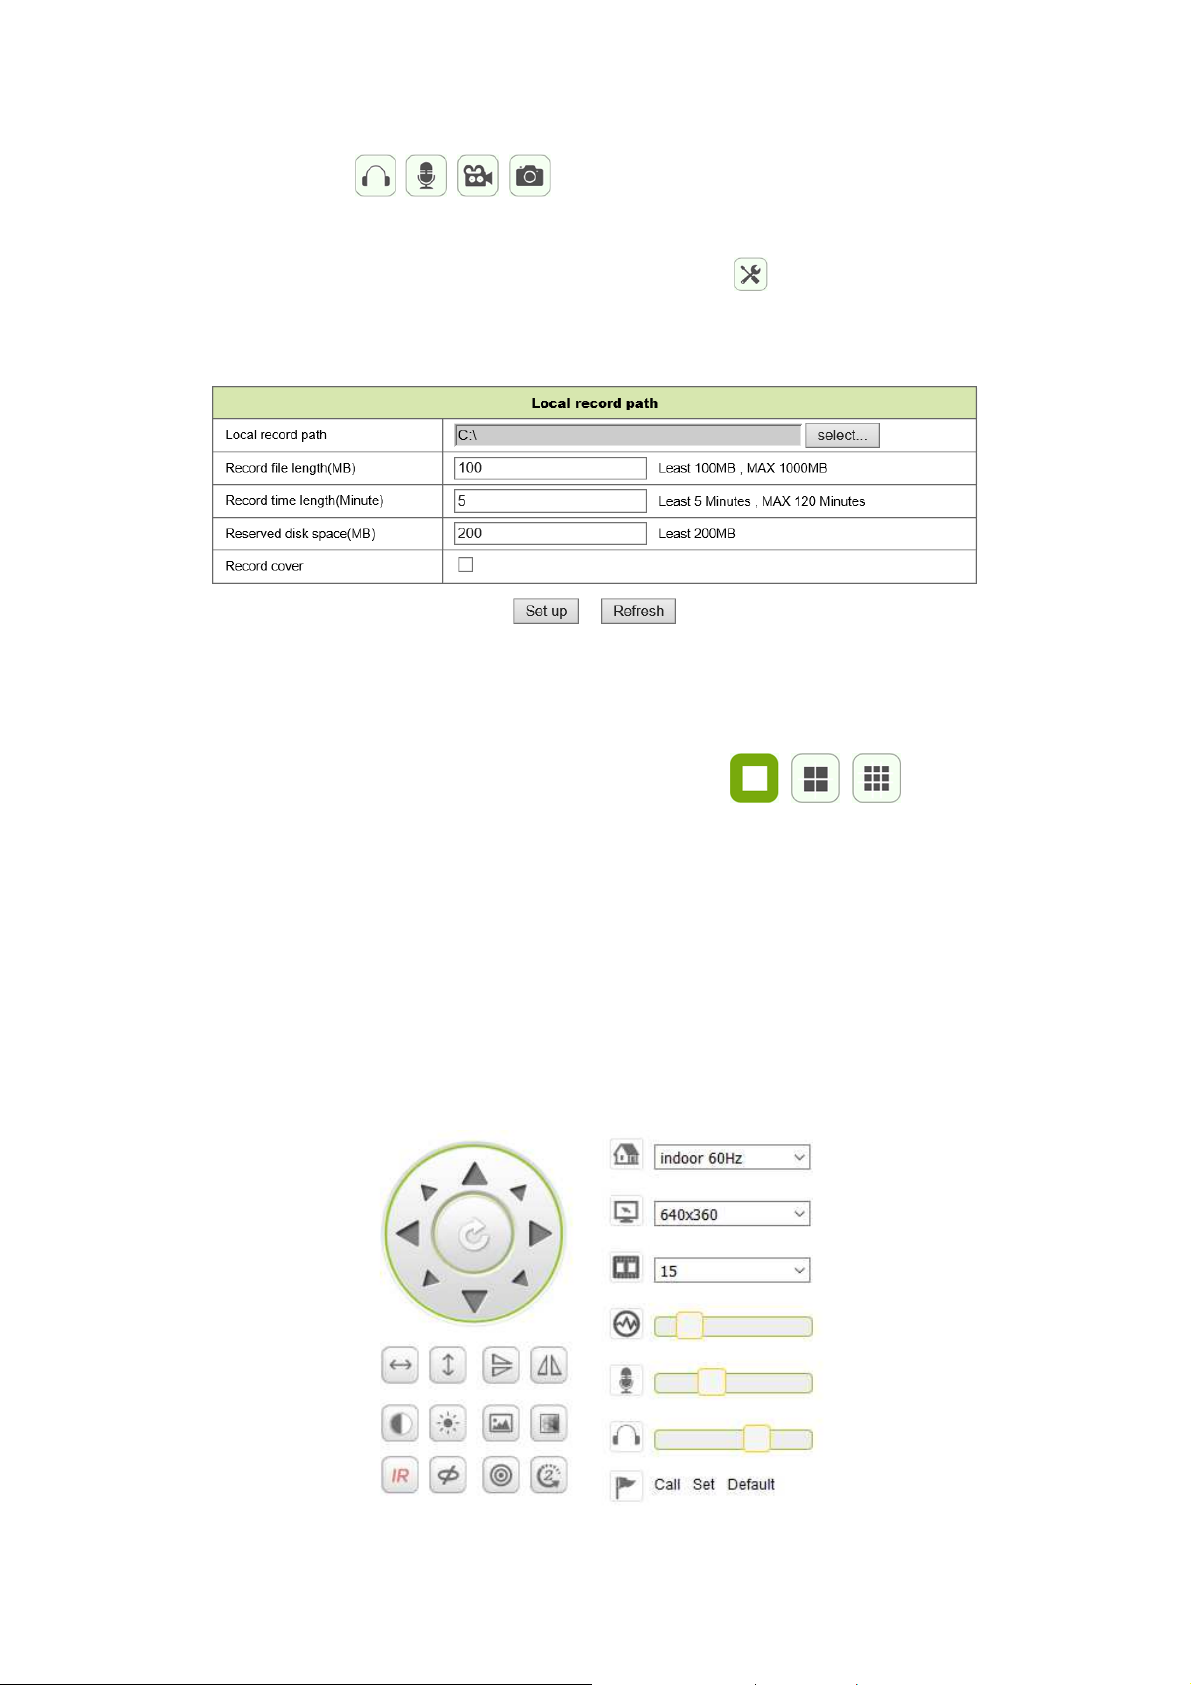
Audio, Hablar, Grabar, Instantánea
Puede hacer clic en estos botones para usar las funciones audio,
hablar, grabar e instantánea.
Nota: Para establecer una ruta, haga clic en el botón y acceda a la interfaz. En
Información Básica de Dispositivo podrá establecer “Local Recording Path (Ruta Local de
Grabación)” para guardar instantáneas y grabaciones hechas manualmente (figura 4-2.)
Figura 4-2
Botón de cambio para imágenes múltiples: Si añade varios dispositivos en el capítulo
4.6.1 “Configuración de Dispositivos Múltiples”, se conectará automáticamente para
mostrar imágenes cuando cambie de la pantalla dividida de 4 imágenes
á la 9. En la zona de reproducción de vídeo, podrá seleccionar una imagen para controlar
el audio, hablar, grabar, tomar instantáneas, controlar la inclinación y rotación, etc.
Zona de control de visionado: Puede controlar el movimiento de inclinación y rotación,
inversión de imagen, imagen en espejo, etc., mientras visualiza vídeo. Vea la figura 4-3.
Entre los parámetros de ajuste de imagen se incluyen resolución, brillo, contraste, colores,
etc. La cámara incluye 16 configuraciones predeterminadas. Podrá establecer una
configuración predeterminada moviendo la cámara con los controles de inclinación y
rotación al lugar deseado. También puede activar una configuración predeterminada
seleccionándola. La cámara se moverá al punto predeterminado seleccionado.
Figura 4-3
Page 12
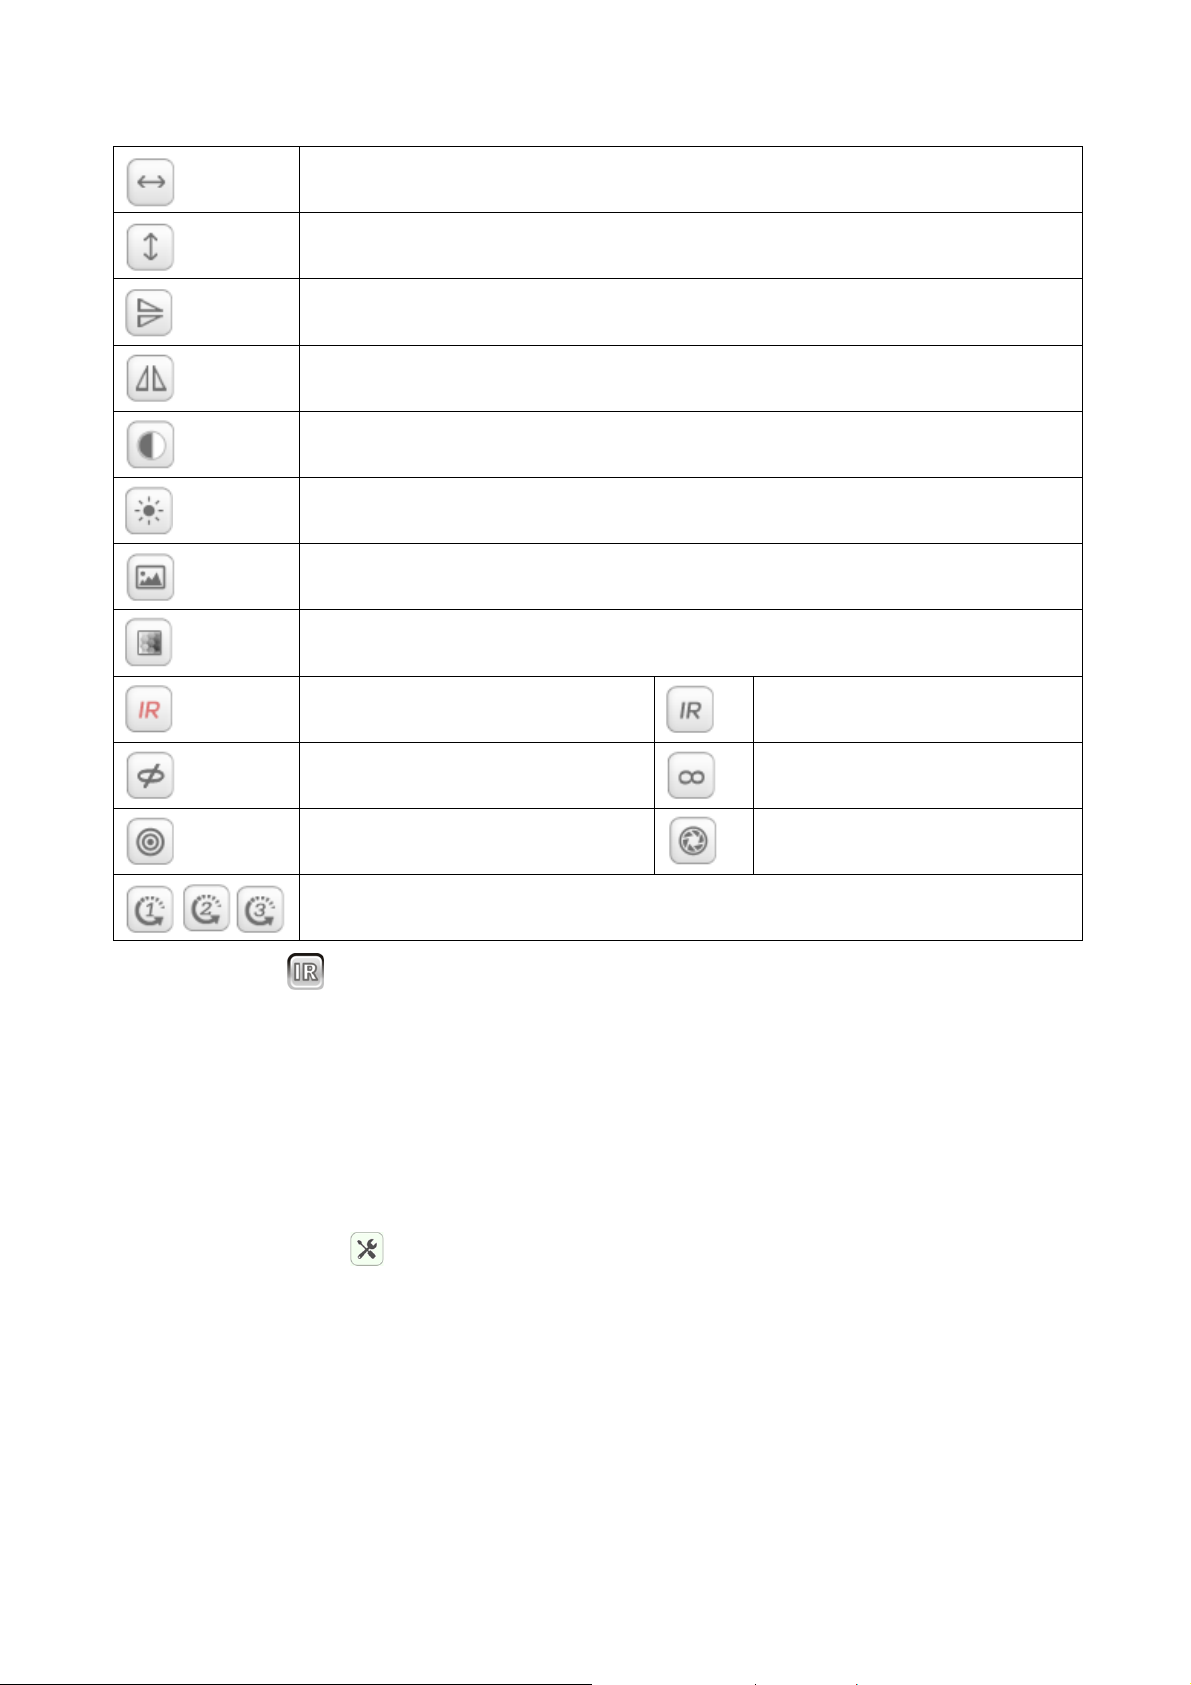
Patrulla horizontal
Patrulla vertical
Invertir
En espejo
Contraste
Brillo
Colores
Saturación
LED IR ENCENDIDO /Auto
APAGADO
Resolución: CBR
LED IR APAGADO
ENCENDIDO
Resolución: VBR
Configuración de velocidad de inclinación y rotación: Lenta, Media,
Rápida
Nota: El botón puede controlar el modo de funcionamiento del LED IR. El LED IR
podría estar en modo auto o forzar cierre. El LED IR se encenderá o apagará según la luz
ambiente en modo auto; siempre se apagará en modo forzar cierre. Algunos de los
botones de arriba no tienen función en este modelo de cámara.
Importante: Si la imagen en directo no es lo bastante nítida, intente regularla girando el
anillo negro de la parte frontal del objetivo. Consulte el capítulo 2, figura 2-1, punto 5.
Configurar los parámetros del dispositivo
Haga clic en el botón para acceder a la interfaz de configuración. Podrá configurar
todos los parámetros de la cámara descritos en el capítulo 4.2-4.6. Solo el administrador
puede iniciar sesión para configurar estos parámetros.
Page 13

4.2 Información Básica del Dispositivo
4.2.1 Información de Dispositivo
El usuario puede obtener la “Versión del Firmware del Dispositivo”, la “Versión de la IU
Web”, “Alias”, “MAC”, etc. También podrá cambiar el idioma aquí. La configuración UPnP
de la cámara está siempre activada.
4.2.2 Configuración de Alias
El usuario podrá poner nombre a la cámara. Por ejemplo, Hogar, Oficina, etc.
4.2.3 Configuración de Fecha y Hora de Dispositivo
Puede habilitar “Sync with NTP Server (Sincronizar con Servidor NTP)” cuando el
dispositivo esté conectado mediante WLAN o LAN, pero deberá seleccionar la zona
horaria correcta donde se encuentra la cámara. De lo contrario, seleccione “Sync with PC
time (Sincronizar con Hora del PC)” (recomendamos esta opción).
Figura 4-4
Nota: Compruebe cuidadosamente la hora de la cámara para asegurar la precisión de la
alarma.
4.2.4 Ruta Local de Grabación
La cámara creará automáticamente una carpeta llamada “Record files (Archivos
grabados)” cuando el usuario ha establecido la “local recording path (Ruta de Grabación
Local)”. Solo se guardarán aquí las instantáneas y archivos grabados hechos
manualmente. Para seleccionar la ruta, haga clic en “select... (seleccionar...)” y elija
haciendo clic con el ratón el directorio correcto. Vea la figura 4-5.
Figura 4-5
Page 14

4.2.5 Tabla de Grabación en Tarjeta MicroSD
Aquí podrá ver la capacidad total de la tarjeta MicroSD en MB. También podrá formatear la
tarjeta MicroSD. Se puede marcar la grabación cíclica para sobrescribir automáticamente
el archivo más antiguo. Tras marcar la casilla de grabación por Temporizador podrá
configurar la tabla de horarios. Al hacer clic en la tabla, la parte activada se pondrá en azul.
Todas las horas se separan en 4 partes de 15 minutos.
Figura 4-6
4.2.6 Configuración de Voz
En Configuración de Voz podrá seleccionar el idioma (alemán o inglés) en el que la
cámara le indica el estado en que se encuentra. También puede inhabilitar esta función
silenciándola.
Page 15

4.3 Configuración de Alarma
4.3.1 Configuración de Servicios de Alarma
Si necesita vigilar una zona fija, cuando se produzca cualquier movimiento, se detectará y
se dará la alarma. Regule la sensibilidad de la detección de movimiento. Cuando menor
sea el valor, mayor la sensibilidad.
Tras habilitar la alarma, podrá elegir varios modos de alarma una vez que el dispositivo
está activado.
• Enlazar al punto predeterminado al darse la alarma: Se precisa establecer un punto
predeterminado de la cámara.
• Enviar información de alarma por correo electrónico (el correo electrónico incluye una
imagen); cada alarma envía un correo.
• Subir la imagen al servidor FTP. El usuario también puede determinar el número de
imágenes.
El dispositivo solo da la alarma cuando detecta cualquier movimiento una vez que está
activado. El usuario puede determinar que el tiempo en la tabla sea “all the time (siempre)",
así como asignar el tiempo que la alarma permanece activa. Antes de determinar "Time
Schedule (Tabla de Horarios)”, vaya a la configuración de Fecha y Hora para establecer la
hora correcta
Figura 4-7
Page 16

Tras activar Activada Detección de Movimiento, podrá ver las siguientes opciones.
Sensibilidad de la Detección de
Movimiento
Sensibilidad de la Alarma por
Audio
Establezca la sensibilidad desde 1 a 10 (cuanto
menor sea el valor, mayor sensibilidad).
Elija si desea que se dé la alarma al detectarse
ruido (bajo, medio, alto o cancelar).
Alarma infrarroja (no compatible) Marque la casilla para activar el sensor PIR
Activada Entrada de Alarma (no
Marque la casilla para usar una alarma externa
compatible)
Nivel de activación (no compatible) Establezca una entrada de alarma externa baja o
alta
Enlace con Configuración
Predeterminada
Elija una configuración predeterminada aquí.
Cuando se detecta movimiento, la cámara se
desplazará a la posición predeterminada
seleccionada.
Enlace de E/S al darse la Alarma
(no compatible)
Marque la casilla para exportar la señal de control
de alarma
Nivel de salida (no compatible) Establezca el nivel de salida a bajo o alto
Enviar Notificación de Alarma por
Correo
Marque la casilla para recibir un correo electrónico
cuando se detecte movimiento. El correo
electrónico incluye una imagen.
Nota: Primero deberá establecer la configuración
del correo electrónico.
Subir Imagen de Alarma Marque la casilla. Cuando se detecte movimiento y
esté configurado el servidor FTP, se subirá una
imagen a dicho servidor.
Número de imágenes subidas Establece el número (1-10) de imágenes que
deberían guardarse en el servidor FTP.
Grabación por alarma Marque la casilla. La cámara grabara vídeos con
audio.
Programación con tabla Marque la casilla para activar la Tabla.
Seleccionar todo Marque la casilla para seleccionar la tabla
completa.
Page 17

4.3.2 Configuración del Servicio de Correo
Cuando se dé la alarma, puede enviarse un correo electrónico a la dirección indicada, pero
deberá establecer los parámetros del servicio de correo correctamente. Ejemplo en la
figura 4-8. Haga clic en “Set up (Configurar)” para guardar estos parámetros. A
continuación podrá hacer clic en “Test (Probar)” para verificar si la configuración se ha
hecho correctamente. Para introducir la información sobre el servidor SMTP, busque su
proveedor de correo en internet y elija los parámetros correctos para rellenar como se
indica en la figura 4-8. Nuestro complemento (Plug-IN) WEB le ayudará.
Figura 4-8
4.3.3 Configuración del Servicio FTP
Al dar la alarma, el dispositivo tomará una imagen local y la enviará al servidor FTP, pero
deberá establecer la configuración FTP correctamente. Como en la figura 4-9, una vez
finalizada la configuración, haga clic en “Test (Probar)” para comprobar si su configuración
es correcta o no.
Figura 4-9
Nota: Para usar la función FTP, deberá acceder con un usuario con autorización que
pueda escribir y crear un submenú y algo de espacio en la memoria. Para el servidor FTP,
simplemente introduzca la dirección IP.
Page 18

4.3.4 Registro
Puede consultar cuándo el dispositivo da la alarma mediante el registro de alarmas.
Figura 4-10
4.4 Configuración de Red
4.4.1 Configuración Básica de Red
El usuario también puede introducir la Configuración Básica de Red para establecer la
dirección IP además de utilizar el software de búsqueda “IPCameraSearch (Búsqueda de
Cámara IP)”. La configuración predeterminada aquí es DHCP. Vea la figura 4-11 más
abajo.
Figura 4-11
Nota: El router conectado a la cámara necesita habilitar DHCP cuando el usuario utiliza
“obtain IP from DHCP server (Obtener IP DHCP de Servidor)”. Los routers habilitan DHCP
con la configuración de fábrica.
Page 19

4.4.2 Configuración de Lan inalámbrico
Por favor, consulte el capítulo 3.2.
Haga una búsqueda de redes. A continuación, elija su red inalámbrica. Marque la casilla,
seleccione el tipo de red, seleccione la autenticación de su router e introduzca la
contraseña de su router. Presione “Set up (Configurar)” para guardar la configuración.
Figura 4-12
4.4.3 Configuración del Servicio DDNS
El usuario puede también usar DDNS, como www.dyndns.com. El usuario deberá solicitar
un nombre de dominio gratuito de esta web e introducir la información en los campos que
se indican (Figura 4-13) y guardar la configuración. A continuación podrá usar el nombre
de dominio.
Figura 4-13
Nota: Cuando utilice el nombre de dominio, si el puerto http no es 80, el número del puerto
deberá añadirse empleando dos puntos. Ejemplo: http://btest.dyndns.biz:81.
Además, deberá registrar usted mismo a una nueva cuenta para el servicio DDNS.
Page 20

4.5 Configuración de inclinación y rotación
Piloto Establezca abrir / cerrar para ENCENDER / APAGAR el piloto.
contra pre-bit Marque la casilla para inhabilitar la función predeterminada.
Posición
Predeterminada al
Arrancar
Velocidad de
Inclinación y
Rotación
Barridos Seleccione el número de barridos del menú desplegable. La
Seleccione la posición predeterminada que la cámara adoptará
tras reiniciarla / producirse un corte en el suministro eléctrico.
Ajuste la velocidad del movimiento de la cámara a baja, alta o
rápida.
cámara hará el número de barridos seleccionado. Cuando
establezca los barridos en Siempre, la cámara girará todo el
tiempo, pero se detendrá automáticamente cuando lleve una hora.
Figura 4-16
Page 21

4.6 Configuración de Usuario y Dispositivo
4.6.1 Configuración de Dispositivos Múltiples
Como en la Figura 4-17, el usuario puede añadir un máximo de 9 dispositivos para ver
vídeo simultáneamente. Haga clic en el botón “refresh (Actualizar)” para comprobar el
dispositivo en LAN. Primero elija un dispositivo de la izquierda, como “The 2nd Device (El
Segundo Dispositivo)” y haga clic en él. Aparecerán los diálogos de configuración. Ahora
introduzca la información del dispositivo manualmente (o haciendo clic en el dispositivo
que quiere añadir) y rellene usuario y contraseña. Haga clic en “Add (Añadir)” para añadir
el dispositivo. Una vez hecho eso, debe hacer clic en el botón “Set up (Configurar)” para
guardar el dispositivo.
Figura 4-17
4.6.2 Configuración de Usuario
Visitante Solo puede ver la retransmisión en directo.
Operario Podrá además establecer inclinación y rotación, conversación
bidireccional, cambiar resolución, establecer contraste, brillo, etc.
Administrador Podrá configurar todos los parámetros como administrador.
Figura 4-18
Page 22

4.6.3 Mantenimiento
Figura 4-19
Haga clic en “Restore factory settings (Restablecer configuración de fábrica)”. Aparecerá
un diálogo preguntando si quiere restablecer la configuración de fábrica. La cámara
restablecerá la configuración de fábrica y se reiniciará cuando confirme.
Si hubiera algún problema con la cámara, también podrá reiniciarla haciendo clic en
Reiniciar Dispositivo.
Hay dos tipos de software en la cámara: uno es el firmware del dispositivo y el otro es la IU
Web, y puede actualizar ambos.
Page 23

5. Instrucciones para el Software de PC
El software para PC puede realizar las funciones de vigilancia, configuración, visualización
de grabaciones remotas y otras funciones en el PC.
Encienda la cámara IP y conéctela al router con el cable de red. Por otro lado, conecte su
ordenador al mismo router. Arranque el ordenador, abra el CD y elija Security Advanced
PC Client. Instale el software y ejecútelo. Tras iniciar el software, aparecerá la siguiente
ventana, figura 5-1.
Figura 5-1
Para iniciar sesión, introduzca el usuario y contraseña que utiliza con la cámara.
5.1 Añadir Cámara
Para añadir una cámara, haga clic en “Manage (Gestionar)”, como se muestra en la figura
5-2.
Page 24

Figura 5-2
En la nueva ventana que se ha abierto, haga clic en “search (Buscar)” en la parte de abajo.
Vea la Figura 5-3.
Figura 5-3
Se buscarán dispositivos en LAN. Cuando se encuentre un dispositivo, se pondrá en la
lista. Vea la Figura 5-4.
Figura 5-4
Page 25

Haga doble clic en el nombre del dispositivo que quiere añadir. Vea la figura 5-5.
Introduzca la contraseña, haga clic en “OK” y termine de añadir la cámara. Cuando es la
primera vez que añade la cámara y la contraseña no se ha modificado, no es necesario
escribir contraseña, ya que el valor de fábrica es la contraseña en blanco.
Figura 5-5
En la interfaz principal del software para ordenador, haga clic en la cámara en la lista y
arrástrela a un canal a la izquierda.
Figura 5-6
Page 26

Haga clic en al lado del nombre de la cámara (Figura 5-7), y acceda a la lista de
configuraciones de cámara que ve en la figura 5-8.
Figura 5-7
Figura 5-8
Page 27

Nota: Por su seguridad, rogamos que personalice la contraseña antes de cambiar la
configuración. Vaya a Configuración de Usuario (figura 5-8) y establezca un nombre de
usuario y contraseña personalizados. Para diferentes clases de usuario, consulte el
capítulo 4.6.2.
6. Software para Teléfono Móvil (Security Advanced)
6.1 Descarga de la APP
6.1.1 Descarga de la APP para Android
Busque el software “Security Advanced” en Google Play Store e instálelo en
su smartphone. Haga clic en el icono de la APP “Security Advanced” para
ejecutarla.
6.1.2 Descarga de la APP para iOS
Busque el software “Security Advanced” en Apple App Store con su iPhone, descárguelo e
instálelo en su teléfono. Haga clic en el icono de la APP “Security Advanced” para
ejecutarla.
6.2 Añadir Cámara a la APP
Hay 3 formas de añadir cámaras:
1. Añadir con una Tecla
2. Escanear Código QR en el Dispositivo
3. Buscar Dispositivo en LAN
6.2.1 Añadir con una Tecla
Conecte la cámara a la fuente de alimentación incluida para iniciar la cámara y espere 90
segundos. Conecte su smartphone al WIFI y abra la APP Security Advanced. Siga estos
pasos. Vea la Figura 6-1 y la Figura 6-2:
(1) Haga clic en “Add device (Añadir dispositivo)” para acceder a la interfaz de añadir
dispositivos.
(2) Haga clic en “One key to add (Añadir con una Tecla)” para acceder a la interfaz de una
tecla para configurar el WIFI.
(3) Introduzca la contraseña de la red WIFI a la que está conectado el smartphone.
(4) Primero, suba el volumen del smartphone y oriente el altavoz del smartphone al
micrófono de la cámara. Pulse “Start Configuration (Iniciar Configuración)”
Page 28

Figura 6-1
(5) Después de realizarse correctamente la configuración de cámara, la APP puede buscar
la ID de Dispositivo y mostrarla. Haga clic en ID de Dispositivo en la lista y acceda a la
interfaz para añadir cámara. (si no se muestra el punto (5), vaya hacia atrás y busque la
cámara por LAN)
(6) Introduzca la contraseña de la cámara
(7) Haga clic en “Done (Finalizar)” para terminar de añadir la cámara.
Nota: La contraseña inicial de la cámara está en blanco. La primera vez que se usa no es
necesario introducirla. Si pulsa “Done (Finalizar)” directamente, se confirmará la
configuración. Importante: Tras iniciar sesión por primera vez, ¡cambie la contraseña!
(Capítulo 4.6.2 Configuración de Usuario)
Page 29

Figura 6-2
6.2.2 Escanear Código QR en el Dispositivo
Conecte la cámara al router mediante el cable de red y enchufe la alimentación para iniciar
la cámara.
Figura 6-3
Router/Modem Router/Módem
Network cable Cable de red
IP Camera Cámara IP
Page 30

Abra la APP Security Advanced y aplique los siguientes pasos:
Figura 6-4
(1) Abra la APP y haga clic en “Add device (Añadir dispositivo)” para acceder a la interfaz
de añadir dispositivos. (2) Haga clic “Scan QR code (Escanear Código QR)” (QR=
bidimensional) para iniciar el escaneo QR (Nota: Si aparece una ventana emergente
preguntando si autoriza que la APP emplee la cámara del teléfono, seleccione SÍ). (3)
Enfoque la cámara del smartphone al código QR de la cámara y escanéelo. (4) Escriba la
contraseña de la cámara y haga clic en “Done (Finalizar)”. Habrá añadido la cámara.
Nota: La contraseña inicial de la cámara está en blanco. La primera vez que se usa no es
necesario introducirla. Si pulsa “Done (Finalizar)” directamente, se confirmará la
configuración. Importante: Tras iniciar sesión por primera vez, ¡cambie la contraseña!
(Capítulo 6.4 Configuración de Usuario)
6.2.3 Buscar Dispositivo en LAN para Añadir Cámara
Conecte la cámara al router mediante el cable de red y enchufe la alimentación para iniciar
la cámara. Abra la APP Security Advanced y aplique los siguientes pasos:
Figura 6-5
Page 31

(1) Abra la APP y haga clic en “Add device (Añadir dispositivo)” para acceder a la interfaz
de añadir dispositivos. (2) Haga clic en “LAN search (Búsqueda en LAN)” para acceder a la
interfaz de búsqueda de cámaras por ID de Dispositivo en LAN. (Nota: El smartphone y la
cámara deben conectarse a la misma red) (3) Si se encuentra la ID de Dispositivo, podrá
hacer clic directamente en ella para añadir la cámara a la lista. (4) Escriba la contraseña de
la cámara (5) Haga clic en “Done (Finalizar)”. Habrá añadido la cámara.
Nota: La contraseña inicial de la cámara está en blanco. La primera vez que se usa no es
necesario introducirla. Si pulsa “Done (Finalizar)” directamente, se confirmará la
configuración. Importante: Tras iniciar sesión por primera vez, ¡cambie la contraseña!
(Capítulo 6.4 Configuración de Usuario)
6.3 Configuración WIFI
Para establecer o cambiar la configuración WIFI para la cámara mediante smartphone,
siga los pasos indicados en las figuras siguientes:
(1) Abra la APP Security Advanced, haga clic en el icono con forma de engranaje a la
derecha para acceder a la interfaz de configuración de cámara. (2) Haga clic en “WIFI
setting (Configuración WIFI)” para acceder a la interfaz de configuración WIFI. (3) Haga clic
en “WIFI Manager (Gestor WIFI)” para buscar redes WIFI cercanas.
Figura 6-6
Page 32

Figura 6-7
(4) Seleccione la red WIFI que desea añadir y haga clic en ella.
(5) Introduzca la contraseña WIFI en el campo contraseña.
(6) Haga clic en “Done (Finalizar)”. Habrá terminado de configurar la conexión WIFI.
Nota: Si necesita ayuda, haga clic en “About (Acerca de)” “Help (Ayuda)” en la APP de
Security Advanced. Hay una descripción detallada para cada icono. Las interfaces Android
e iOS son básicamente iguales y ambas pueden utilizarse según estas instrucciones.
Page 33

6.4 Configuración de Usuario
Para cambiar el nombre de usuario / contraseña de Administrador u Operario mediante su
smartphone siga los pasos que se muestran en la figura 6-8 siguiente:
(1) Abra la APP Security Advanced, haga clic en el icono con forma de engranaje a la
derecha para acceder a la interfaz de configuración de cámara.
(2) Haga clic en “User setting (Configuración de Usuario)” para acceder a la interfaz de
configuración de usuario.
(3) Escriba el nombre de usuario y contraseña
(4) Haga clic en “Done (Finalizar)”. Habrá concluido con este parámetro.
Figura 6-8
Nota: Memorice o anote la configuración de usuario. Si olvida los datos de usuario, tendrá
que restablecer (configuración de fábrica) la cámara.
Page 34

7. Especificaciones Técnicas
Velocidad de bits
Alarma inteligente
Almacenamiento local
Cámara
Sensor de imágenes CMOS de 1/4" de 1Megapíxel
Sistema de señales PAL/NTSC
Iluminación mín. 0,1Lux @ (F1.2,AGC ACTIVO), 0 LUX con IR
Obturador 1/50(1/60)s ~1/100000 s
Objetivo f=3,6 mm@ F1,2 Campo de visión horizontal: 62,6°
Soporte para el objetivo M12
Rotación 120° vertical, 355° horizontal
Día/Noche IR-CUT incorporado
Modo de sincronización sincronización interna
Relación S/R > 40dB
Compresión
Compresión de vídeo Transmisión por secuencias doble H.264 / MJPEG
128 Kbps ~ 4 Mbps
Compresión audio G.711
Imagen
Resolución vídeo 1280 x 720 HD máximo
Cuadros por segundo 5–25fps @ 1280x720 / 640x480
Configuración imagen
Brillo, Contraste, Claridad, Saturación regulables por
servidor Web
Red
Detección de movimiento & de sonido ~10m
Sensibilidad Detección de sonido 60dB mínimo
Protocolo TCP/IP, HTTP, DHCP, DNS, DDNS, SMTP, NTP, etc.
Wifi 802.11/b/g/n
Básicos
Interfaz
Entrada de audio Micrófono incorporado
Salida de audio 1ch, interfaz audio 3,5 mm Altavoz incorporado
Interfaz de comunicaciones 1 Interfaz de Ethernet autoadaptable 10/100M RJ45
General
Fuente de Alimentación CC 5V ± 10 %
Consumo eléctrico 5W máximo
Distancia IR ~10m
Condiciones operativas –10°~60°C, humedad 90 % o menos (no condensada)
Peso / Dimensiones 350 g / (L) 11,5 x (An) 13,0 x (Al) 13,5cm
Botón de restablecimiento, anticentelleos, transmisión por
secuencias doble, protección por contraseña
Compatible con tarjetas MicroSD de hasta 64GB
Page 35

This product includes software developed by third parties, including software which
is released under the GNU General Public License Version 2 (GPL v2). This program
is free software; you can redistribute it and/or modify it under the terms of the GNU
General Public License as published by the Free Software Foundation; either
version 2 of the License, or (at your option) any later version. You may obtain a
complete machine-readable copy of the source code for the above mentioned
software under the terms of GPL v2 without charge except for the cost of media,
shipping, and handling, upon written request to Technaxx GmbH & Co. KG,
Kruppstraße 105, 60388 Frankfurt am Main, Germany.
This program is distributed in the hope that it will be useful, but WITHOUT
ANY WARRANTY; without even the implied warranty of MERCHANTABILITY or
FITNESS FOR A PARTICULAR PURPOSE. See the GNU General Public License for
more details. You should have received a copy of the GNU General Public License
along with this program; if not, write to the Free Software Foundation, Inc., 51
Franklin Street, Fifth Floor, Boston, MA 02110-1301, USA. (Notice from Technaxx: A
copy of the GPL is included below).
GNU GENERAL PUBLIC LICENSE: Version 2, June 1991 / Copyright (C) 1989, 1991
Free Software Foundation, Inc. / 51 Franklin Street, Fifth Floor, Boston, MA
02110-1301, USA. Everyone is permitted to copy and distribute verbatim copies of this
license document, but changing it is not allowed.
Preamble
The licenses for most software are designed to take away your freedom to share and
change it. By contrast, the GNU General Public License is intended to guarantee your
freedom to share and change free software--to make sure the software is free for all its
users. This General Public License applies to most of the Free Software Foundation's
software and to any other program whose authors commit to using it. (Some other Free
Software Foundation software is covered by the GNU Lesser General Public License
instead.) You can apply it to your programs, too.
When we speak of free software, we are referring to freedom, not price. Our General
Public Licenses are designed to make sure that you have the freedom to distribute copies of
free software (and charge for this service if you wish), that you receive source code or can
get it if you want it, that you can change the software or use pieces of it in new free
programs; and that you know you can do these things.
To protect your rights, we need to make restrictions that forbid anyone to deny you
these rights or to ask you to surrender the rights. These restrictions translate to certain
responsibilities for you if you distribute copies of the software, or if you modify it.
For example, if you distribute copies of such a program, whether gratis or for a fee,
you must give the recipients all the rights that you have. You must make sure that they, too,
receive or can get the source code. And you must show them these terms so they know their
rights.
We protect your rights with two steps: (1) copyright the software, and (2) offer you this
license which gives you legal permission to copy, distribute and/or modify the software.
Also, for each author's protection and ours, we want to make certain that everyone
Page 36

understands that there is no warranty for this free software. If the software is modified by
someone else and passed on, we want its recipients to know that what they have is not the
original, so that any problems introduced by others will not reflect on the original authors'
reputations.
Any free program is threatened constantly by software patents. We wish to avoid the
danger that redistributors of a free program will individually obtain patent licenses, in effect
making the program proprietary. To prevent this, we have made it clear that any patent must
be licensed for everyone's free use or not licensed at all.
The precise terms and conditions for copying, distribution and modification follow.
TERMS AND CONDITIONS FOR COPYING, DISTRIBUTION AND MODIFICATION
0. This License applies to any program or other work which contains a notice placed by the
copyright holder saying it may be distributed under the terms of this General Public License.
The "Program", below, refers to any such program or work, and a "work based on the
Program" means either the Program or any derivative work under copyright law: that is to
say, a work containing the Program or a portion of it, either verbatim or with modifications
and/or translated into another language. (Hereinafter, translation is included without
limitation in the term "modification".) Each licensee is addressed as "you".
Activities other than copying, distribution and modification are not covered by this
License; they are outside its scope. The act of running the Program is not restricted, and the
output from the Program is covered only if its contents constitute a work based on the
Program (independent of having been made by running the Program). Whether that is true
depends on what the Program does.
1. You may copy and distribute verbatim copies of the Program's source code as you
receive it, in any medium, provided that you conspicuously and appropriately publish on
each copy an appropriate copyright notice and disclaimer of warranty; keep intact all the
notices that refer to this License and to the absence of any warranty; and give any other
recipients of the Program a copy of this License along with the Program. You may charge a
fee for the physical act of transferring a copy, and you may at your option offer warranty
protection in exchange for a fee.
2. You may modify your copy or copies of the Program or any portion of it, thus forming a
work based on the Program, and copy and distribute such modifications or work under the
terms of Section 1 above, provided that you also meet all of these conditions:
a) You must cause the modified files to carry prominent notices stating that you changed the
files and the date of any change.
b) You must cause any work that you distribute or publish, that in whole or in part contains or
is derived from the Program or any part thereof, to be licensed as a whole at no charge to all
third parties under the terms of this License.
c) If the modified program normally reads commands interactively when run, you must
cause it, when started running for such interactive use in the most ordinary way, to print or
display an announcement including an appropriate copyright notice and a notice that there
Page 37

is no warranty (or else, saying that you provide a warranty) and that users may redistribute
the program under these conditions, and telling the user how to view a copy of this License.
(Exception: if the Program itself is interactive but does not normally print such an
announcement, your work based on the Program is not required to print an announcement.)
These requirements apply to the modified work as a whole. If identifiable sections of
that work are not derived from the Program, and can be reasonably considered independent
and separate works in themselves, then this License, and its terms, do not apply to those
sections when you distribute them as separate works. But when you distribute the same
sections as part of a whole which is a work based on the Program, the distribution of the
whole must be on the terms of this License, whose permissions for other licensees extend to
the entire whole, and thus to each and every part regardless of who wrote it.
Thus, it is not the intent of this section to claim rights or contest your rights to work
written entirely by you; rather, the intent is to exercise the right to control the distribution of
derivative or collective works based on the Program.
In addition, mere aggregation of another work not based on the Program with the
Program (or with a work based on the Program) on a volume of a storage or distribution
medium does not bring the other work under the scope of this License.
3. You may copy and distribute the Program (or a work based on it, under Section 2) in
object code or executable form under the terms of Sections 1 and 2 above provided that you
also do one of the following:
a) Accompany it with the complete corresponding machine-readable source code, which
must be distributed under the terms of Sections 1 and 2 above on a medium customarily
used for software interchange; or,
b) Accompany it with a written offer, valid for at least three years, to give any third party, for
a charge no more than your cost of physically performing source distribution, a complete
machine-readable copy of the corresponding source code, to be distributed under the terms
of Sections 1 and 2 above on a medium customarily used for software interchange; or,
c) Accompany it with the information you received as to the offer to distribute corresponding
source code. (This alternative is allowed only for noncommercial distribution and only if you
received the program in object code or executable form with such an offer, in accord with
Subsection b above.)
The source code for a work means the preferred form of the work for making
modifications to it. For an executable work, complete source code means all the source
code for all modules it contains, plus any associated interface definition files, plus the scripts
used to control compilation and installation of the executable. However, as a special
exception, the source code distributed need not include anything that is normally distributed
(in either source or binary form) with the major components (compiler, kernel, and so on) of
the operating system on which the executable runs, unless that component itself
accompanies the executable.
If distribution of executable or object code is made by offering access to copy from a
designated place, then offering equivalent access to copy the source code from the same
place counts as distribution of the source code, even though third parties are not compelled
to copy the source along with the object code.
Page 38

4. You may not copy, modify, sublicense, or distribute the Program except as expressly
provided under this License. Any attempt otherwise to copy, modify, sublicense or distribute
the Program is void, and will automatically terminate your rights under this License.
However, parties who have received copies, or rights, from you under this License will not
have their licenses terminated so long as such parties remain in full compliance.
5. You are not required to accept this License, since you have not signed it. However,
nothing else grants you permission to modify or distribute the Program or its derivative
works. These actions are prohibited by law if you do not accept this License. Therefore, by
modifying or distributing the Program (or any work based on the Program), you indicate your
acceptance of this License to do so, and all its terms and conditions for copying, distributing
or modifying the Program or works based on it.
6. Each time you redistribute the Program (or any work based on the Program), the recipient
automatically receives a license from the original licensor to copy, distribute or modify the
Program subject to these terms and conditions. You may not impose any further restrictions
on the recipients' exercise of the rights granted herein. You are not responsible for enforcing
compliance by third parties to this License.
7. If, as a consequence of a court judgment or allegation of patent infringement or for any
other reason (not limited to patent issues), conditions are imposed on you (whether by court
order, agreement or otherwise) that contradict the conditions of this License, they do not
excuse you from the conditions of this License. If you cannot distribute so as to satisfy
simultaneously your obligations under this License and any other pertinent obligations, then
as a consequence you may not distribute the Program at all. For example, if a patent license
would not permit royalty-free redistribution of the Program by all those who receive copies
directly or indirectly through you, then the only way you could satisfy both it and this License
would be to refrain entirely from distribution of the Program.
If any portion of this section is held invalid or unenforceable under any particular
circumstance, the balance of the section is intended to apply and the section as a whole is
intended to apply in other circumstances.
It is not the purpose of this section to induce you to infringe any patents or other
property right claims or to contest validity of any such claims; this section has the sole
purpose of protecting the integrity of the free software distribution system, which is
implemented by public license practices. Many people have made generous contributions
to the wide range of software distributed through that system in reliance on consistent
application of that system; it is up to the author/donor to decide if he or she is willing to
distribute software through any other system and a licensee cannot impose that choice.
This section is intended to make thoroughly clear what is believed to be a
consequence of the rest of this License.
8. If the distribution and/or use of the Program is restricted in certain countries either by
patents or by copyrighted interfaces, the original copyright holder who places the Program
under this License may add an explicit geographical distribution limitation excluding those
Page 39

countries, so that distribution is permitted only in or among countries not thus excluded. In
such case, this License incorporates the limitation as if written in the body of this License.
9. The Free Software Foundation may publish revised and/or new versions of the General
Public License from time to time. Such new versions will be similar in spirit to the present
version, but may differ in detail to address new problems or concerns.
Each version is given a distinguishing version number. If the Program specifies a
version number of this License which applies to it and "any later version", you have the
option of following the terms and conditions either of that version or of any later version
published by the Free Software Foundation. If the Program does not specify a version
number of this License, you may choose any version ever published by the Free Software
Foundation.
10. If you wish to incorporate parts of the Program into other free programs whose
distribution conditions are different, write to the author to ask for permission. For software
which is copyrighted by the Free Software Foundation, write to the Free Software
Foundation; we sometimes make exceptions for this. Our decision will be guided by the two
goals of preserving the free status of all derivatives of our free software and of promoting the
sharing and reuse of software generally.
NO WARRANTY
11. BECAUSE THE PROGRAM IS LICENSED FREE OF CHARGE, THERE IS NO
WARRANTY FOR THE PROGRAM, TO THE EXTENT PERMITTED BY APPLICABLE
LAW. EXCEPT WHEN OTHERWISE STATED IN WRITING THE COPYRIGHT HOLDERS
AND/OR OTHER PARTIES PROVIDE THE PROGRAM "AS IS" WITHOUT WARRANTY
OF ANY KIND, EITHER EXPRESSED OR IMPLIED, INCLUDING, BUT NOT LIMITED TO,
THE IMPLIED WARRANTIES OF MERCHANTABILITY AND FITNESS FOR A
PARTICULAR PURPOSE. THE ENTIRE RISK AS TO THE QUALITY AND
PERFORMANCE OF THE PROGRAM IS WITH YOU. SHOULD THE PROGRAM PROVE
DEFECTIVE, YOU ASSUME THE COST OF ALL NECESSARY SERVICING, REPAIR OR
CORRECTION.
12. IN NO EVENT UNLESS REQUIRED BY APPLICABLE LAW OR AGREED TO IN
WRITING WILL ANY COPYRIGHT HOLDER, OR ANY OTHER PARTY WHO MAY
MODIFY AND/OR REDISTRIBUTE THE PROGRAM AS PERMITTED ABOVE, BE LIABLE
TO YOU FOR DAMAGES, INCLUDING ANY GENERAL, SPECIAL, INCIDENTAL OR
CONSEQUENTIAL DAMAGES ARISING OUT OF THE USE OR INABILITY TO USE THE
PROGRAM (INCLUDING BUT NOT LIMITED TO LOSS OF DATA OR DATA BEING
RENDERED INACCURATE OR LOSSES SUSTAINED BY YOU OR THIRD PARTIES OR A
FAILURE OF THE PROGRAM TO OPERATE WITH ANY OTHER PROGRAMS), EVEN IF
SUCH HOLDER OR OTHER PARTY HAS BEEN ADVISED OF THE POSSIBILITY OF
SUCH DAMAGES.
END OF TERMS AND CONDITIONS
Page 40

HOW TO APPLY THESE TERMS TO YOUR NEW PROGRAMS
(1) If you develop a new program, and you want it to be of the greatest possible use to the
public, the best way to achieve this is to make it free software which everyone can
redistribute and change under these terms.
(2) To do so, attach the following notices to the program. It is safest to attach them to the
start of each source file to most effectively convey the exclusion of warranty; and each file
should have at least the "copyright" line and a pointer to where the full notice is found.
<one line to give the program's name and an idea of what it does.>
Copyright (C) <yyyy> <name of author>
(3) This program is free software; you can redistribute it and/or modify it under the terms of
the GNU General Public License as published by the Free Software Foundation; either
version 2 of the License, or (at your option) any later version.
(4) This program is distributed in the hope that it will be useful, but WITHOUT ANY
WARRANTY; without even the implied warranty of MERCHANTABILITY or FITNESS FOR
A PARTICULAR PURPOSE. See the GNU General Public License for more details.
(5) You should have received a copy of the GNU General Public License along with this
program; if not, write to the Free Software Foundation Inc; 51 Franklin Street, Fifth Floor,
Boston, MA 02110-1301, USA.
(6) Also add information on how to contact you by electronic and paper mail.
(7) If the program is interactive, make it output a short notice like this when it starts in an
interactive mode: Gnomovision version 69, Copyright (C) year name of author
Gnomovision comes with ABSOLUTELY NO WARRANTY; for details type `show w'.
(8) This is free software, and you are welcome to redistribute it under certain conditions;
type `show c' for details.
(9) The hypothetical commands `show w' and `show c' should show the appropriate parts of
the General Public License. Of course, the commands you use may be called something
other than `show w' and `show c'; they could even be mouse-clicks or menu
items--whatever suits your program.
(10) You should also get your employer (if you work as a programmer) or your school, if any,
to sign a "copyright disclaimer" for the program, if necessary. Here is a sample; alter the
names:
(11) Yoyodyne, Inc., hereby disclaims all copyright interest in the program `Gnomovision'
(which makes passes at compilers) written by James Hacker.
<signature of Ty Coon>, 1 April 1989 [Ty Coon, President of Vice]
(12) This General Public License does not permit incorporating your program into
proprietary programs. If your program is a subroutine library, you may consider it more
useful to permit linking proprietary applications with the library. If this is what you want to do,
use the GNU Lesser General Public License instead of this License.
 Loading...