

Page 1

Technaxx® * User Manual
Bluetooth Vinyl Record and Cassette Converter TX-22+
The manufacturer Technaxx Deutschland GmbH & Co.KG hereby declares that this device,
to which this user manual belongs, complies with the essential requirements of the
standards referred to the Directive RED 2014/53/EU. The Declaration of Conformity you
find here: www.technaxx.de/ (in bar at the bottom “Konformitätserklärung”). Before using
the device the first time, read the user manual carefully.
Service phone No. for technical support: 01805 012643 (14 cent/minute from German
fixed-line and 42 cent/minute from mobile networks).
Free Email: support@technaxx.de
Keep this user manual for future reference or product sharing carefully. Do the same with
the original accessories for this product. In case of warranty, please contact the dealer or
the store where you bought this product. Warranty 2 years
Before usage
Choose the installation location of your unit carefully. Avoid placing it in direct
sunlight or close to a source of heat. Also avoid locations subject to vibrations and
excessive dust, heat, cold or moisture.
Do not install the unit in a inclined position, It is designed to be operated in a
horizontal position only.
If the unit is brought directly from a cold to a warm location, moisture may condense
inside the player, and cause damage it. When you first install the unit, or when you
move it from a cold to a warm location, wait for 30 minutes before operating the unit.
The ventilation holes should not be covered. Make sure there is enough space
above and beside the amplifier/receiver. Do not place a CD player or other equipment
on top of the device.
Do not open the cabinet. This might cause a damage to circuitry or electrical shock.
If you are not going to use the player for long time, be sure do disconnect the player
from the AC power source. When removing the power plug, never yank the cord.
To prevent fire or shock hazard, disconnect your unit from the AC power source
when cleaning. Use caution when cleaning and wiping the plastic parts. Do not attempt
to clean the unit with the chemical solvents as this might damage the finish.
1
Page 2
Features
Digitizing vinyl records & audio cassettes to USB or SD card up to 32GB
Music playback & recording via Bluetooth 2.0
Recording from external devices via AUX-IN connection
Playback of MP3/WMA music files from USB or SD card up to 32GB
No computer/notebook required
RCA outputs for connection to HiFi systems
Record player with automatic stop & 3 speeds: 33, 45, 78 rpm
Built-in cassette player
Built-in stereo loudspeakers
LED display with backlight
Functional and easy handling
Technical specifications
Bluetooth V2.0 / profil A2DP & HFP / distance ~10m open areas
Mode Phono, Cassette, USB, SD card, AUX–IN, Bluetooth
Lautsprecher
2x 2W stereo (Ø= 7cm), SNR ≦ 80dB, impedance 4Ω
Frequency range Speakers 80Hz–15kHz
Recording MP3 music files on USB or SD card up to 32GB
Playback MP3/WMA music files from USB or SD card up to 32GB
Belt-drive
Mechanics
Semi-automatic play tone pickup arm
Ceramic stereo cartridge with sapphire stylus
3.5mm AUX-IN jack & 3.5mm headphone jack
Connections
2x RCA outputs for connection to HiFi systems 400mV
USB port & SD card slot (up to 32GB)
Input device AC 220~240V / 0.8A
Material MDF + PVC + Plastic
Weight/Dimensions 3kg / (L) 32.3 x (W) 31.1 x (H) 13.2cm
Package Contents
Bluetooth Vinyl Record and Cassette Converter TX-22+,
45rmp single Puck adapter, User Manual
2
Page 3
Product Overview
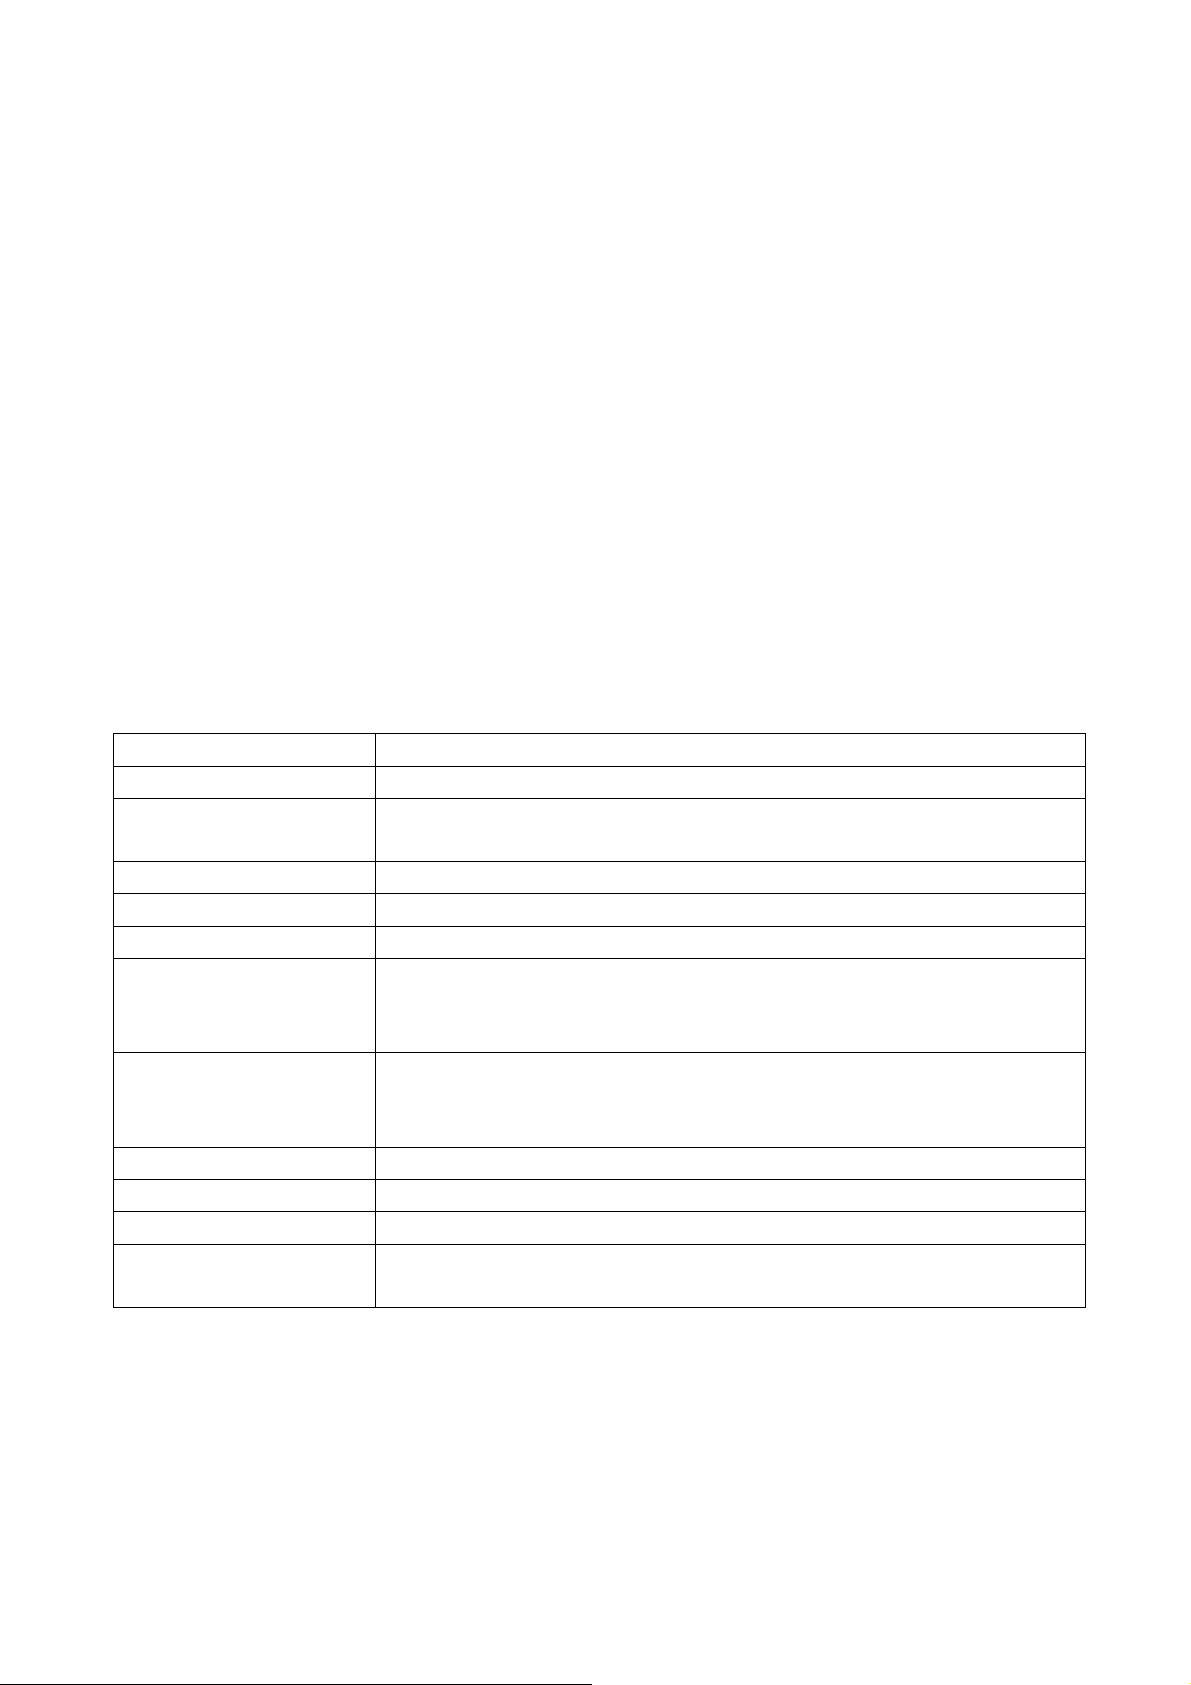
Front View
1 Dust cover 9 USB port
2 Source/ Mode (USB/SD 10 LCD display
3 Record button 11 Power LED indicator
4 Function selector 12 Play/Pause button
5 AUX–IN jack 13 Stop button
6 Delete button 14 Volume knob / ON / OFF
7 3.5mm headphone jack 15 Next/ Skip up button
8 Folder/Program button 16 Previous/ Skip down button
17 SD card slot
3
Page 4
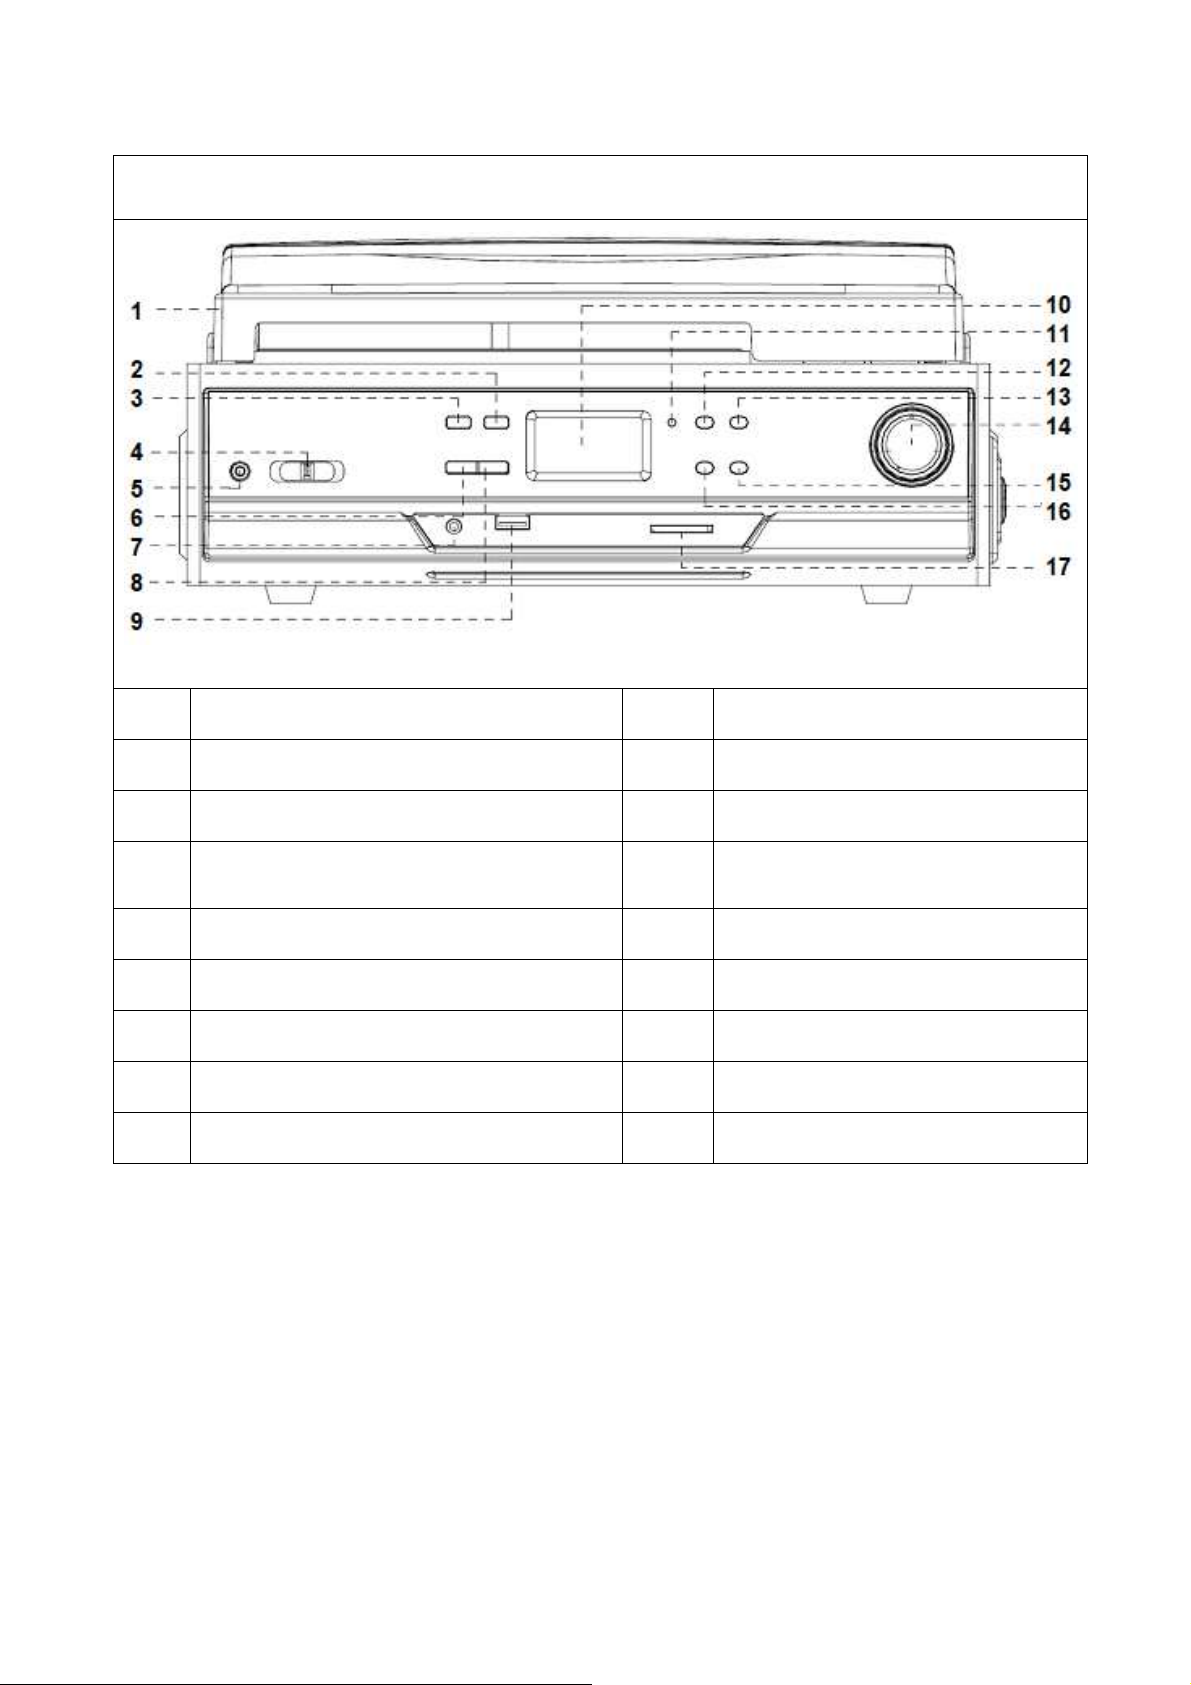
Top View
20 Right speaker 24 Speed selectors (33/45/78 rpm)
21 45 rpm adaptor 25 Tone arm
22 Lift lever 26 Cassette player
23 Auto stop control
4
Page 5
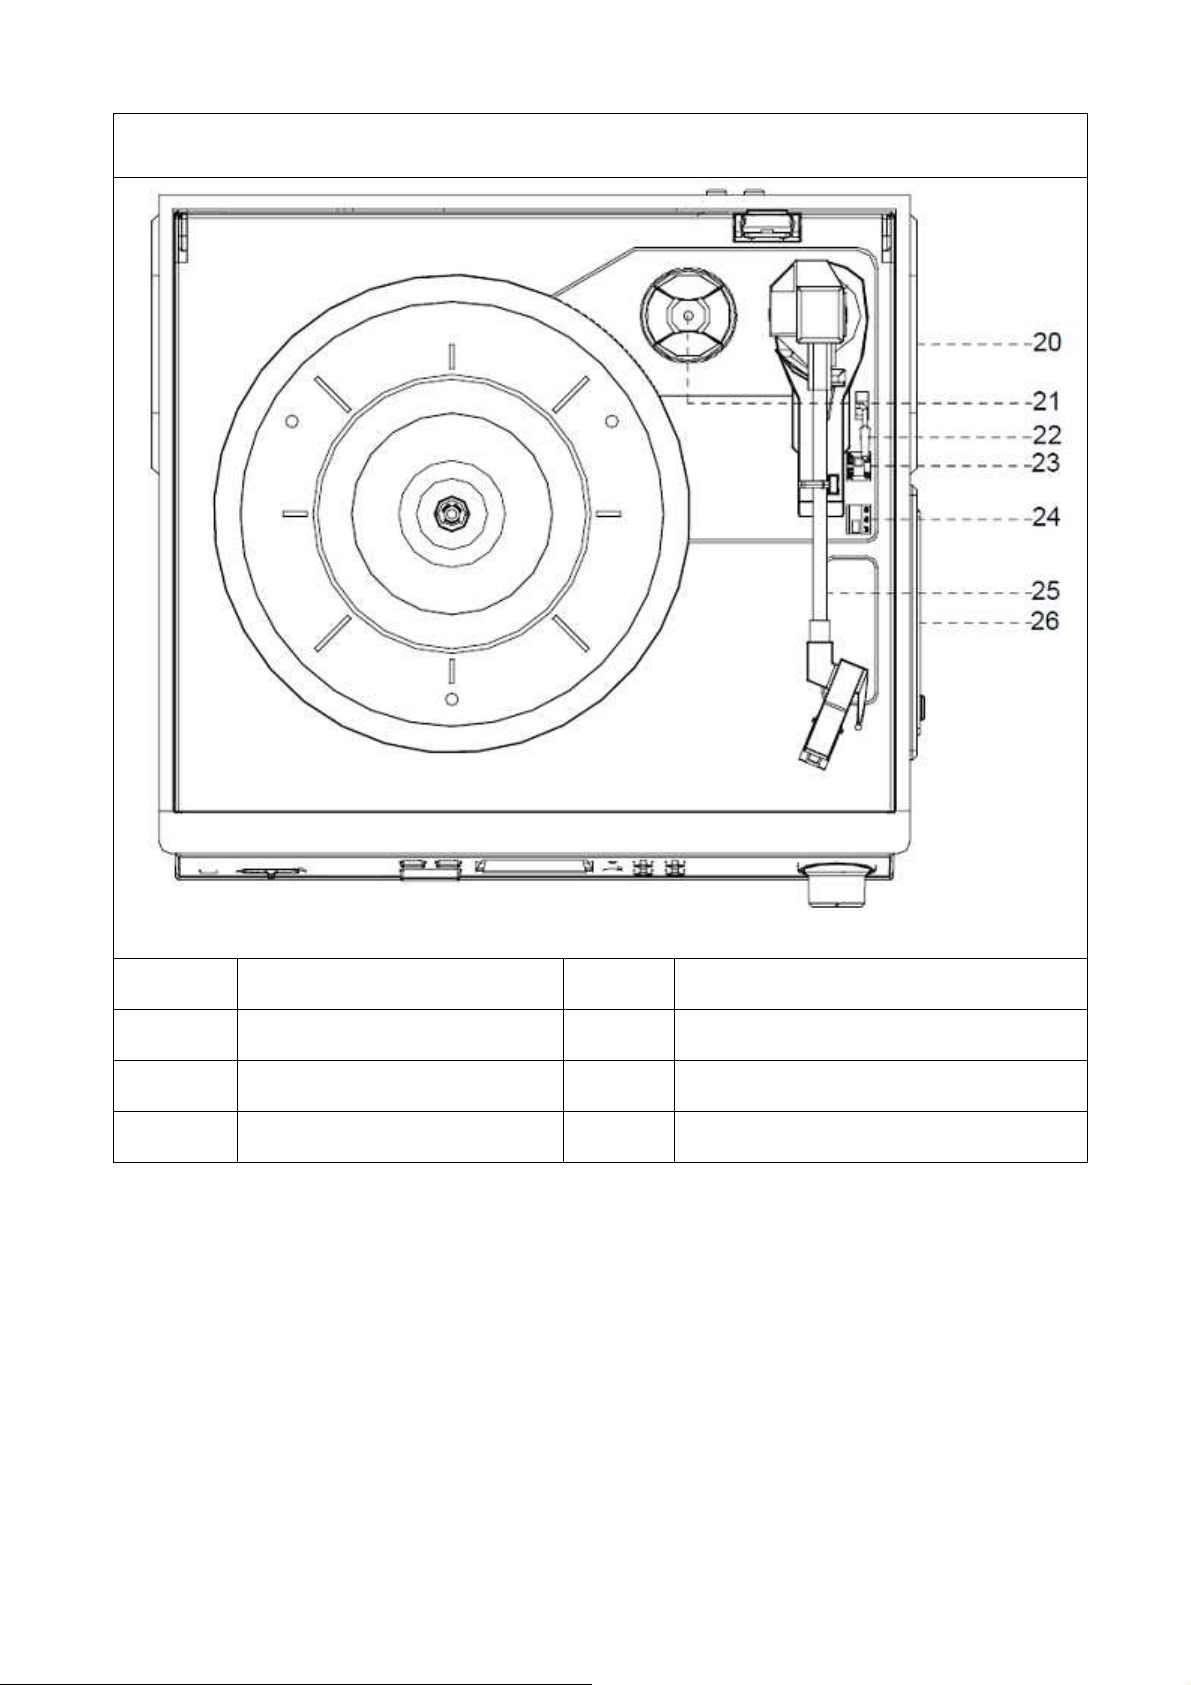
Rear View
27 RCA output 28 AC power cord
First start
Carefully read the user manual. Insert the USB power adapter of the device
into a socket with AC 220–240V. Be reminded: “Non-connected devices
always work faulty!”
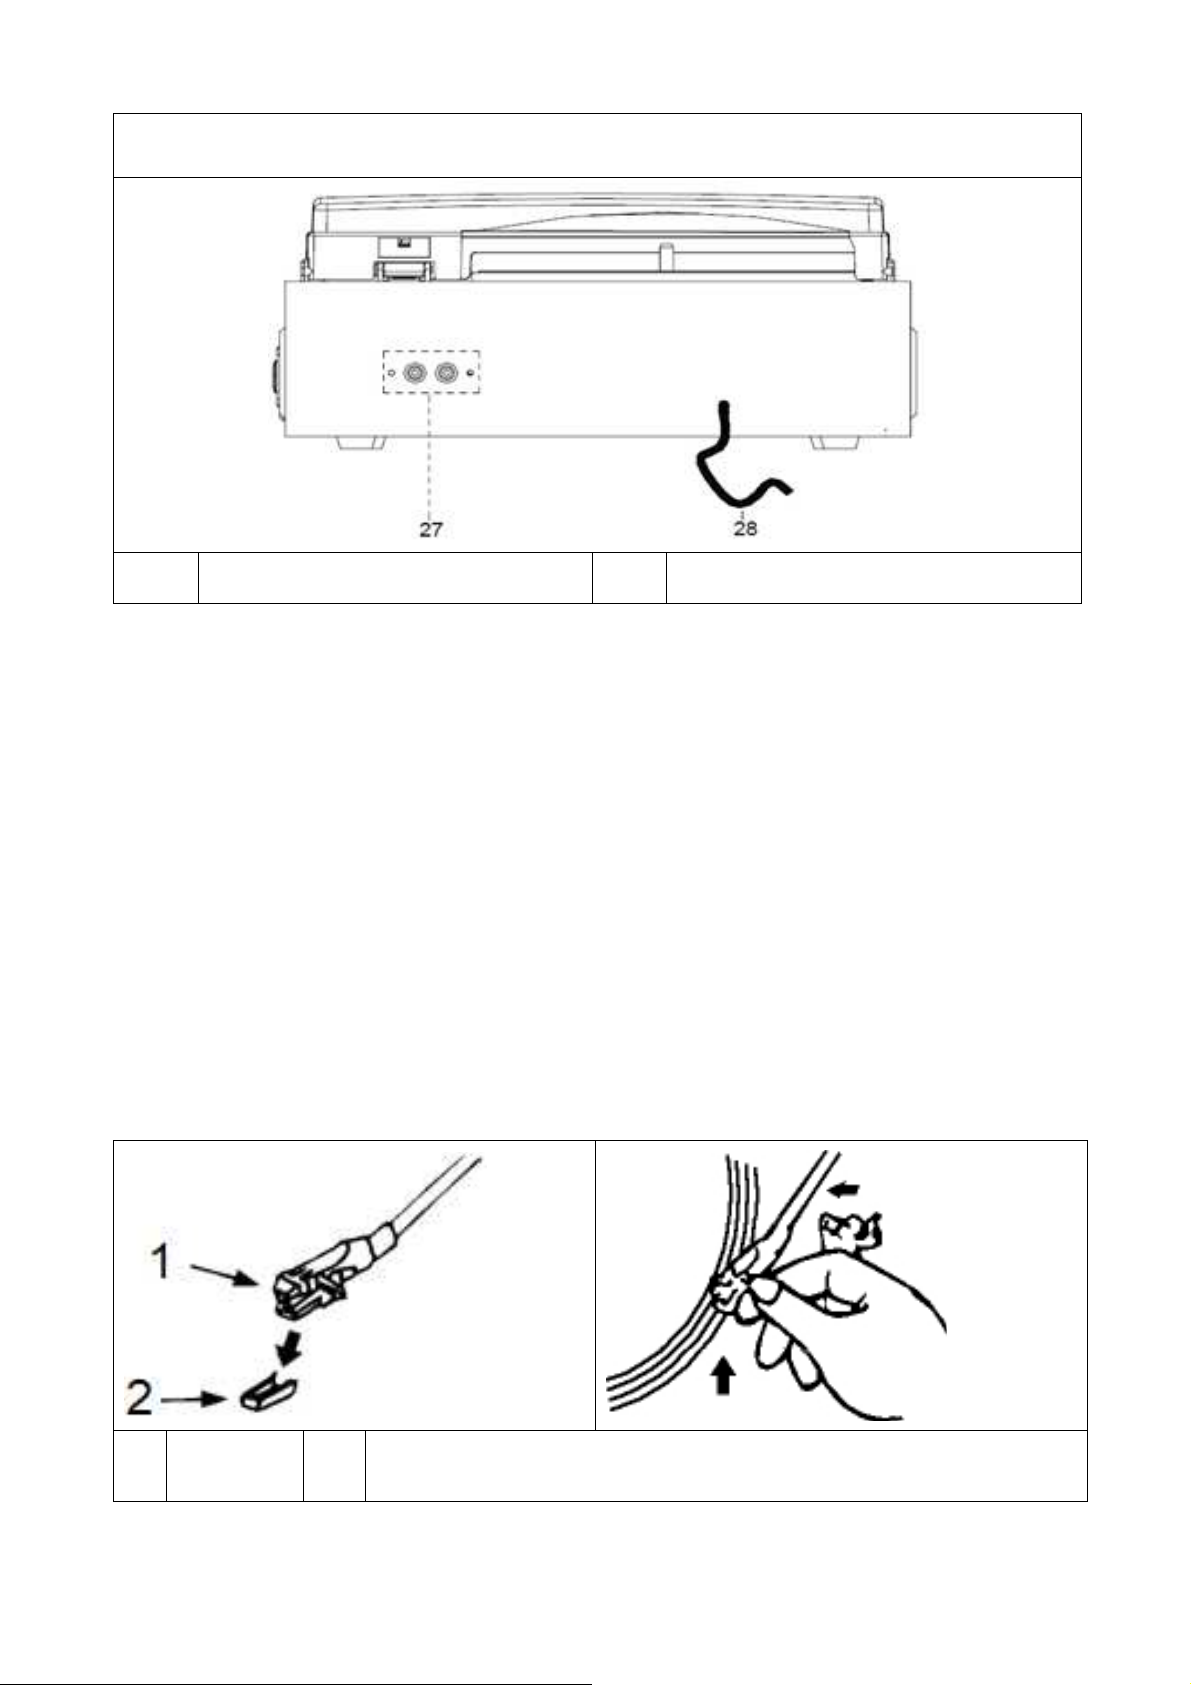
Phono Mode
IMPORTANT! When using the turntable:
Make sure to remove the stylus protector, as illustrated on the left picture (it
should easily slide off the stylus assembly).
Make sure to unclip the tone arm lock before use and to secure it again after
use.
1
Cartridge
2
Needle protection
5
Page 6

Playing in Phono mode (Vinyl)
1. Open the dust cover. Turn the volume knob (14) to turn the equipment on.
2. Use the function selector (4) to select PHONO mode.
3. Set the speed selector to the appropriate position: 33, 45 or 78, depending
on the record to be played.
4. Set the auto stop control to ON if you want the turntable to stop turning
when it has reached the end of the record. If the switch is set to OFF, the
turntable will continue turning at the end of the record.
5. Place the record on the turntable (use the 45 rpm adaptor, if required).
6. Remove the needle protection. Move the lift lever towards the back to raise
the tone arm from the arm park, then slowly move the arm to the record, as
illustrated on the right picture above. The turntable will start rotating.
7. Move the lift lever towards the front, the tone arm will gently drop onto the
record and playback will start.
8. To stop playback, move the lift lever towards the back to raise the tone arm.
The turntable will still be rotating but the record will stop playing. To continue
playback, move the lift lever towards the front.
9. To play a different piece on the record, move the lift lever towards the back,
move the raised tone arm to the start of the piece and then move the lift lever
towards the front to lower the tone arm and start playback.
10. To adjust the volume level, turn the volume knob to the right or left.
11. At the end of the record, move the lift lever towards the back to raise the
tone arm and move it back to the tone arm park, and then move the lift lever
towards the front to lower the arm onto its rest.
12. Alternatively, lift the tone arm off the record and return it to the arm rest
manually.
13. When you have finished playing records, engage the tone arm lock to
protect it from accidental movement. Turn the volume knob switch the unit off.
Unplug it from the power supply if you are not going to use it for a while.
NOTE: Should your record stop before the last track finishes, set the auto stop
control to OFF. Your record will now play to the end, but you will have to stop
the turntable rotation manually. (Return the tone arm to its rest manually and if
the turntable is still rotating, switch off the unit by pressing the volume control
knob. Then set the auto stop control back to ON.)
6
Page 7

Recording in Phono mode (Vinyl)
Firstly insert memory device (USB drive or SD card). When turntable is
working, press the REC key for 1-2 seconds on the top control board of the
unit, (between step 5 and 7 from “Playing a record”) now recording will begin
and REC LED is flashing. To finish the work just need to press the STOP key.
How to replace a needle
Removing the needle from the
cartridge:
Inserting the needle:
1. Guide Pins (inside)
Place a screwdriver at the tip of the
needle heads hell and push
downwards in the direction shown in
sketch “A”. Remove the needle head
shell by pulling it forwards and pushing
downwards.
Hold the tip of the needle head shell
and insert it by pressing in the direction
illustrated by “B”. Push the needle
head shell upwards in the direction
illustrated by “C” until the needle locks
into the tip position.
7
Page 8
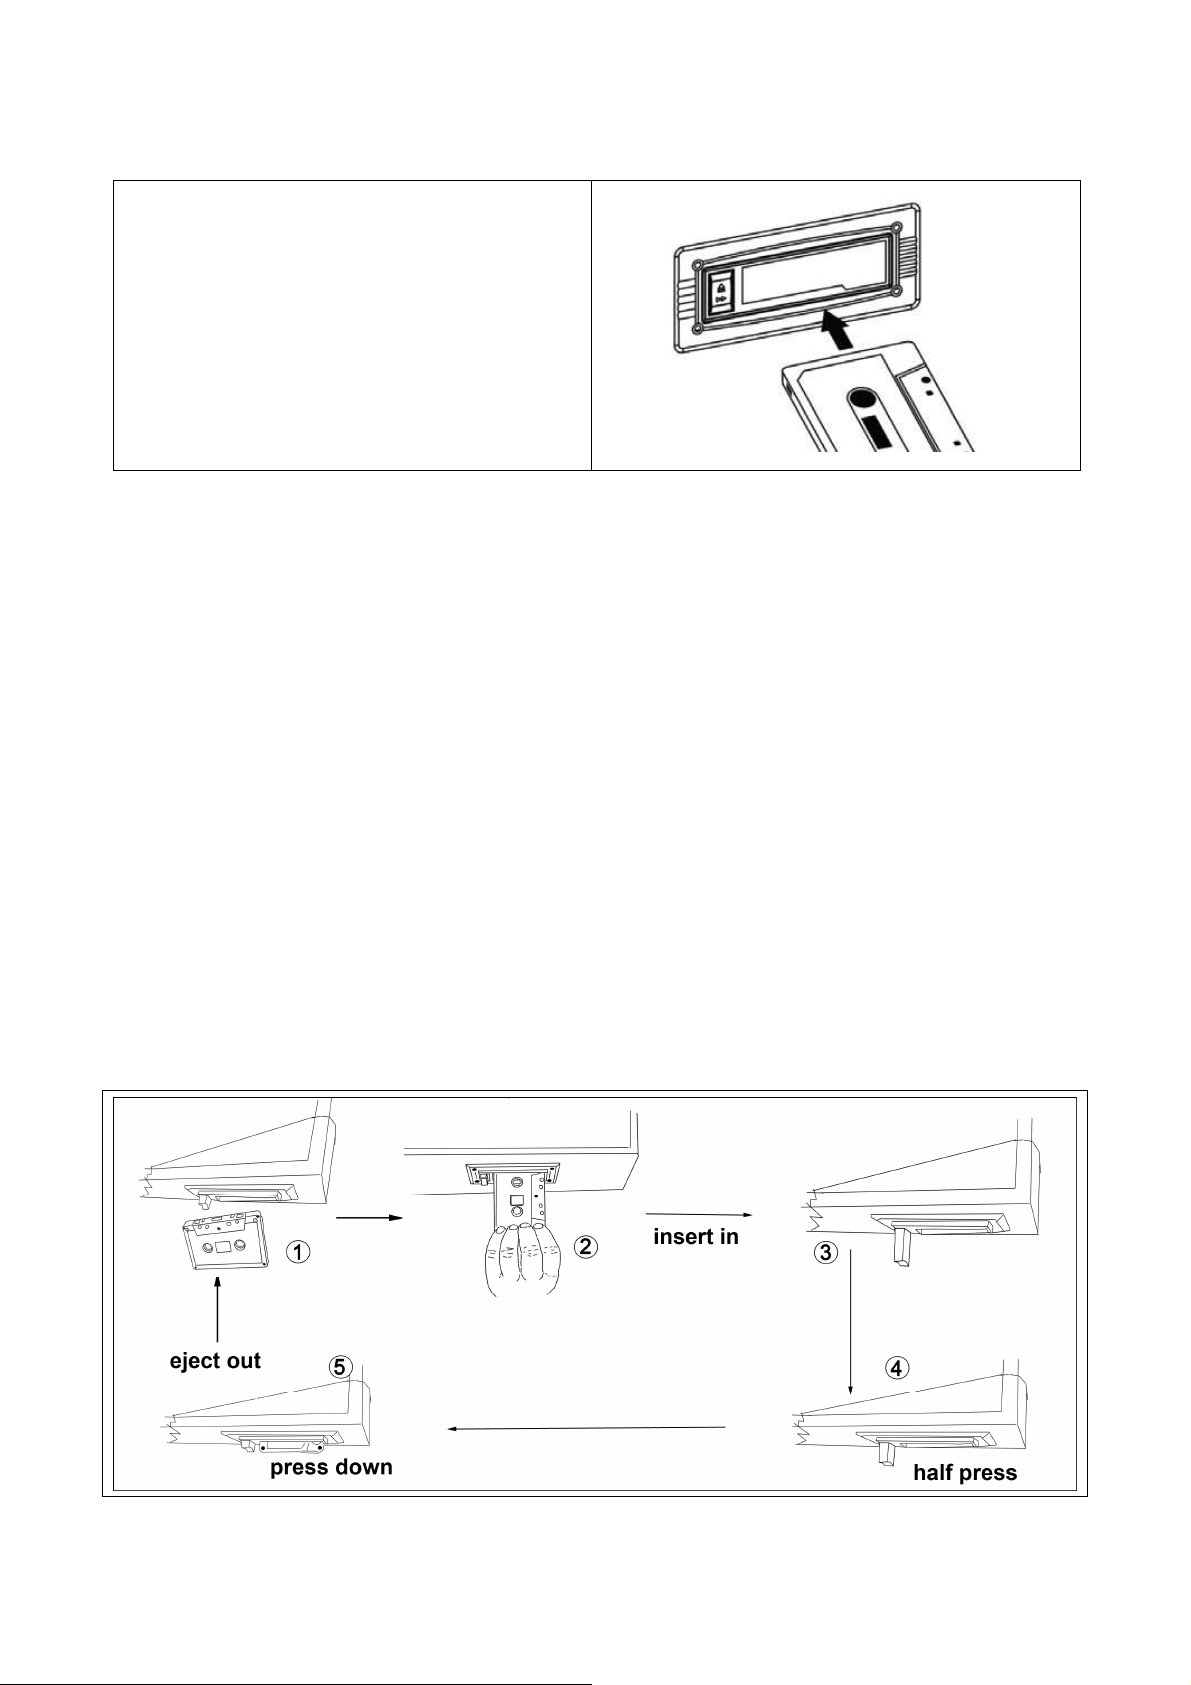
Tape Mode
When using the cassette player:
Make sure to insert the cassette in
the correct direction.
To avoid damaging the cassette, we
strongly recommend
taking it out of the equipment after
playing the cassette.
Playing a cassette
1. Press the volume knob (14) to turn the equipment on.
2. Use the function selector (4) to select TAPE/AUX mode.
3. Insert a cassette with the tape facing away from you, as illustrated in the
picture above. The EJECT/FAST FORWARD button will pop out and the
system will start playing the tape automatically.
4. Turn the volume knob to your desired level.
5. To fast forward the cassette tape, press the EJECT/FAST FORWARD
button halfway down while the cassette is playing. The tape will be advanced
forward rapidly.
6. To resume normal playback, slightly press the EJECT/FAST FORWARD
button again. The button will fully pop out again.
7. To stop playback, press the EJECT/FAST FORWARD button completely.
Playback will be stopped and the cassette tape will be ejected.
8
Page 9

Record a cassette
1. Set the function button to TAPE/AUX mode and then insert a memory
device (USB drive or SD card).
2. Press the record REC button, it will take 3 - 4 second to read the memory
device, then the USB or SD icon will be flashing on the LCD display.
3. Press the next or previous button to select the desired mode (USB or SD)
for recording, then press the record REC button again to confirm.(You can
skip this step if only a USB drive or an SD card is inserted.)
4. The system will start the recording mode after a few seconds. Insert your
cassette into the playback slot. During encoding, the USB or SD icon will be
flashing on the display.
5. To finish the recording, press the stop button. The display will show “END”
and return to TAPE/AUX mode.
NOTE:
The recording speed is 1:1. Recording will take as long as playing the
cassette.
The recording format is preset at MP3 bit rate 128Kbps.
AUX-IN Mode
Reproduction via AUX-IN
1. Press the volume knob (14) to turn the equipment on.
2. Use the function selector (4) to select TAPE/AUX mode, then connect the
external audio device (such as a CD player, Smartphone, etc.) to the AUX-IN
socket at the front of the equipment. The audio signal from the external audio
device will now be played through the system.
3. If an external audio device is connected to the AUX IN socket, playing of the
AUX–IN mode takes priority over cassette playback.
9
Page 10
Recording AUX IN
1. Set the function button to TAPE/AUX mode and then insert a memory
device (USB drive or SD card).
2. Press the record REC button, it will take 3 - 4 second to read the memory
device, then the USB or SD icon will be flashing on the LCD display.
3. Press the next or previous button to select the desired mode (USB or SD)
for recording, then press the record REC button again to confirm.(You can
skip this step if only a USB drive or an SD card is inserted.)
4. The system will start the recording mode after a few seconds. Insert your
cassette into the playback slot. During encoding, the USB or SD icon will be
flashing on the display.
5. To finish the recording, press the stop button. The display will show “END”
and return to TAPE/AUX mode.
NOTE:
The recording speed is 1:1. Recording will take as long as playing the CD
(or other auxiliary input).
The recording format is preset at MP3 bit rate 128Kbps.
To enjoy the function, user need to select the function switch to AUX-IN
position, and AUX-IN source will be prior to tape play.
When you insert both USB drive and SD card, the recorded file will be saved
into the latter inserting device.
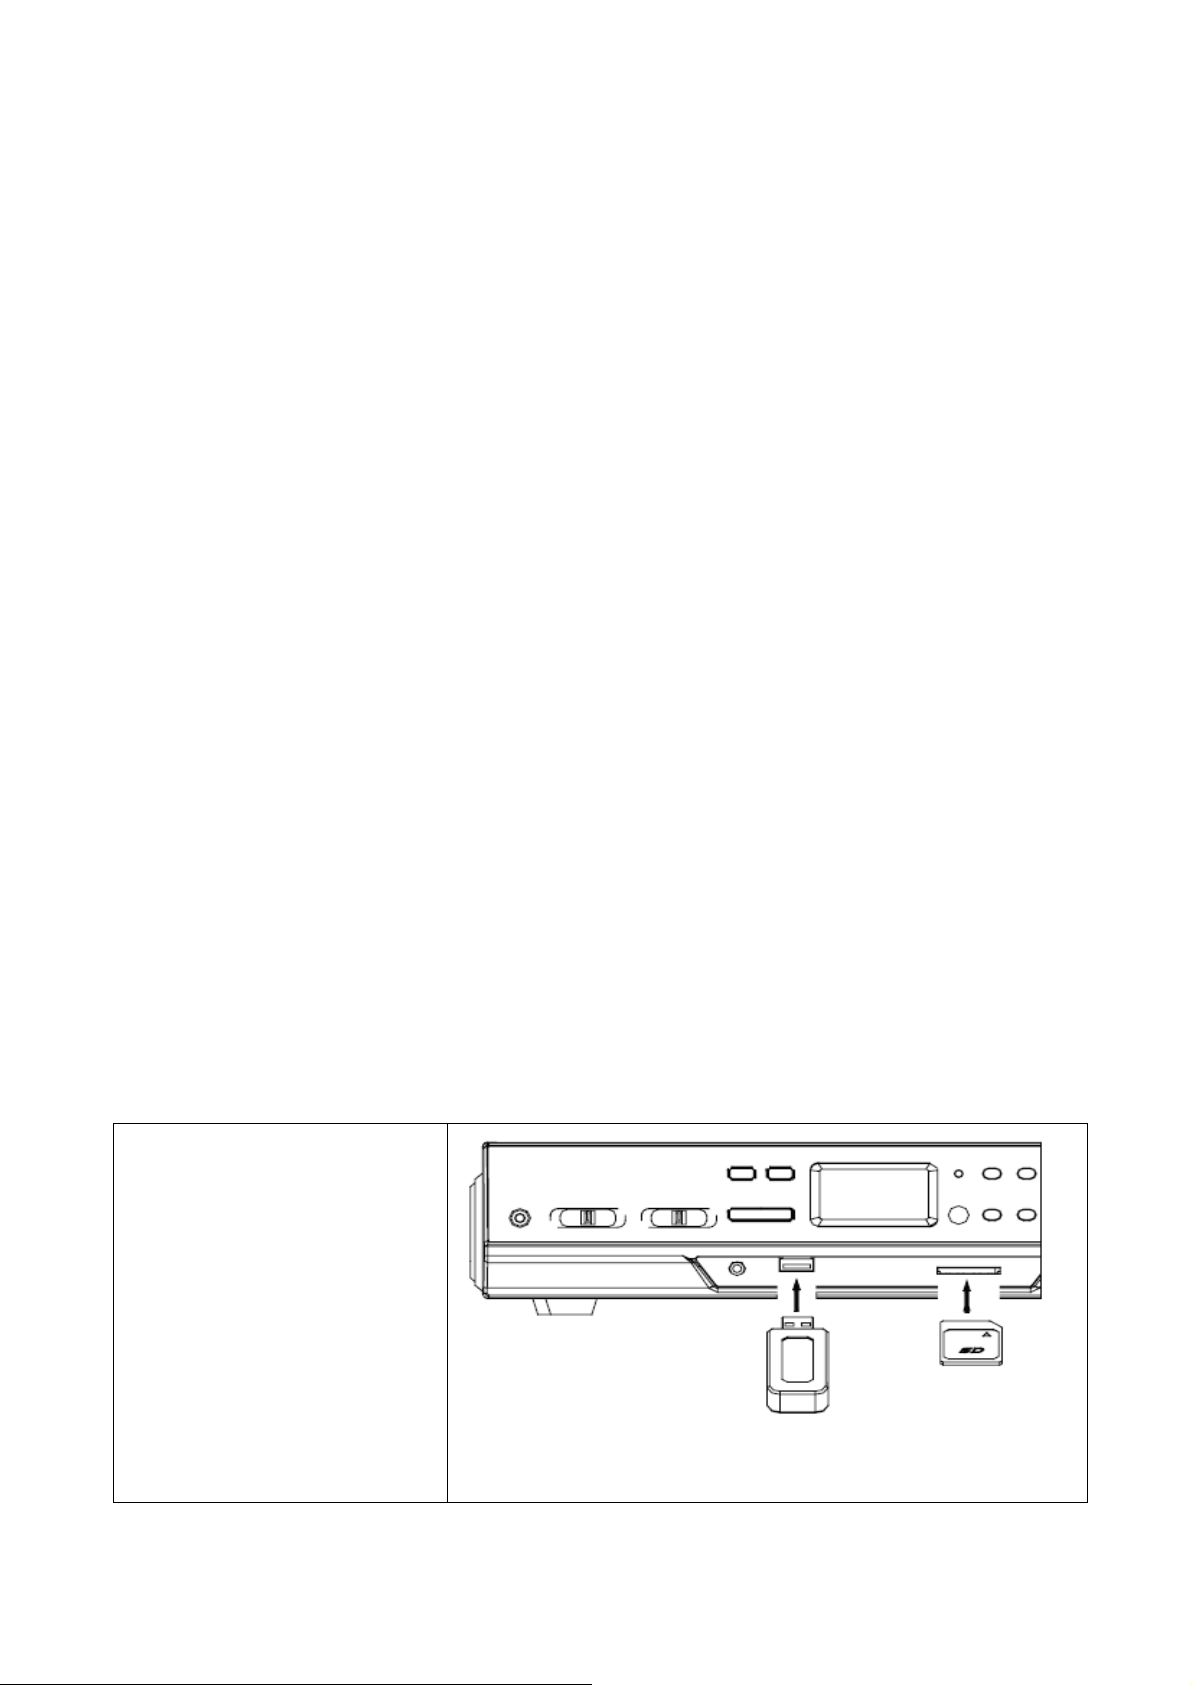
The USB Port and SD Card Slot
The system is able to
decode and playback all
MP3/WMA files stored in
the memory media
connected to the USB
port or SD card slot.
10
Page 11

Playback MP3/WMA format via USB device or SD card
1. Press the volume knob (14) to turn the equipment on.
2. Following the illustration above, insert a USB device face up into the USB
port, making sure it is fully inserted. Alternatively, insert a memory card in the
direction of the arrow (as shown on the label next to the memory card slot),
making sure to insert it straight without bending.
IMPORTANT: Connecting the USB device upside down or backwards could
damage the audio system or storage media (USB drive, SD card). Check to
ensure the direction is correct before connection.
3. Set the function selector to USB/SD mode. (If you have both a USB device
and a memory card inserted, press the MODE/SOURCE button to toggle
between USB and SD mode.) The system will start reading the storage
medium automatically after mode selection and will display the total number of
folders and MP3/WMA files.
4. The system will then start audio playback from the media storage device
(USB or SD card) automatically.
Playback from Bluetooth enabled Smartphone’s
1. Press the volume knob (14) to turn the equipment on.
2. Set the function selector (4) to USB/SD mode. Press the MODE/SOURCE
button to toggle between USB,SD and BT mode.
3. Open the Bluetooth on your Smartphone and search for the Bluetooth name
“Technaxx TX-22+“ to connect.
4. When successfully connected you hear a confirmation sound.
5. Select NEXT+ or PREV– (Skip+ or Skip–), Play/Pause key, to navigate to
your playlist.
Note:
Under this function, turntable function will be stopped automatically.
When you turn on the equipment and activate “Bluetooth mode” again, the
last connected Smartphone will be connected automatically!
11
Page 12

Playback controls
PLAY/PAUSE: Press this button once to stop playing, press it again to
continue.
STOP: Press this button to stop audio playback, the display will then show the
total number of MP3/WMA files.
SKIP UP/NEXT: Press this button once to play the next file, press and hold
this button to fast forward through the files/tracks.
SKIP DOWN/PREVIOUS: Press this button once to play the previous file,
press and hold this button to fast reverse through the files/tracks.
MODE: Press this button to toggle between USB and SD Card mode.
Important notes:
The system can detect and read files in MP3 / WMA format only via the USB
port or SD card slot.
You can connect an MP3 player to the system via the USB socket; however,
some MP3 players may not be able to play via the USB socket. This is due to
variances in the MP3 encoding format; it is not a malfunction of the system.
There are numerous USB and SD device producers and their products vary
in solution and format. We therefore cannot guarantee that this unit will
support all USB and SD devices from every brand.
This system supports USB drives/SD cards up to 32GB.
MP3 / WMA track format requirements: MP3 bit rate: 32 Kbps~256 Kbps;
WMA bit rate: 32 Kbps~320 Kbps.
12
Page 13

Programming track order for playback
Up to 64 tracks can be programmed for MP3 / WMA file playback in any order.
Before programming, however, be sure the system is in STOP mode.
1. Set the function selector (4) to USB/SD mode, then press the stop button.
2. Press the program PROG button, MEM will be flashing on the LCD display,
and it will indicate the program number and digits for the track number to be
programmed.
3. Press the SKIP UP (NEXT) or SKIP DOWN (PREV) button to select a
desired track.
4. Press the program PROG button to store the track into the memory.
5. Repeat steps 3 and 4 to enter additional tracks into the memory.
6. When all desired tracks have been programmed, press the PLAY/PAUSE
button to play the tracks in the assigned order.
7. To cancel programming, move the function selector to another mode (e.g.
phono).
Copying of MP3 / WMA files
The system allows you to copy files from USB to SD or vice versa. You can
copy a single file/track, a folder of files/tracks, or all files/tracks on the storage
medium.
Copying a single file/track
1. Insert a USB storage device and SD card, then select USB/SD mode (as
described previously).
2. Press the record REC button during playback of the track you want to copy:
“ONE” will be flashing on the display. Press the record REC button again to
confirm.
3. The USB or SD icon will be flashing on the display while the system is
copying the file.
4. Once the file has been copied, the unit will stop playback automatically.
“END” will be shown on the display and the system will revert to USB or SD
mode.
13
Page 14

Copying all files/tracks
1. Insert a USB storage device and SD card, then select USB/SD mode (as
described previously). When the system has recognized the device, press the
stop button.
2. Press the record REC button: “ONE” will be flashing on the display. Press
the SKIP UP or SKIP DOWN button to select “ALL” on the display. Press the
record REC button again to confirm.
3. The USB or SD icon will be flashing on the display while the system is
copying the files/tracks.
4. When all files/tracks have been copied, the USB or SD icon will stop
flashing on the display.
NOTE: If you press the record REC button during playback in USB or SD
mode, the file will copy from USB to SD or vice versa.
Copying a folder
1. Insert a USB storage device and SD card, then select USB/SD mode (as
described previously). When the system has recognized the device, press the
stop button.
2. Turn the tuning knob to select the desired folder for copying.
3. Press the record REC button: “ONE” will be flashing on the display. Press
the SKIP UP or SKIP DOWN button to select “FOL” (folder) on the display.
Press the record REC button again to confirm.
4. The USB or SD icon will be flashing on the display while the system is
copying the folder.
5. When the folder has been copied, the USB or SD icon will stop flashing on
the display.
14
Page 15

Deleting files (USB/SD card)
The system is able to erase files stored on the USB drive or SD card. You can
delete a single file/track, a folder of files/tracks, or all files/tracks on the
storage medium.
Deleting a single file/track
1. Insert the USB storage device or SD card, then select USB/SD mode (as
described previously).
2. Press the delete DEL button during the playback of the track you want to
delete: “ONE” will be flashing on the display. Press the delete DEL button
again to confirm.
3. “DEL” will show on the display while the file/track is being deleted until the
deletion is complete.
Deleting all files/tracks
1. Insert a USB storage device and SD card, then select USB/SD mode (as
described previously). When the system has recognized the device, press the
stop button.
2. Press the delete DEL button: “ONE” will be flashing on the display. Press
the SKIP UP or SKIP DOWN button to select “ALL” on the display. Press the
delete DEL button again to confirm.
3. While the system is deleting the files/tracks, the USB or SD icon will be
flashing on the display until the deletion is complete.
NOTE: Pressing the delete DEL button will completely delete all files/tracks on
the USB device or SD card.
Deleting a folder
1. Insert a USB storage device and SD card, then select USB/SD mode (as
described previously). When the system has recognized the device, press the
stop button.
2. Turn the tuning knob to select the desired folder for deleting.
15
Page 16

3. Press the delete DEL button: “ONE” will be flashing on the display. Press
the SKIP UP or SKIP DOWN button to select “DIR” (directory) on the display.
Press the delete DEL button again to confirm.
4. “DEL” will show on the display while the folder is being deleted until the
deletion is complete.
Removing the USB flash drive or SD card
First move the function selector (4) to another mode (phono or cassette),
then turn the volume knob (14) to turn off the power.
To remove the USB flash drive, pull it out of the USB port.
To remove the SD memory card, pull it out of the SD card slot.
Amplifier connection (if required)
While listening to your new turntable using the built in speakers you may
wish to connect it to your existing HiFi system.
Connect the audio plugs to the Line input on your mixer or amplifier using an
RCA cable (*not included)
Red plug into R channel input.
White plug into L channel input.
FAQs
If you are experiencing problems with your USB Turntable with Cassette Deck,
check in the section below whether there are any quick and easy checks you
can do that may help you solve the problem. If you cannot solve the problem
by yourself, contact our after sales support line for advice. Do not attempt to
open, repair or modify the equipment yourself.
Problems with sound
Clockwise rotate the power/volume knob to increase the volume.
Make sure the power cord of the device is connected to an appropriate
electrical outlet and make sure the wall socket is switched on.
16
Page 17

Make sure the function switch is set to your desired function: PHONO,
USB/SD, TAPE/AUX.
When playing records, make sure you have selected the correct speed (33,
45 or 78 rpm).
When playing a cassette, make sure it is properly inserted.
When playing a CD via the AUX IN connection, make sure the cable is firmly
connected, all controls on the CD player are properly set, the disc tray is
closed and the disc is clean and undamaged.
When playing music from a USB device (or SD card), make sure the
memory device is properly inserted in the USB port (SD card slot) and the
correct MODE is selected.
Electrical safety and cord handling
Before installing this equipment, make sure your outlet voltage corresponds
to the voltage stated on the appliance rating label.
To prevent contact with high voltage components inside, do not attempt to
open the equipment.
When connecting the equipment, align the plug properly and insert it fully to
prevent electric shock.
Only use this equipment with the cord and plug supplied, and do not
overload the power outlet.
If the power cord is damaged, do not use the equipment. The cord must be
replaced by the manufacturer or similarly qualified personnel in order to avoid
a hazard.
Note:
We advise you to clean your records with an anti-static cloth to gain
maximum enjoyment from them and to make them last. We would also point
out that for the same reason your stylus should be replaced periodically
(approximately every 250 hours) Dust the stylus from time to time using a very
soft brush dipped in alcohol (brushing from back to front of the cartridge).
When transporting your LP player do not forget to: 1. Replace the protective
cap on the stylus. 2. Put the rest clip into the pick-up arm.
17
Page 18

Reattaching the turntable belt-drive
The turntable drive belt is factory fitted - use these instructions only if the
turntable fails to revolve.
STEP 1
Remove the turntable anti-slip mat
from the platter. looking through one
of the holes in the platter, check if
the belt has indeed come off the
turntable pulley. Use a screwdriver
to remove the black iron ‘C’-clip (iron
binder) and lift the turntable off the
Turntable mechanism.
STEP 2
Retrieve the dropped black rubber
band (the drive belt) and place it
around the platter base - then pull
the belt out gently without
overstretching. Turn the platter over
while holding on to the belt.
STEP 3
Looking through one of the holes in
the platter, locate the small Brass
Pulley (the pulley is attached to the
turntable motor). Then proceed to
hook the pulled out part of the rubber
belt by hand around the Pulley and
then line up the Centre of the platter
with the silver turntable spindle.
Lower the platter gently onto the
deck and let go until it is back in
position.
STEP 4
When the urntable platter is in the
correct position, check the belt is still
around the pulley and then replace
the ‘C’-clip to secure the turntable to
the spindle.
Hints for Environment Protection: Packages materials are
raw materials and can be recycled. Do not disposal old devices
or batteries into the domestic waste. Cleaning: Protect the
device from contamination and pollution (use a clean drapery).
Avoid using rough, coarse-grained materials or
solvents/aggressive cleaner. Wipe the cleaned device
accurately. Distributor: Technaxx Deutschland GmbH &
Co.KG, Kruppstr. 105, 60388 Frankfurt a.M., Germany
Rubber
Drive Belt
Pull belt out gently
Brass Pulley
18
 Loading...